


anyweb
-
Posts
9,108 -
Joined
-
Last visited
-
Days Won
362
Posts posted by anyweb
-
-
Introduction
This is Part 8 in a new series of guides about getting started with Windows 365. This series of guides will help you to learn all about Windows 365 in a clear and insightful way. This series is co-written by Niall & Paul, both of whom are Enterprise Mobility MVP’s with broad experience in the area of modern management. At the time of writing, Paul is a 6 times Enterprise Mobility MVP based in the UK and Niall is a 12 times Enterprise Mobility MVP based in Sweden. In this series we aim to cover everything we learn about Windows 365 and share it with you to help you to deploy it safely and securely within your own organization. In Part 1 we introduced you to Windows 365, selecting the right edition with the level of management that you need, choosing the plan that suits your users needs at a cost you can afford, or modifying the configuration to make it more suited to your individual needs, purchasing licenses and saving money for your organization via the Windows Hybrid Benefit. In Part 2 you learned how to provision an Azure Ad joined Cloud PC and take a look at the different network options available when provisioning an Azure Ad joined Cloud PC. In Part 3 you learned about the steps needed to successfully provision a Hybrid Azure Ad Joined Cloud PC. In Part 4 you saw the many different ways you can connect to your Cloud PC from many device be it Android, Mac, Windows, Linux or iPhone and you learned that not all connection options have the same abilities. In Part 5 we covered the management capabilities of your Cloud PCs and explained the different options available depending on which version (Business versus Enterprise) that you purchase. In Part 6 we looked at the built in configurable backup technology in Windows 365 which is known as Point-in-time restore, which gives the admin (or user) the ability to restore Cloud PC's to an earlier time before a problem such as a Ransomware incident occurred. In Part 7 we looked at the ability to use Windows Autopatch to patch your Cloud PC's with ease and covered how to allow access to admins without licenses, enrolling into Windows Autopatch, the Readiness assessment tool, device registration and moving devices between deployment rings. Finally we looked at Windows Autopatch reports and the overall User Experience. In this part we'll take a look at the long awaited Windows 365 Boot feature and learn all about it.
Below you can find all parts in this series:
- Getting started with Windows 365 - Part 1. Introduction
- Getting started with Windows 365 - Part 2. Provisioning an Azure Ad Joined Cloud PC
- Getting started with Windows 365 - Part 3. Provisioning a Hybrid Azure Ad Joined Cloud PC
- Getting started with Windows 365 - Part 4. Connecting to your Cloud PC
- Getting started with Windows 365 - Part 5. Managing your Cloud PC
- Getting started with Windows 365 - Part 6. Point in time restore
- Getting started with Windows 365 - Part 7. Patching your Cloud PCs with Windows Autopatch
- Getting started with Windows 365 - Part 8. Windows 365 boot <- you are here
- Getting started with Windows 365 - Part 9. Windows 365 switch
- Getting started with Windows 365 - Part 10. Windows 365 offline
In this part we'll cover the following:
- Introduction to Windows 365 Boot
- Prerequisites
- Enabling Windows 365 Boot
- Preparing devices for Windows 365 Boot
- Using Windows 365 Boot
- Recommended reading
- Summary
Introduction to Windows 365 Boot

Update: Windows 365 Boot and Switch became Generally Available 26th September, 2023, so as long as you are using Windows 11 22H2 with build 2361 or later (or natively in Windows 11 23H2 later in Q4), then there should be no need to use the Windows Insider Preview steps mentioned below.
Windows 365 Boot is currently in Public Preview (at time of writing), so any screenshots and functionality shown here may change before it becomes Globally Available (GA). In addition, during the Preview it's designed for the following scenario, shared PC scenarios.
Windows 365 Boot lets admins configure Windows 11 physical devices so that users can:
- Avoid signing in to their physical device.
- Sign in directly to their Windows 365 Cloud PC on their physical device.
If that's confusing, then keep in mind that Windows 365 Boot is defined by Microsoft as follows:
QuoteWhen a user turns on their physical device and signs in, Windows 365 Boot signs them in directly to their Cloud PC, not their physical device. If single sign-on is turned on for their Cloud PC, they don't have to sign in again to their Cloud PC. This expedited sign in process reduces the time it takes the user to access their Cloud PC.
Multiple users can use the same physical device to sign in to their own personal Cloud PCs. When each user signs in to the physical device, their unique identity takes them to their assigned and secure Cloud PC. This flexibility makes Windows 365 Boot a good solution for workers such as nursing, salespeople, and call centers, who share company physical devices. Such workers might frequently switch between physical tasks and computer interaction. Windows 365 Boot lets them bypass the lengthy startup process and boot directly into their secure Cloud PC to pick up right where they left off.
Prerequisites
To setup Windows 365 Boot the following prerequisites need to be met on the physical devices:
- Each device must be running the latest Dev Channel Windows Insider Preview Build. You can download the Windows Insider Preview build ISO and use that for testing or deploy Windows 11 version 22H2 and then update it to the Insider Preview developer channel using Windows Settings.
- Enroll each physical device into Windows Autopilot.
- Assign the physical device to the Windows 365 Boot ESP
- Assign the physical device to the Windows 365 Boot Azure AD group you created in the guided scenario wizard.
Enabling Windows 365 Boot
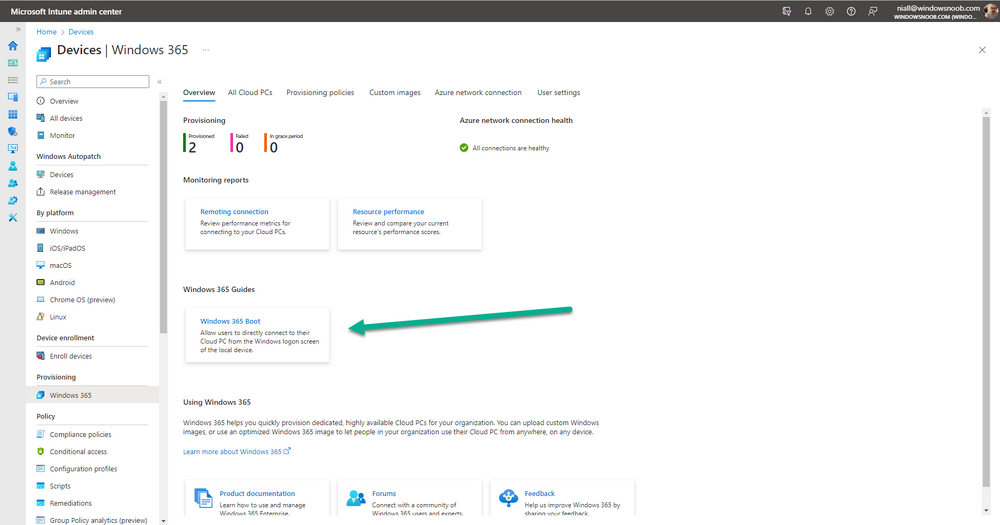
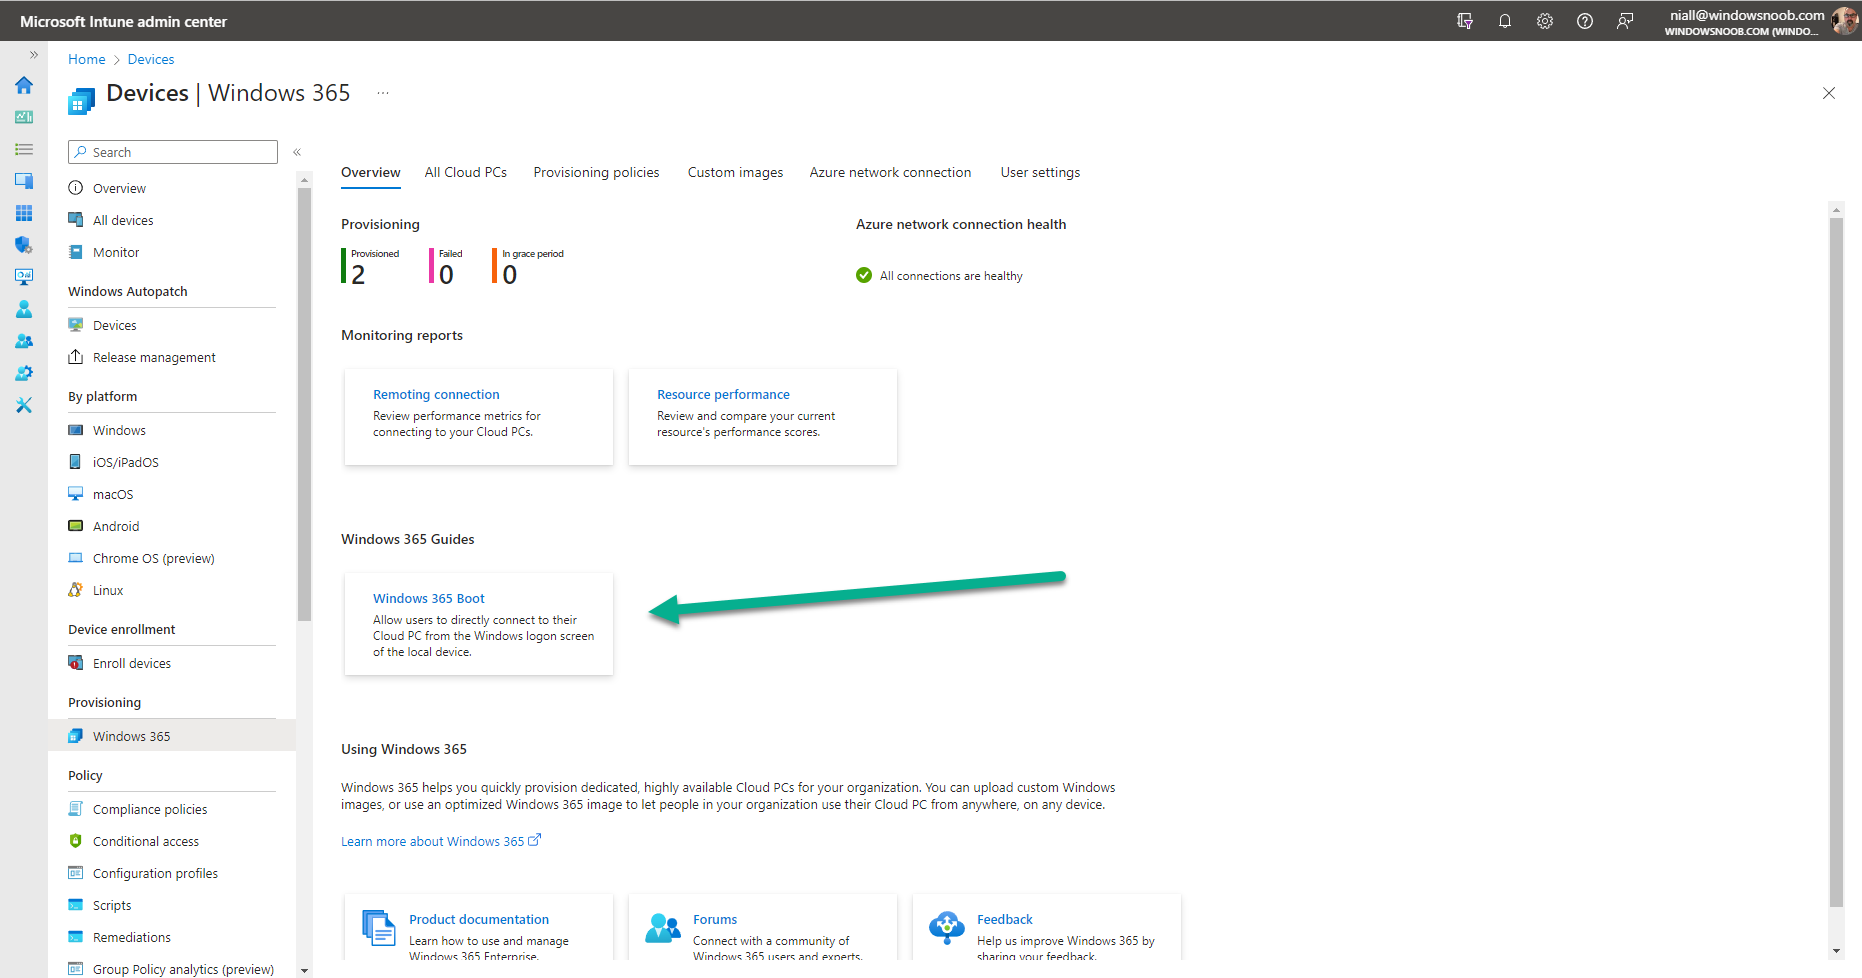
To enable Windows 365 Boot in your tenant do as follows. Remember, this will most likely change when it goes GA, we'll update the guide when that happens. But for now, navigate to the Windows 365 provisioning node and you should see a Windows 365 Boot guide as shown in the screenshot below. You need to click on that to start the guided scenario.
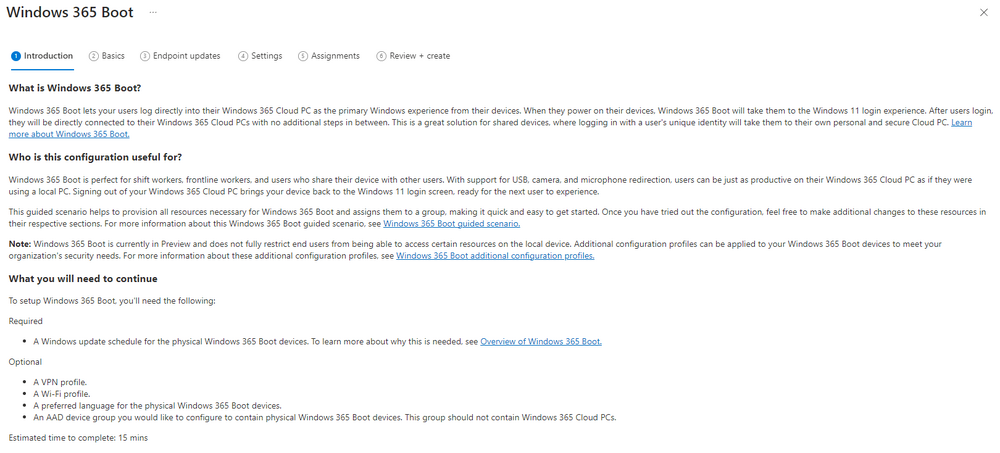
And here it is, the Introduction screen of the guided scenario for Windows 365 Boot.
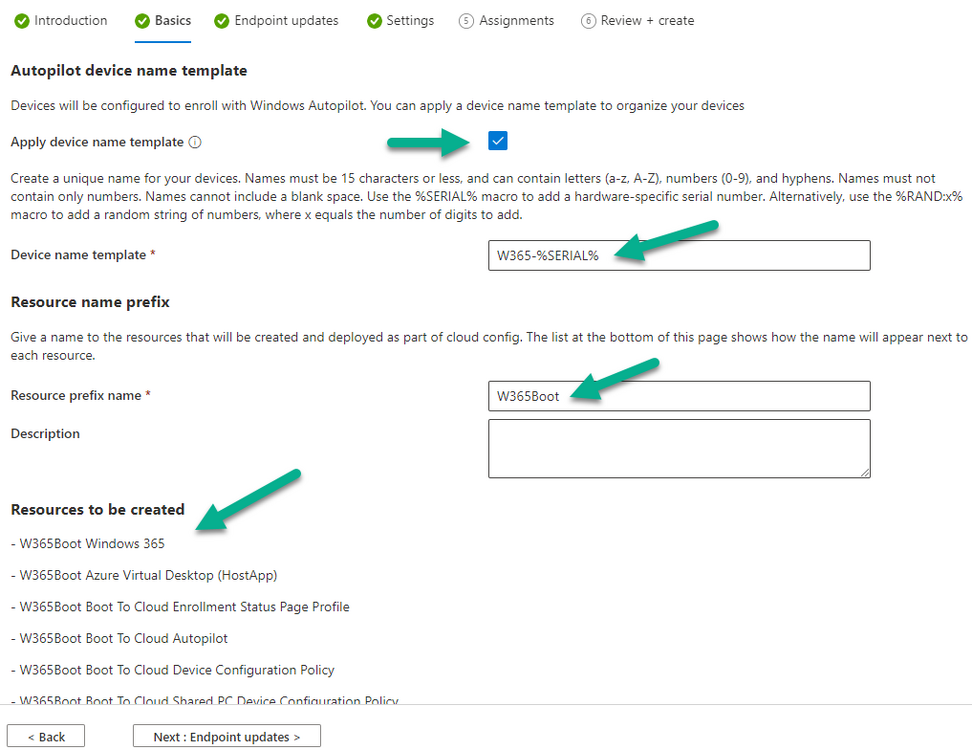
Clicking Next gathers the basic info, including whether or not you want to use a device name template (as you do for Windows Autopilot devices...). Once you've confirmed the resource name prefix, it'll list a list of resources that will be created using that naming convention.
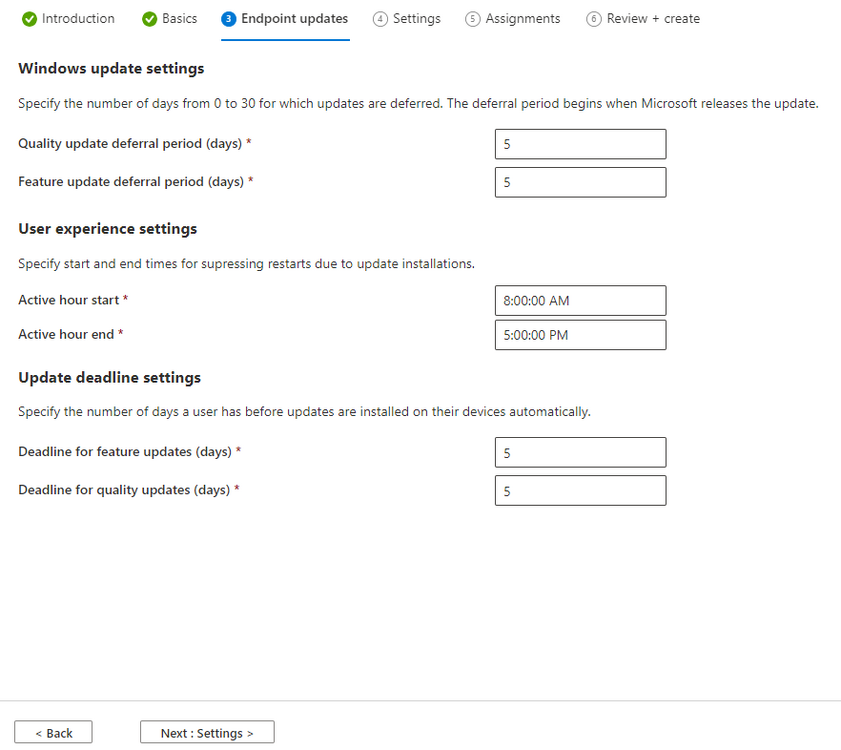
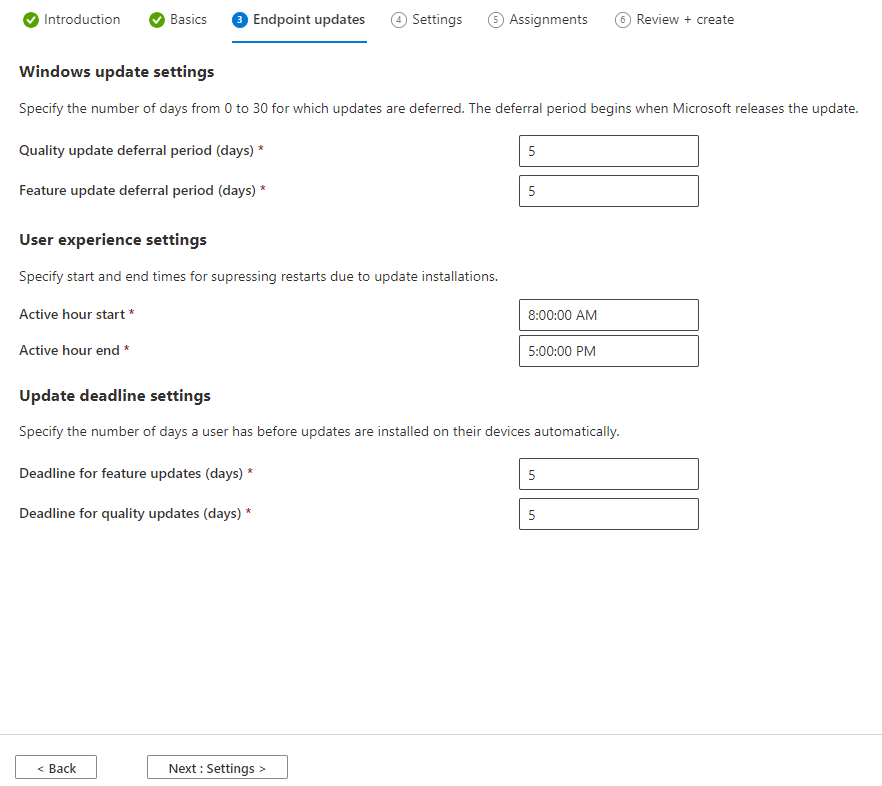
Even though you can use Windows Autopatch to patch your Windows 365 Boot devices, there's no easy way to do that (yet) in this wizard, we've provided that feedback already to the Product Group. For now, configure the settings as appropriate.
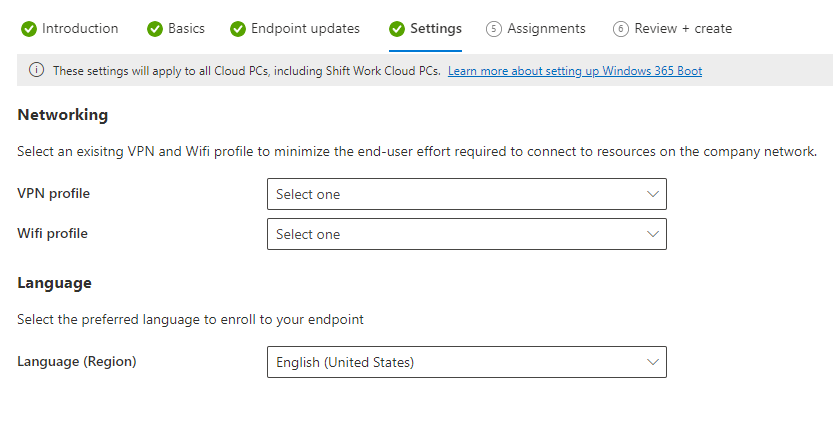
On the next screen (Settings) you get to choose an option VPN and Wi-Fi setup, and to decide which language to use.
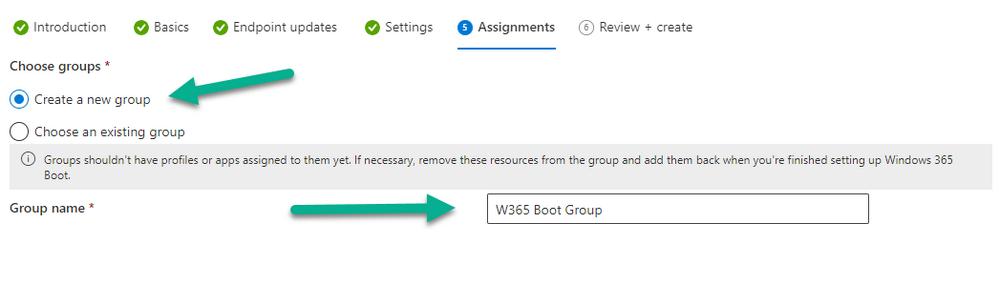
On the next screen you add your assignments. We chose to create a new group and gave it a suitable name.
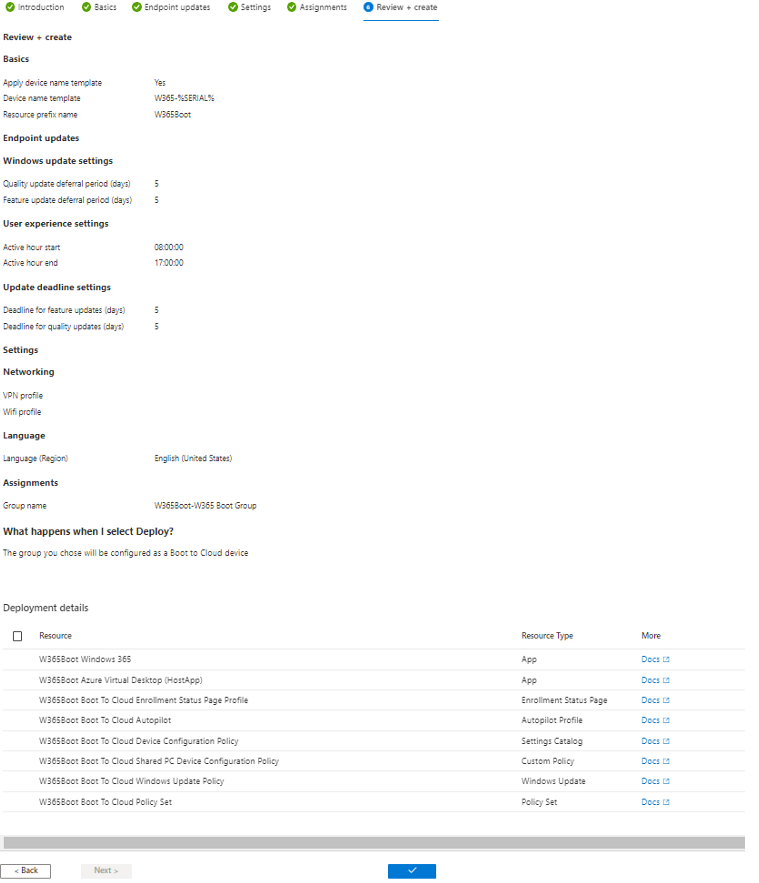
Finally you'll get a summary of the settings you've chosen along with a list of resources it will create.
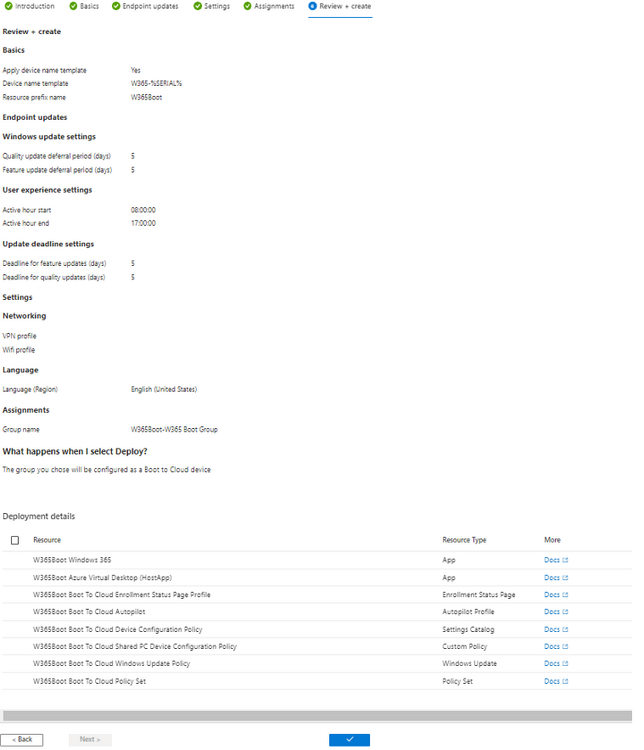
Note that the guided scenario creates several things as part of the setup including an Enrollment Status Page profile, a Windows Autopilot deployment profile, and some apps which must be installed before the device can be logged on to.

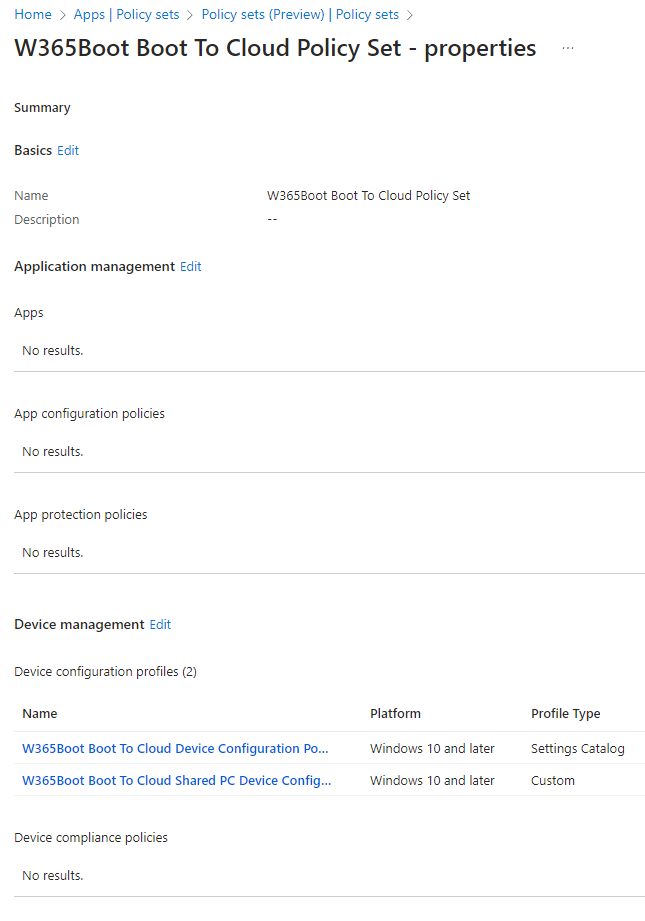
These and other configuration profiles are listed/defined in the policy set created during the wizard. You can find the Windows 365 Boot policy set in Apps, Policy Sets.

Also to note, when the Windows 365 Boot ESP is created, it's at the lowest priority so if you want your shared devices/hosts to get that profile, make sure to increase the priority or change the assignments.
Preparing devices for Windows 365 Boot
Now you are ready to test Windows 365 Boot, and to do so you'll need a device that matches the prerequisites mentioned earlier. You can use Intune Update Rings to target Windows 11 devices with that Windows 11 developer edition (dev channel).
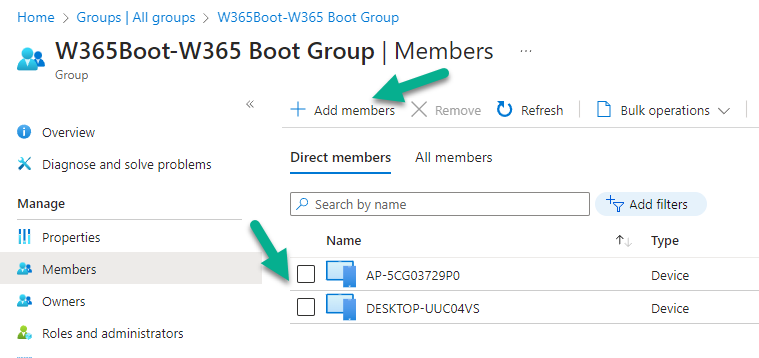
Once those devices are upgraded then add them to the Windows 365 boot group that you defined during the wizard.
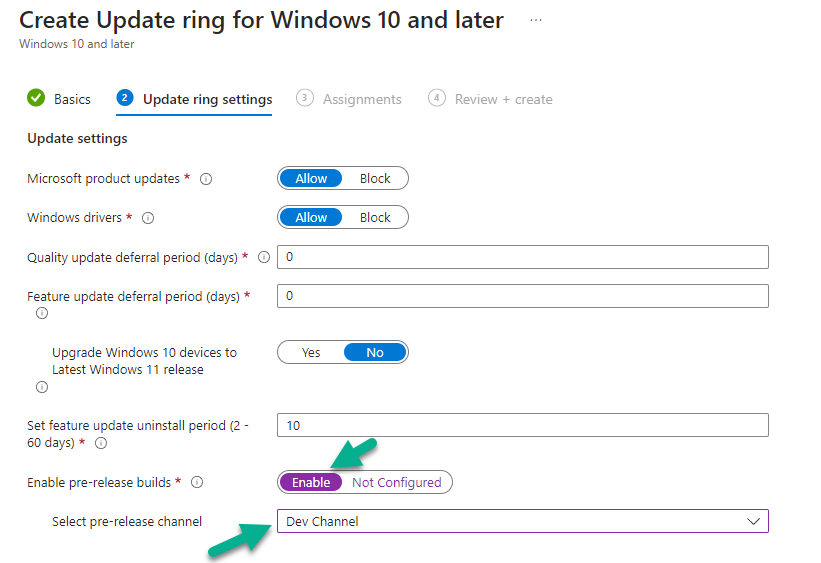
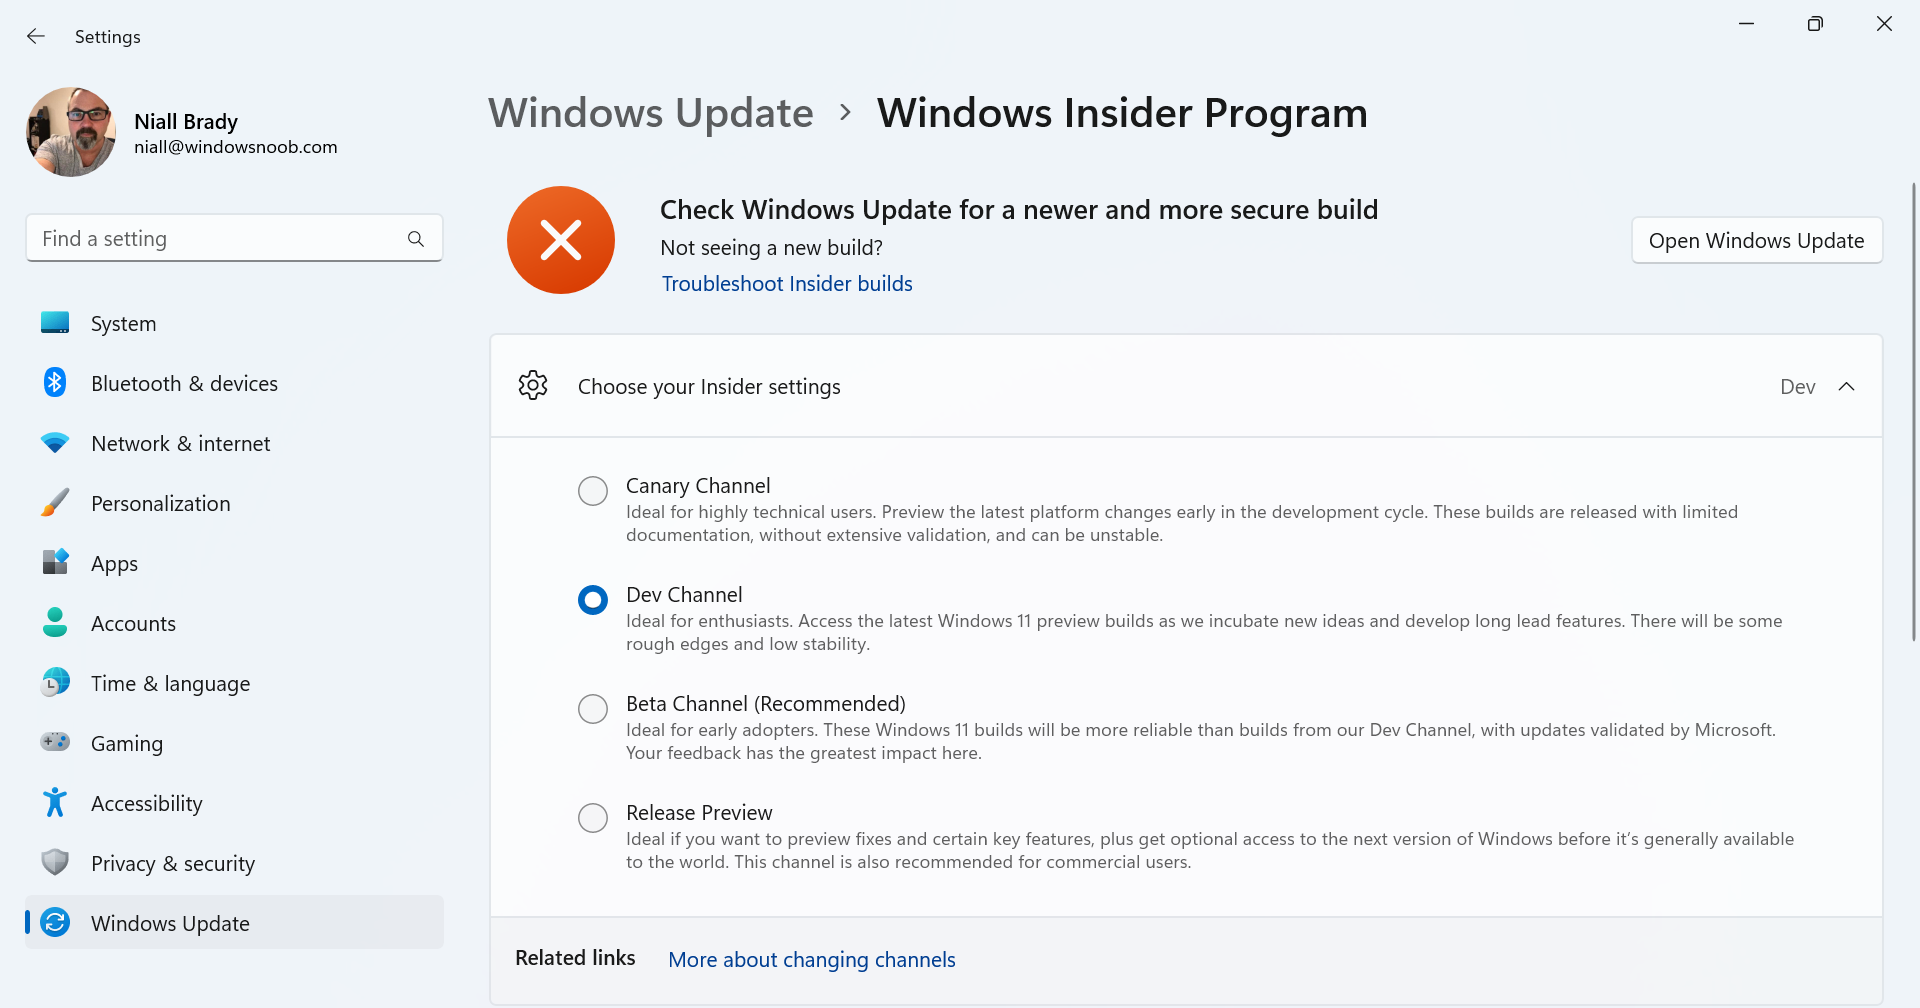
If you don't want to automate it, and want to simply test this on the fly, open Windows settings on a Windows 11 22H2 device, select Windows Update settings, choose Windows Insider Program and select the Dev Channel during the sign up.

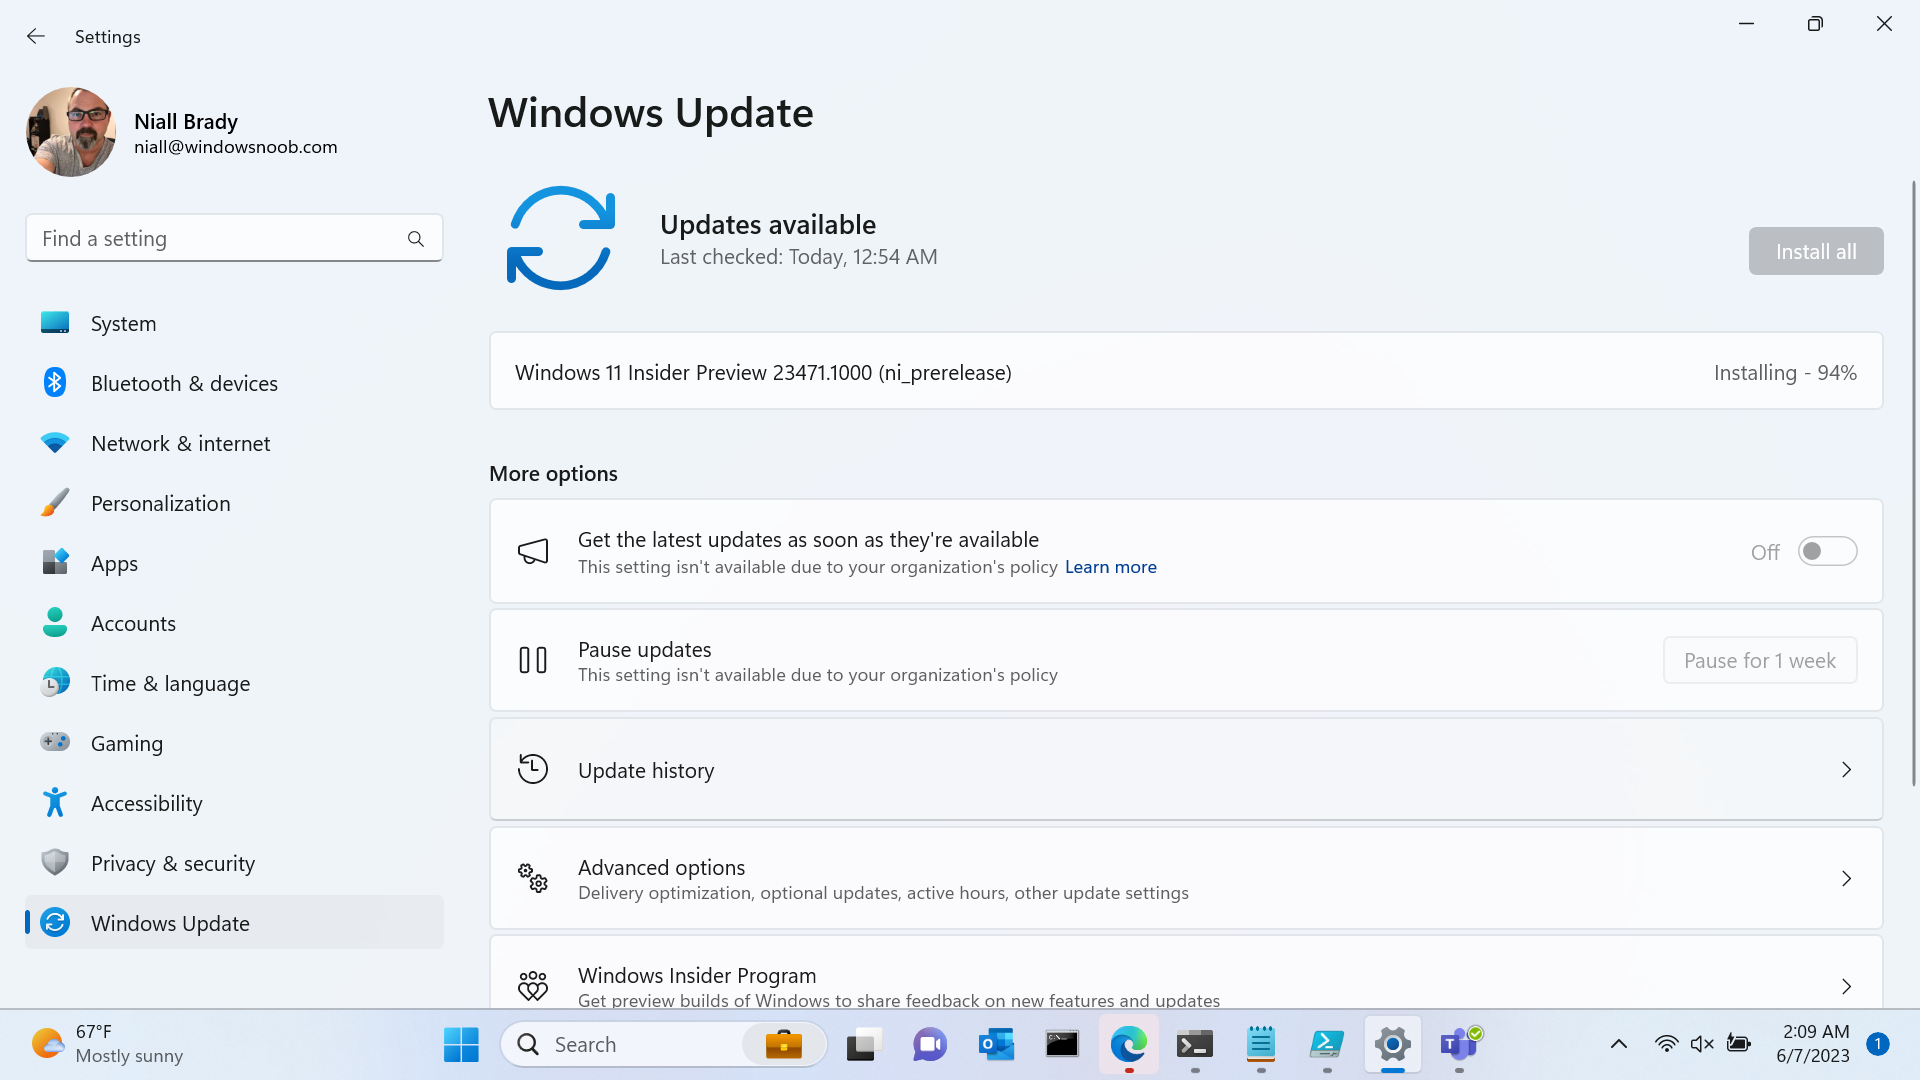
Make sure to update Windows as prompted until it's at the required level, in the below screenshot you can see it's installing the Windows 11 Insider Preview (dev channel) release version 23471.1000 (ni_prerelease).

After the device is upgraded to the dev channel release, you can reset it via Intune or via Windows Settings and then go through a Windows Autopilot enrollment as normal.
Using Windows 365 Boot
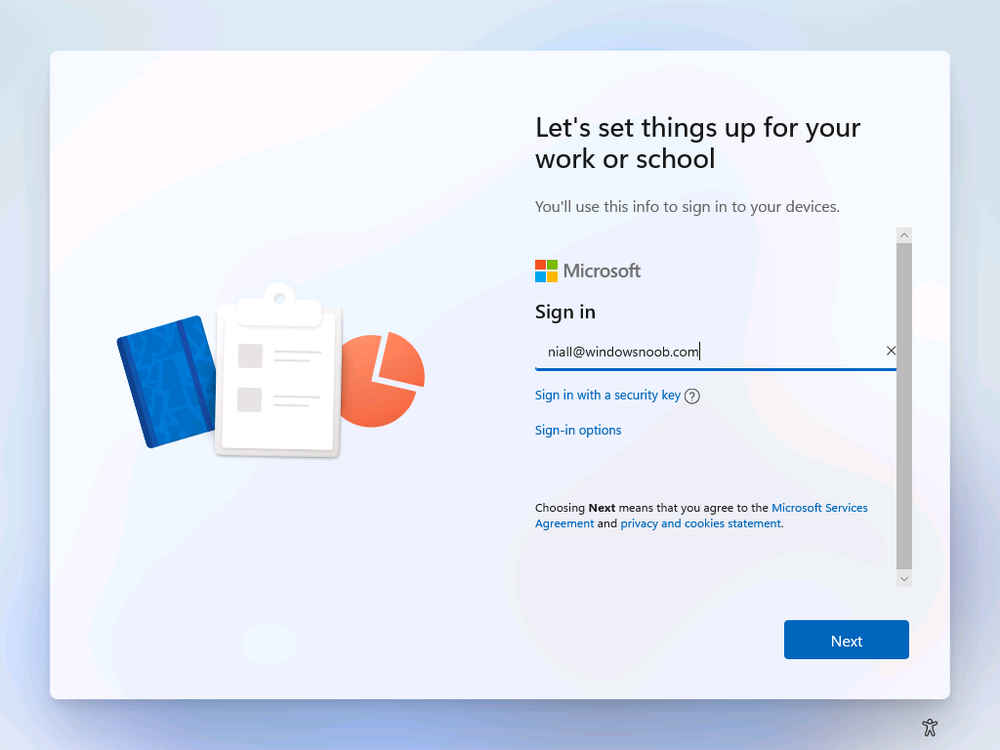
After Windows Autopilot enrollment is complete on your shared physical device it will be ready for Windows 365 Boot and that will become obvious as the logon screen changes.

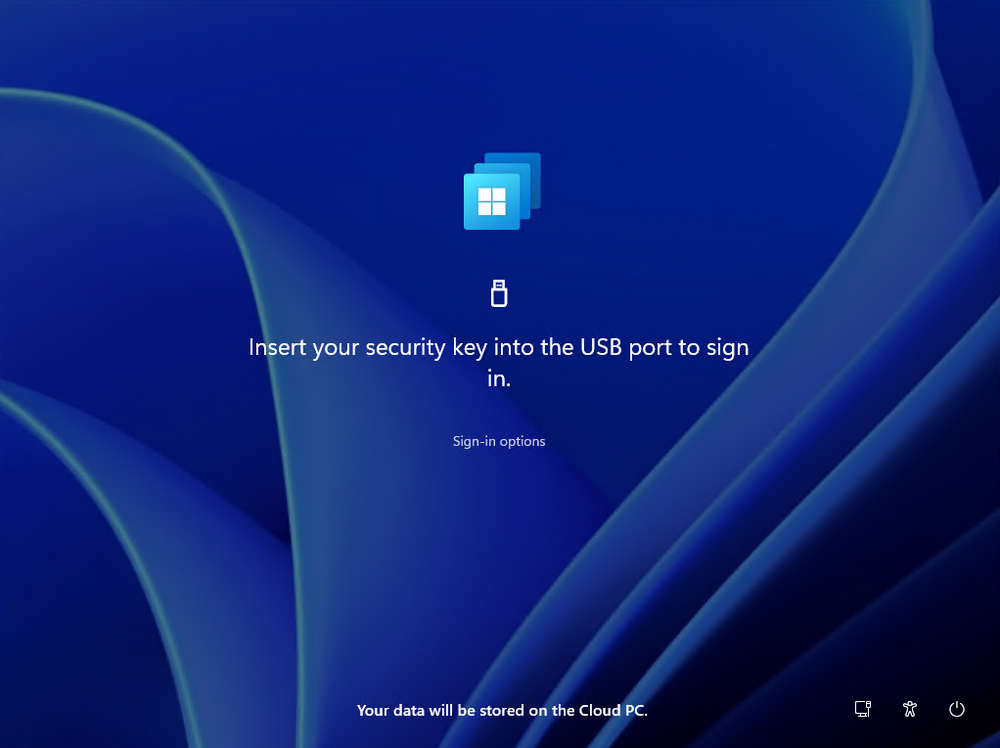
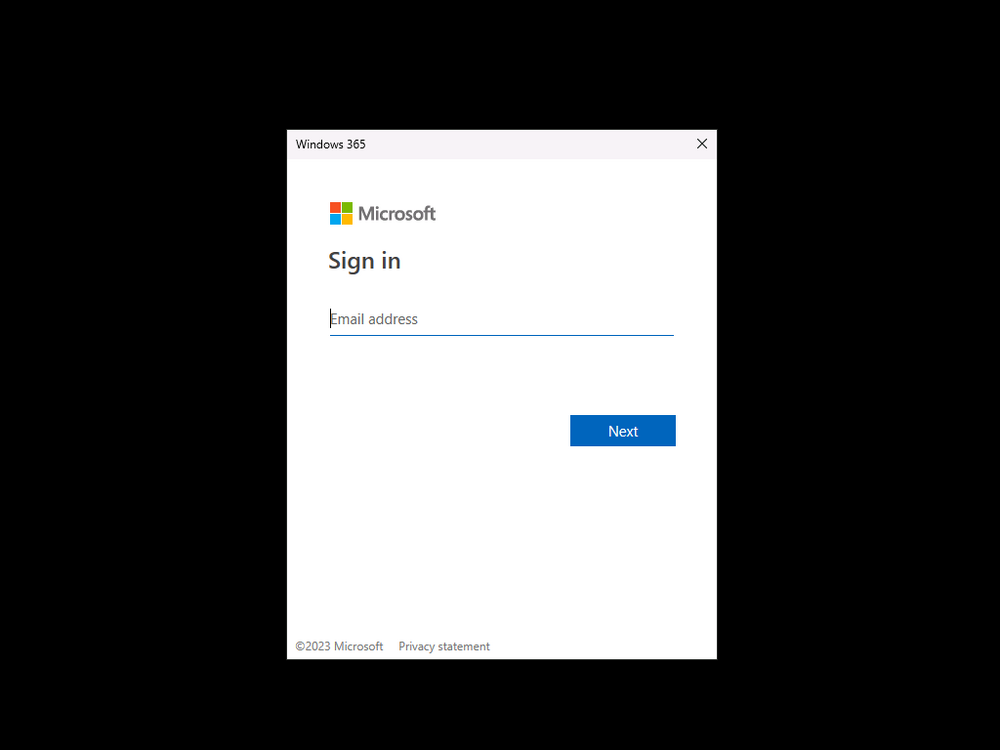
You'll get the following login screen, which is the new Windows 365 Boot login UI with a cool Windows 365 logo. Note how it clearly states that your data will be stored on your Cloud PC.
To login, click Sign-in options and enter the credentials of a user with a Windows 365 license.
It'll state "preparing Windows" for a moment followed more excitingly by this.

However, we are using a hybrid azure ad joined Cloud PC the next part is less exiting as their is no possibility to configure single sign on (SSO) yet.
After signing in again (and completing MFA) it will show your Cloud PC !

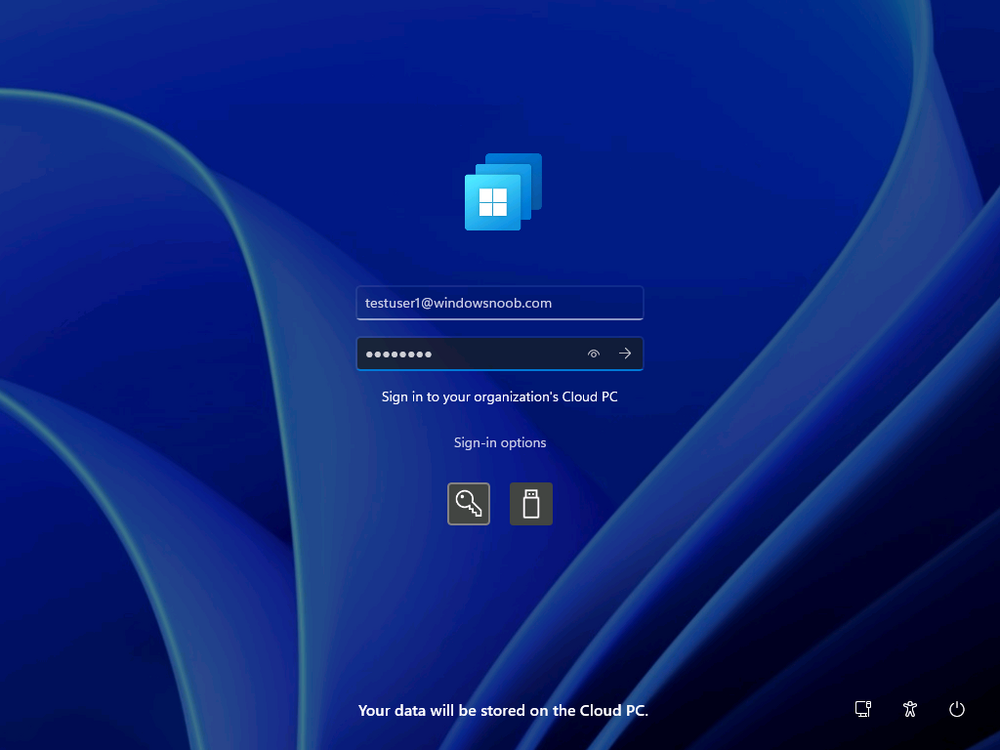
And here's where the fun starts, as this is a shared PC scenario, multiple users can login (after the other users logs off...) as long as they are assigned a Cloud PC.
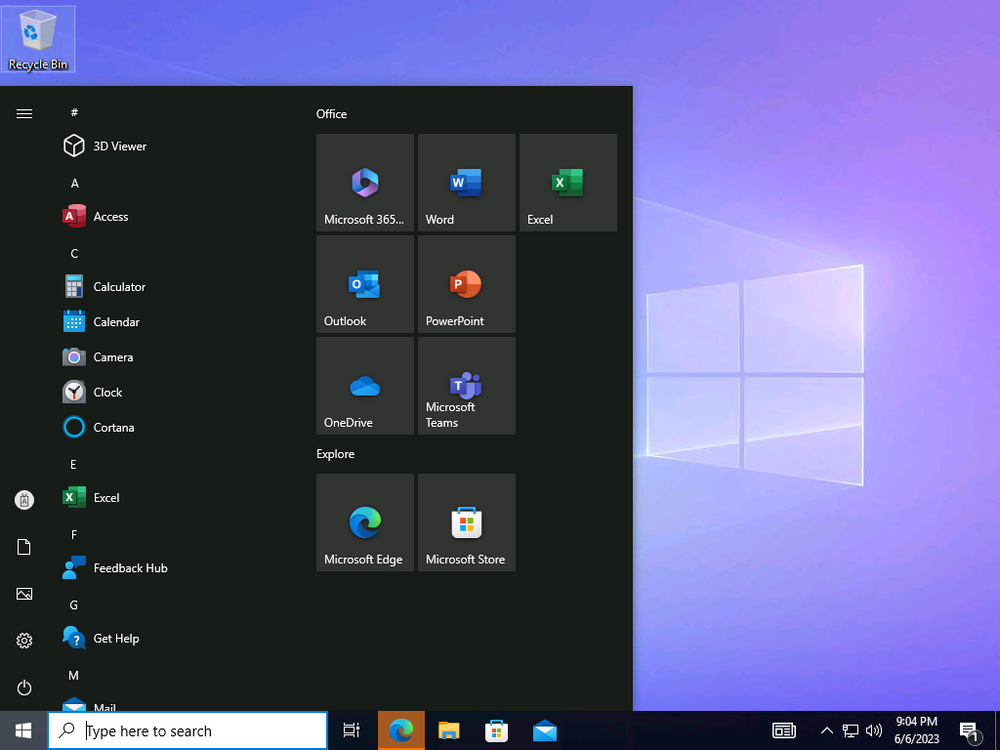
So here for example is another user logged on to the same Windows 365 Boot device, however their Cloud PC is running Windows 10.
As the physical device is connected directly to your Cloud PC, resources such as the MIC, Camera are shared with the Cloud PC allowing you to use them in Teams calls etc. One thing to be aware of however is that once Windows 365 Boot 'takes over' a physical device you can no longer get back to the main UI on that device without first removing the physical device from the targeted device configuration profiles in Intune. You can however bring up task manager to run Explorer.exe and browse your local files on the physical device if needed.

Note that Microsoft will most likely remove the ability to start the Task Manager on physical devices once Windows 365 Boot exits from Preview.
Recommended reading
Summary
Windows 365 Boot in its current form (preview) allows shared PC's to be used for connecting straight to a Windows 365 Cloud PC, you could say booting to the Cloud PC but in reality the host device must boot up first. It is seamless however, and very well executed. You simply prepare the device, hand it over to the user and they logon to their Cloud PC. Once they are done, they can hand the physical device back and another user can use it to connect to their Cloud PC. This is a great way of simplifying this scenario, and having all the back end bits created by the wizard makes it a breeze to setup. The downside is that once you've targeted a device with this policy, there's not a whole lot you can do on it other than connect to Cloud PC's, but all you have to do to restore it's former glory is to remove it from the device configuration profiles targeted to it.
-
what version of SCCM is it ?
-
hi Alex
can you verify that you meet these requirements when creating the ANC ? as you are just doing AAD the first line is what you need
Intune Administrator, Windows 365 Administrator, or Global Administrator role.
and... once created, if you need to edit it... you'll also need > to have the Subscription Reader role in the Azure Subscription where the VNET associated with the ANC was located.
for more info > Azure network connection overview | Microsoft Learn
cheers
niall
Permissions required for Azure network connections
The ANC wizard requires access to Azure and, optionally, on-premises domain resources. The following permissions are required for the ANC:
- Intune Administrator, Windows 365 Administrator, or Global Administrator role.
- An Active Directory user account with sufficient permissions to join the AD domain into this Organizational Unit( (Hybrid Azure AD Join ANCs only).
To create or edit an ANC, you must also have the Subscription Reader role in the Azure Subscription where the VNET associated with the ANC was located.
For a full list of requirements, see Windows 365 requirements.
-
IT compliance is a critical aspect of modern business as it refers to the adherence to policies, regulations, and government laws protecting IT systems and processes. IT compliance ensures businesses and organizations operate under strict security requirements, guidelines, and industry best practices for data protection and governance.
IT business leaders, CIOs/CTOs/CISOs, MSPs, system administrators, and other roles within IT must understand the importance of implementing stricter compliance requirements to protect valuable data.
Here are a few reasons why modern businesses and organizations must become IT-compliant:
Ensuring Data Privacy and Security
Businesses that handle sensitive information, such as customer data and financial and medical information, must comply with industry-specific frameworks like HIPAA, PCI-DSS, GDPR, and others. These frameworks provide guidelines for protecting the most sensitive of information a business handles, including data encryption, access controls, and vulnerability assessments.

Mitigating Security Risks
IT Compliance standards, such as ISO 27001, NIST, and CIS, provide guidelines for identifying, assessing, and mitigating security risks. These standards enable businesses to implement best practices for security and ensure that their IT infrastructure is secure against cyber threats.
Avoiding Legal and Financial Fines
IT compliance can help businesses avoid legal and financial penalties. However, non-compliance with industry-specific regulations can result in hefty fines, legal suits, and loss of reputation in case of data breaches and general loss of sensitive information.
Providing Competitive Advantage
Compliance with industry-specific regulations demonstrates to customers the willingness and seriousness businesses take toward data privacy and information security. Compliance can also help businesses improve their reputation, build customer trust, and enhance brand value.
Take the Hornetsecurity IT Compliance Survey now!
Feel free to participate and get a chance to win!
-
can you show me how you originally configured SCCM other sources ? maybe that was the issue
-
hi Joe,
do you still have this problem ?
-
point the server role to the right IP address.. that should do it
-
are these devices domain joined or not ? if not, then you'll need to do some things on each computer (including approving them in SCCM) before they work correctly
see this post for more details
-
ok i've shared the new code with you @TomBlack
please read the instructions in the ZIP (7zip)
-
hi TomBlack, i have a new version (not released yet) with several fixes/changes/enhancements, if you want to try it, pm me and i'll make it available to you, blog coming later...
-
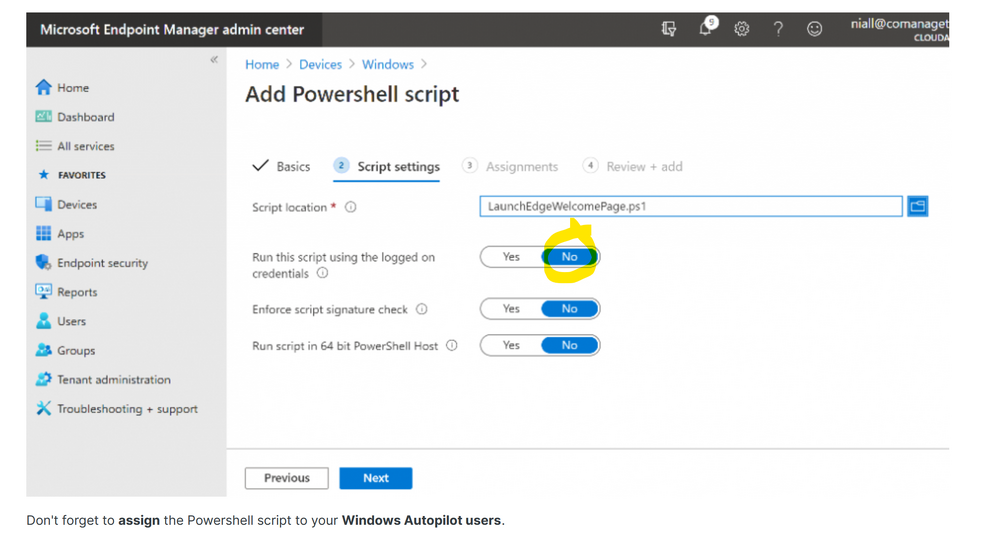
did you assign this to your Windows Autopilot users or ?
-
check how you deployed it, is it like so ?
-
do you know what software is installed on this cloud pc, probably one or more apps are slowing things down, that's my guess, but it's hard to tell without more info about whats running on the cloud pc, do you know ?
-
this looks like a Windows 365 Cloud PC (business), based on the 'please wait' I wonder is it getting updated by any chance, it looks like it needs a restart, if you browse to https://www.windows365.com do you see an option to restart your Cloud PC there ?
if that doesn't help when you see 'please wait' then you'll need to troubleshoot on the Cloud PC itself to see what is causing it to be in this state,-
 1
1
-
-
hi @Wizu
I've now finished updating the changes and testing to the new release (1.5.28)
I plan on blogging about the changes shortly, if you'd like to try it before I blog it then please pm me and i'll make the code available,
-
Microsoft Outlook users advised to urgently apply the security patches provided by Microsoft
Hannover, Germany – 16 March 2023 – A severe security vulnerability has been discovered in Microsoft Outlook, which is currently being exploited by cybercriminals. The vulnerability, identified as CVE-2023-23397 with a CVSS score of 9.8, permits a remote, unauthorized attacker to compromise systems simply by transmitting a specifically crafted email. This malicious email enables the attacker to gain unauthorized access to the recipient’s credentials.
More widespread attacks that target this vulnerability are expected
Umut Alemdar, Head of the Security Lab at Hornetsecurity, said, “We expect that the likelihood of more widespread attacks targeting the CVE-2023-23397 vulnerability to increase, as public proof-of-concepts have already been released. We therefore highly recommend that all users of Microsoft Outlook apply the security patches provided by Microsoft as soon as possible.”
He confirmed that Hornetsecurity detects emails that exploit the vulnerability and quarantines them to prevent emails from reaching the victim’s inbox, and added, “The Security Lab at Hornetsecurity is continuing to monitor the threat landscape to ensure that customers are protected from the latest cyber threats.”
Exploitation occurs even before the email is displayed in the preview pane
The exploit is initiated by fetching and processing a malicious email by the Outlook client, potentially leading to exploitation even before the email is displayed in the preview pane. It triggers a connection from the victim to a location controlled by the attacker. This results in the leakage of the victim’s Net-NTLMv2 hash, a challenge-response protocol used for authentication in Windows environments. The attacker can then relay this information to another service and authenticate as the victim, further compromising the system.
The complexity of the attack is low, and it has been seen in the wild according to Microsoft, with the exploit being used to target the European government, military, energy, and transportation organisations. It was initially reported to Microsoft by CERT-UA (the Computer Emergency Response Team for Ukraine). A proof-of-concept created by the Hornetsecurity’s Security Lab team demonstrates that the exploit is hard-to-detect since all anti-malware and sandbox services incorporated into VirusTotal were unable to recognize it as malicious.Recommended actions
For a list of affected versions, and recommended action to secure your organization, please click here. -
Introduction
If you are new to Windows 365 Cloud PC's please check out our series about Getting Started with Windows 365. Microsoft recently blogged about the ability to use alternate ANCs (Azure Network Connection) when Provisioning Cloud PCs so that if one ANC goes down it can fall over to the next in line according to priority. You can read that blog post here. Lets look at the new feature in detail.
But first, what is a provisioning policy. This policy defines what settings you will apply to new Cloud PCs when they are provisioned for your users. When creating a new provisioning policy you have to enter some details, such as join type, network type, and so on. In this case we are interested in the type of network we'll use, it can be
- Microsoft hosted network
- Azure network connection
as you can see here

The reason there are two types of network depends entirely on your needs. If you want minimum fuss and minimum requirements when creating the policy choose the Microsoft hosted network, that way you don't have to create a virtual network or have an Azure subscription tied to your Cloud PCs connectivity. If on the other hand you want to have more control over the type of network settings such as specifying individual DNS servers, IP ranges or address spaces then you need to choose Azure network connection and create those separate virtual networks (vnet) in your Azure subscription.
Once you've decided which network join type to use, you are shown active working ANCs in your environment at the time you started creating the provisioning policy.
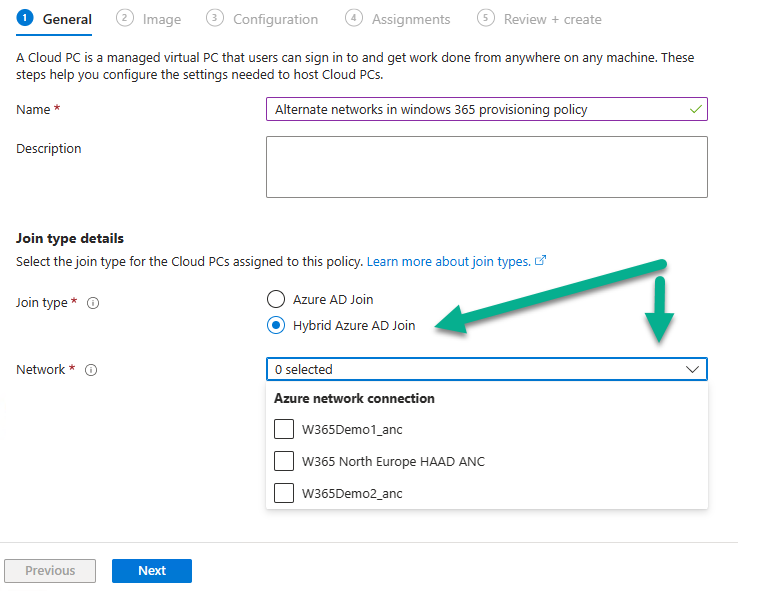
Those ANC's listed are based on the list of healthy ANC's you have at time of creation of the provisioning policy, so at the time I created this provisioning policy, the following ANCs were healthy. Note that it will only list those ANCs based on the join type you select.
Note: You should only add an alternate ANC if you fully understand the implications of provisioning Cloud PCs in a different ANC.

If any of the above are unhealthy, they won't appear in the drop down list. Select those that you want included in this provisioning policy. You'll notice that a new Network prioritization UI appears behind your choices.

Clicking away from the drop down menu allows you to sort your ANCs by your chosen priority. You can click and drag the ANC from one priority to another within your list.
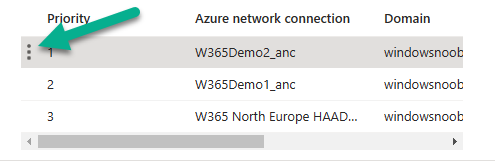
After sorting your ANCs by priority your new list is shown

UI note: It would be nice if all the information in each of the columns for each ANC was shown, right now you need to scroll right to see what's what.
Continue through the wizard to complete your Alternate ANC provisioning policy.

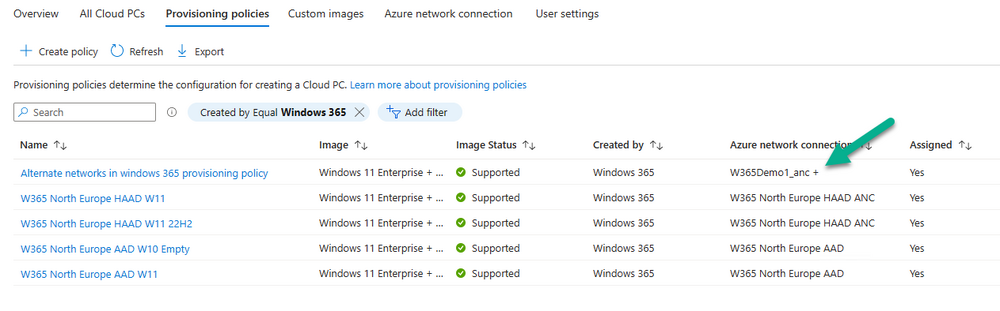
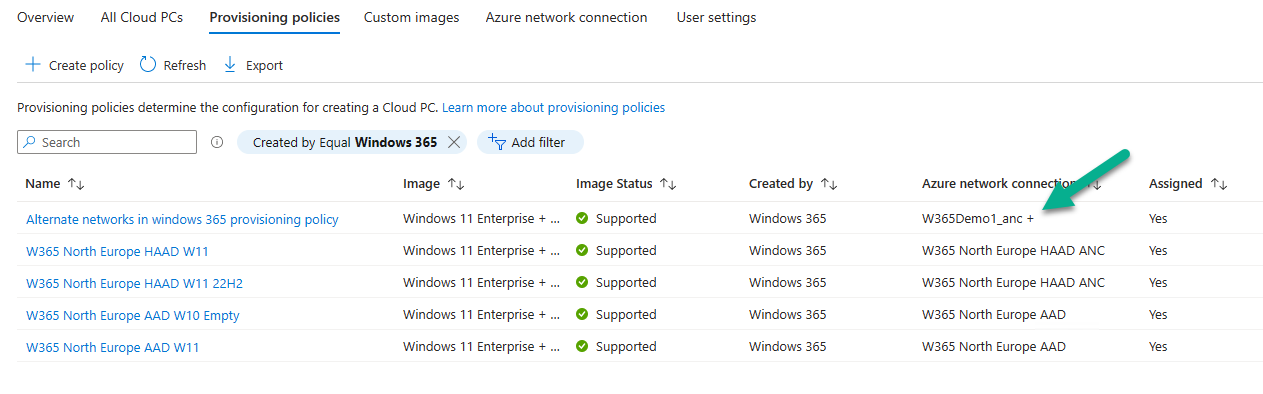
The policy is listed below, note how the Azure network connection column shows a +
What about existing provisioning policies ?
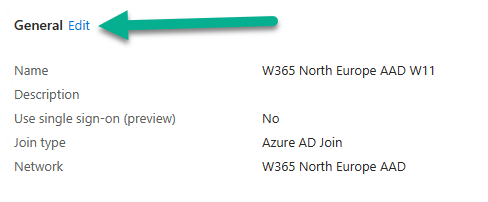
You can also edit existing provisioning policies to add alternate ANCs, however it's not that intuative. To do so, open the properties of an existing policy and click Edit at the General settings.
in the Azure network connection section, click the drop down menu to show other healthy ANC's
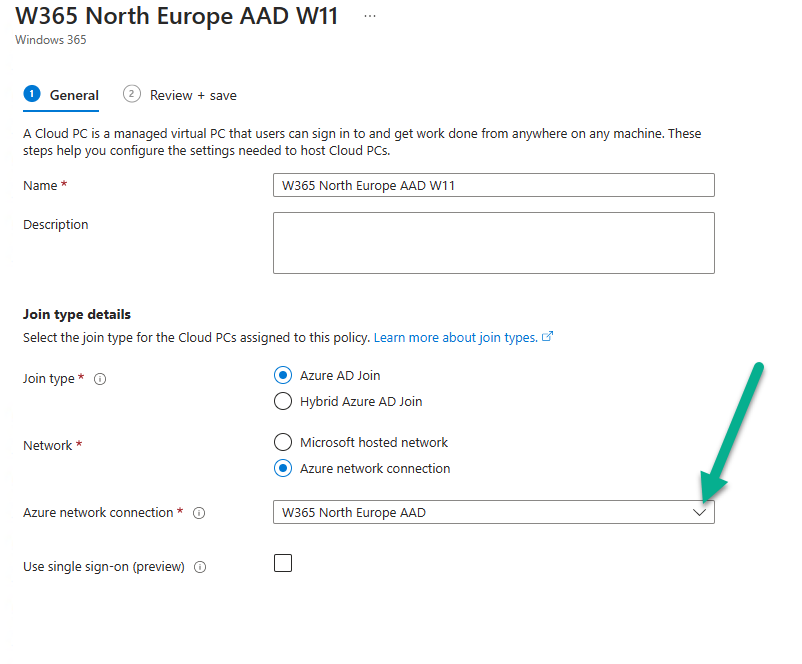
next, make your selection and change priority as shown earlier

Verifying alternate ANCs in your provisioning policy
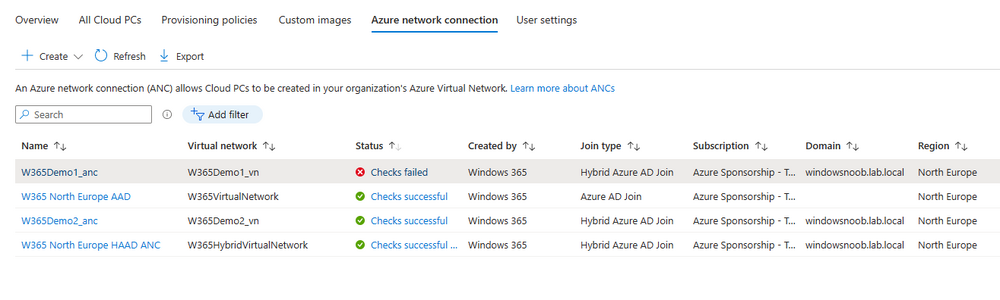
Now that I've created an Alternate ANC provisioning policy with three healthy ANCs (listed below), I decided it was time to see this working in a lab.
- W365Demo1_anc
- W365Demo2_anc
- W365 North Europe HAAD ANC
For this test I forced one of the three Routing and Remote Access Service (RRAS) servers which host services used in the hybrid azure network connections into an unhealthy state by shutting down the corresponding on premises server.
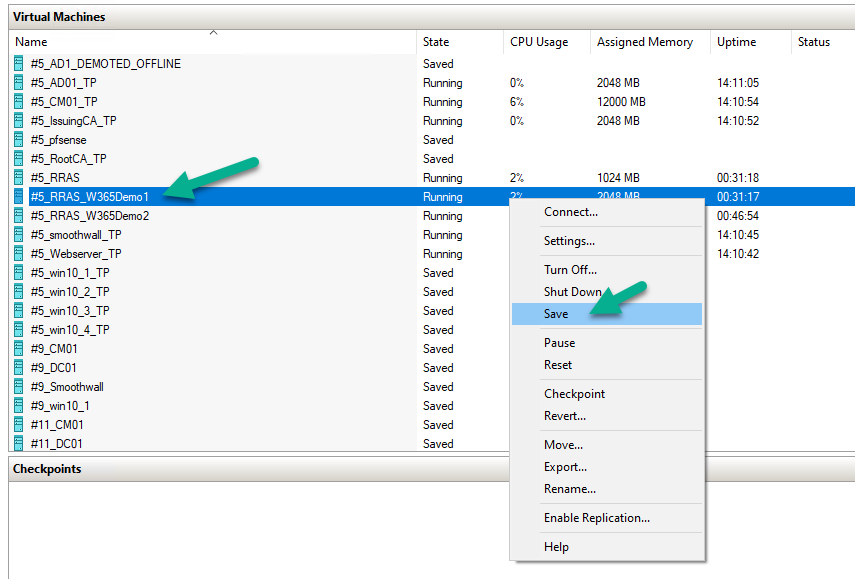
By doing this I basically forced the following ANC offline.
- W365Demo1_anc
Once that ANC was offline I retried the network tests in each respective ANC and then refreshed to see the latest status. You can clearly see that W365Demo1_anc is listed with a status of Checks failed.
The next logical step is to provision a Cloud PC for a user targeted with the Alternate networks in windows 365 provisioning policy. I then added a user to the group targeted with the this provisioning policy and waited for it to provision.

The provisioning started after a few minutes, but strangely it listed the very ANC that i took offline in the Azure network connection status column.
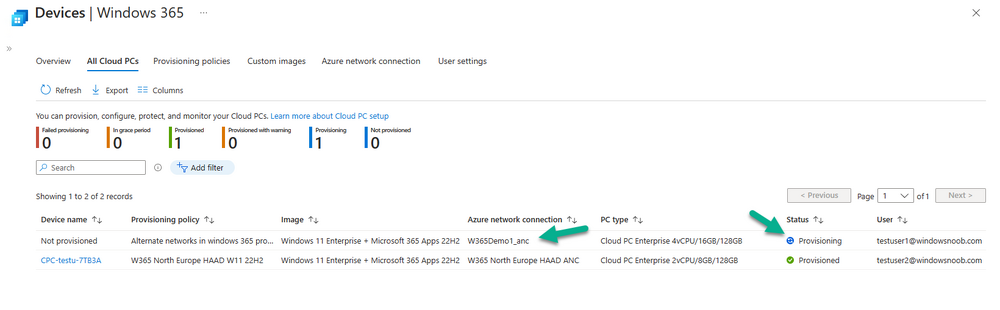
This was not what I expected, but maybe just a UI glitch. According to the priority I specified in my alternate ANC list, I expected W365Demo2_anc to be the ANC used during provisioning as W365Demo1_anc was already offline and marked unhealthy. I've made the Product Group aware of this. I'll update this blog post once they reply back.
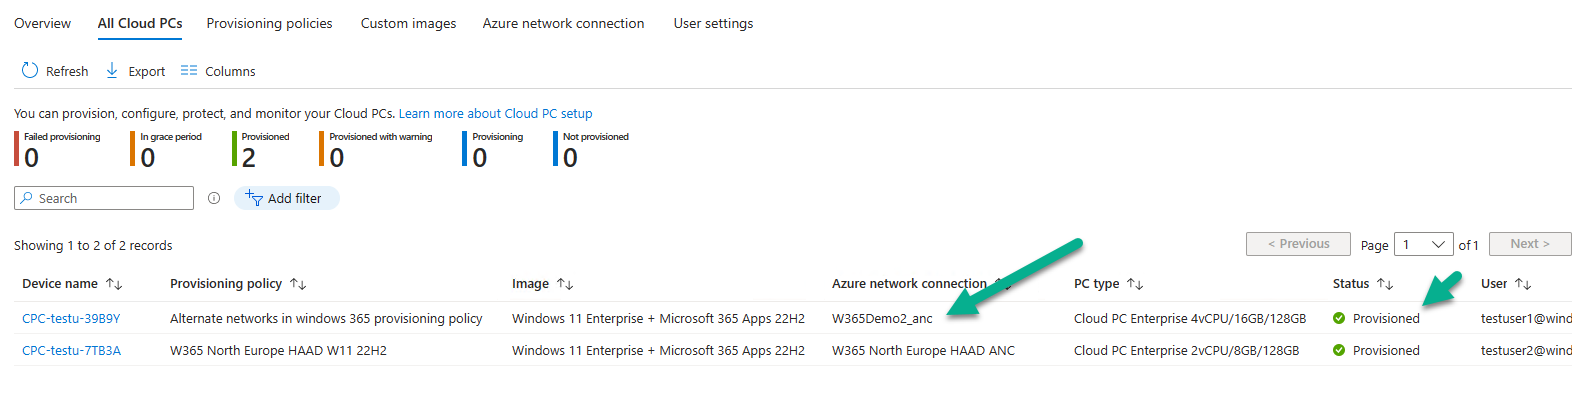
After completing the provisioning process I could see that it correctly listed the second of three available ANC's from my list (as the first was offline).

That's a result ! Great job Microsoft !
Recommended reading
- Using Alternate ANCs in Windows 365 - https://techcommunity.microsoft.com/t5/windows-it-pro-blog/using-alternate-ancs-in-windows-365/ba-p/3780384
- Getting started with Windows 365 - https://www.windows-noob.com/forums/topic/23040-getting-started-with-windows-365-part-1-introduction/
- Configuring alerts for Windows 365 Cloud PC's - https://www.windows-noob.com/forums/topic/23164-how-can-i-configure-alerts-for-windows-365-activity-in-intune/
- Create and assign provisioning policy - https://learn.microsoft.com/en-us/windows-365/enterprise/create-provisioning-policy#continue-creating-a-provisioning-policy
Summary
Providing the ability to use multiple/alternate ANC's during provisioning of a new Windows 365 Cloud PC is an important step forward in reducing downtime when provisioning new Cloud PC's. The recommended actions in Matt's blog post do point out that you should keep an eye on the health of your ANC's and while that is nice in theory, the existing methods of doing that are to look at the ANC health in the Azure Network Connections view directly, or read the emails generated by the alerting feature. I'd like to see a report that shows the reliability/health of your ANC's over time, so that it's easy for the admin to pinpoint problem locations (during specific time periods) and fix them. This new feature only applies to the actual provisioning of the new Cloud PC. It does not apply to existing Cloud PC's that may be affected if an ANC goes unhealthy.
-
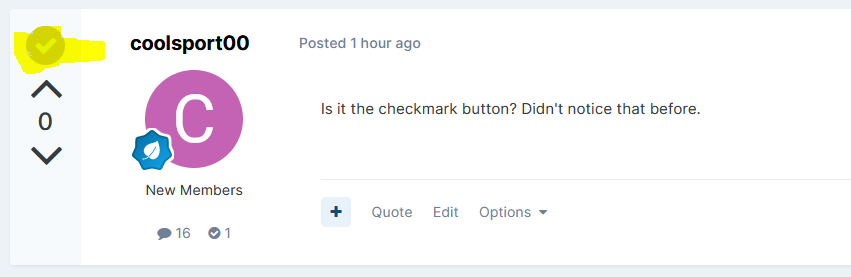
Click on the area I marked in yellow
-
nevermind i figured it out, it was a forum setting
you should be able to mark it as solved now
-
i admit i'm stumped, do you have time to do a remote session with me so I can see exactly what you see ?
-
hmm i'll keep digging, I've not found the answer yet, but i'll try !
-
does this help ?
https://invisioncommunity.com/news/invision-community/45-marking-as-solved-r1187/
do you see the option by clicking in the top right of a post ?
-
heh good question, let me try and figure it out, it could be a forum setting that i need to enable, i'll take a look and report back later
-
@sugarpickle check your pm


How can I use Updates and Servicing in Offline mode in System Center Configuration Manager (Current Branch) ?
in System Center Configuration Manager (Current Branch)
Posted
what does the ServiceConnectionTool.log file reveal ? can you attach it here
did anything appear in the C:\Temp\UpdatePacks folder ?