


Dietmar
-
Posts
23 -
Joined
-
Last visited
-
Days Won
3
Posts posted by Dietmar
-
-
You are welcome. 😊
-
I hope it's ok if I answer my question on my own for all who read this post. On friday I registered on IANA a private enterprise number (pen).
You can do this here: https://pen.iana.org/pen/PenApplication.page
It's absolutly for free. I received my number for "Einfaches Netzwerk" a few hours later via e-mail.
After a day or so you can find your number on a really hugh list here: https://www.iana.org/assignments/enterprise-numbers/enterprise-numbers.
Mine looks like this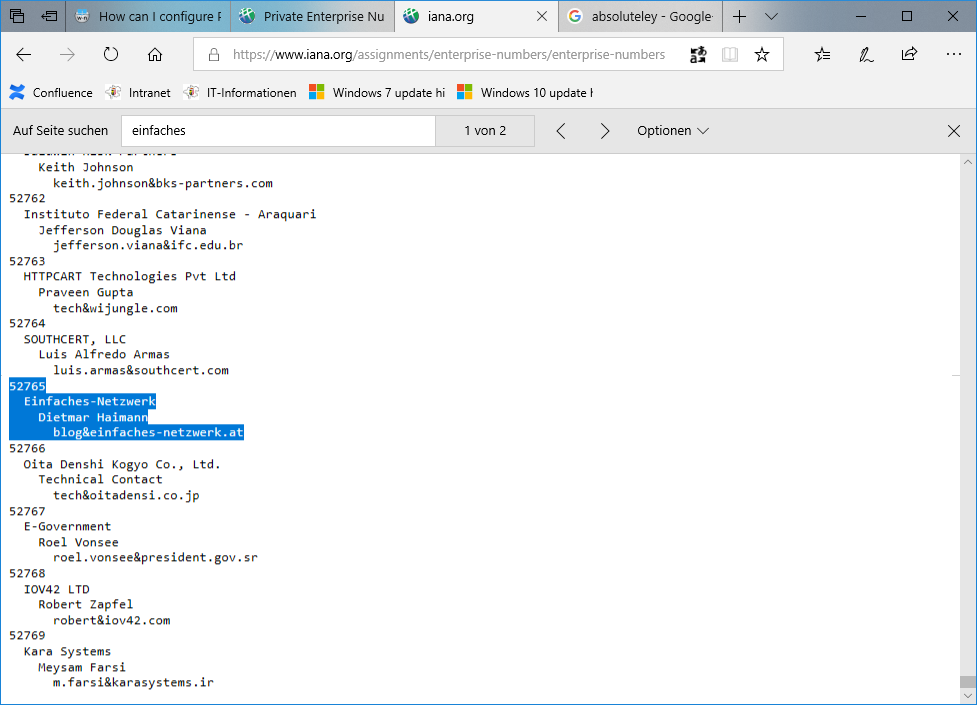
Now I am able to build my own OID with the prefix: iso.org.dod.internet.private.enterprise (1.3.6.1.4.1) > 1.3.6.1.4.1.52765 (the prefix is listed on the site above on the top).
Behind this OID you can add additional nubmers according to your certification policy statement (cps.txt). For example:- 1.3.6.1.4.1.52765.1.1 > Client certificates
- 1.3.6.1.4.1.52765.1.2 > Server certificates
- 1.3.6.1.4.1.52765.1.3 > EFS and so on.
You can find a cps template here: https://www.globalsign.com/en/repository/TrustedRoot Template CPS.pdf
You only need a public OID if your organization plans with other organzations to use PKI-enabled applications. It this case you need an OID which is unique on the internet.
...Dietmar
-
 1
1
-
Hi! Great work! However, I have two questions:
- The OID thing: why or for what reason is this necessary? I never heard before. What if I use the standard OID?
-
Quote
URL=http://pki.windows-noob.com/cps.txt
What is the cps.txt file for? What's the content of this file? I read all of your instructions twice but this file only appears here.
Can you explain this in a little more detail, please! Thank you very much!
...Dietmar
-
Hi! This is a very good idea! I love it! Thanks! I hate the driver repository integrated with ConfigMgr out-of-box. For this winroot thing: In "Patition Disk" step you can set OSDisk. For dism use
dism.exe /Image:%OSDisk%\ /Add-Driver /Driver:.\ /Recurse
What I cound'nt find: What means success code 2 50? Can you explain? Thanks!
-
 1
1
-
-
Hallo! Thanks for your solution! Now it works. I set the checkbox for installing IIS on remote machine. I didn't know that this do not work on windows 7. Thank you very much. This is a very important feature in our company!
-
I can see no errors. Nothing happens on the Windows 7 machine. No special logs, no folders, nothing. Strange. We know about branch cache but we also want to use distribution points.
-
Yes, I know. However, the Distribution Point can be on a Windows 7 machine. But I cannot get this working.
-
Hi! Yesterday I tried to create a distribution point on a Windows 7 Enterprise SP1 x86 machine because on SCCM 2007 we have about 110 small locations with a BDP. So we need this feature in 2012, too. I clicked through the wizard to add a new site system but on the Windows 7 machine nothing happens. The client is already installed and everything else works fine. I configured the site server and network access account as domain admin. The client push installation also works fine.
What's wrong? On the Technet Library for SCCM 2012 I could'nt find any solution. Did anyone (or anyweb :-) tried this and got this working? Has the DP machine to have a x64 architecture?
Thanks for help.
-
Your step-by-step instructions are still the best on web! Thanks for that!
Everything is working perfectly! Now I am waiting for RTM ;-)
-
1
-
-
To wipe the disk everytime just add these lines into winbom.ini:
[Factory]
WinBOMType=WinPE
Reseal=No
[WinPE]
Quiet=Yes
Restart=No
[PnPDriverUpdate]
[PnPDrivers]
[NetCards]
[updateInis]
[FactoryRunOnce]
[branding]
[AppPreInstall]
[DiskConfig]
Disk1 = Disk1.Config
[Disk1.Config]
WipeDisk = Yes
Size1 = *
PartitionType1 = Primary
FileSystem1 = NTFS
QuickFormat1 = Yes
SetActive1 = Yes
-
Hi! Sorry for late answer. No ALLUSERS=1 did no difference. I still have the same problem. If I install with a "run as" action in task sequence only the "%_SMSTSMachineName\Administrator" works. In technet forum I got the tip to only use "Administrator" without domain but this do not work.
"Install Application" action in TS do not apply the settings in .mst file. I evertime have to click "repair" in ARP to apply settings in mst. Once more: On Windows 7 it's the same with Office 2003. Our management still do not want to pay the licenses for a newer office version for 6000 clients.
-
OK. Thanks for patience. I think now I am able to create a working solution.
-
Is an obsolete machine also a known machine?
-
Not all unknown computers will be Windows 7 ready computers because our hardware team repairs broken machines and give them back into the hardware pool. So it's possible that an older PC will be installed. We use active directory group membership of machines for membership of SCCM collections to deploy the software to the users PC. Because of this our support members delete the active directory computer object if it's broken and have to be changed. I think this machine is now an unknown machine to SCCM. Isn't it?
-
One more question: How do you handle unknown computers? Do you pre-stage all of your PCs? Hard to do in an environment with more than 6000 machines.
 I really do not know every new PC. Any idea?
 -
Yes that make sense! Of course! Sometimes it's so easy. I feel ashamed. Because of the way with bootstrap.ini I was so fixated on the pre-execution hook files that I didn't see this simple solution. Thank you very much.

-
Hi!
How do you solve the following:
I created a reference image with windows 7 and a task sequence to deploy called "Windows 7 target deployment".
I did the same with Windows XP with SP3 with the task sequence called "Windows XP target deployment".
We want to deploy Win 7 only to our newer machines. All the others should be installed with Win XP.
I advertised the TS so it's possible to choose one TS Win7 either Win XP. However, I want to do this automatically for the end users.
How do you solve this? Do you create only one TS with many options? Or is it possible to manage with media hook-files? But how to choose
a specific TS for specific Model? In MDT 2008 I did this in the bootstrap.ini. How to solve with SCCM?
Thanks! Didi
-
Thanks for answer. I will do so.
-
Hi, this is great! I love your step-by-step guides! (I wrote on TechNet Forum to you).
One question: What do you realize with the "phase 1", "phase 2" and "phase 3" collections?
I do not understand the whole purpose for this hirachy. If the updates are successfully deployed to
the test group and you get positiv feedback, how do you deploy the updates to the rest of computers
in environment? Do you create an own deployment with All Windows XP Collection as target or do you change the
existing deployment target to another collection?
-
I will try, this will take a while... Thanks.
-
I build the XP master image with a imported mdt task sequence and Office is a part of this installation. The problem was that the user settings in the mst file did not work because SCCM installs software with system account. I got this working running the installation of Office with "run commandline task sequence" with the run as function of SCCM 2007 R2. First I set a task sequence varibale LOCALADMIN to %_SMSTSMachineName%\Administrator. Then I run the commandline as %LOCALADMIN%. This works fine. However, the problem with the additional profile folder. I know it not a technical problem. It's more a kind of "cosmetic" problem.
P.S.: This is the command line: Setup.exe /i "Pro11.msi" /m /qn ALLUSERS=2 TRANSFORMS="MySettings.mst"
Another question: What do you mean with "are you only deploying Office 2003 using a Task Sequence"? Is it possible to deploy software to existing clients using task sequences instead of "classic" advertisements? Sorry, I'm new to SCCM.
-
Hi, I use SCCM 2007 SP1 R2, MDT 2008 installed.
I have to install Office 2003 with custom settings in a mst-file on Windows XP with SP3. To get this working fine I use a run command line task sequence running as local administrator. This works fine! However, the profile of the local Administrator is created in a subfolder like C:\Documents and Settings\{MachineName}\Administrator and not C:\Documents and Settings\Administrator.
How can I prevent this behavior? I thought after sysprep and deploy the image the admin profile is moved to the right folder but it isn't. On the new machine the admin profile is still in the folder C:\Documents and Settings\{MachineName}\Administrator. {MachineName} is the name of the reference machine and not of the new machine. It's confusing me a little bit.
After searching the Internet I found an article which describes this method to move profiles:
* logon as user with administrative rights
* open regedit
* search this key: HKLM\Software\Microsoft\Windows NT\CurrentVersion\ProfileList\{SID}
* change the value of the REG_EXPAND_SZ ProfileImagePath from %SystemDrive%\Documents and Settings\{MachineName}\Administrator to
%SystemDrive%\Documents and Settings\Administrator
* logon as Administrator
* open cmd
* enter set and verify the profile path
Do you think it's OK to move the built-in Administrator profile with this method? Thanks!
How can I configure PKI in a lab on Windows Server 2016 - Part 5
in PKI
Posted
I can definitely confirm that this guide works. In truth, there aren't many alternative ways to install this, just a few. But it would be practically the same with hopefully the same result.
Do not install the PKI on DC and for simlpe deplyoments forget the OID and use the standard one.