


Trung Thanh
-
Posts
7 -
Joined
-
Last visited
Posts posted by Trung Thanh
-
-
After installing Operation Console, a web-based environment is used to deploy workflow processes for end-users, the security which contained users and password, is necessary but it’s a clear-text or plain-text, I think using web-based withi https and certificate technology is the best suite on this case, the extranet or Internet implementatiion.
Opalis Operation Console uses Jboss – Java Technology inside – and so we have a strange environment which is implemented with SSL + Certificates. On the Administrator Guide Opalis has a step by step but it not useful if you don’t have an experience to work with certificate and Java before, so that, I write this post to show some steps which is hidden from Administrative Guide, the small steps but I think they are time-saving.
Step 1: Preparing Certificate Authority Environment.
On Domain Controller, we must install IIS (Web Server) at first, don’t try install IIS and Certificate Authority at the same times because of errors
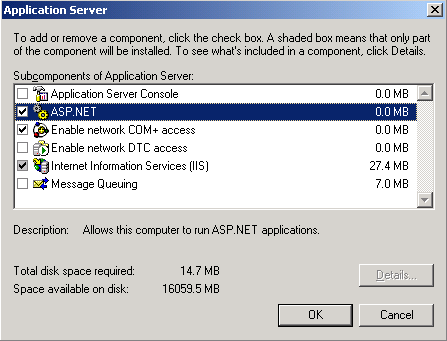
Secure Opalis Operation Console - Install Web Server
Install the Certificate Service
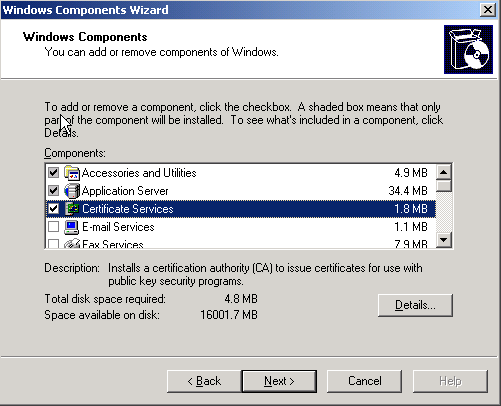
Secure Opalis Operation Console - Install Authority Service
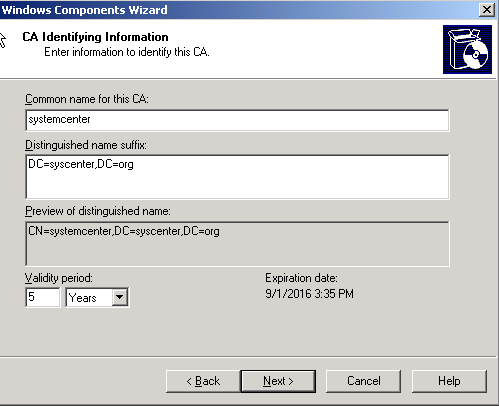
Secure Opalis Operation Console - Install Authority Service Root CA
Type the name of Root CA - systemcenter is the name of my scenario root CA.
Complete the wizard steps.
Click on Start | Run | type MMC
MMC appears and click add-in and finds Certificate from dialogue, click Add
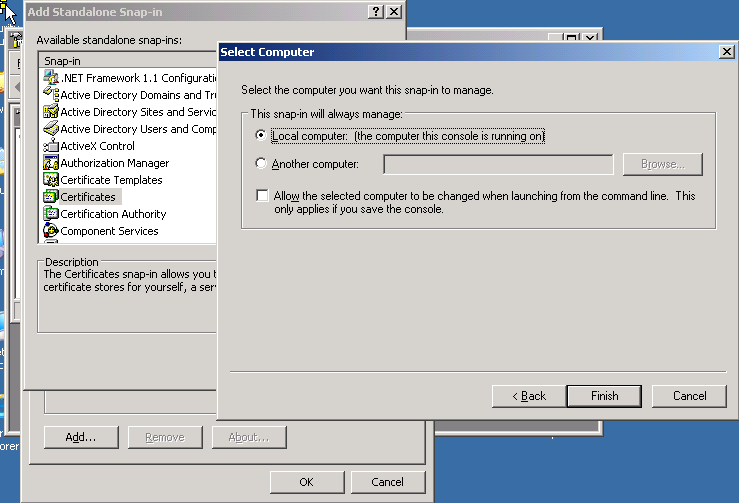
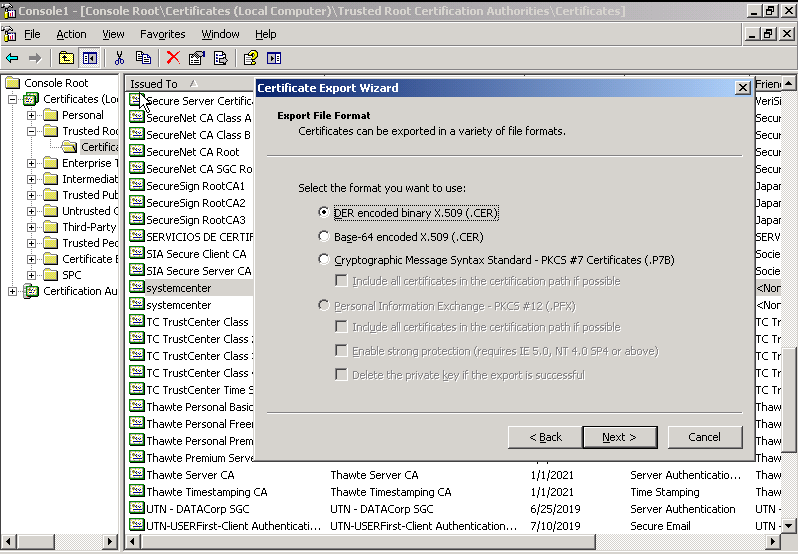
Secure Opalis Operation Console - Export Root CA from MMC
Expand Trusted Root Certificate | Certificate and find systemcenter, right-click and export this certificate for preparing the next-step: Import Certificate.
Secure Opalis Operation Console - Install Authority Service Root CA
Step 2: Creating certificate sef-service, importing and submit request to CA.
On Opalis Server, Java allow to creating the certificate self-services, and we must submit the request of this certificate to CA.
Creating certificate self-services by the command-line:
“%JAVA_HOME%\bin\keytool.exe” -genkey -alias opalis -keyalg RSA -keystore “%JAVA_HOME%\jre\lib\security\opalis“Notes: “%JAVA_HOME%” is shown the Java home directory, by default C:\Program Files\Java\jdk<version>, using ” ” because of the space on the path directory. Replace the highlight with the other name.
Type changeit on the password reminder. You can change the password if you want, on this case I use changeit – default password during the steps.
Type the first – last name, using FQDN on this Opalis server, on this case, it’s opalis.syscenter.org, others field can blank, and Enter for using default password.
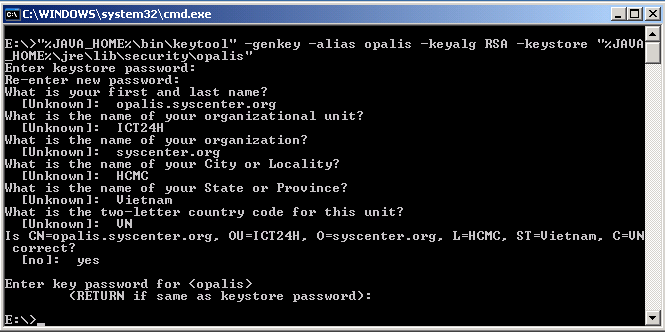
Secure Opalis Operation Console - Creating self-service certificate
Creating the request certificate file
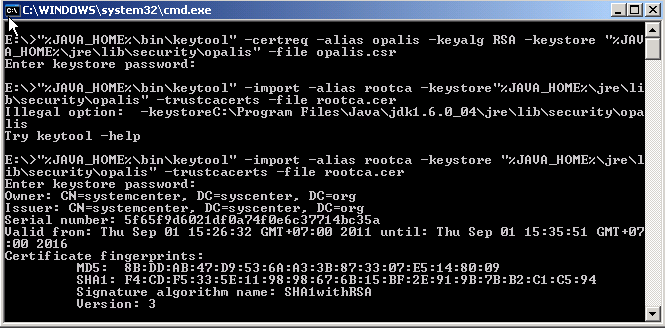
“%JAVA_HOME%\bin\keytool.exe” -certreq -alias opalis -keylag RSA -keystore “%JAVA_HOME%\jre\lib\security\opalis” -file opalis.csr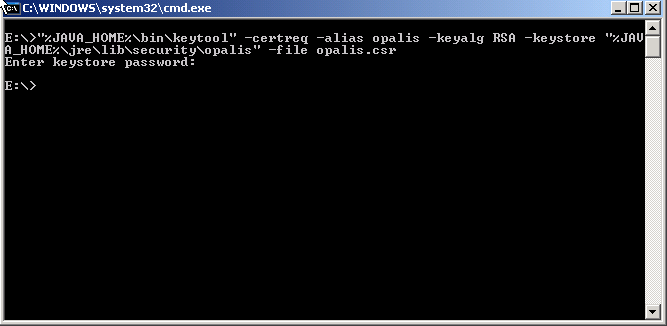
Secure Opalis Operation Console - Creating request certificate file
Opalis.csr is created at the location where you are running the command, opening opalis.csr by notepad or wordpad program, copy all content of this file
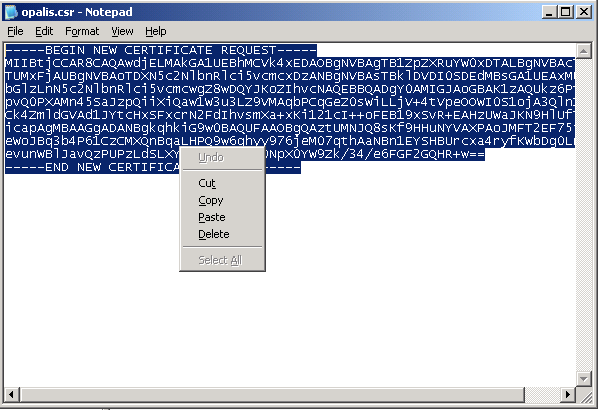
Secure Opalis Operation Console - Open request certificate file
Using Internet Explorer and type address of Certificate Web Enroll, type the username and password (Administrator for example), click Request a certificate, click Advanced certificate request
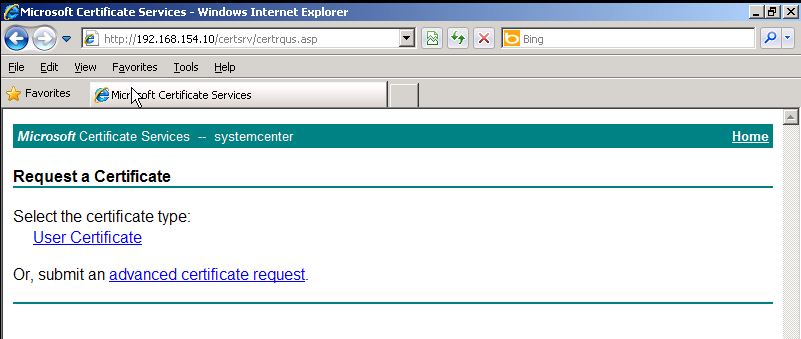
Secure Opalis Operation Console - submit request certificate file
Click Submit a certificate request ….. file
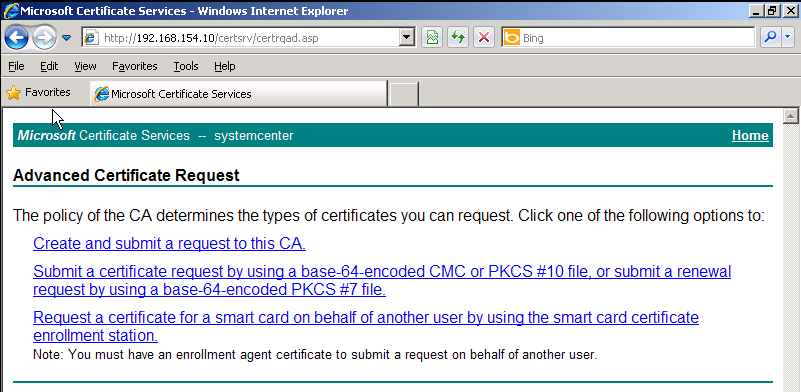
Secure Opalis Operation Console - submit request certificate file
Paste the content of opalis.csr to Save Request textbox, and choose Web Server on Template Combox-box, click Submit button at the bottom page.
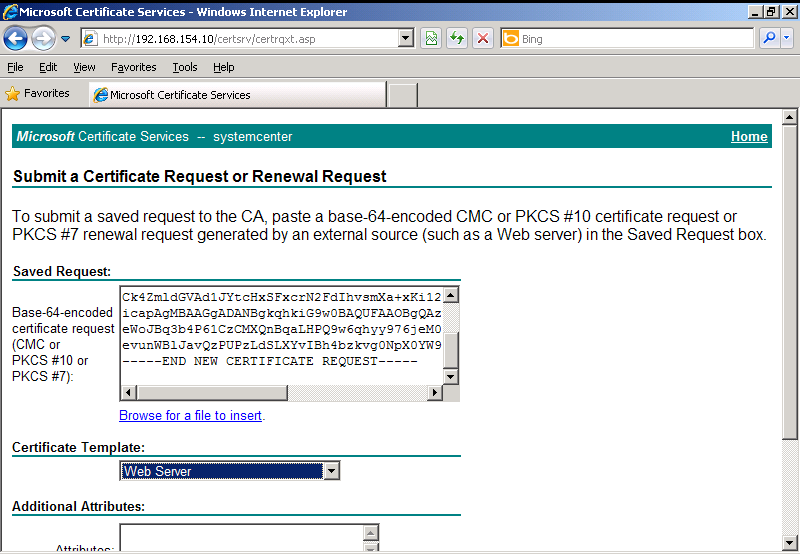
Secure Opalis Operation Console - submit request certificate file
Download the Certificate with DER, save the file with the name opalis.cer.
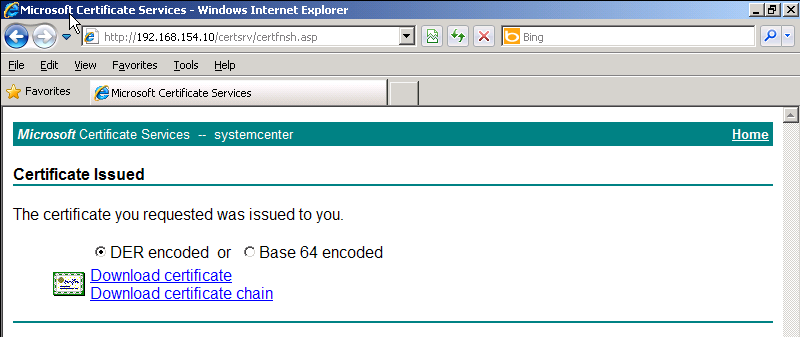
Secure Opalis Operation Console - submit request certificate file
Now, we get the opalis.cer and we must import rootca to authorize opalis.cer. Copy the rootca which you export from Step1 to folder where you want to run command-line.
Secure Opalis Operation Console - get rootca file
Importing the RootCA and Certificate
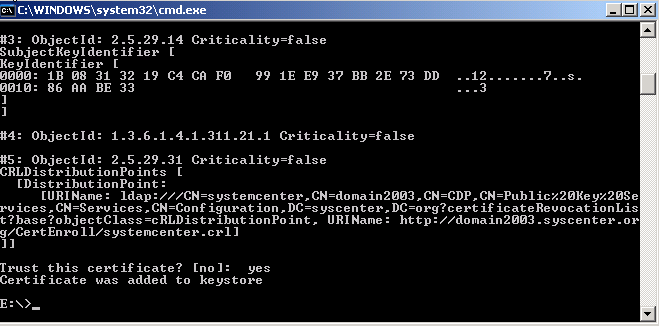
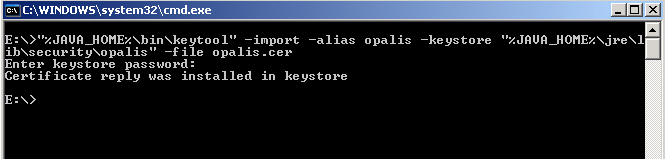
“%JAVA_HOME%\bin\keytool.exe” -import -alias rootca -keystore “%JAVA_HOME%\jre\lib\security\opalis” -trustcacerts -file rootca.cer“%JAVA_HOME%\bin\keytool.exe” -import -alias opalis -keystore “%JAVA_HOME%\jre\lib\security\opalis” -file opalis.cer
Secure Opalis Operation Console - Import certificate file
Secure Opalis Operation Console - Import certificate file
Secure Opalis Operation Console - Import certificate file
Notes: you must import rootca at first, and choose yes to import this certificate, if you don’t import rootca, you will have error appear to warning, not reply from chain.
Step 3: Change configuration file of JBoss.
Open Operation Console folder, e:\jboss\jboss-4.2.3-GA for example, navigate the server.xml on Operation Console Folder | server | default | deploy | jboss-web.deployer
Find HTTPs Protocol and modify content file like this
< –! HTTPs Protocol –><Connector port=”8443″ address=”${jboss.bind.address}”
protocol=”HTTP/1.1″ SSLEnabled=”true”
maxThreads=”250″ scheme=”https” secure=”true”
clientAuth=”false” keystoreAlias=”opalis”
keystoreFile=”${java.home}/lib/security/opalis”
keystorePass=”changeit” sslProtocol=”TLS” />
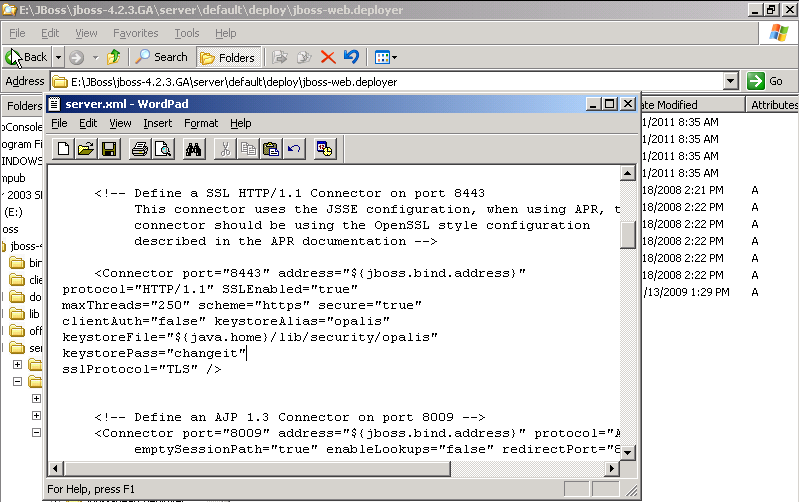
Secure Opalis Operation Console - Configure server.xml
Copy the server from folder Operation Console folder | offline | protocol | https to Operation Console folder
Modify the application.xml file located at Operator Console Folder | server | default | deploy | OpsConsoleApp-1.0.ear | ME TA-INF | application.xml by changing
<module><ejb>OpConsoleWebService-1.0.jar</ejb></module> to <module><ejb>OpConsoleWebServiceSSL-1.0.jar</ejb></module>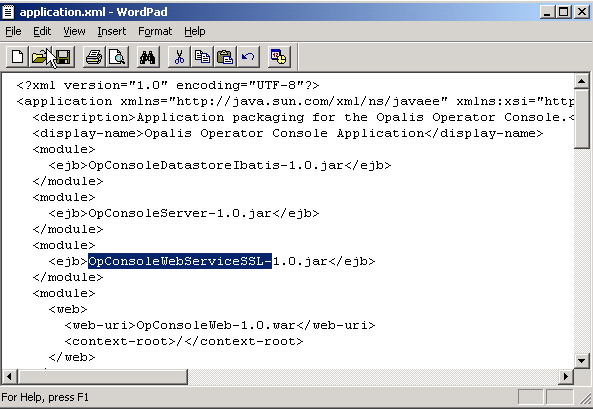
Secure Opalis Operation Console - Configure application.xml
Modify the security-constraint section of the Operator Console Folder | server | default | deploy | OpConsoleWebServiceBridge-1.0.war | WEB-INF | web.xml file to the following:
<security-constraint><web-resource-collection>
<web-resource-name>SecuredAll</web-resource-name>
<url-pattern>/*</url-pattern> </web-resource-collection>
<user-data-constraint>
<transport-guarantee>CONFIDENTIAL</transport-guarantee>
</user-data-constraint>
</security-constraint>
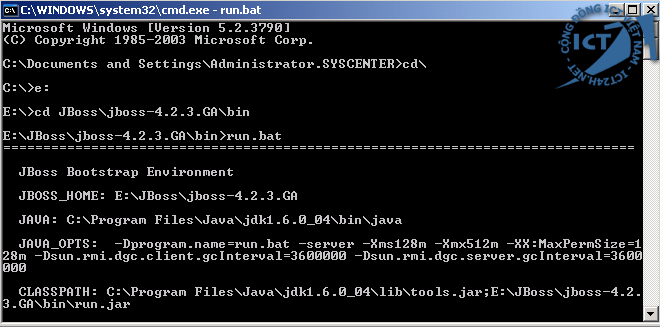
After that, restart Jboss with run.bat from Jboss\Jboss-4.2.3-GA\bin to load new server.xml
Step 4: Test
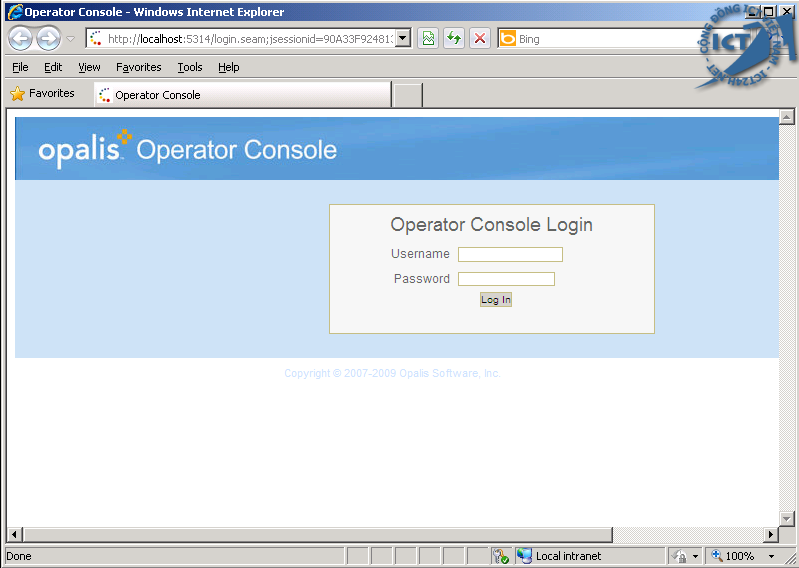
Using Internet Explorer and type https://localhost:8443 for testing
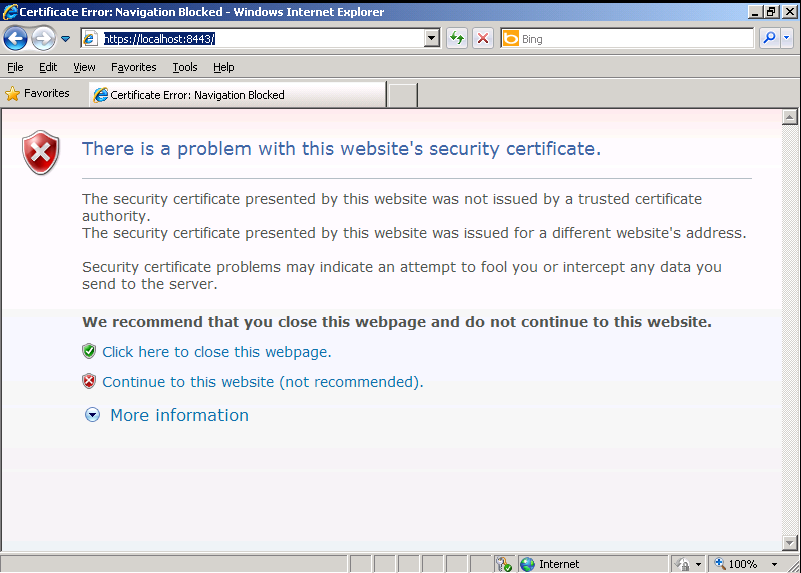
Secure Opalis Operation Console - Test HTTPs
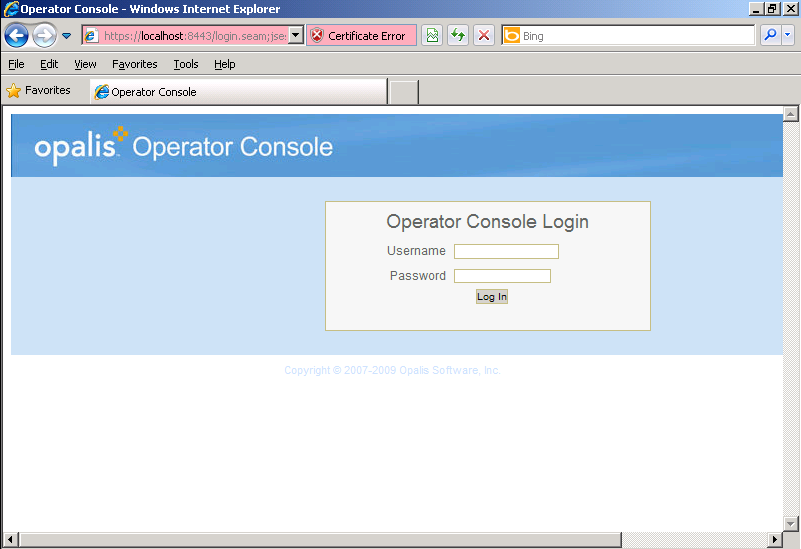
Secure Opalis Operation Console - Test HTTPs
Secure Opalis Operation Console - Test HTTPs
Secure Opalis Operation Console - Test HTTPs
-
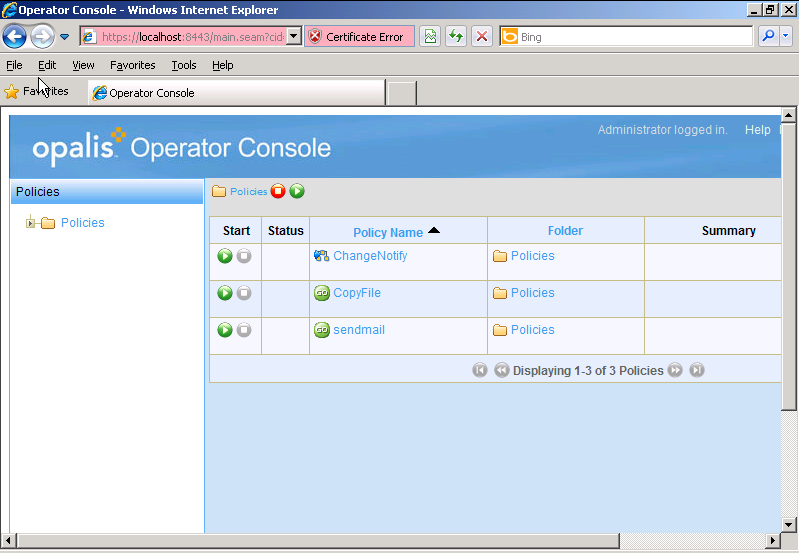
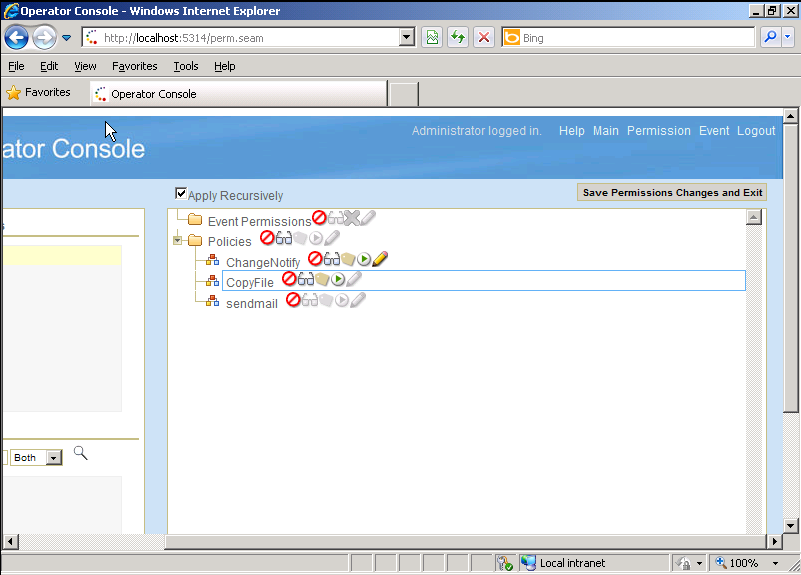
Assign Permission on User to apply or run Policy Workflow is very important, users don't need to call the agents for supporting, users can do this, based on Policy Workflow which runs on Web-based.
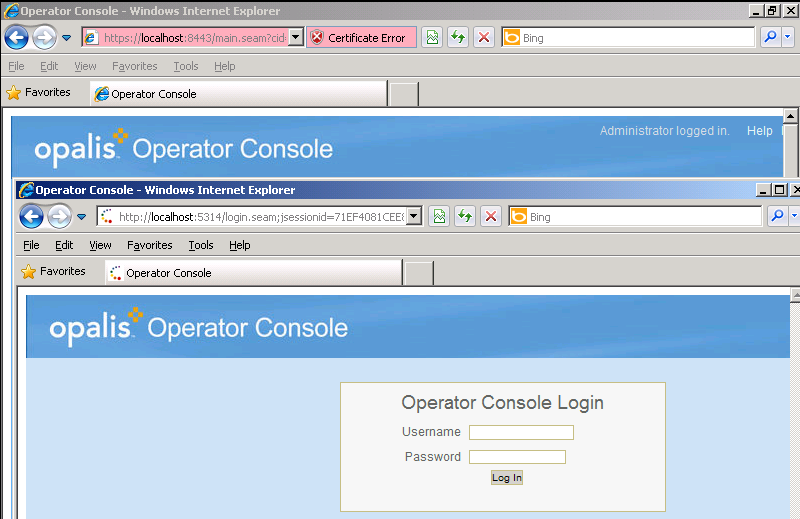
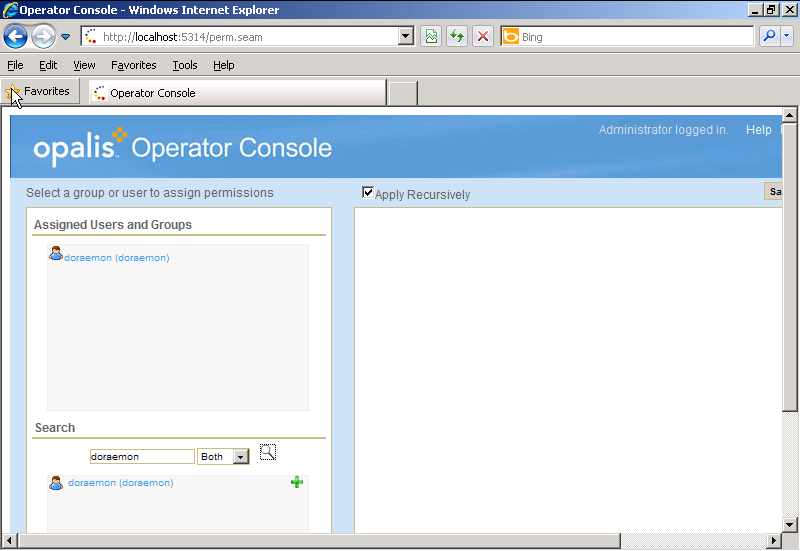
By default, no one can view the policy and run this except administrators, so that, administrators group or IT group need to assign permission on this policy for users who can run directly. By log in Operation Console on Opalis, administrator can assign the permission

Look in the top of left-hand, click on Permission, the new page appears, type name of user or group on Search, choose users and click green plus (+) to add User to Assign User Permission.
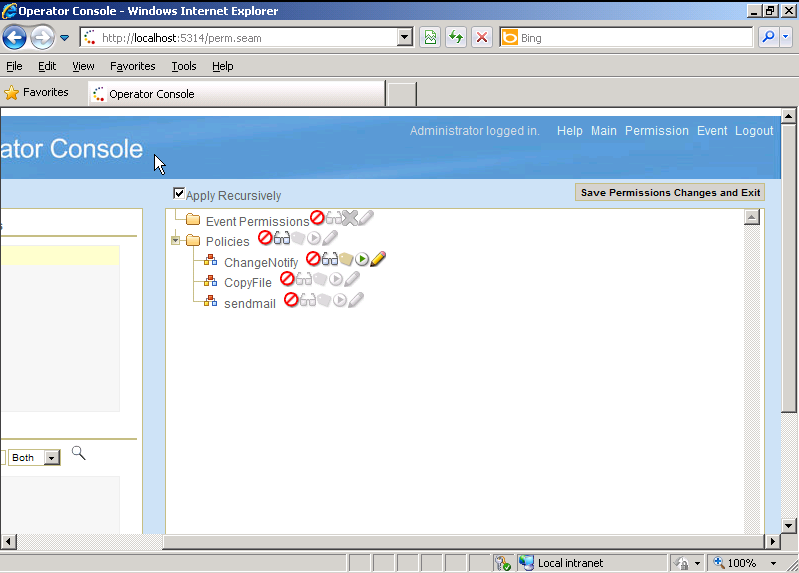
Click on Users and the middle-page page shows all policy and Permission. Every Policy has Run, View, Tag and Eidt (icon) Permission, Click on the Permission which integrated with Policy to assign permission for users.
I show the user permission on web page before apply new permission

Back to Administrator of Operation Console and click Save Permissions Changes and Exit to complete the task.
Now back to User of Operation Console and press F5 to refresh the Web page and see the results
The task is completed.
Regards,
-
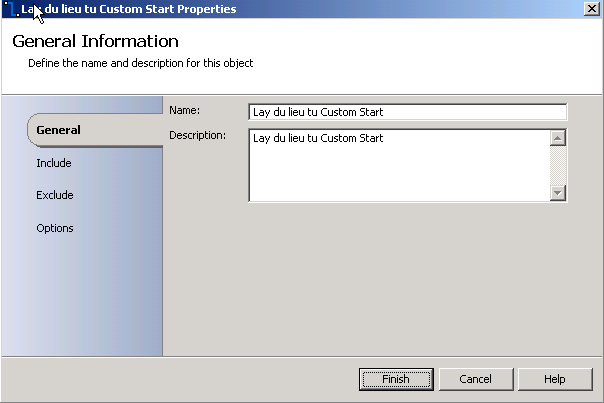
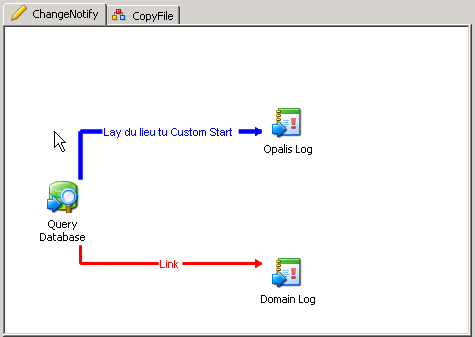
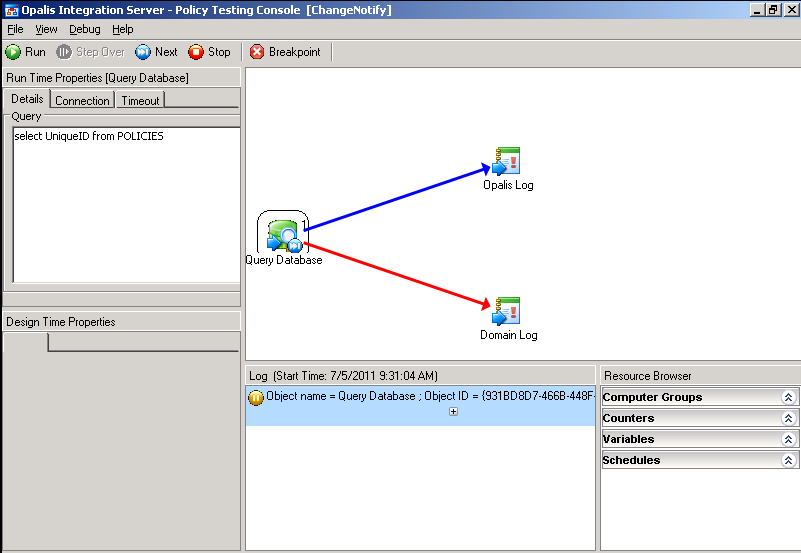
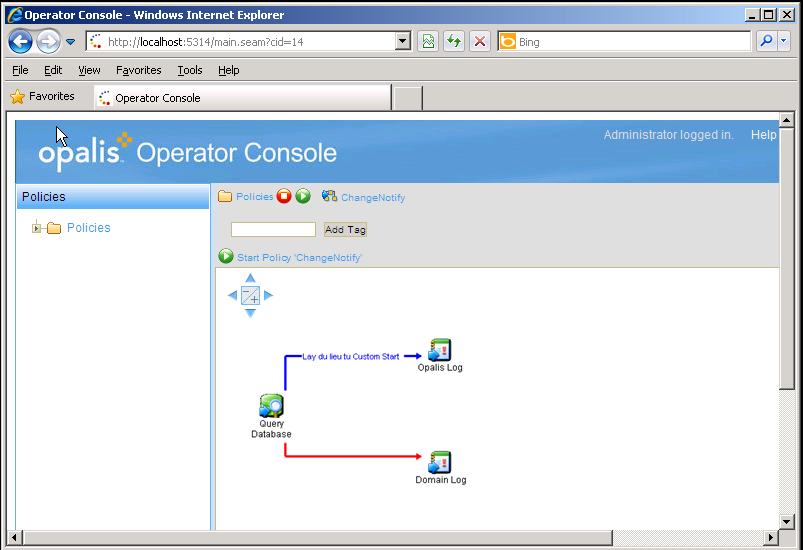
After install Opalis Integration Server, we can use Opalis Integration Server and Client to create a new Policy. Drag the Object on Taskpane on Right Hand and drop into the working space.
In situation, I create a basic workflow like the picture below
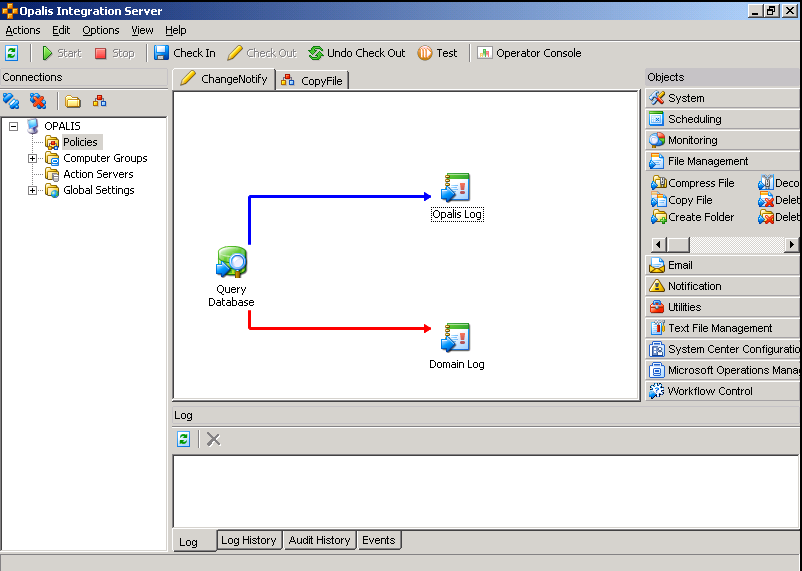
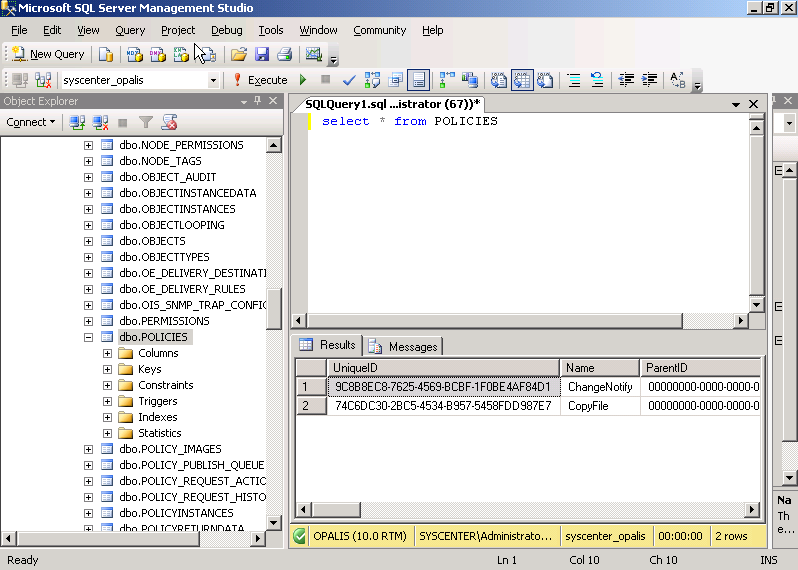
Double-click or right-click on Query Database Object and choose Properties, edit some object's information
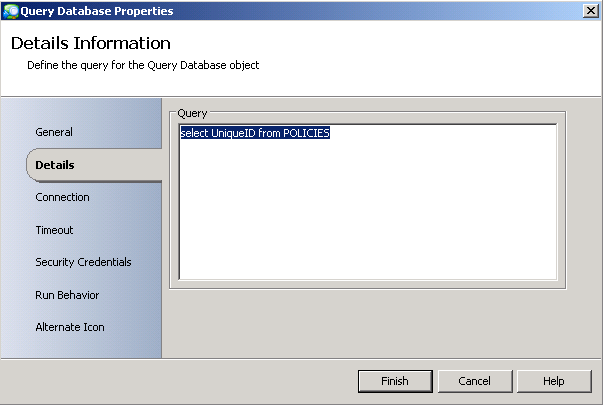
Almost object has General - the name definition for object, Detail show information about data which located or received from parameter. This picture above, I use SQL Statement to get data from database. And this picture below is shown my database and results of the SQL execution
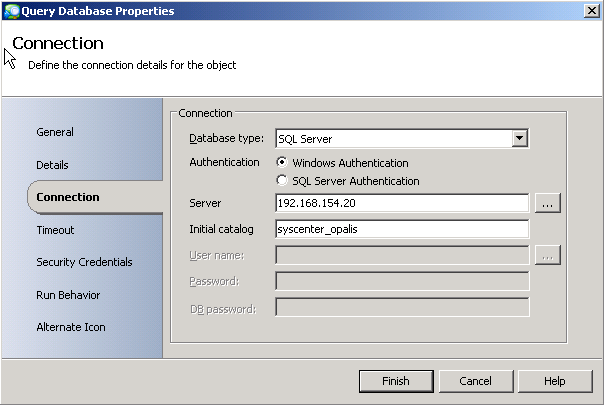
We must configure parameter for connecting to Database
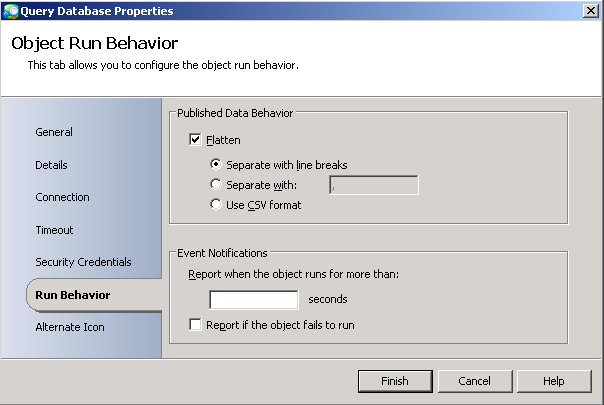
On Behavior is shown the ways of data appearing, such as data separates with comma (,) or with others symbols, some symbol like as $,%,@,# must be restricted because of the conflict.
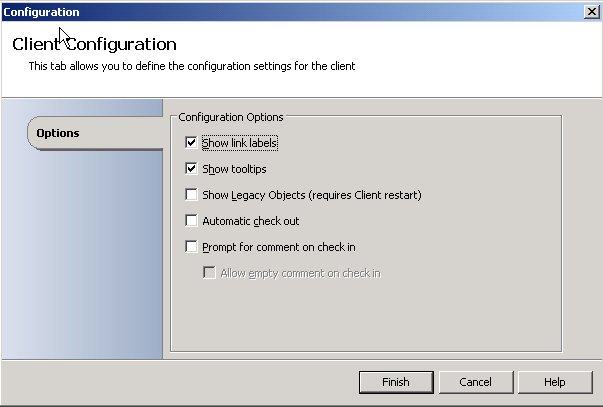
You can go Options | Configuration to show the Link Description, it's very useful for troubleshooting.
Change Link color by using Options on Link Properties
Double Click on Log Object, type information needed in. In this Object, we can use information which is the result of SQL Execution from Query Database by using right-click on the box and choose Subscribe, choose Published Data
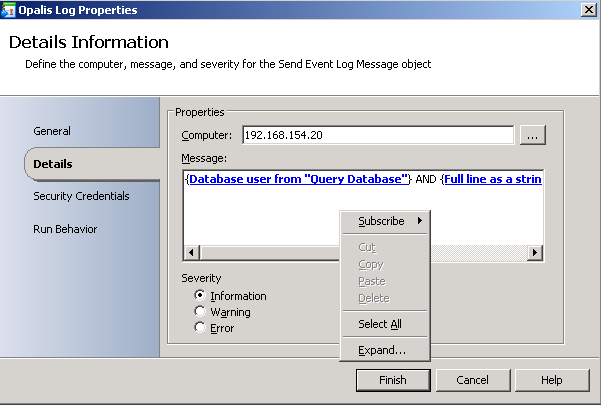
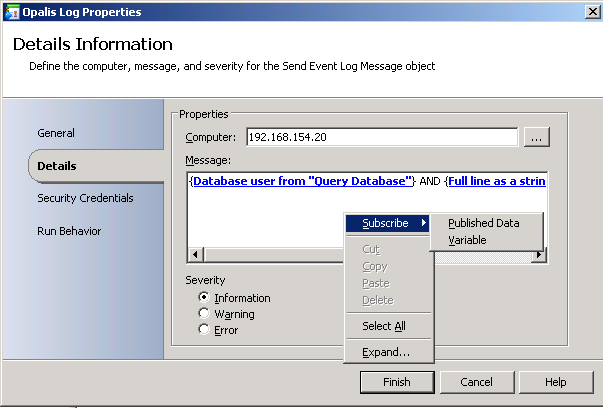
Choose Data which you need to use. If you can deal with Loop Options, click on Show Common Published Data for more information. Click the Combo-box from Object to change other Object's Published Data.
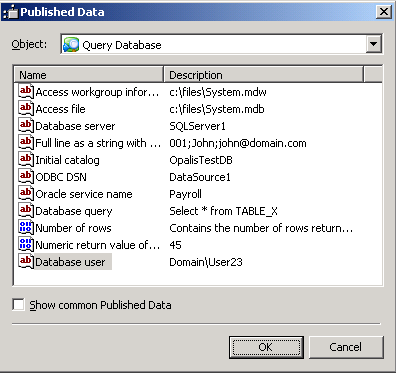
Note: Published Data which you choose is contained in { } and all characters is bold and blue
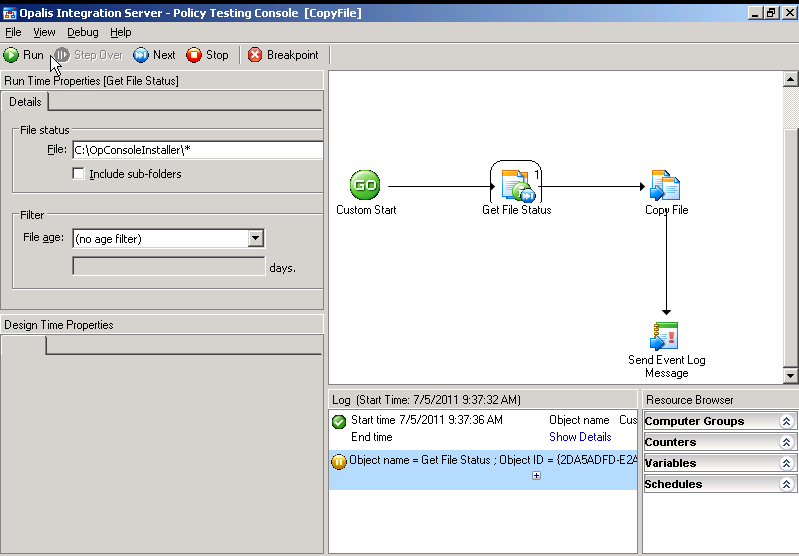
Now we change to test environment

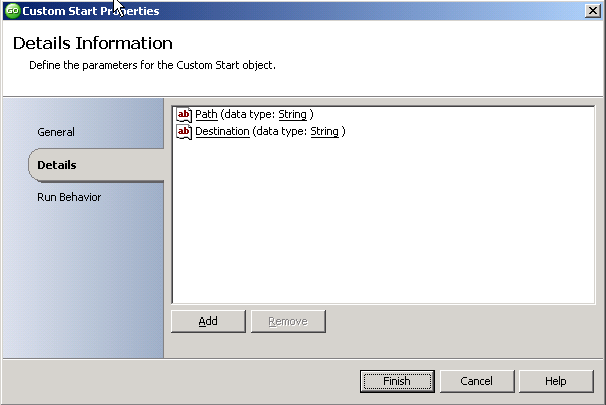
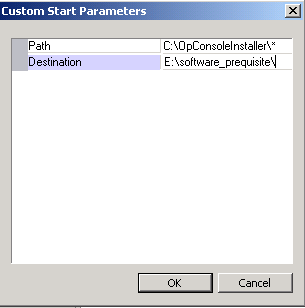
At next, I show you the way to deal with the first parameter on Custom Start Object. This parameter or variable to use during Policy. This picture below is shown the situation, I defined to path (source) and destination for File Copy Object - this object copy all file from source to destination. This File Status is used to verify the source is correct (has file).

Double-click on Custom Start, on Details, click Add and type the parameter name, format.
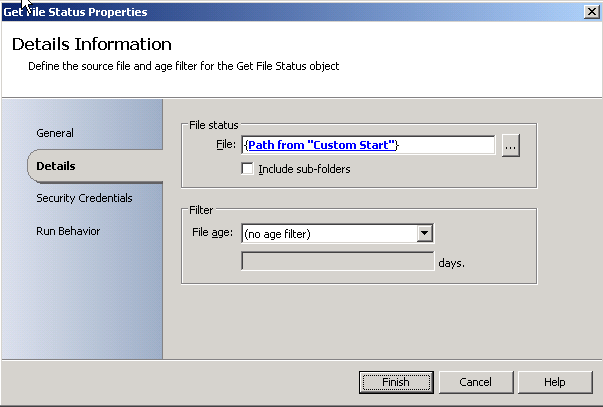
On Get File Status Object, choose Published Data from Custom Start (path name)
The similar for File Copy Object
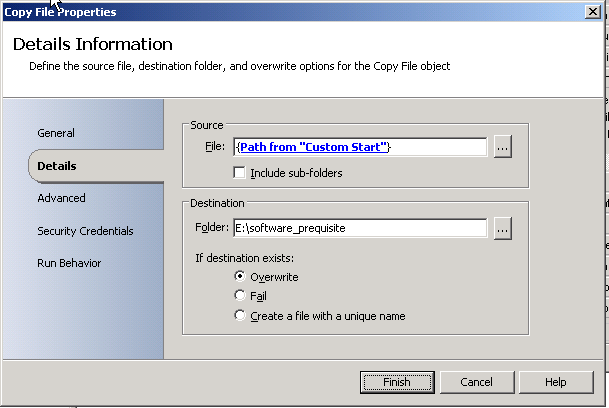
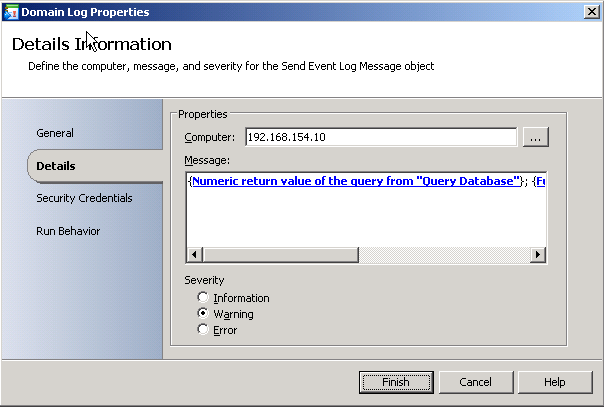
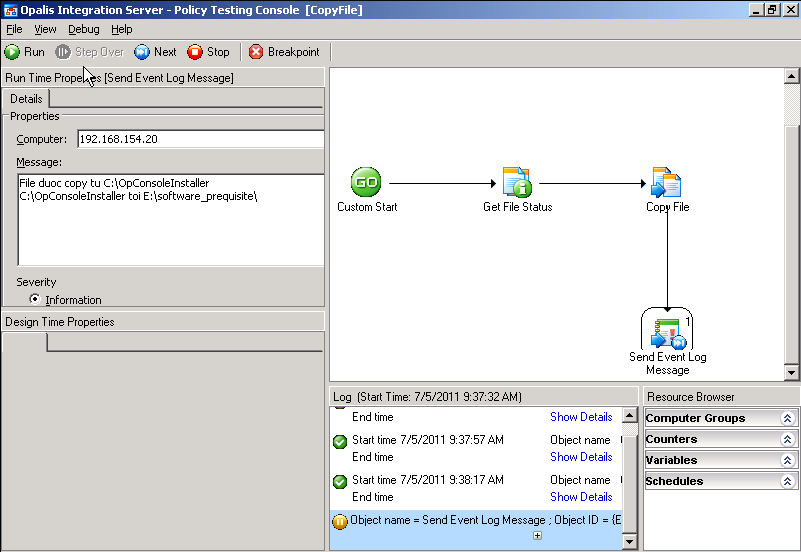
Finally, configuration for Send-Event-Log Object.

Change on the Test Environment
Notes: File Copy Object copies file only, if you want to copy all files and sub-folders use asterisk (*) symbols to do this chỉ copy file nếu như

OK, these Policies are all right. You must to Check-out to complete the Policy.
Vậy là hoàn tất các bước và cần chú ý là Policy sẽ không được hoàn tất tới khi Check-out, lúc này Policy mới thực sự tồn tại.
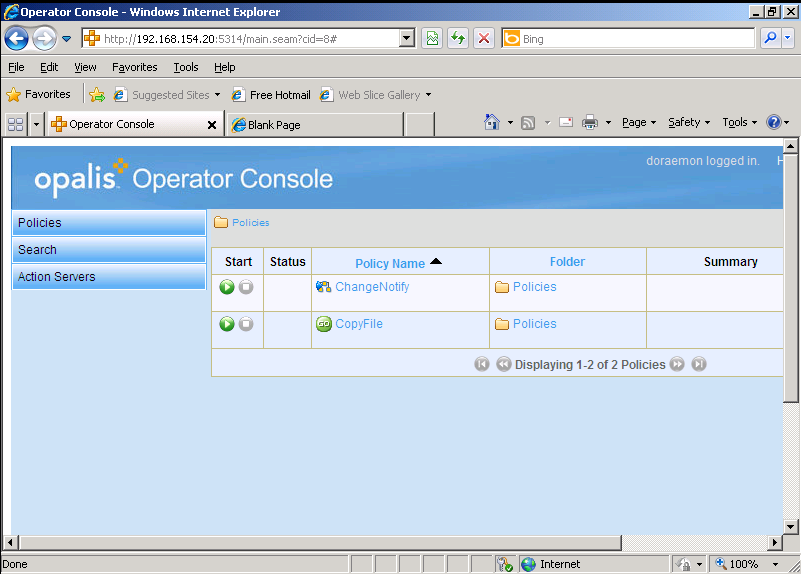
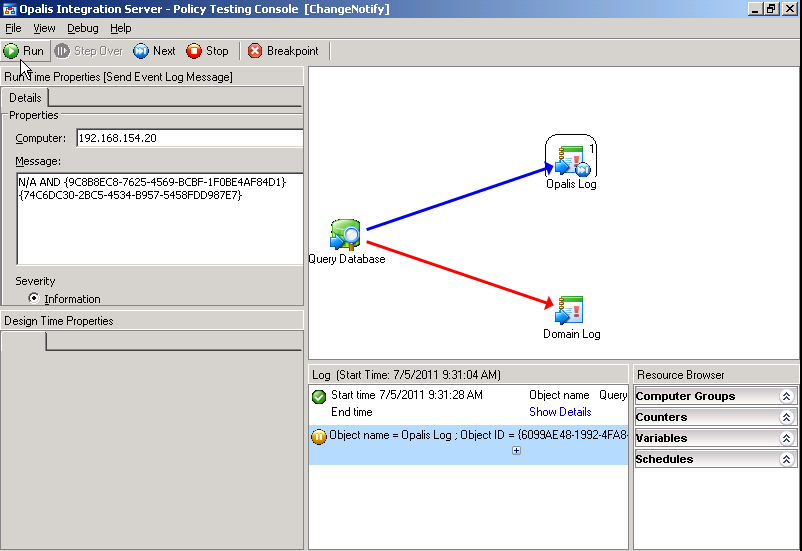
On previous post, the Operation Console to set up the Web Environment to communicating with Opalis. Now, we create Policy and see on Web pages, and we can run the Policy on the Web pages by click Run button.
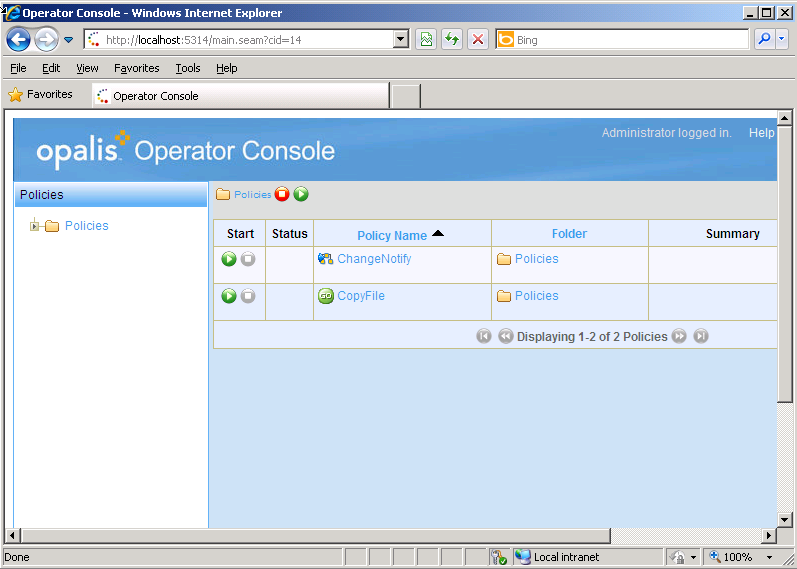
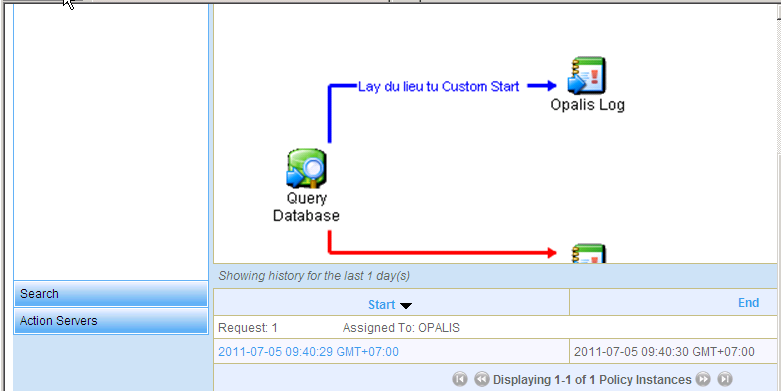
Policy runs without step by step checking.
And results
Regards,
-
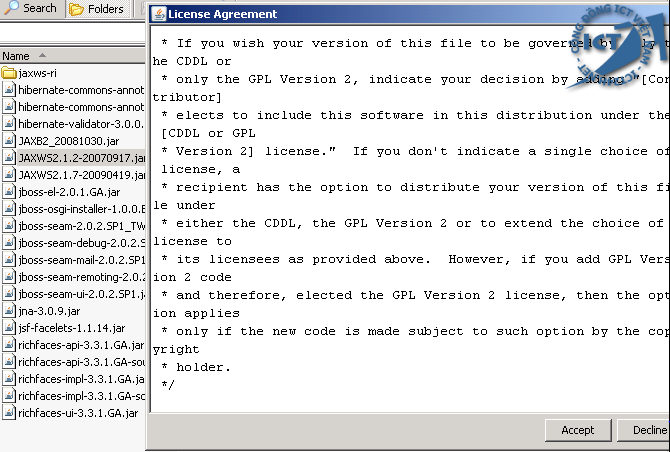
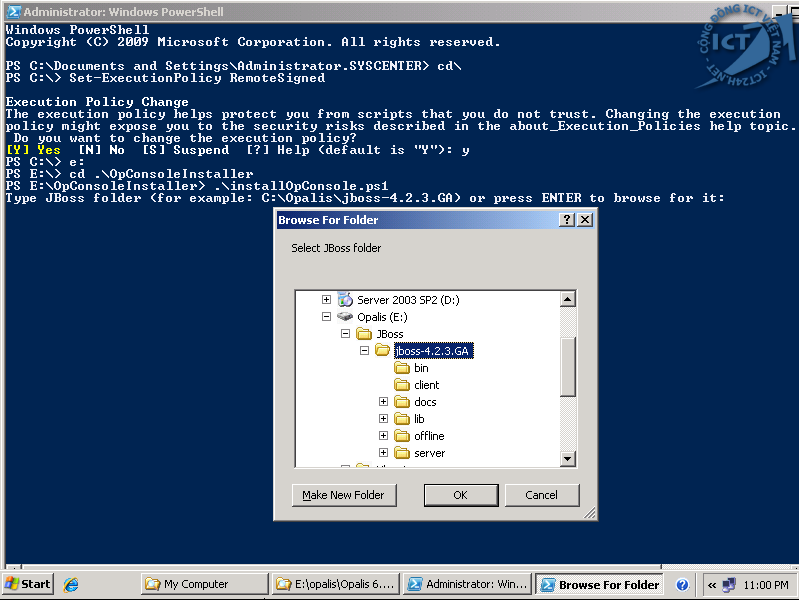
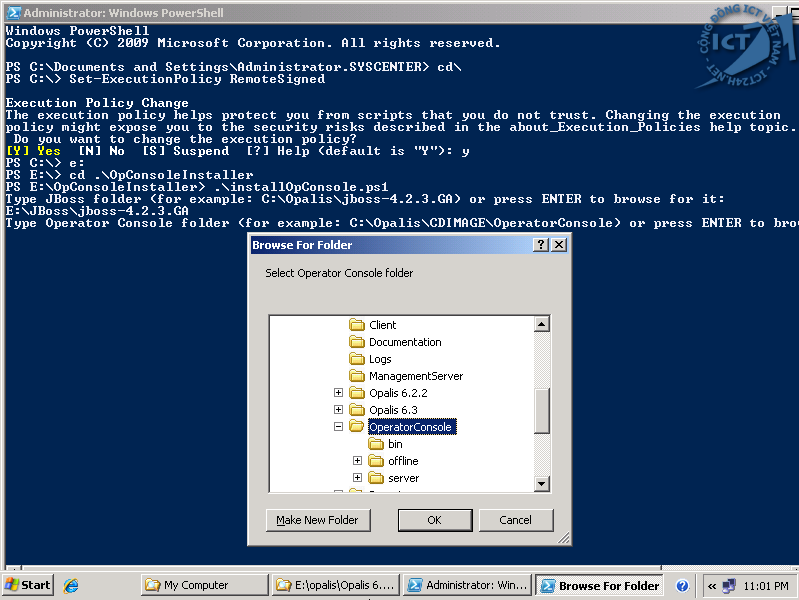
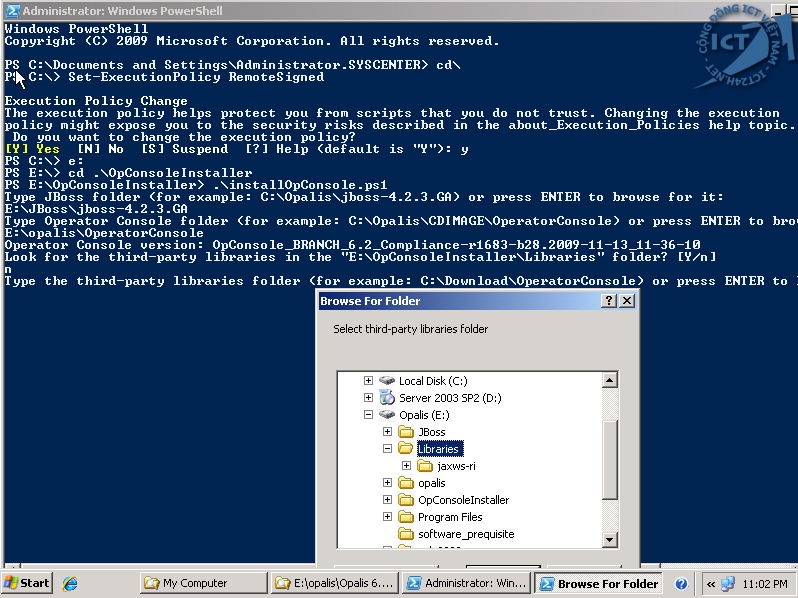
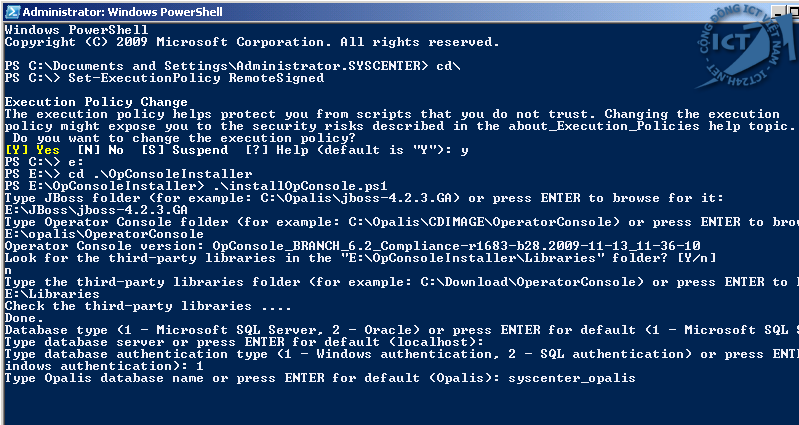
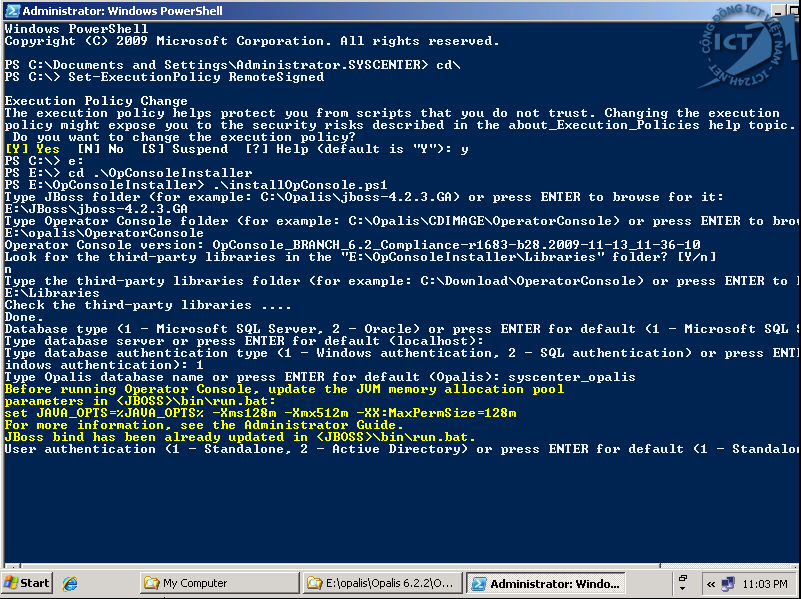
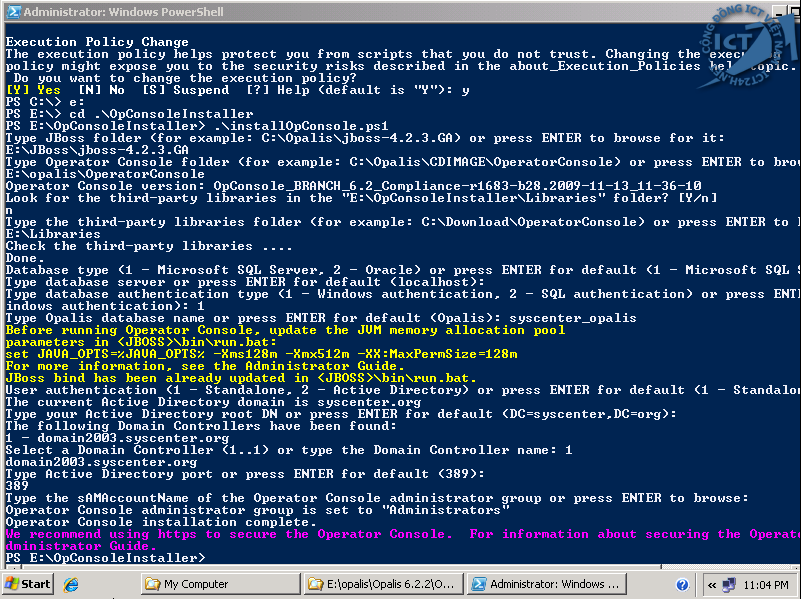
At first, the most difficult to install Opalis Operation Console is finding requirements such as JAR extensions, the web environment is running with JAVA not ASP or PHP, it's strange for me. Too much time to waste to find and test. I upload all file JAR to All JAR 4 Operation Console
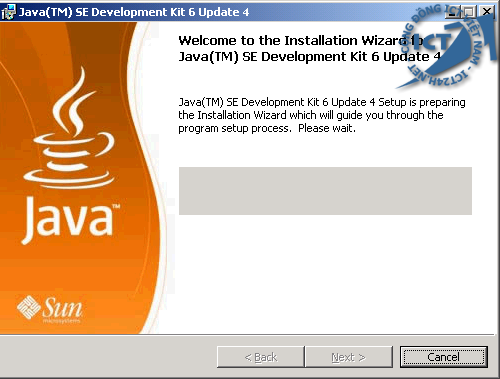
In this topic, I notes some steps need to do success installing Opalis Operation Console. Now, installing JAVA JDK 1.6 update 4, if you use Windows 2008 may be need update 16.
Install JAVA JDK with default setting.
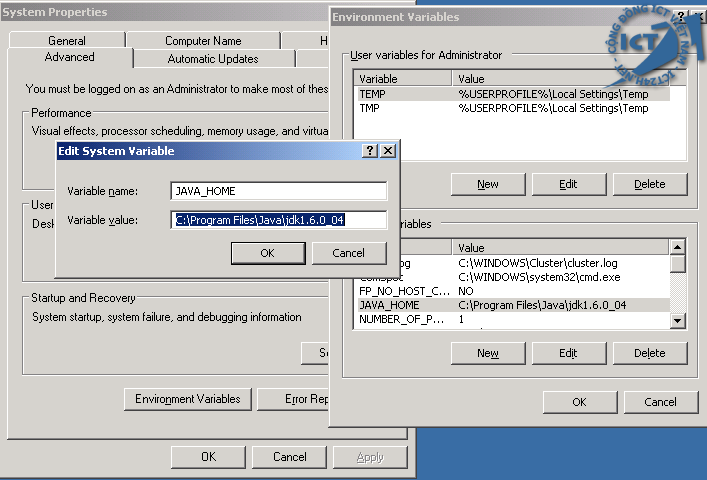
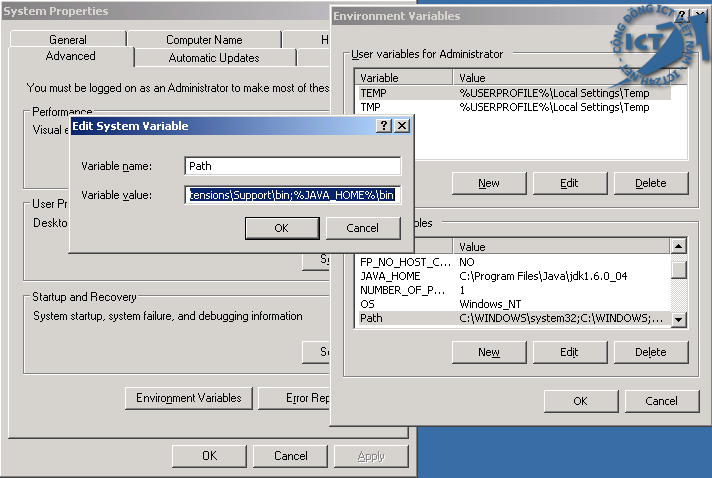
Now click Ok to complete and find the Path and double click to edit %HOME_JAVA%\bin at the end.
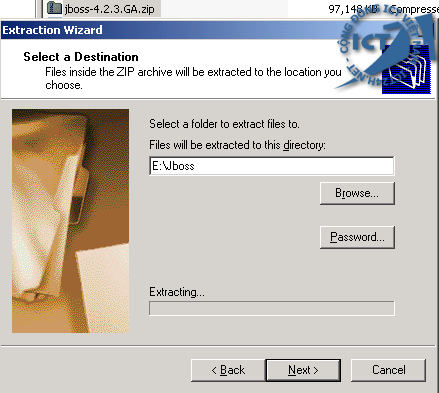
Extract Jboss4.2.3.GA to folder which you expected to run JBoss, the best way like [drive]:\JBoss
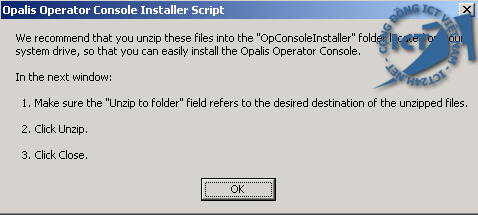
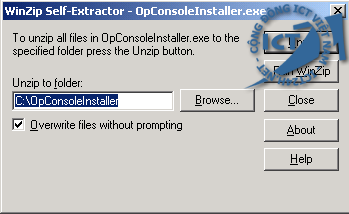
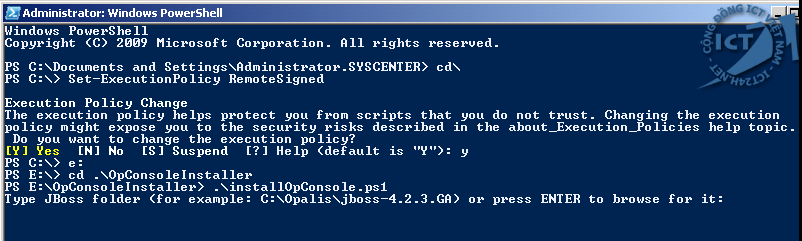
OK, now we running the scripts and set policy to execute script with set-excutionpolicy
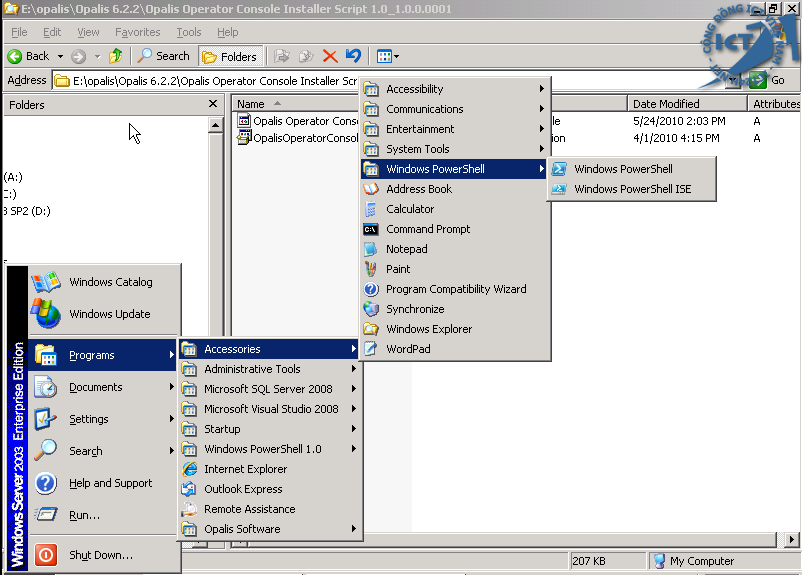

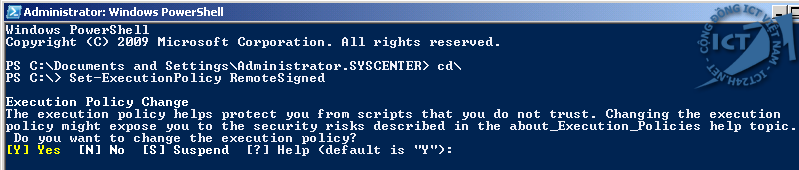
Navigate to OpOpalisInstaller folder and execute script
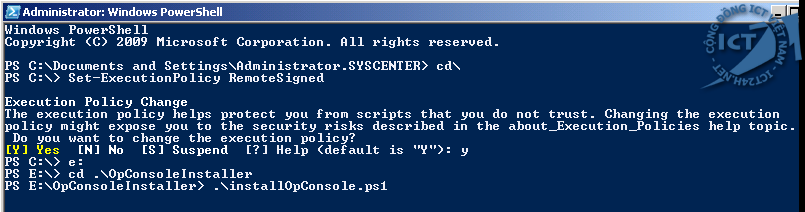
It's done, now we check the result, click Start | Programs | Opalis Software | Operation Console and you can see...
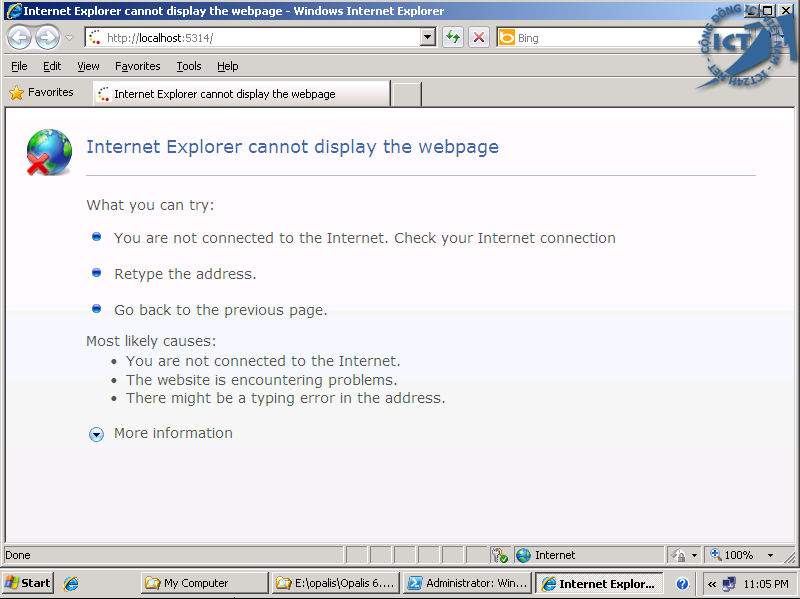
Why? Because no Jboss server runs, we need to start Jboss by running run.bat from Jboss\Jboss-4.2.3.GA\bin folder at command-line.
Notes: Admin Guide for Opalis is too complex to do, but need to understand how to opalis works.
-
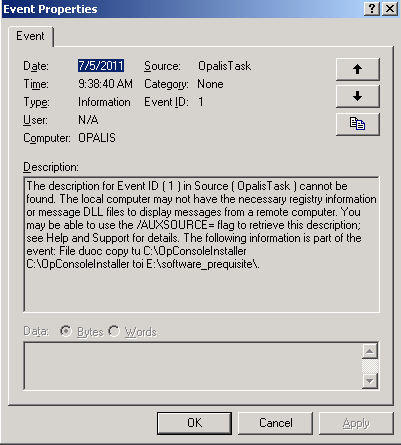
I look at ccm.log but nothing created, I wonder why windows 2008 R2 is installed, but WindowsXP SP3 is not. In SCCM 2007, client push install for Windows XP and 2003 is OK.
What hotfix may I have to update for Windows XP?
Thanks and regards,
-
Dear all,
I installed SCCM 2007 R3 on Windows Server 2008 R2, extended Scheme domain. I push install Client agent on SCCM 2007 R3, Windows Server 2008 R2 (other server) is installed correctly, but Windows XP (32 bit) is not installed. I ran ccmsetup.exe but nothing appears on Task Manager, and no log appears on ccmsetup in Windows\system32\ccmsetup (windows XP).
All windows xp are up-to-date.
Please help me,
Regard,


Opalis: Install Report
in System Center Orchestrator
Posted
In this topic, I install Reports for Opalis Integration Server, this install is more easy than Operation Console
Opalis Report is built inLogiXML LGX Report, and can find in the directory of Opalis source, with the name Reports
Having two sub-directories, SQL and Oracle - database type which used for data store of Opalis, copy the folder Opalis to others folder where we want to setup a website. Example, C:\inetpub\wwwroot.
At nex, open file _Settings.lgx in Opalis | _Definitions - this file is used to define connection to database, and others files with aspx extension is used the conneciton defined to get data from database
Find tag <Connection > </Connection> and modify the content of <Connection Type="Application" ...>, see in below (modify selected the high-light only).
Open IIS Management, expand Default Website right-click on Opalis choose Properties
On Tab Directory, in Application Settings, click Create allow Opalis folder is execute as application
After Create, this image like this
click Tab Documents, click Add, add file-type Default.aspx, and Move-up to top:
On Tab Directory Security, click Edit in Authentication and Access Control, uncheck Enable Anonymous Access and check Integrated Windows authentication
Click Apply to complete, exit IIS.
Open Internet Explorer, type http://localhos/Opalis, type username: administrator and password in dialogure:
Sign-in with normal users - doraemon
Click and see a few reports
Edit _settings.lgx
Have fun !!!