Search the Community
Showing results for tags 'Encryption'.
Found 6 results
-
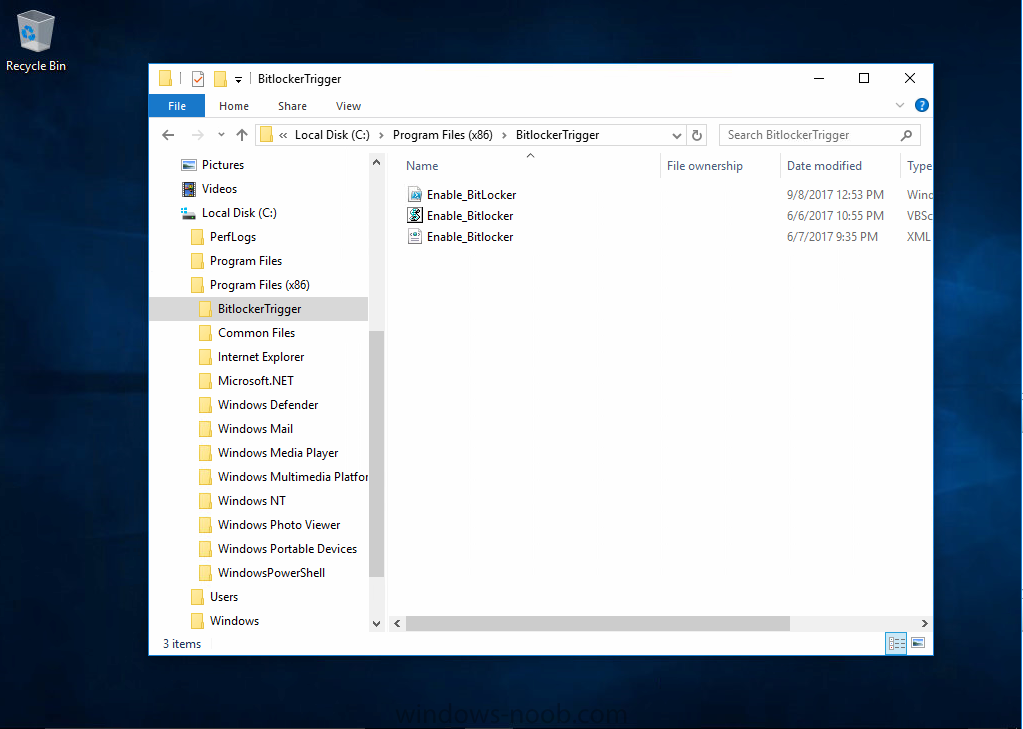
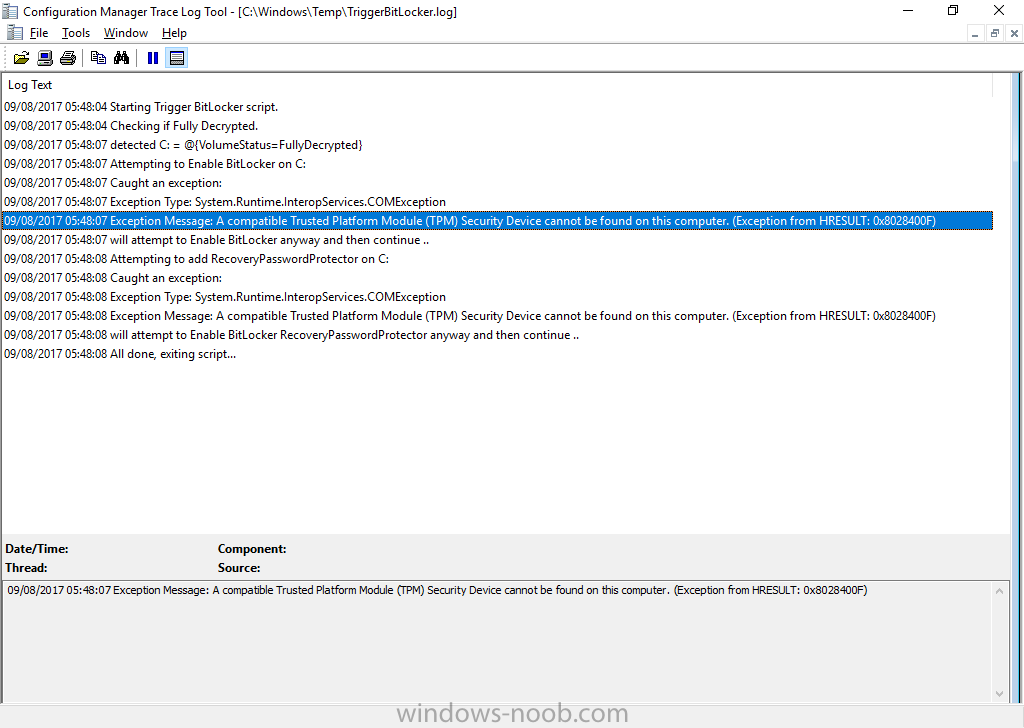
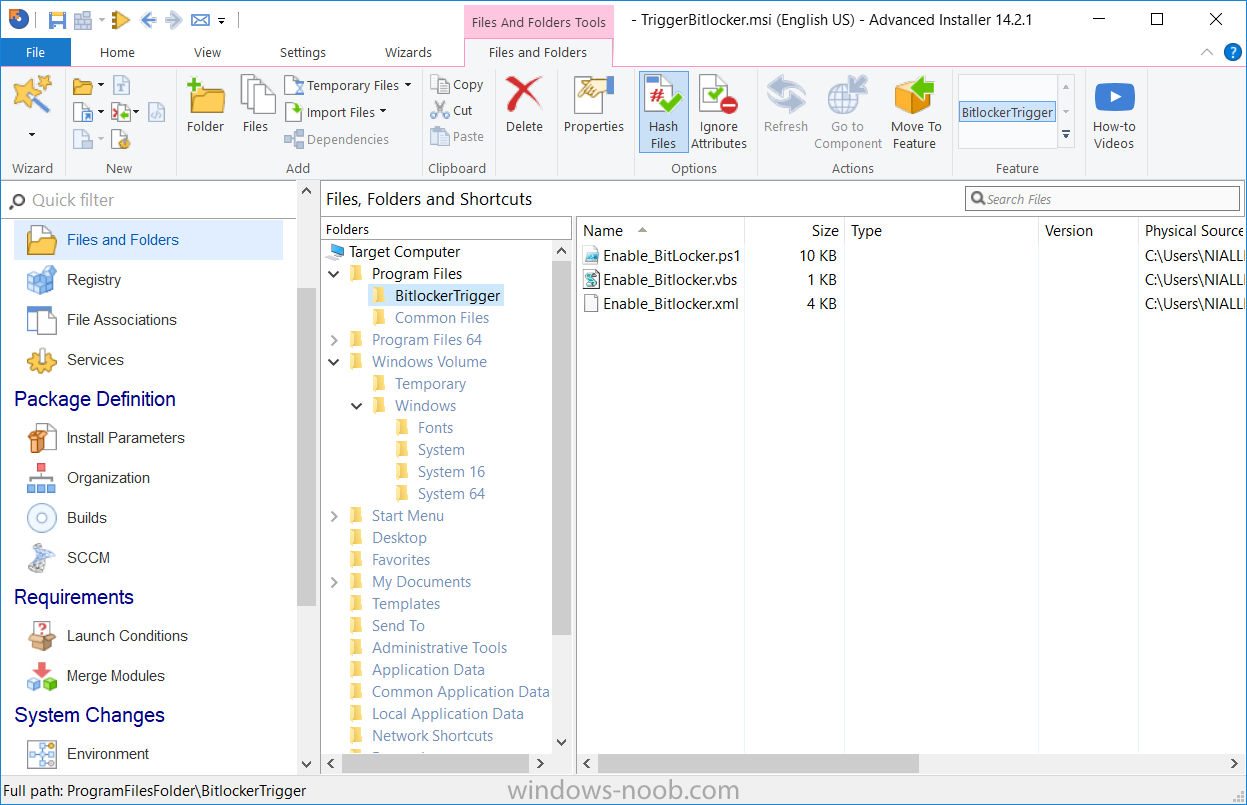
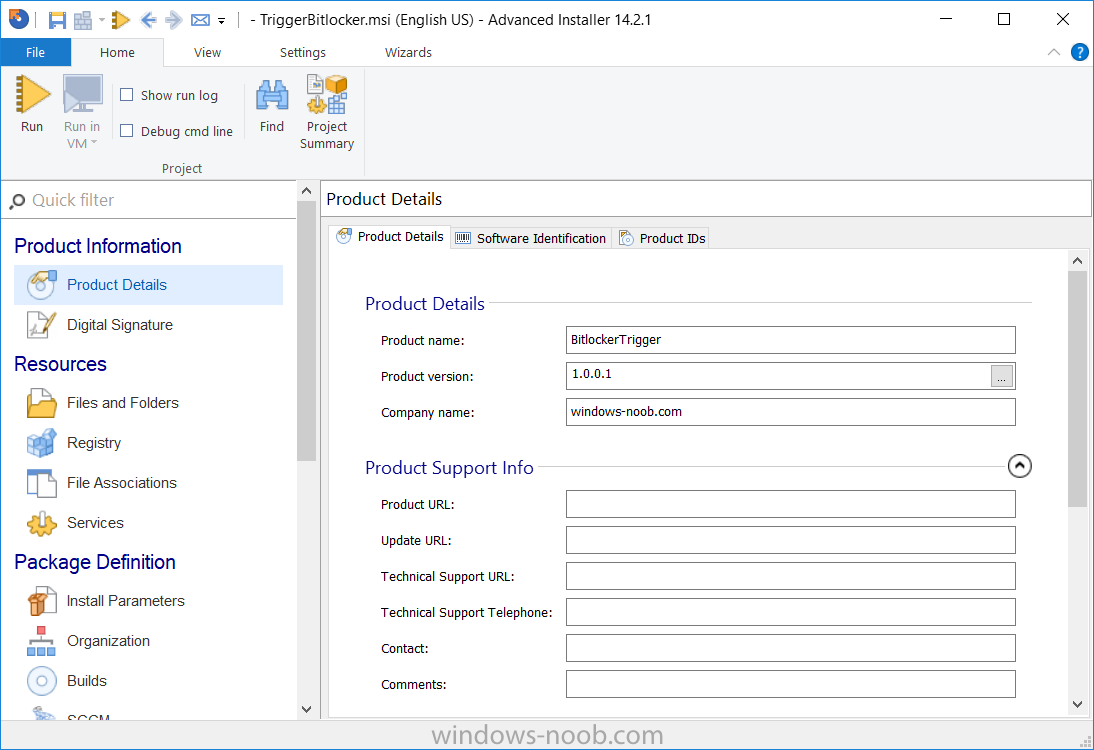
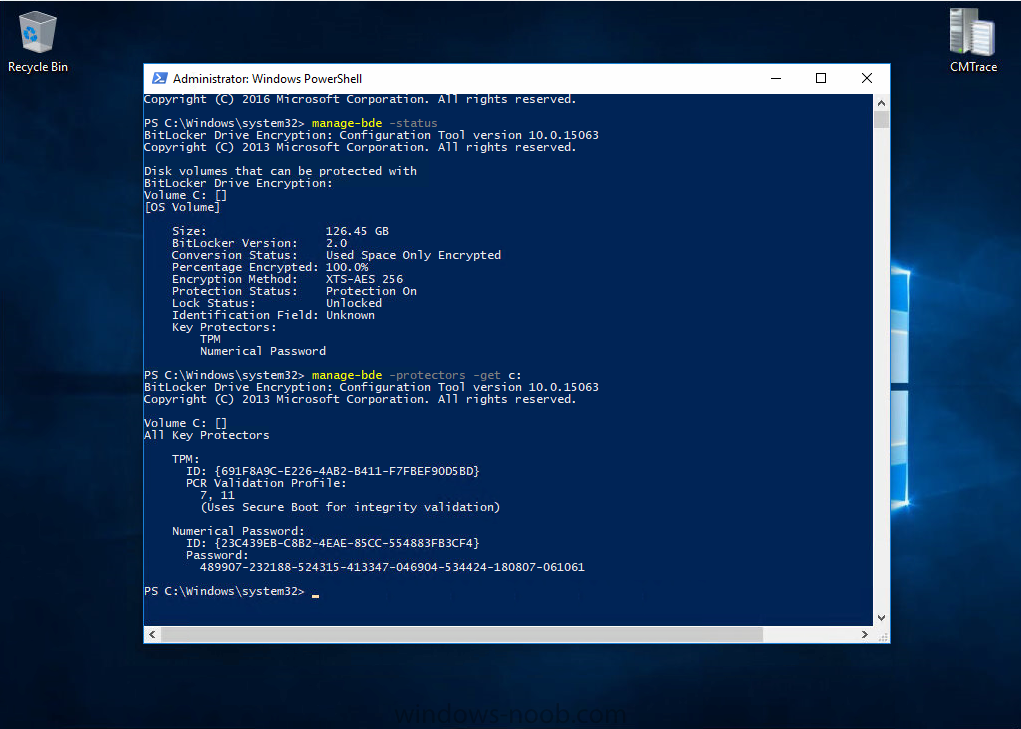
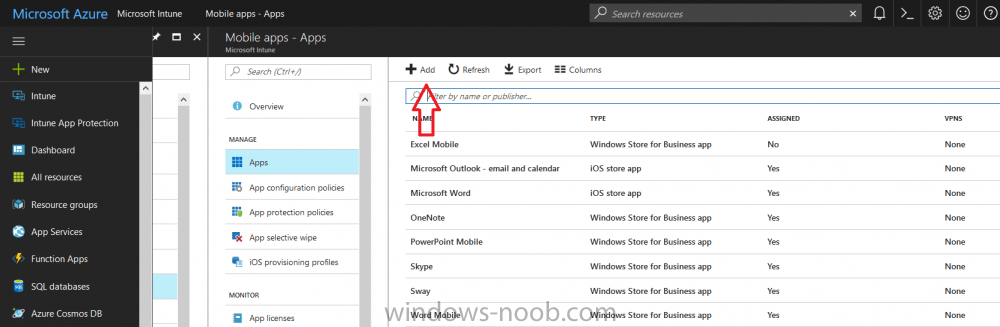
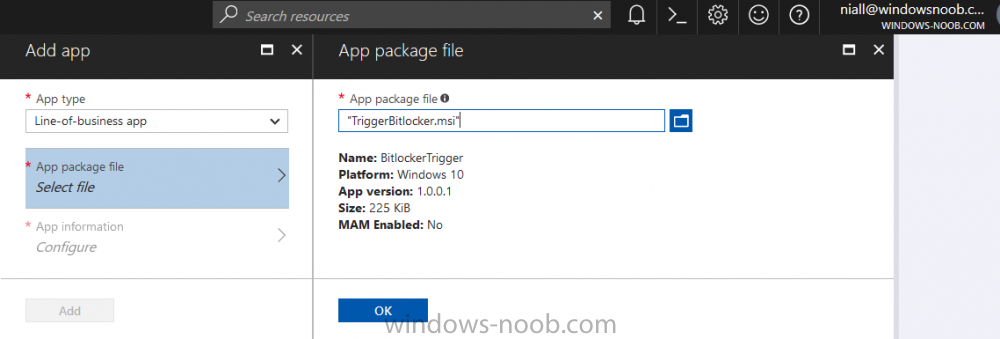
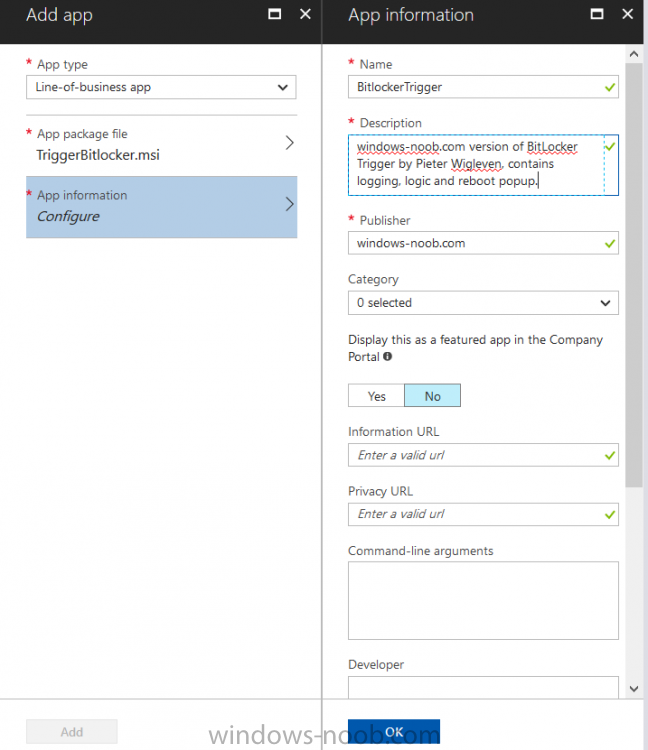
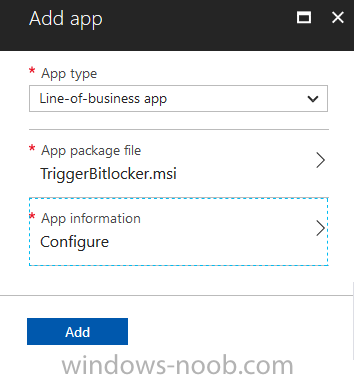
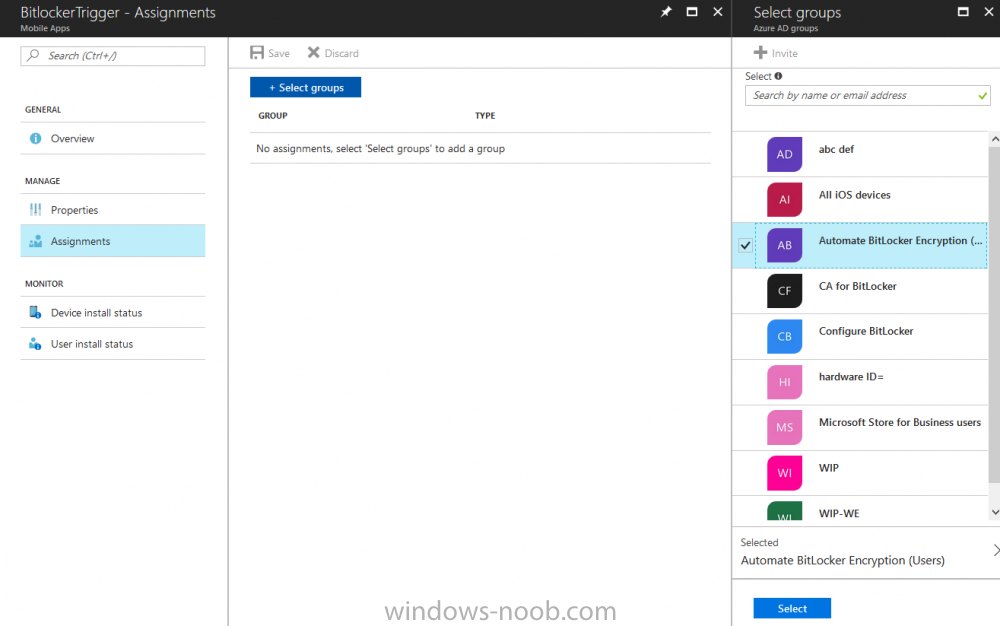
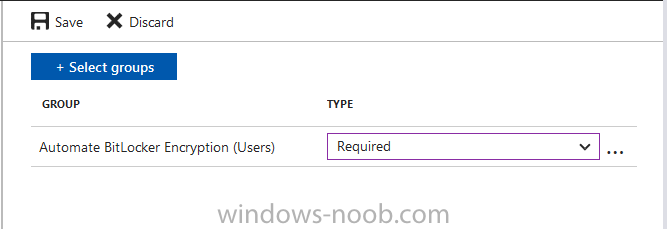
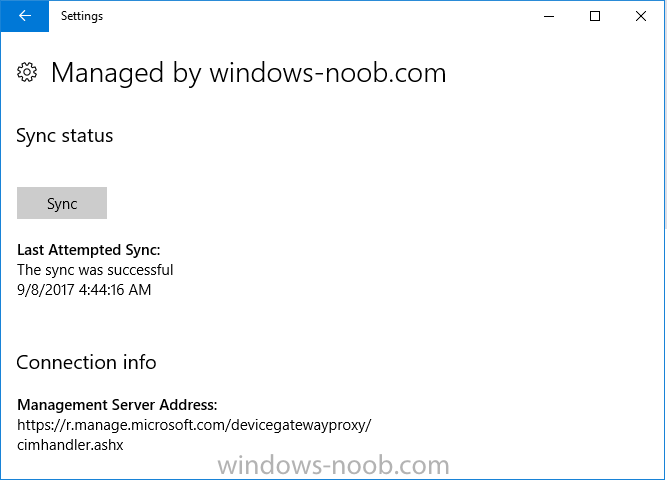
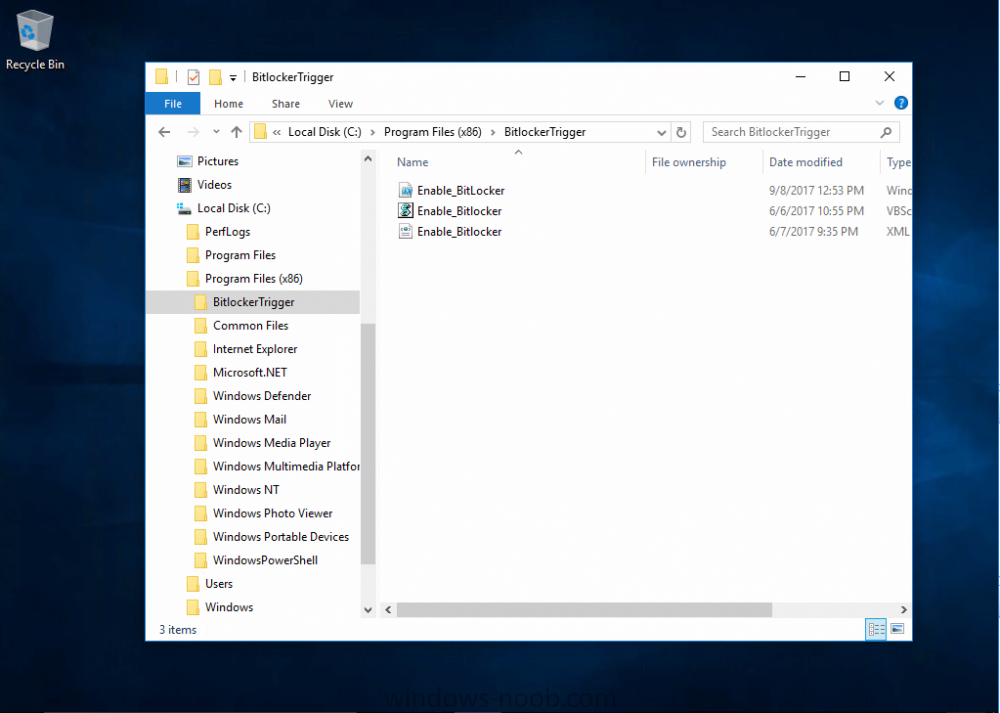
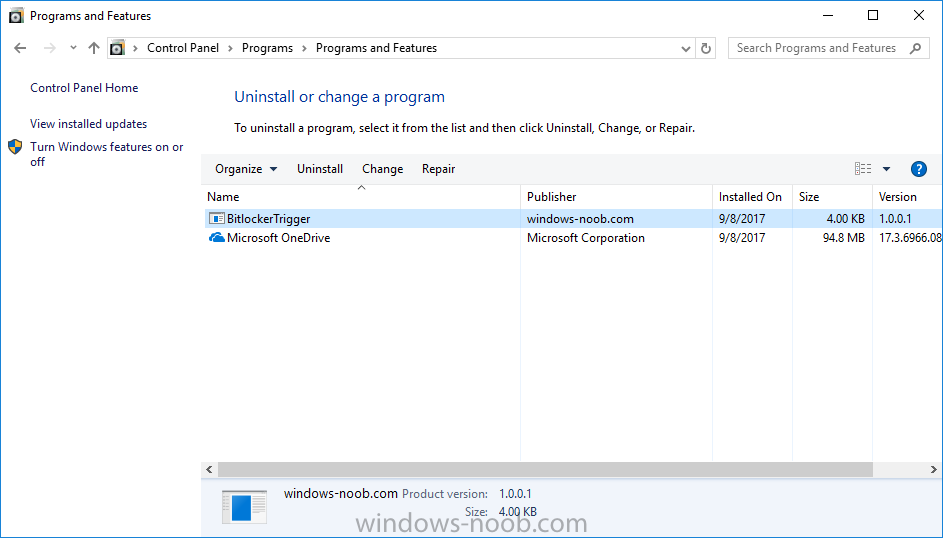
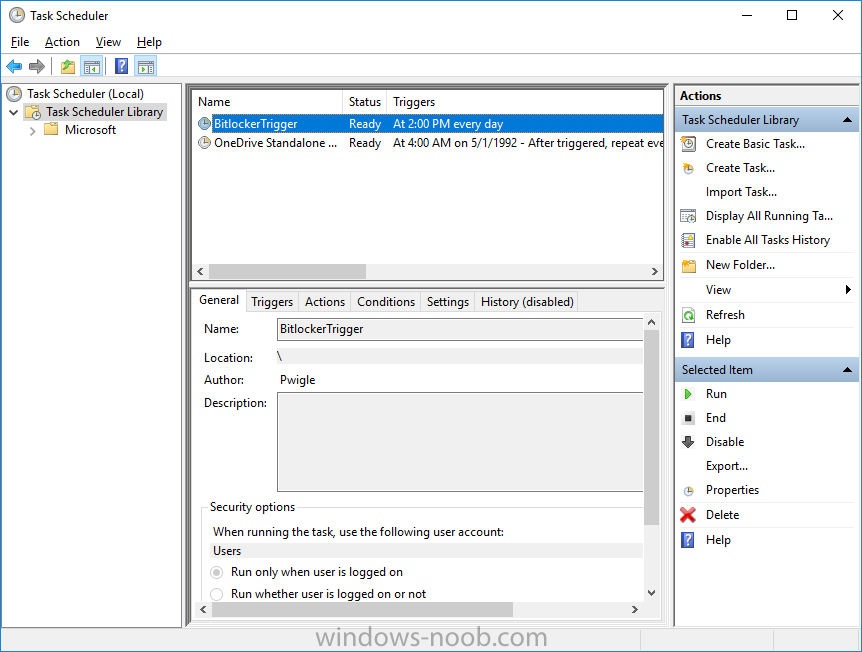
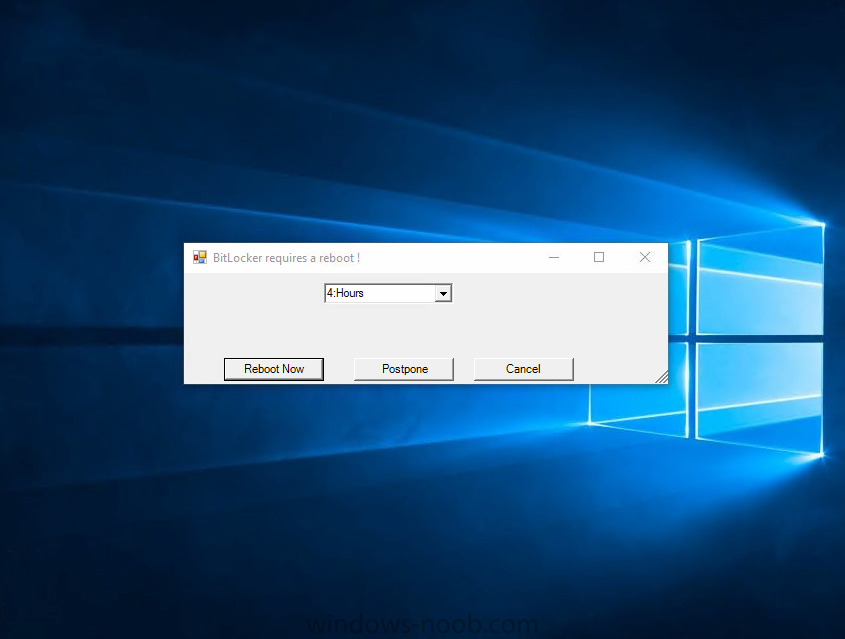
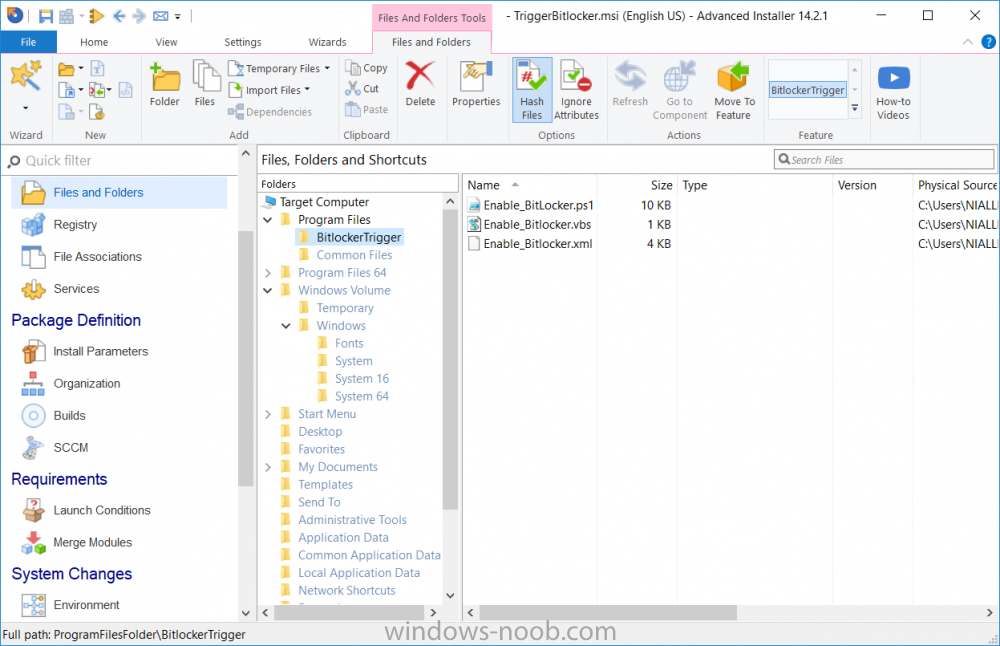
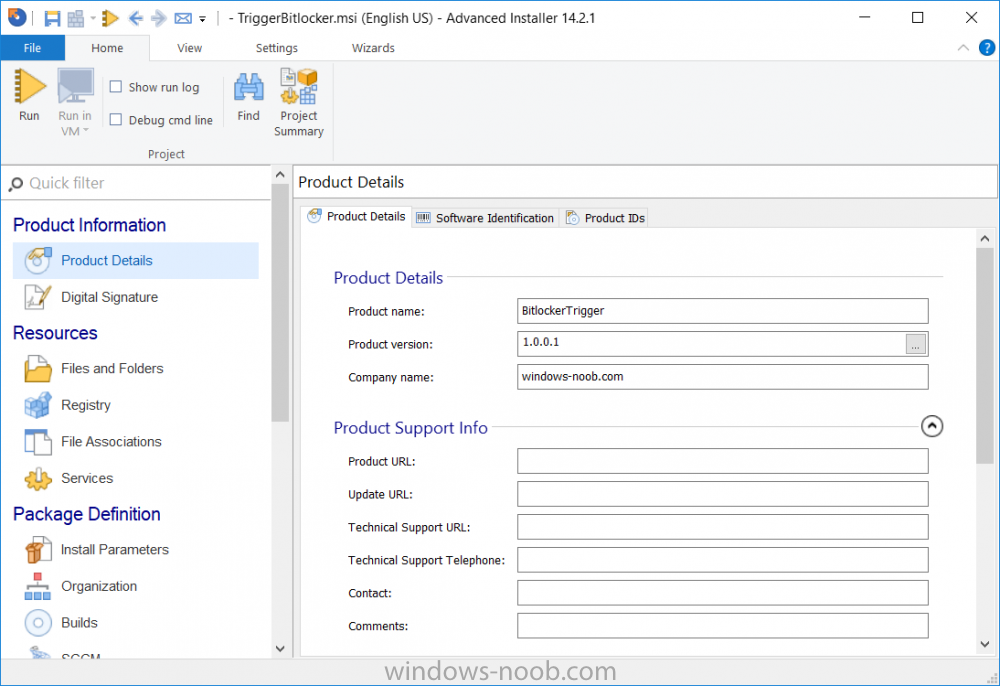
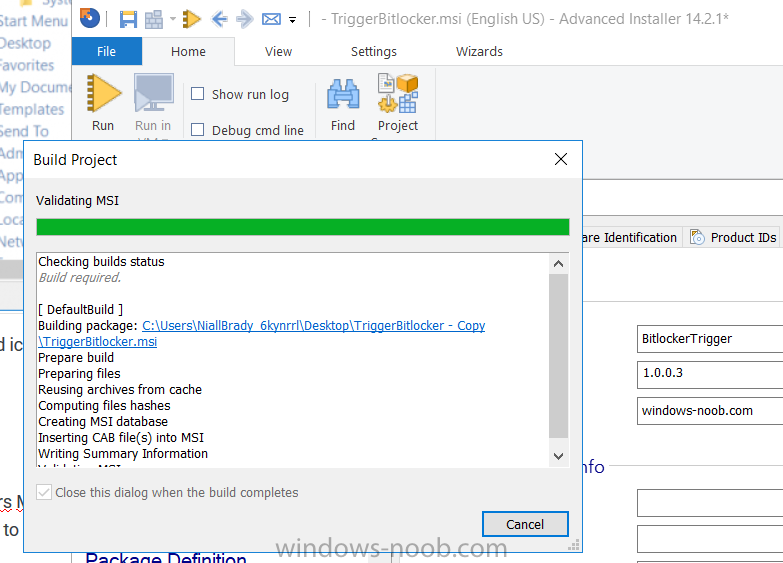
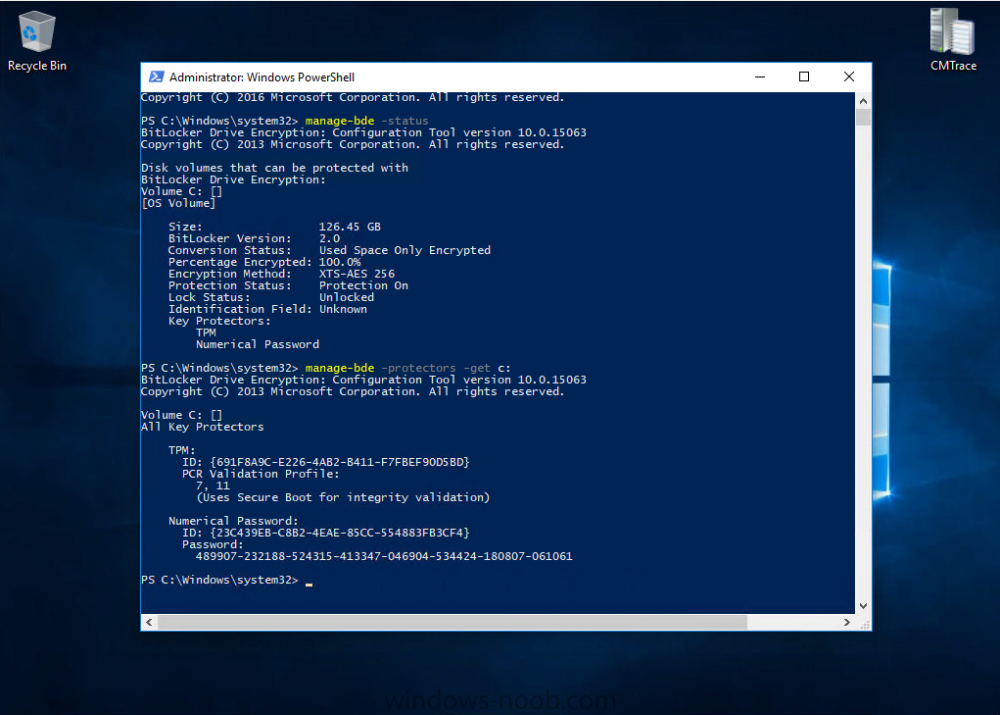
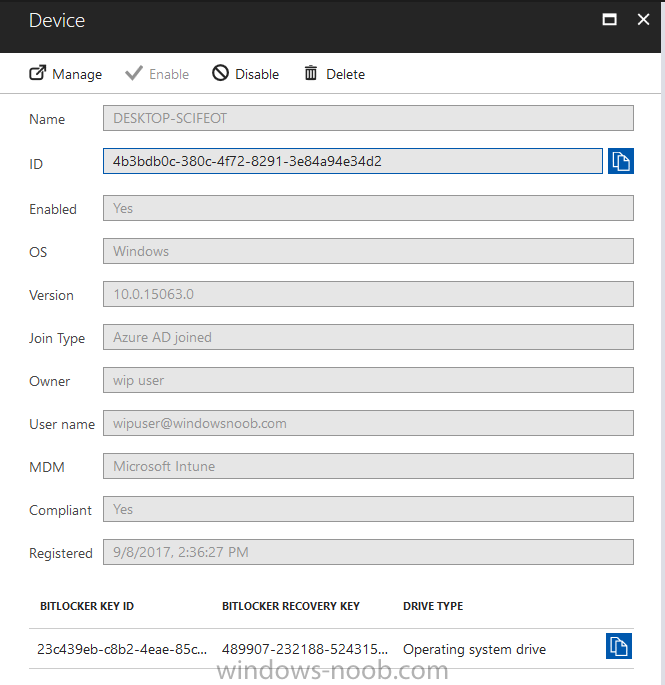
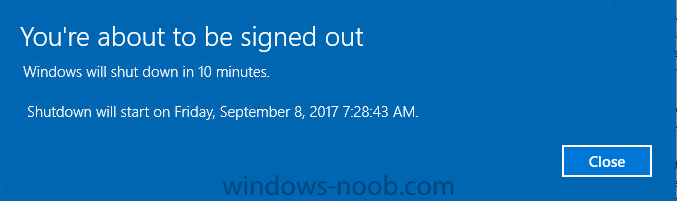
 Introduction In Part 1 I showed you how you can configure BitLocker on Windows 10 devices using Microsoft Intune, but that method relies on the end user actually clicking on the notification in Windows and then continuing through the wizard until completion. In this post I'll show you how you can automate that part of the process, using an MSI that is based upon an MSI that was originally created by Pieter WigLeven. That MSI creates a scheduled task to run daily until the drive is encrypted. Pieter's solution was great but lacked some key features that I wanted such as logging (so that you can view errors which may occur during the encryption phase), logic and a user facing reboot prompt. Therefore, I decided to rewrite the PowerShell script included in the MSI and then re-package it for your benefit. Note: I'd recommend you test this solution in a lab environment, I used Windows 10 version 1703 Hyper-v based virtual machines (Generation 2) with a Virtual TPM enabled. Also to note, this MSI (and Pieters) does not check for the existance of a third party encryption tool, if you want that functionality then you'll need to modify the PowerShell script accordingly and then repackage it as described in Step 5. Enabling a Virtual TPM If you use Hyper-v VM's without a Virtual TPM enabled then the PowerShell script will exit logging errors and will not start the encryption. You can enable the Virtual TPM in the Security settings of your virtual machine (shown in the screenshot below) by placing a check mark in Enable Trusted Platform Module. Step 1. Download the MSI Note: In this guide I've used the windows-noob.com version of the MSI. I've modified the MSI as described in Step 5 and made it available in the Downloads section of this Guide, it includes new features such as Detailed logging Logic to check if encryption was enabled Reboot notification for end users Automatically remove the scheduled task once encryption is enabled You can get the the windows-noob.com version of the MSI in the Downloads section of this guide (scroll down....) or you can get the original MSI from Pieter. Keep in mind that if you are doing Azure AD join, that the user is automatically an Administrator, if however you are using Windows Autopilot then the user will not be an Administrator. The windows-noob.com version of the tool is based on the user being an Administrator. Step 2. Add the MSI as a LOB app in Intune Now that you have the MSI available, it's time to upload it into Intune. In the Intune service in Azure, select Mobile Apps, then Apps, then click on + Add to add an App. Select Line of Business app in the drop down, then select Select file and point it to the downloaded MSI file before clicking on OK. Next click on App Configuration and fill in some details about the application before clicking on OK finally click on Add. Step 3. Assign the app as Required to a User Group Next you will deploy the application (Assign) to a group of Users. In this guide I've created an Assigned User Group called Automate BitLocker Encryption (Users) which contains users that I want to target with this policy. Click on Assignment, then click on Select Groups, select the User Group you created previously and then click on Select. For Type, click on the dropdown and select Required and then click on Save. This will mean that any users in this User Group will be targeted by this required application and it will automatically download and run. Step 4. Verify the experience On a Windows 10 computer that is not yet BitLockered (and not encrypted by any third party encryption), Logon as a user that is a member of the above User Group. Keep in mind that they also need to have received the BitLocker Configuration created in Part 1 of this guide. That policy will set the BitLocker Configuration options (such as Encryption Algorithm), but it will not start encryption automatically. Trigger a Sync using the appropriate button. This will pull down the new policy and start the download and installation of the MSI which in turn will copy some files, and create a scheduled task. Once policy is received, you can see that the application is installed in Control Panel And three files are present in the File System at C:\Program Files (x86)\BitLockerTrigger. Note: The VBS kicks off the PowerShell script and the XML file is used in the creation of the Task Scheduler task. You can also check Task Scheduler to see the task is added, and that it is scheduled to run at 2pm. Tip: By default Windows Task Scheduler has the History tab disabled by default, to enable it you must start Task Scheduler as Administrator (Run as Administrator) and then click on Enable All Tasks History in the right pane. This will give you some details about the running task and whether it did run or not, but for more details about the task review the TriggerBitLocker.log file as described below. Running the Task You can wait until 2pm for the scheduled task to run or right click on the task and choose Run to run it now. after it has run, if everything was ok it will popup a reboot to the user, if things don't go according to plan use CMTrace.exe and navigate to C:\Windows\Temp and open the generated log file C:\Windows\Temp\TriggerBitLocker.log The log file should reveal any problems that occur. In the example below you can see what happens when you try to run the task on a computer without a TPM. The key takeaway here is that logging is now included with the MSI and the PowerShell logic will avoid popping up a reboot message to the end user in the event that it has not succeeded to enable Encryption. On a computer that meets the specifications (TPM), the PowerShell script enables encryption and the user will see the popup, they can delay for a few hours or accept the reality that they are getting Encrypted with BitLocker. and if they choose Reboot Now they'll see something like this After the reboot we can verify BitLocker encryption status and the recovery key is in Intune in Azure. job done ! Note: After successfully enabling BitLocker the script deletes the Scheduled Task so that it no longer re-runs. Step 5. (Optional) Edit the MSI with Advanced Installer If you'd like to update the MSI yourself, you can install the MSI on a vm, and pull the scripts from the folder shown above, then load it using Advanced Installer. Edit what you want in the package and edit the PowerShell script to suit your needs, once done copy the replacement scripts back into the MSI in the Files and Folders section below Once done, to build the package click on the Save icon in the ribbon. And use that compiled MSI in the guide above. Downloads Below is the windows-noob.com version of Pieters MSI, this version was compiled using Advanced Installer 14.2.1 (great product !) and contains improvements to the PowerShell script such as logic handling, logging to help with troubleshooting and a Reboot computer popup at the end of the script which only appears if encryption is enabled. windows-noob.com TriggerBitlocker.msi (version 1.0.0.2) - TriggerBitlocker.msi windows-noob.com TriggerBitLockerUser.msi (version 1.0.0.2TriggerBitlockerUser.msi Recommended reading Hardware independent automatic Bitlocker encryption using AAD/MDM https://blogs.technet.microsoft.com/home_is_where_i_lay_my_head/2017/06/07/hardware-independent-automatic-bitlocker-encryption-using-aadmdm/#comment-26696 Configuring BitLocker in Intune - Part 1. Configuring BitLocker https://www.windows-noob.com/forums/topic/15514-configuring-bitlocker-in-intune-part-1-configuring-bitlocker/ Download Advanced Installer http://www.advancedinstaller.com/download.html
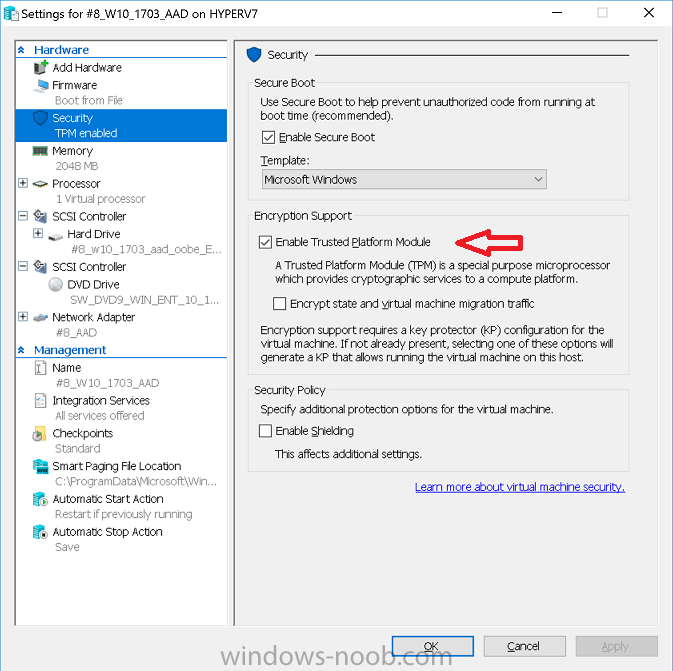

-
Hello Everyone. I am trying to integrate SCCM 2012 R2 with MBAM 2.5 But I have problem with importing BitLocker Policy (Win32Reg_MBAMPolicy) When I run mofcomp against sms_def.mof C:\Users\scwi\Desktop>mofcomp mbam.mof Microsoft ® MOF Compiler Version 6.3.9600.16384 Copyright © Microsoft Corp. 1997-2006. All rights reserved. Parsing MOF file: mbam.mof MOF file has been successfully parsed Storing data in the repository... An error occurred while creating object 2 defined on lines 10 - 42: 0X80041002 Class, instance, or property 'SMS_Class_Template' was not found. Compiler returned error 0x80041002 Ok so I queried my WMI and I do have that class. It has to be there since I successfully importerd BitLocker Encryption Details (Win32_BitLockerEncryptionDetails) all the MOF files I got I have from MS websites below. https://technet.microsoft.com/en-us/library/dn645321.aspx https://technet.microsoft.com/en-us/library/dn656927.aspx I was able to import - Computer System Ex - Operating System Ex - Win32_BitLockerEncryptionDetails) when I removed this portion from the script: #pragma namespace ("\\\\.\\root\\cimv2\\SMS") #pragma deleteclass("Win32Reg_MBAMPolicy", NOFAIL) [ SMS_Report(TRUE), SMS_Group_Name("BitLocker Policy"), SMS_Class_ID("MICROSOFT|MBAM_POLICY|1.0")] Class Win32Reg_MBAMPolicy: SMS_Class_Template { [sMS_Report(TRUE),key] string KeyName; //General encryption requirements [sMS_Report(TRUE)] UInt32 OsDriveEncryption; [ SMS_Report (TRUE) ] UInt32 FixedDataDriveEncryption; [ SMS_Report (TRUE) ] UInt32 EncryptionMethod; //Required protectors properties [ SMS_Report (TRUE) ] UInt32 OsDriveProtector; [ SMS_Report (TRUE) ] UInt32 FixedDataDriveAutoUnlock; [ SMS_Report (TRUE) ] UInt32 FixedDataDrivePassphrase; //MBAM Agent fields //Policy not enforced (0), enforced (1), pending user exemption request (2) or exempted user (3) [sMS_Report(TRUE)] Uint32 MBAMPolicyEnforced; [sMS_Report(TRUE)] string LastConsoleUser; //Date of the exemption request of the last logged on user, //or the first date the exemption was granted to him on this machine. [sMS_Report(TRUE)] datetime UserExemptionDate; //Errors encountered by MBAM agent. [ SMS_Report (TRUE) ] UInt32 MBAMMachineError; [ SMS_Report (TRUE) ] string EncodedComputerName; }; I tried to integrate MBAM and sccm but I am getting this error : Unexpected Configurator error. Description: Exception thrown from feature provider. Exception: System.NullReferenceException: Object reference not set to an instance of an object. at Microsoft.ConfigurationManagement.ManagementProvider.WqlQueryEngine.WqlResultObjectBase.get_Item(String name) at Microsoft.Mbam.Setup.Common.CmIntegration.SmsEntities.SmsCollection.get_CollectionId() at Microsoft.Mbam.Setup.Common.CmIntegration.Implementors.CmObjectsManager.TryDeleteInvalidCollection(ISmsCollection collection) at Microsoft.Mbam.Setup.Common.CmIntegration.Implementors.CmObjectsManager.CreateAndInitializeCollection[T,U](T collectionSettings, Boolean& updated, ISmsCollection& collectionBeforeUpdate) at Microsoft.Mbam.Setup.Common.CmIntegration.Implementors.CmObjectsManager.CreateCollection(String collectionSettingsFilePath, CultureInfo desiredCulture, CMVersion cmVersion, Boolean& updated, ISmsCollection& collectionBeforeUpdate) at Microsoft.Mbam.Setup.Common.CmIntegration.CMObjects.CreateCmCollections() at Microsoft.Mbam.Setup.Common.ActionItem.Run() at Microsoft.Mbam.Setup.Common.ActionItemQueue.Run() at Microsoft.Mbam.Setup.Common.CmIntegration.CmIntegrationProvider.Enable(IProgress`1 progress, CancellationToken cancellationToken, CmIntegrationConfiguration configuration) at Microsoft.Mbam.Setup.Common.FeatureProviderBase`1.<>c__DisplayClass34`1.<InvokeAsync>b__33() at System.Threading.Tasks.Task`1.InnerInvoke() at System.Threading.Tasks.Task.Execute() --- End of stack trace from previous location where exception was thrown --- at System.Runtime.CompilerServices.TaskAwaiter.ThrowForNonSuccess(Task task) at System.Runtime.CompilerServices.TaskAwaiter.HandleNonSuccessAndDebuggerNotification(Task task) at Microsoft.Mbam.Setup.Common.FeatureProviderBase`1.<InvokeAsync>d__36`1.MoveNext() --- End of stack trace from previous location where exception was thrown --- at System.Runtime.CompilerServices.TaskAwaiter.ThrowForNonSuccess(Task task) at System.Runtime.CompilerServices.TaskAwaiter.HandleNonSuccessAndDebuggerNotification(Task task) at Microsoft.Mbam.Setup.Common.FeatureProviderBase`1.<>c__DisplayClass2.<<EnableAsync>b__0>d__4.MoveNext() --- End of stack trace from previous location where exception was thrown --- at System.Runtime.CompilerServices.TaskAwaiter.ThrowForNonSuccess(Task task) at System.Runtime.CompilerServices.TaskAwaiter.HandleNonSuccessAndDebuggerNotification(Task task) at System.Runtime.CompilerServices.ConfiguredTaskAwaitable`1.ConfiguredTaskAwaiter.GetResult() at Microsoft.Mbam.Setup.Common.FeatureProviderBase`1.<EnableAsync>d__8.MoveNext() --- End of stack trace from previous location where exception was thrown --- at System.Runtime.CompilerServices.TaskAwaiter.ThrowForNonSuccess(Task task) at System.Runtime.CompilerServices.TaskAwaiter.HandleNonSuccessAndDebuggerNotification(Task task) at Microsoft.Mbam.Setup.Configurator.CMUIFeatureModel.<EnableTransacted>d__4.MoveNext() --- End of stack trace from previous location where exception was thrown --- at System.Runtime.CompilerServices.TaskAwaiter.ThrowForNonSuccess(Task task) at System.Runtime.CompilerServices.TaskAwaiter.HandleNonSuccessAndDebuggerNotification(Task task) at Microsoft.Mbam.Setup.Configurator.BatchTaskModel.<>c__DisplayClass5.<<Commit>b__1>d__7.MoveNext() I am assuming it is because I don't have BitLocker Policy imported to my default client inventory because MBAM 2.5 Integration wizard creates device collection MBAM managed devices . It feels like I tried everything but I know I don't so I decided to ask all the generous people to help me here.
-
 actually i made a task sequence for MBAM to encrypt all drives - it starts only, when i´m login to Windows 10, but i need it while the tasksequence is running, before starting installing Office 365 and so on. Have anyone experience for this step? the mbam-client config (last step) set the registry for "no delay" and the mbam-client-Trigger -> reg.exe ADD HKLM\Software\Microsoft\Windows\CurrentVersion\Run /t REG_SZ /v TriggerMBAM /d "%ProgramFiles%\Microsoft\MDOP MBAM\MBAMClientUI.exe" /f will not run, have tried on different places in the tasksequence, but nothing worked ... is it in generall possible to start the encryption while running the "Installation" ... Thx for your help.
-
 Morning All, any ideas on this one would be greatly appreciated. I am deploying our captured image using one task sequence that caters for the Bare metal and Refresh (now Wipe & Load I believe) scenarios, this has worked fined until we perform a Wipe & Load on the Checkpoint Encrypted laptops in the fleet. These laptops have all partitions encrypted leaving no un-encrypted estate on them. You may already see where I am going with this…. The task sequence is being advertised to the user who runs the TS from within Windows enabling the capture of USMT data to the SMP. Once the USMT Capture is complete the system is rebooted to the PE boot image in order to run diskpart and apply the image etc…. This is where the TS fails. The Task Sequence config files have been staged to the c:\_SMSTaskSequence directory which is of course Encrypted within PE, we then receive the “Unable to read task sequence configuration disk.” I have seen a number posts elsewhere that mention using a “Hook” that runs a diskpart script upon the restart to clean and re-partition the disk before TS begins to process. I am a little unsure how this would work as the config files will have been “blown away” by the diskpart script and surely the TS will fail again with same error, can any confirm my suspicions? I have also seen some articles that mention changing the location of the Staging config files from c:\_SMSTaskSequence to x:\_SMSTaskSequence . Again I’m a bit unsure about this as I didn’t think X: was accessible prior to loading the PE boot image. I hope this makes sense. I look forward to hearing any suggestions.. Kind Regards, Rich.
 -
 Hi Has anyone had any success in deploying Windows 10 Update 1607 to a Windows 10 machine with 1511 and encryption enabled (in our environment we run Check Point Full Disk Encryption). After the update "installs", the machine boots up and before even showing the Windows splash page, it gets a blue screen with the error 0xc000000f which indicates boot selection failed. The only information i can find from Check Point with regards to Windows 10 updates is from the webpage regarding In-Place updates https://supportcenter.checkpoint.com/supportcenter/portal?eventSubmit_doGoviewsolutiondetails=&solutionid=sk106433&partition=General&product=FDE Please advise Thanks
 -
 Hello, I was hoping someone could help point me in the right direction. We are using SCCM 2007 and UDI Toolkit 12 to deploy new WIndows 7 machines through a task sequence. We are now trying to migrate from XP to Windows 7 using USMT 4.0. We are trying to do this through the PE environment. We have it successfully doing a scan state, however we run into issues when applying the new OS. I'll mention at this point we have PointSec full disk encryption running on these devices. If we do the scanstate and use the task sequence option to format and partition the disk. It fails as it says the files are protected, these are the ones protected by USMT. So all the xml files, working directory. I think it also protects areas such as boot. I've tried calling a disk part myself and doing a clean, delete of volumes and re-creating them. It then allows it to install the OS, however whenever it does its first reboot it says no OS is present. When I run diskpart its changed the volume to RAW and you cannot access the data. I've tried various combinations on running both types of formats/partitions cleans etc.. One thing I cannot make sense of is that we use the task sequence format and partition when we don't need to save data. So this just blows away XP with encryption and puts on Windows 7, i've tried using this same command but it doesn't have the same effect. Anyone able to help please? Thanks, Andy