Search the Community
Showing results for tags 'sccm'.
-
Hi, I've recently had an issue were my Windows 10 1803 clients don't get signature updates although the definition updates seem to apply ok. Looking through the logs nothing really stuck out except that the machine didn't have a antimalware policy. I check SCCM and the policy is deployed and apperently installed ok (going from the console). Any ideas would really be great!
-
 So, I have a few custom groups in my task sequence that install applications based upon some WMI queries using a naming convention. But I am having some issues trying to get it working exactly. Here is what I am trying to do. I have two groups. Employee and Labs. The naming convention for employees is LIB-AU and for the Labs its LIB-AUXXXXX-XX where the X's represent numbers I have this particular "If" statement. Here is the query in question that I currently have for employee SELECT * FROM Win32_ComputerSystem WHERE Not Name LIKE 'LIB-AU%-%' Here is the query for the labs group. SELECT * FROM Win32_ComputerSystem WHERE Name LIKE 'LIB-AU%-%' The behavior that occurs is that everything under the employees group installs to a system if it has the name "LIB-AUXXXXX-XX" - I don't want this to happen. I only want it to run the steps if it meets the 'LIB-AUXXXXX' naming, but otherwise skip it. The query for the "labs" group works fine. Any suggestions?
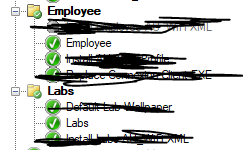

-
 Hello Folks! Firstly I want to say that I'm new here to this forum, so hello. 😀 The ConfigMgr team just released the latest version av SCCM CB, 31 July if I understood correctly. Now, it is 8 August and 1806 hasn't appeared in the Updates and Servicing node for us. I have clicked on the button Check for Updates and even checked the dmpdownloader.log but no error messages seems to strike out. I have even restarted the SMS_EXECUTIVE component without any issues. I am currently running out of ideas, I have been googling for some answers why new versions don't appear in the node but don't find any relevant so I'm reaching out to you guys. Our current environment is SCCM CB 1802, 5.00.8634.1000 (Not the hotfix though). The only update that is available in there is the hotfix CB 1802 Hotfix KB4163547. If it isn't that what's causing the trouble? Am i too early that is searching for that update or is there something wrong that I'm doing? Can't really hesitate to try out the new third party update feature and even CMPivot! Have a great day everyone, cheers!
 -
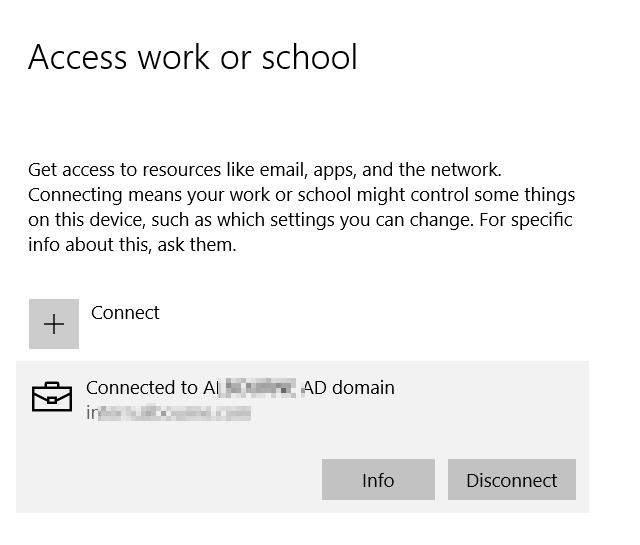
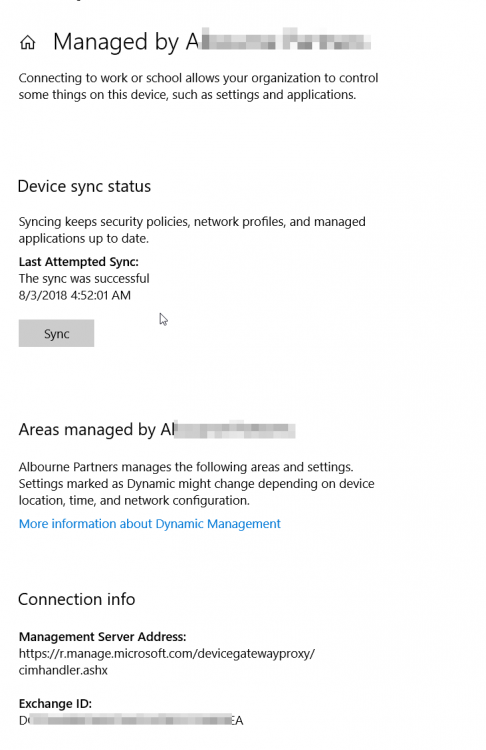
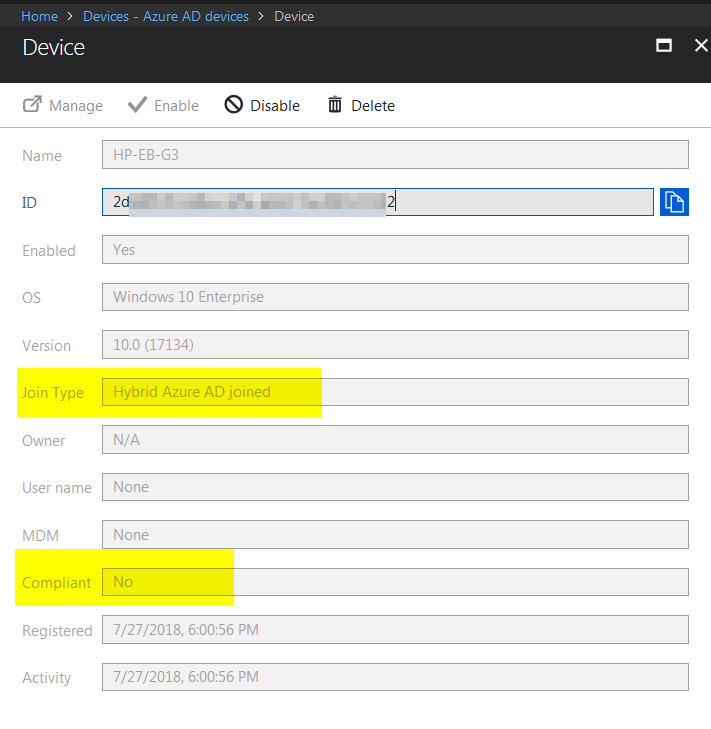
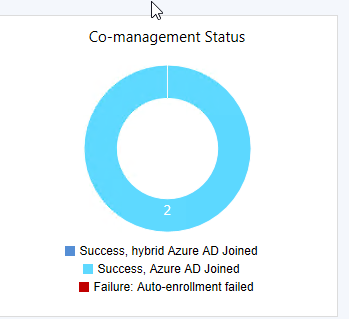
 I am facing a very weird issue with SCCM CoManagement where Windows 10 machines registered to AzureAD in Hybrid Azure AD Join, are shown as Azure AD Joined. I will be focusing on one machine so we see the issue in depth. Configuration details SCCM Current Branch 1802 with all three hotfixes installed Windows 10 Enterprise 1803 with latest updates Co-Management Enabled for All Devices (no pilot group) No workloads have yet been migrated to Intune Group Policies for Automatic Enrollment to MDM and Automatic Registration with AzureAD enabled SCCM Client Cloud option for Automatic Registration enabled Intune set as Standalone Intune Enrollment set as MDM only (MAM disabled) ADFS Federated Domain 3.0 (2012R2) with AAD Connect Federation Facts SSO et. all are working as expected on the client Client detects client as Hybrid Azure AD Joined Intune detects client as Hybrid Azure AD Joined Issue SCCM detects client as Azure AD Joined I will now provide all relevant screenshots from Intune, SCCM and Client. SCCM As seen below, SCCM thinks the device is Azure AD Join and not Hybrid Azure AD Join. I also used the following SCCM query: select SMS_R_System.NetbiosName, SMS_Client_ComanagementState.Authority, SMS_Client_ComanagementState.AADDeviceID, SMS_Client_ComanagementState.ComgmtPolicyPresent, SMS_Client_ComanagementState.EnrollmentErrorDetail, SMS_Client_ComanagementState.EnrollmentFailed, SMS_Client_ComanagementState.EnrollmentStatusCode, SMS_Client_ComanagementState.HybridAADJoined, SMS_Client_ComanagementState.MDMEnrolled, SMS_Client_ComanagementState.MDMWorkloads, SMS_Client_ComanagementState.AADJoined from SMS_R_System inner join SMS_Client_ComanagementState on SMS_Client_ComanagementState.ResourceID = SMS_R_System.ResourceId where SMS_Client_ComanagementState.ComgmtPolicyPresent = 1 and SMS_Client_ComanagementState.MDMEnrolled = 1 And had the following results, same probem. Azure AD Joined = Yes, Hybrid Azure AD Joined = No AzureAD As seen on the Devices > Azure AD Devices, the machine is properly detected as Hybrid Azure AD Joined As seen below, DeviceTrustType = Domain Joined and DeviceTrustLevel = Managed should be correct (see here). Get-MsolDevice -Name hp-eb-g3 Enabled : True ObjectId : cxxxxxxxxxxxxxxxxxxxxxxxx0 DeviceId : 2xxxxxxxxxxxxxxxxxxxxxxxxxxxxx2 DisplayName : HP-EB-G3 DeviceObjectVersion : 2 DeviceOsType : Windows 10 Enterprise DeviceOsVersion : 10.0 (17134) DeviceTrustType : Domain Joined DeviceTrustLevel : Managed DevicePhysicalIds : {[USER-GID]:2xxxxxxxxxxxxxxxxxxxxxxxxxxxxxx2, [GID]:g:6xxxxxxxxxxxxxxxx2, [USER-HWID]:2xxxxxxxxxxxxxxxxxxxxxxxxxxxxx2, [HWID]:h:6xxxxxxxxxxxxxxxxxx2} ApproximateLastLogonTimestamp : 27/07/2018 15:00:56 AlternativeSecurityIds : {X509:<SHA1-TP-PUBKEY>0xxxxxxxxxxxxxxxxxxxxxxxxxxxxxxxxxxxxxx} DirSyncEnabled : True LastDirSyncTime : 03/08/2018 02:31:16 RegisteredOwners : {} GraphDeviceObject : Microsoft.Azure.ActiveDirectory.GraphClient.Device Intune This is how the device shows up in Intune Client DeviceManagement Log event 75 properly happened Client properly seeing management from Intune dsregcmd properly recognizes machine as AAD and MDM enrolled and AD Domain Joined dsregcmd /status +----------------------------------------------------------------------+ | Device State | +----------------------------------------------------------------------+ AzureAdJoined : YES EnterpriseJoined : NO DeviceId : 2xxxxxxxxxxxxxxxxxxxxxxxxx2 Thumbprint : 0xxxxxxxxxxxxxxxxxxxxxxA KeyContainerId : cxxxxxxxxxxxxxxxxxxxxxx7 KeyProvider : Microsoft Platform Crypto Provider TpmProtected : YES KeySignTest: : PASSED Idp : login.windows.net TenantId : 9xxxxxxxxxxxxxxxxxxx2 TenantName : Axxxxxxxxxxxxxs AuthCodeUrl : https://login.microsoftonline.com/9xxxxxxxxxxxxxxxxxxxx2/oauth2/authorize AccessTokenUrl : https://login.microsoftonline.com/9xxxxxxxxxxxxxxxxxxxxxxxxx2/oauth2/token MdmUrl : https://enrollment.manage.microsoft.com/enrollmentserver/discovery.svc MdmTouUrl : https://portal.manage.microsoft.com/TermsofUse.aspx MdmComplianceUrl : https://portal.manage.microsoft.com/?portalAction=Compliance SettingsUrl : JoinSrvVersion : 1.0 JoinSrvUrl : https://enterpriseregistration.windows.net/EnrollmentServer/device/ JoinSrvId : urn:ms-drs:enterpriseregistration.windows.net KeySrvVersion : 1.0 KeySrvUrl : https://enterpriseregistration.windows.net/EnrollmentServer/key/ KeySrvId : urn:ms-drs:enterpriseregistration.windows.net WebAuthNSrvVersion : 1.0 WebAuthNSrvUrl : https://enterpriseregistration.windows.net/webauthn/9xxxxxxxxxxxxxxxxxxxxxxxxxxxx2/ WebAuthNSrvId : urn:ms-drs:enterpriseregistration.windows.net DeviceManagementSrvVersion : 1.0 DeviceManagementSrvUrl : https://enterpriseregistration.windows.net/manage/9xxxxxxxxxxxxxxxxxxxxxxxxxxxxxxx2/ DeviceManagementSrvId : urn:ms-drs:enterpriseregistration.windows.net DomainJoined : YES DomainName : XXXXXXXXXX +----------------------------------------------------------------------+ | User State | +----------------------------------------------------------------------+ NgcSet : NO WorkplaceJoined : NO WamDefaultSet : YES WamDefaultAuthority : organizations WamDefaultId : https://login.microsoft.com WamDefaultGUID : {Bxxxxxxxxxxxxxxxxxxxxxxxxxxxxx0} (AzureAd) AzureAdPrt : YES AzureAdPrtAuthority : https://login.microsoftonline.com/9xxxxxxxxxxxxxxxxxxxxxxxxxx2 EnterprisePrt : NO EnterprisePrtAuthority : +----------------------------------------------------------------------+ | Ngc Prerequisite Check | +----------------------------------------------------------------------+ IsUserAzureAD : YES PolicyEnabled : NO PostLogonEnabled : YES DeviceEligible : YES SessionIsNotRemote : NO CertEnrollment : none AadRecoveryNeeded : NO PreReqResult : WillNotProvision Can anyone having a similar configuration crosscheck and let me know what difference there is? References: https://www.imab.dk/flipping-the-switch-how-to-enable-co-management-in-configuration-manager-current-branch/ https://allthingscloud.blog/automatically-mdm-enroll-windows-10-device-using-group-policy/ -- Alex
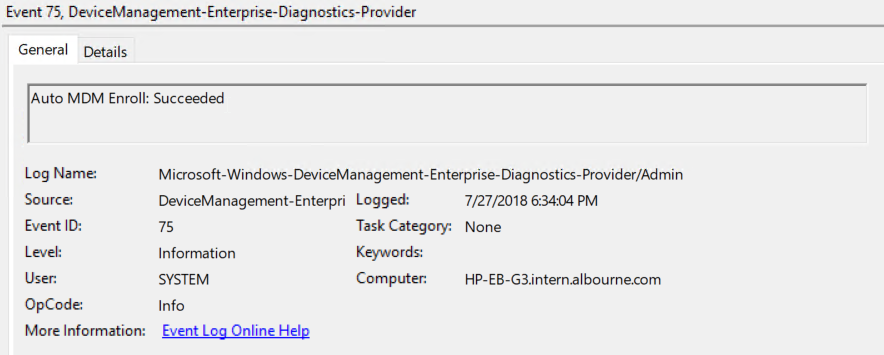


-
 I'm in the process of automating reader so that it downloads and creates the application in SCCM We use a global condition to get the version of reader out of the registry. I have two deployment types, One installs the full reader and the second just installs the patch. On the second deployment type we use the requirement Between operand with the values of "17.011.130000" "17.011.130080" that way it will only install the patch it fails on the between operand. If I use greaterthan or others it works fine. Any help???? Here is the error message. Add-CMScriptDeploymentType : ConfigMgr Error Object: instance of SMS_ExtendedStatus { Description = "There is a failure while generating lantern documents for this configuration item"; ErrorCode = 1078462256; File = "..\\sspconfigurationitem.cpp"; Line = 2164; Operation = "PutInstance"; ParameterInfo = ""; ProviderName = "ExtnProv"; StatusCode = 2147749889; }; At C:\Reader\Add-Depend.ps1:155 char:1 + Add-CMScriptDeploymentType -SourceUpdateProductCode "$ReaderGUID" -A ... + ~~~~~~~~~~~~~~~~~~~~~~~~~~~~~~~~~~~~~~~~~~~~~~~~~~~~~~~~~~~~~~~~~~~~~ + CategoryInfo : NotSpecified: (Microsoft.Confi...mentTypeCommand:AddScriptDeploymentTypeCommand) [Add-CMScriptDeploymentType], WqlQueryException + FullyQualifiedErrorId : UnhandledException,Microsoft.ConfigurationManagement.Cmdlets.AppMan.Commands.AddScriptDeploymentTypeCommand
 -
Hello all, I am trying to get a report of workstations that have a shortcut on desktop. select SMS_R_System.NetbiosName, SMS_R_System.LastLogonUserName, SMS_G_System_SoftwareFile.FileName from SMS_R_System inner join SMS_G_System_SoftwareFile on SMS_G_System_SoftwareFile.ResourceID = SMS_R_System.ResourceId where SMS_G_System_SoftwareFile.FileName like "foo.lnk" and SMS_G_System_SoftwareFile.FilePath like "C:\\Users\\Public\\Desktop\\" I could not make it work as this program is installed on the machine. its just a link to web portal
-
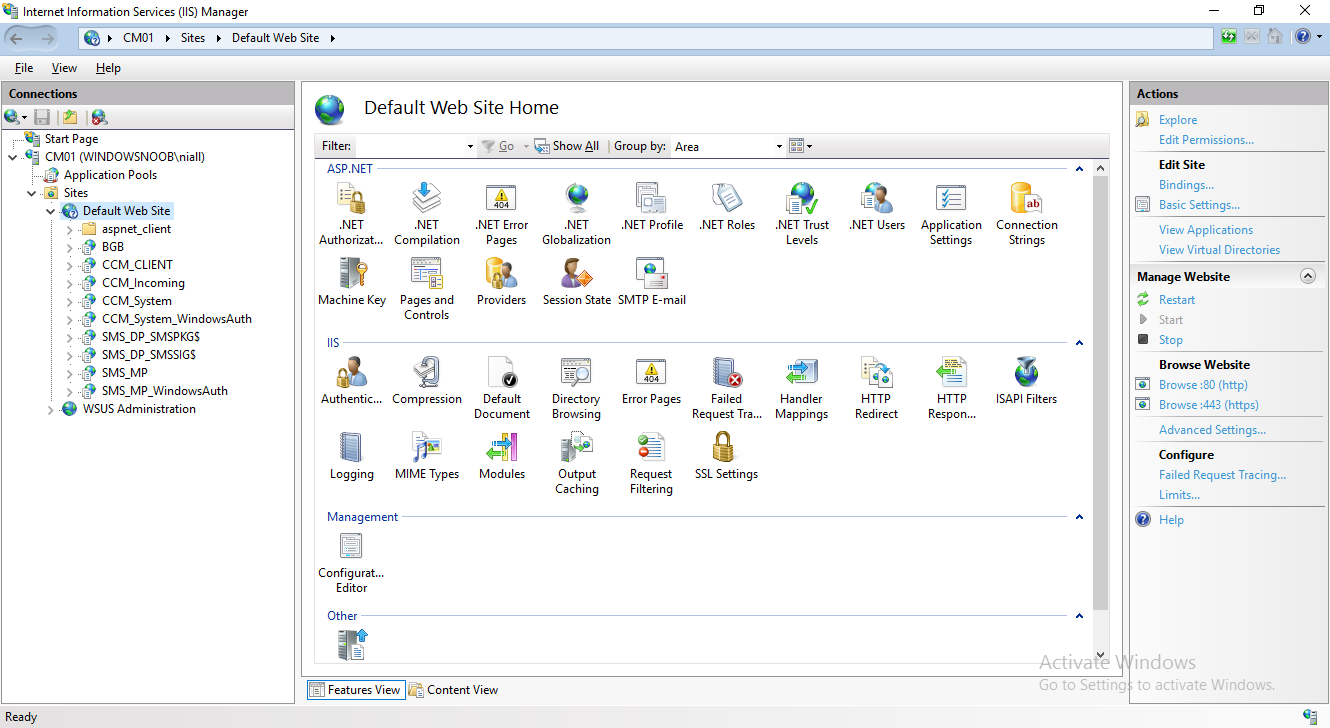
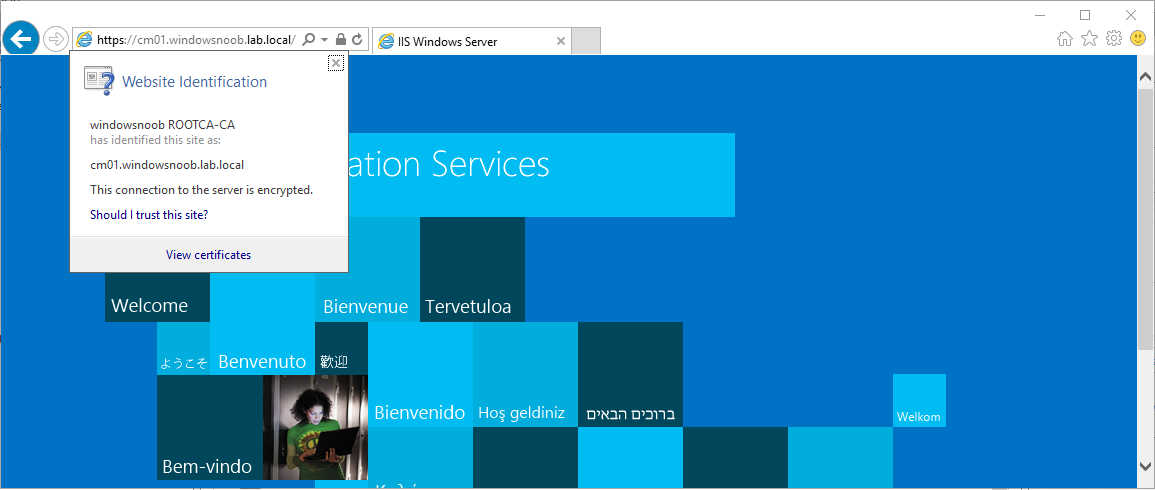
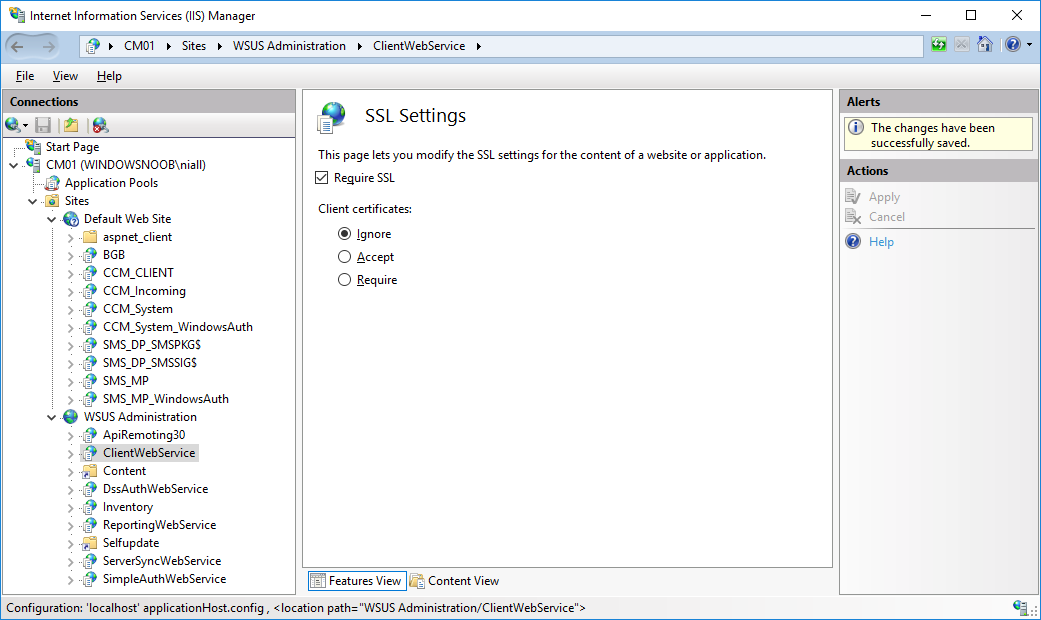
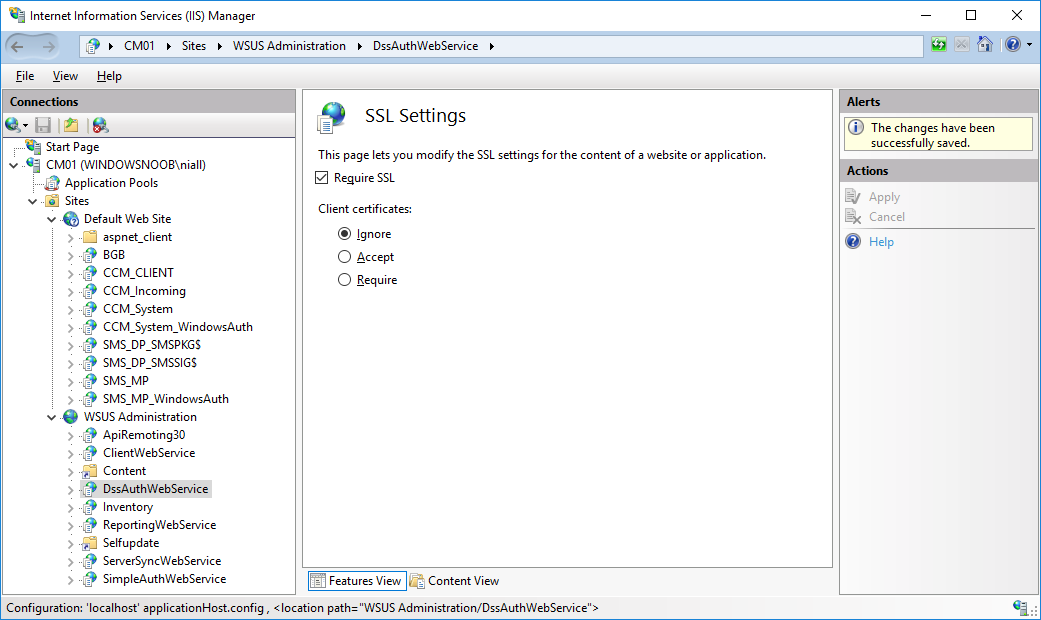
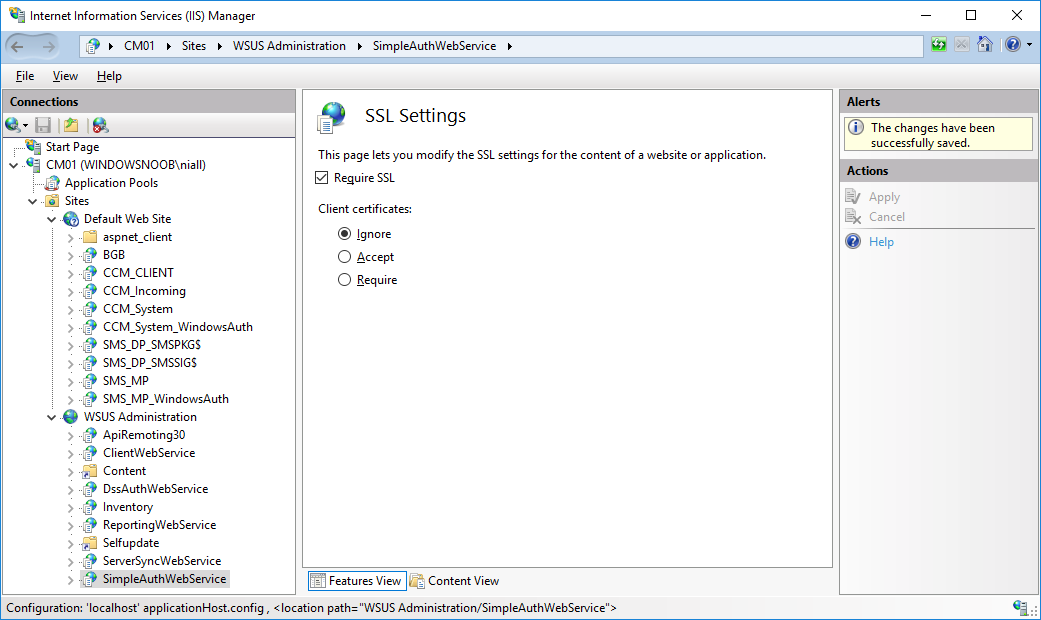
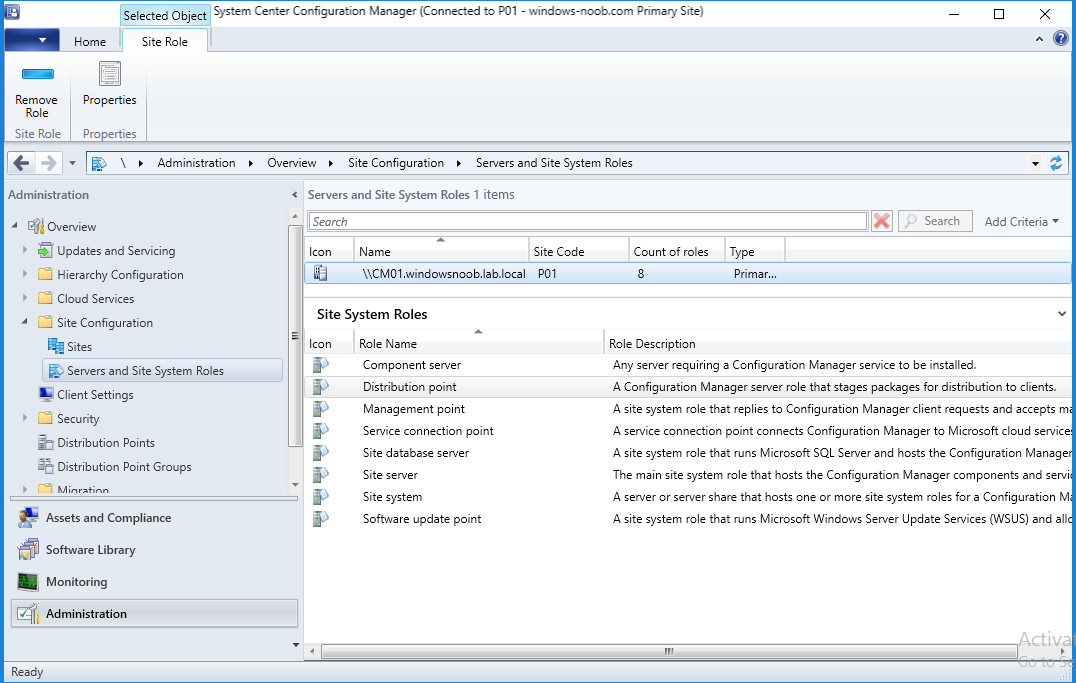
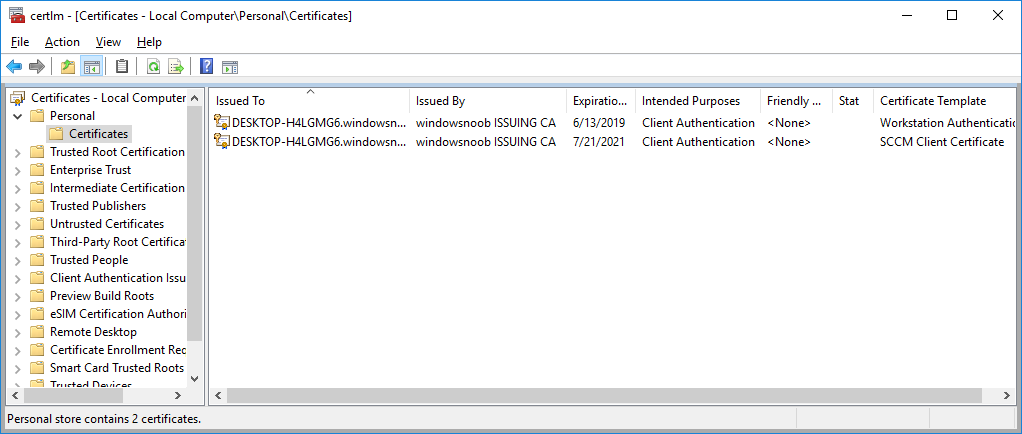
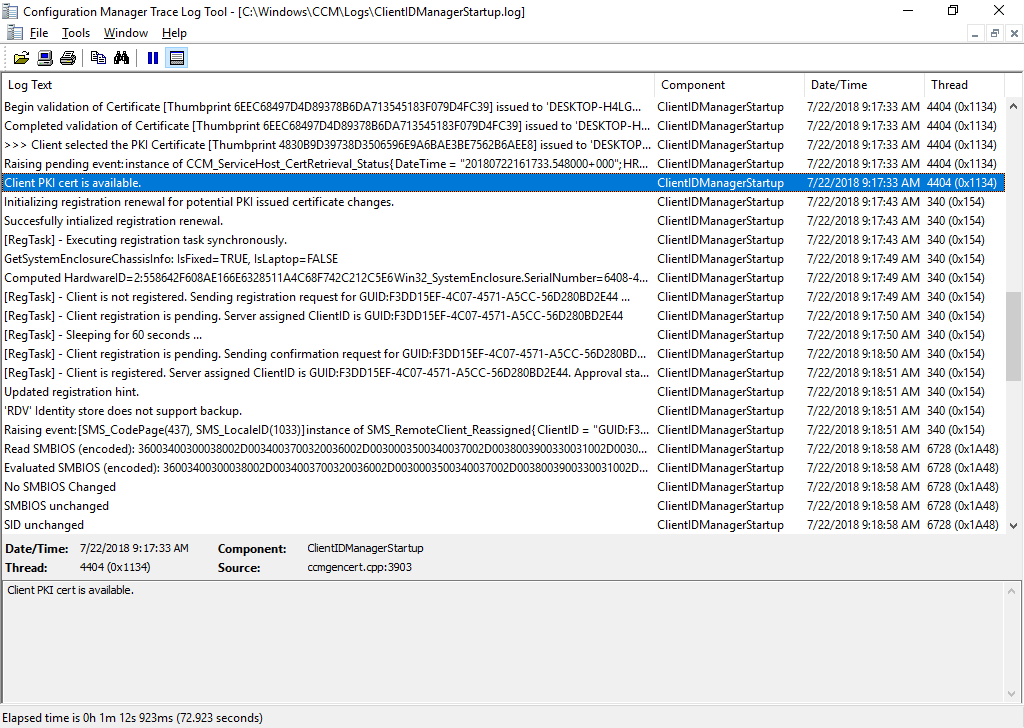
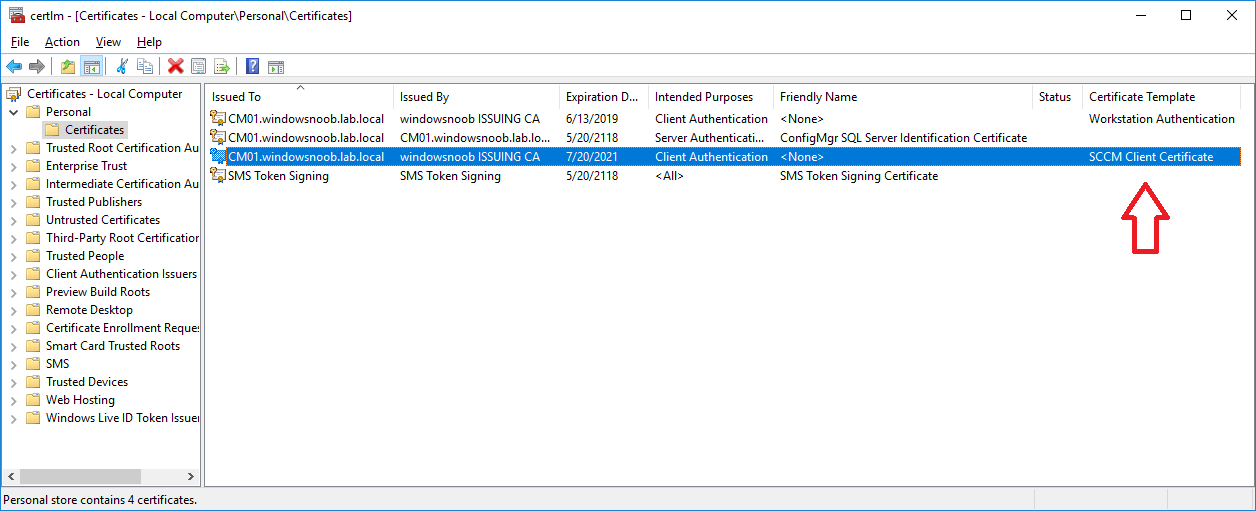
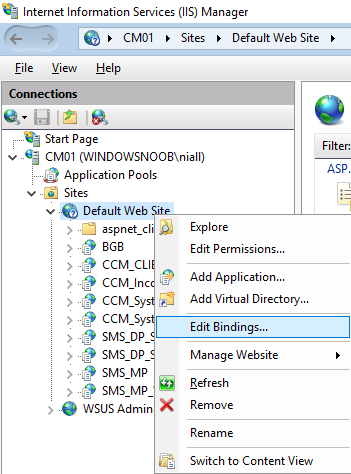
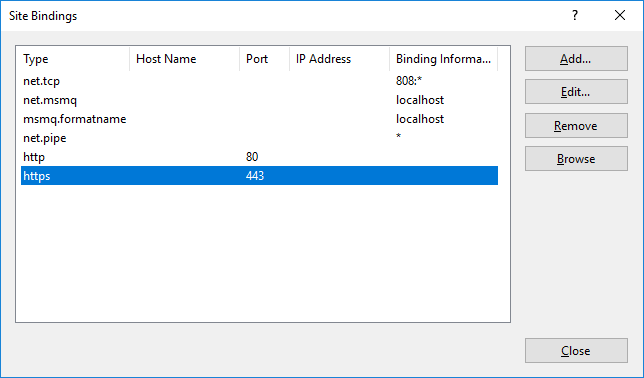
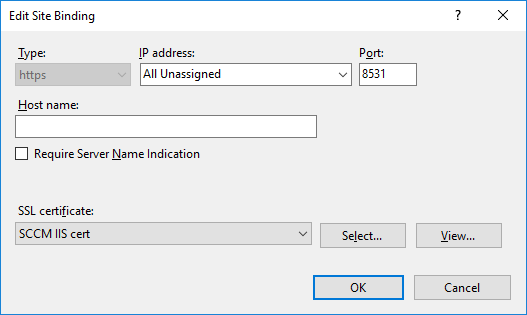
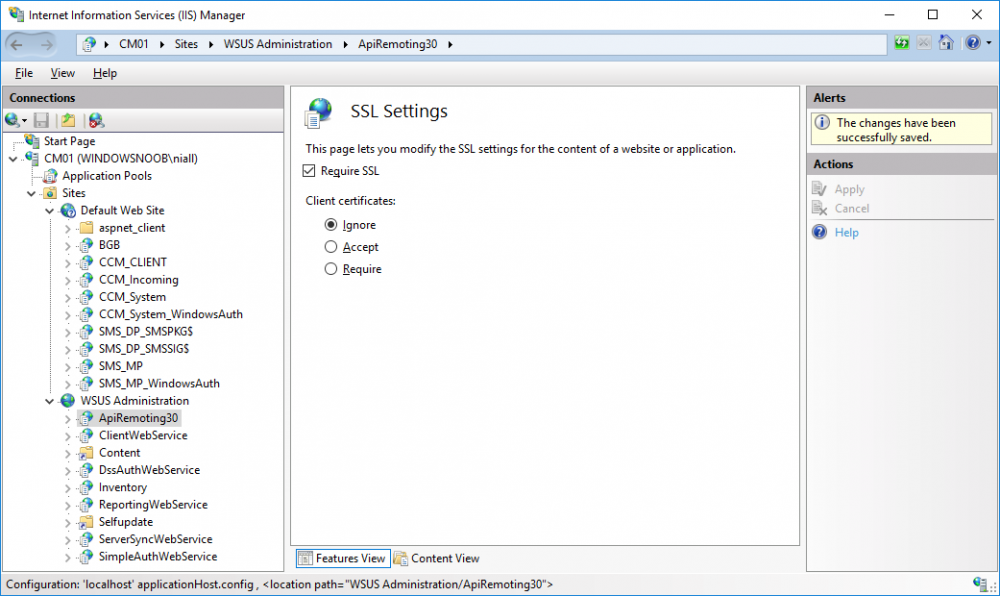
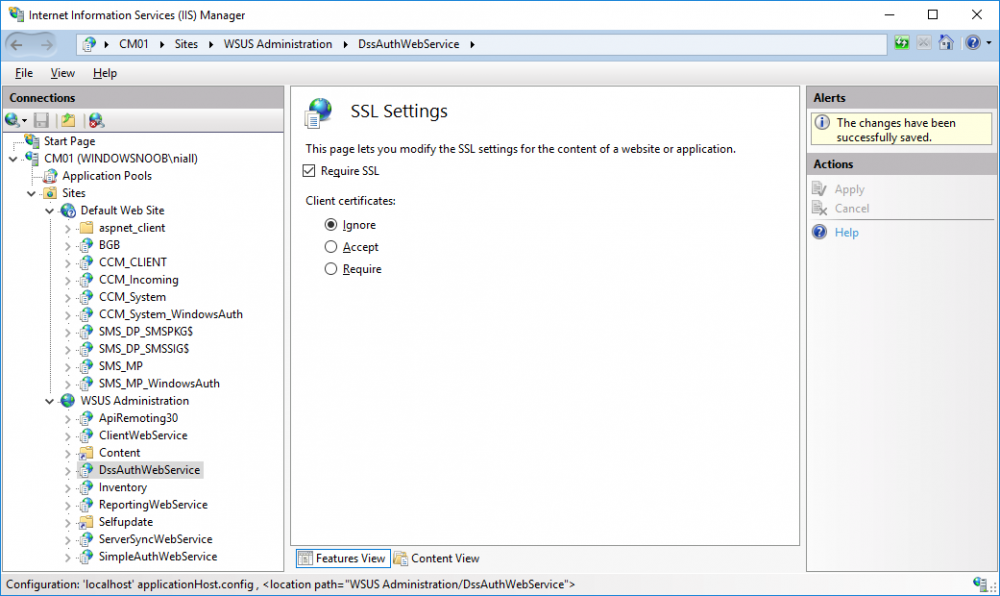
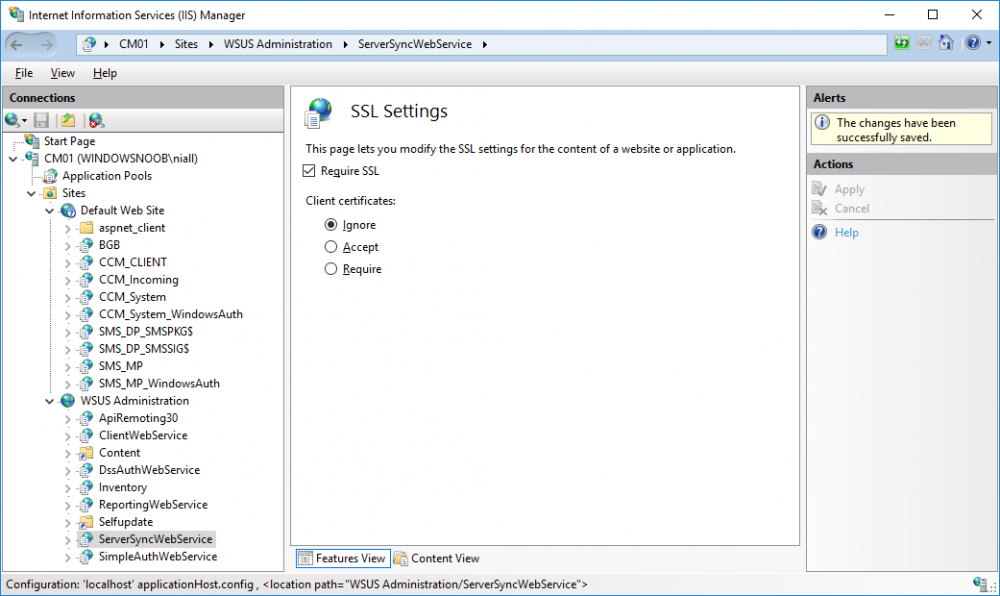
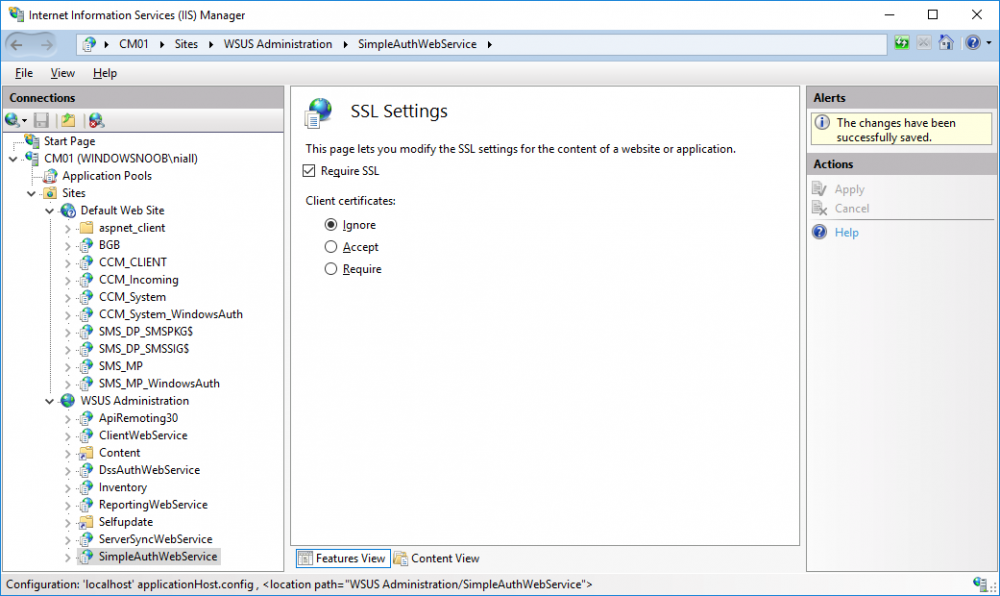
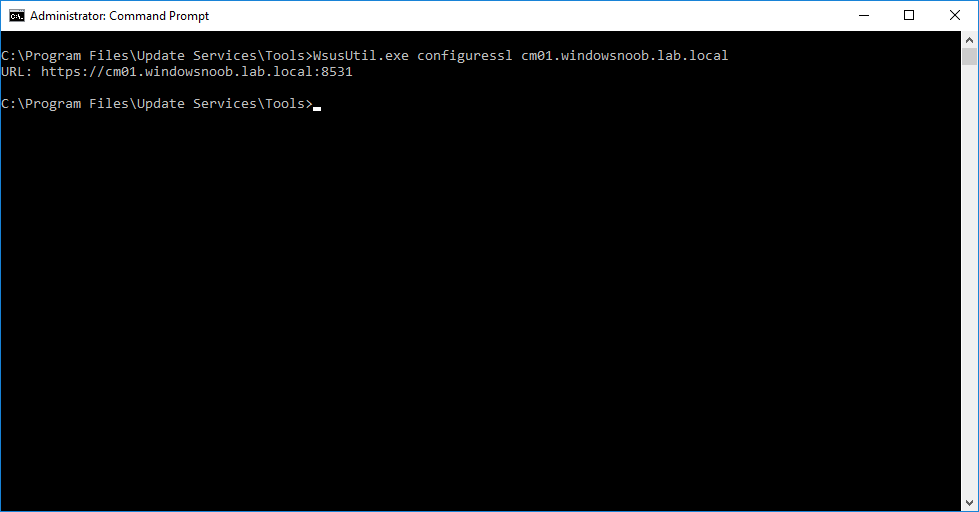
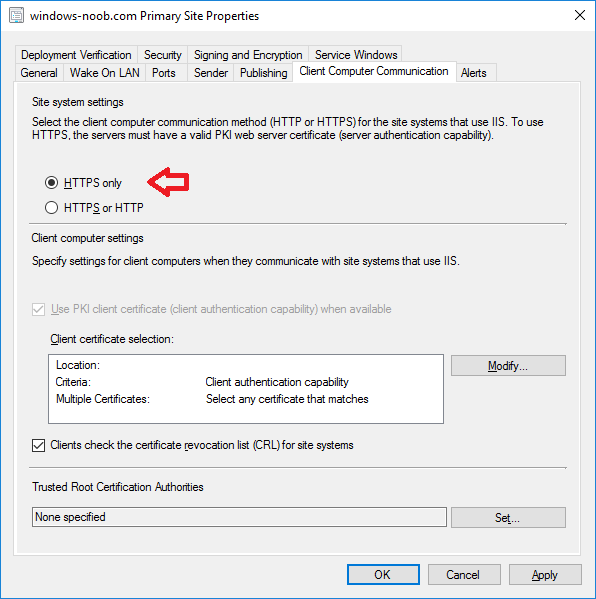
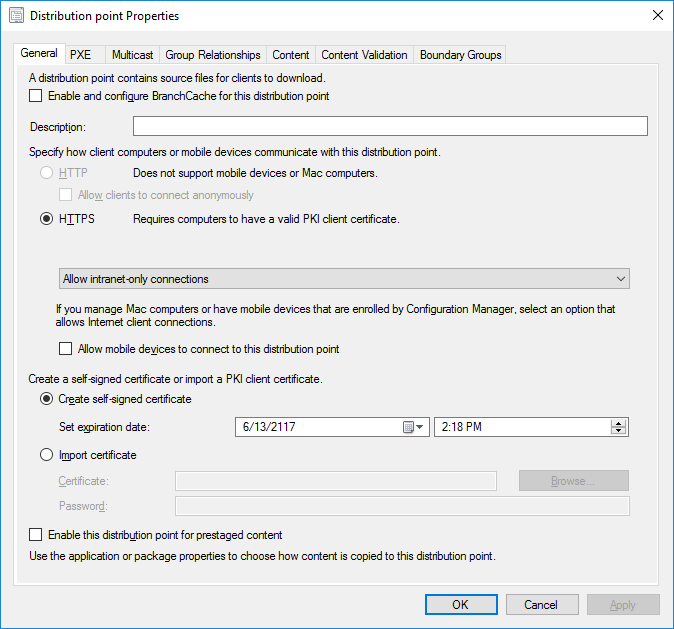
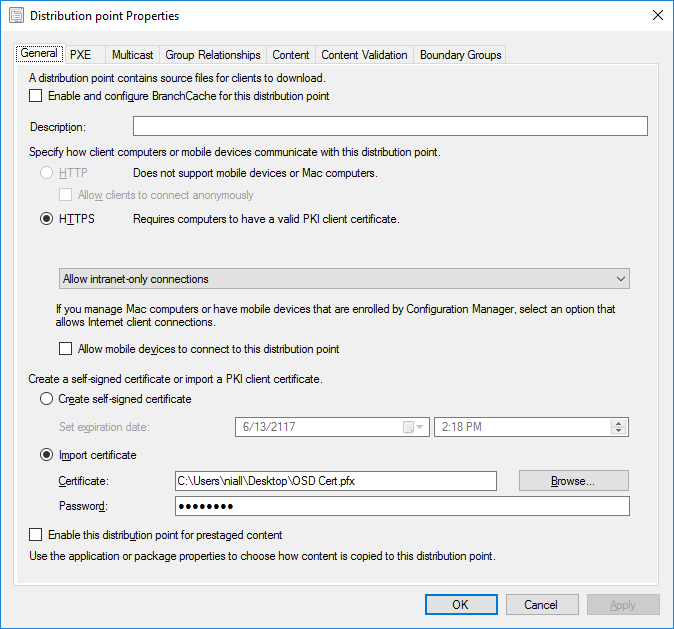
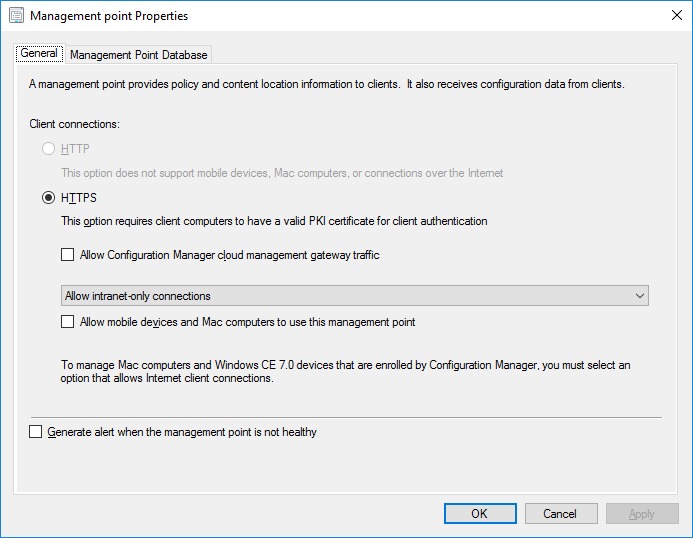
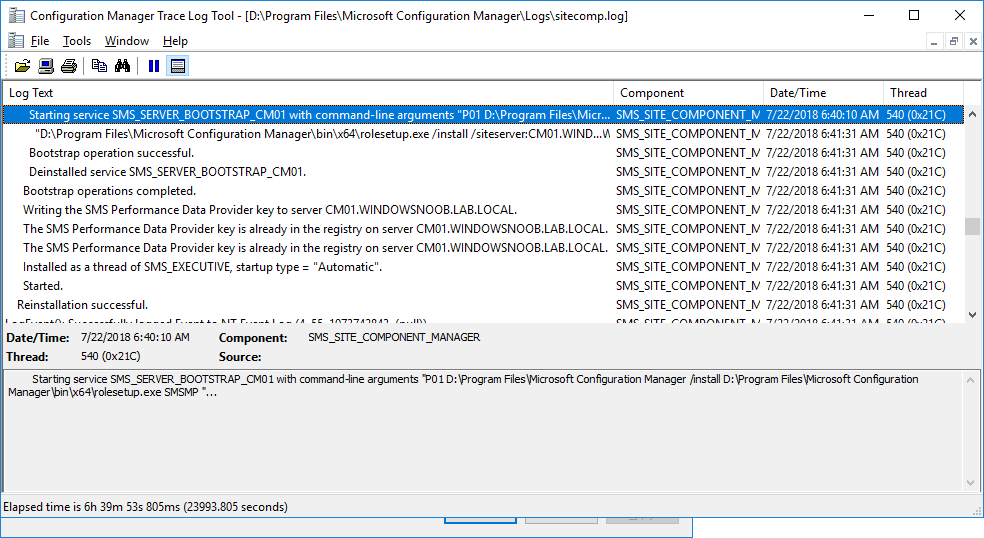
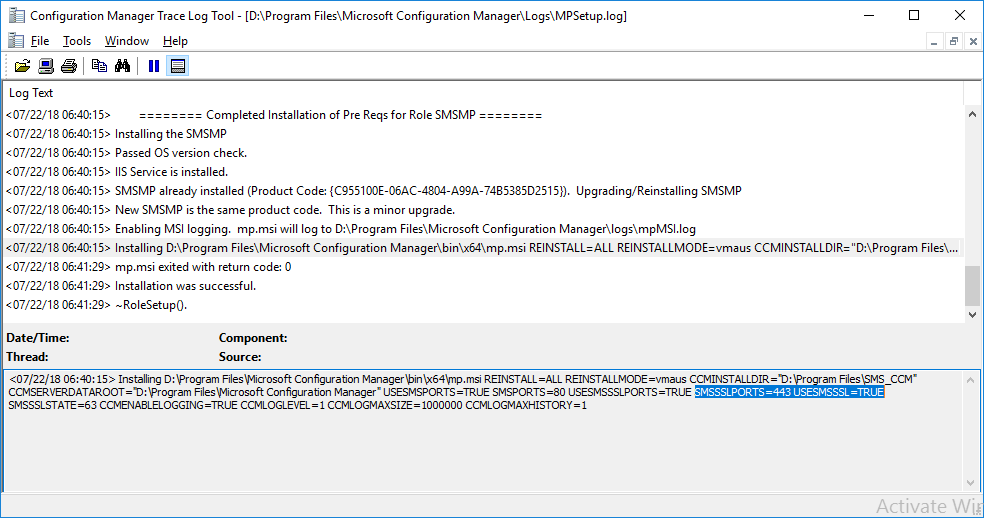
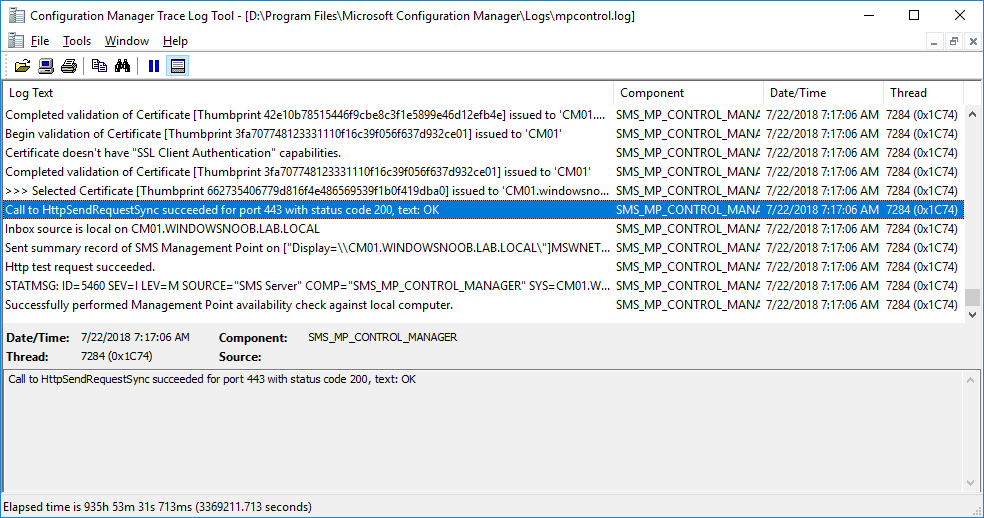
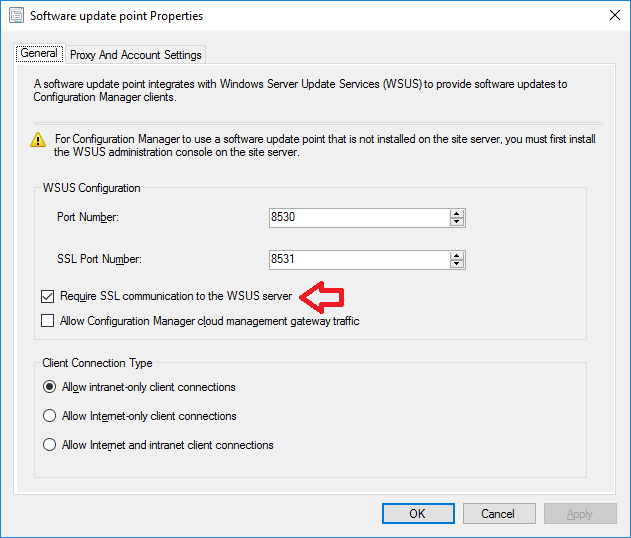
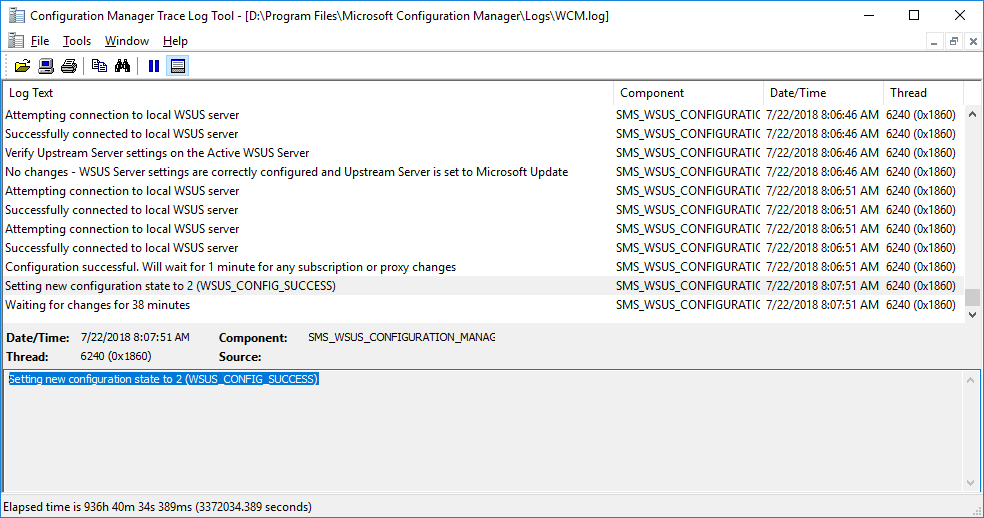
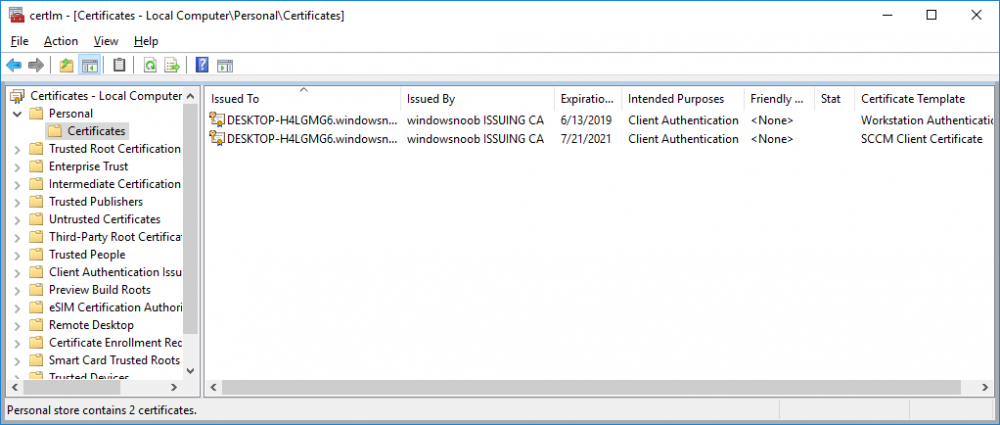
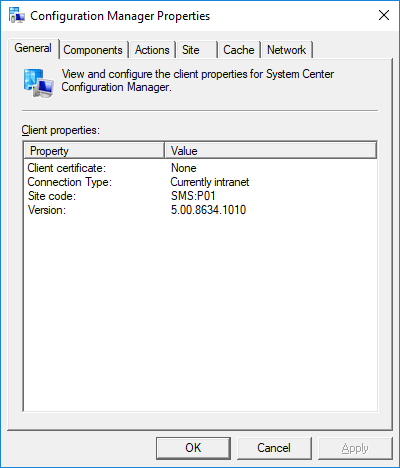
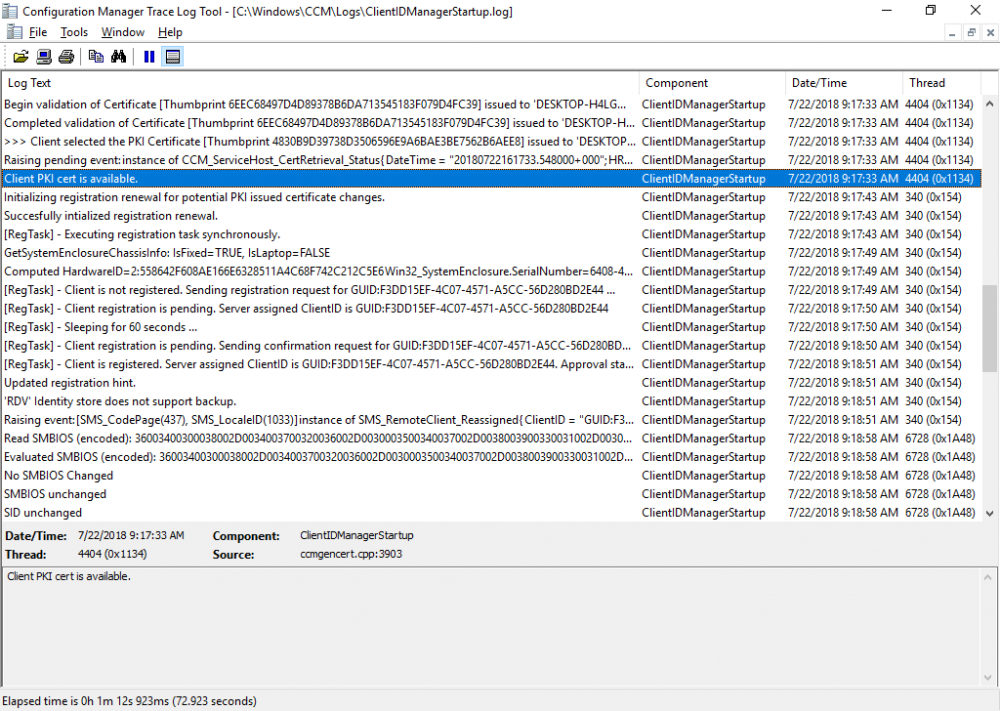
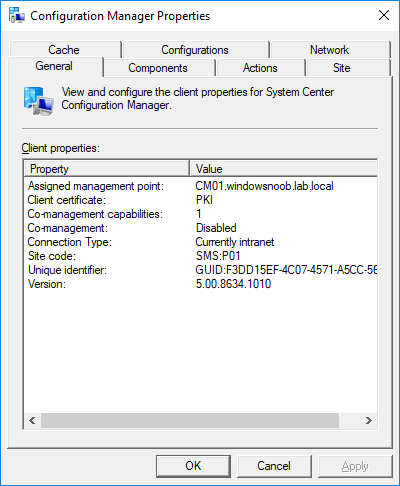
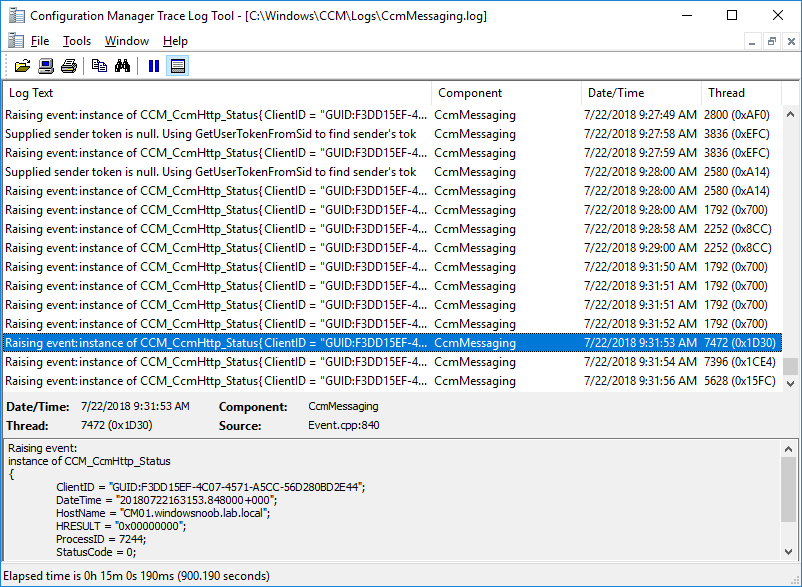
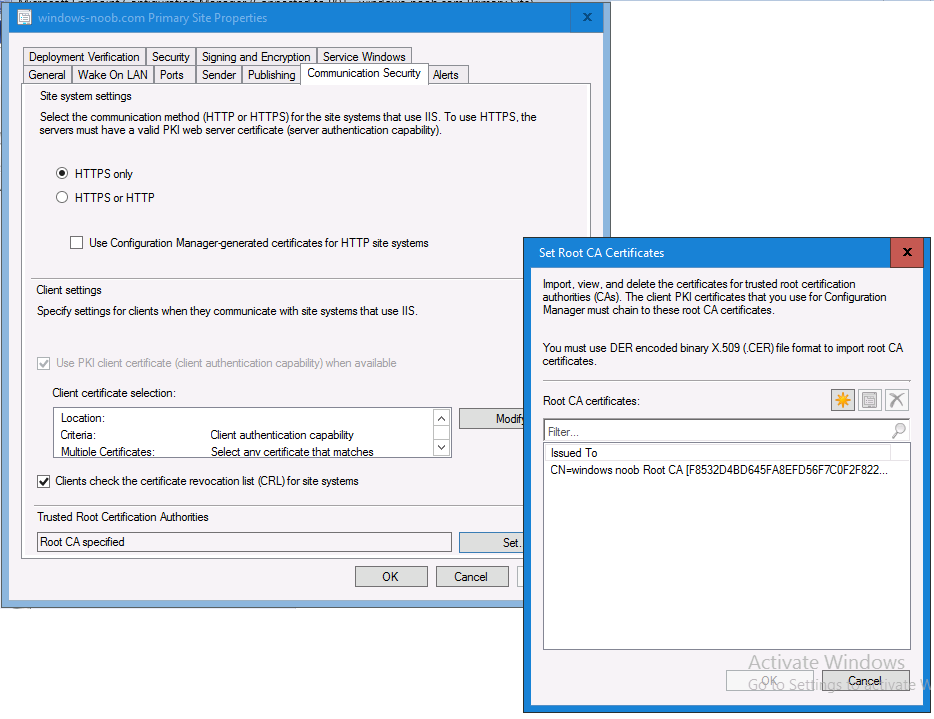
 In a previous series of guides I showed you how to configure PKI in a lab on Windows Server 2016. In another series, I also showed you how to install System Center Configuration Manager (Current Branch) version 1802 on Windows Server 2016 with SQL Server 2017. In this lab, I will show you how to configure SCCM to utilize that PKI environment. This series is based upon an excellent video by the talented former Microsoft Premier Field Engineer Justin Chalfant here. If you haven't seen it yet, do check it out. The intention here is that after you've completed this PKI enabled SCCM lab you can then use this in future guides, and to dig deeper into new technologies from Microsoft, for example enabling a Cloud Management Gateway and/or Cloud Distribution Point and using later on, using Co-Management. Note: To complete this lab you must first complete the PKI Lab series (8 parts) and then install a new virtual machine within that PKI lab running System Center Configuration Manager (Current Branch) version 1802 utilizing this series (4 parts), that installation of Configuration Manager will be in HTTP mode. In addition, you must configure the Software Update Point role (in HTTP mode) on CM01 See this guide (step 2 onward) for details. For details how to configure that, see this post. It will take some time to setup but you'll be glad you did. Also, don't do this in production without consulting with a PKI Expert. I don't claim to be one, I'm just helping you get it up and running in a lab. This is intended for use in a lab only. In part 1 of this series you created an Active Directory Security Group to contain your SCCM servers that host IIS based roles such as Distribution Point, Management Point and Software Update Point, you then rebooted that server after adding it (CM01) to the group. You then created 3 certificate templates for SCCM on the Issuing CA server (IssuingCA) and issued them so that they could be available to applicable computers. You verified that you had a GPO in place for AutoEnrollment before requesting the IIS and DP/OSD Certificates on the IIS Site System (CM01) using certlm.msc. Step 1. Edit bindings in IIS for the Default Web Site and WSUS Administration Websites On the SCCM server (CM01), start Internet Information Services (IIS) Manager, expand Sites so that you can see the Default Web Site and the WSUS Administration websites listed. Select the Default Web Site, this web site is where the management point, distribution point and other SCCM roles such as Application Catalog can be found (if they are installed). Edit bindings on the Default Web Site Right click on the Default Web Site and choose Edit Bindings from the options available. In the window that appears, select the https section (port 443) and choose Edit. In the SSL certificate dropdown menu, select SCCM IIS Cert. Click OK and then click Close. Verify changes made Once done, you can open up Internet Explorer and verify that it's reporting back in HTTPS mode for the default web site by browsing to the following addresses to verify the Netbios name and FQDN resolve in HTTPS mode. Click on the Lock in the address bar to get info about the connection. https://cm01 https://cm01.windowsnoob.lab.local/ Edit bindings on the WSUS Administration Web Site Repeat the above operation, on the WSUS Administration website (note that it uses port 8531 for https mode). click OK and Close when done. Step 2. Modify WSUS Administration SSL Settings WSUS itself requires some additional changes documented here (1) that we need to configure to allow WSUS to use HTTPS. In the Internet Information Services (IIS) Manager, expand sites and selct WSUS Administration. Select ApiRemoting30 under the WSUS Administration web site, in the right pane, click on SSL Settings and select Require SSL and verify that Ignore is selected before clicking Apply. Next, select ClientWebService under the WSUS Administration web site, in the right pane, click on SSL Settings and select Require SSL and verify that Ignore is selected before clicking Apply. Next, select DSSAuthWebService under the WSUS Administration web site, in the right pane, click on SSL Settings and select Require SSL and verify that Ignore is selected before clicking Apply. Next, select ServerSyncWebService under the WSUS Administration web site, in the right pane, click on SSL Settings and select Require SSL and verify that Ignore is selected before clicking Apply. Finally, select SimpleAuthWebService under the WSUS Administration web site, in the right pane, click on SSL Settings and select Require SSL and verify that Ignore is selected before clicking Apply. Step 3. Configure WSUS to require SSL In an administrative command prompt on CM01, browse to the location of WSUS installation files. cd C:\Program Files\Update Services\Tools Next issue the following command where CM01.windowsnoob.lab.local is the Fully qualified domain name of your ConfigMgr server hosting WSUS. WsusUtil.exe configuressl cm01.windowsnoob.lab.local The results are shown below: Step 4. Configure SCCM to use HTTPS In this step you will configure SCCM to operate in HTTPS mode. To do that, first bring up the site properties in the SCCM Console on CM01. To bring up the site properties, select the Administration workspace, select Site Configuration, select your site and in the ribbon choose Properties. Next, click on Client Computer Configuration, select HTTPS only from the options and then select Apply. Note: If you have both HTTP and HTTPS site systems in your environment, keep the second box checked (HTTPS or HTTP) and enable the Use PKI client certificate (client authentication capability) when available check box. Step 5. Configure Trusted Root Certification Authorities Note: If you fail to add the Root CA (ROOTCA_windows noob Root CA.crt) specified here, PXE boot will fail to download policy after entering the PXE password. In the site properties screen, click on Communication Security and then click on Set beside Trusted Root Certification Authorities, and click on the yellow star to add your Root CA, in this case, the Root CA for your lab (from the offline root ca), in other words point it to the ROOTCA_windows noob Root CA.crt file which is the Trusted Root Certificate for this site (the Root CA cert). Step 6. Verify that the Distribution Point, Management Point and Software Update Point are using SSL Next you need to verify the DP (and perform some additional configuration), MP and SUP roles are using SSL. To do this, select the Administration workspace in the console, click Site Configuration, select Servers and Site System roles, and select the Distribution Point role. Right click it and choose Properties to bring up the Distribution Point role properties. You should see that it is already configured for HTTPS. Next you need to add the certificate used by clients being imaged by operating system deployment in WinPE or for WorkGroup based clients, to do so, click on Import Certificate and select Browse, browse to the location where you saved the OSD Cert.pfx file (which you created in Step 5 of part 1 here), enter the password you specified, and click Apply. Click OK to close the Distribution Point role properties. For more info on the DP Cert requirements see - https://docs.microsoft.com/en-us/sccm/core/plan-design/network/pki-certificate-requirements Next, select the Management Point role properties, they are shown below, again, HTTPS is selected by default as you set it site wide with the HTTPS only option. When you selected HTTPS Only in the Client Computer Communication of the site properties, this initiated the Management Point to reinstall itself with the new settings, as you can see here in the sitecomp.log. In addition in the mpsetup.log you can see that it's configured for SSL Finally you can check mpcontrol.log this log logs the status of your Management Point, and in there you can verify that the Management Point is up and running and communicating OK in HTTPS mode and that it has successfully performed Management Point availability checks. Next, double click the Software Update Point role to review it's properties. Place a check in the Require SSL communication to the WSUS Server check box. Click Apply and click OK to close the Software Update Point properties. At this point open the WCM.log and look for a line that reads Step 7. Verify Client Received Client Certificate and SCCM Client Changes to SSL Logon to the Windows 10 1803 client and start and administrative command prompt, from there launch certlm.msc to bring up Certificates on the Local Machine. Browse to Personal and Certificates, and you should see the SCCM Client Certificate listed. Note: I assume you've already installed the ConfigMgr client agent using whatever method your prefer on the Windows 10 1803 virtual machine. Next, open the Control Panel and locate the Configuration Manager client agent in System and Security, and open it. If the client was just installed the Client Certificate will probably state Self-Signed (or None if you have just installed the client..). After a couple of minutes, close and then reopen the client and you should see that the Client Certificate states PKI. At this point, open the ClientIDManagerStartup.log in C:\Windows\CCM\Logs and you can see Client PKI cert is available. You can also verify client communication to the Management Point in the CCMMessaging.log and we can see it's successful in that communication. Job done ! You've successfully converted SCCM from HTTP to HTTPS using your PKI lab, and you've verified that the client is operating in HTTPS mode. In the next parts we'll look at the Cloud Management Gateway and Cloud Distribution Point. Recommended reading (1) - https://technet.microsoft.com/en-us/library/bb633246.aspx https://docs.microsoft.com/en-us/sccm/core/plan-design/network/pki-certificate-requirements https://www.enhansoft.com/how-to-setup-ssrs-to-use-https-part-1/


-
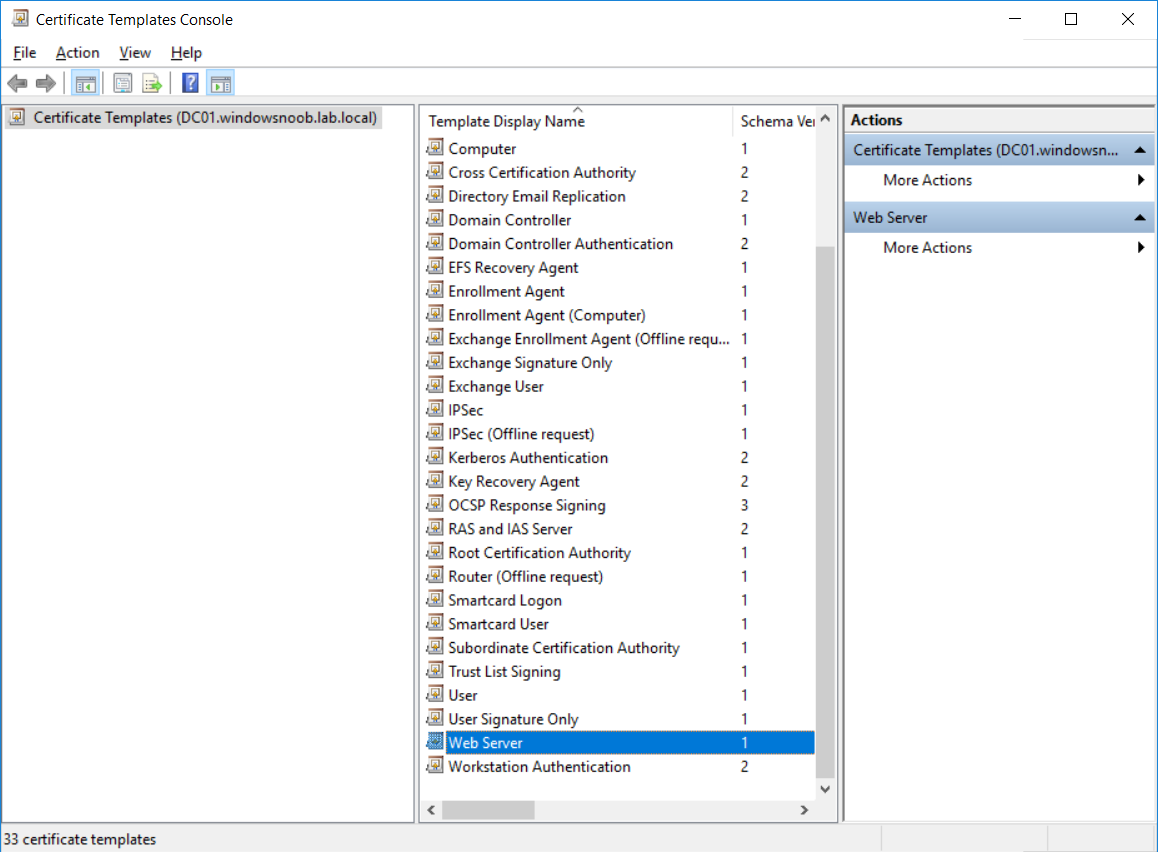
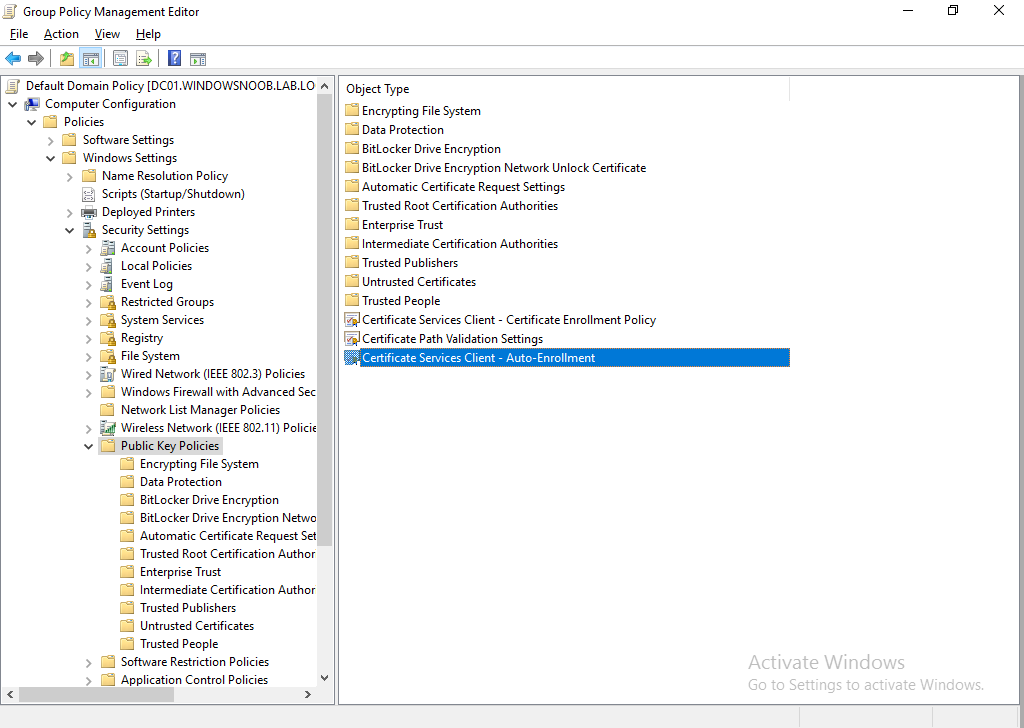
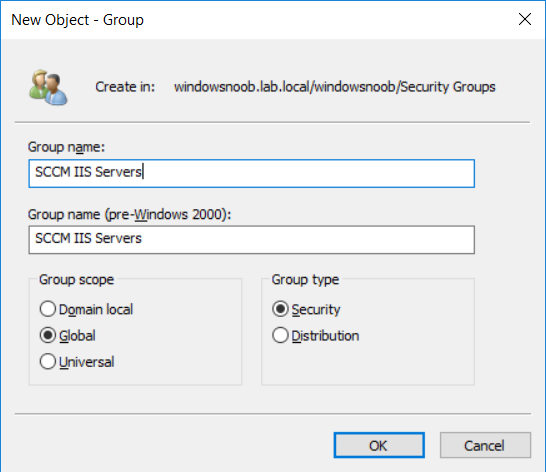
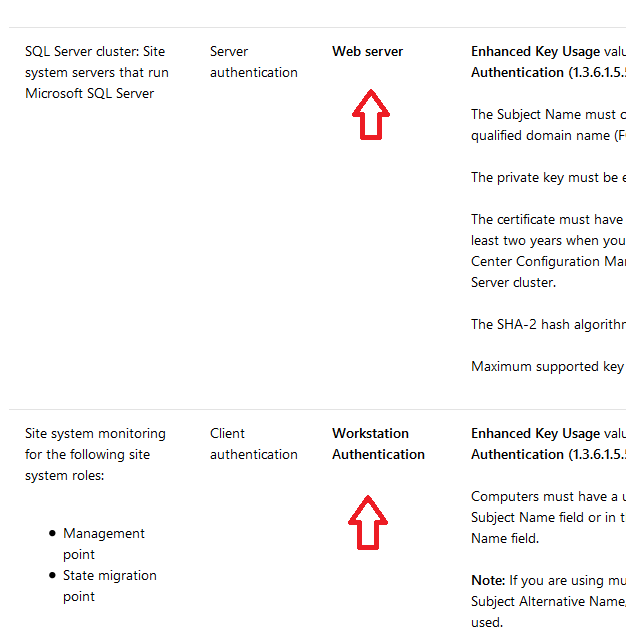
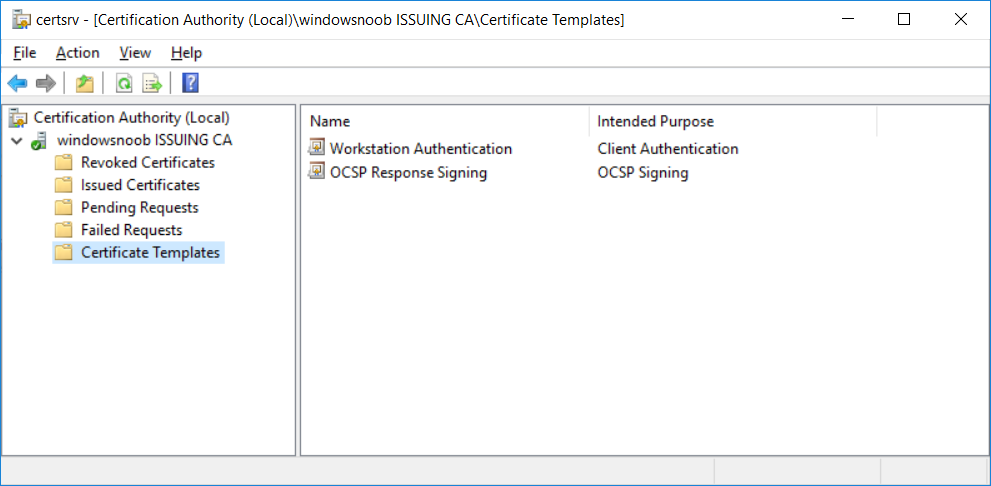
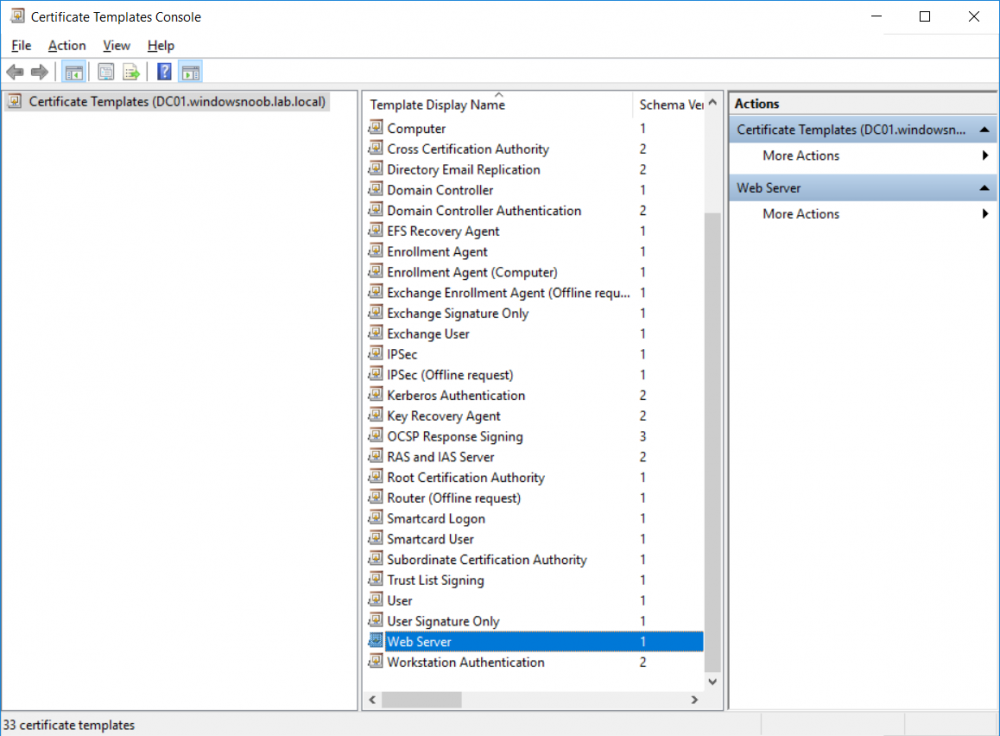
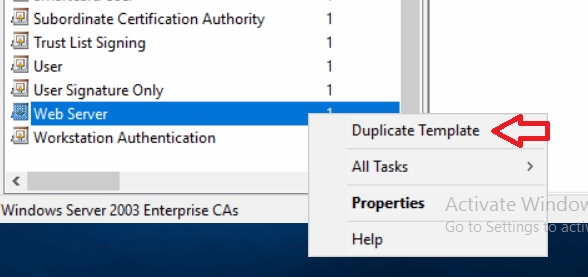
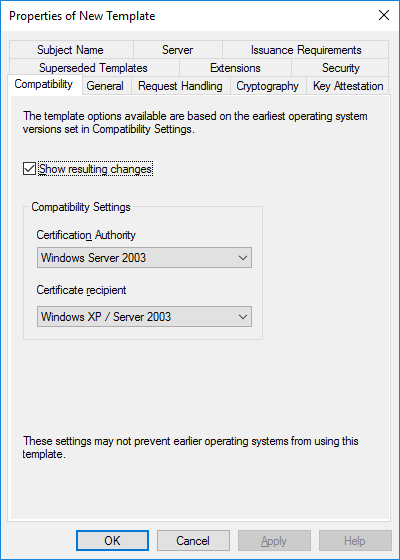
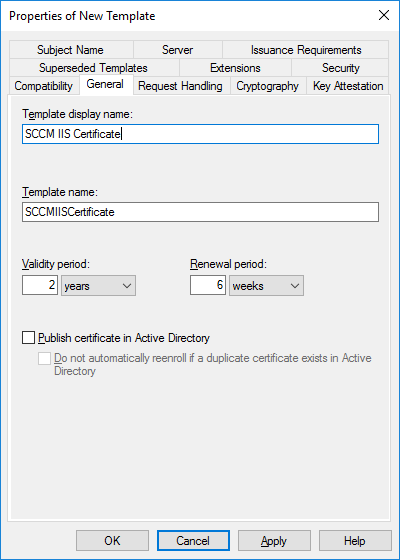
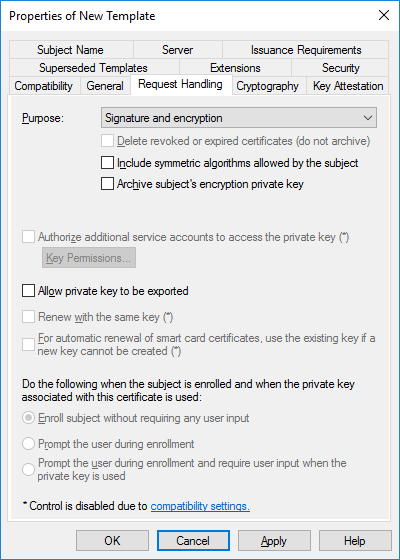
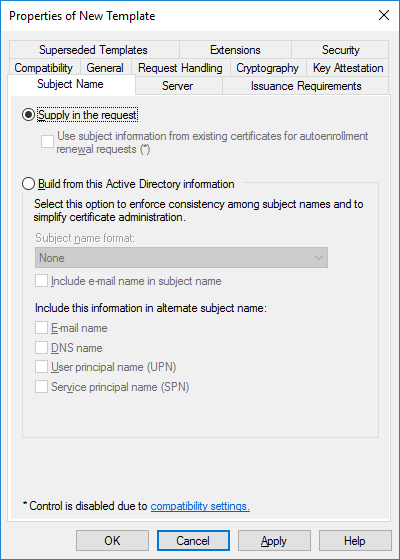
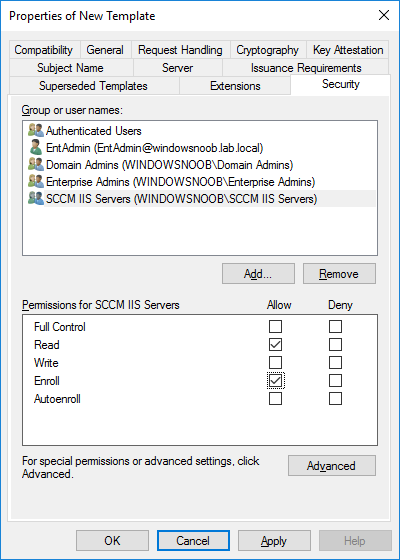
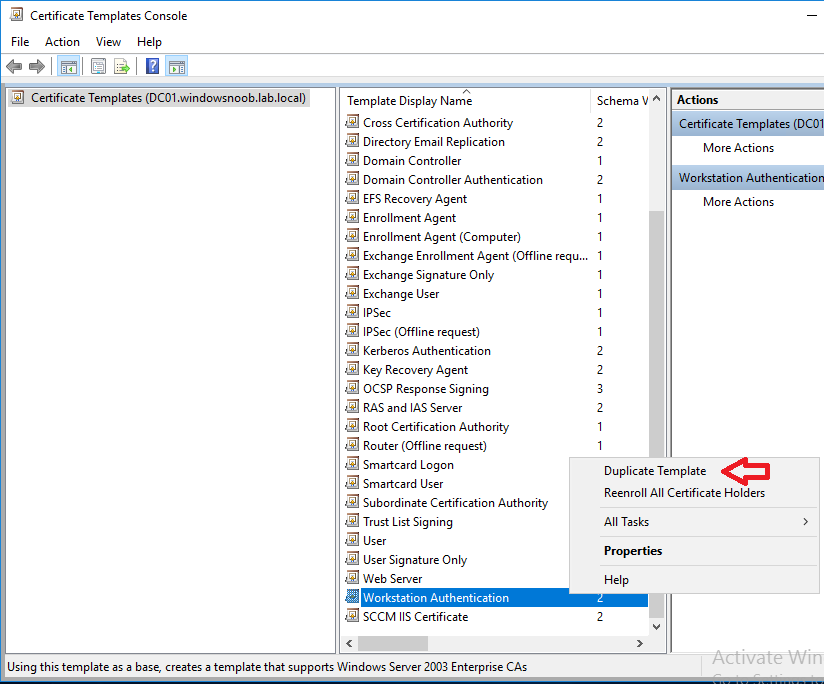
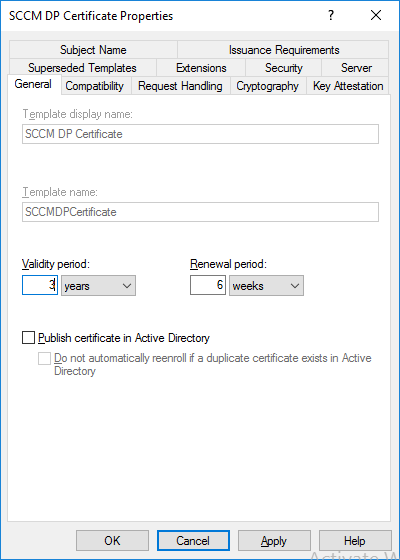
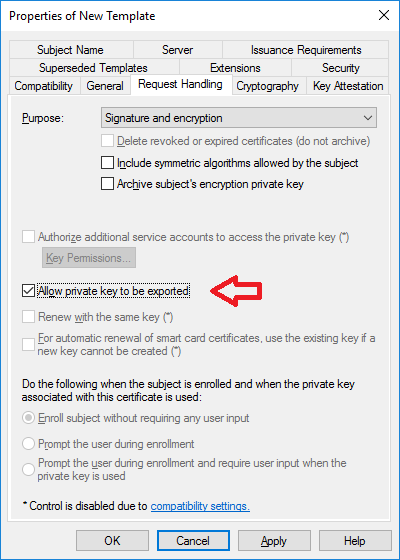
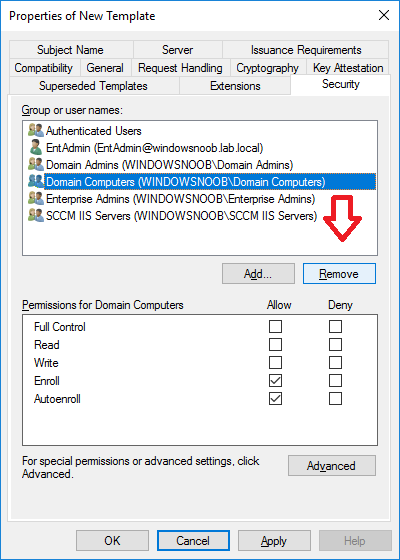
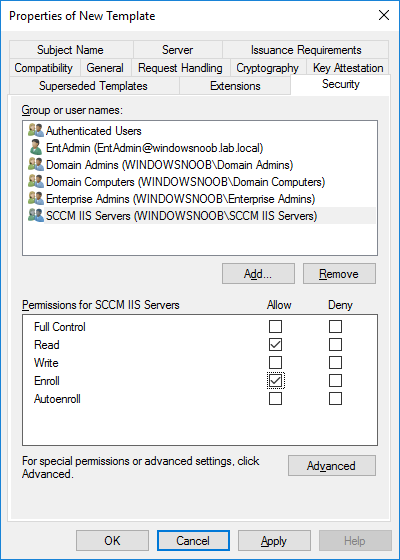
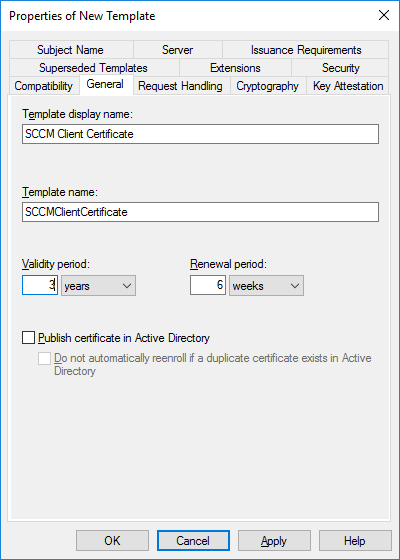
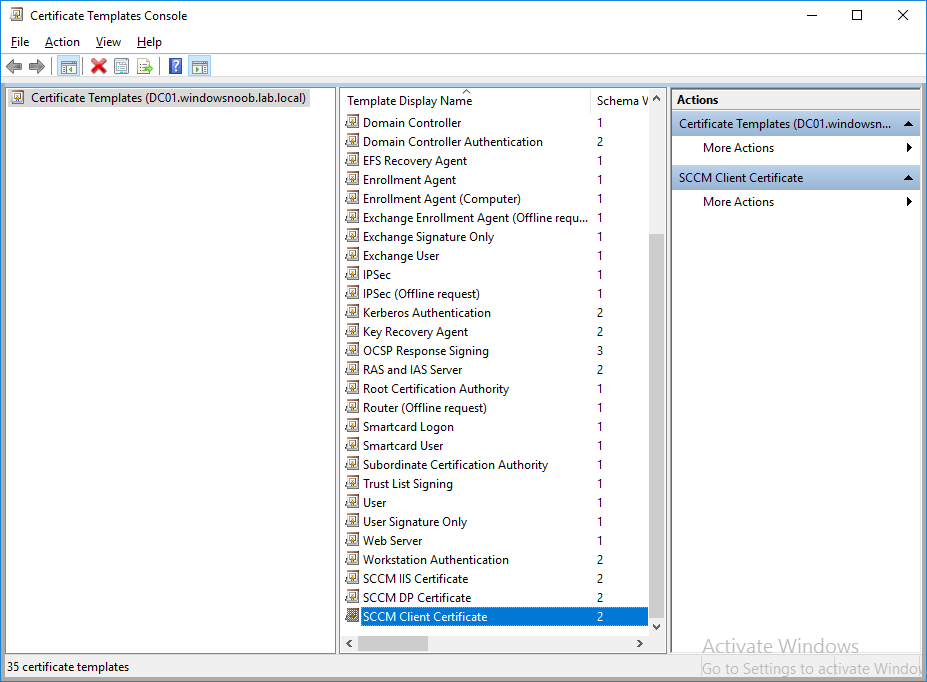
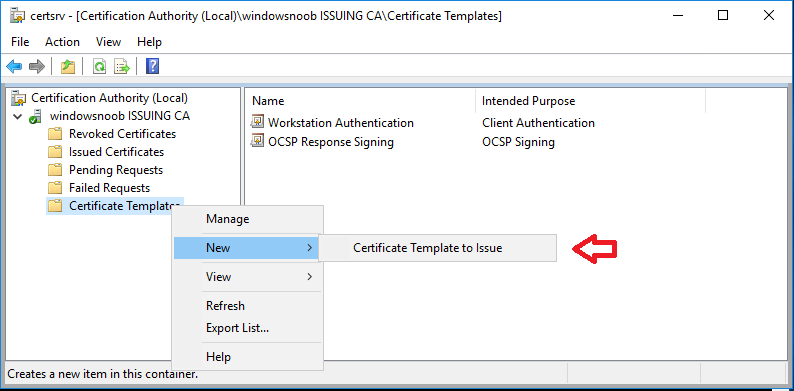
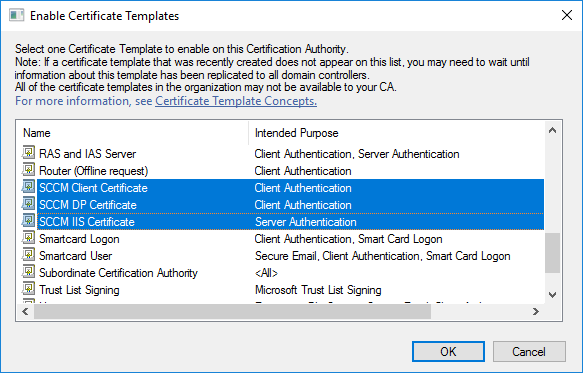
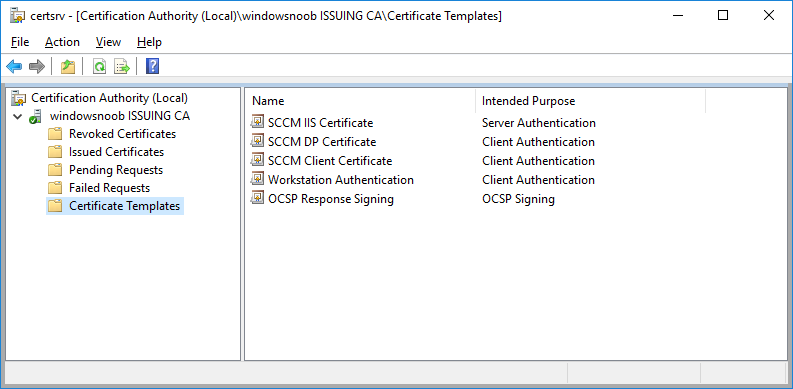
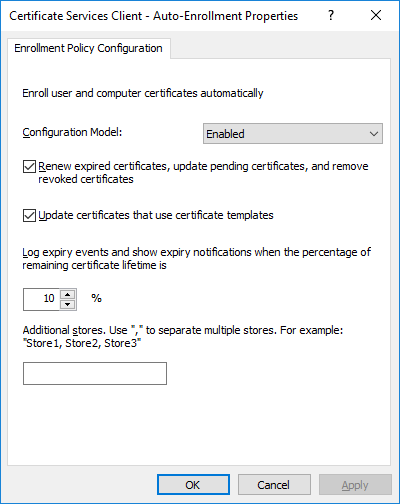
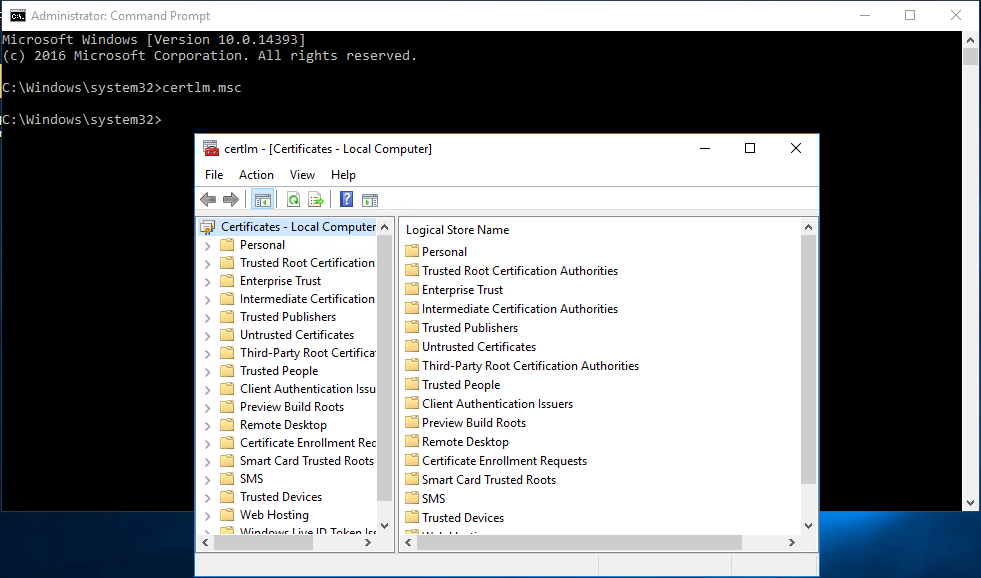
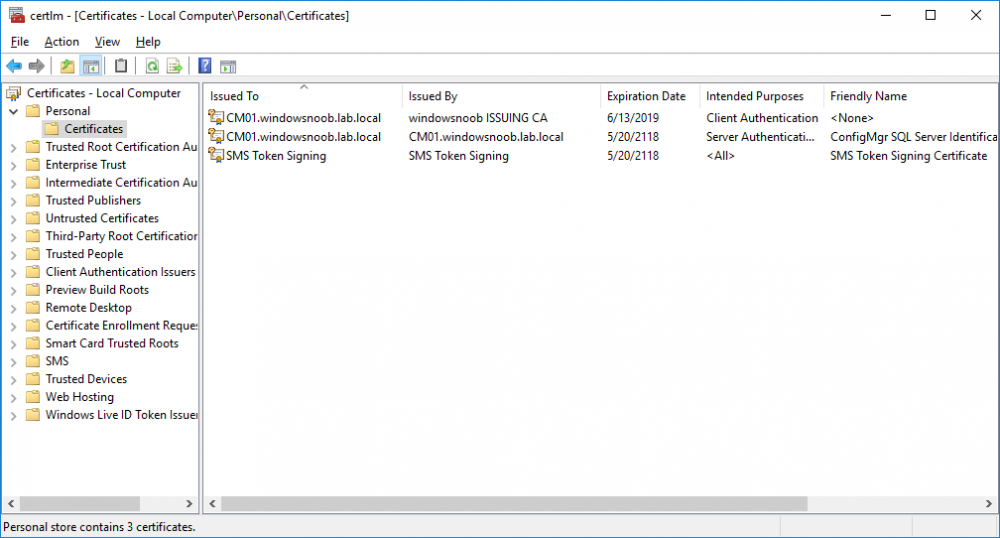
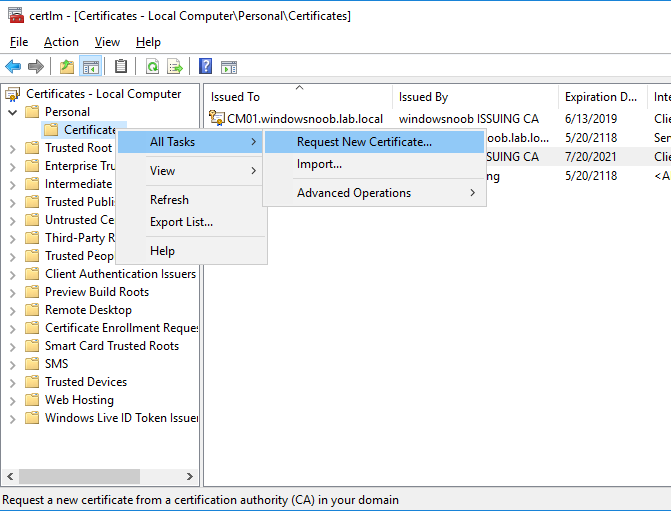
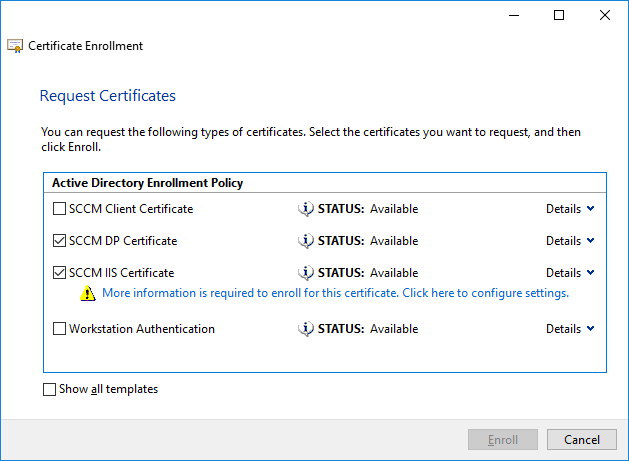
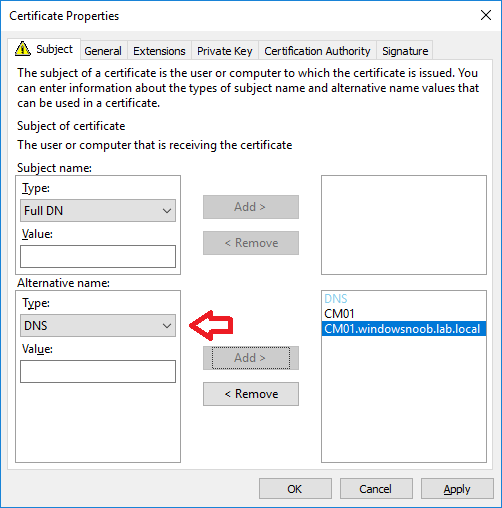
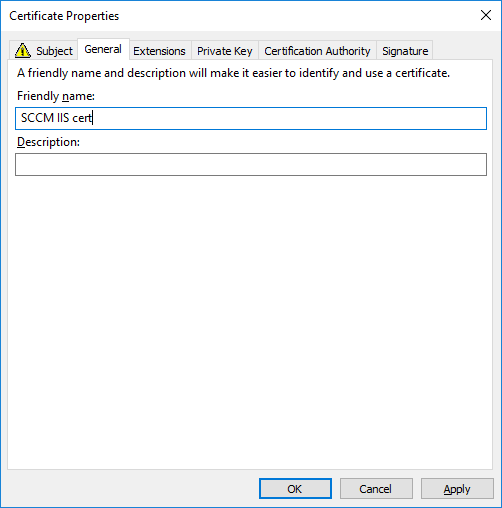
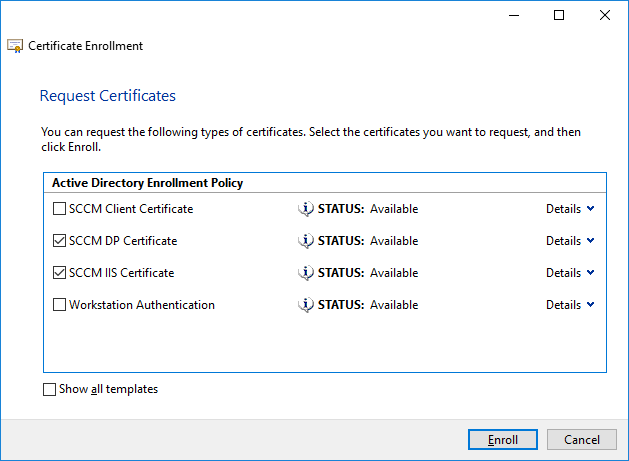
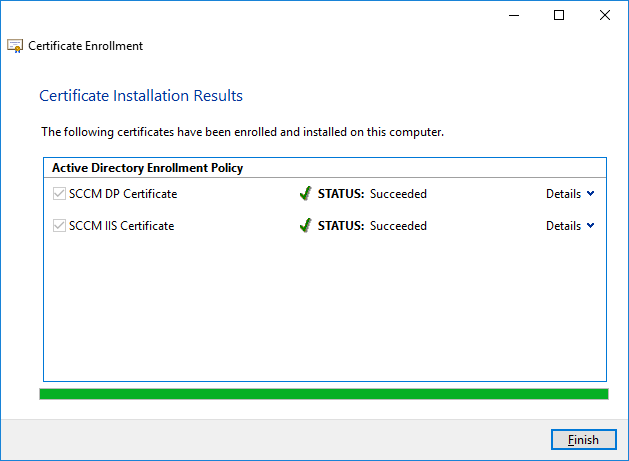
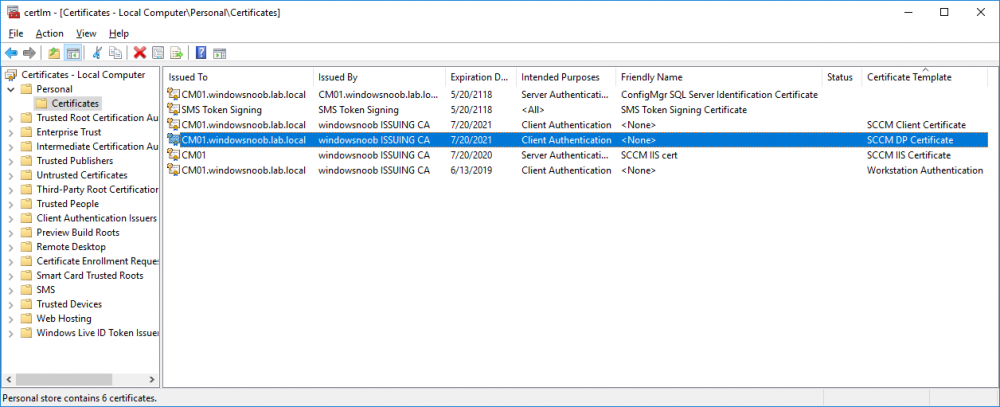
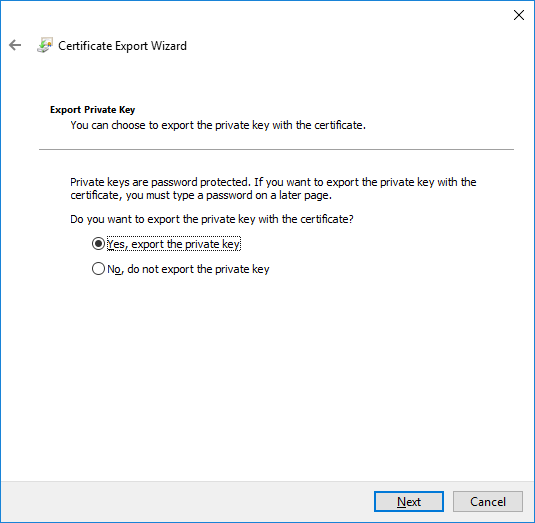
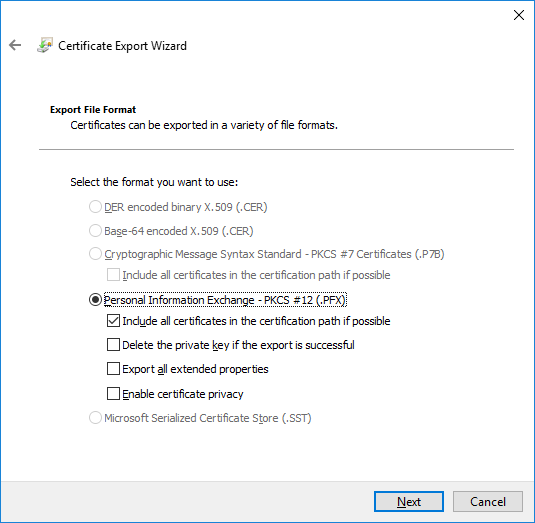
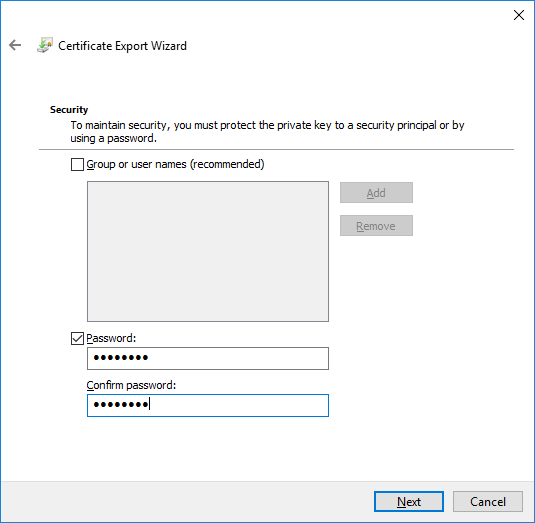
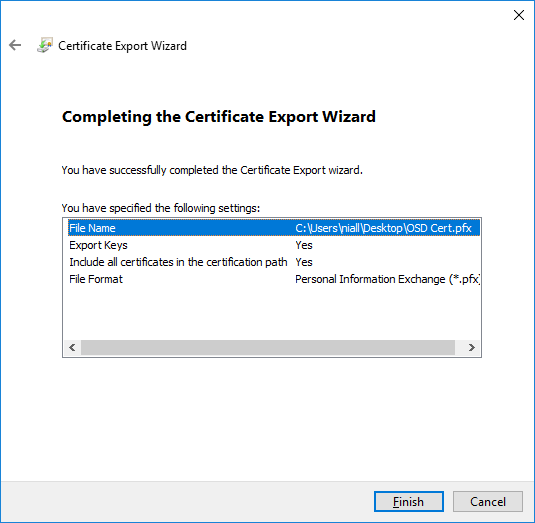
In a previous series of guides I showed you how to configure PKI in a lab on Windows Server 2016. In another series, I also showed you how to install System Center Configuration Manager (Current Branch) version 1802 on Windows Server 2016 with SQL Server 2017. In this lab, I will show you how to configure SCCM to utilize that PKI environment. This series is based upon an excellent video by the talented former Microsoft Premier Field Engineer Justin Chalfant here. If you haven't seen it yet, do check it out. The intention here is that after you've completed this PKI enabled SCCM lab you can then use this in future guides, and to dig deeper into new technologies from Microsoft, for example enabling a Cloud Management Gateway and/or Cloud Distribution Point and using later on, using Co-Management. Note: To complete this lab you must first complete the PKI Lab series (8 parts) and then install a new virtual machine within that PKI lab running System Center Configuration Manager (Current Branch) version 1902 utilizing this series, that installation of Configuration Manager will be in HTTP mode. In addition, you must configure the Software Update Point role (in HTTP mode) on CM01 See this guide (step 2 onward) for details. For details how to configure that, see this post. It will take some time to setup but you'll be glad you did. Also, don't do this in production without consulting with a PKI Expert. I don't claim to be one, I'm just helping you get it up and running in a lab. This is intended for use in a lab only. Step 1 - Create an Active Directory Security Group In this step you'll create an active directory group which will contain all your site systems that use Configuration Manager server roles which utilize IIS (Internet Information Systems) such as the below (1): Management point Distribution point Software update point State migration point Enrollment point Enrollment proxy point Application Catalog web service point Application Catalog website point A certificate registration point On the Active Directory domain controller (DC01), open Active Directory Users and Computers, and expand the windowsnoob organisational unit (OU) created in this Step 1, part 5 of this blog post. Click on Security Groups, and then right click and choose New, select Group. Give the group a name, SCCM IIS Servers. Once done, right click on the SCCM IIS Servers Active Directory Security Group, choose Properties and click on the Members tab, click on Add, for Object Types make sure Computers are selected. Add the Configuration Manager server (CM01) to that group. Once done, reboot the Configuration Manager server (CM01) using the following command otherwise you might get access denied when trying to request a certificate. shutdown /r Step 2. Create certificate templates on the Issuing CA In this step you will create three new certificate templates for use within SCCM by duplicating existing templates. Using the windowsnoob\Entadmin credentials, logon to the Issuing CA server (IssuingCA) and launch the certificate authority console (CertSrv.msc). In the three templates below, one uses the Web Server template, and the others use the Workstation Authentication template, you can verify which Microsoft certificate template to use by using the tables on the following blog post, of which i'm showing a screenshot below to make it clear. 1. SCCM IIS Certificate Right click on Certificate Templates and choose Manage. Scroll down to Web Server from the templates listed. Right click on the Web Server template and choose Duplicate Template. The Properties of New Template screen appears. Verify that the Certificate Authority Compatibility settings are set to Windows Server 2003. Note: When you use an enterprise certification authority and certificate templates, do not use the Version 3 templates (well you can but read this first). These certificate templates create certificates that are incompatible with System Center Configuration Manager. Instead, use Version 2 templates by using the following instructions. On the Compatibility tab of the certificate template properties, specify Windows Server 2003 for the Certification Authority option, and Windows XP / Server 2003 for the Certificate recipient option. (1) Click on the General tab and rename it to SCCM IIS Certificate. On the Request Handling tab, verify that Allow private key to be exported is not selected (default). On the Subject Name tab verify that the Supply in the Request is selected (default). On the Security tab, add the previously created Active Directory Security Group called SCCM IIS Servers and give it Read and Enroll access. Optionally you can remove Enroll from the Domain Admin and Enterprise Admins as it is mentioned in the docs. Click Apply to apply the changes and then close the Properties of New Template. 2. SCCM DP Certificate This template is used by the distribution point site system for Operating System Deployment (clients that are not domain joined). Next, right click on Workstation Authentication from the templates listed and choose Duplicate Template. The Properties of New Template screen appears. The Properties of New Template screen appears. Verify that the Certificate Authority Compatibility settings are set to Windows Server 2003. Click on the General tab and rename it to SCCM DP Certificate, change the validity period to something more reasonable, like 3 years. On the Request Handling tab, ensure that Allow private key to be exported is selected to allow us to export the certificate as a pfx file and we need the private key to do so, as we'll import that certificate into our console so that the clients can utilize it during imaging (workgroup members, to authenticate back to your site). On the Security tab, add the previously created Active Directory Security Group called SCCM IIS Servers and give it Read and Enroll access. Next, remove Domain Computers altogether. Click Apply to apply the changes and then close the Properties of New Template. 3. SCCM Client Certificate This template is used by clients to communicate with site systems. Next, right click on Workstation Authentication from the templates listed and choose Duplicate Template. The Properties of New Template screen appears. The Properties of New Template screen appears. Verify that the Certificate Authority Compatibility settings are set to Windows Server 2003. Click on the General tab and rename it to SCCM Client Certificate, change the validity period to something more reasonable, like 3 years. Under Subject Name verify that Build from Active Directory is selected. On the Request Handling tab, verify that Allow private key to be exported is not selected (default). On the Security tab, select Domain Computers and ensure that Read, Enroll and AutoEnroll permisions are selected. Click Apply to apply the changes and then close the Properties of New Template. The three SCCM templates are now shown below. Close the Certificate Templates console. Next you will issue these certificate templates. To do so, in the Certificate Authority (on the IssuingCA), right click on Certificate Templates and choose New, then Certificate Template to Issue. In the Enable Certificate Templates window, select the 3 previously created SCCM templates as shown below and click OK. They will now appear under Certificate Templates. Step 3. Verify Auto-Enrollment GPO is enabled for the Client Certificate In Part 8 of the PKI lab you enabled Auto Enrollment so that clients can request certificates automatically. As it is a lab, the setting is deployed in the default domain GPO. The setting is in Computer Configuration, Policies, Windows Settings, Security Settings, Public Key Policies, and Certificate Services Client - Auto Enrollment. The setting should look like so (Enabled). Step 4. Requesting the IIS and DP/OSD Certificates on the IIS Site System On the SCCM server (CM01), which hosts all those IIS ConfigMgr roles, start certlm.msc from an Administrative command prompt. if you expand Personal, then Certificates, you'll see certificates issued to that computer, there will be a few by default. In the administrative command prompt, run gpupdate /force to pull down group policy changes...and refresh the view in certlm. Below you can see the SCCM Client Certificate template was used to generate this Client Authentication certificate. Requesting New certificates Next, you will request certificates from Active Directory, to do so, right click on Certificates and choose All Tasks then Request New Certificate. click Next at the Before you begin screen, and verify that Active Directory Enrollment Policy is selected before clicking Next. Select the SCCM DP Certificate and SCCM IIS Certificate from those listed (you already have the SCCM Client Certificate from AutoEnrollment). You'll notice that for the SCCM IIS Certificate, more information is required to enroll, Click on the message to enter this info. For Alternative Name, choose the DNS option and then click on Add to add the hostname and fully qualified domain name of your SCCM server (CM01). Note: If you want this server to be available via IBCM you could also add the publicly available FQDN of the site here (eg: cm01.windowsnoob.com) Next Click on General, and give this cert a friendly name so we can distinguish it in IIS later when we bind it. click OK, then click Enroll. It should state a status of Succeeded for both certificates. If not look at the details to find out what went wrong. Click Finish to exit. Step 5. Exporting the Distribution Point certificate Next you need to export the Distribution Point certificate so that during OSD the client can authenticate to the management point in WinPE. To do that, refresh the view in Certificates (certlm.msc) and then select the client authentication certificate created with the SCCM DP Certificate template. Right click and choose All Tasks, then select Export. In the welcome to certificate export wizard click Next and choose to export the private key. stick with the defaults and give it a password that you will use when you import it back into the SCCM Console, I used P@ssw0rd Save the cert to your desktop with a filename of OSD Cert.pfx and continue through that wizard until completion. You should see that the export was successful. That's it for this part, please join me in part 2 where we will complete the configuration of SCCM to HTTPS. cheers niall Recommended reading (1) - https://docs.microsoft.com/en-us/sccm/core/plan-design/network/pki-certificate-requirements


-
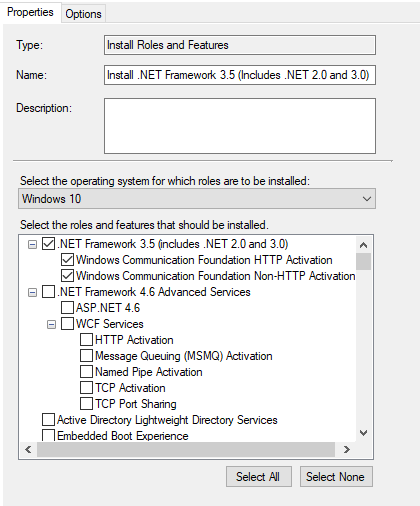
Morning all, I'm running into an odd problem with my SCCM OSD TS. I am using MDT integration and have selected the steps Install Roles and Features to install the .NET Framework 3.5. I have this step right after the Setup Windows and Configuration Manager step. However, upon OSD completion, the process is not complete. Here is the excerpt of the step from SMSTS.log, it doesn't show any failures Adding begin group instruction at 38 TSManager 7/16/2018 2:13:53 PM 1620 (0x0654) There are 1 first level steps or groups TSManager 7/16/2018 2:13:53 PM 1620 (0x0654) Parsing step node: Install .NET Framework 3.5 (Includes .NET 2.0 and 3.0) TSManager 7/16/2018 2:13:53 PM 1620 (0x0654) Description: TSManager 7/16/2018 2:13:53 PM 1620 (0x0654) ContinueOnError: true TSManager 7/16/2018 2:13:53 PM 1620 (0x0654) SuccessCodeList: 0 TSManager 7/16/2018 2:13:53 PM 1620 (0x0654) RetryCount: 0 TSManager 7/16/2018 2:13:53 PM 1620 (0x0654) No condition is associated with the step. TSManager 7/16/2018 2:13:53 PM 1620 (0x0654) Disable: TSManager 7/16/2018 2:13:53 PM 1620 (0x0654) Run in attribute: WinPEandFullOS TSManager 7/16/2018 2:13:53 PM 1620 (0x0654) Timeout: TSManager 7/16/2018 2:13:53 PM 1620 (0x0654) DefaultVarlist found TSManager 7/16/2018 2:13:53 PM 1620 (0x0654) Variable name: OSFeatures TSManager 7/16/2018 2:13:53 PM 1620 (0x0654) Variable name: OSRoleIndex TSManager 7/16/2018 2:13:53 PM 1620 (0x0654) Variable name: OSRoleServices TSManager 7/16/2018 2:13:53 PM 1620 (0x0654) Variable name: OSRoles TSManager 7/16/2018 2:13:53 PM 1620 (0x0654) Action command line: smsswd.exe /run: cscript.exe "%DeployRoot%\Scripts\ZTIOSRole.wsf" TSManager 7/16/2018 2:13:53 PM 1620 (0x0654) Adding instruction at 39 TSManager 7/16/2018 2:13:53 PM 1620 (0x0654) Processed all elements TSManager 7/16/2018 2:13:53 PM 1620 (0x0654) Any assistance is greatly appreciated.
-

OSD failing with error 0x80004005. Please help
jockey posted a question in Microsoft Deployment Toolkit (MDT)
Hi all, I was trying to deploy a Task sequence, which I Copied from standard T.S. and made little change and trying to test it before using. This T.S. is to make BIOS system to UEFI system in boot (Dell system) and then install OS. But when I try to implement this its throwing an error code "0x80004005". I am pasting my SMSTS log file. Please help me. Log: please see the attachment. -
I am new to Task Sequence. I am working on a task Sequence to convert BIOS (Legacy) mode systems to UEFI mode systems (Dell Laptops)(SCCM with MDT) . Can some share a task sequence to do so or share your experience to do so. Actually my requirement is to add these steps for PXE OSD win 10 1607 task sequence.
-
 dear all, we wanted to test scep instead of mcafee on our clients. Everything looks good but in sc configuration manager the system status of the endpoint protection role status button is critical red. When we look into the log files it states ______________________________________________ Key "SOFTWARE\Microsoft\Microsoft Antimalware" not found, trying key "SOFTWARE\Microsoft\Windows Defender" $$<SMS_ENDPOINT_PROTECTION_CONTROL_MANAGER><06-28-2018 08:05:34.550-120><thread=11964 (0x2EBC)> RegOpenKeyEx failed with 0X80070002 $$<SMS_ENDPOINT_PROTECTION_CONTROL_MANAGER><06-28-2018 08:05:34.550-120><thread=11964 (0x2EBC)> GetAMInstallLocation failed with 0X80070002 $$<SMS_ENDPOINT_PROTECTION_CONTROL_MANAGER><06-28-2018 08:05:34.550-120><thread=11964 (0x2EBC)> Failed to load common client library (0x80070002) $$<SMS_ENDPOINT_PROTECTION_CONTROL_MANAGER><06-28-2018 08:05:34.550-120><thread=11964 (0x2EBC)> Failed to initialize AMMetadataUpdater (0x80070002) $$<SMS_ENDPOINT_PROTECTION_CONTROL_MANAGER><06-28-2018 08:05:34.550-120><thread=11964 (0x2EBC)> Checking threat definitions in 900 seconds... $$<SMS_ENDPOINT_PROTECTION_CONTROL_MANAGER><06-28-2018 08:05:34.597-120><thread=11964 (0x2EBC)> ____________________________________________ i think the system wants to install scep on the server also. The problem is that the sccm servers are managed by another team and they insist on keeping mcafee on the server. Is there any option to bypass this install so the status of the endpoint protection point in site status becomes green without having to install scep on the server thank you all
 -
I have just built out a new sccm CB environment running alongside my 2012 r2. we have a server in our DMZ that is used as an MP, DP and SUP. I am trying to replication this for our CB environment. I have finally got all the Firewall ports opened that are required. I started installed the roles but am having a few issues. ADSI Edit isn't getting updated - Service account is used and has proper rights but nothing update my wsus on prem is working but on my dmz server the content folder is empty. I have enebled the whole site to use HTTPS. if anyone has any good links they have used I would greatly appreciate hearing of them or any suggestion. seeing these errors in the Component status: WSUS Control Manager failed to monitor WSUS Server "local.DMZ". WSUS Control Manager failed to configure proxy settings on WSUS Server "local.DMZ". MP Control Manager detected MP is not responding to HTTP requests. The http error is 2147500037.
-

Secondry Site in DMZ
KeithDib posted a topic in System Center Configuration Manager (Current Branch)
Hi I currently have SCCM 1710 running in out company domain. this we use for patching [amongst other things] we now want to use it to patch Servers in the DMZ. The DMZ is a different domain with no trusts between the 2. We have the SCCM Server and the Server in the DMZ pinging each other, but sccm does not see this server. I have Forest discovery running and also have a boundary for the DMZ IP range what am I missing? -
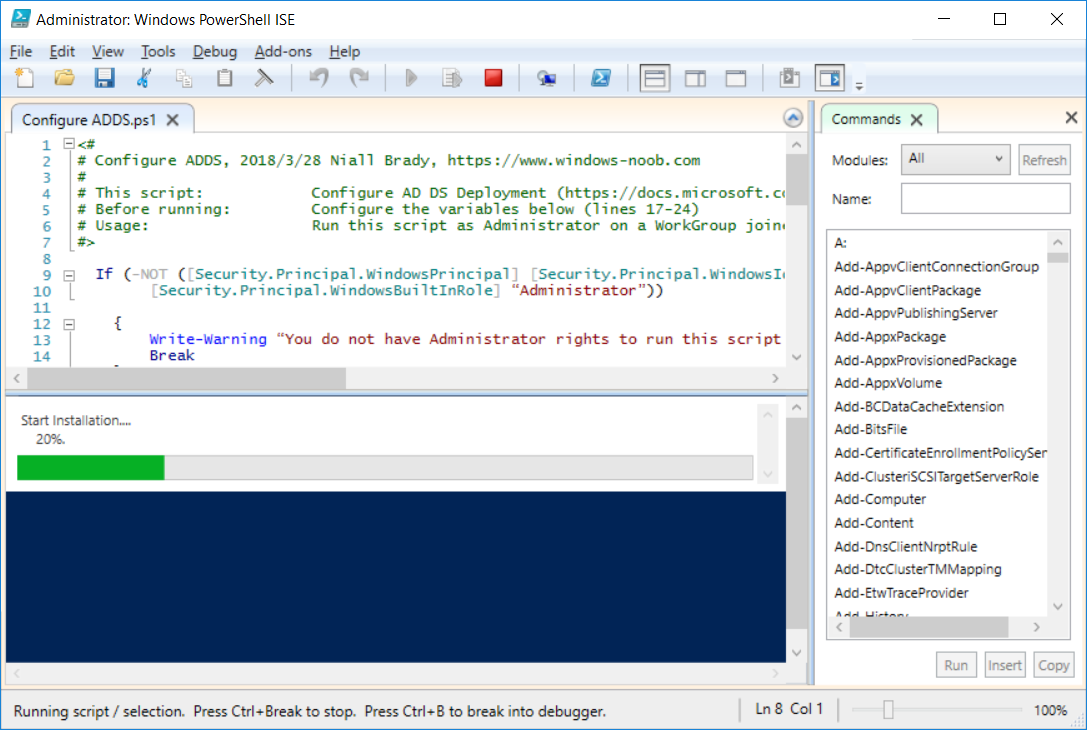
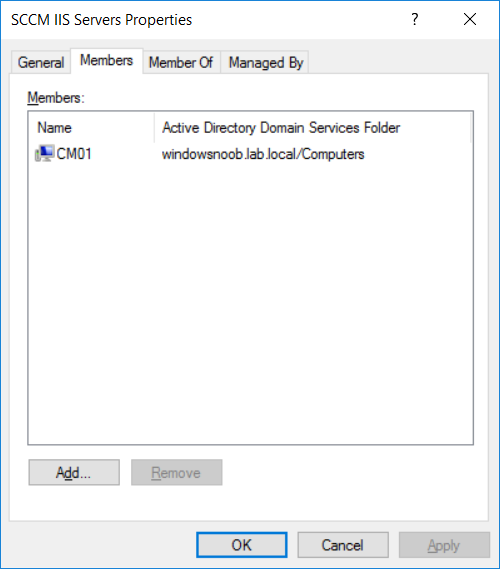
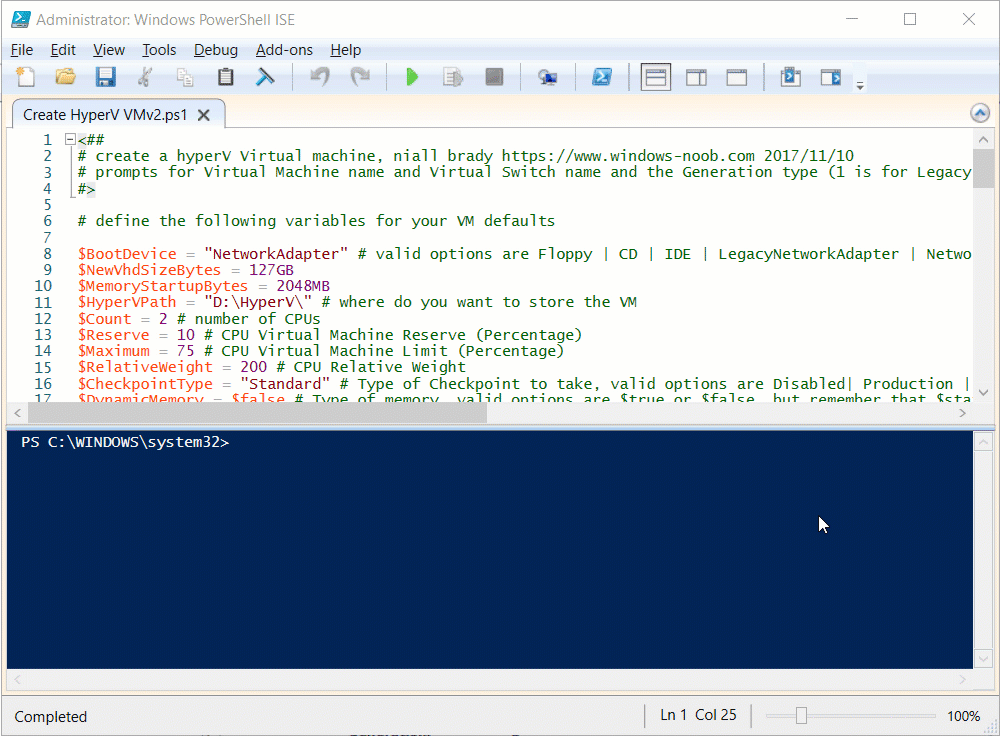
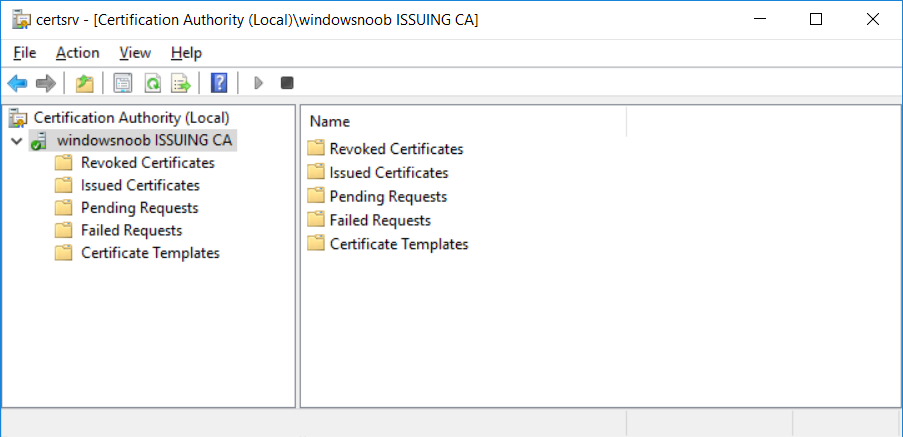
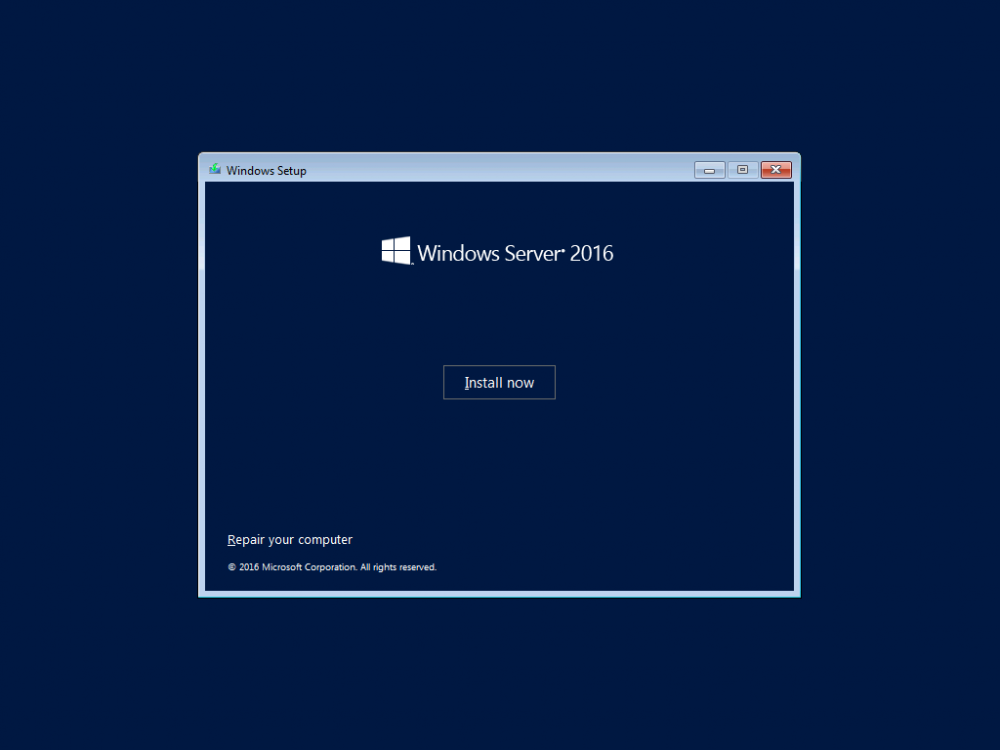
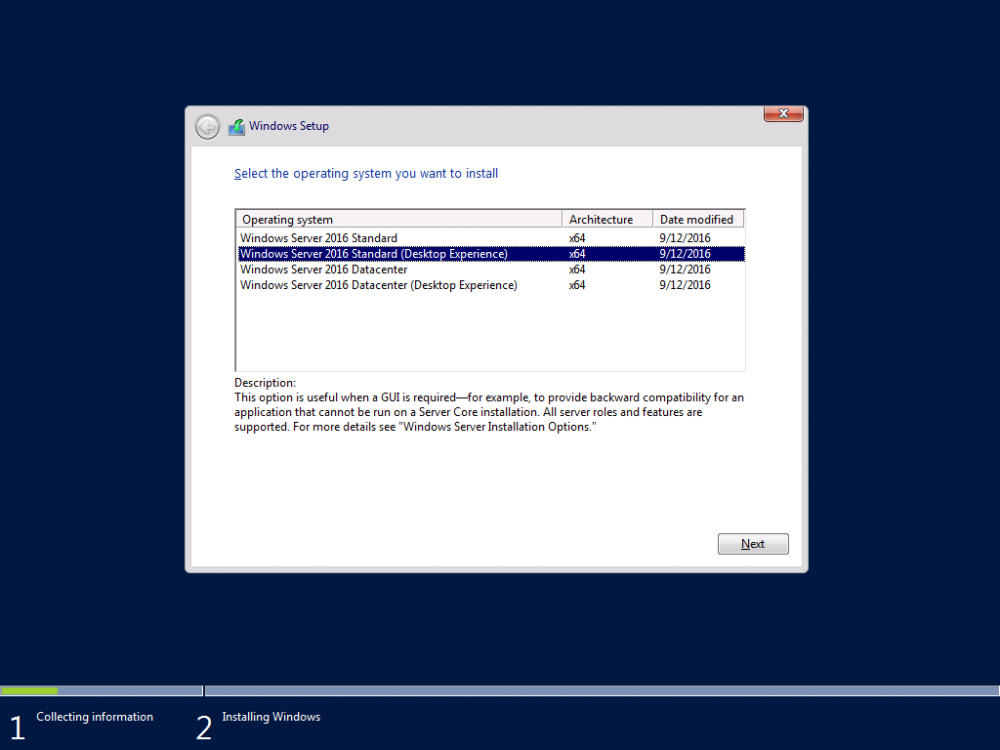
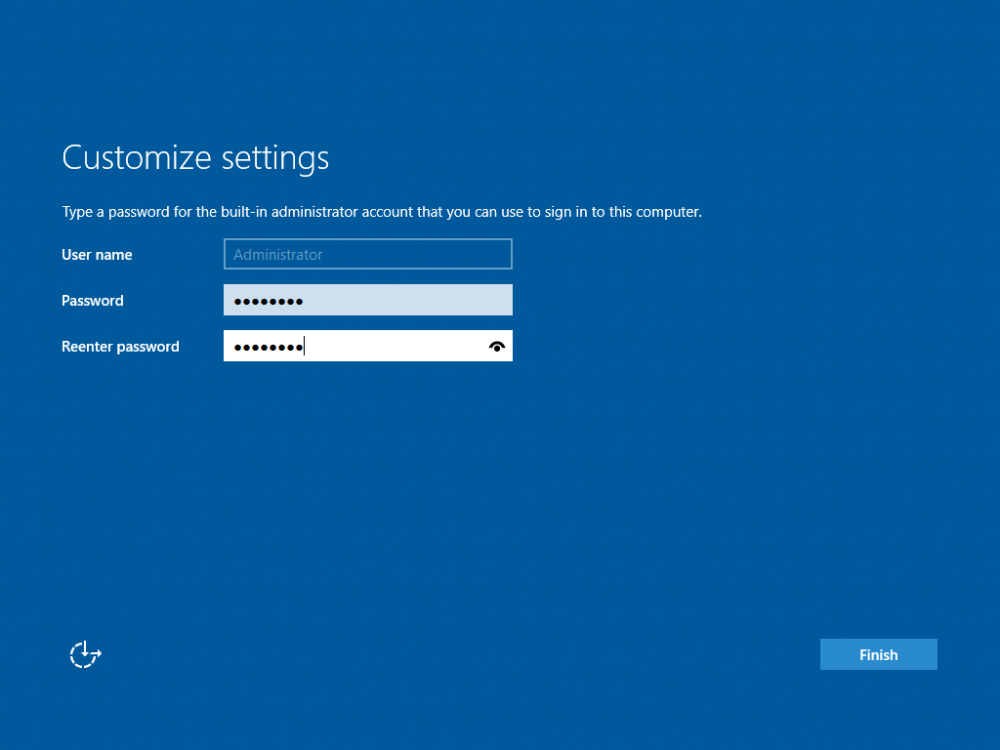
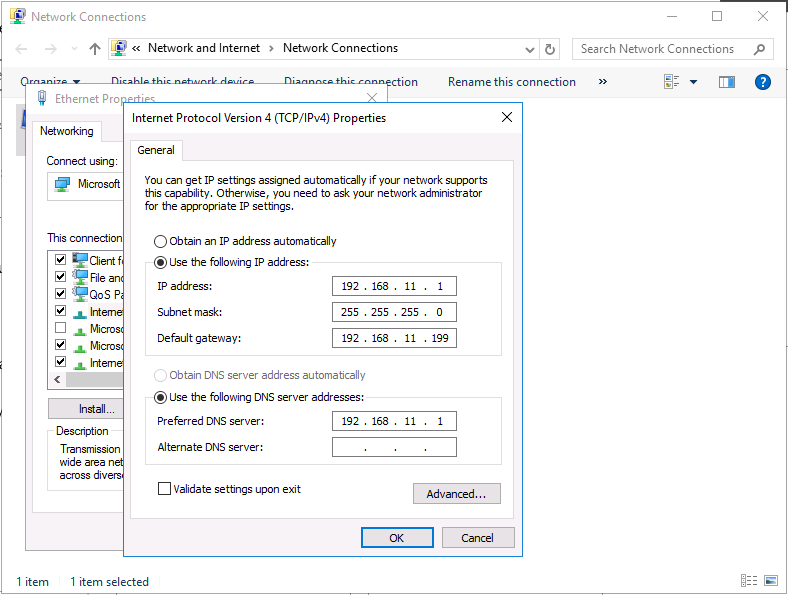
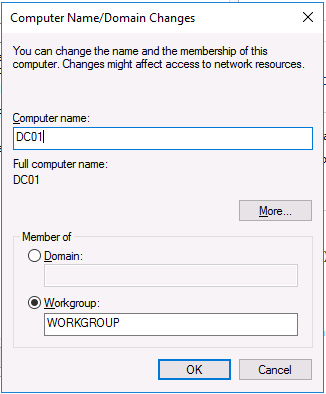
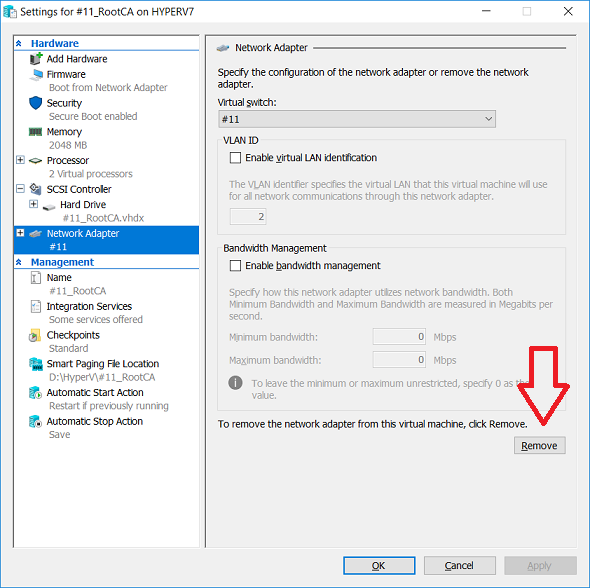
This series is comprised of different parts, listed below. Part 1 - Introduction and server setup (this part) Part 2 - Install and do initial configuration on the Standalone Offline Root CA Part 3 - Prepare the HTTP Web server for CDP and AIA Publication Part 4 - Post configuration on the Standalone Offline Root CA Part 5 - Installing the Enterprise Issuing CA Part 6 - Perform post installation tasks on the Issuing CA Part 7 - Install and configure the OCSP Responder role service Part 8 - Configure AutoEnroll and Verify PKI health Introduction Security is everywhere, and a core component of security is certificates. Public key infrastructure (PKI) is a set of roles, policies, and procedures needed to create, manage, distribute, use, store, and revoke digital certificates and manage public-key encryption (1). In this series of guides I will show you how to set up a 2 tier PKI hierarchy running on Windows Server 2016 and you can use this to set up your own LAB so that you can learn about PKI and later use it for related System Center Configuration Manager roles such as Co-Management (3). Note: I don't claim to be an expert on PKI and would absolutely advise you to consult with a PKI expert if you plan on setting up PKI in production. This guide is designed to help you setup your LAB, it's based on a Windows Server 2012 R2 PKI guide on Technet from here and kudos to those guys for writing it (2). The difference here is you'll be using Windows Server 2016 and you'll see more screenshots and hints to guide you through the experience. I'd highly recommend you go through this entire series at least twice, just to get a feel for how PKI works and to become familiar with the terms involved. The first time you complete this series will probably feel laborious, however the second time you do it things will start to make sense and you'll have a better understanding of why you are doing it. This series will be tough to wrap your head around especially if you are new to PKI, but take it one part at a time, one step at a time, methodically. If in any doubt, about any of the content then please ask your questions here by starting a new thread. By the end of this series of guides you'll have the following setup and running in your windowsnoob.lab.local PKI LAB. Domain Controller (Windows Server 2016) - 192.168.11.1 Issuing CA (Windows Server 2016) - 192.168.11.2 Webserver (Windows Server 2016) - 192.168.11.3 Offline Root CA (Windows Server 2016) Windows 10 (Windows 10 Enterprise, version 1803) - 192.168.11.4 (Optional) Smoothwall NAT (linux) - 192.168.11.199 and MMC based applications like this screenshot from the Enterprise Issuing CA will become familiar to you Before we start the series let's list some of the terms you'll see popping up over and over. I will try to explain them as we move through the guide. PKI - Public Key Infrastructure AIA - Authority Information Access CDP - Certificate revocation list Distribution Point CRL - Certificate Revocation List OCSP - Online certificate status protocol CA - Certificate Authority Note: I'd recommend that you snapshot (checkpoint) the Virtual Machines at the end of each part of this series, so if you make a mistake, you can always back track to a known good state. Step 1. Create the Virtual Machines I use Hyper-V for my labs, as it's a role built into Windows Server 2016 (and even Windows 10), so as long as your computer is relatively new and the hardware supports virtualization, you can use it (simply enable the role, reboot, and start using it). You should have at least 16GB of ram and 500GB of SSD storage to set this lab up comfortably. To quickly create the virtual machines I use a PowerShell script which I wrote, you can download it here. Download the script - Create HyperV VMv2.ps1 Virtual Machine Names For this LAB, please use the following naming convention for your virtual machines (note this is not the computer name but the virtual machine name). #11_DC01 #11_IssuingCA #11_RootCA #11_W10_1803 #11_Webserver #11_Smoothwall Note: The #11 prefix is simply a method I use in Hyper-V to separate my labs visually in Hyper-v manager, so #11 is one lab, and #10 is another (and so on). You don't have to use the same convention as I do, but it would make it easier for you to follow the entire series. I use the Smoothwall linux based NAT to provide Port Forwarding capability and to share internet into my various LABs. Virtual Machine Roles The Virtual Machines created will have the following functions #11_DC01 Roles: DC, DNS, LDAP CDP,AIA #11_IssuingCA Roles: Enterprise Issuing CA #11_RootCA Roles: Standalone Offline Root CA #11_W10_1803 Roles: A Windows client #11_Webserver Roles: Webserver HTTP CDP, AIA #11_Smoothwall Roles: Port Forward, Internet sharing Note: When prompted for a network switch, create a unique one (#11) for the first VM created, and use the same one for each of the other vm's (we will remove the network from the Offline Root CA). For generation type, use Gen 2. Below is how I created the virtual machines listed above. Note: After creating the virtual machines and before installing Windows Server 2016 on the Offline Root CA, you must remove the Network Card for the Offline Root CA virtual machine as it should not be connected to any network. Step 2. Install the virtual machines Install Server 2016 On DC01, RootCA, IssuingCA and Webserver, install Windows Server 2016. It's up to you how to do this, you can use an Automated MDT PowerShell script, or install them manually. To install all Windows Server 2016 on all 4 servers as WorkGroup joined computers do as follows.. Choose Windows Server 2016 Standard (Desktop Experience) Continue through the installation wizard until prompted for a password, use P@ssw0rd as the Administrator password Click Finish. And then logon using the Administrator username and password configured above. Once Windows is installed, set the IP address for each virtual machine as shown below. Note: Below are the Computer Name and IP addresses used in this guide. For the Offline Root CA, you must remove the Network card in the Hyper-V virtual machine settings. Computer Name: DC01, IP address: 192.168.11.1, Subnet mask 255.255.255.0, Default gateway: 192.168.11.199, Preferred DNS server: 192.168.11.1 Computer Name: IssuingCA, IP address: 192.168.11.2, Subnet mask 255.255.255.0, Default gateway: 192.168.11.199, Preferred DNS server: 192.168.11.1 Computer Name: Webserver, IP address: 192.168.11.3, Subnet mask 255.255.255.0, Default gateway: 192.168.11.199, Preferred DNS server: 192.168.11.1 Computer Name: RootCA, IP: <NO NETWORK> Computer Name: W101803, IP address: 192.168.11.4, Subnet mask 255.255.255.0, Default gateway: 192.168.11.199, Preferred DNS server: 192.168.11.1 Computer Name: smoothwall11, IP address: (Green, static) 192.168.11.199 (Red, DHCP internet IP) x.x.x.x Here's how you can set the IP address for DC01. And configure the Computer Name as per the list (in this example it's for the Domain Controller) Reboot when prompted. Install Windows 10 Enterprise version 1803 Install Windows 10 Enterprise, version 1803 on the remaining virtual machine (#11_W10_1803). Configure the Computer Name and IP address as specified. Leave it WorkGroup joined. Optionally install Smoothwall To learn how to setup Smoothwall express as a firewall see this blog post. Step 3. Configure ADDS on DC01 Now that you've installed the servers, it's time to make DC01 a domain controller, to do that we'll install Active Directory Domain Services (ADDS) and to do that we'll use this PowerShell script, simply run the script as Administrator in Windows PowerShell ISE on DC01. Download the script -Configure ADDS.ps1 After running the script, DC01 is prompted to a Domain Controller and is ready for the next part of this series. Note: Please only run this script on the DC01 virtual machine. After running the script, the Domain Controller is ready for Part 2 (configured as dc01.windowsnoob.lab.local) and internet is working (via the Smoothwall) To continue with Part 2 of this series, click here. Recommended reading (1) - https://en.wikipedia.org/wiki/Public_key_infrastructure (2) - https://social.technet.microsoft.com/wiki/contents/articles/15037.ad-cs-step-by-step-guide-two-tier-pki-hierarchy-deployment.aspx (3) - https://docs.microsoft.com/en-us/sccm/core/clients/manage/co-management-overview


- 2 replies
-
- 2
-

-
- co-mangement
- ca
- (and 12 more)
-
Hi I have a couple of questions regarding using language packs in a reference image in MDT. We want to deploy Swedish OS to all our users and I was advised to do this using English OS media with corresponding language pack (Windows 10 1803) instead of using localized media. It appears to have installed the language pack correctly in the reference image but the display language of the OS before the capture is in English (I have a suspend action in the task sequence). My question is what is the best way to set the display language automatically to Swedish once the LP is installed by the task sequence? Some other concerns regarding patching and updating the client once it has been deployed: We will be deploying the REF-image using OSD in SCCM 1802 and use SUP/ADR rules to patch the clients, I assume the patches we download for Windows 10 will need to be in English since the base OS is English? Are there any other considerations we need to make? What are the implications of using SCCM/Servicing for Windows 10 when updating a client with a LP, say 1709 to 1803? I know that the version of the language pack must match the release version of Windows but is there anything else? I would really appreciate if someone has some experience of this and could give me some feedback. Regards Emile
-
Hello. I am in the process of trying to setup Subscribing to reports in SCCM. I have created a folder path \\cm01\Reports to send the reports to. What I need help with is what permissions does this folder require? Read/ write permissions? To be more specific, what read permissions would a user need to see the reports and what write permissions does SCCM need to that folder? My network administrator has tasked me with figuring this out. I am more of a Desktop support guy. I have read several books and have been searching the internet but have not found a comprehensive guide on how to set this up. Initially I want to have the report send to the file share \\cm01\Reports. Once that is working the next step would be to have the reports delivered by email. Any help would be greatly appreciated! Thank you.
-
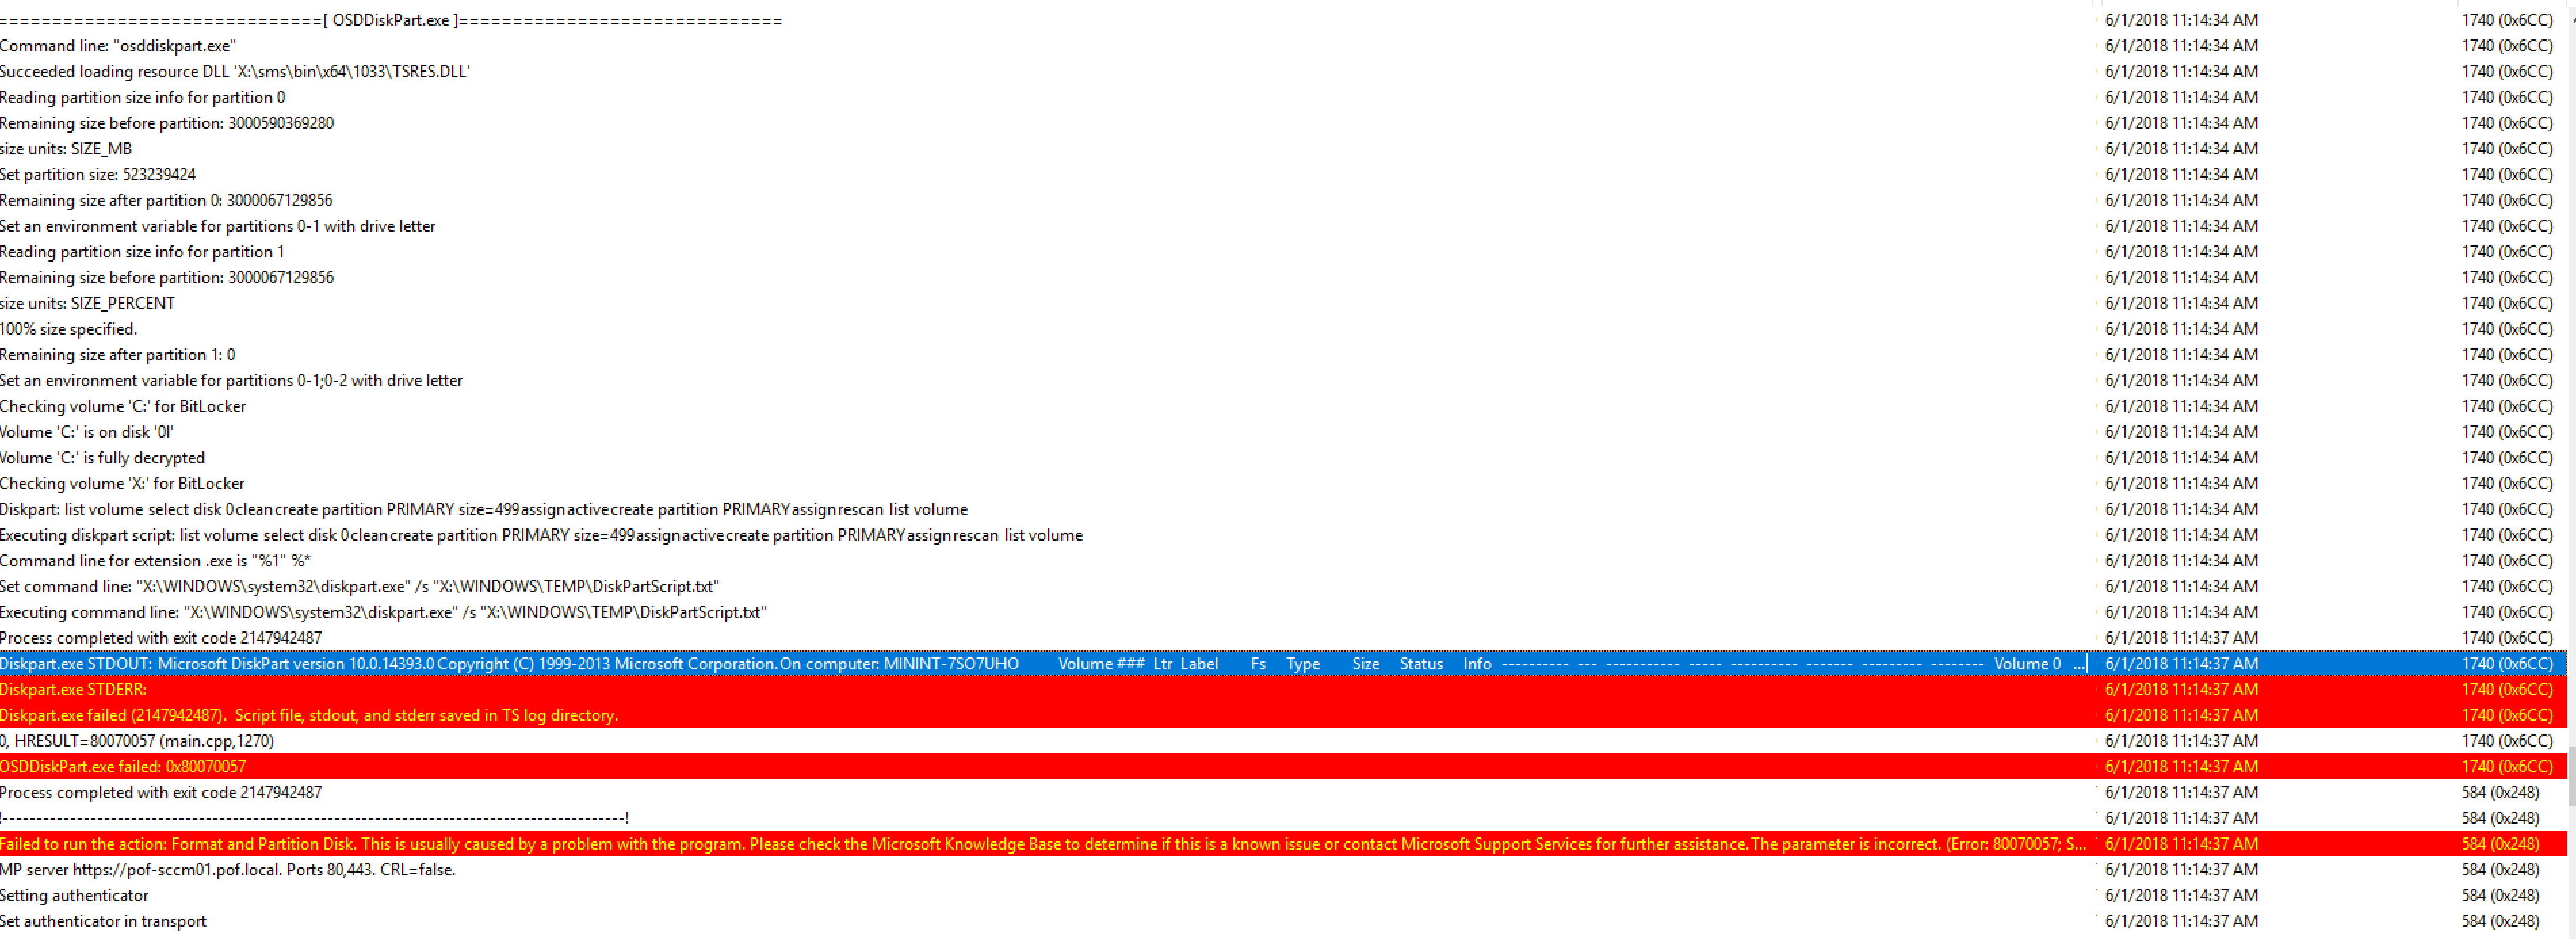
 Hi all, I have an unusual problem in that my employer is purchasing old Supermicro blade servers. They don't support SAS and as such I'm using large SATA drives and I'm pretty sure these are BIOS only as I didn't see anything in BIOS setup that looked like I could enable a UEFI boot mode (they are over 7 years old and cheap.) Currently, I've run down to 3TB and above and my 2016 installations are failing as SCCM is forcing initialization to GPT to use the 3TB capacity. I need these to be MBR and 2TB for Windows to successfully be deployed. The trouble is, I can't locate where the diskpart.exe and diskpartscript.txt are being run during the installation. I'm guessing it's buried in a VBS script in the OSDDiskpart step but I haven't acquired the skills yet to get down to the granular level of tweaking. So far I've tried enabling: Set Diskpart BIOS compatibility in both locations where it's greyed out. Disabling all three Format and Partition Disk (UEFI) and tried flipping the Disk Type drop-down option in each UEFI format step to MBR from GPT, but for some reason that didn't work. but the disk still gets initialized to GPT. If I knew where the initialization step was taking place I could just add a WMI query that ignores Supermicro X8DTT-H or something similar. Another possible solution would be to insert my own Diskpart script that converts it back to MBR right before it's failing. Here's part of my log: And here are the details of what's happening in Stdout: Diskpart.exe STDOUT: Microsoft DiskPart version 10.0.14393.0 Copyright (C) 1999-2013 Microsoft Corporation. On computer: MININT-7SO7UHO Volume ### Ltr Label Fs Type Size Status Info ---------- --- ----------- ----- ---------- ------- --------- -------- Volume 0 C NTFS Partition 2047 GB Healthy Disk 0 is now the selected disk. DiskPart succeeded in cleaning the disk. Disk is uninitialized, initializing it to GPT. DiskPart succeeded in creating the specified partition. DiskPart successfully assigned the drive letter or mount point. The selected disk is not a fixed MBR disk. The ACTIVE command can only be used on fixed MBR disks. Thanks for any help! I'm just finding that the MDT task schedule is a bit blackboxed and I can't seem to find where this lives.
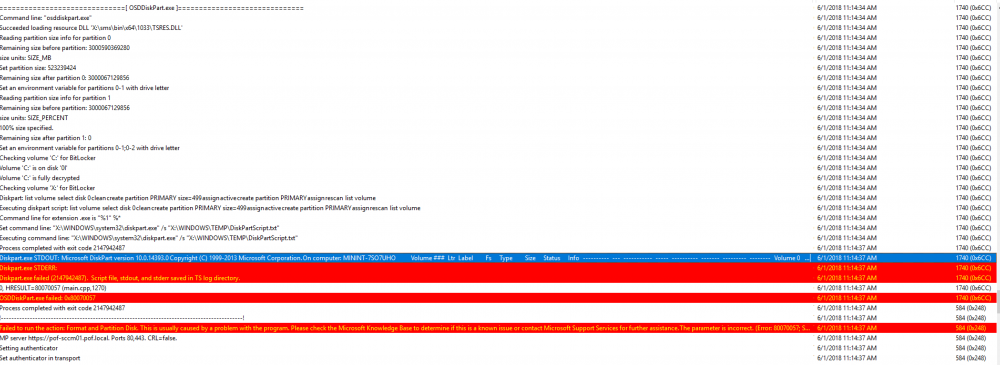
-
 I've been at this for a couple weeks and haven't had any lucky resolving it myself. I'm around ready to give up and rebuild or primary site. SCCM Ver: CB1802 Our old WSUS server was 2012R2 running WID and we wanted to move it to 2016 and SQL. I removed the SUP role, removed the server from SCCM, then decomed the server. I rebuilt the WSUS server on 2016, connected to SQL DB, installed SUP role, and synced WSUS. In SCCM everything appears to be functioning normally, I can see updates, metadata, create software update groups, deploy, etc and Offline Servicing works but Clients and Build and Capture task sequences fail to update. This issue is not specific to one client, update, or OS version. It's everything. I've included logs from a Windows 10 1703 client I just imaged. Following may help when looking through logs: SUG UID: {FB172790-25B5-4030-94EF-084AF60311D4} Unique Update ID: 2018-05 Update for Windows 10 Version 1703 for x64-based Systems (KB4132649) 5/17/2018 12:00:00 PM f176e292-745f-4757-9b64-c25f1d382bb0 Clients can see the SUGs deployed to them but they still fail to update: EnumerateUpdates for action (UpdateActionInstall) - Total actionable updates = 0 I do see some interesting behavior in the WindowsUpdateLog: 2018/05/29 09:40:33.8562624 4204 4372 Misc [0]106C.1114::05/29/2018-09:40:33.856 [endpointproviders]EP: error: 0x8024500C : - failed to get SLS data 2018/05/29 09:40:33.8562631 4204 4372 Misc [0]106C.1114::05/29/2018-09:40:33.856 [endpointproviders]EP: error: 0x8024500C: GetSecondaryServicesEnabledState failed 2018/05/29 09:40:33.8562643 4204 4372 Agent [0]106C.1114::05/29/2018-09:40:33.856 [agent]AutoRecovery: DetectAndToggleServiceState failed 0x8024500c 2018/05/29 09:40:33.8562714 4204 4372 Agent [0]106C.1114::05/29/2018-09:40:33.856 [agent]Failed to resolve federated serviceId 9482F4B4-E343-43B6-B170-9A65BC822C77, hr=8024500c 2018/05/29 09:40:33.8569169 4204 4372 Agent [0]106C.1114::05/29/2018-09:40:33.856 [agent]Failed to execute service registration call {0212BB3F-3F60-41E9-A2F8-134D35857144}, hr=8024500c (cV: Y9kDJUwh+kyup8zk.1.0.1) 2018/05/29 09:40:33.8586463 4204 4372 IdleTimer [0]106C.1114::05/29/2018-09:40:33.858 [agent]WU operation (SR.Device Driver Retrieval Client ID 1, operation # 3) stopped; does<NULL> use network; is not at background priority<NULL> 2018/05/29 09:40:33.8597622 4204 4368 DownloadManager [0]106C.1110::05/29/2018-09:40:33.859 [agent]Received power state change notification: Old: <unknown>; New: AC. 2018/05/29 09:40:33.8597634 4204 4368 DownloadManager [0]106C.1110::05/29/2018-09:40:33.859 [agent]Power state changed from <unknown> to AC. 2018/05/29 09:40:33.8647205 356 1832 ComApi [0]0164.0728::05/29/2018-09:40:33.864 [comapi]* END * Federated Search failed to process service registration, hr=0x8024500C (cV = Y9kDJUwh+kyup8zk.1.0) 2018/05/29 09:40:33.8670209 356 1756 ComApi [0]0164.06DC::05/29/2018-09:40:33.867 [comapi]ISusInternal:: DisconnectCall failed, hr=8024000C I also see the following behavior in the ScanAgent.Log, but I'm not sure if it's normal or not: CScanAgent::ScanByUpdates - Found UpdateClassification cd5ffd1e-e932-4e3a-bf74-18bf0b1bbd83 for Update:bba02b7f-1d17-4e92-bae9-9f3651dcc2de ScanAgent 5/29/2018 9:46:30 AM 11232 (0x2BE0) CScanAgent::CanPerformOnlineCatScan - Cannot perform online category scan as update does not belong to pre-defined classifications for this. ScanAgent 5/29/2018 9:46:30 AM 11232 (0x2BE0) Found CategoryID of :a3c2375d-0c8a-42f9-bce0-28333e198407 for Update:c03178c9-b5d2-4c5f-819f-c8871513e23d ScanAgent 5/29/2018 9:46:30 AM 11232 (0x2BE0) CScanAgent::ScanByUpdates - Found UpdateClassification 0fa1201d-4330-4fa8-8ae9-b877473b6441 for Update:c03178c9-b5d2-4c5f-819f-c8871513e23d ScanAgent 5/29/2018 9:46:30 AM 11232 (0x2BE0) CScanAgent::CanPerformOnlineCatScan - Cannot perform online category scan as update does not belong to pre-defined classifications for this. ScanAgent 5/29/2018 9:46:30 AM 11232 (0x2BE0) Found CategoryID of :a3c2375d-0c8a-42f9-bce0-28333e198407 for Update:c68e52ad-4e74-4f15-95d2-17da18f296fe ScanAgent 5/29/2018 9:46:30 AM 11232 (0x2BE0) CScanAgent::ScanByUpdates - Found UpdateClassification 0fa1201d-4330-4fa8-8ae9-b877473b6441 for Update:c68e52ad-4e74-4f15-95d2-17da18f296fe ScanAgent 5/29/2018 9:46:30 AM 11232 (0x2BE0) CScanAgent::CanPerformOnlineCatScan - Cannot perform online category scan as update does not belong to pre-defined classifications for this. ScanAgent 5/29/2018 9:46:30 AM 11232 (0x2BE0) Found CategoryID of :d2085b71-5f1f-43a9-880d-ed159016d5c6 for Update:cbb9515d-b809-4d11-983b-6047fea6c907 ScanAgent 5/29/2018 9:46:30 AM 11232 (0x2BE0) Any help or ideas of where to look would be much appreciated.
 -
 Hi all, First time poster, so apologise in advance if I post incorrectly. Currently building Windows 10 devices, some are upgrades from Windows 7 to Windows 10 and others are fresh Windows 10 using SCCM (MDT integrated). This works as expected, but when I log in and check TPM Administration the following message show up Reduced Functionality errors codes 0x400900 = The Device lock counter has not be created 0x2900 = The monotonic counter incremental during the boot has not been created Do I need to do something in the Task Sequence to clear the protectors or clear TPM before BitLocker is enabled Cheers all
 -
 Hi all I am trying to successfully image a Surface Pro 3 and am failing miserably. It keeps failing on a particular task sequence which checks if a folder call Code exists and IF it DOESN'T it CREATES it. Can anyone help me please. Thank you
 -
I was attempting to create a new boot image (testing concept) and the following error message occurred after the WIM loaded. The following file is missing or corrupt.... 0xc0000359 megasas2.sys I am using a 64 bit boot image, with the Dell WinPE driver cab (v10) loaded. What is causing this issue?
-
Background (Using SCCM CBB 1802, MDT & Deployment share on a physical computer, and the image is Windows 10 LTSB 1607) Two part question: I am capturing my Windows 10 image using MDT. The MDT TS installs Windows, then checks and installs windows updates, next it installs office 2016 - run windows updates again - sysprep and capture. - Entire TS runs without a hitch. Then that image is imported into SCCM, then being deployed to new computers. Once completed with OSD (which shows no errors), I receive the following issue when attempting to check for updates: Windows Update failed to check for updates with error 0x8024500C. Error 5/8/2018 2:06:54 PM WindowsUpdateClient 25 Windows Update Agent What could be causing this? Is it a result of running the WIndows update steps during my MDT process? Thanks
-
 I've been pushing the upgrade from Windows 7 to Windows 10 1607 for a couple of months. Have done 600+ machines succesfully. All of a sudden, starting a few weeks ago ALL upgrades are failing and rolling back to Windows 7 with one of the following errors: The task sequence execution engine failed execution of the task sequence. The task sequence manager could not successfully complete the execution of the task sequence. I suspect it's failing at the Intel HD video driver that's incompatible because I have to accept the removal when manually updating. Before, it would just delete and add the Microsoft generic, and I'd have to load the Win10 Intel Driver later in the task sequence. ...but that's just a guess. Where should I look and what do I look for? Why all of a sudden would this stop working?
 -
This multi-part guide will show you how to install the latest baseline version of Configuration Manager from Microsoft. The latest available baseline version is System Center Configuration Manager (Current Branch) version 1802 as of March 29th 2018. How can I install System Center Configuration Manager (Current Branch) version 1802 on Windows Server 2016 with SQL Server 2017 – Part 1 How can I install System Center Configuration Manager (Current Branch) version 1802 on Windows Server 2016 with SQL Server 2017 – Part 2 How can I install System Center Configuration Manager (Current Branch) version 1802 on Windows Server 2016 with SQL Server 2017 – Part 3 How can I install System Center Configuration Manager (Current Branch) version 1802 on Windows Server 2016 with SQL Server 2017 – Part 4 You can use this multi-part guide to get a hierarchy up and running on Windows Server 2016 using SQL Server 2017. The concept behind this is to guide you through all the steps necessary to get a working Configuration Manager Primary site installed using manual methods or automating it by using PowerShell. This gives you the power to automate the bits that you want to automate, while allowing you to manually do other tasks when needed. You decide which path to take. PowerShell knowledge is desired and dare I say required if you are in any way serious about Configuration Manager. I will show you how to do most steps via two methods shown below, it’s up to you to choose which method suits you best but I highly recommend automating everything that you can (if possible), using PowerShell. Method #1 – Do it manually Method #2 – Automate it with PowerShell In Part 1, you configured Active Directory Domain Services (ADDS) on AD01, then joined the Configuration Manager primary server (CM01) to the newly created domain. You then created users, usergroups and OU's in Active Directory and created the System Management Container. Finally you delegated permission to the Configuration Manager server to the System Management container. In Part 2, you configured Windows Server 2016 roles and features on the Configuration Manager primary server (CM01) and then you downloaded and installed Windows ADK 1709. Next you installed SQL Server 2017 CU5 with SQL Server Management Studio (SSMS) and Reporting Services before installing the WSUS role which uses SQL to store the SUSDB instead of the Windows Internal Database (WID). In Part 3, you downloaded and extracted the ConfigMgr content, you downloaded the ConfigMgr prerequisites and then you extended the Active Directory schema before installing System Center Configuration Manager (Current Branch) version 1802. In this part you'll create some device collections to prepare your lab for Servicing Windows 10, whether using WAAS or Upgrade Task Sequences built into ConfigMgr. The collections create include some based on the recently released Windows 10 version 1803. Step 1. Create some device collections Note: Perform the following on the Configuration Manager server (CM01) as a Local Administrator You can create collections using the ConfigMgr console and clicking your way through the wizard, you'll need to add membership queries to populate the collections, and include Include or Exclude rules as appropriate. Method #1 – Do it manually <to be added> Method #2 – Automate it with PowerShell To automate the creation of a bunch of device collections simply run the CreateDeviceCollectionsWindows10.ps1 Powershell script by starting PowerShell ISE as Administrator on the ConfigMgr server (CM01). Summary In this guide you created a whole bunch of collections to sort all your Windows 10 computers into easily identifiable groups based on Windows Version number, so that you can target them with policy or use Upgrade task sequences or Windows Servicing. Downloads The scripts used in this guide are available for download here. Unzip to C:\Scripts on both servers. The scripts are placed in the corresponding folder (Part 1, Part 2 etc) and sorted into which server you should run the script on (AD01 or CM01). Scripts.zip