Search the Community
Showing results for tags 'sccm'.
-
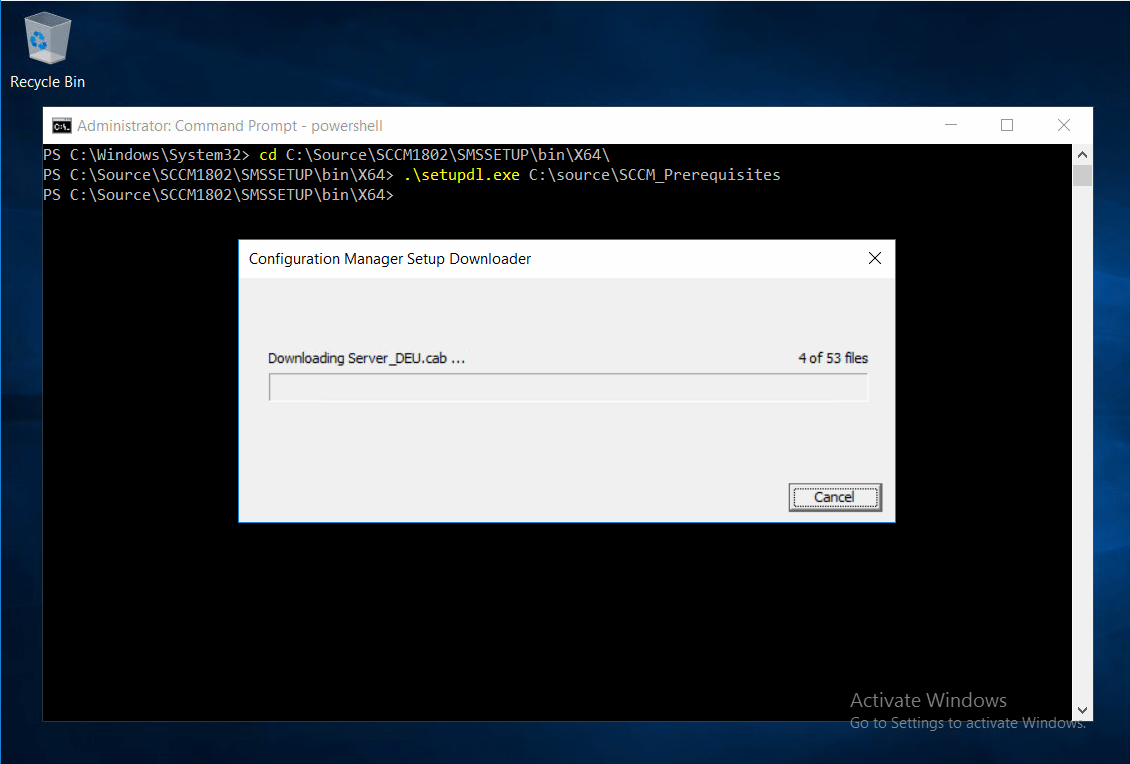
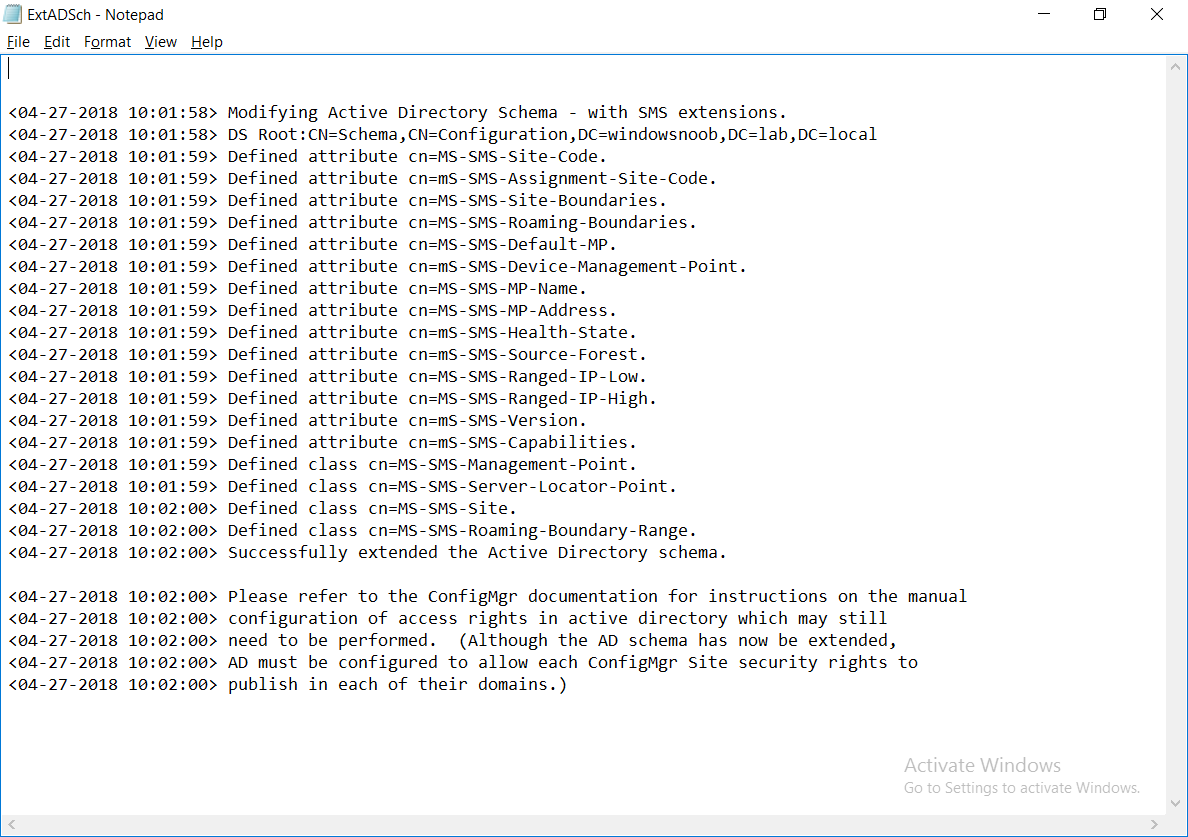
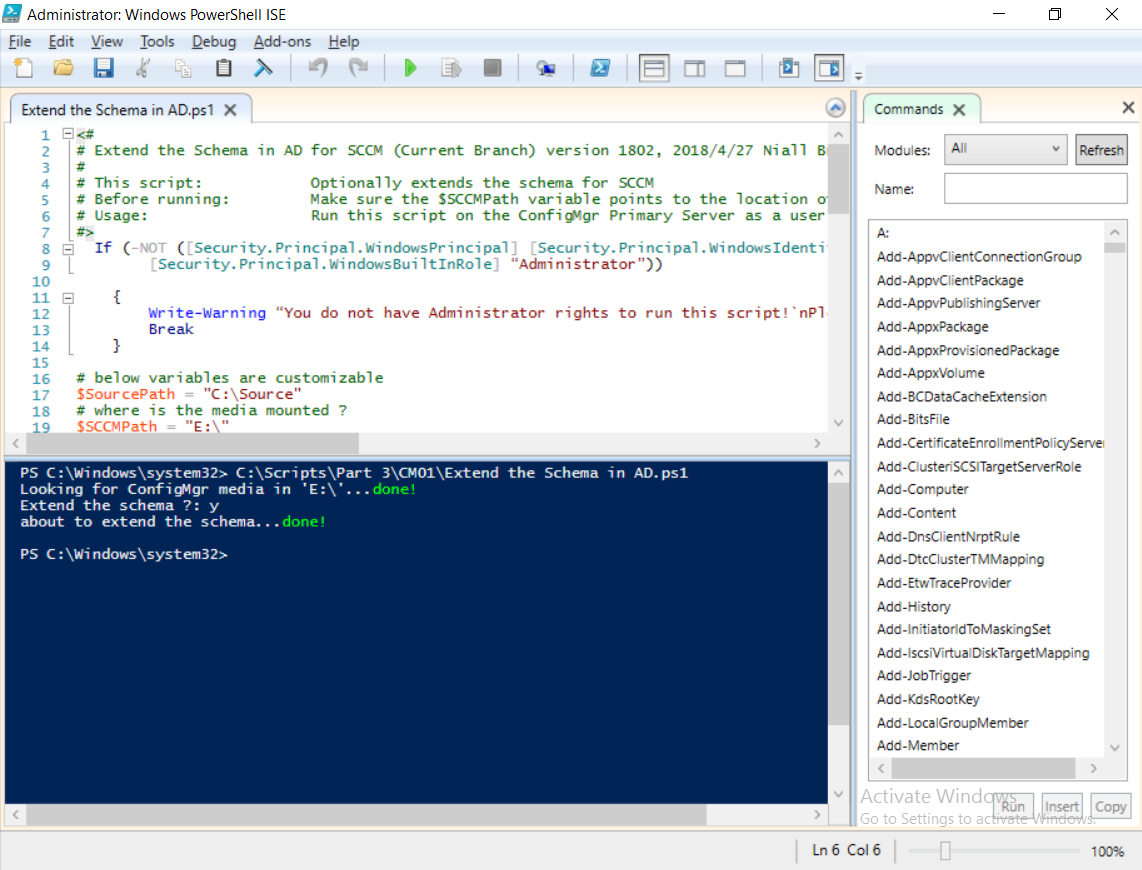
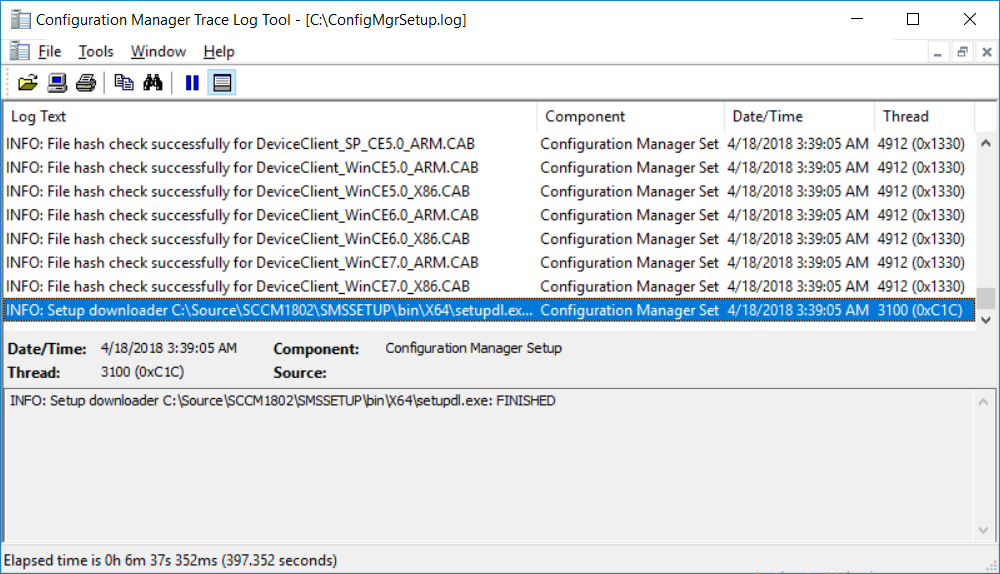
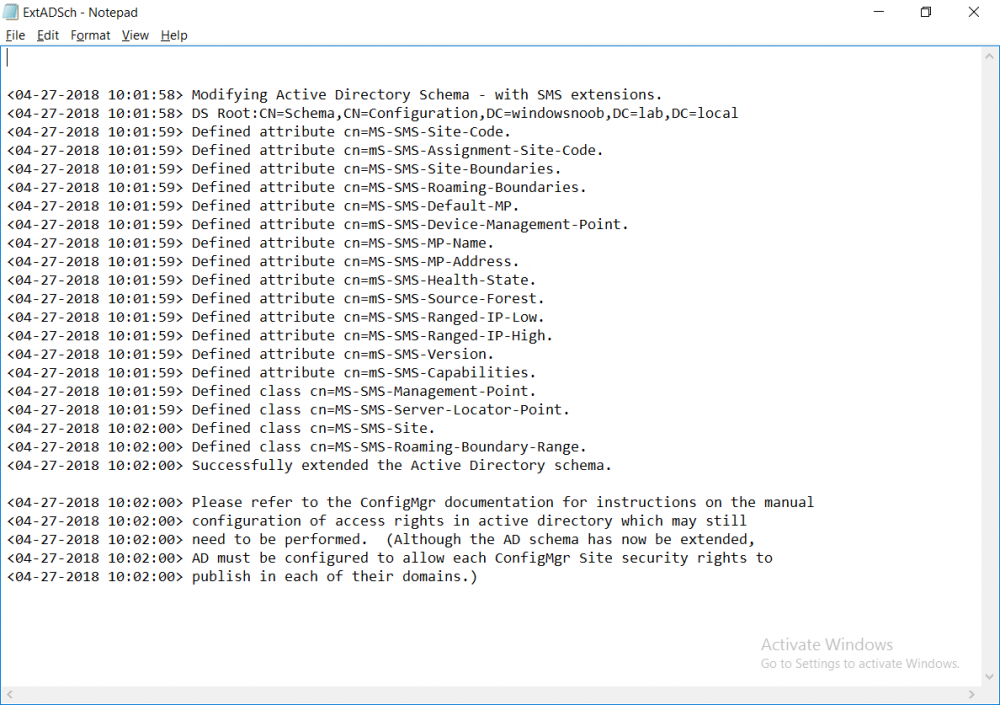
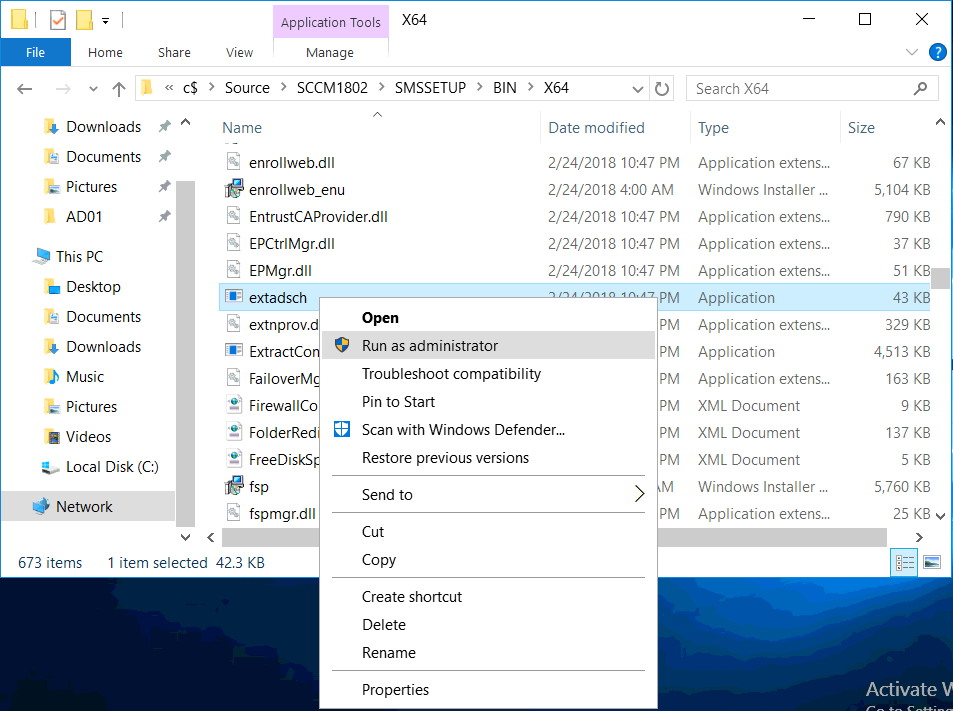
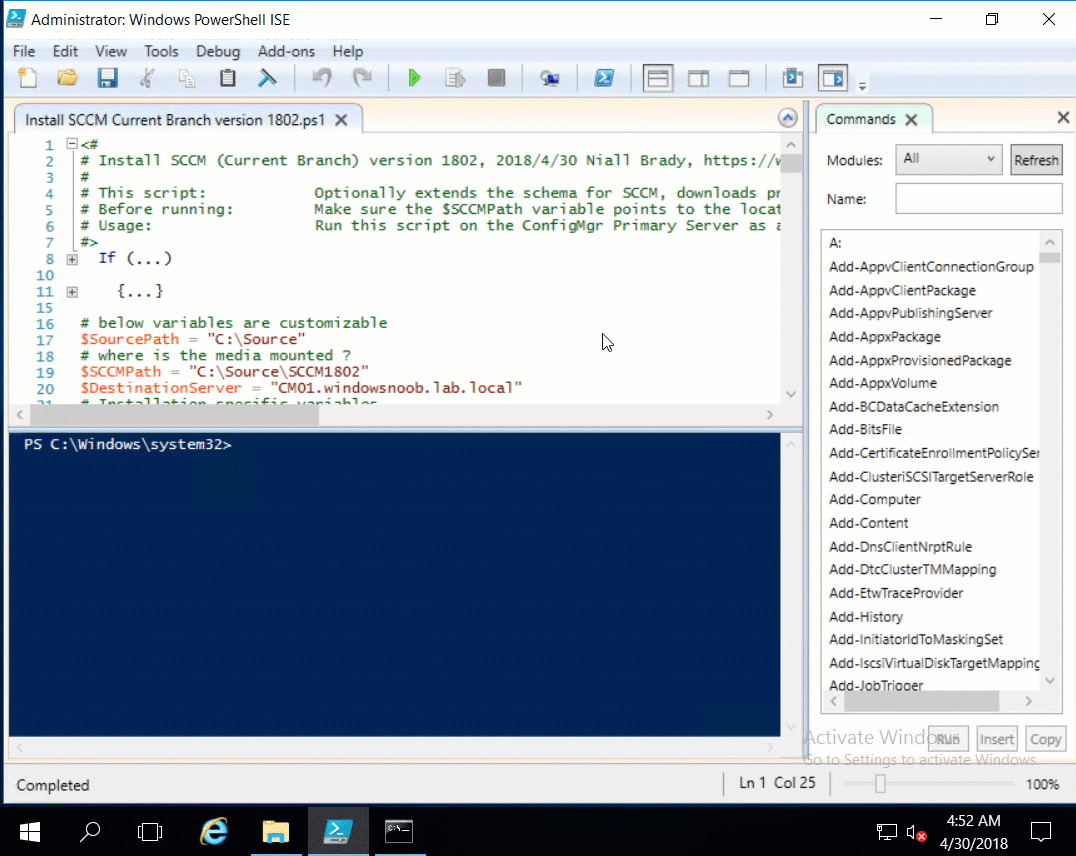
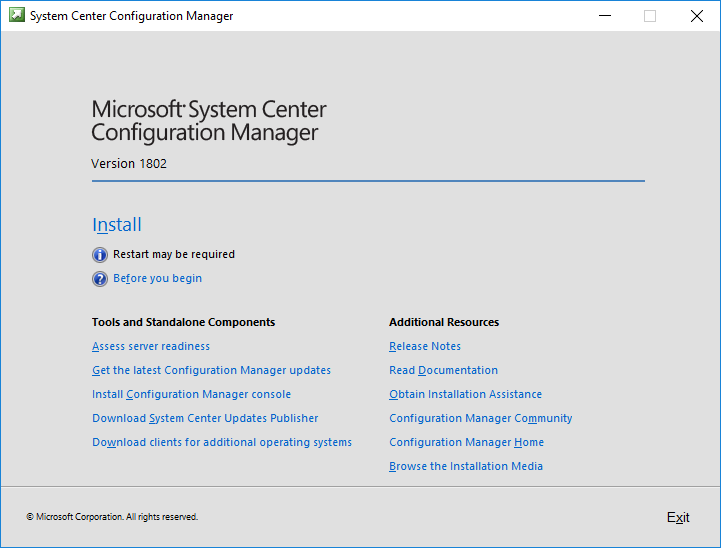
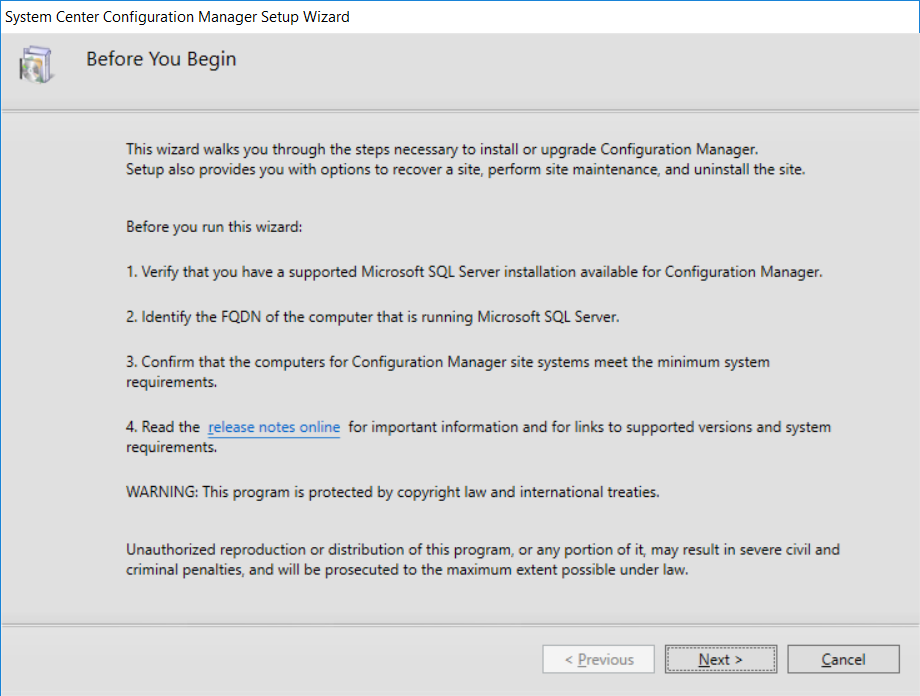
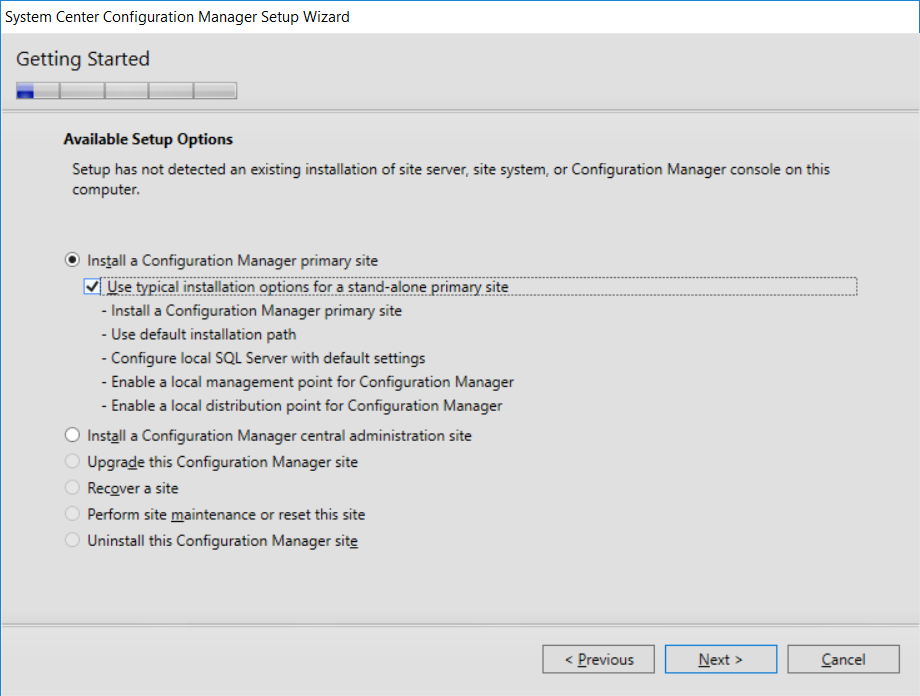
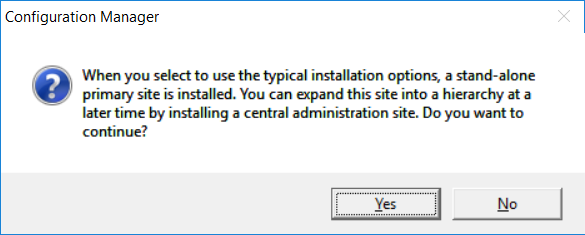
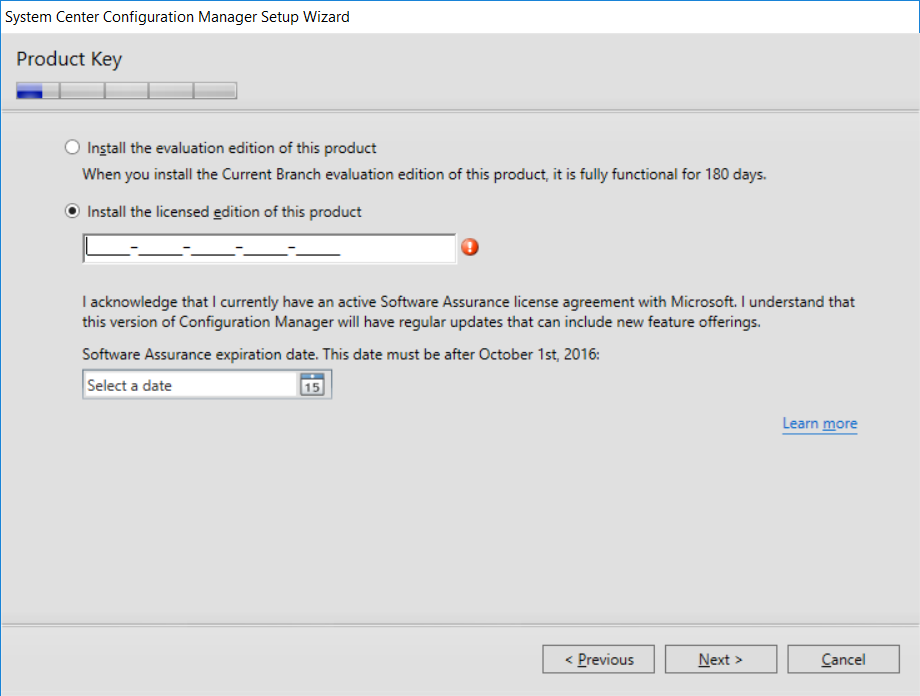
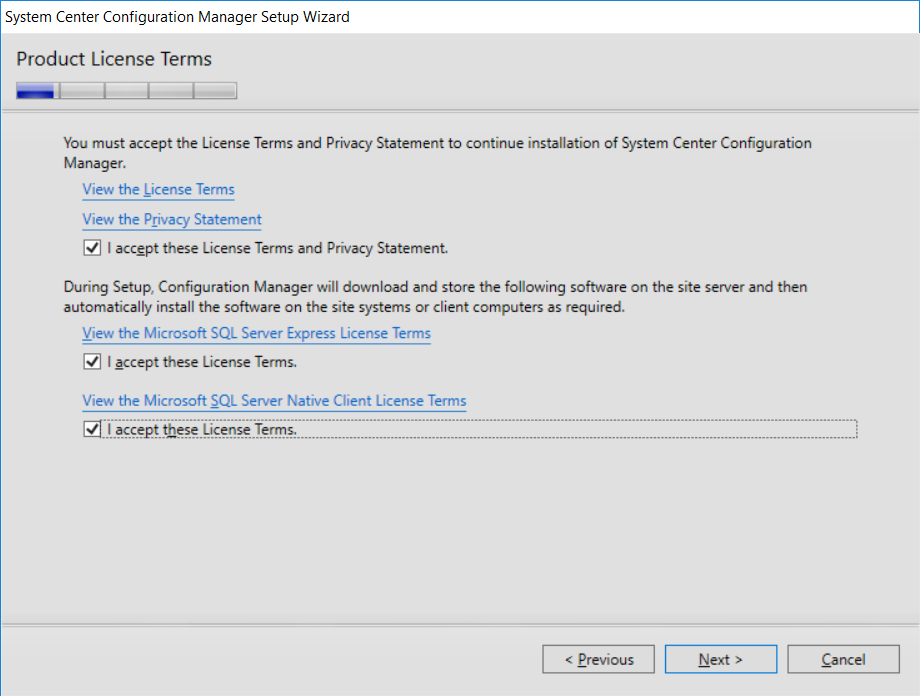
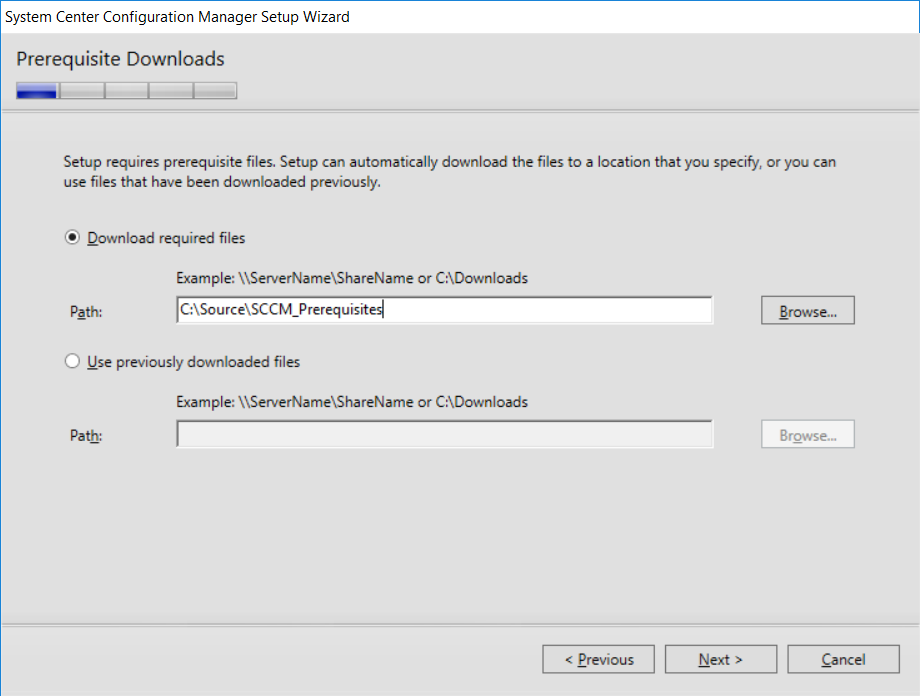
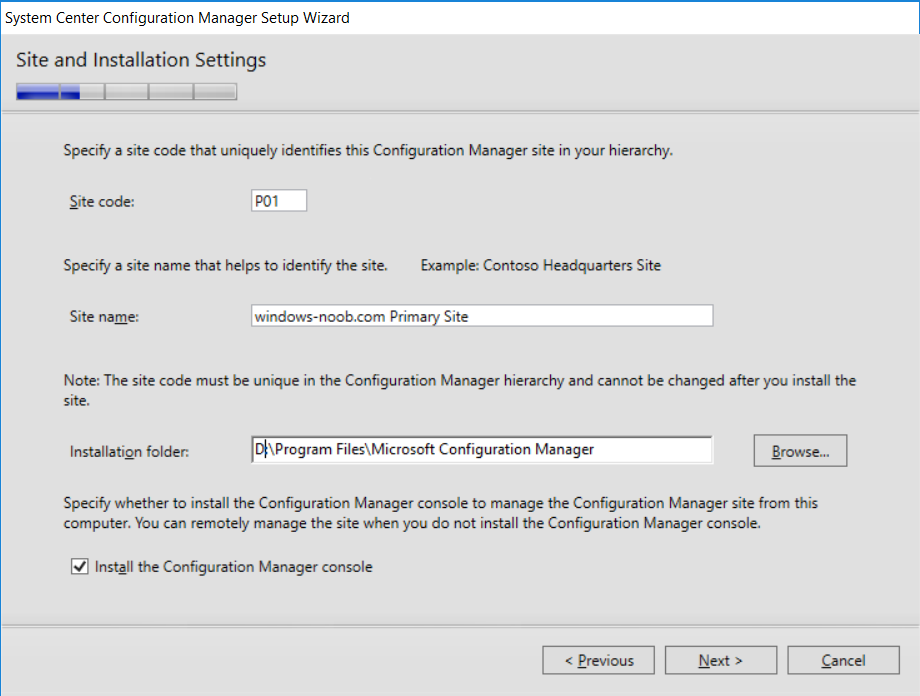
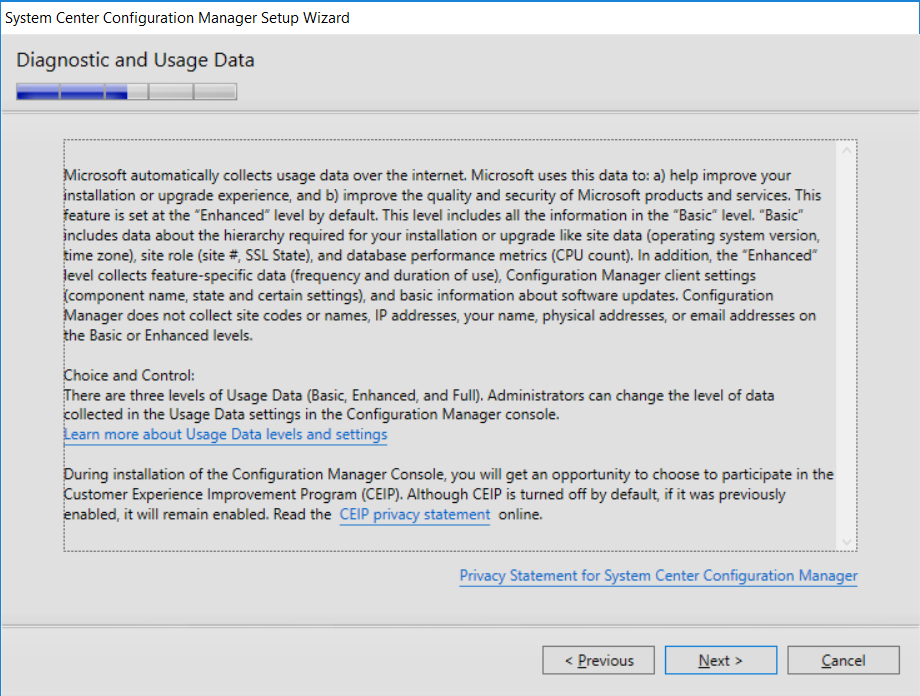
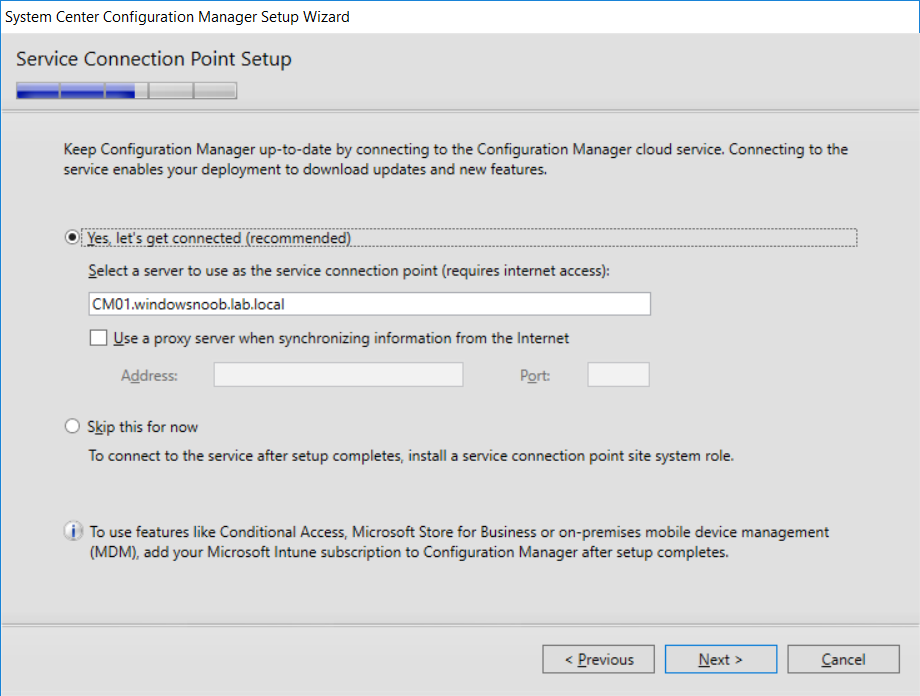
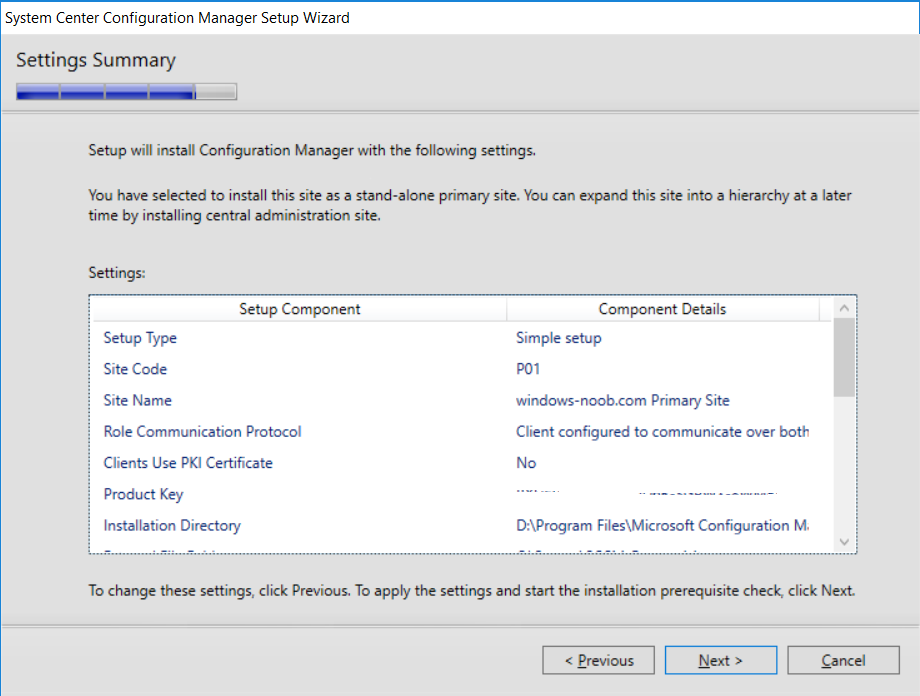
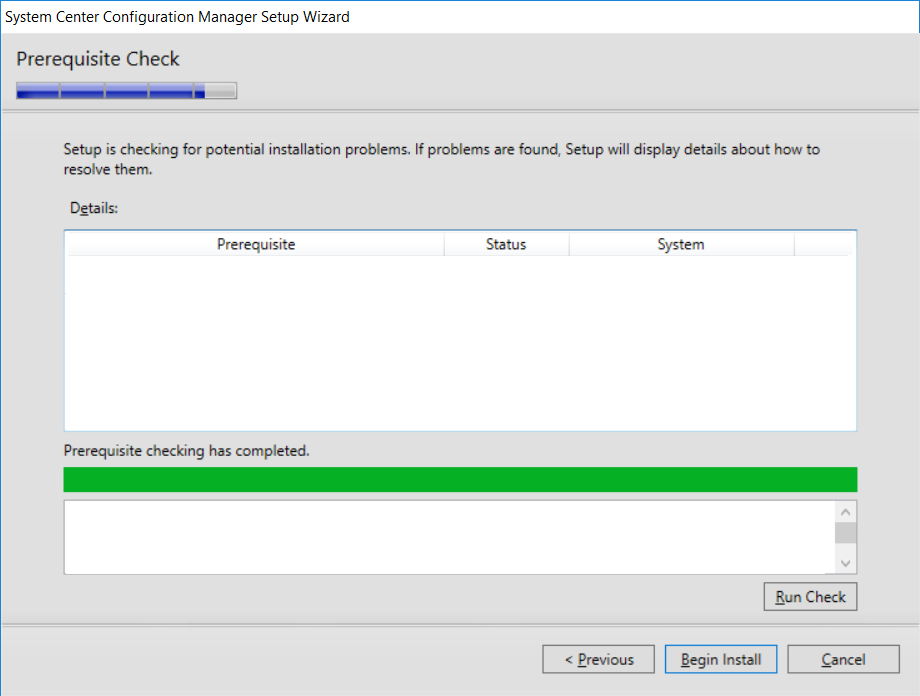
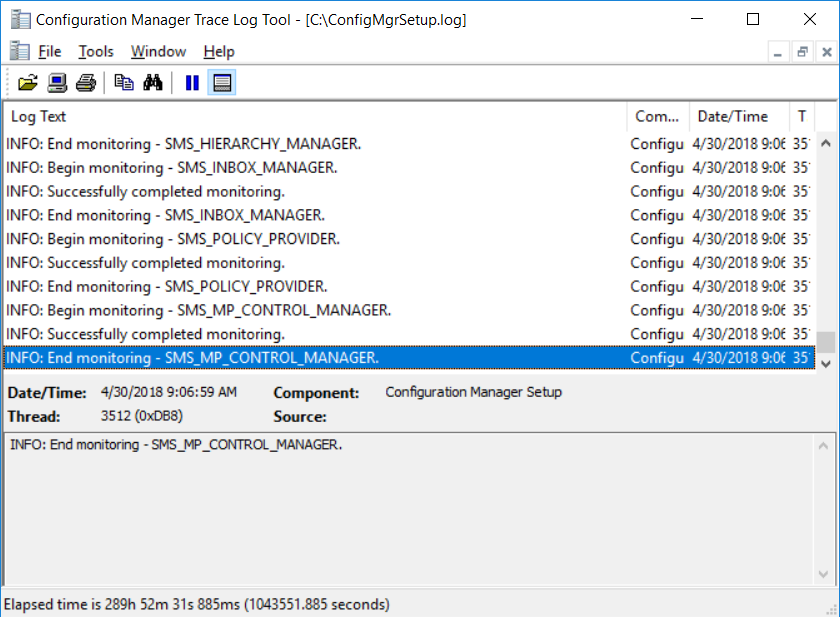
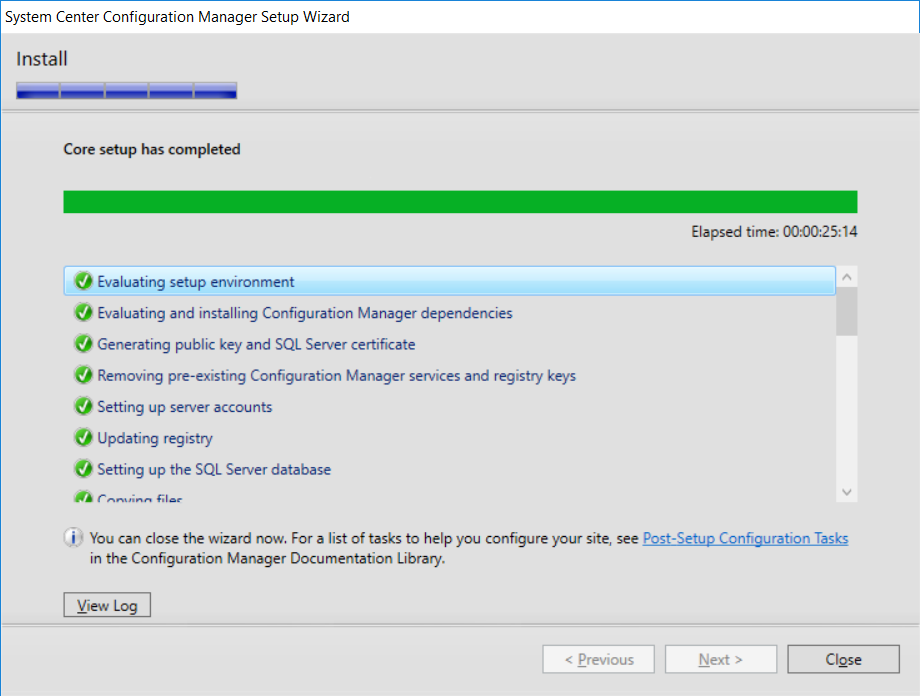
 This multi-part guide will show you how to install the latest baseline version of Configuration Manager from Microsoft. The latest available baseline version is System Center Configuration Manager (Current Branch) version 1802 as of March 29th 2018. How can I install System Center Configuration Manager (Current Branch) version 1802 on Windows Server 2016 with SQL Server 2017 – Part 1 How can I install System Center Configuration Manager (Current Branch) version 1802 on Windows Server 2016 with SQL Server 2017 – Part 2 How can I install System Center Configuration Manager (Current Branch) version 1802 on Windows Server 2016 with SQL Server 2017 – Part 3 How can I install System Center Configuration Manager (Current Branch) version 1802 on Windows Server 2016 with SQL Server 2017 – Part 4 You can use this multi-part guide to get a hierarchy up and running on Windows Server 2016 using SQL Server 2017. The concept behind this is to guide you through all the steps necessary to get a working Configuration Manager Primary site installed using manual methods or automating it by using PowerShell. This gives you the power to automate the bits that you want to automate, while allowing you to manually do other tasks when needed. You decide which path to take. PowerShell knowledge is desired and dare I say required if you are in any way serious about Configuration Manager. I will show you how to do most steps via two methods shown below, it’s up to you to choose which method suits you best but I highly recommend automating everything that you can (if possible), using PowerShell. Method #1 – Do it manually Method #2 – Automate it with PowerShell In Part 1, you configured Active Directory Domain Services (ADDS) on AD01, then joined the Configuration Manager primary server (CM01) to the newly created domain. You then created users, usergroups and OU's in Active Directory and created the System Management Container. Finally you delegated permission to the Configuration Manager server to the System Management container. In Part 2, you configured Windows Server 2016 roles and features on the Configuration Manager primary server (CM01) and then you downloaded and installed Windows ADK 1709. Next you installed SQL Server 2017 CU5 with SQL Server Management Studio (SSMS) and Reporting Services before installing the WSUS role which uses SQL to store the SUSDB instead of the Windows Internal Database (WID). In this Part, you will download and extract the ConfigMgr content, you'll download the ConfigMgr prerequisites and then you'll extend the Active Directory schema before installing System Center Configuration Manager (Current Branch) version 1802. Step 1. Download and extract the ConfigMgr content Before installing System Center Configuration Manager version 1802 you'll need to download the content as it is a baseline version. You can download baseline versions of the ConfigMgr media from Microsoft's Volume licensing Service Center (VLSC) site for use in production or from MSDN (or the Microsoft Evaluation site) for use in a lab. The VLSC download can be found be searching for Config and then selecting System Center Config Mgr (current branch and LTSB) as shown below. Once you've downloaded the ISO, mount it using Windows File Explorer and copy the contents to somewhere useful like C:\Source\SCCM1802 on the Configuration Manager server. Step 2. Download the ConfigMgr Prerequisites Note: Perform the following on the Configuration Manager server (CM01) as a Local Administrator You can download the prerequisites during ConfigMgr setup or in advance. As you'll probably want to install more than one copy of ConfigMgr (one lab, one production) it's nice to have the prerequisites downloaded in advance. Method #1 – Do it manually To do that, open an administrative PowerShell command prompt and navigate to the following folder: C:\Source\SCCM1802\smssetup\bin\X64 Run the following line .\SetupDL.exe C:\Source\SCCM_Prerequisites Once the process is complete you can open C:\ConfigMgrSetup.log with CMTrace (or notepad) to verify the status of the download. Note: You can find the CMTrace executable in the SMSSetup Tools folder in the location that you extracted the ConfigMgr media, eg: C:\Source\SCCM1802\SMSSETUP\TOOLS. Method #2 – Automate it with PowerShell To automate the download of the prerequisites simply follow the instructions and run the Install SCCM Current Branch version 1802.ps1 Powershell script in Step 4 or use the Download SCCM prerequisite files.ps1. Step 3. Extend the Schema Note: Perform the following on the Domain controller server (AD01) as Administrator. You do not have to extend the Active Directory schema if it was already extended for Configuration Manager previously. Method #1 – Do it manually To do that, on the Active Directory domain controller (AD01), open Windows File Explorer and browse to the network path of the ConfigMgr server where you've copied the SCCM source, eg: \\cm01\c$\Source\SCCM1802\SMSSETUP\BIN\X64 In that folder, locate extadsch.exe and right click, choose Run as Administrator. After the schema has been extended for SCCM, you can open C:\ExtAdsch.log on the root of C:\ on the server you are performing this on, and review the success or failure of that action. Method #2 – Automate it with PowerShell To automate extending the schema, use the Extend the Schema in AD.ps1 PowerShell script. Run the script on the CM01 server using credentials that have the ability to extend the schema. Step 4. Install SCCM Current Branch (version 1802) Note: Perform the following on the ConfigMgr server (CM01) as Administrator. Method #1 – Do it manually To do that, on the Configuration Manager server (CM01), open Windows File Explorer and browse to the network path of the ConfigMgr server where you've copied the SCCM source, eg: C:\Source\SCCM1802\ In that folder, double click on splash.hta. The Installer appears, click on Install. At the Before You Begin screen click Next. In the Available Setup Options screen, place a checkbox in "Use typical Installation options for a stand alone primary site" When prompted if you want to continue click Yes. On the Product Key screen enter your Key (or choose the eval option), and set the Software Assurance Date (optional) On the Product License Terms screen, select the 3 available options and click Next. On the Prerequisite Downloads screen, select the first option and specify C:\Source\SCCM_Prerequisites as the folder to download the prerequisite files. Click Next to start the download. On the Site and Installation Settings screen, enter your chosen site code (eg: P01), your site name and the path where you want to install ConfigMgr. On the Diagnostics and Usage data screen, click Next. On the Service Connection Point Setup screen, enter your choices and click Next. On the Settings Summary, review your choices and when happy with them click Next. On the Prerequisite Check screen click Begin Install when ready. During the installation, click on View Log (opens C:\ConfigmgrSetup.log) to review the installation progress using CMTrace and when the installation is done, click Close. Method #2 – Automate it with PowerShell To automate the installation of ConfigMgr 1802 (including all the previous steps above), simply run the Install SCCM Current Branch version 1802.ps1 PowerShell script. Run the script on the CM01 server and when prompted to extend the schema, enter your choice (yes or no) and if you choose to extend the schema, provide suitable credentials when prompted. Once done with the schema extension, the installation will continue (as shown below). and once installed you can launch the console. Success ! Summary In this 3 part guide you used quite a bit of PowerShell to automate pretty much most of Installing System Center Configuration Manager Current Branch (version 1802), including installing and configuring SQL Server 2017 on Windows Server 2016. Doing it with PowerShell means you can safely say that you've got a handle on Automation using PowerShell. I hope you learned a lot from doing it this way, and until next time, adios ! Downloads The scripts used in this guide are available for download here. Unzip to C:\Scripts on both servers. The scripts are placed in the corresponding folder (Part 1, Part 2 etc) and sorted into which server you should run the script on (AD01 or CM01). Scripts.zip
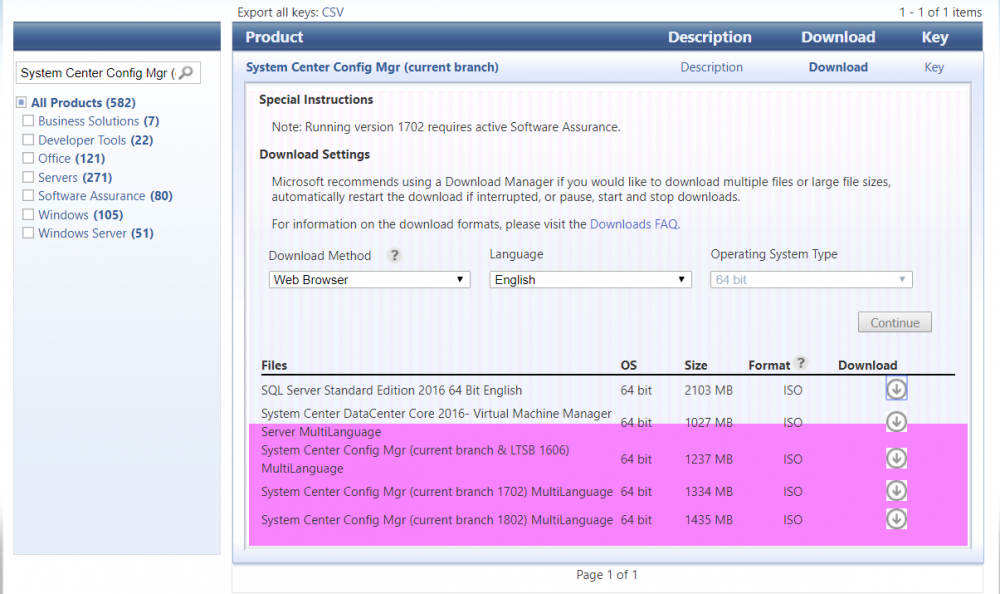


-
 Hi all, I've headed here to post my problem as I've spent the best part of 2 weeks on and off troubleshooting and I'm not getting anywhere. The company I'm currently working for now have a mixture of Windows 10 clients in their environment. 1511, 1607, 1703, 1709. We've been plugging away for months now to try and clear the last few hundred 1511 clients as we suffered from the WSUS decryption key issue with Feature Updates, but this was resolved and seemed to be working fine. We don't use servicing plans at all as we prefer to control the deployments more manually via direct deployments of the Feature Updates to device collections. We're now down to just over 100 1511 clients and we've been upgrading them to 1703 until we've unearthed a new problem. Around 75 of the machines in the collection are not receiving the Feature Update in Software Center. After a bit of digging it became clear that these machines think they are already "compliant" when reviewing the SCCM deployment under the monitoring pane! We have now seen this same behaviour when trying to advertise the 1703 Feature Update to some 1607 clients. I've read about the "defer upgrades" GPO causing problems and as a result I have a new GPO to turn these settings off and prevent the client from trying to use WUfB (Windows Update for Business) but these machines still remain "compliant". On Friday I built a VM with our Corporate 1607 build to use as a test machine. This VM is showing compliant when I deploy the 1703 Feature Update to it so I tried the 1709 Update and this has appeared in software Center. It seems to be a bit random as to which machines report as compliant and which don't. Some have "defer updates" set, some don't, there doesn't appear to be an obvious pattern. Has 1703 recently been written off because Microsoft prefer clients to be on the most latest version as soon as it is classed as being Business Ready??? Please let me know if anyone has any ideas or suggestions to troubleshoot this as I'd like to straighten it out before we need to start upgrading the remaining 1607 clients. Thanks in advance, Westy
 -
 Hi, I have a hibrid SCCM (CB 1702) + Intune scenario. When i enroll a mobile device it doesn't appear in SCCM console, so any application or configuration it will deployed but it is correctly created in Azure AD . It occurs randomly during last year and i don't why. any suggestions? Thanks
 -
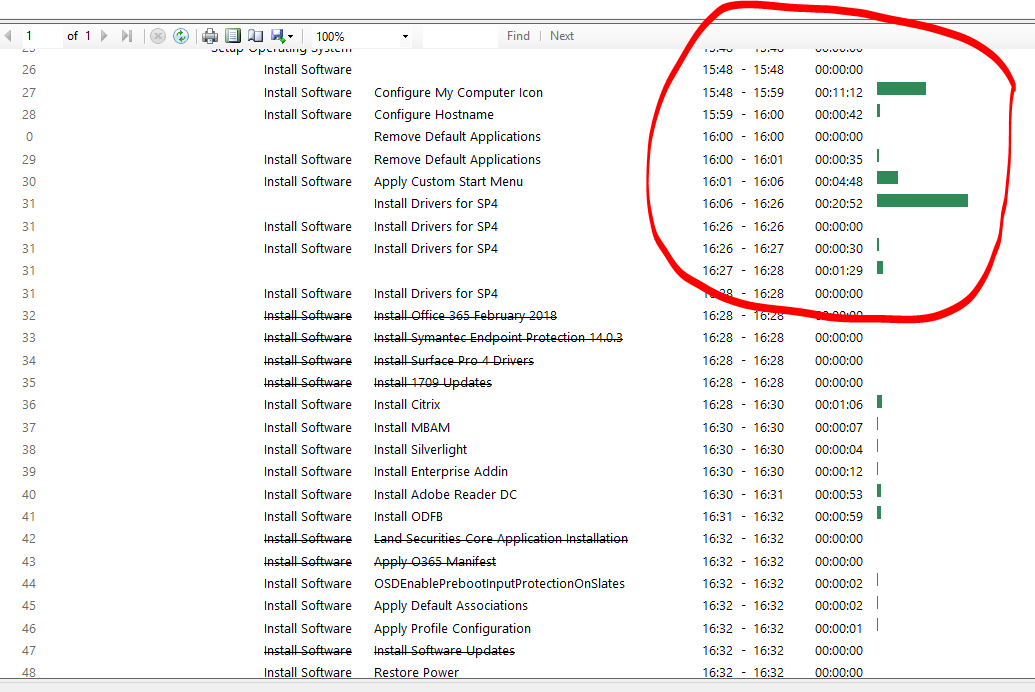
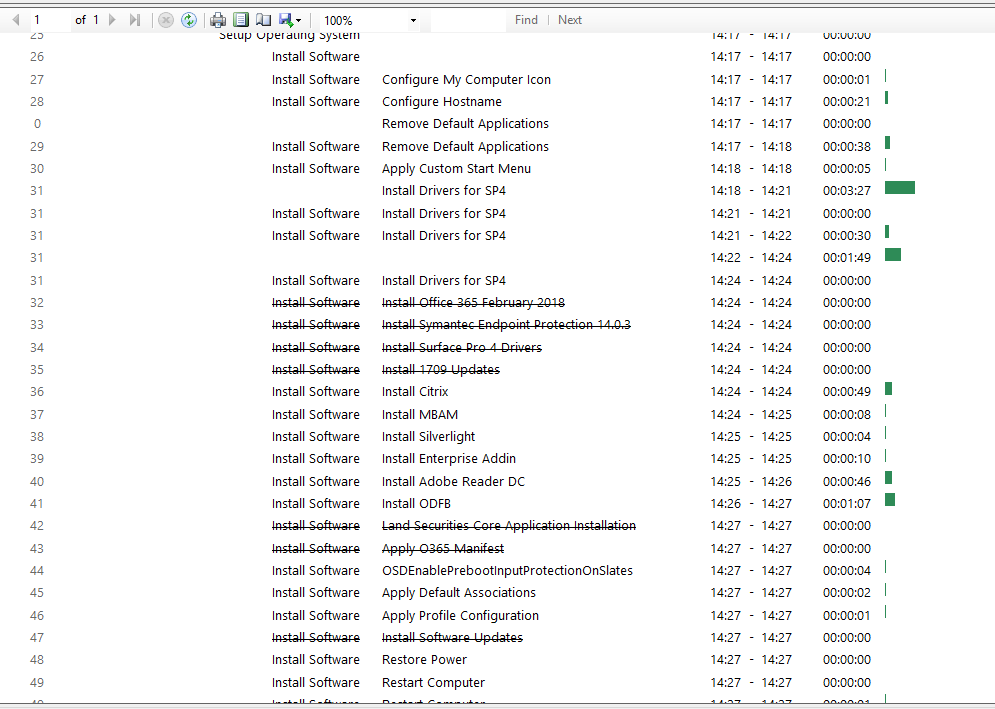
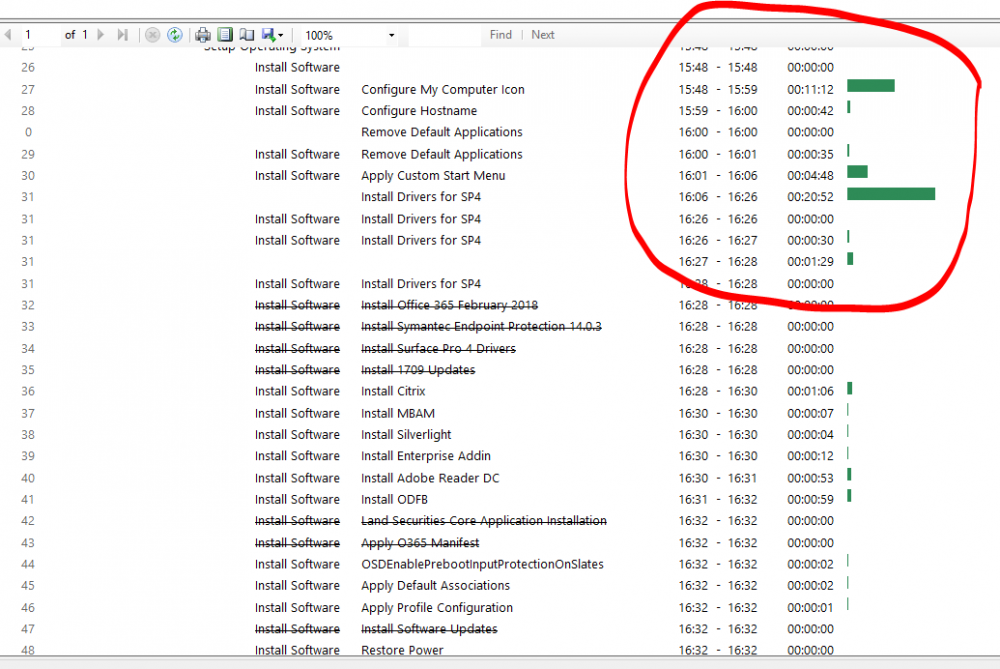
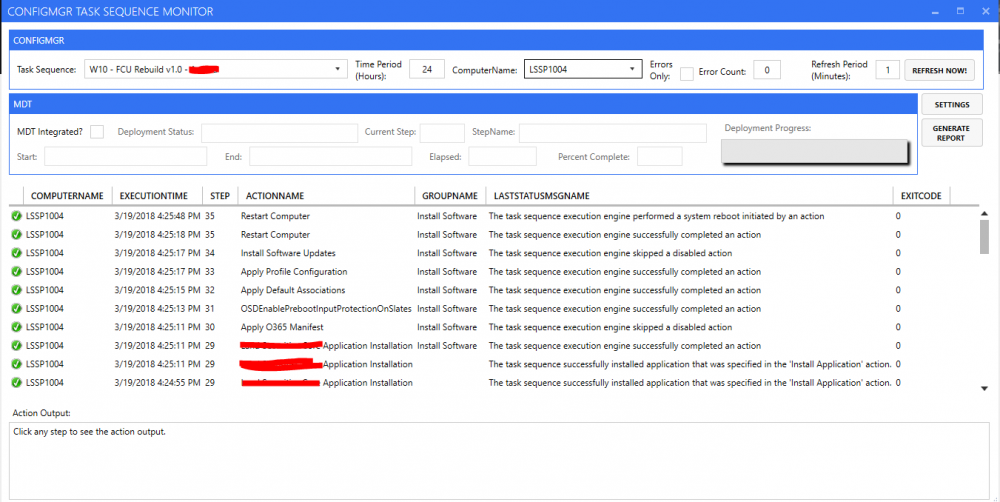
 My TS OSD used to take around 35-40 minutes to complete. But after enabling Pre-Release in Hierarchy, my TS now takes over 1 hour. It struggles when it gets to packages/applications. This is the changes I made after enabling pre-release Time it takes to complete the TS OLD TS After enabling Pre-Release and Share Content It looks like it's waiting for something to happen, but I don't know what. How do I fix this? Or go back to how apps/packages are deployed. Many thanks,
-
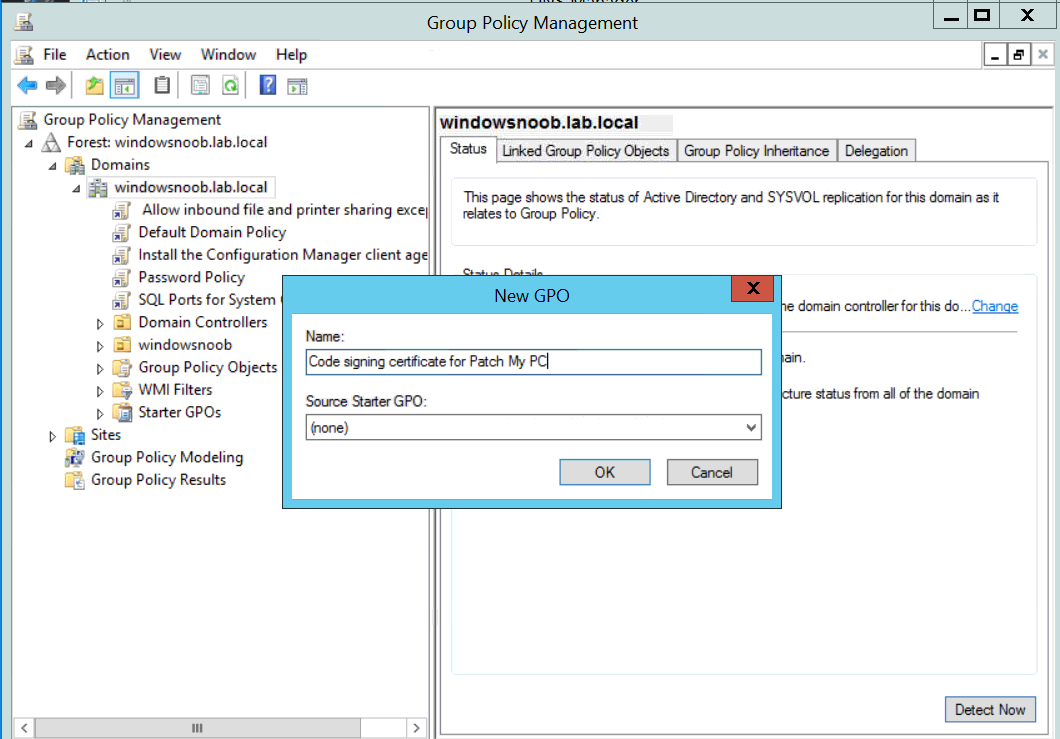
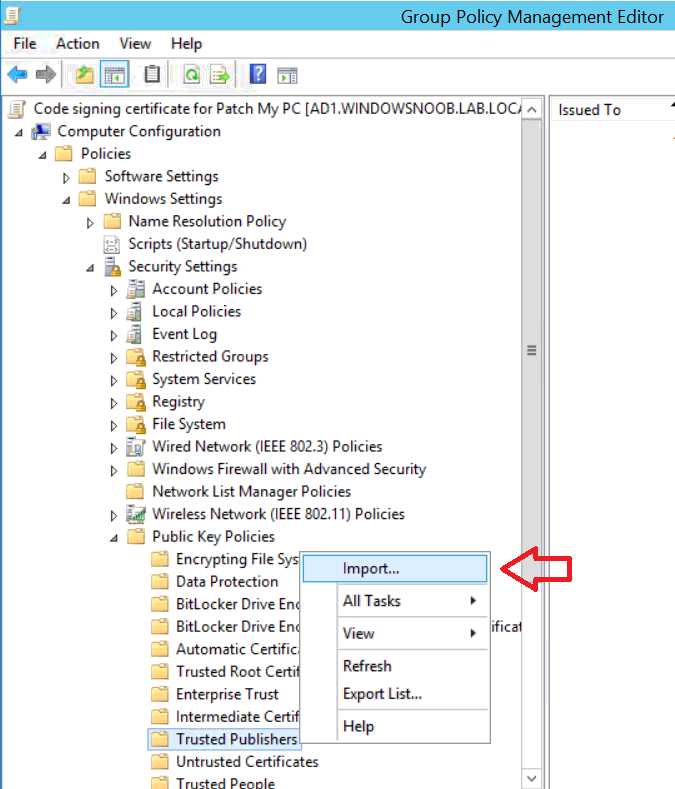
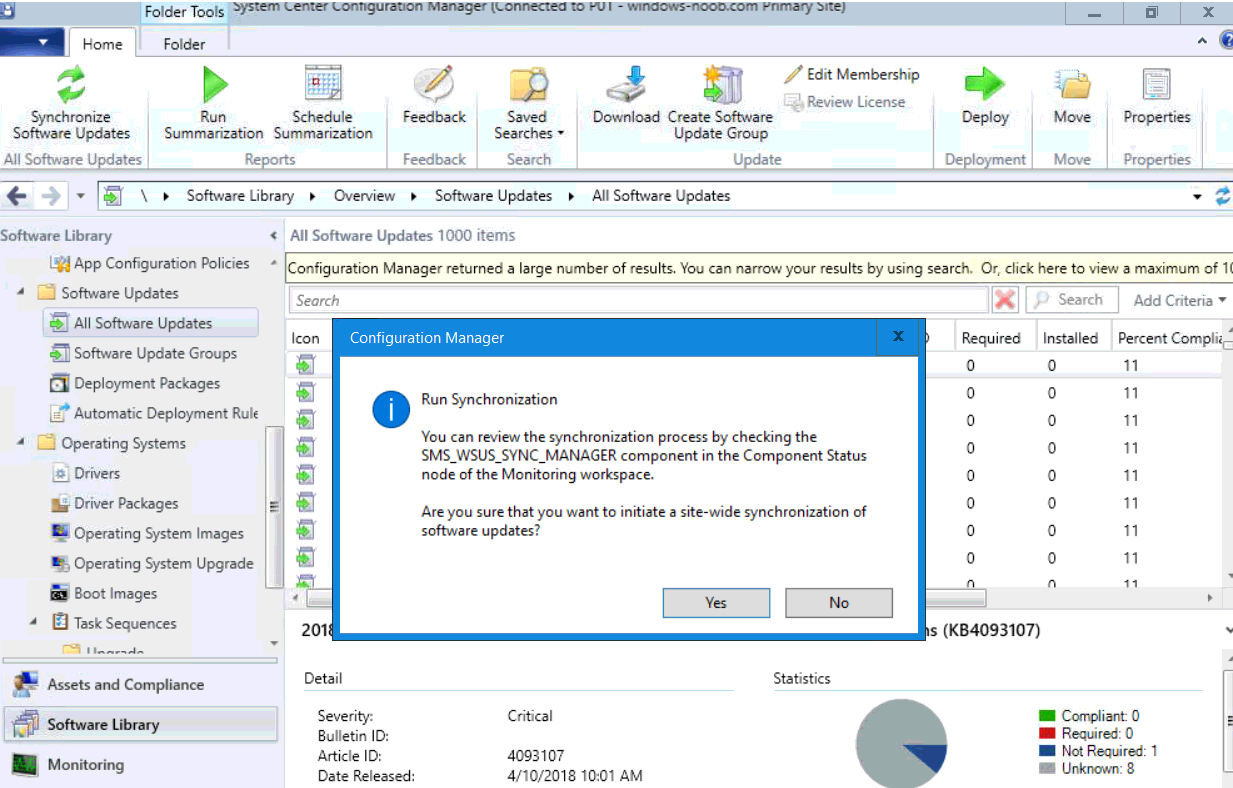
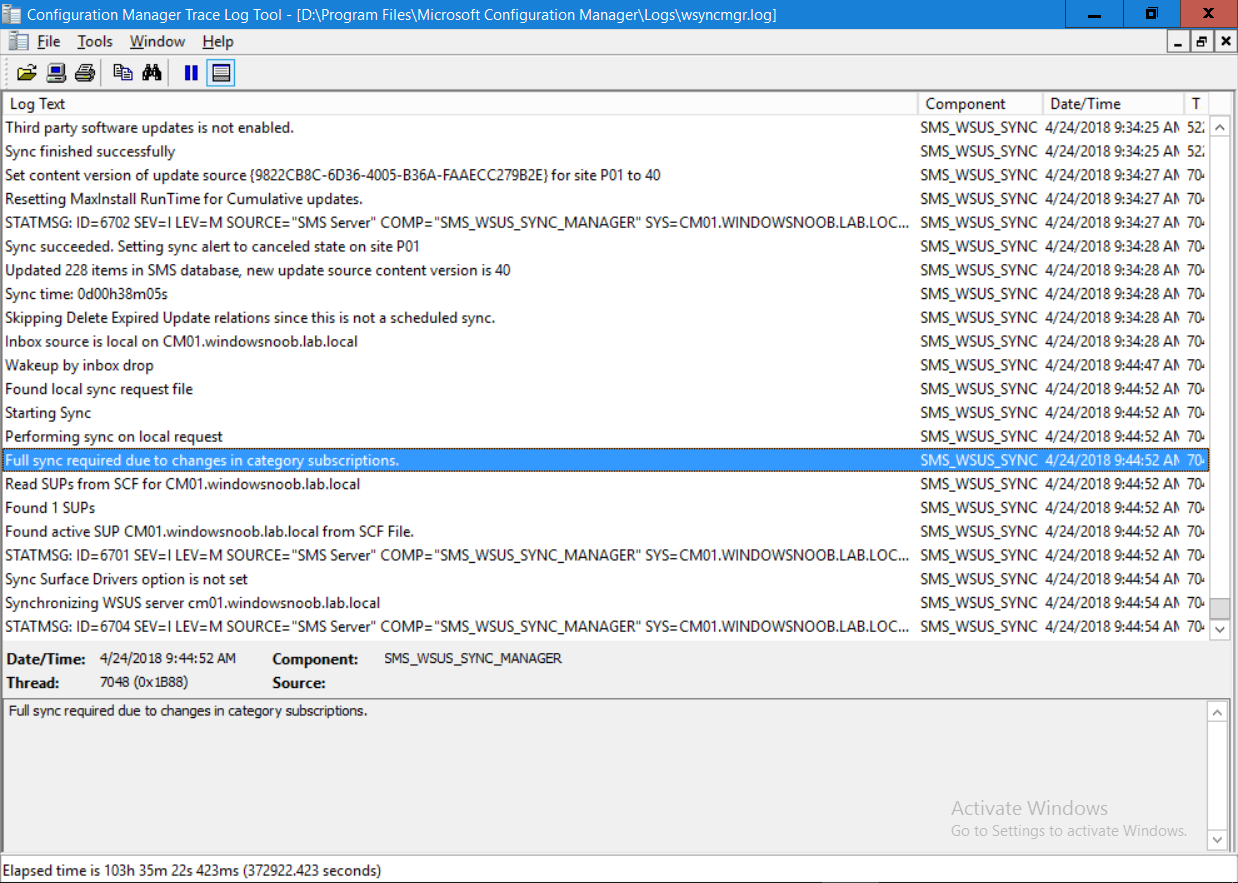
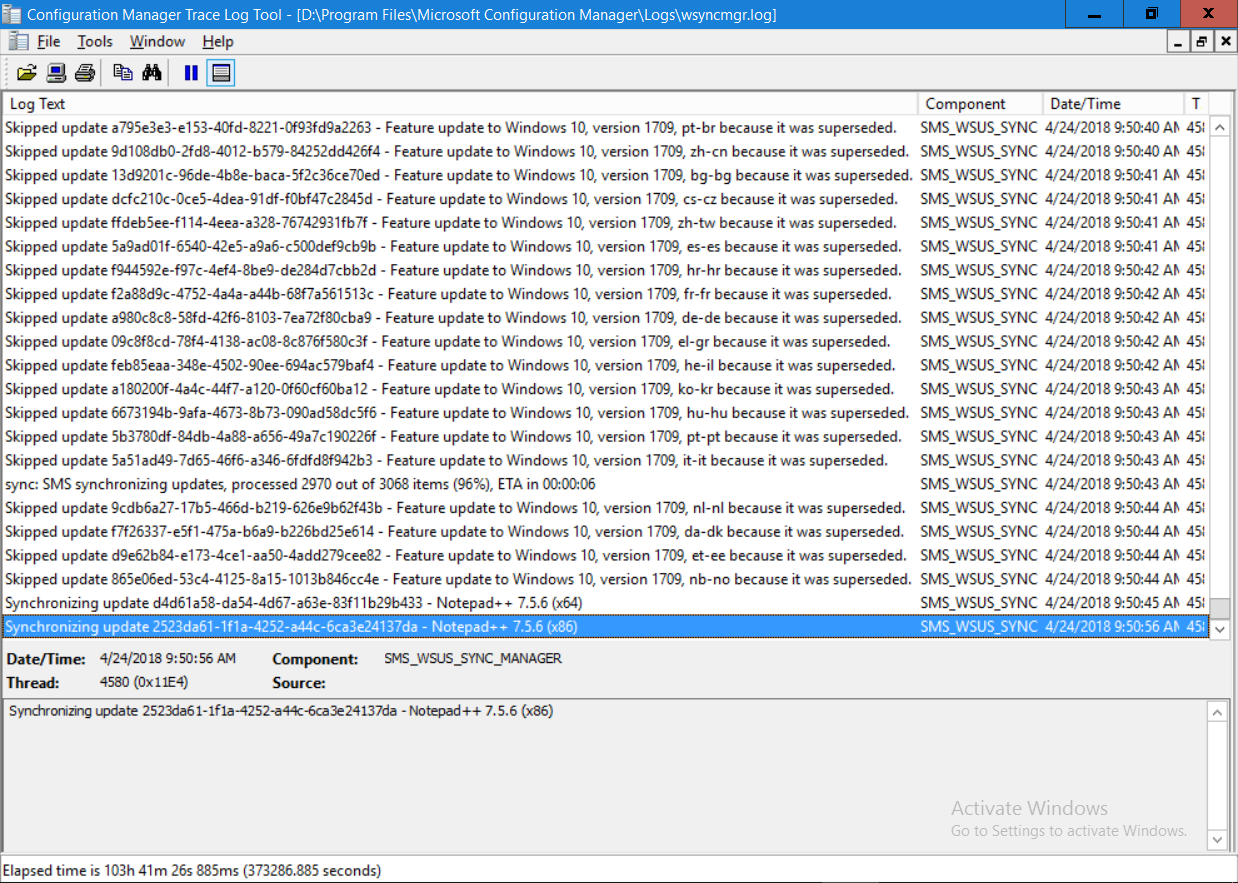
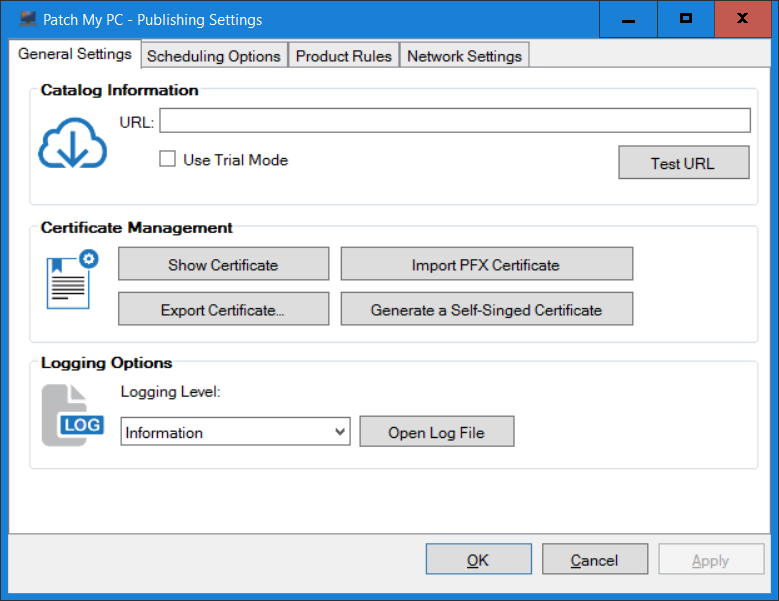
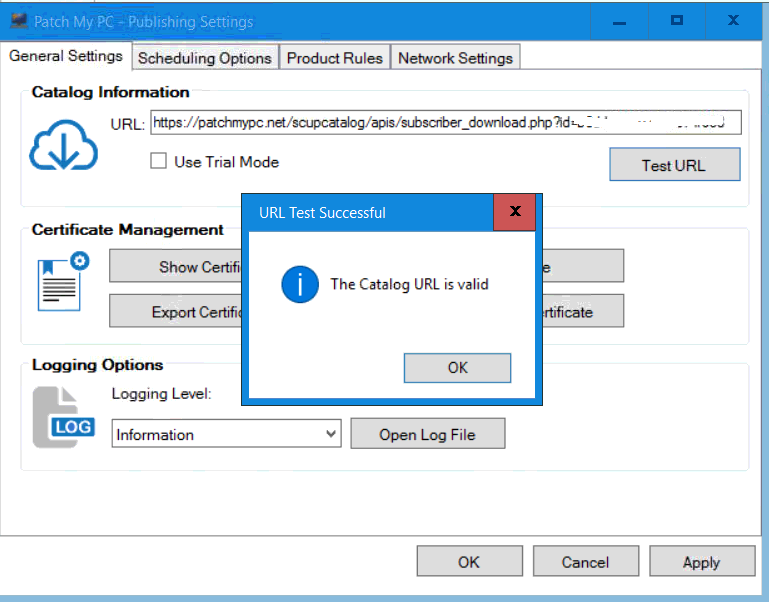
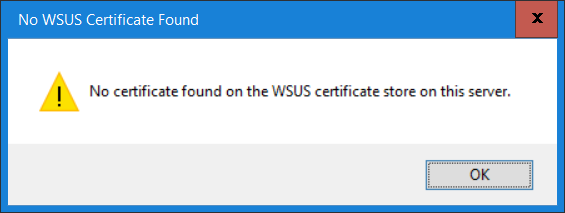
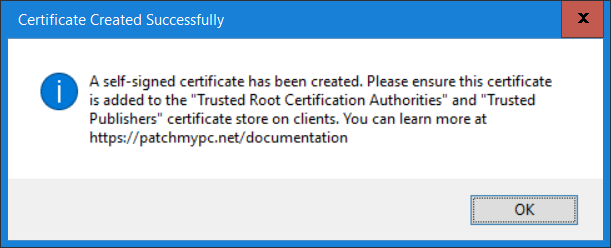
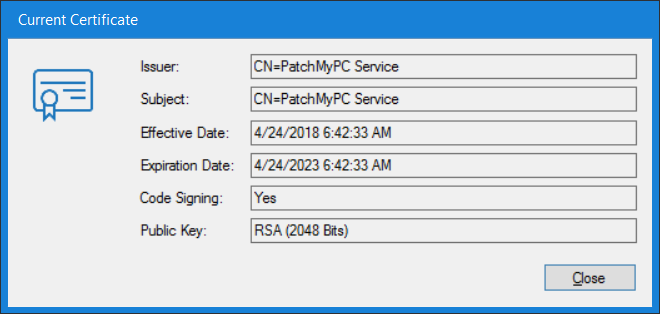
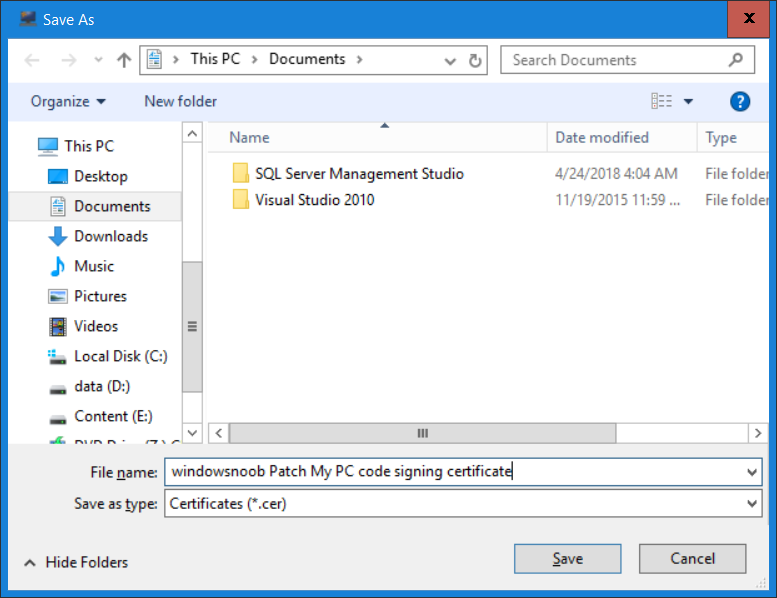
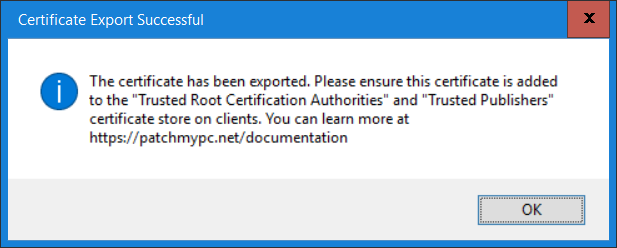
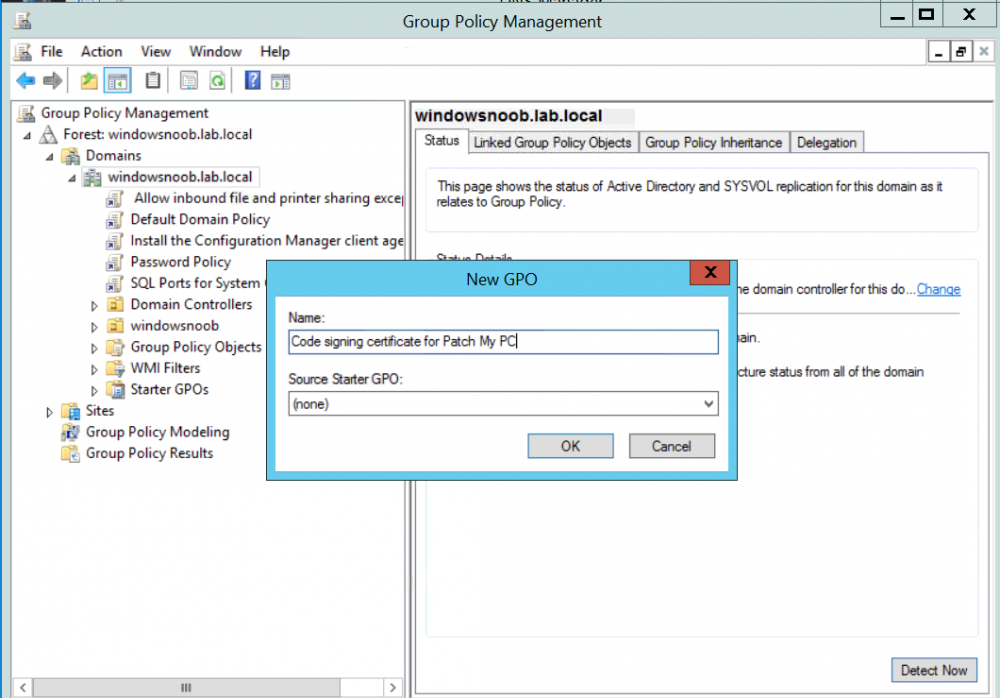
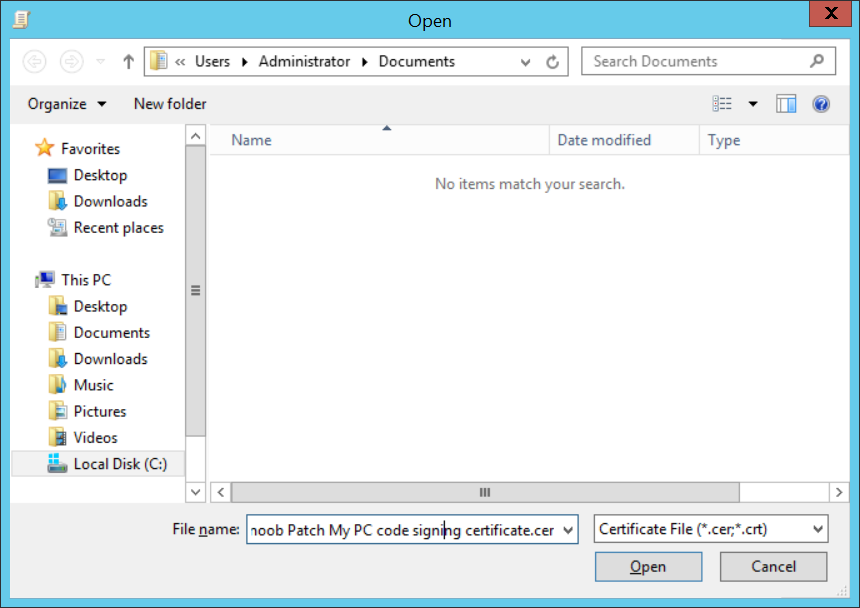
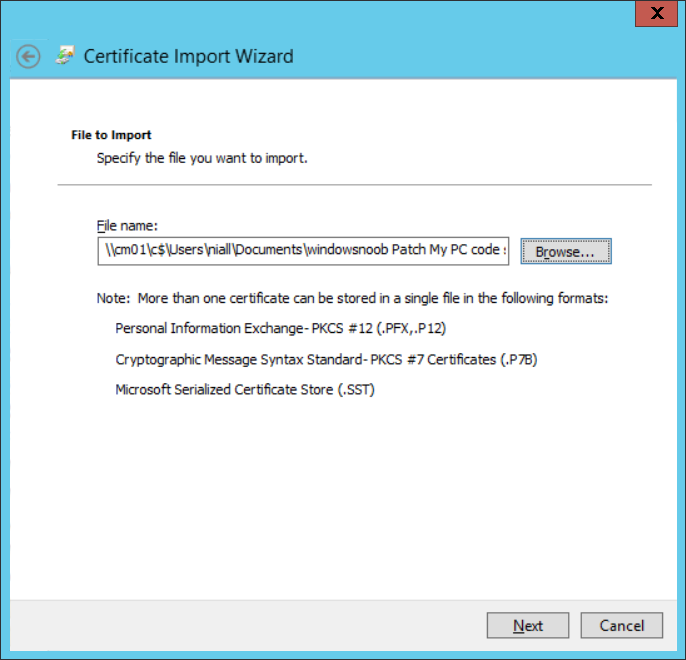
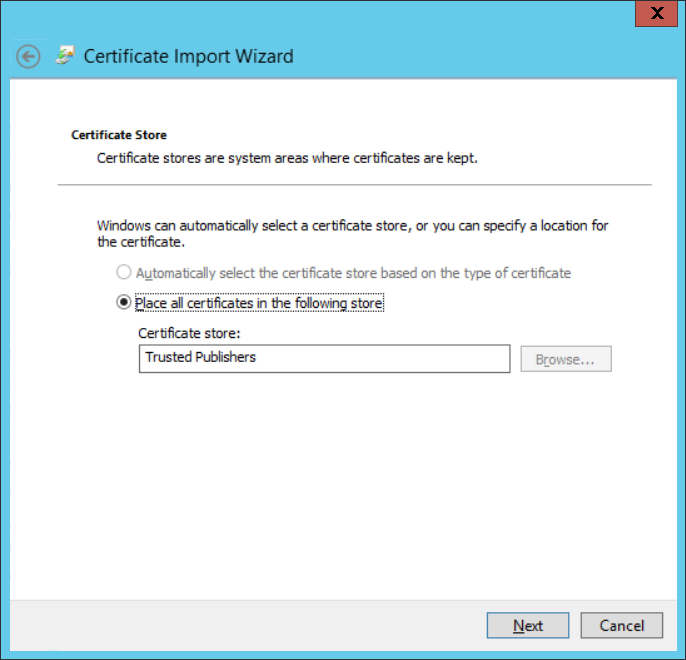
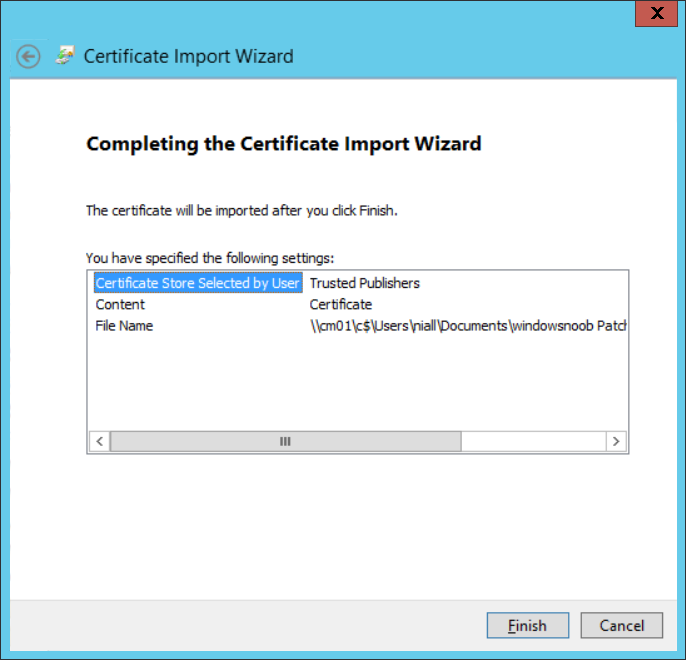
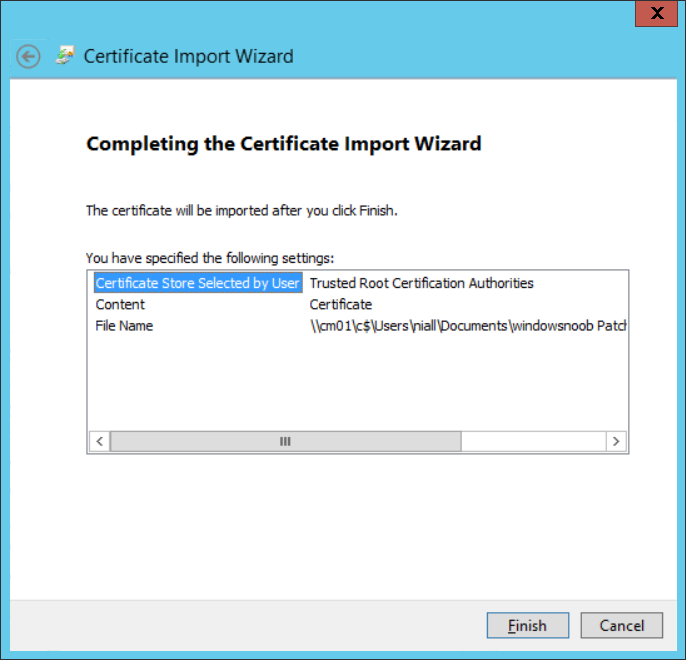
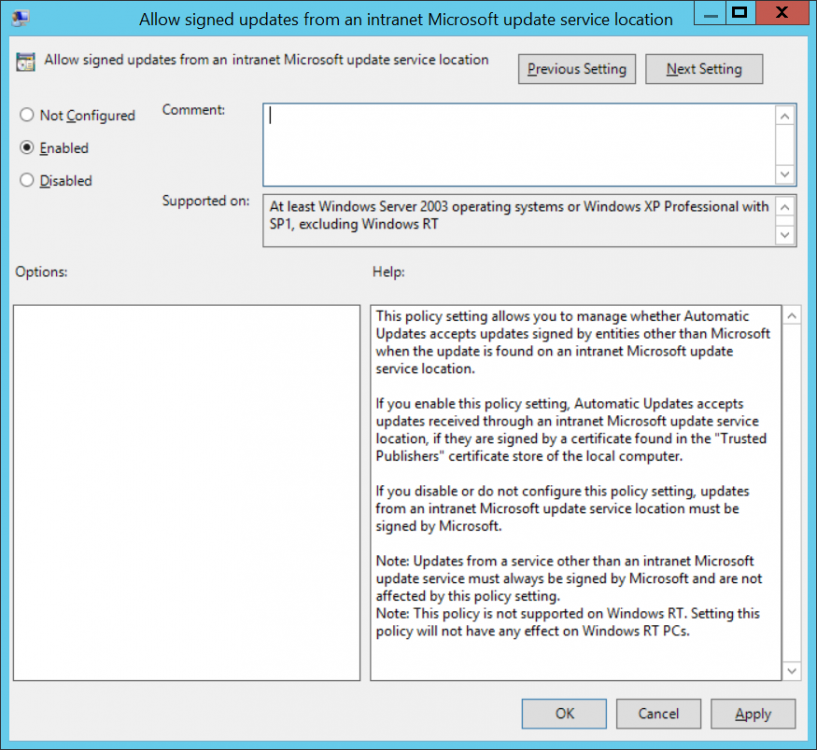
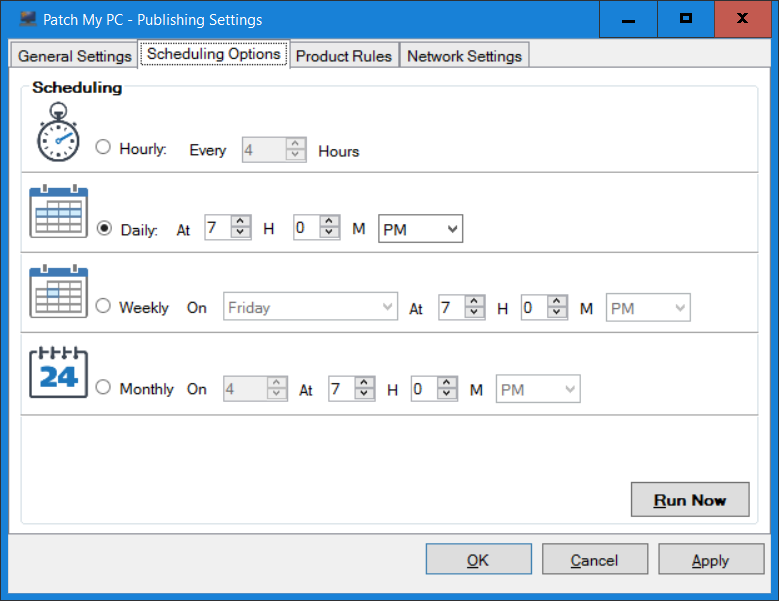
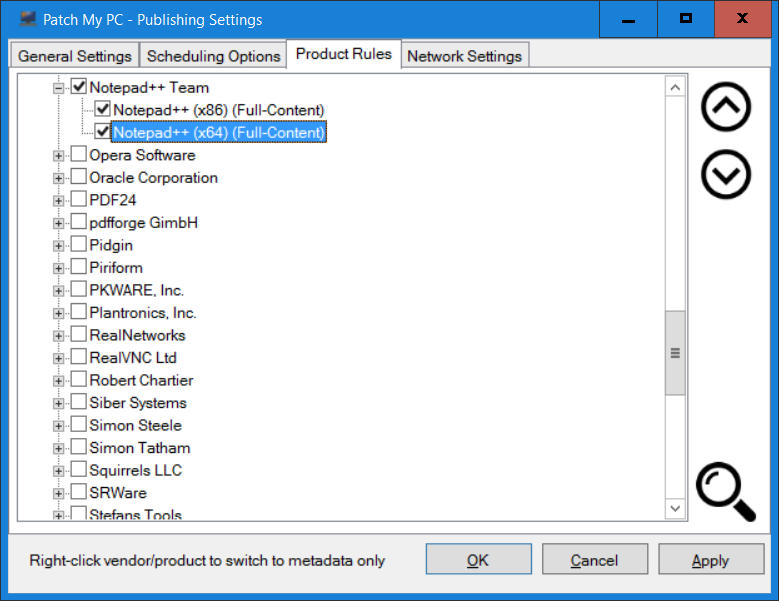
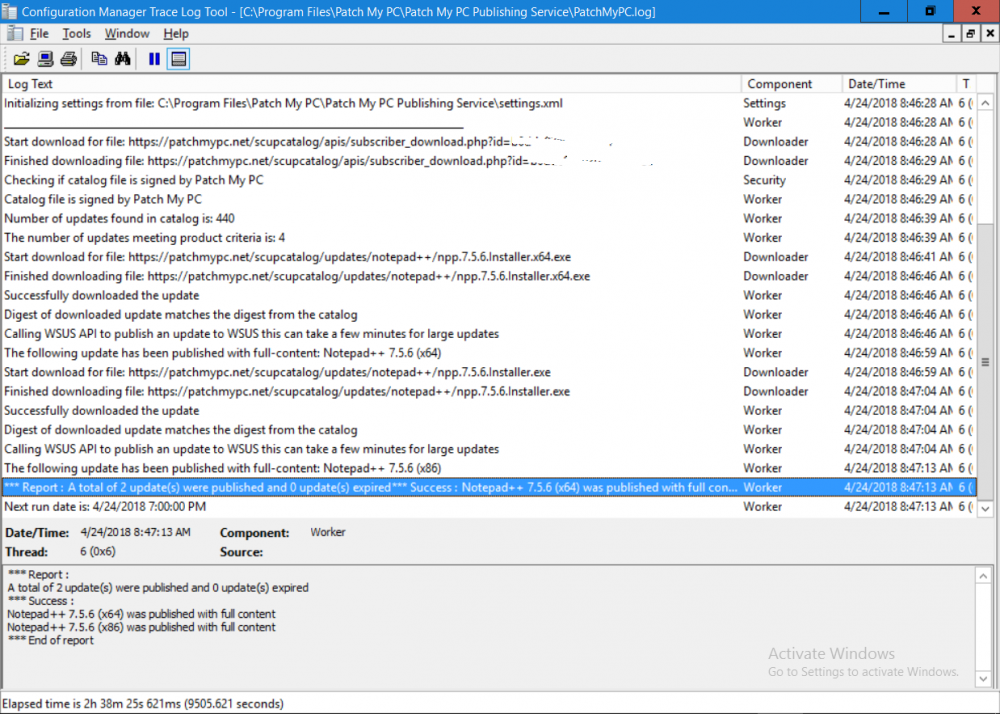
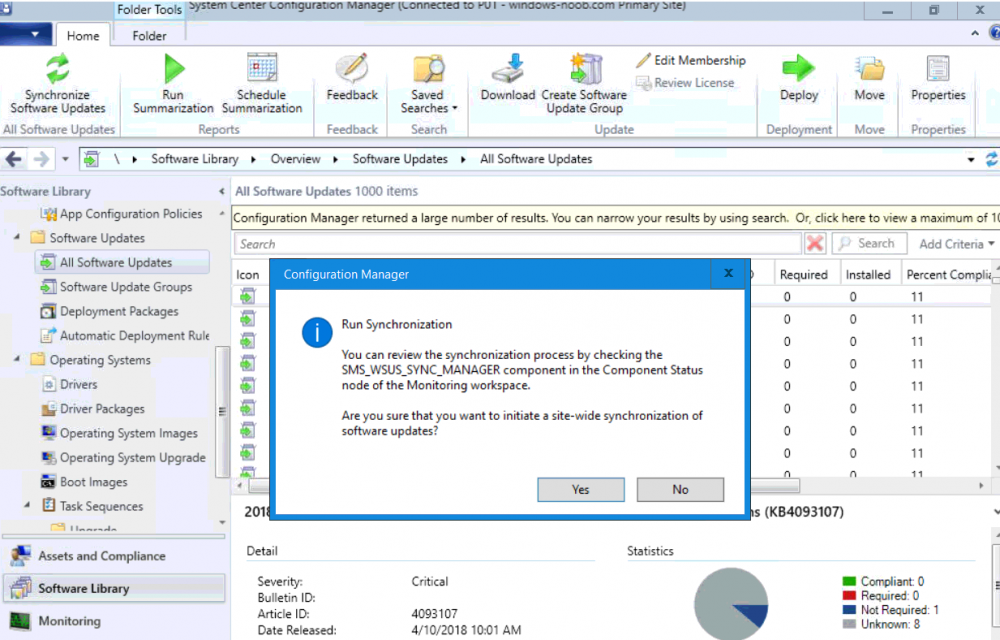
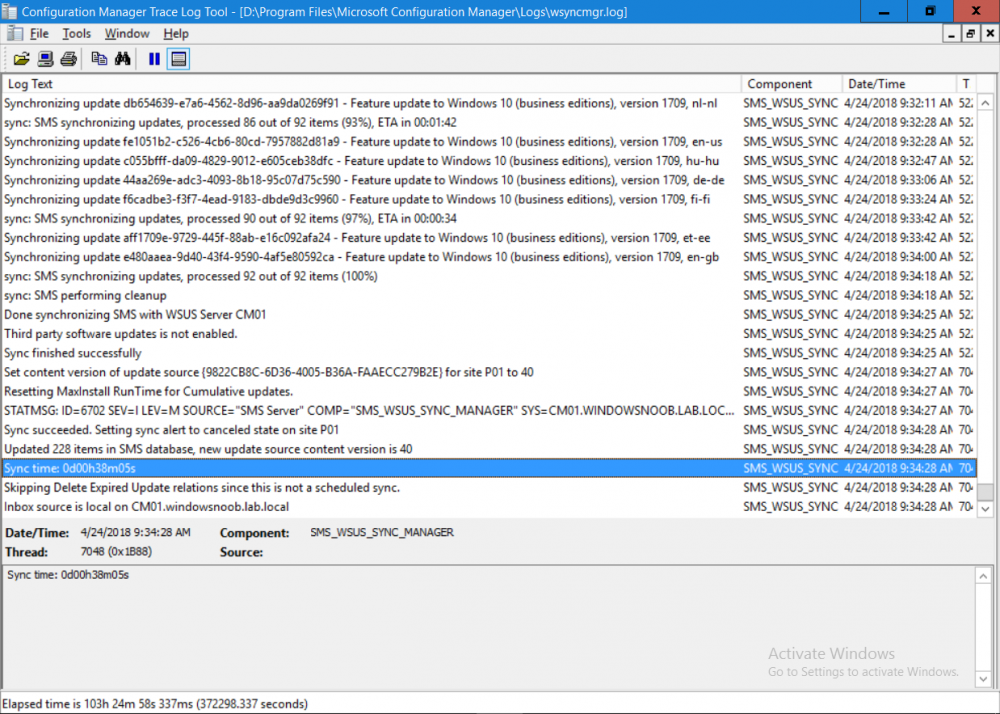
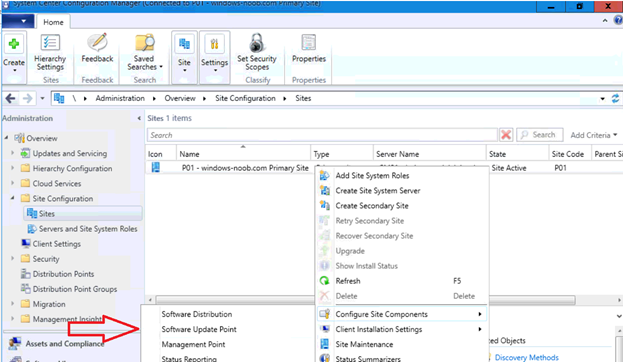
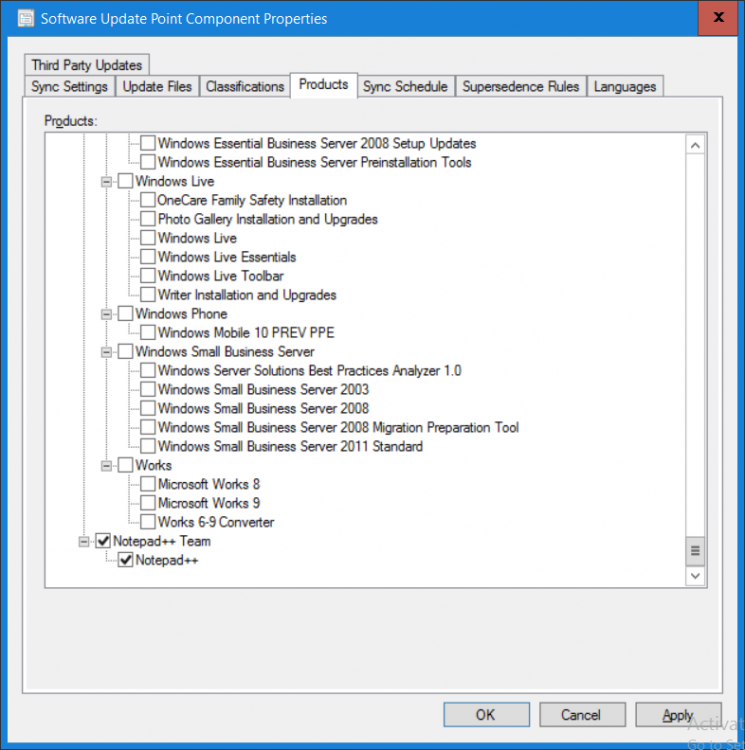
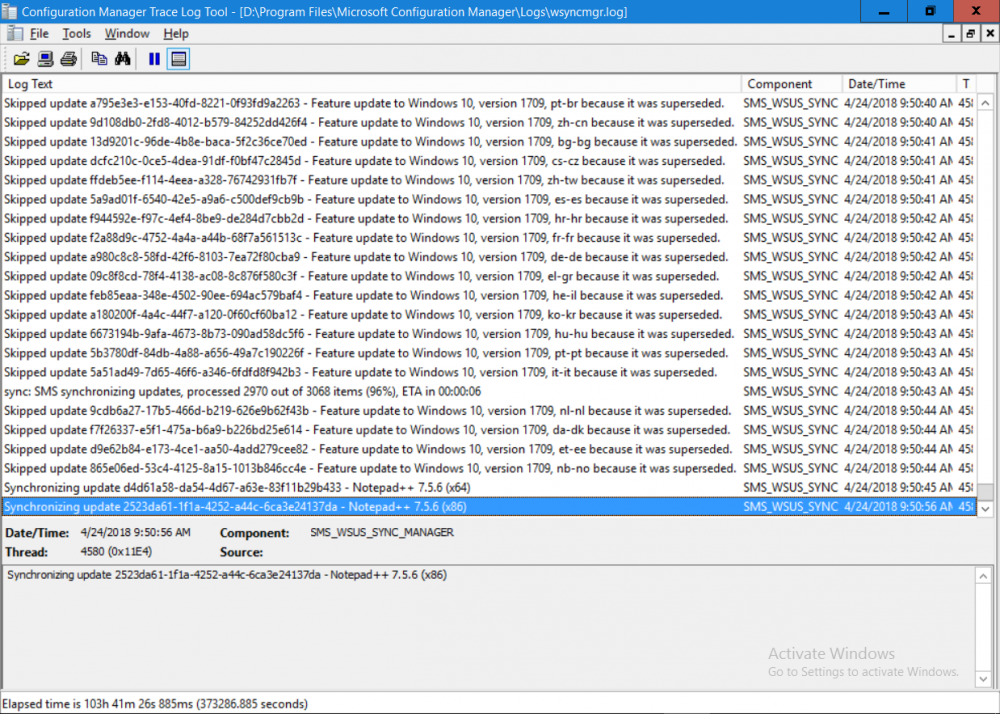
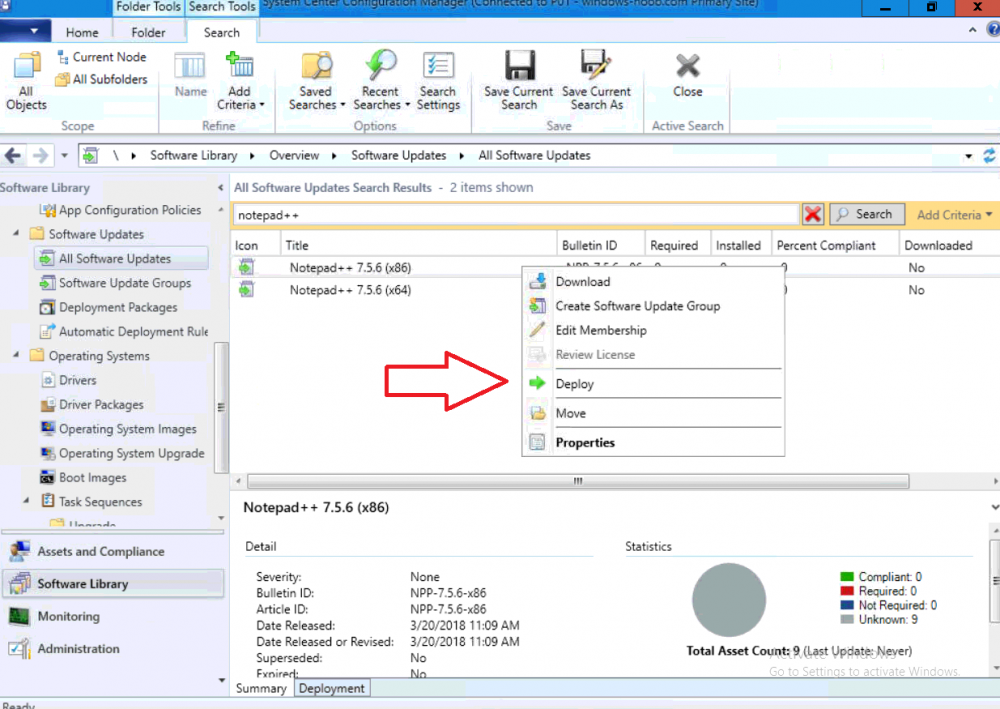
Introduction Security is a bigger focus today than ever before, and rightly so. As part of that focus ongoing patching is a requirement, both of the operating system (quality updates and feature updates) and the application layer too. Microsoft provides updates for their supported operating systems and applications that can be downloaded manually or automatically on the client via Microsoft Update, or deployed using on premise infrastructures like WSUS or SCCM or even via cloud based technology such as Microsoft Intune and Windows Update for Business. But what about on-premise patching of 3rd party applications (applications that come from vendors other than Microsoft), those vendors usually provide their own patches to help secure their products, but because they are 3rd party, they are not natively trusted by WSUS. Getting those patches into WSUS requires some outside help and there are several companies offering applications to help you with that task, one of which is called Patch My PC. Patch My PC is recommended because it’s lean, easy to use and competitively priced and it was developed by former Premier Field Engineers at Microsoft. Step 1. Download the Patch My PC Publishing Service Setup file Note: This guide was completed using SCCM version 1802 (Current Branch) running on Server 2016. To install that version of SCCM yourself, follow this link. Download the Patch My PC Publishing Service Setup file (MSI format) from the link below: https://patchmypc.net/publishing-service-download You should install it on the computer hosting your Software Update Point. Note: The MSI only supports WSUS 4.0 (Windows Server 2012 & 2016). Once the software is installed you can choose to launch it, the Settings UI appears. Step 2. Adding the catalog URL in the service After installing the software, you need to enter your individual catalog URL (if you are subscribed to the service) or enable trial mode to test the software. To do this, paste the unique download ID supplied in the email you received when you signed up for the service into the field provided. Click on Test URL to verify the catalog URL is correct. Using your unique catalog URL gives you access to all the supported applications in the catalog whereas when using the trial mode you only get access to a small subset (12) of those supported applications. Step 3. Creating a self-signed or importing a PFX based certificate In order to publish updates to WSUS, you need to setup a code-signing certificate. Certificates are used by the Patch My PC Publishing Service to sign the 3rd party updates so that WSUS can use them. There are two options available: · Self-signed certificate · PFX based certificate (3rd party or internal certificate authority) Note: Clicking on Show Certificate will show if any existing certificate is in place, for example if you’ve migrated from System Center Updates Publisher (SCUP). If like me you haven’t set this up yet, clicking on Show Certificate will not find any certificate in the WSUS certificate store. A self-signed certificate is the easiest way to get started with this tool and it’s free, however it does not provide security focused features such as revocation (cancellation of the certificate for all computers using CRL’s). For the purpose of this guide however, you’ll create a self-signed certificate using the tool. To create a self-signed certificate, click on the Generate a Self-Signed Certificate button in Certificate Management. Click OK to the Certificate Created Successfully message and then click on Show Certificate again, to see details about the newly created self-signed certificate. Step 4. Exporting the code-signing certificate In order for clients to install third-party updates, they must trust the code-signing certificate. To do this you can export the certificate and deploy it using group policy. Click on Export Certificate and give the .CER file a suitable name so you know what it is for. Click OK to the Certificate Export Successful popup. Step 5. Deploy the code signing certificate to clients using Group Policy On the domain controller, open Group Policy Management and create or edit an existing GPO. Edit the GPO settings and navigate to Computer Configuration, Policies, Windows Settings, Security Settings and select Public Key Policies. Right Click on Trusted Publishers and click on Import. In the wizard that appears, click Next and then browse to the location where you saved the code-signing certificate, select it and click on Open. The certificate will be displayed, click Next. Click Next again and click Finish to complete the wizard. Click OK to the Import was successful message. Note: If you used a self-signed certificate, you must also import the exported .CER file to the Trusted Root Certificate Authorities certificate store. Right-click on Trusted Root Certification Authorities and select Import, follow the same process as above to import the exported .CER file. Once done, click OK to the Import was successful message. Step 6. Enabling the group policy object for allowing third-party updates to be used on clients In order that clients will allow 3rd party updates to be installed, you need to configure the Allow signed updates from an intranet Microsoft update service location policy to Enabled. To do so, select the GPO created above and navigate to Computer Configuration, Administrative Templates, Windows Components, then choose Windows Update, select the Allow signed updates from an intranet Microsoft update service location policy and set it to Enabled as shown below. Step 7. Setting the schedule for the publishing service If you need to configure the Patch My PC tool scheduling service to check for updates, then click on the scheduling options tab, the default options are displayed and should be adequate. Step 8. Enabling the product you want to include for automatic publishing Next on the Product Rules tab, select the Product (or Products) that you want to include for automatic publishing. In this guide you will select Notepad++. You can scroll up and down to find the vendor, or use the search magnifying glass to search. Right clicking on a product will change from Full-Content to metadata, and this allows you to report on compliance information for a large number of updates prior to deciding if you need to patch computers with a particular 3rd party update. Once done, click on Apply. Step 9. Trigger the initial publishing of updates To trigger the initial publishing of updates available from selected vendors, click on the scheduling options tab and select Run Now. You’ll get a popup informing you to check the log. The Log in question (PatchMyPC.log) can be found in the General Settings tab by clicking on Open Log File and is best viewed with CMTrace. As you can see below it’s found some updates for Notepad++. Step 10. Synchronize Software Updates in ConfigMgr In SCCM, select Software Library, Software Updates All Software Updates and click on Synchronize Software Updates. You can monitor the progress of that operation via the wsyncmgr.log available in the SCCM logs folder. And once the sync is complete you’ll see a line like Sync time:…. Step 11. Configure Products in ConfigMgr Once the sync is complete, select the Administration workspace, select site configuration, sites, right click on your site and configure site components, select Software Update Point as shown below. Next, select the Products you had previously selected in the Patch My PC tool. Click Apply and then OK. Next, trigger another Synchronize Software Updates in the SCCM console to synchronize the newly selected product(s). You’ll note that a full sync is required due to a change in categories. And you can see that NotePad++ updates are found And after a successful sync, they show up in the ConfigMgr console (refresh the console view), and can be deployed using whatever method you prefer, create an ADR (Automatic Deployment Rule) or Software Update or Software Update Group. Summary When using Patch My PC and System Center Configuration Manager (Current Branch), it’s never been easier to patch your computers with applicable 3rd party patches.


-
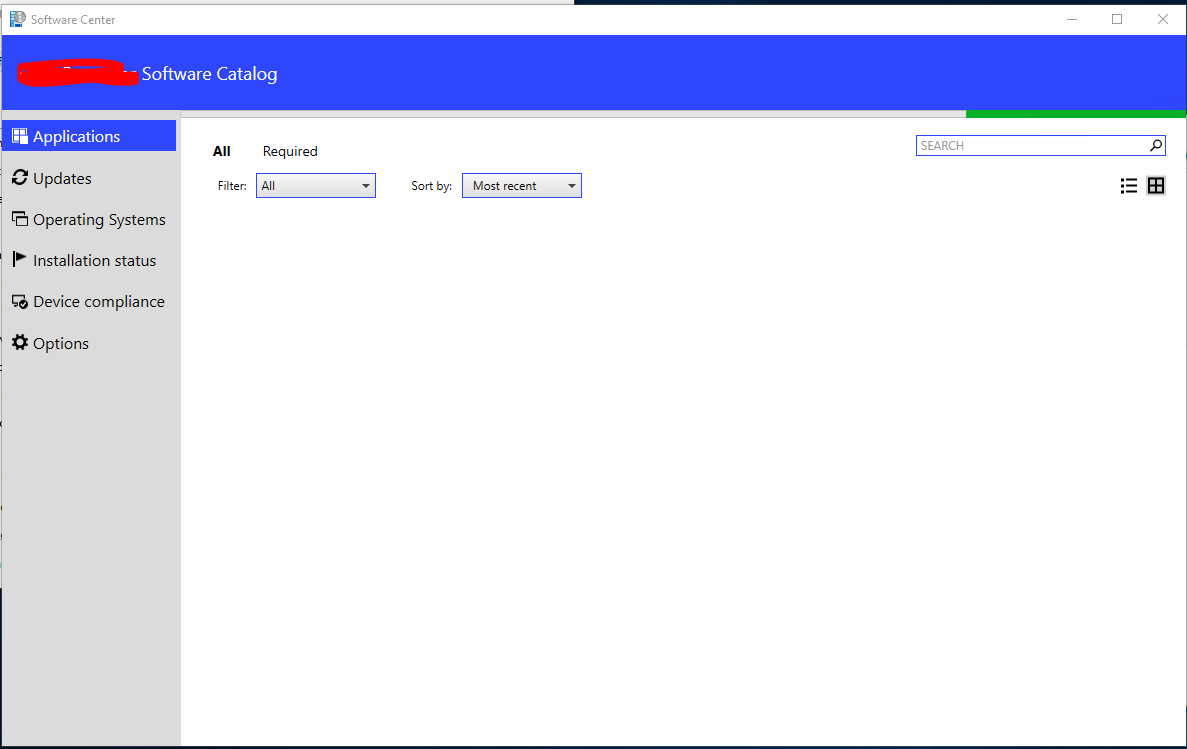
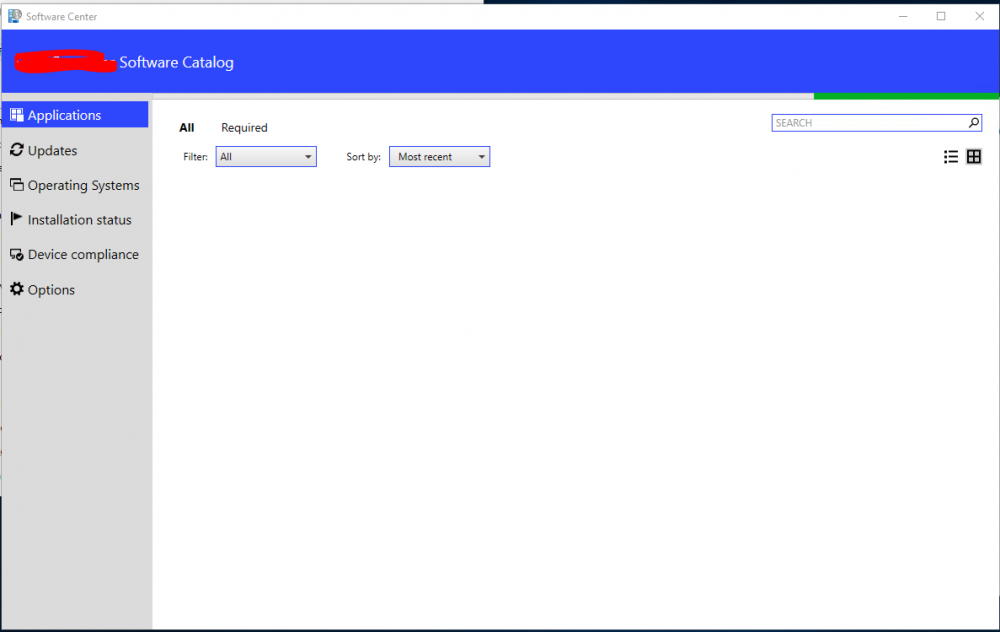
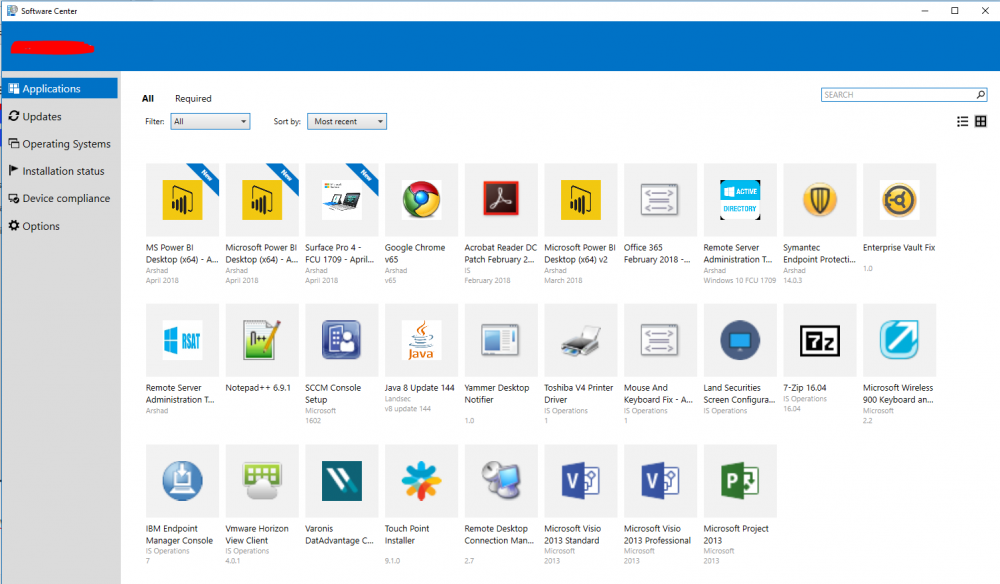
We upgraded our SCCM to 1702 a few weeks back and I noticed that Software Centre now takes ages to load the Application Tab. This has happened to 800+ machines, except very few. (1 or 2) SoftwareCentre1 ( look at the name on top, it says xxxxxxx Software Catalog - xxxx being the company name) - this one takes at least 1 minute to load - this is the SoftwareCentre that is on 800+ machines and then there's SoftwareCentre2 (which is on 1 machine so far) which works perfectly, it takes around 2-3 seconds to populate the apps + other stuff. Notice the name on top, it just says the company name as opposed to Company Name + Software Catalog Can someone please advise? Many thanks, RiDER
-
 I have 300 servers that use a different endpoint protection (Sophos) than my workstations (SCCM MS Endpoint). How can I keep the servers from reporting in my system center endpoint statistics. They show as endpoint protection agent not installed, and it's messing up my numbers. Thanks
 -
I cannot get an uninstalled program to stop showing in SCCM query. I've: Uninstalled it. Run a script to remove the registry settings Deleted the program folder. Run Hardware and Software Inventory Cycles from the Workstation clients The program is still showing up in my query against the program name. I need to remove this from the SCCM report ASAP because of an audit. (It was accidentally added to one of the gold images, even though it's not been used in 10 years.)
-
 Hello, We are just starting down the path of SCCM and building out a DEV environment. Will install 1702 then upgrade to 1710 and then possibly 1802. Looking at the Hardware and Server requirements wondering if anyone could shed any light into their builds. There are a number of posts out there talking about the (2) different install scenarios. Do more people install SQL locally on the Primary site server or do they install it on a remote server - which could be beneficially if you're looking at clustering your SQL environment. We're currently an Oracle shop which really doesn't help us out. The other Q I have is in regards to the hardware requirements. Our PROD environment will only start off with approximately 1000 clients. Reading the MS recommendations they seem rather beefy especially if you do install the SQL server locally (16 cores / 96GB ram). Are those numbers exaggerated? Thank you ZT
 -
I am upgrading 3000 PCs from Windows 7 to Windows 10 with SCCM 2012. There are 10+ different models (mostly HP). I've done about 400 so far. After the upgrade to windows 10, the Intel video driver is stripped and replaced by a generic Microsoft video driver. The different models require different drivers. How can I update the video drivers on the multiple versions of PCs during the OS upgrade task sequence? Thanks!
-
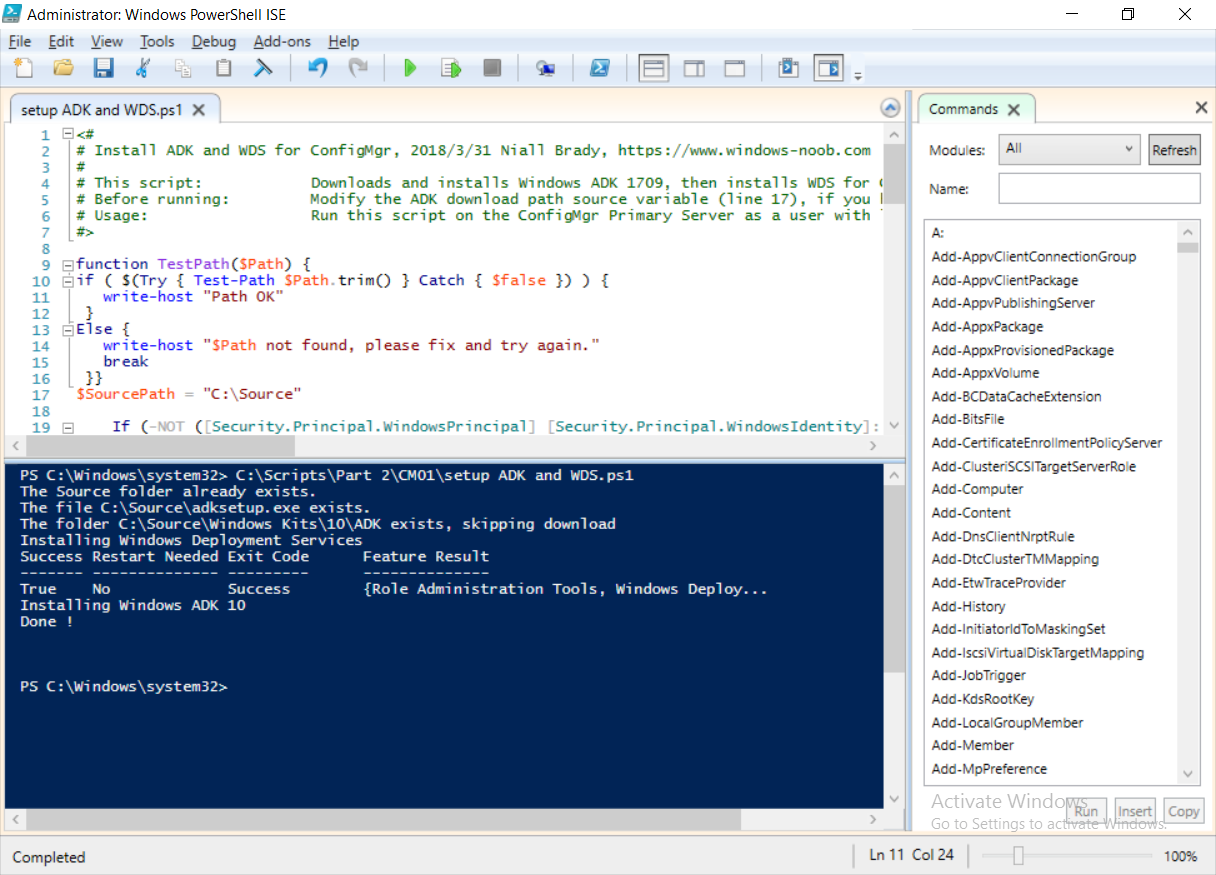
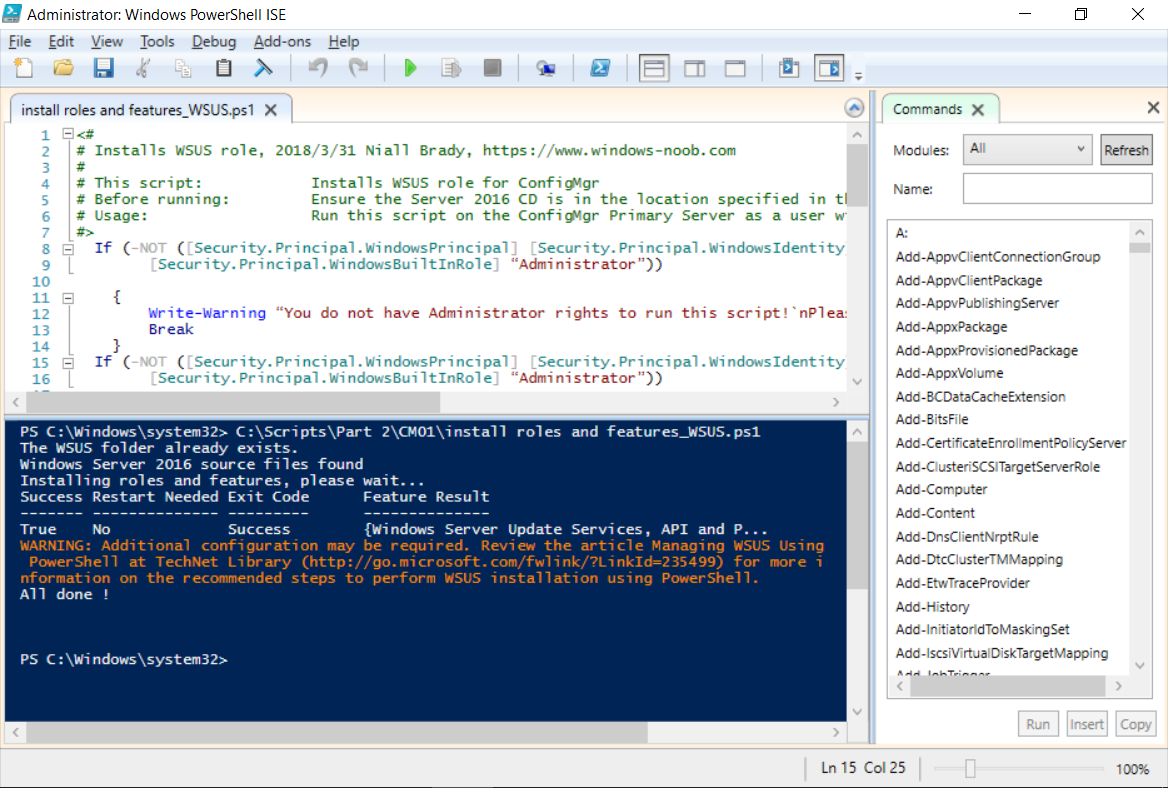
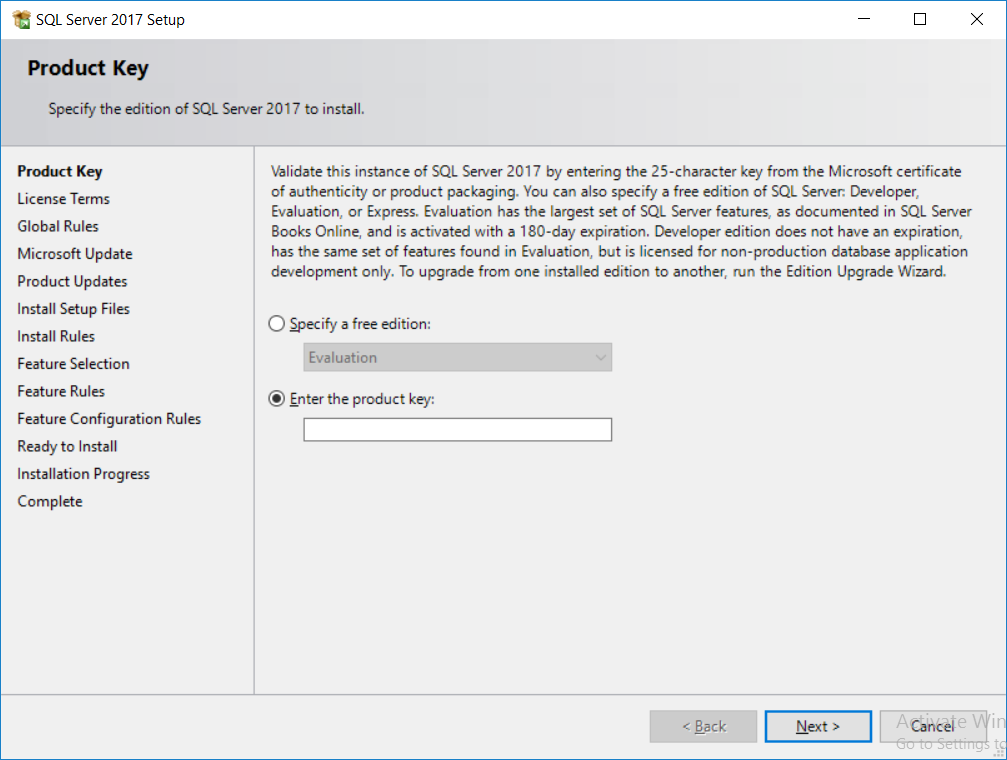
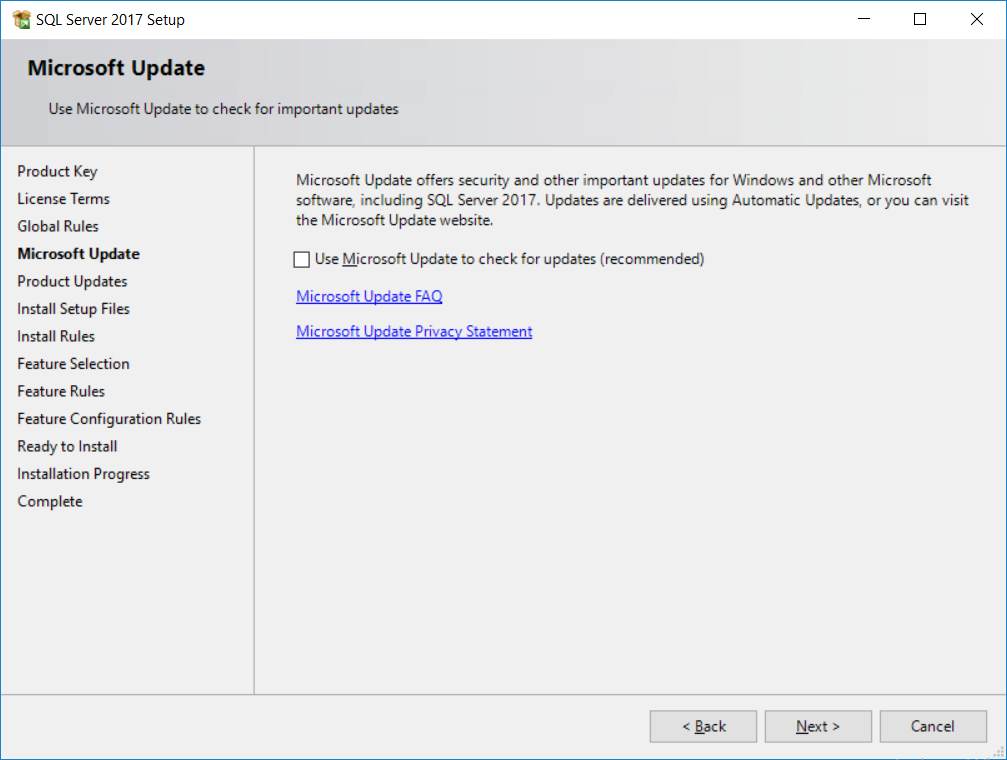
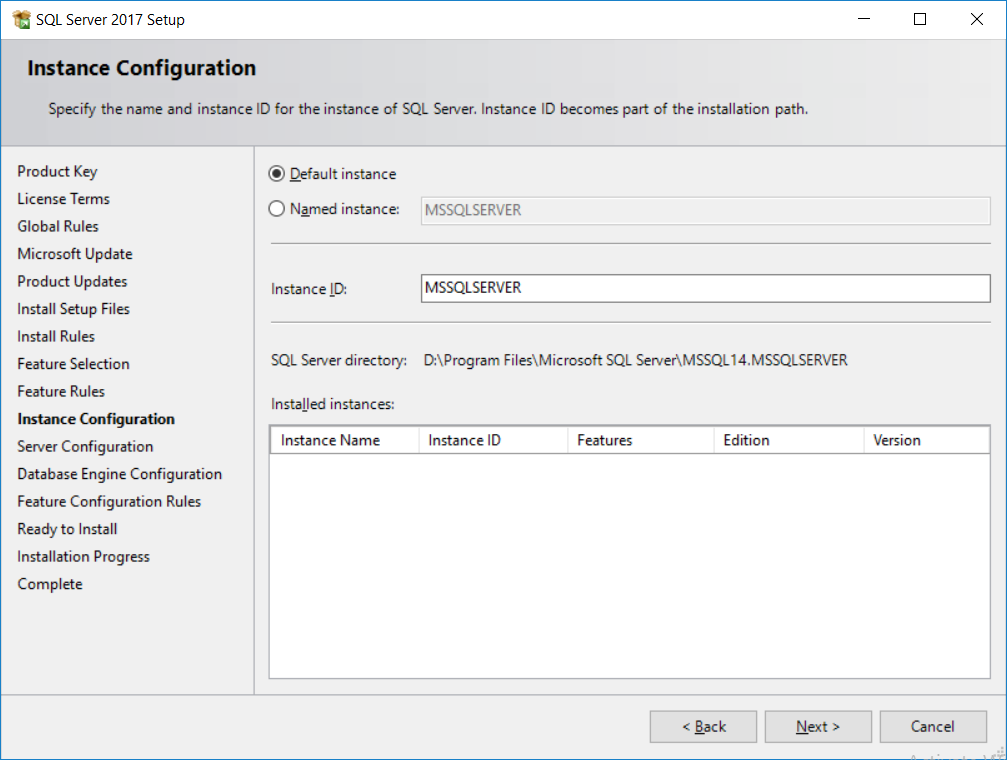
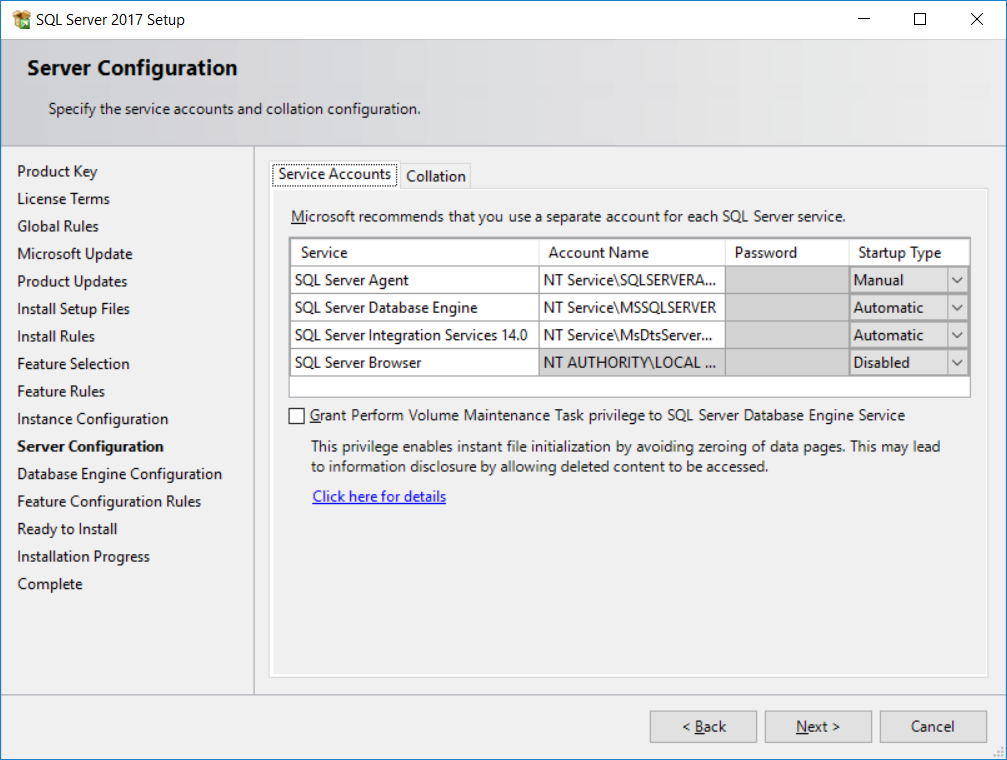
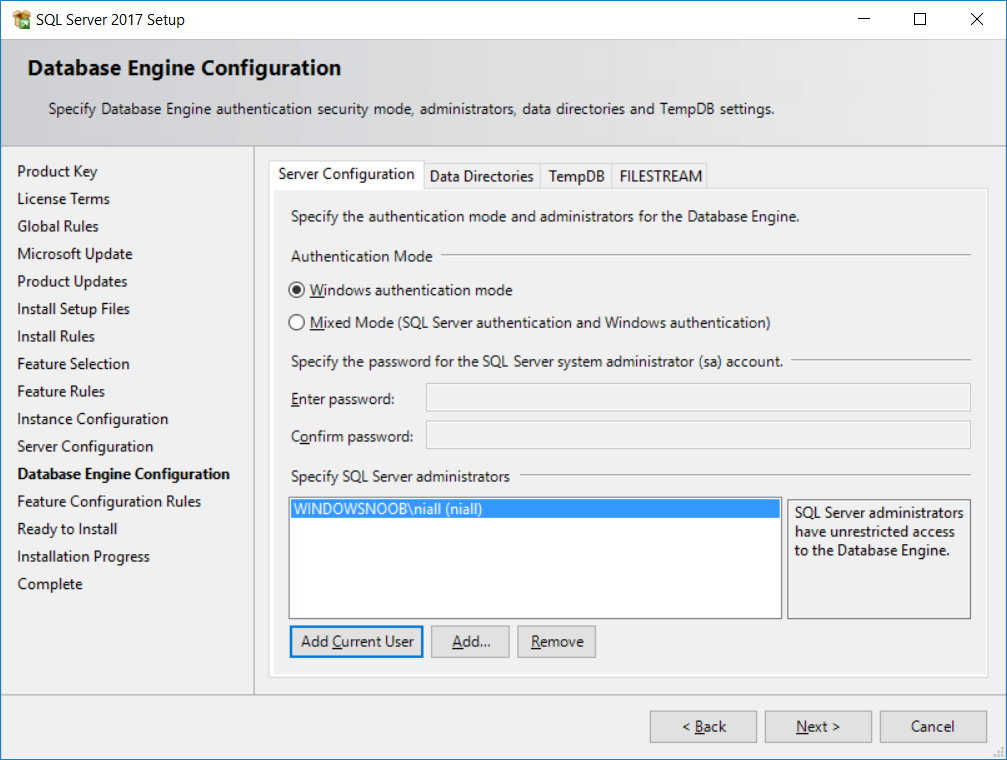
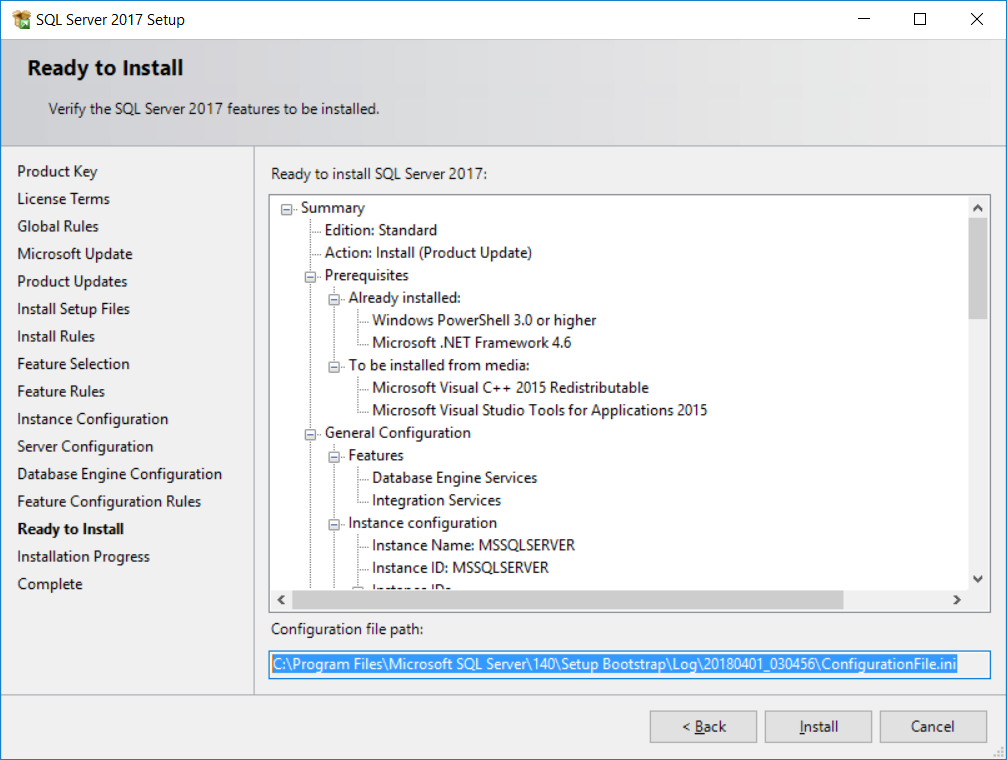
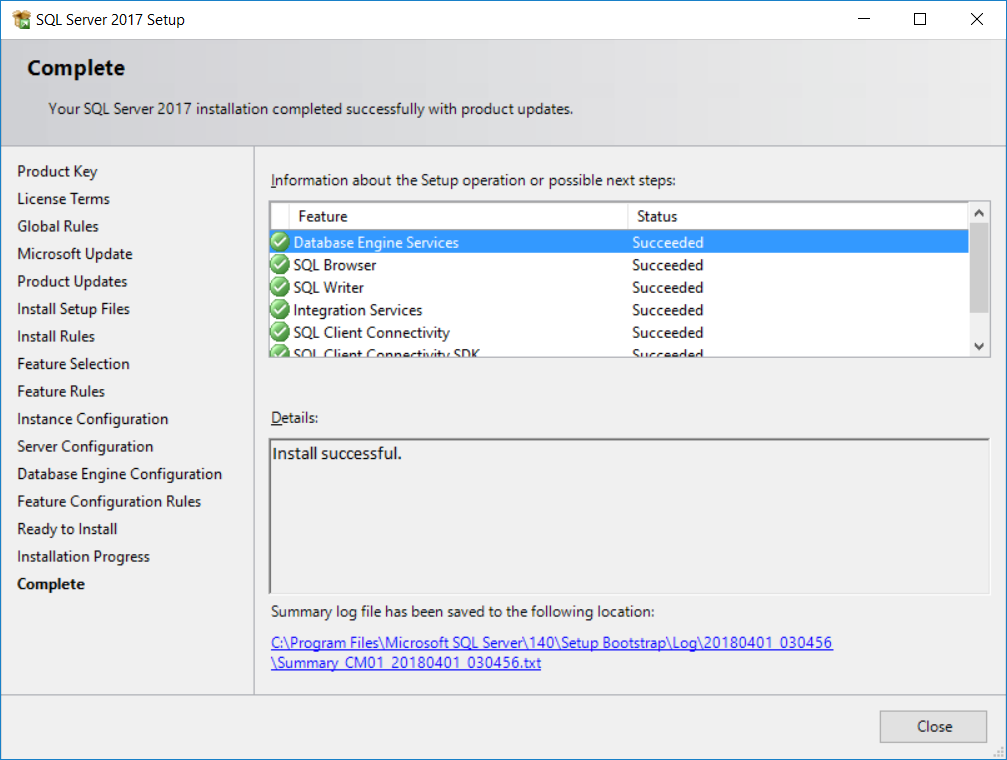
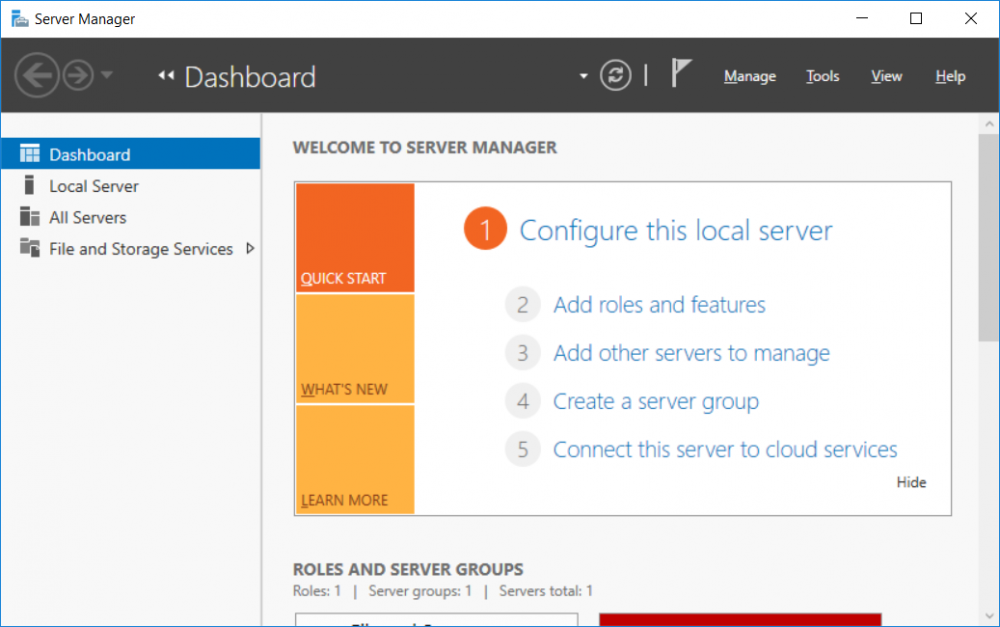
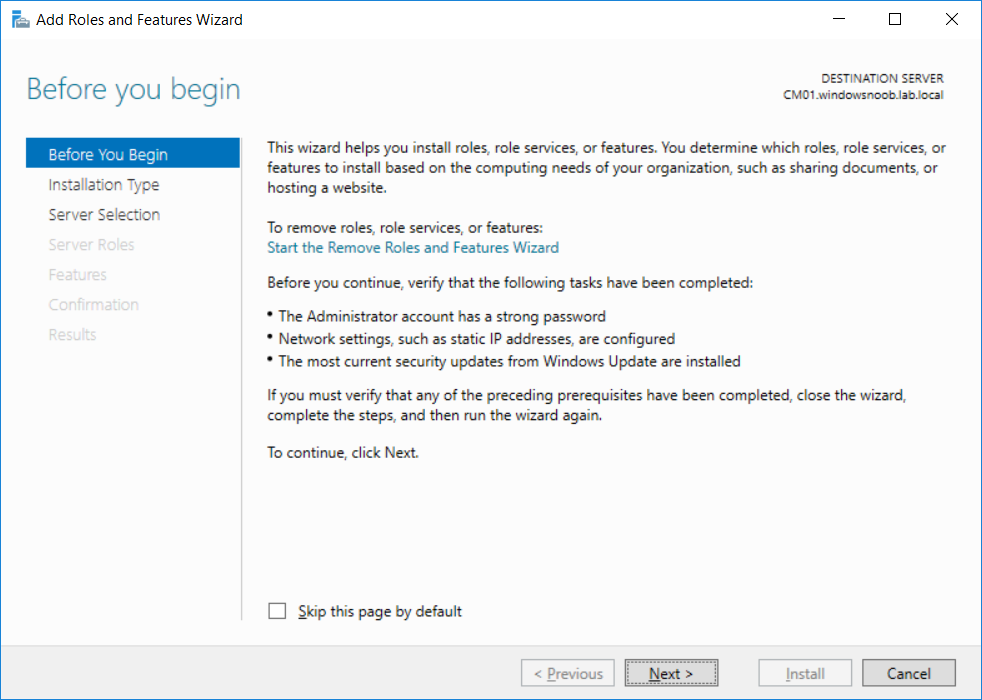
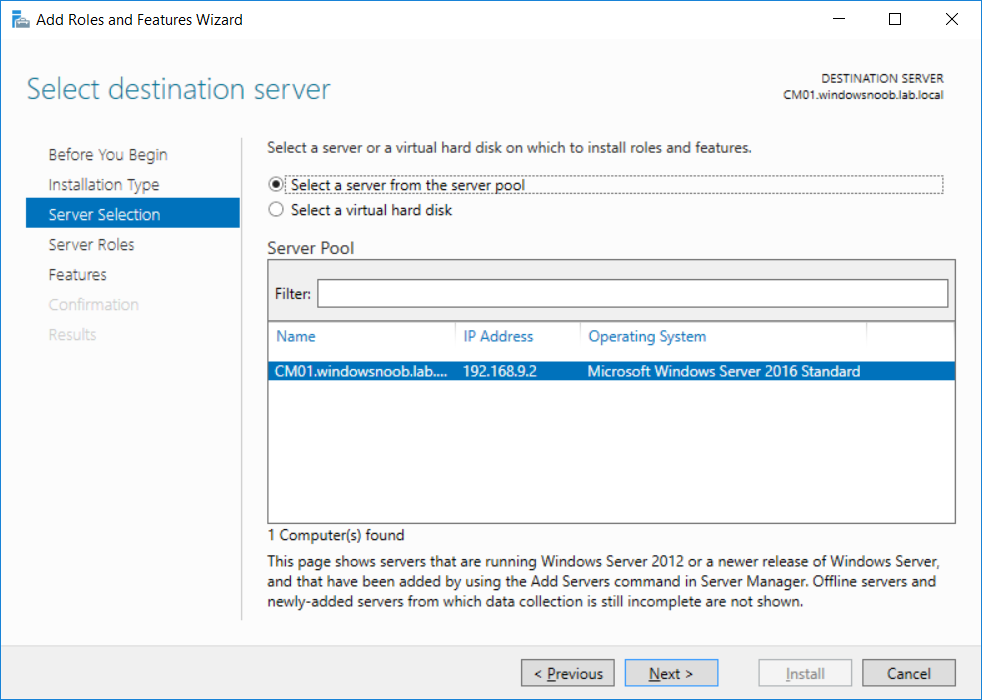
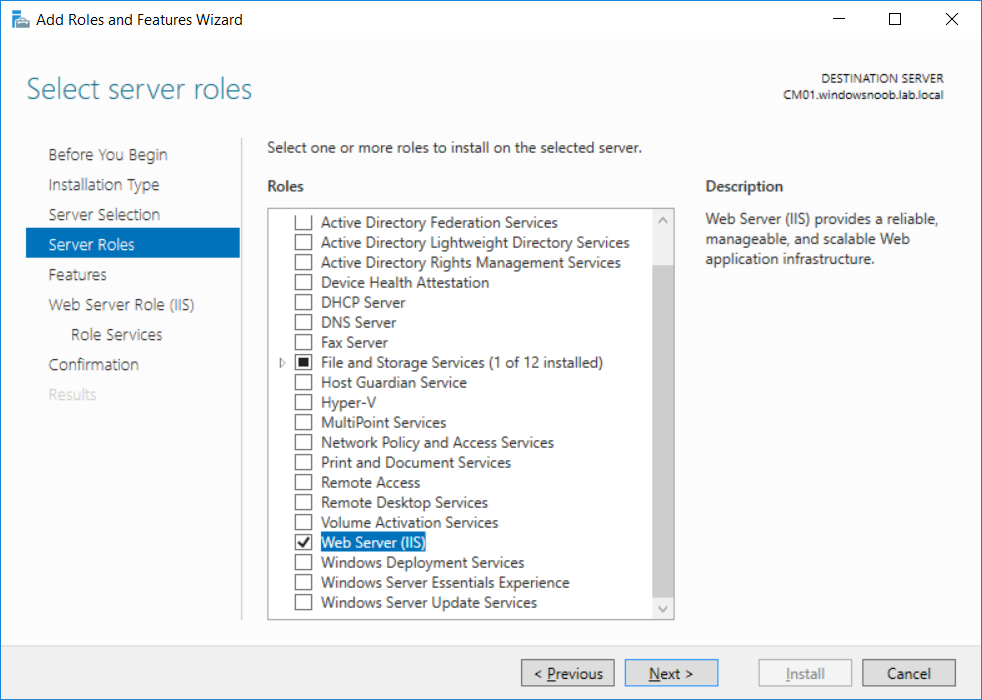
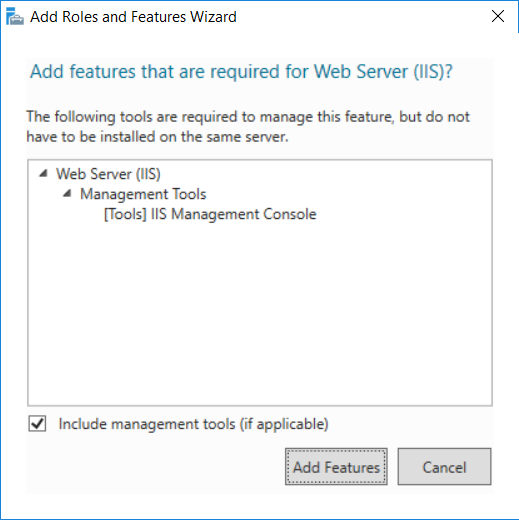
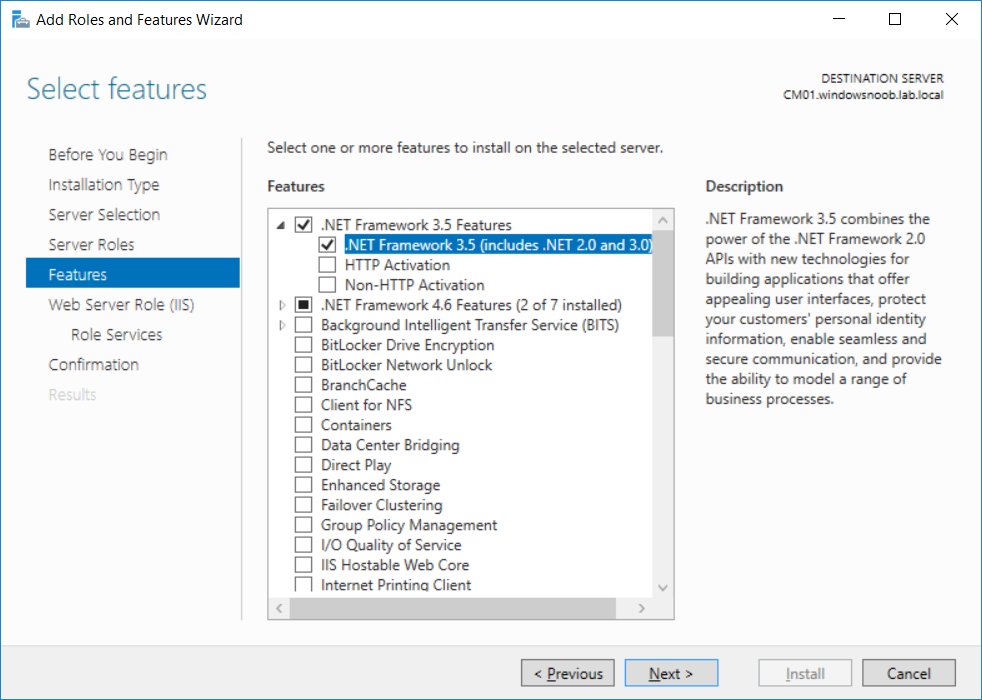
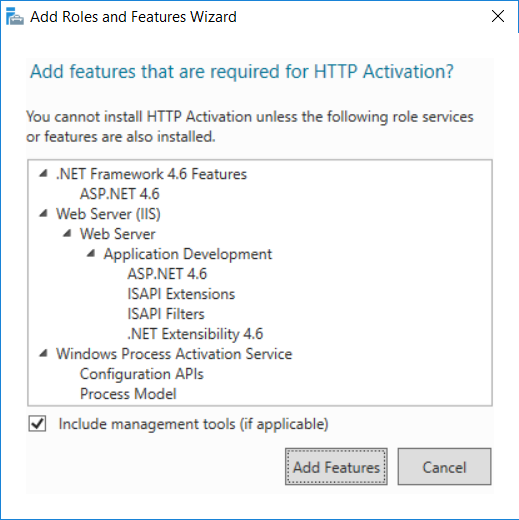
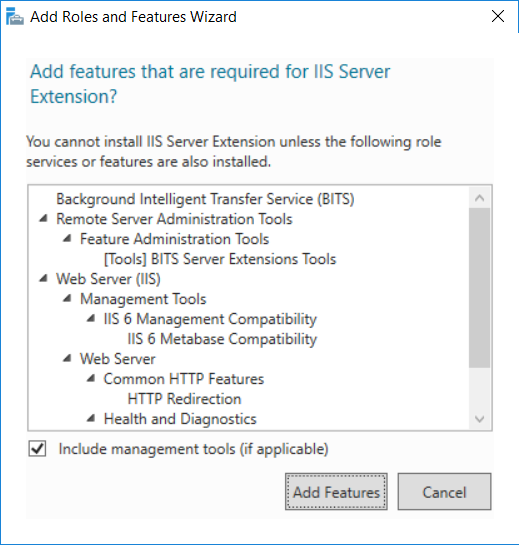
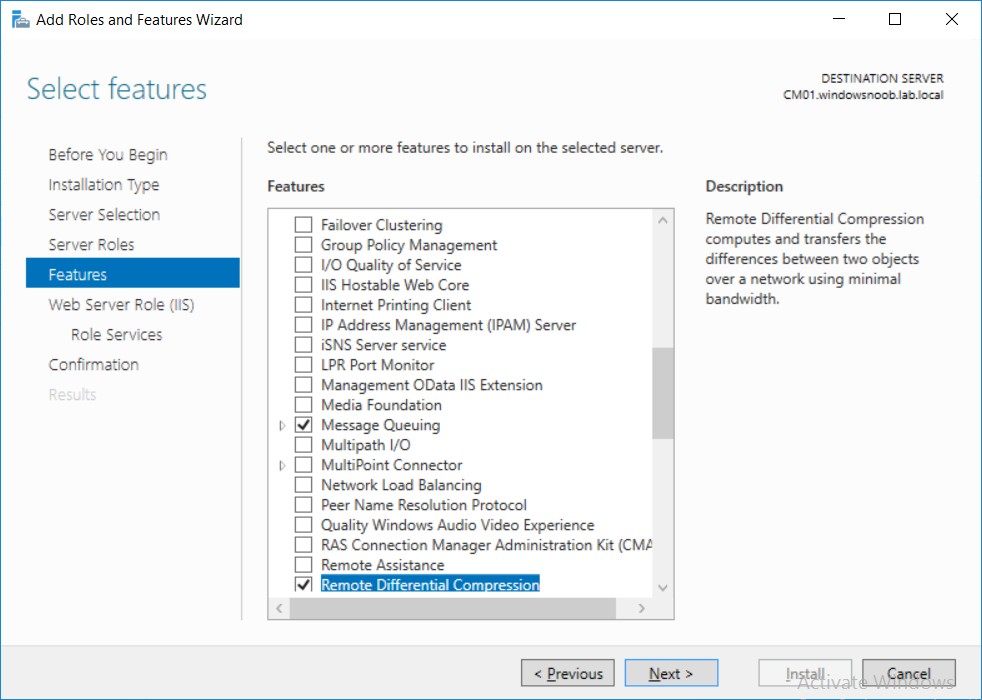
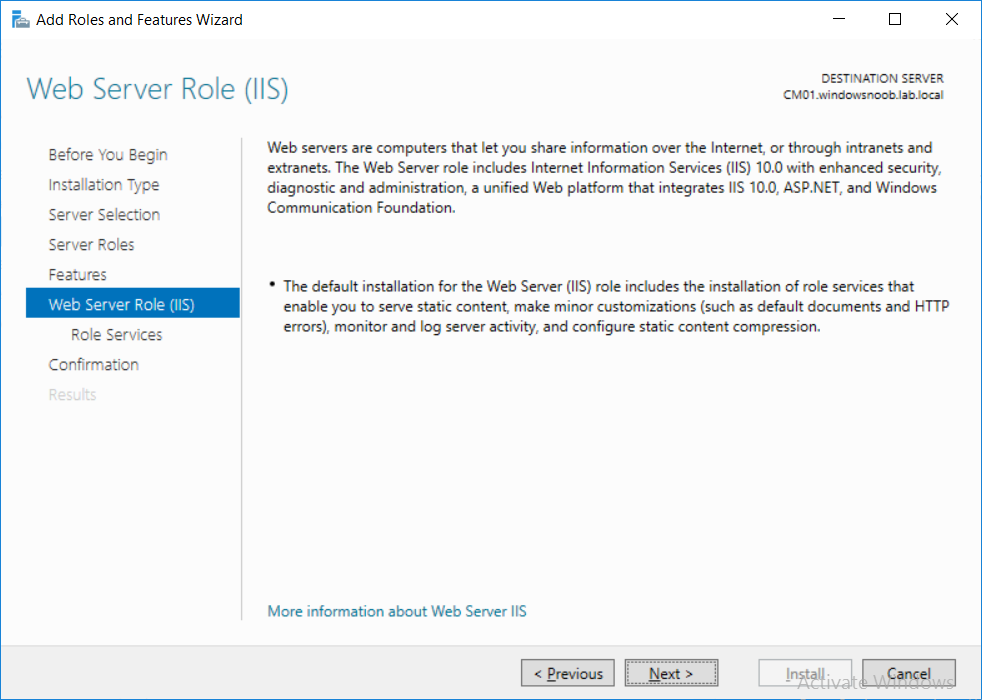
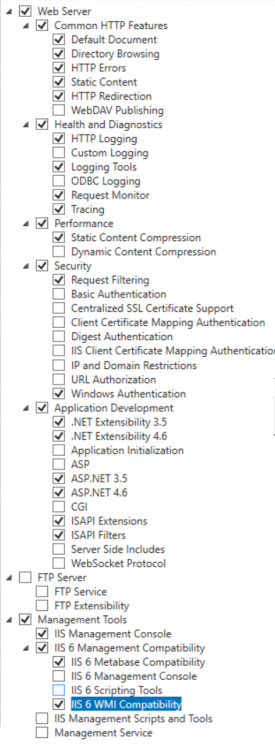
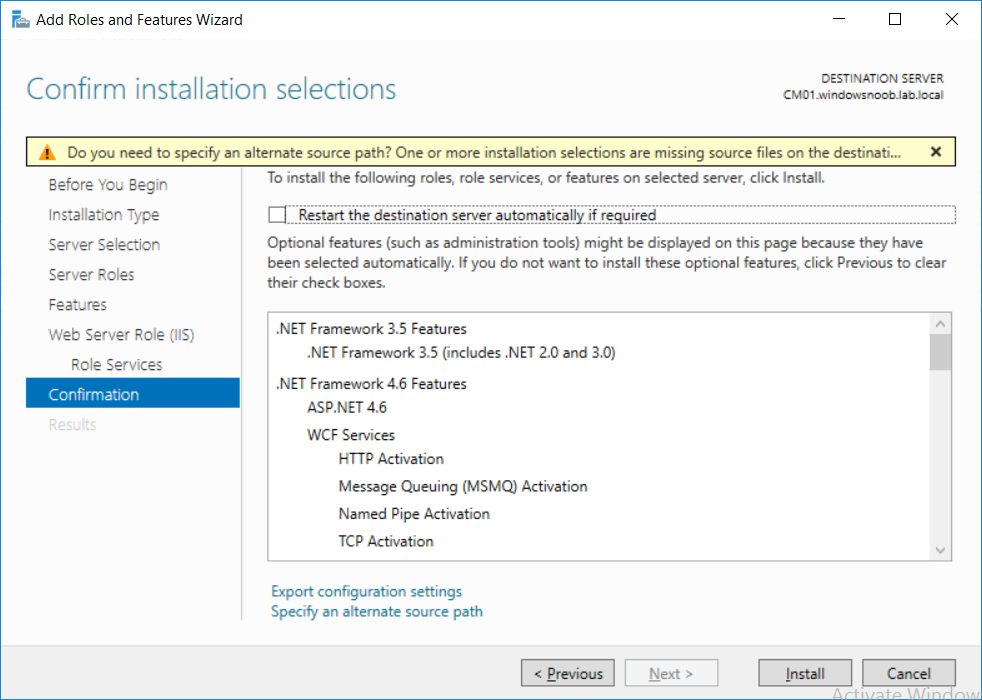
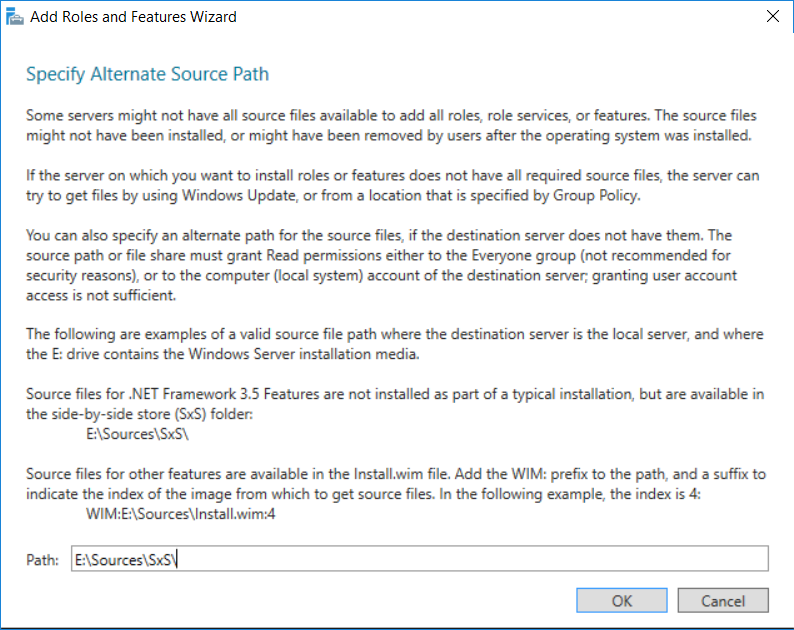
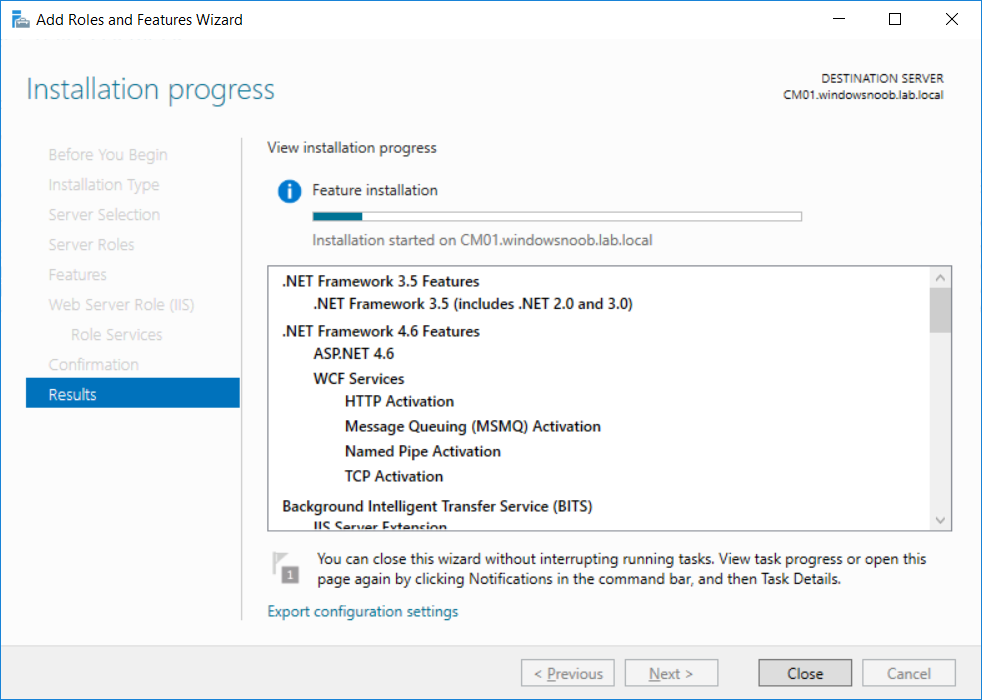
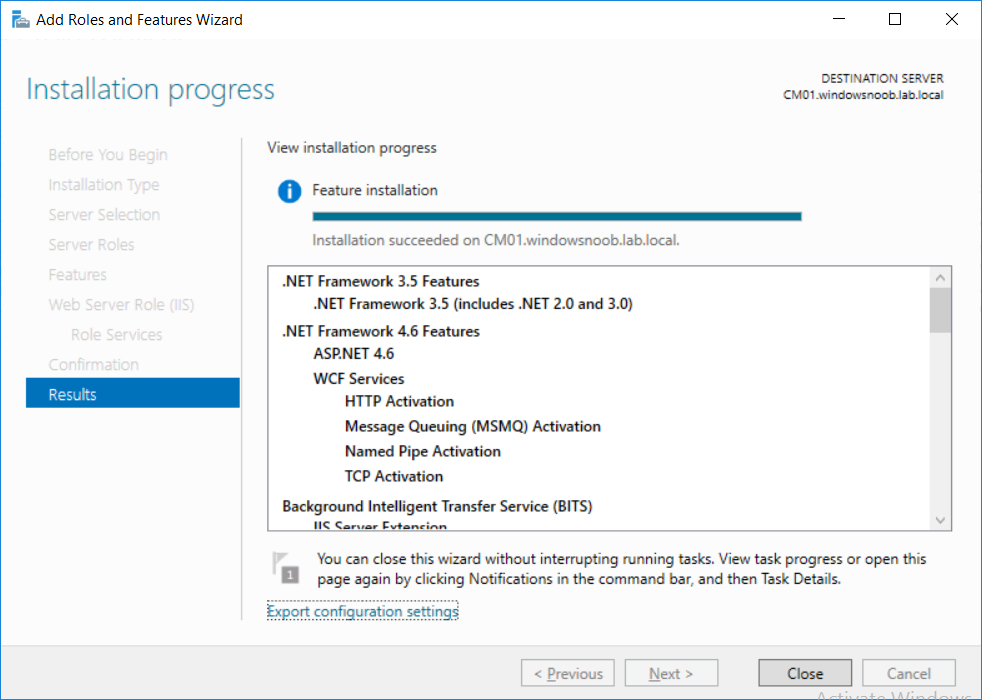
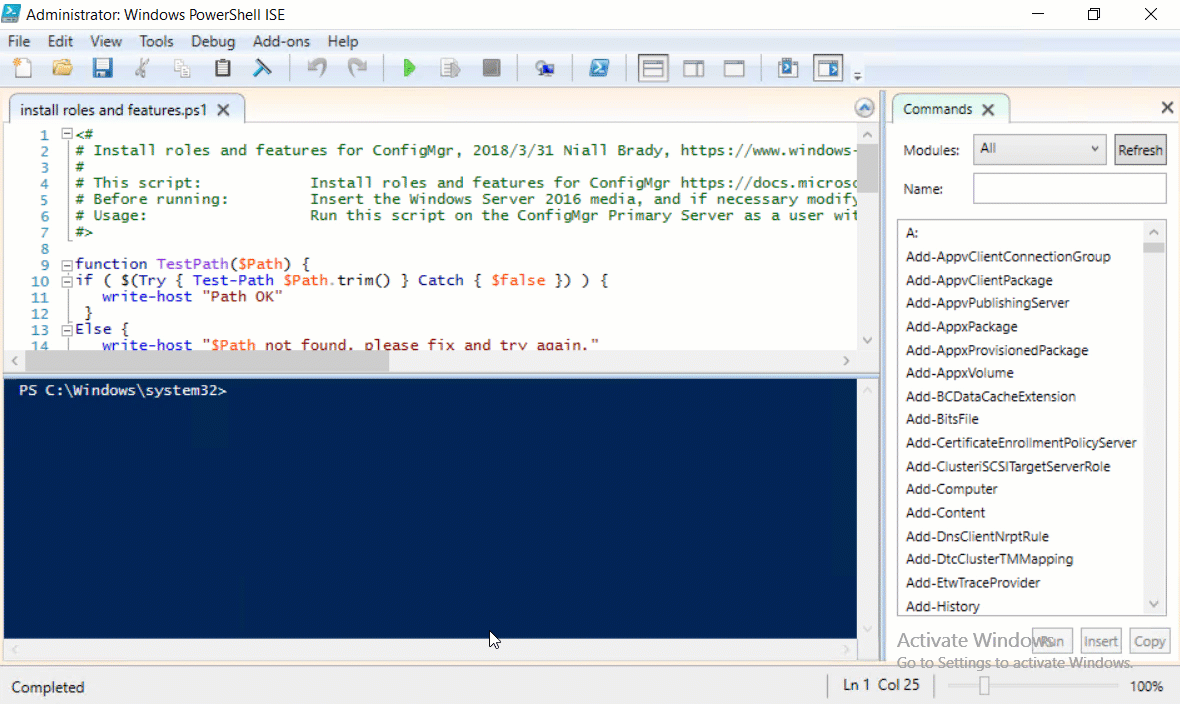
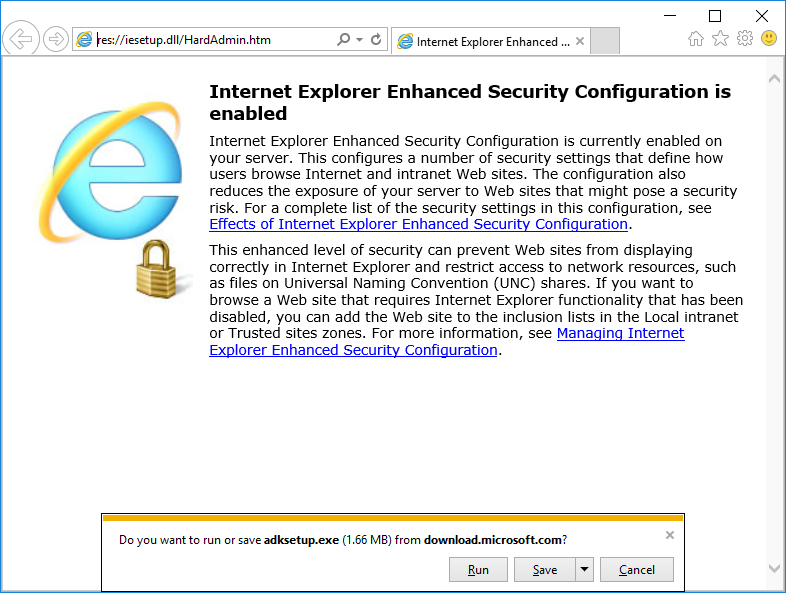
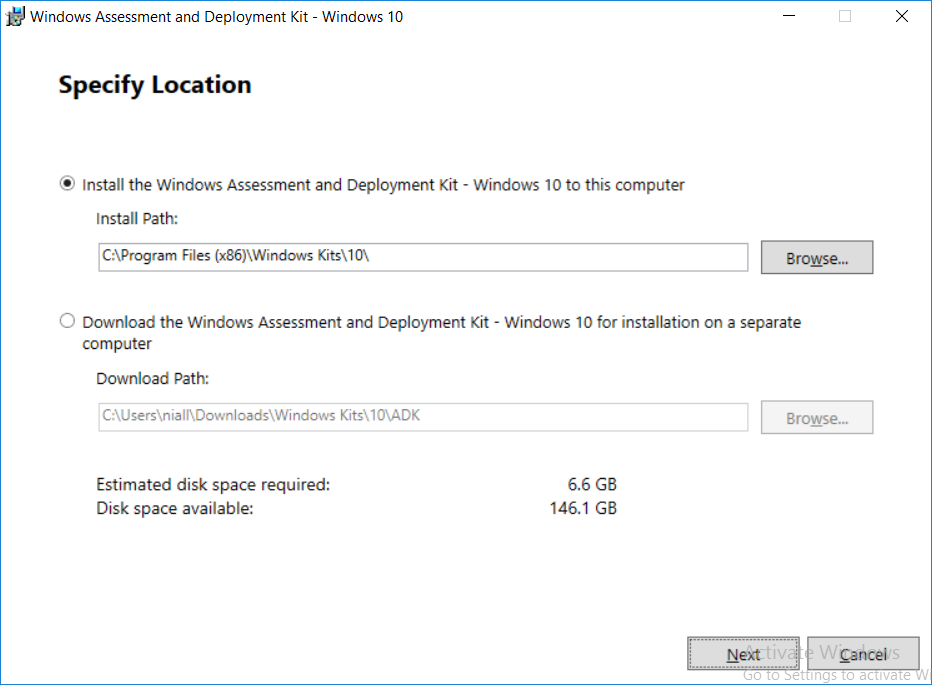
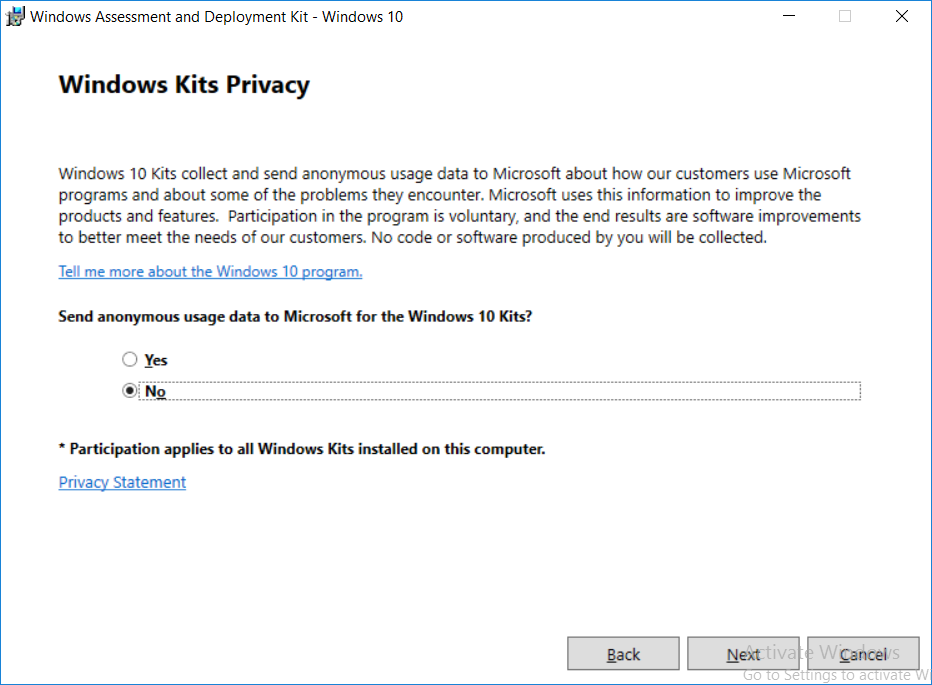
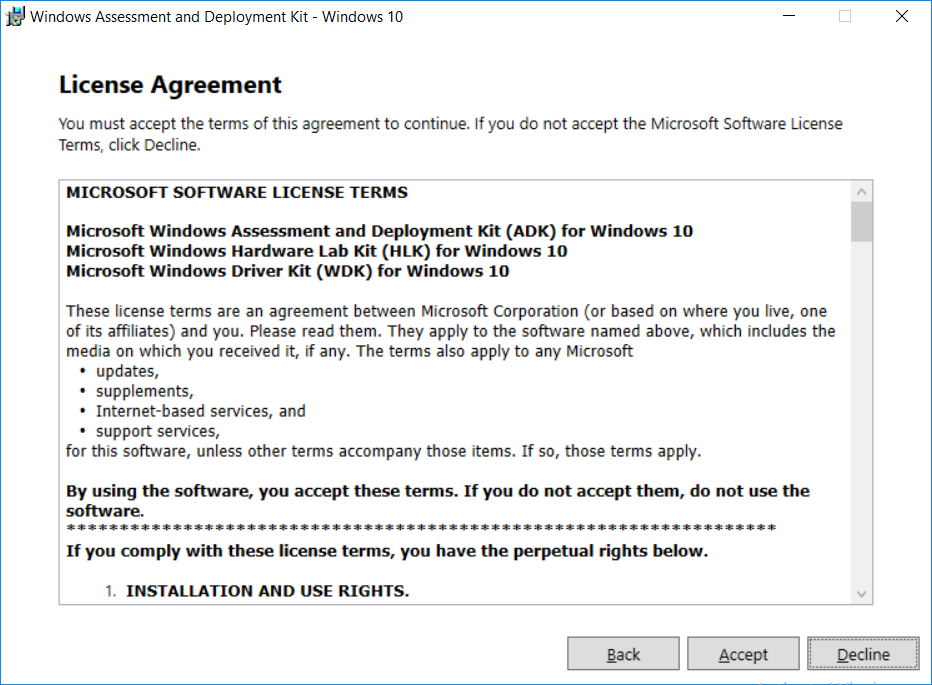
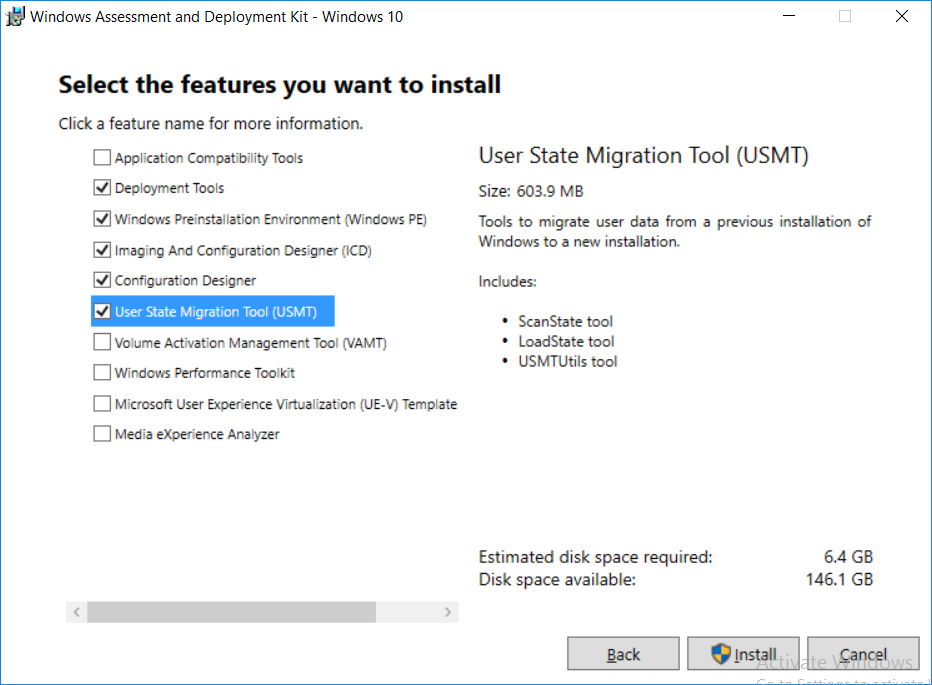
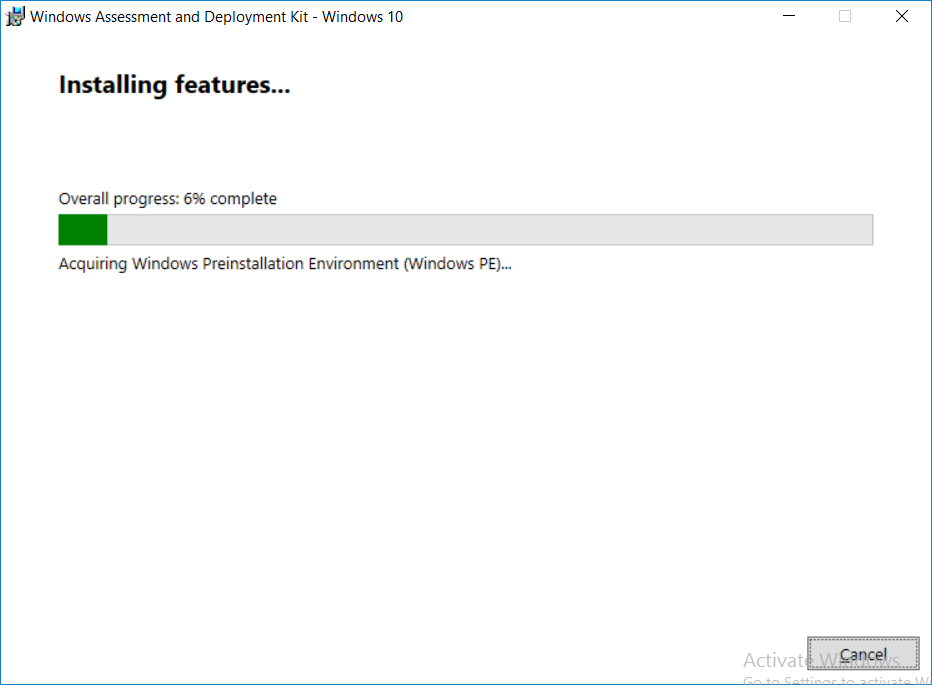
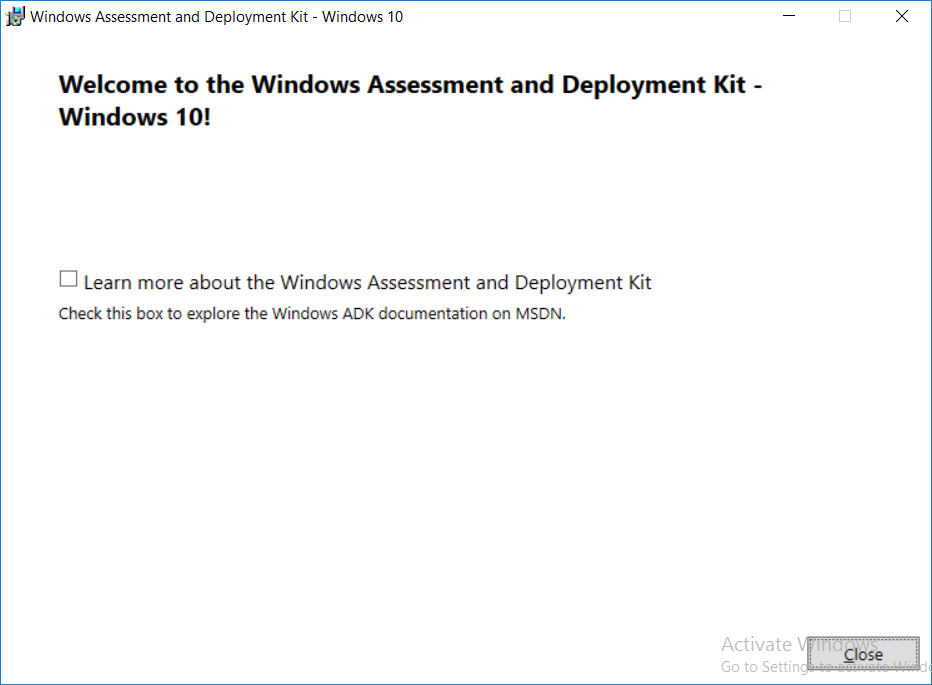
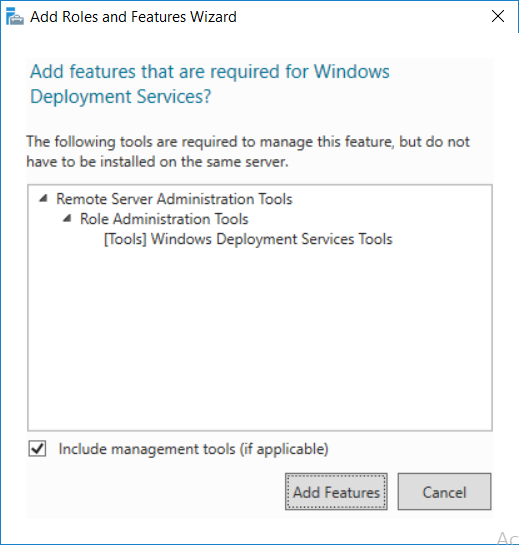
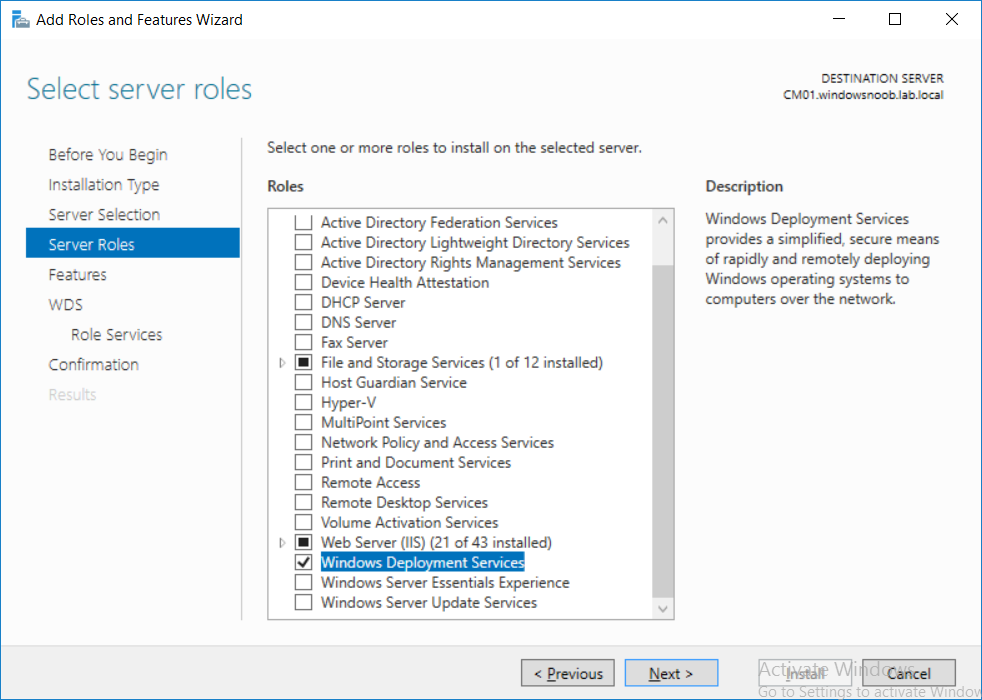
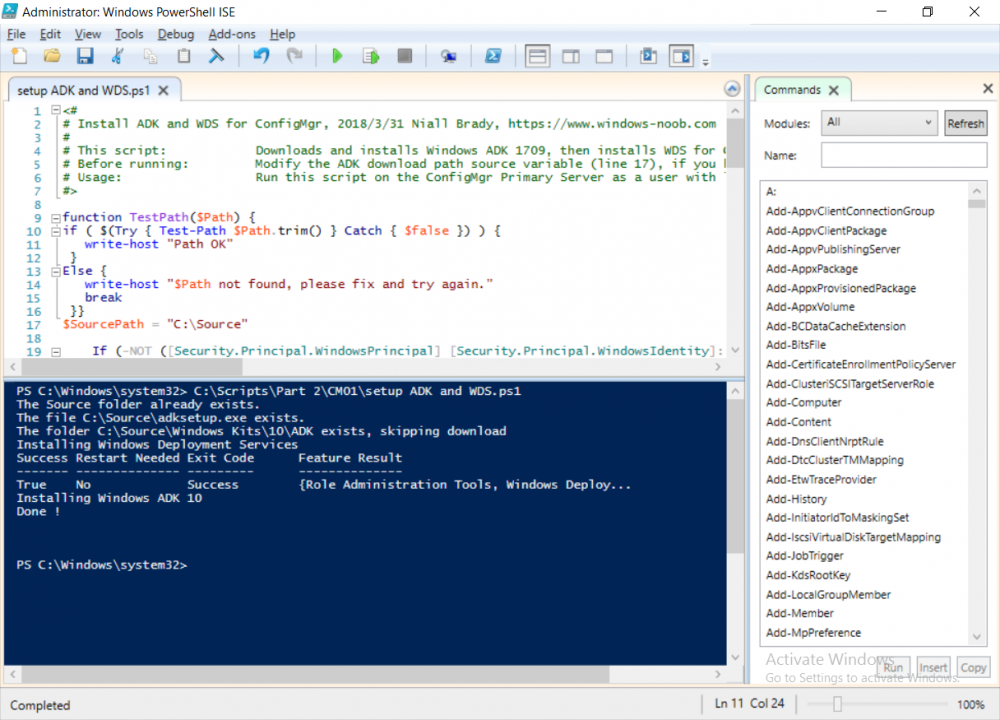
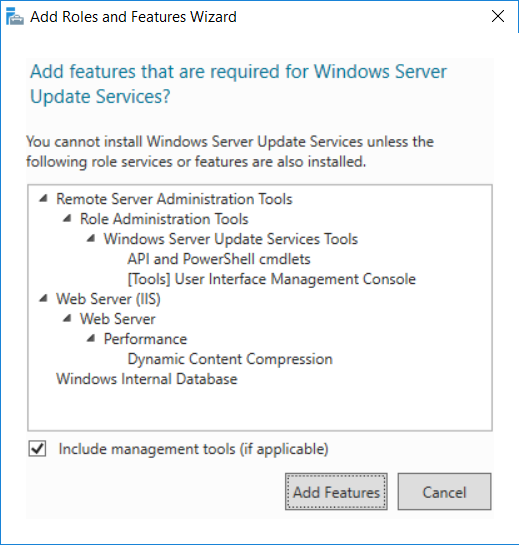
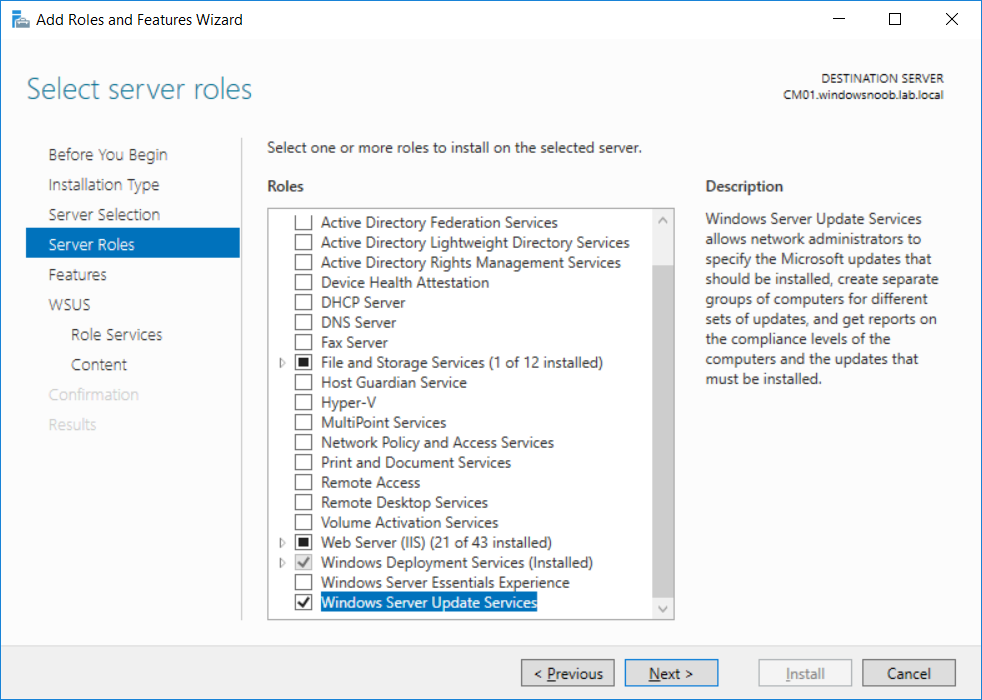
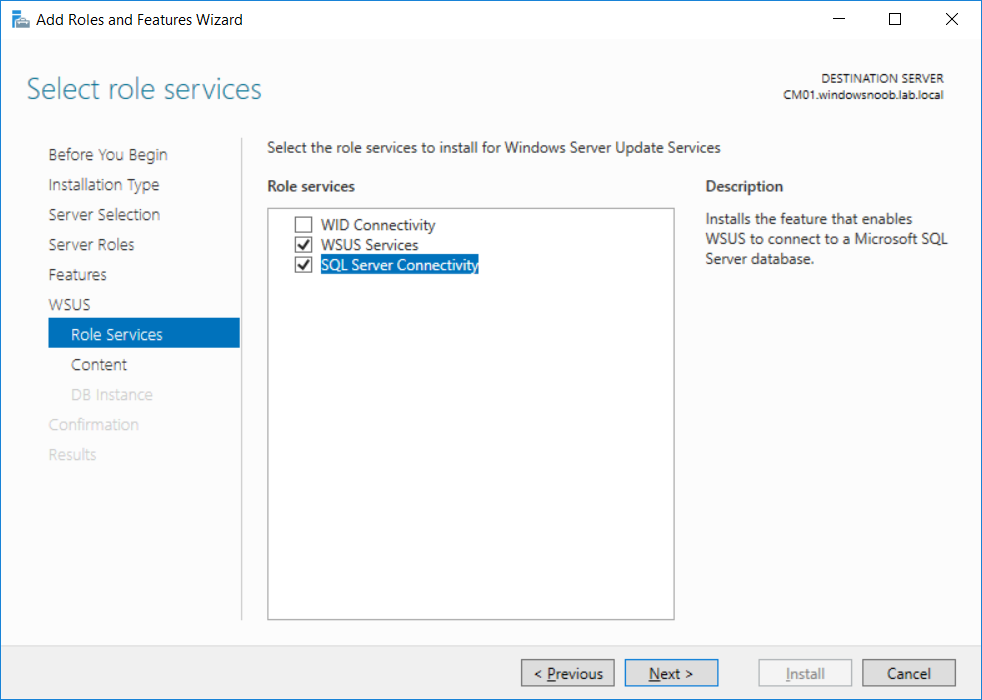
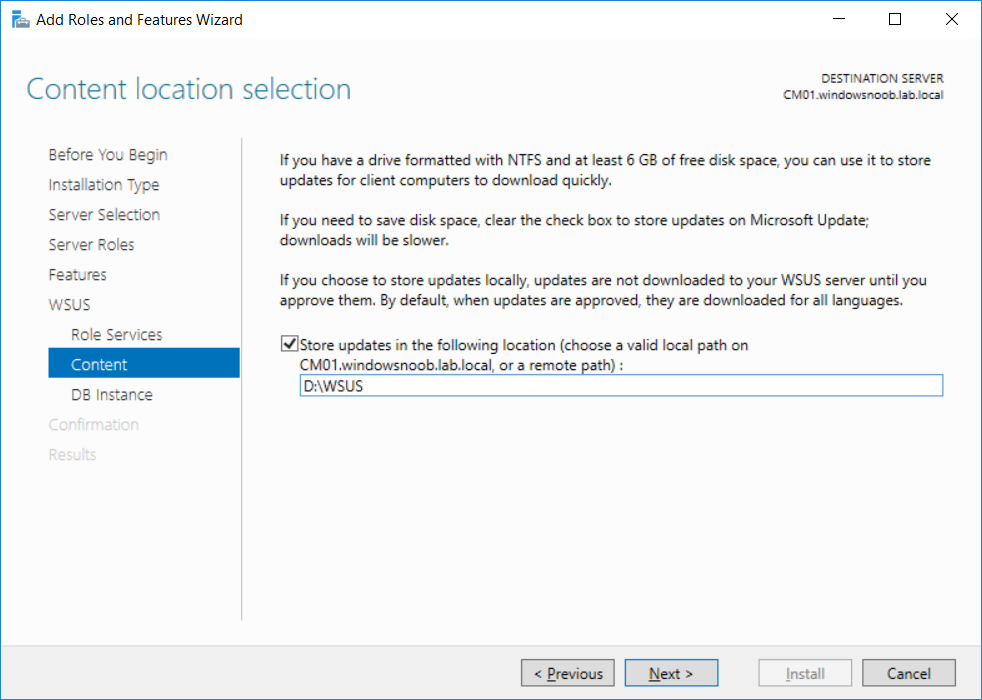
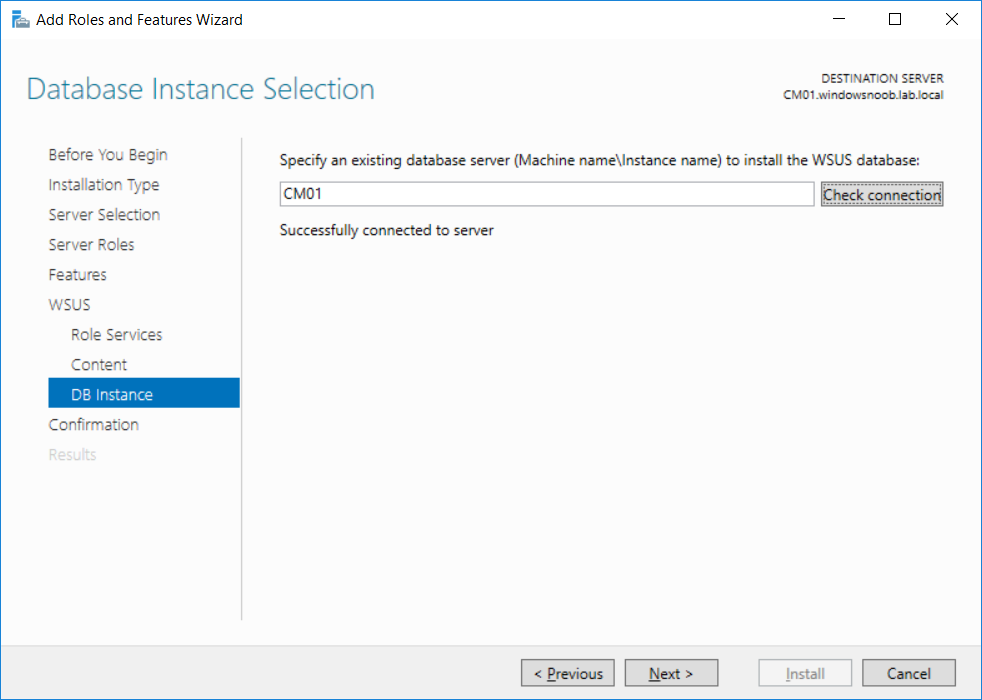
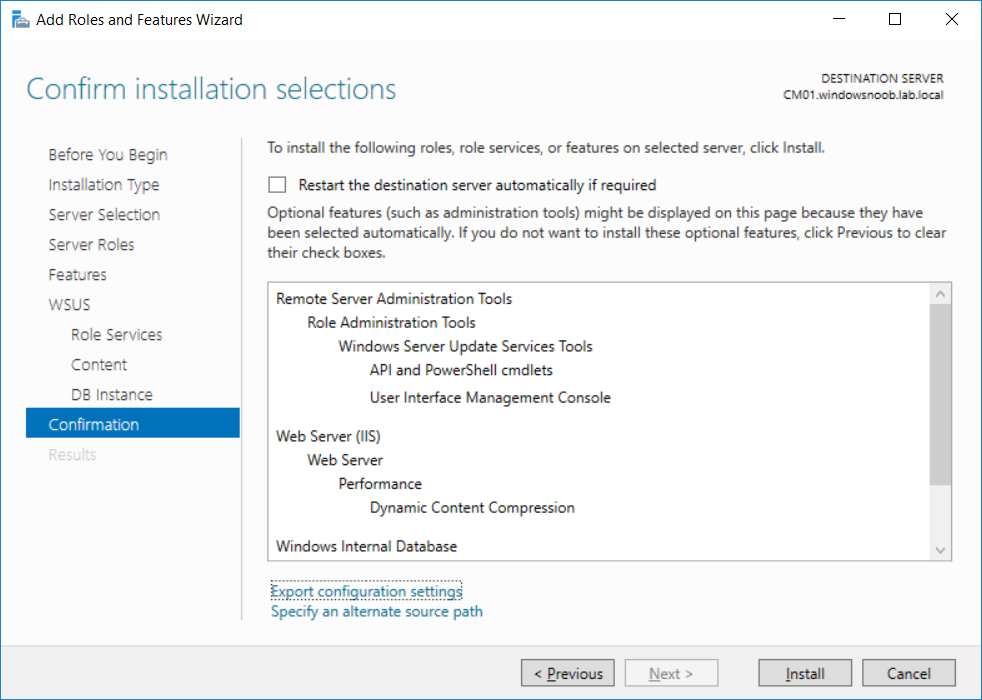
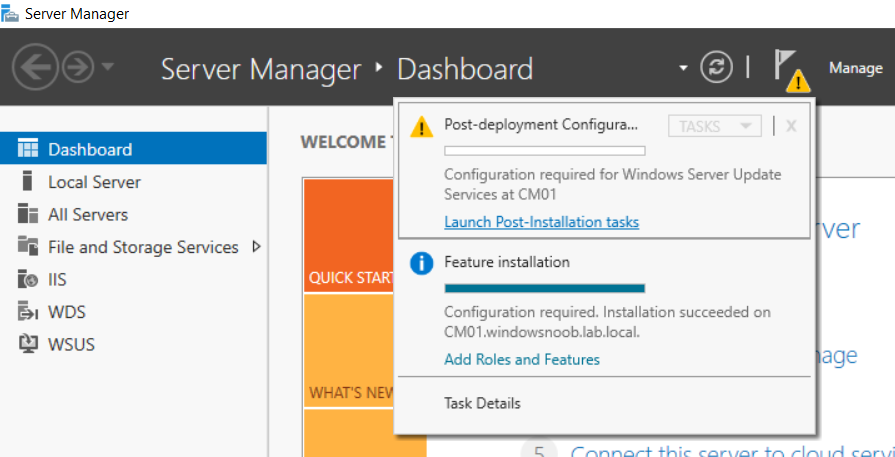
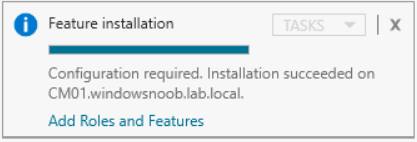
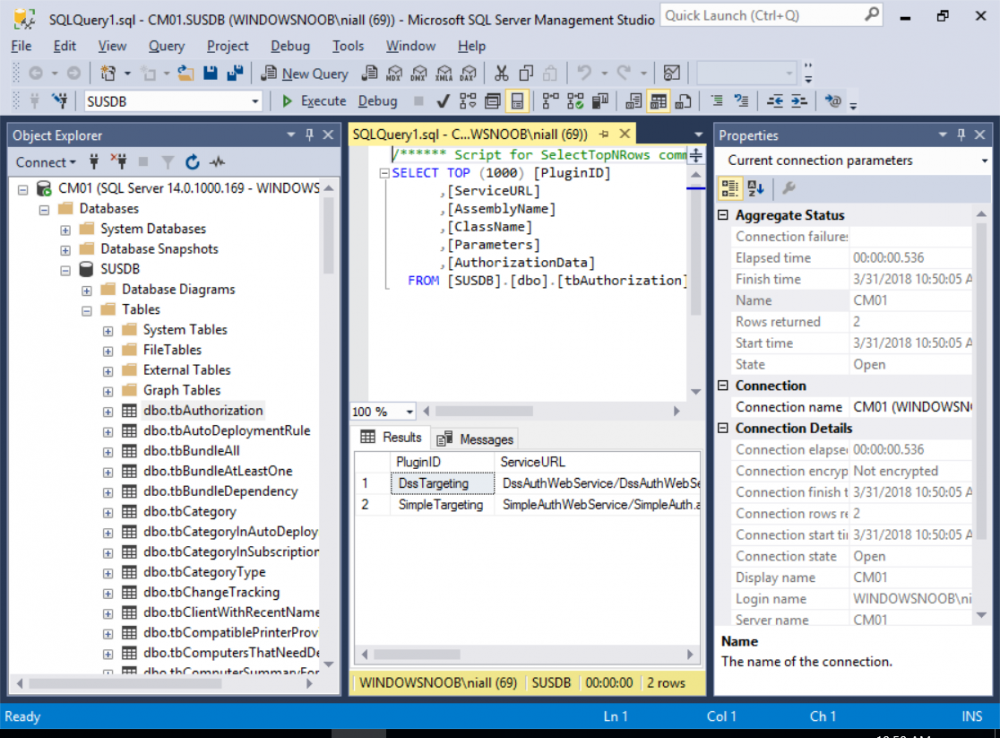
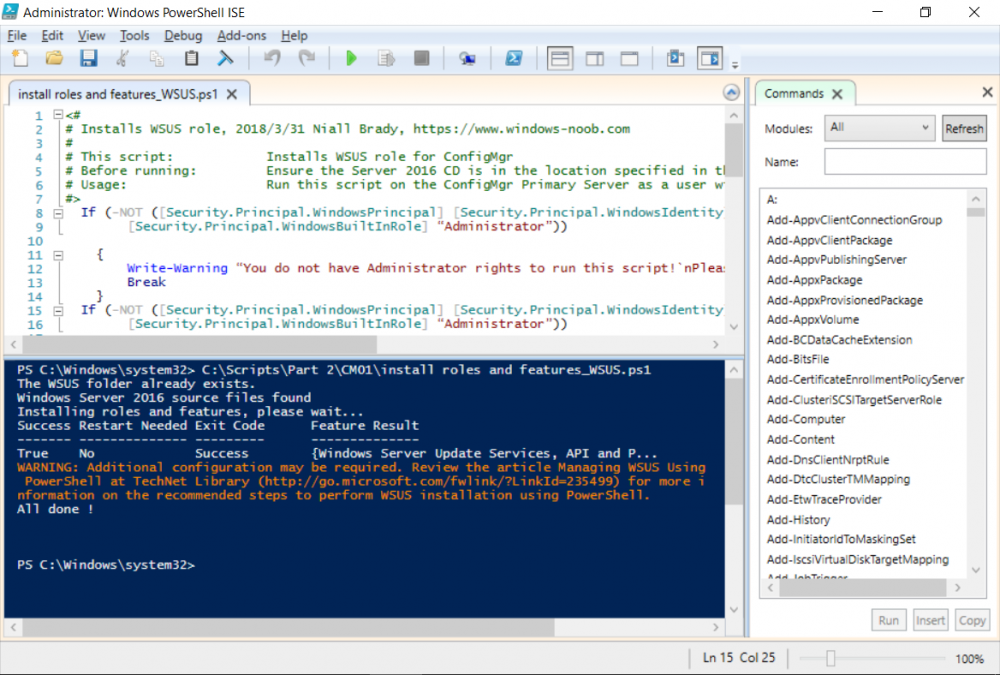
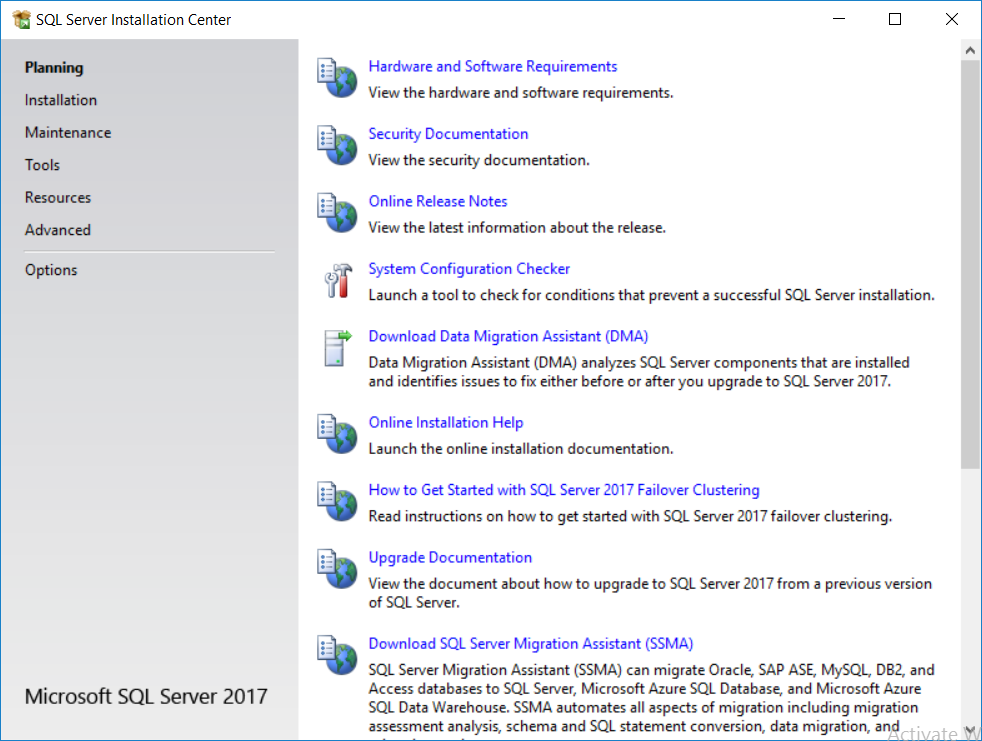
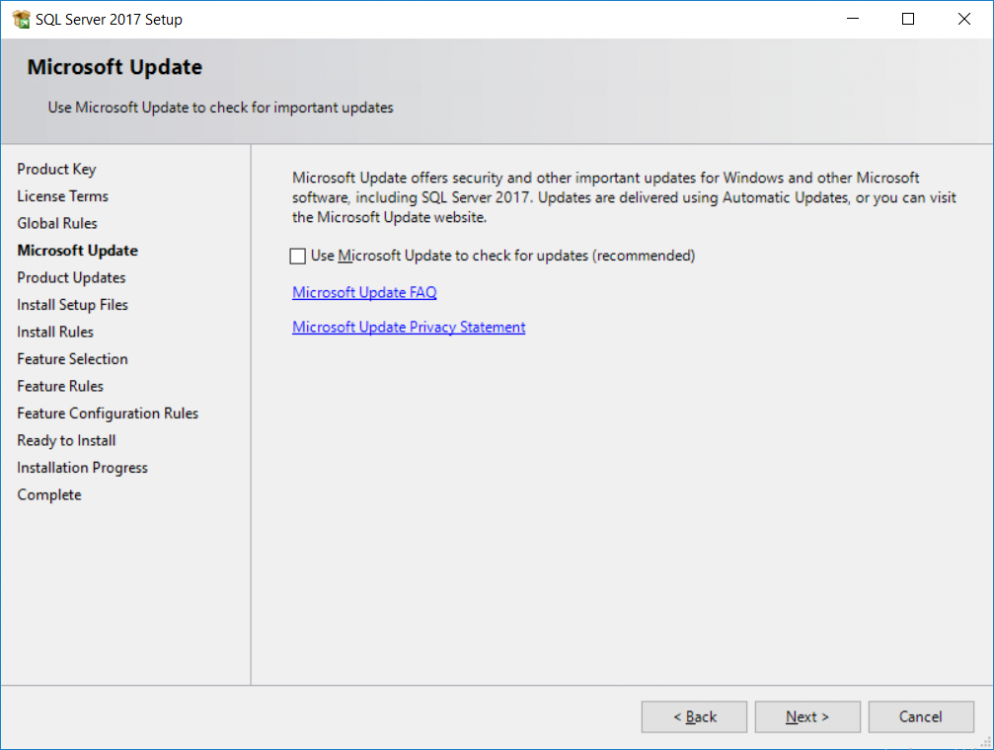
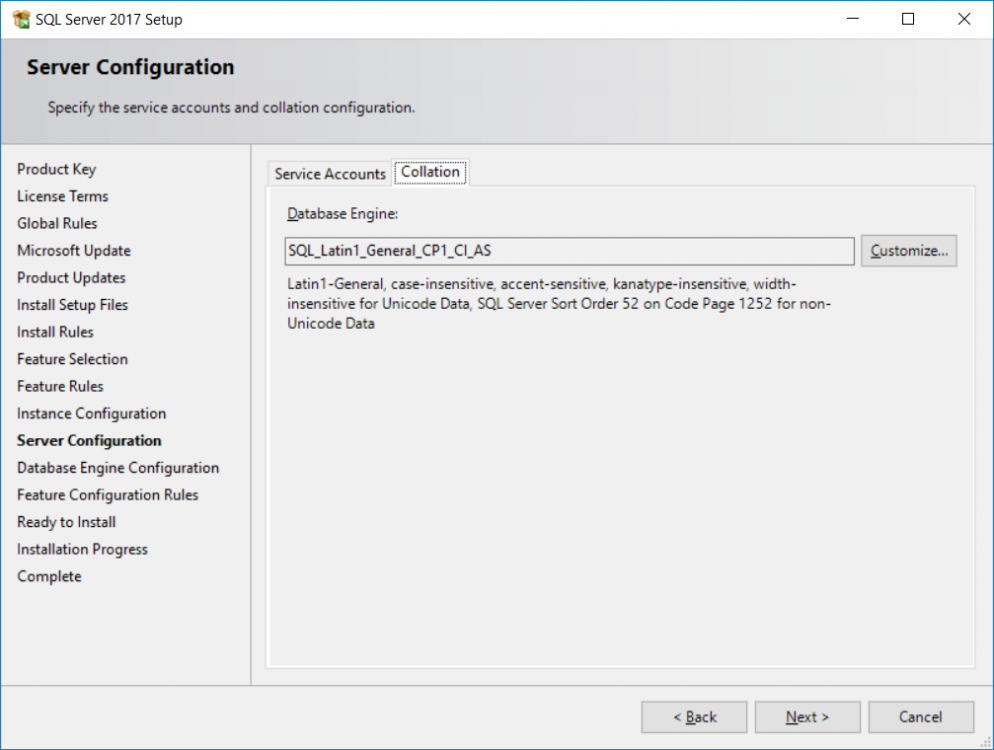
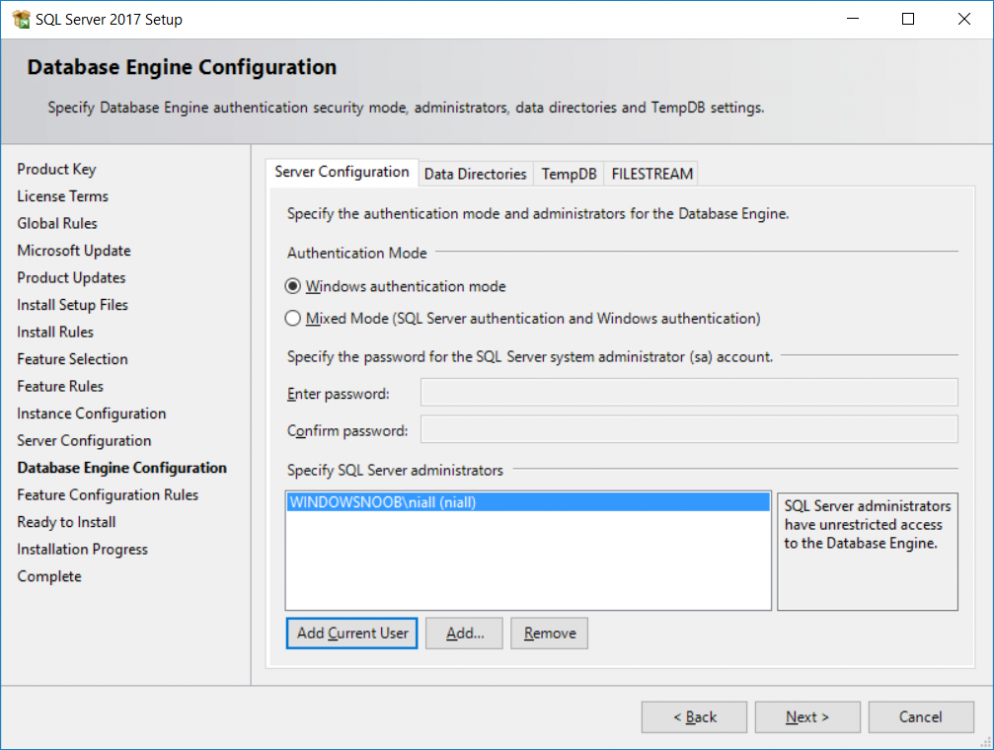
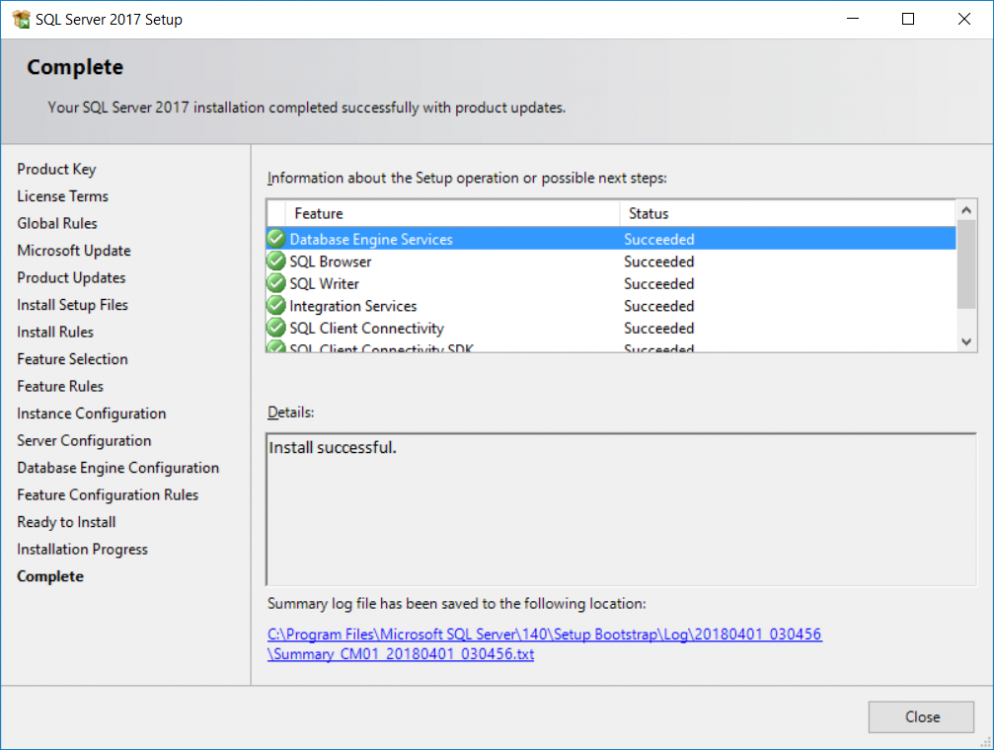
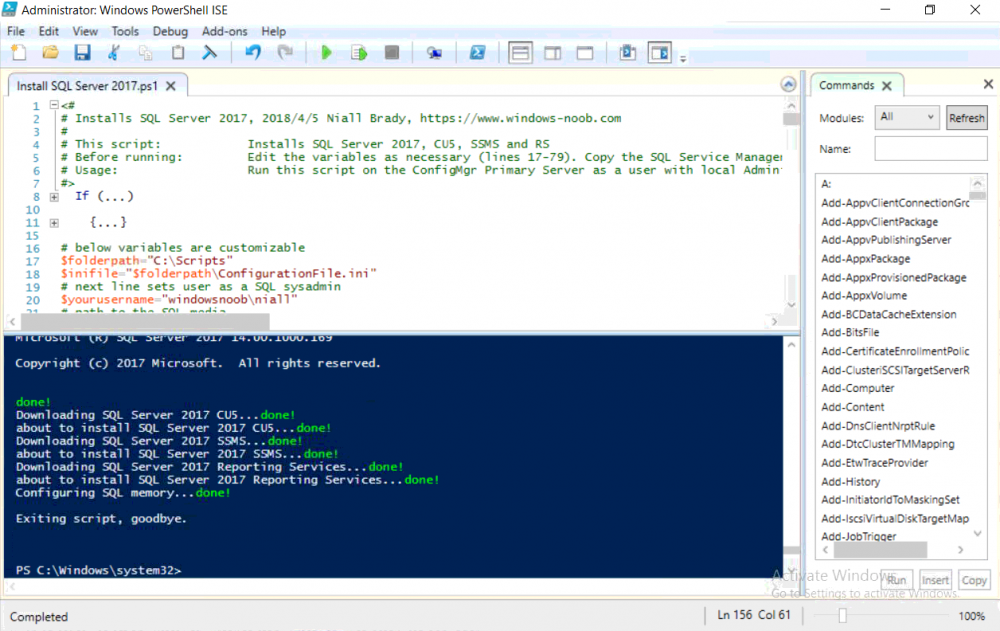
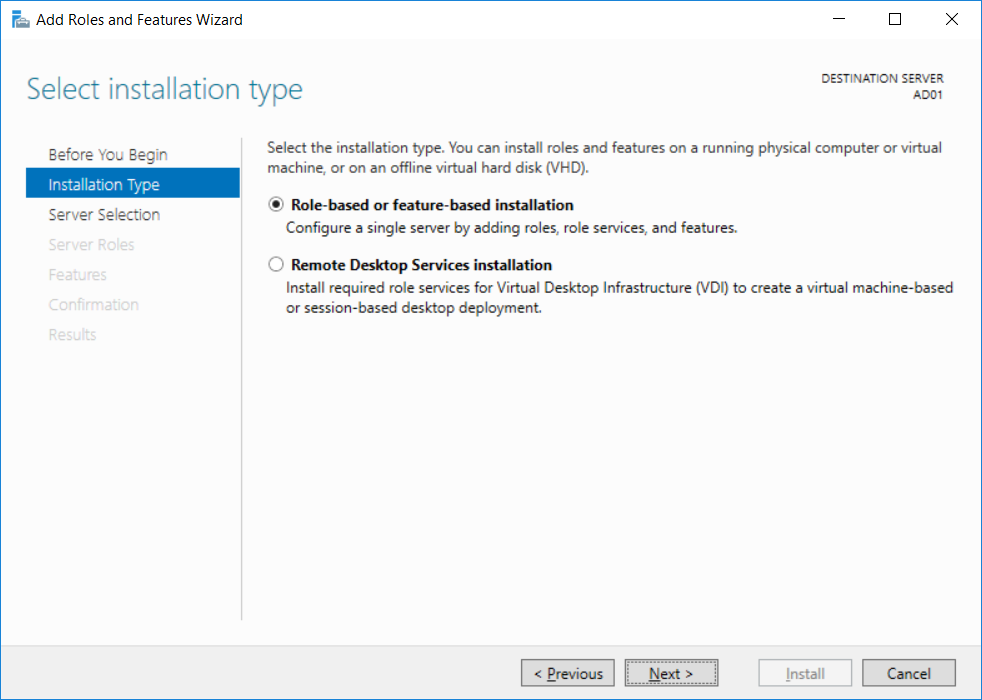
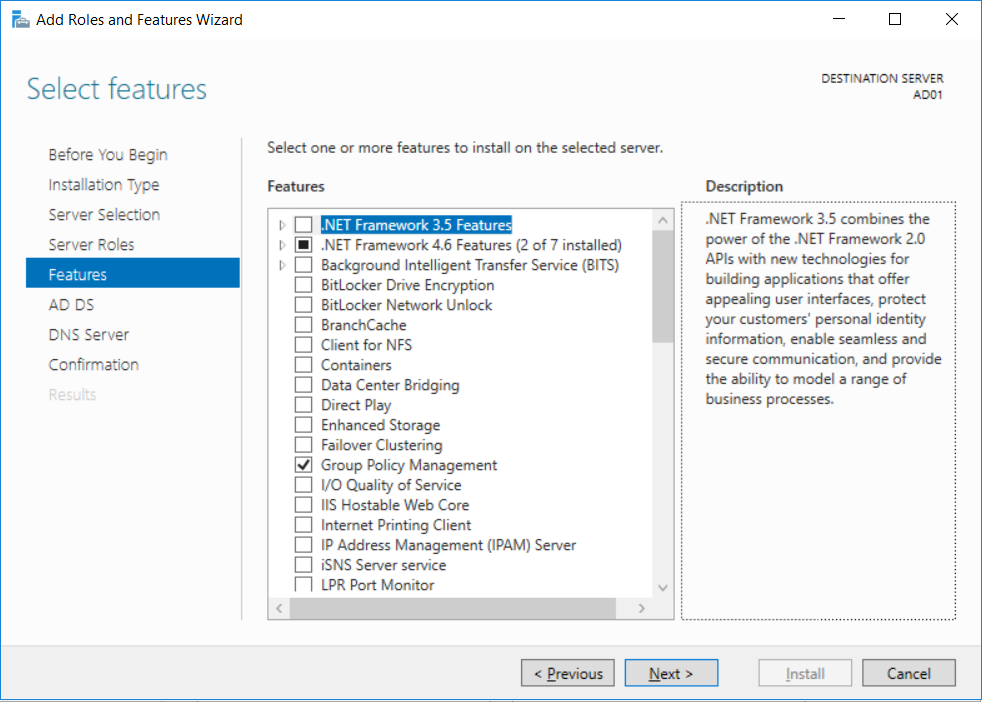
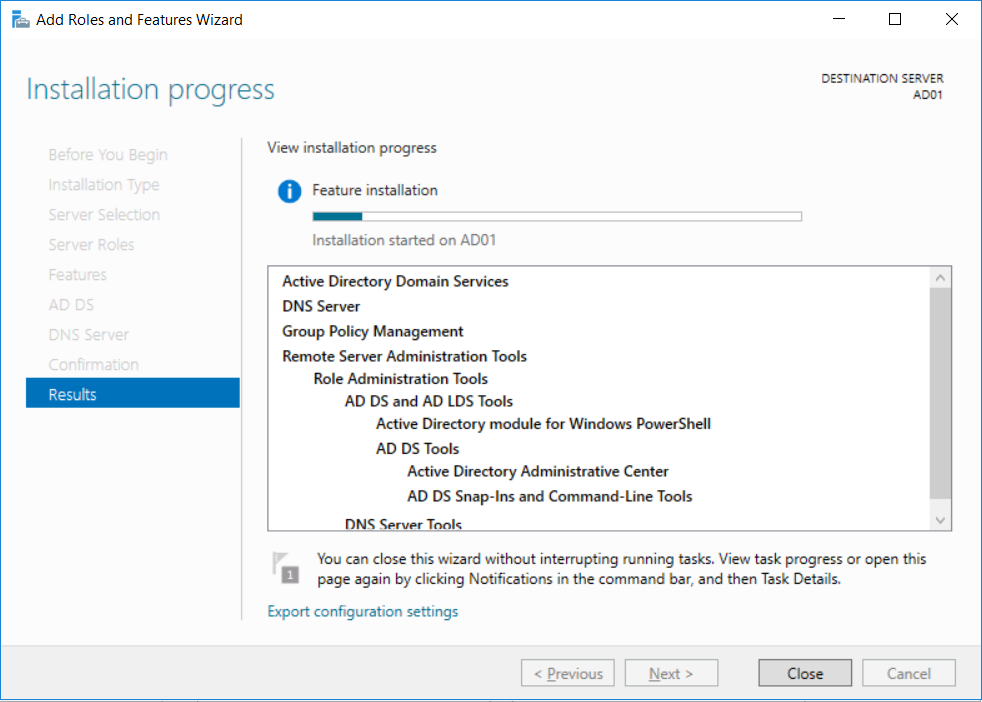
This multi-part guide will show you how to install the latest baseline version of Configuration Manager from Microsoft. The latest available baseline version is System Center Configuration Manager (Current Branch) version 1802 as of March 29th 2018. How can I install System Center Configuration Manager (Current Branch) version 1802 on Windows Server 2016 with SQL Server 2017 – Part 1 How can I install System Center Configuration Manager (Current Branch) version 1802 on Windows Server 2016 with SQL Server 2017 – Part 2 How can I install System Center Configuration Manager (Current Branch) version 1802 on Windows Server 2016 with SQL Server 2017 – Part 3 How can I install System Center Configuration Manager (Current Branch) version 1802 on Windows Server 2016 with SQL Server 2017 – Part 4 You can use this multi-part guide to get a hierarchy up and running on Windows Server 2016 using SQL Server 2017. The concept behind this is to guide you through all the steps necessary to get a working Configuration Manager Primary site installed (for lab use) using manual methods or automated using PowerShell. This gives you the power to automate the bits that you want to automate, while allowing you to manually do other tasks when needed. You decide which path to take. PowerShell knowledge is desired and dare I say required if you are in any way serious about Configuration Manager. I will show you how to do most steps via two methods shown below, it’s up to you to choose which method suits you best but I highly recommend automating everything that you can, using PowerShell. Method #1 – Do it manually Method #2 – Automate it with PowerShell In Part 1, you configured Active Directory Domain Services (ADDS) on AD01, then joined the Configuration Manager server (CM01) to the newly created domain. You then created users, usergroups and OU's in Active Directory and created the System Management Container. Finally you delegated permission to the Configuration Manager server to the System Management container. Step 1. Install Roles and Features on CM01 Note: Perform the following on the Configuration Manager server (CM01) as a Local Administrator To support various features in System Center Configuration Manager, the setup wizard requires some server roles and features preinstalled. On CM01, login as the username you added to the Local Administrators group and start Server Manager. Method #1 - Do it manually The role and feature requirements for ConfigMgr are listed here https://docs.microsoft.com/en-us/sccm/core/plan-design/configs/site-and-site-system-prerequisites. On CM01, login as a user with administrative permissions on the server. Start Server Manager. Click on Add roles and features, on the Before you begin page click Next Choose Role-based or feature-based installation In the Server Selection screen verify CM01.windowsnoob.lab.local is selected and click Next On the Server Roles screen select Web Service (IIS) and when prompted to add features for Web Server (IIS) click on Add Features Click Next and on the Features screen select the .NET Framework 3.5 (includes .NET 2.0 and 3.0) feature Expand the .NET Framework 4.6 Features and select HTTP Activation under WCF Services, answer Add Features when prompted. Select Message Queuing (MSMQ) Activation and when prompted select Add Features Select Named Pipe Activation and TCP Activation and under Background Intelligent Transfer Service (BITS) select IIS Server Extension when prompted to add features click on Add Features Scroll down and select Remote Differential Compression Click Next and on the Web Server Role (IIS) screen click Next on the Select Role Services verify that the following are selected Click Next and point to the Installation Source by clicking on Specify an alternate source path Enter the path to the media eg: E:\Sources\SxS Click Install when ready, at this point you could export configuration settings for later automation Click on Close when the feature installation has succeeded. Method #2 - Automate it with PowerShell Note: Make sure your Server 2016 media is in the drive specified in the script or edit the script to point to the new location of the media. To install the roles and features needed, start Windows Powershell ISE as a user with administrative permissions on the server, edit the variables as appropriate and run the install roles and features.ps1 script. The script will automatically stop and prompt you to correct things, if it cannot find the XML file or the Windows Server 2016 installation media. 1. Extract the scripts to C:\Scripts on CM01 and load the install roles and features.ps1script located in C:\Scripts\Part 2\CM01 2. Edit the variables (lines 18-19) as desired before running. 3. Start Windows PowerShell ISE as Administrator and run the script by clicking on the green triangle. Step 2. Download and install Windows ADK and install WDS Note: Perform the following on the Configuration Manager server (CM01) as a Local Administrator When you deploy operating systems with Configuration Manager, the Windows ADK is an external dependency that is required. The ConfigMgr prerequisite checker will check for various things, including ADK components such as USMT and Windows Preinstallation Environment (among others), therefore you need to install Windows ADK on your server. System Center Configuration Manager version 1802 supports Windows ADK 1709 as I've explained here. Method #1 - Do it manually Go to this link and download ADK 1709. You'll be prompted to save or run ADKSETUP.EXE, select Run. When prompted for the path, accept the defaults...(or change it to something else if you wish) Select your privacy settings Accept the ADK EULA Make sure to have selected at least the following ADK features Deployment Tools Windows Preinstallation Environment (Windows PE) Imaging and Configuration Designer (ICD) Configuration Designer User State Migration tool (USMT) and click Install to start the download and Installation of the Windows ADK, version 1709. Once the ADK installation is complete, click Close. To install WDS, open Server Manager, select Add roles and features and select the Windows Deployment Services role. When prompted click on Add Features to include management tools. and click through the wizard until completion, close the wizard when done. Method #2 - Automate it with PowerShell To download and then install Windows ADK 10 version 1709 with the components needed for ConfigMgr, start Windows Powershell ISE as Administrator and run the setup ADK and WDS.ps1 script. This script not only downloads and installs ADK 1709, but it installs the Windows Deployment Services role. Tip: If you've already downloaded ADK 1709 and want to save yourself some time, copy the Windows Kits folder and all files/folders within to the source folder (eg: C:\Source\Windows Kits) and the script will skip the download. 1. Extract the scripts to C:\Scripts on CM01 and load the setup ADK and WDS.ps1 script located in C:\Scripts\Part 2\CM01 2. Edit the variable (line 17) as desired before running. 3. Start Windows PowerShell ISE as Administrator and run the script by clicking on the green triangle. Step 3. Install SQL Server 2017 Note: Perform the following on the Configuration Manager server (CM01) as a Local Administrator Method #1 - Do it manually Configure the firewall as described in https://go.microsoft.com/fwlink/?linkid=94001. After configuring the firewall, browse to the drive where the SQL Server 2017 media is, and run setup.exe. The SQL Server Installation Center wizard will appear. Click on Installation and then choose New SQL Server standalone installation or add features to an existing installation. Enter the Product Key or use the evaluation version if that's what you want to use. The product key will be automatically filled in for licensed media downloaded from Microsoft Volume Licensing Service Center. Accept the EULA Make your Microsoft Update choices and review your Install rules, select the SQL server instance features you need and if necessary change the drive letter where you intend to install it And configure the Instance Configuration or just leave it as default Verify the Service Accounts settings and for Collation, make sure the collation is set to SQL_Latin1_General_CP1_CI_AS For Server Configuration, click on Add Current User After configuring Data Directories, TempDB and Filestream settings you are Ready to Install Click on Install to start the installation of SQL Server 2017, and once it's completed, click Close. After installing SQL Server 2017, download SQL Server 2017 SSMS from here and install it. Method #2 - Automate it with PowerShell Note: Make sure your SQL Server 2017 media is in the drive specified in the script or edit the script to point to the new location of the media. The script and accompanying INI file have the path pointing at D:\Program Files, please change the variables as appropriate. To install SQL Server 2017 use the Install SQL Server 2017.ps1 script. The script will create a ConfigurationFile.ini used to automate the installation of SQL Server 2017, and after it's installed the script will download the SSMS executable (Management Studio) and install it. Then it will download Reporting Services and install it. If either of the EXE's are in the download folder, it will skip the download and just install. SQL Server no longer comes with the Management Studio or Reporting Services built in, and they are offered as separate downloads, don't worry though, my PowerShell script takes care of that for you. 1. Extract the scripts to C:\Scripts on CM01 and load the Install SQL Server 2017.ps1 script located in C:\Scripts\Part 2\CM01 2. Edit the variables [lines 17-76] as desired before running. 3. Start Windows PowerShell ISE as Administrator and run the script by clicking on the green triangle. Step 4. Restart the Configuration Manager Primary Server Note: Perform the following on the Configuration Manager server (CM01) as a Local Administrator Open an administrative command prompt and issue the following command: shutdown /r Step 5. Install the WSUS role Note: Perform the following on the Configuration Manager server (CM01) as a Local Administrator Now that SQL server is installed, we can utilize SQL Server for the WSUS database. To install WSUS and configure it to use the SQL server database instead of the Windows Internal Database, do as follows: Method #1 - Do it manually Using Roles and Features in Server Manager, add the Windows Server Update Services role. When prompted to add features for the WSUS role, click on Add features. When prompted for the Role Services, uncheck WID Connectivity and add SQL Server Connectivity instead. When prompted for Content location, enter a valid path When prompted for Database Instance Selection, enter the server name and click on Check Connection On the Confirm Installation Selections screen, click on Install. and finally click close. After installing the WSUS role, in Server Manager, click on the yellow exclamation mark and choose Launch Post Installation Tasks. When the tasks are completed Optional: The WSUS database (SUSDB) can be observed using SQL Server SSMS. Method #2 - Automate it with PowerShell Browse to the location where you extracted the scripts, C:\scripts. Start Windows PowerShell ISE as administrator, open the Install roles and features_WSUS.ps1 script, edit the $servername variable and replace CM01 with the ServerName your are installing ConfigMgr on (SQL server). Note: Make sure to have your Windows Server 2016 media in the path referred to by $Sourcefiles. 1. Extract the scripts to C:\Scripts on CM01 and load the Install roles and features_WSUS.ps1 script located in C:\Scripts\Part 2\CM01 2. Edit the variables [lines 22-25] as desired before running. 3. Start Windows PowerShell ISE as Administrator and run the script by clicking on the green triangle. Downloads The scripts used in this guide are available for download here. Unzip to C:\Scripts on both servers. The scripts are placed in the corresponding folder (Part 1, Part 2 etc) and sorted into which server you should run the script on (AD01 or CM01). Scripts.zip Summary Using PowerShell to automate things leaves more time for yourself and it's fun. Please join me in Part 3 of this multi-part guide when you will install System Center Configuration Manager version 1802 (Current Branch).


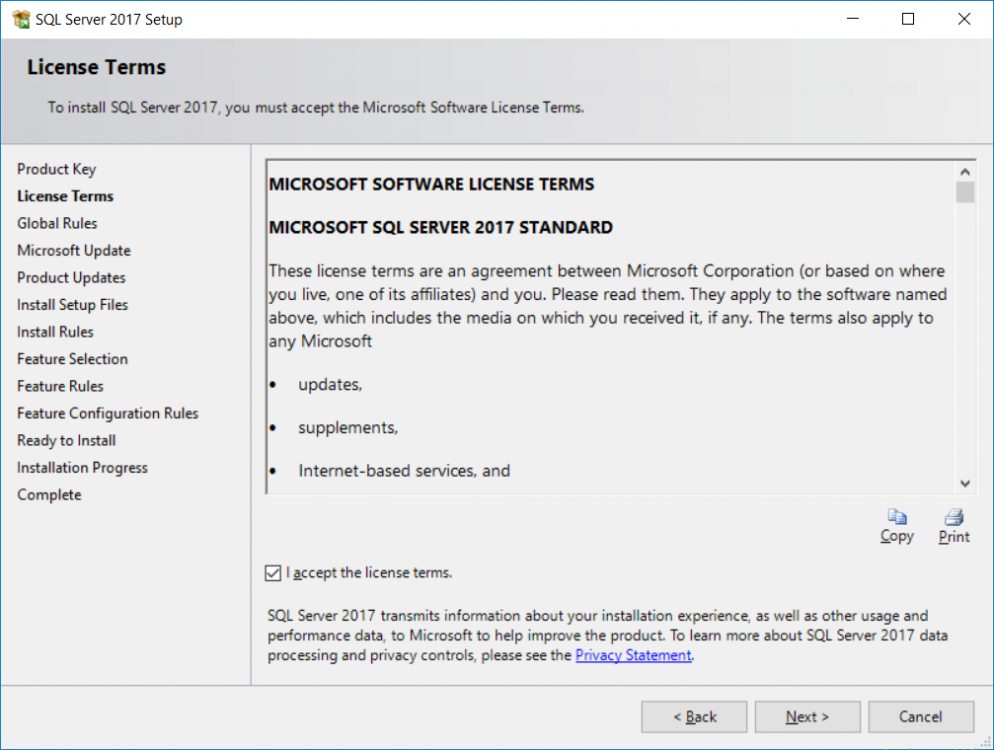


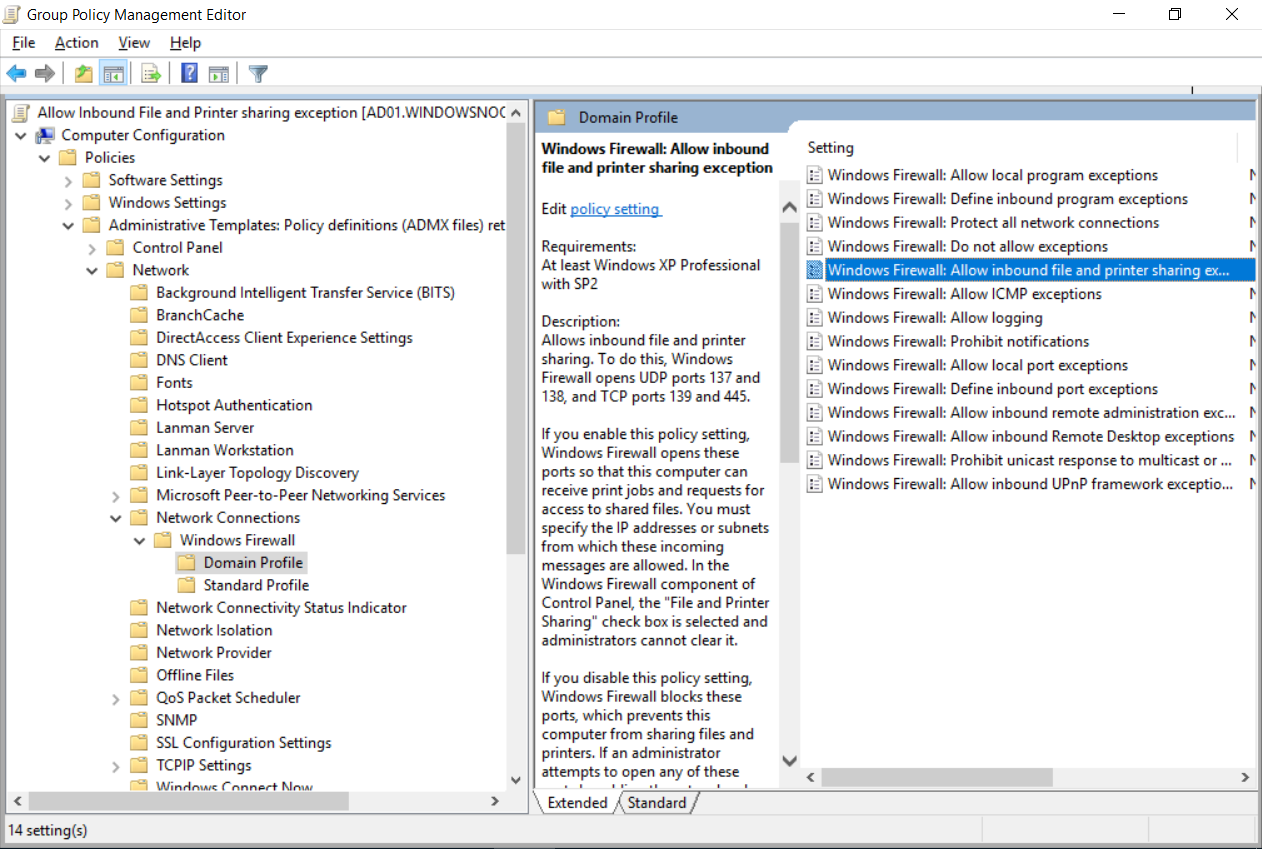
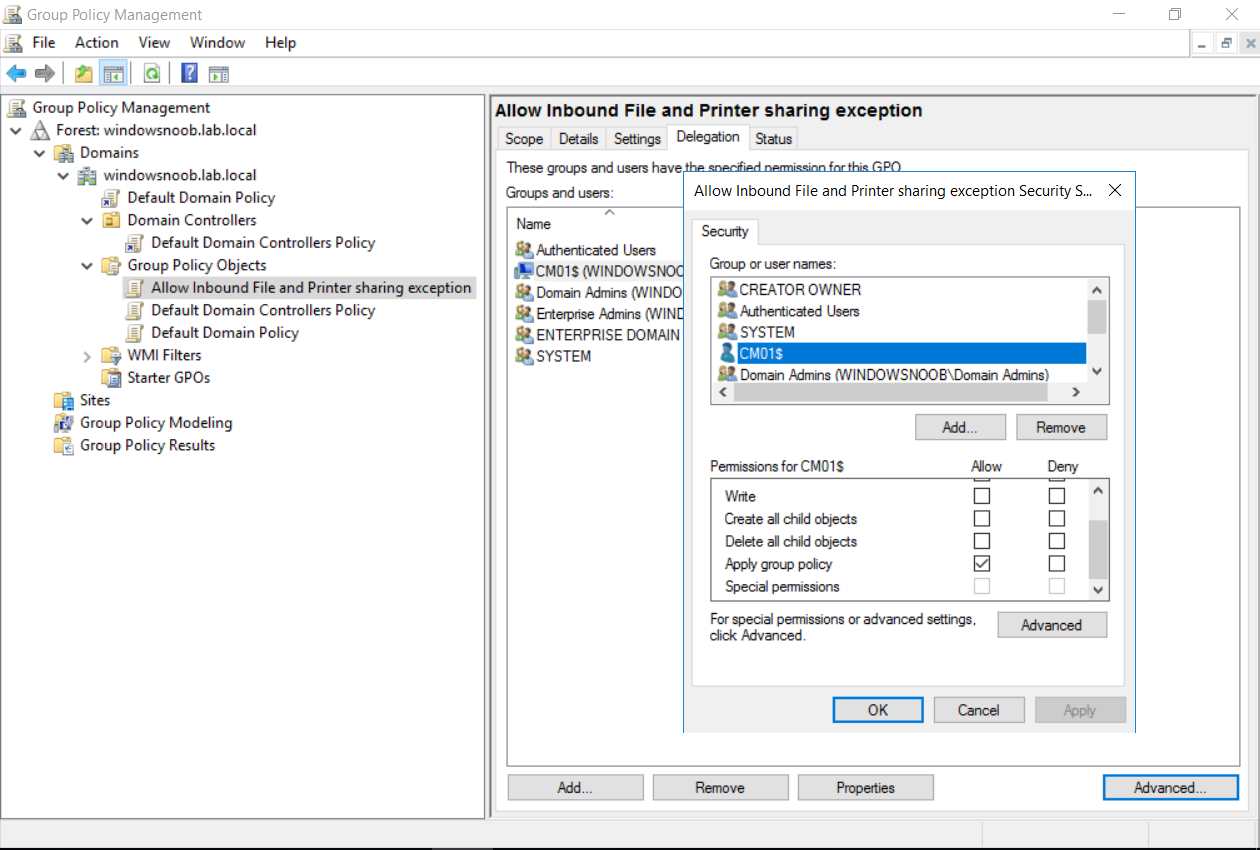
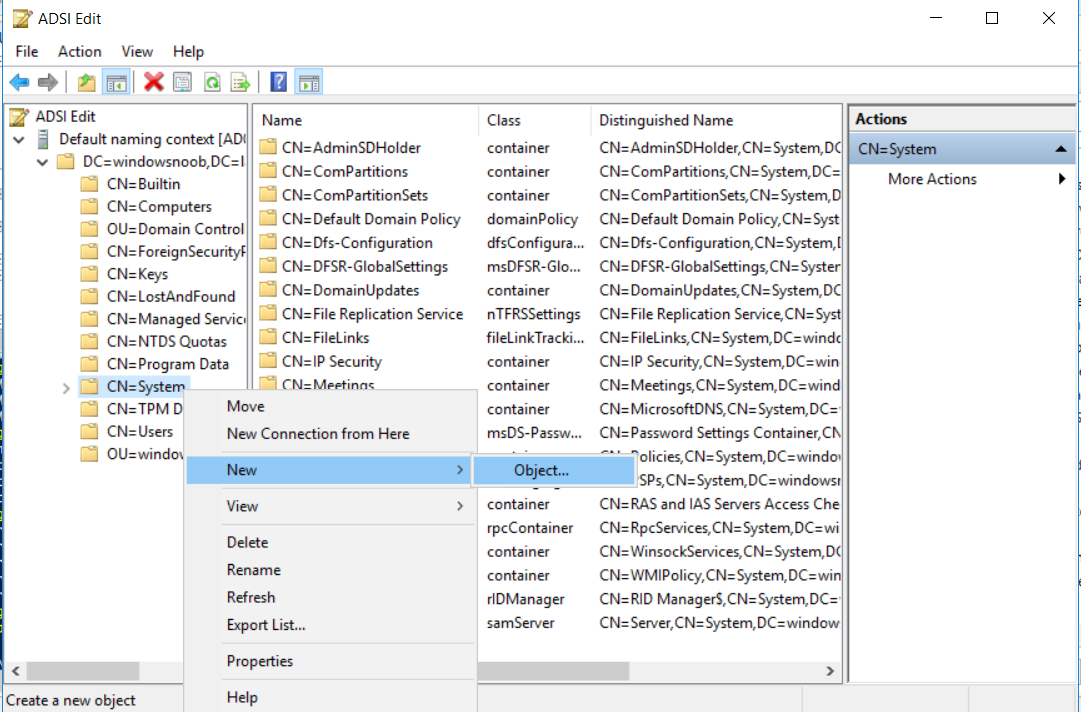
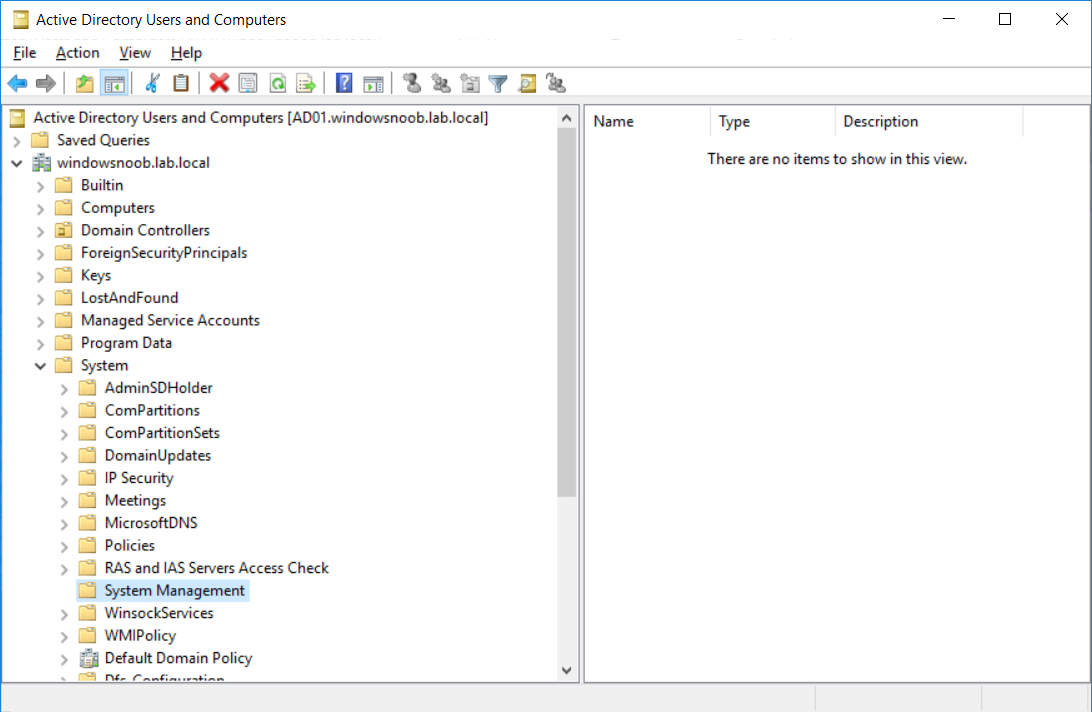
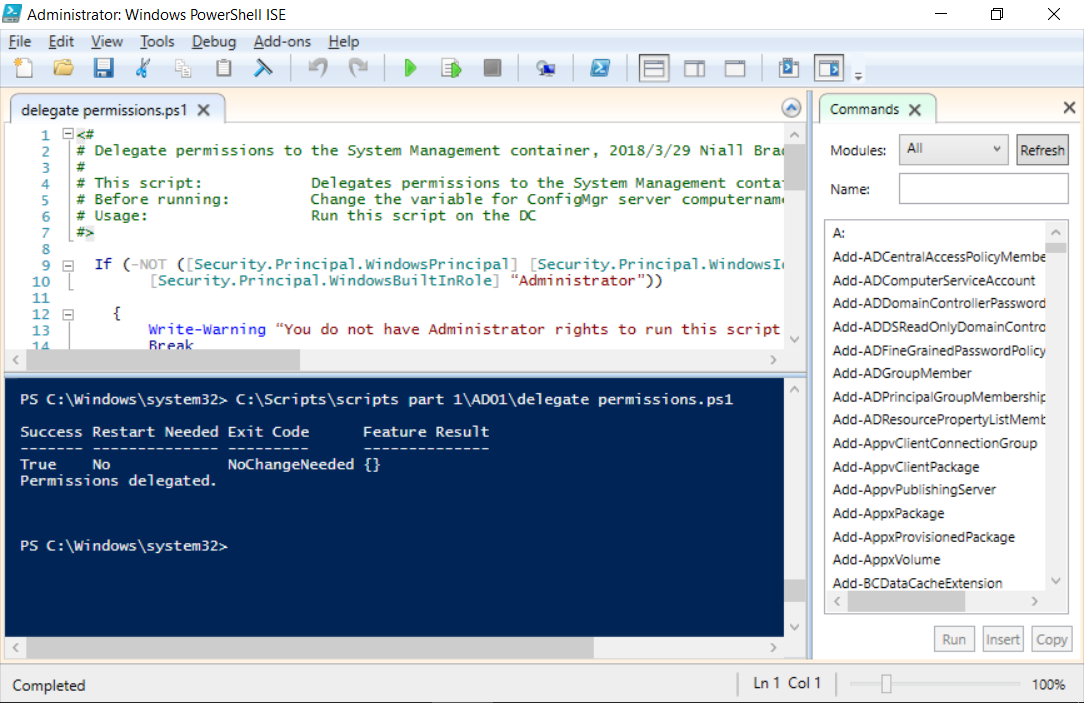
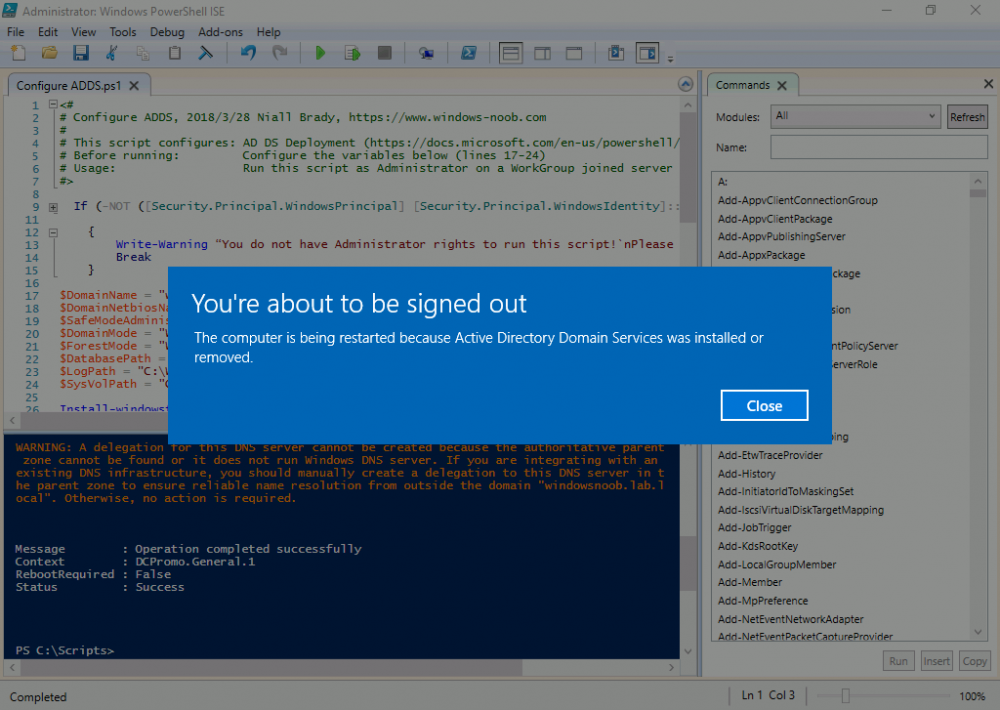
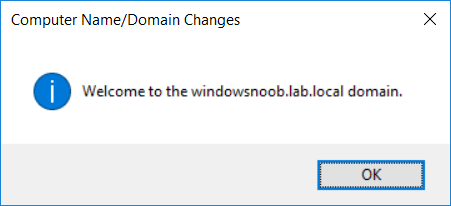
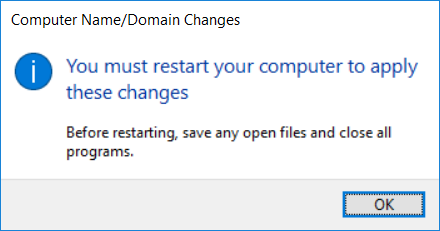
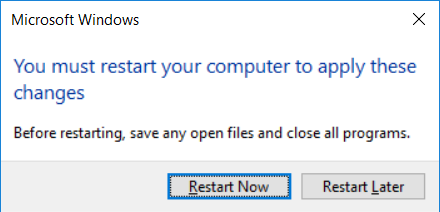
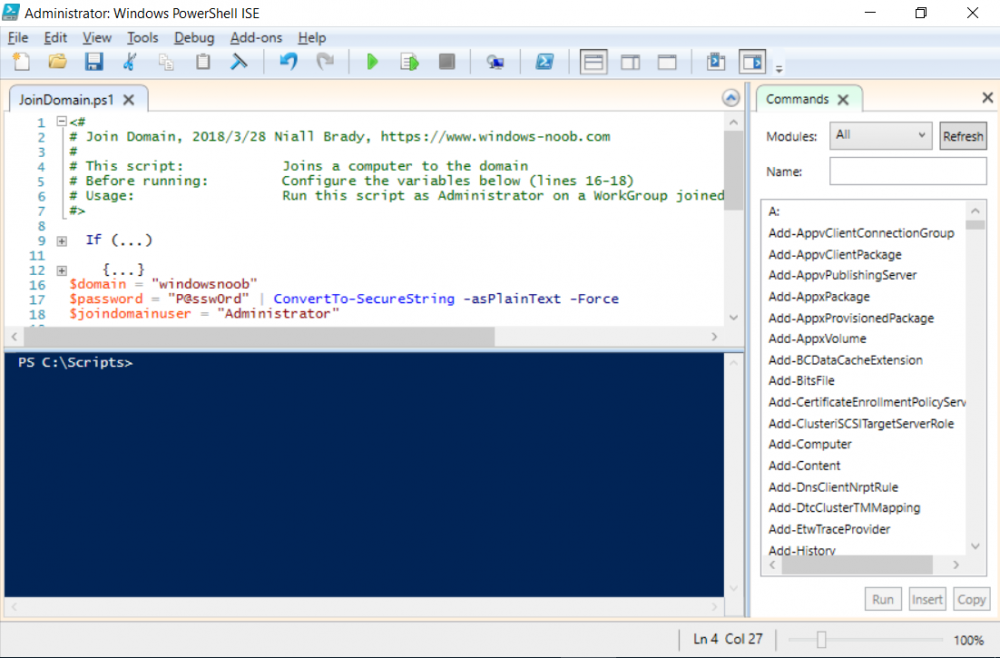
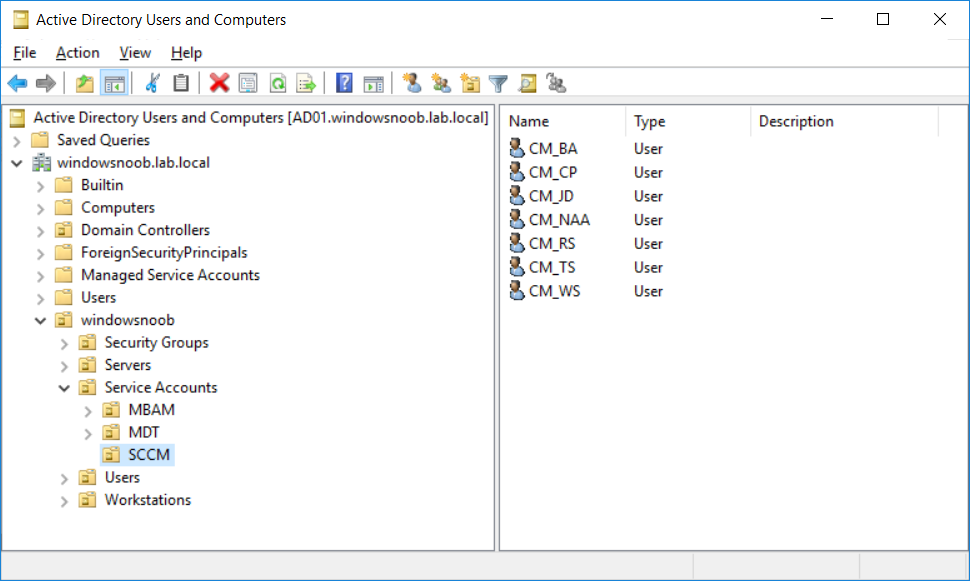
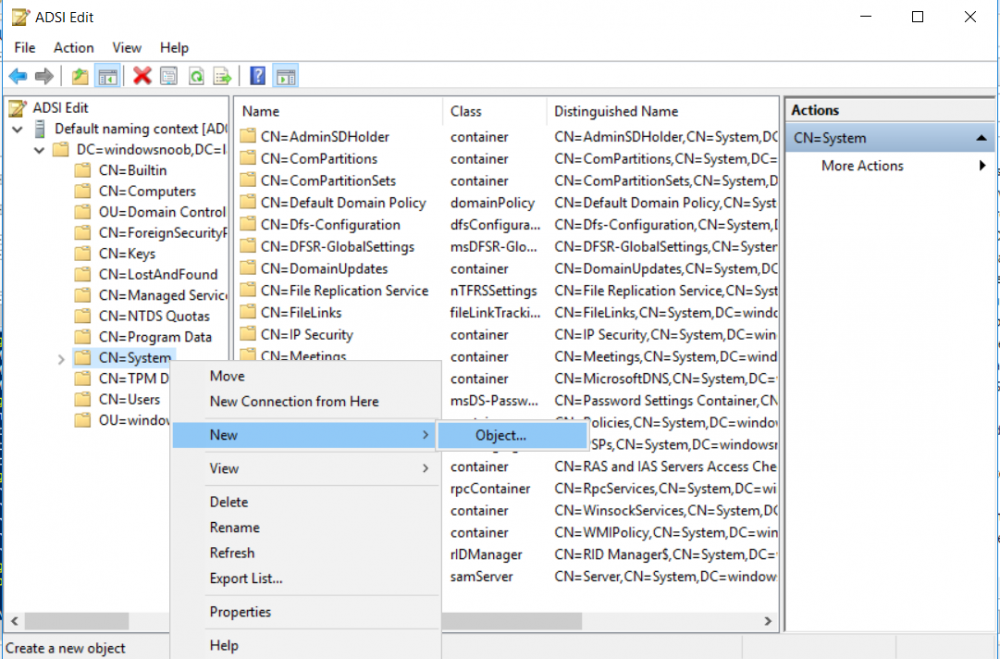
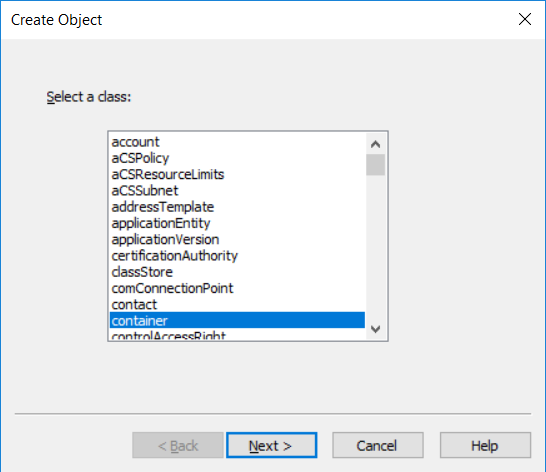
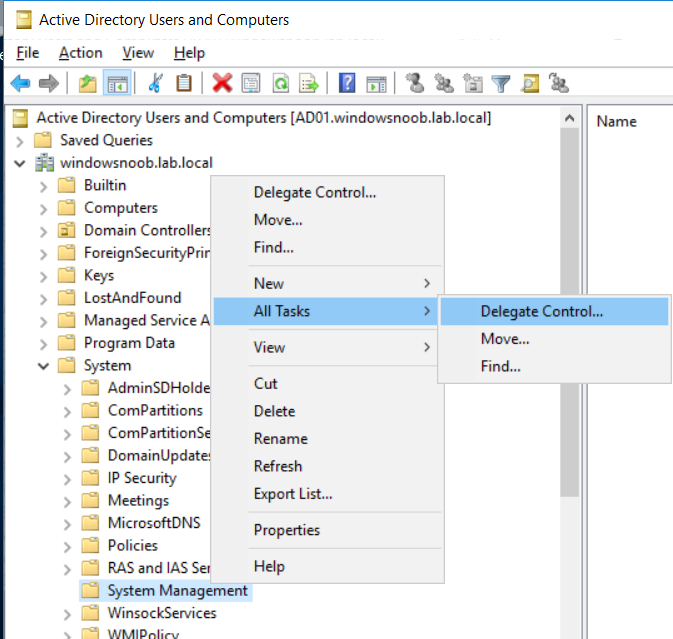
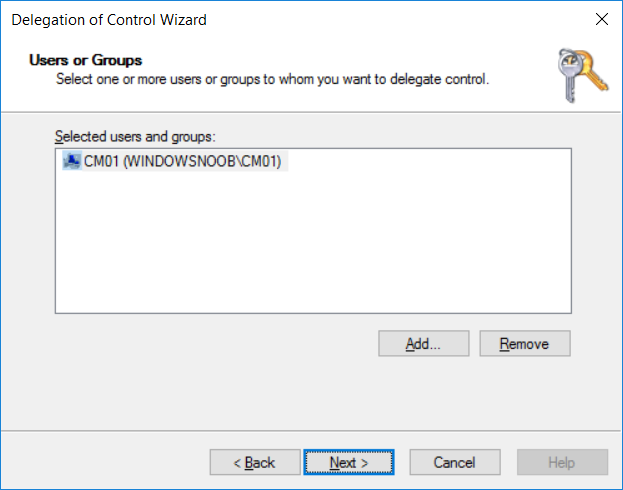
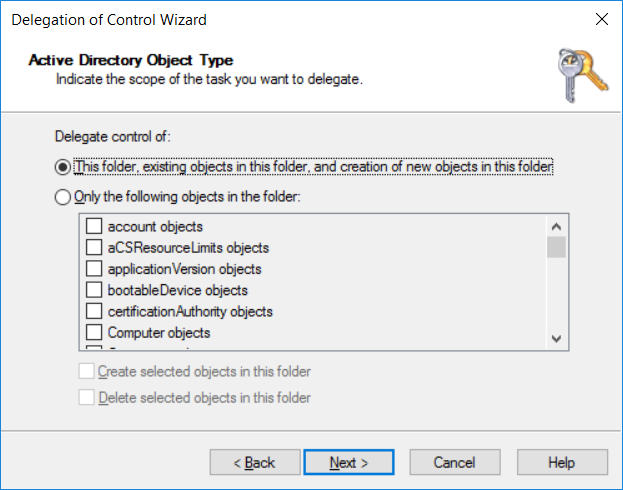
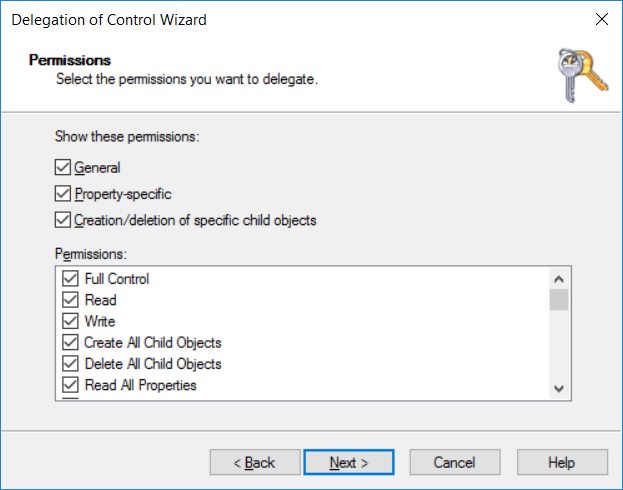
-
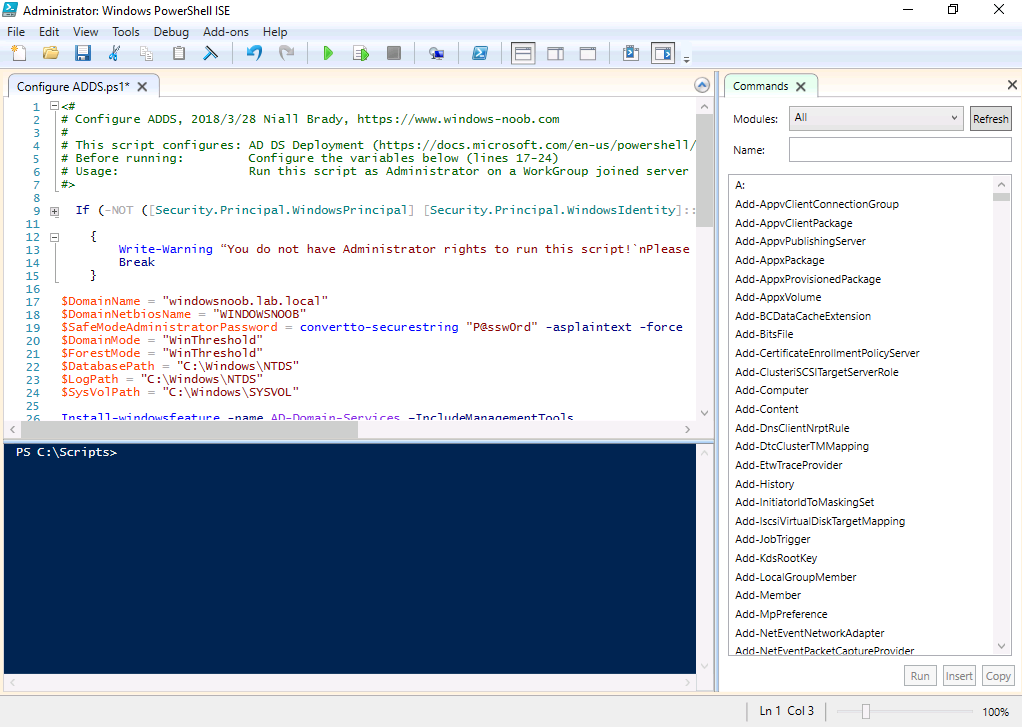
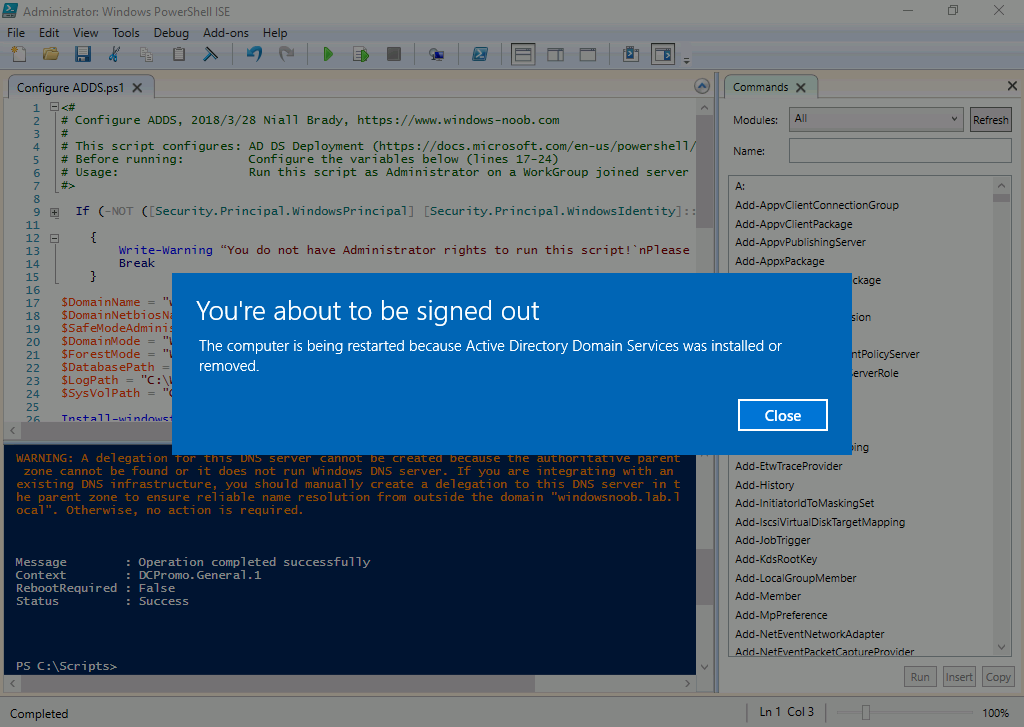
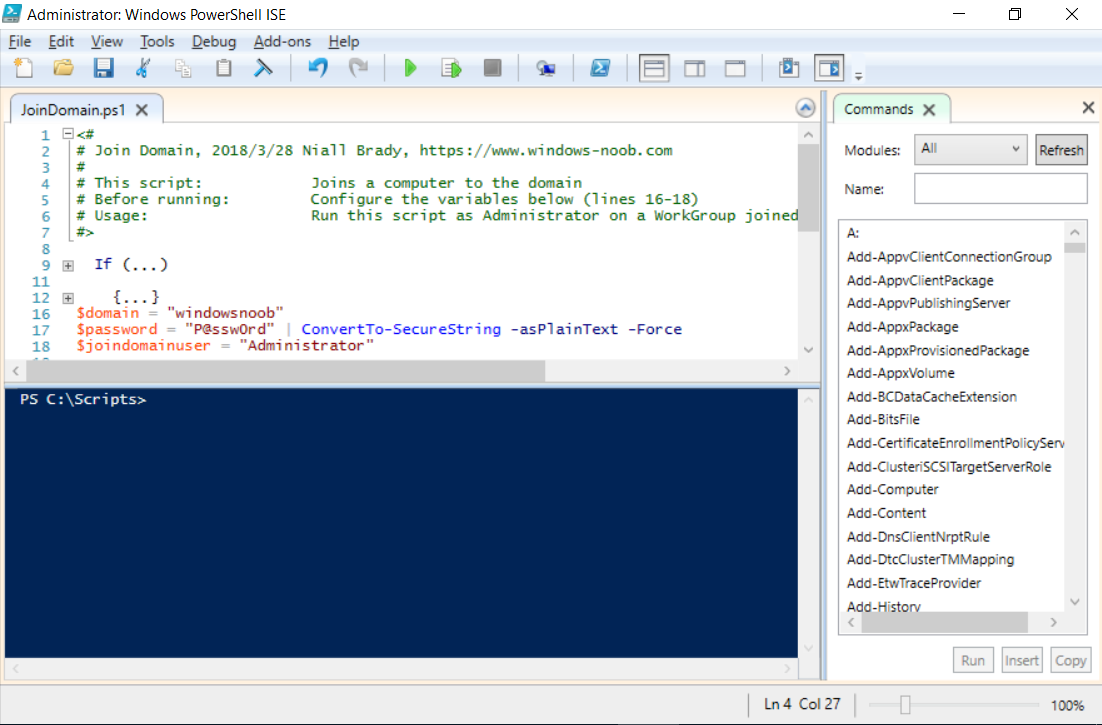
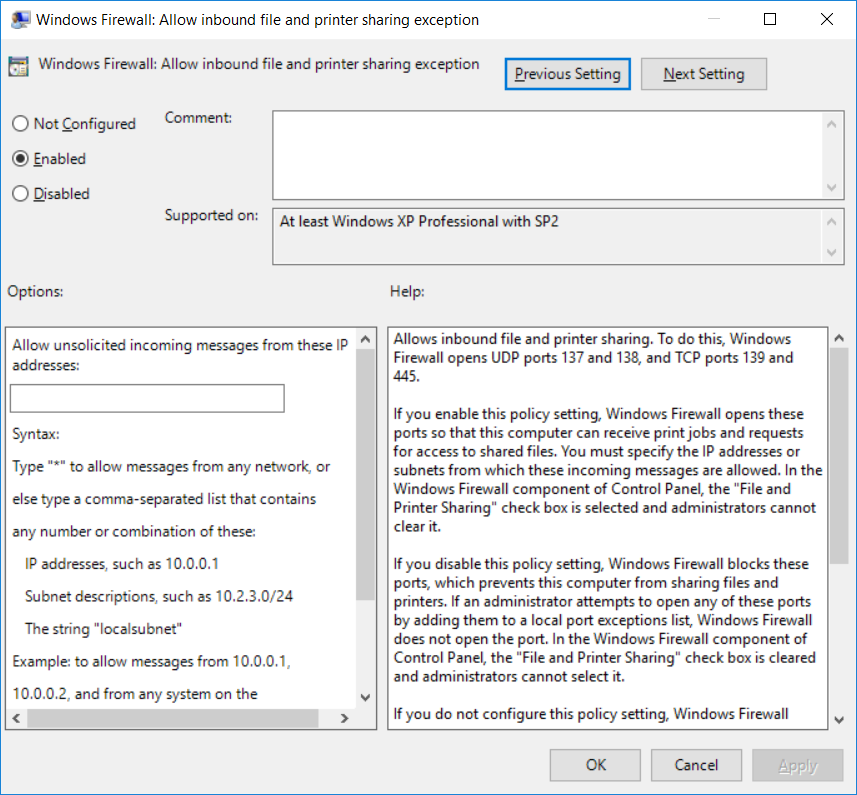
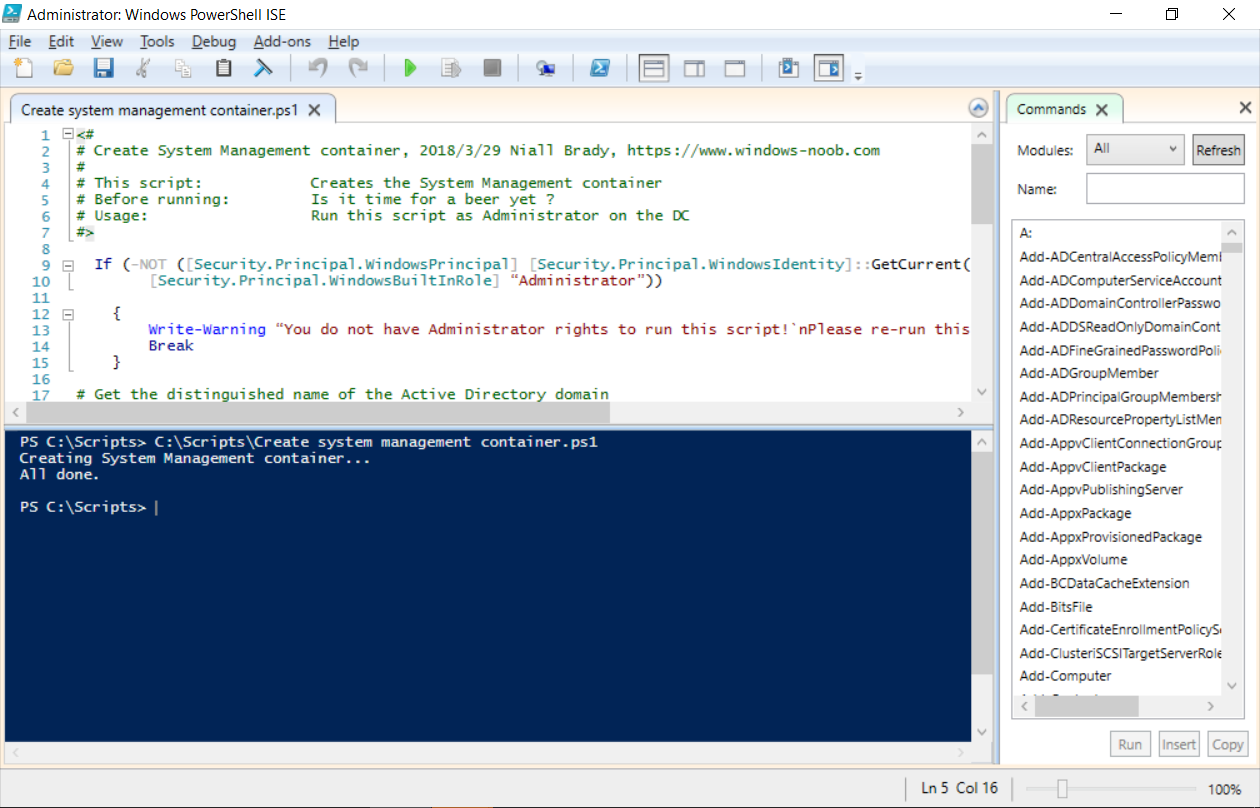
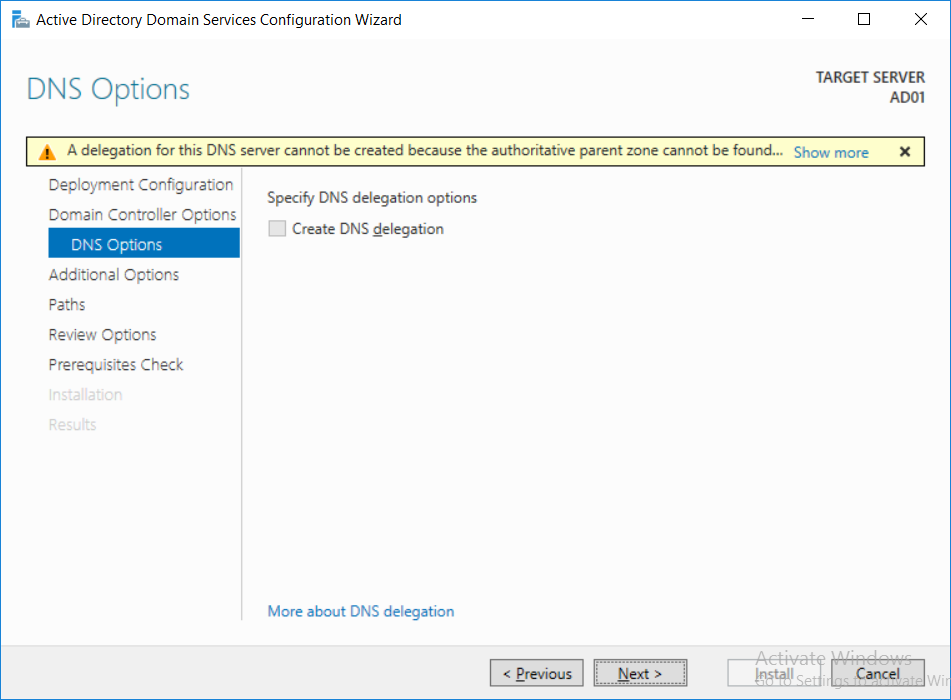
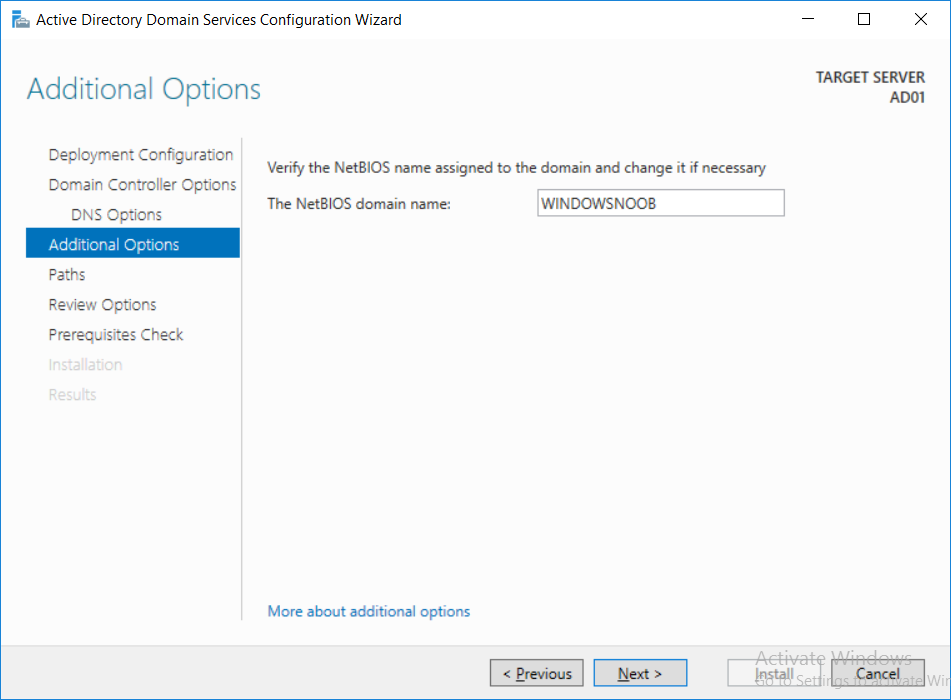
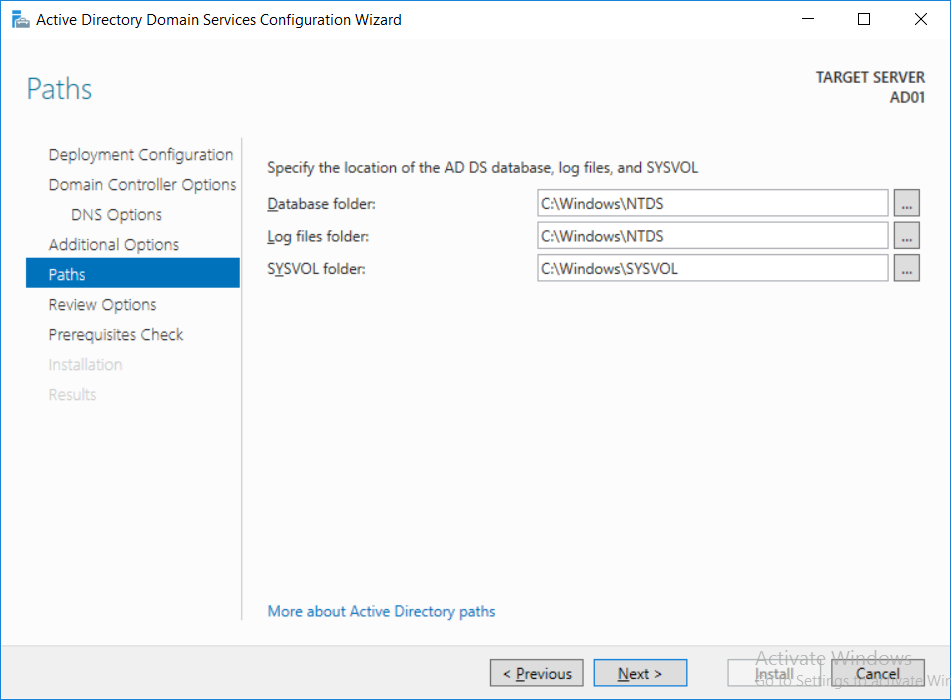
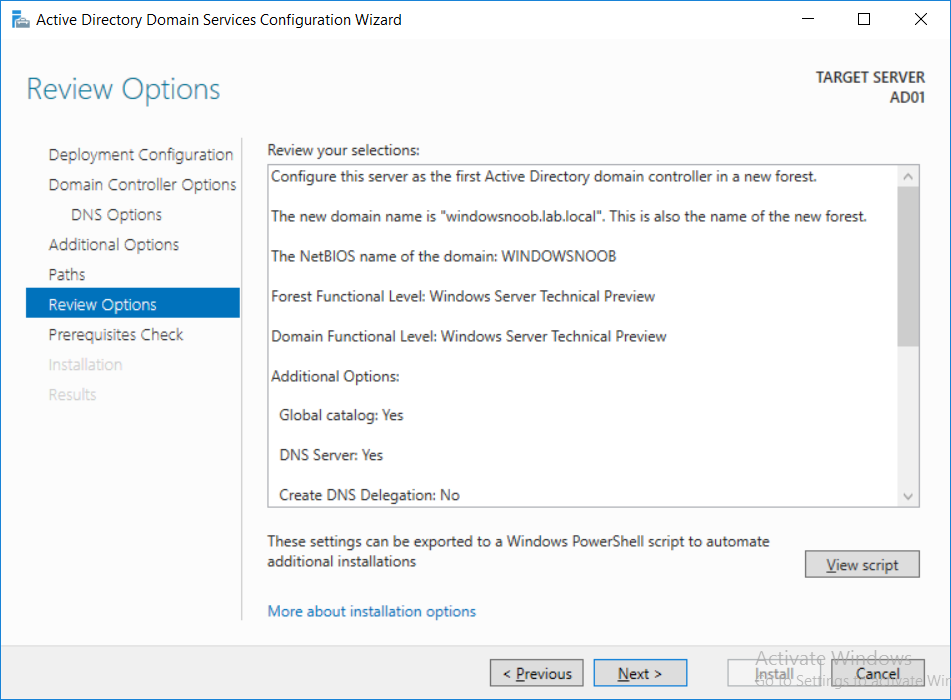
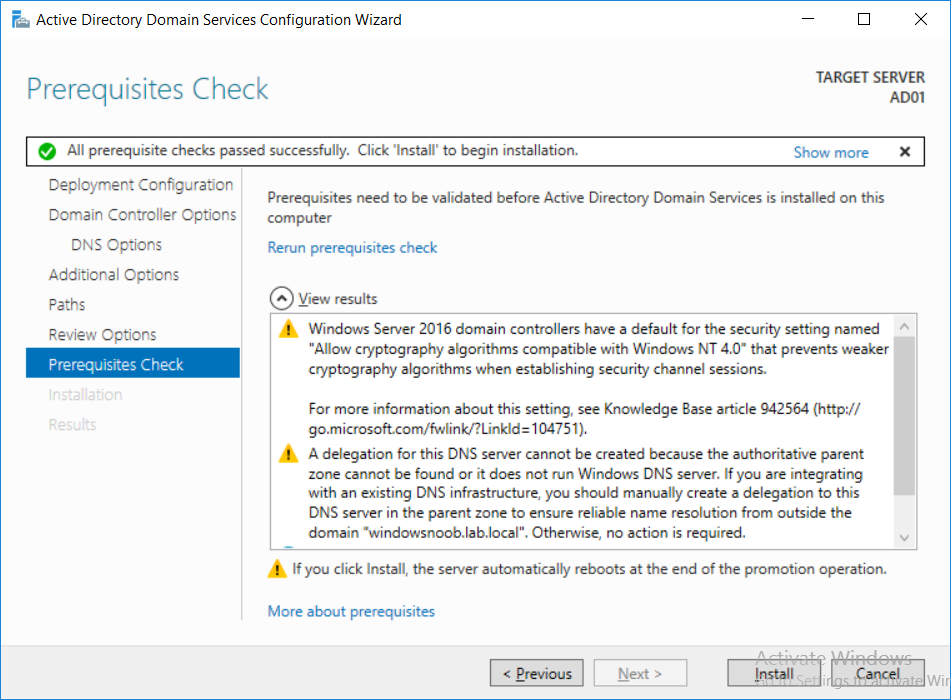
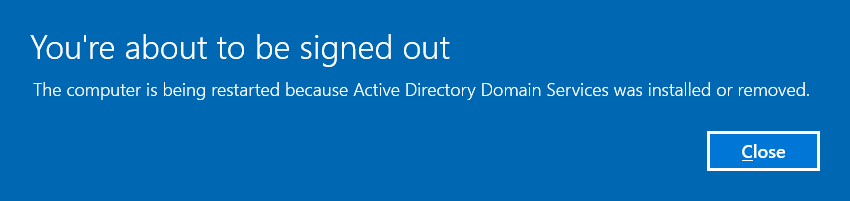
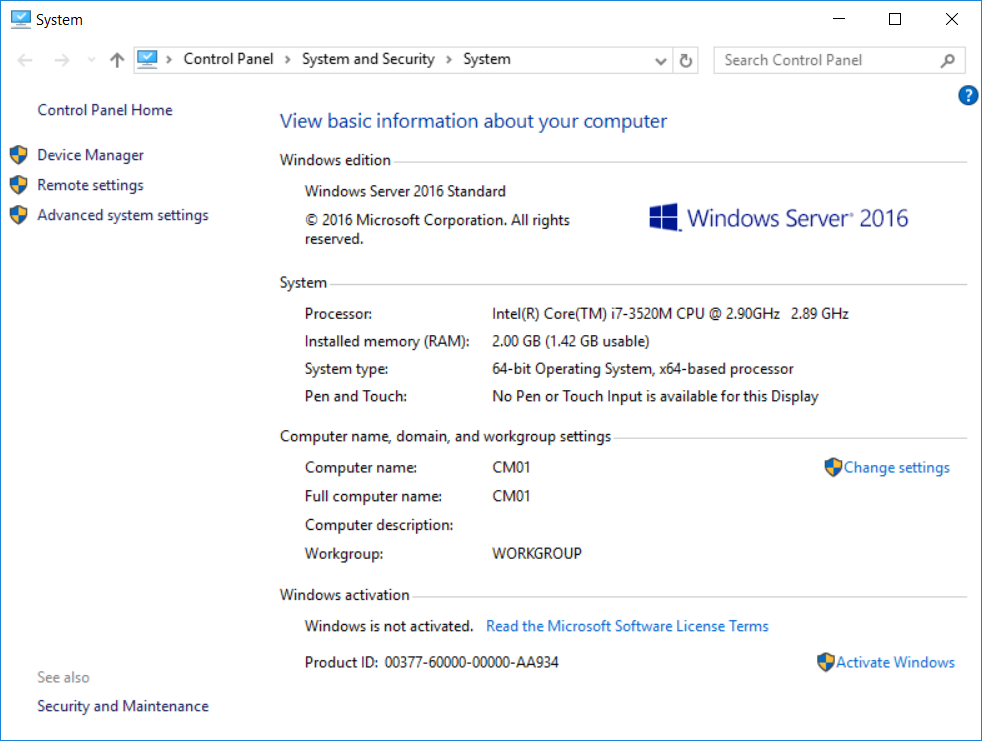
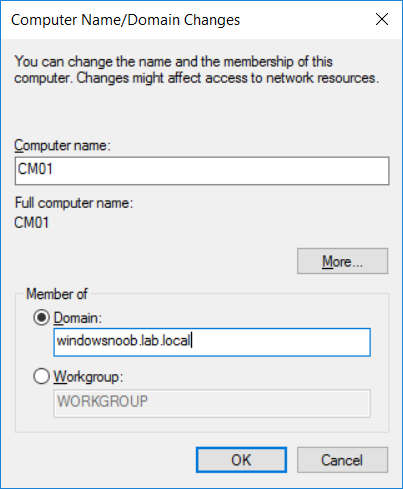
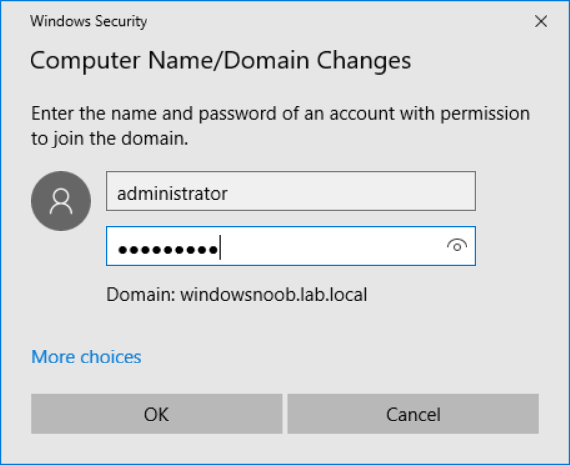
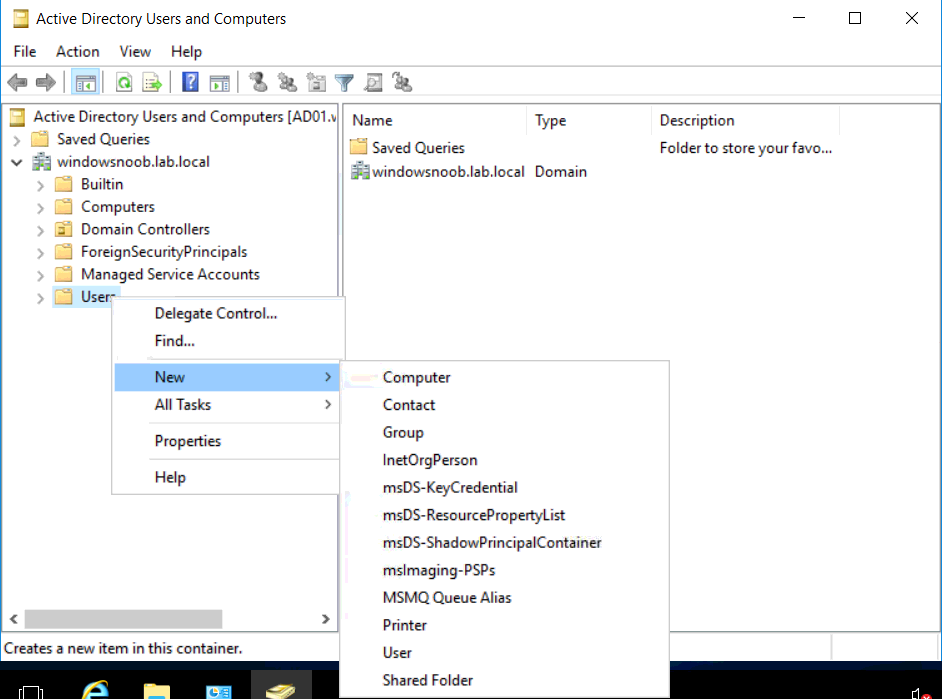
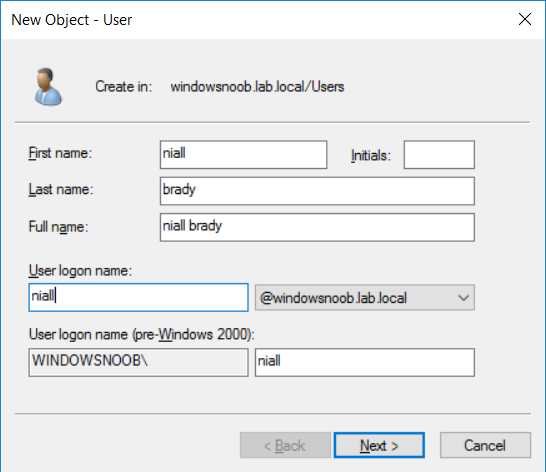
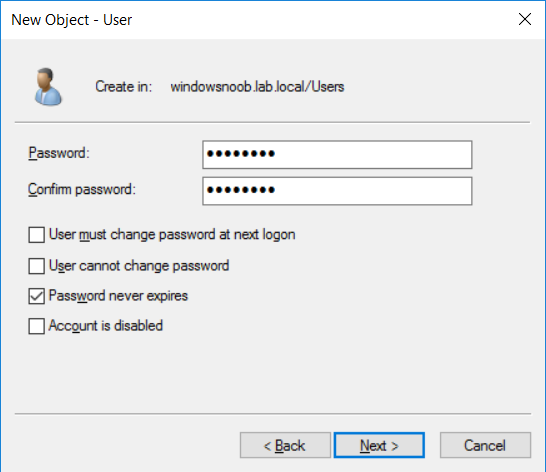
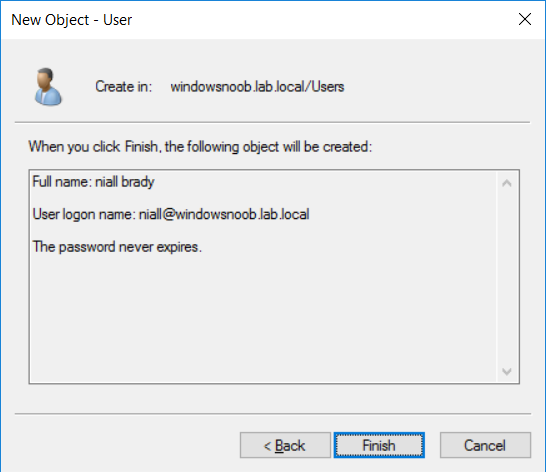
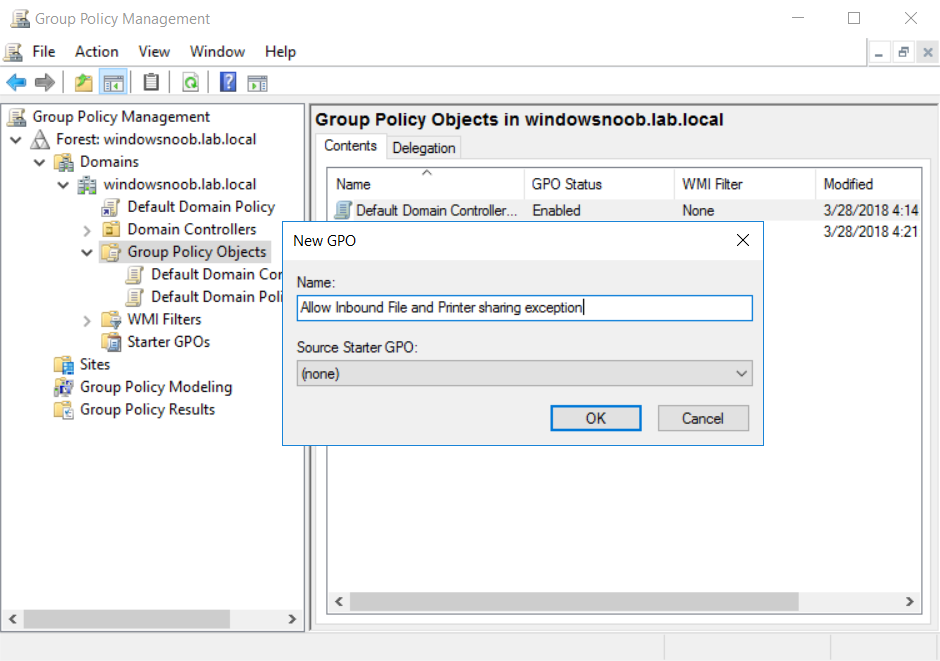
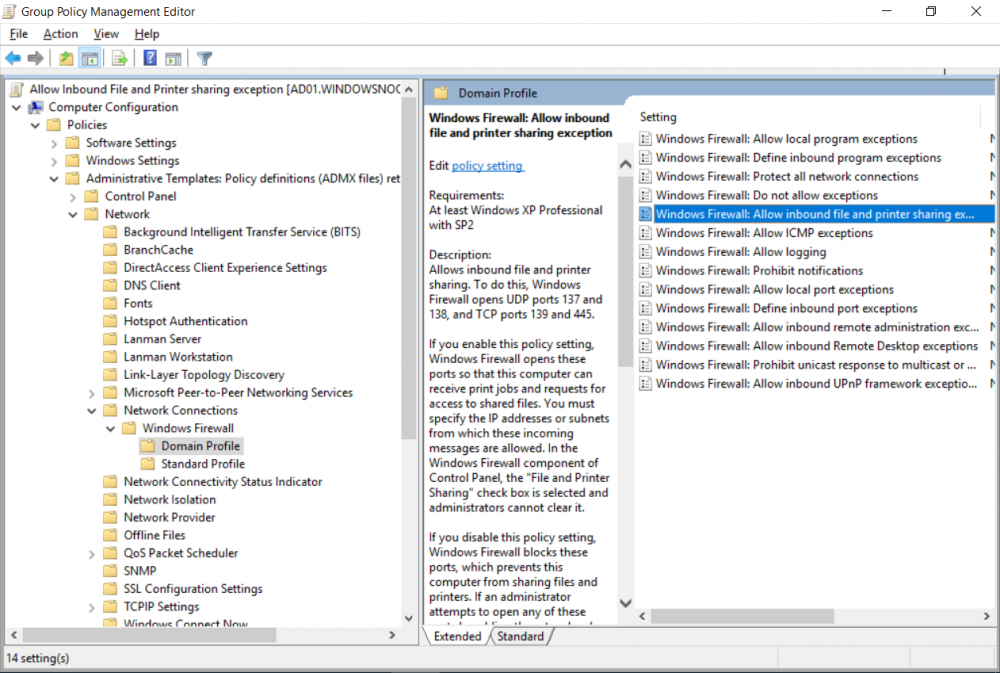
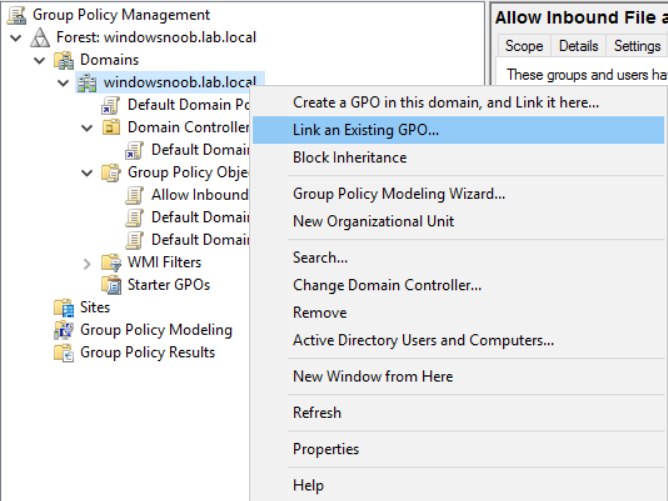
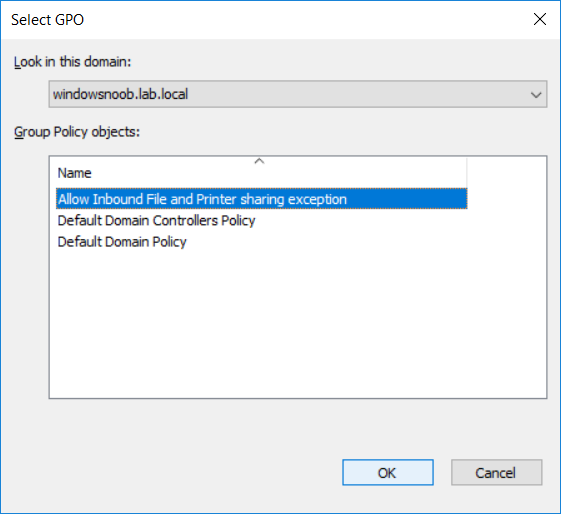
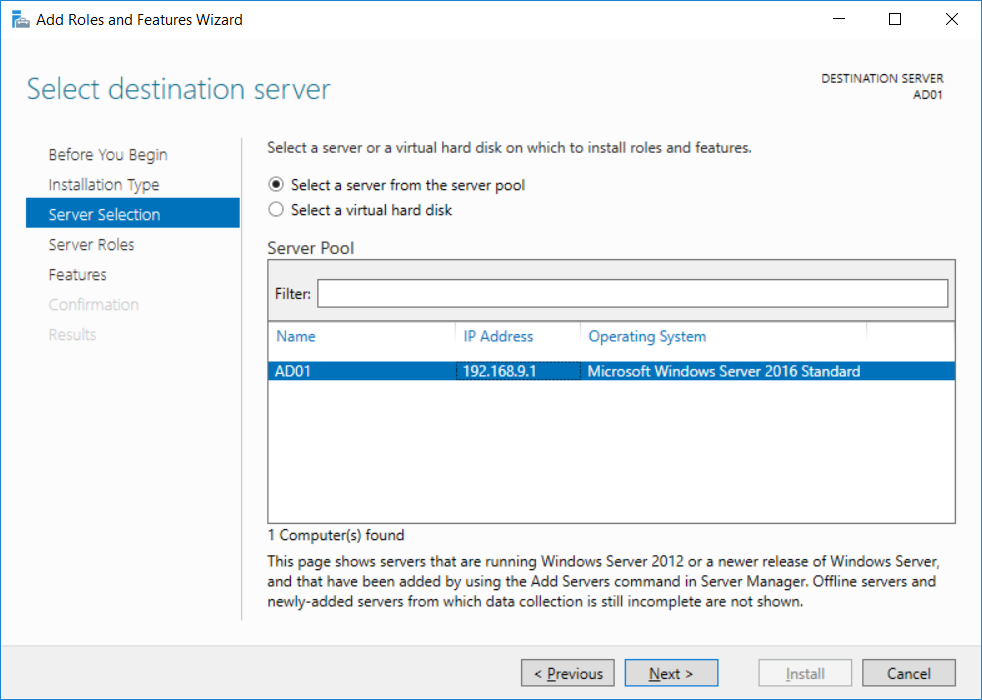
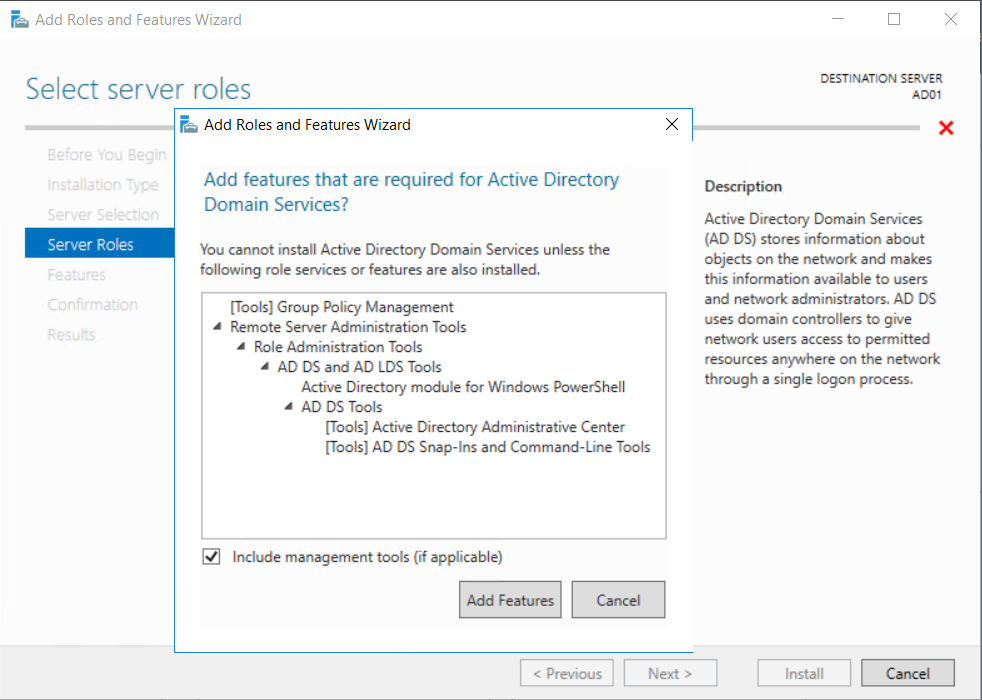
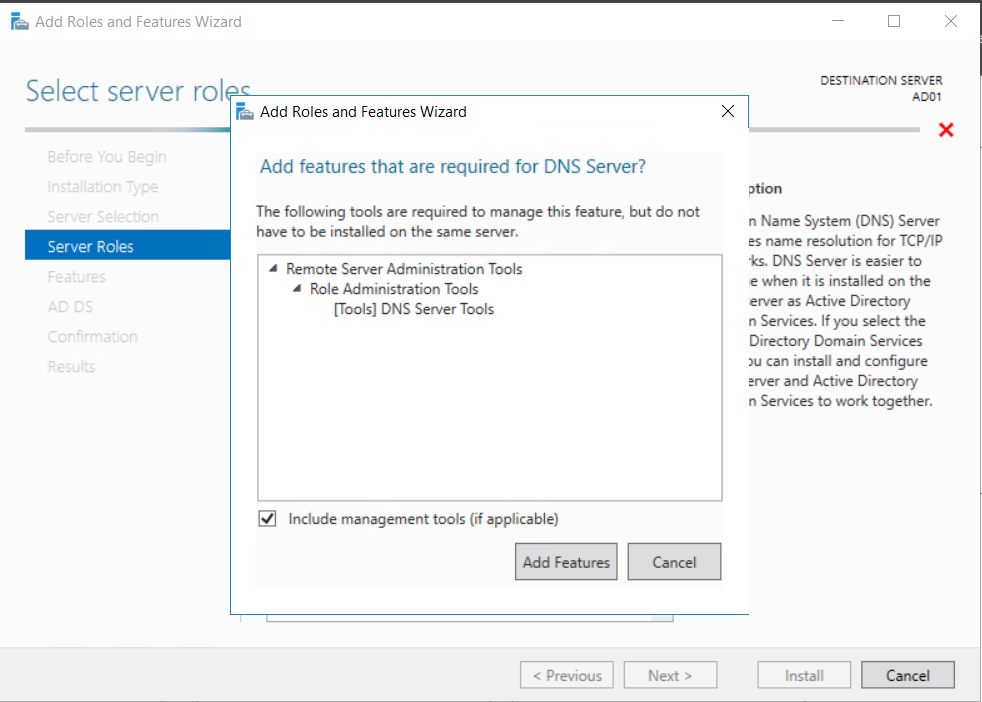
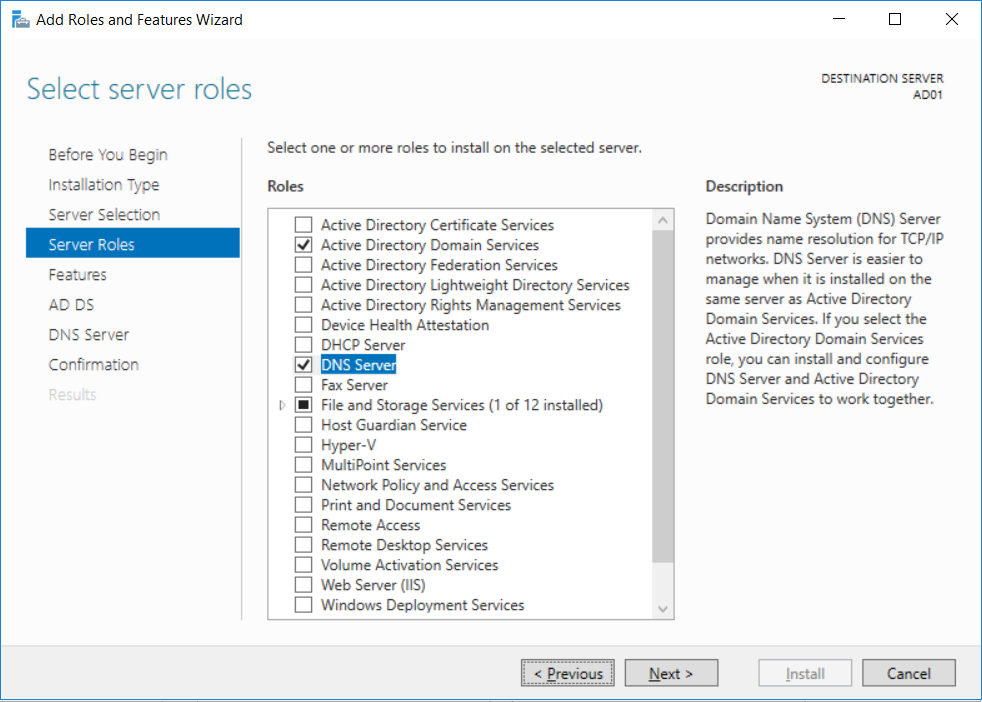
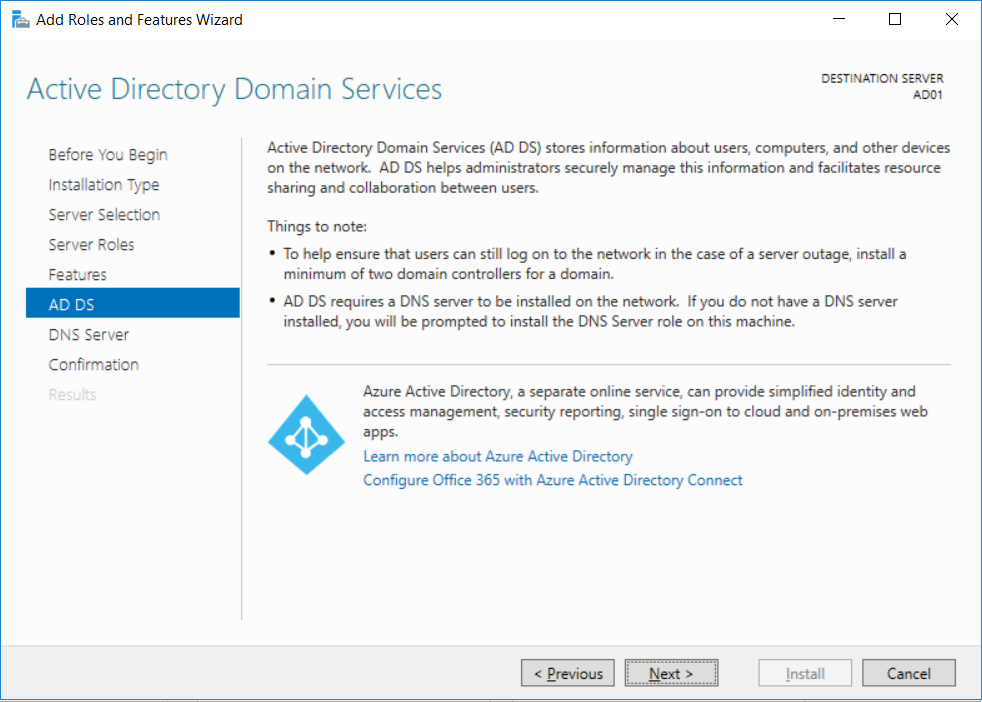
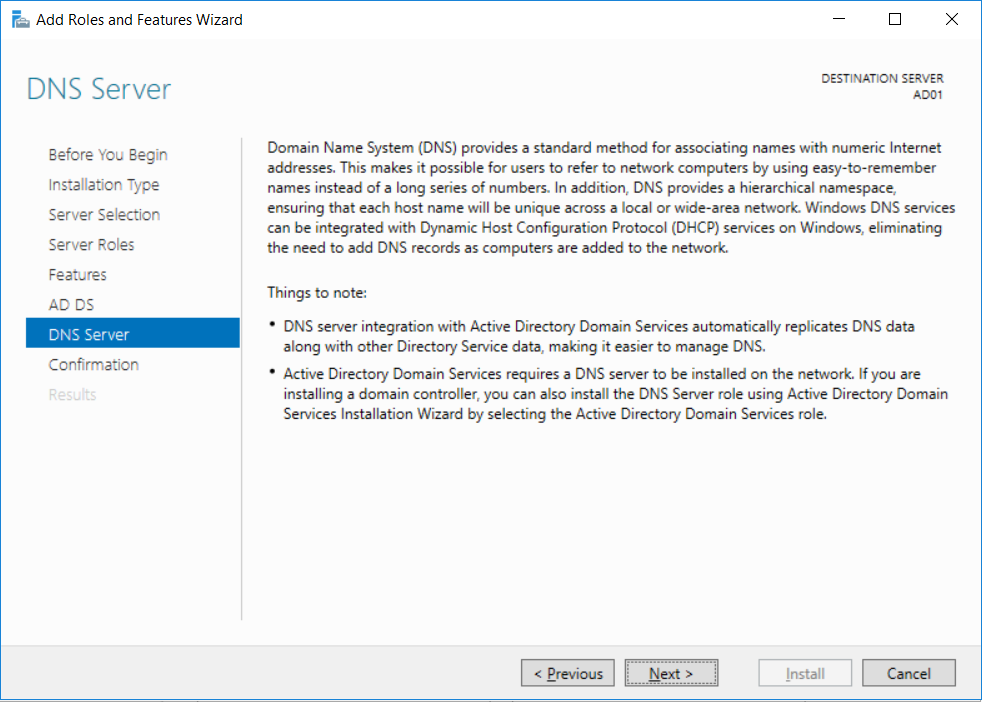
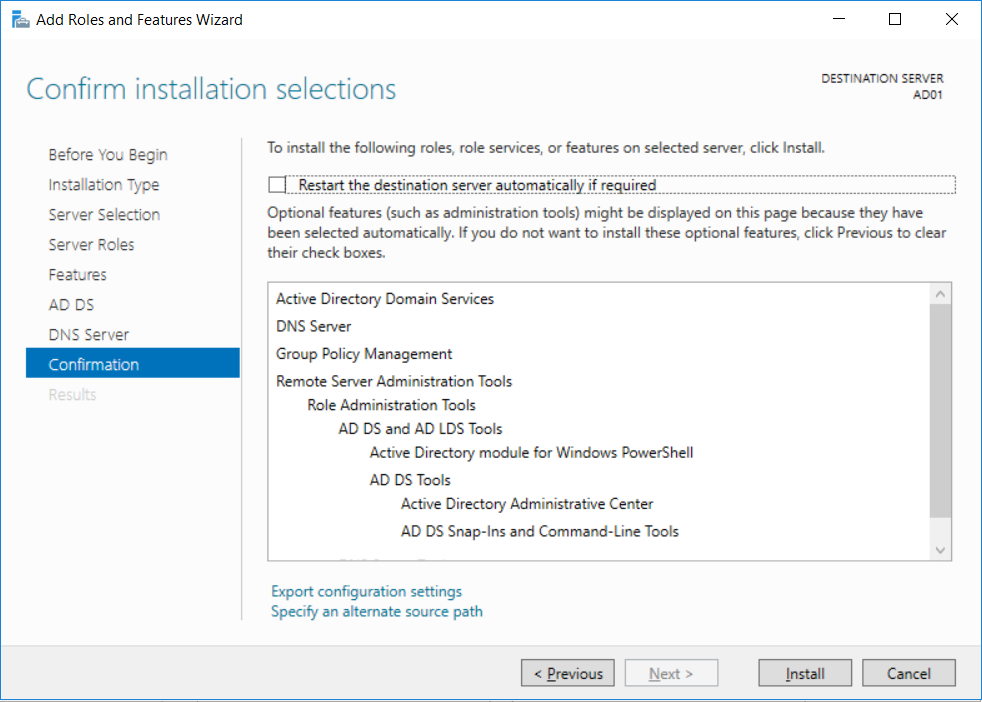
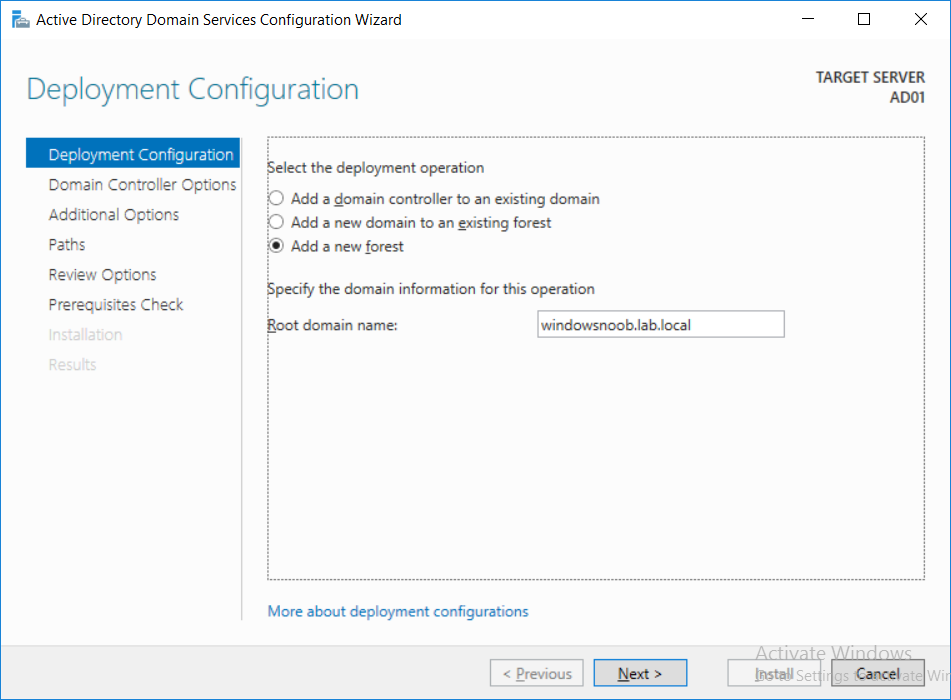
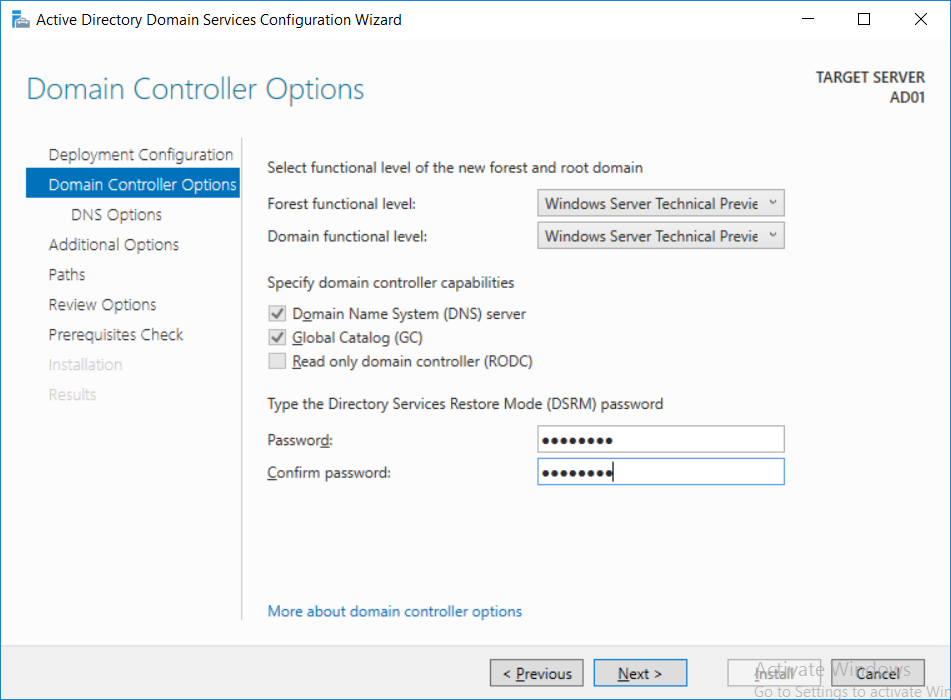
Introduction UPDATE: please use the newer version of this guide here. This multi-part guide will show you how to install the latest baseline version of Configuration Manager from Microsoft. The latest available baseline version is System Center Configuration Manager (Current Branch) version 1802 as of March 29th 2018. How can I install System Center Configuration Manager (Current Branch) version 1802 on Windows Server 2016 with SQL Server 2017 – Part 1 How can I install System Center Configuration Manager (Current Branch) version 1802 on Windows Server 2016 with SQL Server 2017 – Part 2 How can I install System Center Configuration Manager (Current Branch) version 1802 on Windows Server 2016 with SQL Server 2017 – Part 3 How can I install System Center Configuration Manager (Current Branch) version 1802 on Windows Server 2016 with SQL Server 2017 – Part 4 You can use this multi-part guide to get a hierarchy up and running on Windows Server 2016 using SQL Server 2017. The concept behind this is to guide you through all the steps necessary to get a working Configuration Manager Primary site installed (for lab use) using manual methods or automated using PowerShell. This gives you the power to automate the bits that you want to automate, while allowing you to manually do other tasks when needed. You decide which path to take. PowerShell knowledge is desired and dare I say required if you are in any way serious about Configuration Manager. I will show you how to do most steps via two methods shown below, it's up to you to choose which method suits you best but I highly recommend automating everything that you can, using PowerShell. Method #1 - Do it manually Method #2 - Automate it with PowerShell Get your lab ready In this guide I assume you have already installed two WorkGroup joined servers with Windows Server 2016 installed, how you install the operating system is up to you. When installing the servers please choose Windows Server 2016 Standard (Desktop Experience). The servers used in this guide are configured as listed below, the SmoothWall (NAT) is optional. Server name: AD01 Server function: Domain Controller Server status: Workgroup joined IPv4 Address: 192.168.9.1 Subnet Mask: 255.255.255.0 Default Gateway: 192.168.9.199 DNS: 192.168.9.1 Server name: CM01 Server function: Configuration Manager Primary site Server status: Workgroup joined IPv4 Address: 192.168.9.2 Subnet Mask: 255.255.255.0 Default Gateway: 192.168.9.199 DNS: 192.168.9.1 Server name: Smoothwall Server function:Linux firewall Server status: 2 legacy nics eth0: 192.168.9.199 eth1: x.x.x.x (internet facing ip) Step 1. Configure Active Directory Domain Services (ADDS) Note: Perform the following steps on the AD01 server as a Local Administrator. To setup Active Directory Domain Services you could manually click your way through the appropriate wizard in Server Manager or automate it using PowerShell. For your benefit I'll show you both methods below, all you have to do is choose which one suits you. Method #1 - Do it manually Open Server Manager. Click on Add roles and features On the Before You Begin screen click Next For Installation Type select Role-based or Feature-based installation For Server Selection select Select a server from the server pool and choose AD01 For Server Roles select Active Directory Domain Services, when prompted to add features that are required for Active Directory Domain Services select Add Features Select DNS Server, when prompted to add features that are required for DNS Server, accept the changes by clicking on Add Features Continue the the wizard by clicking Next On the Features screen click Next On the AD DS screen click Next On the DNS Server screen click Next On the Confirmation screen click Install and then click on Close After it's finished, perform the Post Deployment Configuration by clicking on Promote this server to a domain controller select the Add a new forest option, give it a root domain name such as windowsnoob.lab.local Next, depending on your requirements set the Forest functional level and Domain functional level, I've selected the default options below however you may want to configure it differently for your hierarchy, For the password field use P@ssw0rd, Click Next when ready, for DNS options, click Next, Next verify the NetBIOS name and click Next To specify the location of the AD DS database, log files and so forth, either accept the defaults, or change them to something that suits your hierarchy and click Next. Next you can review the options (clicking view script will save your actions to a PowerShell script for use later if you wish). Click Next when done. Next, click Install to begin Once it is complete making the changes it will automatically reboot the server Method #2 - Automate it with PowerShell To configure ADDS and DNS automatically, use the ConfigureADDS.ps1 PowerShell script. 1. Copy the script to C:\scripts on AD01 2. Edit the variables in lines 17-24 as desired before running. 3. Start Windows PowerShell ISE as Administrator and run the script by clicking on the green triangle. Once the script is run, it will automatically reboot. Step 2. Join CM01 to the domain Note: Perform the following on the ConfigMgr server (CM01) as Local Administrator Method #1 - Do it manually To join the domain manually, login to CM01. Start Windows File Explorer. Right-click on This-PC and choose Properties. The System screen will appear. Click on Change settings to the right of Computer name. For the option To rename this computer or change its domain or workgroup, click Change, click Change and for Member of select Domain, enter the Domain details used in Step 1 and click OK when prompted for credentials, enter them and click OK You'll be welcomed to the Domain. Click OK. And prompted to reboot the computer, Click OK. In the Computer Name/Domain changes screen, click Close then click Restart now when prompted. Method #2 - Automate it with PowerShell To join the domain automatically, use the joindomain.ps1 PowerShell script. 1. Copy the script to C:\Scripts on CM01 2. Edit the variables (lines 16-18) as desired before running. 3. Start Windows PowerShell ISE as Administrator and run the script by clicking on the green triangle. Note: If DNS is not set correctly on the CM01 Network Properties, then the Domain Join process will fail. The script checks for success and reports an error if one occurs. If successful it will automatically restart the computer after the Domain Join process is complete. Step 3. Create users (optional) Note: Perform the following on the Active Directory Domain Controller server (AD01) as Administrator Method #1 - Do it manually To create users manually, click on Start and choose Windows Administrative Tools and then select Active Directory Users and Computers. In Active Directory Users and Computers, add new users by expanding <domain name>, select Users and right click, choose New then select User. In the wizard that appears fill in the New Object user details enter the Password details using password P@ssw0rd and click Finish when done Repeat the above process to add remaining users as appropriate for your environment Testuser, used for testing stuff CM_BA, used for building ConfigMgr created images CM_JD, used for joining computers to the domain CM_RS, used for reporting services. CM_CP, used when installing the Configuration Manager Client for Client Push. CM_NAA, (Network Access Account) used during OSD Note: The PowerShell script creates users and makes a user a local admin on the CM01 server. To facilitate the local administrator creation, you'll need to (optionally) manually create a GPO on AD01 called Allow Inbound File and Printer sharing exception which sets Windows Firewall: Allow inbound file and printer sharing exception to Enabled. To Create the GPO on AD01, click the Start menu and choose Windows Administrative Tools, then select Group Policy Management. Expand Group Policy Objects and Right click, choose New and give it a Name: Allow Inbound File and Printer Sharing Exception. In the GPO settings, expand Computer Configuration, Policies, Administrative Templates, then select Network, Network Connections, Windows Firewall and select the Domain Profile. Locate the Windows Firewall: Allow inbound file and printer sharing exception and set it to Enabled. Apply the changes. Here you can see the path to the GPO setting. After creating the GPO, you'll want to limit it to only apply to your ConfigMgr server (or servers). To do that select the Delegation tab of the GPO, and click on Advanced button. Select the Authenticated Users security group and then scroll down to the Apply Group Policy permission and un-tick the Allow security setting. This denies authenticated users from applying this GPO setting Next, click on the Add button, for Select this object type make sure to select Computers from the Object Types and select the group or Computer object that you want to have this policy apply to. Then select the group (e.g. ConfigMgr Servers) and scroll the permission list until you see the Apply group policy option and then tick the Allow permission as shown here. Finally, you need to Link the GPO, to do that, right click on your Domain (in this example it's windowsnoob.lab.local) and select Link an existing GPO and then select the newly created GPO Note: Once the above is completed, please update Group Policy on CM01 using Gpupdate /force prior to running the PowerShell script below. Method #2 - Automate it with PowerShell To create users automatically, use the Create Users Usergroups and OUs in AD.ps1 PowerShell script. Tip: You should edit the script and adjust the variables to your liking, for example if you want to change the default password. You may also want to rem out the MDT and MBAM user/groups that are created and change some of the user names within the script. To rem out a line place a # in front of it. 1. Copy the script to C:\scripts on AD01 2. Edit the variables [lines 79-100] as desired before running. 3. Start Windows PowerShell ISE as Administrator and run the script by clicking on the green triangle. Once the script is complete you can browse Active Directory Users and Groups to see the Users and Groups it created. Step 4. Create the System Management Container Note: Perform the following on the Active Directory Domain Controller server (AD01) as Local Administrator For details of why you are doing this see https://docs.microsoft.com/en-us/sccm/core/plan-design/network/extend-the-active-directory-schema Method #1 - Do it manually Open ADSI Edit, click on Action, then Connect To and click Ok, Double Click on Default Naming Context and the DC= that appears below it. Click on the > and scroll down to CN=System. Right Click on CN=System and choose New, Object choose Container from the options, click Next enter System Management as the value. Click Next and then click Finish. Method #2 - Automate it with PowerShell Note: Perform the following on the Active Directory Domain Controller server (AD01) as Local Administrator To create the System Management container automatically, use the Create System Management container.ps1 PowerShell script. Step 5. Delegate Permission Note: Perform the following on the Active Directory Domain Controller server (AD01) as Local Administrator Method #1 - Do it manually Open Active Directory Users and Computers. Click on view, select Advanced Features. Select the System Management Container under System Right click the System Management container, choose All Tasks and Delegate Control. When the Welcome to Delegation of Control Wizard appears click next, then click Add. click on Object Types, select Computers. Type in your Configuration Manager server name (CM01) and click on Check Names, it should resolve. Click Ok Click Next then select Create a Custom Task to Delegate, click Next, make sure This folder, existing objects in this folder and creation of new objects in this folder is selected. Click next, select the 3 permissions General, Property-Specific and Creation-deletion of specific child objects are selected then place a check mark in Full Control. Tip: Repeat the above process for each site server that you install in a Hierarchy. Method #2 - Automate it with PowerShell To delegate permissions to the System Management container automatically, use the Delegate Permissions.ps1 PowerShell script on AD01. Edit line 24 to point to the ConfigMgr server if you are using a different computer name than CM01. Note: You need to start Windows PowerShell ISE as a user that has Administrative Permissions in AD on the AD01 server. Downloads The scripts used in this guide are available for download here. Unzip to C:\Scripts on both servers. The scripts are placed in the corresponding folder (Part 1, Part 2 etc) and sorted into which server you should run the script on (AD01 or CM01). Scripts.zip Summary Using PowerShell to automate things leaves more time for yourself and it's fun. Please join me in Part 2 of this multi-part guide where you will configure Windows Server 2016 roles and features and then install SQL Server 2017. Continue to Part 2 of this guide > https://www.windows-noob.com/forums/topic/16116-how-can-i-install-system-center-configuration-manager-current-branch-version-1802-on-windows-server-2016-with-sql-server-2017-part-2/


-
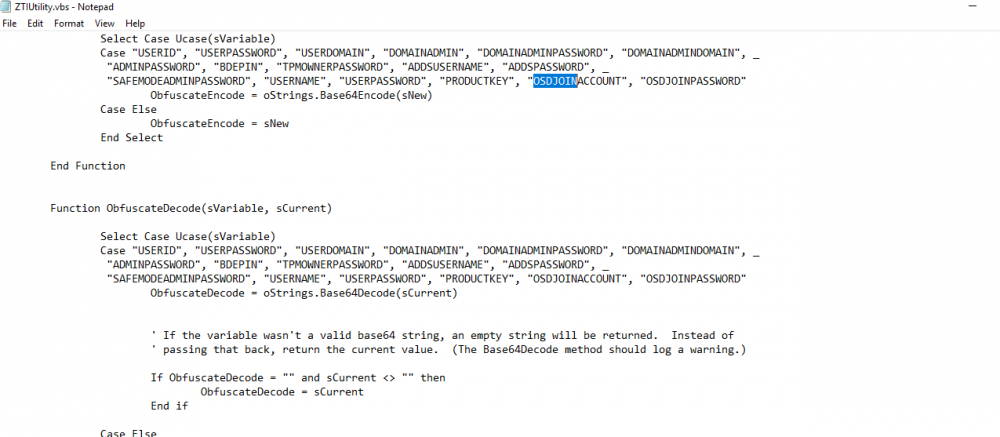
 I'm using a UDI\MDT taskseqence and encoding the OSDJoinaccount . I enclosed a a sample Custom.ini with dummy password I'm also using a VB script to decode placing the decode script before configure but getting a domain join error if any sees what i might be doing wrong . Apply Network setting is Joining a workgroup just above that but this seems normal because the Domain join is being controlled by the MDT\UDI variables . The Goal is the obfuscation of the OSDdomainjoin password in Codebase64 then decode it to clear text just before its Configured. I'm getting a domain join error at the end which telling me is drivers this on a VM which i don't think is because i have built to servers with no problem in Hydration. So i think I'm missing something possibly in the Decode script when I'm calling ZTIutility or possibly in customsetting.ini ENCLOSED PICTURES Can some one give some some pointers on what I'm doing wrong.


-
Hi, We have a hibrid SCCM + Intune scenario and i got an alert on SMS_CLOUD_USERSYNC component. In cloudusersync.log reports that are a duplicated object and it can't remove the license: ERROR: RemoveLicensedUsers exception Microsoft.Management.Services.Common.InvalidParameterException: Duplicate object key found in request: Id: 'guid'219c3d11-feed-4291-b251-c84b782ed7b4''~~ at Microsoft.Management.Services.DistributedQuery.DistributedQuery`1.CheckBatchForDuplicateItems(IEnumerable`1 items)~~ at Microsoft.Management.Services.DistributedQuery.DistributedQuery`1.<DeleteAsync>d__33.MoveNext() SMS_CLOUD_USERSYNC 28/03/2018 15:34:09 41440 (0xA1E0) I don't know how to "unlock" this situation, what can i do? it's trying to synchronize every 5 minutes Any suggestions?
-
 We have trouble using PXE in our environment. Our setup: SCCM 2016 management point in remote datacentre (running on Windows Server 2016) SCCM 2016 distribution point + OSD in local serverroom (running on Windows Server 2016). On this server, 2 network cards are configured. One is connected to the domain, the other is connected to a seperate 'installation LAN'. We also configured DHCP on this server with a binding only to the 'installation LAN NIC'. We also configured DHCP options 60, 66 and 67. On this local server, we installed Hyper-V to run a virtual machine which we can use to create a clean Build and Capture using OSD. However, we cannot boot this virtual machine into PXE. It doesn't seem to get an IP address from DHCP. If we boot up a laptop to the installation LAN, then there is no issue booting up in to WinPE. We've tried several things: Change WDS settings; (set PXE response to respond to all computers / Configured DHCP options / Authorized server in to DHCP / let DHCP give out the multicast address) Changed DHCP options (removed option 60 (PXEClient) / Configured DHCP option to also use BOOTP) Configured different virtual switches in Hyper-V (Internal / external / private), configured RRAS to create a shared NIC, disabled DCHP guard, disabled 'Protected Network' Added computer manually in to SCCM using MAC address. We are running out of options. If I boot up a VM on the laptop using Hyper-V, I don't have any issues. However, we would like to use Hyper-V on the server itself to create images because it is a central and permanent solution. Any suggestions? Many thanks in advance.
 -
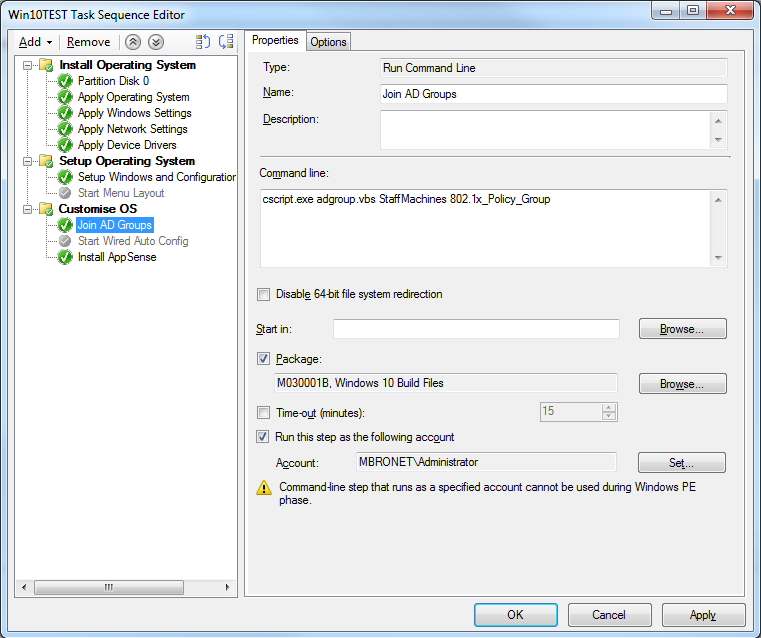
Hi all, Having an issue re creating our build process in the new SCCM environment i've been building lately. During the deployment of an OS we have two visual basic scripts that run after the OS has been booted into for the first time that add the PC to the correct AD groups and starts the 802.1x service (i know there is probably other ways of doing this but i'd rather replicate than redesign). This works flawlwessly on our current live SCCM but in the new one, which is working with Windows 10 rather than 7, i cannot get it to run during the TS, i just receieve an incorrect function error, whereas if i run the script manually on the Windows 10 machine it works as expected. I've attached some screenshots that show the position in the task sequence of the script step, and the command line im using to call it (also copied from our current live environment) The content is on the DPs correctly as the unattend file that runs during the initial OS setup is also called from that same package. Thanks Phil
-
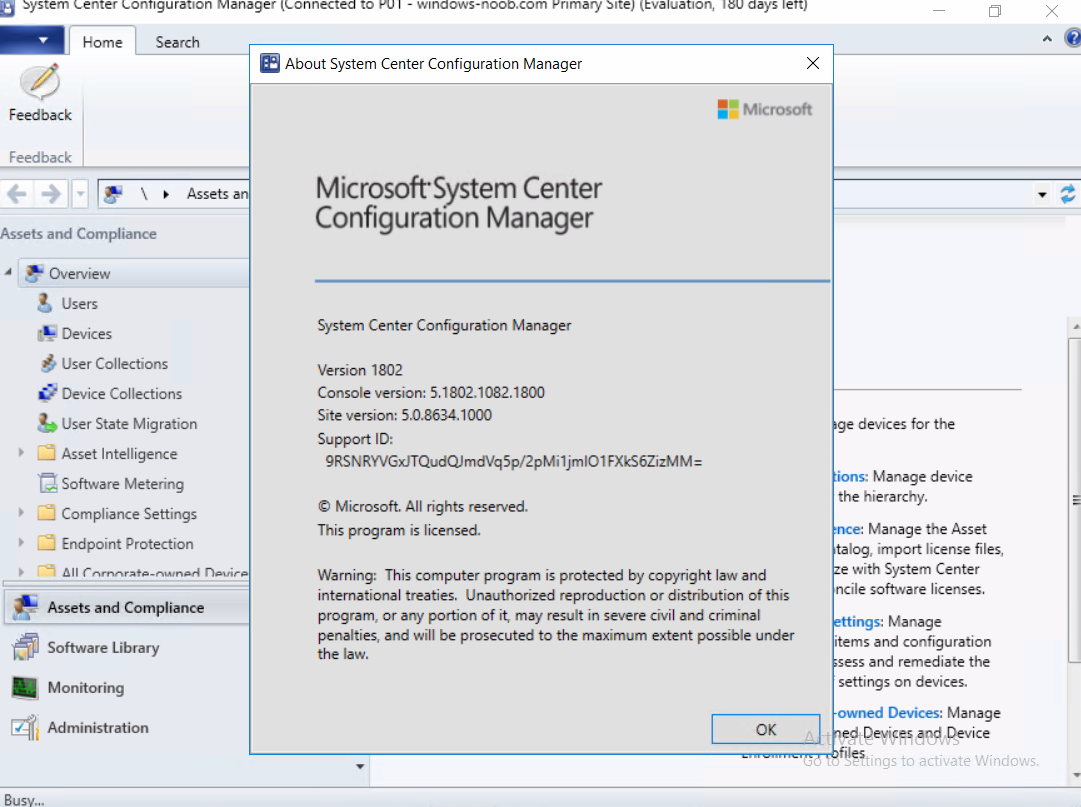
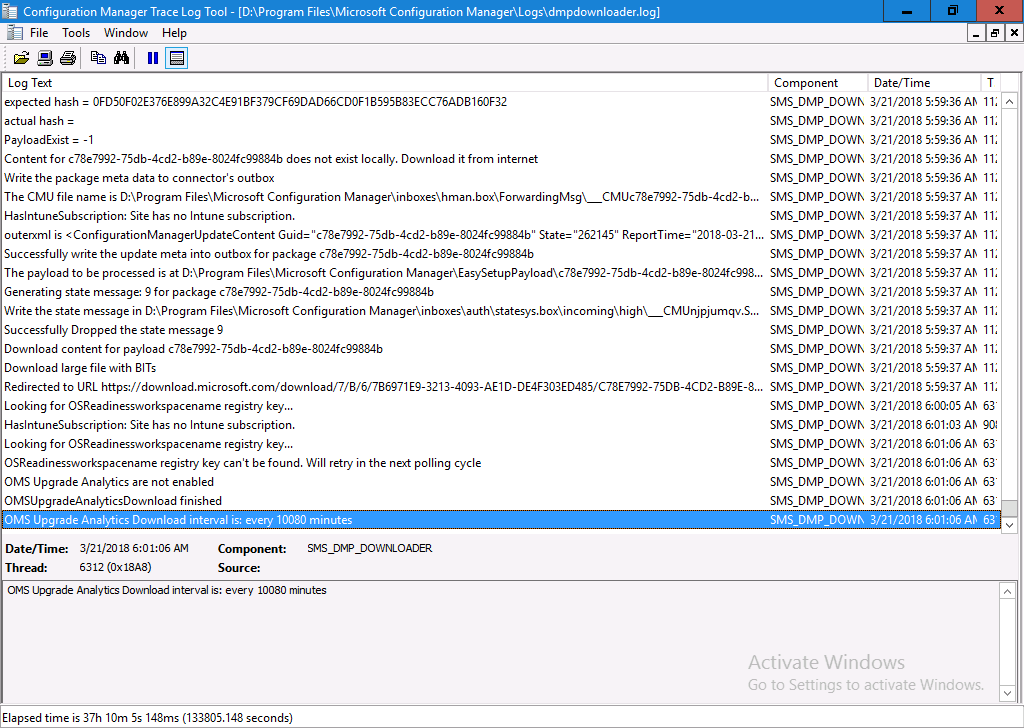
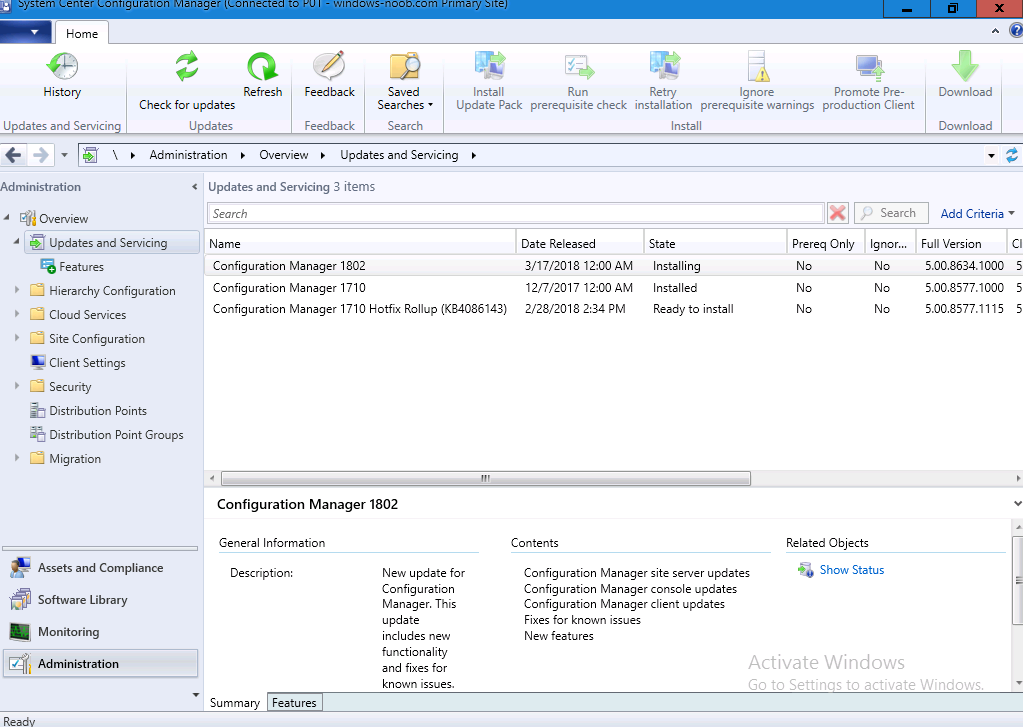
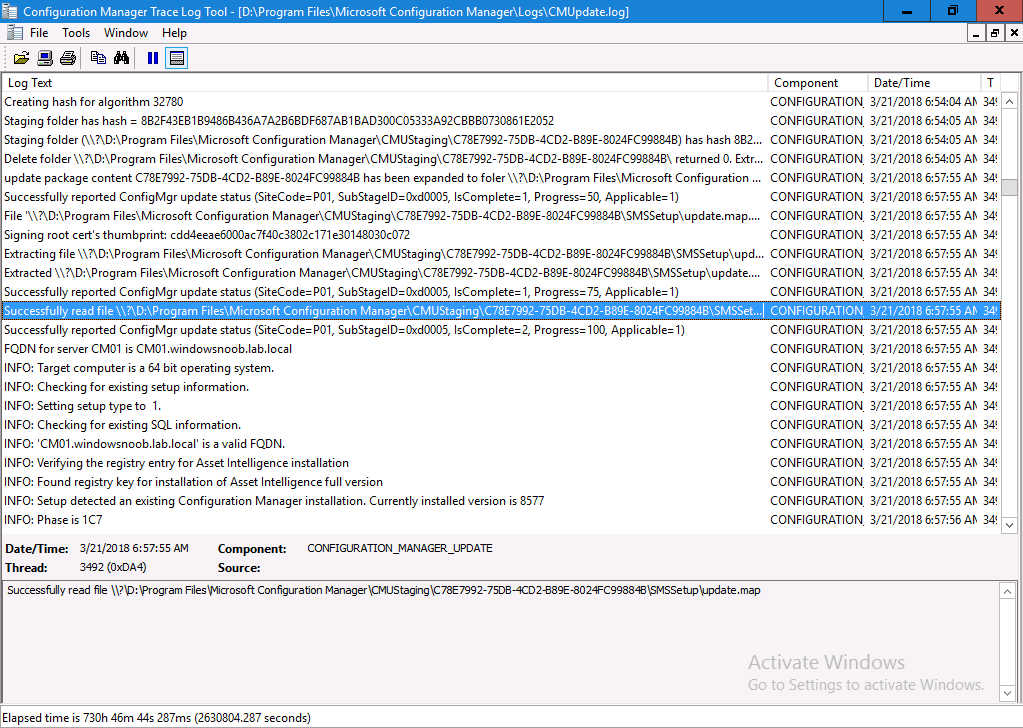
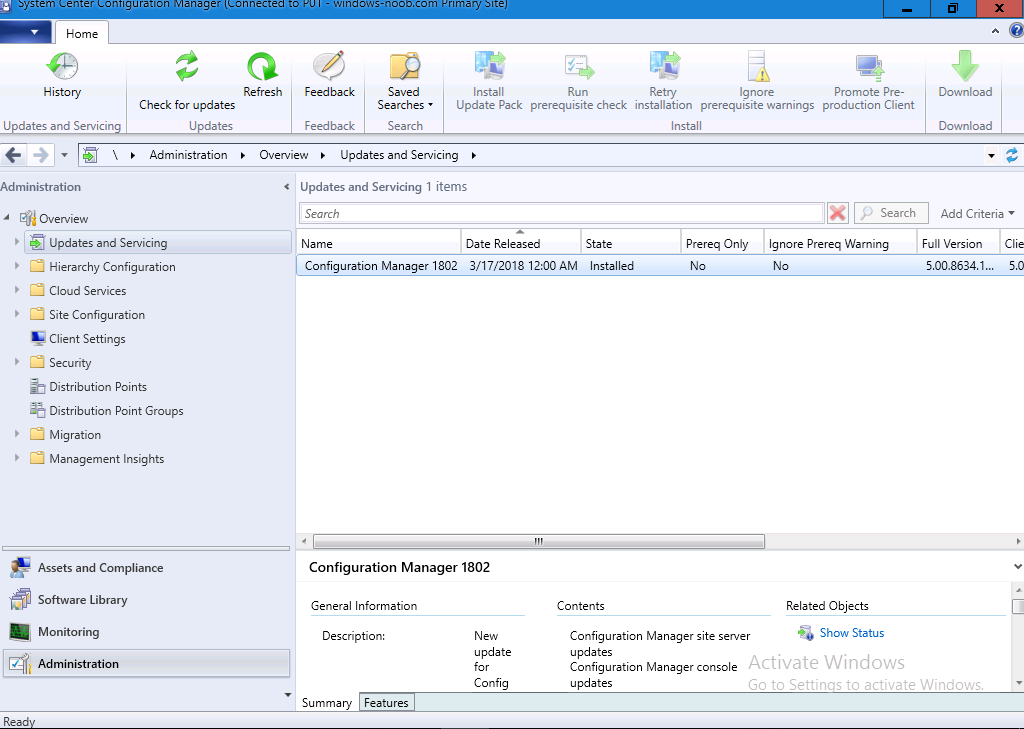
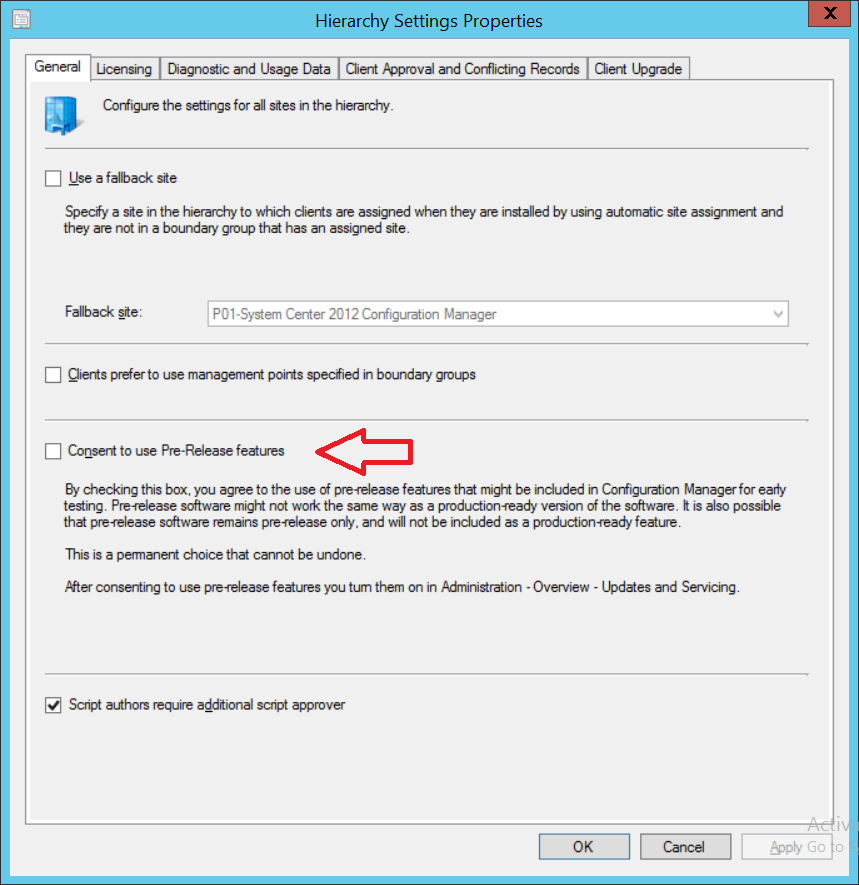
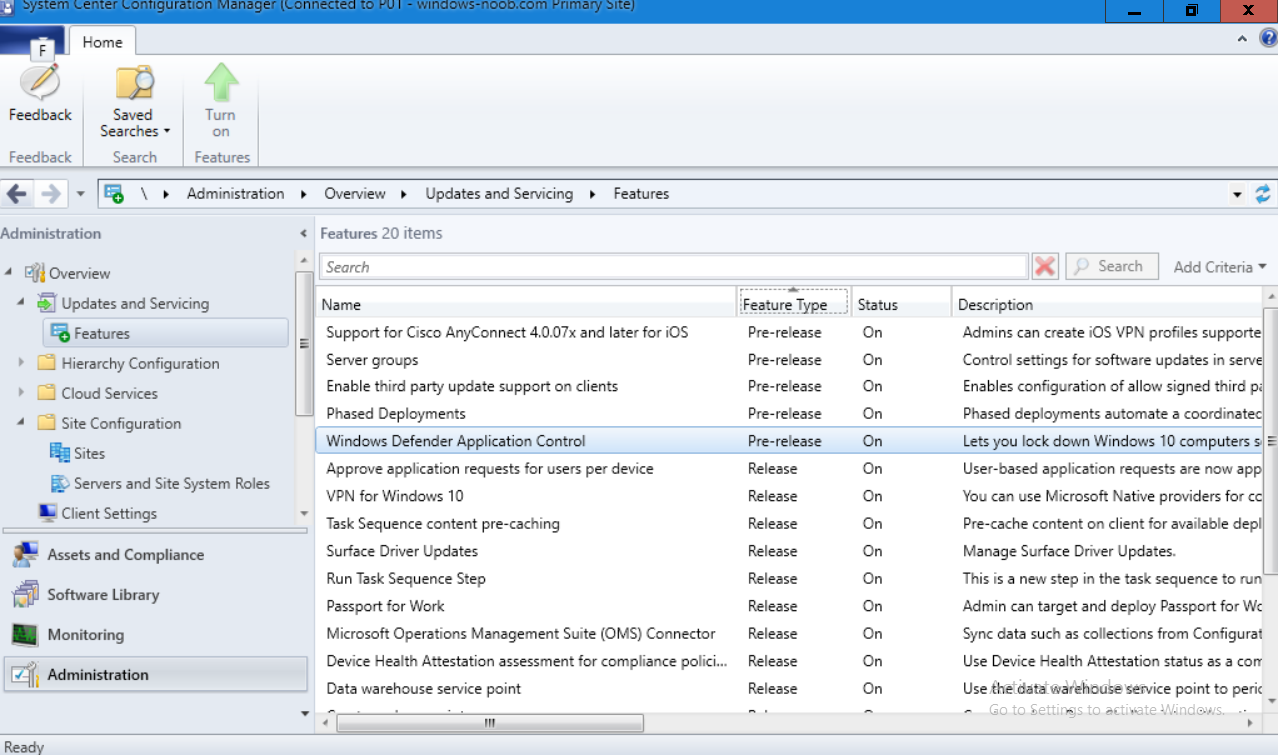
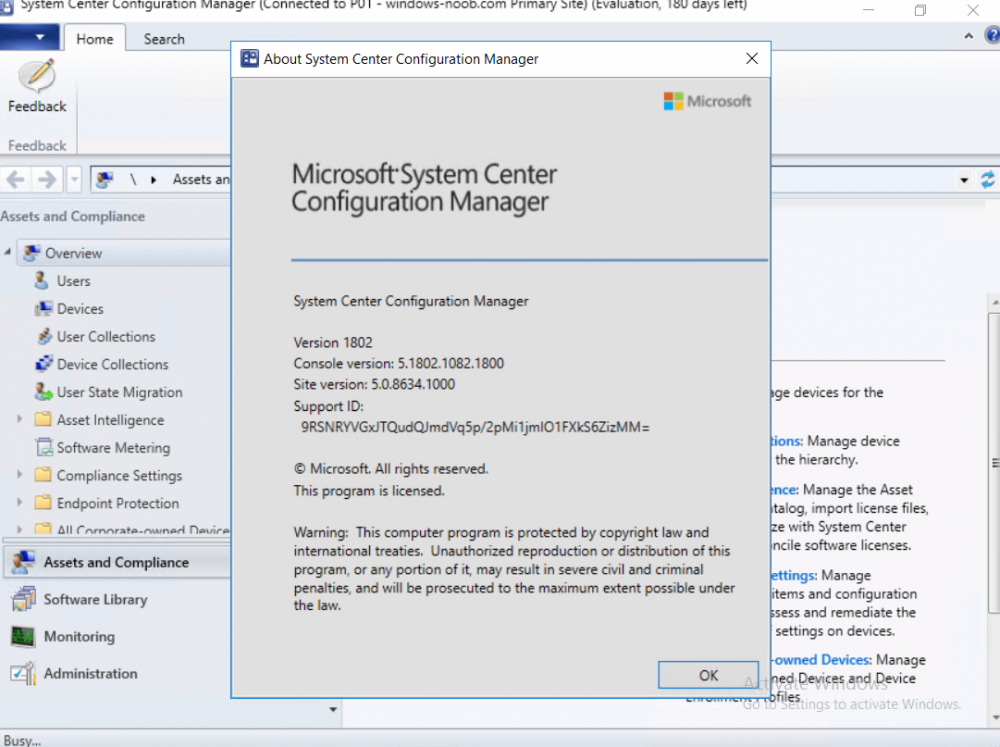
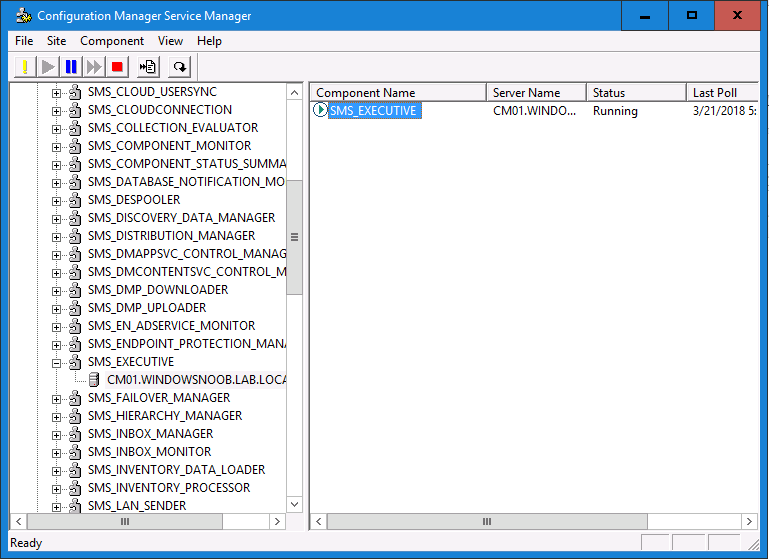
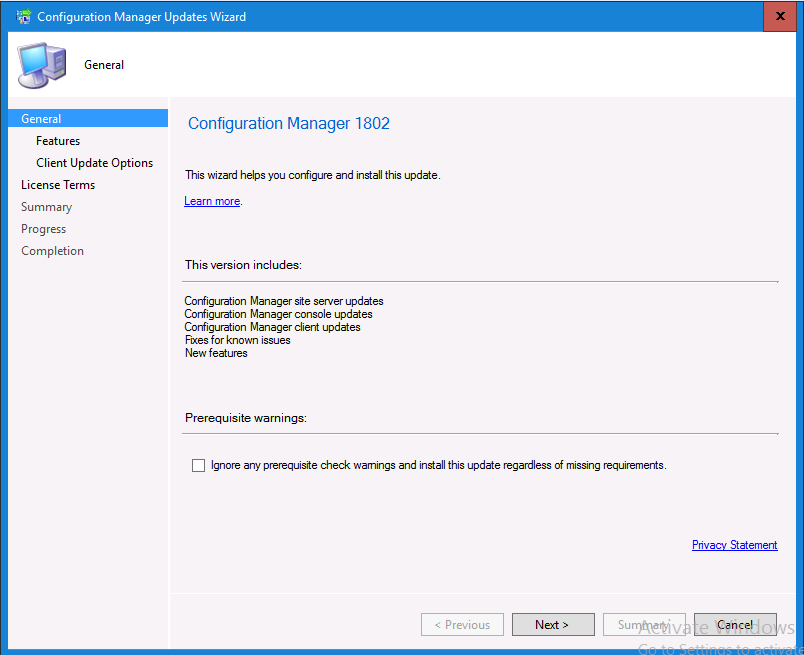
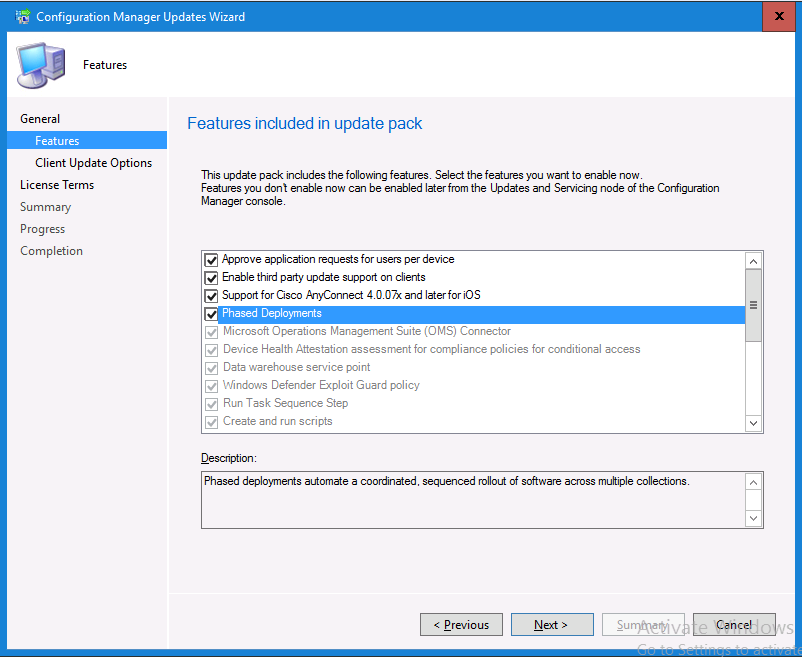
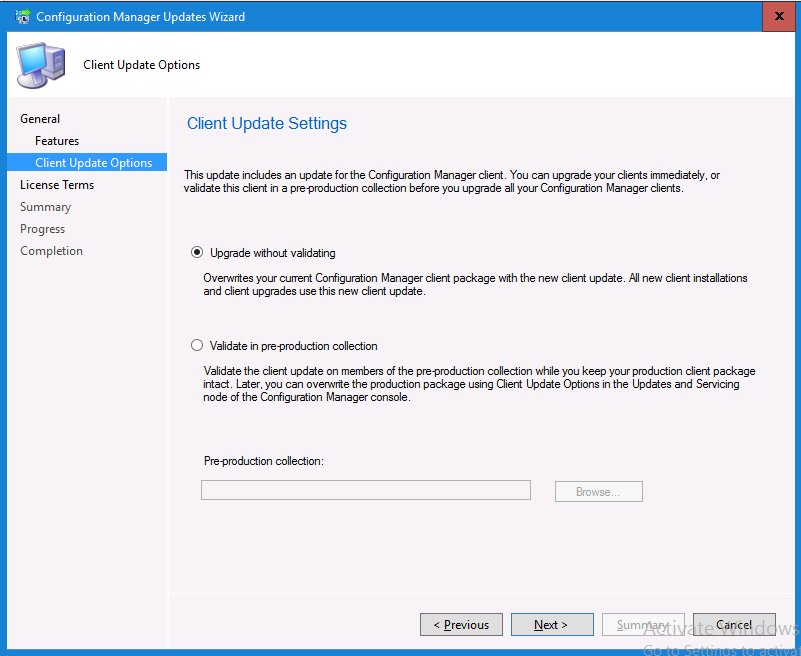
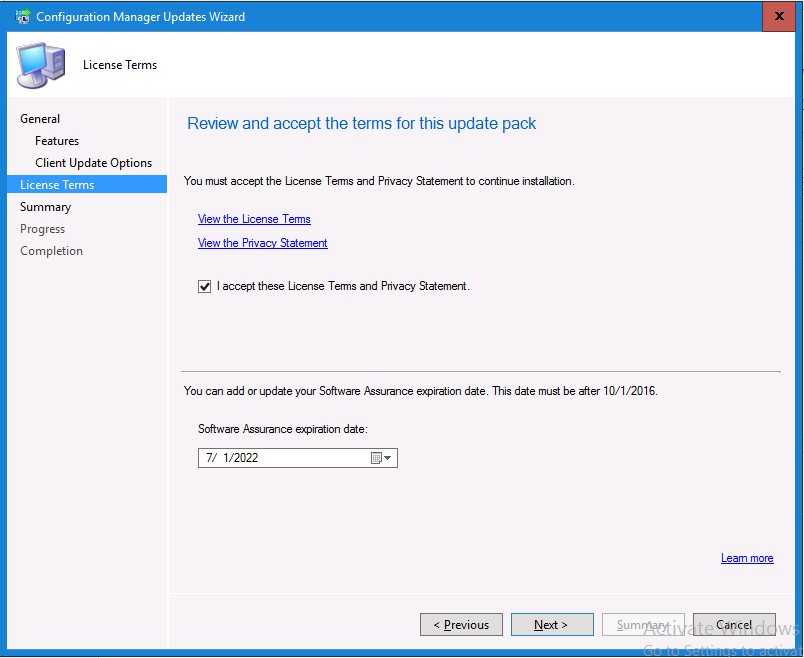
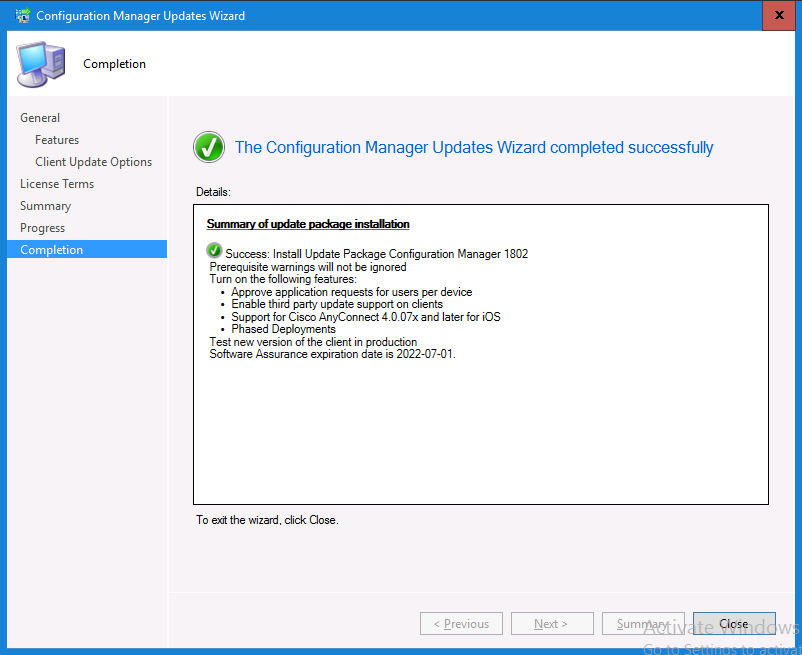
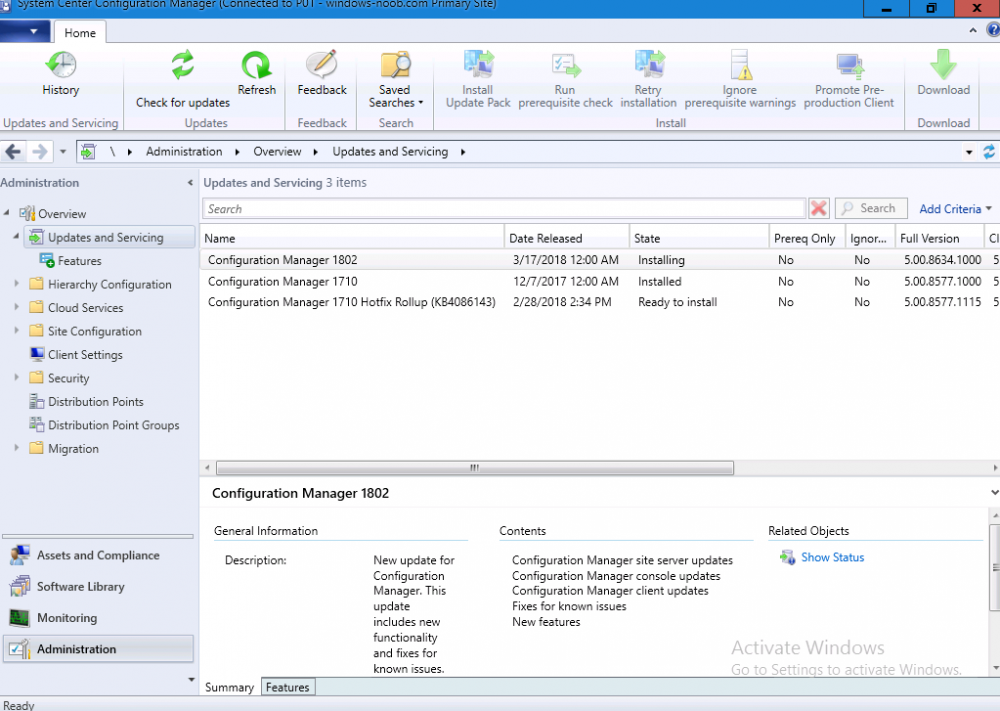
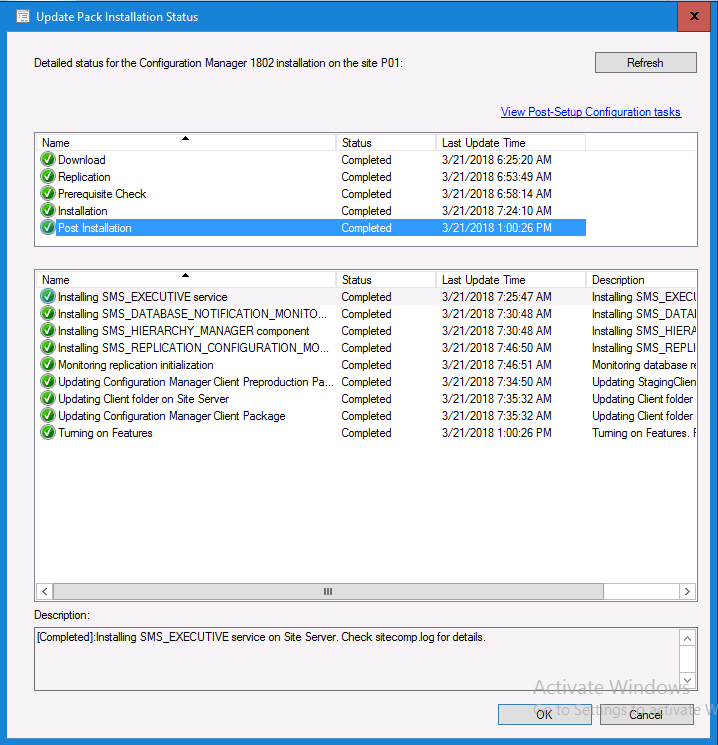
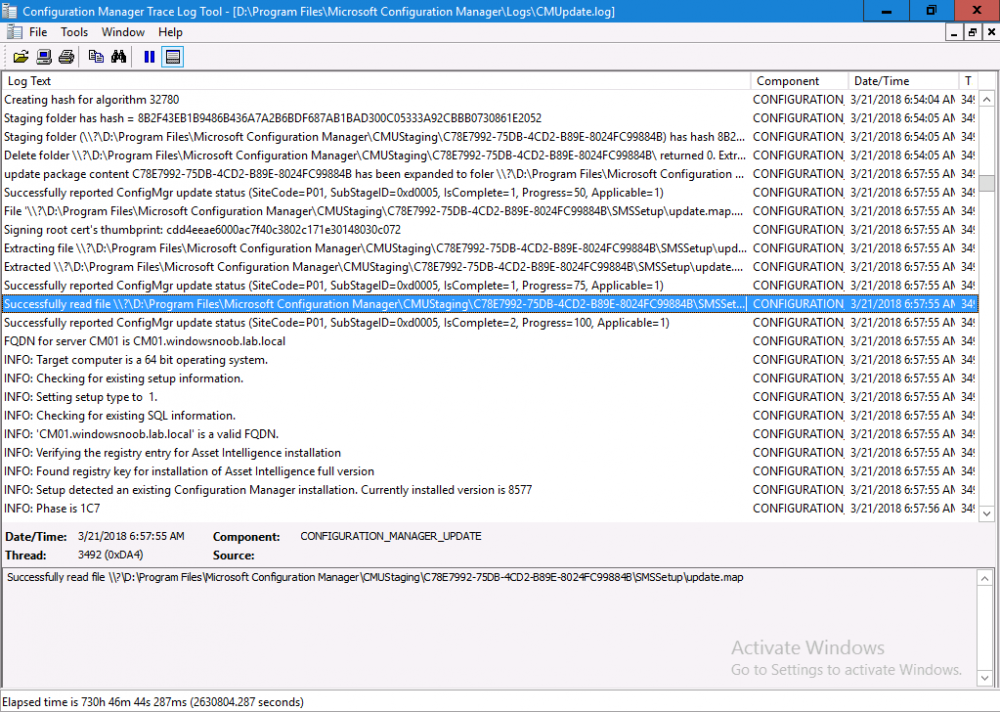
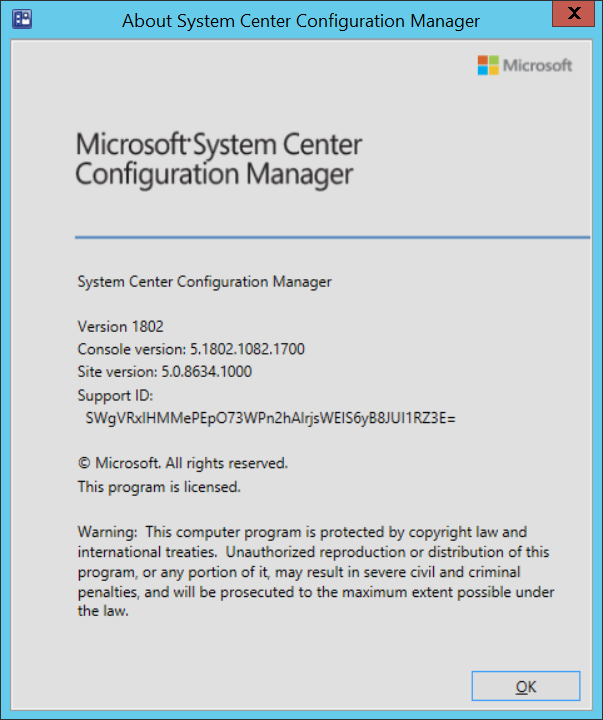
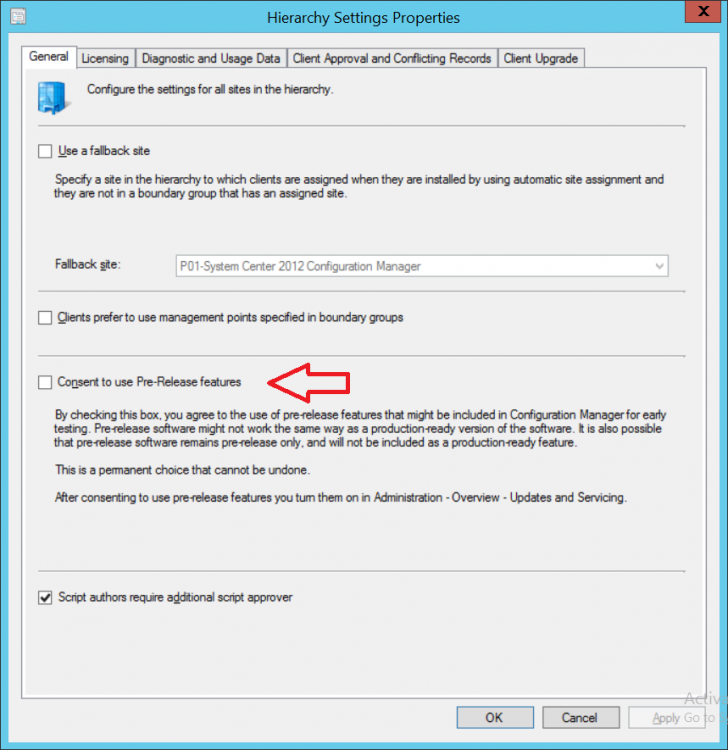
Introduction Today (in Seattle WA) Thursday the 22nd of March, 2018, System Center Configuration Manager (Current Branch) version 1802 was released. You can read the official announcement here and for a detailed list of what's new, please see the following blog post. The white elephant above is based upon an original graphic which I found here, thanks Djam ! Understanding the different SCCM releases There are two main branches of Configuration Manager currently available, Current Branch and Technical Preview. System Center Configuration Manager (Current Branch) is designed for use in production environments, for managing anything from relatively small to very very large Enterprises, whereas System Center Configuration Manager (Technical Preview) is for lab testing environments only and is limited to 10 clients. The Technical Preview releases are released monthly, and contain the latest and greatest features that are being trialed in the product, and usually these new features are the result of feedback from uservoice. Current Branch releases on the other hand are released only a few times per year and contain stable, tested features that are mature enough to release into production environments. Note: You cannot upgrade from a Current Branch to Technical Preview or vice versa, they are two distinct different branches. The following versions have been previously released since Microsoft moved to the Current Branch release cadence for Configuration Manager: Source Microsoft. A note about Baseline versions Baseline versions are versions of Configuration Manager that you can use to perform a clean install of Configuration Manager or when upgrading a supported version of System Center Configuration Manager 2012 hierarchy to Current Branch. Baseline versions are available for download in the Microsoft Volume License Service Center. As System Center Configuration Manager (Current Branch) version 1802 is now the new Baseline, you should it for all new installs (or applicable upgrades) until the next Baseline version is released. Note: Even though 1802 is listed as a baseline version here, it is not yet available for download on MVLS (as of 2018/3/25). Usually it takes a few weeks to get the new build media in place, so until that happens you can continue to use the 1702 baseline media for new installs and supported upgrades. Upgrading to 1802 Current Branch In a previous post you used PowerShell scripts to install System Center Configuration Manager (Current Branch) version 1702. This post will focus on upgrading from one current branch version to version 1802. This post assumes you are running a minimum version of 1702 of System Center Configuration Manager (Current Branch). If you have a hierarchy containing a CAS and one or more Primaries, then you must upgrade the CAS first before upgrading the Primary site servers. Note: Before upgrading, please review the following checklist to verify you are ready for the update. Fast ring versus Slow ring Do you want it now or later ? If you want it right now then you have the choice of getting the release immediately using a method called the fast ring. The fast ring method uses a PowerShell script which you download from Microsoft. After running the PowerShell script, the upgrade will show up in the ConfigMgr console. Note: The fast ring method is usually only available for the first 2 weeks after a Current Branch release is released. If however you decide to wait a couple of weeks after the release is publicly available, then the upgrade will be released to the slow ring and at that point it will show up in the ConfigMgr console for all Current Branch hierarchies without the need for running any PowerShell script. If you want to use the Fast Ring, download the PowerShell script and run it to self-extract to FastRingScript_1802. Once extracted, start an Administrative PowerShell command prompt in that folder and from there use the following command (where CM01 is the <SiteServer_Name | SiteServer_IP> of your CAS or standalone Primary site server). .\EnableFastUpdateRing1802.ps1 CM01 Next, open the ConfigMgr console and find Updates and servicing in the Administration node. Click on Check for Updates in the ribbon, followed by Refresh. After a few minutes you should see that Configuration Manager 1802 is listed with a state of Available to download as shown below. Note: If the upgrade does not show up in the console even after refreshing the view, you can restart the SMS_Executive component in Configuration Manager Service Manager in the Monitoring node of the console or alternatively restart the Configuration Manager server. After some time the update will automatically start downloading at which point you can open the dmpdownloader.log using CMtrace to keep track of things. Once it has completed downloading, the update pack will be listed in the ConfigMgr console with a state of Ready to Install. You may need to click refresh in the ConfigMgr console to update the view. Installing the Update pack Right click on the update and choose Install Update Pack. when the Wizard appears, make your choice for pre-requisites and click next. review the features included in this update pack , and make selections if you wish, you can always add them later in the Console. Note: You'll also notice lots of Pre-Release features that are greyed out, to turn them on see the steps after upgrading the console the bottom of this guide. Before clicking next at the Client update settings please see this post accept the EULA and configure the software assurance expiration date and continue through until the wizard is complete. Monitoring the update In the console, the update pack state will change to Installing (refresh the console view to see this). Clicking on Show Status will give you detailed info about the state the Installation is in, there are 5 distinct phases in the top pane: Download Replication Prerequisite Check Installation Post Installation Selecting a phase will highlight what state the update is in, including what (if any) problems it has. Logs, logs and more logs. During the upgrade you should monitor the following log files available in <drvletter>:\Program Files\Microsoft Configuration Manager\Logs, you can use CMTrace to do so. CMUpdate.log Hman.log These logs will detail the installation of the update pack. you should also pay close attention to the following log files present in the root of C:\. CompMgrProv.Log ConfigMgrPrereq.log ConfigMgrSetup.log After the update is complete, click Refresh in the console and you'll be reminded to update the ConfigMgr Console via a popup, the new version is 5.1802.1082.1700. Make sure to update your console as you cannot use the new features until you do. The observant among you will notice a change to the Console versioning. The new console version is 5.1802.1082.1700 versus the old console version (in my lab) which was 5.00.8577.1100. The new Console versioning works as follows: Major Minor Build Revision So that translates to... Major = 5 Minor = 1802 Build = 1082 Revision = 1700 Click OK to upgrade your ConfigMgr console, and after all is done you’ll see the 1802 version listed in the console. and clicking on about shows you Enabling Pre-release features If you want to use the Pre-Release features, then select the Administration node, select Site Configuration, Sites, Hierarchy Settings, and place a check mark in Consent to use Pre-Release features. After that, select Updates and Servicing, click on the Update Pack, select Features and in the right pane of the ConfigMgr console you'll be able to turn pre-release features on or off by right clicking and choosing Turn on or Turn off. Summary This release is packed with great features and new functionality and proves that the SCCM as a Service (SAAS) model is working. Not only is it working but quick adoption by Enterprises large and small is proof indeed that they like and trust the direction that ConfigMgr is evolving towards. If you are not on Twitter yet then get on it, and Tweet a thank you to David James (@Djammmer) and his Team for the amazing work they do. Recommended reading System Center: Configuration Manager - https://blogs.technet.microsoft.com/configurationmgr/ Checklist for updating to SCCM 1802 - https://docs.microsoft.com/en-us/sccm/core/servers/manage/checklist-for-installing-update-1802 What's new In System Center Configuration Manager (Current Branch) 1802 - https://docs.microsoft.com/en-us/sccm/core/plan-design/changes/whats-new-in-version-1802 Co-Management for Windows 10 devices - https://docs.microsoft.com/en-us/sccm/core/clients/manage/co-management-overview Log files in System Center Configuration Manager - https://docs.microsoft.com/en-us/sccm/core/plan-design/hierarchy/log-files


-
 I just need some clarification on the ports that need to be opened on the client. Following this document, https://docs.microsoft.com/en-us/sccm/core/plan-design/hierarchy/ports#BKMK_CommunicationPorts Client Wake on Lan UDP 9 Wake-up Proxy UDP 25536 Remote Control TCP 2701 Remote Assistance TCP 3389 Are there any additional needed?
 -
I deployed the latest March Update for Office 365 to one Test Machine and it was marked as compliant even though it hasn't installed the update and is still on the old Office 365. I have checked the logs, nothing there. I went through the logs mentioned here https://technet.microsoft.com/en-gb/library/bb693878.aspx Can you someone please point me in the right direction of troubleshooting? Thank you
-
Hi guys, Trying to deploy Windows 10 Fall Creators Update 1709 using SCCM 1606. Everything works fine until a restart step and it gets stuck on a black screen until you press a key or tap the mouse pad and then it carries on to the next step. Deploying to Surface Pro 4s SCCM 1606 Simple TS - Install OS from WIM, join domain, install few apps, and that's it. https://i.imgur.com/BuGSczP.png https://i.imgur.com/EQYmeYW.png It happens to every restart i have in the TS. Can someone please assist me? Thank you

-
My task sequence is pretty simple, I just want to include Office 365 in it as it takes a long time to install during a normal W10 deployment, which is why I'm including it in my Capture. It's coming up with this error 0x00001007 This is the log from CONFIGMGR TASK SEQUENCE MONITOR ... ESULT=80091007 (e:\qfe\nts\sms\framework\tscore\bootimage.cpp,798) TS::Boot::BootImage::StageBootImage(sPkgID), HRESULT=80091007 (e:\nts_sccm_release\sms\client\osdeployment\prepareos\prepareos.cpp,846) PreStageWINPE(m_bDebug), HRESULT=80091007 (e:\nts_sccm_release\sms\client\osdeployment\prepareos\prepareos.cpp,1292) pCmd->Sysprep(bActivate, bMsd), HRESULT=80091007 (e:\nts_sccm_release\sms\client\osdeployment\prepareos\main.cpp,270) De-Initialization successful Exiting with error code 4103 Hashcould not be matched for the downloded content. Original ContentHash = CE4C495E359A3A0A18BF1B429BB909D2119C05531AD7980D12346772E662343A, Downloaded ContentHash = A9F2E5E0475E0D4C33625C81C0E4A254DB52A37E7977FBB777C9AA82E3E06351 Boot Image package not found. he hash value is not correct. (Error: 80091007; Source: Windows) Failed to resolve boot image LS100005 source Failed to pre-stage WINPE image, hr=0x80091007 Unable to sysprep the machine, hr=80091007 Sysprep'ing the machine failed, hr=80091007 Any help is much appreciated.
-
Hello Windows Noob family! I am attempting to a very basic, nothing crazy refresh from windows 8.1 to windows 10 using SCCM with MDT. I am doing a user driven installation with the latest ADK installation. I create a standard User Driven task sequence. Under the capture user state step I have Capture all user profiles by using standard options selected, with verbose logging and Copy by using file system access - checked continue if some files cannot be captured and capture locally using hard links. Then under Restore User state I am using Restore all captured user profiles with standard options. When kicking off the task sequence from within the OS, I have no trouble managing the wizard... which reboots me into WinPE and begins the image. I watch it run the USMT package which "Processes the User State". When the image is done, the user profiles are not restored, altho - all the data is still there under C:\StateStore. I can browse through that folder and see all the user profiles that were backed up, and all the content is there. It just appears to be skipping, or failing? On the Loadstate portion... I cannot find any scanstate / loadstate logs - and the SMTS.log files don't appear to display any errors. Any thoughts from the gurus here? Thank you!
-
 Hello, We are planning a Win10 migration in the next few months, we have about 1300 endpoints. The management team wants to split the migration on 2 weenkends. Here is our SCCM infrastructure Architecure : 1 Site server \MP 7 DPs with SMP role (one for each location on different timezones) 1 SUP server. My question is, would you think that we should scale up our architecture? what changes you may want to make to adjust to the migration? Thanks,
 -
 Dear Experts, I Would like to get some inputs from you Please. My Data Center is located in 2 Regions. This data center is supplying the services (Windows Server, Network., etc) At Present we are planning to perform SCCM CB Implementation with High Availability for SCCM Client Roles. In fact not for SQL (Due to Commercial items) Single Standalone Primary Site is fair enough for the environment. However, We would like to reduce the usage of SQL Server, and make the Client facing roles with HA. Hence your inputs would be helpful for us Data Center Region A: Server 1 - SCCM Site Server - A Primary Site with Roles (Component Server, Site Server, Site System, Reporting Service Point, Other Non Client Facing Roles) Server 2 - SCCM Site System - Client Facing Roles (Management Point, Software Update Point/WSUS, Distribution Point (With WDS/PXE OSD Capabilties) Data Center Region B: Server 3 - SCCM Site System - Client Facing Roles (Management Point, Software Update Point/WSUS, Distribution Point (WithOut WDS/PXE OSD Capabilties) So all Client facing role, will be working with HA Option. However, PXE Boot for OSD will work only with SERVER 2 from WDS (Which respond to the Client during the OS Imaging) - To make this happen I need to mention the IP Details of WDS Server (Server 2 from Region A) in the DHCP Scope. Am I correct? The reason, I do not preferred to give the SERVER 3 (From Region B)as WDS Role with PXE, which we do not need to give the multiple entries with DHCP Scope (Option 66, 67) for OSD Please suggest, if this is looks good for an organization. The Ultimate goal is to reduce the SQL CPU Utilization.
 -
Hi All, I hope you are well, Currently I have an issue I have unsuccessfully been battling with for a few days now. The original plan was to have the sccm db running on a sql high availability always on group setup. 1 x primary server 1 x sup server 1 x dp server 2 x sql servers when I tried to install SCCM initially, on the clustered sql, I was getting issues with listener admin rights / ports Excerpt from sccm install log --------------- CWmiRegistry::GetStr: Failed to get string value MSSQLSERVER Configuration Manager Setup 06/03/2018 16:05:16 92 (0x005C) Failed to retrieve SQL Server instance name[MSSQLSERVER]. Configuration Manager Setup 06/03/2018 16:05:16 92 (0x005C) WARNING: failed to retrieve port number for XXX-SCCM-LST.ncc.local. Configuration Manager Setup 06/03/2018 16:05:16 92 (0x005C) WARNING: failed to retrieve port number for XXX-SCCM-LST.ncc.local. Configuration Manager Setup 06/03/2018 16:05:16 92 (0x005C) ---------------- End of Excerpt XXX-SCCM-LST = sql listener this is a named instance on the sql (SCCM) and the sql port is 1433 /broker 4022 Why is it looking for MSSQLSERVER ? why failing to retrieve port ? So - I recently gave up and installed SCCM on a named server (not the listener) (SERVER-A - which is to be used in the HA cluster) sccm installs and works fine. I have installed the DB on a single box, and SCCM is looking good and functioning / patched up to 1710 + hotfix. OK - So I think I can do SCCM site maintenance, and change the DB location to the SQL Listener. But no same errors in logs again. Any one got any ideas or further experience with sql availability groups and are we missing something simple. Hope to hear back from anyone Regards, WAZZIE