Search the Community
Showing results for tags 'sql server 2017'.
Found 3 results
-
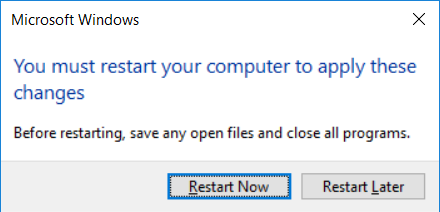
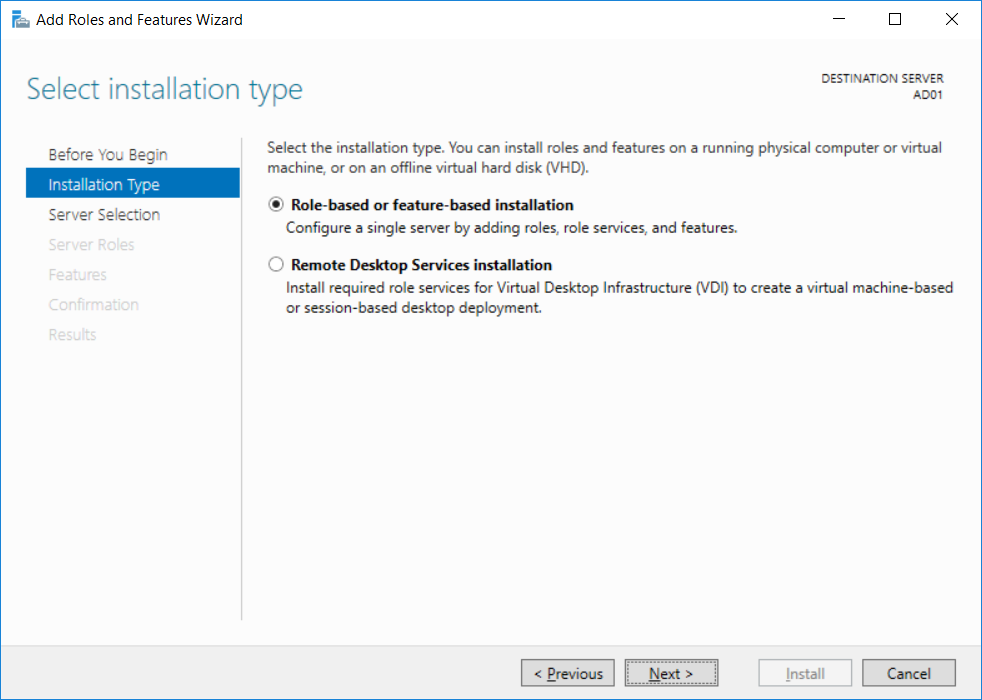
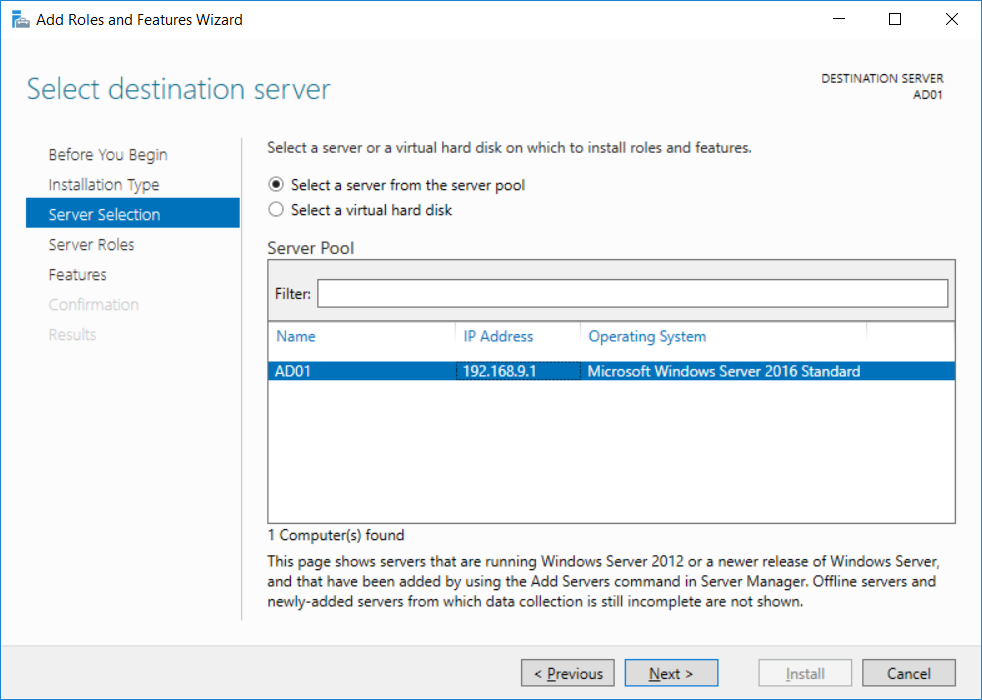
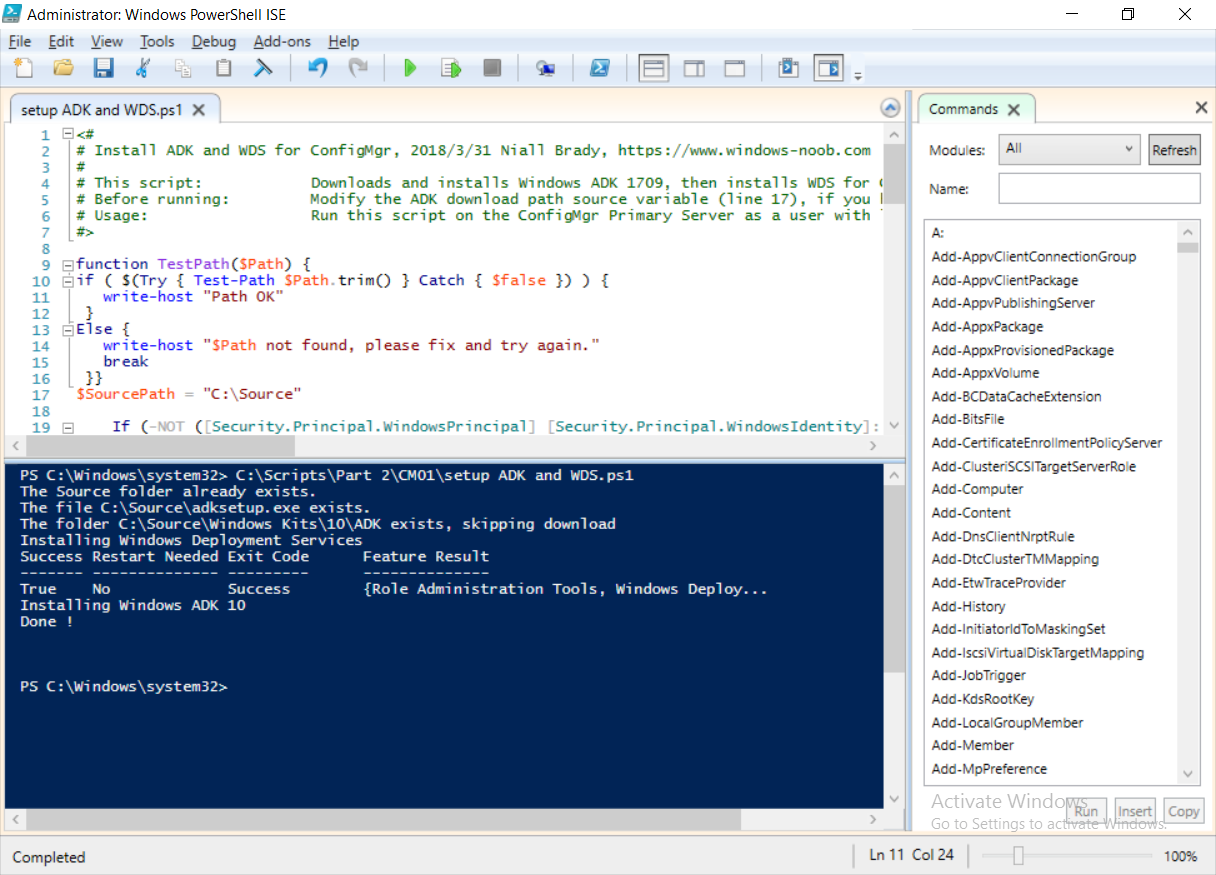
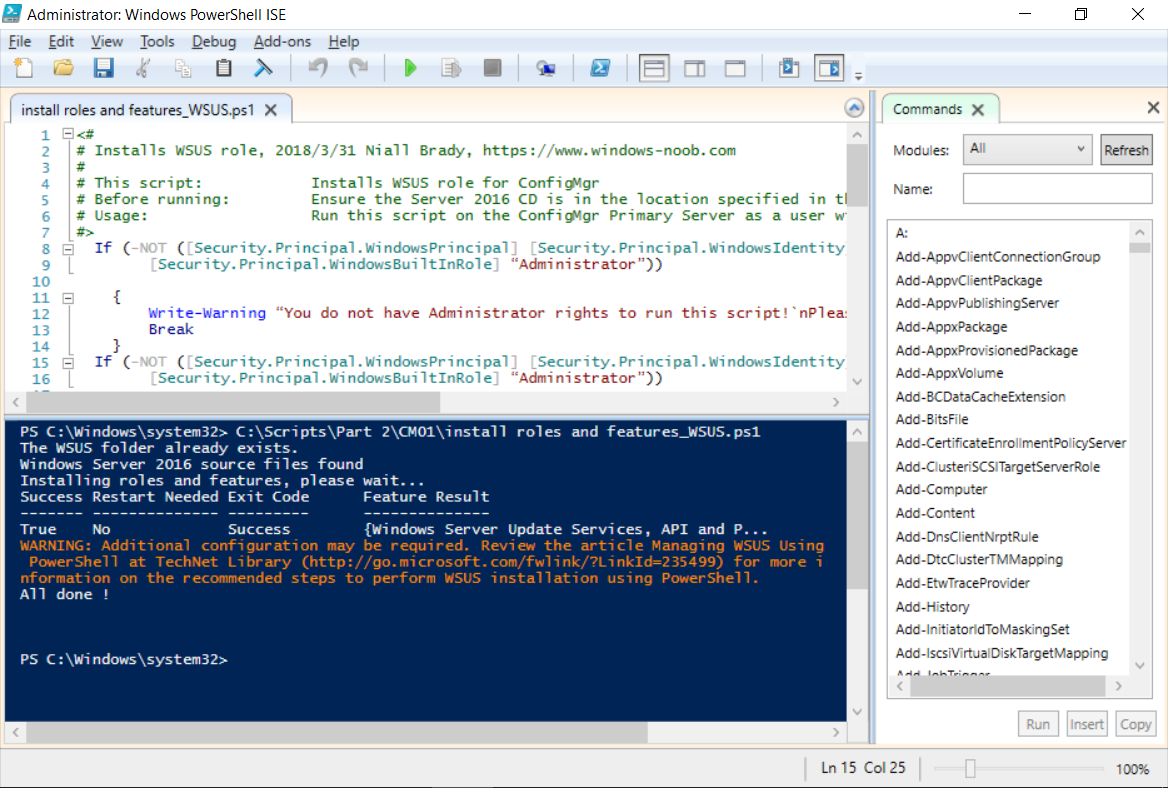
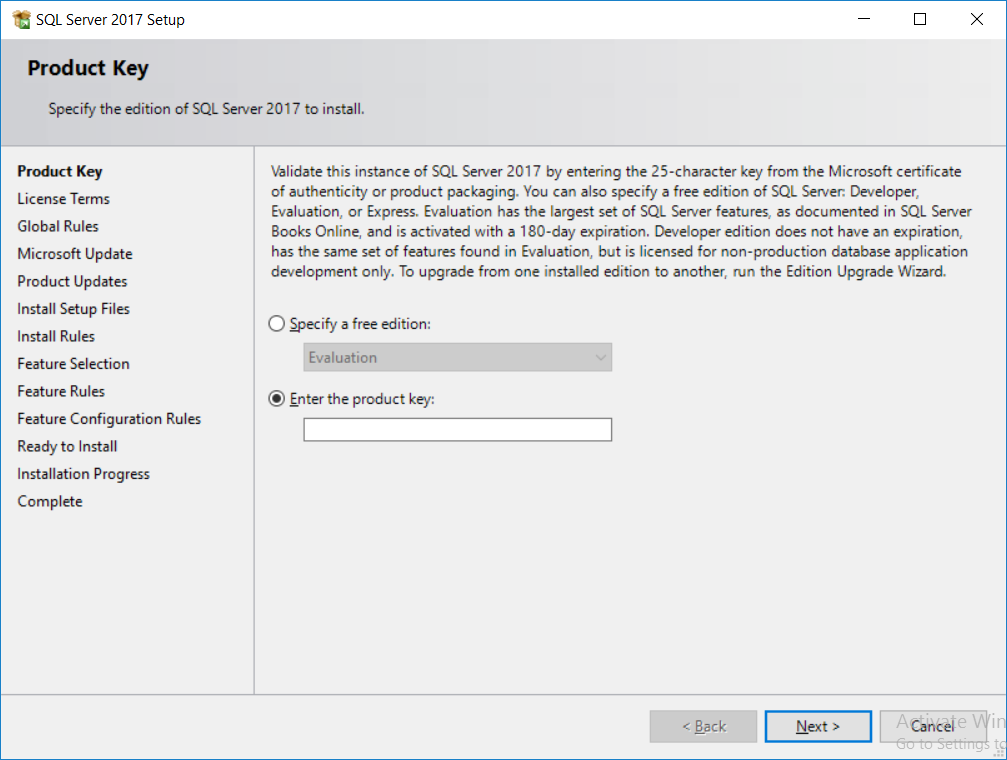
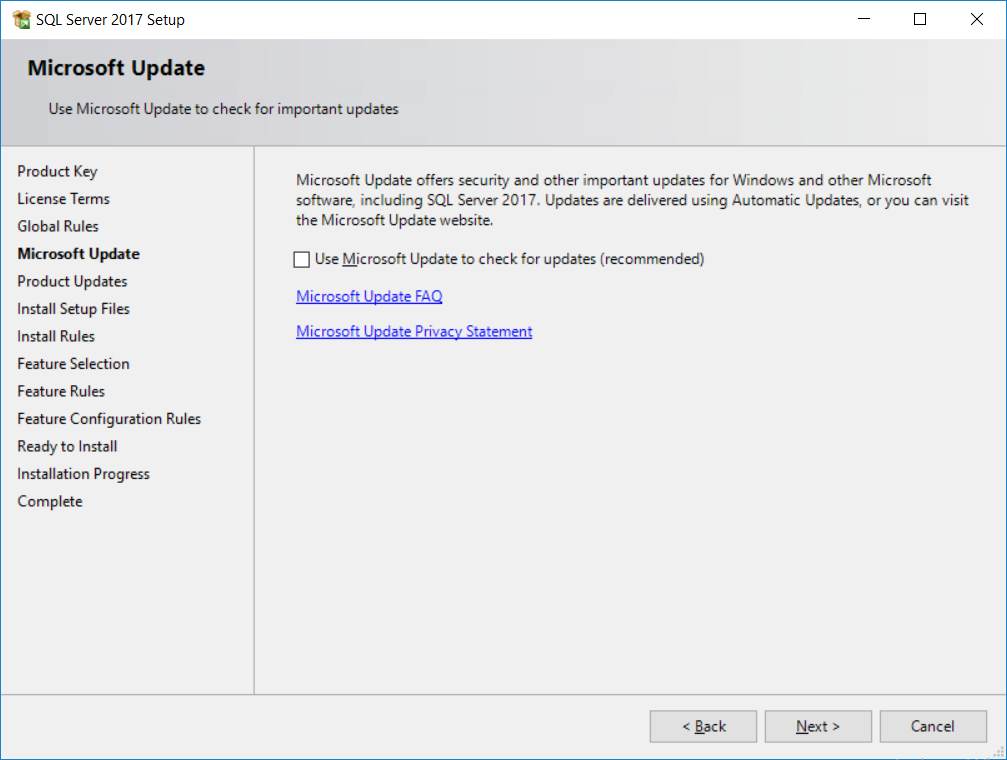
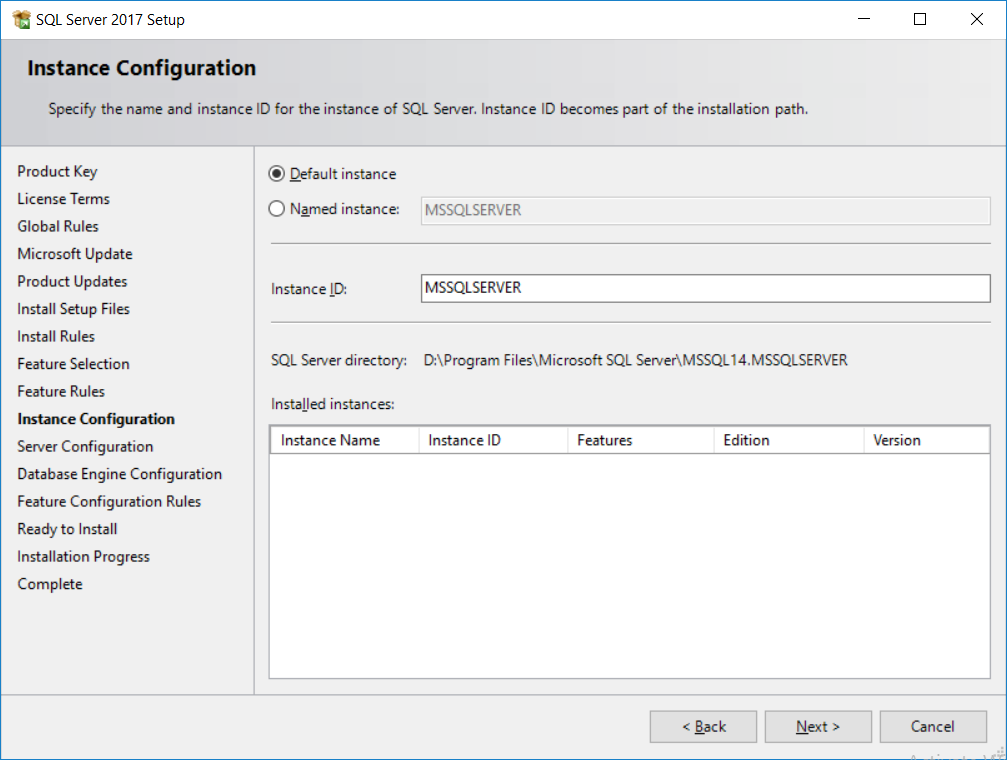
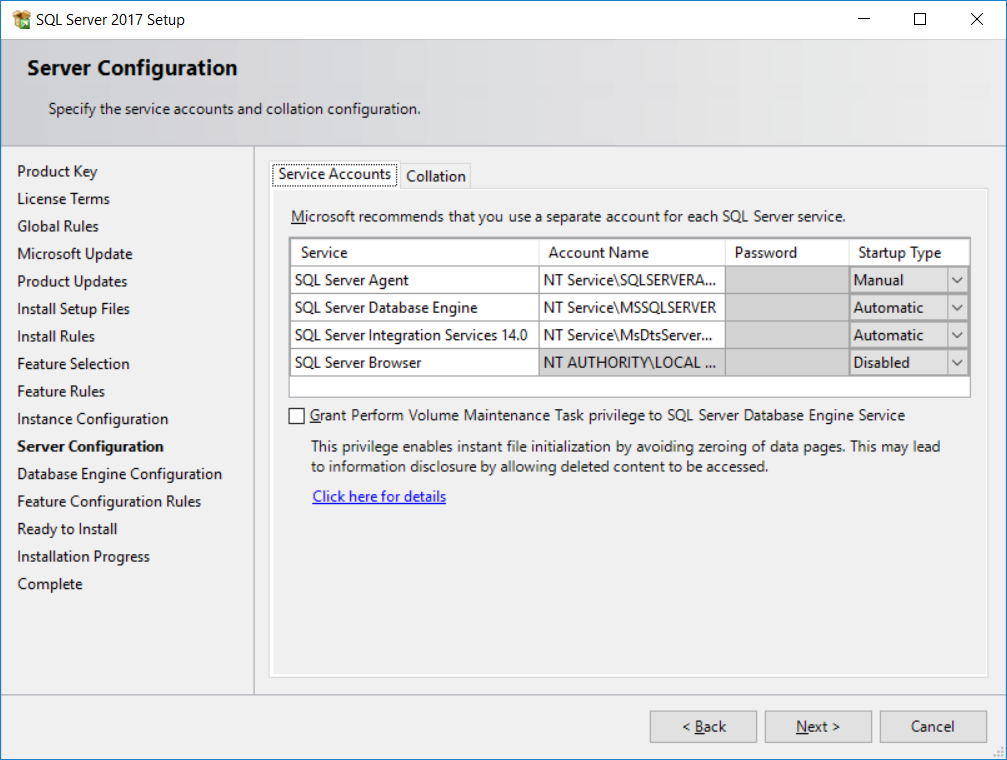
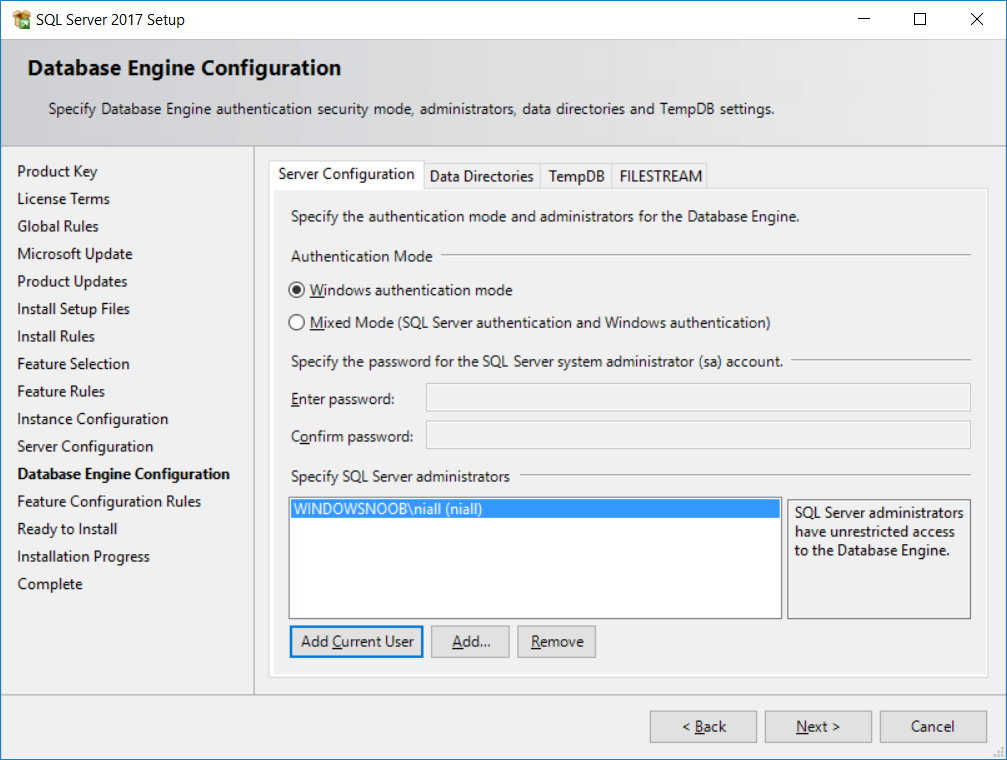
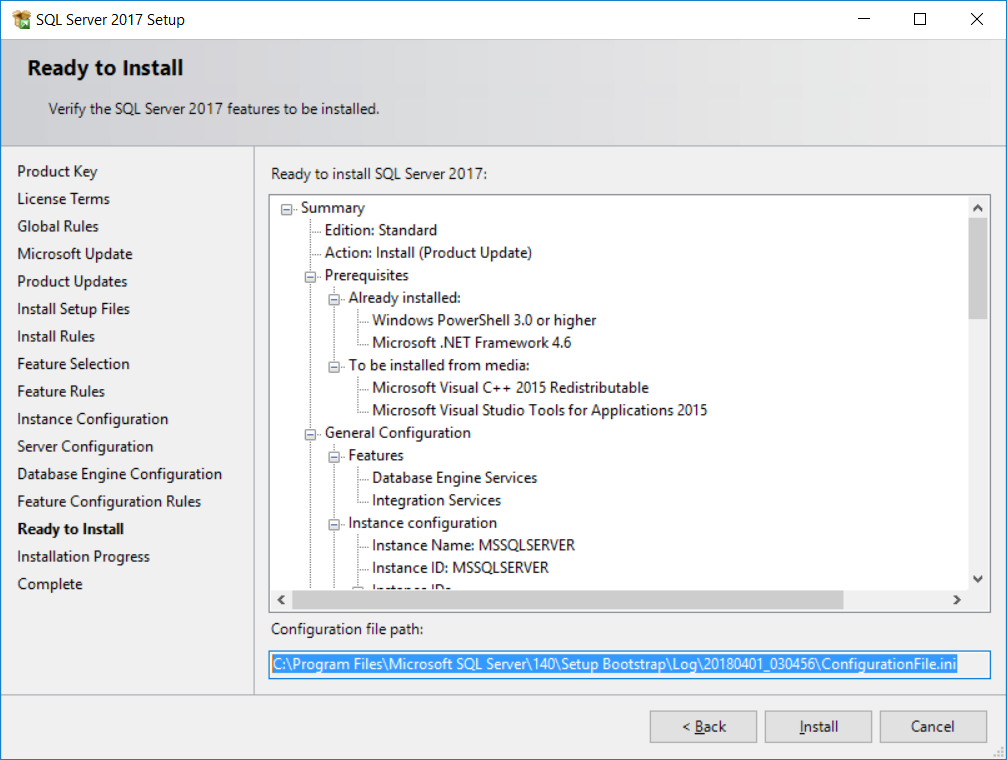
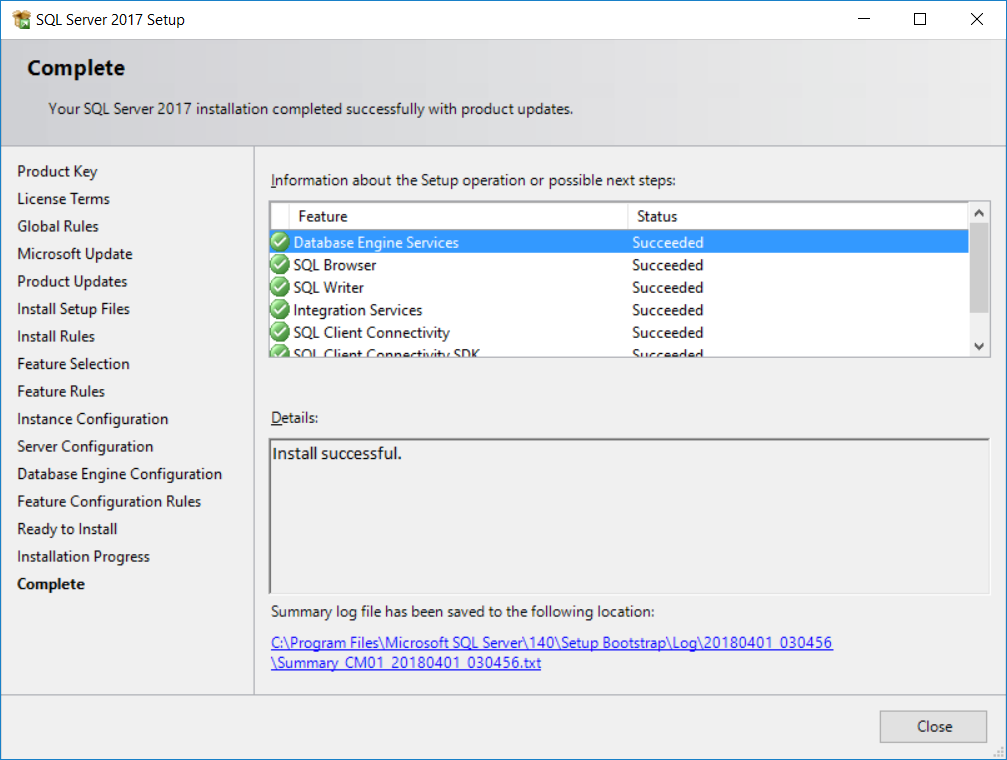
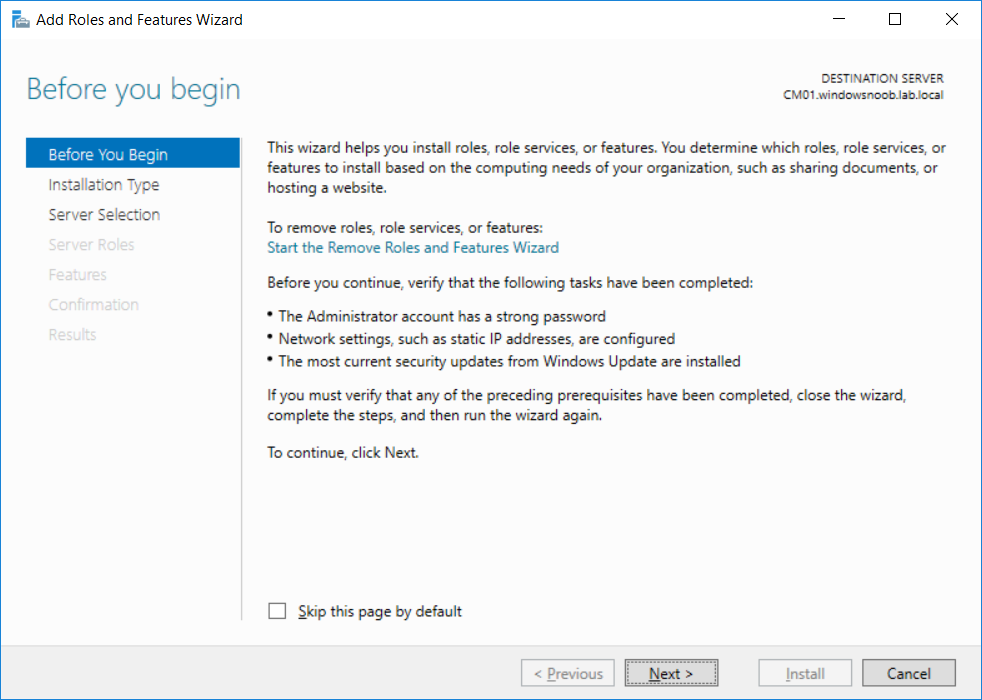
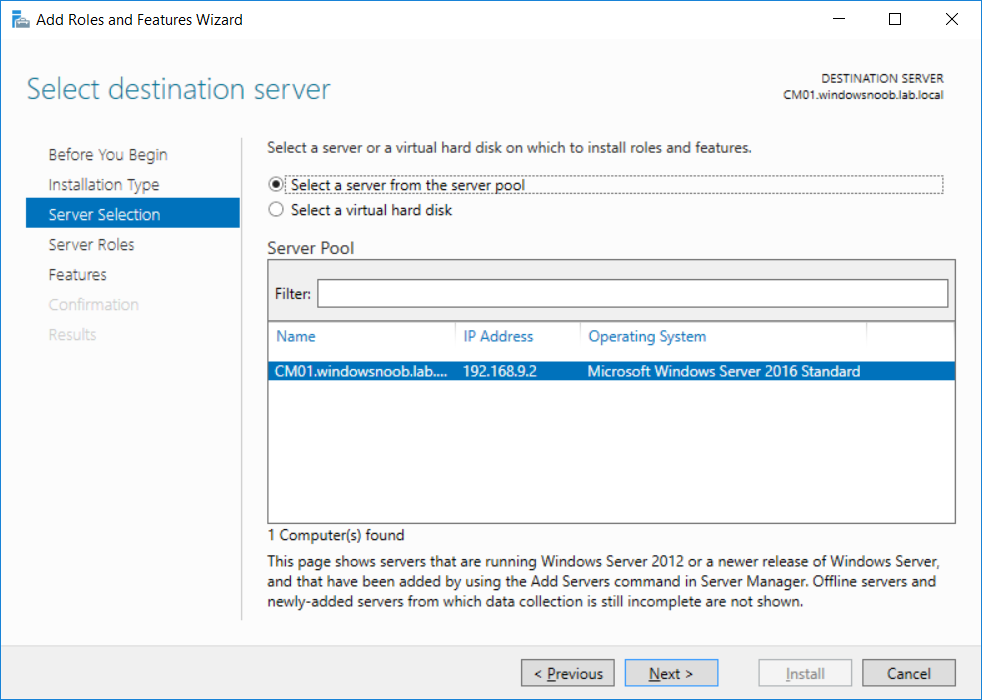
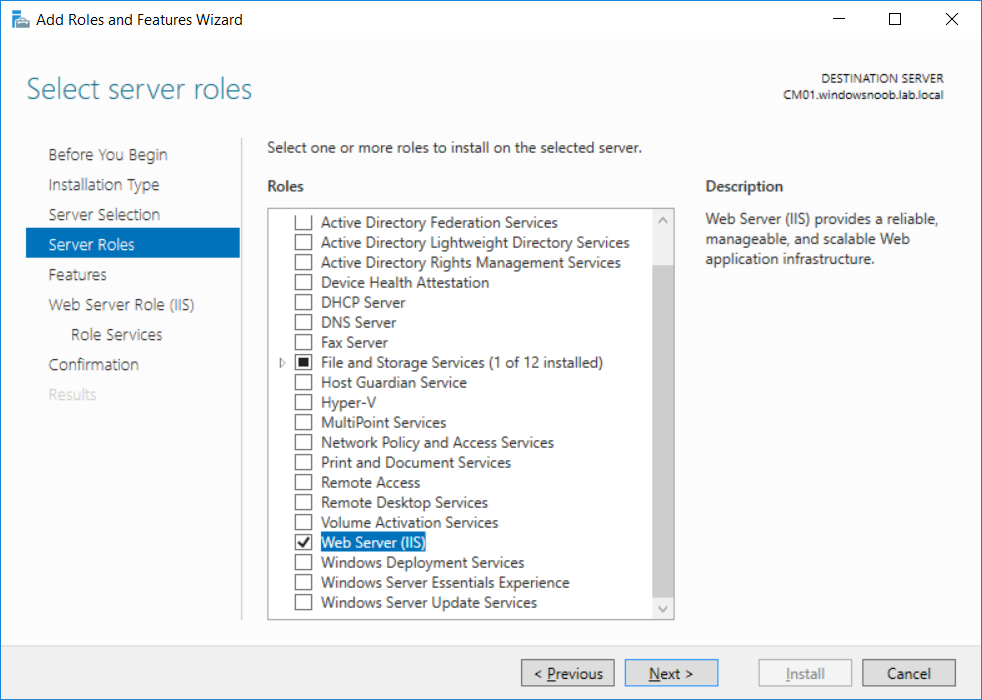
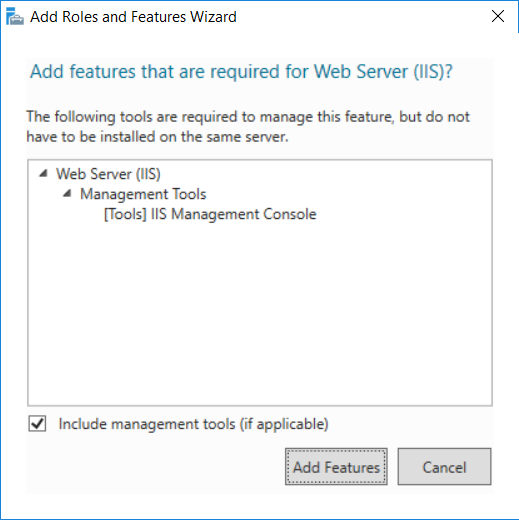
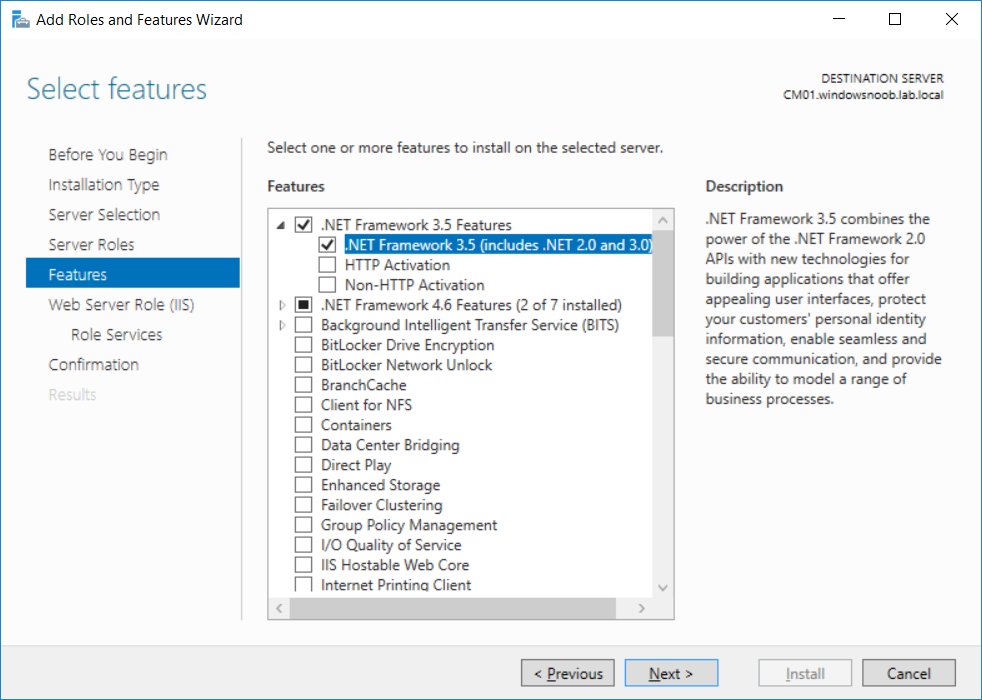
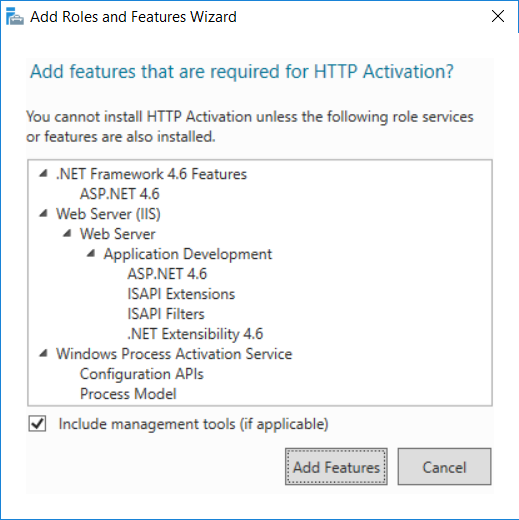
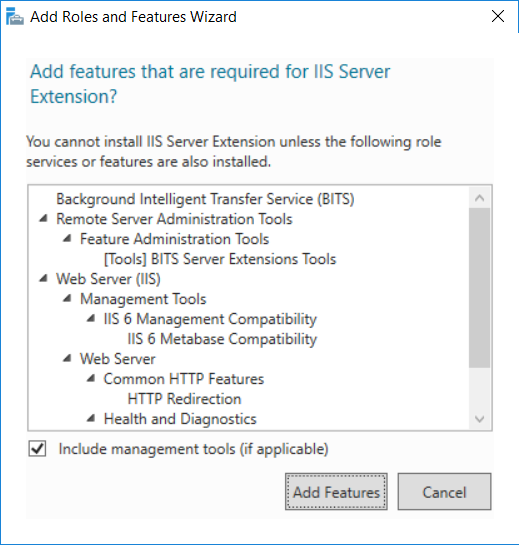
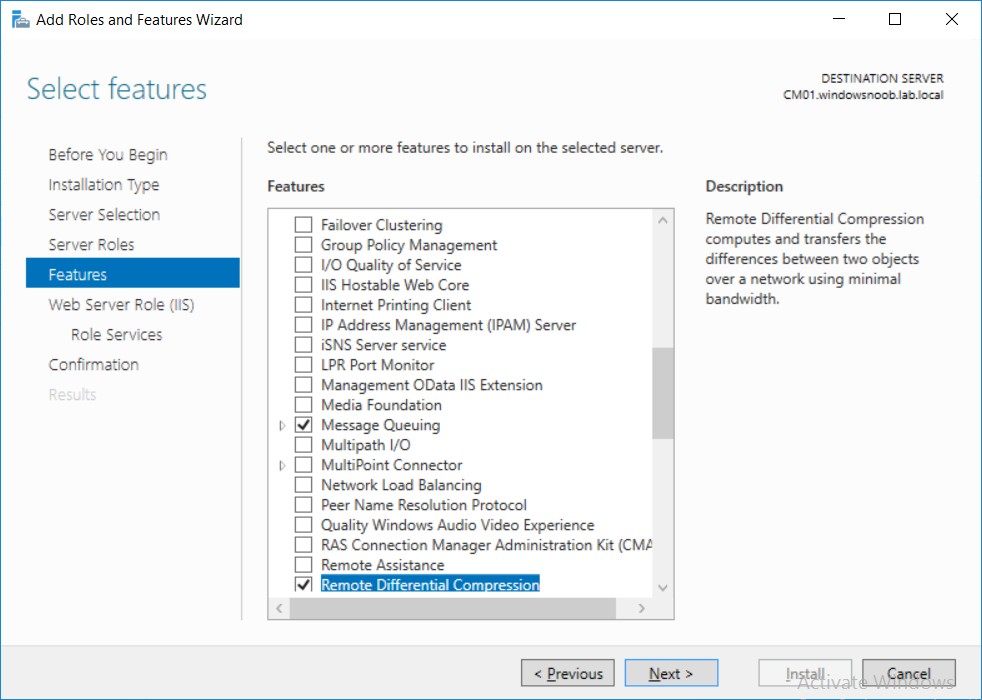
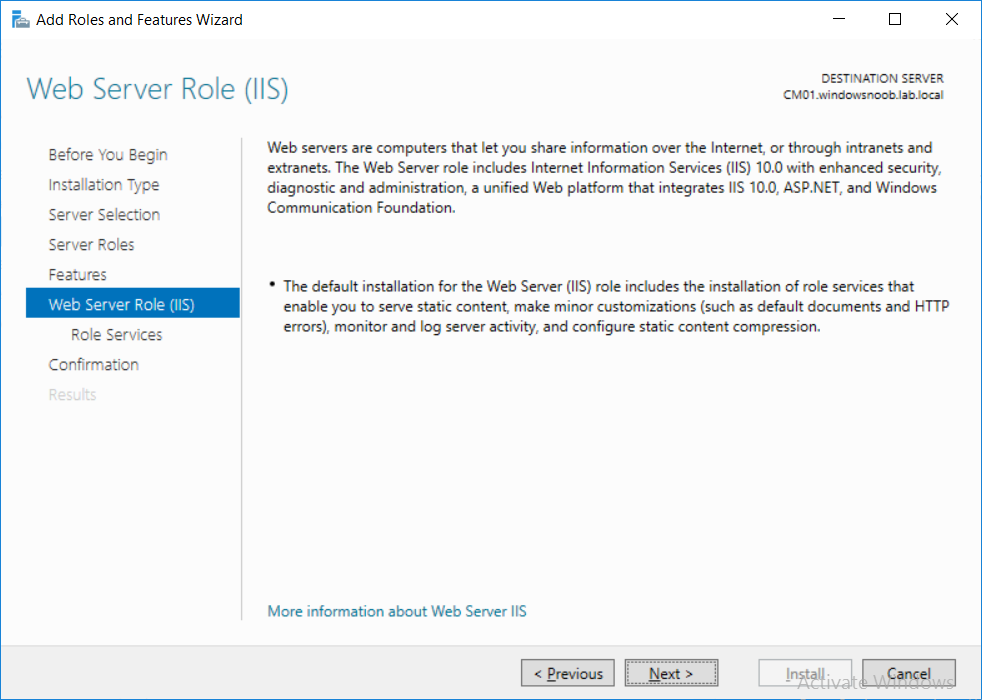
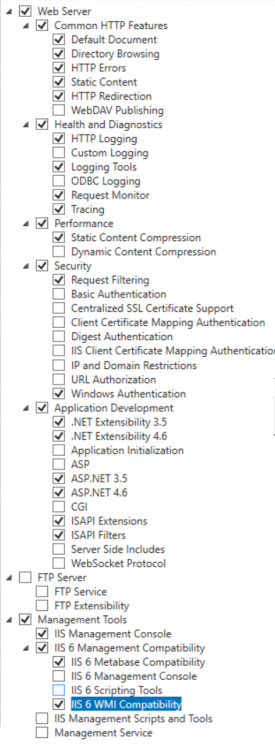
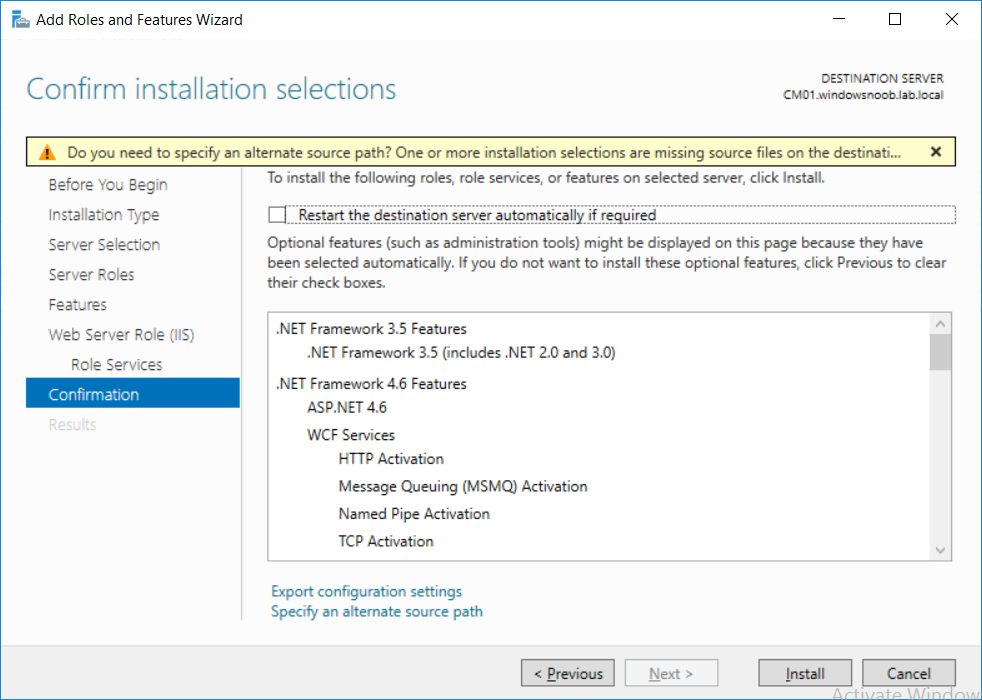
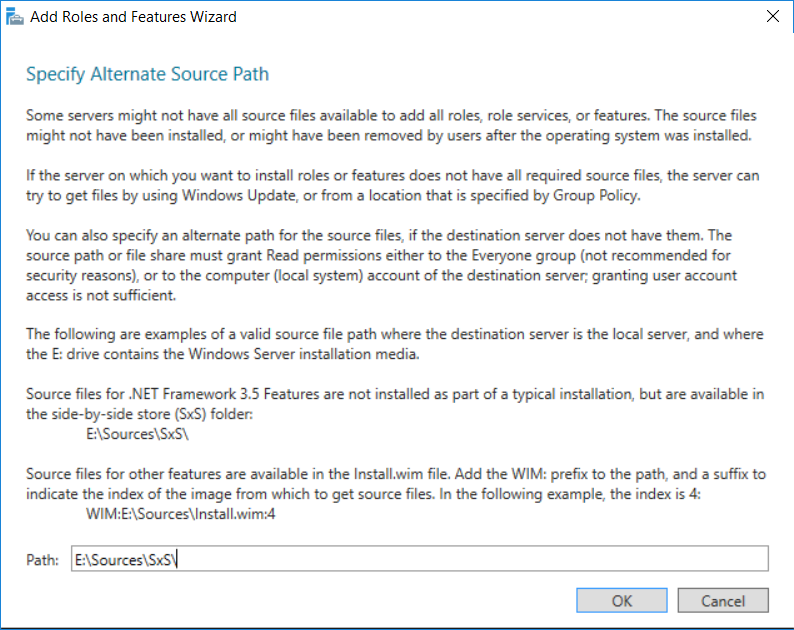
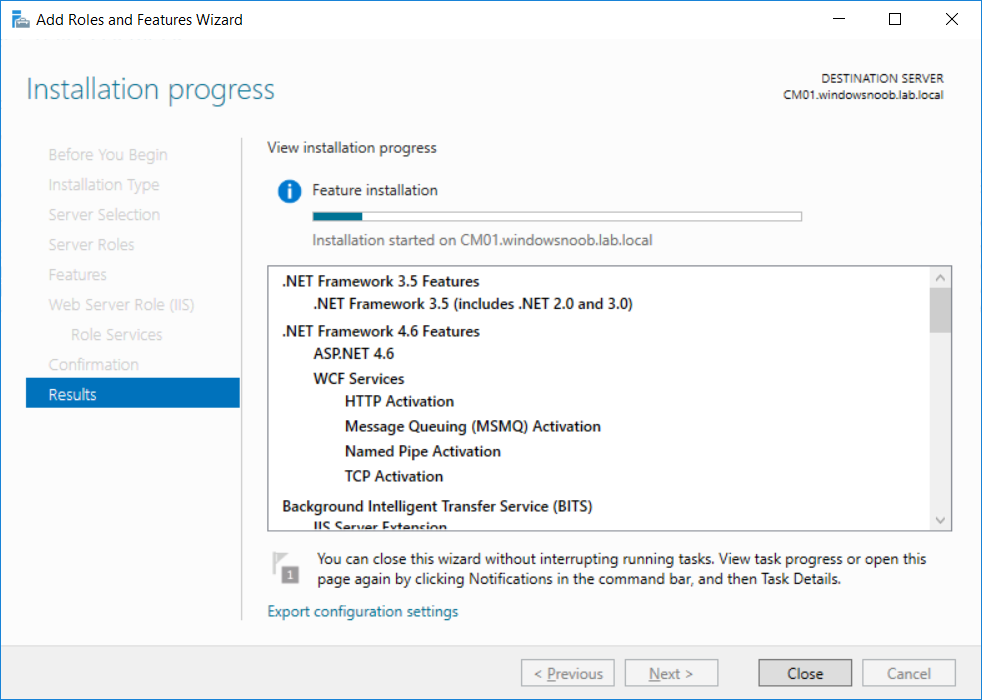
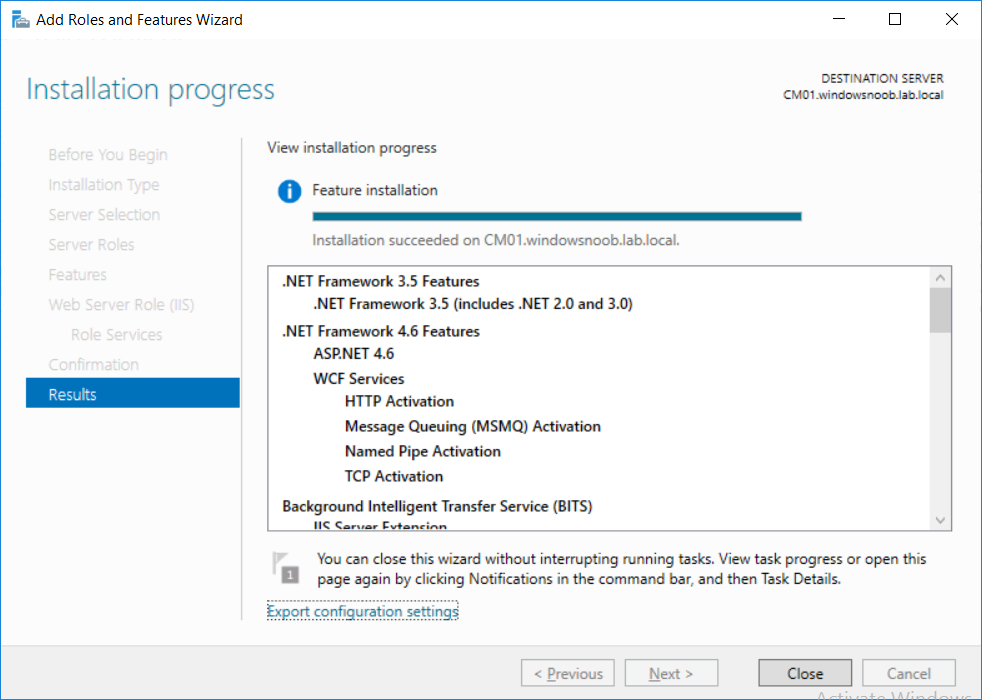
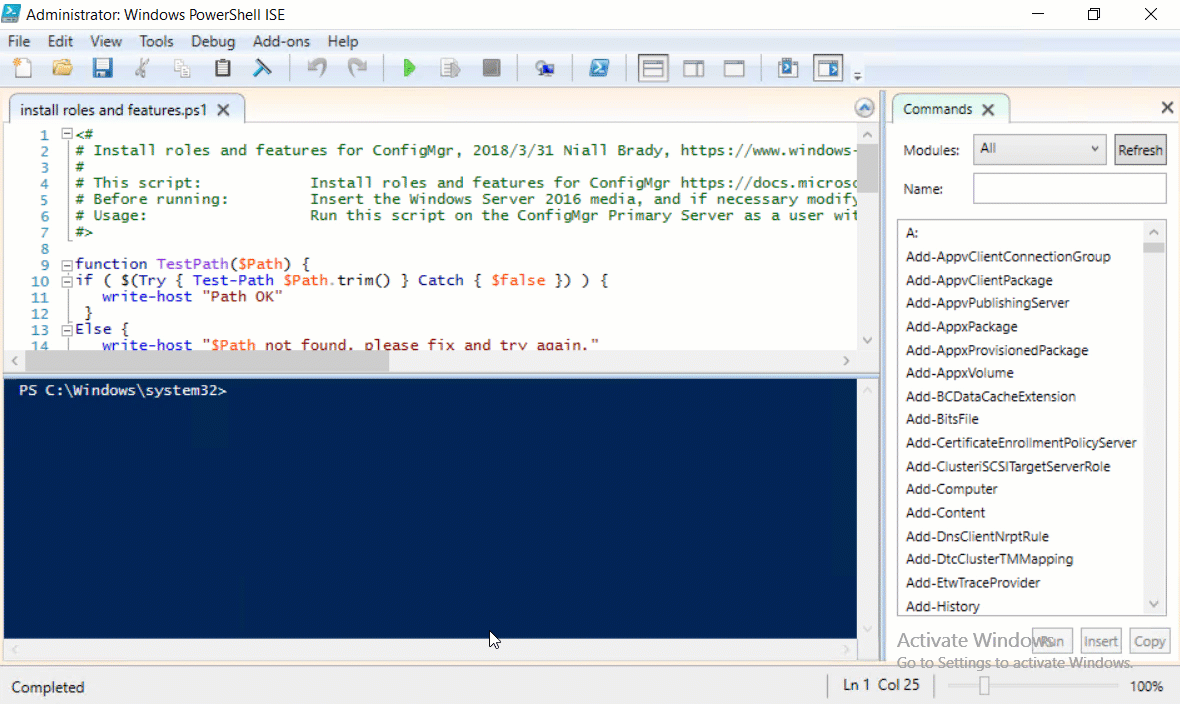
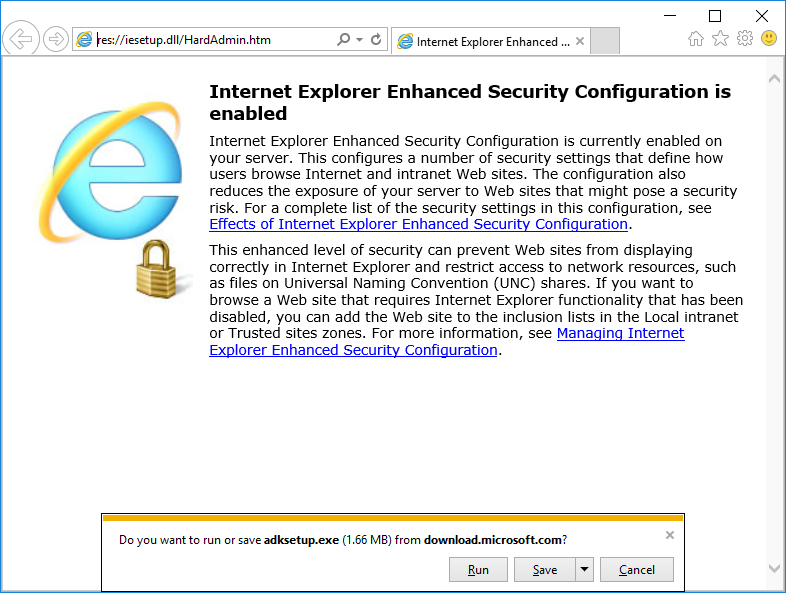
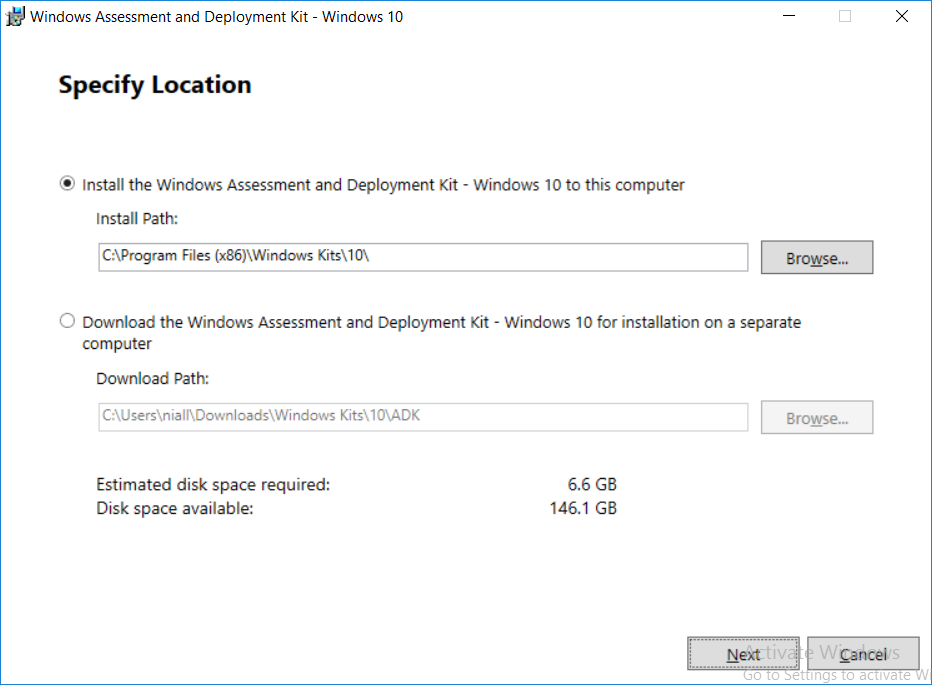
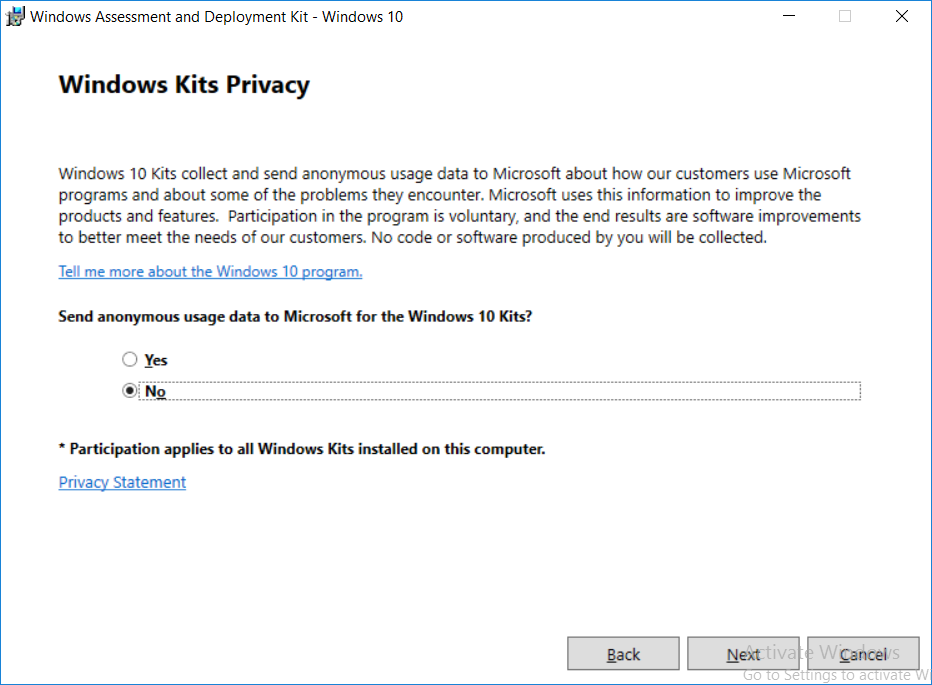
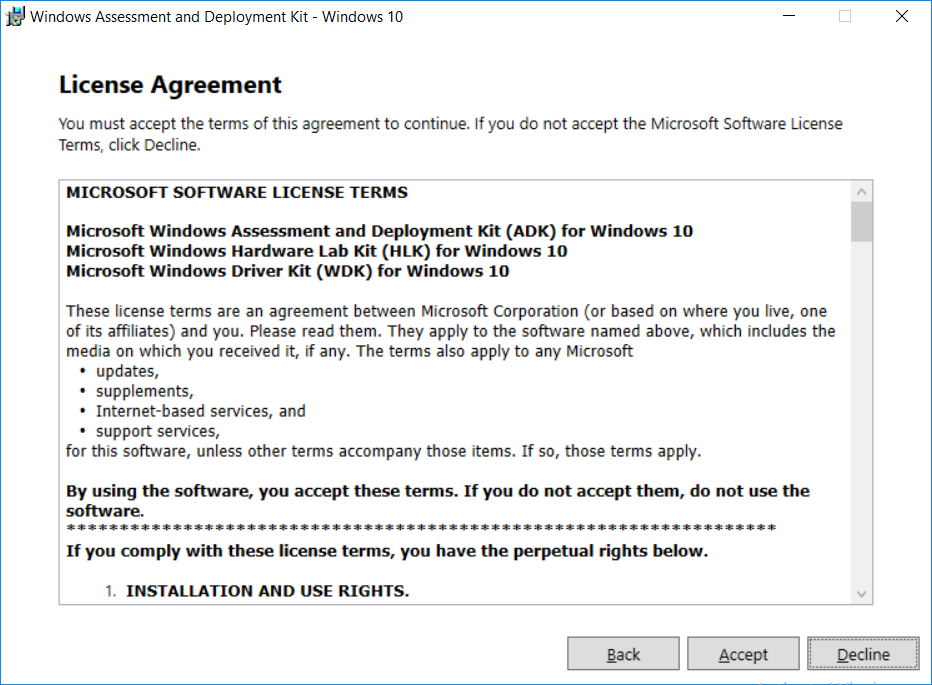
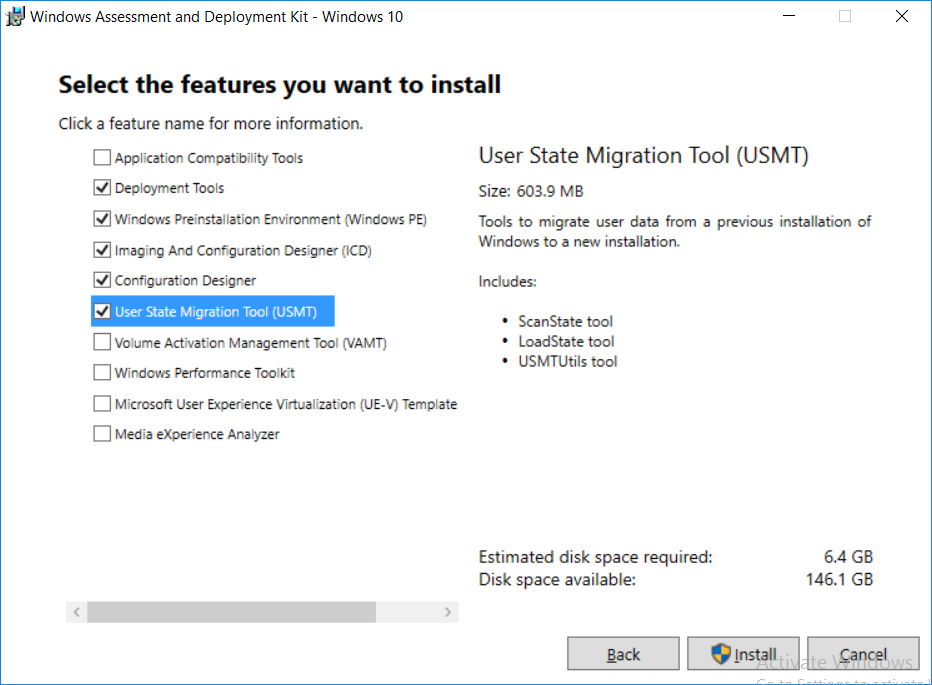
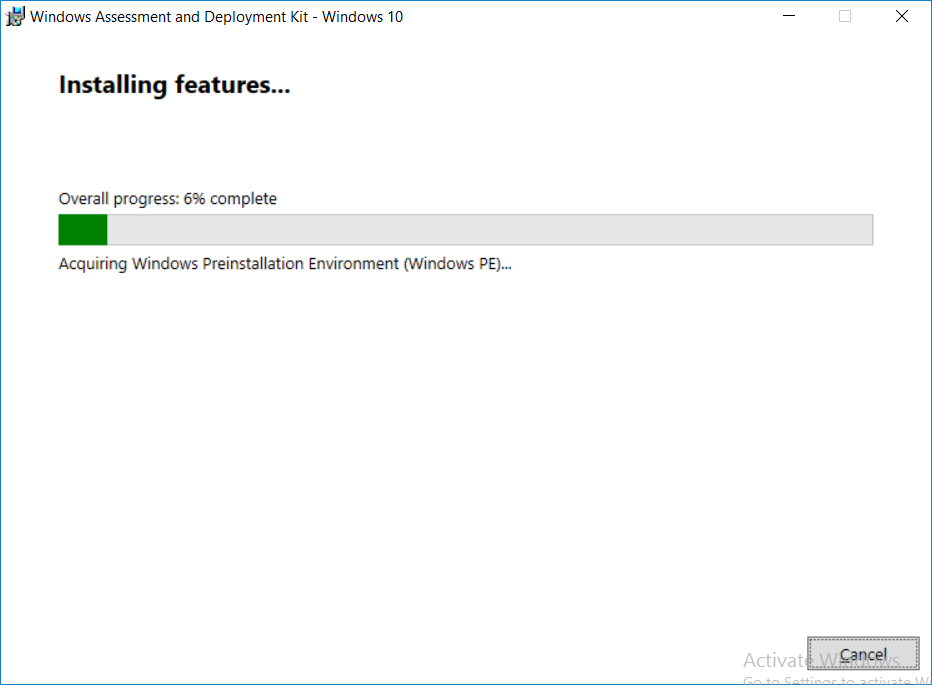
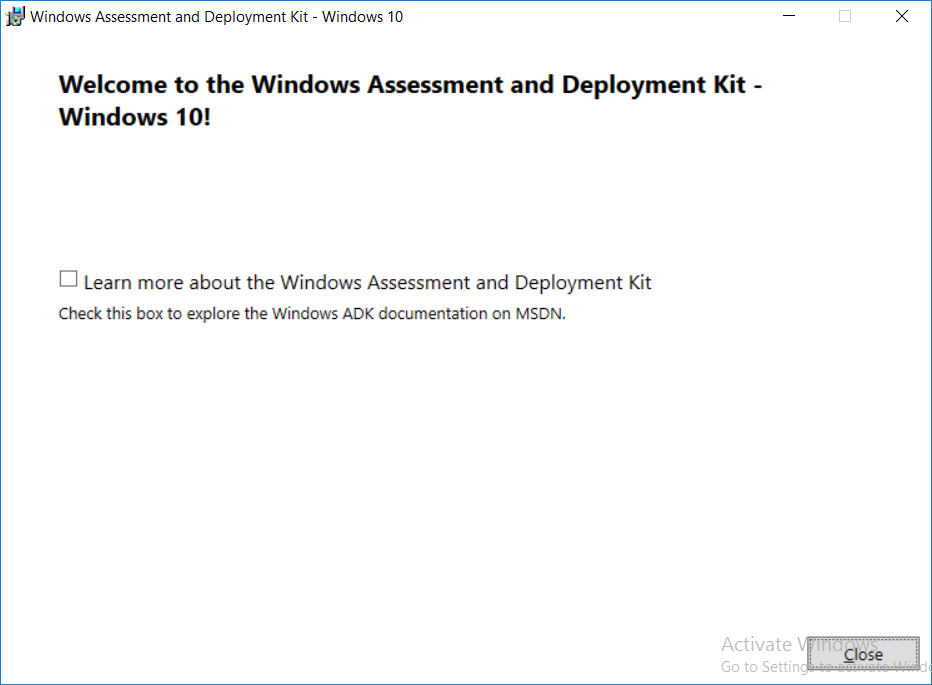
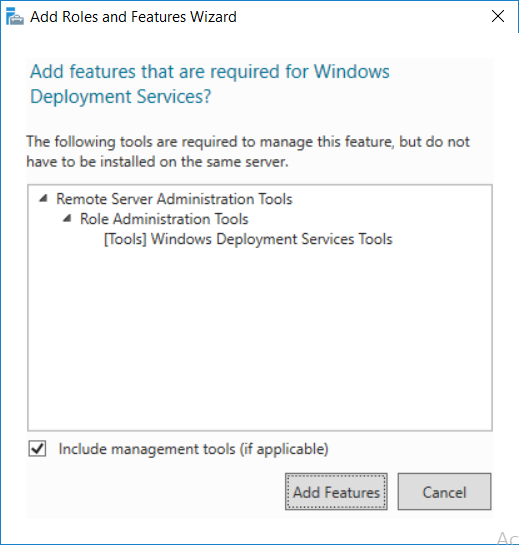
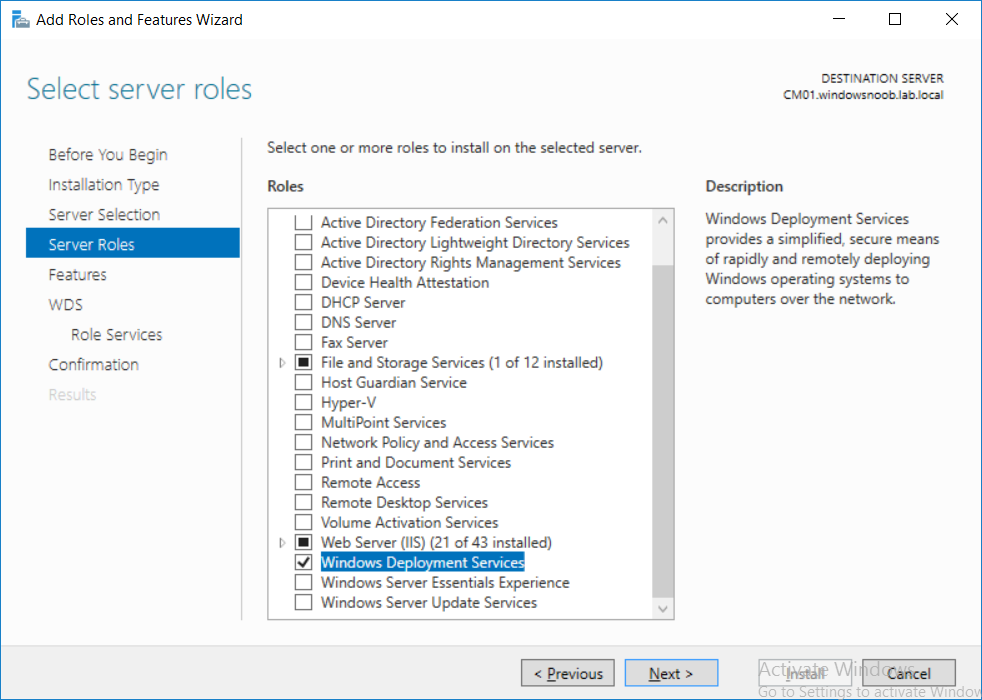
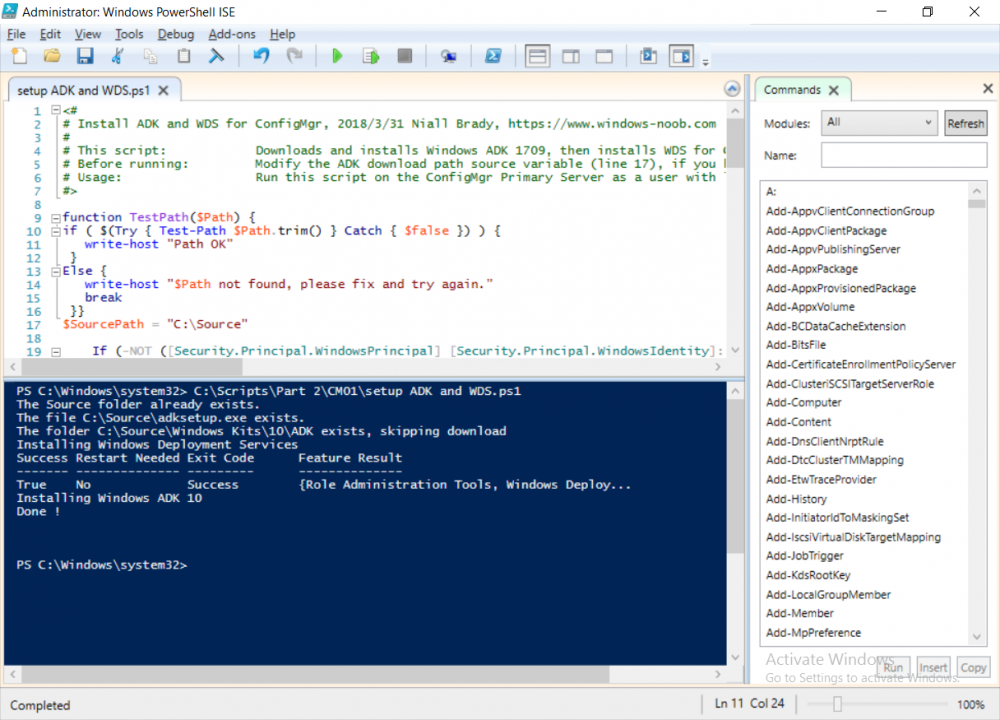
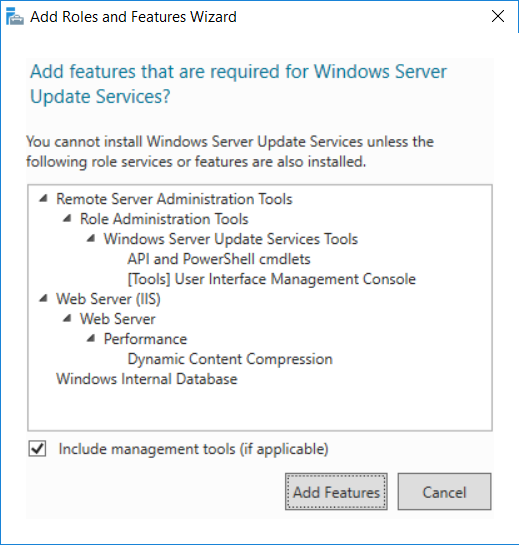
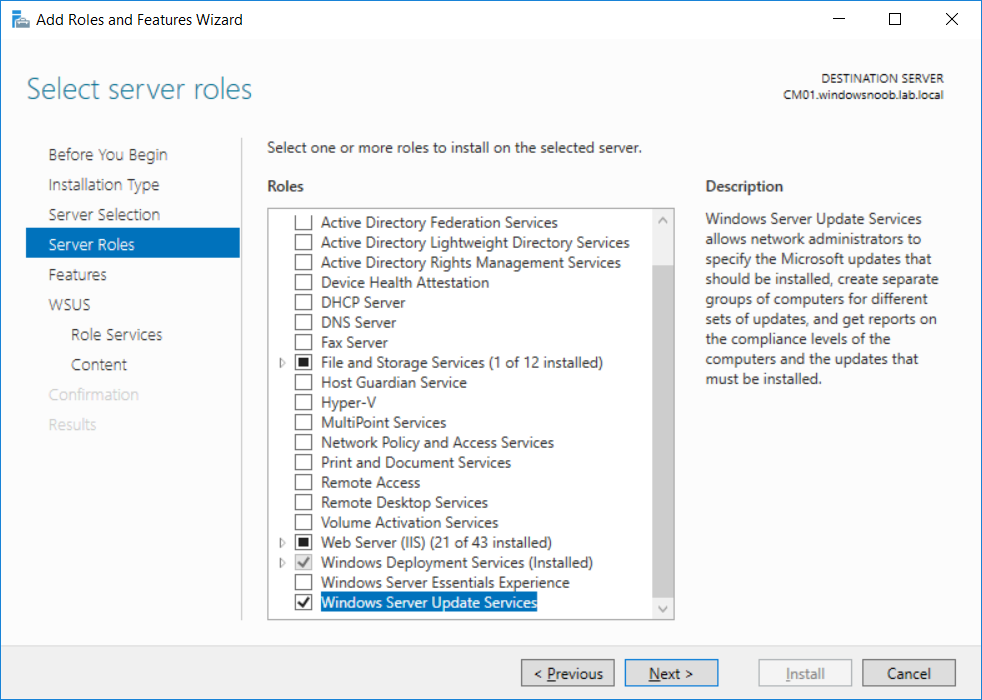
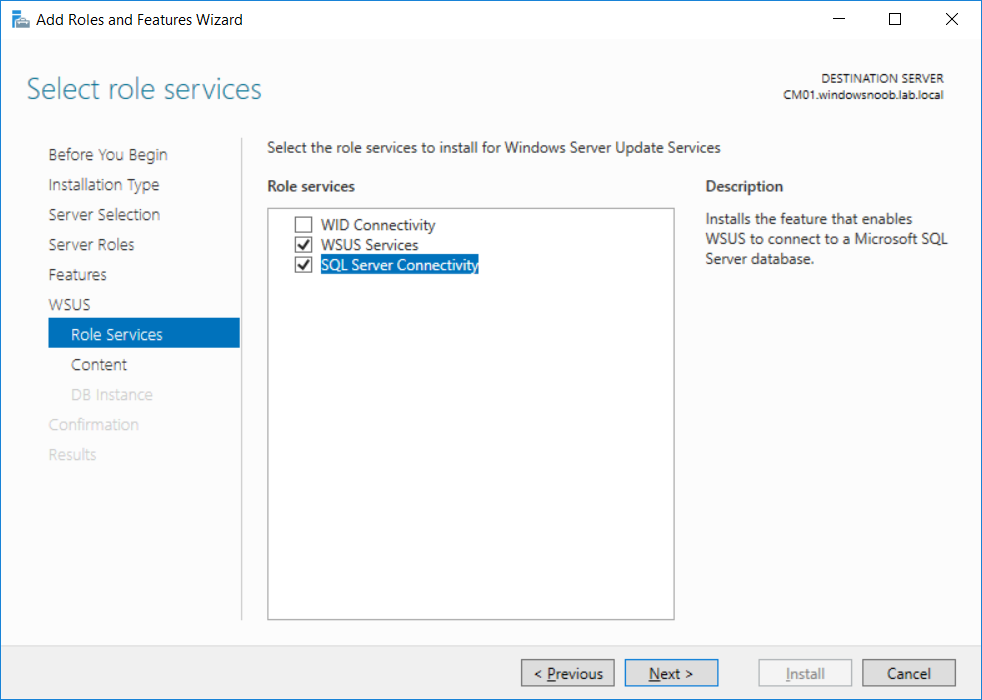
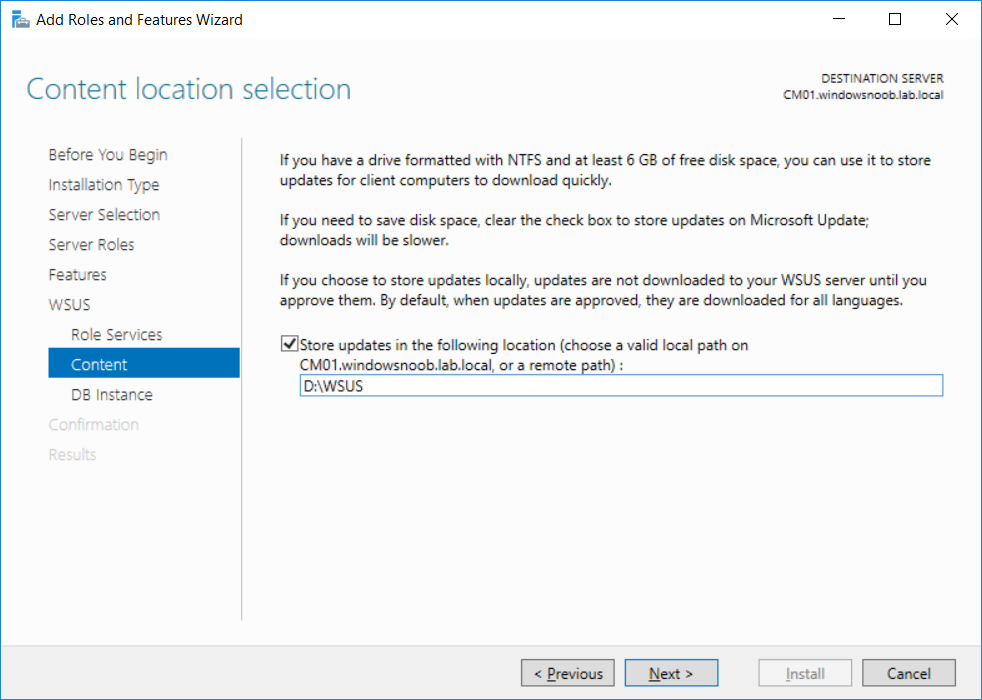
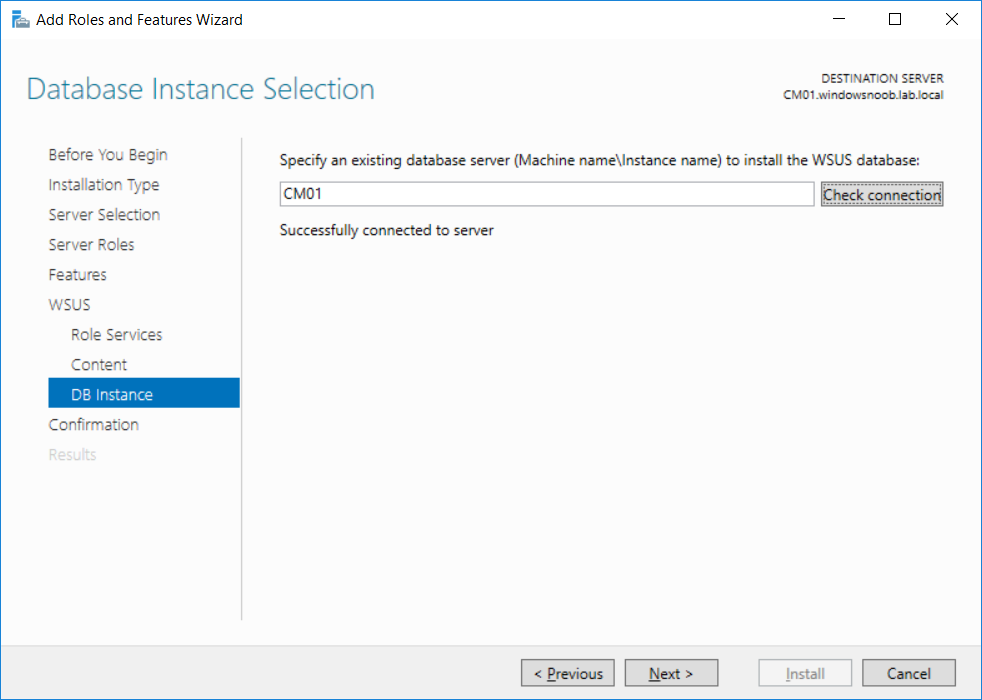
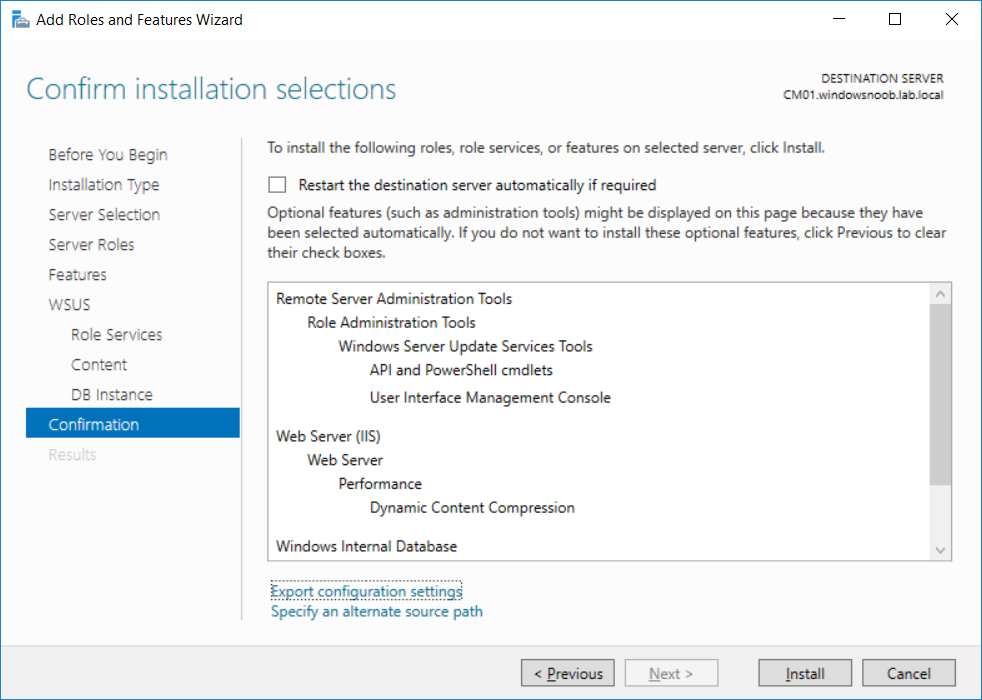
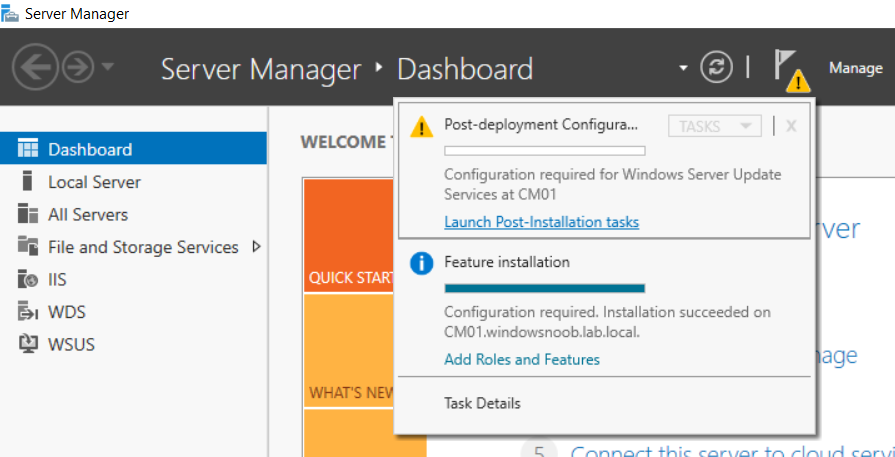
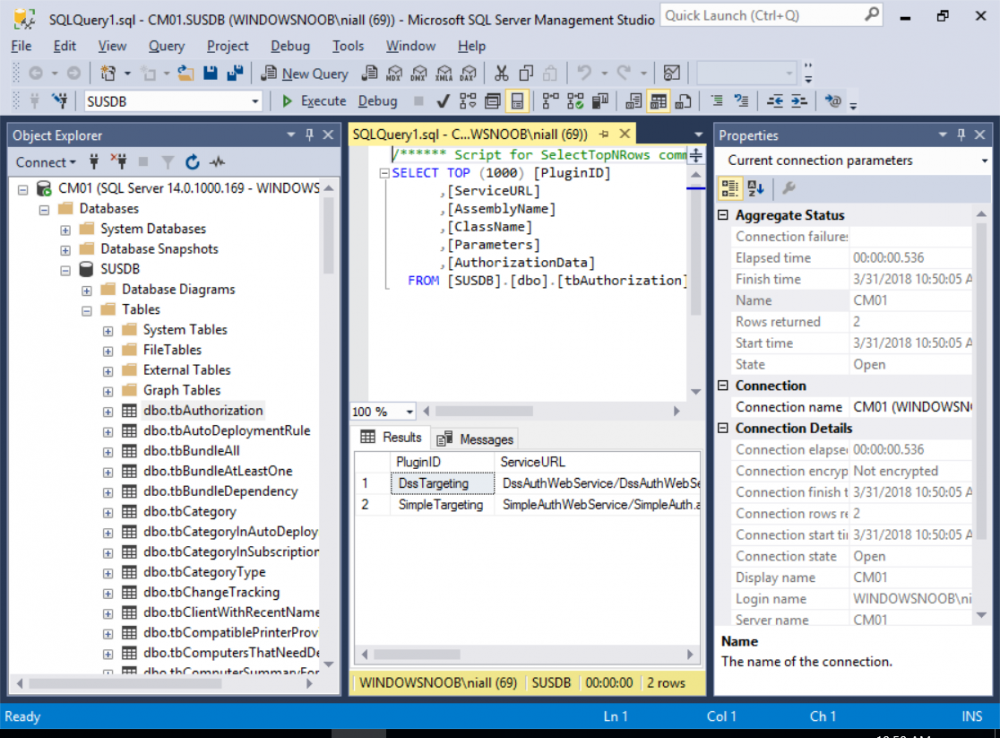
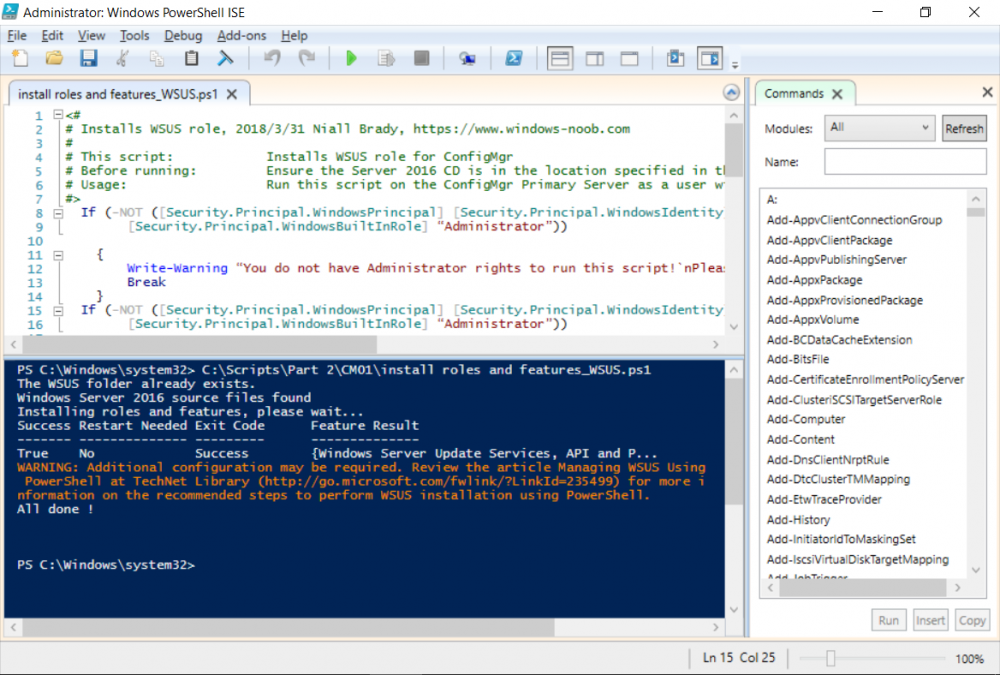
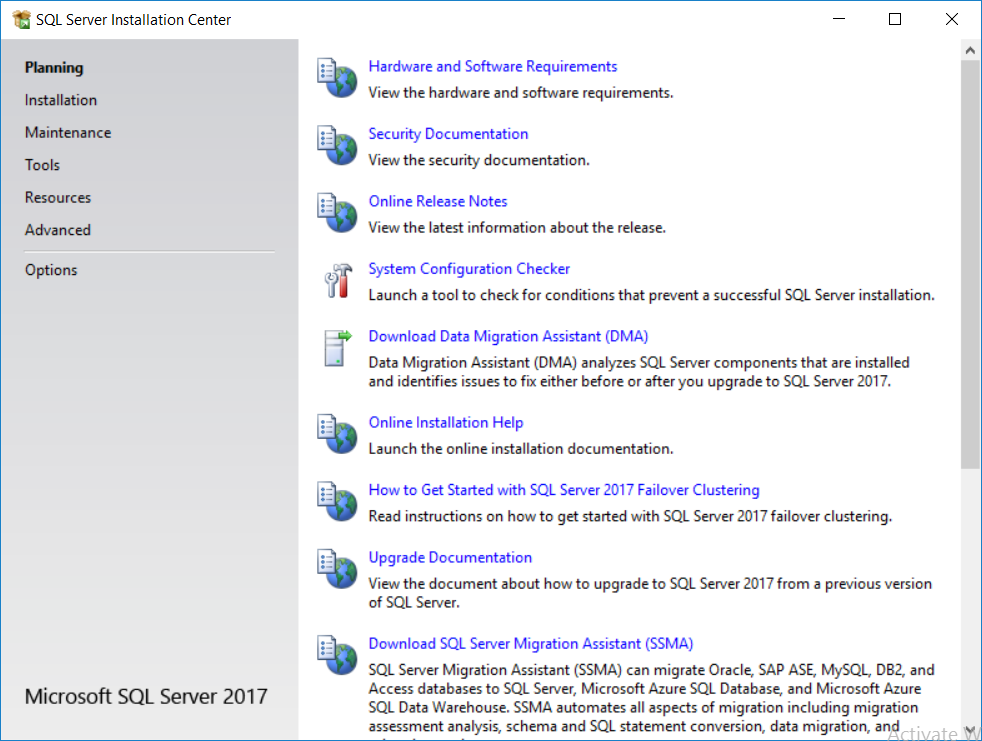
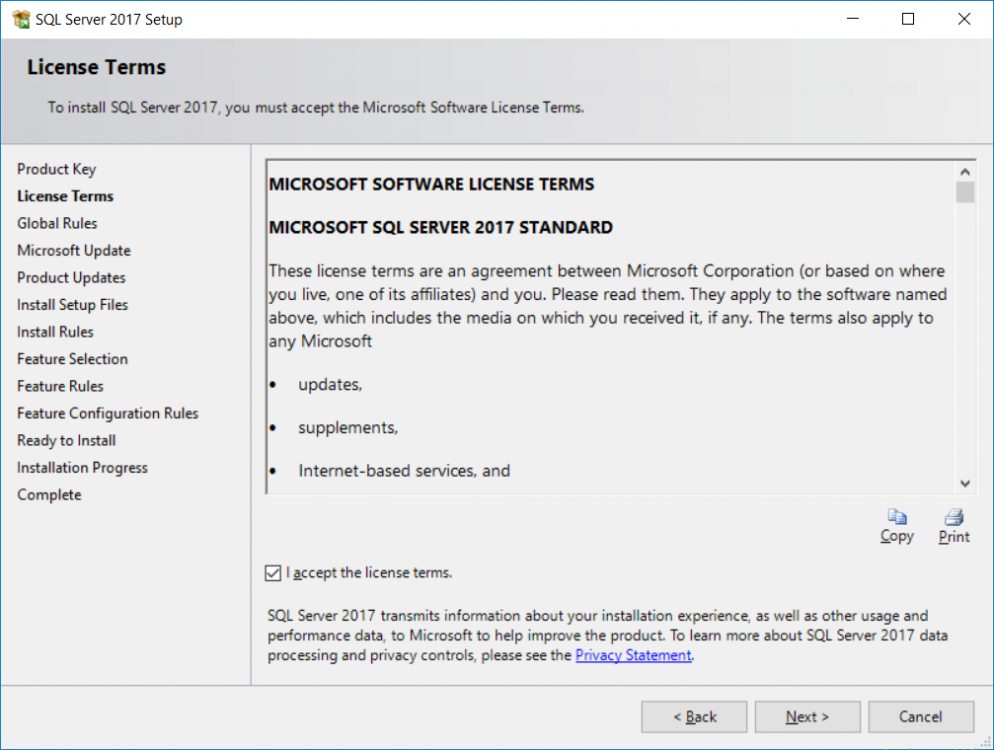
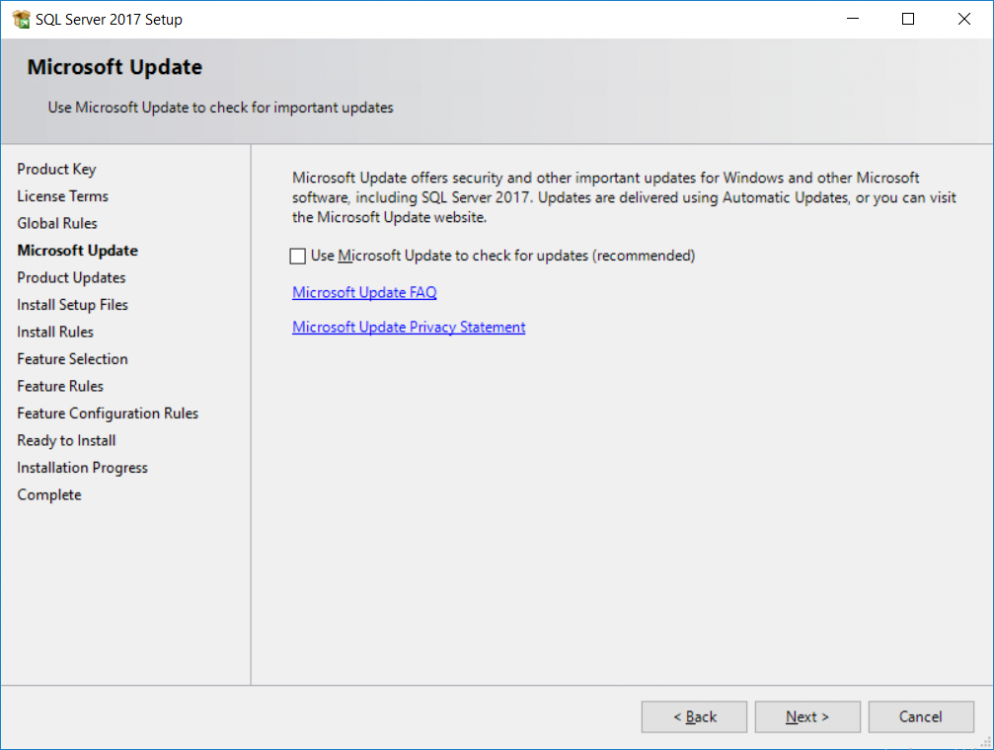
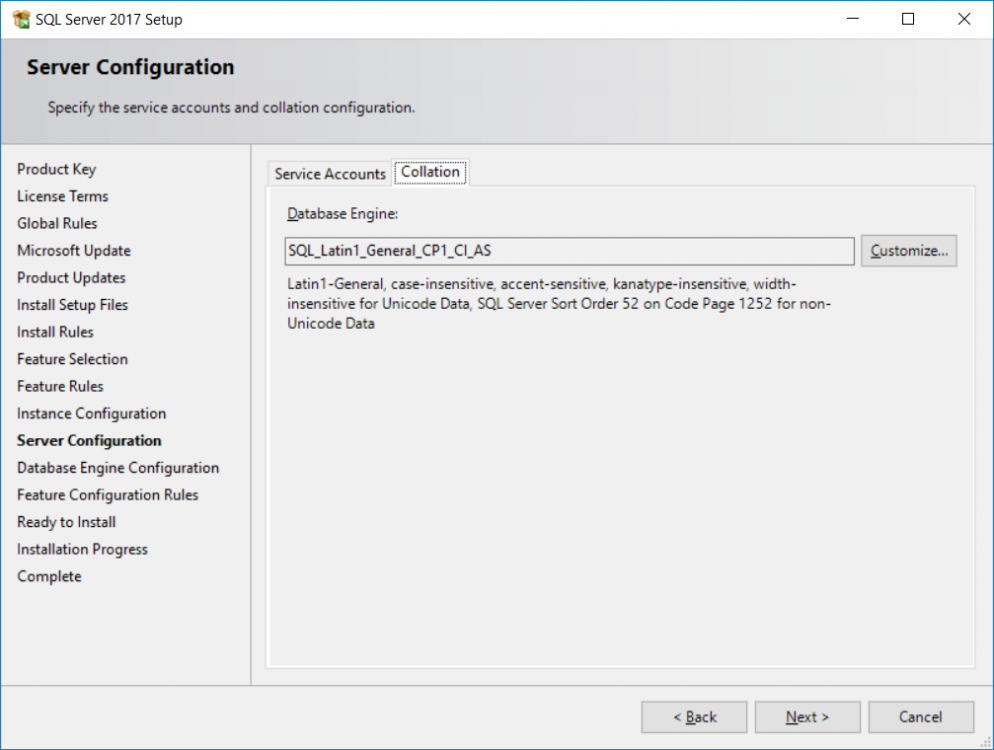
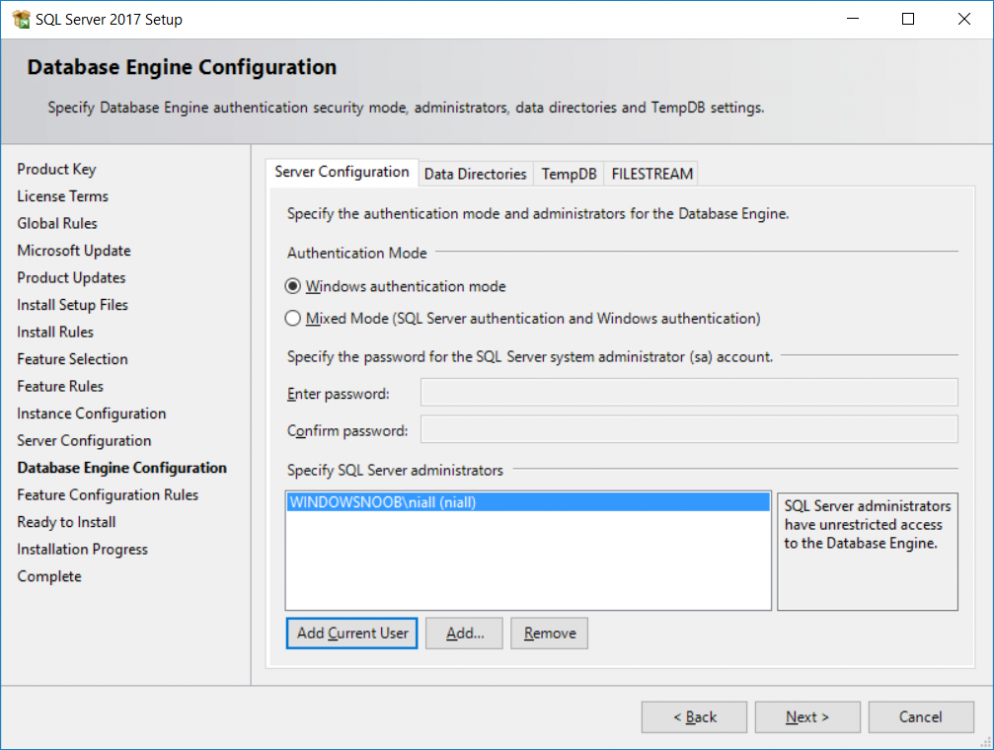
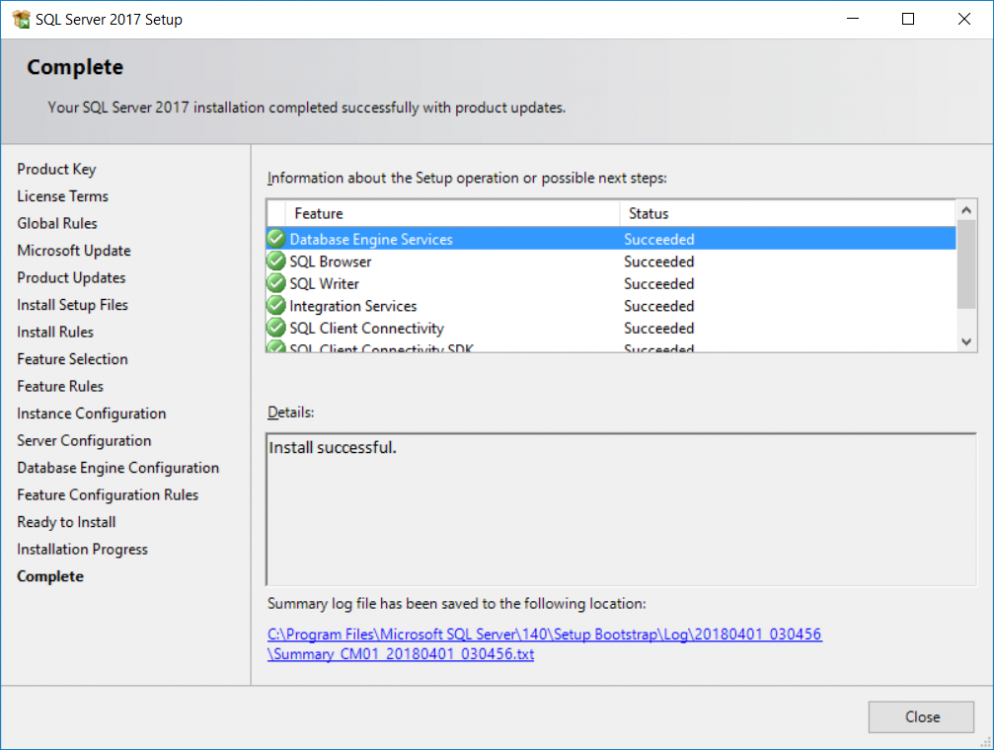
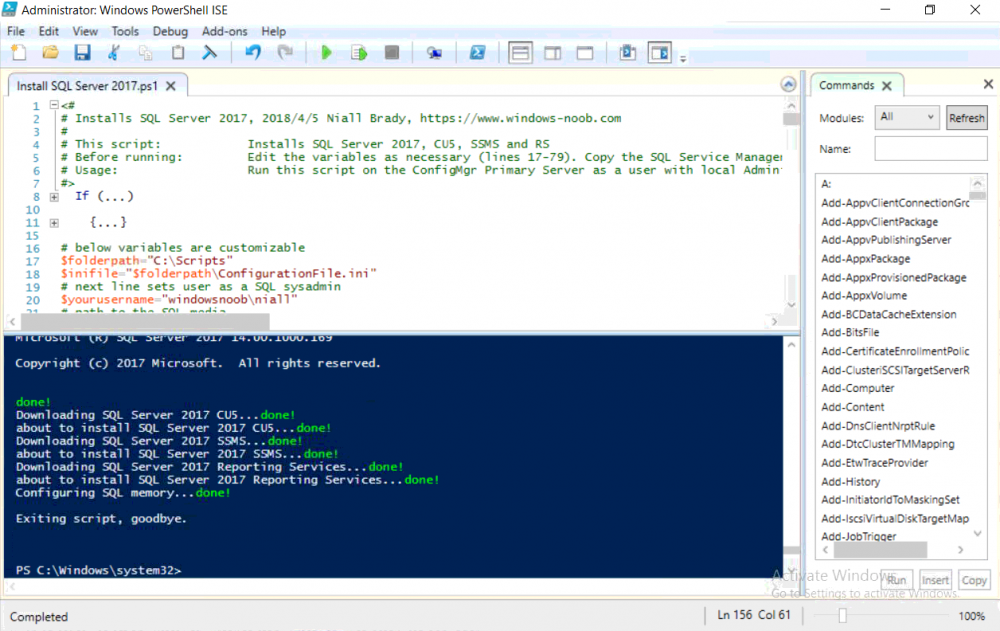
 This multi-part guide will show you how to install the latest baseline version of Configuration Manager from Microsoft. The latest available baseline version is System Center Configuration Manager (Current Branch) version 1802 as of March 29th 2018. How can I install System Center Configuration Manager (Current Branch) version 1802 on Windows Server 2016 with SQL Server 2017 – Part 1 How can I install System Center Configuration Manager (Current Branch) version 1802 on Windows Server 2016 with SQL Server 2017 – Part 2 How can I install System Center Configuration Manager (Current Branch) version 1802 on Windows Server 2016 with SQL Server 2017 – Part 3 How can I install System Center Configuration Manager (Current Branch) version 1802 on Windows Server 2016 with SQL Server 2017 – Part 4 You can use this multi-part guide to get a hierarchy up and running on Windows Server 2016 using SQL Server 2017. The concept behind this is to guide you through all the steps necessary to get a working Configuration Manager Primary site installed (for lab use) using manual methods or automated using PowerShell. This gives you the power to automate the bits that you want to automate, while allowing you to manually do other tasks when needed. You decide which path to take. PowerShell knowledge is desired and dare I say required if you are in any way serious about Configuration Manager. I will show you how to do most steps via two methods shown below, it’s up to you to choose which method suits you best but I highly recommend automating everything that you can, using PowerShell. Method #1 – Do it manually Method #2 – Automate it with PowerShell In Part 1, you configured Active Directory Domain Services (ADDS) on AD01, then joined the Configuration Manager server (CM01) to the newly created domain. You then created users, usergroups and OU's in Active Directory and created the System Management Container. Finally you delegated permission to the Configuration Manager server to the System Management container. Step 1. Install Roles and Features on CM01 Note: Perform the following on the Configuration Manager server (CM01) as a Local Administrator To support various features in System Center Configuration Manager, the setup wizard requires some server roles and features preinstalled. On CM01, login as the username you added to the Local Administrators group and start Server Manager. Method #1 - Do it manually The role and feature requirements for ConfigMgr are listed here https://docs.microsoft.com/en-us/sccm/core/plan-design/configs/site-and-site-system-prerequisites. On CM01, login as a user with administrative permissions on the server. Start Server Manager. Click on Add roles and features, on the Before you begin page click Next Choose Role-based or feature-based installation In the Server Selection screen verify CM01.windowsnoob.lab.local is selected and click Next On the Server Roles screen select Web Service (IIS) and when prompted to add features for Web Server (IIS) click on Add Features Click Next and on the Features screen select the .NET Framework 3.5 (includes .NET 2.0 and 3.0) feature Expand the .NET Framework 4.6 Features and select HTTP Activation under WCF Services, answer Add Features when prompted. Select Message Queuing (MSMQ) Activation and when prompted select Add Features Select Named Pipe Activation and TCP Activation and under Background Intelligent Transfer Service (BITS) select IIS Server Extension when prompted to add features click on Add Features Scroll down and select Remote Differential Compression Click Next and on the Web Server Role (IIS) screen click Next on the Select Role Services verify that the following are selected Click Next and point to the Installation Source by clicking on Specify an alternate source path Enter the path to the media eg: E:\Sources\SxS Click Install when ready, at this point you could export configuration settings for later automation Click on Close when the feature installation has succeeded. Method #2 - Automate it with PowerShell Note: Make sure your Server 2016 media is in the drive specified in the script or edit the script to point to the new location of the media. To install the roles and features needed, start Windows Powershell ISE as a user with administrative permissions on the server, edit the variables as appropriate and run the install roles and features.ps1 script. The script will automatically stop and prompt you to correct things, if it cannot find the XML file or the Windows Server 2016 installation media. 1. Extract the scripts to C:\Scripts on CM01 and load the install roles and features.ps1script located in C:\Scripts\Part 2\CM01 2. Edit the variables (lines 18-19) as desired before running. 3. Start Windows PowerShell ISE as Administrator and run the script by clicking on the green triangle. Step 2. Download and install Windows ADK and install WDS Note: Perform the following on the Configuration Manager server (CM01) as a Local Administrator When you deploy operating systems with Configuration Manager, the Windows ADK is an external dependency that is required. The ConfigMgr prerequisite checker will check for various things, including ADK components such as USMT and Windows Preinstallation Environment (among others), therefore you need to install Windows ADK on your server. System Center Configuration Manager version 1802 supports Windows ADK 1709 as I've explained here. Method #1 - Do it manually Go to this link and download ADK 1709. You'll be prompted to save or run ADKSETUP.EXE, select Run. When prompted for the path, accept the defaults...(or change it to something else if you wish) Select your privacy settings Accept the ADK EULA Make sure to have selected at least the following ADK features Deployment Tools Windows Preinstallation Environment (Windows PE) Imaging and Configuration Designer (ICD) Configuration Designer User State Migration tool (USMT) and click Install to start the download and Installation of the Windows ADK, version 1709. Once the ADK installation is complete, click Close. To install WDS, open Server Manager, select Add roles and features and select the Windows Deployment Services role. When prompted click on Add Features to include management tools. and click through the wizard until completion, close the wizard when done. Method #2 - Automate it with PowerShell To download and then install Windows ADK 10 version 1709 with the components needed for ConfigMgr, start Windows Powershell ISE as Administrator and run the setup ADK and WDS.ps1 script. This script not only downloads and installs ADK 1709, but it installs the Windows Deployment Services role. Tip: If you've already downloaded ADK 1709 and want to save yourself some time, copy the Windows Kits folder and all files/folders within to the source folder (eg: C:\Source\Windows Kits) and the script will skip the download. 1. Extract the scripts to C:\Scripts on CM01 and load the setup ADK and WDS.ps1 script located in C:\Scripts\Part 2\CM01 2. Edit the variable (line 17) as desired before running. 3. Start Windows PowerShell ISE as Administrator and run the script by clicking on the green triangle. Step 3. Install SQL Server 2017 Note: Perform the following on the Configuration Manager server (CM01) as a Local Administrator Method #1 - Do it manually Configure the firewall as described in https://go.microsoft.com/fwlink/?linkid=94001. After configuring the firewall, browse to the drive where the SQL Server 2017 media is, and run setup.exe. The SQL Server Installation Center wizard will appear. Click on Installation and then choose New SQL Server standalone installation or add features to an existing installation. Enter the Product Key or use the evaluation version if that's what you want to use. The product key will be automatically filled in for licensed media downloaded from Microsoft Volume Licensing Service Center. Accept the EULA Make your Microsoft Update choices and review your Install rules, select the SQL server instance features you need and if necessary change the drive letter where you intend to install it And configure the Instance Configuration or just leave it as default Verify the Service Accounts settings and for Collation, make sure the collation is set to SQL_Latin1_General_CP1_CI_AS For Server Configuration, click on Add Current User After configuring Data Directories, TempDB and Filestream settings you are Ready to Install Click on Install to start the installation of SQL Server 2017, and once it's completed, click Close. After installing SQL Server 2017, download SQL Server 2017 SSMS from here and install it. Method #2 - Automate it with PowerShell Note: Make sure your SQL Server 2017 media is in the drive specified in the script or edit the script to point to the new location of the media. The script and accompanying INI file have the path pointing at D:\Program Files, please change the variables as appropriate. To install SQL Server 2017 use the Install SQL Server 2017.ps1 script. The script will create a ConfigurationFile.ini used to automate the installation of SQL Server 2017, and after it's installed the script will download the SSMS executable (Management Studio) and install it. Then it will download Reporting Services and install it. If either of the EXE's are in the download folder, it will skip the download and just install. SQL Server no longer comes with the Management Studio or Reporting Services built in, and they are offered as separate downloads, don't worry though, my PowerShell script takes care of that for you. 1. Extract the scripts to C:\Scripts on CM01 and load the Install SQL Server 2017.ps1 script located in C:\Scripts\Part 2\CM01 2. Edit the variables [lines 17-76] as desired before running. 3. Start Windows PowerShell ISE as Administrator and run the script by clicking on the green triangle. Step 4. Restart the Configuration Manager Primary Server Note: Perform the following on the Configuration Manager server (CM01) as a Local Administrator Open an administrative command prompt and issue the following command: shutdown /r Step 5. Install the WSUS role Note: Perform the following on the Configuration Manager server (CM01) as a Local Administrator Now that SQL server is installed, we can utilize SQL Server for the WSUS database. To install WSUS and configure it to use the SQL server database instead of the Windows Internal Database, do as follows: Method #1 - Do it manually Using Roles and Features in Server Manager, add the Windows Server Update Services role. When prompted to add features for the WSUS role, click on Add features. When prompted for the Role Services, uncheck WID Connectivity and add SQL Server Connectivity instead. When prompted for Content location, enter a valid path When prompted for Database Instance Selection, enter the server name and click on Check Connection On the Confirm Installation Selections screen, click on Install. and finally click close. After installing the WSUS role, in Server Manager, click on the yellow exclamation mark and choose Launch Post Installation Tasks. When the tasks are completed Optional: The WSUS database (SUSDB) can be observed using SQL Server SSMS. Method #2 - Automate it with PowerShell Browse to the location where you extracted the scripts, C:\scripts. Start Windows PowerShell ISE as administrator, open the Install roles and features_WSUS.ps1 script, edit the $servername variable and replace CM01 with the ServerName your are installing ConfigMgr on (SQL server). Note: Make sure to have your Windows Server 2016 media in the path referred to by $Sourcefiles. 1. Extract the scripts to C:\Scripts on CM01 and load the Install roles and features_WSUS.ps1 script located in C:\Scripts\Part 2\CM01 2. Edit the variables [lines 22-25] as desired before running. 3. Start Windows PowerShell ISE as Administrator and run the script by clicking on the green triangle. Downloads The scripts used in this guide are available for download here. Unzip to C:\Scripts on both servers. The scripts are placed in the corresponding folder (Part 1, Part 2 etc) and sorted into which server you should run the script on (AD01 or CM01). Scripts.zip Summary Using PowerShell to automate things leaves more time for yourself and it's fun. Please join me in Part 3 of this multi-part guide when you will install System Center Configuration Manager version 1802 (Current Branch).
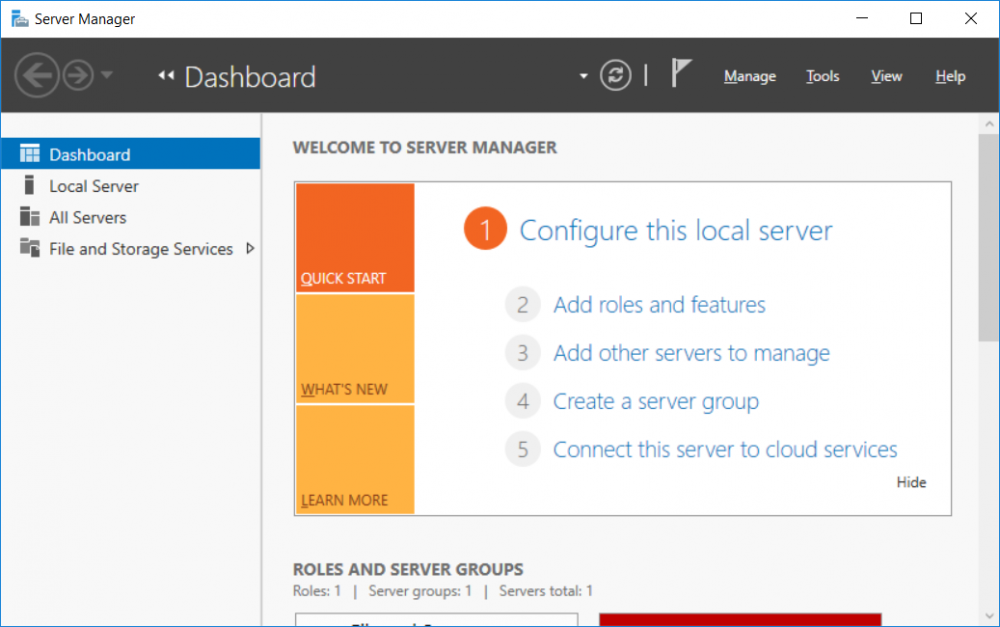


-
 My reports are not showing up under my console. (Monitoring, Reporting, Reports). I've added Administrator User for the Reporting. And created a custom role for this purpose. When I go to reports in the console, it shows as: http://sccm2016/Reports_SCCMTEST16, and when it attempts to open, it gives this error: The report server cannot decrypt the symmetric key that is used to access sensitive or encrypted data in a report server database. You must either restore a backup key or delete all encrypted content. (rsReportServerDisabled) Get Online Help Keyset does not exist (Exception from HRESULT: 0x80090016) this is a fresh install, so I do not have a backup. The name of the server is sccm2016; how can I get that changed, maybe that's the issue, but I don't think it is. In the Site Status, (Site System Role: Reporting Services Point - the error shows: The report server service is not running on Reporting Service Point server "sccm2016.xxx.xxx"; start the service to enable reporting. - Which I have done, multiple times. Am I able to uninstall SQL without uninstalling SCCM?
 -
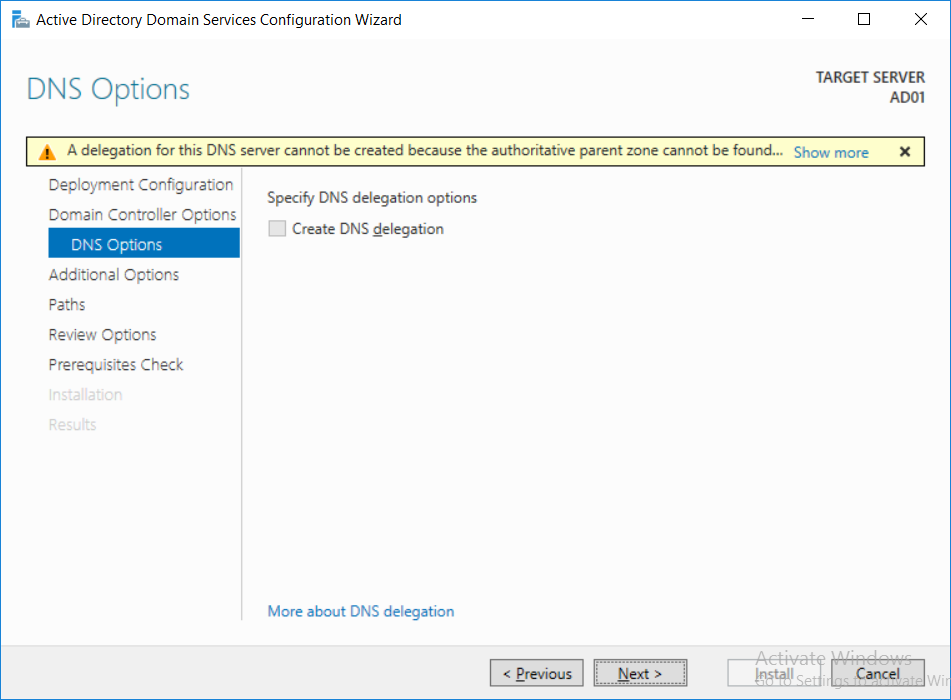
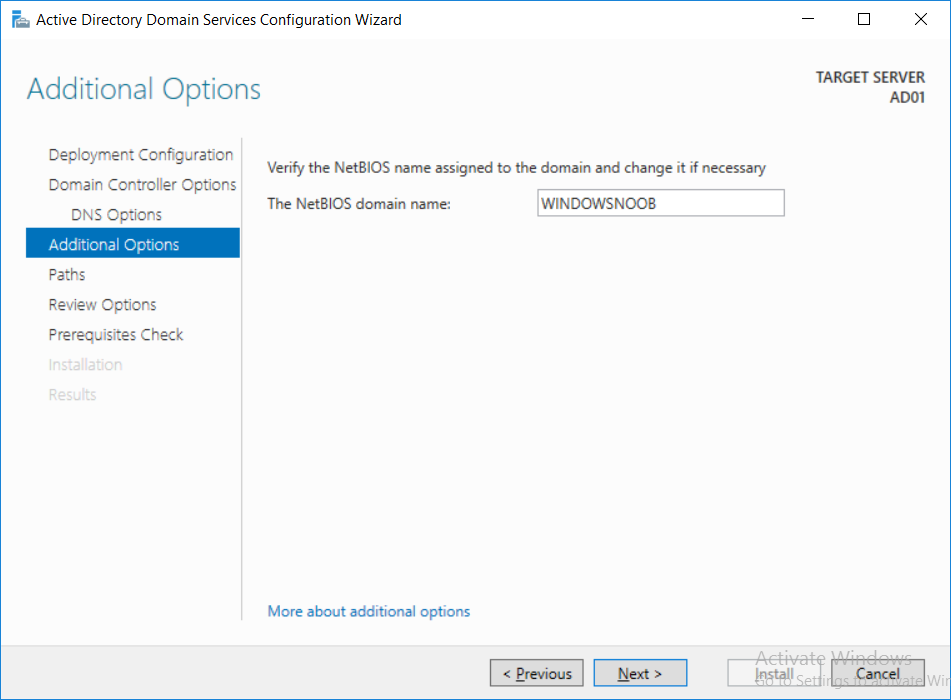
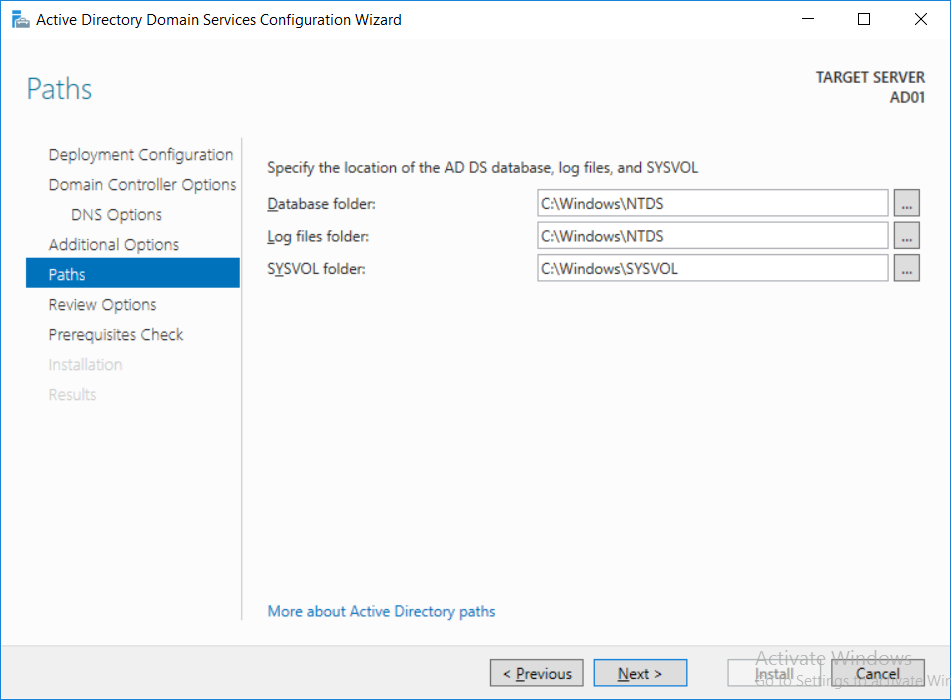
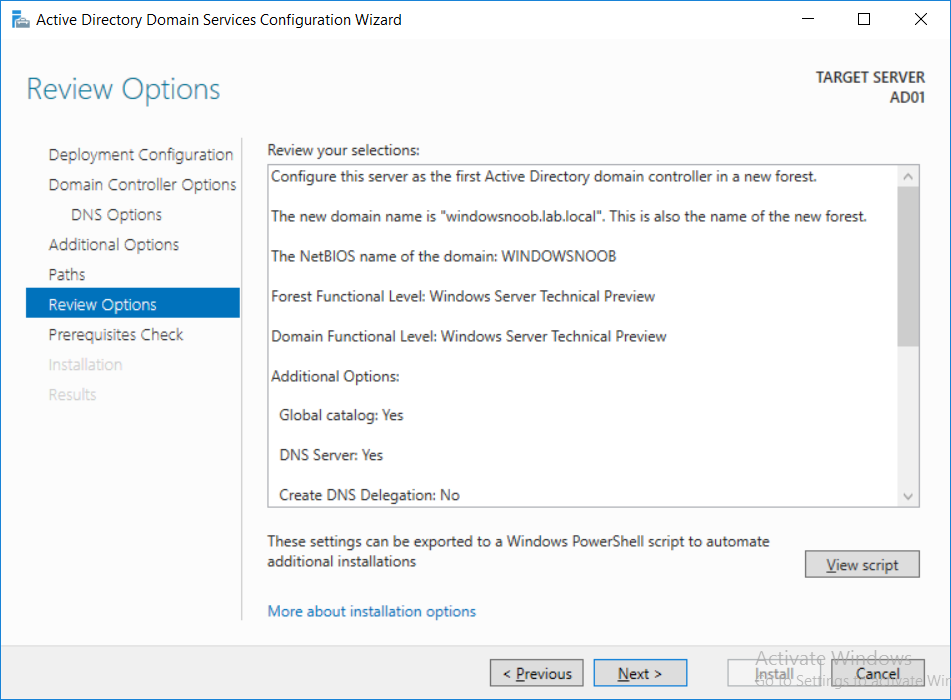
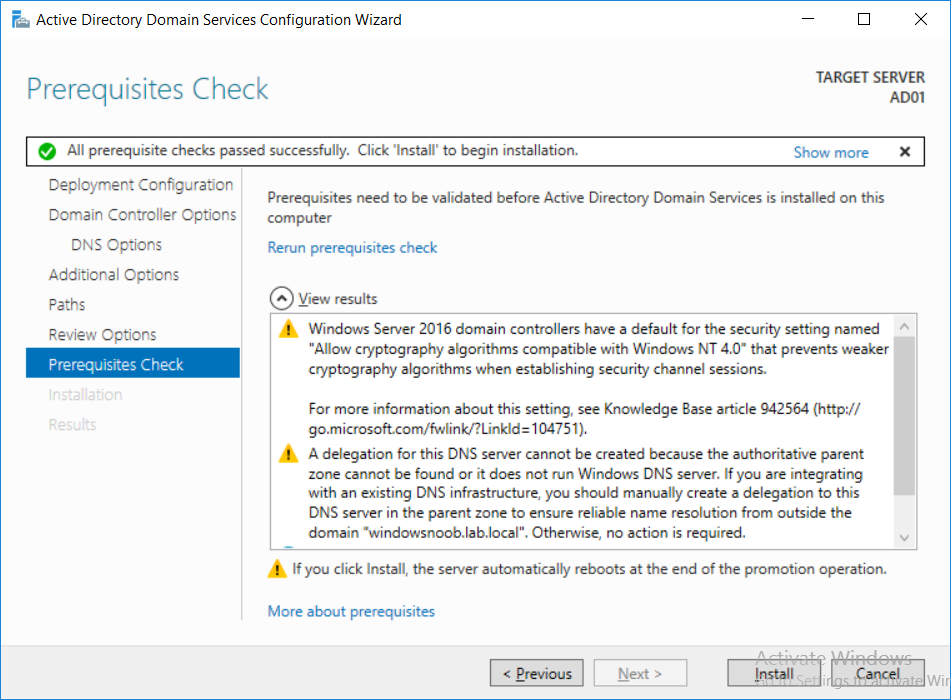
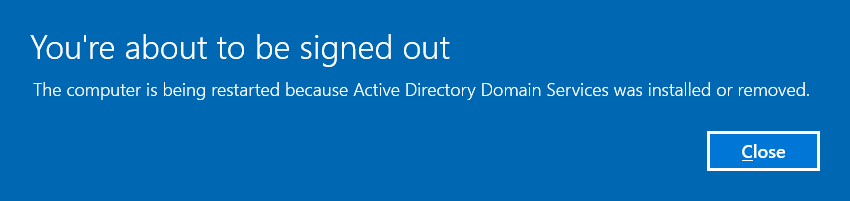
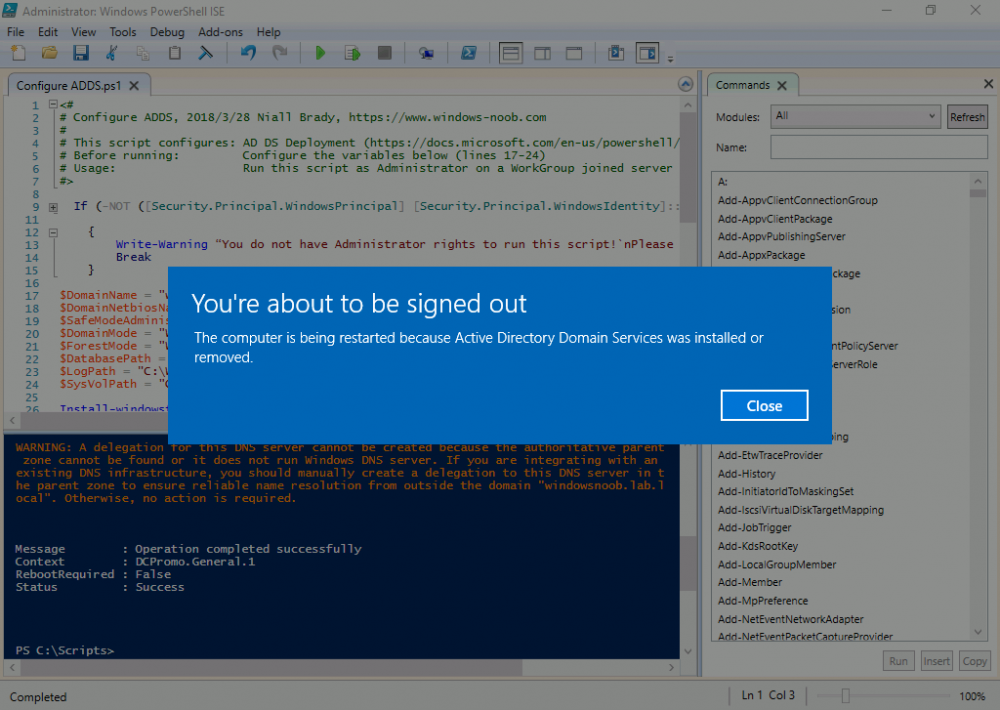
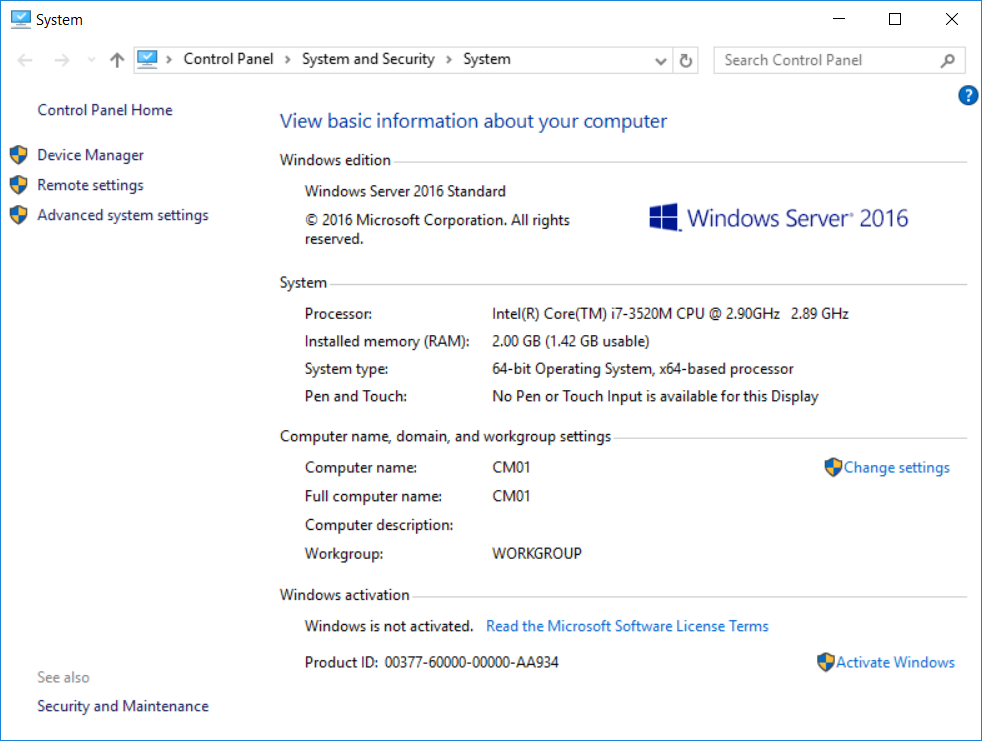
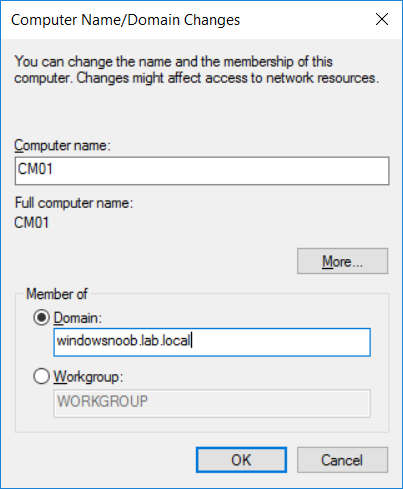
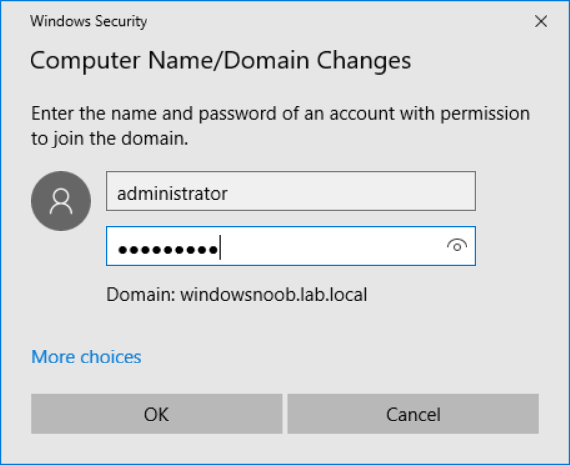
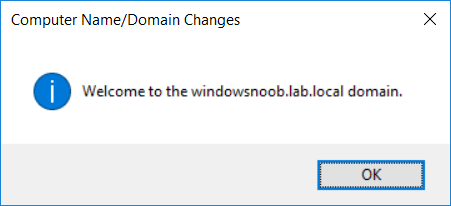
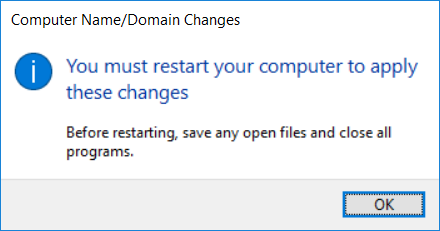
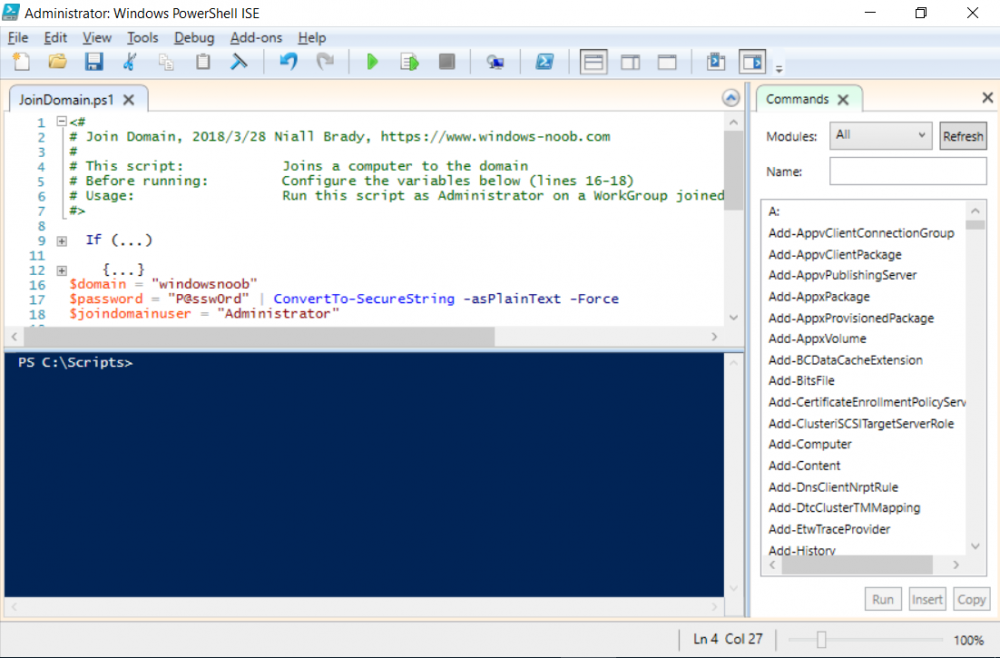
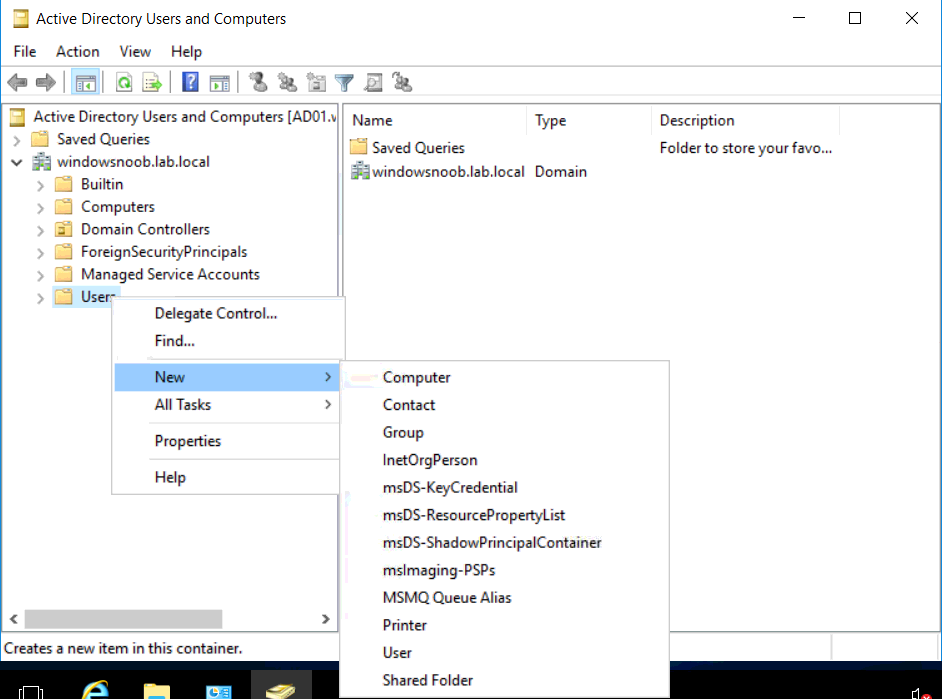
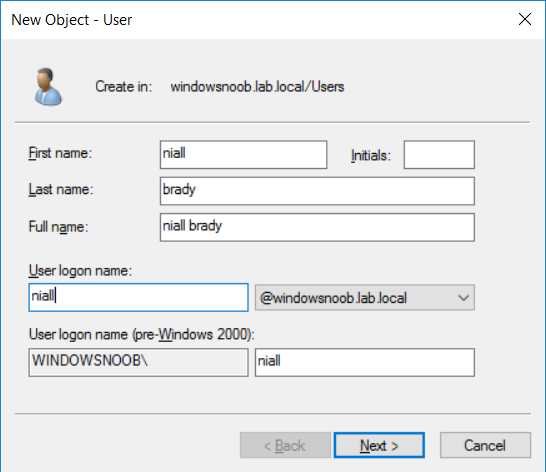
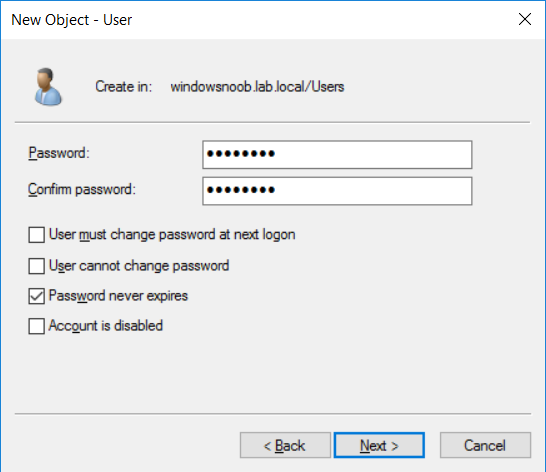
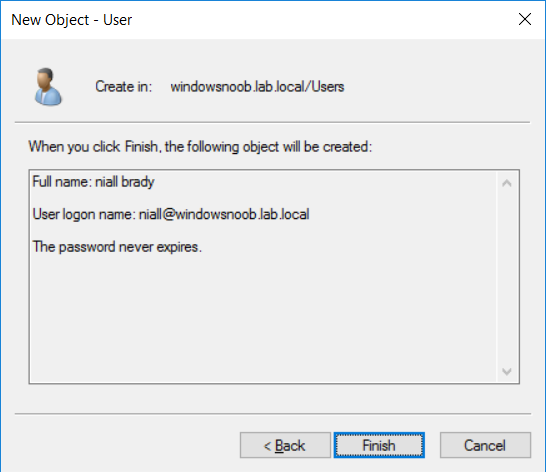
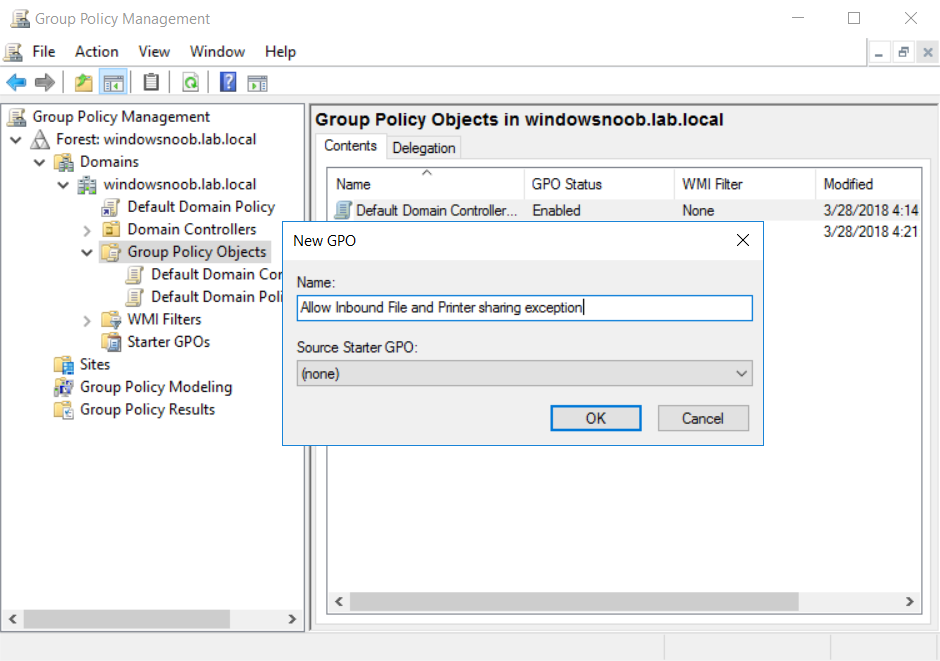
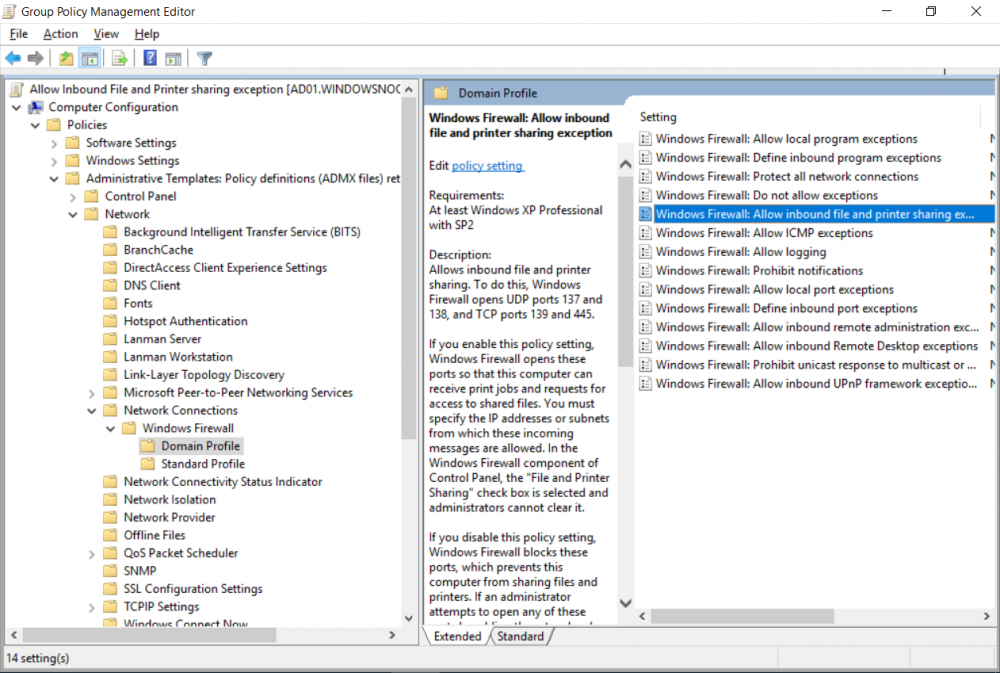
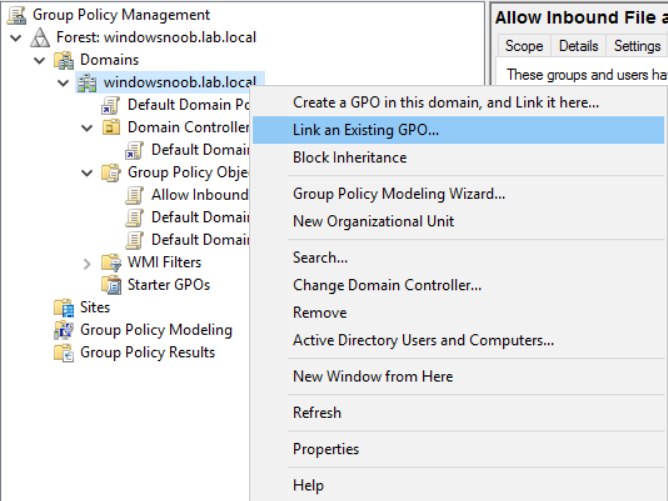
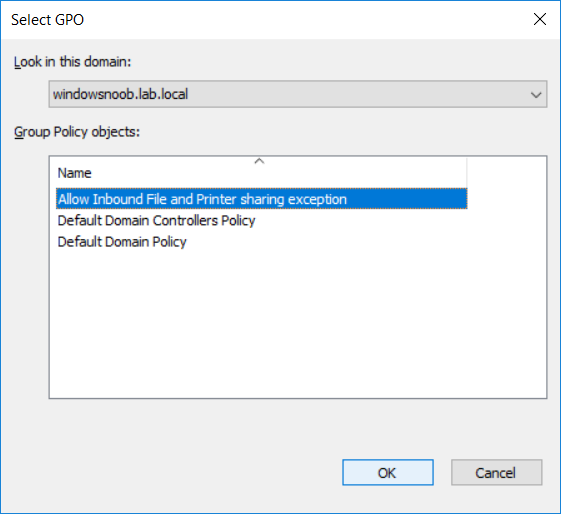
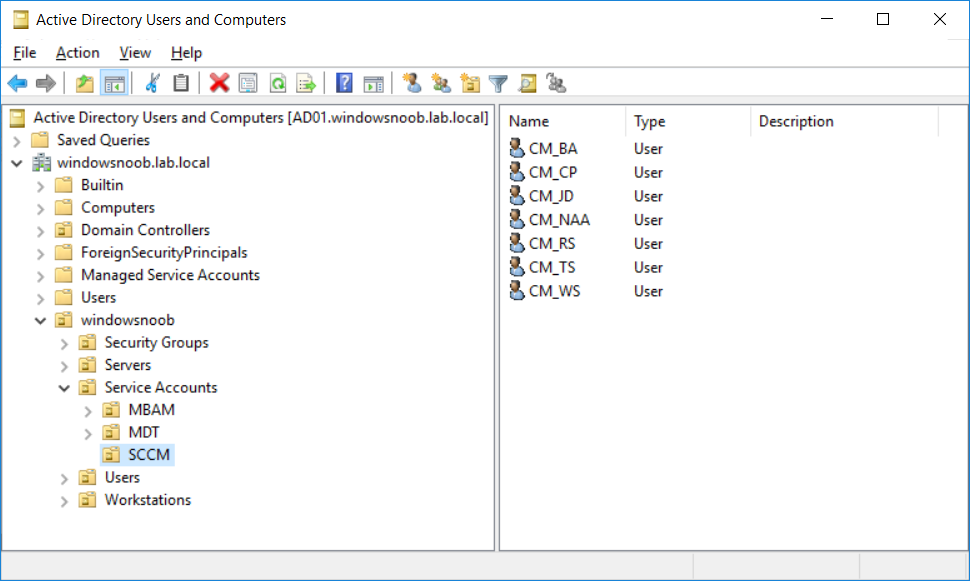
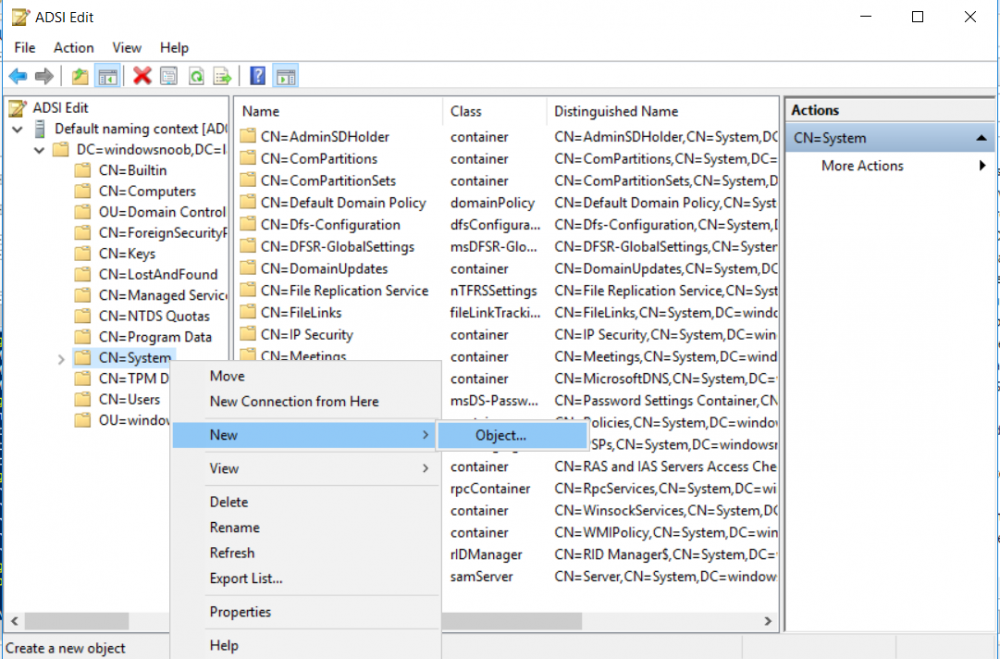
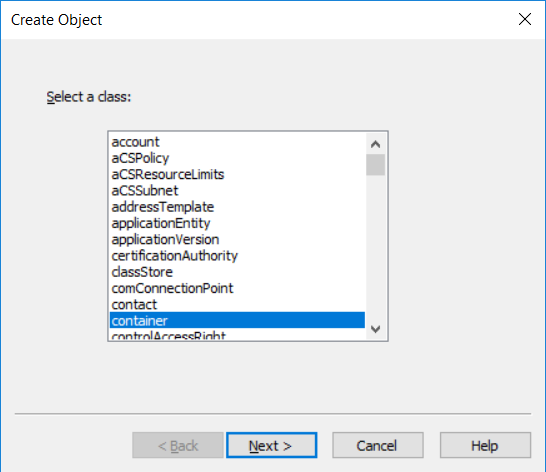
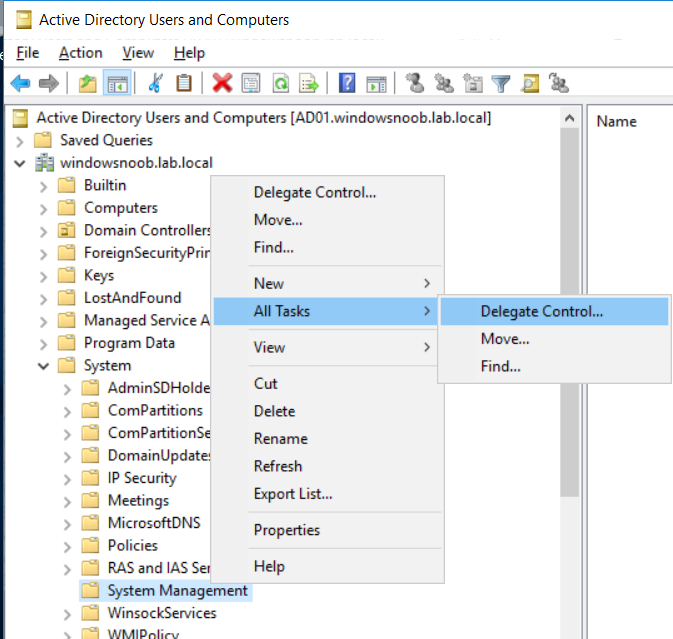
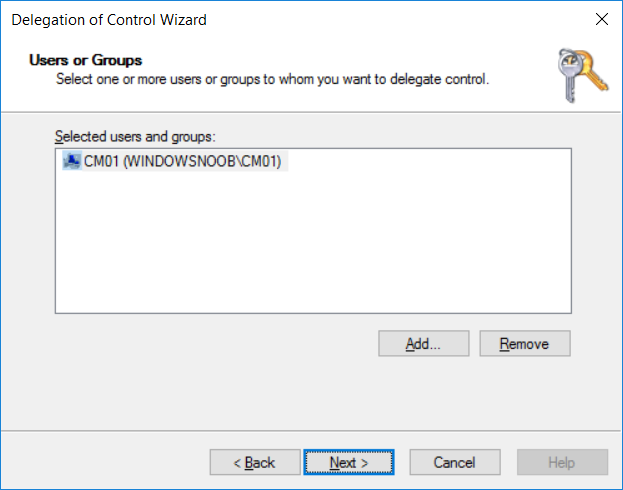
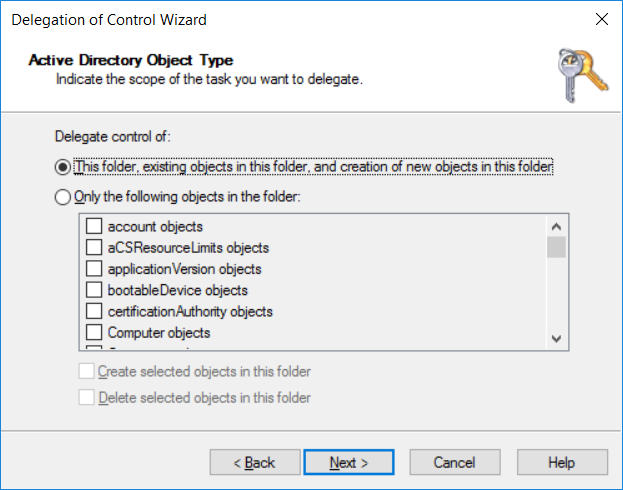
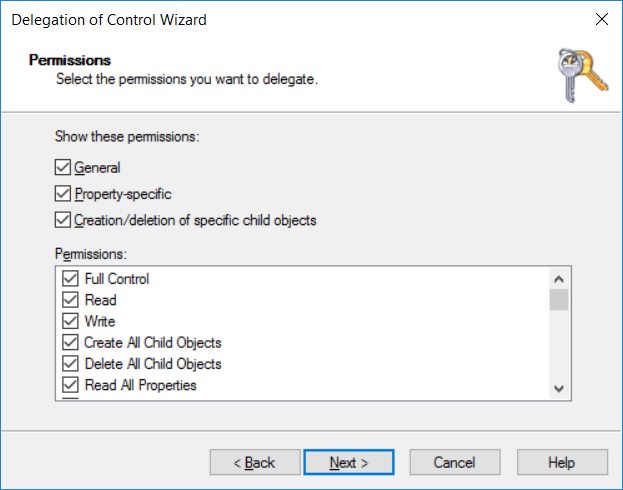
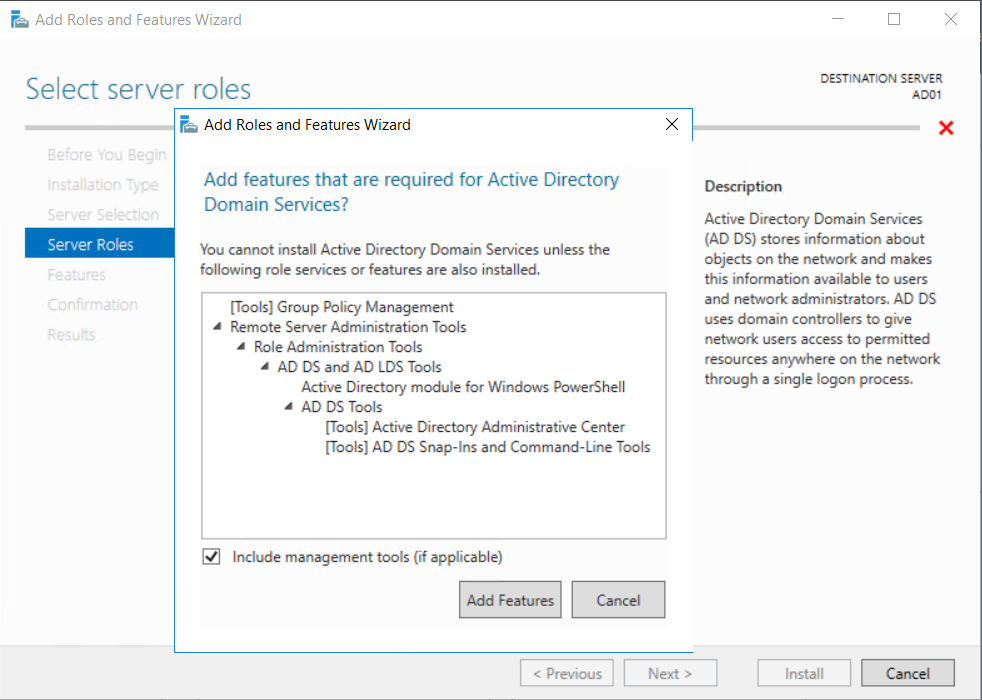
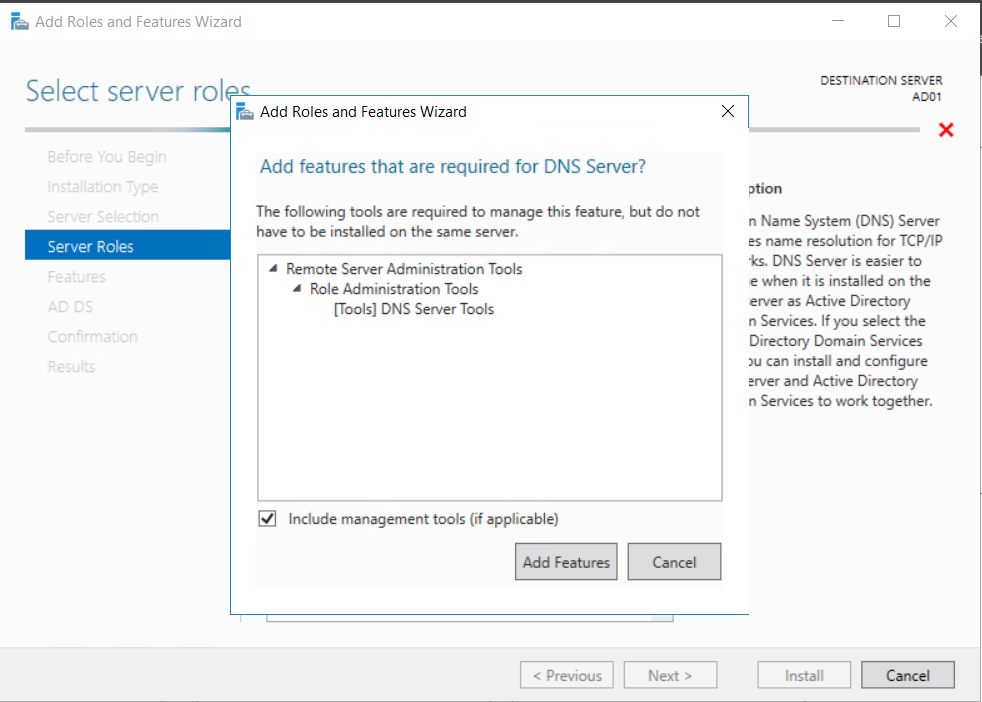
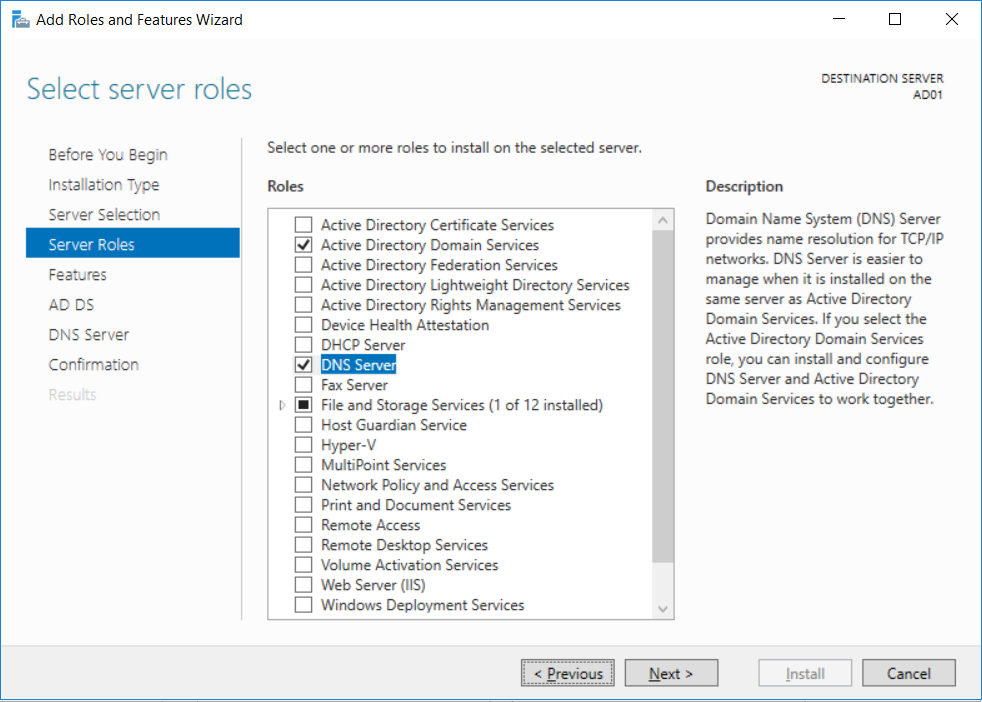
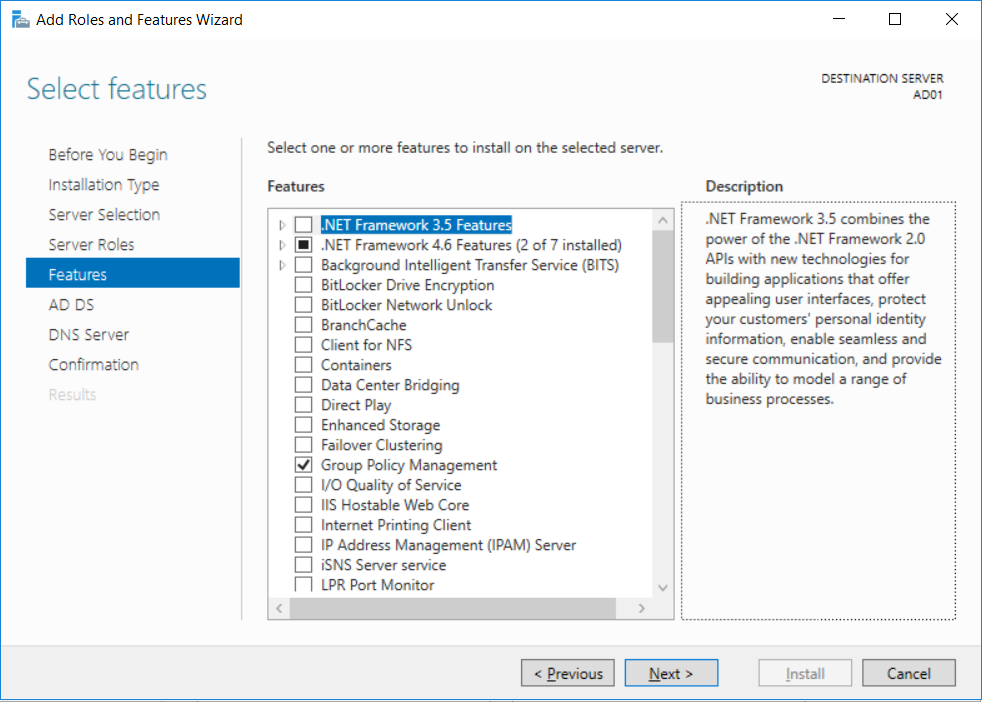
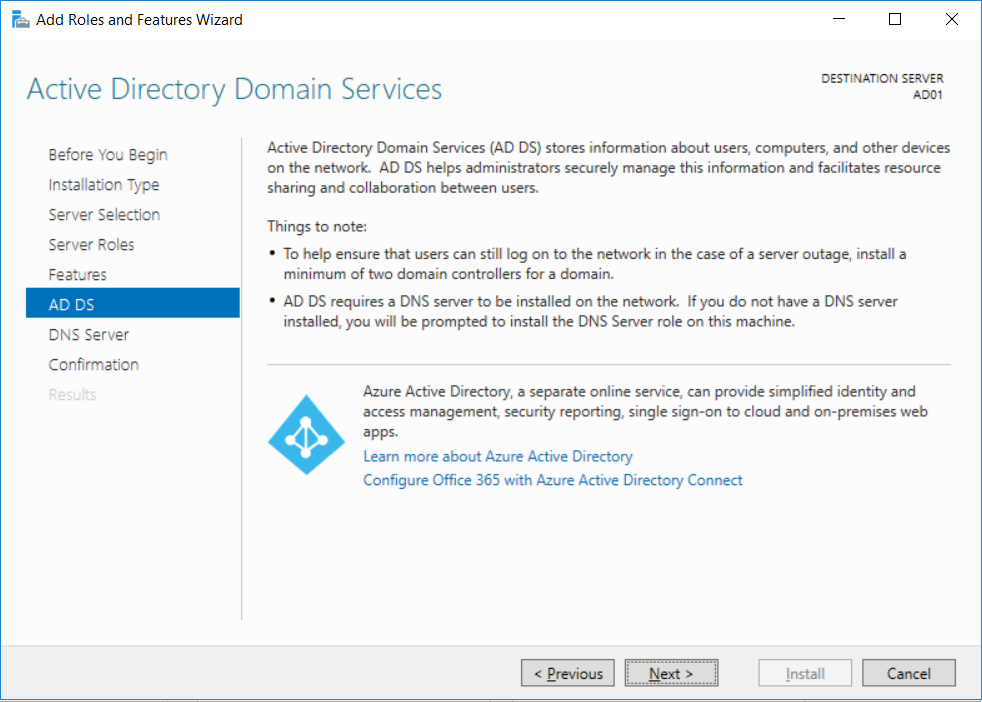
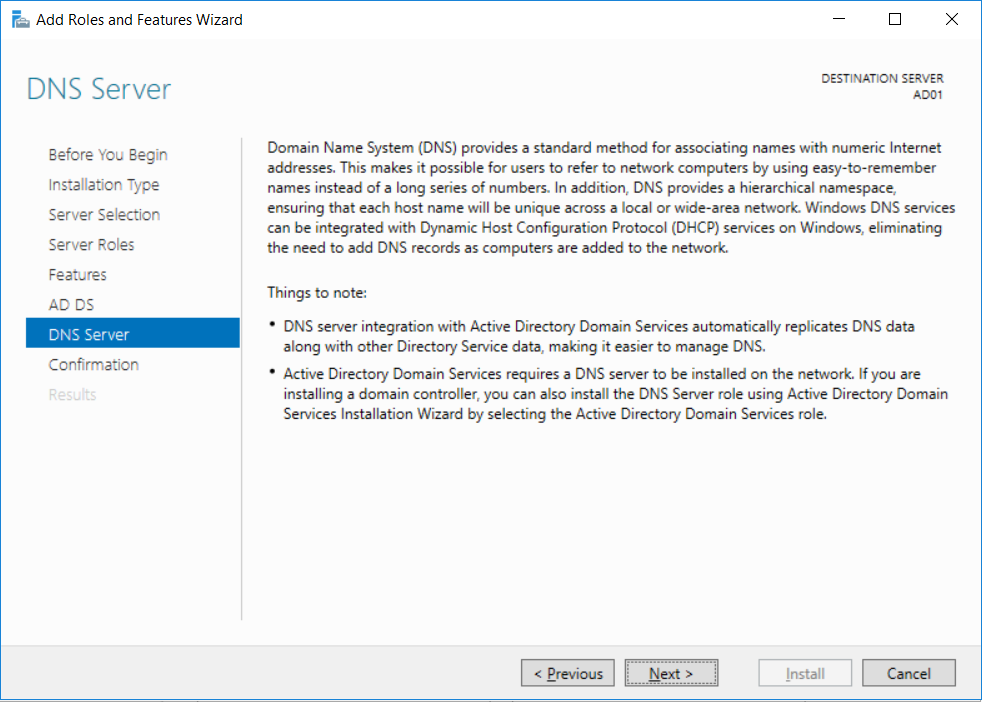
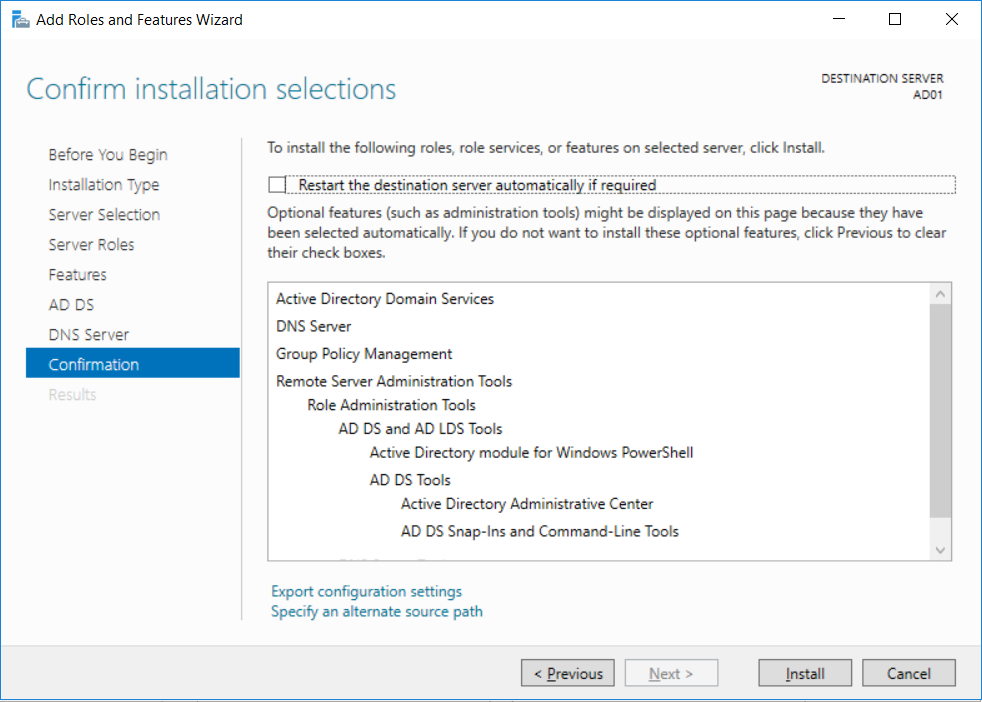
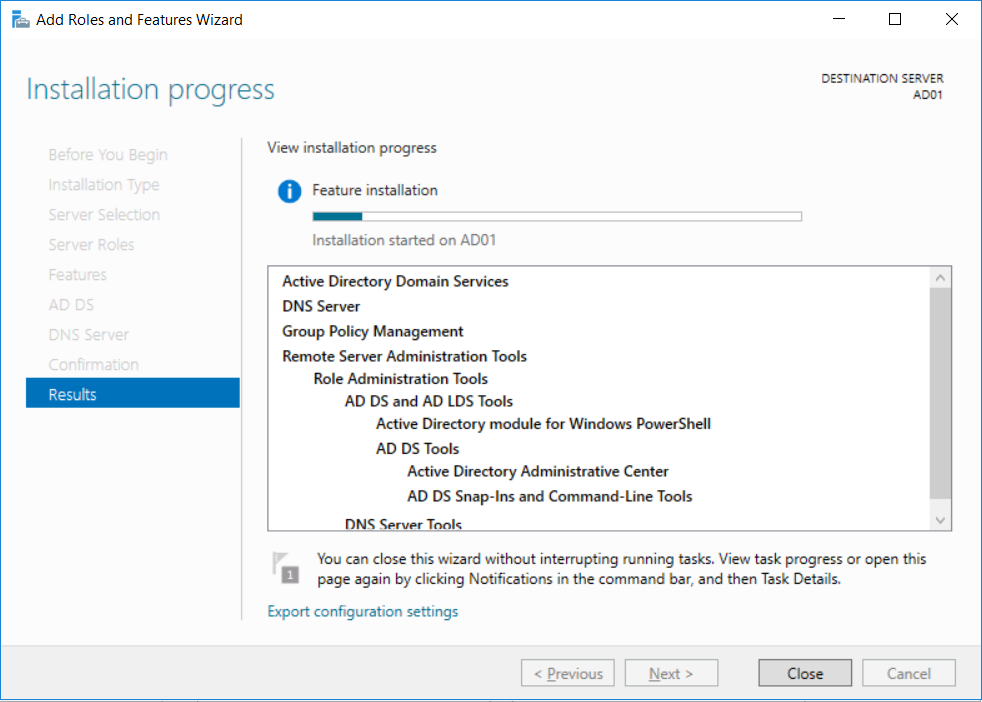
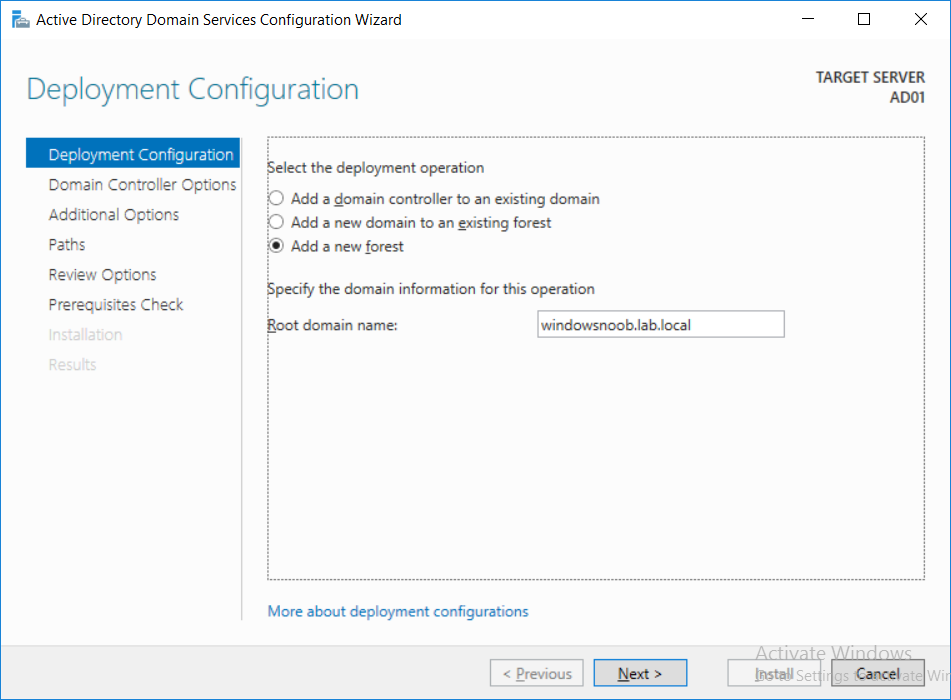
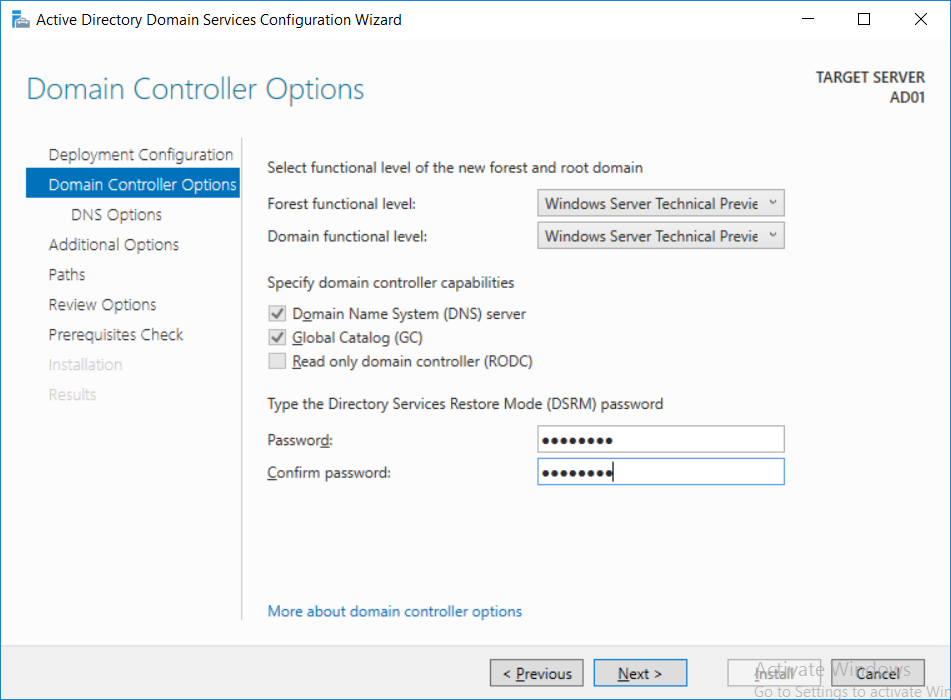
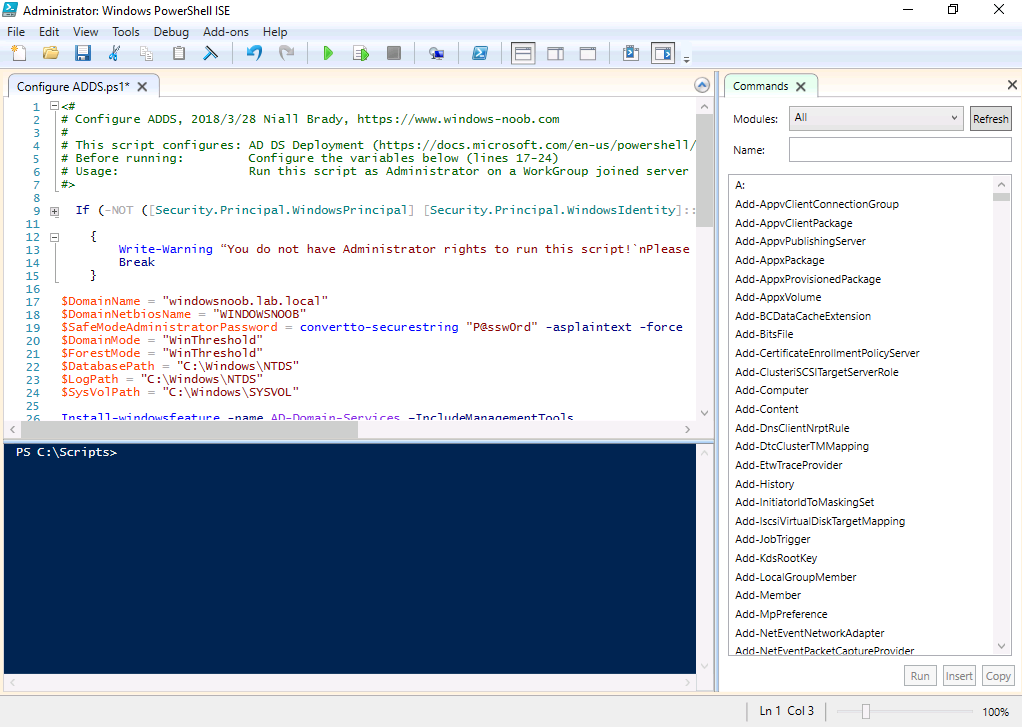
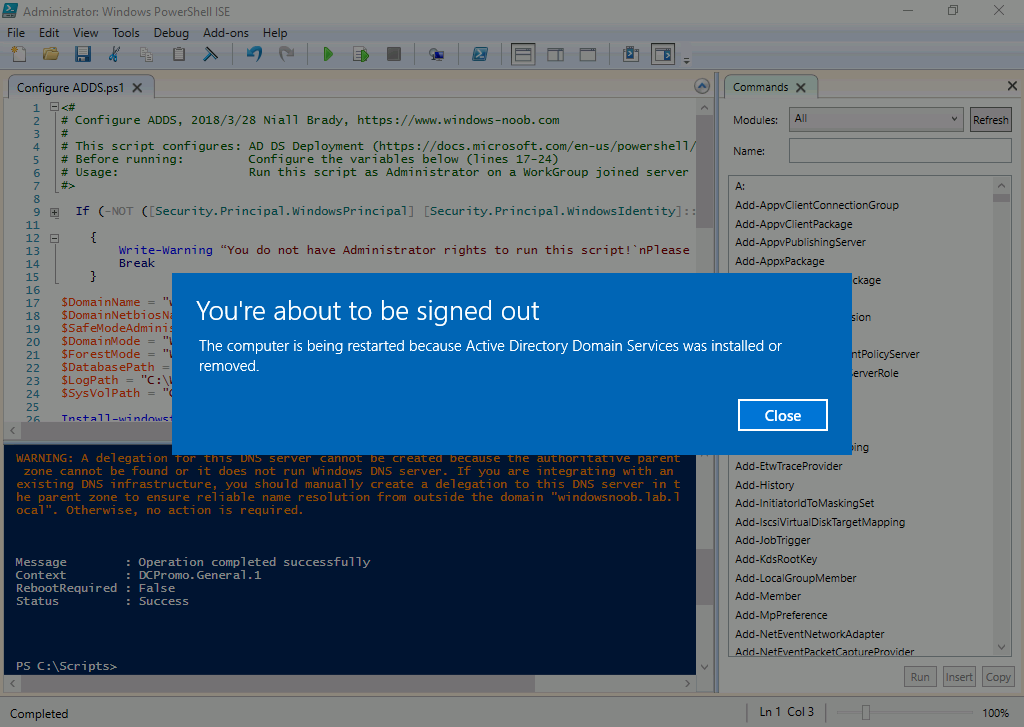
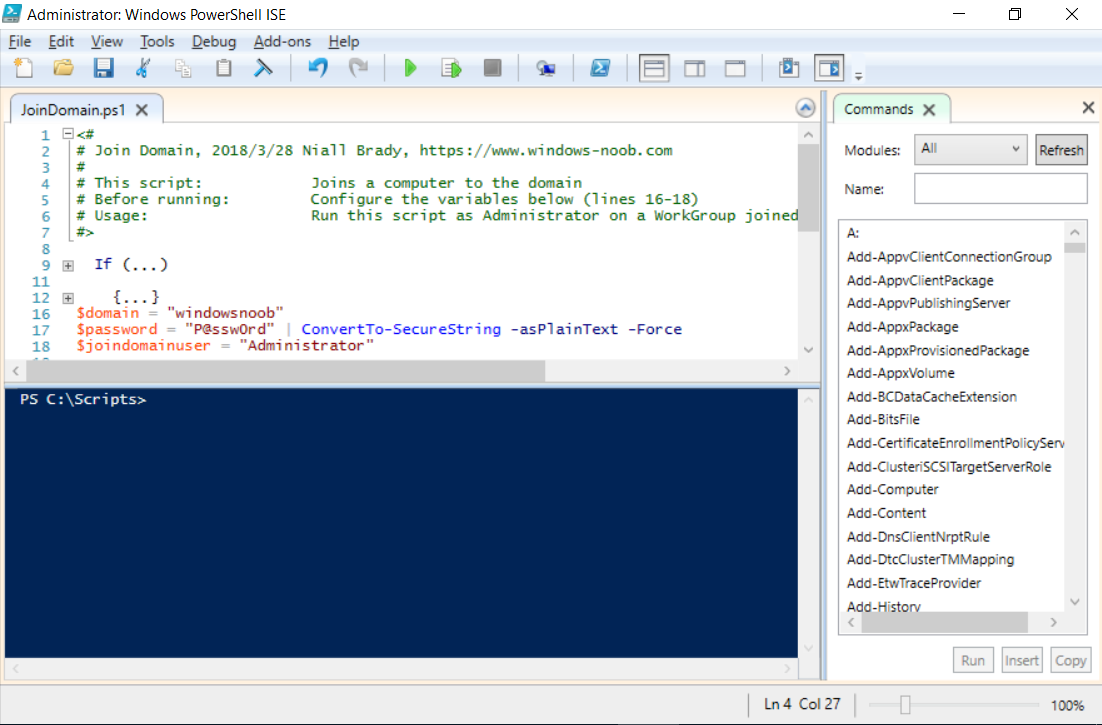
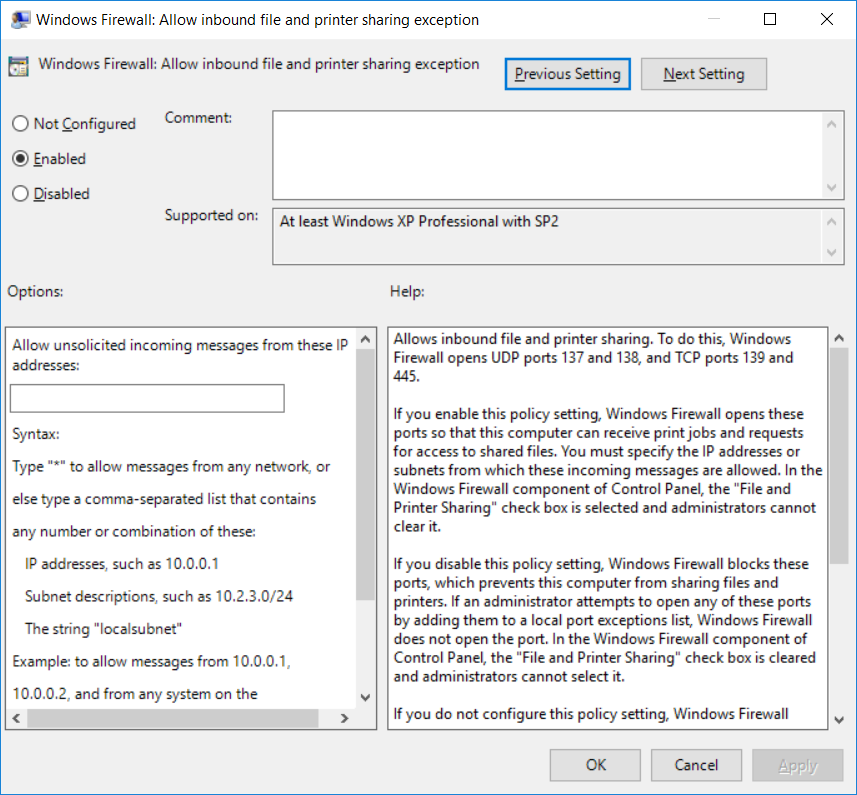
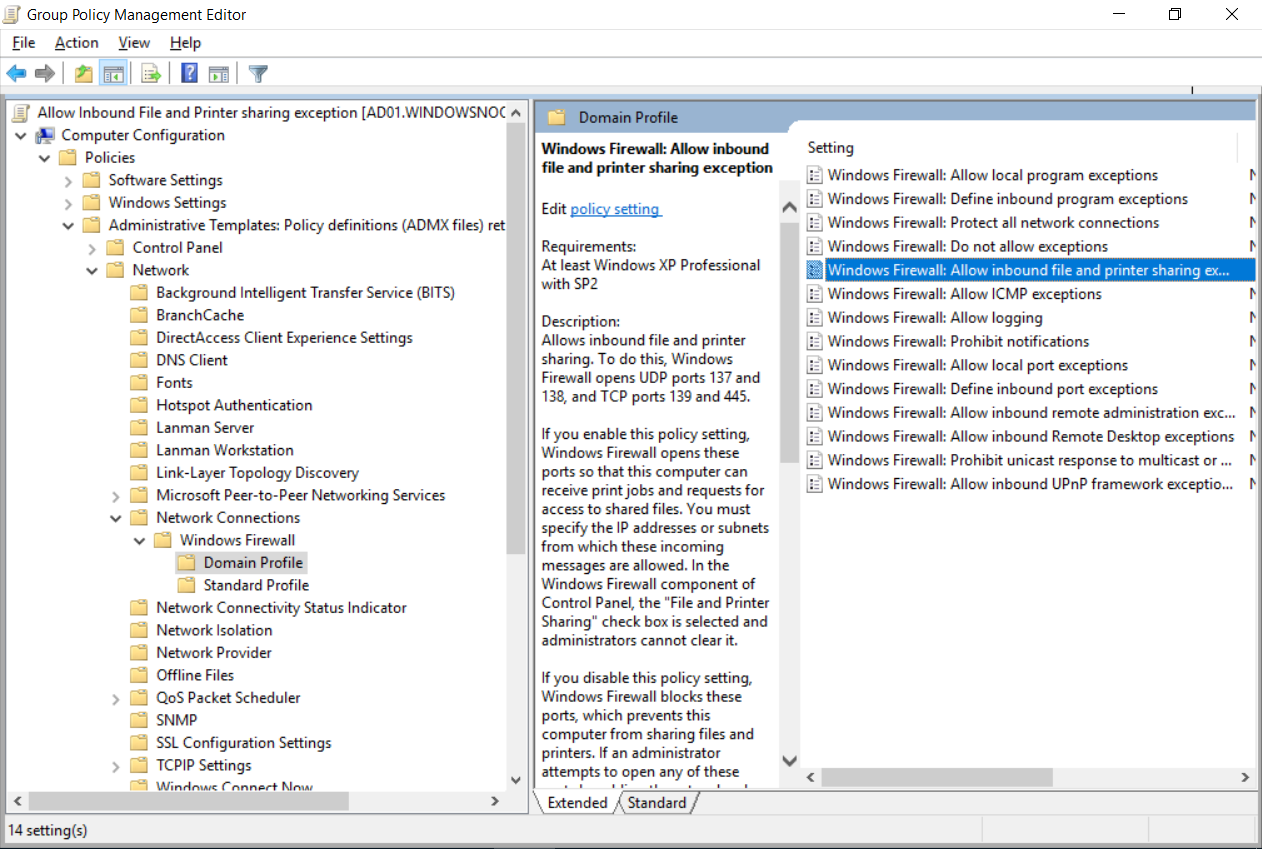
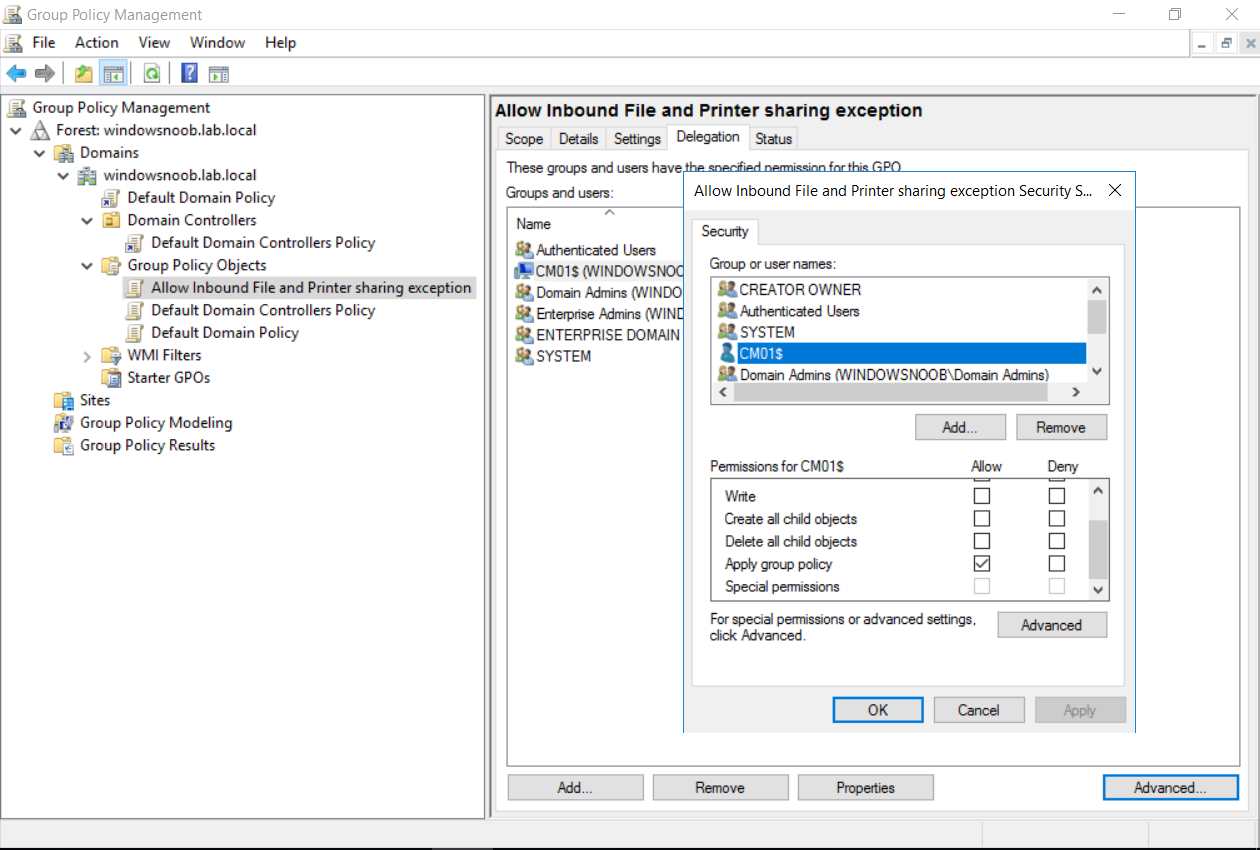
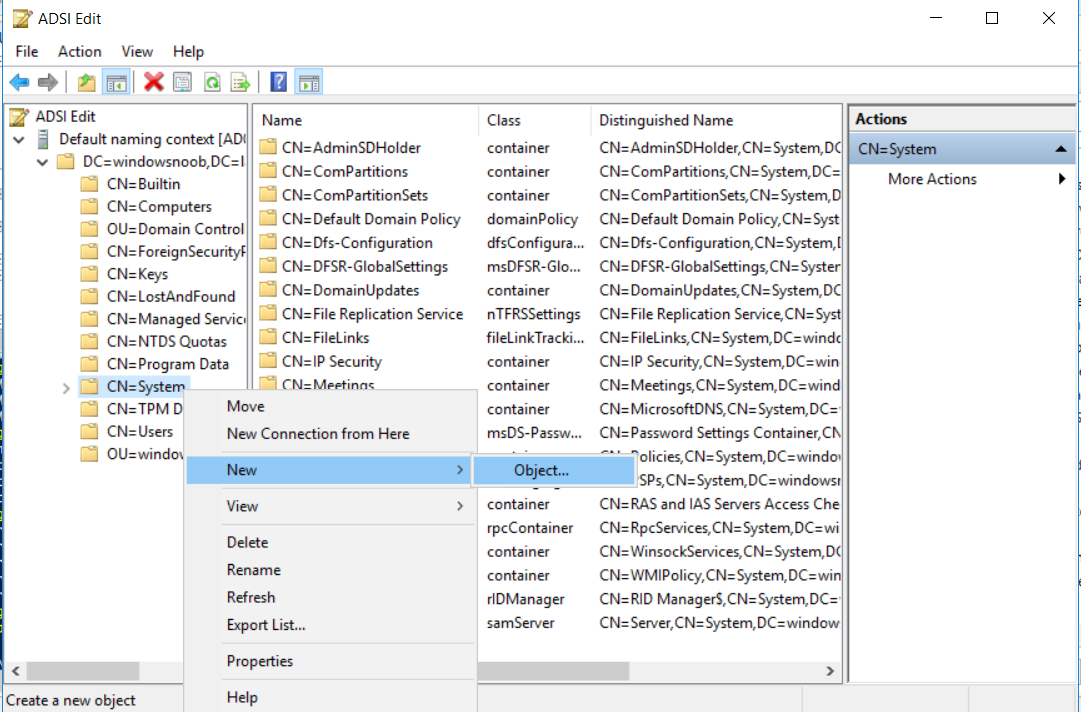
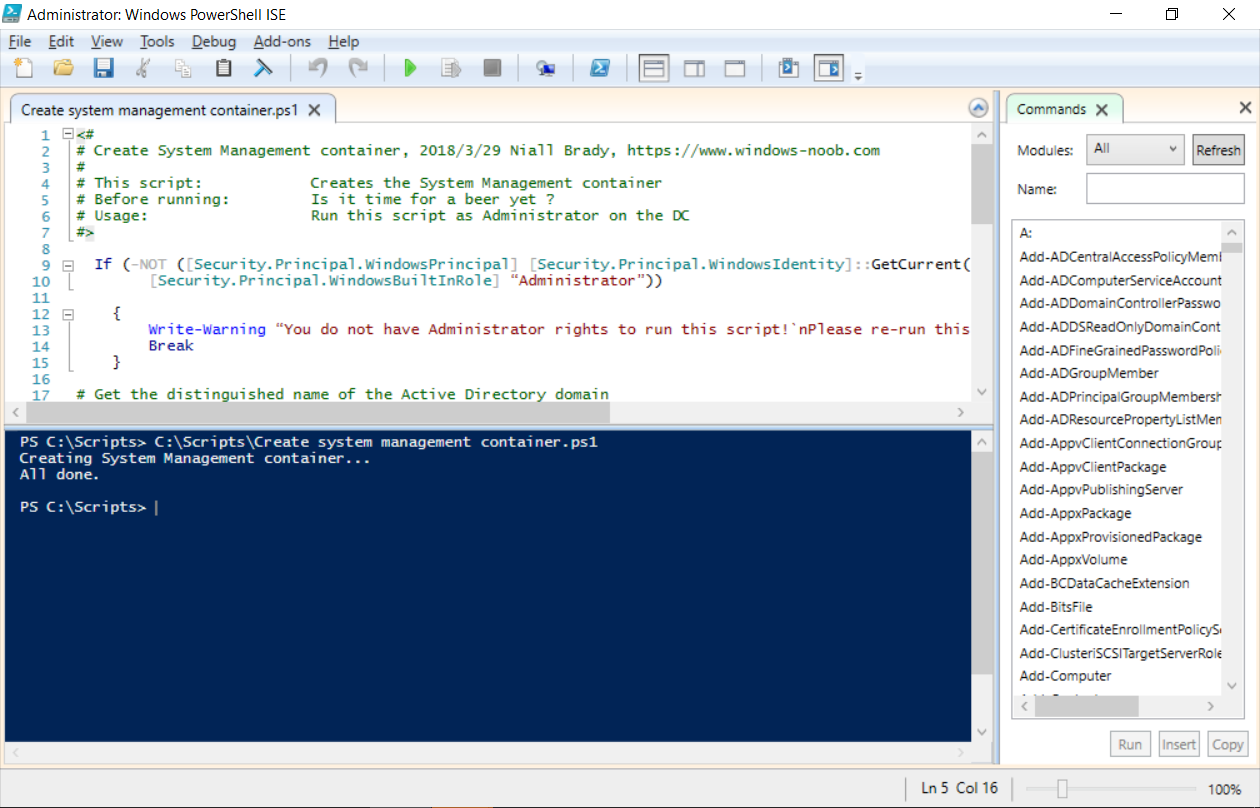
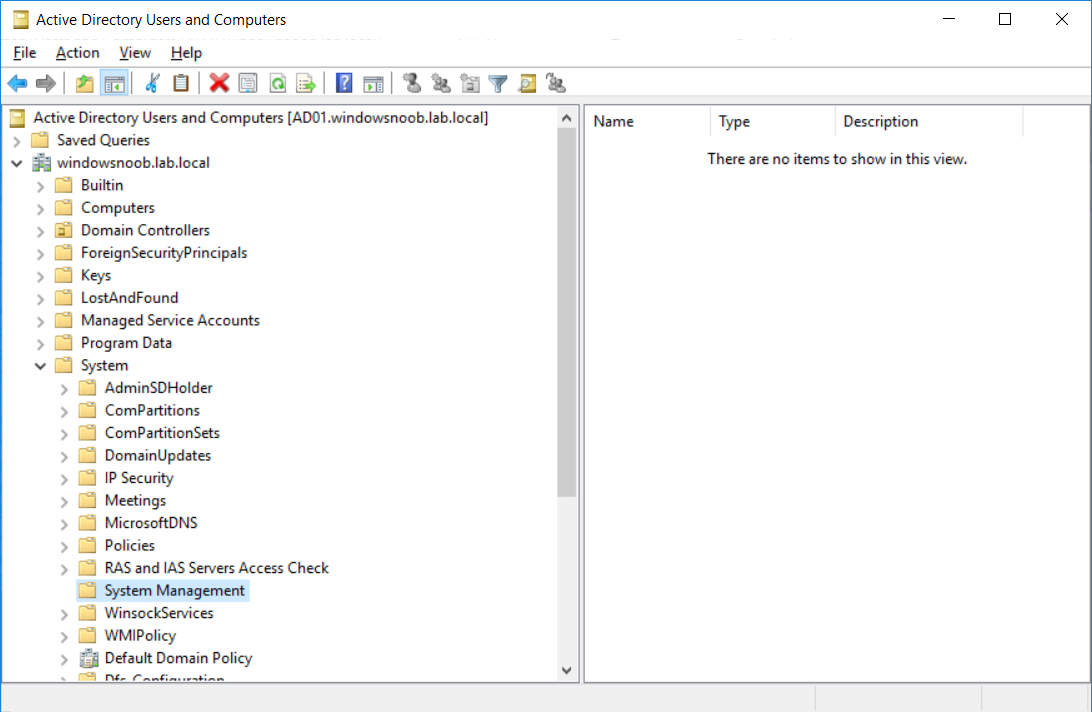
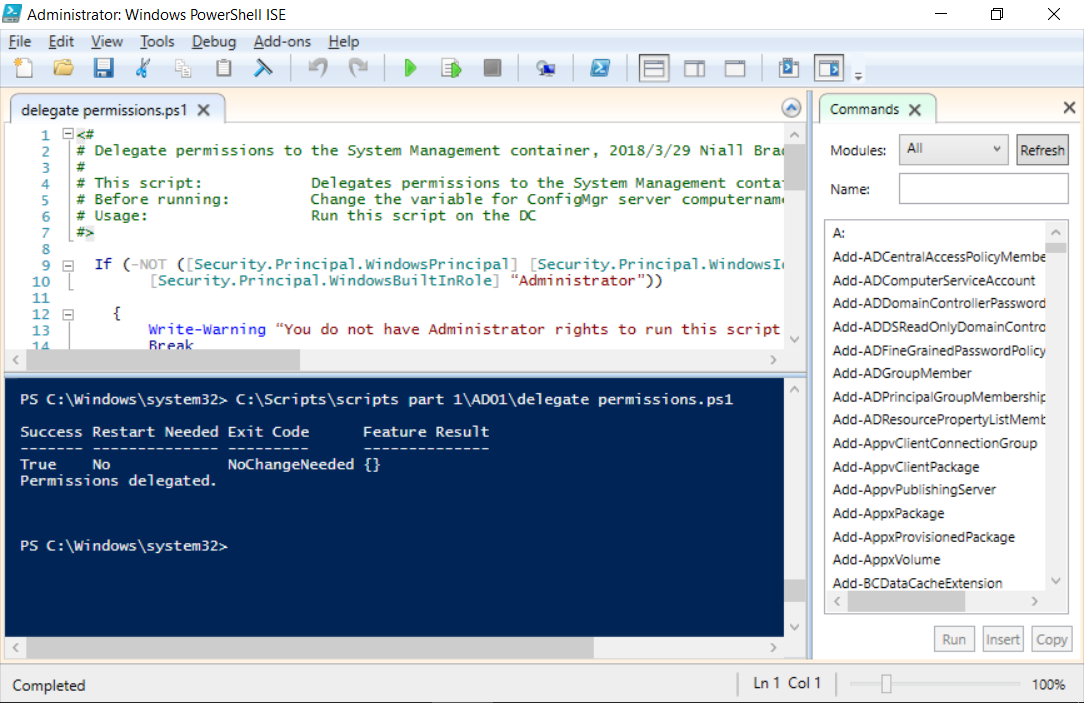
Introduction UPDATE: please use the newer version of this guide here. This multi-part guide will show you how to install the latest baseline version of Configuration Manager from Microsoft. The latest available baseline version is System Center Configuration Manager (Current Branch) version 1802 as of March 29th 2018. How can I install System Center Configuration Manager (Current Branch) version 1802 on Windows Server 2016 with SQL Server 2017 – Part 1 How can I install System Center Configuration Manager (Current Branch) version 1802 on Windows Server 2016 with SQL Server 2017 – Part 2 How can I install System Center Configuration Manager (Current Branch) version 1802 on Windows Server 2016 with SQL Server 2017 – Part 3 How can I install System Center Configuration Manager (Current Branch) version 1802 on Windows Server 2016 with SQL Server 2017 – Part 4 You can use this multi-part guide to get a hierarchy up and running on Windows Server 2016 using SQL Server 2017. The concept behind this is to guide you through all the steps necessary to get a working Configuration Manager Primary site installed (for lab use) using manual methods or automated using PowerShell. This gives you the power to automate the bits that you want to automate, while allowing you to manually do other tasks when needed. You decide which path to take. PowerShell knowledge is desired and dare I say required if you are in any way serious about Configuration Manager. I will show you how to do most steps via two methods shown below, it's up to you to choose which method suits you best but I highly recommend automating everything that you can, using PowerShell. Method #1 - Do it manually Method #2 - Automate it with PowerShell Get your lab ready In this guide I assume you have already installed two WorkGroup joined servers with Windows Server 2016 installed, how you install the operating system is up to you. When installing the servers please choose Windows Server 2016 Standard (Desktop Experience). The servers used in this guide are configured as listed below, the SmoothWall (NAT) is optional. Server name: AD01 Server function: Domain Controller Server status: Workgroup joined IPv4 Address: 192.168.9.1 Subnet Mask: 255.255.255.0 Default Gateway: 192.168.9.199 DNS: 192.168.9.1 Server name: CM01 Server function: Configuration Manager Primary site Server status: Workgroup joined IPv4 Address: 192.168.9.2 Subnet Mask: 255.255.255.0 Default Gateway: 192.168.9.199 DNS: 192.168.9.1 Server name: Smoothwall Server function:Linux firewall Server status: 2 legacy nics eth0: 192.168.9.199 eth1: x.x.x.x (internet facing ip) Step 1. Configure Active Directory Domain Services (ADDS) Note: Perform the following steps on the AD01 server as a Local Administrator. To setup Active Directory Domain Services you could manually click your way through the appropriate wizard in Server Manager or automate it using PowerShell. For your benefit I'll show you both methods below, all you have to do is choose which one suits you. Method #1 - Do it manually Open Server Manager. Click on Add roles and features On the Before You Begin screen click Next For Installation Type select Role-based or Feature-based installation For Server Selection select Select a server from the server pool and choose AD01 For Server Roles select Active Directory Domain Services, when prompted to add features that are required for Active Directory Domain Services select Add Features Select DNS Server, when prompted to add features that are required for DNS Server, accept the changes by clicking on Add Features Continue the the wizard by clicking Next On the Features screen click Next On the AD DS screen click Next On the DNS Server screen click Next On the Confirmation screen click Install and then click on Close After it's finished, perform the Post Deployment Configuration by clicking on Promote this server to a domain controller select the Add a new forest option, give it a root domain name such as windowsnoob.lab.local Next, depending on your requirements set the Forest functional level and Domain functional level, I've selected the default options below however you may want to configure it differently for your hierarchy, For the password field use P@ssw0rd, Click Next when ready, for DNS options, click Next, Next verify the NetBIOS name and click Next To specify the location of the AD DS database, log files and so forth, either accept the defaults, or change them to something that suits your hierarchy and click Next. Next you can review the options (clicking view script will save your actions to a PowerShell script for use later if you wish). Click Next when done. Next, click Install to begin Once it is complete making the changes it will automatically reboot the server Method #2 - Automate it with PowerShell To configure ADDS and DNS automatically, use the ConfigureADDS.ps1 PowerShell script. 1. Copy the script to C:\scripts on AD01 2. Edit the variables in lines 17-24 as desired before running. 3. Start Windows PowerShell ISE as Administrator and run the script by clicking on the green triangle. Once the script is run, it will automatically reboot. Step 2. Join CM01 to the domain Note: Perform the following on the ConfigMgr server (CM01) as Local Administrator Method #1 - Do it manually To join the domain manually, login to CM01. Start Windows File Explorer. Right-click on This-PC and choose Properties. The System screen will appear. Click on Change settings to the right of Computer name. For the option To rename this computer or change its domain or workgroup, click Change, click Change and for Member of select Domain, enter the Domain details used in Step 1 and click OK when prompted for credentials, enter them and click OK You'll be welcomed to the Domain. Click OK. And prompted to reboot the computer, Click OK. In the Computer Name/Domain changes screen, click Close then click Restart now when prompted. Method #2 - Automate it with PowerShell To join the domain automatically, use the joindomain.ps1 PowerShell script. 1. Copy the script to C:\Scripts on CM01 2. Edit the variables (lines 16-18) as desired before running. 3. Start Windows PowerShell ISE as Administrator and run the script by clicking on the green triangle. Note: If DNS is not set correctly on the CM01 Network Properties, then the Domain Join process will fail. The script checks for success and reports an error if one occurs. If successful it will automatically restart the computer after the Domain Join process is complete. Step 3. Create users (optional) Note: Perform the following on the Active Directory Domain Controller server (AD01) as Administrator Method #1 - Do it manually To create users manually, click on Start and choose Windows Administrative Tools and then select Active Directory Users and Computers. In Active Directory Users and Computers, add new users by expanding <domain name>, select Users and right click, choose New then select User. In the wizard that appears fill in the New Object user details enter the Password details using password P@ssw0rd and click Finish when done Repeat the above process to add remaining users as appropriate for your environment Testuser, used for testing stuff CM_BA, used for building ConfigMgr created images CM_JD, used for joining computers to the domain CM_RS, used for reporting services. CM_CP, used when installing the Configuration Manager Client for Client Push. CM_NAA, (Network Access Account) used during OSD Note: The PowerShell script creates users and makes a user a local admin on the CM01 server. To facilitate the local administrator creation, you'll need to (optionally) manually create a GPO on AD01 called Allow Inbound File and Printer sharing exception which sets Windows Firewall: Allow inbound file and printer sharing exception to Enabled. To Create the GPO on AD01, click the Start menu and choose Windows Administrative Tools, then select Group Policy Management. Expand Group Policy Objects and Right click, choose New and give it a Name: Allow Inbound File and Printer Sharing Exception. In the GPO settings, expand Computer Configuration, Policies, Administrative Templates, then select Network, Network Connections, Windows Firewall and select the Domain Profile. Locate the Windows Firewall: Allow inbound file and printer sharing exception and set it to Enabled. Apply the changes. Here you can see the path to the GPO setting. After creating the GPO, you'll want to limit it to only apply to your ConfigMgr server (or servers). To do that select the Delegation tab of the GPO, and click on Advanced button. Select the Authenticated Users security group and then scroll down to the Apply Group Policy permission and un-tick the Allow security setting. This denies authenticated users from applying this GPO setting Next, click on the Add button, for Select this object type make sure to select Computers from the Object Types and select the group or Computer object that you want to have this policy apply to. Then select the group (e.g. ConfigMgr Servers) and scroll the permission list until you see the Apply group policy option and then tick the Allow permission as shown here. Finally, you need to Link the GPO, to do that, right click on your Domain (in this example it's windowsnoob.lab.local) and select Link an existing GPO and then select the newly created GPO Note: Once the above is completed, please update Group Policy on CM01 using Gpupdate /force prior to running the PowerShell script below. Method #2 - Automate it with PowerShell To create users automatically, use the Create Users Usergroups and OUs in AD.ps1 PowerShell script. Tip: You should edit the script and adjust the variables to your liking, for example if you want to change the default password. You may also want to rem out the MDT and MBAM user/groups that are created and change some of the user names within the script. To rem out a line place a # in front of it. 1. Copy the script to C:\scripts on AD01 2. Edit the variables [lines 79-100] as desired before running. 3. Start Windows PowerShell ISE as Administrator and run the script by clicking on the green triangle. Once the script is complete you can browse Active Directory Users and Groups to see the Users and Groups it created. Step 4. Create the System Management Container Note: Perform the following on the Active Directory Domain Controller server (AD01) as Local Administrator For details of why you are doing this see https://docs.microsoft.com/en-us/sccm/core/plan-design/network/extend-the-active-directory-schema Method #1 - Do it manually Open ADSI Edit, click on Action, then Connect To and click Ok, Double Click on Default Naming Context and the DC= that appears below it. Click on the > and scroll down to CN=System. Right Click on CN=System and choose New, Object choose Container from the options, click Next enter System Management as the value. Click Next and then click Finish. Method #2 - Automate it with PowerShell Note: Perform the following on the Active Directory Domain Controller server (AD01) as Local Administrator To create the System Management container automatically, use the Create System Management container.ps1 PowerShell script. Step 5. Delegate Permission Note: Perform the following on the Active Directory Domain Controller server (AD01) as Local Administrator Method #1 - Do it manually Open Active Directory Users and Computers. Click on view, select Advanced Features. Select the System Management Container under System Right click the System Management container, choose All Tasks and Delegate Control. When the Welcome to Delegation of Control Wizard appears click next, then click Add. click on Object Types, select Computers. Type in your Configuration Manager server name (CM01) and click on Check Names, it should resolve. Click Ok Click Next then select Create a Custom Task to Delegate, click Next, make sure This folder, existing objects in this folder and creation of new objects in this folder is selected. Click next, select the 3 permissions General, Property-Specific and Creation-deletion of specific child objects are selected then place a check mark in Full Control. Tip: Repeat the above process for each site server that you install in a Hierarchy. Method #2 - Automate it with PowerShell To delegate permissions to the System Management container automatically, use the Delegate Permissions.ps1 PowerShell script on AD01. Edit line 24 to point to the ConfigMgr server if you are using a different computer name than CM01. Note: You need to start Windows PowerShell ISE as a user that has Administrative Permissions in AD on the AD01 server. Downloads The scripts used in this guide are available for download here. Unzip to C:\Scripts on both servers. The scripts are placed in the corresponding folder (Part 1, Part 2 etc) and sorted into which server you should run the script on (AD01 or CM01). Scripts.zip Summary Using PowerShell to automate things leaves more time for yourself and it's fun. Please join me in Part 2 of this multi-part guide where you will configure Windows Server 2016 roles and features and then install SQL Server 2017. Continue to Part 2 of this guide > https://www.windows-noob.com/forums/topic/16116-how-can-i-install-system-center-configuration-manager-current-branch-version-1802-on-windows-server-2016-with-sql-server-2017-part-2/