itsbaxagain
-
Posts
3 -
Joined
-
Last visited
itsbaxagain's Achievements
")
Newbie (1/14)
0
Reputation
-
Is there a way to not be on the network and have the computer join the domain during the deployment process? Currently when I and not plugged into the Network it will not join the domain or ad the computer to the domain it still says WORKGROUP. But if I am connected to the network and image it connects to the domain. Thanks
-
DISM Error:112 There is not enough space on the disk
itsbaxagain replied to itsbaxagain's question in Microsoft Deployment Toolkit (MDT)
Ok I got this fixed by starting from scratch. Using the November Update [update3] ISO from the MSDN's site. Windows 8.1 Enterprise with Update (x64) - DVD (English) ISO English Release Date: 12/15/2014 Details Includes November 2014 update roll up, please review KB3000850 for more information. Before installing this product please review KB2966870. Release Notes: Important Issues in Windows 8.1 Download Windows 8.1 app samples. Samples are available in C#, C++, and JavaScript and are compatible with Windows 8.1 and require Visual Studio 2013 or the standalone SDK to compile and run. Download the WDK 8.1. The Windows Driver Kit (WDK) 8.1 includes better provisioning, deployment, and a unified Windows Driver Framework (WDF). Start by downloading Visual Studio 2013 for Windows Desktop, Visual Studio Professional 2013 or Visual Studio Ultimate 2013. Then download WDK 8.1. Download the Windows Assessment and Deployment Kit (ADK). The Windows Assessment and Deployment Kit is a collection of tools that you can use to customize, assess, and deploy Windows operating systems to new computers. See also Installing the Windows ADK. Download the Windows 8.1 SDK. The SDK is included with your installation of Visual Studio 2013. File Name: en_windows_8.1_enterprise_with_update_x64_dvd_6054382.iso Languages: English SHA1: B7DD748446D89B9449A160CDC24BD282989BBD96 Permalinks: File Download Direct Download en_windows_8.1_enterprise_with_update_x64_dvd_6054382.iso I then enabled NET3.5 and injected all but 22 updates using the DISM tool. I just used MDT to apply the rest of the patches during the image process. Now I have a Image that is fully updated. But I am all set. -
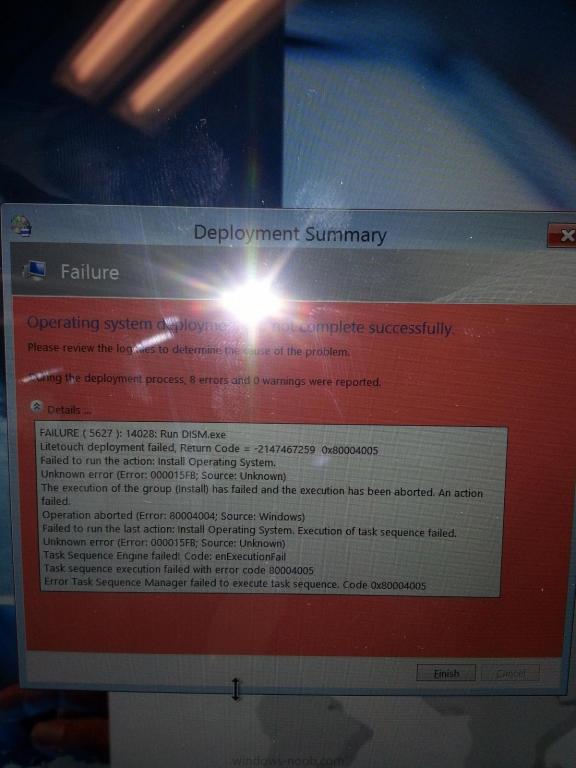
Problem: I have setup a Windows 8.1 x64 deployment with MDT 2013. I use it to deploy to MS Surface 1, 2 and 3s. I have imported all the drivers/firmware. I imported the all the patches but a few up to Dec 2014. I deployed this on 6 Surface 3s and 3 Surface 1s with no problem. There is one Surface 1 that is not imaging and it is failing. [see DISMError5627] BUT I can get it to work if I disable the patches. Only problem is that I have to do the patches manually. I don't want to do this if it will happen again. We are currently have about 200 devices deployed with Windows 8 on them and are in the process of testing Windows 8.1. So I thought I would test injecting the patches this way: MOUNTED THE IMAGE: C:\Program Files (x86)\Windows Kits\8.1\Assessment and Deployment Kit\Deployment Tools>Dism /mount-wim /wimfile:e:\install.wim /index:1 /mountdir:c:\mount Deployment Image Servicing and Management tool Version: 6.3.9600.17029 Mounting image [==========================100.0%==========================] The operation completed successfully. Ran: Dism /image:C:\mount /Add-Package /PackagePath:C:\Win81Patches It added all but a few. Giving me this error: Error: 0x800f081e The specified package is not applicable to this image. The specified package is not applicable to this image. The specified package is not applicable to this image. The specified package is not applicable to this image. The specified package is not applicable to this image. The specified package is not applicable to this image. The specified package is not applicable to this image. The command completed with errors. For more information, refer to the log file. Then when I try to commit the changes: C:\Program Files (x86)\Windows Kits\8.1\Assessment and Deployment Kit\Deployment Tools>Dism /unmount-wim /mountdir:c:\mount /commit Deployment Image Servicing and Management tool Version: 6.3.9600.17029 Image File : e:\install.wim Image Index : 1 Saving image [====================== 38.0% ] Error: 112 There is not enough space on the disk. The DISM log file can be found at C:\Windows\Logs\DISM\dism.log Tried again using the scratchdir flag on the local hard disk: C:\Program Files (x86)\Windows Kits\8.1\Assessment and Deployment Kit\Deployment Tools>Dism /unmount-wim /mountdir:c:\mount /commit /scratchdir:C:\scratch Deployment Image Servicing and Management tool Version: 6.3.9600.17029 Image File : e:\install.wim Image Index : 1 Saving image [====================== 38.0% ] Error: 112 There is not enough space on the disk. The DISM log file can be found at C:\Windows\Logs\DISM\dism.log Then again but to the drive where the .wim is located C:\Program Files (x86)\Windows Kits\8.1\Assessment and Deployment Kit\Deployment Tools>Dism /unmount-wim /mountdir:c:\mount1 /commit /scratchdir:e:\scratch Deployment Image Servicing and Management tool Version: 6.3.9600.17029 Image File : e:\install.wim Image Index : 1 Saving image [====================== 38.0% ] Error: 112 There is not enough space on the disk. The DISM log file can be found at C:\Windows\Logs\DISM\dism.log What can be done to fix this? dism.logBDD.log