

All Activity
- Last week
-

Prerequsites for SCCM 2012 R2 and SCCM 1606
paulg117 replied to charris211's topic in Configuration Manager 2012
i think its mostly part of my obsession with tech old and new. -

Prerequsites for SCCM 2012 R2 and SCCM 1606
GarthMJ replied to charris211's topic in Configuration Manager 2012
But why would you learn the SW that could get you a job and is 90% the same and fully supported.. What exactly would you learn on a 14 year SW that you can't learn on the current version? -
Prerequsites for SCCM 2012 R2 and SCCM 1606
paulg117 replied to charris211's topic in Configuration Manager 2012
oh thats easy i like to tinker with older software in a virtual environment, learn and and all that. -
Prerequsites for SCCM 2012 R2 and SCCM 1606
GarthMJ replied to charris211's topic in Configuration Manager 2012
I have to ask @paulg117, why are you looking to setup ConfigMgr 2012, which 14 year old and unsupported for years. Instead of looking at Current Branch? - Earlier
-
Prerequsites for SCCM 2012 R2 and SCCM 1606
paulg117 replied to charris211's topic in Configuration Manager 2012
im intrested in this aswell, ive found prerequisites files for version 2007 but been looking for ages for 2012 r2 files. -

Dialog windows during TS in WinPE
anyweb replied to slarti's topic in System Center Configuration Manager (Current Branch)
try this -
 Hi! Is someone have experience to show user dialog window during TS inside WinPE and ask some information? I used AI but its gave me not working script in PS. Its minimize progress window but nothing showing to user and waiting forever. Thanks!
 -
Management points critical 0mb
anyweb replied to Mark C's topic in System Center Configuration Manager (Current Branch)
great to hear it, thanks for posting the solution -

Management points critical 0mb
Mark C replied to Mark C's topic in System Center Configuration Manager (Current Branch)
Installed KB39398030 and management points are now working -
Introduction 4 years ago in a previous blog post I looked at accessing Windows 365 Cloud PC’s from Linux using 3 different distros, namely: LinuxMint Ubuntu Fedora I talked about the general usability, and discussed using Microsoft Office apps on the Cloud PC, which all worked great. I also mentioned Teams audio calls and noticed that there was little noticeable lag, but I also found issues with video playback within Teams calls where the camera was used due to the fact that there was no native Windows app within Linux, so no optimization could take place. Time has moved on, but I felt it was a very good time to return to the topic as Windows 365 has matured and I’ve been using Linux daily now for months. I’m currently using an Ubuntu based distro called ZorinOS and to be honest, I love it. First things first, let’s talk about ZorinOS and why I chose it to use on a daily use laptop. My Lenovo T570 laptop, while old, worked very well with Windows 11, but it wasn’t perfect. For example, when docked to my docking station, only 2 of the three monitors would display at full resolution (2560×1440), and the third rendered at a lower max resolution, which meant moving content from one monitor to another never looked right. That wasn’t terrible but it was annoying. Installation I read great things about ZorinOS and decided I’d give it a try, but to be honest, I guess I was intending to return to Windows if it didn’t work out so I removed the Windows 11 nVme disk in the Lenovo and installed ZorinOS on a fresh new nvme disk. You can download ZorinOS from here, I chose the free version (Core) it was 3.5GB is size. The installation was quick and easy, and you even get the ability to try it before installing. I installed it on my old i7 based Lenovo T570, with 32GB of RAM. The installation was easy and quick and using ZorinOS as a Windows user, is intuitive and easy. After the installation was complete, I got to the desktop, and was greeted with a welcome message. Nice and clean. The preinstalled OS comes with a start menu (Z), the Brave web browser, a file manager and a software installer (snap software app store), that’s it. The start menu is clean and easy to understand, so Windows users will have no problem adapting to this OS. Once I figured out the display settings it rendered all 3 monitors at their correct resolution, an instant win! ZorinOS comes with preinstalled software and makes it easy to install additional software, such as web browsers, or Teams for Linux or accessing remote servers via RDP using the Reminna app. I can do it all. In fact it even offers Steam so you can play games from your Steam Library just like on a Windows computer, I was definitely impressed. Teething problems? All went well for a few days, until I started seeing crashes, like system lockups. That wasn’t fun as on the third crash, it crashed so bad (or rather I was impatient and hard powered off) that I had to do filesystem repairs and lots of troubleshooting to get it back and running again. Copilot was very helpful in this regard, and eventually the troubleshooting pointed out that perhaps it wasn’t Linux that was the issue, but that the nvme disk itself was at fault. I then copied the installed and configured OS from the suspect drive to the original nvme disk that was in the T570 and I haven’t had one crash on the device since then. Months of stability. It’s been perfect. To prove that it was indeed the disk, I put the suspect disk back in the computer, formatted it, installed Windows 11 and guess what, it crashed, big time, loads of errors in event viewer for the disk. Even with firmware updates applied, the disk is still unreliable no matter if it’s running Windows or Linux. I wanted to mention the initial crashing, as I did have teething issues and posted about it on Twitter back in July, but again, since replacing the disk it’s been plain sailing. Using Windows 365 Now that I felt very comfortable with this Linux distro, I wanted to access my Cloud PC’s, both personal and work. That was easy using the preinstalled web browser, Brave browser. Just browse to https://windows365.microsoft.com and the Windows app appears in the web browser. It’s actually very, very good, but when accessing a Cloud PC you do get a message that the browser is not supported, but to be honest I’ve not seen any issues or downsides to using the Brave web browser for Cloud PC access. After connecting using the Brave web browser, you’ll see a warning at the top of the screen along with a popup asking you to enable location services. Aside from the warning, you can click the icon to the left of the URL to access the Windows app web browser settings bar, with lots of available options to choose from, such as those shown here (Location, Camera, Window management, Sound). Clicking the settings icon in the toolbar, reveals all the additional settings for the Windows app via the web browser. It’s extensive and even includes multiple monitor support, however in the Brave browser it only showed one of three connected monitors as you can see below. Audio playback works surprisingly well in this web browser, as do Teams calls from the Cloud PC. What doesn’t work well however (as expected) is video meetings, or web cameras. The web camera works just fine using the Camera app in ZorinOS, but when you try to use camera abilities on the Cloud PC, it’s a miserable experience (via any web browser). Next, I wanted to compare the Brave browser for accessing Windows 365 Cloud PC’s to a supported web browser, Microsoft Edge. Yup, you can install Edge in ZorinOS too! Accessing my Cloud PC’s via Edge worked just like with the Brave web browser except now I don’t see the warning about an unsupported web browser. The options available seem to be pretty much on par with what was offered with Brave, except now it could see all three monitors. But, when trying to enable multiple monitors I could only get two of the three connected monitors to render at the same time using this option. I did try the camera, and while it worked, but it was very glitchy and laggy, not something you’d want to try a video meeting with. The cool thing about having multiple web browsers installed in ZorinOS is that I can have multiple Cloud PC’s running via those different browsers, for example as shown below, a personal Cloud PC on the left monitor via Brave, and my work Cloud PC on the right monitor via Microsoft Edge. Unofficial Windows App ZorinOS also offers an unofficial Windows app (client software) available for install via the snap software app store. It’s unofficial because Microsoft themselves have not released it, but it’s definitely worth a look. This unofficial client wraps the Windows Cloud Devices (Windows App) web interface in an Electron shell, configured to behave like the Microsoft Edge browser. It enables full access to Azure Virtual Desktop sessions through Windows App web access, with proper handling of camera, microphone, and other device permissions required for remote desktop connections. After installing it, I clicked the app, but nothing happened. I went to his website, and found this. I’ll reach out to him and see if he can assist with getting it to work in ZorinOS and post back here If I get it working. Summary Using your Windows 365 Cloud PC’s is absolutely possible with Linux and more specifically ZorinOS, however I still wish that we had an official Microsoft release of the Windows app. The Microsoft learn.microsoft.com docs page for the official Windows app does not even mention Linux 🙁 which is very disappointing. Having no native app in Linux means that optimizations for Teams (audio and video) cannot take place and therefore won’t work as well as they could. It’s a shame because everything else is working really really well via the Web Browser sessions. I will definitely keep bugging the Program managers for Windows 365 to release a Linux client, and I’ll be happy to post here once that day comes, if ever. Also regarding keeping Linux on my Lenovo T570, that’s for sure, I’ve been running it since early July and am not going back to Windows on this device except via Windows 365.
-
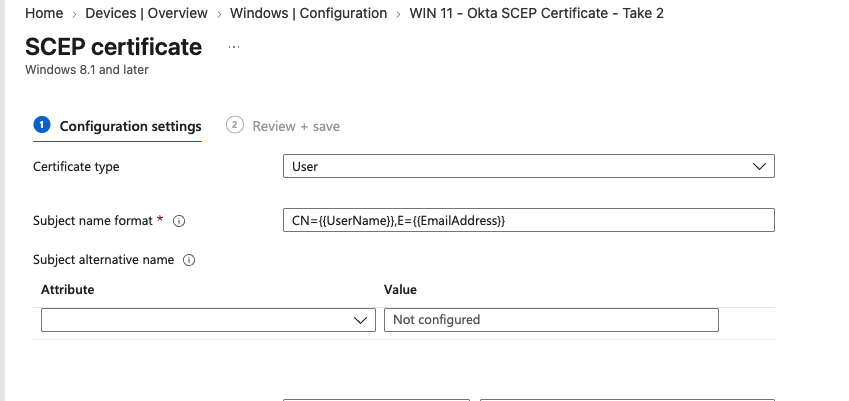
here's what Copilot had to say about your issue Based on what alex2026 posted, the key missing detail is whether the SCEP profile is being deployed as a user certificate or a device certificate. That's exactly the same question anyweb asked on the forum. [windows-noob.com] My thoughts would be: 1. Check where the certificate is being installed If Okta is expecting a user identity certificate, but Intune is issuing it into the Local Machine store and the private key ends up owned by SYSTEM, Okta may identify the request as the system account instead of the logged-on user. This can result in devices appearing as Not managed. [support.okta.com] I would ask them to verify: Intune SCEP profile type (User vs Device) Certificate store location: Current User\Personal Local Machine\Personal Subject Name format SAN values configured in the SCEP profile 2. Examine the SCEP profile variables A common misconfiguration is using device attributes where Okta expects user attributes. For example: CN={{DeviceName}} instead of something like: CN={{UserPrincipalName}} If the certificate subject contains device information only, Okta may not be able to associate the certificate with the authenticated user. 3. Check the certificate on an affected endpoint On a device showing "Not managed": certlm.msc or certmgr.msc Then inspect: Issued To Issued By Subject Subject Alternative Name Enhanced Key Usage Private key permissions Pay special attention to whether the certificate was issued to: SYSTEM or whether it contains the actual user UPN. 4. Verify the Intune SCEP deployment status Microsoft recommends reviewing the SCEP issuance flow and connector/NDES logs when troubleshooting identity mapping problems. Even when a certificate successfully issues, the logs can reveal whether Intune generated the challenge for a user or device context. [learn.microsoft.com] 5. If this is specifically for Okta Device Trust / Device Access Okta documentation specifically discusses scenarios where certificates deployed to the machine store can end up being usable only by SYSTEM, especially when TPM key storage is used. In those cases, users may not be recognized as managed even though the certificate exists. Okta recommends reviewing certificate private-key permissions and deployment method. [support.okta.com], [support.okta.com] What I'd reply on the forum Can you share: Whether the SCEP profile is assigned as a User certificate or Device certificate? The Subject Name and SAN configuration from the Intune SCEP profile (remove any sensitive values). Whether the certificate is being installed into Current User or Local Machine. A screenshot/export of the Intune certificate deployment report. If Okta is seeing the certificate as SYSTEM rather than the logged-on user, I'd initially suspect either: the certificate is being deployed in device context instead of user context, the subject/SAN is using device attributes rather than user attributes, or the private key permissions are restricted to SYSTEM (frequently seen with machine-store deployments). That would be my first line of investigation before looking at NDES or Intune Certificate Connector issues.
-
 The export wasn't any different from the data in the website itself. It's been a couple of months at least. I know the users login at least a few times a week to their VMs. One of the VMs is actually mine and I login all the time to test and still showing "system account" for me.
 -
did the exported XLS reveal anything interesting ? when did you deploy this to those devices ? and are you sure users are actively logged on to the devices to receive policy updates
-
Yes, I've enrolled every user in with their work emails in Settings>Accounts>Access work or school. When I look at my own VM, it's still saying connected to the domain Entra ID with my work email. It's syncing too.
-
ok interesting, and are users actually logged on to those VM's ? could the VM's have been reverted ?
-
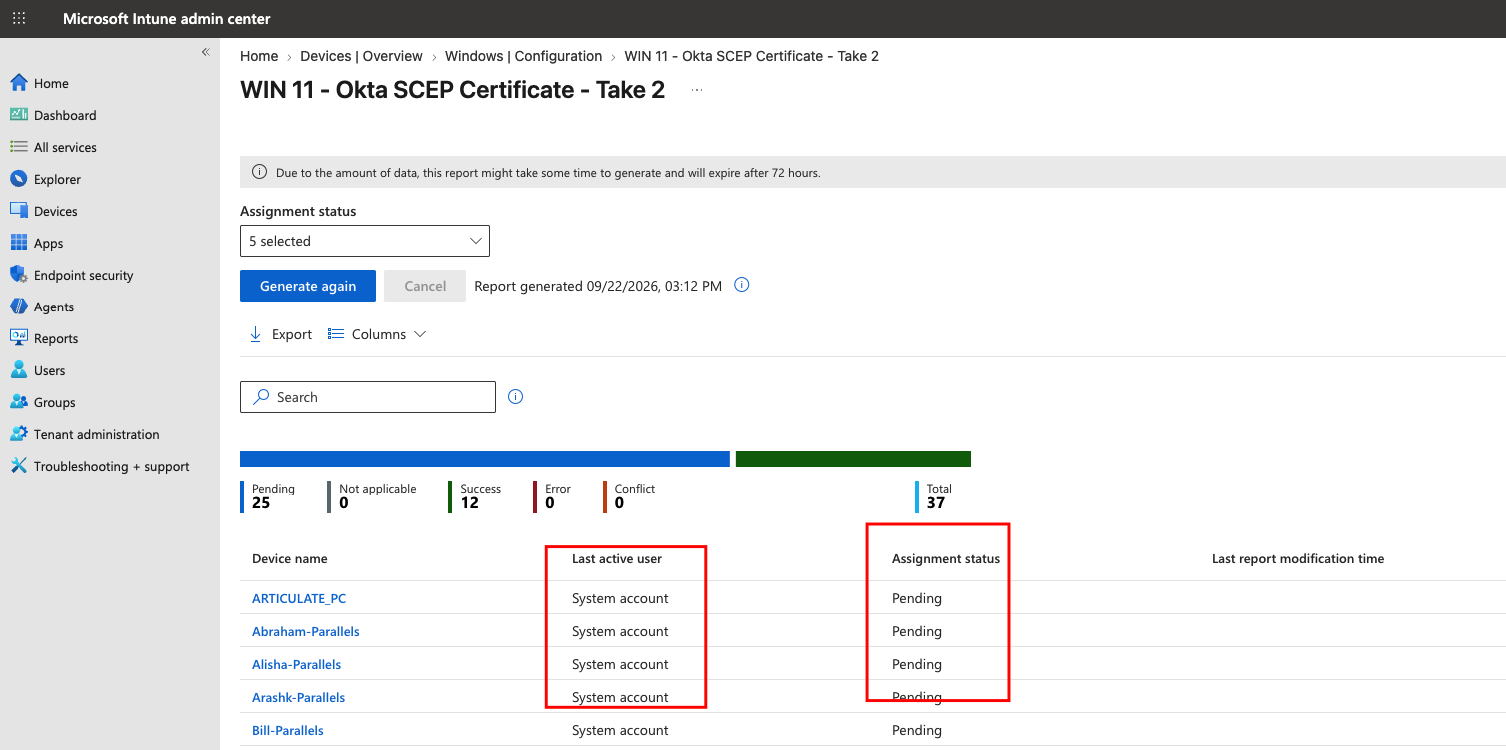
I appreciate your response. It's been deployed to users. Also, not sure if this has anything to do with the issue, but it seems like only the Parallels Windows VM are stuck in pending status. I'll try to export the data and see if I can find out more.
-
how are you deploying this SCEP certificate ? is it to users or devices ? if you want to get more details you could try clicking on Export, and open the exported data in XL, sometimes that reveals information that is missing in the report above
-
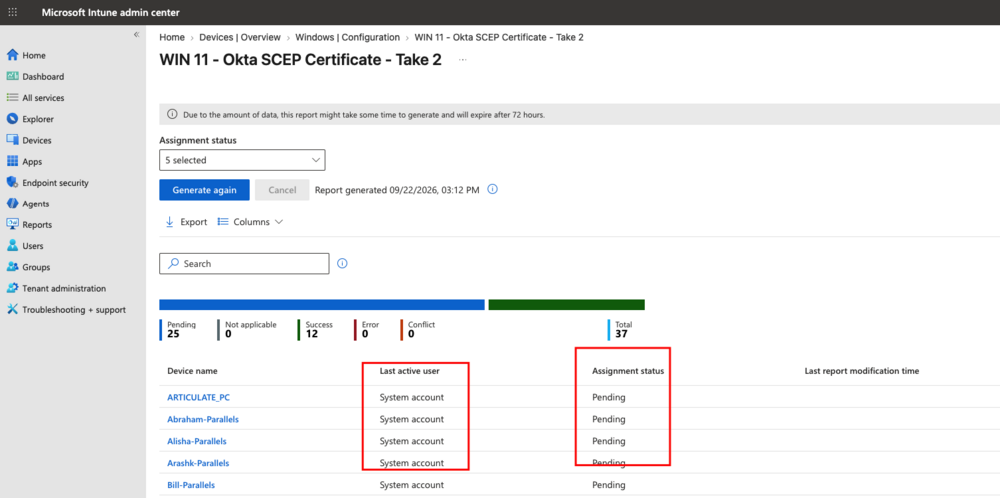
Hi all, I've been having this issue with SCEP cert not recognizing the users and going by system account, and that will cause the device show as "Not managed" in Okta. Could anyone point me to the right direction on how to resolve this problem? I've tried working with Intune Support but not help there. Any help would be appreciated since we've been stuck on this for a couple of months now. Thanks, Alex
-
the only way you'll be able to 'shim' the computer name into thinking it's the serial number, is if you know exactly what method (or methods) the medical software uses to determine the computer name, do you know how they are doing this ? modern applications often don't just call GetComputerName(). They may query: WMI (Win32_ComputerSystem) Environment variables (COMPUTERNAME) Registry values Active Directory attributes Their own licensing service If that's the case, a simple shim won't help. You could try this easier alternative depending on the architecture: Run the software in a VM whose hostname remains the serial number. Ask the vendor for a revised license tied to a hardware ID instead of hostname. Use a license server if the product supports one.
-
I work for the medical company, as stated earlier... I can't believe a simple DLL hook or shim can't be explained here... that's all I'm asking, like many of the other forums on here... I'll just look elsewhere. Thanks...
-
Introduction In previous blog posts I took a look at Windows 365 Reserve, explained what it was and shared my thoughts about how to implement it and configuring it for use as a disaster recovery method in your organization. In this post, I wanted to address some additional items that did not show themselves clearly until after provisioning and using Windows 365 Reserve Cloud PC’s for some days, as this will help you plan accordingly. You can review the other posts in this mini-series below. First looks at Windows 365 Reserve Following up on Windows 365 Reserve Final thoughts on Windows 365 Reserve <- you are here Imagine the scenario, your sales workers are somehow hit with malware or a cyber attack, or some other disaster leaving their physical laptops rendered unusable. Luckily, you had some Windows 365 Reserve licenses purchased in advance and assigned them to those very same workers before the incident occurred. So far, so good. Once the incident occurred, you informed those sales workers to connect to their Windows 365 Reserve Cloud PC’s via the Windows app from any device that supported it. This allowed them to continue working until the damage from the Cyberattack was resolved and they could utilize their physical laptops again. Those sales workers logged back on to their physical laptops and completely forgot about their Windows 365 Reserve Cloud PC’s. What happens to those reserve Cloud PC’s and the 10 day window of opportunity that they are entitled to ? That’s what this blog post will focus on. 3 days remaining If you as the Intune admin fail to do anything about the Windows 365 Reserve Cloud PC’s after they did their job, then the clock will keep ticking and even if they are not in use, the 10 days left will expire, rendering them unusable. This becomes apparent in the Intune console, by locating the Windows 365 Reserve provisioning policy, and selecting the devices tab. Look at the Days left column, in the example below, it states only 3 out of 10. In addition, the end user will be notified in the Windows app, via the Windows 365 Reserve Cloud PC title itself, and via a notification (shown below) in the Windows app. This of course assumes that they are still using the Windows app, and assumes that the Windows 365 Reserve Cloud PC is still in use. Here’s the message in the Windows app, shown below. Keep in mind that they may no longer be using the Windows app as the disaster that forced them to use their Windows 365 Reserve Cloud PC may have been solved after a few days, allowing them to re-use their physical laptop, so you cannot guarantee that the end user will even see this warning in the Windows app, and thus, if the admin does not deprovision the Windows 365 Reserve Cloud PC, it will expire. Stopping the clock As an Intune admin, to stop the clock from using up more of these 10 days, you would need to select each of the Windows 365 Reserve Cloud PC’s that are provisioned and in use, and deprovision them. Below is an example of the action on one of the Reserve Cloud PC’s. After doing this action, the 10 day clock will stop ticking, meaning that you’ll still have usable days on that Windows 365 Reserve license for future needs in that time period (10 days per calendar year). Licenses allow up to 10 days of Cloud PC access per year for one user. Note: In case it’s not clear, if you do NOT deprovision your provisioned Windows 365 Reserve Cloud PC’s then they will keep running and use up all of those assigned 10 days. The only warning you’ll get is if you happen to be in the the Intune console looking at the Windows 365 Reserve provisioned Cloud PC’s, you’ll notice the 3 out of 10 days left warning. After deprovisioning the Windows 365 Reserve Cloud PC, the provisioning status will change to Not provisioned and the days left will stay at what days you have left. In previous posts on this subject I pointed out that you as the admin can allow the end user to provision, or even deprovision their Windows 365 Reserve Cloud PC by configuring settings in Intune to allow the end user to do these actions themselves (self-service) via the Windows app. But you should be aware that if an end user wants to start deprovisioning their Windows 365 Reserve Cloud PC, the action to do so isn’t as straight forward as provisioning it (set up your cloud pc). To illustrate this, look at the self service actions below for an end user to begin provisioning their own Windows 365 Reserve Cloud PC via the Windows app. End user provisioning action The end user provisioning action for a Windows 365 Reserve Cloud PC is referred to as Set up your Cloud PC and shown below. followed by once done, the Windows 365 Reserve Cloud PC will be available for use after the provisioning process is complete. End user deprovisioning action If you want your end users to also deprovision their Windows 365 Reserve Cloud PC after the disaster is over, then you’ll have to inform them to return it via the actions below. First, the user needs to locate their Windows 365 Reserve cloud pc in the Windows app, and then click on the … (elipsees) settings icon. From there, click on Return as shown below. This will prompt for confirmation, they need to agree to Delete all my saved data and return this Cloud PC. Once confirmed, the returning process will begin (or deprovisioning). This is a great way of empowering your end users to do the provisioning and deprovisioning actions themselves, but assumes that the users would actually be technically competent enough to do both. And to be honest, after whatever disaster prompted you to issue them these Reserve licenses in the first place is over, do you really think they’ll remember to deprovision (return) their Windows 365 Reserve Cloud PC ? Summary In the final part I took a closer look at what happens after the disaster is over and your users can begin using their physical devices again. You as the admin must remember to deprovision the provisioned Windows 365 Reserve Cloud PC’s when no longer in use otherwise you’ll lose out on remaining days available for the next disaster. It would be great if there was a reminder (Alert) that you could configure to remind the admin and/or Reserve users to deprovision (return) their Cloud PC’s after usage to save those unused days. There is an alert related to deprovisioning Windows 365 Reserve Cloud PC’s but it only covers the eventuality of deprovisioning failing on the Reserve Cloud PC, not actually reminding you to deprovision them once not in use. Your users can be educated to do this themselves but I would doubt that they’d remember to do so, once they regain access to their physical computer. Therefore it’s up to you the Intune admin to not only be proactive in selecting, provisioning and assigning Windows 365 reserve licenses in advance of a disaster scenario, but also to be reactive after the event and ‘clean up’ or deprovision the used Windows 365 Reserve Cloud PC’s. Failure to do so will mean that you’ll lose out on the remaining days and won’t have any reserve left for the next disaster scenario. See you in the next one!
-
Introduction In a previous blog post, First looks at Windows 365 Reserve, I explained what this new offering was, how to enable it and the expected outcome. However, I also pointed out the odd choice of having to wait 7 days after adding users to a AAD group targeted with a provisioning policy, prior to being able to provision or use the Windows 365 Reserve Cloud PC. Note: The 7 days delay is the initial delay that you the admin must wait BEFORE you can provision a Windows 365 Reserve Cloud PC for any of the assigned users. In other words, it’s forcing you the Admin, to be proactive, and I discussed that at length in the previous blog post on this subject. If you look at the Can be provisioned after column in the Cloud PC users tab of the provisioning policy, it will list Ready for Provisioning once that initial 7 days delay has passed. You can review the other posts in this mini-series below. First looks at Windows 365 Reserve Following up on Windows 365 Reserve <- you are here Final thoughts on Windows 365 Reserve In this post, I’ll take a look at what additional options are available after those initial 7 days delay have passed, and look at the Windows 365 Reserve Cloud PC itself. So let’s get started. First, let’s find the Windows 365 Reserve provisioning policy in Intune. It’s listed below with a Name of Windows 365 Reserve in the list of Provisioning policies that I’ve previously configured in my tenant. Interestingly, the Image for it is listed as Automatic, and the License type is Reserve. After clicking on that Windows 365 Reserve provisioning policy, we can see all the users that are assigned to that policy (they are in a group that the policy was assigned to) by clicking on the Cloud PC users tab. This is where the action happens with Windows 365 Reserve. But before we do, let’s also remind ourselves what the Windows 365 Reserve Cloud PC assigned to this user looks like in the Windows app. As you can see, it has a ‘Set up your Cloud PC’ clearly visible in the Reserve Cloud PC. This is because we enabled a setting in the previous blog post allowing the user to provision their Reserve Cloud PC themselves if desired (after the initial 7 days delay of course). Here’s that setting. So technically speaking, we could provision the Windows 365 Reserve Cloud PC as an admin via the Cloud PC users tab in the Windows 365 Reserve provisioning policy, or we could ask the end user to set it up via the Set up your Cloud PC option in the Windows app. Provisioning a Windows 365 Reserve Cloud PC as an admin For now, let’s see what happens when we select a user targeted by the previously created policy as an admin in Intune, via the Cloud PC users tab. Doing the above, after the 7 days License ‘wait or delay’ has passed, now allows you to select an available option for that user, and the option is Provision. Previously (before those 7 days wait pass) this option was greyed out (not available). Deprovision is not yet available as we have not yet provisioned a Windows 365 Reserve Cloud PC. Note: You can also select multiple users to provision them in bulk for those users at the same time. So let’s click on Provision. Once done, you get a popup telling you that users will be able to use their Cloud PC via the Windows app once it is fully provisioned. Clicking Provision again, starts that process and the provisioning status for that user, should change to Provisioning. Now in the Windows app, after clicking the Refresh icon (top right), we can see that the Windows 365 Reserve Cloud PC has changed colour, and has a spinning Windows circle to indicate that it is provisioning. After some time the Cloud PC is provisioned and the Provisioning status changes to Provisioned in Intune. Interestingly, the Days left column, shows 9 out of 10 for the newly provisioned Windows 365 Reserve Cloud PC, which means that the user only has 9 more days of usage of this disaster recovery Cloud PC. Additionally, in the Windows app, the spinning circle to indicate it’s provisioning, is no longer present, and the Windows 365 Reserve Cloud PC looks like any other that is made available to that user. If we go back to Intune, we can now see the Deprovision option is available for that selected user as the Cloud PC has been provisioned. Using the Windows 365 Reserve Cloud PC Now that the Windows 365 Reserve Cloud PC is provisioned for my user, I tried to launch it via the Windows app, but got an error. So I did that, I restarted the Windows app and it informed me twice (two popups which I didn’t get time to screenshot) that the Windows 365 Reserve Cloud PC was ready. And now, when clicking on that Cloud PC I’m prompted for credentials like any other Cloud PC. And after some time the desktop appeared. Success. So this means that your users targeted with this provisioning policy, and after the initial 7 day ‘wait’, will be able to self provision or and Intune Admin can provision a Windows 365 Reserve Cloud PC for them, allowing them to work for up to 10 days per year in a disaster recovery scenario. That is excellent. Summary I’m glad I returned to Windows 365 Reserve to see what additional options were available after the enforced initial 7 day delay after creating and assigning the initial provisioning policy. I also was pleasantly surprised with how easy it was to get going once the additional steps were done in the console. However, I find it odd that the Windows app itself couldn’t launch the Windows 365 Reserve Cloud PC after it was successfully provisioned, but instead gave the user an error telling them to restart the app. To me, that needs to be fixed and I’ll pass that info directly back to Microsoft. I hope this post helps you to understand more about Windows 365 Reserve and helps you to use it in your organization, any questions, post them below.
-

SCCM 2007 SP2 prerequisites download
Tech Stuff replied to EngiNerd's topic in Configuration Manager 2007
Any chance I could get a copy of these, @anyweb? -
honestly, i think you'll need to go to the team that are in control of the ad naming scheme and get an exception for these devices OR contact the medical software manufacturer and ask them to modify their software to work with the companies AD naming scheme anything else will ultimately fail
-
Anyone?