Search the Community
Showing results for tags 'notifications'.
Found 3 results
-
 Hi Guys, I'm sure this question was asked more than one time ... I'm looking for an option to have massage pop up windows to notify users about pending reboot. Does someone has any experience with it? Currently, WSUS is not integrated with SCCM, just looking for a way to notify them. Thanks!
 -
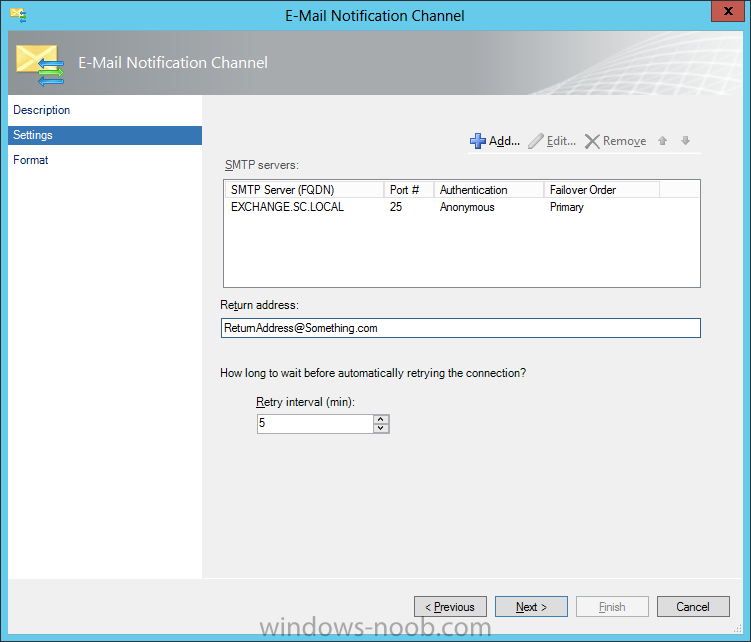
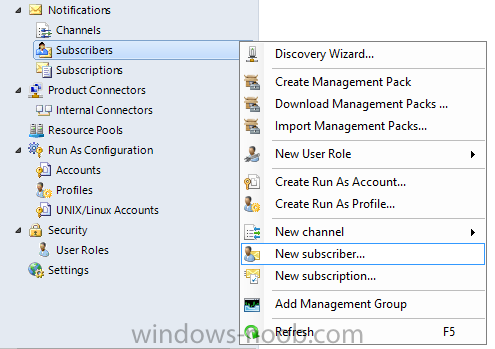
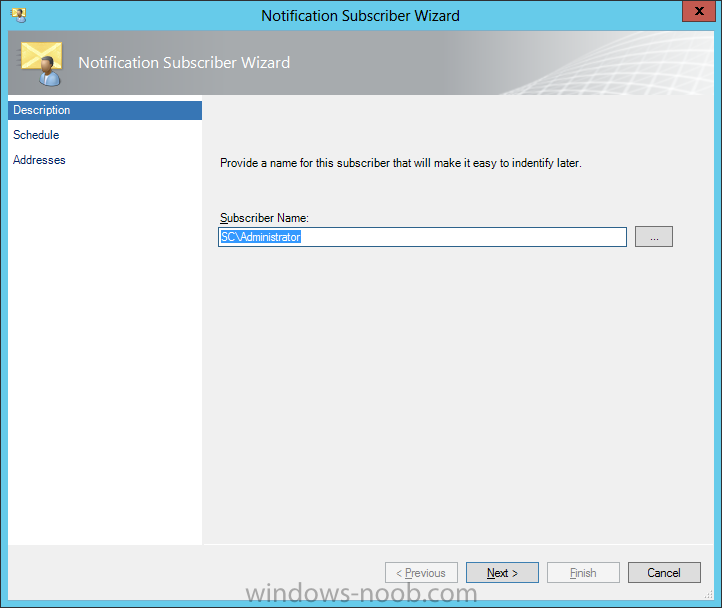
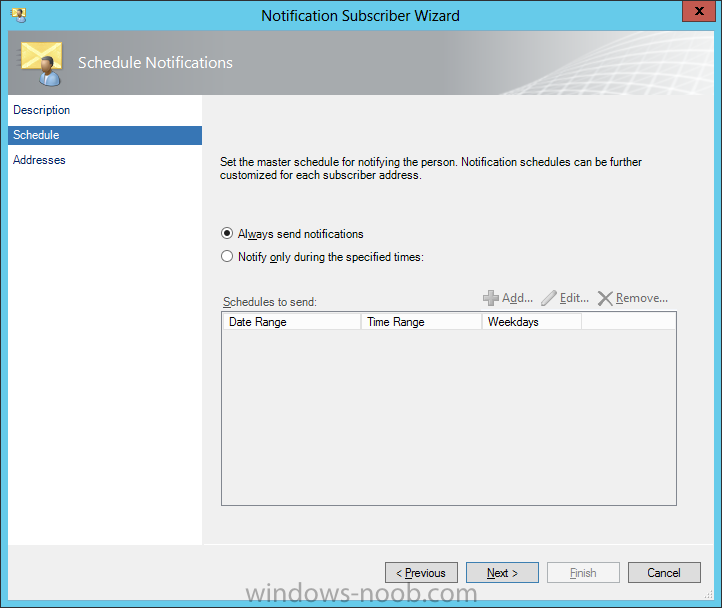
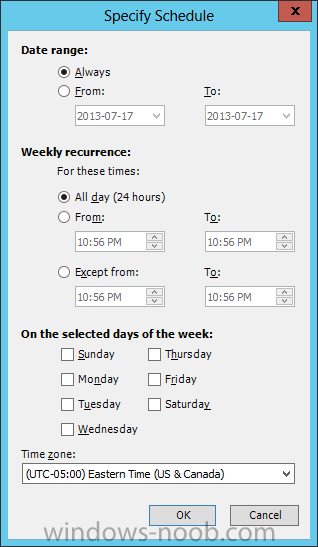
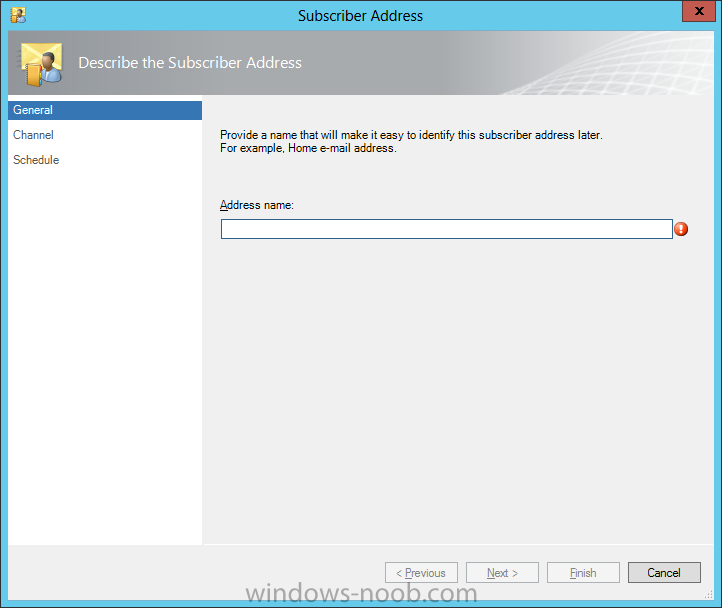
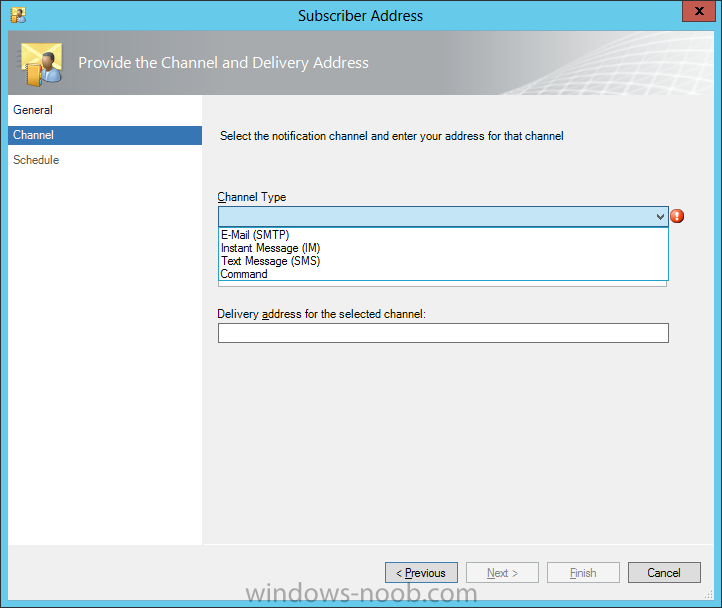
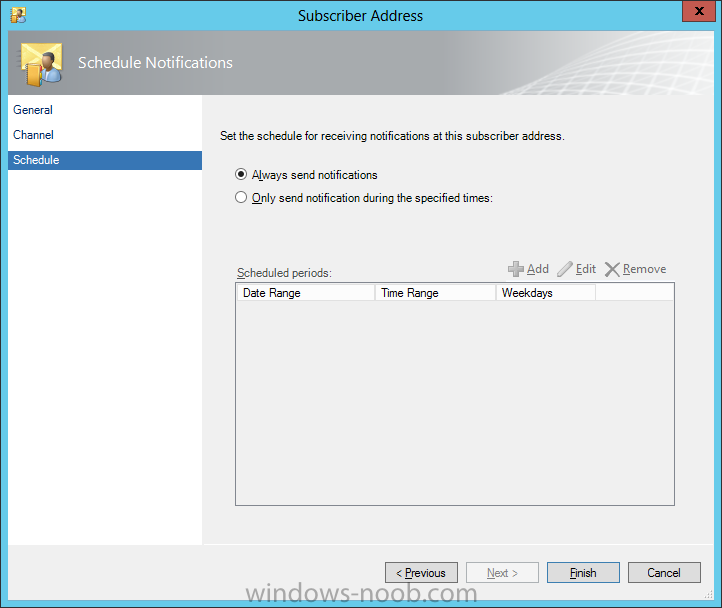
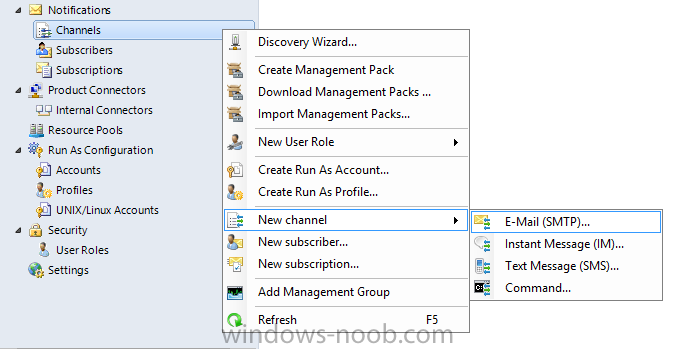
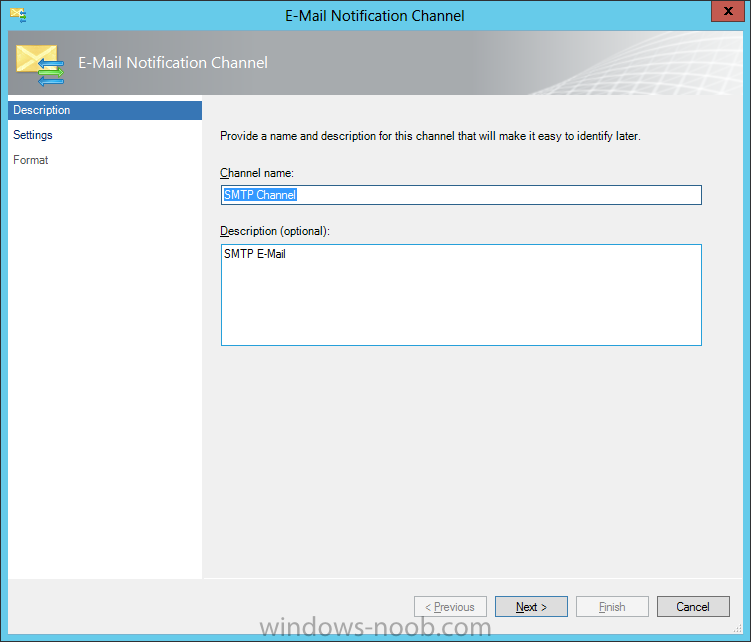
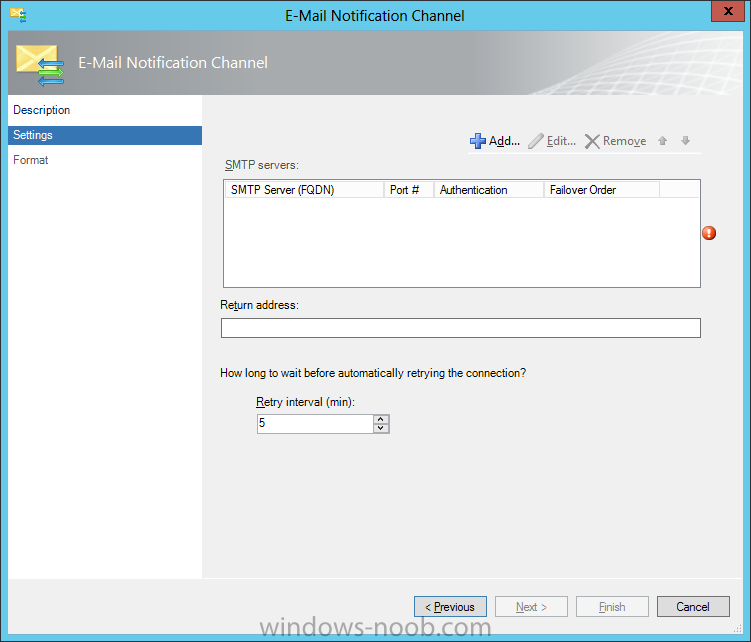
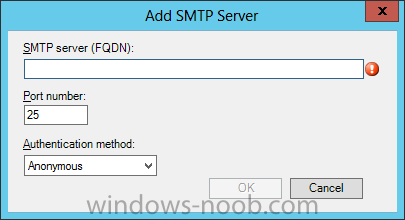
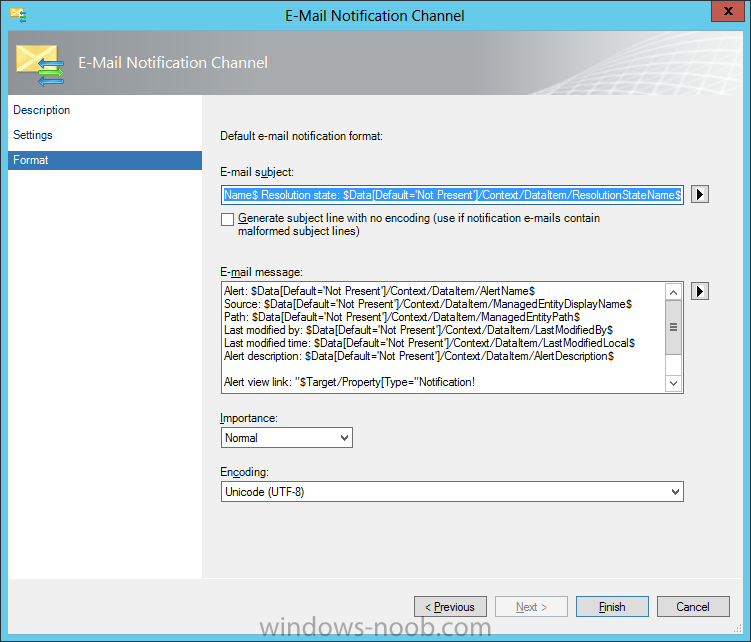
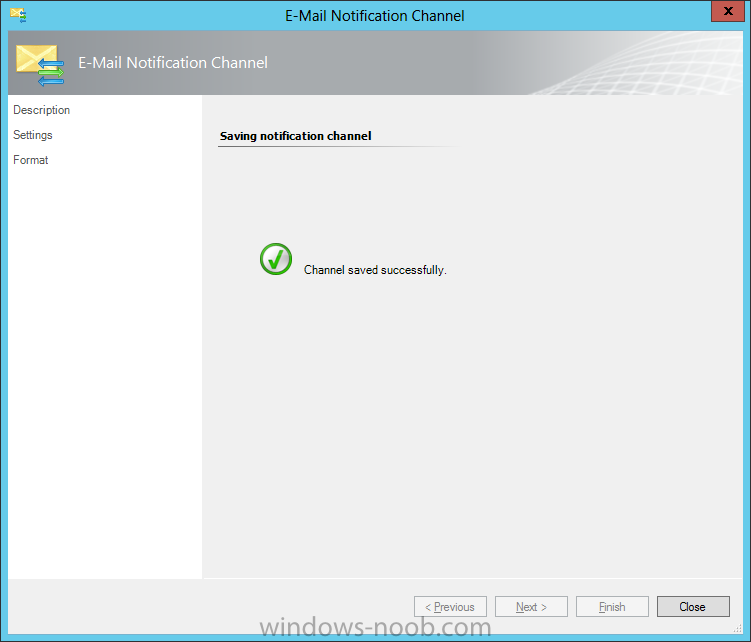
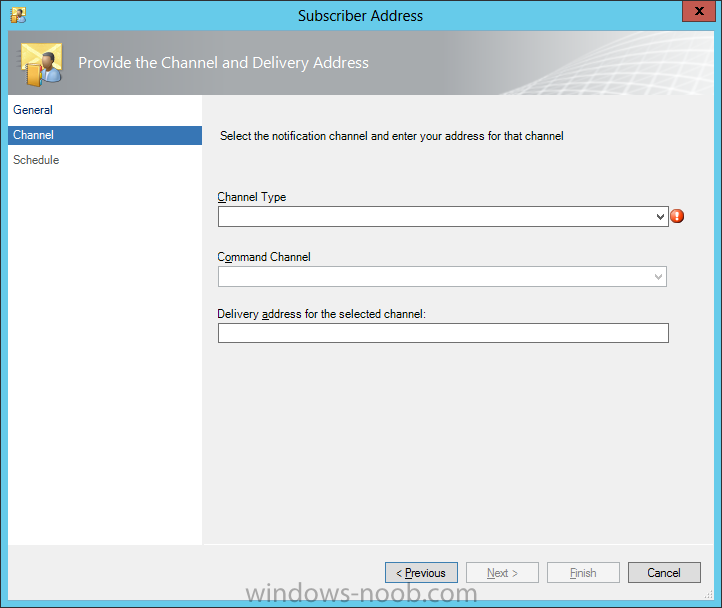
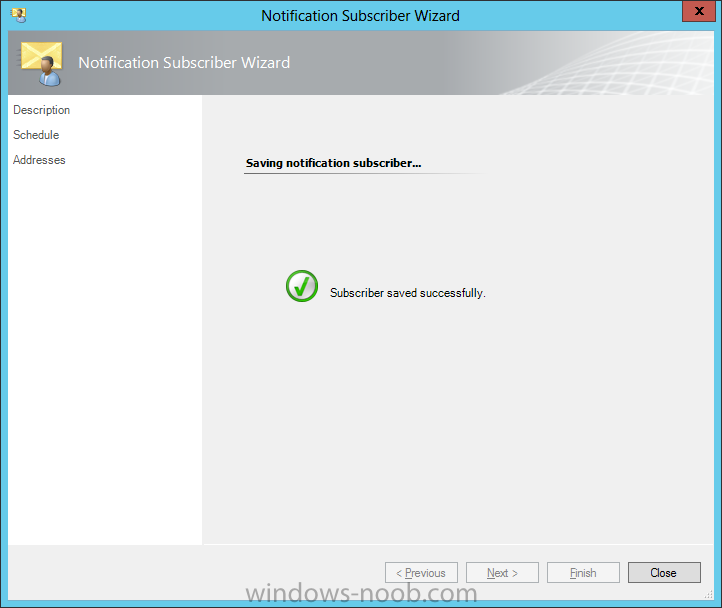
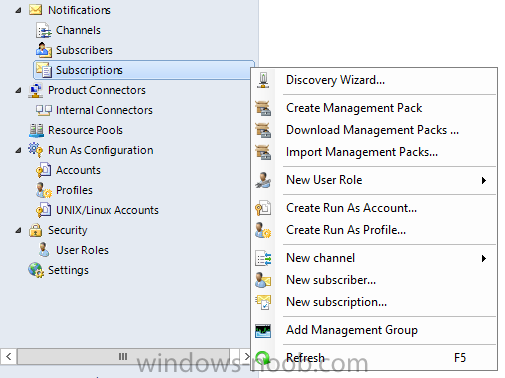
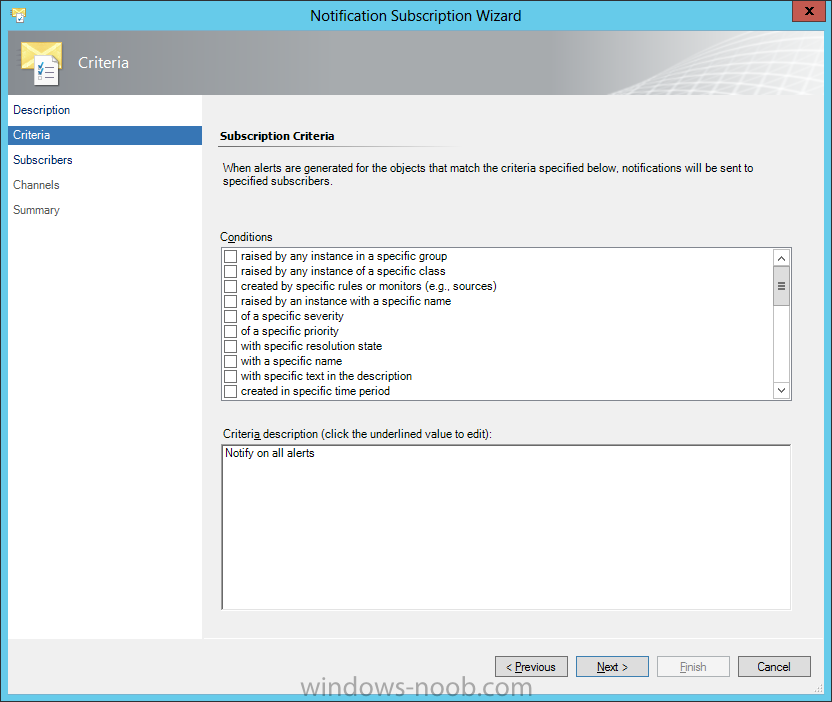
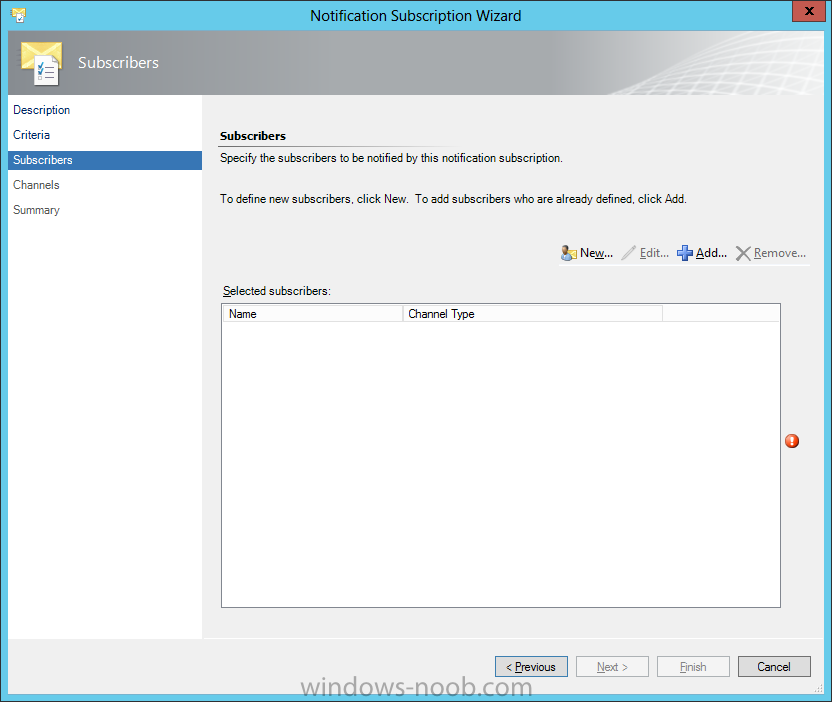
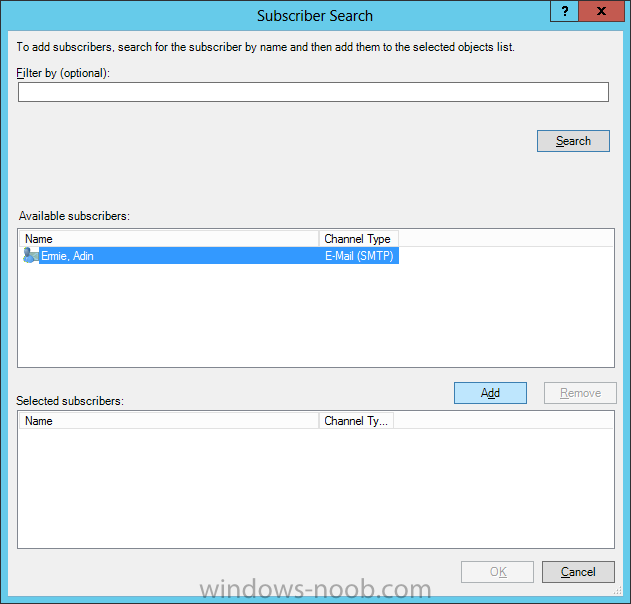
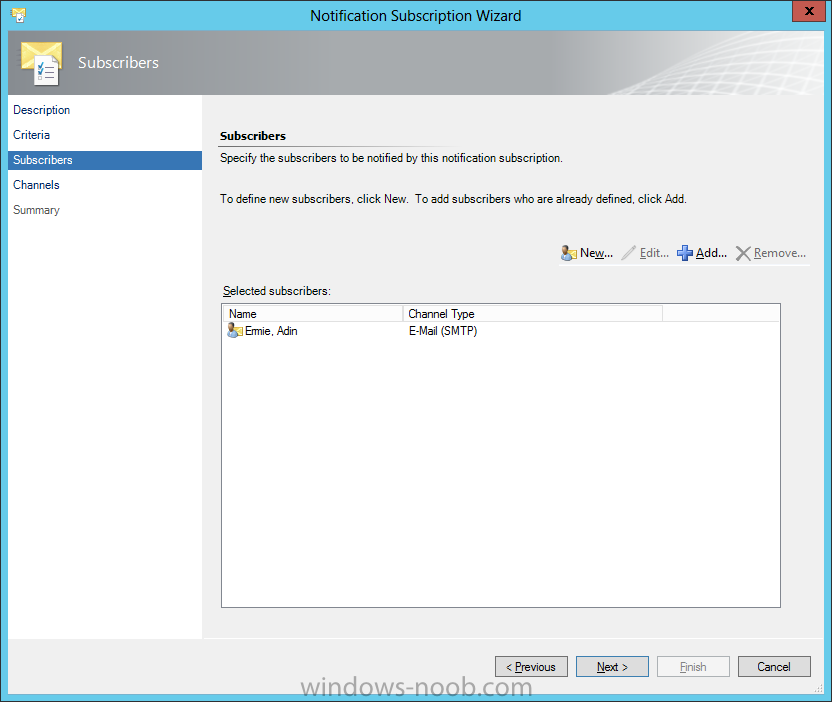
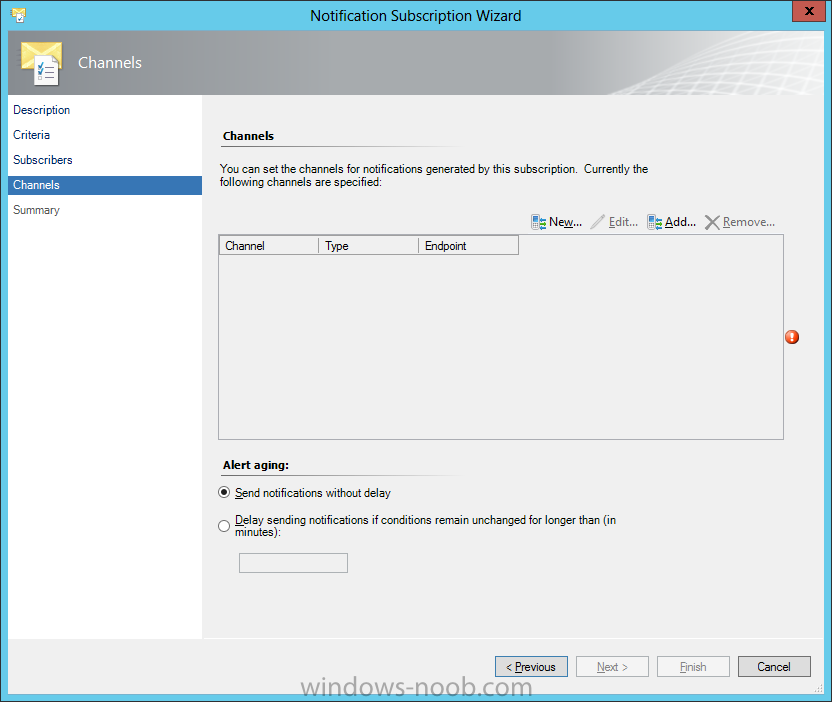
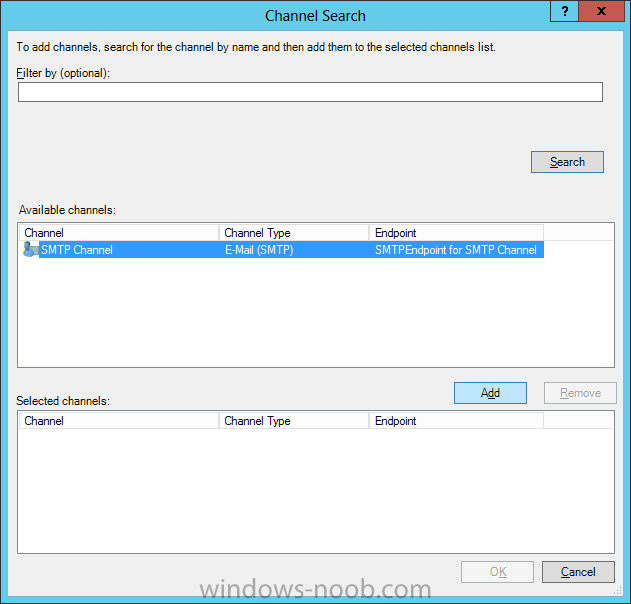
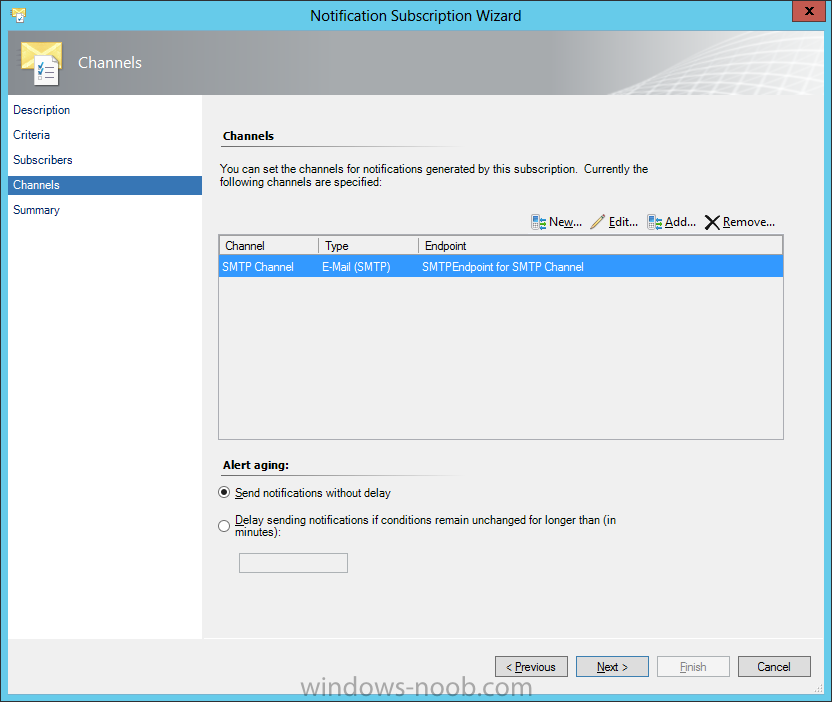
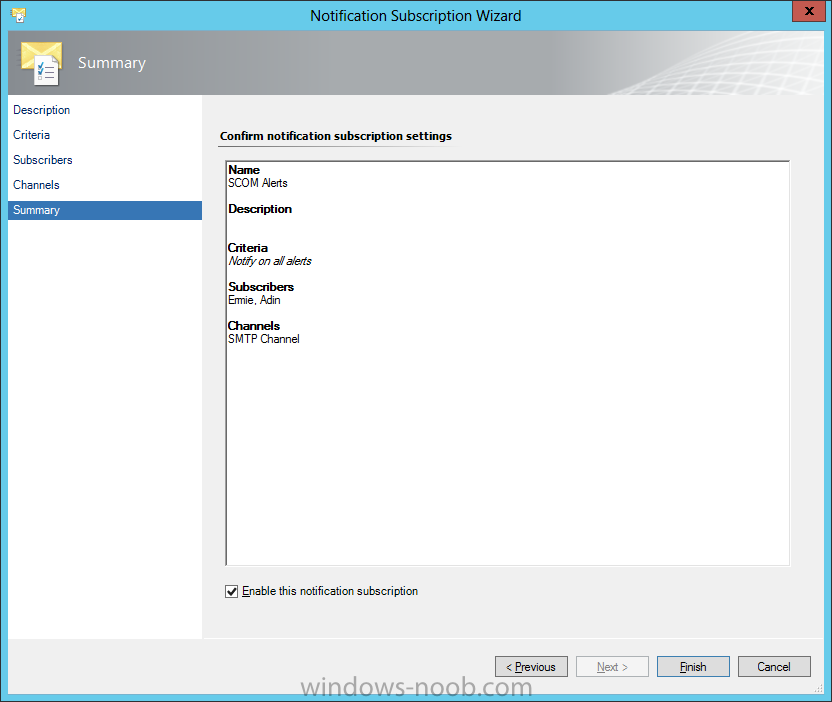
In our last post we imported Management Packs. Now we need to work with the data being collected by SCOM. OK, so we now have SCOM setup, have installed the Agent on systems to monitor, and imported Management Packs to help monitor at the technology platform level. But what do we do with the Alerts that are generated by SCOM? Well, if you are the SCOM Administrator (or you have granted other users access), you can look at the Alerts from the console. But, that means you’re assuming/relying on others to regularly check the console for Alerts. In my personal experience, that’s not really going to happen, thus we have Notification Channels. Start by opening the SCOM console and navigate to the Administration space. You will notice a section called ‘Notifications’, and beneath that section, 3 other items: Channels, Subscribers, and Subscriptions. Channels Start by right clicking on ‘Channels’ and selecting ‘New Channel’. From there select the type of channel you want to create. In this example we are going to create an ‘E-Mail (SMTP)’ channel. On the Description screen, you can accept the defaults for Channel Name and Description, unless you want to provide something specific. Make the applicable decision, and then click Next. On the Settings screen, click the ‘+ Add’ button to enter an SMTP server. Enter the server FQDN, Port Number, and the Authentication Method applicable to your environment, and then click OK. You will be returned to the Settings screen. On here you must enter a Return Address. Please note that this address does not need to be a real email address, so it literally can be anything (i.e. see my example). In a Production environment, you may want to enter a Distribution List for a specific team, but that is a decision you have to make for your implementation. Now click Next. On the Format screen, you can customize what the Email subject will display, along with the information provided in the email. Additionally, you can control the email Importance and Encoding. As an example, from my personal experience, for one SCOM implementation I created 4 different SMTP channels, one for each ‘zone’ (i.e. PROD, UAT, TST, DEV). For the DEV/TST zones, we set the Importance to Low, for UAT we left it at Normal, and for PROD we set it to High. This way when the various teams received the Alert emails (i.e. the SQL team), they could immediately identify which emails (and thus which Alerts) they needed to respond to immediately. Again, this is more of a design/configuration decision. Make the applicable changes and click Finish. You will receive indication that the channel was successfully created. Click Close. Back in the SCOM console your newly created channel will now appear. Congratulations, now you have a channel setup. But, that still doesn’t get Alerts via email to your support team. For that, we need Subscribers. Subscribers To send Alerts via email, SCOM needs email address to send to. So let’s now configure some Subscribers. Start by right clicking on Subscribers and select ‘New Subscriber’. The Notification Subscriber Wizard will start. On the Description screen it asks for a name, and even gives you the ability to look a user up in Active Directory. Note, as per the sentence on the screen, this is just to make it easier to identify. Side Note: Did you notice the typo/spelling mistake? It says “indentify” and not “identify”. Enter a name and then click Next. On the Schedule screen, you can choose either to ‘Always send notifications’ or ‘Notify only during the specified times’. If you choose the second option, click the Add button to create the required schedule. For our example we are going to accept the default to ‘Always send notifications’. Make you choice and click Next. If you want to specify a schedule, make the applicable changes on the prompt provided and click OK. Now you need to add the email address that will be used for this Subscriber. Click the Add button. This will cause another wizard to launch, the Subscriber Address wizard. Again you are prompted for a name, but only for the use of identification later, and does not factor into how the Notifications work. From my personal experience, on this screen I would add the users name so that I knew who it was for (i.e. in case from the email address it is not apparent). In my example, I used my own name, and entered “Ermie, Adin”. Make your decision and then click Next. On the Channel screen, you need to specify the channel to use for Notifications for this individual. Click the down-arrow for the selection list. In our example, since we only have an SMTP Channel setup/configured, we will choose ‘Email (SMTP)’. You will also be required to supply a Delivery Address for use with the selected channel. Make the appropriate selection and enter the required information and then click Next. On the Schedule screen, you can create a schedule (exactly like the option we had before) but this is specific for the user that you are adding. This may seem confusing right now, because, aren’t we already adding a user as a subscriber? Yes, but you can use the Subscriber option like an email distribution list. For example, the very first Subscriber ‘Name’ that you enter could be the name of a team, like say “SQL Team”. You can then use the Subscriber Address wizard to add the individual team members email addresses. You may have to try some different configurations to find the right combination that will work for you. Make applicable configurations and then click Finish. Back on the Notification Subscriber Wizard, which is where you will be after clicking Finish on the Subscriber Address wizard, click Finish. The wizard will then go off and create the Subscriber, and you will receive confirmation once it is complete. Click Close. Returning to the SCOM console you will now see your Subscriber that you created. You now have Channels setup, and Subscribers to send to, but you still need a trigger to send the Notifications. We are now going to configure the final piece, Subscriptions. Subscriptions OK, we now need a way to trigger SCOM to send Alert notifications to our Subscribers. We do this through Subscriptions. Start by right clicking on Subscriptions and select ‘New Subscription’. On the Description screen, create a name for the Subscription. For example, from my personal experience, I would create a subscription based on zone and technology (i.e. PROD – SQL Alerts). Enter a name, and click Next. On the Criteria screen, you can modify the conditions that will trigger the Alert to be sent to the Subscribers via the Subscription. NOTE: This guide does not cover the vast and complex options on Condition customization. I would recommend searching online if you need help, and best of all, try different options. Make your customizations and then click Next. On the Subscribers screen, click the Add button. From here, you can search for any existing Subscribers you have already created. Select them (you can add more than one), press Add, and then click OK. Your added Subscribers will now appear in the list. Click Next. Now you can add the Channels to use for this Subscription. Click the Add button. Similar to the Subscribers search, you can search for Channels. Find the Channel(s) you want to add, click the Add button, and then click OK. You Channel(s) will now be displayed in the list. Notice that on this screen you can also customize a delay in notifications being sent out. Why would you want to have a delay? Here’s an example from my personal experience. Imagine that you are part of an Operations team that is on-call and paged when there are issues with Production servers. You have a Subscriber/Subscription setup specifically for paging. When a system that is being monitored by SCOM loses its ability to communicate with the Agent installed, it throws an Alert about the Agent being unreachable. SCOM also attempts to ping the system to confirm that there is an issue with either just the SCOM Agent, or if the system is in fact down. If ICMP is blocked in the environment, even if there is only an issue with the SCOM Agent, the “Server down” Alert will still be generated. This will then cause the individual to be paged to respond. This sounds fine, and normally it is. However, sometimes SCOM can lose connectivity with the Agent for one reason or another, though it may only last a few minutes (i.e. network bandwidth, backups running, etc.). If there is no delay in sending notifications, then even if SCOM loses connectivity for a moment, someone will be paged. If there is a delay enabled, and SCOM loses connectivity to the Agent and that connection is re-established within the delay timeframe, then no notification/paging will occur. I speak from personal experience, being paged multiple times in a night, just because SCOM lost connectivity to the Agent; not that the server(s) were actually down! Make applicable changes, and click Next. Review the information on the Summary screen, and then click Finish. You will receive confirmation that the Subscription was created successfully, then click Close. Back in the SCOM console, your Subscription will now be present. Excellent, you now have SCOM setup to notify individuals of Alerts based on any customizations you need. That concludes the Configuration Guides for System Center 2012 Operations Manager (at least for what I can think of for now). If anyone has any questions or suggestions on what they need help with, or would like a guide on, please message me.


-
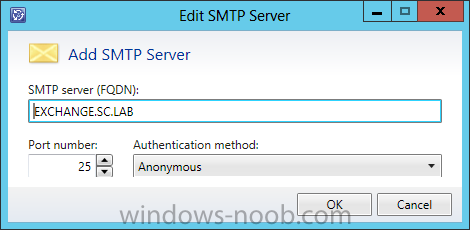
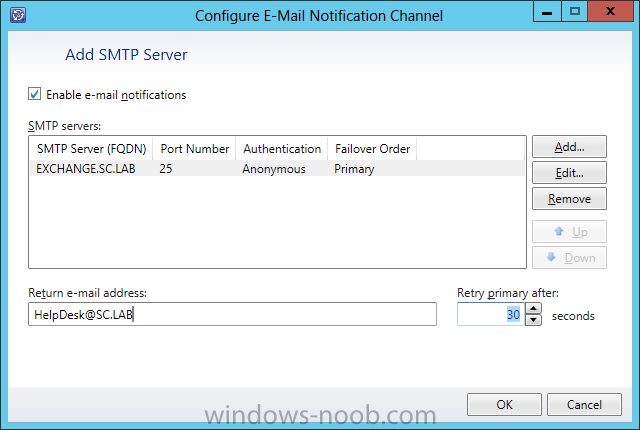
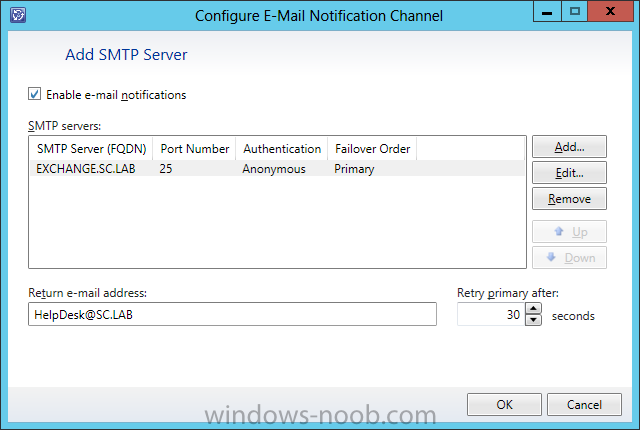
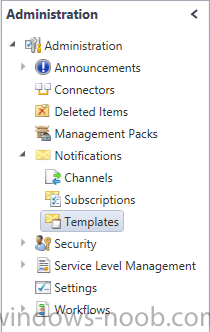
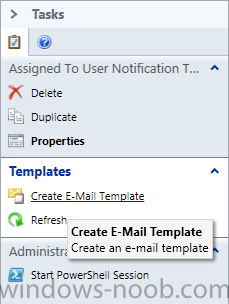
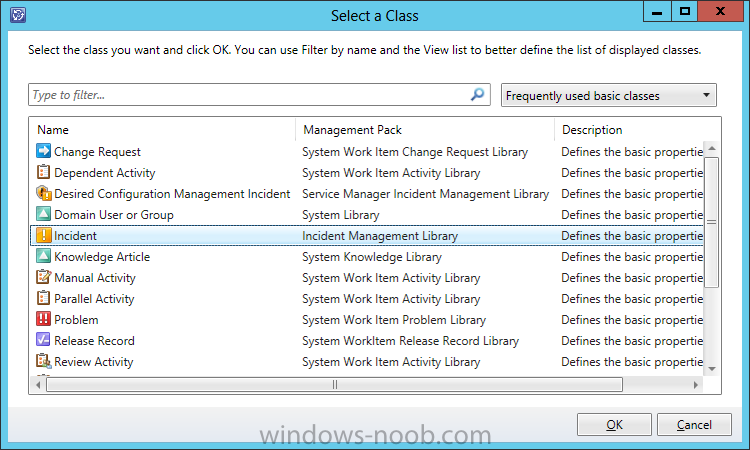
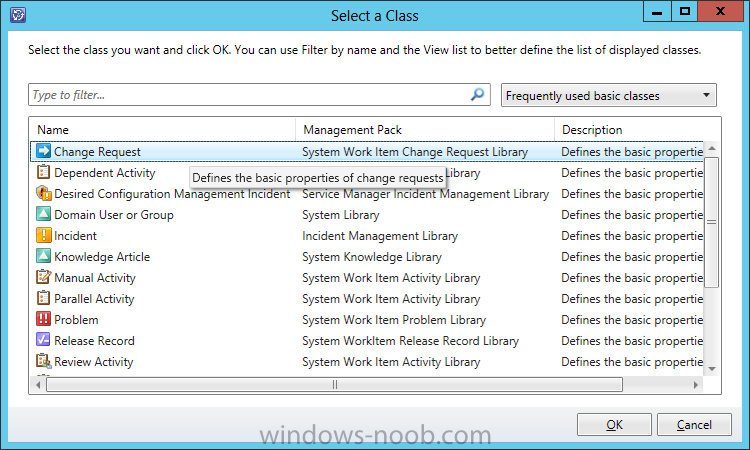
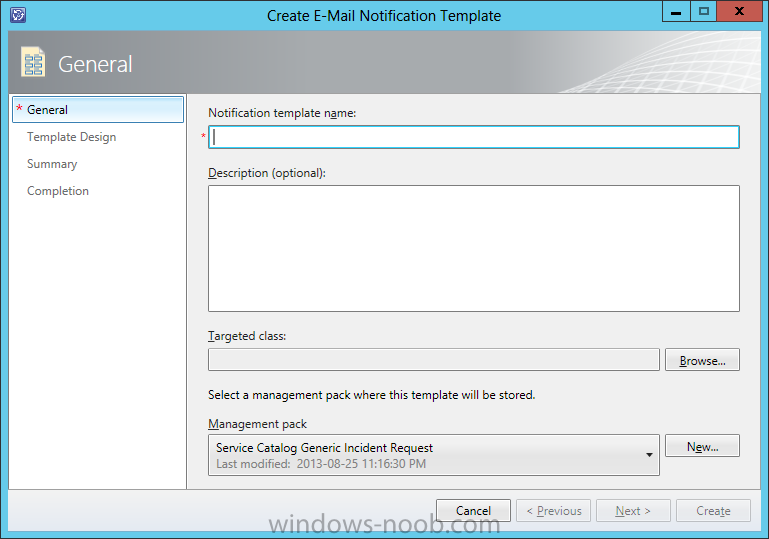
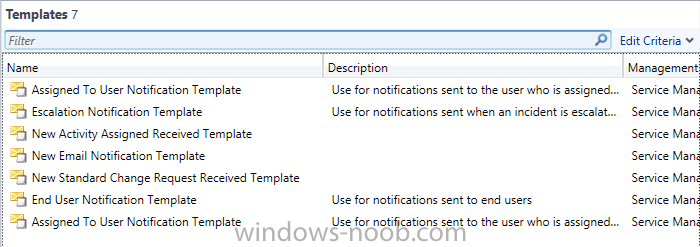
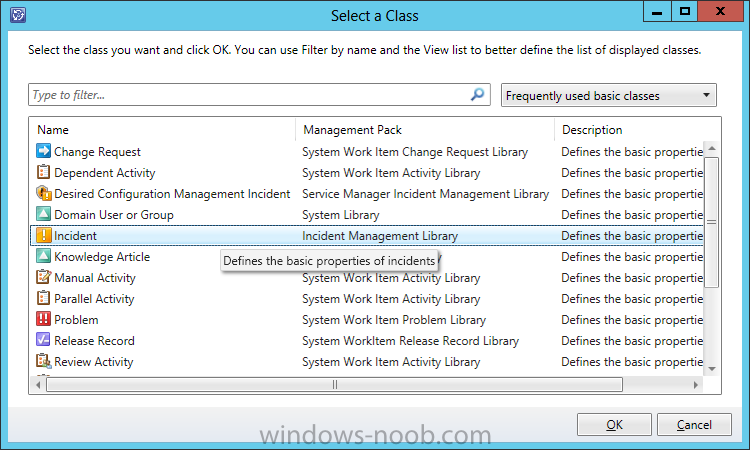
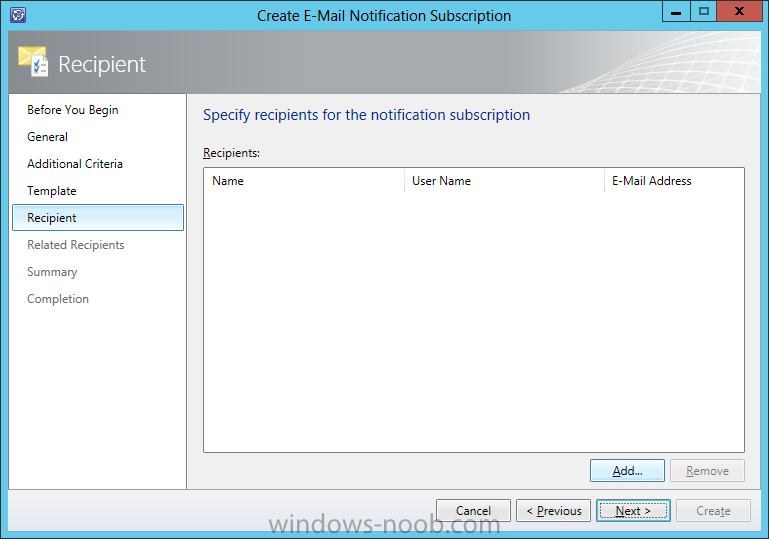
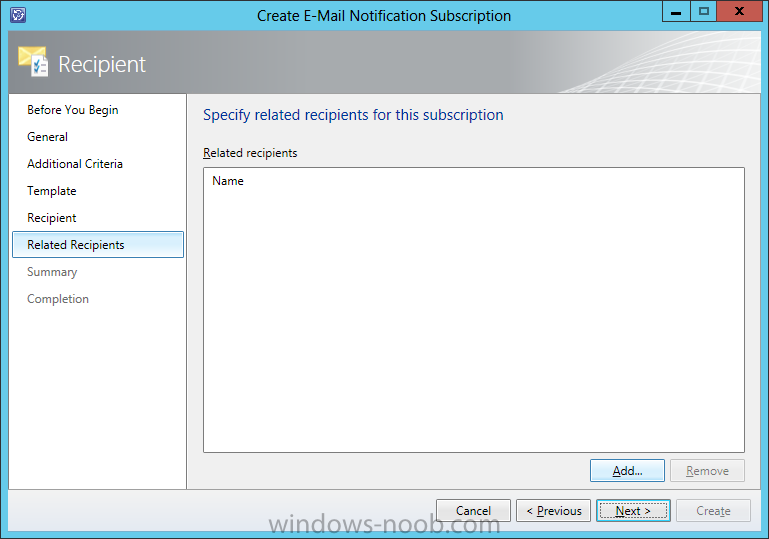
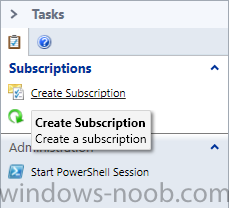
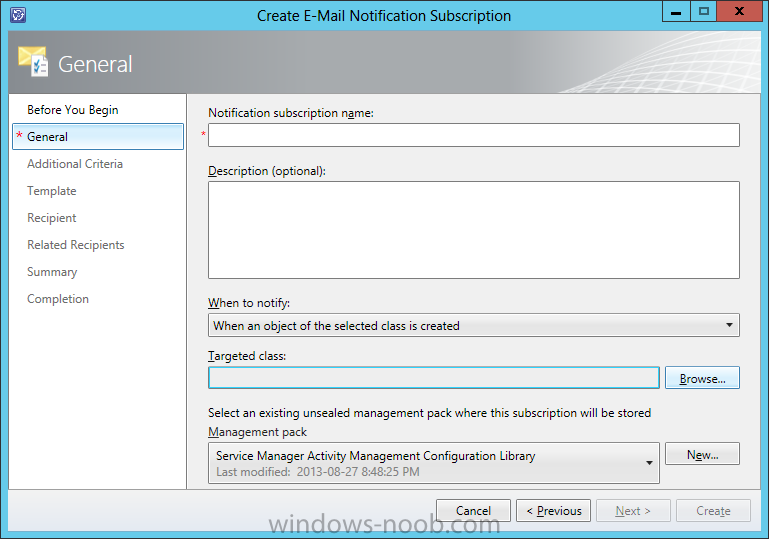
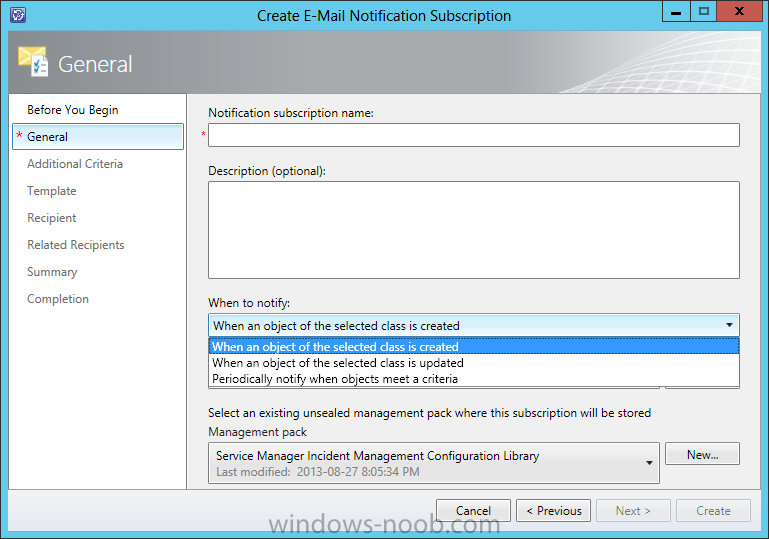
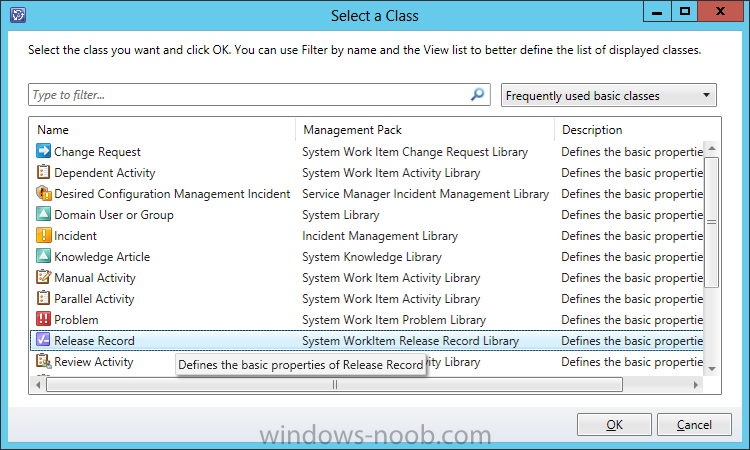
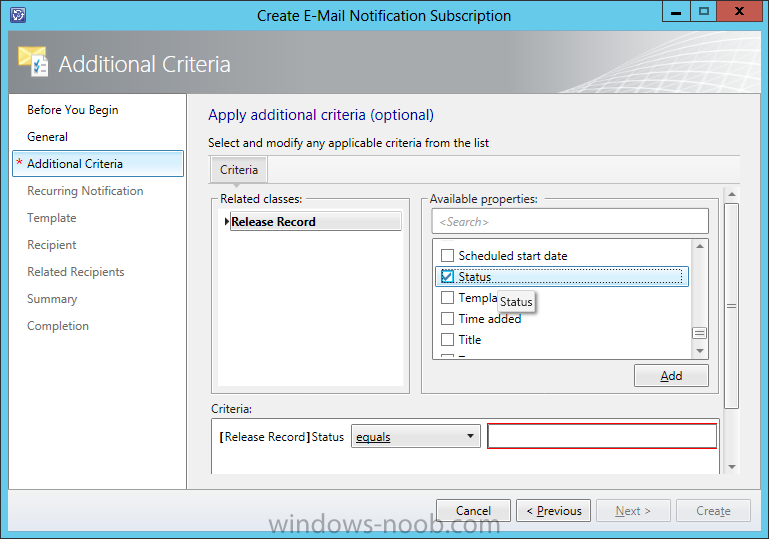
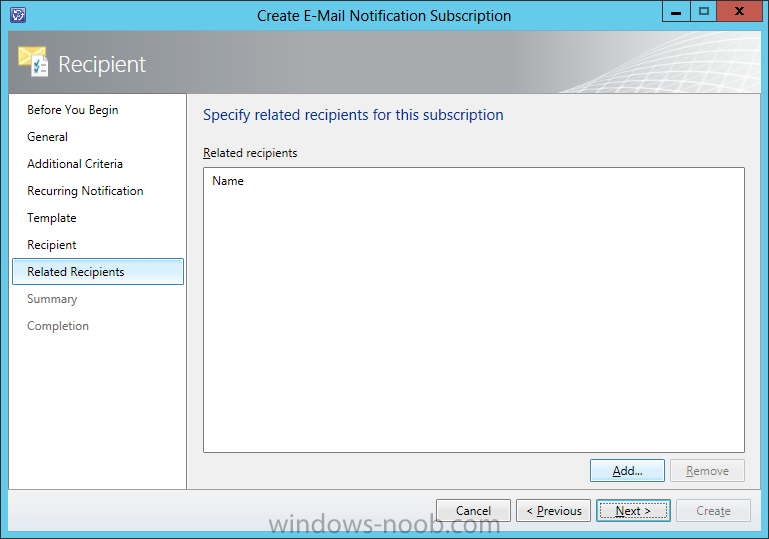
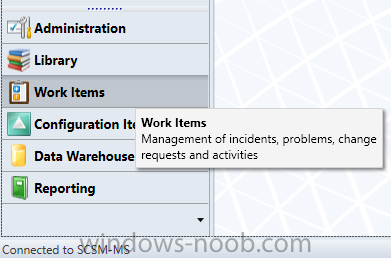
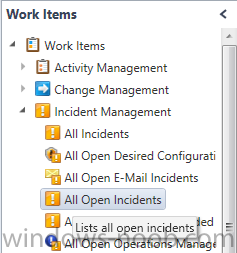
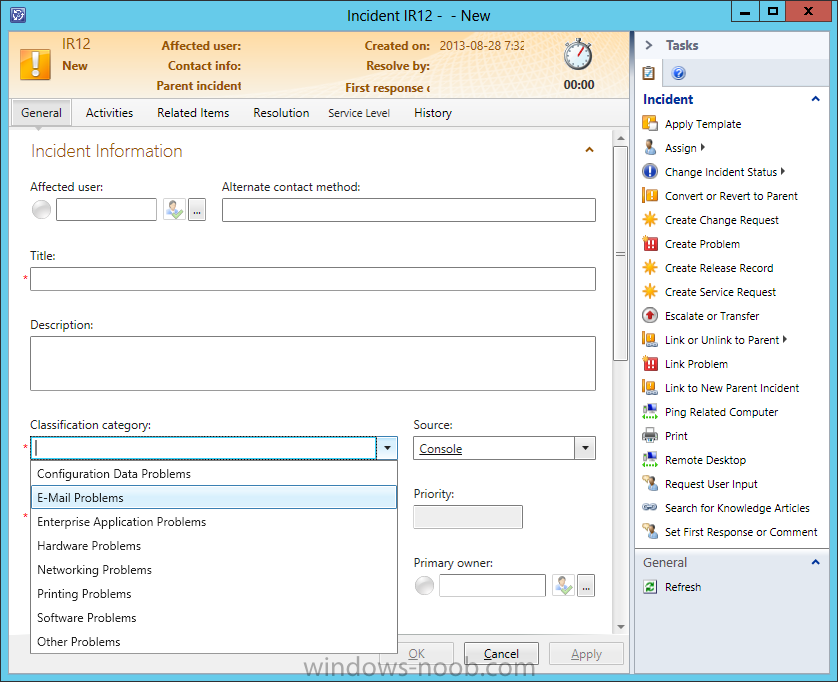
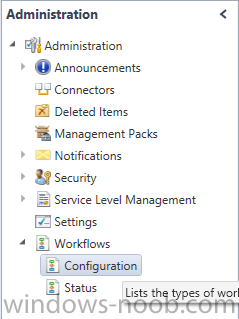
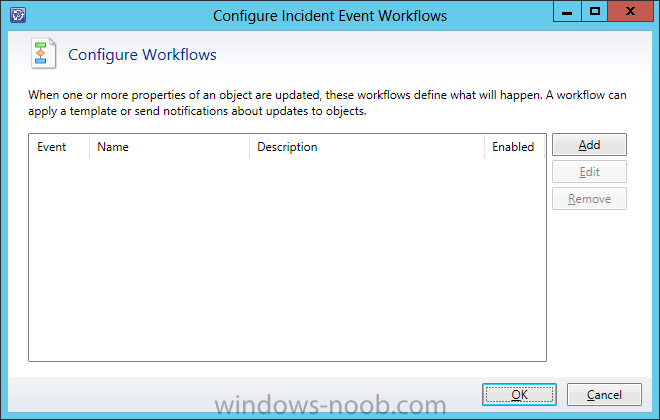
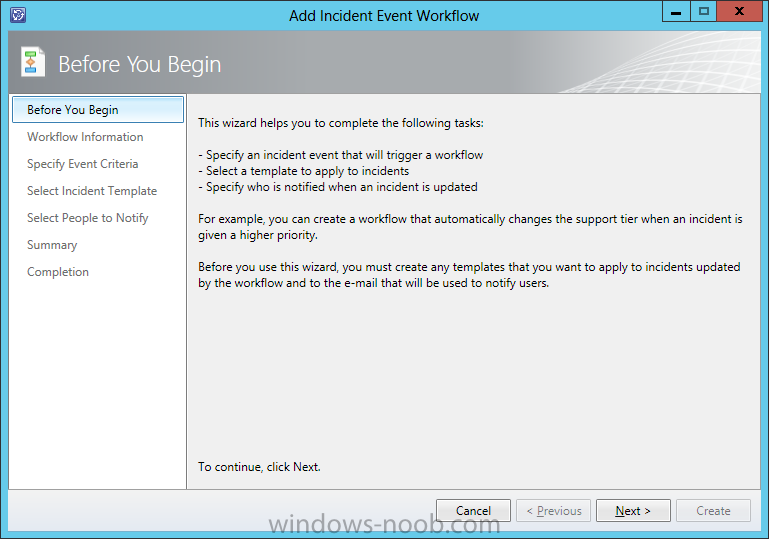
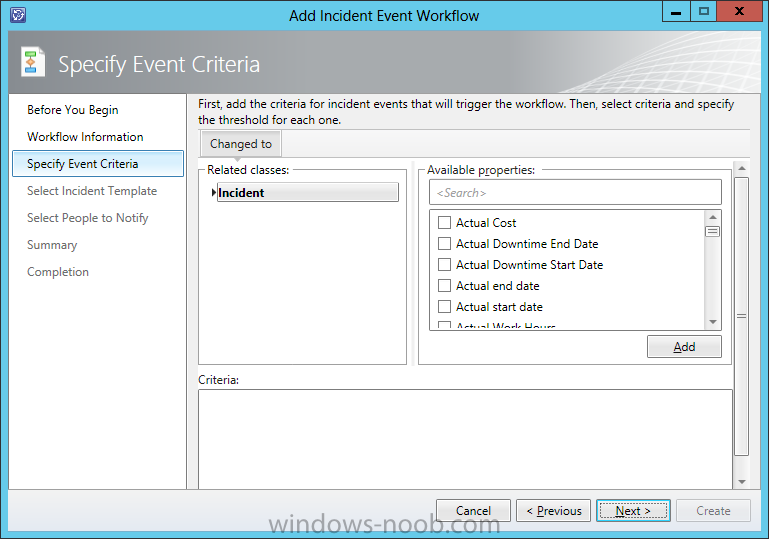
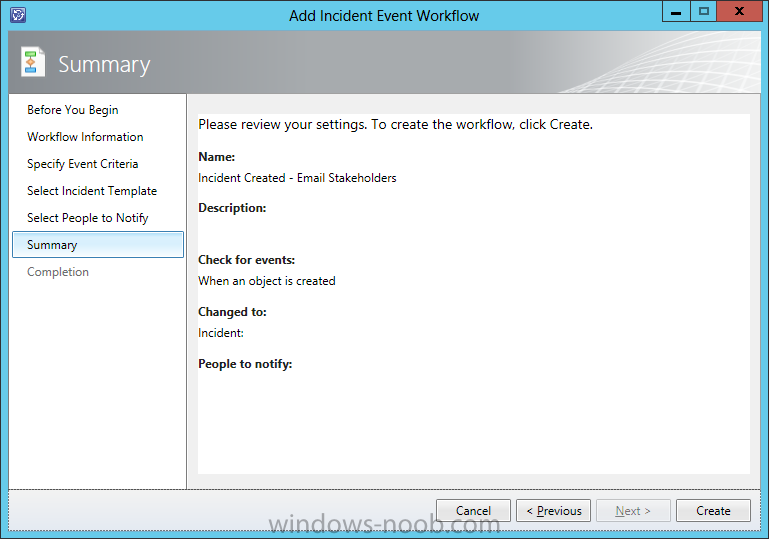
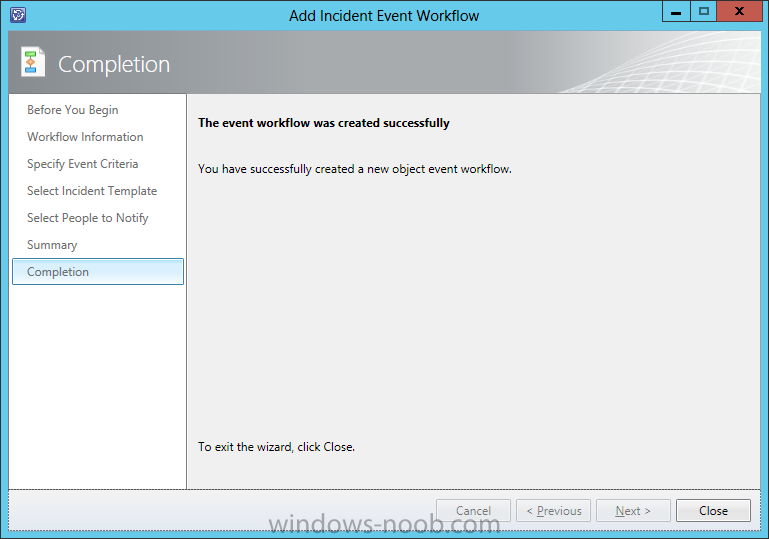
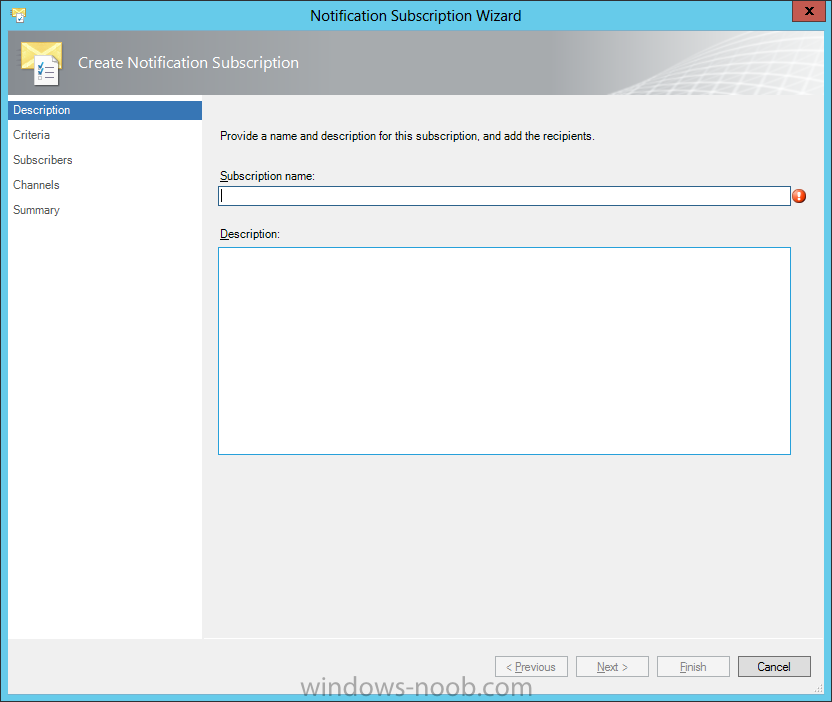
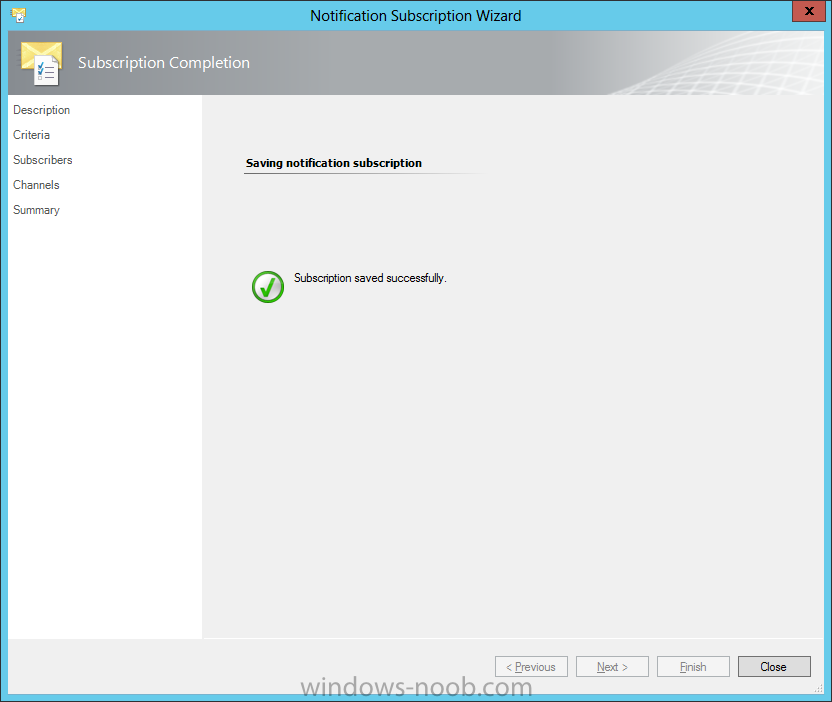
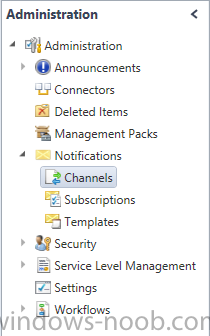
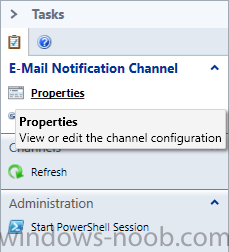
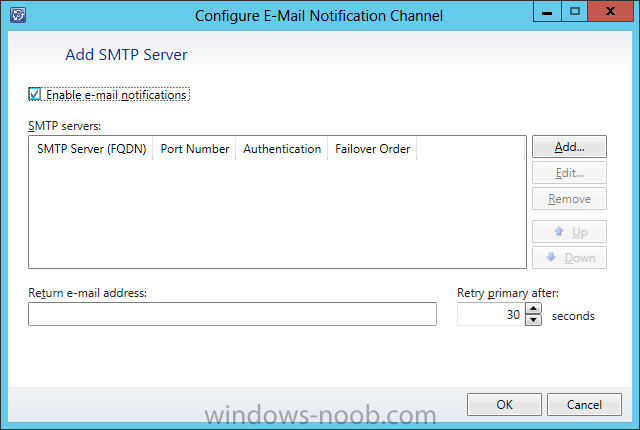
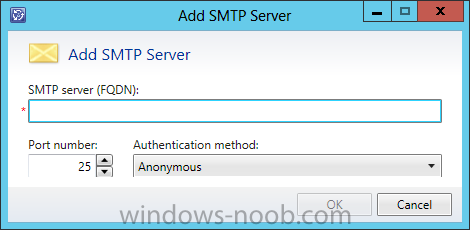
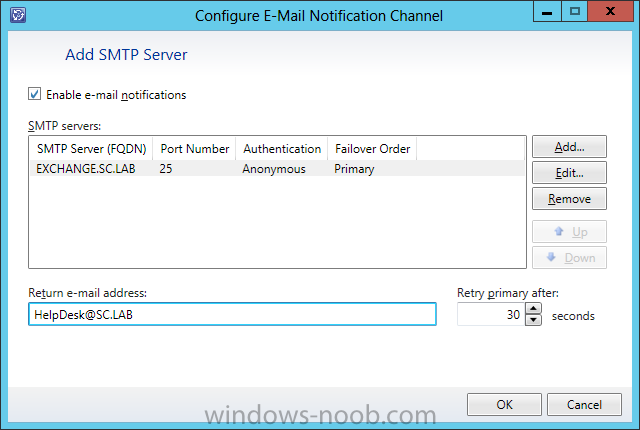
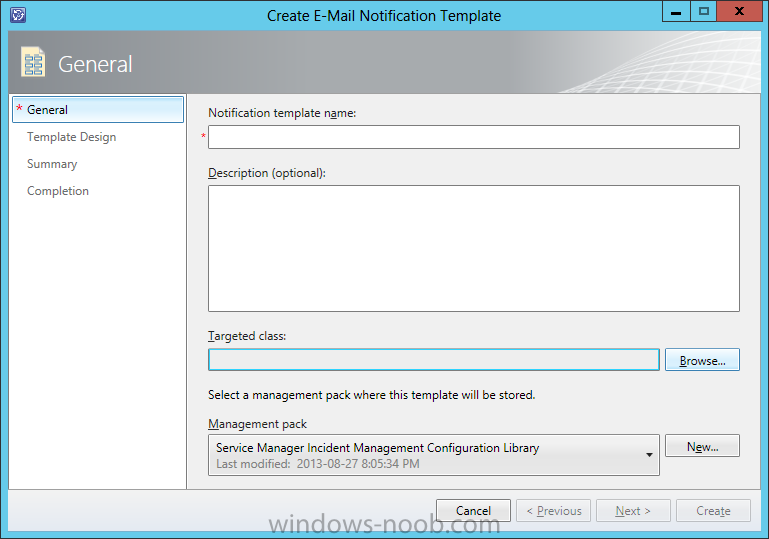
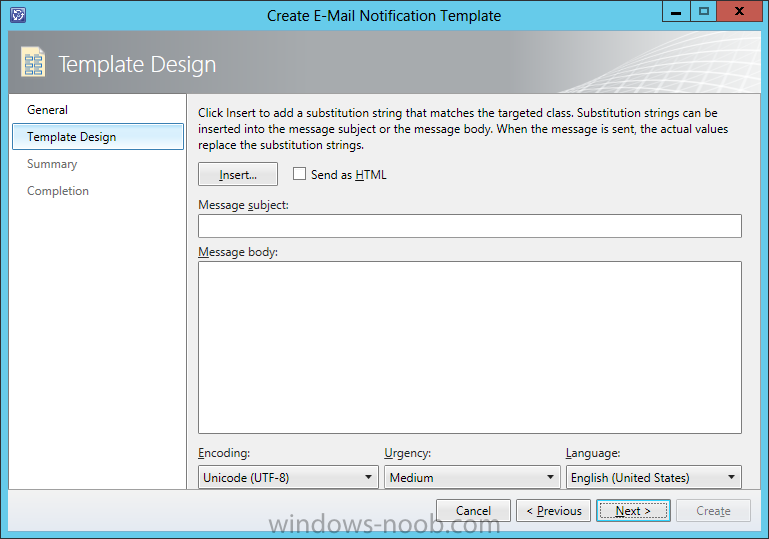
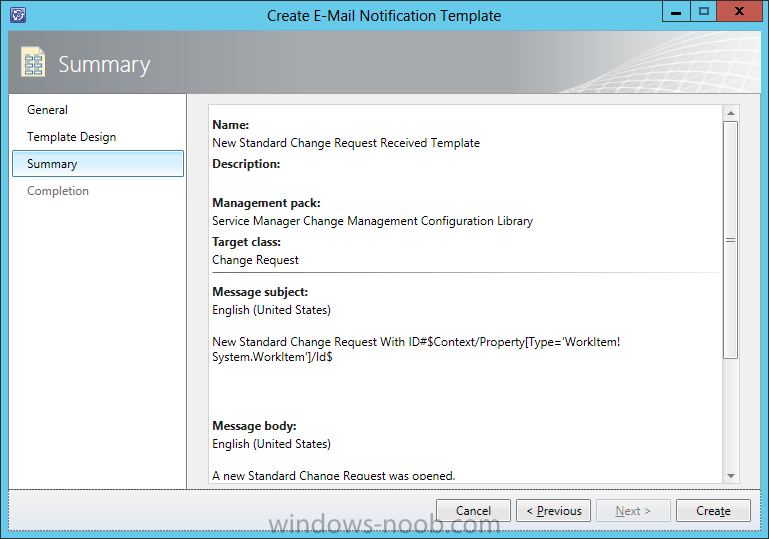
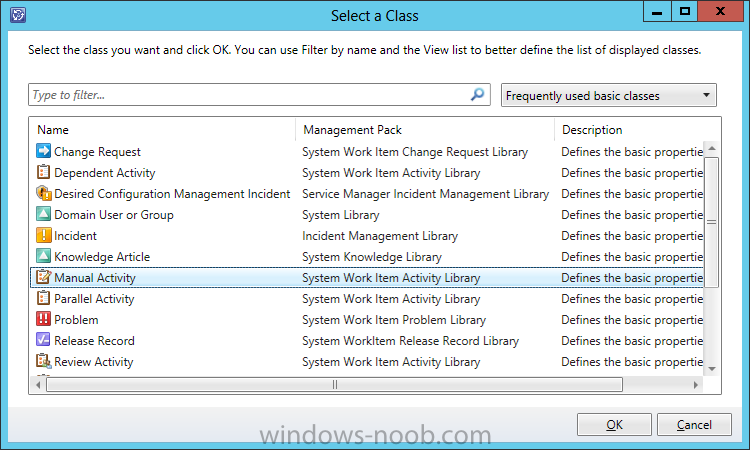
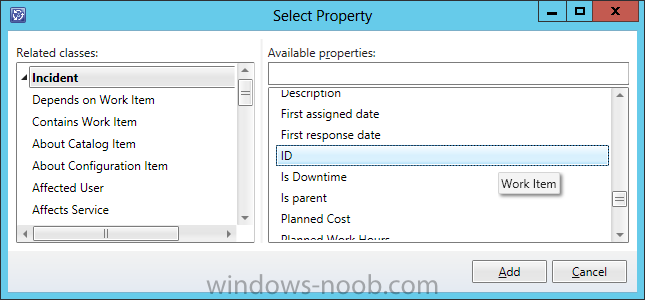
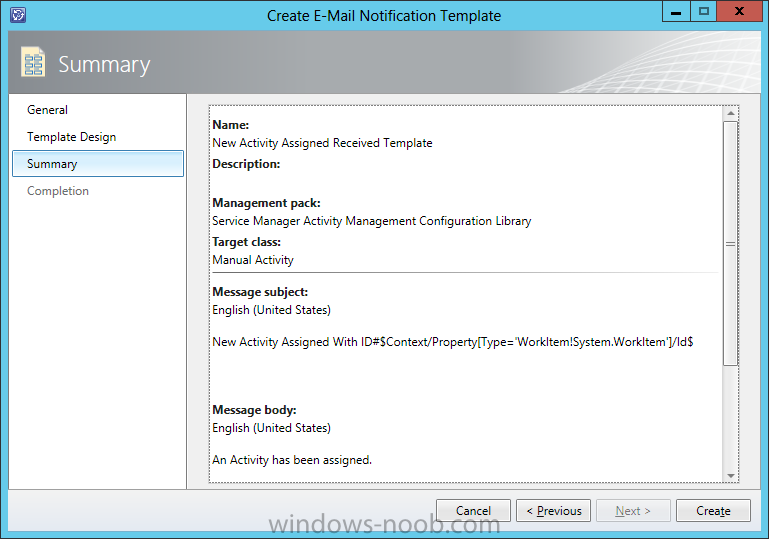
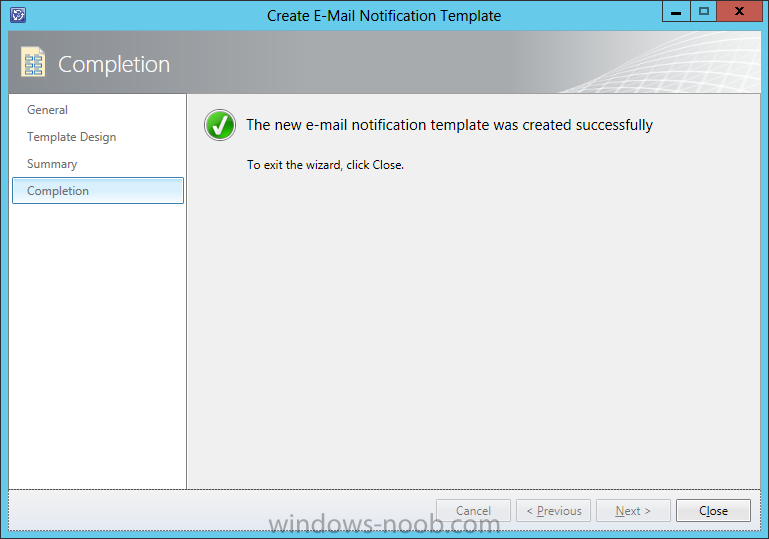
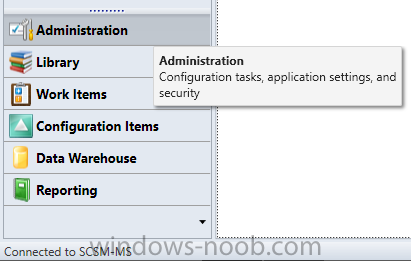
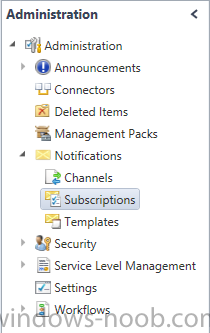
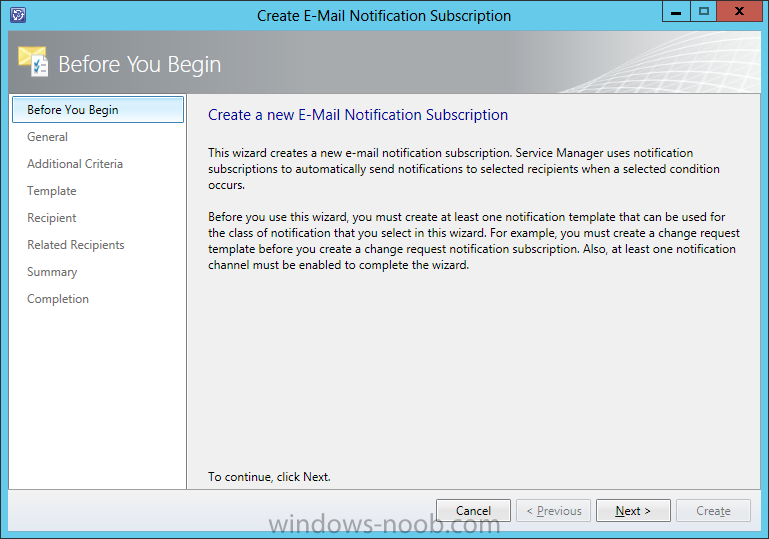
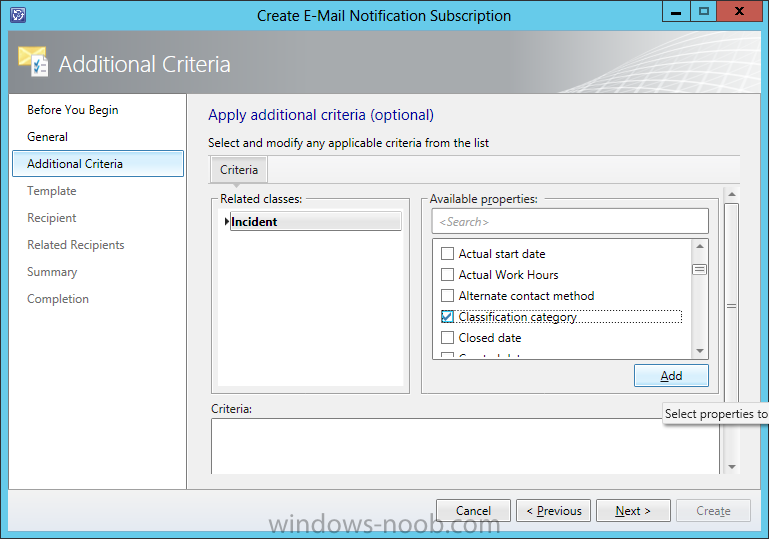
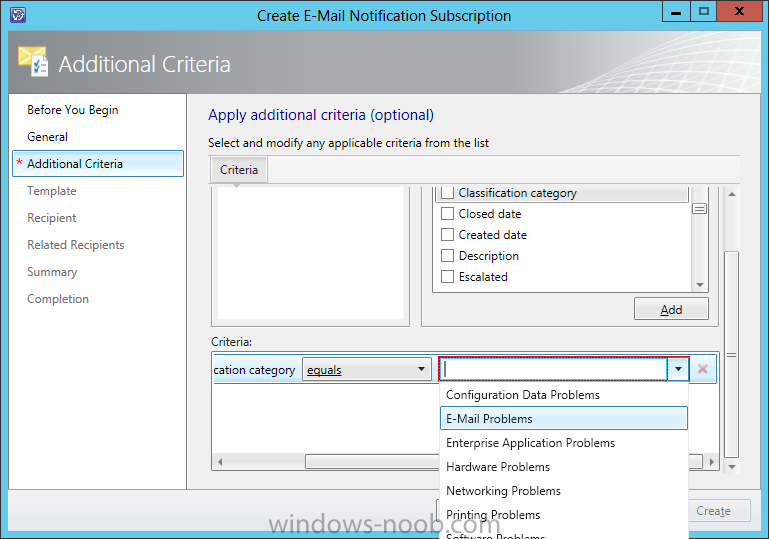
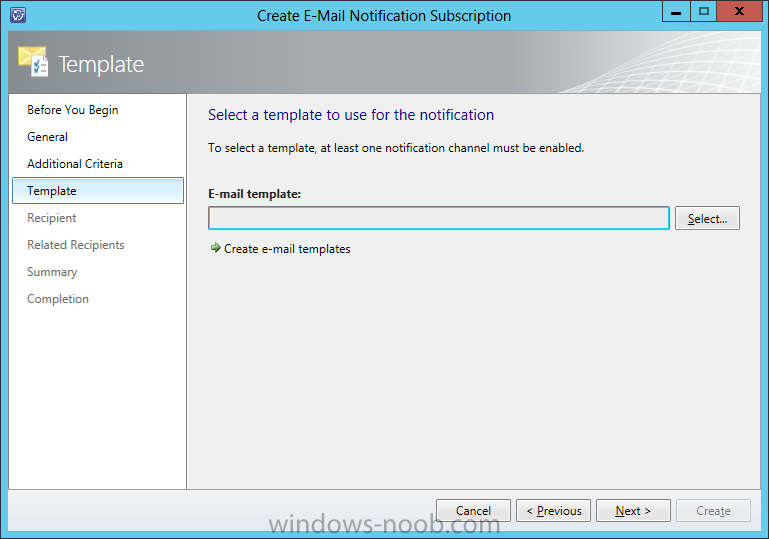
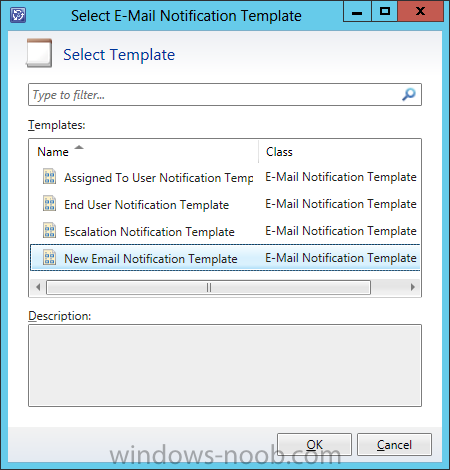
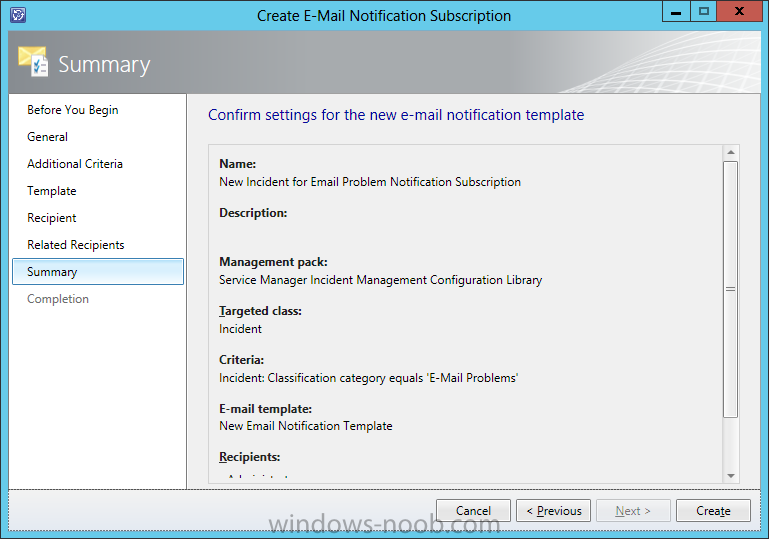
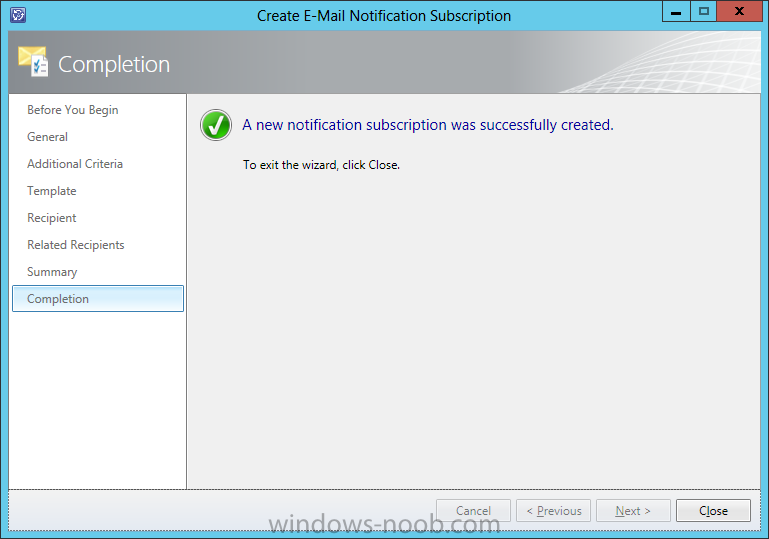
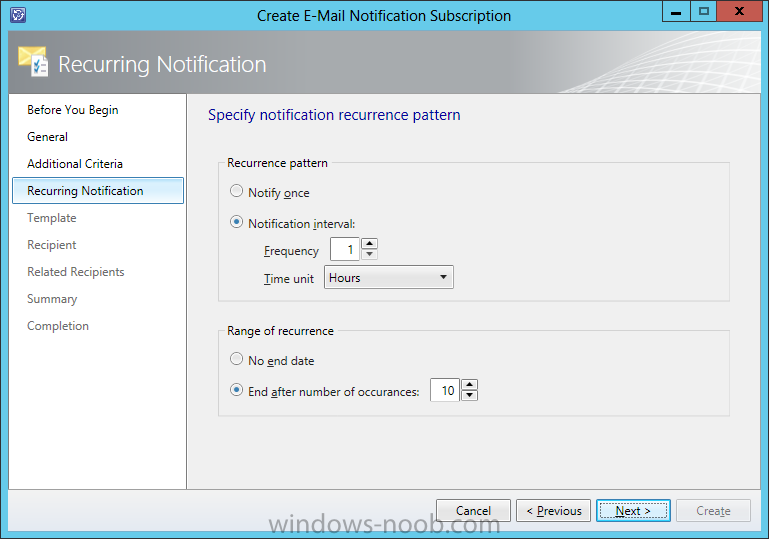
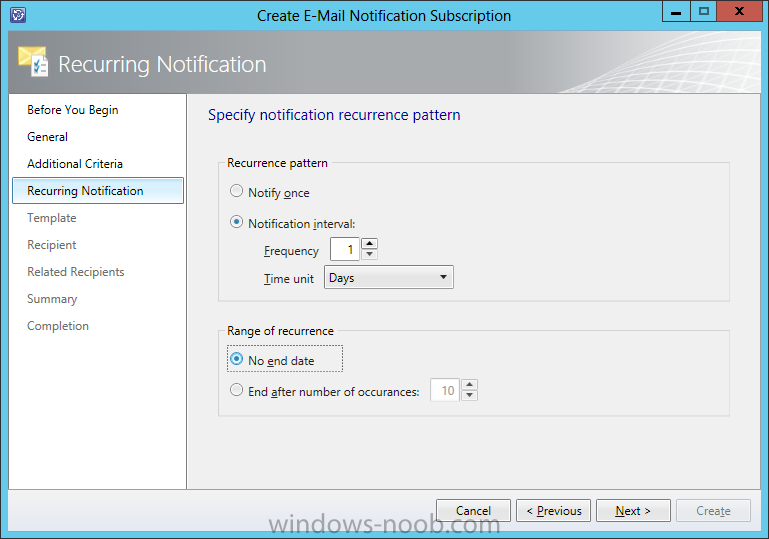
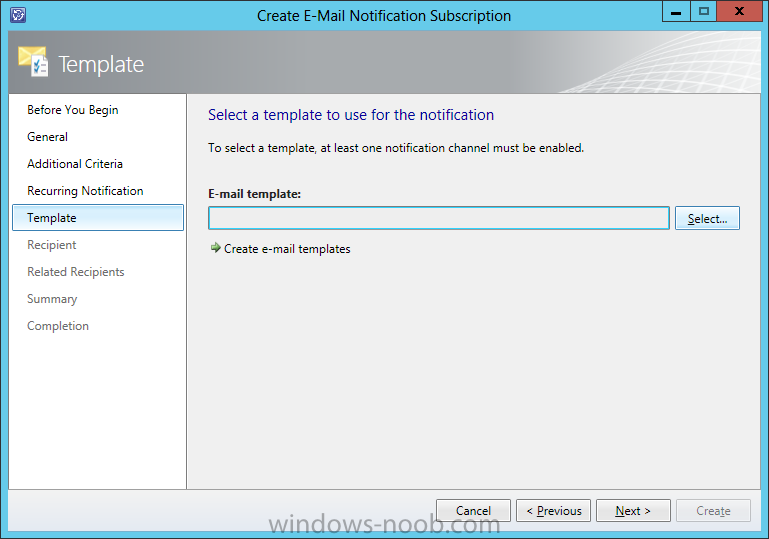
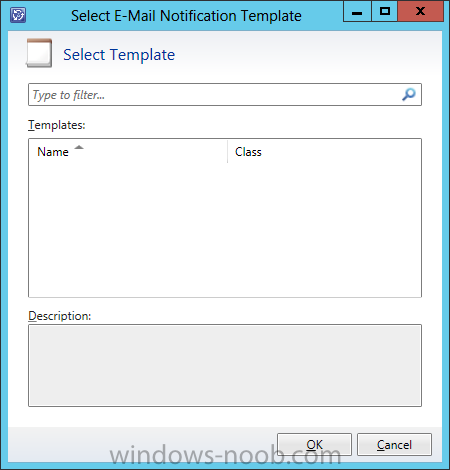
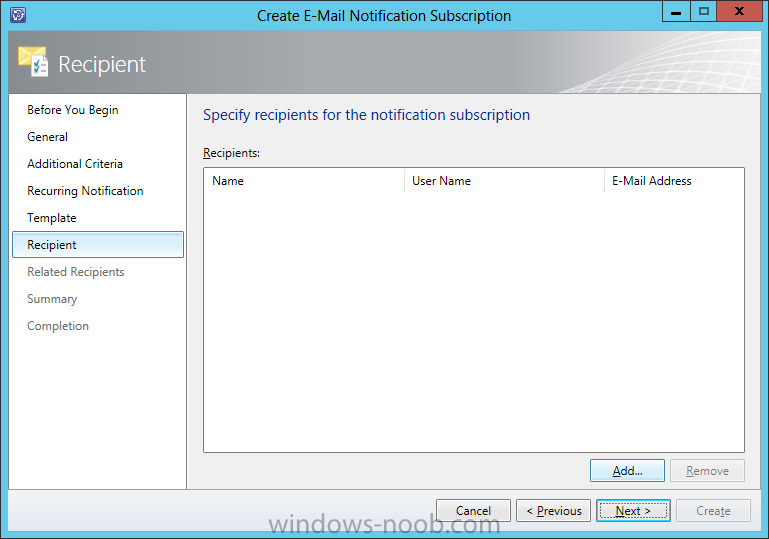
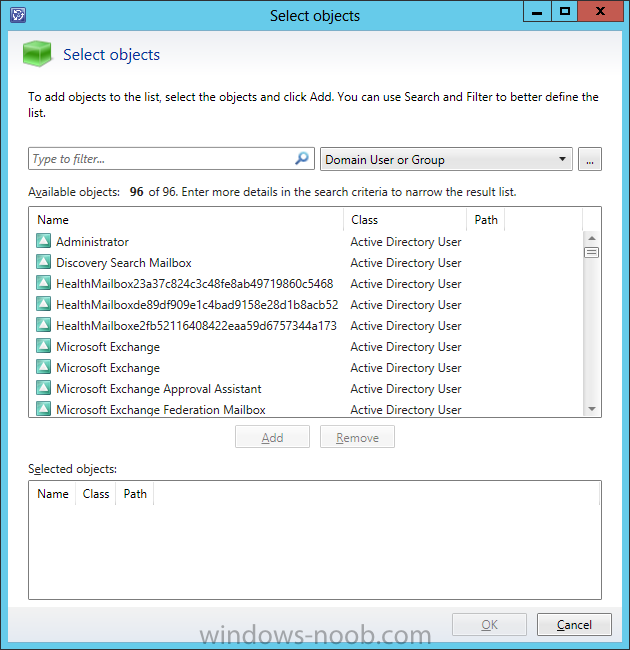
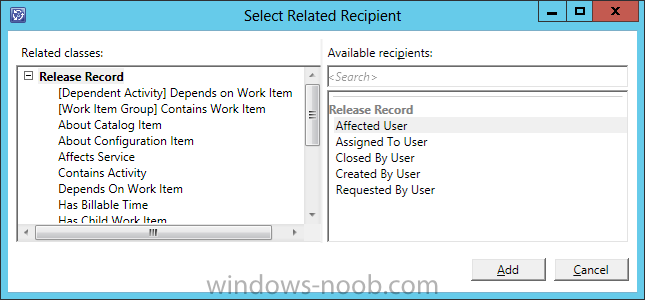
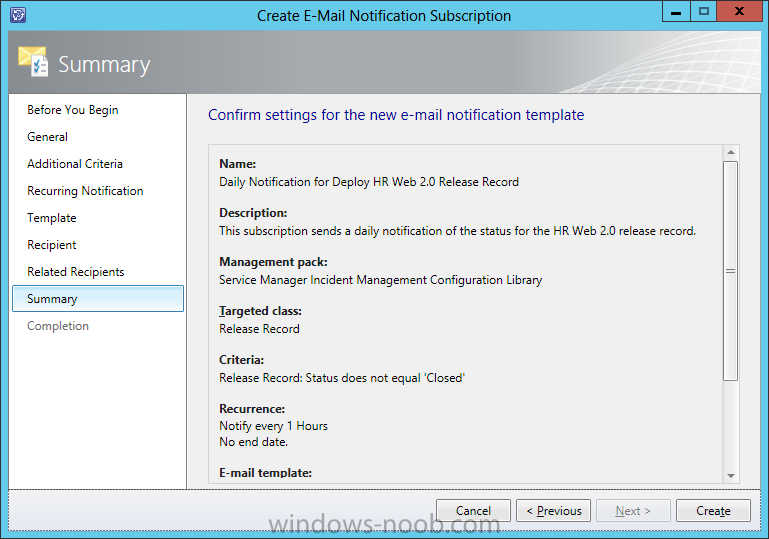
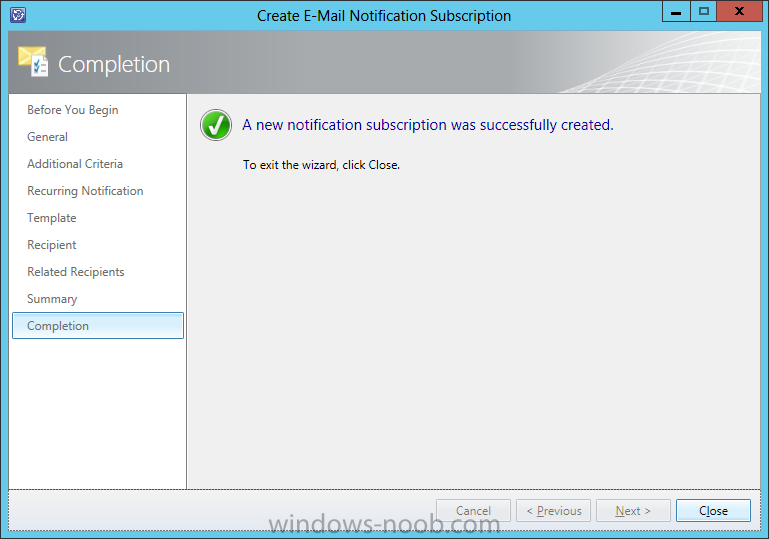
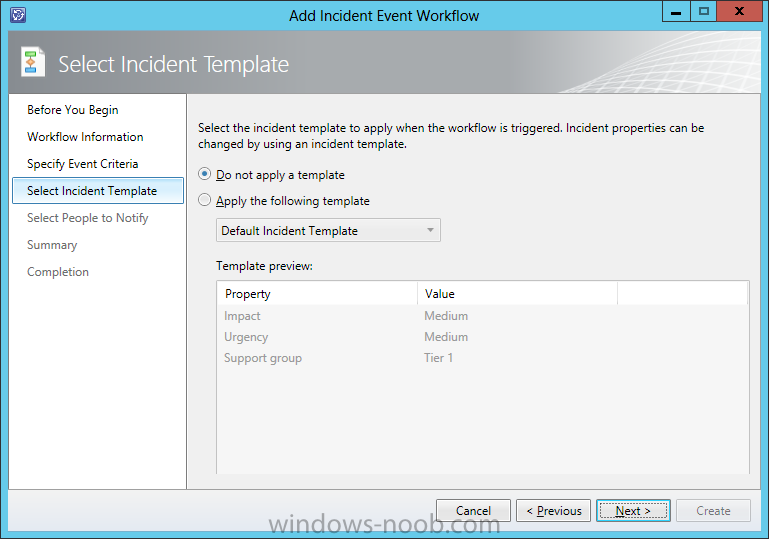
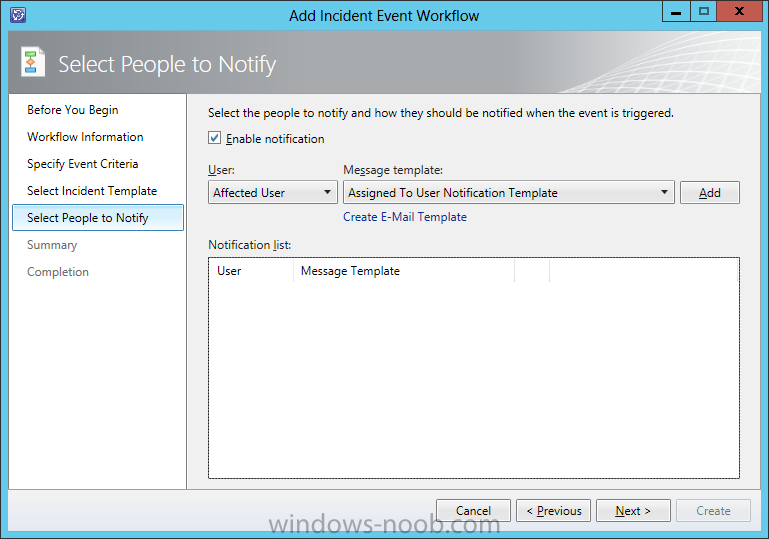
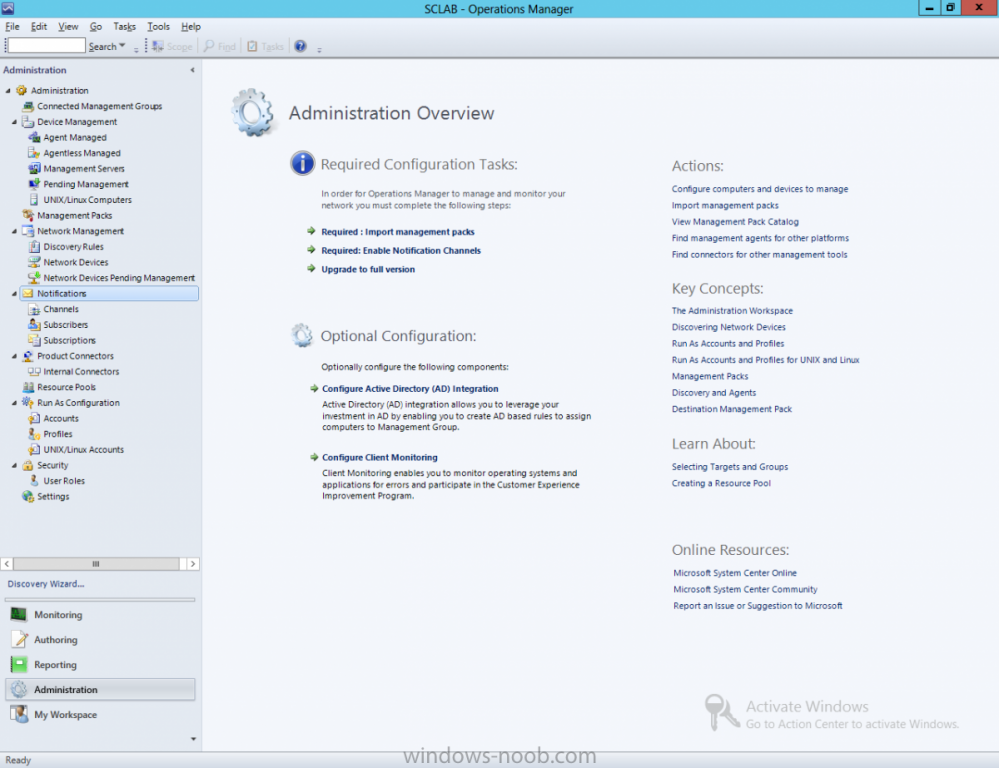
 Before notifications are sent, first configure each notification channel, such as the settings for Simple Mail Transfer Protocol (SMTP). Notification messages are sent based on a notification template. Therefore, you must create a notification template. You can then use the Notification Subscription Wizard to subscribe a group of users to a notification that will be sent whenever the changes that you specify occur. Finally, you can verify that a notification is sent by manually generating the change. To configure email notificationsIn the Service Manager console, click Administration. In the Administration pane, expand Notifications, and then click Channels. In the Channels pane, click E-Mail Notification Channel. In the Tasks pane, under E-Mail Notification Channel, click Properties to open the Configure E-Mail Notification Channel dialog box. Select the Enable e-mail notifications check box. Click Add. In the Add SMTP Server dialog box, type the fully qualified domain name (FQDN) of the SMTP server that you want to use. In the Port number box, type or select the SMTP port number that you want to use. For example, select 25. In the Authentication method box, select either Anonymous or Windows Integrated. For example, select Anonymous. Then, click OK. In the Return e-mail address box, type the email address of the service account that is used during setup. In the Retry primary after box, type or select the number of seconds that you want Service Manager to wait before it tries to resend outgoing email notifications. For example, select 25. Click OK to close the dialog box. To validate email notification configurationIn the Channels pane, click E-Mail Notification Channel. In the Tasks pane, under E-Mail Notification Channel, click Properties to open the Configure E-Mail Notification Channel dialog box. Verify that the configuration you entered is correct. To create a notification template for incidentsIn the Service Manager console, click Administration. In the Administration pane, expand Notifications, and then click Templates. In the Tasks pane, under Templates, click Create E-mail Template. On the General page of the Create E-mail Notification Template Wizard, in the Notification template name box, type a name. For example, type New E-mail Incident Template. Optionally, in the Description box, you can type a description for the template that you are creating. Next to the Targeted class box, click Browse. In the Choose Class dialog box, click Incident, and then click OK. Make sure that an unsealed management pack of your choice is selected, and then click Next. On the Template Design page, in the Message subject box, type a subject for the email template. For example, type New Incident created with ID#. Then, click Insert. In the Select Property dialog box, select ID, and then click Add. In the Message body box, type a description to indicate that a new incident was opened for an email problem. Use the other default values on this page, and then click Next. On the Summary page, review the settings that you have selected for the template. Then, click Create. On the Completion page, click Close. To create a notification template for change requestsIn the Service Manager console, click Administration. In the Administration pane, expand Notifications, and then click Templates. In the Tasks pane, under Templates, click Create E-mail Template. On the General page of the Create E-mail Notification Template Wizard, in the Notification template name box, type a name. For example, type New Standard Change Request Received Template. Optionally, in the Description box, you can type a description for the template that you are creating. Next to the Targeted class box, click Browse. In the Choose Class dialog box, click Change Request, and then click OK. Make sure that an unsealed management pack of your choice is selected, and then click Next. On the Template Design page, in the Message subject box, type a subject for the email template. For example, type New Standard Change Request with ID#. Then, click Insert. In the Select Property dialog box, select ID, and then click Add. In the Message body box, type a description to indicate that a new standard change request was opened. Use the other default values on this page, and then click Next. On the Summary page, review the settings that you have selected for the template. Then, click Create. On the Completion page, click Close. To create a notification template for a newly assigned activityIn the Service Manager console, click Administration. In the Administration pane, expand Notifications, and then click Templates. In the Tasks pane, under Templates, click Create E-mail Template. On the General page of the Create E-mail Notification Template Wizard, in the Notification template name box, type a name. For example, type New Activity Assigned Received Template. Optionally, in the Description box, you can type a description for the template that you are creating. Next to the Targeted class box, click Browse. In the Select a Class dialog box, click Manual Activity, and then click OK. Make sure that an unsealed management pack of your choice is selected, and then click Next. On the Template Design page, in the Message subject box, type a subject for the email template. For example, type New Activity Assigned with ID#. Then, click Insert. In the Select Property dialog box, select ID, and then click Add. In the Message body box, type a description to indicate that an activity has been assigned. Use the other default values on this page, and then click Next. On the Summary page, review the settings that you have selected for the template. Then, click Create. On the Completion page, click Close. To validate template creationVerify that the new template you created appears in the list of notification templates. To create a notification subscription for an incidentIn the Service Manager console, click Administration. In the Administration pane, expand Notification, and then click Subscriptions. In the Tasks pane, click Create Subscription. On the Before You Begin page of the Create E-mail Notification Subscription Wizard, click Next. On the General page, in the Notification subscription name box, type a name. For example, type New Incident for E-mail Problem Notification Subscription. Optionally, in the Description box, you can type a description for the subscription that you are creating. Next to the Targeted class box, click Browse. In the Choose Class dialog box, choose a class. For example, click Incident. Then, click OK. In the When to notify box, select When an object of the selected class is created. Make sure that an unsealed management pack of your choice is selected, and then click Next. On the Additional Criteria page, select Incident. In the Available Properties list, select Classification Category, and then click Add. On the Additional Criteria page, click the Criteria tab. In the Criteria area, next to [incident] Classification Category, select equals. In the list, select E-mail Problems, and then click Next. On the Template page, next to the E-mail template box, click Select. In the Select Objects dialog box, in the Templates list, select a notification template. For example, select New E-mail Incident Template, click OK, and then click Next. On the Recipient page, click Add. In the Select Objects dialog box, search for the appropriate user, and then select the user. Click Add, click OK, and then click Next. For example, select the user account for a messaging analyst or messaging administrator. NOTE: The notification address must be configured for the user account of the messaging analyst or messaging administrator. On the Related Recipients page, click Add. In the Select Related Recipient dialog box, search for the appropriate class, and then select the appropriate substitution string that represents the user. Click Add, click OK, and then click Next. For example, select additional user accounts that you want to send the notification to. On the Summary page, review the settings that you selected for the notification subscription, and then click Create. On the Completion page, click Close. To create a periodic notification subscription for a release recordIn the Service Manager console, click Administration. In the Administration pane, expand Notifications, and then click Subscriptions. In the Tasks pane, click Create Subscription. On the Before You Begin page of the Create E-mail Notification Subscription Wizard, click Next. On the General page, in the Notification subscription name box, type a name. For example, type Daily Notification for Deploy HR Web 2.0 Release Record. Optionally, in the Description box, you can type a description for the subscription that you are creating. For example, type This subscription sends a daily notification of the status for the HR Web 2.0 release record. In the When to notify box, select Periodically notify when objects meet a criteria. Next to the Targeted class box, click Browse. In the Choose Class dialog box, choose a class, and then click OK. For example, click Release Record. Make sure that an unsealed management pack of your choice is selected, and then click Next. On the Additional Criteria page, select Release Record. In the Available Properties list, select Status, and then click Add. In the Criteria area, next to [Release Record] Status, select does not equal. In the list, select Closed, and then click Next. On the Recurring Notification page under Recurrence pattern, select Notify every <TimeInterval> and then choose an interval. For example, set the recurrence pattern to every 1 day. On the Recurring Notification page under Range of recurrence, select a range of recurrence or choose no end date. For example, select No end date. On the Template page, next to the E-mail template box, click Select. In the Select Template dialog box, in the Templates list, select a notification template that you have created for release record notifications. On the Recipient page, click Add. In the Select Objects dialog box, search for the appropriate user, and then select the user. Click Add, click OK, and then click Next. For example, select the user account for the release manager. NOTE: The notification address must be configured for the user account of the messaging analyst or messaging administrator. On the Related Recipients page, click Add. In the Select Related Recipient dialog box, search for the appropriate class, and then select the appropriate substitution string that represents the user. Click Add, click OK, and then click Next. For example, select additional user accounts that you want to send the notification to. On the Summary page, review the settings that you selected for the notification subscription, and then click Create. On the Completion page, click Close. To validate a notification subscriptionLocate the notification subscription that you created in the list of subscriptions. To verify a notification configurationIn the Service Manager console, click Work Items. In the Work Items pane, expand Work Items, expand Incident Management, and then click All Open Incidents. In the Tasks pane, under Incident Management, click Create Incident. In the Incident <Number> New form, enter the required information in the Affected user, Title, Classification Category, Impact, and Urgency boxes. In the Classification Category list, select E-mail Problems, and then click OK. Verify that an email notification that contains the information you entered in the template is received. The email title should contain the incident ID number. To create a messaging-enabled universal security groupIn the Exchange Management Console, navigate to Recipient Configuration, right-click Distribution Group, and then click New Distribution Group. On the Introduction page, either choose an existing universal group or create a new group. On the Group Information page, select the Security group type. Complete the creation of the group. Add members to the group by right-clicking them, clicking Properties, and accessing the Members tab. Wait for Service Manager to sync with Active Directory Domain Services (AD DS), or perform a manual Synchronization from Administration>Connectors. (Click AD Connector, and then click the Synchronize Now task on the right-hand side). Once the Active Directory synchronization has completed, the newly created group will be available as a configuration item in Service Manager, and it can be selected in the user picker fields, such as Affected User and Assigned To. To create a workflow to notify stakeholders when an incident is createdNavigate to Administration > Workflows > Configuration. Double-click Incident Event Workflow Configuration. Click Add, and then click Next on the Before you Begin page. Give the workflow a name, such as “Incident Created – Email Stakeholders”. Leave the default of When an incident is created in the Check for Events drop-down list. Select one of your custom management packs (or create one) to store the workflow in, and then click Next. Click Next on the Specify Incident Criteria page. (We want this workflow to run when any new incident is created.) Optionally, apply a template. (In this case we are creating the workflow for notification only, so we choose Do not apply a template.) In the Select People to Notify dialog box, select the Enable notification check box. Add the appropriate users you want to notify with the appropriate templates. Click Next, and then click Create to complete creation of the workflow. To test the workflow and mail the enabled universal security group Create an incident and assign it to the messaging-enabled universal security group that you created earlier.Before notifications are sent, first configure each notification channel, such as the settings for Simple Mail Transfer Protocol (SMTP). Notification messages are sent based on a notification template. Therefore, you must create a notification template. You can then use the Notification Subscription Wizard to subscribe a group of users to a notification that will be sent whenever the changes that you specify occur. Finally, you can verify that a notification is sent by manually generating the change.
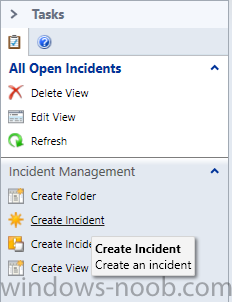
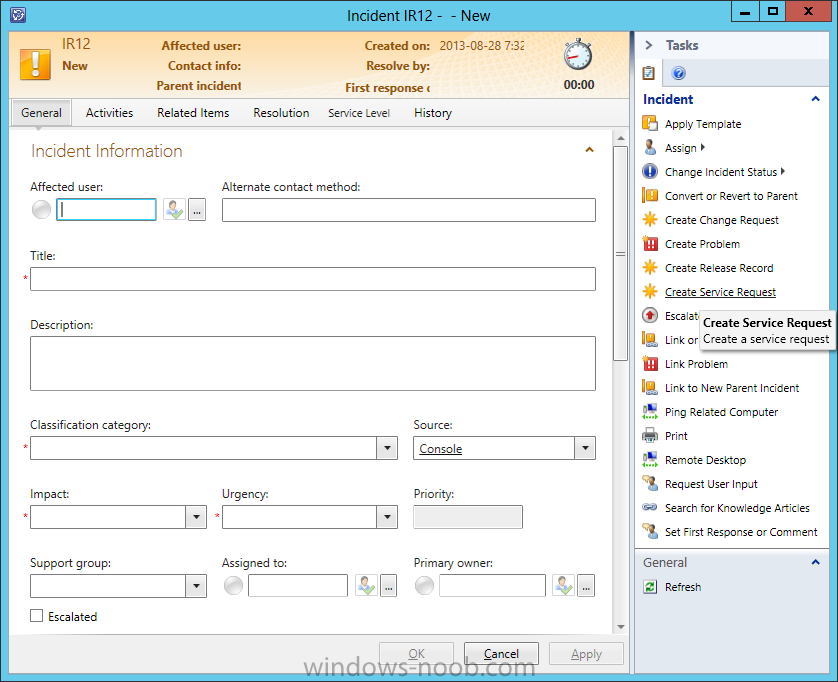
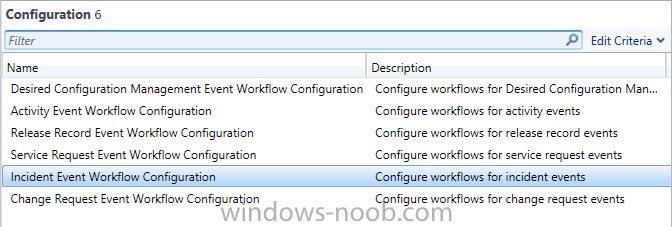
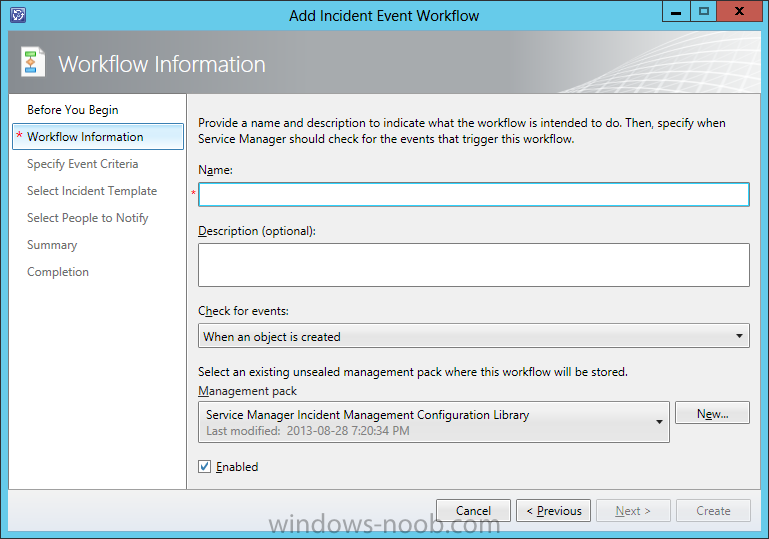