Search the Community
Showing results for tags 'Operations Manager'.
Found 16 results
-
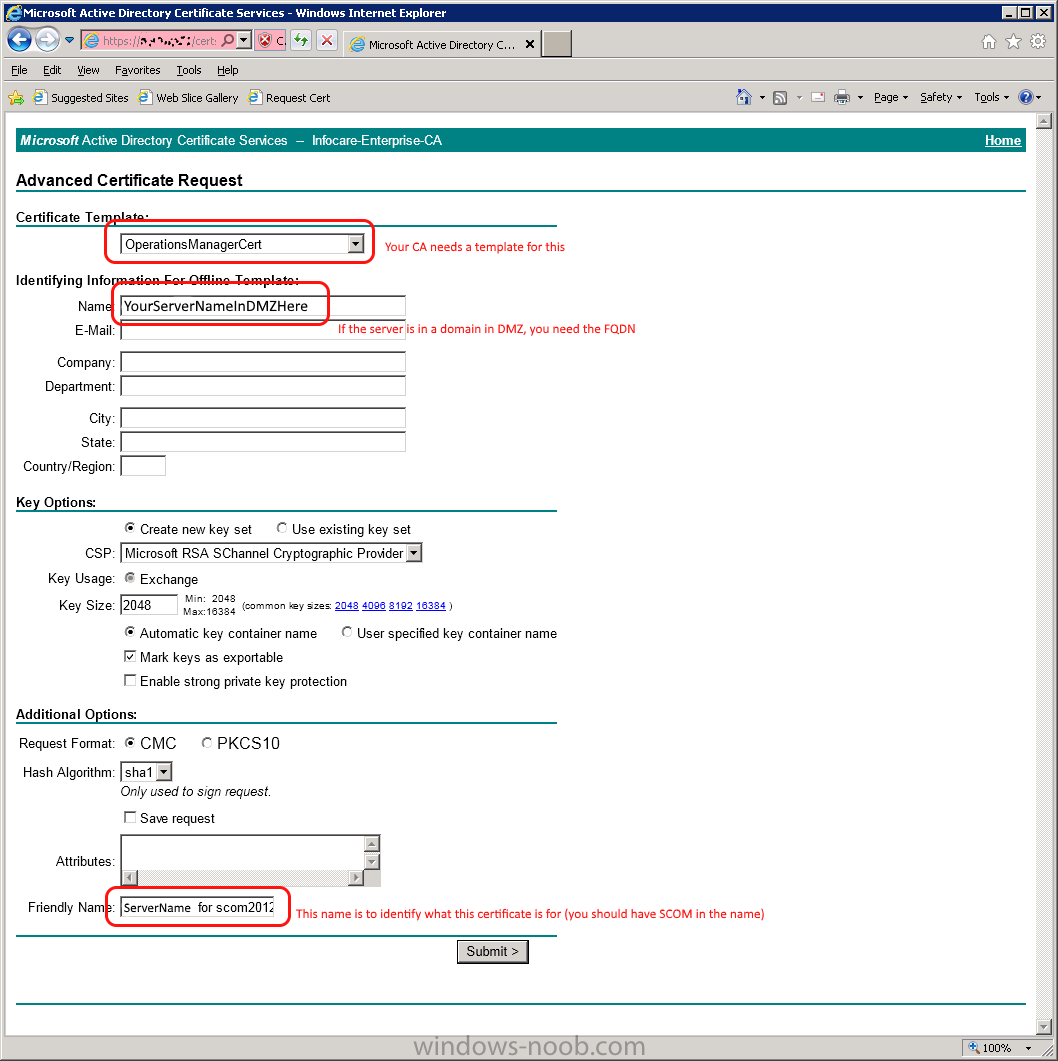
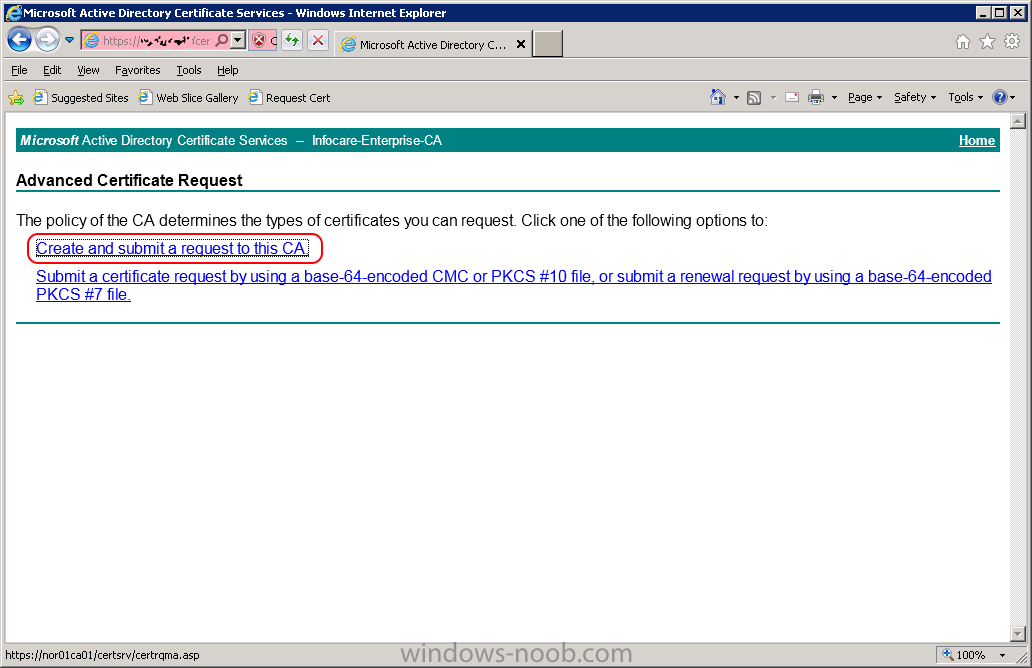
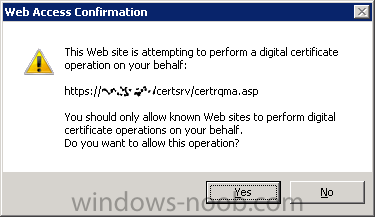
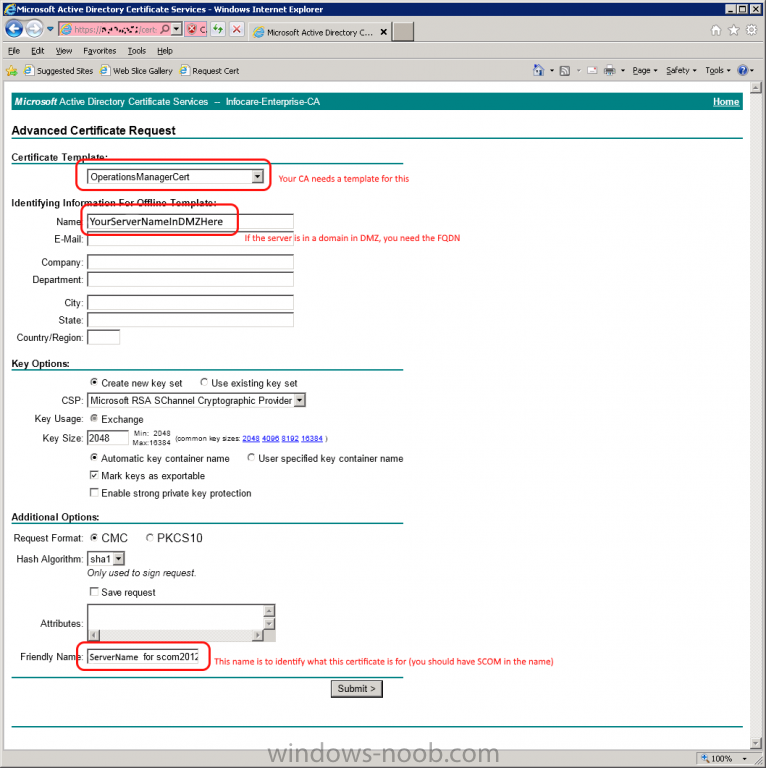
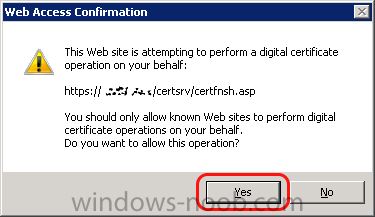
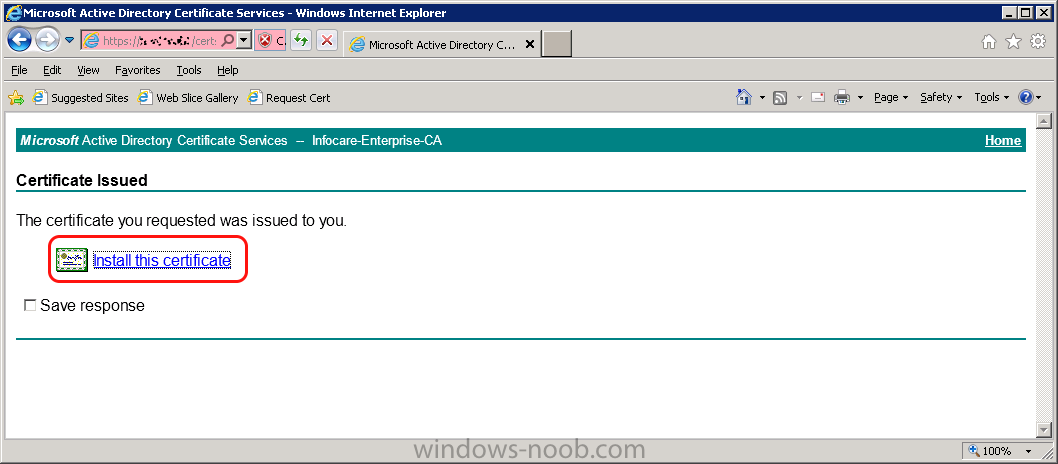
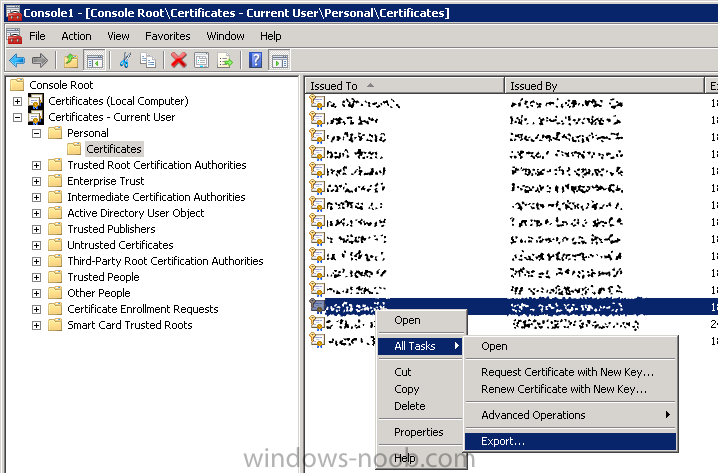
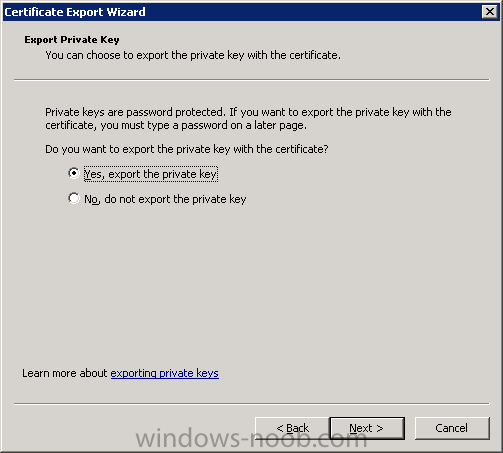
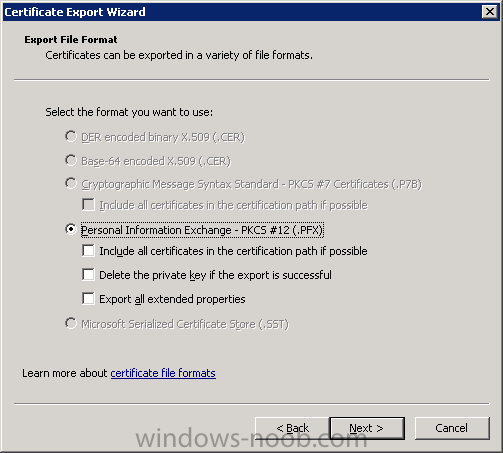
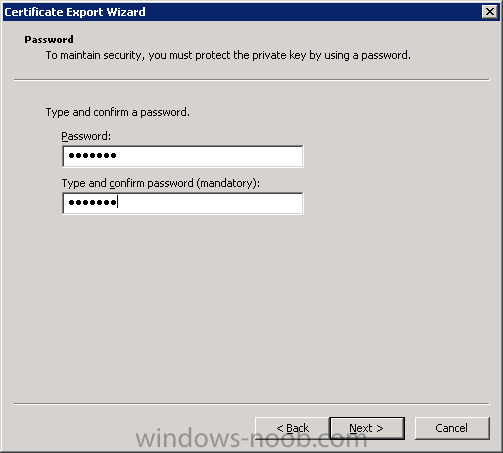
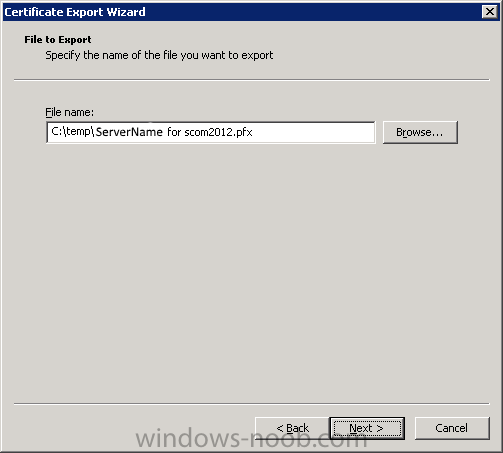
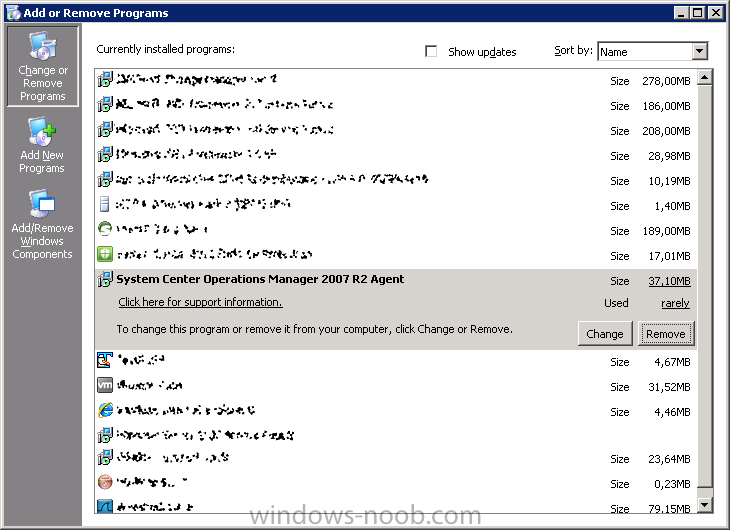
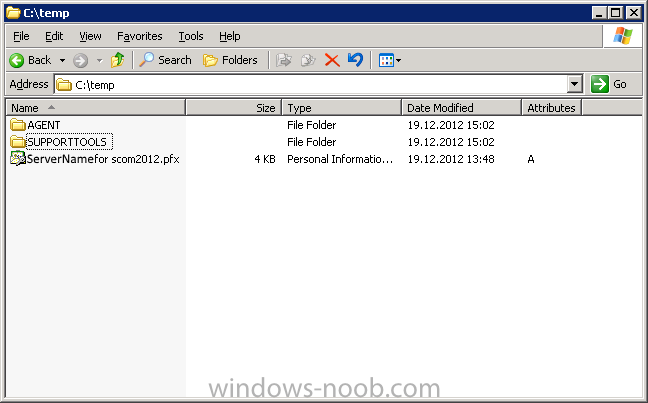
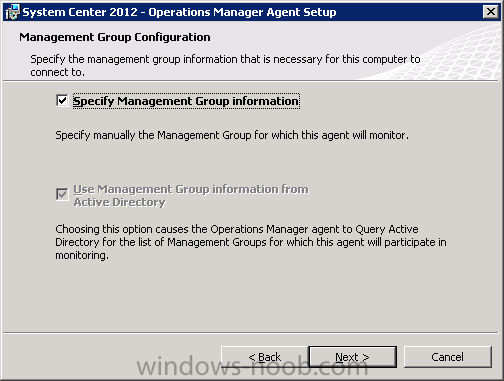
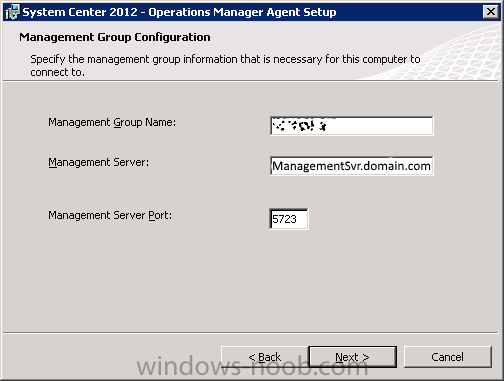
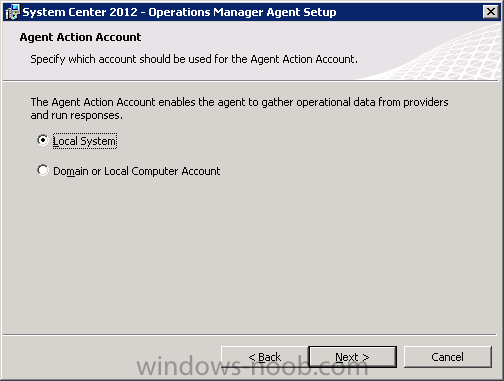
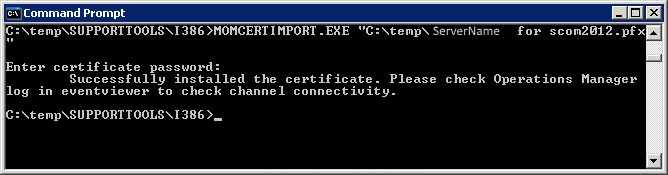
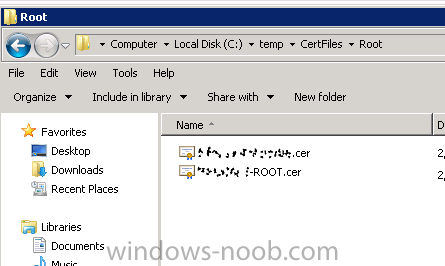
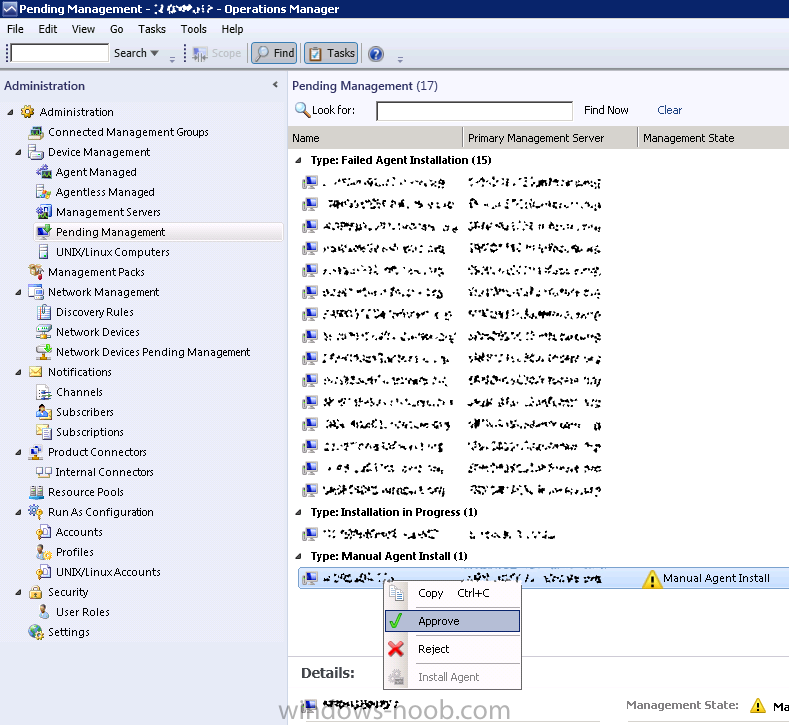
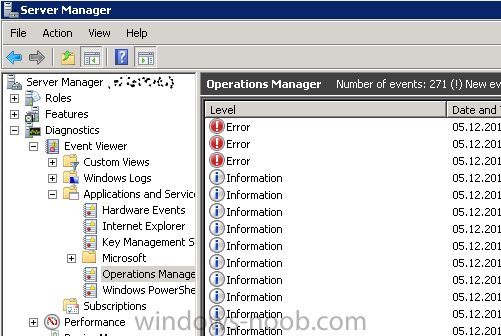
 Same procedure for a gateway server in DMZ 1.1 - Generating the certificate RDP to your Operations Manager (it's a good idea to have all the certificates at one server) Start Internet Explorer and navigate to: https://yourCAserver/certsrv If the server in DMZ is in a domain, you need the FQDN (for example servername.domainindmz.local) If the server is in workgroup, the servername is sufficient Export the Company Root Chain Certificate also! You need both installed on the server in workgroup/domain in DMZ in order for it to communicate with our servers. 1.2 - Exporting the certificate to file Start – run – mmc.exe Add snap-in – Certificate – My User Account Find the Certificate we Generated and installed, right click and choose Export Use a password (you will need it later) 2 - Install agent and certificate Log on to the server in DMZ (remember to map local drive for copying files over) 2.1 - Install agent 2.1.1 - Uninstall the SCOM2007 agent if present 2.1.2 - Copy folders/files needed for install to server C:\temp \\tsclient\D\Backup\Setup\System Center 2012\SCOM\SW_DVD5_Sys_Ctr_Ops_Mgr_Svr_2012_English_MLF_X17-95297\ AGENT SUPPORTTOOLS ServerName for scom2012.pfx 2.1.3 - Install SCOM2012 agent Use momagent.msi : (here C:\temp\AGENT\I386\MOMAGENT.MSI) NB! All certificates use FQDN, so your servers in DMZ need to have a reference to YourManagementServer.yourdomain.com in their HOSTS file Using the IP here will not work, you NEED the FQDN! 2.1.4 - Import Certificate Start – Run – cmd C:\temp\SUPPORTTOOLS\I386\MOMCERTIMPORT.EXE "C:\temp\ServerName for scom2012.pfx" Update! Import the Root chain certificate on the server in workgroup/domain in DMZ also. 2.1.5 - Approve the manual agent in SCOM 2012 console Error handling! Common mistakes is network equipment blocking ports for communication. A quick test it to use telnet on port to see if it can connect or not. Don't forget to use the eventlog! -Tor
-
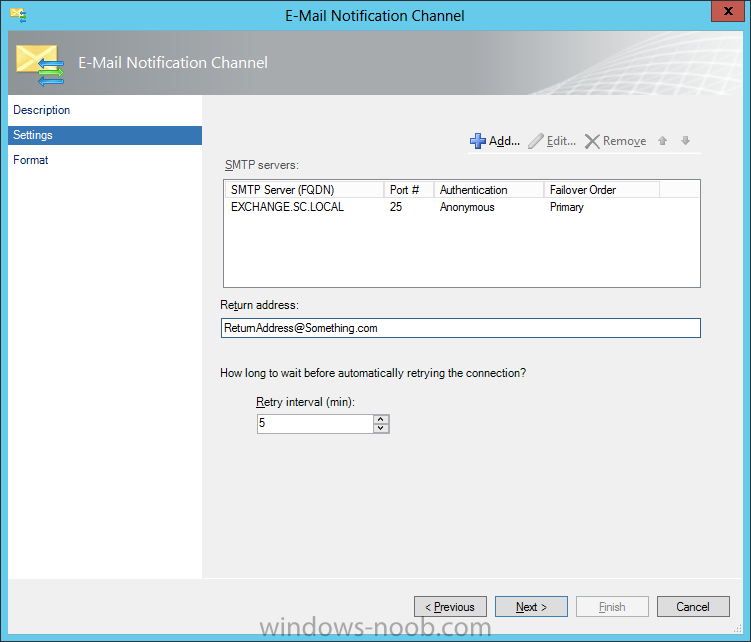
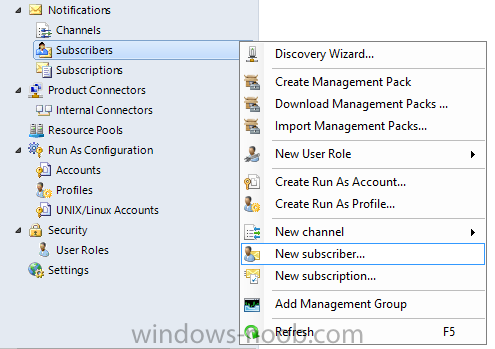
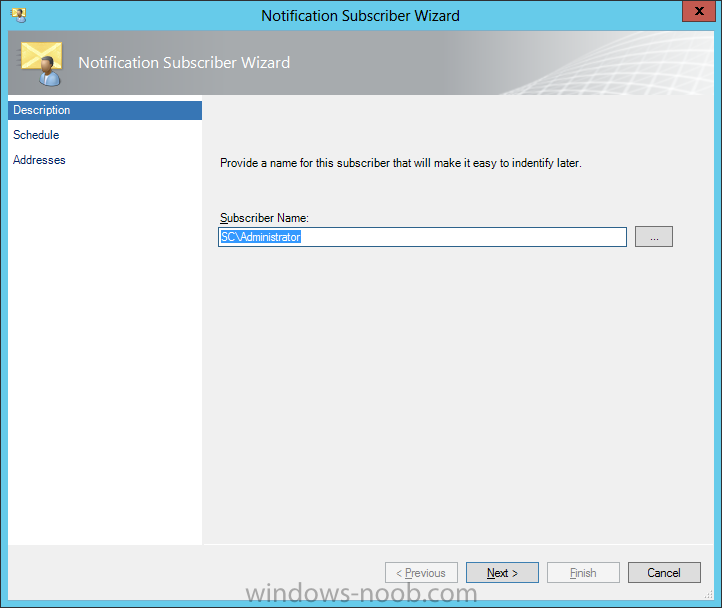
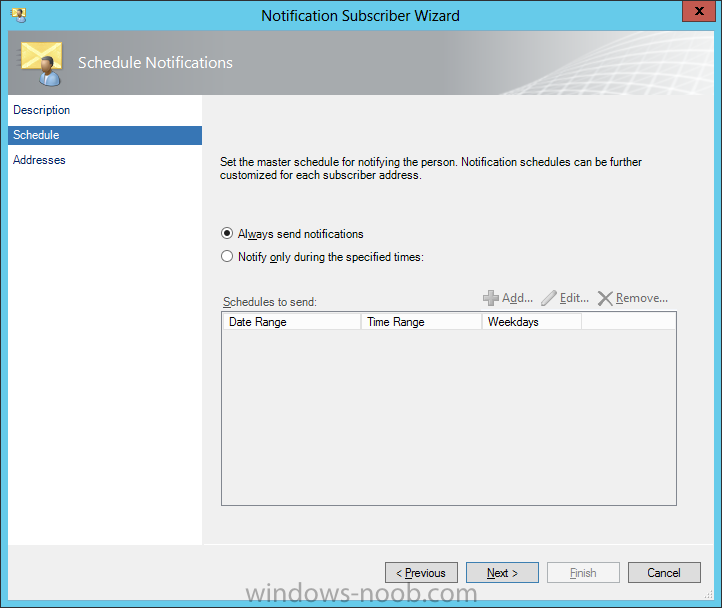
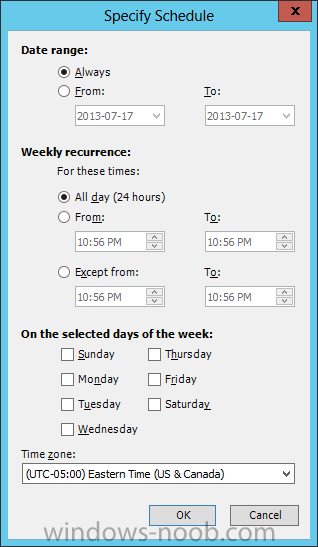
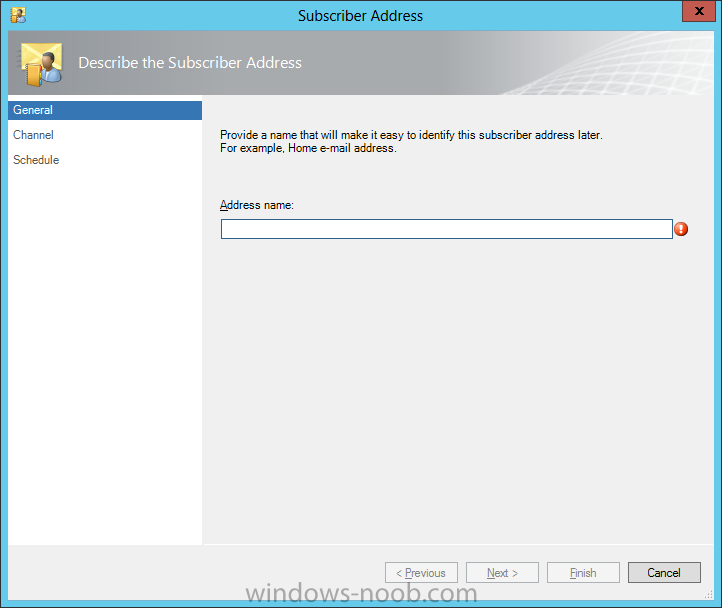
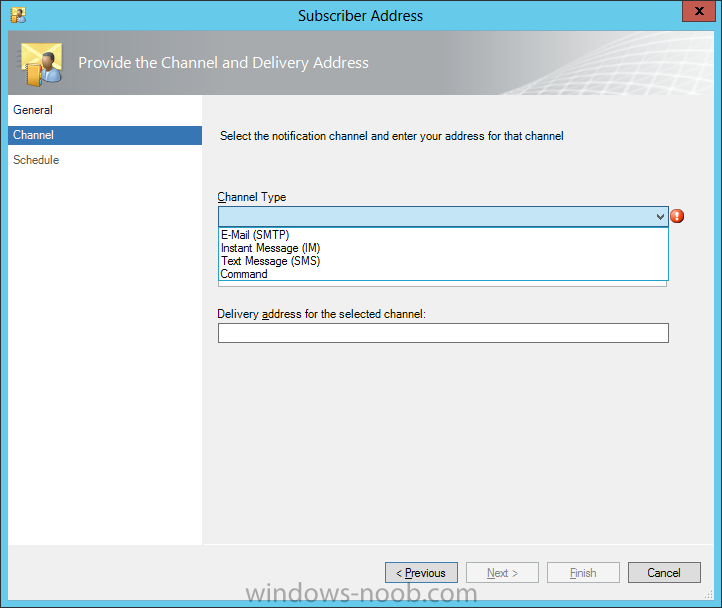
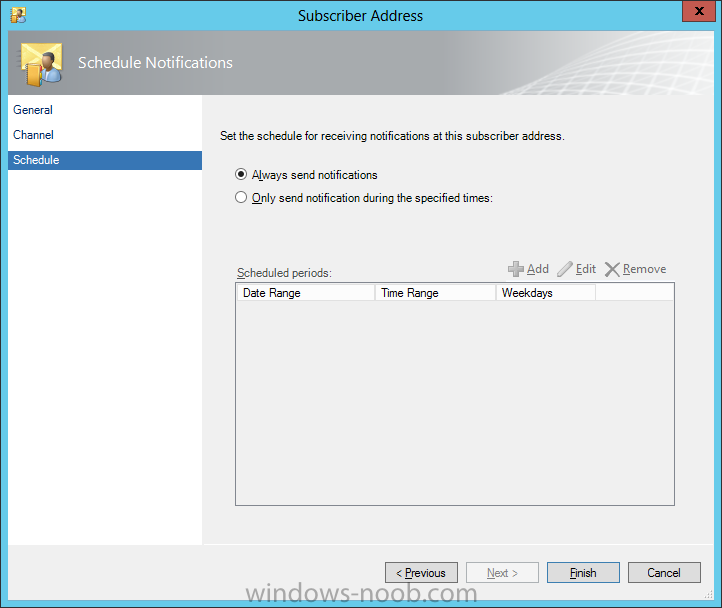
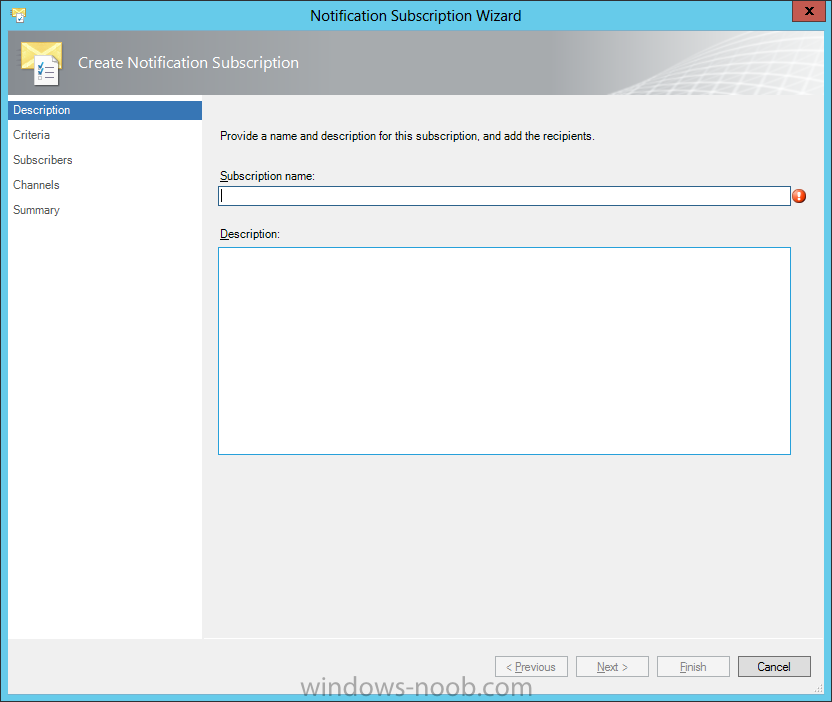
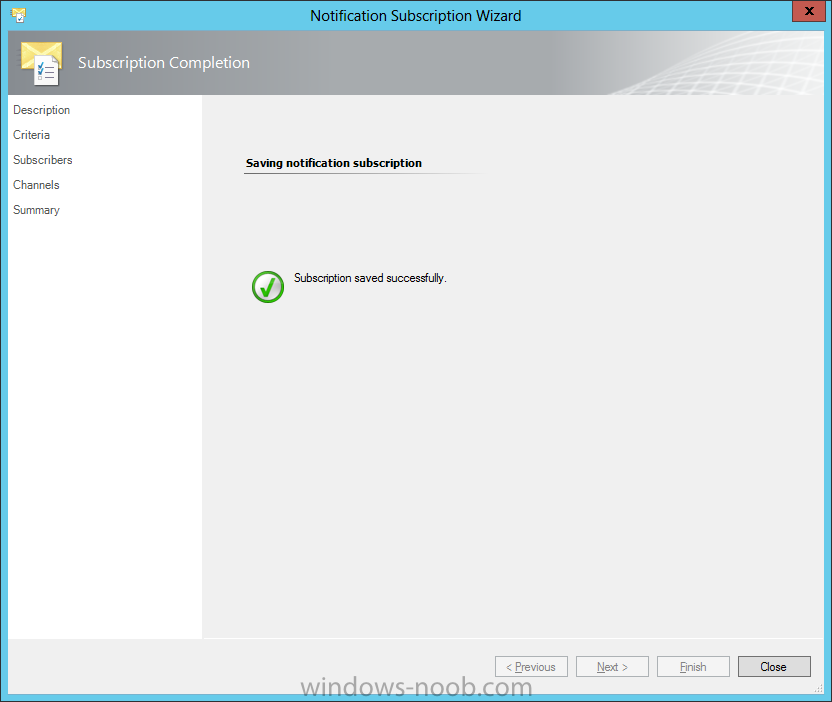
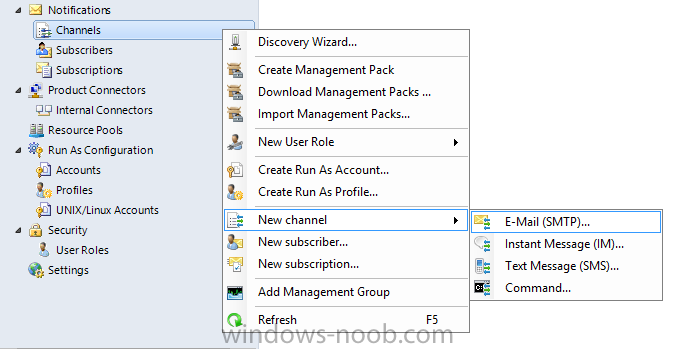
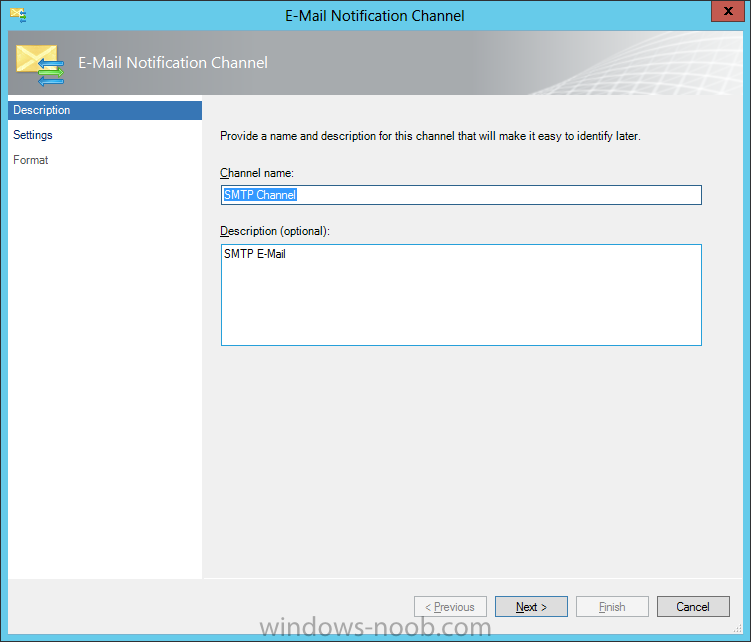
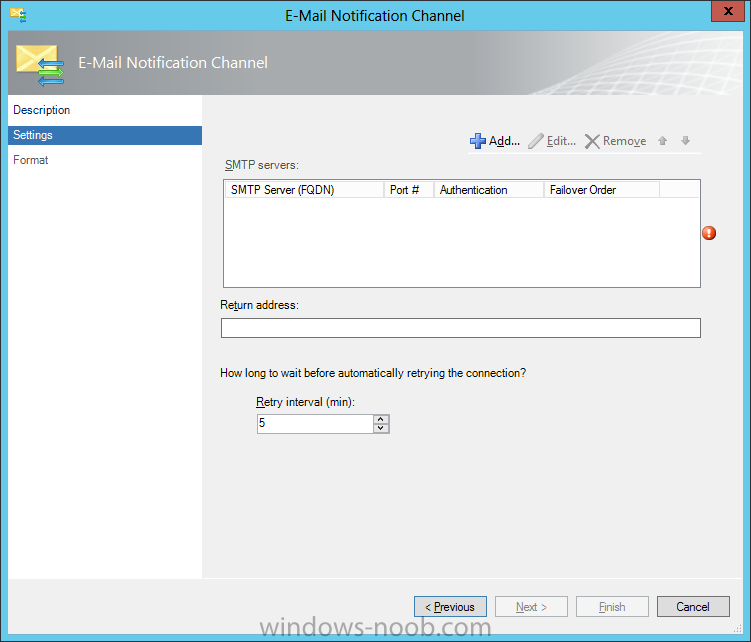
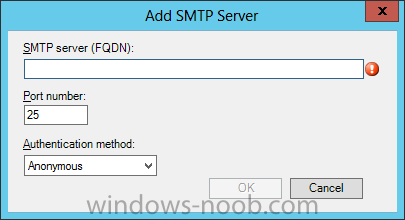
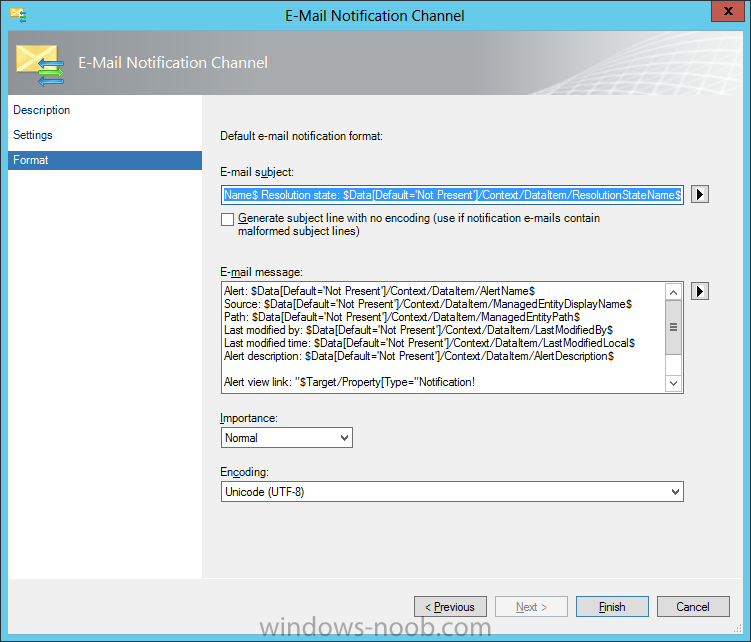
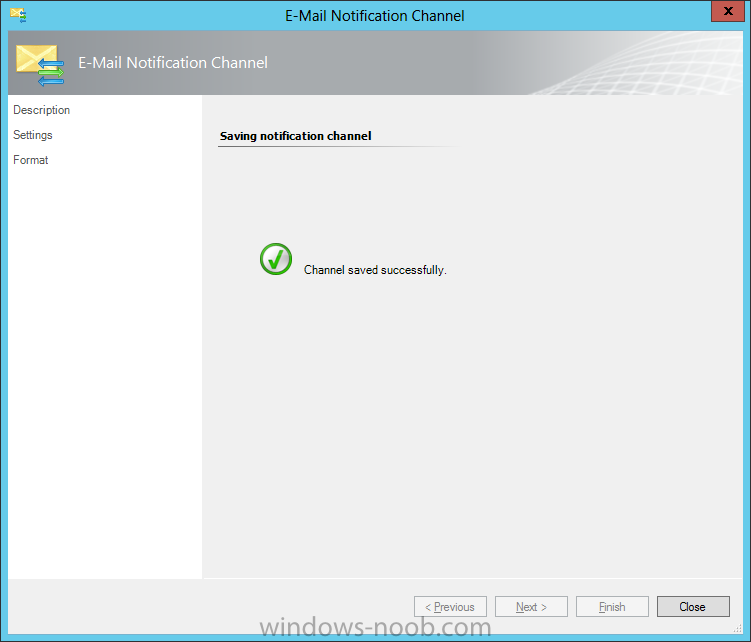
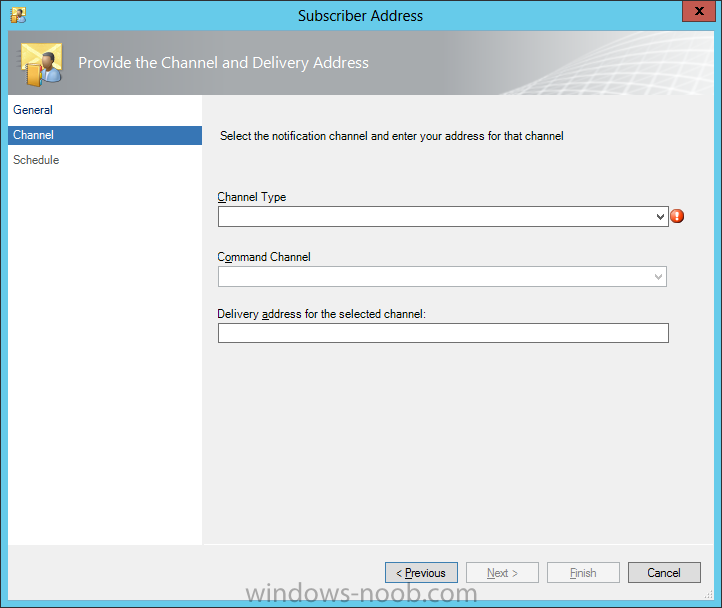
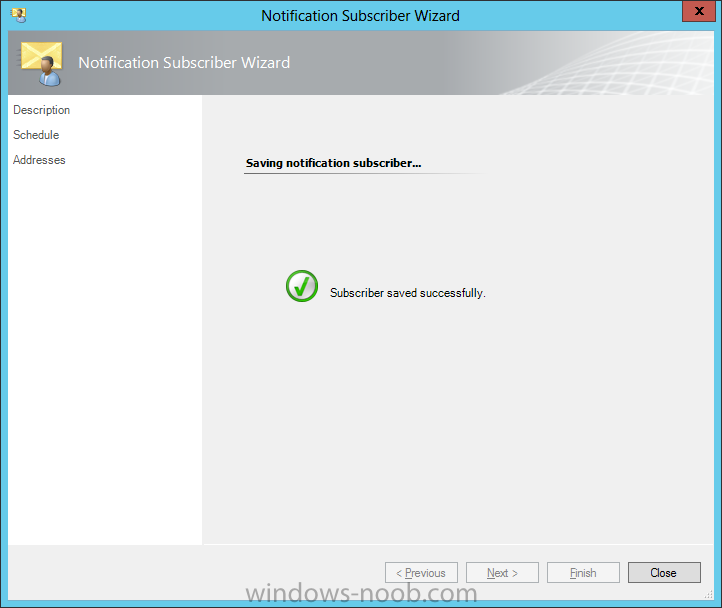
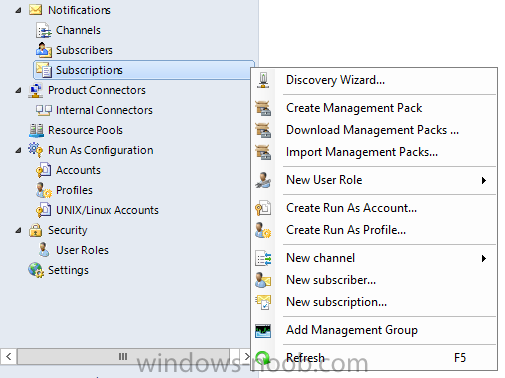
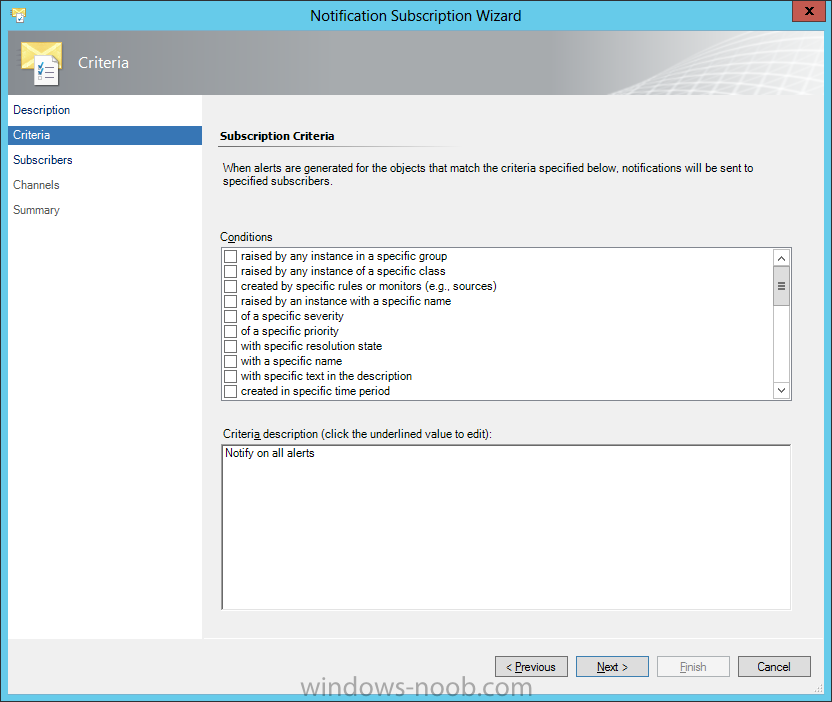
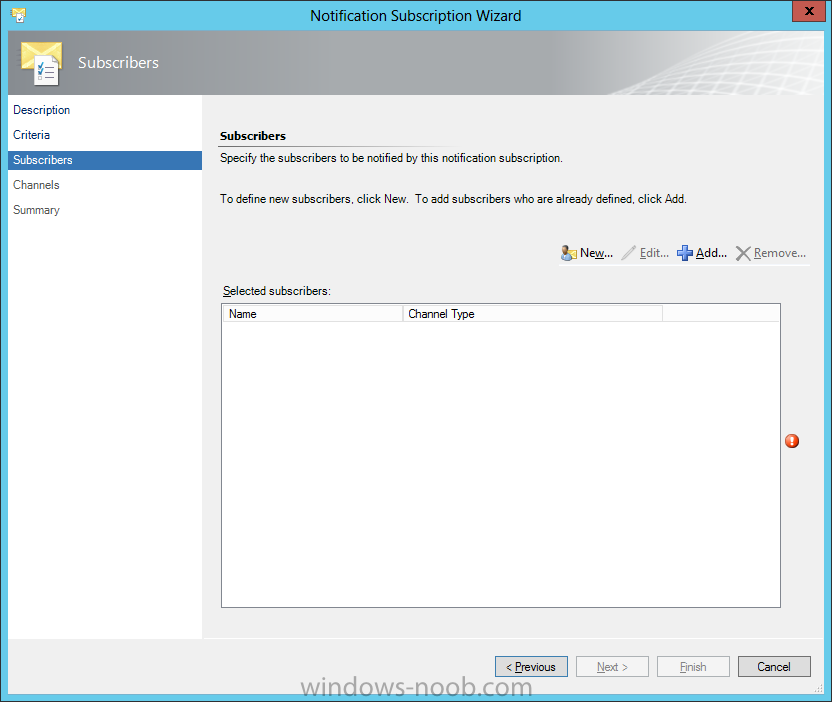
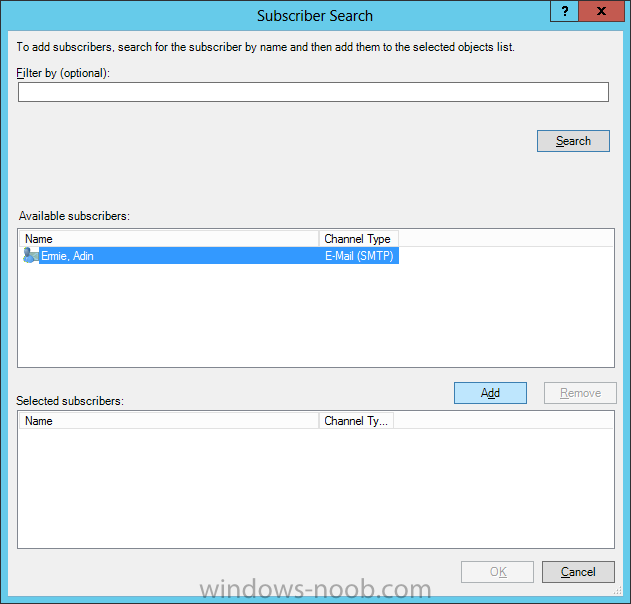
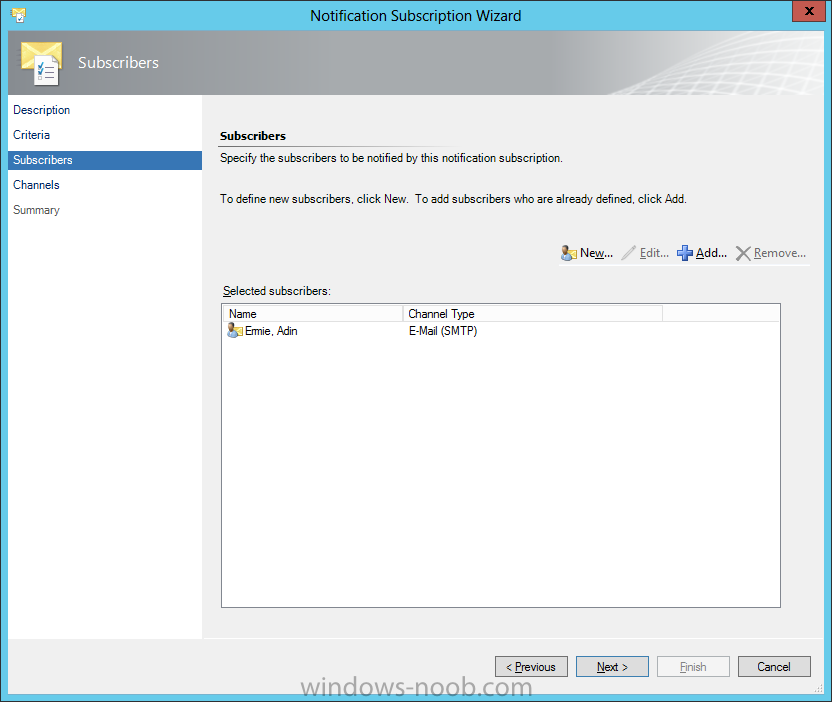
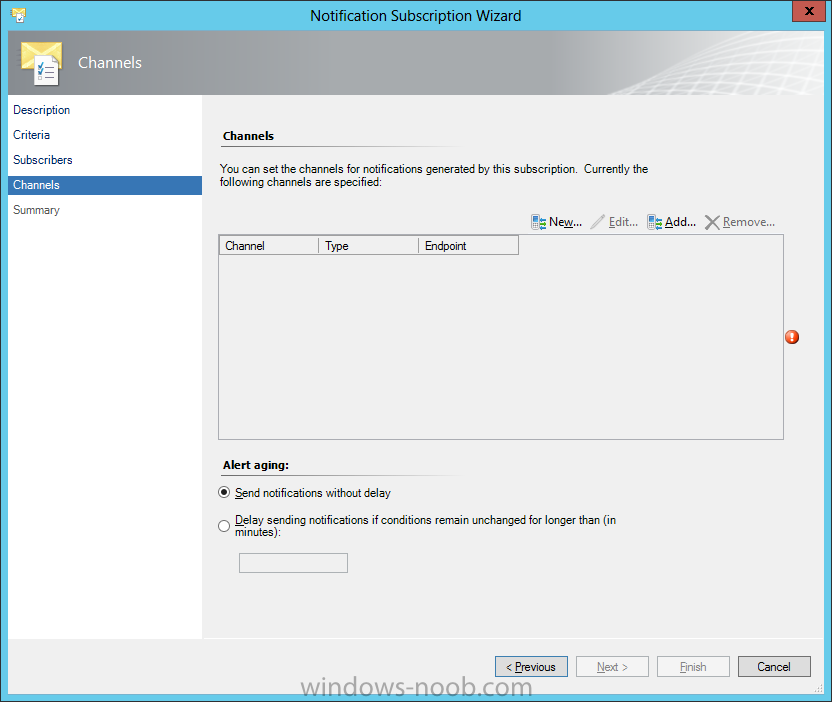
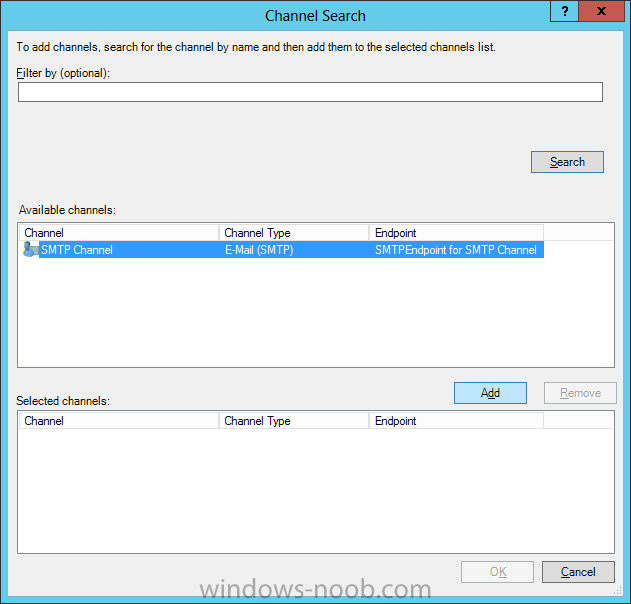
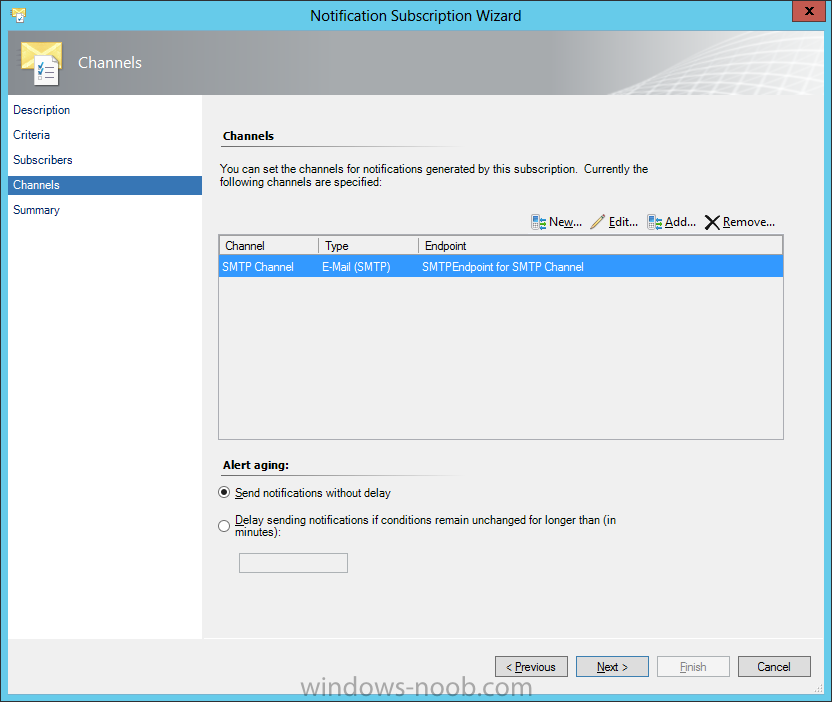
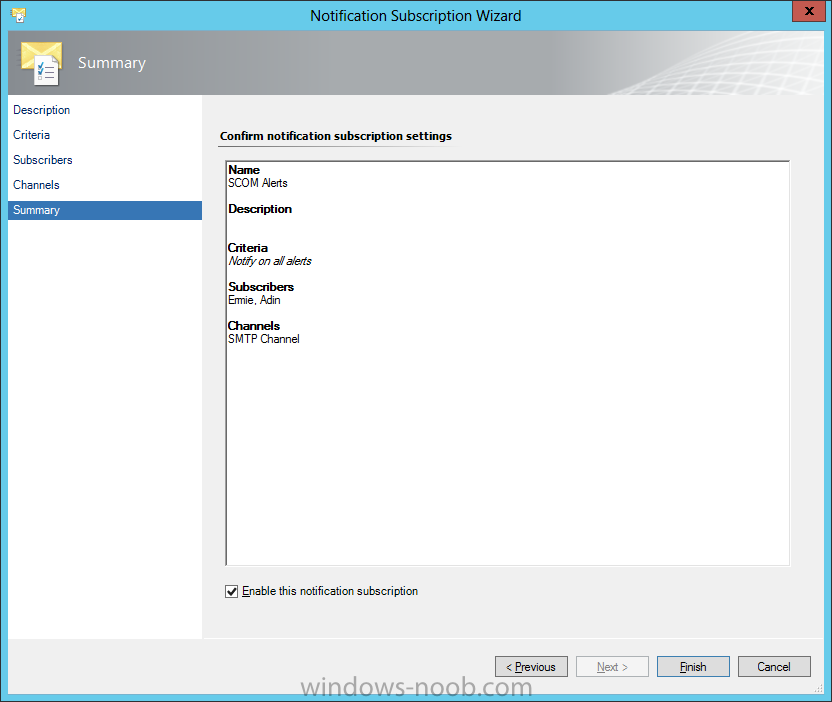
In our last post we imported Management Packs. Now we need to work with the data being collected by SCOM. OK, so we now have SCOM setup, have installed the Agent on systems to monitor, and imported Management Packs to help monitor at the technology platform level. But what do we do with the Alerts that are generated by SCOM? Well, if you are the SCOM Administrator (or you have granted other users access), you can look at the Alerts from the console. But, that means you’re assuming/relying on others to regularly check the console for Alerts. In my personal experience, that’s not really going to happen, thus we have Notification Channels. Start by opening the SCOM console and navigate to the Administration space. You will notice a section called ‘Notifications’, and beneath that section, 3 other items: Channels, Subscribers, and Subscriptions. Channels Start by right clicking on ‘Channels’ and selecting ‘New Channel’. From there select the type of channel you want to create. In this example we are going to create an ‘E-Mail (SMTP)’ channel. On the Description screen, you can accept the defaults for Channel Name and Description, unless you want to provide something specific. Make the applicable decision, and then click Next. On the Settings screen, click the ‘+ Add’ button to enter an SMTP server. Enter the server FQDN, Port Number, and the Authentication Method applicable to your environment, and then click OK. You will be returned to the Settings screen. On here you must enter a Return Address. Please note that this address does not need to be a real email address, so it literally can be anything (i.e. see my example). In a Production environment, you may want to enter a Distribution List for a specific team, but that is a decision you have to make for your implementation. Now click Next. On the Format screen, you can customize what the Email subject will display, along with the information provided in the email. Additionally, you can control the email Importance and Encoding. As an example, from my personal experience, for one SCOM implementation I created 4 different SMTP channels, one for each ‘zone’ (i.e. PROD, UAT, TST, DEV). For the DEV/TST zones, we set the Importance to Low, for UAT we left it at Normal, and for PROD we set it to High. This way when the various teams received the Alert emails (i.e. the SQL team), they could immediately identify which emails (and thus which Alerts) they needed to respond to immediately. Again, this is more of a design/configuration decision. Make the applicable changes and click Finish. You will receive indication that the channel was successfully created. Click Close. Back in the SCOM console your newly created channel will now appear. Congratulations, now you have a channel setup. But, that still doesn’t get Alerts via email to your support team. For that, we need Subscribers. Subscribers To send Alerts via email, SCOM needs email address to send to. So let’s now configure some Subscribers. Start by right clicking on Subscribers and select ‘New Subscriber’. The Notification Subscriber Wizard will start. On the Description screen it asks for a name, and even gives you the ability to look a user up in Active Directory. Note, as per the sentence on the screen, this is just to make it easier to identify. Side Note: Did you notice the typo/spelling mistake? It says “indentify” and not “identify”. Enter a name and then click Next. On the Schedule screen, you can choose either to ‘Always send notifications’ or ‘Notify only during the specified times’. If you choose the second option, click the Add button to create the required schedule. For our example we are going to accept the default to ‘Always send notifications’. Make you choice and click Next. If you want to specify a schedule, make the applicable changes on the prompt provided and click OK. Now you need to add the email address that will be used for this Subscriber. Click the Add button. This will cause another wizard to launch, the Subscriber Address wizard. Again you are prompted for a name, but only for the use of identification later, and does not factor into how the Notifications work. From my personal experience, on this screen I would add the users name so that I knew who it was for (i.e. in case from the email address it is not apparent). In my example, I used my own name, and entered “Ermie, Adin”. Make your decision and then click Next. On the Channel screen, you need to specify the channel to use for Notifications for this individual. Click the down-arrow for the selection list. In our example, since we only have an SMTP Channel setup/configured, we will choose ‘Email (SMTP)’. You will also be required to supply a Delivery Address for use with the selected channel. Make the appropriate selection and enter the required information and then click Next. On the Schedule screen, you can create a schedule (exactly like the option we had before) but this is specific for the user that you are adding. This may seem confusing right now, because, aren’t we already adding a user as a subscriber? Yes, but you can use the Subscriber option like an email distribution list. For example, the very first Subscriber ‘Name’ that you enter could be the name of a team, like say “SQL Team”. You can then use the Subscriber Address wizard to add the individual team members email addresses. You may have to try some different configurations to find the right combination that will work for you. Make applicable configurations and then click Finish. Back on the Notification Subscriber Wizard, which is where you will be after clicking Finish on the Subscriber Address wizard, click Finish. The wizard will then go off and create the Subscriber, and you will receive confirmation once it is complete. Click Close. Returning to the SCOM console you will now see your Subscriber that you created. You now have Channels setup, and Subscribers to send to, but you still need a trigger to send the Notifications. We are now going to configure the final piece, Subscriptions. Subscriptions OK, we now need a way to trigger SCOM to send Alert notifications to our Subscribers. We do this through Subscriptions. Start by right clicking on Subscriptions and select ‘New Subscription’. On the Description screen, create a name for the Subscription. For example, from my personal experience, I would create a subscription based on zone and technology (i.e. PROD – SQL Alerts). Enter a name, and click Next. On the Criteria screen, you can modify the conditions that will trigger the Alert to be sent to the Subscribers via the Subscription. NOTE: This guide does not cover the vast and complex options on Condition customization. I would recommend searching online if you need help, and best of all, try different options. Make your customizations and then click Next. On the Subscribers screen, click the Add button. From here, you can search for any existing Subscribers you have already created. Select them (you can add more than one), press Add, and then click OK. Your added Subscribers will now appear in the list. Click Next. Now you can add the Channels to use for this Subscription. Click the Add button. Similar to the Subscribers search, you can search for Channels. Find the Channel(s) you want to add, click the Add button, and then click OK. You Channel(s) will now be displayed in the list. Notice that on this screen you can also customize a delay in notifications being sent out. Why would you want to have a delay? Here’s an example from my personal experience. Imagine that you are part of an Operations team that is on-call and paged when there are issues with Production servers. You have a Subscriber/Subscription setup specifically for paging. When a system that is being monitored by SCOM loses its ability to communicate with the Agent installed, it throws an Alert about the Agent being unreachable. SCOM also attempts to ping the system to confirm that there is an issue with either just the SCOM Agent, or if the system is in fact down. If ICMP is blocked in the environment, even if there is only an issue with the SCOM Agent, the “Server down” Alert will still be generated. This will then cause the individual to be paged to respond. This sounds fine, and normally it is. However, sometimes SCOM can lose connectivity with the Agent for one reason or another, though it may only last a few minutes (i.e. network bandwidth, backups running, etc.). If there is no delay in sending notifications, then even if SCOM loses connectivity for a moment, someone will be paged. If there is a delay enabled, and SCOM loses connectivity to the Agent and that connection is re-established within the delay timeframe, then no notification/paging will occur. I speak from personal experience, being paged multiple times in a night, just because SCOM lost connectivity to the Agent; not that the server(s) were actually down! Make applicable changes, and click Next. Review the information on the Summary screen, and then click Finish. You will receive confirmation that the Subscription was created successfully, then click Close. Back in the SCOM console, your Subscription will now be present. Excellent, you now have SCOM setup to notify individuals of Alerts based on any customizations you need. That concludes the Configuration Guides for System Center 2012 Operations Manager (at least for what I can think of for now). If anyone has any questions or suggestions on what they need help with, or would like a guide on, please message me.


-
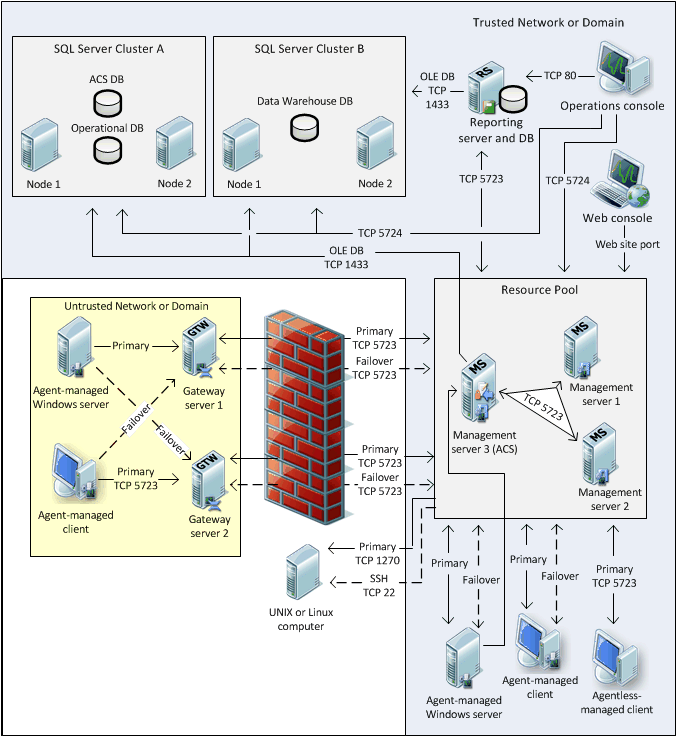
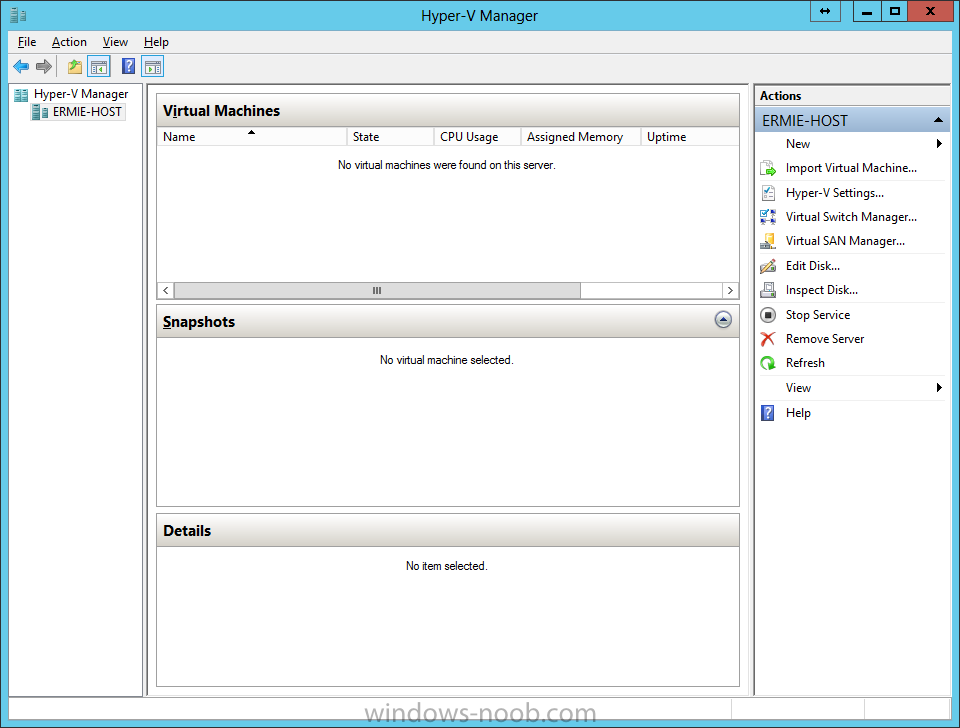
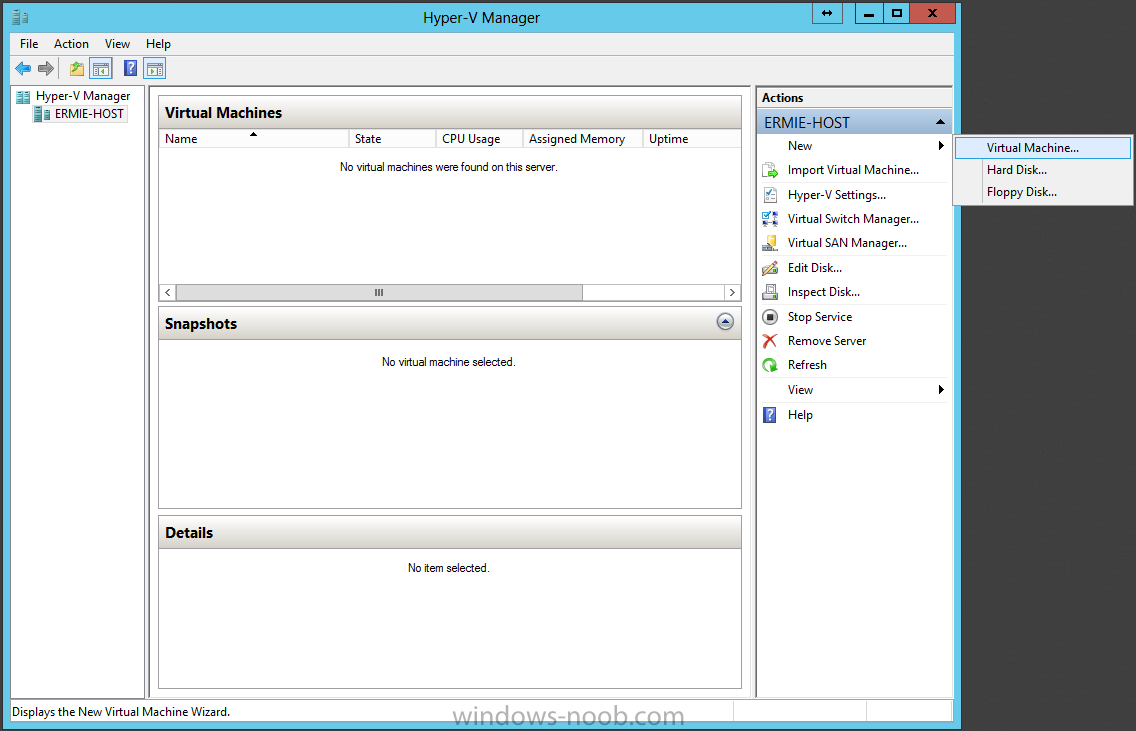
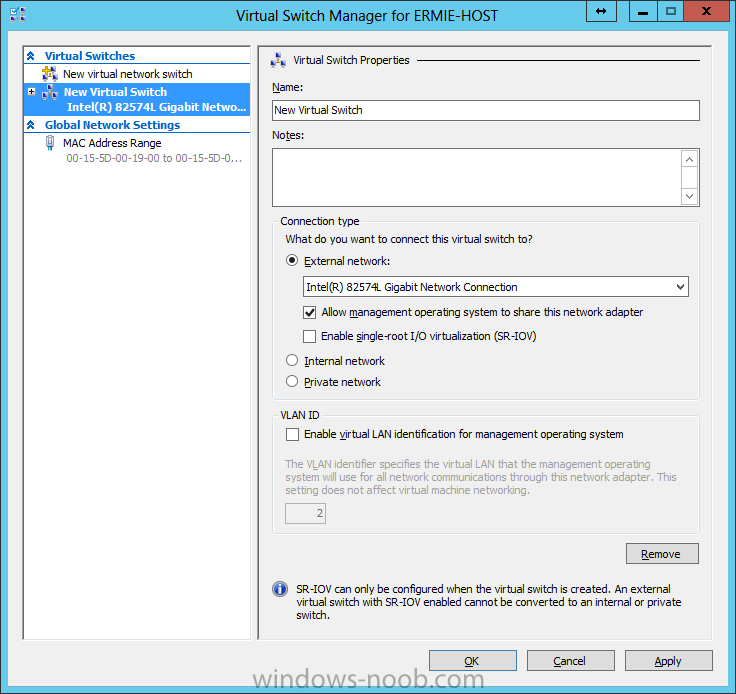
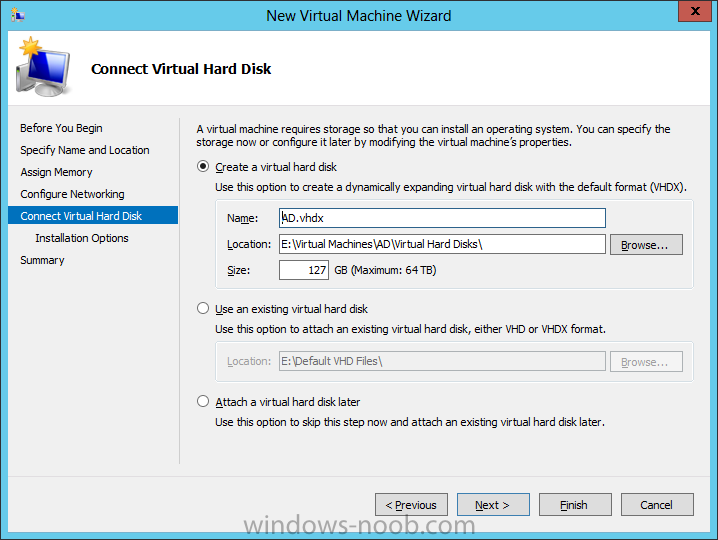
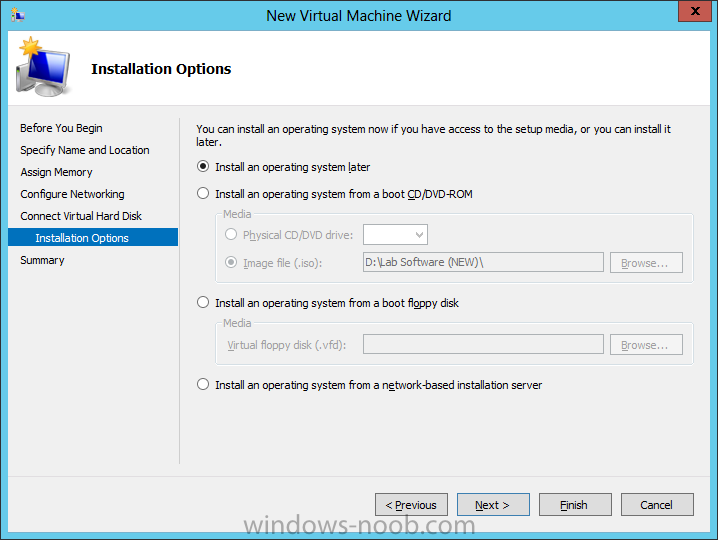
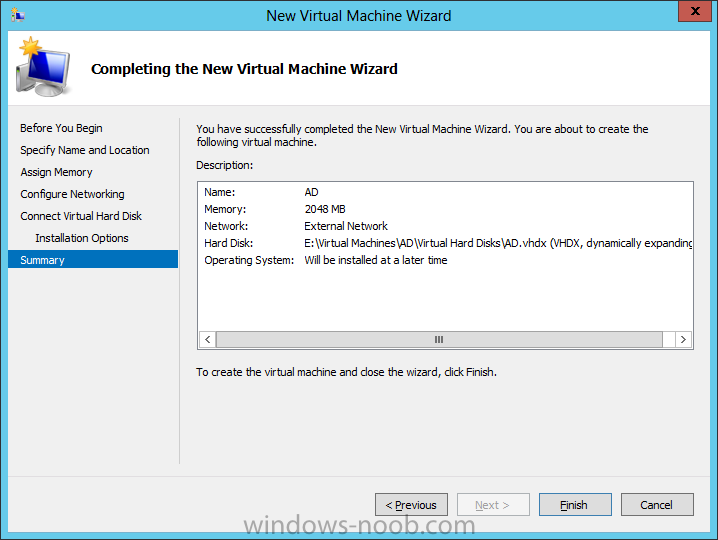
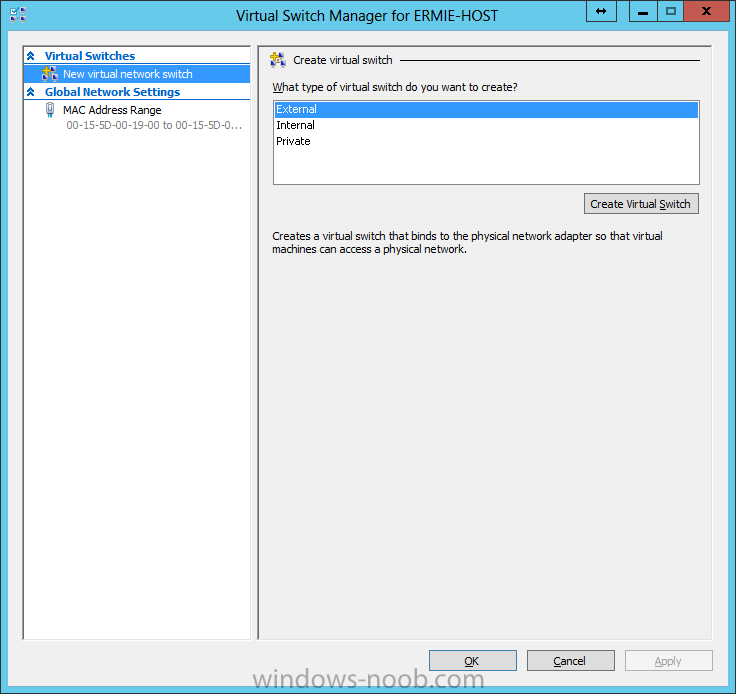
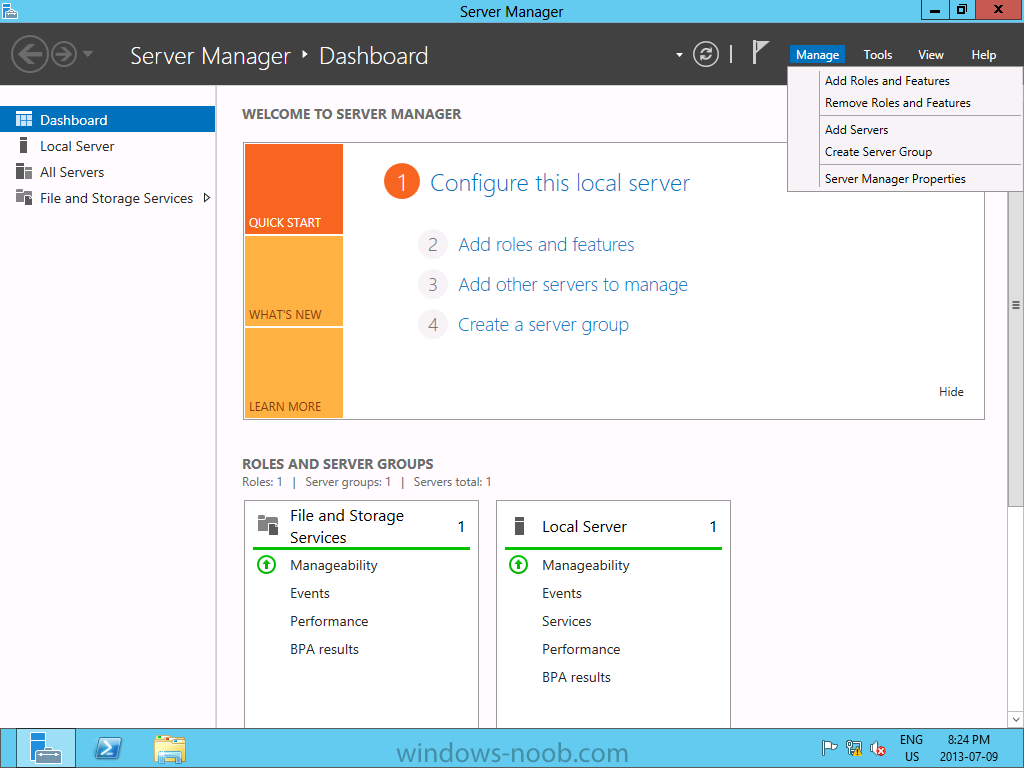
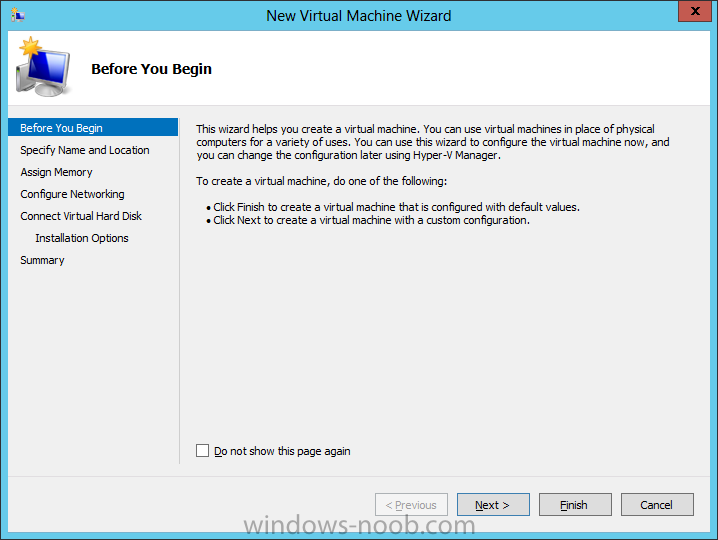
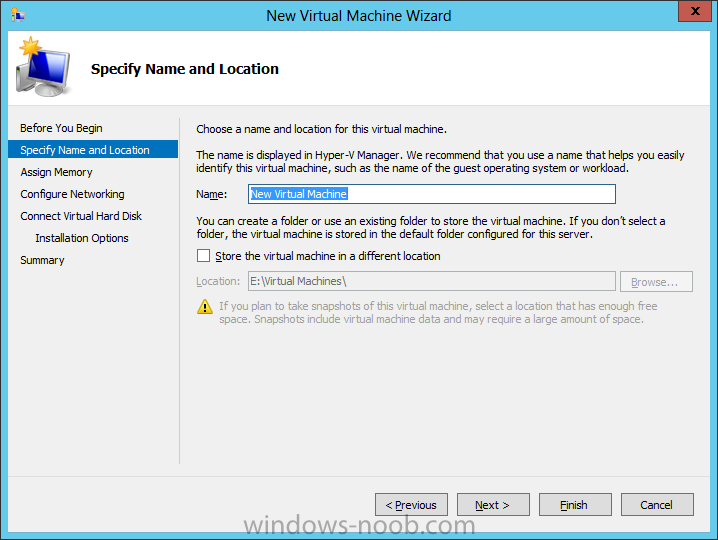
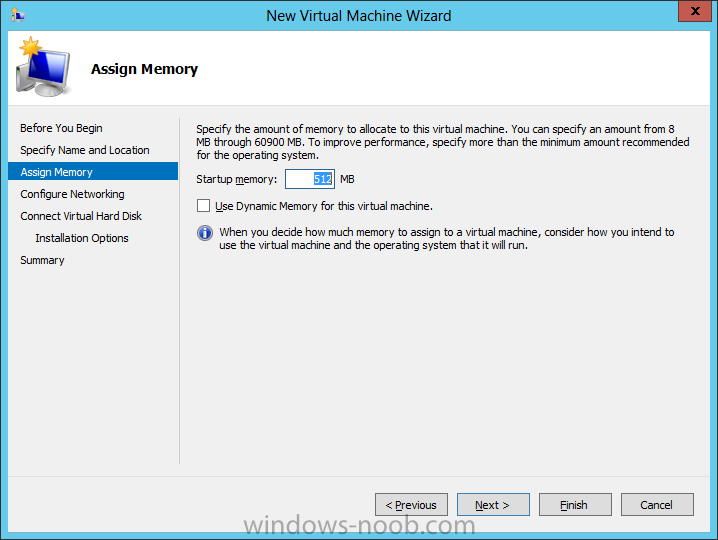
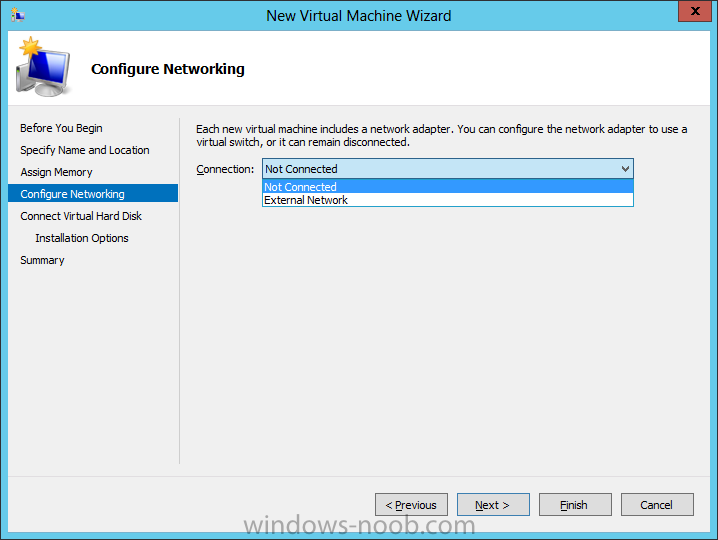
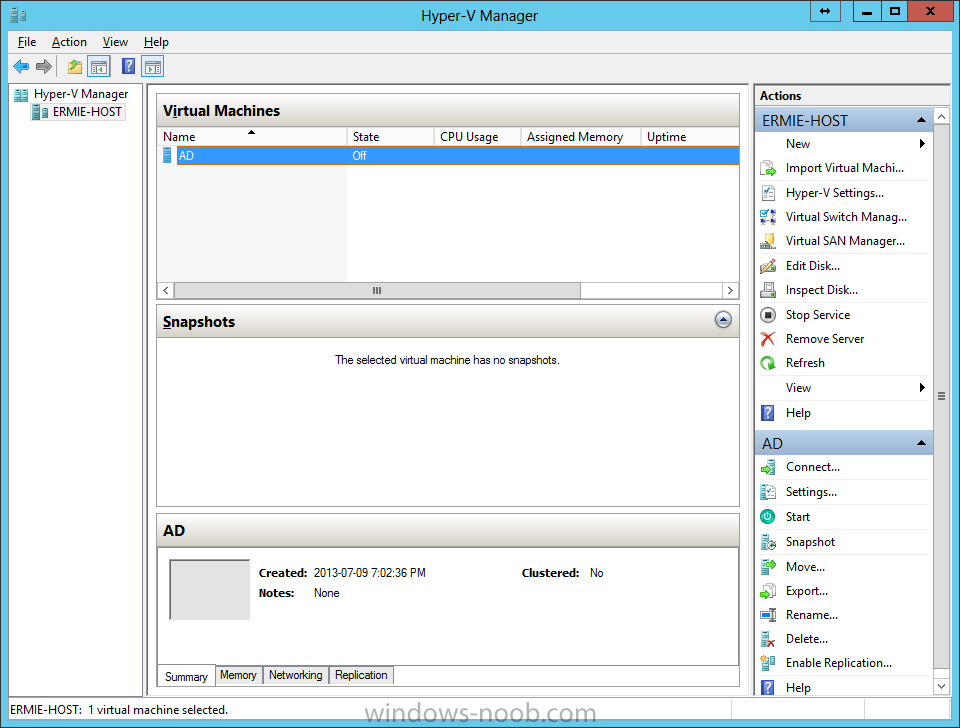
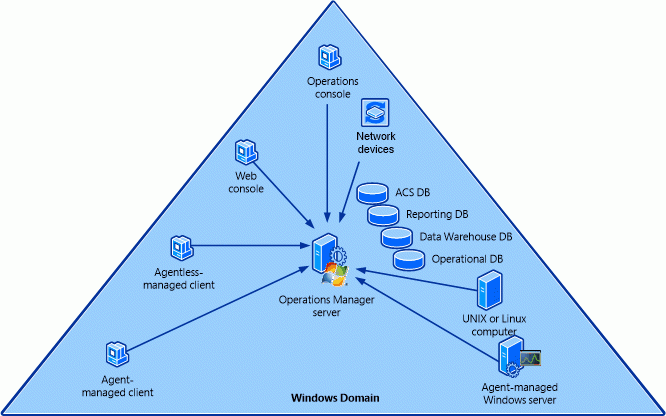
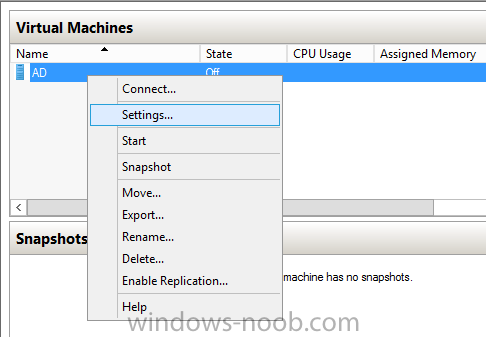
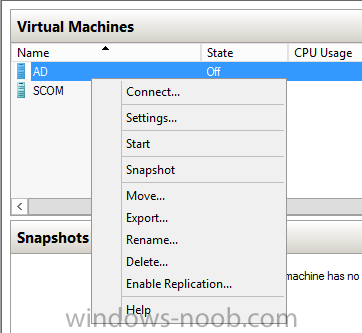
SCOM 2012 SP1 in a LAB – Installation (Part A – Create The Lab Environment) TechNet Recommended Reading: Release Notes for the System Center 2012 Operations Manager SP1: http://technet.microsoft.com/en-us/library/jj656651.aspx Deploying System Center 2012 - Operations Manager: http://technet.microsoft.com/en-us/library/hh278852.aspx System Requirements: http://technet.microsoft.com/en-us/library/jj656654.aspx Getting Started with System Center 2012 - Operations Manager: http://technet.microsoft.com/en-us/library/hh509025.aspx What’s New in Operations Manager: http://go.microsoft.com/fwlink/p/?LinkID=223462 Key Concepts for Operations Manager: http://go.microsoft.com/fwlink/p/?LinkID=224022 Operations Manager Release Notes: http://go.microsoft.com/fwlink/?LinkID=221147 Operations Manager for System Center 2012 Supported Configurations: http://go.microsoft.com/fwlink/p/?LinkId=223642 Deployment Guide for Operations Manager: http://go.microsoft.com/fwlink/p/?LinkID=213291 Operations Guide for Operations Manager: http://go.microsoft.com/fwlink/p/?LinkID=207751 Hardware Requirements Note: The following page on TechNet describes the recommend hardware requirements for the Management Server(s) along with other features. Use this information to help plan for hardware requirements for your Management Server(s). Management Server Disk space: %SYSTEMDRIVE% requires at least 1024 MB free hard disk space. Server Operating System: must be Windows Server 2008 R2 SP1, Windows Server 2012, or Windows Server 2012 Core Installation. Processor Architecture: must be x64. Windows PowerShell version: Windows PowerShell version 2.0, or Windows PowerShell version 3.0. Windows Remote Management: Windows Remote Management must be enabled for the management server. .NET Framework 4 is required. Installation There are 2 different deployment scenarios that you can use: Single-Server, and Distributed. Microsoft has created 2 diagrams to show the different deployments. In our example, we are going to use the Single-Server type. Single-Server Deployment of Operations Manager Distributed Deployment of Operations Manager For the purpose of our demonstration and simplicity, we are going to use the single server method, and install all features/elements within 1 server, this includes the databases, web console, reporting, ACS, etc. Introduction: I use Hyper-V in my LAB and that's what all these virtual machines will be running on. In my lab, I have Windows Server 2012 Datacenter installed as the server OS on the host machine. All other virtual machines will be running Windows Server 2012 Standard edition, with the graphical user interface (GUI). My hardware consists of the following: § Intel Xeon E5-2620 § Asus P90X79 WS § 64 GB G.Skill Ripjaws Z Series § 2 x 256 GB Samsung 840 Pro Series SSD High Level Plan Here is a high level of what we are going to complete in this initial part of the series. 1. Create the Lab Environment 2. Install the Operating System 3. Install Active Directory Domain Services 4. Install SQL Server 5. Install System Center Operations Manager In a later posts, we will also cover installing agents, reporting/dashboards, management packs, ACS, etc. So now let’s start with the first part, creating the lab environment. Create the Lab Environment: Hyper-V Configuration As mentioned, my environment uses Hyper-V. So, we’re going to start by configuring Hyper-V for our needs, and creating the Virtual Machines (VMs) required for our lab. The first thing we need to do is setup a Virtual Switch for the VMs to connect through. Launch Server Manager, click on Tools, and select Hyper-V Manager. When Hyper-V loads, it will have nothing in it. Even if we were to create a VM, it wouldn’t have a network connection to use. So we’ll start with creating a Virtual Switch. As you can from my screenshot, I have 2 LAN ports on my host. One of them has a connection to my home network and the Internet. In the Hyper-V Manager, click the Virtual Switch Manager from the Actions pane. Now, click on the Create Virtual Switch button. From here, you now need to configure the virtual switch that your VMs will use. Give it a name to clearly identify it (in my case I called it ‘External Network’), and choose the connection type. For more information about virtual networks, see the following TechNet article: http://technet.microsoft.com/en-us/library/cc816585(v=ws.10).aspx. Here is an excerpt from the article: External virtual networks. Use this type when you want to provide virtual machines with access to a physical network to communicate with externally located servers and clients. This type of virtual network also allows virtual machines on the same virtualization server to communicate with each other. This type of network may also be available for use by the management operating system, depending on how you configure the networking. (The management operating system runs the Hyper-V role.) For more information, see “A closer look at external virtual networks” later in this topic. Internal virtual networks. Use this type when you want to allow communication between virtual machines on the same virtualization server and between virtual machines and the management operating system. This type of virtual network is commonly used to build a test environment in which you need to connect to the virtual machines from the management operating system. An internal virtual network is not bound to a physical network adapter. As a result, an internal virtual network is isolated from all external network traffic. Private virtual networks. Use this type when you want to allow communication only between virtual machines on the same virtualization server. A private virtual network is not bound to a physical network adapter. A private virtual network is isolated from all external network traffic on the virtualization server, as well any network traffic between the management operating system and the external network. This type of network is useful when you need to create an isolated networking environment, such as an isolated test domain. For our demonstration, we are going to use an External Network so that the VMs can communicate with the Host system. Make all the appropriate selections and so forth, and then press OK. You may encounter the following warning message. This is because we are remotely connecting to the Host machine using the same network connection that we are about to setup as a Virtual Switch (hence selecting the ‘Allow management operating system to share this network adapter’ checkbox). Press ‘Yes’ to the dialog. Now that we have the virtual switch setup, we can start creating VMs for our lab. Create the Virtual Machines Let’s now create the VM’s we will need for the lab, specifically one for Active Directory, and another for SCOM (since we are install all roles within the same server). In Hyper-V Manager, from the Actions pane, click on New and choose Virtual Machine. On the New Virtual Machine wizard beginning screen, click read the information presented and then click Next. Enter a name for the VM. Note that this is NOT the name the VM will have within the Operating System (unless you name it the same), but rather, used as an identifier in Hyper-V Manager. After you have entered a name, click Next. Now assign the amount of memory you want your VM to have, and then press Next. This is the screen where you connect your VM to the network that we created, then press Next. This is the screen where you configure how large a hard drive the VM will have. Make the appropriate customizations and click Next. For the Installation Options, choose if you will install an OS later, or if you want to use an ISO, then click Next. On the Summary screen, review your selections and entries, and click Finish. Once the VM is created, it will appear in the Hyper-V Manager. If you want to configure further settings, like the number of CPUs and mounting an OS ISO, right click on the VM and choose Settings or click on Settings from the Actions pane. Repeat these steps for each VM you need to create, in our case one for Active Directory and another for SCOM. Here are the settings I have used for each of the VM’s: Active Directory: Virtual Machine Name: AD Memory: 2048 MB NOTE: Active Directory doesn't need 2 GB of RAM, it will run fine with 512 MB. I just increased the RAM so that the OS would install/respond faster. CPUs: 2 OS: Windows Server 2012 SCOM: Virtual Machine Name: SCOM Memory: 8192 MBNOTE: You may need to increase the amount of RAM this VM has, depending on performance. CPUs: 2 OS: Windows Server 2012 In the next part, we will install the Operating System, so stay tuned.


- 1 reply
-
- 2
-

-
- SCOM
- Operations Manager
- (and 3 more)
-
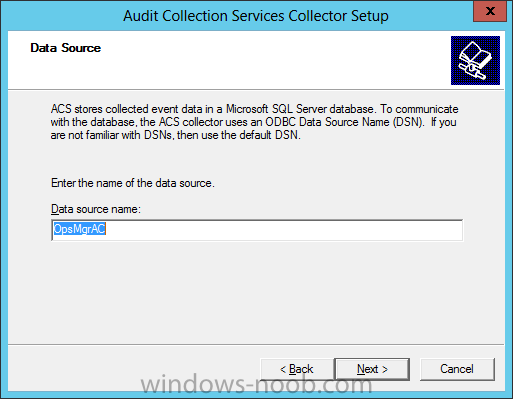
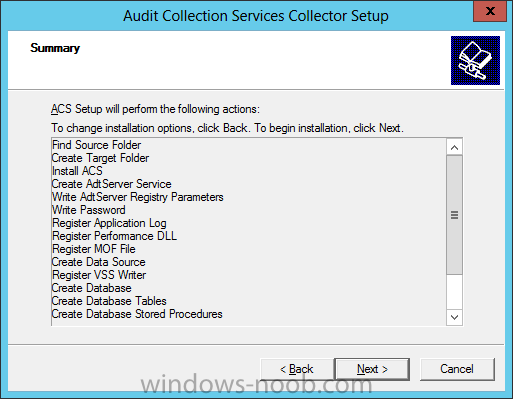
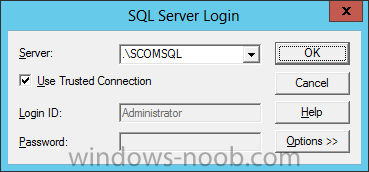
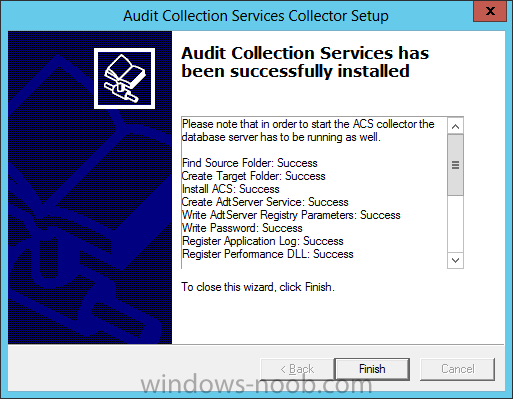
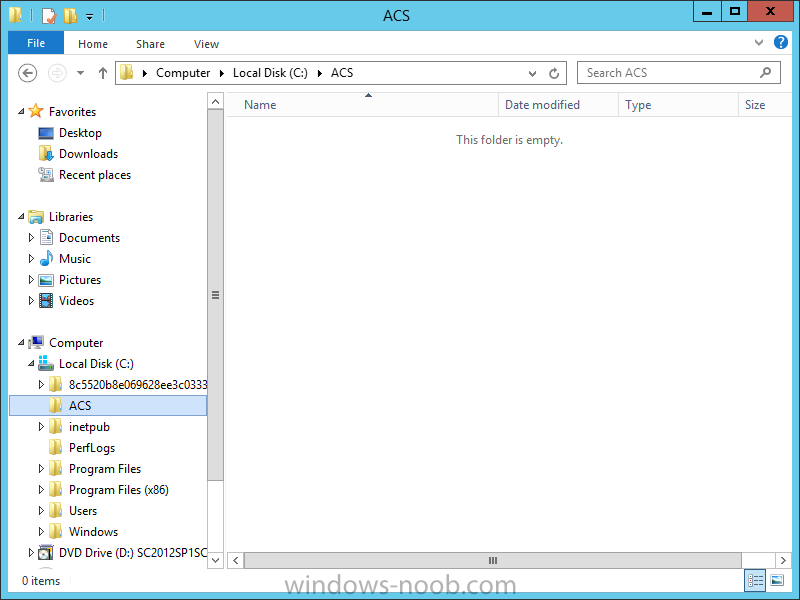
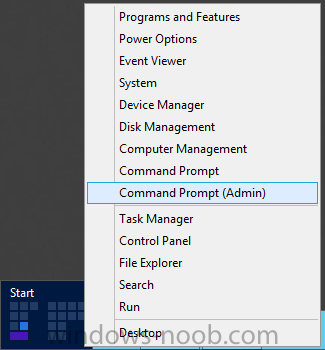
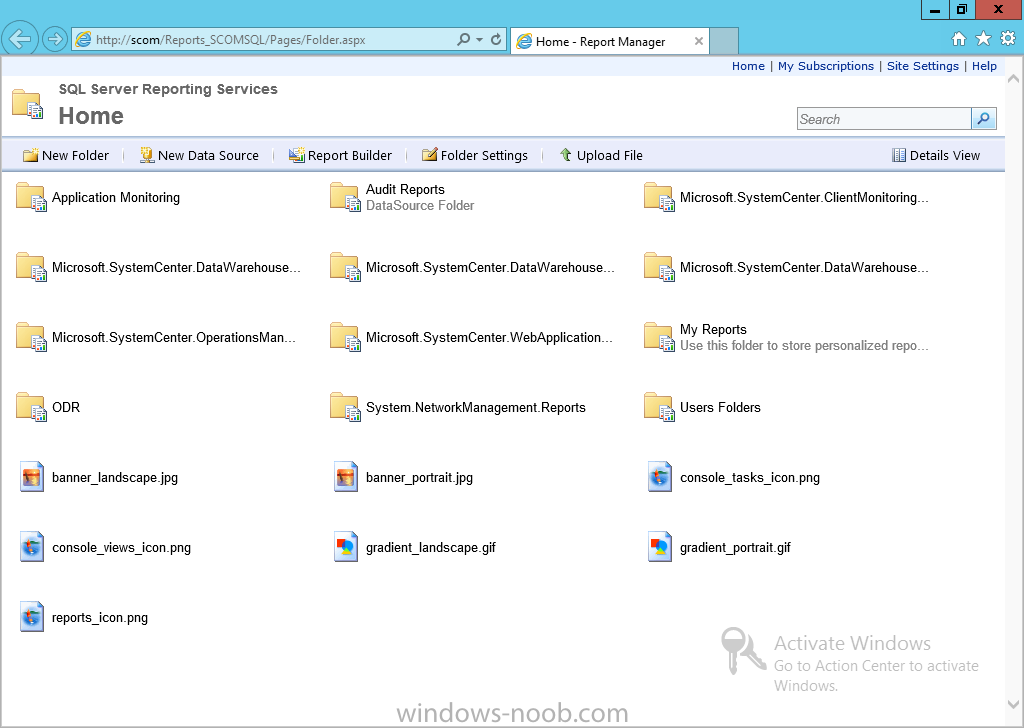
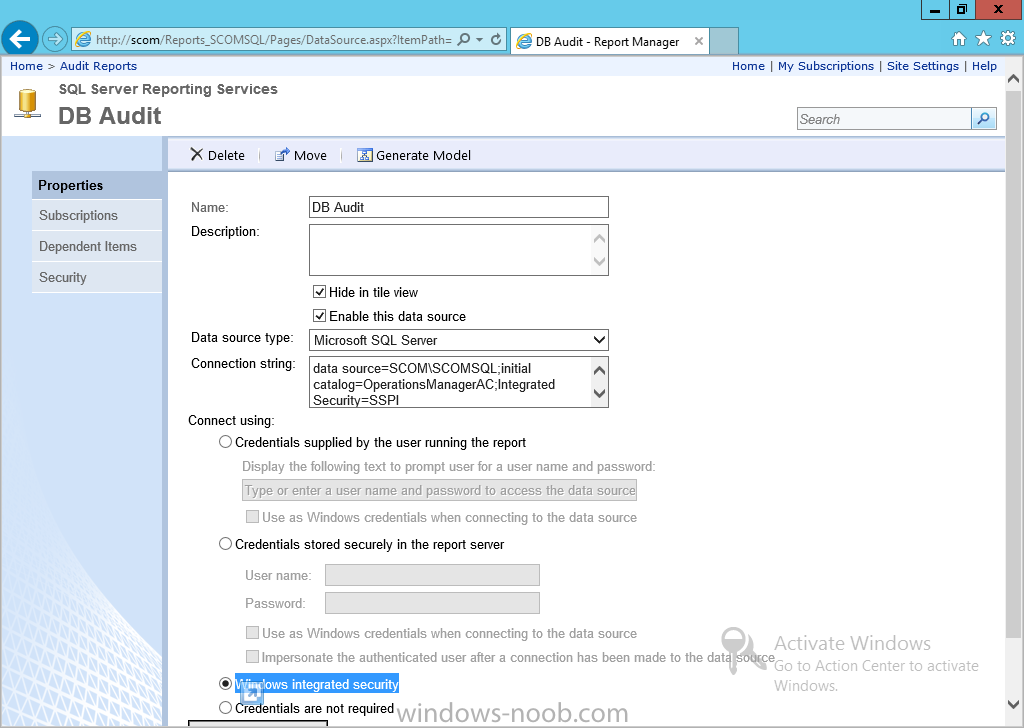
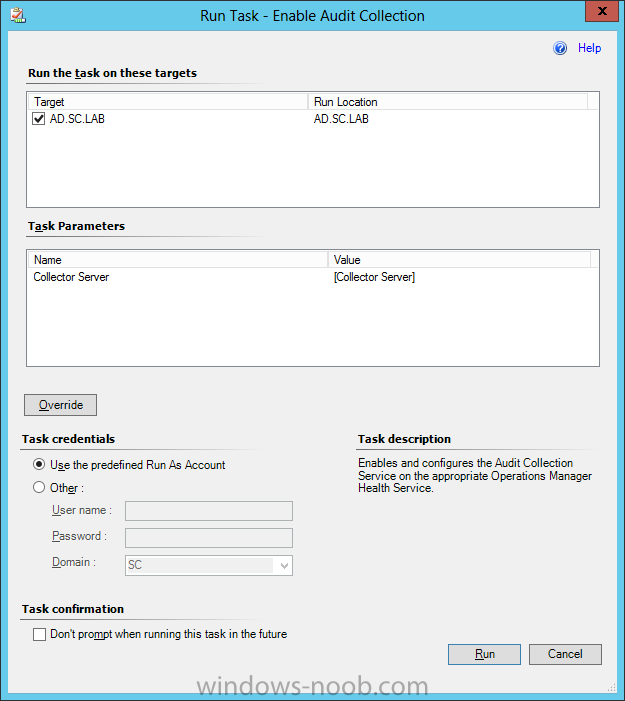
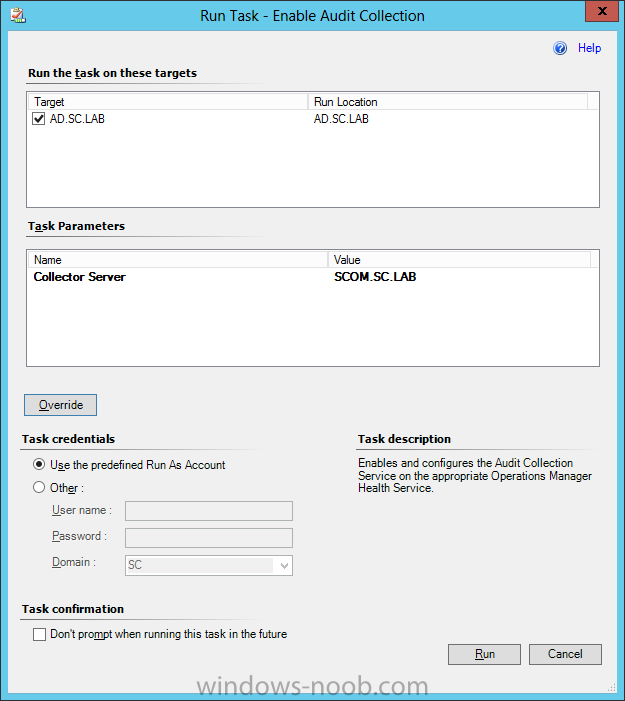
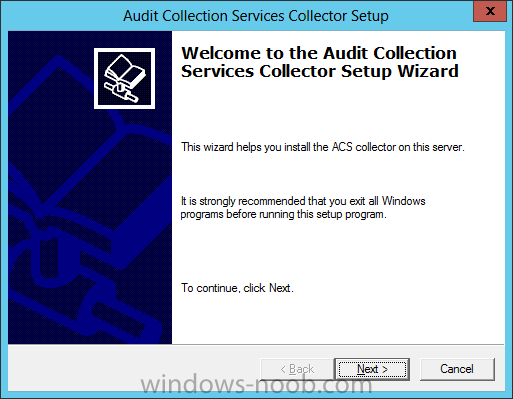
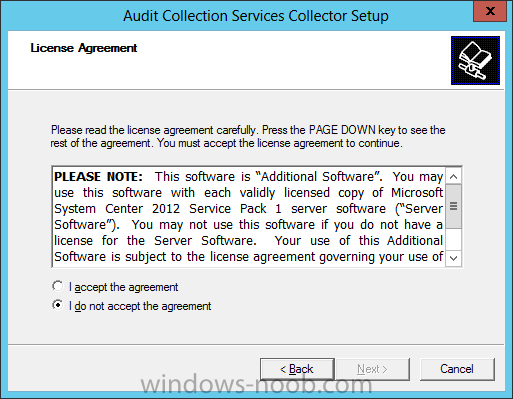
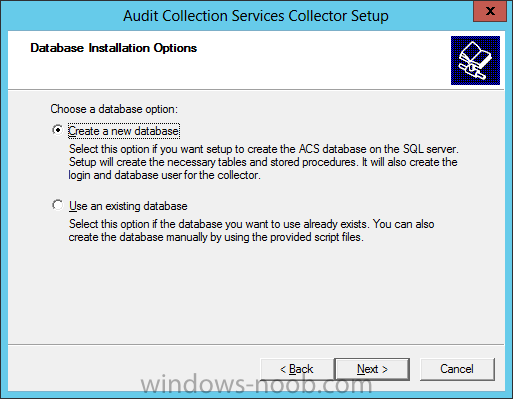
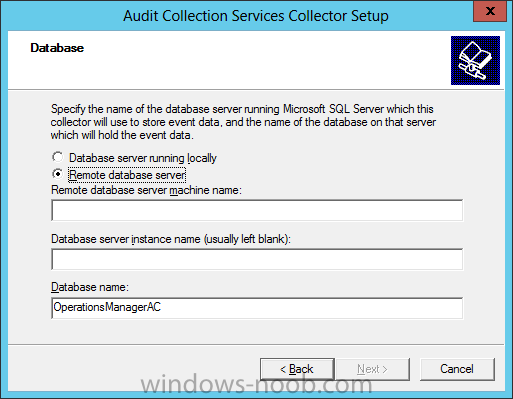
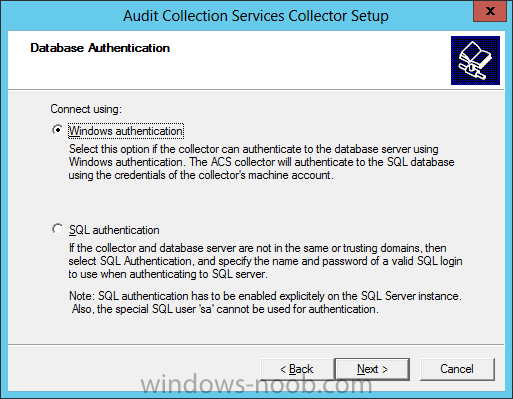
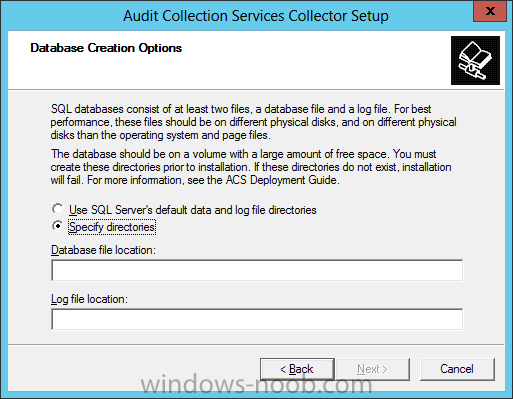
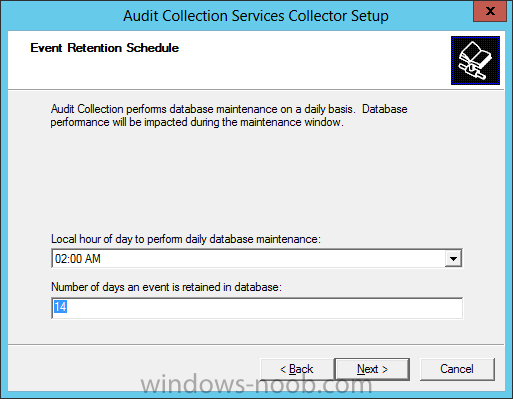
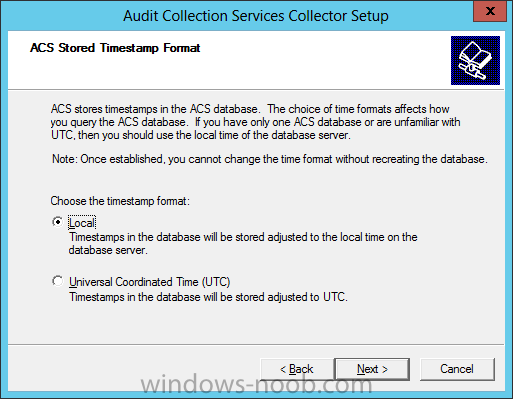
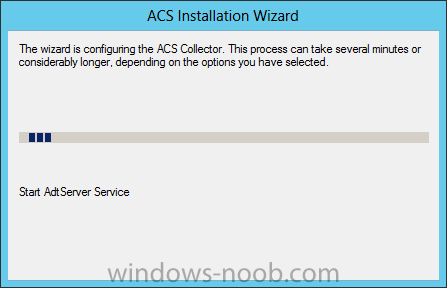
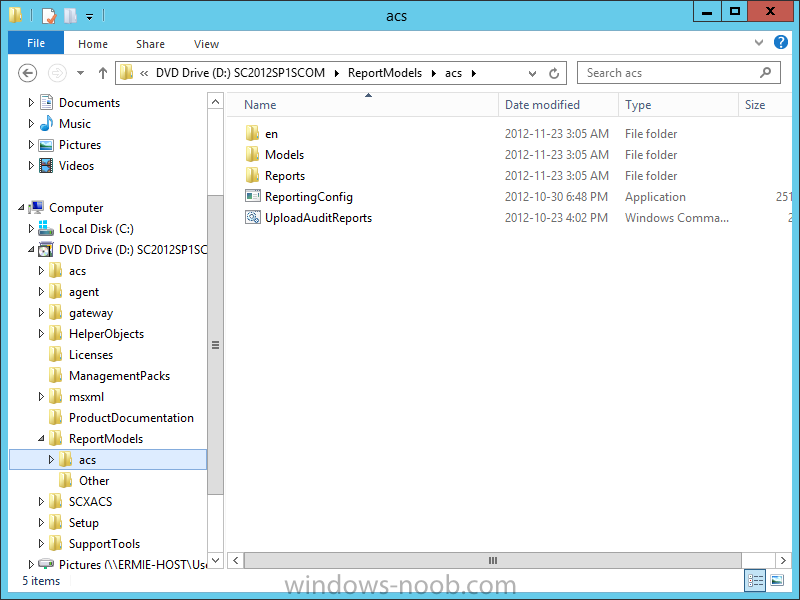
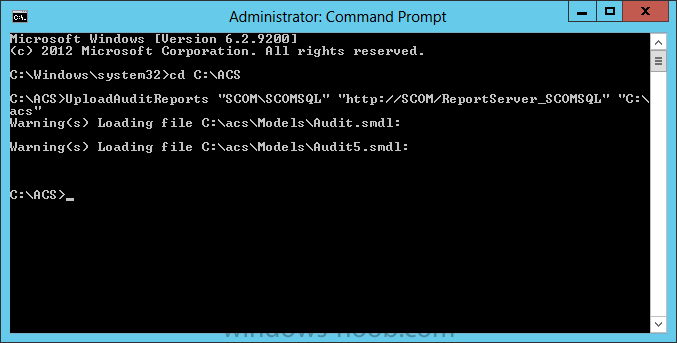
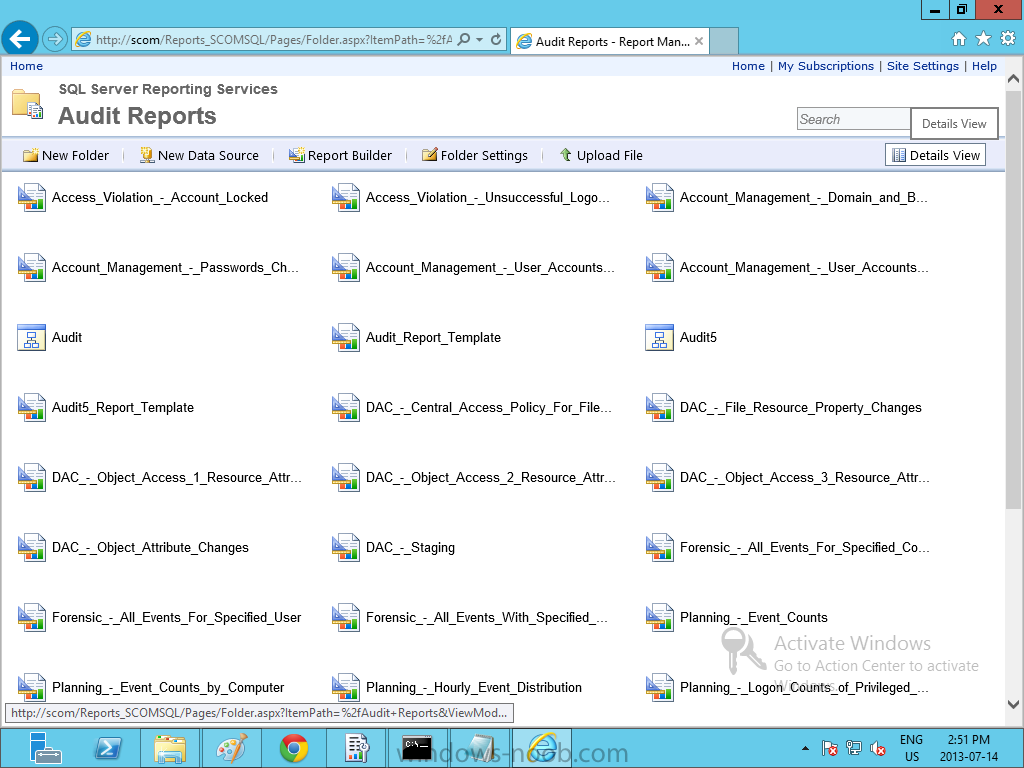
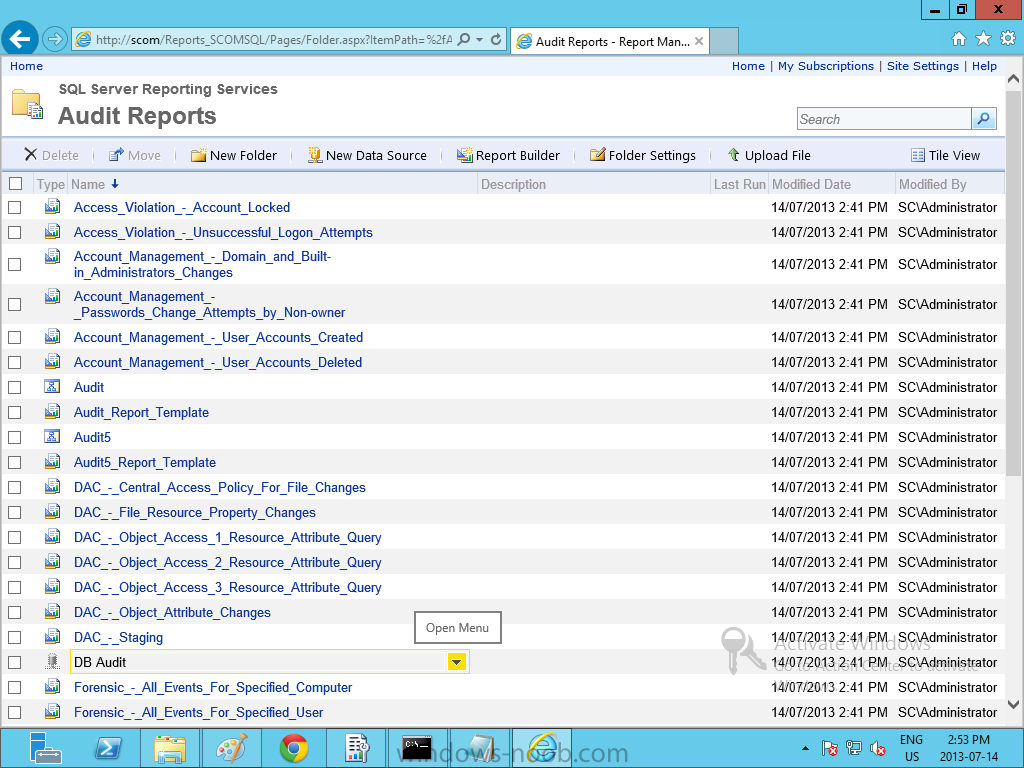
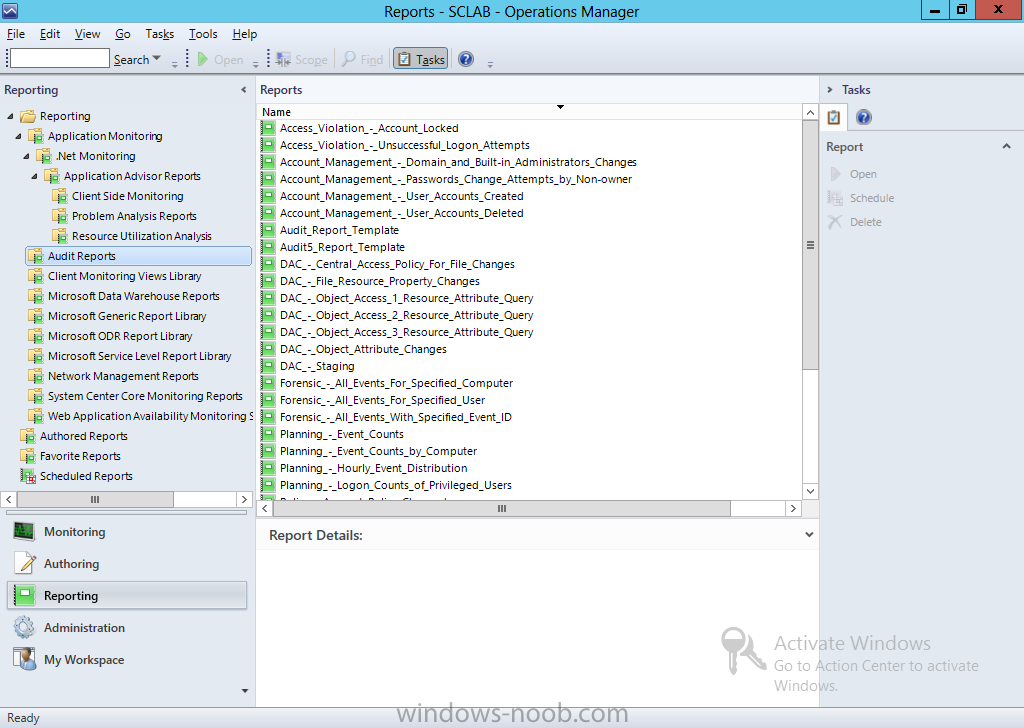
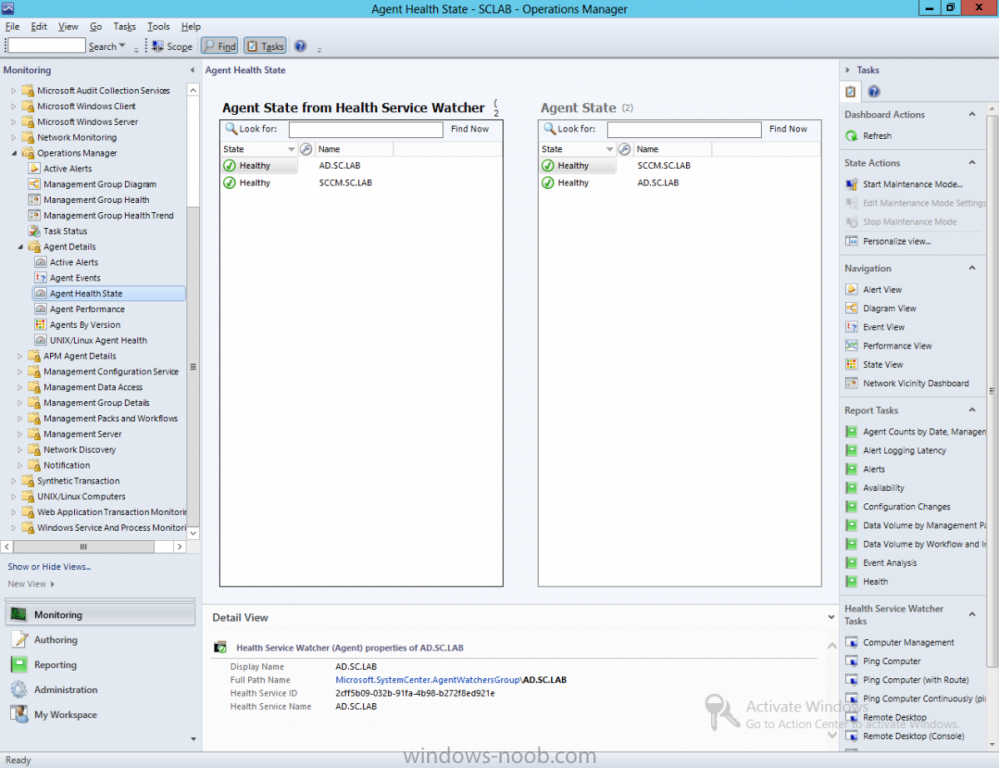
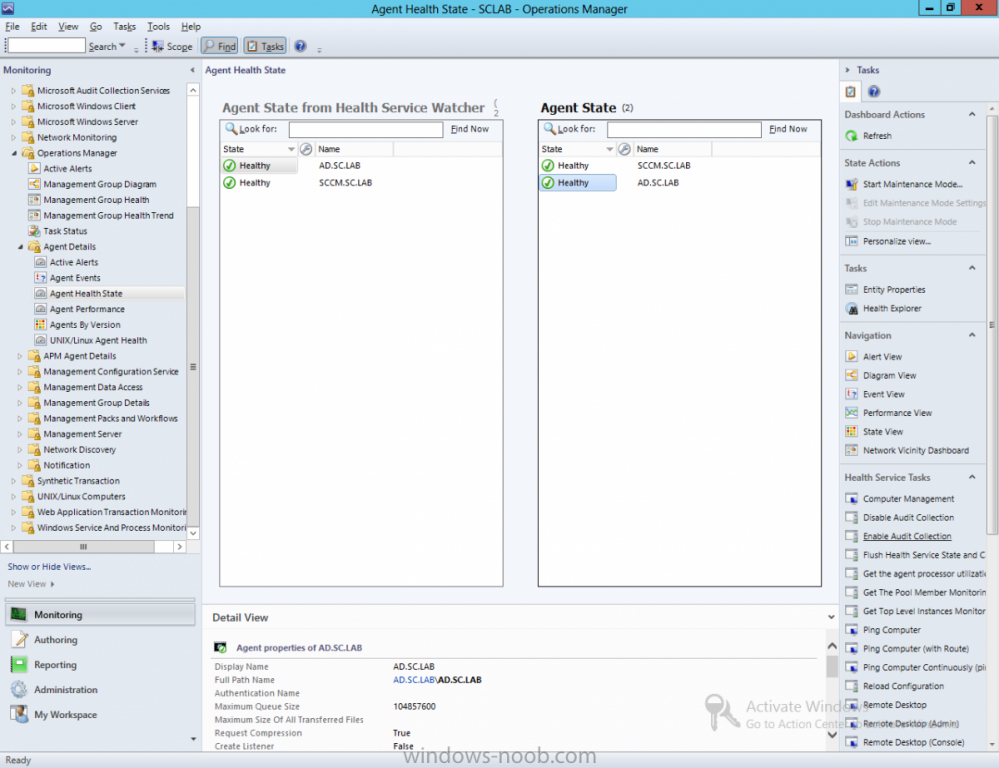
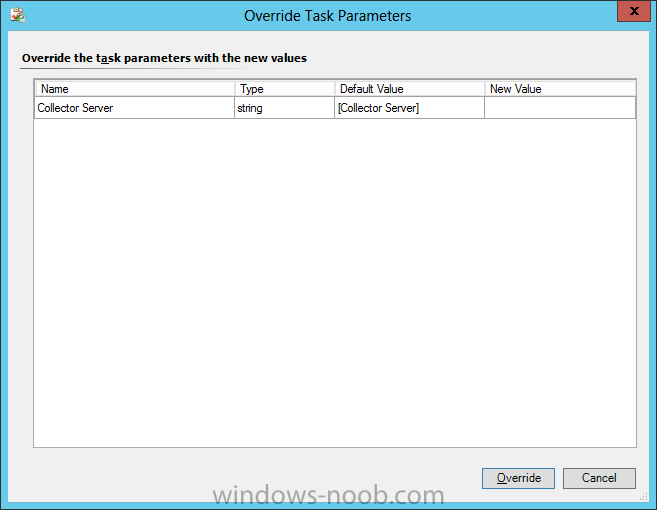
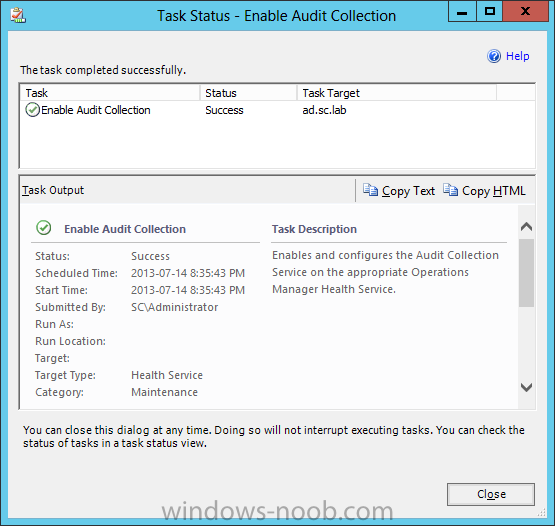
In our last post we installed SCOM and the Agent on several systems. Now we are going to install ACS to audit security events. Install Audit Collection Services Since Audit Collection Services (ACS) is not a part of the main SCOM installation, we have to install it separately. NOTE: In a Production environment, ACS is normally implemented in a segregated space. The reason for this is because ACS is used to audit security and logons. Since the Administrator of SCOM will more than likely be a part of an Operations team, and have access to various Production/Non-Production servers, for security reasons, the ACS installation would be on a server that the Operations team would not have access to (since they would be among the logons being monitored/audited). To start the installation, mount the SCOM ISO and run the setup.exe. From the splash screen, click the ‘Audit Collection Services’ link. On the Welcome screen click Next. Read the License Agreement, accept the agreement, and click Next. On the Database Installation Options screen, choose whether you will create a new database or use an existing one. In our example, we will choose the ‘Create a new database’ option, and click Next. On the Data Source screen, enter a new for the data source or accept the default, and then click Next. On the Database screen, enter the database server name and instance name, and change the database name if you do not want to use the default. Since this is a lab environment, we will choose the ‘Database server running locally’ because we have SQL Server installed on the same server as SCOM. Make the appropriate choices, and then click Next. For Database Authentication, we are going to choose the ‘Windows authentication’ option for our lab since it’s in its own domain. Read the information for each option, and make the applicable choice, and then click Next. For the Database Creation Options, in a Production environment you would specify different disks for the database and log files, but since we are in a lab, we will chose the ‘Use SQL Server’s default data and log file directories’ and click Next. NOTE: I believe, though am not 100% sure, that if when you first setup/install SQL Server and specify different disks for the database(s) and log(s), then choose the ‘use SQL default’ would be appropriate since the defaults would already be offloaded to appropriate separate disks. On the Event Retention Schedule screen, you can specify the time for the database maintenance to occur, as well as the number of days to retain. This last option is very important, as in Production your organization may have some legal/security obligations to meet. However, just remember that the longer the retention, the more space the database will need. Usually, when planning ACS in a Production environment, most use the SCOM Sizing Helper Tool to know how large the database will be, and how much to plan for growth. For our lab environment, we will accept the defaults and click Next. Make the appropriate selection for the Timestamp Format, and click Next. In our lab example, we will use ‘Local’. On the Summary screen, review the selections and input, and click Next. Immediately after you click Next from the Summary screen, you will be prompted for the SQL Server Login. By default it will assume the login for the account that is currently logged in. If this is accurate, just click OK. Wait for the Installation Wizard to complete, which didn’t take too long in our small scaled-down environment. Finally, the installation will complete. Click Finish. Congratulations, you have now installed ACS! But there is still more to do. We need to setup reporting, and the event forwarder. ACS Reporting For ACS Reporting, you first need an instance of SQL Server Reporting Services (SSRS). If you have been following these guided series, we will be using the same SSRS instance that we originally setup/configured for SCOM Reporting, since we are in a lab environment. For our process, we are going to be following the steps outlined in this TechNet article: http://technet.microsoft.com/en-us/library/hh299397.aspx. First, we need to log onto the server that we will use for hosting the ACS reports. In our example, this is the same server that we installed SCOM on. From within that server, we need to create a temporary folder. We’ll create one on the root of C:\ and call it ACS (i.e. C:\ACS). Mount the SCOM ISO, and navigate to \ReportModels\ACS (in my example it is D:\ReportModels\ACS\) and copy everything from this location into the temporary folder that we created. Next, still within the mounted ISO, navigate to \SupportTools\ (in my example it is D:\SupportTools\AMD64\ReportingConfig.exe) and copy the ReportingConfig.exe file into the temporary folder that we created. Now we need to run a command through an elevated command prompt. In Windows Server 2012 to do this, mouse over to the bottom left corner, which will cause the Start ‘square’ (not sure what the official name is) to appear. Right-click on the Start square, and click on ‘Command Prompt (Admin)’ to launch an Administrative Command Prompt. Next, you will need to change the directory to the temporary folder that we created. You will then have to run the following command: UploadAuditReports “<auditdbserver\instance>” “” “”. In our lab example the command line would be: UploadAuditReports "SCOM\SCOMSQL" "http://SCOM/Reports_SCOMSQL" "C:\ACS" NOTE: The reporting server URL needs the reporting server virtual directory (ReportingServer_<InstanceName>) instead of the reporting manager directory (Reports_<InstanceName>). This creates a new data source called DB Audit, uploads the reporting models Audit.smdl and Audit5.smdl, and uploads all reports in the ACS\Reports directory. IMPORTANT: In order for the import to function properly make sure you have the .NET Framework 3.5 installed. If you have been following these guides, this will already be installed from when we installed SQL Server 2012. Next, open Internet Explorer and navigate to the following URL: http:///Reports_, in our example it will be http://SCOM/Reports_ SCOMSQL. Now click on the ‘Audit Reports’ directory folder, and then click the ‘Details View’ button in the top right corner. Now click the DB Audit data source to open it. Finally, under the ‘Connect Using’ selections, ensure that ‘Windows Integrated Security’ is selected, and click Apply. You can now go into the SCOM console, under Reporting, and view the Audit Reports. REMINDER: It is acceptable to have the Audit Reports accessible via the SCOM console in a lab environment. But in a Production environment your organization may have strict security policies that you are required to follow, which would include auditing of IT to be handled by some security department. Congratulations, you have finished configuring/deploying ACS Reporting. But, there is still one last step we need to complete, the Event Forwarder. ACS Event Forwarder Now that we have ACS installed, and the Reporting configured, we can now turn on the Event Forwarder to start collecting security events. We are going to follow the TechNet article here: http://technet.microsoft.com/library/hh272397.aspx. As stated by this article: “By default, the service needed for an agent to be an Audit Collection Services (ACS) forwarder is installed but not enabled when the Operations Manager agent is installed.” Therefore, in order to audit security events, you need to have the SCOM Agent installed on the system(s) first. Log onto the SCOM server and open the SCOM console and click on the Monitoring pane. From there, navigate to Operations Manager > Agent Details > Agent Health State. In the details pane (the middle pane), in the Agent State area, select the system(s) that you want to enable Audit Collection on. When you select a system, in the right-hand Actions pane, under the Health Services Tasks, click the ‘Enable Audit Collection’ link. This will launch the Enable Audit Collection task. From this window, you will need to enter the Collector Server for the Forwarder to report to. To do this, click the Override button. On the Override dialog, enter the FQDN of the Collector Server. In our lab example, we will enter the only Management Server in our environment (i.e. SCOM.SC.LAB). Enter the appropriate information and then click the Override button. The Enable Audit Collection dialog will now show the Collector Server that you just entered. At this point, you can also add a specific account to use within the Task Credentials section, or accept the defaults. Once you are ready to enable ACS, click the Run button. Once the task runs and completes successfully, the dialog will appear similar to the following. You can click Close. Congratulations, not only do you now have SCOM installed, along with Reporting; you additionally have setup ACS and enabled security auditing in your environment. I haven't decided what to do next for the series, but I believe I have covered all installation elements. The next series extension will be more configuration vs. installation. If anyone has any requests or suggestions, let me know.


- 7 replies
-
- 1
-
-
- SCOM
- Operations Manager
- (and 5 more)
-
 Hello All, I wanted to share this article/post that I wrote recently about an error I encountered while trying to configure SCOM monitoring on a System Center 2012 R2 Service Manager installation. URL: http://adinermie.wordpress.com/2014/05/03/scom-2012-r2-agent-on-service-manager-error-the-management-group-configuration-could-not-be-saved/ Don't forget to check out my blog regularly, as I post article there first before re-posting here.
 -
Hello All, I just wanted to share this mini-series I wrote/posted about making the SCOM Data Access Service highly available (though not officially supported). URL: http://adinermie.wordpress.com/2014/04/18/scom-2012-r2-data-access-service-das-high-availability-part-1-configure-a-static-ip/. Don't forget to check out my blog for new posts regularly (as I post there first before re-posting here).
-
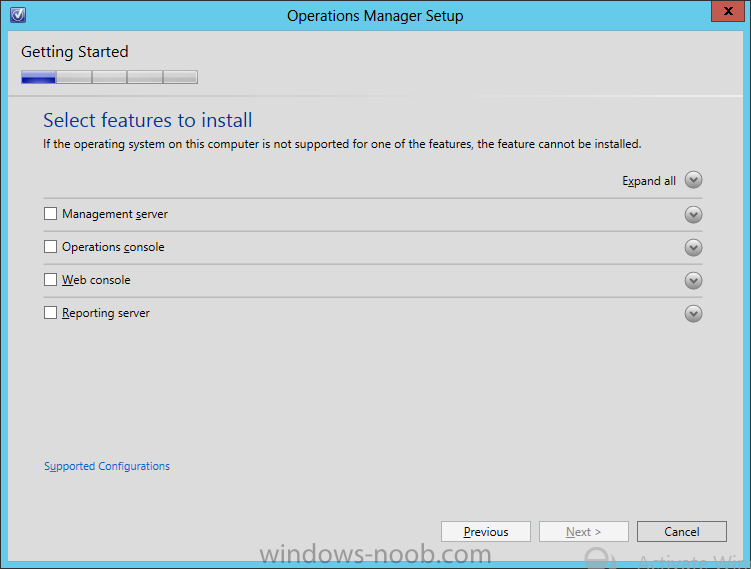
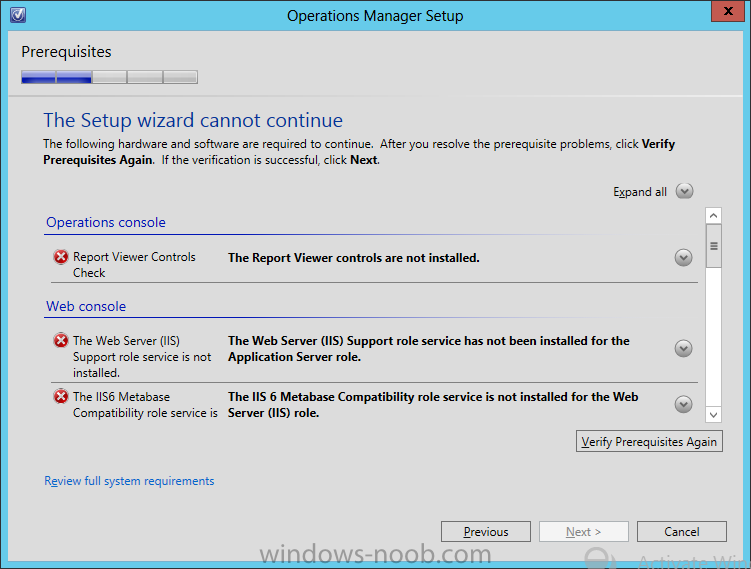
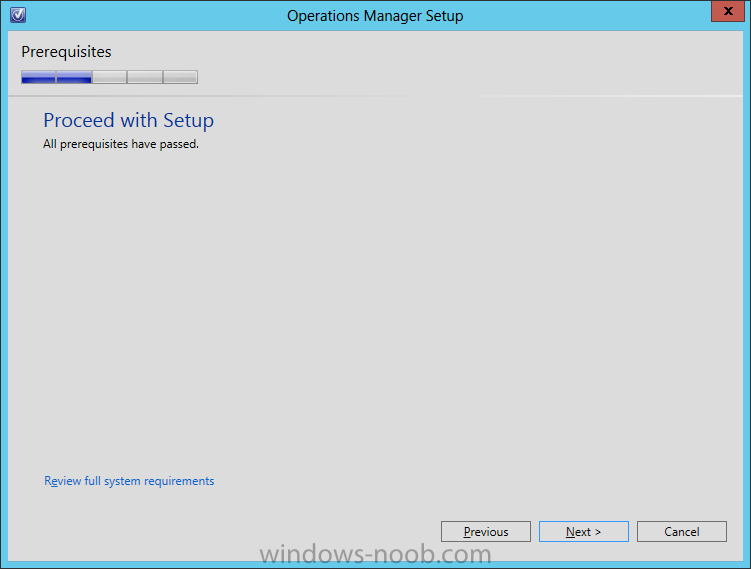
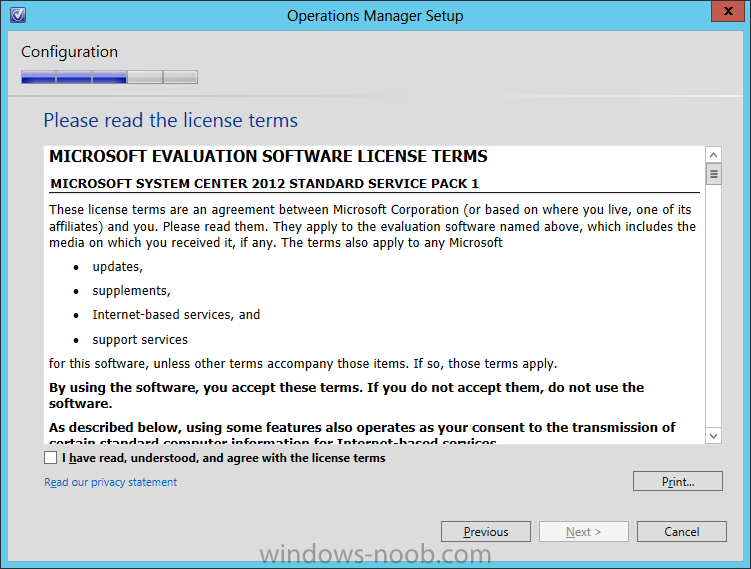
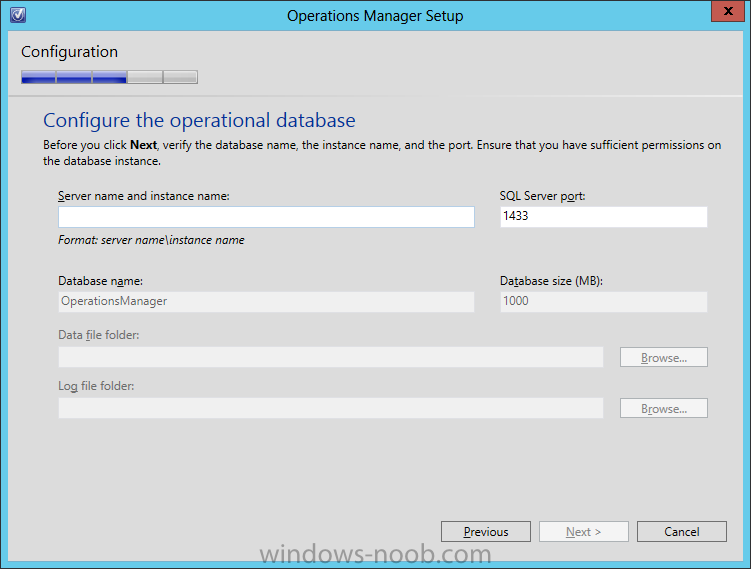
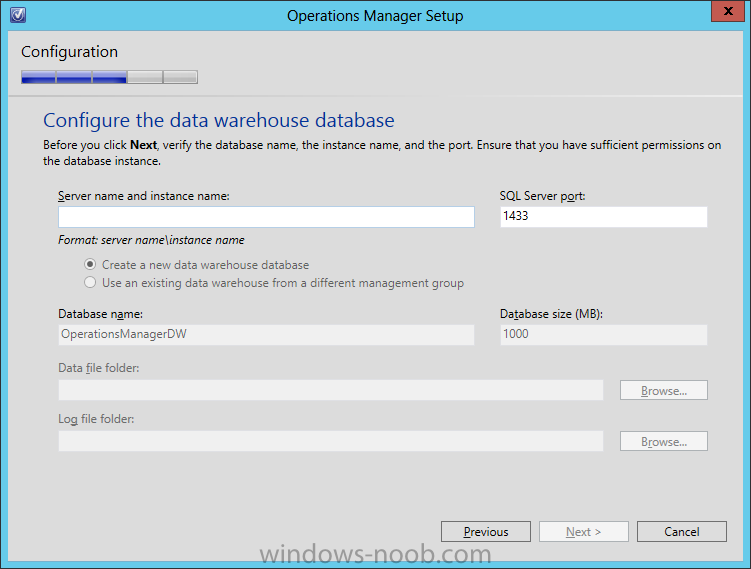
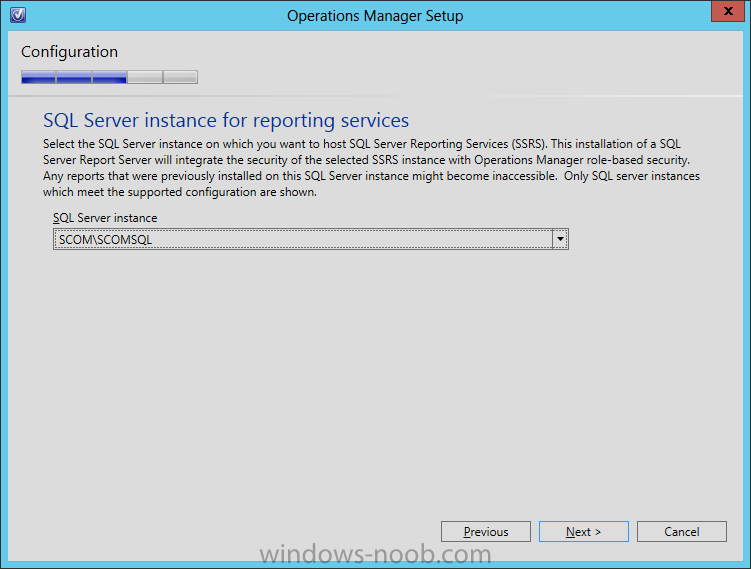
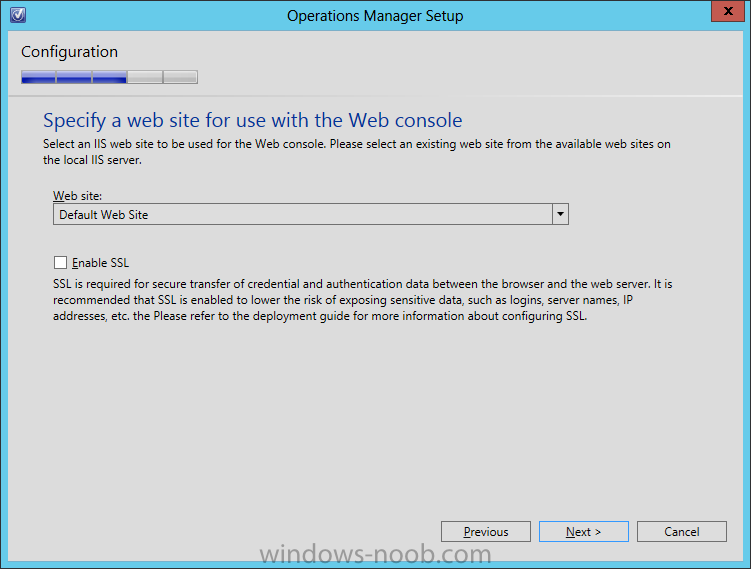
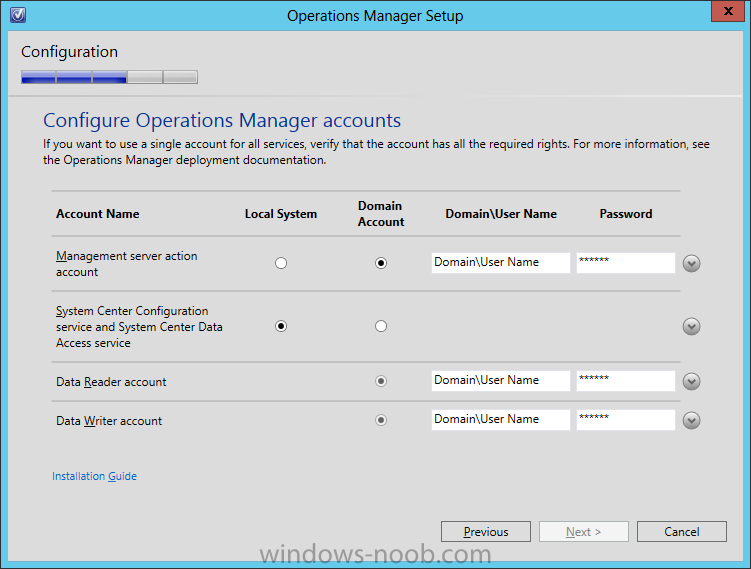
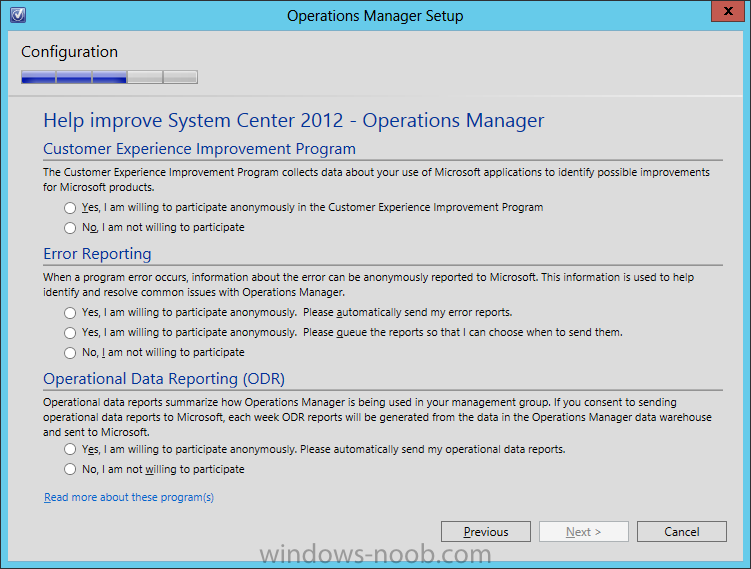
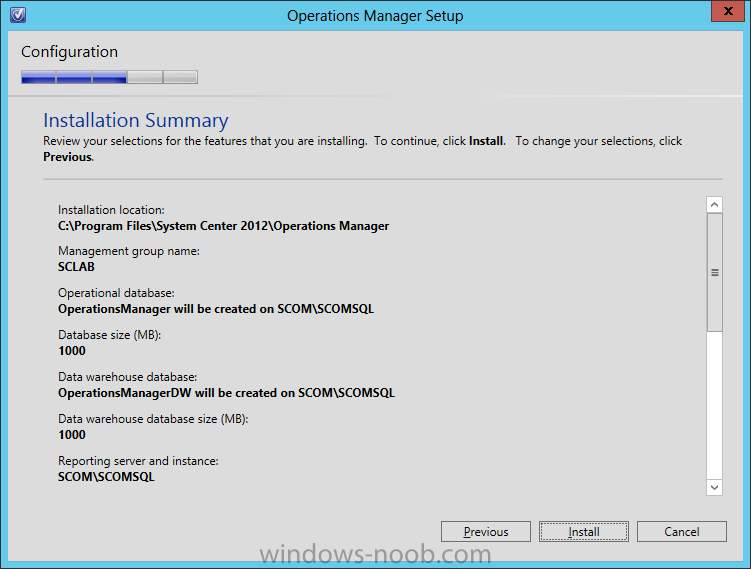
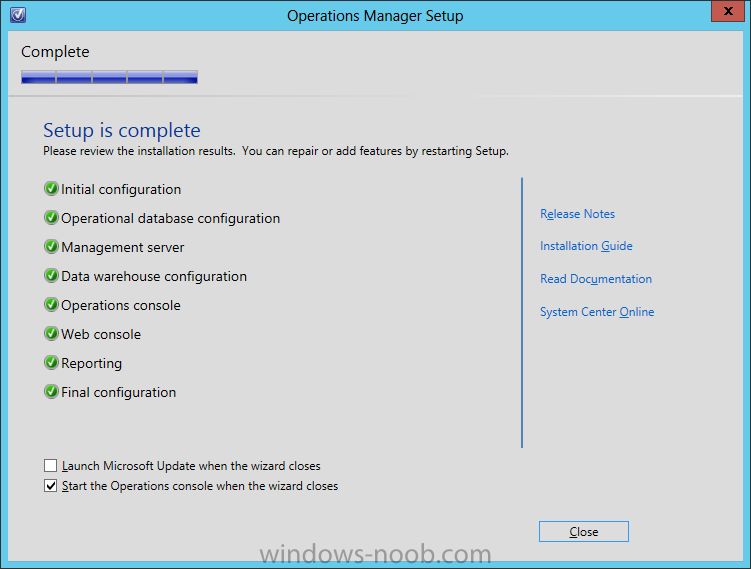
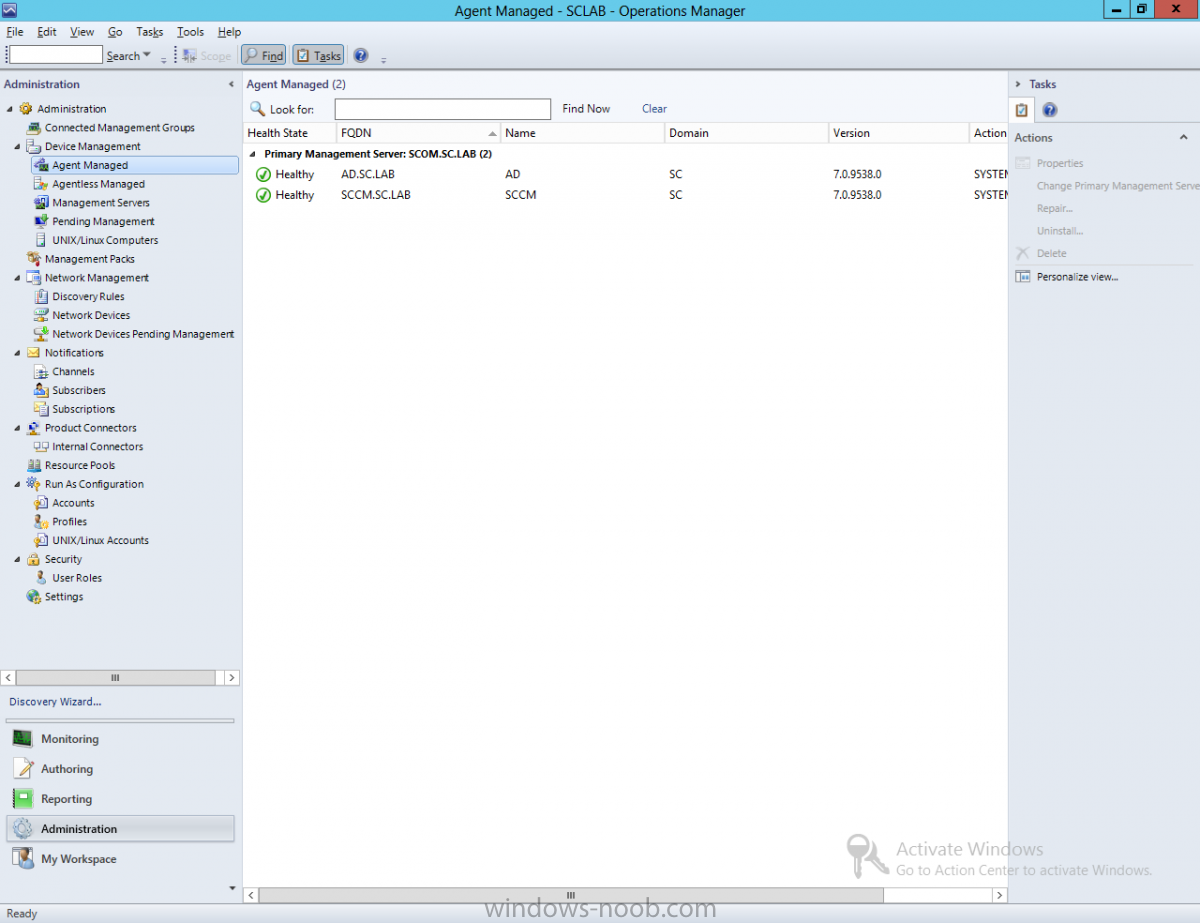
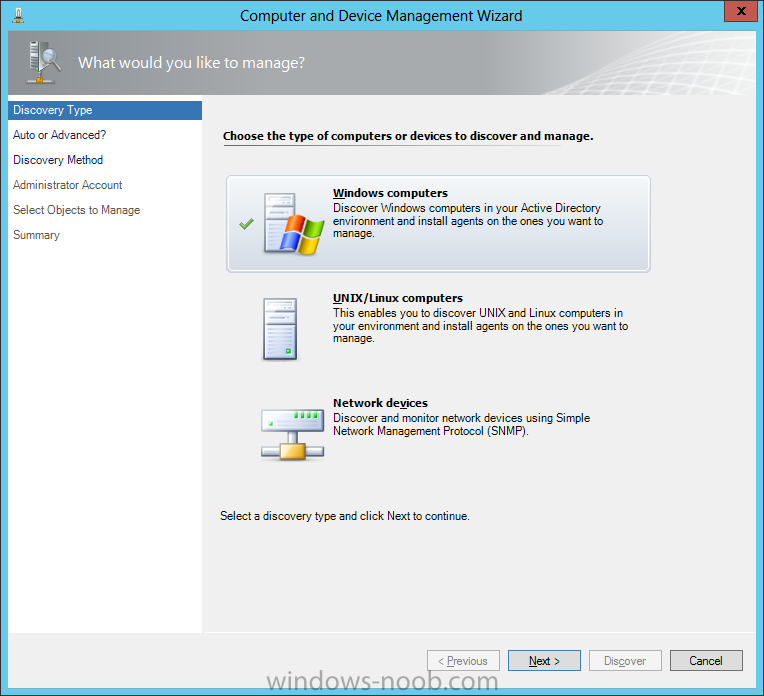
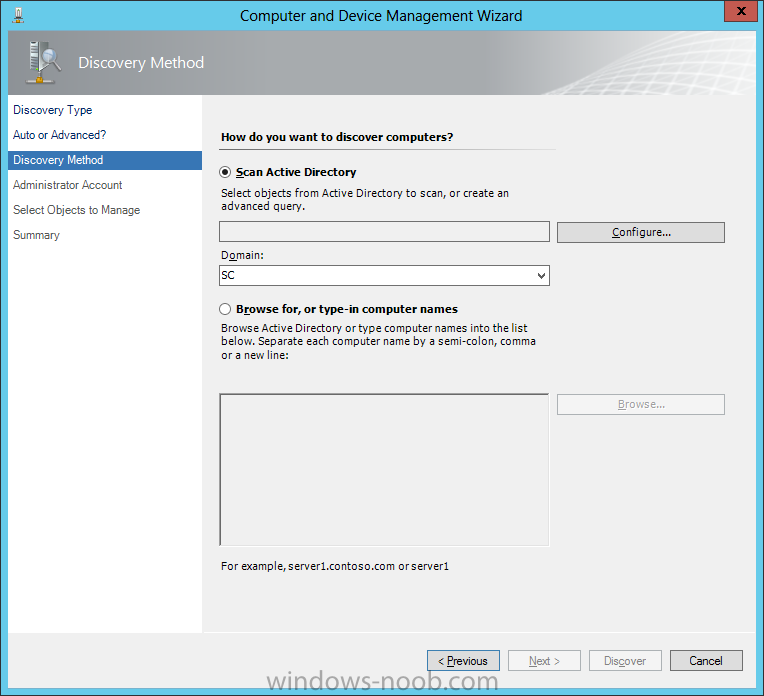
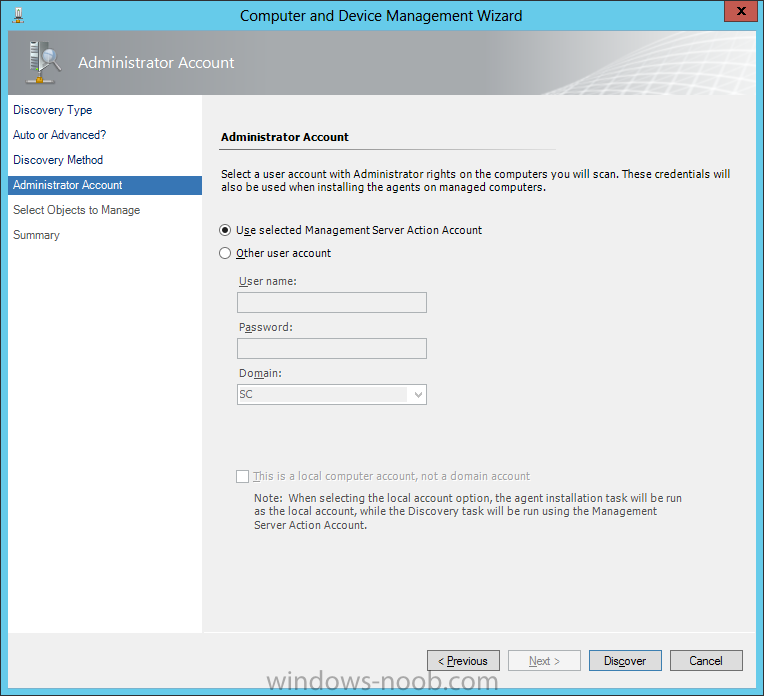
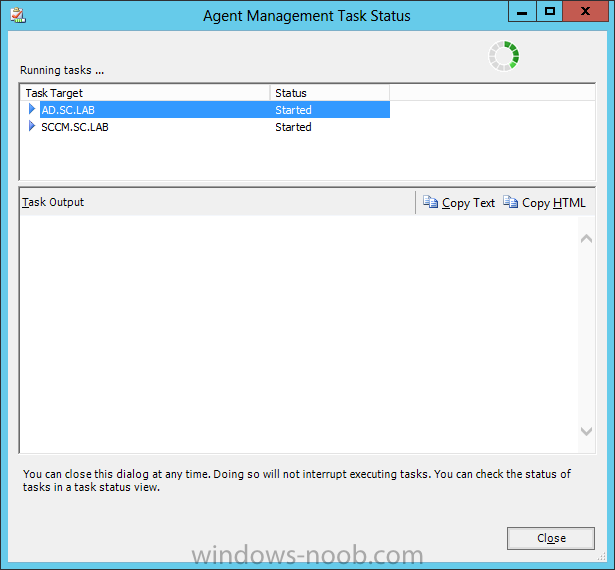
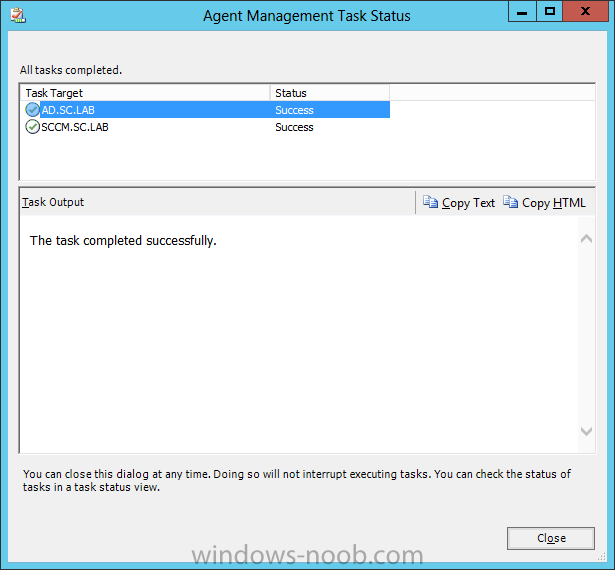
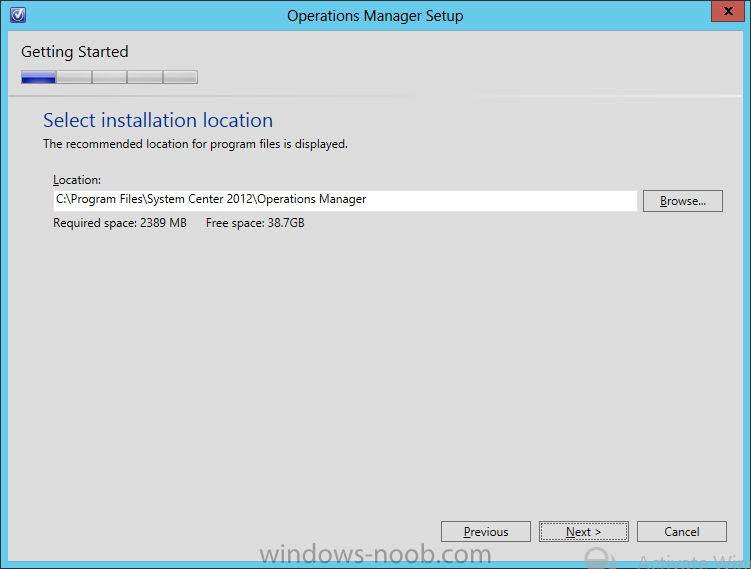
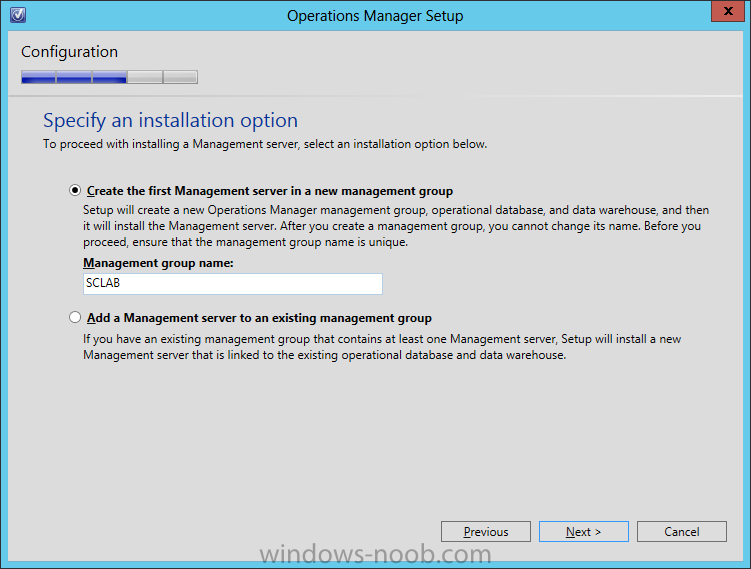
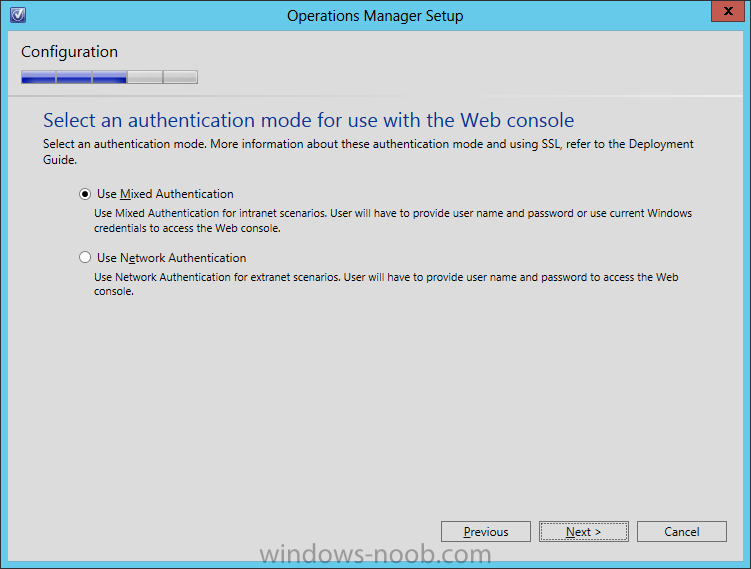
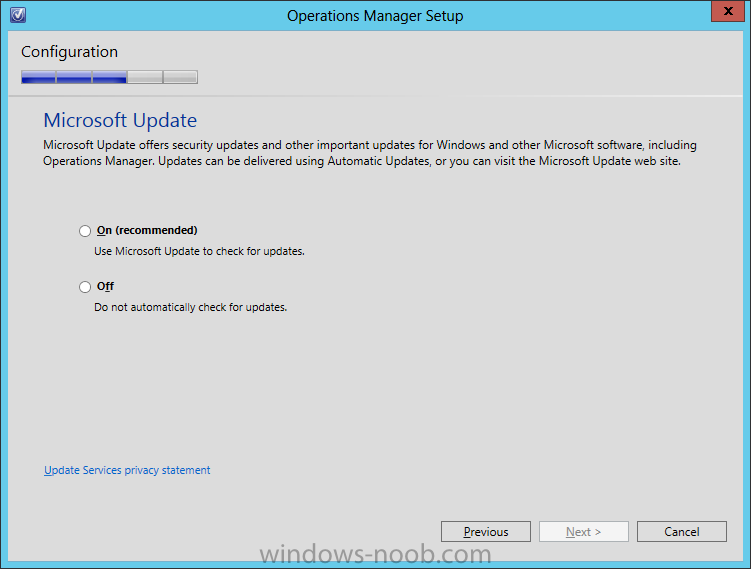
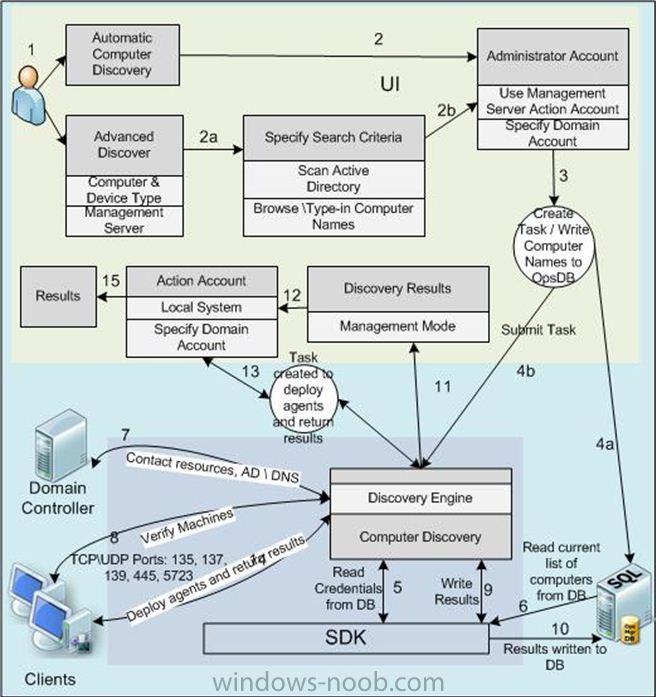
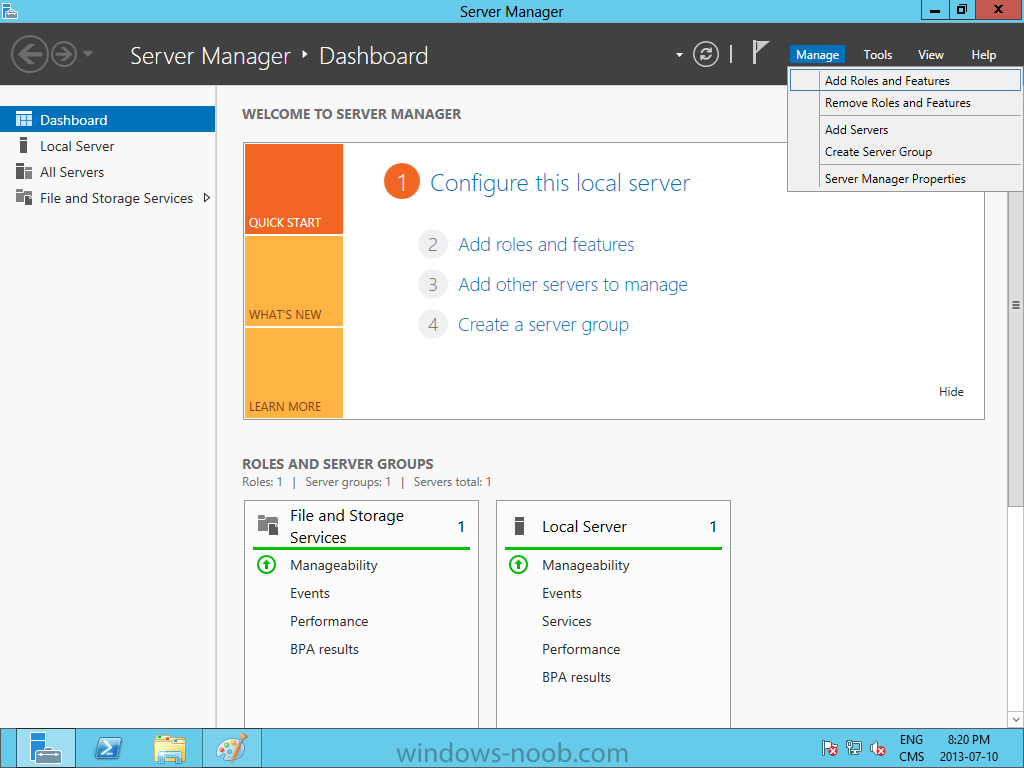
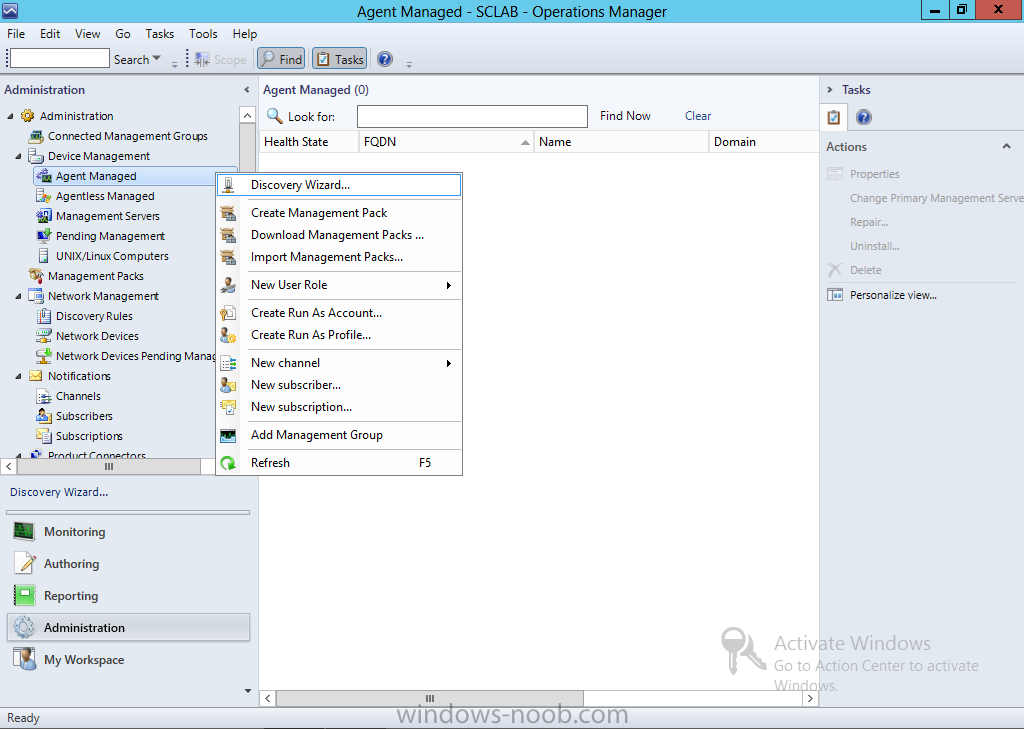
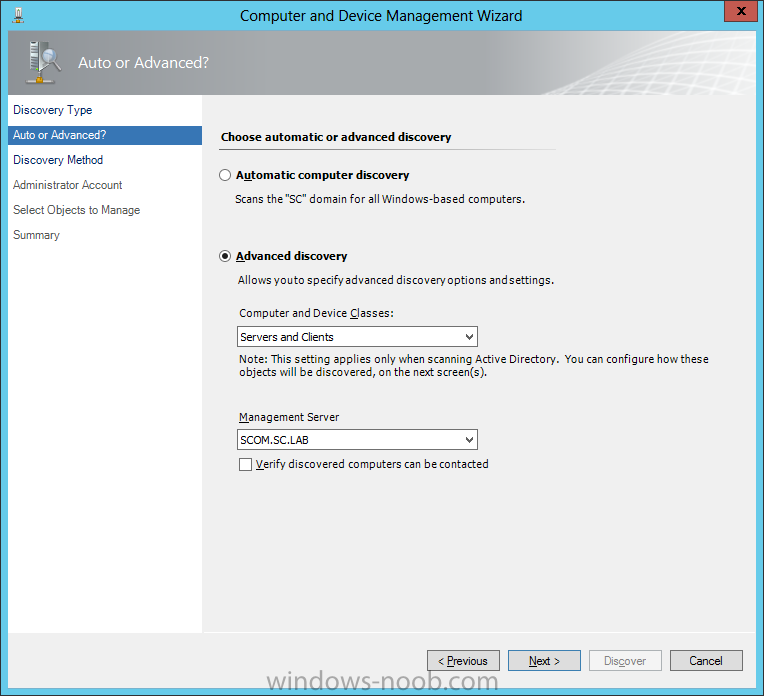
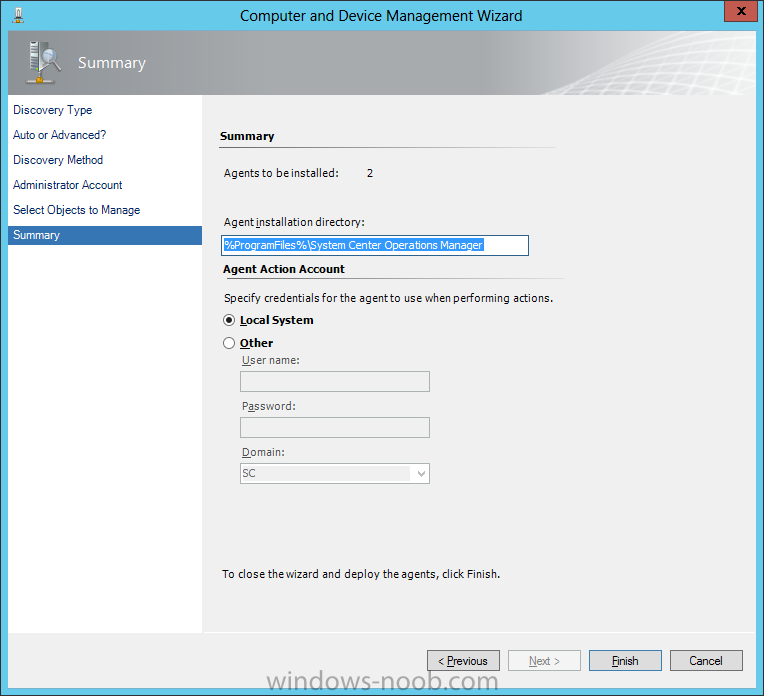
In our last post, we installed SQL Server. Install System Center Operations Manager We are now finally ready to install SCOM. Install SCOM Start by either extracting the DVD contents, or mounting the ISO (the TechNet ISO is currently labelled as en_system_center_2012_operations_manager_with_sp1_x86_x64_dvd_1347175). Start by running the setup.exe. On the splash screen click the Install link. On the Select Features screen, select the feature you want to install. In our example, we are installing all features on the same server, so we will select all of them and click Next. Next chose the location that you want to install the software to, and ensure there is enough space. Then click Next. The Setup Wizard will then check the prerequisites that are needed, based on what features you selected to install. If there are any issues you will need to address these before you can continue. Review the information and the resolution(s) provided. For example, you will need to install the Web Server (IIS) role, including some non-default elements along with the Microsoft Report Viewer 2010 Redistributable Package. NOTE: I didn't have time to document how to install these roles/features, hopefully you are able to accomplish it without issue. However, if anyone needs it, please message me and I will work to add it in. Once you address all prerequisite needs, the setup wizard should appear as follows. Click Next. On the Installation Option screen, choose the appropriate option. In our example, since this is the first Management Server that we are installing, we will choose the ‘Create the first Management server in a new management group’ option, and also enter a Management Group Name. Next read and accept the license terms, and click Next. On the Configure Operational Database screen, fill in the SQL server and instance name. When you do, the data and log folders paths will auto-populate. Now click Next. On the Configure Data Warehouse screen, fill in the SQL server and instance name. When you do, the data and log folders paths will auto-populate. Now click Next. Next select a SQL server instance to use for the Reporting Services, then click Next. Next select the IIS website to use for the Web Console, and then click Next. Note: if you chose to use SSL, you will need a certificate. For the Authentication Mode, chose the applicable option based on how you plan on using the web console. For our example, we will only use it in an Intranet environment, so we will choose ‘Use Mixed Authentication’ and click Next. For the Operations Manager accounts, fill in the appropriate information and click Next. Note: As part of your preparation for installing SCOM, you can follow your provisioning process and have these accounts pre-created. You should also take note of the level of access each account requires. You can choose if you want to participate in the Customer Experience Improvement Program (CEIP). Make your choices, and then click Next. For the Microsoft Update screen, choose if you want to automatically apply updates. Note: In a Production environment, you will probably not want to turn this on, because there are applicable change management procedures to follow, and you should test updates in a non-Production environment. On the Installation Summary screen, review the input and selections made, and click Install. The installation may take several minutes, but once it has been completed, click Close. Note: If you do not want to launch the SCOM console immediately, then de-select the ‘Start the Operations console when the wizard closes’ checkbox. Congratulations, you have now successfully installed SCOM! In the next part of the series, we will install Audit Collection Services (ACS), since it is not a part of the main installation. BONUS: How to Install the SCOM Agent Now that you have SCOM setup, you need to install the Agent on the systems you want to monitor. Start by launching the SCOM console, and navigate to the Administration pane. From there, under Device Management find ‘Agent Managed’. Right-click on the Agent Managed item, and choose Discovery Wizard. The Computer and Device Management Wizard will start. You must first choose why type of device you want to discover and manager. You have 3 choices, Windows Computers, UNIX/Linux Computers, or Network Devices. For our example we will choose Windows Computer, and then click Next. On the Auto or Advanced screen, you can choose to let SCOM scan the domain to find the computers, or if you want more control over which systems are monitored, you can choose the Advanced Discovery. If you choose the Advanced option, you can also choose if you want to discover only servers, clients, or both. Additionally, you can choose which Management Server you want the discovered systems to be managed by. Since we only have one Management Server in our lab, we only have one option, but in a Production environment you can use this to balance the load between multiple Management Servers. Make your appropriate selections, and click Next. Next you need to specify the Discovery Method that will be used. Again, you can allow SCOM to scan Active Directory, or you can manually type the computer names for it to check against. From my own personal experience, it is usually best to manually type the names of the computers, as this gives you more control over what systems are added to SCOM, and how many at a time. Choose your appropriate options, and click Next. You can now specify the Administrator Account to use. We will accept the default selection to use the Management Server Action Account, and then click Discover to initiate the process. SCOM will then go off and attempt to communicate with the specified systems. Here is a diagram that shows how computer discovery works in SCOM. The systems that SCOM is able to communicate with will appear in the Discovery Results. From there, select the device(s) that you want to install the SCOM agent on. In our example we will install the SCOM agent on all systems in our lab environment. Make your selection(s) and click Next. On the Summary screen, you can control where the SCOM Agent will be installed. In my personal experience, the default location is sufficient. You can also provide an Agent Action Account. In a lab environment, we can use the Local System, however, in a Production environment I have personally seen a designated Agent Action Account (usually a Service Account) be used in this context. Make the appropriate selection/input, and click Finish. SCOM will then start the Agent installation task. Depending on your network, the number of devices, etc. it may take a while to complete. When the discovery and agent installation completes, it should look like this. You can click Close on the status window. Returning back to the SCOM console, you will now see the system(s) that you discovered and installed the Agent on. Congratulations, not only do you have a working SCOM environment, but you also have SCOM actively monitoring!


-
Hello All, I have just posted a quick page on my initial experience with installing System Center Operations Manager (SCOM) 2012 R2. You can find it here: http://adinermie.wordpress.com/scom/scom-2012-r2/ Feedback and requests are welcome.
-
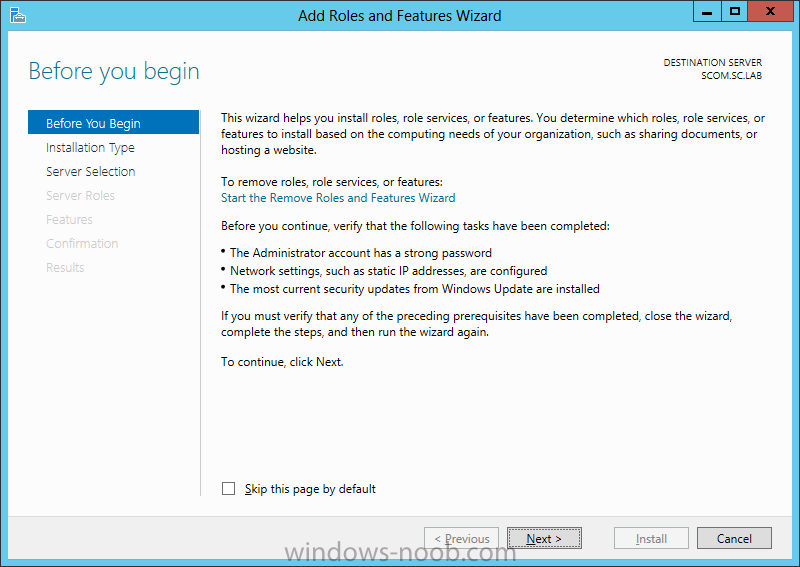
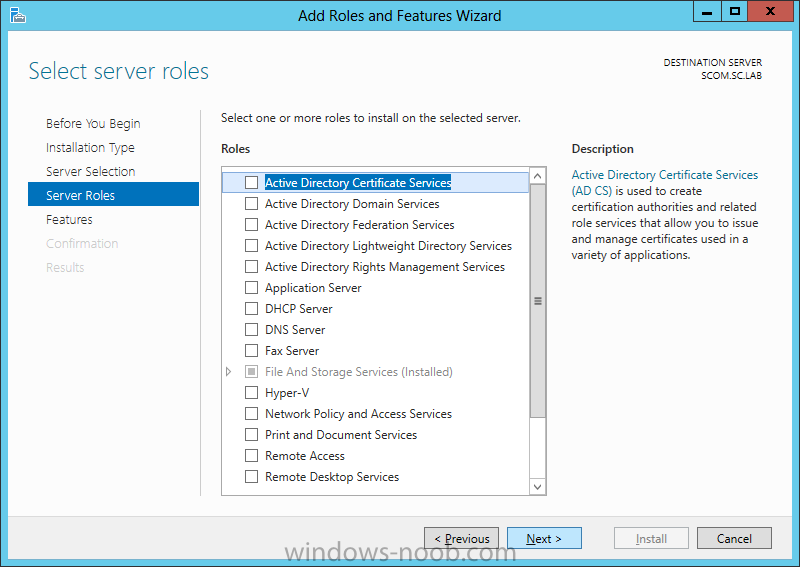
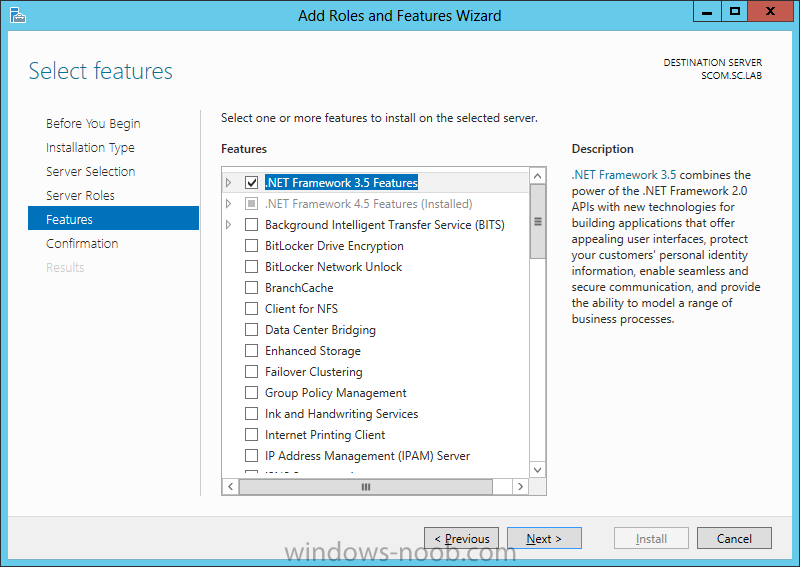
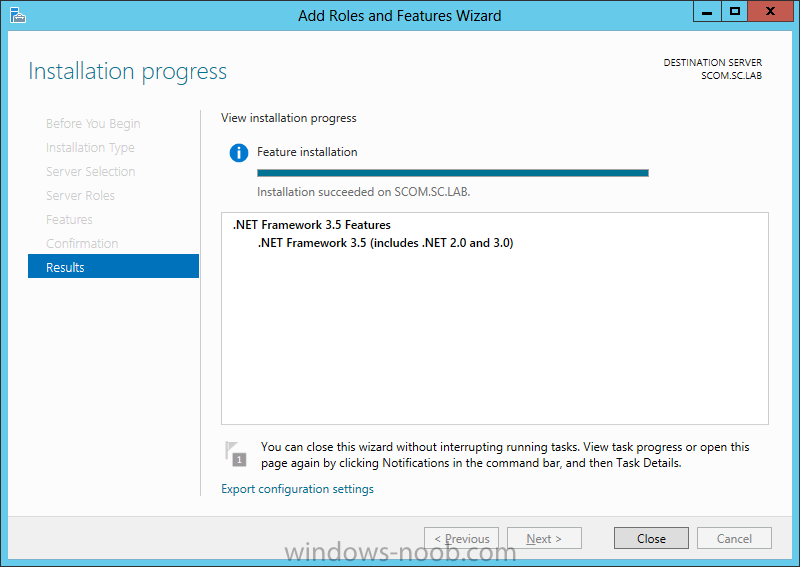
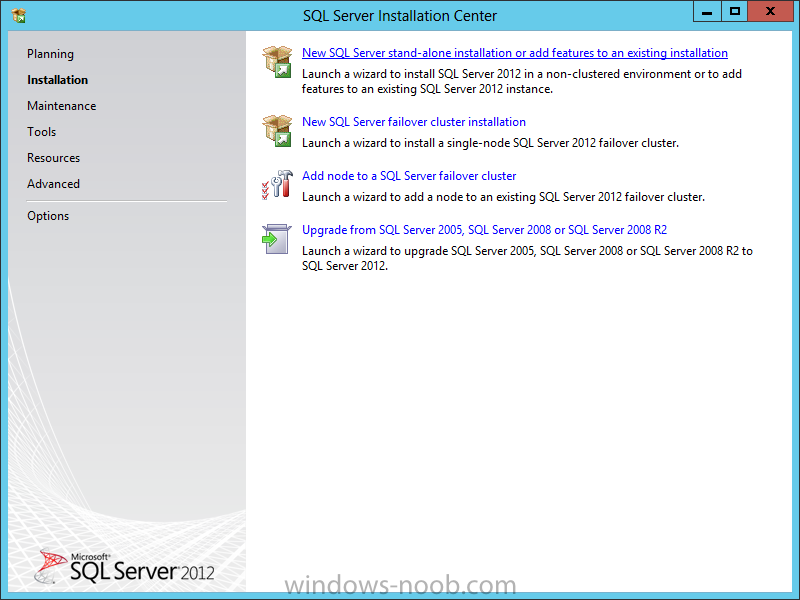
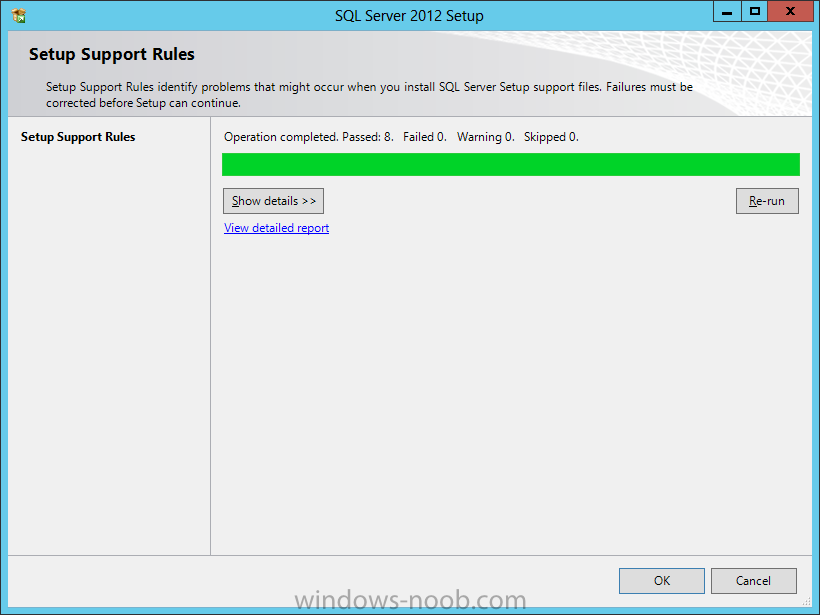
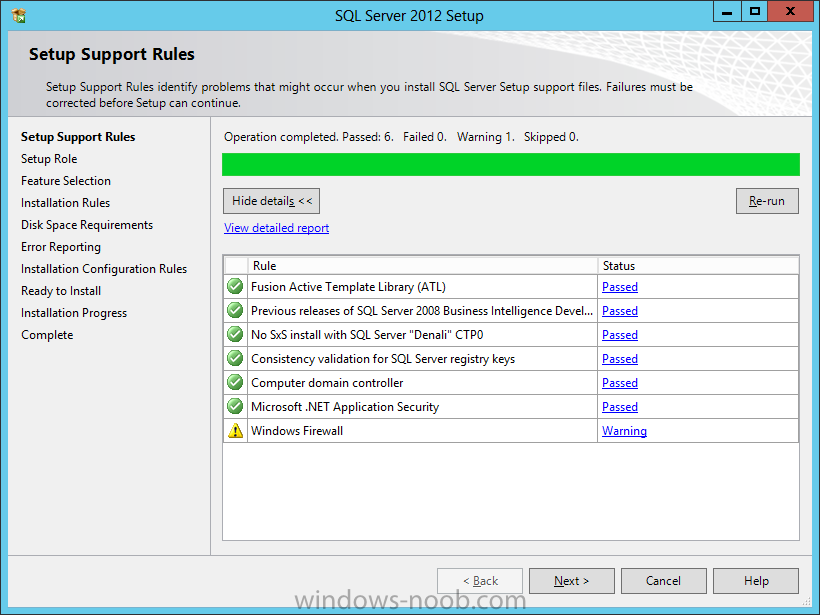
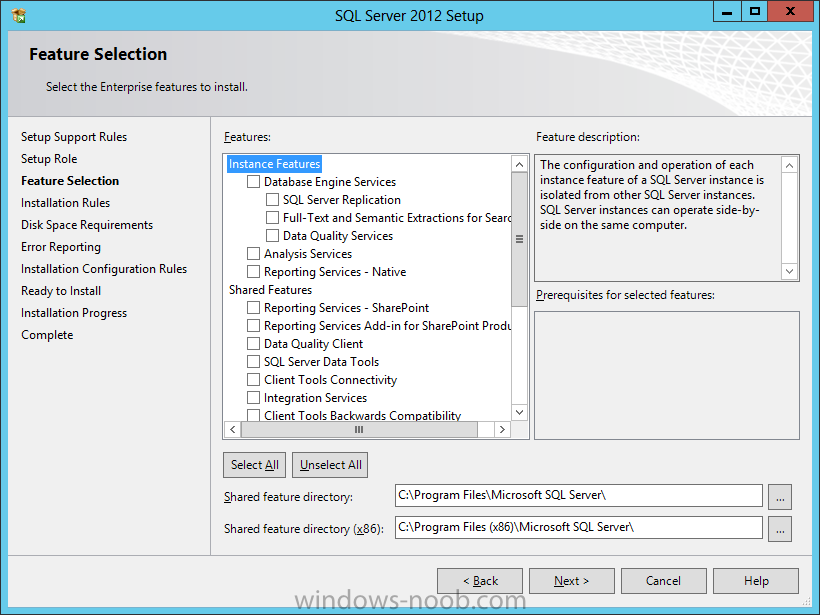
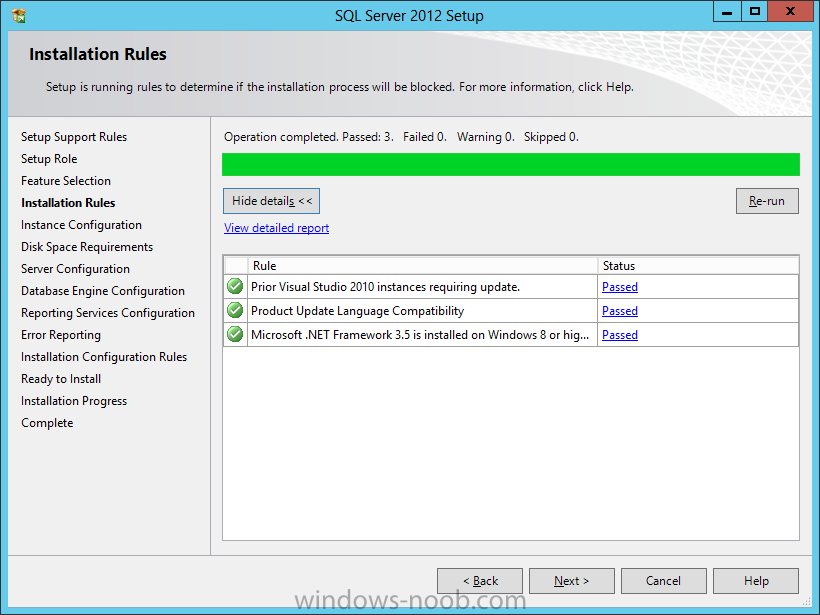
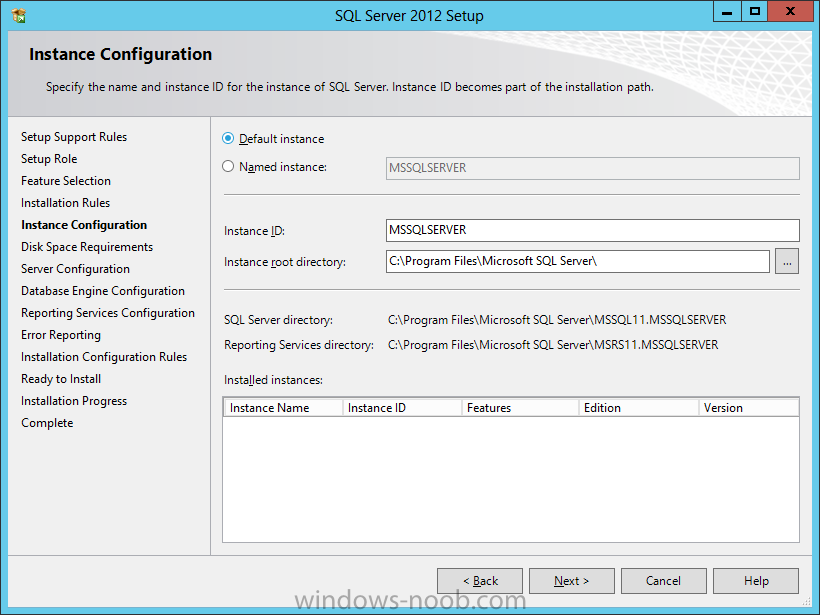
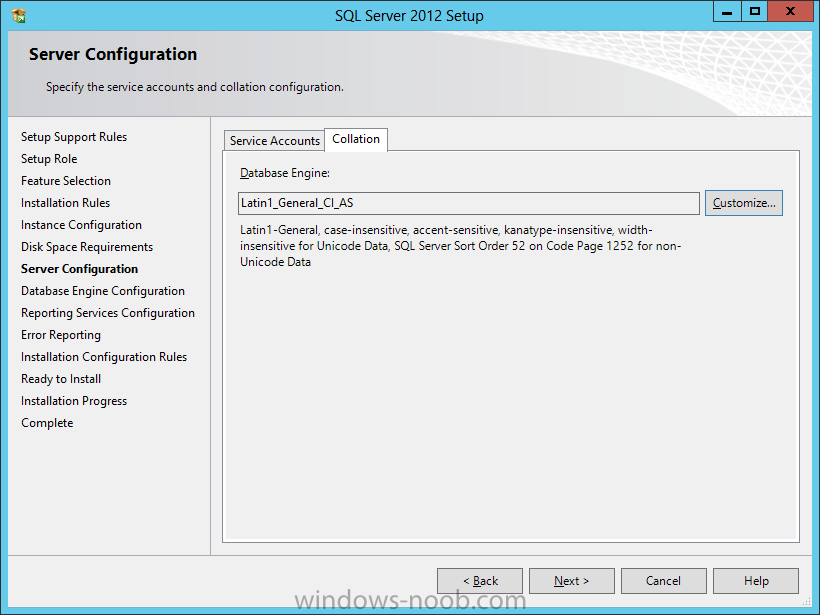
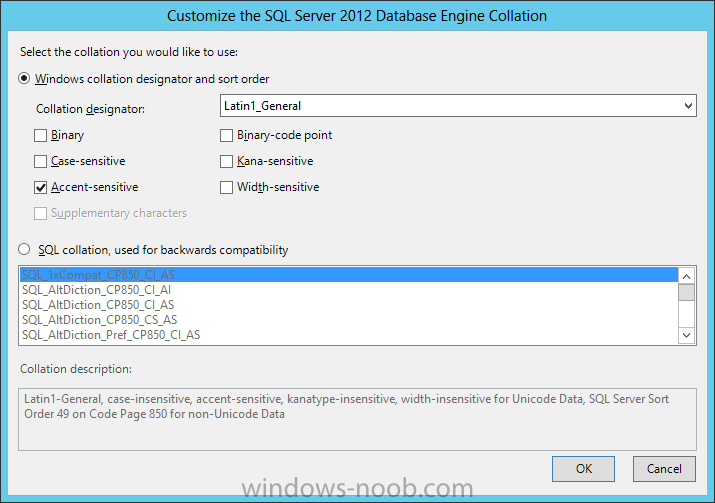
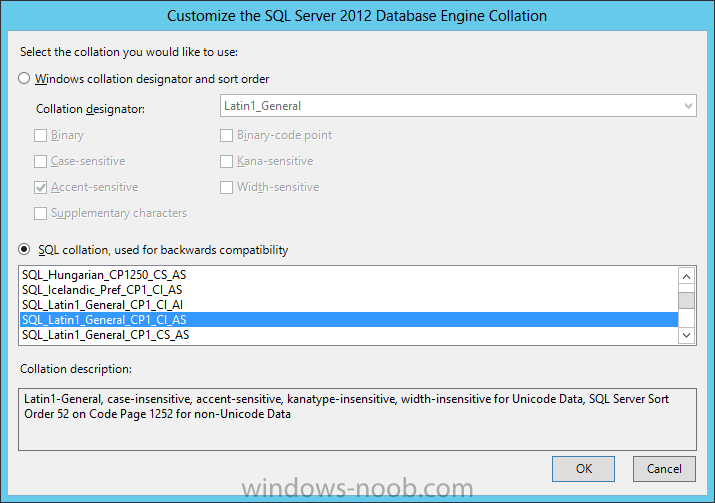
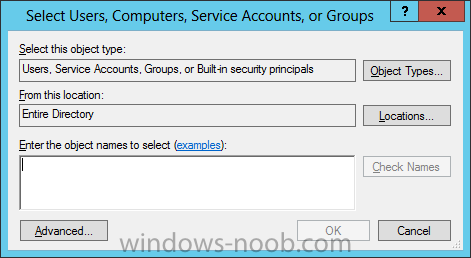
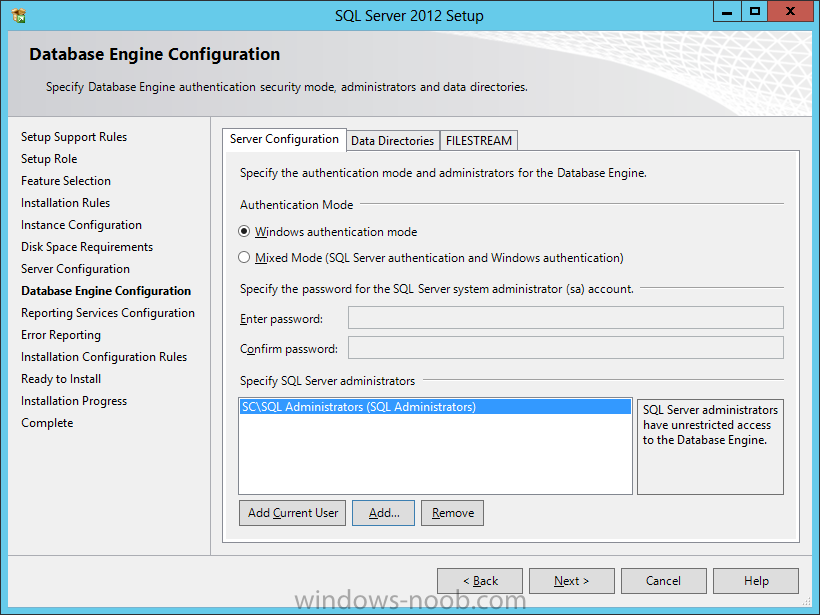
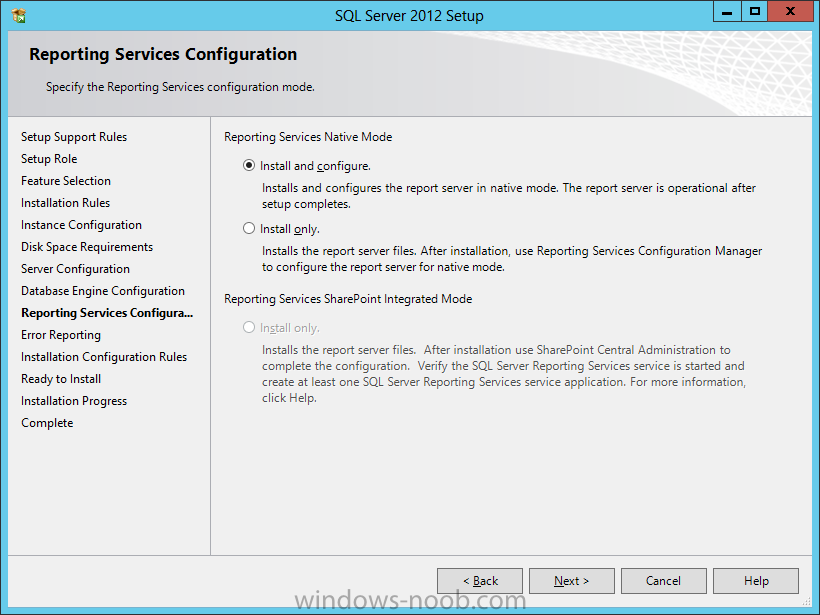
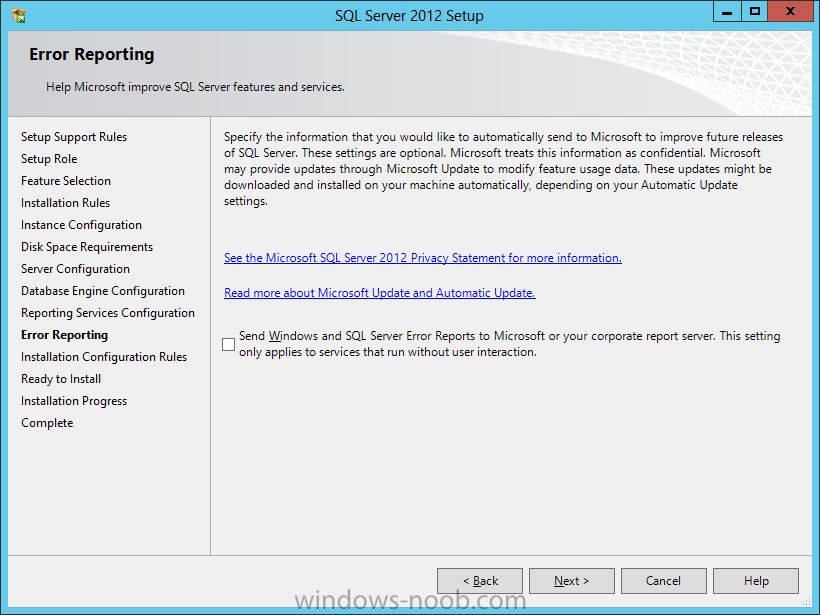
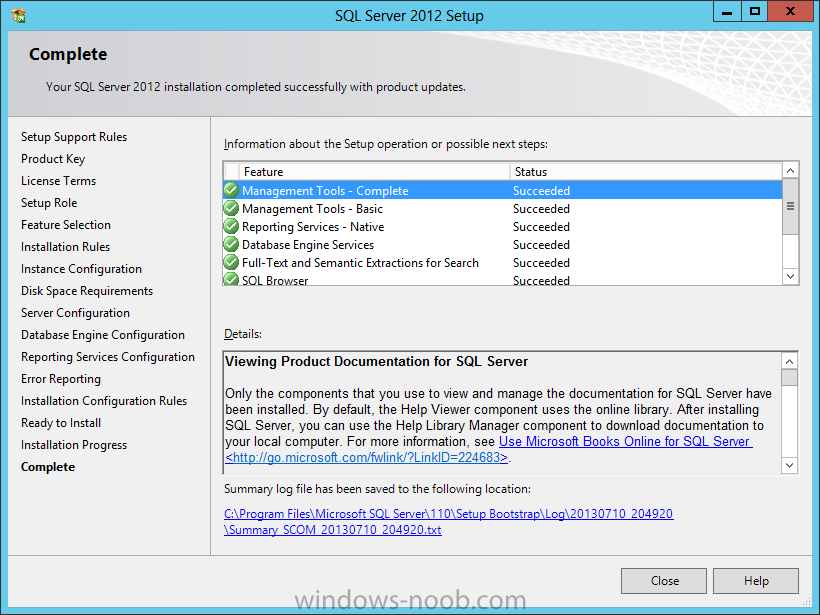
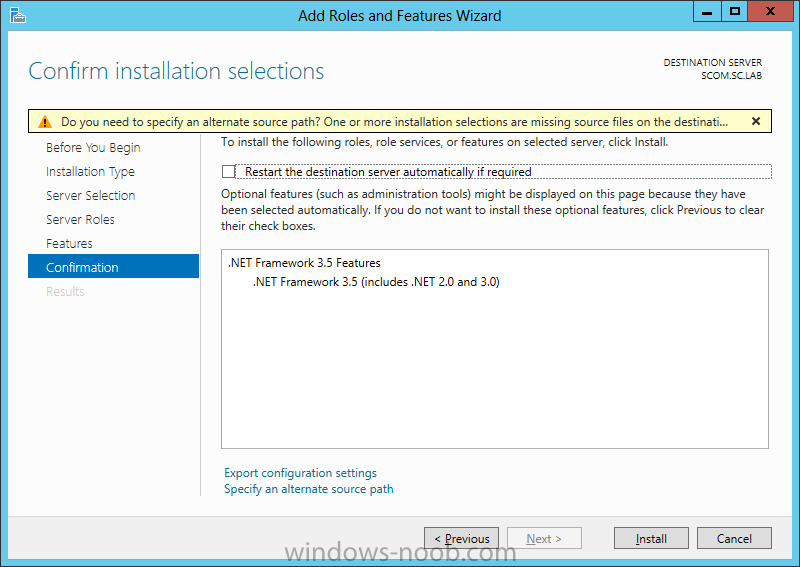
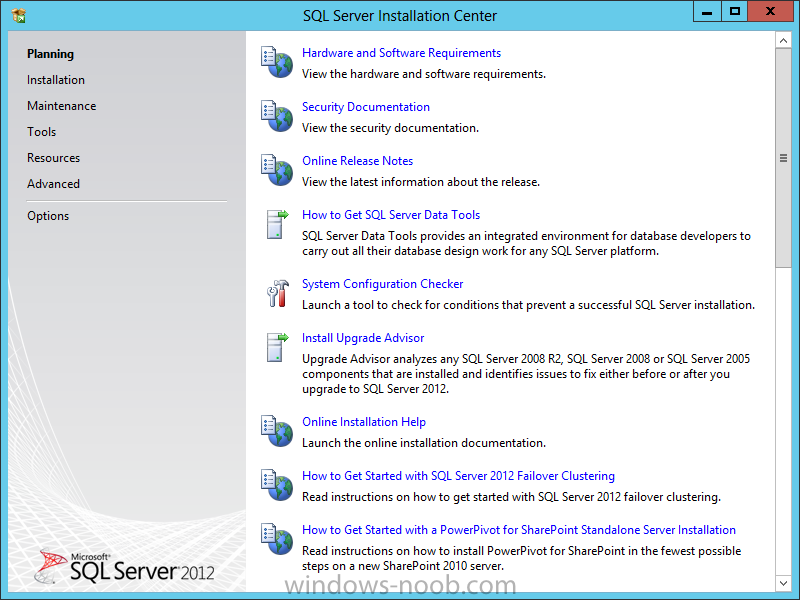
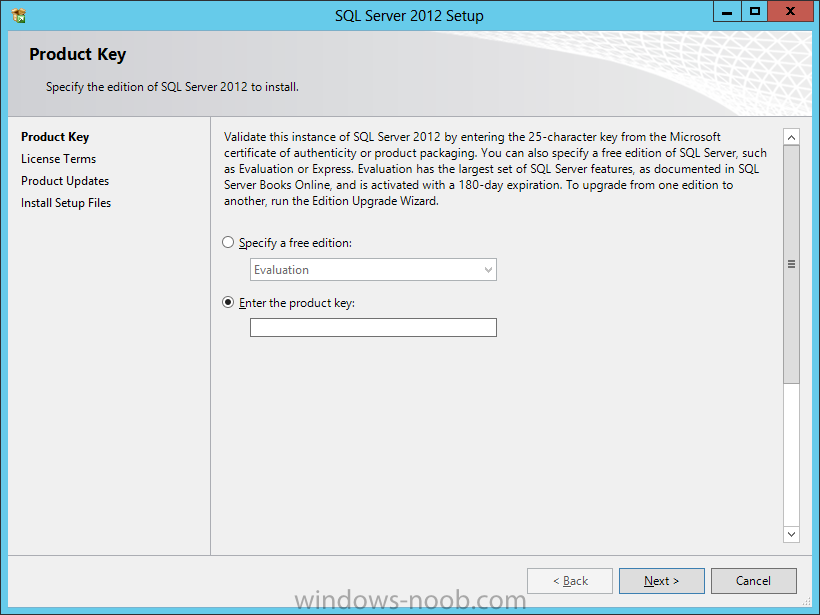
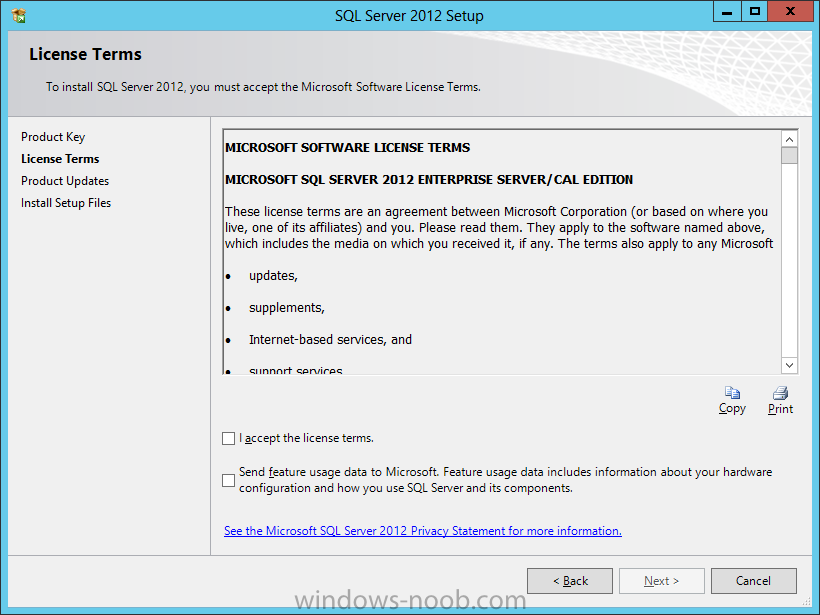
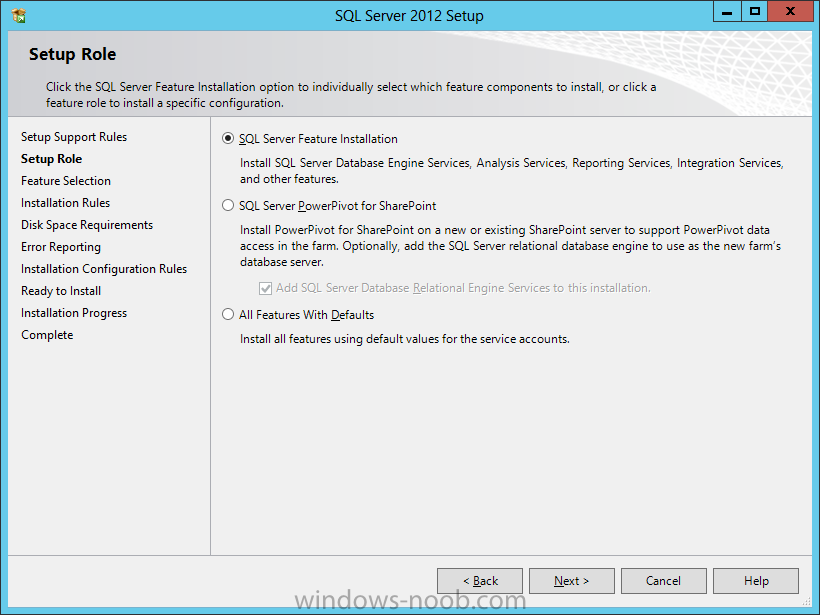
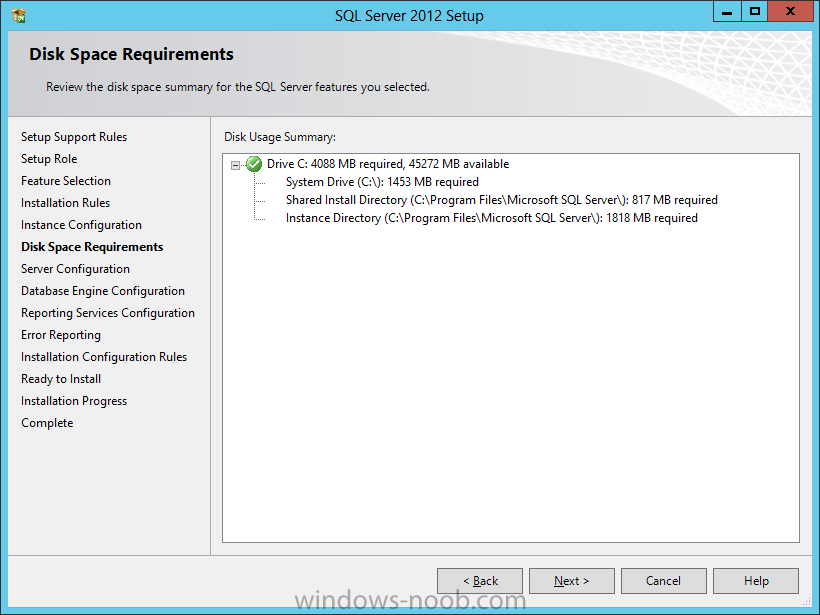
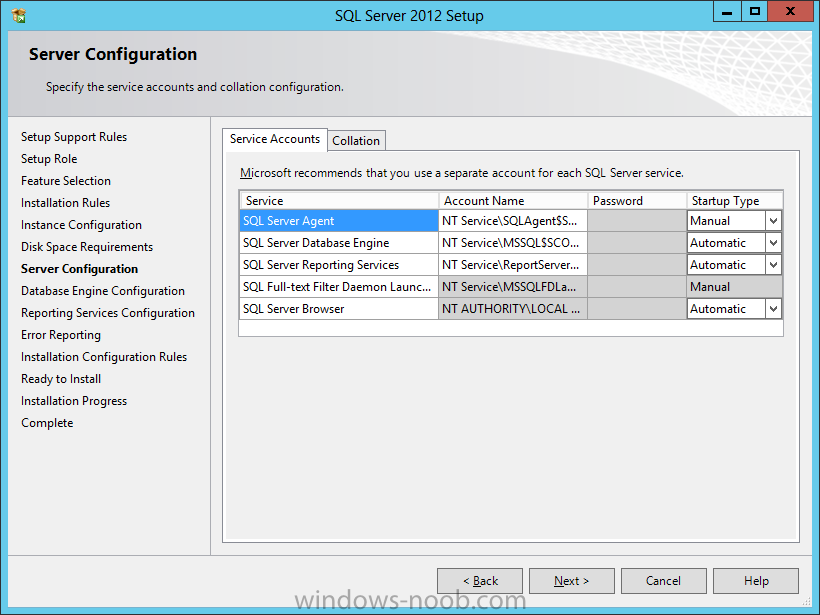
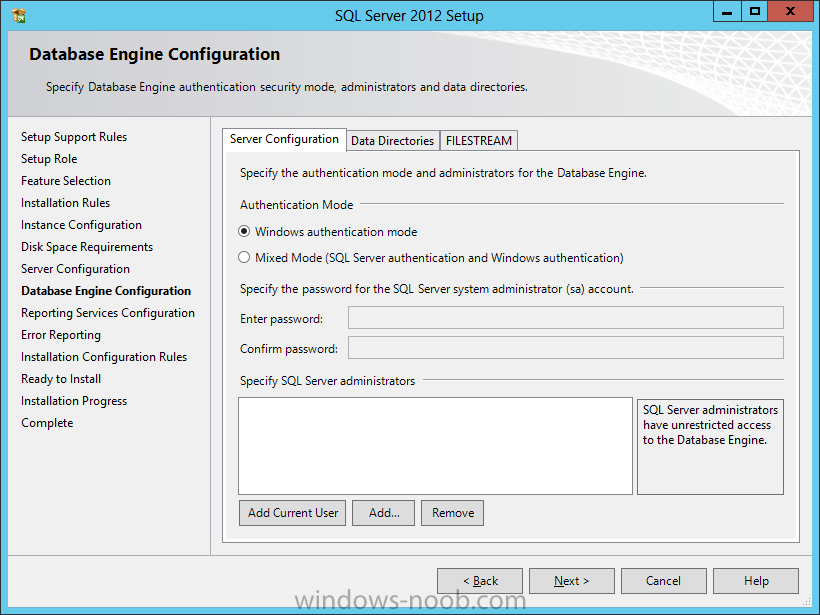
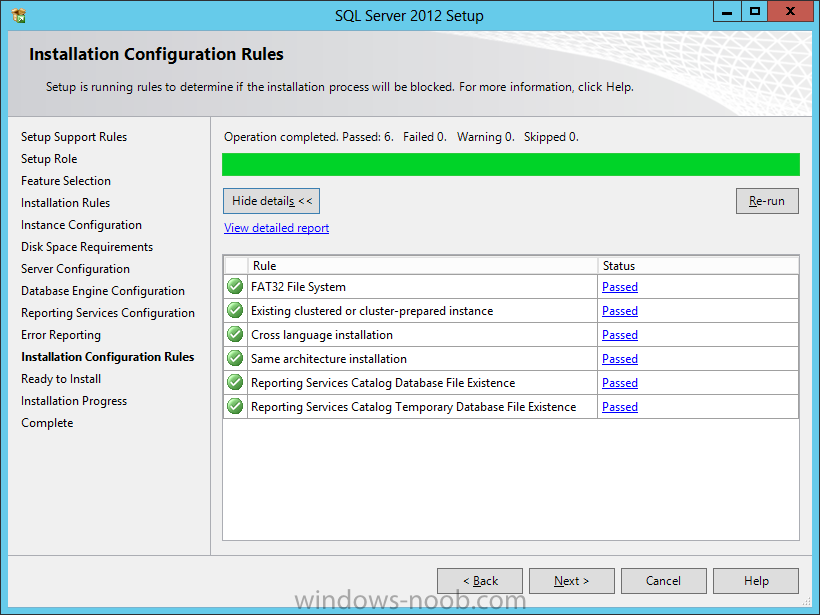
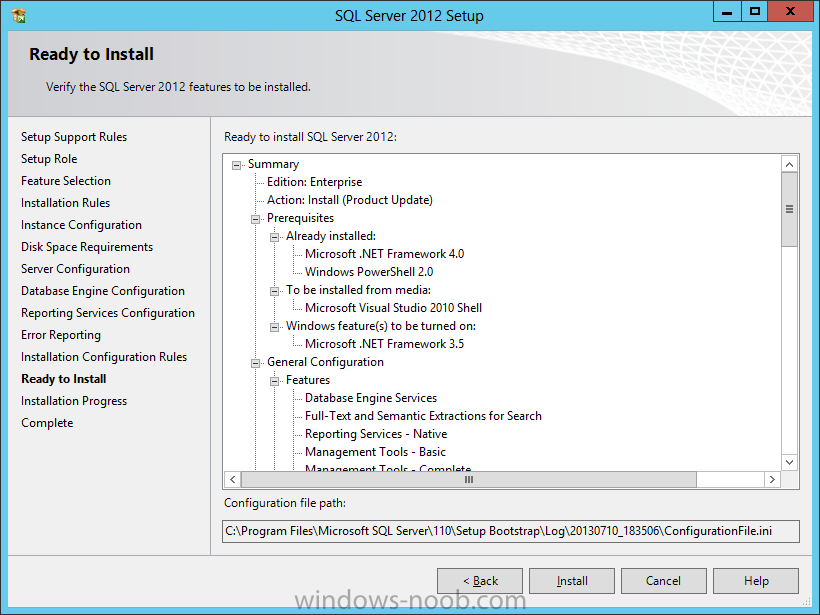
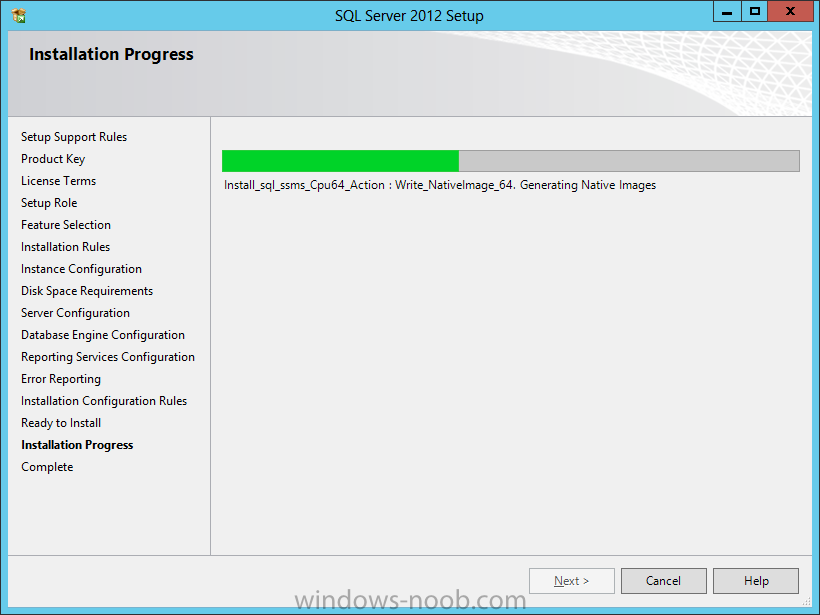
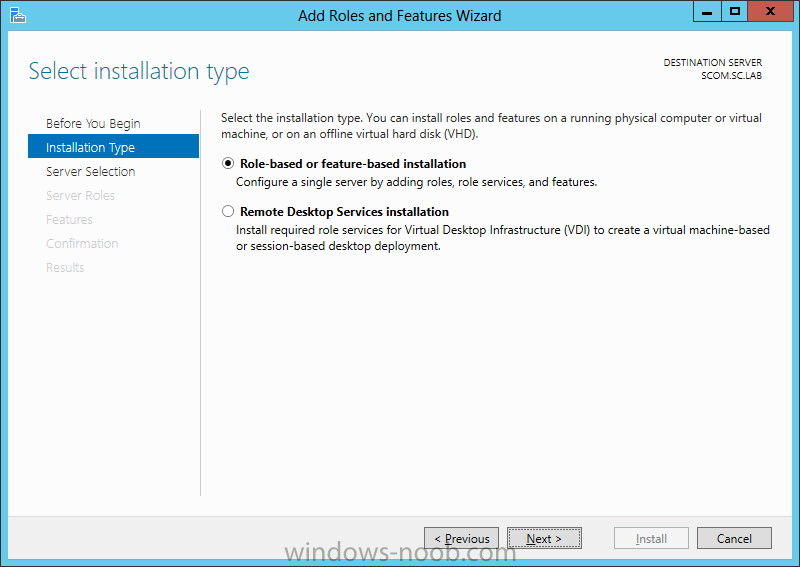
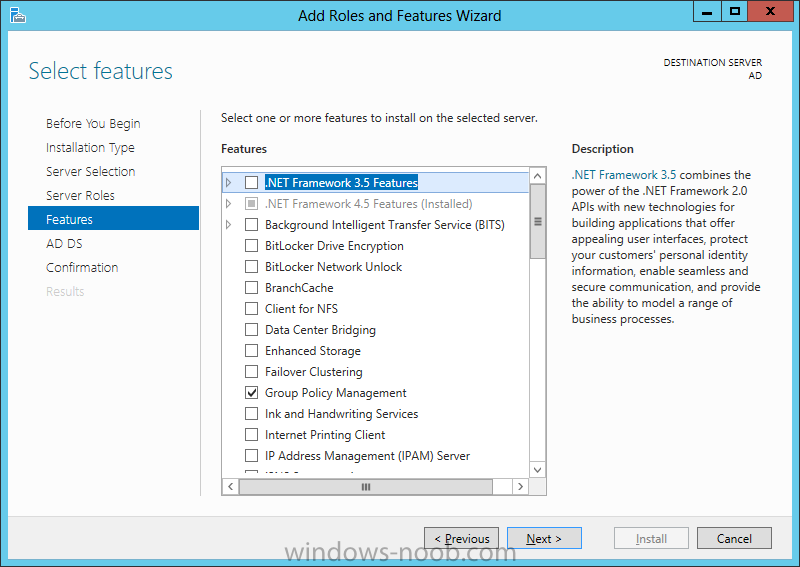
In our last post, we installed Active Directory. Now we will install SQL Server. Install SQL Server At this point, since we will be installing SQL Server on the same server that we will be installing SCOM, it is expected that you have the VM created, the OS is installed, the appropriate networking has been configured, and it is joined to your lab domain. To avoid a specific installation error (see the end of the Install SQL Server section), you have to install the .NET Framework 3.5. So we’re going to complete this first before we start the installation of SQL. .NET Framework Installation To install the specific version of .NET that we require (version 3.5 in this case), start by launching the Server Manager, and selecting Manager > Add Roles and Features. On the Add Roles and Features Wizard, read the information on the Before You Begin screen, and then click Next. On the Installation Type screen, select ‘Role-based or feature-based installation’, and click Next. On the Server Selection screen, since we are installing SQL on the same server as SCOM, ensure that it is selected, and then click Next. On the Server Roles screen, we are not installing a Role, but rather a Feature, so just click Next. On the Features screen, select .NET Framework 3.5 Features, and click Next. Since in Windows Server 2012 the .NET Framework 4.x is the main framework, the OS installation does not contain the source files for this installation. Therefore, you will need to click on the ‘Specify an alternate source path’ link at the bottom of the dialog. You will need to provide the path to where the source files are. This is found within the installation media of Windows Server 2012. If you insert a DVD or mount an ISO, specify the path to the SxS folder (i.e. D:\Sources\SxS), and then press OK. Click Install, and once it has completed, click Close. SQL Installation Start by either extracting or mounting the SQL Server ISO, and run the setup.exe. In this example, we are installing SQL Server 2012 SP1. On the main installation screen, click on the Installation link on the left pane. From the Installation screen, click the ‘New SQL Server stand-along installation or add features to an existing installation’ link. This is initiate the installation. First, the Setup Support Rules will check for any issues. As long as there isn’t any ‘Failed’ issues, click OK to continue with the installation. Next, enter your product key or select the evaluation copy to install, and press Next. Accept the License Terms and choose if you will send usage data to Microsoft, then press Next. If you have an Internet connection, the installer will check if there are any applicable updates to the installation, and will download the updates to use during the install. Click Next. The Setup will perform another Setup Support Rules check. As long as there are no Failures, you can click Next. Next is the Setup Role. For our needs, we will choose ‘SQL Server Feature Installation’, then press Next. For the Feature Selection, select the following, and then press Next. § Database Engine Services § Full-Text and Semantic Extractions for Search § Reporting Services - Native § Management Tools – Basic and Complete (for running queries and configuring SQL services) The Installation Rules will run to determine if anything will block the SQL installation. If there are no Failures, click Next. Next we will configure the instance. You can choose either to use a Default instance, or a Named instance. In this example, I will use a named instance, so as to not get this installation of SQL mixed up with any other I will have in my lab. Make your applicable choice, and click Next. The setup will check and confirm there is enough space on the drive for the installation. If everything is reported as OK, click Next. You next have to configure the server, which includes the Service Accounts and Collation. In Production, it is best practice to have a separate account for each of the services. In our lab, we will leave everything at defaults, with the exception of changing the ‘SQL Server Agent’ startup type from ‘Manual’ to ‘Automatic’. After you have completed this, don’t click Next, but rather click on the Collation tab. On the Collation tab, you will need to click the Customize button to be able to change it appropriately. On the Customize dialog, select ‘SQL collation, used for backwards compatibility’. Within the list, find ‘SQL_Latin1_General_CP1_CI_AS’ and select it, then click OK. You will be back on the Server Configuration dialog, click Next. On the Database Engine Configuration screen, leave the Authentication Mode at ‘Windows authentication mode’. What do have to change is to add SQL Server Administrators. Click the Add button. On the next dialog, you will need to add either the user(s) or security group(s) you want to have administrator access to SQL. At a bare minimum, add the current user account, so that you can log into SQL Server. Add the user(s)/security group(s), and click OK. You will be back on the Database Engine Configuration screen, and your accounts will now be present. In my example, I have an Active Directory Security Group I specifically created for SQL Administrators. Then click Next. Since we checked off Reporting Services, we are now presented with its configuration. Leave the default ‘Install and configure’ option selected, and click Next. You can choose to send Error Reporting information to Microsoft. Make your choice, and click Next. The setup will now re-check the configuration rules, based on the selections and information that has been supplied. If it passes, click Next. Review the information on the Ready To Install screen, and then click Install. Note: during the installation, you may encounter the following error message. This is due to not having the .NET Framework 3.5 installed prior to attempting to install SQL Server. If you encounter this, cancel the SQL server installation, and install the .NET Framework 3.5 (which is an available feature within Roles and Features). You may have to wait a while for the Installation Progress to complete. On the Complete screen, click Close. Congratulations, you now have SQL Server installed and are finally ready to install System Center Operations Manager (SCOM).


-
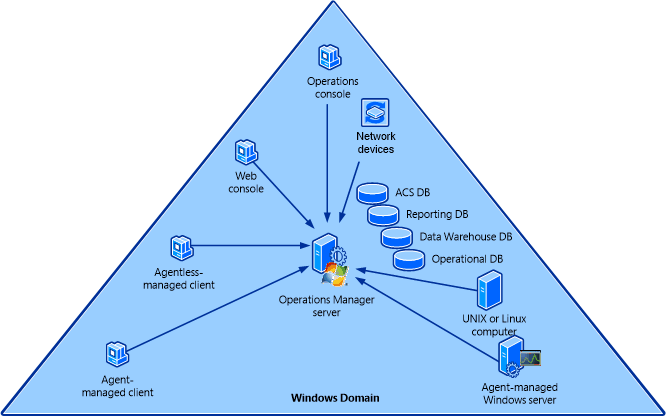
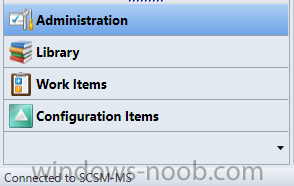
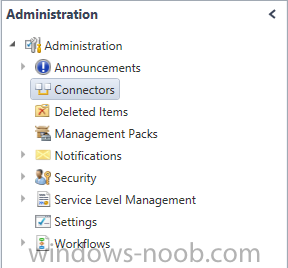
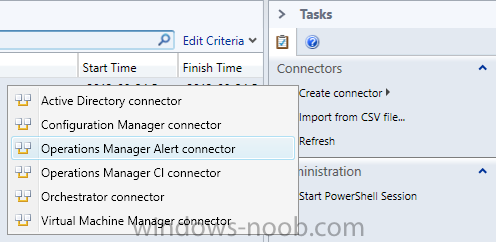
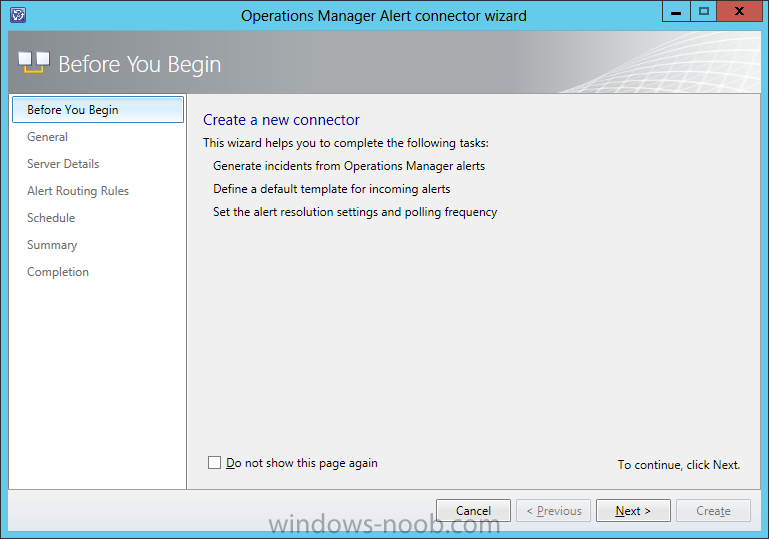
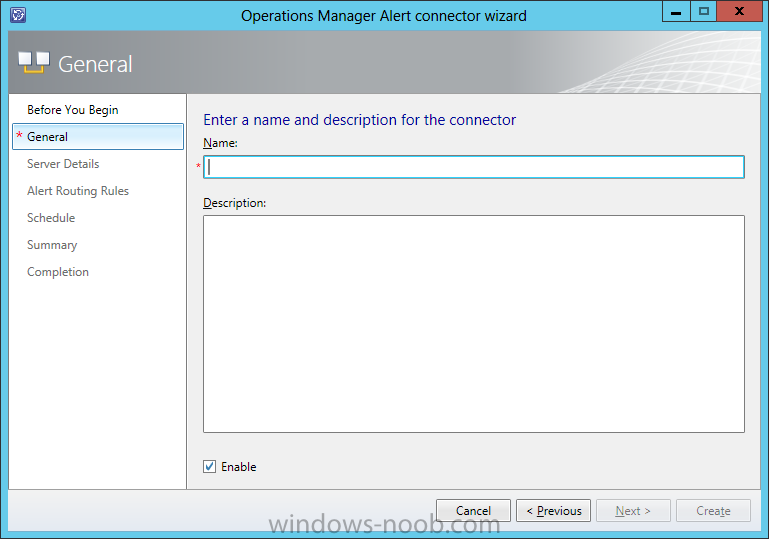
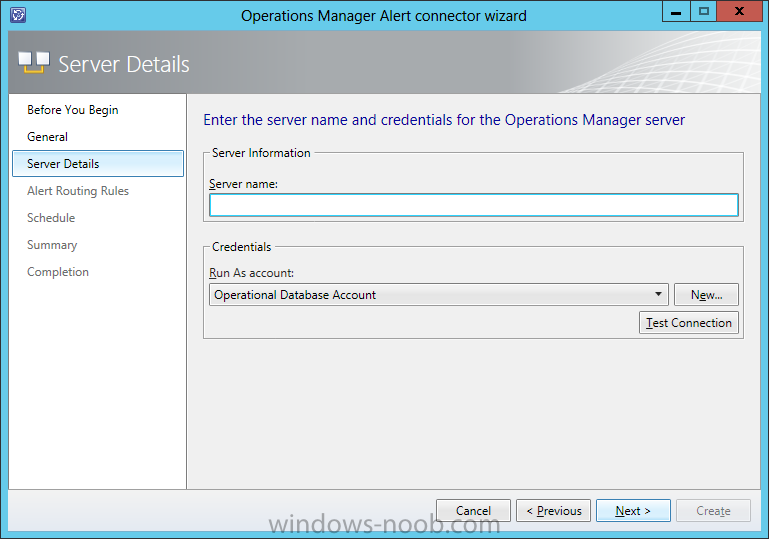
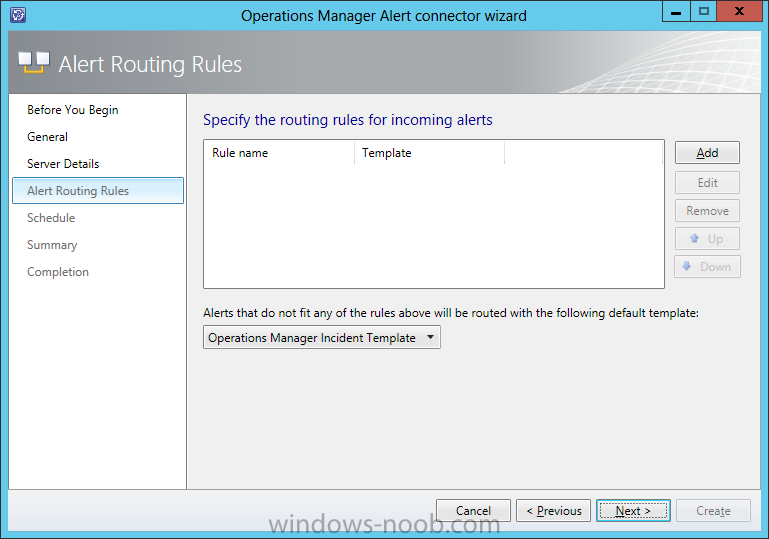
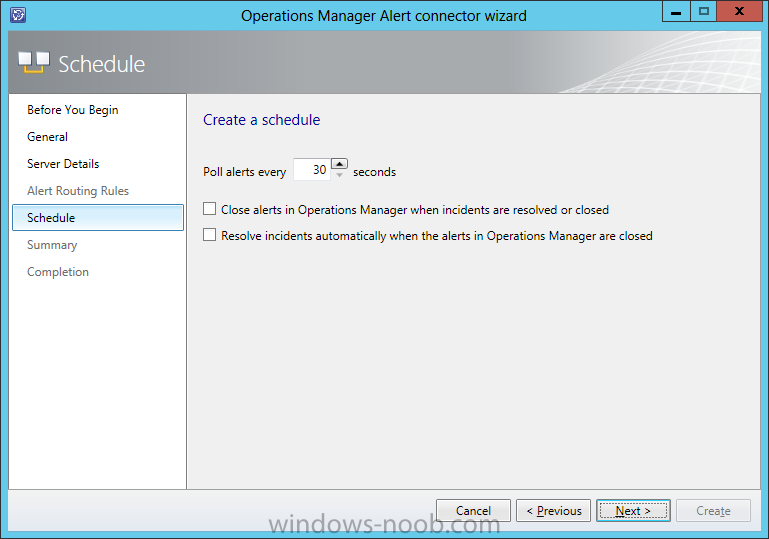
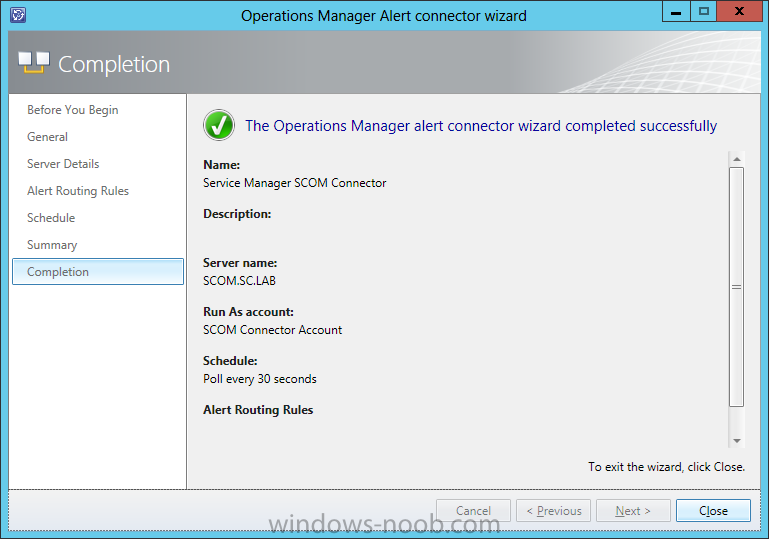
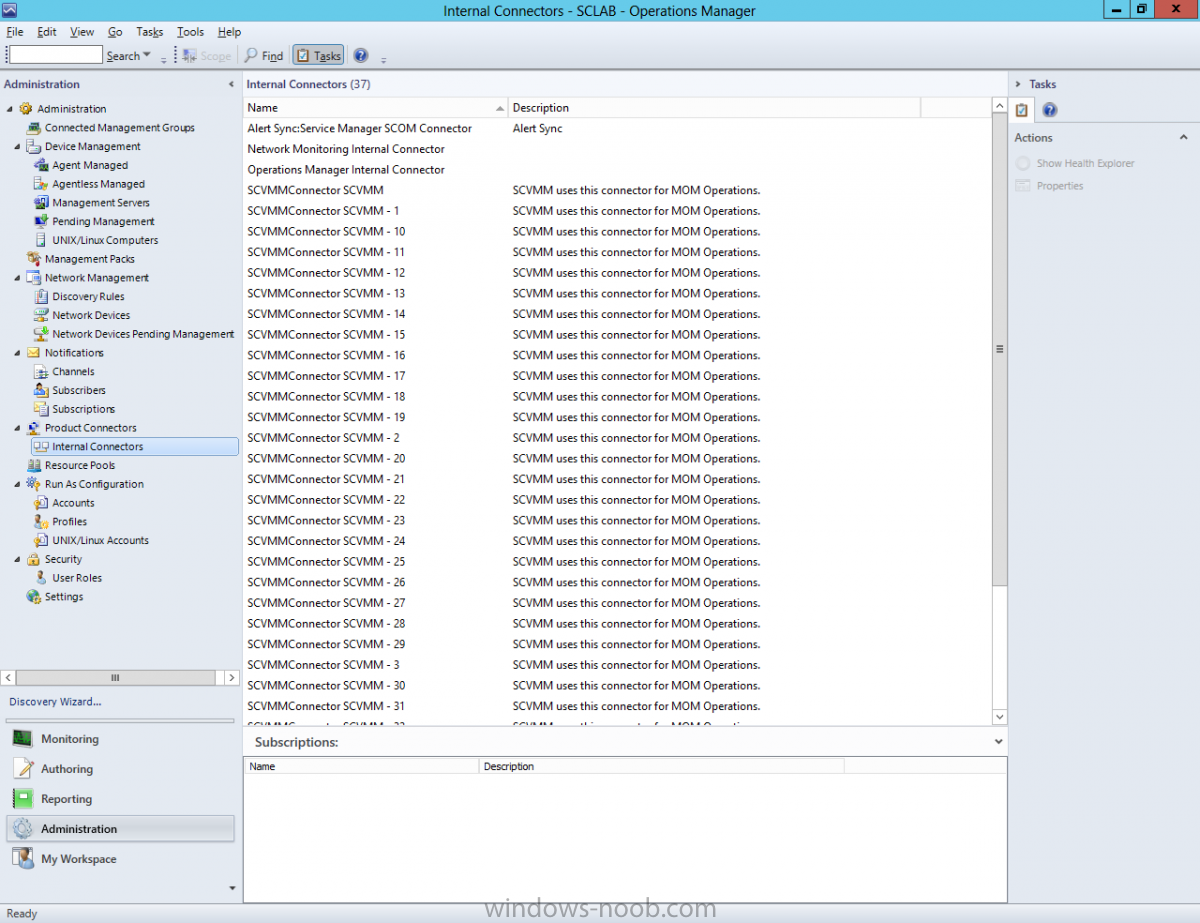
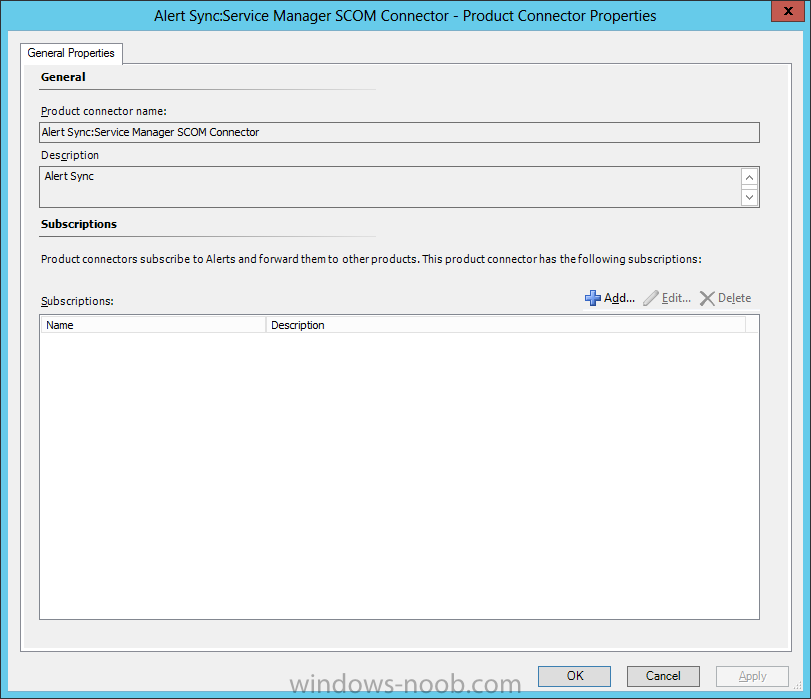
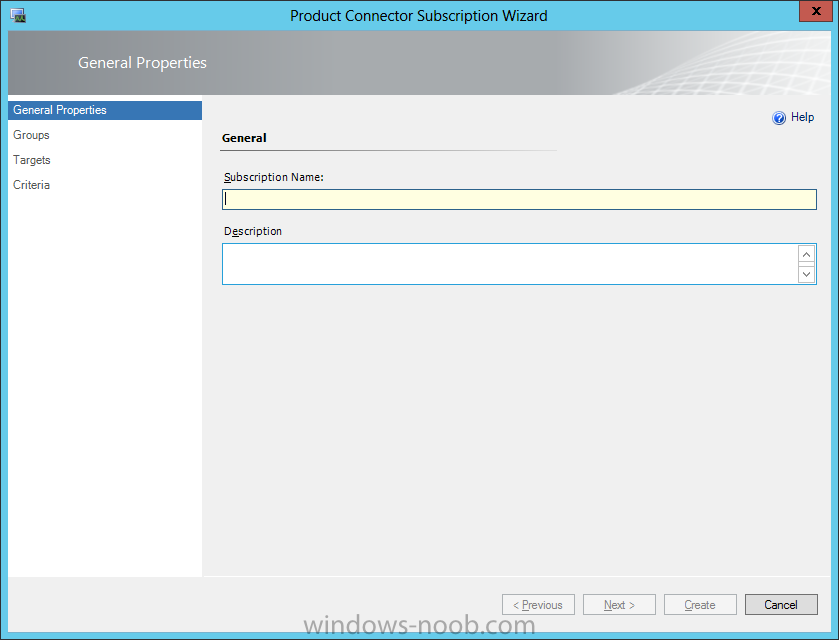
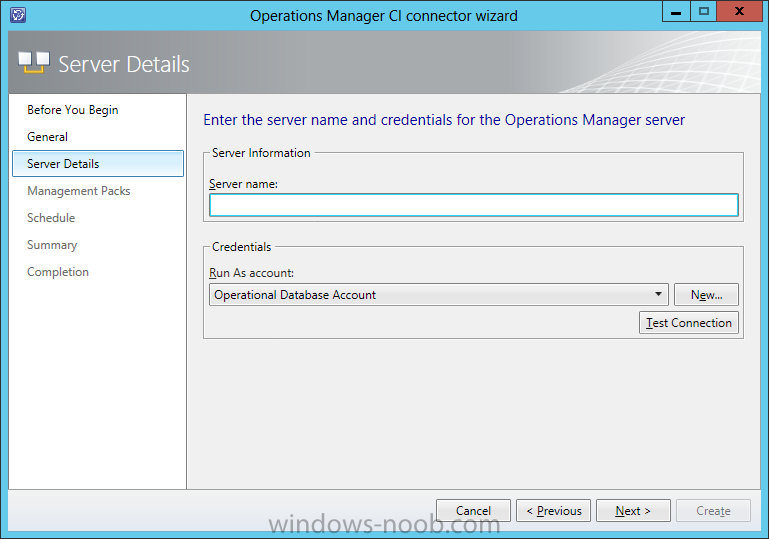
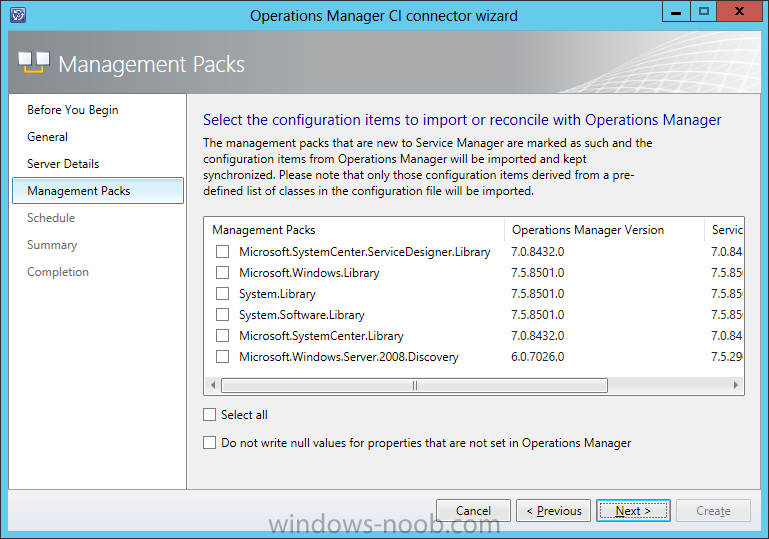
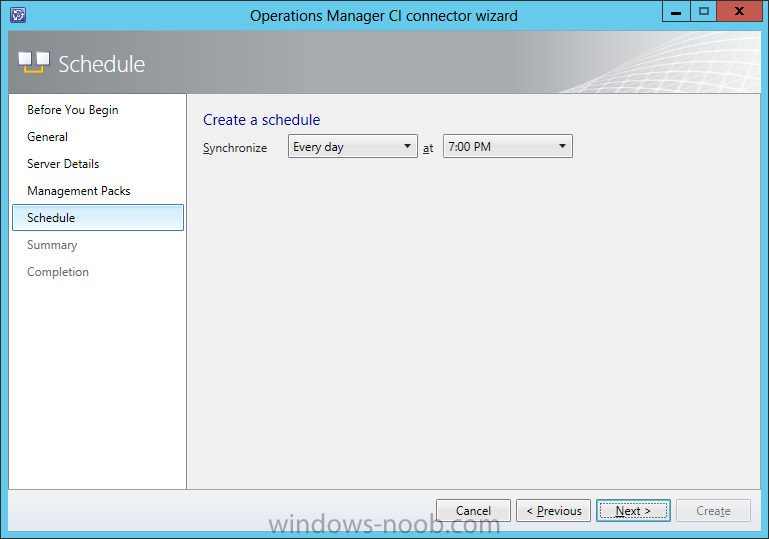
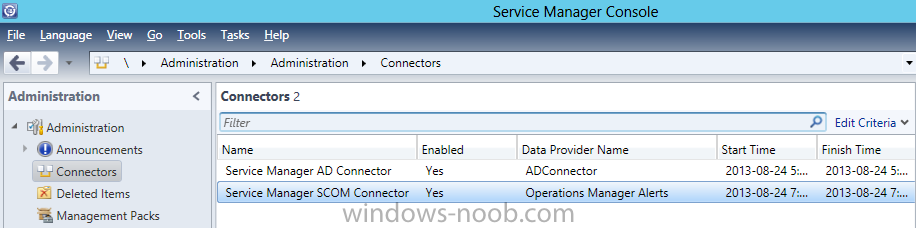
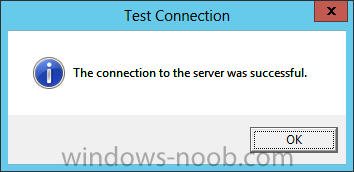
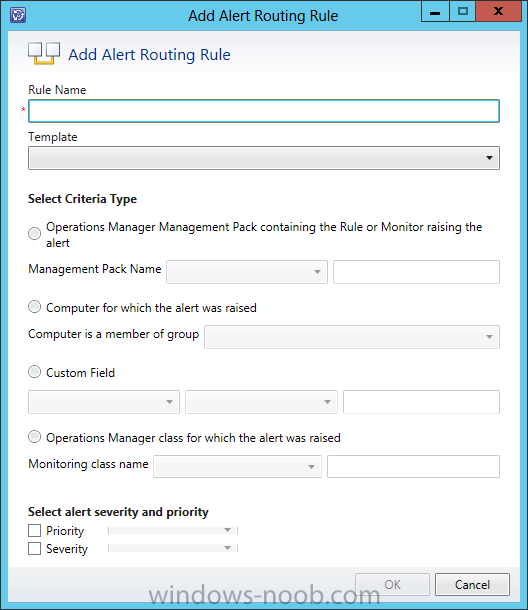
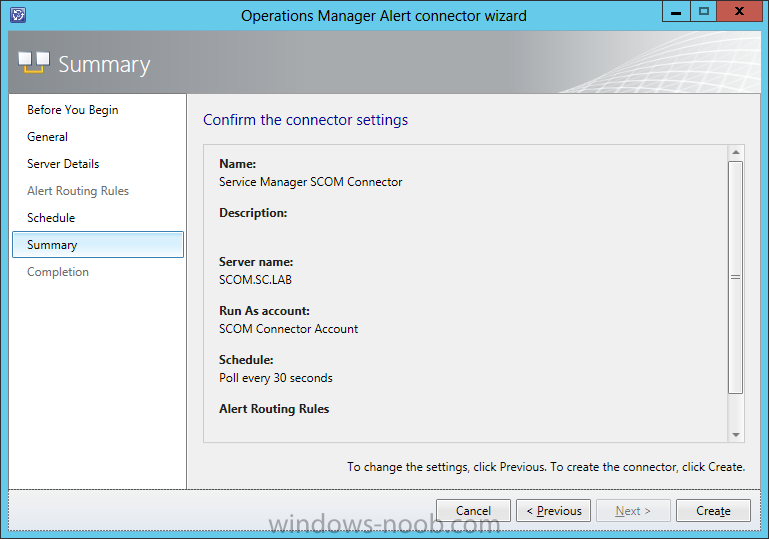
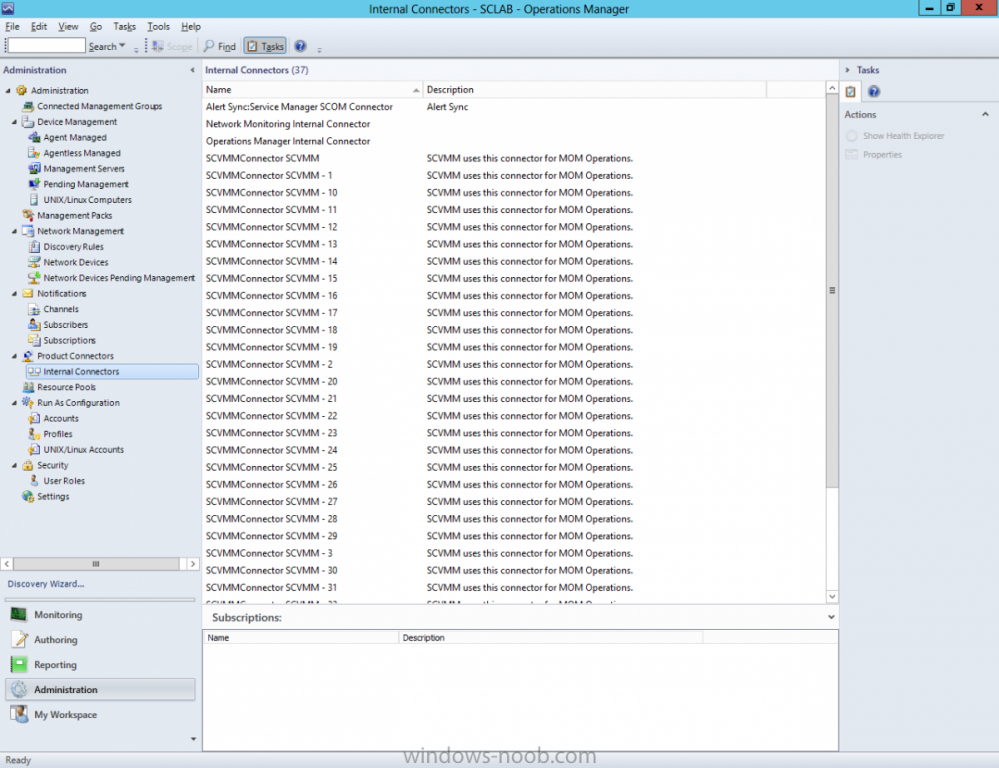
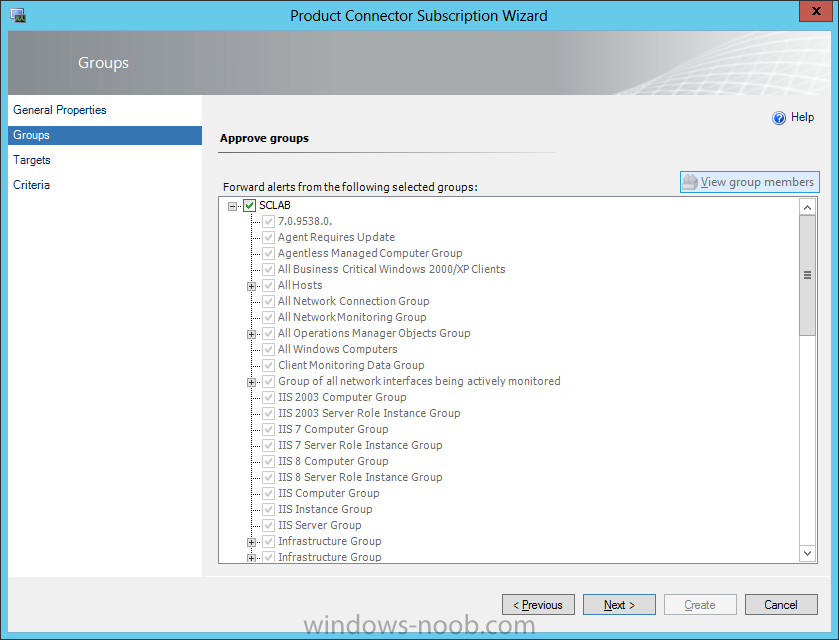
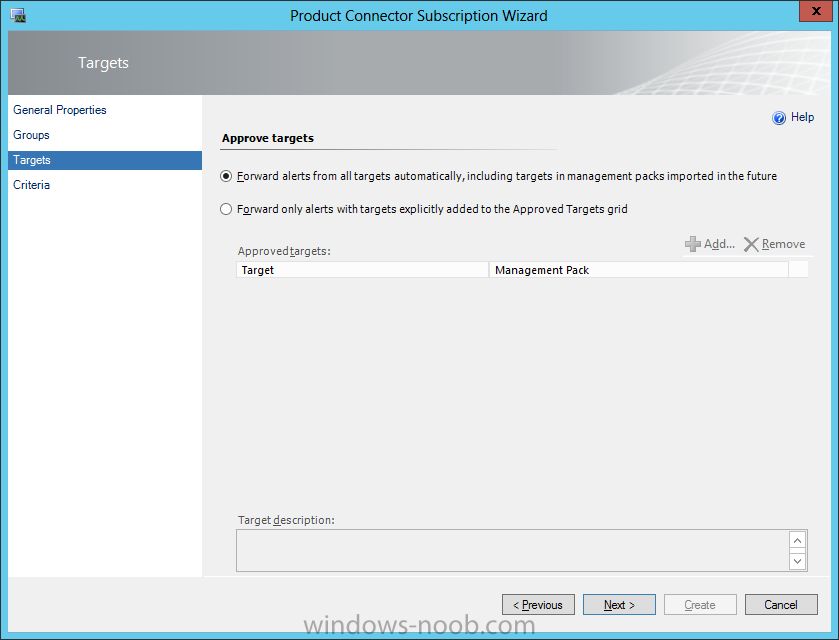
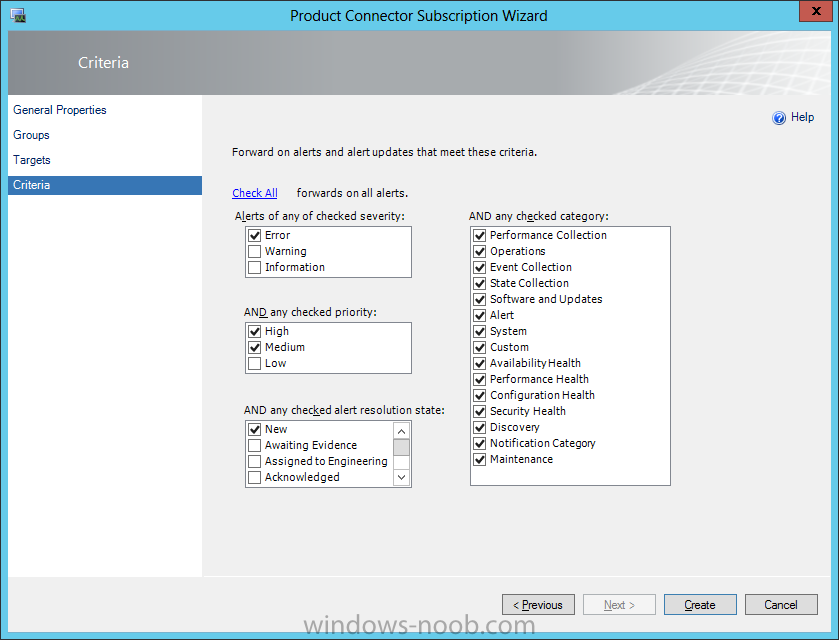
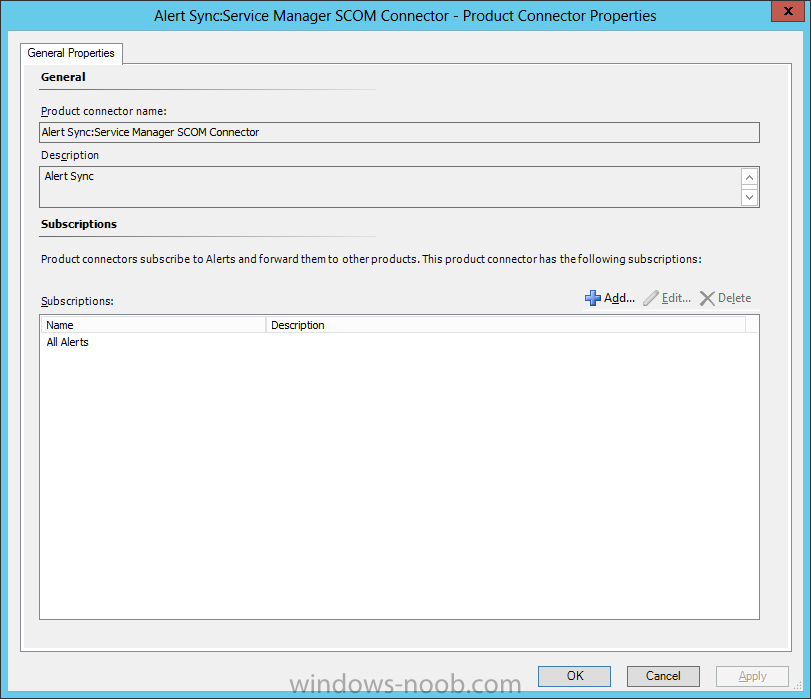
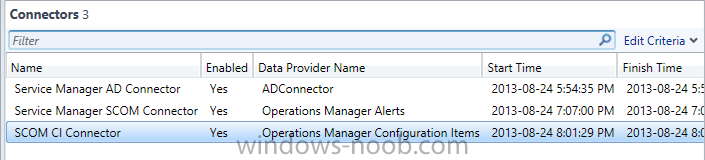
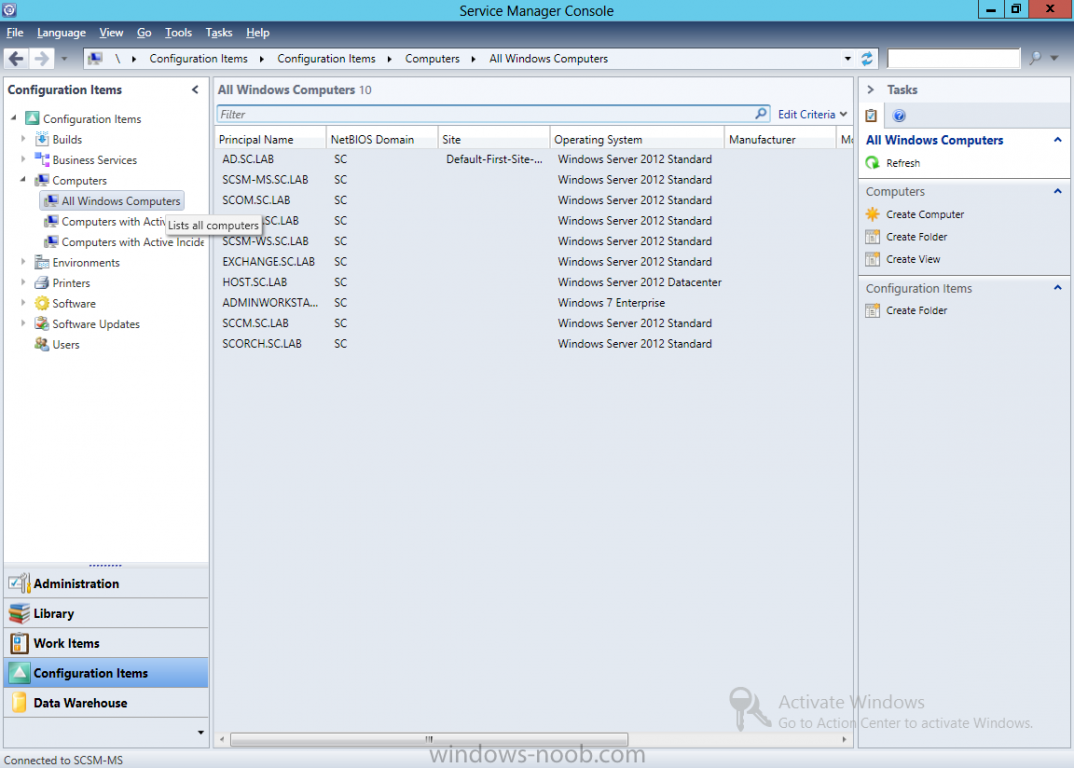
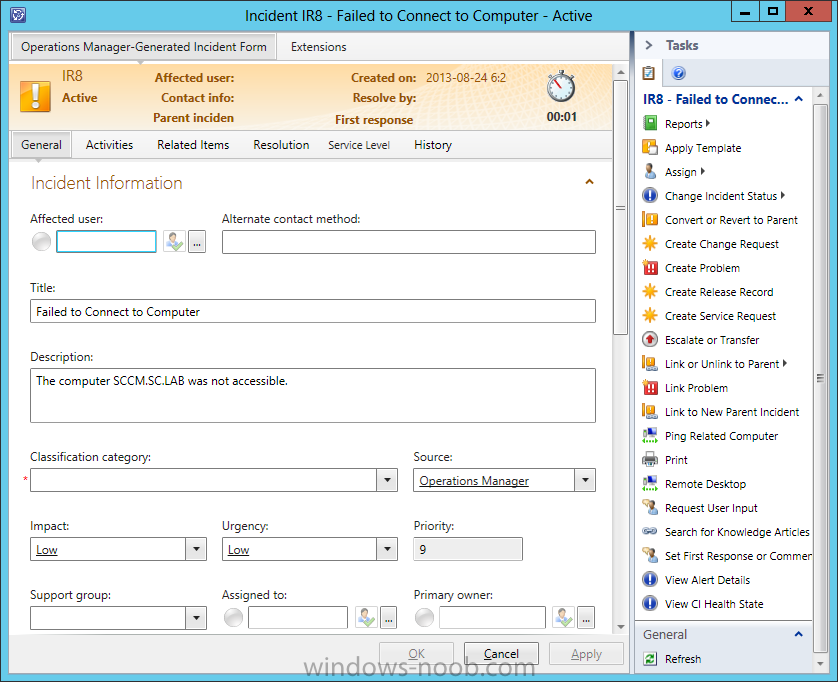
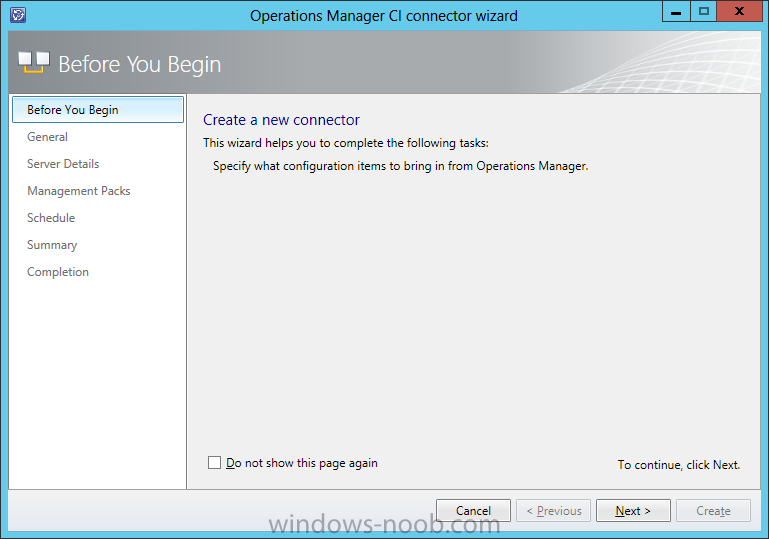
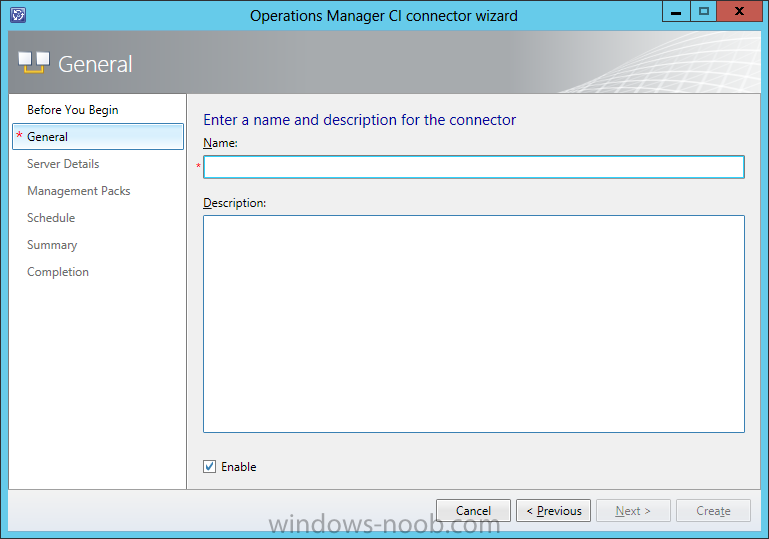
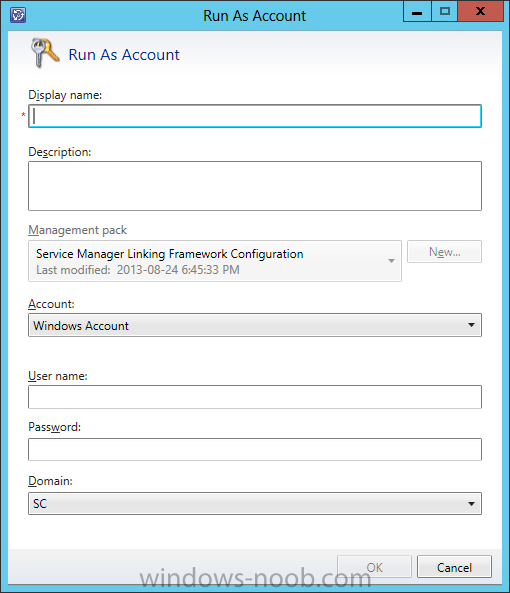
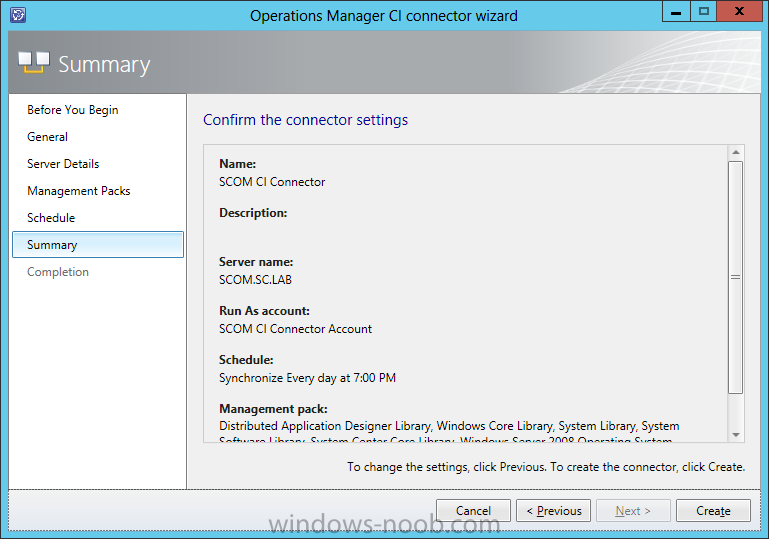
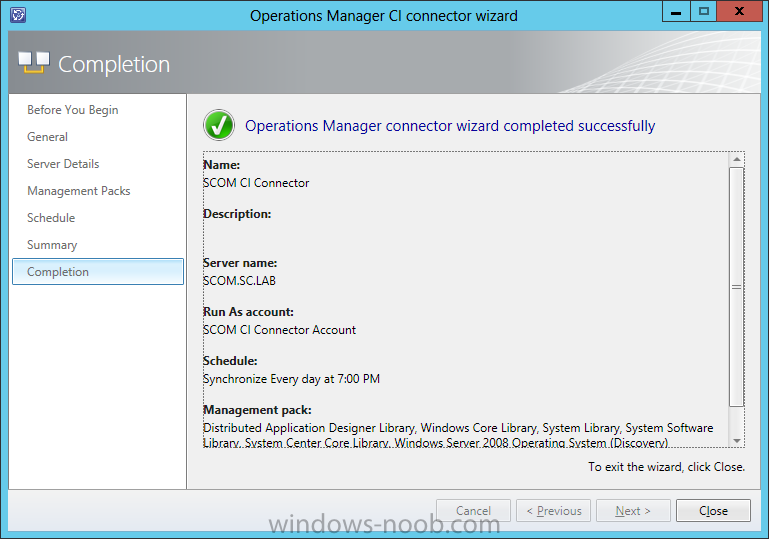
Two connectors for Operations Manager are available in System Center 2012 – Service Manager: the configuration item (CI) connector that imports objects that are discovered by Operations Manager into the Service Manager database, and an alert connector that can create incidents based on alerts. System Center Operations Manager collects information about many different types of objects, such as hard disk drives and Web sites. To import objects that are discovered by Operations Manager, Service Manager requires a list of class definitions for these objects; the list of definitions is in the System Center Operations Manager management packs. Therefore, you must import some System Center Operations Manager management packs into Service Manager. When you install Service Manager, a set of System Center Operations Manager management packs for common objects and the required Windows PowerShell scripts are copied to your Service Manager installation folder. If you have installed additional management packs in Operations Manager, and you want to add the data from those additional management packs to Service Manager, you can modify the configuration item (CI) connector to add the additional management packs. To create an Operations Manager alert connectorIn the Service Manager console, click Administration. In the Administration pane, expand Administration, and then click Connectors. In the Tasks pane, under Connectors, click Create Connector, and then click Operations Manager Alert Connector. Complete the following steps to complete the Operations Manager Alert Connector Wizard: On the Before You Begin page, click Next. On the General page, in the Name box, type a name for the new connector. Make sure that the Enable check box is selected, and then click Next. On the Server Details page, in the Server name box, type the name of the server that is hosting the Operations Manager root management server. Under Credentials, click New. In the Run As Account dialog box, in the Display name box, type a name for this Run As account. In the Account list, select Windows Account. In the User Name, Password, and Domain fields, type the credentials for the Run As account, and then click OK. For more information about the permissions that are required for this Run As account, see Accounts Required During Setup in the Planning Guide for System Center 2012 - Service Manager. On the Server Details page, click Test Connection. If you receive the following confirmation message, click OK, and then click Next: “The connection to the server was successful.” On the Alert Routing Rules page, click Add. In the Add Alert Routing Rule dialog box, create a name for the rule, select the template that you want to use to process incidents created by an alert, and then select the alert criteria that you want to use. Click OK, and then click Next. On the Schedule page, select Close alerts in Operations Manager when incidents are resolved or closed or Resolve incidents automatically when the alerts in Operations Manager are closed, click Next, and then click Create. Start the Operations Manager console on the SCOM server. Use the appropriate method, based on the version of Operations Manager you are using: In Operations Manager 2007 Service Pack 1 (SP1), in the Administration pane, click Product Connectors. In Operations Manager 2007 R2 and in System Center 2012 - Operations Manager, in the Administration pane, click Product Connectors, and then click Internal Connectors. In the Connectors pane, click the name of the alert connector that you specified in Service Manager. In the Actions pane, click Properties. In the Alert Sync: <name of connector> dialog box, click Add. In the Product Connector Subscription Wizard dialog box, on the General page, in the Subscription Name box, type the name for this subscription. For example, type All Alerts, and then click Next. On the Approve groups page, click Next. On the Approve targets page, click Next. On the Criteria page, click Create. In the Alert Sync:<name of connector> dialog box, click OK. To validate the creation of an Operations Manager alert connector· Confirm that the connector you created is displayed in the Service Manager console in the Connectors pane. · Confirm that incidents are created in Service Manager from alerts in Operations Manager. To create an Operations Manager CI connectorIn the Service Manager console, click Administration. In the Administration pane, expand Administration, and then click Connectors. In the Tasks pane, under Connectors, click Create Connector, and then click Operations Manager CI Connector. Complete the following steps to complete the Operations Manager CI Connector Wizard: On the Before You Begin page, click Next. On the General page, in the Name box, type a name for the new connector. Make sure that the Enable check box is selected, and then click Next. On the Server Details page, in the Server name box, type the name of the server that is hosting the Operations Manager root management server. Under Credentials, click New. In the User name, Password, and Domain boxes, type the credentials for the Run As account, and then click OK. For more information about the permissions that are required for this Run As account, see Accounts Required During Setup in the Deployment Guide for System Center 2012 - Service Manager. On the Server Details page, click Test Connection. If you receive the following confirmation message, click OK, and then click Next: “The connection to the server was successful.” On the MP Selection page, click Select all, or select the management packs that define the configuration items you want to import, and then click Next. On the Schedule page, click Next, and then click Next. On the Summary page, review the selections made and then click Create. On the Completion page, click Close. To validate the creation of an Operations Manager CI connectorConfirm that the objects that Operations Manager discovered are listed as configuration items in Service Manager. To confirm the status of an Operations Manager connectorView the columns in the Connector pane; the columns contain information about the start time, the finish time, the status, and the percentage of import completion.


-
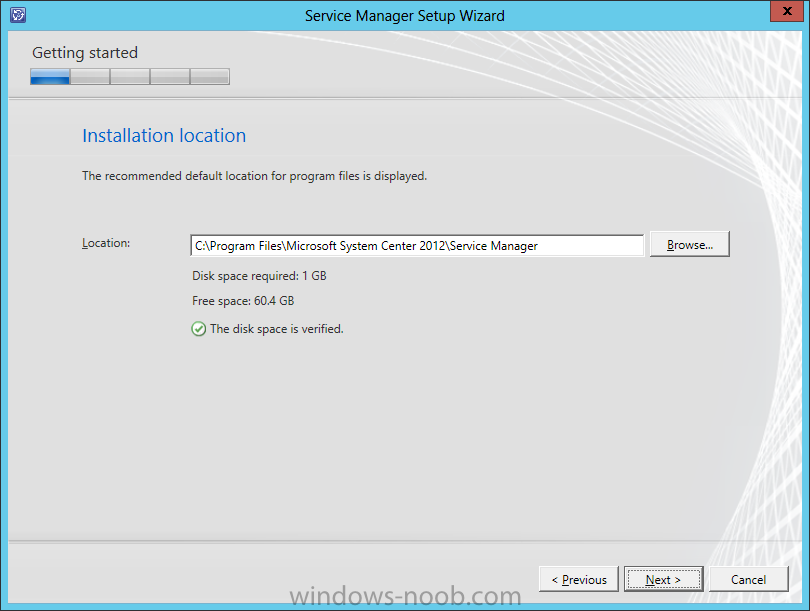
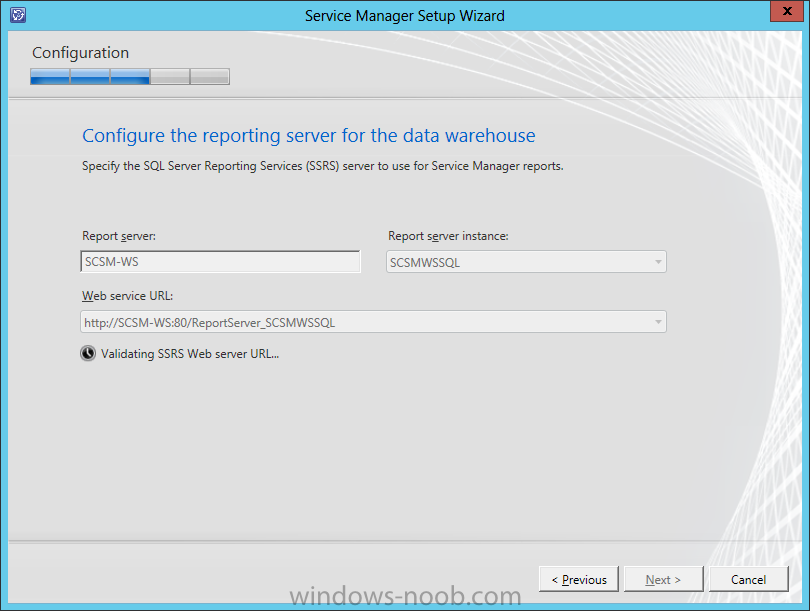
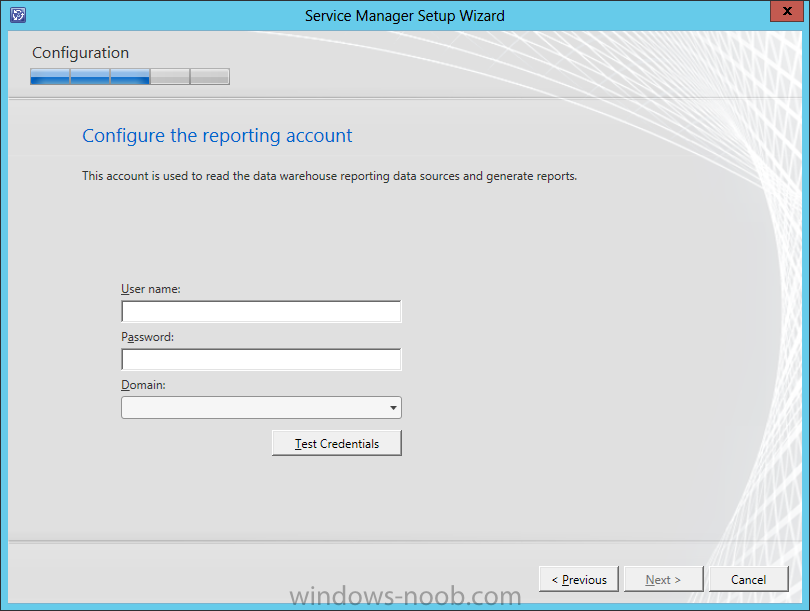
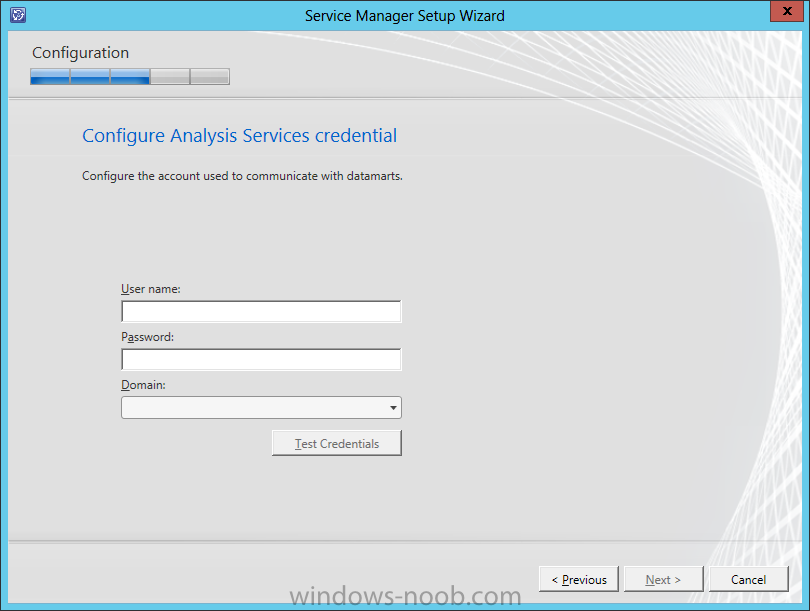
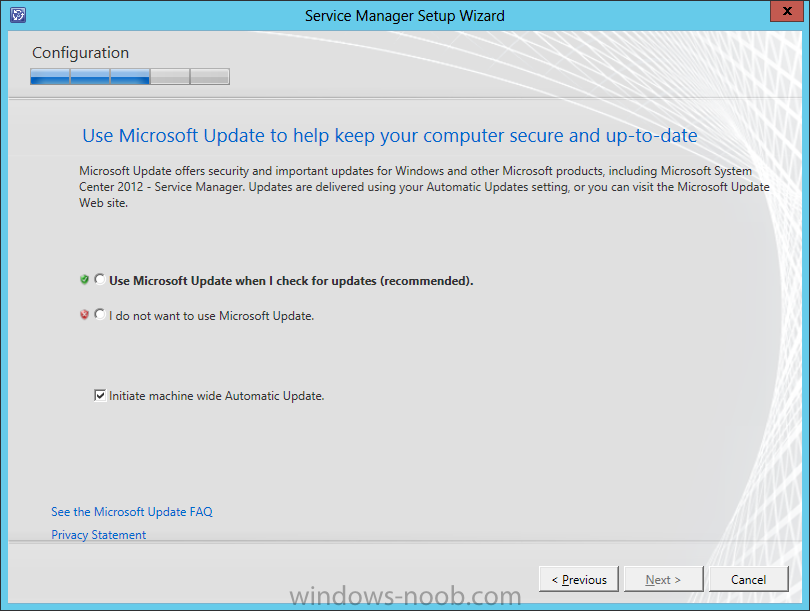
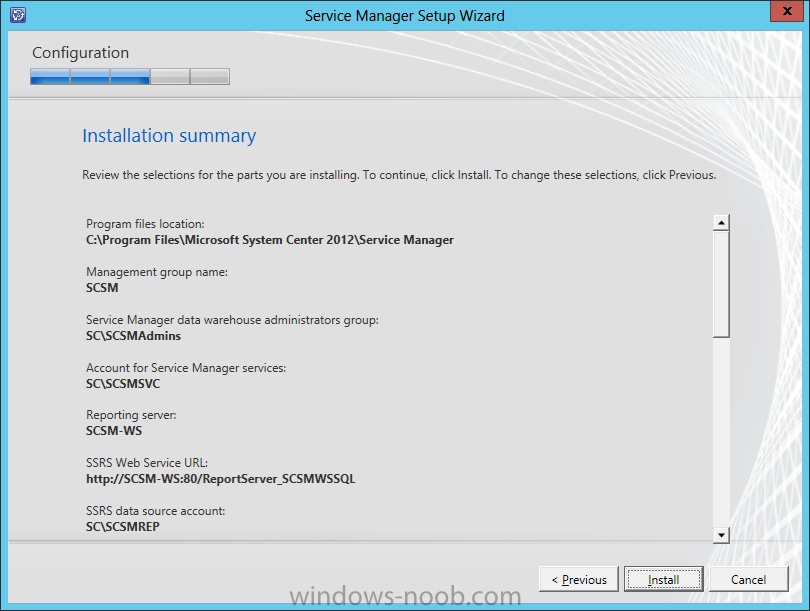
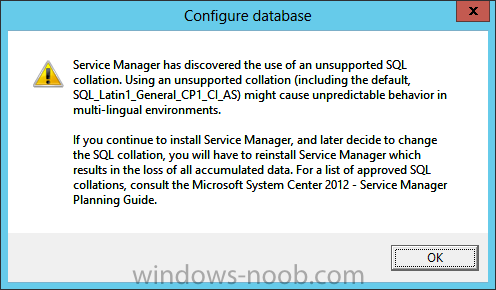
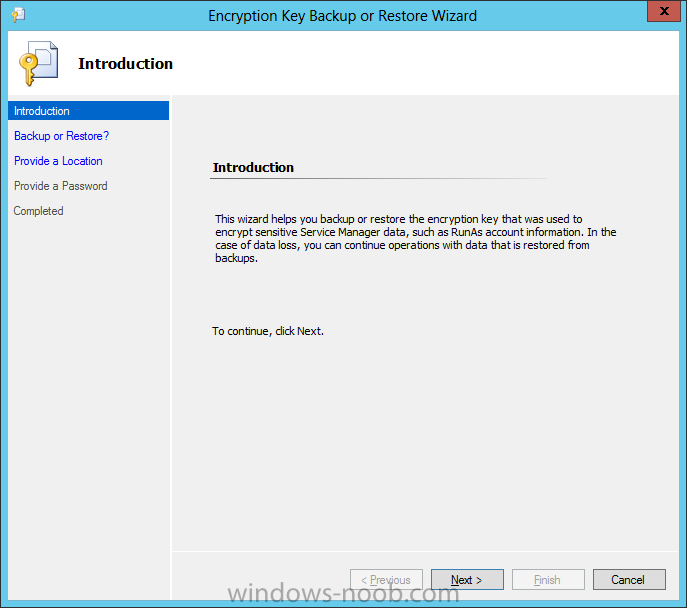
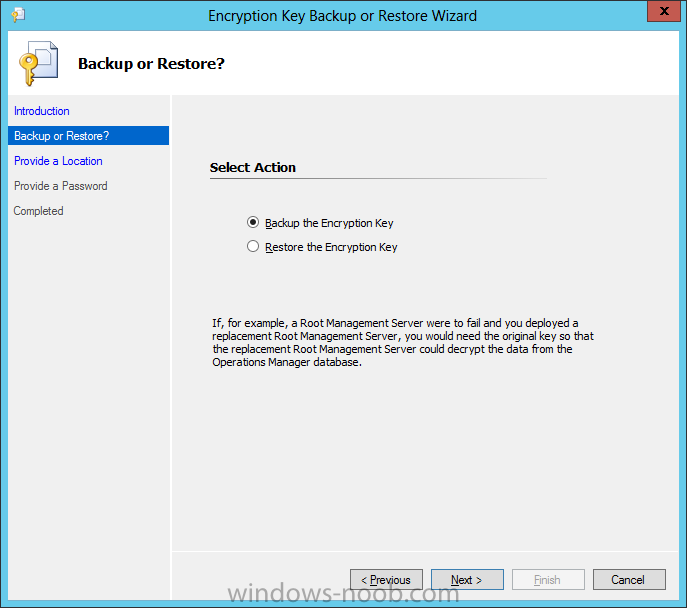
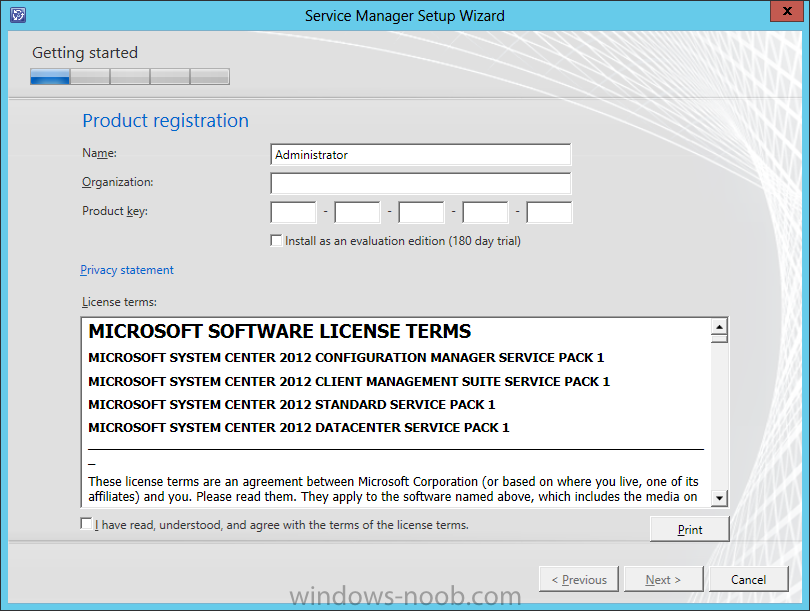
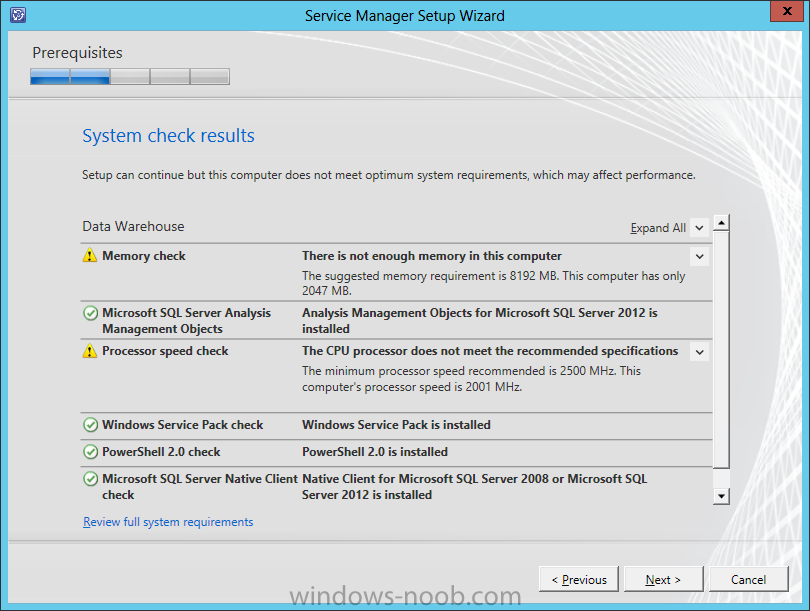
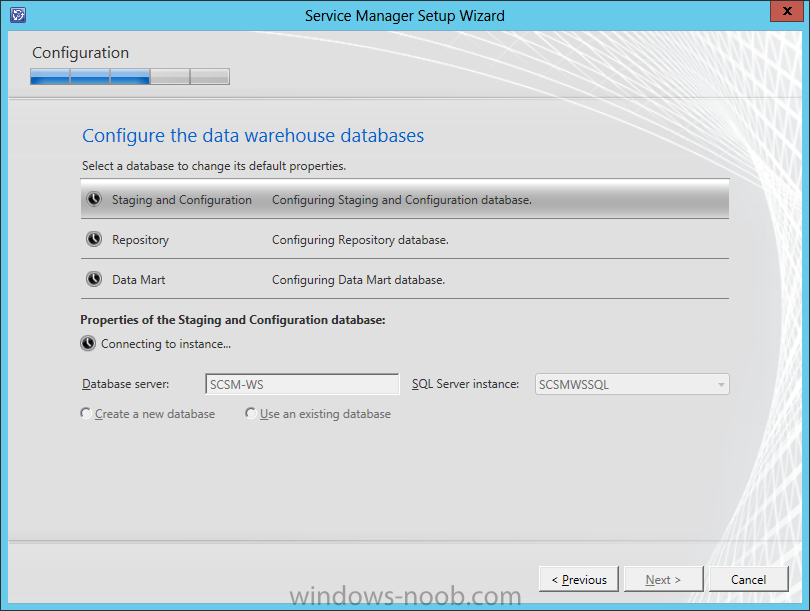
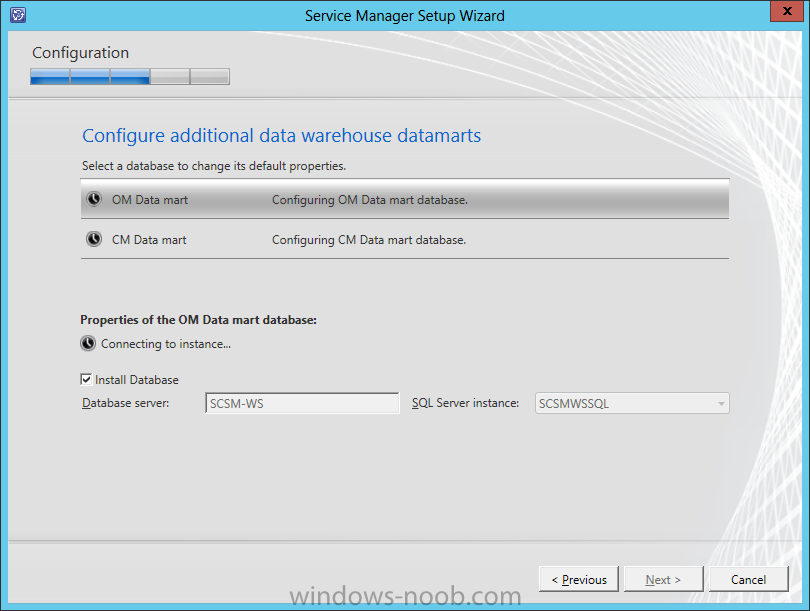
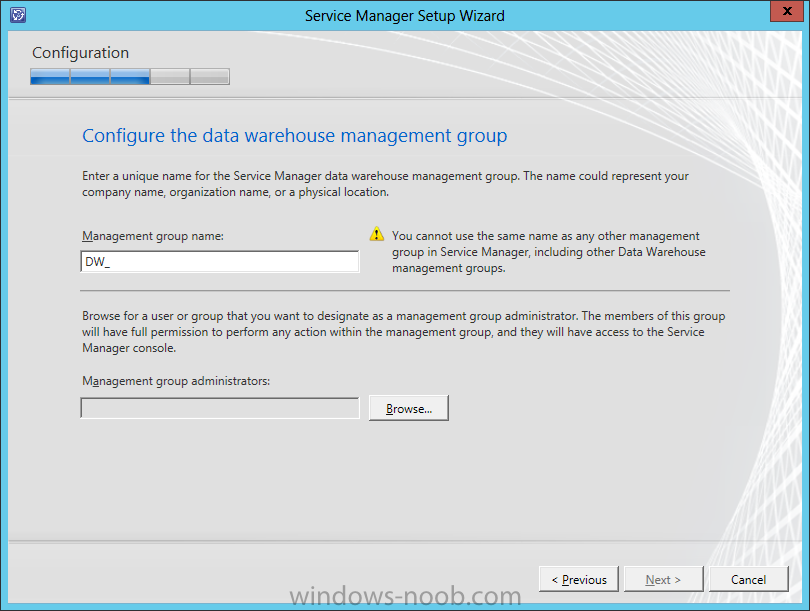
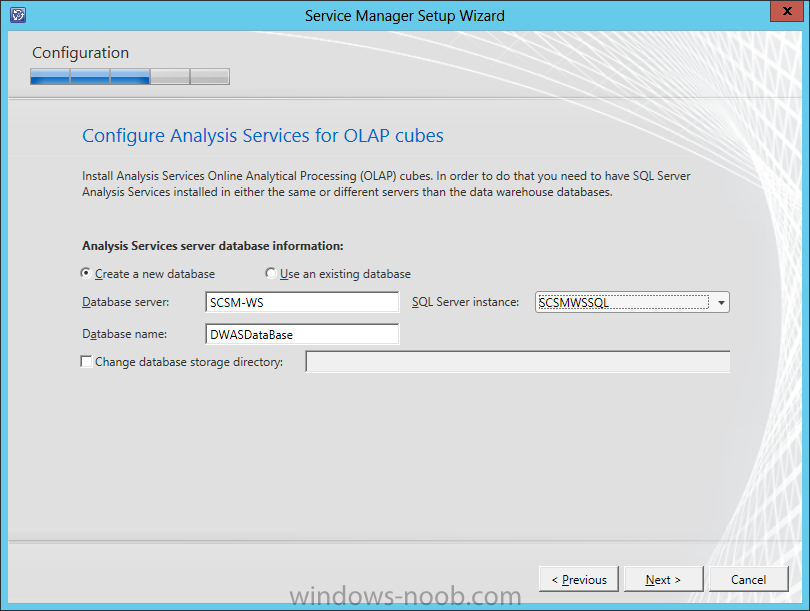
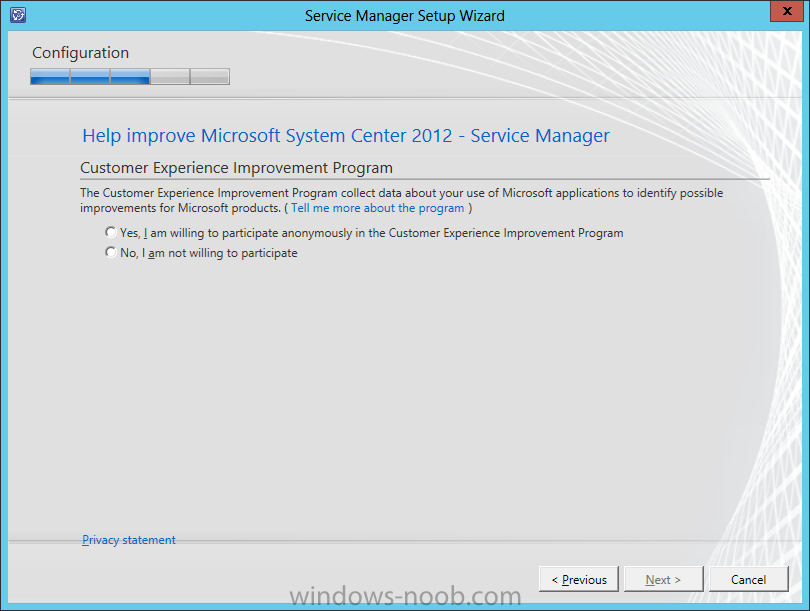
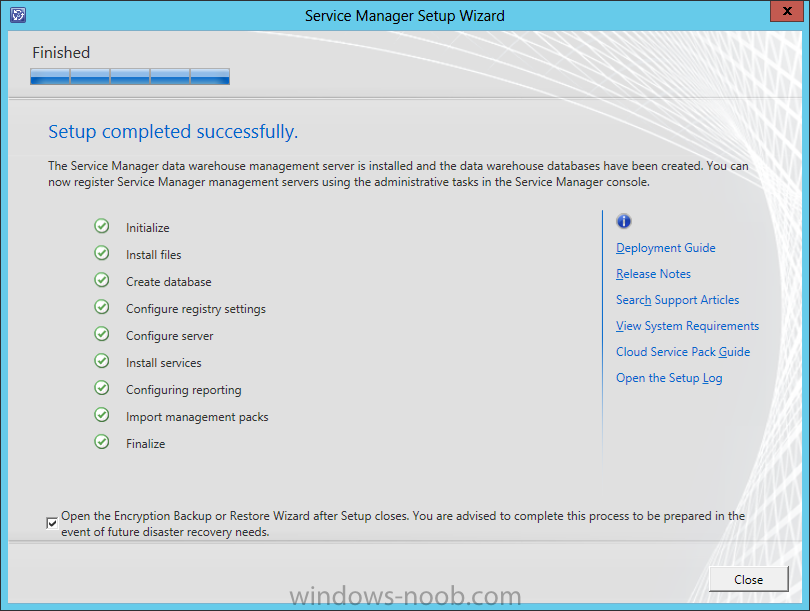
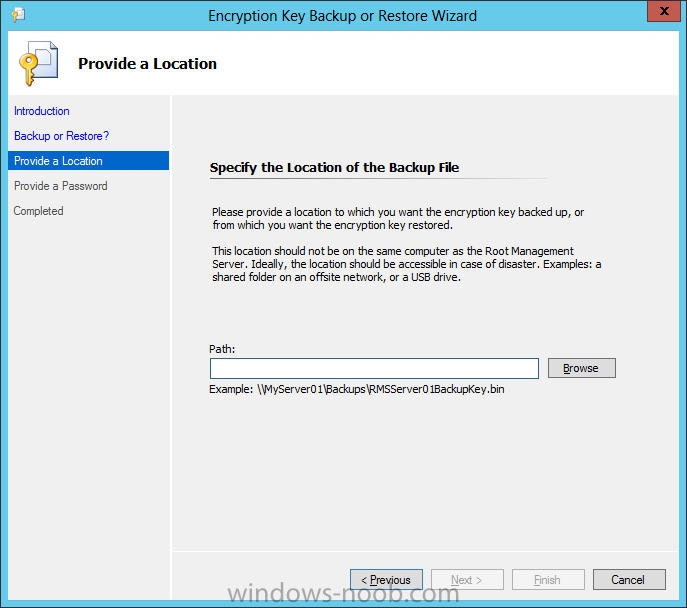
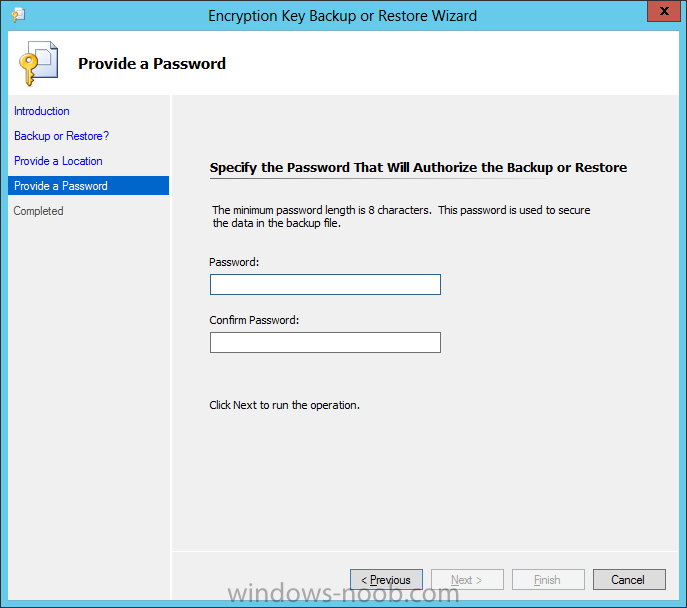
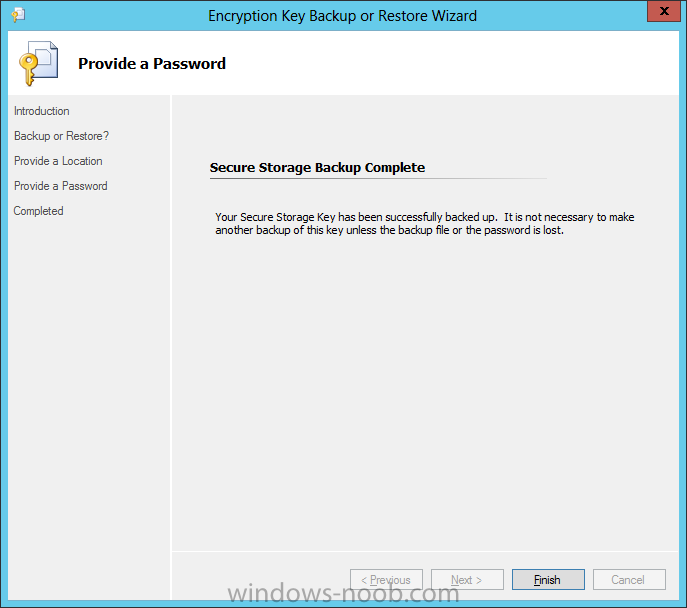
Now that we have the Service Manager Management Server installed, we can move onto the Data Warehouse. Install PrerequisitesTo start, before we will actually be able to install Service Manager Management Server, we have to install a few prerequisites. § .NET Framework 3.5 SP1 § Microsoft SQL Server Analysis Management Objects § Microsoft SQL Server Native Client Install SCSM-WS (Warehouse Server)Start by either extracting the DVD contents, or mounting the ISO (the TechNet ISO is currently labelled as mu_system_center_2012_service_manager_with_sp1_x64_dvd_1348926). Start by opening your DVD drive, navigating to the corresponding architecture (i.e. x86 or amd64), and run the Setup.exe. On the splash screen click the Service Manager Data Warehouse Management Server install link. On the Product Registration screen, enter a Name, Organization, and Product Key. Also read the License Terms and check the ‘I agree’ checkbox, then click Next. On the Installation Location screen, you can either accept the default location, or change it according to your needs. Then click Next. The Prerequisite checker will run and indicate if there are any issues preventing the installation from continuing. If there are any identified issues, resolve the issue(s) until all checks are green and/or if there are only Warnings left. Then click Next. The next screen is to configure the Data Warehouse databases. You may encounter this Warning message. This is the same message from when we installed the Management Server for Service Manager. Click OK. This will return you to the Data Warehouse database screen. It may take some time but once it has connected to the instance successfully, click Next. When you click Next on the Data Warehouse database screen, you will be presented with the Data Warehouse Datamarts screen. This is where Service Manager collects the data from Operations Manager (OM), and Configuration Manager (CM). You will encounter this Warning message again, just click OK. This will return you to the Data Warehouse Datamarts screen. It may take some time but once it has connected to the instance successfully, click Next. On the Data Warehouse Management Group screen, provide a group name. Note that this should be different from other Management Groups (i.e. SCCM, SCOM). Also add a user or group as the Administrator. In a Production environment, it is best to use an Active Directory Security Group as it is easier to add/remove individuals. On the Reporting Server screen, you will have to wait for the validation to complete, then click Next. Next you need to either specify to use a Local Account, or specify a Domain Account for the Service Manager services. This can be the same domain account used for the services on the Management Server. You will not be able to click Next until the credentials are tested successfully. Once it is, then click Next. On the Reporting Account screen, provide an account and click the Test Credentials button. Then click Next. On the Analysis Services screen, we will accept the defaults in our lab example, and click Next. You next need to provide an Analysis Services service account. Provide the credentials and click the Test Credentials button. You will not be able to click Next until you do. Once tested, then click Next. On the CEIP screen, choose whether you will join the program, and then click Next. New to System Center 2012, you can choose to include the System Center product in Microsoft Updates. Make your applicable choice and then click Next. On the Summary screen, review the selections made, and then click Install. Once the installation is complete, ensure that the ‘Open the Encryption Backup or Restore Wizard’ checkbox is selected. Then click Close. Encryption Key BackupWhen the Encryption Key Backup wizard launches, read the Introduction information and then click Next. On the Backup or Restore screen, select ‘Backup the Encryption Key’ and click Next. On the Provide A Location screen, it is recommended to store the Encryption Key backup in a secure location (i.e. a file server that is regularly backed up). Enter an applicable UNC path, along with a filename, and then click Next. On the Provide A Password screen, provide a password for security purposes (and keep it in a secure location), and click Next. Once the backup is complete, click Finish. That completes the installation of Service Manager’s Warehouse Server. We now need to install the SharePoint / Self-Service Portal.


-
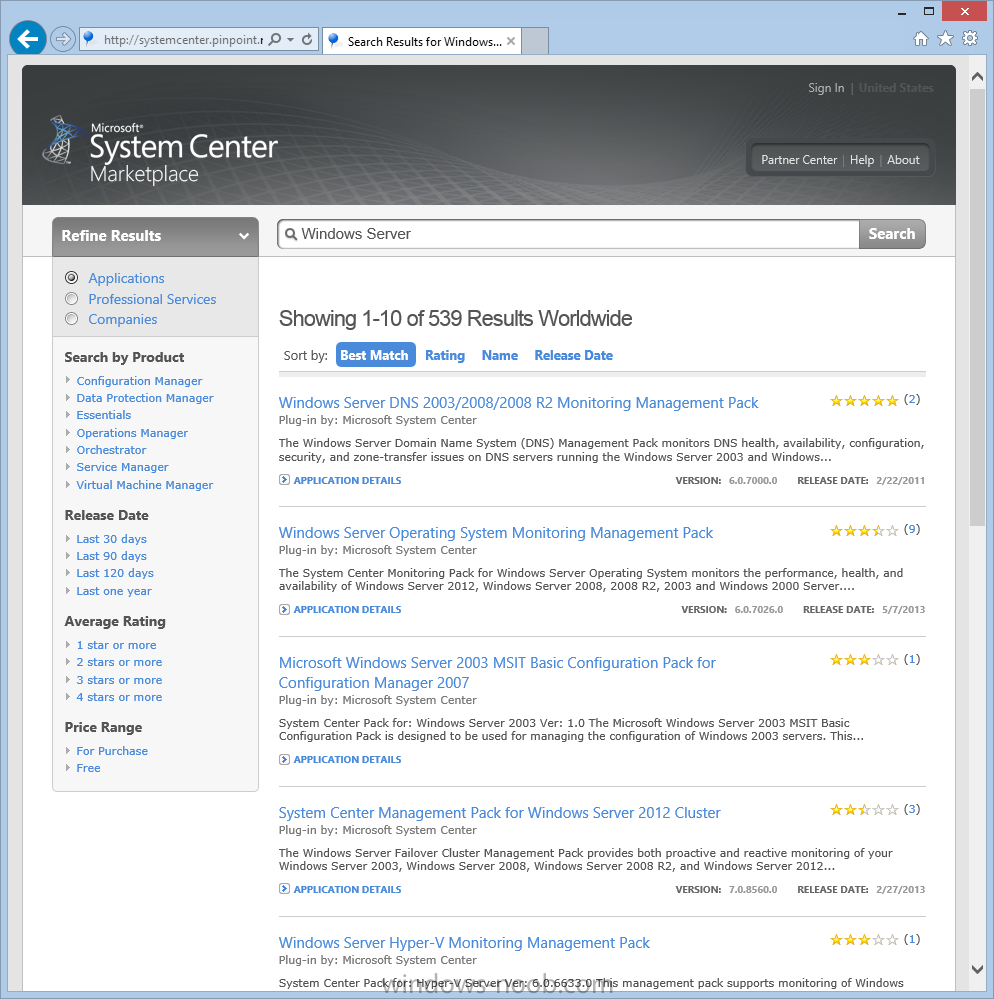
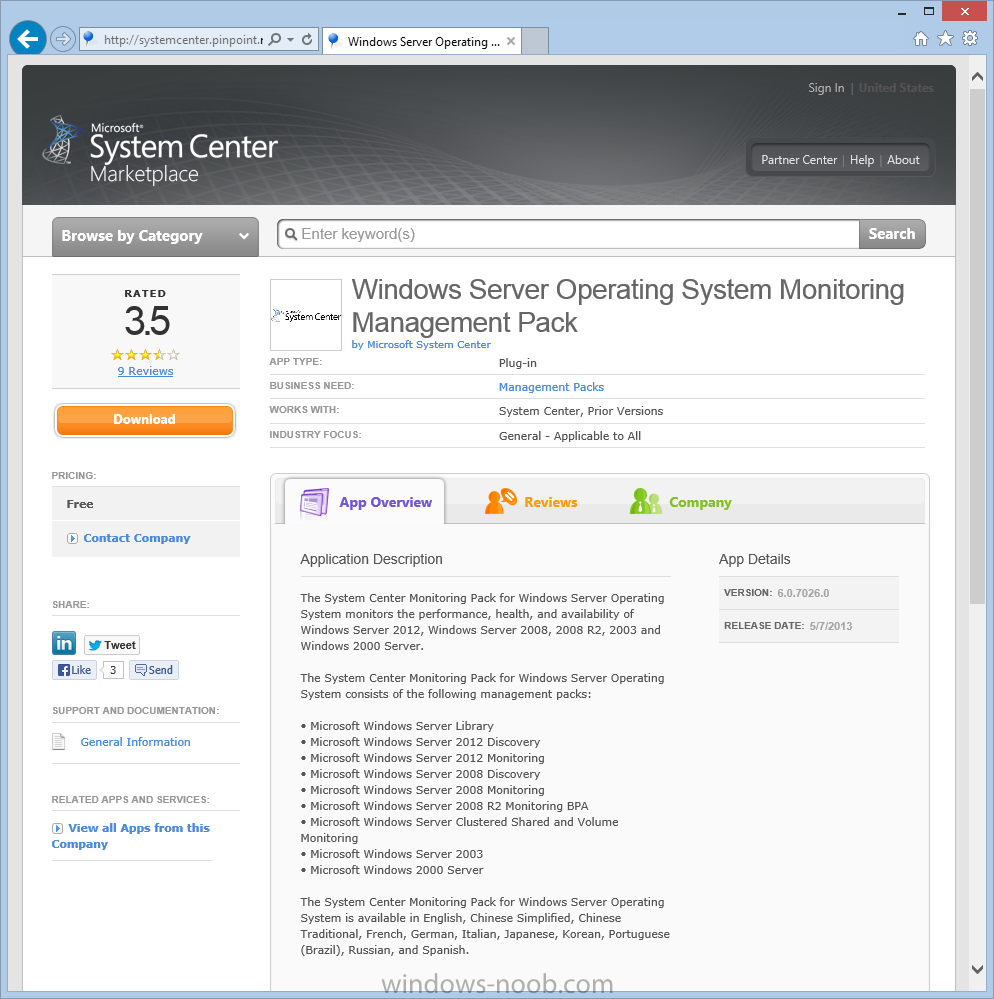
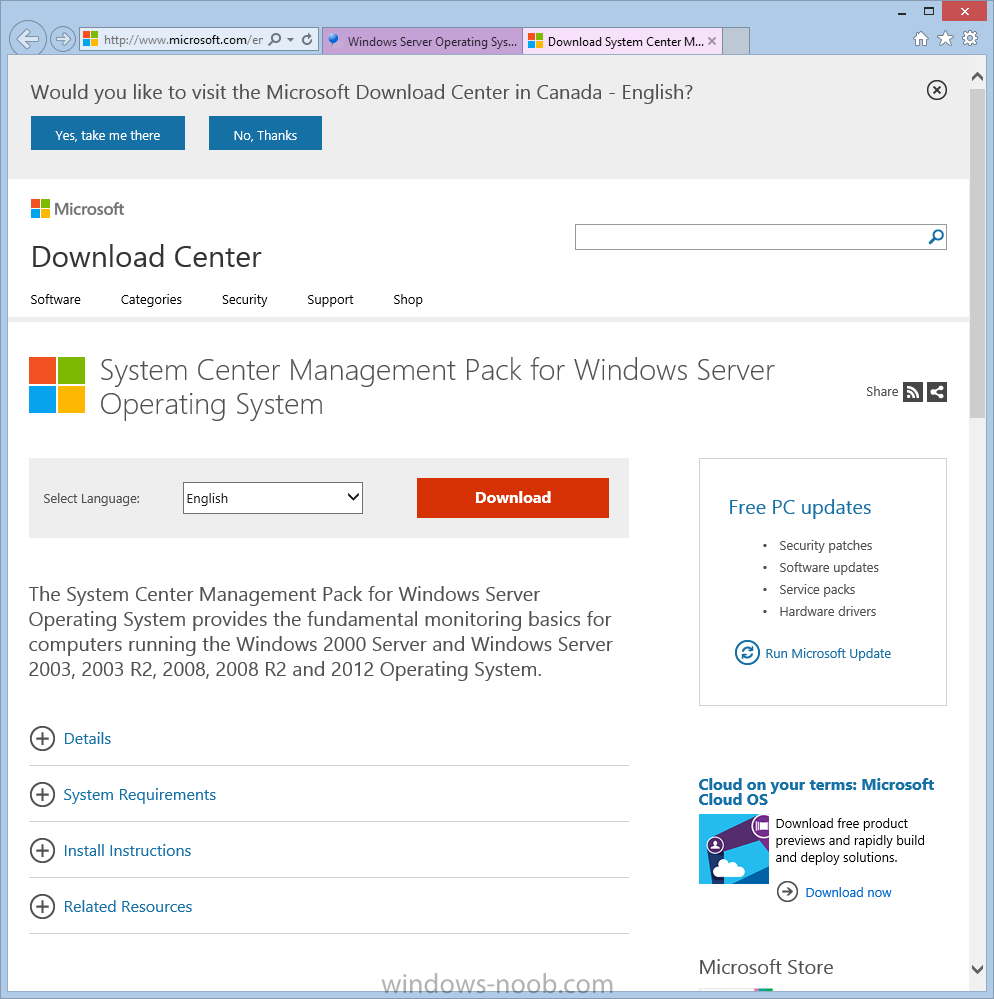
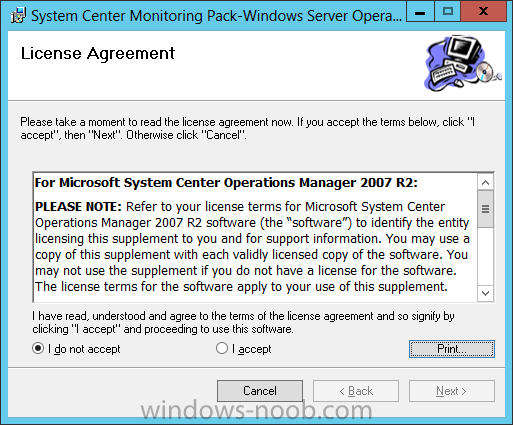
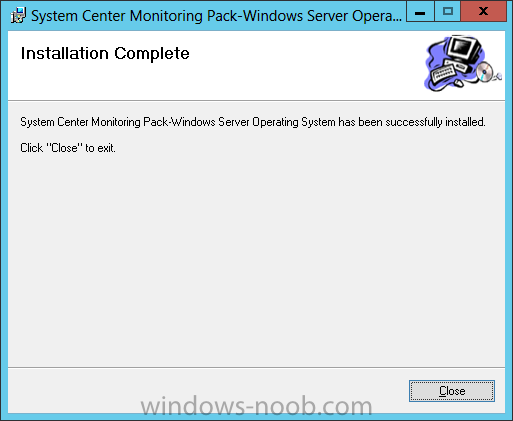
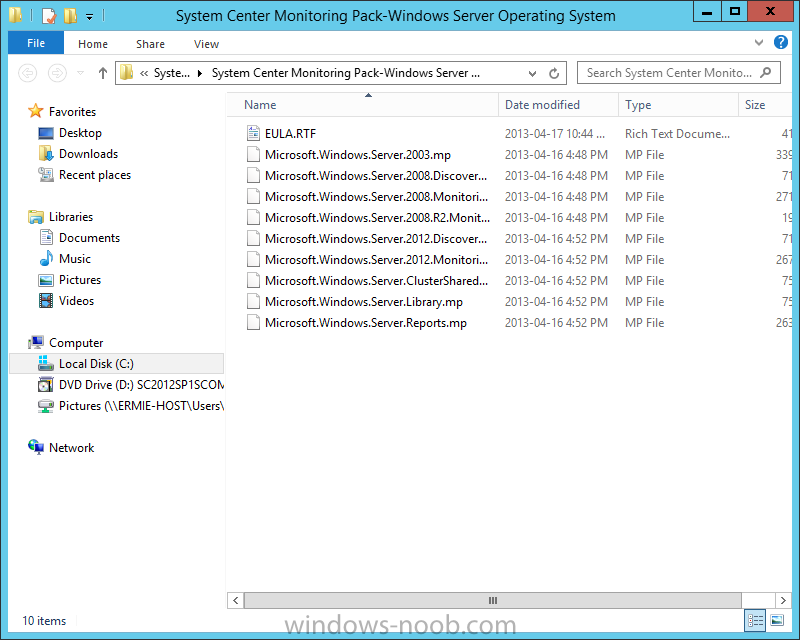
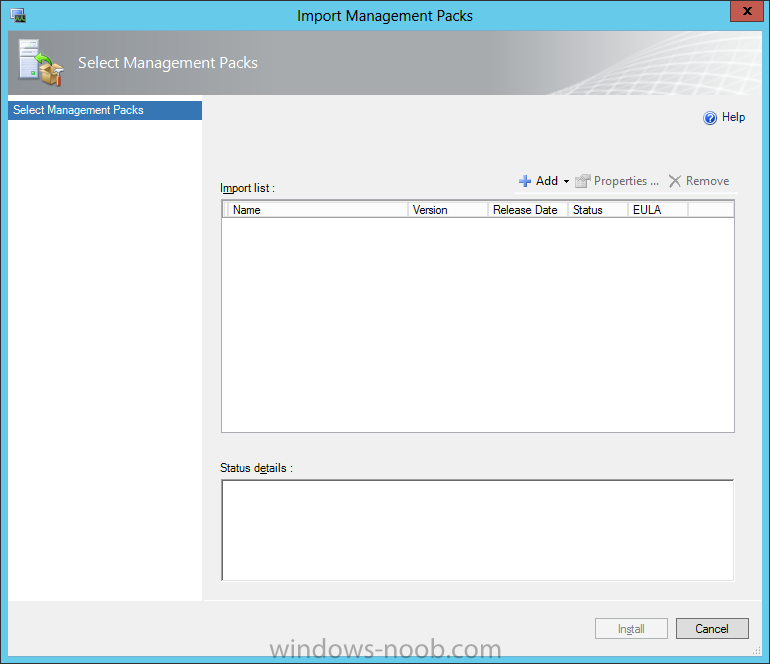
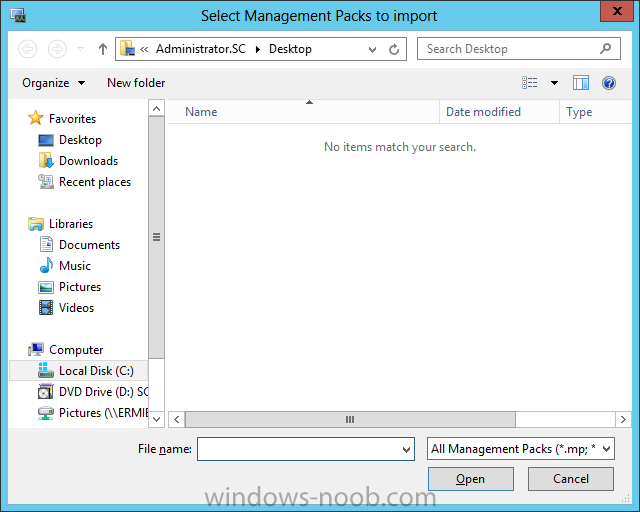
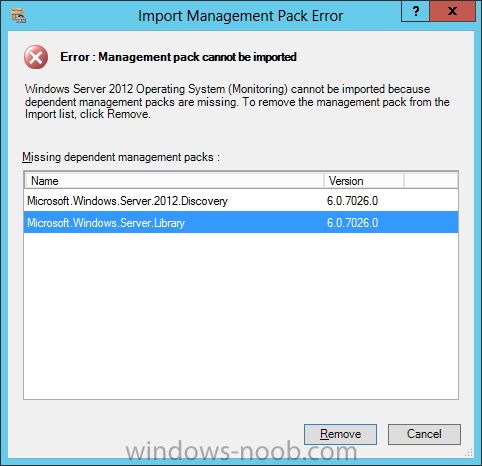
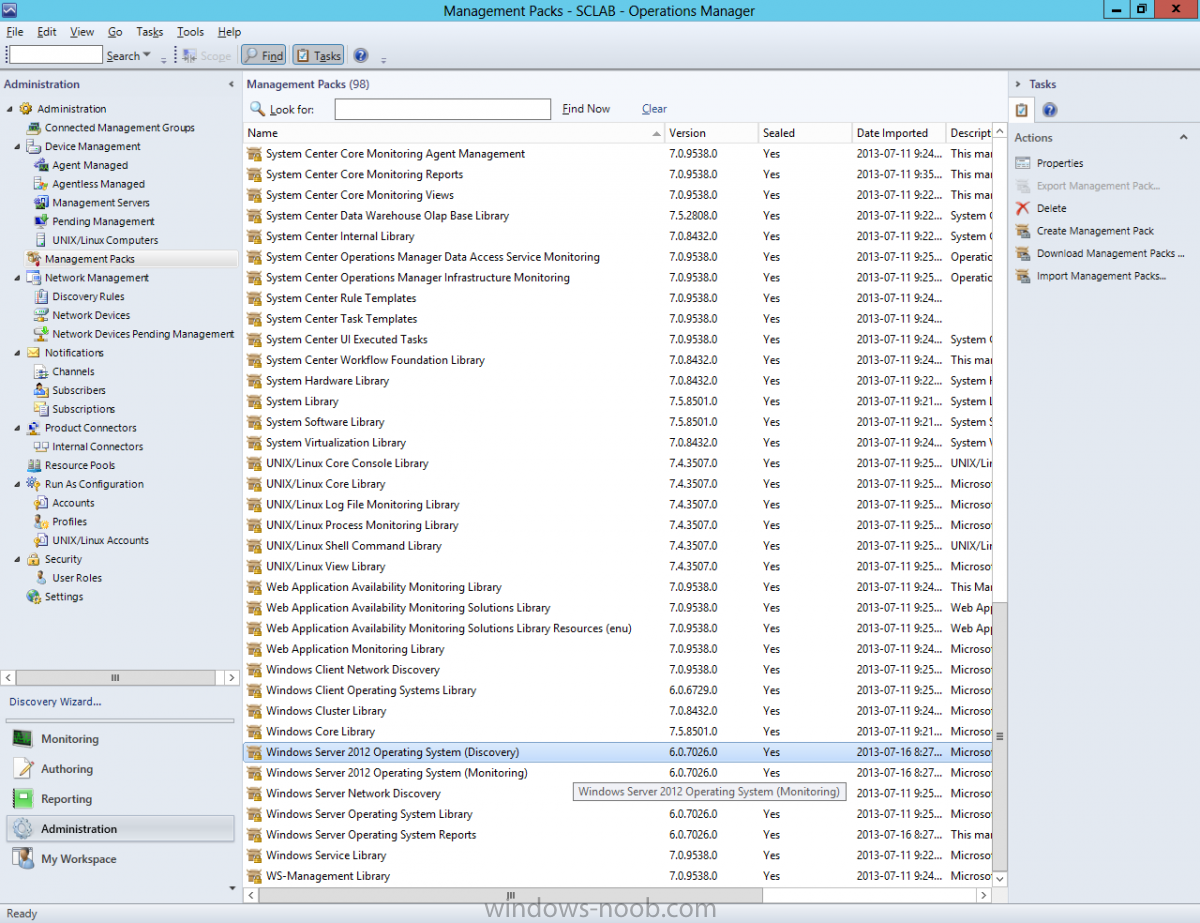
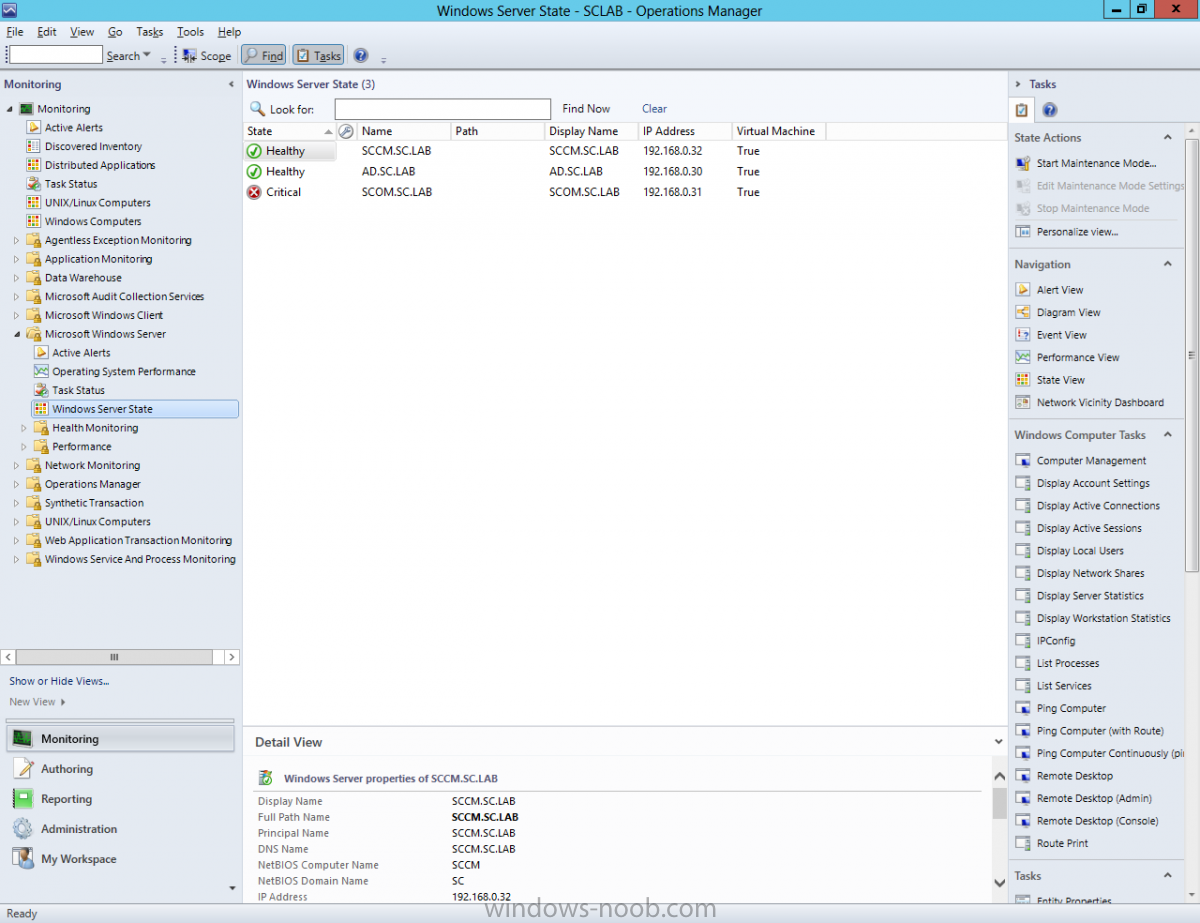
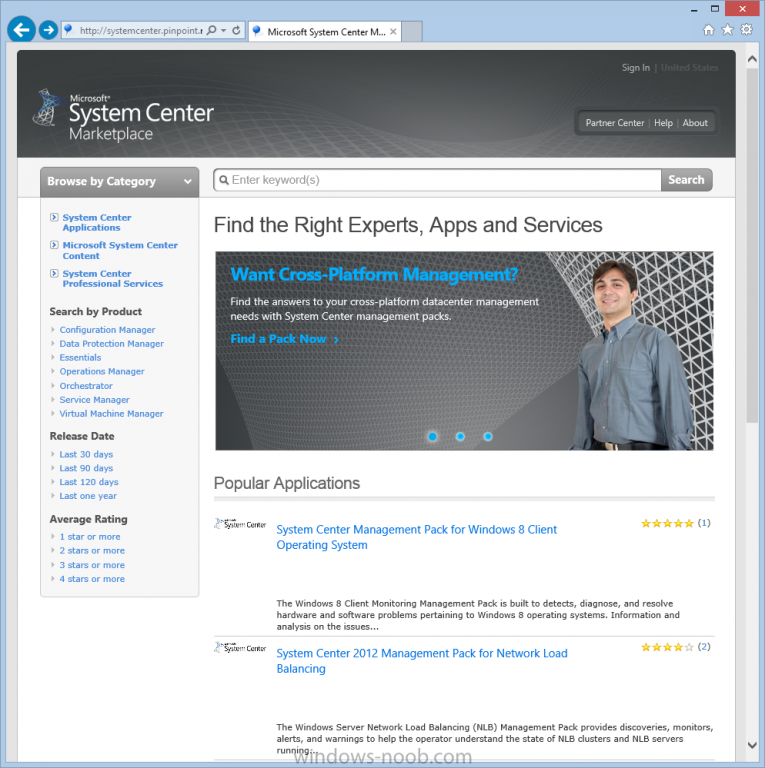
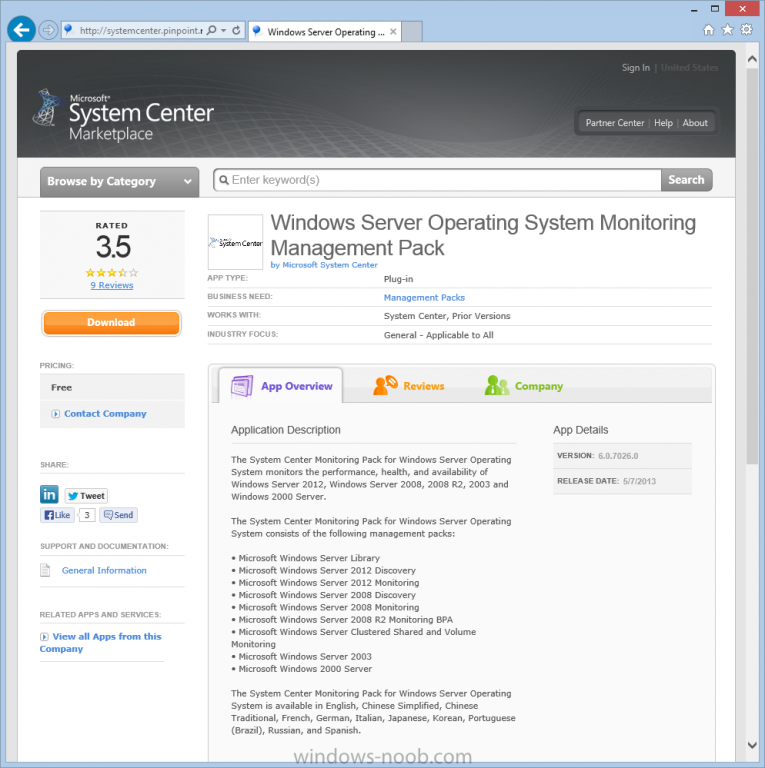
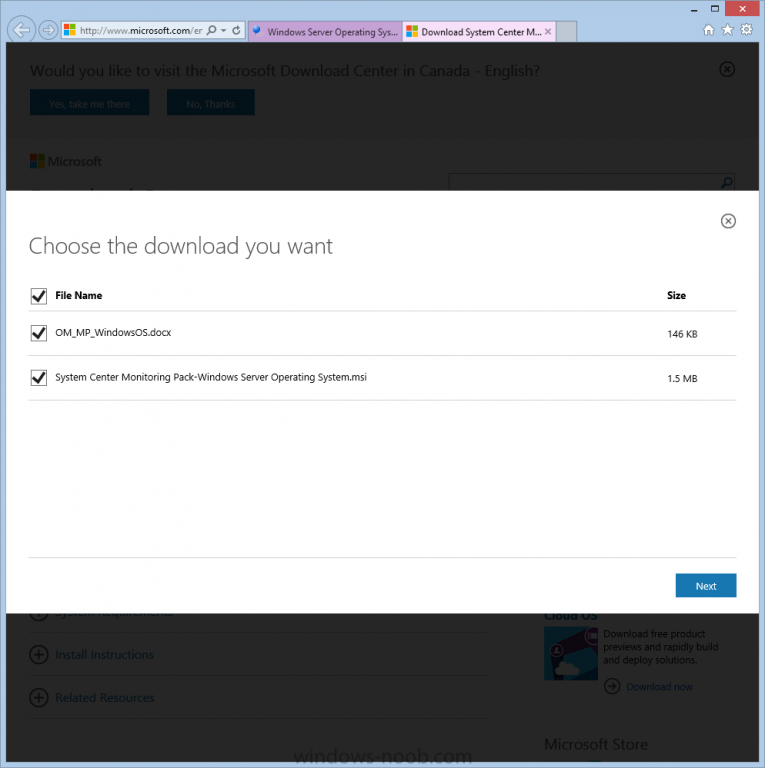
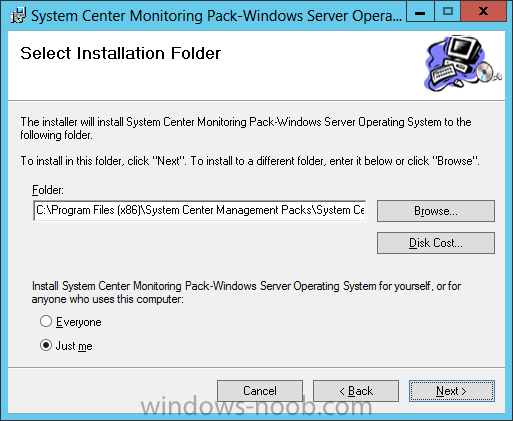
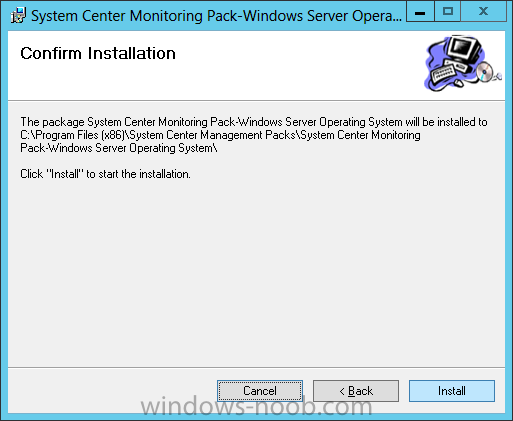
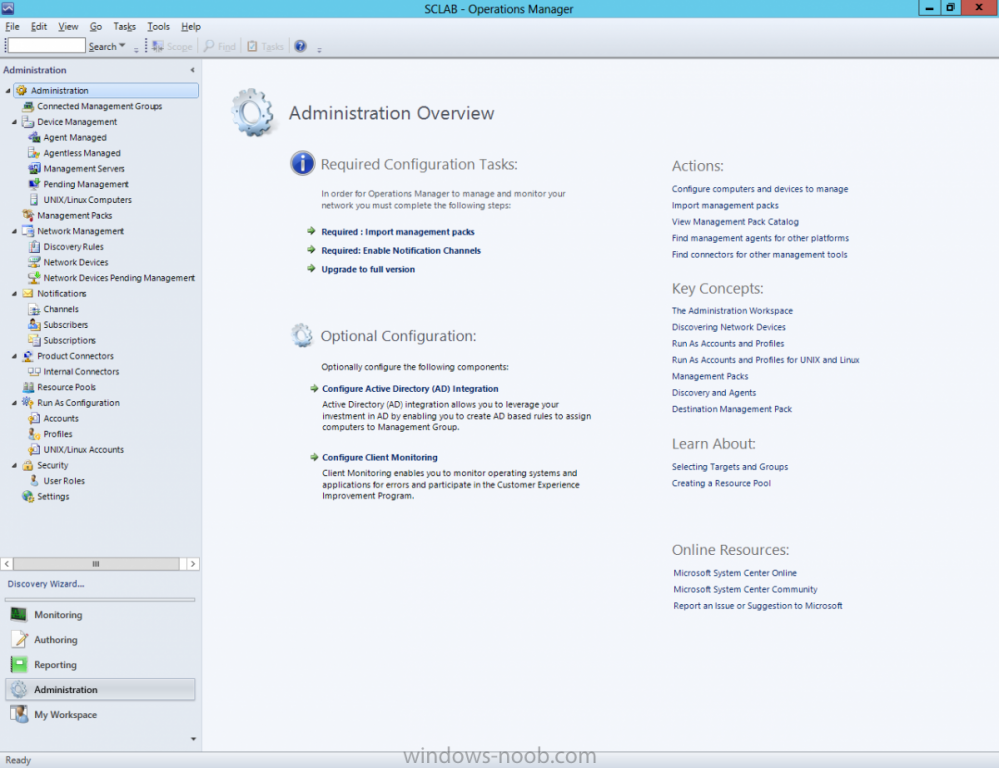
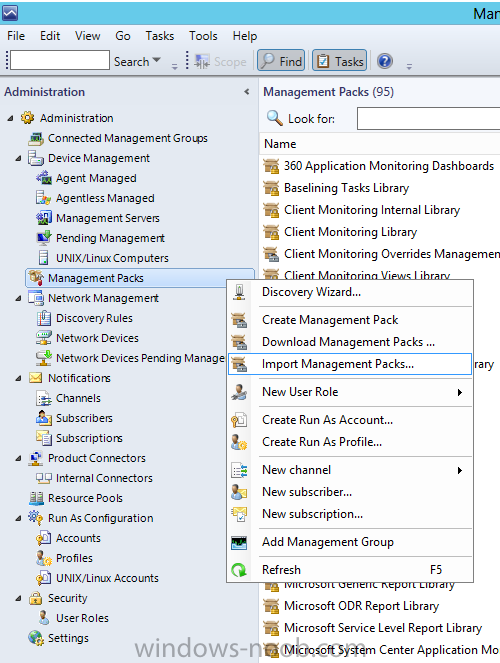
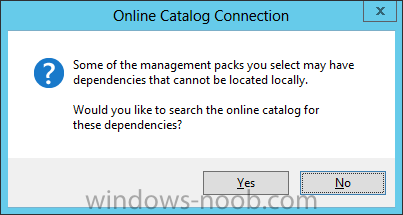
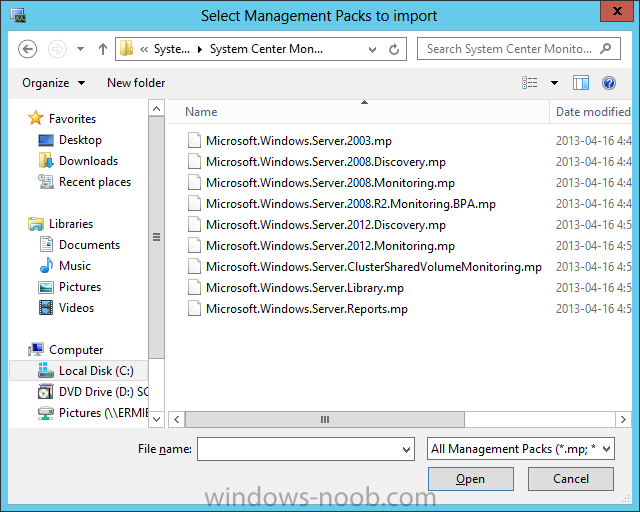
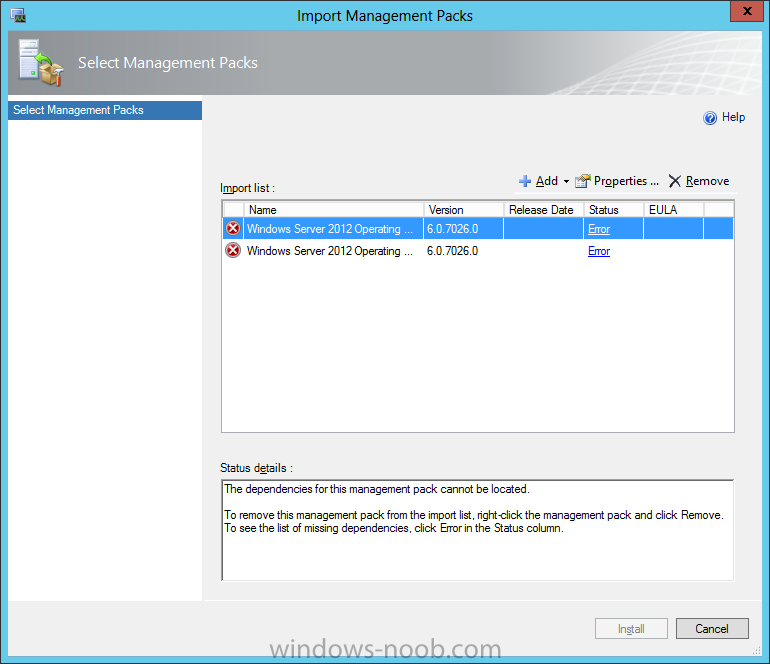
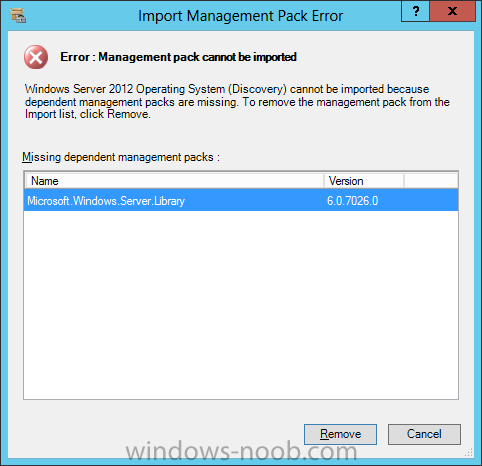
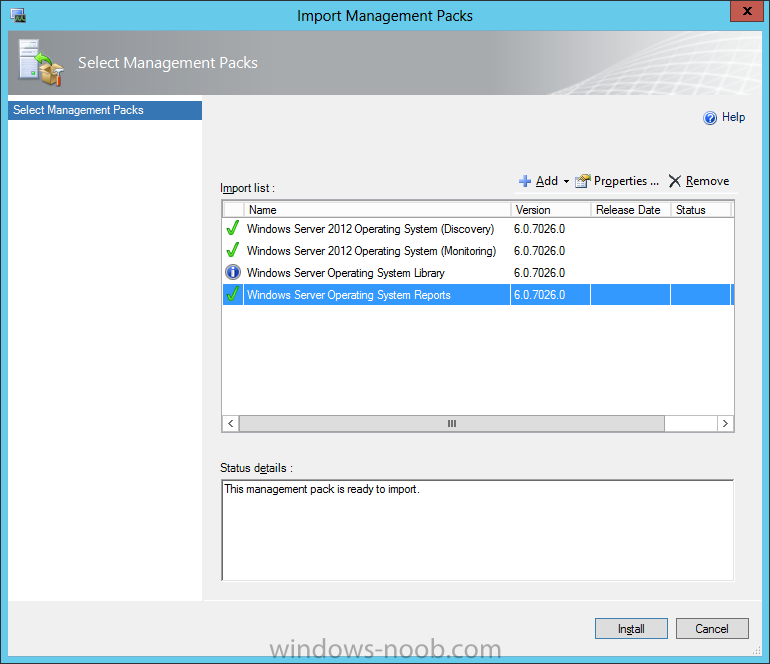
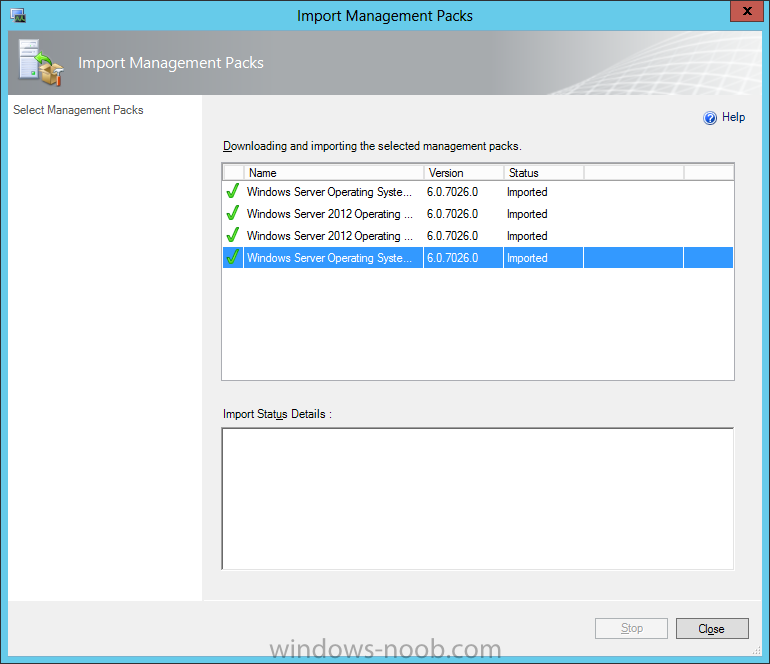
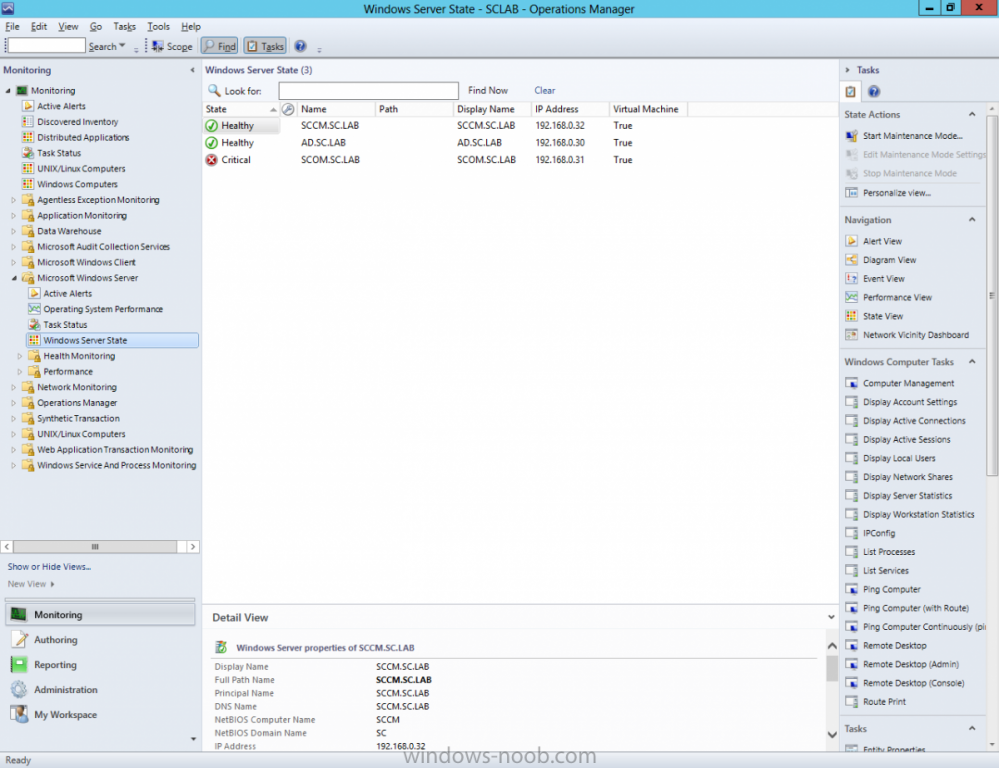
In our last post, we finished configuring computers and devices to be managed by SCOM. So at this point we have SCOM setup and running, along with a few agents installed on other systems in our environment. Technically, you could say that we are monitoring our environment, however, this isn’t entirely accurate. In actual reality, SCOM is only monitoring the state of the Agent that is installed on the systems. Right now, SCOM has no insight into the Operating System, or any middleware platforms (i.e. SQL, IIS, AD, etc.). We are going to correct that by importing Management Packs. Download Management Packs To start, we need to download the Management Packs (MPs) we want to install. Open a browser and navigate to the System Center Marketplace (URL: http://systemcenter.pinpoint.microsoft.com/en-US/home). From here, enter your search term, and click Search. For our example we will enter “Windows Server” (I will explain why shortly). Currently there are 539 results, though this may change depending on when you perform your search. In reference to SCOM, we are specifically looking for ‘Monitoring Management Pack’ as this marketplace will also contain other packs for use with SCCM, Orchestrator, etc. In our example of “Windows Server”, look for “Windows Server Operating System Monitoring Management Pack”, and click the title (which will be a hyperlink). This will bring you to that specific Management Packs page. From this page you can read information about it (i.e. which OS’s it supports), reviews, release date, etc. You will need to determine if this Management Pack is applicable to your environment. This one is applicable to my lab environment I am using, because I have Windows Server 2012. Click the orange ‘Download’ button in the top left area of the page. This will bring you to the Microsoft Download Center. From here you can read further information about system requirements, installation instructions, etc. When you are ready, click the red ‘Download’ button. You will be prompted with a dialog, asking you which files you want to download. The MSI file contains the Management Pack, and the DOCX provides more in depth information. I would recommend downloading both files. From my personal experience, I would read the entire Management Pack documentation twice (and I have done so for each/every Management Pack that I have implemented). This serves 2 purposes. First, I highlight points that are applicable to the environment that I am implementing it in. Second, I review it a second time focusing on the points I’ve highlighted. Select the file(s) that you want to download, and click the Next button. Download the files to your either your workstation or your SCOM server. I mention your workstation, only because you probably don’t have Microsoft Word installed on your server, and you need to be able to read the documentation. At this point to move forward, I will assume that you have downloaded or copied the MSI file (in this specific example ‘System Center Monitoring Pack-Windows Server Operating System.msi’) to your SCOM server. Install Management Packs On your SCOM server, run the MSI to install it. Read and accept the License Agreement and click Next. Next select the folder you want to install to. There are a few things to take note of at this point. First, remember the directory that the Management Pack is installed to, as this will be used in a later step. Second, it is recommended that you select the option to install the Management Pack for ‘Everyone’ to avoid any access related issues. Third, and the most important, is that this is actually NOT installing the Management Pack. I disagree with the wording used in this dialog, since in fact this is not installing anything, but rather is extracting the files required for installation (you’ll see what I mean shortly). But I digress. Click Next. Finally, click the Install button. The installation will be quick. Once it is complete, click Close. When you close the installation dialog, the directory that you installed the Management Pack to MAY open in File Explorer. I stress “may” because I haven’t noticed every Management Pack that I have installed behave this way. If File Explorer does open, you can close it, as we will work with these files in another step. Now that we have “installed” the Management Pack so that the .MP files are extracted, we can now move onto the final step, importing. Import Management Pack At this point, we have downloaded the Management Packs we are interested in (in our example the Windows Server OS), installed it on the SCOM server so that the .MP files are extracted and available for use. Now we have to import the Management Packs so that SCOM will have the information required to identify and monitor the technology platform. Start by opening the SCOM console, and navigating to the Administration space. From the Administration space, you can either click on the link ‘Required: Import Management Packs’, or you can right-click on the Management Pack item in the left navigation pane. I am going to demonstrate using the navigation pane option, since the link may not always be present after you import a few Management Packs. So, right-click on the Management Pack item in the navigation pane, and choose ‘Import Management Packs’. This will cause the Import Management Packs wizard to launch. From the first and really only dialog screen, click the Add button. You will be presented with 2 options, ‘Add From Catalog’ and ‘Add From Disk’. The ‘Add From Catalog’ option will enable you to search the catalog directly, however, most Production systems don’t have an Internet connection, which this option requires. \ Therefore, we will demonstrate and choose the ‘Add From Disk’ option. When you select this option, you will immediately receive the following prompt. Since, in Production, your server probably will not have Internet access, we will choose ‘No’. Now, you will see the File Explorer dialog. From here you need to navigate to the location that you installed the Management Pack (in our example it is: C:\Program Files (x86)\System Center Management Packs\System Center Monitoring Pack-Windows Server Operating System\). When you navigate to the location that the Management Pack is installed, you will then see several .MP files. You can select more than one MP file at a time. Since our lab example is running on Windows Server 2012, we will select the ‘Microsoft.Windows.Server.2012.Discovery.mp’ and ‘Microsoft.Windows.Server.2012.Monitoring.mp’ files, then click Open. The system will add the .MP files to the import list. However, you will notice that there are a few errors! Why is that? As you can see in the Status Details this is because some Management Packs have dependencies. To see which dependencies you are missing, click the Error link. You can see from the following 2 examples, that some Management Packs have more than one dependency. So, to be able to import the Windows Server 2012 Operating System Management Pack(s), we need to also import 3 additional Management Packs. Thankfully, we can import all of these Management Packs at the same time. So, click Cancel on the Import Management Pack Error dialog, and go back to the Import Management Packs dialog and click Add > From Disk, and select the other dependant Management Packs. Your Select Management Packs dialog should then look similar to this: Now all you have to do is click the Install button. The import will begin, and may take some time depending on the number of Management Packs you are importing. Once the import has completed, click Close. You can confirm that the Management Packs have been successfully imported, but looking for them in the Management Pack list. Additionally, when a new Management Pack is imported, there may be new/updated Reports included. As well, if you navigate to the Monitoring space, you will see new folders/views for the technology platform that the Management Pack relates to. In our example, we now see the Microsoft Windows Server folder, and within there it has a Windows Server State view that shows the status of the server(s). With this new Management Pack imported into SCOM (specifically the ‘Discovery’ Management Pack), SCOM is now able to identify systems that are running this technology platform. This is how it works for all Management Packs (i.e. SQL, IIS, WSUS, AD, etc.). SCOM will now start Alerting to issues that pertain to the technologies that it can detect and monitor. Congratulations, your SCOM environment is now able to monitor your Windows Server 2012 Operating System and report/alert on any issues. For any other technologies, repeat the same steps described. Now that we have SCOM monitoring and alerting to issues in our environment, we need a way to easily be notified when there is an issue. That’s why we need to Enable Notification Channels. Stay tuned for the next post.


-
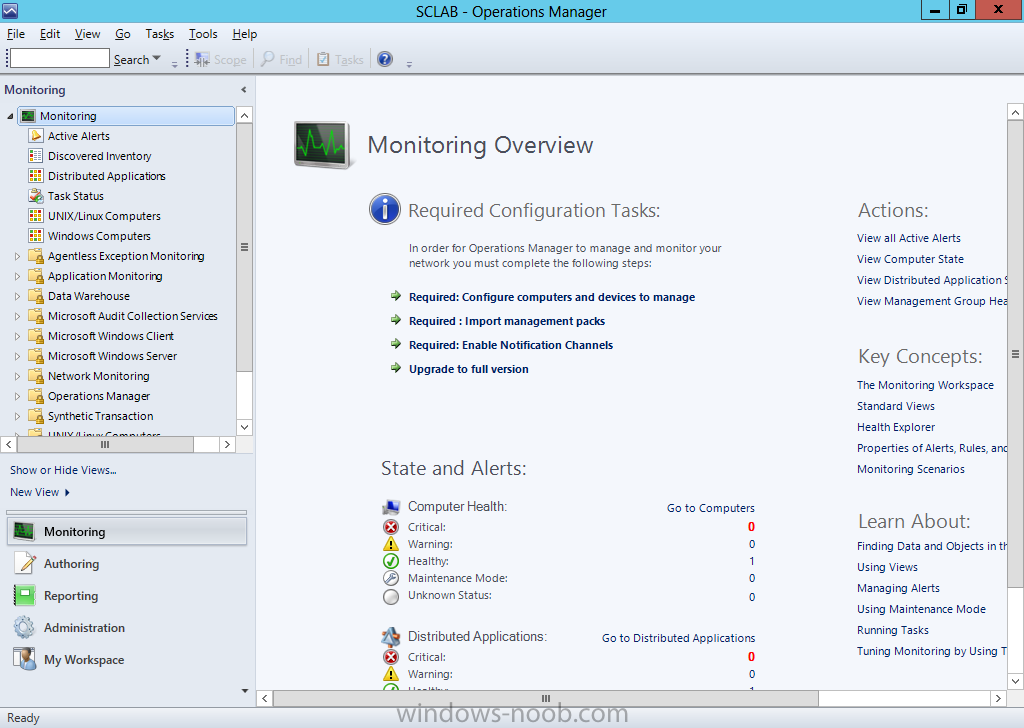
Hello everyone, if you have been following along with my installation guides, you should now have SCOM installed. But SCOM won’t do you any good if it doesn’t have any computers or devices to manage, so that’s where we will start as part of these Configuration guides. First, start by launching the SCOM console. Now, navigate to the Administration pane. From there, under Device Management find ‘Agent Managed’. Right-click on the Agent Managed item, and choose Discovery Wizard. The Computer and Device Management Wizard will start. You must first choose why type of device you want to discover and manager. You have 3 choices, Windows Computers, UNIX/Linux Computers, or Network Devices. For our example we will choose Windows Computer, and then click Next. On the Auto or Advanced screen, you can choose to let SCOM scan the domain to find the computers, or if you want more control over which systems are monitored, you can choose the Advanced Discovery. If you choose the Advanced option, you can also choose if you want to discover only servers, clients, or both. Additionally, you can choose which Management Server you want the discovered systems to be managed by. Since we only have one Management Server in our lab, we only have one option, but in a Production environment you can use this to balance the load between multiple Management Servers. Make your appropriate selections, and click Next. Next you need to specify the Discovery Method that will be used. Again, you can allow SCOM to scan Active Directory, or you can manually type the computer names for it to check against. From my own personal experience, it is usually best to manually type the names of the computers, as this gives you more control over what systems are added to SCOM, and how many at a time. Choose your appropriate options, and click Next. You can now specify the Administrator Account to use. We will accept the default selection to use the Management Server Action Account, and then click Discover to initiate the process. SCOM will then go off and attempt to communicate with the specified systems. Here is a diagram that shows how computer discovery works in SCOM. The systems that SCOM is able to communicate with will appear in the Discovery Results. From there, select the device(s) that you want to install the SCOM agent on. In our example we will install the SCOM agent on all systems in our lab environment. Make your selection(s) and click Next. On the Summary screen, you can control where the SCOM Agent will be installed. In my personal experience, the default location is sufficient. You can also provide an Agent Action Account. In a lab environment, we can use the Local System, however, in a Production environment I have personally seen a designated Agent Action Account (usually a Service Account) be used in this context. Make the appropriate selection/input, and click Finish. SCOM will then start the Agent installation task. Depending on your network, the number of devices, etc. it may take a while to complete. When the discovery and agent installation completes, it should look like this. You can click Close on the status window. Returning back to the SCOM console, you will now see the system(s) that you discovered and installed the Agent on. Congratulations, not only do you have a working SCOM environment, but you also have SCOM actively monitoring! In the next part of this series, we will Import Management Packs.


-
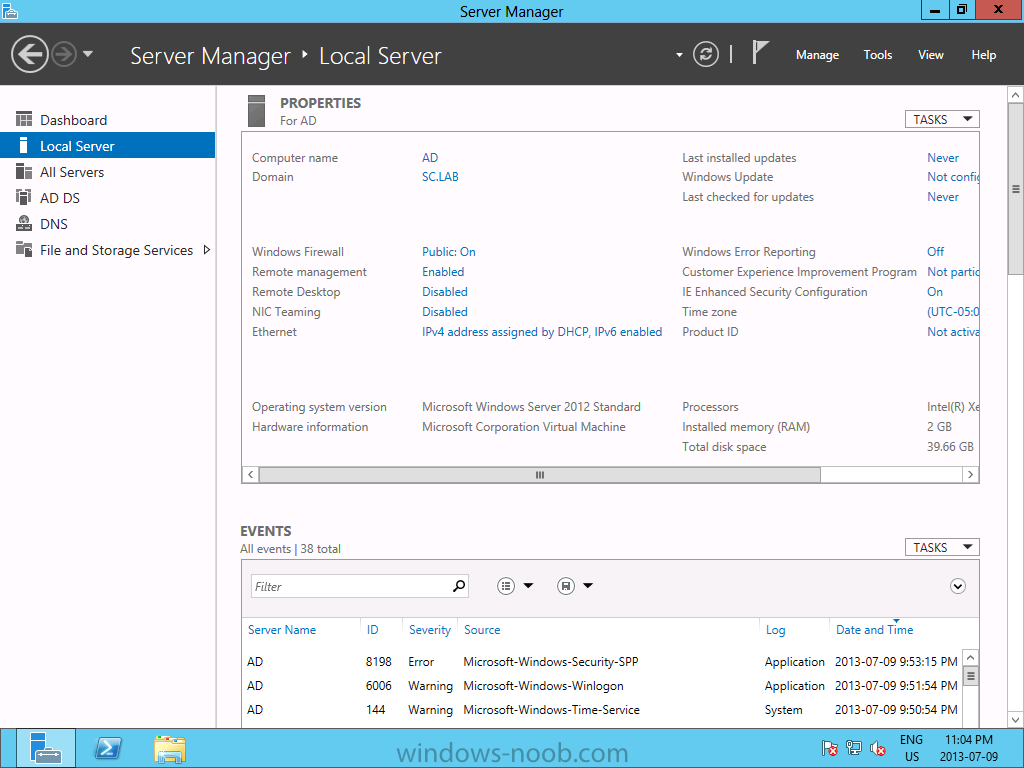
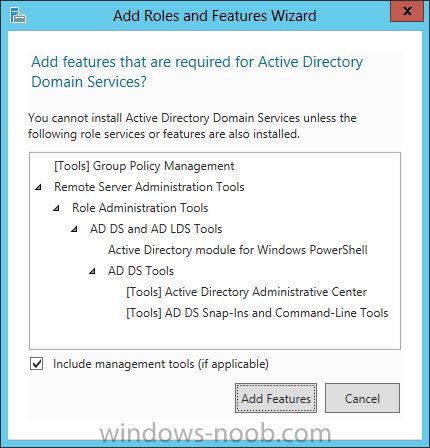
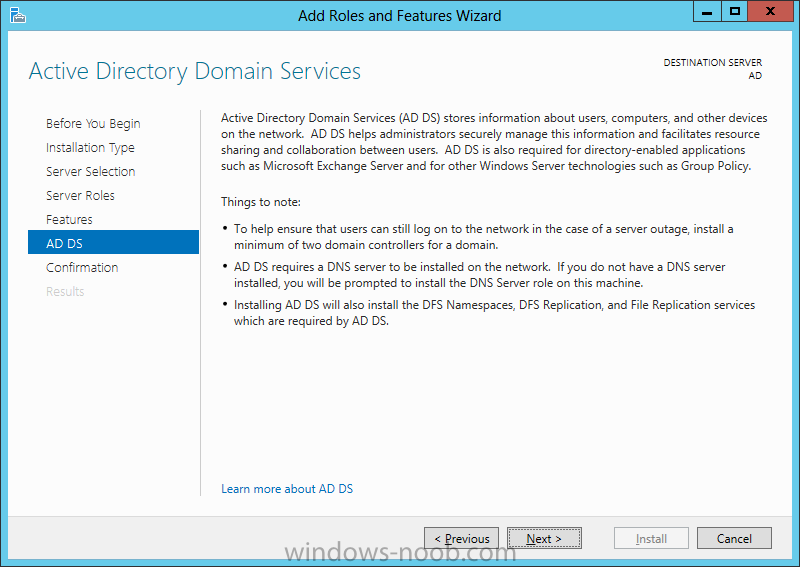
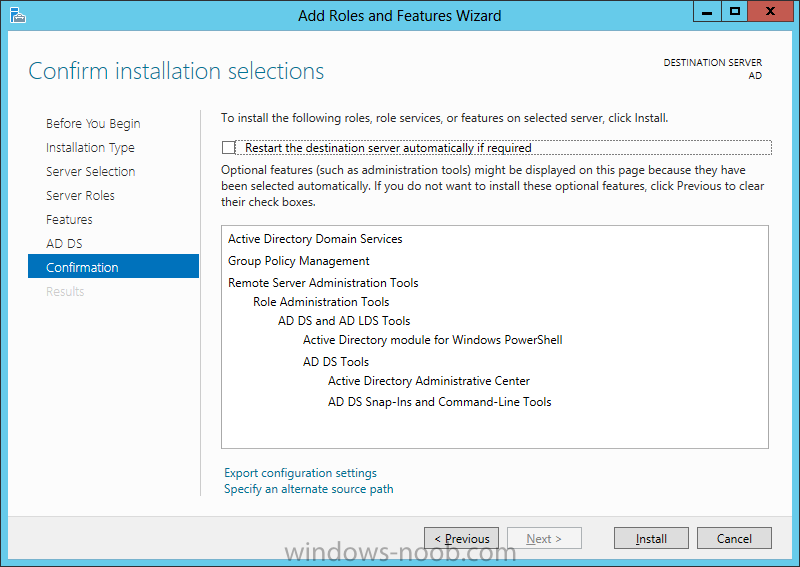
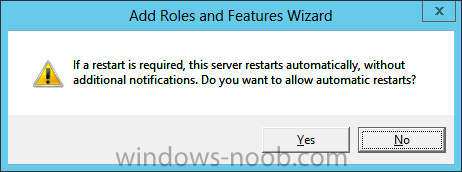
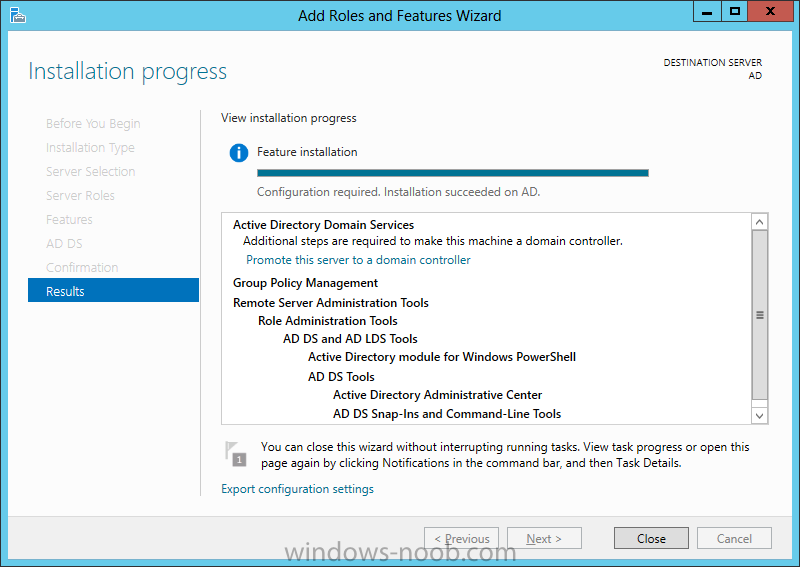
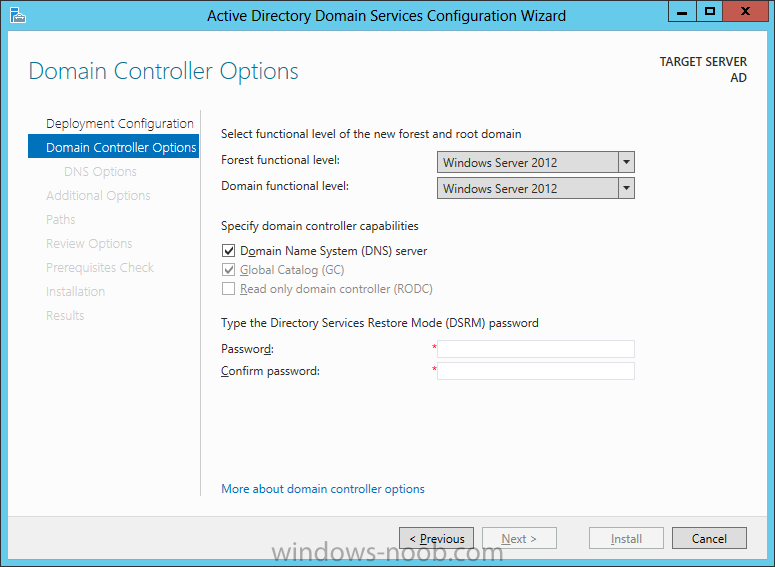
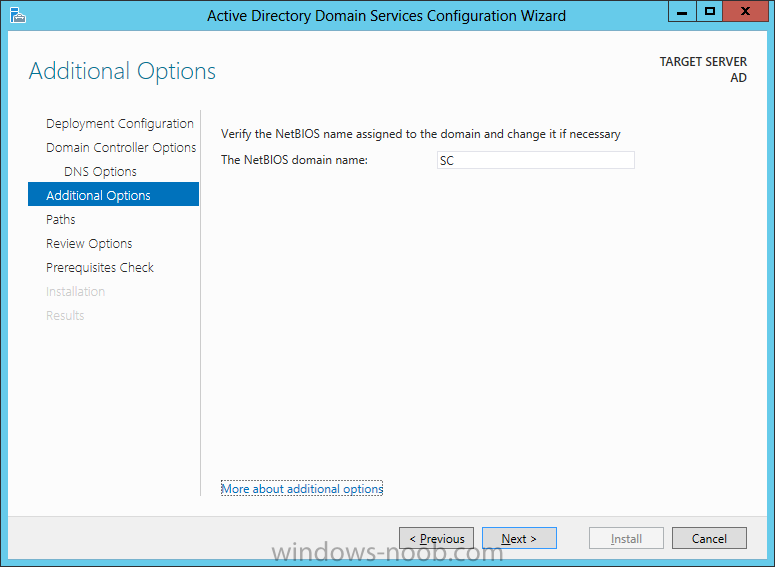
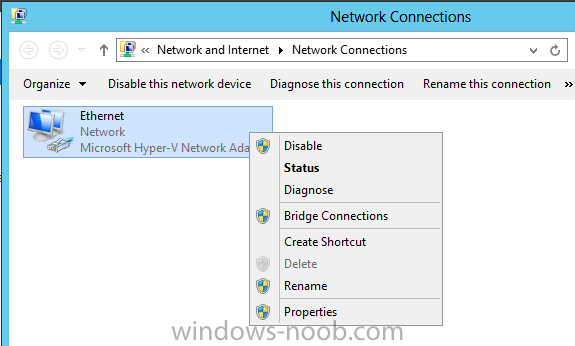
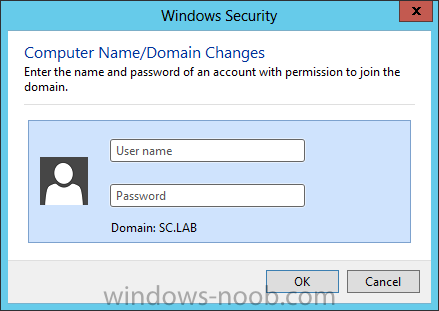
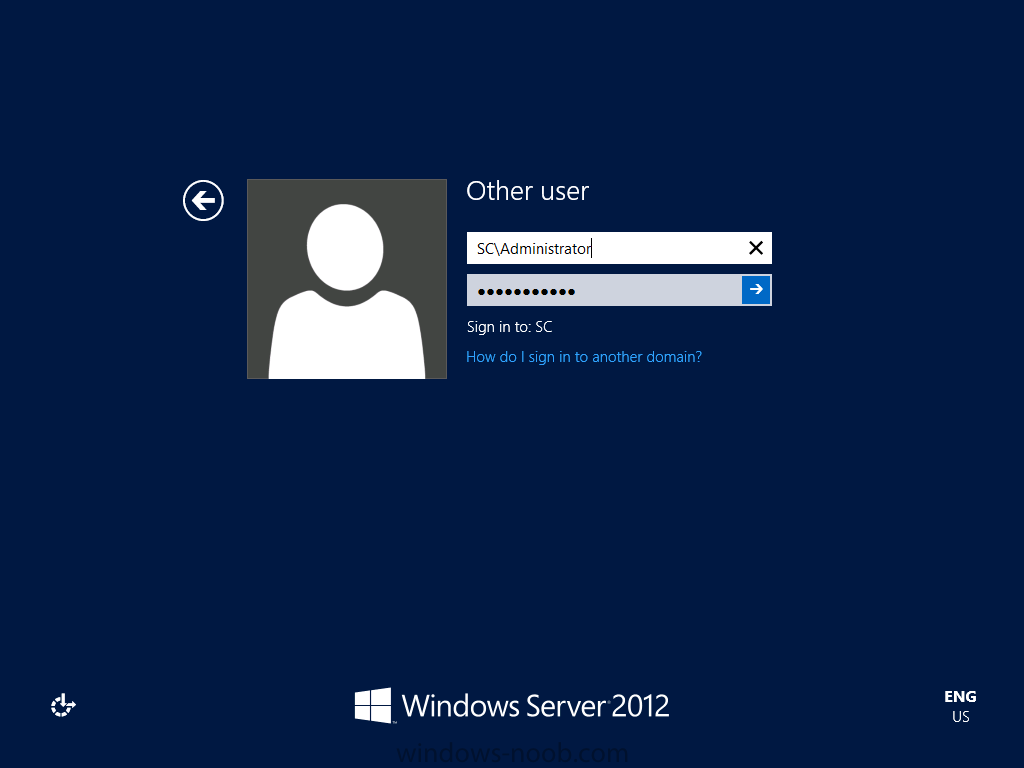
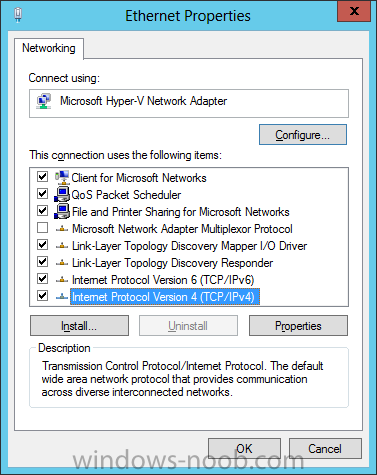
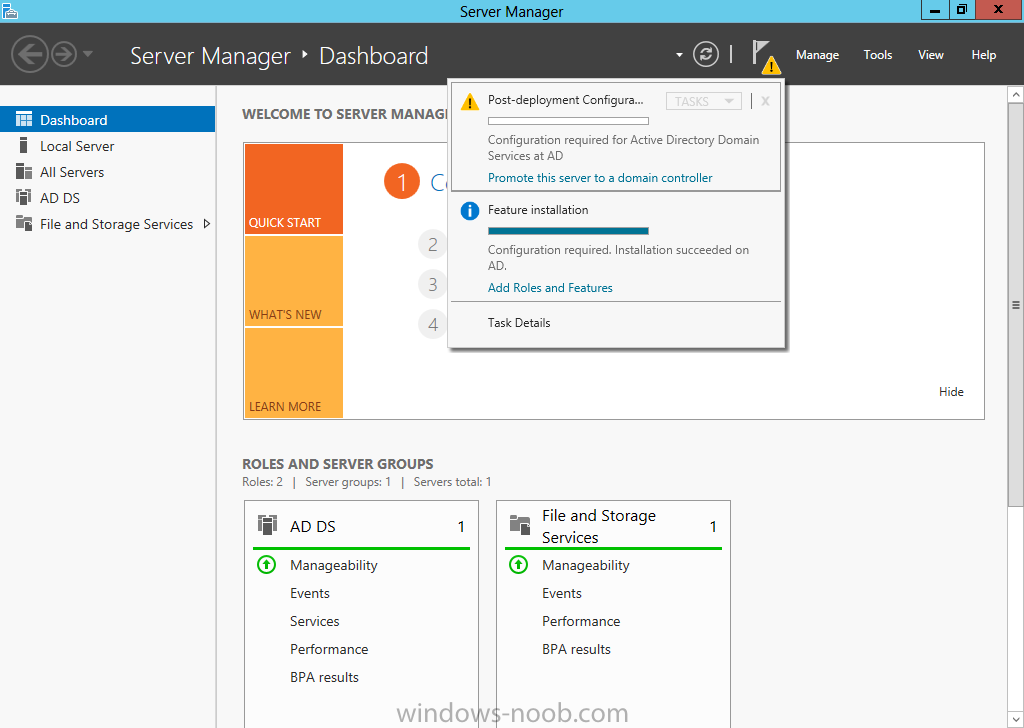
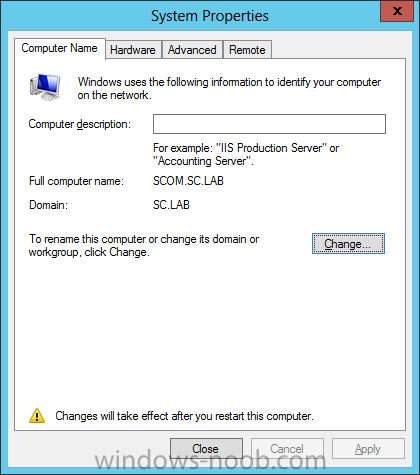
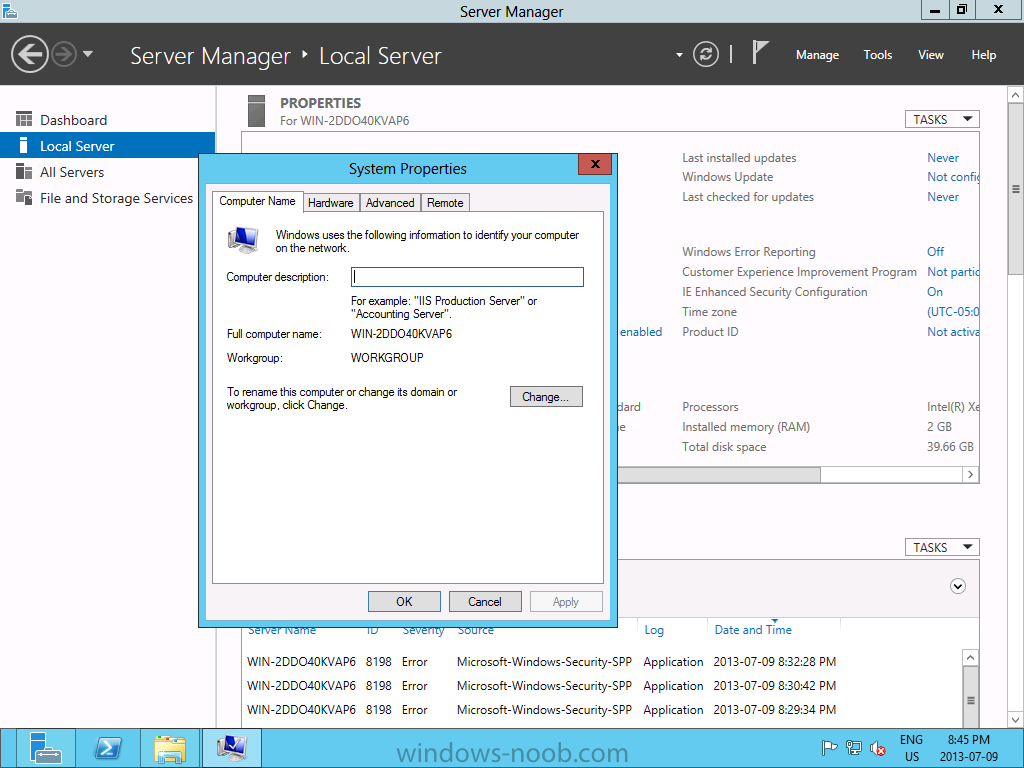
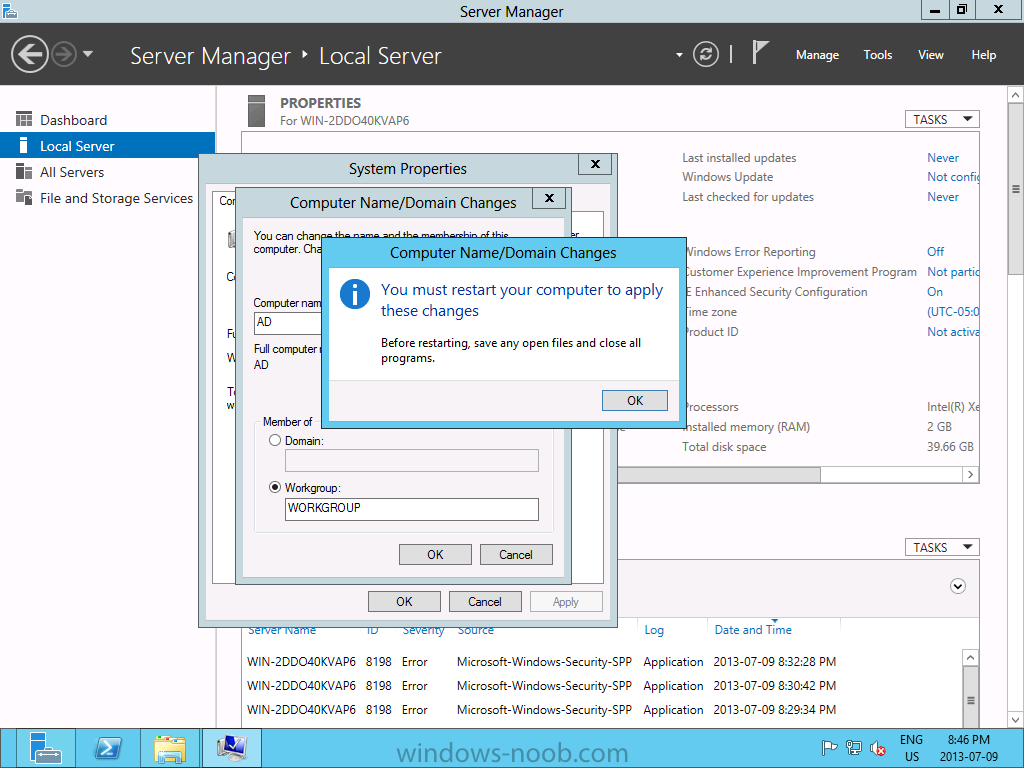
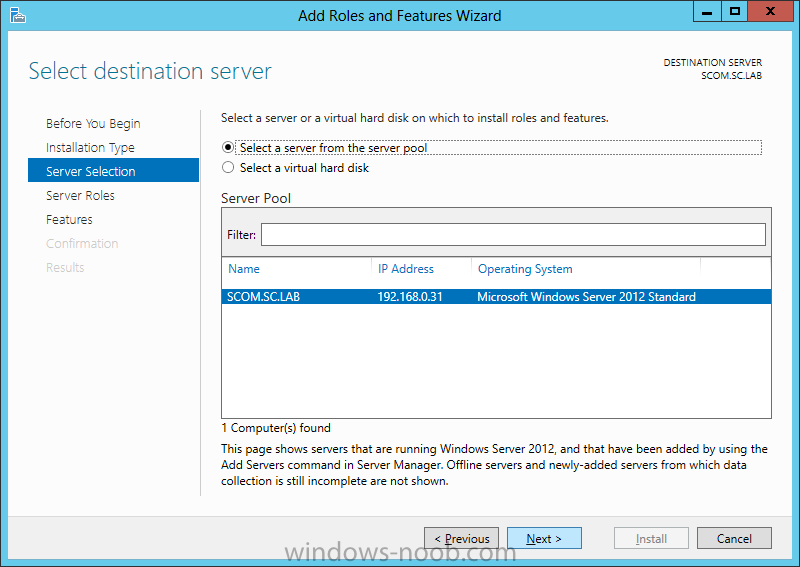
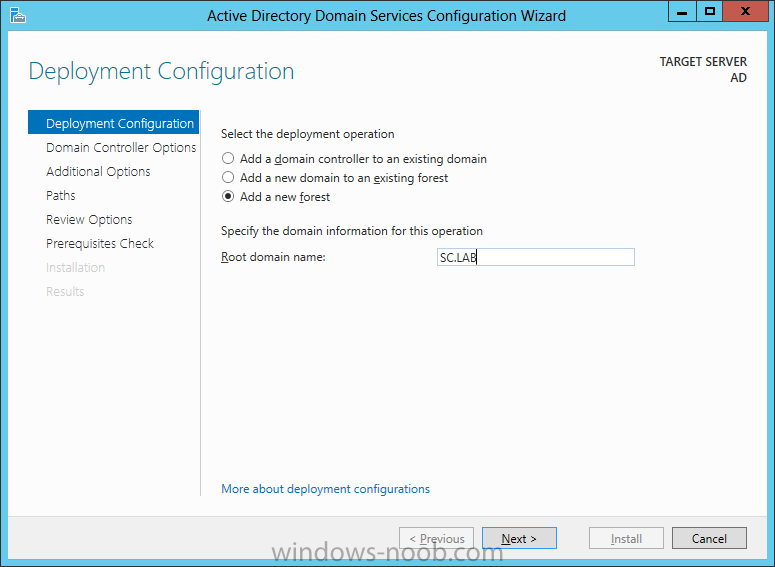
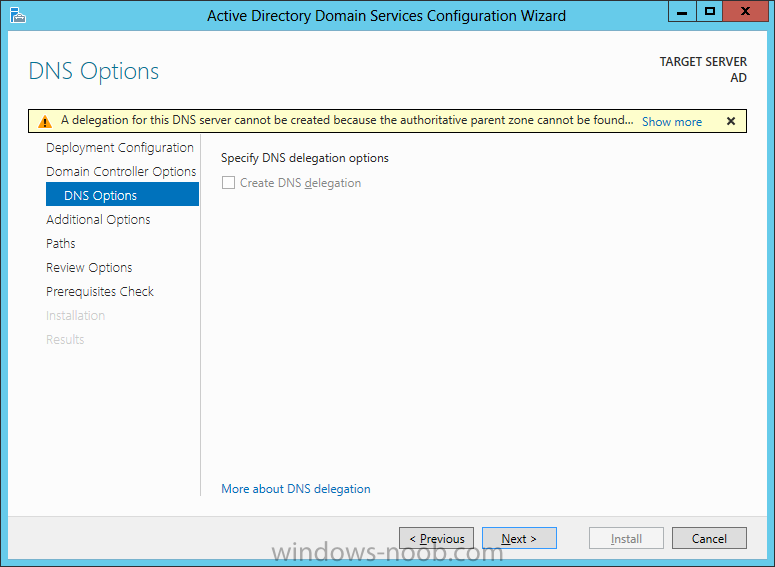
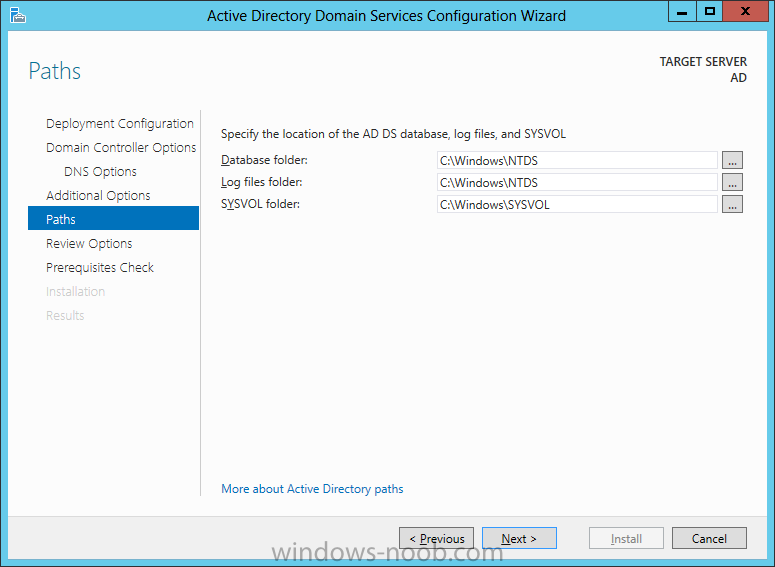
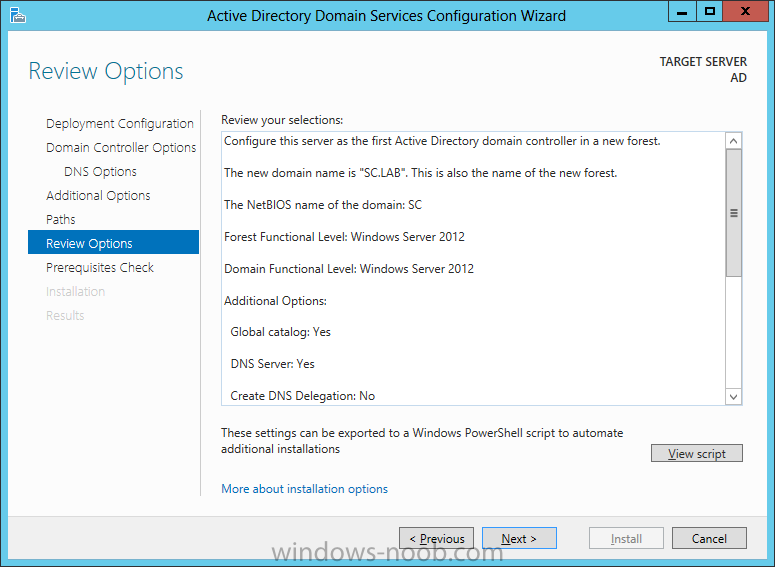
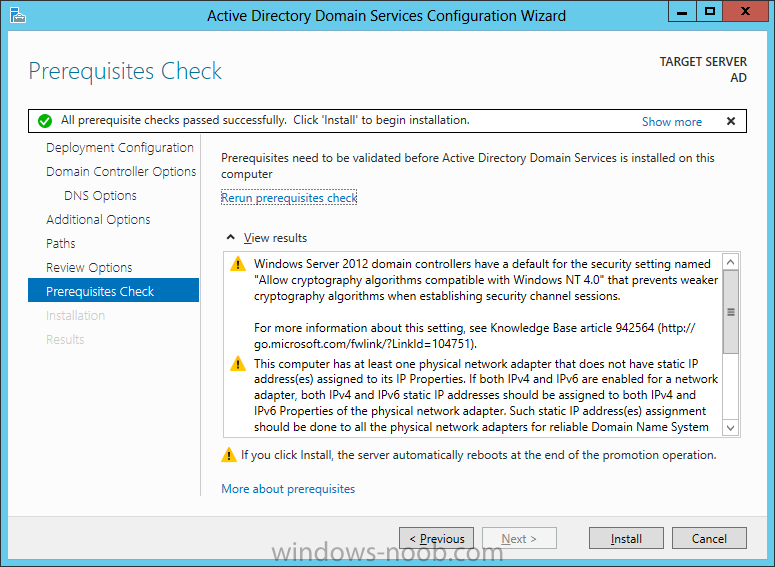
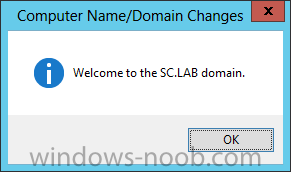
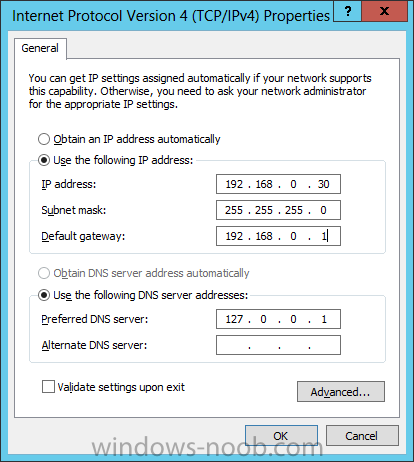
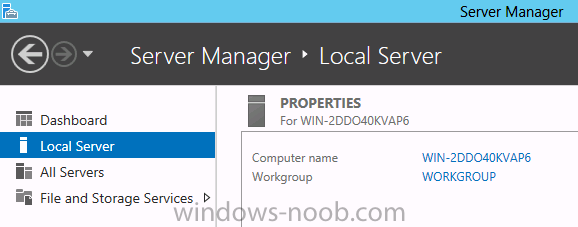
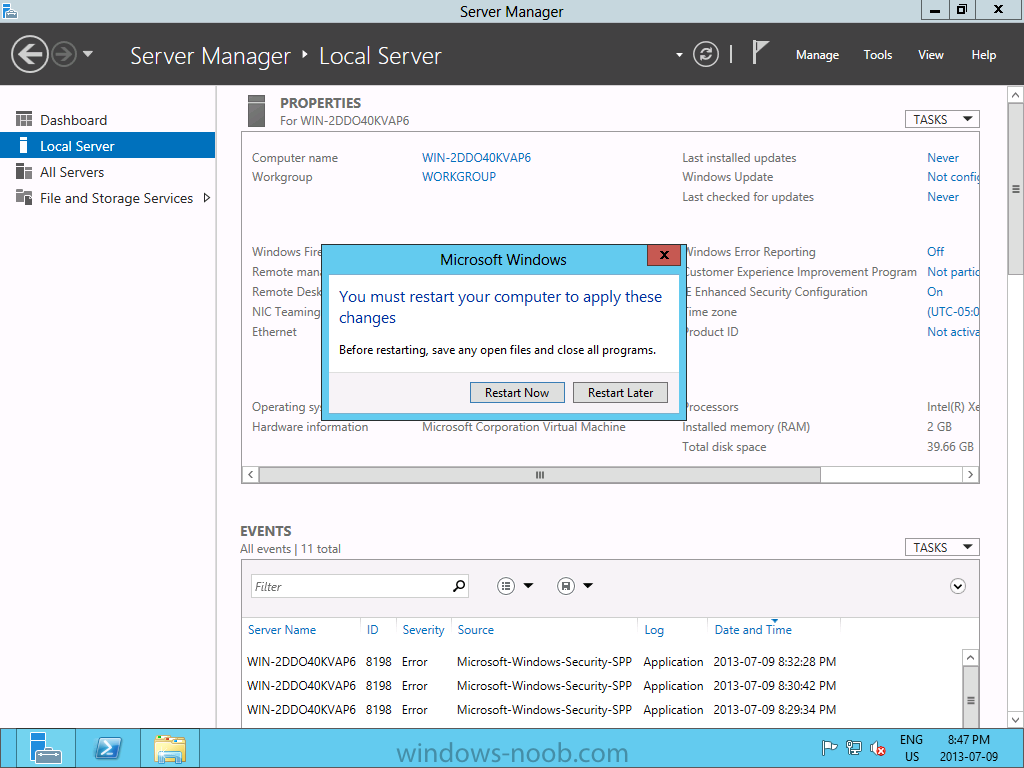
In our last post we installed the Operating System on our VM's. Now, we will install Active Directory. Install Active Directory Domain Services Now that we have the VMs created, and the OS installed on both, we need to first install/setup Active Directory (AD). When you log into a new installation of Server 2012, Server Manager will auto launch. From Server Manager, click on Manage, and choose ‘Add Roles and Features’. On the Add Roles and Features Wizard, read the information on the Before You Begin dialog, and then click Next. On the Installation Type screen, select ‘Role-based on feature-based installation’ and then click Next. On the ‘Server Selection’ screen, since we are installed Active Directory on this local system, ensure that it is selected, and click Next. Side note: Windows Server 2012 has a new feature that allows you to remotely install Roles and Features on other systems. On the Server Roles screen, select ‘Active Directory Domain Services’. When you select ‘Active Directory Domain Services’, immediately you will be presented with the following dialog. Click Add Features. On the Features screen, accept what has already been selected by default, and click Next. On the AD DS screen, read the information presented, and click Next. On the Confirmation screen, check the ‘Restart the destination server automatically if required’ checkbox, and then click Install. Note: You are not required to check the ‘restart’ checkbox, however, you’re going to have to restart the system anyways after the installation, so you might as well let the system do it for you. Note: When you check off the ‘Restart the destination server automatically if required’ checkbox, you will immediately be prompted with the following dialog. Click Yes. On the Results screen, click Close. After the system restarts, and Server Manager launches, you will have to promote the server as a domain controller. This is because Active Directory has been installed, but that process does not automatically promote the server. Click on the ‘Promote this server to a domain controller’ link. On the Deployment Configuration screen, select ‘Add a new forest’ since this is the first domain controller in our lab. Then enter a root domain name, and click Next. In my example I am using “SC.LAB” for System Center Lab (since I will be installing all other System Center products in my lab eventually). For the Domain Controller Options, select the appropriate Forest functional level, and Domain functional level. This is more applicable if you already have an existing domain and are adding a new domain controller. But since this is the first domain controller in our new domain, then we’ll use the highest level, that of Windows Server 2012. Also, don’t forget to create the Directory Service Restore Mode password. Then press Next. On the DNS Options screen, you can ignore this warning message and click Next. On the Additional Options screen, click Next. On the Paths screen, normally you would change the location for the database, log files, and SYSVOL, but since we are just in a lab environment, we’ll leave it at the defaults and click Next. On the Review Options scree, review what you have entered/selected, and click Next. The Prerequisites Check screen will check and confirm that everything passes before promoting the system as a domain controller. You will notice in my screenshot, that I have 1 warning because I didn’t set a static IP for the server yet. After installation completes, the system will automatically restart. You will then be presented with the login screen. Something to note here, that because we were originally logged in with a local account, the first time you want to log on using a domain account you will have to type the domain\username; in my example SC\Administrator. When you login, you will then see in the Server Manager, that AD DS is now listed, along with DNS. Now all that you need to do is assign a static IP to your domain controller. To do this, in Server Manager, select Local Server from the panel on the left. From there, click on the Ethernet link labelled ‘IPv4 address assigned by DHCP, IPv6 enabled’. This will cause the Networks Connections explorer to open. From here, right click on the Ethernet network that is displayed. This is in fact the network connection that we configured when we first created the VM. On the Ethernet Properties dialog, select ‘Internet Protocol Version 4 (TCP/IPv4)’ and click the Properties button. Within the Internet Protocol Version 4 (TCP/IPv4) Properties dialog, enter a static IP, gateway, and DNS that is applicable to your network. Once all the items have been entered, click OK. You will also have to click Close on the Ethernet Properties dialog as well. Congratulations, you now have a domain setup in your lab environment. Add Systems to Your Domain Now that you have your domain setup, you need to add your other VM (the one that we will use for SCOM) to the domain before being able to install SCOM. Log into the system you want to add to the domain. To do this in Server 2012, launch Server Manager, and click on Local Server. Then click on the computer name. This will launch the System Properties dialog. From this dialog, click the Change button. From this dialog, select the Domain option for ‘Member of’, and enter the domain name you want to join and press OK. After pressing OK, you are immediately presented with a Windows Security dialog, in which you need to enter the credentials of an account that has Domain Admin rights. Enter the credentials and click OK. Once the system is successfully joined to the domain, you will receive the following Welcome message. Press OK. After you press OK to the Welcome message, you will receive a second prompt, indicating that you need to restart the system for the changes to take effect. You will be back on the System Properties dialog. Press Close. When you press Close, you will receive yet another prompt about restarting the system. You can choose to Restart Now or Restart Later, but you won’t be able to install SCOM without the VM being added to the domain. After the system restarts, you will then be presented with the login screen. Something to note here, that because we were originally logged in with a local account, the first time you want to log on using a domain account you will have to type the domain\username; in my example SC\Administrator. Now we have our Active Directory server setup and ready, and the VM we will be installing SCOM on is joined to the domain. Now we can move onto installing SQL Server.


-
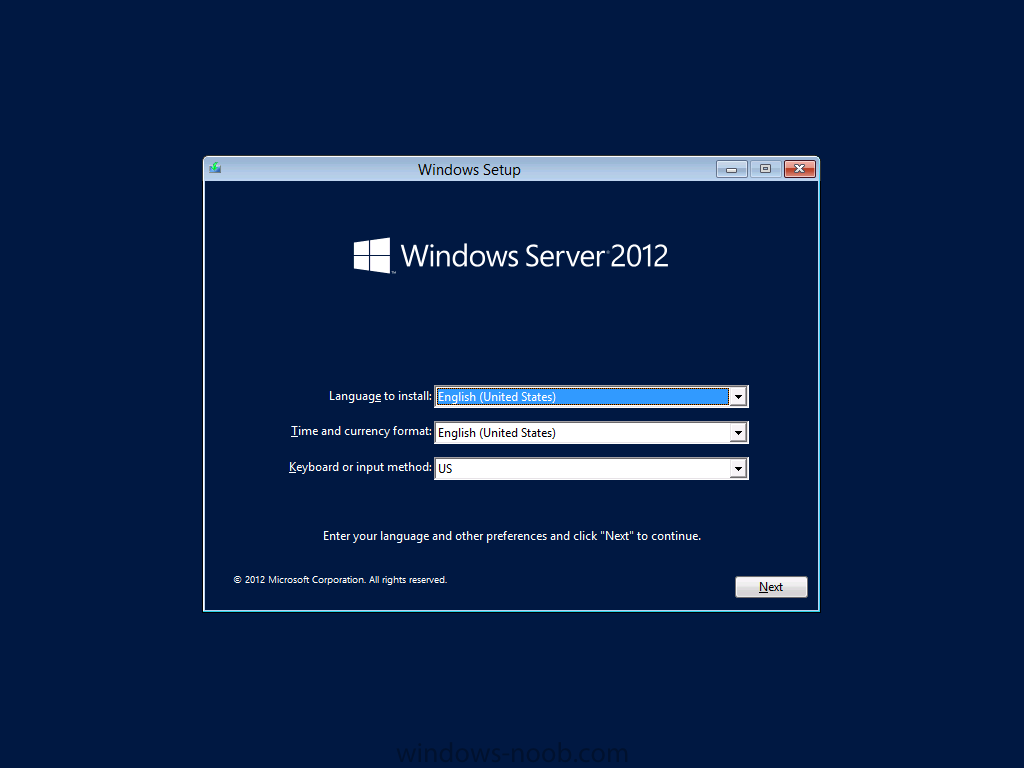
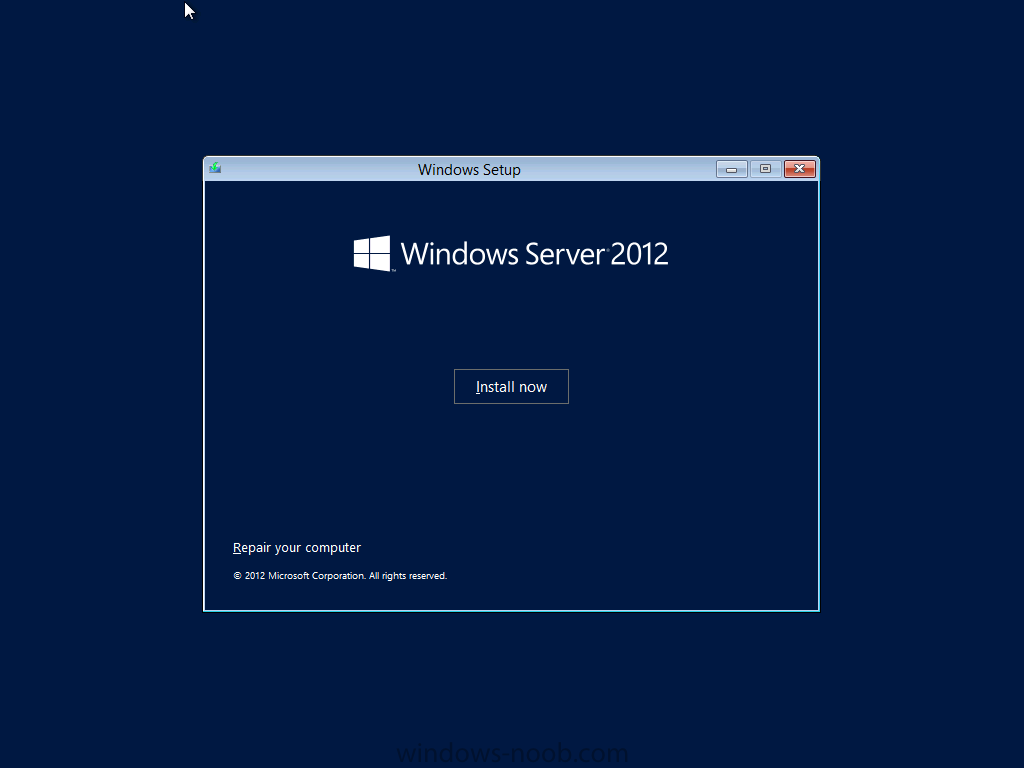
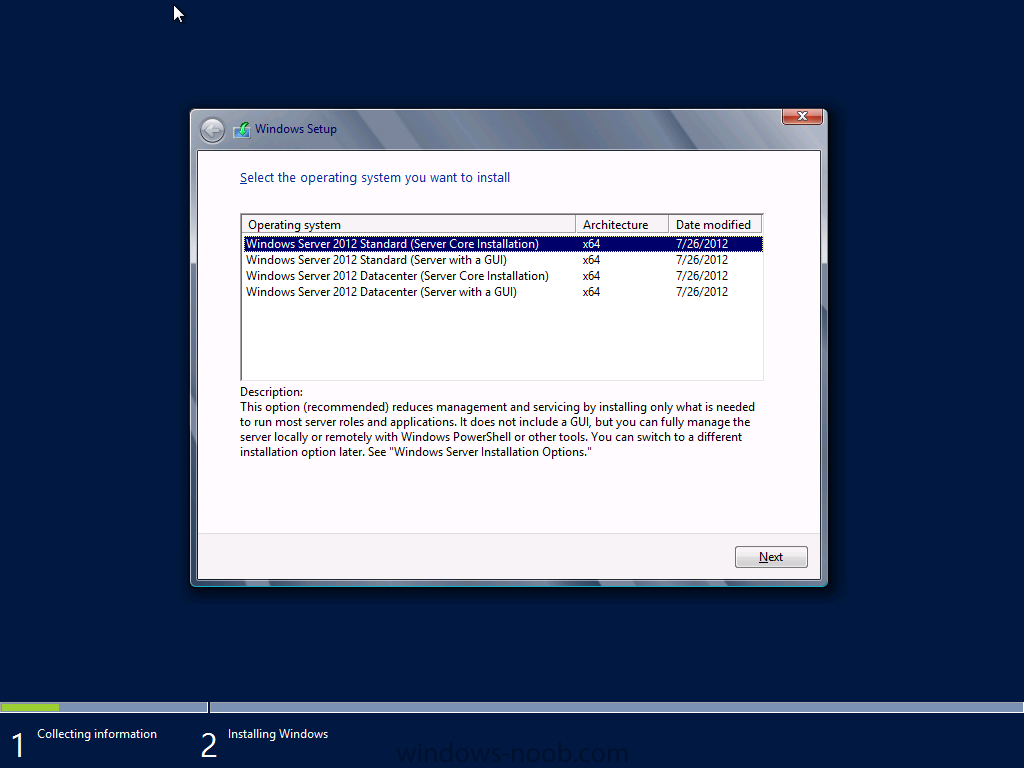
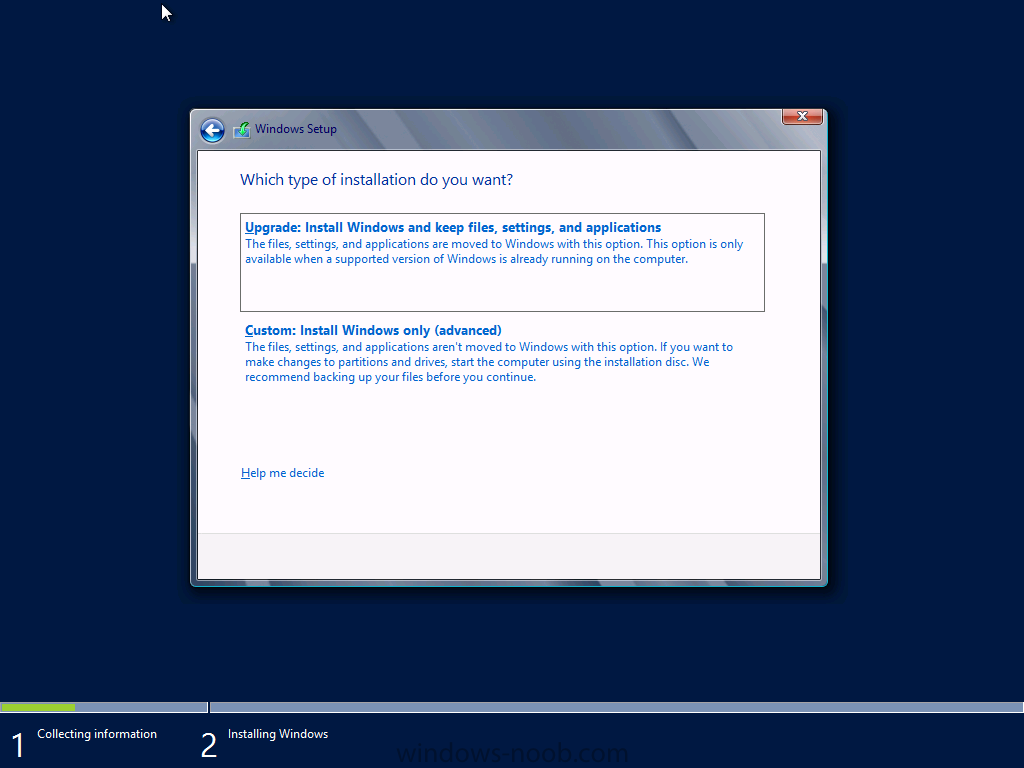
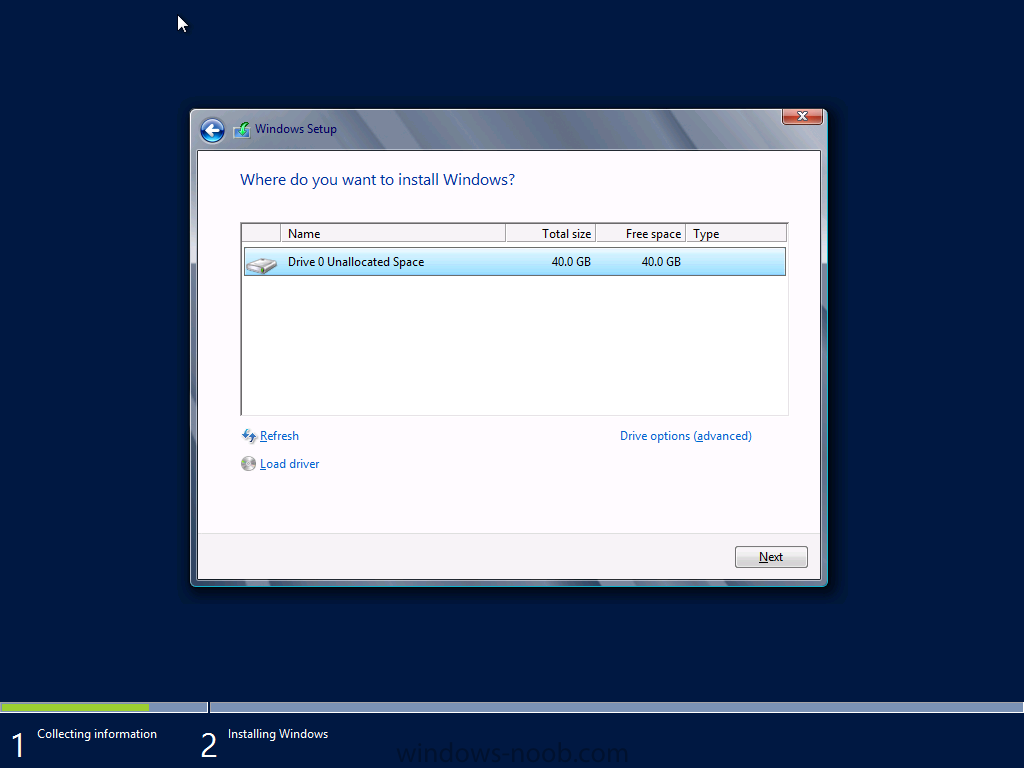
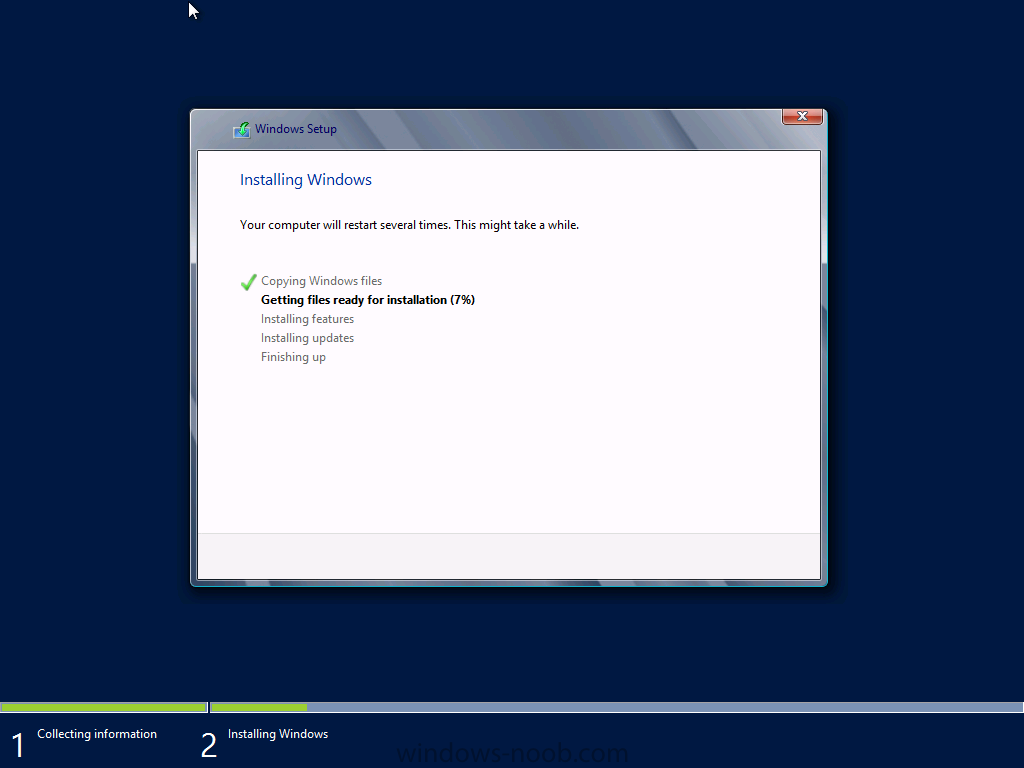
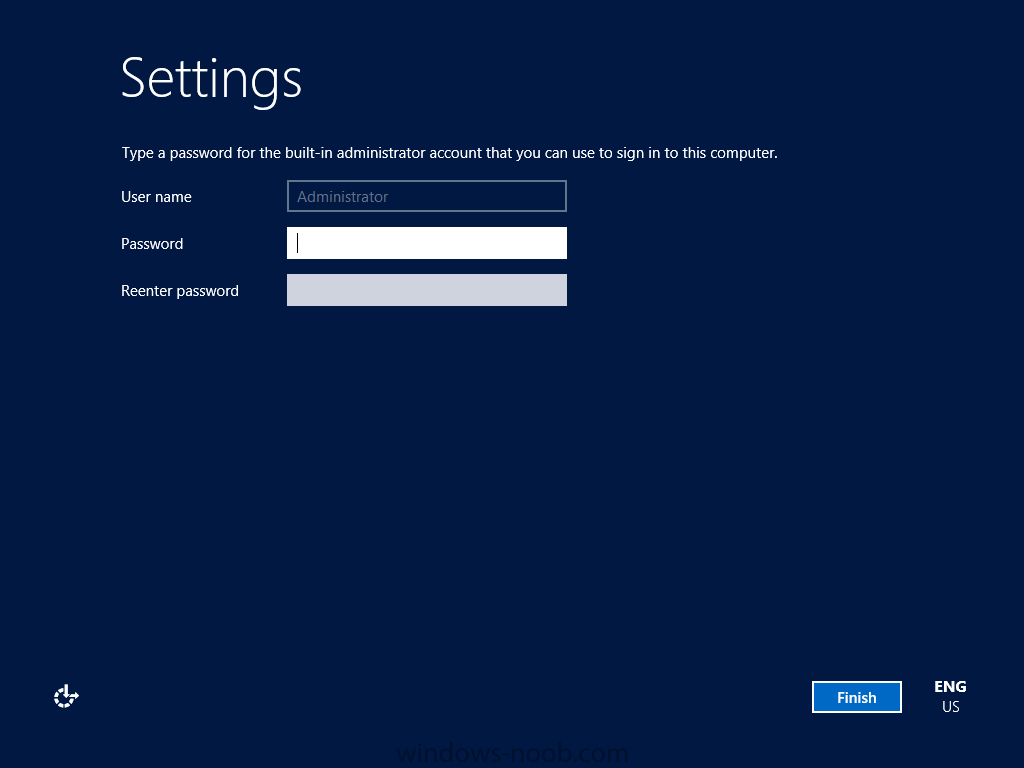
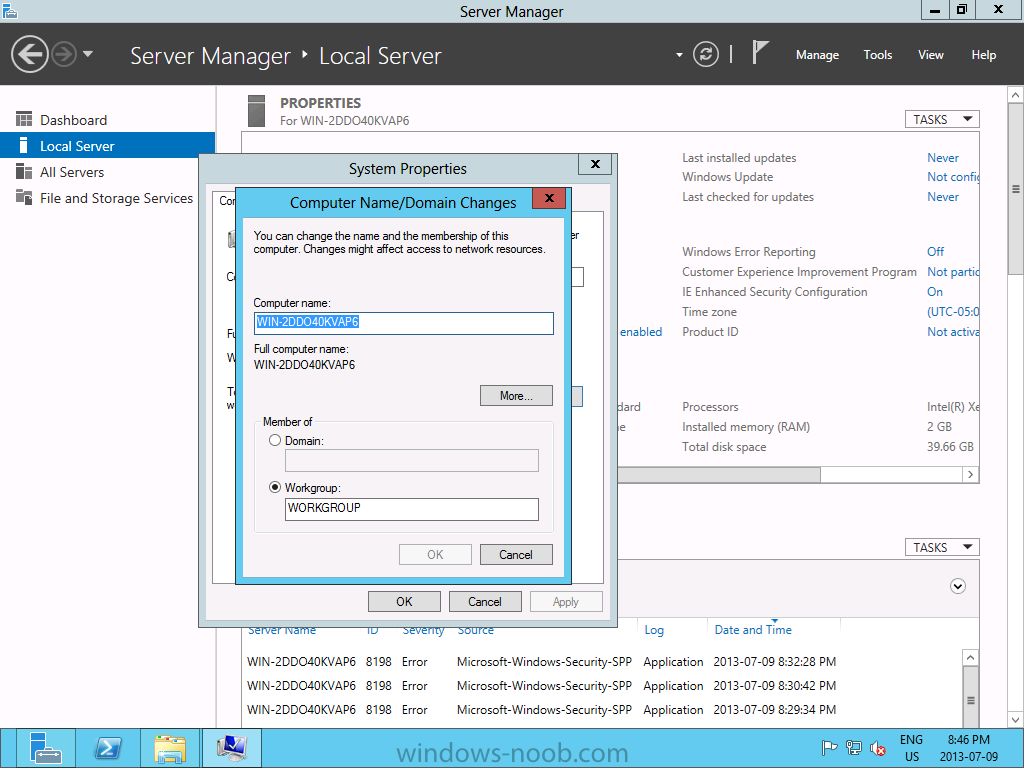
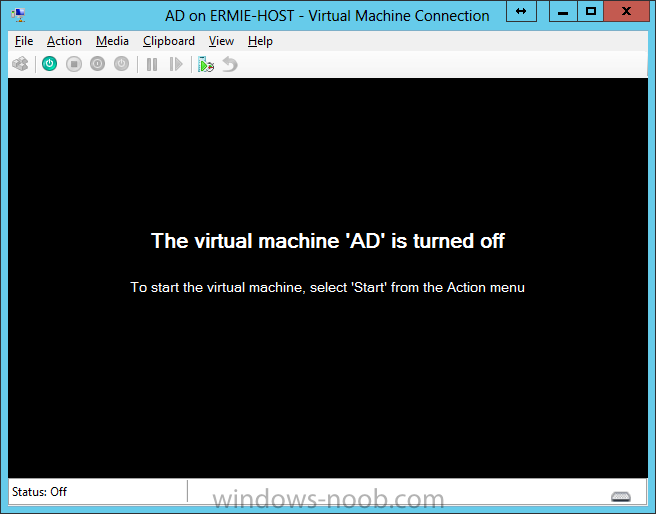
In our last post, we initially setup the VM's required for our lab. Now we'll focus on the OS. Install the Operating System Now that we have created the VMs for our lab, we can install the Operating System (OS). Start by connecting to one of the VMs, either by double clicking on the VM in Hyper-V Manager, right click the VM and choose Connect, or click on Connect from the Action pane/menu. When you have the VM connection up, and an ISO mounted, power the VM on. On the Windows Setup screen, select the Language, Time/Currency Format, and Keyboard Method appropriate, and click Next. All you have to do now is click Install Now. Next you have to choose the Operating System and version you want to install. In our lab example, I will choose Windows Server 2012 Standard (Server with a GUI). Make your selection and then click Next. You will have to accept the license terms, and then click Next. For the Installation Type, since we don’t already have an OS installed, we will choose the ‘Custom: Install Windows only (advanced)’ option. Now select the hard drive that you want to install the OS to. Since we only created one hard drive when setting up the VM, we only have one to choose from. Select it, and click Next. Now all you have to do is wait for the installation to finish. Once the installation is complete, you will be prompted to enter a password for the local administrator account. This is different from a domain-based local administrator account. Enter a password and click Finish. After some final quick configuration, you will then be presented with the login screen. Now repeat these steps for the other VMs in the lab. NOTE: After you install an OS, you will need to rename the computer within the OS. To do this in Server 2012, launch Server Manager, and click on Local Server. Then click on the computer name. This will launch the System Properties dialog. From this dialog, click the Change button. From this dialog, enter the name you want to call the computer. In my lab, I called the Active Directory computer “AD”, and the Operations Manager computer “SCOM”. Press OK after entering the name. You will encounter the following prompt. Click OK. Then click Close on the System Properties dialog. You can choose to either Restart Now or Restart Later, but the name change will not take effect until you do so. In the next part of our guide, we will install Active Directory Domain Services, so stay tuned.


-
 Does anyone know of a how to guide or LAB Guide on how to setup Operations Manager in SCCM 2012 RC? It is not clear to me how to configure it. Does SCCM 2012 have the ability to show a Dashboard of your entire network and its devices, show real time graphs of devices you want to monitor, send out alerts via email should a device stop responding. I was hoping it worked a lot like PTRG by Pressler. Thank you!