Search the Community
Showing results for tags 'Active Directory'.
-
 Hello. We currently have an OSD Task Sequence for deploying Windows 10 Enterprise 1709 to our client machines. This works quite well for existing PCs which are known to AD and SCCM. We have a mixed environment, where we have multiple departments which require their own set of applications. Again, this works well for existing machines. The issue in which I'm being faced with at the moment, is when we introduce new clients to the environment. Due to the design of SCCM with AD System Discovery, new devices are not discovered as there is no DNS entry for those devices. I have done the following - Pre-staged computer accounts on Active Directory. Created computer objects within SCCM with the Name and MAC address of the new devices. Added new objects to the OSD Device Collection for OSD. The problem here is that some Device Collections which have Collection Variables attached, rely on Active Directory OU membership rules. As these machines haven't yet been discovered as such, they don't become members of these collections until the OSD process has finished the installation of the ConfigMgr Client has completed. Once that has completed, the machines then fall into the correct collections, but the Install Applications step within the Task Sequence doesn't complete as the collection variables haven't yet been evaluated. I was wondering if anybody else here has experienced this and maybe have a solution/work around? Would there be any Powershell scripts which could be used to force a re-evaluation on collection variables prior to the Install Applications step? Cheers, Richard
 -
 Hello everyone! Some years ago I was looking for a script to create collections in SCCM based on AD OUs. I've found some of them, but they seemed a bit complex and incomprehensible to me. So I've wrote my own rather simple script, added a few options that I think would be in hand for SCCM admin and added a lot of comments to make the script easy to understand and modify. So I present it to your judge. Any comments and suggestions are appreciated. <# Crafted by Maestro, 17/03/2017 The purposes of this script: 1. Create device collections in SCCM based on AD. Assign Canonical name of OU to collection and OU GUID to collection description. I use OU GUID for my further needs, so you can omit this. In addition, I think that Canonical name is the best variant to use in SCCM but you can pick simple Name or Distinguished Name - it is up to you 2. Define the Refresh Schedule of collection. 3. Create Query Rule for collection membership 4. Move created collection to custom folder (very handy, never saw this option in other scripts). 5. Updates collection membership at once. #> # Importing necessary PS modules Import-Module ActiveDirectory Import-Module 'D:\Program Files\Microsoft Configuration Manager\AdminConsole\bin\ConfigurationManager.psd1' # Defining main variables # SCCM Site $Site = (Get-PSDRive -PSProvider CMSite).name <# Folder to move collections into. I've selected the ready one. You can create new folder right in script with simple "mkdir" in "${Site}:\DeviceCollection\" #> $TargetFolder = "${Site}:\DeviceCollection\FromAD_by_OU" # Relocating to SCCM PSDrive cd ${Site}: # Defining refresh interval for collection. I've selected 15 minutes period. $Refr = New-CMSchedule -RecurCount 15 -RecurInterval Minutes -Start "01/01/2017 0:00" <# Getting Canonical name and GUID from AD OUs. -SearchScope is Subtree by default, you can use it or use "Base" or "OneLevel". OUs are listed from the root of AD. To change this i.e. to OU SomeFolder use -SearchBase "OU=SomeFolder,DC=maestro,DC=local" #> $ADOUs = Get-ADOrganizationalUnit -Filter * -Properties Canonicalname |Select-Object CanonicalName, ObjectGUID # And at last, let's create some collections! foreach ($OU in $ADOUs) { $O_Name = $OU.CanonicalName $O_GUID = $OU.ObjectGUID # Adding collection New-CMDeviceCollection -LimitingCollectionName 'All Systems' -Name $O_Name -RefreshSchedule $Refr -Comment $O_GUID # Creating Query Membership rule for collection Add-CMDeviceCollectionQueryMembershipRule -CollectionName $O_Name -QueryExpression "select * from SMS_R_System where SMS_R_System.SystemOUName = '$O_Name'" -RuleName "OU Membership" # Getting collection ID $ColID = (Get-CMDeviceCollection -Name $O_Name).collectionid # Moving collection to folder Move-CMObject -FolderPath $TargetFolder -ObjectId "$ColID" # Updating collection membership at once Invoke-CMDeviceCollectionUpdate -Name $O_Name } Write-Host "----------------------------" Write-Host "All done, have some beer! ;)" Write-Host "----------------------------"
 -
 The writing of the Bitlocker key to AD has been working flawlessly... until we started to receiving machines with SSD drives in them. The task sequence works flawlessly with no errors. The problem is the bitocker recovery tab within AD is empty. I can run the manual way (https://blogs.technet.microsoft.com/askcore/2010/04/06/how-to-backup-recovery-information-in-ad-after-bitlocker-is-turned-on-in-windows-7/ ) and it will input the data in to ad, but I do not want to have to do this . The real strange thing is if I remove the machine from AD, and reimage it, the key properly registers itself within AD. Only on the second pass will it work?
 -

SCCM - Active Directory System Discovery OU Name issues
limiteddenial posted a question in Collections
I'm having some consistency issues with the Active Directory system discovery. I have one domain that populates the "System OU Name" differently than the rest of the domains. I have looked at the domain controllers and the service accounts and I'm not seeing anything that would cause the property to be populated differently. There are only 2 obvious differences between the domains. The one that isn't working like the others has the domain functional level as Windows Server 2012 and isn't trusted by the domain that the primary site is joined to. I have 3 domains setup for Active Directory system discovery. Discovery settings are all setup the same, Search path LDAP://OU=Desktop,DC=My,DC=DOMAIN. Each domain has a different service account used for the discovery. Systems are found in all the domains but the "System OU Name" property is different in the domain with the functional level of Windows Server 2012. This is what the "System OU Name" property looks like when discovered from a domain with the functional level of Windows Server 2003, as expected. This is what the "System OU Name" property looks like when discovered from a domain with the functional level of Windows Server 2012. Environment Information SCCM Version: SCCM 2012 R2 SP1 CU2 Correct domains: Domain functional level: Windows Server 2003 Forest functional level: Windows Server 2003 Primary Site is joined to this domain AD Schema extended SCCM servers published Incorrect Domains Domain functional level: Windows Server 2012 Fores functional level: Windows Server 2012 This is not a trusted domain AD Schema extended SCCM servers published Any help would be appreciated.

-
Need help to narrow down the issue...I get this error in netsetup.log as the PC is unable to join domain after the t/s is run

-
Hi there, I'm new to SCCM ,I just installed SCCM 2012 and enabled Active DIrectory Group Discovery ,All my users have been imported successfully, howerver the security groups haven't. Is there any particular option for security groups ? Thanks,
-
I successfully installed SCOM clients onto computers belonging to an external but trusted domain, but ran into authentication problems along the way. I had to change one trust relationship setting to make it work. Here's what I found I had to do to make cross-domain installation and monitoring work: * Changed my trust relationship from "External" to "Forest," to enable Kerberos authentication * Open needed network firewall ports, as the external domain's network is separated by a firewall router deliberately * Create an action account that matched a domain account in the external domain * Changed the trust relationship to permit forest-wide authentication, as it was originally selective authentication I'm comfortable with all of these except the last one. When I had selective authentication enabled, I would see event ID 20057 on the external domain PCs, indicating an error 0xC000413 (Authentication firewall); the external domain PCs were not permitted to log on to the SCOM management server. Usually if I want to grant cross-domain logon permission I would go to the computer account and grant the "Allowed to Authenticate" permission to the external domain's account, but that alone didn't work. I granted that permission to the action account first, and when that didn't work I tried granting it to an external PC's computer account. Only after permitting forest-wide authentication did clients start reporting in by themselves. If I want to restore selective authentication to this domain trust, what permissions do I need to grant to what accounts so SCOM clients can report in? --
-
Dear All, I have a network of 25 Client Machines with Server 2008 R2 Active Directory Installed. Its the only Active Directory server in my network with no additional one, the problem is last day it was crashed. I install Active Directory server on another machine with same domain but the clients are unable to connect with domain controller. please help me out to solve this issue. waiting for a prompt response from all of you. Regards RMA
-
We have a central admin site and a few primary sites. I want to pull in user groups from AD. Is it better for network traffic to do the discovery from the Central admin site or from the primary sites? I'm thinking of running group discovery as well as user discovery from the central site but I'm not sure. Also, I'm guessing it's better to run user discovery as well even though I technically only need groups?
-
 I'm trying to run a script which will create a group within Active Directory, specific to the server being deployed in an OSD TS, and then add that group to the local admins on the server. The TS completes successfully but the group isn't created, no error is recorded in smsts log file. I can run the script manually on the server after the build completes, so the actual powershell code works, but it fails to do what it's meant to do during OSD. Anyone had any experience of anything similar to this (script is listed below)? #Add Active Directory server admin groups to local administrators #The script connects to AD, checks for the existence of the groups, creates them if necessarry, then adds them to the local admin #If the server is in the Test or Dev domains, the additional Domain Local group to allow for permissions to be granted to prod #domain accounts #check if the Active Directory powershell module has been imported, import if required. if (@(get-module | where-object{$_.name -eq "ActiveDirectory"}).count -eq 0) { import-module activedirectory } #set variables to be used in the script $comp = gc env:computername [string]$domainname = (get-addomain -identity (gwmi Win32_ComputerSystem).Domain).NetBIOSName [string]$domaindn=([adsi]("LDAP://ROOTDSE")).defaultnamingcontext $domaindn=$domaindn.tostring().toupper() $path=",OU=Local Server Administration,OU=groups,"+$domaindn $ggroup = "<groupname>-"+$comp $ggroupdn="CN="+$ggroup+$path $dlgroup = "<groupname>-"+$comp+"-L" $dlgroupdn="CN="+$dlgroup+$path switch -wildcard ($domaindn) { "*DEV" {[string]$pdc=(get-addomain <devdomain>).PDCEmulator} "*TEST" {[string]$pdc=(get-addomain <testdomain>).PDCEmulator} "*PROD" {[string]$pdc=(get-addomain <proddomain>).PDCEmulator} } #check for the existence of the AD security group, create it if needed $checkgroup=get-adgroup -server $pdc -filter{name -eq $ggroup} if ($checkgroup -eq $null) { $Description = "Local administration rights to " + $comp dsadd group $ggroupDN -samid $ggroup -desc $Description -s $pdc -u <user> -p <password> start-sleep -seconds 15 } # Add AD group to local administrators on the server #check if this is the prod domain, if not then create the domain local groups #if prod then add <server admins> group to local administrators if($domaindn -ne "<prod domain DN>") { $checkgroup=get-adgroup -server $pdc -filter {(name -eq $dlgroup)} if ($checkgroup -eq $null) { $Description = "Local administration rights to " + $comp + " for Prod Domain" dsadd group $dlgroupDN -samid $dlgroup -scope l -desc $Description -s $pdc -u <user name> -p <Password> start-sleep -seconds 15 } } else { }
 -
I have one SQL server that is complaining about missing SPN principals. SCOM monitoring is saying SQL can't authenticate using Kerberos because it's missing the SPNs "MSSQLSvc/[server.domain.tld]:1433" and "MSSQLSvc/[server.domain.tld]". It's the default instance. This doesn't seem specific to SQL. I attempted to list SPNs in use with klist and setspn. klist will give me a list for the currently logged-on user, but setspn -L will fail, claiming this: C:\> setspn -L username@domain.tld FindDomainForAccount: Call to DsGetDcNameWithAccountW failed with return value 0x00000525 Could not find account username@domain.tld I'm also seeing odd security log entries, telling me the failure reason is "Account currently disabled," when it is not. The logon failures use Kerberos for the authentication package where the logon successes use NTLMv2. The setspn failure occurs on a domain-joined Windows 7 PC as well as on my affected SQL server. I can't list SPNs for any domain user account or domain computer account. I can log on using a username@domain.tld username from a console or remote desktop. Kerberos seems to work on at least two non-Windows PCs; there are two MacOS X 10.8 PCs that use Outlook 2011 and they log on to Exchange using Kerberos; the users log on to the domain from the MacOS logon screen and they get a Kerberos SPN they can select from Outlook. --
-
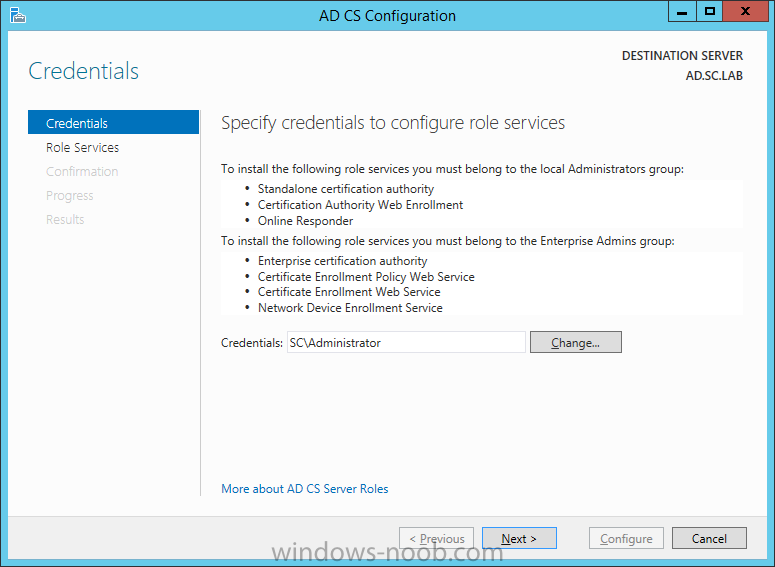
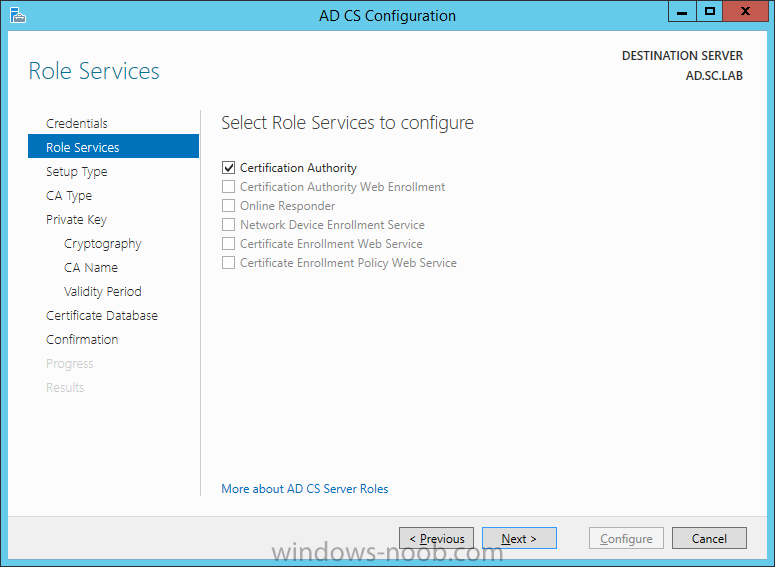
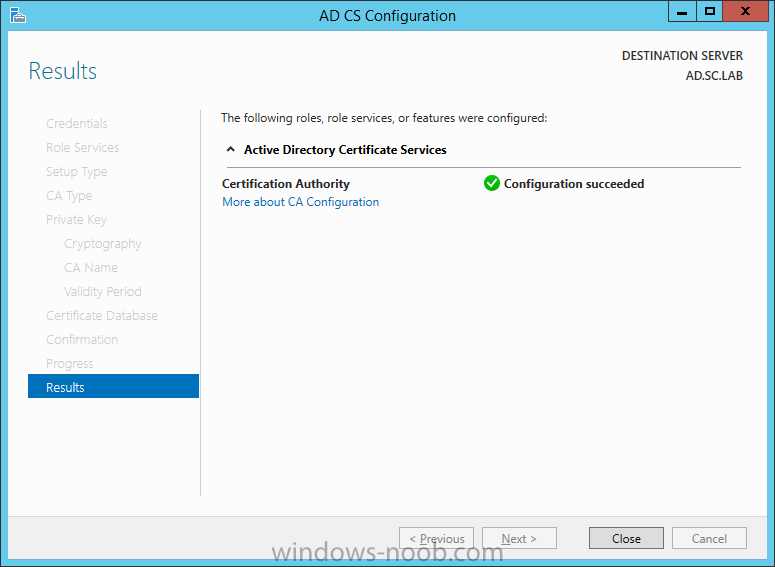
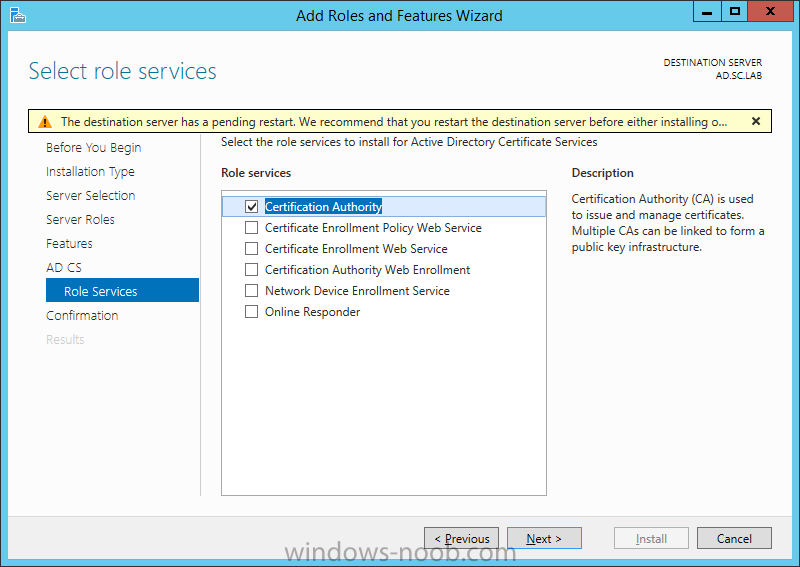
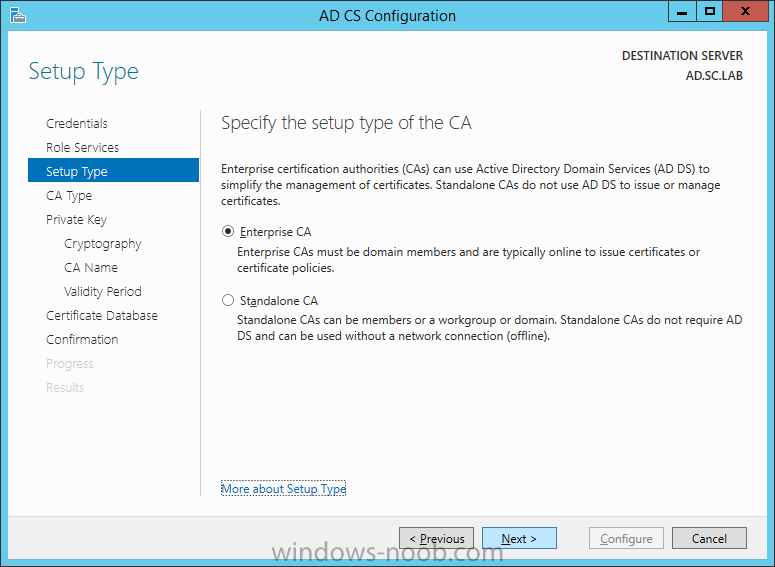
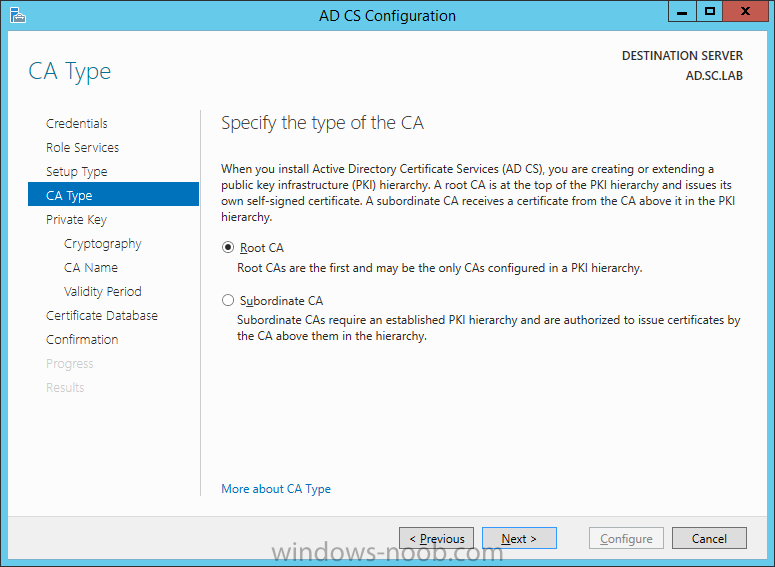
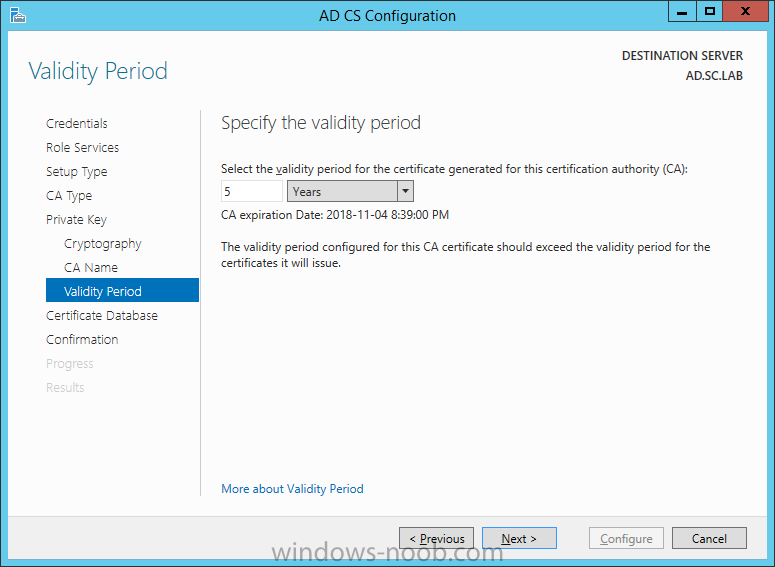
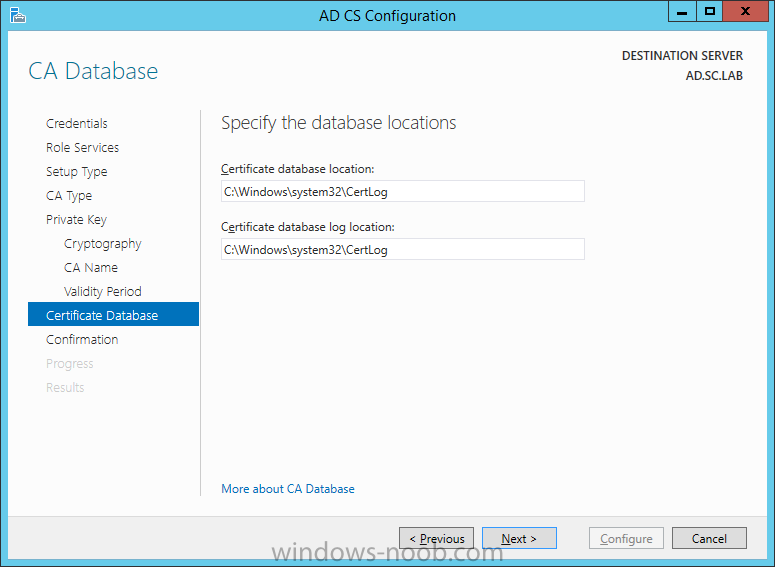
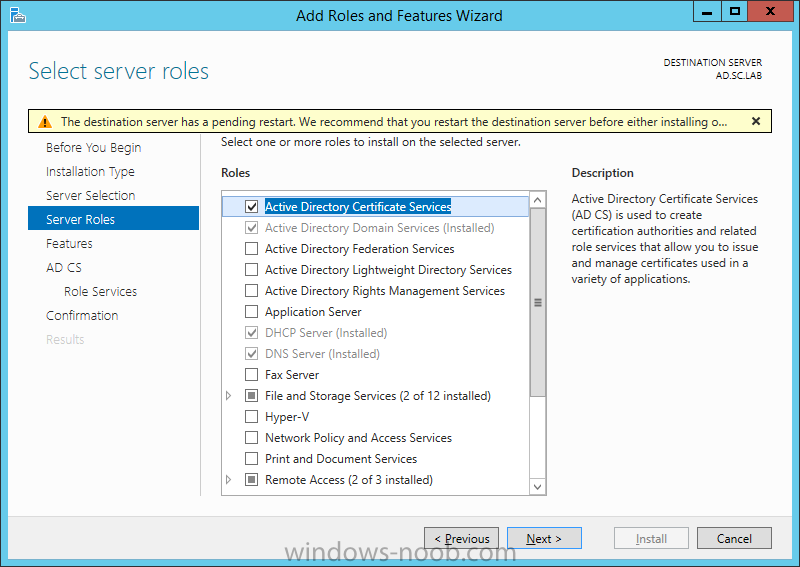
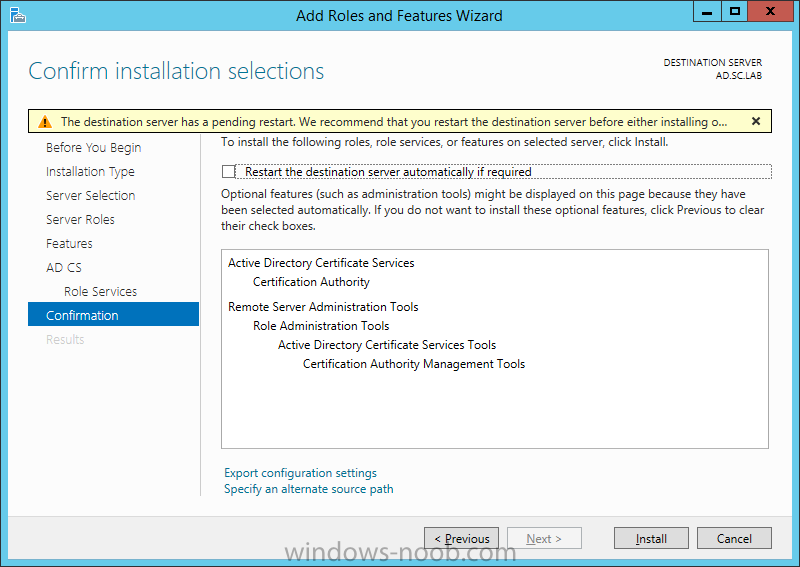
 On the Credentials page, supply appropriate credentials and then click Next. On the Role Services page, select Certification Authority and then click Next. On the Setup Type page, select Enterprise CA and then click Next. On the Specify CA Type page, select Root CA and then click Next. On the Set Up Private Key page select Create a new private key and then click Next. Leave the defaults on the Configure Cryptography for CA page, and then click Next. Important: CSP, Hash Algorithm and Key length must be selected to meet application compatibility requirements. On Configure CA Name page, enter Domain Root CA (ex. SC LAB Root CA) in the Common name for this CA field, and then click Next. On Set Validity Period page enter 10 Years, then select Next. Keep the default on the Configure Certificate Database page, and then click Next. On the Confirmation page, click Configure. Review the information on the Results page to verify that the installation is successful and then click Close. You now have Active Directory Certificate Services installed.


-
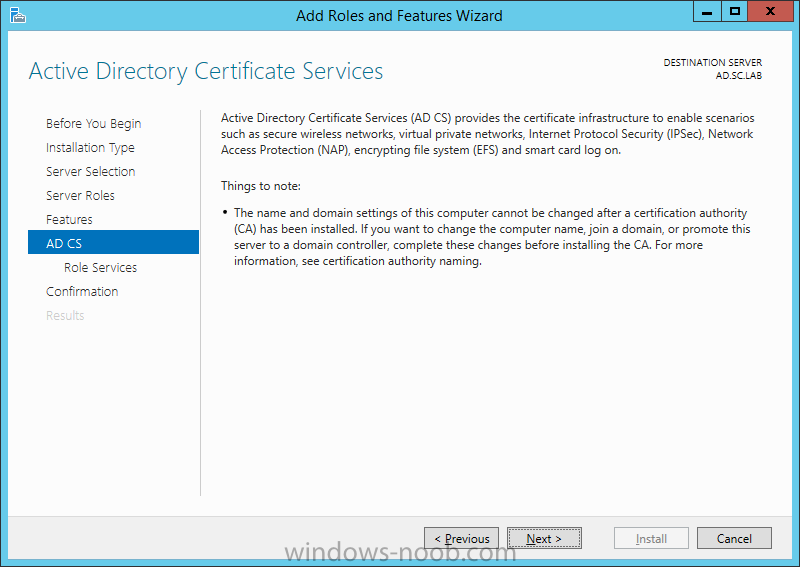
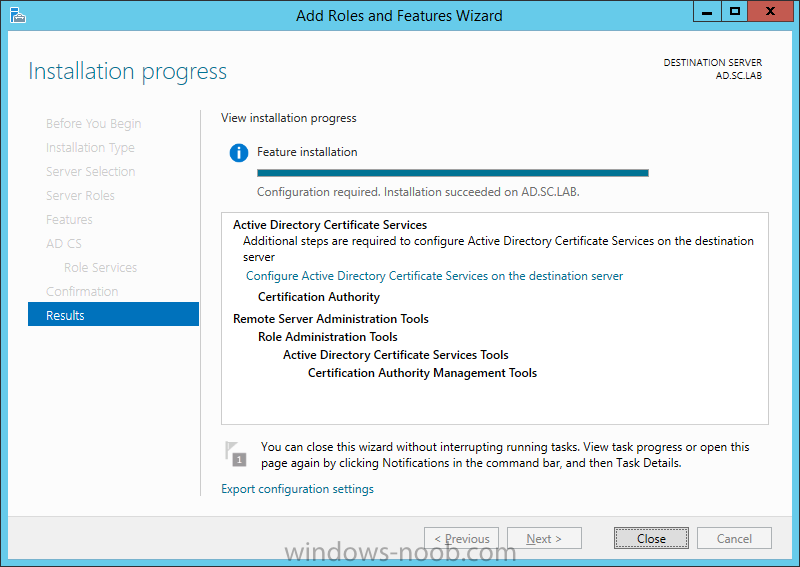
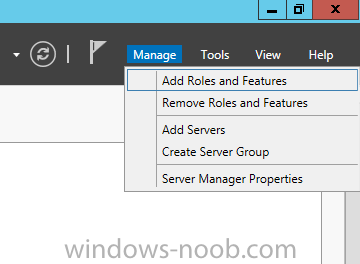
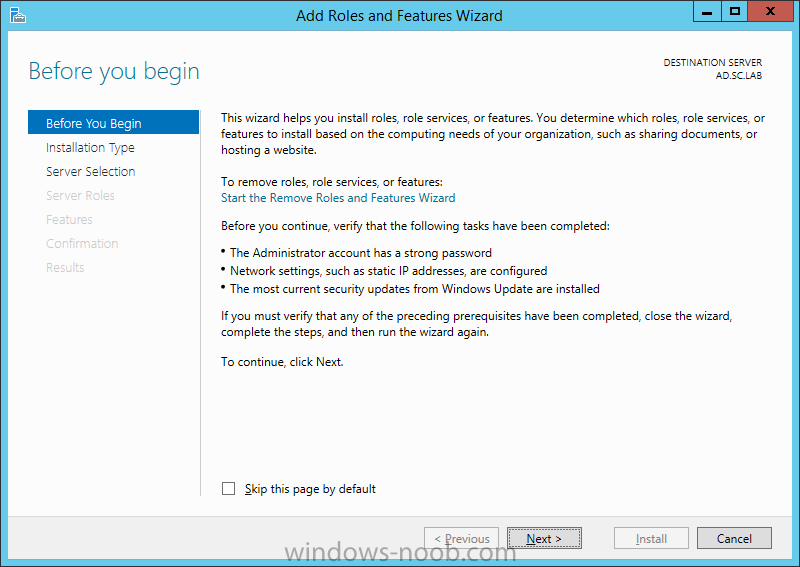
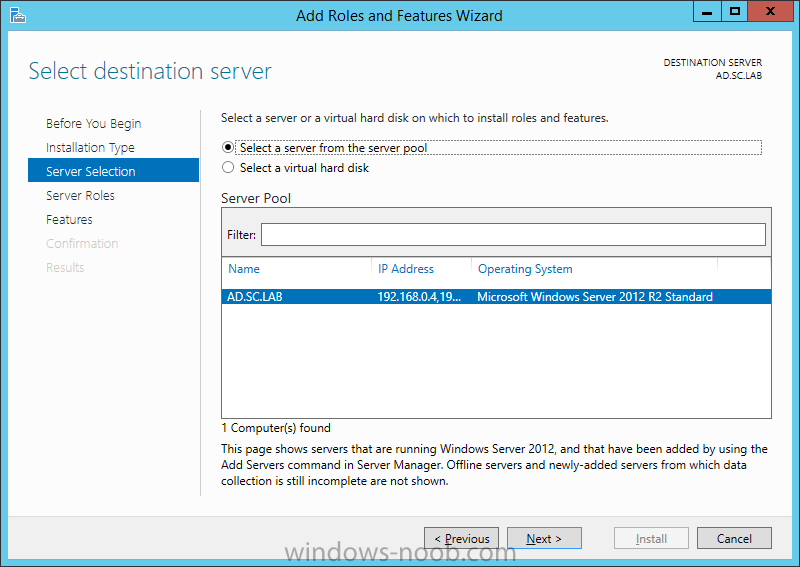
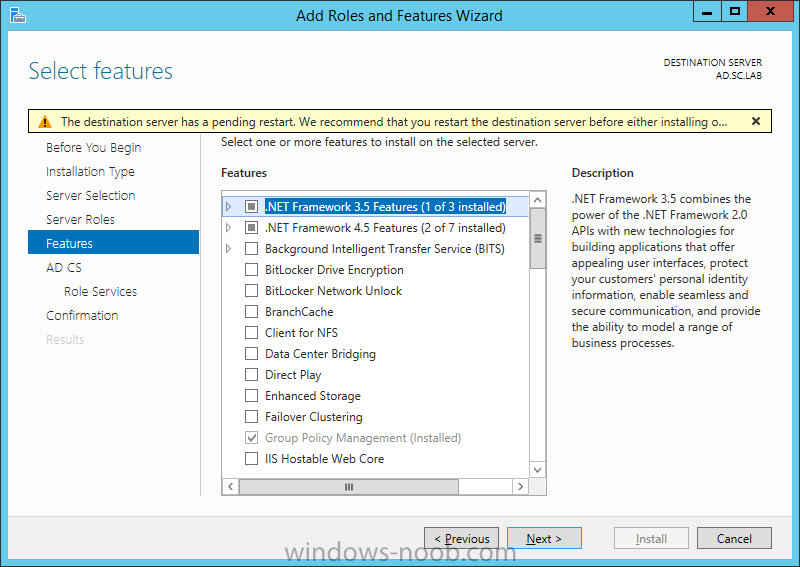
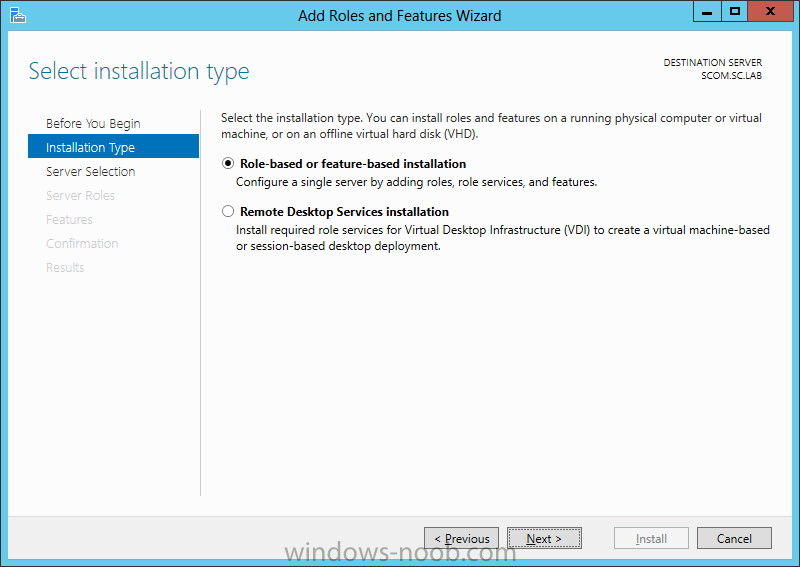
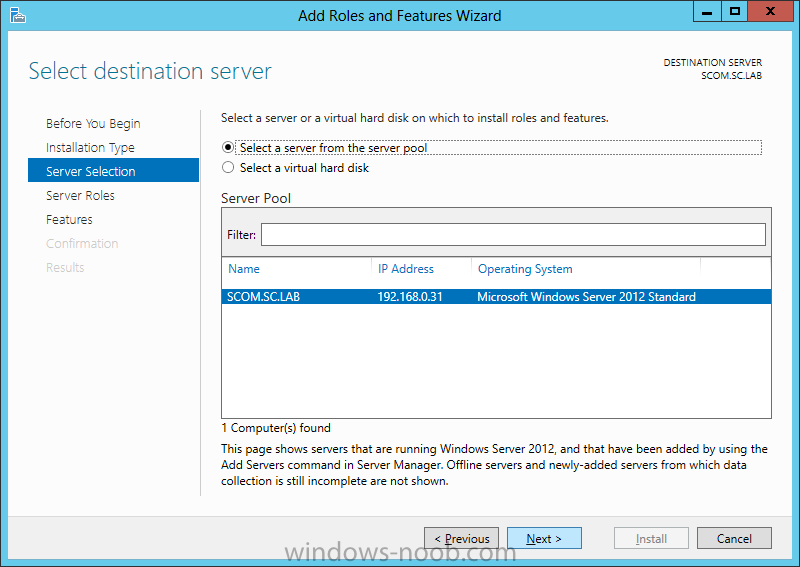
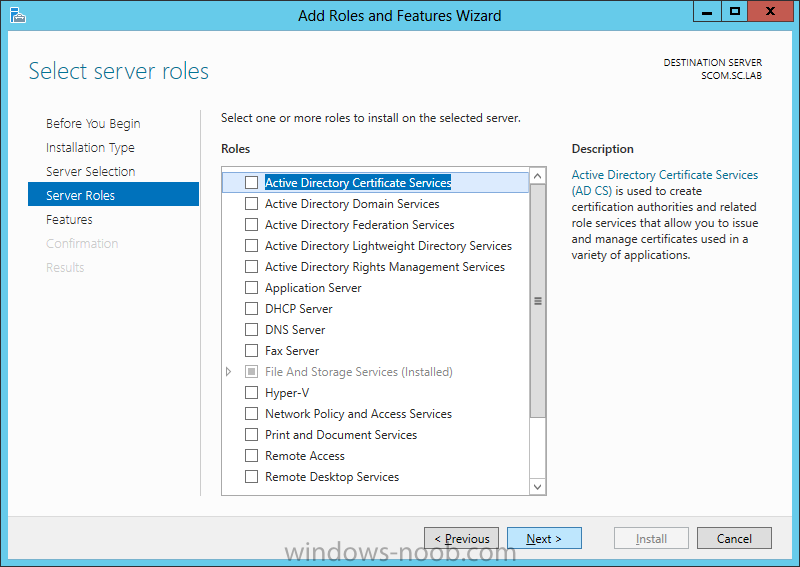
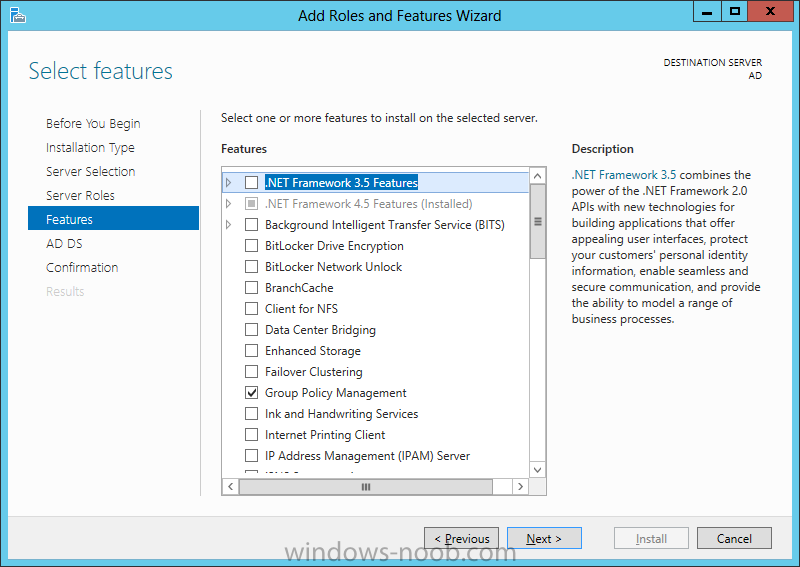
Install Enterprise Root CA using Server Manager Ensure that you are logged on to your server as an Administrator. Open Server Manager. Click on Manage and then select Add Roles and Features. On the Before You Begin page select Next. On the Installation Type page select Role-based or feature-based installation. On the Server Selection page ensure that the correct server is selected. On the Select Server Roles page select Active Directory Certificate Services and then click Next. On the Select Features page, click Next. On the Introduction to Active Directory Certificate Services page, click Next. On the Select Role Services page, ensure that Certificate Authority is selected, and then click Next. On the Confirmation page, click Install. On the Results page, click Close. Once the installation is complete, we need to do some post-deployment configuration.


-
Good to see a SCOM section here. Started using SCOM 2012 R2 to monitor a domain network. It's complaining that the DCs are lagging in AD queries: "The AD Last Bind latency is above the configured threshold." DCs talking to the PDC emulator are also complaining, "The Op Master PDC Last Bind latency is above the configured threshold." Turning off the Windows Firewall on the DCs stops the lag, but I don't consider that an acceptable solution. Further research told me that a firewall filter named, "Port Scanning Prevention Filter," is responsible. I won't go into the frustration about that filter here. Is there a way to adjust the threshold in the SCOM health monitors for Active Directory so it doesn't complain about this? The lag itself isn't a workflow-stopper, even if it is annoying at times. --
-
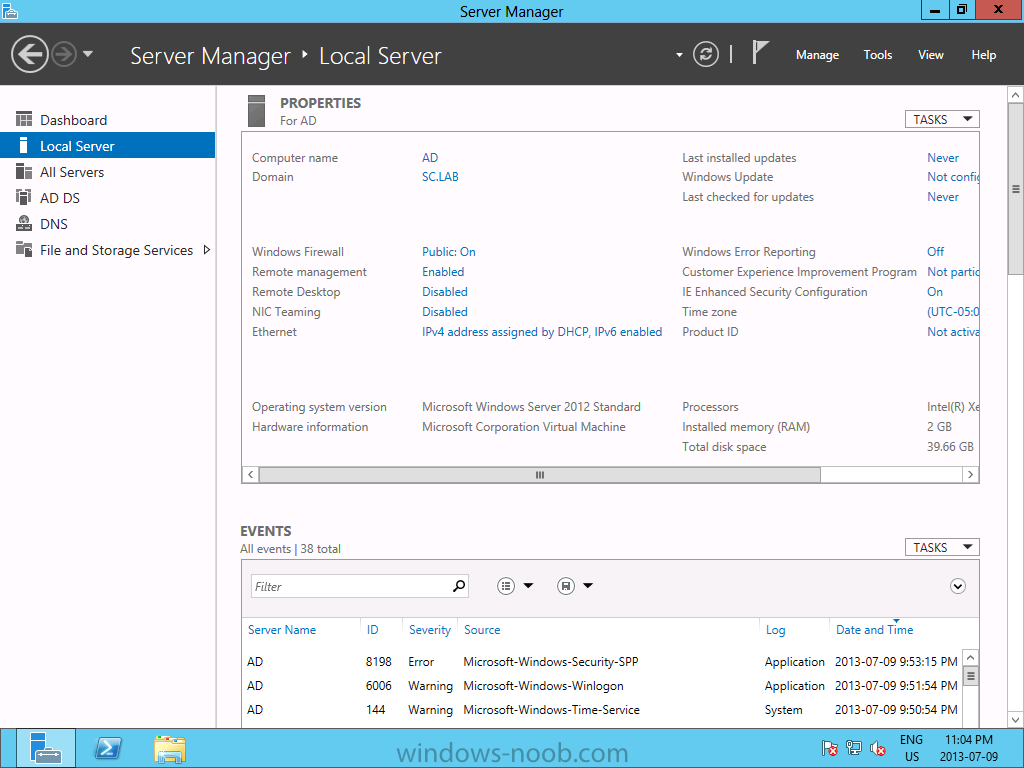
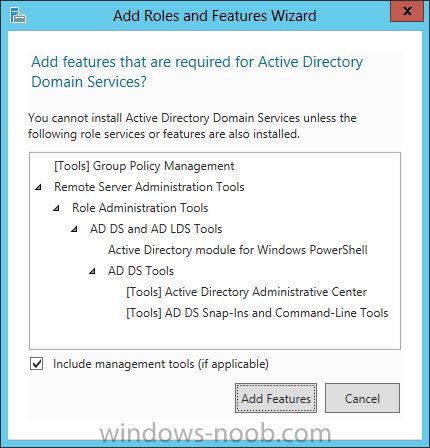
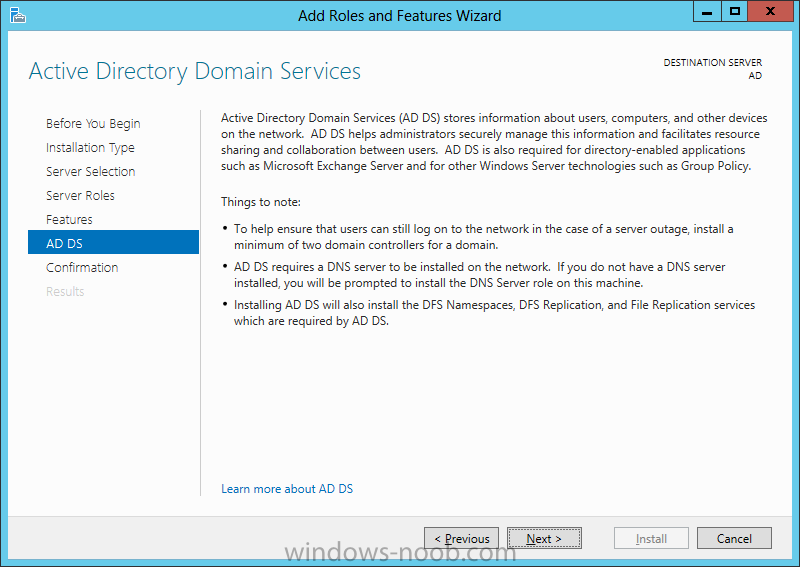
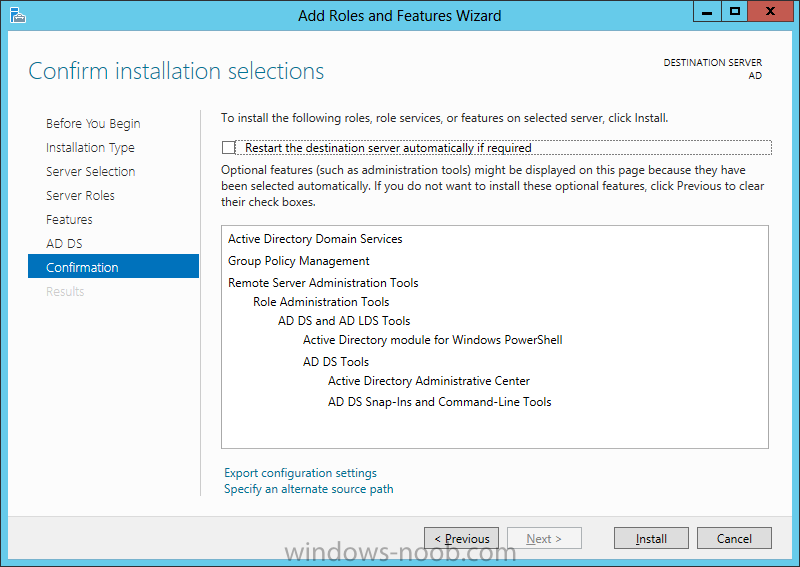
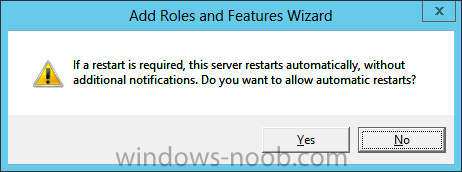
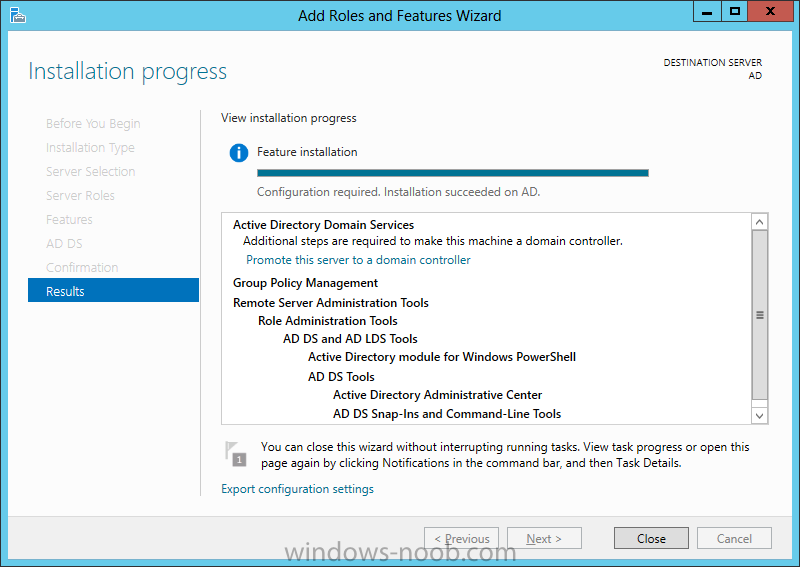
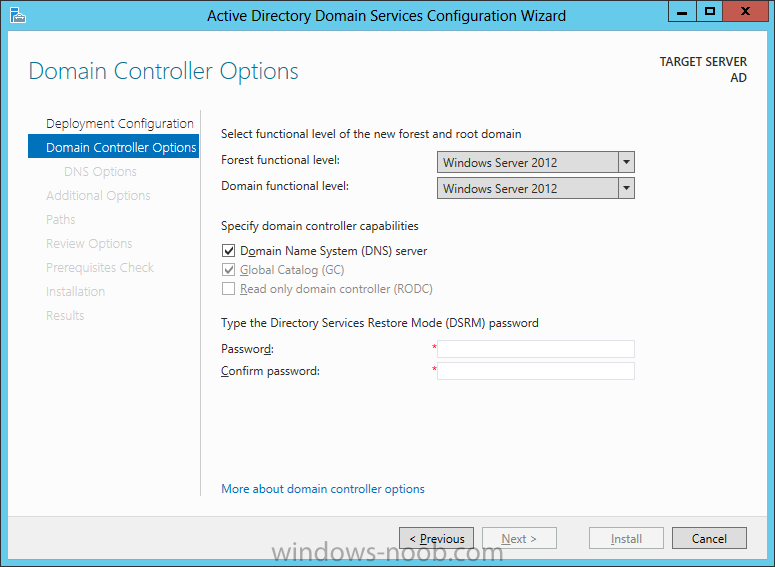
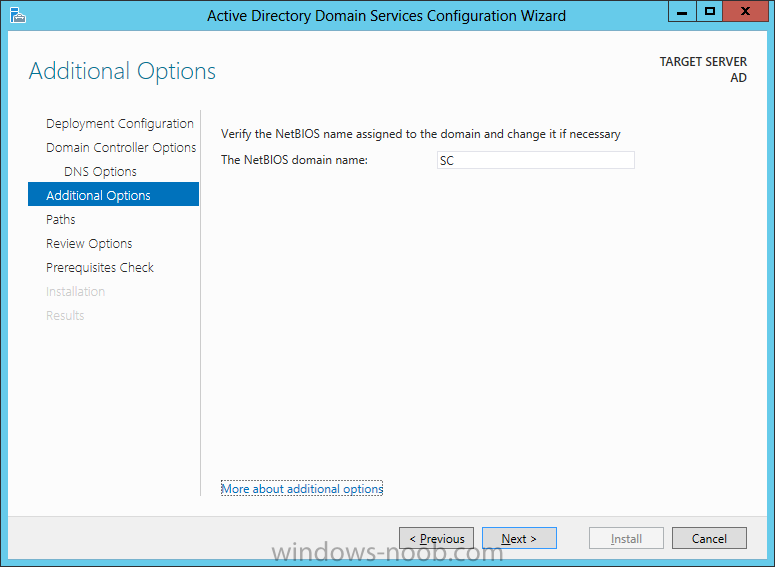
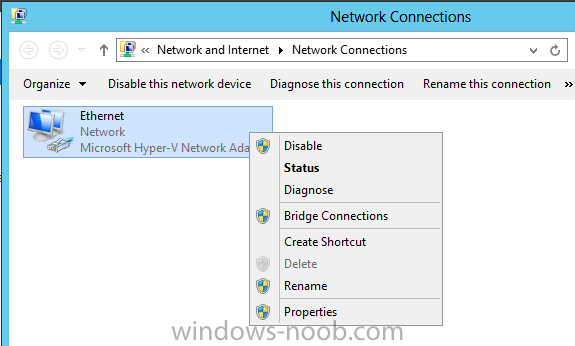
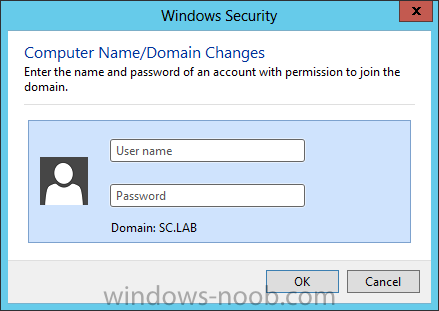
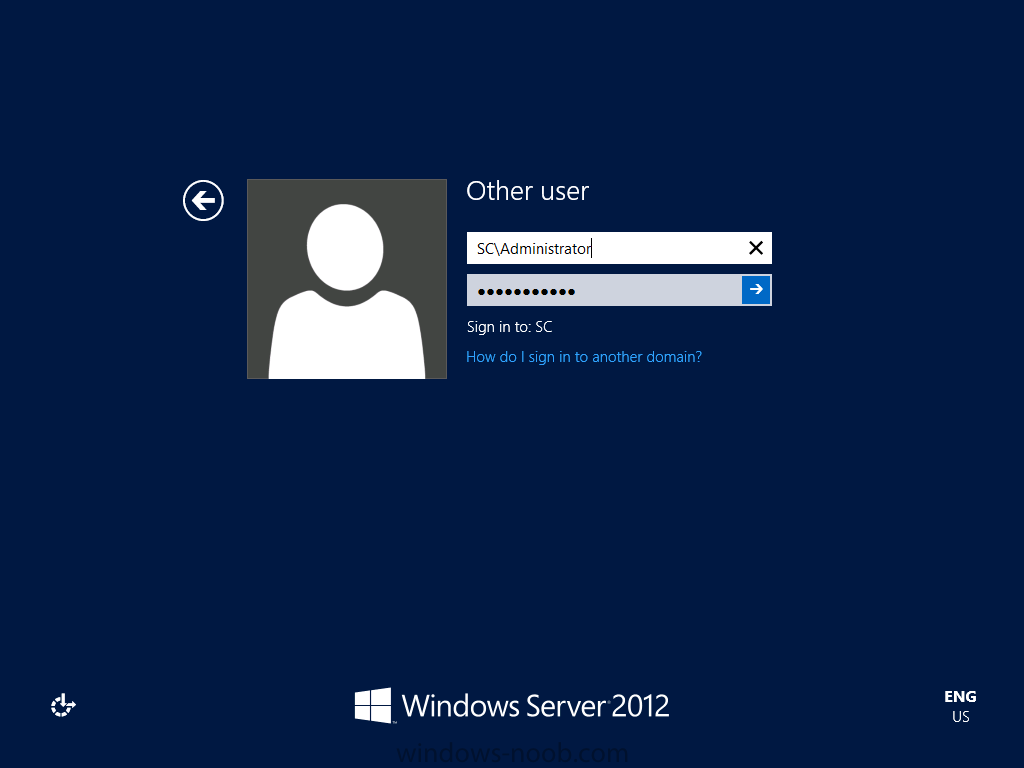
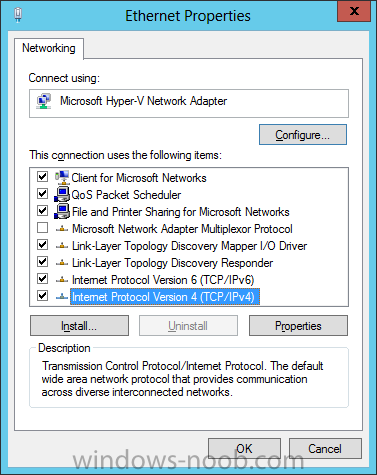
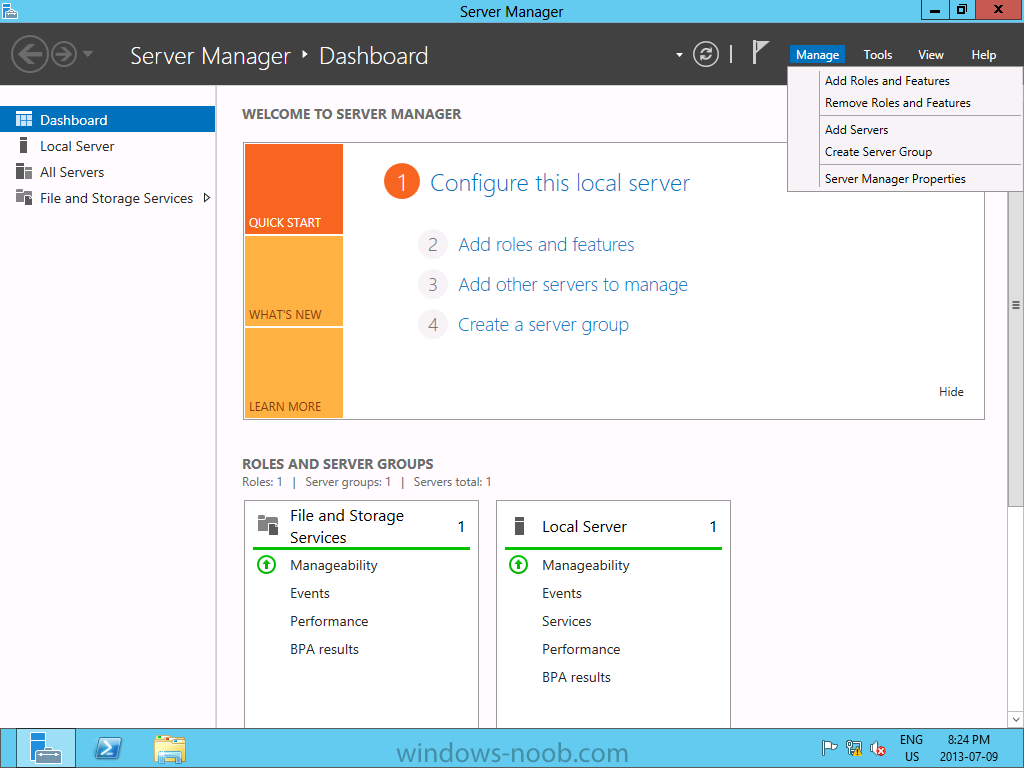
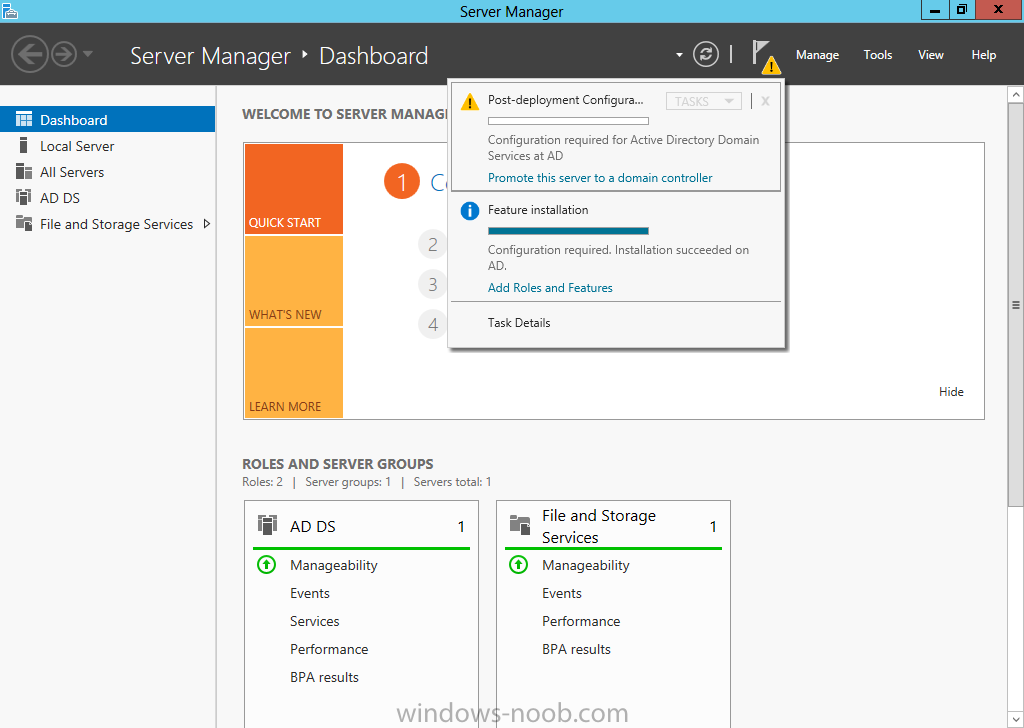
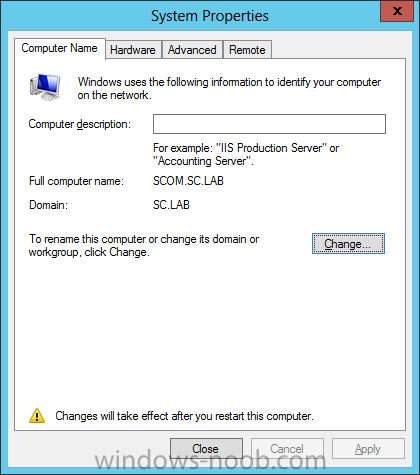
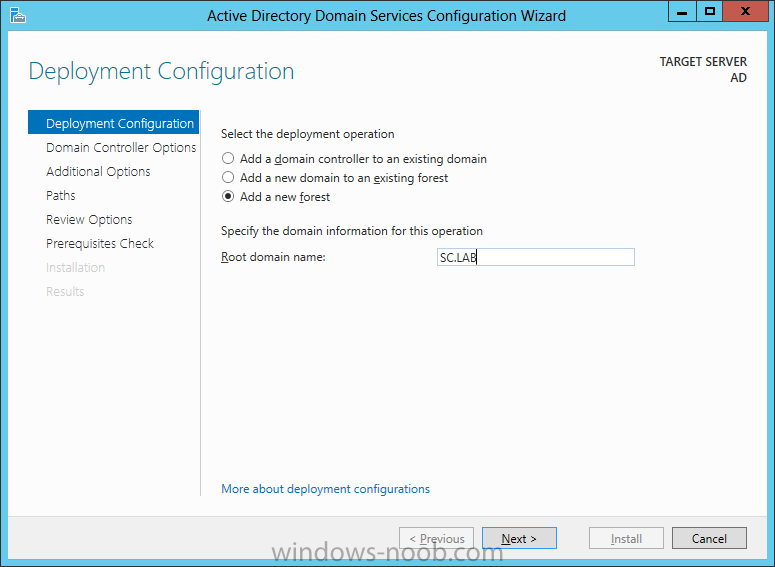
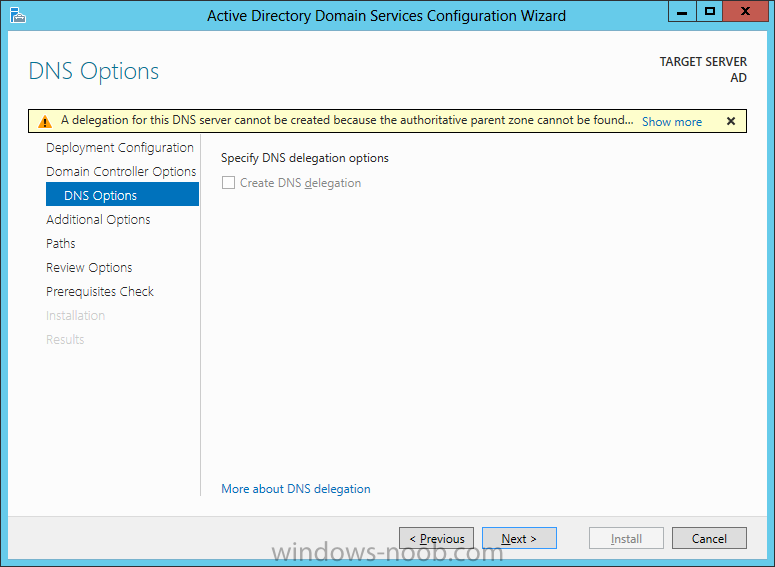
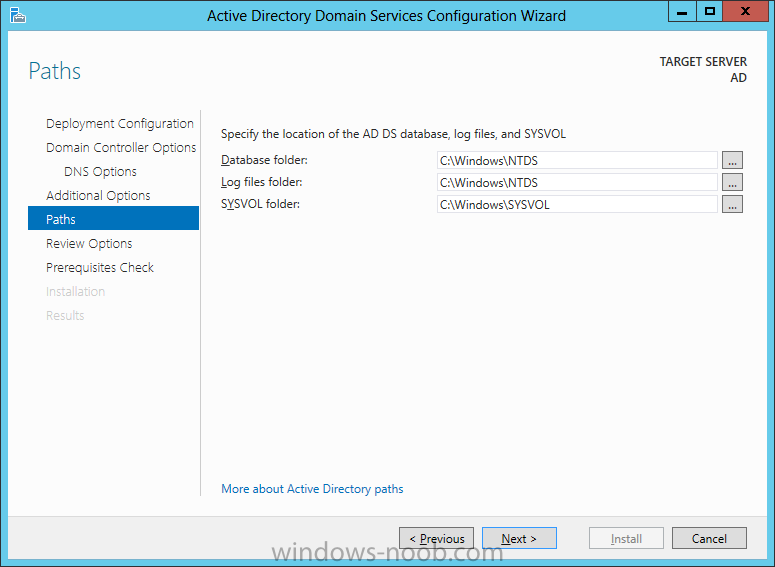
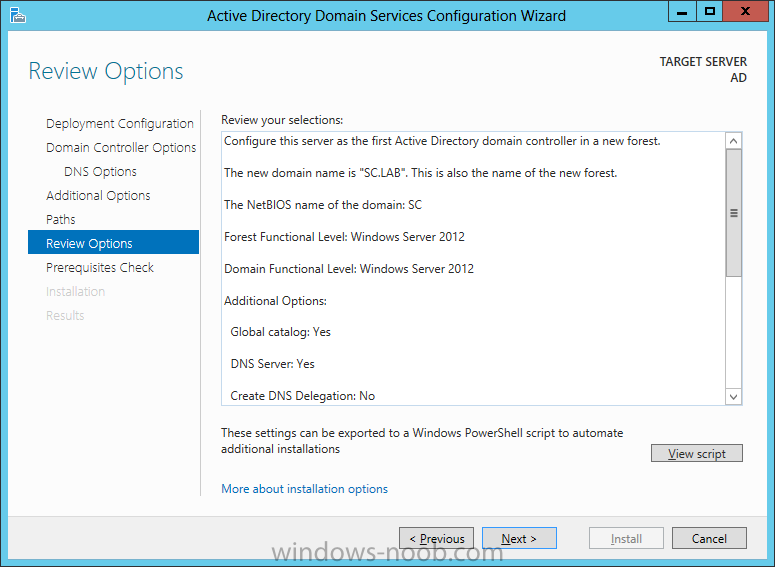
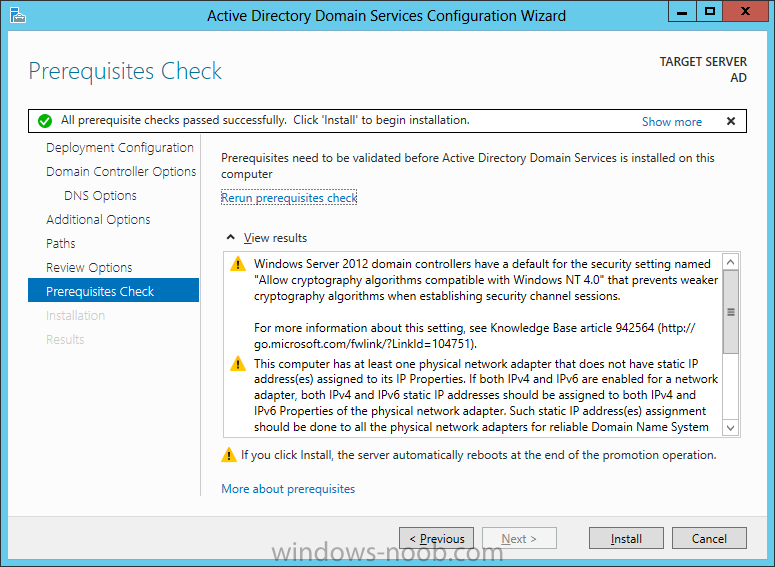
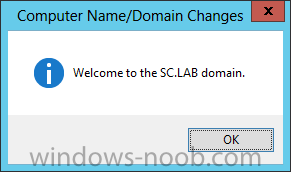
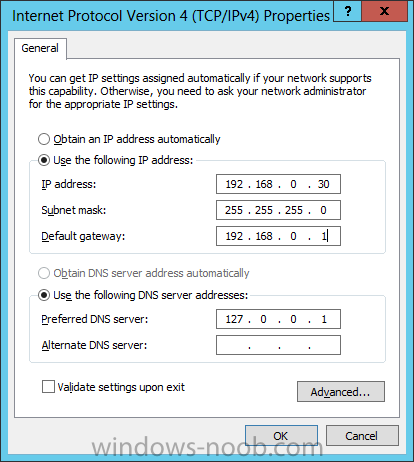
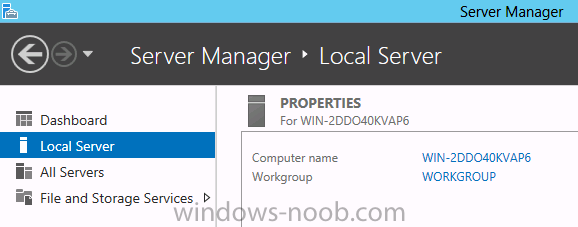
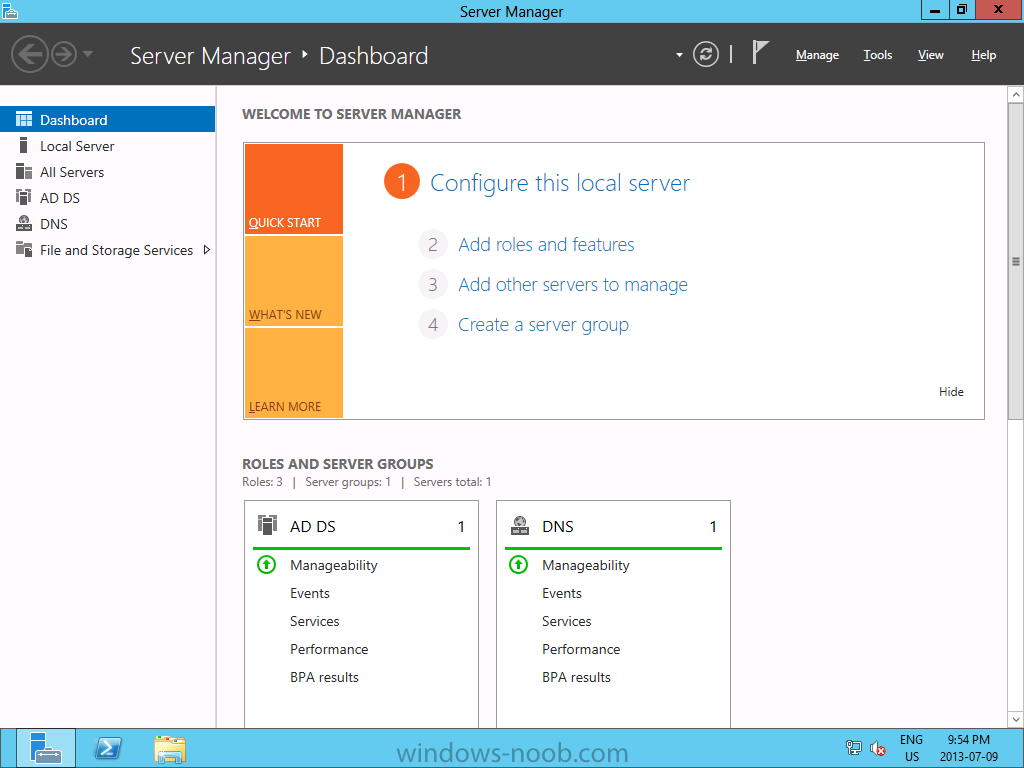
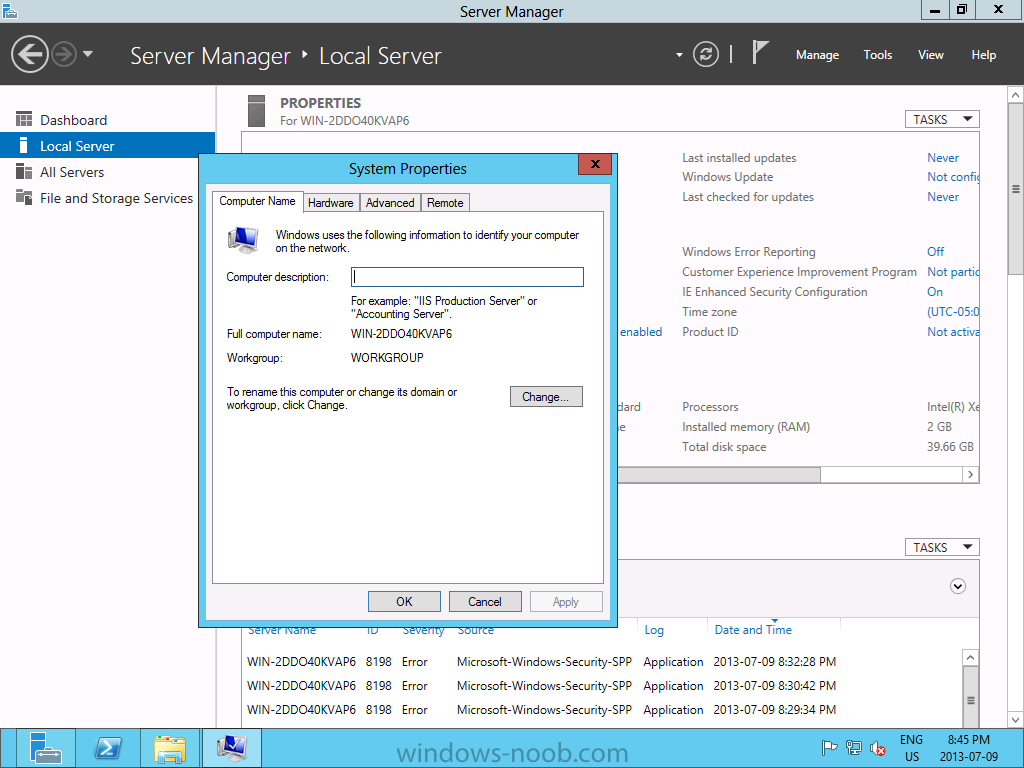
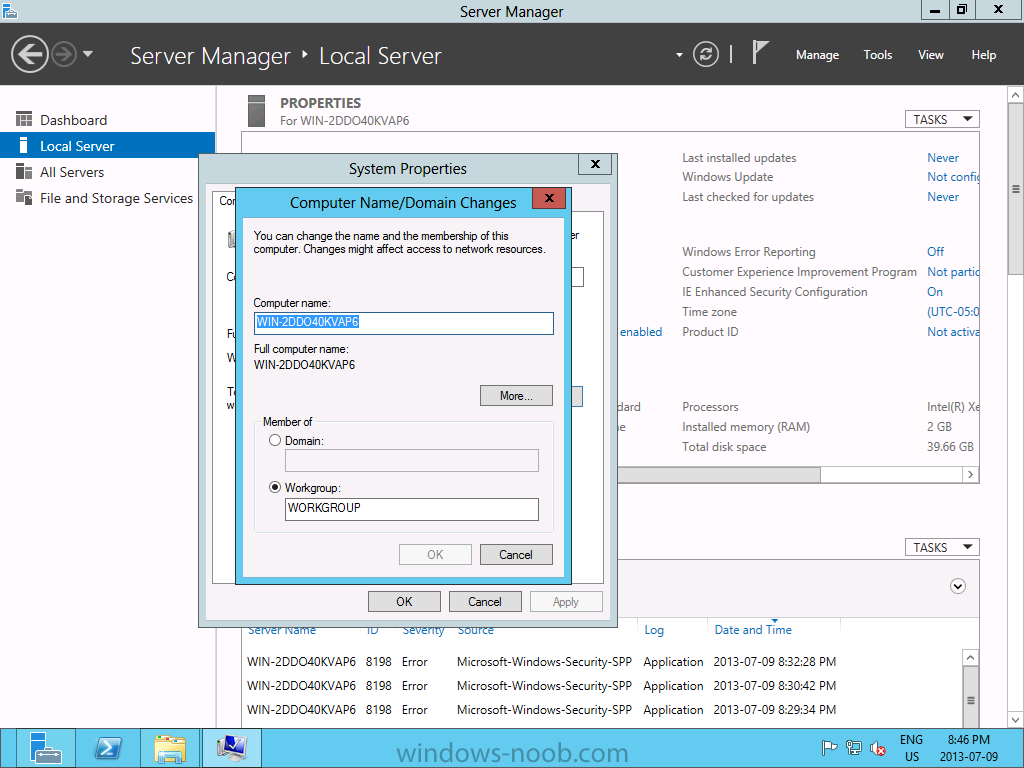
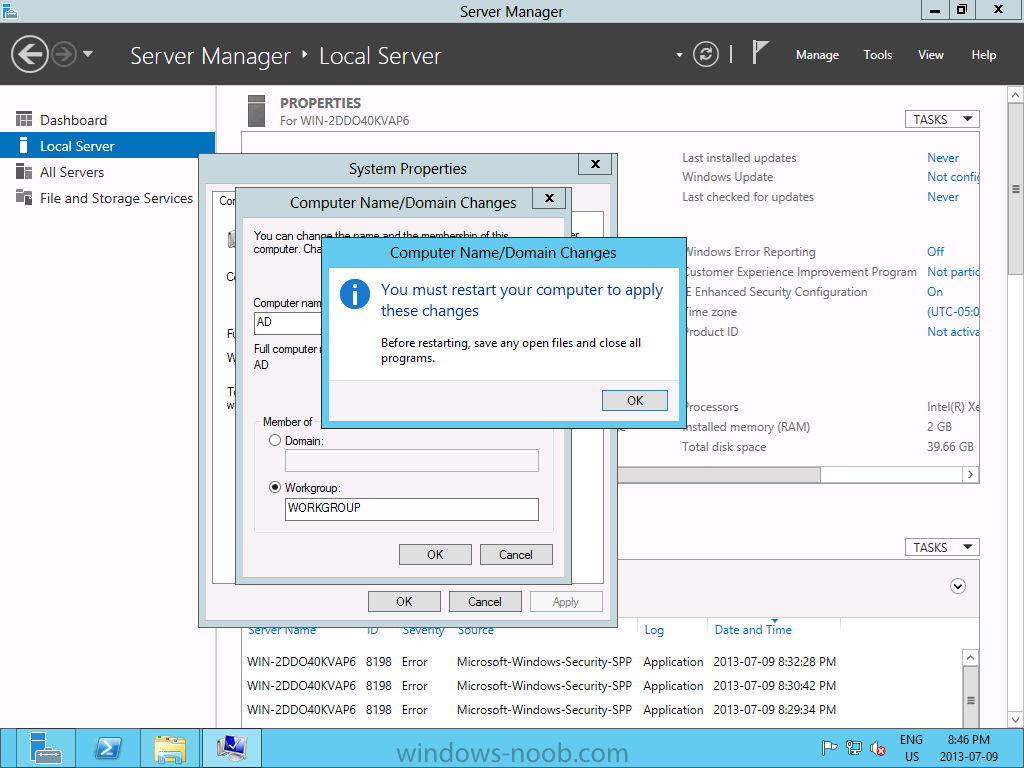
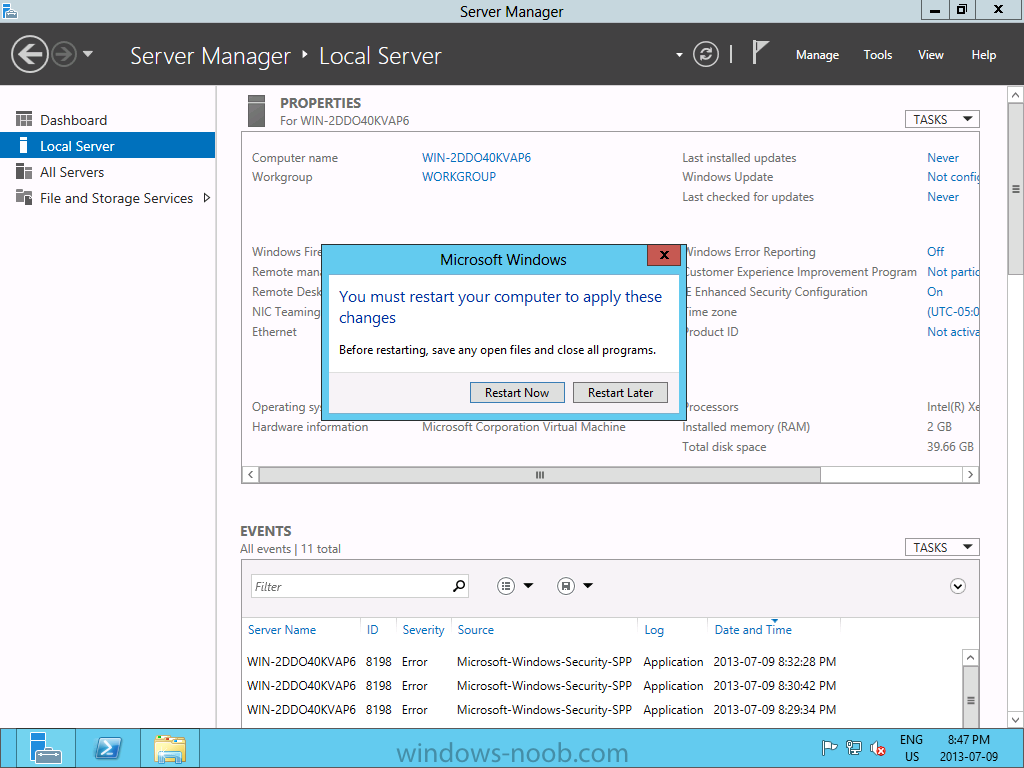
Install Active Directory Domain Services Now that we have the VMs created, and the OS installed on both, we need to first install/setup Active Directory (AD). When you log into a new installation of Server 2012, Server Manager will auto launch. From Server Manager, click on Manage, and choose ‘Add Roles and Features’. On the Add Roles and Features Wizard, read the information on the Before You Begin dialog, and then click Next. On the Installation Type screen, select ‘Role-based on feature-based installation’ and then click Next. On the ‘Server Selection’ screen, since we are installed Active Directory on this local system, ensure that it is selected, and click Next. Side note: Windows Server 2012 has a new feature that allows you to remotely install Roles and Features on other systems. On the Server Roles screen, select ‘Active Directory Domain Services’. When you select ‘Active Directory Domain Services’, immediately you will be presented with the following dialog. Click Add Features. On the Features screen, accept what has already been selected by default, and click Next. On the AD DS screen, read the information presented, and click Next. On the Confirmation screen, check the ‘Restart the destination server automatically if required’ checkbox, and then click Install. Note: You are not required to check the ‘restart’ checkbox, however, you’re going to have to restart the system anyways after the installation, so you might as well let the system do it for you. Note: When you check off the ‘Restart the destination server automatically if required’ checkbox, you will immediately be prompted with the following dialog. Click Yes. On the Results screen, click Close. After the system restarts, and Server Manager launches, you will have to promote the server as a domain controller. This is because Active Directory has been installed, but that process does not automatically promote the server. Click on the ‘Promote this server to a domain controller’ link. On the Deployment Configuration screen, select ‘Add a new forest’ since this is the first domain controller in our lab. Then enter a root domain name, and click Next. In my example I am using “SC.LAB” for System Center Lab (since I will be installing all other System Center products in my lab eventually). For the Domain Controller Options, select the appropriate Forest functional level, and Domain functional level. This is more applicable if you already have an existing domain and are adding a new domain controller. But since this is the first domain controller in our new domain, then we’ll use the highest level, that of Windows Server 2012. Also, don’t forget to create the Directory Service Restore Mode password. Then press Next. On the DNS Options screen, you can ignore this warning message and click Next. On the Additional Options screen, click Next. On the Paths screen, normally you would change the location for the database, log files, and SYSVOL, but since we are just in a lab environment, we’ll leave it at the defaults and click Next. On the Review Options scree, review what you have entered/selected, and click Next. The Prerequisites Check screen will check and confirm that everything passes before promoting the system as a domain controller. You will notice in my screenshot, that I have 1 warning because I didn’t set a static IP for the server yet. After installation completes, the system will automatically restart. You will then be presented with the login screen. Something to note here, that because we were originally logged in with a local account, the first time you want to log on using a domain account you will have to type the domain\username; in my example SC\Administrator. When you login, you will then see in the Server Manager, that AD DS is now listed, along with DNS. Now all that you need to do is assign a static IP to your domain controller. To do this, in Server Manager, select Local Server from the panel on the left. From there, click on the Ethernet link labelled ‘IPv4 address assigned by DHCP, IPv6 enabled’. This will cause the Networks Connections explorer to open. From here, right click on the Ethernet network that is displayed. This is in fact the network connection that we configured when we first created the VM. On the Ethernet Properties dialog, select ‘Internet Protocol Version 4 (TCP/IPv4)’ and click the Properties button. Within the Internet Protocol Version 4 (TCP/IPv4) Properties dialog, enter a static IP, gateway, and DNS that is applicable to your network. Once all the items have been entered, click OK. You will also have to click Close on the Ethernet Properties dialog as well. Congratulations, you now have a domain setup in your lab environment. Add Systems to Your Domain Now that you have your domain setup, you need to add your other VM (the one that we will use for DPM) to the domain before being able to install DPM. Log into the system you want to add to the domain. To do this in Server 2012, launch Server Manager, and click on Local Server. Then click on the computer name. This will launch the System Properties dialog. From this dialog, click the Change button. From this dialog, select the Domain option for ‘Member of’, and enter the domain name you want to join and press OK. After pressing OK, you are immediately presented with a Windows Security dialog, in which you need to enter the credentials of an account that has Domain Admin rights. Enter the credentials and click OK. Once the system is successfully joined to the domain, you will receive the following Welcome message. Press OK. After you press OK to the Welcome message, you will receive a second prompt, indicating that you need to restart the system for the changes to take effect. You will be back on the System Properties dialog. Press Close. When you press Close, you will receive yet another prompt about restarting the system. You can choose to Restart Now or Restart Later, but you won’t be able to install App Controller without the VM being added to the domain. After the system restarts, you will then be presented with the login screen. Something to note here, that because we were originally logged in with a local account, the first time you want to log on using a domain account you will have to type the domain\username; in my example SC\Administrator. Now we have our Active Directory server setup and ready, and the VM we will be installing App Controller on is joined to the domain.
-
Install Active Directory Domain Services Now that we have the VMs created, and the OS installed on both, we need to first install/setup Active Directory (AD). When you log into a new installation of Server 2012, Server Manager will auto launch. From Server Manager, click on Manage, and choose ‘Add Roles and Features’. On the Add Roles and Features Wizard, read the information on the Before You Begin dialog, and then click Next. On the Installation Type screen, select ‘Role-based on feature-based installation’ and then click Next. On the ‘Server Selection’ screen, since we are installed Active Directory on this local system, ensure that it is selected, and click Next. Side note: Windows Server 2012 has a new feature that allows you to remotely install Roles and Features on other systems. On the Server Roles screen, select ‘Active Directory Domain Services’. When you select ‘Active Directory Domain Services’, immediately you will be presented with the following dialog. Click Add Features. On the Features screen, accept what has already been selected by default, and click Next. On the AD DS screen, read the information presented, and click Next. On the Confirmation screen, check the ‘Restart the destination server automatically if required’ checkbox, and then click Install. Note: You are not required to check the ‘restart’ checkbox, however, you’re going to have to restart the system anyways after the installation, so you might as well let the system do it for you. Note: When you check off the ‘Restart the destination server automatically if required’ checkbox, you will immediately be prompted with the following dialog. Click Yes. On the Results screen, click Close. After the system restarts, and Server Manager launches, you will have to promote the server as a domain controller. This is because Active Directory has been installed, but that process does not automatically promote the server. Click on the ‘Promote this server to a domain controller’ link. On the Deployment Configuration screen, select ‘Add a new forest’ since this is the first domain controller in our lab. Then enter a root domain name, and click Next. In my example I am using “SC.LAB” for System Center Lab (since I will be installing all other System Center products in my lab eventually). For the Domain Controller Options, select the appropriate Forest functional level, and Domain functional level. This is more applicable if you already have an existing domain and are adding a new domain controller. But since this is the first domain controller in our new domain, then we’ll use the highest level, that of Windows Server 2012. Also, don’t forget to create the Directory Service Restore Mode password. Then press Next. On the DNS Options screen, you can ignore this warning message and click Next. On the Additional Options screen, click Next. On the Paths screen, normally you would change the location for the database, log files, and SYSVOL, but since we are just in a lab environment, we’ll leave it at the defaults and click Next. On the Review Options scree, review what you have entered/selected, and click Next. The Prerequisites Check screen will check and confirm that everything passes before promoting the system as a domain controller. You will notice in my screenshot, that I have 1 warning because I didn’t set a static IP for the server yet. After installation completes, the system will automatically restart. You will then be presented with the login screen. Something to note here, that because we were originally logged in with a local account, the first time you want to log on using a domain account you will have to type the domain\username; in my example SC\Administrator. When you login, you will then see in the Server Manager, that AD DS is now listed, along with DNS. Now all that you need to do is assign a static IP to your domain controller. To do this, in Server Manager, select Local Server from the panel on the left. From there, click on the Ethernet link labelled ‘IPv4 address assigned by DHCP, IPv6 enabled’. This will cause the Networks Connections explorer to open. From here, right click on the Ethernet network that is displayed. This is in fact the network connection that we configured when we first created the VM. On the Ethernet Properties dialog, select ‘Internet Protocol Version 4 (TCP/IPv4)’ and click the Properties button. Within the Internet Protocol Version 4 (TCP/IPv4) Properties dialog, enter a static IP, gateway, and DNS that is applicable to your network. Once all the items have been entered, click OK. You will also have to click Close on the Ethernet Properties dialog as well. Congratulations, you now have a domain setup in your lab environment. Add Systems to Your Domain Now that you have your domain setup, you need to add your other VM (the one that we will use for DPM) to the domain before being able to install DPM. Log into the system you want to add to the domain. To do this in Server 2012, launch Server Manager, and click on Local Server. Then click on the computer name. This will launch the System Properties dialog. From this dialog, click the Change button. From this dialog, select the Domain option for ‘Member of’, and enter the domain name you want to join and press OK. After pressing OK, you are immediately presented with a Windows Security dialog, in which you need to enter the credentials of an account that has Domain Admin rights. Enter the credentials and click OK. Once the system is successfully joined to the domain, you will receive the following Welcome message. Press OK. After you press OK to the Welcome message, you will receive a second prompt, indicating that you need to restart the system for the changes to take effect. You will be back on the System Properties dialog. Press Close. When you press Close, you will receive yet another prompt about restarting the system. You can choose to Restart Now or Restart Later, but you won’t be able to install DPM without the VM being added to the domain. After the system restarts, you will then be presented with the login screen. Something to note here, that because we were originally logged in with a local account, the first time you want to log on using a domain account you will have to type the domain\username; in my example SC\Administrator. Now we have our Active Directory server setup and ready, and the VM we will be installing DPM on is joined to the domain.
-
Install Active Directory Domain Services Now that we have the VMs created, and the OS installed on both, we need to first install/setup Active Directory (AD). When you log into a new installation of Server 2012, Server Manager will auto launch. From Server Manager, click on Manage, and choose ‘Add Roles and Features’. On the Add Roles and Features Wizard, read the information on the Before You Begin dialog, and then click Next. On the Installation Type screen, select ‘Role-based on feature-based installation’ and then click Next. On the ‘Server Selection’ screen, since we are installed Active Directory on this local system, ensure that it is selected, and click Next. Side note: Windows Server 2012 has a new feature that allows you to remotely install Roles and Features on other systems. On the Server Roles screen, select ‘Active Directory Domain Services’. When you select ‘Active Directory Domain Services’, immediately you will be presented with the following dialog. Click Add Features. On the Features screen, accept what has already been selected by default, and click Next. On the AD DS screen, read the information presented, and click Next. On the Confirmation screen, check the ‘Restart the destination server automatically if required’ checkbox, and then click Install. Note: You are not required to check the ‘restart’ checkbox, however, you’re going to have to restart the system anyways after the installation, so you might as well let the system do it for you. Note: When you check off the ‘Restart the destination server automatically if required’ checkbox, you will immediately be prompted with the following dialog. Click Yes. On the Results screen, click Close. After the system restarts, and Server Manager launches, you will have to promote the server as a domain controller. This is because Active Directory has been installed, but that process does not automatically promote the server. Click on the ‘Promote this server to a domain controller’ link. On the Deployment Configuration screen, select ‘Add a new forest’ since this is the first domain controller in our lab. Then enter a root domain name, and click Next. In my example I am using “SC.LAB” for System Center Lab (since I will be installing all other System Center products in my lab eventually). For the Domain Controller Options, select the appropriate Forest functional level, and Domain functional level. This is more applicable if you already have an existing domain and are adding a new domain controller. But since this is the first domain controller in our new domain, then we’ll use the highest level, that of Windows Server 2012. Also, don’t forget to create the Directory Service Restore Mode password. Then press Next. On the DNS Options screen, you can ignore this warning message and click Next. On the Additional Options screen, click Next. On the Paths screen, normally you would change the location for the database, log files, and SYSVOL, but since we are just in a lab environment, we’ll leave it at the defaults and click Next. On the Review Options scree, review what you have entered/selected, and click Next. The Prerequisites Check screen will check and confirm that everything passes before promoting the system as a domain controller. You will notice in my screenshot, that I have 1 warning because I didn’t set a static IP for the server yet. After installation completes, the system will automatically restart. You will then be presented with the login screen. Something to note here, that because we were originally logged in with a local account, the first time you want to log on using a domain account you will have to type the domain\username; in my example SC\Administrator. When you login, you will then see in the Server Manager, that AD DS is now listed, along with DNS. Now all that you need to do is assign a static IP to your domain controller. To do this, in Server Manager, select Local Server from the panel on the left. From there, click on the Ethernet link labelled ‘IPv4 address assigned by DHCP, IPv6 enabled’. This will cause the Networks Connections explorer to open. From here, right click on the Ethernet network that is displayed. This is in fact the network connection that we configured when we first created the VM. On the Ethernet Properties dialog, select ‘Internet Protocol Version 4 (TCP/IPv4)’ and click the Properties button. Within the Internet Protocol Version 4 (TCP/IPv4) Properties dialog, enter a static IP, gateway, and DNS that is applicable to your network. Once all the items have been entered, click OK. You will also have to click Close on the Ethernet Properties dialog as well. Congratulations, you now have a domain setup in your lab environment. Add Systems to Your Domain Now that you have your domain setup, you need to add your other VMs to the domain before being able to install Service Manager. Log into the system you want to add to the domain. To do this in Server 2012, launch Server Manager, and click on Local Server. Then click on the computer name. This will launch the System Properties dialog. From this dialog, click the Change button. From this dialog, select the Domain option for ‘Member of’, and enter the domain name you want to join and press OK. After pressing OK, you are immediately presented with a Windows Security dialog, in which you need to enter the credentials of an account that has Domain Admin rights. Enter the credentials and click OK. Once the system is successfully joined to the domain, you will receive the following Welcome message. Press OK. After you press OK to the Welcome message, you will receive a second prompt, indicating that you need to restart the system for the changes to take effect. You will be back on the System Properties dialog. Press Close. When you press Close, you will receive yet another prompt about restarting the system. You can choose to Restart Now or Restart Later, but you won’t be able to install Service Manager without the VMs being added to the domain. After the system restarts, you will then be presented with the login screen. Something to note here, that because we were originally logged in with a local account, the first time you want to log on using a domain account you will have to type the domain\username; in my example SC\Administrator. Now we have our Active Directory server setup and ready, and the VMs we will be installing Service Manager on are joined to the domain.
-
In our last post we installed the Operating System on our VM's. Now, we will install Active Directory. Install Active Directory Domain Services Now that we have the VMs created, and the OS installed on both, we need to first install/setup Active Directory (AD). When you log into a new installation of Server 2012, Server Manager will auto launch. From Server Manager, click on Manage, and choose ‘Add Roles and Features’. On the Add Roles and Features Wizard, read the information on the Before You Begin dialog, and then click Next. On the Installation Type screen, select ‘Role-based on feature-based installation’ and then click Next. On the ‘Server Selection’ screen, since we are installed Active Directory on this local system, ensure that it is selected, and click Next. Side note: Windows Server 2012 has a new feature that allows you to remotely install Roles and Features on other systems. On the Server Roles screen, select ‘Active Directory Domain Services’. When you select ‘Active Directory Domain Services’, immediately you will be presented with the following dialog. Click Add Features. On the Features screen, accept what has already been selected by default, and click Next. On the AD DS screen, read the information presented, and click Next. On the Confirmation screen, check the ‘Restart the destination server automatically if required’ checkbox, and then click Install. Note: You are not required to check the ‘restart’ checkbox, however, you’re going to have to restart the system anyways after the installation, so you might as well let the system do it for you. Note: When you check off the ‘Restart the destination server automatically if required’ checkbox, you will immediately be prompted with the following dialog. Click Yes. On the Results screen, click Close. After the system restarts, and Server Manager launches, you will have to promote the server as a domain controller. This is because Active Directory has been installed, but that process does not automatically promote the server. Click on the ‘Promote this server to a domain controller’ link. On the Deployment Configuration screen, select ‘Add a new forest’ since this is the first domain controller in our lab. Then enter a root domain name, and click Next. In my example I am using “SC.LAB” for System Center Lab (since I will be installing all other System Center products in my lab eventually). For the Domain Controller Options, select the appropriate Forest functional level, and Domain functional level. This is more applicable if you already have an existing domain and are adding a new domain controller. But since this is the first domain controller in our new domain, then we’ll use the highest level, that of Windows Server 2012. Also, don’t forget to create the Directory Service Restore Mode password. Then press Next. On the DNS Options screen, you can ignore this warning message and click Next. On the Additional Options screen, click Next. On the Paths screen, normally you would change the location for the database, log files, and SYSVOL, but since we are just in a lab environment, we’ll leave it at the defaults and click Next. On the Review Options scree, review what you have entered/selected, and click Next. The Prerequisites Check screen will check and confirm that everything passes before promoting the system as a domain controller. You will notice in my screenshot, that I have 1 warning because I didn’t set a static IP for the server yet. After installation completes, the system will automatically restart. You will then be presented with the login screen. Something to note here, that because we were originally logged in with a local account, the first time you want to log on using a domain account you will have to type the domain\username; in my example SC\Administrator. When you login, you will then see in the Server Manager, that AD DS is now listed, along with DNS. Now all that you need to do is assign a static IP to your domain controller. To do this, in Server Manager, select Local Server from the panel on the left. From there, click on the Ethernet link labelled ‘IPv4 address assigned by DHCP, IPv6 enabled’. This will cause the Networks Connections explorer to open. From here, right click on the Ethernet network that is displayed. This is in fact the network connection that we configured when we first created the VM. On the Ethernet Properties dialog, select ‘Internet Protocol Version 4 (TCP/IPv4)’ and click the Properties button. Within the Internet Protocol Version 4 (TCP/IPv4) Properties dialog, enter a static IP, gateway, and DNS that is applicable to your network. Once all the items have been entered, click OK. You will also have to click Close on the Ethernet Properties dialog as well. Congratulations, you now have a domain setup in your lab environment. Add Systems to Your Domain Now that you have your domain setup, you need to add your other VM (the one that we will use for Orchestrator) to the domain before being able to install Orchestrator. Log into the system you want to add to the domain. To do this in Server 2012, launch Server Manager, and click on Local Server. Then click on the computer name. This will launch the System Properties dialog. From this dialog, click the Change button. From this dialog, select the Domain option for ‘Member of’, and enter the domain name you want to join and press OK. After pressing OK, you are immediately presented with a Windows Security dialog, in which you need to enter the credentials of an account that has Domain Admin rights. Enter the credentials and click OK. Once the system is successfully joined to the domain, you will receive the following Welcome message. Press OK. After you press OK to the Welcome message, you will receive a second prompt, indicating that you need to restart the system for the changes to take effect. You will be back on the System Properties dialog. Press Close. When you press Close, you will receive yet another prompt about restarting the system. You can choose to Restart Now or Restart Later, but you won’t be able to install Orchestrator without the VM being added to the domain. After the system restarts, you will then be presented with the login screen. Something to note here, that because we were originally logged in with a local account, the first time you want to log on using a domain account you will have to type the domain\username; in my example SC\Administrator. Now we have our Active Directory server setup and ready, and the VM we will be installing Orchestrator on is joined to the domain. Now we can move onto installing SQL Server.
-
In our last post we installed the Operating System on our VM's. Now, we will install Active Directory. Install Active Directory Domain Services Now that we have the VMs created, and the OS installed on both, we need to first install/setup Active Directory (AD). When you log into a new installation of Server 2012, Server Manager will auto launch. From Server Manager, click on Manage, and choose ‘Add Roles and Features’. On the Add Roles and Features Wizard, read the information on the Before You Begin dialog, and then click Next. On the Installation Type screen, select ‘Role-based on feature-based installation’ and then click Next. On the ‘Server Selection’ screen, since we are installed Active Directory on this local system, ensure that it is selected, and click Next. Side note: Windows Server 2012 has a new feature that allows you to remotely install Roles and Features on other systems. On the Server Roles screen, select ‘Active Directory Domain Services’. When you select ‘Active Directory Domain Services’, immediately you will be presented with the following dialog. Click Add Features. On the Features screen, accept what has already been selected by default, and click Next. On the AD DS screen, read the information presented, and click Next. On the Confirmation screen, check the ‘Restart the destination server automatically if required’ checkbox, and then click Install. Note: You are not required to check the ‘restart’ checkbox, however, you’re going to have to restart the system anyways after the installation, so you might as well let the system do it for you. Note: When you check off the ‘Restart the destination server automatically if required’ checkbox, you will immediately be prompted with the following dialog. Click Yes. On the Results screen, click Close. After the system restarts, and Server Manager launches, you will have to promote the server as a domain controller. This is because Active Directory has been installed, but that process does not automatically promote the server. Click on the ‘Promote this server to a domain controller’ link. On the Deployment Configuration screen, select ‘Add a new forest’ since this is the first domain controller in our lab. Then enter a root domain name, and click Next. In my example I am using “SC.LAB” for System Center Lab (since I will be installing all other System Center products in my lab eventually). For the Domain Controller Options, select the appropriate Forest functional level, and Domain functional level. This is more applicable if you already have an existing domain and are adding a new domain controller. But since this is the first domain controller in our new domain, then we’ll use the highest level, that of Windows Server 2012. Also, don’t forget to create the Directory Service Restore Mode password. Then press Next. On the DNS Options screen, you can ignore this warning message and click Next. On the Additional Options screen, click Next. On the Paths screen, normally you would change the location for the database, log files, and SYSVOL, but since we are just in a lab environment, we’ll leave it at the defaults and click Next. On the Review Options scree, review what you have entered/selected, and click Next. The Prerequisites Check screen will check and confirm that everything passes before promoting the system as a domain controller. You will notice in my screenshot, that I have 1 warning because I didn’t set a static IP for the server yet. After installation completes, the system will automatically restart. You will then be presented with the login screen. Something to note here, that because we were originally logged in with a local account, the first time you want to log on using a domain account you will have to type the domain\username; in my example SC\Administrator. When you login, you will then see in the Server Manager, that AD DS is now listed, along with DNS. Now all that you need to do is assign a static IP to your domain controller. To do this, in Server Manager, select Local Server from the panel on the left. From there, click on the Ethernet link labelled ‘IPv4 address assigned by DHCP, IPv6 enabled’. This will cause the Networks Connections explorer to open. From here, right click on the Ethernet network that is displayed. This is in fact the network connection that we configured when we first created the VM. On the Ethernet Properties dialog, select ‘Internet Protocol Version 4 (TCP/IPv4)’ and click the Properties button. Within the Internet Protocol Version 4 (TCP/IPv4) Properties dialog, enter a static IP, gateway, and DNS that is applicable to your network. Once all the items have been entered, click OK. You will also have to click Close on the Ethernet Properties dialog as well. Congratulations, you now have a domain setup in your lab environment. Add Systems to Your Domain Now that you have your domain setup, you need to add your other VM (the one that we will use for SCOM) to the domain before being able to install SCOM. Log into the system you want to add to the domain. To do this in Server 2012, launch Server Manager, and click on Local Server. Then click on the computer name. This will launch the System Properties dialog. From this dialog, click the Change button. From this dialog, select the Domain option for ‘Member of’, and enter the domain name you want to join and press OK. After pressing OK, you are immediately presented with a Windows Security dialog, in which you need to enter the credentials of an account that has Domain Admin rights. Enter the credentials and click OK. Once the system is successfully joined to the domain, you will receive the following Welcome message. Press OK. After you press OK to the Welcome message, you will receive a second prompt, indicating that you need to restart the system for the changes to take effect. You will be back on the System Properties dialog. Press Close. When you press Close, you will receive yet another prompt about restarting the system. You can choose to Restart Now or Restart Later, but you won’t be able to install SCOM without the VM being added to the domain. After the system restarts, you will then be presented with the login screen. Something to note here, that because we were originally logged in with a local account, the first time you want to log on using a domain account you will have to type the domain\username; in my example SC\Administrator. Now we have our Active Directory server setup and ready, and the VM we will be installing SCOM on is joined to the domain. Now we can move onto installing SQL Server.


-
 Hi! I ran a AD System Discovery when I first set up SCCM 2012, and all the computer accounts in AD has been listed in the 'All Systems' collection as intended. The only issue here is, almost 2000 of these computer objects are objects that hasn't been active or been in contact with a Domain Controller for the last 180 days. Yesterday, I started a cleaning process in AD, so the old computer objects in AD has now been disabled. Is there any possibility for me to clean the 'All Computers' collection and get rid of the disabled computer objects? Any help is highly appreciated :-) Brgds. Stian M.
 -
Hello, I have been trying to wrap my head around this problem. I am an SCCM 2007 administrator and we are porting over our packaged applications to SCCM 2012. Some of our packages have multiple programs attached to them. The programs attached to some of our packages define certain settings a group will get. For example "Package A" is used by 3 different business units and each has a certain configuration, so Program 1 will perform a slightly different configuration then program 2 or 3. Here inlays the problem, one of the major differences with the Application model in SCCM 2012 is that you can have multiple deployment types but they will be sequentially run at deployment time with whatever requirements are met. One way I have been trying to get around this with little luck is create a scripted Global Condition that will pull back a list of all the groups a user is in. $Raw = C:\Windows\system32\whoami /groups /fo csv /nh $isgroup = $Raw | %{$_.Split(",")[0] } | %{ $_ -replace ","""} Return $isgroup If run this in PowerShell it will return every single group a user is in from their current logged on system, each group is displayed on a new line. I have also tried to make them display all in one line $sg = $isgroup -join ' ' Return $sg Since I know each group will have an Active Directory Security Group that is unique to the business unit I can then add that requirement set the operator to "Contains" and the value to "Domain\ADGroup" in the Requirements tab in the deployment type. When I go to deploy the application this explicitly fails out during the Requirements evaluation phase. Has anyone been able to resolve this problem? Or is this a limitation of SCCM 2012? I have seen examples online which basically run the whoami tool and compare it to a static group within the script. I do not want to create dozens of these Global Conditions. I would like to tackle this with one condition. Any ideas would be appreciated.
-
Dear all, After had migrated my machine and user accounts from one AD domain to another AD domain. I configured SCCM 2007 with the new parameters of the new AD domain, SCCM 2007 can obtain the machines from the new AD domain but unfortunately the client agent could not be installed on them. The site code is the same as in the previous AD Domain. Regards.
-
Help with SCCM and Active Directory On same server. Well hello my name is Zaper and I'm from Israel First thing first: I never seen an SCCM in my life this is my first time and I got no idea how to use it. Now few years ago a guy that used to work here installed the SCCM in our Active Directory server so I have on the same server both SCCM 2007 and my active directory. (Windows server 2003). my manager came over and sad "well we got this something that supposed to work but no one have a clue how to use it so you do it". Now all I need to happen is I want to push a package that will be installed on certain clients in my active directory. When I had a new client to my AD it wont show on SCCM but! When I click: Connect to site data base > connect to site data base on this server > browse I see the new client I added to the AD. Please If I got no chance to make it work please let me know. Sorry for bad grammar Zaper.
-
Hi, I'm wondering if it is possible to pull in only computer objects that are part of a specific Active directory Security group to a collection, and how such a query will look. Has anyone had to do this in the past, and is it possible? Ultimately we would like to separate computers by departments, and our AD access is such that we cannot create new ou's. Thanks. Coenie
-
In a deploy task sequance you can set the AD location of the machine to build to, can you how ever have the machine detect the location (OU) that is is currently in and build to the same place or do you have to have a different ask sequence for every AD location? Thanks