Search the Community
Showing results for tags 'SCCM'.
-
 Hi, I am not sure but since one month my ADR for monthly Windows update does not work. I see the KB deployed to the client machine, but on the Software Center tuck at Downloading (0% complete). All Applications can be downloaded and install it, only Windows Update does not work I restarted the IIS but not help. Can anybody help me? Regards
 -

task sequence [Help] - Powershell script SMSTSPostAction
Deilson Oliveira posted a question in scripting
I need to install Symantec Endpoint Protection, what would the command line be like in powershell where I can call a .ps1 script in a completely hidden and silent way? I did a previous TS that copies the setup64.exe from SEP to "C:\TEMP\" I don't have much knowledge on powerhsell as would the script that would install it silently? the argument for installing it via Batch File is / s. However, the CMD window appears during Windows logon, and Powershell can do all of this without any windows appearing, and I wanted powershell to wait for the installation to finish (I researched this and think the parameter is -WaitProcess but I don't know where how to put it) and after the installation is finished, delete the TEMP folder and restart the computer. Any help with that please?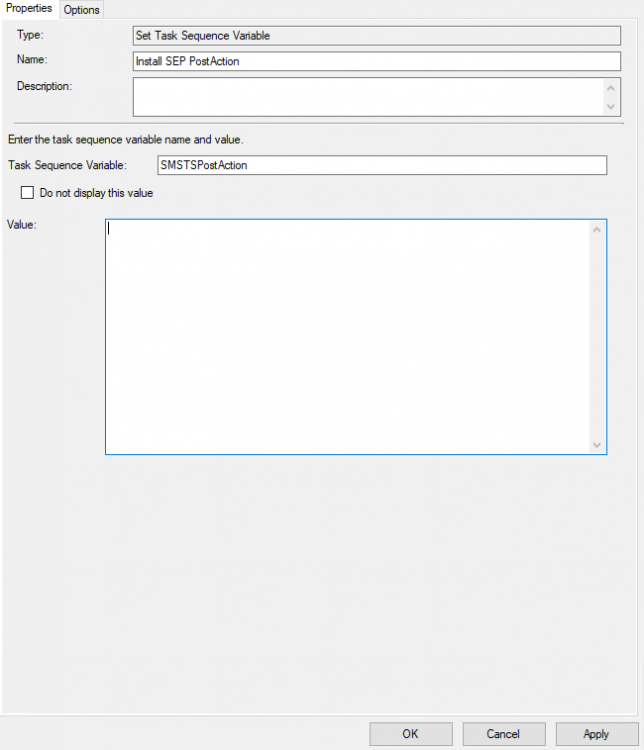
-
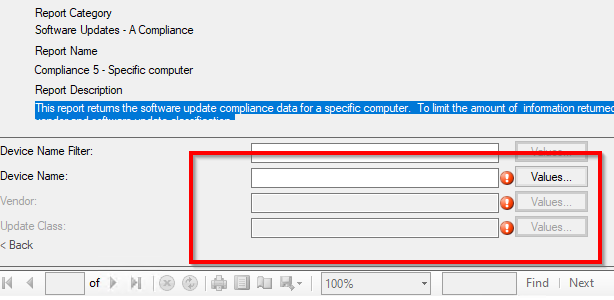
Hi, I am trying to create on the SCCM 2403 an Report for example for "Complaince 5 - Specific computer. As you know, it should fill many "Valuses" to create an Report. IS there any way select all Values together as "ALL"?
-
 We have a HTTPS-only enabled SCCM (MDT integrated) and have disabled the network access account in the software distribution properties. After disabling the network access account our task sequence is stuck at the very last stage when it´s trying to copy the log files to the share defined in CustomSettings.ini. There is a network credentials dialog box displayed behind the TS progress bar, at that point we can enter any text in the username/PW fields (non-existing account/PW) and press OK and the logs are successfully copied to the server share. Any ideas what can be causing this password prompt at that stage? The share/NTFS permissions seem OK and it obviously does not need any valid credentials to successfully copy the files, is it using the computer account?
 -
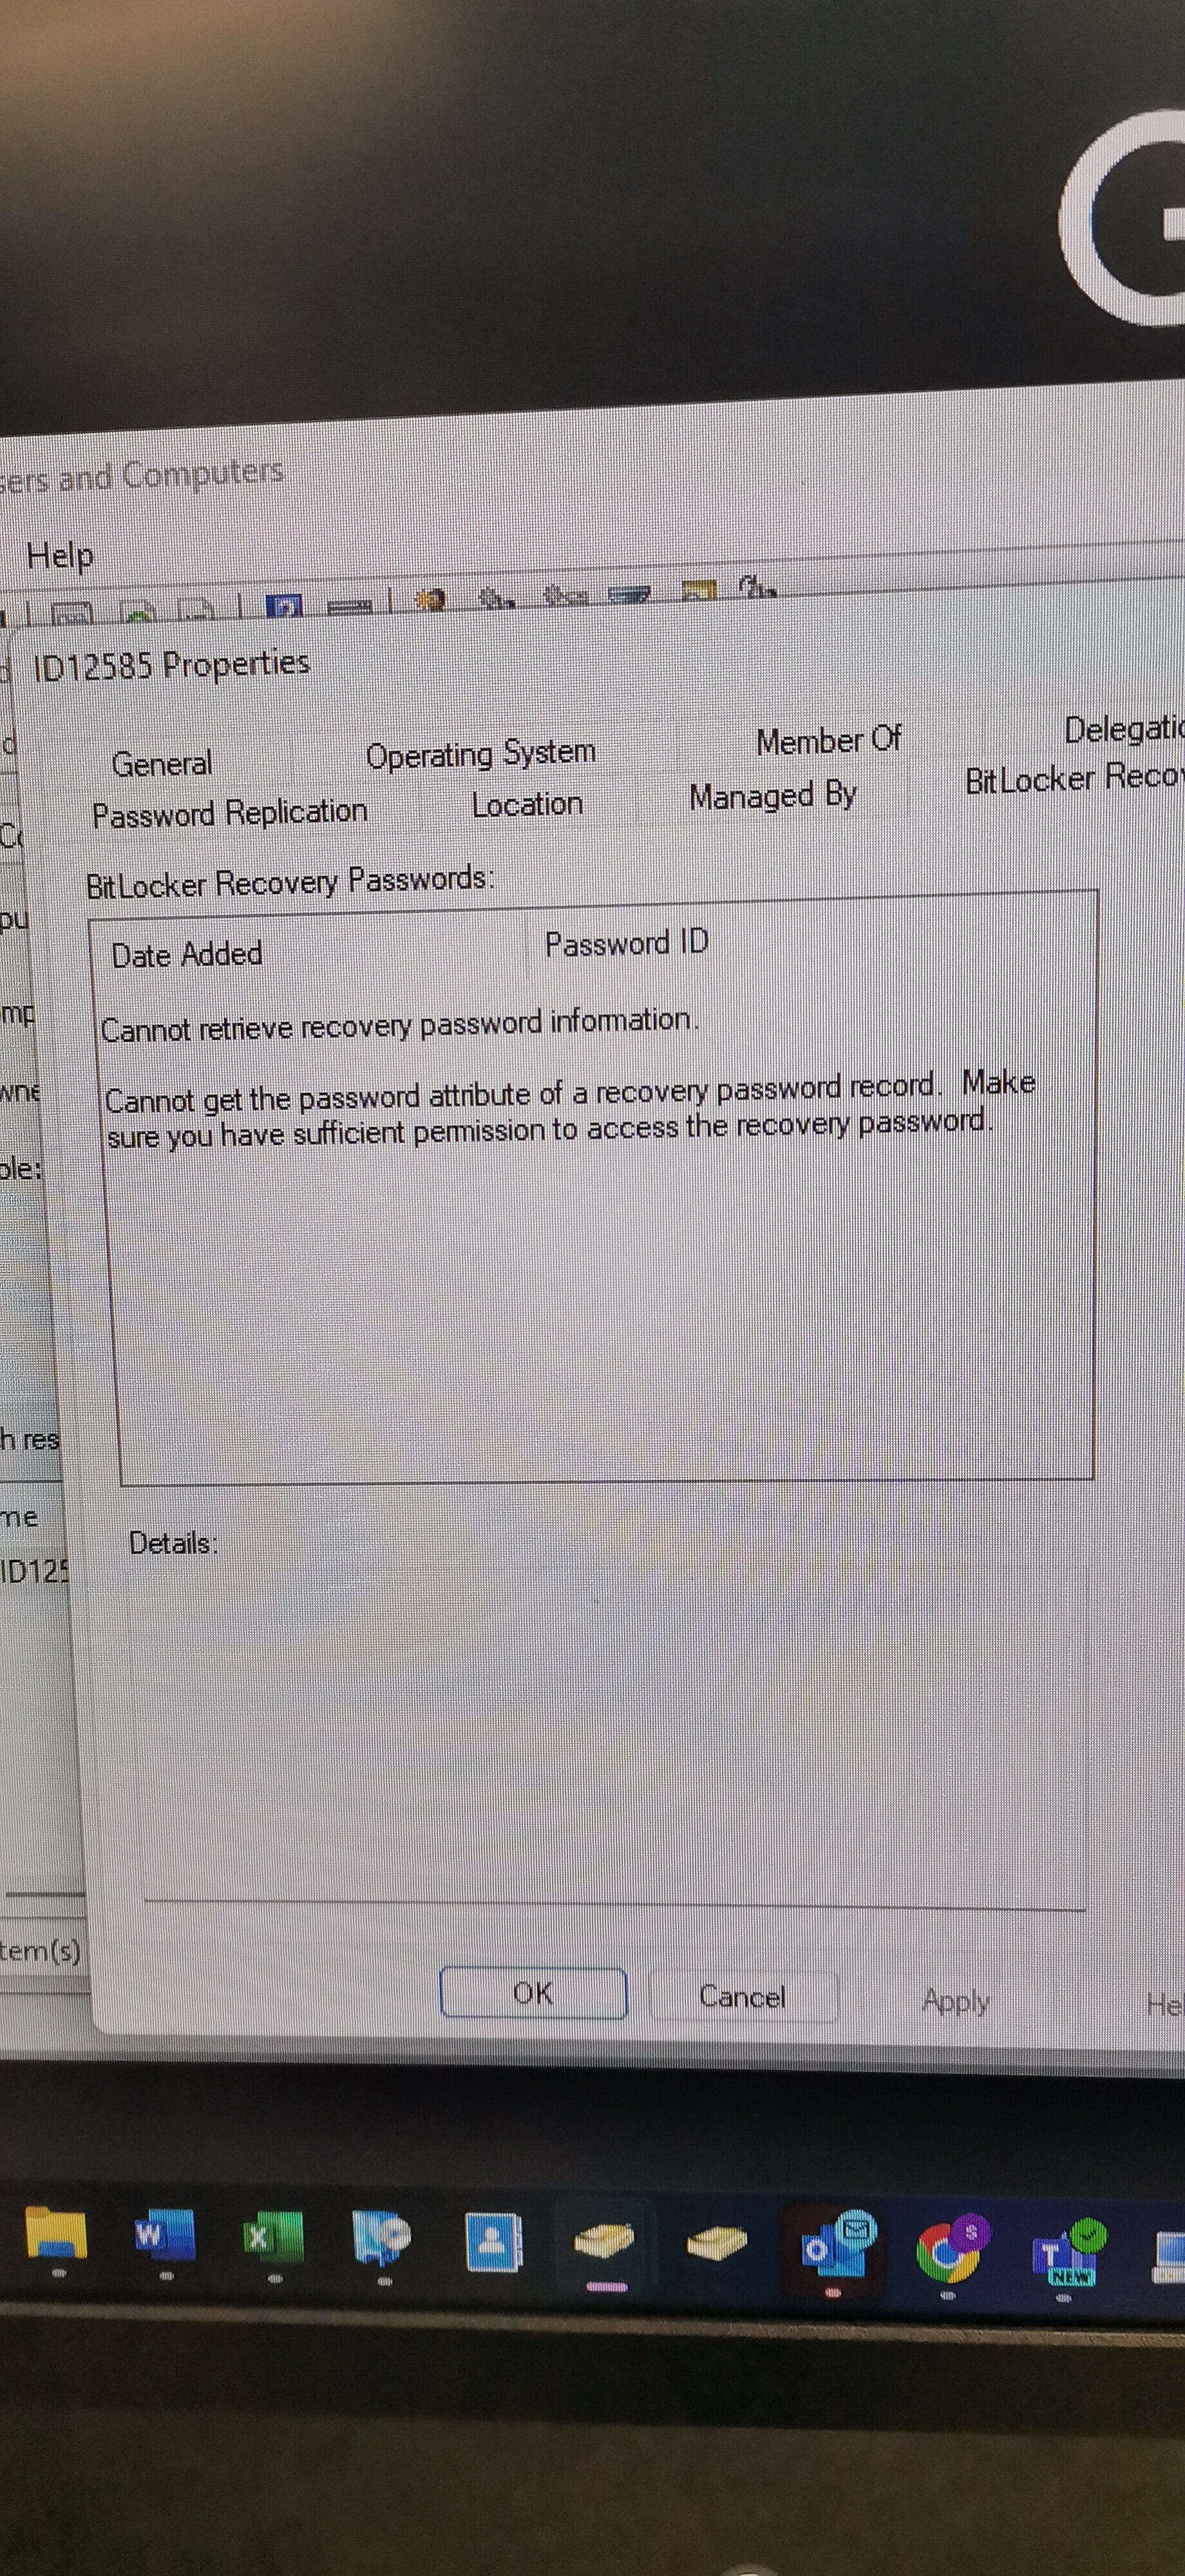
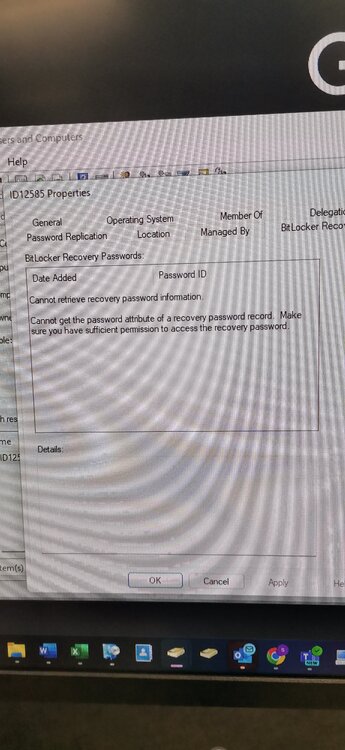
Bitlocker issue:- Task Sequence tries to escrow the key to AD it can't read it from registry. After deploying bitlocker i can see Bitlocker Recovery Tab on AD under the relevant PC im using for testing but there are no recovery keys and gives this message as per screenshot.
-
 Hi, Has anyone come across this before? I am moving our SCCM database from SQL 2012 on a 2012r2 server to SQL 2019 on a 2019 server, by recovering from a backup. All seems to have gone fine, until the final step of running config manager setup again to choose the site maintenance option, to 'modify SQL server configuration', in order to point SCCM to the new server that is now hosting the database. ERROR: SQL Server error: [42000][137][Microsoft][SQL Server Native Client 11.0][SQL Server]Must declare the scalar variable "@String". : dbo.spCreateAndBackupSQLCert Create_BackupSQLCert : Failed to execute spCreateAndBackupSQLCert CSiteControlSetup::SetupCertificateForSSB : Failed to create/backup SQL SSB certificate. ERROR: Failed to set up SQL Server certificate for service broker on "SERVER NAME" . I have enabled broker, set trustworthy on and honor broker priority on, on the new instance before running setup.exe again. From some reading online, I believe it could be something to do with setting up SCCM initially with one account, but then changing it to another domain account running the service(s) and now somehow not being able to unlock the master key for the database certs. Sorry if this is making no sense, I am no SQL expert. Being right at the final stage of moving the database, I'm really stuck with this issue now, so any advice/pointers would be greatly welcomed, even if it's just to point me in the direction of which account I need to try to figure out was initially running things - I'm not clear whether that means the account running the config mgr console, the database instance, or the running the sql or sccm services. Thanks Paul
 -
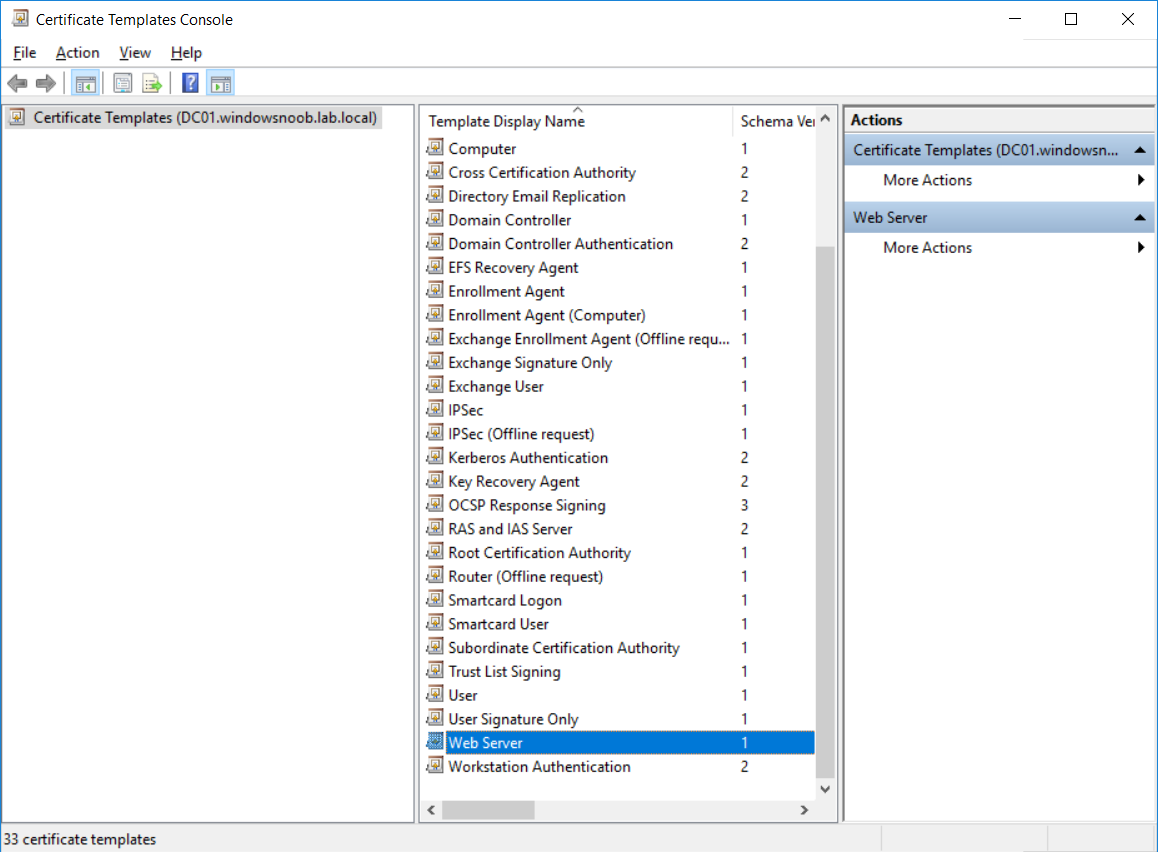
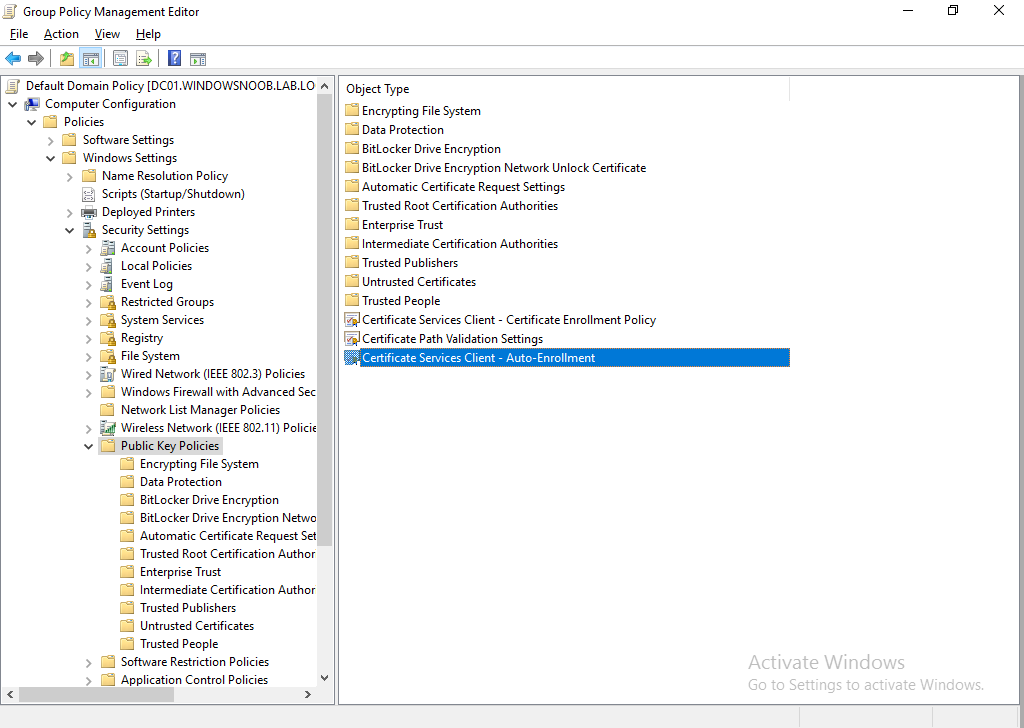
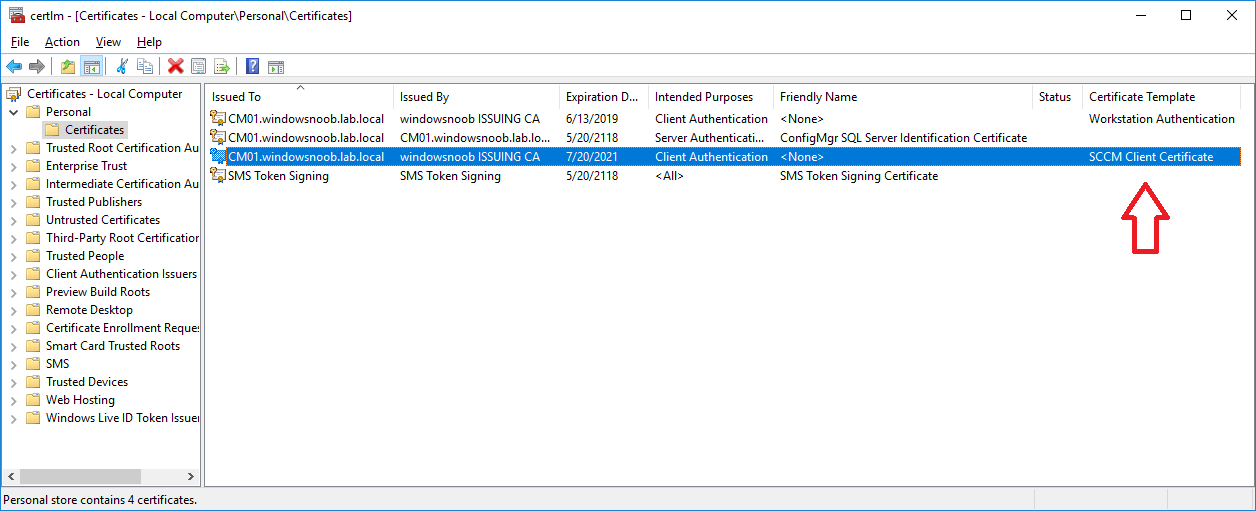
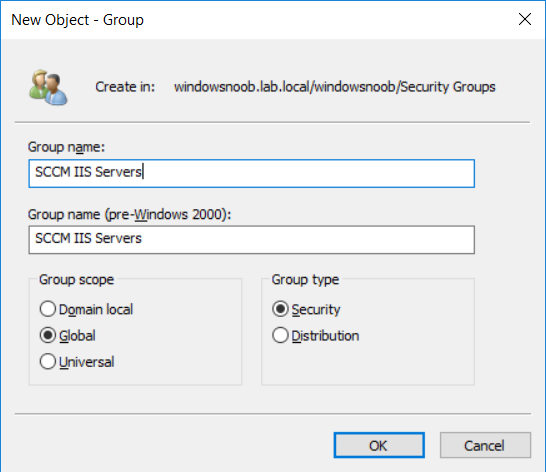
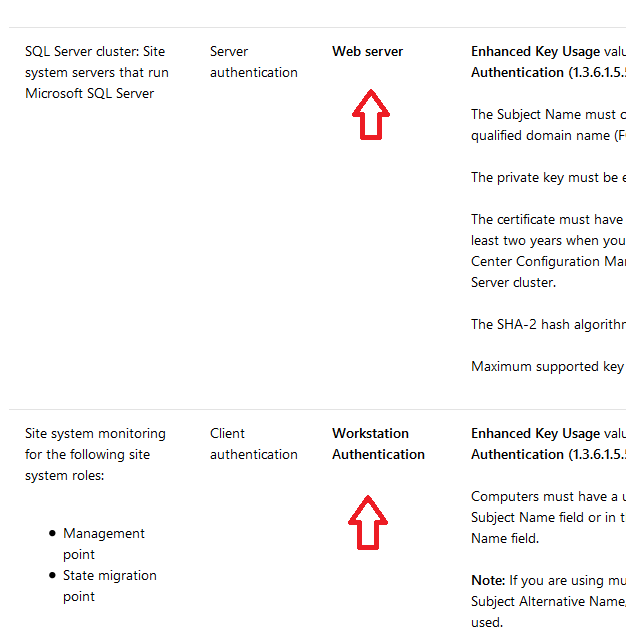
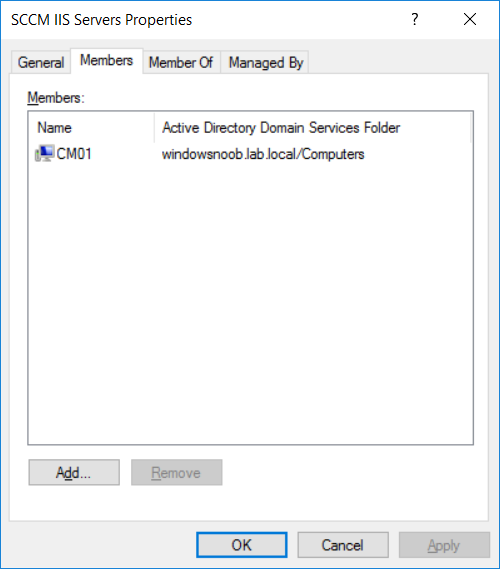
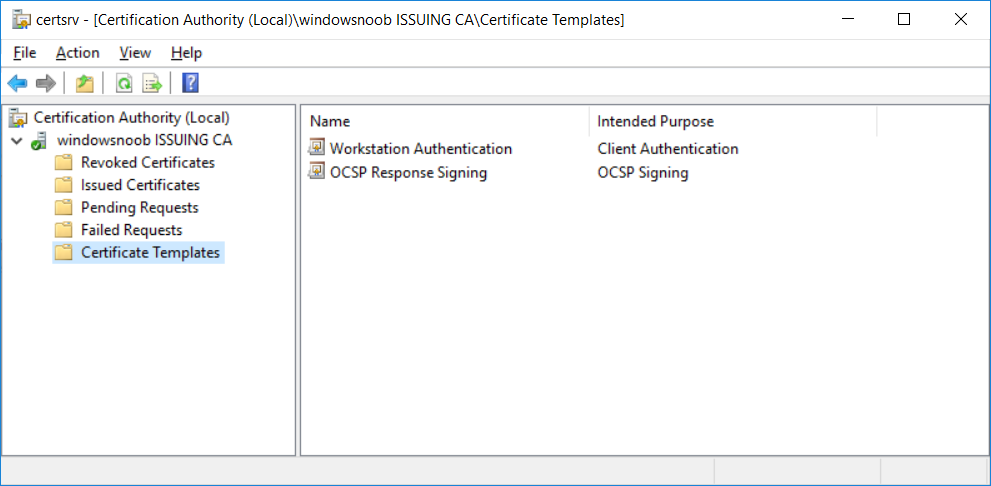
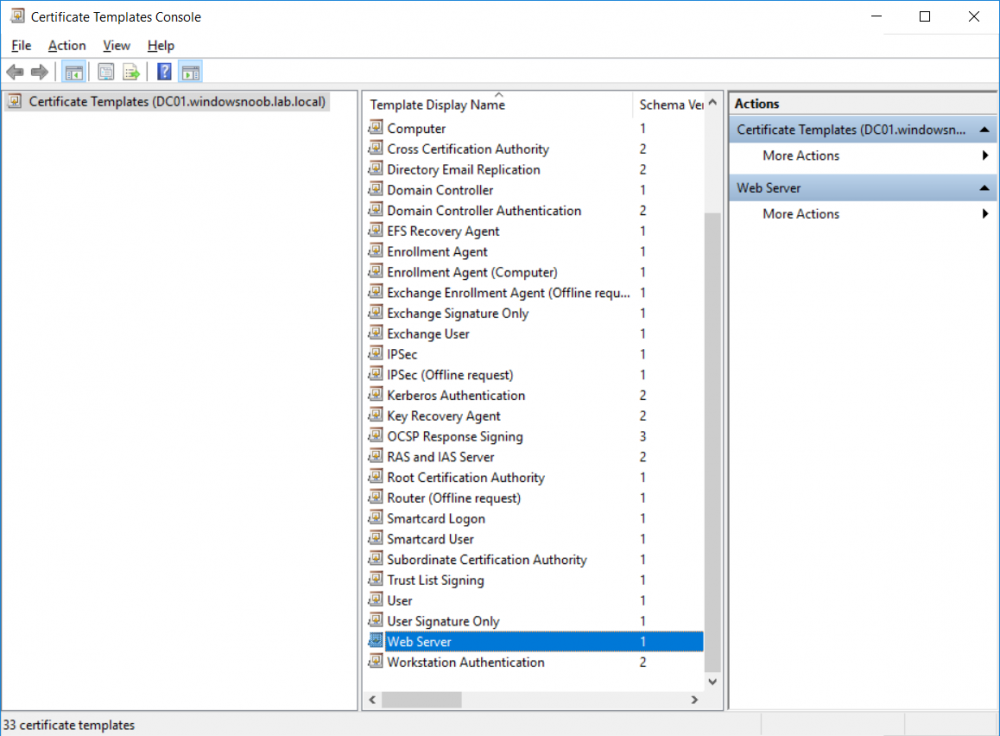
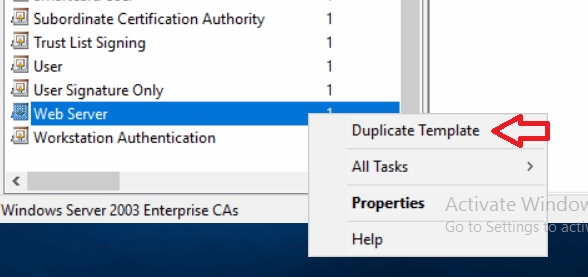
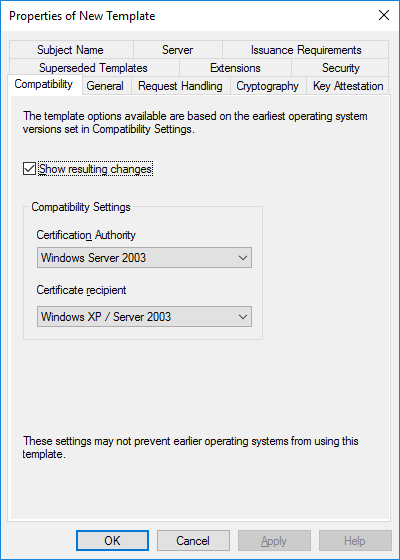
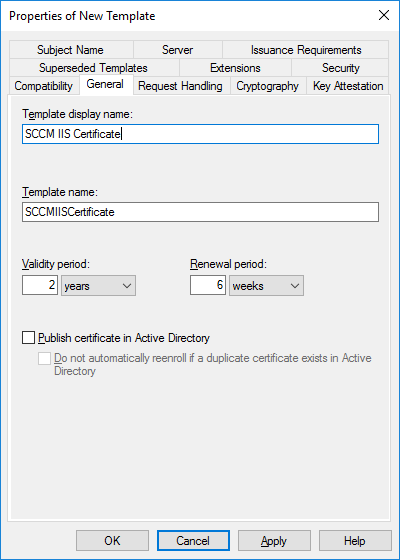
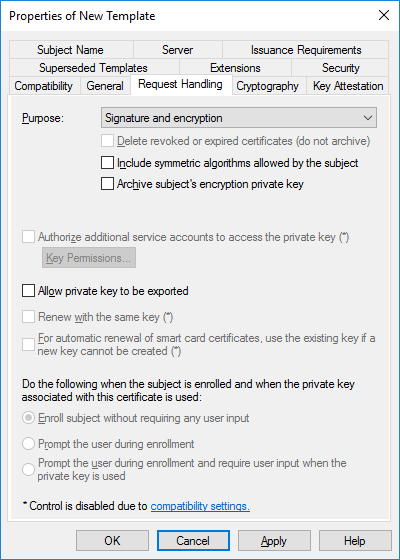
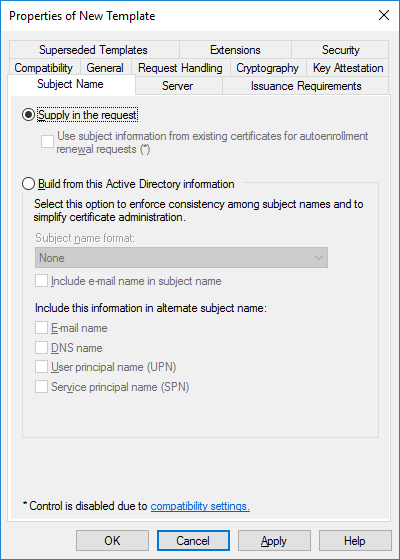
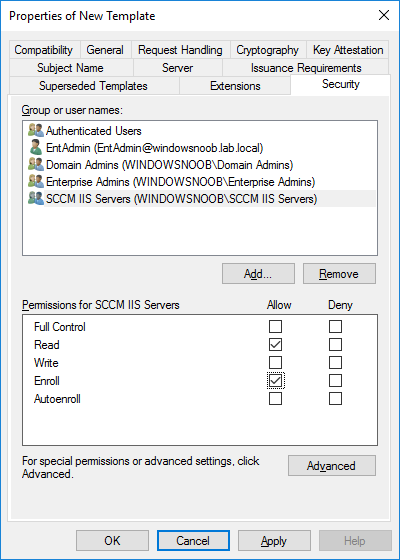
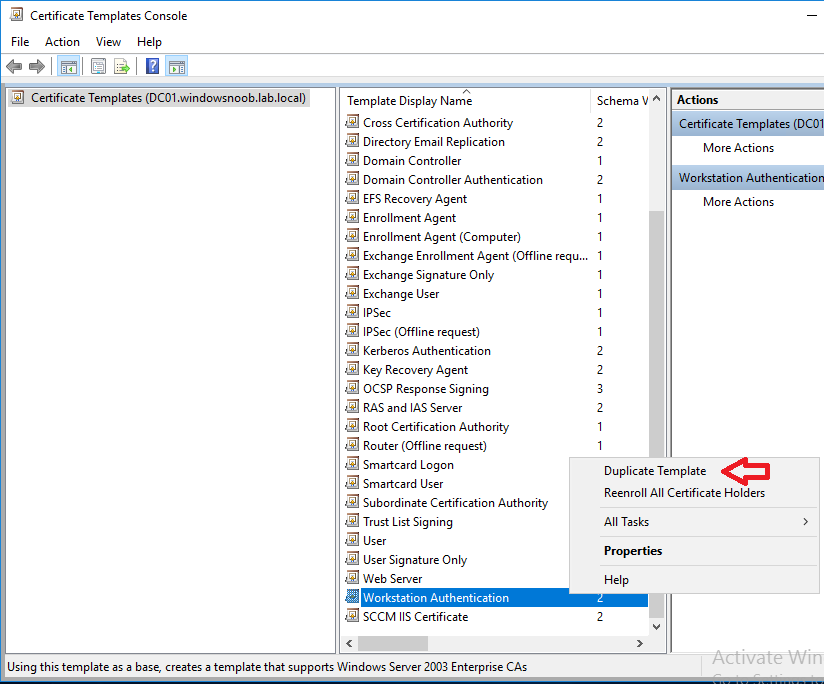
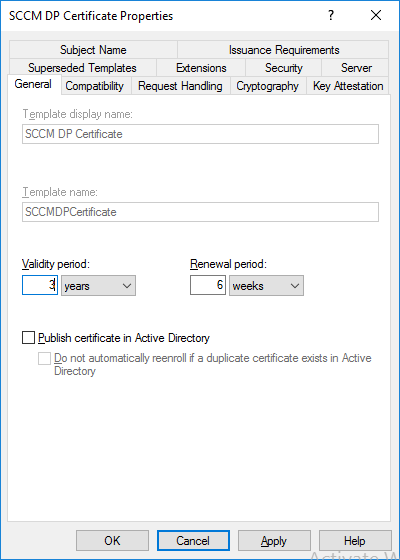
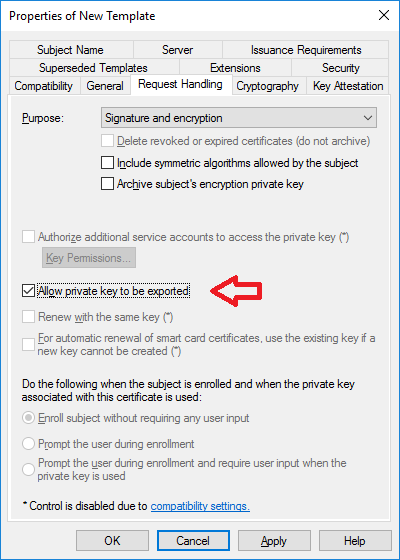
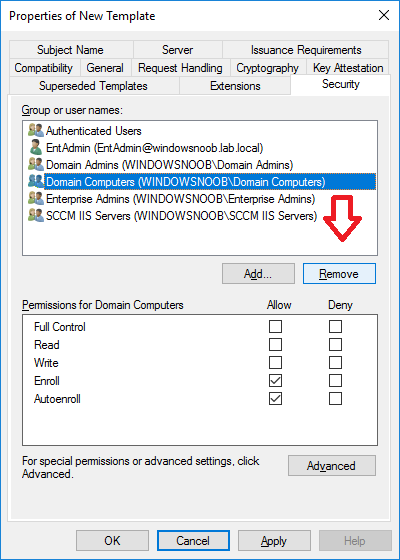
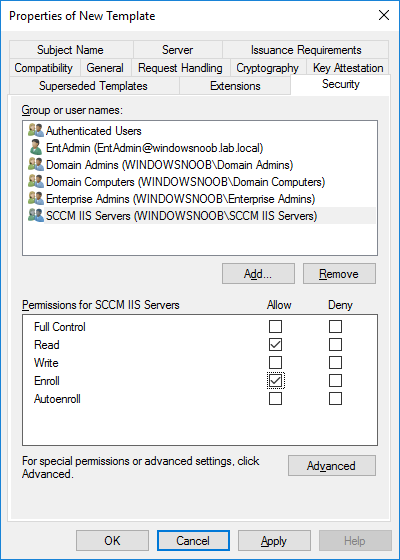
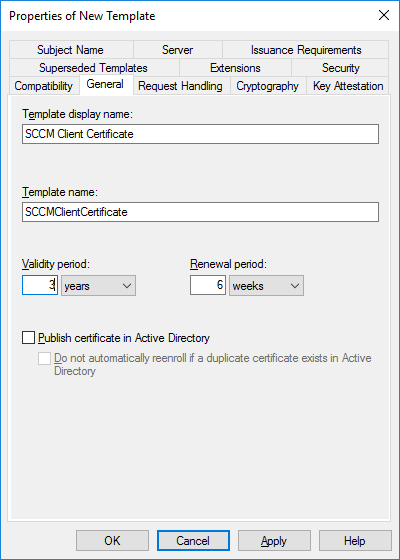
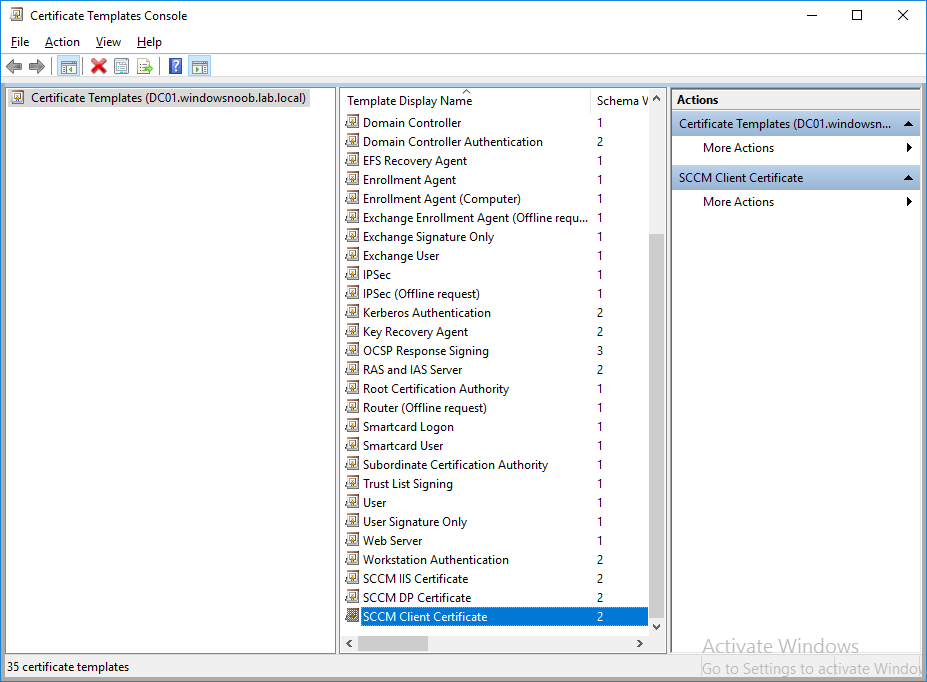
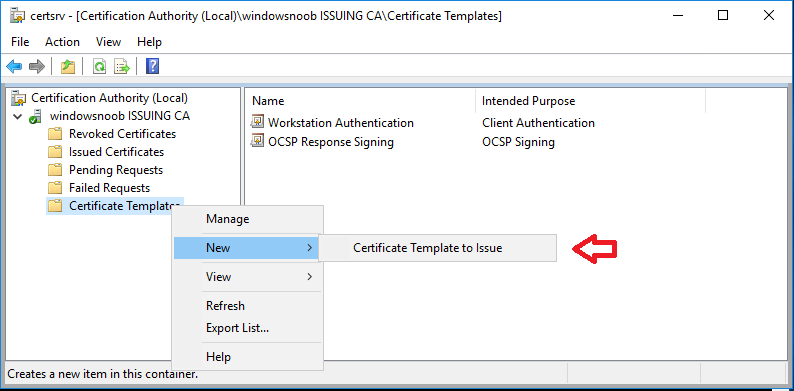
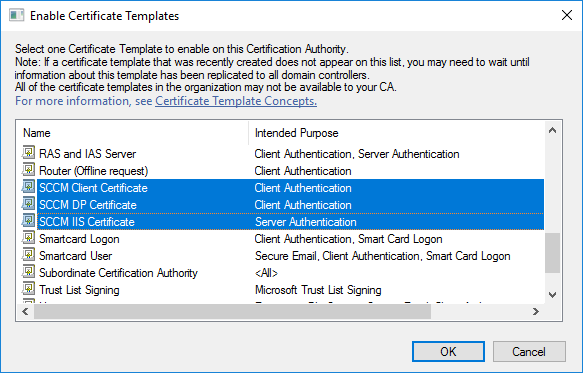
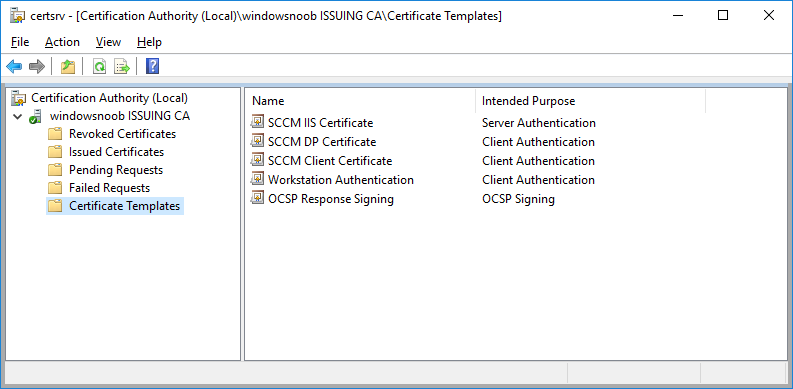
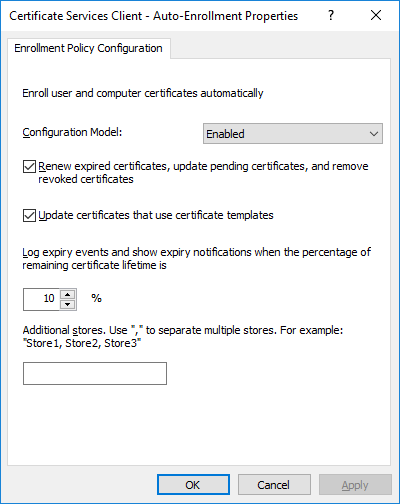
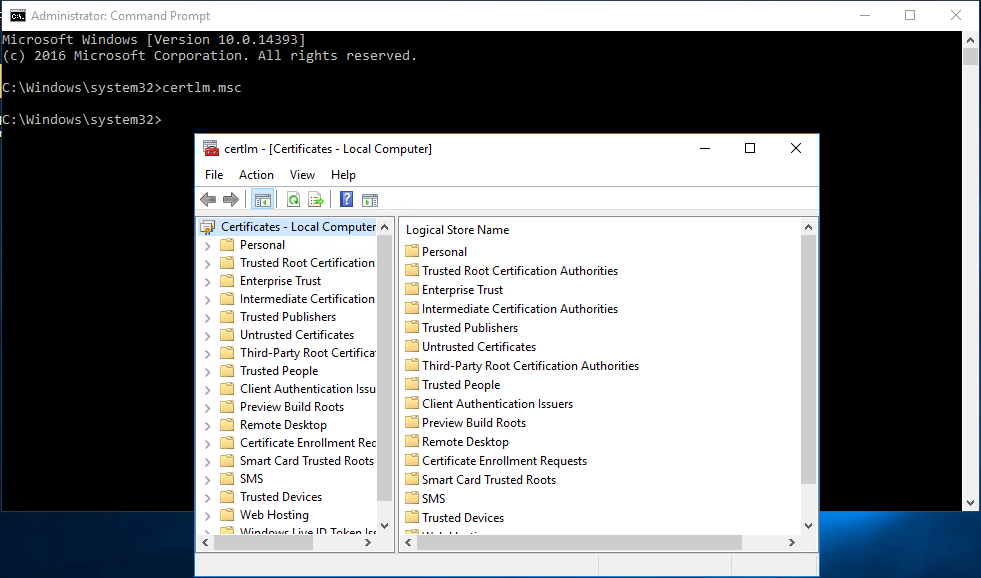
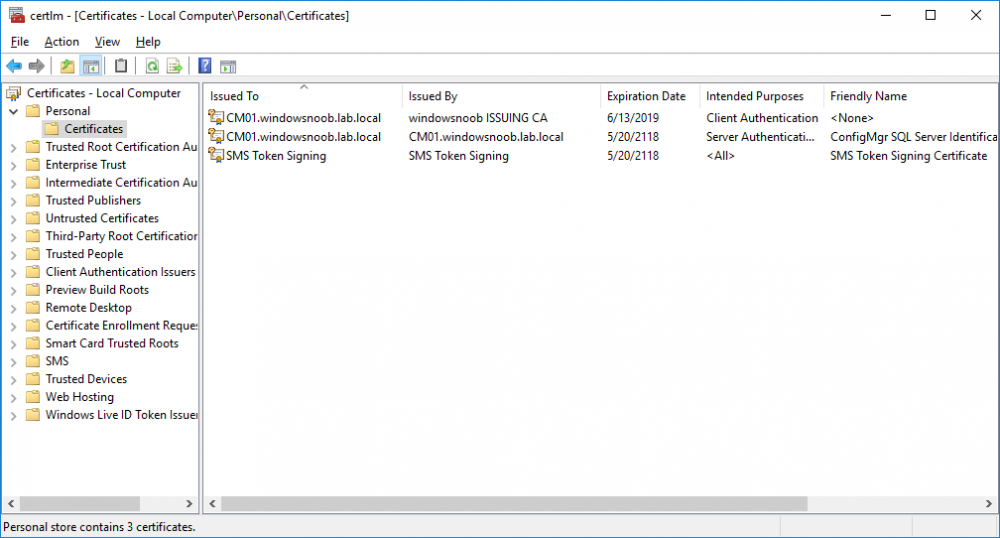
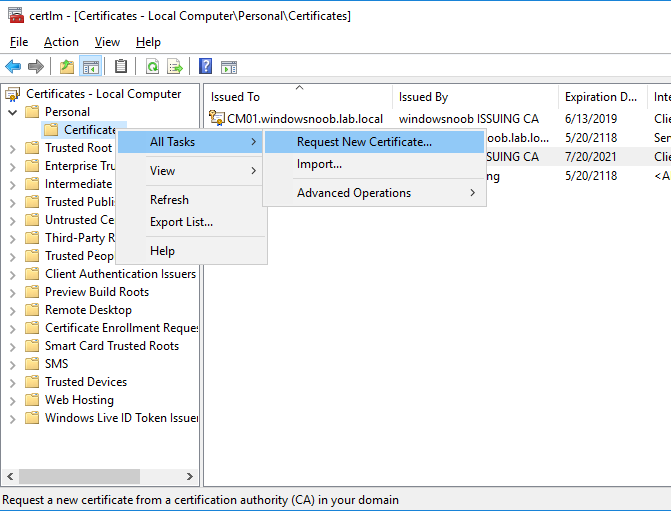
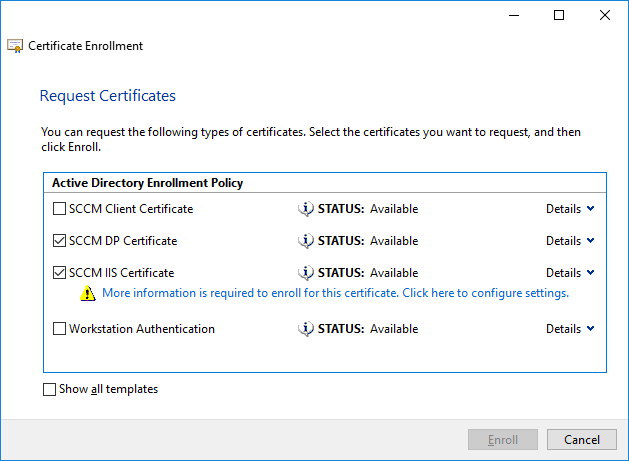
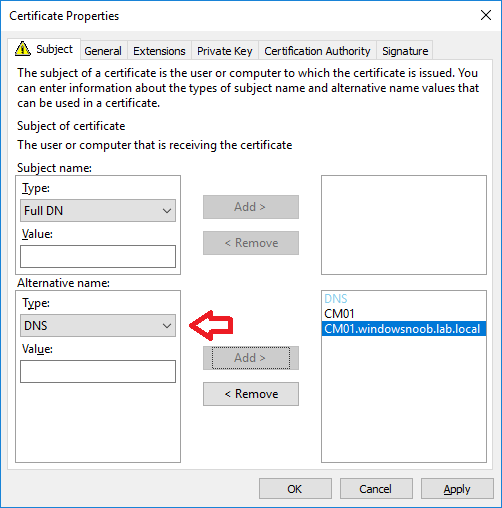
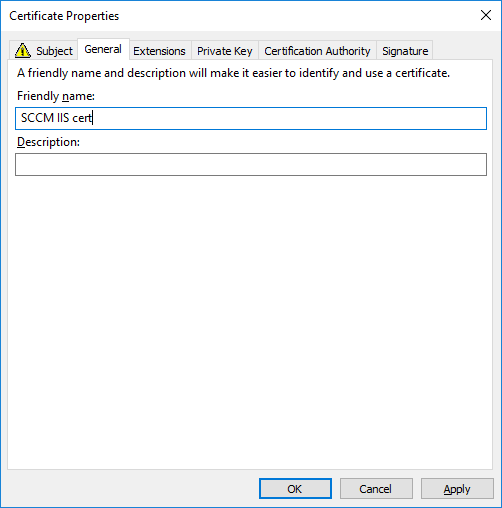
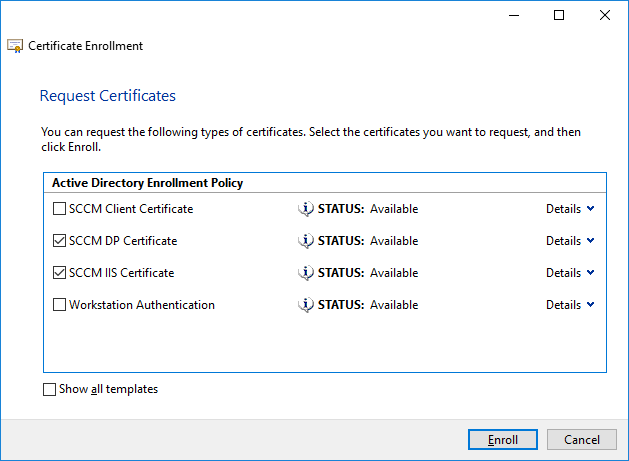
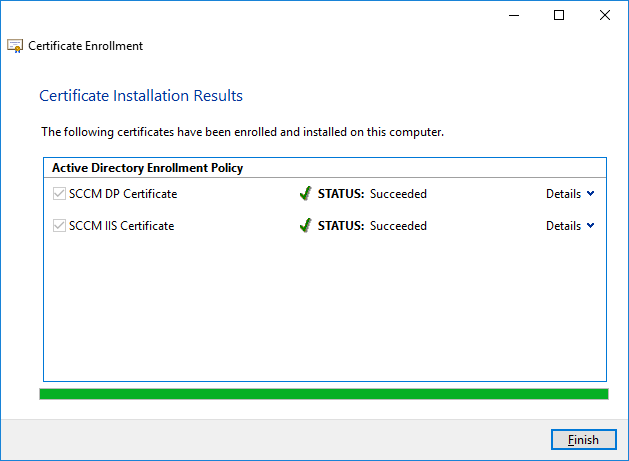
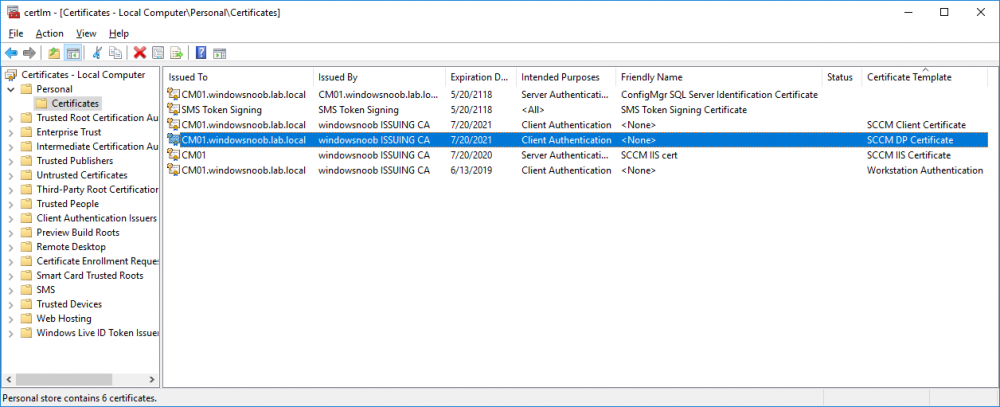
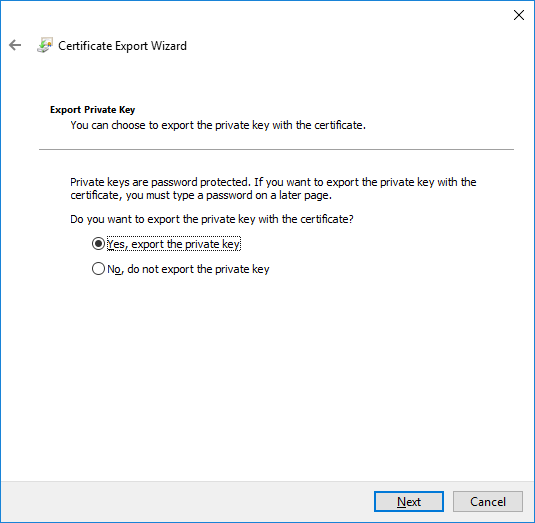
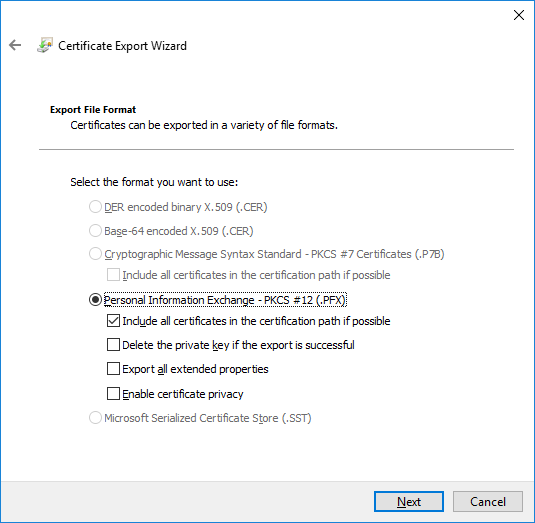
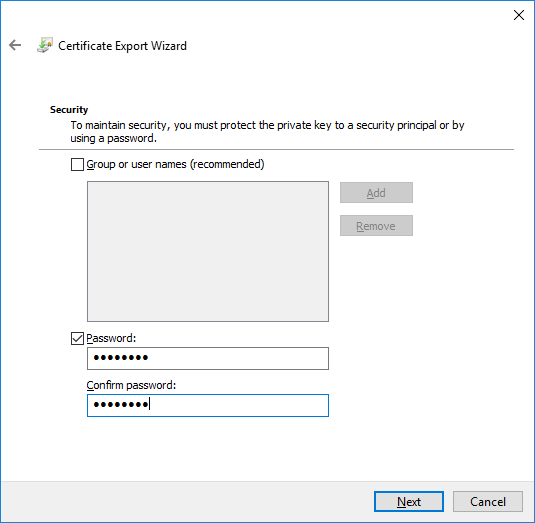
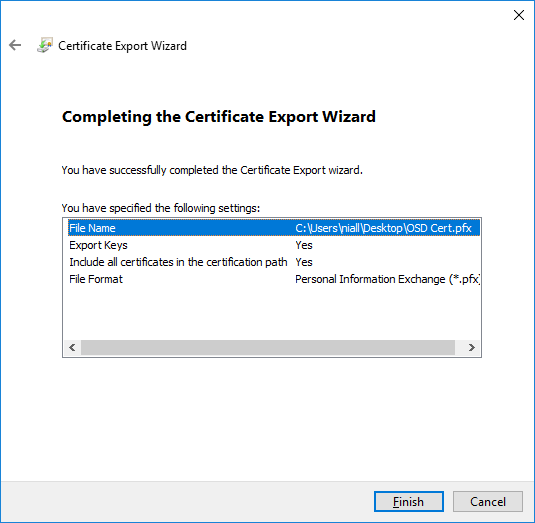
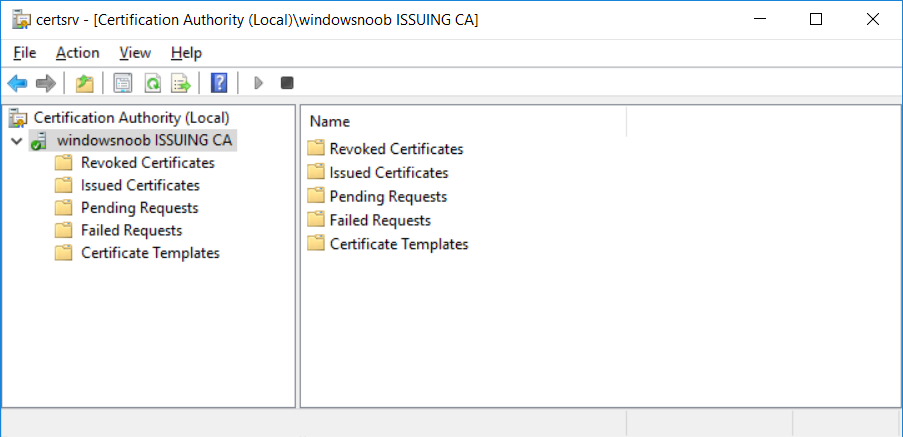
 In a previous series of guides I showed you how to configure PKI in a lab on Windows Server 2016. In another series, I also showed you how to install System Center Configuration Manager (Current Branch) version 1802 on Windows Server 2016 with SQL Server 2017. In this lab, I will show you how to configure SCCM to utilize that PKI environment. This series is based upon an excellent video by the talented former Microsoft Premier Field Engineer Justin Chalfant here. If you haven't seen it yet, do check it out. The intention here is that after you've completed this PKI enabled SCCM lab you can then use this in future guides, and to dig deeper into new technologies from Microsoft, for example enabling a Cloud Management Gateway and/or Cloud Distribution Point and using later on, using Co-Management. Note: To complete this lab you must first complete the PKI Lab series (8 parts) and then install a new virtual machine within that PKI lab running System Center Configuration Manager (Current Branch) version 1902 utilizing this series, that installation of Configuration Manager will be in HTTP mode. In addition, you must configure the Software Update Point role (in HTTP mode) on CM01 See this guide (step 2 onward) for details. For details how to configure that, see this post. It will take some time to setup but you'll be glad you did. Also, don't do this in production without consulting with a PKI Expert. I don't claim to be one, I'm just helping you get it up and running in a lab. This is intended for use in a lab only. Step 1 - Create an Active Directory Security Group In this step you'll create an active directory group which will contain all your site systems that use Configuration Manager server roles which utilize IIS (Internet Information Systems) such as the below (1): Management point Distribution point Software update point State migration point Enrollment point Enrollment proxy point Application Catalog web service point Application Catalog website point A certificate registration point On the Active Directory domain controller (DC01), open Active Directory Users and Computers, and expand the windowsnoob organisational unit (OU) created in this Step 1, part 5 of this blog post. Click on Security Groups, and then right click and choose New, select Group. Give the group a name, SCCM IIS Servers. Once done, right click on the SCCM IIS Servers Active Directory Security Group, choose Properties and click on the Members tab, click on Add, for Object Types make sure Computers are selected. Add the Configuration Manager server (CM01) to that group. Once done, reboot the Configuration Manager server (CM01) using the following command otherwise you might get access denied when trying to request a certificate. shutdown /r Step 2. Create certificate templates on the Issuing CA In this step you will create three new certificate templates for use within SCCM by duplicating existing templates. Using the windowsnoob\Entadmin credentials, logon to the Issuing CA server (IssuingCA) and launch the certificate authority console (CertSrv.msc). In the three templates below, one uses the Web Server template, and the others use the Workstation Authentication template, you can verify which Microsoft certificate template to use by using the tables on the following blog post, of which i'm showing a screenshot below to make it clear. 1. SCCM IIS Certificate Right click on Certificate Templates and choose Manage. Scroll down to Web Server from the templates listed. Right click on the Web Server template and choose Duplicate Template. The Properties of New Template screen appears. Verify that the Certificate Authority Compatibility settings are set to Windows Server 2003. Note: When you use an enterprise certification authority and certificate templates, do not use the Version 3 templates (well you can but read this first). These certificate templates create certificates that are incompatible with System Center Configuration Manager. Instead, use Version 2 templates by using the following instructions. On the Compatibility tab of the certificate template properties, specify Windows Server 2003 for the Certification Authority option, and Windows XP / Server 2003 for the Certificate recipient option. (1) Click on the General tab and rename it to SCCM IIS Certificate. On the Request Handling tab, verify that Allow private key to be exported is not selected (default). On the Subject Name tab verify that the Supply in the Request is selected (default). On the Security tab, add the previously created Active Directory Security Group called SCCM IIS Servers and give it Read and Enroll access. Optionally you can remove Enroll from the Domain Admin and Enterprise Admins as it is mentioned in the docs. Click Apply to apply the changes and then close the Properties of New Template. 2. SCCM DP Certificate This template is used by the distribution point site system for Operating System Deployment (clients that are not domain joined). Next, right click on Workstation Authentication from the templates listed and choose Duplicate Template. The Properties of New Template screen appears. The Properties of New Template screen appears. Verify that the Certificate Authority Compatibility settings are set to Windows Server 2003. Click on the General tab and rename it to SCCM DP Certificate, change the validity period to something more reasonable, like 3 years. On the Request Handling tab, ensure that Allow private key to be exported is selected to allow us to export the certificate as a pfx file and we need the private key to do so, as we'll import that certificate into our console so that the clients can utilize it during imaging (workgroup members, to authenticate back to your site). On the Security tab, add the previously created Active Directory Security Group called SCCM IIS Servers and give it Read and Enroll access. Next, remove Domain Computers altogether. Click Apply to apply the changes and then close the Properties of New Template. 3. SCCM Client Certificate This template is used by clients to communicate with site systems. Next, right click on Workstation Authentication from the templates listed and choose Duplicate Template. The Properties of New Template screen appears. The Properties of New Template screen appears. Verify that the Certificate Authority Compatibility settings are set to Windows Server 2003. Click on the General tab and rename it to SCCM Client Certificate, change the validity period to something more reasonable, like 3 years. Under Subject Name verify that Build from Active Directory is selected. On the Request Handling tab, verify that Allow private key to be exported is not selected (default). On the Security tab, select Domain Computers and ensure that Read, Enroll and AutoEnroll permisions are selected. Click Apply to apply the changes and then close the Properties of New Template. The three SCCM templates are now shown below. Close the Certificate Templates console. Next you will issue these certificate templates. To do so, in the Certificate Authority (on the IssuingCA), right click on Certificate Templates and choose New, then Certificate Template to Issue. In the Enable Certificate Templates window, select the 3 previously created SCCM templates as shown below and click OK. They will now appear under Certificate Templates. Step 3. Verify Auto-Enrollment GPO is enabled for the Client Certificate In Part 8 of the PKI lab you enabled Auto Enrollment so that clients can request certificates automatically. As it is a lab, the setting is deployed in the default domain GPO. The setting is in Computer Configuration, Policies, Windows Settings, Security Settings, Public Key Policies, and Certificate Services Client - Auto Enrollment. The setting should look like so (Enabled). Step 4. Requesting the IIS and DP/OSD Certificates on the IIS Site System On the SCCM server (CM01), which hosts all those IIS ConfigMgr roles, start certlm.msc from an Administrative command prompt. if you expand Personal, then Certificates, you'll see certificates issued to that computer, there will be a few by default. In the administrative command prompt, run gpupdate /force to pull down group policy changes...and refresh the view in certlm. Below you can see the SCCM Client Certificate template was used to generate this Client Authentication certificate. Requesting New certificates Next, you will request certificates from Active Directory, to do so, right click on Certificates and choose All Tasks then Request New Certificate. click Next at the Before you begin screen, and verify that Active Directory Enrollment Policy is selected before clicking Next. Select the SCCM DP Certificate and SCCM IIS Certificate from those listed (you already have the SCCM Client Certificate from AutoEnrollment). You'll notice that for the SCCM IIS Certificate, more information is required to enroll, Click on the message to enter this info. For Alternative Name, choose the DNS option and then click on Add to add the hostname and fully qualified domain name of your SCCM server (CM01). Note: If you want this server to be available via IBCM you could also add the publicly available FQDN of the site here (eg: cm01.windowsnoob.com) Next Click on General, and give this cert a friendly name so we can distinguish it in IIS later when we bind it. click OK, then click Enroll. It should state a status of Succeeded for both certificates. If not look at the details to find out what went wrong. Click Finish to exit. Step 5. Exporting the Distribution Point certificate Next you need to export the Distribution Point certificate so that during OSD the client can authenticate to the management point in WinPE. To do that, refresh the view in Certificates (certlm.msc) and then select the client authentication certificate created with the SCCM DP Certificate template. Right click and choose All Tasks, then select Export. In the welcome to certificate export wizard click Next and choose to export the private key. stick with the defaults and give it a password that you will use when you import it back into the SCCM Console, I used P@ssw0rd Save the cert to your desktop with a filename of OSD Cert.pfx and continue through that wizard until completion. You should see that the export was successful. That's it for this part, please join me in part 2 where we will complete the configuration of SCCM to HTTPS. cheers niall Recommended reading (1) - https://docs.microsoft.com/en-us/sccm/core/plan-design/network/pki-certificate-requirements


-
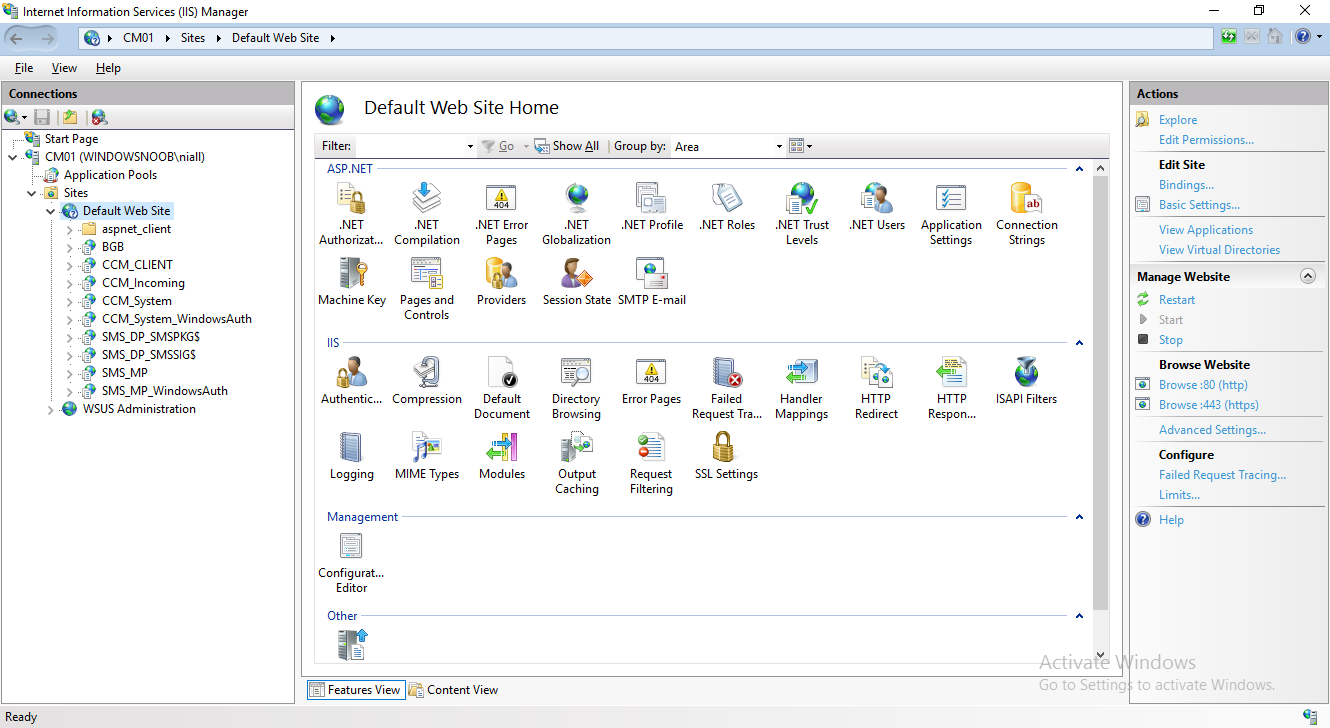
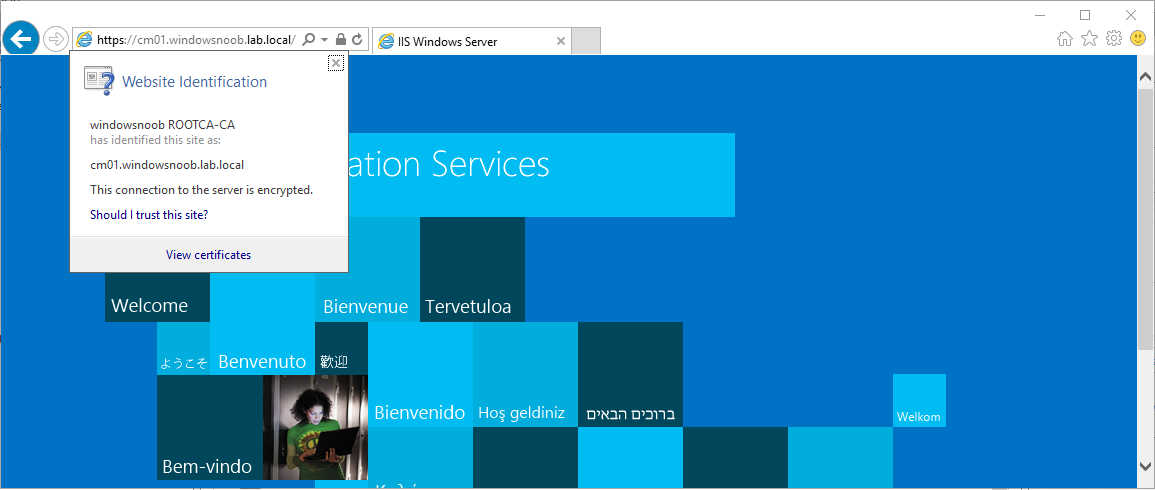
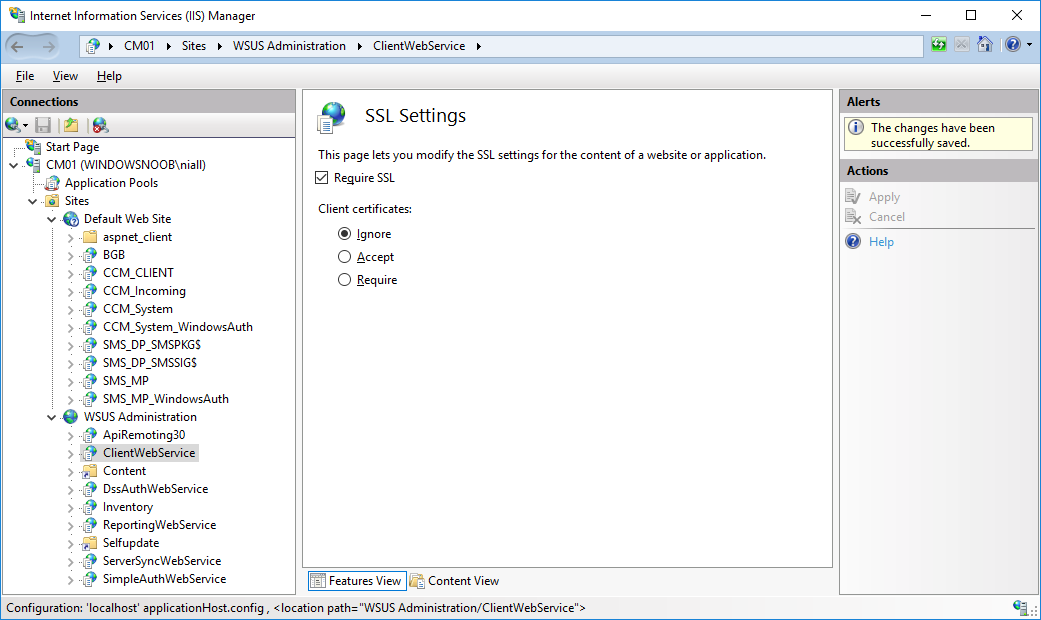
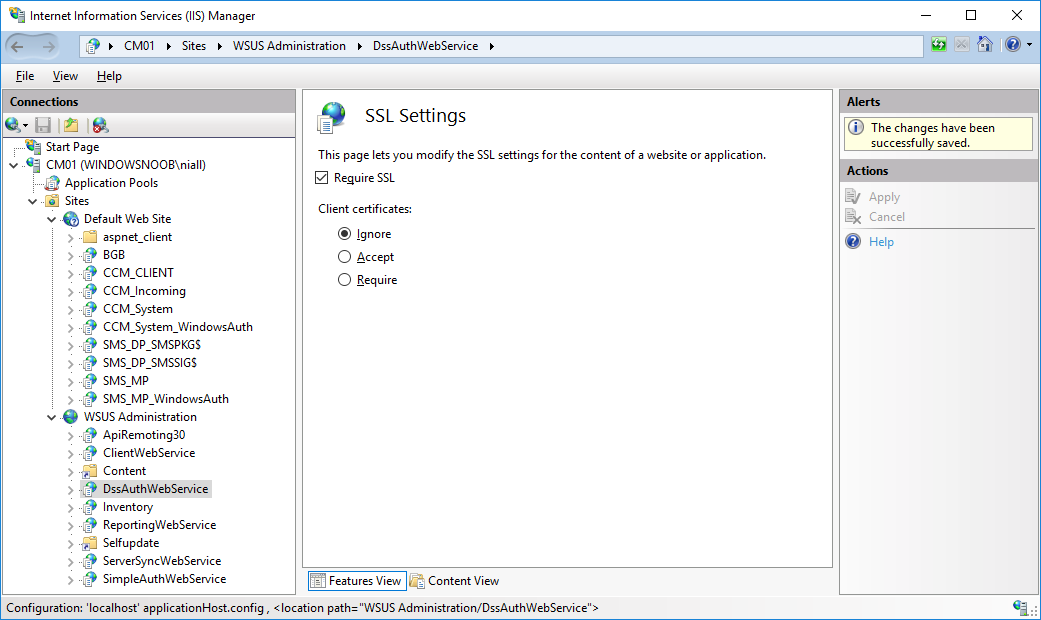
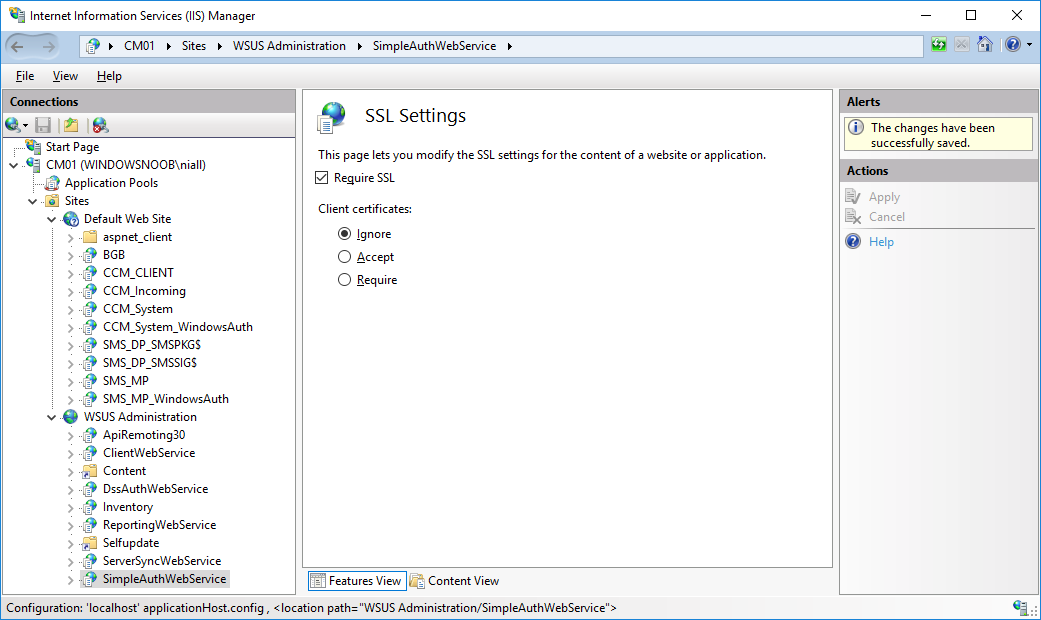
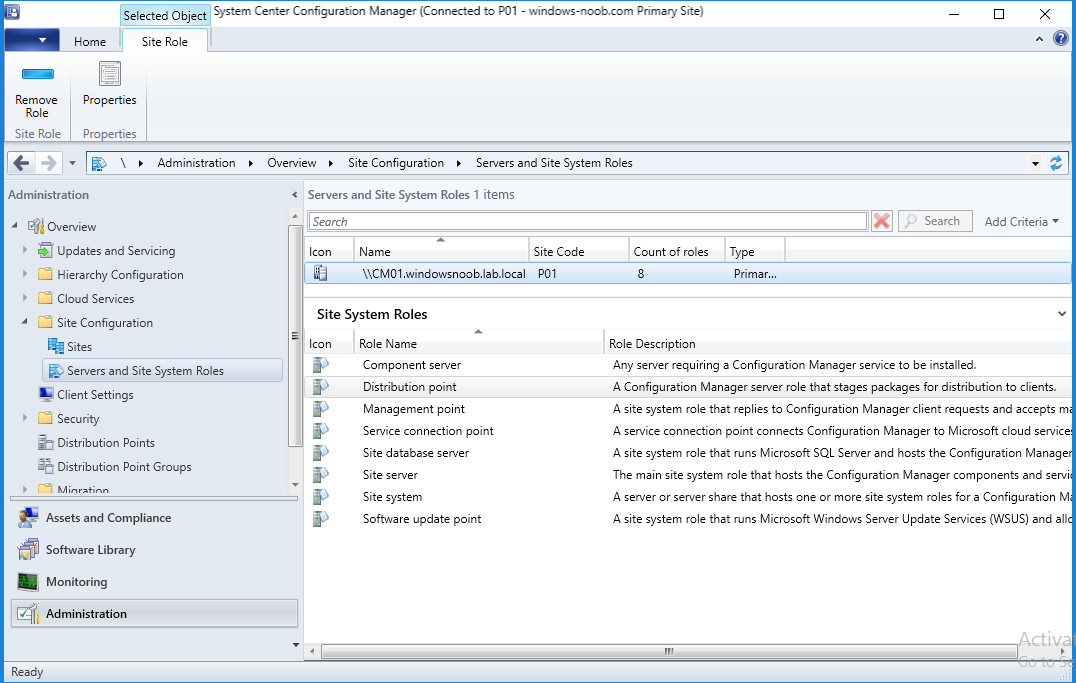
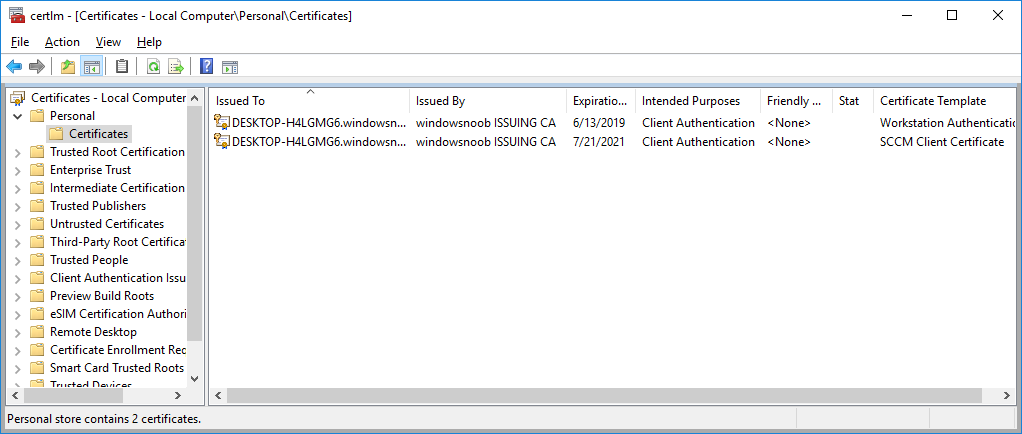
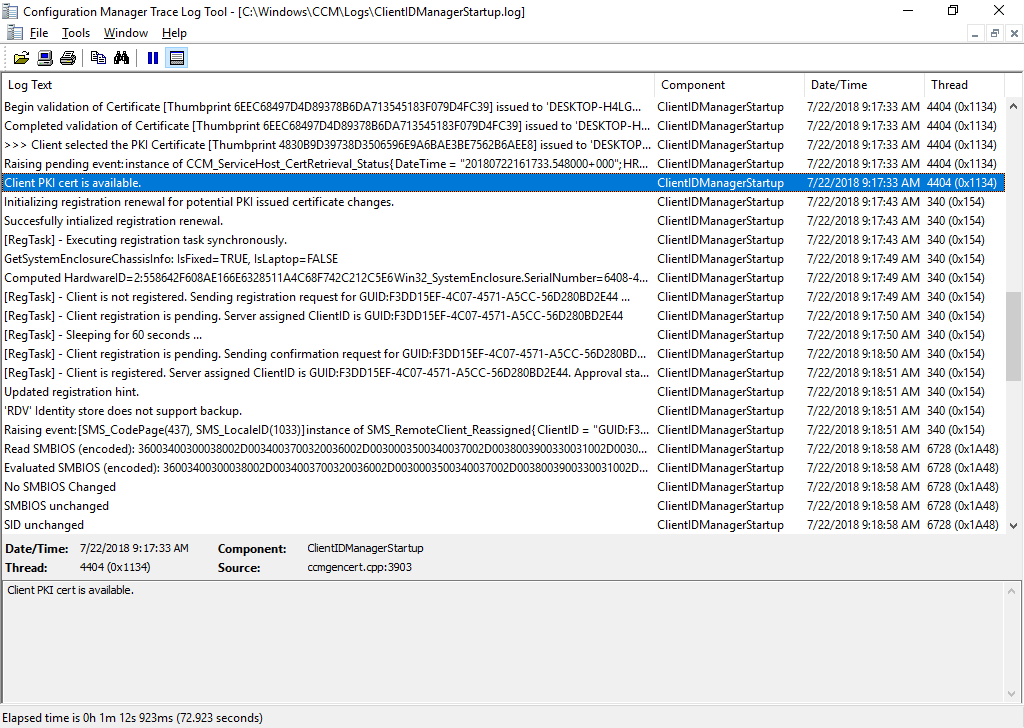
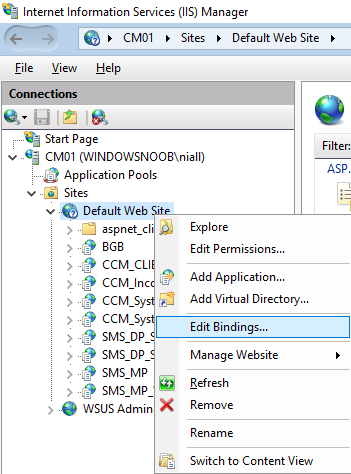
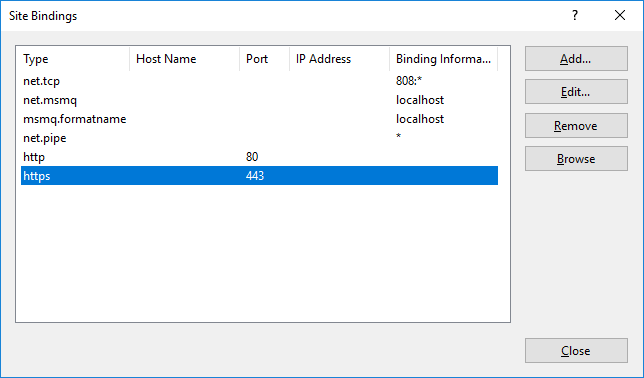
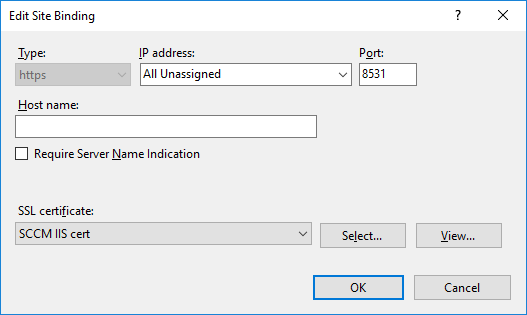
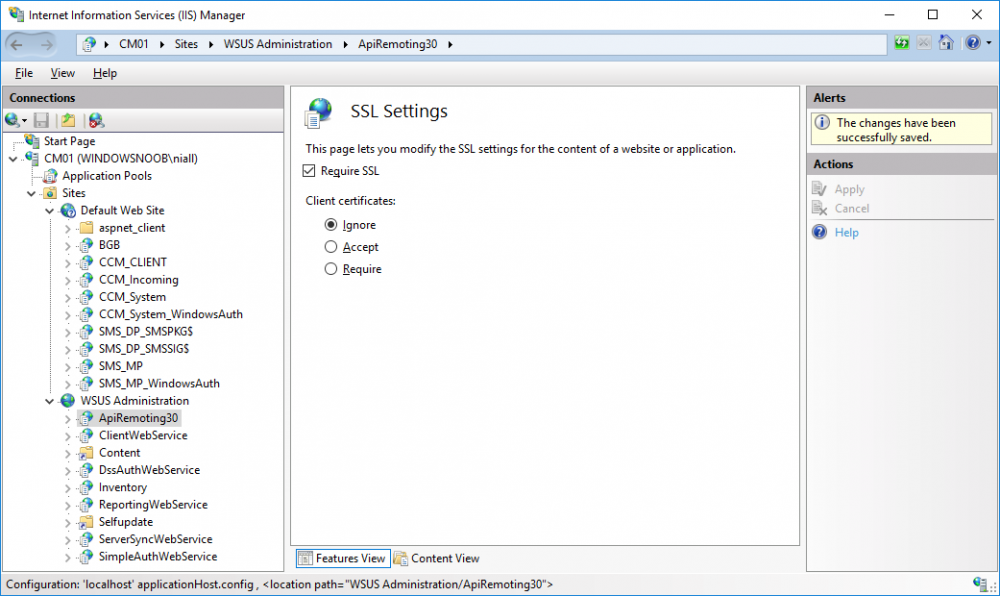
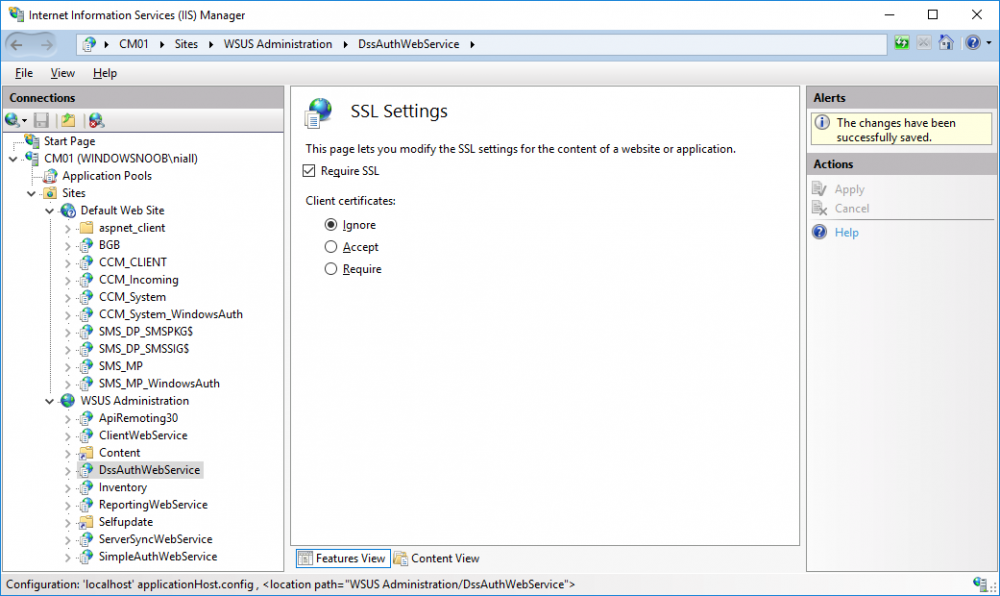
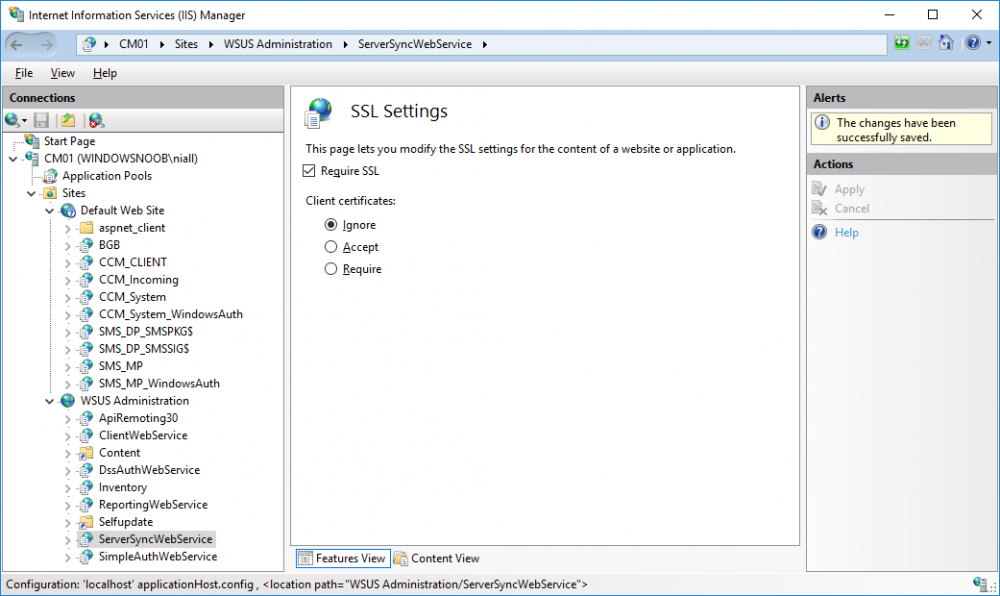
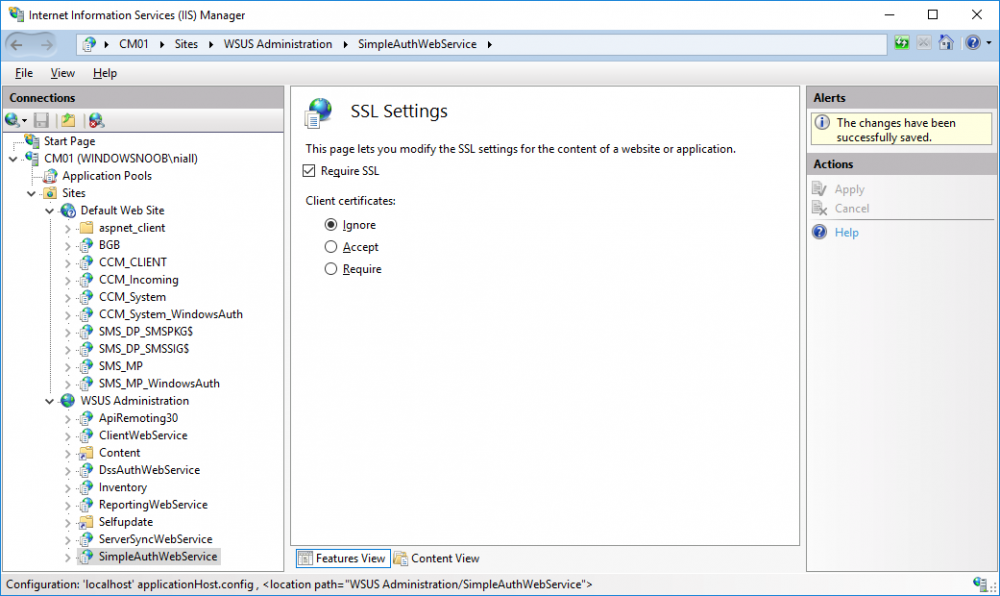
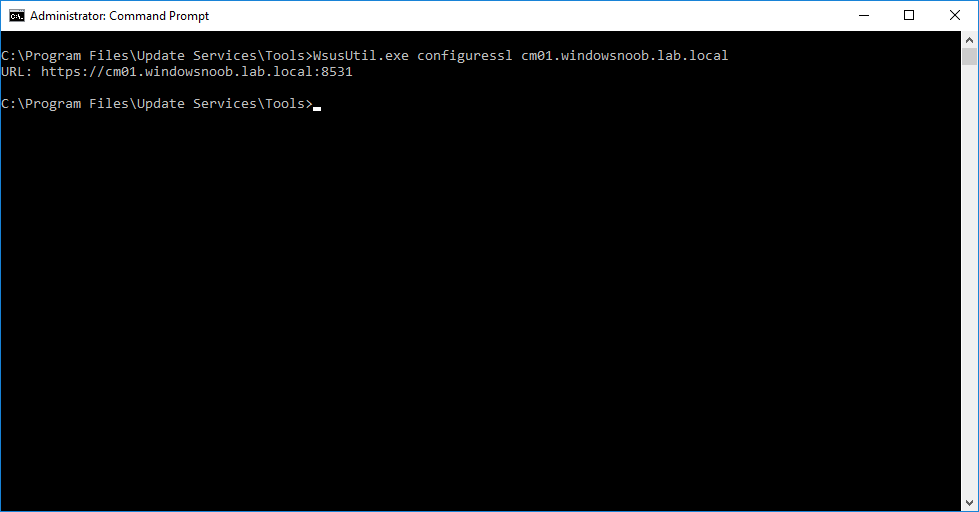
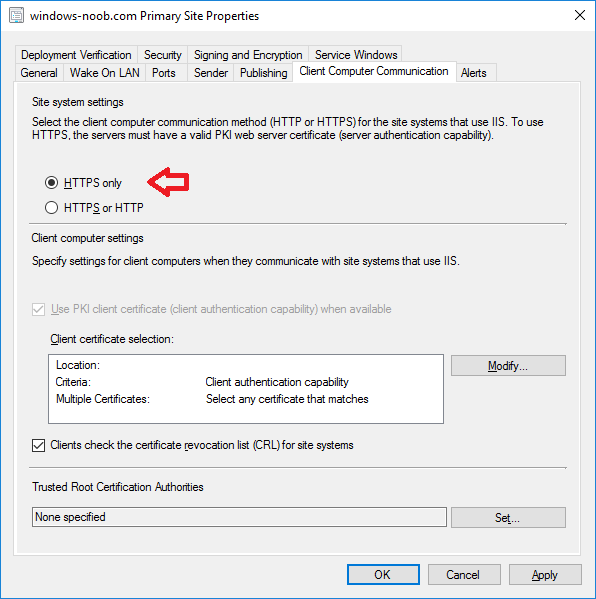
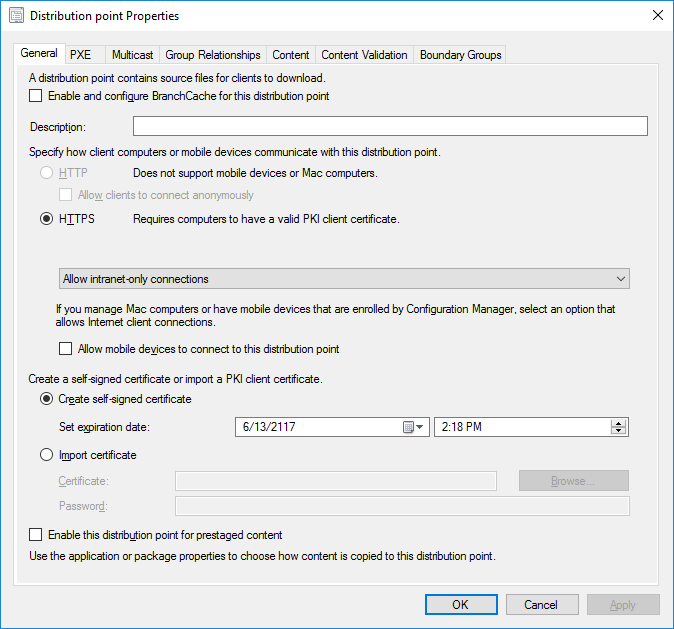
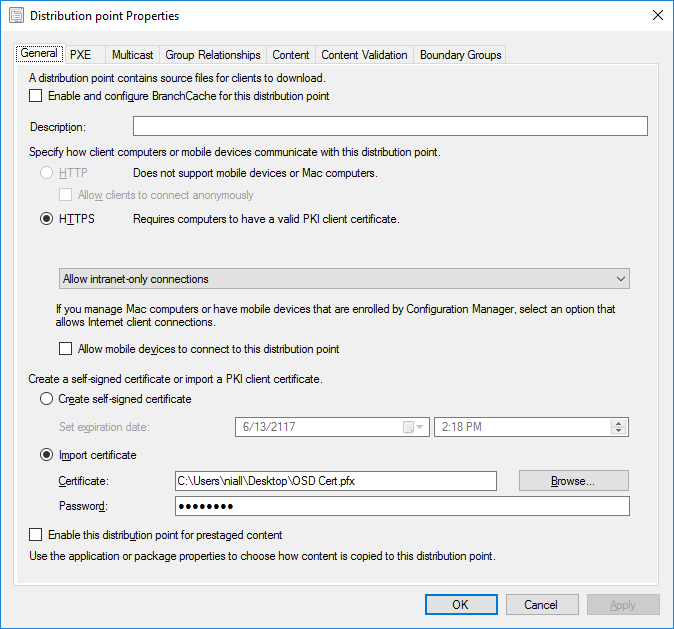
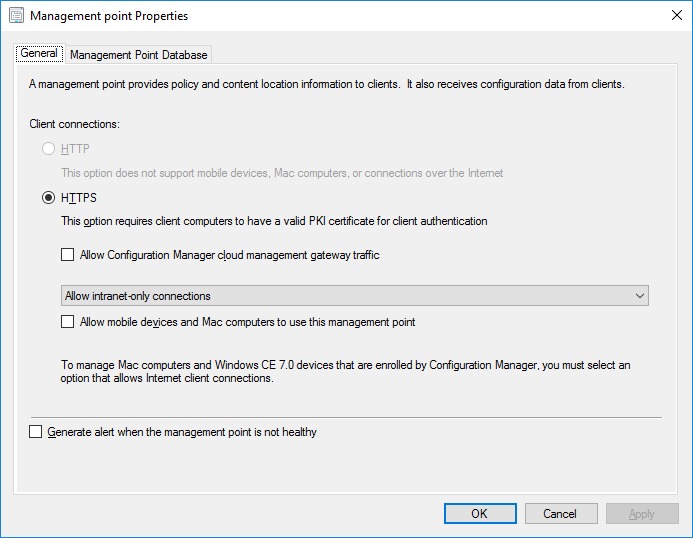
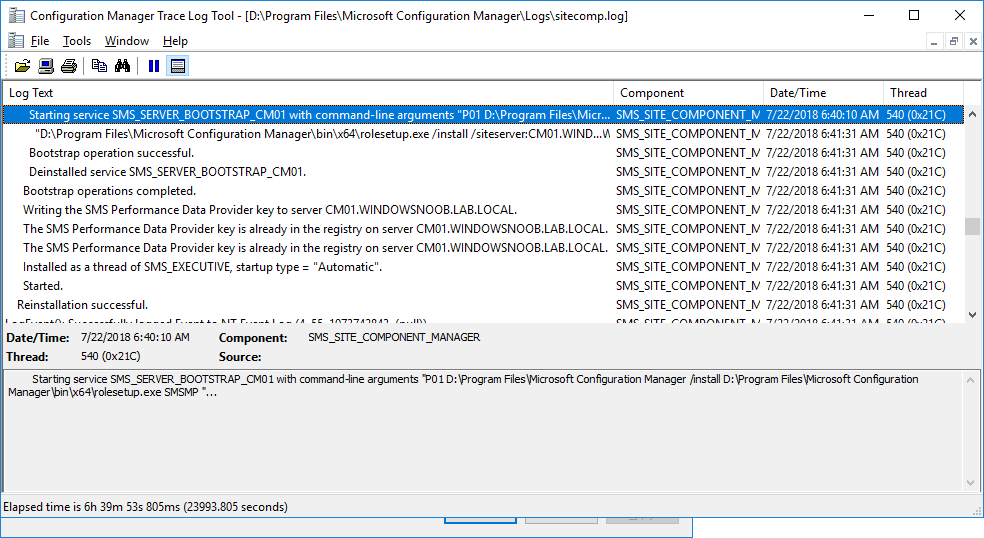
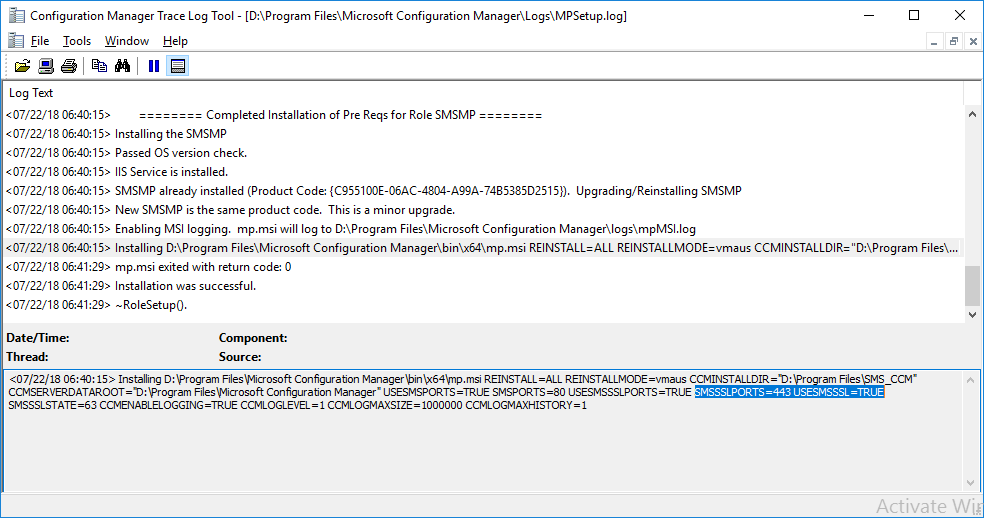
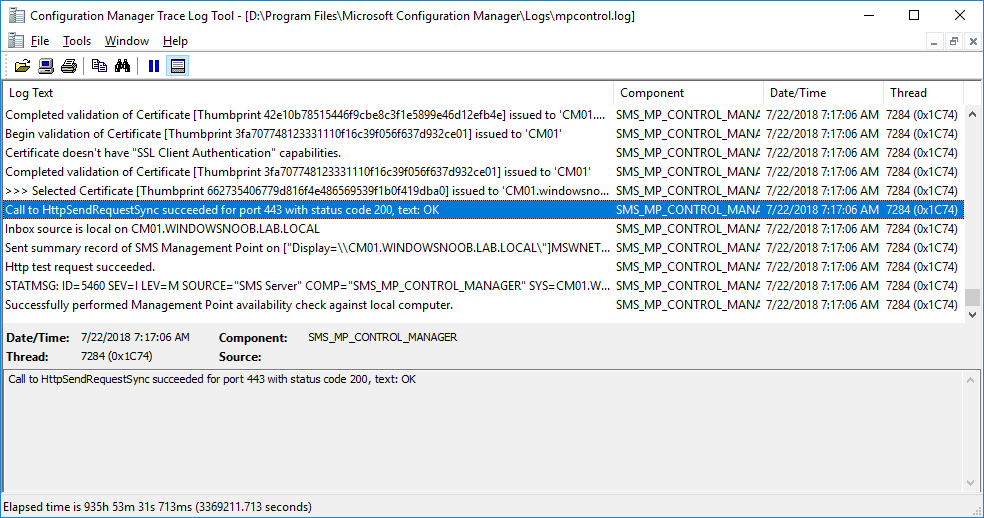
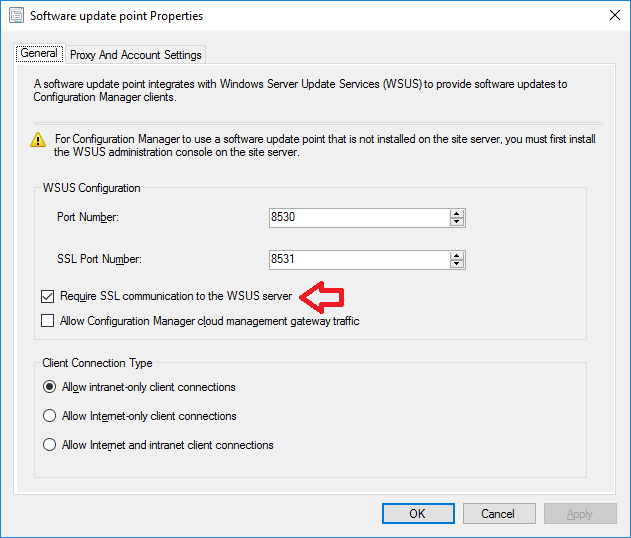
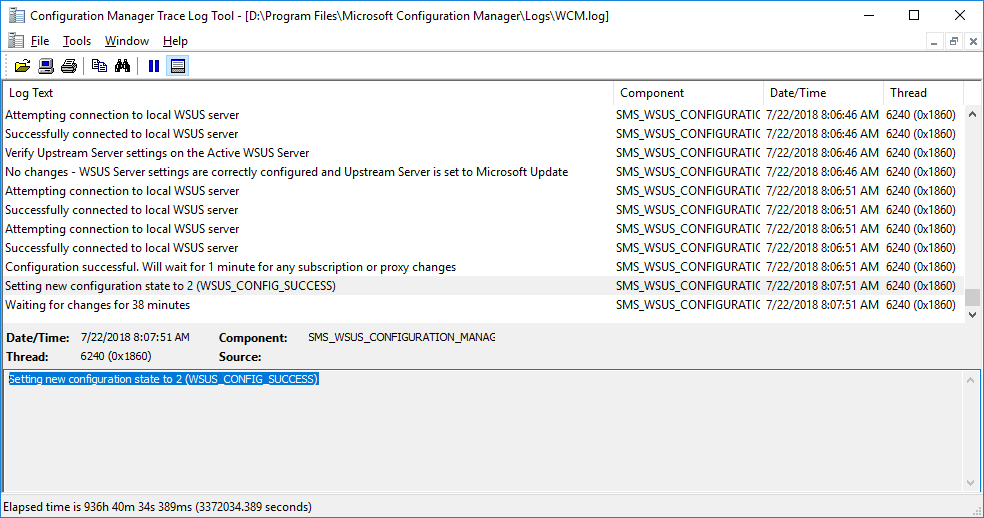
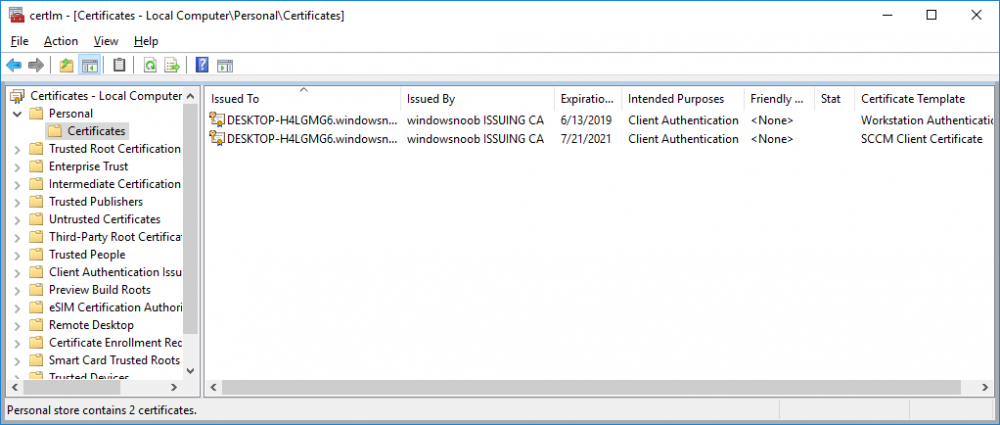
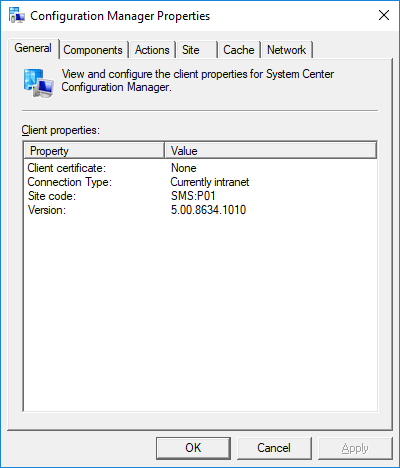
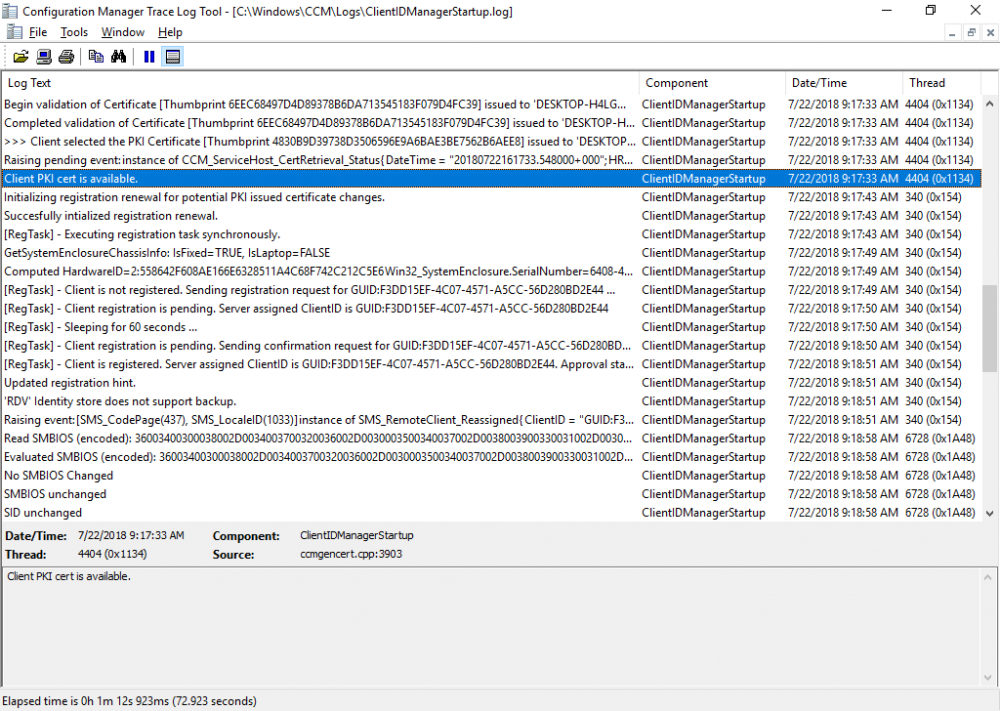
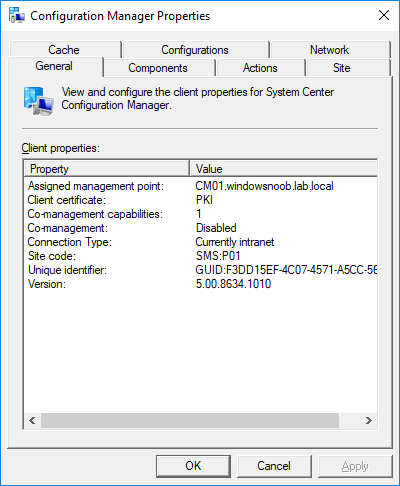
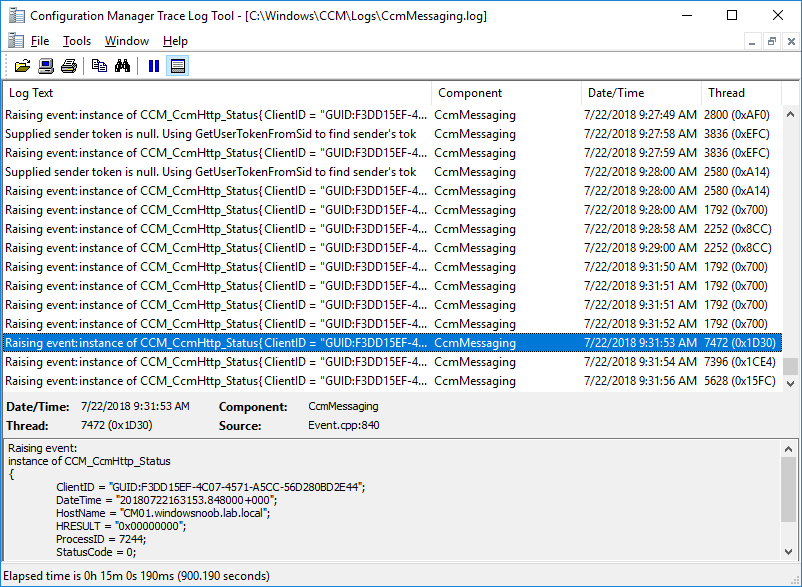
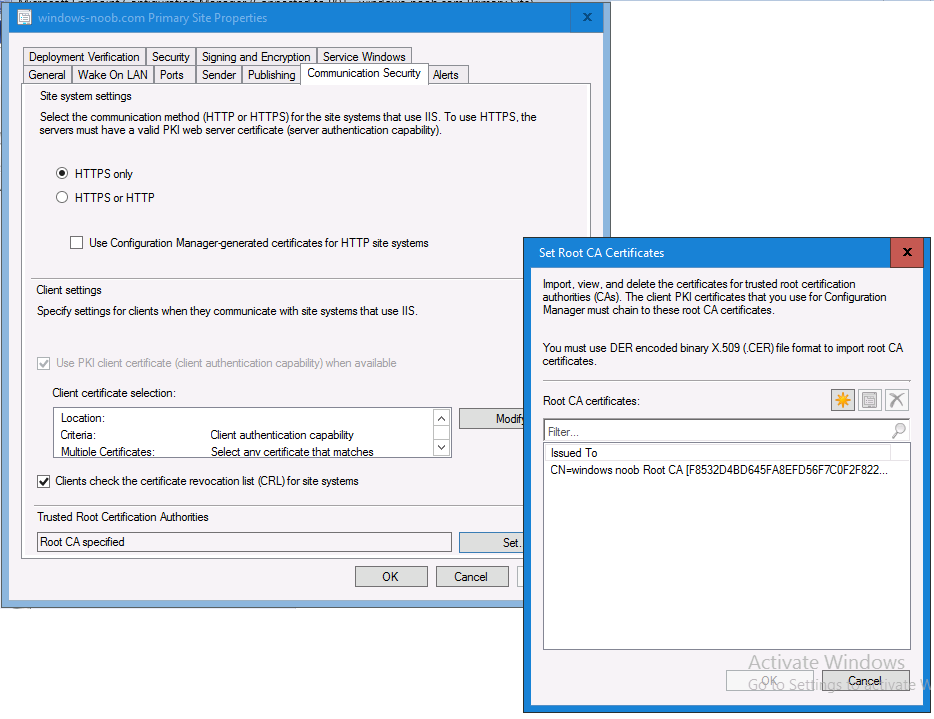
In a previous series of guides I showed you how to configure PKI in a lab on Windows Server 2016. In another series, I also showed you how to install System Center Configuration Manager (Current Branch) version 1802 on Windows Server 2016 with SQL Server 2017. In this lab, I will show you how to configure SCCM to utilize that PKI environment. This series is based upon an excellent video by the talented former Microsoft Premier Field Engineer Justin Chalfant here. If you haven't seen it yet, do check it out. The intention here is that after you've completed this PKI enabled SCCM lab you can then use this in future guides, and to dig deeper into new technologies from Microsoft, for example enabling a Cloud Management Gateway and/or Cloud Distribution Point and using later on, using Co-Management. Note: To complete this lab you must first complete the PKI Lab series (8 parts) and then install a new virtual machine within that PKI lab running System Center Configuration Manager (Current Branch) version 1802 utilizing this series (4 parts), that installation of Configuration Manager will be in HTTP mode. In addition, you must configure the Software Update Point role (in HTTP mode) on CM01 See this guide (step 2 onward) for details. For details how to configure that, see this post. It will take some time to setup but you'll be glad you did. Also, don't do this in production without consulting with a PKI Expert. I don't claim to be one, I'm just helping you get it up and running in a lab. This is intended for use in a lab only. In part 1 of this series you created an Active Directory Security Group to contain your SCCM servers that host IIS based roles such as Distribution Point, Management Point and Software Update Point, you then rebooted that server after adding it (CM01) to the group. You then created 3 certificate templates for SCCM on the Issuing CA server (IssuingCA) and issued them so that they could be available to applicable computers. You verified that you had a GPO in place for AutoEnrollment before requesting the IIS and DP/OSD Certificates on the IIS Site System (CM01) using certlm.msc. Step 1. Edit bindings in IIS for the Default Web Site and WSUS Administration Websites On the SCCM server (CM01), start Internet Information Services (IIS) Manager, expand Sites so that you can see the Default Web Site and the WSUS Administration websites listed. Select the Default Web Site, this web site is where the management point, distribution point and other SCCM roles such as Application Catalog can be found (if they are installed). Edit bindings on the Default Web Site Right click on the Default Web Site and choose Edit Bindings from the options available. In the window that appears, select the https section (port 443) and choose Edit. In the SSL certificate dropdown menu, select SCCM IIS Cert. Click OK and then click Close. Verify changes made Once done, you can open up Internet Explorer and verify that it's reporting back in HTTPS mode for the default web site by browsing to the following addresses to verify the Netbios name and FQDN resolve in HTTPS mode. Click on the Lock in the address bar to get info about the connection. https://cm01 https://cm01.windowsnoob.lab.local/ Edit bindings on the WSUS Administration Web Site Repeat the above operation, on the WSUS Administration website (note that it uses port 8531 for https mode). click OK and Close when done. Step 2. Modify WSUS Administration SSL Settings WSUS itself requires some additional changes documented here (1) that we need to configure to allow WSUS to use HTTPS. In the Internet Information Services (IIS) Manager, expand sites and selct WSUS Administration. Select ApiRemoting30 under the WSUS Administration web site, in the right pane, click on SSL Settings and select Require SSL and verify that Ignore is selected before clicking Apply. Next, select ClientWebService under the WSUS Administration web site, in the right pane, click on SSL Settings and select Require SSL and verify that Ignore is selected before clicking Apply. Next, select DSSAuthWebService under the WSUS Administration web site, in the right pane, click on SSL Settings and select Require SSL and verify that Ignore is selected before clicking Apply. Next, select ServerSyncWebService under the WSUS Administration web site, in the right pane, click on SSL Settings and select Require SSL and verify that Ignore is selected before clicking Apply. Finally, select SimpleAuthWebService under the WSUS Administration web site, in the right pane, click on SSL Settings and select Require SSL and verify that Ignore is selected before clicking Apply. Step 3. Configure WSUS to require SSL In an administrative command prompt on CM01, browse to the location of WSUS installation files. cd C:\Program Files\Update Services\Tools Next issue the following command where CM01.windowsnoob.lab.local is the Fully qualified domain name of your ConfigMgr server hosting WSUS. WsusUtil.exe configuressl cm01.windowsnoob.lab.local The results are shown below: Step 4. Configure SCCM to use HTTPS In this step you will configure SCCM to operate in HTTPS mode. To do that, first bring up the site properties in the SCCM Console on CM01. To bring up the site properties, select the Administration workspace, select Site Configuration, select your site and in the ribbon choose Properties. Next, click on Client Computer Configuration, select HTTPS only from the options and then select Apply. Note: If you have both HTTP and HTTPS site systems in your environment, keep the second box checked (HTTPS or HTTP) and enable the Use PKI client certificate (client authentication capability) when available check box. Step 5. Configure Trusted Root Certification Authorities Note: If you fail to add the Root CA (ROOTCA_windows noob Root CA.crt) specified here, PXE boot will fail to download policy after entering the PXE password. In the site properties screen, click on Communication Security and then click on Set beside Trusted Root Certification Authorities, and click on the yellow star to add your Root CA, in this case, the Root CA for your lab (from the offline root ca), in other words point it to the ROOTCA_windows noob Root CA.crt file which is the Trusted Root Certificate for this site (the Root CA cert). Step 6. Verify that the Distribution Point, Management Point and Software Update Point are using SSL Next you need to verify the DP (and perform some additional configuration), MP and SUP roles are using SSL. To do this, select the Administration workspace in the console, click Site Configuration, select Servers and Site System roles, and select the Distribution Point role. Right click it and choose Properties to bring up the Distribution Point role properties. You should see that it is already configured for HTTPS. Next you need to add the certificate used by clients being imaged by operating system deployment in WinPE or for WorkGroup based clients, to do so, click on Import Certificate and select Browse, browse to the location where you saved the OSD Cert.pfx file (which you created in Step 5 of part 1 here), enter the password you specified, and click Apply. Click OK to close the Distribution Point role properties. For more info on the DP Cert requirements see - https://docs.microsoft.com/en-us/sccm/core/plan-design/network/pki-certificate-requirements Next, select the Management Point role properties, they are shown below, again, HTTPS is selected by default as you set it site wide with the HTTPS only option. When you selected HTTPS Only in the Client Computer Communication of the site properties, this initiated the Management Point to reinstall itself with the new settings, as you can see here in the sitecomp.log. In addition in the mpsetup.log you can see that it's configured for SSL Finally you can check mpcontrol.log this log logs the status of your Management Point, and in there you can verify that the Management Point is up and running and communicating OK in HTTPS mode and that it has successfully performed Management Point availability checks. Next, double click the Software Update Point role to review it's properties. Place a check in the Require SSL communication to the WSUS Server check box. Click Apply and click OK to close the Software Update Point properties. At this point open the WCM.log and look for a line that reads Step 7. Verify Client Received Client Certificate and SCCM Client Changes to SSL Logon to the Windows 10 1803 client and start and administrative command prompt, from there launch certlm.msc to bring up Certificates on the Local Machine. Browse to Personal and Certificates, and you should see the SCCM Client Certificate listed. Note: I assume you've already installed the ConfigMgr client agent using whatever method your prefer on the Windows 10 1803 virtual machine. Next, open the Control Panel and locate the Configuration Manager client agent in System and Security, and open it. If the client was just installed the Client Certificate will probably state Self-Signed (or None if you have just installed the client..). After a couple of minutes, close and then reopen the client and you should see that the Client Certificate states PKI. At this point, open the ClientIDManagerStartup.log in C:\Windows\CCM\Logs and you can see Client PKI cert is available. You can also verify client communication to the Management Point in the CCMMessaging.log and we can see it's successful in that communication. Job done ! You've successfully converted SCCM from HTTP to HTTPS using your PKI lab, and you've verified that the client is operating in HTTPS mode. In the next parts we'll look at the Cloud Management Gateway and Cloud Distribution Point. Recommended reading (1) - https://technet.microsoft.com/en-us/library/bb633246.aspx https://docs.microsoft.com/en-us/sccm/core/plan-design/network/pki-certificate-requirements https://www.enhansoft.com/how-to-setup-ssrs-to-use-https-part-1/


-
HI, I want to deploy my Visual Studio 2019 (50 GB large) to the client machine and dont want to download it into CCMCACHE on the client machine first. As you know the Software Center download first the files into CCMCACHE, after downloding beginn to install the Application. But I have my Visual Studio Files on the local machine D:\VS Is there anyway to use D:\VS as Source path in my deployment Type? The Reason is that I dont want to download 50 GB on the client machine (CCMCACHE), the SCCM should use the local Files D:\VS to install the Visual Studio without download any files. The Client machine has no internet access
-
Hi Looking for advice/recommendations regarding BIOS update ( and settings) and driver servcing for a HP only-shop. I´m aware that there are a number of options available for updating drivers and am trying to find the best solution to fit our needs. We have the luxury of only having one model to service (HP Elitebook 840 G9) thanks to a recent hardware swap which was done in conjunction with rolling out W11 to all our users. We are running CM 2303 and using HP driver packs for TS/OSD bare metal deploys. What we would like to achieve is the following: Update BIOS if/when needed. Check compliance of BIOS settings (password, boot order, secure boot etc.) Create a baseline of updated preapproved drivers to deploy HP have their options with MIK/Image Assistant/CMSL which I don't have any experience of but seem interesting. I am, however, a little bit hesitant when I read some comments from experienced config manager admins that have had difficulties when evaluating these options in the past (to be fair, a few years ago, things may have improved since). We have used third-party catalogs in CM in the past when we had a mix of Lenovo and HP and my experience was not very good (I won't go into the details but it was mostly Lenovo-related). Considering that we only have one model to keep updated, what do you think based on your experience would be a reasonable solution (time and effort) to look at? I like to keep things simple with as little interaction as possible for the user. Any real world advice would be appreciated, regardless if it´s a vendor specific, community tool or commercial product. Thanks in advance! Emile
-
 I have inherited an SCCM 2211 environment that was supposed to have been setup in HA, but it was not fully configured (no passive site node). I'm a bit stumped with how the SQL AOG has been configured and the person that built it is no longer around. In the past when setting up HA, I would setup the SQL AOG and point SCCM to the listener node. In the console I would see a single site database sever and it would use the name of the listener as the server name. In the environment I inherited, they setup an AOG, but there are 2 site database server roles in the console and they are both pointing to the 2 AOG replicas rather than the listener. I can't find anything saying this is supported and I don't see how that gets you HA capability, but before I start reconfiguring things I wanted to make sure this is not a supported method for HA with SQL and SCCM? Thanks
 -
 Hello We recently moved our sccm on prem server to the azure cloud , since this move we are having issues with building devices. Basically we transferred the pxe from the main server as it is in the cloud to our on prem distribution point so we can now pxe boot and get the screen to kick of the task sequence , but now i am seeing it is missing so many applications and customizations i did, I already distributed all packages to the on prem distribution point. I have tried all sorts its been like this for a week now but i am not sure what else i can try next. Thank you tnt_115
 -
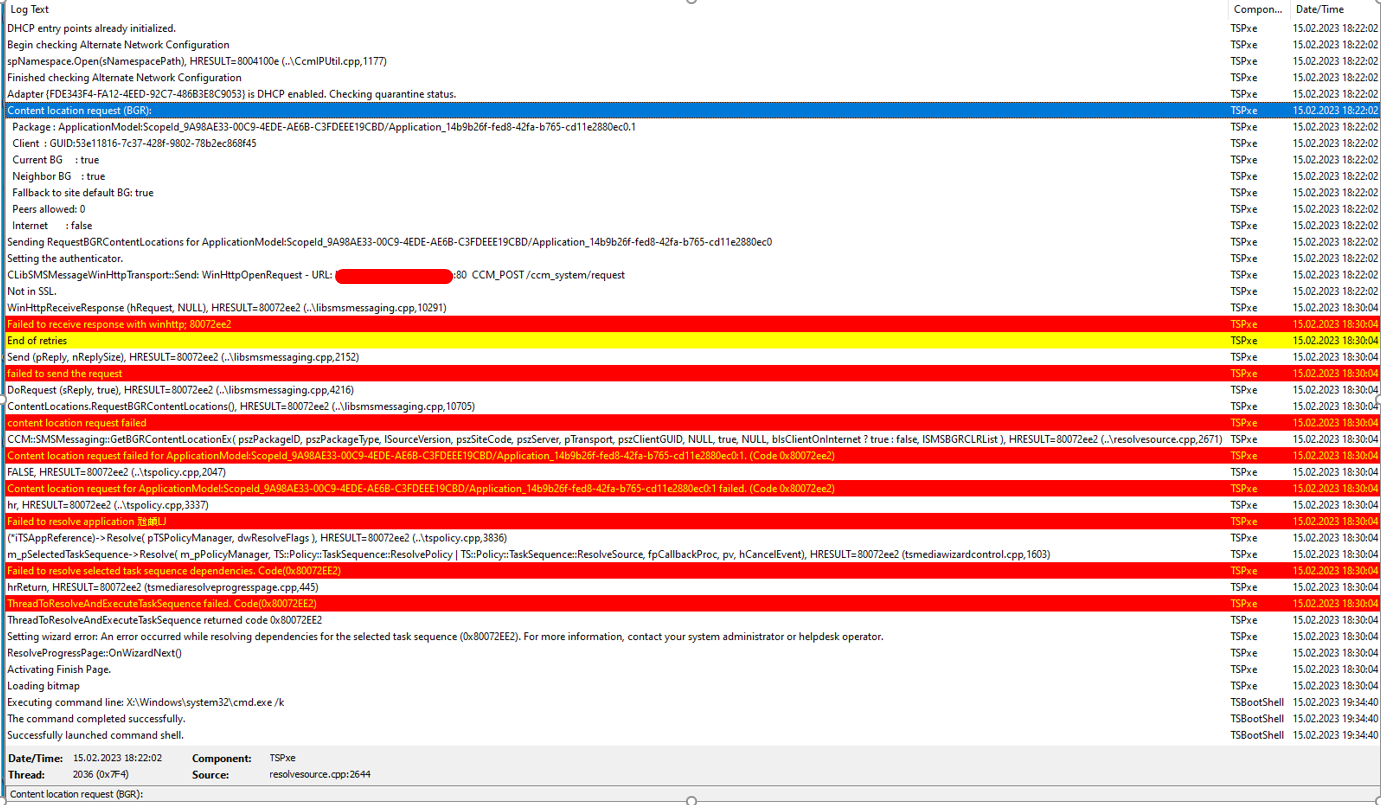
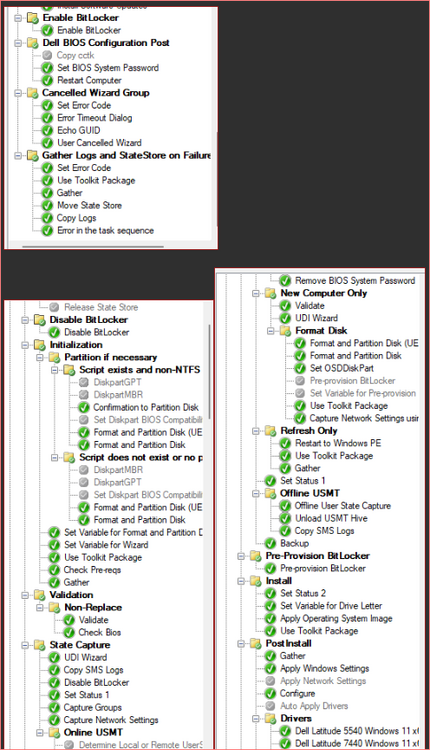
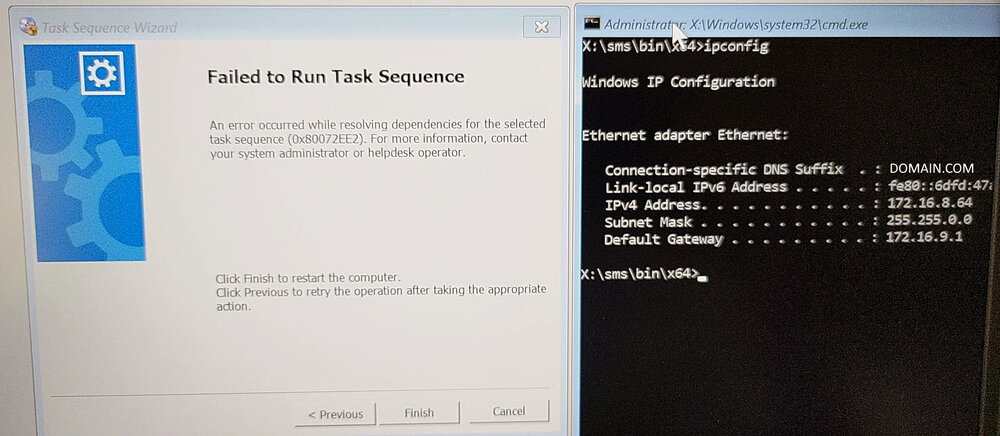
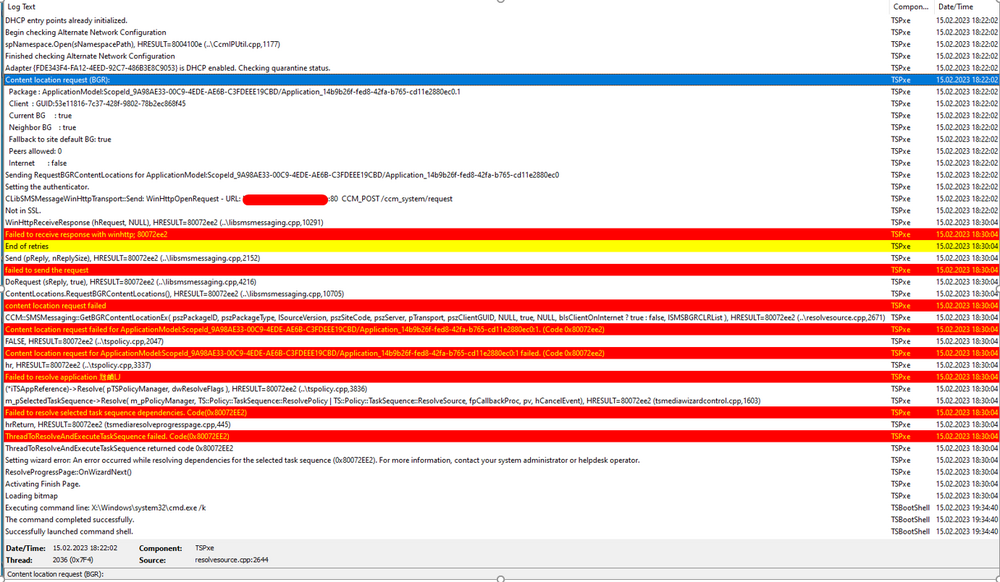
 Dear brothers and sisters from the IT World, I trust this finds you very well. We have received a new DELL Model: DELL Latitude 5530. The model has the following Network Interface: Intel Ethernet I219 Network The required drivers have been properly imported and added to the task sequence (driver package). We have two vlan/subnet where we can stage the laptops: Vlan A - Same Subnet as the SCCM Server Vlan B - A diferent Subnet (Sccm Server), we use ip helpers to root the trafic. Staging Vlan A Test1 - Port RJ45 - Network Interface: Intel Ethernet I219 NetworK I tried with a diferent dell model and everything worked properly, really fast and stable. I tried with the model DELL Latitude 5530 (2 diferent laptops) and the Task Sequence return an error right at the begining, the DISK is not even formated and we get the following: An error occurred while resolving dependencies for the selected task sequence (0x80072EE2). For more information, contact your system administrator or helpdesk operator. As we can see on the SMSTS.LOG located in (X:\windows\temp), an IP is properly assigned: And as you can see in this screenshot, i have an ip address: Please find more details about the error below: Test2 - USB-C - Docking Station I tried with the model DELL Latitude 5530 (2 diferent laptops). The WINPE Img takes a lot of time to download but after that, the TS works properly (even if it is slow) and i dont get the error. Staging Vlan B Test1 - Port RJ45 - Network Interface: Intel Ethernet I219 NetworK I tried with a diferent dell model and everything worked properly, however, the network is slower but it is stable. I tried with the model DELL Latitude 5530 (2 diferent laptops) and everything worked properly, the network is slow but it is stable. Test2 - I didnt do it because the objectif if to reimage on the SCCM Subjet. This is driving me nuts.... Can you please guys have the kindness of helping me? As always, your help and support is very much appreciated. Thank you all and best regards, your help and support is very much appreciated. Peace
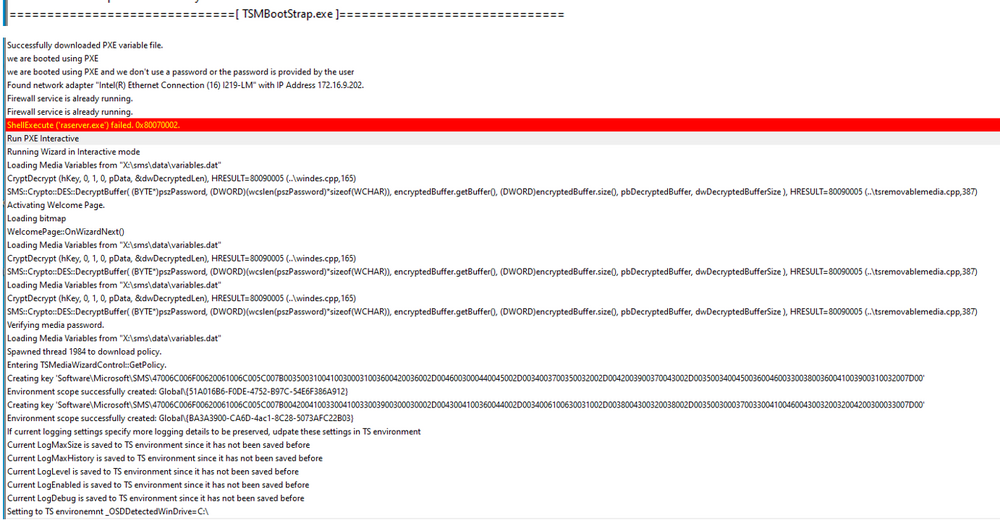
-
Hi, I need to update drivers on existing machine how can I do this for all of the drivers We have over 1000 machine which required new drivers as old one are causing issue with performance
-
 Hi, I have SCCM server without internet connection and a remote WSUS server with internet connection, SUP installed and synchronizing from Microsoft update. When I try to download updates from the software updates in sccm console I get the below error: - Proxy is enabled for download, using registry settings or defaults. - Connecting - Adding file range by calling HttpAddRequestHeaders, range string = "Range: bytes=0-" - HttpSendRequest failed 12029, can still rety for 3 times - HttpSendRequest failed 12029, can still rety for 2 times - HttpSendRequest failed 12029, can still rety for 1 times - HttpSendRequest failed 12029 When I give the SCCM serve internet connection , the download succeeds because it is being downloaded on the sccm server that has internet access. My question is that, is it possible to configure the SCCM server without internet and let it download updates using the wsus server which has internet access? Since the WSUS server has SUP installed can't it handle the download in that server (wsus-server), why does the software updates download occurs in the sccm server? And can anyone inform me how to properly setup SCCM with remote WSUS?
 -
 After I installed the Configuration Manager 2111 Hotfix on the server, several people are no longer to run the Configuration Management Console. They get the message "The Configuration Manager Console cannot connect to the Configuration Manager site database. Verify the following" However I am able to run the console from the server and my PC.
 -

Endpoint protection manager fails after installation
AndreasM posted a question in Endpoint Protection
Hello, we have a test environment and a productive environment. In the test environment we could install and configure an end point protection manager. In the production environment we get errors as these: Cannot find path for destination inbox Notification Manager on server REGISTRY. The current component is possibly not installed. Cannot connect to the inbox source, sleep 30 seconds and try again. [Software Inventory Processor (Site Trusted)] cannot update environment so skiping outbox processing. Cannot find path for destination inbox Distribution Manager (incoming) on server registry. ~~ same goes for: Software Metering Processor Usage (Site), Success Policy Requests / Discovery Data Manager, etc. [Notification Manager] cannot update environment so skiping outbox processing. [Distribution Manager (Incoming)] halting execution. Remote site is in pull-mode. Coult not read registy key HKEY_LOCAL_MACHINE\Software\Microsoft\SMS\MPFDM\INboxes\ on the server. The operating system reported error 2: cannot find the file We have no clue how to resolve this. We opened a case with MS, but so far nothing. It seems during the installation stuff from the new epp-server should be pushed onto the siteserver (and stuff should also be written in the registry of the site server,) but this fails. The SiteServer is admin on the new Site System (we tried to install using the site servers computer account as well as the install service account - both failed). The service RemoteRegistry runs on both systems. Thank you for ideas. Sincerely Andreas -
 Hello all. During OSD my task sequence is failing with error code 0x80004005 at the very end of "Apply Operating System". The attached smsts.log (smtsprobook) seems to indicate something funny going on with partitions? Test Systems: 1. HP Prodesk 400 G3 SFF 2. HP Probook 430 G3 History: I have created a task sequence for deploying Windows 7 Enterprise X64 w/ SP1. This task sequence works great for the HP Prodesk. No issues at all. Task Sequence Steps (in order): Capture Windows Settings Capture Network Settings Install Operating System Restart in Windows PE Format and Partition Disk Apply Operating System Apply Windows Settings The rest doesn't really matter since the task sequence is failing at "Apply Operating System" (On the HP Probook 430 G3) This issue only occurs on the Probook (laptop) and NOT the Prodesk (desktop). The way we are managing OSD here at my company is to have a "Golden" Task Sequence, then just copy that same task sequence for as many different model of systems we have and insert the corresponding driver package as well as rename the task sequence for whatever new model we discover we have or receive. So we received our new shipment of Probooks (laptops) and I did what I always do when we get a new model. I grabbed the Windows 7 drivers for it (Note: These systems come with Windows 10 installed. Our image is Windows 7 Enterprise x64 SP1.) and created/copied a task sequence for the new model by simply switching out whatever driver package was in the task sequence that I just copied with the correct package for that model (a lot of this is irrelevant since again, the task sequence is failing at "Apply Operating System" before it even tries to install drivers.) Things I Have Done: Made sure all content called for in the task sequence is on the DP Deployed the TS as Available (PXE,Media,Blah blah) to All Unknown Computers Read through the provided smsts.log and could not make sense of it. Seems error 0x80004005 is a "beat around the bush" error Created a task sequence from scratch then tested. Still same issue at the same place Thought maybe its an issue with my .wim but I dont think so as this has worked on some of our other models tested Came here for help I am at a total loss as of where to start to troubleshoot this error. Most of the info you will need to help asses the issue is probably contained in the log(CMTrace it). Please let me know of anything I left out that could help. Thank you! smtsprobook
 -
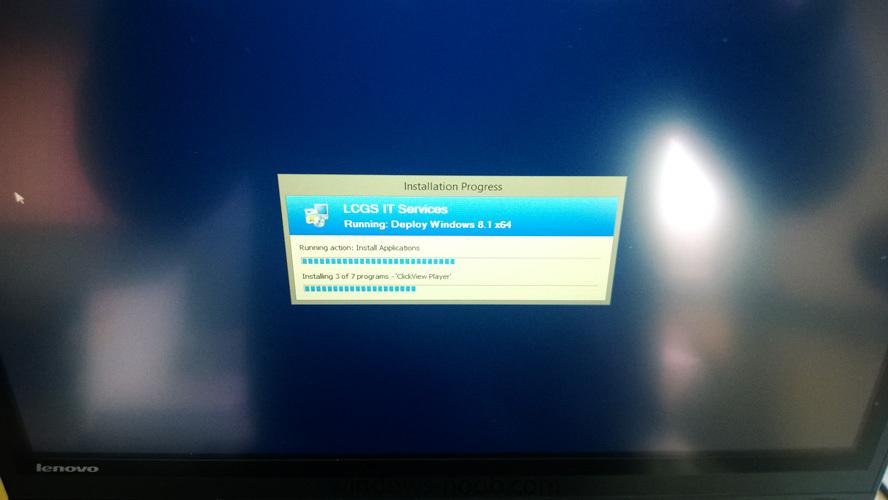
Hi all, I have an error that has plagued me since, I think, upgrading to SCCM 2012 R2. I have a handful of OSD's which I have setup and generally, they all exhibit the same issue at seemingly random times. I could have multiple machines on my bench all using the same OSD and a couple of them will hang during the installation of applications. So, it installs the Windows image, sets up the CCM client, reboots and finishes the client install and then starts installing applications. When it hits about the third or fourth application it just sits there and does nothing for as long as the machine stays on (no error). It seems to be something that happens after a fixed amount of time (not sure how long), probably ~10 minutes after the last reboot. It makes no difference how I order the apps to install. I've sorted the log list by date and time to try and find an error somewhere but I can't see anything. The really frustrating thing is, if I have a machine that is failing it will usually keep failing repetitively but then suddenly it might start working and completed the TS all the way through. Can anyone give me any advice as to what logs I should keep a closer eye on (client/server) or if anyone has heard of anything similar. It's really frustrating when you have hundreds of machines to do! Sorry if I'm a bit light on info, I'm not sure what to provide as I'm still learning! Cheers!
-
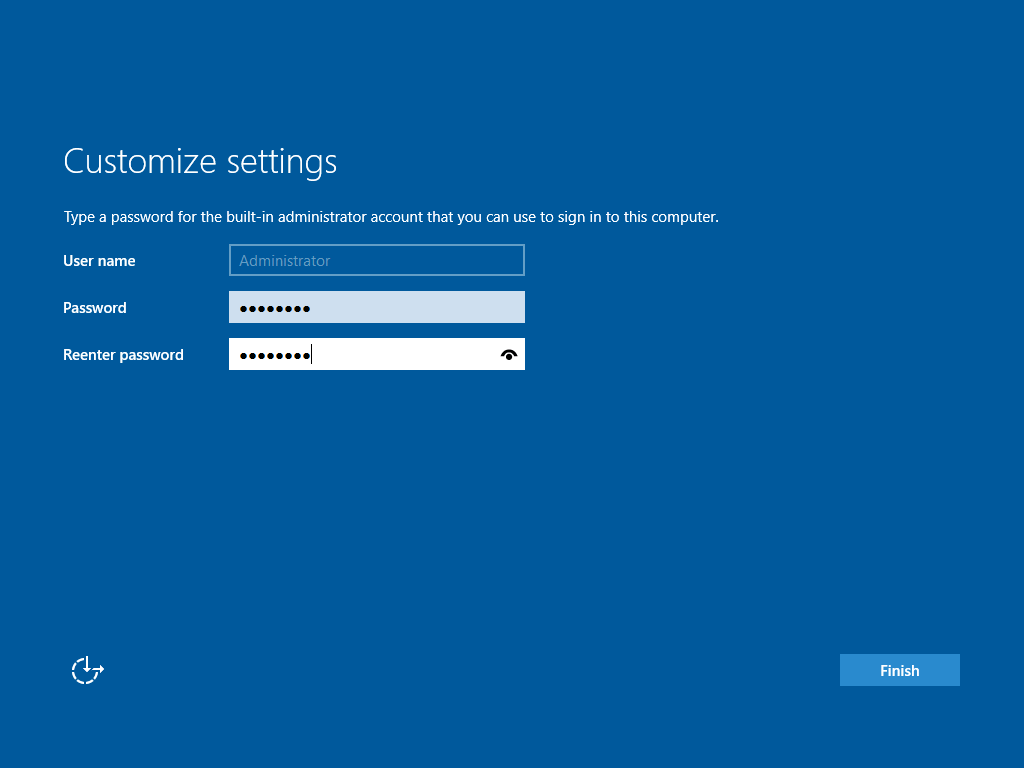
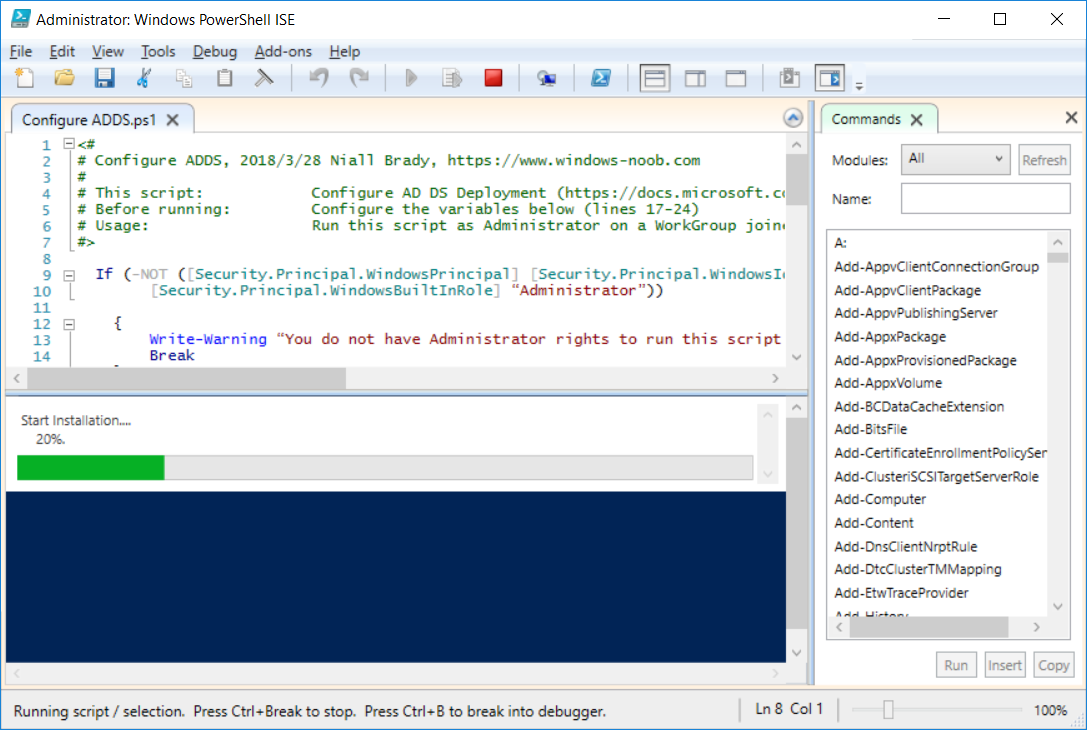
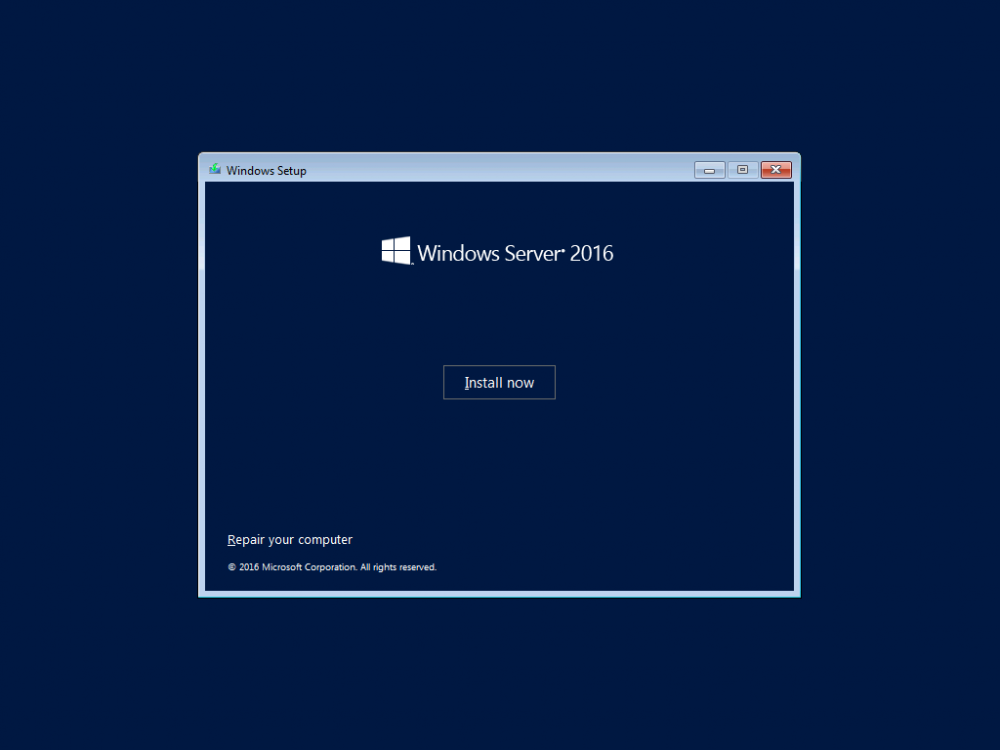
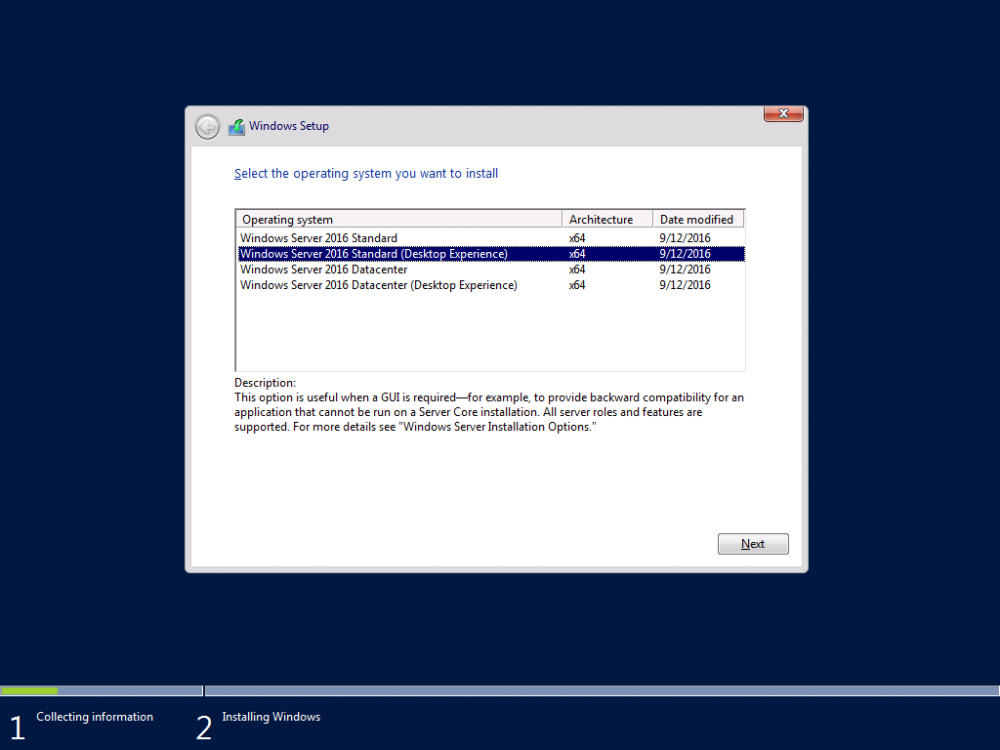
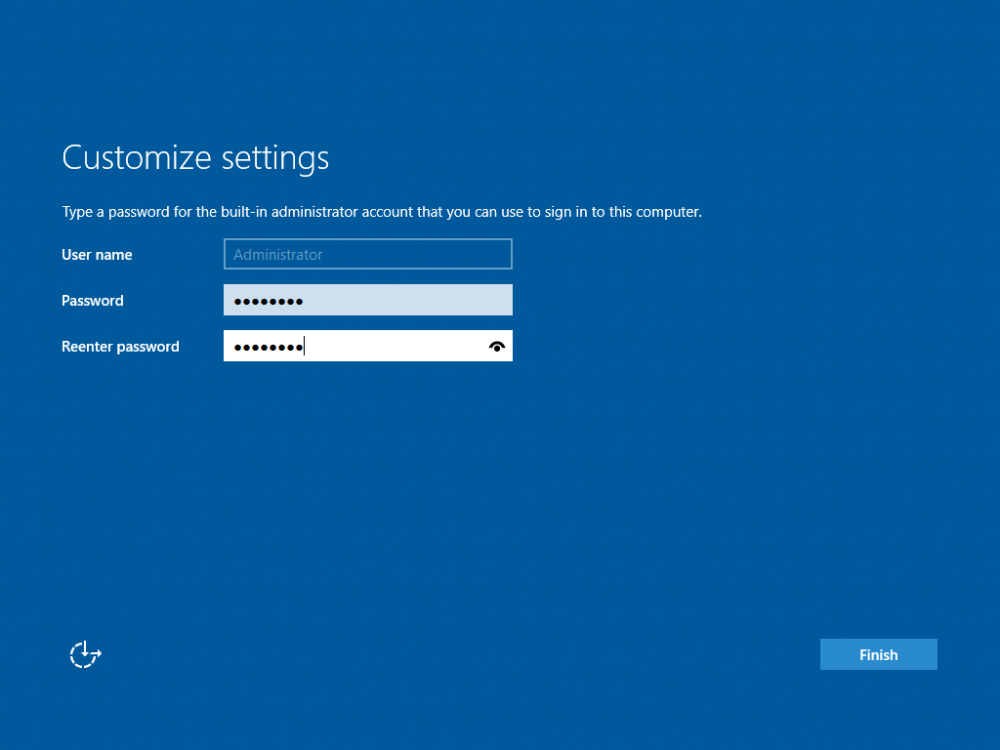
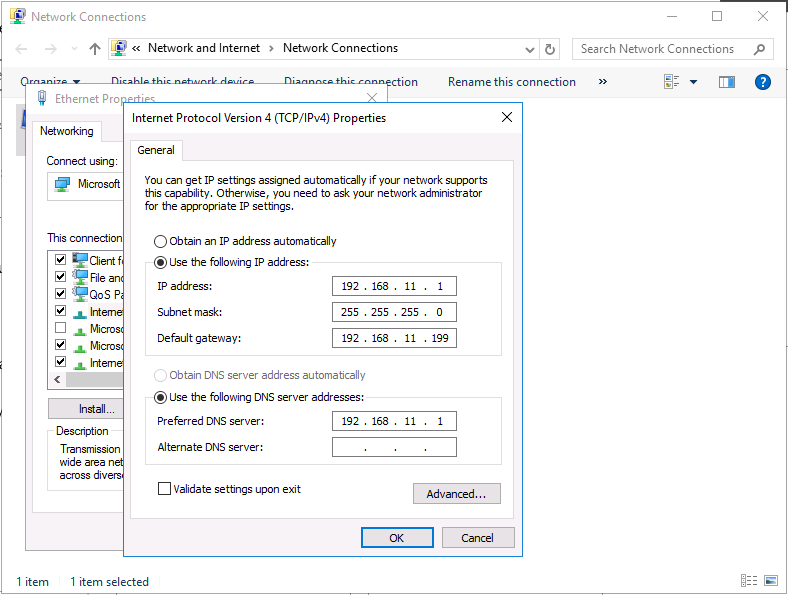
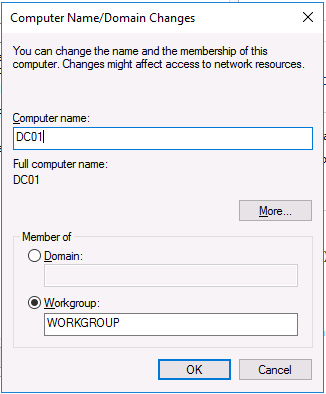
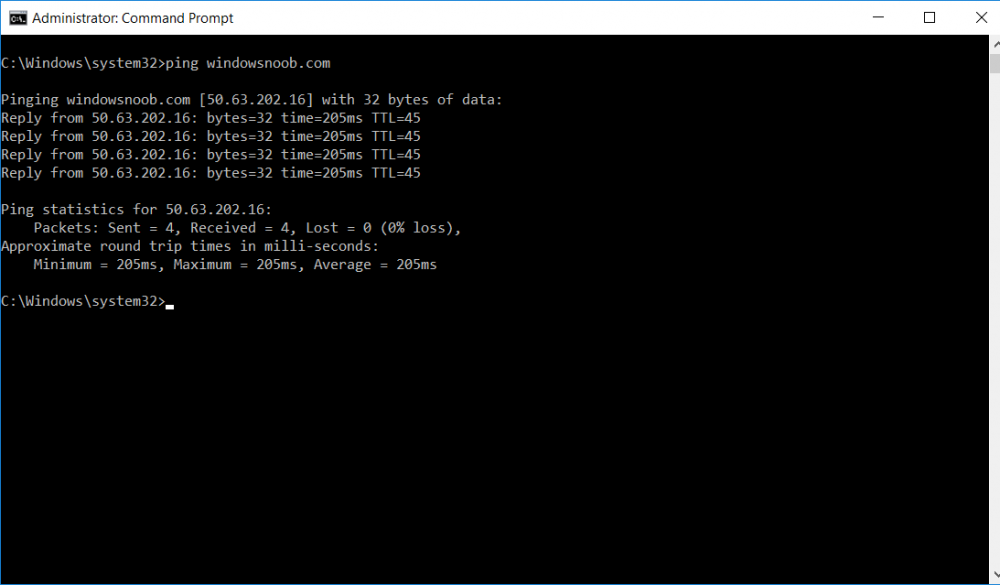
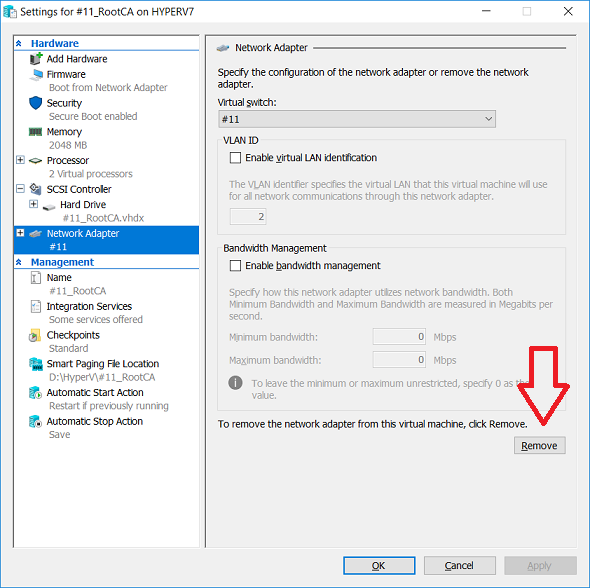
This series is comprised of different parts, listed below. Part 1 - Introduction and server setup (this part) Part 2 - Install and do initial configuration on the Standalone Offline Root CA Part 3 - Prepare the HTTP Web server for CDP and AIA Publication Part 4 - Post configuration on the Standalone Offline Root CA Part 5 - Installing the Enterprise Issuing CA Part 6 - Perform post installation tasks on the Issuing CA Part 7 - Install and configure the OCSP Responder role service Part 8 - Configure AutoEnroll and Verify PKI health Introduction Security is everywhere, and a core component of security is certificates. Public key infrastructure (PKI) is a set of roles, policies, and procedures needed to create, manage, distribute, use, store, and revoke digital certificates and manage public-key encryption (1). In this series of guides I will show you how to set up a 2 tier PKI hierarchy running on Windows Server 2016 and you can use this to set up your own LAB so that you can learn about PKI and later use it for related System Center Configuration Manager roles such as Co-Management (3). Note: I don't claim to be an expert on PKI and would absolutely advise you to consult with a PKI expert if you plan on setting up PKI in production. This guide is designed to help you setup your LAB, it's based on a Windows Server 2012 R2 PKI guide on Technet from here and kudos to those guys for writing it (2). The difference here is you'll be using Windows Server 2016 (or later) and you'll see more screenshots and hints to guide you through the experience. I'd highly recommend you go through this entire series at least twice, just to get a feel for how PKI works and to become familiar with the terms involved. The first time you complete this series will probably feel laborious, however the second time you do it things will start to make sense and you'll have a better understanding of why you are doing it. This series will be tough to wrap your head around especially if you are new to PKI, but take it one part at a time, one step at a time, methodically. If in any doubt, about any of the content then please ask your questions here by starting a new thread. Please note, Microsoft released a new updated PKI guide of their own, here June 2025. By the end of this series of guides you'll have the following setup and running in your windowsnoob.lab.local PKI LAB. Domain Controller (Windows Server 2016) - 192.168.11.1 Issuing CA (Windows Server 2016) - 192.168.11.2 Webserver (Windows Server 2016) - 192.168.11.3 Offline Root CA (Windows Server 2016) Windows 10 (Windows 10 Enterprise, version 1803) - 192.168.11.4 (Optional) Smoothwall NAT (linux) - 192.168.11.199 and MMC based applications like this screenshot from the Enterprise Issuing CA will become familiar to you Before we start the series let's list some of the terms you'll see popping up over and over. I will try to explain them as we move through the guide. PKI - Public Key Infrastructure AIA - Authority Information Access CDP - Certificate revocation list Distribution Point CRL - Certificate Revocation List OCSP - Online certificate status protocol CA - Certificate Authority Note: I'd recommend that you snapshot (checkpoint) the Virtual Machines at the end of each part of this series, so if you make a mistake, you can always back track to a known good state. Step 1. Create the Virtual Machines I use Hyper-V for my labs, as it's a role built into Windows Server 2016 (and even Windows 10), so as long as your computer is relatively new and the hardware supports virtualization, you can use it (simply enable the role, reboot, and start using it). You should have at least 16GB of ram and 500GB of SSD storage to set this lab up comfortably. To quickly create the virtual machines I use a PowerShell script which I wrote, you can download it here. Download the script - Create HyperV VMv2.ps1 Virtual Machine Names For this LAB, please use the following naming convention for your virtual machines (note this is not the computer name but the virtual machine name). #11_DC01 #11_IssuingCA #11_RootCA #11_W10_1803 #11_Webserver #11_Smoothwall Note: The #11 prefix is simply a method I use in Hyper-V to separate my labs visually in Hyper-v manager, so #11 is one lab, and #10 is another (and so on). You don't have to use the same convention as I do, but it would make it easier for you to follow the entire series. I use the Smoothwall linux based NAT to provide Port Forwarding capability and to share internet into my various LABs. Virtual Machine Roles The Virtual Machines created will have the following functions #11_DC01 Roles: DC, DNS, LDAP CDP,AIA #11_IssuingCA Roles: Enterprise Issuing CA #11_RootCA Roles: Standalone Offline Root CA #11_W10_1803 Roles: A Windows client #11_Webserver Roles: Webserver HTTP CDP, AIA #11_Smoothwall Roles: Port Forward, Internet sharing Note: When prompted for a network switch, create a unique one (#11) for the first VM created, and use the same one for each of the other vm's (we will remove the network from the Offline Root CA). For generation type, use Gen 2. Below is how I created the virtual machines listed above. Note: After creating the virtual machines and before installing Windows Server 2016 on the Offline Root CA, you must remove the Network Card for the Offline Root CA virtual machine as it should not be connected to any network. Step 2. Install the virtual machines Install Server 2016 On DC01, RootCA, IssuingCA and Webserver, install Windows Server 2016. It's up to you how to do this, you can use an Automated MDT PowerShell script, or install them manually. To install all Windows Server 2016 on all 4 servers as WorkGroup joined computers do as follows.. Choose Windows Server 2016 Standard (Desktop Experience) Continue through the installation wizard until prompted for a password, use P@ssw0rd as the Administrator password Click Finish. And then logon using the Administrator username and password configured above. Once Windows is installed, set the IP address for each virtual machine as shown below. Note: Below are the Computer Name and IP addresses used in this guide. For the Offline Root CA, you must remove the Network card in the Hyper-V virtual machine settings. Computer Name: DC01, IP address: 192.168.11.1, Subnet mask 255.255.255.0, Default gateway: 192.168.11.199, Preferred DNS server: 192.168.11.1 Computer Name: IssuingCA, IP address: 192.168.11.2, Subnet mask 255.255.255.0, Default gateway: 192.168.11.199, Preferred DNS server: 192.168.11.1 Computer Name: Webserver, IP address: 192.168.11.3, Subnet mask 255.255.255.0, Default gateway: 192.168.11.199, Preferred DNS server: 192.168.11.1 Computer Name: RootCA, IP: <NO NETWORK> Computer Name: W101803, IP address: 192.168.11.4, Subnet mask 255.255.255.0, Default gateway: 192.168.11.199, Preferred DNS server: 192.168.11.1 Computer Name: smoothwall11, IP address: (Green, static) 192.168.11.199 (Red, DHCP internet IP) x.x.x.x Here's how you can set the IP address for DC01. And configure the Computer Name as per the list (in this example it's for the Domain Controller) Reboot when prompted. Install Windows 10 Enterprise version 1803 Install Windows 10 Enterprise, version 1803 on the remaining virtual machine (#11_W10_1803). Configure the Computer Name and IP address as specified. Leave it WorkGroup joined. Optionally install Smoothwall To learn how to setup Smoothwall express as a firewall see this blog post. Step 3. Configure ADDS on DC01 Now that you've installed the servers, it's time to make DC01 a domain controller, to do that we'll install Active Directory Domain Services (ADDS) and to do that we'll use this PowerShell script, simply run the script as Administrator in Windows PowerShell ISE on DC01. Download the script -Configure ADDS.ps1 After running the script, DC01 is prompted to a Domain Controller and is ready for the next part of this series. Note: Please only run this script on the DC01 virtual machine. After running the script, the Domain Controller is ready for Part 2 (configured as dc01.windowsnoob.lab.local) and internet is working (via the Smoothwall) To continue with Part 2 of this series, click here. Recommended reading (1) - https://en.wikipedia.org/wiki/Public_key_infrastructure (2) - https://social.technet.microsoft.com/wiki/contents/articles/15037.ad-cs-step-by-step-guide-two-tier-pki-hierarchy-deployment.aspx (3) - https://docs.microsoft.com/en-us/sccm/core/clients/manage/co-management-overview


- 2 replies
-
- 2
-

-
- co-mangement
- ca
- (and 12 more)
-
 I am trying to setup a test sccm server running the tech preview with a site code of TP1 in the same domain as my main lab sccm server with a site code of RYK. When I install the client on a windows 10 pc from the TP1 sccm console after a while it will be assigned to the RYK site. My boundaries for site RYK are setup as such: 10.0.0.2-10.0.0.99 (clients) 10.10.0.20-10.10.0.24 (servers a) 10.10.0.26-10.10.0.99 (servers b) so here i am excluding the IP of 10.10.0.25 which is the TP1 site server. My boundary group for my main RYK site is called production and it contains the three boundaries listed above. I do have another boundary which is my AD site but there are no site systems in it and its not a member of any boundary groups, My boundaries for site TP1 are setup as such: 10.0.0.200-10.0.0.210 (test clients) 10.10.0.25-10.10.0.25 (cm02 TP1 server) this site server also has a boundary which is my AD site the same as above and it also does not contain any members or is a member of any boundary groups VM-PC08 has an manual ip of 10.0.0.201 and is joined to the home.local domain, both site servers RYK (10.10.0.24) and TP1 (10.10.0.25) are members of the home.local domain as well. How can i run a production version of sccm along side a test tech preview version of sccm and have my clients assigned to the correct site. when I installed the client on vm-pc08 initially it was assigned to TP1 but after a while it moved to RYK. As you can see my boundaries and groups don't overlap so in theory that shouldn't be an issue but what am i missing? Client push is disabled on both sites. My clients get installed via a OSD TS on the RYK site and manually from the console in TP1
 -
 I recently removed HP MIK and some client settings it's created which weren't deployed and ever since i've been getting the below errors every 30 minutes. I wonder if anyone else has had this and if they have a resolution to the problem? I saw a post on redit where someone just ignored the error as after 100 reports sccm stops trying to delete the record. SMS_OBJECT_REPLICATION_MANAGER 620 Errors Microsoft SQL Server reported SQL message 547, severity 16: [23000][547][Microsoft][SQL Server Native Client 11.0][SQL Server]The DELETE statement conflicted with the REFERENCE constraint "DataItem_ActionID_FK". The conflict occurred in database "CM_CA1", table "dbo.DataItem", column 'ActionID'. : ClientAgentProp Objreplmgr.log Errors Failed to delete Granular Client Settings Object {C970EE9A-7B92-47D0-B6A2-561F6CB6AF0F} *** [23000][547][Microsoft][SQL Server Native Client 11.0][SQL Server]The DELETE statement conflicted with the REFERENCE constraint "DataItem_ActionID_FK". The conflict occurred in database "CM_CA1", table "dbo.DataItem", column 'ActionID'. : ClientAgentProperty_Value_del
 -
 Gents, We are currently facing Sync issues between our site server and our 2 SUPs (separated servers). After some investigation we noticed that the site server wants to tell one of our SUP to start a synchronization but nothing is happening on the SUP side because of an access denied when the site server wants to connect to the SUP on port 8531. This error does not happen all the time ... The system wide proxy is configured to bypass the local range where the site server and the SUPs are located. We already cleaned up our WSUS. I think I have similar issue in WCM.log : Do you have an idea ?
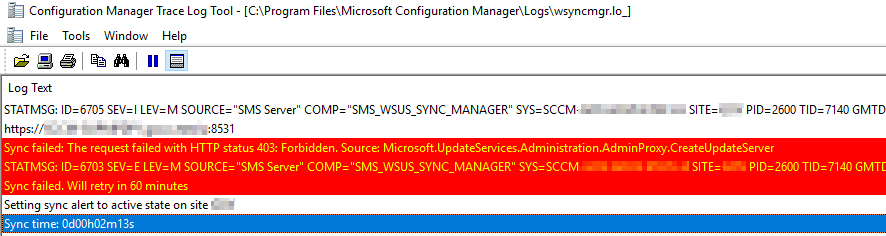

-
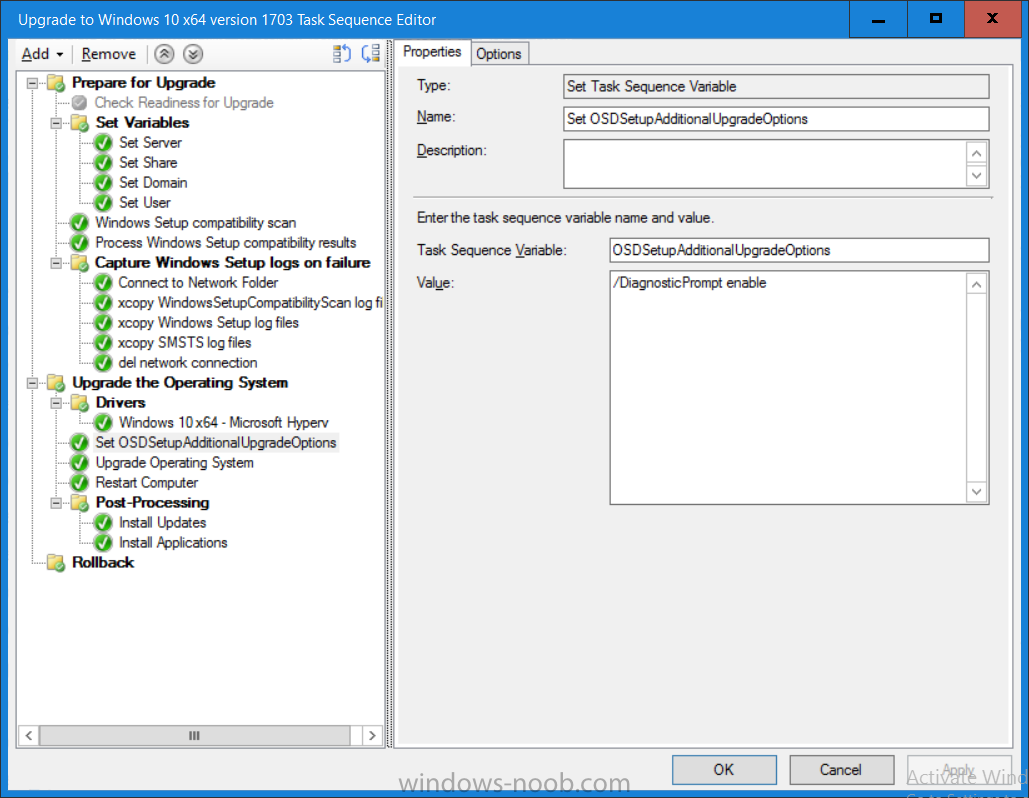
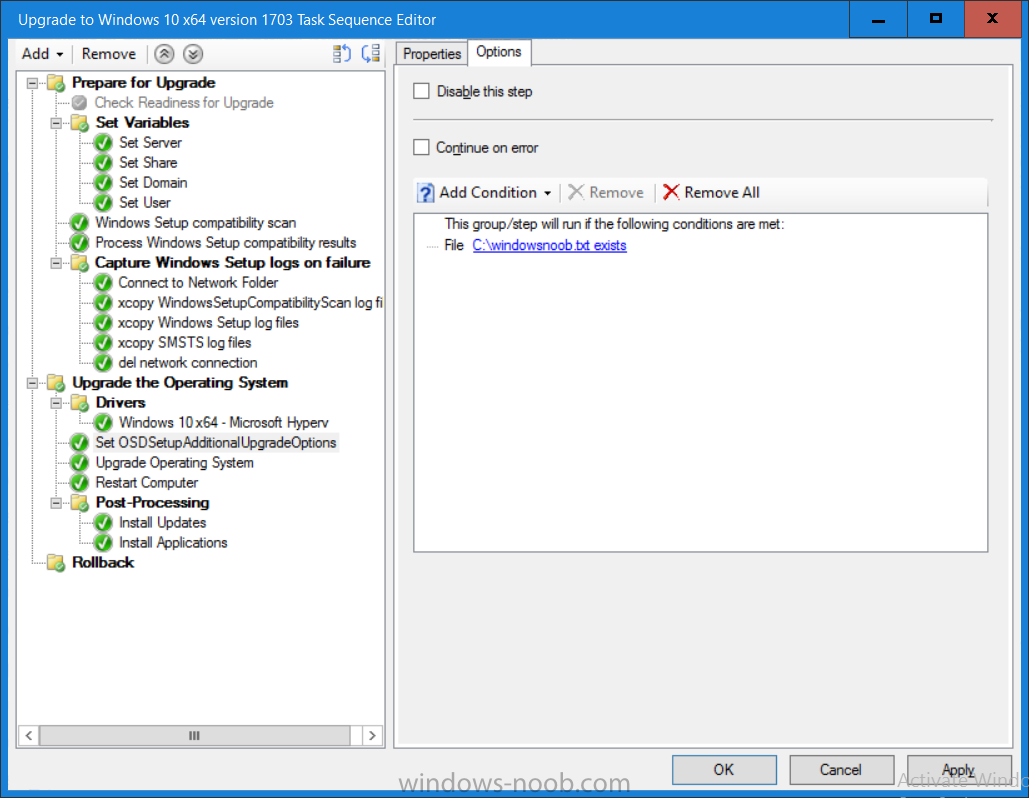
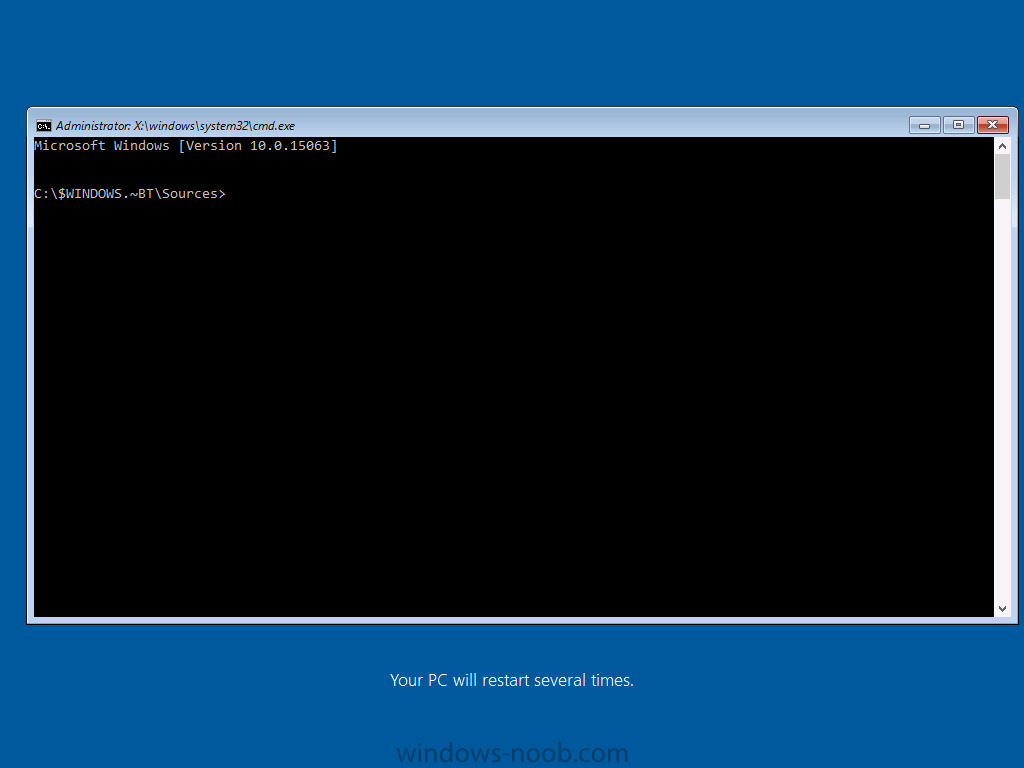
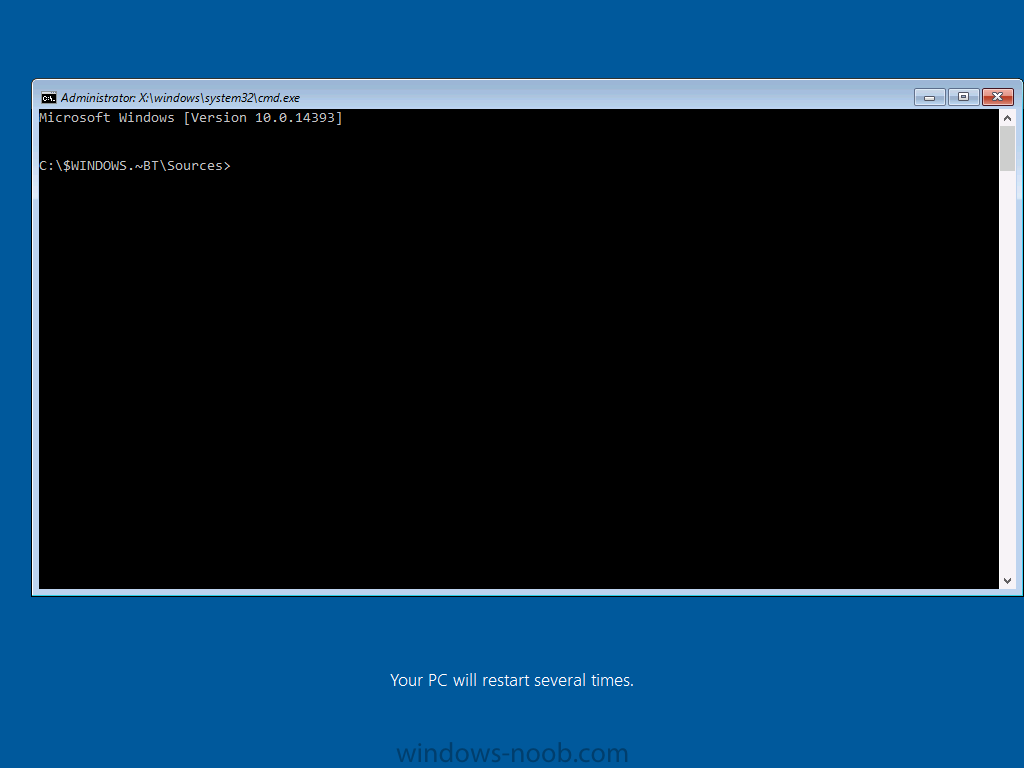
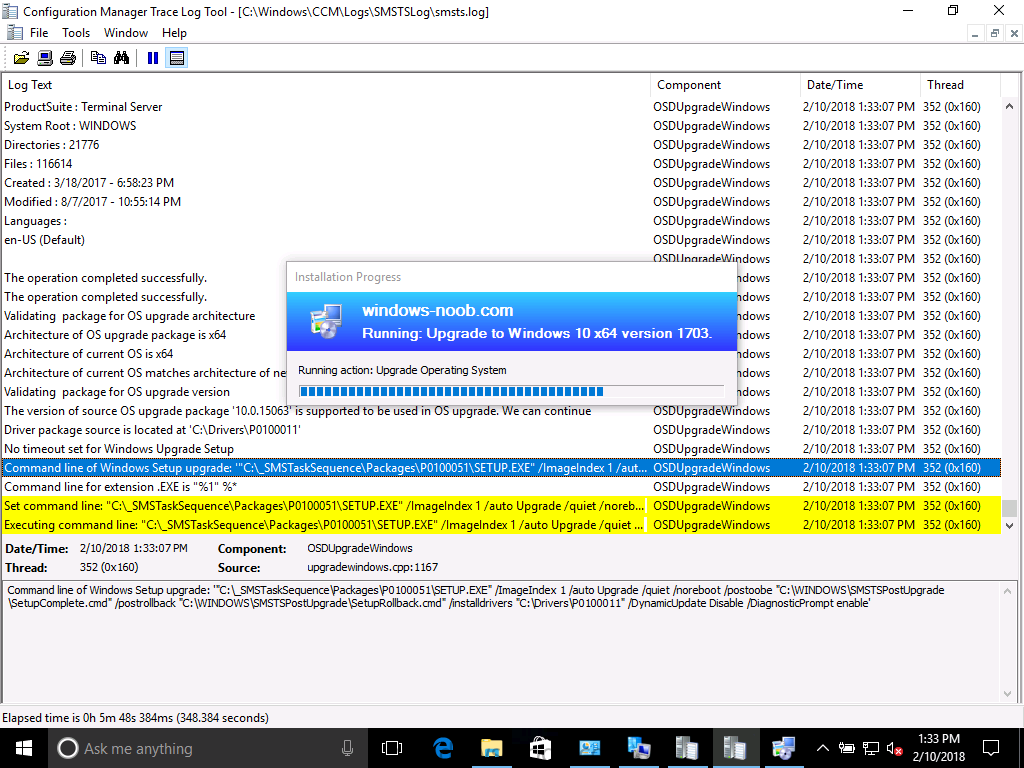
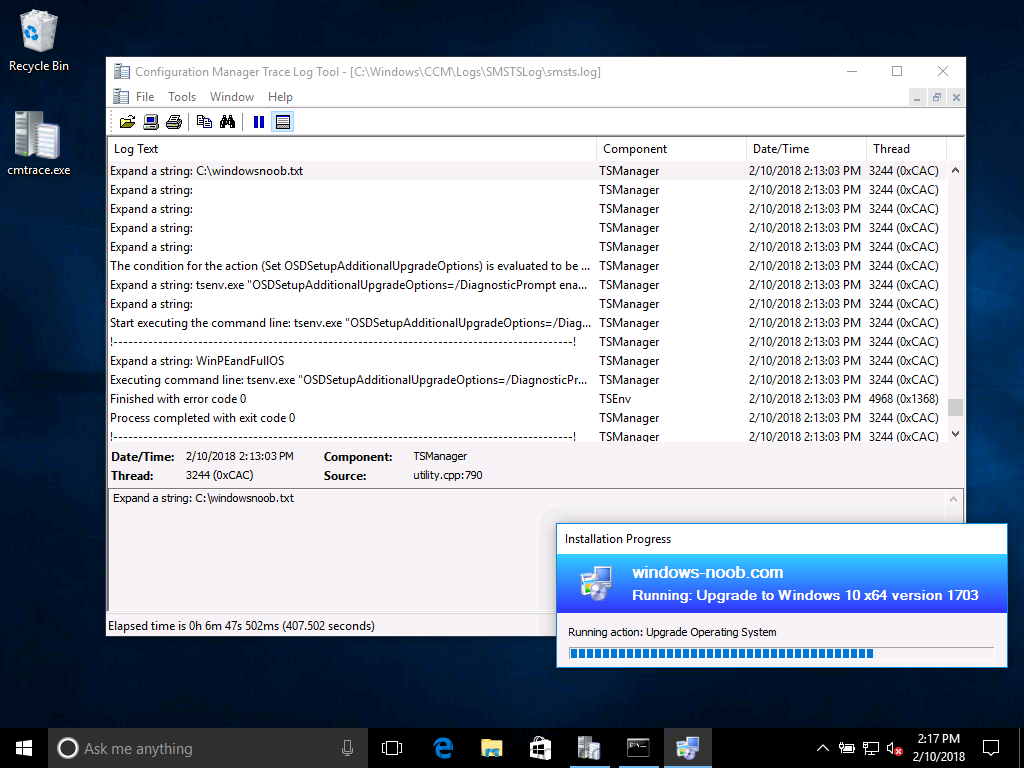
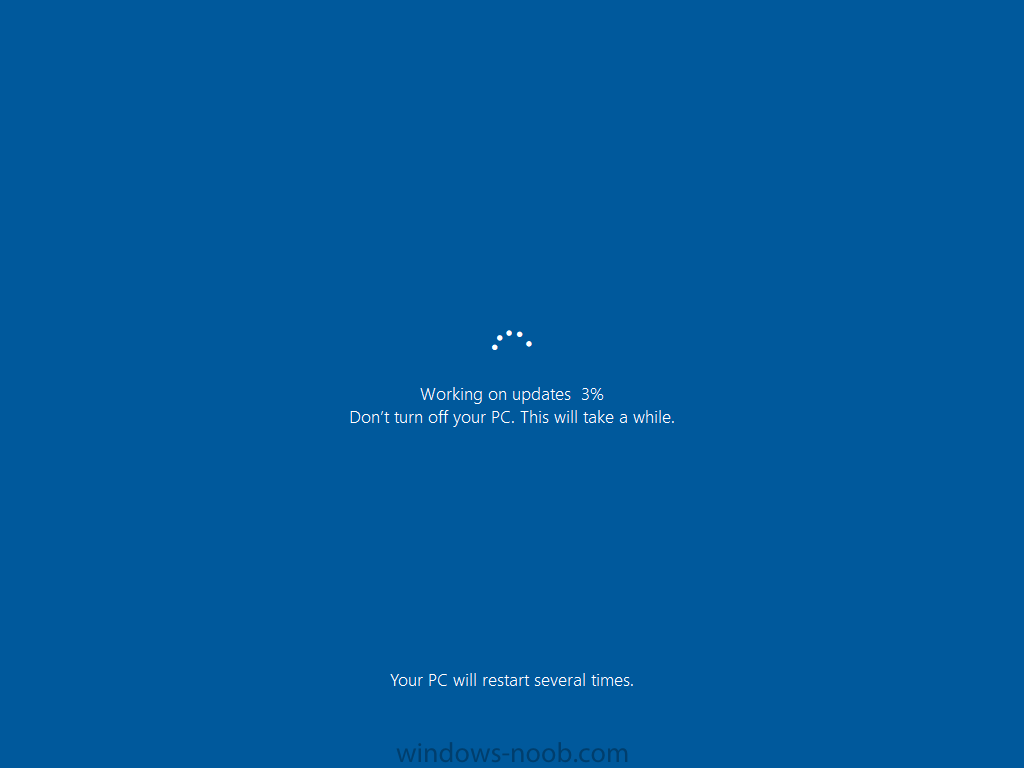
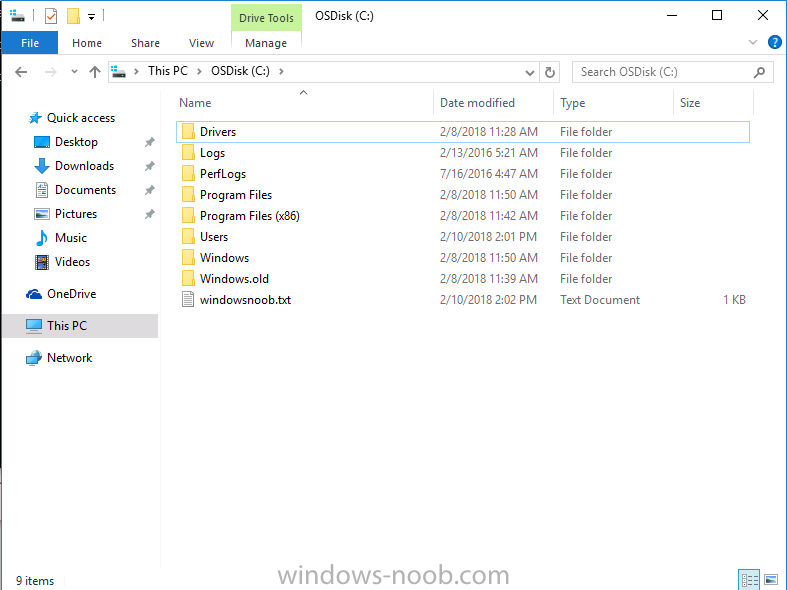
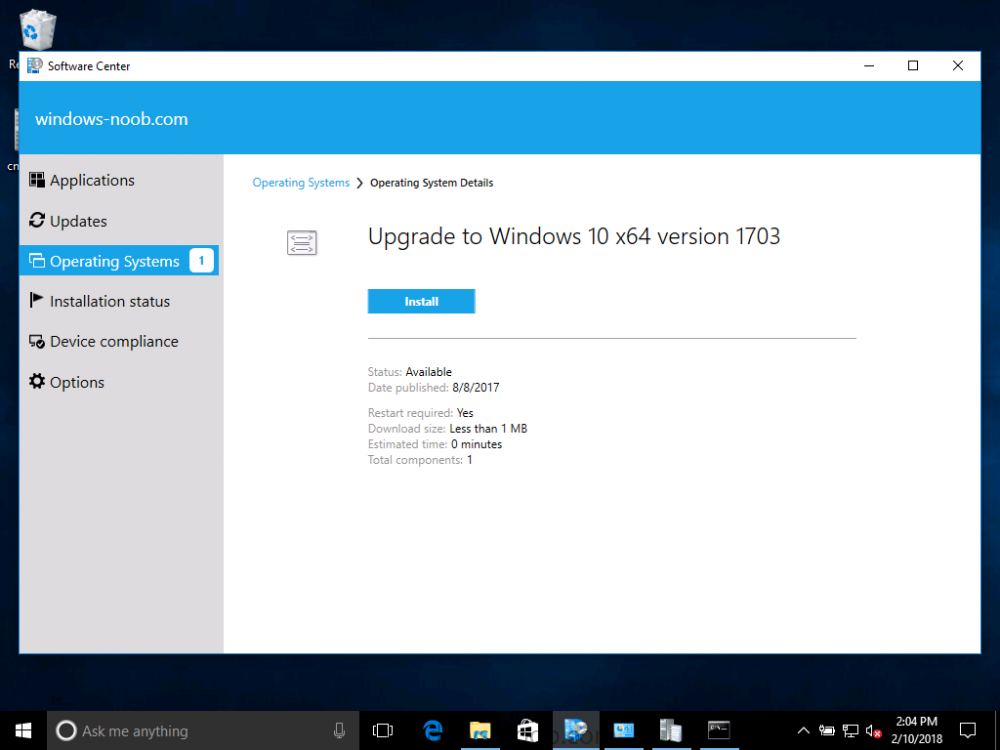
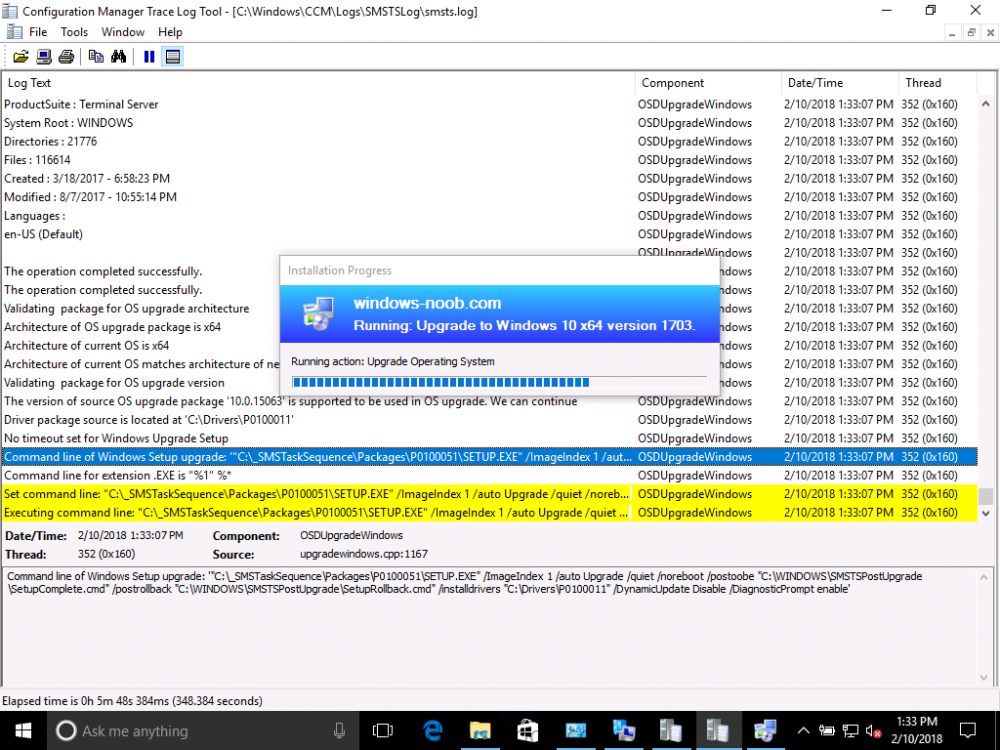
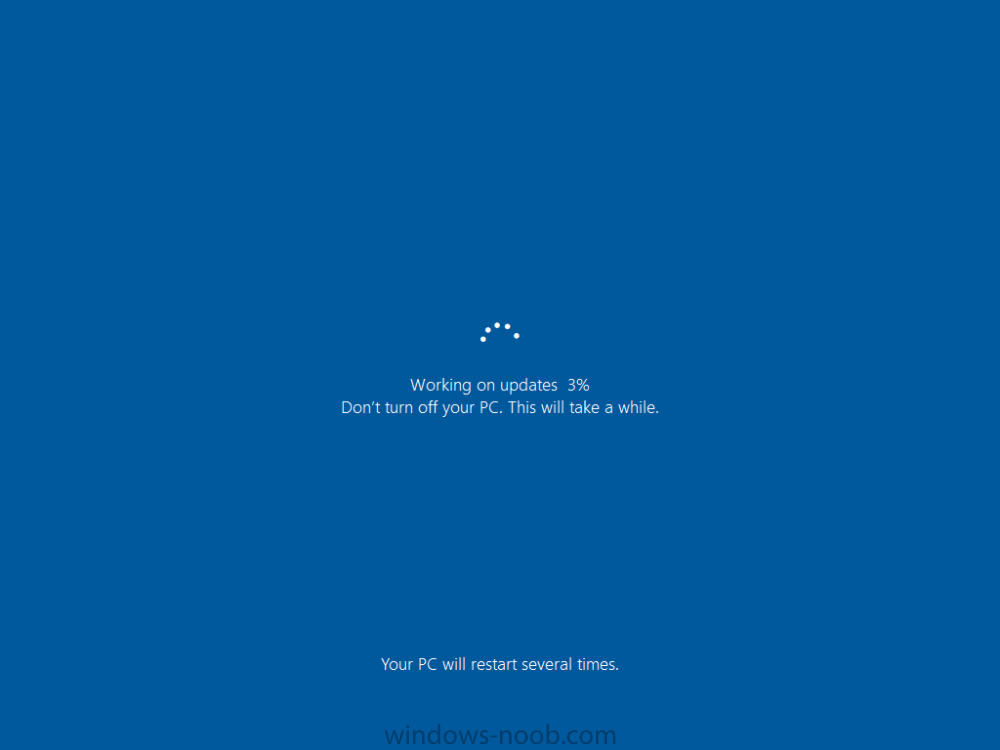
Introduction On Windows 10 version 1607 and earlier during Windows 10 upgrades from one version to another, after the computer reboots to upgrade the operating system you'll see a screen similar to the below At this point you could press Shift and F10 to bring up a command prompt, which is extremely useful if you need to check a log file, verify driver installation or to do troubleshooting. The screenshot below is from Windows 10 version 1607 which was being upgraded from Windows 10 version 1511. Security changes everything However there's a downside to this, having the ability to open a command prompt in the wrong hands could mean elevation of privileges or data theft. We all know that security is a big focus with Microsoft and as a direct result of the concerns above, the diagnostic prompt ability was disabled by default in Windows 10 version 1703 and later. That's all well and good for Joe public, but what about the SCCM admin who is trying to debug a task sequence ? Fear not, help is at hand. To re-enable the Diagnostic command prompt (Shift F10 during Windows setup in an upgrade scenario) you need to modify your task sequence to set a variable, and that variable is called OSDSetupAdditionalUpgradeOptions which is described here. This variable allows us to pass command line options to Windows setup during the upgrade and that's how we'll re-enable the diagnostic command prompt, however we don't want it available to everyone, except those 'in the know', aka the SCCM admins who need more info while troubleshooting. Step 1. Set a task sequence variable To make this work you need to add a Set Task Sequence Variable step before the Upgrade Operating system step in the Upgrade Task Sequence, like so. Task Sequence Variable: OSDSetupAdditionalUpgradeOptions Value: /DiagnosticPrompt enable Step 2. Add Options to limit exposure (optional) To limit the exposure of this diagnostic command prompt to only you (or your admins), you can add an option on the step to check for a file, reg key, variable or something that works for you, in this example, you'll look for the presence of a file on C:\ called windowsnoob.txt. Note: As stated, you can use whatever method you wish to limit exposure, Mike Terril has a nice blogpost on using collection variables to achieve something similar here. Step 3. Test it ! That's it, apply the changes and optionally create a file called windowsnoob.txt on C:\ on a computer you intend to test this on. Here's the file, created by the SCCM admin who plans on troubleshooting an Upgrade. Starting the upgrade... Before the reboot you can see the check for the file presence step is here, and as the file was present, the set task sequence variable step will run and here you can see the option has been appended to the Setup.exe command line by opening C:\Windows\CCM\Logs\SMSTSLOG\smsts.log in CMTrace After rebooting into the Windows Setup portion, try pressing Shift and F10 together, if everything went ok you'll see this. So that's it, now you know how to re-enable the Diagnostic command prompt during Windows 10 1703 or later upgrades and to do it in a reasonably limited way. Related reading https://docs.microsoft.com/en-us/sccm/osd/understand/task-sequence-action-variables https://docs.microsoft.com/en-us/windows-hardware/manufacture/desktop/windows-setup-command-line-options


-
I created an offline media of the Windows 20H2, where I have two Windows version options, I'll call version A and version B Version A: is a standard task sequence, which disables the bitlocker, partitions the disk, installs install.wim, installs the configuration manager, restarts, then adds 3 programs, which are: 7Zip, Adobe and Notepad++, and finishes Version B: identical to version A, but without 7zip. The most bizarre thing is that in version B, everything works without a problem. But in version A, at the end of the Task Sequence (NOTE: I use TSBackground, but that's not the problem, otherwise it would affect both versions) the success screen appears, and I click the Finish button, and then I go to a screen blue (not the BSOD) saying: "Sign-in process initialization failure, Interactive logon process initialization has failed. Please consult the event log for more details." How is this possible if the difference between them is just 7zip? This screen does not corrupt the system, it only appears once, restarts, and I can log in again without any problems, and 7Zip is still there without any problem, and consulting the smsts.log, 7Zip is terminated with Exit Code 0. This error does not interfere with nothing, but it bothers me a lot, even more that I will distribute this system to more than 2,000 machines, everyone will have doubts about this screen, and this is not pleasant to leave showing. I googled it, but it seems that it happens when it really corrupts the system, in my case it doesn't, it shows up once, but I wanted to understand why the hell it shows up because of a 7Zip (already tested it with msi version, exe, old version, version new, and etc and with no result, I tried to put another program in place, like CCleaner for example and it causes the same result) I created an offline media, where I have two Windows version options, I'll call version A and version B Version A: is a standard task sequence, which disables the bitlocker, partitions the disk, installs install.wim, installs the configuration manager, restarts, then adds 3 programs, which are: 7Zip, Adobe and Notepad++, and finishes Version B: identical to version A, but without 7zip. The most bizarre thing is that in version B, everything works without a problem. But in version A, at the end of the Task Sequence (NOTE: I use TSBackground, but that's not the problem, otherwise it would affect both versions) the success screen appears, and I click the Finish button, and then I go to a screen blue (not the BSOD) saying: "Sign-in process initialization failure, Interactive logon process initialization has failed. Please consult the event log for more details." How is this possible if the difference between them is just 7zip? This screen does not corrupt the system, it only appears once, restarts, and I can log in again without any problems, and 7Zip is still there without any problem, and consulting the smsts.log, 7Zip is terminated with Exit Code 0. This error does not interfere with nothing, but it bothers me a lot, even more that I will distribute this system to more than 2,000 machines, everyone will have doubts about this screen, and this is not pleasant to leave showing. I googled it, but it seems that it happens when it really corrupts the system, in my case it doesn't, it shows up once, but I wanted to understand why the hell it shows up because of a 7Zip (already tested it with msi version, exe, old version, version new, and etc and with no result, I tried to put another program in place, like CCleaner for example and it causes the same result) (Note, the 2004 version I've never seen this happen and it's the same Task Sequence, I just changed install.wim to the new 20H2 version)