Search the Community
Showing results for tags 'bitlocker'.
-
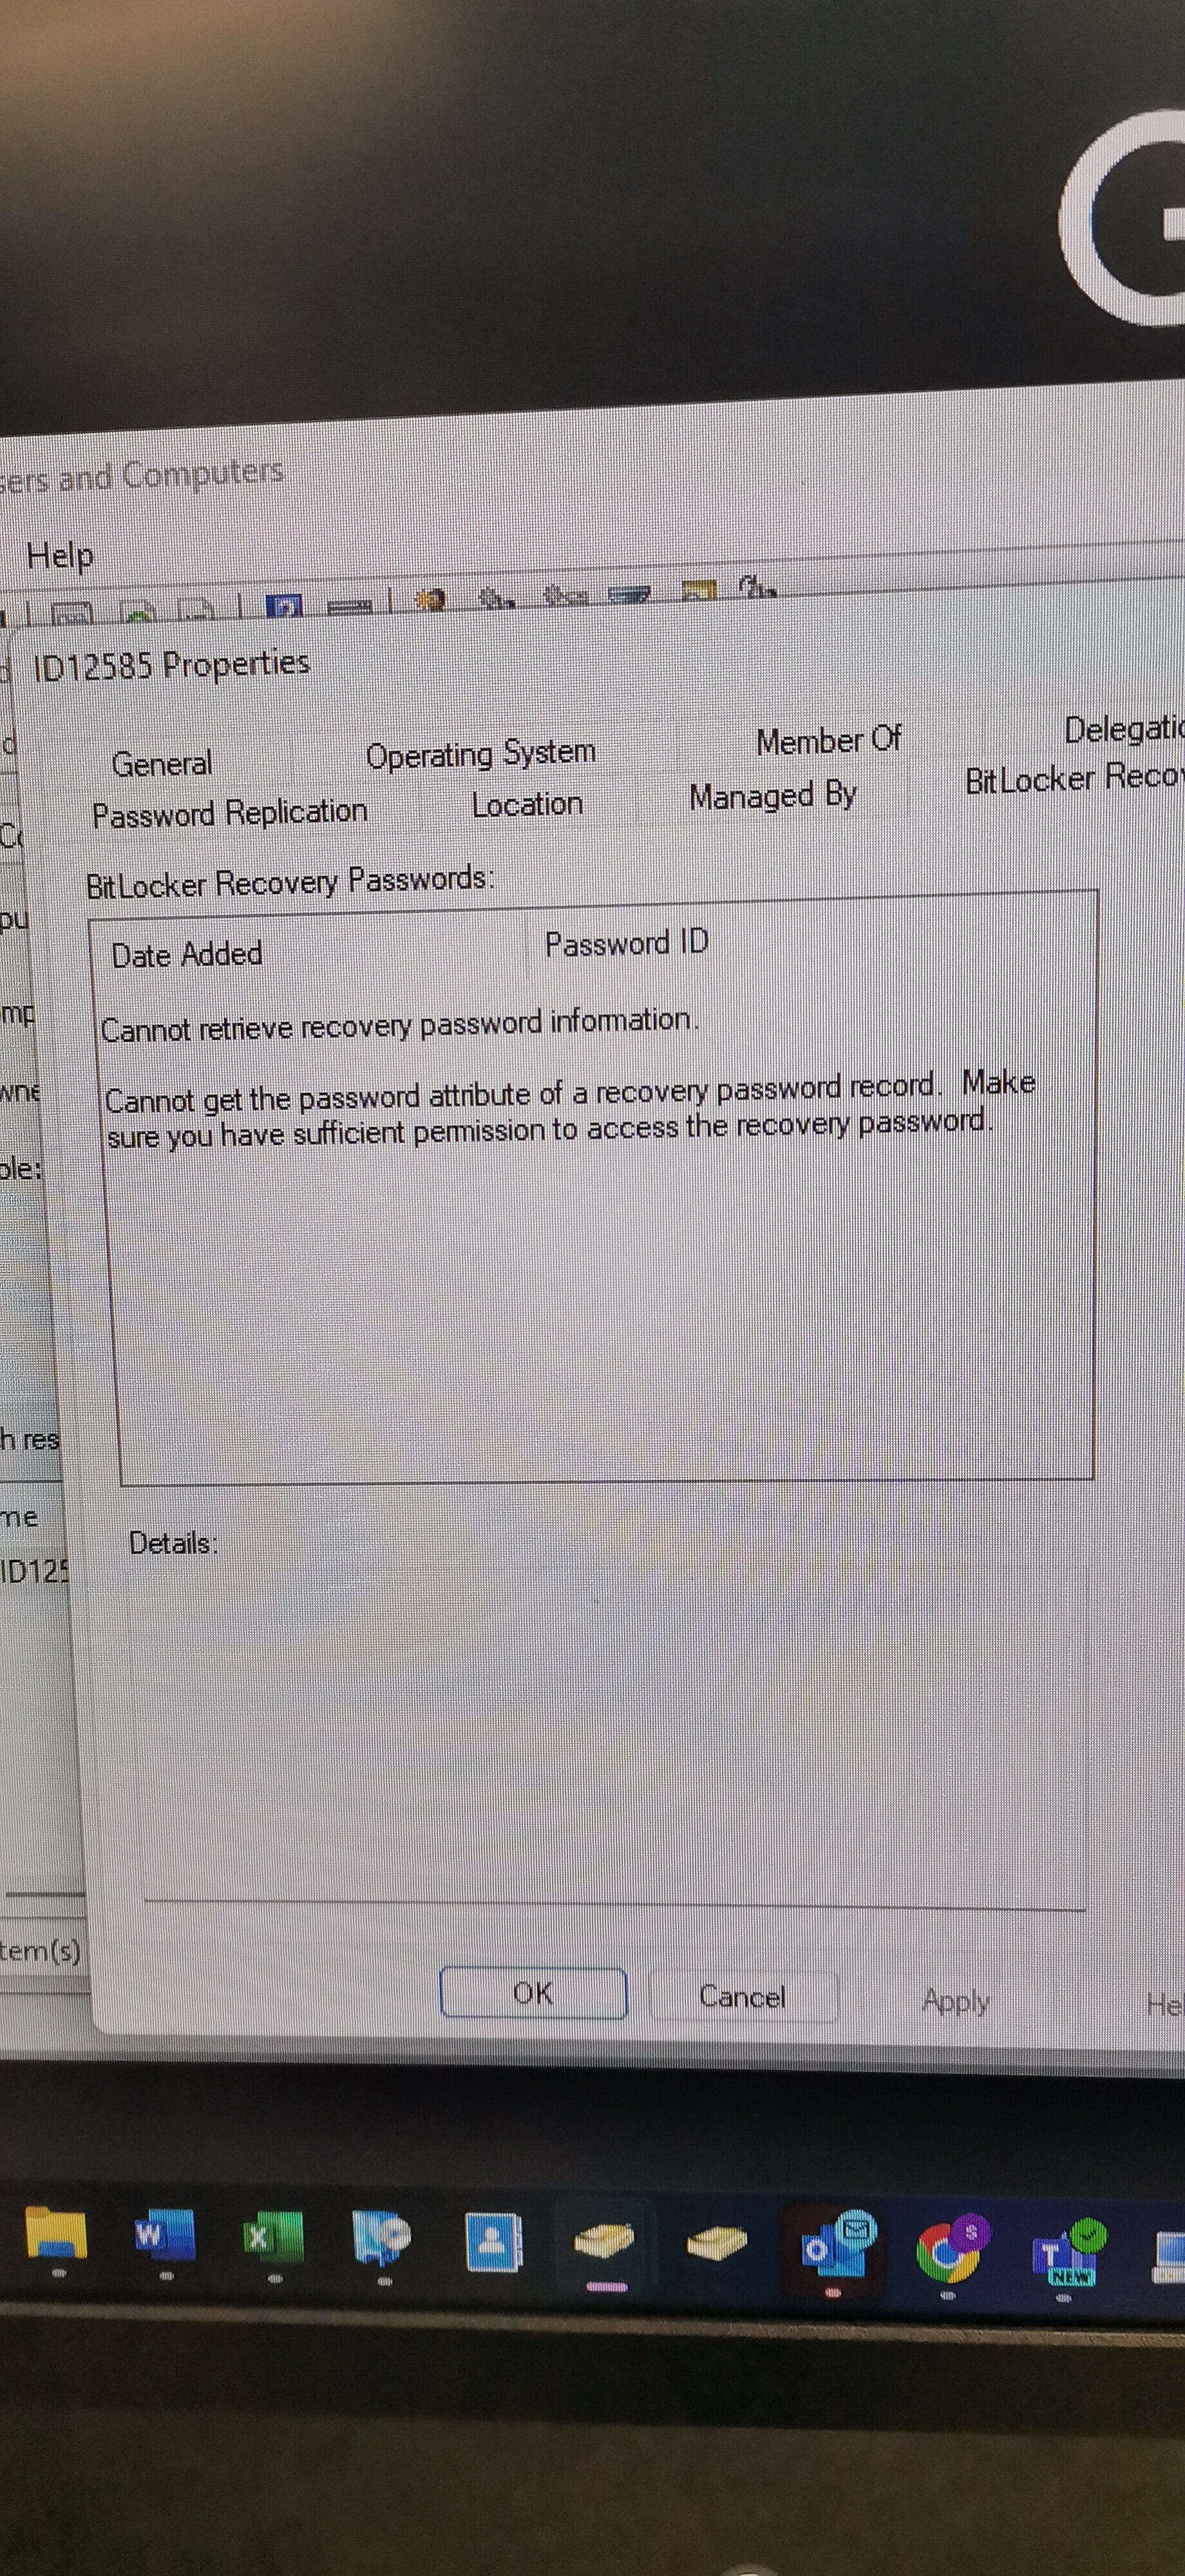
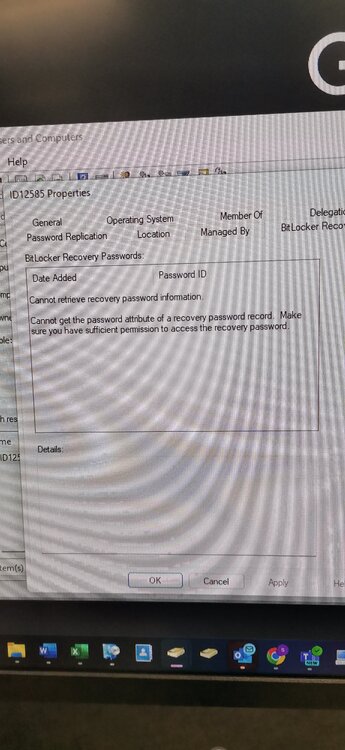
Bitlocker issue:- Task Sequence tries to escrow the key to AD it can't read it from registry. After deploying bitlocker i can see Bitlocker Recovery Tab on AD under the relevant PC im using for testing but there are no recovery keys and gives this message as per screenshot.
-
 We use SCCM to enable/configure BitLocker on Windows 10 computers. The BitLocker PIN must follow our password policy for changing the password every 60 days. We don't see that as a selection when configuring the policy. Can this be done?
 -
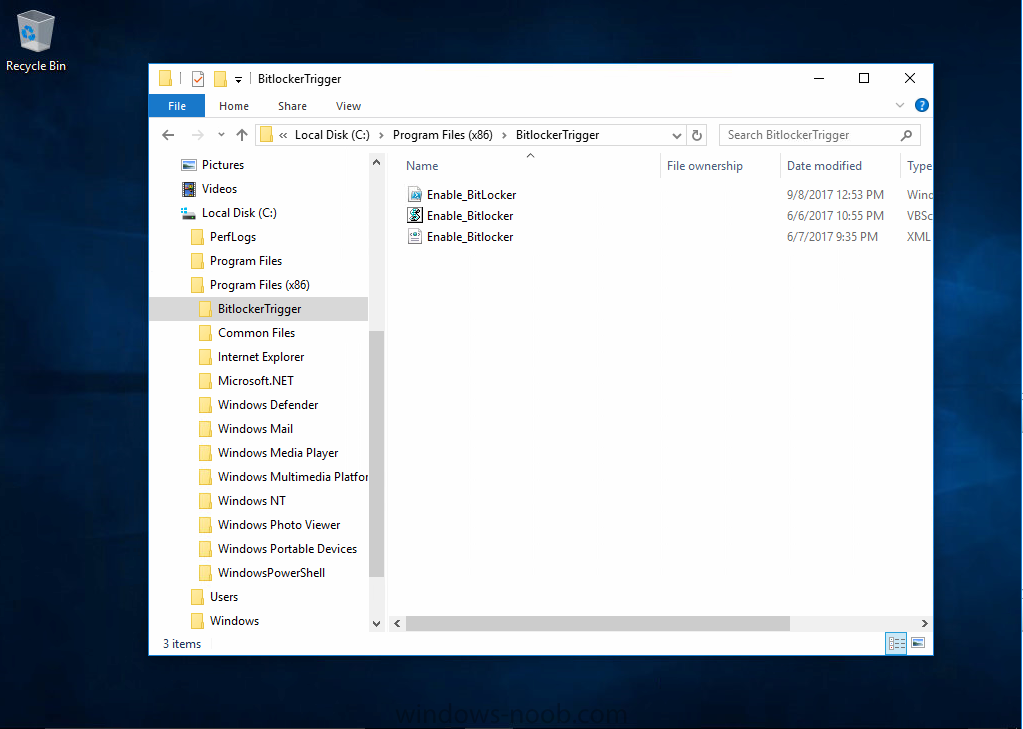
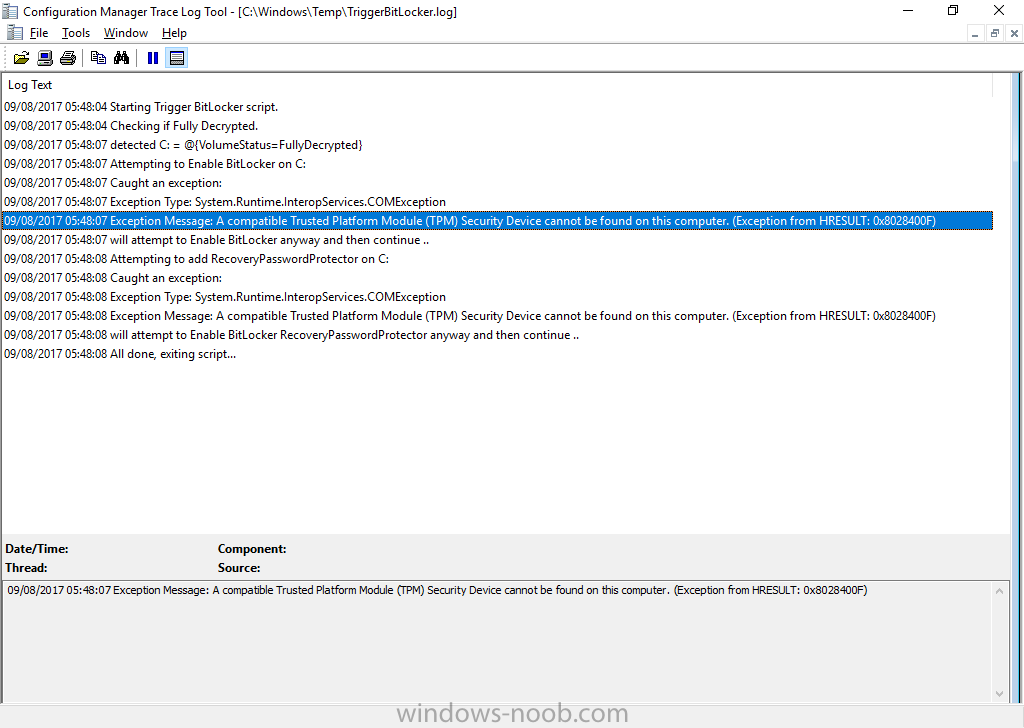
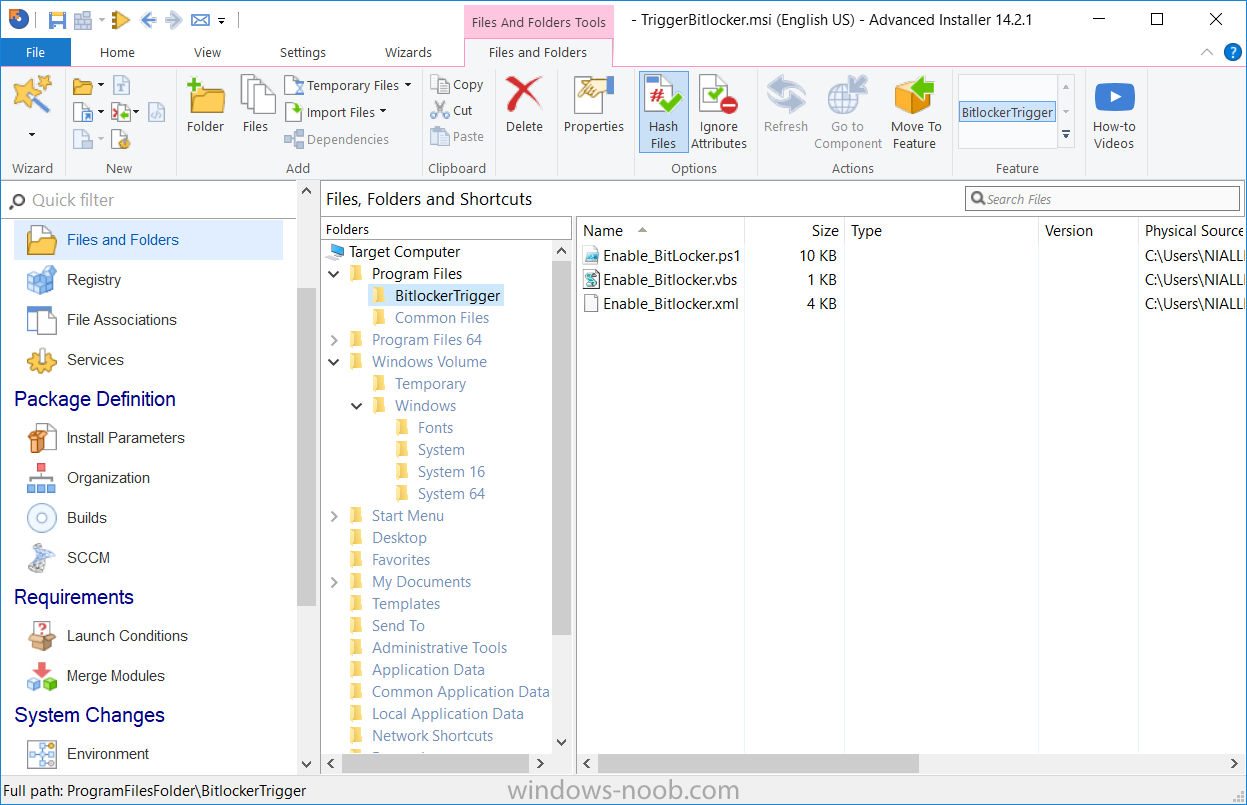
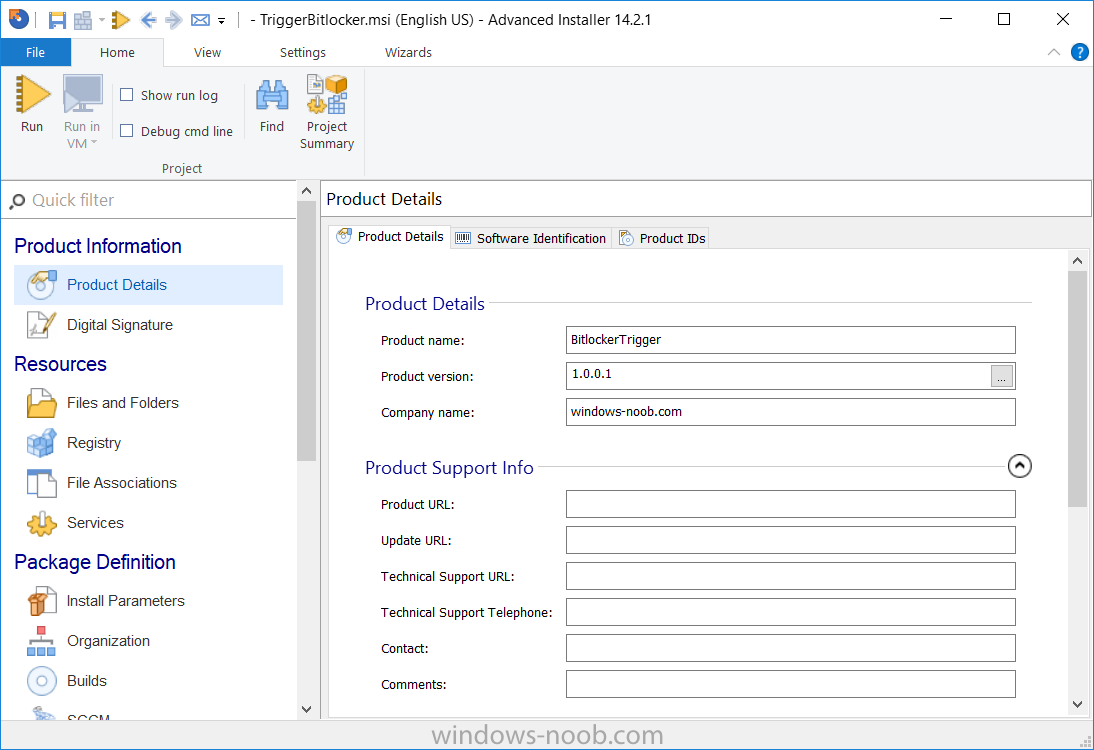
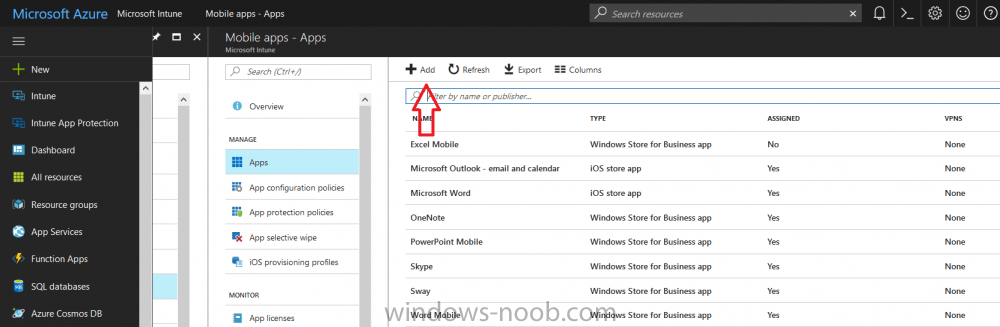
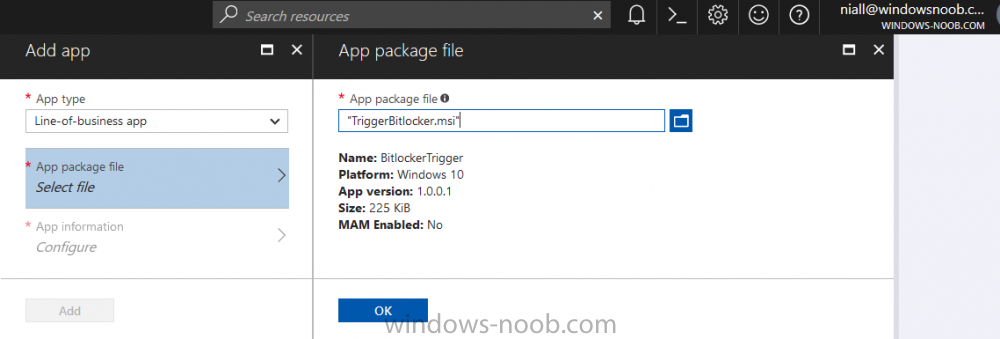
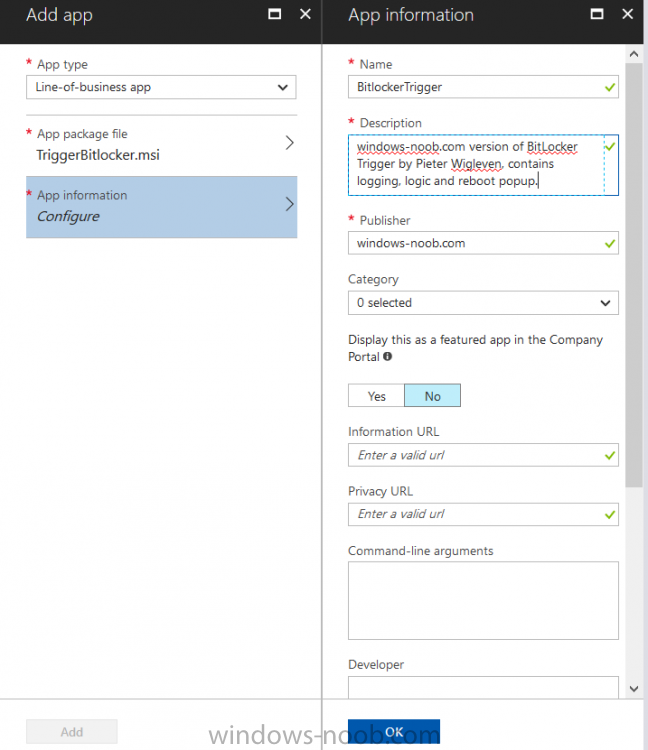
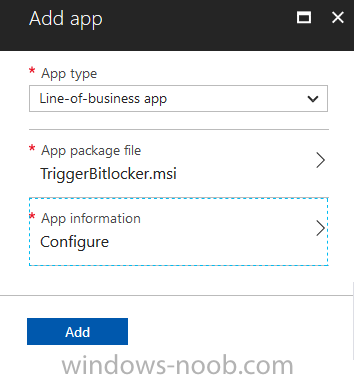
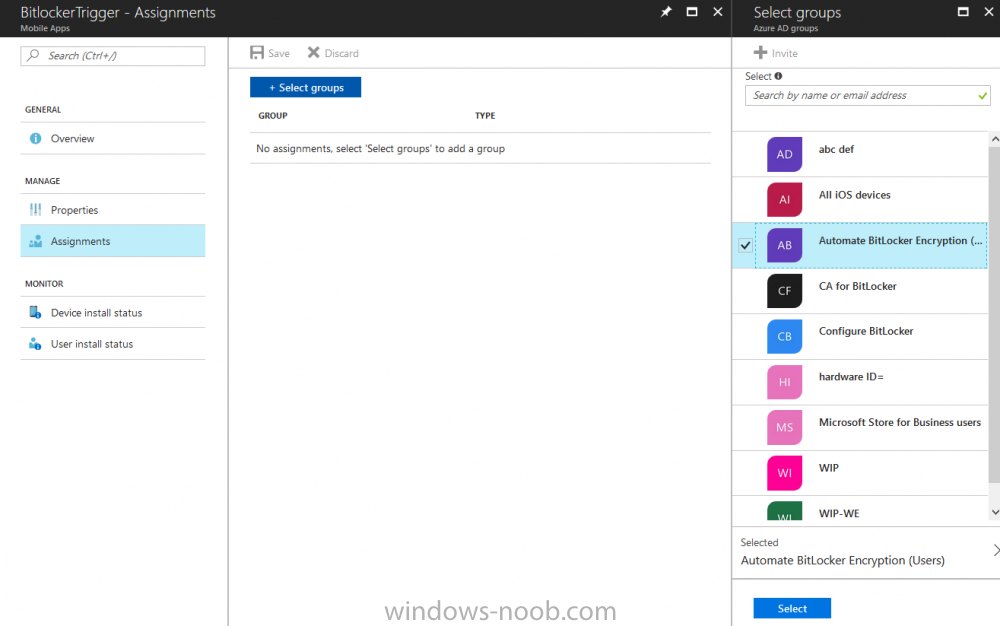
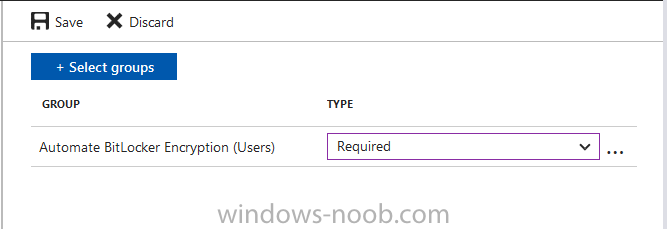
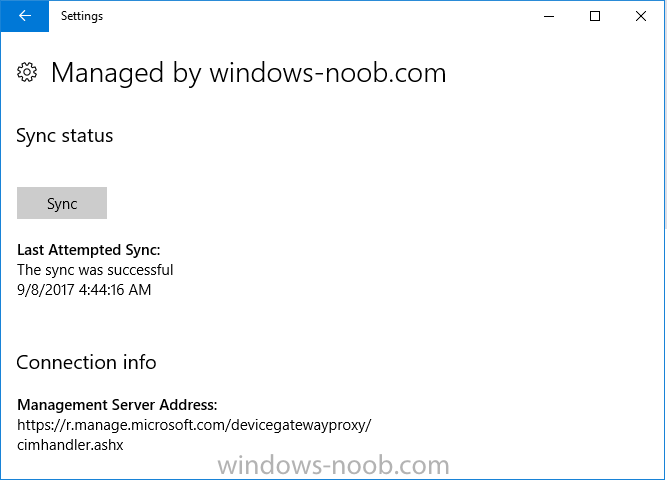
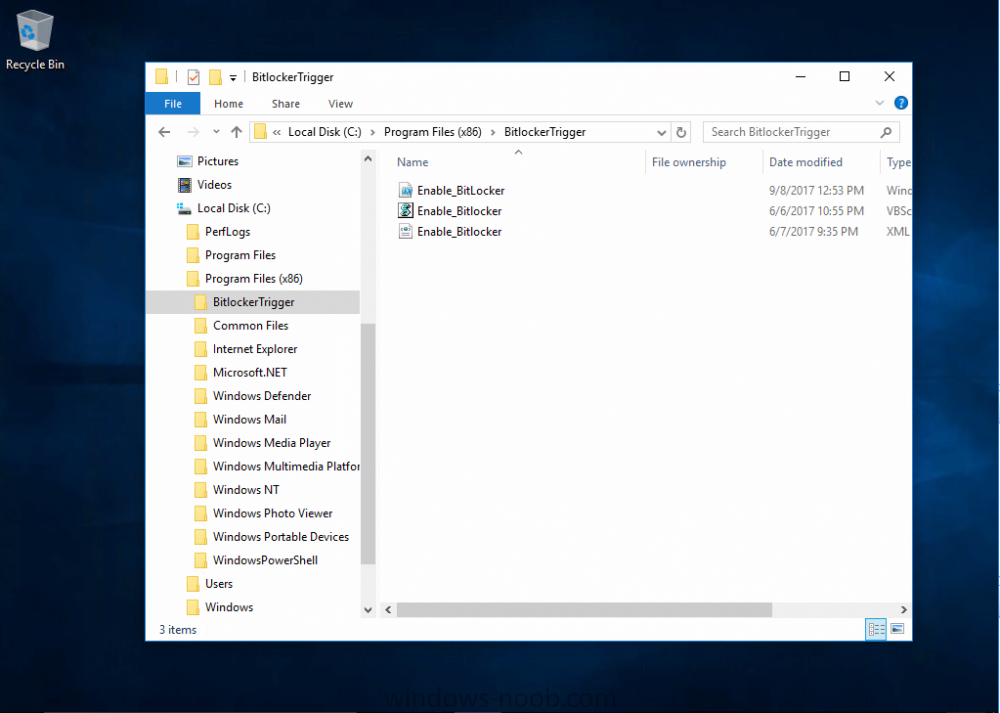
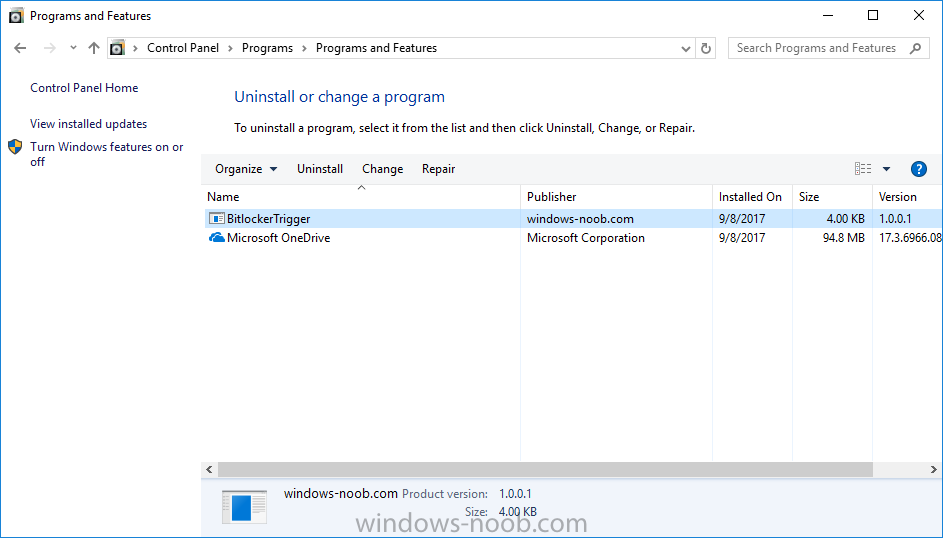
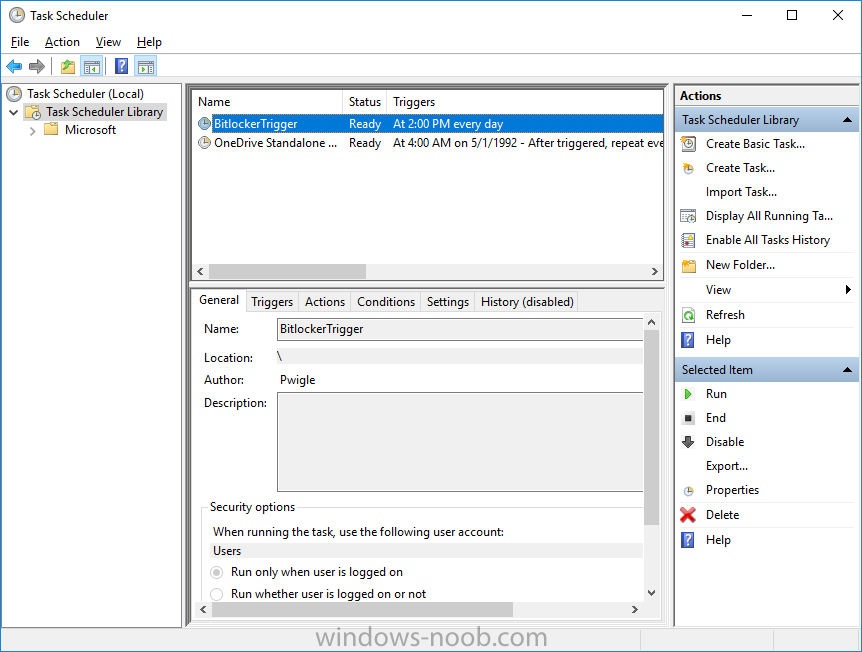
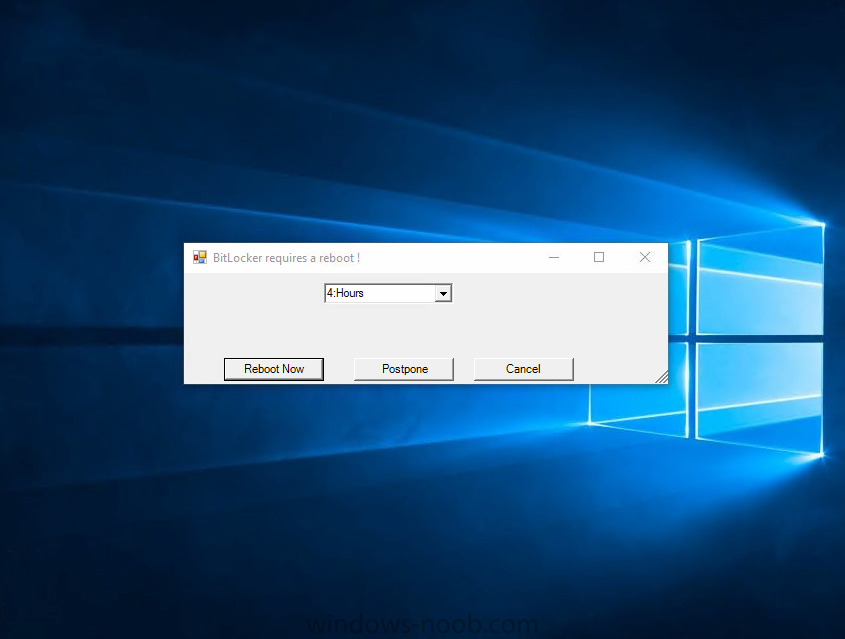
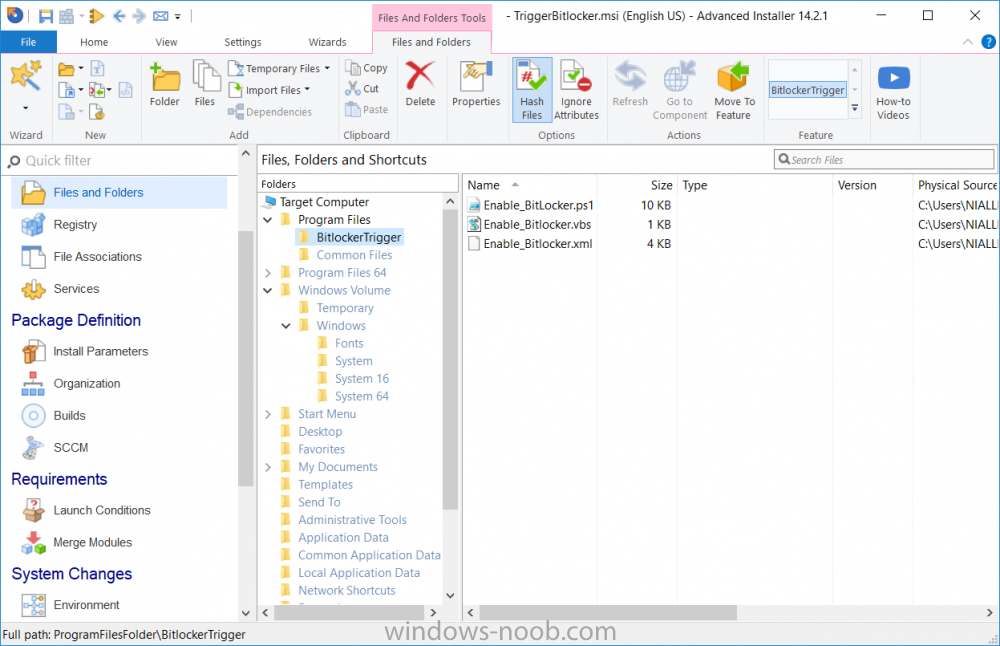
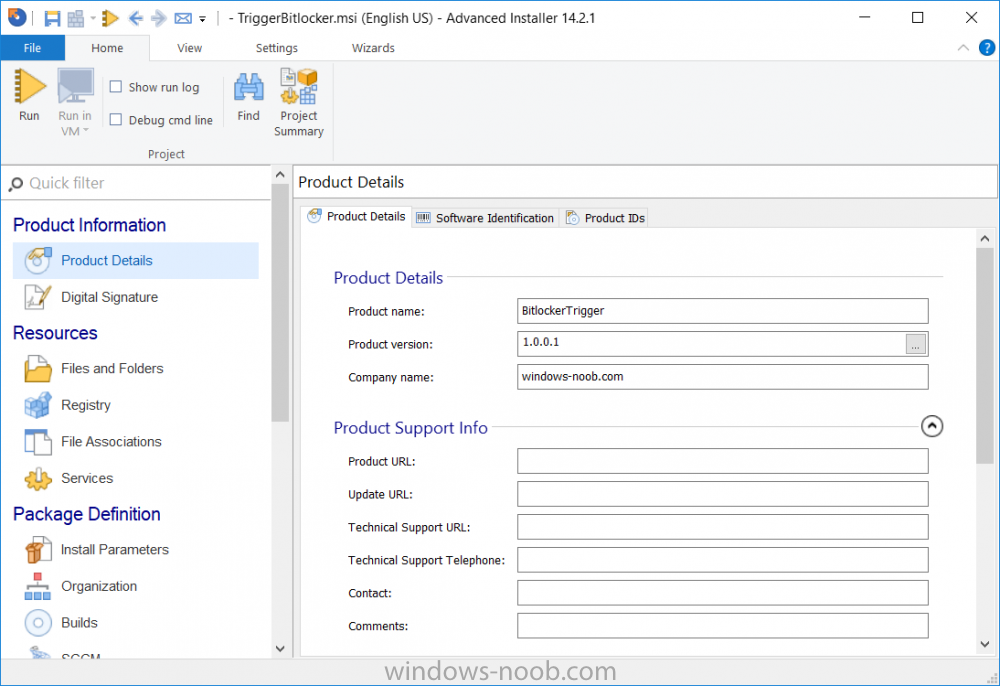
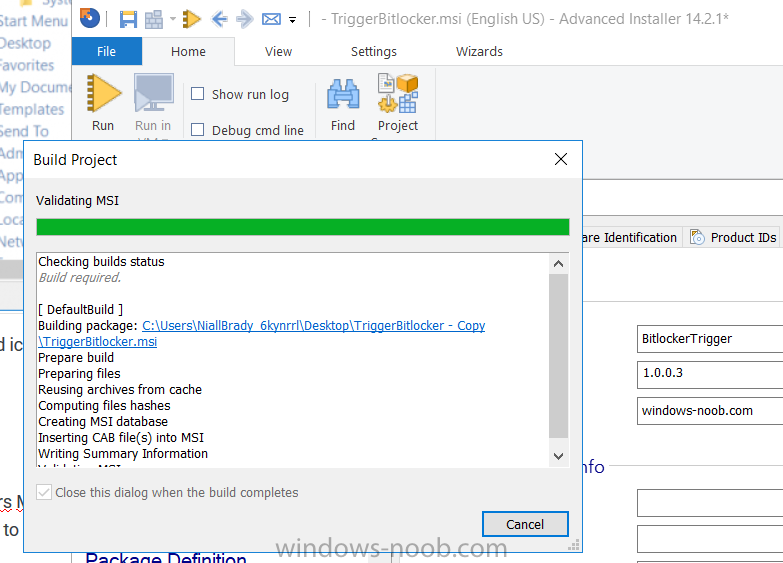
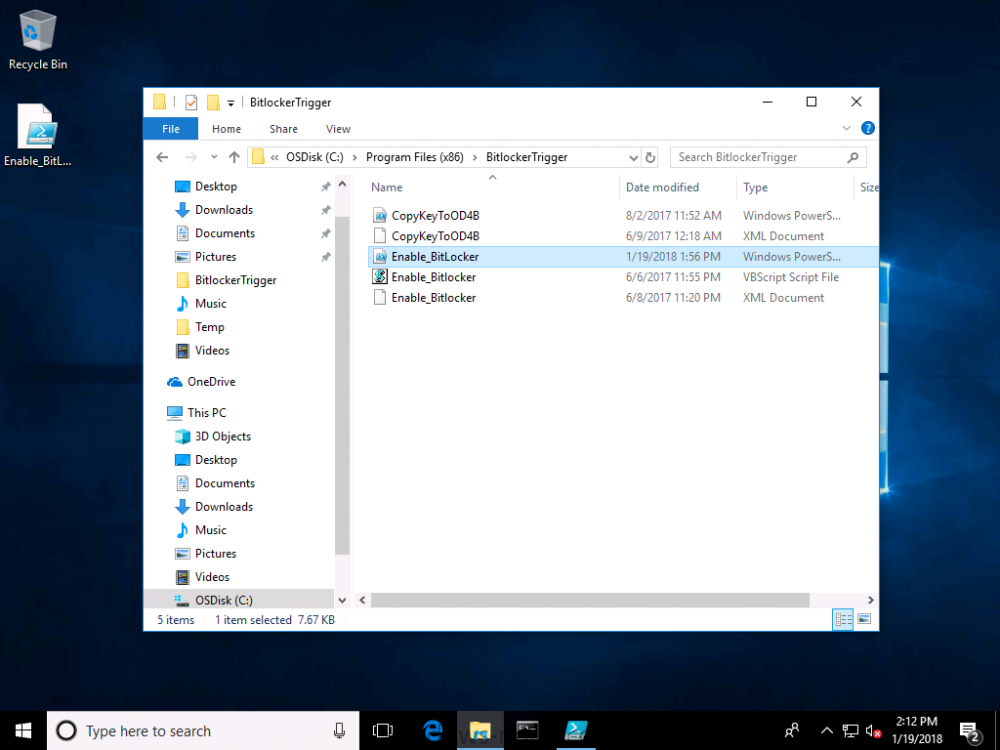
 Introduction In Part 1 I showed you how you can configure BitLocker on Windows 10 devices using Microsoft Intune, but that method relies on the end user actually clicking on the notification in Windows and then continuing through the wizard until completion. In this post I'll show you how you can automate that part of the process, using an MSI that is based upon an MSI that was originally created by Pieter WigLeven. That MSI creates a scheduled task to run daily until the drive is encrypted. Pieter's solution was great but lacked some key features that I wanted such as logging (so that you can view errors which may occur during the encryption phase), logic and a user facing reboot prompt. Therefore, I decided to rewrite the PowerShell script included in the MSI and then re-package it for your benefit. Note: I'd recommend you test this solution in a lab environment, I used Windows 10 version 1703 Hyper-v based virtual machines (Generation 2) with a Virtual TPM enabled. Also to note, this MSI (and Pieters) does not check for the existance of a third party encryption tool, if you want that functionality then you'll need to modify the PowerShell script accordingly and then repackage it as described in Step 5. Enabling a Virtual TPM If you use Hyper-v VM's without a Virtual TPM enabled then the PowerShell script will exit logging errors and will not start the encryption. You can enable the Virtual TPM in the Security settings of your virtual machine (shown in the screenshot below) by placing a check mark in Enable Trusted Platform Module. Step 1. Download the MSI Note: In this guide I've used the windows-noob.com version of the MSI. I've modified the MSI as described in Step 5 and made it available in the Downloads section of this Guide, it includes new features such as Detailed logging Logic to check if encryption was enabled Reboot notification for end users Automatically remove the scheduled task once encryption is enabled You can get the the windows-noob.com version of the MSI in the Downloads section of this guide (scroll down....) or you can get the original MSI from Pieter. Keep in mind that if you are doing Azure AD join, that the user is automatically an Administrator, if however you are using Windows Autopilot then the user will not be an Administrator. The windows-noob.com version of the tool is based on the user being an Administrator. Step 2. Add the MSI as a LOB app in Intune Now that you have the MSI available, it's time to upload it into Intune. In the Intune service in Azure, select Mobile Apps, then Apps, then click on + Add to add an App. Select Line of Business app in the drop down, then select Select file and point it to the downloaded MSI file before clicking on OK. Next click on App Configuration and fill in some details about the application before clicking on OK finally click on Add. Step 3. Assign the app as Required to a User Group Next you will deploy the application (Assign) to a group of Users. In this guide I've created an Assigned User Group called Automate BitLocker Encryption (Users) which contains users that I want to target with this policy. Click on Assignment, then click on Select Groups, select the User Group you created previously and then click on Select. For Type, click on the dropdown and select Required and then click on Save. This will mean that any users in this User Group will be targeted by this required application and it will automatically download and run. Step 4. Verify the experience On a Windows 10 computer that is not yet BitLockered (and not encrypted by any third party encryption), Logon as a user that is a member of the above User Group. Keep in mind that they also need to have received the BitLocker Configuration created in Part 1 of this guide. That policy will set the BitLocker Configuration options (such as Encryption Algorithm), but it will not start encryption automatically. Trigger a Sync using the appropriate button. This will pull down the new policy and start the download and installation of the MSI which in turn will copy some files, and create a scheduled task. Once policy is received, you can see that the application is installed in Control Panel And three files are present in the File System at C:\Program Files (x86)\BitLockerTrigger. Note: The VBS kicks off the PowerShell script and the XML file is used in the creation of the Task Scheduler task. You can also check Task Scheduler to see the task is added, and that it is scheduled to run at 2pm. Tip: By default Windows Task Scheduler has the History tab disabled by default, to enable it you must start Task Scheduler as Administrator (Run as Administrator) and then click on Enable All Tasks History in the right pane. This will give you some details about the running task and whether it did run or not, but for more details about the task review the TriggerBitLocker.log file as described below. Running the Task You can wait until 2pm for the scheduled task to run or right click on the task and choose Run to run it now. after it has run, if everything was ok it will popup a reboot to the user, if things don't go according to plan use CMTrace.exe and navigate to C:\Windows\Temp and open the generated log file C:\Windows\Temp\TriggerBitLocker.log The log file should reveal any problems that occur. In the example below you can see what happens when you try to run the task on a computer without a TPM. The key takeaway here is that logging is now included with the MSI and the PowerShell logic will avoid popping up a reboot message to the end user in the event that it has not succeeded to enable Encryption. On a computer that meets the specifications (TPM), the PowerShell script enables encryption and the user will see the popup, they can delay for a few hours or accept the reality that they are getting Encrypted with BitLocker. and if they choose Reboot Now they'll see something like this After the reboot we can verify BitLocker encryption status and the recovery key is in Intune in Azure. job done ! Note: After successfully enabling BitLocker the script deletes the Scheduled Task so that it no longer re-runs. Step 5. (Optional) Edit the MSI with Advanced Installer If you'd like to update the MSI yourself, you can install the MSI on a vm, and pull the scripts from the folder shown above, then load it using Advanced Installer. Edit what you want in the package and edit the PowerShell script to suit your needs, once done copy the replacement scripts back into the MSI in the Files and Folders section below Once done, to build the package click on the Save icon in the ribbon. And use that compiled MSI in the guide above. Downloads Below is the windows-noob.com version of Pieters MSI, this version was compiled using Advanced Installer 14.2.1 (great product !) and contains improvements to the PowerShell script such as logic handling, logging to help with troubleshooting and a Reboot computer popup at the end of the script which only appears if encryption is enabled. windows-noob.com TriggerBitlocker.msi (version 1.0.0.2) - TriggerBitlocker.msi windows-noob.com TriggerBitLockerUser.msi (version 1.0.0.2TriggerBitlockerUser.msi Recommended reading Hardware independent automatic Bitlocker encryption using AAD/MDM https://blogs.technet.microsoft.com/home_is_where_i_lay_my_head/2017/06/07/hardware-independent-automatic-bitlocker-encryption-using-aadmdm/#comment-26696 Configuring BitLocker in Intune - Part 1. Configuring BitLocker https://www.windows-noob.com/forums/topic/15514-configuring-bitlocker-in-intune-part-1-configuring-bitlocker/ Download Advanced Installer http://www.advancedinstaller.com/download.html
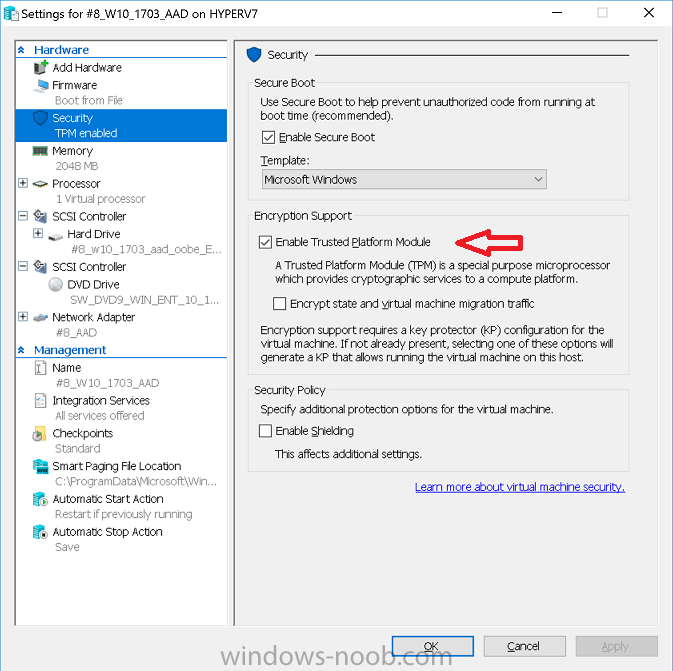

-
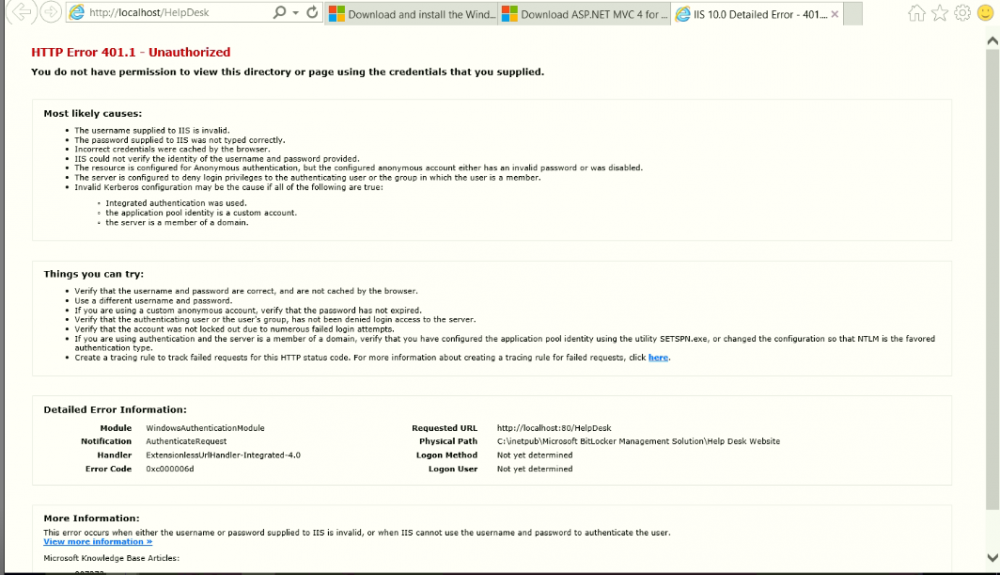
 I run the script for creating a BitLocker portals. , I tried to access the portal but cannot connect it keeps prompting for the credential.
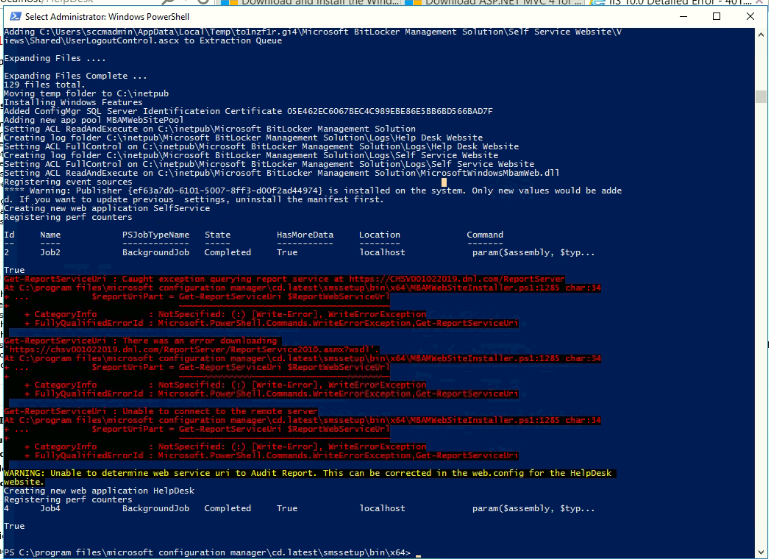
-
 Hi Nial, Hi everybody Have you ever had this error? I am working on activating the new MBAM functionality on SCCM 2002 (in the laboratory). https is configured but when running the script, I get the warning "Unable to determine web service uri to Audit Report ... Can you help me please ?
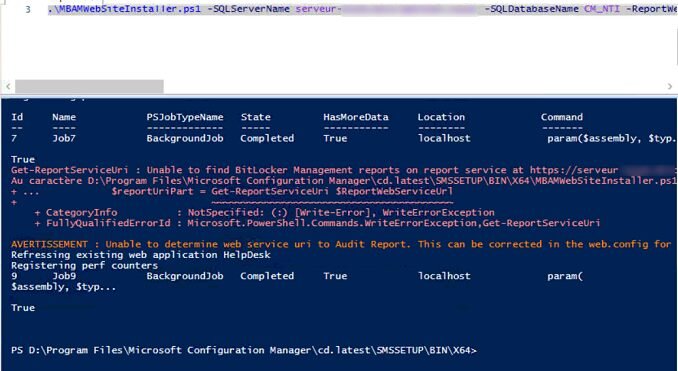
-
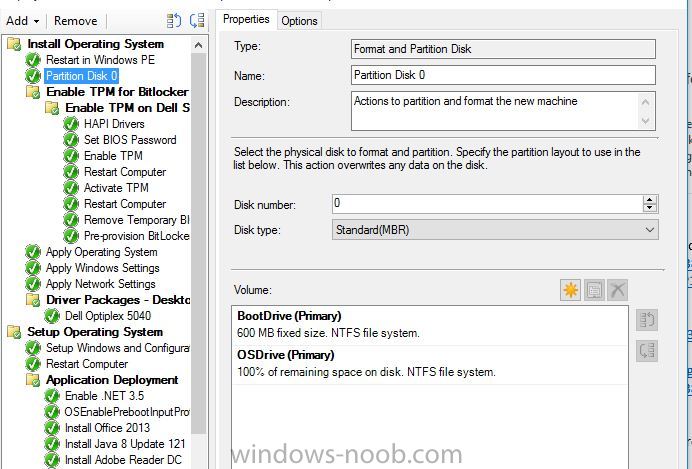
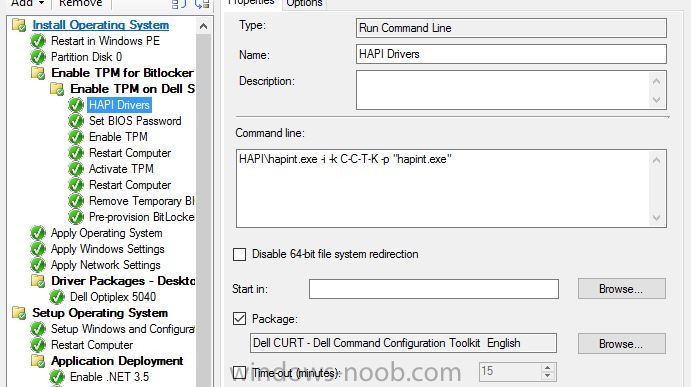
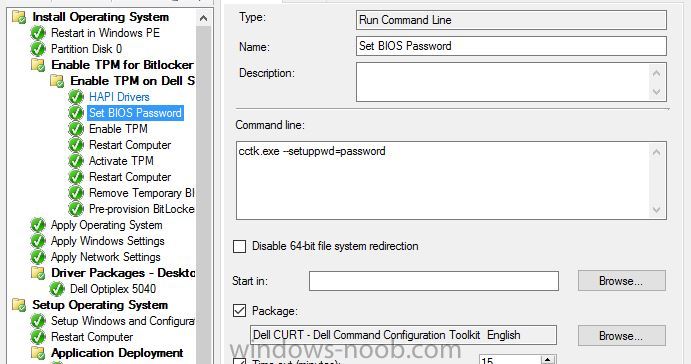
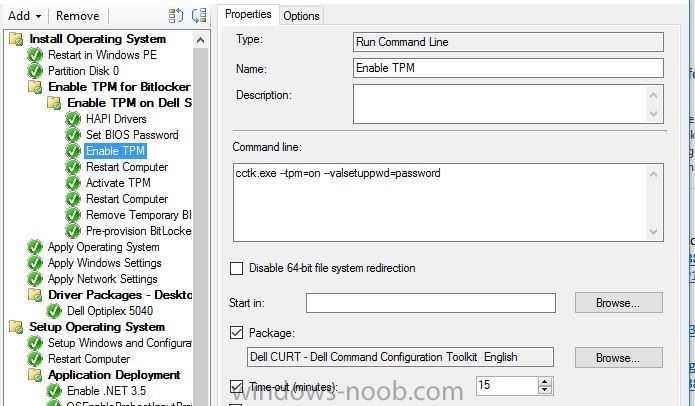
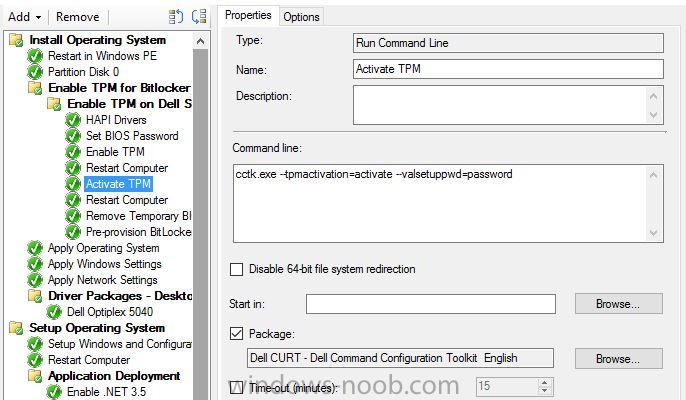
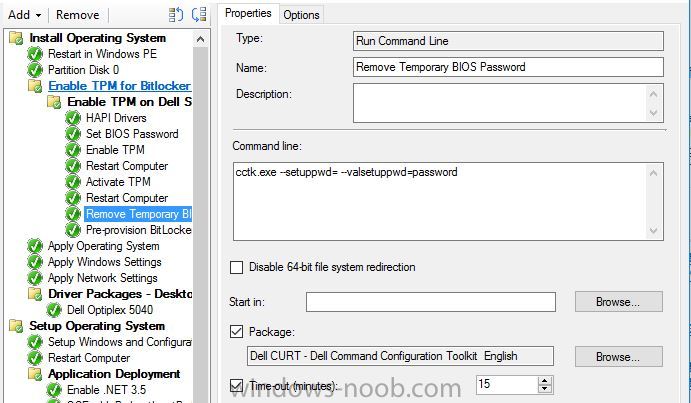
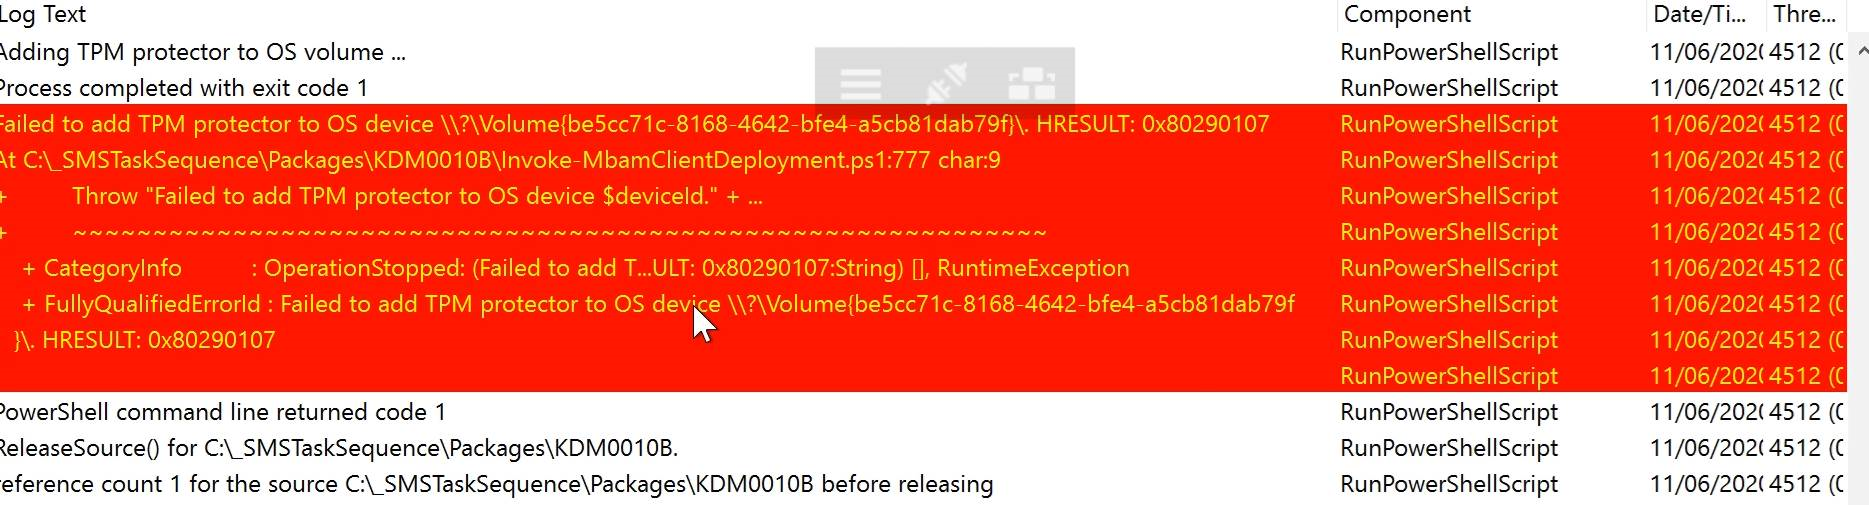
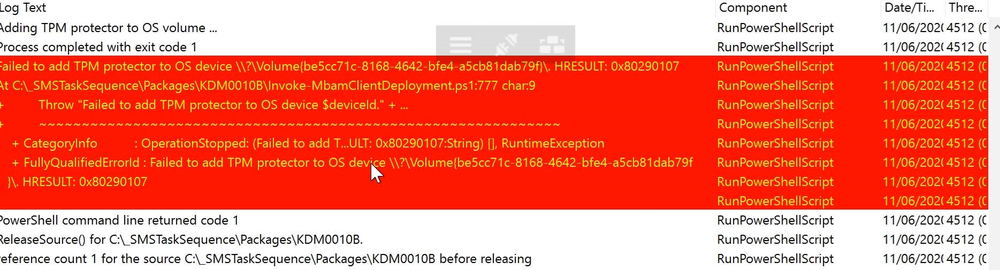
 Hello, hoping for some help from with a strange issue I have on a customer site I am currently unable to build Dell Optiplex 5040 devices with Windows 10 1909 x64 Enterprise from an Endpoint manager 1910 MDT integrated task sequence. The task sequence fails when trying to execute the Invoke-MbamClientDeployment.ps1 script. I have detailed the high level tasks below and attached the SMSTS.log. BIOS upgraded to latest version BIOS Reset to factory settings BIOS Password Set BIOS Standard config applied UEFI Boot enabled TPM Cleared & activated TPM Converted from 1.2 to 2.0 TPM Cleared again and reactivated OS Deployed Drivers deployed MBAM TPMPassTheHash step completed DOTNET Enabled C++ Redists applied Security Patches Applied The MBAM Group MBAM_XTS_AES256 applied to reg PreBoot Input Protectors for Tablets applied to reg MDOP MBAM 2.5 SP1 Installed MBAM Client Hot Fix KB4505175 Applied Sleep 2 mins DisableRootAutoUpdate (Certificate applied) Restart Set PowerShell Execution Policy Set to bypass Set PowerShell Execution Policy powershell.exe -command Initialize-TPM Is run **THE STEP THAT FAILS** Invoke-MbamClientDeployment.ps1 with the below parameters Parameters - -RecoveryServiceEndpoint "https://MBAM:443/MBAMRecoveryAndHardwareService/CoreService.svc" -StatusReportingServiceEndpoint "https://MBAM:443/MBAMComplianceStatusService/StatusReportingService.svc" –IgnoreEscrowOwnerAuthFailure -EncryptionMethod "XTSAES256" **The Post Steps** Reset TPM Policy EnableRootAutoUpdate The TPM status is Enabled, Activate & NOT owned The above works on all other models tested but fails on the 5040 The actual error message received is contained in the smsts.log file attached and the extract is below. The device is also in a staging OU that receives no Group Policy. The device does register in MBAM if continue on error is checked on the offending task and the computer object moved to the correct OU but will not encrypt. The same task sequence works on the other Dell models tested e.g. 5050 I have logged in after and BitLocker throws a internal error if you try to run it manually. **THE ENVIRONMENT**** A single site deployment of Endpoint Manager 1910 with two distribution points deploying Windows 10 1909 x64 enterprise with a MDT Integrated task sequence. The Dell command tool kit has been integrated into End Point Manager and drives the BIOS/TPM config steps in the task sequence. The Dell TPM conversion tool is used to convert the TPM to 2.0. The devices been build are production Windows 7 and are been repurposed as Windows 10 x64 Enterprise 1909
-
Does anyone know of a way to create a report that shows a list of Windows 10 Pro devices that are configured with BitLocker from Intune? Since they are using Pro Edition, Endpoint Protection Policies don't work so I am using the default Windows Device Restriction Policy that includes device encryption in the Azure AD Join process. The only type of reporting option I found was using Intune Data Warehouse in conjunction with PowerBI. So far, I set it to show "osCaption", "deviceName", and "encryptionState". The problem is that the data that comes out of the "encryptionState" is very confusing.
-
 Hi All, We are experiencing a weird issue with BitLocker when re-installing existing Windows 10 1709 machines with Windows 10 1903. The machines are hybrid AD joined and the BitLocker recovery information is stored in Active Directory. During a new installation of the device with Windows 10 1903, the BitLocker key fails on storing the recovery information in Active Directory. After examining the Windows event log, it turns out the device is trying to store the recovery information in Azure AD. Is this new behavior of Windows 10 1903 and can we modify this behavior?
 -
 Hi There, Anyone here has hands-on experience on implement Bit-Locker To-Go? In my environment we use SCCM CB-1902 and MBAM server & client. We have single drive in all the client and it has been protected using MBAM agent. Now looking for encryption the removal disc \USB automatically, when it insert. How can I achieve this? Please free to ask me, if required more information. BR, Biju
 -
Customer has upgraded to Config-Mgr 1910 and now would like to use BitLocker management. however currently encryption is happening via McAfee and would like to migrate from McAfee to Bitlocker. anyone has run into this scenario as of now? Windows 7 devices needs Wipe and load to use Bitlocker feature or exiting OS can we implement bitlocker and remove McAfee agents.
-
 HI On a Windows 10 OSD TS, i want ot add the Bitlocker recover Key to Azure for Hybrid Joined devices. How can i achive this from an SCCM TS? Thanks
 -

InvokeMbamClientDeployment.ps1 return error 1
Takechico posted a topic in Configuration Manager 2012
Please guys, I need a help, cuz I become a mad. I have spent a lot of time for this problem, and can't solve it. I'm trying to deploy MBAM client 2.5 SP1 (September update) on Windows 10 1803 with storing recovery keys on MBAM server via SCCM2012 r2 task sequence. I have deployed MBAM server at our SQL Server with SCCM integration ( at another server with sccm 2012 r2). Also I've configure MBAM services with SSL certificate, which is created by CA. The problem is error 0x00000001 in " InvokeMbamClientDeployment.ps1" step during Task Sequence. It's absolutely strange , but when I do this step manually after logon, It works perfectly. After googling this issue, I have find many solutions, but no one helped me. Also, I can't understand how can I find the logs of this script. When task sequence get error, folder with logs doesn't created. This is my task sequence with many fixes that I can find at internet : 1) Install MBAM 2.5 SP1 with SP1 and restart 2) Disable certificate update, this step can avoid the problem with error 0x803d0006 3) Incert MBAM Cer : I copy CA certificate to ROOT, because windows 10 1803 have the problem with it. Also, I find another advice with Remove Auto Provision by a command : powershell.exe -command “New-ItemProperty -Path HKLM:\SOFTWARE\Policies\Microsoft -Name FVE; Set-ItemProperty -Path HKLM:\SOFTWARE\Policies\Microsoft\FVE -Name OSEnablePrebootInputProtectorsOnSlates -Value 1 -Type DWord -Force; Set-ItemProperty -Path HKLM:\System\CurrentControlSet\Services\Tpm\WMI -Name NoAutoProvision -Value 1 -Type DWord -Force 4) For My script I have this parametrs : powershell.exe -ExecutionPolicy Bypass -File Invoke-MbamClientDeployment.ps1 -RecoveryServiceEndpoint https://servername.domain.com/MBAMRecoveryAndHardwareService/CoreService.svc -EncryptionMethod UNSPECIFIED -IgnoreEscrowOwnerAuthFailure -IgnoreReportStatusFailure I don't have any ideas how to solve it. Please help me))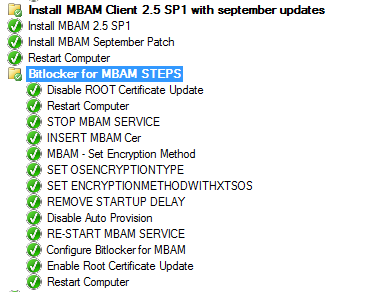
-
 Hi all, First time poster, so apologise in advance if I post incorrectly. Currently building Windows 10 devices, some are upgrades from Windows 7 to Windows 10 and others are fresh Windows 10 using SCCM (MDT integrated). This works as expected, but when I log in and check TPM Administration the following message show up Reduced Functionality errors codes 0x400900 = The Device lock counter has not be created 0x2900 = The monotonic counter incremental during the boot has not been created Do I need to do something in the Task Sequence to clear the protectors or clear TPM before BitLocker is enabled Cheers all
 -
You may have already seen Part 2 of this series where you can automate BitLocker encryption in Intune using supplied MSI's, which contain logging, reboot prompt and other features. I've put together this video to show you how you can test the PowerShell scripts contained within the two MSI's here. This allows you to test the scripts outside of Intune, and when you are happy with the results you can re-package them and deploy the MSI via Intune. The video shows you how to use Psexec to start a process (in this example it's CMD.EXE) as SYSTEM. psexec.exe /s /i cmd.exe After starting the cmd prompt as SYSTEM, you can launch powershell. Next, browse to the folder where the scripts are, by default it's C:\Program Files (x86)\BitLockerTrigger and launch Enable_BitLocker.ps1. After the TriggerBitlocker msi is installed by Intune on a Windows AutoPilot enrolled device, the PowerShell script will run via the Scheduled Task as SYSTEM, so this method of testing is a valid way to verify any changes you add to the PowerShell script before repackaging it as an MSI. To see the video click below, have a look and happy troubleshooting. cheers niall
-
 Hi all, I'm hoping that someone can help as I'm really struggling to find anyone else that's had this specific problem. When trying to build brand new HP equipment with an SCCM (MDT integrated) OSD task sequence I am seeing the following error when the machine runs the "Invoke-MbamClientDeployment.ps1" script: Failed to escrow TPM owner-auth to http://MBAMSERVER.domain/MBAMRecoveryAndHardwareService/CoreService.svc. HRESULT: 0x80280012 I've found that 0x80280012 means "There is no Storage Root Key (SRK) set." but I'm struggling to understand why this error only effects some new machines and not others even though they are all the same model and spec. We have a workaround which seems to be working every single time which is to turn on a new machine and let it run through OOBE of the shipped W10 OS then once completed, reboot the machine and PXE boot to the W10 Task Sequence. So something during the OOBE of a brand new machine seems to be creating/setting the SRK for the very first time. Does anyone have any ideas as to what might be causing this and how/when a TPM SRK is initially created? Thanks in advance, Westy
 -

Bitlocker to AD
Nemanja Jovic posted a topic in System Center Configuration Manager (Current Branch)
Hello everyone, I have the client that wants to do something specific with bitlocker and its pins, but that is beyond of this topic. Issues is: When you create a step in task sequence to set up the bitlocker, if you choose TPM and PIN, you will be able to backup the recovery key into Active Directory. But, if you try to do the same via command line on the client, you will get the error: The key protector specified cannot be used for this operation. Somebody have a clue how to overcome this, since we really want only to use TPM and PIN and to store recovery key in AD, for specific reasons, we have to use command line to setup the Bitlocker. Thanks,
-
Hi, We're looking at a wipe and reload on all of our machines because we're changing our encryption from Checkpoint to BitLocker as we move from Windows 7 to Windows 10. However, I'm wondering if it's possible to use hardlinks for USMT since we do have the Checkpoint filter driver as part of our boot wim. I can't find much about this topic on Google or anywhere else. Our environment is SCCM 1710 and we're moving to Win 10 1703 currently. Checkpoint is 80.64 FDE. Any advice would be helpful. Thanks in advance.
-
 Hello all, I have a specific question for a customer of mine. This customer is using a custom boot images + scripting to deploy Windows machines. SCCM/MDT is not used in the deployment process (SCCM is only used to manage the assets and push software). They want to integrate the deployment of bitlocker in this custom bootimage. What would be the best start to do this? Could the same scripts of the TS steps in MDT (pre-provision bitlocker & enable bitlocker) be used? How could this be done? At the moment the customer is using Windows 7 but would like to move to windows 10. Are there new things regarding the deployment of bitlocker we need to keep in mind or is the deployment the same as in Windows 8? On technet, I couldn't find anything new listed regarding to deployment of bitlocker in windows 10. Since this customer doesn't have SA, they can't use MBAM and the new deployment capabilities in 2.5 sp1... I was looking for the same deploymen tmethod as these powershell scripts if this would be possible? Thanks in advance!
 -
Are you planning to deploy Microsoft Intune and looking for straightforward technical guidance to help you accelerate this effort? Please join us as we share our deployment experience working with customers from all over the world, covering Intune pilot planning, deployment and management. At the end of this session, you will have a solid foundation to deliver a successful Intune pilot deployment in your organization. The above is a session I did with Peter Daalmans @ Microsoft Ignite on Friday 29th of September 2017, please check it out especially if you are interested in Microsoft Intune. cheers niall
-
 actually i made a task sequence for MBAM to encrypt all drives - it starts only, when i´m login to Windows 10, but i need it while the tasksequence is running, before starting installing Office 365 and so on. Have anyone experience for this step? the mbam-client config (last step) set the registry for "no delay" and the mbam-client-Trigger -> reg.exe ADD HKLM\Software\Microsoft\Windows\CurrentVersion\Run /t REG_SZ /v TriggerMBAM /d "%ProgramFiles%\Microsoft\MDOP MBAM\MBAMClientUI.exe" /f will not run, have tried on different places in the tasksequence, but nothing worked ... is it in generall possible to start the encryption while running the "Installation" ... Thx for your help.
-
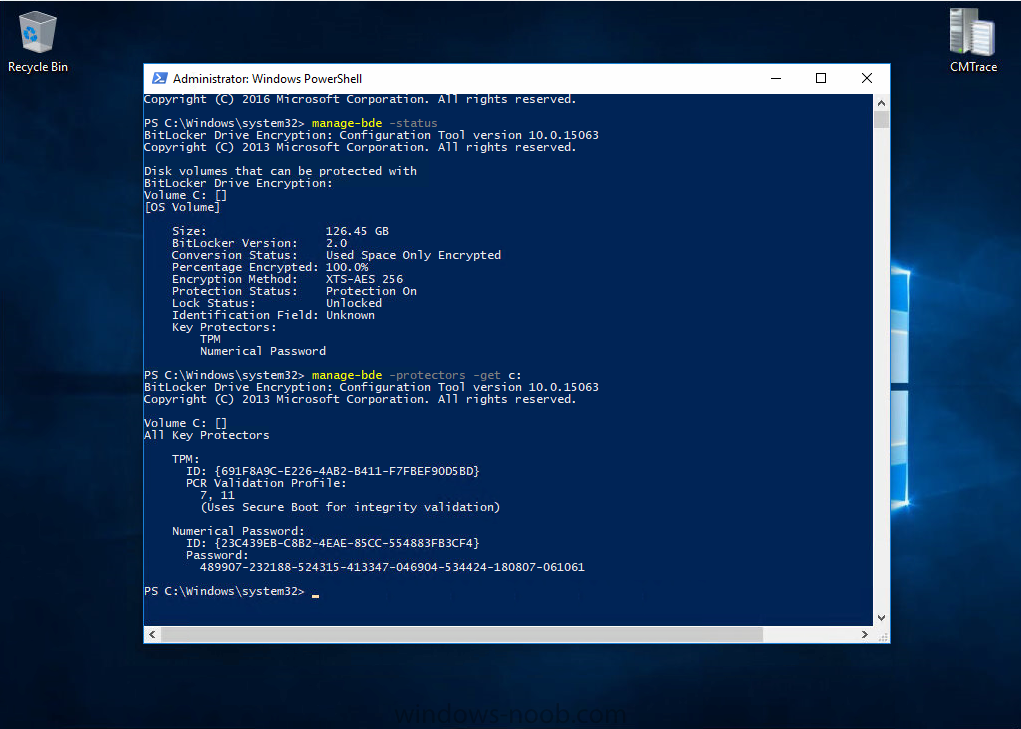
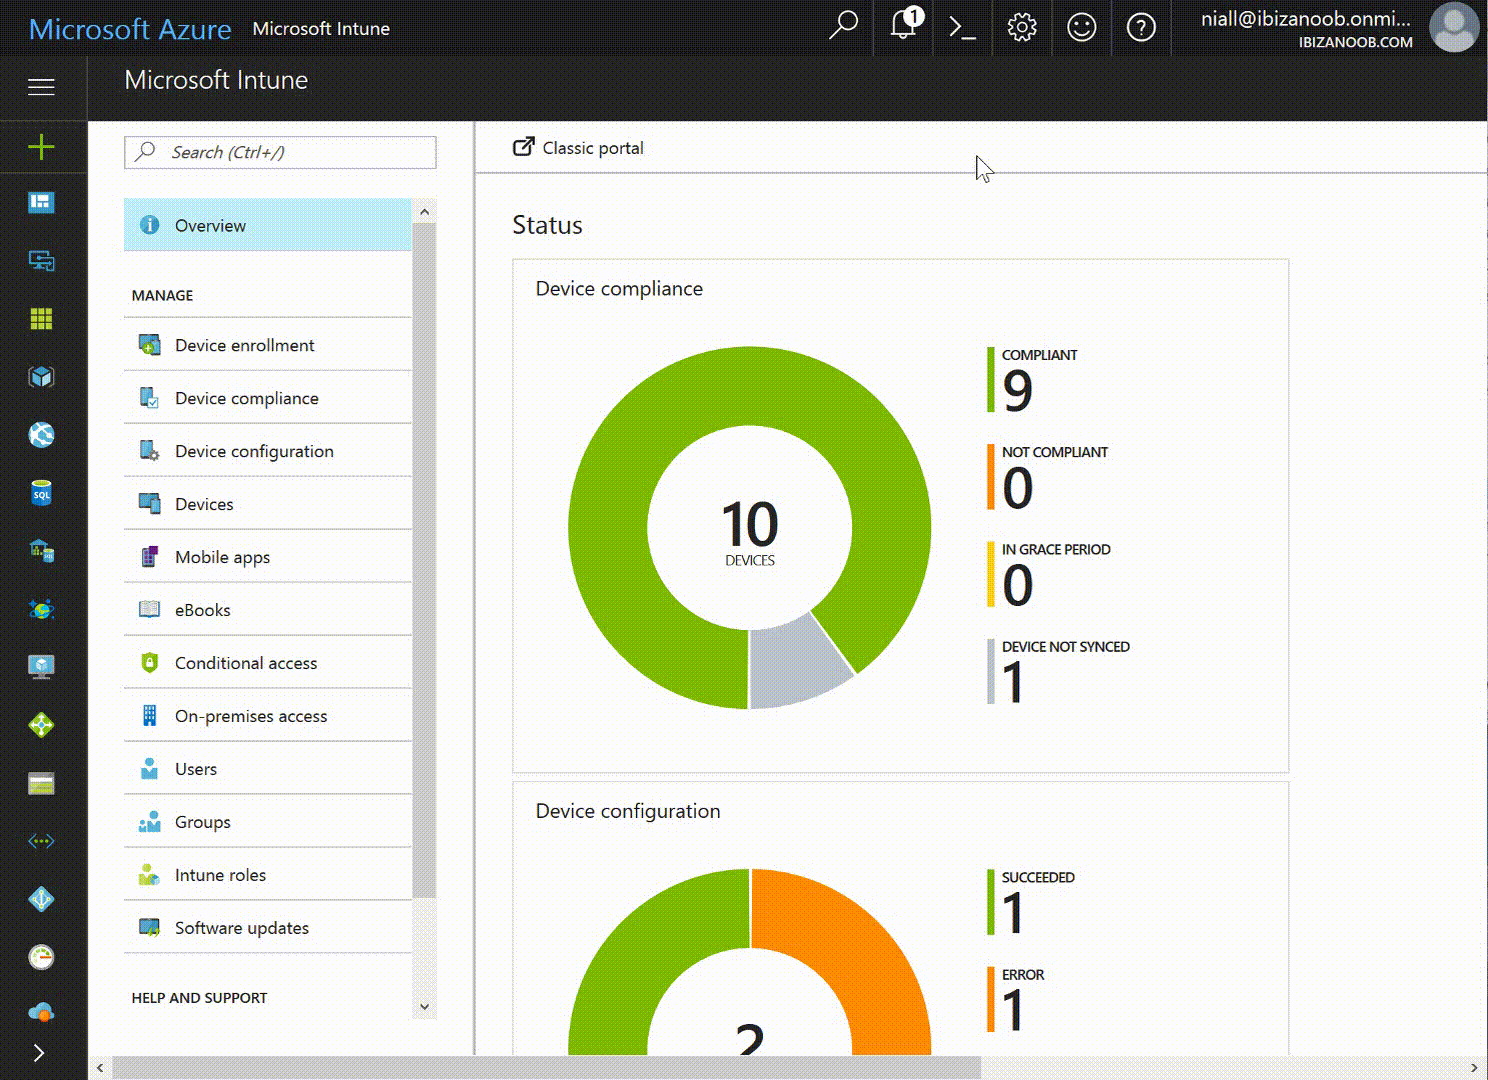
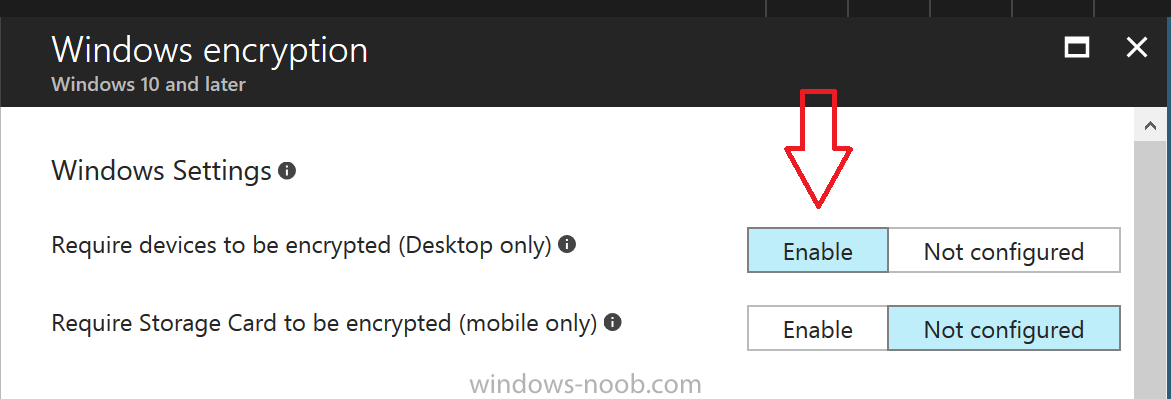
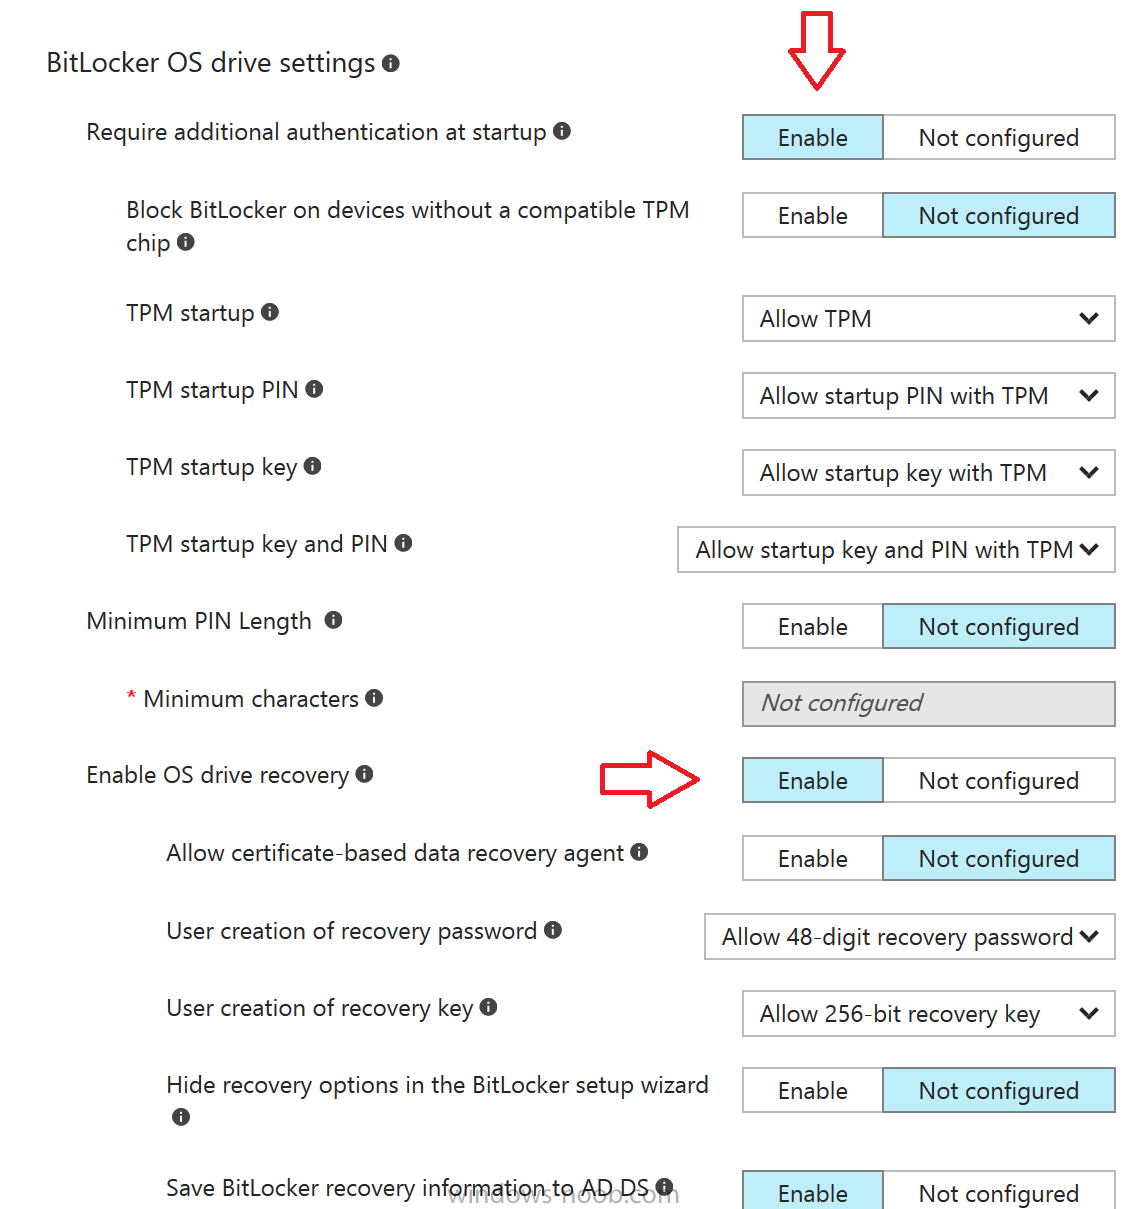
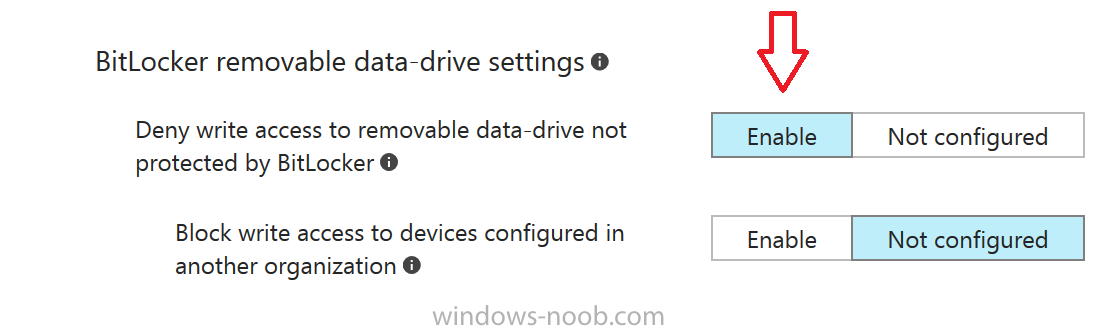
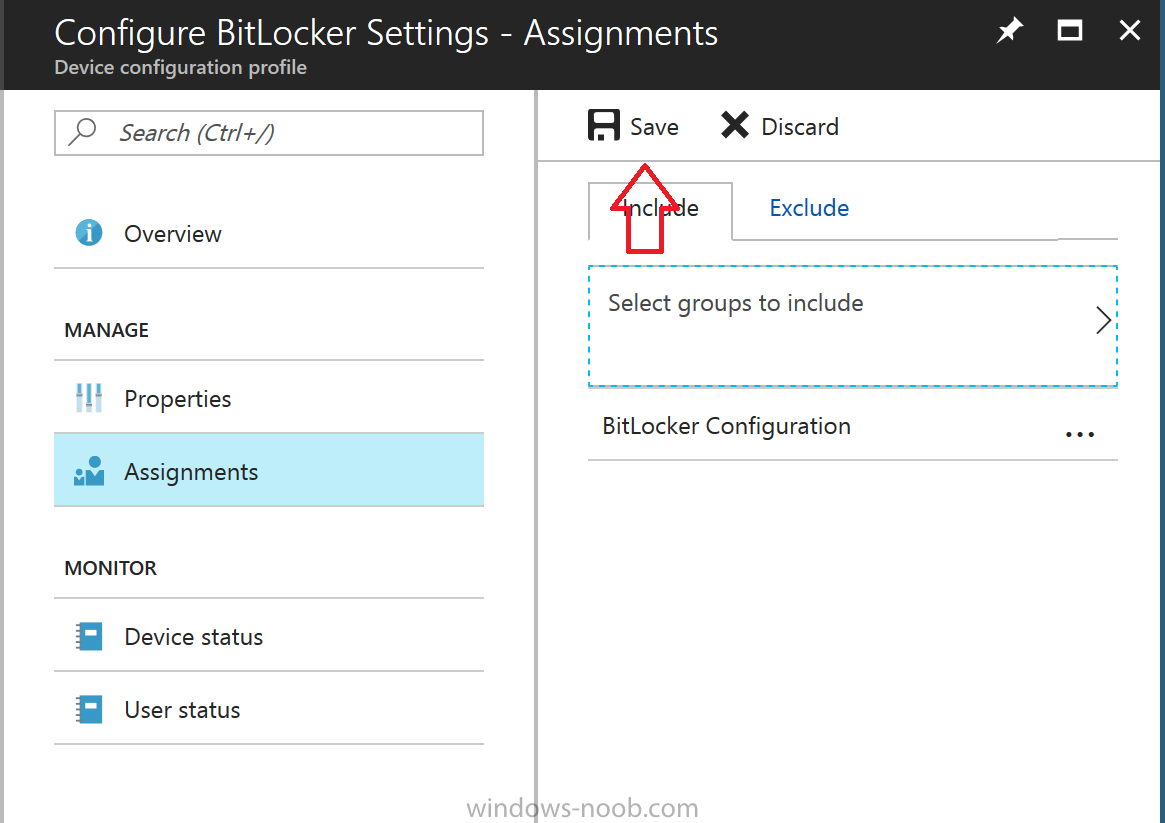
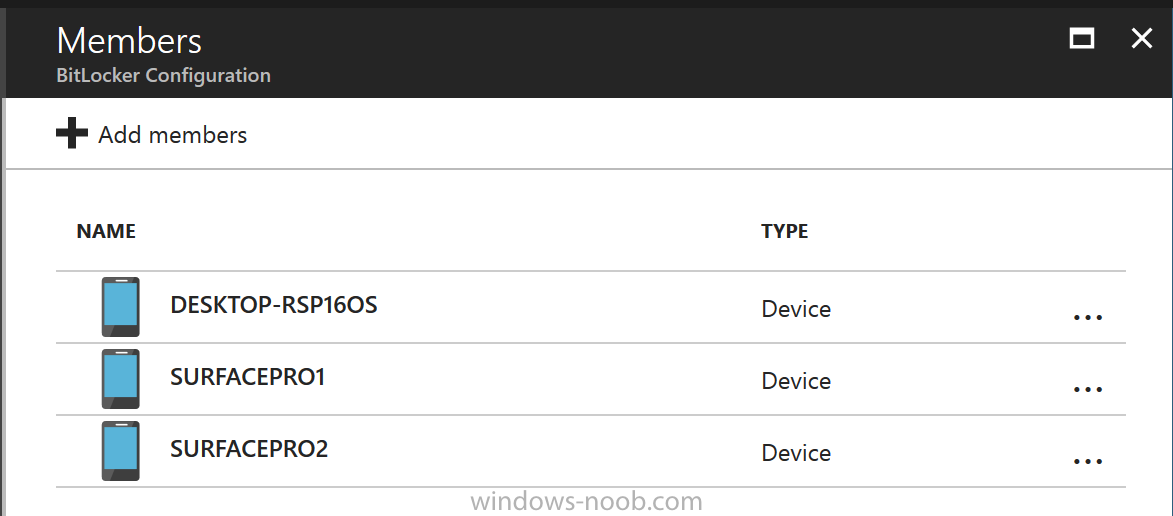
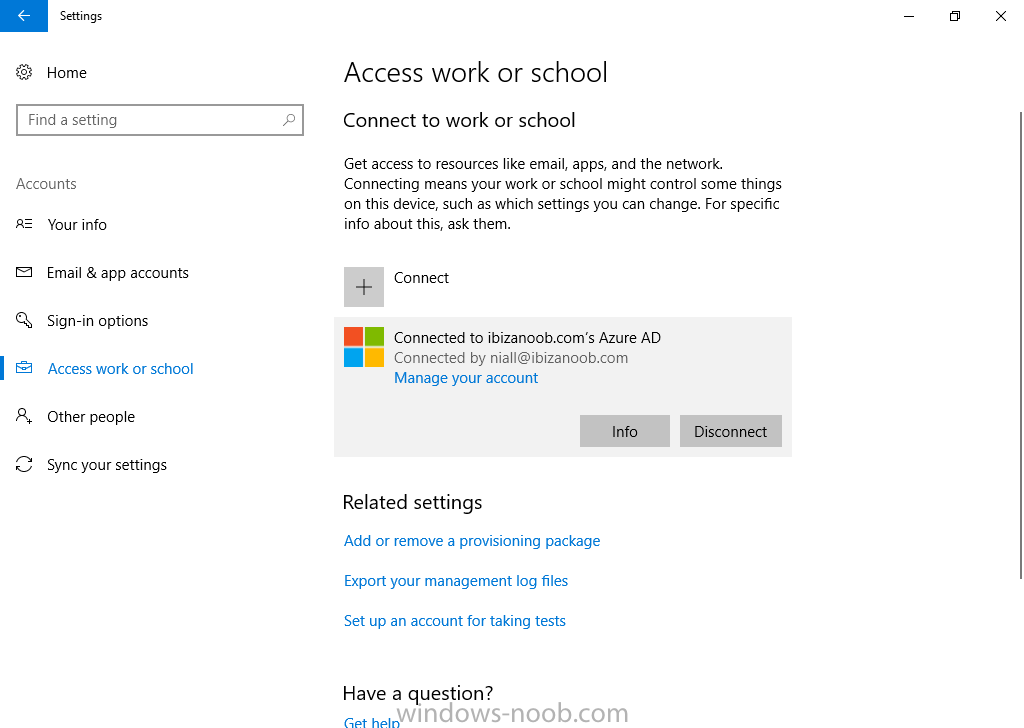
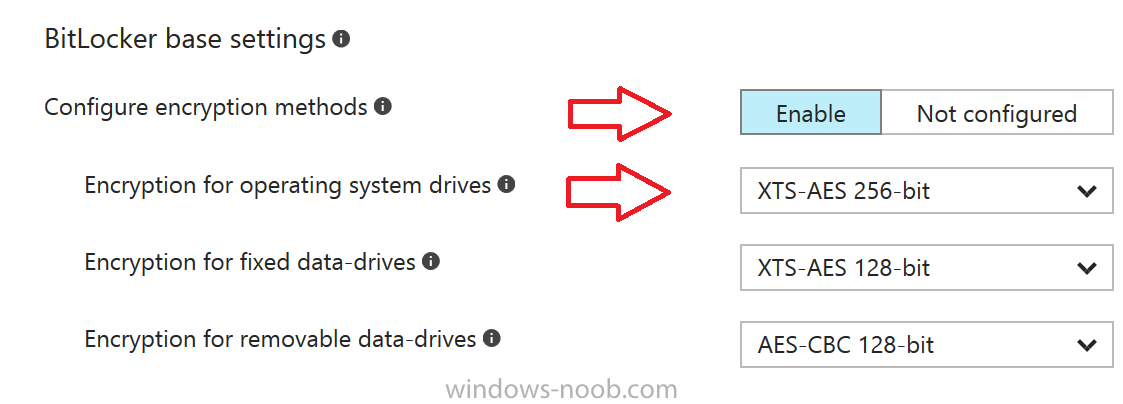
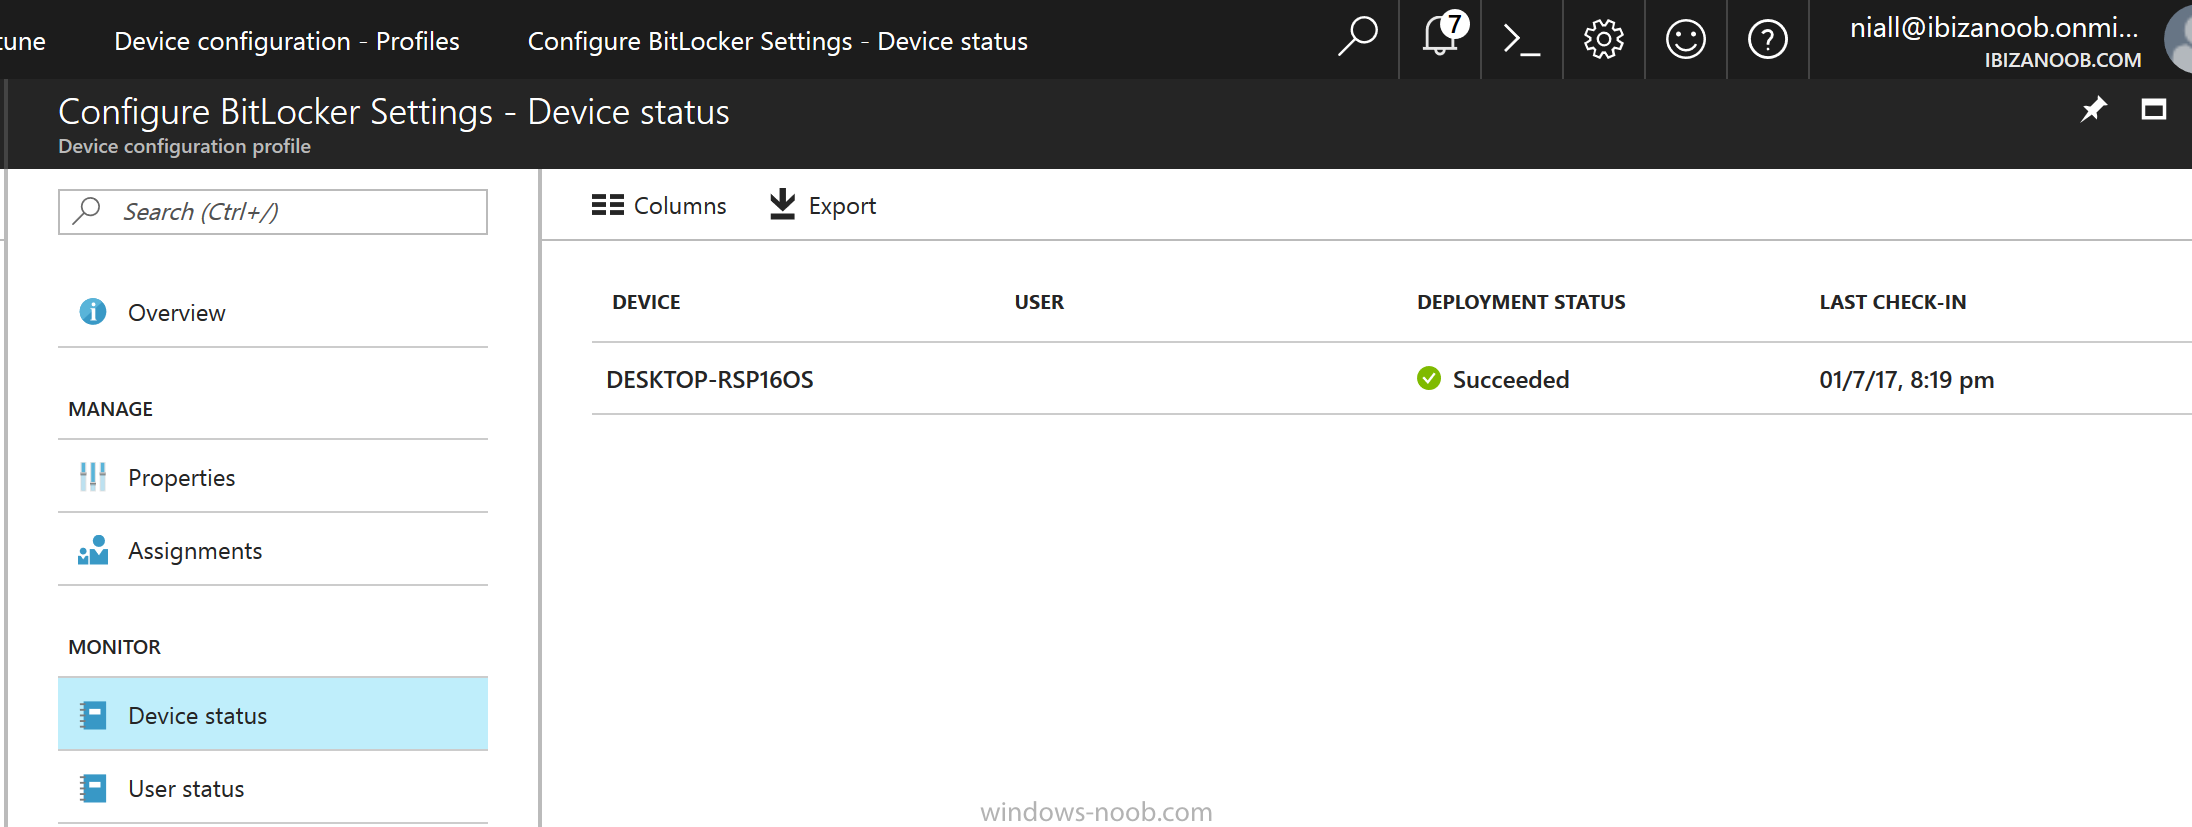
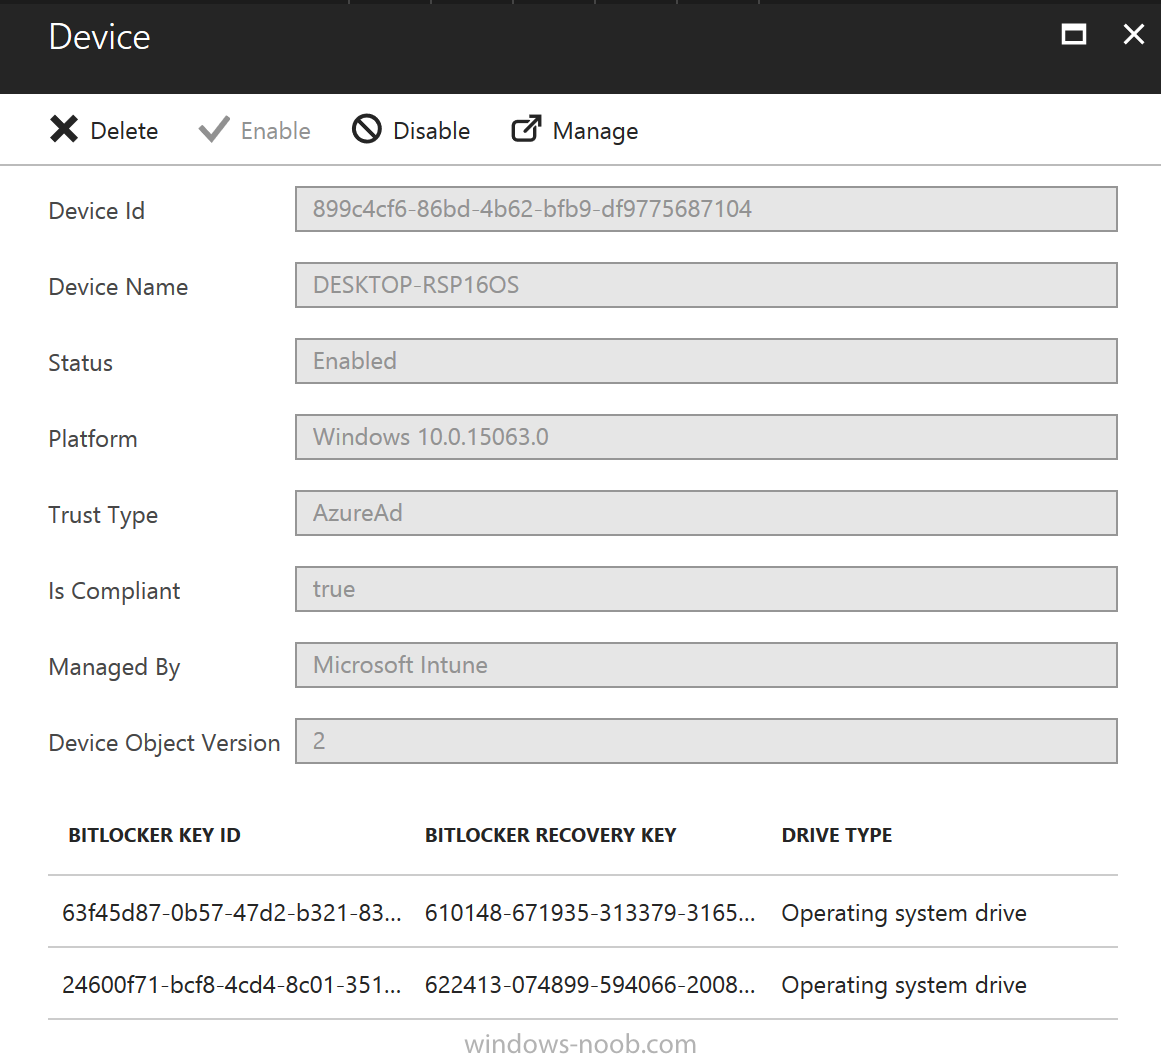
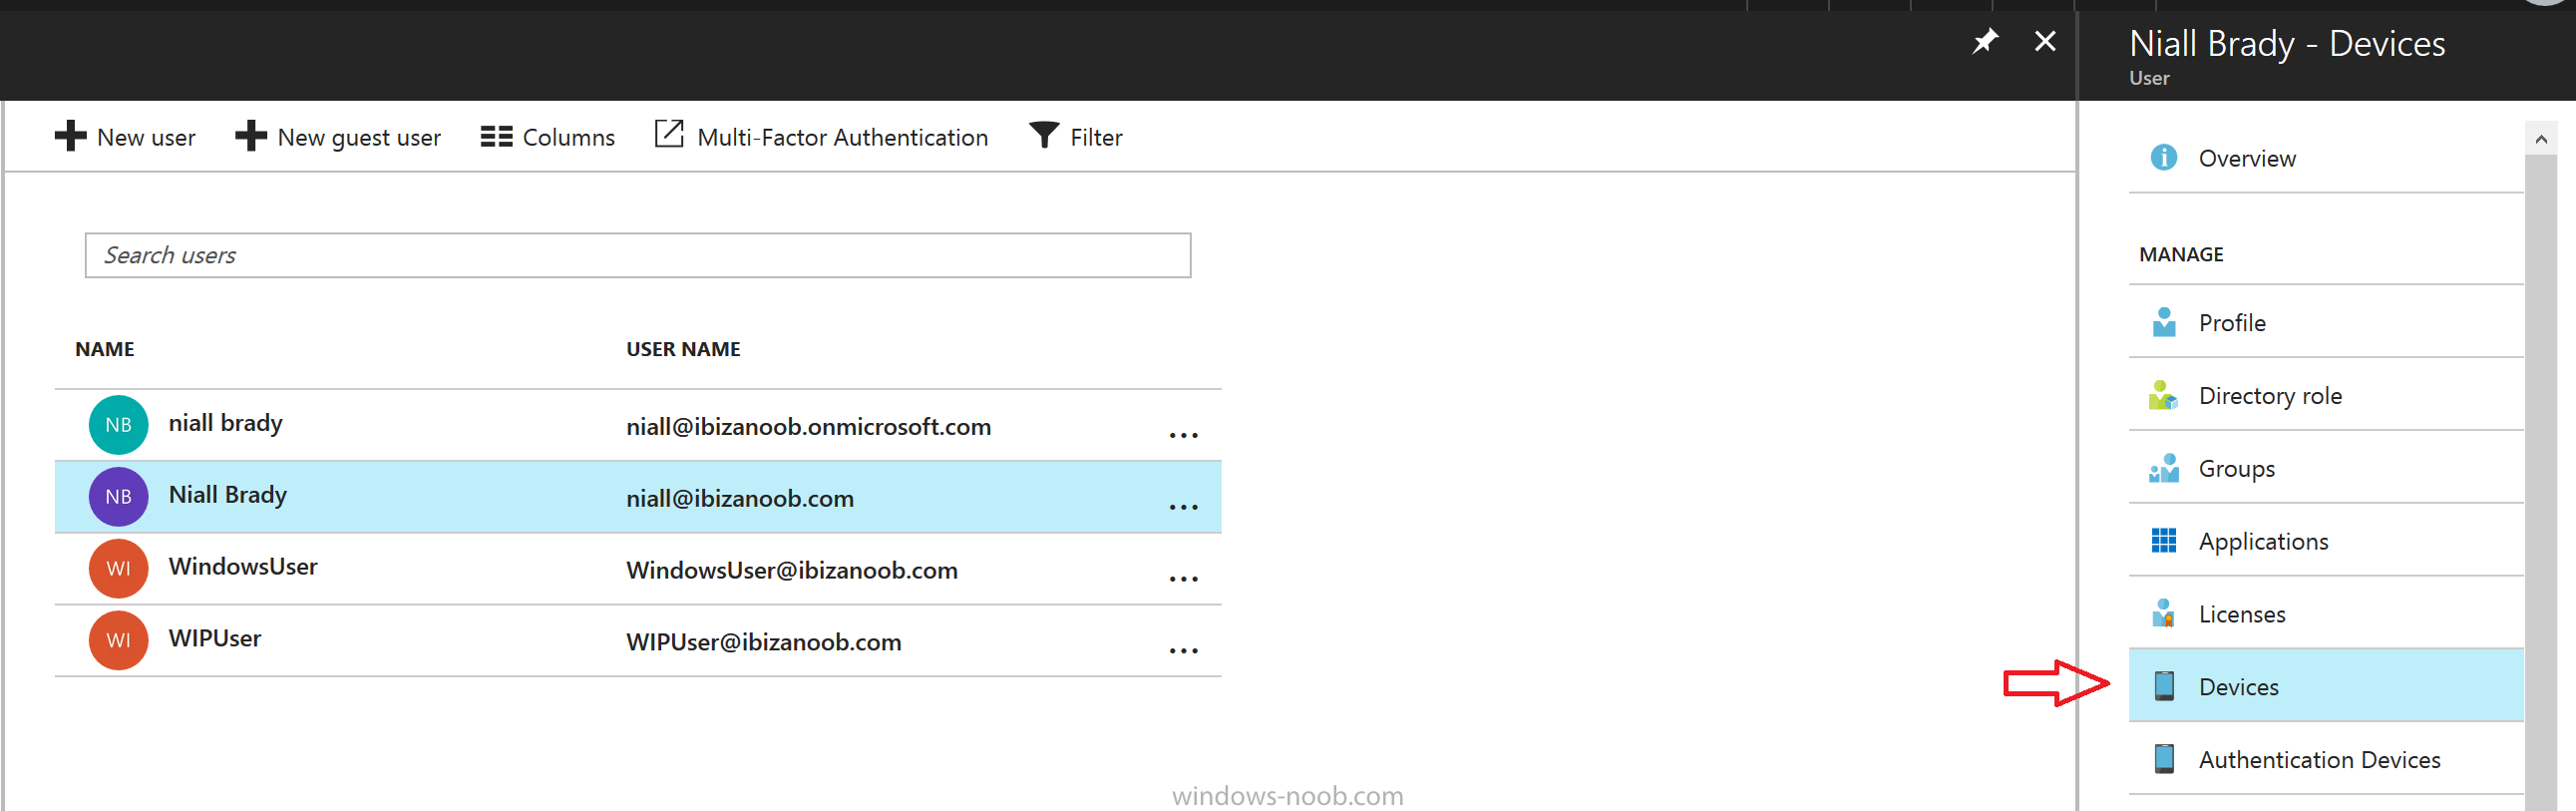
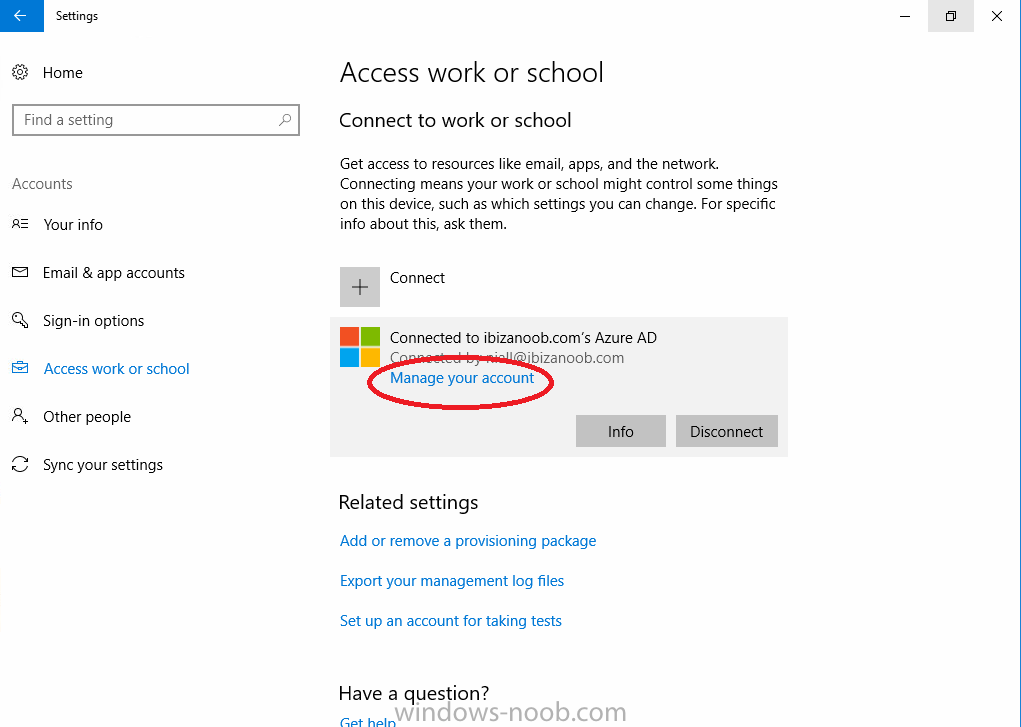
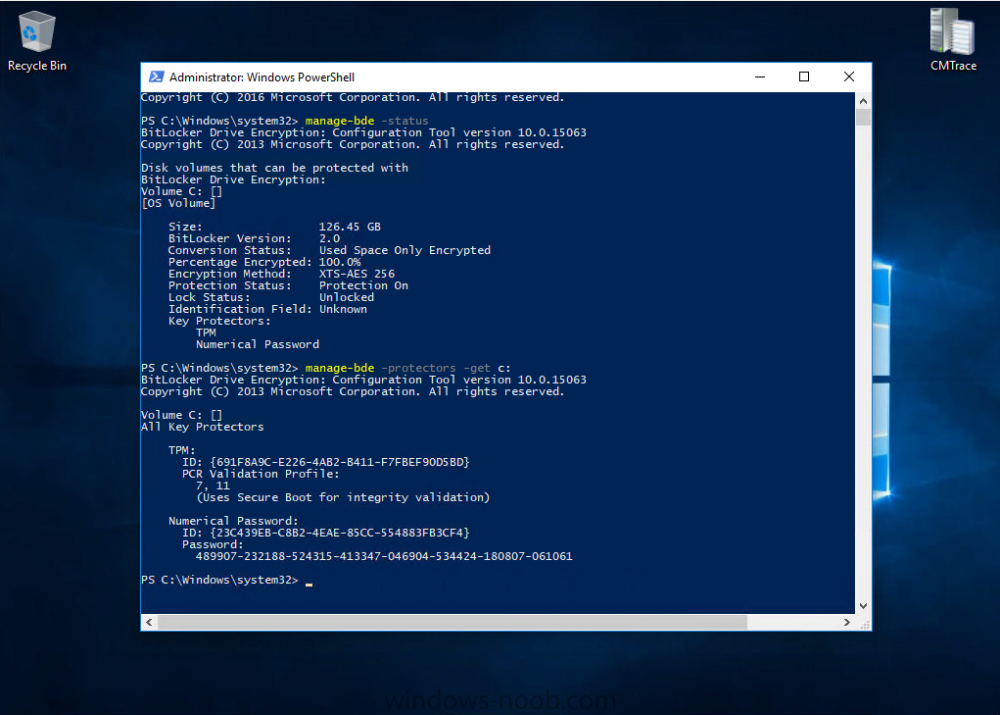
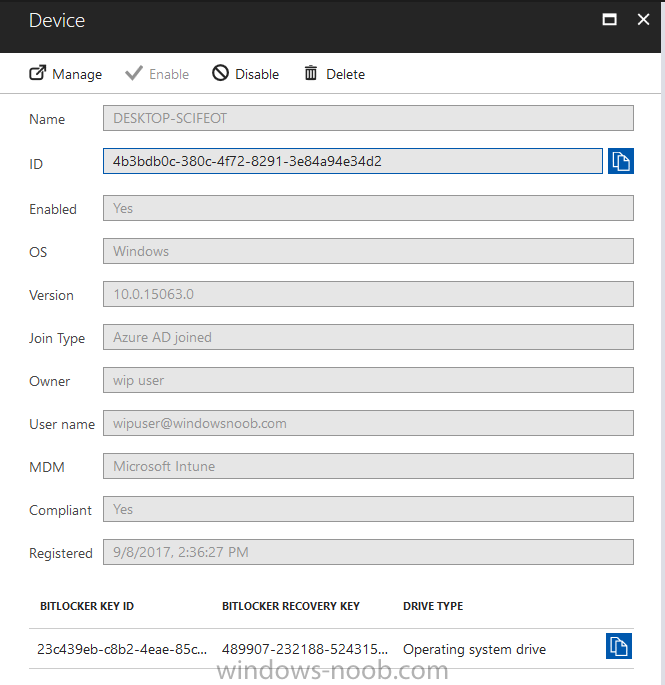
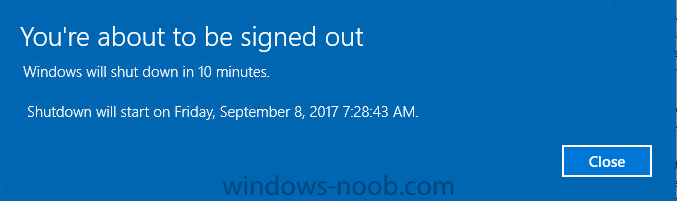
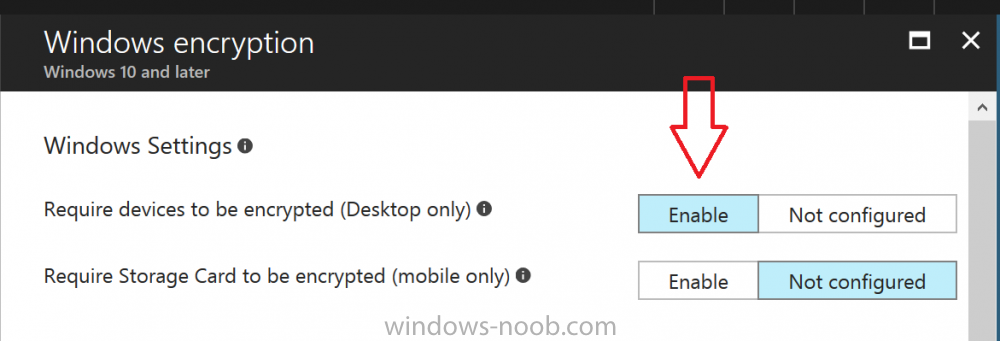
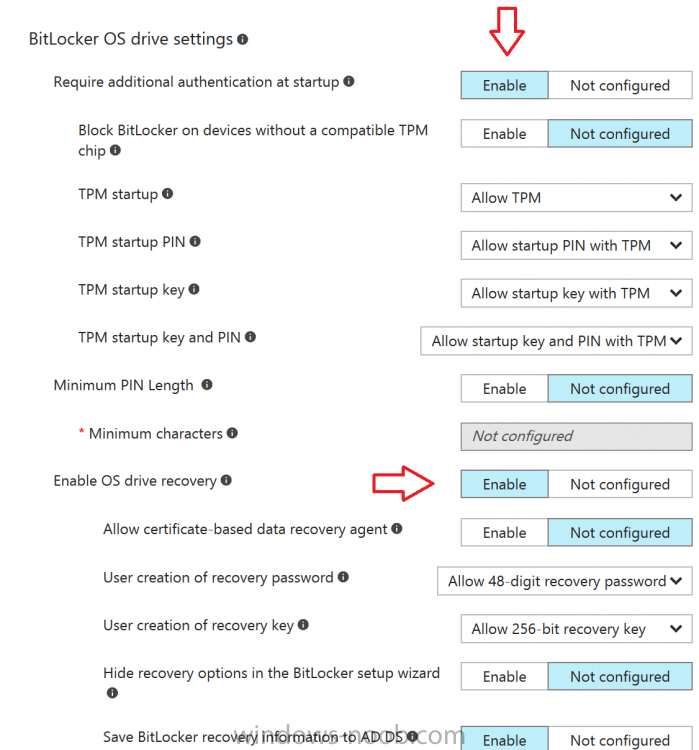
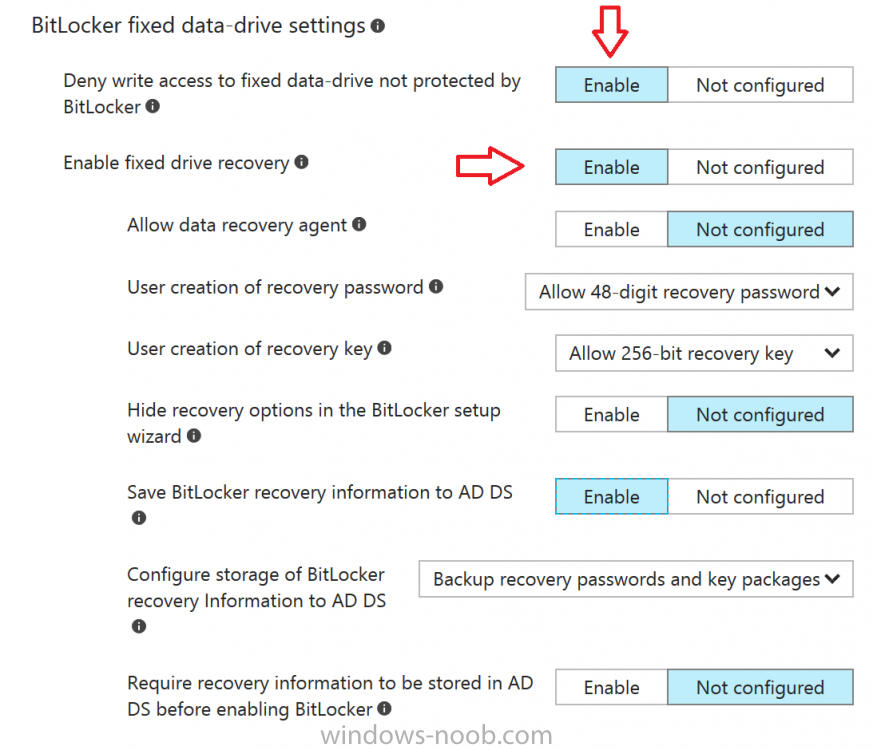
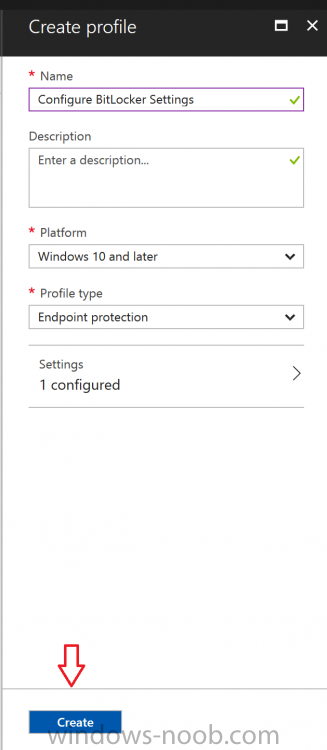
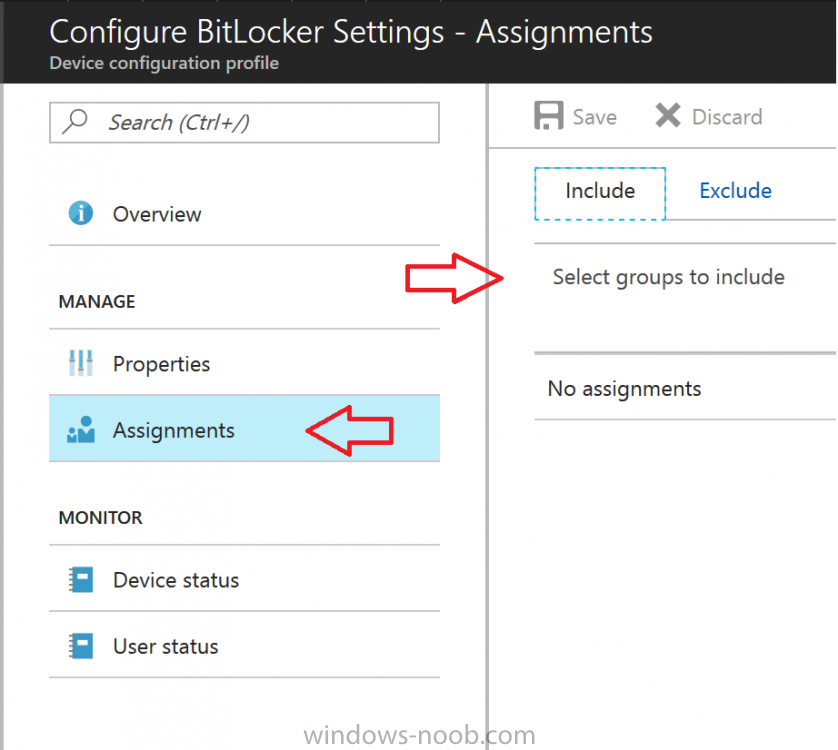
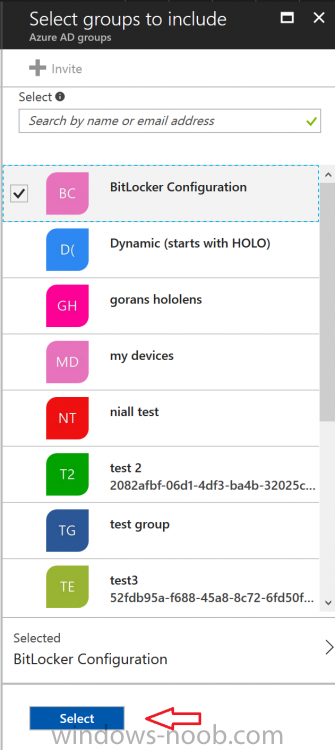
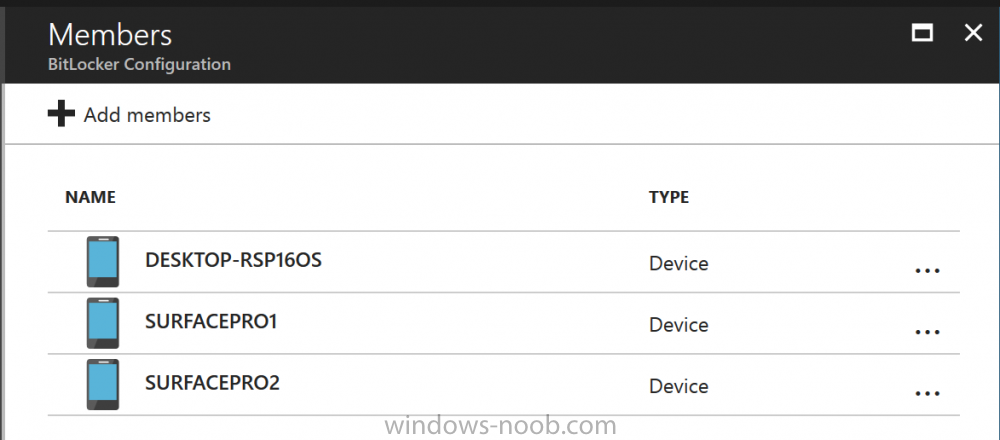
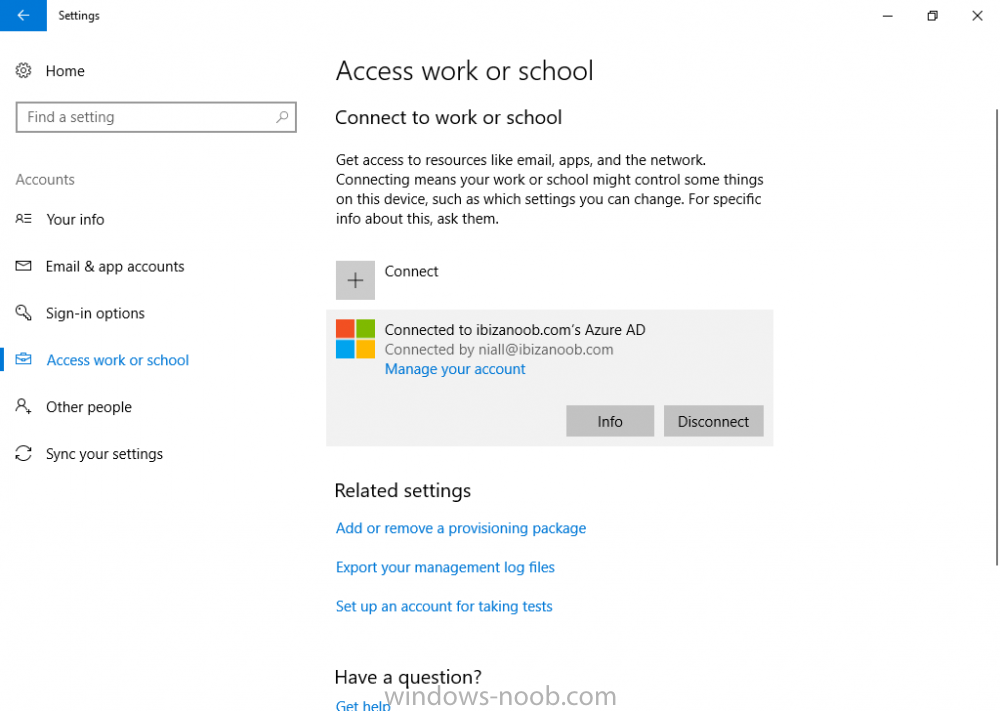
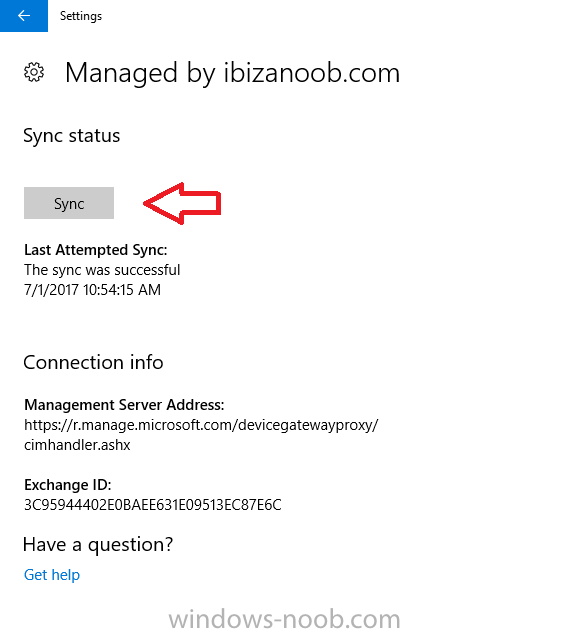
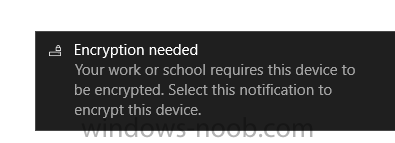
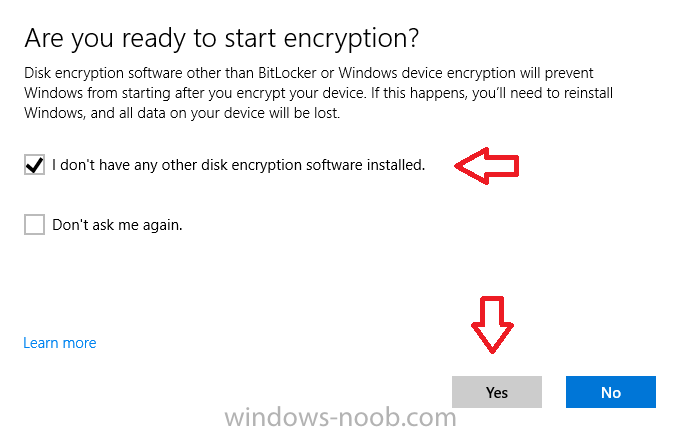
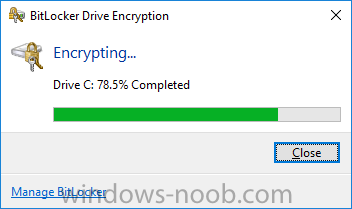
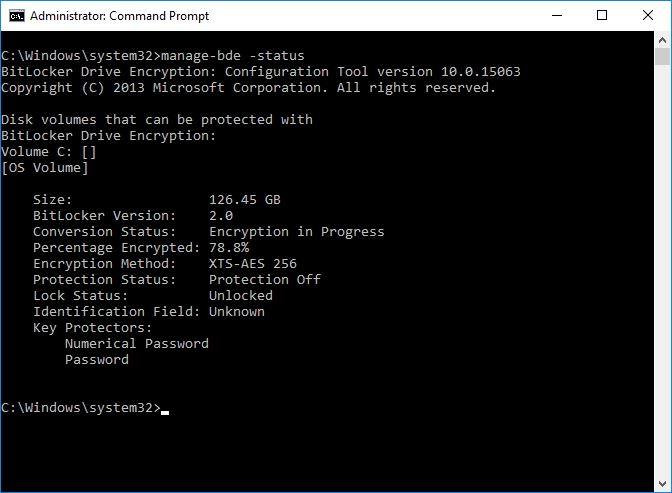
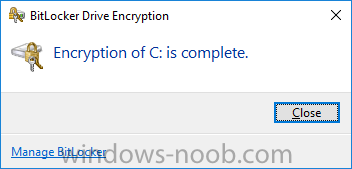
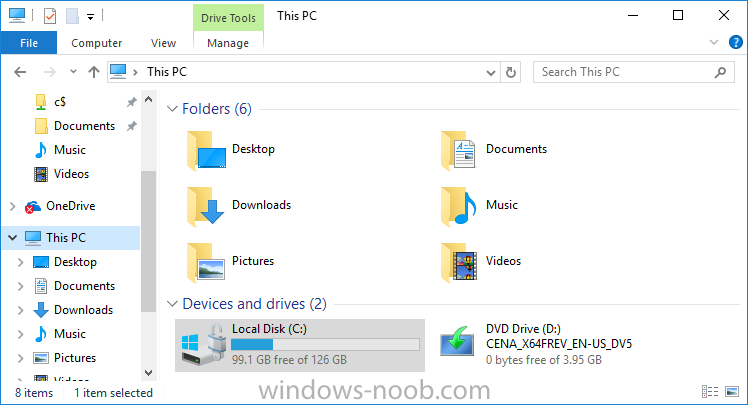
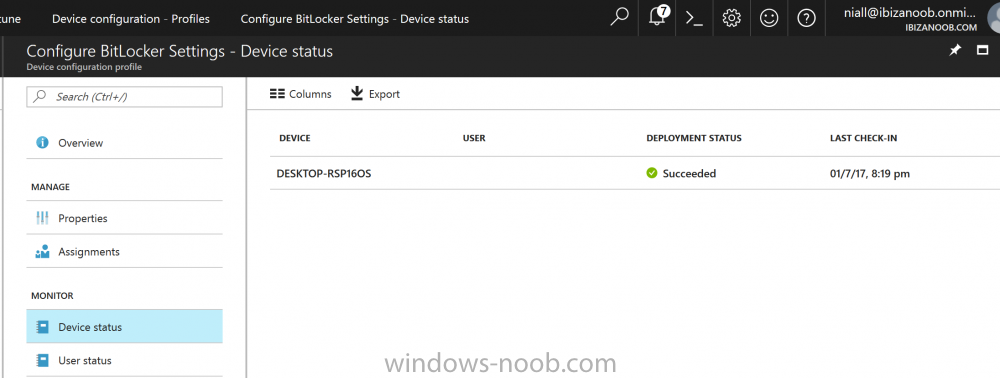
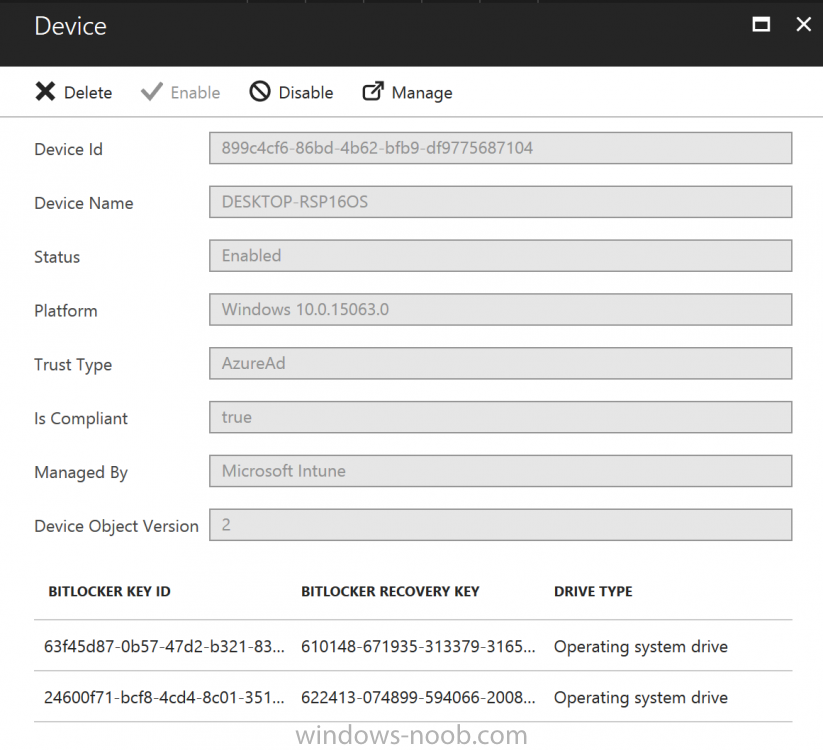
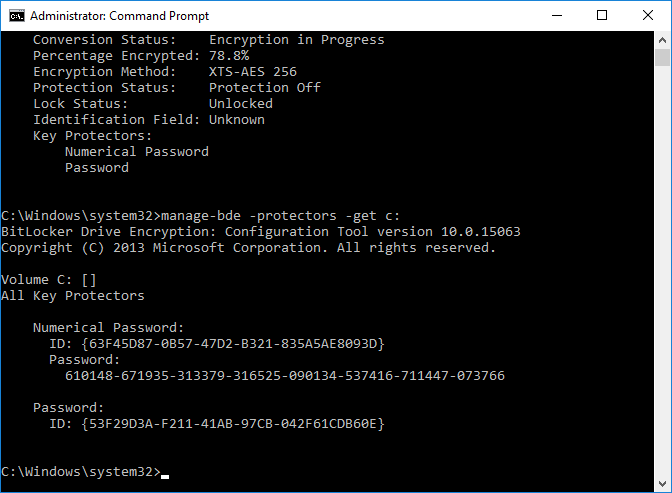
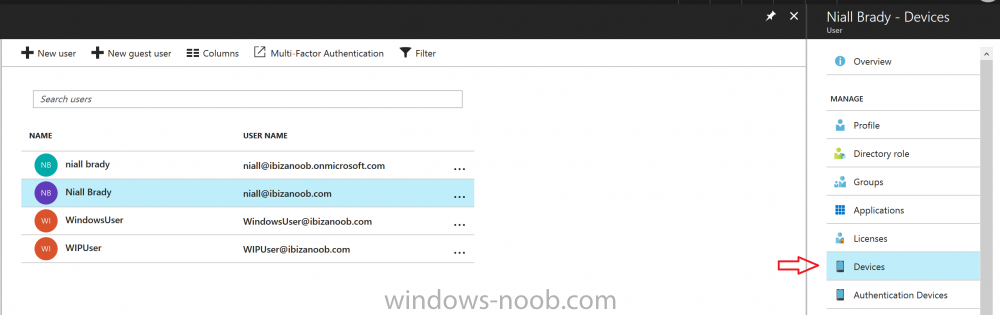
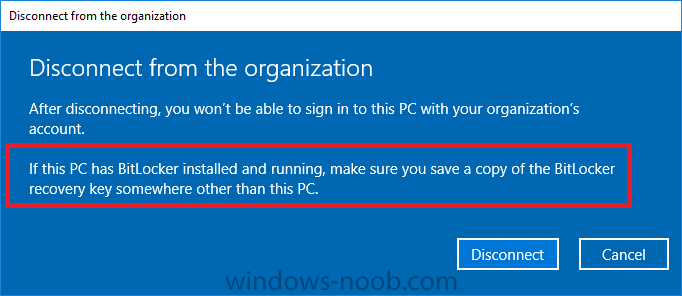
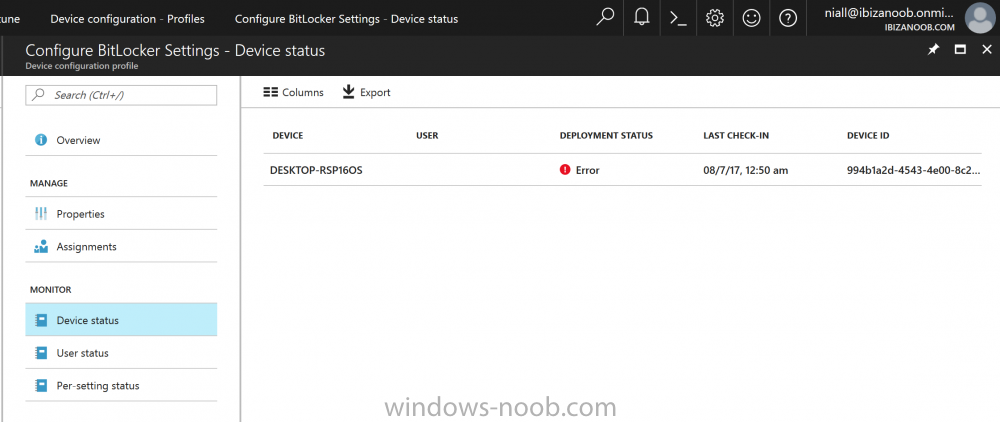
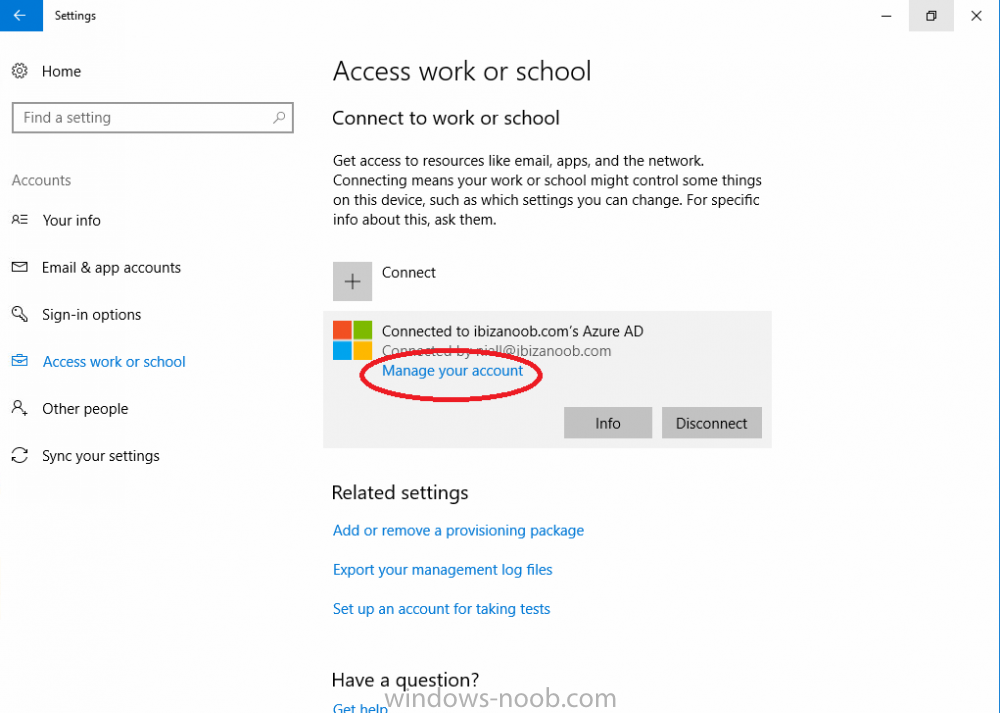
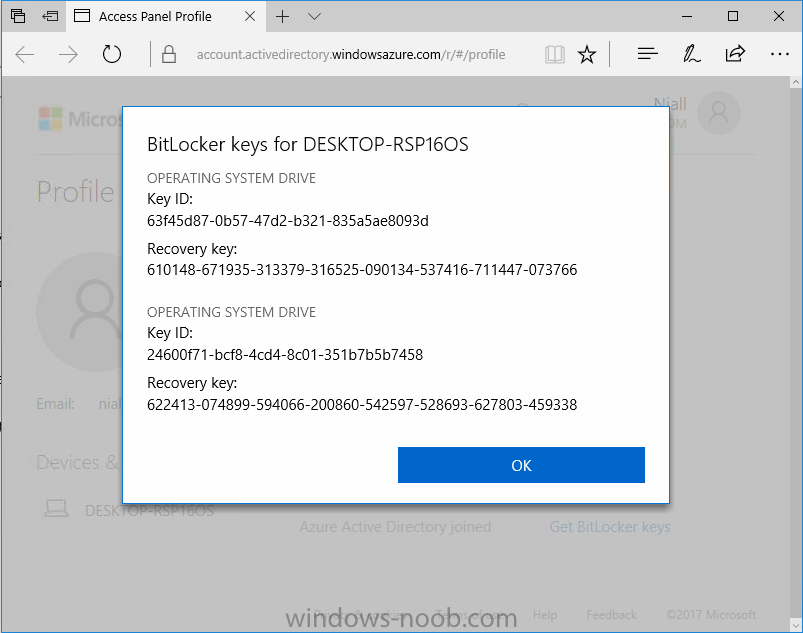
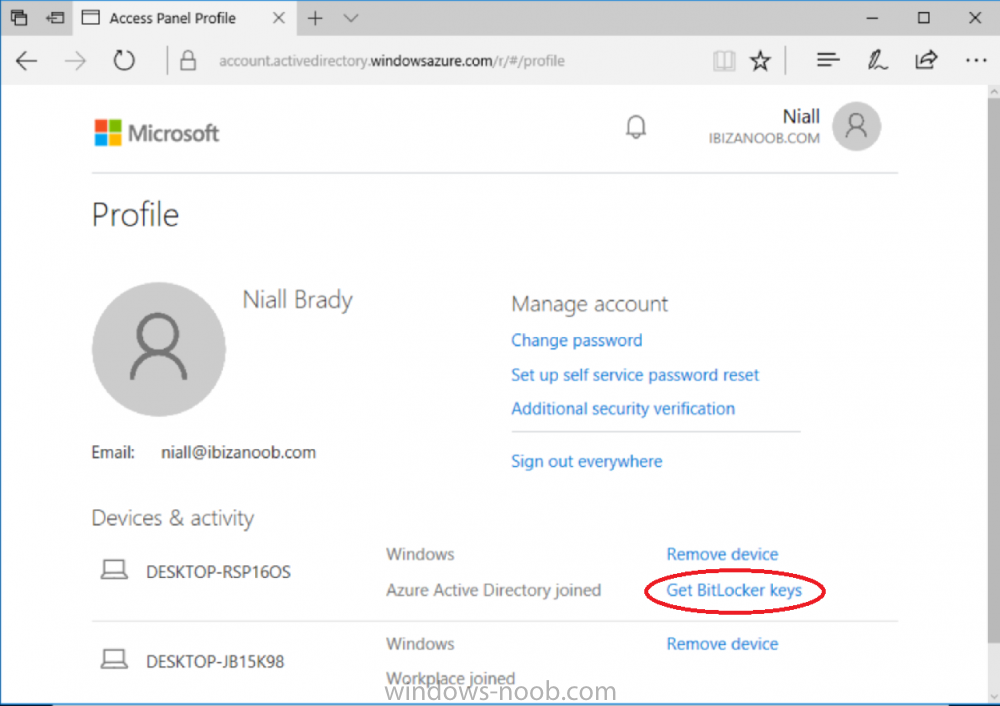
Introduction Security is a big focus for many companies, especially when it comes to data leakage (company data). Encrypting data on Windows 10 devices using BitLocker means that data is protected ("data at rest") . Microsoft Intune got yet more updates on June 30th, 2017, one of which was the ability to configure BitLocker settings detailed here. This ability was initially raised as a uservoice item. So let's take a look at how it works. Step 1. Create a Device Configuration Profile In the Azure Portal, navigate to Intune, and select Device Configuration, then click on Profiles and then click on Create Profile, and fill in the following details: Name: Configure BitLocker Settings Platform: Windows 10 and later Profile type: Endpoint Protection Note: Endpoint Protection is the profile type for BitLocker configuration, not to be confused with System Center Endpoint Protection. as shown below. Step 2. Configure Settings in the profile Next, in the Windows Encryption pane that appears, make your choices for Windows Settings, Set the Require devices to be encrypted (Desktop only) option to Enable. Make note of the note (the 'i', you can hover over it to see the info it contains), and I've bolded part of that statement below: So by requiring BitLocker encryption, your users will need to confirm the above prior to encryption taking place. Hopefully in the future we'll be able to automate it 100% so that no user interaction is required. For BitLocker base settings, set Configure encryption methods to Enable and then set the desired encryption level via the drop down menus for each drive connected. For BitLocker OS drive settings make your choices after setting Require additional authentication at startup to Enable. Note: For Enable OS drive recovery, although it states that you can Save BitLocker recovery information to AD DS it actually saves the recovery information to Azure AD if you enable the option (and you should). In other words, if you want to be able to retrieve a BitLocker key from an Azure AD and MDM enrolled device, make sure to Enable OS drive recovery and Save BitLocker recovery information to AD DS. For BitLocker fixed data-drive settings, you can deny write access to drives not BitLockered by enabling the option. And for BitLocker removable data-drive settings, make your choices. Once you've finished configuring the settings, click on OK and then click on Create, to Create the device configuration profile. Step 3. Assign the profile to a group Now that you've created the profile, you need to deploy it (assign it) to a Group containing Windows 10 devices. Select the profile created above, and click on Assignments, next click on Select groups to Include. Select a previously created Group (or groups if you wish), I selected one which I previously created called BitLocker Configuration but you can select whichever Group you want, and then click on the Select button at the bottom of that pane, if it's not visible, zoom out (browser zoom). Finally, click on Save to save the changes. If you haven't done so already, add some Windows 10 Device members to the Group. Step 4. Monitor the device configuration on a Windows 10 device Login to a MDM connected (and in this case Azure AD joined) device that is not yet encrypted, and trigger a Sync. To trigger a policy sync, select All Settings Accounts, select Access Work or School, select your MDM account and click on Info. Next, click on Sync Once the sync is done you should see an Encryption Needed notification in the systray. Click on the notification and you'll see the following screen. Select I don't have any other disk encryption before clicking on Yes. and off it goes... And you can open an administrative command prompt to verify the encryption algorithm using the following manage-bde -status As you can see from the above, encryption is in progress and the Encryption method matches the XTS-AES 256 setting selected in the device configuration. After it's done encrypting, you'll be notified. And in Windows File Explorer you can see the BitLocker icon on the operating system drive. Step 5. Verify device is configured with BitLocker in Azure At this point trigger another Sync on the device. After the sync is complete, click on the Device configuration profile, and select Device status as shown below. Devices targeted by the profile will be listed along with the Deployment Status of the configuration profile. If the user has allowed BitLocker to complete the deployment status will be listed as "Succeeded" as shown below. If the user did not start encryption (or if there was some other problem), it will be listed with a Deployment Status of "Error". If the Deployment Status is listed as Error, you can click on the device listed, and it will take you to the devices' properties. From there click on Device configuration and then click on the Device Configuration error on the right side of this screenshot. Here you see that it mentions the user needs to click on Yes to start the encryption, so it's likely (in this case) that the user ignored the notifications which is why an error is reported. To enforce this, or rather to force the user to do what we want (in regards to starting the BitLocker encryption via the notification), please see the comments in the summary at the bottom of this guide. Step 6. Retrieving the BitLocker key as the admin in Azure AD To locate the BitLocker protector key, select the User that enrolled into MDM, and click on Devices. Then select the device in question. The BitLocker key id and BitLocker recovery key will be listed. Which can be double checked against the actual computer using this command (in an administrative command prompt on the client computer that is BitLocker encrypted) manage-bde -protectors -get c: Note: If the user un-enrolls the device, the BitLocker recovery keys will be removed from Azure AD. Step 7. Retrieving the BitLocker key as the user The user can also check their BitLocker keys on any of their enrolled devices by clicking on Settings, Accounts, Access work or school, highlight the connection, and select Manage your account or by going to https://myapps.microsoft.com in a web browser and clicking on their username, and then clicking on Profile, select the device and then click on Get BitLocker Keys. From there they can click select the device in question, and click on Get BitLocker Keys and the BitLocker keys will be listed Note: If you want to automate this and remove user choice then use the windows-noob.com custom MSI in Part 2. Recommended reading https://docs.microsoft.com/en-us/intune/endpoint-protection-windows-10 https://docs.microsoft.com/en-us/windows/device-security/bitlocker/bitlocker-management-for-enterprises https://en.wikipedia.org/wiki/Data_at_rest https://docs.microsoft.com/en-us/azure/active-directory/active-directory-conditional-access https://nhogarth.net/2017/07/17/intune-denying-access-to-windows-10-without-bitlocker-enabled/ https://blogs.technet.microsoft.com/home_is_where_i_lay_my_head/2017/06/07/hardware-independent-automatic-bitlocker-encryption-using-aadmdm/ Summary It's great that we've finally got the ability to enable BitLocker in Intune but forcing encryption is not that straight forward. To force your users to be compliant you can either use Conditional Access (1) to deny those machines access to email and associated office applications unless they are encrypted, to do that you'll need to configure a Device Compliance policy (2) to verify that the device is encrypted, and based on that the user can access the applications specified. Or, you can automate the encryption like I do in Part 2 of this series of blog posts about BitLocker in Intune. (1) Thanks Jan Ketil Skanke (2) Thanks Nick


-
 Morning All, I have a Windows 10 Task Sequence for a standalone laptop which I need to encrypt with Bitlocker as part of the OSD build. The machine encrypts with bitlocker fine but I cannot find a way to export the recovery key either to a network share (with appropriate credentials) or the local disk (to then backup from the device) during the task sequence. Wondering if anyone has managed to get this working or if has to remain a manual step, i'd appreciate any help/advice? thanks in advance,
 -
 Hi, I'm having trobule with refreshing Windows 10 computers from WinPE. We need to upgrade BIOS before BIOS Conversion step in CM1610 and set BIOS settings. When reinstalling an computer it fails at staging Boot image. I have tried to size up the disk so it can hold larger WinPE Boot image but it does not work. 2048 MB Recovery 1024 MB EFI 128 MB MSR 100% OSD If I disable the step for BIOS Upgrade and Configure I can reinstall an computer without problems. <![LOG[Process completed with exit code 1]LOG]!><time="14:10:08.323-120" date="05-10-2017" component="TSManager" context="" type="1" thread="1320" file="commandline.cpp:1124"> <![LOG[TSUEFIDrive: ]LOG]!><time="14:10:08.323-120" date="05-10-2017" component="TSManager" context="" type="1" thread="1320" file="bootimage.cpp:774"> <![LOG[Staging boot image CM1000AA]LOG]!><time="14:10:08.323-120" date="05-10-2017" component="TSManager" context="" type="1" thread="1320" file="bootimage.cpp:781"> <![LOG[Mounting \Device\HarddiskVolume6 at Z:]LOG]!><time="14:10:08.338-120" date="05-10-2017" component="TSManager" context="" type="1" thread="1320" file="mountpoint.cpp:49"> <![LOG[Unmounting volume Z:\]LOG]!><time="14:10:08.338-120" date="05-10-2017" component="TSManager" context="" type="1" thread="1320" file="mountpoint.cpp:104"> <![LOG[0, HRESULT=80004005 (e:\nts_sccm_release\sms\framework\tscore\encryptablevolume.cpp,437)]LOG]!><time="14:10:08.354-120" date="05-10-2017" component="TSManager" context="" type="0" thread="1320" file="encryptablevolume.cpp:437"> <![LOG[Checking to see if the data path is on a bootable volume]LOG]!><time="14:10:08.354-120" date="05-10-2017" component="TSManager" context="" type="1" thread="1320" file="bootimage.cpp:1104"> <![LOG[ Volume S:\ is not NTFS]LOG]!><time="14:10:09.249-120" date="05-10-2017" component="TSManager" context="" type="1" thread="1320" file="bootimage.cpp:362"> <![LOG[Searching for a volume to stage the boot image]LOG]!><time="14:10:09.249-120" date="05-10-2017" component="TSManager" context="" type="1" thread="1320" file="bootimage.cpp:1128"> <![LOG[ Volume S:\ is not NTFS]LOG]!><time="14:10:09.264-120" date="05-10-2017" component="TSManager" context="" type="1" thread="1320" file="bootimage.cpp:362"> <![LOG[ Volume X:\ is not on a fixed disk]LOG]!><time="14:10:09.264-120" date="05-10-2017" component="TSManager" context="" type="1" thread="1320" file="bootimage.cpp:342"> <![LOG[BootImage::FindBootableVolume( NULL, sPath), HRESULT=80070490 (e:\nts_sccm_release\sms\framework\tscore\bootimage.cpp,1135)]LOG]!><time="14:10:09.264-120" date="05-10-2017" component="TSManager" context="" type="0" thread="1320" file="bootimage.cpp:1135"> <![LOG[Unable to find a volume that is suitable for staging the boot image. Element not found. (Error: 80070490; Source: Windows)]LOG]!><time="14:10:09.264-120" date="05-10-2017" component="TSManager" context="" type="3" thread="1320" file="bootimage.cpp:1135"> <![LOG[BootImage::PrepareForStaging(sLocalDataPath), HRESULT=80070490 (e:\nts_sccm_release\sms\framework\tscore\bootimage.cpp,783)]LOG]!><time="14:10:09.264-120" date="05-10-2017" component="TSManager" context="" type="0" thread="1320" file="bootimage.cpp:783"> <![LOG[Failed to validate for boot image staging]LOG]!><time="14:10:09.264-120" date="05-10-2017" component="TSManager" context="" type="3" thread="1320" file="bootimage.cpp:783"> <![LOG[StageBootImage() failed. 0x80070490.]LOG]!><time="14:10:09.264-120" date="05-10-2017" component="TSManager" context="" type="3" thread="1320" file="bootimage.cpp:889"> <![LOG[TS::Boot::BootImage::StageBootImage(sBootImageID, StageBootImageProgressCallback, (LPVOID) m_sStageBootImageMessage.c_str()), HRESULT=80070490 (e:\nts_sccm_release\sms\client\tasksequence\executionengine\engine.cxx,972)]LOG]!><time="14:10:09.264-120" date="05-10-2017" component="TSManager" context="" type="0" thread="1320" file="engine.cxx:972"> <![LOG[Failed to stage a boot image CM1000AA. Element not found. (Error: 80070490; Source: Windows)]LOG]!><time="14:10:09.264-120" date="05-10-2017" component="TSManager" context="" type="3" thread="1320" file="engine.cxx:972"> <![LOG[Failed to reboot the system. Error 0x80070490)]LOG]!><time="14:10:09.264-120" date="05-10-2017" component="TSManager" context="" type="3" thread="1320" file="engine.cxx:1140"> <![LOG[RebootSystem(pwszRebootMessage, dwRebootTimeout, dwRebootReason, bRebootWinPE), HRESULT=80070490 (e:\nts_sccm_release\sms\client\tasksequence\executionengine\engine.cxx,622)]LOG]!><time="14:10:09.264-120" date="05-10-2017" component="TSManager" context="" type="0" thread="1320" file="engine.cxx:622"> <![LOG[Failed to initialize a system reboot. Element not found. (Error: 80070490; Source: Windows)]LOG]!><time="14:10:09.264-120" date="05-10-2017" component="TSManager" context="" type="3" thread="1320" file="engine.cxx:622"> <![LOG[CheckForRebootRequest(&bRebootInitiated), HRESULT=80070490 (e:\nts_sccm_release\sms\client\tasksequence\executionengine\engine.cxx,310)]LOG]!><time="14:10:09.264-120" date="05-10-2017" component="TSManager" context="" type="0" thread="1320" file="engine.cxx:310"> <![LOG[Fatal error is returned in check for reboot request of the action (Restart Computer). Element not found. (Error: 80070490; Source: Windows)]LOG]!><time="14:10:09.264-120" date="05-10-2017" component="TSManager" context="" type="3" thread="1320" file="engine.cxx:310"> <![LOG[An error (0x80070490) is encountered in execution of the task sequence]LOG]!><time="14:10:09.264-120" date="05-10-2017" component="TSManager" context="" type="3" thread="1320" file="engine.cxx:390"> <![LOG[MP server http://LKSRVSCCM03.res.ludvika.intra. Ports 80,443. CRL=false.]LOG]!><time="14:10:09.264-120" date="05-10-2017" component="TSManager" context="" type="1" thread="1320" file="utils.cpp:6255"> <![LOG[Setting authenticator]LOG]!><time="14:10:09.280-120" date="05-10-2017" component="TSManager" context="" type="1" thread="1320" file="utils.cpp:6277"> <![LOG[Set authenticator in transport]LOG]!><time="14:10:09.280-120" date="05-10-2017" component="TSManager" context="" type="0" thread="1320" file="libsmsmessaging.cpp:7958"> <![LOG[Sending StatusMessage]LOG]!><time="14:10:09.296-120" date="05-10-2017" component="TSManager" context="" type="1" thread="1320" file="libsmsmessaging.cpp:4114"> <![LOG[Setting message signatures.]LOG]!><time="14:10:09.296-120" date="05-10-2017" component="TSManager" context="" type="0" thread="1320" file="libsmsmessaging.cpp:1383"> <![LOG[Setting the authenticator.]LOG]!><time="14:10:09.296-120" date="05-10-2017" component="TSManager" context="" type="0" thread="1320" file="libsmsmessaging.cpp:1413"> <![LOG[CLibSMSMessageWinHttpTransport::Send: URL: LKSRVSCCM03.res.ludvika.intra:80 CCM_POST /ccm_system/request]LOG]!><time="14:10:09.296-120" date="05-10-2017" component="TSManager" context="" type="1" thread="1320" file="libsmsmessaging.cpp:8828"> <![LOG[Request was successful.]LOG]!><time="14:10:09.327-120" date="05-10-2017" component="TSManager" context="" type="0" thread="1320" file="libsmsmessaging.cpp:9163"> <![LOG[Executing command line: X:\WINDOWS\system32\cmd.exe /k]LOG]!><time="14:10:21.451-120" date="05-10-2017" component="TSBootShell" context="" type="1" thread="1016" file="bootshell.cpp:1011"> <![LOG[The command completed successfully.]LOG]!><time="14:10:21.455-120" date="05-10-2017" component="TSBootShell" context="" type="1" thread="1016" file="bootshell.cpp:1093"> <![LOG[Successfully launched command shell.]LOG]!><time="14:10:21.455-120" date="05-10-2017" component="TSBootShell" context="" type="1" thread="1016" file="bootshell.cpp:444"> <![LOG[m_TSEngine.Execute(& m_eExecutionResult), HRESULT=80070490 (e:\nts_sccm_release\sms\client\tasksequence\tsmanager\tsmanager.cpp,1250)]LOG]!><time="14:25:10.554-120" date="05-10-2017" component="TSManager" context="" type="0" thread="1320" file="tsmanager.cpp:1250"> Thanks in advance, EGGLAS
 -
Hi, I'm having trobule with refreshing Windows 10 computers from WinPE. We need to upgrade BIOS before BIOS Conversion step in CM1610 and set BIOS settings. When reinstalling an computer it fails at staging Boot image. I have tried to size up the disk so it can hold larger WinPE Boot image but it does not work. 2048 MB Recovery 1024 MB EFI 128 MB MSR 100% OSD If I disable the step for BIOS Upgrade and Configure I can reinstall an computer without problems. <![LOG[Process completed with exit code 1]LOG]!><time="14:10:08.323-120" date="05-10-2017" component="TSManager" context="" type="1" thread="1320" file="commandline.cpp:1124"> <![LOG[TSUEFIDrive: ]LOG]!><time="14:10:08.323-120" date="05-10-2017" component="TSManager" context="" type="1" thread="1320" file="bootimage.cpp:774"> <![LOG[Staging boot image CM1000AA]LOG]!><time="14:10:08.323-120" date="05-10-2017" component="TSManager" context="" type="1" thread="1320" file="bootimage.cpp:781"> <![LOG[Mounting \Device\HarddiskVolume6 at Z:]LOG]!><time="14:10:08.338-120" date="05-10-2017" component="TSManager" context="" type="1" thread="1320" file="mountpoint.cpp:49"> <![LOG[Unmounting volume Z:\]LOG]!><time="14:10:08.338-120" date="05-10-2017" component="TSManager" context="" type="1" thread="1320" file="mountpoint.cpp:104"> <![LOG[0, HRESULT=80004005 (e:\nts_sccm_release\sms\framework\tscore\encryptablevolume.cpp,437)]LOG]!><time="14:10:08.354-120" date="05-10-2017" component="TSManager" context="" type="0" thread="1320" file="encryptablevolume.cpp:437"> <![LOG[Checking to see if the data path is on a bootable volume]LOG]!><time="14:10:08.354-120" date="05-10-2017" component="TSManager" context="" type="1" thread="1320" file="bootimage.cpp:1104"> <![LOG[ Volume S:\ is not NTFS]LOG]!><time="14:10:09.249-120" date="05-10-2017" component="TSManager" context="" type="1" thread="1320" file="bootimage.cpp:362"> <![LOG[Searching for a volume to stage the boot image]LOG]!><time="14:10:09.249-120" date="05-10-2017" component="TSManager" context="" type="1" thread="1320" file="bootimage.cpp:1128"> <![LOG[ Volume S:\ is not NTFS]LOG]!><time="14:10:09.264-120" date="05-10-2017" component="TSManager" context="" type="1" thread="1320" file="bootimage.cpp:362"> <![LOG[ Volume X:\ is not on a fixed disk]LOG]!><time="14:10:09.264-120" date="05-10-2017" component="TSManager" context="" type="1" thread="1320" file="bootimage.cpp:342"> <![LOG[BootImage::FindBootableVolume( NULL, sPath), HRESULT=80070490 (e:\nts_sccm_release\sms\framework\tscore\bootimage.cpp,1135)]LOG]!><time="14:10:09.264-120" date="05-10-2017" component="TSManager" context="" type="0" thread="1320" file="bootimage.cpp:1135"> <![LOG[Unable to find a volume that is suitable for staging the boot image. Element not found. (Error: 80070490; Source: Windows)]LOG]!><time="14:10:09.264-120" date="05-10-2017" component="TSManager" context="" type="3" thread="1320" file="bootimage.cpp:1135"> <![LOG[BootImage::PrepareForStaging(sLocalDataPath), HRESULT=80070490 (e:\nts_sccm_release\sms\framework\tscore\bootimage.cpp,783)]LOG]!><time="14:10:09.264-120" date="05-10-2017" component="TSManager" context="" type="0" thread="1320" file="bootimage.cpp:783"> <![LOG[Failed to validate for boot image staging]LOG]!><time="14:10:09.264-120" date="05-10-2017" component="TSManager" context="" type="3" thread="1320" file="bootimage.cpp:783"> <![LOG[StageBootImage() failed. 0x80070490.]LOG]!><time="14:10:09.264-120" date="05-10-2017" component="TSManager" context="" type="3" thread="1320" file="bootimage.cpp:889"> <![LOG[TS::Boot::BootImage::StageBootImage(sBootImageID, StageBootImageProgressCallback, (LPVOID) m_sStageBootImageMessage.c_str()), HRESULT=80070490 (e:\nts_sccm_release\sms\client\tasksequence\executionengine\engine.cxx,972)]LOG]!><time="14:10:09.264-120" date="05-10-2017" component="TSManager" context="" type="0" thread="1320" file="engine.cxx:972"> <![LOG[Failed to stage a boot image CM1000AA. Element not found. (Error: 80070490; Source: Windows)]LOG]!><time="14:10:09.264-120" date="05-10-2017" component="TSManager" context="" type="3" thread="1320" file="engine.cxx:972"> <![LOG[Failed to reboot the system. Error 0x80070490)]LOG]!><time="14:10:09.264-120" date="05-10-2017" component="TSManager" context="" type="3" thread="1320" file="engine.cxx:1140"> <![LOG[RebootSystem(pwszRebootMessage, dwRebootTimeout, dwRebootReason, bRebootWinPE), HRESULT=80070490 (e:\nts_sccm_release\sms\client\tasksequence\executionengine\engine.cxx,622)]LOG]!><time="14:10:09.264-120" date="05-10-2017" component="TSManager" context="" type="0" thread="1320" file="engine.cxx:622"> <![LOG[Failed to initialize a system reboot. Element not found. (Error: 80070490; Source: Windows)]LOG]!><time="14:10:09.264-120" date="05-10-2017" component="TSManager" context="" type="3" thread="1320" file="engine.cxx:622"> <![LOG[CheckForRebootRequest(&bRebootInitiated), HRESULT=80070490 (e:\nts_sccm_release\sms\client\tasksequence\executionengine\engine.cxx,310)]LOG]!><time="14:10:09.264-120" date="05-10-2017" component="TSManager" context="" type="0" thread="1320" file="engine.cxx:310"> <![LOG[Fatal error is returned in check for reboot request of the action (Restart Computer). Element not found. (Error: 80070490; Source: Windows)]LOG]!><time="14:10:09.264-120" date="05-10-2017" component="TSManager" context="" type="3" thread="1320" file="engine.cxx:310"> <![LOG[An error (0x80070490) is encountered in execution of the task sequence]LOG]!><time="14:10:09.264-120" date="05-10-2017" component="TSManager" context="" type="3" thread="1320" file="engine.cxx:390"> <![LOG[MP server http://LKSRVSCCM03.res.ludvika.intra. Ports 80,443. CRL=false.]LOG]!><time="14:10:09.264-120" date="05-10-2017" component="TSManager" context="" type="1" thread="1320" file="utils.cpp:6255"> <![LOG[Setting authenticator]LOG]!><time="14:10:09.280-120" date="05-10-2017" component="TSManager" context="" type="1" thread="1320" file="utils.cpp:6277"> <![LOG[Set authenticator in transport]LOG]!><time="14:10:09.280-120" date="05-10-2017" component="TSManager" context="" type="0" thread="1320" file="libsmsmessaging.cpp:7958"> <![LOG[Sending StatusMessage]LOG]!><time="14:10:09.296-120" date="05-10-2017" component="TSManager" context="" type="1" thread="1320" file="libsmsmessaging.cpp:4114"> <![LOG[Setting message signatures.]LOG]!><time="14:10:09.296-120" date="05-10-2017" component="TSManager" context="" type="0" thread="1320" file="libsmsmessaging.cpp:1383"> <![LOG[Setting the authenticator.]LOG]!><time="14:10:09.296-120" date="05-10-2017" component="TSManager" context="" type="0" thread="1320" file="libsmsmessaging.cpp:1413"> <![LOG[CLibSMSMessageWinHttpTransport::Send: URL: LKSRVSCCM03.res.ludvika.intra:80 CCM_POST /ccm_system/request]LOG]!><time="14:10:09.296-120" date="05-10-2017" component="TSManager" context="" type="1" thread="1320" file="libsmsmessaging.cpp:8828"> <![LOG[Request was successful.]LOG]!><time="14:10:09.327-120" date="05-10-2017" component="TSManager" context="" type="0" thread="1320" file="libsmsmessaging.cpp:9163"> <![LOG[Executing command line: X:\WINDOWS\system32\cmd.exe /k]LOG]!><time="14:10:21.451-120" date="05-10-2017" component="TSBootShell" context="" type="1" thread="1016" file="bootshell.cpp:1011"> <![LOG[The command completed successfully.]LOG]!><time="14:10:21.455-120" date="05-10-2017" component="TSBootShell" context="" type="1" thread="1016" file="bootshell.cpp:1093"> <![LOG[Successfully launched command shell.]LOG]!><time="14:10:21.455-120" date="05-10-2017" component="TSBootShell" context="" type="1" thread="1016" file="bootshell.cpp:444"> <![LOG[m_TSEngine.Execute(& m_eExecutionResult), HRESULT=80070490 (e:\nts_sccm_release\sms\client\tasksequence\tsmanager\tsmanager.cpp,1250)]LOG]!><time="14:25:10.554-120" date="05-10-2017" component="TSManager" context="" type="0" thread="1320" file="tsmanager.cpp:1250"> Thanks in advance, EGGLAS
-
 Hello, I've looked on many of forums and I am trying to find a way to enable bitlocker using a task sequence so I don't have to manually do every single laptop separately. I did download and created a package using the Dell CCTK and created a package using the Dell\X86_64 and include all the contents inside. I then add it to the TS and fails. Just dont get why it isnt working and any help would be amazing. Thanks!