Search the Community
Showing results for tags 'automate'.
Found 3 results
-
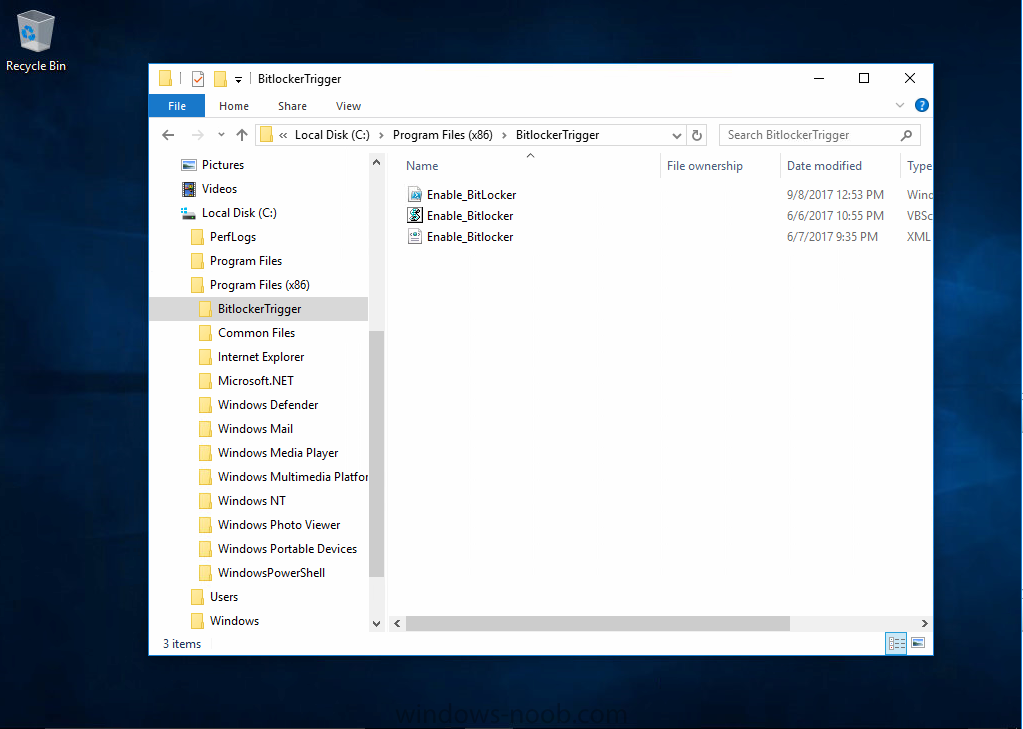
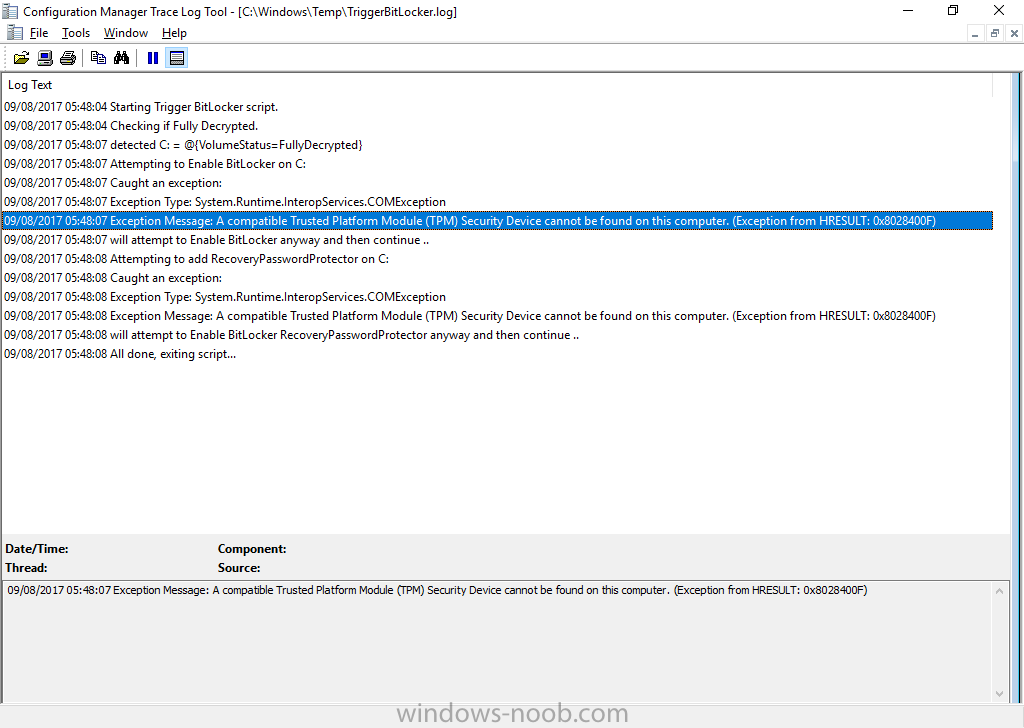
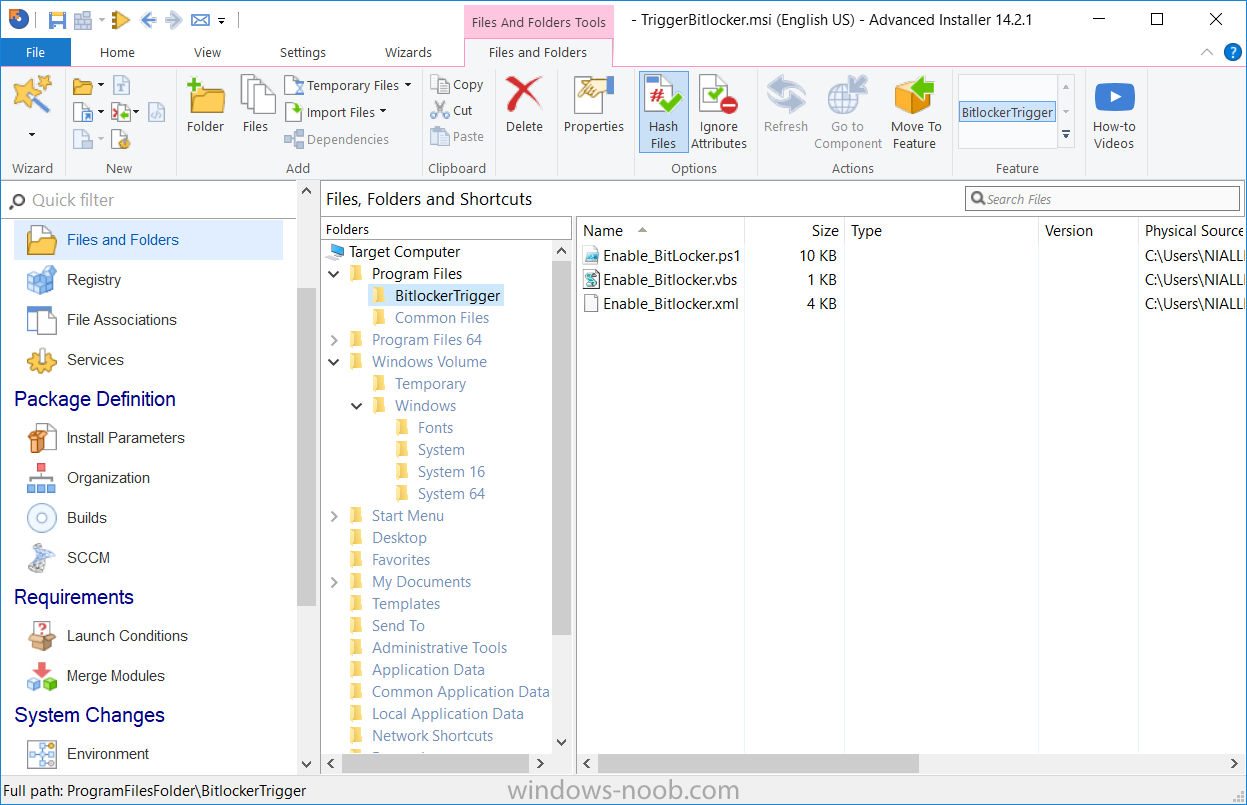
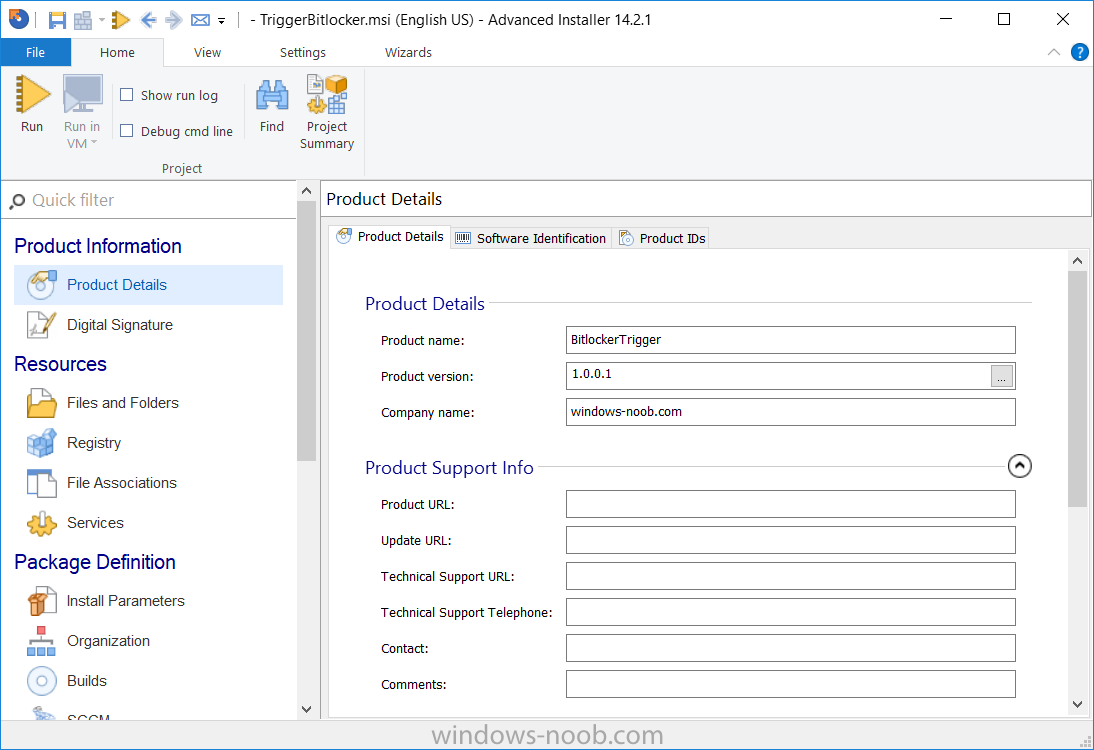
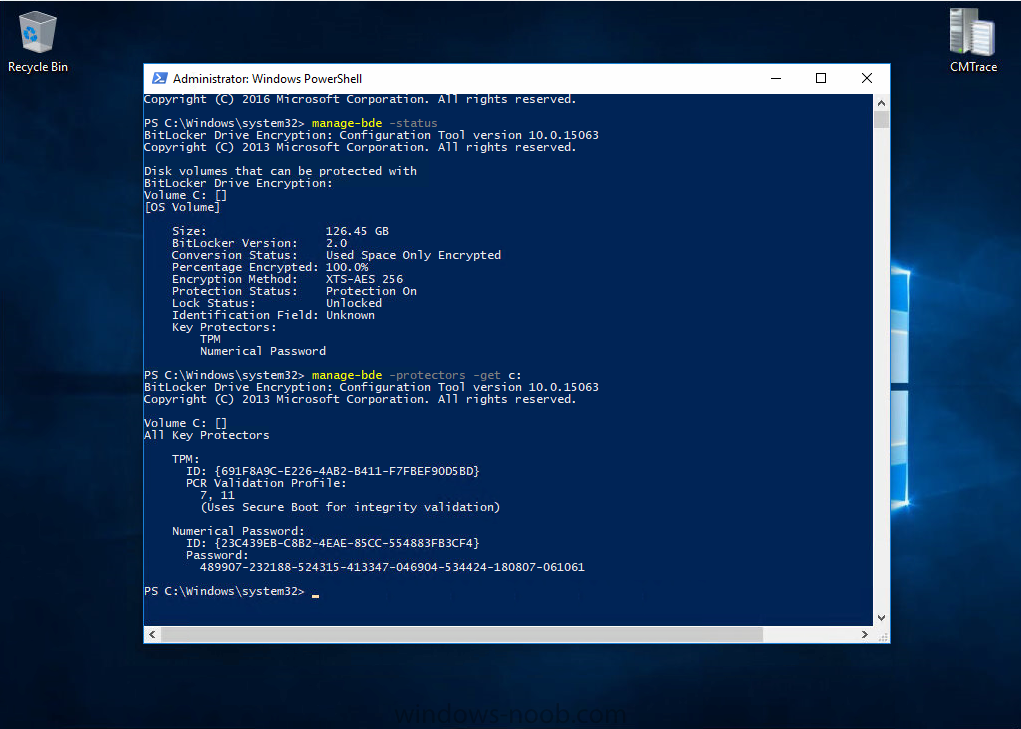
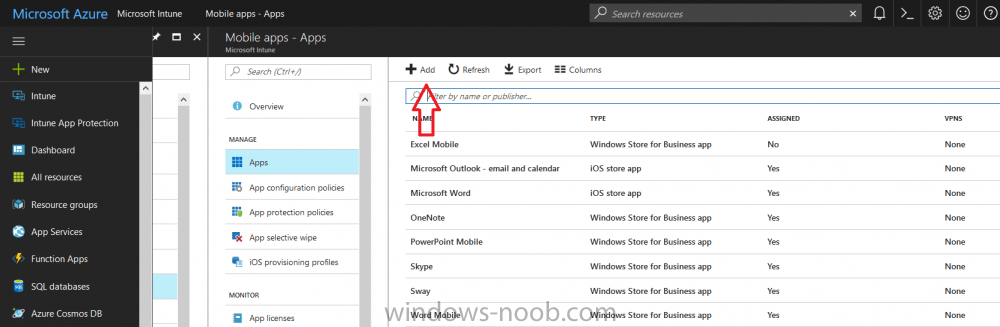
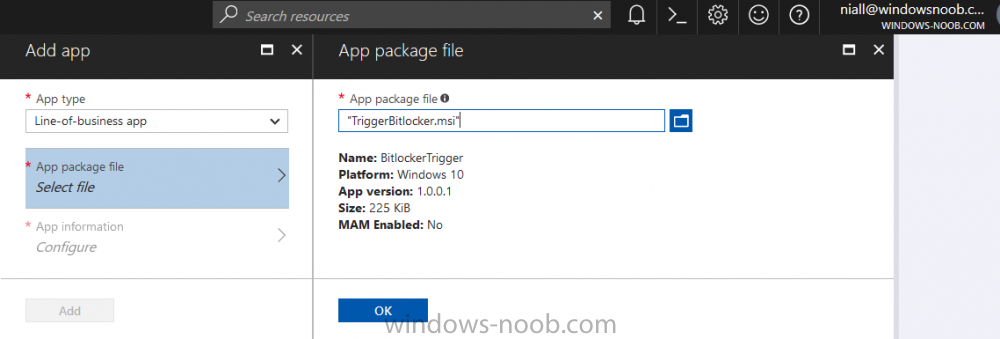
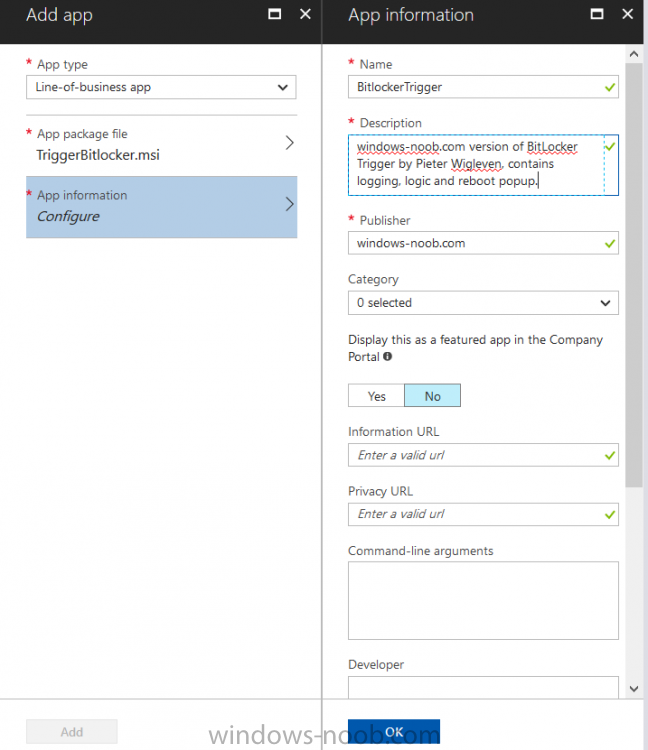
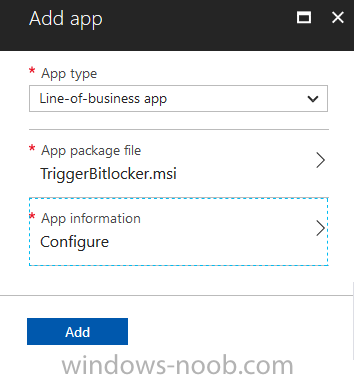
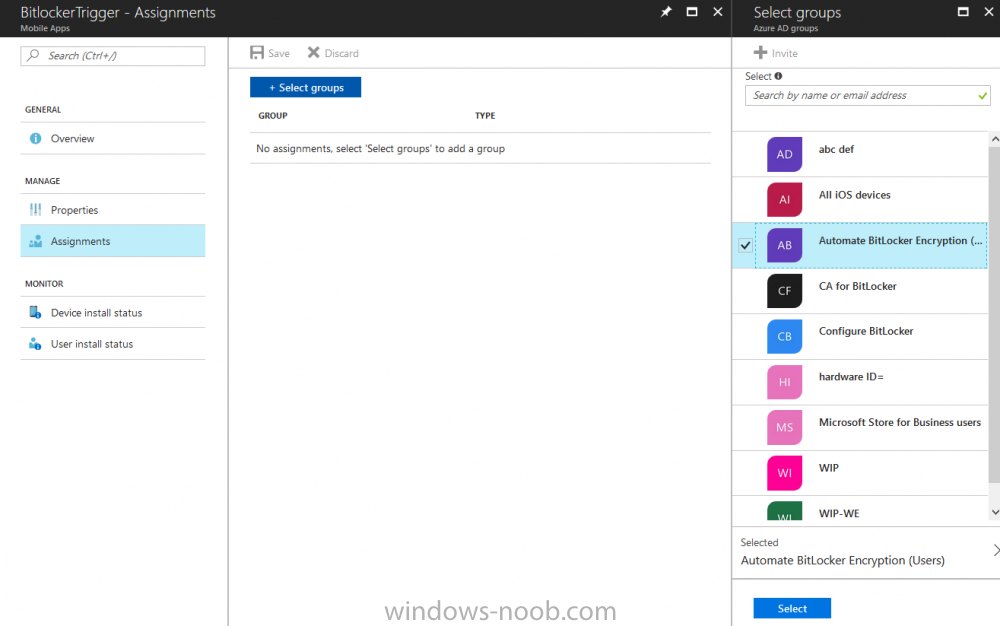
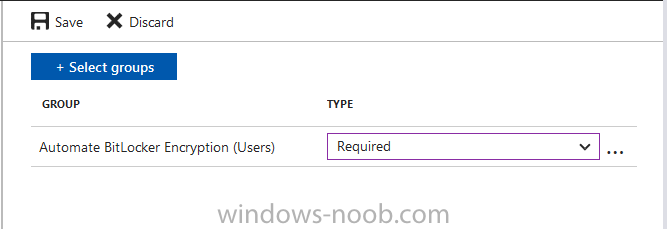
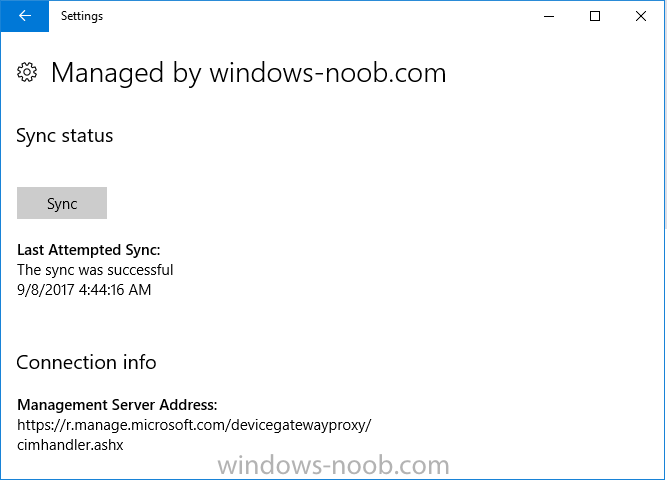
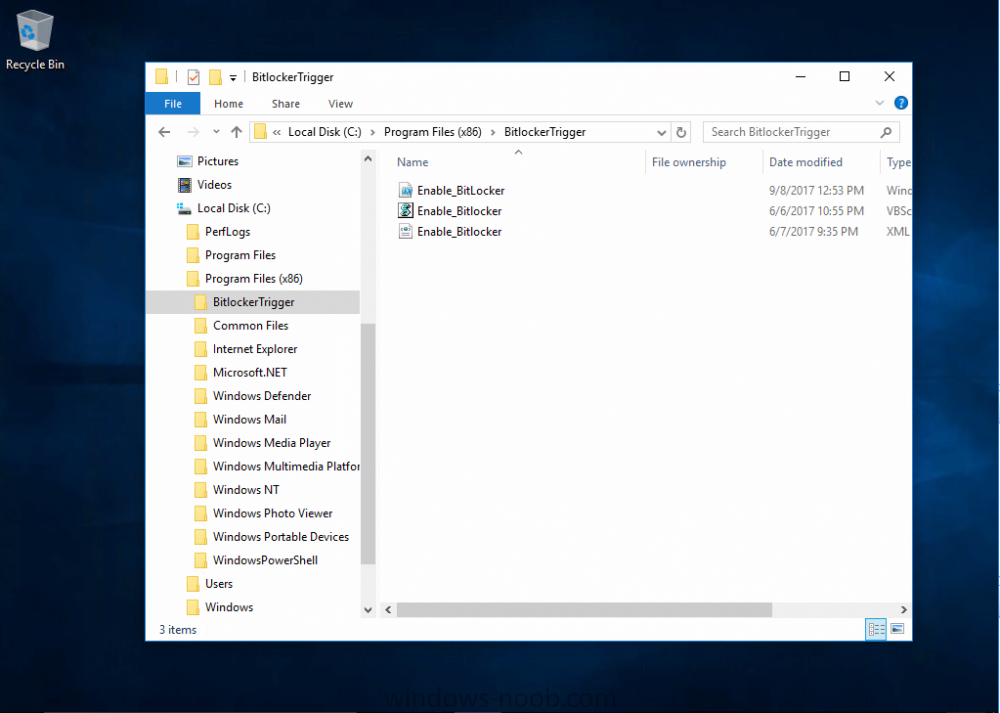
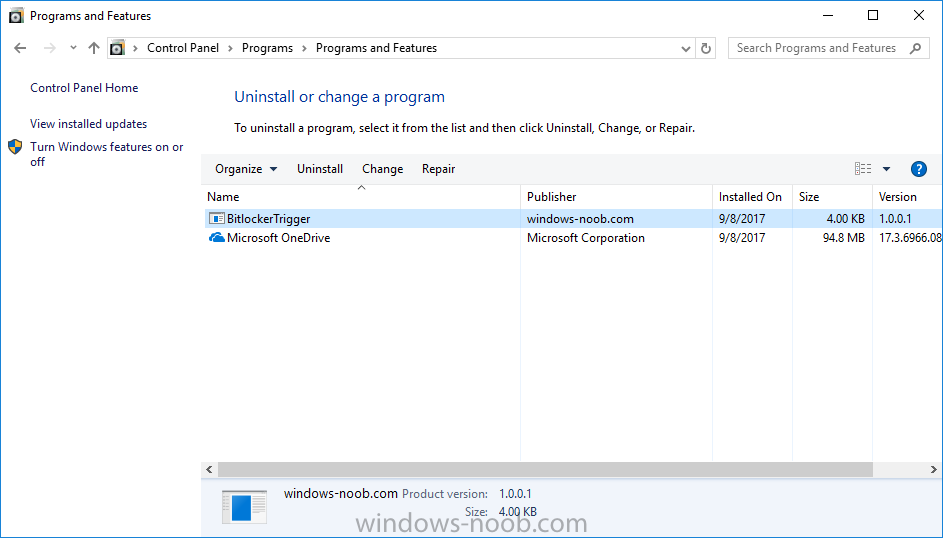
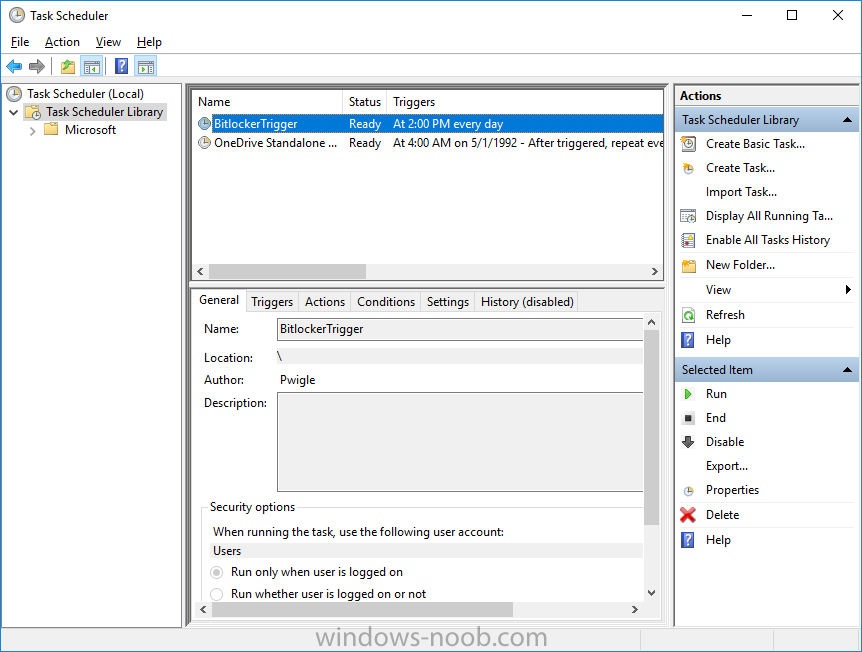
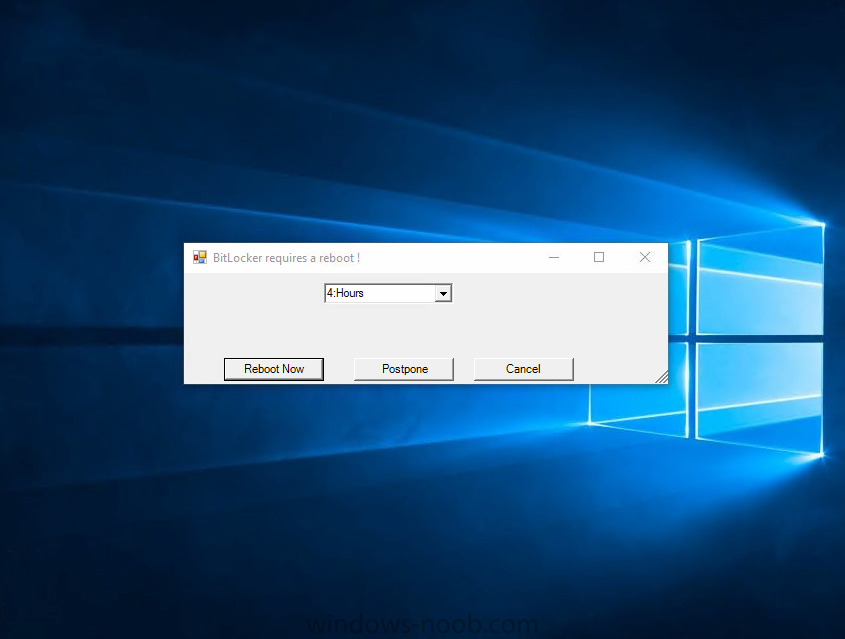
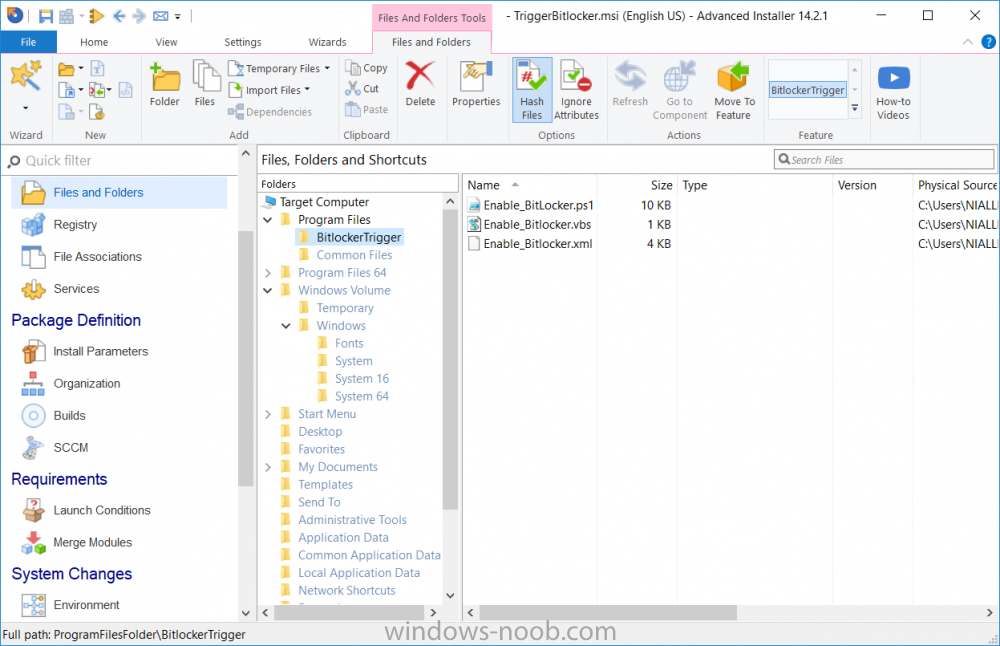
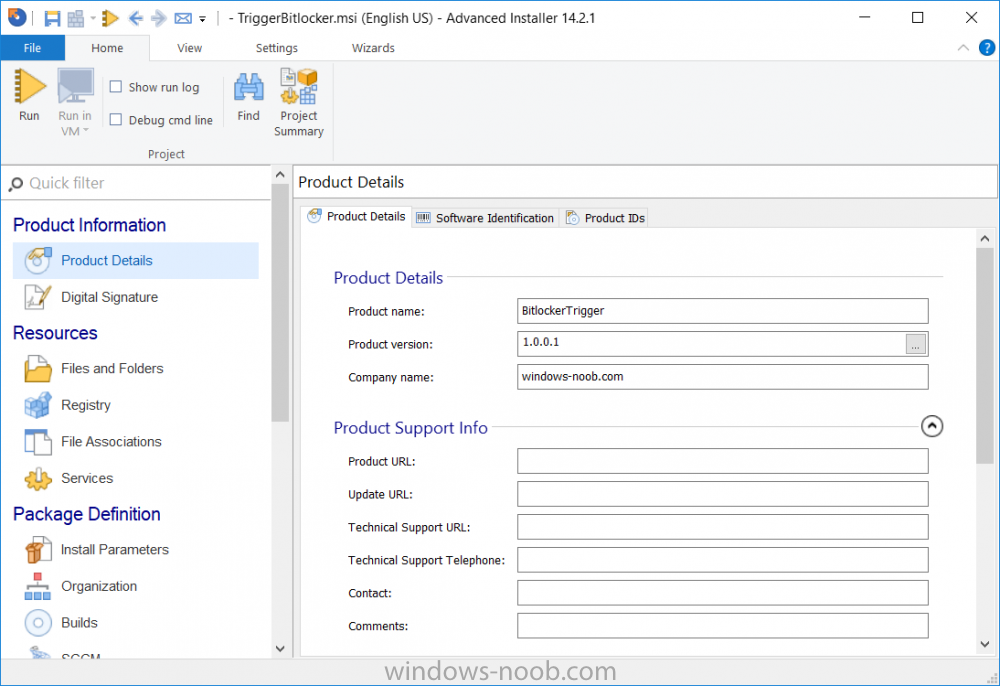
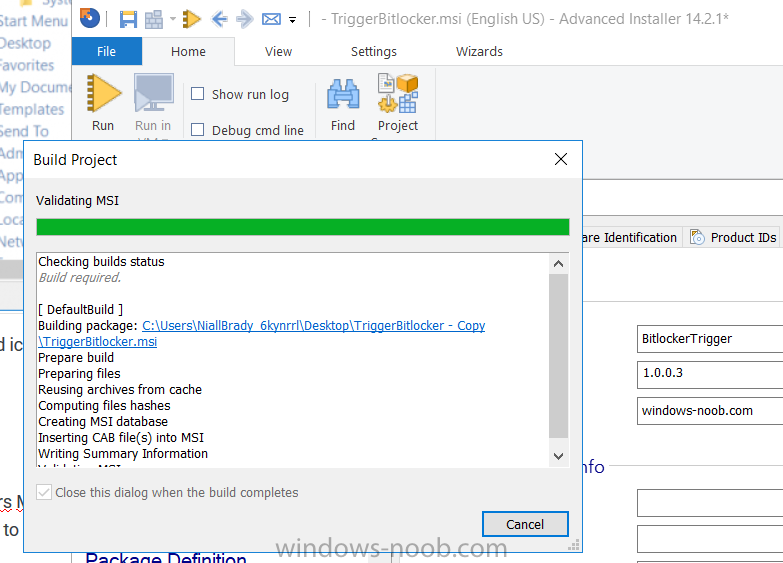
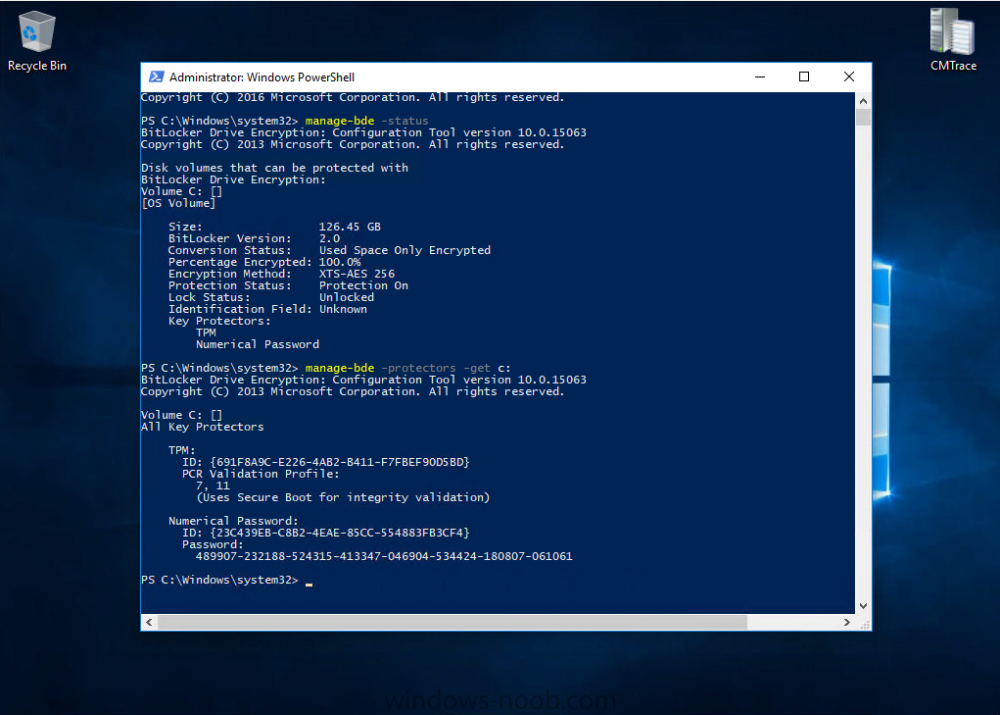
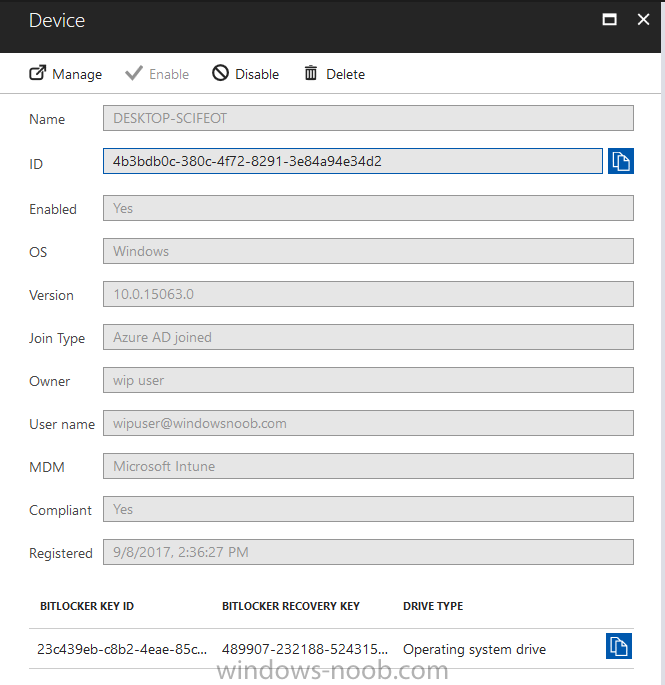
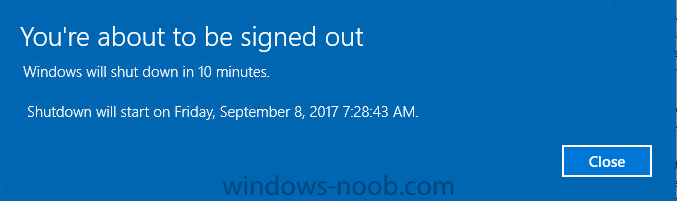
 Introduction In Part 1 I showed you how you can configure BitLocker on Windows 10 devices using Microsoft Intune, but that method relies on the end user actually clicking on the notification in Windows and then continuing through the wizard until completion. In this post I'll show you how you can automate that part of the process, using an MSI that is based upon an MSI that was originally created by Pieter WigLeven. That MSI creates a scheduled task to run daily until the drive is encrypted. Pieter's solution was great but lacked some key features that I wanted such as logging (so that you can view errors which may occur during the encryption phase), logic and a user facing reboot prompt. Therefore, I decided to rewrite the PowerShell script included in the MSI and then re-package it for your benefit. Note: I'd recommend you test this solution in a lab environment, I used Windows 10 version 1703 Hyper-v based virtual machines (Generation 2) with a Virtual TPM enabled. Also to note, this MSI (and Pieters) does not check for the existance of a third party encryption tool, if you want that functionality then you'll need to modify the PowerShell script accordingly and then repackage it as described in Step 5. Enabling a Virtual TPM If you use Hyper-v VM's without a Virtual TPM enabled then the PowerShell script will exit logging errors and will not start the encryption. You can enable the Virtual TPM in the Security settings of your virtual machine (shown in the screenshot below) by placing a check mark in Enable Trusted Platform Module. Step 1. Download the MSI Note: In this guide I've used the windows-noob.com version of the MSI. I've modified the MSI as described in Step 5 and made it available in the Downloads section of this Guide, it includes new features such as Detailed logging Logic to check if encryption was enabled Reboot notification for end users Automatically remove the scheduled task once encryption is enabled You can get the the windows-noob.com version of the MSI in the Downloads section of this guide (scroll down....) or you can get the original MSI from Pieter. Keep in mind that if you are doing Azure AD join, that the user is automatically an Administrator, if however you are using Windows Autopilot then the user will not be an Administrator. The windows-noob.com version of the tool is based on the user being an Administrator. Step 2. Add the MSI as a LOB app in Intune Now that you have the MSI available, it's time to upload it into Intune. In the Intune service in Azure, select Mobile Apps, then Apps, then click on + Add to add an App. Select Line of Business app in the drop down, then select Select file and point it to the downloaded MSI file before clicking on OK. Next click on App Configuration and fill in some details about the application before clicking on OK finally click on Add. Step 3. Assign the app as Required to a User Group Next you will deploy the application (Assign) to a group of Users. In this guide I've created an Assigned User Group called Automate BitLocker Encryption (Users) which contains users that I want to target with this policy. Click on Assignment, then click on Select Groups, select the User Group you created previously and then click on Select. For Type, click on the dropdown and select Required and then click on Save. This will mean that any users in this User Group will be targeted by this required application and it will automatically download and run. Step 4. Verify the experience On a Windows 10 computer that is not yet BitLockered (and not encrypted by any third party encryption), Logon as a user that is a member of the above User Group. Keep in mind that they also need to have received the BitLocker Configuration created in Part 1 of this guide. That policy will set the BitLocker Configuration options (such as Encryption Algorithm), but it will not start encryption automatically. Trigger a Sync using the appropriate button. This will pull down the new policy and start the download and installation of the MSI which in turn will copy some files, and create a scheduled task. Once policy is received, you can see that the application is installed in Control Panel And three files are present in the File System at C:\Program Files (x86)\BitLockerTrigger. Note: The VBS kicks off the PowerShell script and the XML file is used in the creation of the Task Scheduler task. You can also check Task Scheduler to see the task is added, and that it is scheduled to run at 2pm. Tip: By default Windows Task Scheduler has the History tab disabled by default, to enable it you must start Task Scheduler as Administrator (Run as Administrator) and then click on Enable All Tasks History in the right pane. This will give you some details about the running task and whether it did run or not, but for more details about the task review the TriggerBitLocker.log file as described below. Running the Task You can wait until 2pm for the scheduled task to run or right click on the task and choose Run to run it now. after it has run, if everything was ok it will popup a reboot to the user, if things don't go according to plan use CMTrace.exe and navigate to C:\Windows\Temp and open the generated log file C:\Windows\Temp\TriggerBitLocker.log The log file should reveal any problems that occur. In the example below you can see what happens when you try to run the task on a computer without a TPM. The key takeaway here is that logging is now included with the MSI and the PowerShell logic will avoid popping up a reboot message to the end user in the event that it has not succeeded to enable Encryption. On a computer that meets the specifications (TPM), the PowerShell script enables encryption and the user will see the popup, they can delay for a few hours or accept the reality that they are getting Encrypted with BitLocker. and if they choose Reboot Now they'll see something like this After the reboot we can verify BitLocker encryption status and the recovery key is in Intune in Azure. job done ! Note: After successfully enabling BitLocker the script deletes the Scheduled Task so that it no longer re-runs. Step 5. (Optional) Edit the MSI with Advanced Installer If you'd like to update the MSI yourself, you can install the MSI on a vm, and pull the scripts from the folder shown above, then load it using Advanced Installer. Edit what you want in the package and edit the PowerShell script to suit your needs, once done copy the replacement scripts back into the MSI in the Files and Folders section below Once done, to build the package click on the Save icon in the ribbon. And use that compiled MSI in the guide above. Downloads Below is the windows-noob.com version of Pieters MSI, this version was compiled using Advanced Installer 14.2.1 (great product !) and contains improvements to the PowerShell script such as logic handling, logging to help with troubleshooting and a Reboot computer popup at the end of the script which only appears if encryption is enabled. windows-noob.com TriggerBitlocker.msi (version 1.0.0.2) - TriggerBitlocker.msi windows-noob.com TriggerBitLockerUser.msi (version 1.0.0.2TriggerBitlockerUser.msi Recommended reading Hardware independent automatic Bitlocker encryption using AAD/MDM https://blogs.technet.microsoft.com/home_is_where_i_lay_my_head/2017/06/07/hardware-independent-automatic-bitlocker-encryption-using-aadmdm/#comment-26696 Configuring BitLocker in Intune - Part 1. Configuring BitLocker https://www.windows-noob.com/forums/topic/15514-configuring-bitlocker-in-intune-part-1-configuring-bitlocker/ Download Advanced Installer http://www.advancedinstaller.com/download.html
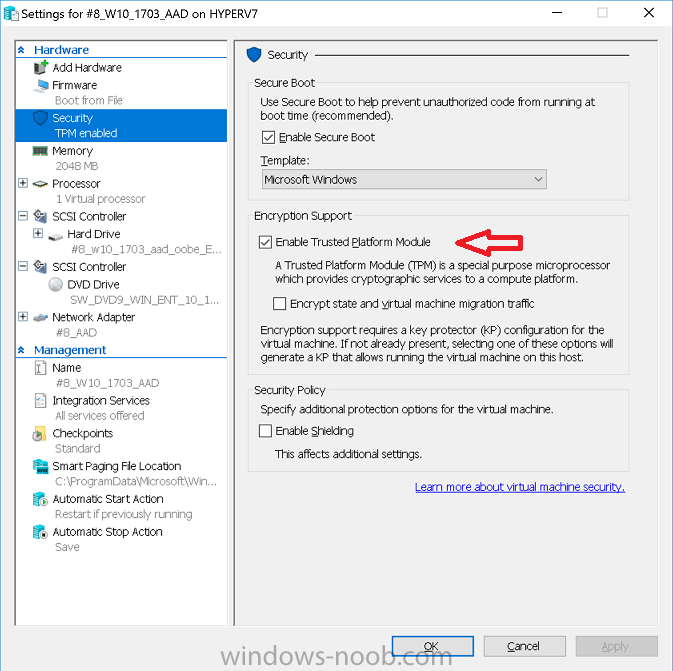

-
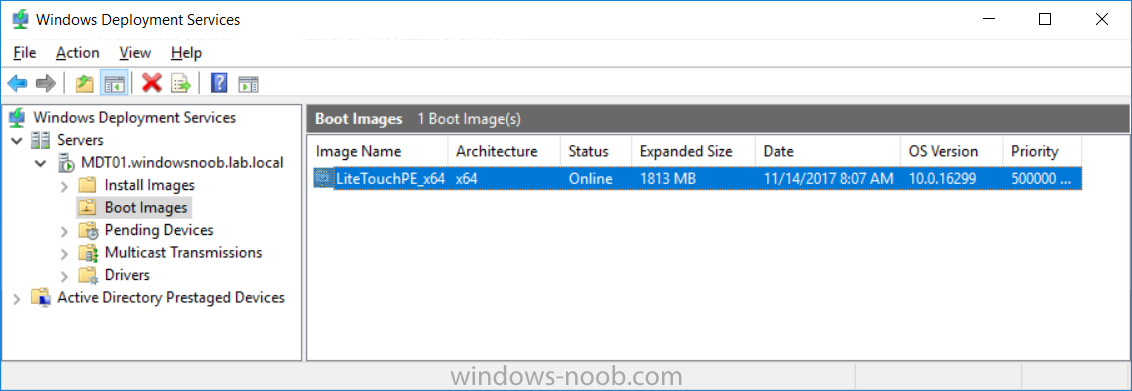
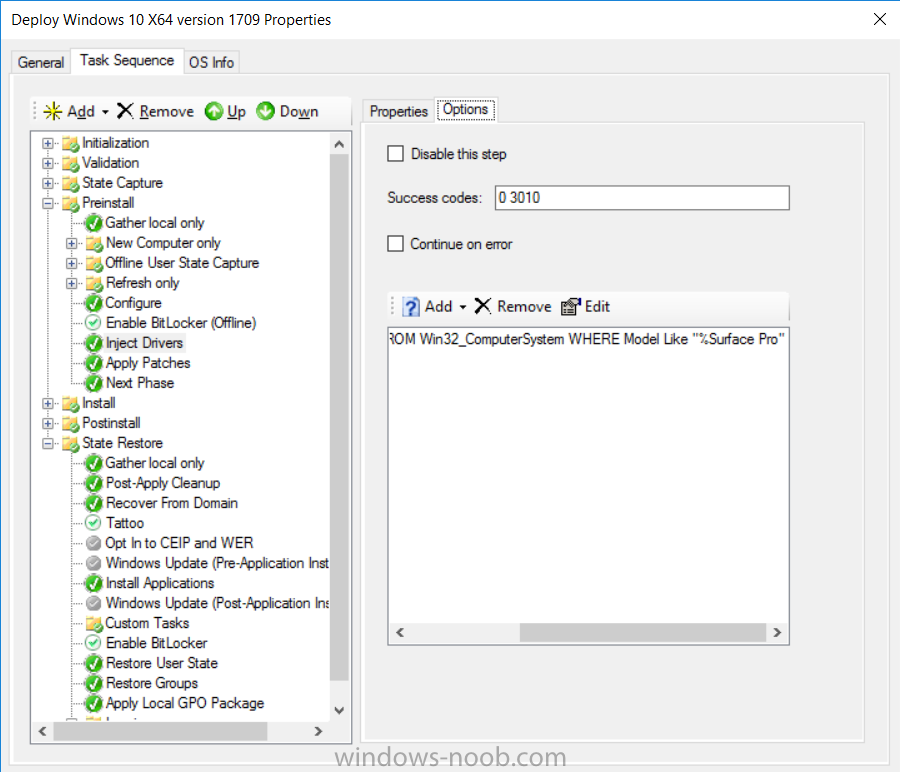
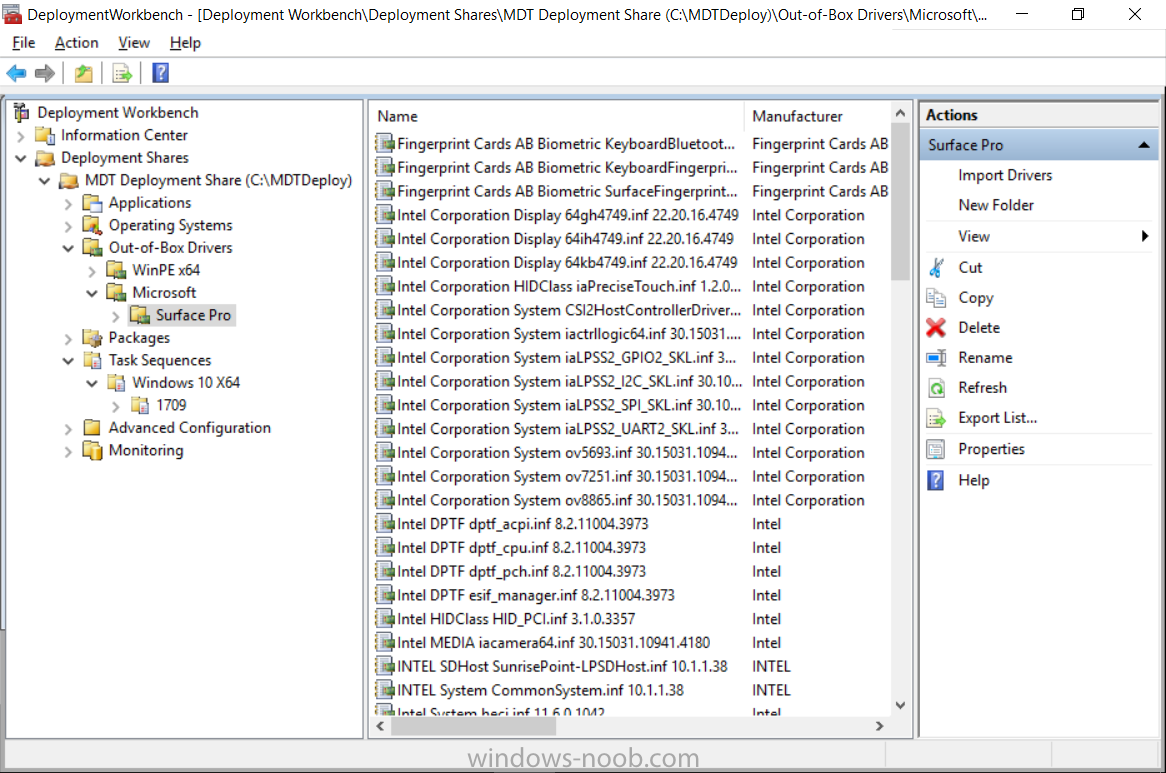
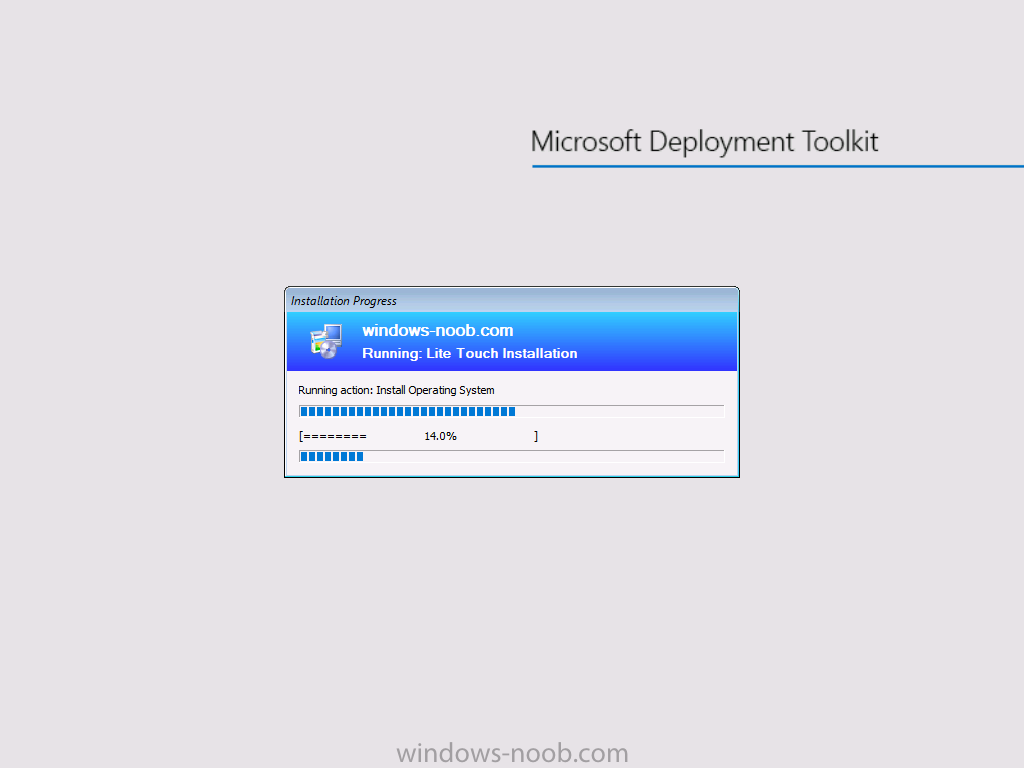
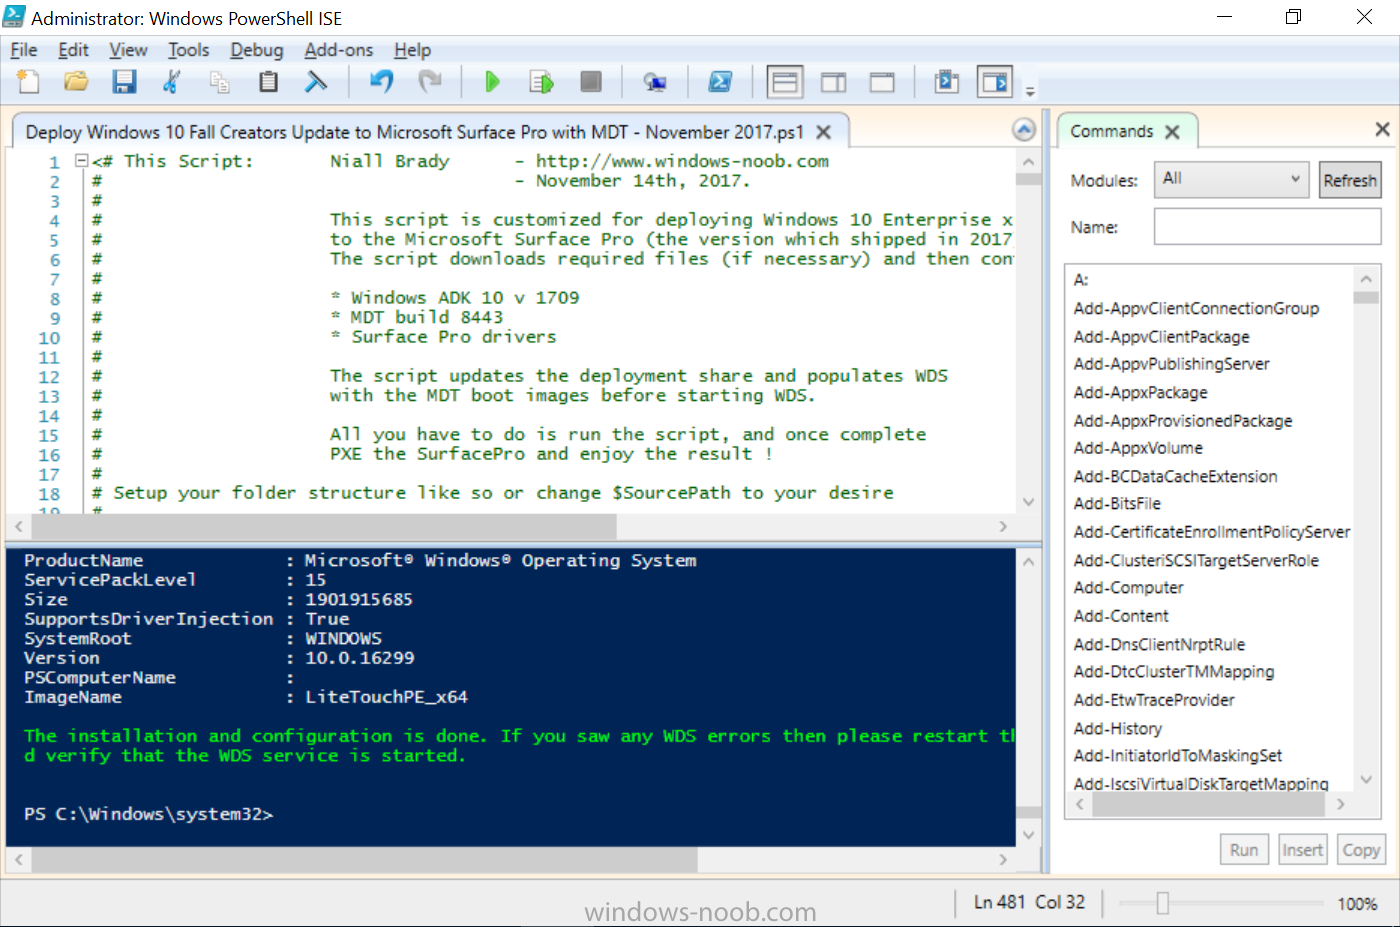
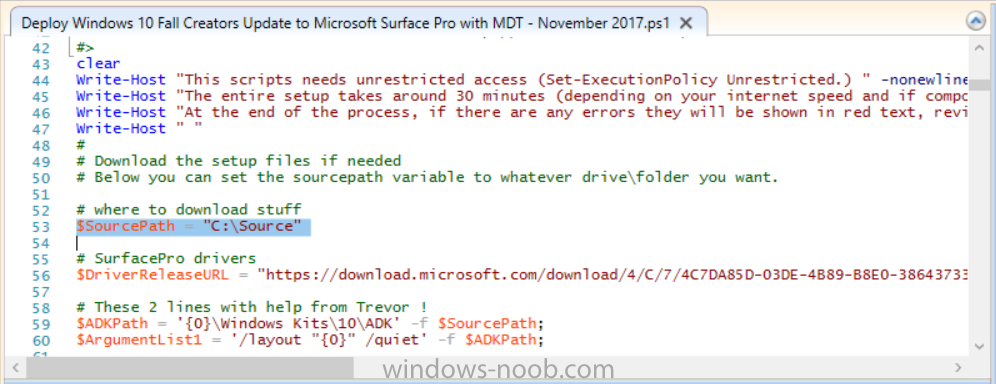
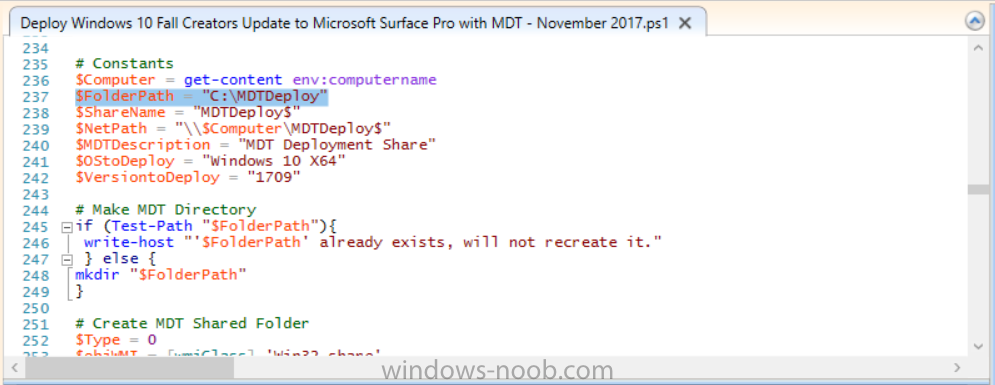
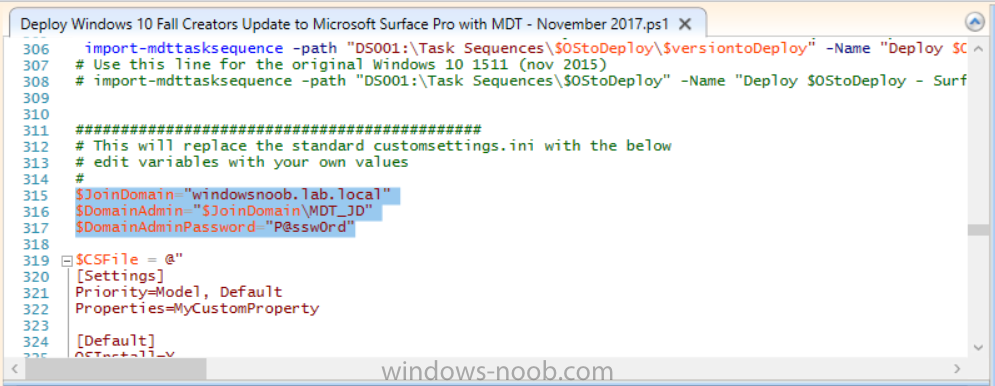
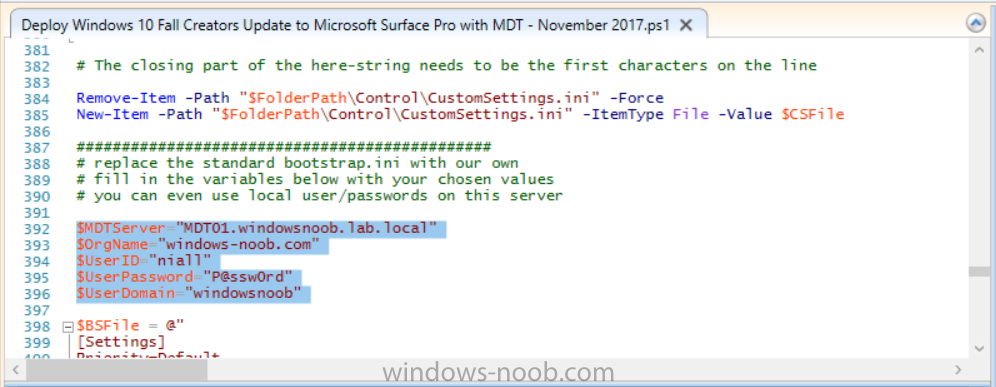
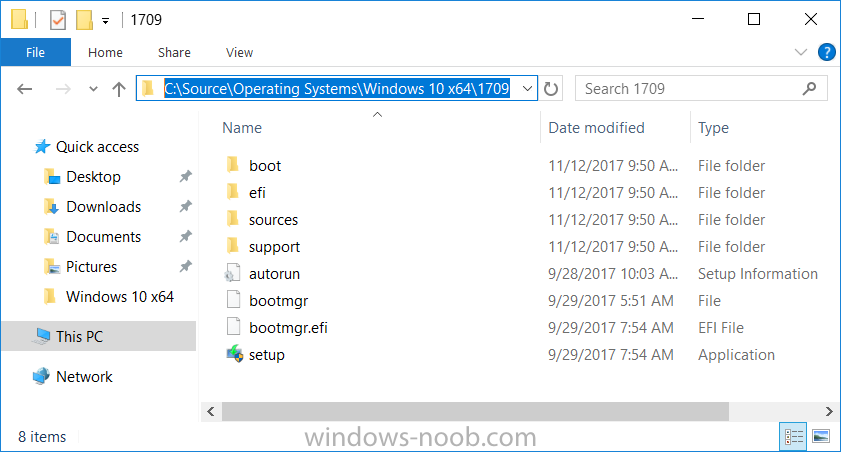
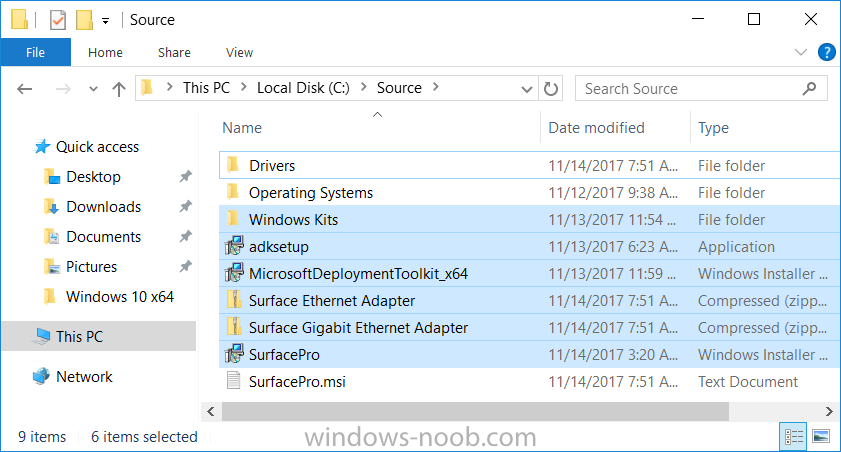
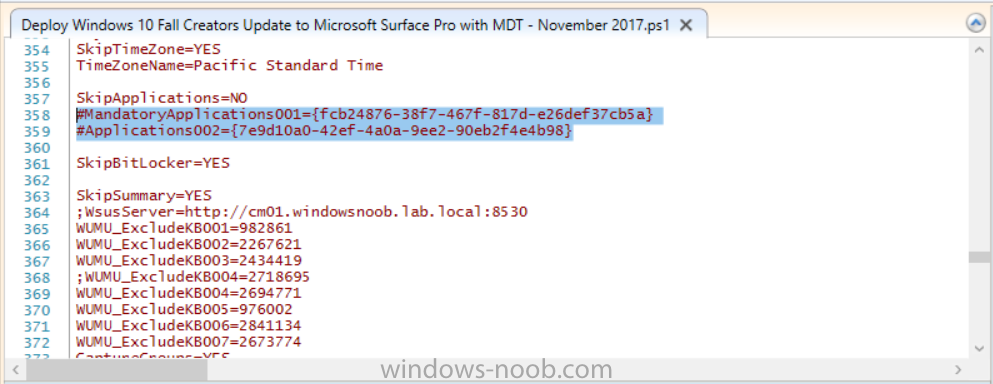
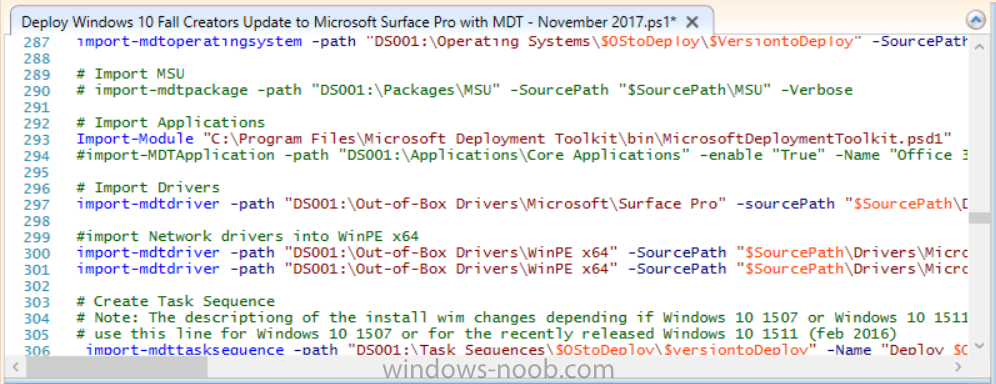
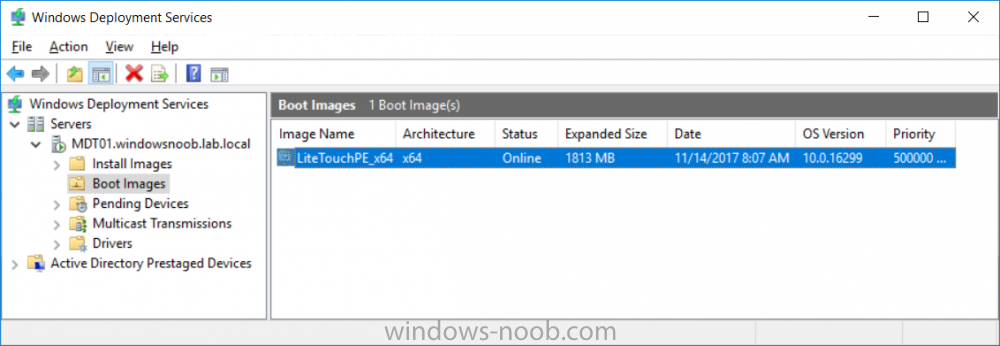
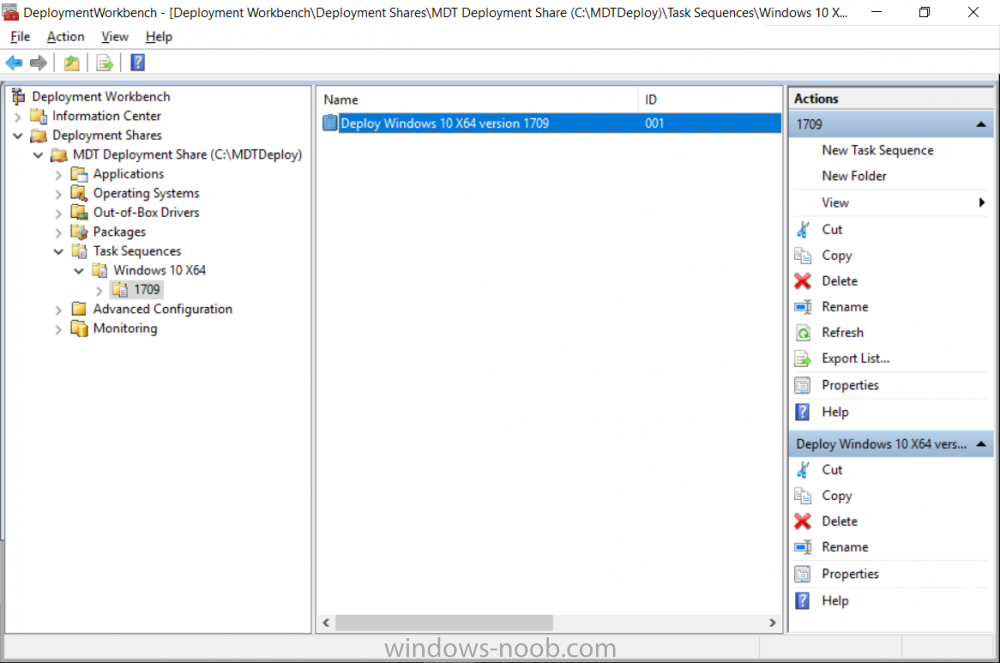
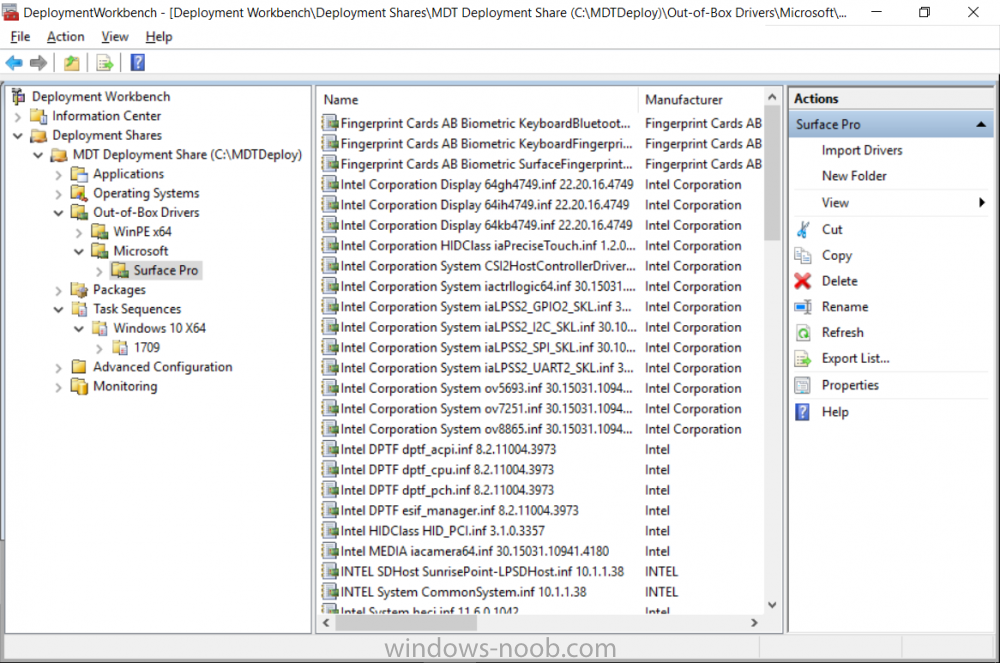
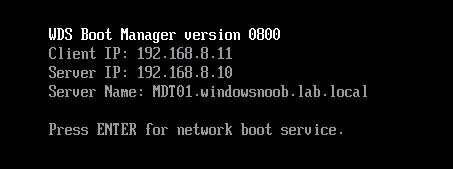
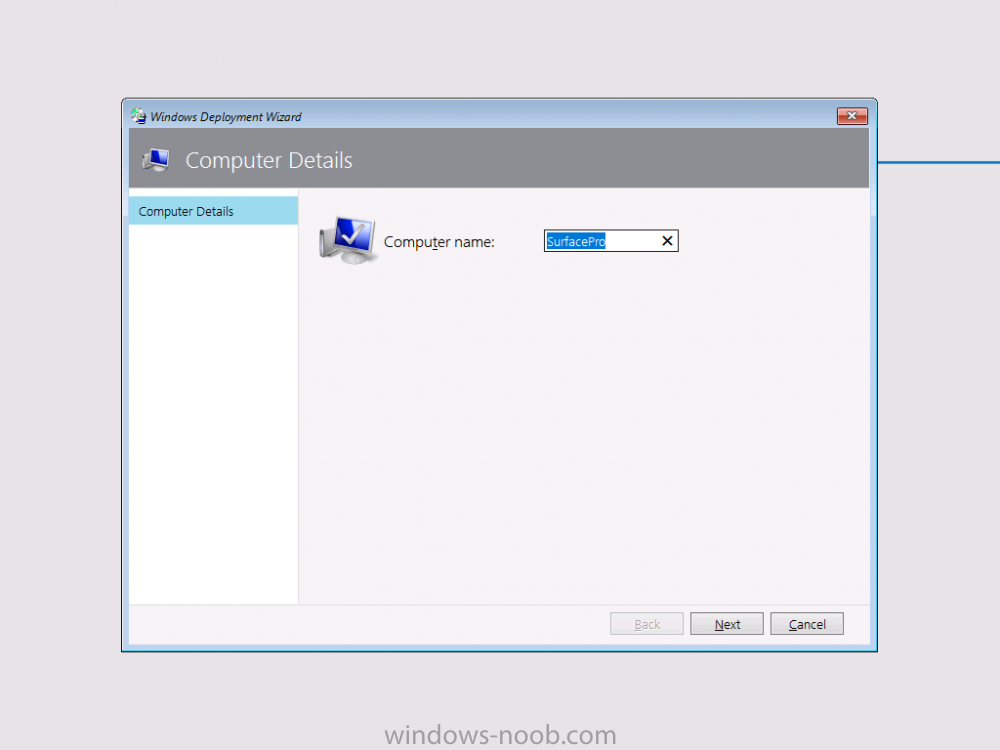
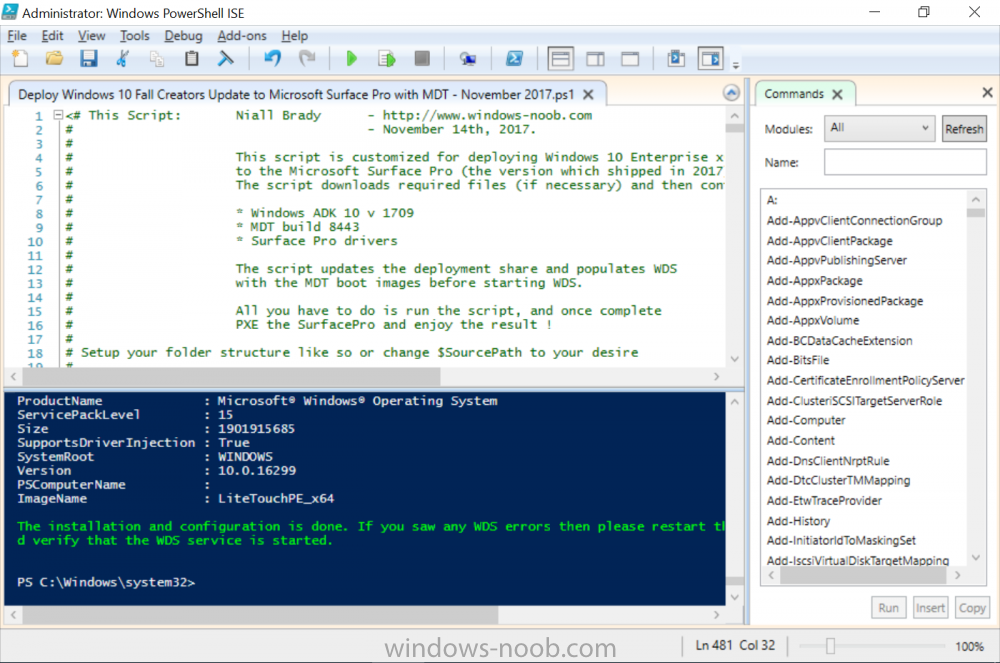
Introduction Microsoft released the new Surface Pro and recently a new operating system, Windows 10 version 1709 (Fall Creators Update). Now you can automate the installation of it using PowerShell. This script has been written to allow you to automate the deployment Windows 10 version 1709 (Fall Creators Update) using the latest available software including: Windows 10 x64 (version 1709) Microsoft Deployment Toolkit (MDT) build 8443 Latest available 2017 drivers for the Surface Pro Windows 10 ADK (version 1709) Windows Server 2016 Note: This is fully automated, and as this does install a Windows Deployment Services server role hosting a boot image, you should modify the script accordingly and test it thoroughly in a lab first. This script is tailored for one thing only, deploying Windows 10 x64 version 1709 to the Microsoft Surface Pro with all drivers loaded and MDT 2013 preconfigured. Download it and customize it to suit your needs for other hardware if you wish because what it does is pretty cool. This script performs the following actions:- Downloads and then Installs Windows ADK 10 (version 1709) if you have not done so already Downloads and then Installs MDT, if you have not done so already Downloads all required drivers for Microsoft Surface Pro if you have not done so already Imports the Windows 10 x64 (version 1709) operating system into MDT Imports the Microsoft Surface Pro drivers into MDT Creates Selection Profiles for Surface Pro and WinPE x64 Creates a Deploy Windows 10 X64 version 1709 task sequence Edits the Deploy Windows 10 X64 version 1709 task sequence and adds an inject drivers step for Microsoft Surface Pro Sets a WMI query for hardware detection for the Surface Pro on the corresponding driver step Injects the Microsoft Surface Pro network drivers into the LiteTouchPE_x64.wim Creates custom CustomSettings.ini and BootStrap.ini files Disables the X86 boot wim (as it is not needed for Surface Pro) Changes the Selection Profile for the X64 boot wim to use the WinPE x64 selection profile Installs the Windows Deployment Service role Configures the WDS role and adds the previously created LiteTouchPE_x64.wim Starts the WDS service so that you can PXE boot (UEFI network boot). All you have to do is download the script below, modify some variables, then place certain files in the right place such as the Windows 10 x64 Enterprise (version 1709) media. Please ensure you have a working DHCP scope on your Active Directory domain controller, then PXE boot a Microsoft Surface Pro and sit back and enjoy the show. Step 1. Download the script The PowerShell script will do all the hard work for you, it is in the Downloads section at the end of this guide, download it, unzip it and place it on the server that is designated to be the MDT server. Step 2. Configure the variables in the script Once you have downloaded and extracted the script, you need to configure certain variables interspersed throughout the script. I'll highlight the ones you need to edit. The most important of them is the $SourcePath variable (line 53) as this decides where to get the content from and where to store it. This variable should point to a valid drive letter, the folder name will be created if it does not exist. The $FolderPath variable (line 237) specifies the MDT Deployment share root folder for example C:\MDTDeploy. There are other variables to configure, for joining the Domain (lines 315-317) and then you need to configure how you actually connect to the MDT server from WinPE (lines 392-396) Step 3. Copy the Windows 10 x64 (version 1709) operating system files Mount a Microsoft Windows 10 x64 Enterprise (version 1709) ISO and copy the contents to $SourcePath\Operating Systems\Windows 10 x64\1709 as shown below Step 4. Optionally copy MDT, ADK 10, Surface Pro drivers This is an optional step. If you've already downloaded the above files then place them in the source folder, otherwise the script will automatically download them for you. Note: You do not have to do this as the script will download the content for you if it's not found. Step 5. Optionally copy your Applications to the respective folders This is an optional step. If you have apps like Office 365, copy them to their respective folders under Applications. If you do add any applications, you'll need to edit the corresponding section within the script for the CustomSettings.ini and replace the GUID for the App, these applications are remmed out with a #, as shown here (line 358) and here in line 294... Step 6. Run the script On the server that will become your MDT server, start PowerShell ISE as Administrator. Click on the green triangle to run the script. Below you can see the script has completed. After the script is complete, you are ready to test deploying Windows 10 version 1709 (Fall Creators Update) to a Microsoft Surface Pro. You can see that Windows Deployment Services is installed and that the ADK 1709 version of the MDT LiteTouch_X64 boot wim is already imported. This boot image also has the Surface Pro network drivers added. After opening the Deployment Workbench, you can see the Deploy Windows 10 x64 version 1709 task sequence is created The Surface Pro Inject drivers step is pre-configured for you and the WMI query for the hardware is also added on the options tab drivers specific to the Surface Pro for are imported into MDT Step 7. Sit back and watch the deployment Take a properly shutdown Surface Pro , and power it on using the following sequence. Hold the down volume key and then press the power button while continuing to hold down the volume key, it should PXE boot. Press enter when prompted before loading the boot image before prompting you for a computer name, note that it's currently set to SurfacePro in CustomSettings.ini contained within the script, you can change that behavior in the UI itself (CustomSettings.ini on the Properties/Rules of the DeploymentShare) or automate it via the many methods available such as those that Mikael describes here click Next and off it goes, with your customized Company name and after a while it's all done Troubleshooting If the script has issues starting WDS (and you see the error below) then restart the server, as you were asked to do at the end of the script ;-). If you cannot PXE boot, because WDS is not accepting connections (revealed by the PXE Response tab in WDS properties), then look for the following error in the scripts output: An error occurred while trying to execute the command. Error Code: 0x5 Error Description: Access is denied. If you see that error, then the user you are logged in as does not have sufficient permissions to configure WDS. To grant permissions to the Windows Deployment Server (MDT01) do as follows Open Active Directory Users and Computers. Right-click the OU where you are creating prestaged computer accounts, and then select Delegate Control. On the first screen of the wizard, click Next. Change the object type to include computers. Add the computer object of the Windows Deployment Services server, and then click Next. Select Create a Custom task to delegate. Select Only the following objects in the folder. Then select the Computer Objects check box, select Create selected objects in this folder, and click Next. In the Permissions box, select the Write all Properties check box, and click Finish. Repeat the above process to grant appropriate permissions for the User who will run the PowerShell script Summary Automating the deployment of Windows 10 version 1709 (Fall Creators Update) to the Microsoft Surface Pro using PowerShell and MDT is easy when you know how. Downloads Download the PowerShell script contained in the ZIP file. Deploy Windows 10 Fall Creators Update to Microsoft Surface Pro with MDT - November 2017.zip


- 1 reply
-
- 1
-

-
- mdt
- powershell
- (and 2 more)
-
Hello, I found the script below on an old TechNet forum post. I'm curious about the variables being used. Are they ConfigMgr variables or something the poster created? If they are known variables in ConfigMgr where can I find these values? Is there a documented list somewhere? Start-CMSoftwareUpdateDeployment -CollectionName $CollectionName -DeploymentType $DeploymentIntent -DeploymentName $DeployMentName -DeploymentAvailableDay(Get-date) -DeploymentExpireTime (Get-Date) Thanks, Mike