Search the Community
Showing results for tags 'windows server 2016'.
Found 4 results
-
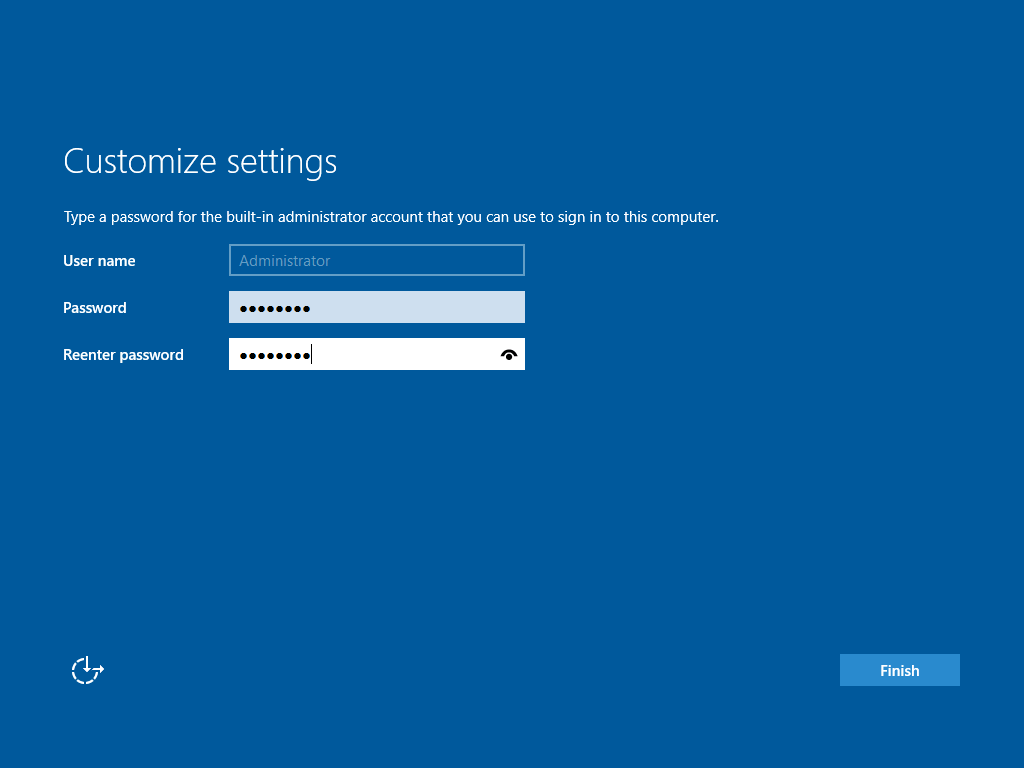
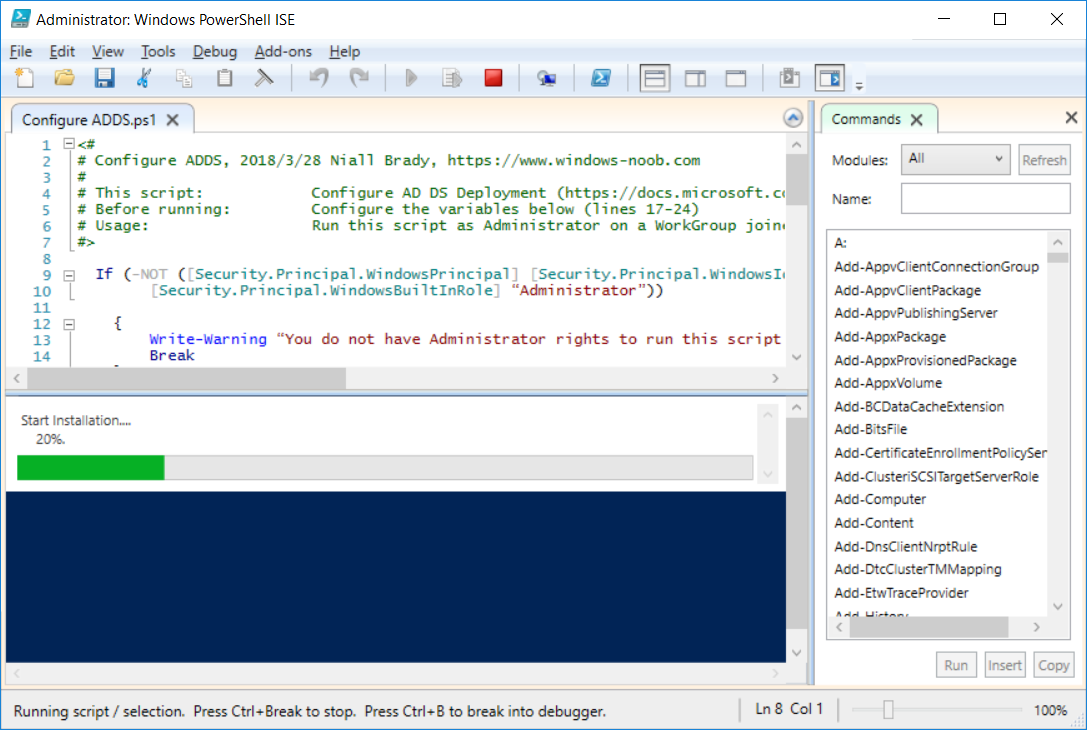
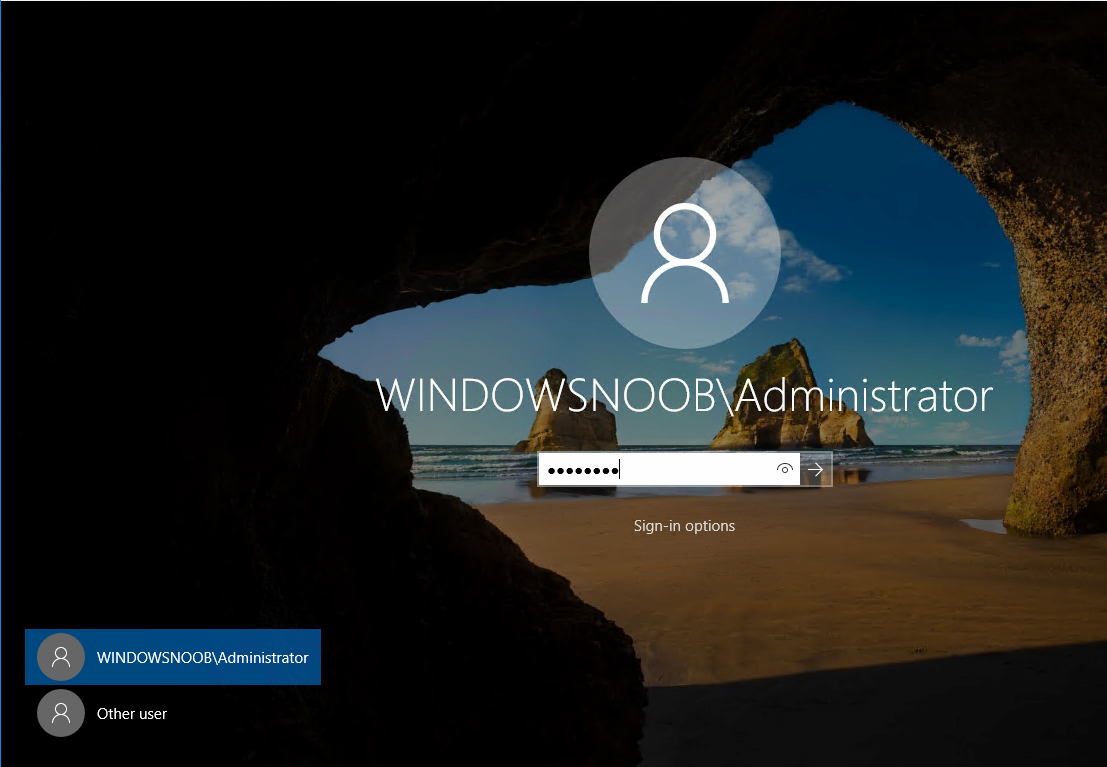
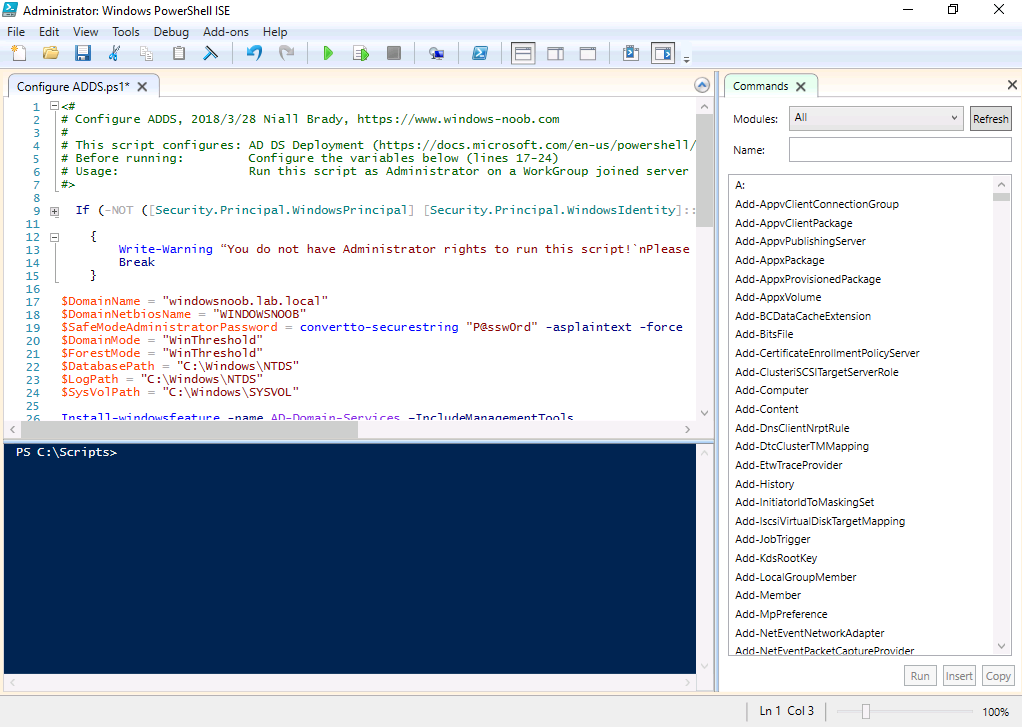
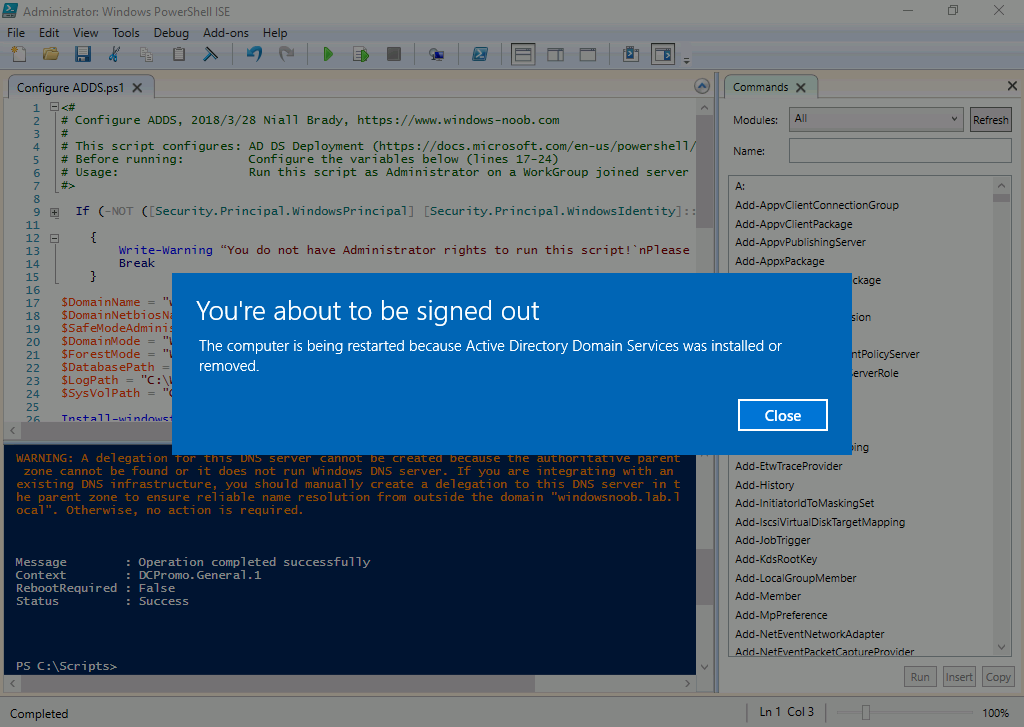
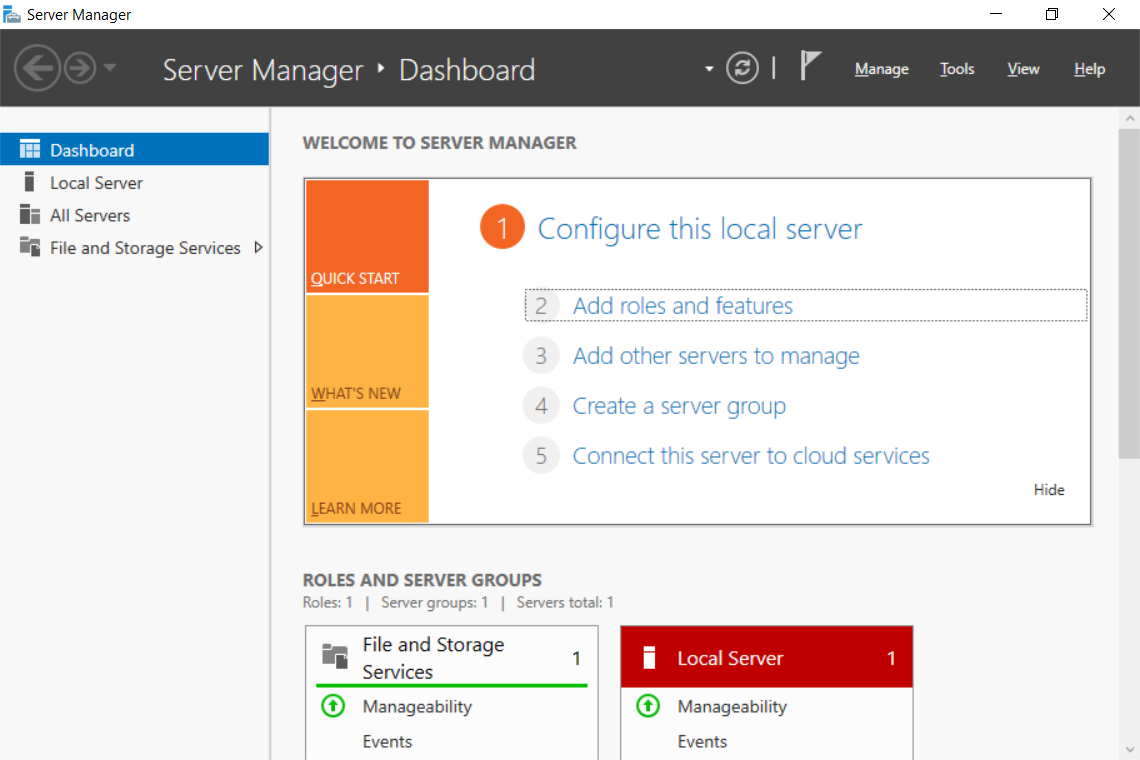
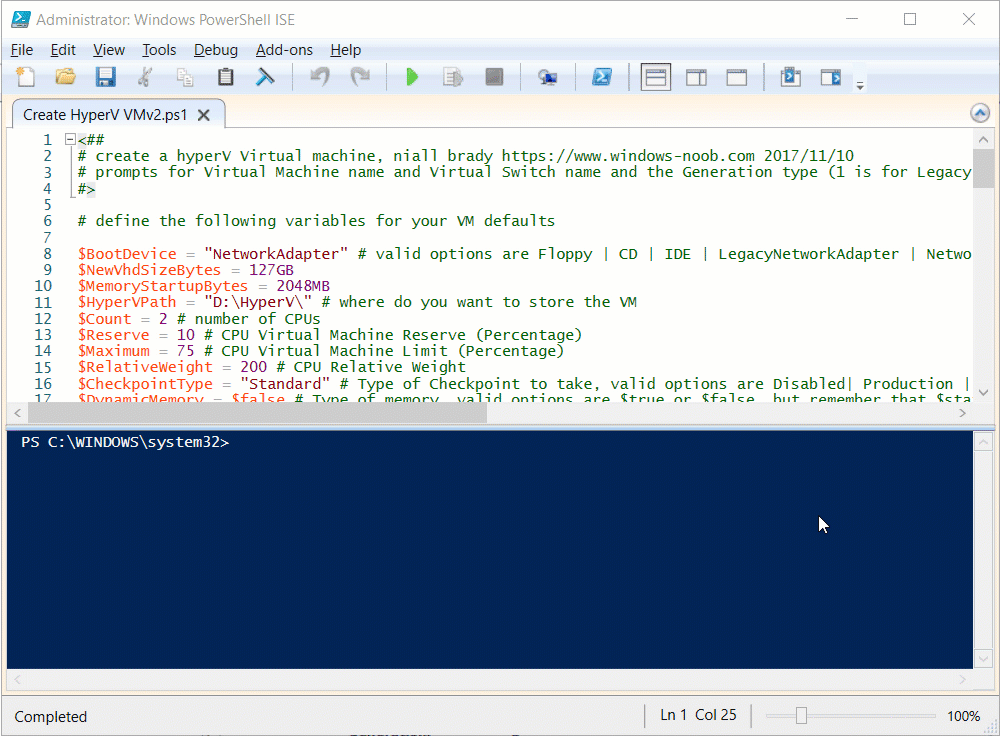
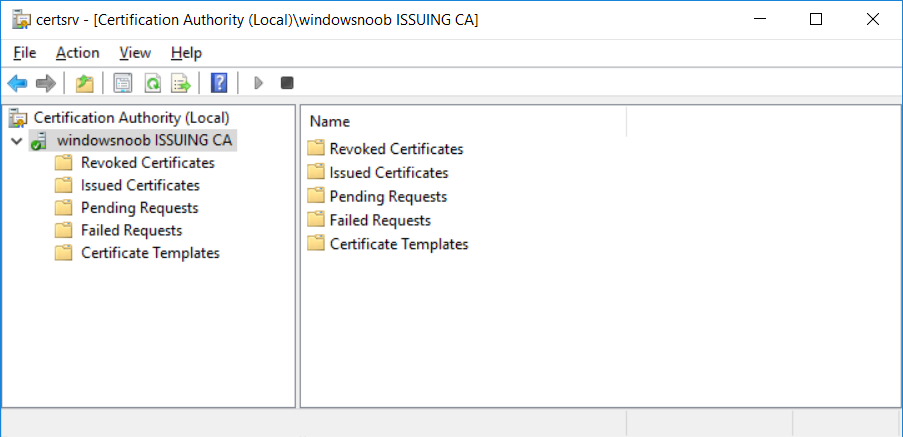
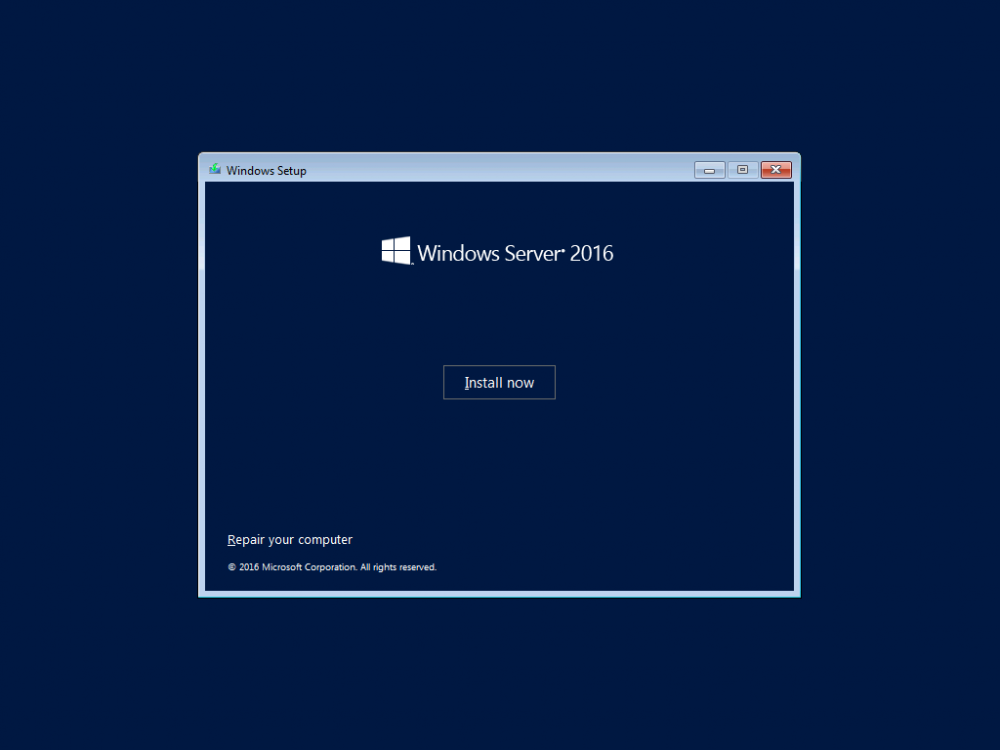
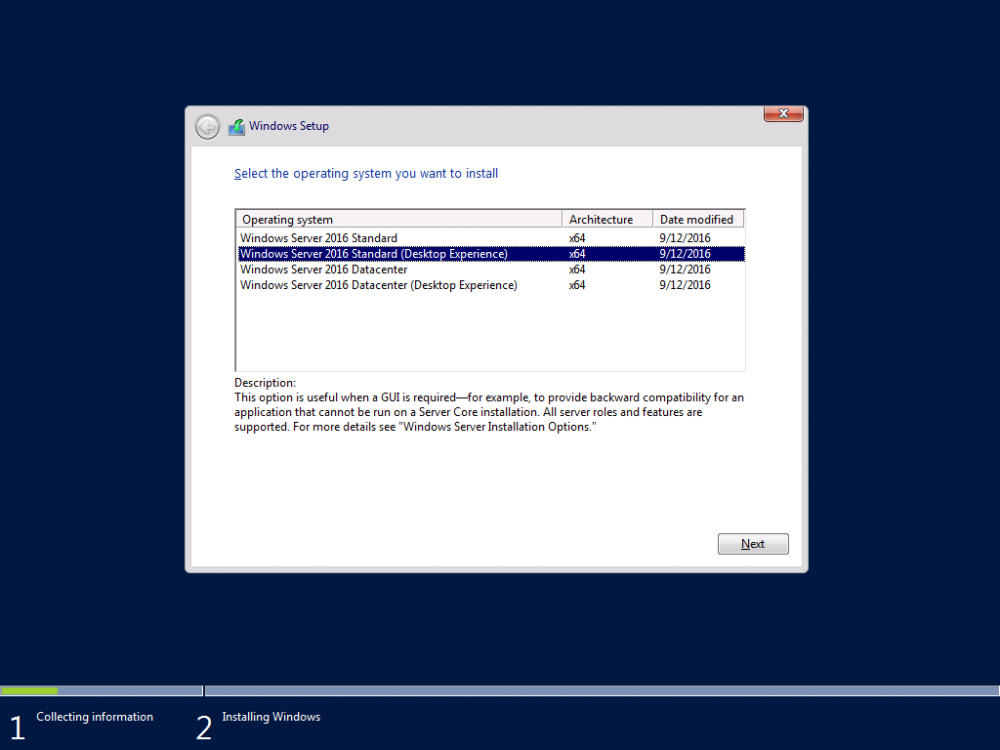
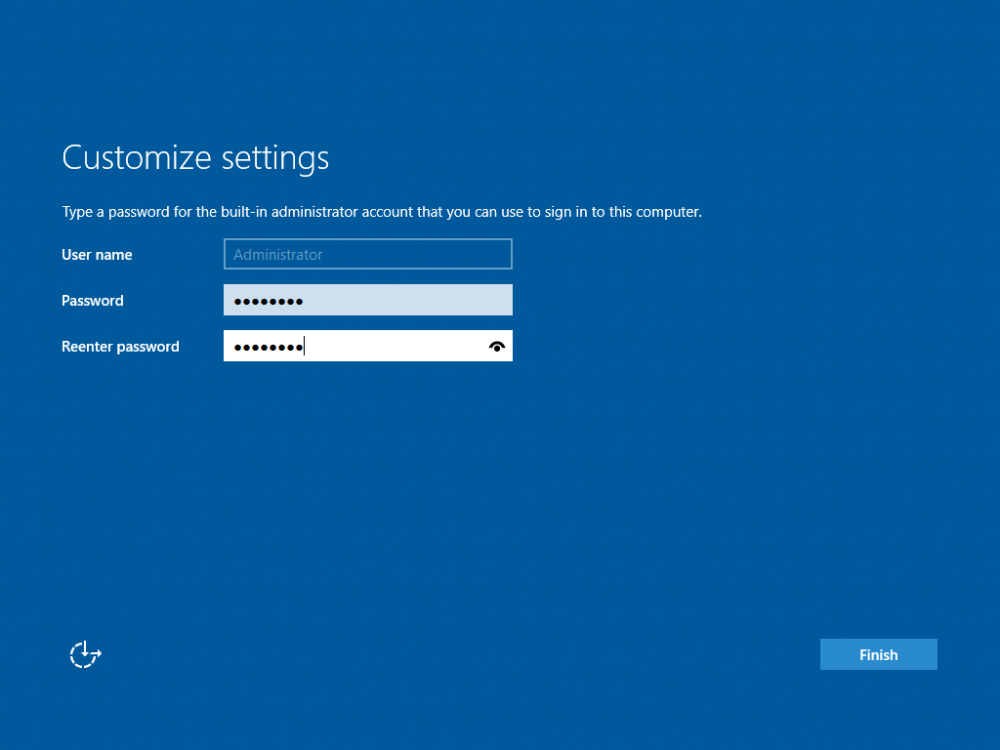
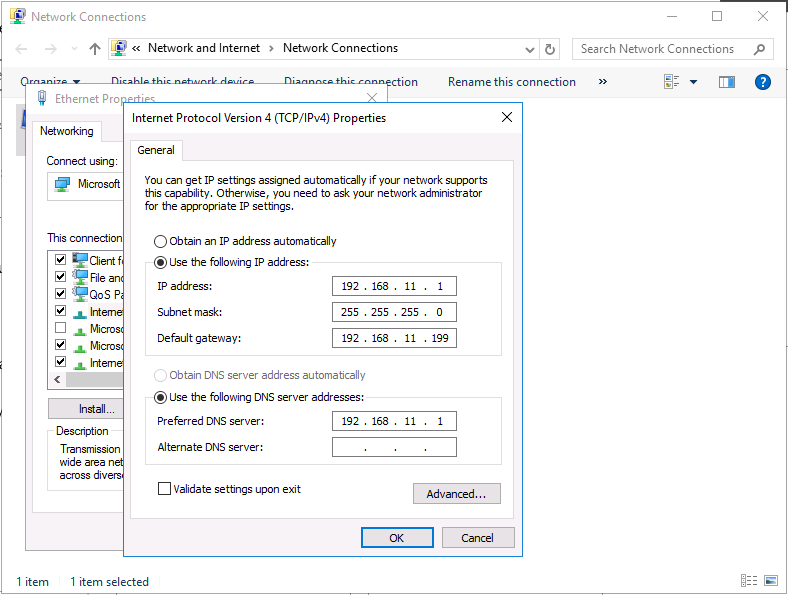
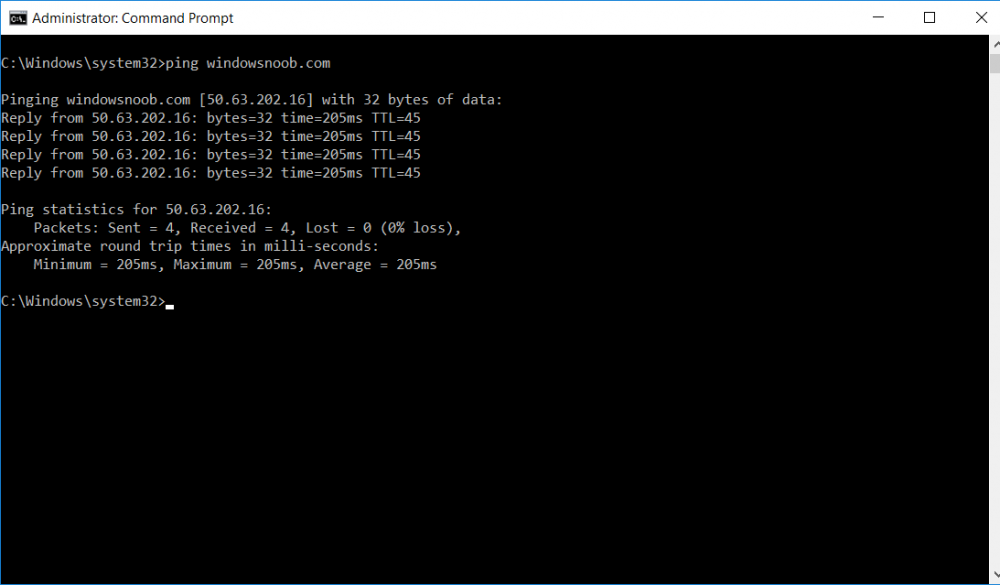
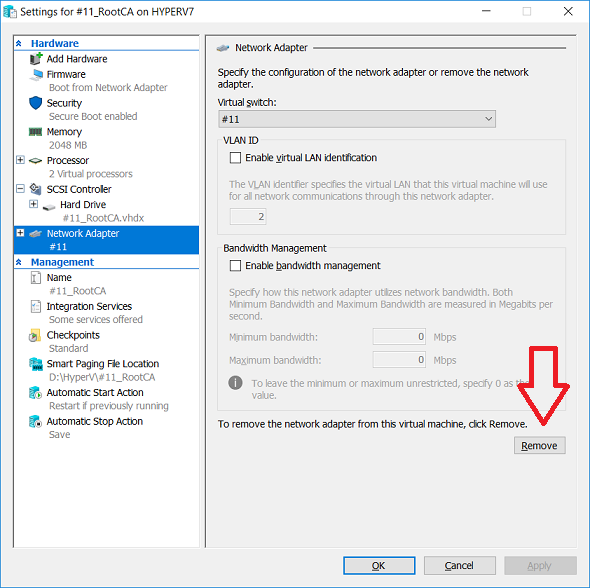
This series is comprised of different parts, listed below. Part 1 - Introduction and server setup (this part) Part 2 - Install and do initial configuration on the Standalone Offline Root CA Part 3 - Prepare the HTTP Web server for CDP and AIA Publication Part 4 - Post configuration on the Standalone Offline Root CA Part 5 - Installing the Enterprise Issuing CA Part 6 - Perform post installation tasks on the Issuing CA Part 7 - Install and configure the OCSP Responder role service Part 8 - Configure AutoEnroll and Verify PKI health Introduction Security is everywhere, and a core component of security is certificates. Public key infrastructure (PKI) is a set of roles, policies, and procedures needed to create, manage, distribute, use, store, and revoke digital certificates and manage public-key encryption (1). In this series of guides I will show you how to set up a 2 tier PKI hierarchy running on Windows Server 2016 and you can use this to set up your own LAB so that you can learn about PKI and later use it for related System Center Configuration Manager roles such as Co-Management (3). Note: I don't claim to be an expert on PKI and would absolutely advise you to consult with a PKI expert if you plan on setting up PKI in production. This guide is designed to help you setup your LAB, it's based on a Windows Server 2012 R2 PKI guide on Technet from here and kudos to those guys for writing it (2). The difference here is you'll be using Windows Server 2016 (or later) and you'll see more screenshots and hints to guide you through the experience. I'd highly recommend you go through this entire series at least twice, just to get a feel for how PKI works and to become familiar with the terms involved. The first time you complete this series will probably feel laborious, however the second time you do it things will start to make sense and you'll have a better understanding of why you are doing it. This series will be tough to wrap your head around especially if you are new to PKI, but take it one part at a time, one step at a time, methodically. If in any doubt, about any of the content then please ask your questions here by starting a new thread. Please note, Microsoft released a new updated PKI guide of their own, here June 2025. By the end of this series of guides you'll have the following setup and running in your windowsnoob.lab.local PKI LAB. Domain Controller (Windows Server 2016) - 192.168.11.1 Issuing CA (Windows Server 2016) - 192.168.11.2 Webserver (Windows Server 2016) - 192.168.11.3 Offline Root CA (Windows Server 2016) Windows 10 (Windows 10 Enterprise, version 1803) - 192.168.11.4 (Optional) Smoothwall NAT (linux) - 192.168.11.199 and MMC based applications like this screenshot from the Enterprise Issuing CA will become familiar to you Before we start the series let's list some of the terms you'll see popping up over and over. I will try to explain them as we move through the guide. PKI - Public Key Infrastructure AIA - Authority Information Access CDP - Certificate revocation list Distribution Point CRL - Certificate Revocation List OCSP - Online certificate status protocol CA - Certificate Authority Note: I'd recommend that you snapshot (checkpoint) the Virtual Machines at the end of each part of this series, so if you make a mistake, you can always back track to a known good state. Step 1. Create the Virtual Machines I use Hyper-V for my labs, as it's a role built into Windows Server 2016 (and even Windows 10), so as long as your computer is relatively new and the hardware supports virtualization, you can use it (simply enable the role, reboot, and start using it). You should have at least 16GB of ram and 500GB of SSD storage to set this lab up comfortably. To quickly create the virtual machines I use a PowerShell script which I wrote, you can download it here. Download the script - Create HyperV VMv2.ps1 Virtual Machine Names For this LAB, please use the following naming convention for your virtual machines (note this is not the computer name but the virtual machine name). #11_DC01 #11_IssuingCA #11_RootCA #11_W10_1803 #11_Webserver #11_Smoothwall Note: The #11 prefix is simply a method I use in Hyper-V to separate my labs visually in Hyper-v manager, so #11 is one lab, and #10 is another (and so on). You don't have to use the same convention as I do, but it would make it easier for you to follow the entire series. I use the Smoothwall linux based NAT to provide Port Forwarding capability and to share internet into my various LABs. Virtual Machine Roles The Virtual Machines created will have the following functions #11_DC01 Roles: DC, DNS, LDAP CDP,AIA #11_IssuingCA Roles: Enterprise Issuing CA #11_RootCA Roles: Standalone Offline Root CA #11_W10_1803 Roles: A Windows client #11_Webserver Roles: Webserver HTTP CDP, AIA #11_Smoothwall Roles: Port Forward, Internet sharing Note: When prompted for a network switch, create a unique one (#11) for the first VM created, and use the same one for each of the other vm's (we will remove the network from the Offline Root CA). For generation type, use Gen 2. Below is how I created the virtual machines listed above. Note: After creating the virtual machines and before installing Windows Server 2016 on the Offline Root CA, you must remove the Network Card for the Offline Root CA virtual machine as it should not be connected to any network. Step 2. Install the virtual machines Install Server 2016 On DC01, RootCA, IssuingCA and Webserver, install Windows Server 2016. It's up to you how to do this, you can use an Automated MDT PowerShell script, or install them manually. To install all Windows Server 2016 on all 4 servers as WorkGroup joined computers do as follows.. Choose Windows Server 2016 Standard (Desktop Experience) Continue through the installation wizard until prompted for a password, use P@ssw0rd as the Administrator password Click Finish. And then logon using the Administrator username and password configured above. Once Windows is installed, set the IP address for each virtual machine as shown below. Note: Below are the Computer Name and IP addresses used in this guide. For the Offline Root CA, you must remove the Network card in the Hyper-V virtual machine settings. Computer Name: DC01, IP address: 192.168.11.1, Subnet mask 255.255.255.0, Default gateway: 192.168.11.199, Preferred DNS server: 192.168.11.1 Computer Name: IssuingCA, IP address: 192.168.11.2, Subnet mask 255.255.255.0, Default gateway: 192.168.11.199, Preferred DNS server: 192.168.11.1 Computer Name: Webserver, IP address: 192.168.11.3, Subnet mask 255.255.255.0, Default gateway: 192.168.11.199, Preferred DNS server: 192.168.11.1 Computer Name: RootCA, IP: <NO NETWORK> Computer Name: W101803, IP address: 192.168.11.4, Subnet mask 255.255.255.0, Default gateway: 192.168.11.199, Preferred DNS server: 192.168.11.1 Computer Name: smoothwall11, IP address: (Green, static) 192.168.11.199 (Red, DHCP internet IP) x.x.x.x Here's how you can set the IP address for DC01. And configure the Computer Name as per the list (in this example it's for the Domain Controller) Reboot when prompted. Install Windows 10 Enterprise version 1803 Install Windows 10 Enterprise, version 1803 on the remaining virtual machine (#11_W10_1803). Configure the Computer Name and IP address as specified. Leave it WorkGroup joined. Optionally install Smoothwall To learn how to setup Smoothwall express as a firewall see this blog post. Step 3. Configure ADDS on DC01 Now that you've installed the servers, it's time to make DC01 a domain controller, to do that we'll install Active Directory Domain Services (ADDS) and to do that we'll use this PowerShell script, simply run the script as Administrator in Windows PowerShell ISE on DC01. Download the script -Configure ADDS.ps1 After running the script, DC01 is prompted to a Domain Controller and is ready for the next part of this series. Note: Please only run this script on the DC01 virtual machine. After running the script, the Domain Controller is ready for Part 2 (configured as dc01.windowsnoob.lab.local) and internet is working (via the Smoothwall) To continue with Part 2 of this series, click here. Recommended reading (1) - https://en.wikipedia.org/wiki/Public_key_infrastructure (2) - https://social.technet.microsoft.com/wiki/contents/articles/15037.ad-cs-step-by-step-guide-two-tier-pki-hierarchy-deployment.aspx (3) - https://docs.microsoft.com/en-us/sccm/core/clients/manage/co-management-overview


- 2 replies
-
- 2
-

-
- co-mangement
- ca
- (and 12 more)
-
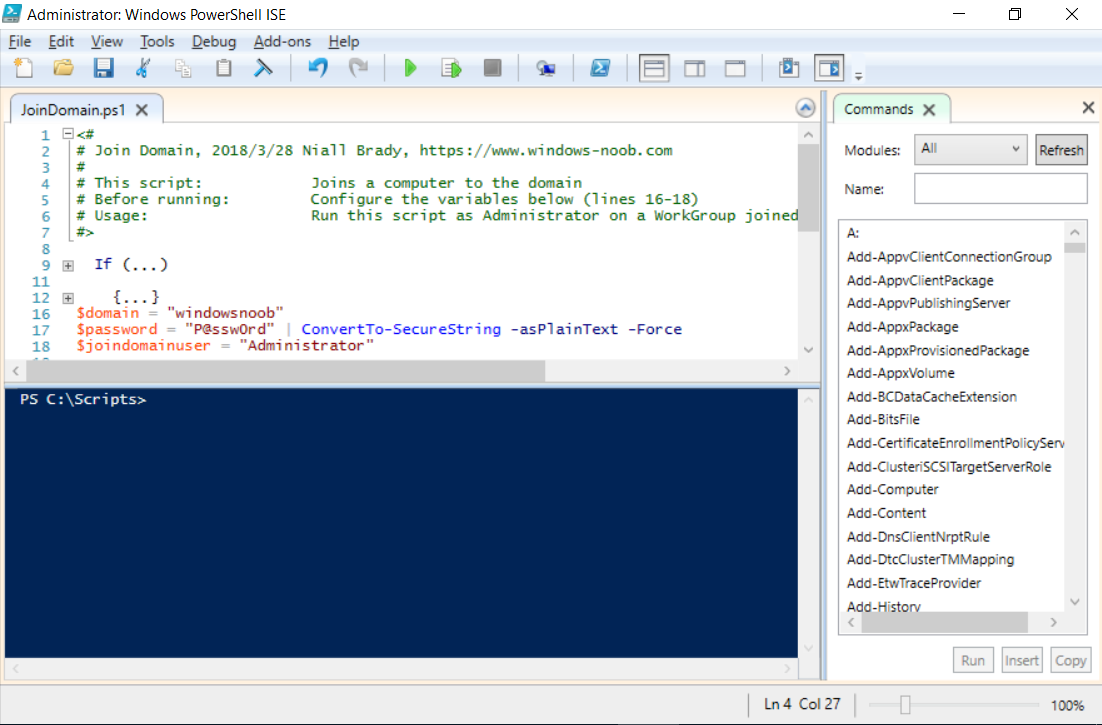
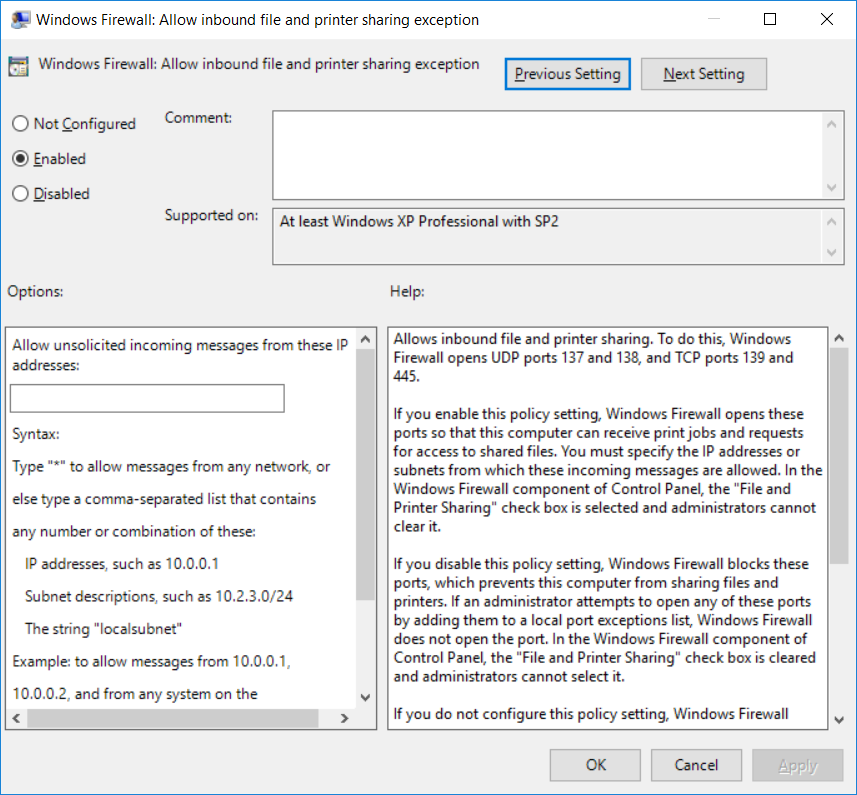
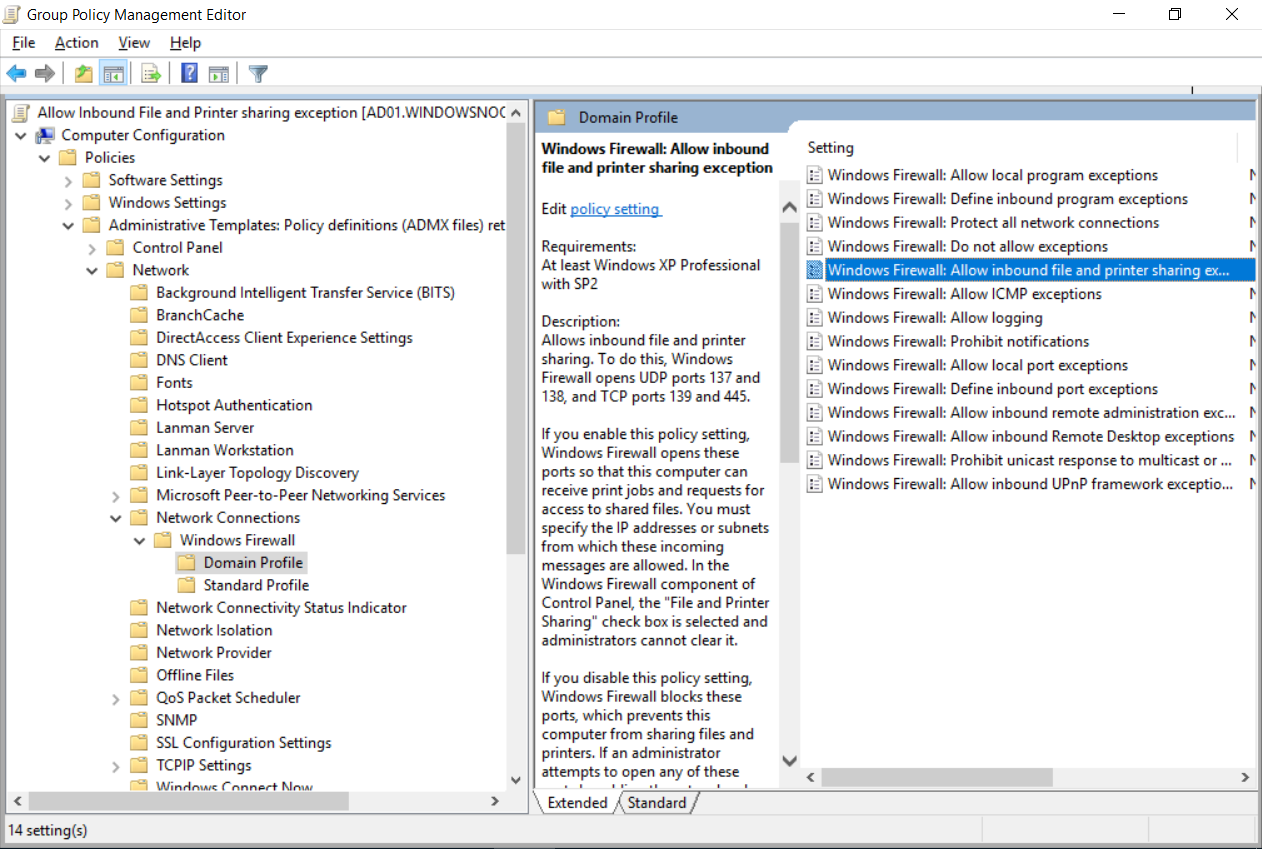
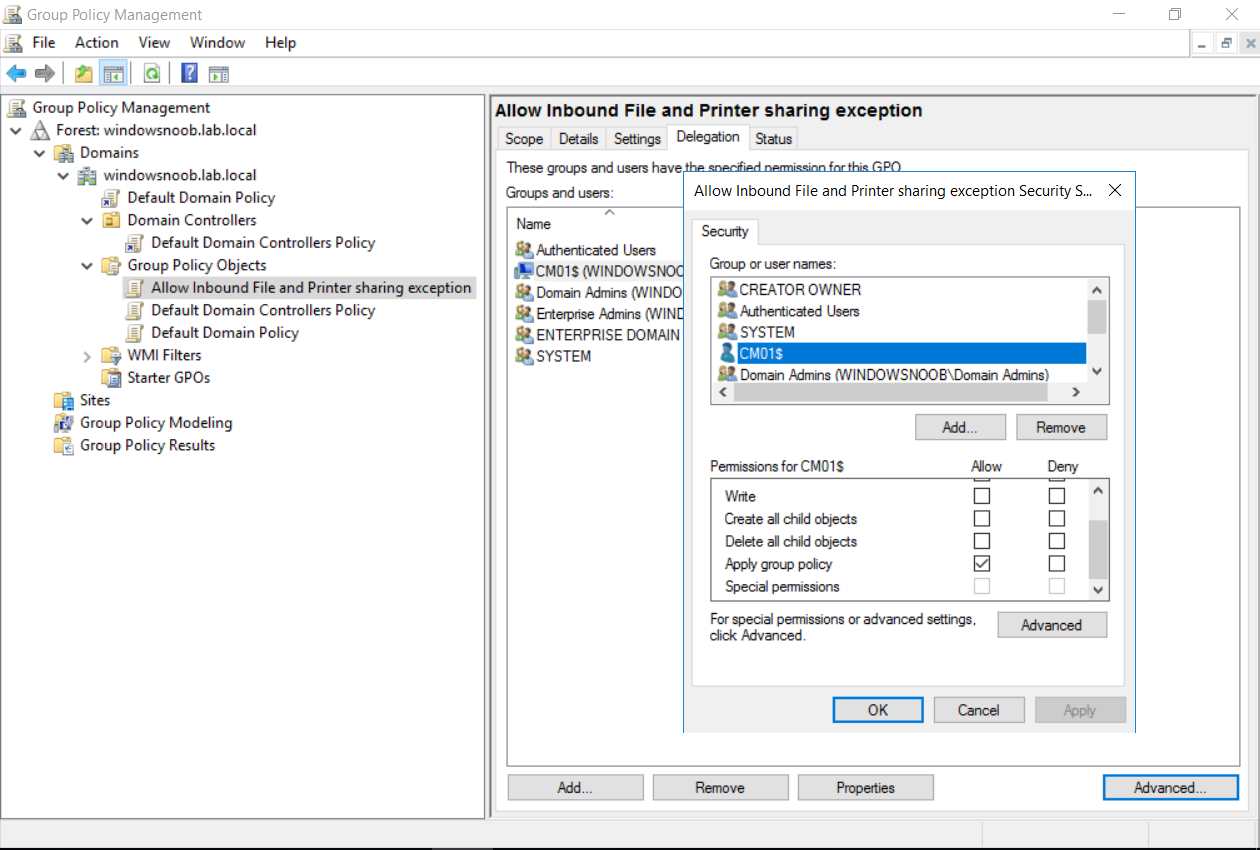
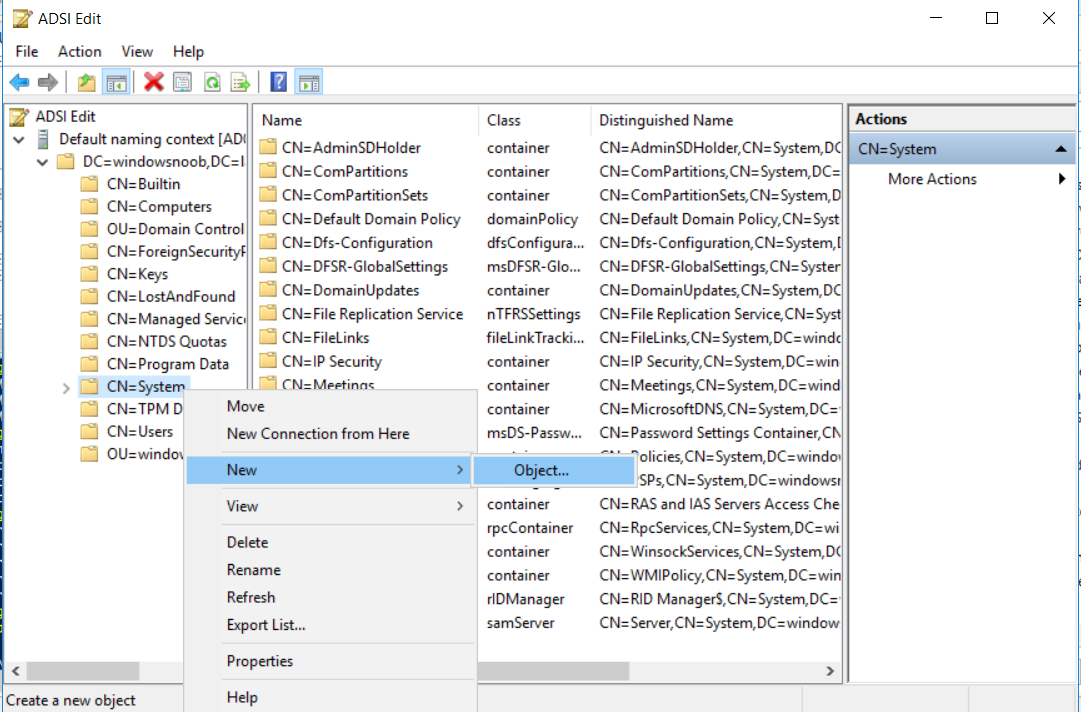
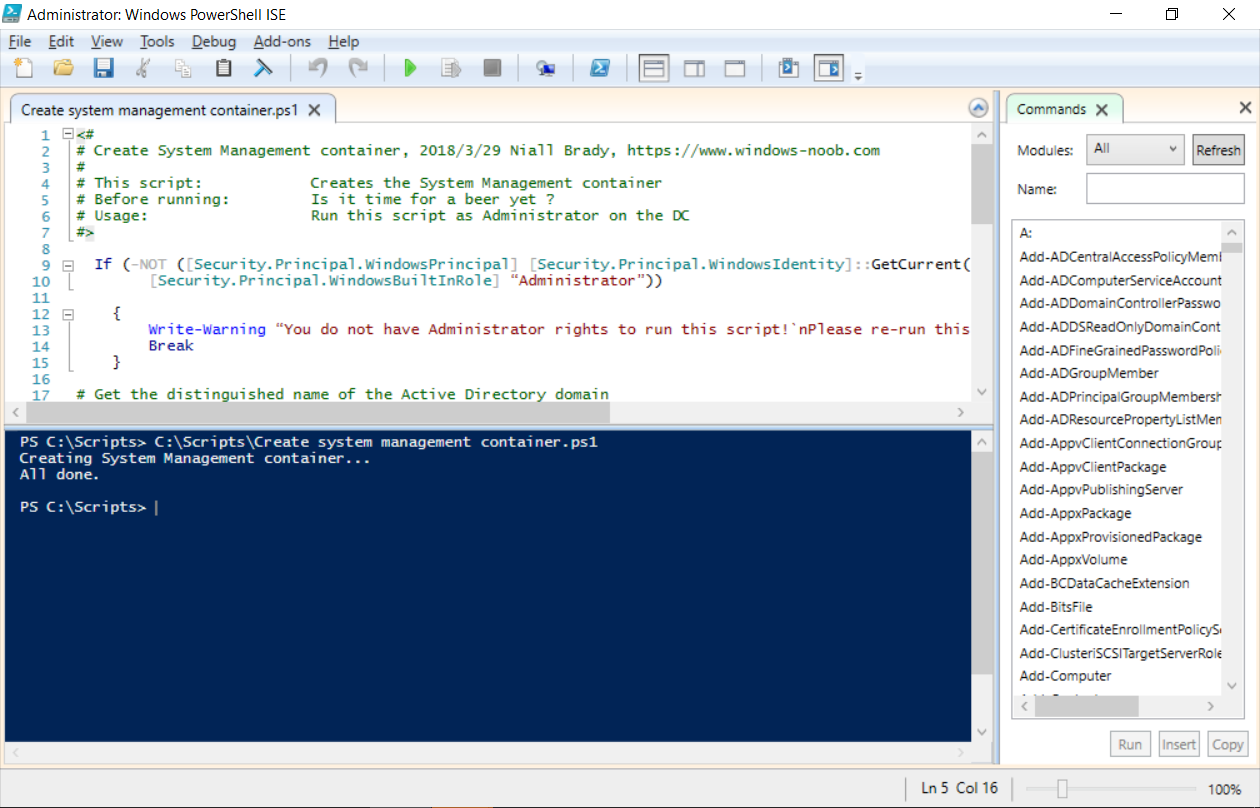
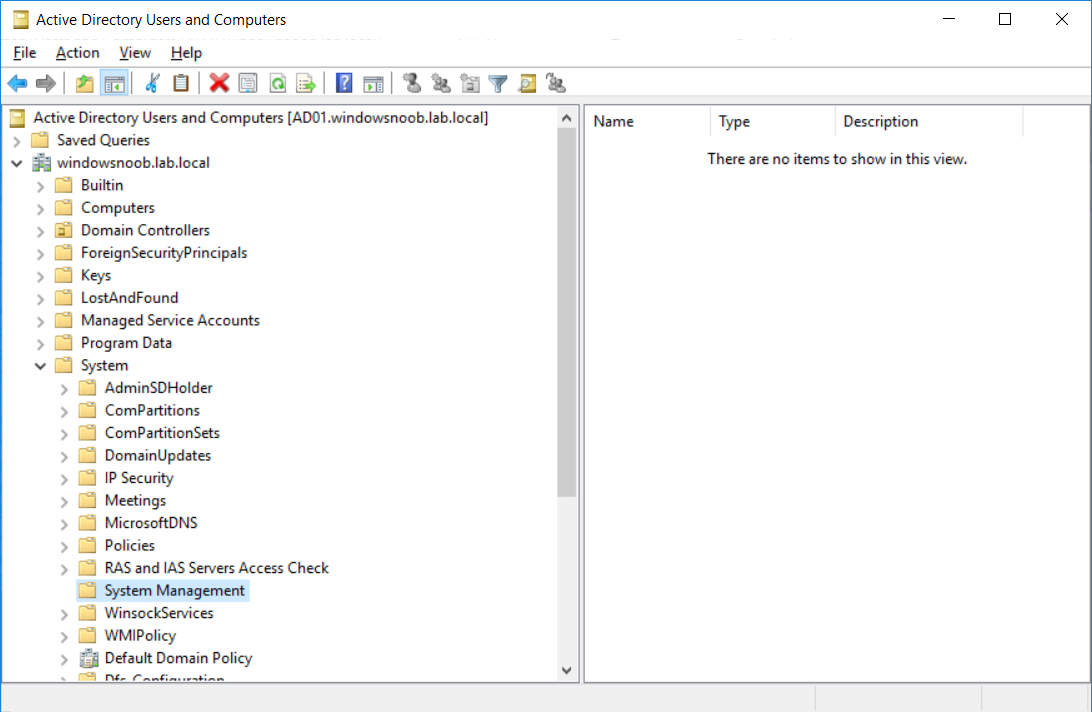
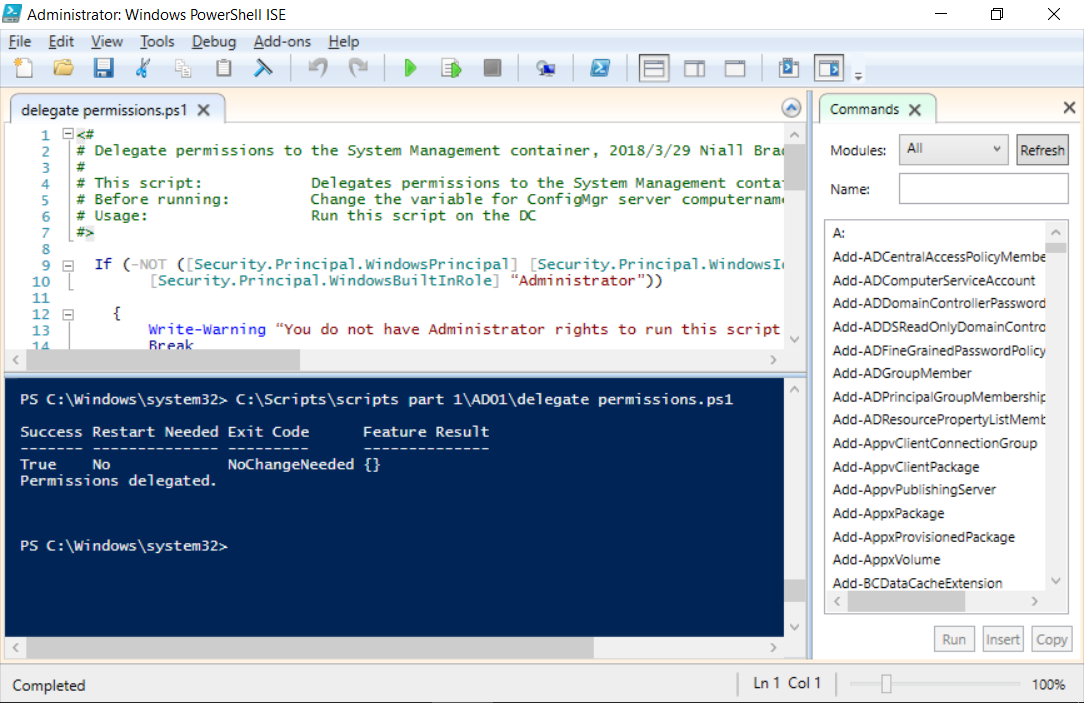
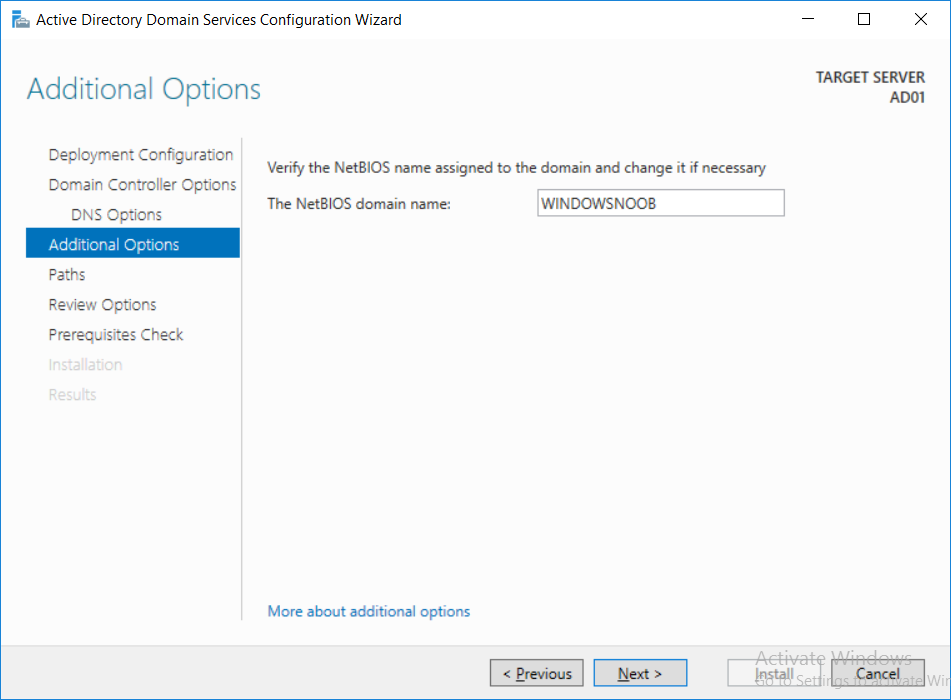
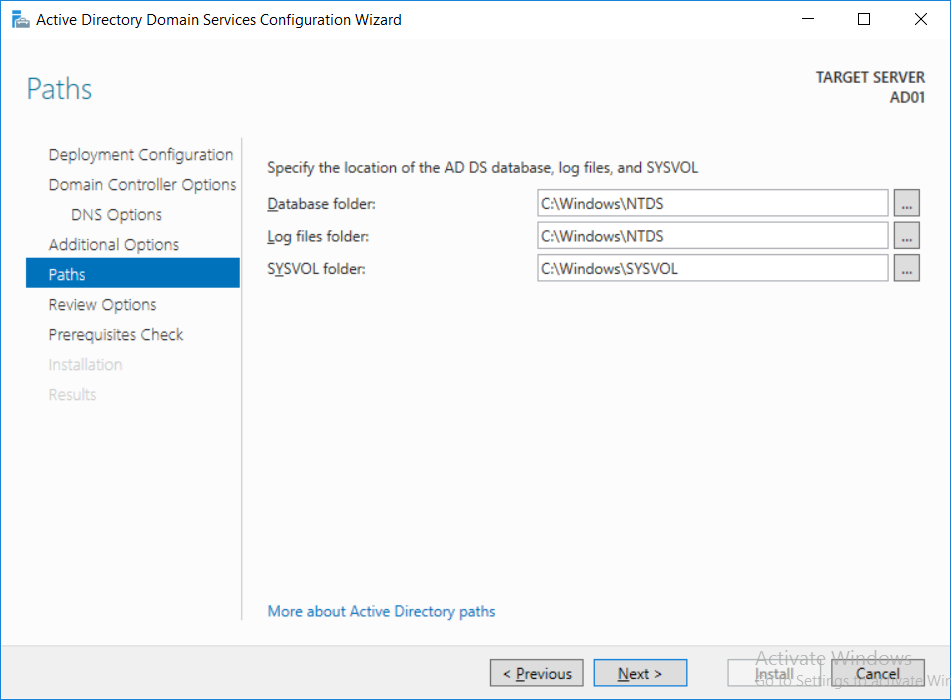
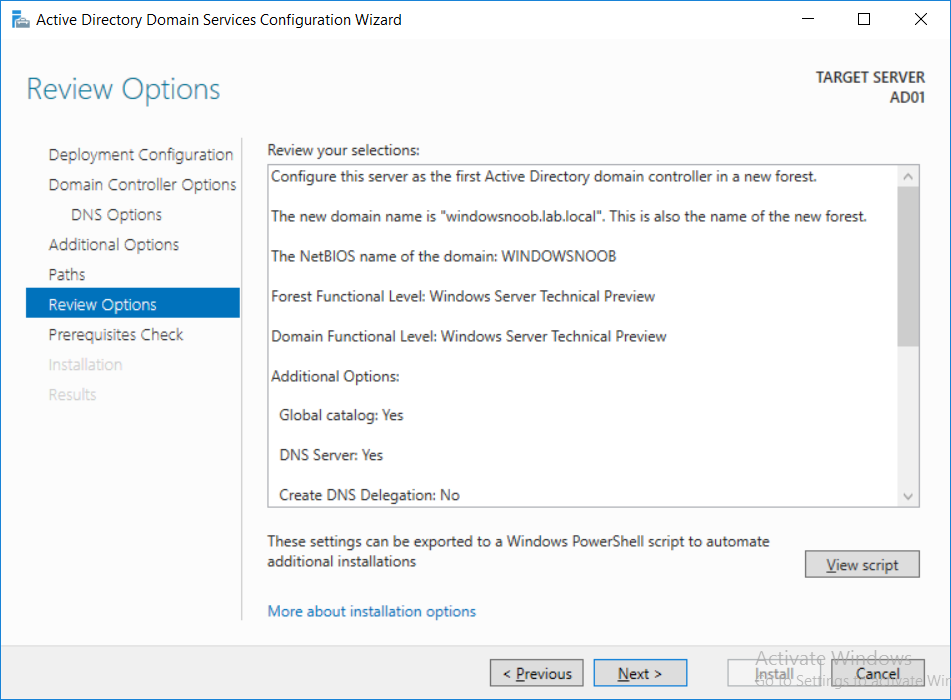
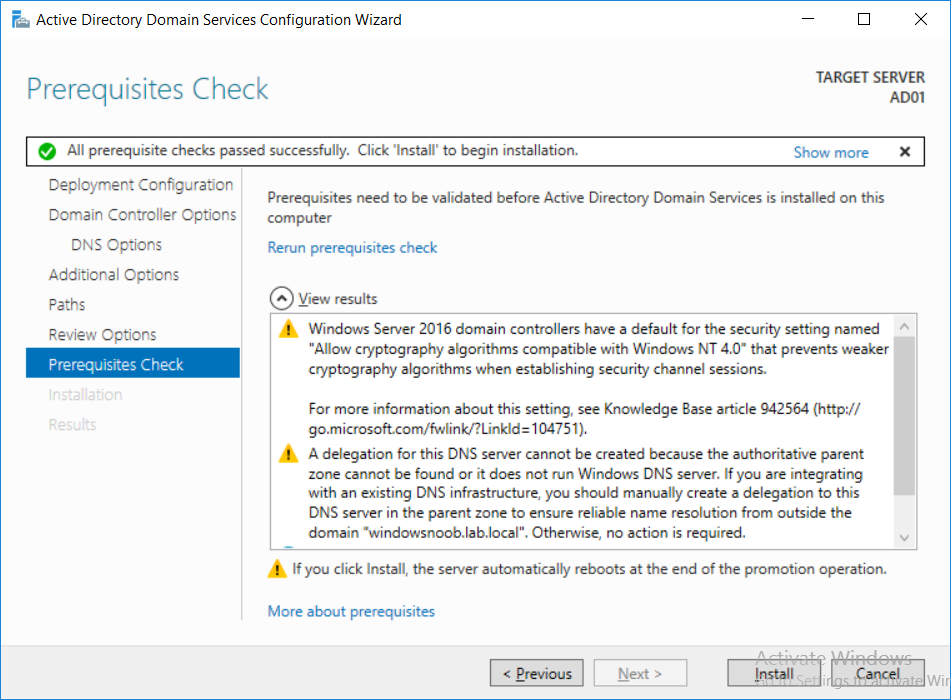
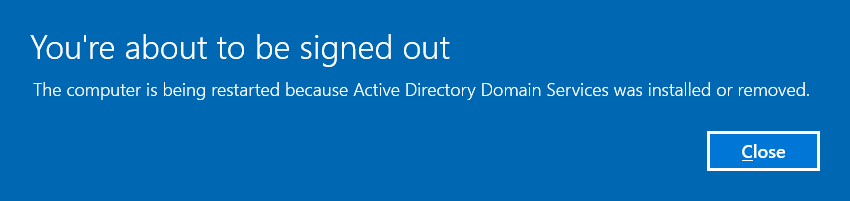
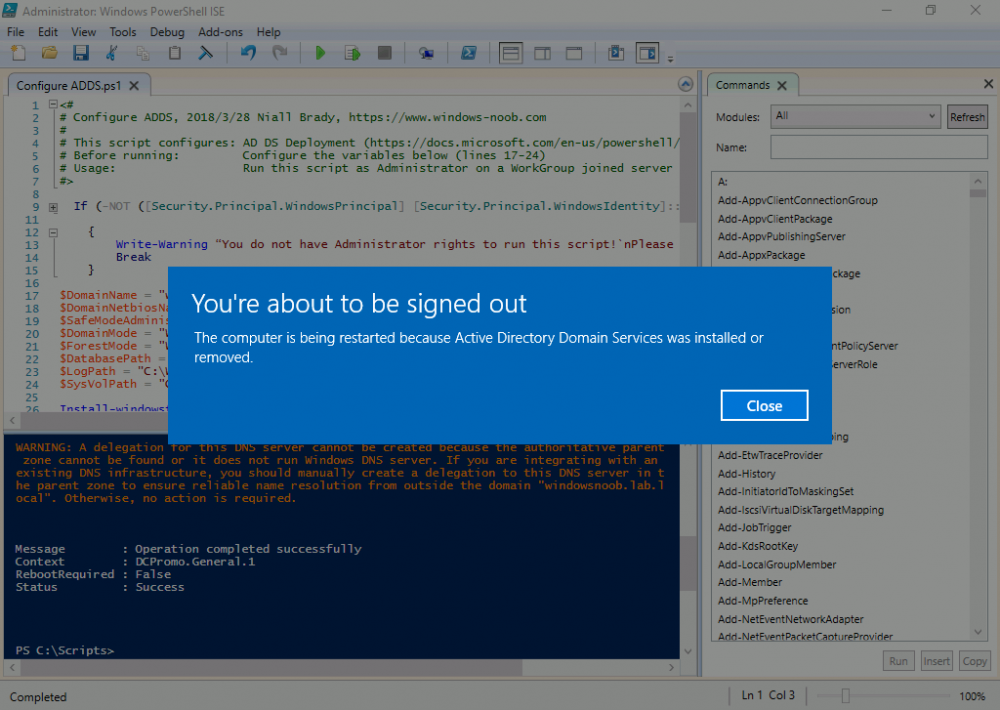
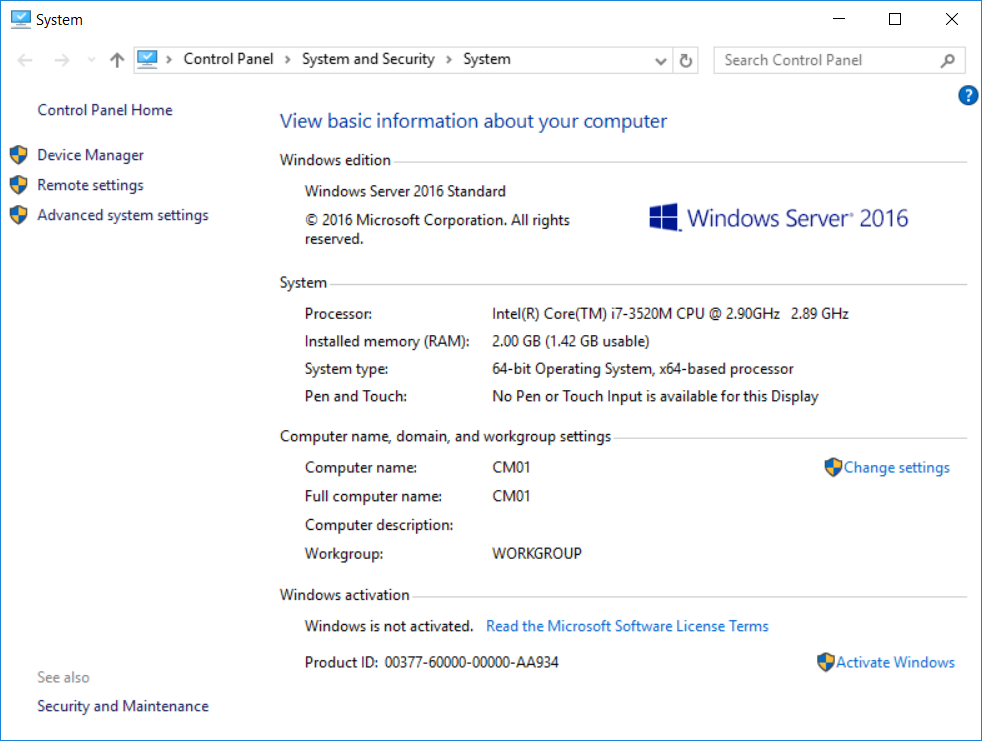
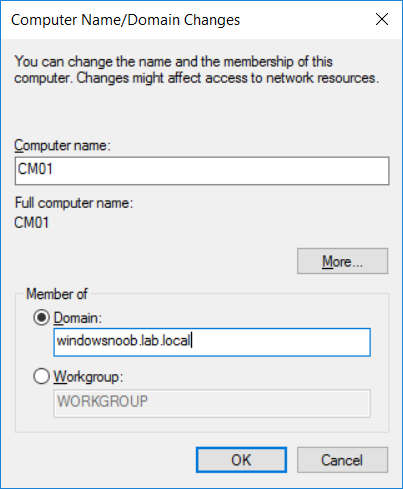
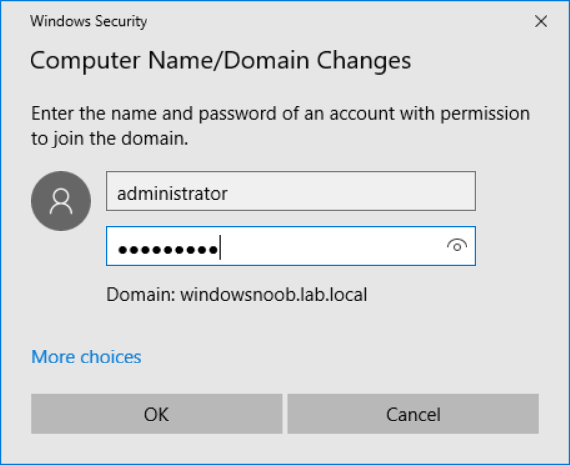
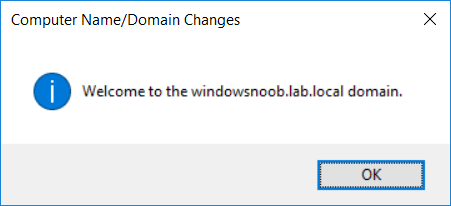
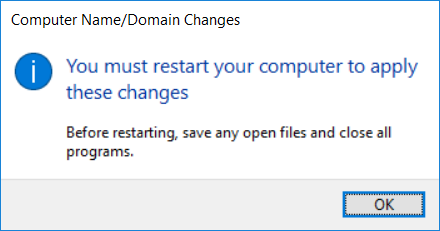
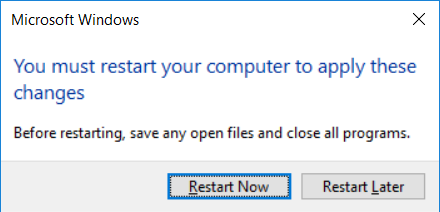
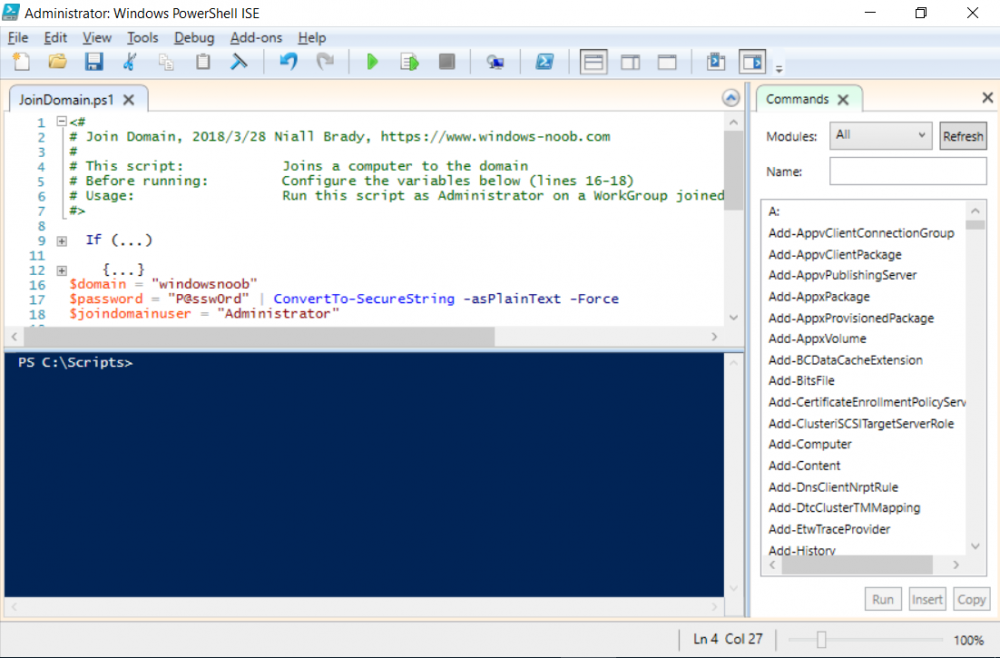
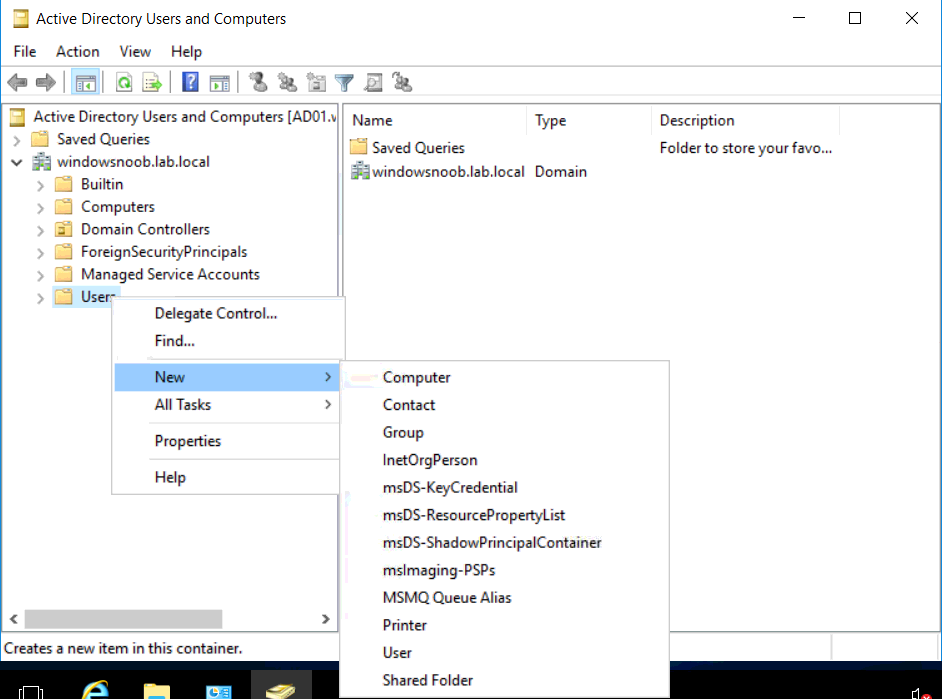
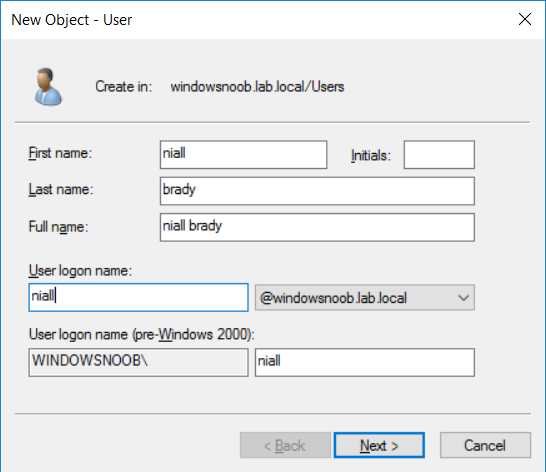
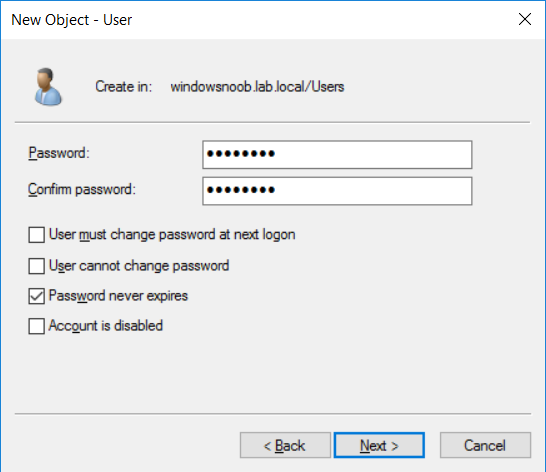
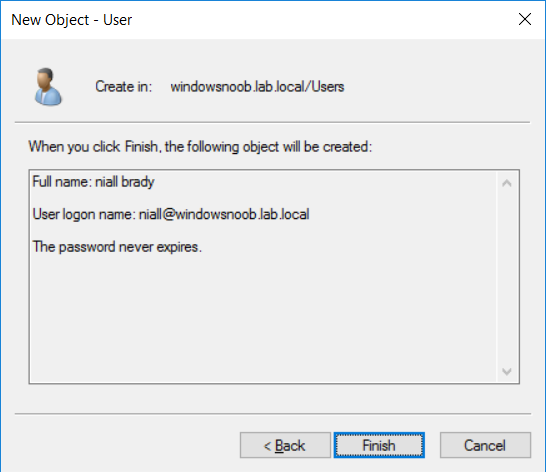
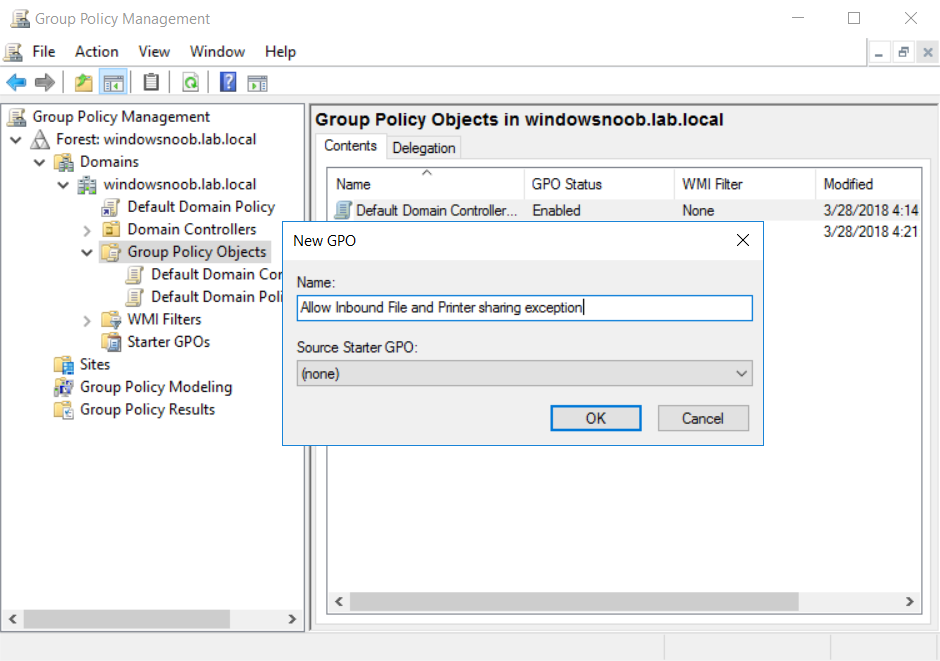
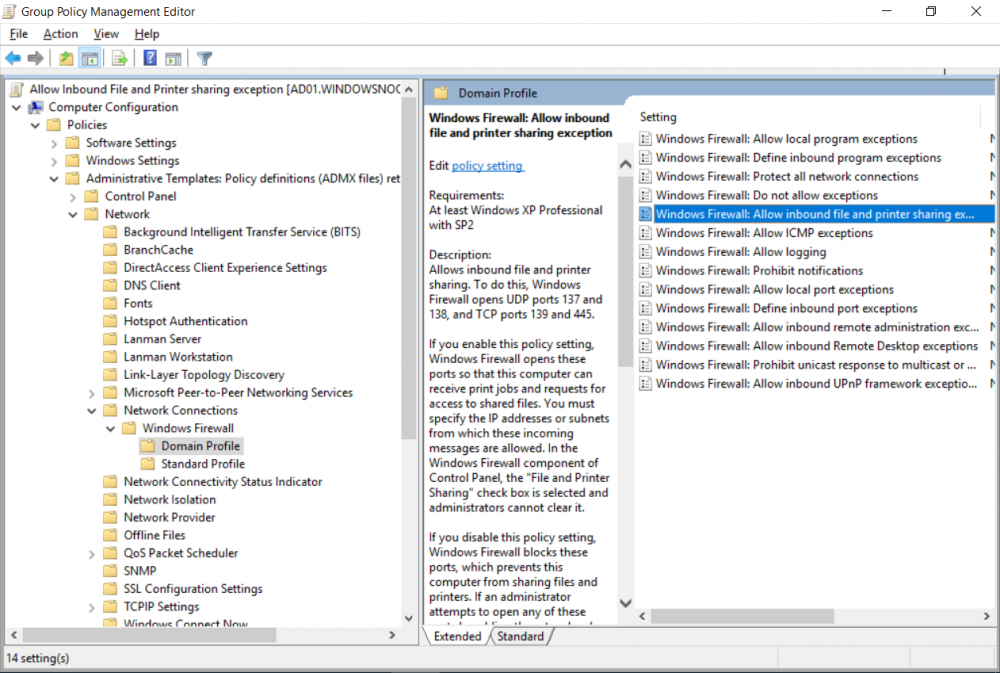
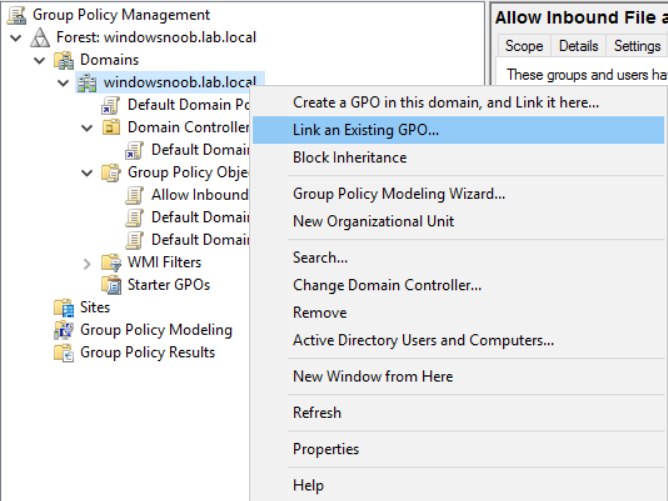
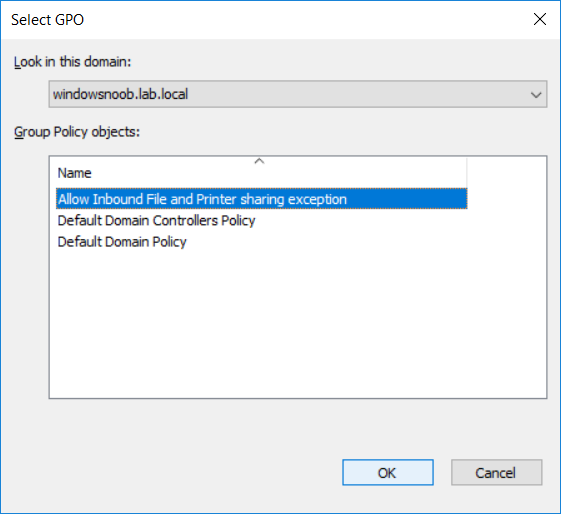
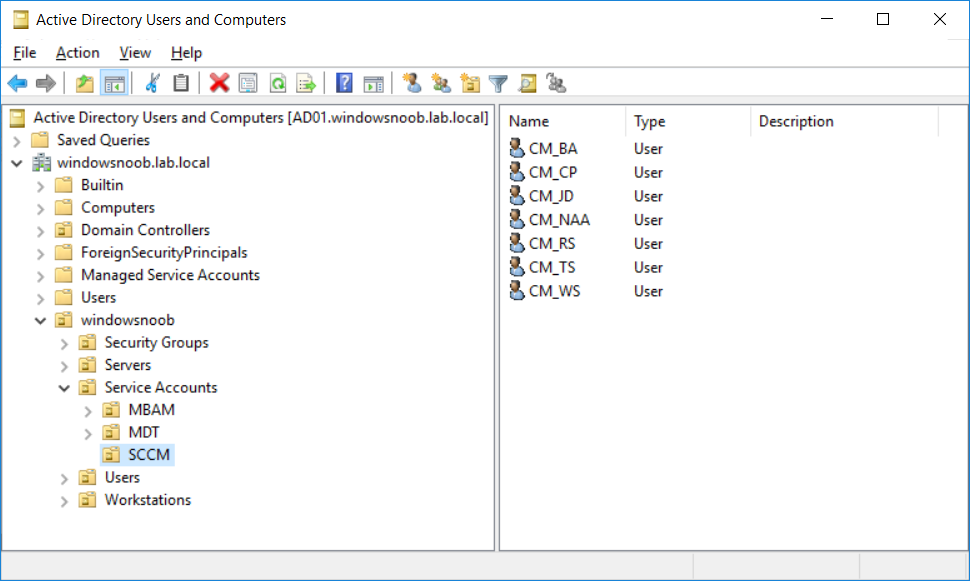
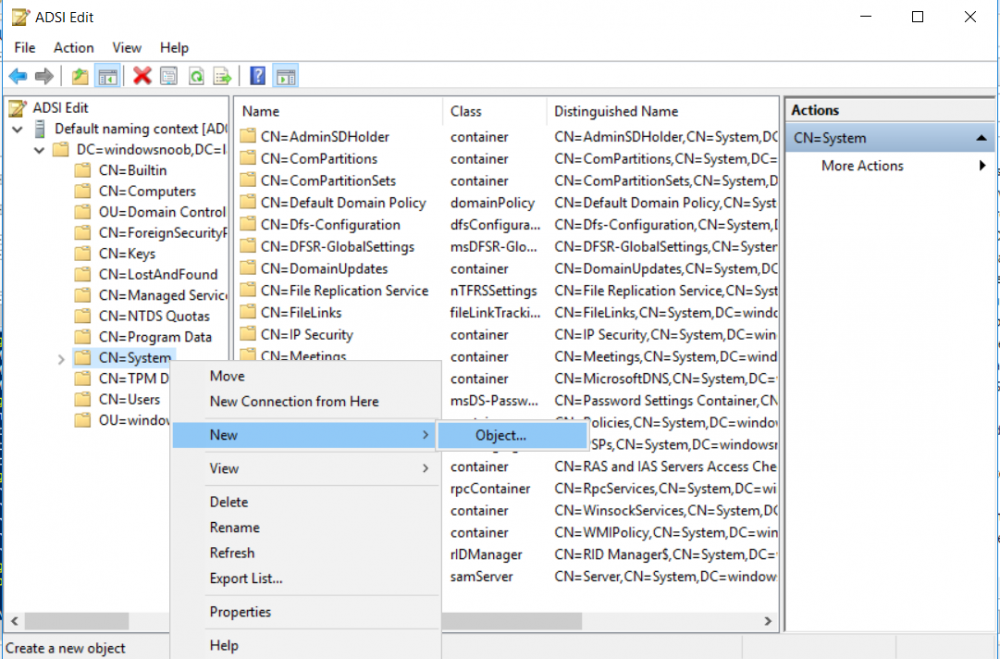
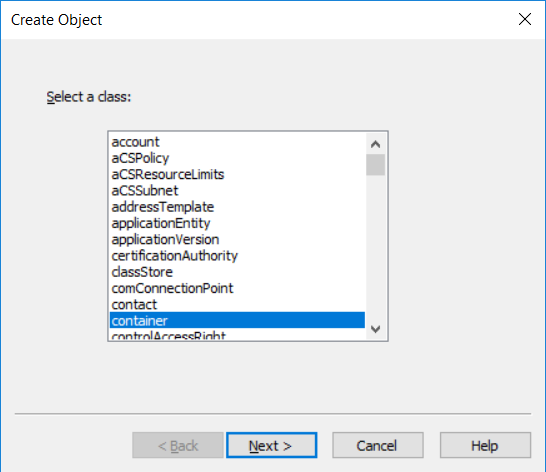
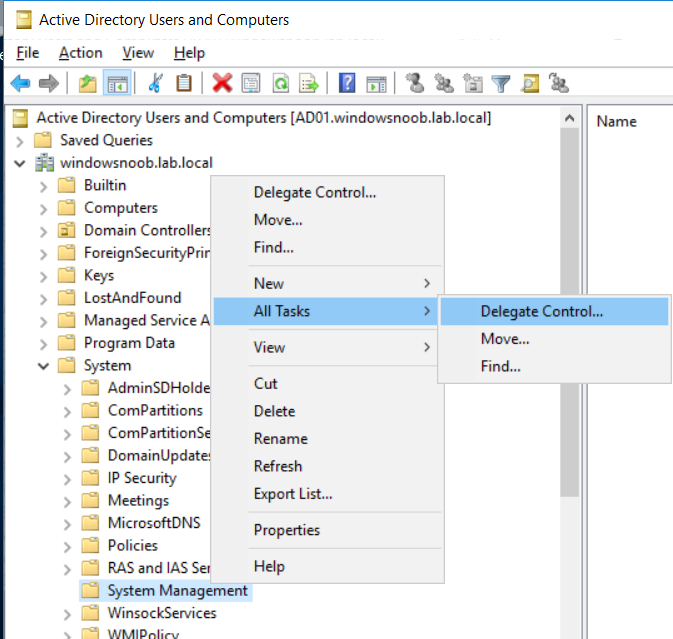
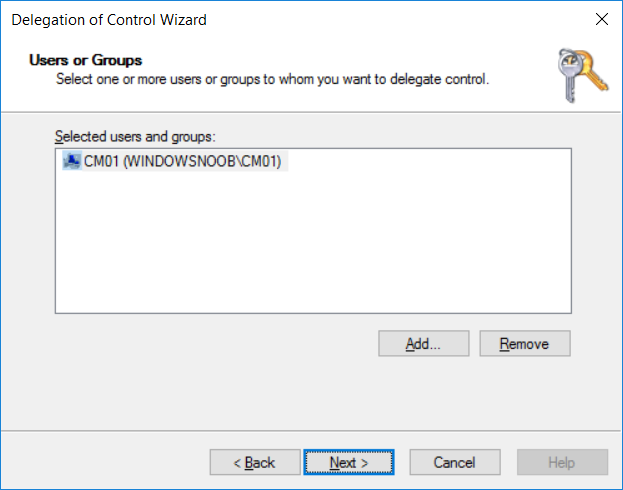
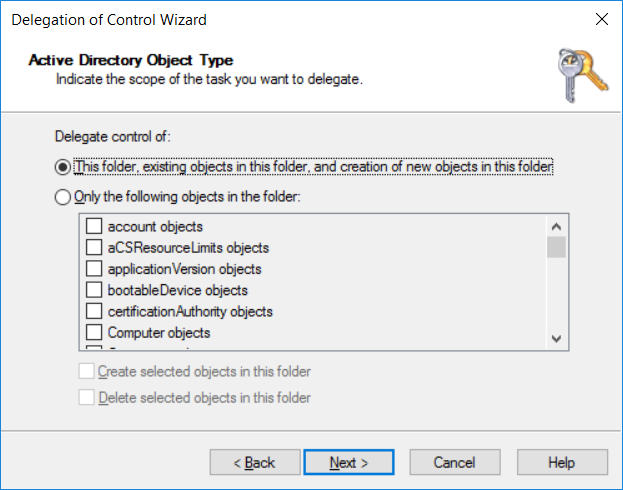
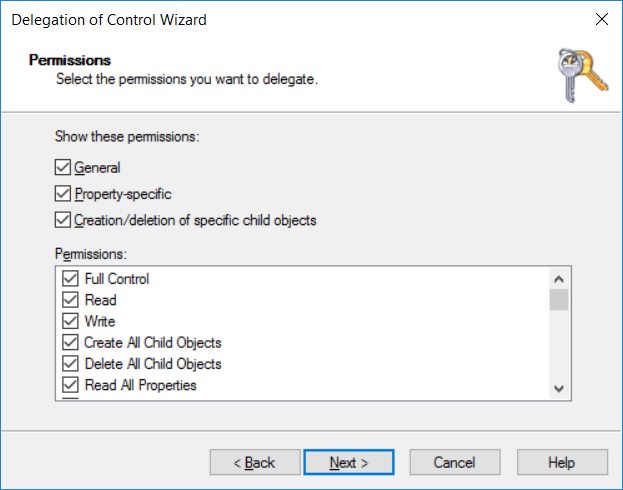
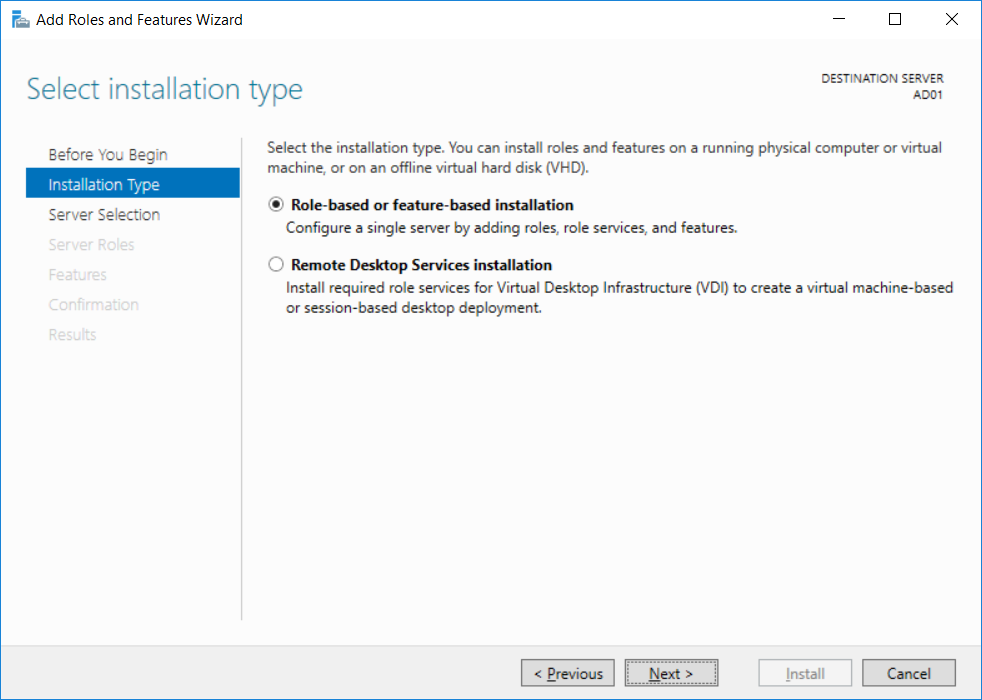
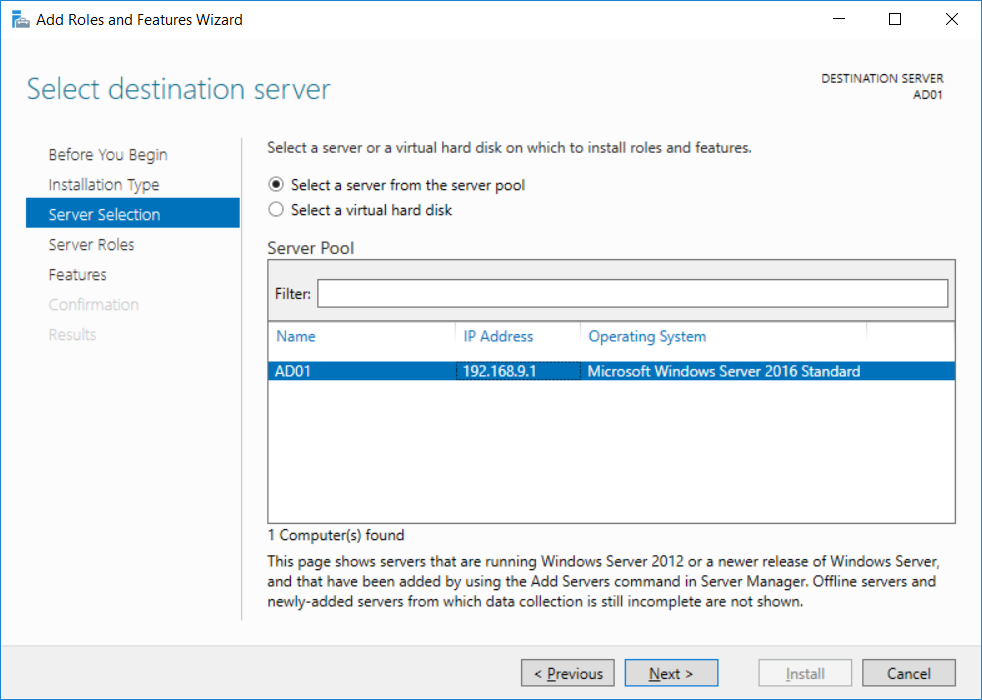
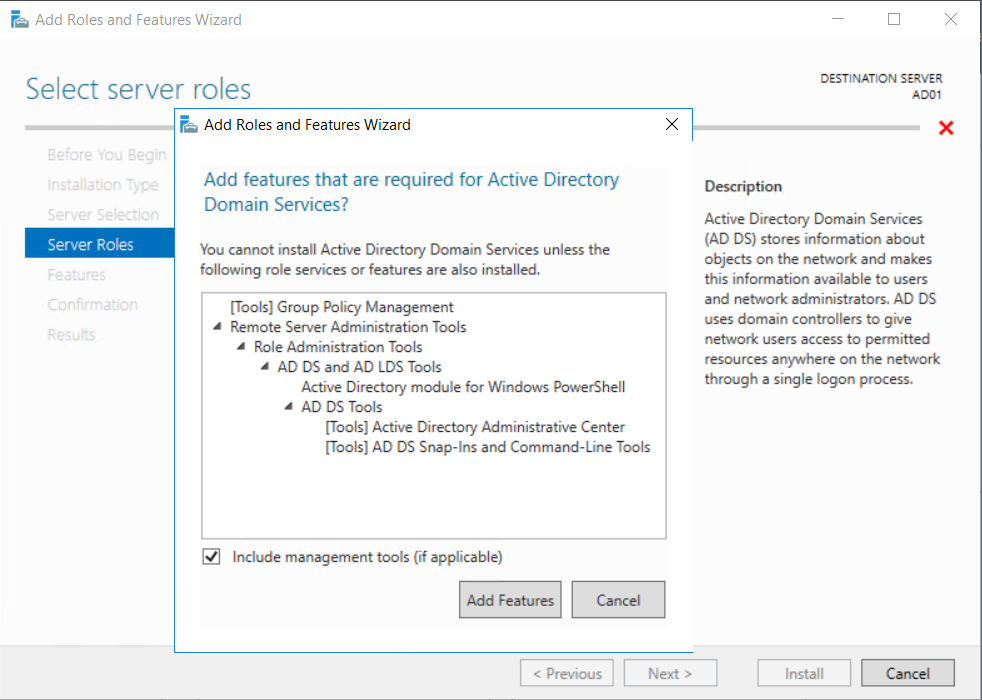
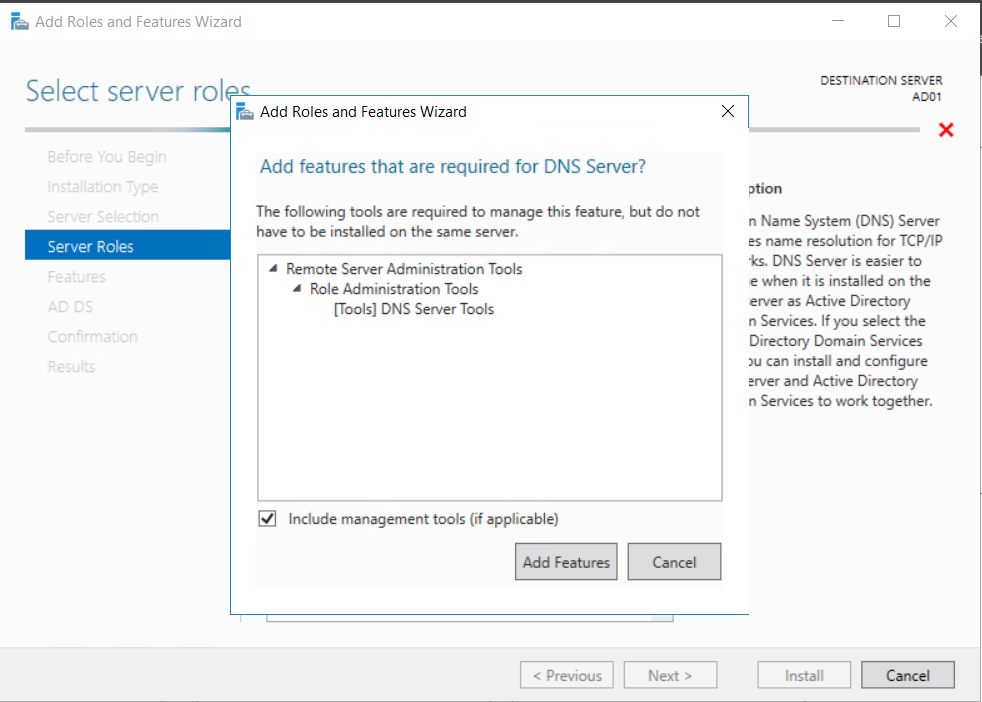
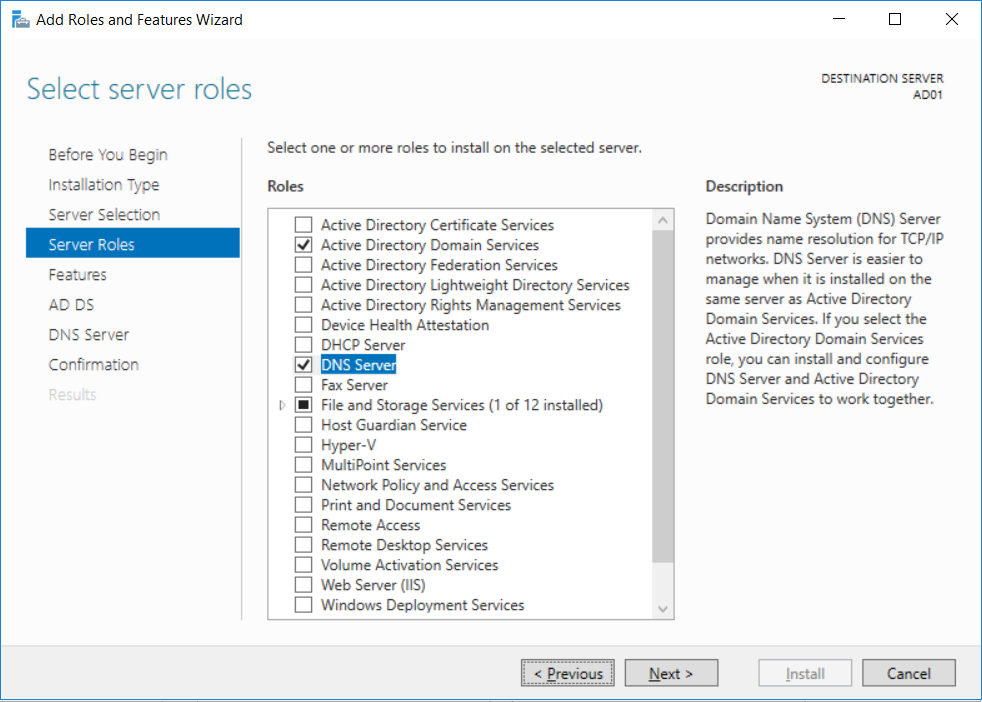
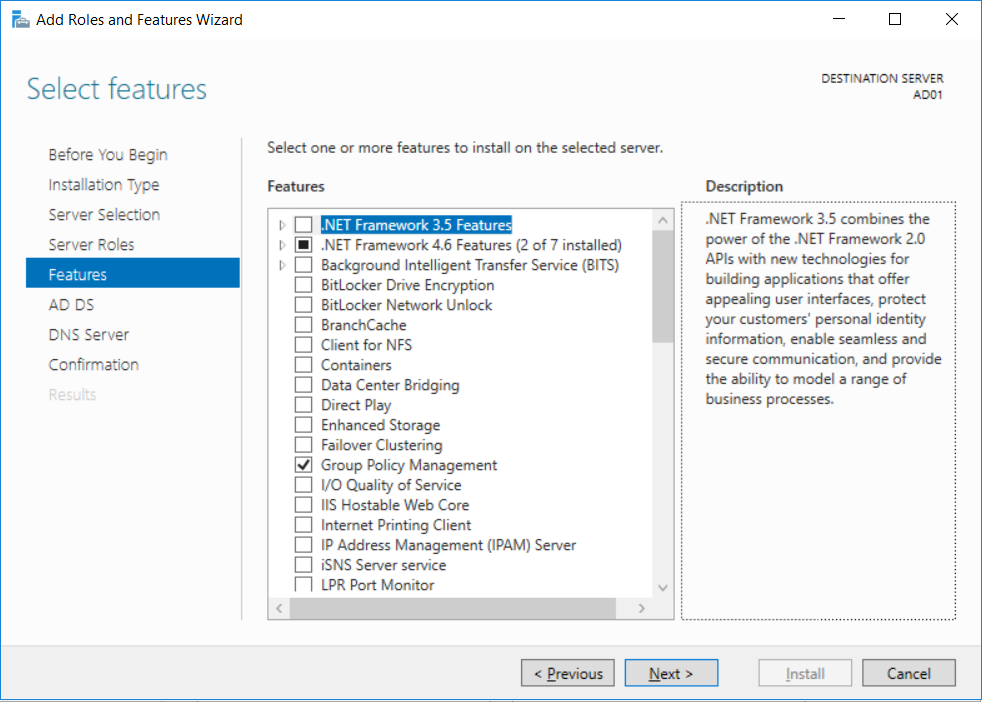
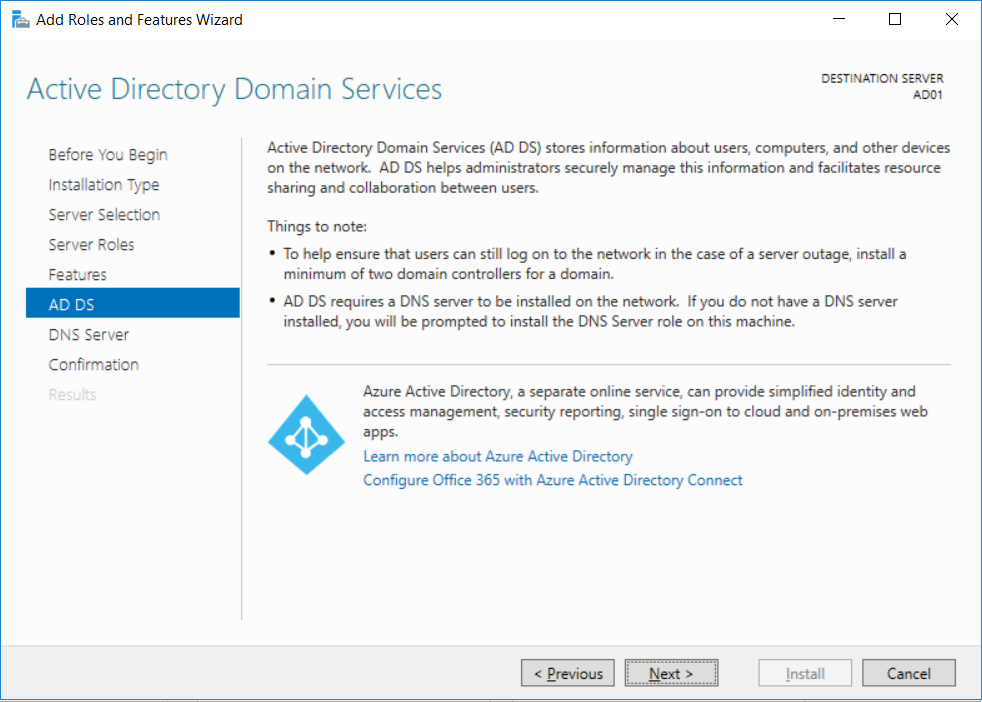
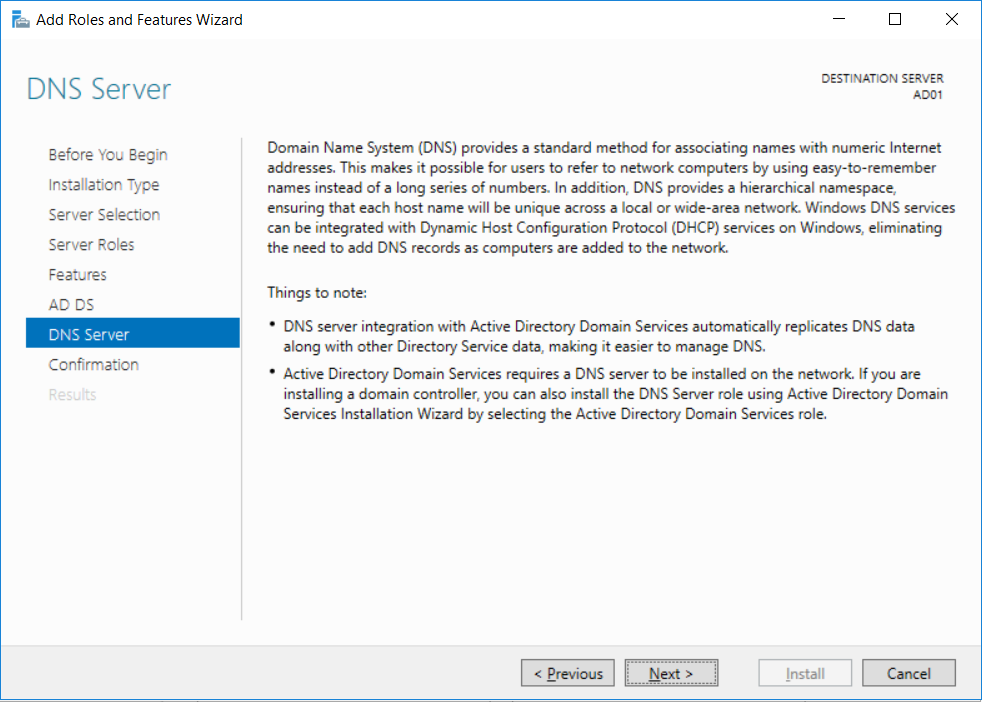
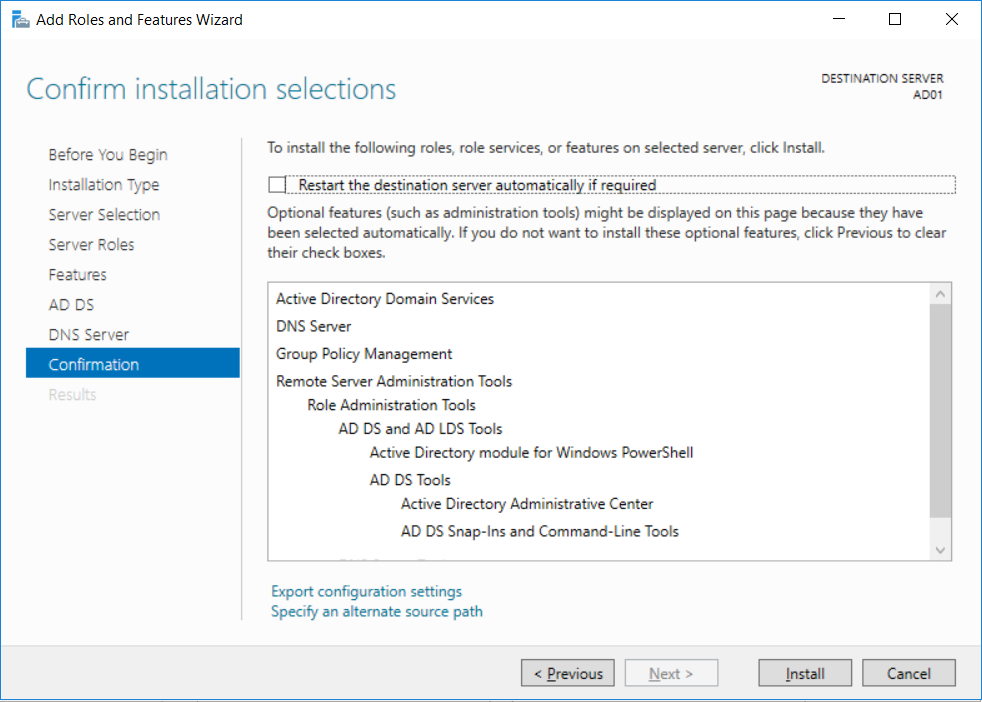
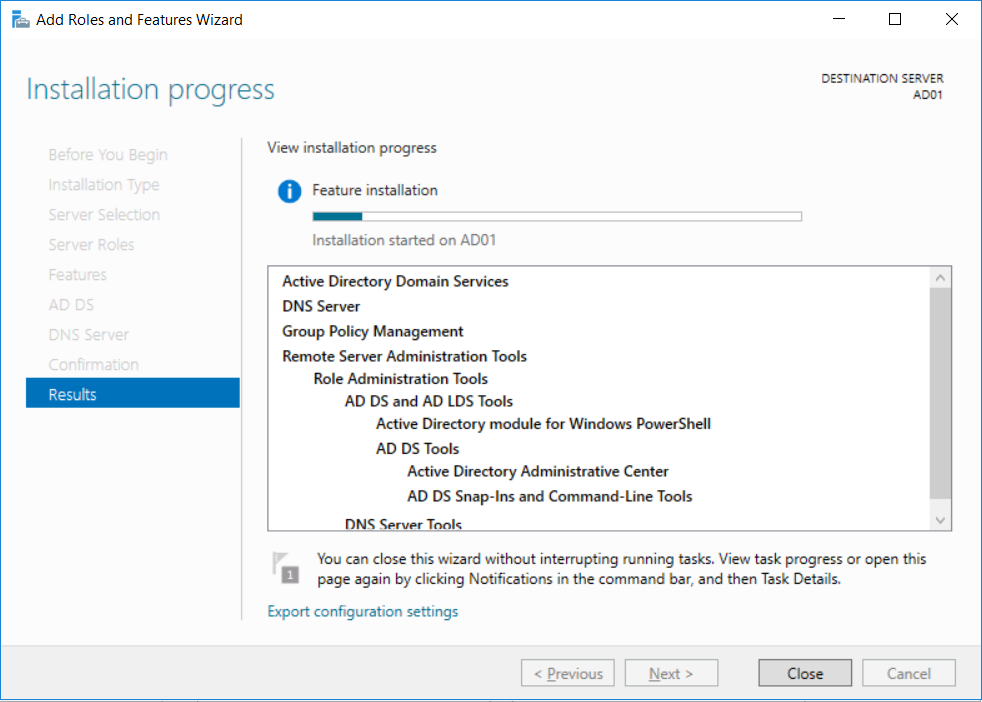
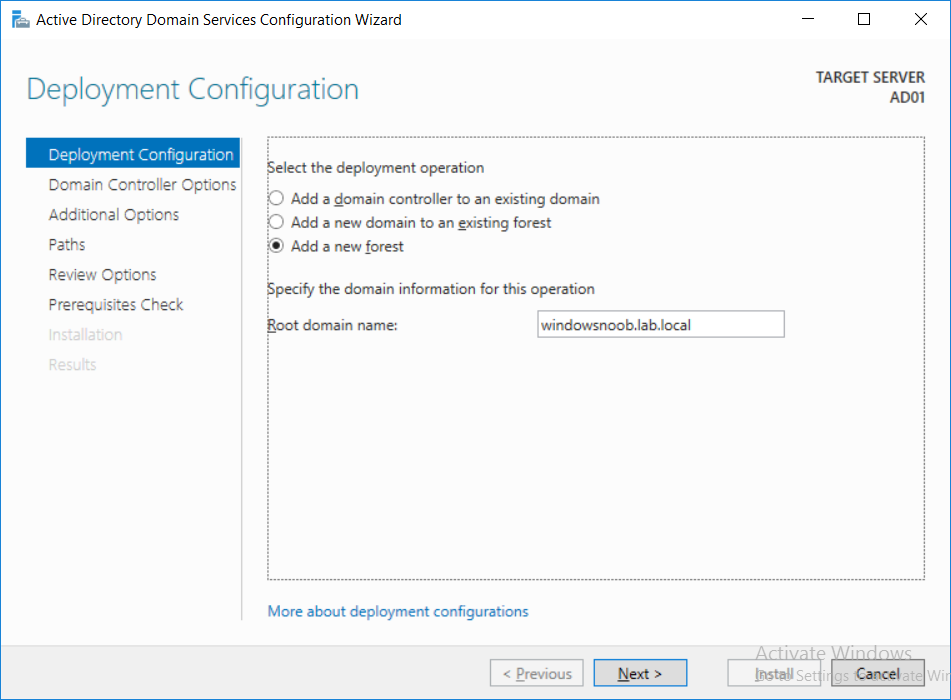
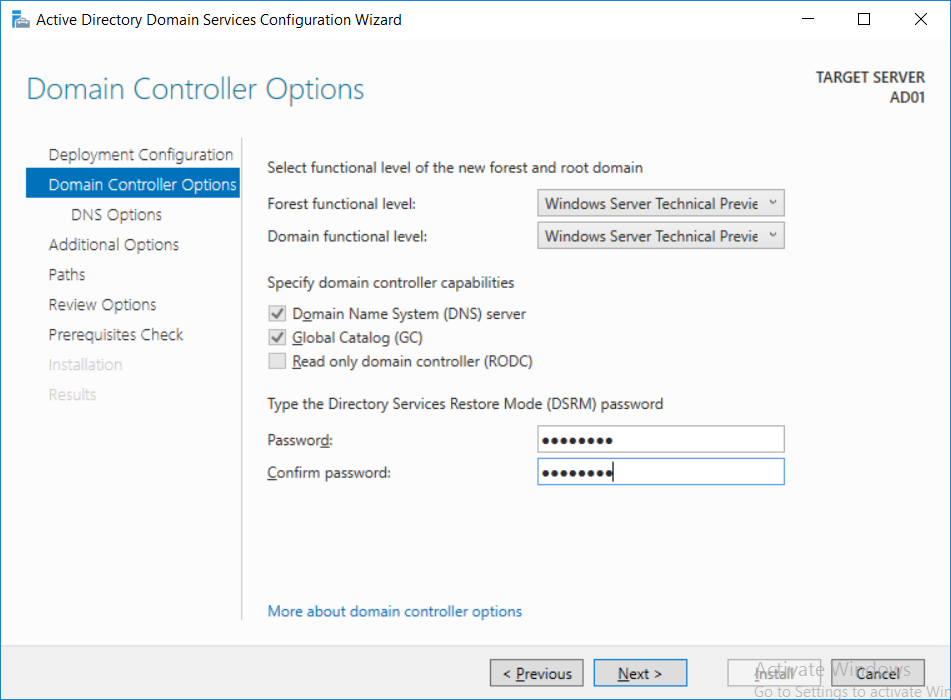
 Introduction UPDATE: please use the newer version of this guide here. This multi-part guide will show you how to install the latest baseline version of Configuration Manager from Microsoft. The latest available baseline version is System Center Configuration Manager (Current Branch) version 1802 as of March 29th 2018. How can I install System Center Configuration Manager (Current Branch) version 1802 on Windows Server 2016 with SQL Server 2017 – Part 1 How can I install System Center Configuration Manager (Current Branch) version 1802 on Windows Server 2016 with SQL Server 2017 – Part 2 How can I install System Center Configuration Manager (Current Branch) version 1802 on Windows Server 2016 with SQL Server 2017 – Part 3 How can I install System Center Configuration Manager (Current Branch) version 1802 on Windows Server 2016 with SQL Server 2017 – Part 4 You can use this multi-part guide to get a hierarchy up and running on Windows Server 2016 using SQL Server 2017. The concept behind this is to guide you through all the steps necessary to get a working Configuration Manager Primary site installed (for lab use) using manual methods or automated using PowerShell. This gives you the power to automate the bits that you want to automate, while allowing you to manually do other tasks when needed. You decide which path to take. PowerShell knowledge is desired and dare I say required if you are in any way serious about Configuration Manager. I will show you how to do most steps via two methods shown below, it's up to you to choose which method suits you best but I highly recommend automating everything that you can, using PowerShell. Method #1 - Do it manually Method #2 - Automate it with PowerShell Get your lab ready In this guide I assume you have already installed two WorkGroup joined servers with Windows Server 2016 installed, how you install the operating system is up to you. When installing the servers please choose Windows Server 2016 Standard (Desktop Experience). The servers used in this guide are configured as listed below, the SmoothWall (NAT) is optional. Server name: AD01 Server function: Domain Controller Server status: Workgroup joined IPv4 Address: 192.168.9.1 Subnet Mask: 255.255.255.0 Default Gateway: 192.168.9.199 DNS: 192.168.9.1 Server name: CM01 Server function: Configuration Manager Primary site Server status: Workgroup joined IPv4 Address: 192.168.9.2 Subnet Mask: 255.255.255.0 Default Gateway: 192.168.9.199 DNS: 192.168.9.1 Server name: Smoothwall Server function:Linux firewall Server status: 2 legacy nics eth0: 192.168.9.199 eth1: x.x.x.x (internet facing ip) Step 1. Configure Active Directory Domain Services (ADDS) Note: Perform the following steps on the AD01 server as a Local Administrator. To setup Active Directory Domain Services you could manually click your way through the appropriate wizard in Server Manager or automate it using PowerShell. For your benefit I'll show you both methods below, all you have to do is choose which one suits you. Method #1 - Do it manually Open Server Manager. Click on Add roles and features On the Before You Begin screen click Next For Installation Type select Role-based or Feature-based installation For Server Selection select Select a server from the server pool and choose AD01 For Server Roles select Active Directory Domain Services, when prompted to add features that are required for Active Directory Domain Services select Add Features Select DNS Server, when prompted to add features that are required for DNS Server, accept the changes by clicking on Add Features Continue the the wizard by clicking Next On the Features screen click Next On the AD DS screen click Next On the DNS Server screen click Next On the Confirmation screen click Install and then click on Close After it's finished, perform the Post Deployment Configuration by clicking on Promote this server to a domain controller select the Add a new forest option, give it a root domain name such as windowsnoob.lab.local Next, depending on your requirements set the Forest functional level and Domain functional level, I've selected the default options below however you may want to configure it differently for your hierarchy, For the password field use P@ssw0rd, Click Next when ready, for DNS options, click Next, Next verify the NetBIOS name and click Next To specify the location of the AD DS database, log files and so forth, either accept the defaults, or change them to something that suits your hierarchy and click Next. Next you can review the options (clicking view script will save your actions to a PowerShell script for use later if you wish). Click Next when done. Next, click Install to begin Once it is complete making the changes it will automatically reboot the server Method #2 - Automate it with PowerShell To configure ADDS and DNS automatically, use the ConfigureADDS.ps1 PowerShell script. 1. Copy the script to C:\scripts on AD01 2. Edit the variables in lines 17-24 as desired before running. 3. Start Windows PowerShell ISE as Administrator and run the script by clicking on the green triangle. Once the script is run, it will automatically reboot. Step 2. Join CM01 to the domain Note: Perform the following on the ConfigMgr server (CM01) as Local Administrator Method #1 - Do it manually To join the domain manually, login to CM01. Start Windows File Explorer. Right-click on This-PC and choose Properties. The System screen will appear. Click on Change settings to the right of Computer name. For the option To rename this computer or change its domain or workgroup, click Change, click Change and for Member of select Domain, enter the Domain details used in Step 1 and click OK when prompted for credentials, enter them and click OK You'll be welcomed to the Domain. Click OK. And prompted to reboot the computer, Click OK. In the Computer Name/Domain changes screen, click Close then click Restart now when prompted. Method #2 - Automate it with PowerShell To join the domain automatically, use the joindomain.ps1 PowerShell script. 1. Copy the script to C:\Scripts on CM01 2. Edit the variables (lines 16-18) as desired before running. 3. Start Windows PowerShell ISE as Administrator and run the script by clicking on the green triangle. Note: If DNS is not set correctly on the CM01 Network Properties, then the Domain Join process will fail. The script checks for success and reports an error if one occurs. If successful it will automatically restart the computer after the Domain Join process is complete. Step 3. Create users (optional) Note: Perform the following on the Active Directory Domain Controller server (AD01) as Administrator Method #1 - Do it manually To create users manually, click on Start and choose Windows Administrative Tools and then select Active Directory Users and Computers. In Active Directory Users and Computers, add new users by expanding <domain name>, select Users and right click, choose New then select User. In the wizard that appears fill in the New Object user details enter the Password details using password P@ssw0rd and click Finish when done Repeat the above process to add remaining users as appropriate for your environment Testuser, used for testing stuff CM_BA, used for building ConfigMgr created images CM_JD, used for joining computers to the domain CM_RS, used for reporting services. CM_CP, used when installing the Configuration Manager Client for Client Push. CM_NAA, (Network Access Account) used during OSD Note: The PowerShell script creates users and makes a user a local admin on the CM01 server. To facilitate the local administrator creation, you'll need to (optionally) manually create a GPO on AD01 called Allow Inbound File and Printer sharing exception which sets Windows Firewall: Allow inbound file and printer sharing exception to Enabled. To Create the GPO on AD01, click the Start menu and choose Windows Administrative Tools, then select Group Policy Management. Expand Group Policy Objects and Right click, choose New and give it a Name: Allow Inbound File and Printer Sharing Exception. In the GPO settings, expand Computer Configuration, Policies, Administrative Templates, then select Network, Network Connections, Windows Firewall and select the Domain Profile. Locate the Windows Firewall: Allow inbound file and printer sharing exception and set it to Enabled. Apply the changes. Here you can see the path to the GPO setting. After creating the GPO, you'll want to limit it to only apply to your ConfigMgr server (or servers). To do that select the Delegation tab of the GPO, and click on Advanced button. Select the Authenticated Users security group and then scroll down to the Apply Group Policy permission and un-tick the Allow security setting. This denies authenticated users from applying this GPO setting Next, click on the Add button, for Select this object type make sure to select Computers from the Object Types and select the group or Computer object that you want to have this policy apply to. Then select the group (e.g. ConfigMgr Servers) and scroll the permission list until you see the Apply group policy option and then tick the Allow permission as shown here. Finally, you need to Link the GPO, to do that, right click on your Domain (in this example it's windowsnoob.lab.local) and select Link an existing GPO and then select the newly created GPO Note: Once the above is completed, please update Group Policy on CM01 using Gpupdate /force prior to running the PowerShell script below. Method #2 - Automate it with PowerShell To create users automatically, use the Create Users Usergroups and OUs in AD.ps1 PowerShell script. Tip: You should edit the script and adjust the variables to your liking, for example if you want to change the default password. You may also want to rem out the MDT and MBAM user/groups that are created and change some of the user names within the script. To rem out a line place a # in front of it. 1. Copy the script to C:\scripts on AD01 2. Edit the variables [lines 79-100] as desired before running. 3. Start Windows PowerShell ISE as Administrator and run the script by clicking on the green triangle. Once the script is complete you can browse Active Directory Users and Groups to see the Users and Groups it created. Step 4. Create the System Management Container Note: Perform the following on the Active Directory Domain Controller server (AD01) as Local Administrator For details of why you are doing this see https://docs.microsoft.com/en-us/sccm/core/plan-design/network/extend-the-active-directory-schema Method #1 - Do it manually Open ADSI Edit, click on Action, then Connect To and click Ok, Double Click on Default Naming Context and the DC= that appears below it. Click on the > and scroll down to CN=System. Right Click on CN=System and choose New, Object choose Container from the options, click Next enter System Management as the value. Click Next and then click Finish. Method #2 - Automate it with PowerShell Note: Perform the following on the Active Directory Domain Controller server (AD01) as Local Administrator To create the System Management container automatically, use the Create System Management container.ps1 PowerShell script. Step 5. Delegate Permission Note: Perform the following on the Active Directory Domain Controller server (AD01) as Local Administrator Method #1 - Do it manually Open Active Directory Users and Computers. Click on view, select Advanced Features. Select the System Management Container under System Right click the System Management container, choose All Tasks and Delegate Control. When the Welcome to Delegation of Control Wizard appears click next, then click Add. click on Object Types, select Computers. Type in your Configuration Manager server name (CM01) and click on Check Names, it should resolve. Click Ok Click Next then select Create a Custom Task to Delegate, click Next, make sure This folder, existing objects in this folder and creation of new objects in this folder is selected. Click next, select the 3 permissions General, Property-Specific and Creation-deletion of specific child objects are selected then place a check mark in Full Control. Tip: Repeat the above process for each site server that you install in a Hierarchy. Method #2 - Automate it with PowerShell To delegate permissions to the System Management container automatically, use the Delegate Permissions.ps1 PowerShell script on AD01. Edit line 24 to point to the ConfigMgr server if you are using a different computer name than CM01. Note: You need to start Windows PowerShell ISE as a user that has Administrative Permissions in AD on the AD01 server. Downloads The scripts used in this guide are available for download here. Unzip to C:\Scripts on both servers. The scripts are placed in the corresponding folder (Part 1, Part 2 etc) and sorted into which server you should run the script on (AD01 or CM01). Scripts.zip Summary Using PowerShell to automate things leaves more time for yourself and it's fun. Please join me in Part 2 of this multi-part guide where you will configure Windows Server 2016 roles and features and then install SQL Server 2017. Continue to Part 2 of this guide > https://www.windows-noob.com/forums/topic/16116-how-can-i-install-system-center-configuration-manager-current-branch-version-1802-on-windows-server-2016-with-sql-server-2017-part-2/
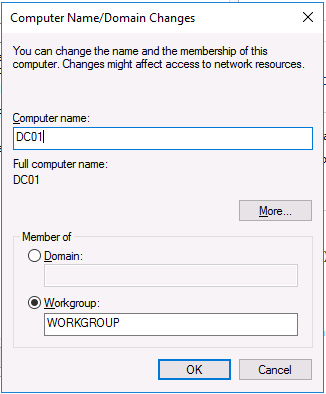


-
 We have trouble using PXE in our environment. Our setup: SCCM 2016 management point in remote datacentre (running on Windows Server 2016) SCCM 2016 distribution point + OSD in local serverroom (running on Windows Server 2016). On this server, 2 network cards are configured. One is connected to the domain, the other is connected to a seperate 'installation LAN'. We also configured DHCP on this server with a binding only to the 'installation LAN NIC'. We also configured DHCP options 60, 66 and 67. On this local server, we installed Hyper-V to run a virtual machine which we can use to create a clean Build and Capture using OSD. However, we cannot boot this virtual machine into PXE. It doesn't seem to get an IP address from DHCP. If we boot up a laptop to the installation LAN, then there is no issue booting up in to WinPE. We've tried several things: Change WDS settings; (set PXE response to respond to all computers / Configured DHCP options / Authorized server in to DHCP / let DHCP give out the multicast address) Changed DHCP options (removed option 60 (PXEClient) / Configured DHCP option to also use BOOTP) Configured different virtual switches in Hyper-V (Internal / external / private), configured RRAS to create a shared NIC, disabled DCHP guard, disabled 'Protected Network' Added computer manually in to SCCM using MAC address. We are running out of options. If I boot up a VM on the laptop using Hyper-V, I don't have any issues. However, we would like to use Hyper-V on the server itself to create images because it is a central and permanent solution. Any suggestions? Many thanks in advance.
 -
 Hi. I am the sole SCCM administrator for a small company. The current site is running Config Manager 2012 R2, on a Windows Server 2008 R2 VM. It's a simple hierarchy, consisting of one primary site, all managed from a single server, and 3 distribution points. SQL is hosted on a separate cluster. This was all set up long before I joined the company. Now that I'm wishing to upgrade to current branch, I've also decided to put it on a new Windows Server 2016 VM. I could do a side-by-side migration, but am quite tempted to start again from scratch, with a clean slate. My plan is to leave the current site up and running, while I set up the new one, giving me ample time to configure it all, create the deployments, distribute content, etc. Once it's ready, I can push-deploy the new client, and eventually take down the old site. I've already chosen a new site code and name, and new names for all the servers, so there should be no conflicts there. The only thing I'm a little uncertain about at present, is what's going to happen in the System Management container, when I set up the new site. Will its site code and name be added alongside the current one, or will it over-write? In either casem will the clients get confused (if not current ones, then new builds)? Should I maybe not give the new site server permissions on the container, and instead get it to publish to ADDS when everything's ready? As a bonus question, I thought I might as well set up the new SQL Server 2016 database for it, on the same cluster as the current one (since we have a cluster already in place, I prefer to use it). I thought I could just install SQL 2016 on the cluster, set up a new instance, and point the new site at that, but are there any potential pitfalls I'm overlooking / anything else I need to consider? Any guidance would be much appreciated. Thank you.