Search the Community
Showing results for tags 'azure'.
Found 13 results
-
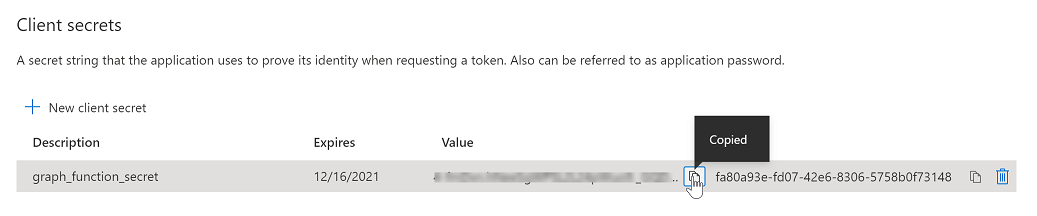
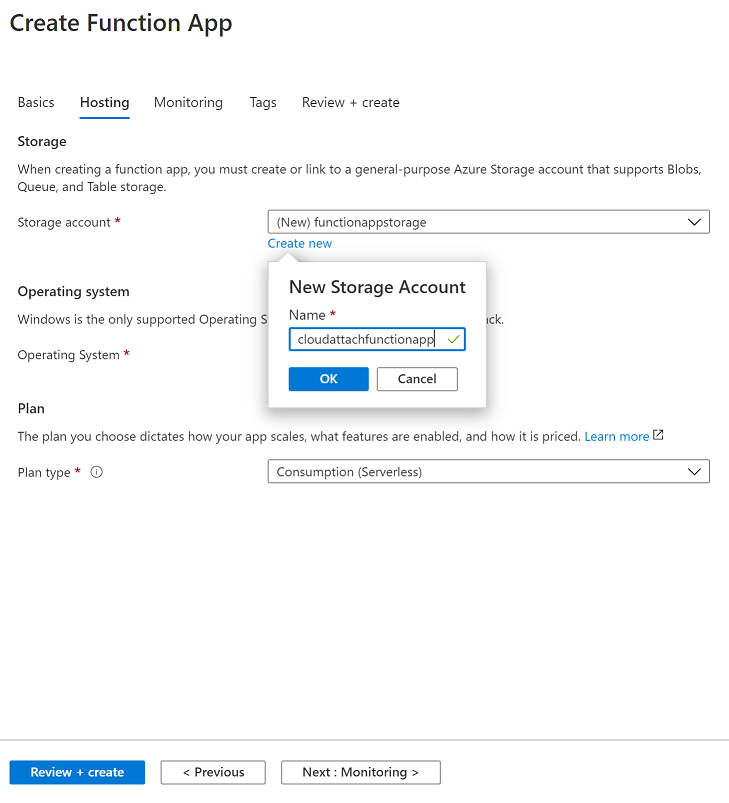
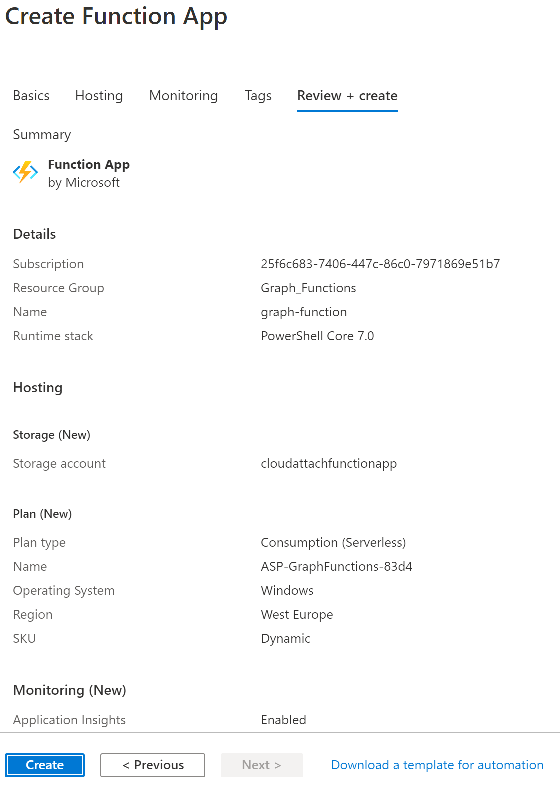
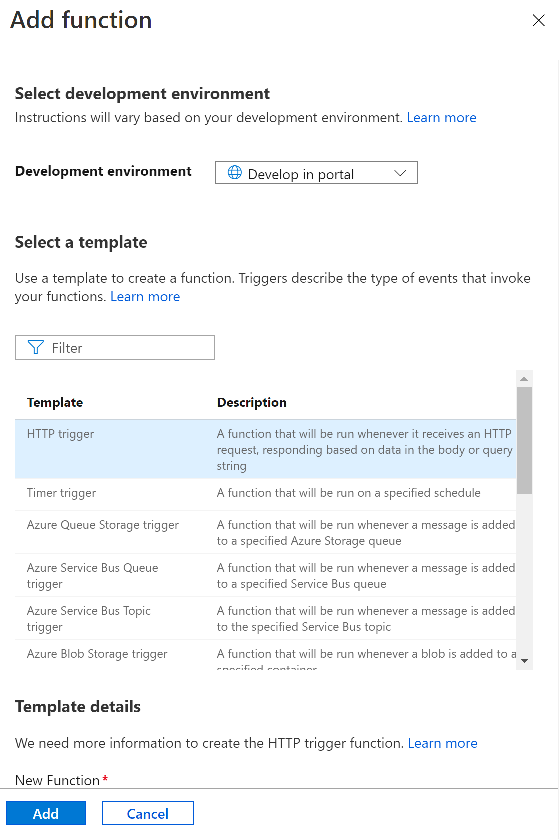
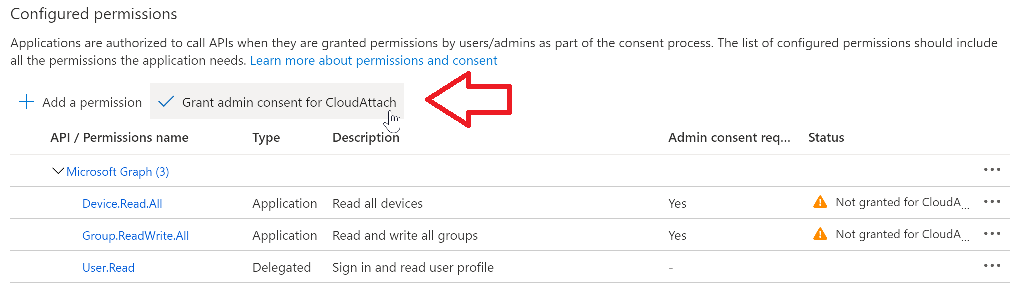
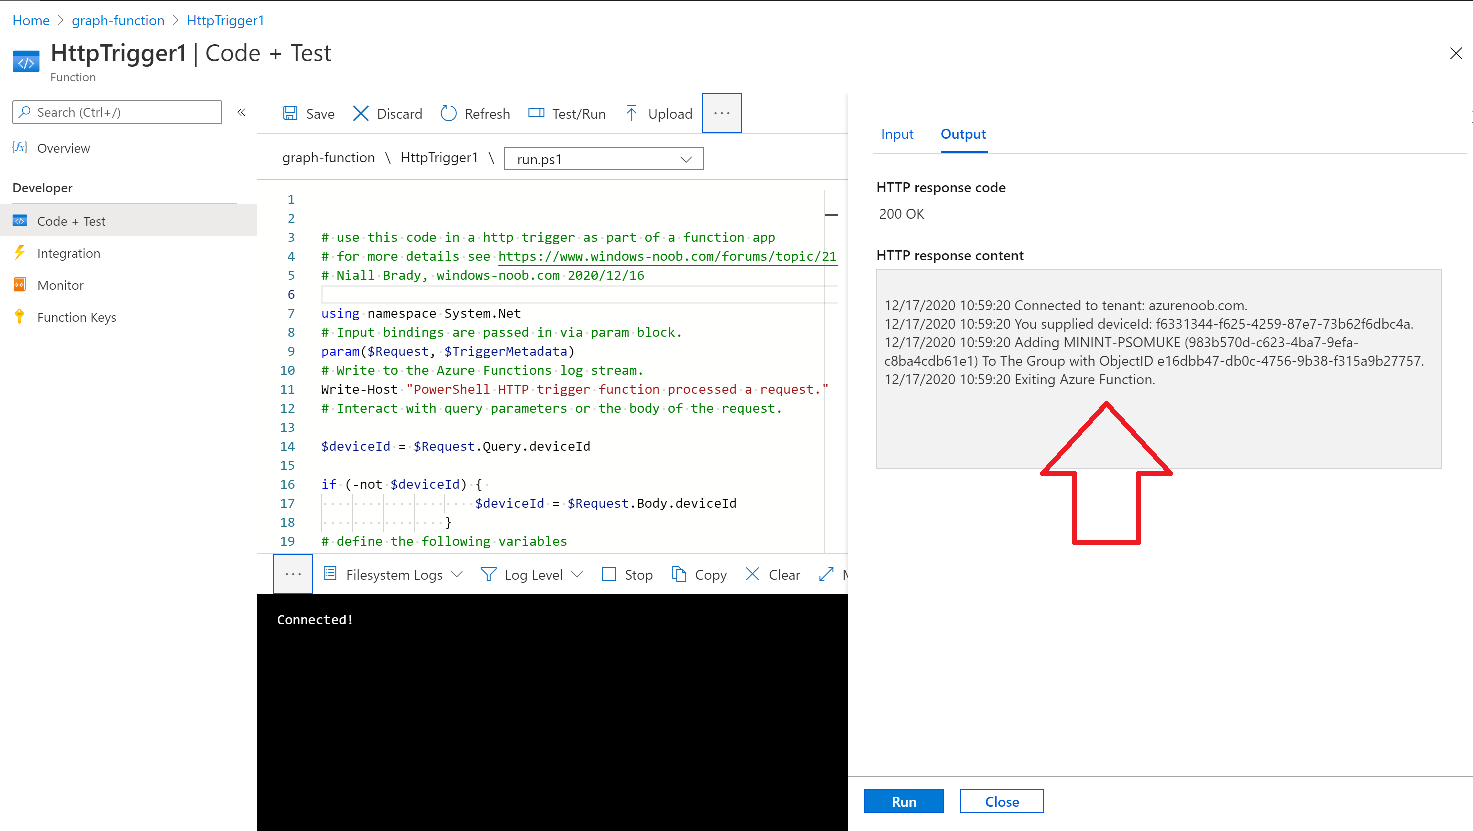
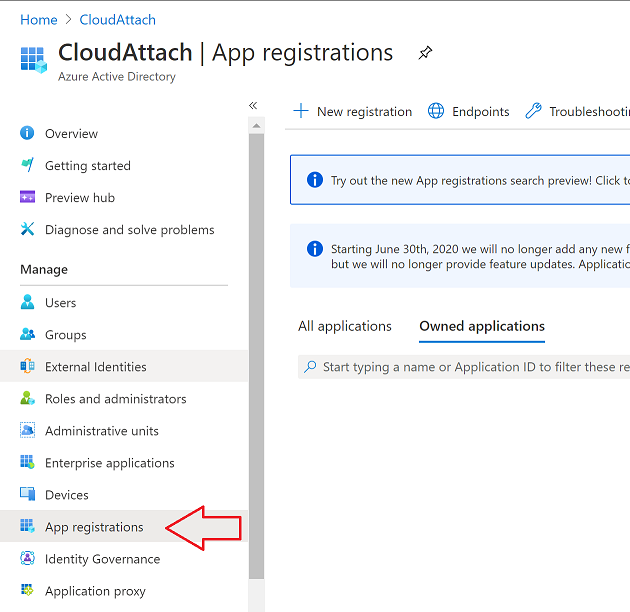
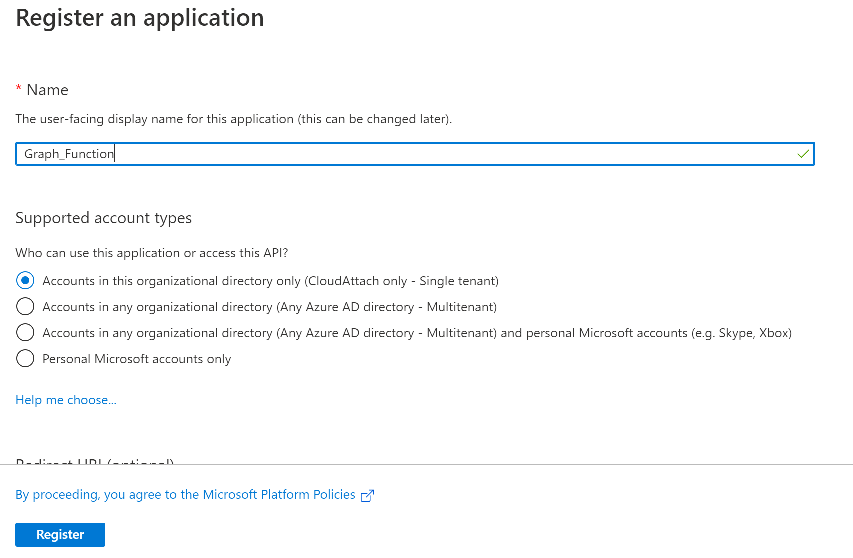
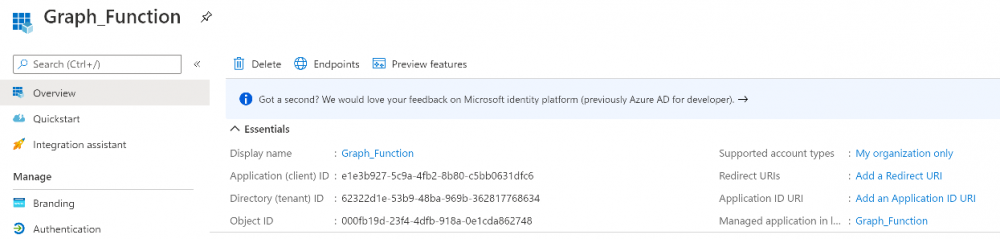
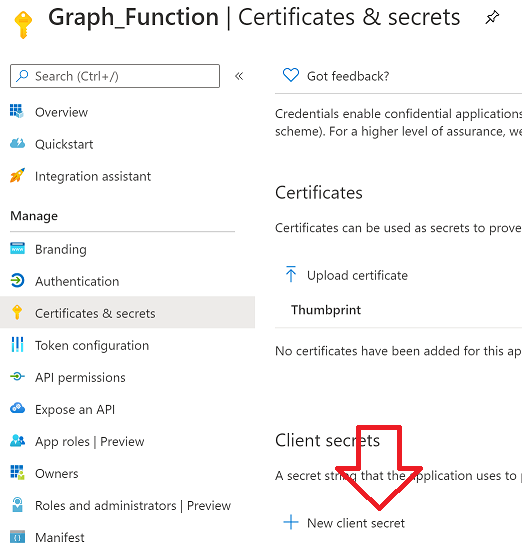
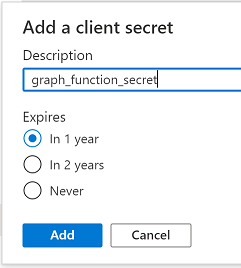
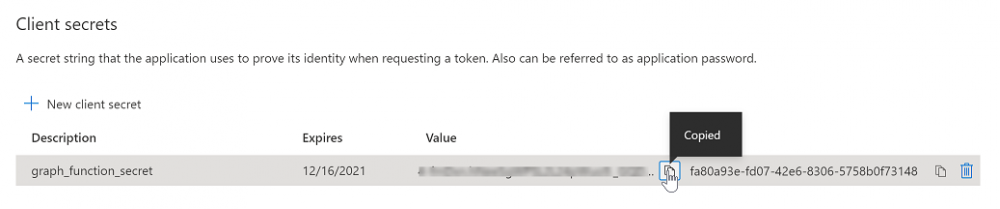
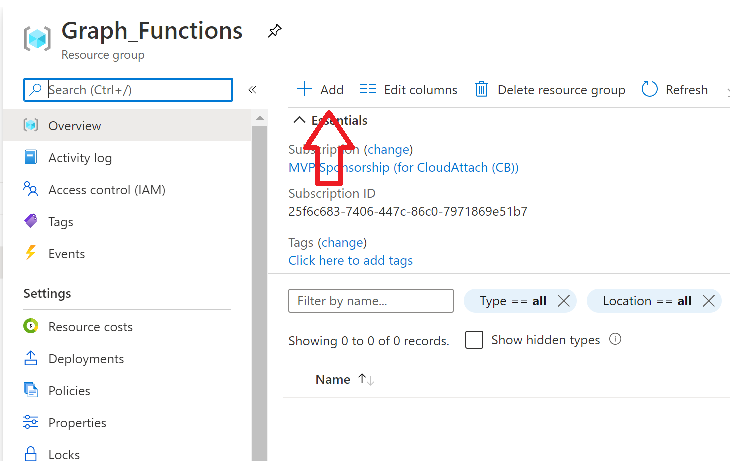
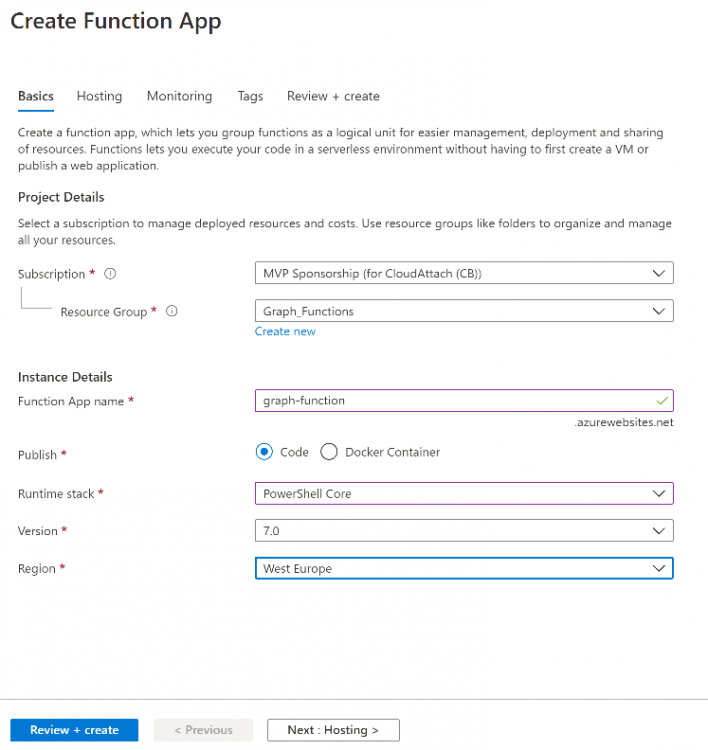
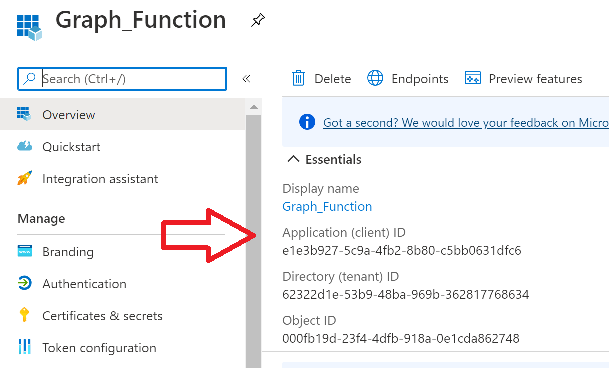
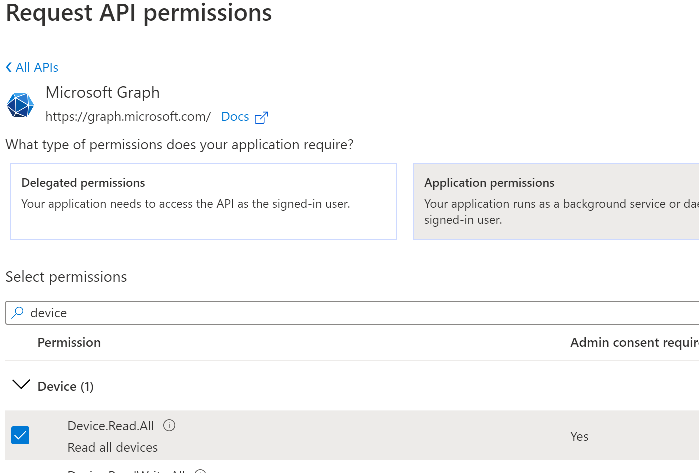
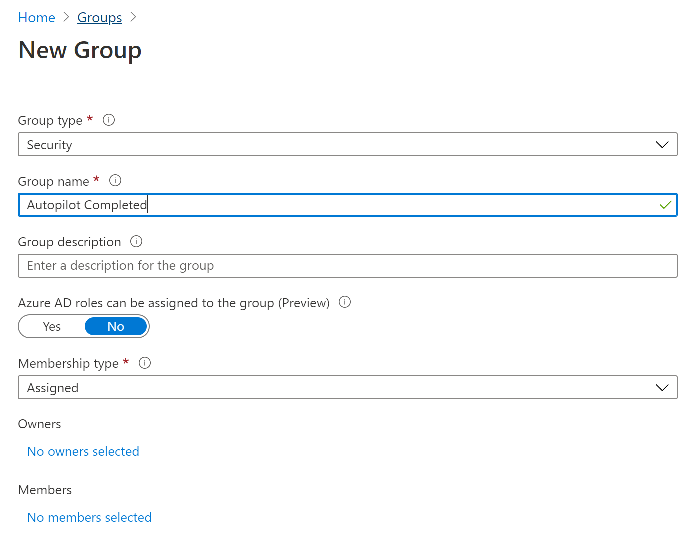
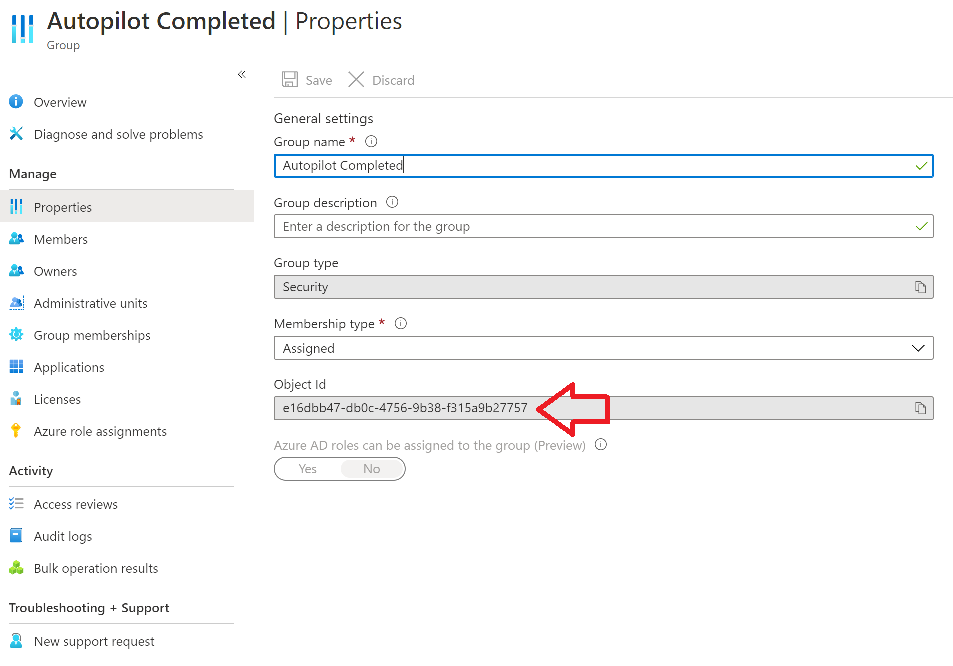
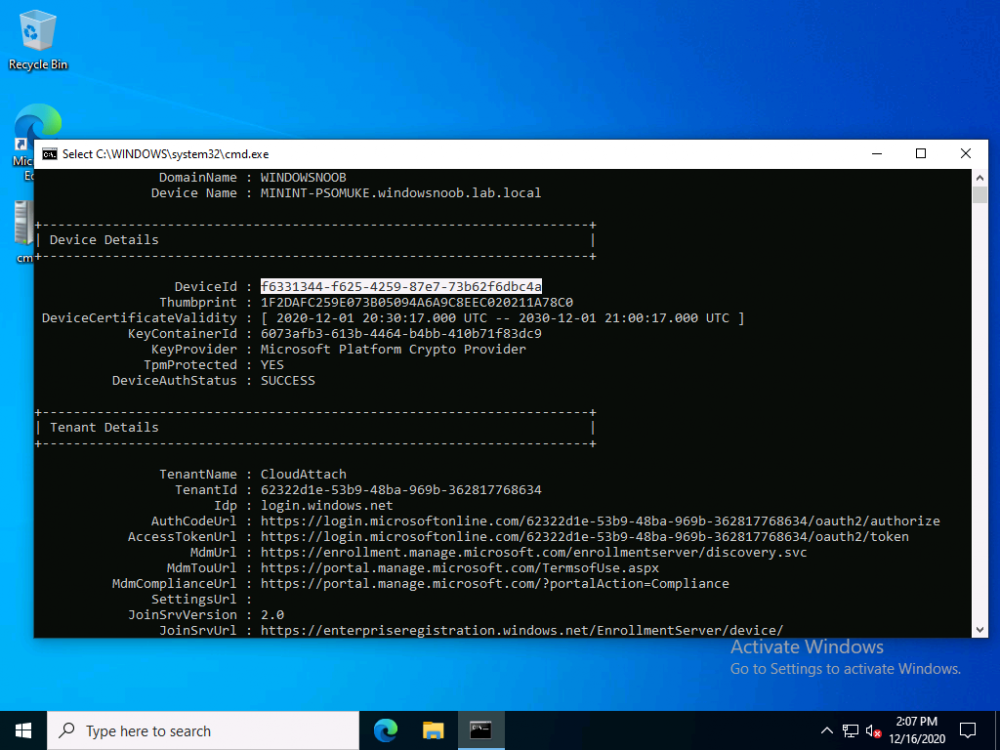
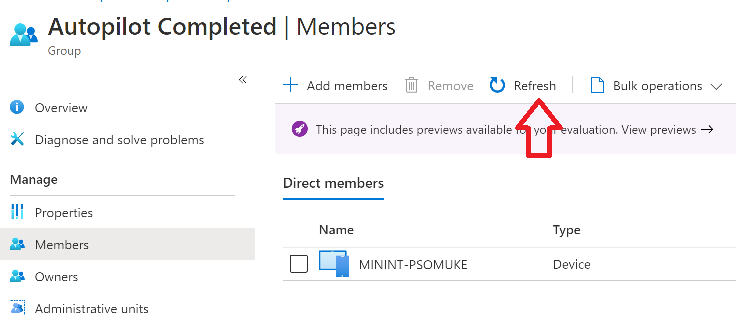
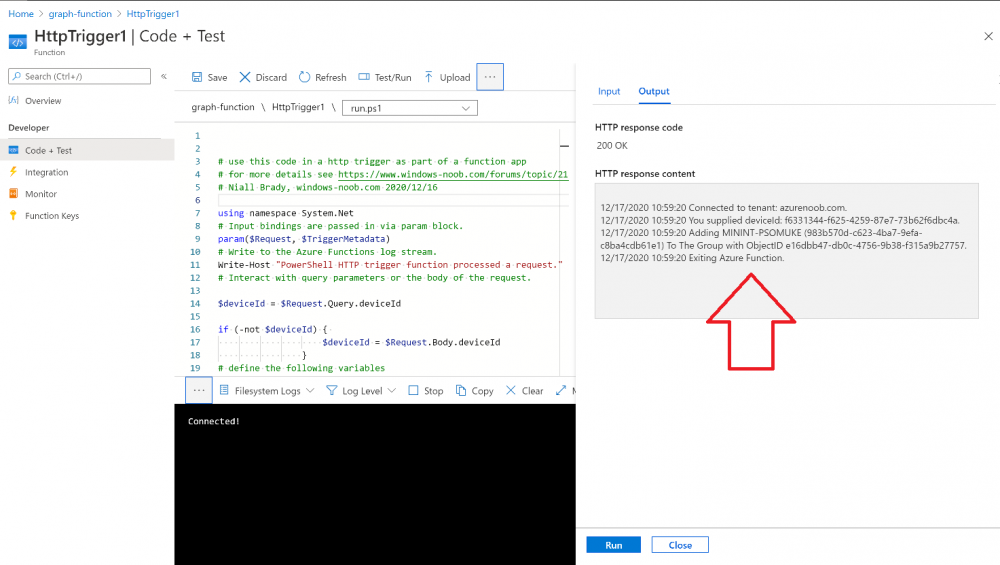
 Introduction I've come across various problems during Windows Autopilot causing OOBE to fail that could be solved if only we could decide the order of when things were installed, and to resolve this in a nice way we wanted to dynamically populate an Azure AD group that could be targeted with a device configuration profile. That would mean that we could target sensitive policies to devices after enrollment instead of during enrollment allowing for a smoother, less error prone experience. Being able to apply a profile after Autopilot is finished requires knowing when Autopilot is actually complete, and I touched upon that subject in a previous blog post here. To expand upon that, we can run a scheduled task on login which runs a PowerShell script which in turn, only delivers the payload if certain things are in place such as. C:\ProgramData\Microsoft\IntuneManagementExtension was created within the last X hours The logged on user is not defaultuser0 We could do this using a PowerShell script which runs as a scheduled task after login but that would require storing sensitive credentials on the client. This blog post will show you the necessary steps taken to get to a stage where you can add devices to an Azure AD group using Azure Functions and Graph, and that is interesting because in conjunction with an app registration allows you to embed certificates or secrets within the function and thereby bypass the need for storing credentials in your PowerShell script which runs on the client. Note: In this blog, the app uses http triggers that use certificate secrets, this is fine in a lab, but in production you should use Azure Key Vault instead as it's more secure. If you'd like to understand how to set that up please read my blog post about Azure Key Vault here. There are other ways of doing this, but this is kind of neat. You need to do the following steps. Create a resource group Create an app registration Create a client secret Create a function app Add a HTTP trigger Get the application ID Create an azure ad group Add missing details Configure API permissions Test adding a client So now you have an idea of what this blog post is about, let's get started. Note: I've released an updated version of this concept which includes checking for device compliance here. Step 1. Create a resource group In Azure Active Directory, create an Azure Resource Group. To do that click on Create a Resource in https://portal.azure.com. In the page that appears, search for Resource Group. Select it and click on Create. Next, give it a useful name like Graph_Functions, and select the region applicable to you. And click on Review + create and after being presented with the summary, click Create. Step 2. Create an app registration In Azure Active Directory, create an create an APP Registration called graph_functions by clicking on App registrations in the left pane and clicking on + New registration. fill in the user-facing display name and then click on Register. The app registration is created. Step 3. Create a client secret In the Graph_Function app registration you just created, click on Certificates & Secrets, choose the option to create a + New client secret Give it a name like graph_function_secret Click Add After adding the client secret make sure to copy the secret and keep it safe. copy the secret value and id, you will need them later. Step 4. Create a function app Next, select your previously created resource group called Graph_Functions and create a function app in the graph_functions resource group by clicking on +Add Search for Function App and click Create. A wizard will appear, fill in your choices and select PowerShell core and your region. Create a new storage group or let the wizard create it's own, then click Review + Create. If it generates an error click on the error details, most likely the storage group name you tried to create is already taken. If so, pick another name. Finally, click on Create to create the function app. Step 5. add a HTTP trigger Select the function app created above and click on functions in the left pane. In the ribbon click on + Add. Select HTTP trigger and click on Add. Select Code + test and paste in the code below then save the results # use this code in a http trigger as part of a function app # for more details see https://www.windows-noob.com/forums/topic/21814-adding-devices-to-an-azure-ad-group-after-windows-autopilot-is-complete-part-1/ # Niall Brady, windows-noob.com 2020/12/18 v 0.3 using namespace System.Net # Input bindings are passed in via param block. param($Request, $TriggerMetadata) # Write to the Azure Functions log stream. Write-Host "PowerShell HTTP trigger function processed a request." # Interact with query parameters or the body of the request. $deviceId = $Request.Query.deviceId if (-not $deviceId) { $deviceId = $Request.Body.deviceId } # define the following variables $ApplicationID = "" # this is the id of the app you created in app registrations $TenantDomainName = "" # your tenant name, eg: windowsnoob.com $AccessSecret = "" # this is the secret of the app you create in app registrations $GroupID = "" # this is the ObjectID of the Azure AD group that we want to add devices to $Body = @{ Grant_Type = "client_credentials" Scope = "https://graph.microsoft.com/.default" client_Id = $ApplicationID Client_Secret = $AccessSecret } # make initial connection to Graph $ConnectGraph = Invoke-RestMethod -Uri "https://login.microsoftonline.com/$TenantDomainName/oauth2/v2.0/token" -Method POST -Body $Body #get the token $token = $ConnectGraph.access_token # to improve logging... $a = Get-Date $body = " `n" $body = $body + "$a Starting Azure function...`n" $body = $body + "$a Connected to tenant: $TenantDomainName.`n" # now do things... if ($deviceId) { $body = $body + "$a You supplied deviceId: '$deviceId'" + ".`n" # deviceID should be supplied to the function via the function url, # if you want to hard code it for testing un rem next line and supply the correct deviceId #$deviceID = "3a4f4d9d-c648-4ca2-966f-6c6c10acff35" #$InputDevice = "MININT-U7CQUG7" #$Devices = Invoke-RestMethod -Method Get -uri "https://graph.microsoft.com/v1.0/devices?`$filter=startswith(displayName,'$InputDevice')" -Headers @{Authorization = "Bearer $token"} | Select-Object -ExpandProperty Value | %{ $Group = Invoke-RestMethod -Method Get -uri "https://graph.microsoft.com/v1.0/groups?`$filter=Id eq '$GroupId'" -Headers @{Authorization = "Bearer $token"} | Select-Object -ExpandProperty Value $GroupName = $Group.displayName $body = $body +"$a Group.displayName: '$GroupName'" + ".`n" $GroupMembers = Invoke-RestMethod -Method Get -uri "https://graph.microsoft.com/v1.0/groups/$GroupID/members" -Headers @{Authorization = "Bearer $token"} | Select-Object -ExpandProperty Value $AddDevice = Invoke-RestMethod -Method Get -uri "https://graph.microsoft.com/v1.0/devices?`$filter=deviceId eq '$deviceId'" -Headers @{Authorization = "Bearer $token"} | Select-Object -ExpandProperty Value | %{ if ($GroupMembers.ID -contains $_.id) { Write-Host -ForegroundColor Yellow "$($_.DisplayName) ($($_.ID)) is in the group" $body = $body + "$a $($_.DisplayName) ($($_.ID)) is already in the '$GroupName' group, nothing to do.`n" } else { Write-Host -ForegroundColor Green "Adding $($_.DisplayName) ($($_.ID)) to the group" $body = $body + "$a Adding $($_.DisplayName) ($($_.ID)) to the group with ObjectID $GroupID.`n" $BodyContent = @{ "@odata.id"="https://graph.microsoft.com/v1.0/devices/$($_.id)" } | ConvertTo-Json Invoke-RestMethod -Method POST -uri "https://graph.microsoft.com/v1.0/groups/$GroupID/members/`$ref" -Headers @{Authorization = "Bearer $token"; 'Content-Type' = 'application/json'} -Body $BodyContent } } $body = $body + "$a Exiting Azure function." } # Associate values to output bindings by calling 'Push-OutputBinding'. Push-OutputBinding -Name Response -Value ([HttpResponseContext]@{ StatusCode = [HttpStatusCode]::OK Body = $body }) Step 6. Get the application ID Go back to app registrations, select the app called graph_functions and copy this field. Application (client) ID: copy the Application (client) ID somewhere. Step 7. Create an azure ad group In Microsoft Endpoint Manager create an azure ad group called Autopilot Completed Take note and copy the Object ID of this Azure Ad group. Step 8. Add missing details Now that you have the values you need (remember you copied the access secret earlier ?), go back into your function app and edit the code, fill in the values below for the following variables $ApplicationID $TenantDomainName $AccessSecret $GroupID like I've done here... but obviously use your own values. Save the code after making your edits. Step 9. configure API permissions Next you need to configure API Permissions for the app registration, don't forget to 'grant admin consent after doing so', please select the following permissions from those available. Click + Add a permission, click Microsoft Graph, select Application permissions Device.Read.All Application Read all devices Yes Granted for windowsnoob.com Group.ReadWrite.All Application Read and write all groups Yes Granted for windowsnoob.com In your lab environment it's ok to Grant admin consent, in Production, think more carefully about how you want to approach it. and once done they'll look like so. Step 10. Test adding a client Now you are ready to test this. On a client, open a cmd prompt and type dsregcmd /status look for the deviceID value highlighted below and copy it. Copy that value and on your http trigger function, use the following in your test window. Replace the deviceID listed below with one from your device. { "deviceID": "f6331344-f625-4259-87e7-73b62f6dbc4a" } Click Run and watch your function do it's thing ? If you followed my guide exactly you'll see something like this. And after a quick look in the members of your Azure Ad group, guess what, your client computer is present ! Awesome ! job done Useful links Graph explorer - https://developer.microsoft.com/en-us/graph/graph-explorer# Powershell modules in Azure functions - https://tech.nicolonsky.ch/azure-functions-powershell-modules/ Create first function in visual studio code - https://docs.microsoft.com/en-us/azure/azure-functions/create-first-function-vs-code-powershell Add devices to an Azure ad group using Graph- https://euc365.com/add-devices-to-an-azure-ad-group-using-the-microsoft-graph-api/ Using Graph in an Azure function - https://techcommunity.microsoft.com/t5/windows-dev-appconsult/using-microsoft-graph-in-an-azure-function/ba-p/317434 That's it for this part, please join me in Part 2 where we'll look into scripting things in an automated way on the client. cheers niall
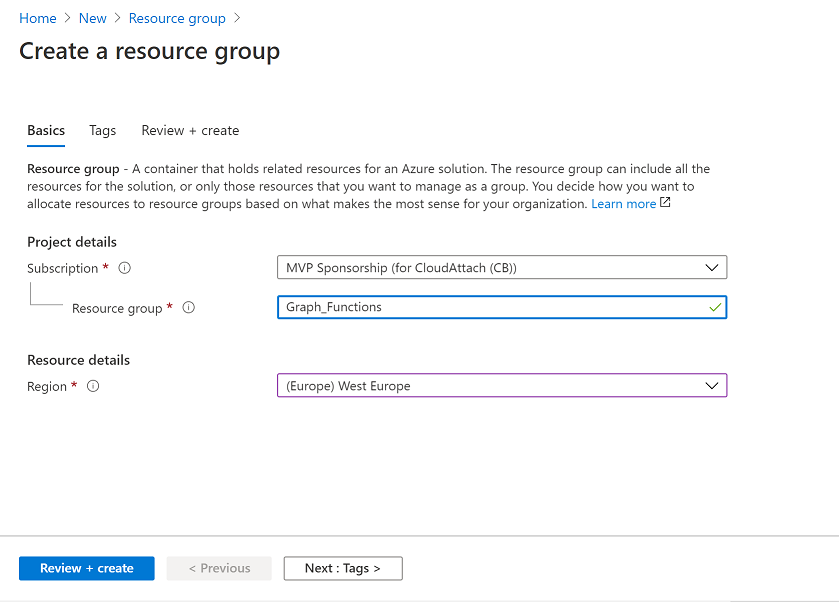


-
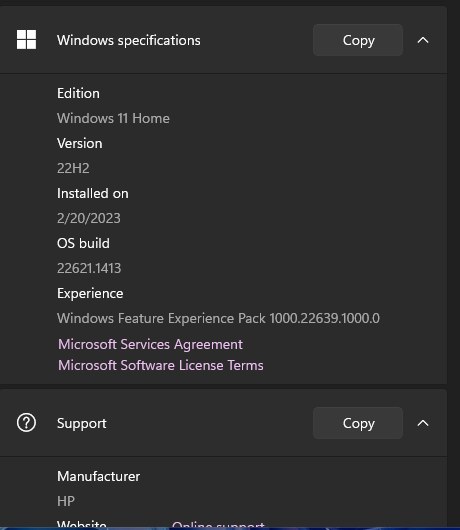
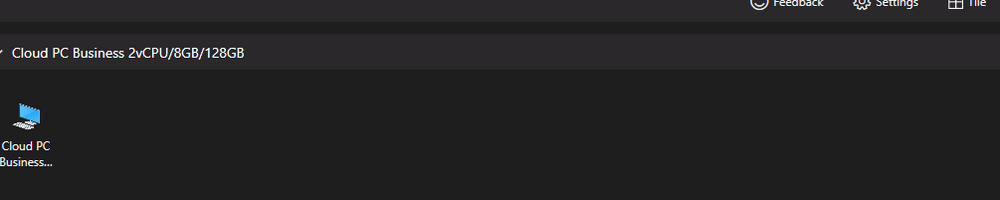
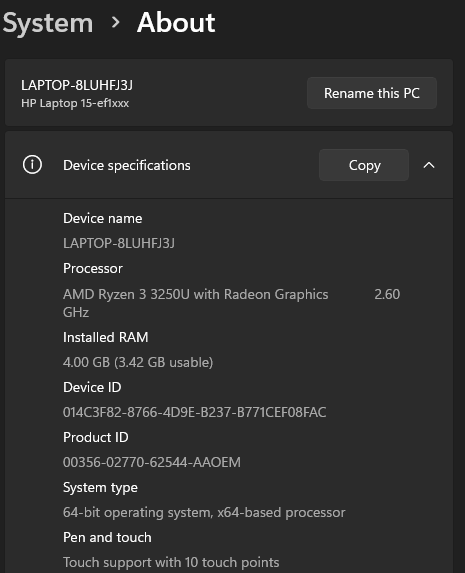
Hi all! I have been using the Azure Remote Desktop app (the one for multiple monitors) for quite some time now for my job. Every once in a while, it decides to have some issues. Yesterday, towards the end of my work day, it forced quit on me and now when I open the app, both of my monitors are black and it says "please wait." This has happened before, and it eventually stopped doing that, but my IT company said to just use Windows 365 in the web browser, but it is really annoying not to have both monitors. I tried uninstalling it and then reinstalling it. I'm not sure what the next step is to get this issue resolved. Any insight is greatly appreciated! Attached is a screenshot of what it shows me and information about my laptop.

-
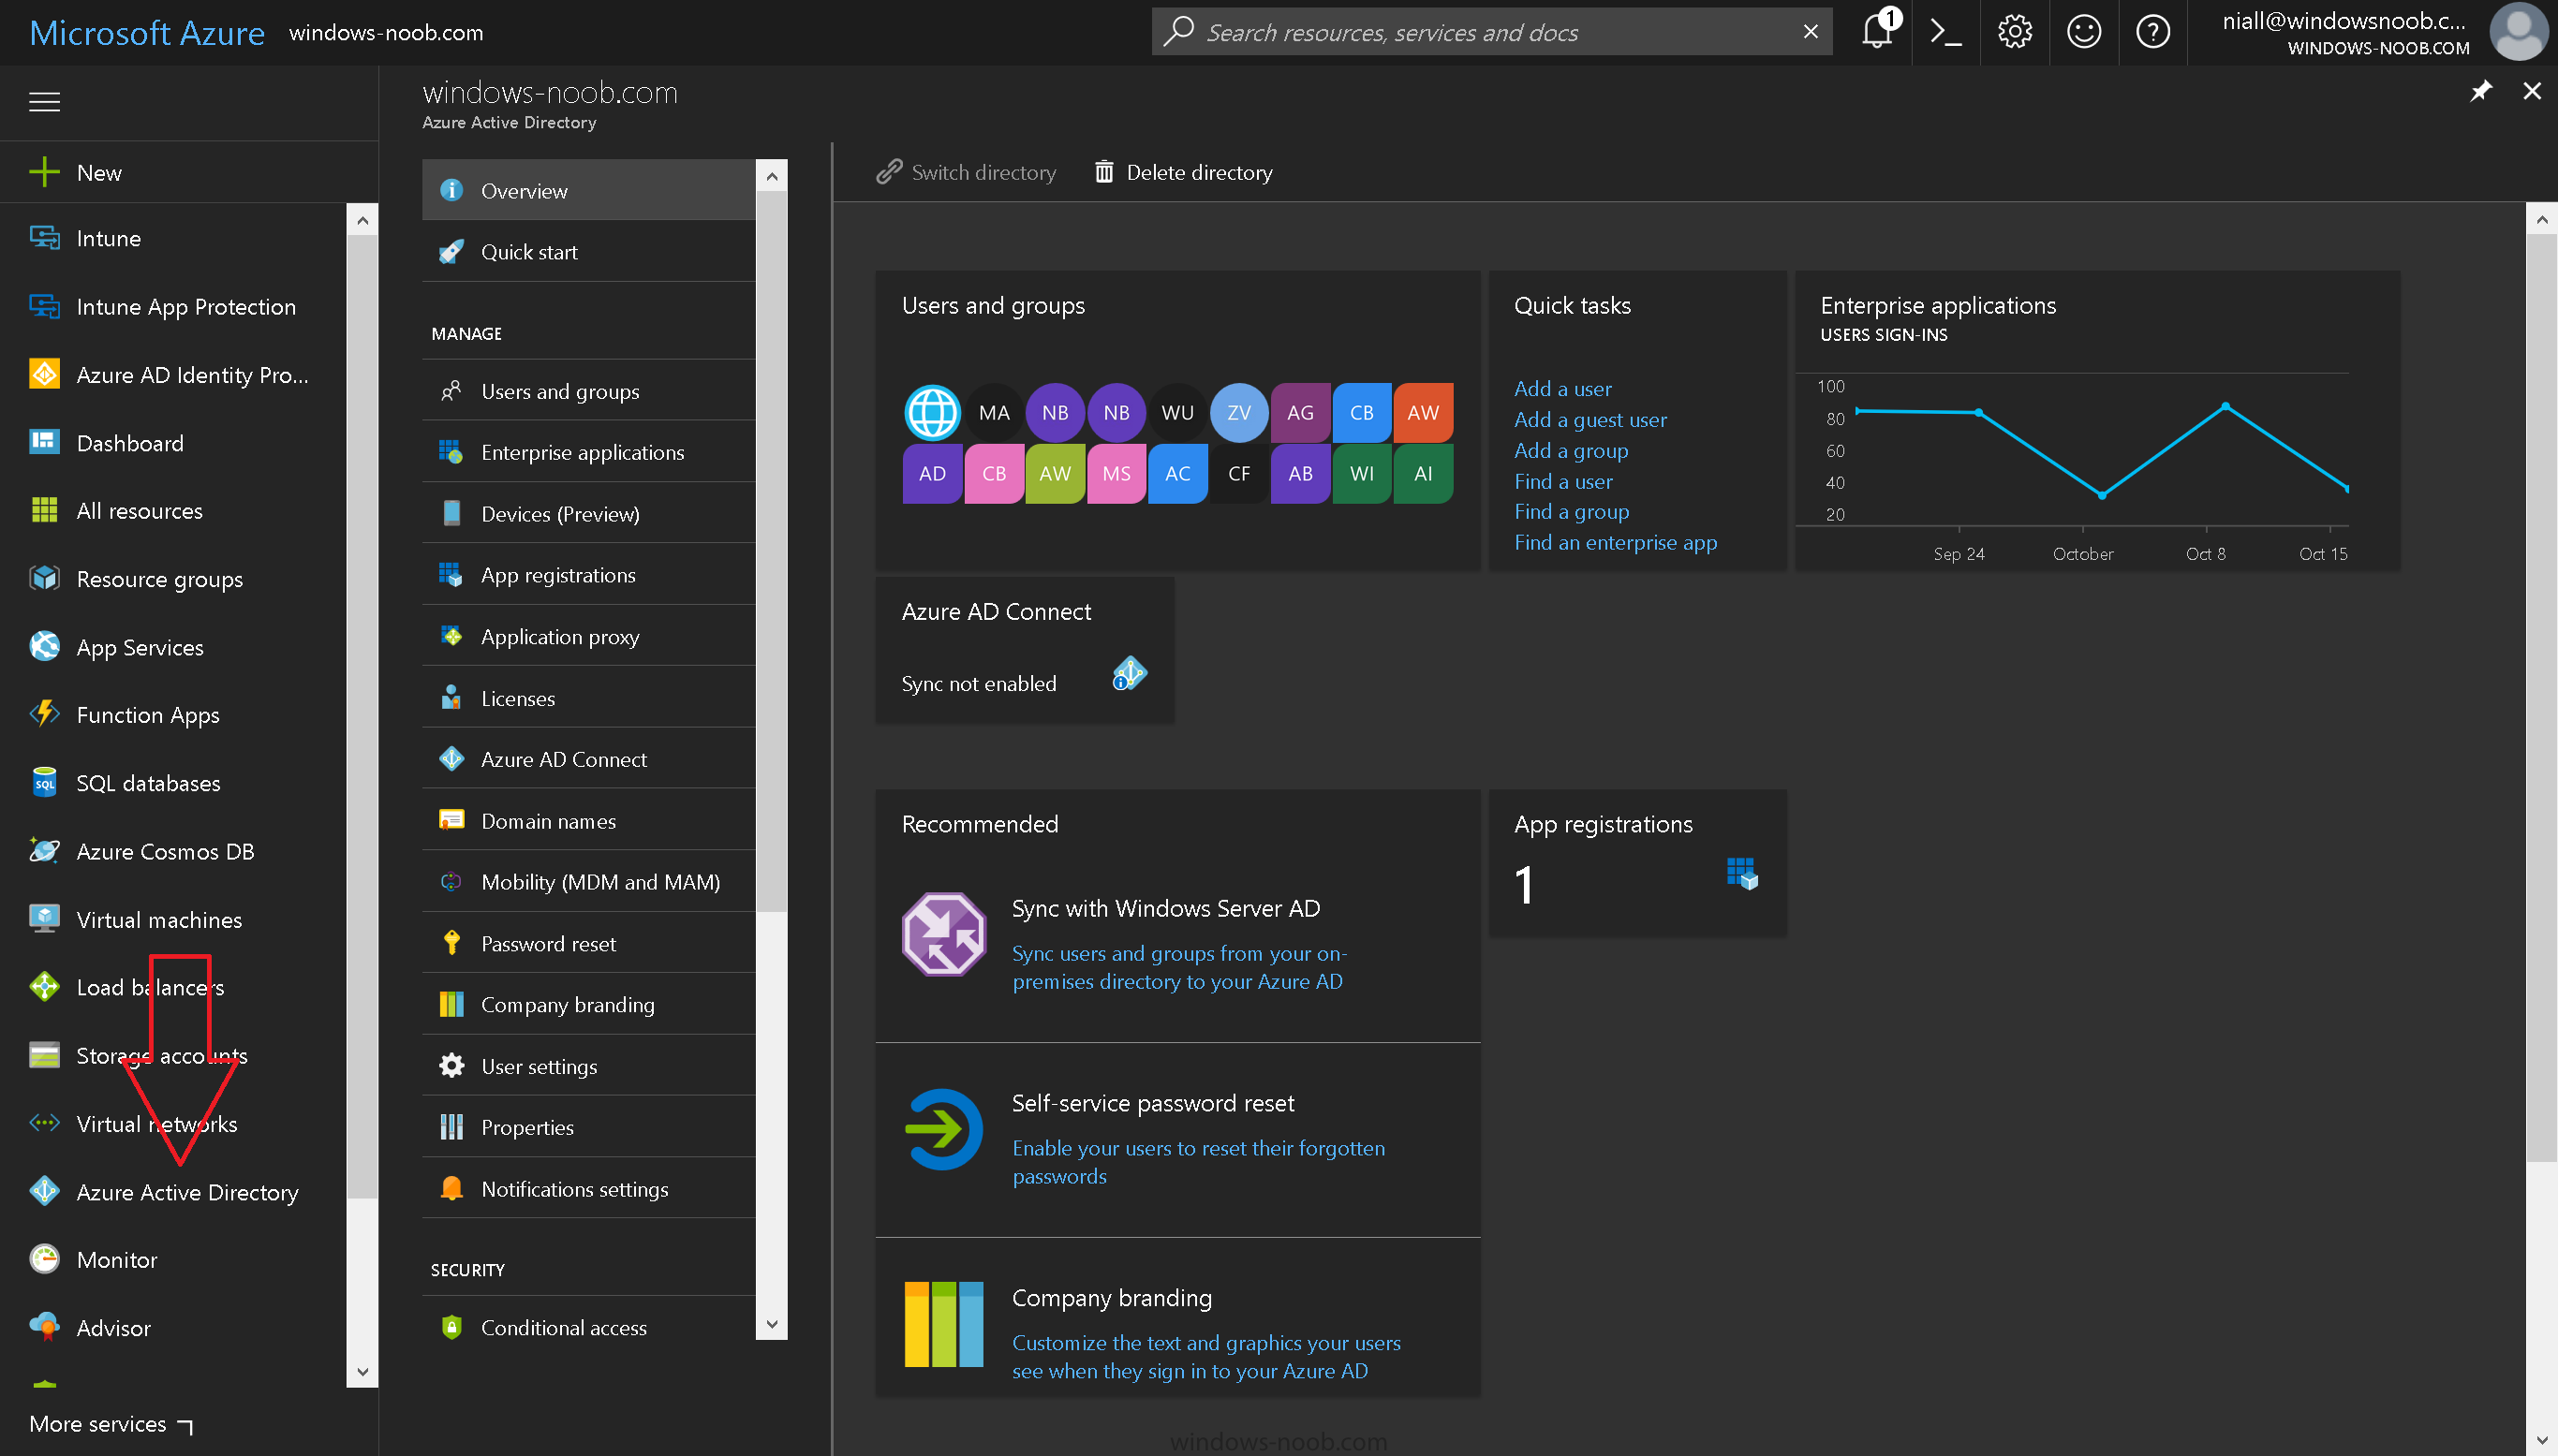
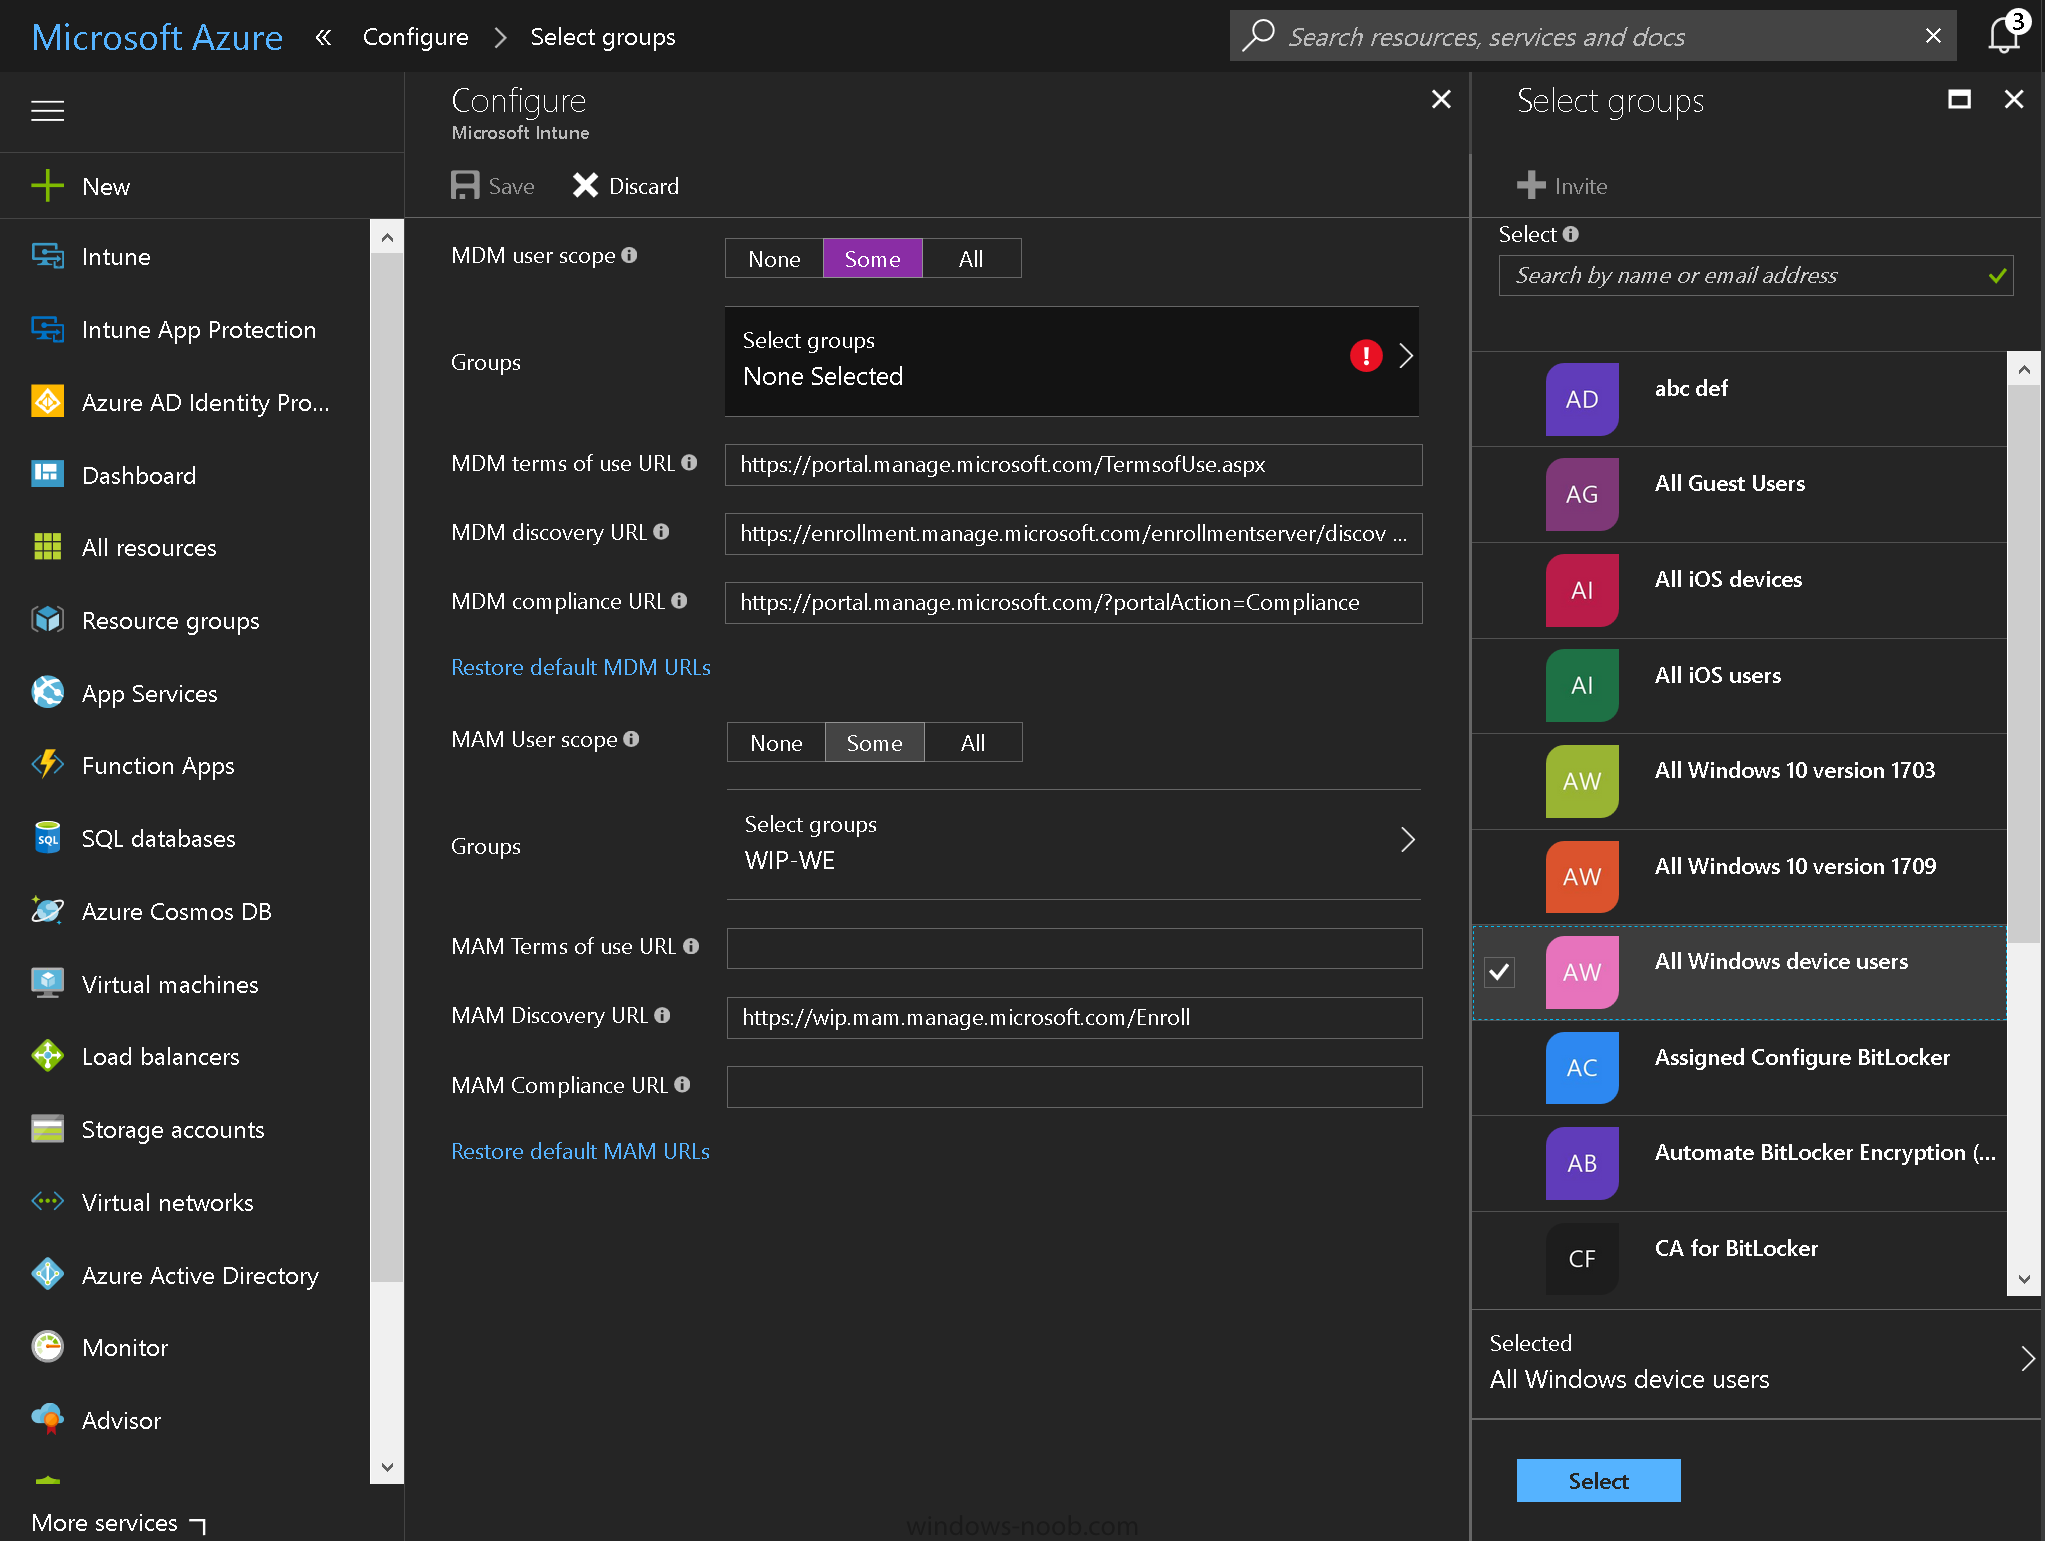
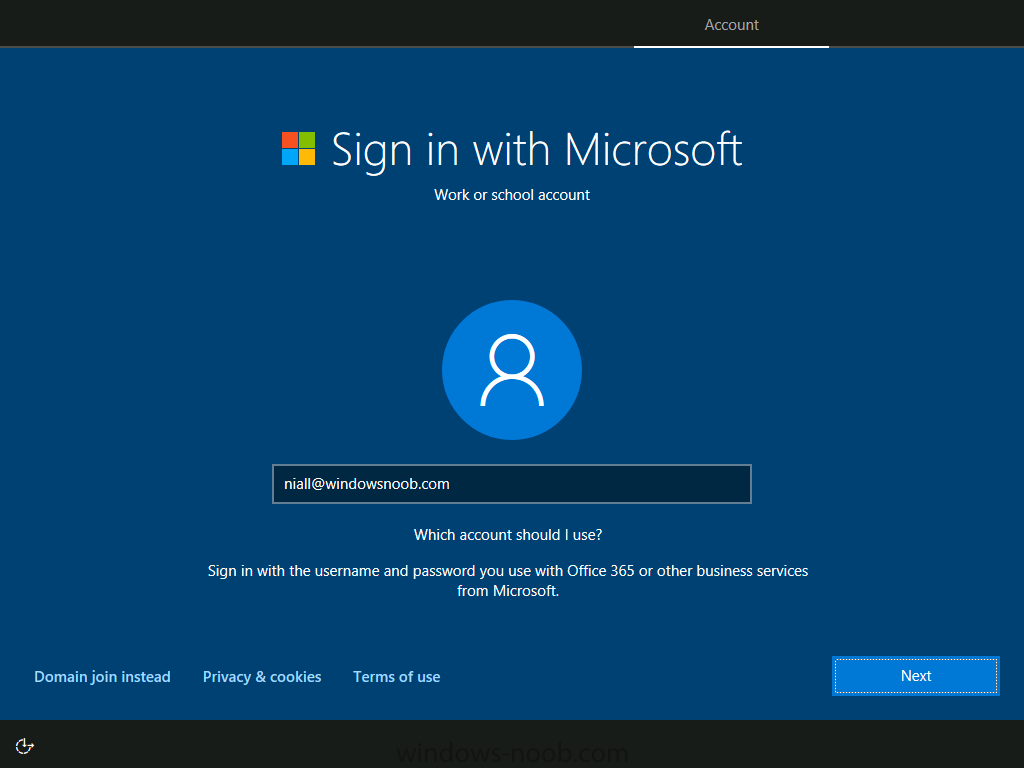
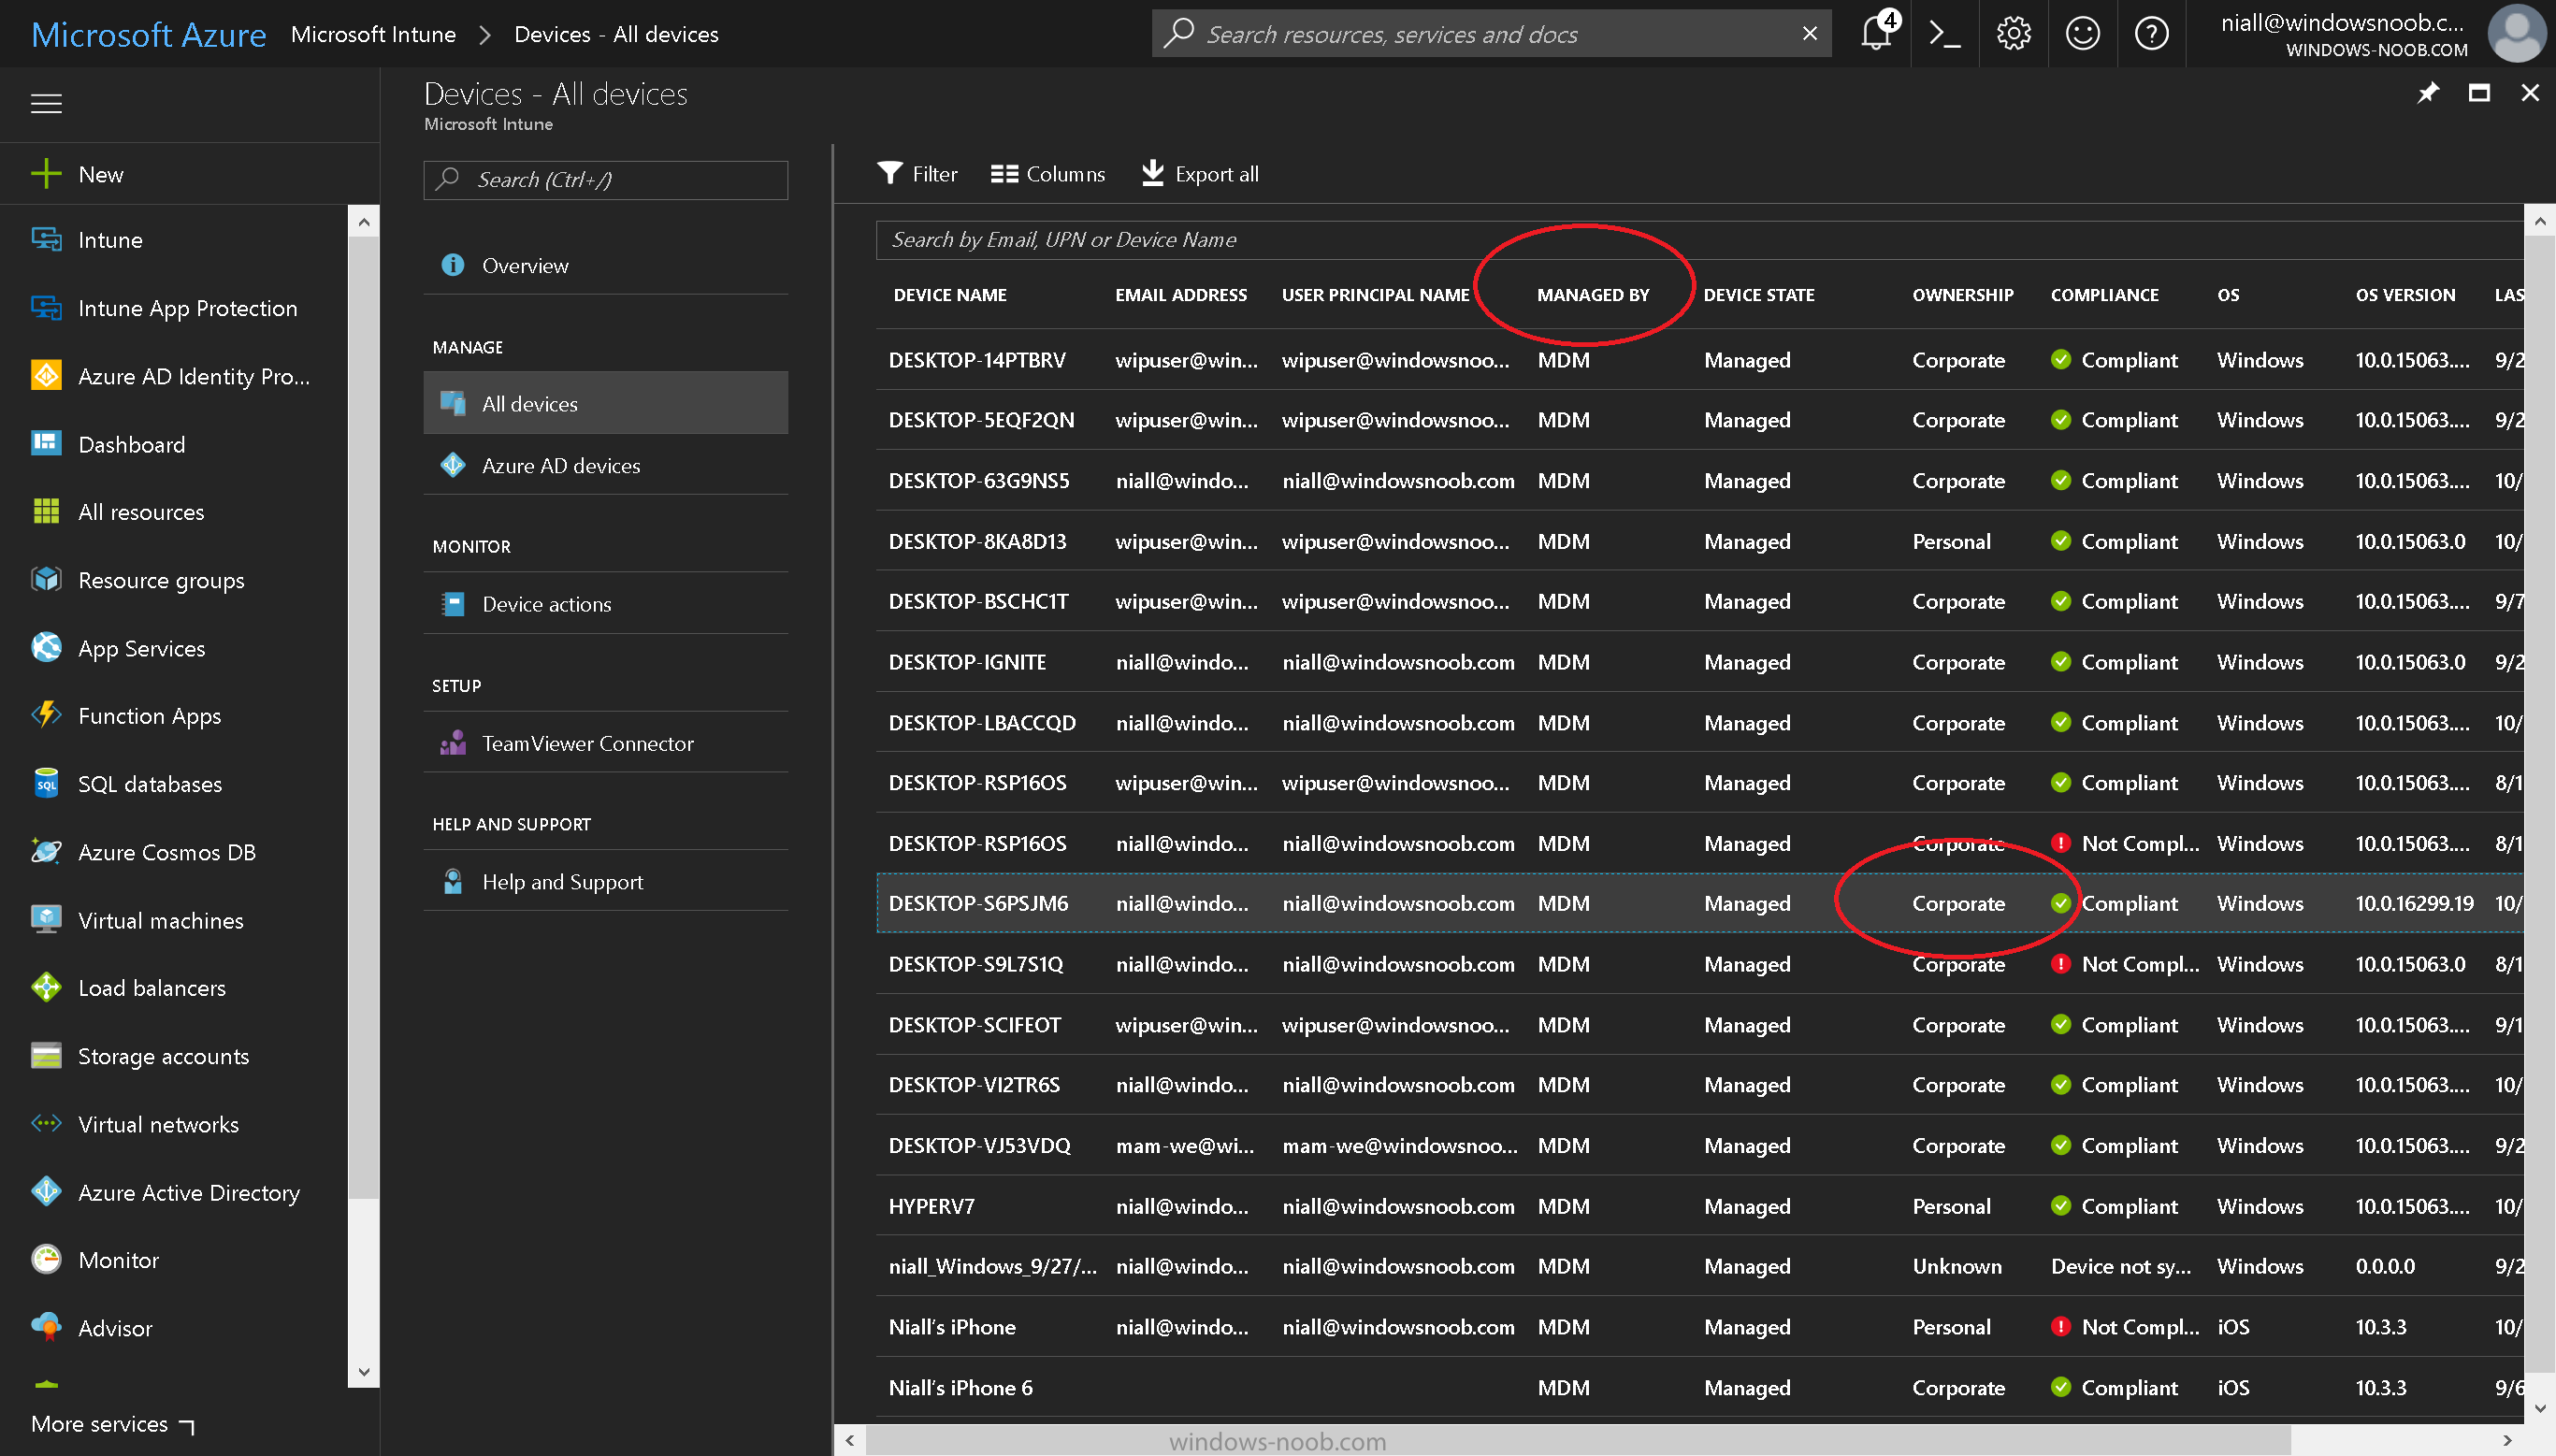
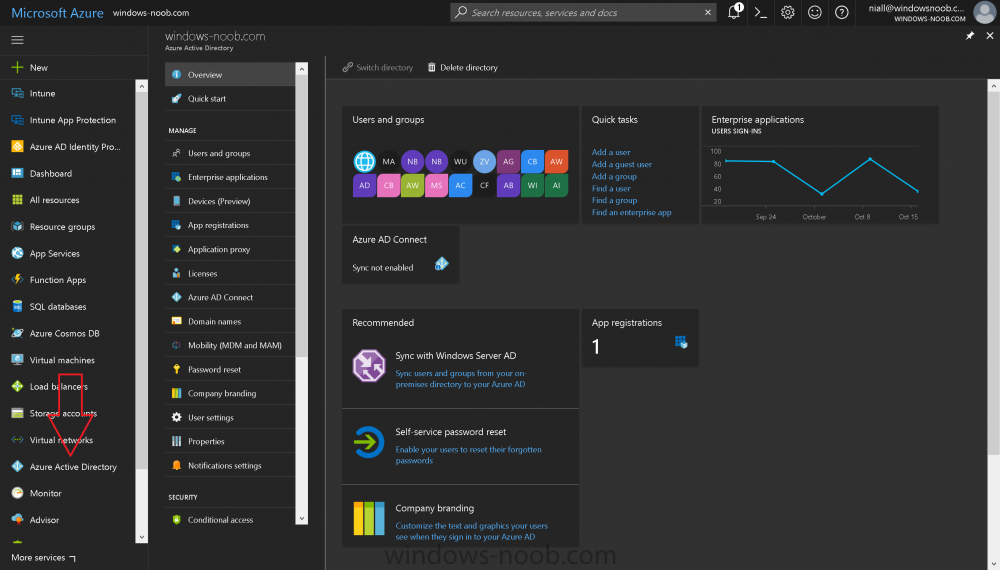
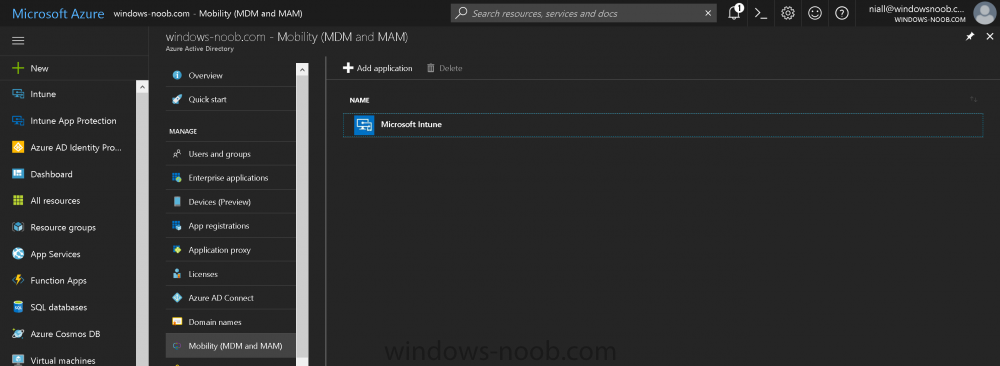
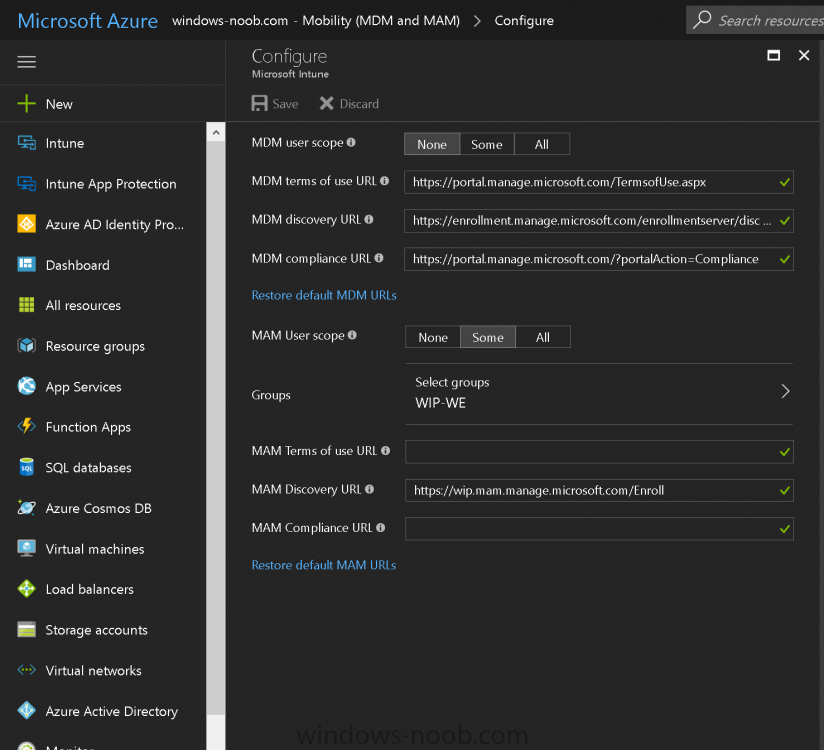
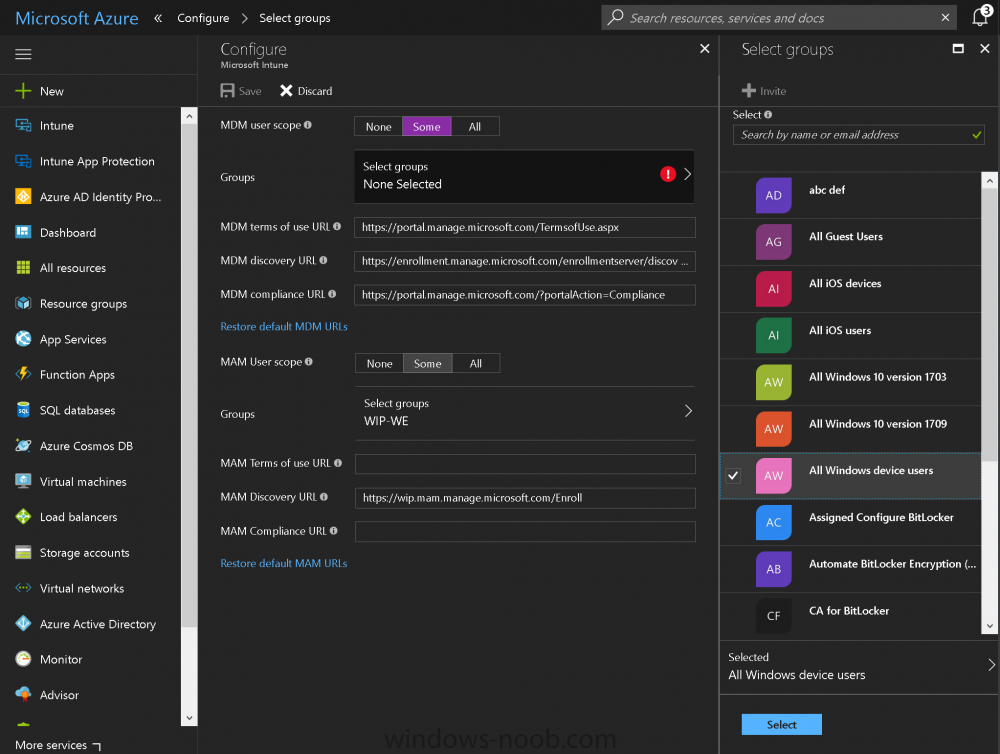
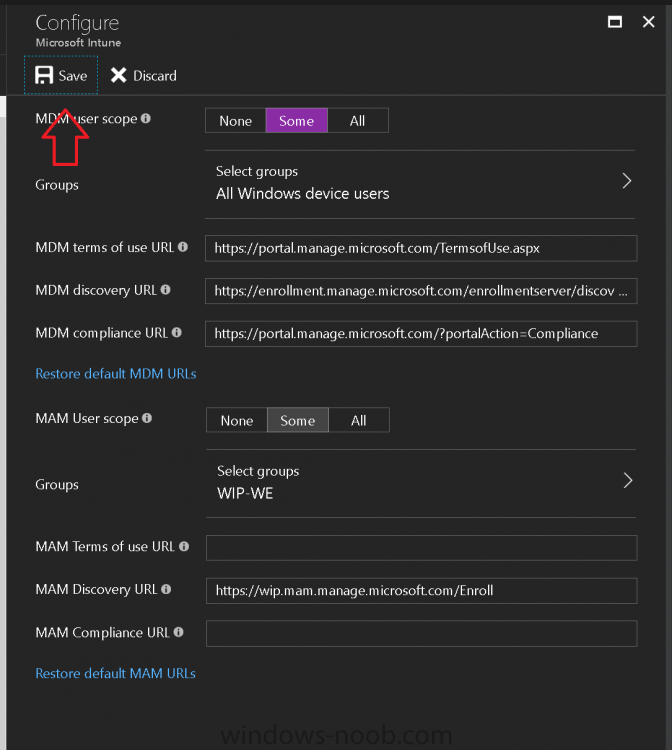
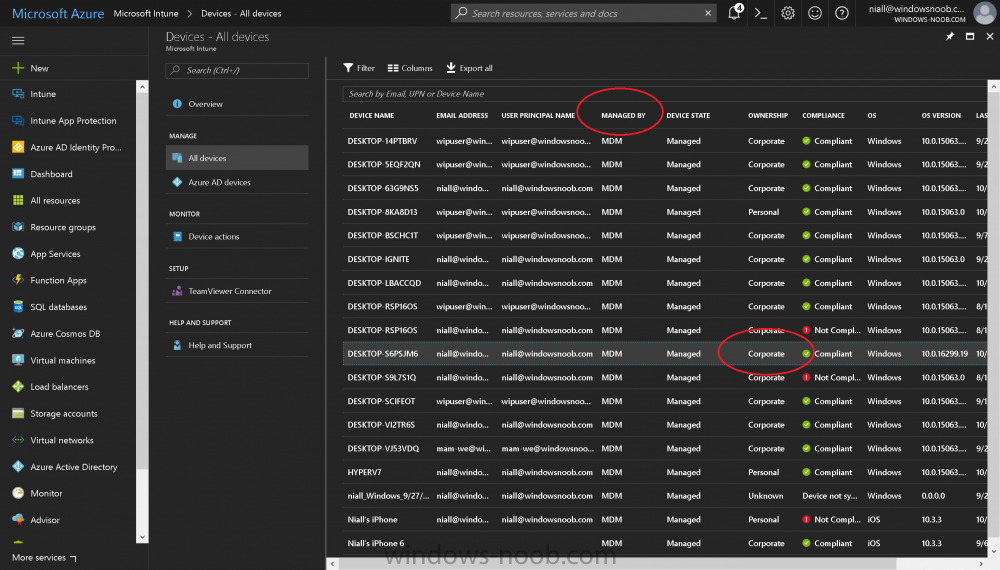
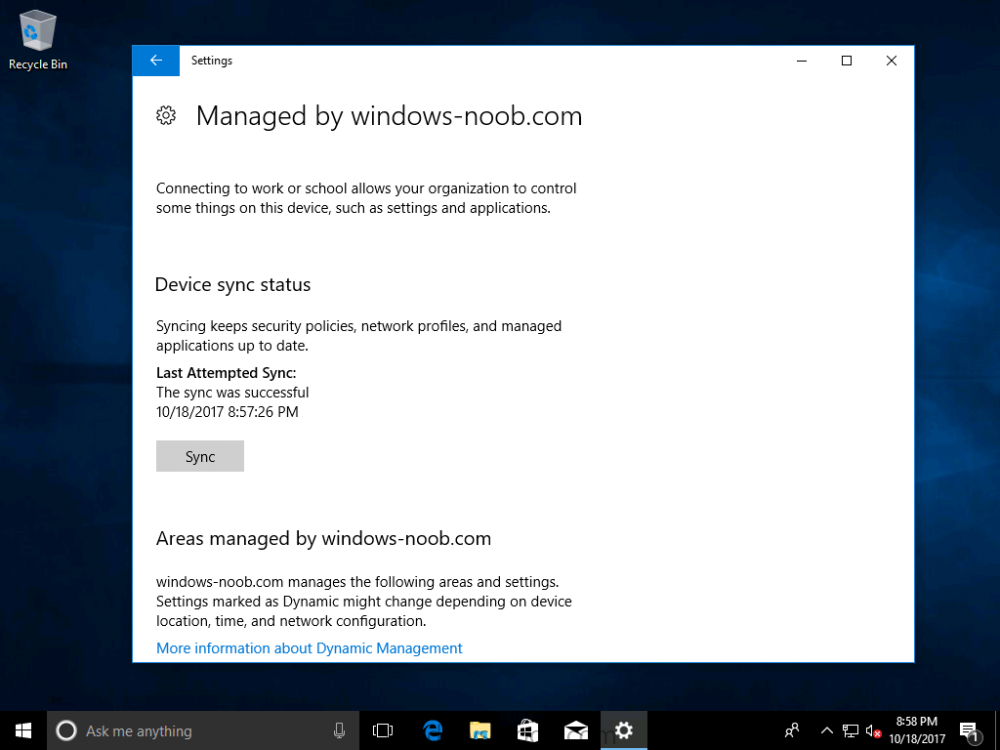
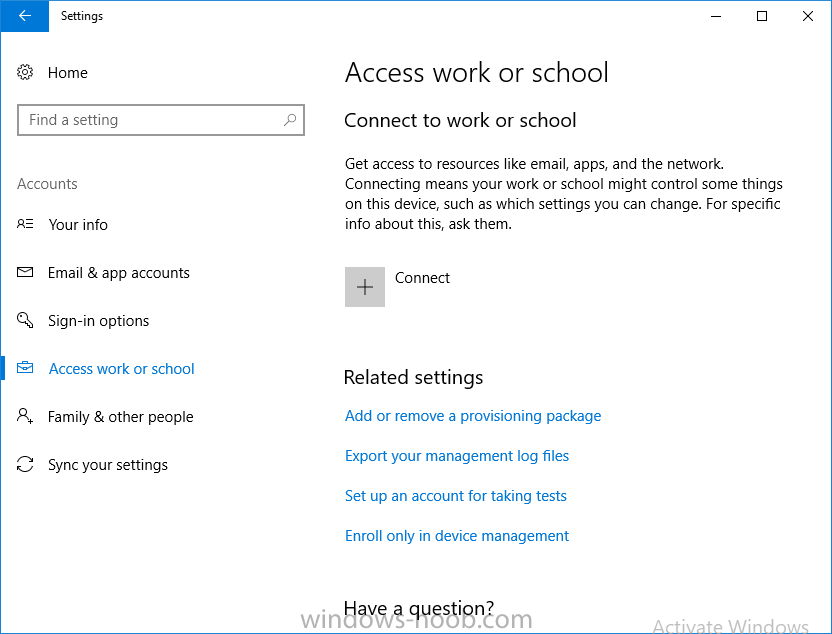
Introduction Devices can be enrolled into Microsoft Intune in many ways, the user can download the Microsoft Company Portal, and enroll the device using the wizard contained within that app, this would then mean the device shows up as Personal owned. Or, the admin can use Bulk Enrollment methods such as Apple Device Enrollment Program or Apple Configurator (which requires an Apple Mac to run the program) or for Windows devices, use Windows AutoPilot. Keep in mind that bulk enrollment is generally for new devices and not devices that have already been deployed. When you join new Windows desktop, mobile, holographic or Surface devices into Azure AD (Azure AD join as part of OOBE or Windows AutoPilot or via the options in the operating system) you can avail of a new MDM auto-enrollment capability which means that not only is the device Azure AD joined, but it will automatically become enrolled (and managed) by Microsoft Intune. This also means that the device will show up as Corporate owned and has the distinct advantage of not needing the end user (or admin) to have to download and use the Company Portal to enroll the device. To setup MDM auto-enrollment in Azure is fairly easy, and here's how to do it. You do need to have both Azure Active Directory Premium subscription and a Microsoft Intune tenant configured before doing this. Step 1. Login to Azure As a user with administrative permissions in Azure Active Directory, login to https://portal.azure.com and select the Azure Active Directory service highlighted here with the red arrow. Step 2. Configure MDM auto-enrollment Click on Mobility (MDM and MAM) and then select Microsoft Intune from the applications listed. The Configure Microsoft Intune blade opens. Notice the following text (by clicking on the information 'i' beside MDM User scope, which explains the capabilities. Use MDM auto-enrollment to manage enterprise data on your employees' Windows devices. MDM auto-enrollment will be configured for AAD joined devices and bring your own device scenarios. Click on Restore default MDM URLs and then select Some (to select one or more user groups you want to enable for MDM auto-enrollment), or All to apply to all users. In this example you will add a User Group (previously created, containing one or more Windows device users), so select Some, and then click on Select Groups to select the User groups you want this MDM auto-enrollment capability to apply to. When you are done with your selection, click on Select. Next click on Save to save your changes. You'll be notified in the top right corner of the success or failure of this action. That's it, job done, now go and Azure AD join a Windows device, using a user that is a member of the group you specified above. After joining Azure AD, it will also become MDM auto-enrolled by Microsoft Intune. You can verify this by going into Microsoft Intune service in Azure, and selecting Devices then All Devices, the device you just joined into Azure AD will now also be MDM Managed by Microsoft Intune (due to MDM auto-enrollment) and listed as a Corporate owned device. And on the device itself you can verify in All Settings, Accounts, Access work or school, and click on the username. For more info about this read https://docs.microsoft.com/en-us/intune/windows-enroll#enable-windows-10-automatic-enrollment


-
 Hello We recently moved our sccm on prem server to the azure cloud , since this move we are having issues with building devices. Basically we transferred the pxe from the main server as it is in the cloud to our on prem distribution point so we can now pxe boot and get the screen to kick of the task sequence , but now i am seeing it is missing so many applications and customizations i did, I already distributed all packages to the on prem distribution point. I have tried all sorts its been like this for a week now but i am not sure what else i can try next. Thank you tnt_115
 -
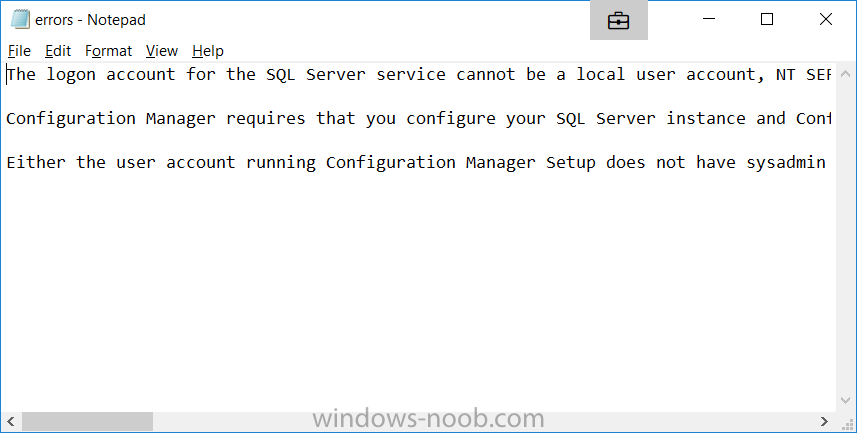
 We're trying to set up a Cloud Management Gateway and following the regular guides all works fine until one of the last steps, the actual creation of the CMG in Azure. At the beginning of the wizard I just log in to my Azure admin account that I used to set up all other parts. The wizard then auto-populates all Azure fields and finds the correct resource group. When clicking finish it shows the error: Error occurred when granting Contributor permission to the Azure AD app for resource group RG-SCCM-CMG. For more information, see SmsAdminUI.log When checking SmsAdminUI.log we see: Hyak.Common.CloudException\r\nInvalidAuthenticationTokenTenant: The access token is from the wrong issuer 'https://sts.windows.net/f8cdef31-xxxx-xxxx-xxxx-xxxx/'. It must match the tenant 'https://sts.windows.net/aa3c372d-xxxx-xxxx-xxxx-xxxx/' associated with this subscription. Please use the authority (URL) 'https://login.windows.net/aa3c372d-xxxx-xxxx-xxxx-xxxx' to get the token. The guid starting with aa3c372d is indeed our correct tenant ID. I have no idea where the one with f8cdef31 comes from. I've search for this guid in our Azure subscription but nothing pops up. Also in SCCM under Azure Active Directory Tenants only the tenant with aa3c372d is shown. Anyone an idea of what could be wrong?
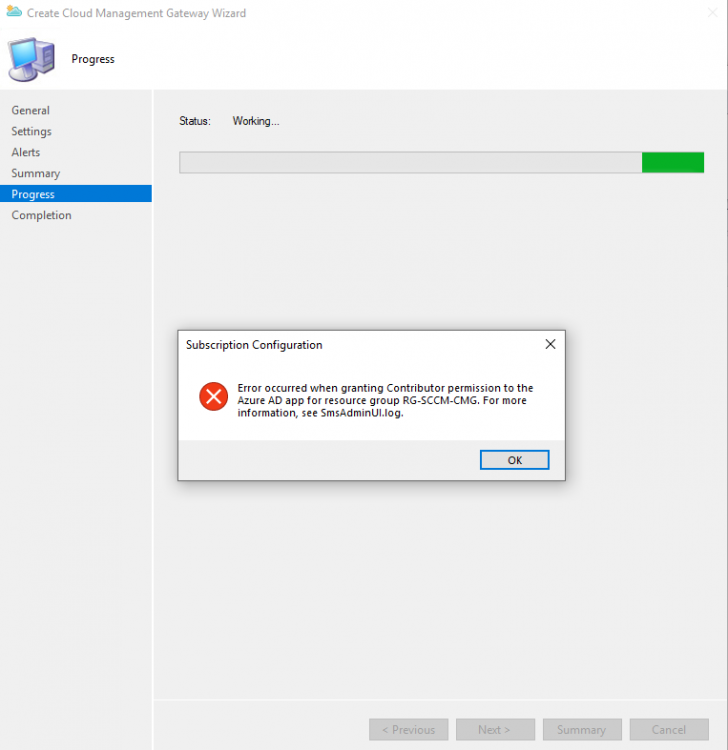
-
Hi Everyone,
I'm a new Level 2 Technician as i was previously Level 1 technician and my main role was helping users troubleshoot issues on their Computer and recently had a few colleagues from Level 3 started helping me get into SCCM environment were i flourishing from their Wisdom, so found your site and started to visit this site to learn a few things and decided to register.
Thank you for visiting my page
-
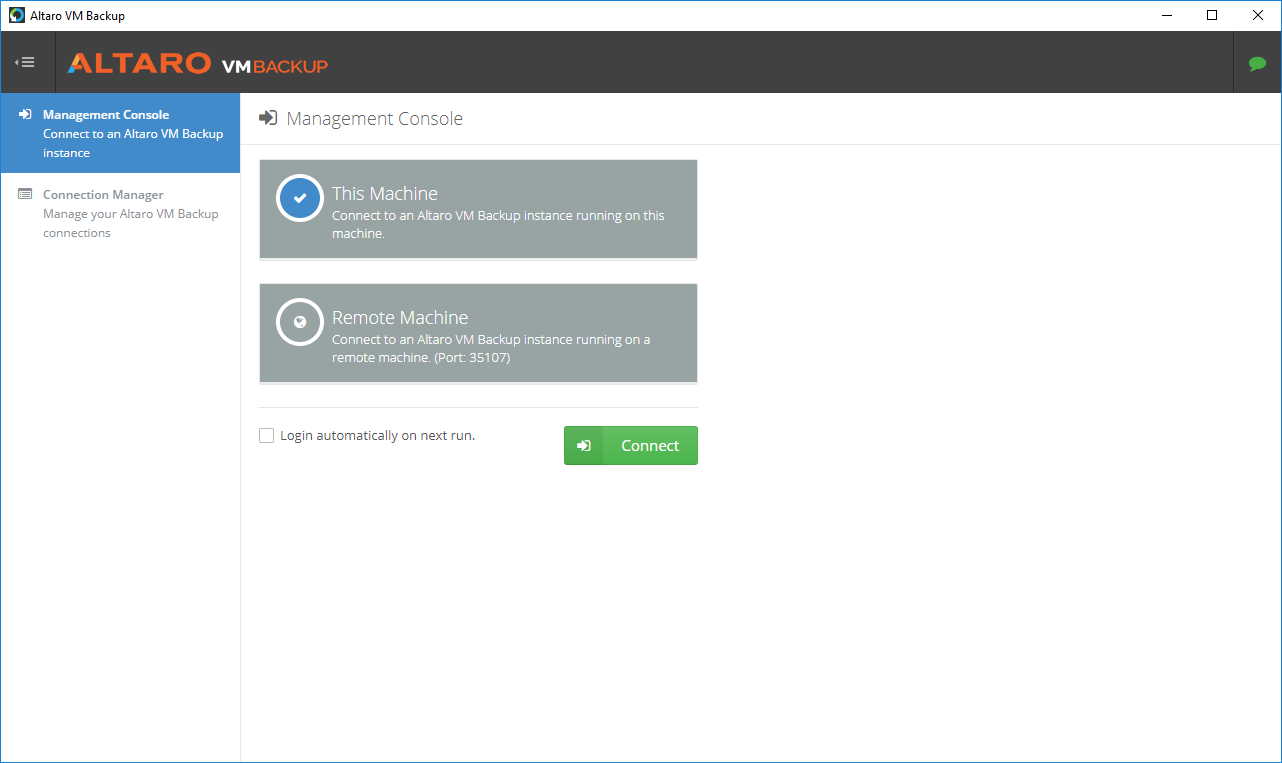
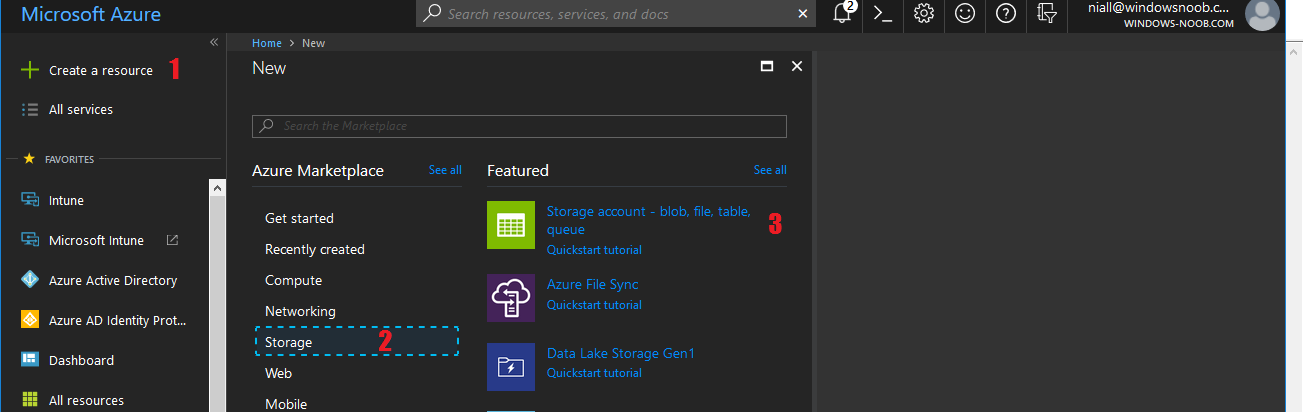
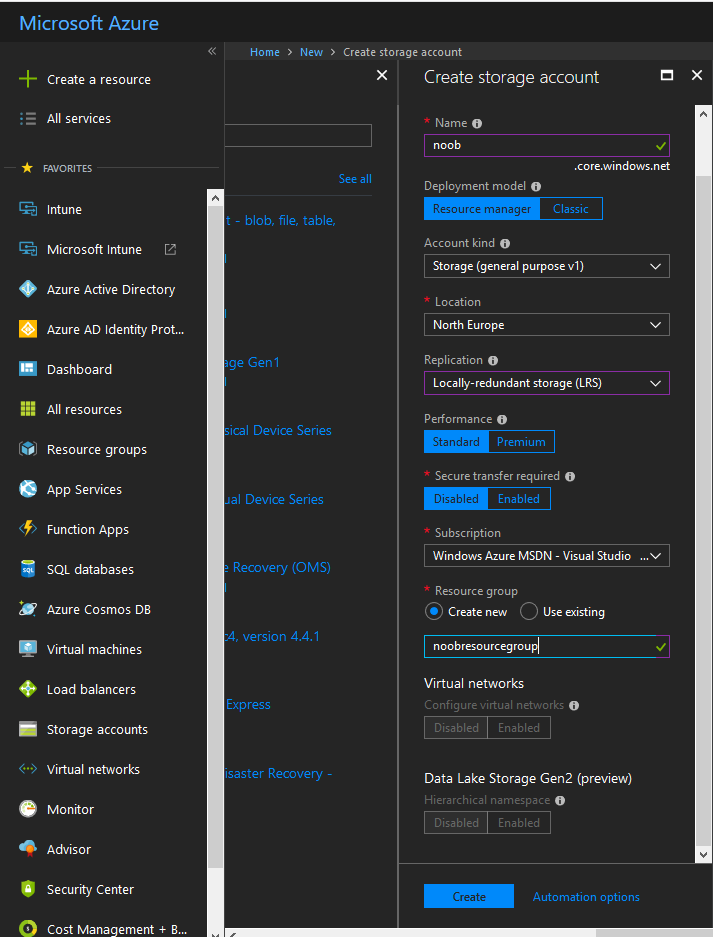
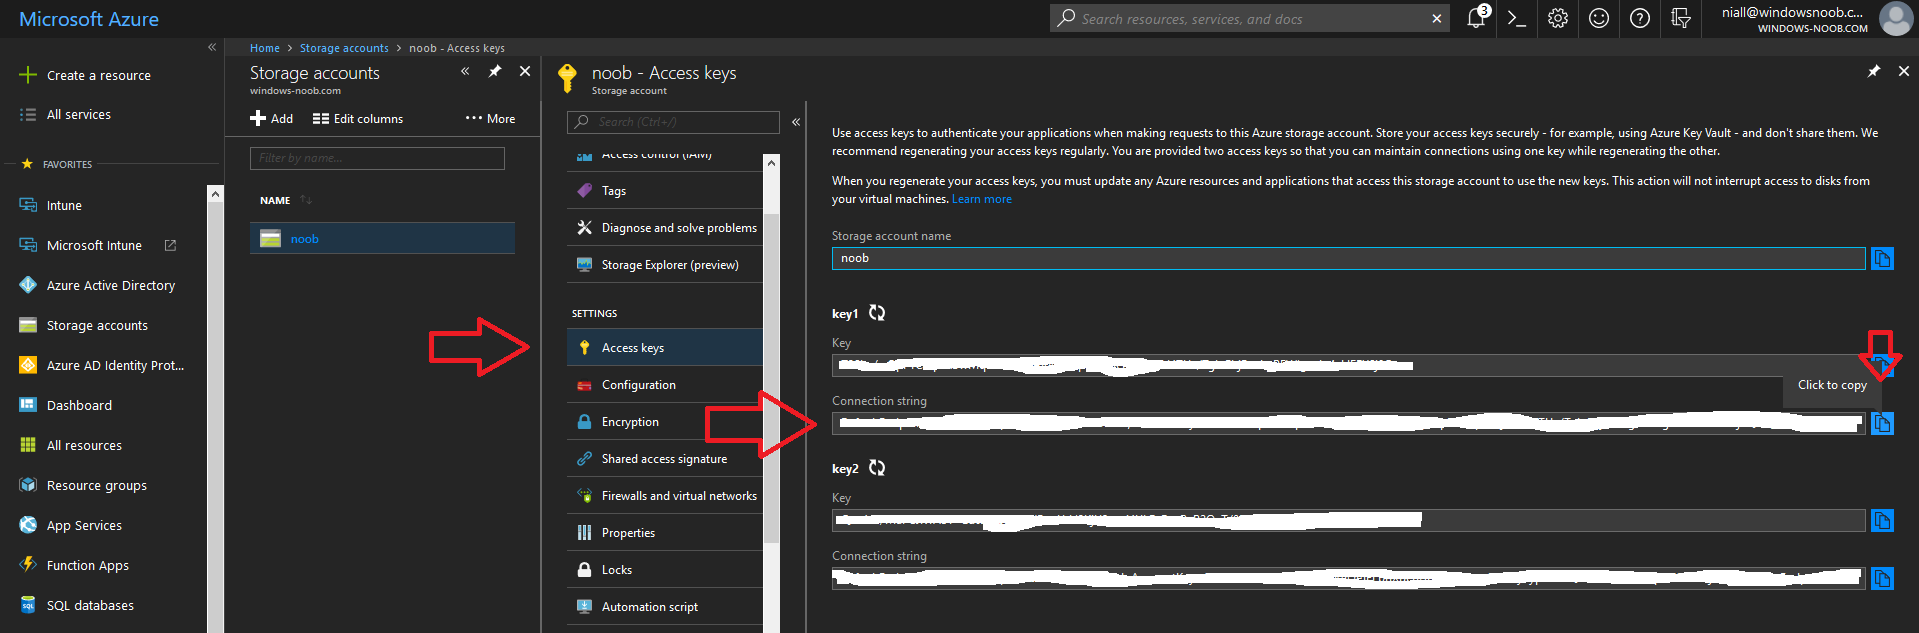
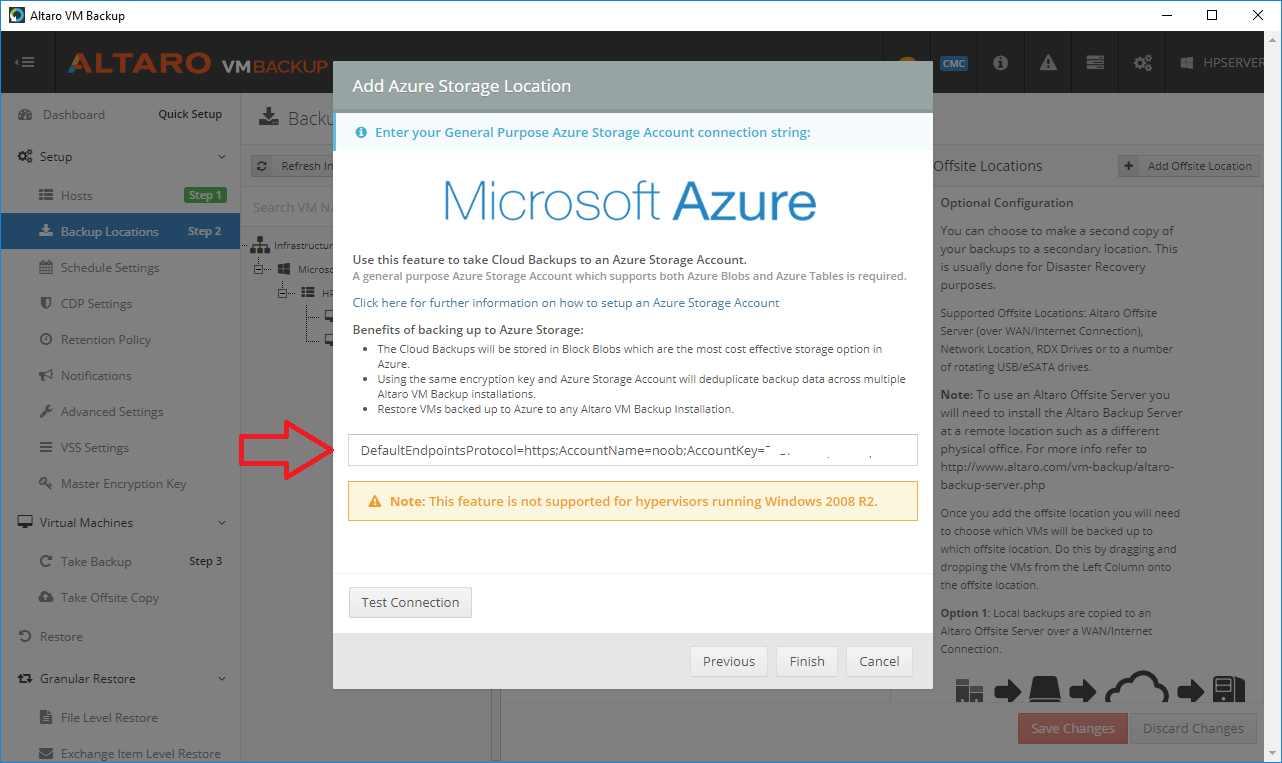
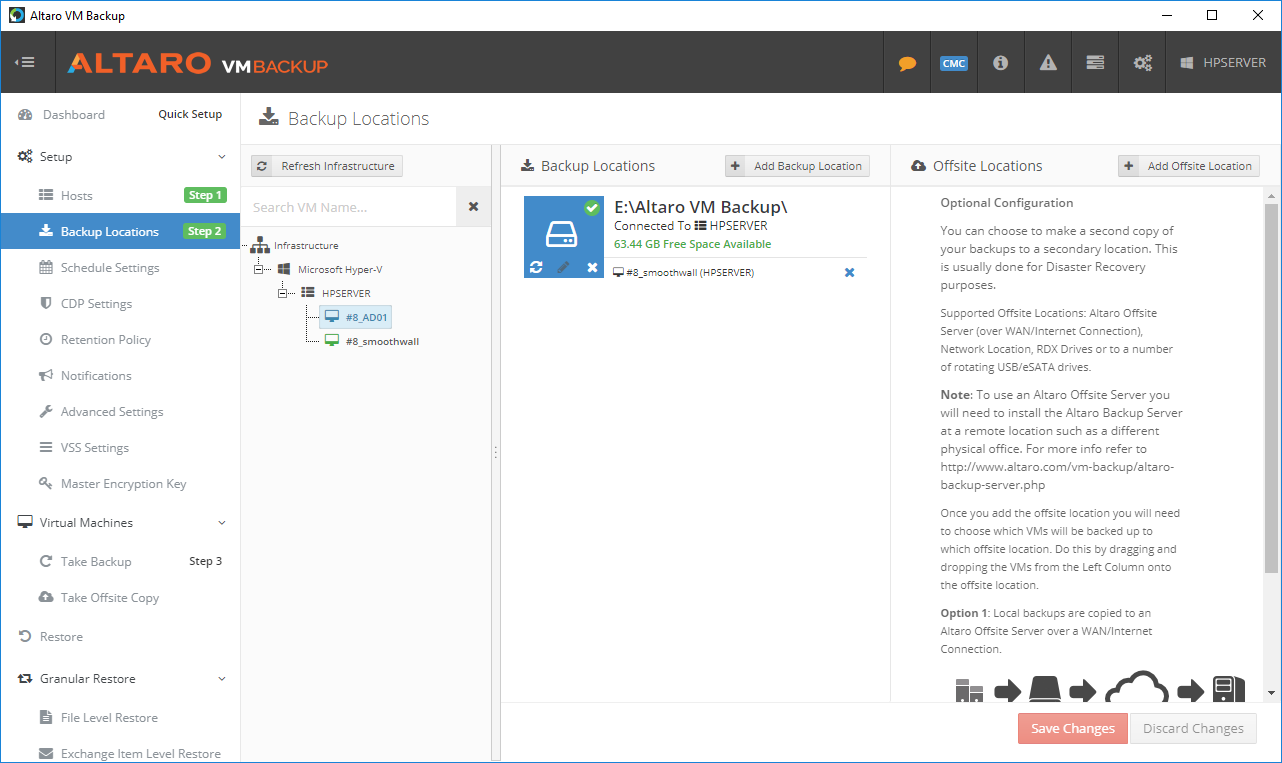
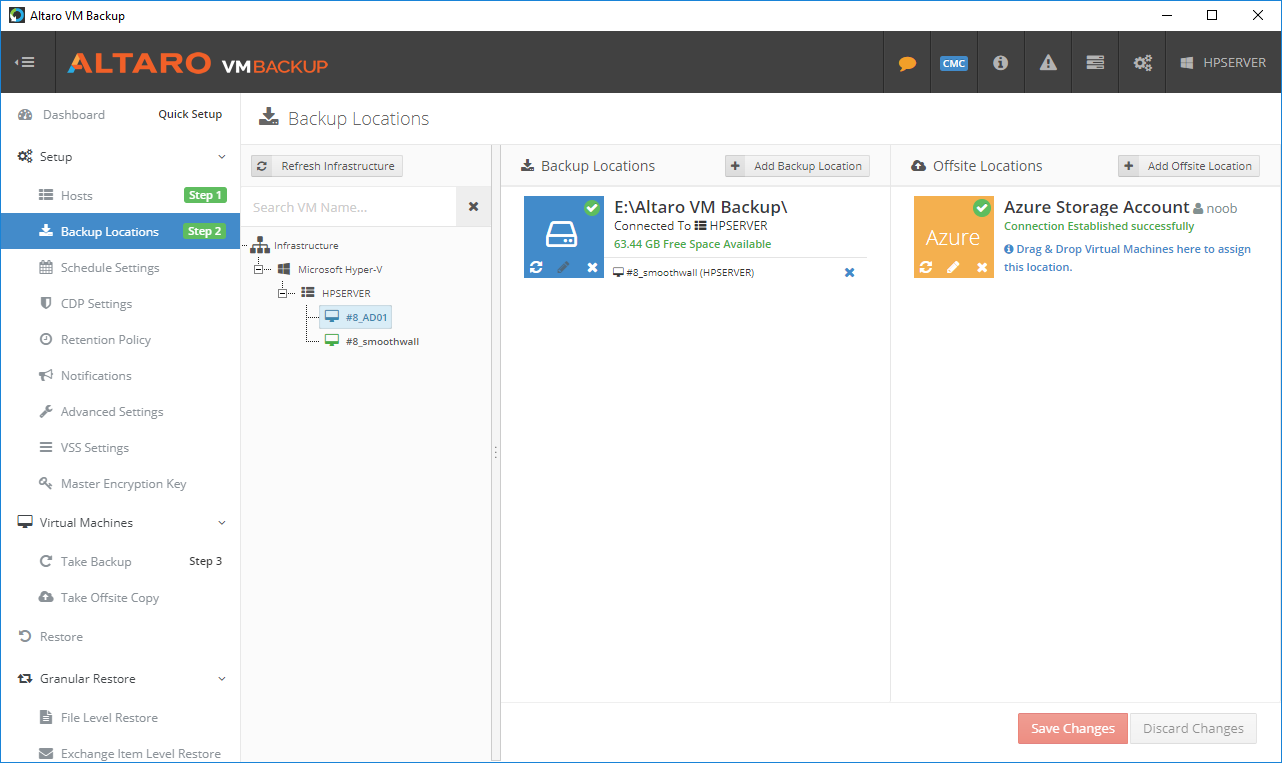
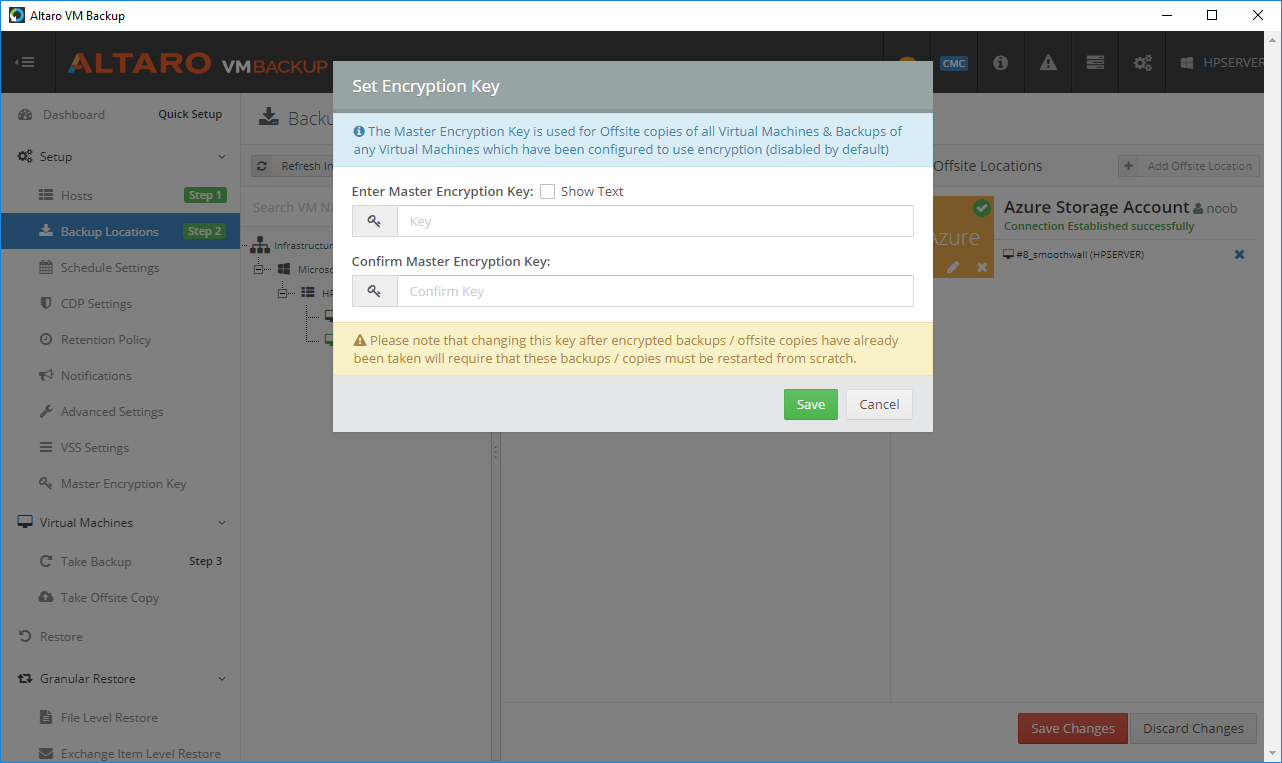
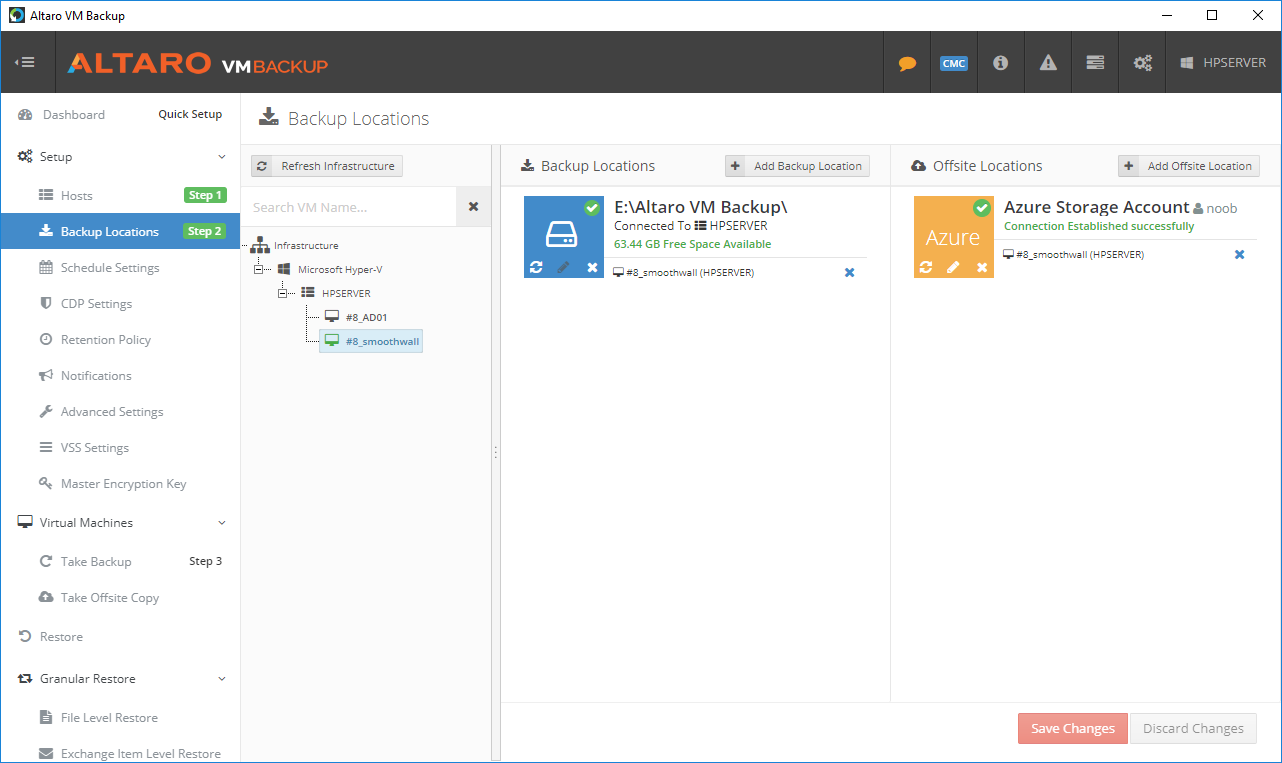
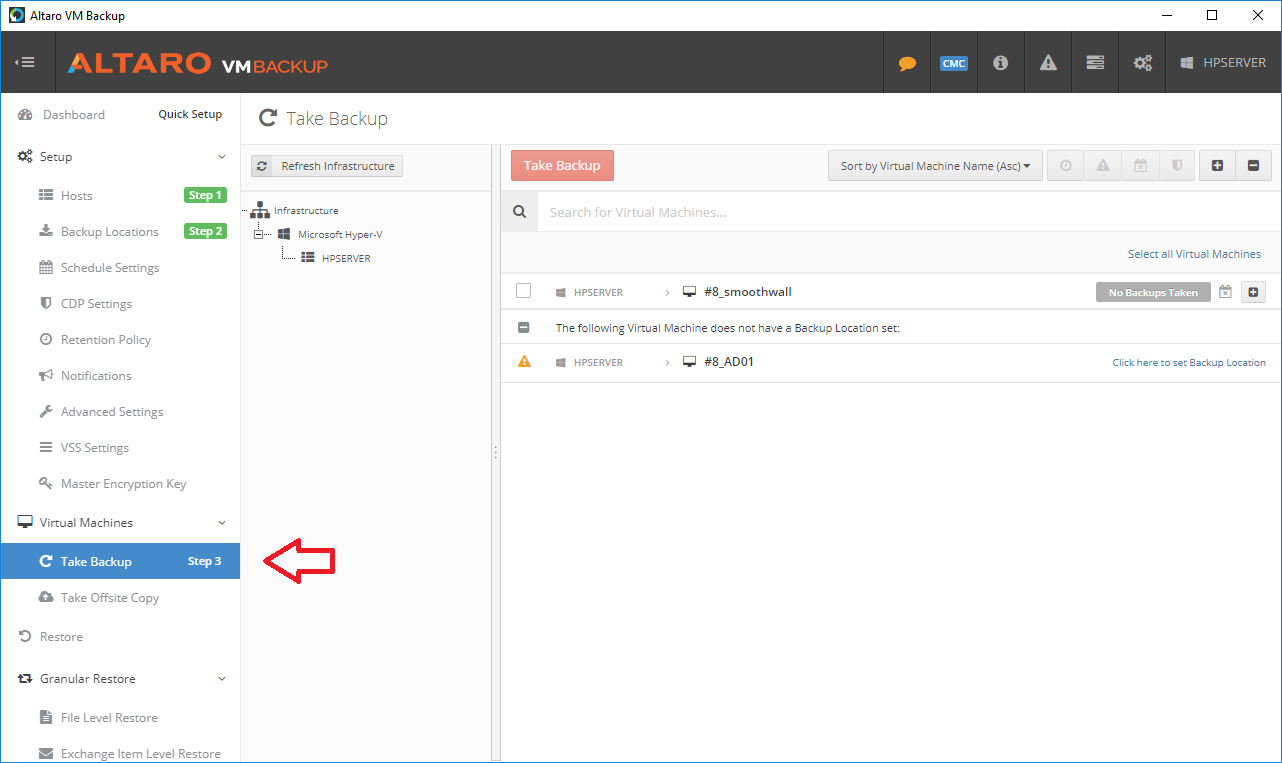
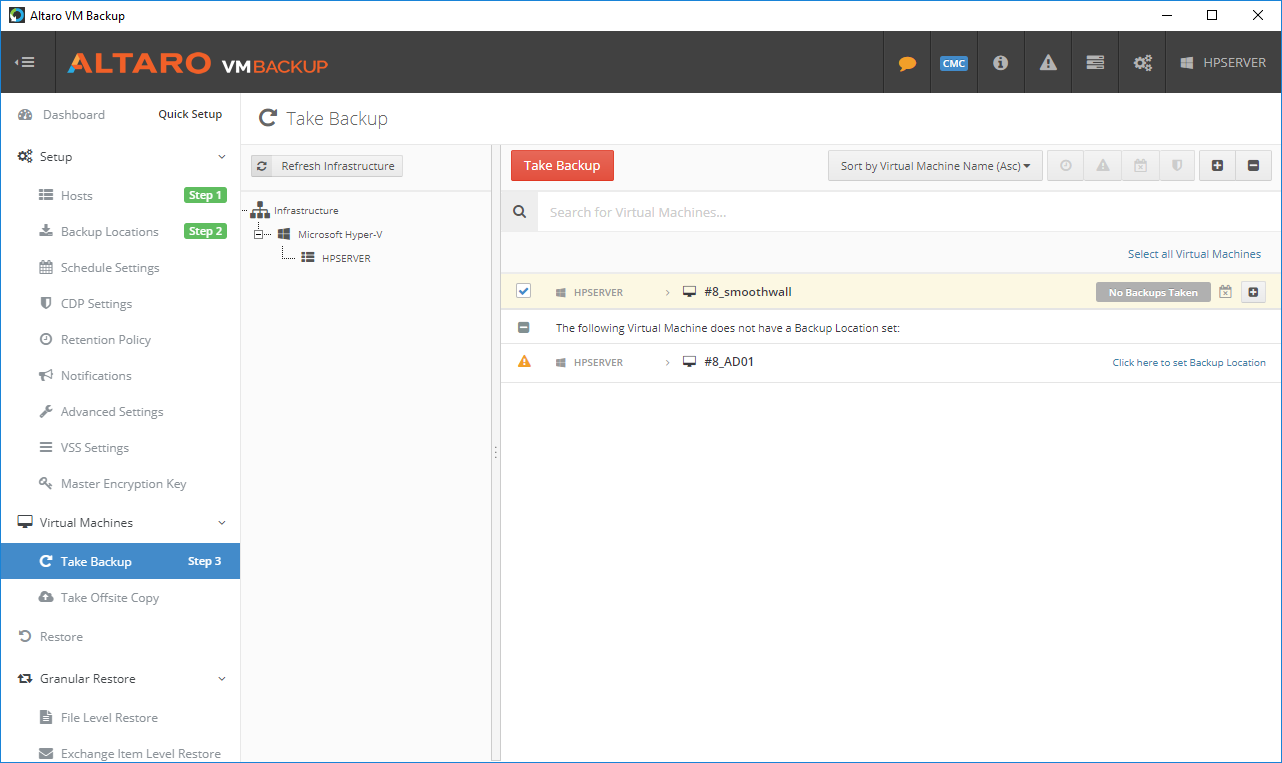
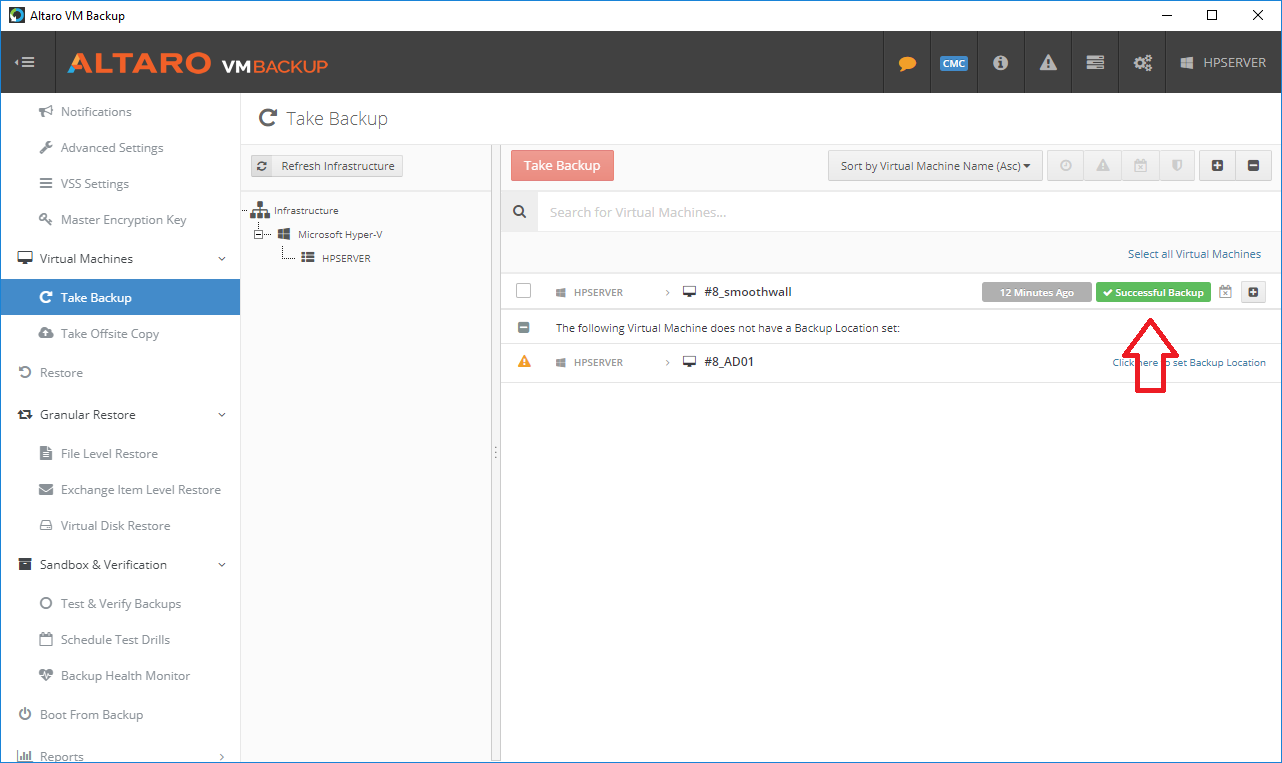
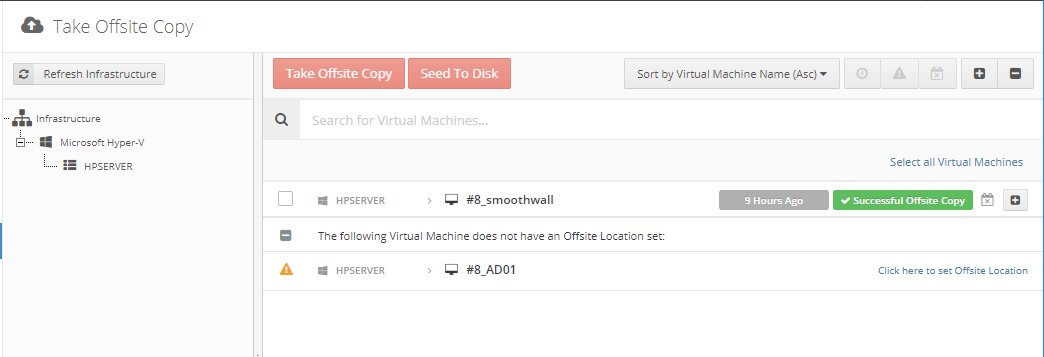
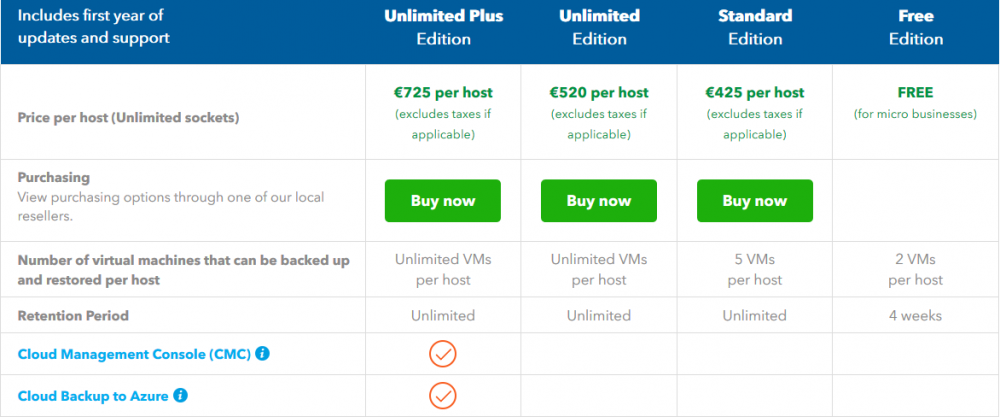
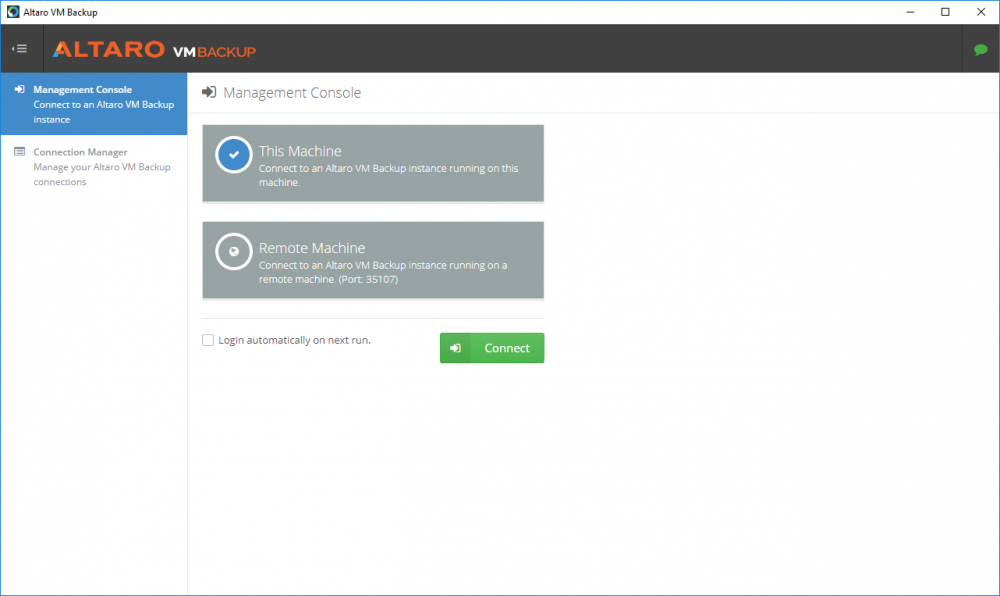
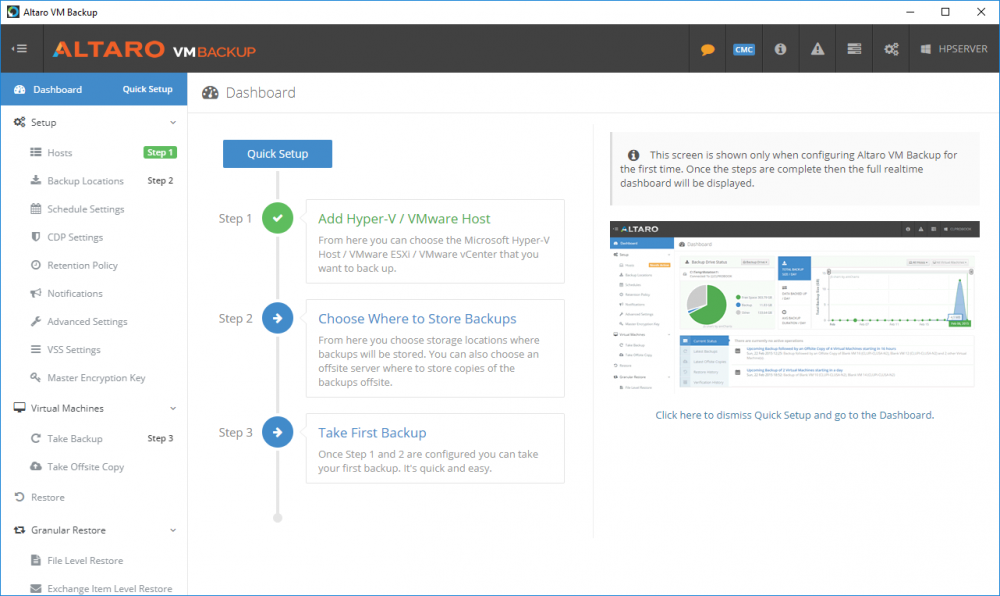
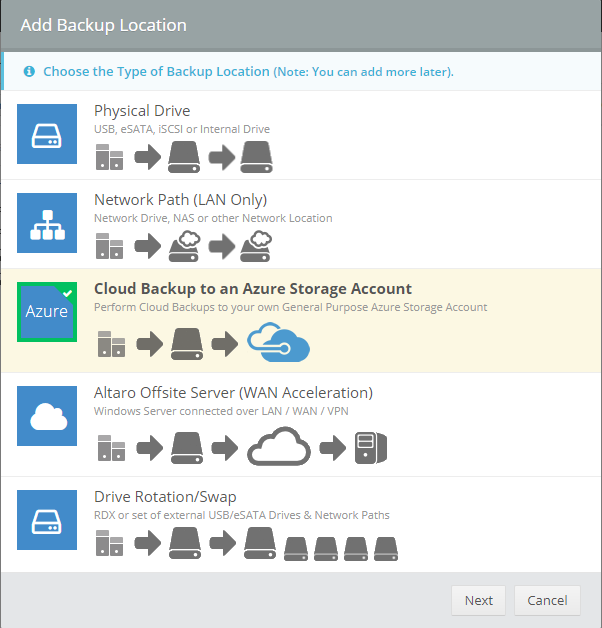
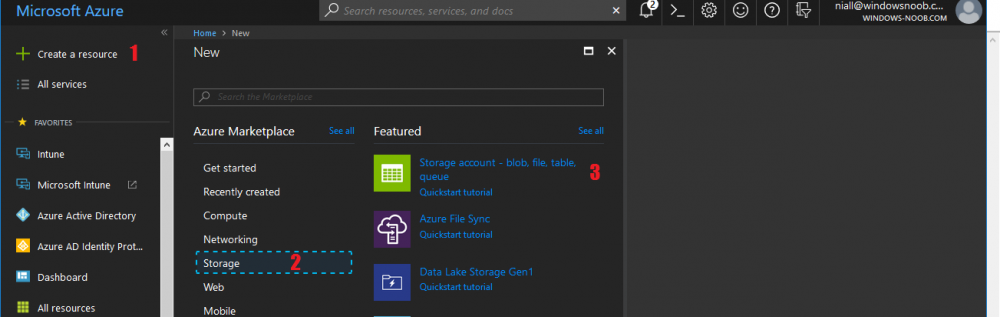
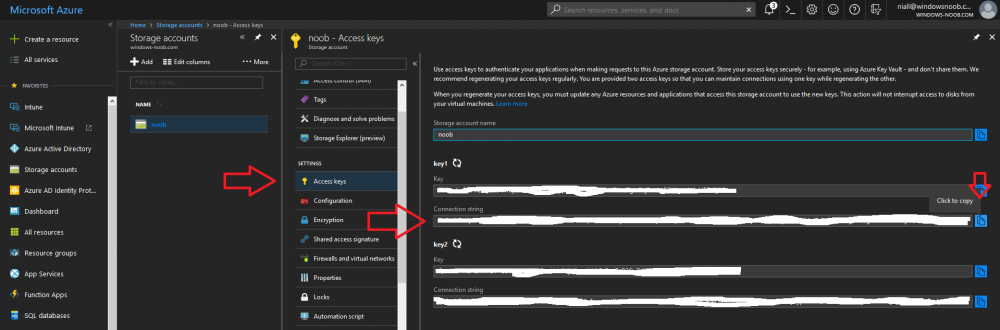
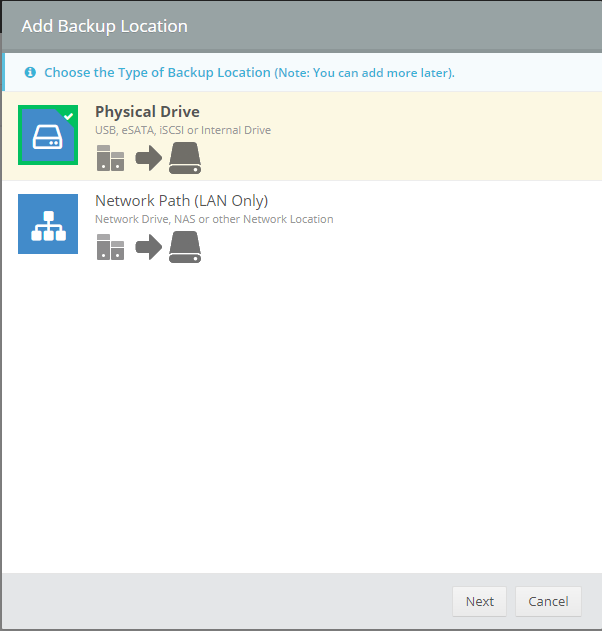
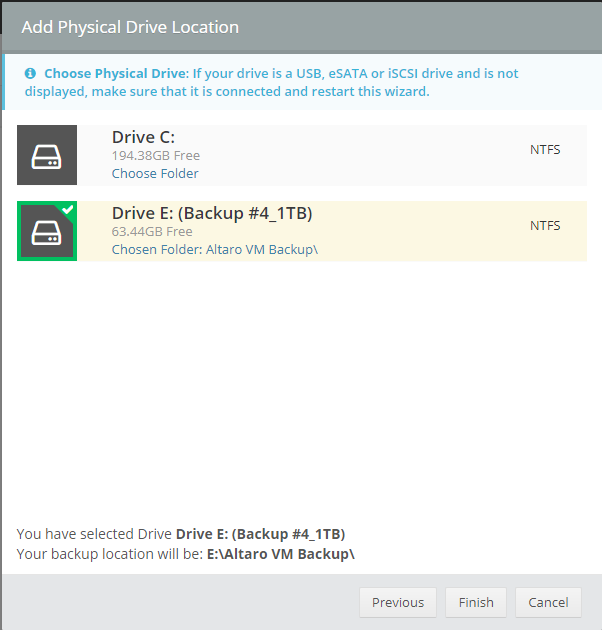
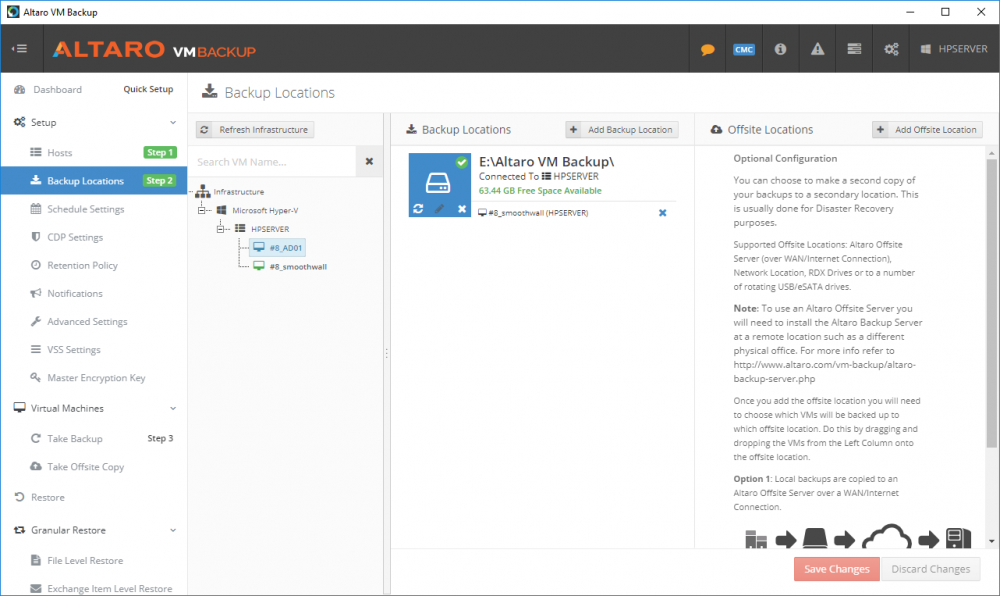
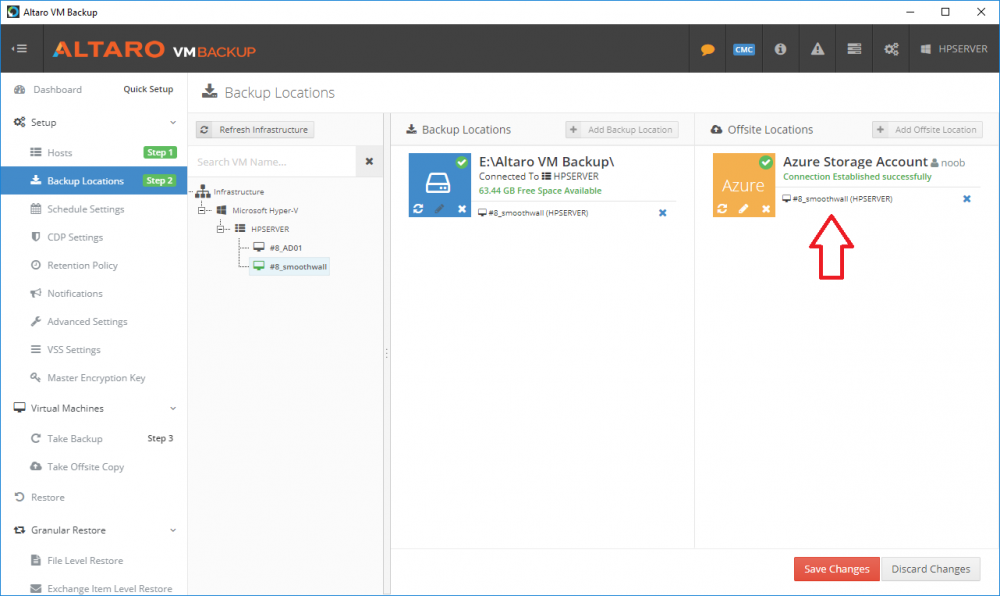
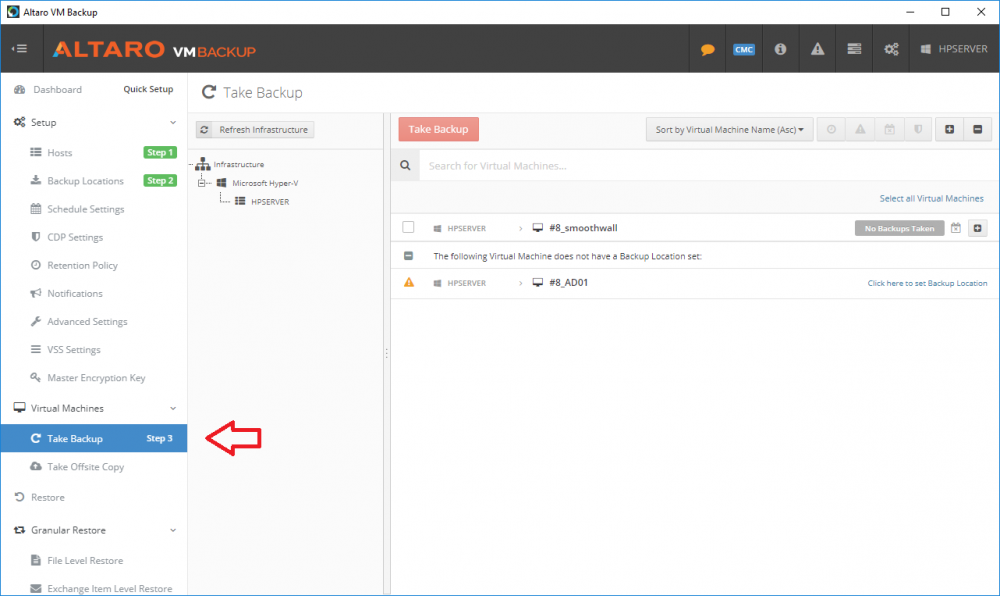
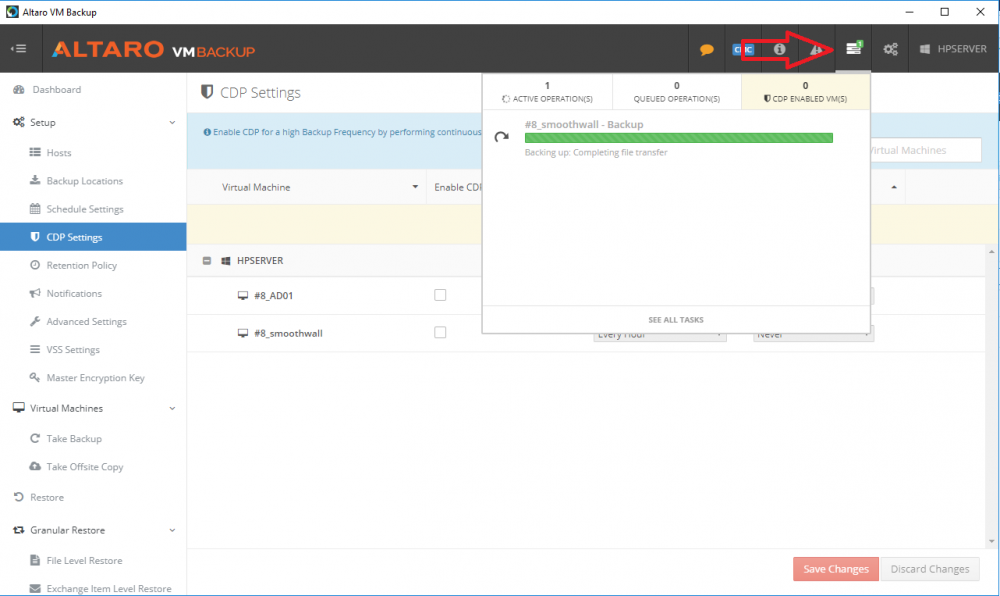
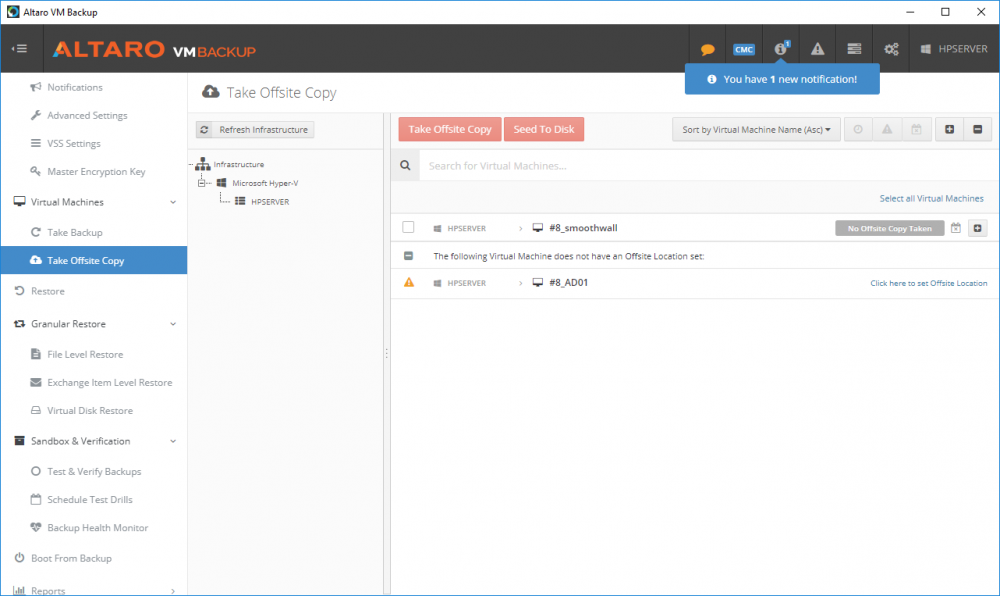
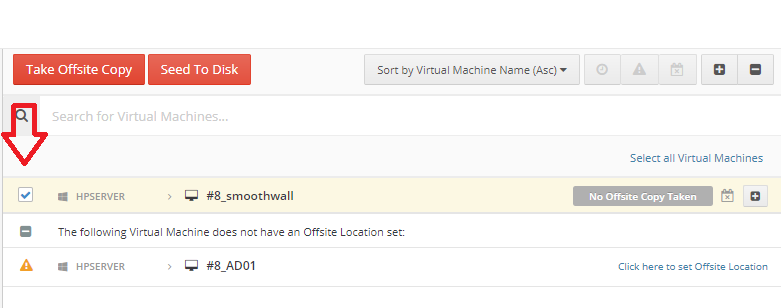
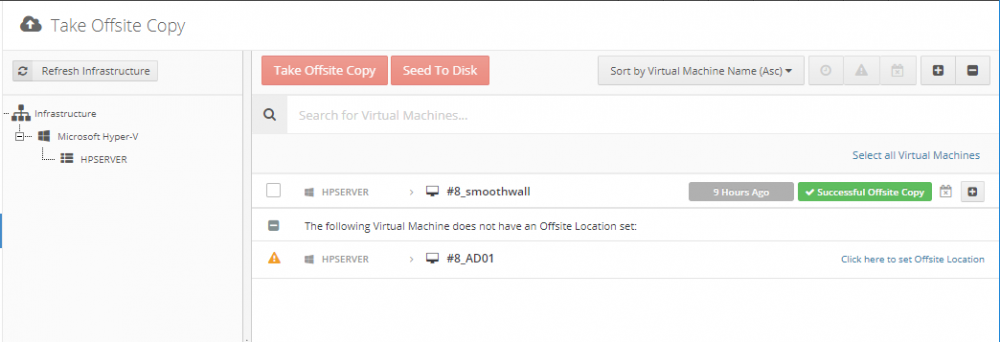
Introduction Those of you who regularly read my guides know that I favor using Hyper-V over VMware for virtual machine work. I like the seamless integration with Windows and the fact that it comes built in to Windows 10. This blog post is about backing up your Hyper-V virtual machines on Windows Server 2016 to Microsoft Azure Cloud Storage using Altaro VM backup software, their software does show the process in 3 steps, but in reality, you need to do more things which I've detailed below. Step 1. Configure Azure Cloud Storage If you've already done this, please skip to step 2 otherwise sign in (or sign up) to the Azure Portal account using https://portal.azure.com. In the Azure Portal, click on the + sign to Create a resource (1) select Storage (2) then select Storage Account (3) Give the storage account a name and select General Purpose v1 as the Account kind (as General Purpose v2 would cost more). For Replication, select Locally redundant storage (LRS). For Performance, leave the default setting of Standard. Click on Create when done. Note: Ensure you select General Purpose v1 as the Account kind as it will result in the lowest cost. This is due to: "workloads with high churn or high read rates may benefit from this account type." Reference: https://docs.microsoft.com/en-us/azure/storage/blobs/storage-account-options Step 2. Download & install Altaro VM Backup software Next you need to go to Altaro's website here where you can download the 30-day free trial of Altaro VM Backup. If you’re opting for the free edition, you will still automatically get a 30-day trial of the Unlimited Plus version, which includes the backup to Azure feature. Note: You'll need Windows Server operating system such as Windows Server 2016 to host Hyper-V for this to work, Altaro VM Backup does not support Windows 10 (sadly). To see a list of supported operating systems click on this link. Once you've downloaded the trial, install it. It's a very simple installation wizard and once done you can launch the Altaro VM Backup console. Step 3. Configure an on premise backup location Now that you've installed Altaro VM Backup, you can start configuring it. In the console ensure that This machine is selected then click on Connect. Below is what it looks like when you haven't yet configured anything. Note: You are required to configure an on premise backup location prior to backing up over the WAN to Azure Cloud Storage. Select Backup Locations in the left pane, and then click on one of the two available on premise locations, in my example I selected Physical drive. click Next and select the destination drive (and previously created folder) where you want to store the backups. click on Finish. Step 4. Select which virtual machines to backup Now that you've configured a backup location, select one or more virtual machines and drag and drop them to the on premise backup location. Each selected virtual machine that you drag and drop, will then appear under that backup location. Click on Save Changes in the lower right corner of the Altaro VM Backup console once done. Step 5. Configure Offsite Location In the Altaro VM Backup console Click on Add Offsite Location (top right) and from the Offsite options that appear, select Azure (Cloud Backup to an Azure Storage Account) and then click Next. Note: There is a link to How to set up Offsite Copies to an Azure Cloud Storage Account, if you need help configuring that click on it otherwise see Step 2 above. Next, you'll need to find the Azure Storage Connection string associated with your Azure Cloud Storage. To do that, in the Azure Portal, select Storage Accounts, select the storage you previously created, and then select Access Keys. The Connection String will be listed, select it and copy it. Paste that Connection String into the empty field in Altaro VM Backup Click Finish. You should see Connection Established Successfully in the top right corner. next, drag and drop the virtual machine(s) that you want to backup to the cloud and finally, click on Save Changes in the lower right corner. You'll be prompted to Set an Encryption Key. This key is basically a text based password that you will use to protect your backups, so make sure it's something secure and that all people that need to access the backups are aware of. click on the green Save button. Once done, you'll notice that Save Changes is RED in colour, this means you cannot click on it, I found it a bit confusing but as long as you've done the steps I've outlined you'll be ok. Step 6. Take a (on premise) backup Now that you've configured an Azure Storage Account as an offsite backup location, you are ready to take a backup. However, you must first take a primary backup (on premise) before being able to backup to the cloud. To do that, click on Take Backup in the left pane. Select one or more virtual machines that you want to backup before clicking on the even redder Take Backup button. you can then click on the Storage symbol (shown here with a red arrow) to get live information about the backup in progress. Once the backup is done, you can verify it's progress in the Take Backup window. Step 7. Take an offsite backup At this point, everything is in place for your first backup to Azure Cloud Storage. So go ahead and click on Take Offsite Copy. As before, select one or more virtual machines to backup and then click on Take Offsite Copy, you'll see a small popup And after the backup is done you'll see the status has updated real time, look for Successful Offsite copy Job done ! Summary Cons: I found the Altaro VM Backup console to be a little bit confusing at times necessitating calling their support number (please change the hold music) What was not immediately clear from the console was that in order to backup to the cloud, you must first define an on-premise (disk or network location) backup location as the primary location, and only after you've successfully backed up to that primary location, can you attempt the offsite backup. (I've given this feedback to Altaro directly.) Pros: Great quick support Altaro VM Backup is definitely one of the best Virtual Machine backup softwares out there today, and it's very competitive The ability to backup to Azure Cloud Storage is a great addition I'd recommend you give it a test run yourself: http://bit.ly/altaro-download Recommended reading Microsoft Azure storage pricing details - https://azure.microsoft.com/en-us/pricing/details/storage/ Microsoft Azure replication options - https://docs.microsoft.com/en-gb/azure/storage/storage-redundancy Altaro support for setting up Azure Cloud Storage - http://support.altaro.com/customer/portal/articles/2814316 Altaro VM Backup best practises - http://support.altaro.com/customer/en/portal/articles/2268483-best-practices-for-setting-up-altaro-vm-backup?b_id=14453 Microsoft Azure Storage Explorer - https://azure.microsoft.com/en-us/features/storage-explorer/ Note: Some of you may have already noticed that Altaro is a sponsor of windows-noob.com, and that is a good thing, please return the favor and use their software.


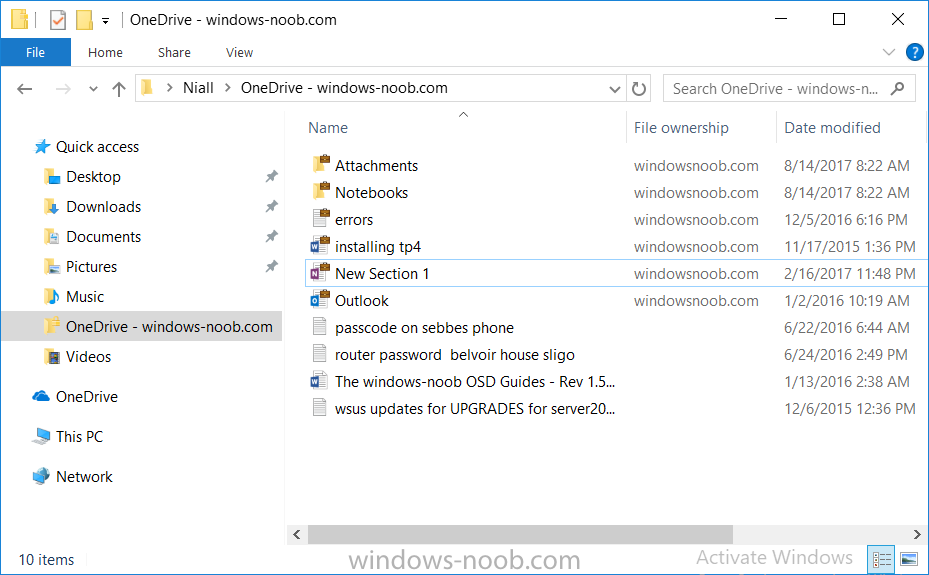
-
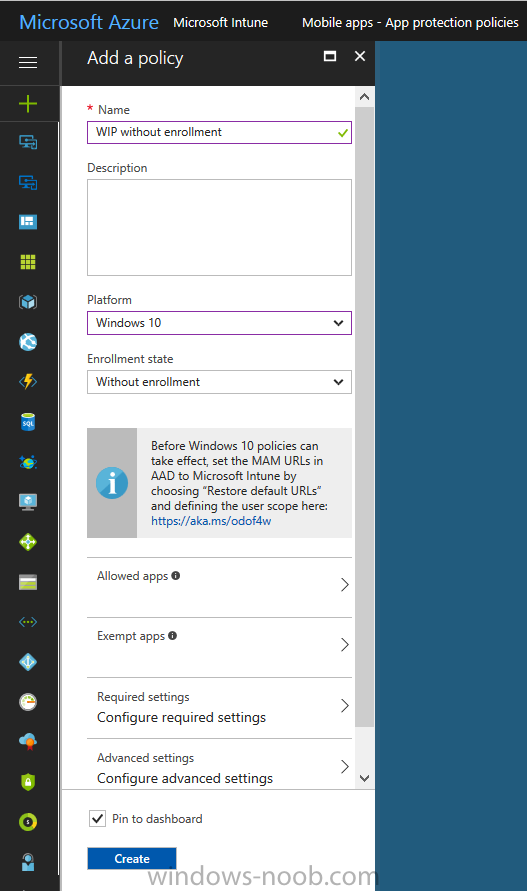
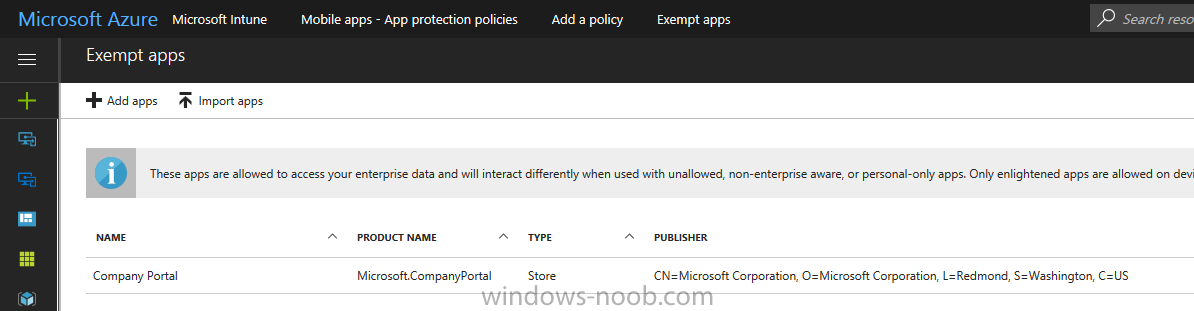
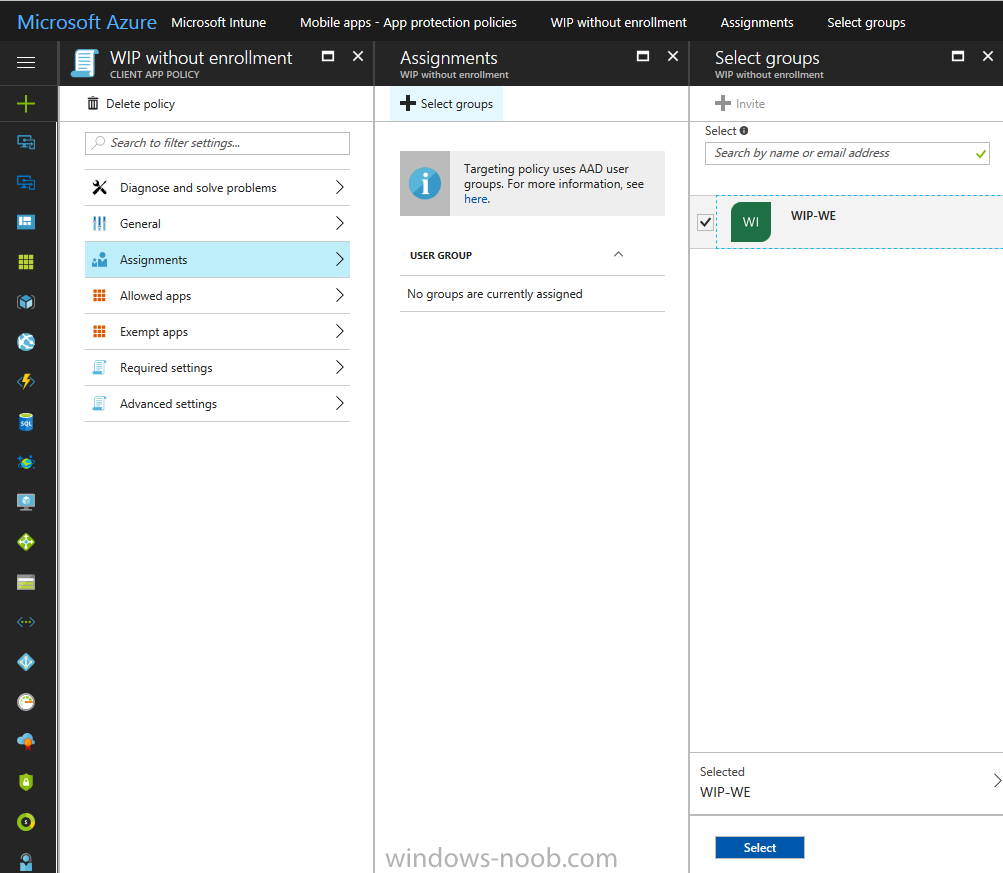
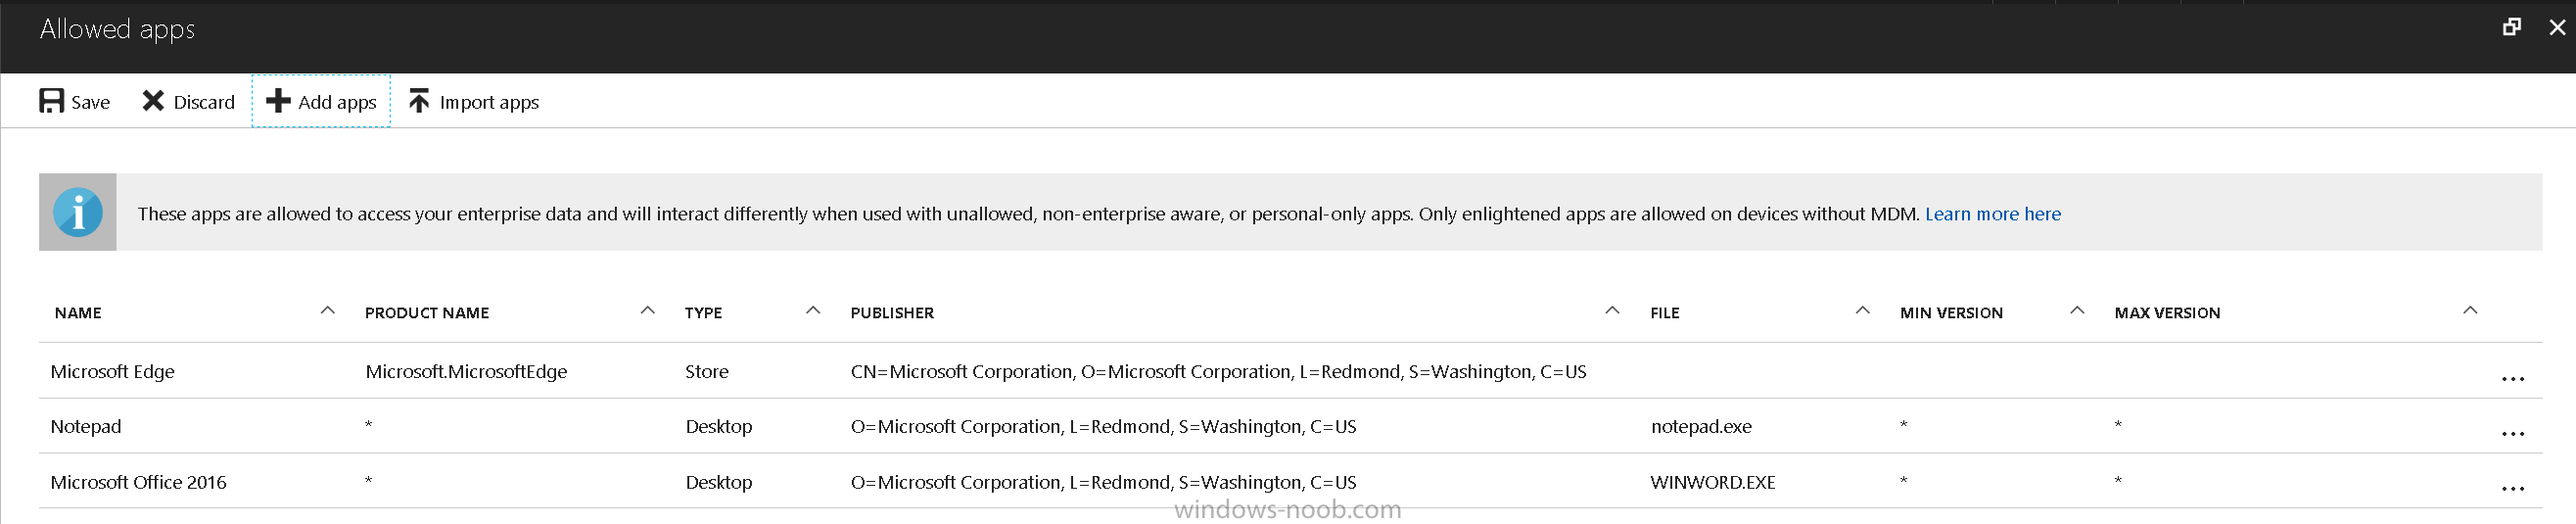
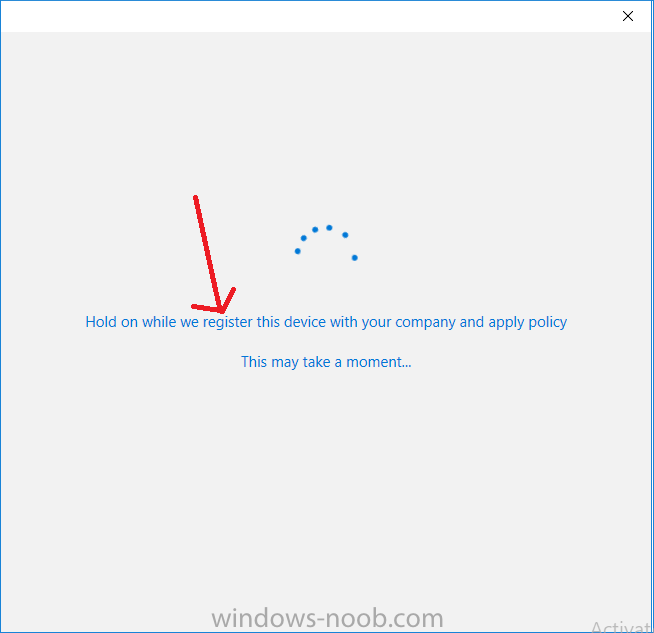
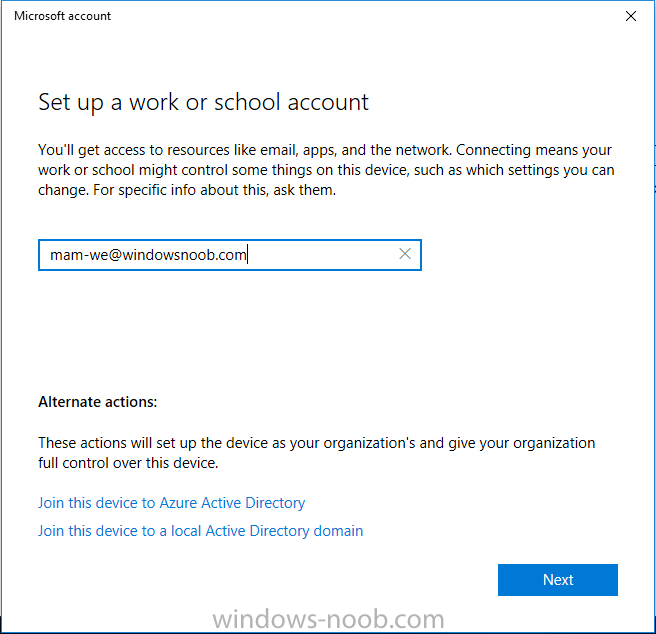
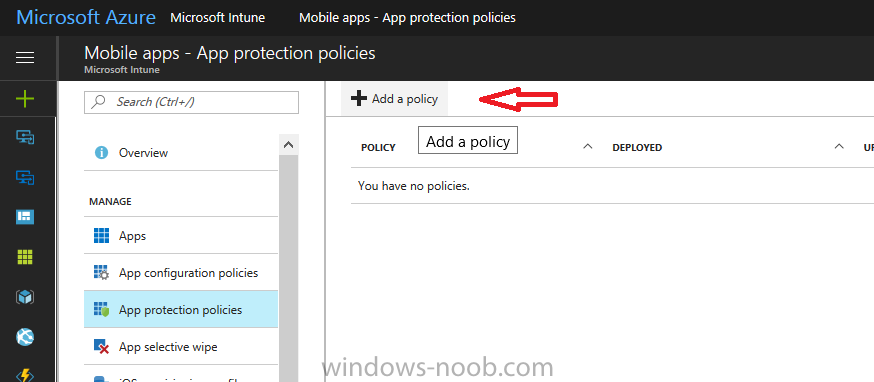
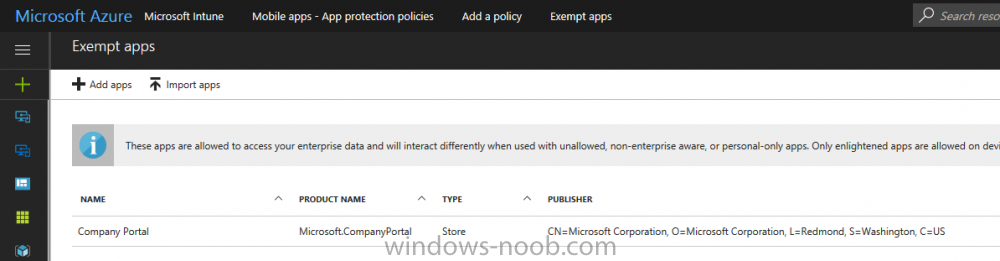
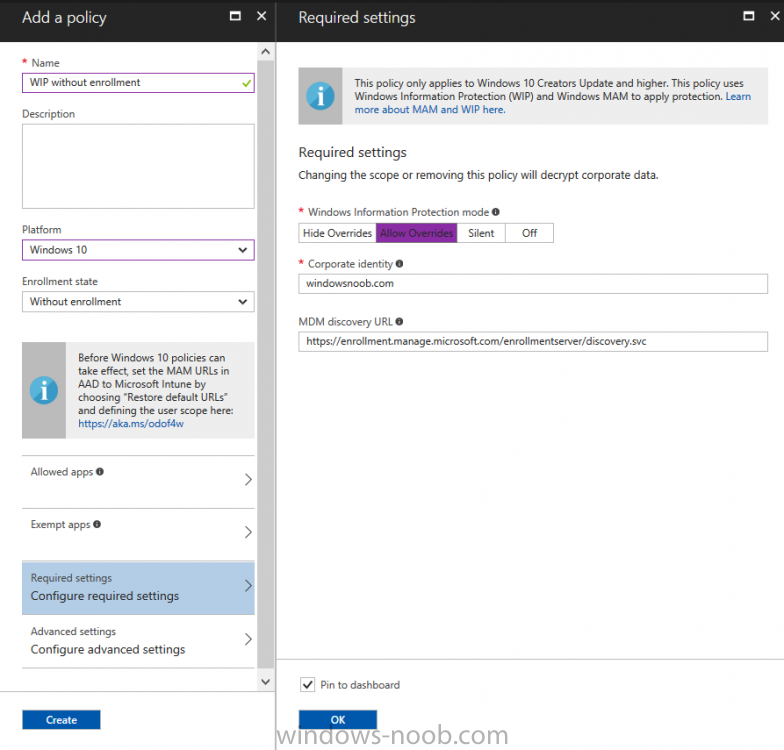
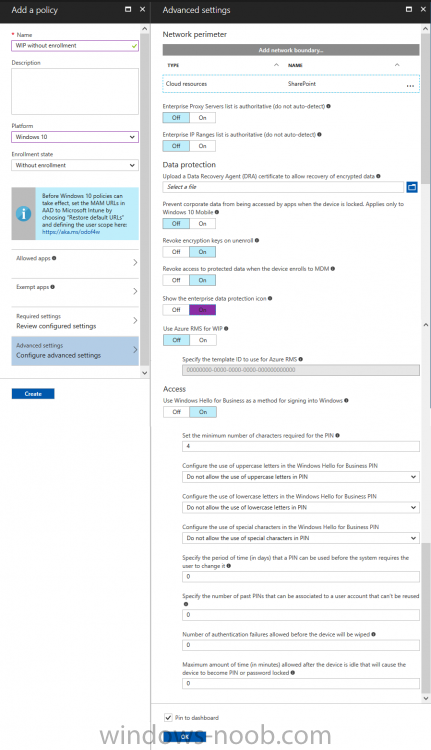
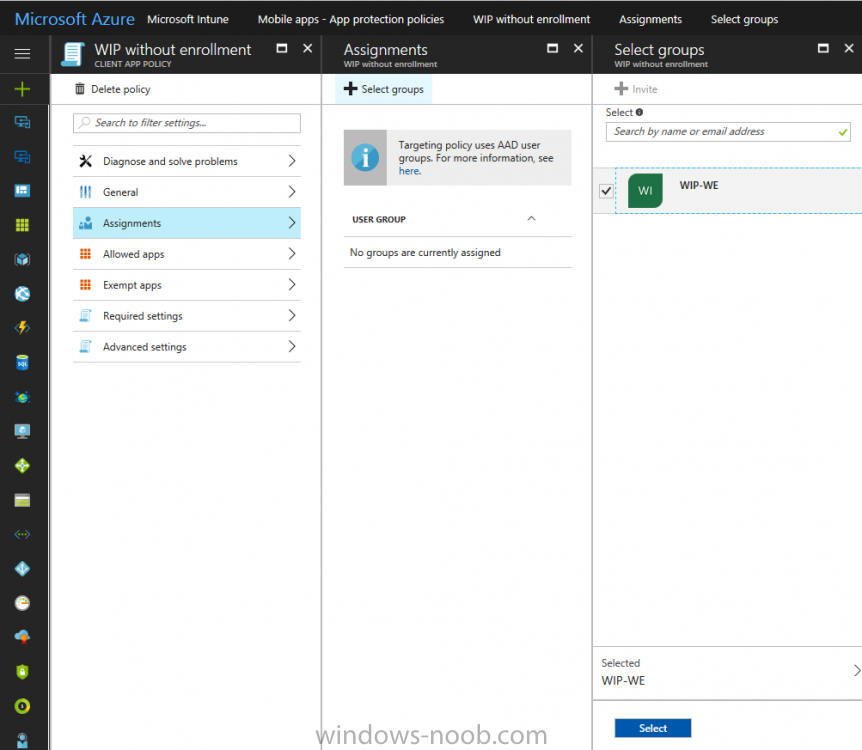
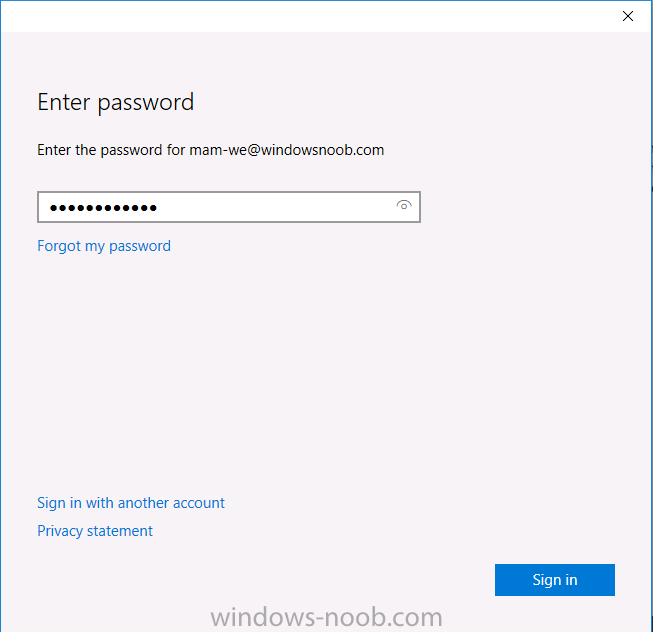
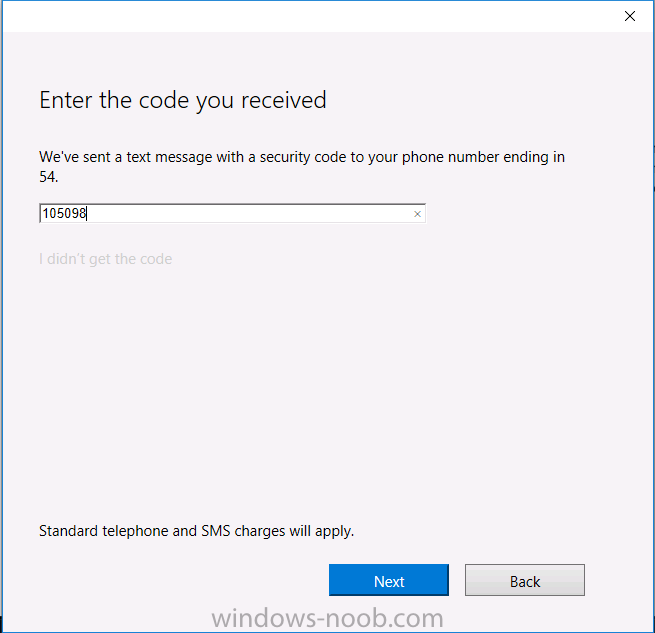
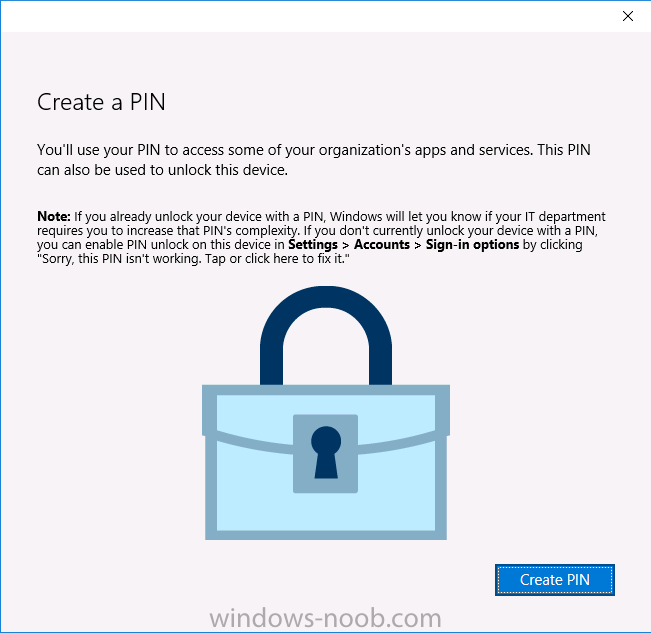
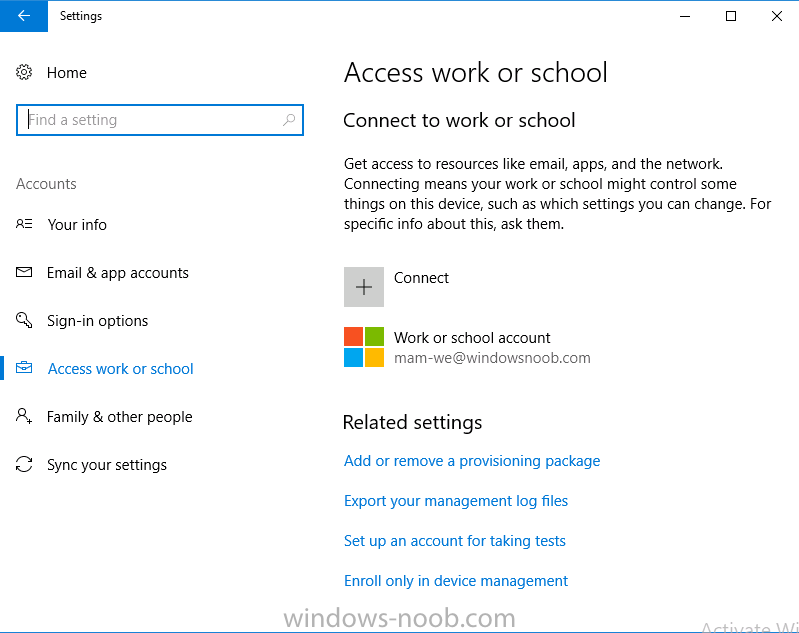
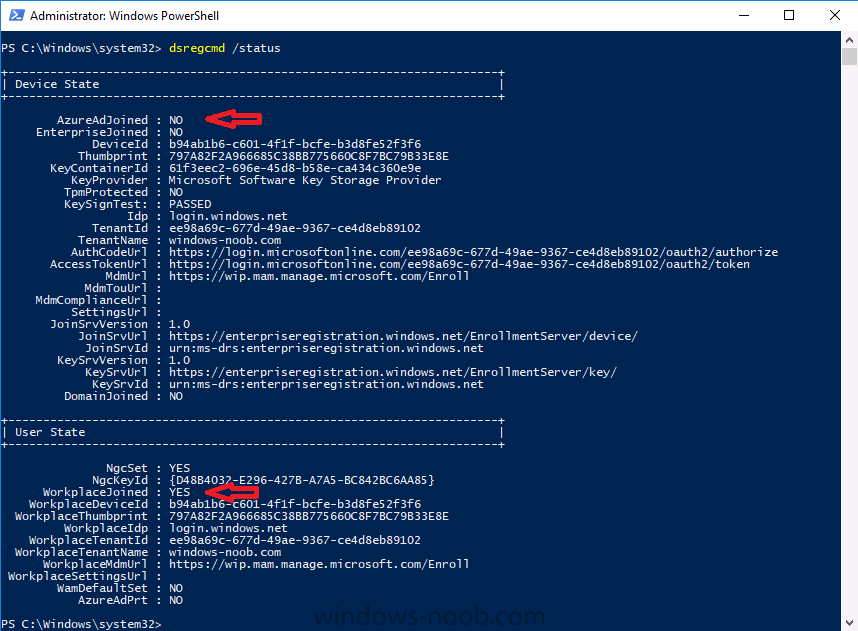
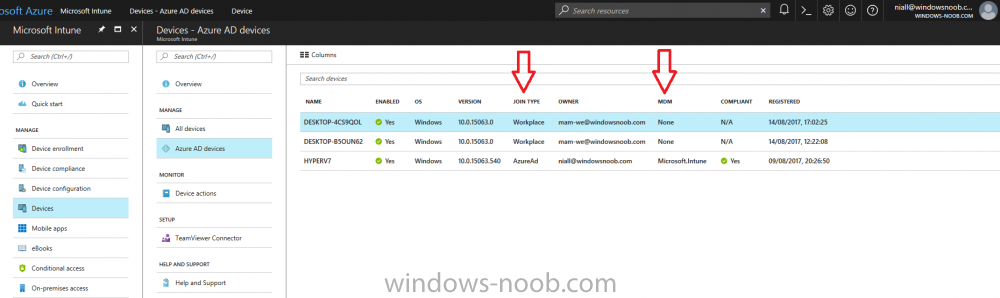
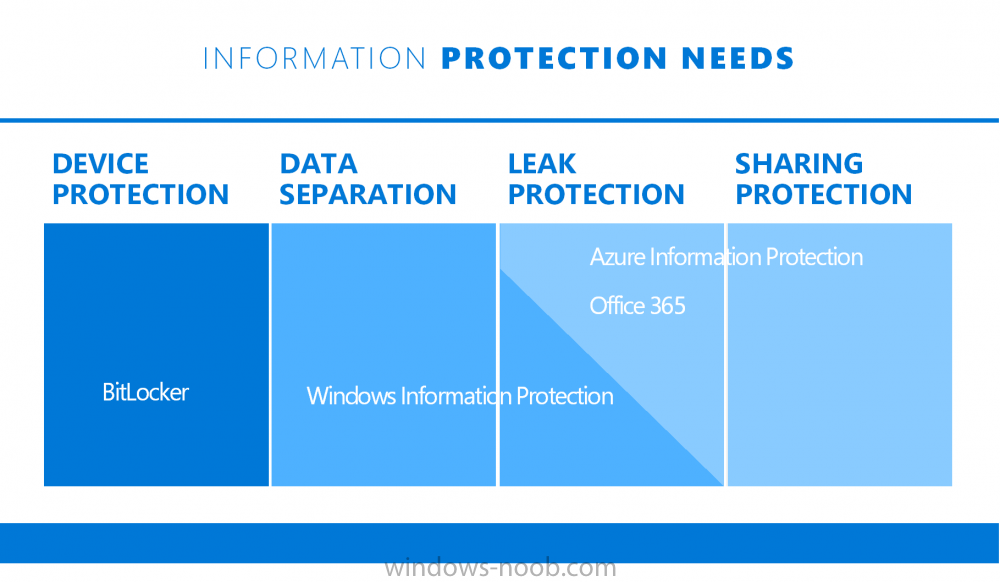
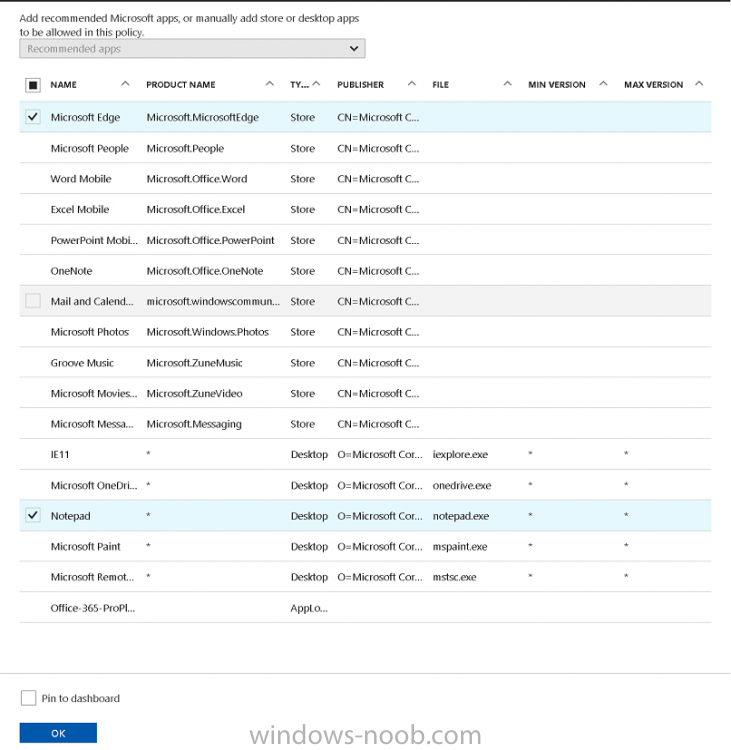
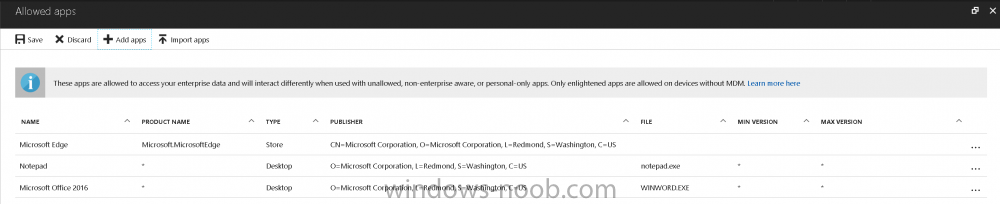
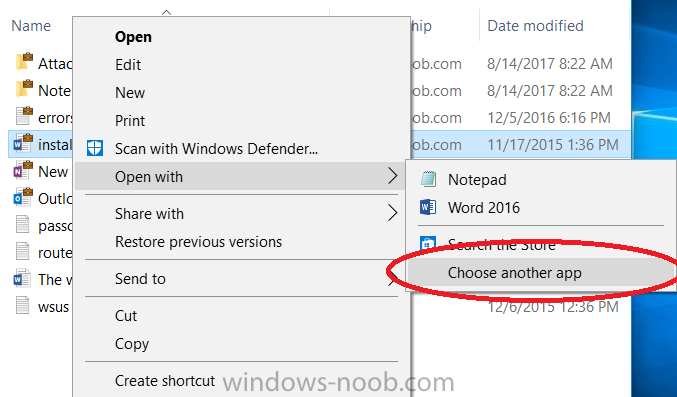
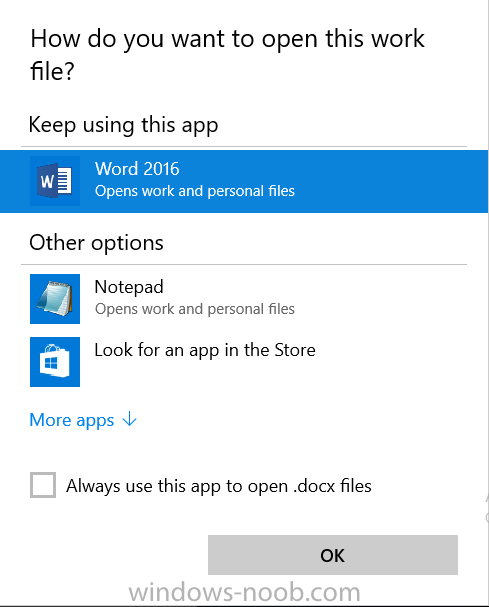
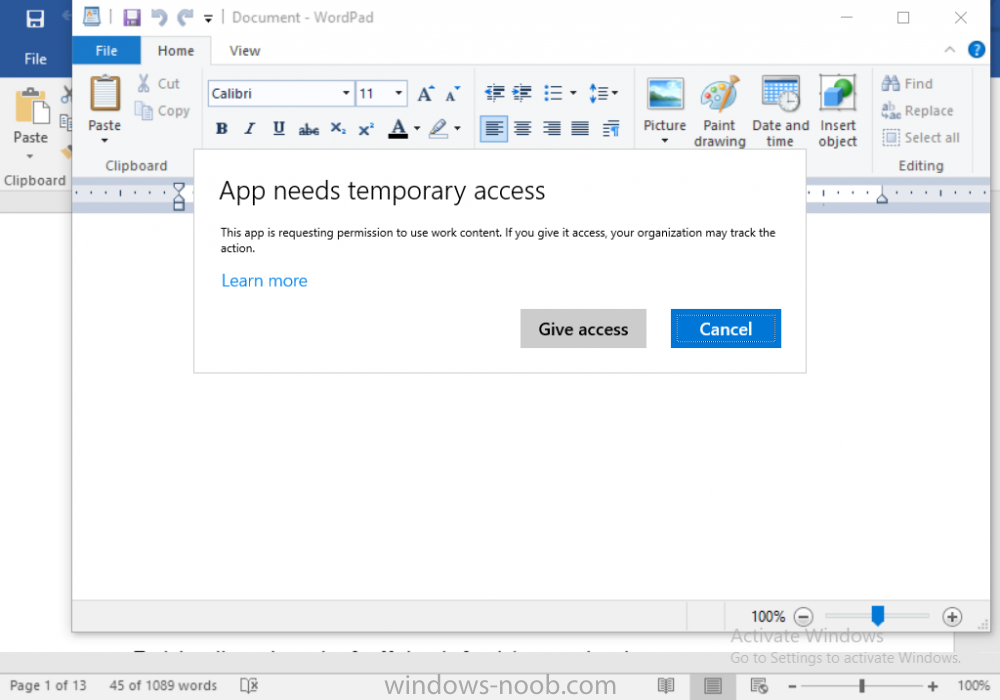
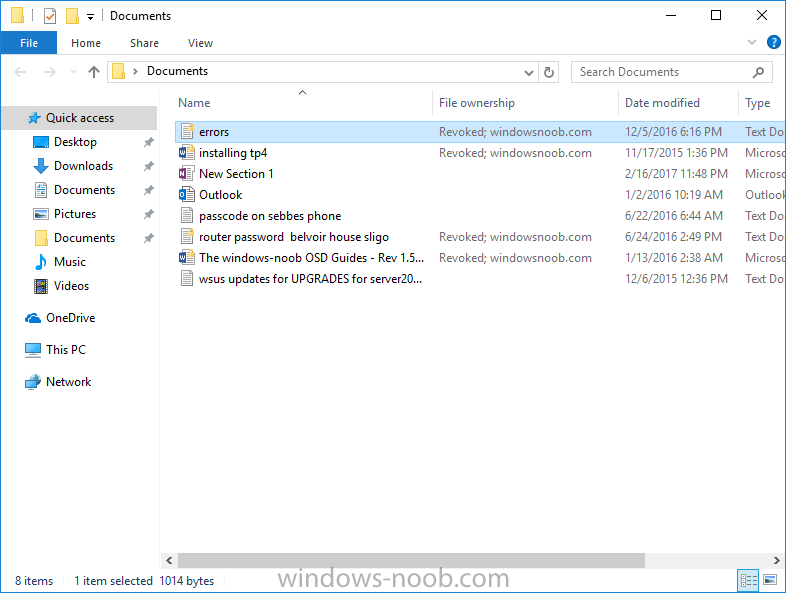
Introduction In a previous post you reviewed what Windows Information Protection (WIP) is and how you can configure Intune to use it, you then deployed a WIP policy to a group of users and verified the end result on a Azure AD joined (with Auto-MDM enrollment) Windows 10 version 1703 device. If you are still not familiar with WIP then I'd recommend you review this blog post from Microsoft, it covers it really well. The graphic below also gives you a nice indication of where WIP fit's in to your information protection needs and how it fits neatly into the Data Separation and Leak Protection space. In this post, you will see how WIP works on a Windows 10 version 1703 device that is Azure AD registered and not enrolled into MDM (MAM-WE). This is a typical Bring Your Own Device (BYOD) scenario. Create a WIP policy for Windows 10 devices without enrollment In a previous post you configured MAM in Azure, and now you will create a WIP policy for Windows 10 devices that are not enrolled into MDM, this will give you additional options to configure in the advanced section of the WIP Policy. To create the WIP Policy in the Microsoft Intune service in Azure, select Mobile Apps then click on App protection policies. Next click on Add a Policy. Give the policy a descriptive name, and optionally a description of what it does, in the Platform drop down select Windows 10 from the choices available. Next choose your enrollment option for Enrollment State, select Without Enrollment. Note, if you select the wrong enrollment option you cannot change it later, you'll have to recreate the policy with the correct enrollment option. Next, there are two sections in the Create Policy wizard related to Apps. Allowed apps - These are the apps that must adhere to the policy Exempt apps - These apps are exempt from the policy and can access enterprise data freely. Note: Apps can be enlightened or unenlightened. Enlightened apps can differentiate between corporate and personal data, correctly determining which to protect, based on your policies. Unenlightened apps consider all data corporate and encrypt everything. For a list of Enlightened apps see here. Adding Allowed Apps Click on Allowed apps and then click on Add apps to add one or more apps that you want to adhere to the policy. There's a drop down with Recommended apps selected by default and those apps are listed below the drop down. Recommended apps: a pre-populated list of (mostly Microsoft Office) apps that allow admins easily import into policy. Store apps: Admin can add any app from the Windows store to policy. Windows desktop apps: Admin can add any traditional Windows desktop apps to the policy (e.g. exe, dll, etc.) If you want to add your own Store apps or Desktop apps manually then you'll need to select the appropriate option and fill in the blanks. To get information about how to generate the info needed for manually adding Store and Windows desktop apps see this post. To add Allowed apps, click on Add apps, then select Recommended apps and make your selection from those available. For the purposes of this guide select Microsoft Edge and Notepad from the list of apps available. Click OK on the Recommended apps page, then click on OK on the Add apps page, next you will add an additional desktop app such as Microsoft Word 2016, to do so use the following method. Click on Add apps, and from the drop down choose Desktop Apps. Fill in the following information in the blanks. Name: Microsoft Office 2016 Product Name: * Type: Desktop Publisher: O=Microsoft Corporation, L=Redmond, S=Washington, C=US File: winword.exe Min Version: * Max Version: * Note: if you get the Publisher information above wrong, for example a missing letter, or misplaced comma or a missing space, then the policy (for Microsoft Word) will fail to apply and it won't work. You can pick a built in desktop app like notepad and compare the publisher settings to your app. Here is a copy of the data used above: NAME PRODUCT NAME TYPE PUBLISHER FILE MIN VERSION MAX VERSION Microsoft Office 2016 * Desktop O=Microsoft Corporation, L=Redmond, S=Washington, C=US WINWORD.EXE * * And below is what it looks like after you've added it correct, compare the Notepad desktop app with the one you just added, the Publisher line must match exactly. Adding Exempt Apps Next click on Exempt apps, and add the Company Portal to allow the app to properly function. To do so, add the following Store app to the list of Exempt apps: Name: Company Portal Publisher: CN=Microsoft Corporation, O=Microsoft Corporation, L=Redmond, S=Washington, C=US Product Name: Microsoft.CompanyPortal as shown here Click OK when done. Next click on Required settings and configure the protection mode, in this example set it to Allow Overrides, remove Pin to Dashboard and click on OK. Note: Allow Overrides lets the user override the policy and share the data, logging the action to your audit log. The 4 available Windows Information Protection mode settings are listed below. Hide Overrides - WIP looks for inappropriate data sharing practices and stops the user from completing the action. This can include sharing info across non-corporate-protected apps, and sharing corporate data between other people and devices outside of your organization. Allow Overrides - WIP looks for inappropriate data sharing, warning users if they do something deemed potentially unsafe. However, this mode lets the user override the policy and share the data, logging the action to your audit log. Silent - WIP runs silently, logging inappropriate data sharing, without blocking anything that would’ve been prompted for employee interaction while in Allow Override mode. Unallowed actions, like apps inappropriately trying to access a network resource or WIP-protected data, are still stopped. Off (not recommended) - WIP is turned off and doesn't help to protect or audit your data. After you turn off WIP, an attempt is made to decrypt any WIP-tagged files on the locally attached drives. Be aware that your previous decryption and policy info isn’t automatically reapplied if you turn WIP protection back on. Configuring advanced settings Next click on Advanced settings, to configure advanced settings. Notice how you can configure Windows Hello for Business options in the policy. These Windows Hello for Business options can by targeted to a User group of your choosing (essentially the same User group that you assign the WIP policy to), which is useful if you don't like the default Windows Enrollment option for enabling Windows Hello for Business (which applies to All Users). Once you are done configuring it, click on OK and then Create to create the WIP policy. Deploying the policy Now that you've created your WIP policy, it needs to be deployed (assigned) to a group of users that you intend to target with this policy. To deploy the policy, select it and then click on Assignments. Next click on Select Groups to select a previously created Azure Group containing one or more users. After selecting a suitable user group, click on Select. The policy is now deployed. Registering a device in Azure AD (workplace join) Let's look at a Windows 10 device that is not joined to Active Directory or Azure AD, it is only work group joined (this is a typical state for BYOD devices). Using an Administrative PowerShell cmd prompt, issue the following command dsregcmd /status Output similar to the below should appear As you can see from the output, the Windows 10 device is not joined to AAD, not Domain Joined and also not Enterprise joined (some future option from Microsoft ?). AzureADJoined: No EnterpriseJoined: No DomainJoined: No To Azure AD register the device (workplace joined) do as follows: Click on All Settings, Accounts, Access work or school. Then click on Connect and enter your Intune user credentials, note that their are options to join Azure AD and an on premise Domain but you will not select either as this device will be AAD registered only. When prompted enter the password and click on Sign-in. you'll be informed about what is happening, note the 'while we register this device' text. If any additional authentication is configured (Windows Hello for Business), you'll be prompted to enter it. after the text message is sent to your phone... Click Next and then Setup a PIN click next and then Done to close the wizard. Note: The User name used to register the device is listed with a Windows icon beside it. At this point, once again issue the dsregcmd /status command in an Administrative PowerShell cmd prompt. From the output you can see that the device is NOT Azure AD Joined and it is Workplace Joined, which is another way of saying it is Azure AD registered. You can verify that the device is not MDM enrolled and that it is Workplace joined and Azure AD Registered by clicking on Azure AD devices in the Intune portal. Review WIP policy on a Windows 10 device So now that our Windows 10 device is Azure AD registered, let's verify how the WIP policy applies. To do so logon to the Windows 10 device used above. In the example below there are some documents, some are marked as Work (they have a suitcase icon on them and File Ownership is listed as the windowsnoob.com Enterprise.) and some are Personal. Right click on a protected Word document and choose Open With, next select Choose another App. if your policy is applied correctly you'll see the following (that Word 2016 can open both Work and Personal files), if not, sync the policy again and try again. Once the document is open in Word, copy some text and attempt to paste it into WordPad (which is not an allowed app.) If everything went well you'll be prompted to either Give Access or Cancel. Note: If you do not get the desired result, for example if the data simply pastes in, then you should verify the version of Office application you are using is up to date. For example, Office 365 may be on the Deferred Channel (now called Semi Annual Channel) meaning that it's version is 1701.(xxxx.xxxx) and that may mean that it cannot process the WIP policy correctly. Once you've updated Office 365 to the Current Channel (now known as Monthly) you'll get the desired result. Tip: You can review your software download settings for Office 365 by going to https://portal.office.com and, clicking on Software Download Settings on the main screen. In there, by default it will be set to the Semi Annual Channel which as of when I tested it in this guide, won't work correctly with WIP. In the screenshot below you can see that Office is configured for the Semi Annual Channel. As time goes on this will auto-correct itself, but if you see issues such as I've described then select Monthly Channel, update the office software on the client, and try again. Next, open a protected (work) txt document with Notepad. Notice the suitcase icon in the banner area. If you click on the suitcase, it will say Managed by your company. Try opening the same document with an app this is not allowed, and you'll see this. And next browse a work site (such as Sharepoint) in Microsoft Edge and you'll again see the suitcase icon, notifying you that Edge realizes this is a Work network resource. Downloading a document from Sharepoint automatically marks it as a Work document, and that means it's protected. as you can see here. Once the BYOD project comes to an end, have the user disconnect the work or school account in Account settings, and any Enterprise data left on the device will be revoked and can no longer be read or used. Hopefully this post helps you understand WIP capability on Windows 10 version 1703 devices (and later) that are not enrolled into MDM (MAM-WE) using policy created in Intune in Azure. I think we'll see more happening in this space in the coming months, hopefully with native reporting in Azure along with selective wipe. Until next time, adios. Recommend reading Introducing Windows Information Protection https://blogs.technet.microsoft.com/windowsitpro/2016/06/29/introducing-windows-information-protection/ Windows Information Protection explained https://blogs.technet.microsoft.com/cbernier/2017/05/19/windows-information-protection-explained-windows-10-creators-update/ App behaviour with WIP https://docs.microsoft.com/en-us/windows/threat-protection/windows-information-protection/app-behavior-with-wip Protect your enterprise data using Windows Information Protection (WIP) https://docs.microsoft.com/en-us/windows/threat-protection/windows-information-protection/protect-enterprise-data-using-wip Limitations using WIP https://docs.microsoft.com/en-us/windows/threat-protection/windows-information-protection/limitations-with-wip Create and Assign WIP application protection policies https://docs.microsoft.com/en-us/intune/windows-information-protection-policy-create Enlightened apps and WIP https://docs.microsoft.com/en-us/windows/threat-protection/windows-information-protection/enlightened-microsoft-apps-and-wip Walkthrough: Workplace Join with a Windows Device https://docs.microsoft.com/en-us/windows-server/identity/ad-fs/operations/walkthrough--workplace-join-with-a-windows-device How to configure hybrid Azure Active Directory joined devices https://docs.microsoft.com/en-us/azure/active-directory/active-directory-conditional-access-automatic-device-registration-setup New to Office 365 https://blogs.office.com/en-us/2017/06/23/new-to-office-365-in-june-classroom-experiences-in-microsoft-teams-and-more/ Manage Windows Information Protection work and personal files https://support.microsoft.com/en-us/help/4012985/windows-10-manage-windows-information-protection-work-personal-files General guidance and best practices for Windows Information Protection (WIP) https://docs.microsoft.com/en-us/windows/threat-protection/windows-information-protection/guidance-and-best-practices-wip


-
Please refer to this link from this point forward.
-
 I currently administer a single, on-premise, MP with ~60 local DPs spread globally. We have around 7500 devices and 4000 users. At present the MP, SQL and foundations all live in the UK, and this is causing a bit of grief for our APAC sites, when pulling down TS policies for OSD etc... We're needing/wanting to spin up a 16xx instance of SCCM anyway, but have been wondering if/how feasible a Cloud Based MP and feature rich site system server would be if based in Azure for example. The rough plan would be... MP (Azure VM, EMEA) DB (Azure SQL, EMEA) DP (Azure VM, 1 per region - EMEA, NASA & APAC) Source Server (Azure VM) We'd use the Azure Based DP's as "Push" DP's, to the 60 or so Local DPs we have globally. The theory being this would alleviate the stress on our a Single UK DP as the "pusher". Is SCCM ready for this kind of setup? Is Azure ready for this kind of setup? Does anyone else, do anything similar?
 -
As title says I am having some issues with my Azure cloud distribution point. First some info about my Azure cloud setup: It is set up with 2 certificates with common name of my FQDN to my Windows Azure. Exported them to the sccm-site server. Configmgr group have read and enroll rights. 1 certificate (.cer) is without a key, uploaded to Windows Azure. Second key (.pfx) was used when setting up cloud dp in the SCCM console. It was set up successfully as far as i can tell and according to the cloudmgr.log on SCCM-server: Deployment instance status for service 75dcea72c6724f99a68bcda7 is StartingVM.~~ $$<SMS_CLOUD_SERVICES_MANAGER><03-22-2013 13:46:09.177-60><thread=5624 (0x15F8)> TaskWorker: Starting...~~ $$<SMS_CLOUD_SERVICES_MANAGER><03-22-2013 13:46:11.565-60><thread=3584 (0xE00)> TaskWorker: Starting task: [CloudServicesTaskBuilder]~~ $$<SMS_CLOUD_SERVICES_MANAGER><03-22-2013 13:46:11.566-60><thread=3584 (0xE00)> CloudServicesTaskBuilder: Starting.~~ $$<SMS_CLOUD_SERVICES_MANAGER><03-22-2013 13:46:11.566-60><thread=5432 (0x1538)> CloudServicesTaskBuilder: Stopping.~~ $$<SMS_CLOUD_SERVICES_MANAGER><03-22-2013 13:46:11.578-60><thread=5432 (0x1538)> Deployment instance status for service 75dcea72c6724f99a68bcda7 is StartingVM.~~ $$<SMS_CLOUD_SERVICES_MANAGER><03-22-2013 13:46:30.336-60><thread=5624 (0x15F8)> Deployment instance status for service 75dcea72c6724f99a68bcda7 is StartingVM.~~ $$<SMS_CLOUD_SERVICES_MANAGER><03-22-2013 13:46:49.396-60><thread=5624 (0x15F8)> Deployment instance status for service 75dcea72c6724f99a68bcda7 is RoleStateUnknown.~~ $$<SMS_CLOUD_SERVICES_MANAGER><03-22-2013 13:47:10.419-60><thread=5624 (0x15F8)> Deployment instance status for service 75dcea72c6724f99a68bcda7 is BusyRole.~~ $$<SMS_CLOUD_SERVICES_MANAGER><03-22-2013 13:47:33.788-60><thread=5624 (0x15F8)> Deployment instance status for service 75dcea72c6724f99a68bcda7 is BusyRole.~~ $$<SMS_CLOUD_SERVICES_MANAGER><03-22-2013 13:47:53.687-60><thread=5624 (0x15F8)> TaskWorker: No tasks to process within timeout period, shutting down.~~ $$<SMS_CLOUD_SERVICES_MANAGER><03-22-2013 13:48:11.560-60><thread=3584 (0xE00)> TaskWorker: Shutting down.~~ $$<SMS_CLOUD_SERVICES_MANAGER><03-22-2013 13:48:11.560-60><thread=3584 (0xE00)> Deployment instance status for service 75dcea72c6724f99a68bcda7 is BusyRole.~~ $$<SMS_CLOUD_SERVICES_MANAGER><03-22-2013 13:48:16.382-60><thread=5624 (0x15F8)> Deployment instance status for service 75dcea72c6724f99a68bcda7 is BusyRole.~~ $$<SMS_CLOUD_SERVICES_MANAGER><03-22-2013 13:48:38.134-60><thread=5624 (0x15F8)> Deployment instance status for service 75dcea72c6724f99a68bcda7 is ReadyRole.~~ $$<SMS_CLOUD_SERVICES_MANAGER><03-22-2013 13:48:58.597-60><thread=5624 (0x15F8)> Deployment 75dcea72c6724f99a68bcda7 instance status is ReadyRole.~~ $$<SMS_CLOUD_SERVICES_MANAGER><03-22-2013 13:48:58.597-60><thread=5624 (0x15F8)> STATMSG: ID=9420 SEV=I LEV=M SOURCE="SMS Server" COMP="SMS_CLOUD_SERVICES_MANAGER" SYS=37E-SCCM.ss.no SITE=SS1 PID=1892 TID=5624 GMTDATE=fr mar 22 12:48:58.597 2013 ISTR0="75dcea72c6724f99a68bcda7" ISTR1="" ISTR2="" ISTR3="" ISTR4="" ISTR5="" ISTR6="" ISTR7="" ISTR8="" ISTR9="" NUMATTRS=1 AID0=404 AVAL0="["Display=\\<my-azure-domain>.cloudapp.net\"]MSWNET:["SMS_SITE=SS1"]\\<my-azure-domain>.cloudapp.net\" $$<SMS_CLOUD_SERVICES_MANAGER><03-22-2013 13:48:58.611-60><thread=5624 (0x15F8)> STATMSG: ID=9408 SEV=I LEV=M SOURCE="SMS Server" COMP="SMS_CLOUD_SERVICES_MANAGER" SYS=37E-SCCM.ss.no SITE=SS1 PID=1892 TID=5624 GMTDATE=fr mar 22 12:48:58.612 2013 ISTR0="75dcea72c6724f99a68bcda7" ISTR1="North Europe" ISTR2="" ISTR3="" ISTR4="" ISTR5="" ISTR6="" ISTR7="" ISTR8="" ISTR9="" NUMATTRS=1 AID0=404 AVAL0="["Display=\\<my-azure-domain>.cloudapp.net\"]MSWNET:["SMS_SITE=SS1"]\\<my-azure-domain>.cloudapp.net\" $$<SMS_CLOUD_SERVICES_MANAGER><03-22-2013 13:48:58.612-60><thread=5624 (0x15F8)> Finished deploying service 75dcea72c6724f99a68bcda7.~~ $$<SMS_CLOUD_SERVICES_MANAGER><03-22-2013 13:48:58.612-60><thread=5624 (0x15F8)> STATMSG: ID=9409 SEV=I LEV=M SOURCE="SMS Server" COMP="SMS_CLOUD_SERVICES_MANAGER" SYS=37E-SCCM.ss.no SITE=SS1 PID=1892 TID=5624 GMTDATE=fr mar 22 12:48:58.613 2013 ISTR0="75dcea72c6724f99a68bcda7" ISTR1="North Europe" ISTR2="" ISTR3="" ISTR4="" ISTR5="" ISTR6="" ISTR7="" ISTR8="" ISTR9="" NUMATTRS=1 AID0=404 AVAL0="["Display=\\<my-azure-domain>.cloudapp.net\"]MSWNET:["SMS_SITE=SS1"]\\<my-azure-domain>.cloudapp.net\" $$<SMS_CLOUD_SERVICES_MANAGER><03-22-2013 13:48:58.613-60><thread=5624 (0x15F8)> TaskWorker: Starting...~~ $$<SMS_CLOUD_SERVICES_MANAGER><03-22-2013 13:48:58.614-60><thread=5624 (0x15F8)> TaskWorker: Starting task: [upload MP Certificates for service 75dcea72c6724f99a68bcda7]~~ $$<SMS_CLOUD_SERVICES_MANAGER><03-22-2013 13:48:58.615-60><thread=5624 (0x15F8)> Upload mp certs starting for service 75dcea72c6724f99a68bcda7...~~ $$<SMS_CLOUD_SERVICES_MANAGER><03-22-2013 13:48:58.625-60><thread=3584 (0xE00)> Storage service already exists 75dcea72c6724f99a68bcda7~~ $$<SMS_CLOUD_SERVICES_MANAGER><03-22-2013 13:49:03.641-60><thread=3584 (0xE00)> Uploading certificate for server 37e-sccm.ss.no to publickeystore for service 75dcea72c6724f99a68bcda7.~~ $$<SMS_CLOUD_SERVICES_MANAGER><03-22-2013 13:49:07.831-60><thread=3584 (0xE00)> Uploading bytearray to container publickeystore with blob name 37e-sccm.ss.no.pubkey using storage account 75dcea72c6724f99a68bcda7~~ $$<SMS_CLOUD_SERVICES_MANAGER><03-22-2013 13:49:07.951-60><thread=3584 (0xE00)> TaskWorker: No tasks to process within timeout period, shutting down.~~ $$<SMS_CLOUD_SERVICES_MANAGER><03-22-2013 13:50:58.609-60><thread=5624 (0x15F8)> TaskWorker: Shutting down.~~ $$<SMS_CLOUD_SERVICES_MANAGER><03-22-2013 13:50:58.609-60><thread=5624 (0x15F8)> Uploading to the cloud dp also works fine, as i can see the package in the storage after it is distrubuted. Now the actual error is on my clients. They can see the advertisement, that they have an application to download. However when they start to download its stuck at 0%, and it stays there for forever. DataTranserService.log shows following: <![LOG[Error sending DAV request. HTTP code 600, status '']LOG]!><time="14:38:51.871-60" date="03-22-2013" component="DataTransferService" context="" type="3" thread="1608" file="util.cpp:701"> <![LOG[GetDirectoryList_HTTP('https://<my-azure-domain>.cloudapp.net:443/downloadrestservice.svc/getcontentxmlsecure?pid=SS10001A&cid=CONTENT_81A08801-D9A3-4606-8C3C-5A755D3DD73F.1&tid=GUID:CD2B5C41-799C-4097-BC3E-00D6B154E6FD&iss=37E-SCCM.SS.NO&alg=1.2.840.113549.1.1.5&st=2013-03-22T13:38:02&et=2013-03-22T21:38:02') failed with code 0x87d00215.]LOG]!><time="14:38:51.871-60" date="03-22-2013" component="DataTransferService" context="" type="3" thread="1608" file="util.cpp:768"> <![LOG[Non-recoverable error retrieving manifest (0x87d00215).]LOG]!><time="14:38:51.871-60" date="03-22-2013" component="DataTransferService" context="" type="2" thread="1608" file="dtsjob.cpp:1310"> The domain ss.no is internal, and not reachable from the outside, could this be the issue, or am i totally off? Could really need some help here, thanks in advance!
-
 Hi, dear mates... Firstly, I would like to say thanks for many of the posts about SCCM2012 that have helped me to know better SCCM2012 and begin to understand it. Anyway, I'm still a rookie on this system. On the other hand I've several problems configuriying my SCCM environment. This is my scenario: I have all the infraestructure in one server, located on Azure. The server is only for admin SCCM 2012 R2 (version 5.0.8239.100, (with the hotfix KB3073015 installed -CU5 not applicable-). WS 2012 R2 and SQL2012. I need it ,basically, for admin the security and updates of 30 workgroup windows machines (Win7 pro and W embeded 7) that connect to internet via 3G. Now I'm working in a lab environment with the SCCM server and two machines (one with W7 and the other with WEmbedded 7. NOTE: As soon as I got the clients set-up, I had problems with Guid's duplication, so I have issued another client certificate, and currently both computers have its own client certificate, but the GUID duplication (after of permorming the recommended actions) hasn't solved, but I'll send another post about it) I've got to solve many problems about PKi infraestructure, finding out for just the ccmpsetup.exe parameters that I needed to setup the clients, etc... After I have solved many errors about MP, checking right all the prerequisites regarding the software needed (all about differential compression, .net Framework, ASP.NET 4.5, Visual c++ etc...), applicable hotfixes, reinstalling SCCM, IIS, Wsus, the clients, Check and configuration of Webdav, test the consitency of WMI ... test the access to ?mp_list and ?mpcert successfully etc... Anyway, I would need to fix the below errors, to be able to carry on with the sccm administration. MPSETUP.LOG ----> ok, without errors MPMSI.LOG... [13:09:36] IGNORE: Failed to delete extension 'C:\Program Files\SMS_CCM\getpolicy.dll'. Return Code = 0x80020009 (The extension might not be registered)...[13:09:36] Method 'DeleteExtensionFileRecord' failed with 80020009 MSI (s) (08:E8) [13:10:22:986]: Executing op: ServiceInstall(Name=CcmExec,DisplayName=SMS Agent Host,ImagePath="C:\Program Files\SMS_CCM\CcmExec.exe",ServiceType=16,StartType=2,ErrorControl=1,,Dependencies=winmgmt[~][~][~],,StartName=LocalSystem,Password=**********,Description=Provides change and configuration services for computer management systems.,,) Property(S): InstallErrorDialog_Title = Setup Aborted ..... Property(S): InstallErrorDialog_SubTitle = Setup failed....Property(S): InstallErrorDialog_Info = Setup encountered an error and could not continue. CTR:MessagesFailed,164,165,65792,novice,0 MSI (s) (08:E8) [13:09:39:644]: Executing op: TypeLibraryRegister(,,FilePath=C:\Windows\system32\ccmcore.dll,LibID={90C7E669-C86D-48A6-8F7A-B16521DB52BD},,,Language=0,,BinaryType=1,IgnoreRegistrationFailure=0, MSI (s) (08:E8) [13:10:26:654]: Windows Installer installed the product. Product Name: ConfigMgr Management Point. Product Version: 5.00.8239.1000. Product Language: 1033. Manufacturer: Microsoft Corporation. Installation success or error status: 0. MPCONTROL.LOG Call to HttpSendRequestSync failed for port 443 with status code 404, text: Not Found Http test request failed, status code is 404, 'Not Found'. Event Viewer... Log Name: Application Source: SMS Server Date: 8/7/2015 3:47:13 PM Event ID: 5436 Task Category: SMS_MP_CONTROL_MANAGER Level: Error Keywords: Classic User: N/A Computer: pudocontrol.domain-name.cloudapp.net Description: On 8/7/2015 3:47:13 PM, component SMS_MP_CONTROL_MANAGER on computer pudocontrol.domain-name.cloudapp.net reported: MP Control Manager detected management point is not responding to HTTP requests. The HTTP status code and text is 404, Not Found. Possible cause: Management point encountered an error when connecting to SQL Server. Solution: Verify that the SQL Server is properly configured to allow Management Point access. Verify that management point computer account or the Management Point Database Connection Account is a member of Management Point Role (msdbrole_MP) in the SQL Server database. Possible cause: The SQL Server Service Principal Names (SPNs) are not registered correctly in Active Directory Solution: Ensure SQL Server SPNs are correctly registered. Review Q829868. Possible cause: Internet Information Services (IIS) isn't configured to listen on the ports over which the site is configured to communicate. Solution: Verify that the designated Web Site is configured to use the same ports which the site is configured to use. Possible cause: The designated Web Site is disabled in IIS. Solution: Verify that the designated Web Site is enabled, and functioning properly. Possible cause: The MP ISAPI Application Identity does not have the requisite logon privileges. Solution: Verify that the account that the MP ISAPI is configured to run under has not been denied batch logon rights through group policy. ----------------------------------------------------------------------------- Log Name: Application Source: MSSQLSERVER Date: 8/7/2015 1:10:50 PM Event ID: 17806 Task Category: Logon Level: Error Keywords: Classic User: N/A Computer: pudocontrol.domain-name.cloudapp.net Description: SSPI handshake failed with error code 0x80090304, state 14 while establishing a connection with integrated security; the connection has been closed. Reason: AcceptSecurityContext failed. The Windows error code indicates the cause of failure. The Local Security Authority cannot be contacted [CLIENT: <local machine>] ------------------------------------------------------------------------------- Log Name: Application Source: Microsoft-Windows-CertificationAuthority Date: 8/7/2015 1:12:20 PM Event ID: 91 Task Category: None Level: Error Keywords: User: SYSTEM Computer: pudocontrol.domain-name.cloudapp.net Description: Could not connect to the Active Directory. Active Directory Certificate Services will retry when processing requires Active Directory access. --------------------------------------------------------------------------------- Log Name: Microsoft-Windows-WMI-Activity/Operational Source: Microsoft-Windows-WMI-Activity Date: 8/7/2015 4:39:38 AM Event ID: 5858 Task Category: None Level: Error Keywords: User: SYSTEM Computer: pudocontrol.domain-name.cloudapp.net Description: Id = {BCC1EB23-D052-0000-121C-C2BC52D0D001}; ClientMachine = PUDOCONTROL; User = NT AUTHORITY\SYSTEM; ClientProcessId = 4316; Component = Unknown; Operation = Start IWbemServices::CreateInstanceEnum - root\CCM : SMS_Authority; ResultCode = 0x80041010; PossibleCause = Unknown ---------- Log Name: Application Source: Microsoft-Windows-WMI Date: 8/7/2015 1:12:02 PM Event ID: 10 Task Category: None Level: Error Keywords: User: SYSTEM Computer: pudocontrol.domain-name.cloudapp.net Description: Event filter with query "SELECT * FROM __InstanceOperationEvent WHERE TargetInstance ISA "ccm_siteassignment"" could not be reactivated in namespace "//./root/ccm/Policy/Machine" because of error 0x80041010. Events cannot be delivered through this filter until the problem is corrected. (this last error was generated more than 3 hours ago, so maybe it's fixed). I would love to have this matter solved... or somebody are gonna boot out to me... Thanks a Bunch, and Greetings from Spain. Roberto
 -
I'm planning an upgrade to sccm 2012. I have multiple sites through out the globe. Most do not have very fast connections. Would I be able to use a cloud DP using Azure and point these clients to that DP? i thought I read somewhere that clients can not download windows updates from Azure,is that true? What functions be available from Azure? Another option I was thinking of at some of these smaller sites was Branch cache. Would I have to designate one client as a branch cache or does every client become a branch cache?