Search the Community
Showing results for tags 'endpoint manager'.
Found 4 results
-
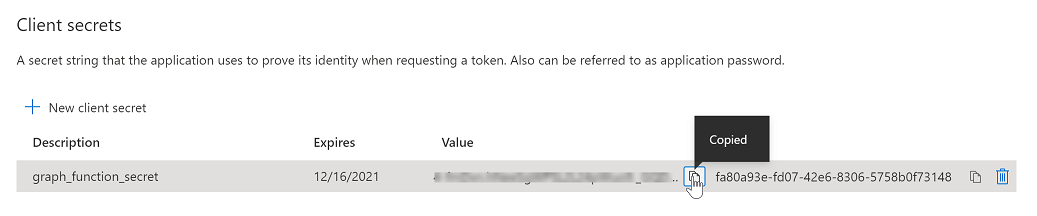
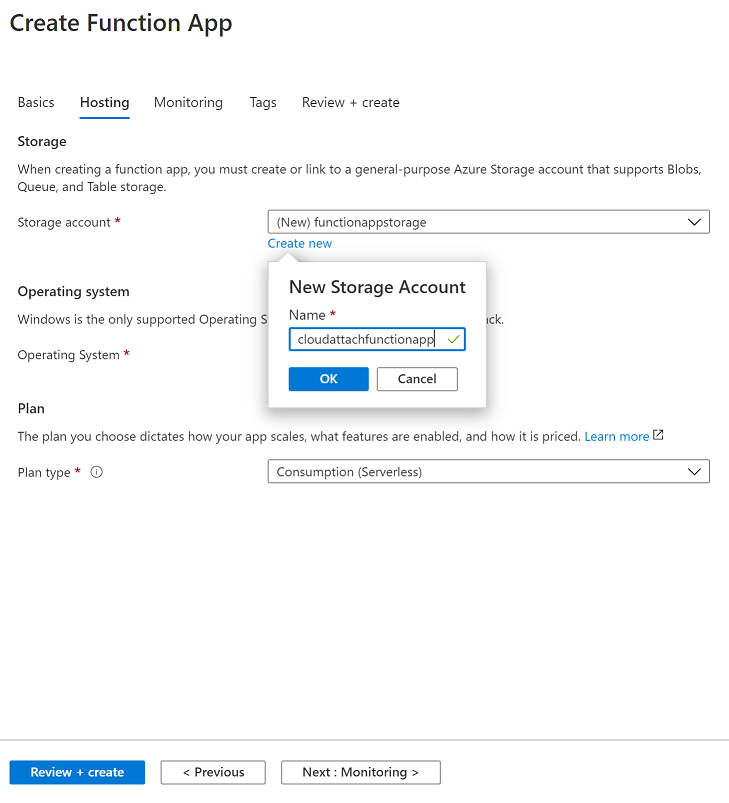
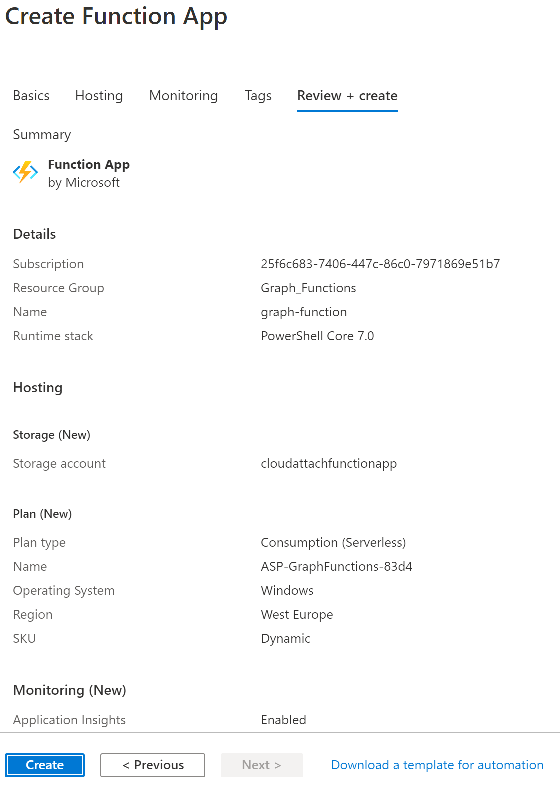
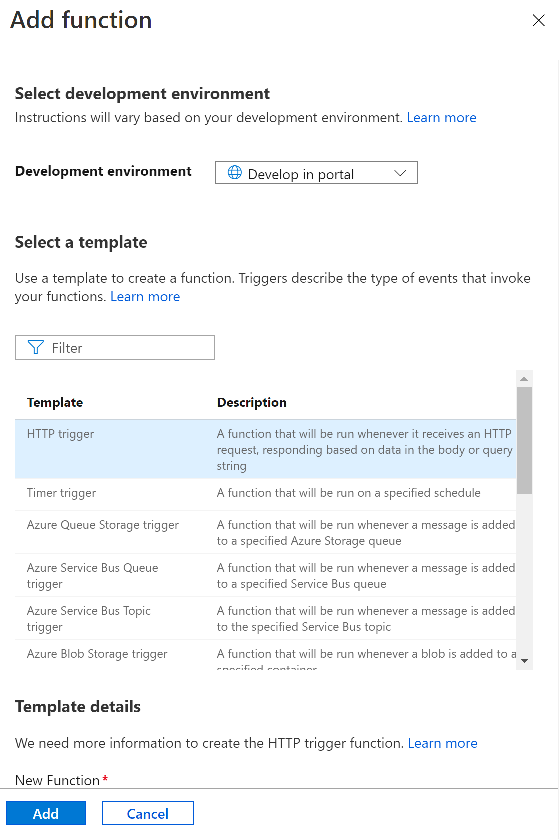
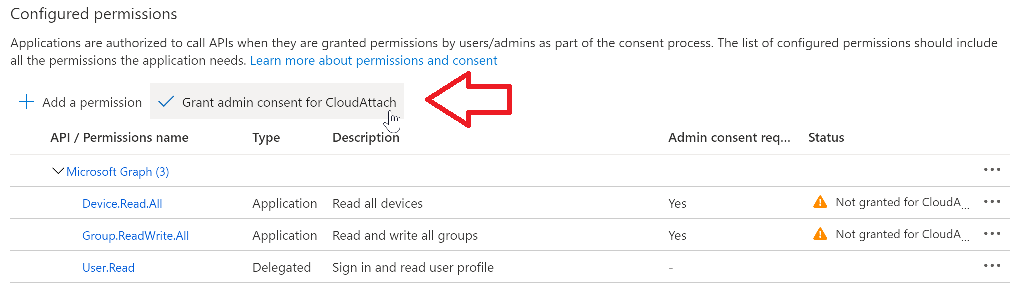
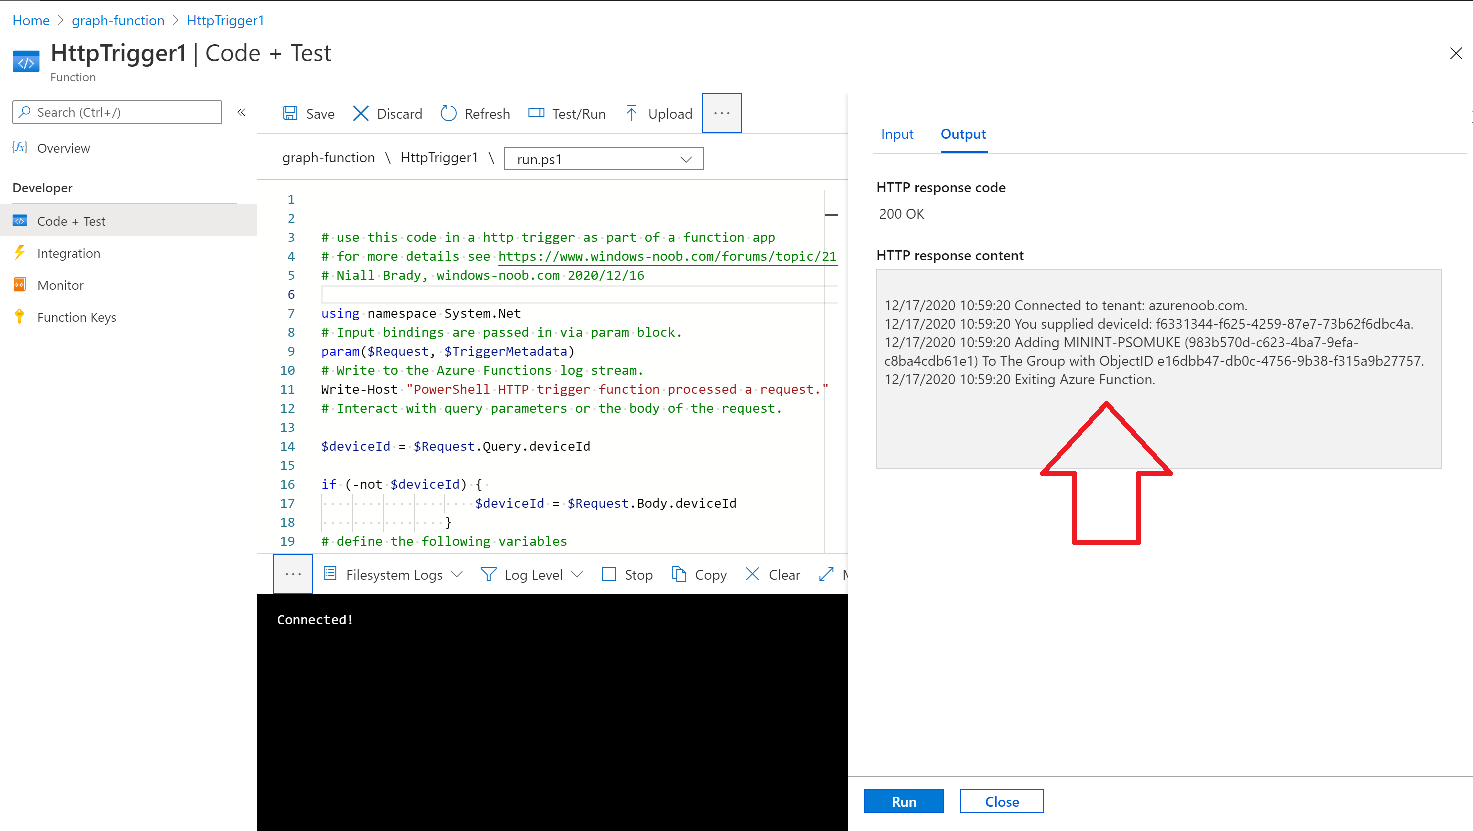
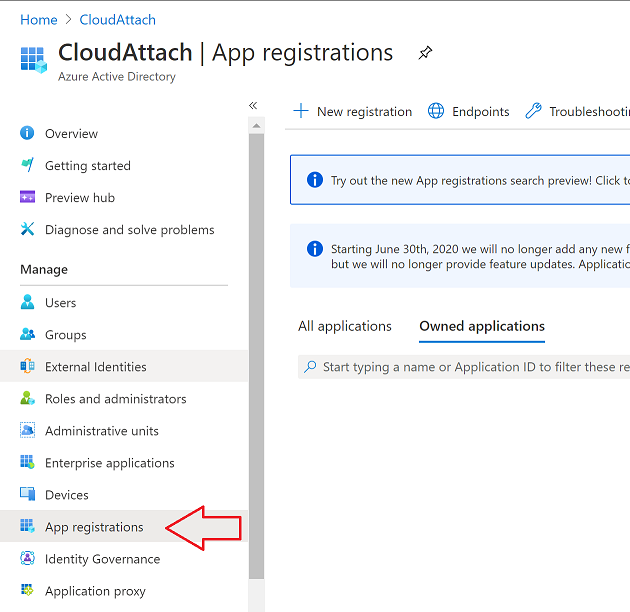
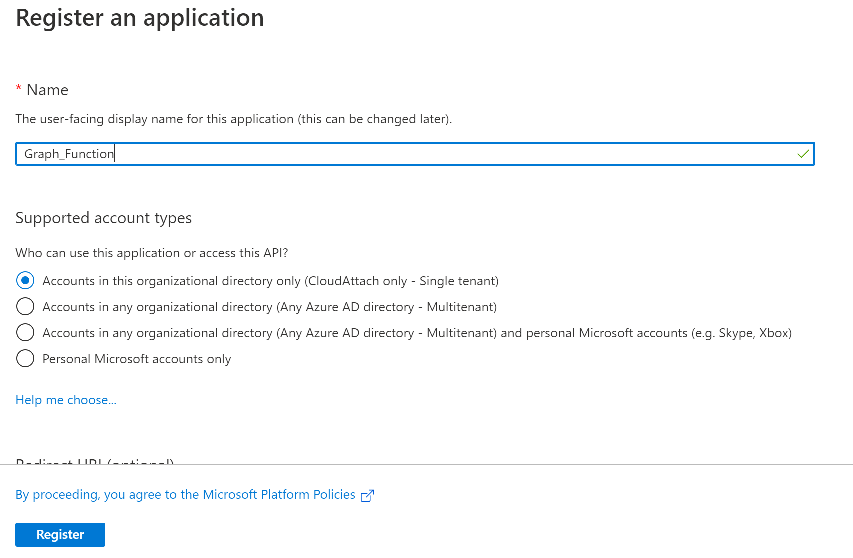
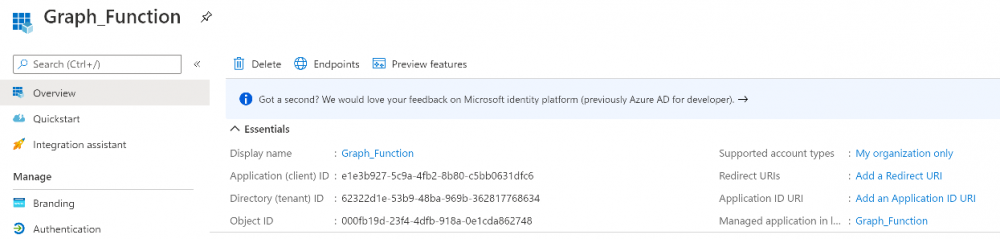
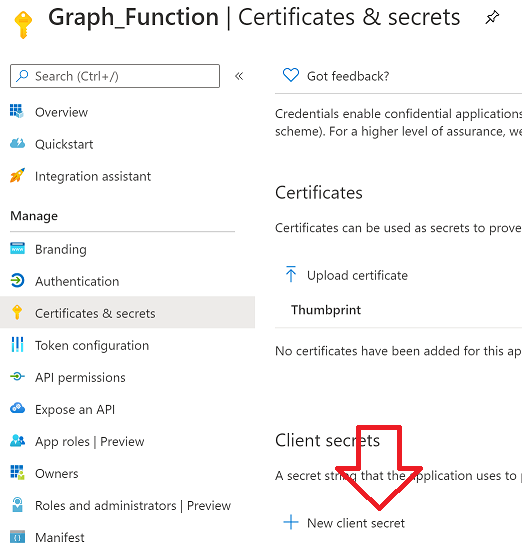
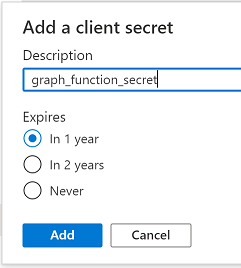
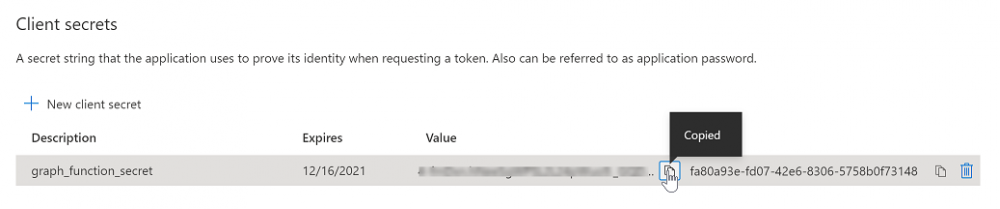
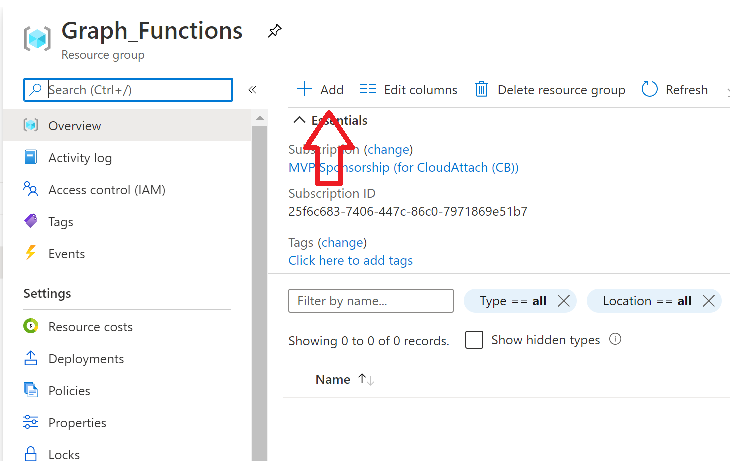
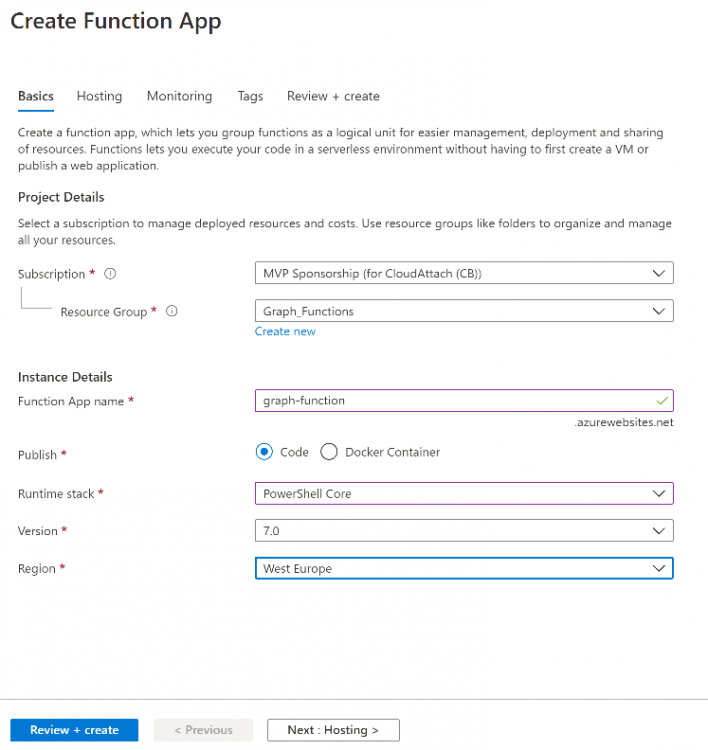
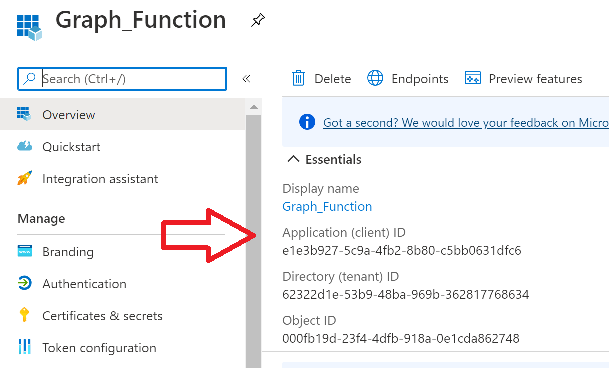
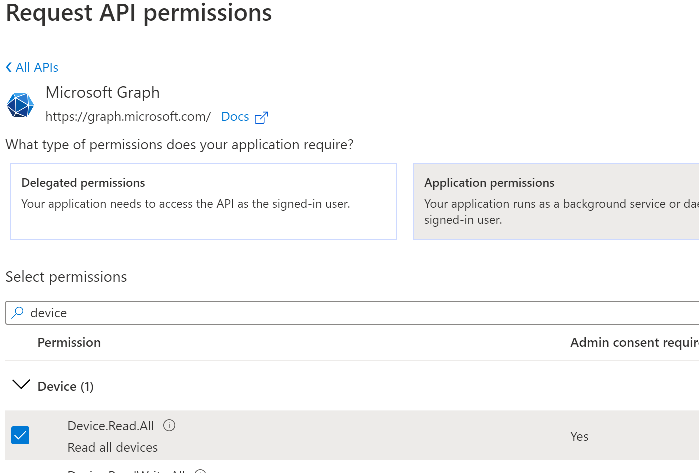
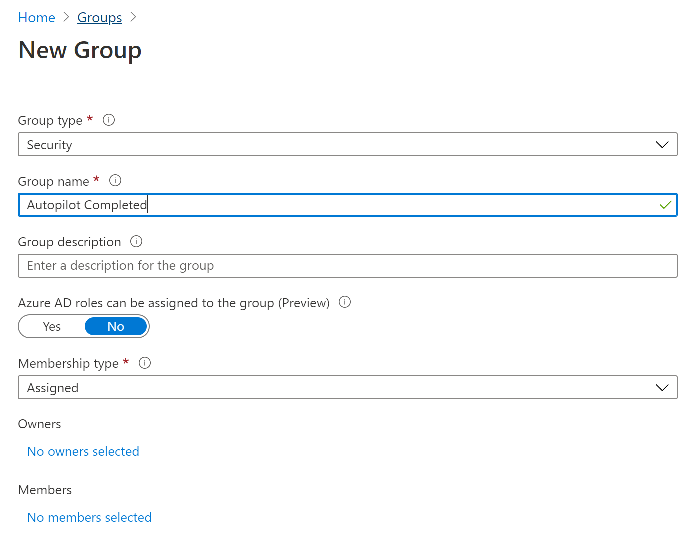
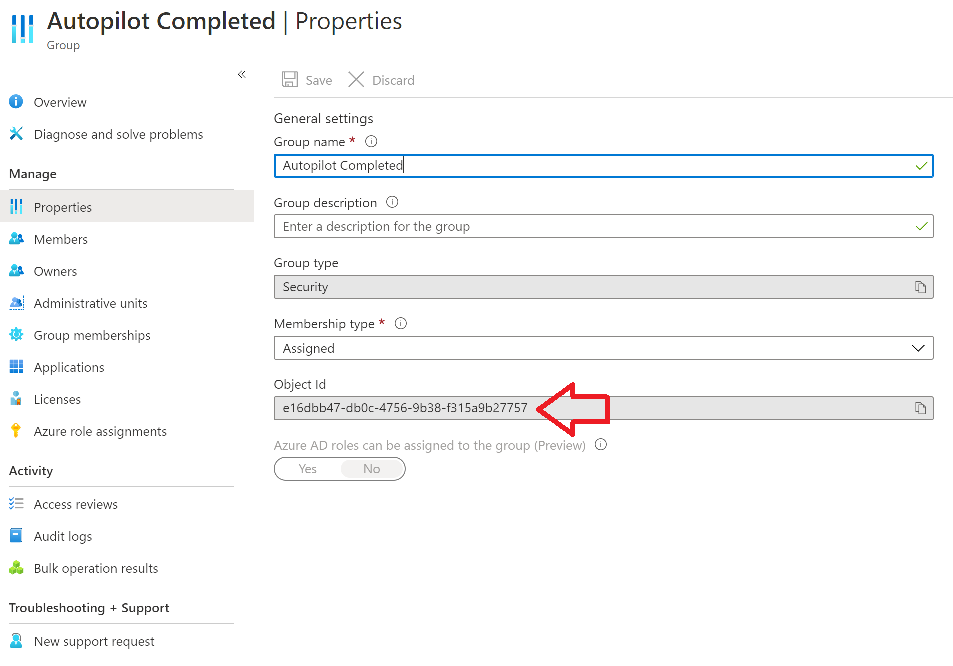
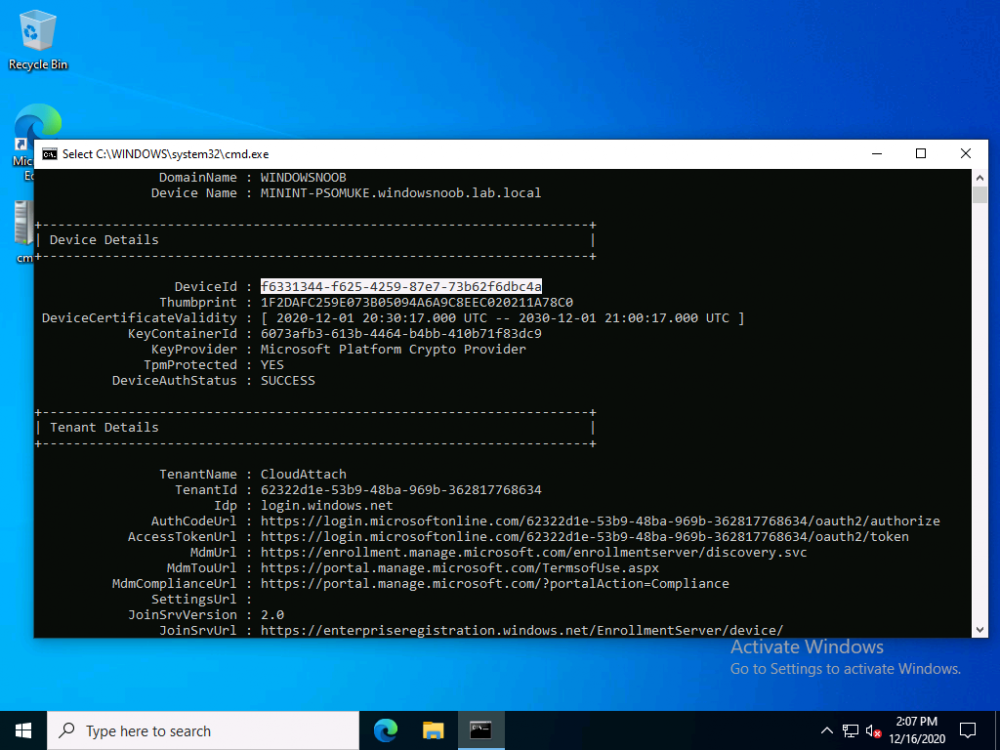
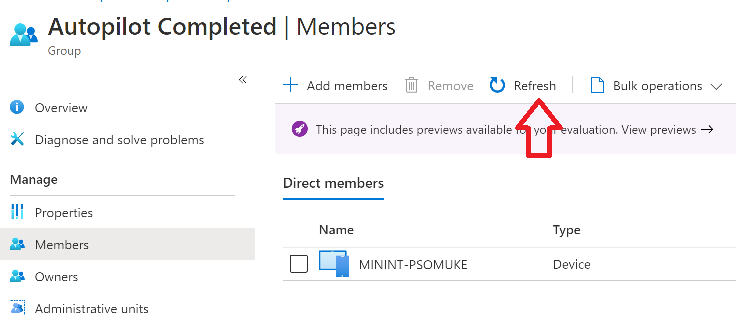
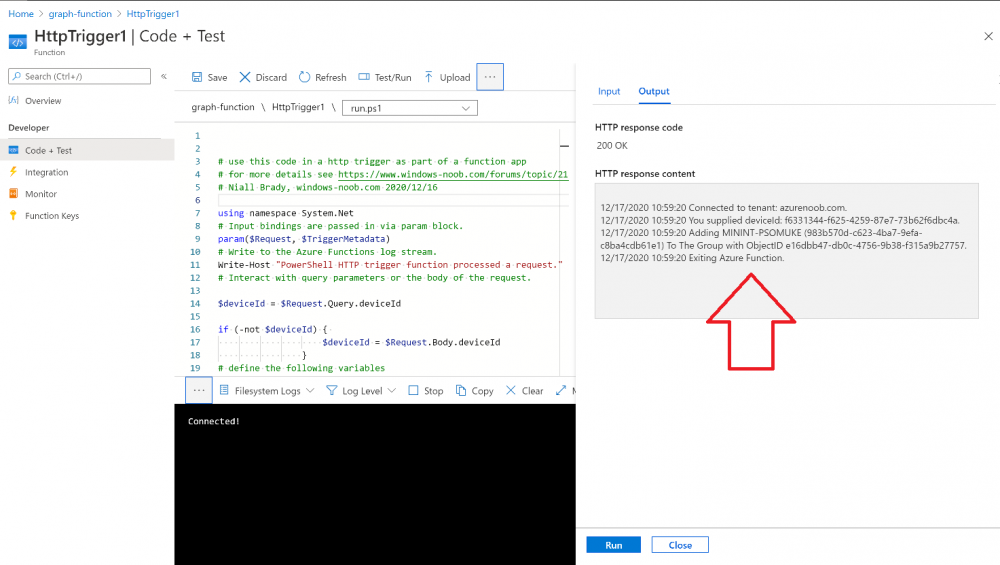
 Introduction I've come across various problems during Windows Autopilot causing OOBE to fail that could be solved if only we could decide the order of when things were installed, and to resolve this in a nice way we wanted to dynamically populate an Azure AD group that could be targeted with a device configuration profile. That would mean that we could target sensitive policies to devices after enrollment instead of during enrollment allowing for a smoother, less error prone experience. Being able to apply a profile after Autopilot is finished requires knowing when Autopilot is actually complete, and I touched upon that subject in a previous blog post here. To expand upon that, we can run a scheduled task on login which runs a PowerShell script which in turn, only delivers the payload if certain things are in place such as. C:\ProgramData\Microsoft\IntuneManagementExtension was created within the last X hours The logged on user is not defaultuser0 We could do this using a PowerShell script which runs as a scheduled task after login but that would require storing sensitive credentials on the client. This blog post will show you the necessary steps taken to get to a stage where you can add devices to an Azure AD group using Azure Functions and Graph, and that is interesting because in conjunction with an app registration allows you to embed certificates or secrets within the function and thereby bypass the need for storing credentials in your PowerShell script which runs on the client. Note: In this blog, the app uses http triggers that use certificate secrets, this is fine in a lab, but in production you should use Azure Key Vault instead as it's more secure. If you'd like to understand how to set that up please read my blog post about Azure Key Vault here. There are other ways of doing this, but this is kind of neat. You need to do the following steps. Create a resource group Create an app registration Create a client secret Create a function app Add a HTTP trigger Get the application ID Create an azure ad group Add missing details Configure API permissions Test adding a client So now you have an idea of what this blog post is about, let's get started. Note: I've released an updated version of this concept which includes checking for device compliance here. Step 1. Create a resource group In Azure Active Directory, create an Azure Resource Group. To do that click on Create a Resource in https://portal.azure.com. In the page that appears, search for Resource Group. Select it and click on Create. Next, give it a useful name like Graph_Functions, and select the region applicable to you. And click on Review + create and after being presented with the summary, click Create. Step 2. Create an app registration In Azure Active Directory, create an create an APP Registration called graph_functions by clicking on App registrations in the left pane and clicking on + New registration. fill in the user-facing display name and then click on Register. The app registration is created. Step 3. Create a client secret In the Graph_Function app registration you just created, click on Certificates & Secrets, choose the option to create a + New client secret Give it a name like graph_function_secret Click Add After adding the client secret make sure to copy the secret and keep it safe. copy the secret value and id, you will need them later. Step 4. Create a function app Next, select your previously created resource group called Graph_Functions and create a function app in the graph_functions resource group by clicking on +Add Search for Function App and click Create. A wizard will appear, fill in your choices and select PowerShell core and your region. Create a new storage group or let the wizard create it's own, then click Review + Create. If it generates an error click on the error details, most likely the storage group name you tried to create is already taken. If so, pick another name. Finally, click on Create to create the function app. Step 5. add a HTTP trigger Select the function app created above and click on functions in the left pane. In the ribbon click on + Add. Select HTTP trigger and click on Add. Select Code + test and paste in the code below then save the results # use this code in a http trigger as part of a function app # for more details see https://www.windows-noob.com/forums/topic/21814-adding-devices-to-an-azure-ad-group-after-windows-autopilot-is-complete-part-1/ # Niall Brady, windows-noob.com 2020/12/18 v 0.3 using namespace System.Net # Input bindings are passed in via param block. param($Request, $TriggerMetadata) # Write to the Azure Functions log stream. Write-Host "PowerShell HTTP trigger function processed a request." # Interact with query parameters or the body of the request. $deviceId = $Request.Query.deviceId if (-not $deviceId) { $deviceId = $Request.Body.deviceId } # define the following variables $ApplicationID = "" # this is the id of the app you created in app registrations $TenantDomainName = "" # your tenant name, eg: windowsnoob.com $AccessSecret = "" # this is the secret of the app you create in app registrations $GroupID = "" # this is the ObjectID of the Azure AD group that we want to add devices to $Body = @{ Grant_Type = "client_credentials" Scope = "https://graph.microsoft.com/.default" client_Id = $ApplicationID Client_Secret = $AccessSecret } # make initial connection to Graph $ConnectGraph = Invoke-RestMethod -Uri "https://login.microsoftonline.com/$TenantDomainName/oauth2/v2.0/token" -Method POST -Body $Body #get the token $token = $ConnectGraph.access_token # to improve logging... $a = Get-Date $body = " `n" $body = $body + "$a Starting Azure function...`n" $body = $body + "$a Connected to tenant: $TenantDomainName.`n" # now do things... if ($deviceId) { $body = $body + "$a You supplied deviceId: '$deviceId'" + ".`n" # deviceID should be supplied to the function via the function url, # if you want to hard code it for testing un rem next line and supply the correct deviceId #$deviceID = "3a4f4d9d-c648-4ca2-966f-6c6c10acff35" #$InputDevice = "MININT-U7CQUG7" #$Devices = Invoke-RestMethod -Method Get -uri "https://graph.microsoft.com/v1.0/devices?`$filter=startswith(displayName,'$InputDevice')" -Headers @{Authorization = "Bearer $token"} | Select-Object -ExpandProperty Value | %{ $Group = Invoke-RestMethod -Method Get -uri "https://graph.microsoft.com/v1.0/groups?`$filter=Id eq '$GroupId'" -Headers @{Authorization = "Bearer $token"} | Select-Object -ExpandProperty Value $GroupName = $Group.displayName $body = $body +"$a Group.displayName: '$GroupName'" + ".`n" $GroupMembers = Invoke-RestMethod -Method Get -uri "https://graph.microsoft.com/v1.0/groups/$GroupID/members" -Headers @{Authorization = "Bearer $token"} | Select-Object -ExpandProperty Value $AddDevice = Invoke-RestMethod -Method Get -uri "https://graph.microsoft.com/v1.0/devices?`$filter=deviceId eq '$deviceId'" -Headers @{Authorization = "Bearer $token"} | Select-Object -ExpandProperty Value | %{ if ($GroupMembers.ID -contains $_.id) { Write-Host -ForegroundColor Yellow "$($_.DisplayName) ($($_.ID)) is in the group" $body = $body + "$a $($_.DisplayName) ($($_.ID)) is already in the '$GroupName' group, nothing to do.`n" } else { Write-Host -ForegroundColor Green "Adding $($_.DisplayName) ($($_.ID)) to the group" $body = $body + "$a Adding $($_.DisplayName) ($($_.ID)) to the group with ObjectID $GroupID.`n" $BodyContent = @{ "@odata.id"="https://graph.microsoft.com/v1.0/devices/$($_.id)" } | ConvertTo-Json Invoke-RestMethod -Method POST -uri "https://graph.microsoft.com/v1.0/groups/$GroupID/members/`$ref" -Headers @{Authorization = "Bearer $token"; 'Content-Type' = 'application/json'} -Body $BodyContent } } $body = $body + "$a Exiting Azure function." } # Associate values to output bindings by calling 'Push-OutputBinding'. Push-OutputBinding -Name Response -Value ([HttpResponseContext]@{ StatusCode = [HttpStatusCode]::OK Body = $body }) Step 6. Get the application ID Go back to app registrations, select the app called graph_functions and copy this field. Application (client) ID: copy the Application (client) ID somewhere. Step 7. Create an azure ad group In Microsoft Endpoint Manager create an azure ad group called Autopilot Completed Take note and copy the Object ID of this Azure Ad group. Step 8. Add missing details Now that you have the values you need (remember you copied the access secret earlier ?), go back into your function app and edit the code, fill in the values below for the following variables $ApplicationID $TenantDomainName $AccessSecret $GroupID like I've done here... but obviously use your own values. Save the code after making your edits. Step 9. configure API permissions Next you need to configure API Permissions for the app registration, don't forget to 'grant admin consent after doing so', please select the following permissions from those available. Click + Add a permission, click Microsoft Graph, select Application permissions Device.Read.All Application Read all devices Yes Granted for windowsnoob.com Group.ReadWrite.All Application Read and write all groups Yes Granted for windowsnoob.com In your lab environment it's ok to Grant admin consent, in Production, think more carefully about how you want to approach it. and once done they'll look like so. Step 10. Test adding a client Now you are ready to test this. On a client, open a cmd prompt and type dsregcmd /status look for the deviceID value highlighted below and copy it. Copy that value and on your http trigger function, use the following in your test window. Replace the deviceID listed below with one from your device. { "deviceID": "f6331344-f625-4259-87e7-73b62f6dbc4a" } Click Run and watch your function do it's thing ? If you followed my guide exactly you'll see something like this. And after a quick look in the members of your Azure Ad group, guess what, your client computer is present ! Awesome ! job done Useful links Graph explorer - https://developer.microsoft.com/en-us/graph/graph-explorer# Powershell modules in Azure functions - https://tech.nicolonsky.ch/azure-functions-powershell-modules/ Create first function in visual studio code - https://docs.microsoft.com/en-us/azure/azure-functions/create-first-function-vs-code-powershell Add devices to an Azure ad group using Graph- https://euc365.com/add-devices-to-an-azure-ad-group-using-the-microsoft-graph-api/ Using Graph in an Azure function - https://techcommunity.microsoft.com/t5/windows-dev-appconsult/using-microsoft-graph-in-an-azure-function/ba-p/317434 That's it for this part, please join me in Part 2 where we'll look into scripting things in an automated way on the client. cheers niall
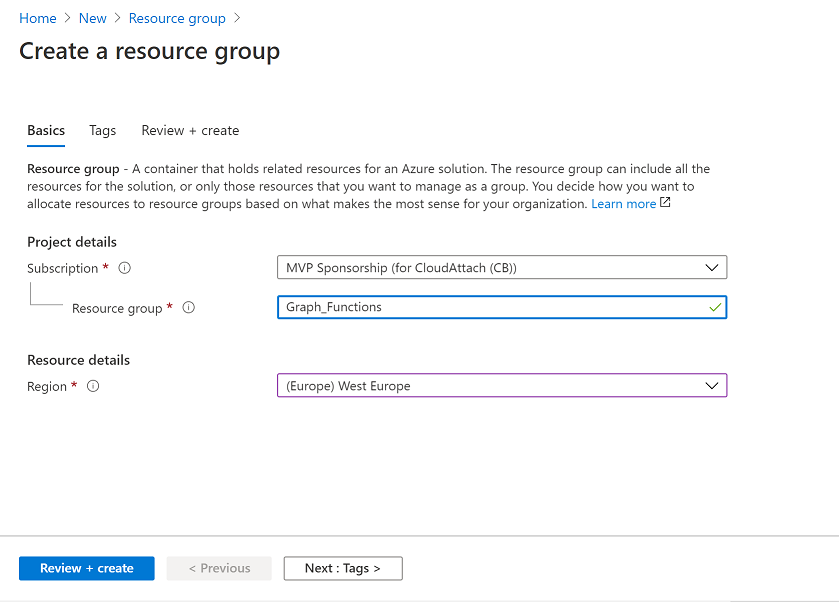


-
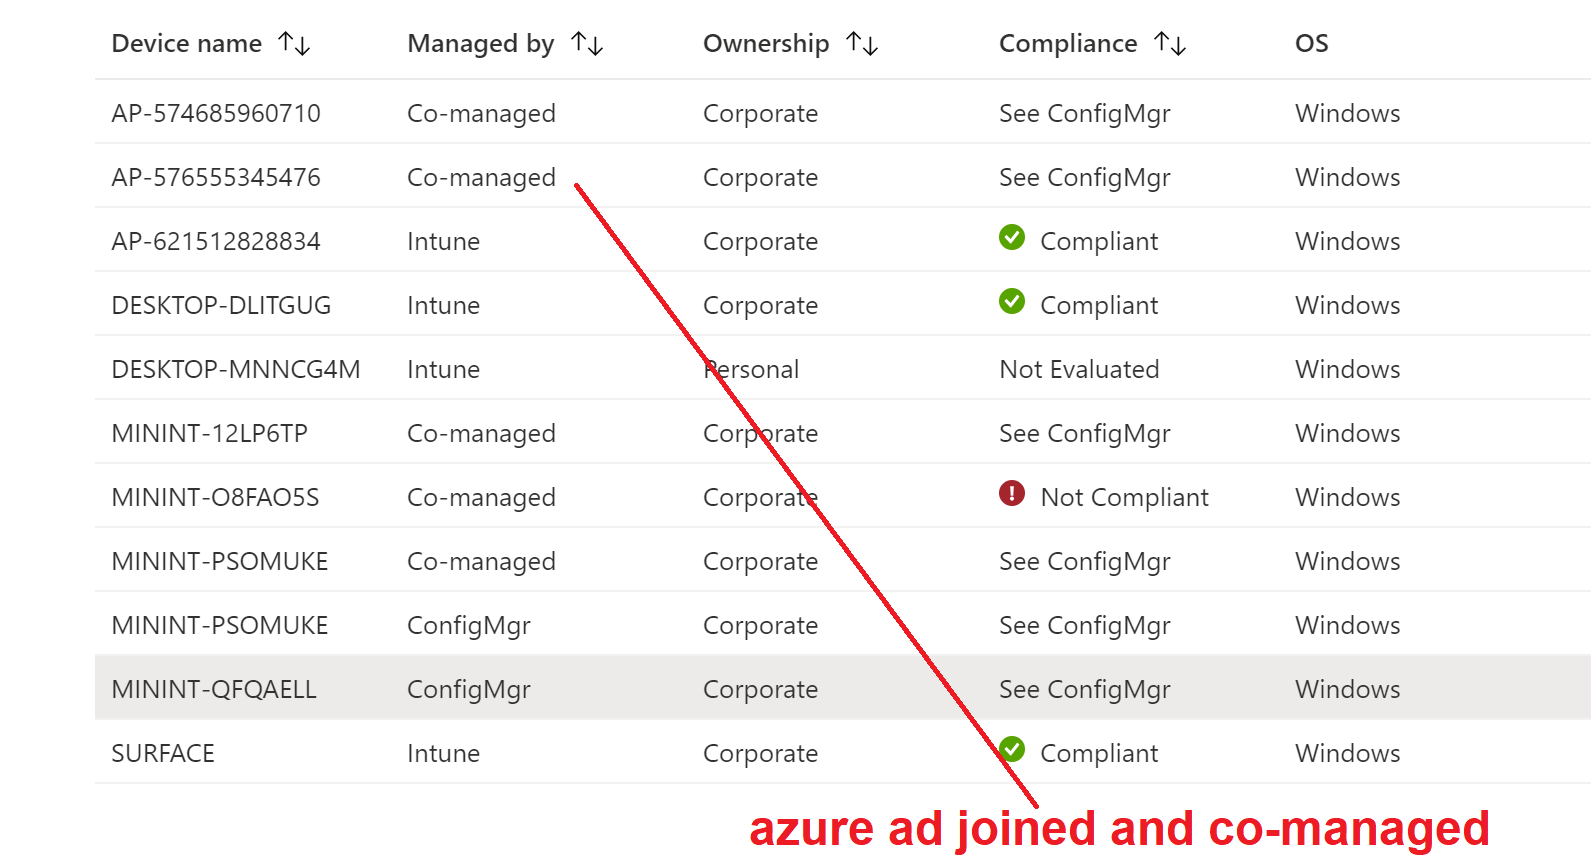
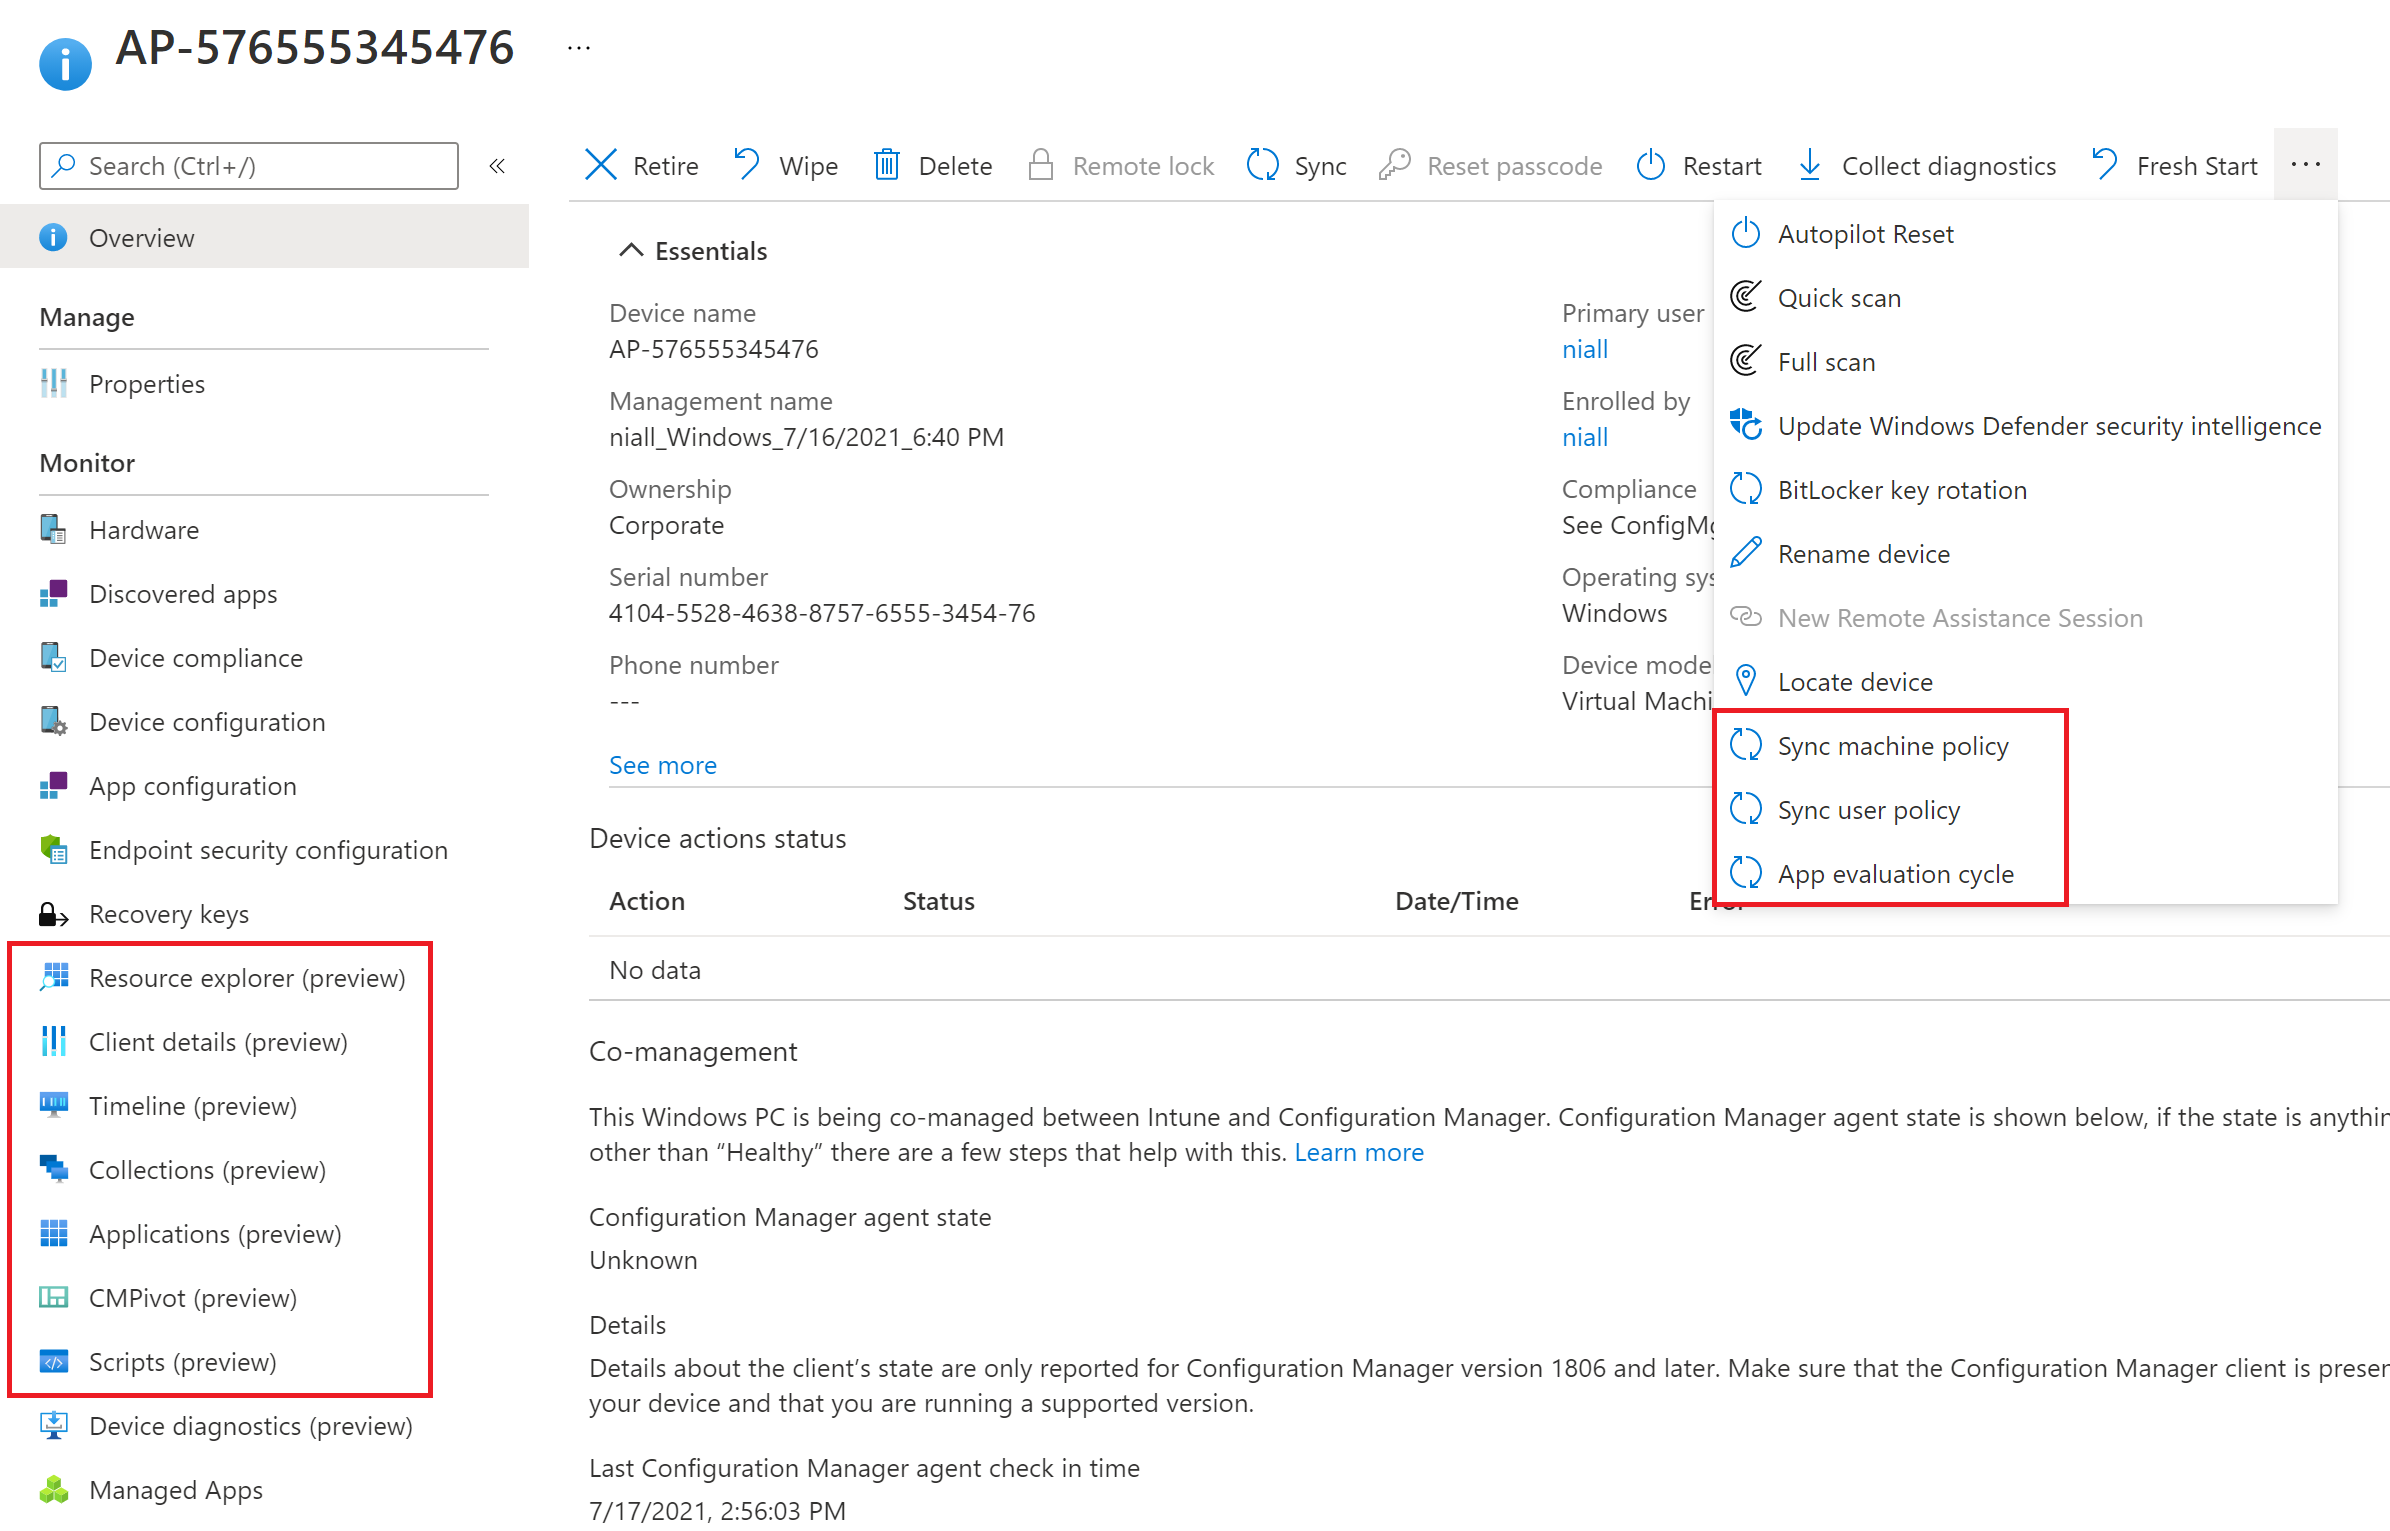
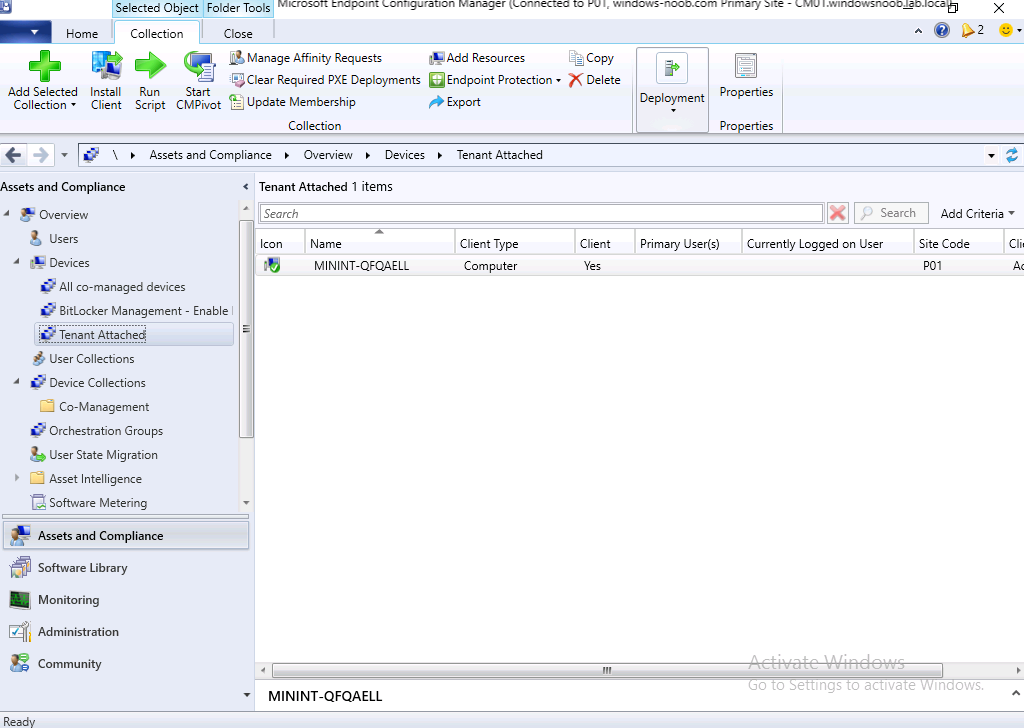
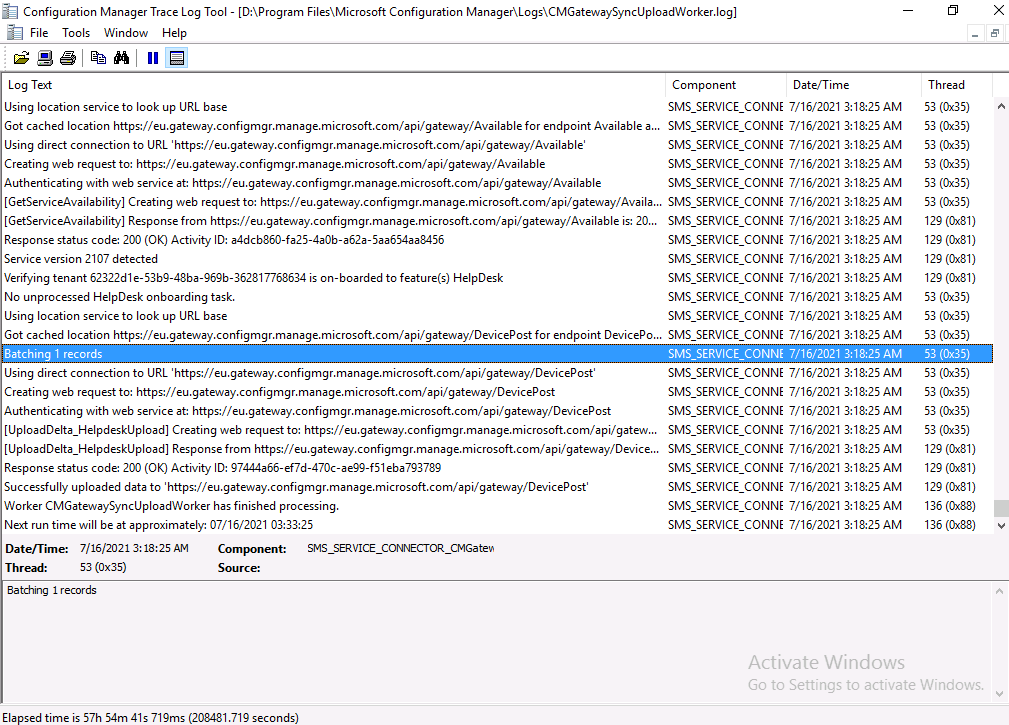
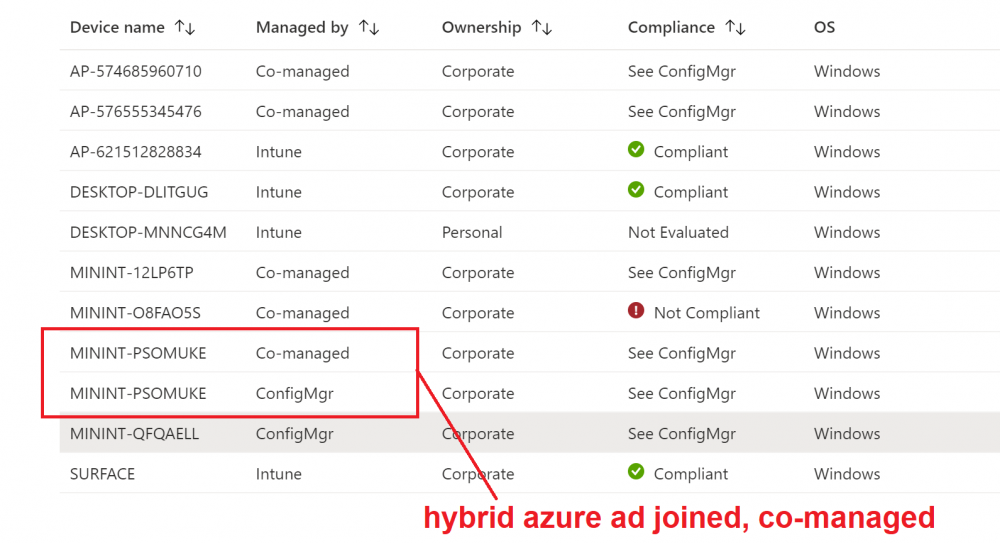
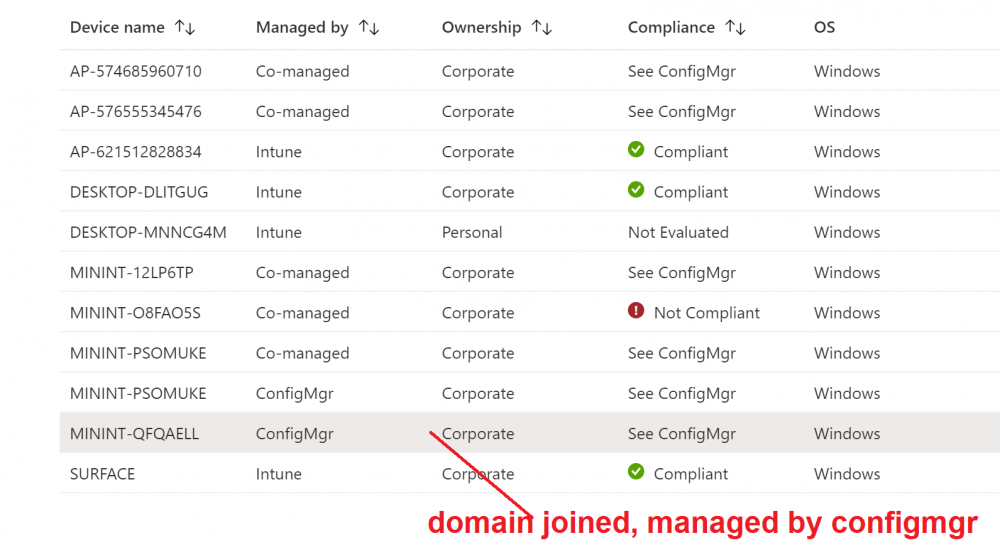
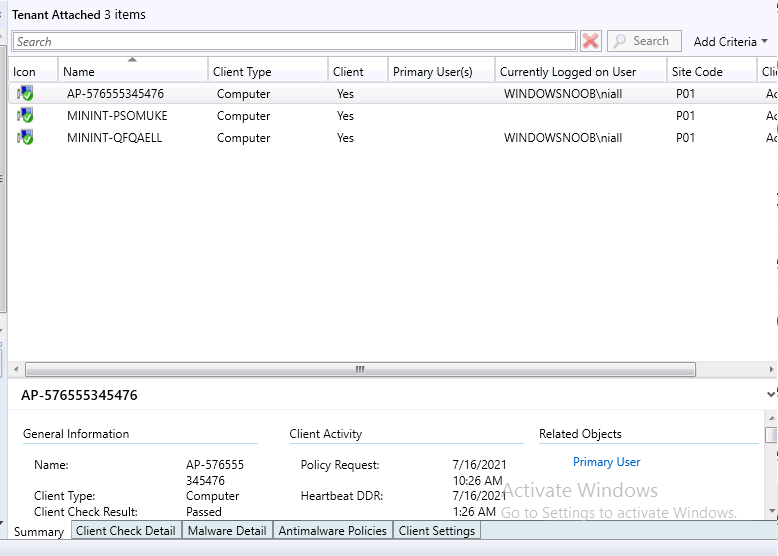
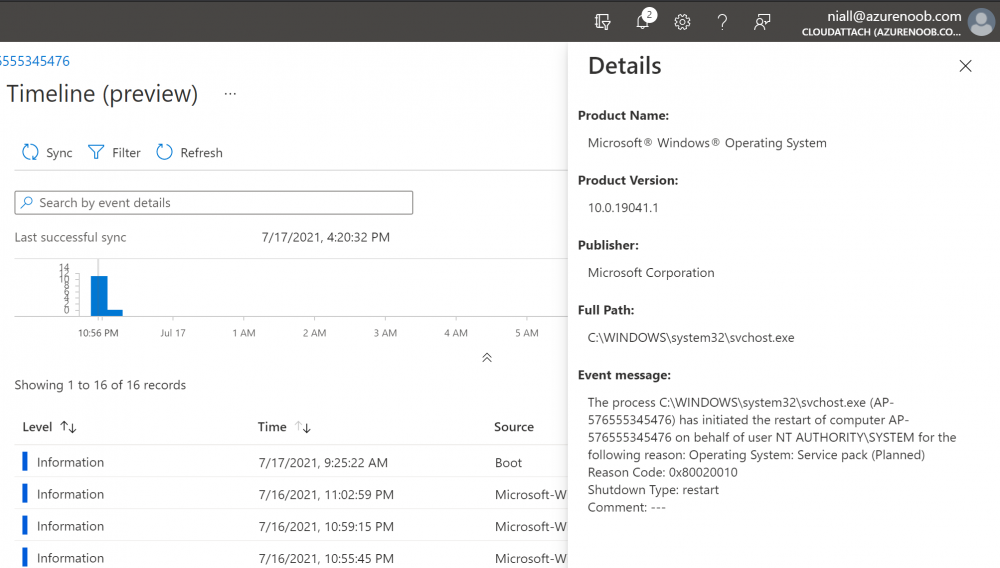
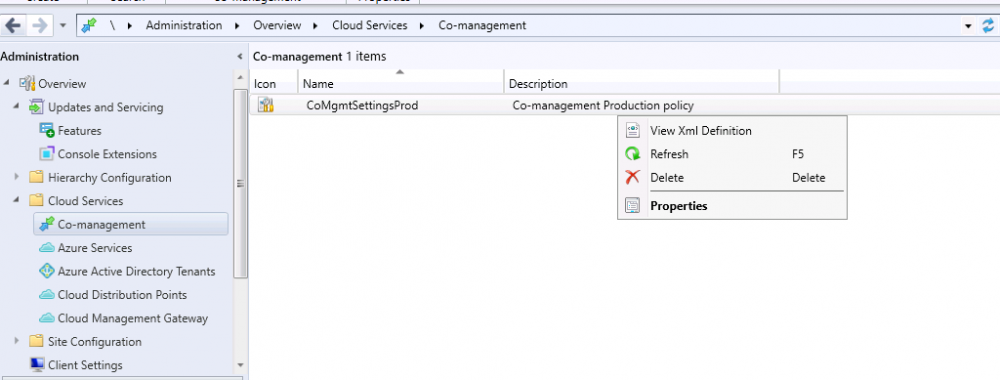
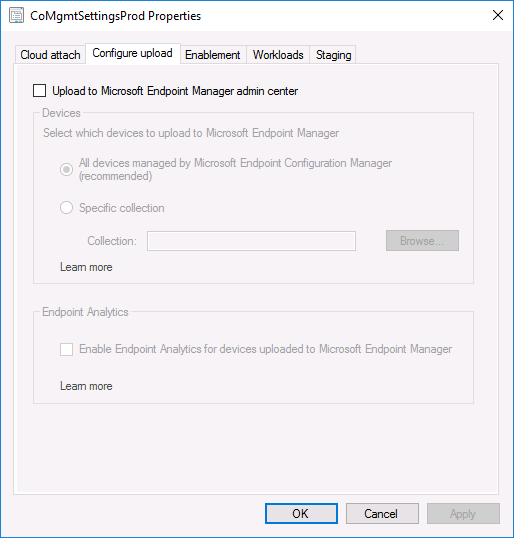
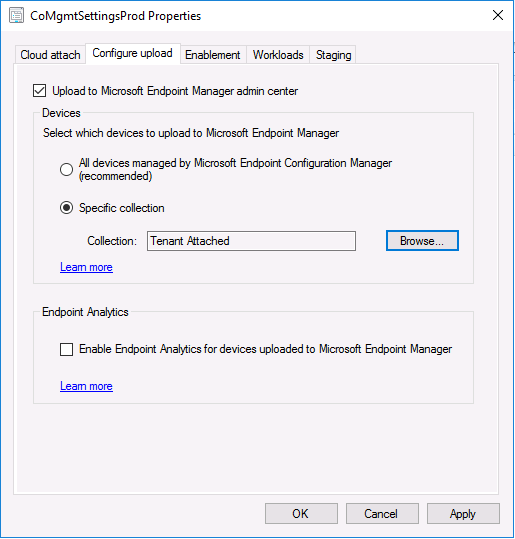
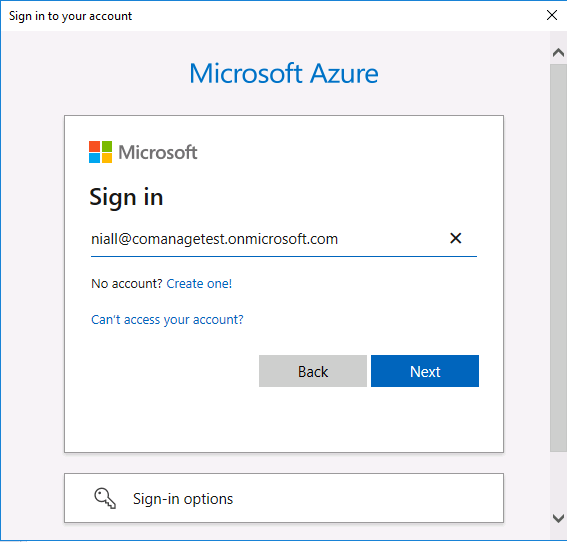
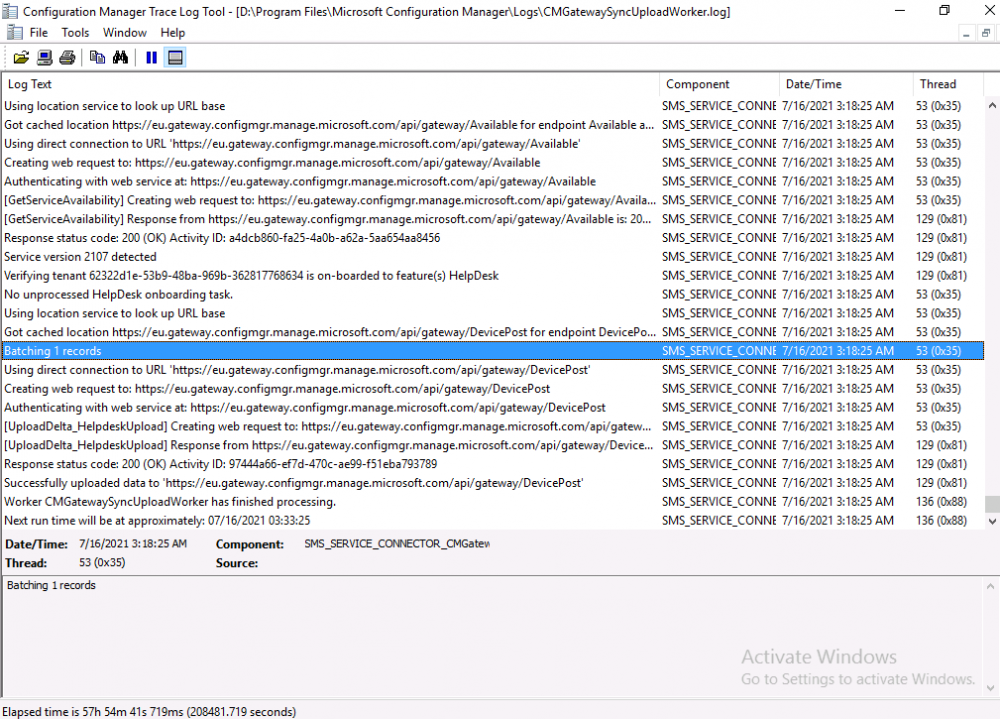
Introduction This is part 8 in a series of guides about cloud attach in Microsoft Endpoint Manager, with the aim of getting you up and running with all things cloud attach. This part will focus on enabling tenant attach. This series is co-written by Niall & Paul, both of whom are Enterprise Mobility MVP’s with broad experience in the area of modern management. Paul is 5 times Enterprise Mobility MVP based in the UK and Niall is 11 times Enterprise Mobility MVP based in Sweden. In part 1 we configured Azure AD connect to sync accounts from the on premise infrastructure to the cloud. In part 2, we prepared Azure resources for the Cloud Management Gateway, in part 3 we created the cloud management gateway and verified that everything was running smoothly. In part 4 we enabled co-management. With co-management, you retain your existing processes for using Configuration Manager to manage PCs in your organization and you gain the additional advantage of being able to transfer workloads to the cloud via Endpoint Manager (Intune). In part 5 we enabled the compliance policies workload and reviewed how that affected a co-managed computer. In this part we will enable conditional access and see how that can be used to deny access to company resources. In part 6 we configured conditional access and used it to deny access to company resources unless the device was encrypted with BitLocker. In part 7 we showed you how to co-manage Azure AD devices. In this part we'll enable Tenant Attach and take a brief look at it's features. Below you can find all parts in this series. Cloud attach - Endpoint Managers silver lining - part 1 Configuring Azure AD connect Cloud attach - Endpoint Managers silver lining - part 2 Prepare for a Cloud Management Gateway Cloud attach - Endpoint Managers silver lining - part 3 Creating a Cloud Management Gateway Cloud attach - Endpoint Managers silver lining - part 4 Enabling co-management Cloud attach - Endpoint Managers silver lining - part 5 Enabling compliance policies workload Cloud attach - Endpoint Managers silver lining - part 6 Enabling conditional access Cloud attach - Endpoint Managers silver lining - part 7 Co-managing Azure AD devices Cloud attach - Endpoint Managers silver lining - part 8 Enabling tenant attach <- you are here Cloud attach - Endpoint Managers silver lining - part 9 Renewing expiring certificates Cloud attach - Endpoint Managers silver lining - part 10 Using apps with tenant attach Tenant attach first showed up in Technical Preview 2002.2, but was released in ConfigMgr 2002 which you can read about here. You can think of tenant attach as being a way to give your Endpoint Manager admins access to ConfigMgr actions/data via the MEM console (login to your tenant at https://aka.ms/memac) without needing to do it via the ConfigMgr console. The prerequisites The user account needs to be a synced user object in Azure AD (hybrid identity). This means that the user is synced to Azure Active Directory from Active Directory. For Configuration Manager version 2103, and later: Has been discovered with either Azure Active Directory user discovery or Active Directory user discovery. For Configuration Manager version 2010, and earlier: Has been discovered with both Azure Active Directory user discovery and Active Directory user discovery. The Initiate Configuration Manager action permission under Remote tasks in the Microsoft Endpoint Manager admin center. For more information about adding or verifying permissions in the admin center, see Role-based access control (RBAC) with Microsoft Intune. Note: In case it’s not clear above, you need to configure Azure AD Connect to sync your on-premise users to the cloud for the user actions to succeed. You also need to go through the Azure services in ConfigMgr and configure cloud management to sync Azure Active Directory User Discovery. During this blog post we used a user that satisfies the above, namely niall@azurenoob.com to perform the tenant attach related actions in MEM. Step 1. Create a collection This is an optional step, but helps you to keep track of which devices are Tenant Attached. Create a collection called Tenant Attached, you will use that collection to populate your tenant attached devices. Once created, place one or more devices into the collection. Step 2. Enable tenant attach In the ConfigMgr console, select the Administration node and expand cloud services, select Co-management (2103 or earlier) or based on what we saw in the recent technical preview (Technical Preview 2106) select Cloud Attach (2107 or later). Select CoMgmgtSettingsProd, right click and bring up the properties. In Co-management properties, click on the Configure upload tab. Next, place a check in the Upload to Microsoft Endpoint Manager admin center checkbox, and select a collection, for example use the Tenant Attached collection we created in step 1, Note: If you select All devices managed by Microsoft Endpoint Configuration Manager then all devices (including servers) will show up in the MEM console. Next, deselect the Enable Endpoint Analytics for devices upload to Microsoft Endpoint Manager. And finally click Apply. When prompted to authenticate to Azure services, enter the credentials of your Global Admin account for the applicable tenant. After correctly entering your credentials, the changes will be applied and you can review the success or failure of your actions via the CMGatewaySyncUploadWorker.log Step 3. Verify upload of data After a device is added to the target collection, you can look at the CMGatewaySyncUploadWorker.log to verify that it uploads data for the number of records you added. So if for example you add one computer to the Tenant Attached collection, then it'll state "Batching 1 records" as shown below. This will only happen when it detects a new device, in the next upload (15 minutes later) it'll return to Batching 0 records and so on unless of course new devices are detected in the collection. This upload of data occurs every 15 minutes. In the below screenshots, all highlighted devices are tenant attached and are in the Tenant Attached collection. Next, login to your tenant at https://aka.ms/memac this will display your devices. After the data is uploaded from ConfigMgr, check devices in Microsoft Endpoint Manager and depending on the type of device you'll see one or more devices matching that device name. In the first example, we have a device that is shown with two records, one is listed as co-managed and the other record as ConfigMgr. That record is tenant attached. The Managed by column will denote how the device is managed and tenant attached co-managed devices (hybrid azure ad joined) may have a second record where it states managed by ConfigMgr. We saw this repeatedly with this specific client, even after clean installing Windows 10 on it...the client version in this particular case was CM2103. If it's an Azure AD joined device that is also co-managed (as we described in Part 7) then the managed by column will state Co-managed and yet this device will have only one record. Lastly if the device is merely managed by ConfigMgr (not co-managed, not azure ad joined) then it will show up with one record. Step 4. Looking into tenant attach features Now that we can identify the different types of devices that are tenant attached, let's take a look at the power of tenant attach. If we look at the Azure AD joined, co-managed device which we deployed in part 7, we can see that the following additional capabilities are now available by enabling tenant attach and adding this computer to that collection so that the device becomes tenant attached. The following are available (in preview): Resource explorer Client details Timeline Collections Applications CMPivot Scripts in addition, you can now trigger the following actions Sync machine policy Sync user policy App evaluation cycle In the MEM console, the tenant attach abilities are highlighted below in red. Below you can see the Timeline feature and some of the data it can provide. To grab more data, click the Sync button and then refresh the screen. And here's a quick look at CMPivot Resource explorer is chock full of data Conclusion Using Tenant attach gives your admins more power to do ConfigMgr actions via the MEM console without needing to even install the ConfigMgr console.


-
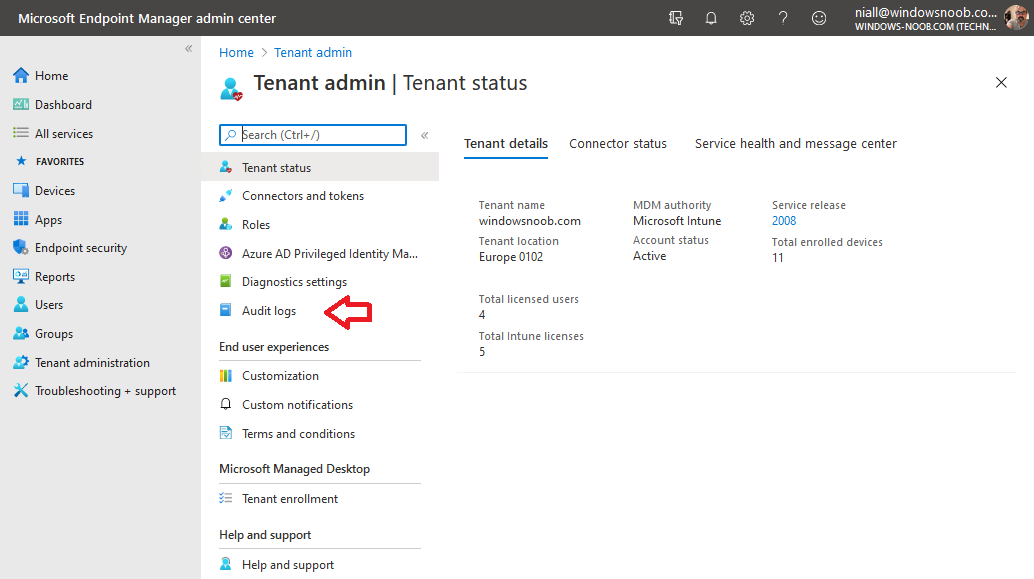
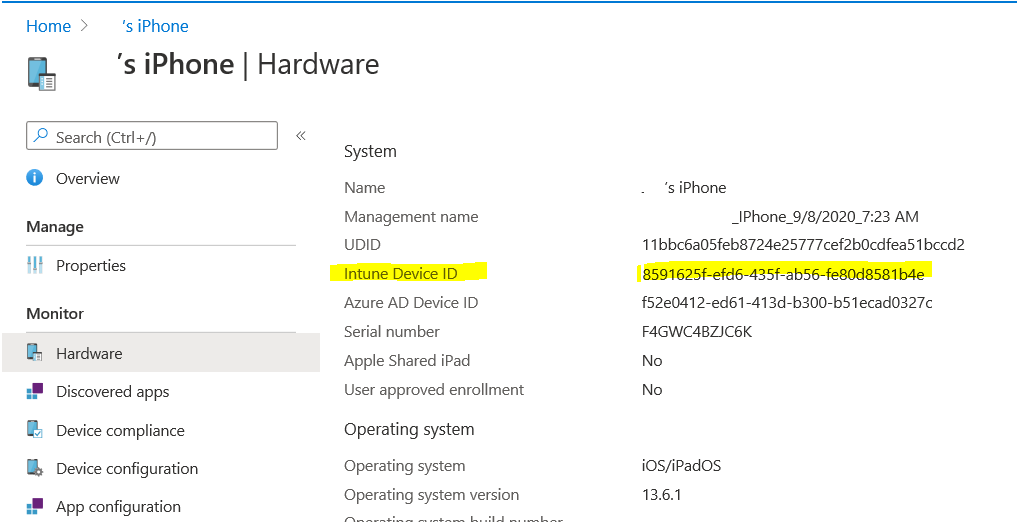
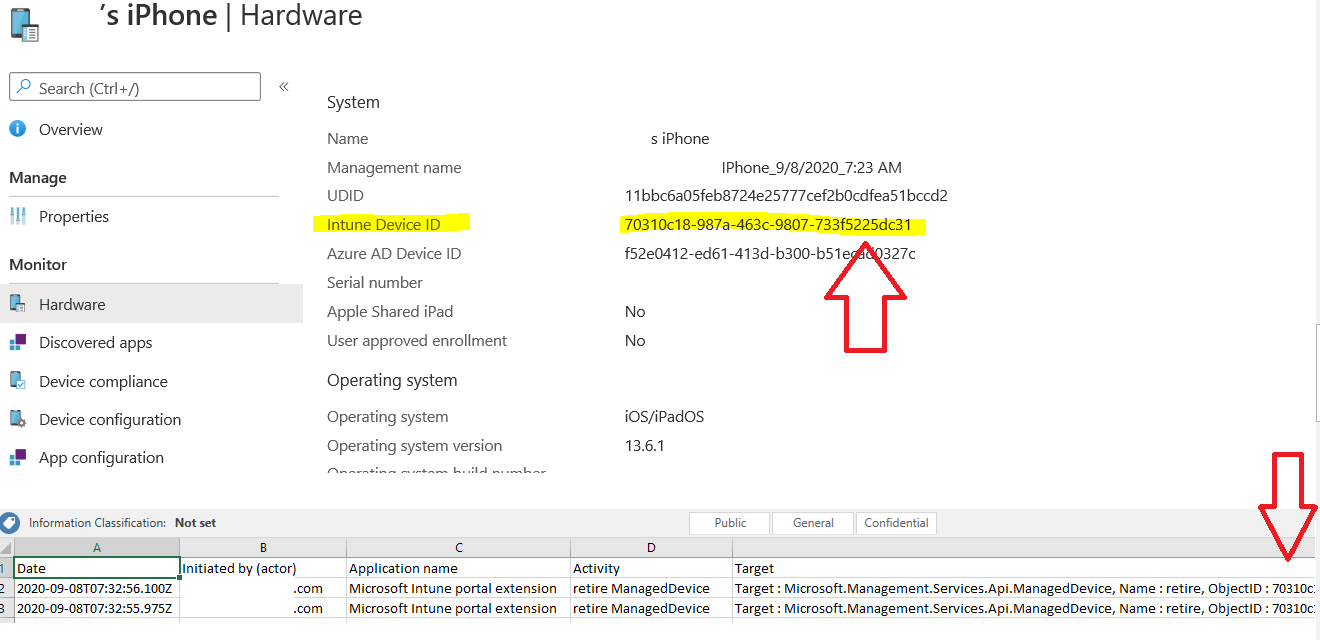
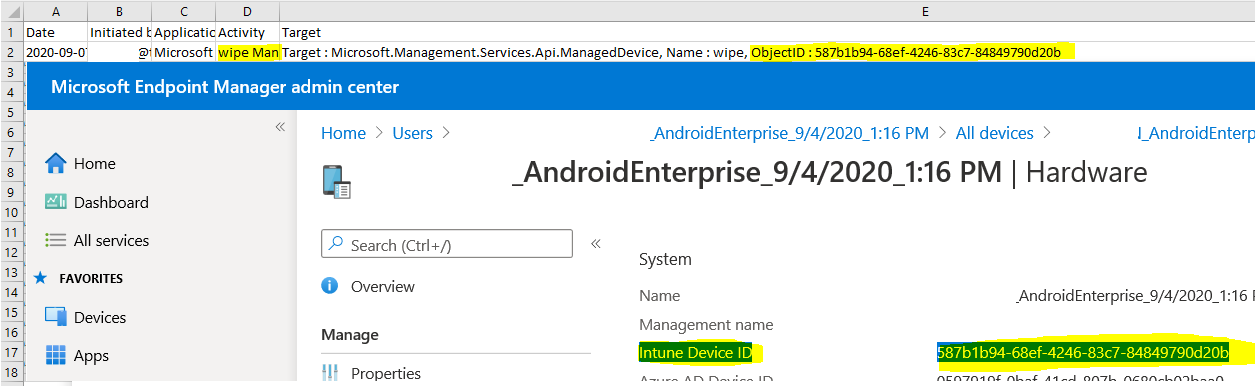
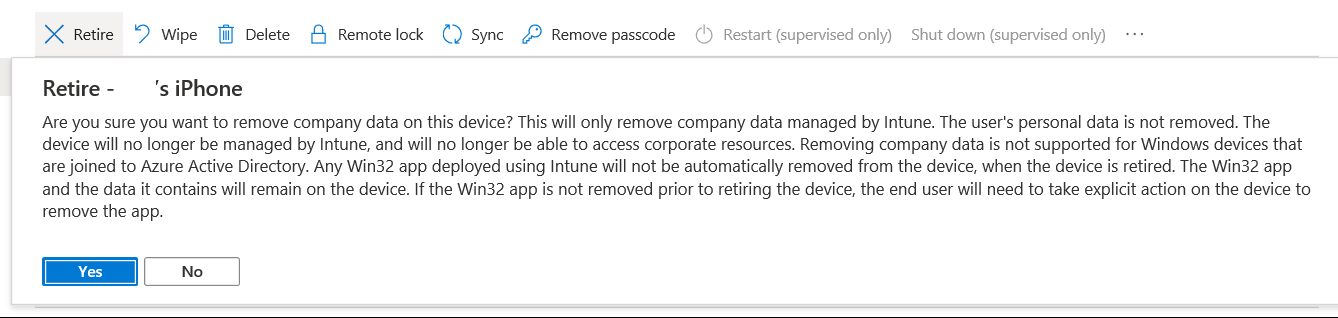
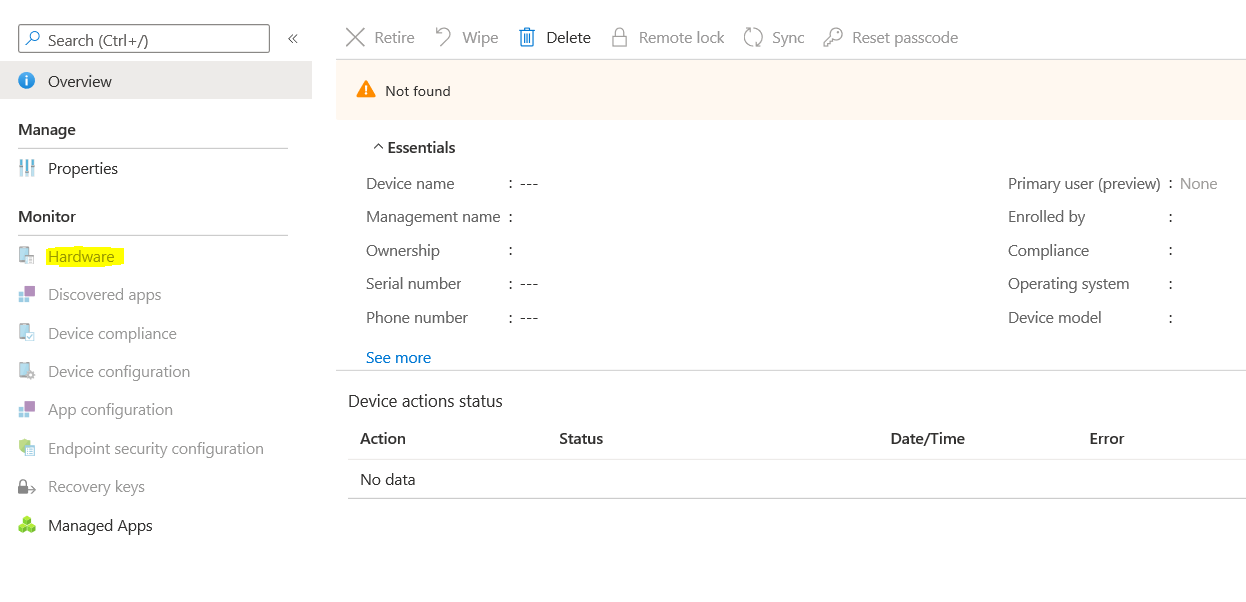
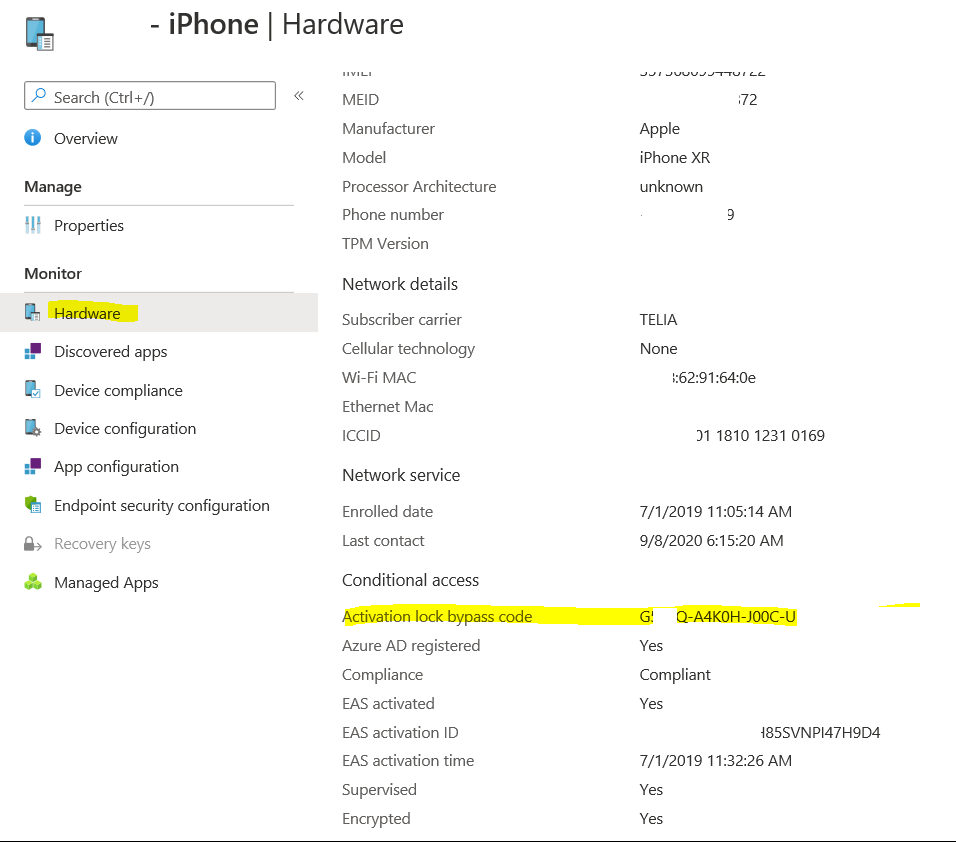
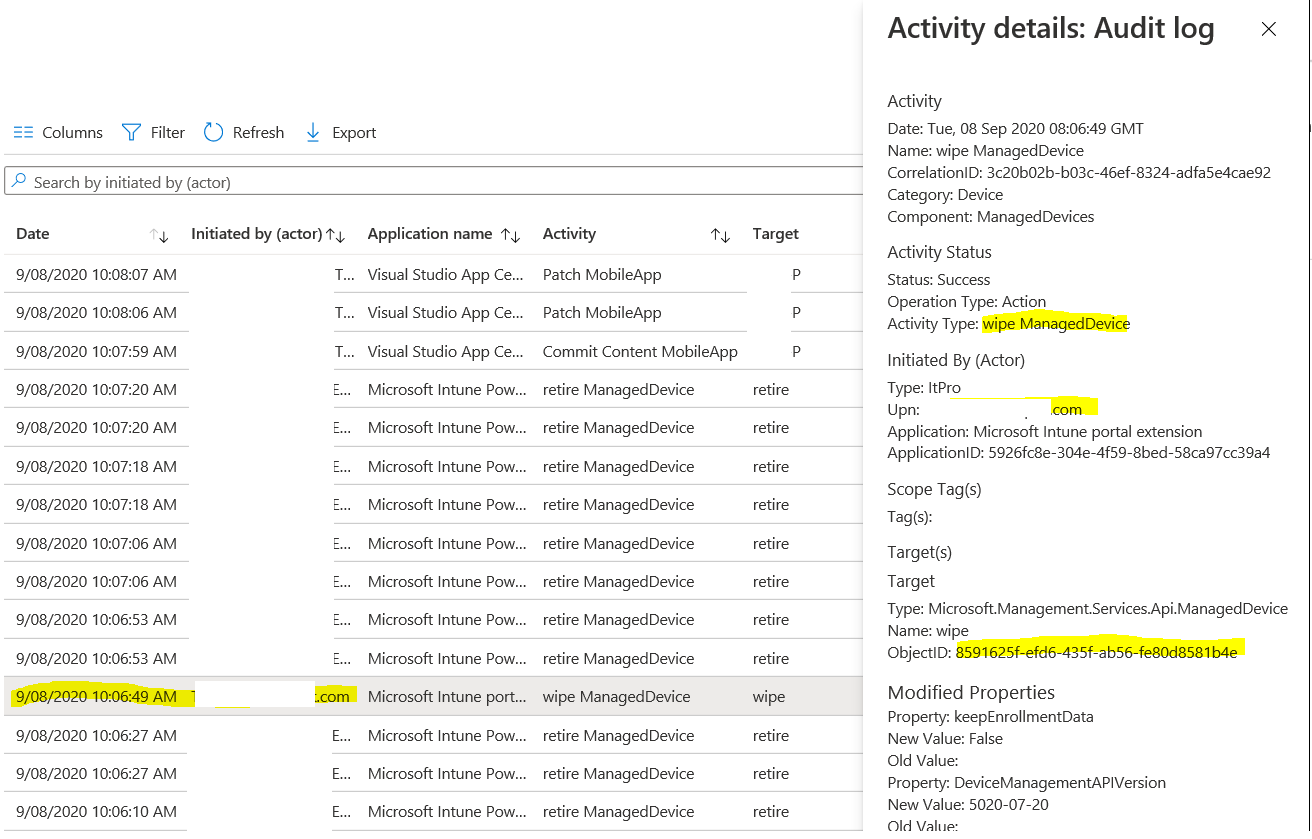
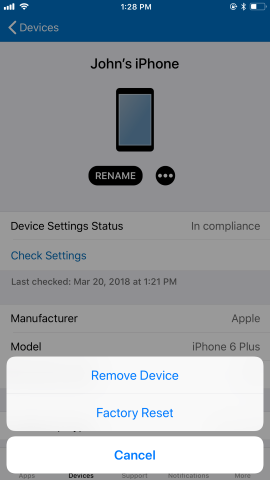
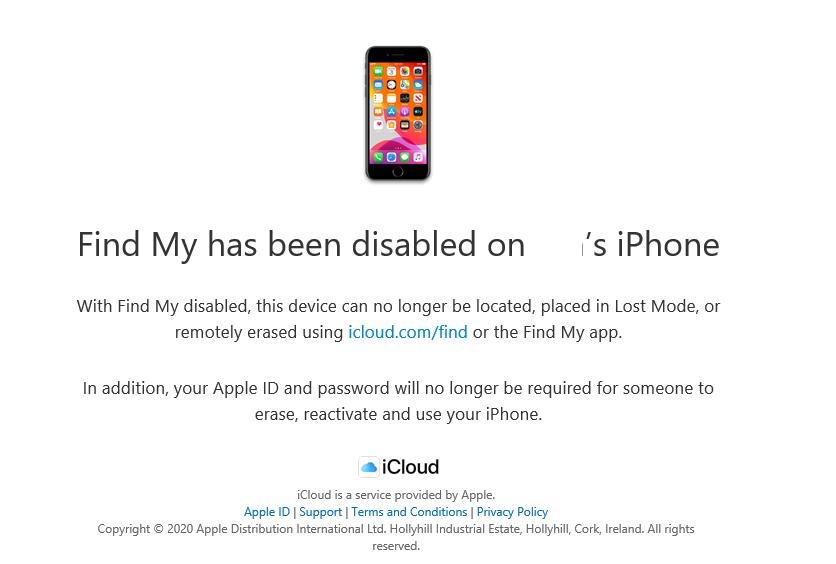
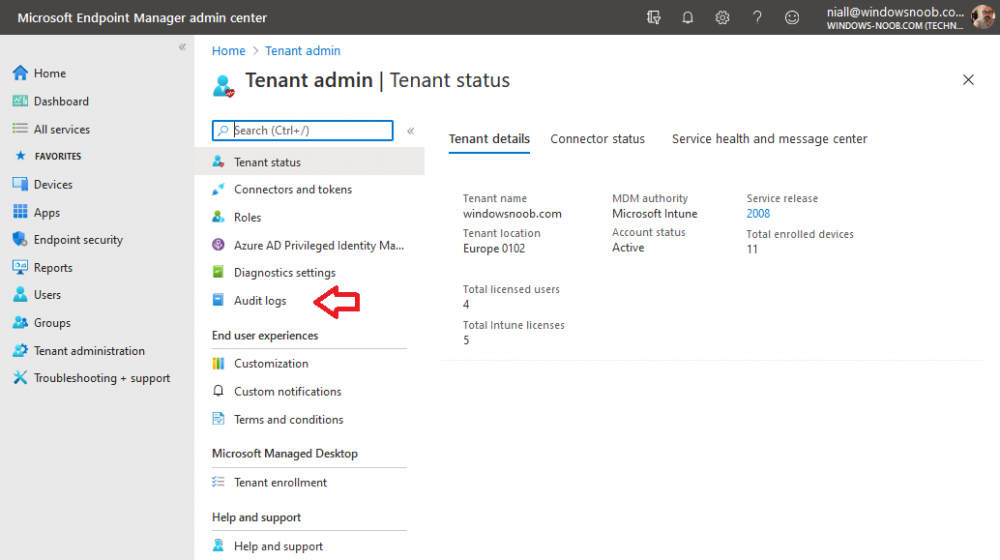
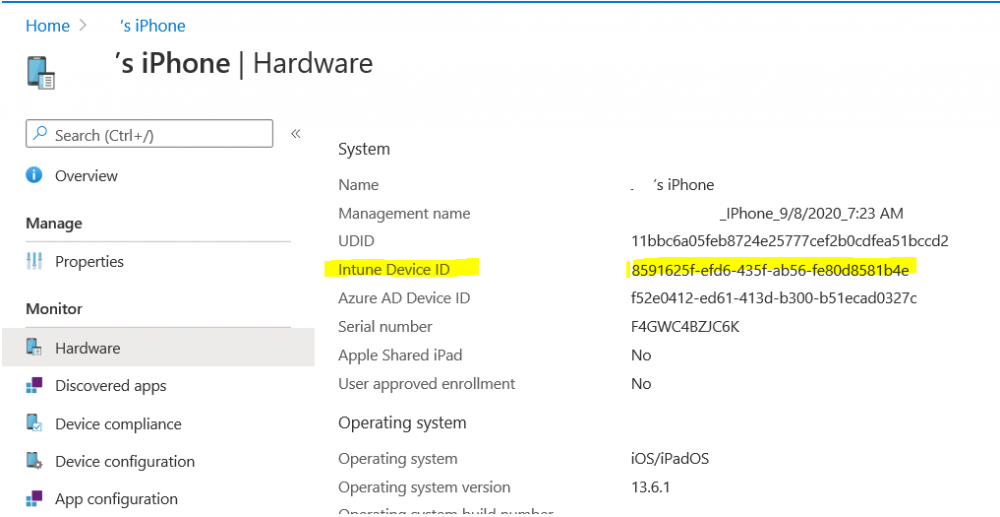
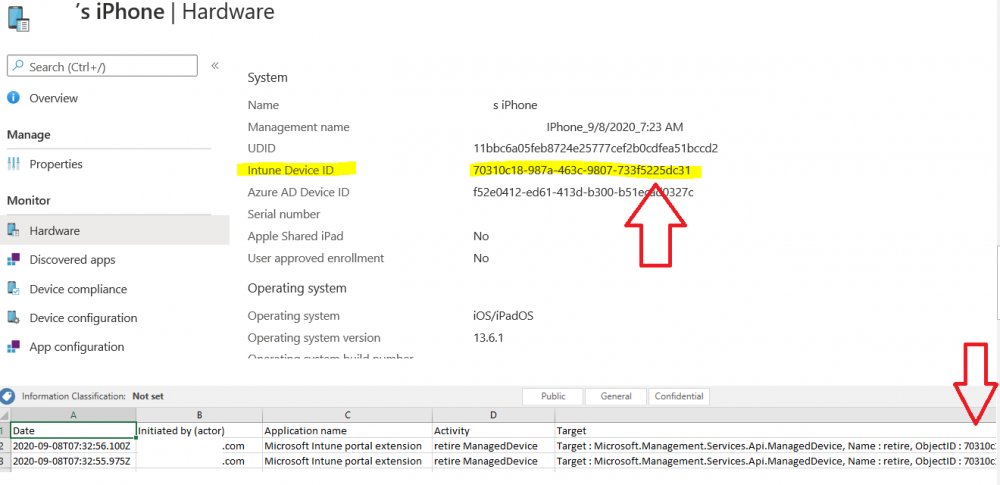
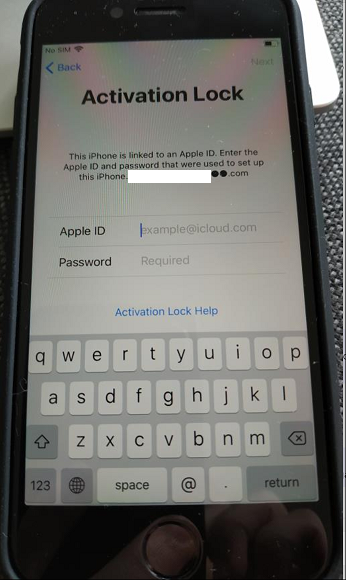
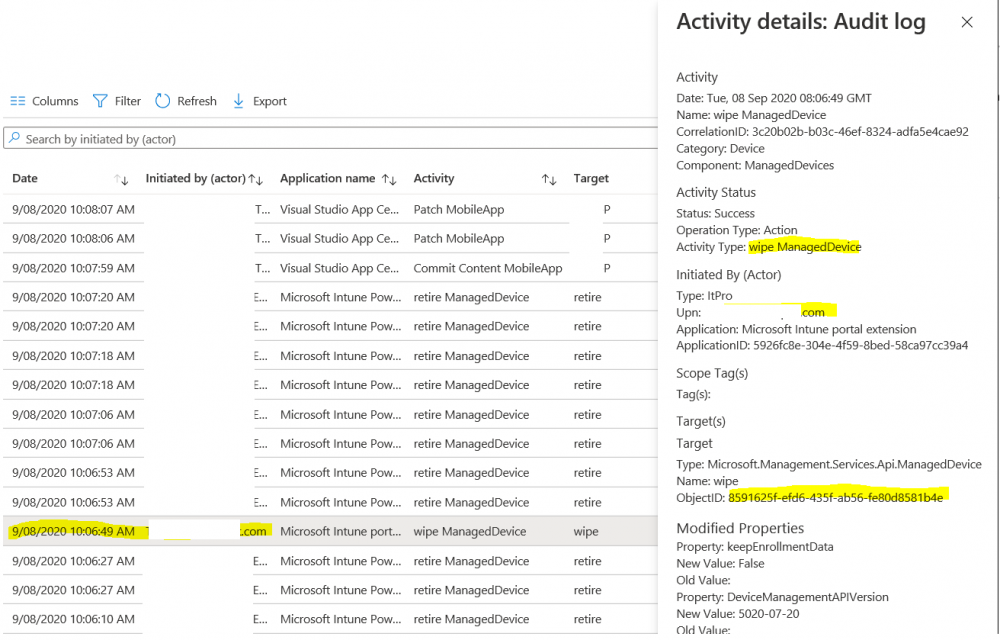
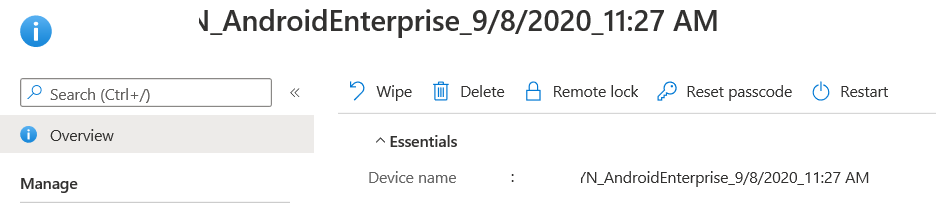
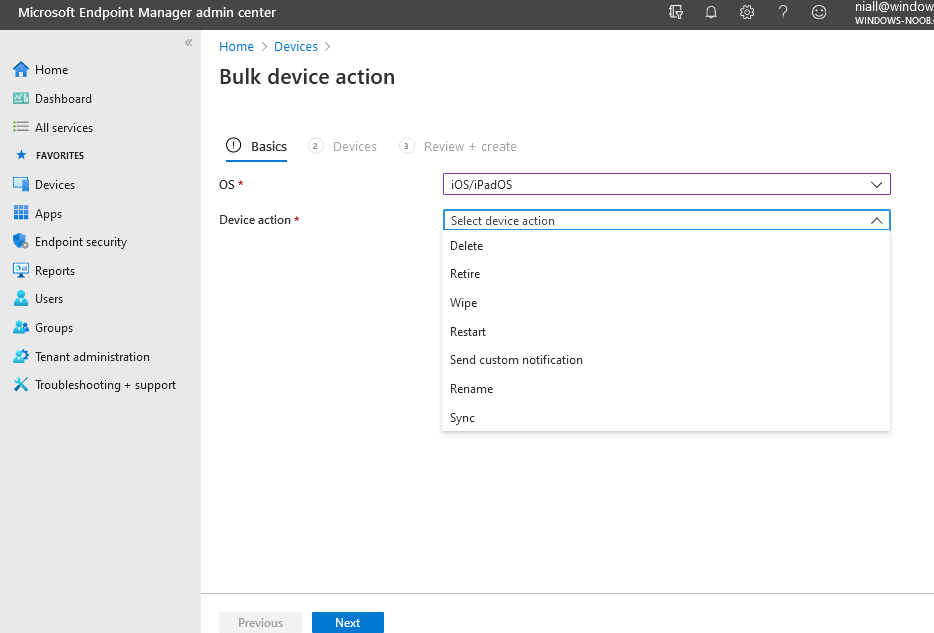
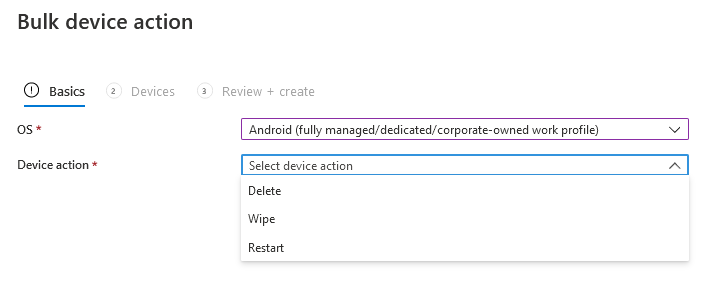
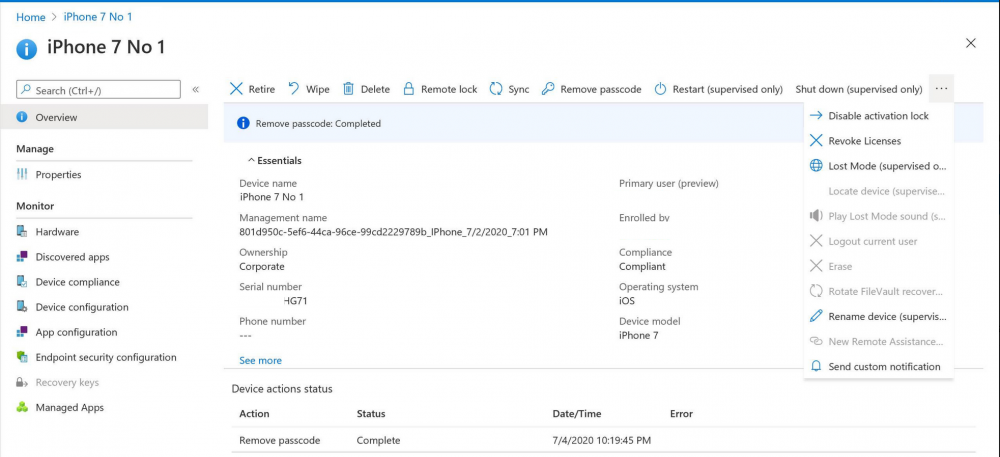
Introduction I wanted to better understand the options available for removing company data from phones enrolled within Endpoint Manager (formally known as Intune) so some research and testing was in order and that's exactly what me and my colleague did, additionally I wanted to get proof of the actions via the Auditing ability within Endpoint Manager. The phones involved in the testing were Company Owned iPhone and Android Fully Managed devices. There were a number of ways of removing company data shown below, and in this blog post I'll focus on the first two options, if you'd like to automate it with PowerShell then see my 2 links at the bottom of this blog post for information on how you can do that. User Actions on the phone itself Remote actions from within Endpoint Manager Remote actions using PowerShell via Graph User actions on the phone On the phone itself (iPhone) the user has a number of options available. They can open the Company Portal app, select the device from the list of devices and click on the 3 dots (elipse) to see actions available and those include Remove Device Factory Reset When you unenroll your device from Intune by selecting Remove Device, here's what happens: Your device won't appear in the Company Portal anymore. You can't install apps from the Company Portal anymore. Any settings that were changed on your device when you added it (for example, disabling the camera, or requiring a certain password length) will no longer apply. You might not have access to some company resources, such as file shares or internal web sites, on your device anymore. You can't use company apps and company data on your device anymore. You might not be able to connect to your company network using Wi-Fi or a virtual private network (VPN) anymore. Company email profiles are removed from the device. Devices that are configured for email only won't appear in the Company Portal app or website anymore. Apps are uninstalled. Company app data is removed. The process above is described here for iOS devices. https://docs.microsoft.com/en-us/mem/intune/user-help/unenroll-your-device-from-intune-ios Choosing the Factory Reset option prompts you to use the factory reset option within the iPhone settings app, and the result is that the phone is factory reset, company data is wiped, in fact everything is wiped including personal data, settings, etc, but the device is not immediately removed from Intune. Choosing this method should also prompt the end user for their icloud password to confirm that they were going to reset the phone, in addition they would receive an email from Apple indicating that 'find my' Iphone has been disabled. As regards Intune auditing of the events above, nothing was recorded as the phone was reset from the phone side and not via the Intune side (which reports on actions related to wipe, delete, retire performed via the console or via a PowerShell script). Removing the device management profile In addition, we tried removing device management, via Settings, General, Device Management and removed the MDM device management profile, this did not reset the phone but removed access to company resources and removed all apps associated with the company. The users personal data remained unchanged. The device (shortly after) showed as non-compliant in Intune/Endpoint Manager and could be automatically removed via the device cleanup ability. Using this method again did not record anything in Auditing. Note: Device cleanup rules aren't available for Android Enterprise scenarios like Fully Managed, Dedicated, and Corporate-Owned with Work Profile. Using actions from within the Endpoint Manager console In Microsoft Endpoint Manager, you have additional options to remove company data from enrolled phones, and these are as follows: Wipe Retire Delete Let's look at each action to see how it relates to the device in question. Wipe This option completely factory resets the phone, does NOT prompt for the users icloud password and all user data and company data is removed. The phone reboots as part of the process. Below is a typical display of what you'd see when you initiate the Wipe action from within Endpoint Manager. As this action took place from within Endpoint Manager, it will be recorded in the Audit Logs. You can find these logs in Tenant Administration, Audit Logs as shown below. After a Wipe is performed in Endpoint Manager, the action (and more details) are recorded in the Audit logs as shown here. You can click an individual action to get a details pane. In the screenshot above, the Activity details refers to an ObjectID and that is actually the Intune Device ID as shown here. So if you want to trace a phones removal from Endpoint Manager, then make sure you've a backup of this information so you can co-relate the Intune Device ID with the ObjectID listed in the audit log. Here you can see the same info relating to the Intune Device ID in the console and the Object ID in the exported CSV file for an Android phone when it's Wiped. You can export the audit log (up to a months data in the console or 1 year via PowerShell Graph) to a CSV file. Remember, take note of the Intune Device ID before you Wipe a phone as once it's wiped the data will also be removed from Intune. In the screenshot below you can see the details remaining for a phone that was just wiped, notice how it states 'not found' and the Hardware node is greyed out, in the hardware node you'd normally find the Intune Device ID but now that the device is wiped, the data is gone. Retire The Retire option removes company data, keeps personal data and does not reboot the device. Below is the prompt received when you select to Retire an iPhone. And below you can see how the Retire option is audited (via the exported CSV file), and again i'm pointing out the Intune Device ID in the console as it's the Object ID in the audit log. Interesting to note that the Intune Device ID (object ID in the audit log) changes every time you enroll the device. In the console itself the device is removed as soon as the next device check in occurs. Note: If you are using Fully Managed for your Android devices then you won't see a Retire option at all. Delete Selecting Delete will prompt the admin with something similar to below for iPhone. and the delete action is audited also. However when I did the Delete action for an Android Fully Managed device, it reset the phone (factory reset) which goes against the popup prior to the action. Bulk Device Actions There is one other way of doing this but it's more risky as it applies to all devices, and that is the ability to choose the available actions (thanks @JeffGilb ) which is available in Bulk Device Actions You can then select the type of device and the action available, here are the options available for iOS/iPadOS and below are the actions for Android (Fully Managed) Summary Deciding which path to take should be based on your security needs and the ultimate destination of the phones after they go EOL. If your company phones are all iPhone based, you may want to choose either Retire or Delete from the Endpoint Manager console (or using a PowerShell script to connect to Intune using the Graph API), as these actions will be logged in the Audit logs (which can be exported for up to one year), and both of these actions are least disruptive to the users phone, as the users data (photos/apps/etc) will remain on the phone but all company data will be removed. This would be suitable in a scenario such as where personnel are giving the option to buy back the company device after it's EOL. Take note however that the Delete option on Android Fully Managed phones also factory resets the device (all data personal and company is removed). That is not expected based on the popup shown to the admin. If for security reasons you want to remove all company data and all personal data AND remove corporate logon details then you should choose the Wipe option as this does a factory reset on both iphone and Android (fully managed) phones, and this will be audited in the audit logs. This method however will not prompt iphone end users to sign out of icloud meaning that after the reset, the phone will be locked to the apple ID of the previous user (as shown below). To resolve this problem you could ask the user to sign out of icloud prior to Wiping the phone (not ideal) or use Apple Business Manager (DEP) to manage the phone, that way you'll get an Activation Bypass lock code which you can use to bypass this activation lock. Below is how that code would appear for a device (obfuscated details) in Intune. Of course this also means that you'll need a script to pull the Activation lock bypass code from Intune regularly (scheduled task) so that you have the data before it gets removed from Intune. Speaking of ABM enabled iPhones, once they are added into ABM you'll see additional options displayed in Intune such as those shown here, the additional options include (and more depending on the device and capabilities): Disable activation lock Lost mode (supervisor only) Rename device (supervisor only) Restart (supervisor only) Finally, if you get your users to remove the device management or factory reset their phones using options available on the phone itself, then there will be no record of that action in Intune so you won't be able to report on it. I hope this helps you understand the options available today in Endpoint Manager for removing company data on enrolled phones. Recommended Reading https://docs.microsoft.com/en-us/mem/intune/user-help/unenroll-your-device-from-intune-ios https://docs.microsoft.com/en-us/mem/intune/remote-actions/devices-wipe https://support.apple.com/en-us/HT202804 https://www.niallbrady.com/2017/08/23/getting-started-with-microsoft-graph-and-using-powershell-to-automate-things-in-intune/ https://www.niallbrady.com/2018/10/10/learn-how-to-leverage-intune-support-for-microsoft-graph-and-powershell-to-enable-powerful-automation-and-it-security-my-notes/ cheers niall


-
This list of guides is a living index covering Windows 365 Cloud PC, Microsoft Intune or Configuration Manager. The Configuration Manager Current Branch releases are meant for your production deployments and the Technical Preview releases are for testing new upcoming features in the product, and are aimed at Lab use only. The PKI guides are added as https communication within ConfigMgr and Intune is desired. These guides are broken down into different sections: Windows 365 Microsoft Intune Configuration Manager - Current Branch Configuration Manager - Technical Preview Setting up PKI Note: The guides in each section are (mostly) sorted in the direction of oldest first. Windows 365 How can I delete a Windows 365 Cloud PC How can I use multiple monitors with Windows 365 Using Windows 365 with Linux Introducing the Windows 365 App How can I resize a Windows 365 Cloud PC USA Windows 365 User Group session – video available Windows 365 – Your connection failed – Error Code 0x3000047 How can I configure alerts for Windows 365 activity in Intune Getting started with Windows 365 - Part 1. Introduction Getting started with Windows 365 - Part 2. Provisioning an Azure Ad Joined Cloud PC Getting started with Windows 365 - Part 3. Provisioning a Hybrid Azure Ad Joined Cloud PC Getting started with Windows 365 - Part 4. Connecting to your Cloud PC Getting started with Windows 365 - Part 5. Managing your Cloud PC Getting started with Windows 365 - Part 6. Point in time restore Getting started with Windows 365 - Part 7. Patching your Cloud PCs with Windows Autopatch Getting started with Windows 365 - Part 8. Windows 365 boot Getting started with Windows 365 - Part 9. Windows 365 switch Getting started with Windows 365 - Part 10. Windows 365 offline Windows 365 app not connecting try this Using alternate ANCs in your Windows 365 provisioning policy Location redirection with Windows 365 Troubleshooting Windows 365 connection issues via the troubleshoot option in the Windows 365 app A quick look at some of the new features in the Windows 365 app An update about location redirection on Windows 365 Cloud PCs Windows 365 end user improvements - open in browser, open in desktop app Windows 365 web client can now use your camera New video: Windows 365 Switch in action Windows 365 boot and Windows 365 switch go GA! Automating Windows 365 part 1 - Introducing Graph and setting up Visual Studio code Automating Windows 365 part 2 - Using Graph X-Ray Automating Windows 365 part 3 - Provisioning Cloud PC's Automating Windows 365 part 4 - Managing your Cloud PC Automating Windows 365 part 5 - Cloud PC reports A quick look at Windows 365 Boot dedicated mode A quick look at Windows 365 Boot shared mode Getting more out of Windows 365 – Windows 365 Boot Getting more out of Windows 365 – Windows 365 GPU Getting more out of Windows 365 – Windows 365 Frontline Getting more out of Windows 365 – Windows 365 Switch Getting more out of Windows 365 – Securing your Windows 365 PC’s Updating the Windows app to the latest version A quick look at using Windows 365 Cloud PC’s via Motorola Thinkphone Automated Provisioning of Windows 365 Cloud PCs: Advanced Scripts Moving one or more Windows 365 Cloud PCs to another location Recovering a Windows 365 Cloud PC that was de-provisioned due to license expiration How healthy are your Windows 365 or Azure Virtual Desktop PC’s ? Using remediation scripts in Intune to grab Windows 365 health check logs Windows 365 and the External Identity preview – using a guest account to access Cloud PCs Cloudy With a Chance of Apps First looks at Windows 365 AI-enabled Cloud PCs First looks at the Windows 365 Cloud Input Protection Preview Feature January 2026 Cumulative Update breaks Windows app First looks at Frontline Shared UES First looks at the Remote Desktop Client app migration tool First looks at resizing Frontline Dedicated Cloud PC’s Microsoft Intune How can I find out version info about Intune Preview in Azure ? How can I unlock Windows Holographic for Business features in Intune Preview? How can I determine how long a blade loads in Intune Preview in Azure ? How can I check the status of my Intune service ? Intune Preview in Azure get’s a new look and Software Updates for Windows 10 ! What is Windows Information Protection and how can I use it to protect Enterprise data on Windows 10 devices using Intune Using Intune to enable WIP to protect Enterprise data on Windows 10 devices (MAM-WE) Getting started with Microsoft Graph and using PowerShell to automate things in Intune How can I integrate Microsoft Store for Business with Intune in Azure How can I create a dynamic group containing all Windows 10 version 1709 in Intune in Azure ? How can I enable MDM auto-enrollment in Azure How can I customize the start screen in Windows 10 using Intune How can I use Windows AutoPilot with a Proxy ? Troubleshooting “Something went wrong error 801c0003” during enrollment via Windows AutoPilot and Microsoft Intune Configuring BitLocker in Intune - Part 1. Configuring BitLocker Configuring BitLocker in Intune - Part 2. Automating Encryption Configuring BitLocker in Intune - Part 3. Testing the scripts How can I send notification messages using PowerShell in Microsoft Intune How can I deploy custom favorites in Microsoft Edge to Windows 10 devices using Microsoft Intune Managing devices with Microsoft Intune: What’s new and what’s next – my notes (Part 1 – new features) Managing devices with Microsoft Intune: What’s new and what’s next – my notes (Part 2 – iOS) Managing devices with Microsoft Intune: What’s new and what’s next – my notes (Part 3 – Android) Managing devices with Microsoft Intune: What’s new and what’s next – my notes (Part 4 – macOS) Managing devices with Microsoft Intune: What’s new and what’s next – my notes (Part 5 – Windows) Learn how to leverage Intune support for Microsoft Graph and PowerShell to enable powerful automation and IT security- my notes How Microsoft uses Intune internally to manage Windows devices Android device management with Microsoft Intune – Part 1. Partnerships Android device management with Microsoft Intune – Part 2. Deployment Scenarios Android device management with Microsoft Intune – Part 3. Dedicated device management Android device management with Microsoft Intune – Part 4. Coming soon and what’s new How can I create dynamic groups for different HoloLens devices in Microsoft Intune Troubleshooting app deployment in Windows Autopilot Configuring the Registered Owner and Organization in Windows Autopilot delivered PCs Removing company data from Endpoint Manager enrolled phones Office 365 issues after Windows Autopilot Displaying a welcome page after Windows Autopilot completes Adding devices to an Azure AD group after Windows Autopilot is complete - part 1 Adding devices to an Azure AD group after Windows Autopilot is complete - part 2 Gathering logs and sending an email when resetting Windows Autopilot - part 1 Gathering logs and sending an email when you need to reset Windows Autopilot - part 2 Gathering logs and sending an email when you need to reset Windows Autopilot - part 3 Adding devices or users to an Azure AD group after Windows Autopilot is complete but only when the device is marked as Compliant Using the updated & secure Retire My PC app via Company Portal Prompting standard users to confirm or change Regional, Time Zone and Country settings after Windows Autopilot enrollment is complete Encrypting devices during Windows Autopilot provisioning (WhiteGlove) - Part 1 Encrypting devices during Windows Autopilot provisioning (WhiteGlove) - Part 2 Encrypting devices during Windows Autopilot provisioning (WhiteGlove) - Part 3 https://www.niallbrady.com/2024/04/06/pc-buyback-for-windows-autopilot-devices-part-2/ PC Buyback for Windows Autopilot devices – part 1 PC Buyback for Windows Autopilot devices – part 2 PC Buyback for Windows Autopilot devices – part 3 Deploying KB5030310 to devices as a Win32 app for Copilot Using remediation scripts to automate a setting for Copilot How can I disable Copilot ? Getting started with Azure Key Vault Expediting updates using Windows Autopatch August Cumulative update causing Windows reset problems Configuration Manager Current Branch Installation - How can I install System Center Configuration Manager (Current Branch) Configuring Discovery - How can I configure discovery for System Center Configuration Manager (Current Branch) Configuring Boundaries - How can I configure boundaries in System Center Configuration Manager (Current Branch) Using Updates and Servicing in Offline mode - How can I use Updates and Servicing in Offline mode in System Center Configuration Manager (Current Branch) Using Updates and Servicing in Online mode - How can I use Updates and Servicing in Online mode in System Center Configuration Manager (Current Branch) Setting up the Software Update Point - How can I setup Software Updates in System Center Configuration Manager (Current Branch) Installing the Client agent - How can I configure client settings and install the ConfigMgr client agent in System Center Configuration Manager Current Branch Upgrading to System Center Configuration Manager (Current Branch) version 1602 from System Center Configuration Manager (Current Branch) version 1511 How can I use the Upgrade Task Sequence in System Center Configuration Manager (Current Branch) ? How can I use servicing plans in System Center Configuration Manager (Current Branch) to upgrade Windows 10 devices ? How can I deploy Windows 10 with MDT 2013 Update 2 integrated with System Center Configuration Manager (Current Branch) Setting up PKI Part 1 - Introduction and server setup Part 2 - Install and do initial configuration on the Standalone Offline Root CA Part 3 - Prepare the HTTP Web server for CDP and AIA Publication Part 4 - Post configuration on the Standalone Offline Root CA Part 5 - Installing the Enterprise Issuing CA Part 6 - Perform post installation tasks on the Issuing CA Part 7 - Install and configure the OCSP Responder role service Part 8 - Configure AutoEnroll and Verify PKI health How can I configure System Center Configuration Manager in HTTPS mode (PKI) - Part 1 How can I configure System Center Configuration Manager in HTTPS mode (PKI) - Part 2 New video: Fixing expired Root CA CDP and Crypt_E_REVOCATION_OFFLINE problems cheers niall
-
- 4
-

-

-
- current branch
- step by step
- (and 12 more)