Search the Community
Showing results for tags 'Configuration Manager'.
-
 Hi Looking for advice/recommendations regarding BIOS update ( and settings) and driver servcing for a HP only-shop. I´m aware that there are a number of options available for updating drivers and am trying to find the best solution to fit our needs. We have the luxury of only having one model to service (HP Elitebook 840 G9) thanks to a recent hardware swap which was done in conjunction with rolling out W11 to all our users. We are running CM 2303 and using HP driver packs for TS/OSD bare metal deploys. What we would like to achieve is the following: Update BIOS if/when needed. Check compliance of BIOS settings (password, boot order, secure boot etc.) Create a baseline of updated preapproved drivers to deploy HP have their options with MIK/Image Assistant/CMSL which I don't have any experience of but seem interesting. I am, however, a little bit hesitant when I read some comments from experienced config manager admins that have had difficulties when evaluating these options in the past (to be fair, a few years ago, things may have improved since). We have used third-party catalogs in CM in the past when we had a mix of Lenovo and HP and my experience was not very good (I won't go into the details but it was mostly Lenovo-related). Considering that we only have one model to keep updated, what do you think based on your experience would be a reasonable solution (time and effort) to look at? I like to keep things simple with as little interaction as possible for the user. Any real world advice would be appreciated, regardless if it´s a vendor specific, community tool or commercial product. Thanks in advance! Emile
 -
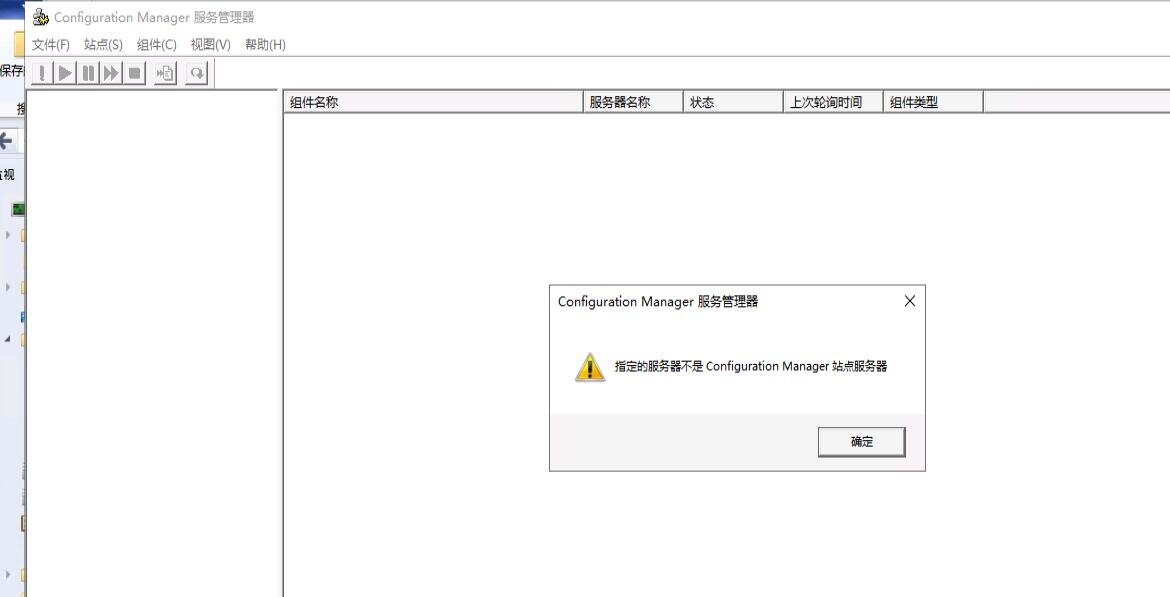
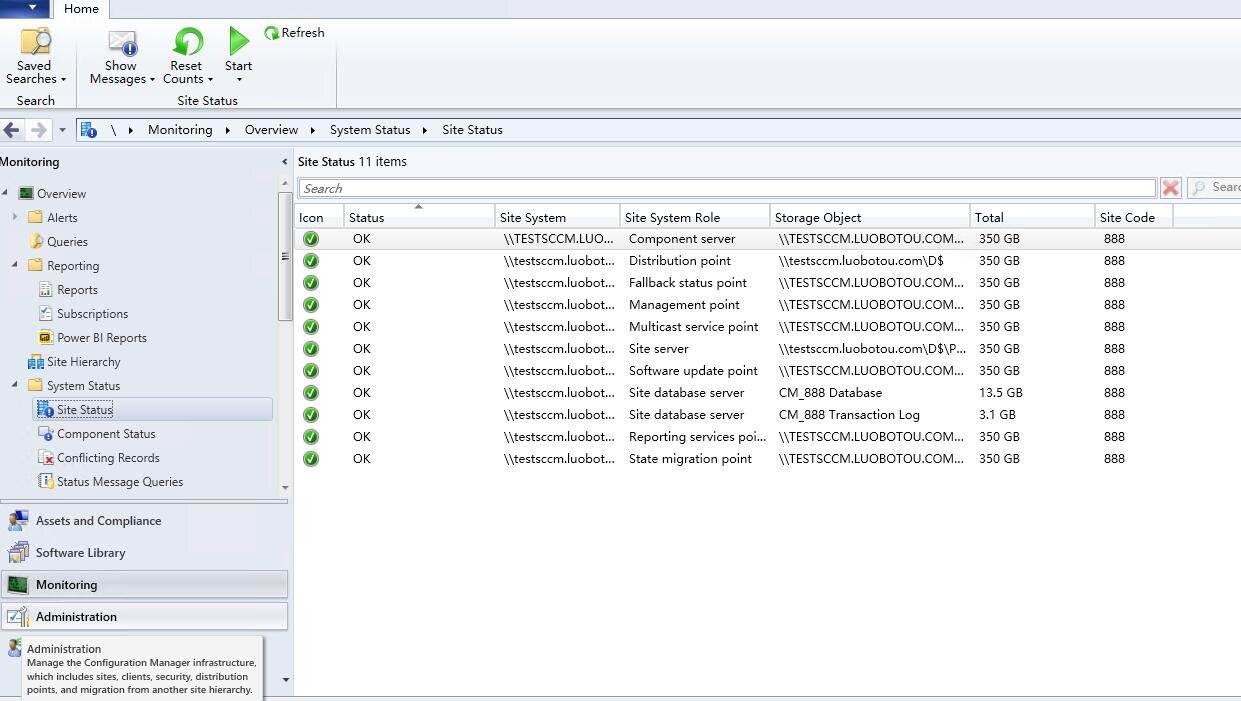
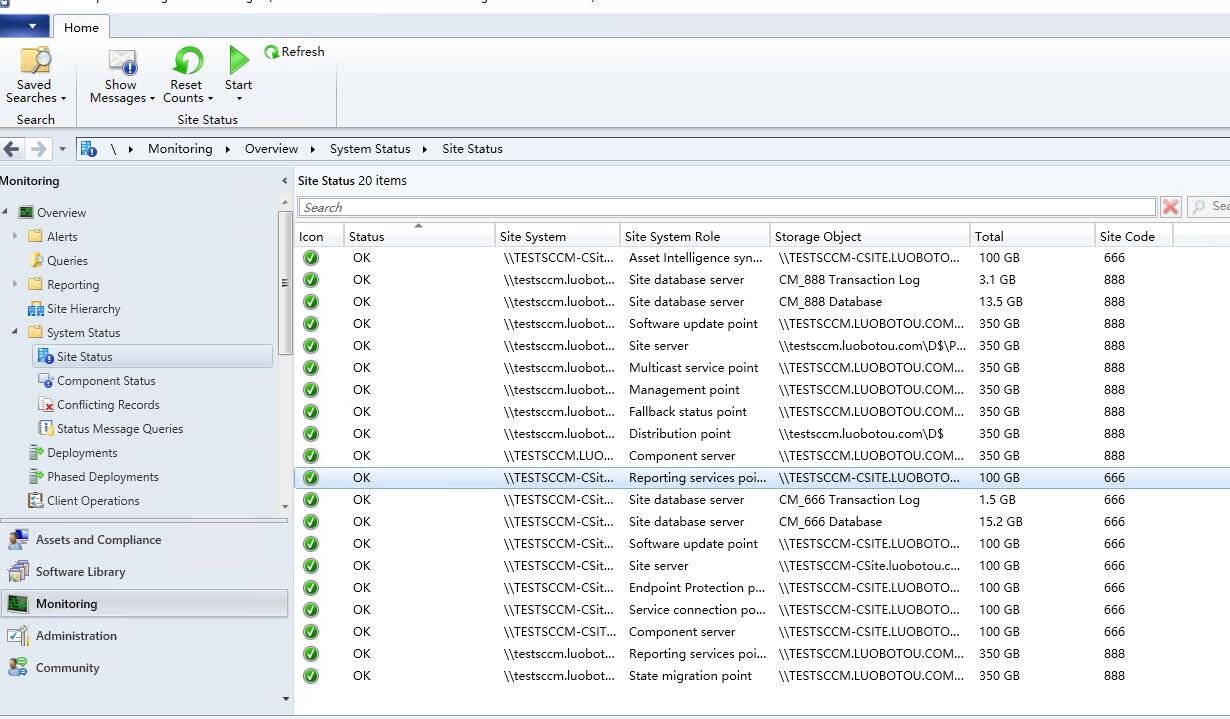
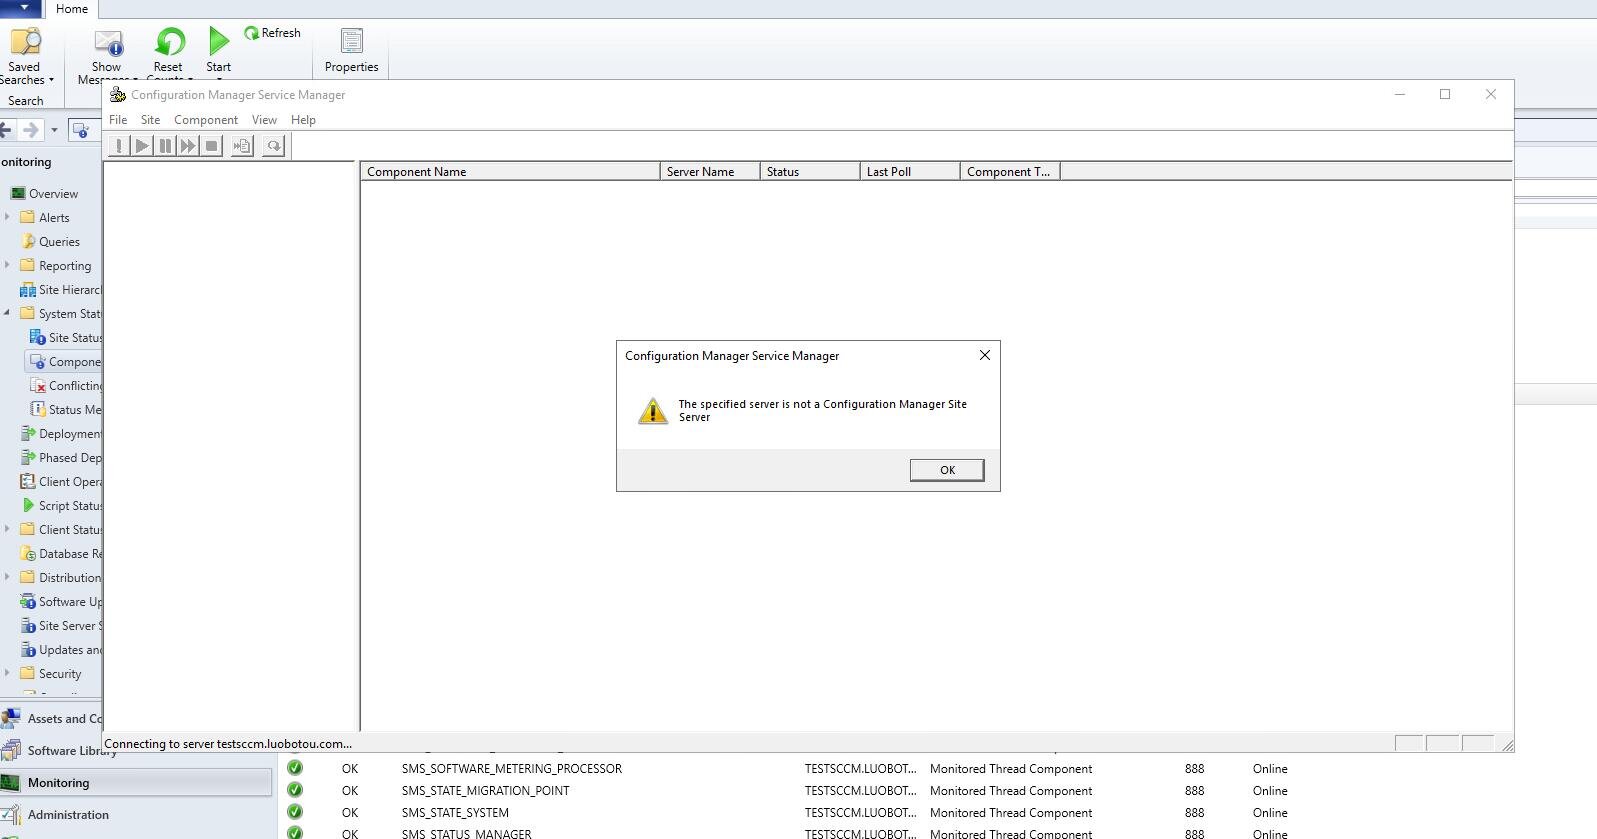
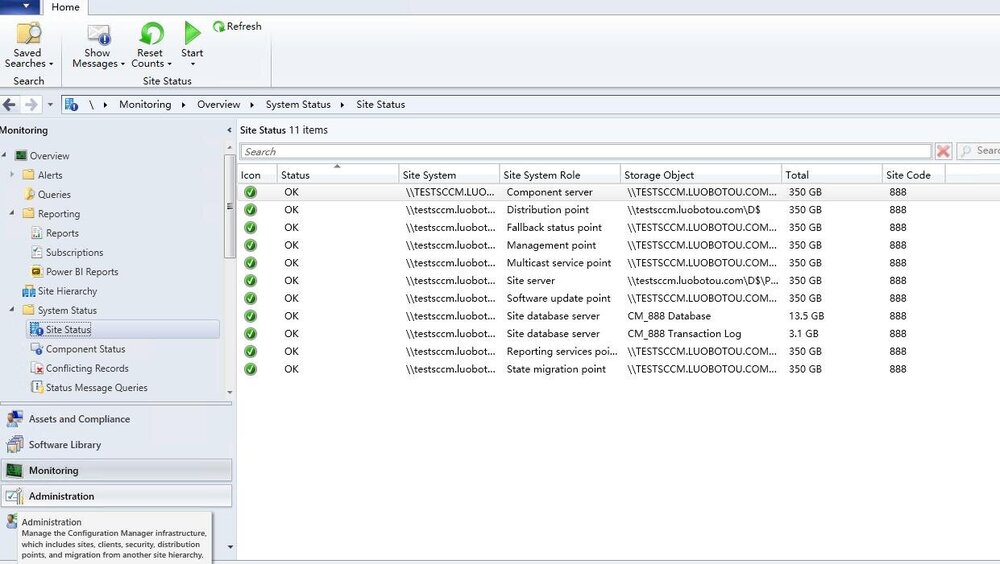
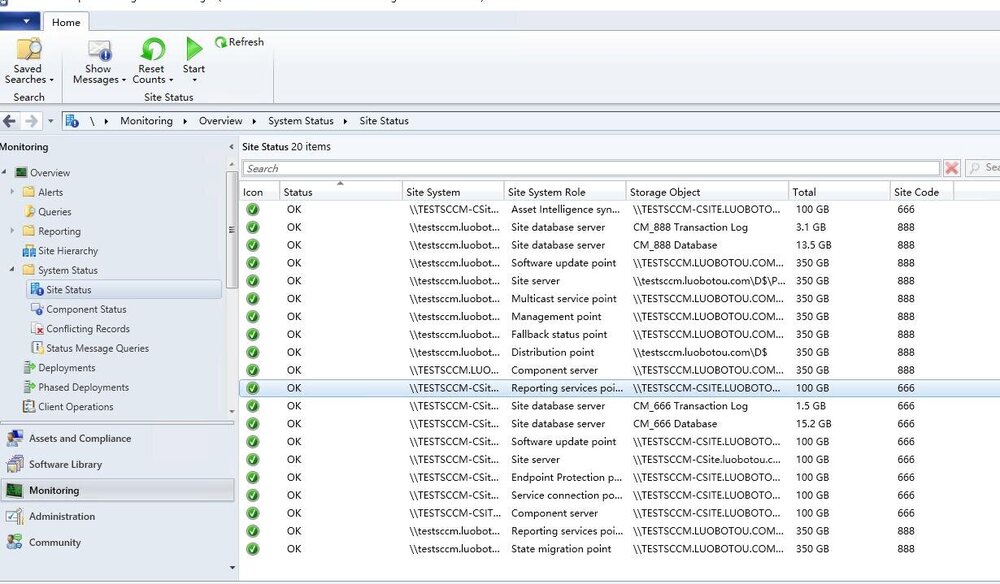
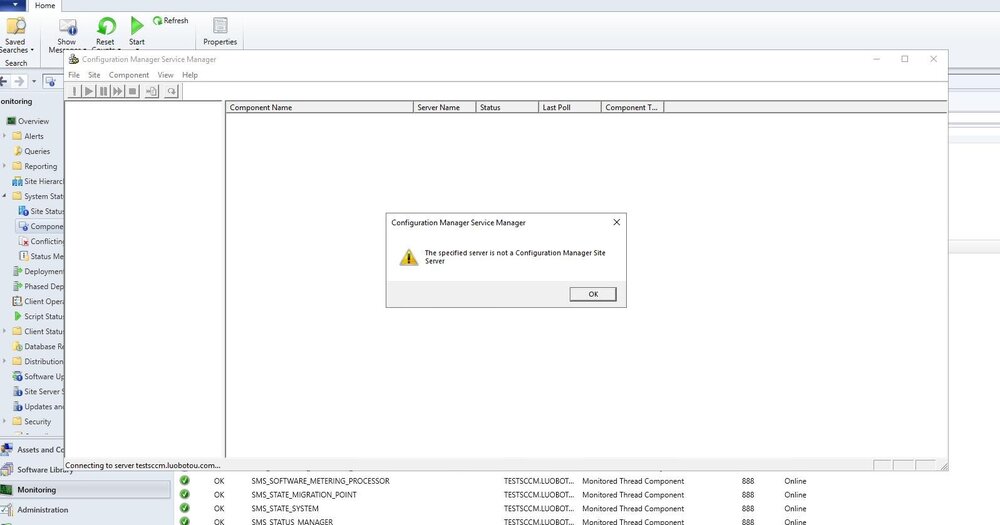
 After sccm2002 server Windows2012R2 is upgraded to server2019, The specified server is not a configuration manager site server A management center site 666 is windows2019, and a main site 888 was originally Windows2012R2 upgraded to Windows2019 Added in the registry Software\Microsoft\SMS HKLM\SYSTEM\CurrentControlSet\Control\SecurePipeServers\Winreg\AllowedPaths The sms permission in wmi is also eligible After upgrading the operating system as required, the main site was reset Does anyone know what's going on? The specified server is not a configuration manager site server How to check the log to fix this problem? I am glad that this problem is solved, I run the installation file from the backup file Reinstall the site server It is now back to normal. This is the step required to clean up the existing server Clean an existing server for site server recovery only Delete SMS registry keys: HKLM\Software\Microsoft\SMS Delete any registry entries starting with SMS from HKLM\System\CurrentControlSet\Services. For example: SMS_DISCOVERY_DATA_MANAGER SMS_EXECUTIVE SMS_INBOX_MONITOR SMS_INVENTORY_DATA_LOADER SMS_LAN_SENDER SMS_MP_FILE_DISPATCH_MANAGER SMS_SCHEDULER SMS_SITE_BACKUP SMS_SITE_COMPONENT_MANAGER SMS_SITE_SQL_BACKUP SMS_SITE_VSS_WRITER SMS_SOFTWARE_METERING_PROCESSOR SMS_STATE_SYSTEM SMS_STATUS_MANAGER SMS_WSUS_SYNC_MANAGER SMSvcHost 3.0.0.0 SMSvcHost 4.0.0.0 Uninstall the Configuration Manager console Restart the server Confirm that all of the above registry keys are deleted. The server is now ready for the Configuration Manager restore procedure.
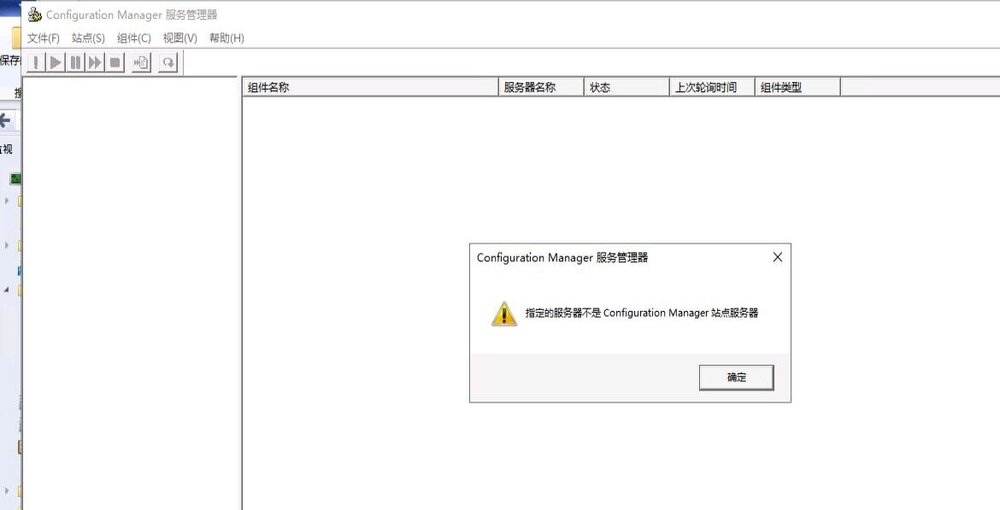
-
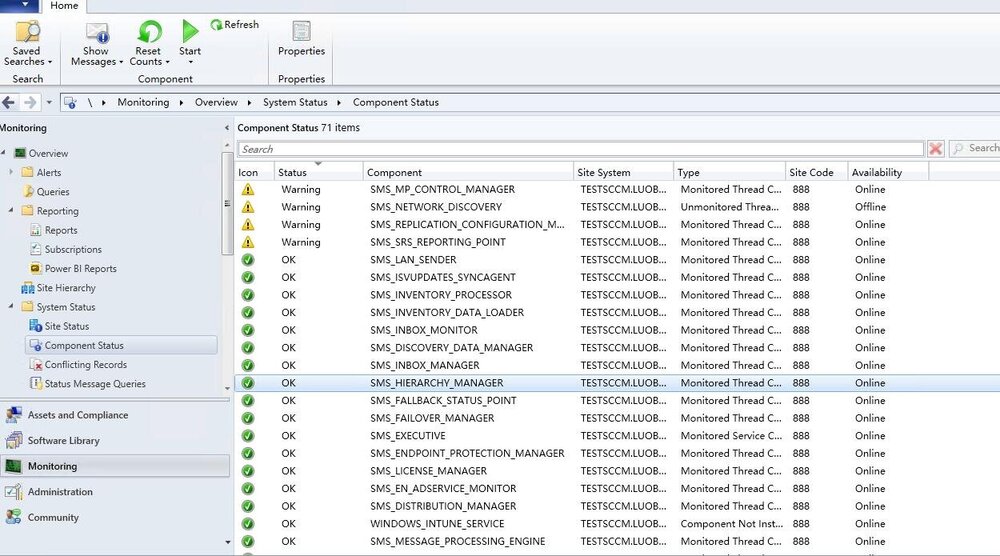
 Hi Team, I have been facing an strange issue. After the machine built by OSD TS, client isn't visible as online in Console and I don't think client is getting policies applied. Validated Firewall ports (80,443,10123) and all are fine. Any clue or troubleshoot approach would be much appreciated. I have attached policyagent.log. Note: To test this tried to install a client on Site Server using clientpush, it installed and shows as online and all the configurations getting applied. PolicyAgent.log
 -
 Patch Connect Plus, a third-party add-on for SCCM, brings two new features - Application Management, and Admin Tools to make your SCCM experience comprehensive. Application Management: 1. Select your desired application that needs to be created in SCCM from a vast repository of applications 2. Customize the application deployment with custom scripts and pre-defined application templates Admin Tools: 1. Access 25 of the most essential client management tools from SCCM console 2. Perform a wide range of functions like on-demand client operation, client troubleshooting, and system management actions You can try the fully functional version free for 30 days! Drop a comment should you have any query.
-
Hi Everyone,
I'm a new Level 2 Technician as i was previously Level 1 technician and my main role was helping users troubleshoot issues on their Computer and recently had a few colleagues from Level 3 started helping me get into SCCM environment were i flourishing from their Wisdom, so found your site and started to visit this site to learn a few things and decided to register.
Thank you for visiting my page
-
Hey Windows Pros, I work as a tech-marketer for ManageEngine. We have some exciting news from Patch Connect Plus, which I thought will be valuable to you. We have introduced "Standard edition" which offers third-party software catalogs to your SCCM 1806. These catalogs can also be used to publish to SCUP too. So if you'd like to avail a free trial and see how it works on your SCCM environment, you can get started here. Here's a list of applications supported: https://www.manageengine.com/sccm-third-party-patch-management/supported-applications.html You can learn how to add the third-party catalogs to SCCM from the video: You can write to sales@manageengine.com if you would like to avail an extension of the free trial(30 days default)/avail more applications under the Standard edition for catalogs. Happy to help.
-

sccm Manage Blades with ESXi SO via SCCM
DiegoShadow posted a question in Troubleshooting, Tools, Hints and Tips
Good night friends ! Is it possible for SCCM to include HP Blades with ESXi operating system in hardware inventory? Is this type of management possible? -
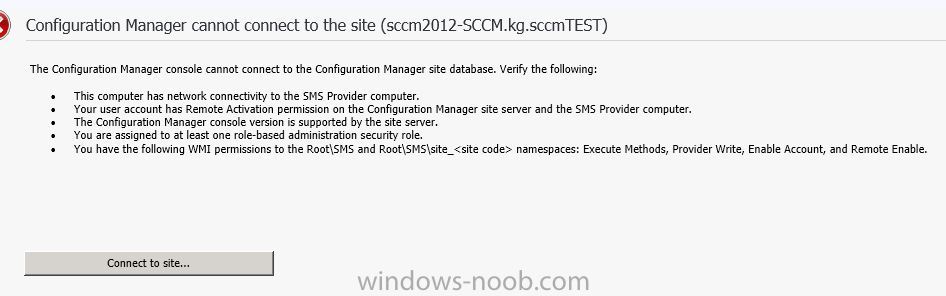
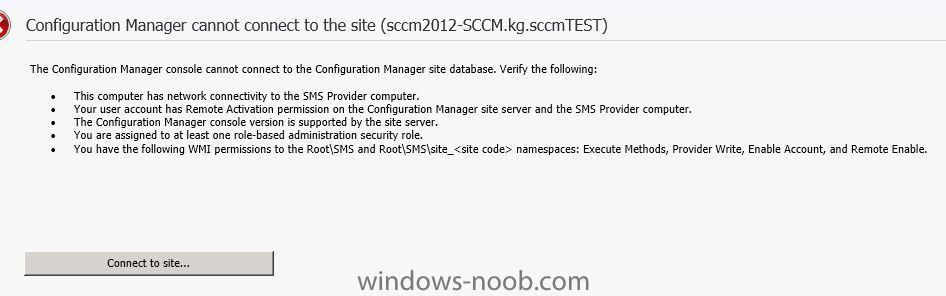
Hei ho, I wonder if anyone can help me with this strange error. I have followed the the instructions here to a tee to install a test of SCCM 2012 but have hit a strange error - Config. Manager cannot connect to the site. And this has me perplexed as the account I am using has full domain rights to this test server, has full access to all files\folders, full access to SQL and was used to install SCCM itself. The only item I cannot confirm is point 4: been assigned to at least one role based admin security role. I am presuming that as the account was used to install in the system it should have access, but maybe I am wrong. The SQL Server 2008 has been patched to SP2 with CU7 and is running locally with all the correct edits to accomodate SCCM 2012 If anyone has any advise, I would appreciate it! Attached is a screen shot of the error message
-
Hi, Console version: 5.0.8355.1306 Site version: 5.00.8355.1000 Having a few issues trying to get 'Configuration Manager 1606' installed using the 'Updates and Servicing' section is SCCM. The 1606 update is in a state of 'Prerequisite check failed'. I have seen a couple of other articles stating this is normally due to HDD space. I have checked this and there is over 20GB free on the drive. Looking at the logs, it has failed on [Failed]:Verifies that the Microsoft Remote Differential Compression (RDC) library is registered on the computer specified for Configuration Manager site server installation. I have no other option with the 1606 update than to run the prerequisite check again which will fail. I have checked both our primary site server and our other distribution point server, both have the RDC feature installed. Any help would be much appreciated! Thanks Jonathan
-
Howdy! Has anyone had any luck with gathering HP warranty information in SCCM hardware scans? I have found a bit of information saying that the most common way was a mix of scripts and custom .MOF's using this guide, however apparently these dont really work now as HP has changed the links used. Was curious to know if anyone has found a way? Have been reading the forum below and its starting to look a bit like we may need a paid service to gather the information? https://social.technet.microsoft.com/Forums/office/en-US/eb004c1c-de23-403a-8ff3-cd4c6d9da4b8/has-anyone-managed-to-get-hp-warranty-information-into-sccm?forum=configmgrgeneral Cheers, GHaM
-
 hi every one i have a strange problem in SCCM 2012 when i use F12 its doesn't work i search alot then i fond when the PC have an OS the F12 doesn't work ( btw its was work fine ) when the PC is free Dos i can use F12 normally also i can't fin smsts.log on my server i look at cmtrace i saw all log file except smsts i really need help
 -
 Hi We are planning a Windows 10 deployment for the not to distant future and I am working on getting a new set of task sequences setup for this, incorporating some of the niggly things we've wanted to do for a long time but haven't had the time or patience. One of those things is setting up the computers BIOS settings to our corporate setup. We are primarily all Dell computers, or varying ages, but the majority will run Dell CCTK commands, which is how we do the settings at the moment post task sequence. I basically followed this article to setup the CCTK part of our task sequence (https://miketerrill.net/2015/08/31/automating-dell-bios-uefi-standards-for-windows-10/). Under a Win PE 10 x86 boot image - I have a CCTK exe which changes the system to remove our standard password and use password. So when the rest of the commands are run (which require the password in the command line) the real password doesn't show in the log files. Another CCTK exe resets the password later. I have now found I need a x64 boot image, so I have done the normal import etc. etc. but the Dell CCTK exe which ran perfectly well under x86 now fails... When I try to run it using the F8 command prompt I get a message saying "Subsystem needed to support the image type is not present" - the exe was made on an x64 machine and should be multi platform. Has anyone else tried this and come up with a similar problem or a solution? Thanks everyone John
 -
 My task sequence fails with - "this task sequence cannot run because the program files for 00100002 cannot be located on a distribution point" (00100002 is config manager client). Does anyone have any idea why? I notice that my client package says 0 programs and has DEPLOY greyed out, so cant be deployed. Has anyone seen this before? the 'version' field is also blank
-
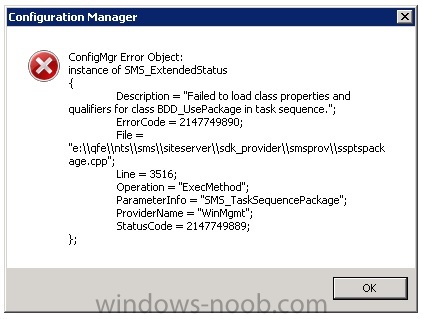
Hello, dear colleagues. We are using SCCM 2012 version 5.00.8239.1000. We have CAS+5 Primary Servers. Some time ago i have noticed that i can't edit task sequences on Cas and on one of Primary servers. Everything is ok on other 4 servers. When i am trying to edit Task Sequences a have error below. Please help me to resolve this problem. I can provide any more information about this error. Thanks in advance.
-
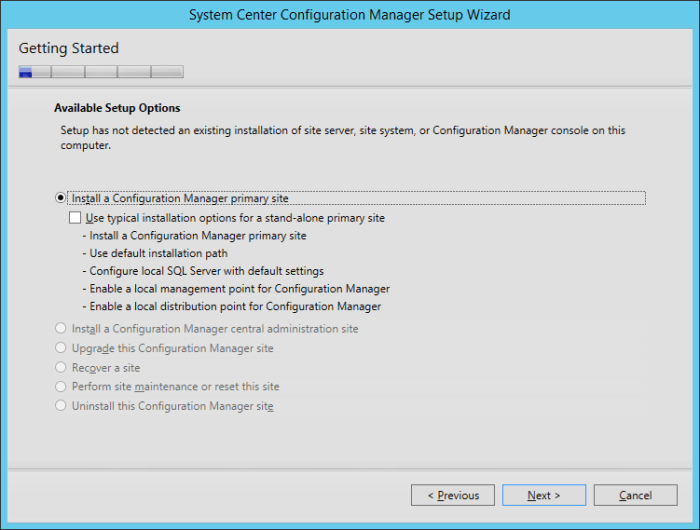
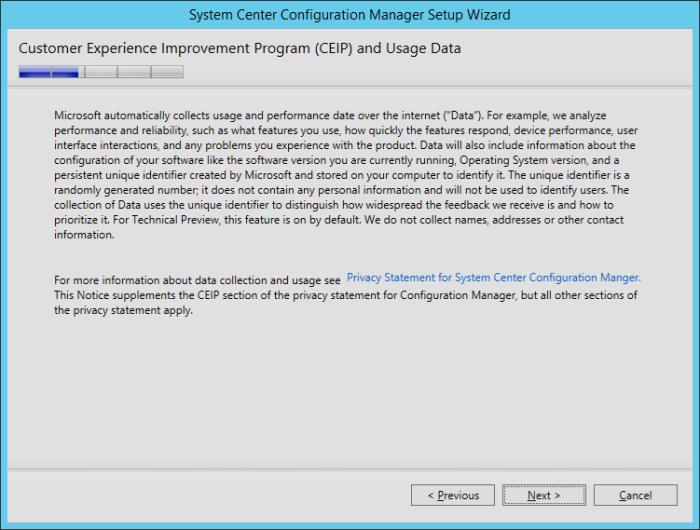
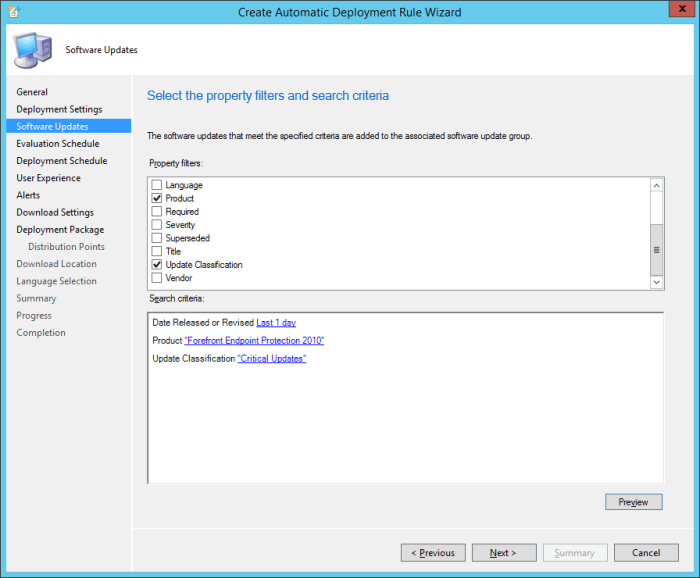
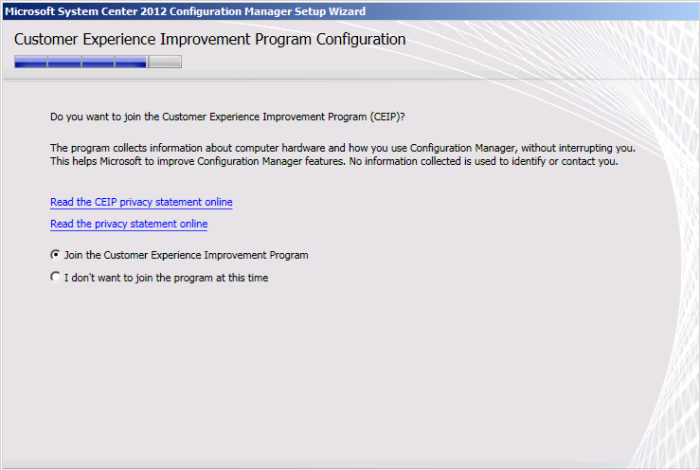
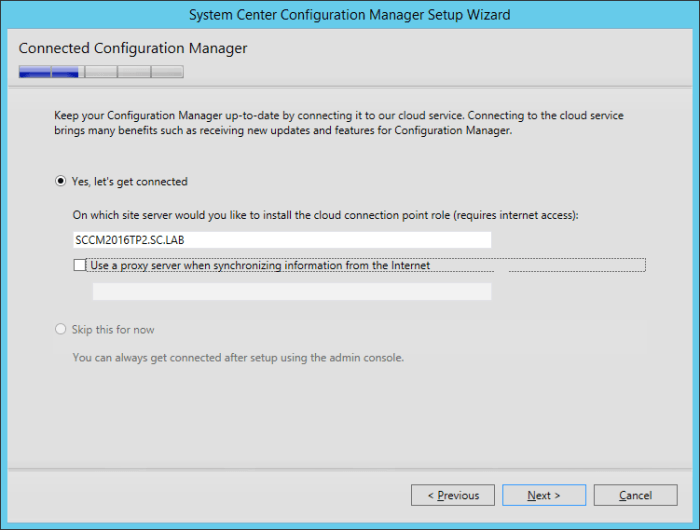
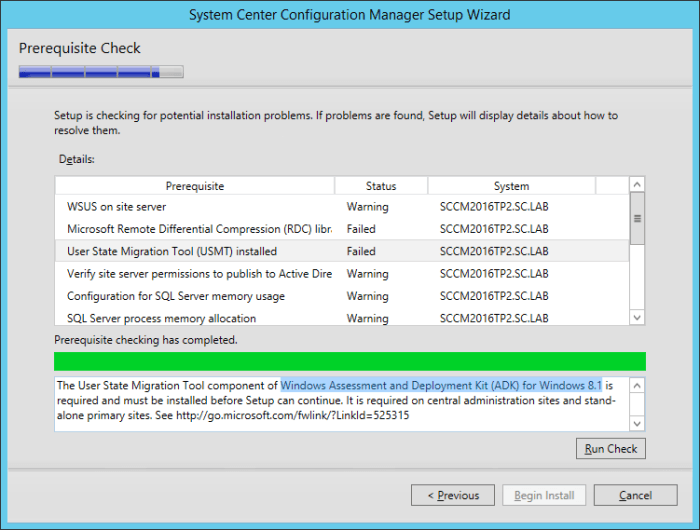
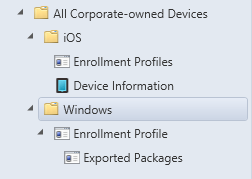
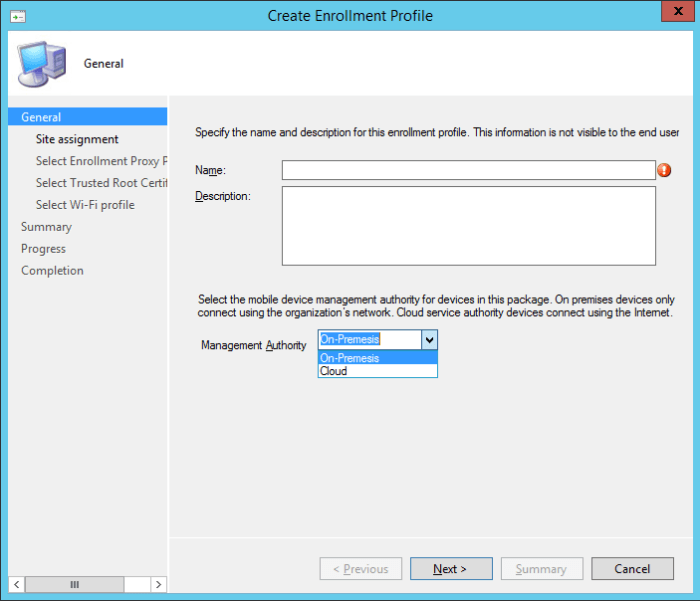
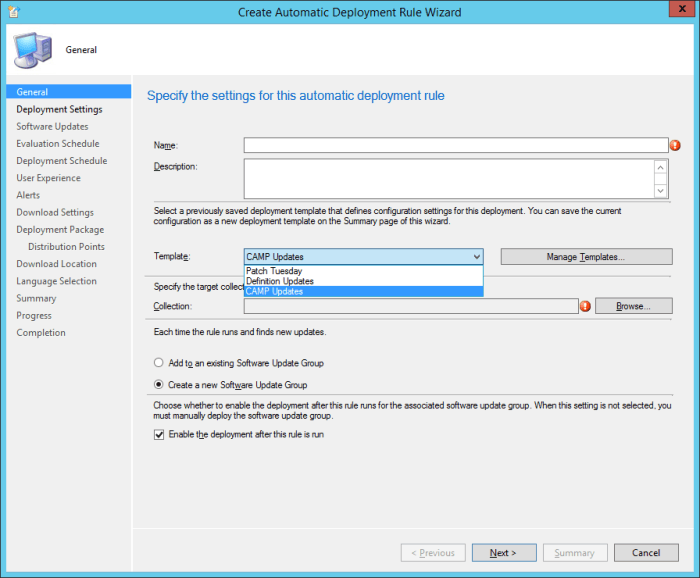
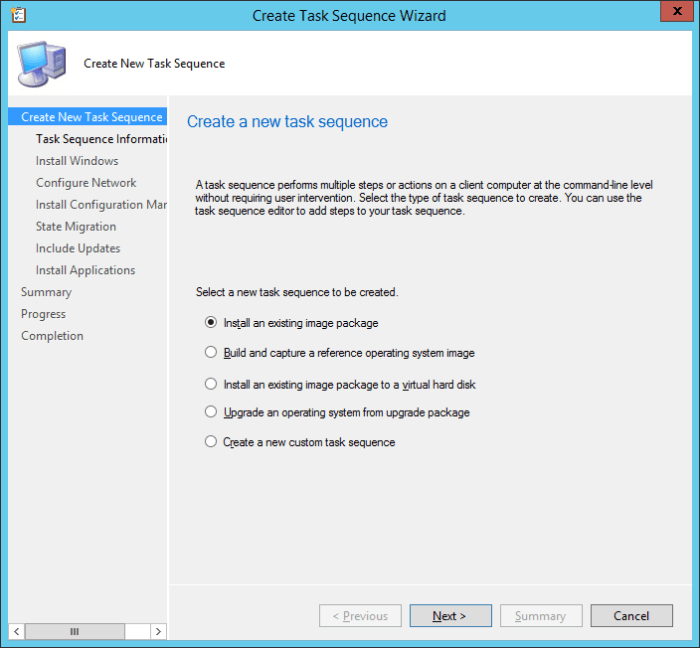
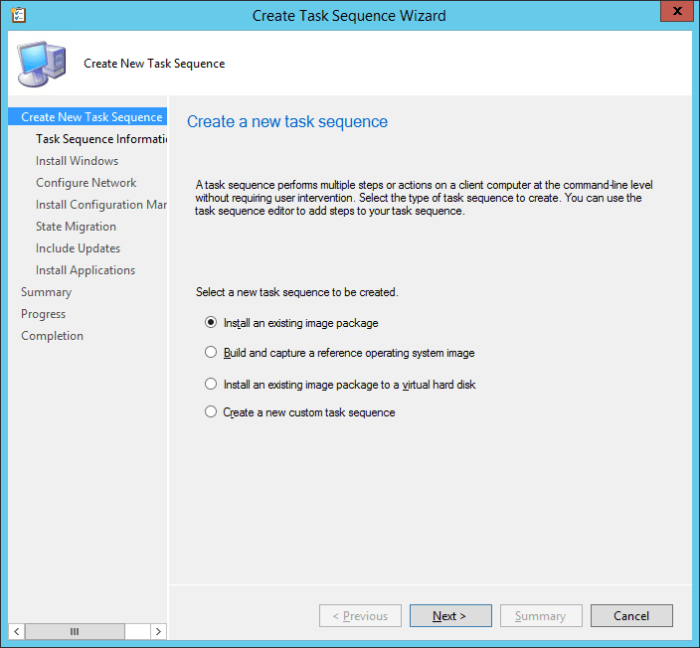
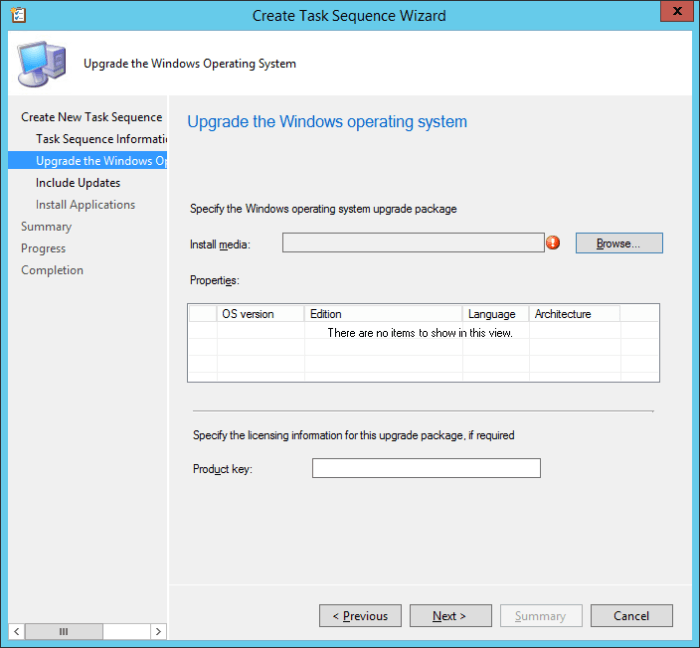
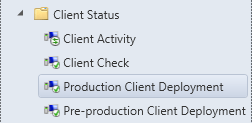
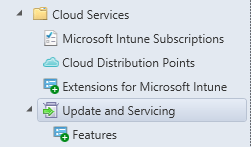
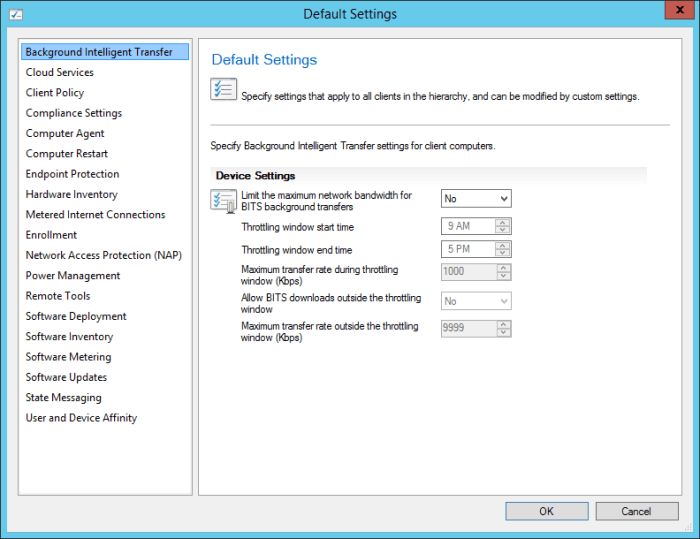
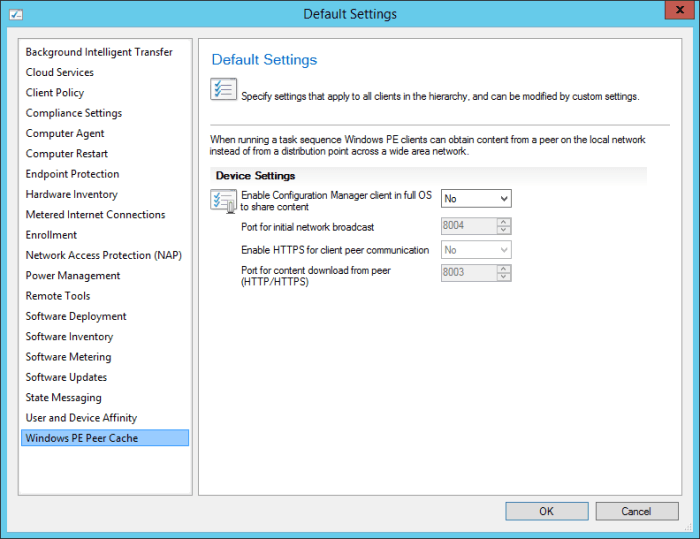
 Microsoft recently released the Technical Preview 2 of System Center Configuration Manager 2016: https://technet.microsoft.com/library/dn965439.aspx Per the TechNet article: This release adds the following additional capabilities: Sideloading apps in Windows 10 Windows PE Peer Cache On-premises MDM: Adds support for Windows 10 desktopBulk enrollment of Windows 10 devices Support for multiple Automatic Deployment Rules In addition to new capabilities, this release includes several incremental improvements we want you to know about: General improvements LimitationsThere are several limitations with this Technical Preview, including the following: Only a stand-alone primary site is supported. There is no support for a central administration site, multiple primary sites, or secondary sites. Only the following versions of SQL Server are supported with this build:SQL Server 2012 with cumulative update 2 or later SQL Server 2014 The site supports up to 10 clients, which must run one of the following:Windows 7 Windows 8 Windows 8.1 Windows 10 InstallationAs per the limitations listed, the only option during the installation is for a Primary Site. Going through the installation, I noticed that the CEIP program page is different (compared to the SCCM 2012 R2 installation), and no longer provides the option to "opt in" or "opt out". There is now also a new option to connect SCCM to Microsoft's cloud service to keep it up-to-date. It will be interesting how this will work, and if we will get a prompt/option for the update, or if it will be forced upon us. When the installer runs the Prerequisites Check, it is interesting that the Technical Preview 2 is still referencing/leveraging the Windows Assessment and Deployment Kit (ADK) for Windows 8.1, and not Windows 10 (even if it is only still in preview). New/Additional FeaturesIn addition to the features contained within the "R2 SP1" release (see my article here: First Look At System Center Configuration Manager 2012 R2 Service Pack 1), there are some additional features now included. All Corporate-Owned DevicesIn Service Pack 1 for SCCM 2012 R2 release, there is already the options for iOS devices. Now in SCCM 2016 Technical Preview 2, we have the added option for Windows devices. On the General screen, we have the option to choose the Management Authority between "On-Premesis" (which is spelt wrong), and "Cloud". Software Library WorkspaceSoftware Updates > Automatic Deployment Rules Although ADRs are not a new feature/addition, there is a new Template to select aside from the "Patch Tuesday" and "Definition Updates" options; called "CAMP Updates". With the 'CAMP Updates' template selected, the default Software Updates are set to "Forefront Endpoint Protection 2010" and "Critical Updates". Operating Systems > Task SequencesWithin the Task Sequences area, there is a new option to choose from compared to SCCM 2012 R2 SP1, "Upgrade an operating system from upgrade package". This new Task Sequence provides the option to, obviously, perform an OS upgrade (think Windows 7/8.1 to Windows 10). Nice. Monitoring WorkspaceClient Status There are 2 new items within the Client Status area, "Production Client Deployment" and "Pre-Production Client Deployment". Per the TechNet article: "This release includes new monitoring for client deployment status, which provides you feedback on client upgrades. This improved status includes drilling into the different status categories to obtain details about individual devices." Administration WorkspaceCloud Services Within the Administration workspace, within the Cloud Services section, there is an area for Update And Servicing/Features, which logically is connected to the new installation option of connecting to Microsoft's Cloud Service for updates and new features to SCCM itself. Hopefully this will list the new features, updates, etc. and provide the option of when and where to install them. Site Configuration > Client SettingsThere are also some new features within Client Settings compared to the SCCM 2012 R2 SP1 release. The new "Windows PE Peer Cache" client settings option, will be really useful especially with OSD. Per the TechNet aritcle: "When you deploy a new operating system, computers that run the task sequence can use Windows PE Peer Cache (a new capability in Configuration Manager) to obtain content from a local peer (a peer cache source) instead of downloading content from a distribution point. This helps minimize wide area network (WAN) traffic in branch office scenarios where there is no local distribution point. Windows PE Peer Cache is similar to Windows BranchCache, but functions in the Windows Preinstallation Environment (Windows PE)." That covers some of the apparent changes. I'm sure there are a bunch of "under the hood" stuff that I haven't explored yet. But at least this gets your started.


-
By any chance... I am deploying new OS and when I give a name to the new computer before running the task sequence, for some reason if have more than 8 characters when applying the new OS the task sequence fails. Is there any way I can override and set it to take more characters? I noticed it fails during the applying Operating System step
-
 I am attempting to write a powershell script for our 2012 SP1 environment that well ask for the input of a package ID and it will prestage its dependencies all in separate pkgx files so it is easier to tell what has already been pre-staged. Each dependency will be named by package ID. I have the logic to get the dependencies, however I noticed something. If I go to prestage a file and check the box to include dependencies, it will list the superseded packages as well. If I try to distribute content, it will only list the dependencies. While researching superscedence and content issues, I have discovered that if it is deployed via Task Sequence, it will download the supersceded application as well. So this then changes the need for my script, I now need a way to determine what applications an application supersedes through a WMI or SQL query. Does anyone have any idea where to find that? I am attempting to find it in the DBprov log now, but I was hoping someone might have that info already available.
 -
 Hi Guys, Today while troubleshooting the MP role installation failure I saw " Failed to grab execution mutex. System error 258." in mpmsi.log file, Is this something because of pending reboot of the system (I noticed that system is pending for reboot in registry and the files that are waiting are mostly like ccm.tmp ). Log file snippet - MSI © (14:A0) [02:03:45:664]: Client-side and UI is none or basic: Running entire install on the server. MSI © (14:A0) [02:03:48:679]: Failed to grab execution mutex. System error 258. MSI © (14:A0) [02:03:48:679]: Cloaking enabled. MSI © (14:A0) [02:03:48:679]: Attempting to enable all disabled privileges before calling Install on Server MSI © (14:A0) [02:03:48:679]: Incrementing counter to disable shutdown. Counter after increment: 0 MSI © (14:A0) [02:03:48:679]: Decrementing counter to disable shutdown. If counter >= 0, shutdown will be denied. Counter after decrement: -1 MSI © (14:A0) [02:03:48:679]: MainEngineThread is returning 1618 === Verbose logging stopped: 4/25/2015 2:03:48 === please help me in getting this cleared.
 -
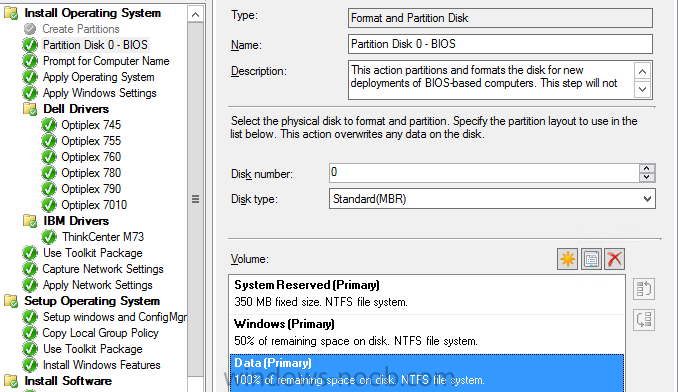
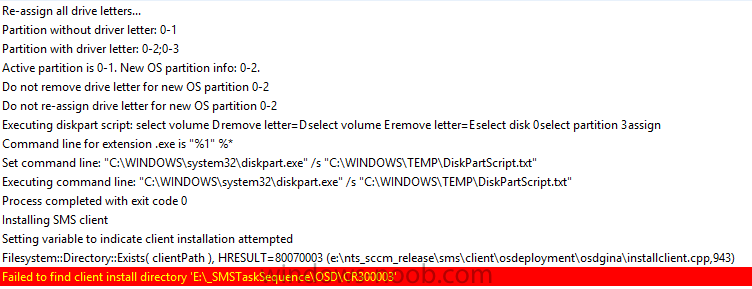
Greetings All, I am having a bit of trouble creating a TS that creates two partitions. If I only have one it works perfectly as soon as I try and add the second the TS fails. I can see what is causing the failure but i don't know why. Let me know if any other info is needed. Desired Outcome: Windows 7 with two partitons C: and D: (system and data respectively) <-- This part does actually occur. But I end up with a partially imaged machine. Partition TS Step: The Cause: The _SMSTaskSequence folder gets placed on D: then after the step below occurs it starts looking for the TS files to be on E: which doesn't exist. (Full log attached) Cheers, Mike smsts.log
-
 I've created an PDF that contains the content of the series I did about integrating Microsoft Intune and System Center 2012 R2 Configuration Manager with Single Sign-On. All the following parts are covered in the PDF: How to integrate Microsoft Intune and System Center 2012 R2 Configuration Manager with Single Sign-On – Part 1: Introduction and prerequisites; How to integrate Microsoft Intune and System Center 2012 R2 Configuration Manager with Single Sign-On – Part 2: Install and configure Active Directory Federation Service; How to integrate Microsoft Intune and System Center 2012 R2 Configuration Manager with Single Sign-On – Part 3: Configure directory synchronization; How to integrate Microsoft Intune and System Center 2012 R2 Configuration Manager with Single Sign-On – Part 4: Integrate ConfigMgr and Microsoft Intune. Before this link was only available via my own blog, but it's now also available for a wider audience here at windows-noob. The guide can be downloaded here:https://gallery.technet.microsoft.com/How-to-integrate-Intune-cb04f7a5
 -
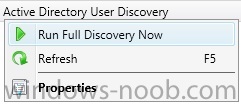
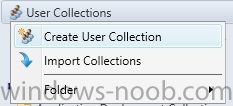
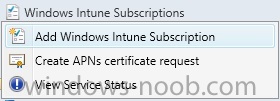
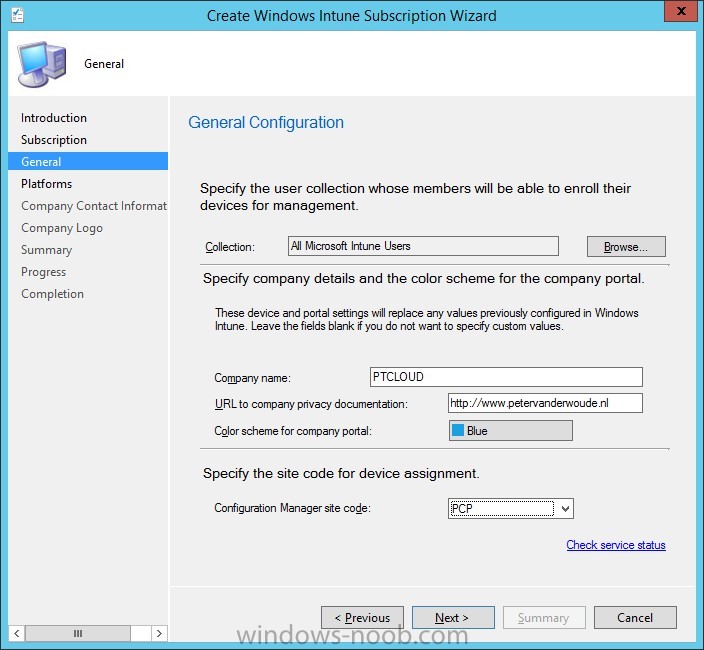
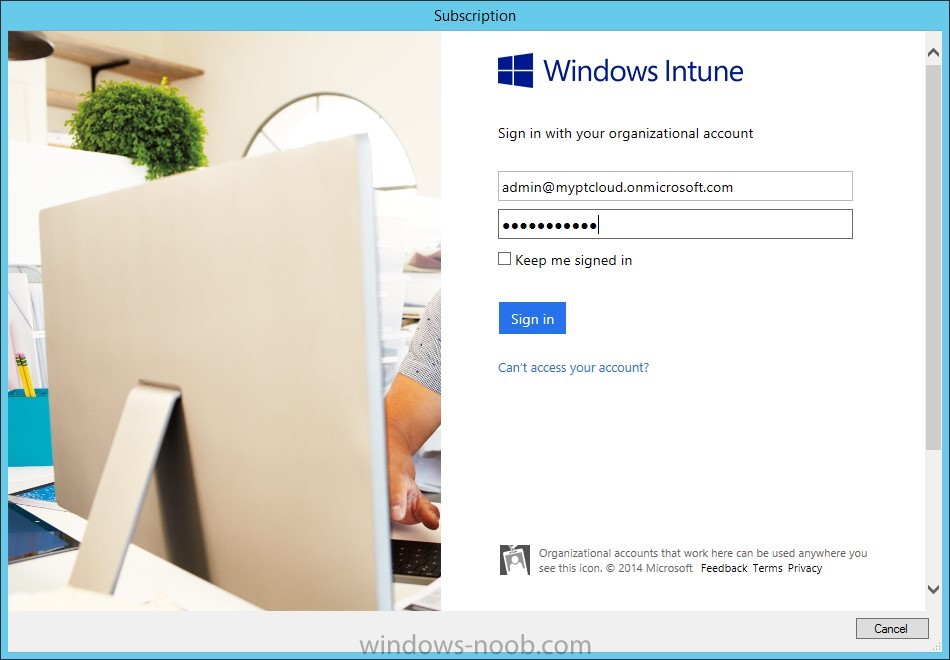
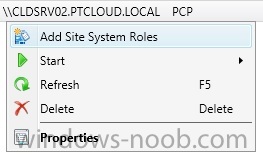
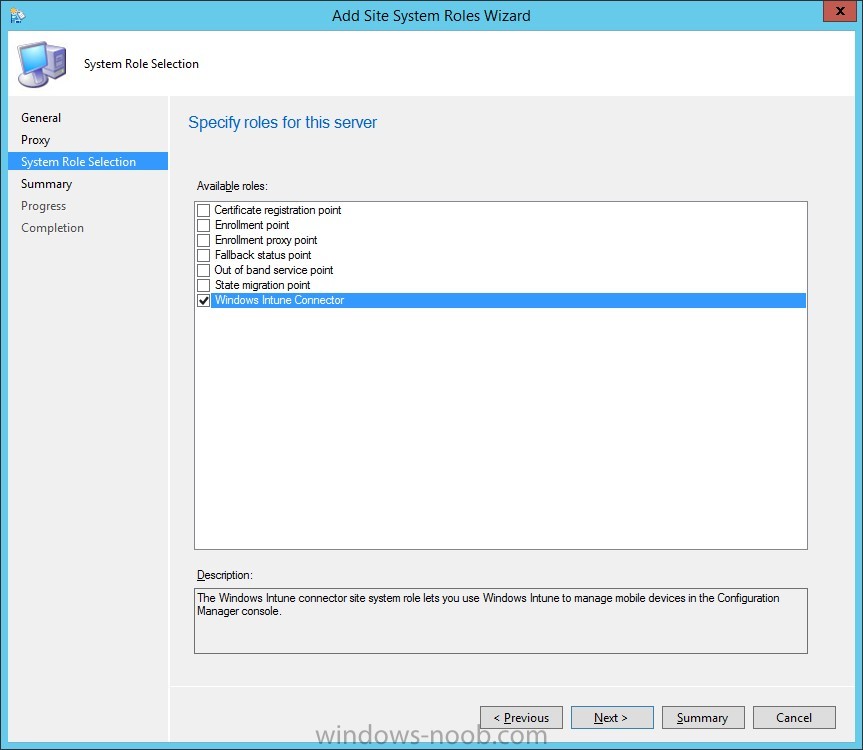
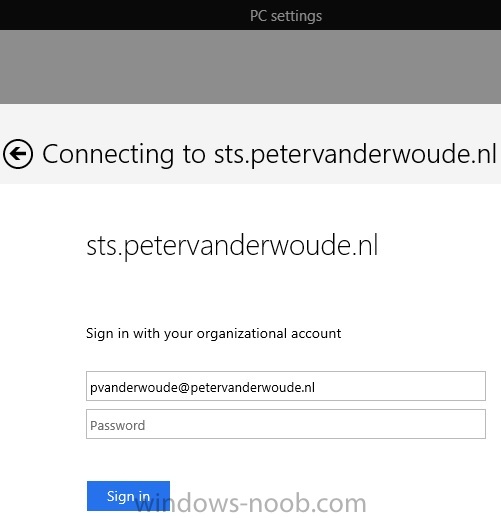
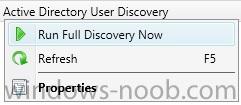
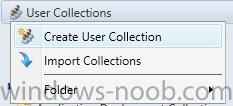
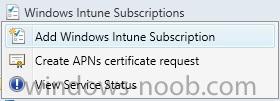
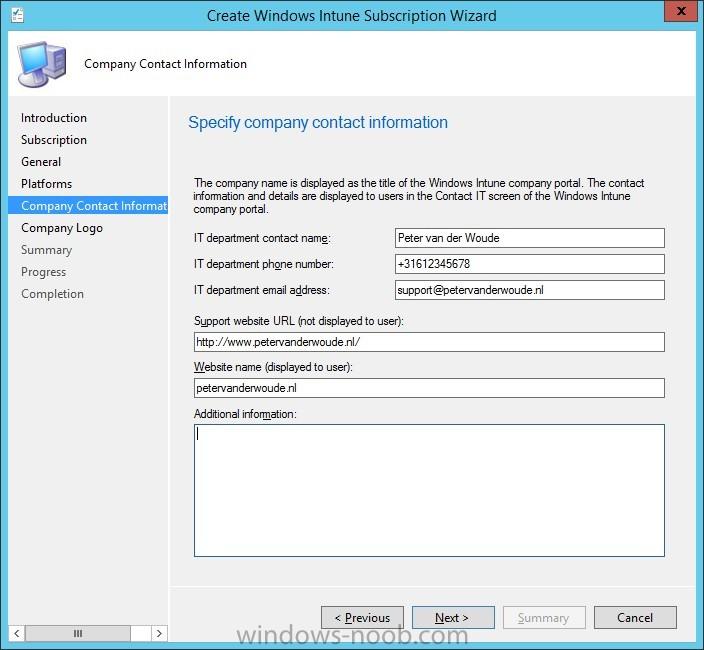
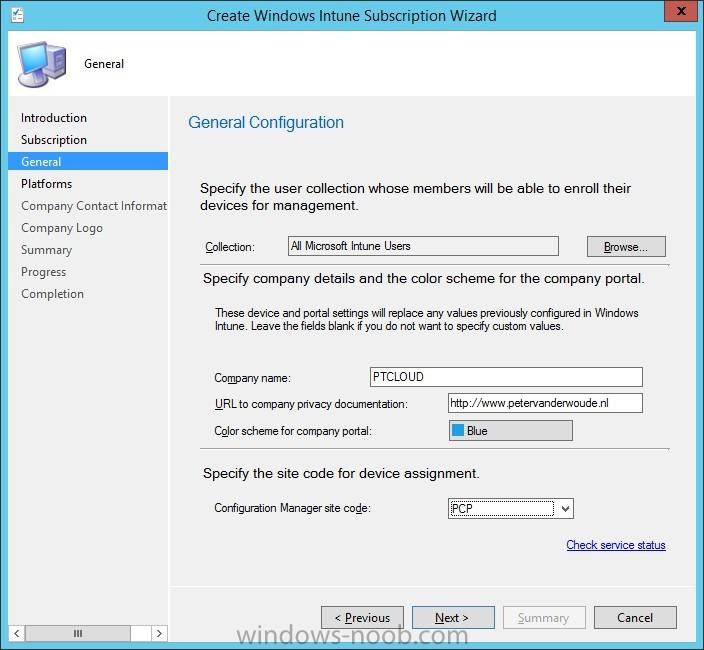
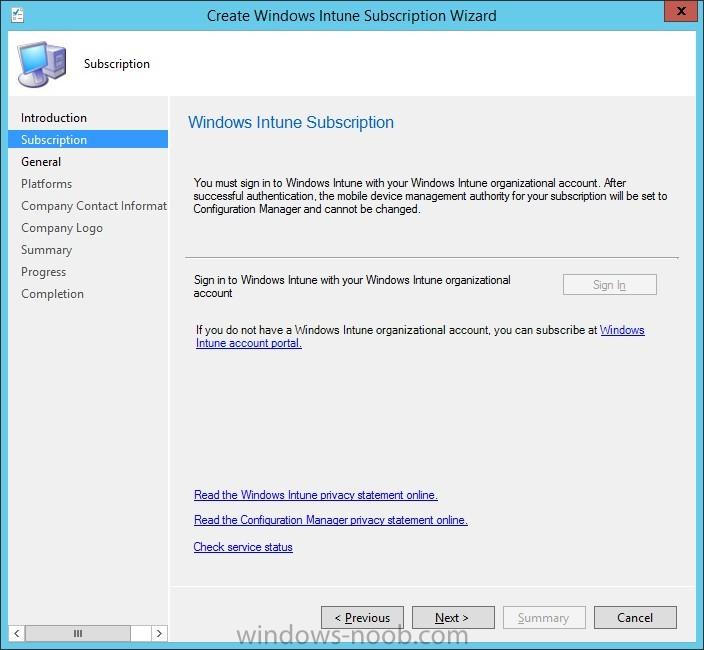
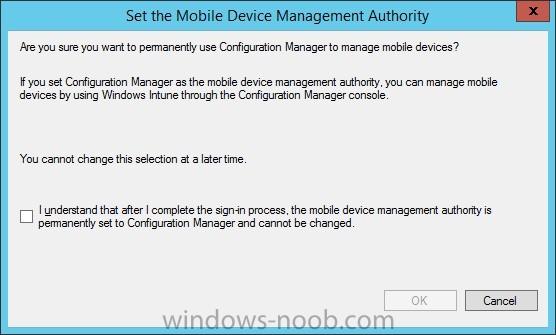
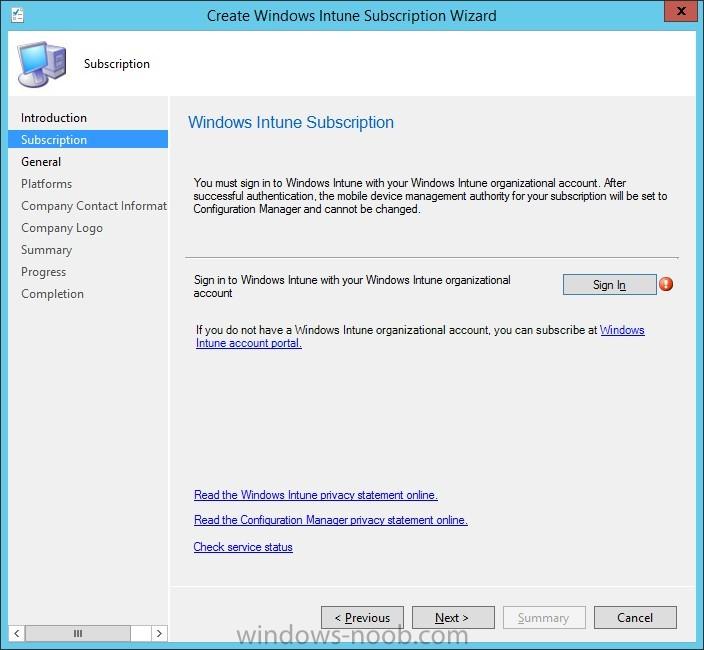
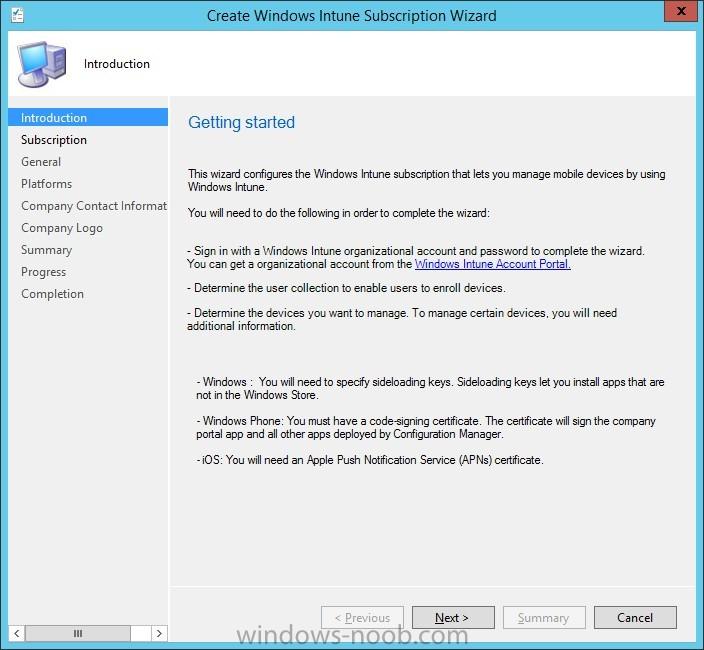
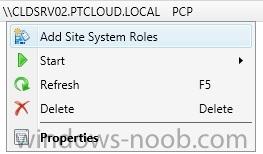
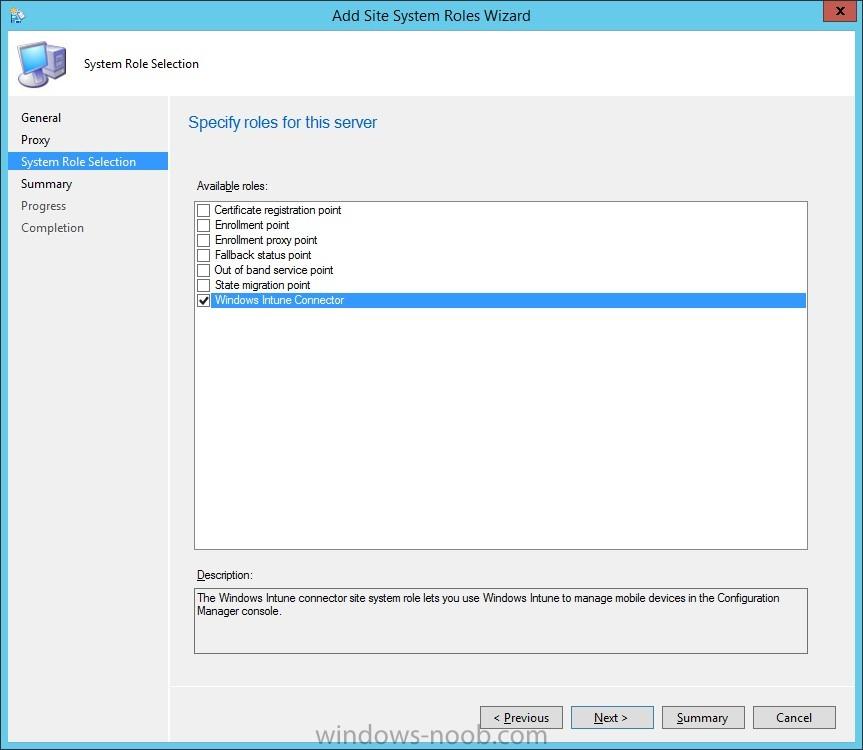
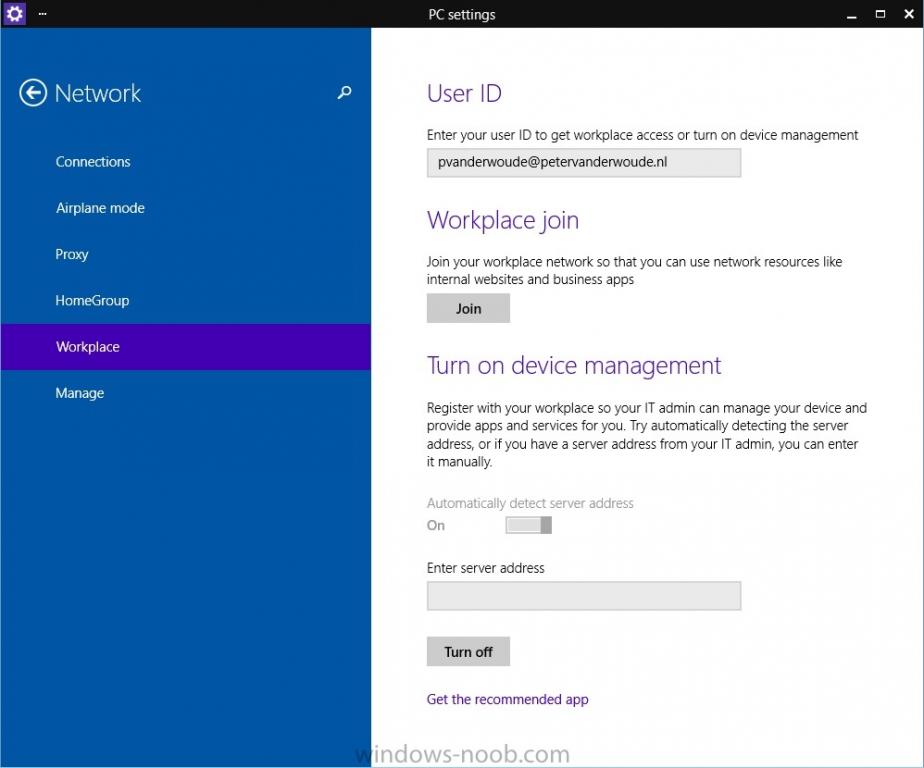
In the first part of this blog series I went through the introduction and the prerequisites, in the second part I went through the installation and configuration of AD FS and in the third part I went through the directory synchronization. This fourth part of the blog series will finally be about ConfigMgr and Microsoft Intune. During this part the last configurations will be done to get the required UPNs to ConfigMgr and to synchronize this information to Microsoft Intune. Synchronize new UPN to ConfigMgr To correctly synchronize the correct user information via Microsoft Intune, it is required to discover the most recent UPN changes to the users. Open the Configuration Manager console and navigate to Administration > Overview > Hierarchy Configuration > Discovery Methods, right-click Active Directory User Discovery and select Run Full Discovery Now.Create a Microsoft Intune collection To allow user to enroll their mobile device through Microsoft Intune it’s required to specify which user are allowed to perform this action. This is done by specifying a collection during the configuration of the Microsoft Intune connector. First we need to create this collection. Open the Configuration Manager console and navigate to Assets and Compliance > Overview, right-click User Collections and select Create User Collection. The Create User Collection Wizard will show. Provide a name like All Microsoft Intune Users and limit the collection to the All Users collection. Walk through the wizard and simply add a few users that a required to enroll their devices through Microsoft Intune. Add Windows Intune Subscription To integrate Microsoft Intune with ConfigMgr it’s required to add the subscription to ConfigMgr. Open the Configuration Manager console and navigate to Administration > Overview > Cloud Services, right-click Windows Intune Subscriptions and select Add Windows Intune Subscription. The Create Windows Intune Subscription Wizard will show. On the Getting started page, click Next. On the Windows Intune Subscription page, click Sign In. In the Set the Mobile Device Management Authority dialog box, select I understand.. and click OK. In the Subscription dialog box, specify the Microsoft Intune subscription details and click Sign In. Back on the Windows Intune Subscription page, click Next. On the General Configuration page, select the collection All Microsoft Intune Users (created in the previous step), provide some company details, specify the site code and click Next. On the Platforms page, click Next. On the Company Contact Information page, specify the contact details of the company and click Next. On the Company Logo page, click Next. On the Summary page, click Next. On the Completion page, click Close. Add the Windows Intune Connector role To connect Microsoft Intune with ConfigMgr the last step is to install the Windows Intune Connector. Open the Configuration Manager console and navigate to Administration > Overview > Site Configuration > Servers and Site System Roles, right-click \\<PrimairySiteServer> and select Add Site System Roles. On the General page, click Next. On the Proxy page, click Next. On the System Role Selection page, select the Windows Intune Connector and click Next. On the Summary page, click Next. On the Completion page, click Close. Verify the Single Sign-On in Microsoft Intune After integrating Microsoft Intune and ConfigMgr the last step is to verify that it’s all working. On a Windows device navigate to PC Settings > Network > Workplace and provide the on-premises credentials of a user that is a member of the All Microsoft Intune Users collection. Notice that this will also redirect to the on-premises AD FS for verifying the credentials. Notice after that a successful enrollment with the on-premises credentials.


-
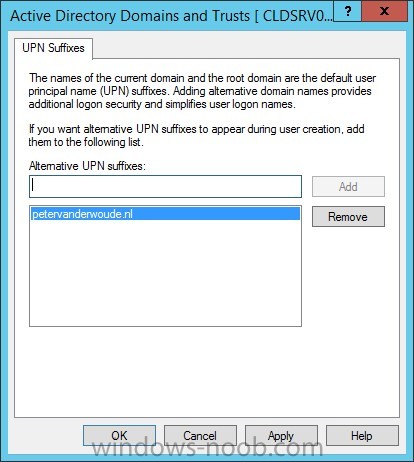
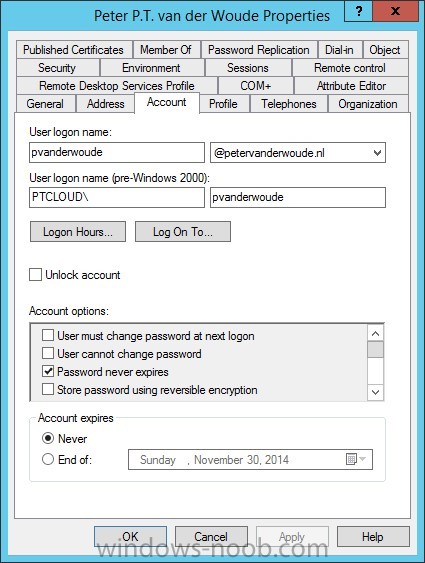
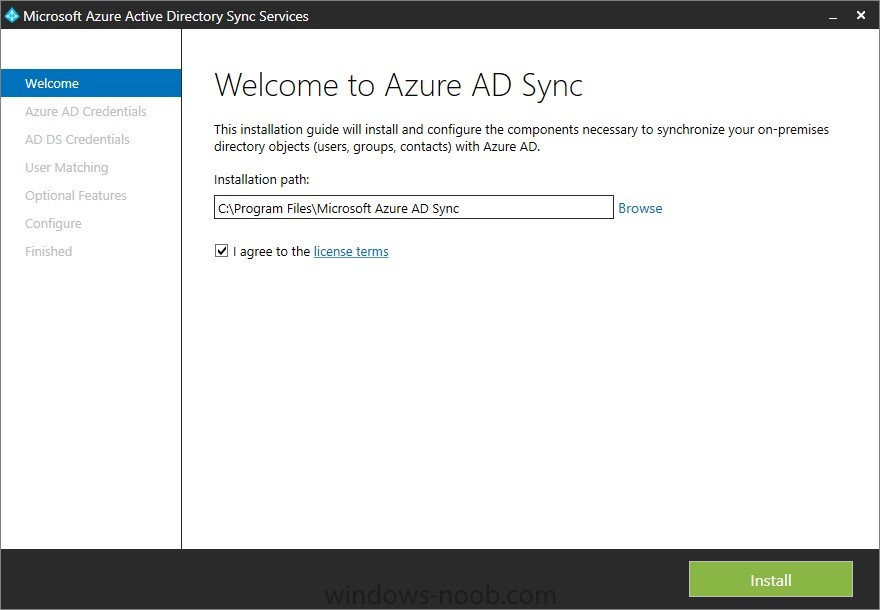
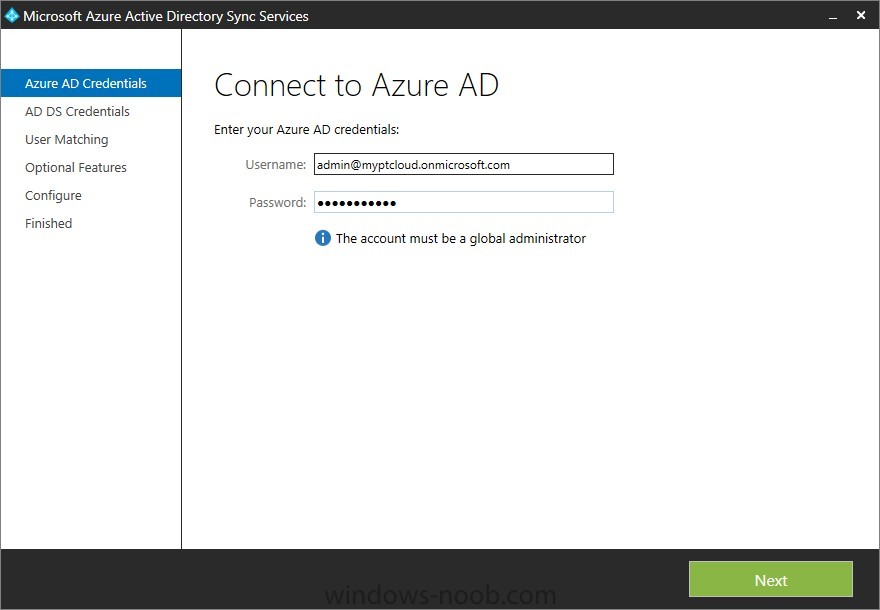
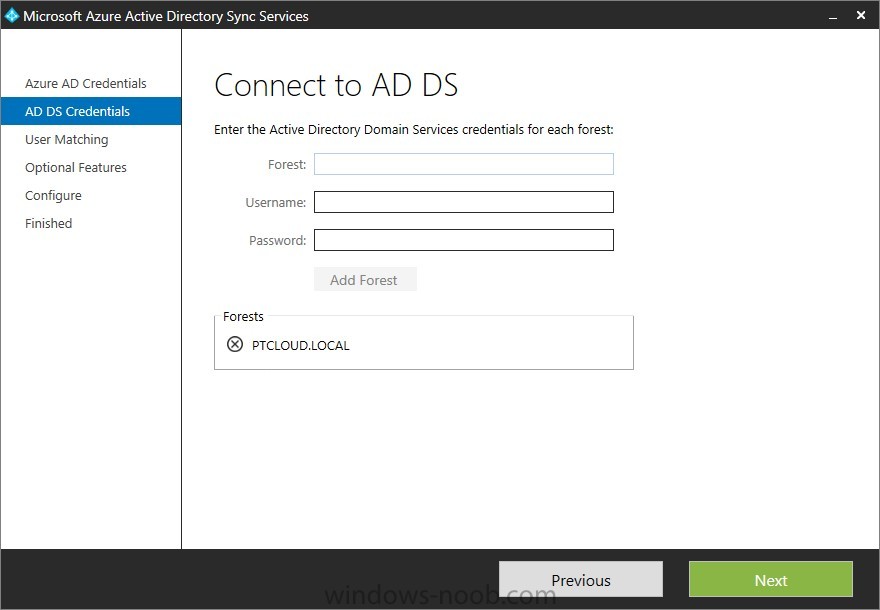
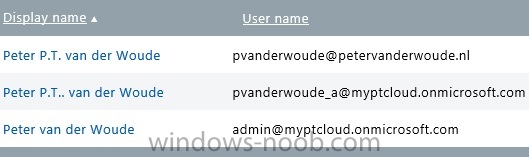
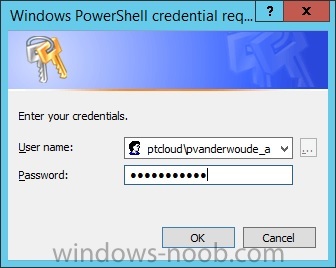
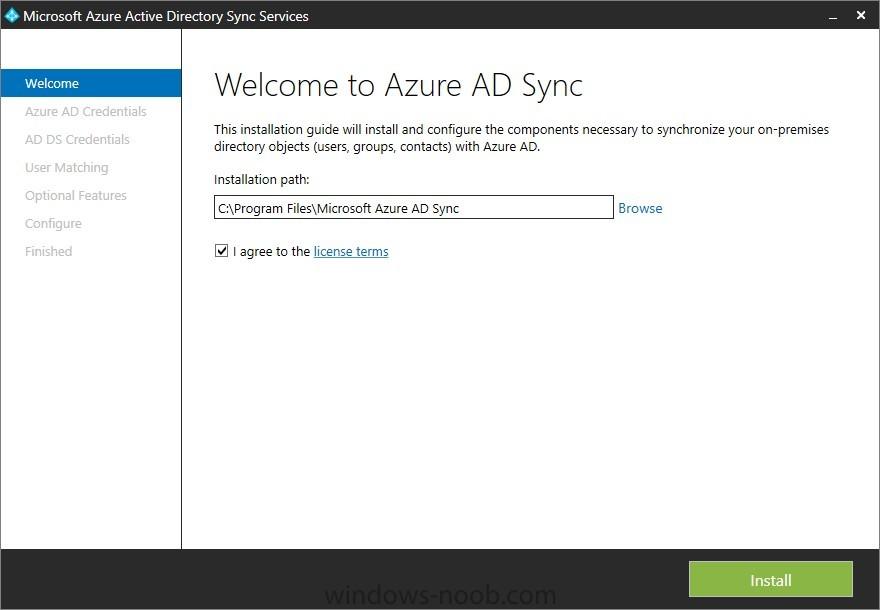
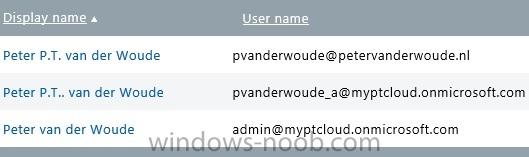
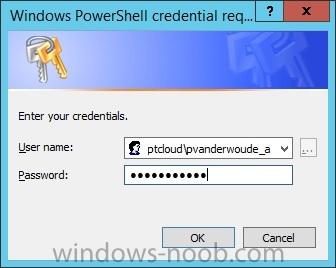
In the first part of this blog series I went through the introduction and the prerequisites and in the second part I went through the installation and configuration of AD FS. This third part of the blog series will be all about configuring, configuring and configuring. First it's required to add the public domain name to the Microsoft Online Services, then I'll add the public domain name as a UPN to the users and then I'll enable active directory synchronization. Enable Active Directory Synchronization The first thing is that I have to enable Active Directory synchronization in the Microsoft Online Services. This allows me to synchronize our on-premises users to the Azure AD. First connect to the Microsoft Online Services by using the following command, which will prompt for credentials. In the credentials dialog box provide the credentials of the Microsoft Intune subscription.Connect-MsolService –Credential $cred After that it’s possible to enable Active Directory synchronization by using the following command.Set-MsolDirSyncEnabled -EnableDirSync $true After using the command to enable Active Directory synchronization it’s required to confirm the action by simply answering with Y. To verify a successful configuration, simply logon to the Account portal and verify the Active Directory synchronization setting by navigating to Management > Users. It should display the following information. Add public User Principal Name to users To enable the user to use the public domain name to logon to their devices, and the Microsoft Online Services, it’s necessary to add the public domain name as their primary User Principal Name (UPN). These configurations will be done through PowerShell. To add a UPN for a forest use the following command. In that command the Identity is the forest name and the UPNSuffixes is the public domain name.Set-ADForest -Identity "PTCLOUD" -UPNSuffixes @{Add="petervanderwoude.nl"} To verify the success of the PowerShell action, simply open the Properties of one of the Active Directory Domains and Trusts and check the UPN Suffixes tab. To set the UPN as a user’s primary UPN use the following command. In that command the SearchBase is the OU that contains the required users and the UserPrincipalName is the public domain name.Get-ADUser -Filter * -SearchBase 'OU=NORMAL USERS,OU=USERS,OU=PTCLOUD,DC=PTCLOUD,DC=LOCAL' -Properties userPrincipalName | foreach { Set-ADUser $_ -UserPrincipalName "$($_.samaccountname)@petervanderwoude.nl"} To verify the success of the PowerShell action, simply open the Properties of one of the users and check the Account tab. Install and configure Microsoft Azure Active Directory Sync Services The next thing is to install and configure the Microsoft Azure Active Directory Sync Services. This tool will allow us to synchronize the on-premises user with the Azure AD. On the Welcome to Azure AD Sync page, specify an Installation path, select I agree to the License terms and click Install. On the Connect to Azure AD page, specify the credentials of the Microsoft Intune subscription and click Next. On the Connect to AD DS page, specify the information of the on-premises forest (see prerequisites) and click Add Forest. After the forest is added click Next. On the Uniquely identifying your user page, click Next. On the Optional features page, click Next. On the Ready to configure page, click Configure. On the Finished page, click Finish. Verify user synchronization After setting up the user synchronization it’s important to verify the success. In the Account portal, navigate to Management and click Users. In the Users overview it should start showing the synchronized users. Note: In my overview it shows a user with the public domain name UPN, a user without and the initial administrator.


-
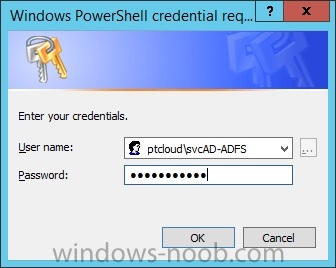
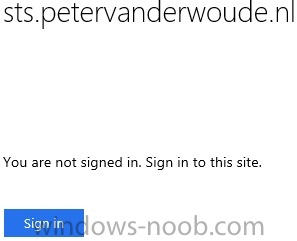
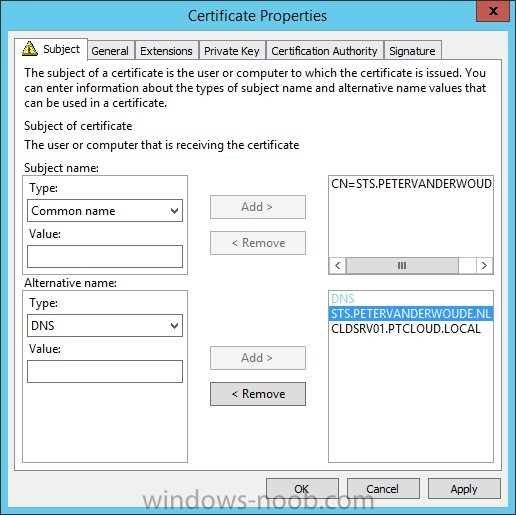
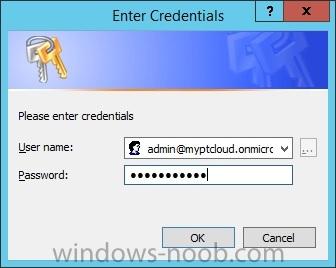
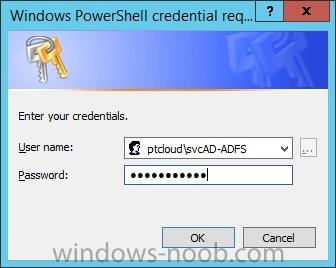
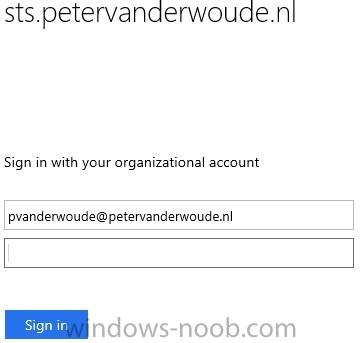
In the first part of this blog series I went through the introduction and the prerequisites. This second part of the blog series will be all about installing and configuring Active Directory Federation Services (AD FS) and the AD FS proxy, which is the Web Application Proxy (WAP) in Server 2012 R2. AD FS will be used to federate with Microsoft Azure AD for the authentication of the user’s on-premises. Install Active Directory Federation Services The first thing that’s required is to install is AD FS. This installation will be done through PowerShell on the CLDSRV01. To install AD FS use the following PowerShell command.Install-WindowsFeature Adfs-Federation -IncludeManagementTools To verify the success of the PowerShell action, simply look at the output of the action. Configure the federation server After installing AD FS it’s required to configure the federation server. This configuration will be done through PowerShell on the CLDSRV01. The first steps will get the required input for the command. Get the certificate thumbprint of the certificate (see prerequisites). To get this information run the command below. This will provide a nice overview of the thumbprints of the different certificates. Simply look for the one that belongs to the mentioned certificate.dir Cert:\LocalMachine\My To provide the credentials of the service account for AD FS run the following command and provide the credentials.$ADFSCred = Get-Credential To configure AD FS run the following command. In this command CertificateThumbprint is the thumbprint of the required certificate (first step) and ServiceAccountCredential is the supplied credentials (second step).Install-AdfsFarm -CertificateThumbprint "6532759C67678B50811739261B101B87916C1BC4" -FederationServiceName "sts.petervanderwoude.nl" -ServiceAccountCredential $ADFScred To verify the success of the PowerShell action, simply look at the output of the action. Install Web Application Proxy The next component that needs to be installed is WAP. This installation will be done through PowerShell on the CLDSRV00. One important thing to note here is that this server should be able to resolve the public federation service name to the CLDSRV01.PTCLOUD.LOCAL. This can be solved to either add an entry to the host file or by adding the information to DNS. To install WAP use the following PowerShell command.Install-WindowsFeature Web-Application-Proxy -IncludeManagementTools To verify the success of the PowerShell action, simply look at the output of the action. Configure Web Application Proxy After the installation of WAP it’s required to configure it to connect to the AD FS server. This will be done through PowerShell on the CLDSRV00. Get the certificate thumbprint of the certificate (see prerequisites). To get this information run the command below. This will provide a nice overview of the thumbprints of the different certificates. Simply look for the one that belongs to the mentioned certificate.dir Cert:\LocalMachine\My To perform the configuration of WAP run the following command in which CertificateThumbprint is the thumbprint of the required certificate (previous step) and FederationServiceName is the name of the configured federantion service. Also, this command will ask for the credentials with enough permissions to configure the federation services.Install-WebApplicationProxy –CertificateThumbprint "6532759C67678B50811739261B101B87916C1BC4" -FederationServiceName "sts.petervanderwoude.nl" To verify the success of the PowerShell action, simply look at the output of the action. Verify the AD FS Sign-In page After installing and configuring AD FS and WAP it’s very important to know for sure that it’s working. This testing can be done on any device connected to the Internet. Open the Internet Explorer and browse to https://sts.petervanderwoude.nl/adfs/ls/idpinitiatedsignon.htm Click Sign in and provide the required credentials and click Sign in again. This should change the displayed text to You are signed in. Note: Replace the public domain for the personal (or company’s) own public domain name. Create a trust between AD FS and Azure AD The next thing that’s required is to configure the federation with the Microsoft Online Services. To do this it’s required to add the public domain name to the Microsoft Online Services as a federated domain. This will allow us to use the public domain name for the various Microsoft Online Services. This configuration will be done through PowerShell on the CLDSRV02. First connect to the Microsoft Online Services by using the following command, which will prompt for credentials. In the credentials dialog box provide the credentials of the Microsoft Intune subscription.Connect-MsolService –Credential $cred After that it’s required to also connect with the on-premises AD FS by using the following command.Set-MsolADFSContext -Computer cldsrv01.ptcloud.local Now it’s possible to add a new federated domain, by using the following command.New-MsolFederatedDomain –DomainName petervanderwoude.nl A message will show that it’s required to verify the specified domain name, by adding a TXT record to the domain registar. Logon to the domain registar and specify the information about the TXT record. After specifying the TXT record it’s required to run the previous command again. This time to verify the domain name.New-MsolFederatedDomain –DomainName petervanderwoude.nl To verify the success of the PowerShell action, simply look at the output of the action. Another place to verify a successful configuration is to simply logon to the Account portal and verify the Single sign-on setting by navigating to Management > Users. It should display the following information. Verify the Single Sign-On configuration After installing and configuring AD FS and WAP it’s very important to know for sure that it’s working. Open the Internet Explorer and browse to https://portal.manage.microsoft.com/ Click Use another account and provide the required credentials and click Sign in. After specifying the public UPN of the user the page will redirect to the on-premises AD FS. Note: Replace the public domain for the personal (or company’s) own public domain name.


-
Introduction In this blog series I’m going to show how to setup a basic configuration of Microsoft Intune, integrated with System Center 2012 R2 Configuration Manager, in combination with and on-premises Active Directory Federation Services (AD FS) for a single sign-on experience. After successfully completing this blog series a user will be able to use his on-premises credentials to access the services of Microsoft Intune. As part of setting up single sign-on, it’s also required to set up directory synchronization. Together, these features integrate the local and cloud directories. It’s only required to set up single sign-on, Active Directory synchronization, and a registered domain on time for a Microsoft Online Service. If Microsoft Office 365 is already used, or any other Microsoft Online Service, then some of the steps, of this blog series, may be completed already. After setting up single sign-on, Active Directory synchronization, or a registered domain for Microsoft Intune, these items will be available for all Microsoft Online services. This information and configurations provided in this blog series are not meant for production environments. It’s purely meant for a lab setup to experiment with the possibilities. I divided this blog series in the following four parts. How to integrate Microsoft Intune and System Center 2012 R2 Configuration Manager with Single Sign-On – Part 1: Introduction and prerequisites;This first part is about what blog series will deliver and what the prerequisites are that need to be in place. How to integrate Microsoft Intune and System Center 2012 R2 Configuration Manager with Single Sign-On – Part 2: Install and configure Active Directory Federation Service;This second part is about installing and configuring AD FS, WAP and single sign-on. How to integrate Microsoft Intune and System Center 2012 R2 Configuration Manager with Single Sign-On – Part 3: Configure directory synchronization;This third part is about configuring the synchronization of the on-premises user accounts to the Azure AD. How to integrate Microsoft Intune and System Center 2012 R2 Configuration Manager with Single Sign-On – Part 4: Integrate ConfigMgr and Microsoft Intune;This fourth part is about integrate Microsoft Intune with ConfigMgr to leverage the single sign-on experience. After the last part of this series is done the status of the environment will be similar as to what is described by Niall in his first part of his series about How can I manage modern devices using System Center 2012 R2 Configuration Manager? - Part1. Basically the next parts of his series can be used to do the required following configurations. The only difference is that the environment will use an on-premises single sign-on experience. Prerequisites I would like to start this blog series with a small list of prerequisites that need to be in place for various different reasons. Also, these prerequisites will contain the servers that I’ll be using during this setup. In the following part I’ll be referring to the different server names to indicate were I’m performing the actions. Register a public domain name In this blog series I’ll be using the public domain name of petervanderwoude.nl. This domain name will be used for the single sign-on configuration. Simply replace every reference to this public domain name with a personal (or company) owned public domain name. Create a Microsoft Intune subscription In this blog series I’ll be using the Microsoft Intune subscription myptcloud.onmicrosoft.com. This subscription will be used for the single sign-on configuration. Simply replace every reference to this subscription with a personal (or company) owned subscription. Register a trial Microsoft Intune subscription here: http://www.microsoft.com/en-us/server-cloud/products/microsoft-intune/try.aspx Prepare the required servers In this blog series I will be referring to multiple servers. Even for a lab environment this should be the minimum number of server used. Of course it’s possible to user more servers to split more roles. Simply replace every reference to these server names with personal (or company) lab server names. CLDSRV00 (WORKGROUP)This server is Internet-facing and will be hosting the Web Application Proxy (WAP). CLDSRV01 (PTCLOUD.LOCAL)This server is the domain controller and will be hosting Active Directory Federation Services (AD FS). CLDSRV02 (PTCLOUD.LOCAL)This server is the ConfigMgr server and will be hosting the Azure Active Directory Synchronization Tool. Install the required Azure AD PowerShell Module In this blog series the Azure AD PowerShell Module is required on the CLDSRV02 to perform actions to manage the Microsoft Online Services. This module is available for download here: http://go.microsoft.com/fwlink/p/?linkid=236297 Create the required service accounts In this blog series I’m using the following service accounts. Of course the names can be adjusted to fit different naming conventions. Simply replace any reference to these service accounts with personal (or company) lab service accounts. svcAD-ADFS (domain user)This service account is used for running AD FS. svcAD-AADSS (domain user)This service account is used for the synchronization between the on-premise AD and the Azure Active Directory. Create the required DNS Records In this blog series the following public DNS records are required to be in place. EnterpriseEnrollment (CNAME);This record has to point to EnterpriseEnrollment.manage.microsoft.com and is used for the device enrollment of Windows Phone, Windows RT and Windows 8.1. STS (A);This record has to point to a personal (or company) owned public ip that is directed to WAP and is used to publicly register the AD FS service for access by public services. Create the required certificates In this blog series the following certificates are required to be in place. Web server certificate;This certificate is used during the configuration of AD FS (and WAP).I’ll use a certificate issued from an internal PKI. In this case it’s important to have a common name and to have the appropriate DNS names. This certificate needs to be installed on the CLDSRV00 and the CLDSRV01. Note: A self-signed certificate, or a certificate from an internal PKI will provide problems with devices that can’t install the root certificate.


-
In Configuration Manager, you right click on a resource and select Clear Last PXE Advertisement a window would appear and if a PXE Flag occurred you would see an Advertisement. I am working on a Front End tool for a client and one of their request is to be able to see if a workstation has a PXE Advertisement. I've been trying to find a way to query this information in a script form. But I'm having a tough time finding a WMI Class where I can find this information. I have found the ability to Clear the PXE Advertisement, and that works, but I want to have a visual display if a PXE Flag has been applied. Any feedback would be greatly appreciate for this. Thank you