radish
-
Posts
79 -
Joined
-
Last visited
-
Days Won
3


radish's Achievements
")


-
 After the earlier version of office is installed, it has a gray status that cannot be modified. I want to create a desktop shortcut to prevent users from modifying information like this. How should I create a desktop shortcut with PowerShell, and the target and starting position are in a gray status that cannot be modified?
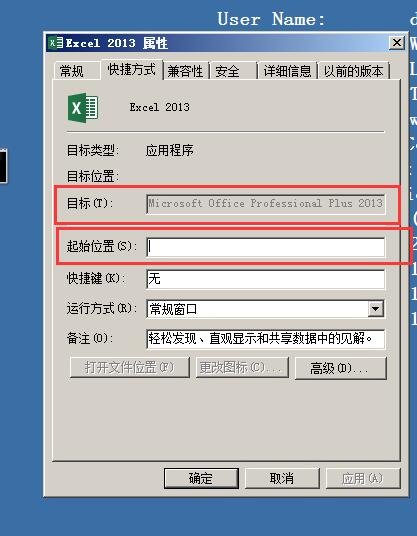
-
The client cannot process the task sequence because the total size of the task sequence exceeds the limit for members of this collection. Five task sequences were deployed, three of which were around 1349KB in size. Reduce the number and size of task sequences of collection members to deploy back to normal use
-
Citrix Workspace Updates
radish replied to ITMick's question in Deploy software, applications and drivers
Use the application substitution rule, first do the uninstallation of the old version parameters or scripts, in the installation will first uninstall the old version before installing the new version- 1 reply
-
- 1
-

-
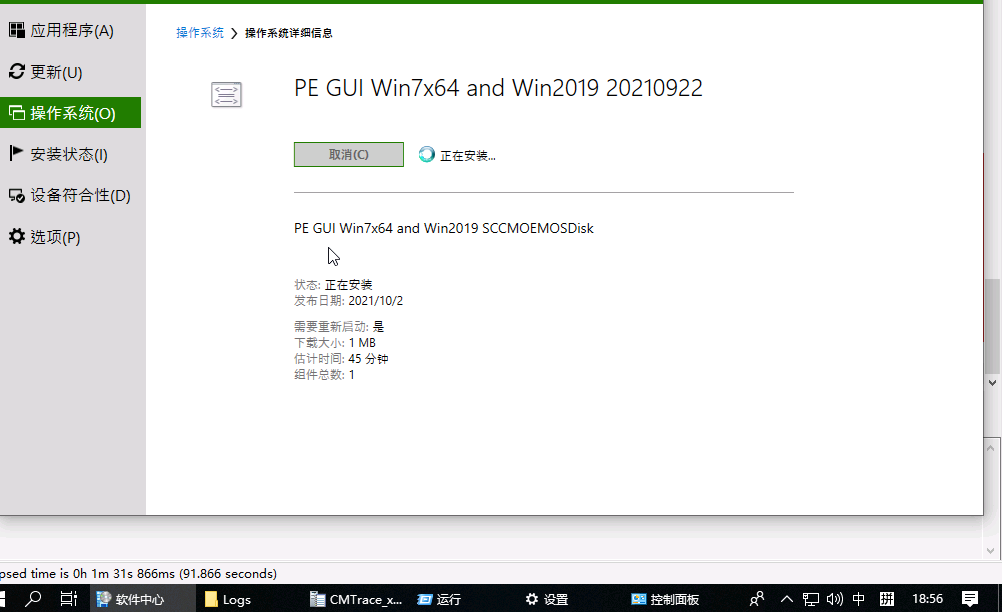
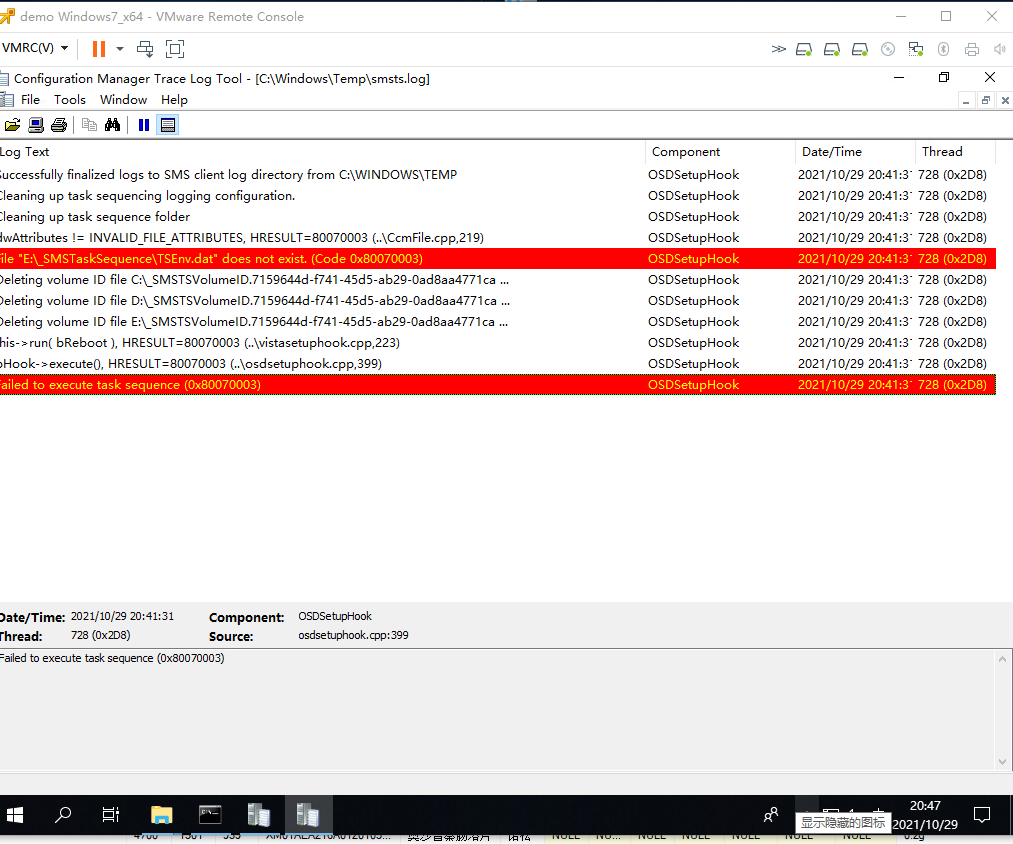
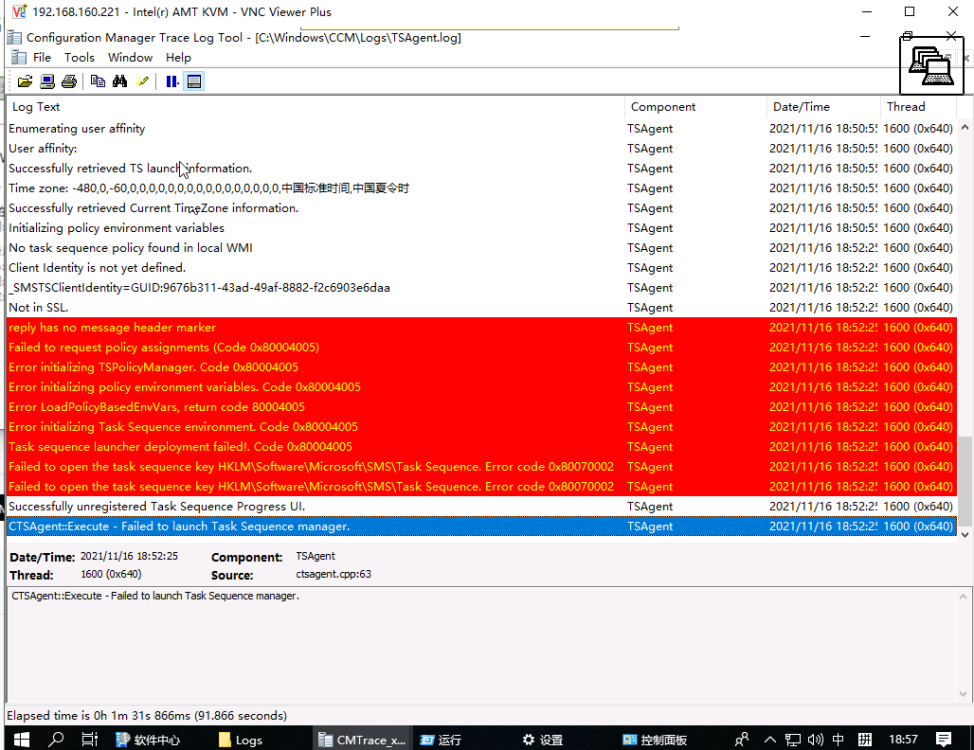
Running the OSD task sequence from the Software Center shows that it is being installed... Does anyone know what's going on? TSAgent.log Show these errors reply has no message header marker Failed to request policy assignments (Code 0x80004005) Error initializing policy environment variables. Code 0x80004005 Error LoadPolicyBasedEnvVars, return code 80004005 Error initializing Task Sequence environment. Code 0x80004005 Task sequence launcher deployment failed!. Code 0x80004005 Failed to open the task sequence key HKLM\Software\Microsoft\SMS\Task Sequence. Error code 0x80070002 CTSAgent::Execute - Failed to launch Task Sequence manager. execmgr.log smsts.log TSAgent.log

-
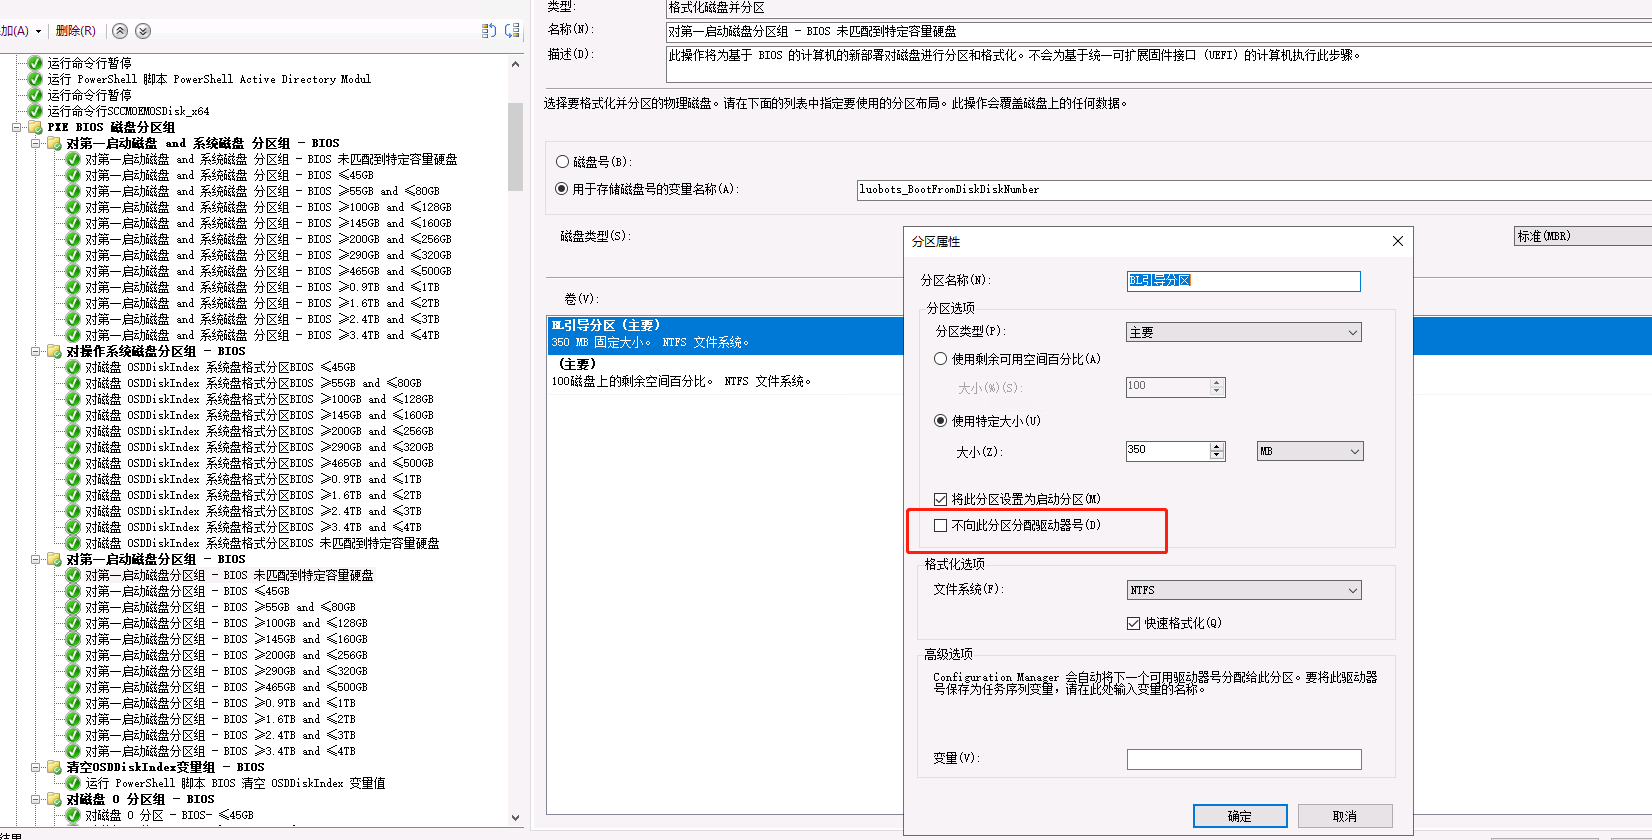
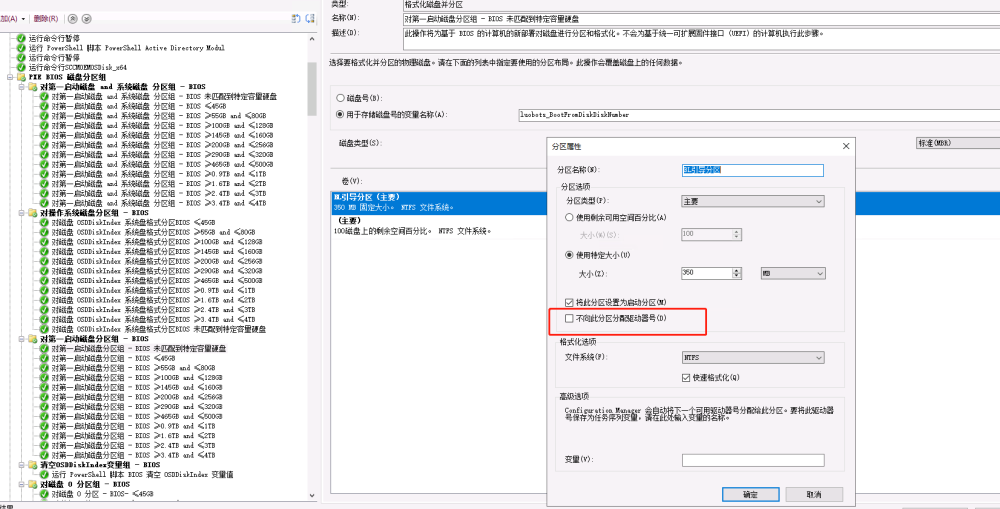
Uncheck the Do not assign drive numbers to this partition to solve the traditional bios way boot task sequence set 3 hard disk format task sequence ccm client installation steps did not find the cache path failure problem
-
Yes, the single hard disk and the 2 hard disks OSD task sequence are working fine. Suppose a physical computer has 3 hard disks. Disk number 0 120G HDD Disk number 1 500G HDD Disk number 2 250G SSD The OSD task sequence has 3 formatting steps where disk number 1 BootFromDisk property is true and is the first boot disk Then installing the OS to disk number 2 250 SSD will cause this problem and the ccm client installation task sequence will fail to boot! Let's look at this Suppose a physical computer has 3 hard disks. Disk number 0 120G HDD Disk number 1 500G HDD Disk number 2 250G SSD The OSD task sequence has 3 formatting steps, we disable a disk number 0 formatting any step where disk number 1 BootFromDisk property is true and is the first boot disk Then the operating system is installed to disk number 1 500G HDD and everything is fine. Make sure that the problem occurs when using the traditional bios method of booting, formatting more than 3 hard disks when the task sequence steps and the first boot hard disk and the operating system hard disk are not in the same hard disk. It is worth mentioning that Suppose a physical computer has 3 hard disks. Disk number 0 120G HDD Disk number 1 500G HDD Disk number 2 250G SSD The OSD task sequence has 3 formatting steps where disk number 1 BootFromDisk property is true and is the first boot disk Then the OS is installed to disk number 1 500G HDD It is worth mentioning that Suppose a physical computer has 3 hard disks. Disk number 0 120G HDD Disk number 1 500G HDD Disk number 2 250G SSD The OSD task sequence has 3 formatting steps where disk number 1 BootFromDisk property is true and is the first boot disk Then the OS is installed to disk number 1 500G HDD and the task sequence works fine. Although this approach can be avoided, it also loses the ability to determine the OS to be installed on a qualified drive. I also have a question: Why does the task sequence work fine when the first boot disk and the OS disk are not the same disk, even though the task sequence has two formatting steps? The task sequence set up 3 formatting steps, the first boot hard disk and the operating system hard disk is not the same hard disk, is not running properly after the deployment of the CCM client task sequence start, prompting that the cache folder path can not be found, it seems that the variables are reset or the disk drive number is disturbed?
-
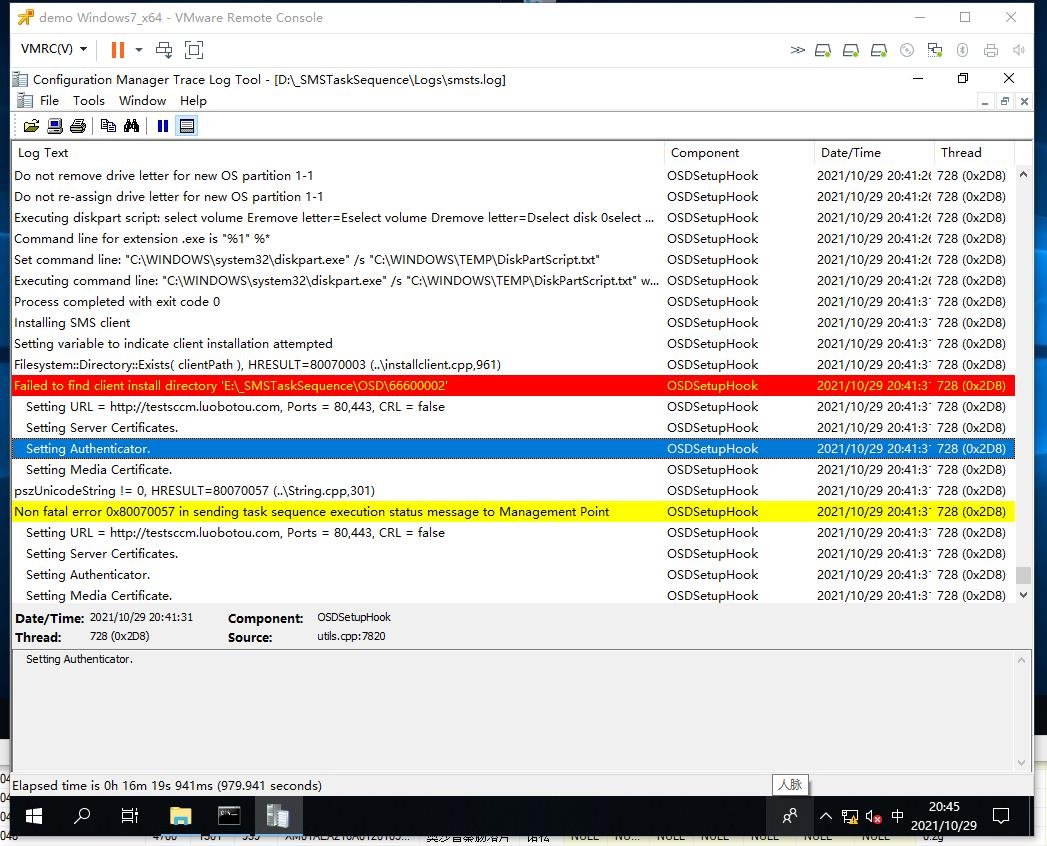
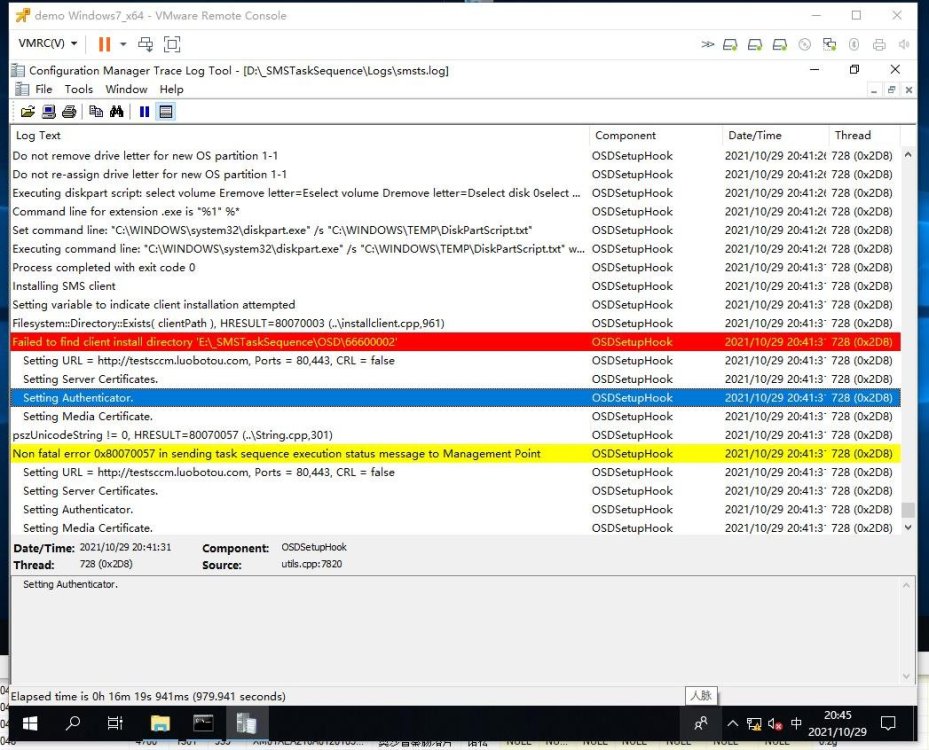
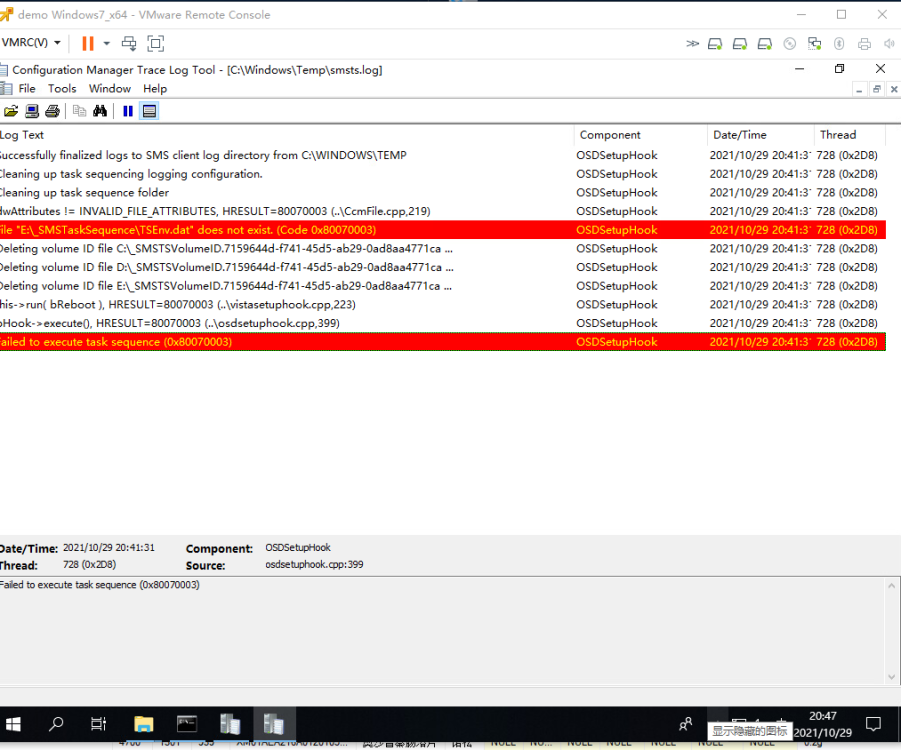
Traditional bios mode boot method, task sequence set more than 3 steps to format the hard disk where the disk 1 task sequence operating system partition does the OSDdisk variable Then the installation of Windows and Configuration Manager steps will not be booted, check the logs to find the cache path corresponding to the folder that can not be properly started to install Windows and Configuration Manager steps ..... After several tests respectively with Hyper-v, Vmware, physical computers have more than 3 hard disk hardware environment, the testing process is very crazy .... The first time I found some laws, I finally found some laws! Traditional bios mode boot method, task sequence set more than 3 steps to format the hard disk, disk 0 task sequence OS partition made OSDdisk variable then everything is fine. Traditional bios mode boot method, task sequence set more than 3 steps to format the hard disk, disk 1 does not contain disk 0 task sequence OS partition made OSDdisk variable, then everything is fine. will lead to formatting more than 3 hard disk steps task sequence environment tasks will lead to the installation of Windows and Configuration Manager steps boot failure, while formatting 2 hard disk steps below the task sequence environment tasks all normal, oh oh Is not feel very amazing? Why not do the OSDdisk variable on disk 0? Because the user computer environment disk 0 is not necessarily the disk where the operating system is installed, perhaps disk 1 is solid state, disk 2 solid state or other solid state disk number, there are Powershell scripts to control the installation of eligible disks as the operating system to set the OSDdisk variable, you can easily avoid IT engineers or ordinary users to set the Bios or open the chassis to the solid state disk plugged into the SATA0 interface. Does anyone know what's going on or is it a bug? 传统bios模式启动方式,任务序列设定3个以上格式化硬盘步骤, 其中磁盘1任务序列操作系统分区做了OSDdisk变量 那么到了安装 Windows 和 Configuration Manager步骤 将不会进行启动,查看日志发现是寻找不到缓存路径对应文件夹导致不能正常启动安装 Windows 和 Configuration Manager步骤..... 经过多次测试分别以Hyper-v、Vmware、物理计算机 都有3个以上硬盘硬件环境,测试过程中很抓狂 ....,终于发现了一些规律!!! 传统bios模式启动方式,任务序列设定3个以上格式化硬盘步骤,磁盘0任务序列操作系统分区做了OSDdisk变量 那么一切都正常。 传统bios模式启动方式,任务序列设定3个以上格式化硬盘步骤,磁盘1以外不包含磁盘0任务序列操作系统分区做了OSDdisk变量, 会导致格式化3个硬盘步骤以上任务序列环境任务时候将导致了安装 Windows 和 Configuration Manager步骤启动失败,而格式化2个硬盘步骤以下任务序列环境任务一切正常,喔哦 是不是觉的很神奇? 为什么不在磁盘0做OSDdisk变量呢?因为用户计算机环境磁盘0不一定是安装操作系统所在磁盘,也许是磁盘1是固态、 磁盘2固态 或者其他固态磁盘编号,有Powershell脚本来控制安装符合条件磁盘作为操作系统设置OSDdisk变量,可以轻松避免IT工程师或者普通用户去设置Bios或者打开机箱把固态磁盘插到SATA0接口上。 有人知道怎么回事吗或者说是BUG? Default Win10 x64 LSTC2019.zip smsts.log
-
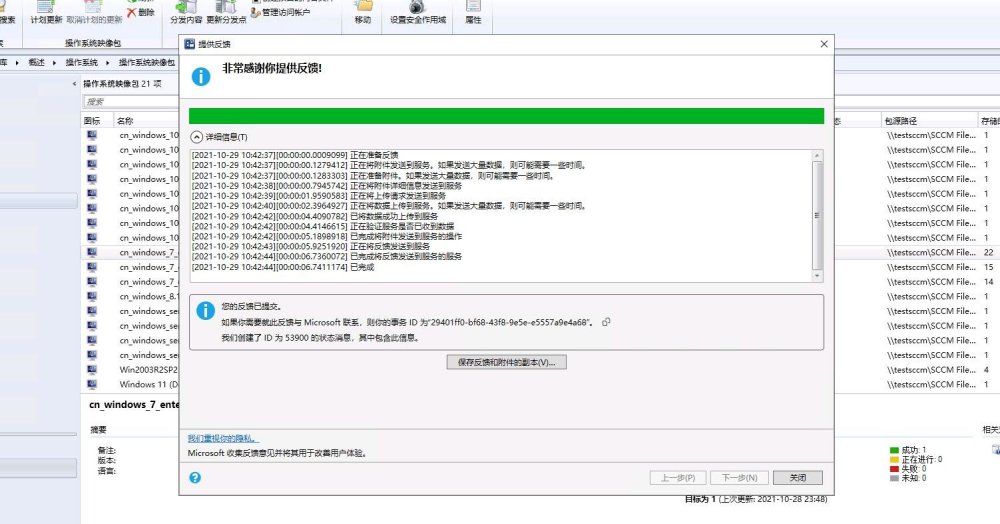
Hi, I have uploaded screenshots and logs through this interface
-
Unsupported Hardware Error\Warning
radish replied to Coffee_muff's question in Deploy software, applications and drivers
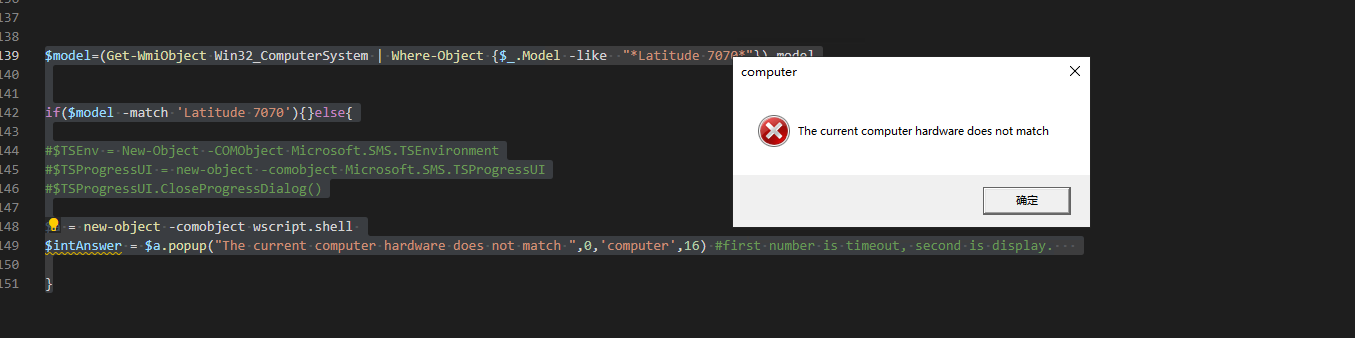
$model=(Get-WmiObject Win32_ComputerSystem | Where-Object {$_.Model -like "*Latitude 7070*"}).model if($model -match 'Latitude 7070'){}else{ $TSEnv = New-Object -COMObject Microsoft.SMS.TSEnvironment $TSProgressUI = new-object -comobject Microsoft.SMS.TSProgressUI $TSProgressUI.CloseProgressDialog() $a = new-object -comobject wscript.shell $intAnswer = $a.popup("The current computer hardware does not match ",0,'computer',16) #first number is timeout, second is display. } Add a running script step in the task sequence, use this command to pop up a gui notification message
-
Yes, I am very sure. I was communicating with other it users and they also encountered this situation
-
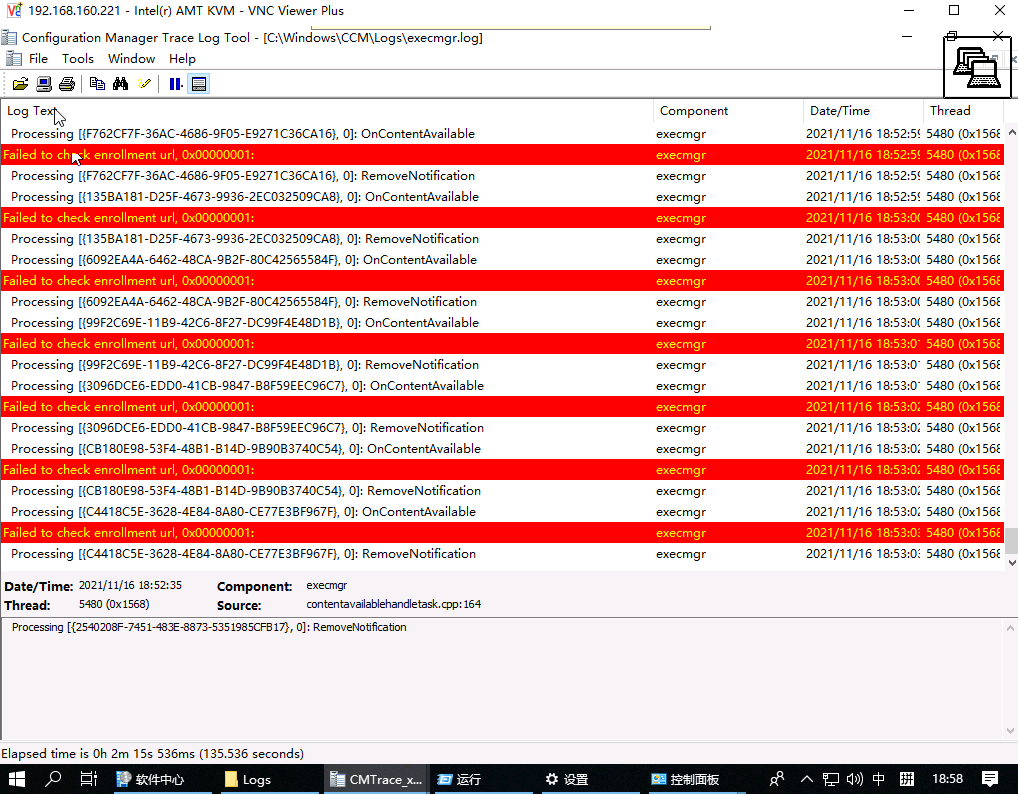
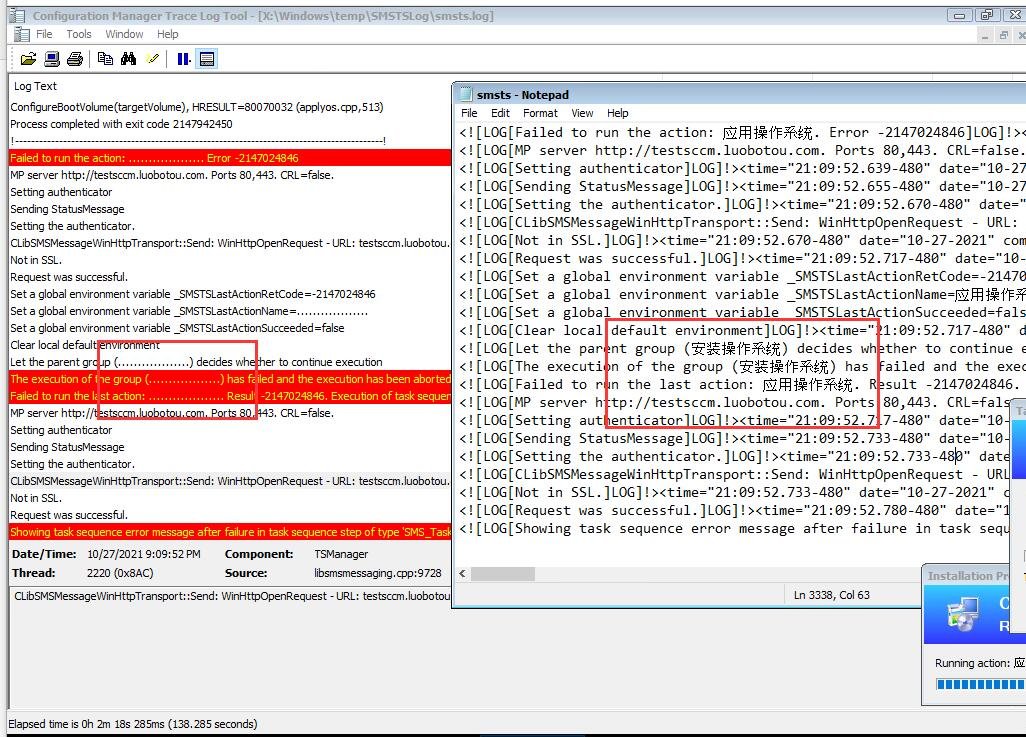
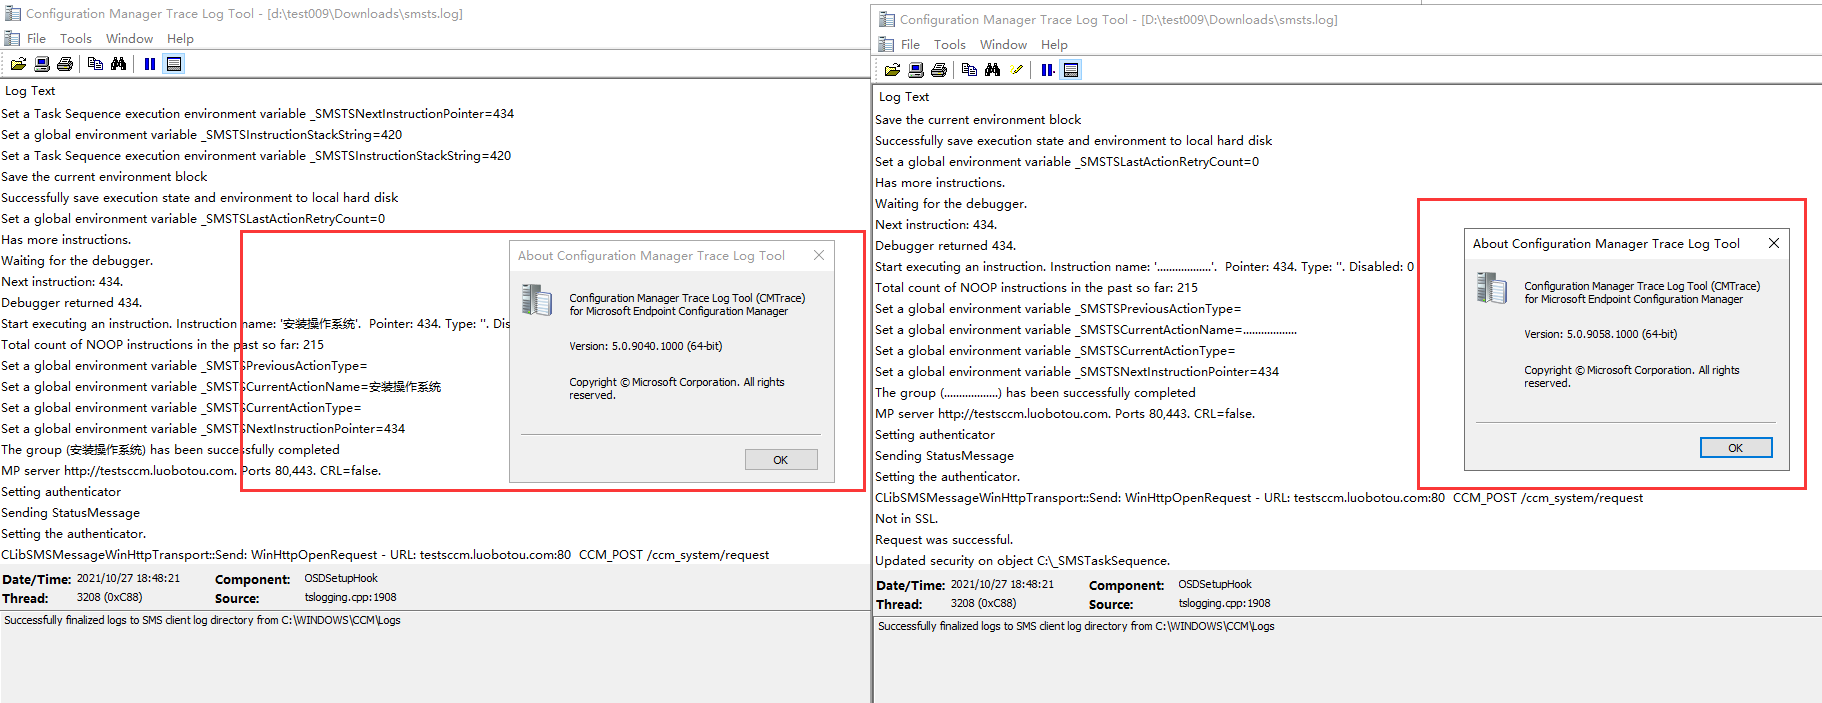
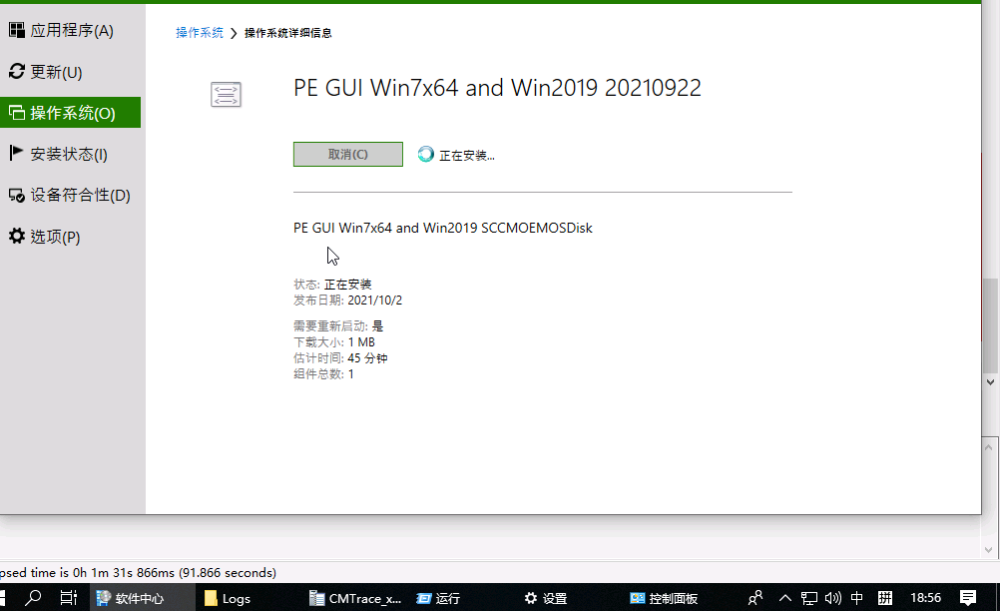
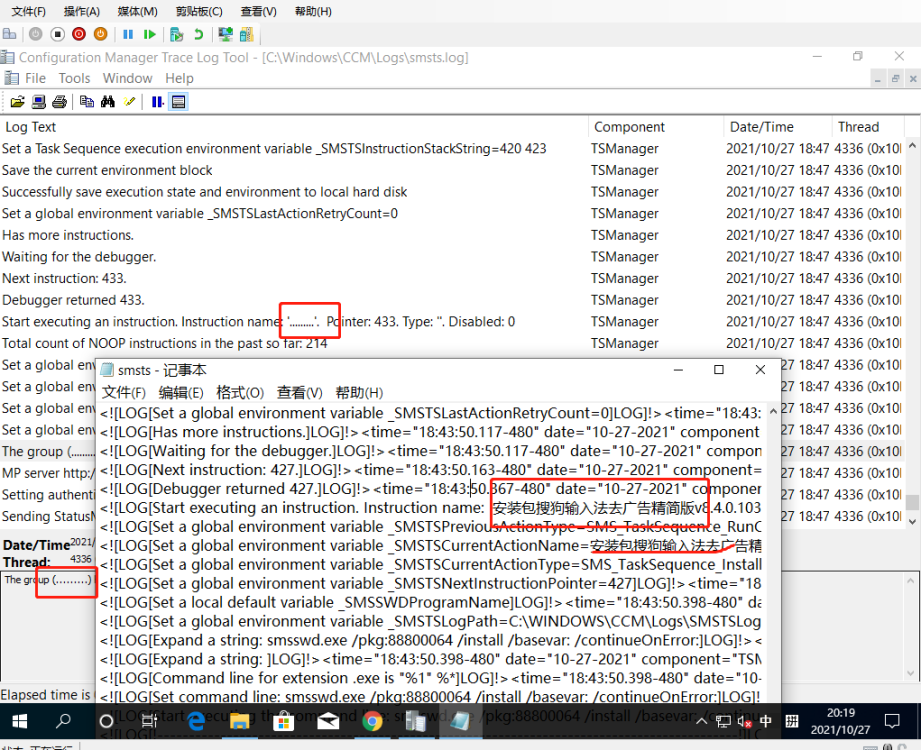
sccm 2103、2107 cmtrace工具打开 OSD smsts登录PE环境,完整windows环境不显示中文 这是一个错误吗? The log tool of the sccm2010 version can display Chinese, and the Chinese part of SCCM2103 2107 is displayed as... smsts.log


-
Thank you very much, but I've already done it in recovery site mode. I'll try this next time I encounter it.
-
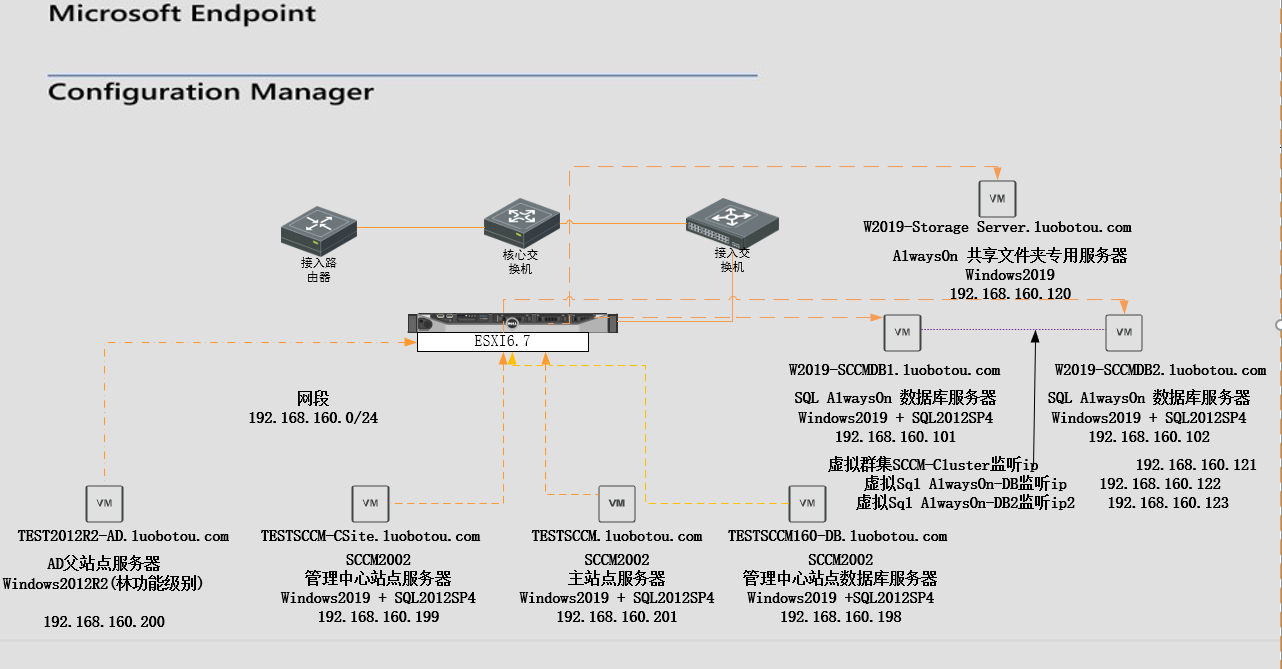
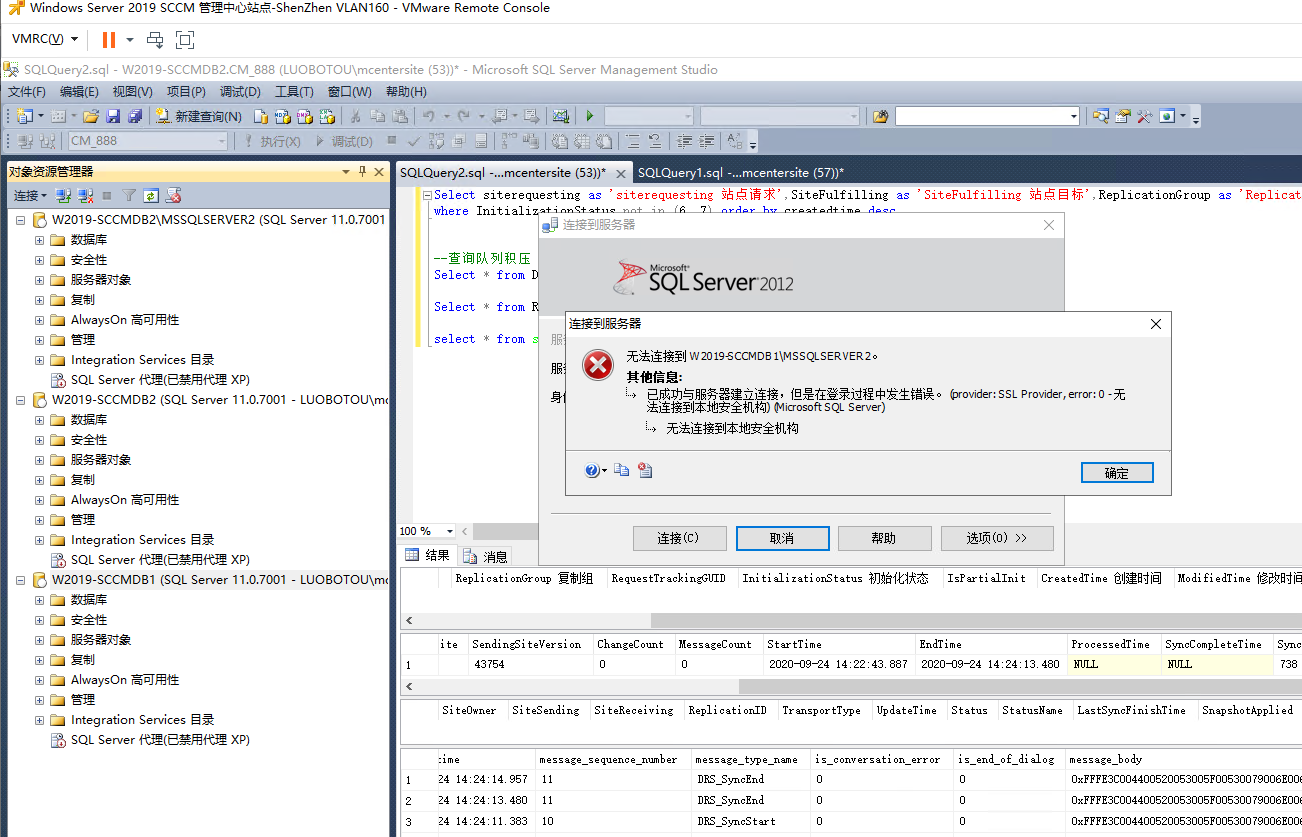
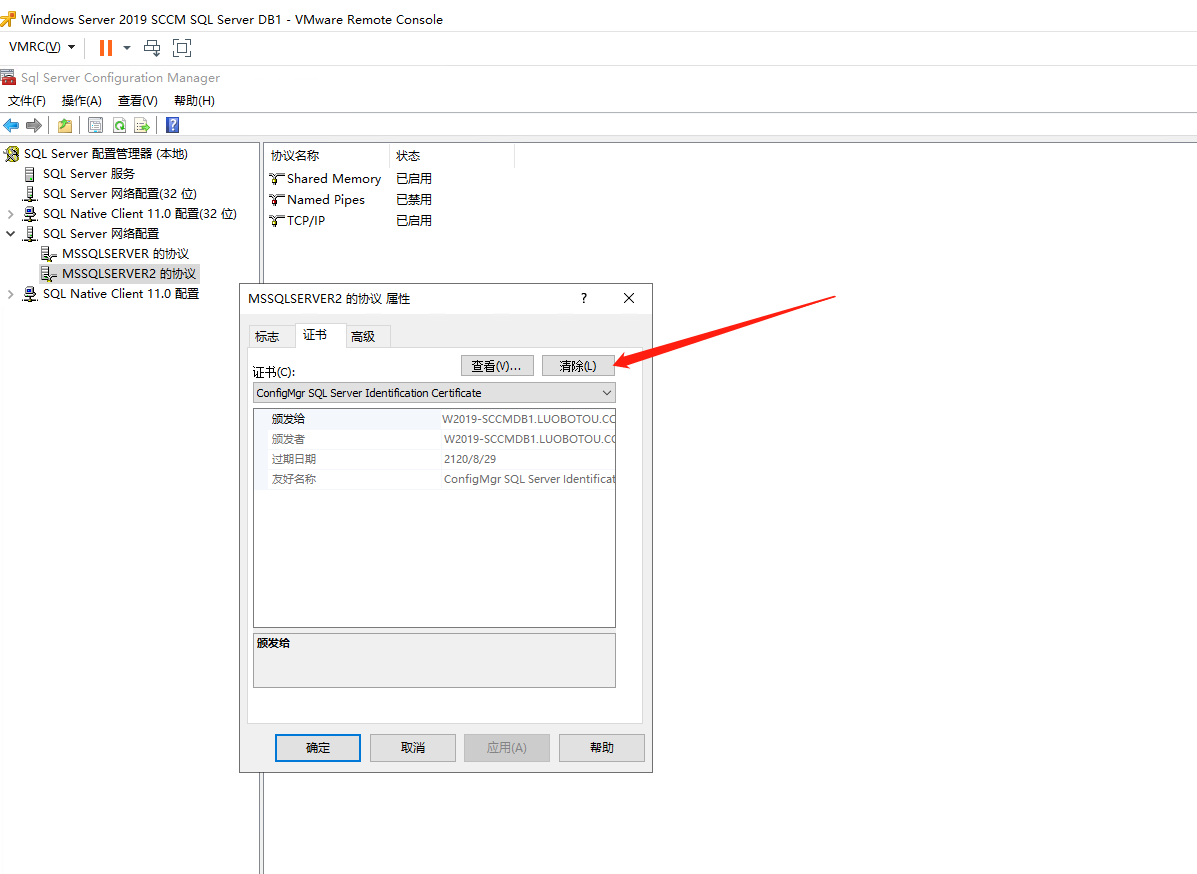
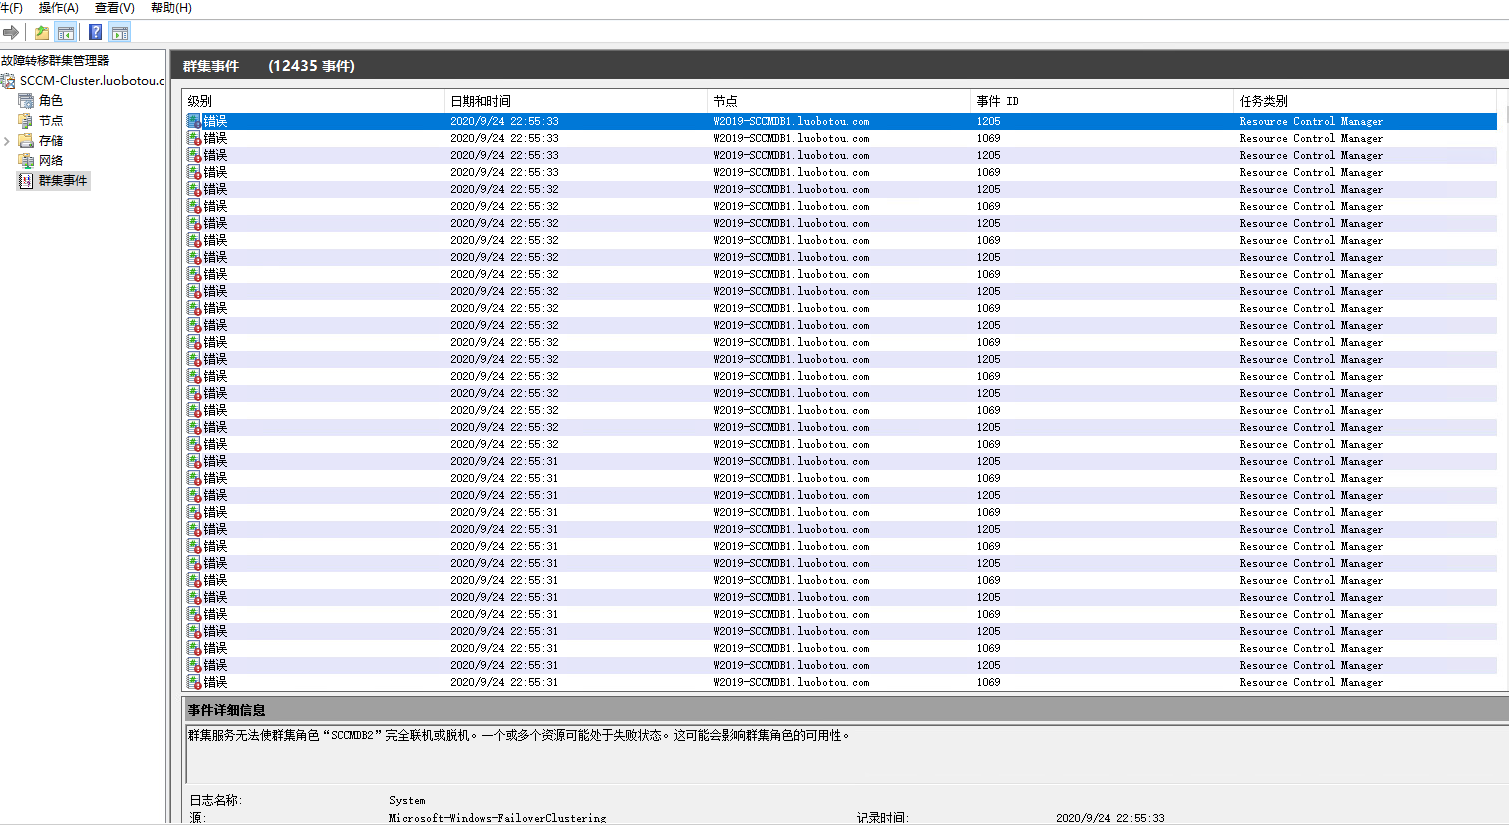
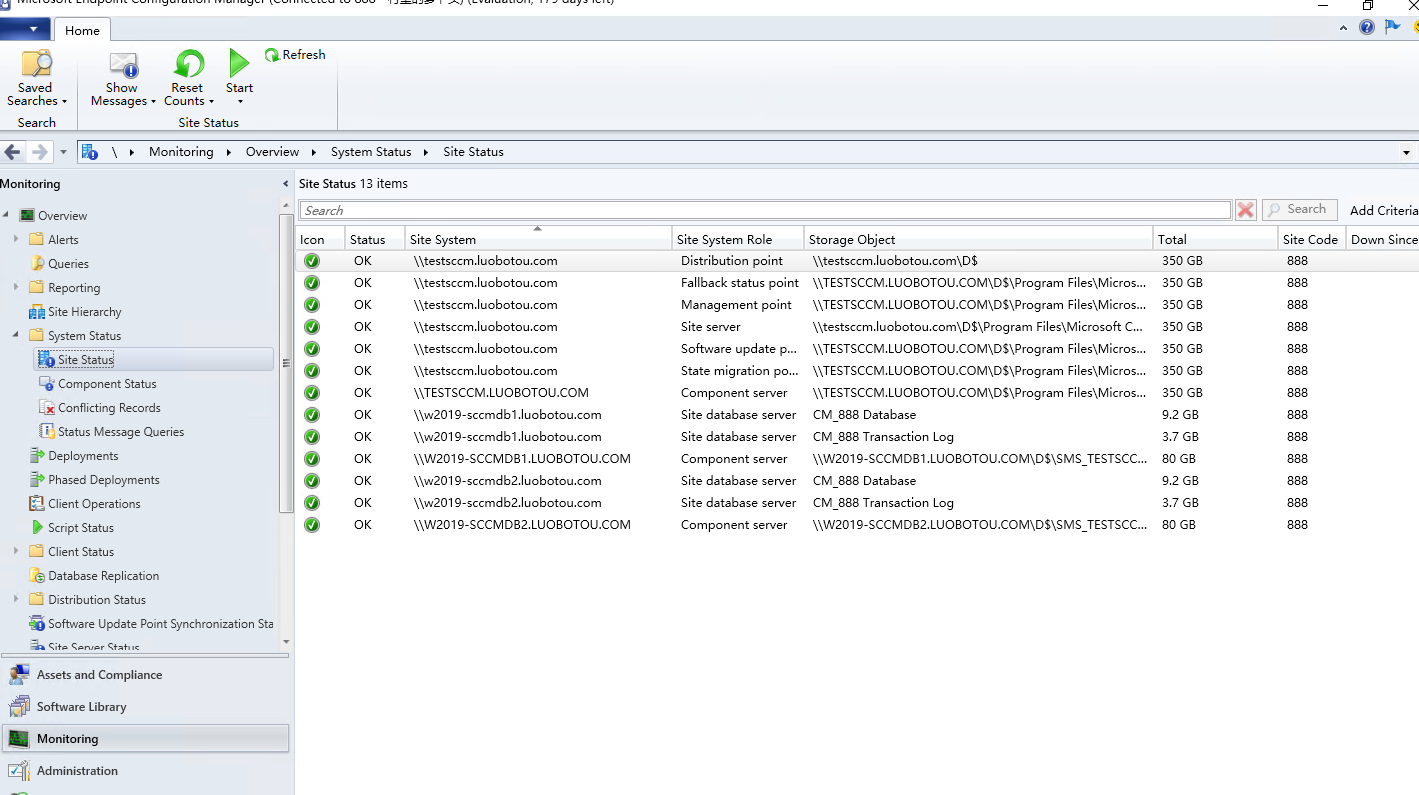
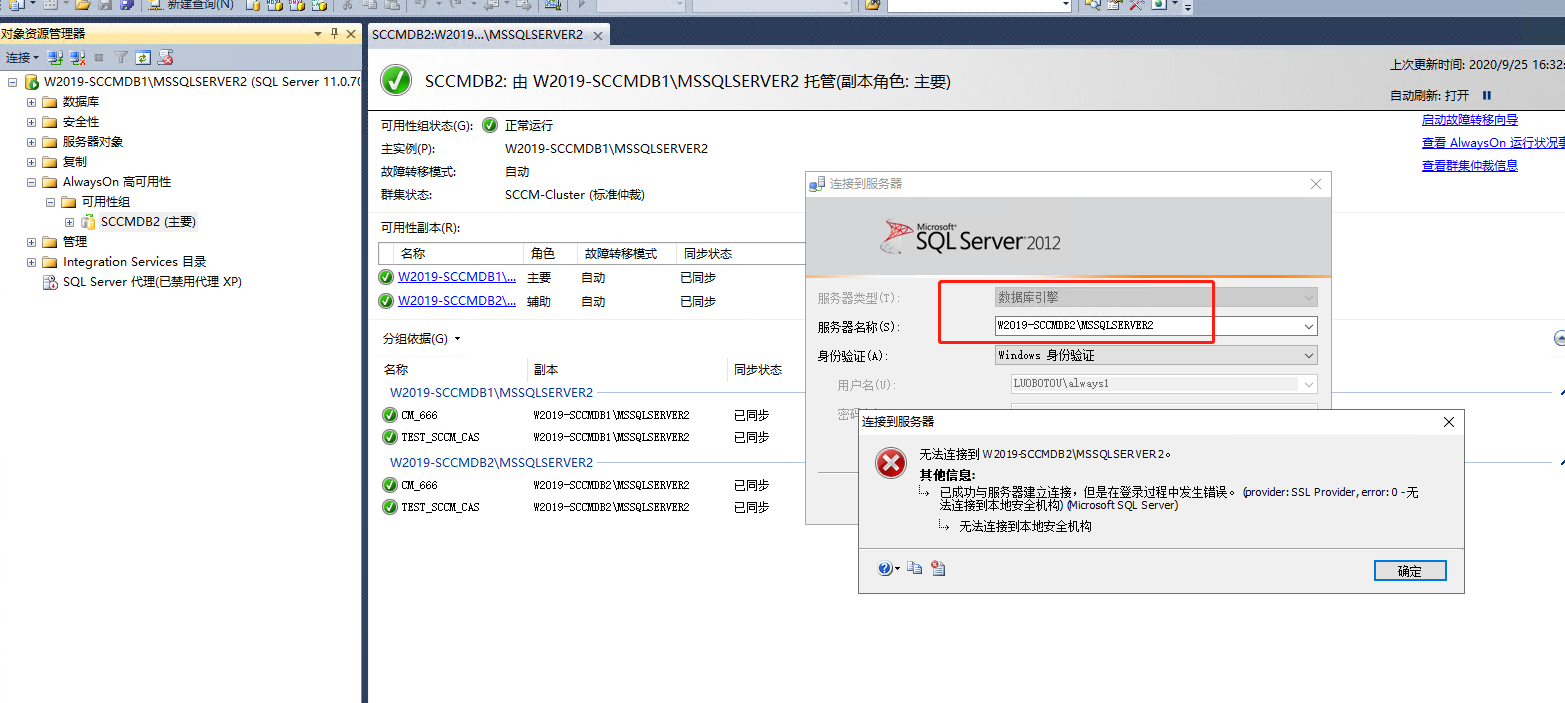
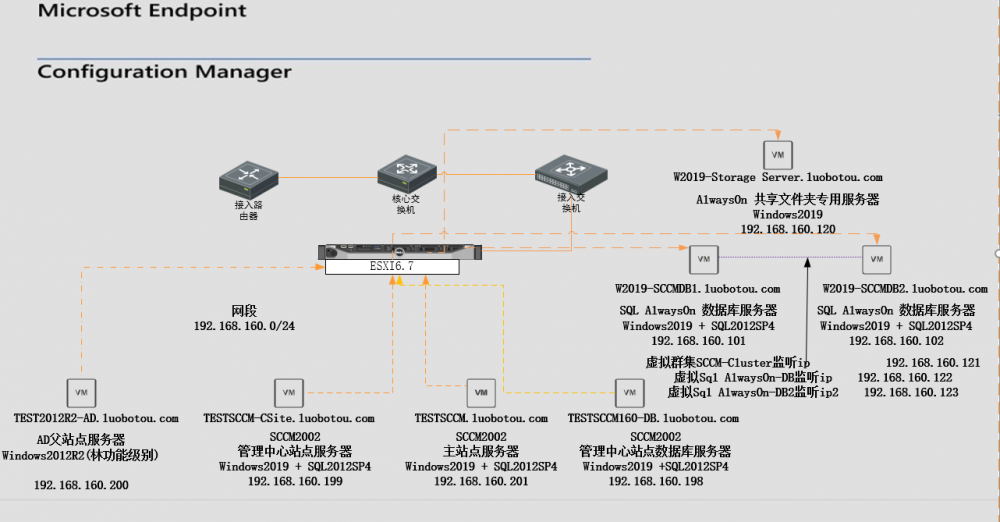
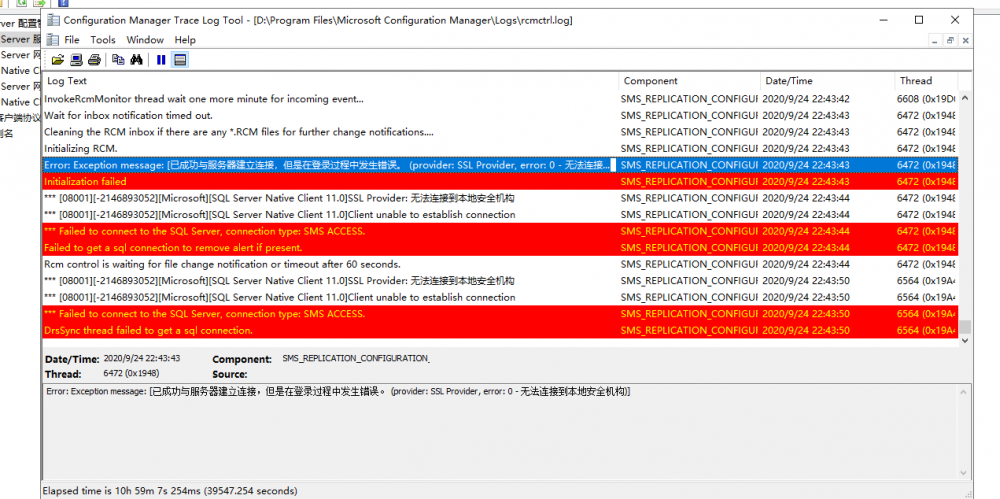
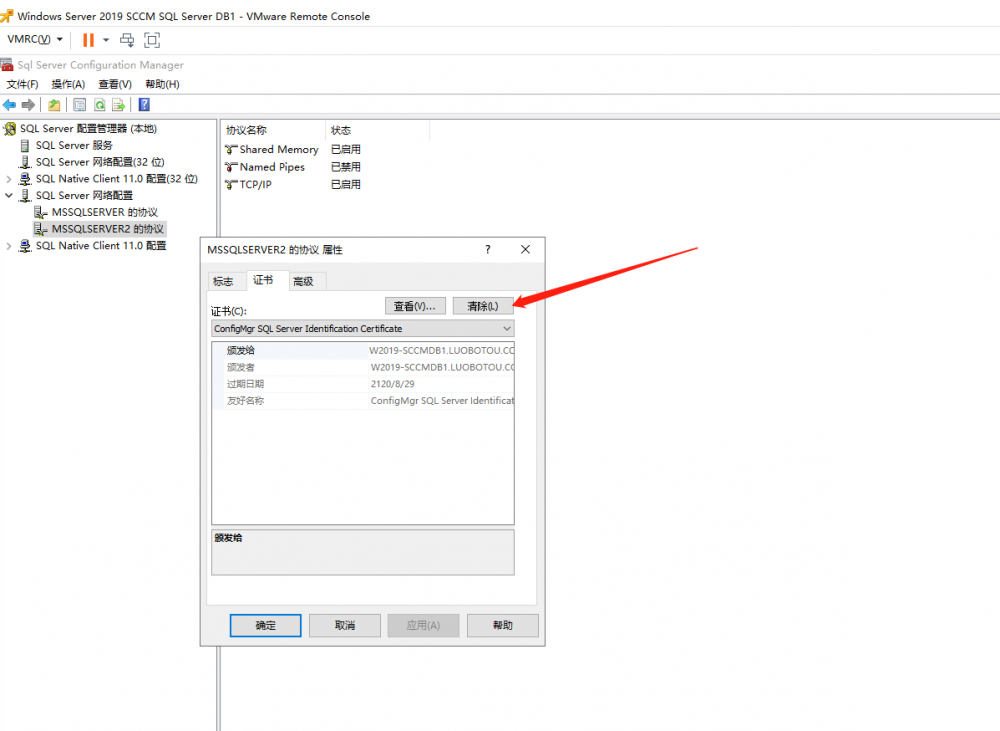
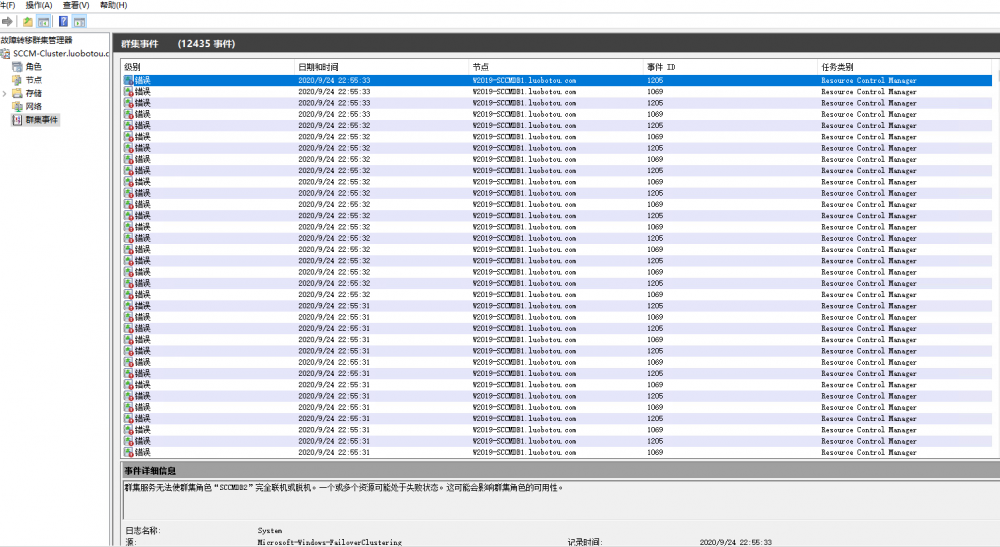
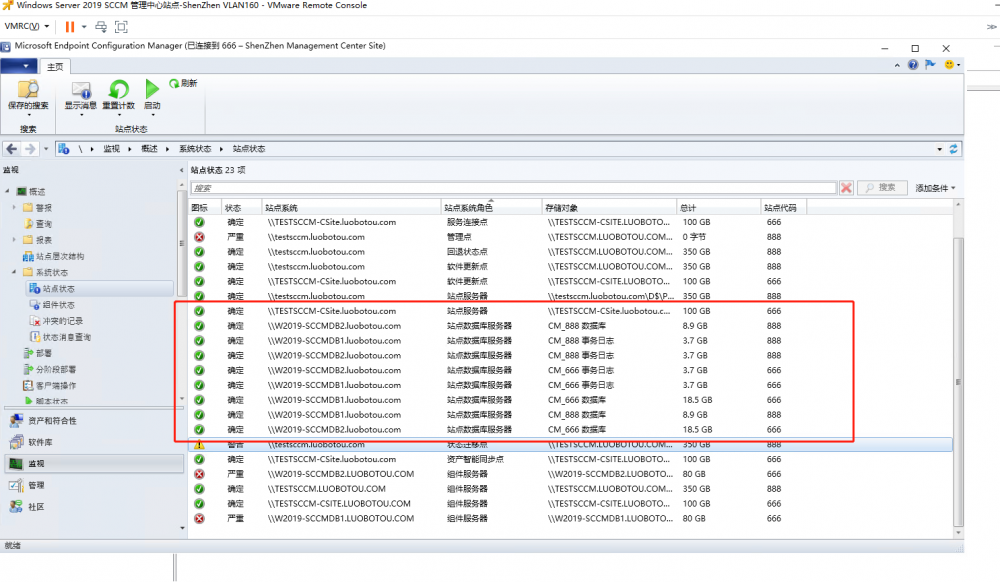
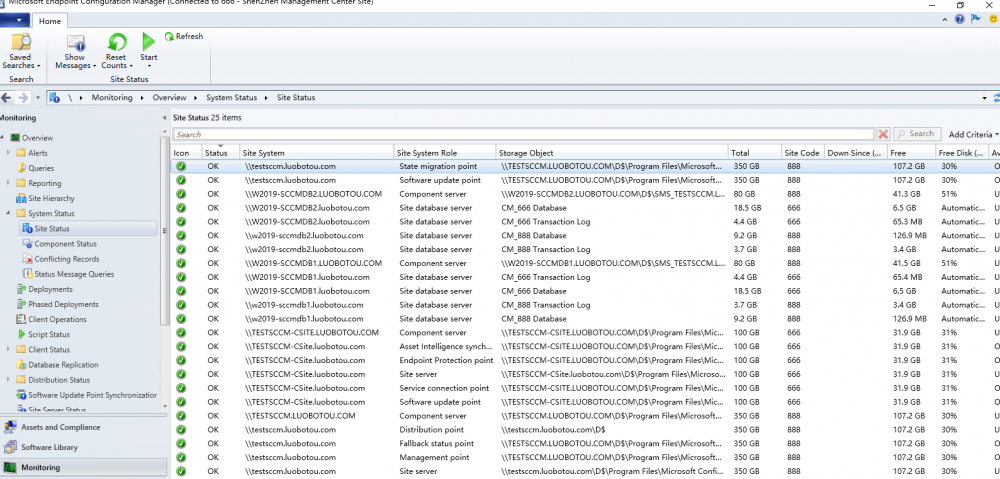
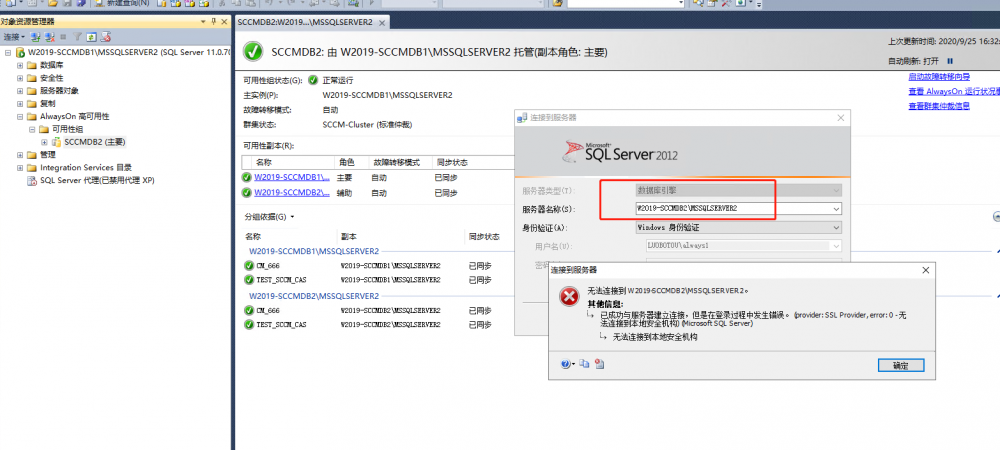
AlwaysOn server multi-instance, 2 member servers W2019-SCCMDB1\MSSQLSERVER 1433,4022 W2019-SCCMDB1\MSSQLSERVER2 1633,4023 W2019-SCCMDB2\MSSQLSERVER 1433,4022 W2019-SCCMDB2\MSSQLSERVER2 1633,4023 AlwayOn-DB 192.168.160.122 5022 5044 port AlwayOn-DB2 192.168.160.123 5023 5045 port First migrate the management center site to W2019-SCCMDB1\MSSQLSERVER2. Everything is fine, even if the members of the alwayson database are restarted. After the management center site completes the restoration of active replication status, I am migrating the main site database to W2019-SCCMDB1\MSSQLSERVER. If the AlwaysOn database member server is restarted at this time, this situation will reappear, and I discovered this problem when I shut down the failover. Once the AlwaysOn database member server is restarted, the management center site must fail to connect, and the SQL cannot be connected. It seems that it is caused by the SQL certificate problem? If you clear the certificate in the sql configuration tool, the MSSQLSERVER2 instance can be connected, but then the CAS console cannot be connected. Don't know what is going on here? At present, the W2019-SCCMDB2 server has been restarted and the SQL connection login failure occurs. W2019-SCCMDB1 can still be used normally because it has not been restarted. Whether SCCM cannot host the SCCM site database in the AlwaysON environment with multiple instances, this problem will surely recur. I don’t know how to check the problem. Is it the SCCM certificate problem or the SQL AlwaysON problem? It is guessed that it is caused by the SQL certificate. Since the main site was the last to migrate, the SQL certificate generated by the main site will invalidate the SQL certificate generated by the previous management center site?


-
Need to write a script to achieve, when there is an old system, it should be installed on the old system partition Here is a video tutorial to install to the original system disk location without formatting other partitions, but it seems to be a paid video https://edu.51cto.com/center/course/lesson/index?id=567096