Search the Community
Showing results for tags 'workgroup'.
Found 5 results
-
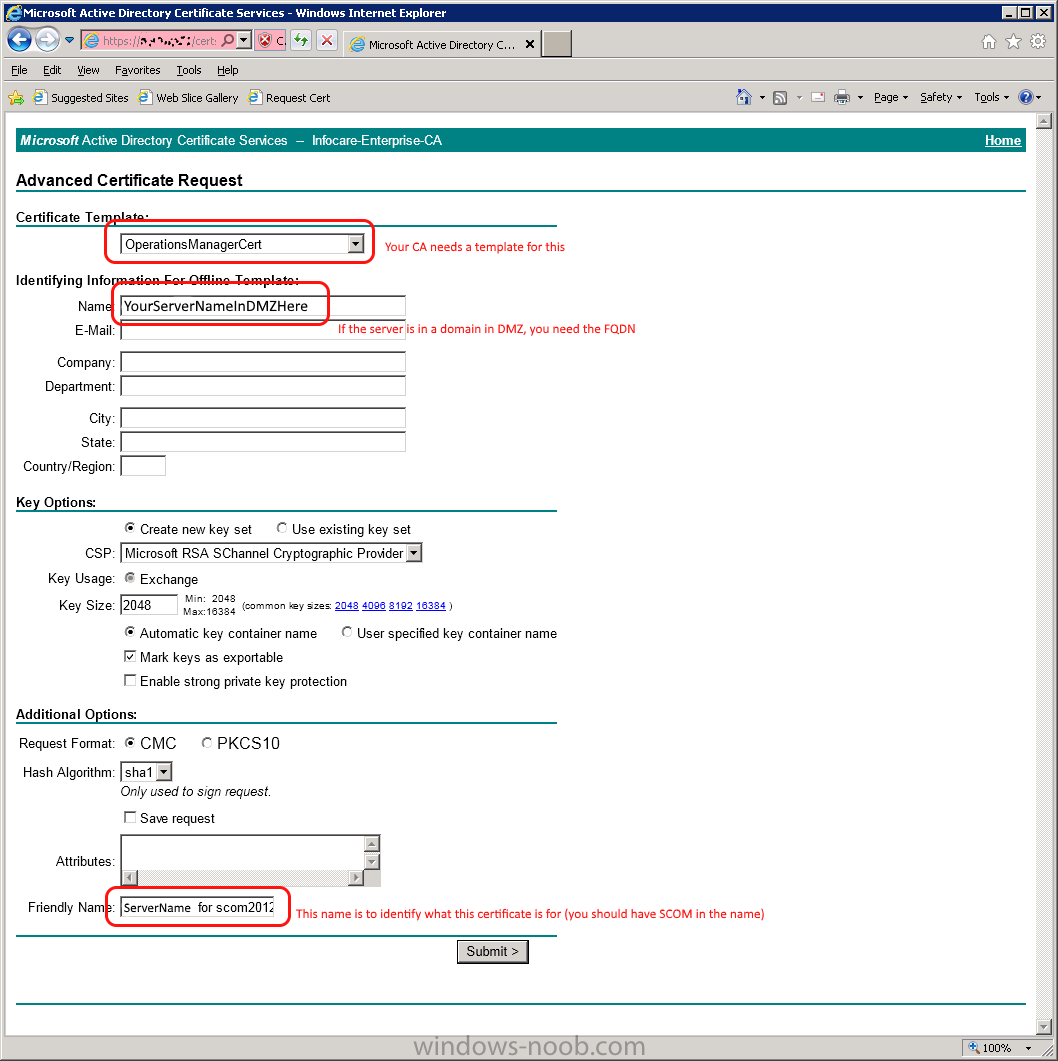
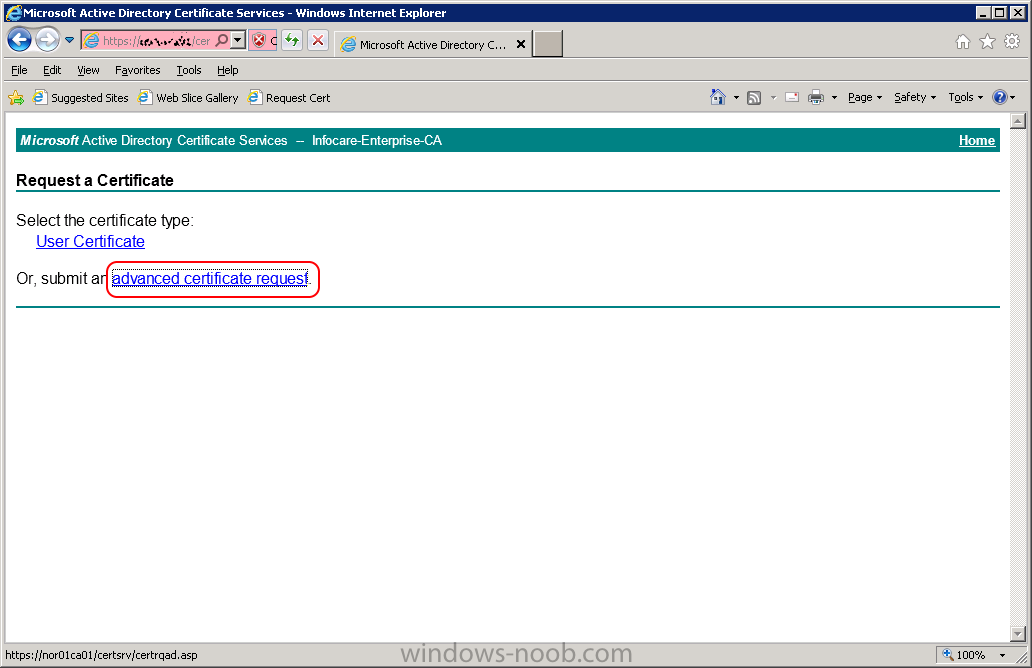
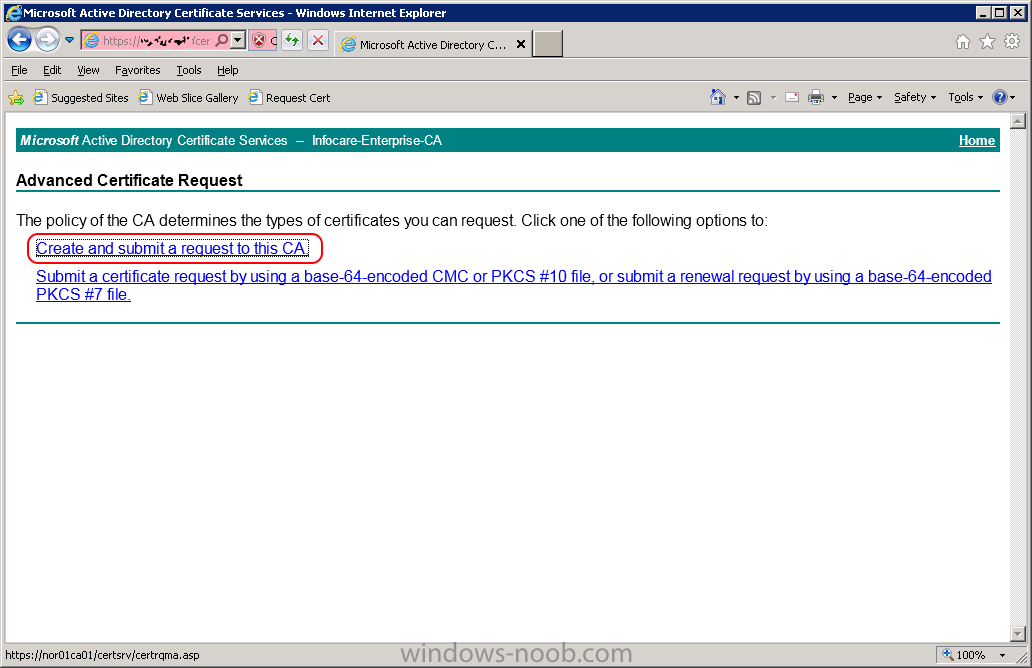
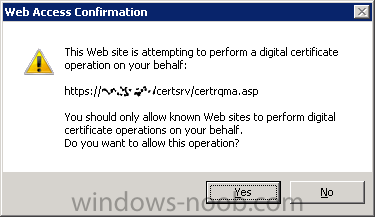
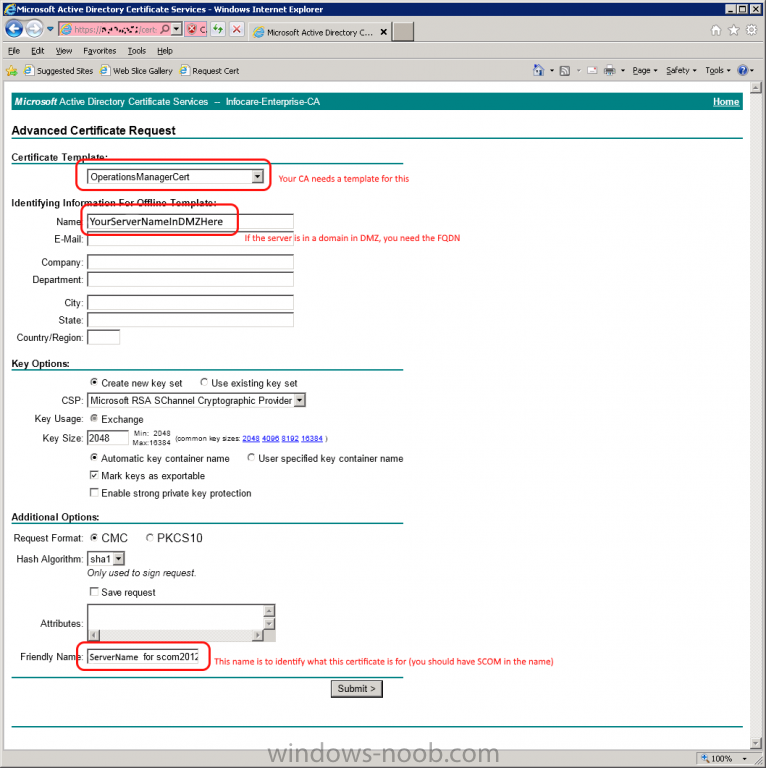
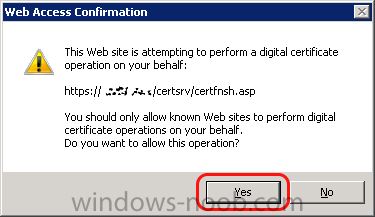
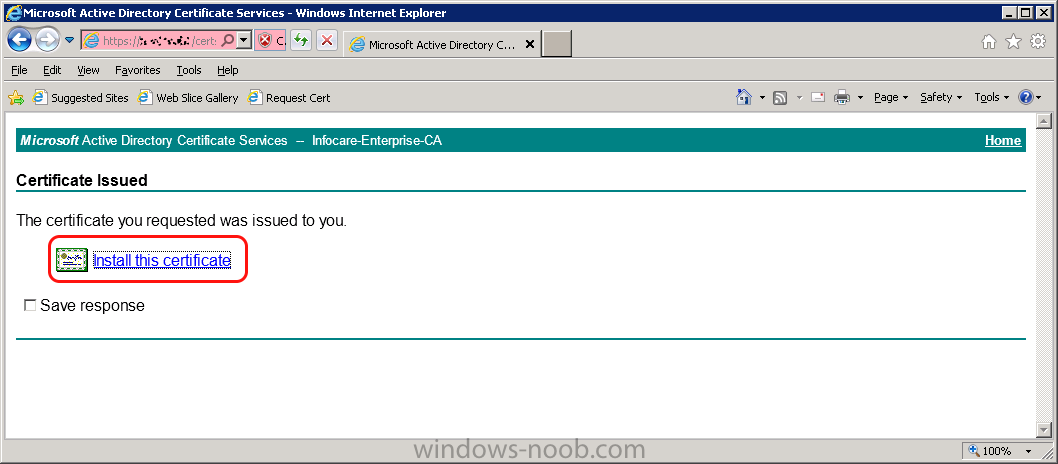
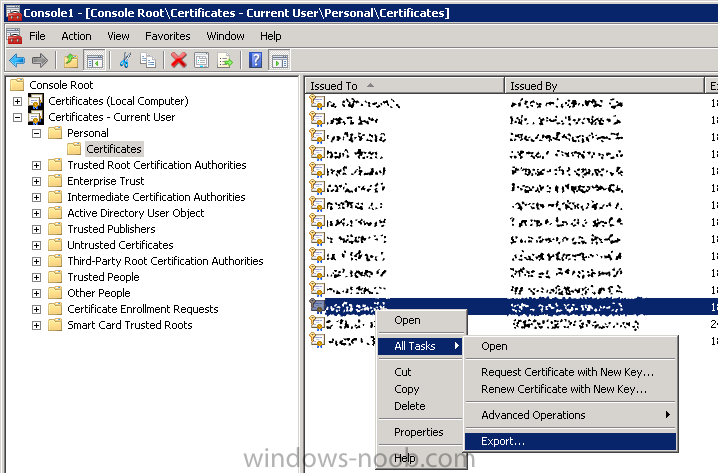
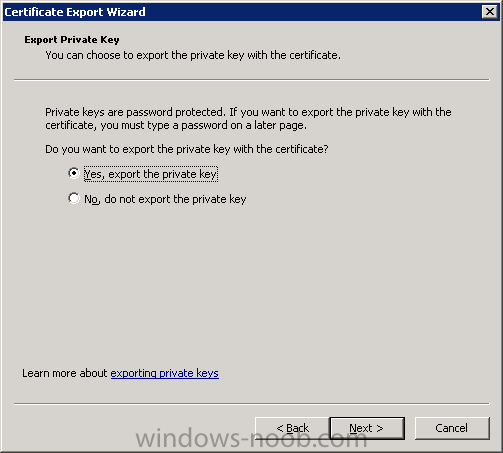
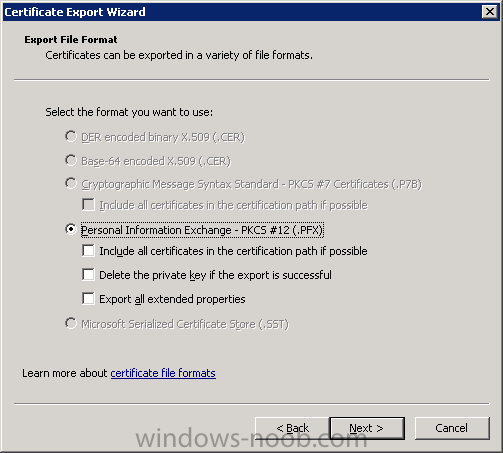
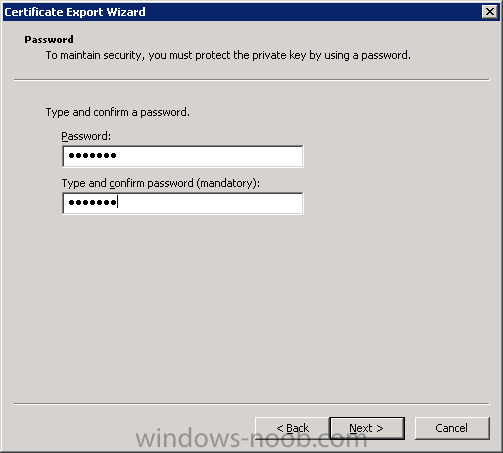
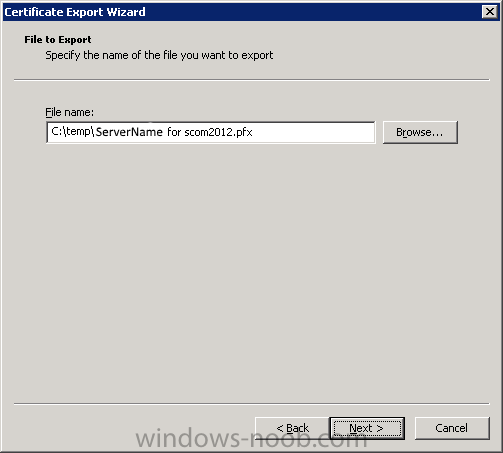
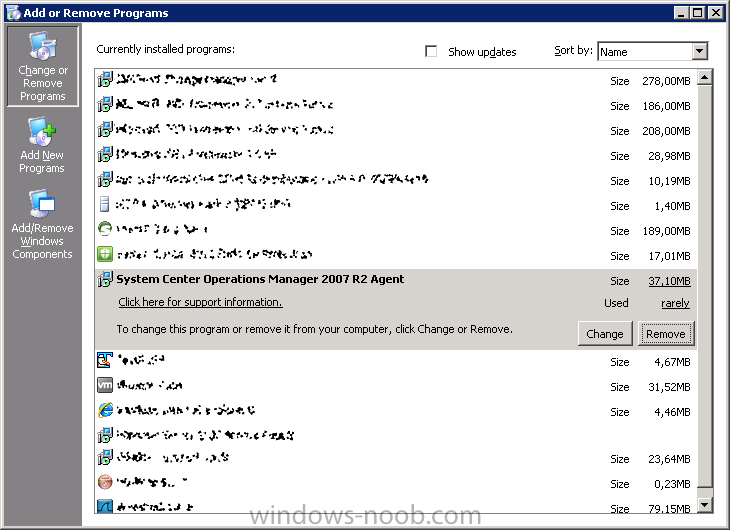
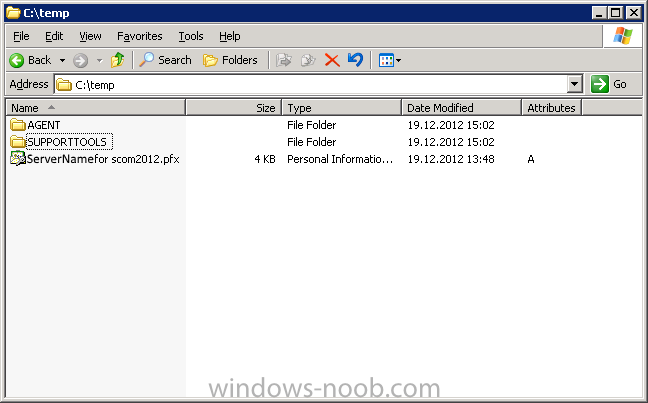
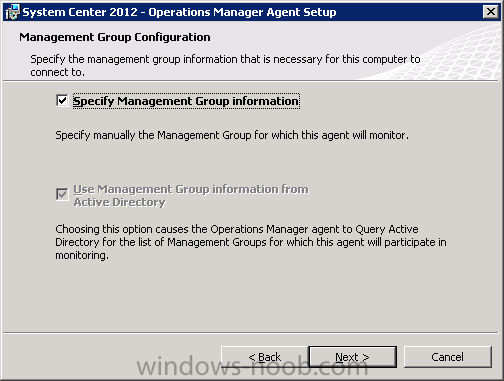
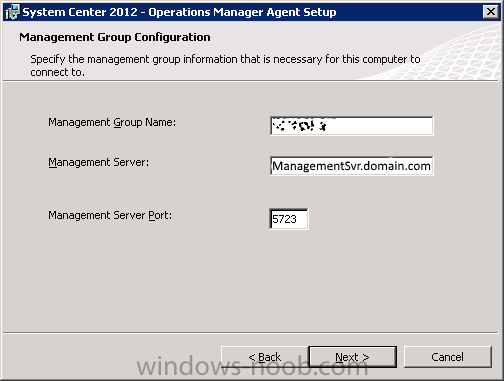
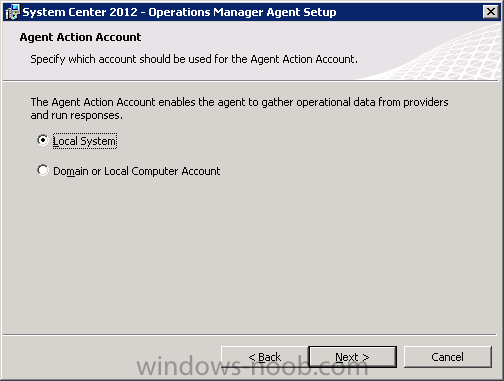
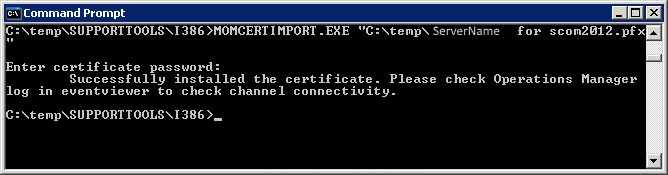
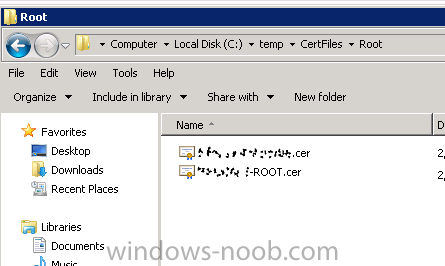
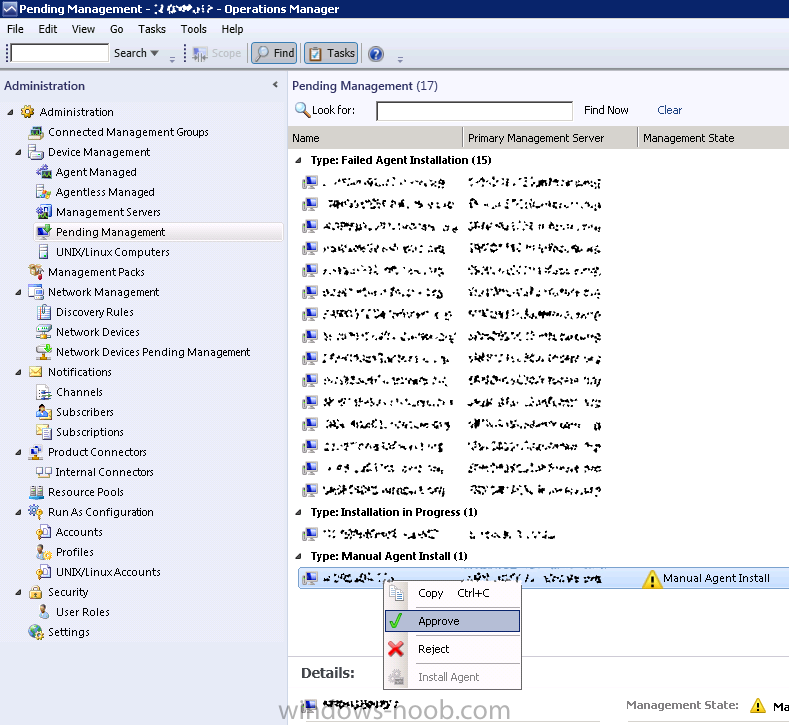
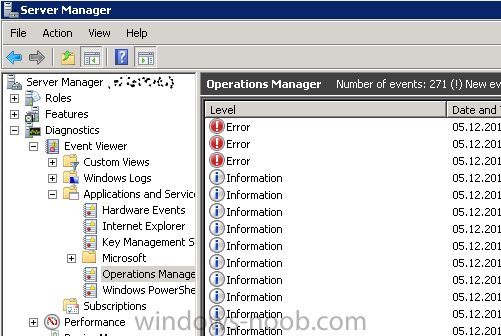
 Same procedure for a gateway server in DMZ 1.1 - Generating the certificate RDP to your Operations Manager (it's a good idea to have all the certificates at one server) Start Internet Explorer and navigate to: https://yourCAserver/certsrv If the server in DMZ is in a domain, you need the FQDN (for example servername.domainindmz.local) If the server is in workgroup, the servername is sufficient Export the Company Root Chain Certificate also! You need both installed on the server in workgroup/domain in DMZ in order for it to communicate with our servers. 1.2 - Exporting the certificate to file Start – run – mmc.exe Add snap-in – Certificate – My User Account Find the Certificate we Generated and installed, right click and choose Export Use a password (you will need it later) 2 - Install agent and certificate Log on to the server in DMZ (remember to map local drive for copying files over) 2.1 - Install agent 2.1.1 - Uninstall the SCOM2007 agent if present 2.1.2 - Copy folders/files needed for install to server C:\temp \\tsclient\D\Backup\Setup\System Center 2012\SCOM\SW_DVD5_Sys_Ctr_Ops_Mgr_Svr_2012_English_MLF_X17-95297\ AGENT SUPPORTTOOLS ServerName for scom2012.pfx 2.1.3 - Install SCOM2012 agent Use momagent.msi : (here C:\temp\AGENT\I386\MOMAGENT.MSI) NB! All certificates use FQDN, so your servers in DMZ need to have a reference to YourManagementServer.yourdomain.com in their HOSTS file Using the IP here will not work, you NEED the FQDN! 2.1.4 - Import Certificate Start – Run – cmd C:\temp\SUPPORTTOOLS\I386\MOMCERTIMPORT.EXE "C:\temp\ServerName for scom2012.pfx" Update! Import the Root chain certificate on the server in workgroup/domain in DMZ also. 2.1.5 - Approve the manual agent in SCOM 2012 console Error handling! Common mistakes is network equipment blocking ports for communication. A quick test it to use telnet on port to see if it can connect or not. Don't forget to use the eventlog! -Tor
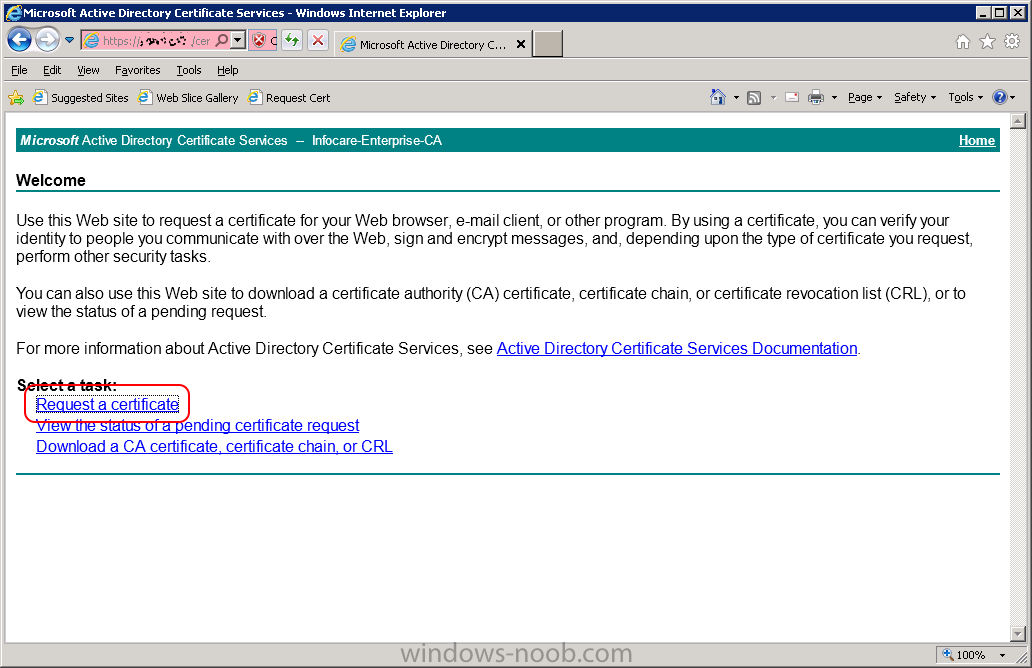
-
 Experts, Wanted to know if this was possible - We are considering SCCM 2012 R2 for a customer, but they have a unique environment where the majority of their workstations are workgroup based computers out there in the wild with no network connections back to homebase. What we're looking to achieve is to stand up a single SCCM 2012 R2 Primary site and configure it for IBCM, then publish a CA web enrollment site out on the internet to register certficates for workgroup workstations. The agents will then be installed manually from an FTP site w/ the switches in place to point back to the Primary Site. I understand the "manual" nature of this, but they're willing to put in the work - I've been trying to get the time to lab this setup out, but figured I'd reach out to this community to see whether anyone has experience with this, or knows whether or not it is even possible? Let me know your thoughts, Thanks in advance!
 -
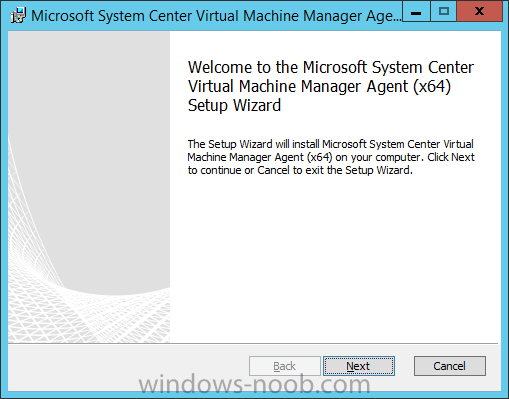
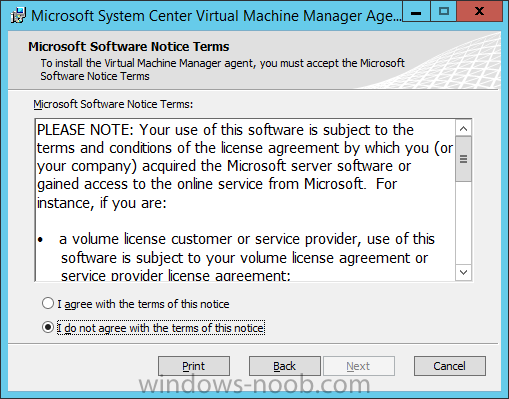
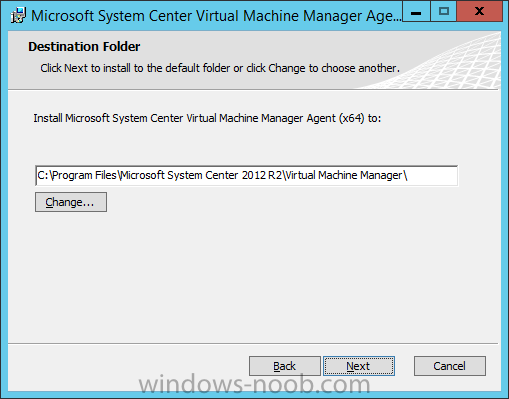
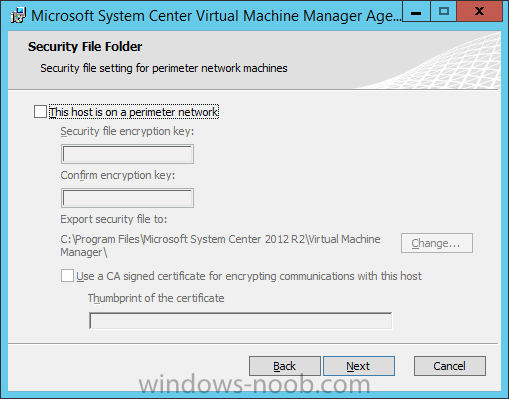
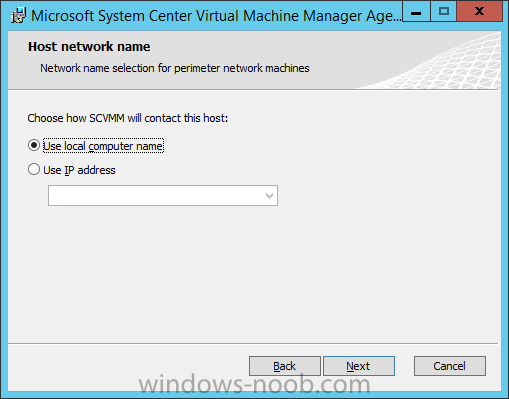
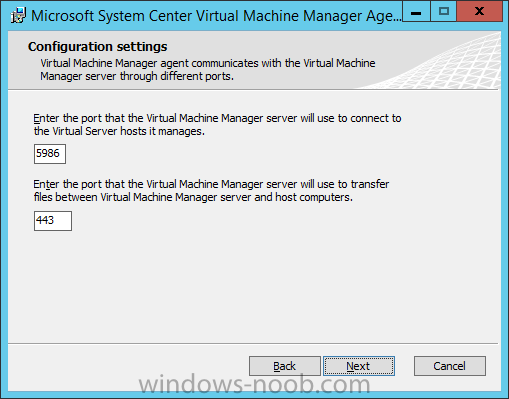
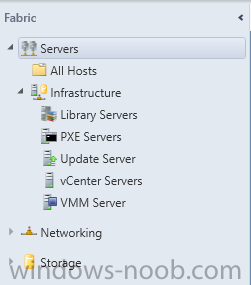
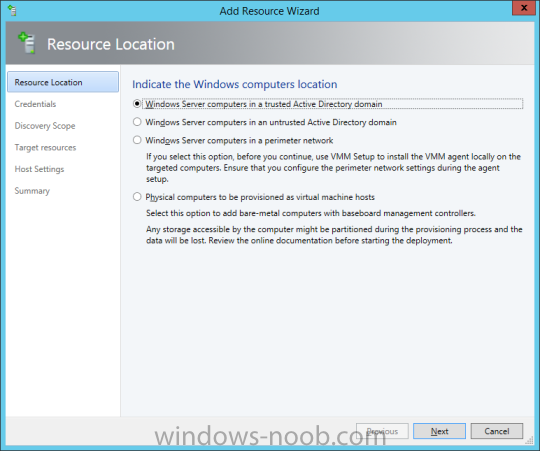
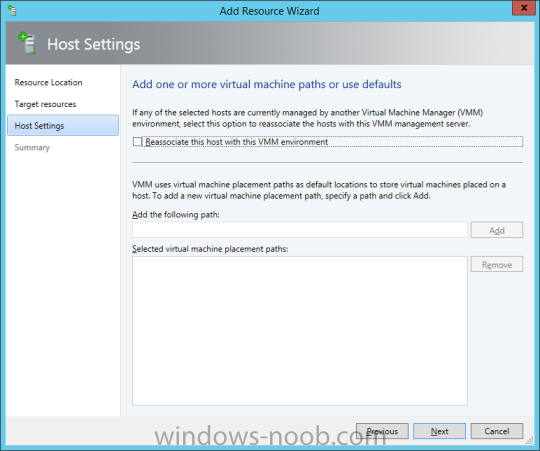
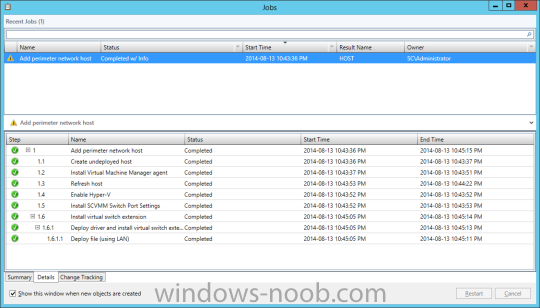
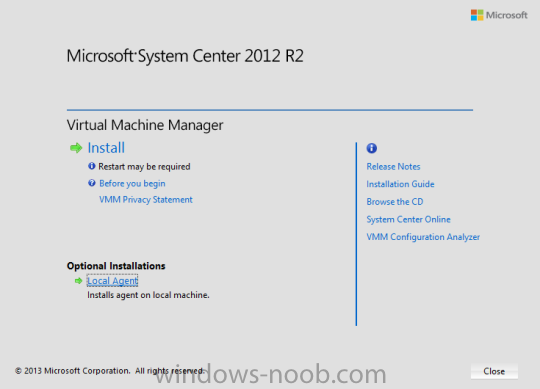
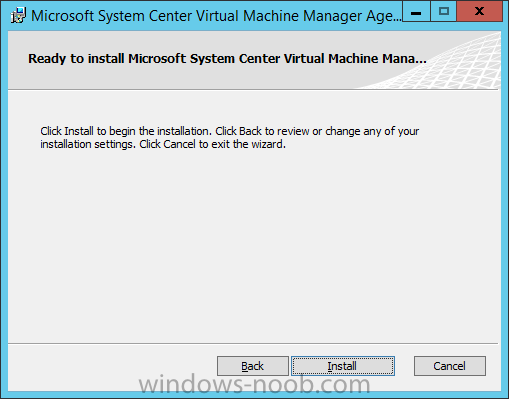
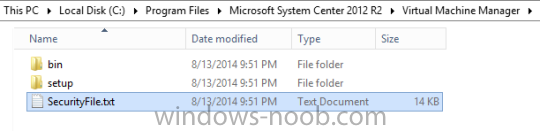
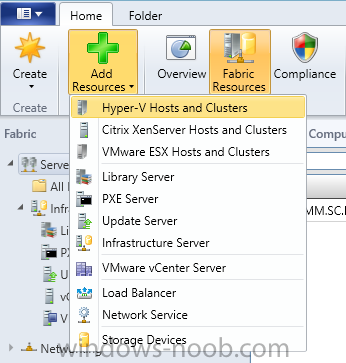
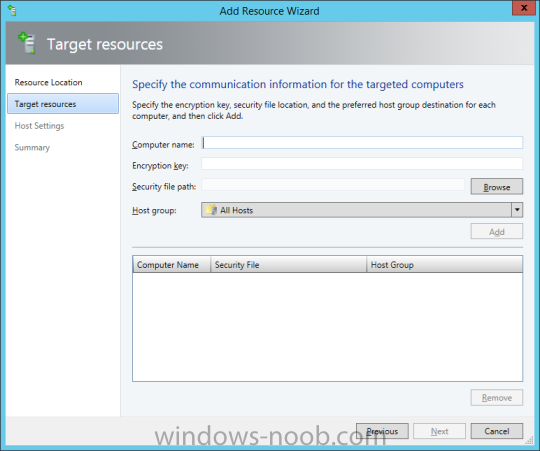
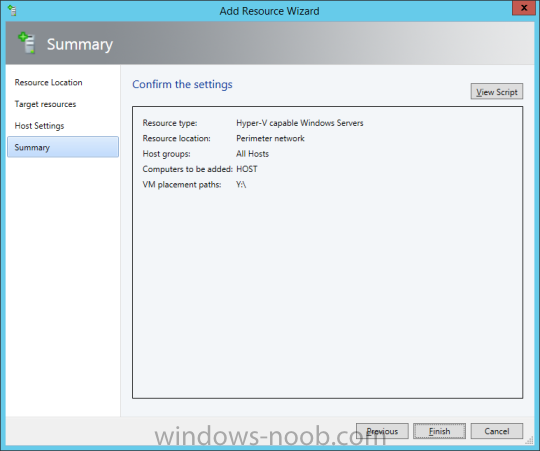
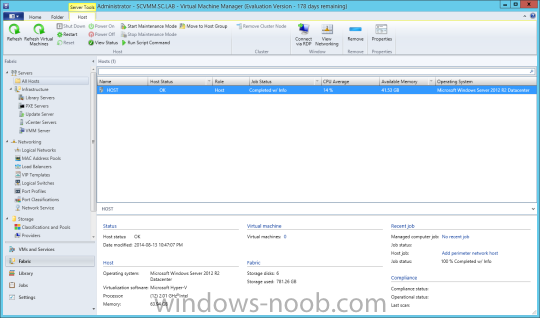
 In my home lab environment, I have a single host, which is NOT a member of my lab’s domain. This is due to the fact that I am constantly re-building my lab environment, which includes my Active Directory Domain Controllers. Therefore, I don’t want to add my host to the domain, and then potentially loose access to it when rebuilding (although I could still use the Local Administrator account). With that being said, I want to add my Host to SCVMM (which is running in a VM on the Host itself). Therefore, I need to be able to add a Host that is not a domain member (aka. a Workgroup host). So, I will be following this TechNet article (http://technet.microsoft.com/en-ca/library/gg610642.aspx), which walks through the process. I will add screenshots to make it easier to follow. You can use the following procedure to add Hyper-V hosts that are in a perimeter network (also known as DMZ, demilitarized zone, and screened subnet) as managed Hyper-V hosts in Virtual Machine Manager. You can only add stand-alone hosts that are in a perimeter network. VMM does not support managing a host cluster in a perimeter network. NOTE: You can also use this procedure to add a stand-alone Hyper-V host that is in a workgroup and not part of a domain. Before you can add a host that is on a perimeter network to VMM, you must install an agent locally on the server that you want to add. TO INSTALL THE VMM AGENT ON THE TARGET HOST On the VMM product media or network share, right-click Setup.exe, and then click Run as administrator. On the Setup menu, under Optional Installations, click Local Agent. On the Welcome page, click Next. Review and accept the software license terms, and then click Next. On the Destination Folder page, accept the default location or click Change to specify a different location, and then click Next. On the Security File Folder page, do the following: Select the This host is on a perimeter network check box. In the Security file encryption key box, enter an encryption key, and then enter it again in the Confirm encryption key box. Security Note: The encryption key is a value that you choose. We recommend that you enter an encryption key that contains a mix of uppercase and lowercase letters, numbers and symbols. Important: Make note of the encryption key that you use to create the security file. You must enter this same key again when you add the host in the VMM console. Either accept the default location where the encrypted security file will be stored, or click Change to specify a different location to store the encrypted security file. Important: Make note of the location where you stored the security file. In the “To ensure that the Security.txt file is available to VMM” procedure, you must transfer the security file to a location that is accessible to the computer on which a VMM console is installed. To use a certificate to encrypt communications between the VMM management server and the host, select the Use a CA signed certificate for encrypting communications with this host check box. In the Thumbprint of the certificate box, enter the thumbprint of the certificate. Note: To obtain the thumbprint of a certificate, open the Certificates snap-in, and then select Computer account. In the Certificates snap-in, locate and then double-click the certificate that you want to use. On the Details tab, select theThumbprint field. In the lower pane, highlight the thumbprint value, and then press Ctrl+C to copy the value to the clipboard. When you are finished, click Next. On the Host network name page, specify how the VMM management server will contact the host, and then click Next. You can select either of the following options: Use local computer name Use IP address If you select Use IP address, click an IP address in the list. Important: Make note of the computer name or IP address of the host. You must enter this same information again when you add the host in the VMM console. On the Configuration settings page, accept the default port settings, or specify different ports, and then click Next. Important: We recommend that you do not change the default port 5986 for agent communication. The port settings that you assign for the agent must identically match the port setting that the VMM management server uses. By default, the VMM management server uses port 5986 for agent communication with hosts in a perimeter network, and port 443 for file transfers. On the Ready to install page, click Install. TO ENSURE THAT THE SECURITYFILE.TXT FILE IS AVAILABLE TO VMM On the target host, navigate to the folder where the security file is stored. By default, the location is C:\Program Files\Microsoft System Center 2012\Virtual Machine Manager. The name of the security file is SecurityFile.txt. Transfer the security file to a location that is accessible to the computer on which a VMM console is installed. For example, transfer the file to the computer where the VMM console is installed, to an internal file share, or to a USB flash drive. TO ADD THE HYPER-V HOST IN THE PERIMETER NETWORK In the VMM console, open the Fabric workspace. In the Fabric pane, click Servers. On the Home tab, in the Add group, click Add Resources, and then clickHyper-V Hosts and Clusters.The Add Resource Wizard starts. On the Resource location page, click Windows Server computers in a perimeter network, and then click Next. On the Target resources page, do the following: In the Computer name box, enter the NetBIOS name or the IP address of the host in the perimeter network. In the Encryption key box, enter the encryption key that you created when you installed the agent on the target host. In the Security file path box, enter the path of the SecurityFile.txt file, or clickBrowse to locate the file. In the Host group list, click the host group where you want to add the host.For example, click the Seattle\Tier2_SEA host group. Click Add.The computer is listed under Computer Name in the lower pane. Repeat this step to add other hosts in the perimeter network. When you are finished, click Next. On the Host settings page, in the Add the following path box, enter the path on the host where you want to store the files for virtual machines that are deployed on hosts, and then click Add. If you leave the box empty, the default path of %SystemDrive%\ProgramData\Microsoft\Windows\Hyper-V is used. Be aware that it is a best practice not to add default paths that are on the same drive as the operating system files. Repeat this step if you want to add more than one path. When you are finished, click Next. Note: You can ignore the Reassociate this host with this Virtual Machine Manager environment check box. This setting does not apply to hosts in a perimeter network. On the Summary page, confirm the settings, and then click Finish. The Jobs dialog box appears to show the job status. Make sure that the job has a status of Completed, and then close the dialog box. To verify that the host was successfully added, in the Fabric pane, expandServers, expand All Hosts, expand the host group where you added the host, and then click the host. In the Hosts pane, verify that the host status is OK. Tip: To view detailed information about host status, right-click the host in the VMM console, and then click Properties. On the Status tab you can view the health status for different areas such as overall health, host agent health, and Hyper-V role health. If there is an issue, you can click Repair all. VMM will to try to automatically fix the issue.
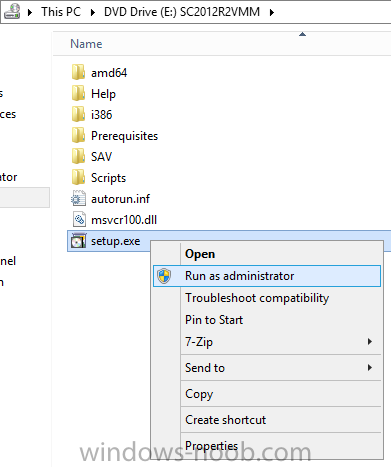


-
 When I try to deploy windows 8 updates follow Anyweb's guide SCCM 2012 RC Part 6 - Deploying Software Updates, Step Install Software Updates failed with 0X800705B4 while system join workgroup instead of domain. If I config system to join domain everything is fine. I have specified SMSMP=CM01.corp.viamonstra.com in installation properties of Configuration Manger Client ConfigMgr version is System Center 2012 ConfigMgr SP1, and config to use HTTPS for communication between server and client. I also try HTTP situation ,windows software can be installed successfully in infrastructure of workgroup and domain. I google for several days, still not found soulation. Logs.zip
 -

Sysprep issues; Workgroup and Original Computer Name
mt204 posted a question in Windows Deployment Services (WDS)
Couple of issues that I can't quite remember when dealing with sysprep. 1) I have a couple images that aren't to be joined to our domain, yet when I set <JoinWorkgroup>WORKGROUP</JoinWorkgroup> in sysprep.xml AND in WDS I select "Do not join the client to a domain after an installation", it still ends up connecting to the domain. 2) I'm noticing in the registry, the original computer name that had been sysprepped and captured was still showing up. I used: sysprep.exe /oobe /generalize /shutdown I can't recall if this is just how it happens or if it's supposed to be like that.