Search the Community
Showing results for tags 'SCVMM'.
-
SCVMM and hyper v after power loss
mattfarnell posted a question in System Center Virtual Machine Manager
hi, hope someone can shed some light on this topic for me. We have just had a power loss to our server cab. In it contains 4 hypervisors and 2 san disk shelves. Our SCVMM server is virtual. When we restored power to the cab we were hoping the vm's would all start by them selves as specified in vmm "power on after failure". We were gobsmacked to find that no vm's started, and more they weren't even listed in hyper v. it was like they'd never been there. We had to go through all the vm's one by one and re import into hyper v. All our hypervisors are listed in the cluster. The SASN is a a Dell ps6100 and 4100. ANy ideas would be appreciated Thanks Guys -
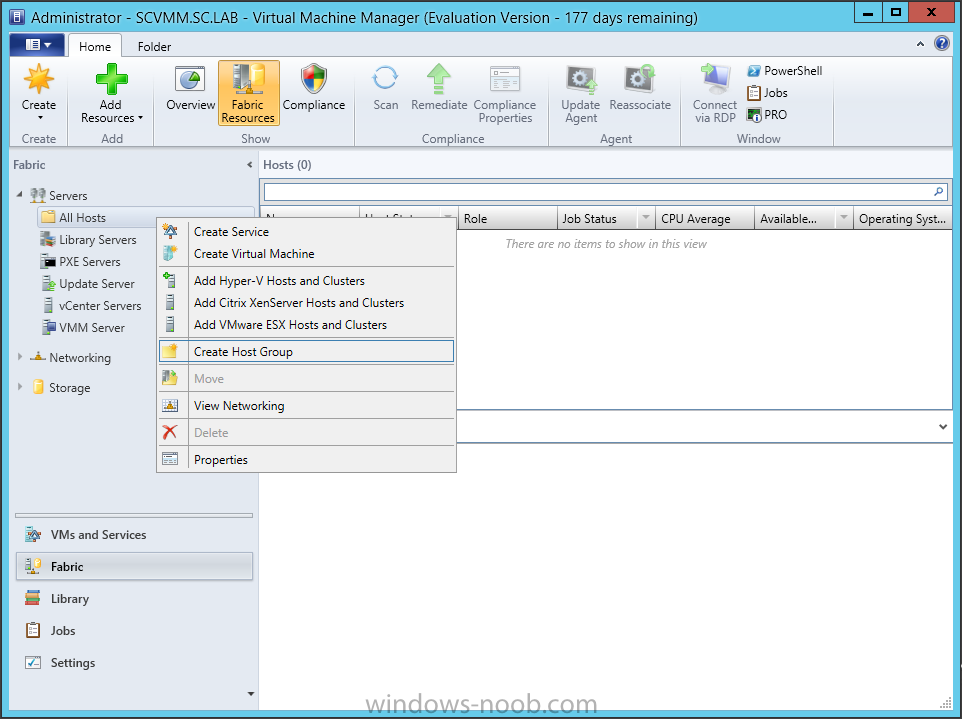
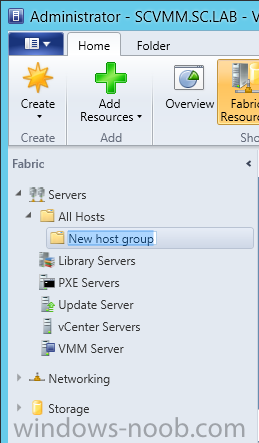
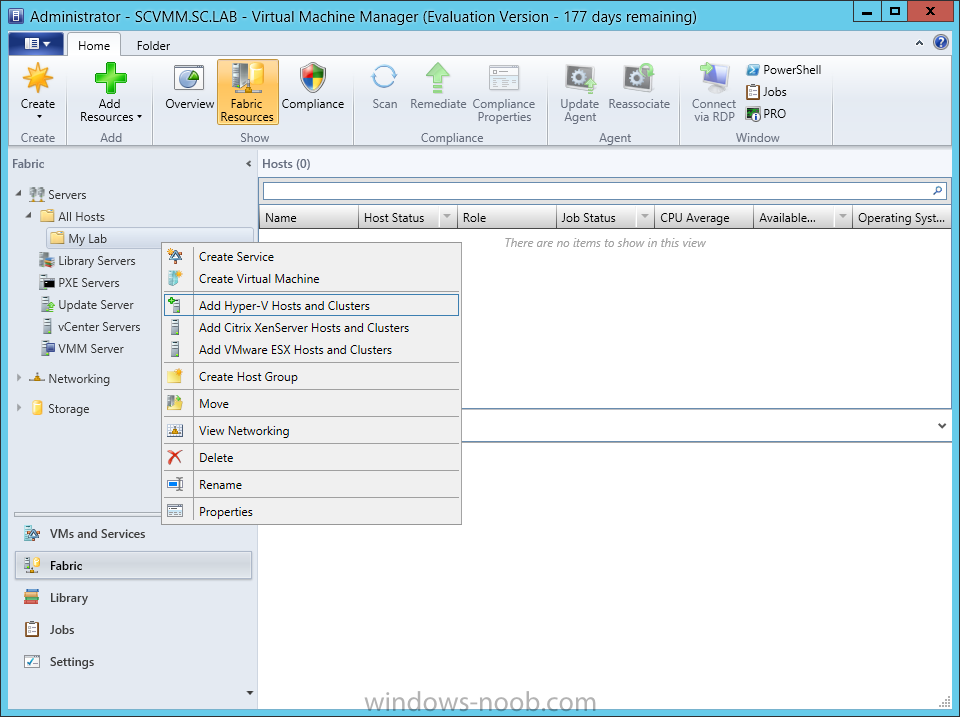
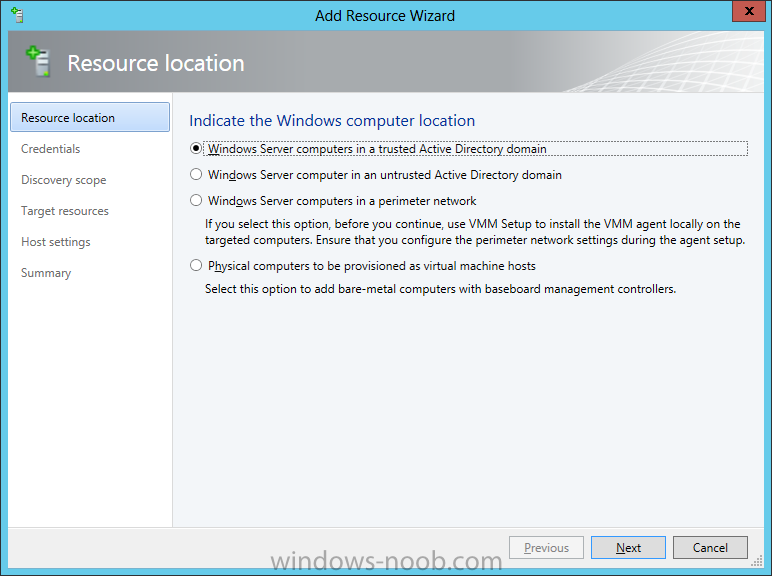
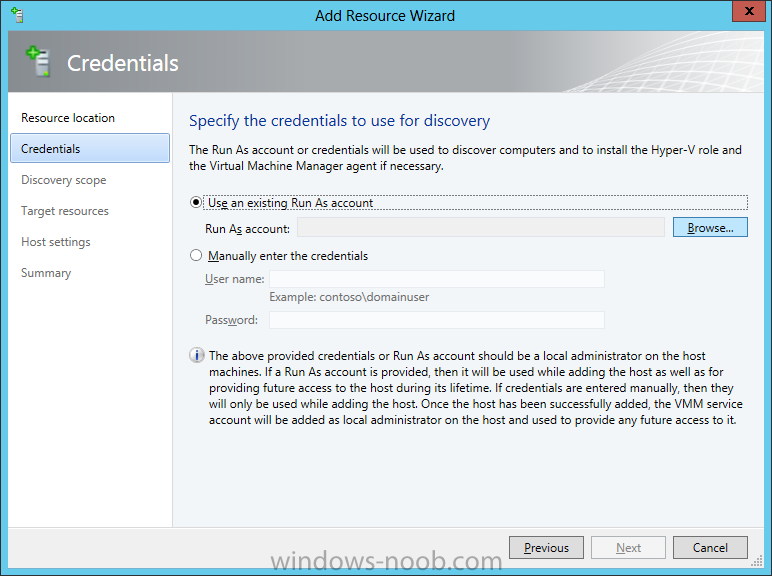
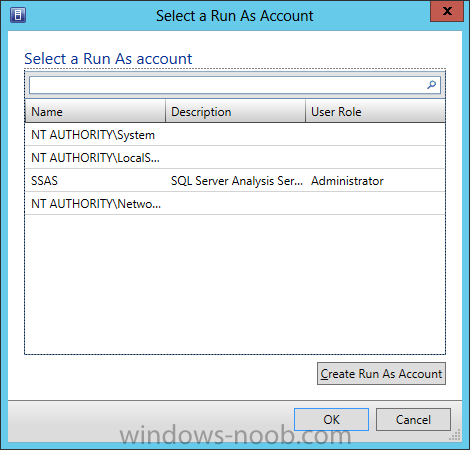
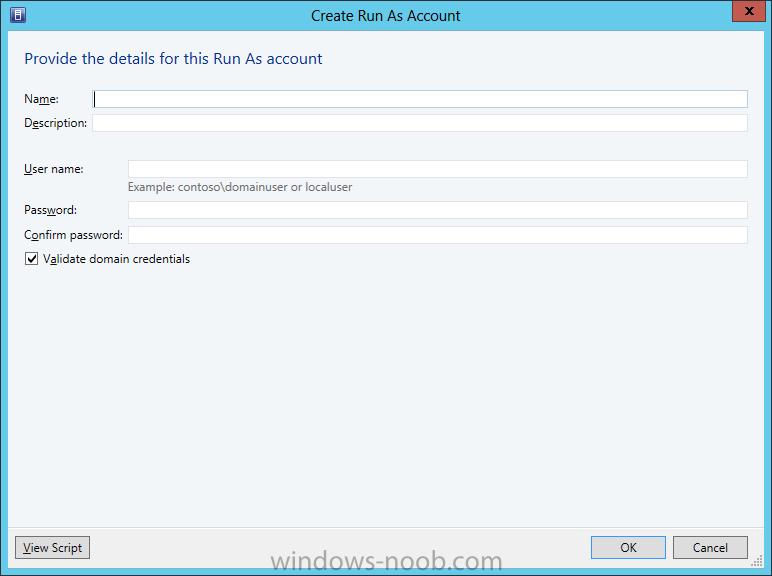
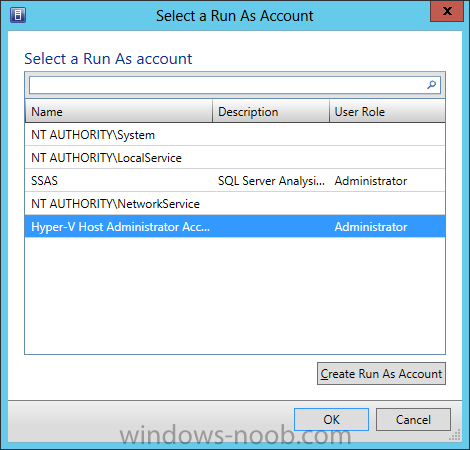
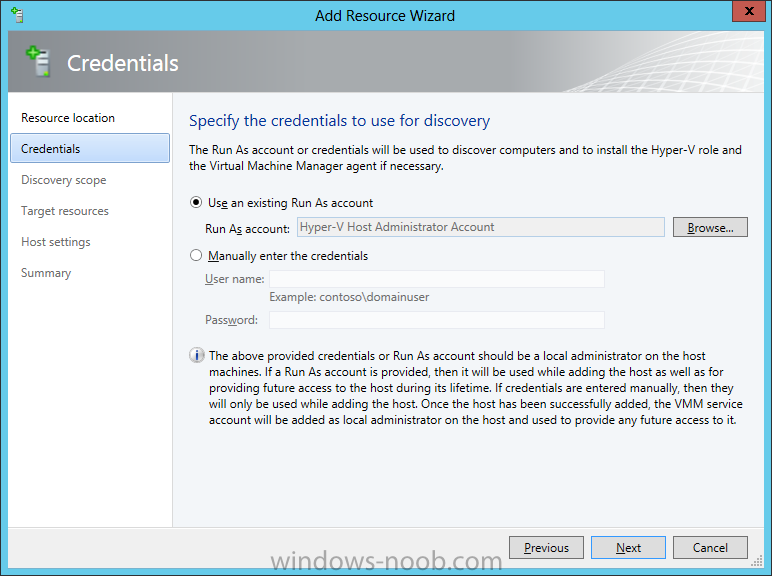
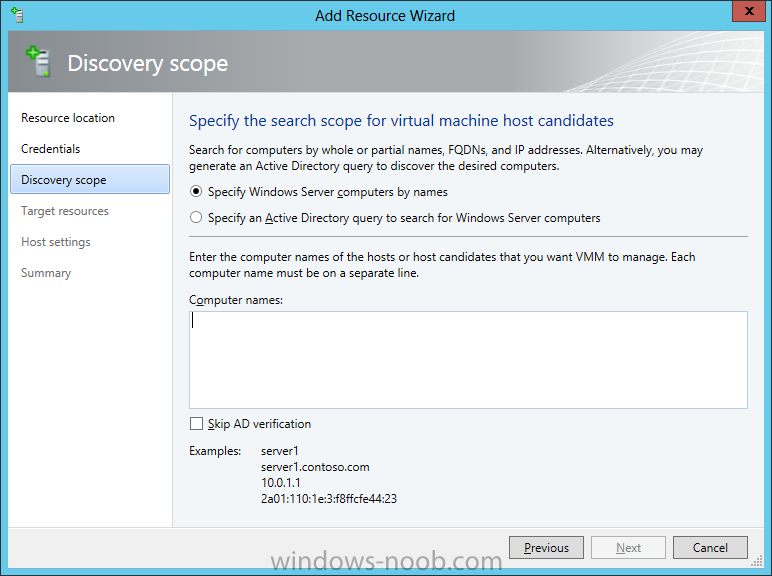
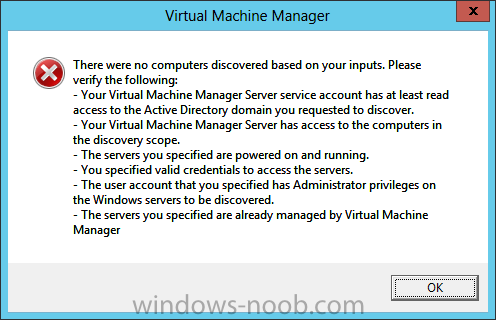
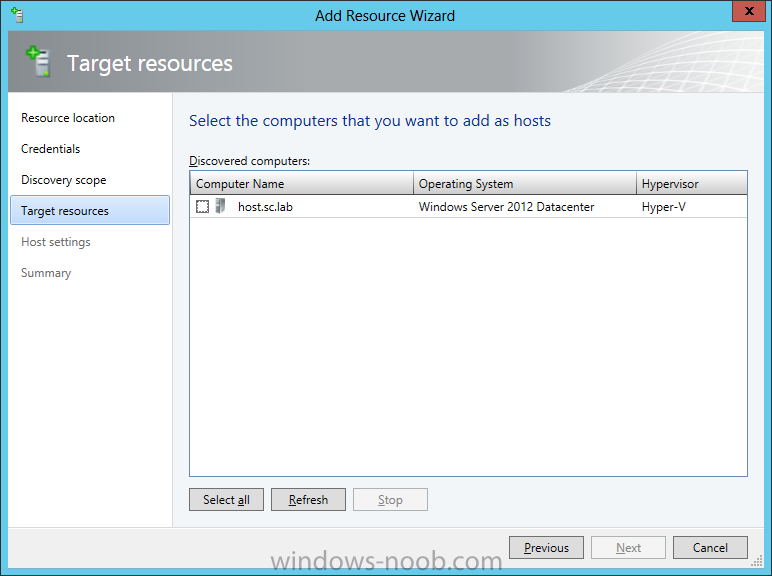
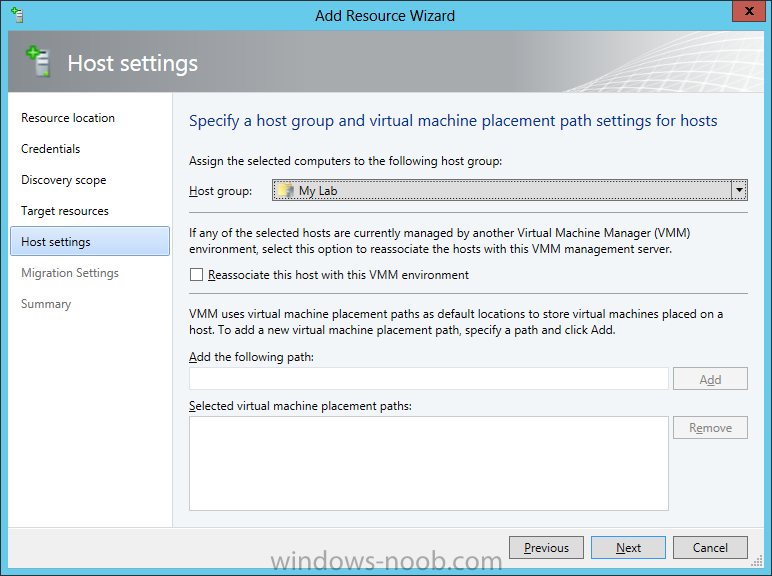
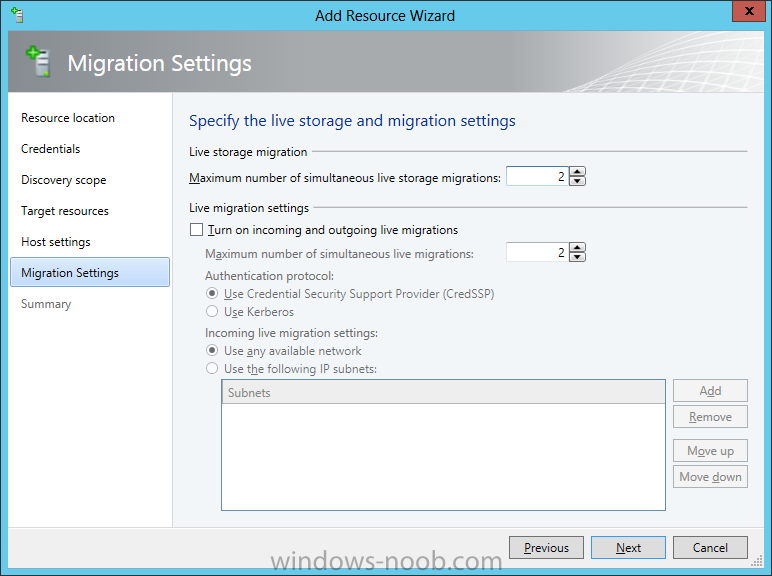
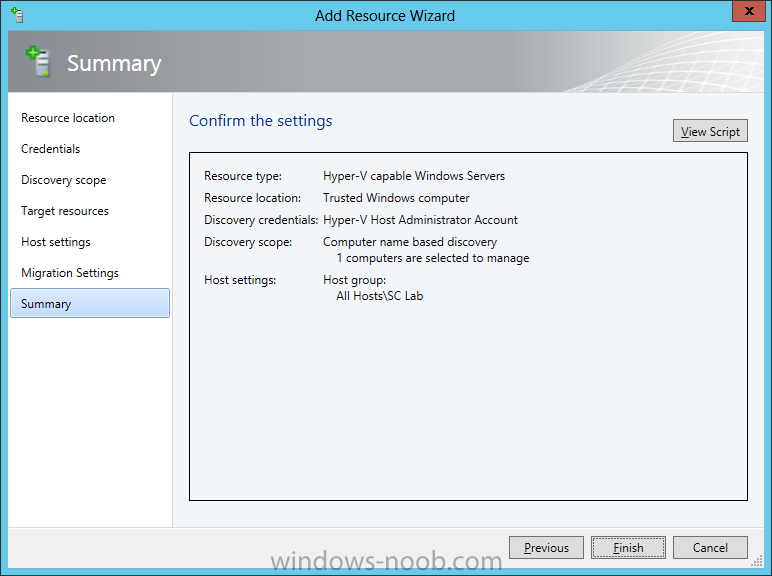
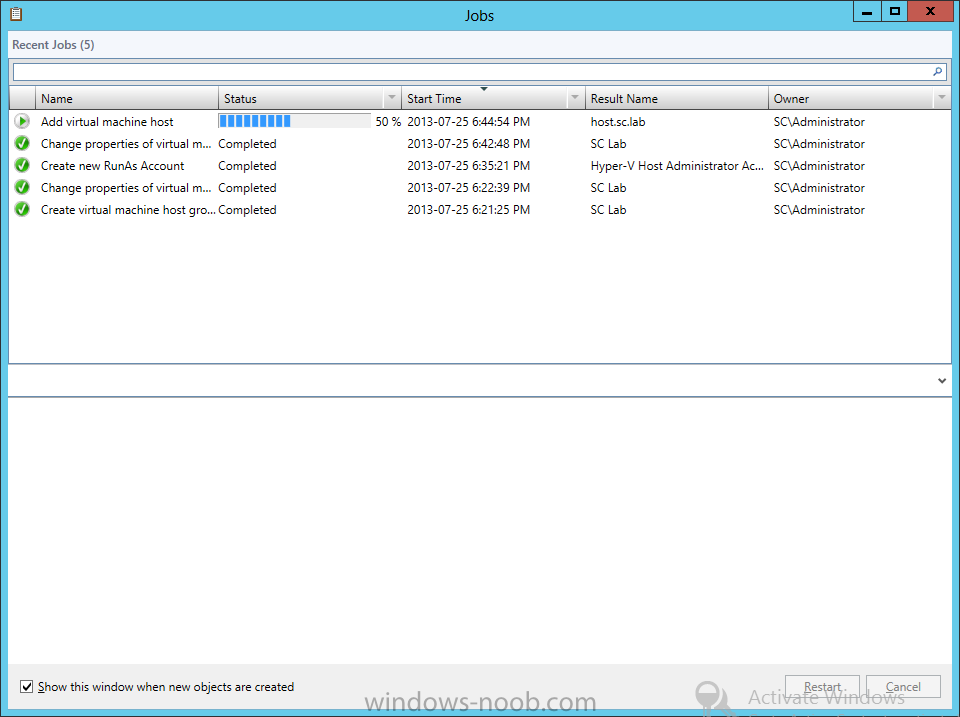
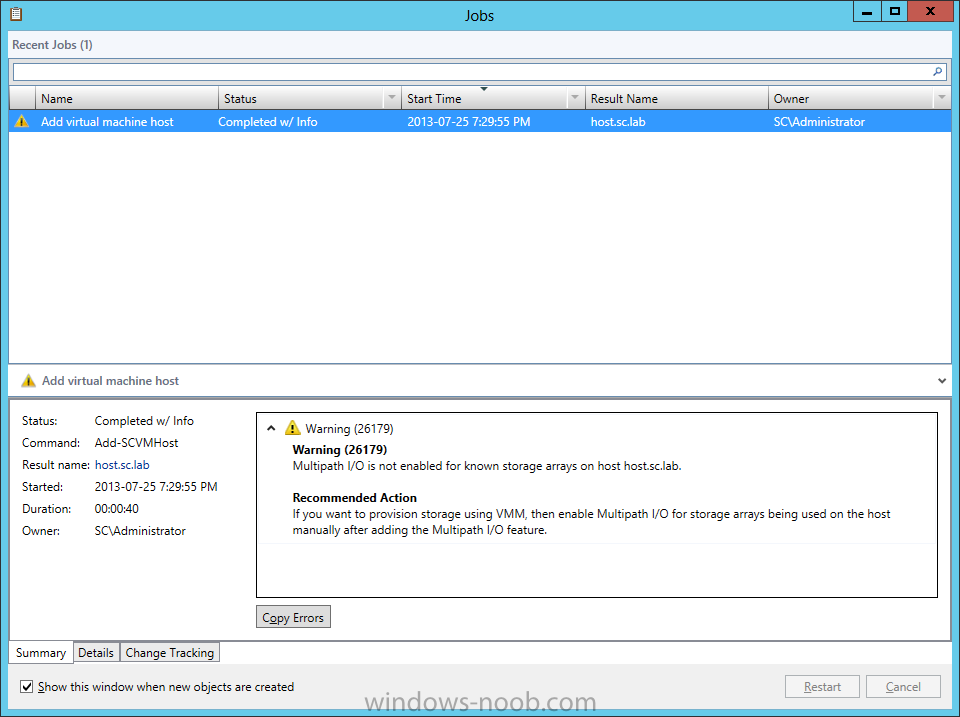
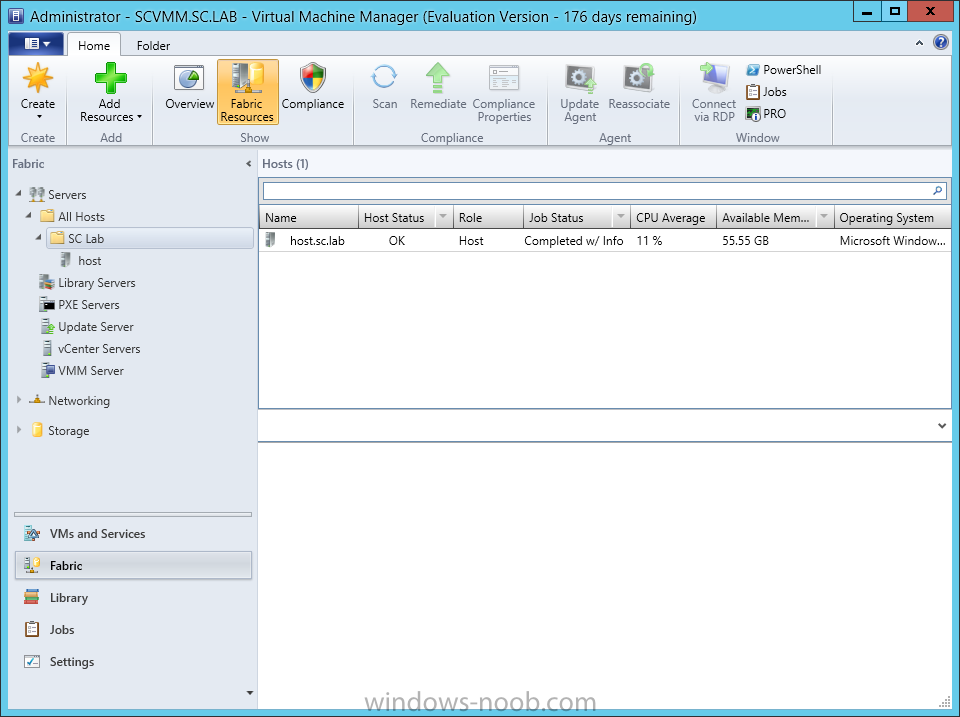
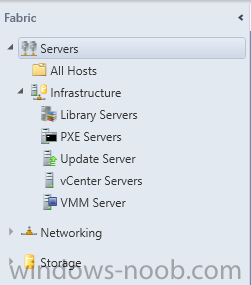
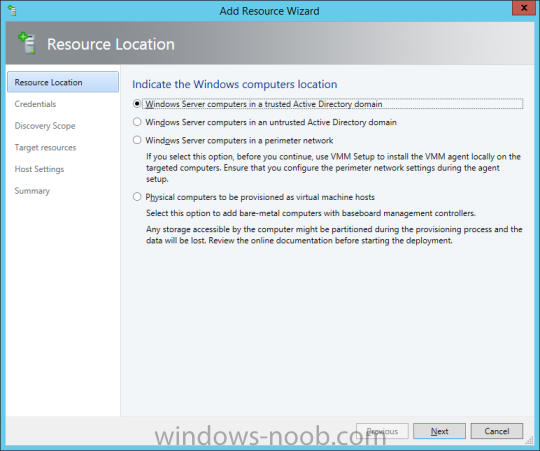
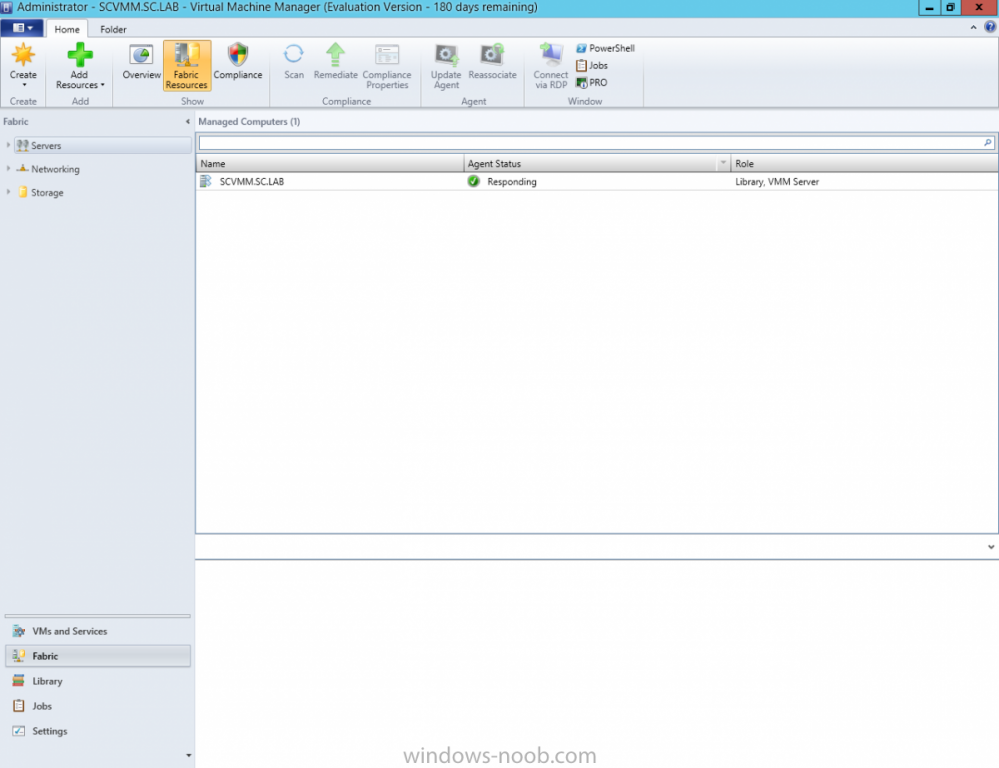
In our last post we finished installing Forecast Analysis Reporting. Now we will start on the configuration. Hello everyone, if you have been following along with my guides, you should now have SCVMM installed. But SCVMM won’t do you any good if it doesn’t know about any Hypervisor/virtualization hosts or VMs, so that’s where we will start as part of these Configuration guides. First, start by launching the SCVMM console. Click on Fabric in the lower left. Now expand the ‘Servers’ directory. From there, right-click on ‘All Hosts’ and choose ‘Create Host Group’. Name your custom Host Group whatever you want. Note, you can rename it at any time if you need to. Now right-click on your new Host Group and choose ‘Add Hyper-V Hosts and Clusters’. On the Resource Location screen of the Add Resource Wizard, make the appropriate selection for the Windows Computer Location, and then click Next. Note that you can even choose ‘Physical computers to be provisioned as virtual machine hosts’, which would allow you to provision bare-metal systems! For our lab example, since we have an Active Directory domain that the SCVMM server is a member of, we will choose the first option. On the Credentials screen, click Browse so that we can add an existing account as the Run As account. Note the information at the bottom of this screen, which reminds us that the Run As account needs to be a Local Administrator on the host machines you want to manage. On the Select a Run As Account, click the ‘Create Run As Account’ button, since we don’t have an account already within SCVMM to use. On this screen you need to provide the details about the account. You can give it a name (Note that this is NOT the actual username used for the account, but an identifying name), and description. You will need to provide the actual username and password for the account. In my lab example I created an account called SCVMMAdmin, and used that on this screen. Enter an applicable account on this screen and then click OK. Now our newly added account is available to be selected. You will notice in my example that I named the account “Hyper-V Host Administrator Account”. Select your account and then click OK. Now the Credentials screen will show the account that we have selected. Now click Next. On the Discovery Scope screen, choose the appropriate the scope option. You can use an Active Directory query, or type the names to search for. In my lab example, I just typed the names. Make your appropriate choice and then click Next. NOTE: You can opt to ‘Skip AD Verification’ however it is best to perform AD verification to ensure the system can be communicated with. If there are issues with the wizard not being able to communicate with the Host(s), you may encounter this error. Read the message displayed and then click OK. Perform whatever actions are required to resolve the communication issues, and then re-attempt to add a host system. On the Target Resources screen, if the host system(s) are able to be contacted, they will appear here. Select the system(s) that you want to add as hosts, and then click Next. On the Host Settings screen, you can assign the selected computers to a specific Host Group (i.e. the one we originally created). You could use the Host Groups to organize hosts based on area/zone (i.e. PROD, UAT, TST, DEV, etc.). For our lab example, just click Next. On the Migration Settings screen you can specify how many live migrations (for both storage, and VMs) can be performed simultaneously. For this example in my lab, since I don’t have a second physical host to use for live migrations, I won’t turn this feature on. At this point, just click Next. Review the information on the Summary screen and then click Finish. This will open the Jobs screen, and show the progress of adding the host. If there are any issues, you will be alerted to them here. Correct any issues, and re-attempt to add the host. Once it has been added successfully, you can close the Jobs window. You will notice in my lab example, that adding my host completed but with a Warning. This is because my physical host does not have Multipath I/O. This is used in reference to SAN storage, which I don’t have. Back in the main SCVMM console your Host will now be present. Congratulations, you now have SCVMM installed, along with adding a Host hypervisor (in our case, Hyper-V) system to be managed. Next we will create host groups and clouds.
- 3 replies
-
- SCVMM
- Virtual Machine Manager
- (and 5 more)
-
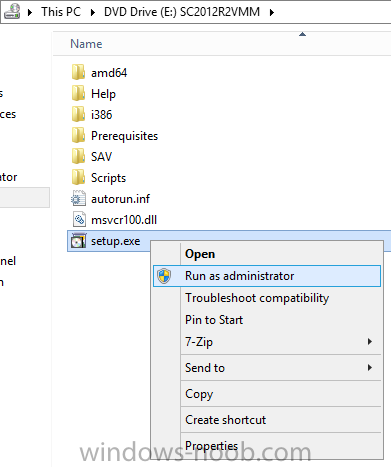
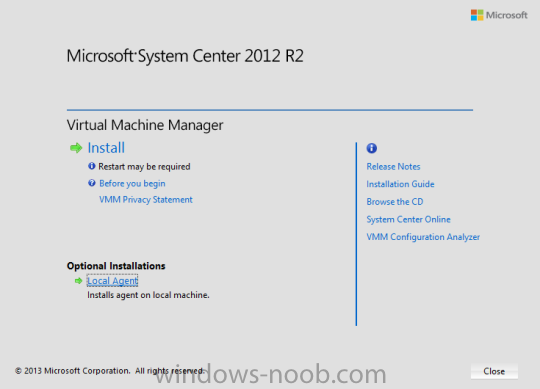
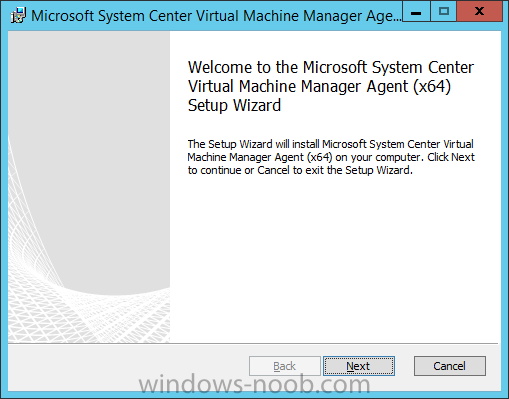
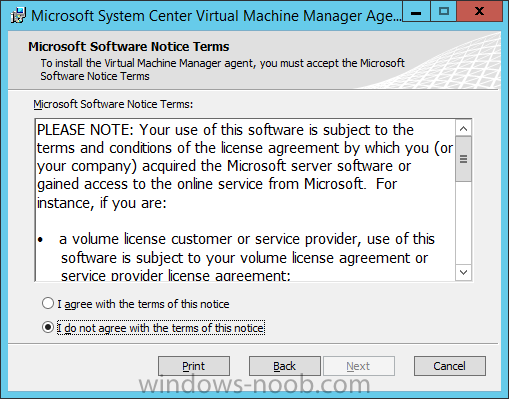
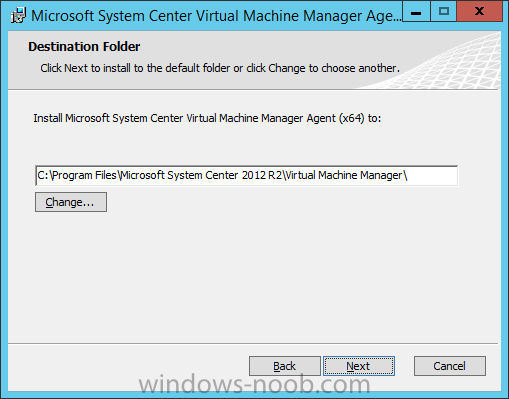
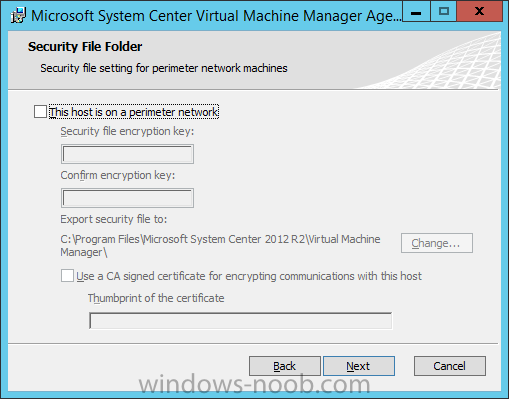
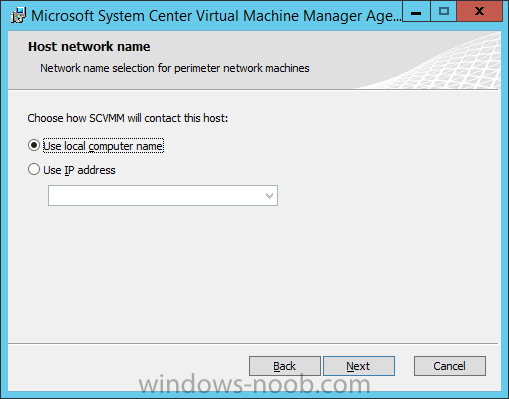
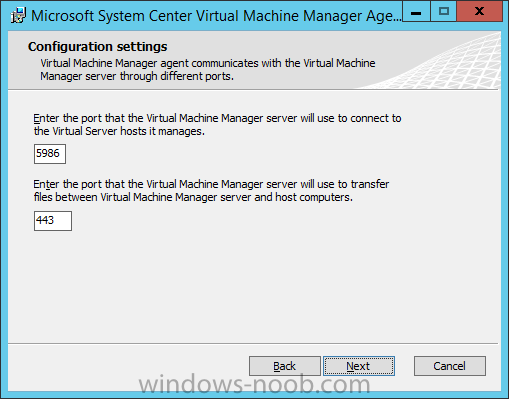
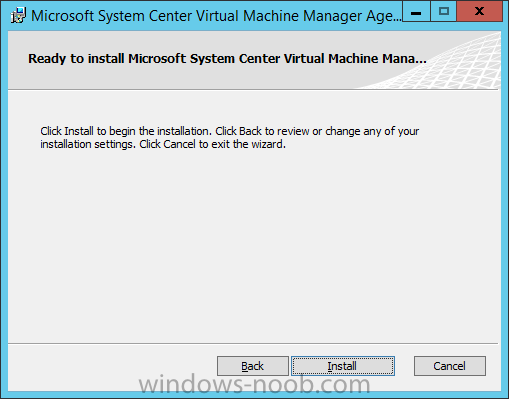
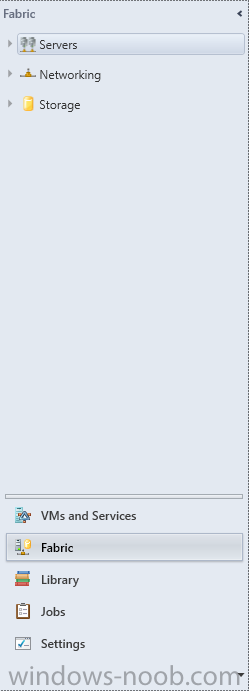
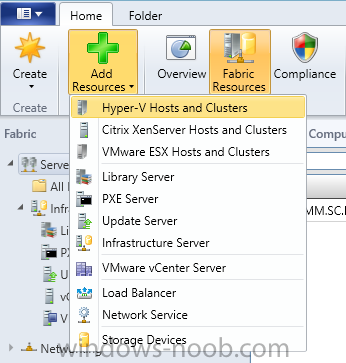
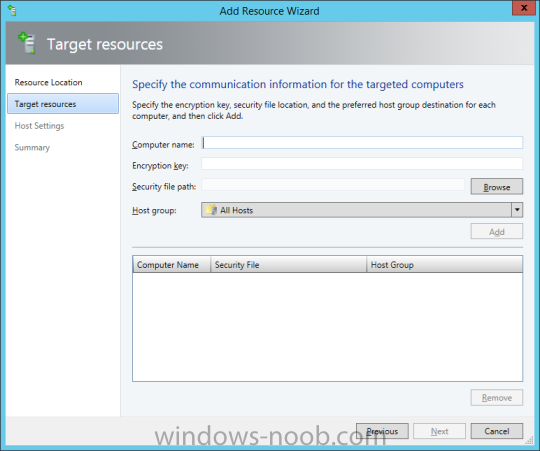
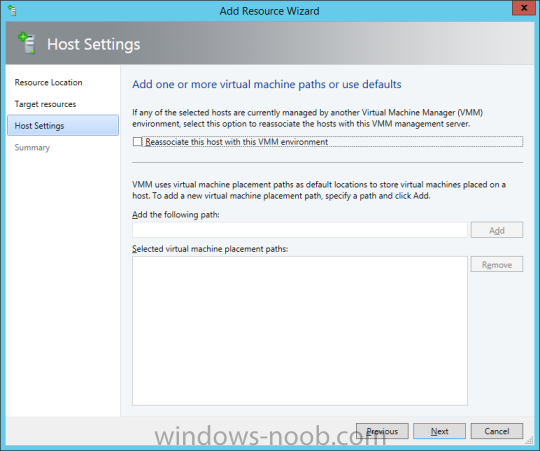
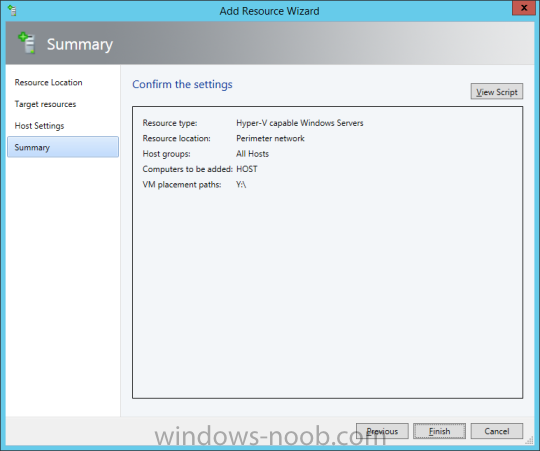
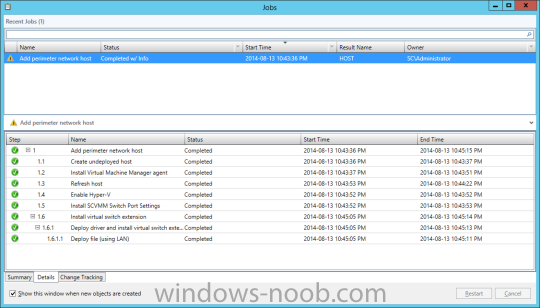
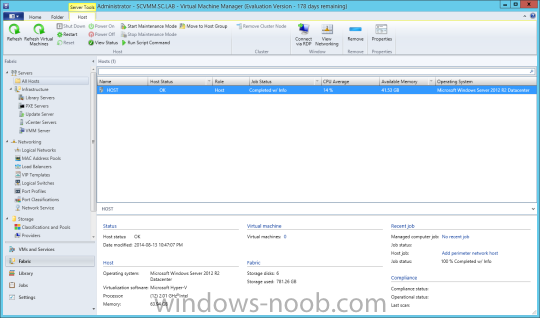
In my home lab environment, I have a single host, which is NOT a member of my lab’s domain. This is due to the fact that I am constantly re-building my lab environment, which includes my Active Directory Domain Controllers. Therefore, I don’t want to add my host to the domain, and then potentially loose access to it when rebuilding (although I could still use the Local Administrator account). With that being said, I want to add my Host to SCVMM (which is running in a VM on the Host itself). Therefore, I need to be able to add a Host that is not a domain member (aka. a Workgroup host). So, I will be following this TechNet article (http://technet.microsoft.com/en-ca/library/gg610642.aspx), which walks through the process. I will add screenshots to make it easier to follow. You can use the following procedure to add Hyper-V hosts that are in a perimeter network (also known as DMZ, demilitarized zone, and screened subnet) as managed Hyper-V hosts in Virtual Machine Manager. You can only add stand-alone hosts that are in a perimeter network. VMM does not support managing a host cluster in a perimeter network. NOTE: You can also use this procedure to add a stand-alone Hyper-V host that is in a workgroup and not part of a domain. Before you can add a host that is on a perimeter network to VMM, you must install an agent locally on the server that you want to add. TO INSTALL THE VMM AGENT ON THE TARGET HOST On the VMM product media or network share, right-click Setup.exe, and then click Run as administrator. On the Setup menu, under Optional Installations, click Local Agent. On the Welcome page, click Next. Review and accept the software license terms, and then click Next. On the Destination Folder page, accept the default location or click Change to specify a different location, and then click Next. On the Security File Folder page, do the following: Select the This host is on a perimeter network check box. In the Security file encryption key box, enter an encryption key, and then enter it again in the Confirm encryption key box. Security Note: The encryption key is a value that you choose. We recommend that you enter an encryption key that contains a mix of uppercase and lowercase letters, numbers and symbols. Important: Make note of the encryption key that you use to create the security file. You must enter this same key again when you add the host in the VMM console. Either accept the default location where the encrypted security file will be stored, or click Change to specify a different location to store the encrypted security file. Important: Make note of the location where you stored the security file. In the “To ensure that the Security.txt file is available to VMM” procedure, you must transfer the security file to a location that is accessible to the computer on which a VMM console is installed. To use a certificate to encrypt communications between the VMM management server and the host, select the Use a CA signed certificate for encrypting communications with this host check box. In the Thumbprint of the certificate box, enter the thumbprint of the certificate. Note: To obtain the thumbprint of a certificate, open the Certificates snap-in, and then select Computer account. In the Certificates snap-in, locate and then double-click the certificate that you want to use. On the Details tab, select theThumbprint field. In the lower pane, highlight the thumbprint value, and then press Ctrl+C to copy the value to the clipboard. When you are finished, click Next. On the Host network name page, specify how the VMM management server will contact the host, and then click Next. You can select either of the following options: Use local computer name Use IP address If you select Use IP address, click an IP address in the list. Important: Make note of the computer name or IP address of the host. You must enter this same information again when you add the host in the VMM console. On the Configuration settings page, accept the default port settings, or specify different ports, and then click Next. Important: We recommend that you do not change the default port 5986 for agent communication. The port settings that you assign for the agent must identically match the port setting that the VMM management server uses. By default, the VMM management server uses port 5986 for agent communication with hosts in a perimeter network, and port 443 for file transfers. On the Ready to install page, click Install. TO ENSURE THAT THE SECURITYFILE.TXT FILE IS AVAILABLE TO VMM On the target host, navigate to the folder where the security file is stored. By default, the location is C:\Program Files\Microsoft System Center 2012\Virtual Machine Manager. The name of the security file is SecurityFile.txt. Transfer the security file to a location that is accessible to the computer on which a VMM console is installed. For example, transfer the file to the computer where the VMM console is installed, to an internal file share, or to a USB flash drive. TO ADD THE HYPER-V HOST IN THE PERIMETER NETWORK In the VMM console, open the Fabric workspace. In the Fabric pane, click Servers. On the Home tab, in the Add group, click Add Resources, and then clickHyper-V Hosts and Clusters.The Add Resource Wizard starts. On the Resource location page, click Windows Server computers in a perimeter network, and then click Next. On the Target resources page, do the following: In the Computer name box, enter the NetBIOS name or the IP address of the host in the perimeter network. In the Encryption key box, enter the encryption key that you created when you installed the agent on the target host. In the Security file path box, enter the path of the SecurityFile.txt file, or clickBrowse to locate the file. In the Host group list, click the host group where you want to add the host.For example, click the Seattle\Tier2_SEA host group. Click Add.The computer is listed under Computer Name in the lower pane. Repeat this step to add other hosts in the perimeter network. When you are finished, click Next. On the Host settings page, in the Add the following path box, enter the path on the host where you want to store the files for virtual machines that are deployed on hosts, and then click Add. If you leave the box empty, the default path of %SystemDrive%\ProgramData\Microsoft\Windows\Hyper-V is used. Be aware that it is a best practice not to add default paths that are on the same drive as the operating system files. Repeat this step if you want to add more than one path. When you are finished, click Next. Note: You can ignore the Reassociate this host with this Virtual Machine Manager environment check box. This setting does not apply to hosts in a perimeter network. On the Summary page, confirm the settings, and then click Finish. The Jobs dialog box appears to show the job status. Make sure that the job has a status of Completed, and then close the dialog box. To verify that the host was successfully added, in the Fabric pane, expandServers, expand All Hosts, expand the host group where you added the host, and then click the host. In the Hosts pane, verify that the host status is OK. Tip: To view detailed information about host status, right-click the host in the VMM console, and then click Properties. On the Status tab you can view the health status for different areas such as overall health, host agent health, and Hyper-V role health. If there is an issue, you can click Repair all. VMM will to try to automatically fix the issue.
-
- Hyper-V Host
- SCVMM
-
(and 1 more)
Tagged with:
-
SCVMM usage and feature set
cobramaster298 posted a question in System Center Virtual Machine Manager
I'm thinking of recommending my team to adopt SCVMM for windows server administration but wanted to know from an IT audience perspective: - Are you using SCVMM today? If not, what other products do you prefer to use? - What are the top 3 features you use within SCVMM that makes system/server administration easy? - How hard was it to make SCVMM a part of your toolset? Thanks, Billy- 1 reply
-
- windows server
- scvmm
- (and 7 more)
-
Hello. 2 Days ago, we had a crash in our Hyper-V enviroment. After getting back online, we are not able to use our SCVMM 2012 R2 console. I have checked the following, to resolve the issue: Checked that the System Center Virtual Machine Manager Agent Service is running - and can be restarted (no errors) Restarted the SCVMM and SQL Server Checked that the SQL Server hosting the SCVMM is accesable, and that i can view the data inside it (not corrupted) Ive checked this link, but it dosent solve the issue: http://social.technet.microsoft.com/wiki/contents/articles/4900.system-center-2012-virtual-machine-manager-vmm-error-codes-1500-1999.aspx Im starting to run out of ideas now, and hoped that you Guys had some
-
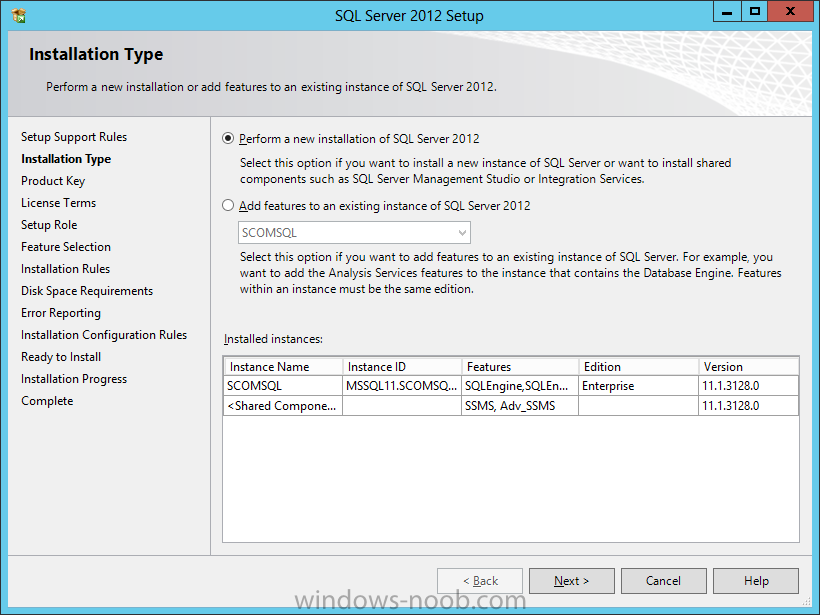
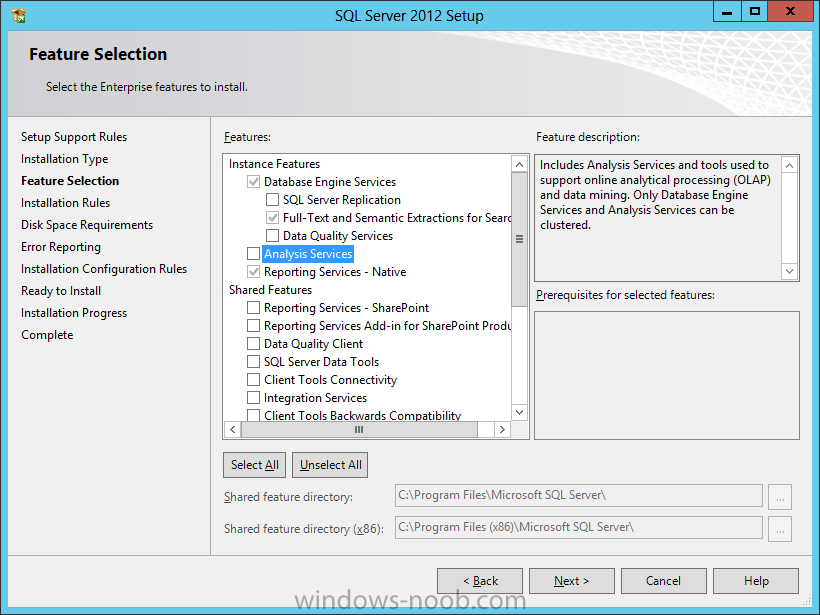
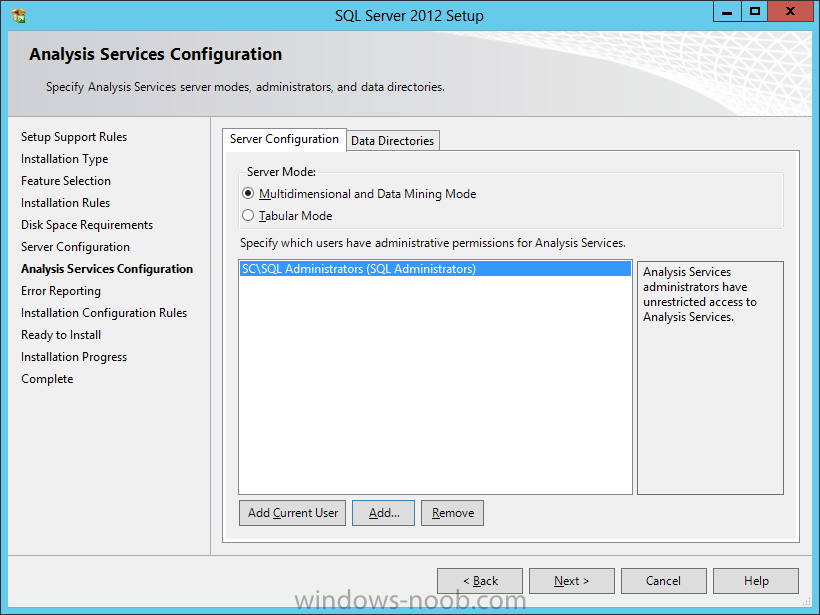
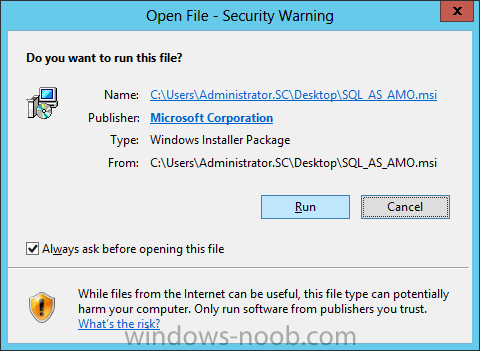
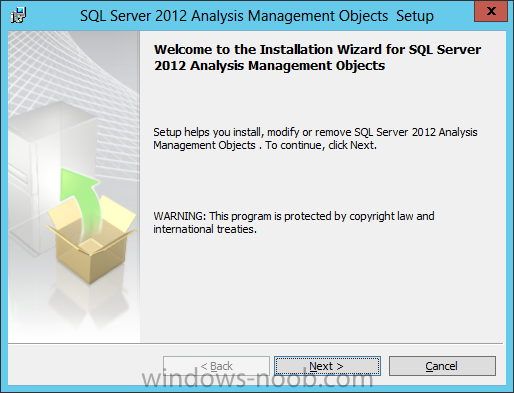
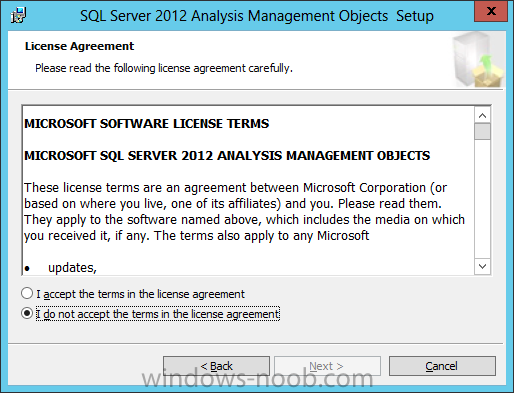
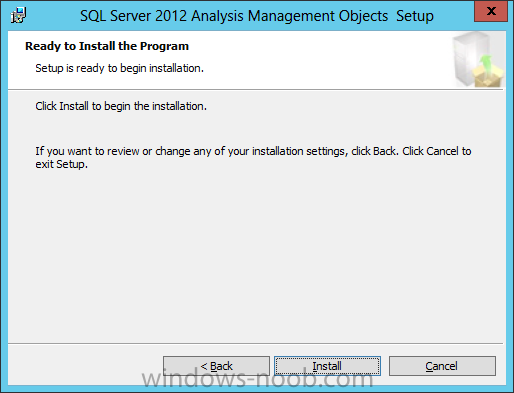
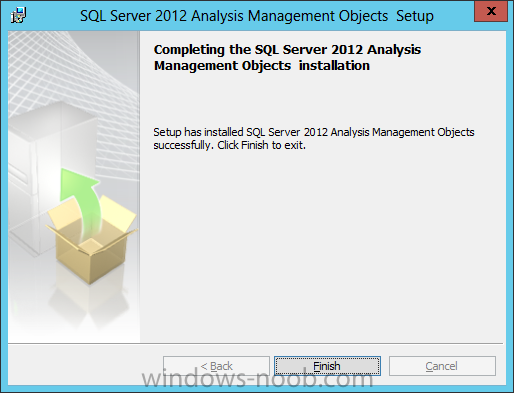
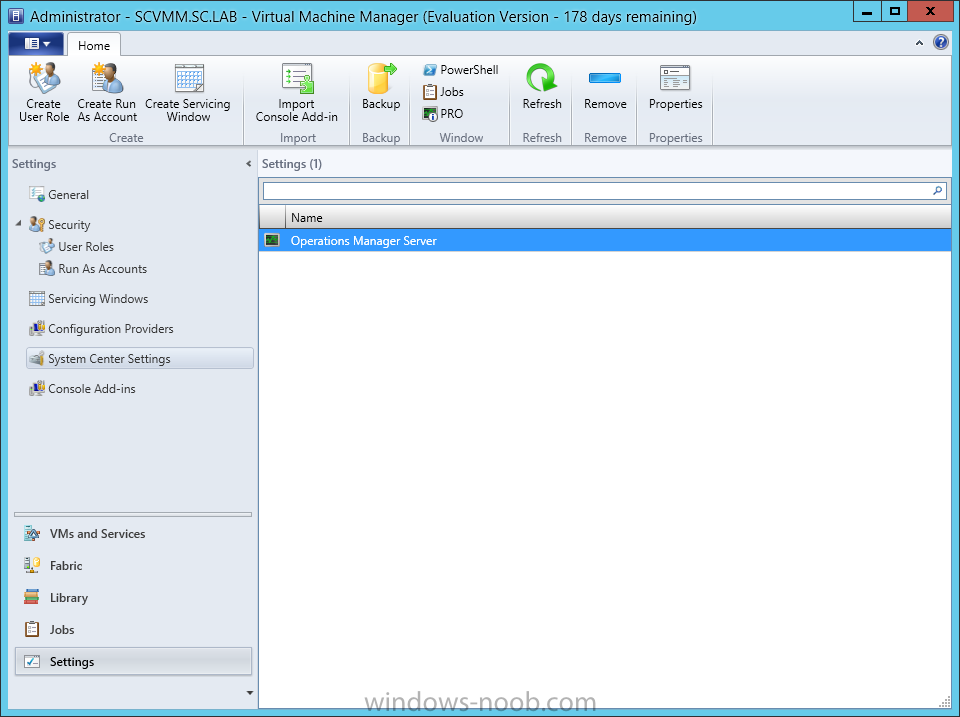
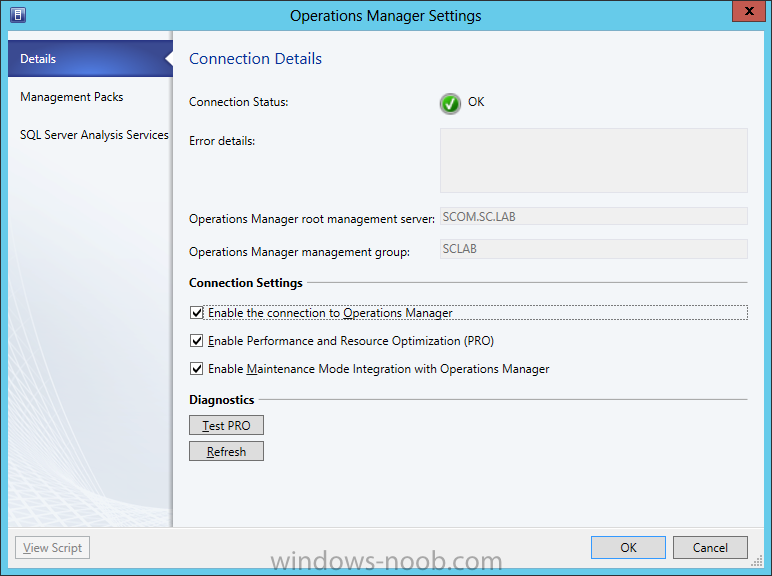
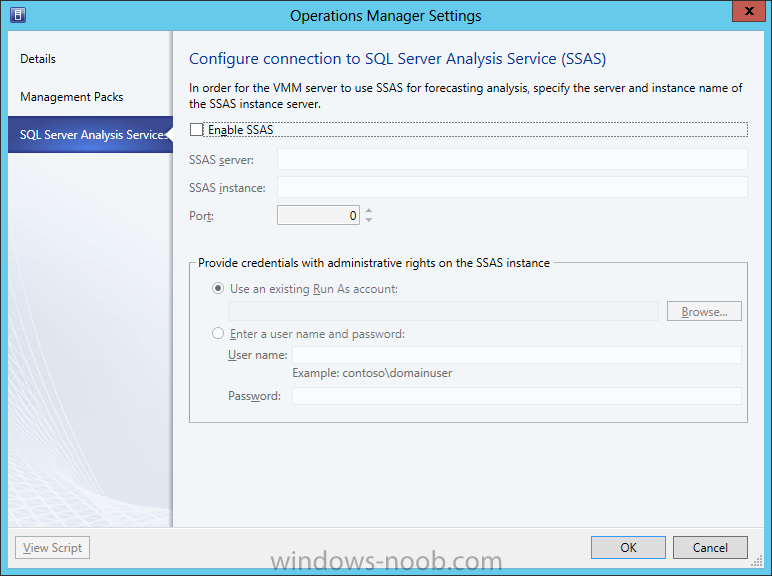
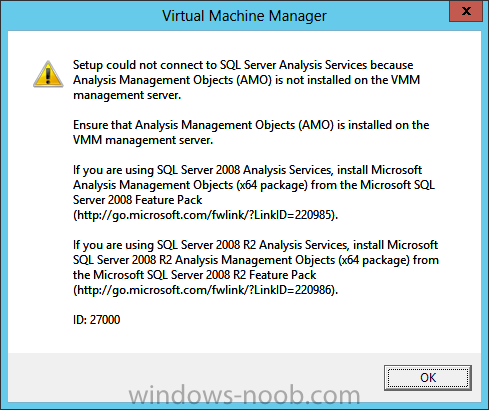
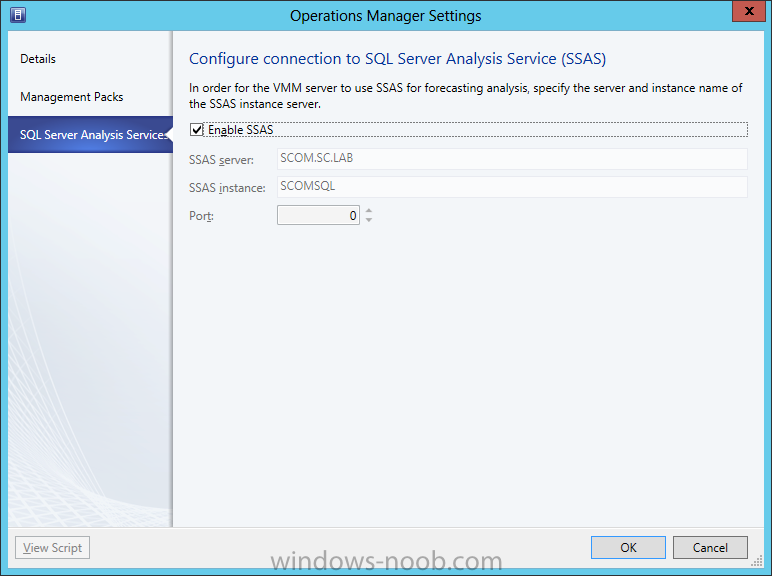
In our last post we installed SCVMM Reporting. By default, you should now have all the SCVMM reports available in SCOM’s Reporting space. However, there is an additional set of reports that is not made available by default. These are the Forecasting Analysis reports, and the only way to be able to use them is with SQL Server Analysis Services (SSAS). Since SCVMM using the reporting feature of SCOM, we need to have SSAS installed on the SCOM Reporting server. In our lab example, we have SQL DB and Reporting installed on the same server that is running SCOM. So, we’re going to go through the steps of installing SSAS first, and then configuring SCVMM to use it. Install SSAS To start, log into your SCOM server. From there, mount the SQL Server ISO or extract it and run the setup.exe. Since we have already installed SQL, I will not repeat each/every step here, since the screens are identical. Just walk through the SQL installation process as if you were installing a new instance of SQL. The screens that you need to take note of are, first, the Installation Type. Instead of selecting ‘Perform a new installation of SQL Server’, choose ‘Add features to an existing instance of SQL Server’. Then click Next. You should next be on the Features Selection screen. On here, select the ‘Analysis Services’ feature, and then click Next. Continue clicking Next until you reach the ‘Analysis Services Configuration’ screen. On this screen, add the applicable user(s)/security group(s) for administrative access to Analysis Services. Identical to how I have setup SQL Server, I have added a Security Group to control access. Make the applicable configuration for your environment, and then click Next. IMPORTANT: The previous screen to this one (Server Configuration) is where we (in a normal SQL installation) would change the Collation (see my guide on SQL Installation). I have be unsuccessful in finding any official documentation from Microsoft about the proper Collation for SSAS, especially since SSAS does not have SQL Collation like the SQL Database and Reporting features does. Therefore, for my lab example, I have accepted the default SSAS Collation. Additionally, I have likewise been unable to find any official documentation from Microsoft about the proper Server Mode configuration for Analysis Servers in reference to SCVMM. Therefore, again, I am accepting the default Server Mode of ‘Multidimensional and Data Mining Mode’. Continue to click Next until you reach the Install screen, and then click Install. SQL Analysis Services AMO Install To avoid an error when attempting to enable SSAS in SCVMM, you must install the Analysis Management Objects for SQL on the SCVMM Management Server. In our lab example, we are using SQL Server 2012. Therefore, to obtain the AMO elements, we need to download and install the Microsoft SQL Server 2012 Feature Pack. You can find the SQL Feature Pack (specifically SQL 2012) here: http://www.microsoft.com/en-us/download/details.aspx?id=29065. Download the file to your SCVMM Management Sever. Now, start the installation by running the SQL_AS_AMO.msi file and click Run. On the Welcome screen click Next. Read and accept the License Agreement, and then click Next. Now all you have to do is click Install. Once the installation is complete, click Finish. We now have the SQL Analysis Management Objects installed, and can proceed with enabling the use of SSAS in SCVMM. NOTE: You may have to restart your SCVMM server after installing this, not because the installation prompts you to, but for everything to initialize properly. Enable Forecasting Analysis After you have SSAS installed, you can now enable SCVMM to use SSAS and forecasting analysis reports. Log into your SCVMM server, and launch the console. From there, navigate to Settings > System Center Settings > Operations Manager Server. Either right-click and choose Properties, choose Properties from the ribbon menu, or just double click on setting option. Since we already performed the integration steps between SCOM and SCVMM, you should see the Connection Status on the Details screen as “OK”. Click on the ‘SQL Server Analysis Services’ label. On this screen, check the ‘Enable SSAS’ checkbox. You will then be able to provide the SSAS server name and instance, along with the port, and account to use. In our lab example since we installed all elements on the SCOM server, our SSAS server name is ‘SCOM.SC.LAB’ and my instance name is ‘SCOMSQL’. Make the applicable entries for your environment, and then click OK. Notice that when you click OK, you may encounter the following message. It indicates that the SCVMM server needs to have the SQL Server Analysis Management Objects installed. Press OK if you encounter this error, and following the steps detailed in the ‘SQL Analysis Services AMO Install’ section of this document. IMPORTANT: Through extensive research, it appears that even if you have SQL Server 2012 installed, along with SQL 2012 Reporting, that you cannot in fact use the SQL 2012 Analysis Services Analysis Management Objects. This is currently applicable with version SCVMM 2012 SP1 UR2. It has been determined that you MUST use SQL 2008 R2 Analysis Management Objects. It is unknown if this will be corrected in a future SCVMM update. NOTE: I cannot take credit for this discovery/solution. Here is the reference page that led me to this conclusion: http://blogs.catapultsystems.com/lrayl/archive/2013/05/20/configuring-the-system-center-2012-sp1-vmm-sql-analysis-services-integration-with-operations-manager.aspx. So at this point, you need to repeat the steps for installing SQL Analysis Services AMO, but with version/feature pack SQL Server AMO for SQL 2008 R2; here is the link: http://www.microsoft.com/en-us/download/details.aspx?id=16978. Once you install SQL Server AMO for SQL 2008 R2, then repeat the steps already detailed for Enable Forecasting Analysis. Once you enable SSAS and enter the applicable information and click OK, if everything else is setup correctly the Operations Manager Settings dialog will automatically close. You can re-open it and confirm that SSAS is enabled. And that’s it. You now have SSAS enabled in SCVMM. The reports already exist in SCOM but now the Forecasting Reports can use the collected information to project data into the future. That completes the Installation Guides for SCVMM. The next part of the series will cover Configuration.
- 9 replies
-
- SCVMM
- Virtual Machine Manager
- (and 8 more)
-
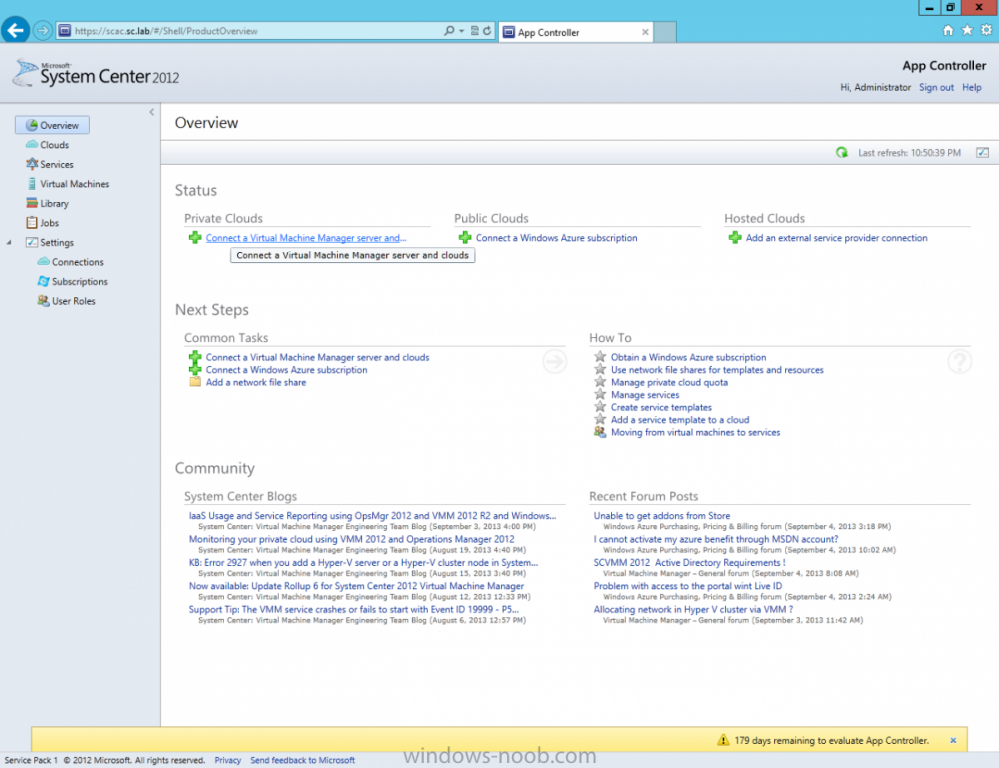
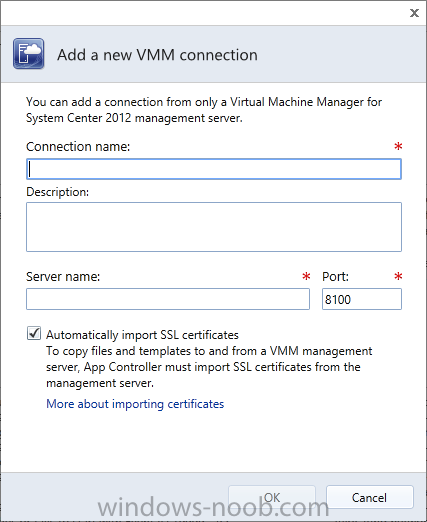
Connect App Controller to A VMM Management ServerOn the App Controller server, open a browser and navigate to the app controller site (in this lab example my site URL is https://SCSM.SC.LAB). Click on the ‘Connect a Virtual Machine Manager server and…’ link. In the Connect dialog box, enter a name for this connection. This name is displayed in the Name column of Clouds page. Add an optional description in the Description text box. In the Server name text box, enter the fully qualified domain name (FQDN) of the VMM management server. In the Port field, enter a port number that matches the port used by the VMM management server (default: 8100). Check Automatically import SSL certificates if you plan to copy files and templates to and from VMM cloud libraries. NOTE: SSL certificates must be imported to the App Controller server in order to copy files or templates to and from VMM cloud libraries. In order for the import to succeed, users need to be part of all of the following roles: the local administrator of the App Controller server, local administrator of the VMM server, and VMM administrator. Click OK to create the connection. You may then be asked to select which VMM user role to use from the new VMM server connection for the current session. NOTE: You may encounter the following error. See the following TechNet thread: http://social.technet.microsoft.com/Forums/en-US/047ba638-81de-4870-a3fd-6f2390633685/app-controller-2012-sp1-rtm-connection-failed-with-virtual-machine-manager-2012-sp1-rtm. Excerpt: “If System Center App Controller and the VMM Server are installed on separate servers, single sign-on does not work when App Controller is used. So, in UR1 for SC 2012 issue was fixed, but in SP1 present again. Solution is to disable SSO and use Basic Authentication or install App Controller on VMM server, but be aware 443 port VMM used for BITS.”
-
- SCAC
- App Controller
-
(and 4 more)
Tagged with:
-
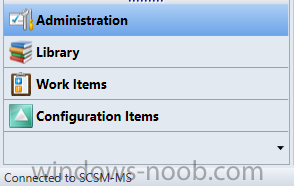
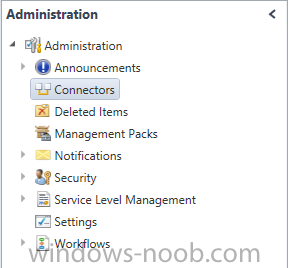
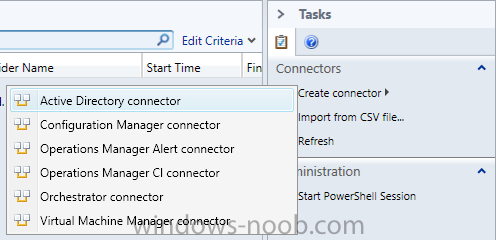
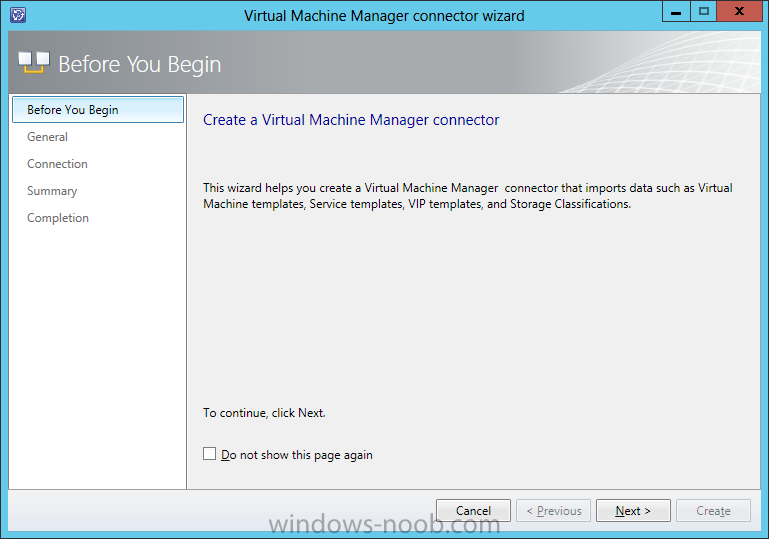
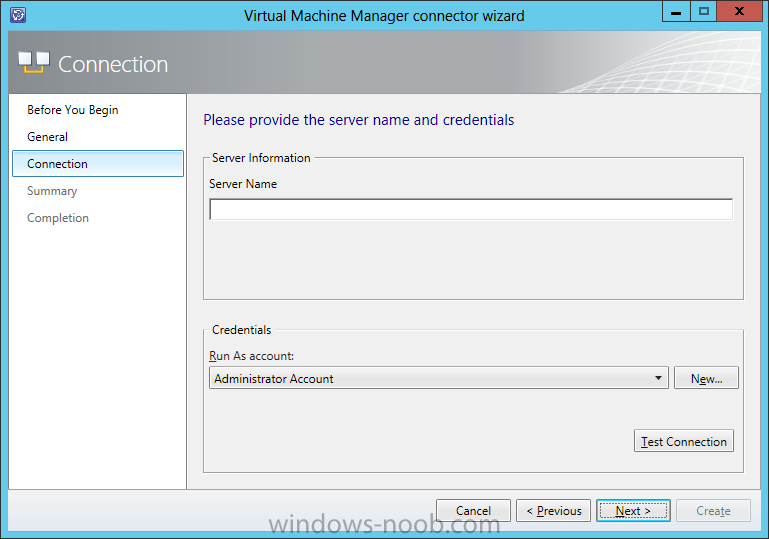
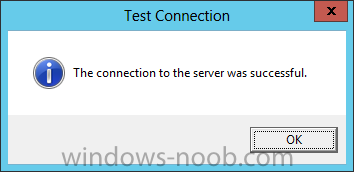
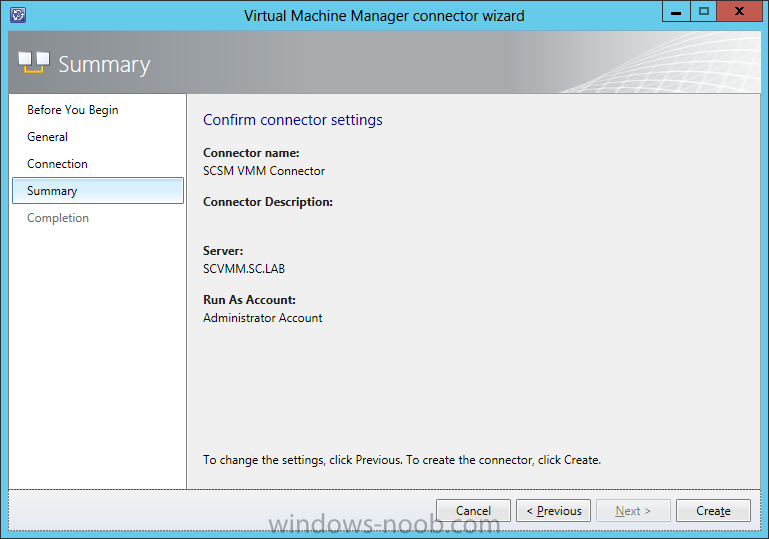
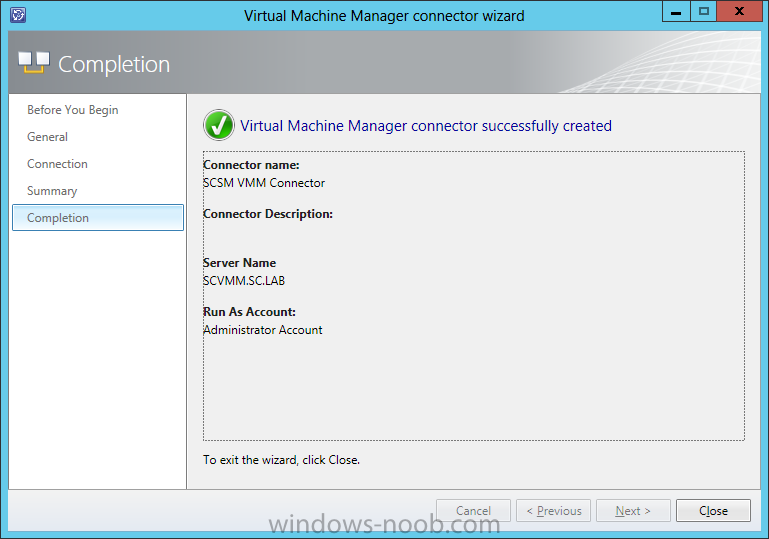
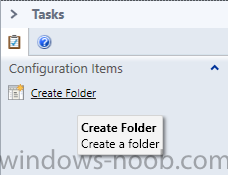
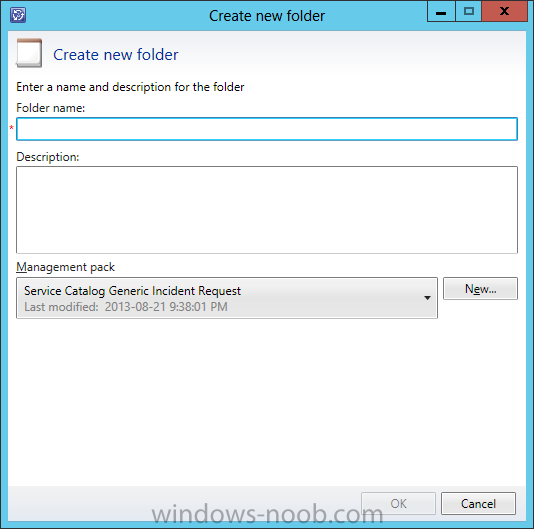
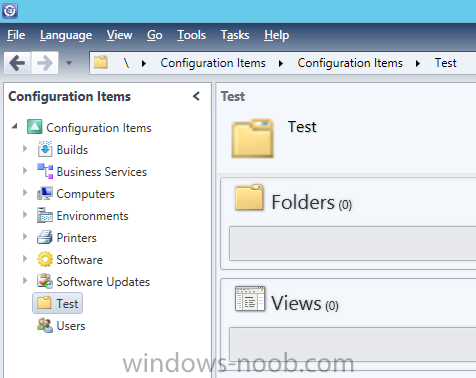
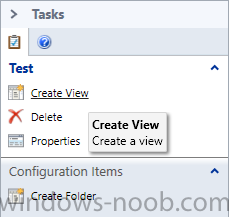
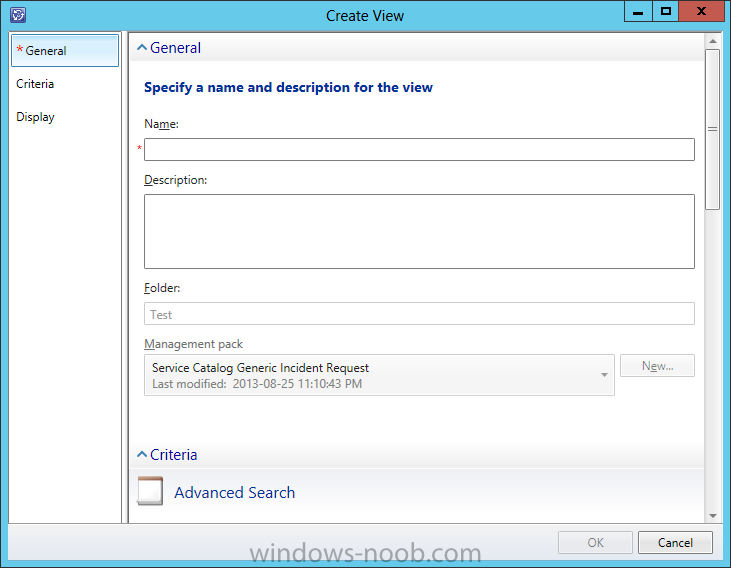
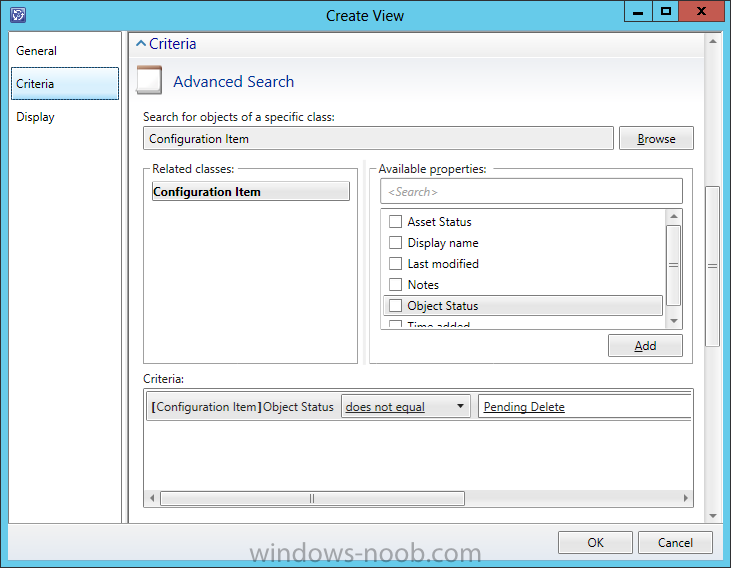
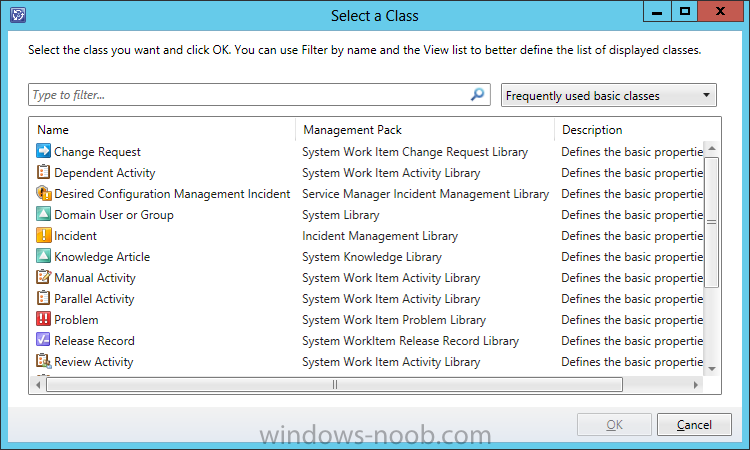
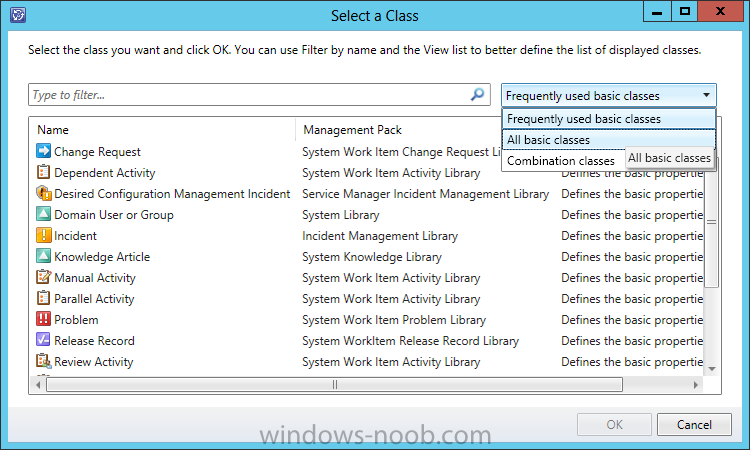
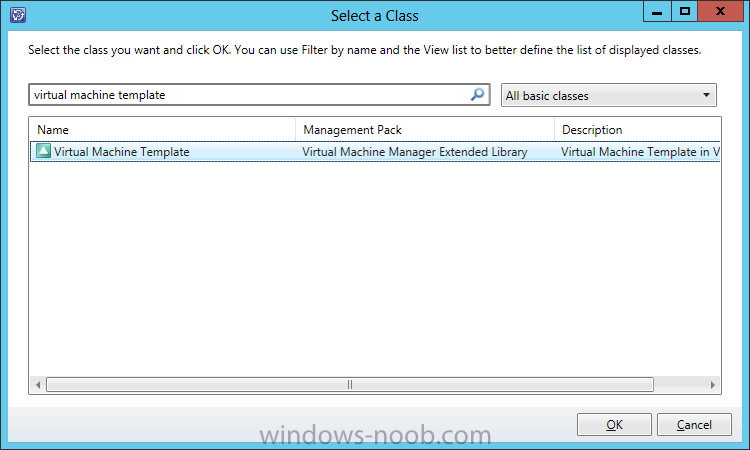
To create a System Center Virtual Machine Manager connectorIn the Service Manager console, click Administration. In the Administration pane, expand Administration, and then click Connectors. In the Tasks pane, under Connectors, click Create Connector, and then click Virtual Machine Manager connector. Complete these steps to complete the Virtual Machine Manager Connector Wizard: On the Before You Begin page, click Next. On the General page, in the Name box, type a name for the new connector. Make sure that Enable this connector is selected, and then click Next. On the Connection page, in the Server Information area, type the same of the computer hosting Virtual Machine Manager (VMM). On the Connection page, in the Credentials area, either select an existing account or click New, and then do the following: In the Run As Account dialog box, in the Display name box, type a name for the Run As account. In the Account list, select Windows Account. Enter the credentials for an account that has rights to connect VMM, and then click OK. On the Connection page, click Test Connection. In the Test Connection dialog box, make sure that The connection to the server was successful appears, and then click OK. On the Connection page, click Next. On the Summary page, make sure that the settings are correct, and then click Create. On the Completion page, make sure that you receive a “Virtual Machine Manager connector successfully created” message, and then click Close. To validate the creation of a System Center Virtual Machine Manager connectorIn the Connectors pane, locate the System Center Virtual Machine Manager connector that you created. Review the Status column for a status of Running. NOTE: Allow sufficient time for the import process to finish if you are importing a large number of virtual machines or clouds. In the Service Manager console, click Configuration Items. In the Tasks pane, click Create Folder. In the Create New Folder Wizard, do the following: In the Folder name box, type a name for the folder. For example, type Test. In the Management pack area, make sure that an unsealed management pack of your choice is selected, and then click OK. For example, select Service Catalog Generic Incident Request. In the Configuration Items pane, click the folder you just created. For example, click Test. In the Tasks pane, click Create View. In the Create View Wizard, do the following: On the General page, in the Name area, type a name for this view. For example, type VMMTemplates. In the Management pack area, make sure that an unsealed management pack of your choice is selected. For example, select Service Catalog Generic Incident Request. In the navigation pane of the wizard, click Criteria. In the Advanced Search area, click Browse. In the drop-down list (located to the right of the Type to filter box), select All basic classes. In the Type to filter box, type virtual machine template, click Virtual Machine Template, click OK, and then click OK to save and close the form. In the Configuration Items pane, expand the folder you created, and then click the view you created. For example, expand Test, and then click VMMTemplates In the VMMTemplates pane, you will see the Virtual Machine Manager templates that have been created.
-
- Service Manager
- System Center 2012
- (and 4 more)
-
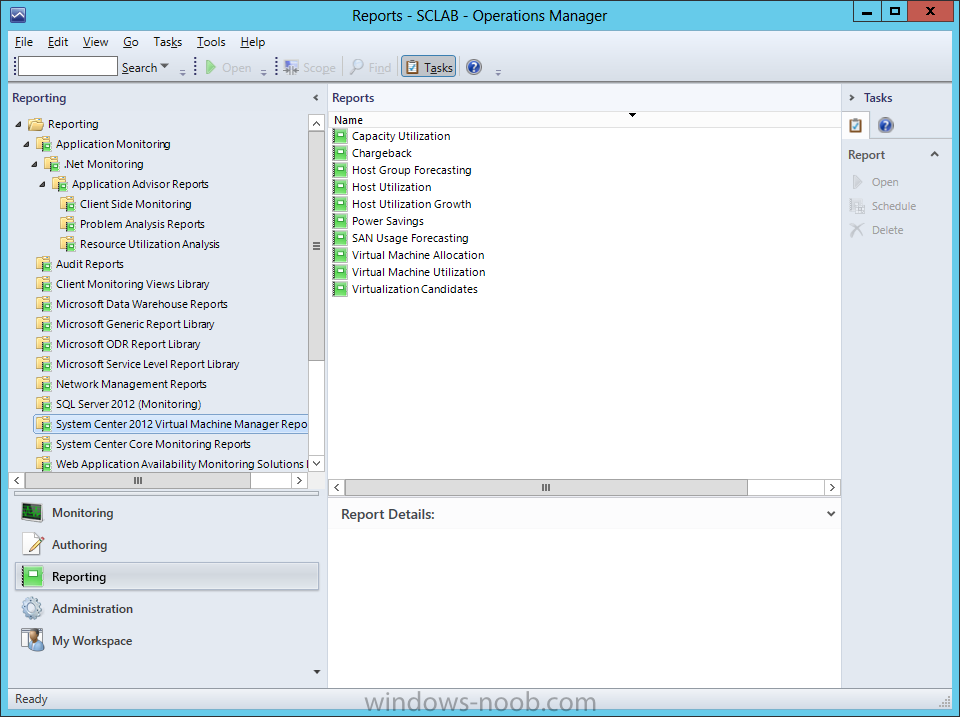
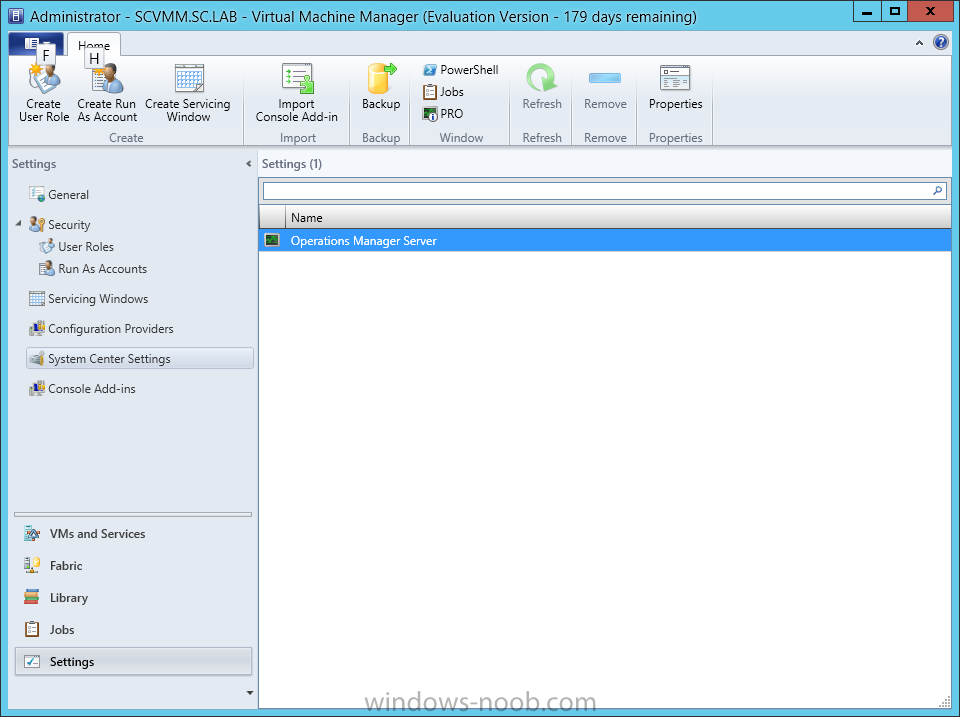
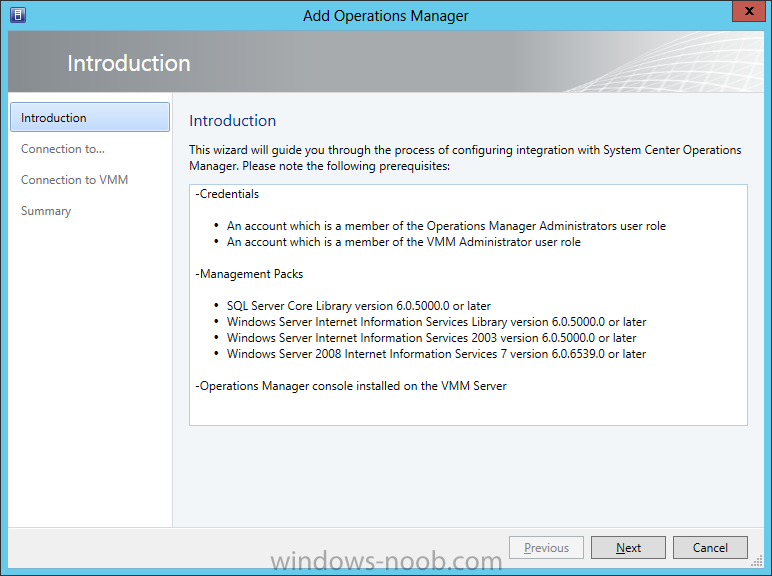
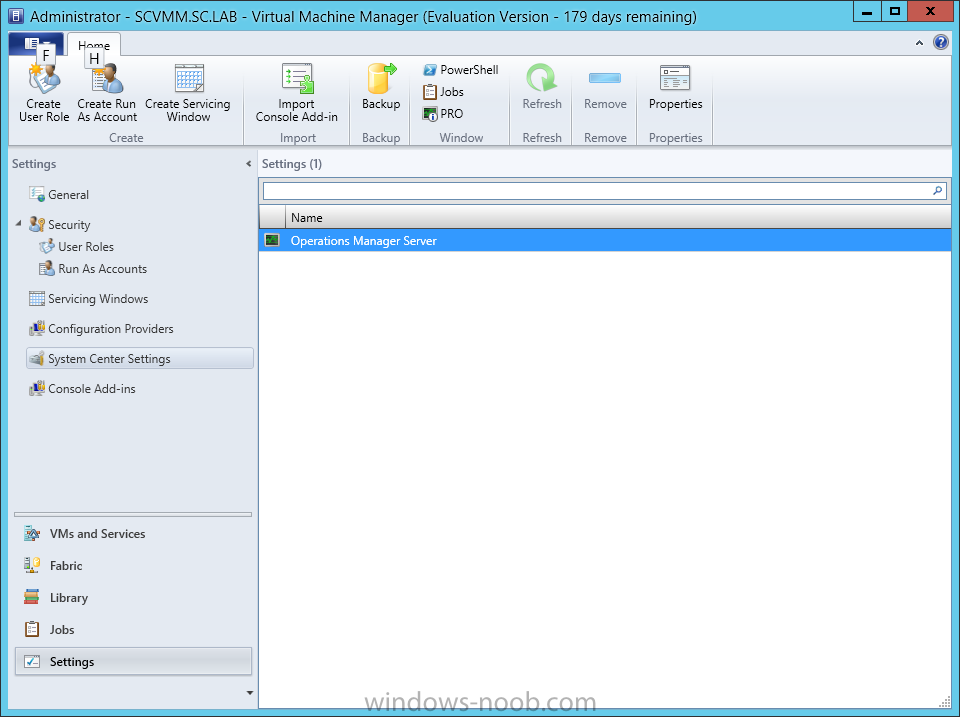
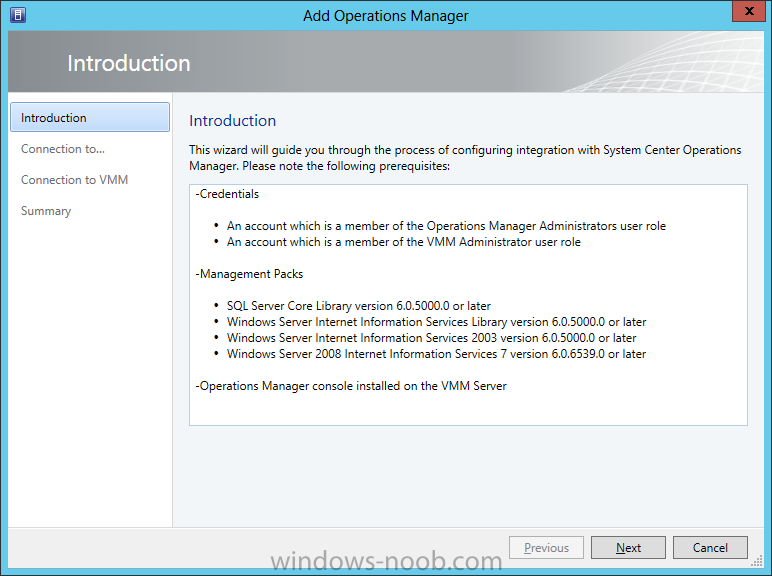
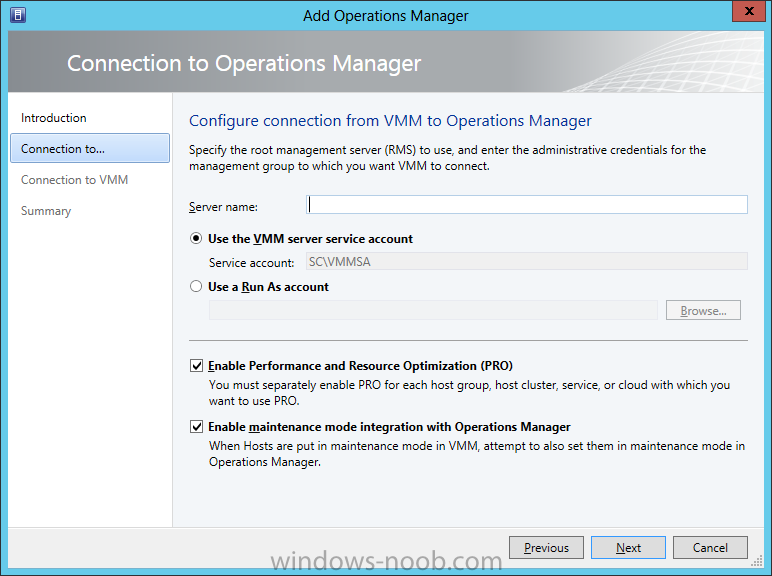
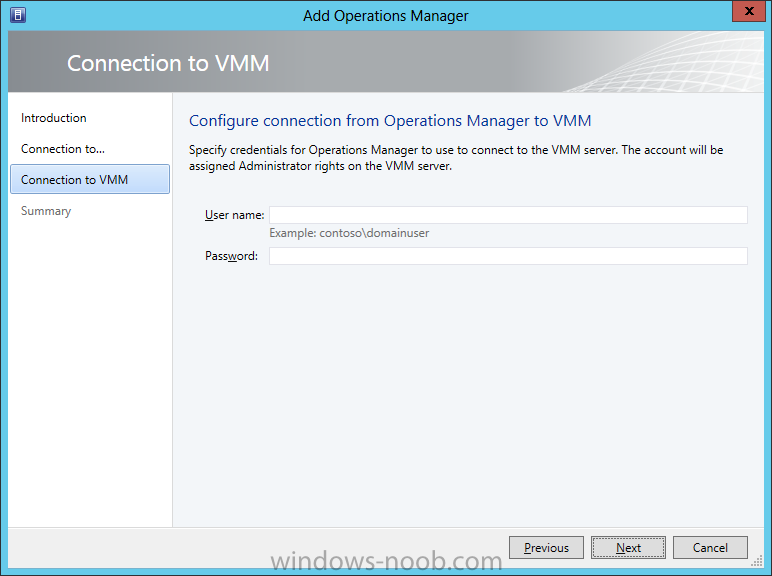
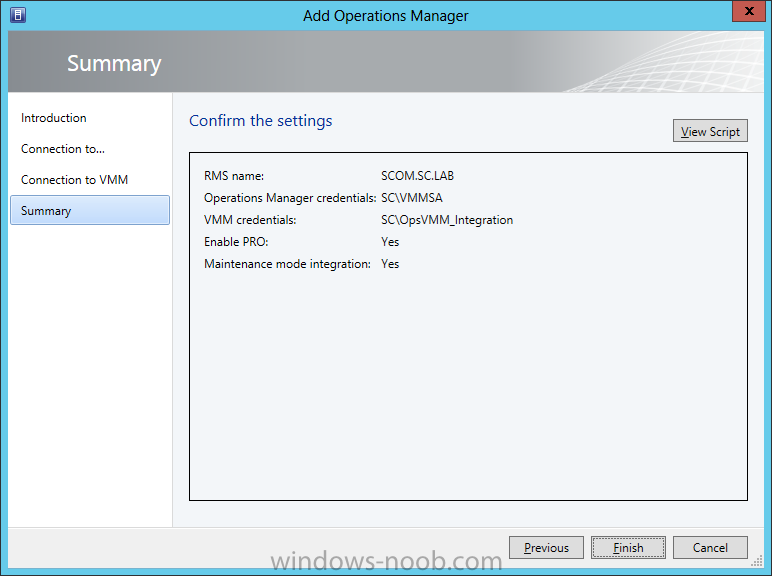
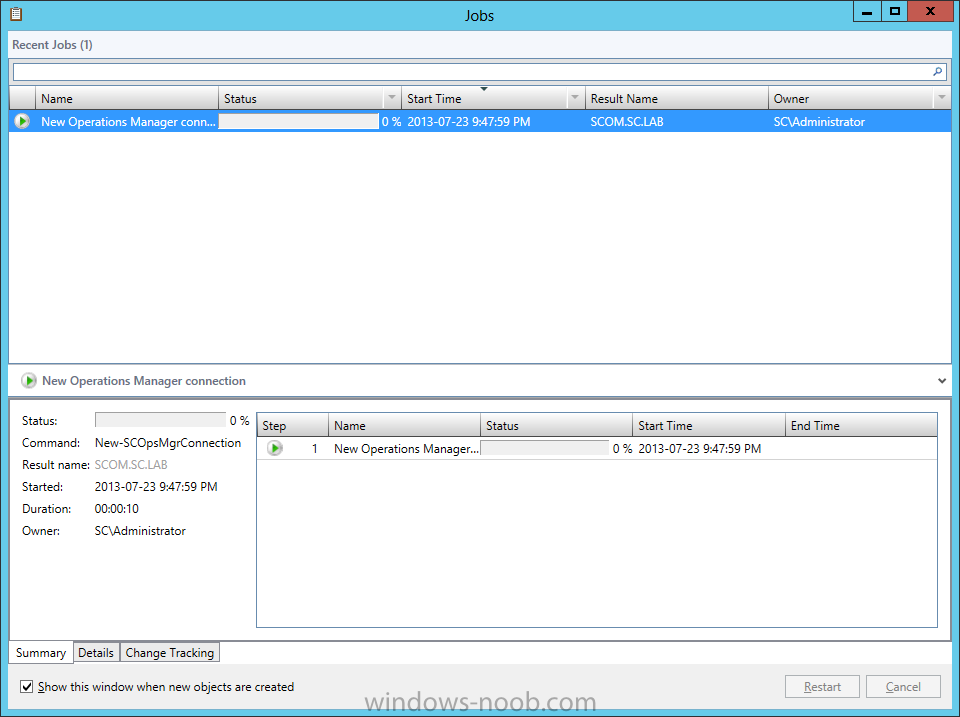
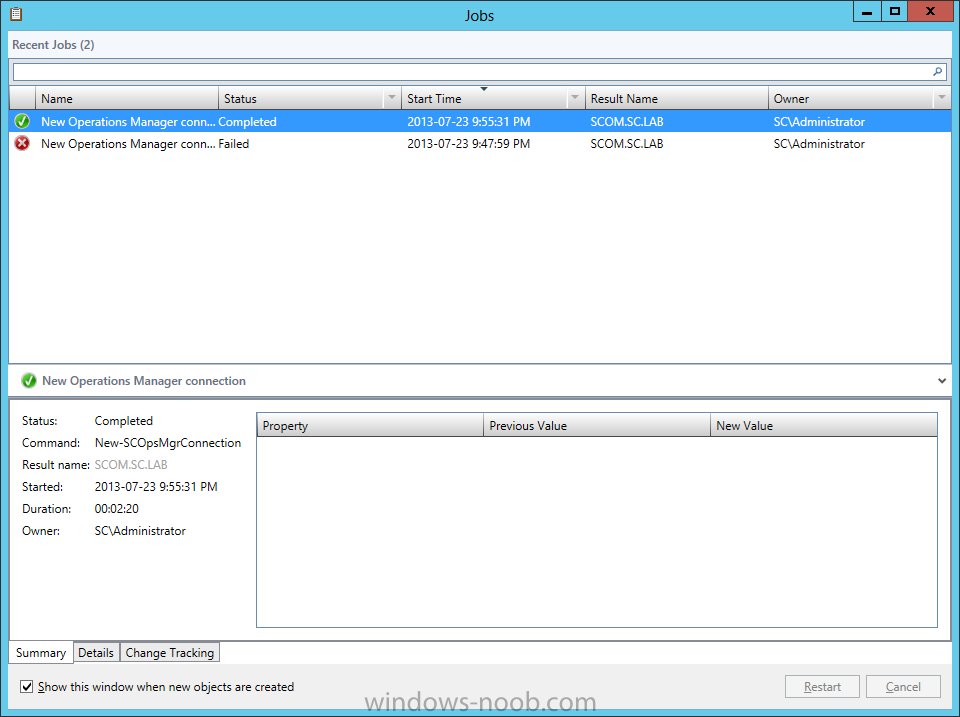
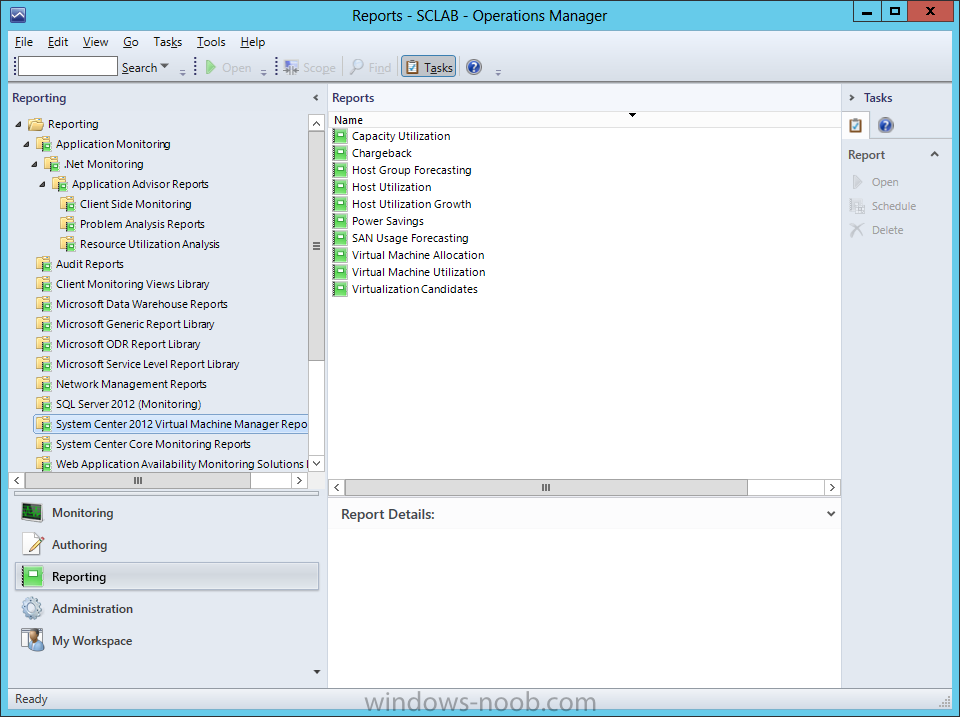
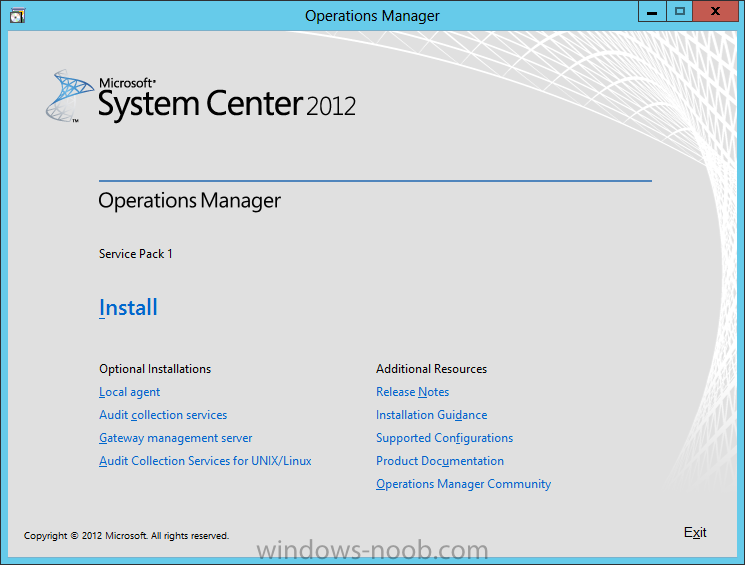
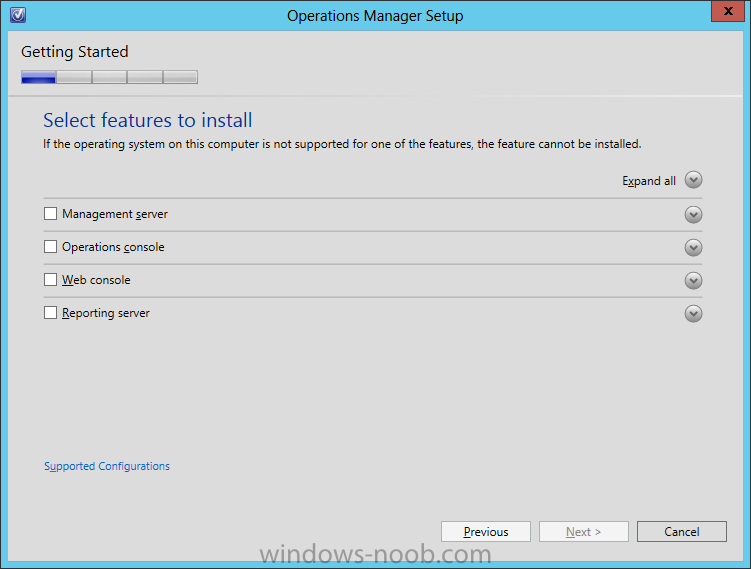
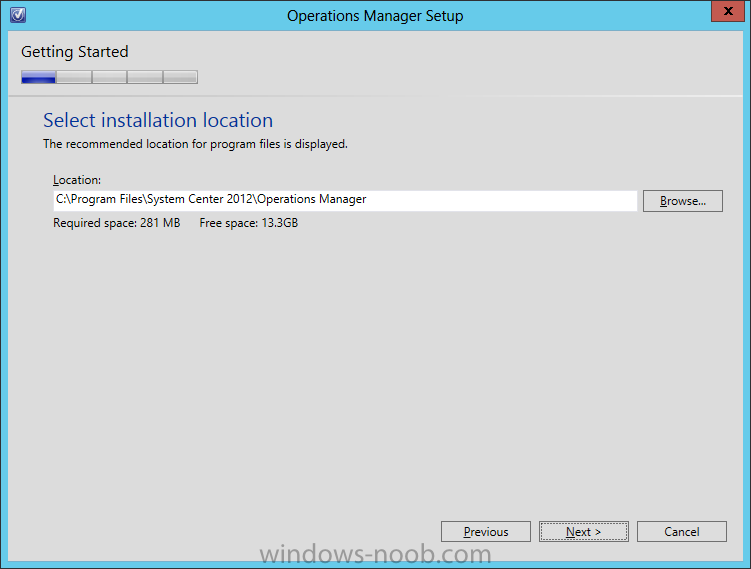
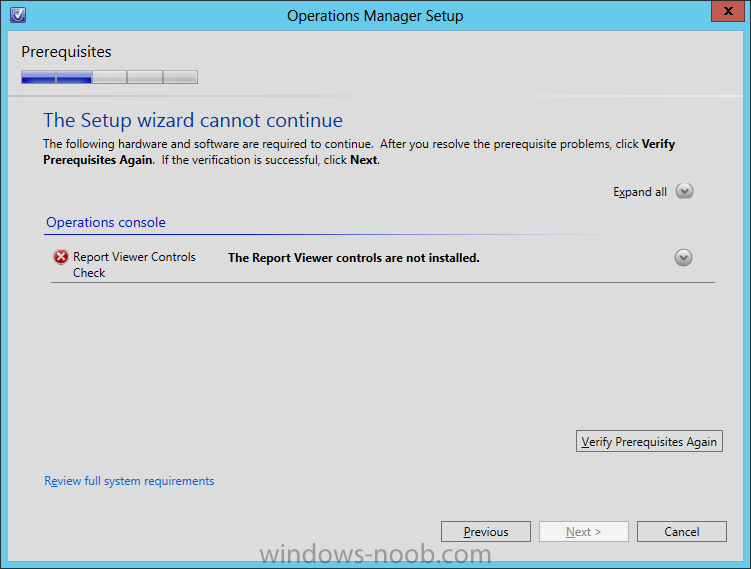
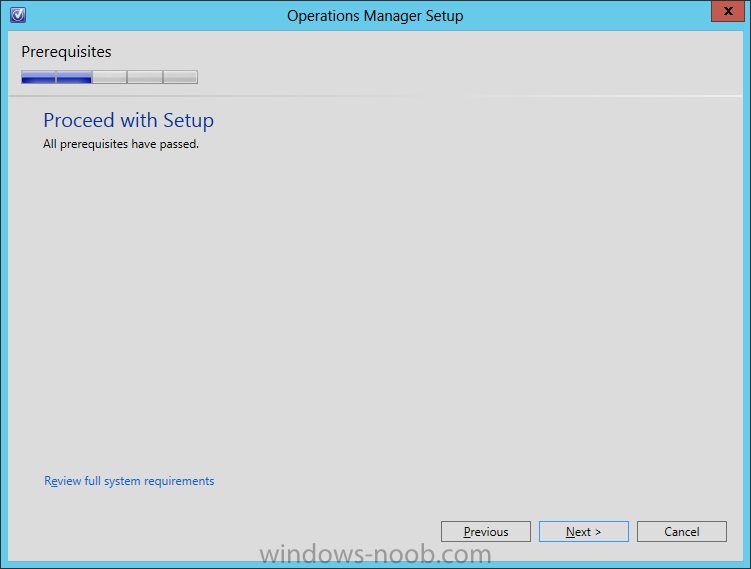
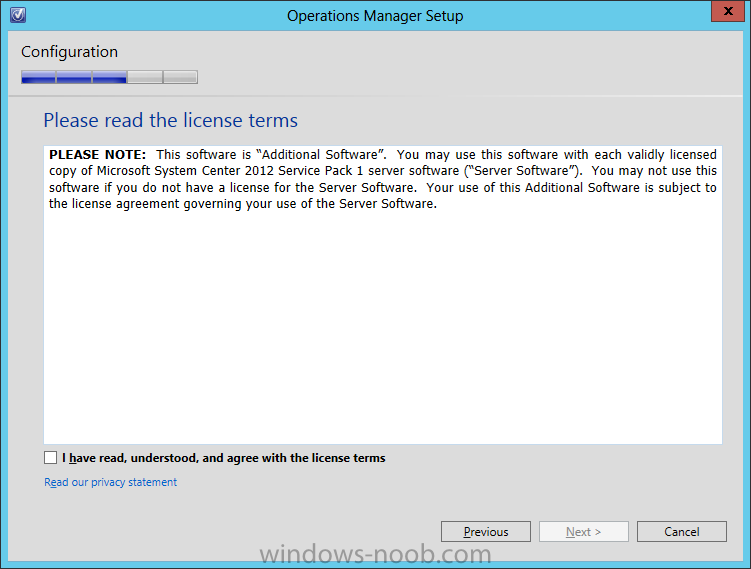
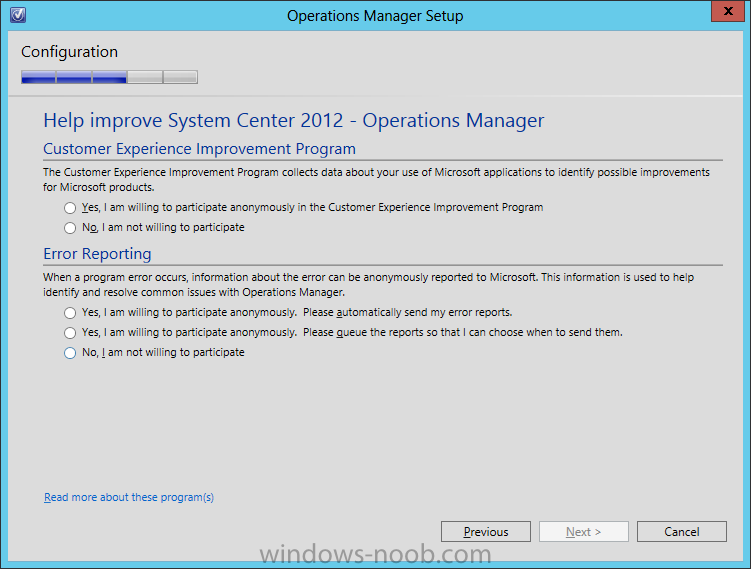
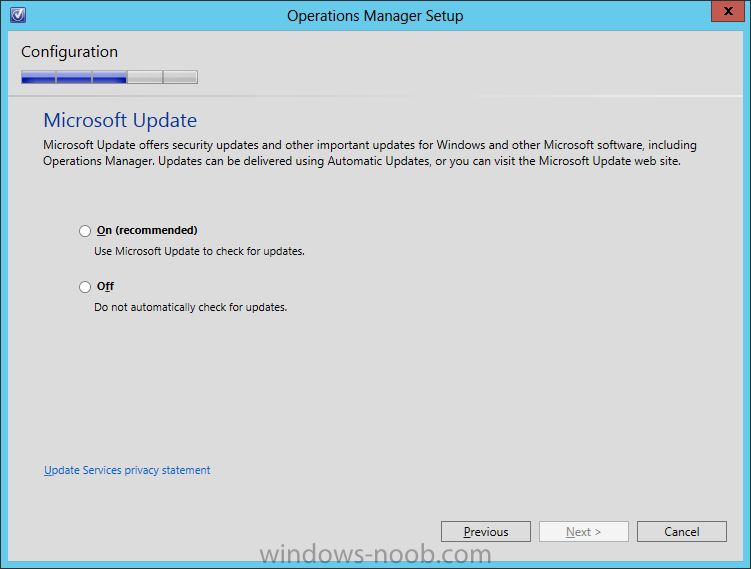
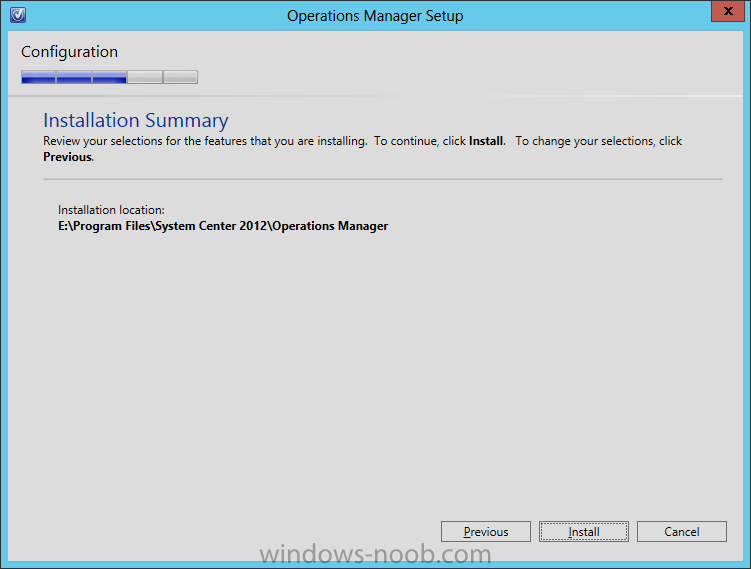
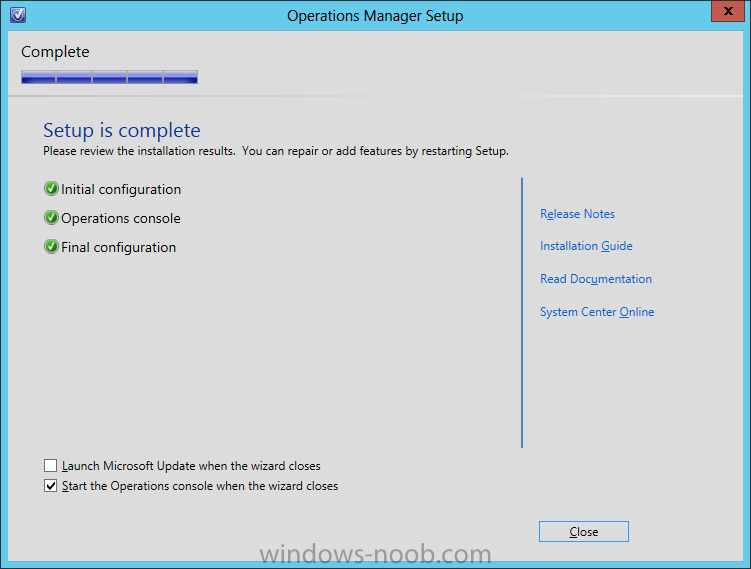
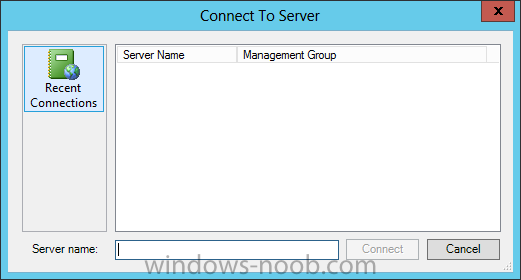
In our last post we installed SCVMM, now we need to install Reporting. Now that we have SCVMM installed, we want to be able to report on the utilization and capacity of our hosts and VMs. The only requirement for SCVMM reporting, isn’t SCVMM at all, but rather System Center Operations Manager (SCOM)! Huh? Why do you need to install a different System Center product just to have reporting for SCVMM. Well, according to Microsoft: “We did this for one big reason; to leverage the rich capabilities of object pickers available in the OpsMgr reporting infrastructure.” That, and “you need to establish the connection to Operations Manager since now in VMM we make our reports available exclusively from within the OpsMgr console.” So, if you don’t have SCOM setup yet (and don’t forget to include SCOM Reporting as well), then see my other SCOM Guides. SCOM Integration To start, open the SCVMM console and navigate to the Settings area. From there navigate to the ‘System Center Settings’ section. You should see only one setting option, labelled ‘Operations Manager Server’. Either right-click and choose Properties, choose Properties from the ribbon menu, or just double click on setting option. On the Introduction screen, read the important information presented. You will notice that we need a few accounts, and SCOM itself needs specific Management Packs installed, as well as having the SCOM console installed on the SCVMM server. Let’s start on satisfying these requirements. So for now, click Cancel. In my lab environment, in my domain/Active Directory, I have 2 Security Groups I created for System Center Administrators (namely ‘SCOM Admins’ and ‘SCVMM Admins’). So, for this integration element, I am going to create a new AD account and add it to both admin groups. I am not going to detail how to create AD accounts or Security Groups, but if detailed steps are needed, please let me know and I will add them. For guided steps on how to install/import Management Packs in SCOM, please see my applicable Configuration Guide. Install SCOM Console So, at this point I will assume that you have SCOM setup, an account that is an Administrator in both System Center tools, and the applicable Management Packs imported into SCOM. Let’s install the SCOM console. Start by mounting/extracting the SCOM ISO you used for installing SCOM, and run the setup.exe. On the Features screen, only select ‘Operations Console’ and click Next. Now specify the location you want to install the console, and click Next. The installer will run a prerequisite check to ensure there are no issues. In this example, for the SCOM console you need to install the Report Viewer Controls first (a link is provided). Correct any prerequisite issues, and then click ‘Verify Prerequisites Again’. If all prerequisites are installed, then you will be able to proceed with the setup. Click Next. Read the License Terms, check the ‘I have read, understood, and agree with the license terms’ checkbox, and click Next. Decide if you want to join the CEIP program, and then click Next. New to System Center 2012, you can choose to include this product as part of the Microsoft Updates check. Make your selection and then click Next. Review the information on the Summary page, and then click Install. The installation should be quick, since it is just the console. You can choose to de-select the ‘Start the Operations Console when the wizard closes’. I would suggest leaving this as-is, since we need the SCOM console to establish its connection with the SCOM server in order for the integration to work. When the console launches for the first time, you will be prompted for the SCOM Management Server. Enter a server name and then click Connect. Now that the SCOM console is installed and connected to the SCOM system, SCVMM will be able to utilize this for the integration communications. Now let’s return to the SCOM integration steps. SCOM Integration (Continued) Now that we have the SCOM console installed (and all other SCOM-related elements completed), we can continue with the integration so that SCVMM Reporting will be available. Go back to the SCVMM console and navigate to the Settings area. From there navigate to the ‘System Center Settings’ section. You should see only one setting option, labelled ‘Operations Manager Server’. Either right-click and choose Properties, choose Properties from the ribbon menu, or just double click on setting option. On the Introduction screen, read the important information presented. At this point I will assume that all prerequisites have been met. Click Next. You now have to provide the SCOM server name to connect to, along with an account that will have Administrator access in SCOM. You will also notice that you have 2 additional options to choose; Enabling PRO, and Maintenance Mode Integration. These are checked off by default. Decide what is applicable for your environment and click Next. In my lab example, I will accept the defaults. Now you need to provide an account that will allow SCOM to connect to VMM. Provide the username (along with domain) and password, and click Next. [ Review the information on the Summary page, and then click Finish. A Job dialog will appear, and show the progress of the task at hand. Once this completes successfully, you will have to manually close the Jobs window. You have now successfully integrated SCVMM with SCOM for the purpose of Reporting. To verify that everything is as it should be, open the SCOM console that was installed on the SCVMM server. This will initiate the connection, and import the necessary Management Packs and Reports into the system. Navigate to the Reports space, and select the ‘System Center 2012 Virtual Machine Manager Reports’ folder. From there you should now see a list of reports available which utilizes information from SCVMM. We now have SCVMM Reporting installed. But, there is an additional reporting element; Forecasting Analysis.
- 1 reply
-
- SCVMM
- System Center 2012
- (and 4 more)
-
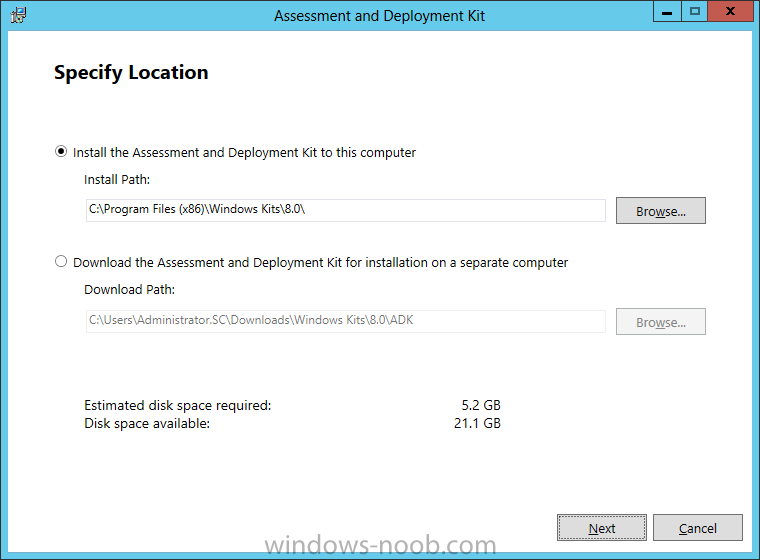
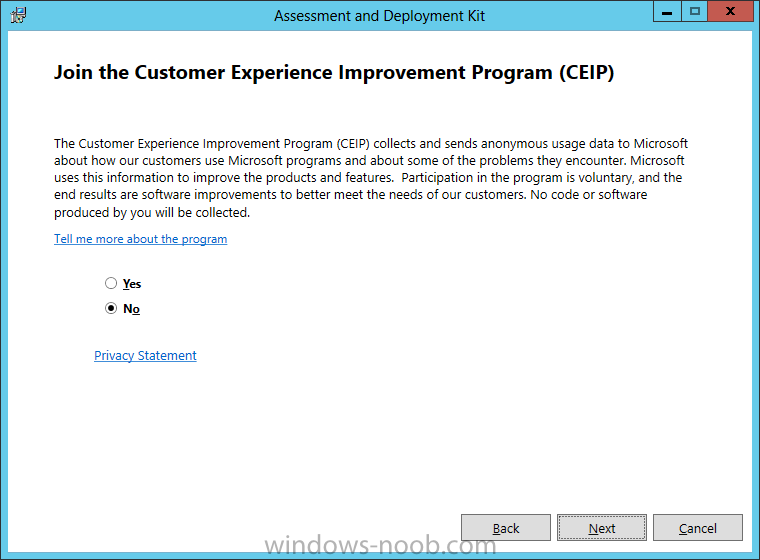
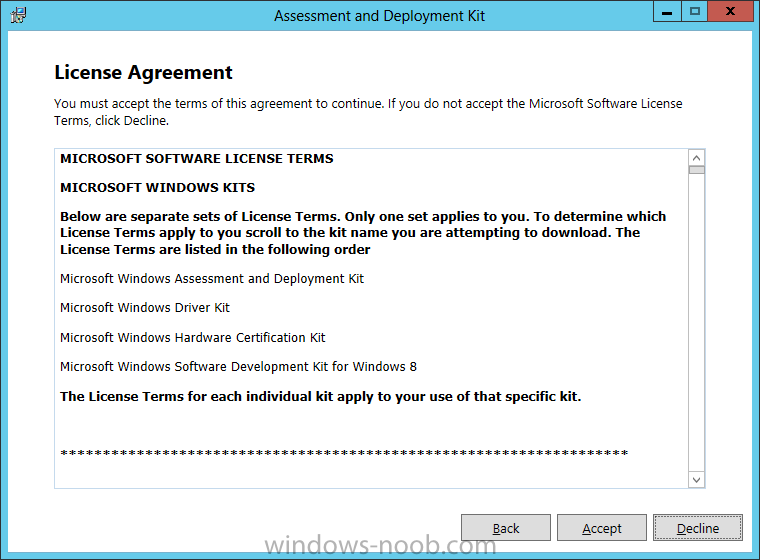
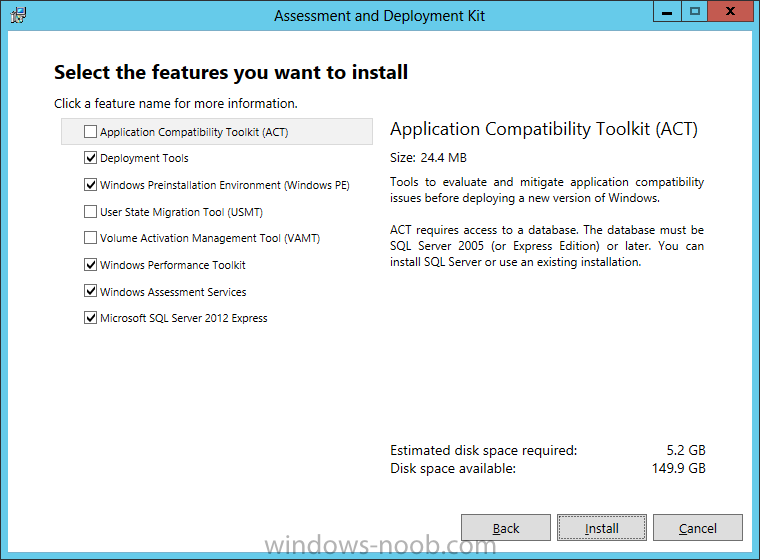
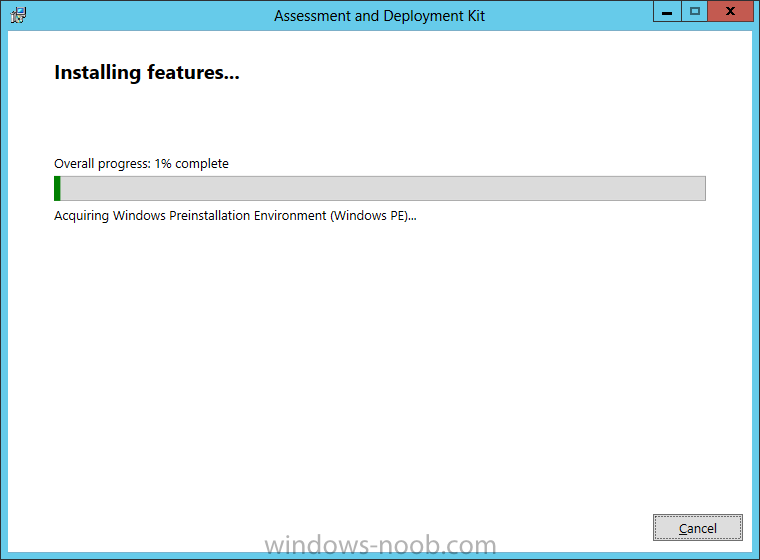
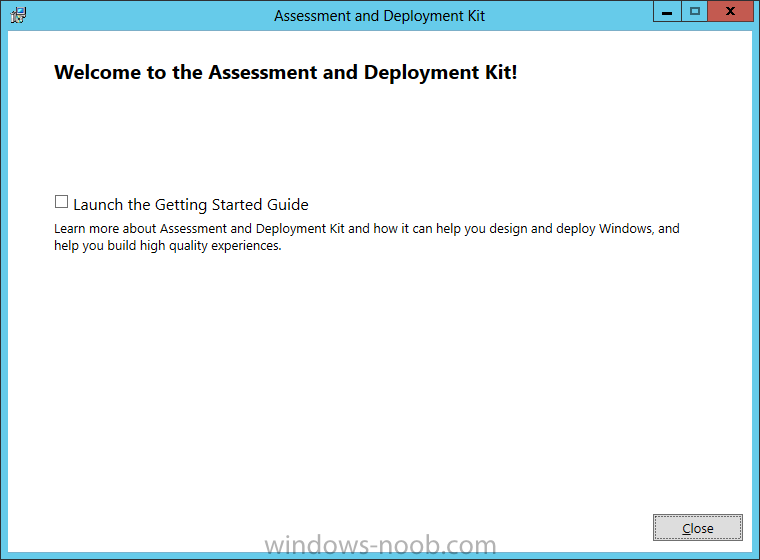
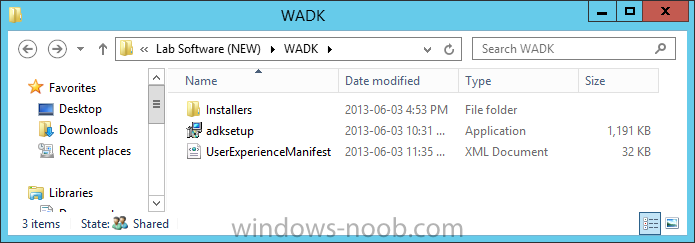
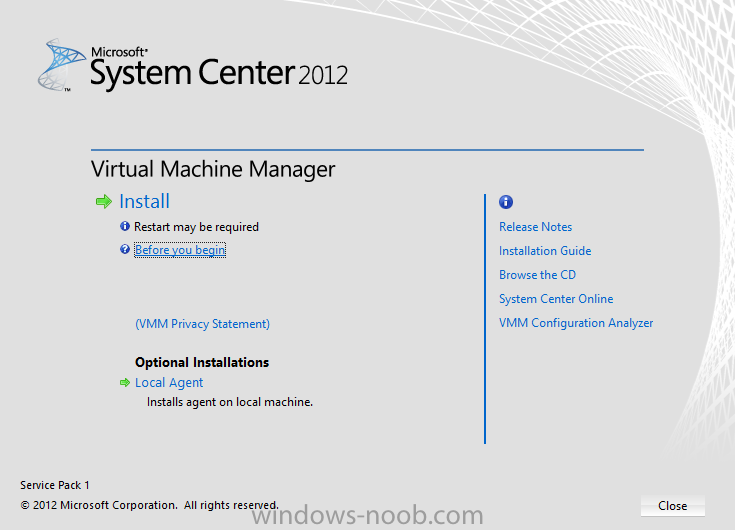
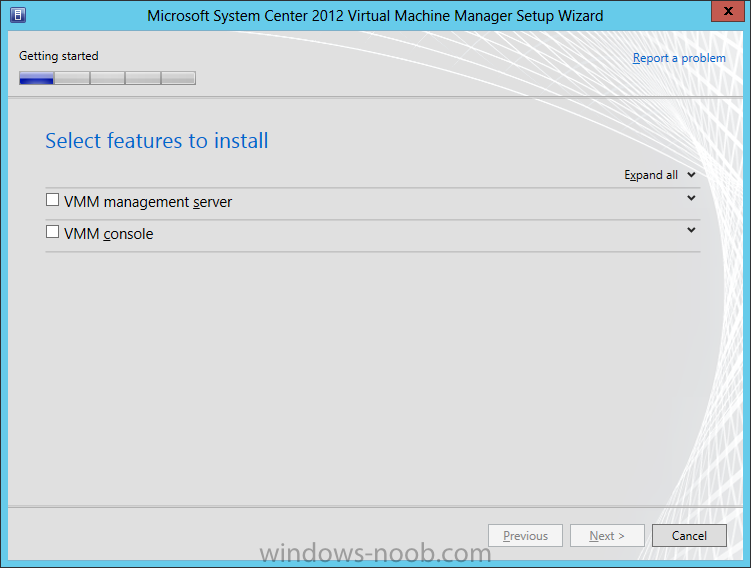
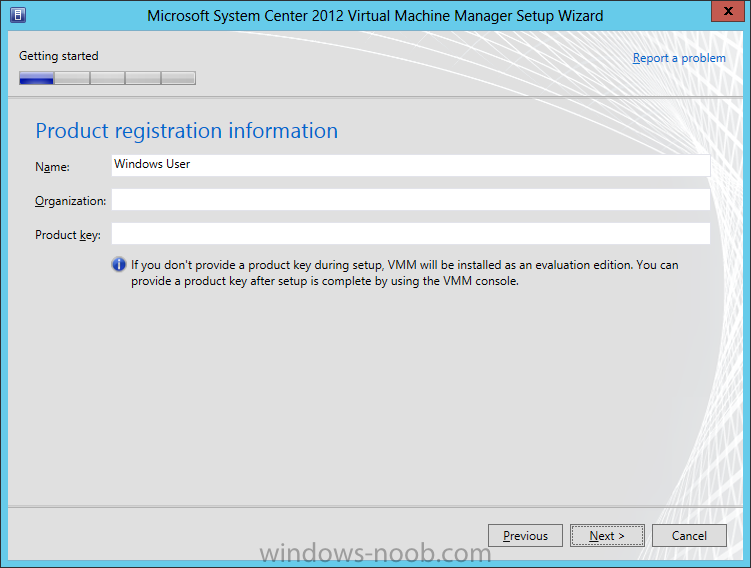
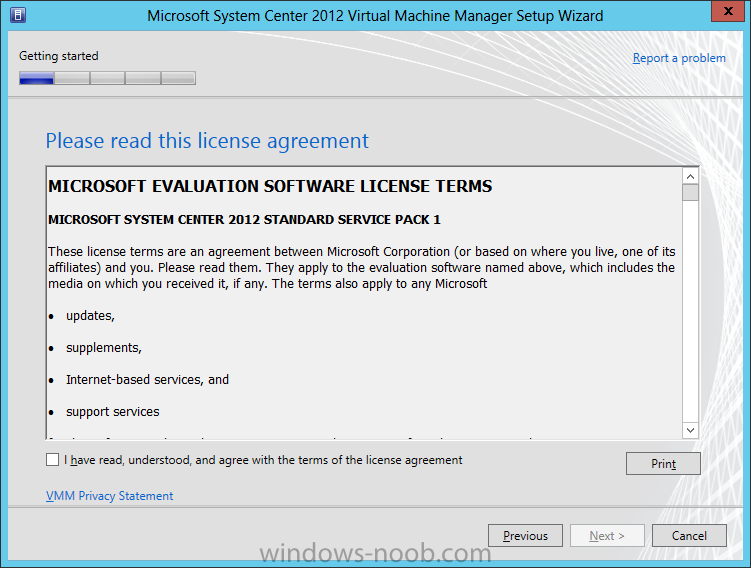
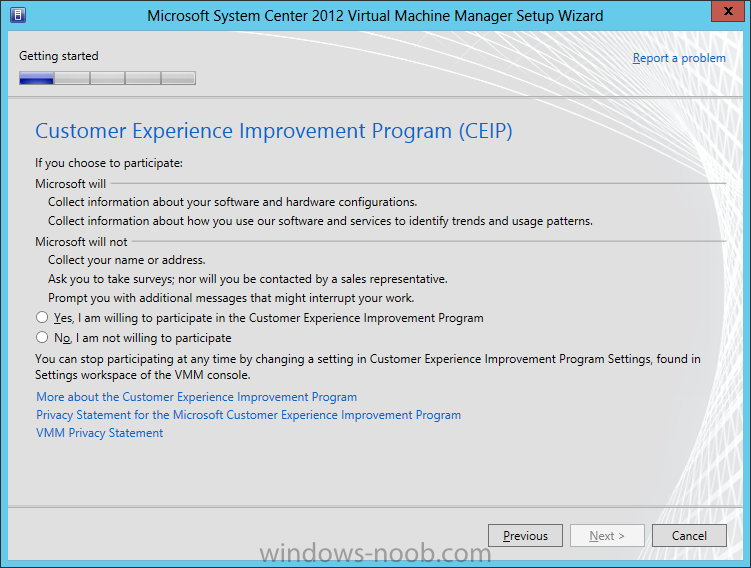
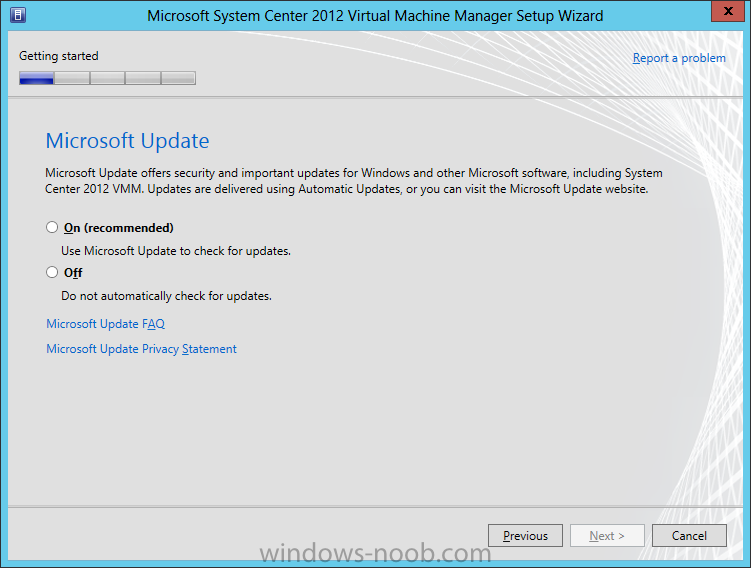
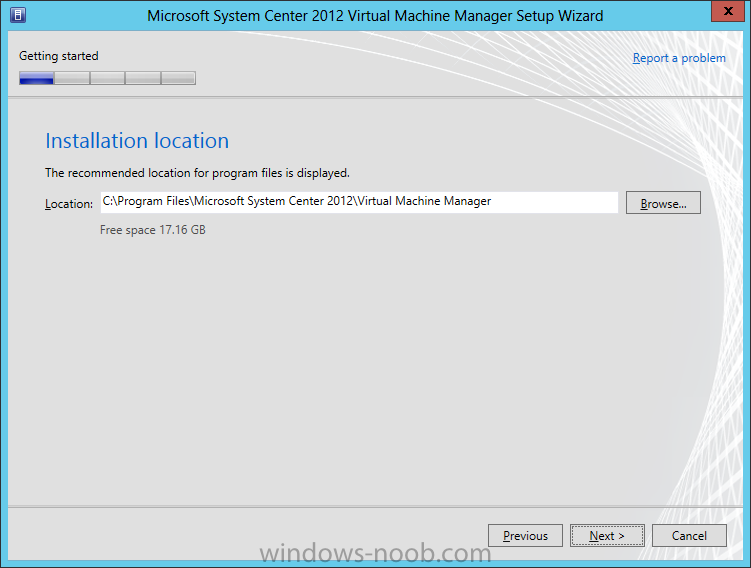
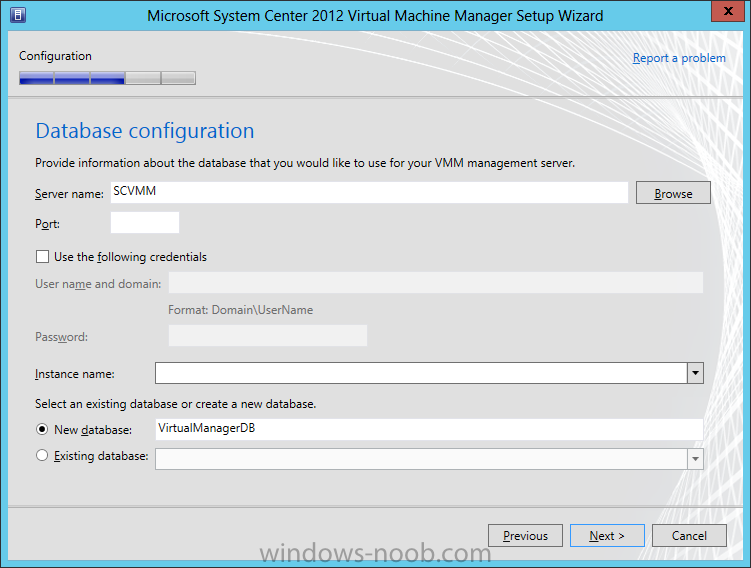
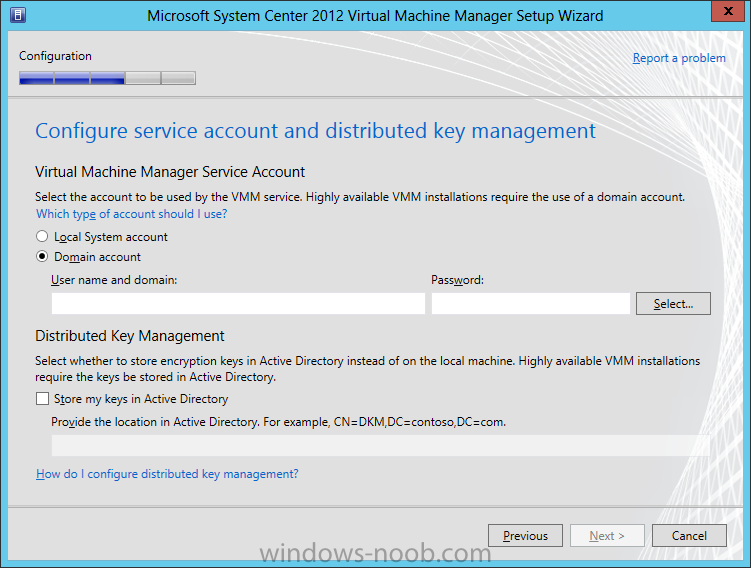
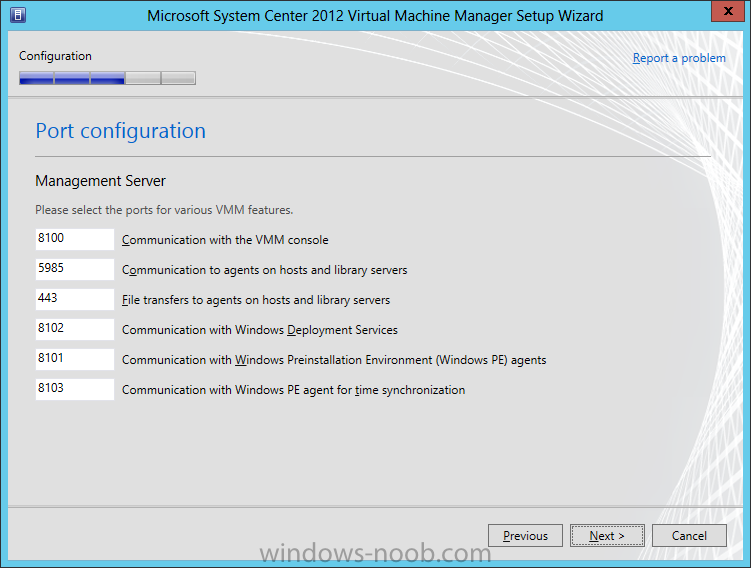
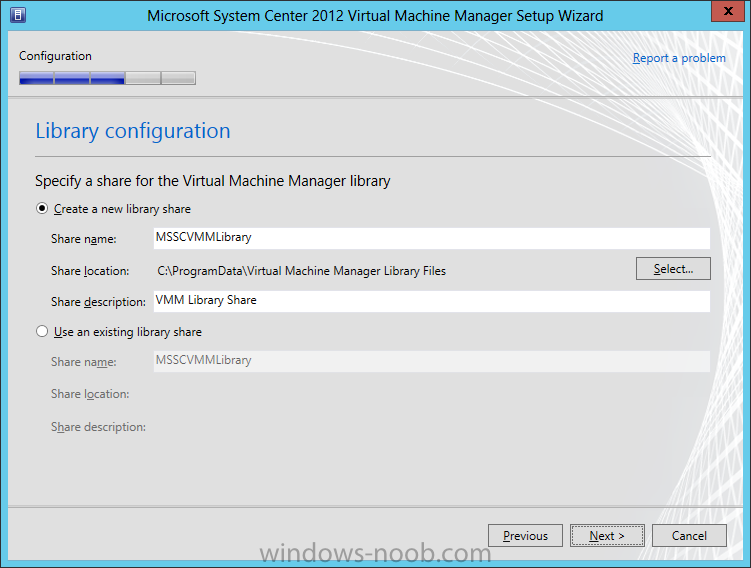
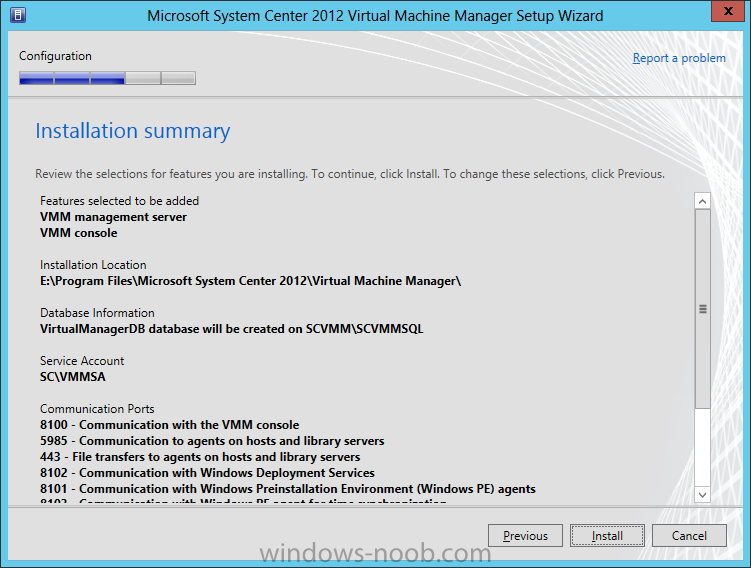
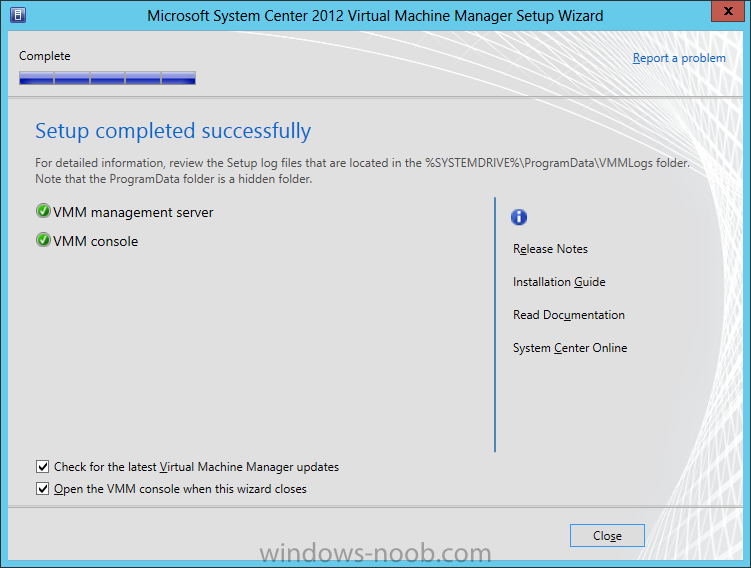
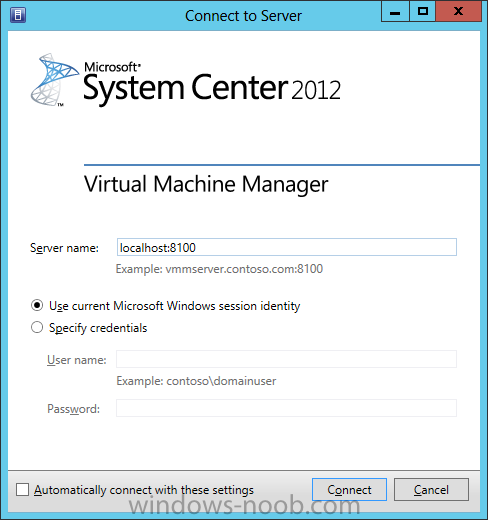
In our last post we finished installing SQL Server. We are now finally ready to install SCVMM. Install Prerequisites To start, before we will actually be able to install SCVMM, we have to install a few prerequisites. Windows Assessment and Deployment Kit for Windows 8Deployment Tools Windows Preinstallation Environment (Windows PE) WADK Install SCVMM requires the Windows Assessment and Deployment Kit to be installed prior to installing SCVMM itself. Start by downloading the WADK from Microsoft: http://www.microsoft.com/en-us/download/details.aspx?id=30652 Once you have downloaded the WADK, copy it to your SCVMM system. Now run the ADKSetup.exe. You will first be presented with a dialog to specify the location for the install. You will also notice that there is an option to install the ADK or to download the files to install on a different system. If you system does not have an Internet connection then you are going to have to run the ADK installing on a system that does, and choose the ‘Download the Assessment and Deployment Kit for installation on a separate computer’. This will download all of the files required, and you will have a different ADKSetup.exe to run for “offline” installation. Make your appropriate selection and click Next. You can then choose to join the CEIP program or not. Make your selection and click Next. Read the License Agreement, and click Accept to proceed with the installation. On the Features screen, the only features you need to install is the ‘Deployment Tools’ and ‘Windows Preinstallation Environment (Windows PE)’. You can de-select all other options, and then click Install. If you are installing this on a system that has Internet connectivity, and you chose the first option on the initial screen, then the tool will go online and download all the files required. Note that this may take a little time for it to complete, depending on your Internet connectivity. Once the WADK finishes downloading the files required, it will automatically initiate the installation. When the installation is complete, click Close. Now we have everything that we need installed, and are ready to install SCVMM. Install SCVMM Start by either extracting the DVD contents, or mounting the ISO (the TechNet ISO is currently labelled as mu_system_center_2012_virtual_machine_manager_with_sp1_x64_dvd_1348927). Start by running the setup.exe. On the splash screen click the Install link. On the Select Features screen, select the feature you want to install. In our example, we are installing all features on the same server, so we will select all of them and click Next. You may notice that there is no Reporting option in comparison to other System Center product installations. This is because the reporting for SCVMM is actually integrated into the reporting feature of System Center Operations Manager (SCOM). We will go through various configuration steps after the installation is complete. If you are performing this installation in Production, you may want to provide Registration information for your organization along with a valid Product Key. Since this example is in a lab, I am not providing any information. Make applicable entries, and then click Next. Next read the License Agreement, check the applicable checkbox, and then click Next. Now you can choose if you want to be a part of the CEIP program. Make an applicable choice and then click Next. You can choose if you want to find updates for the product by using Microsoft Updates. Depending on your patching/upgrading policies/procedures, make an appropriate choice and then click Next. Next you need to provide an Installation Location. Ensure there is sufficient space and then click Next. You will now be asked to supply the Database Connection information. Enter the applicable information for your environment and then click Next. On this next screen you can specify the Service Account to use, and if you want to use Active Directory for your encryption keys. In a Production environment, this would be more applicable, but for our lab it doesn't matter. If you want to walk through the process/uses of this, then choose to enable the option and then click Next. On the Port Configuration screen, you can change the ports that SCVMM uses. Depending on your environment, you may have to make some modifications, but for our lab example, we will use the defaults. Next you need to specify the location for the SCVMM Library. This is the location that will contain all of your ISO’s, VHDs, etc. Be sure to provide sufficient space. Microsoft recommends 150 GB if you’re running a local version of SQL. In my lab example, since I am running out of space on my SSD drive, I opted to create a second VHD drive attached to the VM strictly for installing SCVMM, SQL, and the Library Share. Setup your environment accordingly, and click Next. Review the information presented on the Summary screen, and click Install. The installation may take some time, so be patient. Once it is complete, you can choose to check for the latest updates and open the console if you wish. Click Close. When SCVMM launches for the first time, you will have to provide a server name to connect to. You can choose to check off the ‘Automatically connect with these settings’ checkbox so that you don’t have to continue to enter the server name. Enter your server information and click Connect. The SCVMM console will launch. Navigate around the various areas. Congratulations, you have now successfully installed SCVMM. But if you look, something is missing; i.e. Reporting. Let’s configure that next.
- 1 reply
-
- SCVMM
- Virtual Machine Manager
- (and 5 more)
-
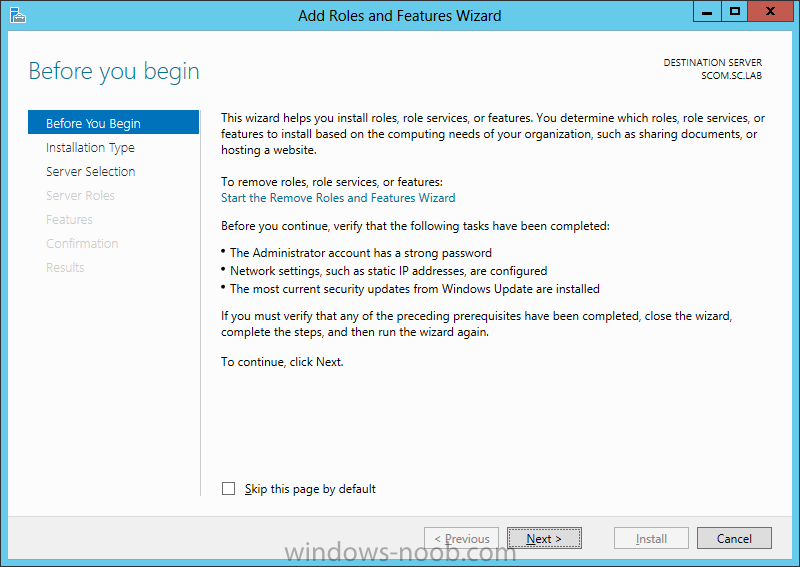
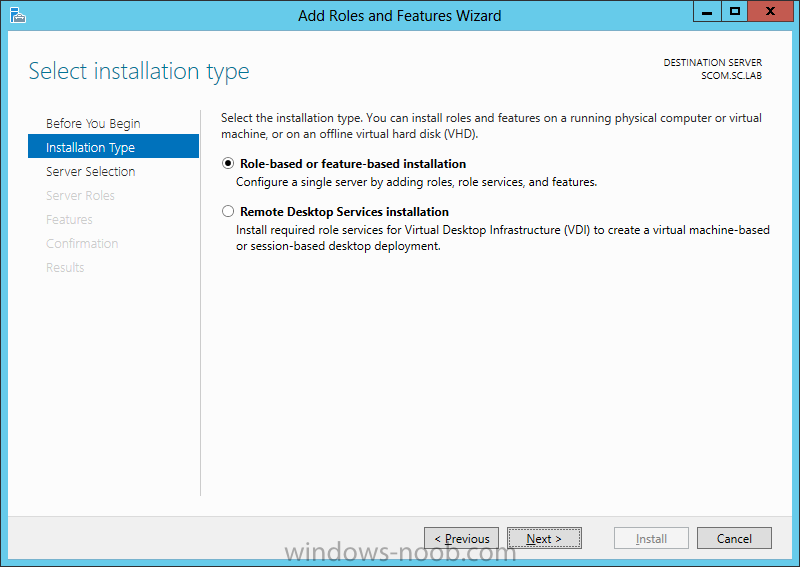
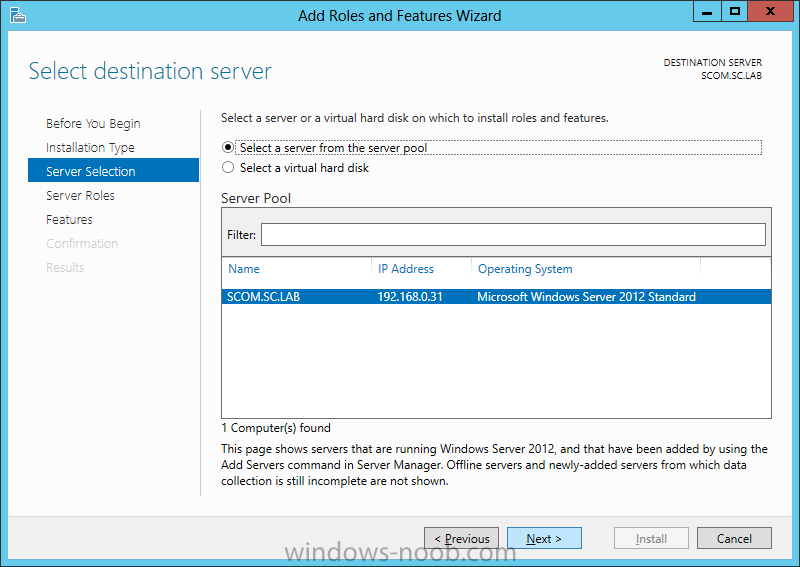
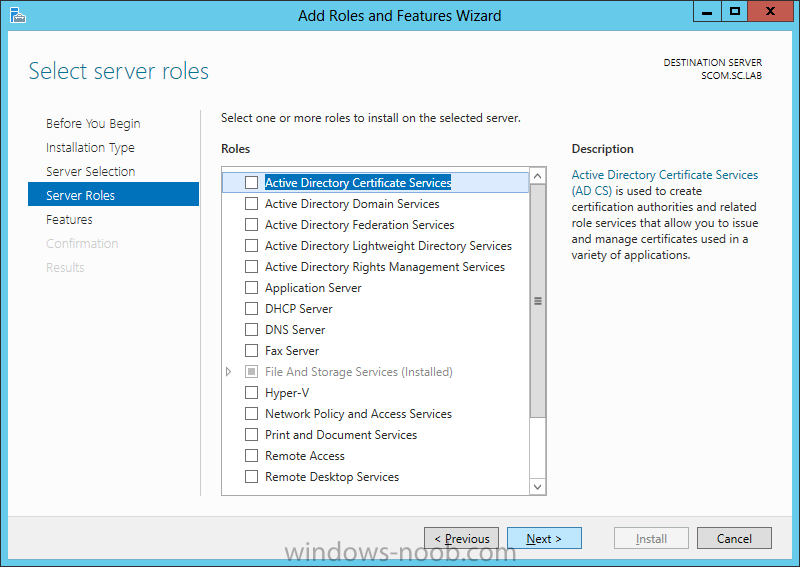
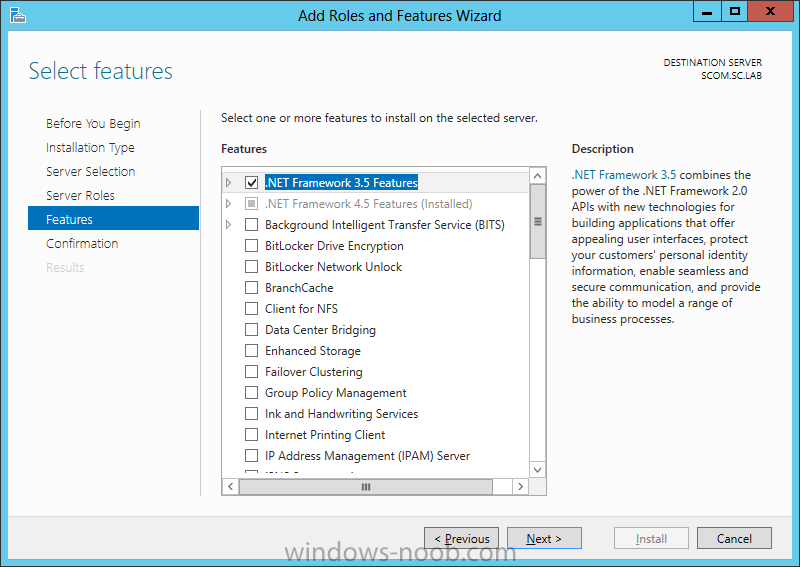
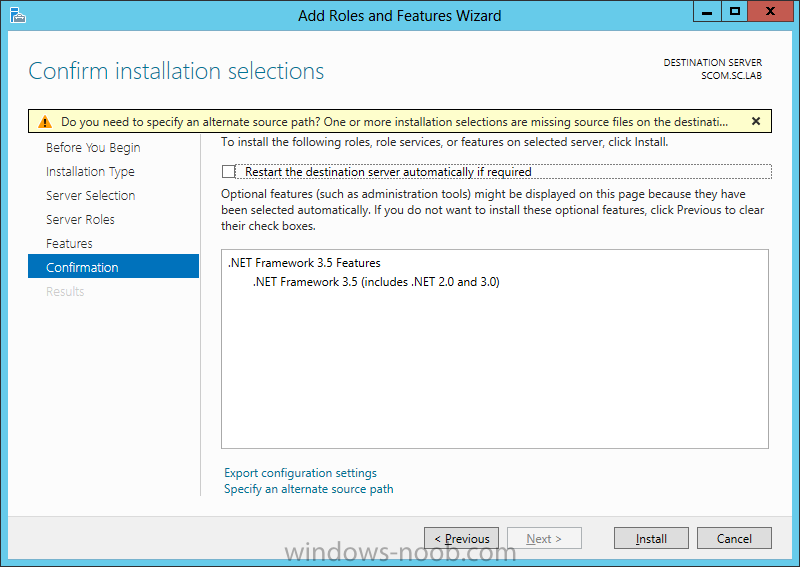
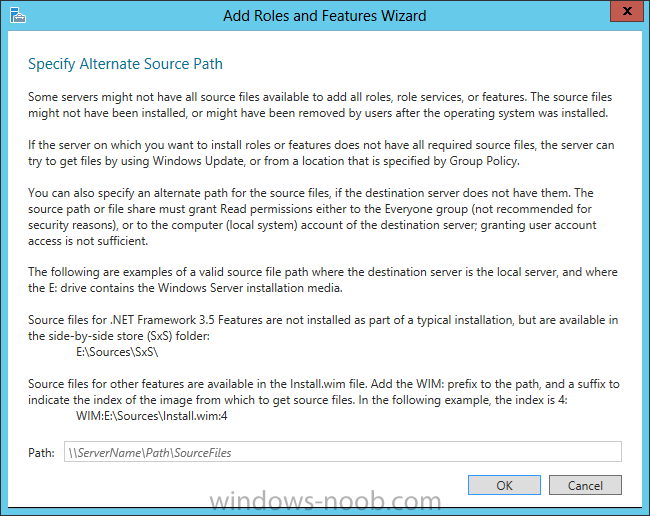
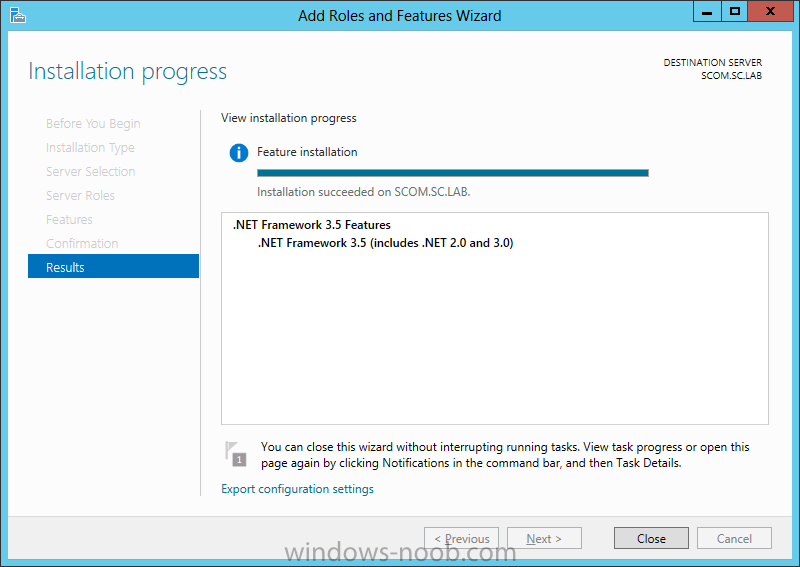
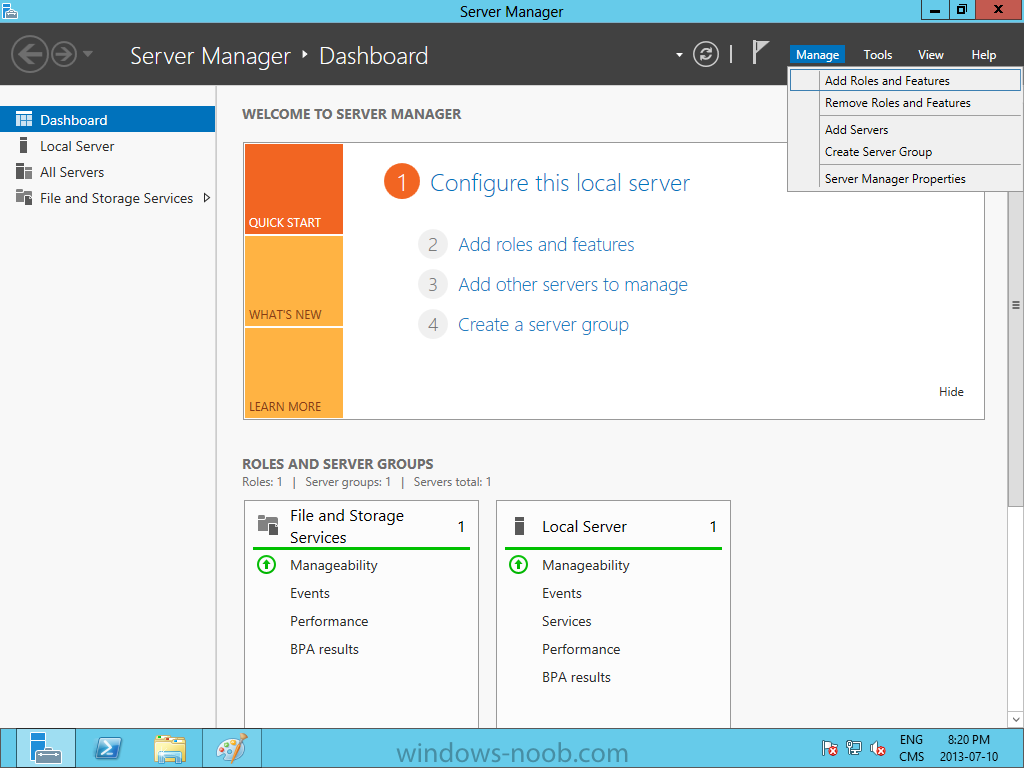
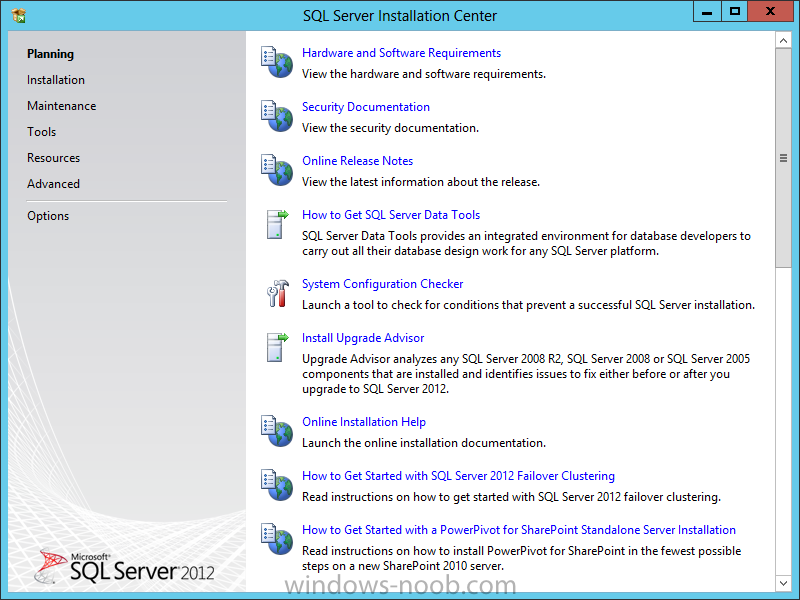
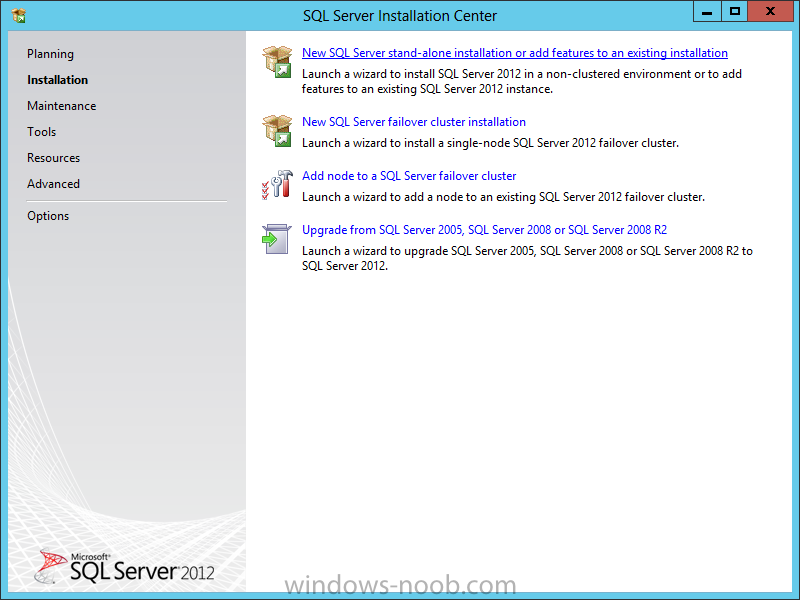
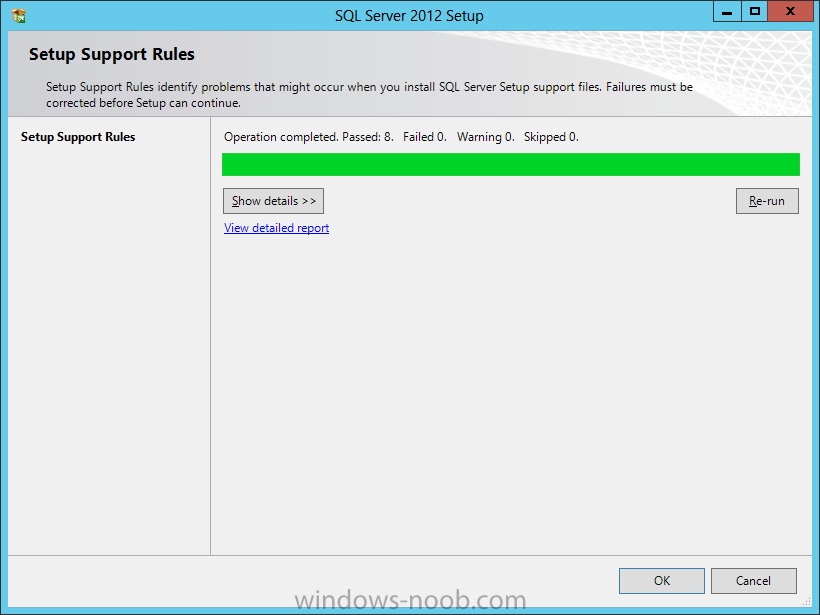
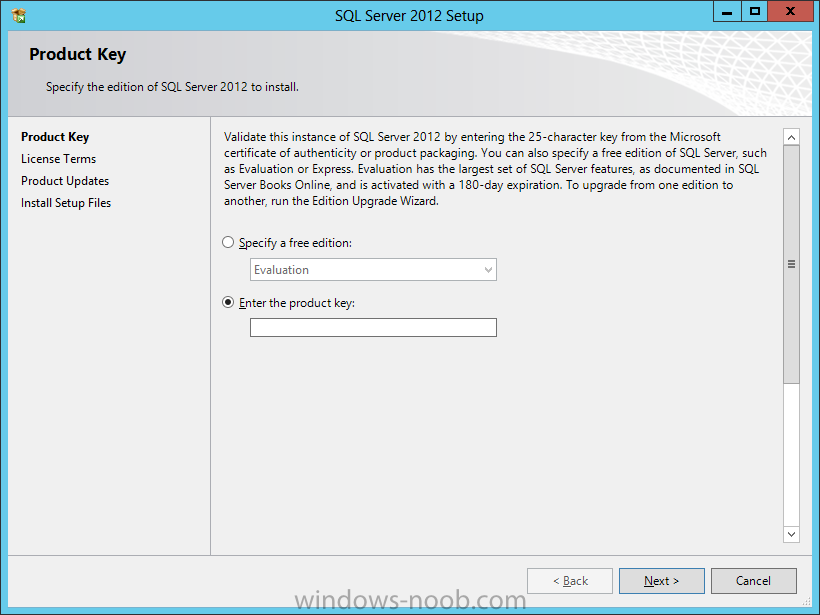
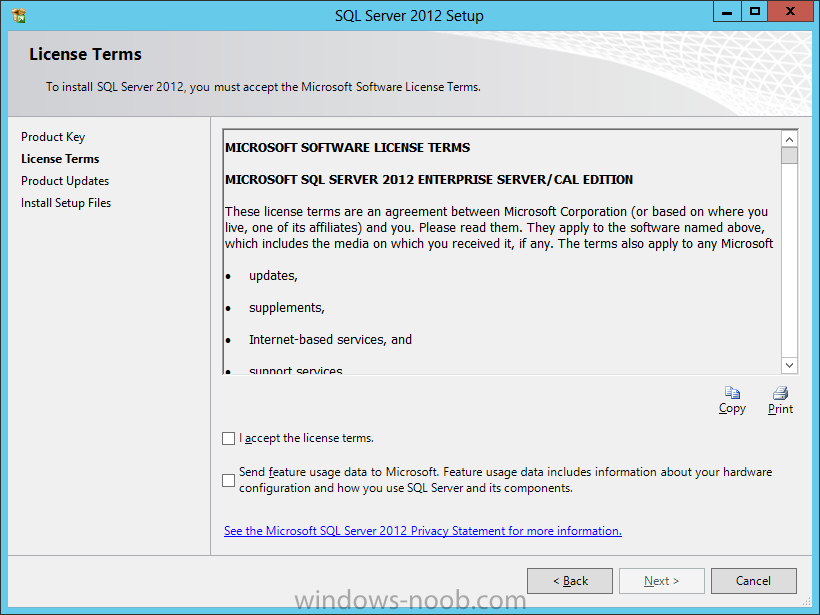
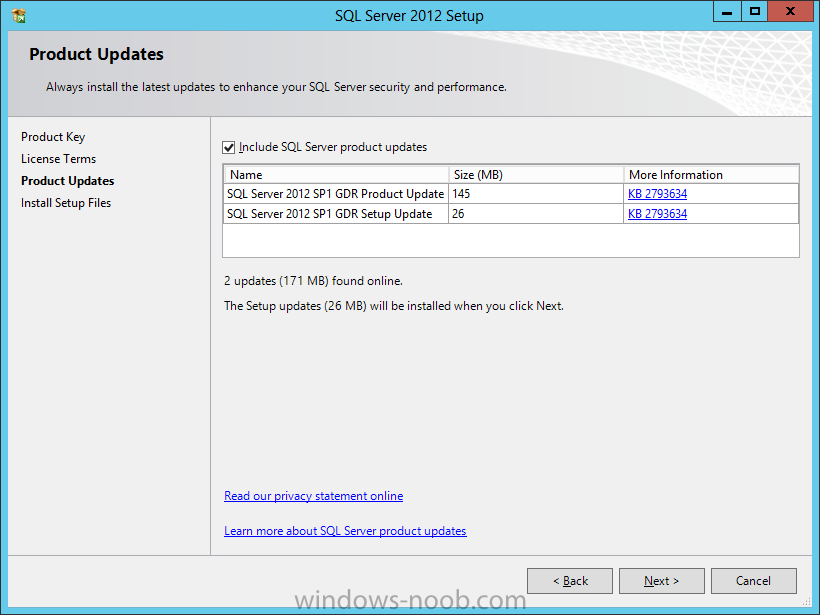
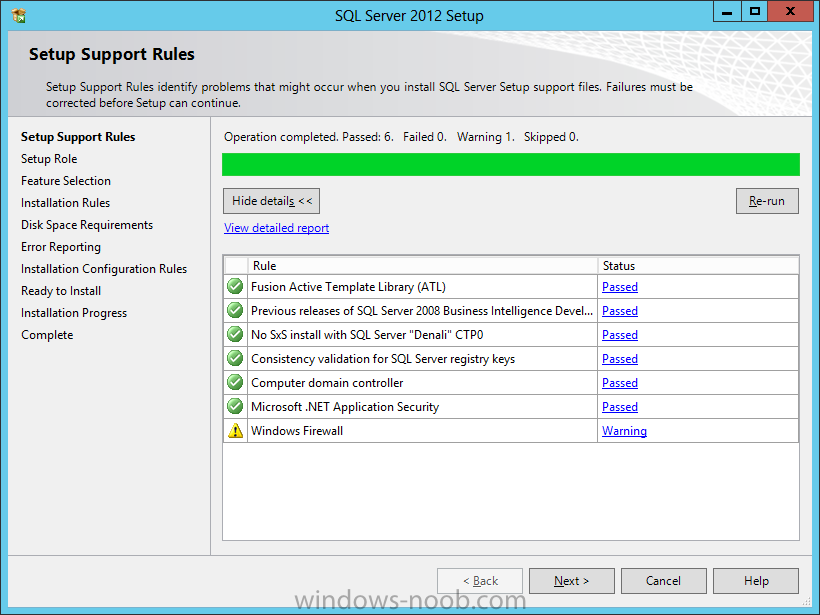
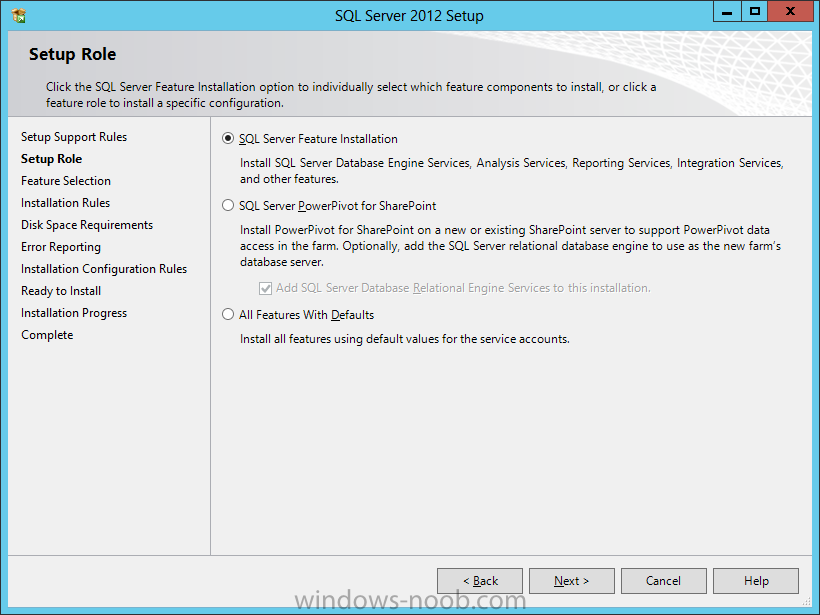
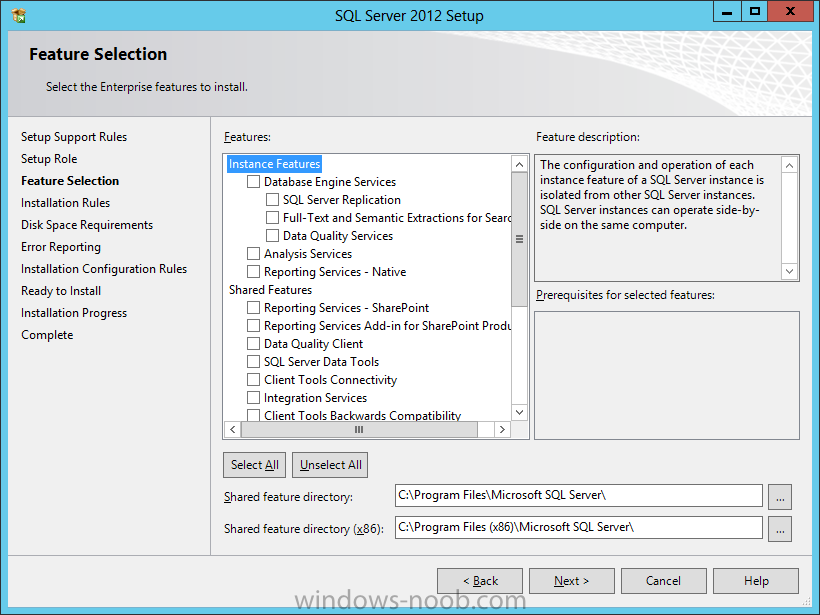
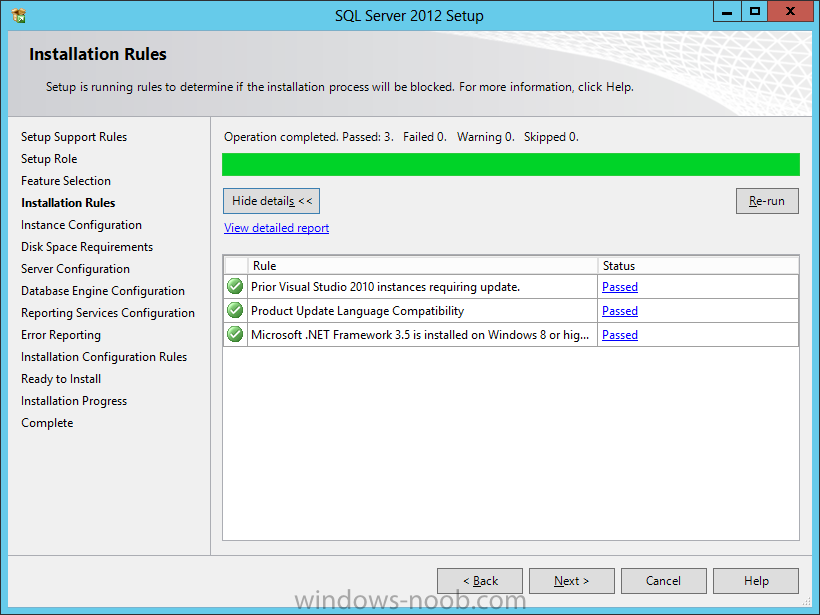
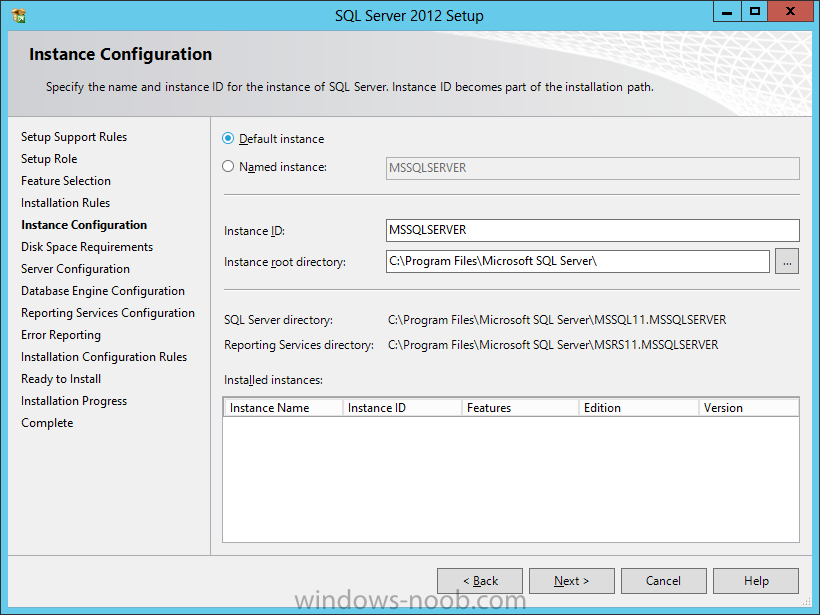
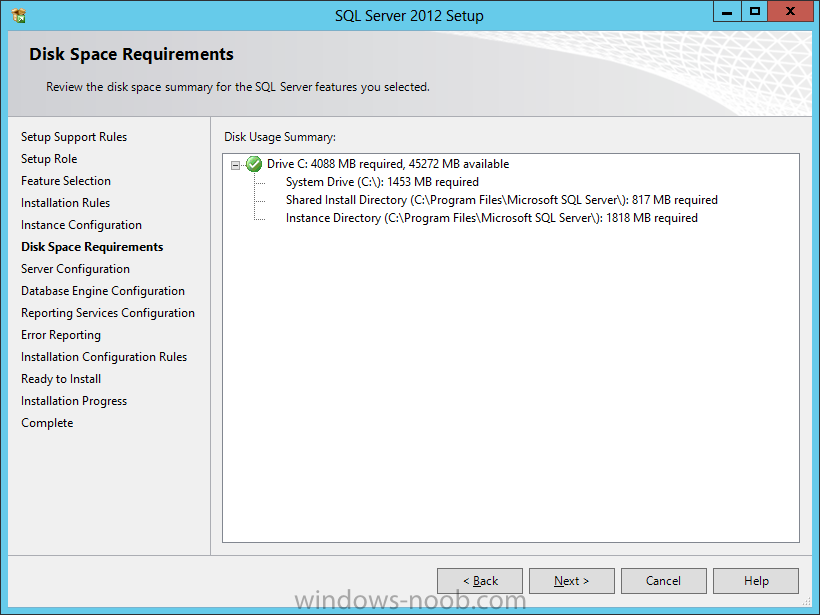
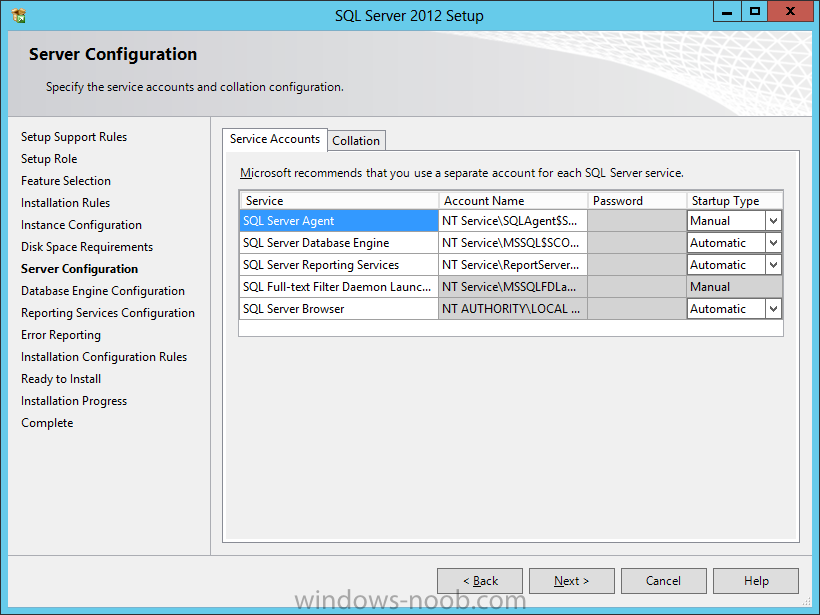
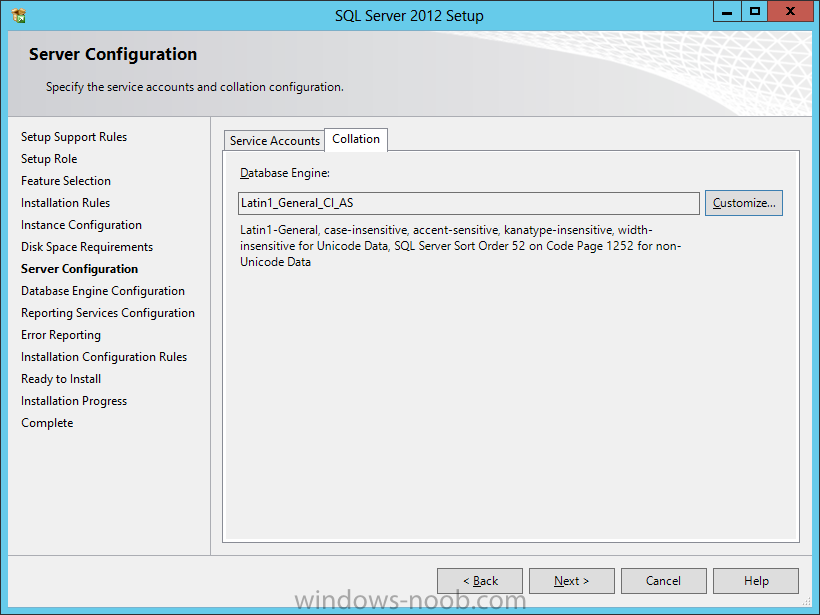
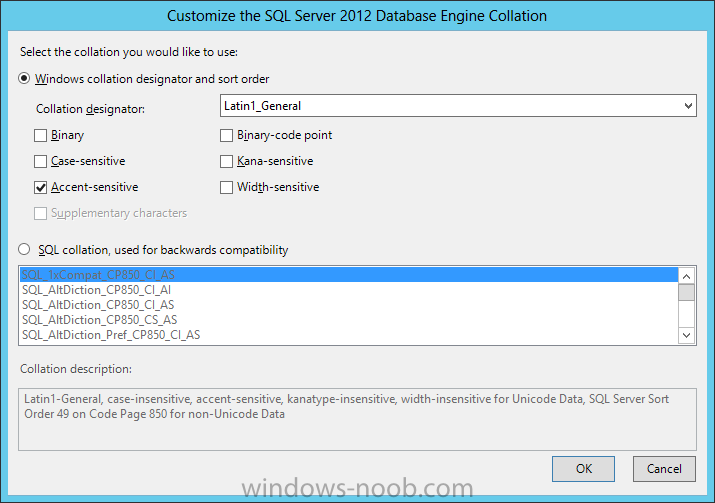
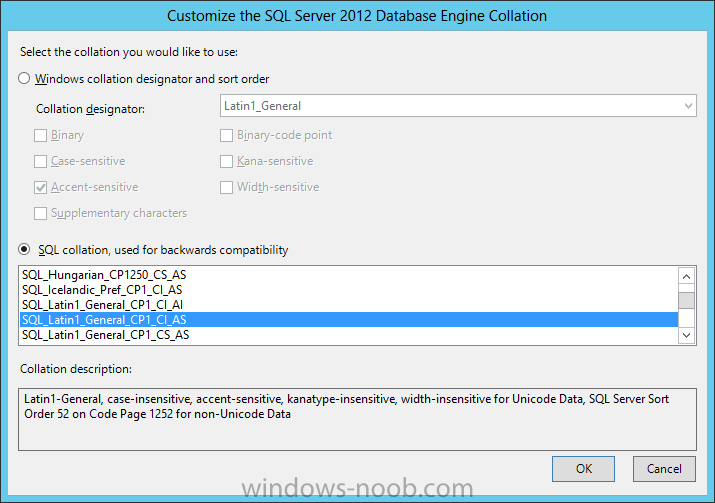
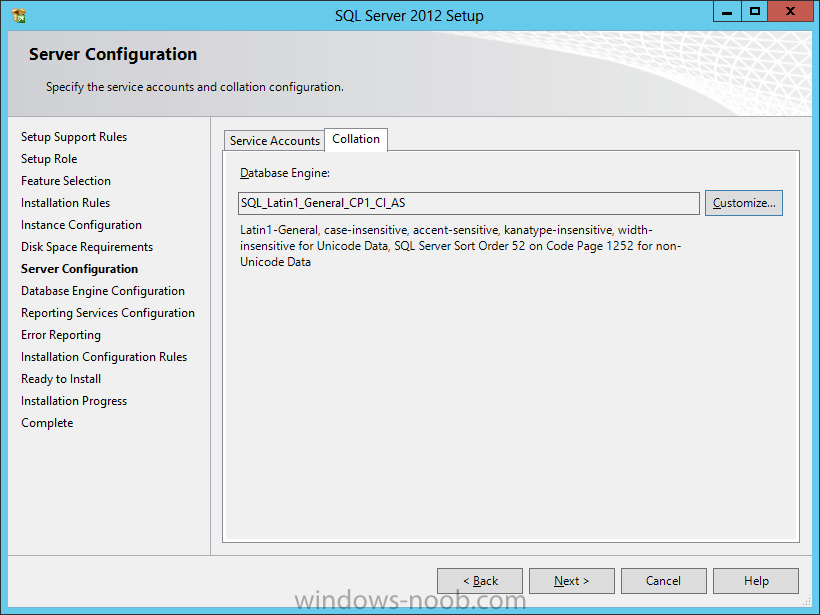
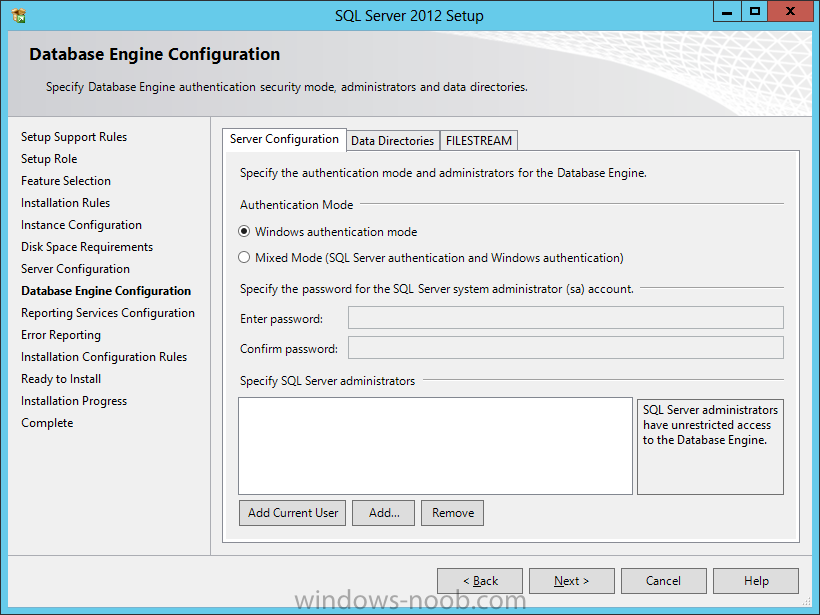
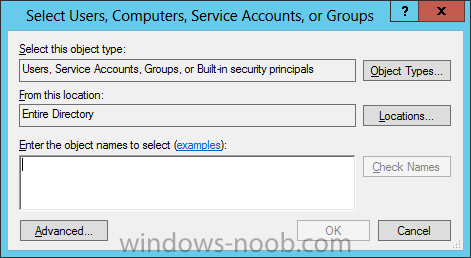
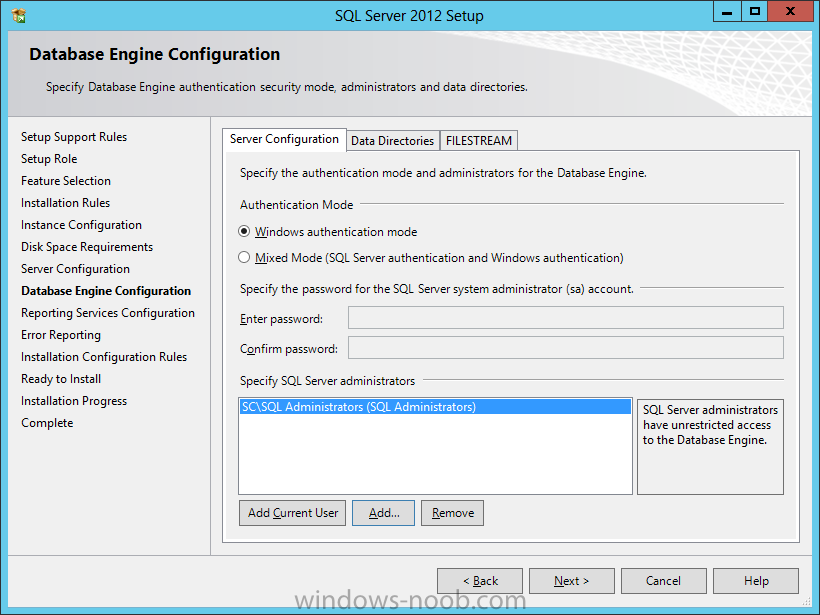
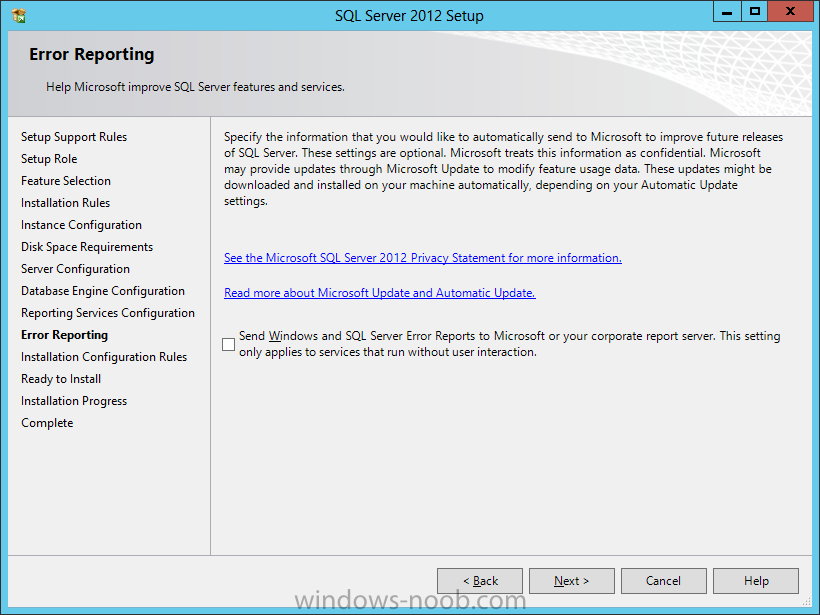
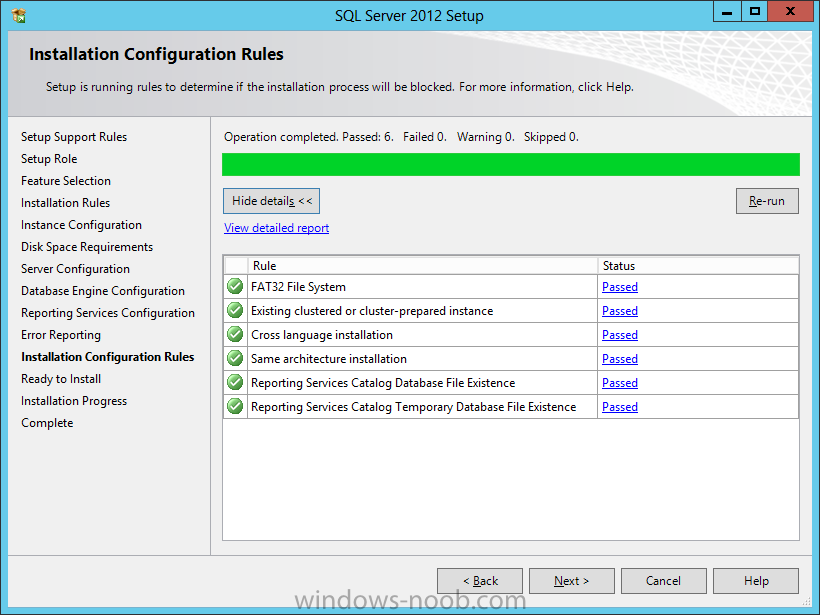
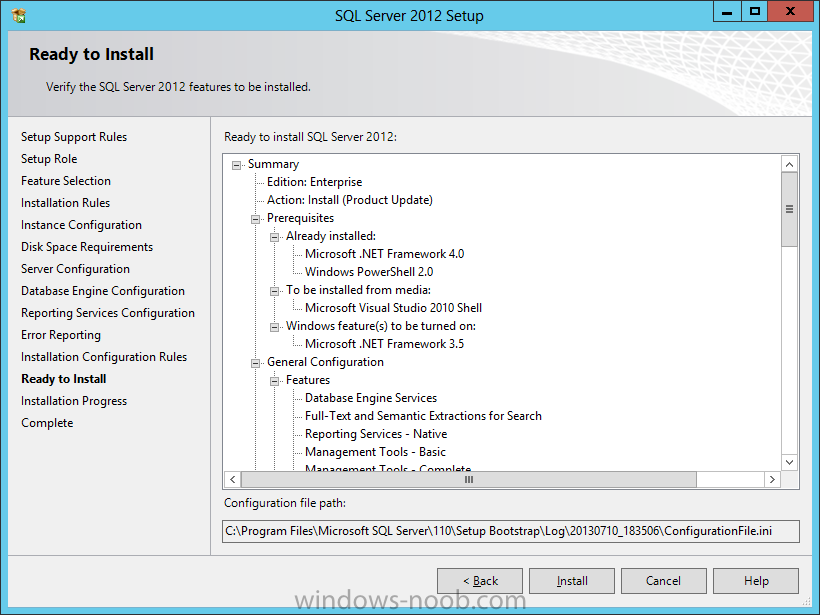
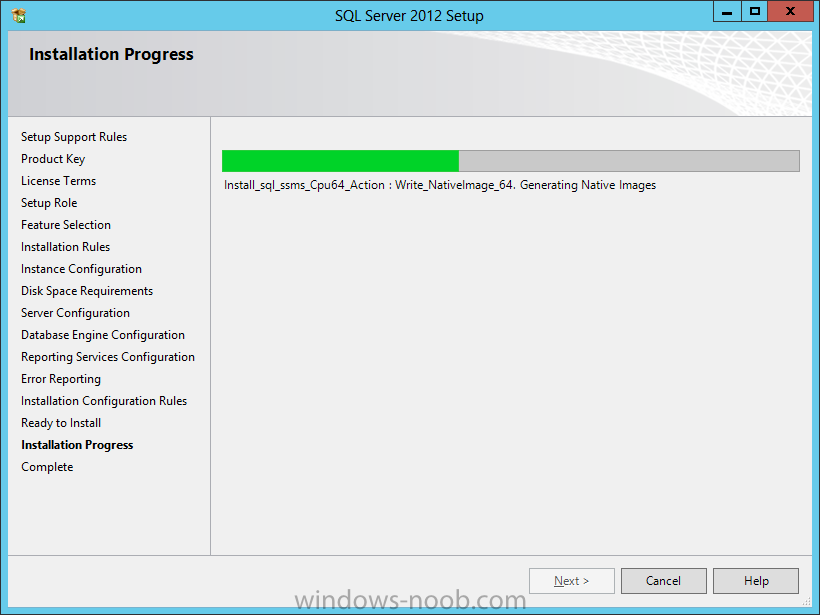
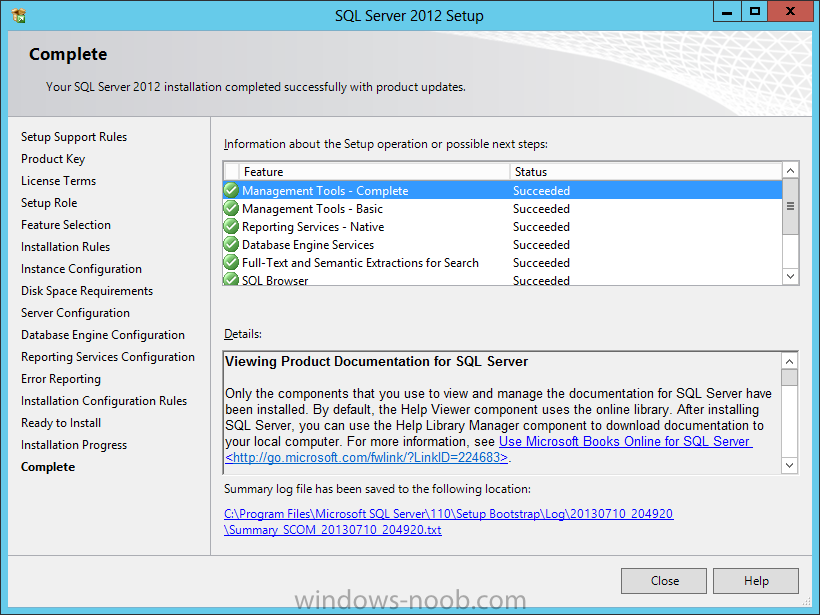
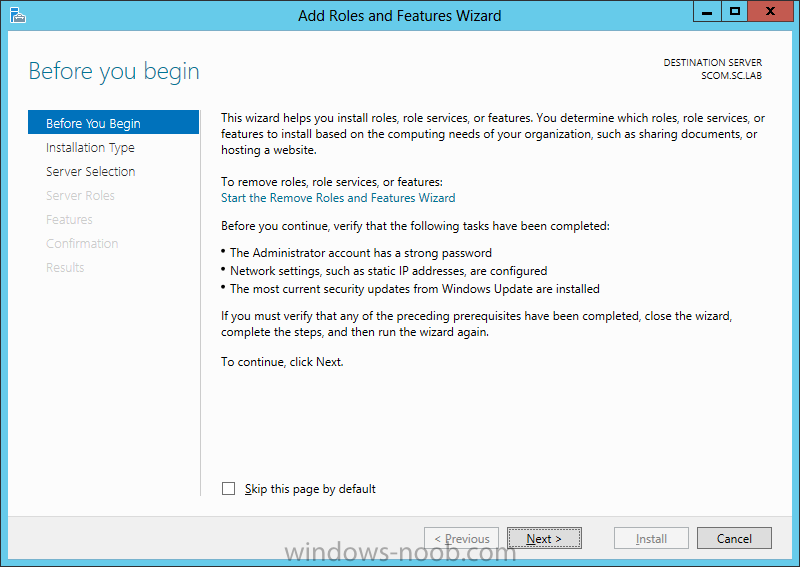
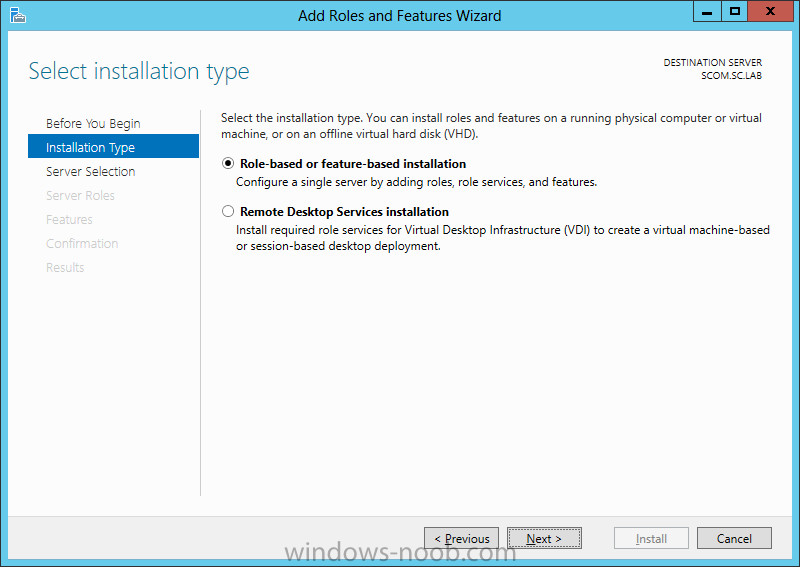
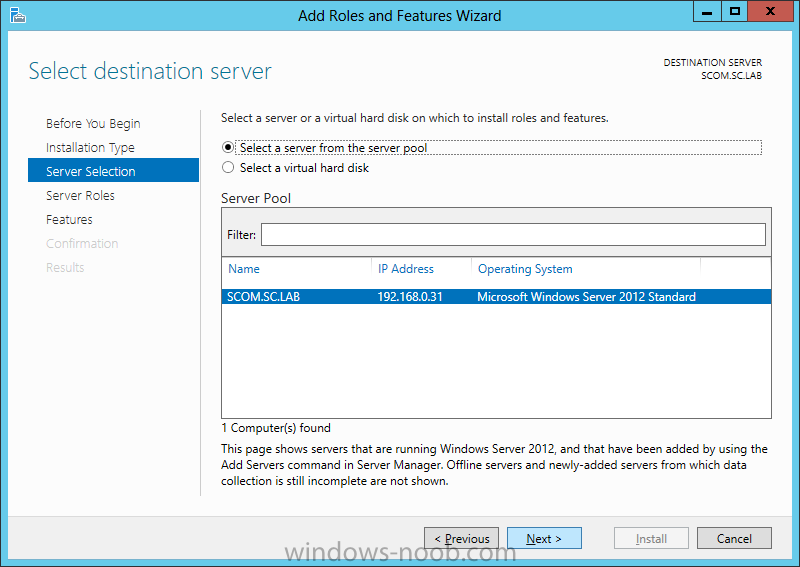
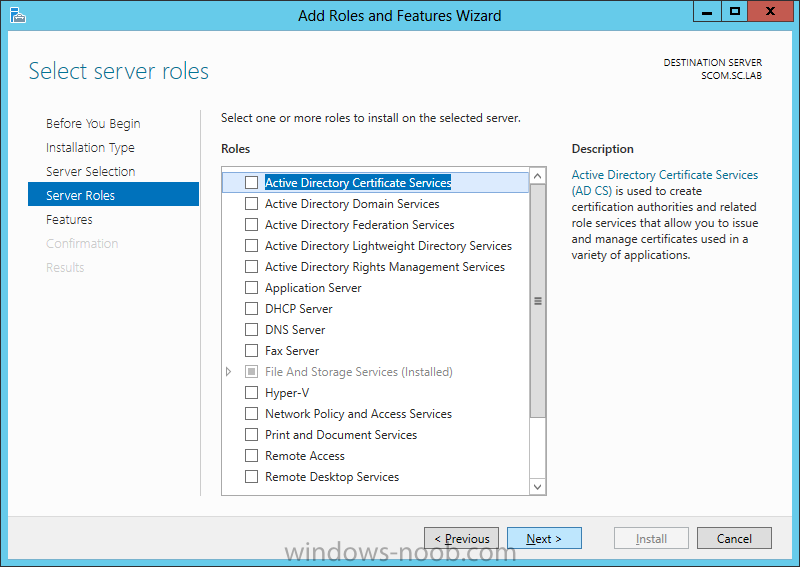
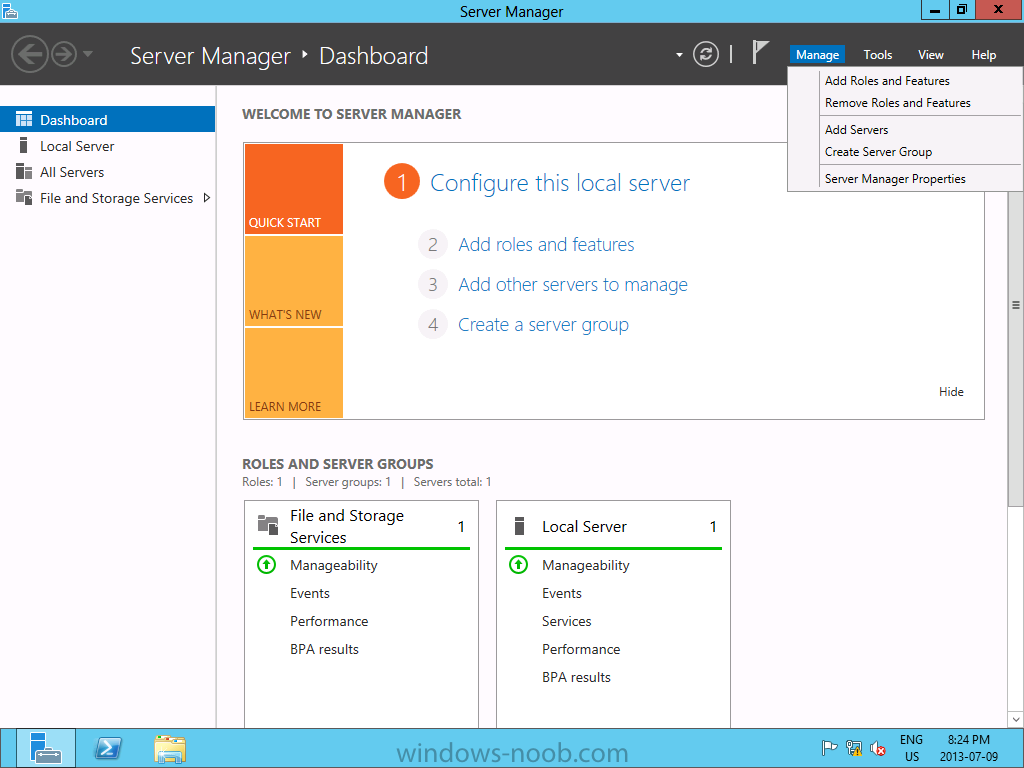
In our last post, we installed Active Directory, now we need to install SQL. At this point, since we will be installing SQL Server on the same server that we will be installing SCVMM, it is expected that you have the VM created, the OS is installed, the appropriate networking has been configured, and it is joined to your lab domain. To avoid a specific installation error (see the end of the Install SQL Server section), you have to install the .NET Framework 3.5. So we’re going to complete this first before we start the installation of SQL. .NET Framework Installation To install the specific version of .NET that we require (version 3.5 in this case), start by launching the Server Manager, and selecting Manager > Add Roles and Features. On the Add Roles and Features Wizard, read the information on the Before You Begin screen, and then click Next. On the Installation Type screen, select ‘Role-based or feature-based installation’, and click Next. On the Server Selection screen, since we are installing SQL on the same server as SCVMM, ensure that it is selected, and then click Next. On the Server Roles screen, we are not installing a Role, but rather a Feature, so just click Next. On the Features screen, select .NET Framework 3.5 Features, and click Next. Since in Windows Server 2012 the .NET Framework 4.x is the main framework, the OS installation does not contain the source files for this installation. Therefore, you will need to click on the ‘Specify an alternate source path’ link at the bottom of the dialog. You will need to provide the path to where the source files are. This is found within the installation media of Windows Server 2012. If you insert a DVD or mount an ISO, specify the path to the SxS folder (i.e. D:\Sources\SxS), and then press OK. Click Install, and once it has completed, click Close. SQL Installation Start by either extracting or mounting the SQL Server ISO, and run the setup.exe. In this example, we are installing SQL Server 2012 SP1. On the main installation screen, click on the Installation link on the left pane. From the Installation screen, click the ‘New SQL Server stand-along installation or add features to an existing installation’ link. This is initiate the installation. First, the Setup Support Rules will check for any issues. As long as there isn’t any ‘Failed’ issues, click OK to continue with the installation. Next, enter your product key or select the evaluation copy to install, and press Next. Accept the License Terms and choose if you will send usage data to Microsoft, then press Next. If you have an Internet connection, the installer will check if there are any applicable updates to the installation, and will download the updates to use during the install. Click Next. The Setup will perform another Setup Support Rules check. As long as there are no Failures, you can click Next. Next is the Setup Role. For our needs, we will choose ‘SQL Server Feature Installation’, then press Next. For the Feature Selection, select the following, and then press Next. Database Engine Services Management Tools – Basic and Complete (for running queries and configuring SQL services) The Installation Rules will run to determine if anything will block the SQL installation. If there are no Failures, click Next. Next we will configure the instance. You can choose either to use a Default instance, or a Named instance. In this example, I will use a named instance, so as to not get this installation of SQL mixed up with any other I will have in my lab. Make your applicable choice, and click Next. The setup will check and confirm there is enough space on the drive for the installation. If everything is reported as OK, click Next. You next have to configure the server, which includes the Service Accounts and Collation. In Production, it is best practice to have a separate account for each of the services. In our lab, we will leave everything at defaults, with the exception of changing the ‘SQL Server Agent’ startup type from ‘Manual’ to ‘Automatic’. After you have completed this, don’t click Next, but rather click on the Collation tab. On the Collation tab, you will need to click the Customize button to be able to change it appropriately. On the Customize dialog, select ‘SQL collation, used for backwards compatibility’. Within the list, find ‘SQL_Latin1_General_CP1_CI_AS’ and select it, then click OK. You will be back on the Server Configuration dialog, click Next. On the Database Engine Configuration screen, leave the Authentication Mode at ‘Windows authentication mode’. What do have to change is to add SQL Server Administrators. Click the Add button. On the next dialog, you will need to add either the user(s) or security group(s) you want to have administrator access to SQL. At a bare minimum, add the current user account, so that you can log into SQL Server. Add the user(s)/security group(s), and click OK. You will be back on the Database Engine Configuration screen, and your accounts will now be present. In my example, I have an Active Directory Security Group I specifically created for SQL Administrators. Then click Next. You can choose to send Error Reporting information to Microsoft. Make your choice, and click Next. The setup will now re-check the configuration rules, based on the selections and information that has been supplied. If it passes, click Next. Review the information on the Ready To Install screen, and then click Install. Note: during the installation, you may encounter the following error message. This is due to not having the .NET Framework 3.5 installed prior to attempting to install SQL Server. If you encounter this, cancel the SQL server installation, and install the .NET Framework 3.5 (which is an available feature within Roles and Features). You may have to wait a while for the Installation Progress to complete. On the Complete screen, click Close. Congratulations, you now have SQL Server installed and are finally ready to install System Center Virtual Manager (SCVMM). Now we can install SCVMM.
-
- SCVMM
- Virtual Machine Manager
- (and 4 more)
-
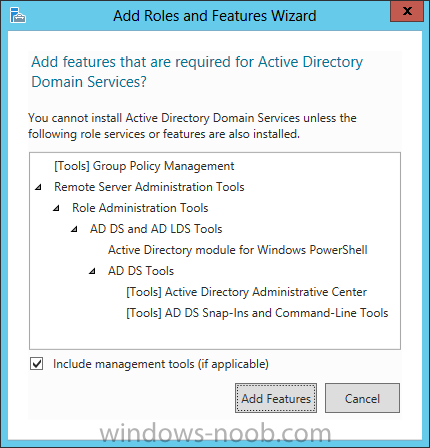
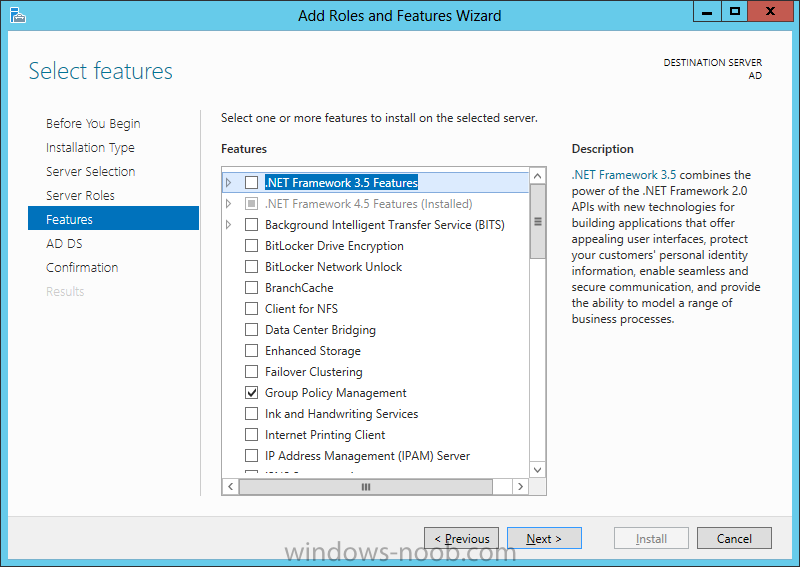
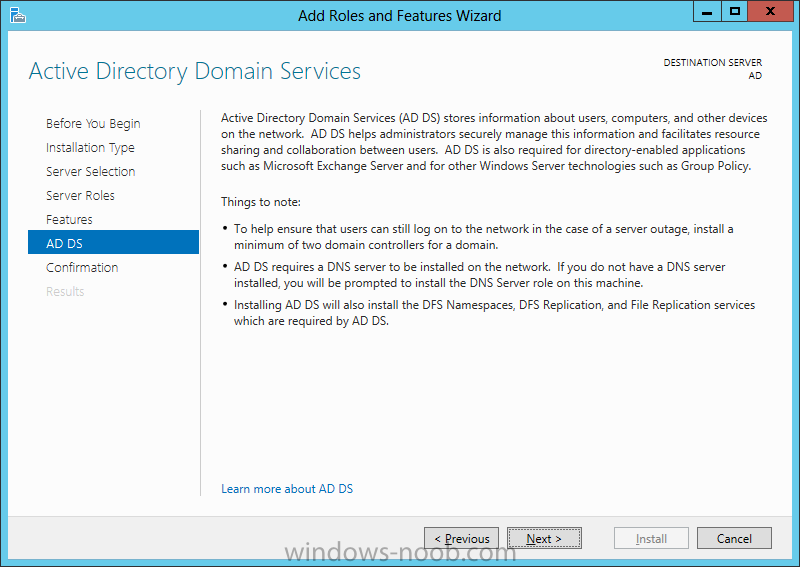
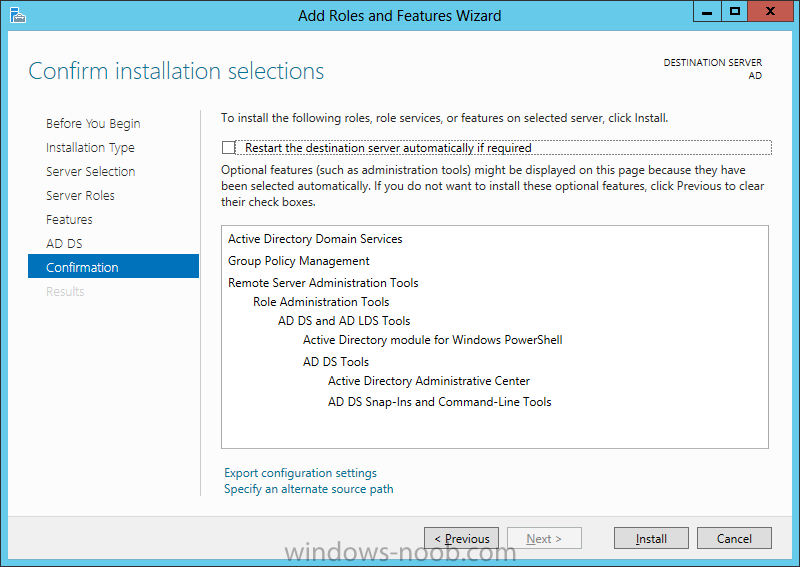
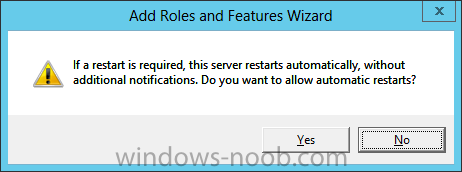
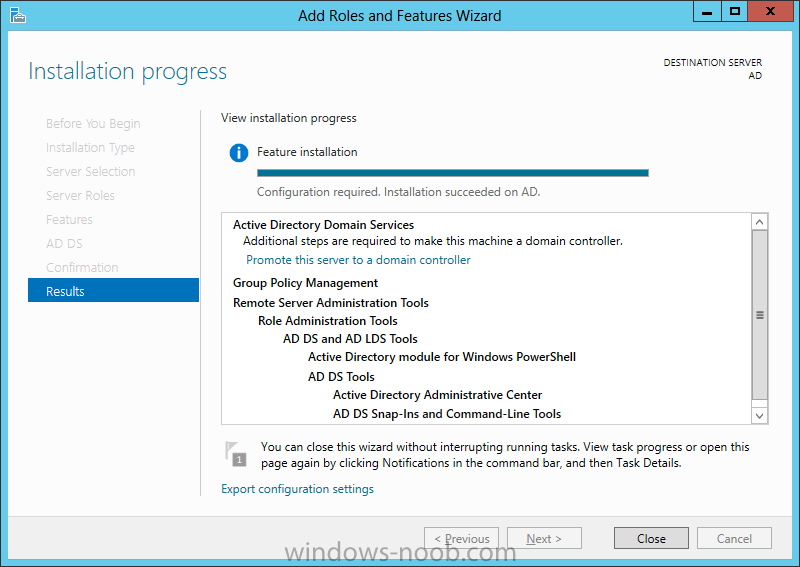
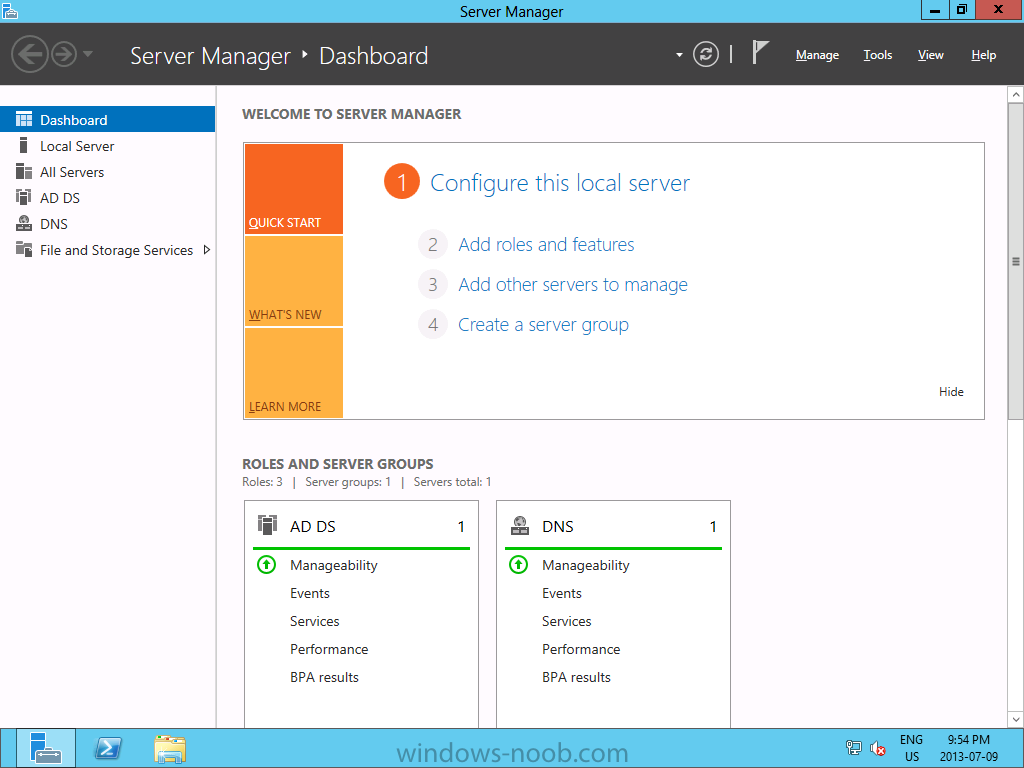
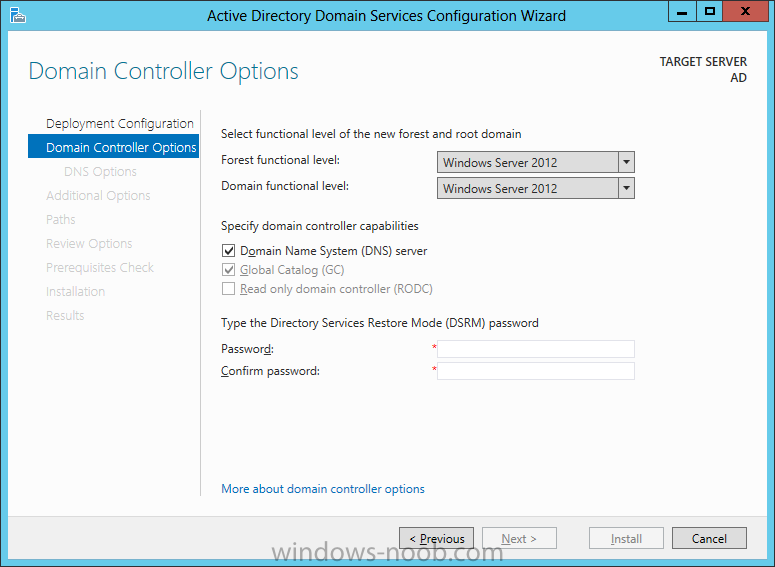
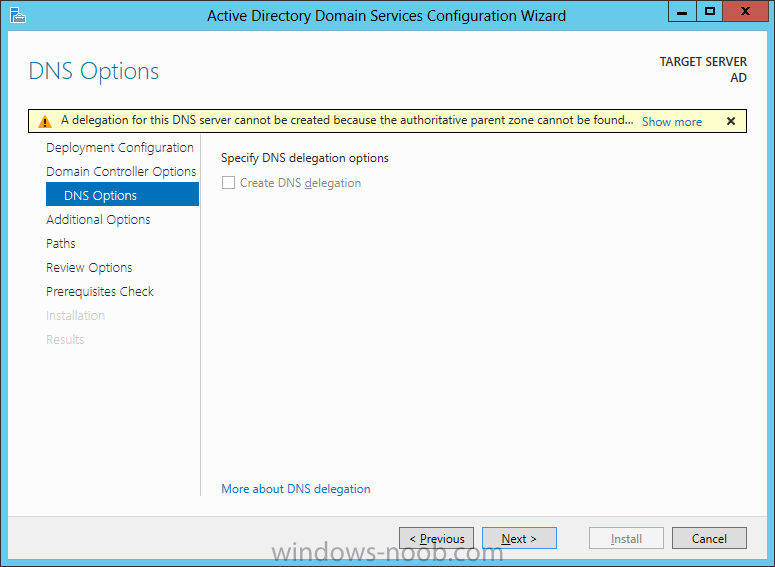
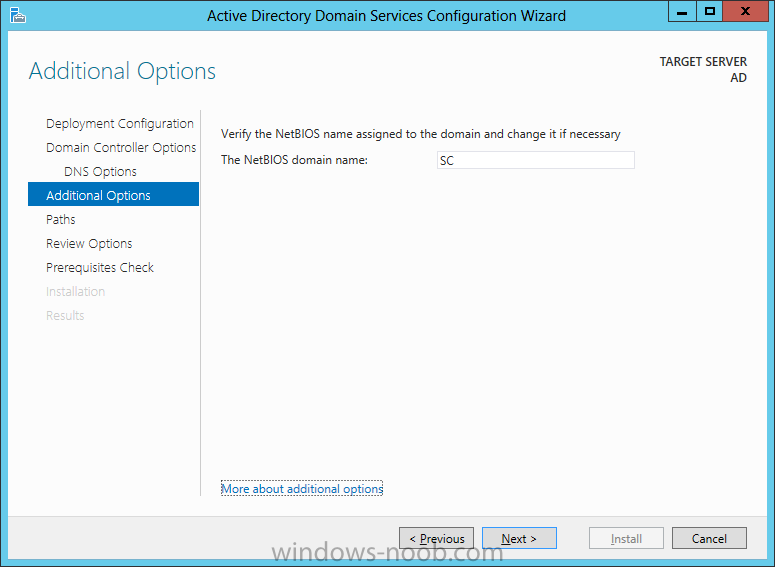
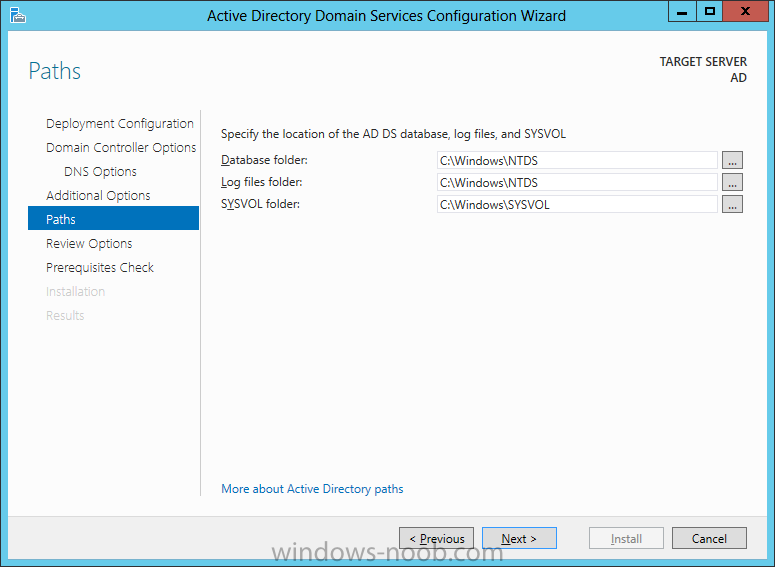
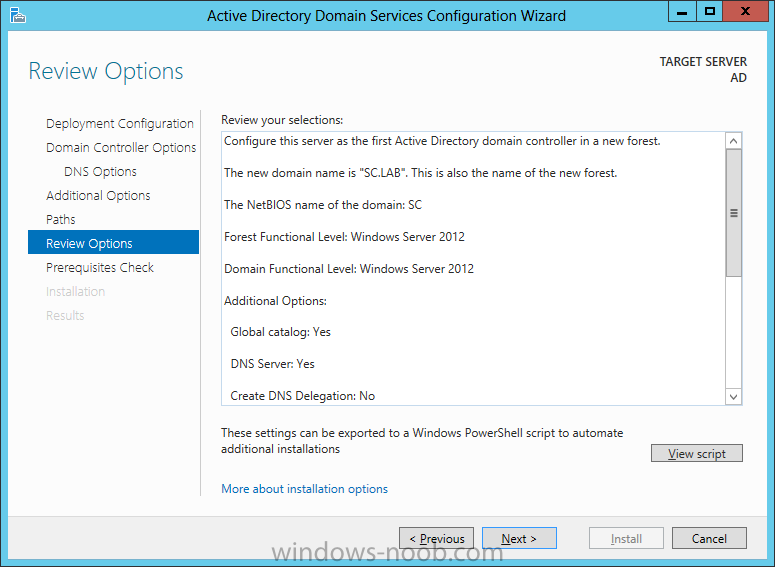
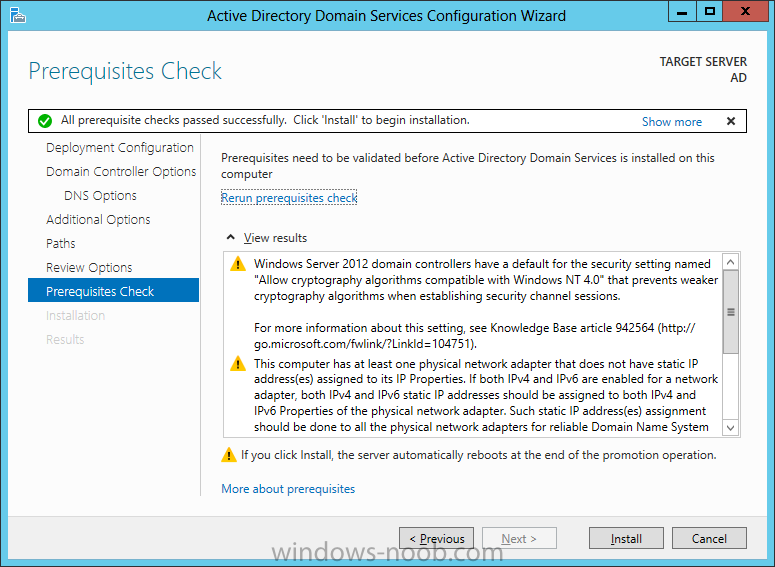
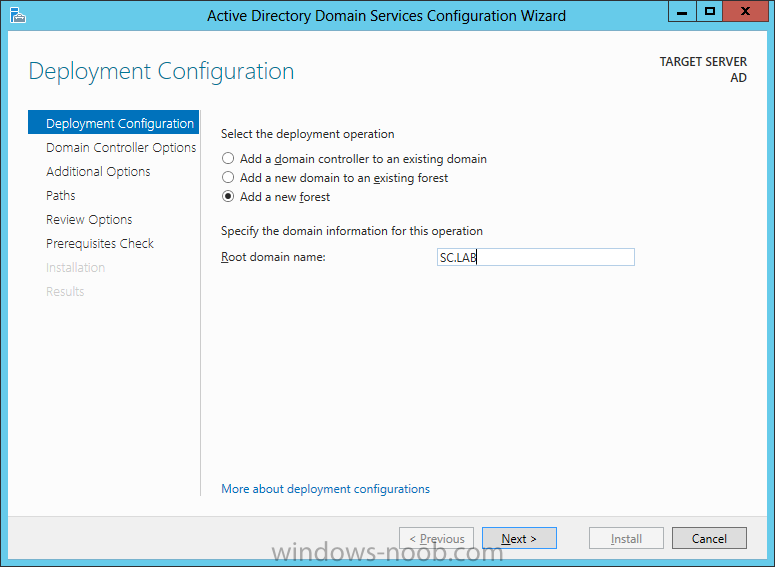
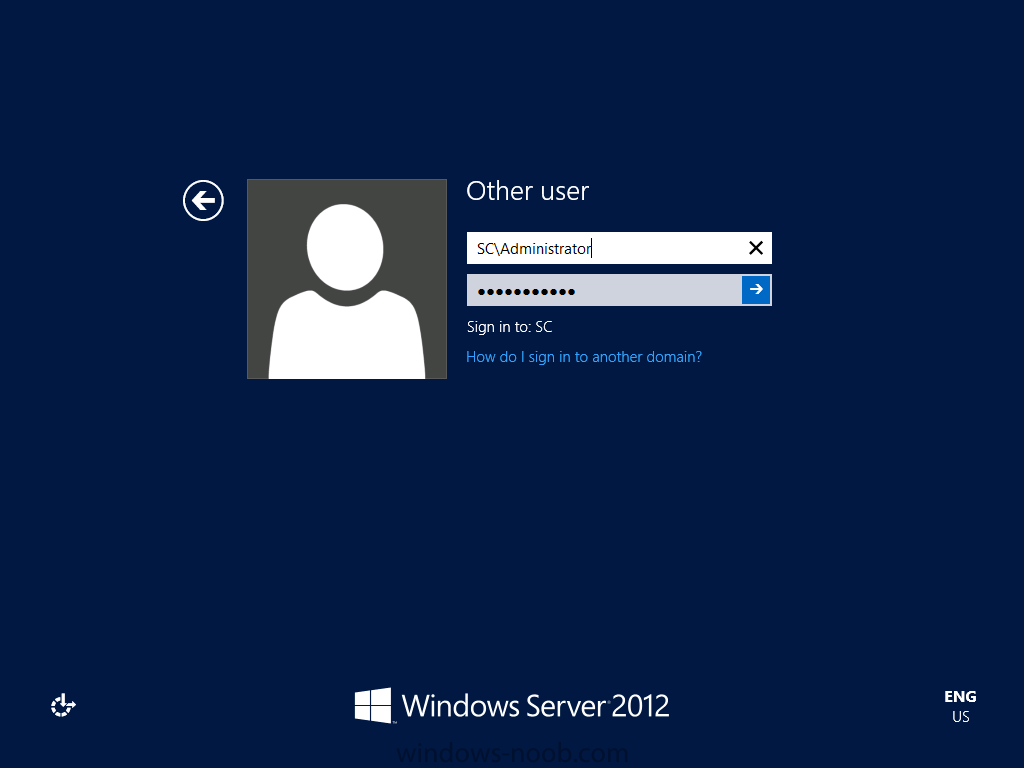
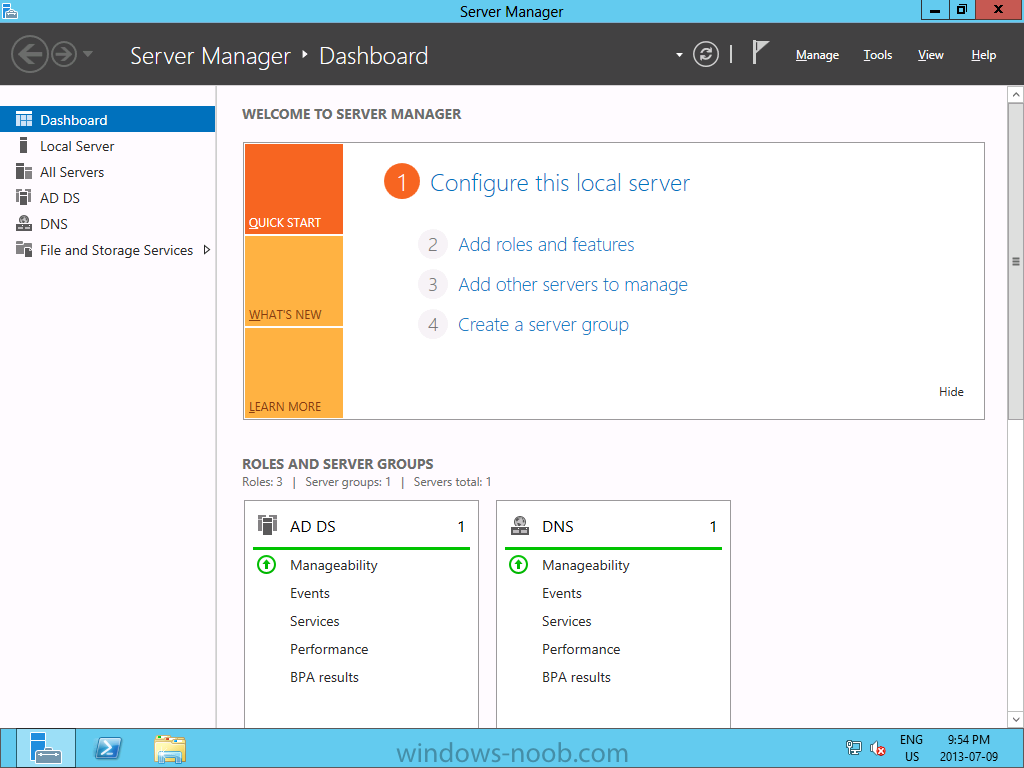
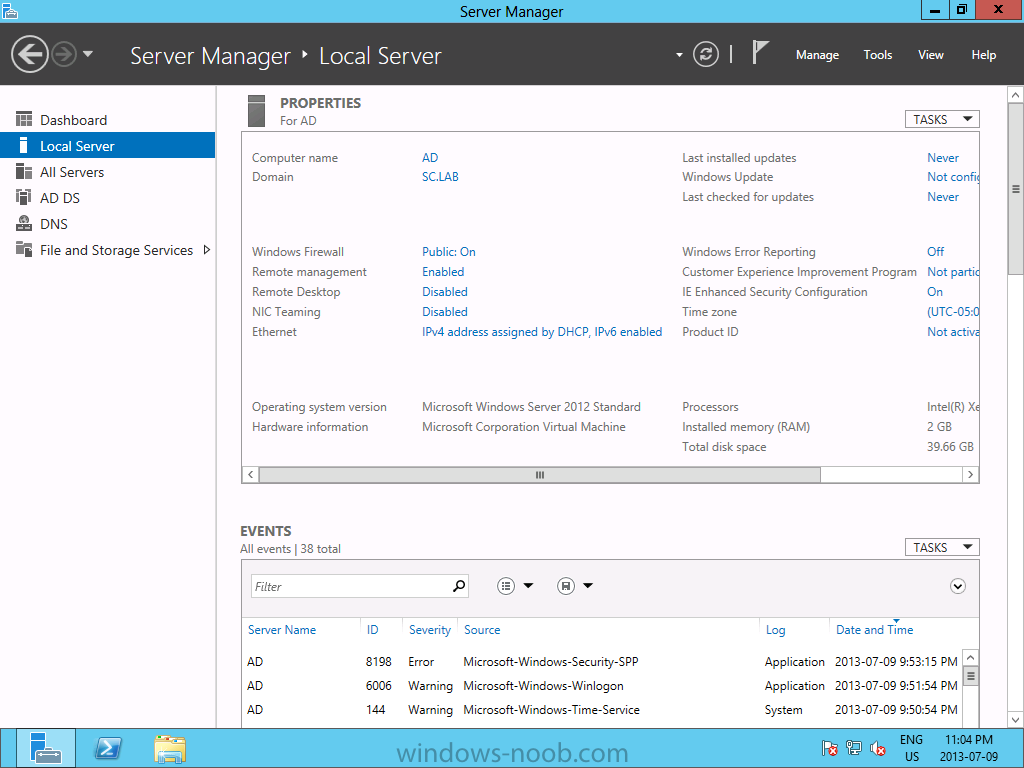
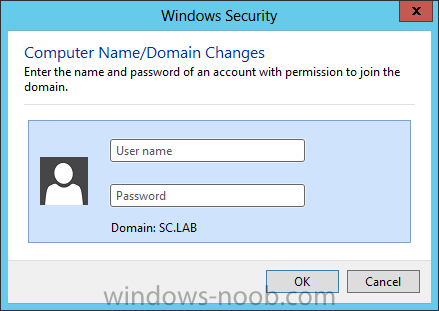
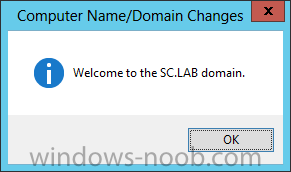
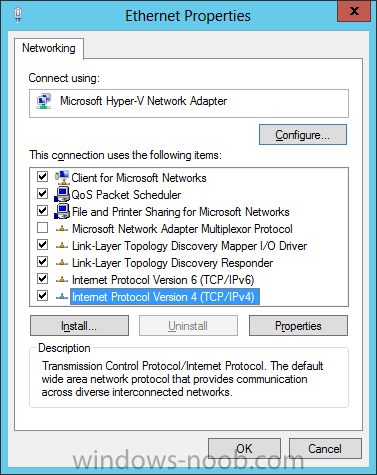
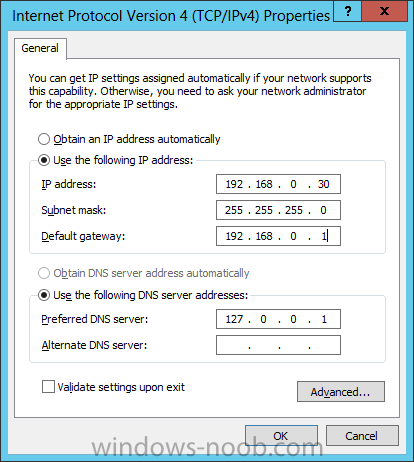
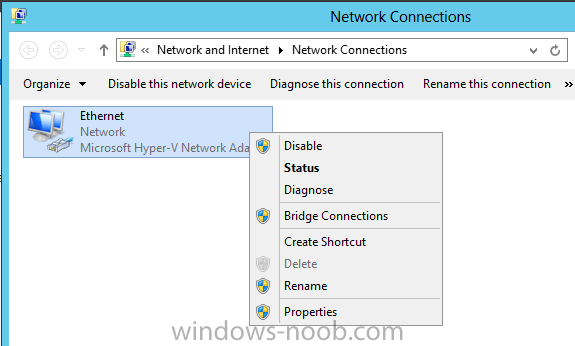
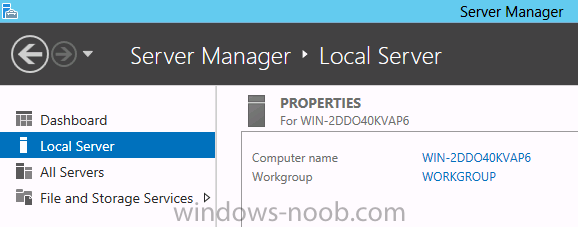
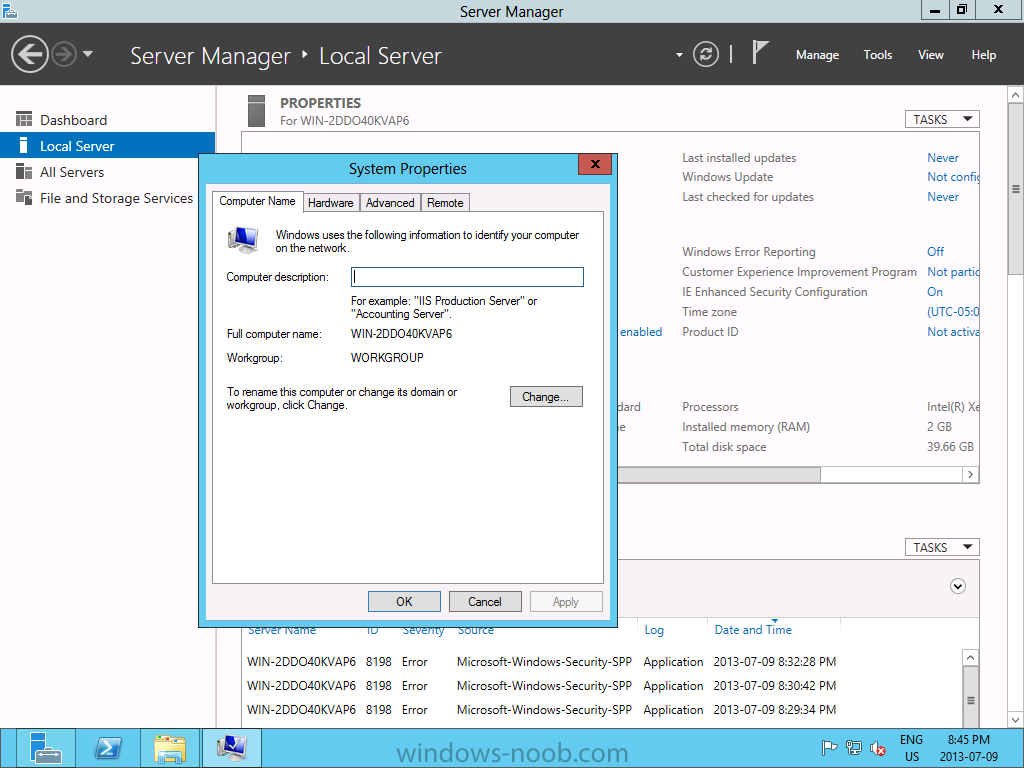
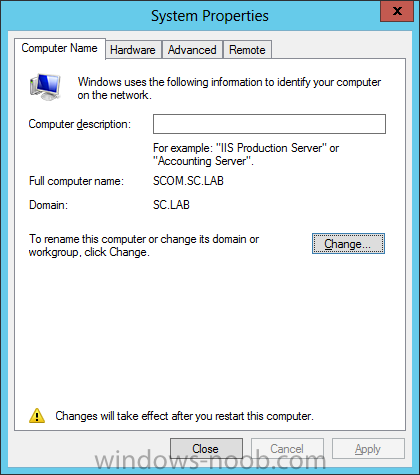
In our last post we installed the Operating System on our VM's. Now, we will install Active Directory. Install Active Directory Domain Services Now that we have the VMs created, and the OS installed on both, we need to first install/setup Active Directory (AD). When you log into a new installation of Server 2012, Server Manager will auto launch. From Server Manager, click on Manage, and choose ‘Add Roles and Features’. On the Add Roles and Features Wizard, read the information on the Before You Begin dialog, and then click Next. On the Installation Type screen, select ‘Role-based on feature-based installation’ and then click Next. On the ‘Server Selection’ screen, since we are installed Active Directory on this local system, ensure that it is selected, and click Next. Side note: Windows Server 2012 has a new feature that allows you to remotely install Roles and Features on other systems. On the Server Roles screen, select ‘Active Directory Domain Services’. When you select ‘Active Directory Domain Services’, immediately you will be presented with the following dialog. Click Add Features. On the Features screen, accept what has already been selected by default, and click Next. On the AD DS screen, read the information presented, and click Next. On the Confirmation screen, check the ‘Restart the destination server automatically if required’ checkbox, and then click Install. Note: You are not required to check the ‘restart’ checkbox, however, you’re going to have to restart the system anyways after the installation, so you might as well let the system do it for you. Note: When you check off the ‘Restart the destination server automatically if required’ checkbox, you will immediately be prompted with the following dialog. Click Yes. On the Results screen, click Close. After the system restarts, and Server Manager launches, you will have to promote the server as a domain controller. This is because Active Directory has been installed, but that process does not automatically promote the server. Click on the ‘Promote this server to a domain controller’ link. On the Deployment Configuration screen, select ‘Add a new forest’ since this is the first domain controller in our lab. Then enter a root domain name, and click Next. In my example I am using “SC.LAB” for System Center Lab (since I will be installing all other System Center products in my lab eventually). For the Domain Controller Options, select the appropriate Forest functional level, and Domain functional level. This is more applicable if you already have an existing domain and are adding a new domain controller. But since this is the first domain controller in our new domain, then we’ll use the highest level, that of Windows Server 2012. Also, don’t forget to create the Directory Service Restore Mode password. Then press Next. On the DNS Options screen, you can ignore this warning message and click Next. On the Additional Options screen, click Next. On the Paths screen, normally you would change the location for the database, log files, and SYSVOL, but since we are just in a lab environment, we’ll leave it at the defaults and click Next. On the Review Options scree, review what you have entered/selected, and click Next. The Prerequisites Check screen will check and confirm that everything passes before promoting the system as a domain controller. You will notice in my screenshot, that I have 1 warning because I didn’t set a static IP for the server yet. After installation completes, the system will automatically restart. You will then be presented with the login screen. Something to note here, that because we were originally logged in with a local account, the first time you want to log on using a domain account you will have to type the domain\username; in my example SC\Administrator. When you login, you will then see in the Server Manager, that AD DS is now listed, along with DNS. Now all that you need to do is assign a static IP to your domain controller. To do this, in Server Manager, select Local Server from the panel on the left. From there, click on the Ethernet link labelled ‘IPv4 address assigned by DHCP, IPv6 enabled’. This will cause the Networks Connections explorer to open. From here, right click on the Ethernet network that is displayed. This is in fact the network connection that we configured when we first created the VM. On the Ethernet Properties dialog, select ‘Internet Protocol Version 4 (TCP/IPv4)’ and click the Properties button. Within the Internet Protocol Version 4 (TCP/IPv4) Properties dialog, enter a static IP, gateway, and DNS that is applicable to your network. Once all the items have been entered, click OK. You will also have to click Close on the Ethernet Properties dialog as well. Congratulations, you now have a domain setup in your lab environment. Add Systems to Your Domain Now that you have your domain setup, you need to add your other VM (the one that we will use for SCVMM) to the domain before being able to install SCVMM. Log into the system you want to add to the domain. To do this in Server 2012, launch Server Manager, and click on Local Server. Then click on the computer name. This will launch the System Properties dialog. From this dialog, click the Change button. From this dialog, select the Domain option for ‘Member of’, and enter the domain name you want to join and press OK. After pressing OK, you are immediately presented with a Windows Security dialog, in which you need to enter the credentials of an account that has Domain Admin rights. Enter the credentials and click OK. Once the system is successfully joined to the domain, you will receive the following Welcome message. Press OK. After you press OK to the Welcome message, you will receive a second prompt, indicating that you need to restart the system for the changes to take effect. You will be back on the System Properties dialog. Press Close. When you press Close, you will receive yet another prompt about restarting the system. You can choose to Restart Now or Restart Later, but you won’t be able to install SCOM without the VM being added to the domain. After the system restarts, you will then be presented with the login screen. Something to note here, that because we were originally logged in with a local account, the first time you want to log on using a domain account you will have to type the domain\username; in my example SC\Administrator. Now we have our Active Directory server setup and ready, and the VM we will be installing SCOM on is joined to the domain. Now we can move onto installing SQL Server.
-
- SCVMM
- Virtual Machine Manager
- (and 5 more)
-
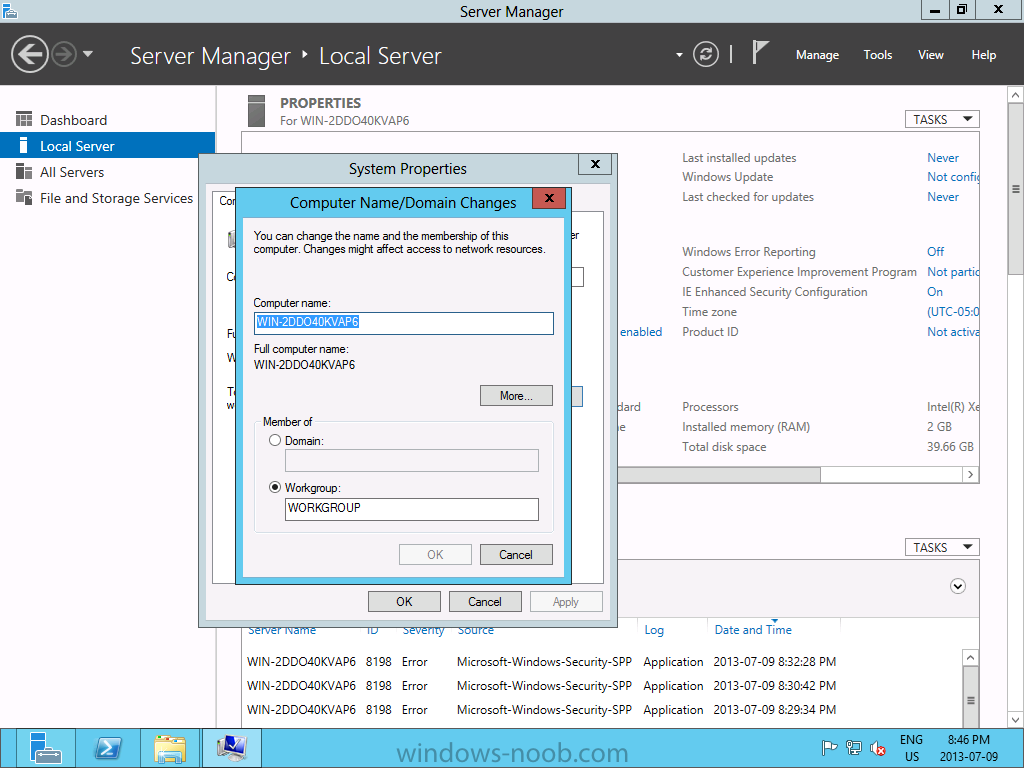
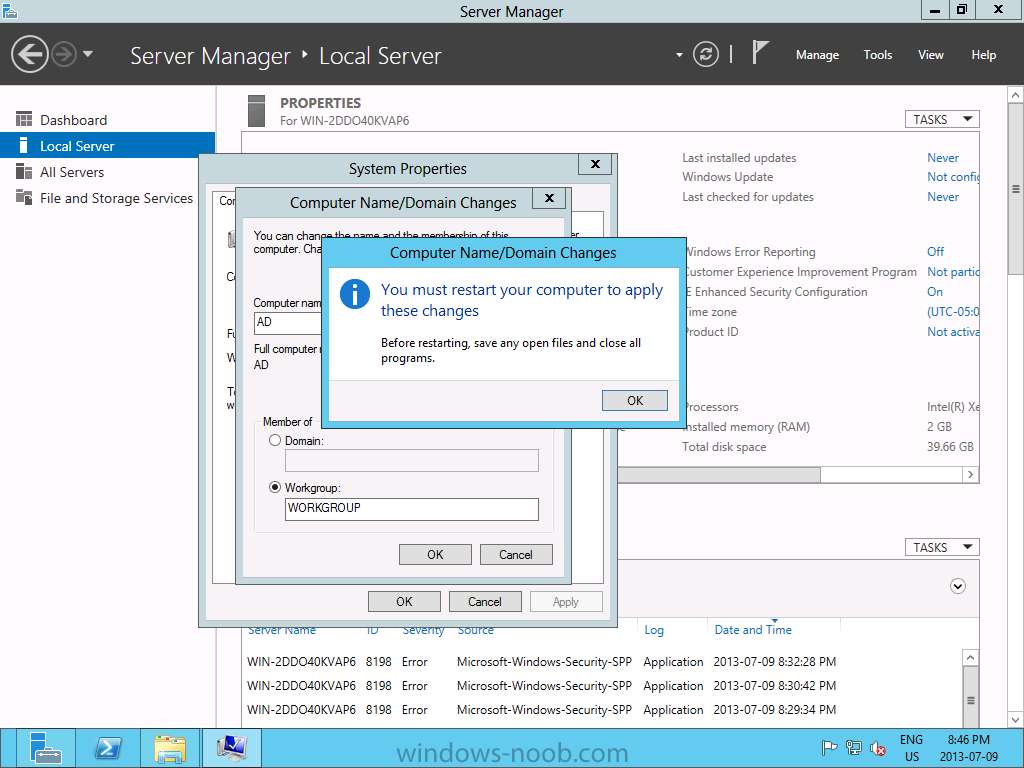
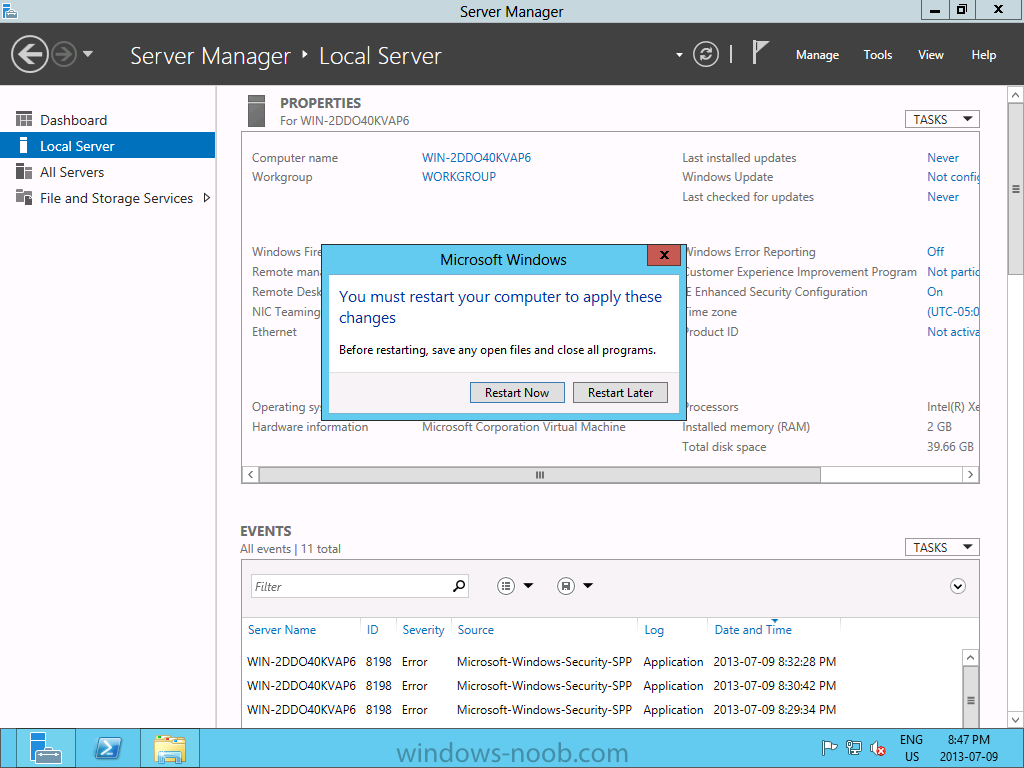
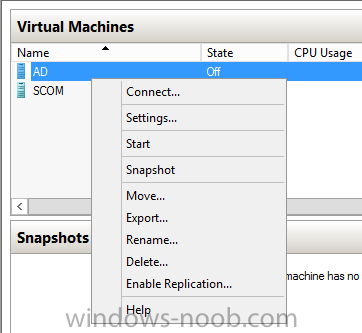
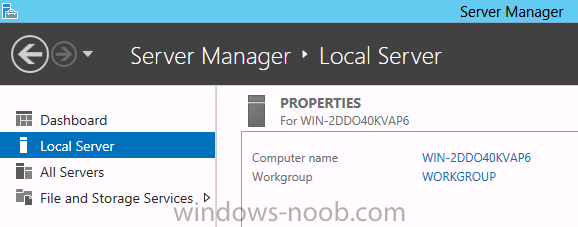
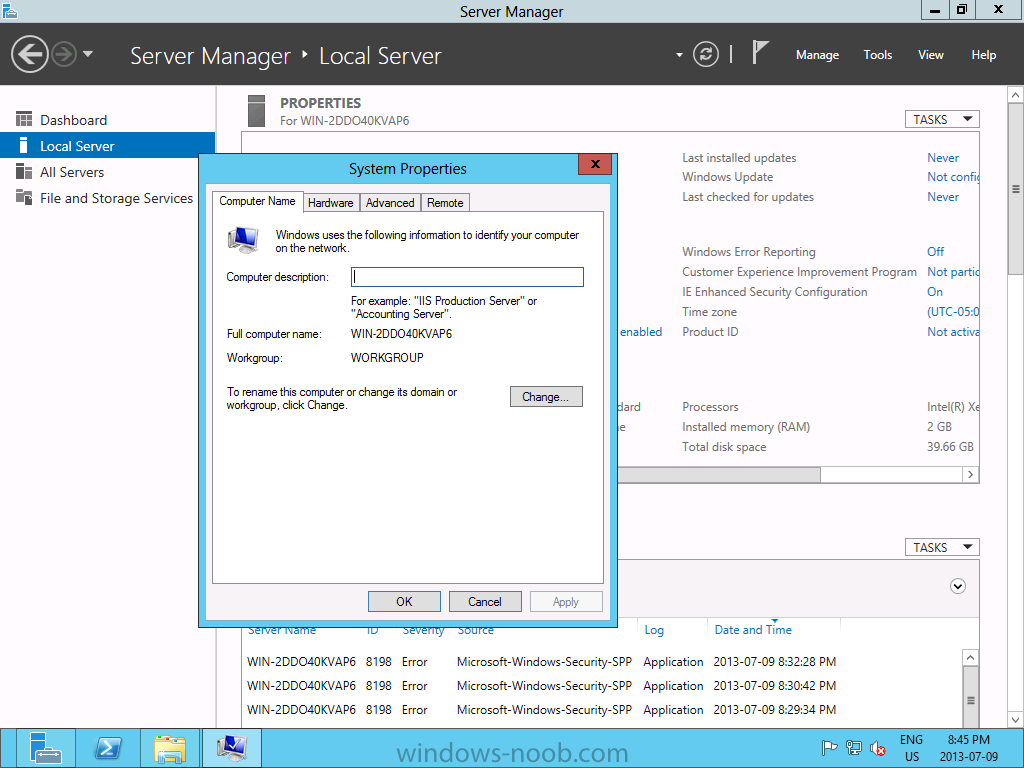
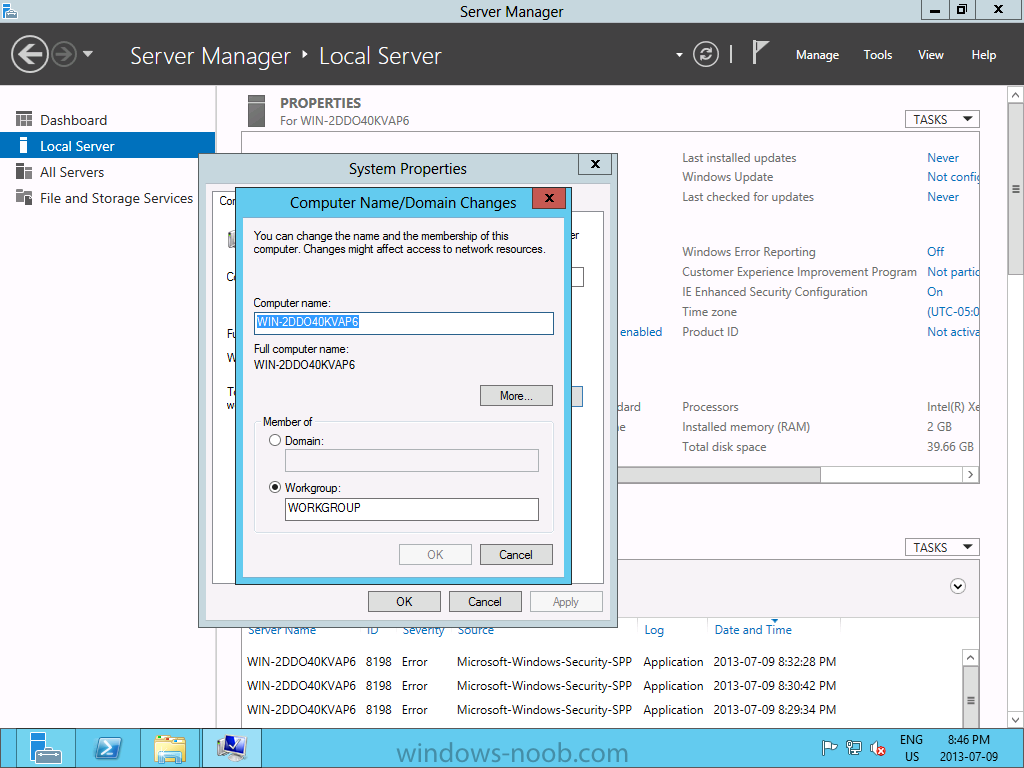
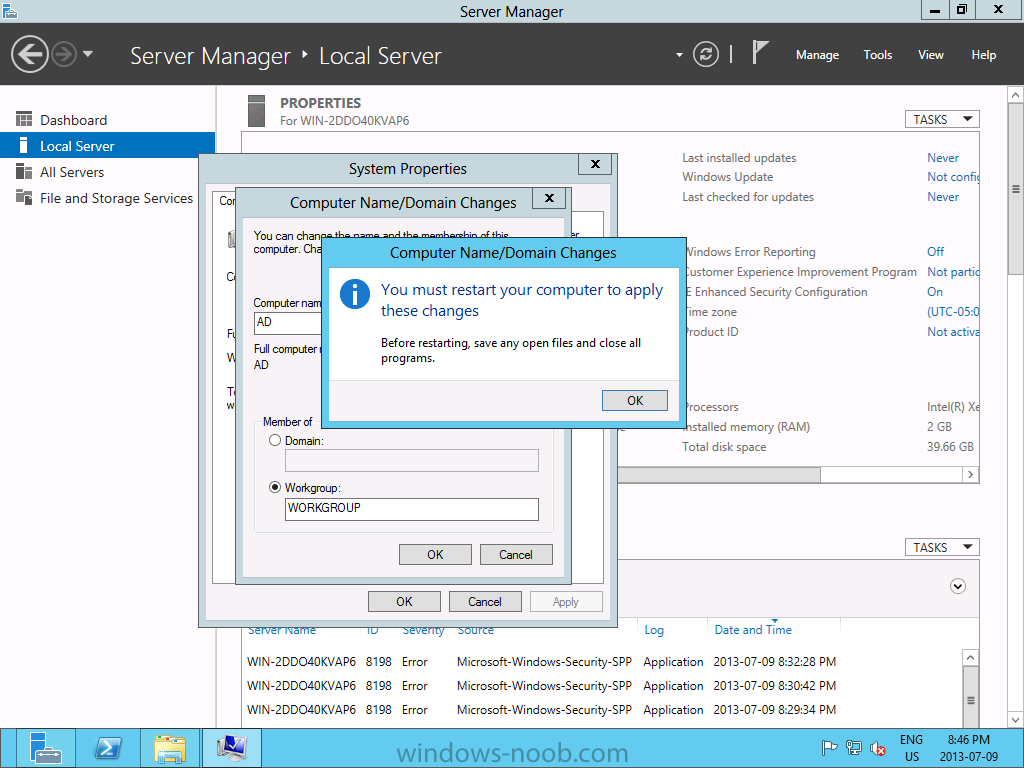
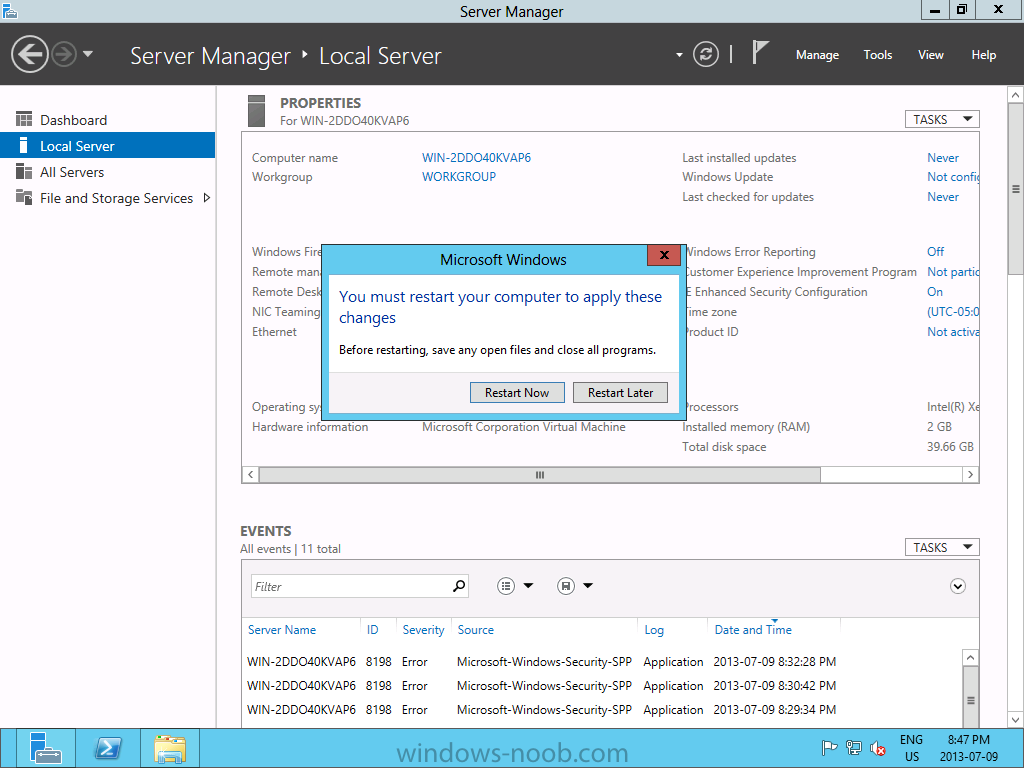
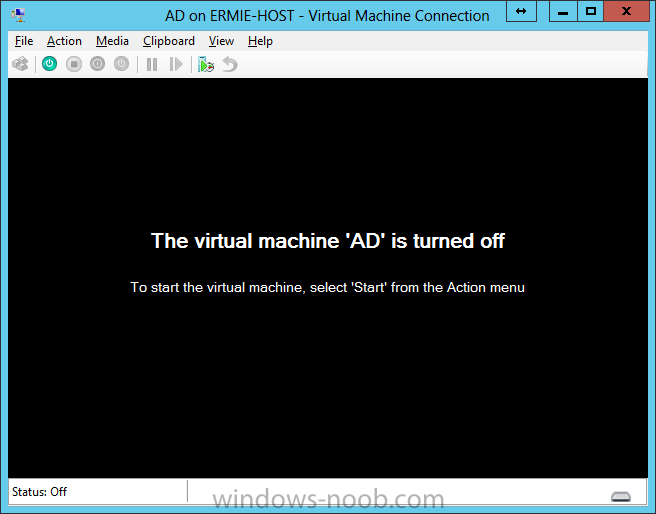
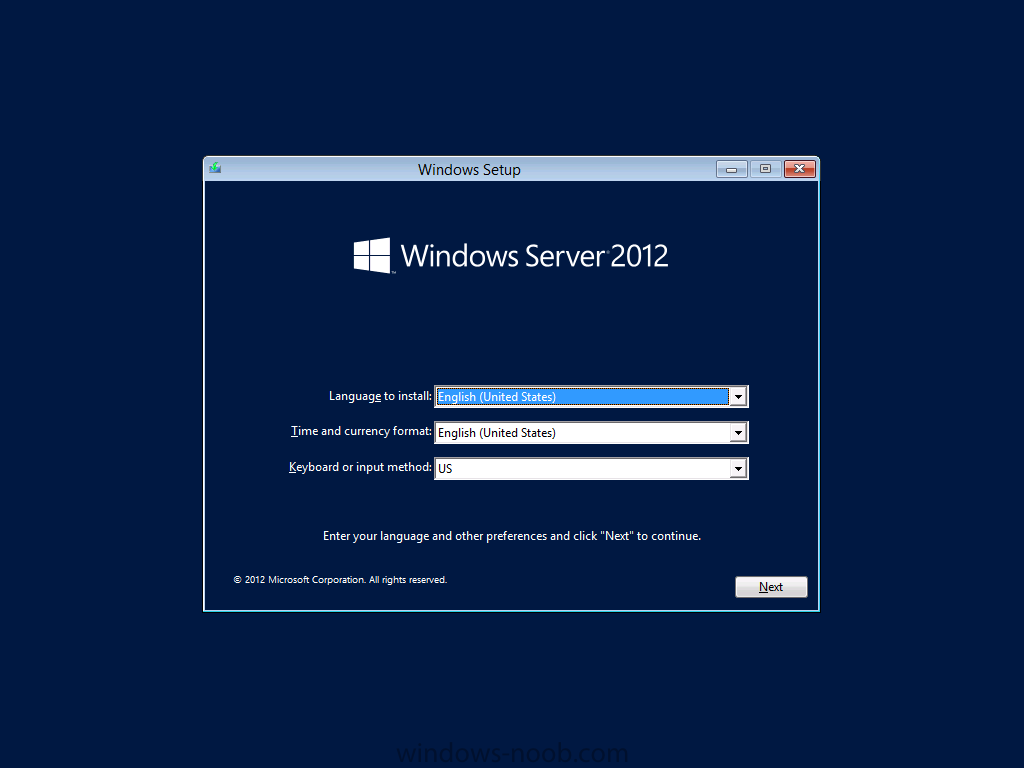
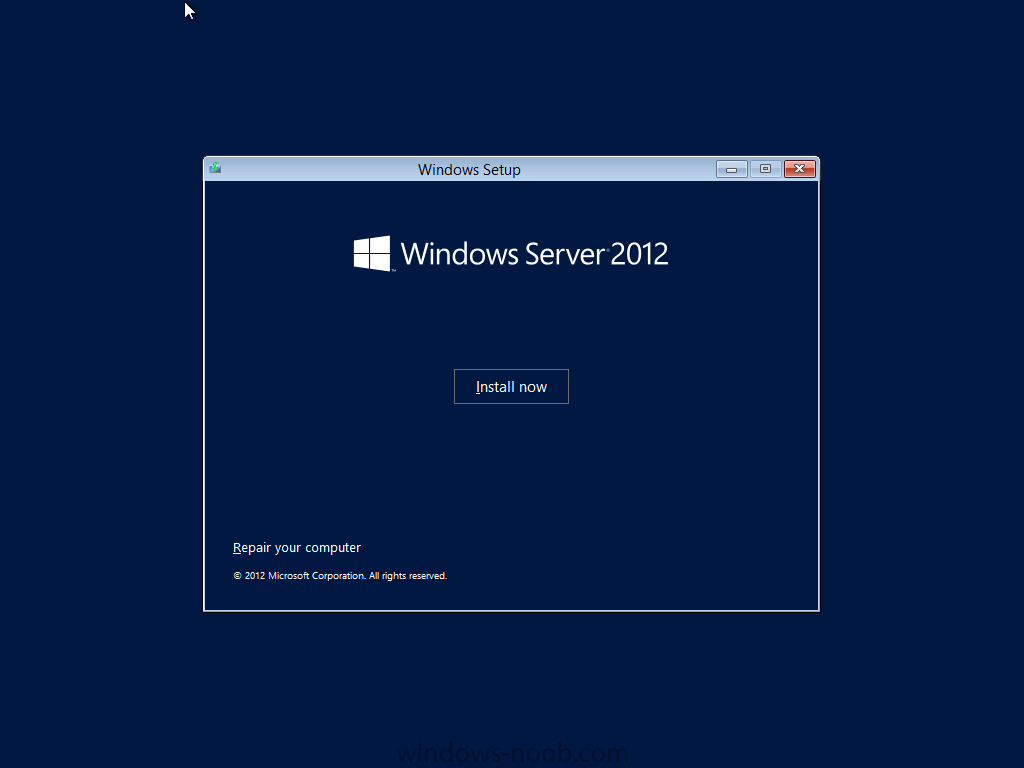
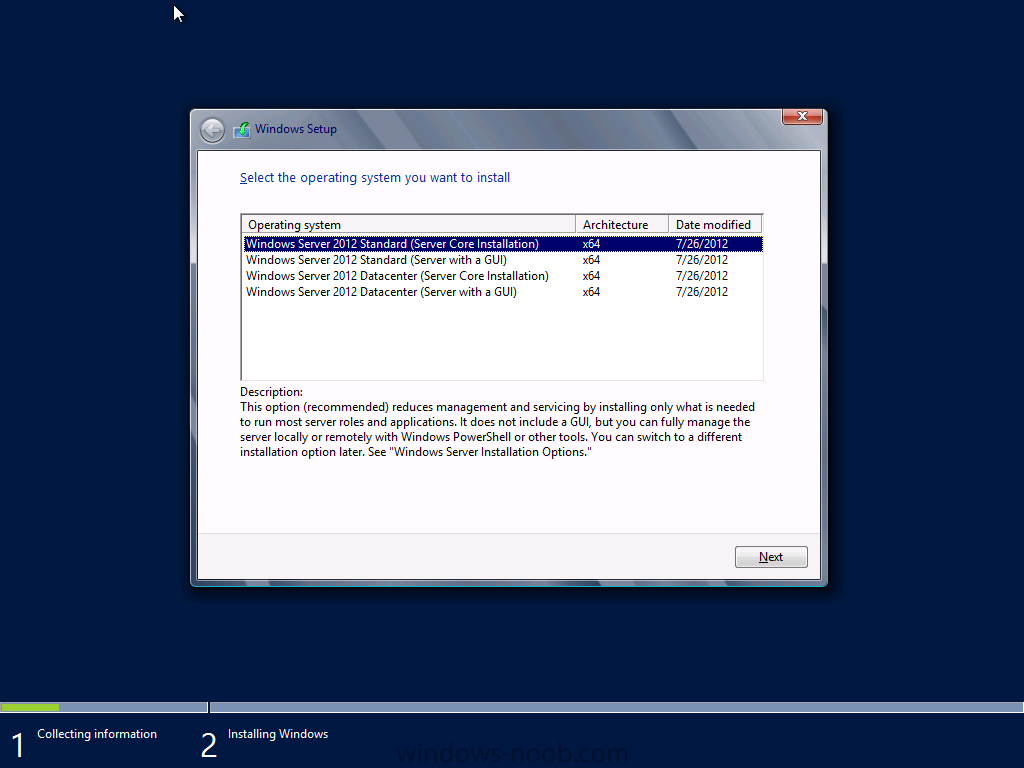
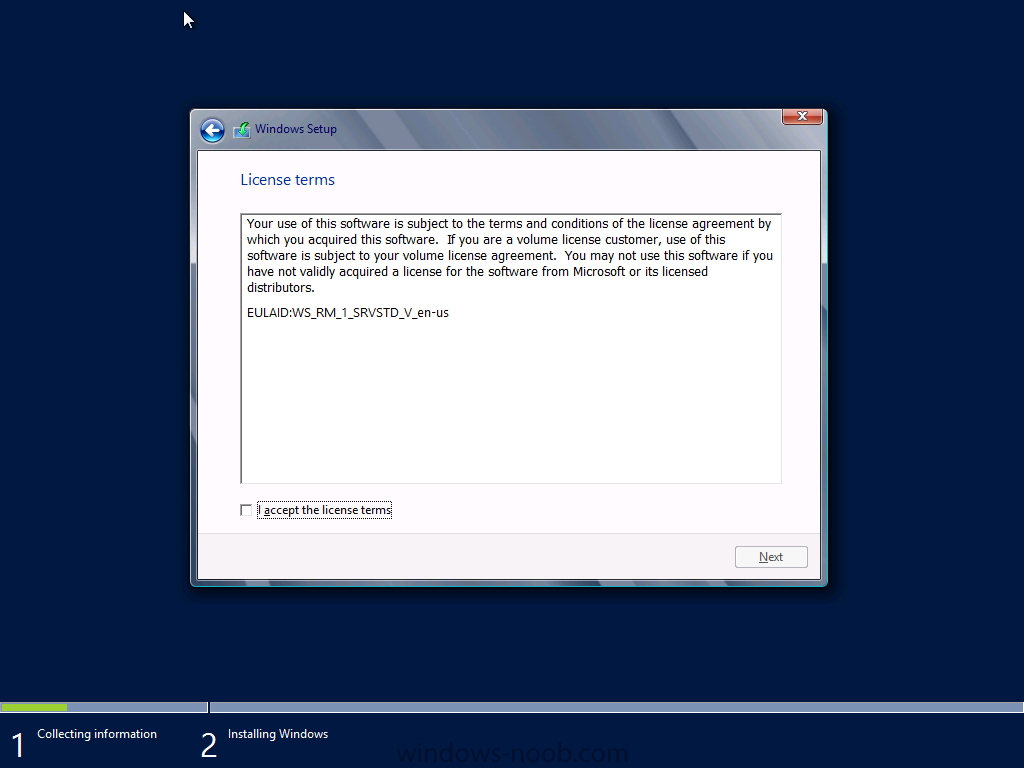
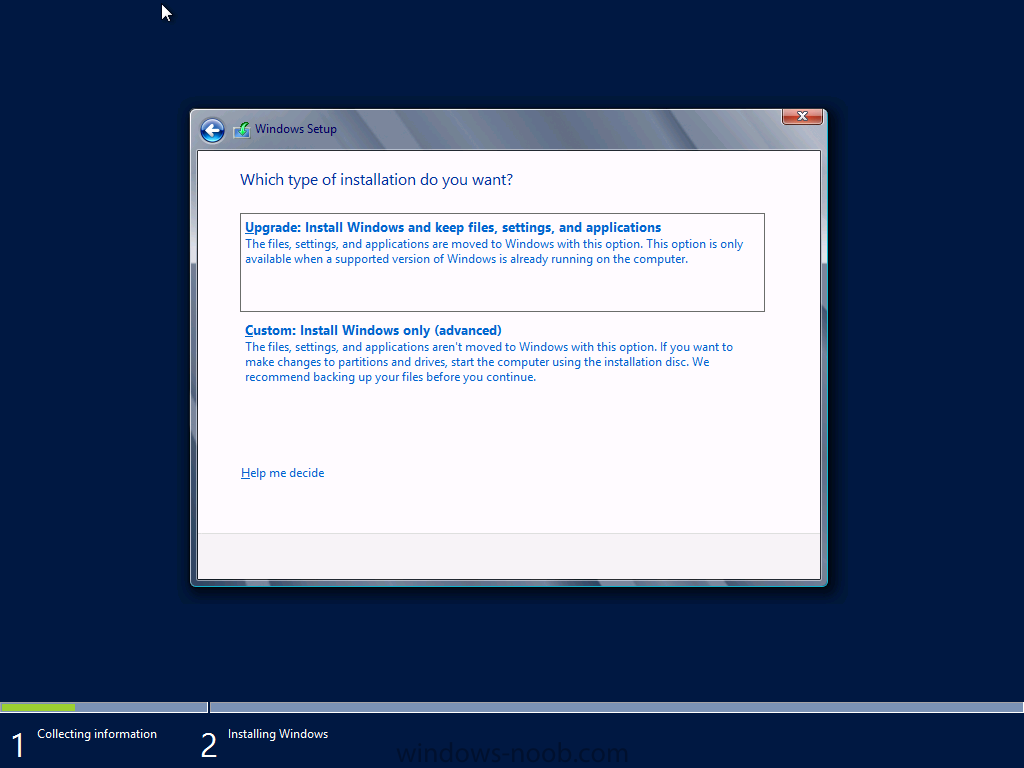
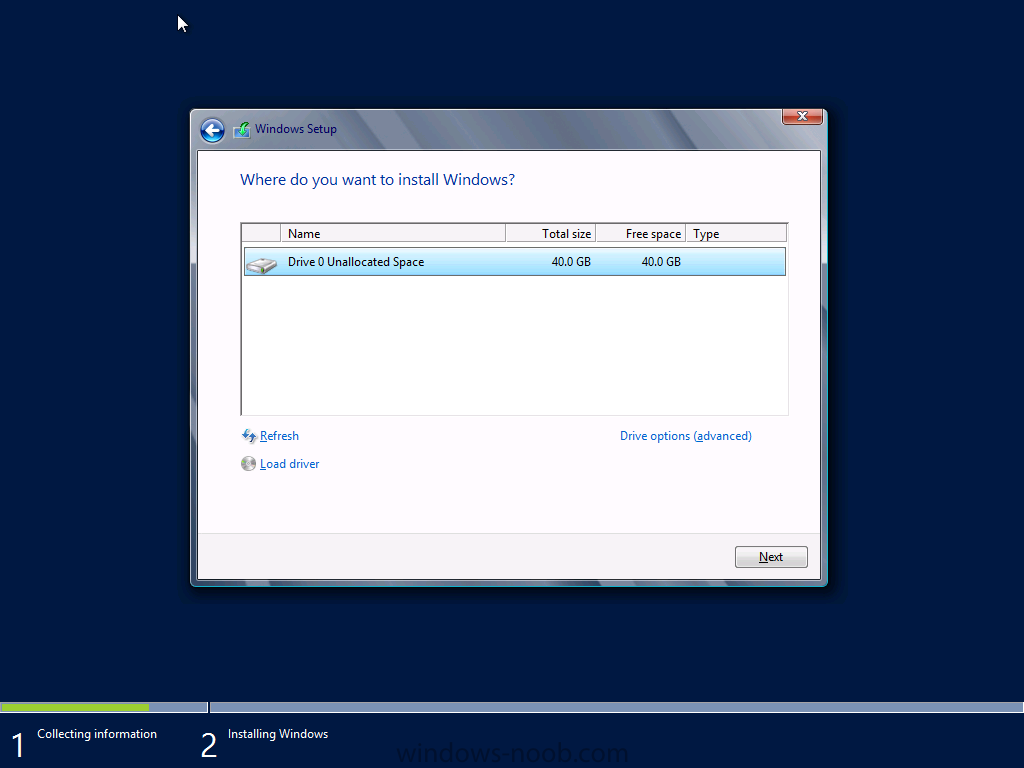
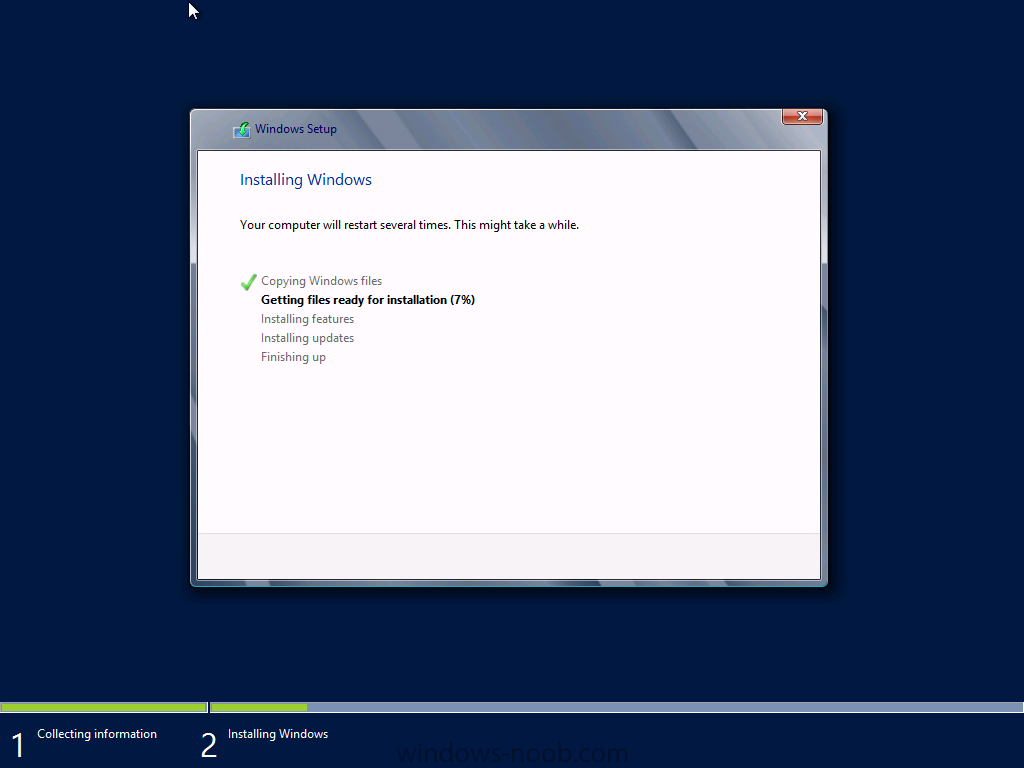
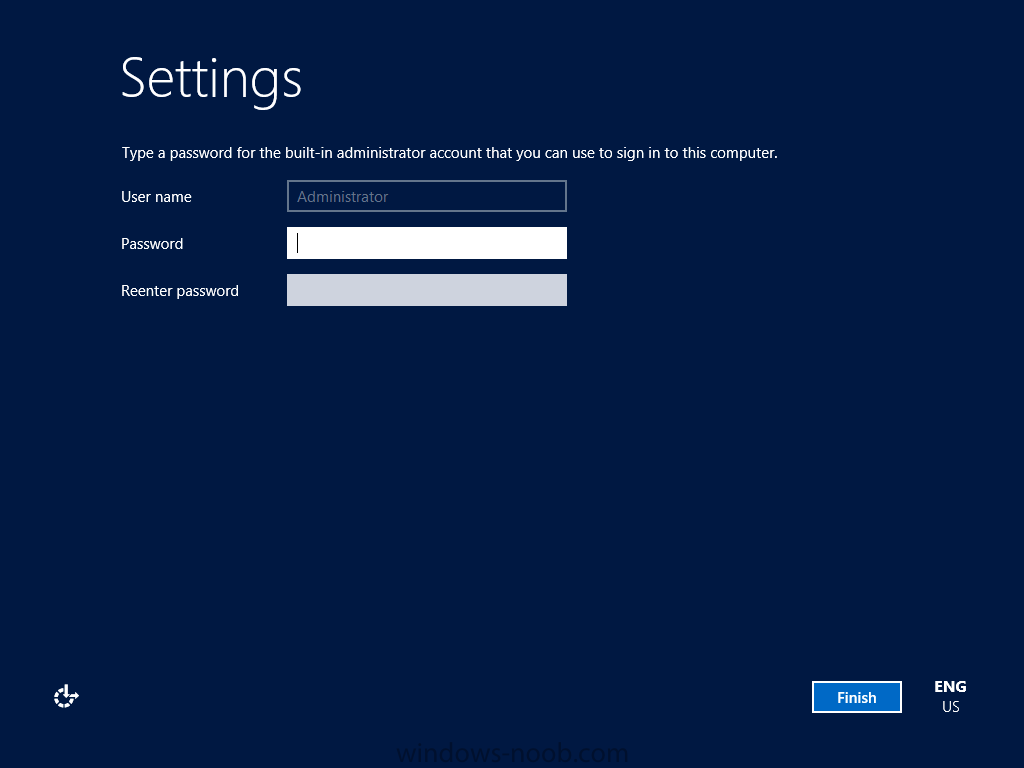
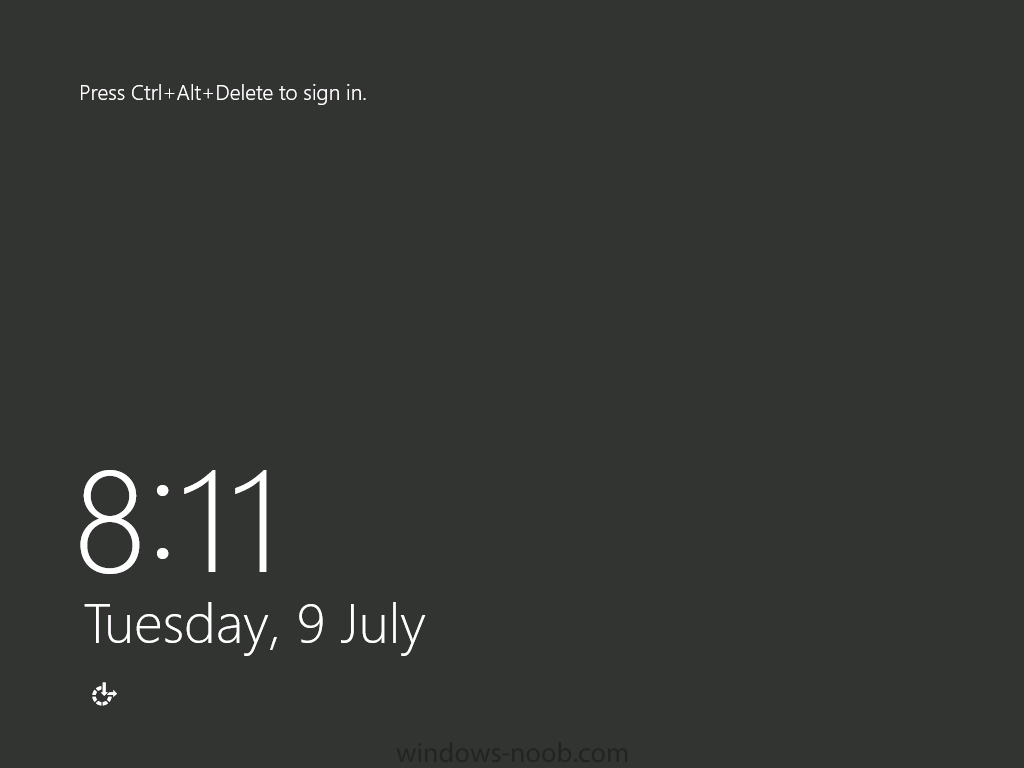
In our last post we created the VM's we require for our lab. Now we will move onto the Operating System (OS). Install the Operating System Now that we have created the VMs for our lab, we can install the Operating System (OS). Start by connecting to one of the VMs, either by double clicking on the VM in Hyper-V Manager, right click the VM and choose Connect, or click on Connect from the Action pane/menu. When you have the VM connection up, and an ISO mounted, power the VM on. On the Windows Setup screen, select the Language, Time/Currency Format, and Keyboard Method appropriate, and click Next. All you have to do now is click Install Now. Next you have to choose the Operating System and version you want to install. In our lab example, I will choose Windows Server 2012 Standard (Server with a GUI). Make your selection and then click Next. You will have to accept the license terms, and then click Next. For the Installation Type, since we don’t already have an OS installed, we will choose the ‘Custom: Install Windows only (advanced)’ option. Now select the hard drive that you want to install the OS to. Since we only created one hard drive when setting up the VM, we only have one to choose from. Select it, and click Next. Now all you have to do is wait for the installation to finish. Once the installation is complete, you will be prompted to enter a password for the local administrator account. This is different from a domain-based local administrator account. Enter a password and click Finish. After some final quick configuration, you will then be presented with the login screen. Now repeat these steps for the other VMs in the lab. NOTE: After you install an OS, you will need to rename the computer within the OS. To do this in Server 2012, launch Server Manager, and click on Local Server. Then click on the computer name. This will launch the System Properties dialog. From this dialog, click the Change button. From this dialog, enter the name you want to call the computer. In my lab, I called the Active Directory computer “AD”, and the Virtual Machine Manager computer “SCVMM”. Press OK after entering the name. You will encounter the following prompt. Click OK. Then click Close on the System Properties dialog. You can choose to either Restart Now or Restart Later, but the name change will not take effect until you do so. In our next post we will install Active Directory.
-
- SCVMM
- Virtual Machine Manager
- (and 3 more)
-
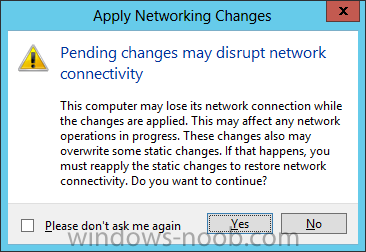
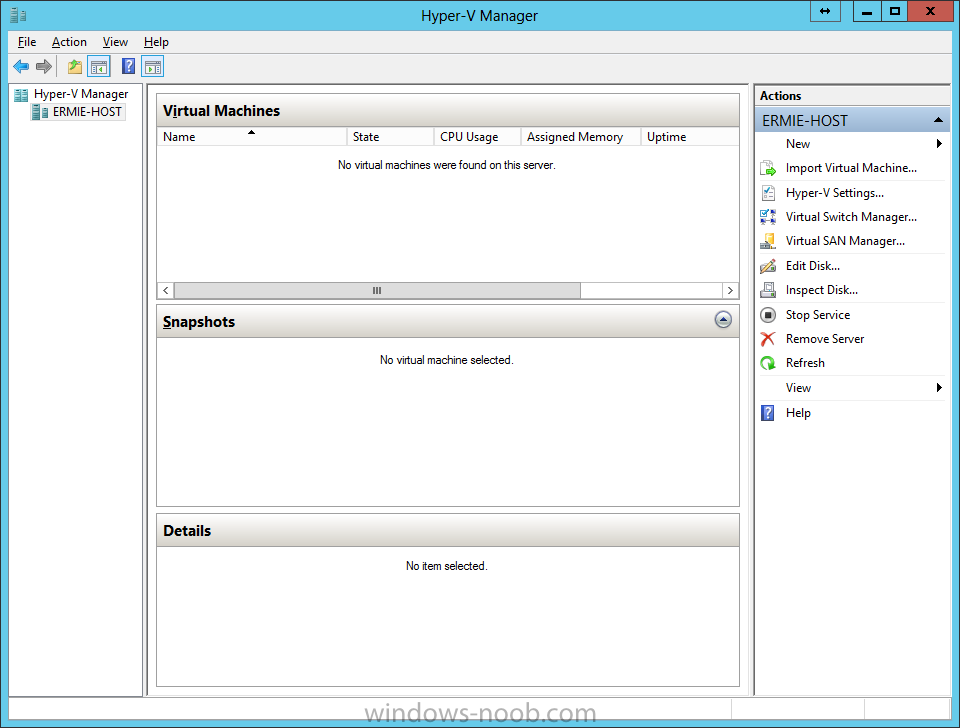
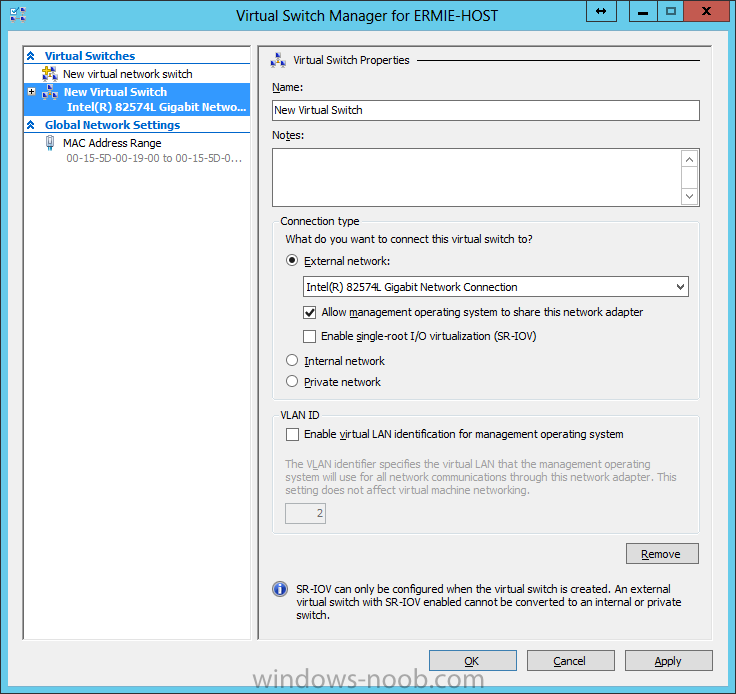
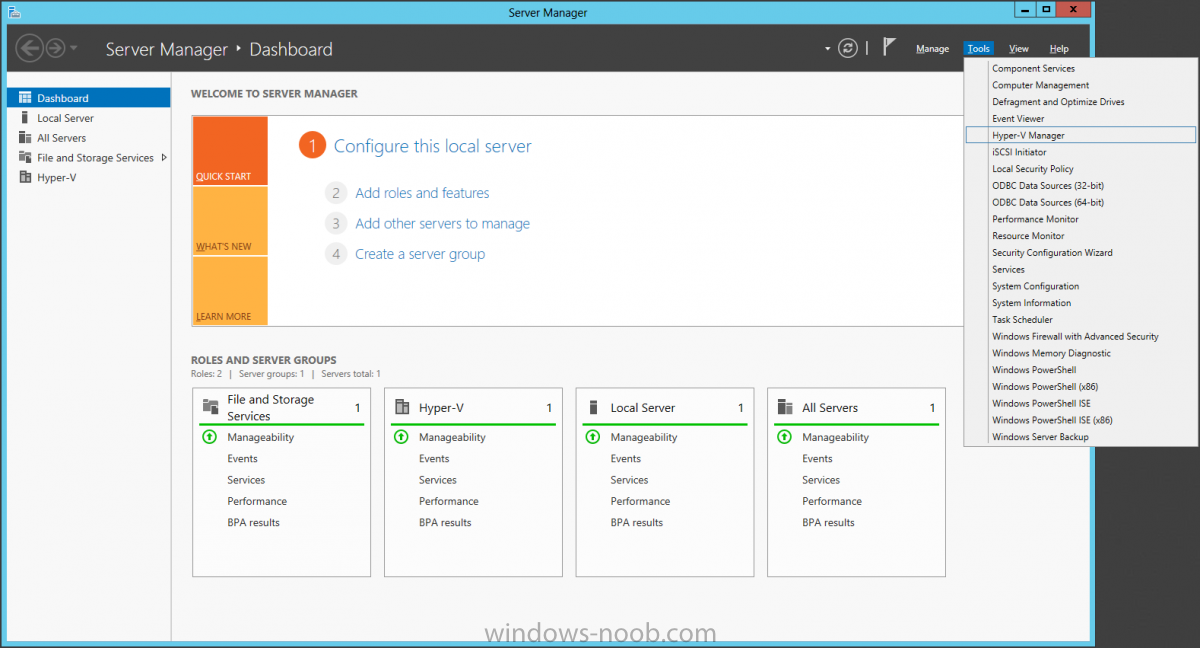
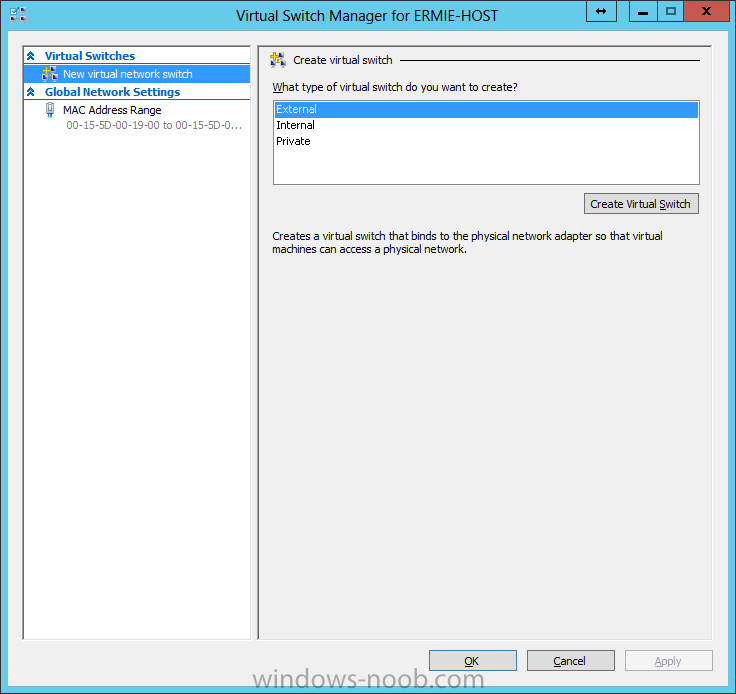
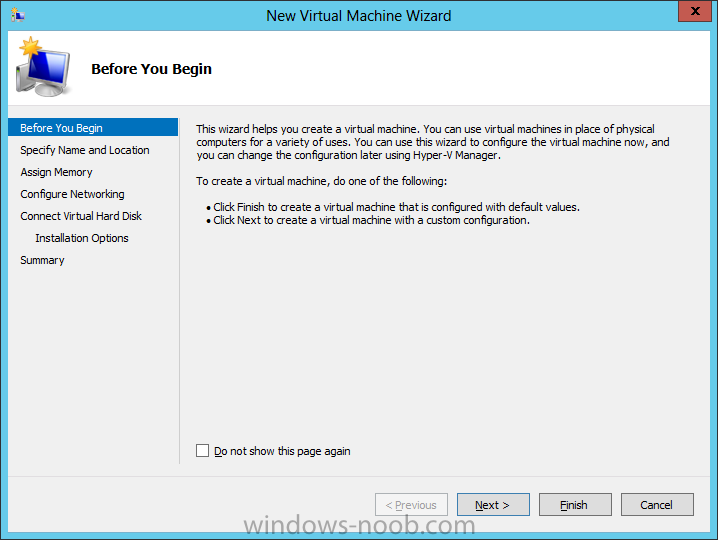
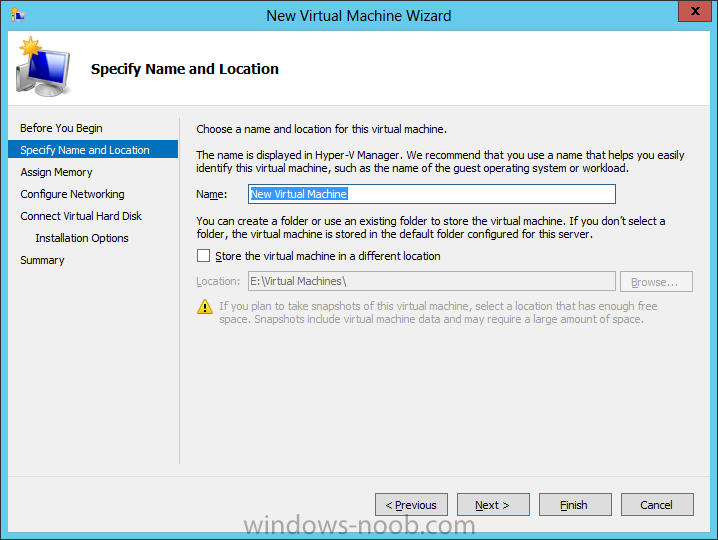
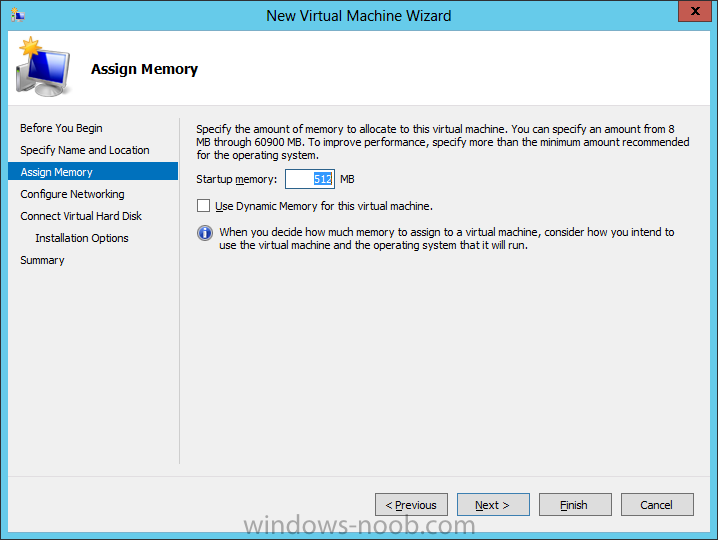
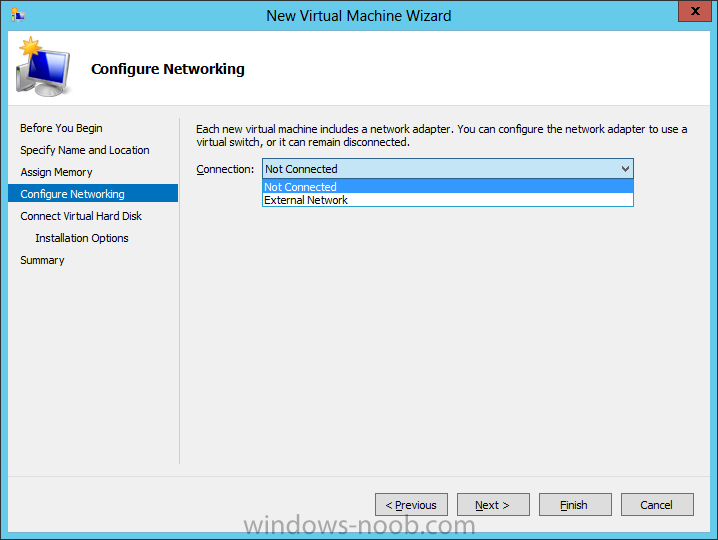
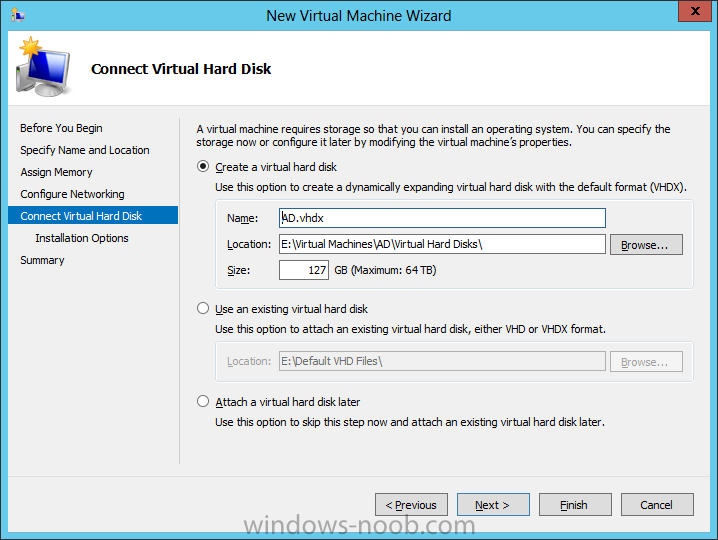
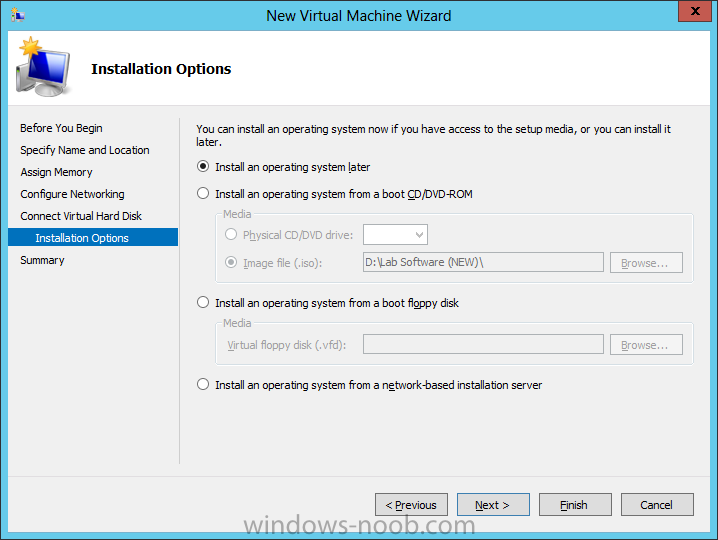
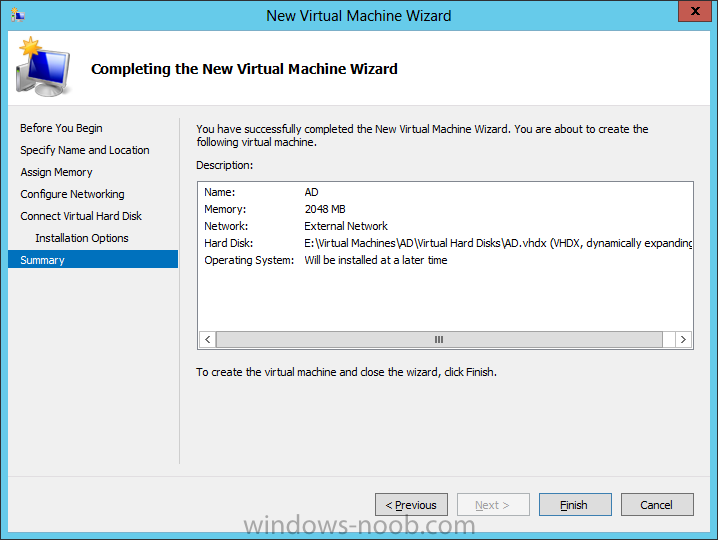
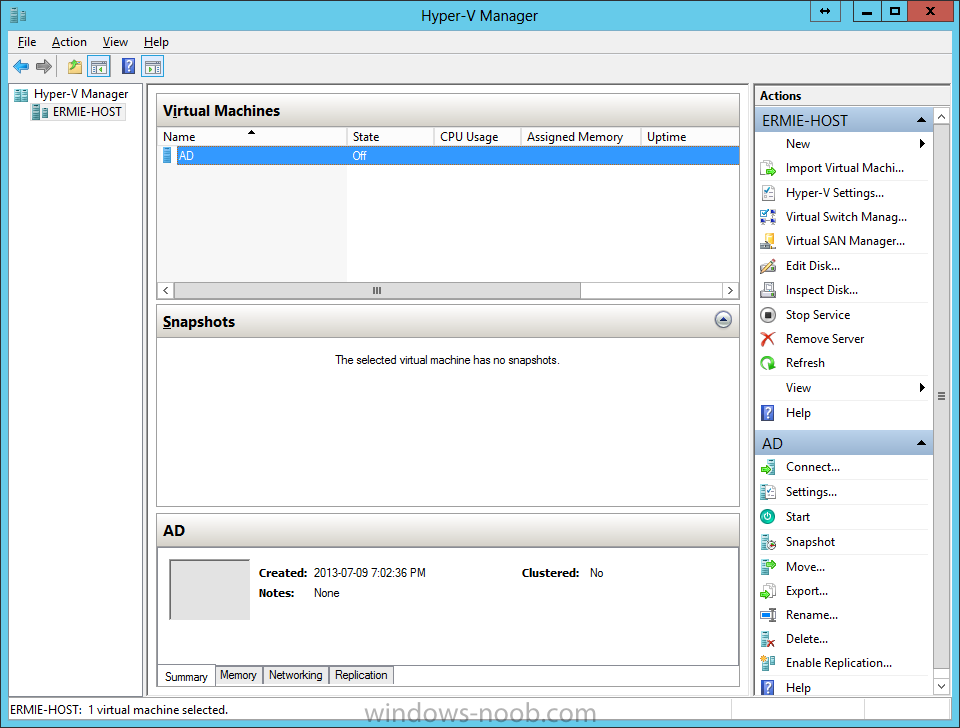
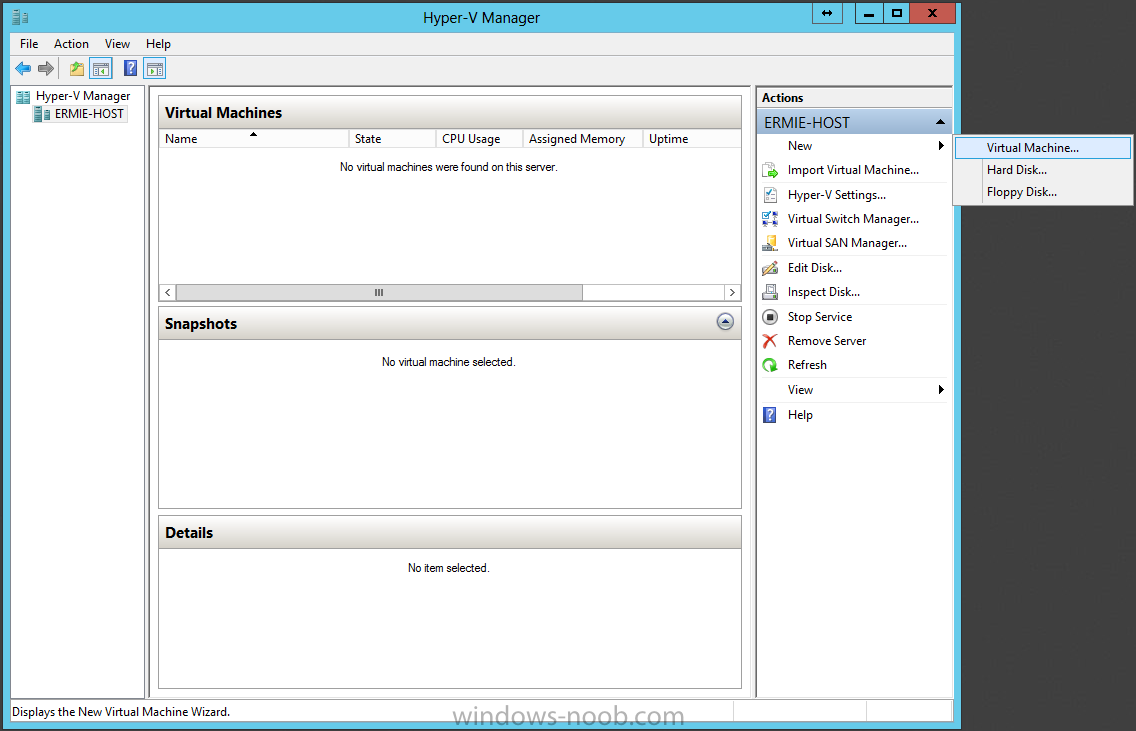
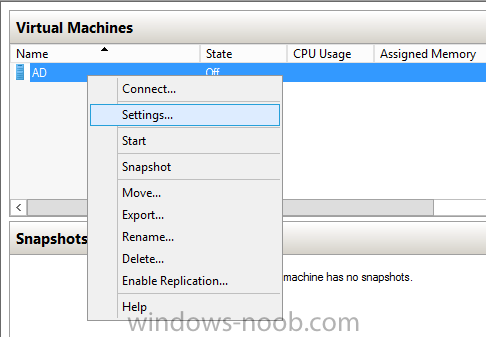
Welcome. For those of you that know me from my SCOM guides, I thought I would attempt to provide a similar series of guides for SCVMM. Please note that some of the screenshots (i.e. for creating the VM, OS/AD install, joining the domain, etc.) are from my SCOM guides. I figured that it would save time on the “normal” stuff, so that I can focus on the actual SCVMM part. Introduction: I use Hyper-V in my LAB and that's what all these virtual machines will be running on. In my lab, I have Windows Server 2012 Datacenter installed as the server OS on the host machine. All other virtual machines will be running Windows Server 2012 Standard edition, with the graphical user interface (GUI). My hardware consists of the following: Intel Xeon E5-2620 Asus P90X79 WS 64 GB G.Skill Ripjaws Z Series 2 x 256 GB Samsung 840 Pro Series SSD High Level Plan Here is a high level of what we are going to complete in this initial part of the series. Create the Lab Environment Install the Operating System Install Active Directory Domain Services Install SQL Server Install System Center Virtual Machine Manager In a later posts, we will also cover reporting, adding hosts, networks, storage, create templates, etc. So now let’s start with the first part, creating the lab environment. Create the Lab Environment:Hyper-V Configuration As mentioned, my environment uses Hyper-V. So, we’re going to start by configuring Hyper-V for our needs, and creating the Virtual Machines (VMs) required for our lab. The first thing we need to do is setup a Virtual Switch for the VMs to connect through. Launch Server Manager, click on Tools, and select Hyper-V Manager. When Hyper-V loads, it will have nothing in it. Even if we were to create a VM, it wouldn't have a network connection to use. So we’ll start with creating a Virtual Switch. As you can from my screenshot, I have 2 LAN ports on my host. One of them has a connection to my home network and the Internet. In the Hyper-V Manager, click the Virtual Switch Manager from the Actions pane. Now, click on the Create Virtual Switch button. From here, you now need to configure the virtual switch that your VMs will use. Give it a name to clearly identify it (in my case I called it ‘External Network’), and choose the connection type. For more information about virtual networks, see the following TechNet article: http://technet.microsoft.com/en-us/library/cc816585(v=ws.10).aspx. Here is an excerpt from the article: § External virtual networks. Use this type when you want to provide virtual machines with access to a physical network to communicate with externally located servers and clients. This type of virtual network also allows virtual machines on the same virtualization server to communicate with each other. This type of network may also be available for use by the management operating system, depending on how you configure the networking. (The management operating system runs the Hyper-V role.) For more information, see “A closer look at external virtual networks” later in this topic. § Internal virtual networks. Use this type when you want to allow communication between virtual machines on the same virtualization server and between virtual machines and the management operating system. This type of virtual network is commonly used to build a test environment in which you need to connect to the virtual machines from the management operating system. An internal virtual network is not bound to a physical network adapter. As a result, an internal virtual network is isolated from all external network traffic. § Private virtual networks. Use this type when you want to allow communication only between virtual machines on the same virtualization server. A private virtual network is not bound to a physical network adapter. A private virtual network is isolated from all external network traffic on the virtualization server, as well any network traffic between the management operating system and the external network. This type of network is useful when you need to create an isolated networking environment, such as an isolated test domain. For our demonstration, we are going to use an External Network so that the VMs can communicate with the Host system. Make all the appropriate selections and so forth, and then press OK. You may encounter the following warning message. This is because we are remotely connecting to the Host machine using the same network connection that we are about to setup as a Virtual Switch (hence selecting the ‘Allow management operating system to share this network adapter’ checkbox). Press ‘Yes’ to the dialog. Now that we have the virtual switch setup, we can start creating VMs for our lab. Create the Virtual Machines Let’s now create the VM’s we will need for the lab, specifically one for Active Directory, and another for SCVMM (since we are install all roles within the same server). In Hyper-V Manager, from the Actions pane, click on New and choose Virtual Machine. On the New Virtual Machine wizard beginning screen, click read the information presented and then click Next. Enter a name for the VM. Note that this is NOT the name the VM will have within the Operating System (unless you name it the same), but rather, used as an identifier in Hyper-V Manager. After you have entered a name, click Next. Now assign the amount of memory you want your VM to have, and then press Next. This is the screen where you connect your VM to the network that we created, then press Next. This is the screen where you configure how large a hard drive the VM will have. Make the appropriate customizations and click Next. For the Installation Options, choose if you will install an OS later, or if you want to use an ISO, then click Next. On the Summary screen, review your selections and entries, and click Finish. Once the VM is created, it will appear in the Hyper-V Manager. If you want to configure further settings, like the number of CPUs and mounting an OS ISO, right click on the VM and choose Settings or click on Settings from the Actions pane. Repeat these steps for each VM you need to create, in our case one for Active Directory and another for SCVMM. Here are the settings I have used for each of the VM’s: Active Directory: Virtual Machine Name: AD Memory: 2048 MBNOTE: Active Directory doesn’t need 2 GB of RAM, it will run fine with 512 MB. I just increased the RAM so that the OS would install/respond faster. CPUs: 2 OS: Windows Server 2012 SCVMM: Virtual Machine Name: SCVMM Memory: 4096 MBNOTE: You may need to increase the amount of RAM this VM has, depending on performance. CPUs: 2 OS: Windows Server 2012 In our next post we will install the Operating System.
-
- SCVMM
- Virtual Machine Manager
- (and 3 more)


