thadkew
-
Posts
139 -
Joined
-
Last visited
-
Days Won
2
Everything posted by thadkew
-
I might have a hard time explaining this, but here goes: I would like to have a separate partition created that can be used for local imaging. Meaning that I'd like a "Z:" drive created that can be used to boot and image the C drive if there is a corruption on C. This Z drive would work similarly to a USB drive that has the MDT Media on it. Does that make sense? Can it be done?
-
We have a set of PCs that are being used as voting stations. The council president would like to have an inventory of the hardware/software, but doesn't want to have *any* software or updates pushed to them. Is there a way to send a "neutered" client to these machines?
-
Is it possible to change the "Recovery From Domain" from the post install to the end of the task sequence? Our system administrators have put in a new sign in policy that after the user presses CTRL-ALT-DEL a "warning" is shown. During the MDT process, this causes a pause that requires user intervention. If I move the "Recovery From Domain" to the end, this should alleviate the issue with that warning, i believe. Can this be done without any issues?
-

MDT 2010 and Windows XP
thadkew replied to bluidgr75's question in Microsoft Deployment Toolkit (MDT)
Create a capture task, image a PC with your XP stuff and make any changes Boot the machine and run the LiteTouch.vbs and select the capture task. Afterwards, import the OS into your deployment share and you're good to go. If you can get the Win7 to work, you can certainly get the WinXP to work. Just don't over-think it. -
X86 vs x64 maybe? disable everything from your task except the capture, the install and the restore. Let's see what happens.
-
I just looked at my rules file and it doesn't specify the server location of backup data and we don't have WIPEDISK at all. But everything else that you have, i have.
-
You should download the USMT 3.0.1 from the information center. I believe the zti error youre getting it from not having a migapp or miguser file that the met is looking for. It looks like your cs.ini setting is correct, but I will have to check further when I get back to work. Check out Johann's site. http://www.deploymentresearch.com/ It's got a lot of great stuff on there. That will also help a lot. I understand what youre trying to do, but also know that winxp to win7 hard inking is probably the easiest way to accomplish it. The upgrade to win 7 through that process saves the user state on the local drive, and therefore uses no network space. In our organization, we do both, because we have an SCCM 2007 and we do a lot of pc reacements. But on the occasion that we upgrade a machine, we will capture offline and then upgrade and then restore. .
-
I assume you have installed USMT through the Information Center/Components (if you're going from XP to 7, i think you need USMT 3.0.1 but i'm probably wrong. It wouldn't hurt to have it anyway) I also don't see this line in your CustomSettings.ini (put them in) USMT4=YES
-
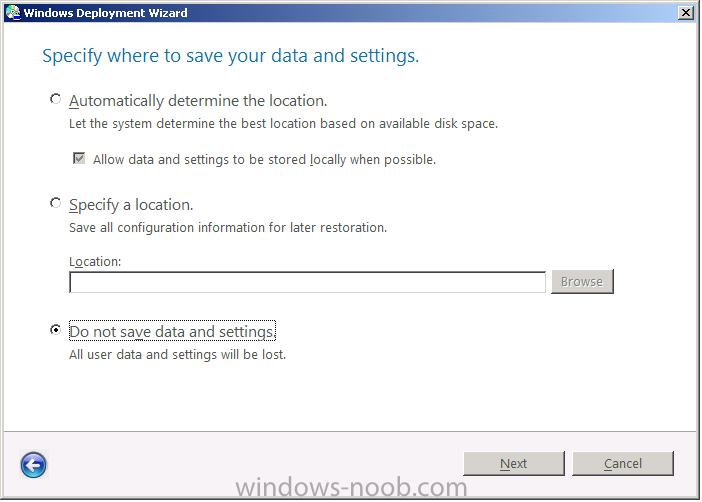
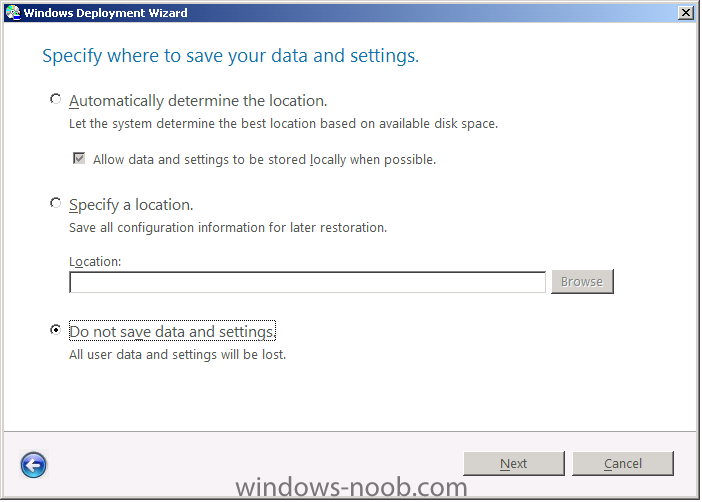
You can do this, however, you wouldn't do it in the way you detail. Make sure the Customsettings.ini has the line: SkipCapture=NO First: you'll need to boot into the PC as an administrator. Second: you'll need to get to the LiteTouch.vbs script from the server Third: If you're doing a hardlink, select "Automatically determine. If not, select the capture and put it somewhere you'd remember (If you're going to put it on the network). Watch it run. Test that out. Hope it works.
-
Prompted for XP Product Key...
thadkew replied to thadkew's question in Microsoft Deployment Toolkit (MDT)
Figured it out. I mounted the WIM and noticed that the sysprep folder contained a sysprep.inf file. Once i deleted that and committed my changes, i can image with no prompts for a password. -
Customsettings.ini shows: SkipProductKey=YES The sysprep.inf and the unattend.xml both have the product key listed. Yet, I just captured an XP image and when i try to deploy, it comes back with a prompt for the product key. I don't want that. I've read that you can add the product key to the customsettings and then put a task sequence variable in there. Where and how do you do that? Please advise.
-
What image are you using? Have you checked out some of the other forums here? anyweb has some great tutorials here...
-
Send Email after OSD Tasks
thadkew replied to thadkew's question in Deploy software, applications and drivers
I don't know if this will help anyone, but here's something I threw together after scouring the googles... strComputer = "." Set objWMIService = GetObject("winmgmts:\\" & strComputer & "\root\cimv2") Set objAdsSystemInfo = CreateObject("adsysteminfo") Set objComputername = Getobject("LDAP://" & objAdsSystemInfo.ComputerName) Set colServiceList = objWMIService.ExecQuery _ ("Select * from Win32_Service where Name = 'PortBlock Service'") strHostName = UCase(replace(objComputerName.Name,"CN=","")) For Each objService in colServiceList If objService.State = "Running" Then objService.StopService() Wscript.Sleep 5000 End If errReturnCode = objService.ChangeStartMode("Automatic") Next Set objMessage = CreateObject("CDO.Message") objMessage.Subject = "SCCM OS deployment has completed" & " " & strHostName objMessage.From = "SCCM_Server@domain.com" objMessage.To = "my_email@domain.com" objMessage.TextBody = "This attachement Contains the Parsed log files" & vbcrlf & "Please review its contents" objMessage.AddAttachment "c:\windows\system32\ccm\logs\smsts.log" objMessage.Configuration.Fields.Item _ ("http://schemas.microsoft.com/cdo/configuration/sendusing") = 2 objMessage.Configuration.Fields.Item _ ("http://schemas.microsoft.com/cdo/configuration/smtpserver") = _ "smtp.domain.com" objMessage.Configuration.Fields.Item _ ("http://schemas.microsoft.com/cdo/configuration/smtpserverport") = 25 objMessage.Configuration.Fields.Update objMessage.Send strComputer = "." Set objWMIService = GetObject("winmgmts:\\" & strComputer & "\root\cimv2") Set colServiceList = objWMIService.ExecQuery _ ("Select * from Win32_Service where Name = 'PortBlock Service'") For Each objService in colServiceList If objService.State = "Stopped" Then objService.StartService() Wscript.Sleep 5000 End If errReturnCode = objService.ChangeStartMode("Automatic") Next -
Check your bios and change the hard drive from raid or ahci to legacy or compatible. If that works, you'll know it's a storage driver...
-
I've tried the instructions here with no success (there's no Task Sequence Manager component) and I tried taking the VBScript and adding it as a "run command prompt" task to the end of a OSD Task. What's the best way to have an email sent out after a deployment is successful (like MDT 2010 can do)
-
Task sequence goes blank in MDT 2010 whiel deploying Win7
thadkew replied to Shweta's question in Zero Touch/ZTI, Lite Touch/LTi
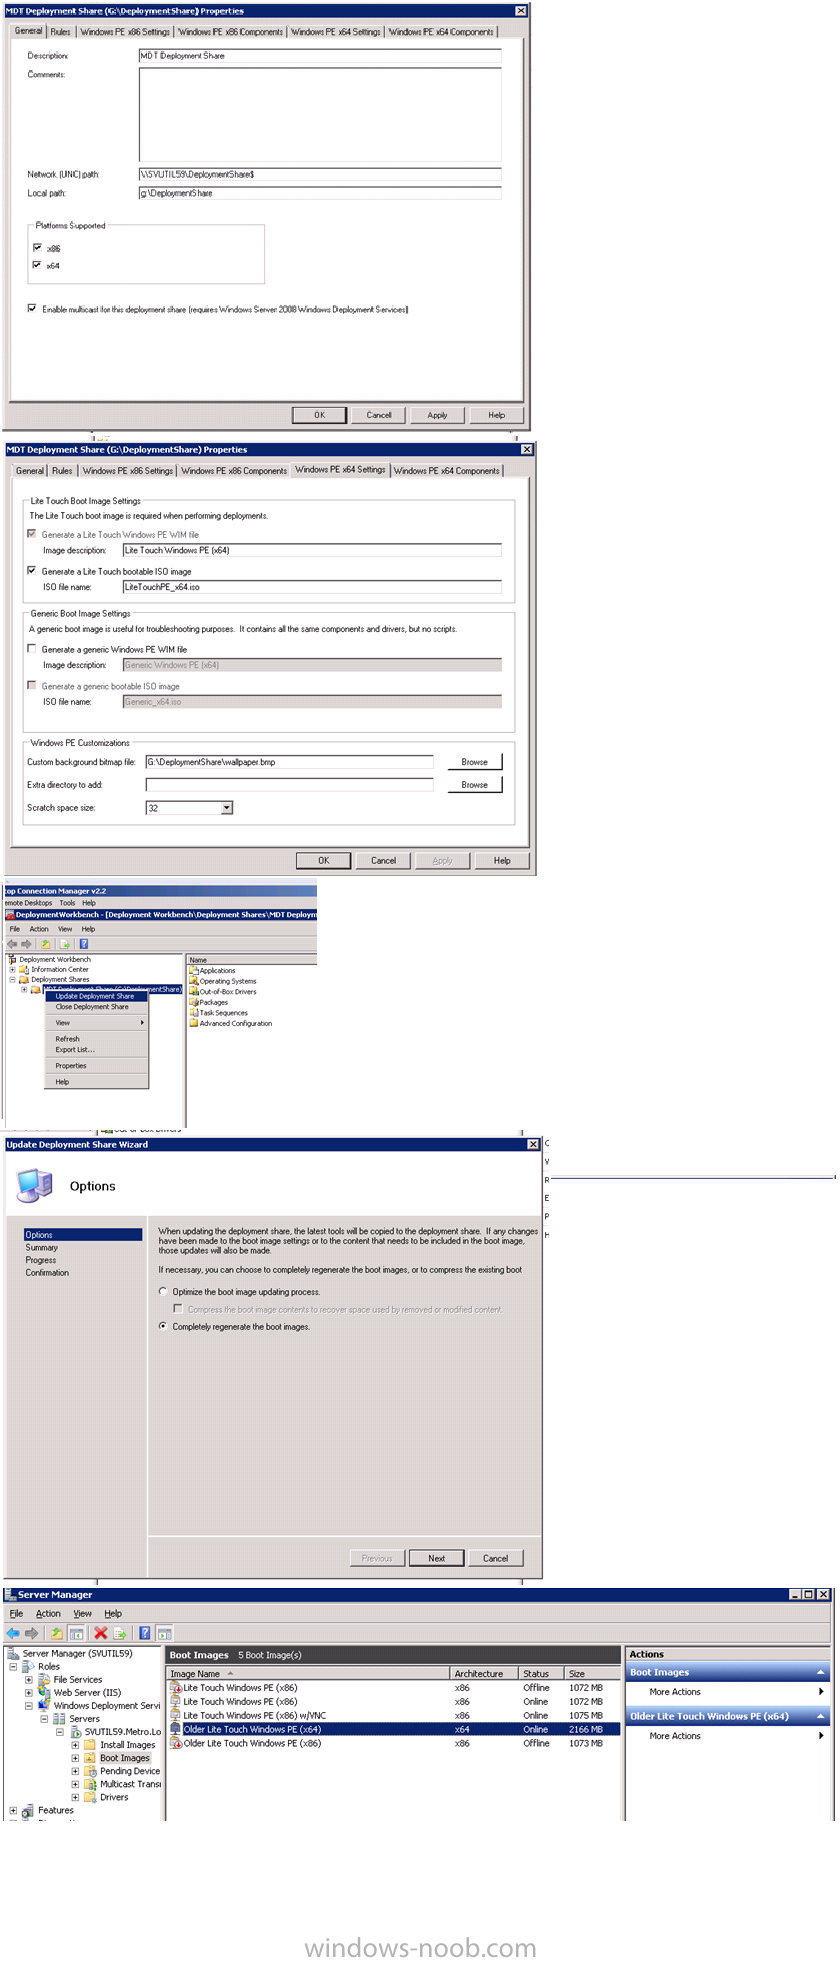
Make sure that you have the check in BOTH boxes in platform supported. Then check the Windows PE x64 settings to make sure they're right. Right click the deployment share and select Update Select "Completely generate the boot images" Import into WDS I hope this helps.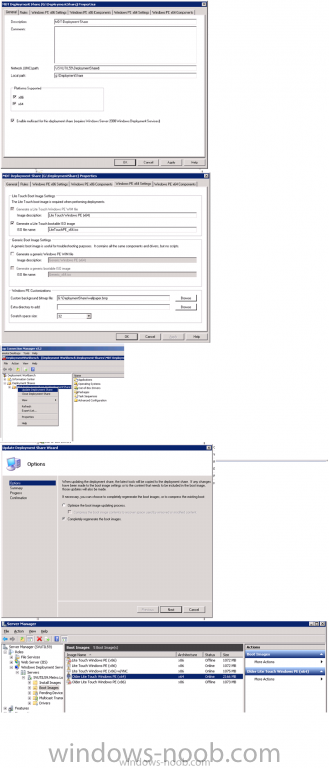
-
Task sequence goes blank in MDT 2010 whiel deploying Win7
thadkew replied to Shweta's question in Zero Touch/ZTI, Lite Touch/LTi
Make sure that you create both a x86 and x64 lite touch PE and add both of those images to WDS server. Even though the task sequence is probably set to work on any architecture (check the properties), it won't show up unless the computer boots with the same architecture. I can post screen shots tomorrow. Essentially, right click on your deployment share and make sure you have both x86 and x64 checked. Then regenerate your boot images. Import the x64 to your WDS and restart WDS. When you boot from PXE, you'll see both LiteTouch PE's. Select the x64. Let me know if that works for you. Fingers crossed. -
Task sequence goes blank in MDT 2010 whiel deploying Win7
thadkew replied to Shweta's question in Zero Touch/ZTI, Lite Touch/LTi
Are you booting into the LiteTouch x64 or the LiteTouch x86 PE version? Also make sure your customsettings.ini is set correctly too. the beginning would be: [settings] Priority= Default Properties=MyCustomProperty [Default] OSInstall=Y -
When you are at the Microsoft Accelerators" screen, please press F8 to open a command prompt. If you type Trace32, you should be able to open the log viewer. From there, you can look for any logs that might help you track down the problem. I think that you don't have any network drivers for that computer model loaded in the MDT. But I can't be sure unless you find some logs.
-
BGInfo and VNC for MDT 2010
thadkew replied to thadkew's question in Microsoft Deployment Toolkit (MDT)
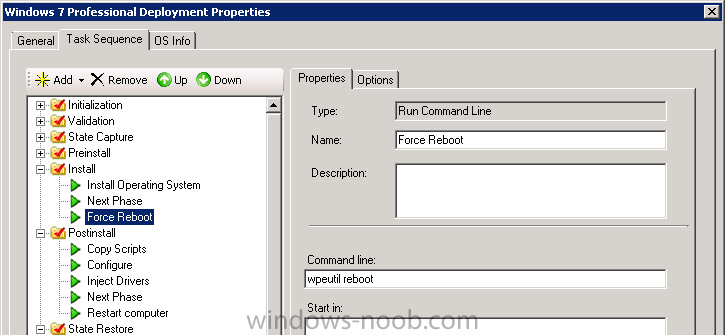
Figured out the command prompt issue. I just added a "Run Command Prompt" task in the sequence that will restart the machine and resume the process. The VNC session is cut (obviously), but by then the PC is most likely completing the imaging process anyway. My task sequence now looks like the attached. One caveat: Make sure to set the Options to "Continue on error"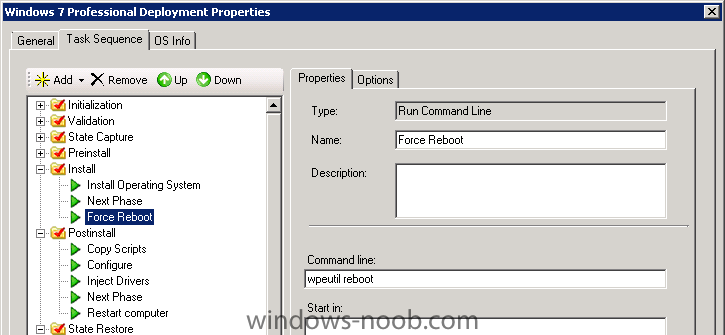
-
Feel Like I'm Missing Something Here
thadkew replied to Dogpatch's question in Microsoft Deployment Toolkit (MDT)
I don't know if this will help, but here's what I did. I installed Windows 7 on a test PC. Then i rebooted that PC and logged in under the "audit" I made some specific config changes (added windows programs, removed some. configured other items, set the admin password) After that I captured my image and put it on the deployment share. When I started up my deployment share, I made sure to add the Operating System full set of files to the directory as well as the WIM i created. This helped when i used the WAIK to edit the config file. Then i just added the OS to the Task Sequence. I assume you're using MDT 2010. I am too. But I'm also using SCCM in our environment. So i have a little background in that which helped me. -
Lite Touch applies image, but doesn't install apps
thadkew replied to crane_IT's question in Microsoft Deployment Toolkit (MDT)
Can you post a screenshot of your TaskSequence ? -
Recently, I started pushing our "field agents" into using the MDT at other sites. Sometimes I'll get a call asking what to do in "this" situation or "that" situation. As many times as I've tried to point folks to our knowledge base articles, I always wished I had a way to "look over their shoulder" so to speak. I've been all over the google and bing to figure out how to accomplish this. Some will say that you need to edit the Unattend.xml file for the WinPE (that didn't work). Others will say "change the winpeshl.ini" (that didn't work either). I'm sure there is a "prettier" way to do it, but this is what I've discovered: ---Ingredients--- UltraVNC Notepad++ BGInfo ConsoleSize (optional) ----Before we start---- customize your BGInfo file and name the output STEP0.bgi customize your ultraVNC installation to make sure you have an ultravnc.ini file. ---Steps--- 1: mount your LiteTouch PE image with dism (example: dism /mount-wim /wimfile:g:\boot\LiteTouchPE_x86.wim /index:1 /mountdir:e:\mnt_x86 2: navigiate to your mounted image and go to Deploy\Tools\x86 directory. 3: add the following files: Winvnc.exe vnchooks.dll ultravnc.ini bginfo.exe STEP0.bgi 4: go to your mounted directory (e:\mnt_x86) and navigate to Windows\System32. Rename the file "winpeshl.ini" to "winpeshl.old" (we rename this file because the existence of his file will not allow startnet.cmd to run) 5: Edit the Startnet.cmd file with notepad++ and add these lines: wpeutil InitializeNetwork x:\deploy\tools\x86\Bginfo.exe X:\deploy\Tools\x86\STEP0.bgi /nolicprompt /silent /timer:0 x:\deploy\tools\x86\winvnc.exe -install wpeutil DisableFirewall wscript.exe X:\Deploy\Scripts\LiteTouch.wsf (One note: it may be worthwhile to download the free tool "ConsoleSize." I use this to minimize the StartNet.cmd box If you do this, simply add ConsoleSize.exe to the Windows\system32 directory and add ConsoleSize MIN to the beginning of your startnet.cmd file) 6: Close out of all files and use dism to commit your new LiteTouchPE image (example: dism /unmount-wim /mountdir:e:\mnt_x86 /commit 7: Add the boot image to your WDS You should be able to boot into your new image and notice that the command prompt will start. After a few moments, you will see the BGInfo background and you should be able to VNC into the PC now. One thing I noticed is that the task sequence will start and run. Eventually the install will get to a point that it needs to reboot. However, the command prompt will still be open. You will need to manually close it so the process will continue. Like I say, there are probably prettier ways to do it. But I spent two days mucking about and found this to my liking. Please add any comments or thoughts that might make this better.
-
You can get it by searching "Dell Client Configuration Utility" on the Dell site. Here's the direct link. http://support.us.dell.com/support/downloads/download.aspx?c=us&cs=RC978219&l=en&s=slg&releaseid=R264520&formatcnt=0&libid=0&typeid=-1&dateid=-1&formatid=-1&source=-1&fileid=388871 It creates a settings.exe file that I run at the end of the task sequence (under the condition that it only run on model=%780) (It will give an error in the deployment summary, but i believe that's only because it is not giving a "0" at the end of the "install")
-
Error, application GUID {} not found...
thadkew replied to crane_IT's question in Microsoft Deployment Toolkit (MDT)
I'm trying to understand: When you say you've removed all Applications, do you mean just from the Applications group in the Deployment Share? Or do you mean from the task sequence? Have you tried recreating a new Task Sequence and then disabling the State Restore "Install Applications" task?