Search the Community
Showing results for tags '1802'.
Found 3 results
-
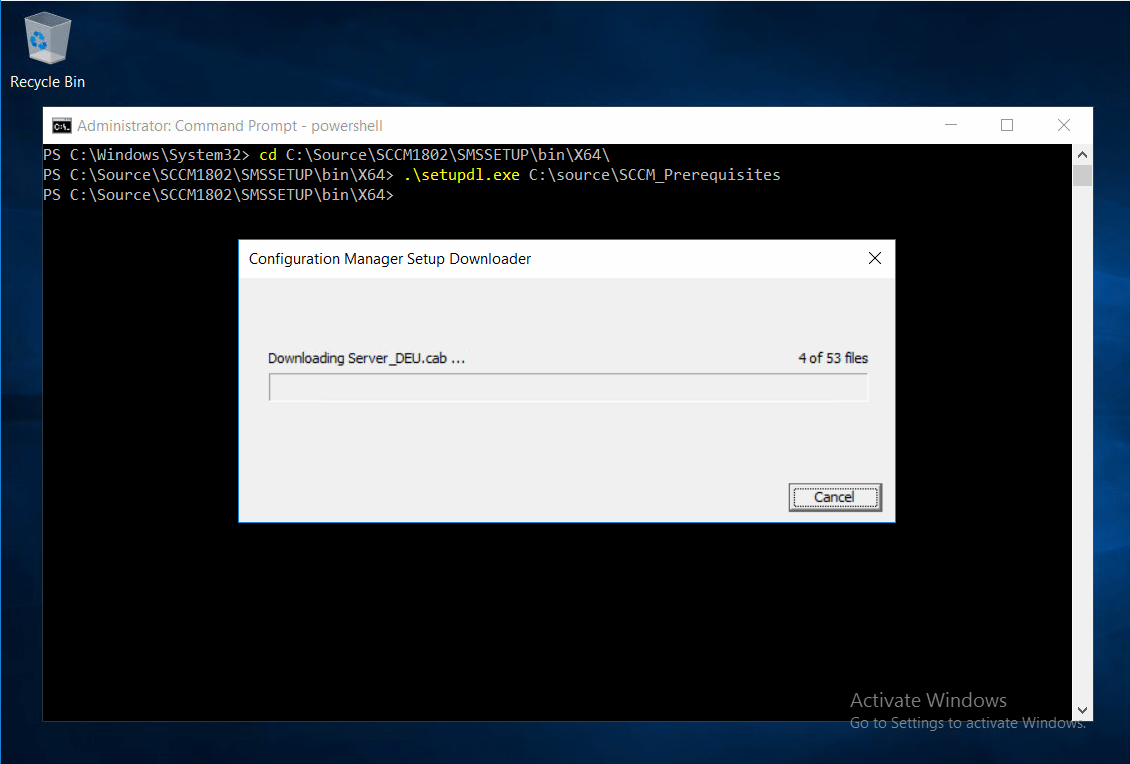
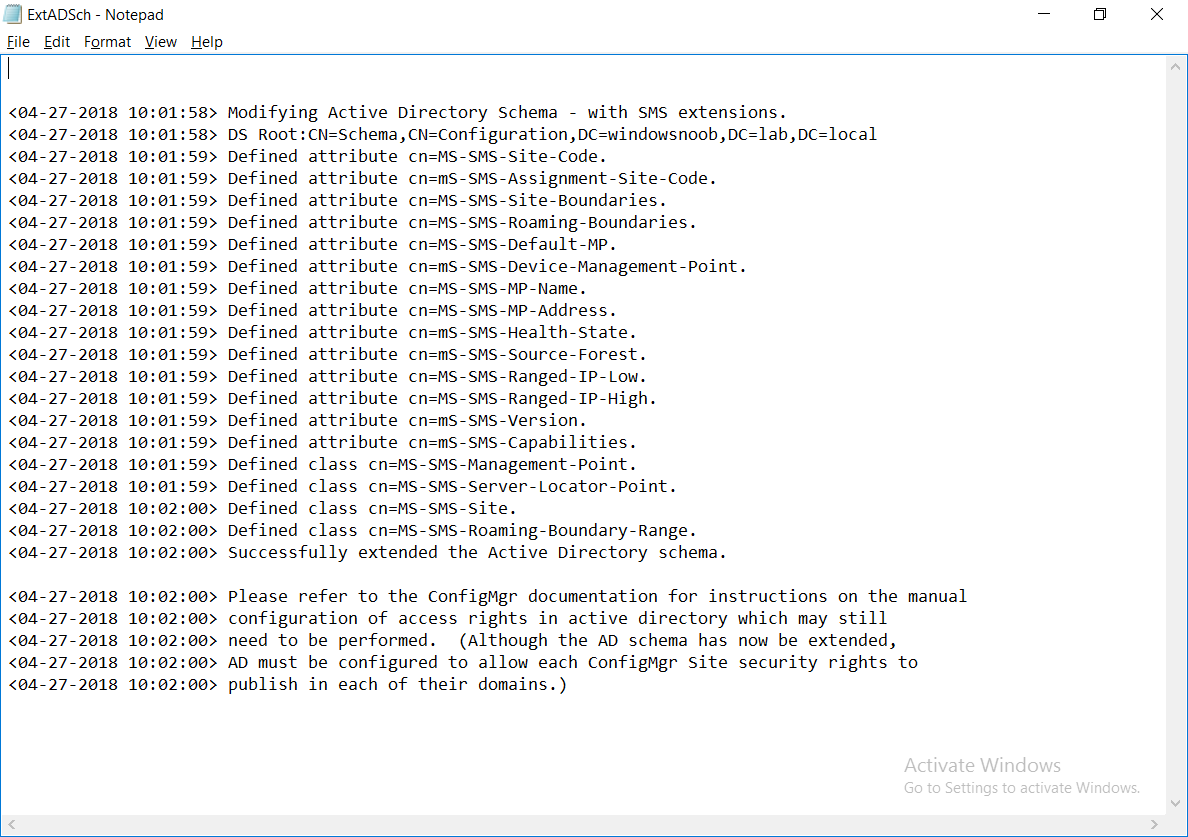
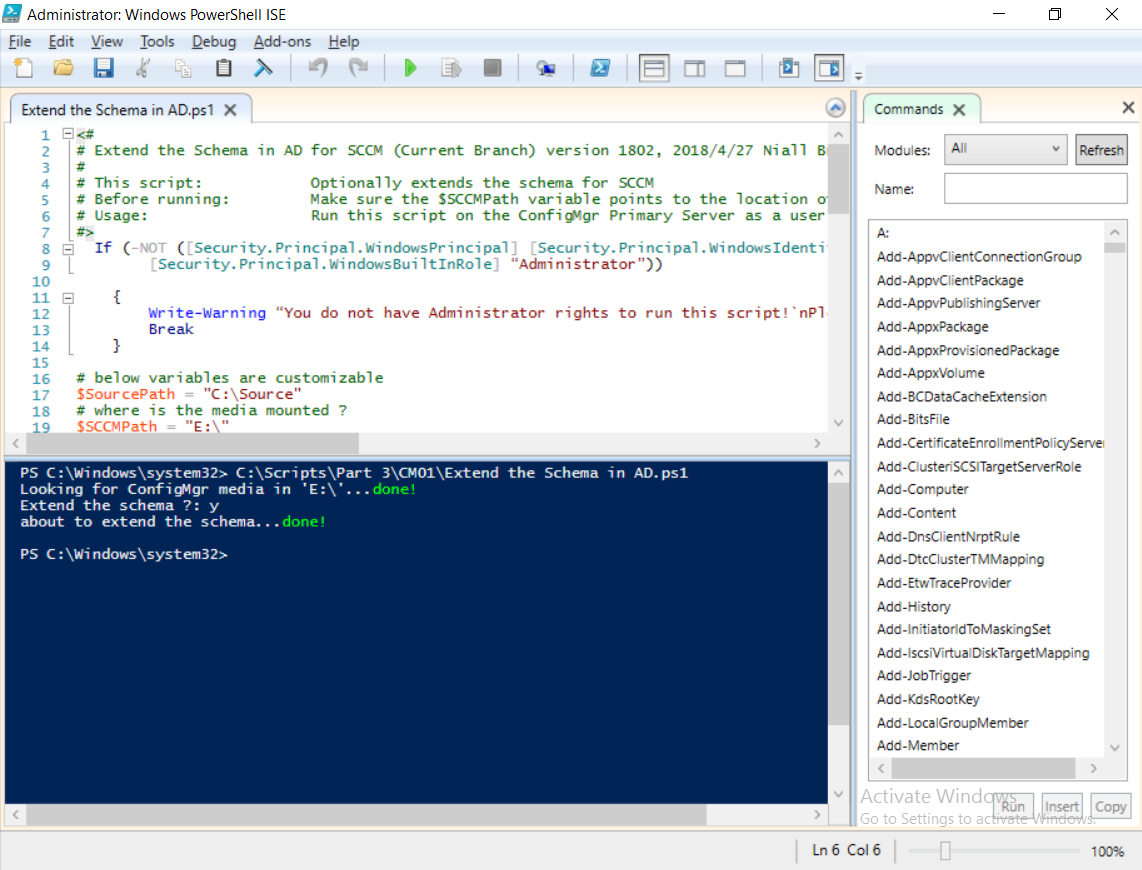
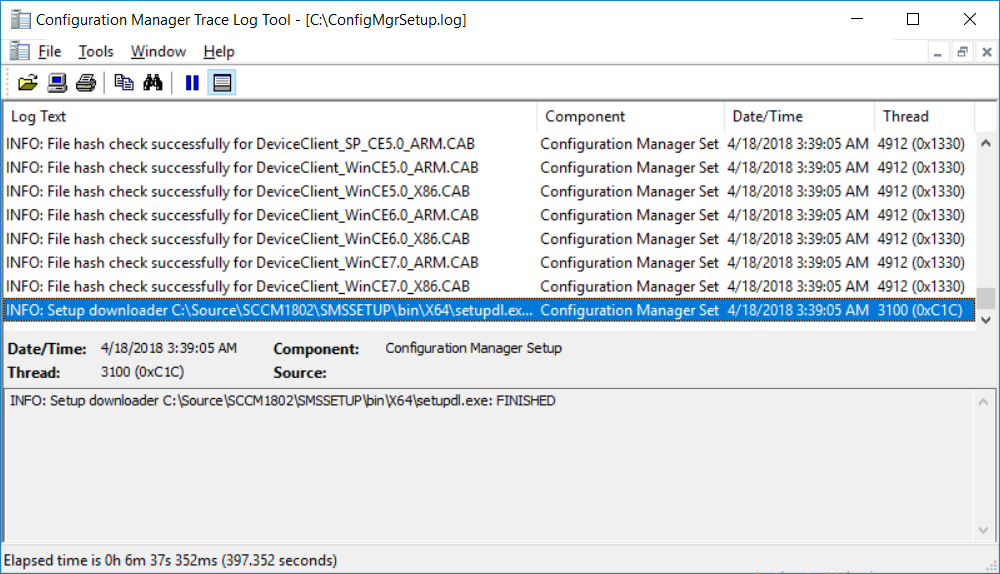
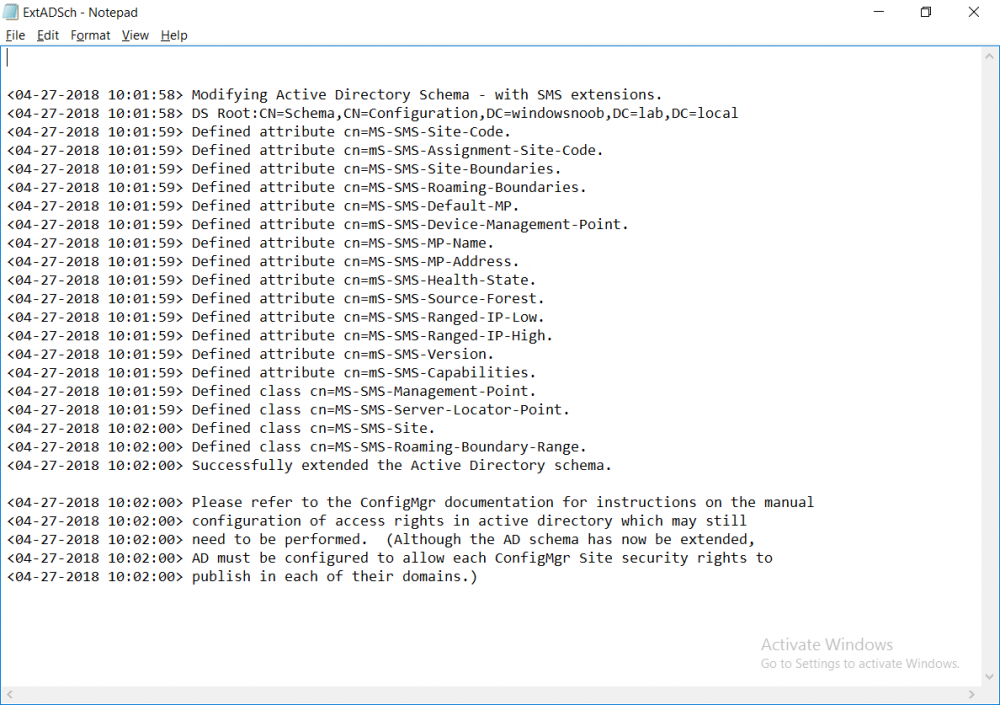
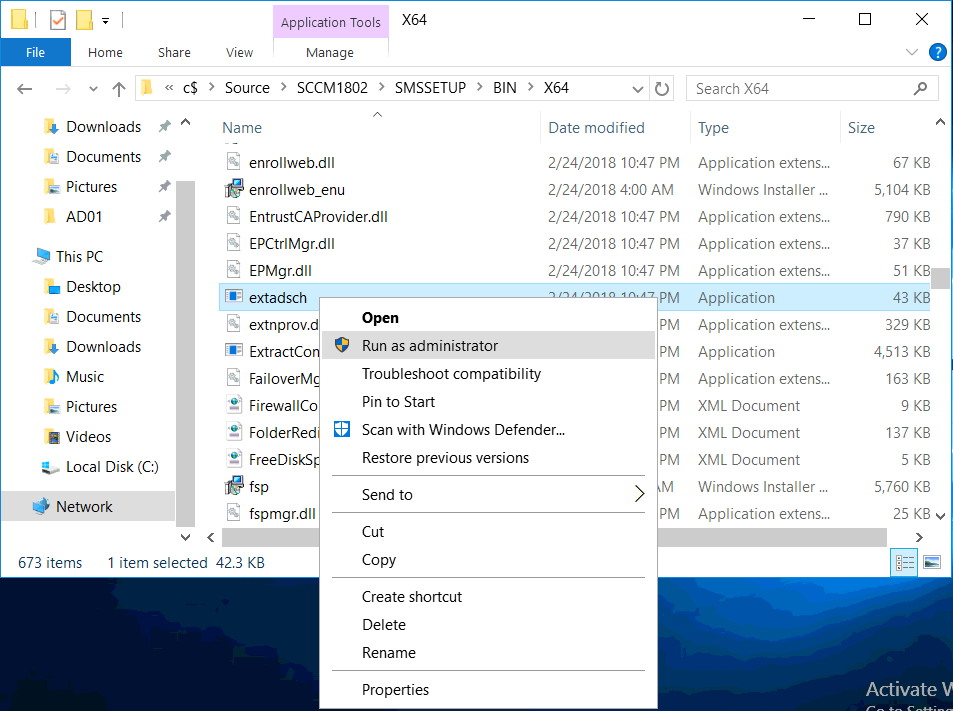
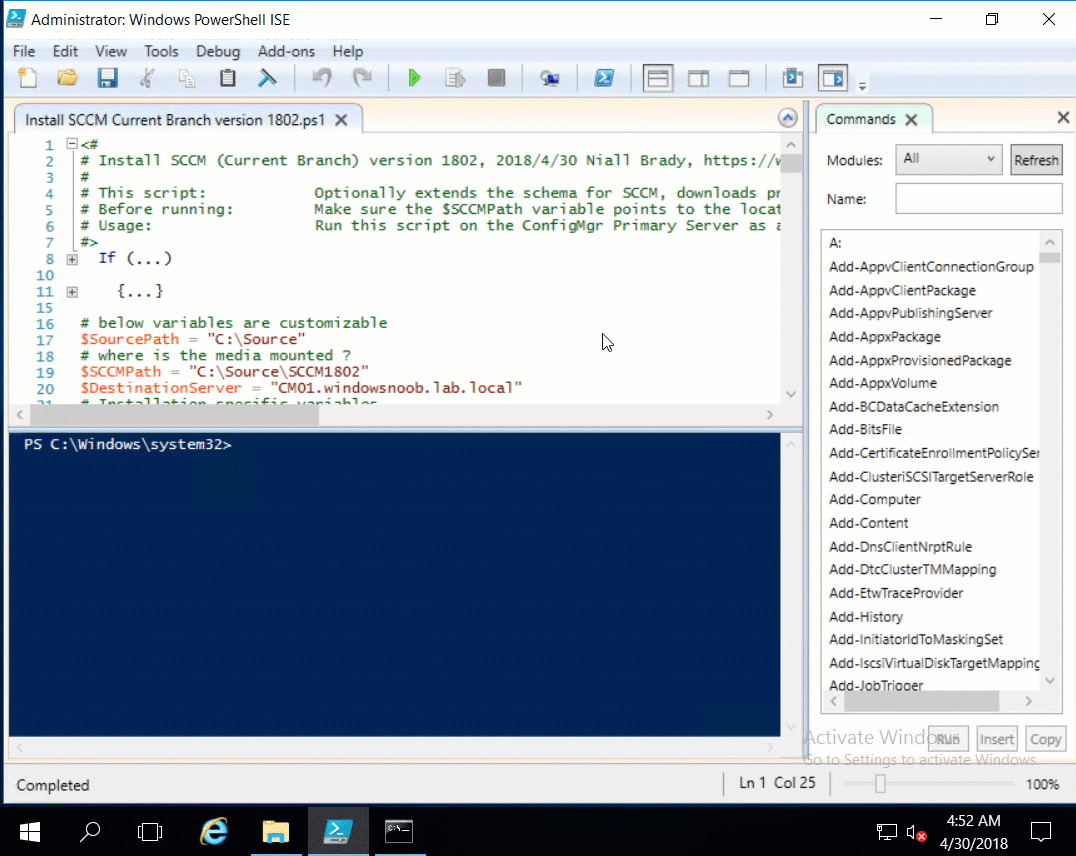
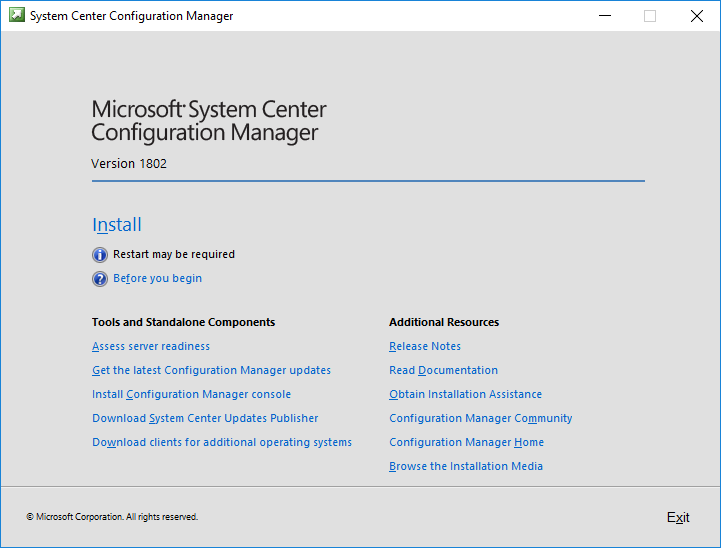
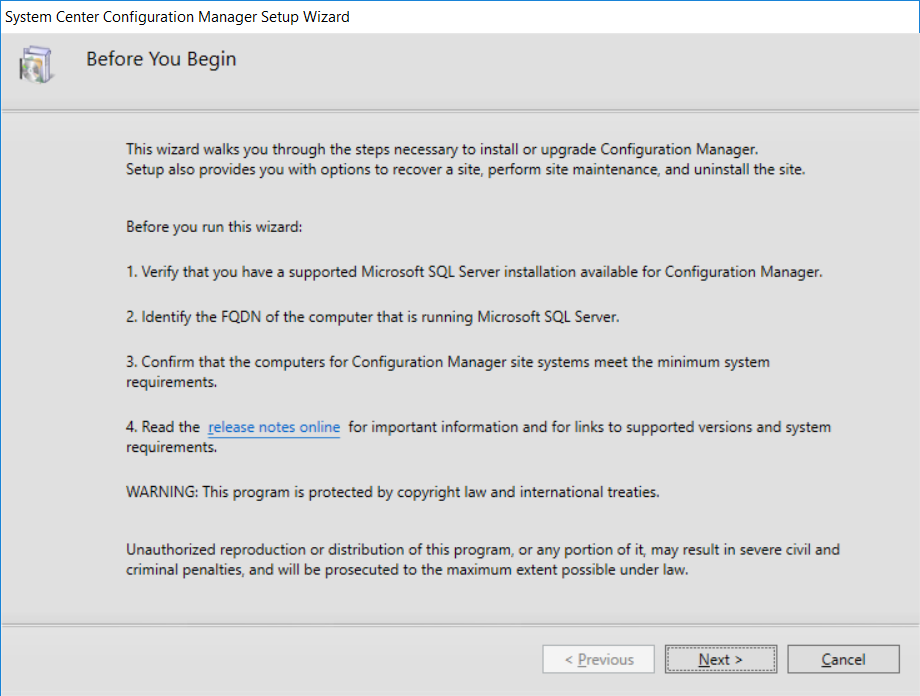
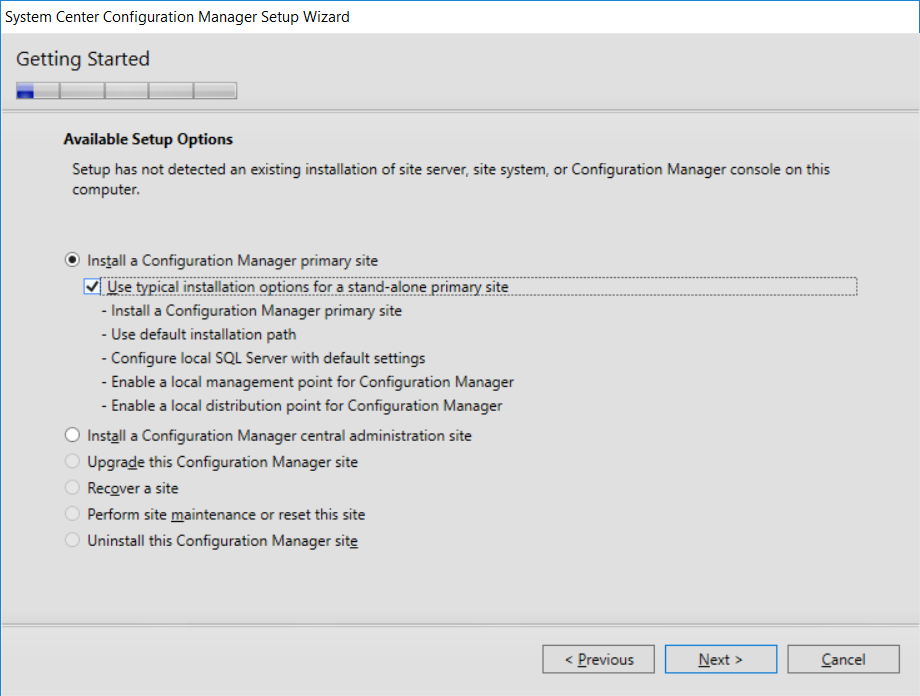
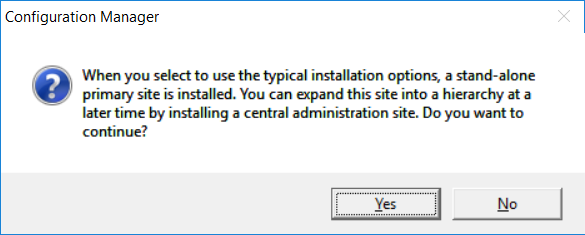
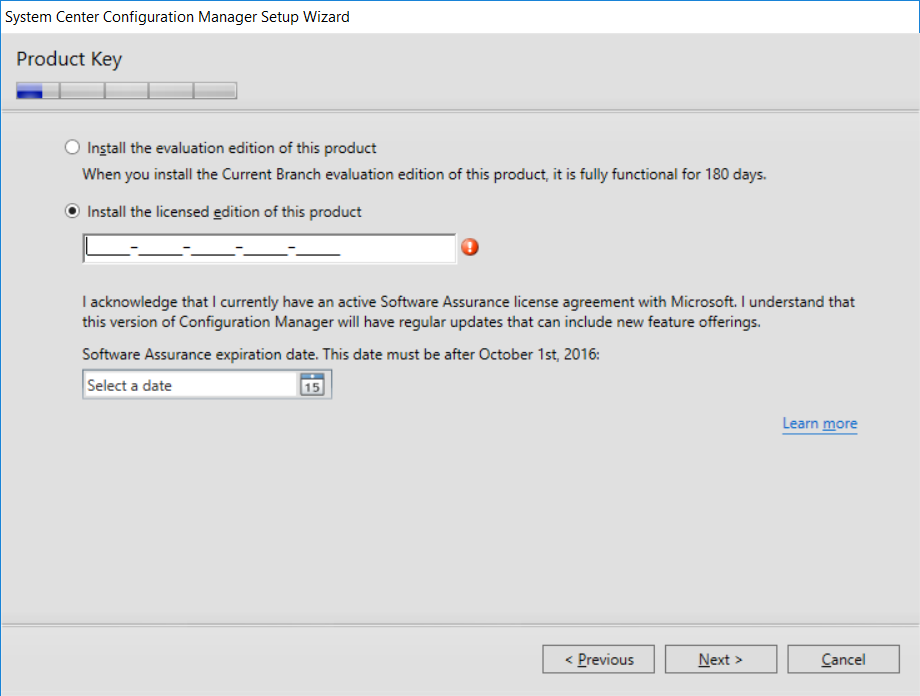
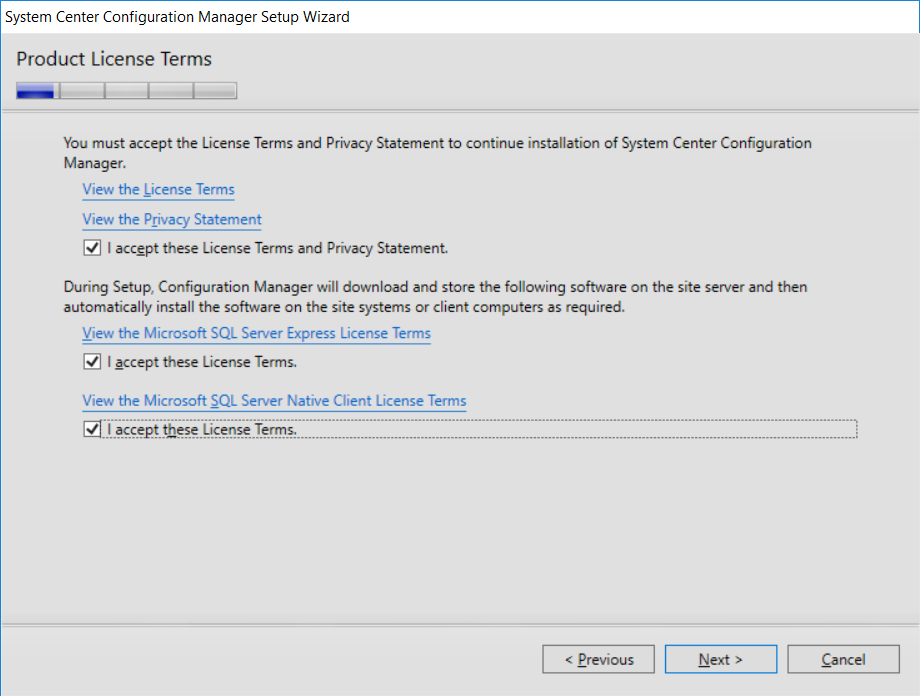
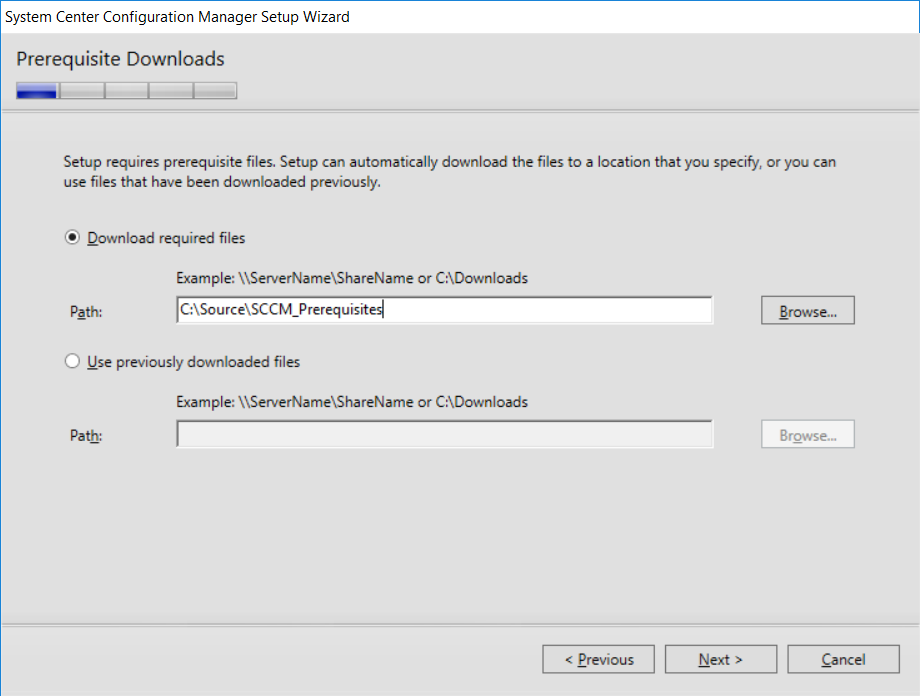
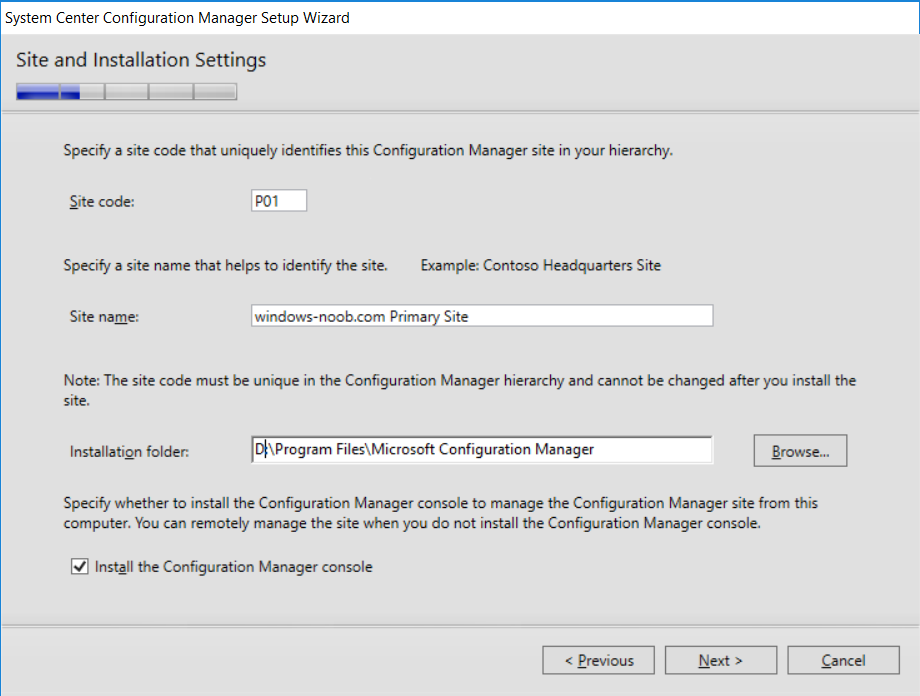
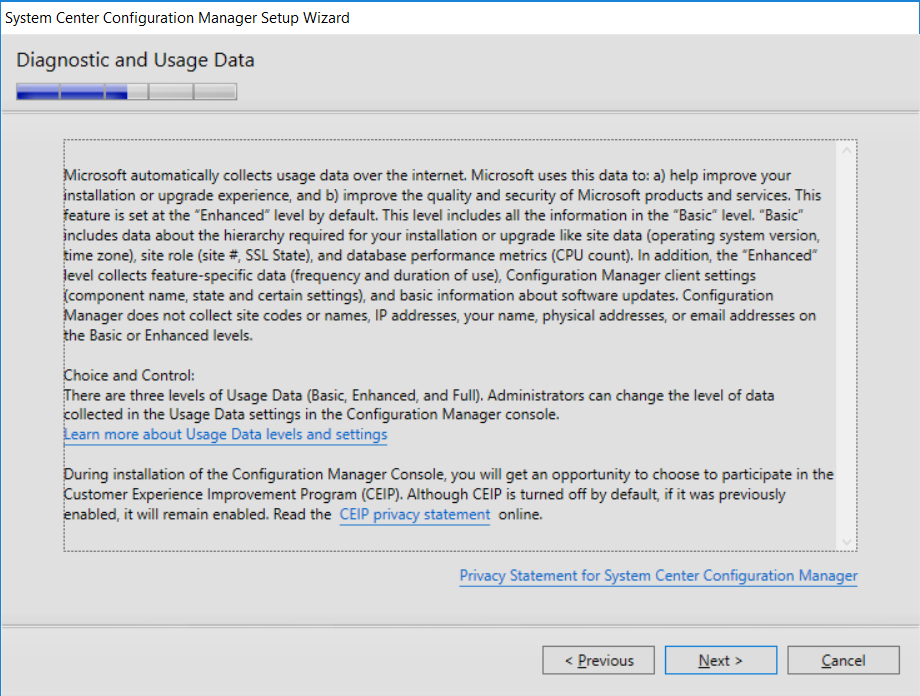
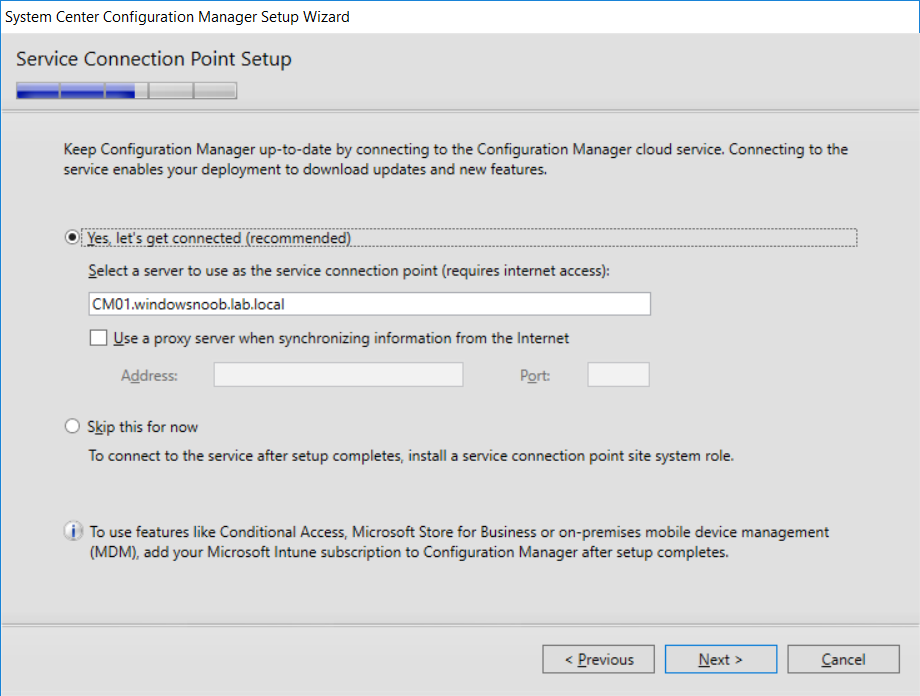
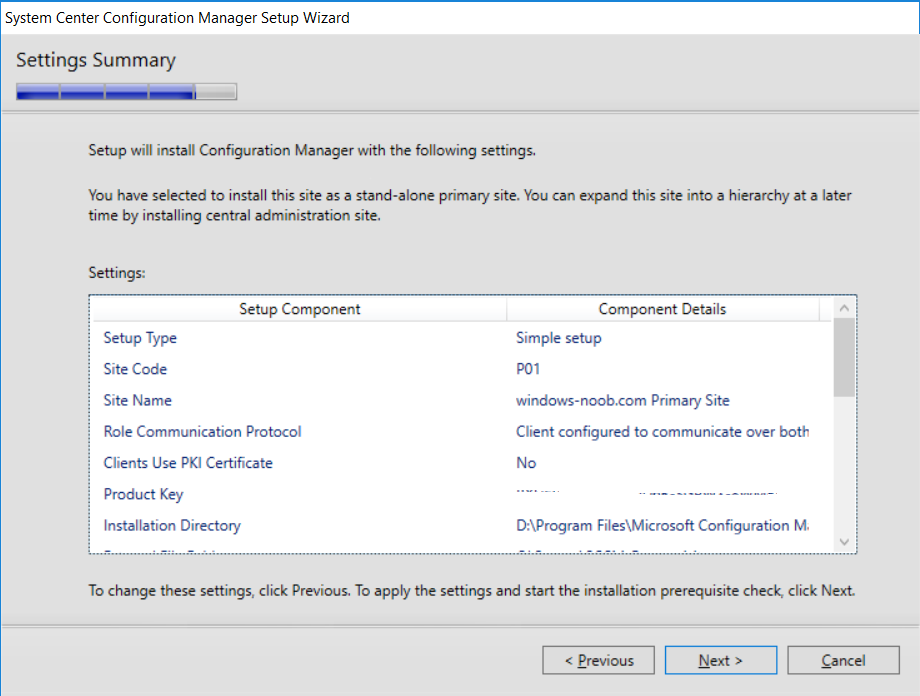
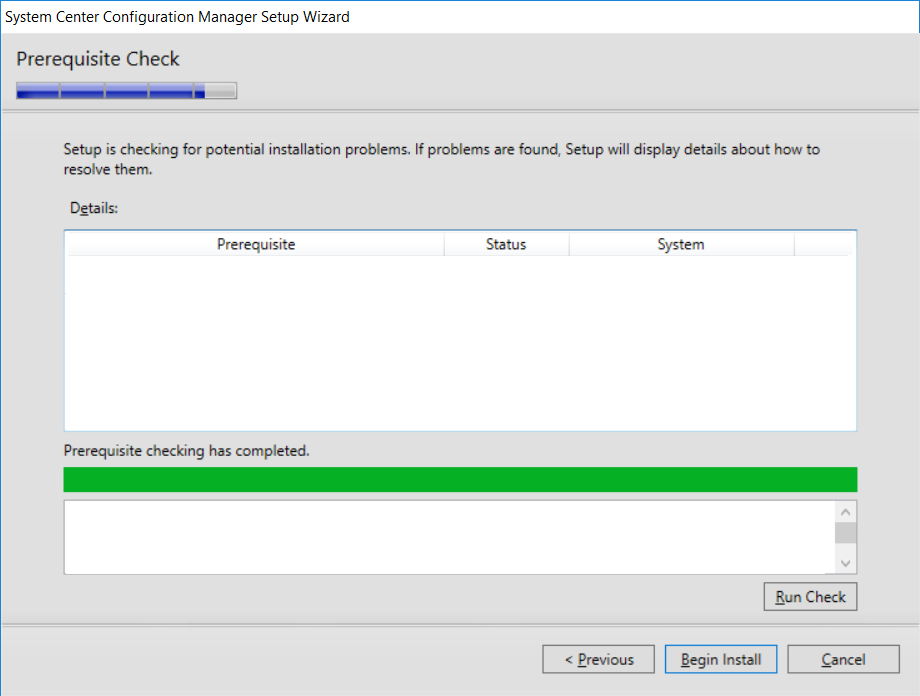
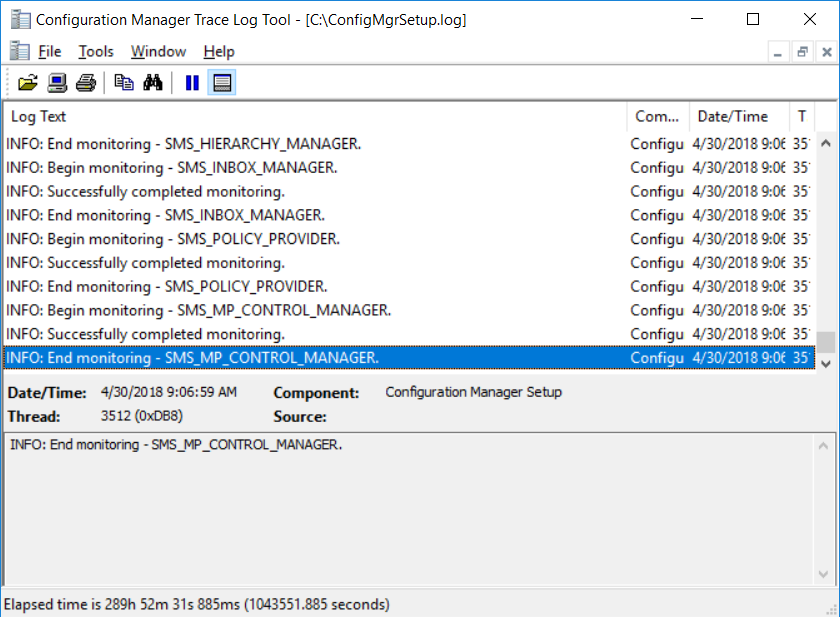
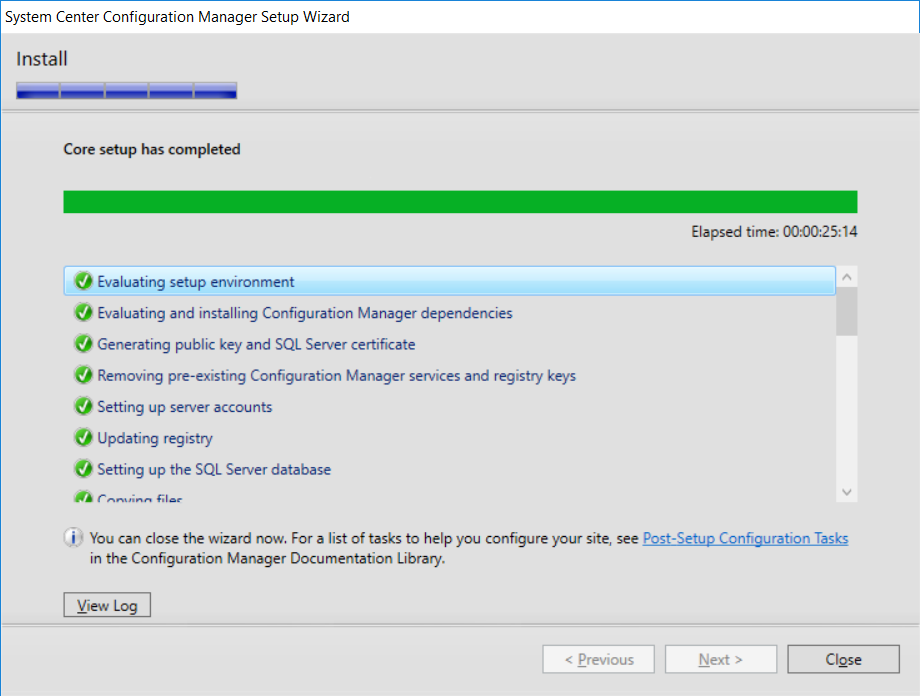
 This multi-part guide will show you how to install the latest baseline version of Configuration Manager from Microsoft. The latest available baseline version is System Center Configuration Manager (Current Branch) version 1802 as of March 29th 2018. How can I install System Center Configuration Manager (Current Branch) version 1802 on Windows Server 2016 with SQL Server 2017 – Part 1 How can I install System Center Configuration Manager (Current Branch) version 1802 on Windows Server 2016 with SQL Server 2017 – Part 2 How can I install System Center Configuration Manager (Current Branch) version 1802 on Windows Server 2016 with SQL Server 2017 – Part 3 How can I install System Center Configuration Manager (Current Branch) version 1802 on Windows Server 2016 with SQL Server 2017 – Part 4 You can use this multi-part guide to get a hierarchy up and running on Windows Server 2016 using SQL Server 2017. The concept behind this is to guide you through all the steps necessary to get a working Configuration Manager Primary site installed using manual methods or automating it by using PowerShell. This gives you the power to automate the bits that you want to automate, while allowing you to manually do other tasks when needed. You decide which path to take. PowerShell knowledge is desired and dare I say required if you are in any way serious about Configuration Manager. I will show you how to do most steps via two methods shown below, it’s up to you to choose which method suits you best but I highly recommend automating everything that you can (if possible), using PowerShell. Method #1 – Do it manually Method #2 – Automate it with PowerShell In Part 1, you configured Active Directory Domain Services (ADDS) on AD01, then joined the Configuration Manager primary server (CM01) to the newly created domain. You then created users, usergroups and OU's in Active Directory and created the System Management Container. Finally you delegated permission to the Configuration Manager server to the System Management container. In Part 2, you configured Windows Server 2016 roles and features on the Configuration Manager primary server (CM01) and then you downloaded and installed Windows ADK 1709. Next you installed SQL Server 2017 CU5 with SQL Server Management Studio (SSMS) and Reporting Services before installing the WSUS role which uses SQL to store the SUSDB instead of the Windows Internal Database (WID). In this Part, you will download and extract the ConfigMgr content, you'll download the ConfigMgr prerequisites and then you'll extend the Active Directory schema before installing System Center Configuration Manager (Current Branch) version 1802. Step 1. Download and extract the ConfigMgr content Before installing System Center Configuration Manager version 1802 you'll need to download the content as it is a baseline version. You can download baseline versions of the ConfigMgr media from Microsoft's Volume licensing Service Center (VLSC) site for use in production or from MSDN (or the Microsoft Evaluation site) for use in a lab. The VLSC download can be found be searching for Config and then selecting System Center Config Mgr (current branch and LTSB) as shown below. Once you've downloaded the ISO, mount it using Windows File Explorer and copy the contents to somewhere useful like C:\Source\SCCM1802 on the Configuration Manager server. Step 2. Download the ConfigMgr Prerequisites Note: Perform the following on the Configuration Manager server (CM01) as a Local Administrator You can download the prerequisites during ConfigMgr setup or in advance. As you'll probably want to install more than one copy of ConfigMgr (one lab, one production) it's nice to have the prerequisites downloaded in advance. Method #1 – Do it manually To do that, open an administrative PowerShell command prompt and navigate to the following folder: C:\Source\SCCM1802\smssetup\bin\X64 Run the following line .\SetupDL.exe C:\Source\SCCM_Prerequisites Once the process is complete you can open C:\ConfigMgrSetup.log with CMTrace (or notepad) to verify the status of the download. Note: You can find the CMTrace executable in the SMSSetup Tools folder in the location that you extracted the ConfigMgr media, eg: C:\Source\SCCM1802\SMSSETUP\TOOLS. Method #2 – Automate it with PowerShell To automate the download of the prerequisites simply follow the instructions and run the Install SCCM Current Branch version 1802.ps1 Powershell script in Step 4 or use the Download SCCM prerequisite files.ps1. Step 3. Extend the Schema Note: Perform the following on the Domain controller server (AD01) as Administrator. You do not have to extend the Active Directory schema if it was already extended for Configuration Manager previously. Method #1 – Do it manually To do that, on the Active Directory domain controller (AD01), open Windows File Explorer and browse to the network path of the ConfigMgr server where you've copied the SCCM source, eg: \\cm01\c$\Source\SCCM1802\SMSSETUP\BIN\X64 In that folder, locate extadsch.exe and right click, choose Run as Administrator. After the schema has been extended for SCCM, you can open C:\ExtAdsch.log on the root of C:\ on the server you are performing this on, and review the success or failure of that action. Method #2 – Automate it with PowerShell To automate extending the schema, use the Extend the Schema in AD.ps1 PowerShell script. Run the script on the CM01 server using credentials that have the ability to extend the schema. Step 4. Install SCCM Current Branch (version 1802) Note: Perform the following on the ConfigMgr server (CM01) as Administrator. Method #1 – Do it manually To do that, on the Configuration Manager server (CM01), open Windows File Explorer and browse to the network path of the ConfigMgr server where you've copied the SCCM source, eg: C:\Source\SCCM1802\ In that folder, double click on splash.hta. The Installer appears, click on Install. At the Before You Begin screen click Next. In the Available Setup Options screen, place a checkbox in "Use typical Installation options for a stand alone primary site" When prompted if you want to continue click Yes. On the Product Key screen enter your Key (or choose the eval option), and set the Software Assurance Date (optional) On the Product License Terms screen, select the 3 available options and click Next. On the Prerequisite Downloads screen, select the first option and specify C:\Source\SCCM_Prerequisites as the folder to download the prerequisite files. Click Next to start the download. On the Site and Installation Settings screen, enter your chosen site code (eg: P01), your site name and the path where you want to install ConfigMgr. On the Diagnostics and Usage data screen, click Next. On the Service Connection Point Setup screen, enter your choices and click Next. On the Settings Summary, review your choices and when happy with them click Next. On the Prerequisite Check screen click Begin Install when ready. During the installation, click on View Log (opens C:\ConfigmgrSetup.log) to review the installation progress using CMTrace and when the installation is done, click Close. Method #2 – Automate it with PowerShell To automate the installation of ConfigMgr 1802 (including all the previous steps above), simply run the Install SCCM Current Branch version 1802.ps1 PowerShell script. Run the script on the CM01 server and when prompted to extend the schema, enter your choice (yes or no) and if you choose to extend the schema, provide suitable credentials when prompted. Once done with the schema extension, the installation will continue (as shown below). and once installed you can launch the console. Success ! Summary In this 3 part guide you used quite a bit of PowerShell to automate pretty much most of Installing System Center Configuration Manager Current Branch (version 1802), including installing and configuring SQL Server 2017 on Windows Server 2016. Doing it with PowerShell means you can safely say that you've got a handle on Automation using PowerShell. I hope you learned a lot from doing it this way, and until next time, adios ! Downloads The scripts used in this guide are available for download here. Unzip to C:\Scripts on both servers. The scripts are placed in the corresponding folder (Part 1, Part 2 etc) and sorted into which server you should run the script on (AD01 or CM01). Scripts.zip
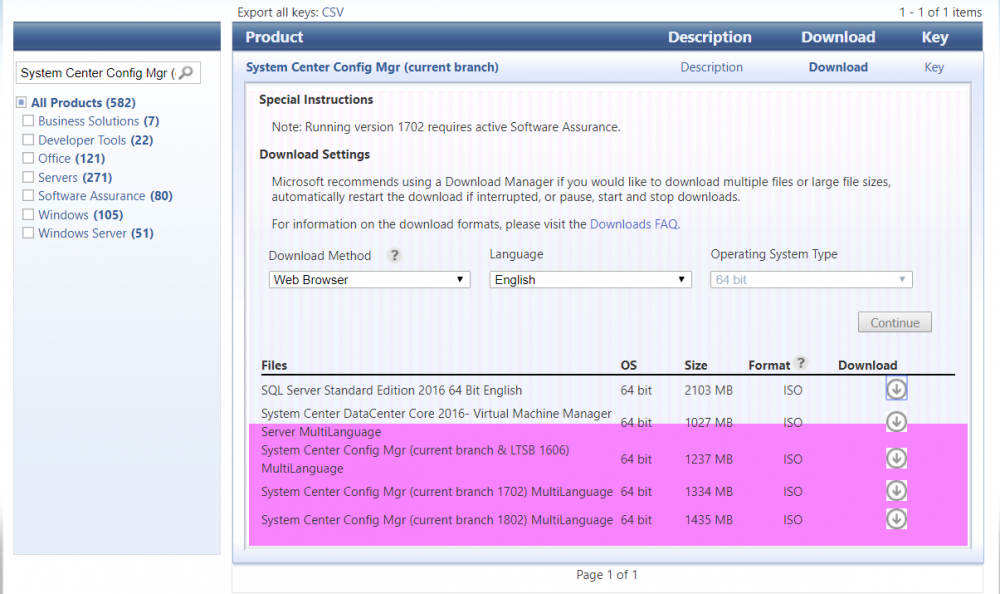


-
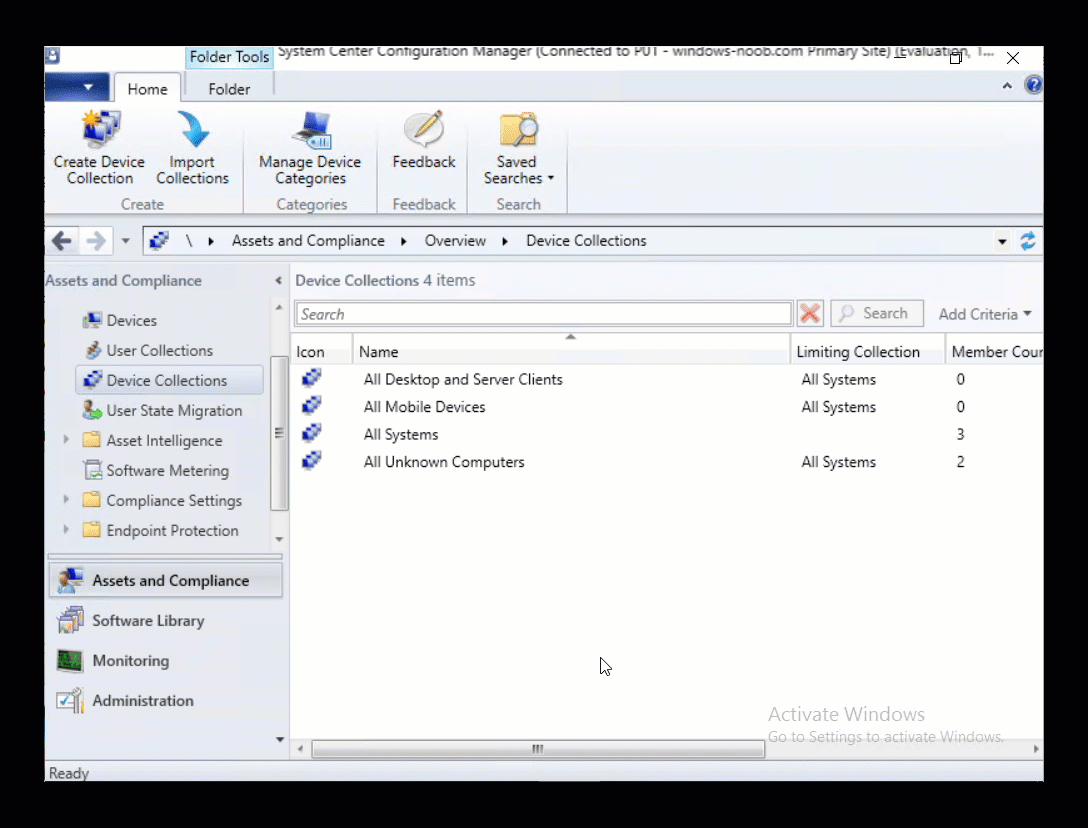
This multi-part guide will show you how to install the latest baseline version of Configuration Manager from Microsoft. The latest available baseline version is System Center Configuration Manager (Current Branch) version 1802 as of March 29th 2018. How can I install System Center Configuration Manager (Current Branch) version 1802 on Windows Server 2016 with SQL Server 2017 – Part 1 How can I install System Center Configuration Manager (Current Branch) version 1802 on Windows Server 2016 with SQL Server 2017 – Part 2 How can I install System Center Configuration Manager (Current Branch) version 1802 on Windows Server 2016 with SQL Server 2017 – Part 3 How can I install System Center Configuration Manager (Current Branch) version 1802 on Windows Server 2016 with SQL Server 2017 – Part 4 You can use this multi-part guide to get a hierarchy up and running on Windows Server 2016 using SQL Server 2017. The concept behind this is to guide you through all the steps necessary to get a working Configuration Manager Primary site installed using manual methods or automating it by using PowerShell. This gives you the power to automate the bits that you want to automate, while allowing you to manually do other tasks when needed. You decide which path to take. PowerShell knowledge is desired and dare I say required if you are in any way serious about Configuration Manager. I will show you how to do most steps via two methods shown below, it’s up to you to choose which method suits you best but I highly recommend automating everything that you can (if possible), using PowerShell. Method #1 – Do it manually Method #2 – Automate it with PowerShell In Part 1, you configured Active Directory Domain Services (ADDS) on AD01, then joined the Configuration Manager primary server (CM01) to the newly created domain. You then created users, usergroups and OU's in Active Directory and created the System Management Container. Finally you delegated permission to the Configuration Manager server to the System Management container. In Part 2, you configured Windows Server 2016 roles and features on the Configuration Manager primary server (CM01) and then you downloaded and installed Windows ADK 1709. Next you installed SQL Server 2017 CU5 with SQL Server Management Studio (SSMS) and Reporting Services before installing the WSUS role which uses SQL to store the SUSDB instead of the Windows Internal Database (WID). In Part 3, you downloaded and extracted the ConfigMgr content, you downloaded the ConfigMgr prerequisites and then you extended the Active Directory schema before installing System Center Configuration Manager (Current Branch) version 1802. In this part you'll create some device collections to prepare your lab for Servicing Windows 10, whether using WAAS or Upgrade Task Sequences built into ConfigMgr. The collections create include some based on the recently released Windows 10 version 1803. Step 1. Create some device collections Note: Perform the following on the Configuration Manager server (CM01) as a Local Administrator You can create collections using the ConfigMgr console and clicking your way through the wizard, you'll need to add membership queries to populate the collections, and include Include or Exclude rules as appropriate. Method #1 – Do it manually <to be added> Method #2 – Automate it with PowerShell To automate the creation of a bunch of device collections simply run the CreateDeviceCollectionsWindows10.ps1 Powershell script by starting PowerShell ISE as Administrator on the ConfigMgr server (CM01). Summary In this guide you created a whole bunch of collections to sort all your Windows 10 computers into easily identifiable groups based on Windows Version number, so that you can target them with policy or use Upgrade task sequences or Windows Servicing. Downloads The scripts used in this guide are available for download here. Unzip to C:\Scripts on both servers. The scripts are placed in the corresponding folder (Part 1, Part 2 etc) and sorted into which server you should run the script on (AD01 or CM01). Scripts.zip
-
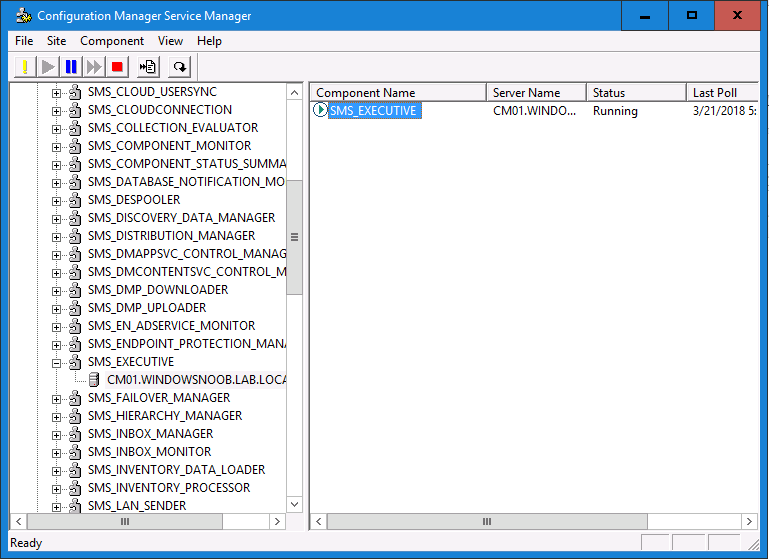
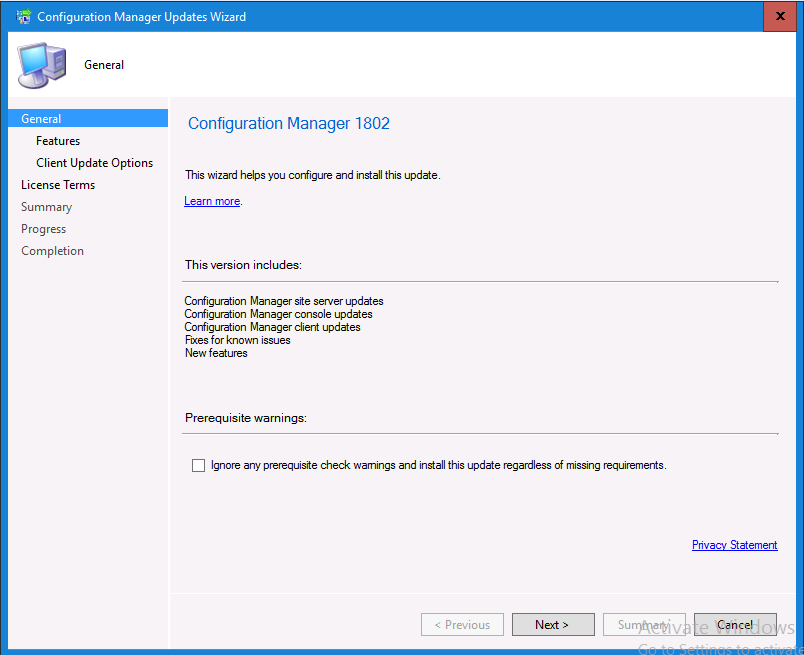
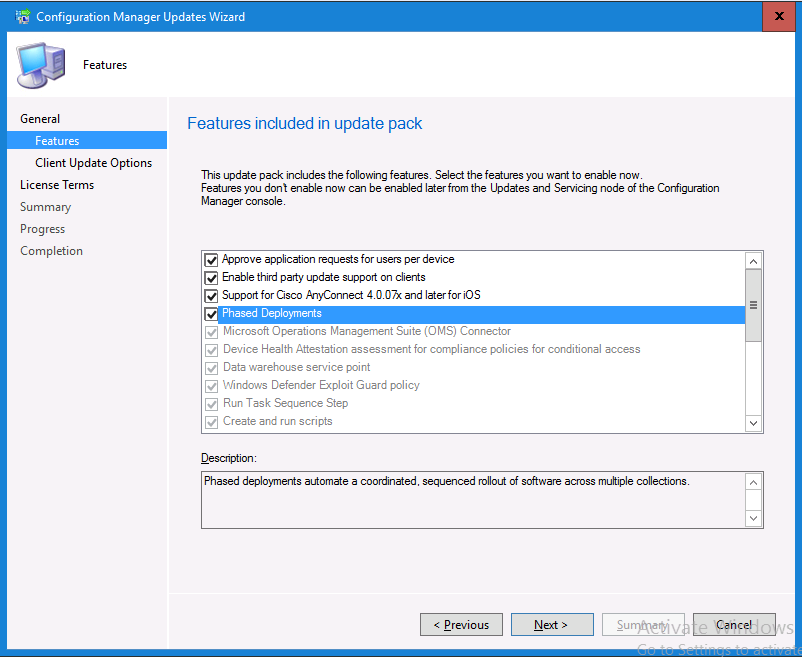
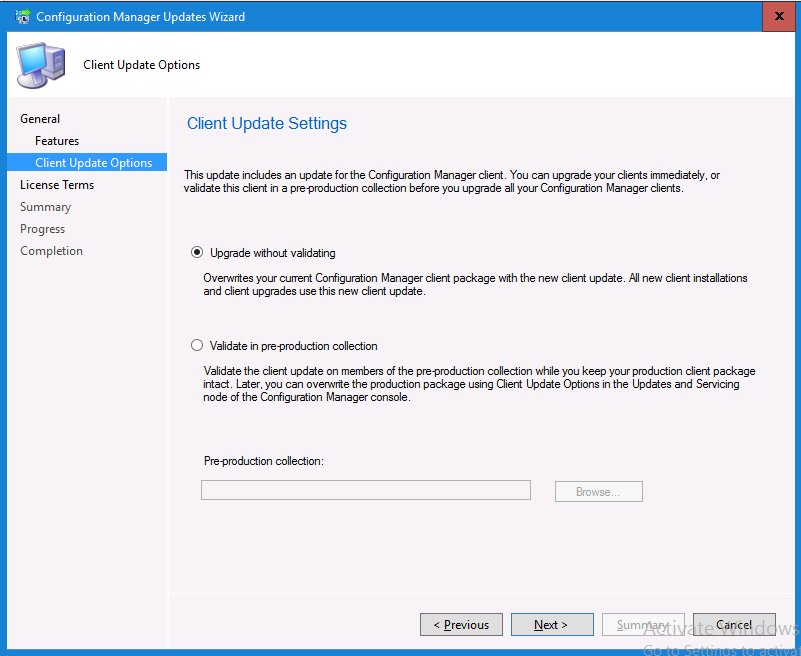
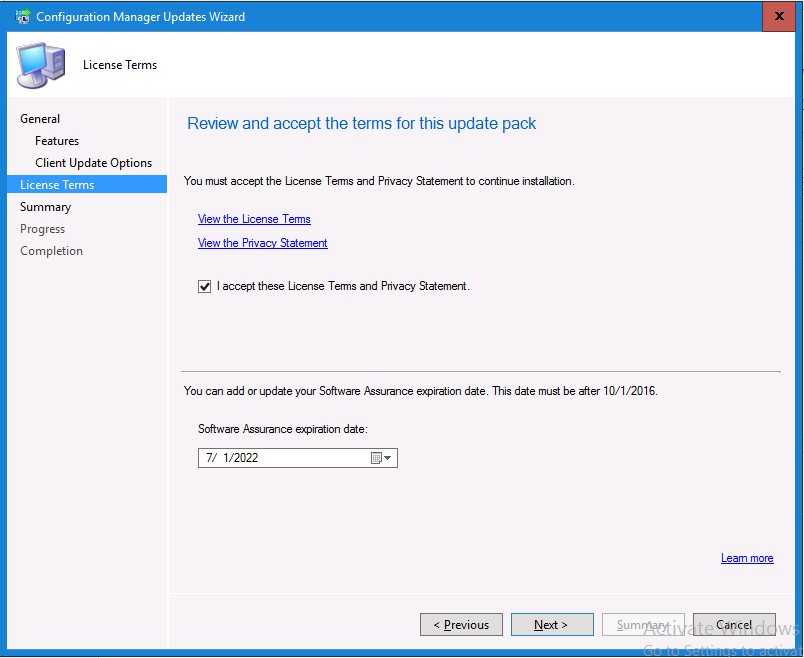
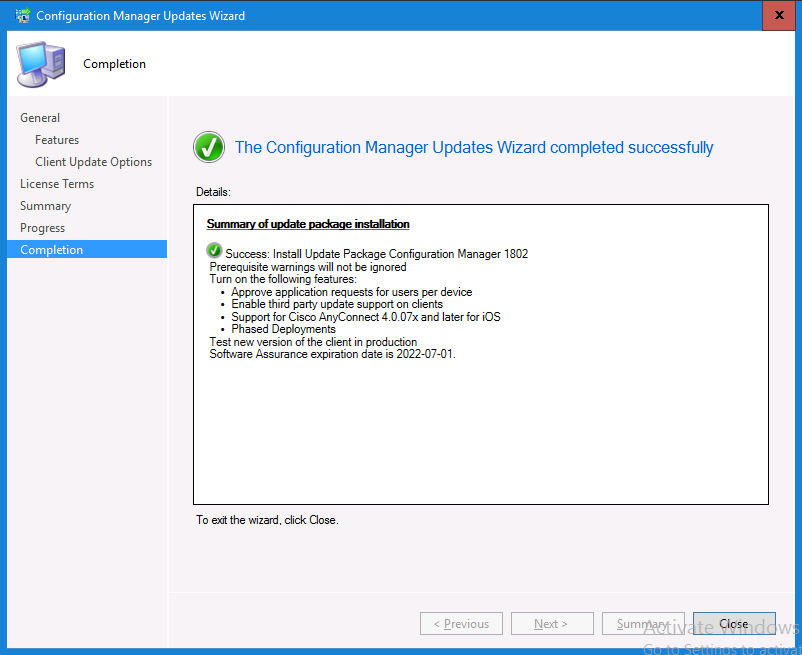
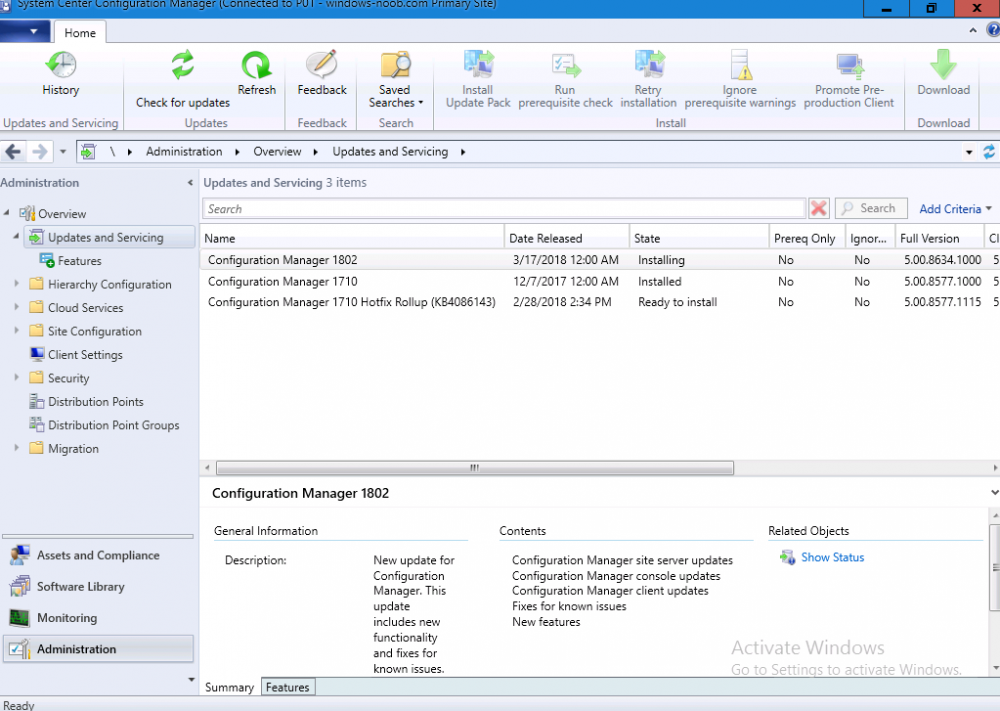
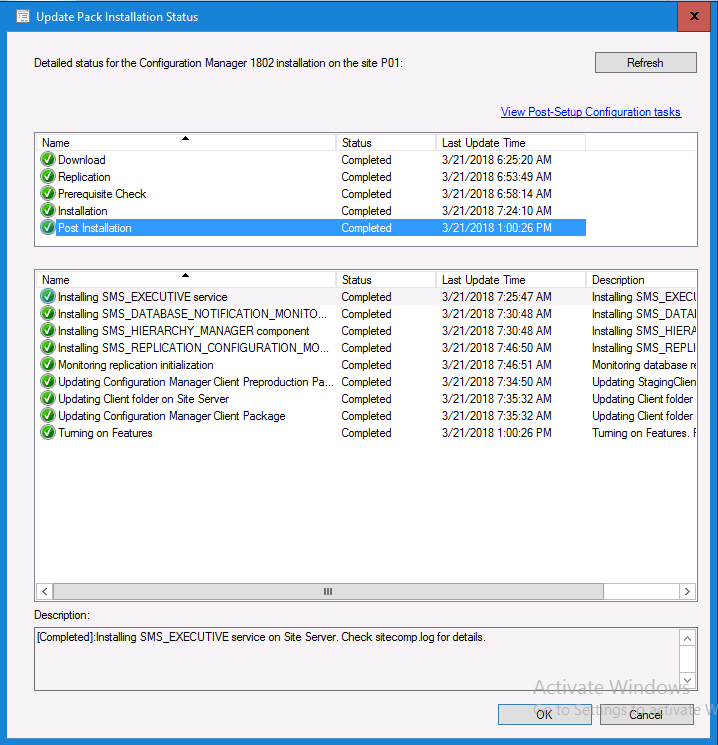
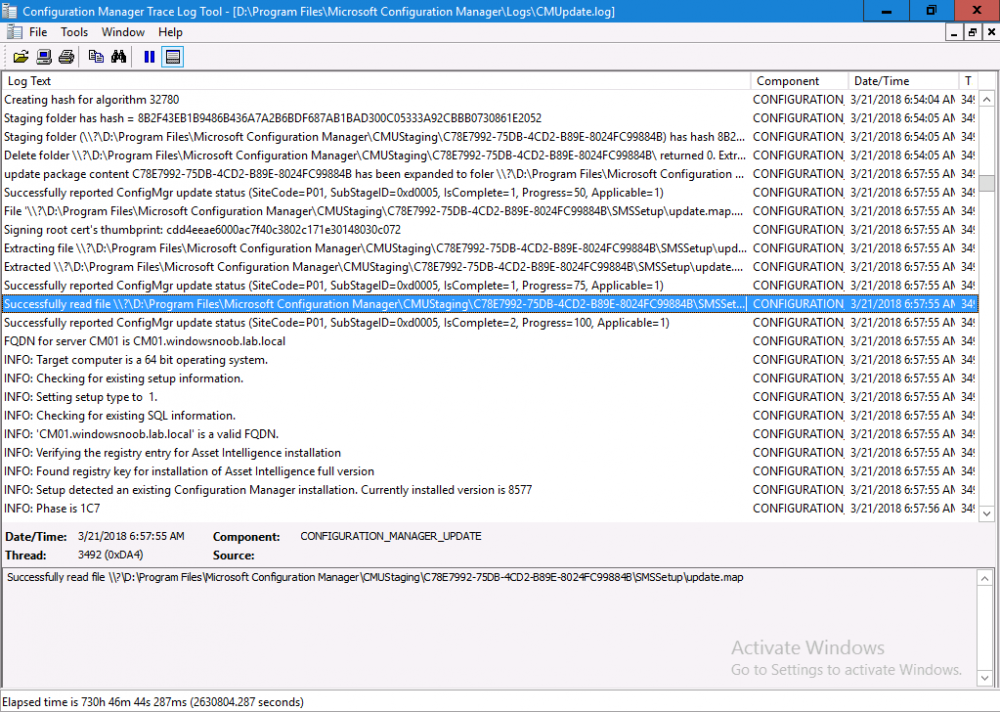
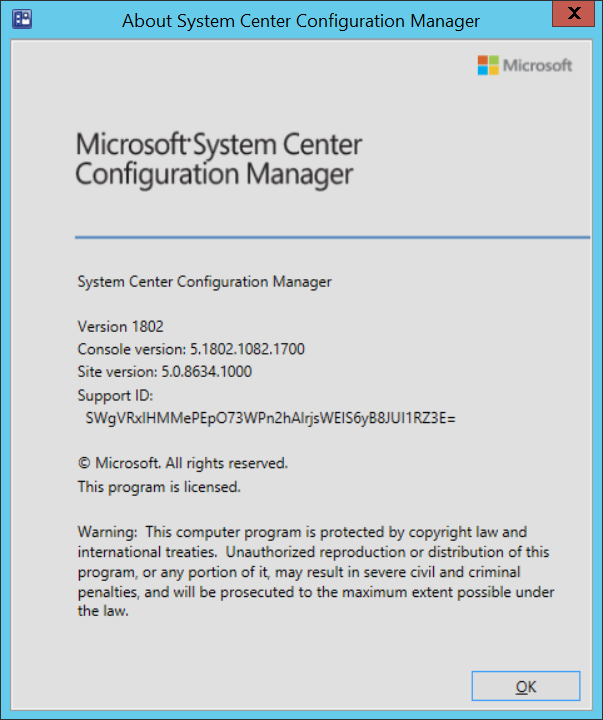
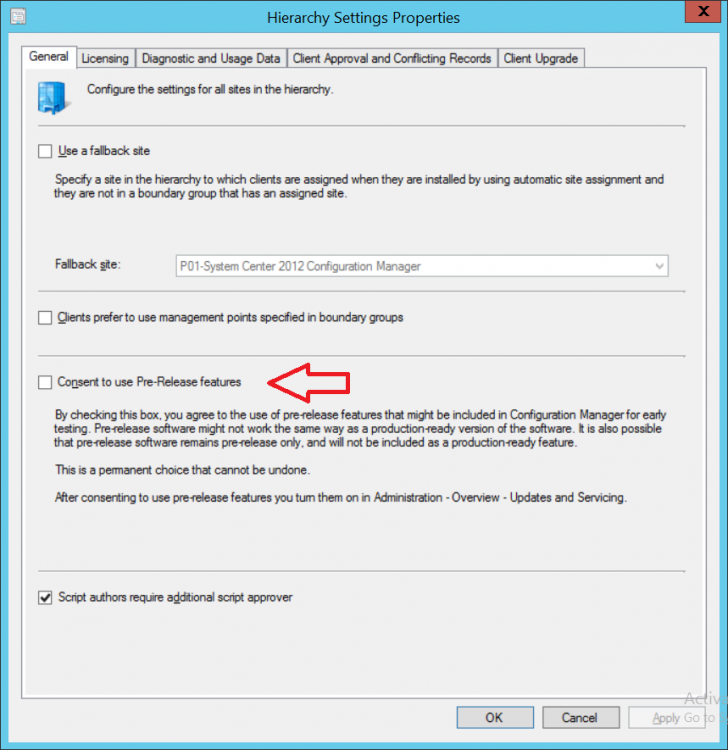
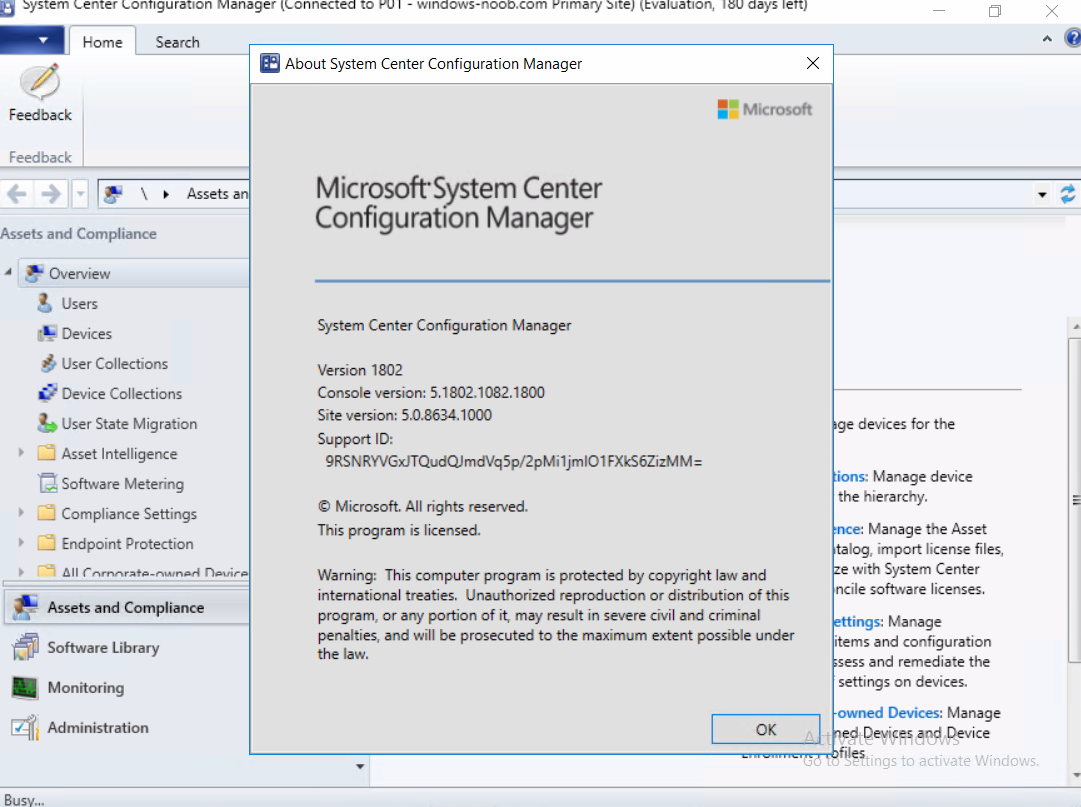
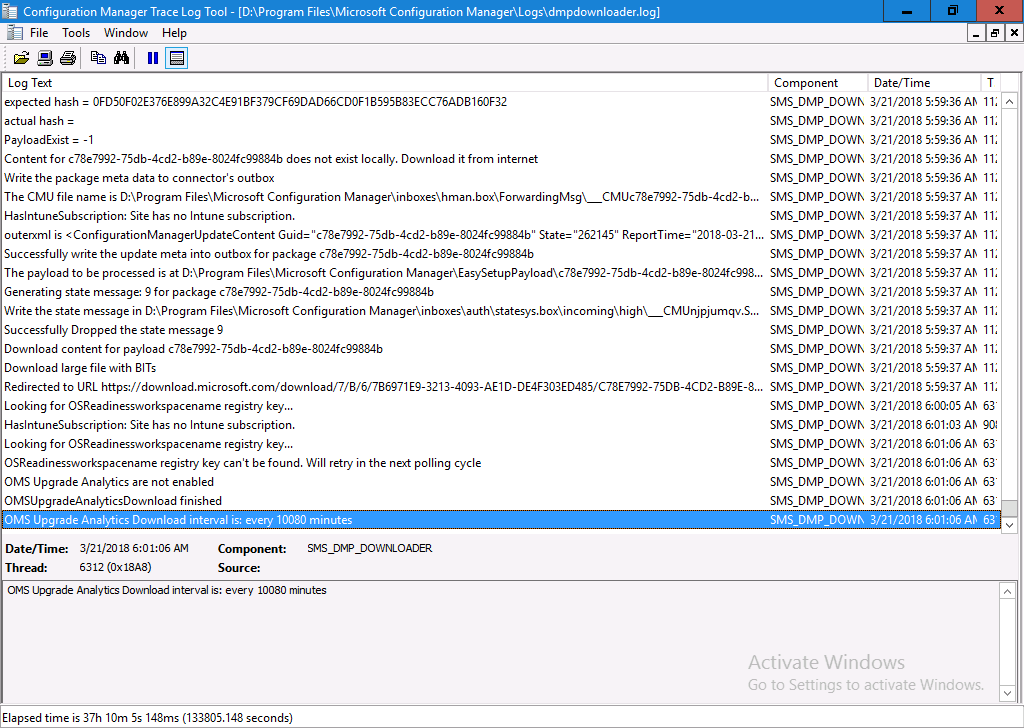
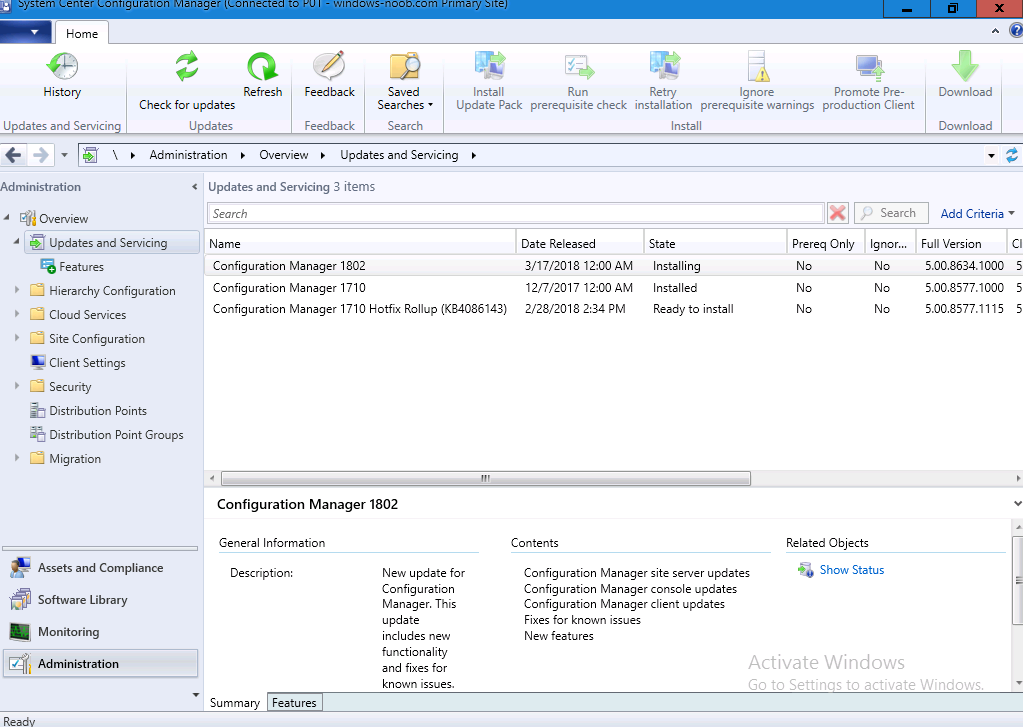
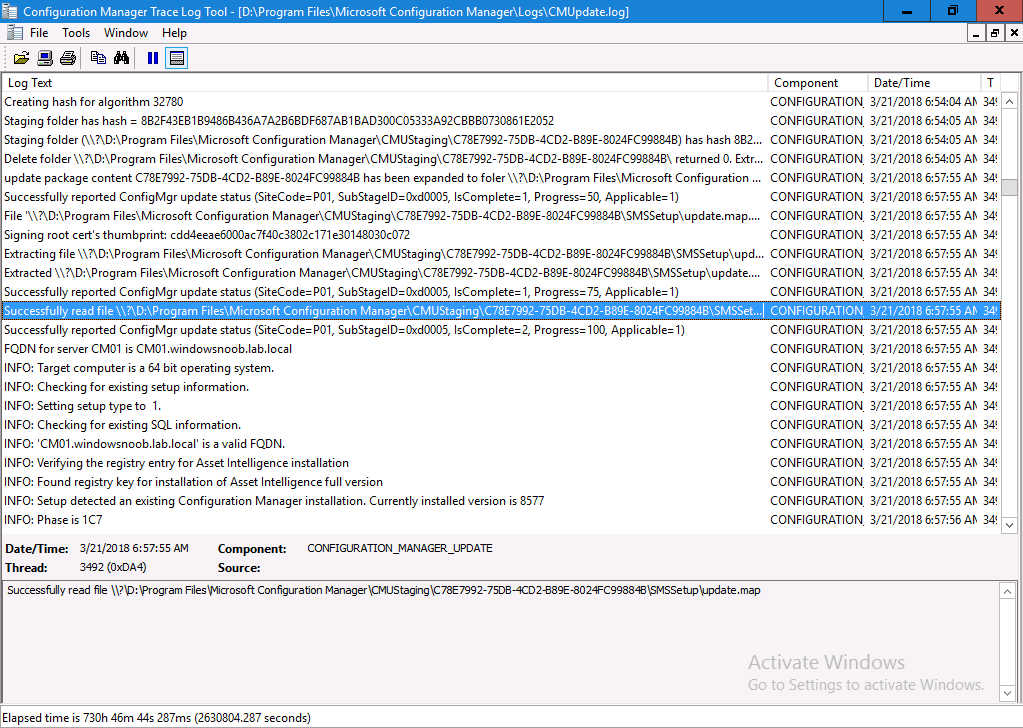
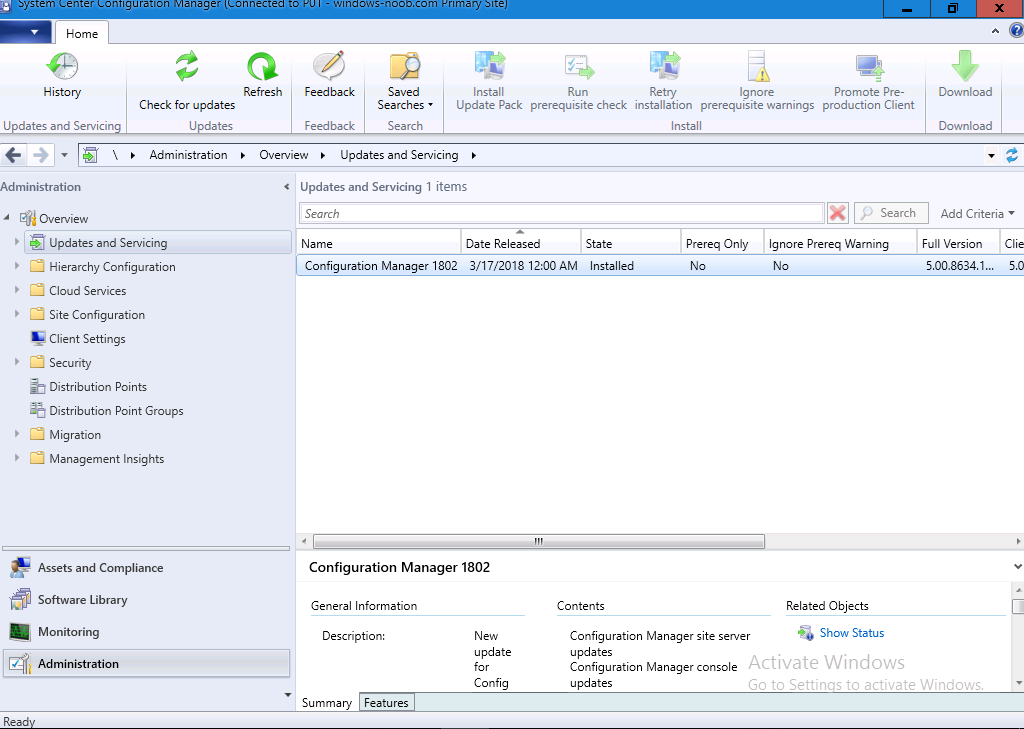
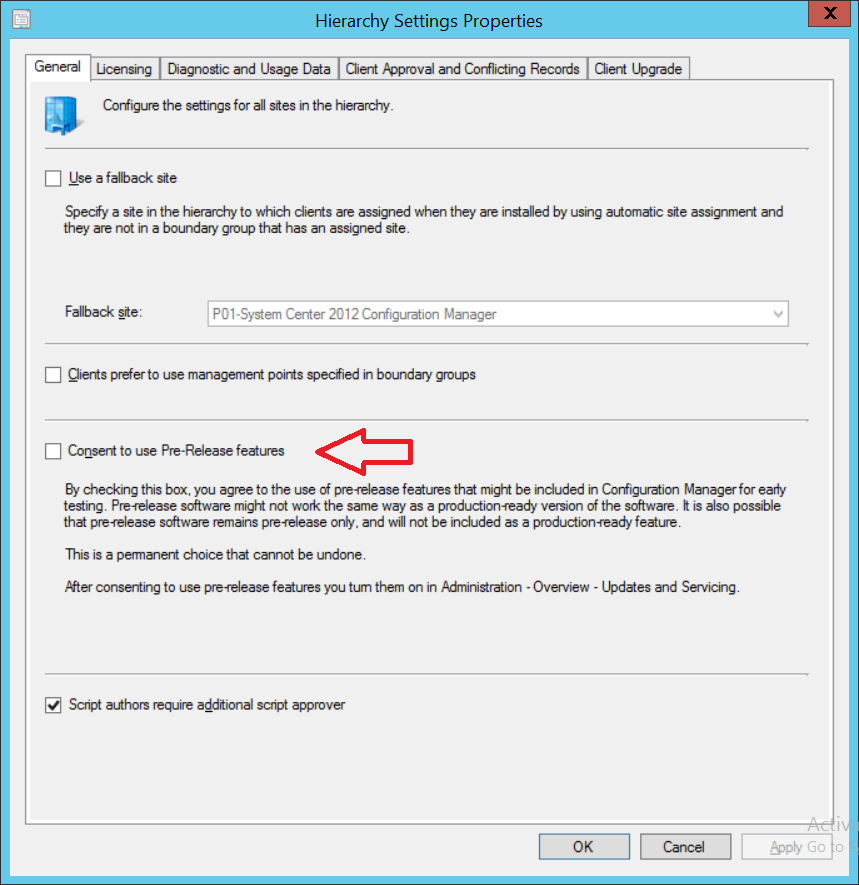
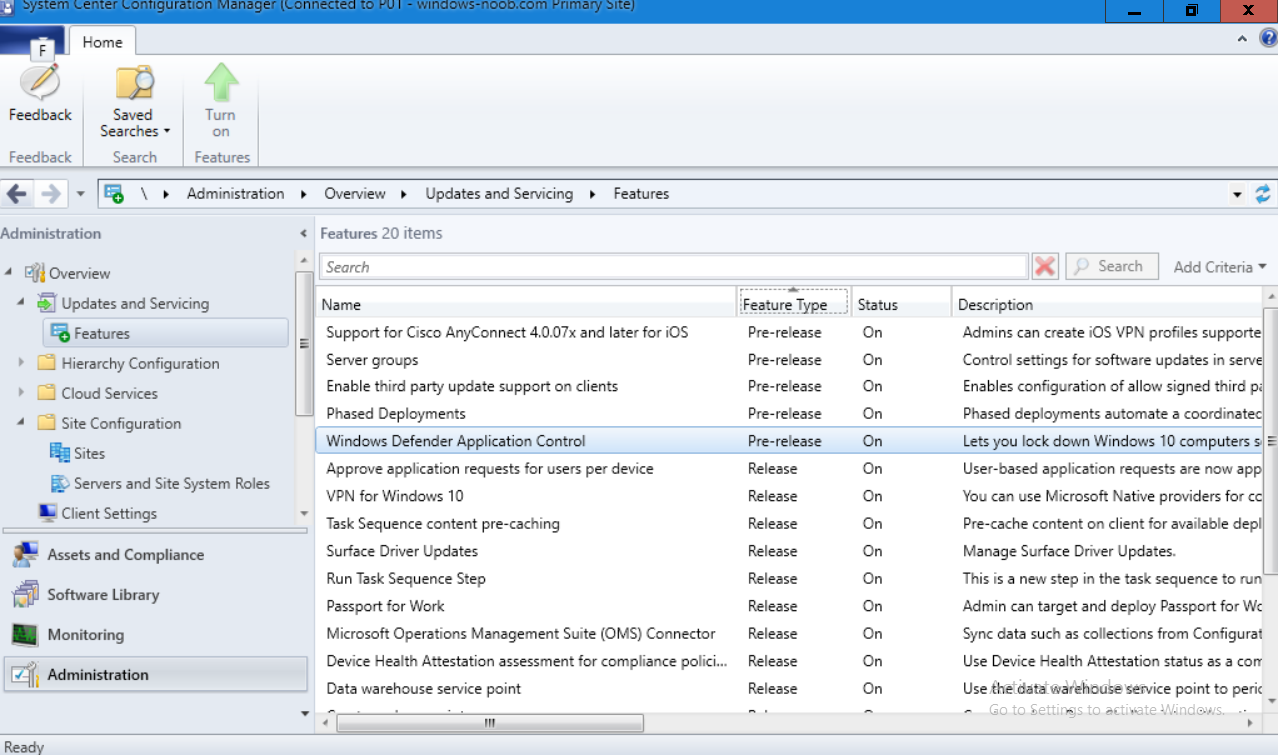
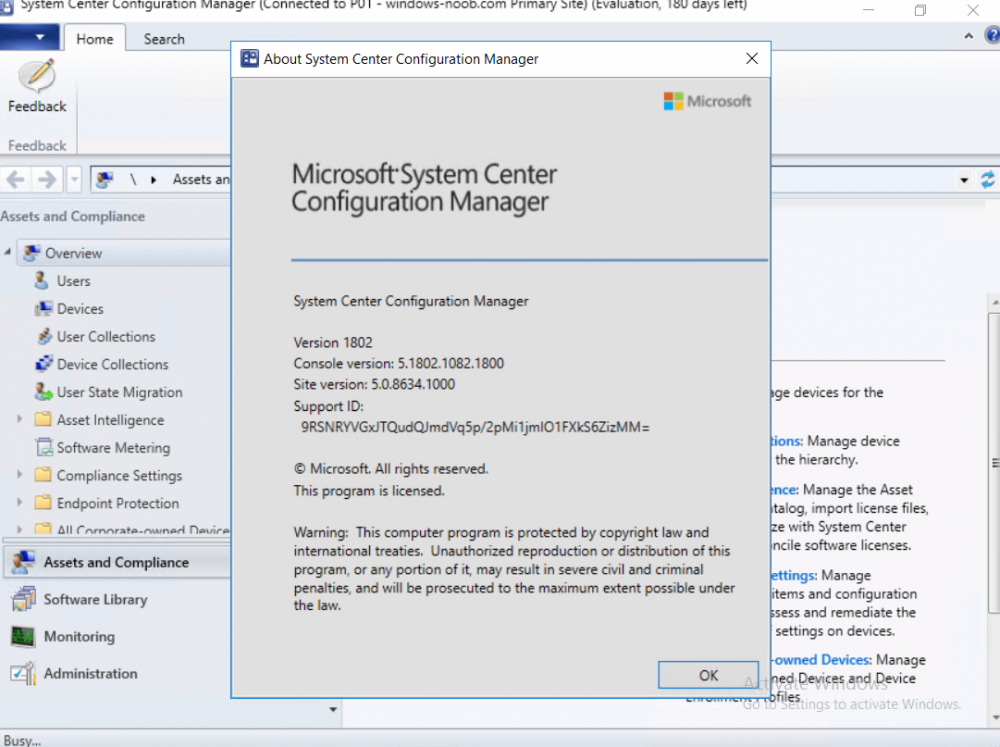
Introduction Today (in Seattle WA) Thursday the 22nd of March, 2018, System Center Configuration Manager (Current Branch) version 1802 was released. You can read the official announcement here and for a detailed list of what's new, please see the following blog post. The white elephant above is based upon an original graphic which I found here, thanks Djam ! Understanding the different SCCM releases There are two main branches of Configuration Manager currently available, Current Branch and Technical Preview. System Center Configuration Manager (Current Branch) is designed for use in production environments, for managing anything from relatively small to very very large Enterprises, whereas System Center Configuration Manager (Technical Preview) is for lab testing environments only and is limited to 10 clients. The Technical Preview releases are released monthly, and contain the latest and greatest features that are being trialed in the product, and usually these new features are the result of feedback from uservoice. Current Branch releases on the other hand are released only a few times per year and contain stable, tested features that are mature enough to release into production environments. Note: You cannot upgrade from a Current Branch to Technical Preview or vice versa, they are two distinct different branches. The following versions have been previously released since Microsoft moved to the Current Branch release cadence for Configuration Manager: Source Microsoft. A note about Baseline versions Baseline versions are versions of Configuration Manager that you can use to perform a clean install of Configuration Manager or when upgrading a supported version of System Center Configuration Manager 2012 hierarchy to Current Branch. Baseline versions are available for download in the Microsoft Volume License Service Center. As System Center Configuration Manager (Current Branch) version 1802 is now the new Baseline, you should it for all new installs (or applicable upgrades) until the next Baseline version is released. Note: Even though 1802 is listed as a baseline version here, it is not yet available for download on MVLS (as of 2018/3/25). Usually it takes a few weeks to get the new build media in place, so until that happens you can continue to use the 1702 baseline media for new installs and supported upgrades. Upgrading to 1802 Current Branch In a previous post you used PowerShell scripts to install System Center Configuration Manager (Current Branch) version 1702. This post will focus on upgrading from one current branch version to version 1802. This post assumes you are running a minimum version of 1702 of System Center Configuration Manager (Current Branch). If you have a hierarchy containing a CAS and one or more Primaries, then you must upgrade the CAS first before upgrading the Primary site servers. Note: Before upgrading, please review the following checklist to verify you are ready for the update. Fast ring versus Slow ring Do you want it now or later ? If you want it right now then you have the choice of getting the release immediately using a method called the fast ring. The fast ring method uses a PowerShell script which you download from Microsoft. After running the PowerShell script, the upgrade will show up in the ConfigMgr console. Note: The fast ring method is usually only available for the first 2 weeks after a Current Branch release is released. If however you decide to wait a couple of weeks after the release is publicly available, then the upgrade will be released to the slow ring and at that point it will show up in the ConfigMgr console for all Current Branch hierarchies without the need for running any PowerShell script. If you want to use the Fast Ring, download the PowerShell script and run it to self-extract to FastRingScript_1802. Once extracted, start an Administrative PowerShell command prompt in that folder and from there use the following command (where CM01 is the <SiteServer_Name | SiteServer_IP> of your CAS or standalone Primary site server). .\EnableFastUpdateRing1802.ps1 CM01 Next, open the ConfigMgr console and find Updates and servicing in the Administration node. Click on Check for Updates in the ribbon, followed by Refresh. After a few minutes you should see that Configuration Manager 1802 is listed with a state of Available to download as shown below. Note: If the upgrade does not show up in the console even after refreshing the view, you can restart the SMS_Executive component in Configuration Manager Service Manager in the Monitoring node of the console or alternatively restart the Configuration Manager server. After some time the update will automatically start downloading at which point you can open the dmpdownloader.log using CMtrace to keep track of things. Once it has completed downloading, the update pack will be listed in the ConfigMgr console with a state of Ready to Install. You may need to click refresh in the ConfigMgr console to update the view. Installing the Update pack Right click on the update and choose Install Update Pack. when the Wizard appears, make your choice for pre-requisites and click next. review the features included in this update pack , and make selections if you wish, you can always add them later in the Console. Note: You'll also notice lots of Pre-Release features that are greyed out, to turn them on see the steps after upgrading the console the bottom of this guide. Before clicking next at the Client update settings please see this post accept the EULA and configure the software assurance expiration date and continue through until the wizard is complete. Monitoring the update In the console, the update pack state will change to Installing (refresh the console view to see this). Clicking on Show Status will give you detailed info about the state the Installation is in, there are 5 distinct phases in the top pane: Download Replication Prerequisite Check Installation Post Installation Selecting a phase will highlight what state the update is in, including what (if any) problems it has. Logs, logs and more logs. During the upgrade you should monitor the following log files available in <drvletter>:\Program Files\Microsoft Configuration Manager\Logs, you can use CMTrace to do so. CMUpdate.log Hman.log These logs will detail the installation of the update pack. you should also pay close attention to the following log files present in the root of C:\. CompMgrProv.Log ConfigMgrPrereq.log ConfigMgrSetup.log After the update is complete, click Refresh in the console and you'll be reminded to update the ConfigMgr Console via a popup, the new version is 5.1802.1082.1700. Make sure to update your console as you cannot use the new features until you do. The observant among you will notice a change to the Console versioning. The new console version is 5.1802.1082.1700 versus the old console version (in my lab) which was 5.00.8577.1100. The new Console versioning works as follows: Major Minor Build Revision So that translates to... Major = 5 Minor = 1802 Build = 1082 Revision = 1700 Click OK to upgrade your ConfigMgr console, and after all is done you’ll see the 1802 version listed in the console. and clicking on about shows you Enabling Pre-release features If you want to use the Pre-Release features, then select the Administration node, select Site Configuration, Sites, Hierarchy Settings, and place a check mark in Consent to use Pre-Release features. After that, select Updates and Servicing, click on the Update Pack, select Features and in the right pane of the ConfigMgr console you'll be able to turn pre-release features on or off by right clicking and choosing Turn on or Turn off. Summary This release is packed with great features and new functionality and proves that the SCCM as a Service (SAAS) model is working. Not only is it working but quick adoption by Enterprises large and small is proof indeed that they like and trust the direction that ConfigMgr is evolving towards. If you are not on Twitter yet then get on it, and Tweet a thank you to David James (@Djammmer) and his Team for the amazing work they do. Recommended reading System Center: Configuration Manager - https://blogs.technet.microsoft.com/configurationmgr/ Checklist for updating to SCCM 1802 - https://docs.microsoft.com/en-us/sccm/core/servers/manage/checklist-for-installing-update-1802 What's new In System Center Configuration Manager (Current Branch) 1802 - https://docs.microsoft.com/en-us/sccm/core/plan-design/changes/whats-new-in-version-1802 Co-Management for Windows 10 devices - https://docs.microsoft.com/en-us/sccm/core/clients/manage/co-management-overview Log files in System Center Configuration Manager - https://docs.microsoft.com/en-us/sccm/core/plan-design/hierarchy/log-files