All Activity
- Past hour
-
 Introduction Microsoft has just pushed out yet another new feature for Windows 365 and Azure Virtual Desktop environments which is called health checks. Myself and my good friend Paul Winstanley took a look at the new feature and wanted to share our thoughts with you. We looked at the new functionality of the Windows app on Windows devices but this new feature is available via the Windows app on the following platforms: Windows: version 2.0.703.0 or later macOS: version 11.1.8 or later iOS: version 11.1.7 or later Android: version 11.0.0.46 or later What are health checks ? Good question. Think of it as a way for the Windows app to carry out a series of checks to verify that everything is in place to ensure that you have a consistently good connection to your Cloud PC and if something is not right, to report that there’s a problem to you via the app and via logs. These checks happen if it detects a network change, or can be triggered manually by the end user or automatically when the Windows App itself starts or when the user makes a connection to a resource such as a Cloud PC or Cloud App. Let’s take a look In the current version of the Windows app (2.0.704.0 at the time of writing), the health checks ability has been added. Please note that it is gradually rolling out to all regions, so if you have updated your Windows app and still don’t see the health symbol, don’t panic, it’s on its way. To verify which version of Windows app you are running see here. Before the feature rolls out your Windows app will look something like this. After the health check feature is enabled for your region, the Windows app will appear something like this, notice the new heart shaped icon on the left menu highlighted with a green arrow. Clicking it, brings up some information on the right side of the Windows app detailing the health of your connection. In there you can see the computer name, and what it determines to be the state of the system, the date and time of the check and the result of the check, in this case Everything looks good. You can also manually check the health by clicking Check again which will kick off the health checks, or click on Open log to see a log file containing what it has checked and the results of that check. Below is what the log file content looks like when everything is OK. The health_checks.log file location on Windows devices is: C\Users\<USERNAME>\AppData\Local\Temp\DiagOutputDir\Windows365\logs\health_checks.log You can also click on See all health checks to expand a list of what is checked. that’s all fine when everything is working, but what about when you have an actual problem ? Detecting network issues If something is detected to be not working, such as a failure to reach a required endpoint, then the Windows app will alert you with a banner, and the Health Check icon will have a red dot to signify something is wrong. These changes to the Windows App appearance happen if a network change is detected. Clicking on the health check icon itself, or clicking the Check device health warning button will allow you to check and reveal what the problem is. At this point you have many options. Check again Open log See all health checks Open network settings Clicking on See all health checks in this example reveals that the network connection is disconnected. And as mentioned above, that was detected when a network change was detected, as is revealed in the log file by clicking on Open log. Clicking on Check again in this failed state reveals (in the log) that this was a user initiated check. After you’ve sourced the root of the problem (in this case the router was turned off to simulate a network failure), and resolved it, the log reveals that there was another network change, and this time all is good. So there you have it, automated and manual health checks are now possible using the new feature in the Windows app. More info You can get more info about the new feature from Microsoft below: Run health checks to detect issues with Windows App connections – Windows App | Microsoft Learn https://techcommunity.microsoft.com/blog/windows-itpro-blog/enhancing-azure-virtual-desktop-and-windows-365-experience-with-health-checks/4446612 Summary The new health checks feature is a very welcome addition to the Windows app, as more and more companies have complex environments that contains proxies, ssl inspection, network sniffers that can interuppt or block the necessary traffic routes. The health check feature highlights when there is a problem with one or more of these endpoints, and alerts the end user with a popup. The admin in their turn can utilize the health check log to get more info about exactly what is failing. Thanks Microsoft for the feature and in particular thanks to the very helpful PM, Pavithra Thiruvengadam.
 -
Introduction A new feature for Windows 365, and now in preview, is Windows 365 Cloud Apps. Instead of giving users a full remote desktop session, Windows 365 Cloud Apps are published as individual applications that run on a Cloud PC but look and behave like they are installed locally on the device. If you are familiar with Remote Apps, first introduced in Windows Server 2008 as part of Remote Desktop Services, then you will have an understand of how these operate. When Windows 365 Cloud Apps are published, you will be able to load up that individual application and if any interaction with another application is required, then that application will also fire up, even if it has not been published to the user. Note that Windows 365 Cloud Apps are only available to you with a Windows 365 Frontline subscription. myself and my good friend Paul Winstanley sat down to test run this new Windows 365 feature. It is nice and simple to set up so follow along. Create the Windows 365 Cloud Apps Provisioning Policy The first step is to create a provisioning policy for the Windows 365 Cloud Apps. This is done in the usual place for Windows 365 provisioning Devices | Device onboarding | Windows 365 | Provisioning Policies | Create Policy. You will notice a new Experience section in the policy wizard, here you will need to select Access only apps which run on a Cloud PC (preview) as the selection defaults to Access a full Cloud PC desktop. When you select the Access only apps which run on a Cloud PC (preview) option, Frontline will be automatically selected for License type and Frontline type will be Shared. All other options are greyed out as they are not applicable to Windows 365 Cloud Apps as mentioned earlier. Enter any other relevant information for join type, geography, region and SSO before proceeding through the wizard. The selection of the Image type is crucial for Windows 365 Cloud Apps as the solution will make available any discoverable applications in the devices’ start menu (Appx and MSIX are currently not supported discoverable app type – therefore Teams is not available at this stage). You can import a custom image to take advantage of other applications which are not included in the Microsoft Gallery images. Clicking the View link for Apps available on the image will display a list of the Cloud Apps that will be available to you when the device is provisioned. When assigning the policy, you will need to select the Frontline Cloud PC size from your Available Cloud PC’s drop down and create an Assignment name and choose the Number of Cloud PC’s, this number will reflect the number of licenses that you have available to use. After creating your policy, the Frontline Shared device, which will host the Cloud Apps will being provisioning. You can view this under All Cloud PCs. Give the device some time to provision and once completed it will report as such. Publishing some Cloud Apps Whilst clicking though the menu system, you may have noticed a new All Cloud Apps option, this is where we need to go to publish the discovered apps, making them available to the assigned users. We can see that 32 items were discovered from the image we selected and their App status is currently set to Ready to publish. Simply select the apps you want to publish and click Publish. Confirm your choice to Publish the apps. The App status will change to Publishing. and will, very quickly, become Published. You now have the option to Unpublish apps. The process is identical. Select apps you want to remove and click Unpublish. Confirm to remove them. The App status will revert to Ready to publish. How to access the Windows 365 Cloud Apps Windows App is the place to go to access your Windows 365 Cloud Apps. Prior to publishing apps to the users, the application will display any device based Cloud PCs the user has access to. With apps assigned a new option Apps appears. Look out for it as it’s a subtle addition and you could miss it initially. Clicking on Apps will display the published apps that you have made available. You can make an app a Favorite by clicking the ellipses. When launching an app a RemoteApp connection to the Frontline device will initiate and you may be prompted to authenticate along the way. and Allow remote desktop connection, depending on policies assigned to you. If this is the first time connecting to the Cloud App, it will take a little long to load up. You can click Configuring remote session to see that Windows is being prepared. You can identify the Cloud App from the icon on the Windows task bar, there is a Windows App logo on the top right hand corner of the icon. Once launched, you will feel as it the application is running on locally on your device. Pretty cool! Things to note To remove Cloud Apps from the All Cloud Apps view, you will need to delete the assignment of the provisioning policy. Since Cloud Apps run as Frontline Shared, the management of them is identical to management of a Frontline Shared Cloud PC, so be aware of any max connection limitations due to licencing. You can utilise policies assigned to Frontline devices, such as redirection. These will apply to Cloud Apps. When using a custom image, Windows 365 Cloud Apps will use a PowerShell script to scan the Start Menu for apps, so ensure that your tenant policies do not require extra authentication for PowerShell scripts to achieve this. Currently only apps discovered in the Start Menu are available. Microsoft are developing the ability to publish apps that are installed by Intune and are included in the Autopilot Device Preparation Policy associated with the Cloud App provisioning policy. We hope this blog post gives you a tester of this great new feaure.
- Last week
-
 Environment details: CM 2503 (5.0.9135.1000) without KB33177653 or KB34503790 installed. Windows 11 = 24H2 customized reference image built from August 2025 ISO. ADK = 21H2 (10.1.22000.1).
 - Earlier
-

New PowerShell Based SCCM OSD Frontend
Abnrangerx67 replied to taylorblakeharris's question in Frontends, HTA's and Web Services
HI, love it so far, and would be giving it try. We currently use the UDI from MDT, and with MDT going away, it is time for something new. In the interim, I built a new package using the scripts from MDT, then I download the package to a central location on the device during OSD, then just use command line steps to run the same commands to the scripts that MDT was using. So far works great, but, now that VB scripts are being deprecated, time for another switch, ugh. Which put me on the search and to your option. I am mediocre when it comes to programming, but I was able to leverage PowerShell script to handle some of the logic such as if the tech checked the box for LTSC, then another GUI would show, but only gave the option to image a specific device type based on its function. I will try and incorporate some of what I have into yours and see how it goes. One other thing I do is use a device name generator built with PowerShell that pulls the last 5 of the serial, then appends based on the location the device belongs to, it also checks AD to make sure device does not already exist. I have built some WPF with PowerShell, so I understand some of the coding. I just downloaded VSCode, so I taking the plunge to learn this on the fly. I hope I can ping you for ideas or solutions. Thanks -
what version of Configmgr are you using and what adk ?
-

SCCM 2007 SP2 prerequisites download
KnYghT replied to EngiNerd's topic in Configuration Manager 2007
@anyweb please share the 2007 sp2 files with me too 😔 -
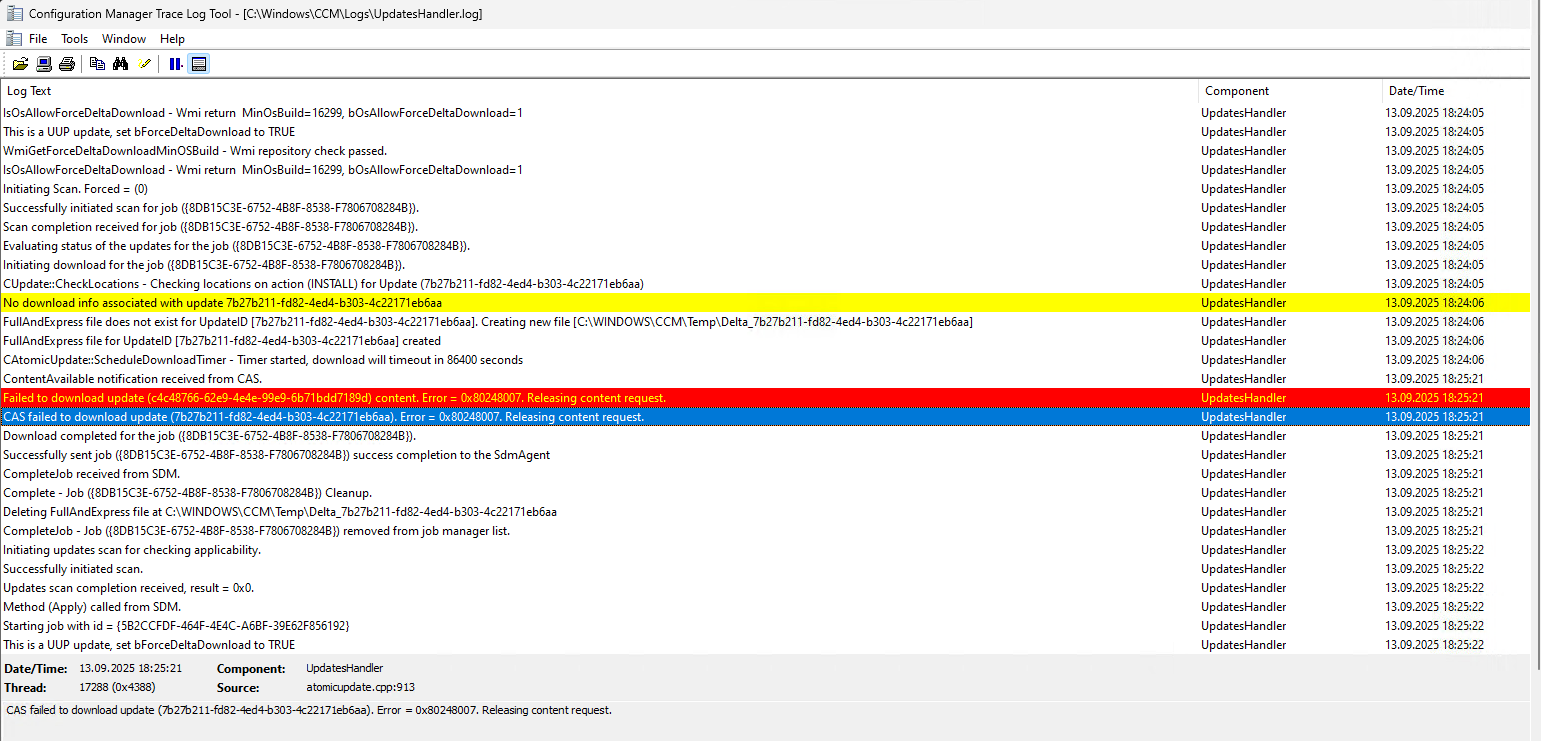
When comparing OS deployment bare metal task sequence times between Windows 11 24H2 and Windows 10 22H2 I could see that 24H2 was considerably slower even though the task sequences were almost identical other than the OS being laid down on the device. I did a timing comparison and noticed two things in particularly that were taking considerably longer on the 24H2 device: 1) reboot tasks 2) time to finish up the task sequence work after the last step. For reboot tasks, I can see that the delay is between these two events in the SMSTS.log log: Waiting for policy to be compiled in 'root\ccm\policy\machine' namespace and Policy verification done within the OSDSetupHook component. On the Windows 10 device the time between those log entries was 1 second, but on Windows 11 24H2 those log entries vary, but it's usually around 2 minutes. At the end of the task sequence, after executing the last task, following The task execution engine successfully completed the current task sequence step smsts.log entry to when the smsts.log stops being written to, it takes 14 seconds for the Windows 10 device, but it takes 4:29 seconds for the Windows 11 device. The delays are similar, between these two events in SMSTS.log (see attached screen shot): End Task Sequence policy cleanup and Policy evaluation initiated within the TSManager component. Any reason policy work should take considerably longer on Win11 24H2? Any suggestions on where I can look to see as to why it's taking such a longer time to deal with policy work in 24H2? Is this a Win11 24H2 issue, a ConfigMan issue, or ConfigMan configuration issue? I am welcome to entertain any thoughts or suggestions folks have. Anyone else seeing this issue in their environment? Environment details: CM 2503 (5.0.9135.1000) without KB33177653 or KB34503790 installed. Windows 11 = 24H2 customized reference image built from August 2025 ISO. ADK = 21H2 (10.1.22000.1).

-

SCCM 2 Domains in 2 Forests
Henchman21 replied to ImaNewb's topic in System Center Configuration Manager (Current Branch)
Create a cert template from existing working template from your CA and name it "XXXXX.INF" on the ca - copy to server that needs the cert SAVE IT WITH THE SERVER NAME. MAKE SURE IT'S AN .INF FILE. Create the REQ from the INF on the local server Open the INF file and replace the server template has “XXXXXX” for server name, replace with the with the server name you are working on. - open CMD as admin, navigate to where you put the XXXXX.INF example below Example: CMD.exe --> C:\temp\Certificate>certreq -new yourservername.inf yourservername.req Copy the XXXXX.req File to your Primary CA, now you want to submita new request. Open the Certification Authority console Click start type in CA and Certificate Authority should appear “Run as Admin” Right-click the CA → All Tasks > Submit a new request Select the XXXXX.req file and save it as a .CER file Example XXXXX.cer Now copy the XXXXX.cer file back to the server that needs it, and import it to the Computer\Personal Store. Trying running your ccmsetup.exe /install /mp blah blah blah I would try to get networks to open up ports to the CA from all subnet in that domain and ports that SCCM needs to communicate with. ports needed Kerberos 464 Certificate Enrollment Web Services Domain Controllers (DC) Allow Source Certificate Enrollment Web Services - Destination : DC LDAP 389 Certificate Enrollment Web Services Domain Controllers (DC) Allow Source Certificate Enrollment Web Services - Destination: DC Service: LDAP (network port tcp/389) LDAP 636 Certificate Enrollment Web Services Domain Controllers (DC) Allow Source Certificate Enrollment Web Services Service: LDAP (network port tcp/636) DCOM/RPC Random port above port 1023 · Certificate Enrollment Web Services CA Allow Please see for details on RPC/DCOM configuration: http://support.microsoft.com/kb/154596/en-us HTTPS 443 All clients requesting certs Certificate Enrollment Web Services Allow CERT INF Example Below: Example: [Version] Signature="$Windows NT$" [NewRequest] Subject = "CN=XXXXX, OU=XXX, O=XXX, L=STATE, S=CITY, C=US" <----needs hostname - no fqdn of server you need KeySpec = 1 KeyLength = 2048 Exportable = TRUE MachineKeySet = TRUE SMIME = FALSE PrivateKeyArchive = FALSE UserProtected = FALSE UseExistingKeySet = FALSE ProviderName = "Microsoft RSA SChannel Cryptographic Provider" ProviderType = 12 RequestType = PKCS10 KeyUsage = 0xa0 [Extensions] 2.5.29.17 = "{text}" _continue_ = "dns=XXXXX.company.com" <---needs FQDN 2.5.29.37 = "{text}" _continue_ = "1.3.6.1.5.5.7.3.2" ; Client Authentication [RequestAttributes] CertificateTemplate = ConfigMgrClientCertificate DisableExtensionsList = "2.5.29.31,1.3.6.1.5.5.7.1.1" Hope this helps! -

SCCM 2007 SP2 prerequisites download
GarthMJ replied to EngiNerd's topic in Configuration Manager 2007
You and me both, the SW is 18 years old and nothing is supported anymore. Even 2012 is 13+ year old now and nothing is supported either. It just doesn't make any sense. -
SCCM 2007 SP2 prerequisites download
KnYghT replied to EngiNerd's topic in Configuration Manager 2007
I wan't testing in homelab how to deploy windows xp and windows 7 with programs. I build at home a retro server farm just for learning old network system's. Thank u if u supporting me with sccm 2007 prerequisites files. My favorite windows server's is:windows server 2003; 2008; and 2008 R2 only. -
SCCM 2007 SP2 prerequisites download
anyweb replied to EngiNerd's topic in Configuration Manager 2007
i'm curious, why are you guys installing such an old unsupported version of SCCM like this today anyway, can you please enlighten me ? -
SCCM 2007 SP2 prerequisites download
KnYghT replied to EngiNerd's topic in Configuration Manager 2007
I sent pm to you too. Thank you for help. -

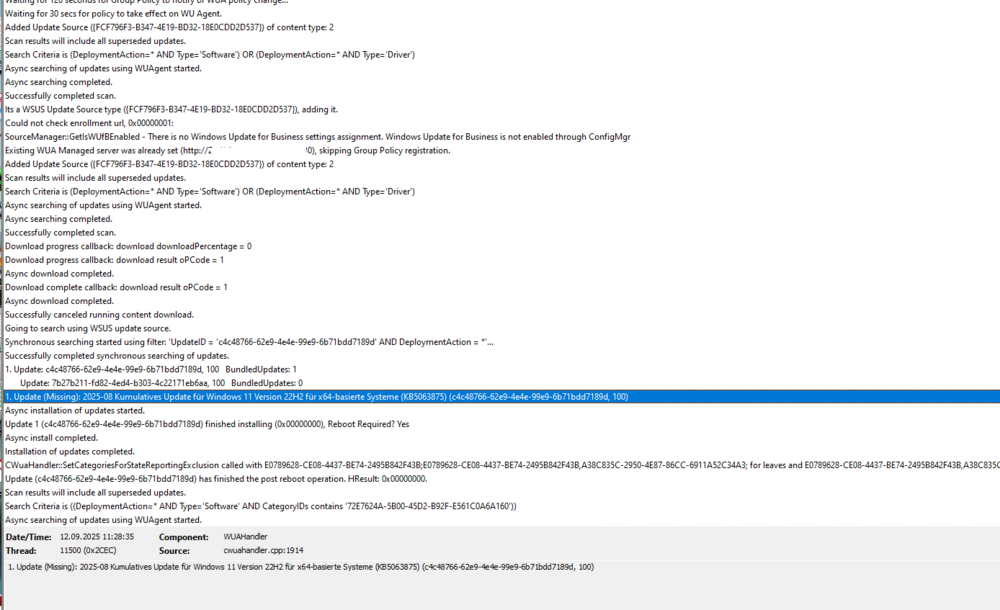
SCCM Software Updates - KB5063875
jackie_jack86 replied to jackie_jack86's topic in Configuration Manager 2012
Thanks sir for your Revert. i have tried the script.whole client went wrong. i have tried again few steps more. This strange think i only noticed in Dell Latitude 5520 1. Uninstall SCCM_Client and install again. -
SCCM Software Updates - KB5063875
anyweb replied to jackie_jack86's topic in Configuration Manager 2012
it looks to me like the update is failing on your clients, have you tried troubleshooting that ? I don't think this is an SCCM problem but a client problem. I asked copilot what it thought about the error given above and it came up with this script which does the following:... Renames Spupdsvc.exe to prevent interference. Stops Windows Update services. Renames update cache folders (SoftwareDistribution and Catroot2). Restarts update services. Runs sfc /scannow to fix system file corruption. Runs DISM /RestoreHealth to repair the Windows image. Prompts you to manually download KB5063875 if needed. Right-click the .bat file and choose "Run as administrator". Let it complete all steps (may take several minutes). Restart your PC and try installing the update again. fix_update_error_0x8024000B.bat -
I asked copilot, and here's the summary of it's answer: For a 12 TB upload to Azure Blob Storage, your main costs will be: Storage tier cost (Hot: $220/month, Cool: $122/month, Archive: $24.50/month) Write operations (~$9–$22 depending on tier) No cost for uploading (data ingress)
-
We are planning to transfer a large amount (12TB) of data from AWS S3 to Azure Blob storage. There are close to 60million objects to deal with and we are planning to use a tool <product name removed> for the same. Before proceeding, we want to estimate the transfer cost. Are there any 'write costs' to Azure blobs? We are aware of egress cost from AWS S3, but to calculate the complete end-to-end cost, we need to understand are there are any write operation costs during the transfer
-
SCCM Software Updates - KB5063875
jackie_jack86 replied to jackie_jack86's topic in Configuration Manager 2012
. -
SCCM Software Updates - KB5063875
jackie_jack86 replied to jackie_jack86's topic in Configuration Manager 2012
-
SCCM Software Updates - KB5063875
jackie_jack86 replied to jackie_jack86's topic in Configuration Manager 2012
-
SCCM Software Updates - KB5063875 In software Centre 2025-08 Cumulative Updates for Windows 11 Version 22H2 for x64 (KB5063875) is keep on installing and system is restarting again and again. It is happening to few devices only Control Panel - system updates View Can any one help

-
Repair .EXE Application from Software Center
jackie_jack86 replied to jackie_jack86's topic in Configuration Manager 2012
Hi sir, i am Looking a script for Repair option in xxxx.Exe file. -
 Thanks for the reply, and yes that's the case, due to which i am unable to use the database configured in it and SUP
 -
this is odd, so are you saying that in Windows File Explorer that you cannot browse the D:\ drive at all ? if that's not what you mean then please explain what "when accessed directly from the system" means.
-
I am facing an issue with our SCCM environment. Please find the details below: SCCM Version: 2403 License Model: 3-year subscription (renewable yearly) License Renewal: Expired last year. I renewed my license last month. However, since my previous environment is in production, I did not proceed with setting up a new environment. Issue Summary: The D: drive on our SCCM server, which is configured for both the SCCM database and SUP, is showing “Access is denied” when accessed directly from the system. The same D: drive works normally when connected to another workstation. Attempts to take ownership of the drive result in the same “Access is denied” error. This issue is isolated to the SCCM server only. Impact: High – as the D: drive hosts both the database and SUP, no updates are currently being distributed to clients. Troubleshooting Performed: Verified drive connectivity. Attempted to reassign ownership of the drive → failed with “Access is denied.” Tested drive functionality on another workstation → works without issues. Could anyone investigate and advise on the root cause and next steps?
-

issue with Powershell script in Task Sequence (output)
keywan replied to keywan's question in Deploy software, applications and drivers
What I want in my TS, is to run my PS and it should display it in my Collection as Value and can see there the Result. Have you any Idea how I can realize it?