


king13p
-
Posts
27 -
Joined
-
Last visited
Everything posted by king13p
-
Hello, I'm working on a Powershell script to install Autodesk products. I'm having issues with a step and hopefully someone can help. I've tried this many different ways and keep running into errors. Using double quotes (Start-Process "msiexec.exe" -ArgumentList ""/i $dirFiles\ABDS2017\Img\x64\RVT\RVT.msi INSTALLDIR="C:\Program Files\Autodesk\" ADSK_SETUP_EXE=1 /qb!"" -NoNewWindow -Wait -PassThru).ExitCode Error Cannot validate argument on parameter 'ArgumentList' Argument is null or empty. Using a variable to define InstallDir $RevitInstallDir = "C:\Program Files\Autodesk\" (Start-Process "msiexec.exe" -ArgumentList "/i $dirFiles\ABDS2017\Img\x64\RVT\RVT.msi INSTALLDIR=$RevitInstallDir ADSK_SETUP_EXE=1 /qb!" -NoNewWindow -Wait -PassThru).ExitCode Doing this I get the msiexec /option Required Parameter error. Tried this also, Single Quotes with Quotes on Path (Start-Process "msiexec.exe" -ArgumentList "/i $dirFiles\ABDS2017\Img\x64\RVT\RVT.msi INSTALLDIR="C:\Program Files\Autodesk\" ADSK_SETUP_EXE=1 /qb!" -NoNewWindow -Wait -PassThru).ExitCode I receive A positional parameter cannot be found that accepts argument C:\Program Using single quotes on InstallDir (Start-Process "msiexec.exe" -ArgumentList "/i $dirFiles\ABDS2017\Img\x64\RVT\RVT.msi INSTALLDIR='C:\Program Files\Autodesk\' ADSK_SETUP_EXE=1 /qb!" -NoNewWindow -Wait -PassThru).ExitCode Doing this I get the msiexec /option Required Parameter error. Using single quotes on the outside (Start-Process "msiexec.exe" -ArgumentList '/i $dirFiles\ABDS2017\Img\x64\RVT\RVT.msi INSTALLDIR="C:\Program Files\Autodesk\" ADSK_SETUP_EXE=1 /qb!' -NoNewWindow -Wait -PassThru).ExitCode If I do this, it prevents the $dirFiles variable from working. The reason I'm using Start-Process is because I have many installers one after the other and I want one installer to wait till the one before it finishes. Any help would be appreciated! Thanks
-
You need to figure out why it is just closing the cmd window. Open a CMD window as admin, then execute the program by typing the full unc path. Doing it this way the cmd window won't close right away and you should be able to diagnose why it didn't run the script. Your other option is to open the script itself and copy each command in one after the other into a cmd window and see what it fails on. Good Luck.
-

Multicast Setup not Working,
king13p replied to king13p's question in Deploying Windows 10, Windows 8.1, Windows 7 and more...
Figured out this issue, Inside the Task Sequence under the Install Image there was a checkbox that said Access content directly from distribution point. After unchecking this option, multicast worked perfectly. -
Multicast Setup not Working,
king13p posted a question in Deploying Windows 10, Windows 8.1, Windows 7 and more...
Hello all, I'm trying to setup Multicast in our environment and are having issues getting it to run. I've configured the distribution point to use Multicast, I've set boundary groups for my machines to only talk to this DP. I've changed the setting of the wim to transfer over multicast, I've made sure the deployment of the task sequence is set to Download Content locally. No matter what I do, it always just does Unicast. Anybody have any ideas? Thanks -
SCCM 2012 Software Center Available After Date Change
king13p replied to FazzaGBR's topic in Configuration Manager 2012
I've seen this before, I believe that is just the chosen date Microsoft put for their start time. Its mainly just for cosmetics but if you want to change it to a different day then Open the properties for your Application Deployment, Click the Scheduling Tab, Click the Schedule At Radio Button and change the date and time to the current time or even a few hours earlier. I believe that should fix your issue. Best of luck. -
SCCM Console Builder Custom Property Class
king13p replied to king13p's topic in Configuration Manager 2012
My problem is I can't seem to find it, Here is the query that lets me know what image is on the machines. I tried looking under SMS_G_SYSTEM for Current Version but its not listed. Thanks select SMS_G_System_CurrentVersion.Version, SMS_R_System.Name from SMS_R_System inner join SMS_G_System_CurrentVersion on SMS_G_System_CurrentVersion.ResourceID = SMS_R_System.ResourceId inner join SMS_G_System_CurrentVersion64 on SMS_G_System_CurrentVersion64.ResourceID = SMS_R_System.ResourceId where SMS_G_System_CurrentVersion.Version = "IMAGE1" or SMS_G_System_CurrentVersion64.Version = "IMAGE1" order by SMS_R_System.Name -
I was wondering if anyone here has used the Console Builder to add things into SCCM? I followed the tutorial here http://idanve.blogspot.com/2015/03/add-custom-column-to-sccm-console-using.html but I'm wondering if its possible to have a custom registry entry in a column. So here is where I'm getting at. I have a reg key that gets placed during OSD that tells SCCM which image it has. I can use Hardware Inventory to collect this Reg Key Value. I can run a query that tells me who has what image. I would like to put this value into a column using the console builder if possible. Following the tutorial I was not able to find this custom field. Does anybody have any ideas? I think it has something to do with a property display item and/or Class Property? Is there any way to create a custom one? Thanks I'm sure its an odd request but I'm bored at work so this will kill some time.
-
Prevent Techs from Modifying "Some" Collections
king13p replied to king13p's topic in Configuration Manager 2012
I ended up figuring this out, The problem was when I set a restriction to this collection, the same restriction would apply to other collections. I ended up duplicating the limiting collection and making all the restrictions on this second collection. Now everything works perfectly. Thanks -
Prevent Techs from Modifying "Some" Collections
king13p posted a topic in Configuration Manager 2012
Hello, I'm looking for a way to prevent certain techs in my organization from adding machines and deleting machines from certain collections, I have 4 collections that I don't want them to modify. Can anyone help me out with this? I tried following some tutorials but can't seem to get them to work. Thanks Lenny -
Hello all, I am having an issue with a new client I just reimaged. This one has Windows 8.1 on it. In the ConfigMGR Control Panel I have only 4 Actions listed: Application Deployment Evaluation Cycle Discovery Data Collection Cycle Machine Policy Retrieval & Evaluation Cycle User Policy Retrieval & Evaluation Cycle I tried uninstalling the client and reinstalling. Tried upgrading the client to R2 CU3. Tried deleting the cert but Nothing seems to be working for me. Any Ideas? Thanks
-
Nevermind, figured it out. I deleted all the power plans and then created them on my computer using windows. Then I found the reg key containing the guid and all policies and imported them into a GPO. I then had folders for each policy and used targeting to apply them to certain security groups and organizational units. I also used a reg key to make the policies the default active policy so they couldnt be changed. I also changed the description of the policy as well. I'll post some pics and a better description tomorrow with how to do all this. Thanks
-
Hello all, Hoping someone can help me out here. I got a question about Group Policy I’m having an issue with. I’m trying to create multiple custom Power Plans, each will be for different purposes. 1 for Staff, 1 for Students, 1 for machines we don’t want to lock. I would like for each of these plans to be default for the specific user and not be able to be changed. I know how to get all of this working except for 1 part. The Plans need to be locked down by their GUID. When I send out the plans, the same plan on computer A will have a different GUID then the same plan on computer B. Does anyone have any idea on how to make it so a custom power plan will have the same GUID on all computers? Thanks
-
Okay so weird issue we are having, We just created a new SCCM 2012 R2 Server almost 2 weeks ago, Since then it seems every morning I come in, The SCCM Console won't connect to the server. If I log into the server, the SCCM Console works just fine, Other users can't get SCCM to work either, The only solution for us is to reboot the server then it starts working again. Any ideas? What logs should I look into? Thanks
-
Been looking around the web and can only find an old video on how to create a clean packaging environment for XP. Here is what I have been doing, Please comment on what else should be done to create a clean environment. 1. You should be using a VM and a good tool is VMware Workstation for PC or VMware Fusion for Mac. 2. Choose an OS (The place I work for uses Windows 7 32-Bit 95% of the time) 3. Create 1 20GB or more HDD and 1 6GB HDD (SWAP) and attached to your VM 4. Install Windows to the 20+ GB HDD. 5. Turn Off Automatic Updates then Run Windows Updates but only Security Updates, Service Packs, and other Critical Updates. Avoid Language Packs, Windows Defender, Internet Explorer Updates, Driver Updates,d and other Junk Updates. I went ahead and installed all the .NET Framework updates but its your choice. If your software complains then you'll know what .NET Framework your PKG needs. 6. Turn Off System Restore 7. Disable Extra Features from Programs / Add or Remove Windows Features you will not need. Such as Games and Print Spooler, ETC 8. Create your Swap file. You may need to format your 6GB Hard Drive. Right Click Computer > Properties > Advanced System Settings > Advanced Tab > Performance Settings > Adjust for Best Perfomance > Advanced Tab > Change... > Uncheck Automatically manage paging File size for all drives > Check Custom size > Click your Second 6GB Drive> Take the amount of Physical Memory in your PC and double it for both Initial size and Maximum Size EX 2048 Physical is 4096 > Click Set > OK > OK > OK > Restart 9. Turn off Services you don't need. Services.msc Double click a service, Choose Disabled, Click Stop, Click Apply. Services I disabled were: Print Spooler Windows Defender Windows Firewall Windows Update - After you ran your updates and don't have anymore to update, you can disable this service. 10. Install VMware Tools, Parallels Tools, VirtualBox tools, ETC. Whichever one you are using. Reboot 11. Install your MSI Packaging Tool, (EX Admin Studio, InstallShield, AppDeploy, EMCO) I'm using EMCO 12. Add anything else you think you may need. Now you can configure your Machine how you want it. EDIT: I also went back and turned off Share Printers with Windows in VMware. Otherwise a process keeps making changes in the registry that gets recorded when you do your MSI Captures. 13. Shutdown the machine and capture its State. You will then be able to start using the MSI tool to create a MSI and then revert back to the original state. Please comment on any other changes that would be helpful.
-
- 1
-

-
Hello everyone, I have decided to create a tutorial on how to add a shortcut into a MSI. Our software packager likes to rebuild MSI from ground up using Admin Studio and what ends up happening is the MSI's don't work great afterwards, Most of the time its Deleting a shortcut or Adding one. So instead of rebuilding an MSI lets use Orca to create a Transforms file to create a shortcut. 1. Download Windows SDK http://www.microsoft.com/en-us/download/details.aspx?id=8279 2. Choose the Default installation options 3. After install navigate to C:\Program Files\Microsoft SDKs\Windows\v7.1\Bin\ 4. Install Orca.MSI 5. After its done installing lets edit the MSI for 7-Zip. We are going to add a desktop shortcut. 6. Download the MSI to the desktop and right click it and choose Edit with Orca. Or open Orca and choose the 7-Zip MSI 7. We need to Create a Transforms file first. Click Transform in the Menu > New Transform 8. In the Tables Column choose Shortcut. 9. There are Two Shortcuts by Default that are placed by default when the MSI is run in this example. The 7-Zip File Manager and the 7-Zip Help. Lets make it so File Manager is on the Desktop. The easiest way to do this is simply Copy the entire row. Right click the shortcut labeled "startmenuFmShortcut" and choose Copy Row. 10. Now Paste the Rows 11. If you want to change the name of the shortcut you can Simply change the value under Name. Right now its listed as "7zipFM|7-Zip File Manager" Everything after the Pipe is what the name of the icon is. Everything before doesn't get put anywhere and far as I can see, It may just be a comment as far as I know, You also don't need it, If you replace the whole line it will show up as the name of the shortcut. I'll label mine "7-Zip" EDIT: Found out that if you label Directory_ as "DesktopFolder" instead of desktop, you can skip steps 13 - 17. DesktopFolder is a variable which places it in the Public Desktop Folder. 12. Directory_ should be "Desktop" You should be good to go. You can go crazier with this but thats not in the scope of this tutorial Here is what it should look like: 13. Now we must place values as to where "Desktop" really is. Otherwise if we ran the MSI with this Transform file it wouldn't know where Desktop is. Click the Directory Table. 14. Here you see basically a table of where the MSI looks to install various things to. Right click the table and choose Add Row. We must add a few rows to this table. Its best to think about this whole thing backwards when you are adding to this table. We want to place a shortcut in this directory. C:\Users\Public\Desktop This will guarantee it will show up on everyones desktop. For Directory put Desktop. For Directory_Parent put PUBLIC For DefaultDir put Desktop 15. Right Click and Choose Add Row For Directory put Public. For Directory_Parent put Users For DefaultDir put Public 16. One more time Right Click and Choose Add Row For Directory put Users. For Directory_Parent put TARGETDIR For DefaultDir put Users 17. In the end it should look like so: 18. Click Transform and Choose Generate Transform > Save it as 7ZIPTRANS.MST on the desktop or in the same directory as your 7-zip msi. 19. Open a Command Prompt and navigate to the same directory as your 7-Zip MSI and Transforms file. 20. Type the following: msiexec.exe /i 7z920.msi TRANSFORMS=7ZIPTRANS.mst /qn This line will install 7zip using the Transforms file we created and it will install silently. You now see the icon on the desktop. Hope you enjoyed this tutorial and hope its helpful for you.
-
I'm getting weird log errors in SMS_SCHEDULER Our SQL server was Peaked at 100% and these are some of the errors we have found. We have tons of these errors all with different Random site codes it thinks we have. Any idea why? SQL is back to normal but we would like to figure out why these errors are coming in. Thanks Error Milestone CCM 1/9/2014 9:06:06 AM CM2012.CCM.org SMS_SCHEDULER 3400 Scheduler does not have an address defined at site "CCM" for site "X96". Files cannot be sent from site "CCM" to site "X96" until an address is defined. Solution: Define a valid address at site "CCM" for site "X96" in the Configuration Manager Console under Site Hierarchy -> CCM -> Site Settings -> Addresses. Error Milestone CCM 1/9/2014 9:06:06 AM CM2012.CCM.org SMS_SCHEDULER 3400 Scheduler does not have an address defined at site "CCM" for site "XCN". Files cannot be sent from site "CCM" to site "XCN" until an address is defined. Solution: Define a valid address at site "CCM" for site "XCN" in the Configuration Manager Console under Site Hierarchy -> CCM -> Site Settings -> Addresses. Error Milestone CCM 1/9/2014 9:06:06 AM CM2012.CCM.org SMS_SCHEDULER 3400 Scheduler does not have an address defined at site "CCM" for site "WVX". Files cannot be sent from site "CCM" to site "WVX" until an address is defined. Solution: Define a valid address at site "CCM" for site "WVX" in the Configuration Manager Console under Site Hierarchy -> CCM -> Site Settings -> Addresses. Error Milestone CCM 1/9/2014 9:06:06 AM CM2012.CCM.org SMS_SCHEDULER 3400 Scheduler does not have an address defined at site "CCM" for site "X1M". Files cannot be sent from site "CCM" to site "X1M" until an address is defined. Solution: Define a valid address at site "CCM" for site "X1M" in the Configuration Manager Console under Site Hierarchy -> CCM -> Site Settings -> Addresses. Error Milestone CCM 1/9/2014 9:06:06 AM CM2012.CCM.org SMS_SCHEDULER 3400 Scheduler does not have an address defined at site "CCM" for site "WQL". Files cannot be sent from site "CCM" to site "WQL" until an address is defined. Solution: Define a valid address at site "CCM" for site "WQL" in the Configuration Manager Console under Site Hierarchy -> CCM -> Site Settings -> Addresses.
-
Hello all, This morning I started reimaging a few machines, I had 2 carts of laptops that needed to be reimaged, The first cart worked just fine and had no issues, The second cart no software gets downloaded to the machine after it boots up, When I open up the Configuration Manager windows in Control Panel only 4 Actions appear. Machine Policy Software Updates Deployment Software Updates Scan Cycle User Policy Anybody have an idea of whats going on? I tried uninstalling the client and reinstalling and that didn't work. The site listed is correct, In SCCM it shows the client as Installed, Not sure what to try next. Thanks
-
I have a few more questions, My Co-Worker was out of town for a month so I used a script to set Update Schedules for collections from 2-4 Hours to 1 Week. I also disabled all incremental updates except for All Systems and Windows 7 Machines. When I set the update times back to a week I was able to finally add machines to a collection almost instantly. Within a 10 seconds the machine showed up in the collection. How are the rest of you guys deploying software instantly to a machine if instantly is even possible? The way I am thinking it should work is Have a collection for the software you want to deploy, EX Google Chrome, Put a machine in the collection, Since it takes a while to update I will just Right Click the collection and choose Update Membership, Within a few seconds I will see the machine in the collection and then within an Hour i believe the machine should start installing Google Chrome, Depending on Client Update settings, Is that correct? I could also use the Right Click Tools to do a Machine Policy Retrieval to get it started sooner? Or is it a different one. Thanks
-
Thanks for the reply, I tried commenting out the line and had no luck, Its worth mentioning I am trying to do a UDI Wizard installation which is popping up at this point, however when I just install the same version just as a task sequence, it does not prompt me for a language. Let me know if there are any files I should look at and upload. Thanks Lenny
-
Also Here is my Unattend file <?xml version="1.0" encoding="utf-8" ?> - <unattend xmlns="urn:schemas-microsoft-com:unattend"> - <settings pass="windowsPE"> - <component name="Microsoft-Windows-Setup" processorArchitecture="x86" publicKeyToken="31bf3856ad364e35" language="neutral" versionScope="nonSxS" xmlns:wcm="http://schemas.microsoft.com/WMIConfig/2002/State"> - <Display> <ColorDepth>16</ColorDepth> <HorizontalResolution>1024</HorizontalResolution> <RefreshRate>60</RefreshRate> <VerticalResolution>768</VerticalResolution> </Display> - <ComplianceCheck> <DisplayReport>OnError</DisplayReport> </ComplianceCheck> - <UserData> <AcceptEula>true</AcceptEula> - <ProductKey> <Key /> </ProductKey> </UserData> </component> - <component name="Microsoft-Windows-International-Core-WinPE" processorArchitecture="x86" publicKeyToken="31bf3856ad364e35" language="neutral" versionScope="nonSxS" xmlns:wcm="http://schemas.microsoft.com/WMIConfig/2002/State" xmlns:xsi="http://www.w3.org/2001/XMLSchema-instance"> - <SetupUILanguage> <UILanguage>en-US</UILanguage> </SetupUILanguage> <InputLocale>en-US</InputLocale> <SystemLocale>en-US</SystemLocale> <UILanguage>en-US</UILanguage> <UserLocale>en-US</UserLocale> </component> </settings> - <settings pass="generalize"> - <component name="Microsoft-Windows-Shell-Setup" processorArchitecture="x86" publicKeyToken="31bf3856ad364e35" language="neutral" versionScope="nonSxS" xmlns:wcm="http://schemas.microsoft.com/WMIConfig/2002/State" xmlns:xsi="http://www.w3.org/2001/XMLSchema-instance"> <DoNotCleanTaskBar>true</DoNotCleanTaskBar> </component> </settings> - <settings pass="specialize"> - <component name="Microsoft-Windows-UnattendedJoin" processorArchitecture="x86" publicKeyToken="31bf3856ad364e35" language="neutral" versionScope="nonSxS" xmlns:wcm="http://schemas.microsoft.com/WMIConfig/2002/State"> - <Identification> - <Credentials> <Username /> <Domain /> <Password /> </Credentials> <JoinDomain /> <JoinWorkgroup /> <MachineObjectOU /> </Identification> </component> - <component name="Microsoft-Windows-Shell-Setup" processorArchitecture="x86" publicKeyToken="31bf3856ad364e35" language="neutral" versionScope="nonSxS" xmlns:wcm="http://schemas.microsoft.com/WMIConfig/2002/State"> <ComputerName /> <ProductKey /> <RegisteredOrganization /> <RegisteredOwner /> <TimeZone /> <DoNotCleanTaskBar>true</DoNotCleanTaskBar> </component> - <component name="Microsoft-Windows-IE-InternetExplorer" processorArchitecture="x86" publicKeyToken="31bf3856ad364e35" language="neutral" versionScope="nonSxS" xmlns:wcm="http://schemas.microsoft.com/WMIConfig/2002/State" xmlns:xsi="http://www.w3.org/2001/XMLSchema-instance"> <Home_Page>http://www.microsoft.com/</Home_Page> <IEWelcomeMsg>false</IEWelcomeMsg> </component> - <component name="Microsoft-Windows-Deployment" processorArchitecture="x86" publicKeyToken="31bf3856ad364e35" language="neutral" versionScope="nonSxS" xmlns:wcm="http://schemas.microsoft.com/WMIConfig/2002/State" xmlns:xsi="http://www.w3.org/2001/XMLSchema-instance"> - <RunSynchronous> - <RunSynchronousCommand wcm:action="add"> <Description>EnableAdmin</Description> <Order>1</Order> <Path>cmd /c net user Administrator /active:yes</Path> </RunSynchronousCommand> - <RunSynchronousCommand wcm:action="add"> <Description>UnfilterAdministratorToken</Description> <Order>2</Order> <Path>cmd /c reg add HKLM\SOFTWARE\Microsoft\Windows\CurrentVersion\Policies\System /v FilterAdministratorToken /t REG_DWORD /d 0 /f</Path> </RunSynchronousCommand> - <RunSynchronousCommand wcm:action="add"> <Description>disable user account page</Description> <Order>3</Order> <Path>reg add HKLM\Software\Microsoft\Windows\CurrentVersion\Setup\OOBE /v UnattendCreatedUser /t REG_DWORD /d 1 /f</Path> </RunSynchronousCommand> </RunSynchronous> </component> - <component name="Microsoft-Windows-International-Core" processorArchitecture="x86" publicKeyToken="31bf3856ad364e35" language="neutral" versionScope="nonSxS" xmlns:wcm="http://schemas.microsoft.com/WMIConfig/2002/State" xmlns:xsi="http://www.w3.org/2001/XMLSchema-instance"> <InputLocale>0409:00000409</InputLocale> <SystemLocale>en-US</SystemLocale> <UILanguage>en-US</UILanguage> <UserLocale>en-US</UserLocale> </component> - <component name="Microsoft-Windows-TapiSetup" processorArchitecture="x86" publicKeyToken="31bf3856ad364e35" language="neutral" versionScope="nonSxS" xmlns:wcm="http://schemas.microsoft.com/WMIConfig/2002/State" xmlns:xsi="http://www.w3.org/2001/XMLSchema-instance"> <TapiConfigured>0</TapiConfigured> - <TapiUnattendLocation> <AreaCode>""</AreaCode> <CountryOrRegion>1</CountryOrRegion> <LongDistanceAccess>9</LongDistanceAccess> <OutsideAccess>9</OutsideAccess> <PulseOrToneDialing>1</PulseOrToneDialing> <DisableCallWaiting>""</DisableCallWaiting> <InternationalCarrierCode>""</InternationalCarrierCode> <LongDistanceCarrierCode>""</LongDistanceCarrierCode> <Name>Default</Name> </TapiUnattendLocation> </component> - <component name="Microsoft-Windows-SystemRestore-Main" processorArchitecture="x86" publicKeyToken="31bf3856ad364e35" language="neutral" versionScope="nonSxS" xmlns:wcm="http://schemas.microsoft.com/WMIConfig/2002/State" xmlns:xsi="http://www.w3.org/2001/XMLSchema-instance"> <DisableSR>1</DisableSR> </component> </settings> - <settings pass="oobeSystem"> - <component name="Microsoft-Windows-Shell-Setup" processorArchitecture="x86" publicKeyToken="31bf3856ad364e35" language="neutral" versionScope="nonSxS" xmlns:wcm="http://schemas.microsoft.com/WMIConfig/2002/State"> - <UserAccounts> - <AdministratorPassword> <Value>QQBkAG0AaQBuAGkAcwB0AHIAYQB0AG8AcgBQAGEAcwBzAHcAbwByAGQA</Value> <PlainText>false</PlainText> </AdministratorPassword> </UserAccounts> - <AutoLogon> <Enabled>true</Enabled> <Username>Administrator</Username> <Domain>.</Domain> - <Password> <Value>UABhAHMAcwB3AG8AcgBkAA==</Value> <PlainText>false</PlainText> </Password> <LogonCount>999</LogonCount> </AutoLogon> - <Display> <ColorDepth>32</ColorDepth> <HorizontalResolution>1024</HorizontalResolution> <RefreshRate>60</RefreshRate> <VerticalResolution>768</VerticalResolution> </Display> - <FirstLogonCommands> - <SynchronousCommand wcm:action="add"> <CommandLine>wscript.exe %SystemDrive%\LTIBootstrap.vbs</CommandLine> <Description>Lite Touch new OS</Description> <Order>1</Order> </SynchronousCommand> </FirstLogonCommands> - <OOBE> <HideEULAPage>true</HideEULAPage> <NetworkLocation>Work</NetworkLocation> <ProtectYourPC>1</ProtectYourPC> </OOBE> <RegisteredOrganization /> <RegisteredOwner /> <TimeZone /> </component> - <component name="Microsoft-Windows-International-Core" processorArchitecture="x86" publicKeyToken="31bf3856ad364e35" language="neutral" versionScope="nonSxS" xmlns:wcm="http://schemas.microsoft.com/WMIConfig/2002/State" xmlns:xsi="http://www.w3.org/2001/XMLSchema-instance"> <InputLocale>en-US</InputLocale> <SystemLocale>en-US</SystemLocale> <UILanguage>en-US</UILanguage> <UserLocale>en-US</UserLocale> </component> </settings> - <settings pass="offlineServicing"> - <component name="Microsoft-Windows-PnpCustomizationsNonWinPE" processorArchitecture="x86" publicKeyToken="31bf3856ad364e35" language="neutral" versionScope="nonSxS" xmlns:wcm="http://schemas.microsoft.com/WMIConfig/2002/State" xmlns:xsi="http://www.w3.org/2001/XMLSchema-instance"> - <DriverPaths> - <PathAndCredentials wcm:keyValue="1" wcm:action="add"> <Path>\Drivers</Path> </PathAndCredentials> </DriverPaths> </component> </settings> <cpi:offlineImage cpi:source="catalog://cmpxe01/osd$/capture/windows 7 enterprise/x86/sources/install_windows 7 enterprise.clg" xmlns:cpi="urn:schemas-microsoft-com:cpi" /> </unattend>
-
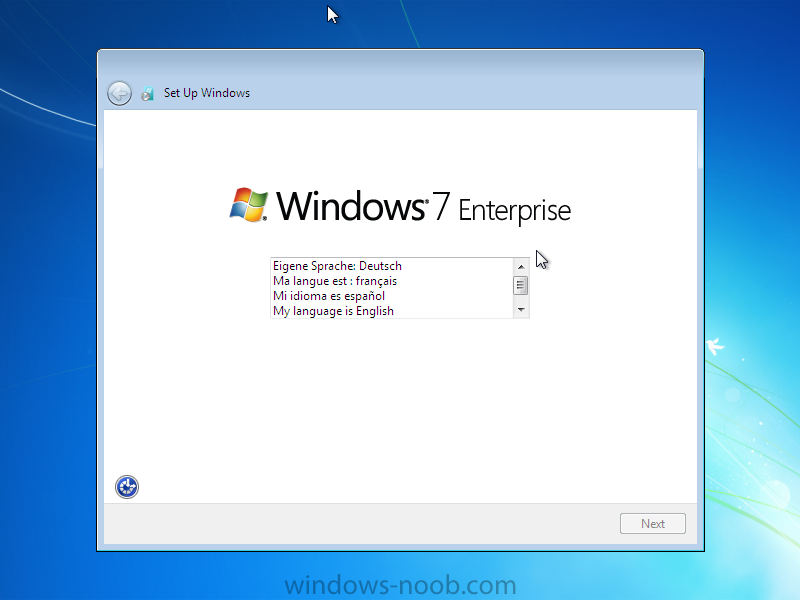
Hello everyone, I'm having an issue with a UDI Task Sequence. I'm using SCCM 2012 with MDT and Windows 7 X86 Enterprise. Everything works fine up until Windows Installation Comes up. Then its asking me for my Language. See Attachment! After I choose "My language is English" the setup continues perfectly. What am I missing from my unattend.xml file? Thanks
-
Under Properties of each collection I tried, Use incremental updates for this collection is not checked. Is there anything special I'm looking for in colleval.log?
-
Thanks for the reply, I have checked a few of them, They say Between 5 and 6 hours for updating. Even if I choose to Update Membership, it still takes a few hours before it actually shows up in the collection. Software Metering is Enabled, It says it occurs every 5 days. Okay so Looking back on this, 550 was wrong, We have 708 Building Collections. Pretty much 1 for each room in our district. So in grand total we have 1031 Collections. Is there any way for me to actually tell how many deployments are targeted to the same system that is a member of many different collections? I know we have a collection for each app, It doesn't appear that the Campus Collections actually deploy anything. Someone must have set them up just to organize them a bit better or something. Thanks for the help!
-
Hello everyone, I just started a new job about a month ago in a school district with mostly windows machines and iPads. One of the rules I've been put into is the role of Managing images and PCs with SCCM. When I started, everyone came up to me and said things are really slow with imaging and they would like for me to find a solution. So I watched the process. The imaging part seems fine its afterwards it takes about 6 hours for Applications to start coming down to the PC. When I looked at the device collections I was kinda shocked. There are over 550 Collections. Is this way over the top? I mean every Room in our district has a collection, Every application has a collection, There are also collections for each building, and each model of machine. I told my co-worker that this has too be too much, When I try to move a machine into a new collection using a direct rule, it takes 2 Hours to appear in that collection! He doesn't seem to believe that 550 is too many. I'm not too experience with SCCM, so if I'm wrong please tell me. If anyone works for any bigger company it would also be great to hear how many collections you have. I would think with 550 collections all trying to run a query to find out what machines belong in it would probably be the reason why we are lagging. Any help would be Greatly Appreciated! THANKS!
-
Hello, I'm running into a problem at home with DHCP on a Server 2008R2 Box and just have a few questions. First off My setup includes a Windows Server 2008R2 which I want to leave on all the time for running Plex, SCCM, DHCP, WDS, MDT, AD, and so on, Might include Asterisk on there as well someday down the line, The system has 12 GBs of Ram and a 60GB SSD, and 160GB HDD and 1TB Plex Storage. Might be adding another 1TB to it as well down the line. My problem with DHCP is I can have it up and running and I'll be able to get IP address from the server but all I have is local intranet. How would I set this up so I can have internet as well? As an FYI I have to Network Cards in my Server. I can plug in from my Qwest ActionTech M1000 straight to one ethernet port then from the other ethernet port to the switch. I tried to do a Bridge Connections deal on both Ethernet ports but I didn't notice anything different. And then also Change my DD-WRT settings to Wireless Access Point only and disable DHCP on it. Any Help at all would be greatly appreciated. I hope I'm on the right track. Thanks
