Tobie
-
Posts
81 -
Joined
-
Last visited
Everything posted by Tobie
-
Guide: Implementing Branch Distribution Points in SCCM 2007
Tobie replied to Tobie's topic in Configuration Manager 2007
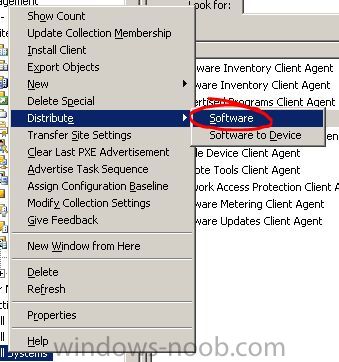
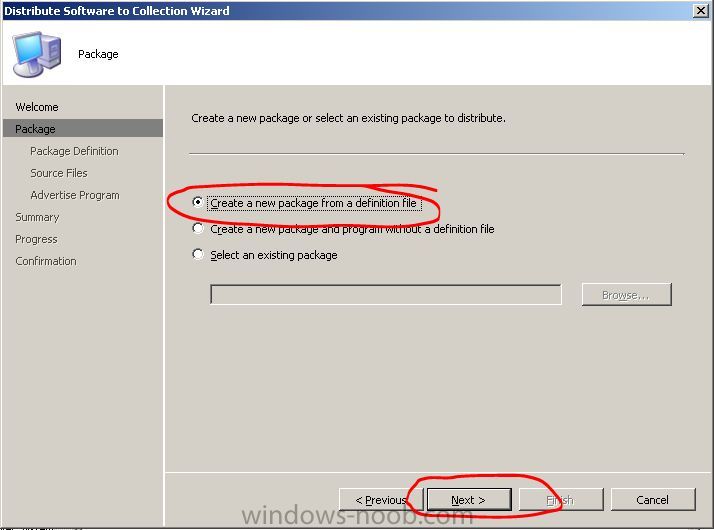
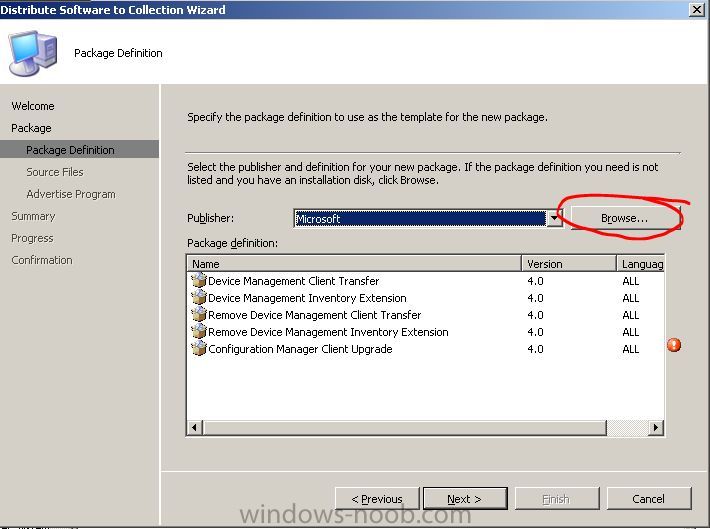
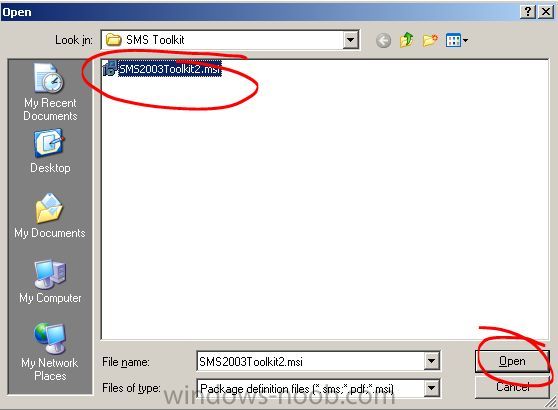
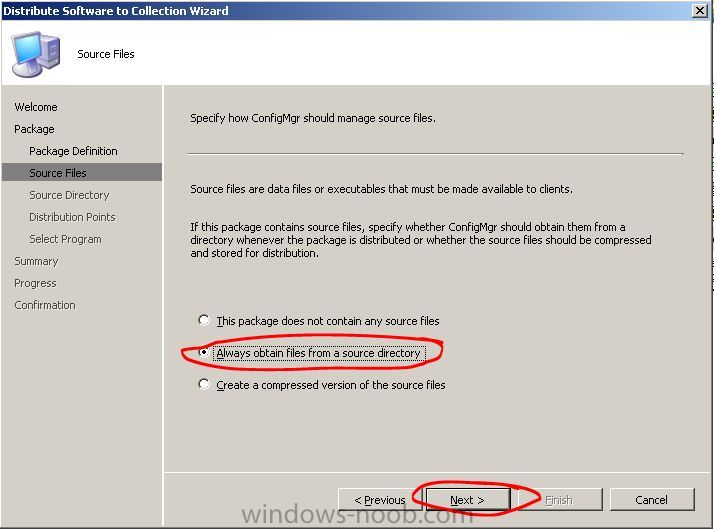
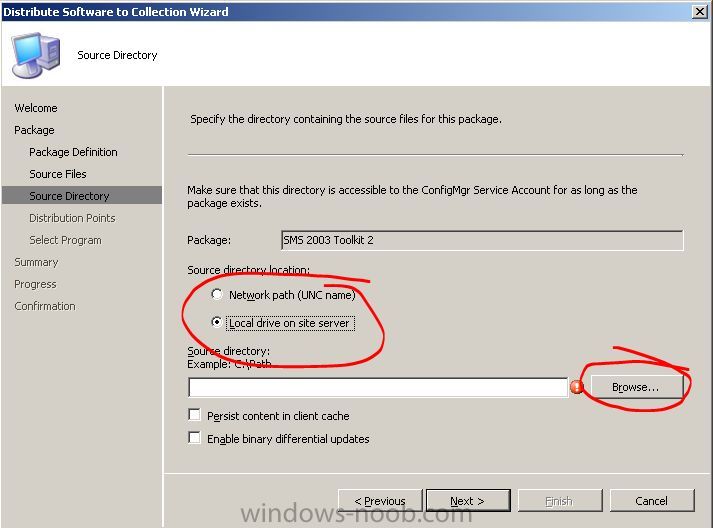
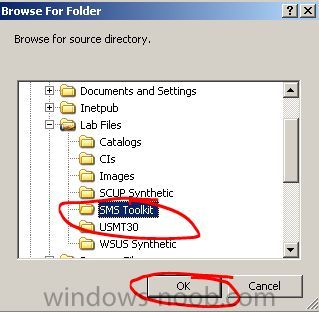
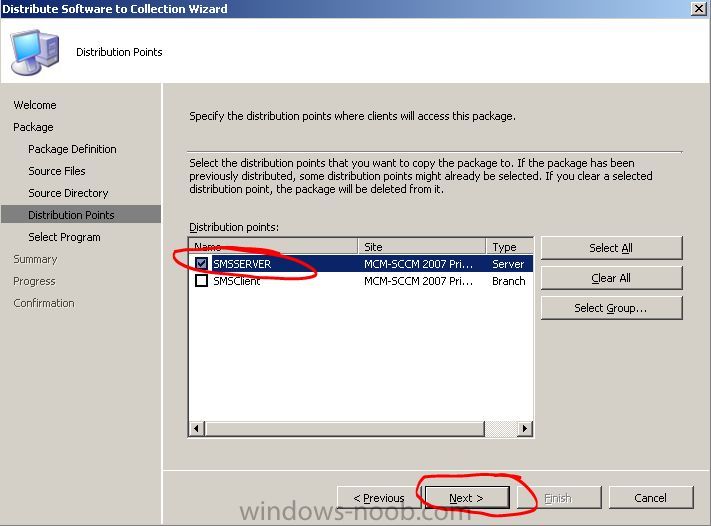
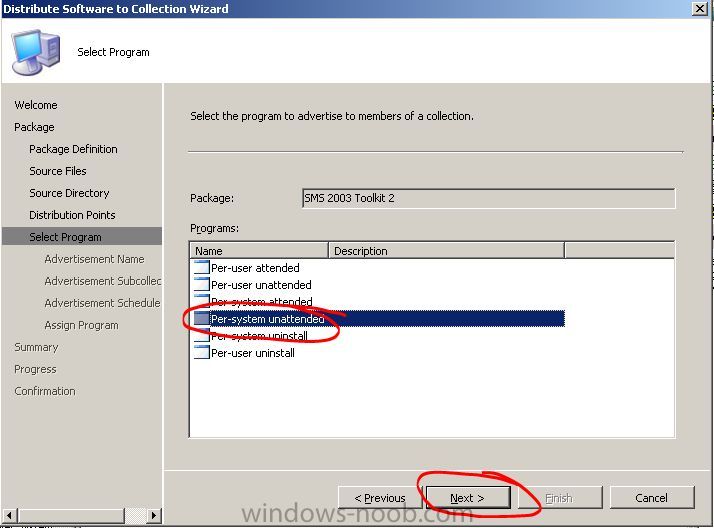
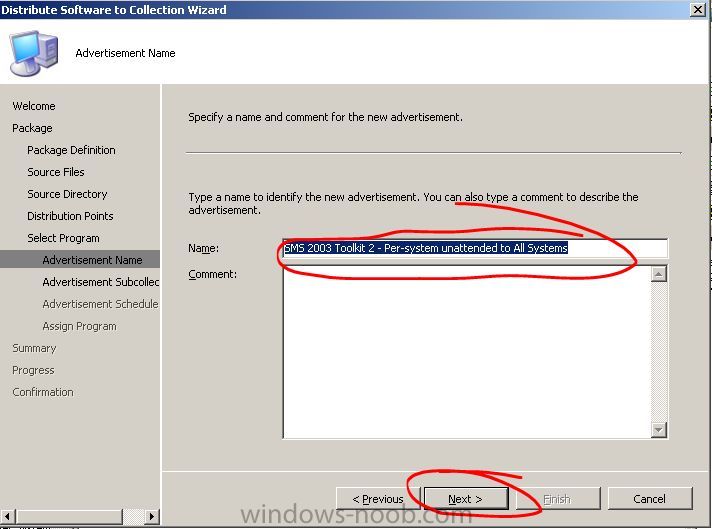
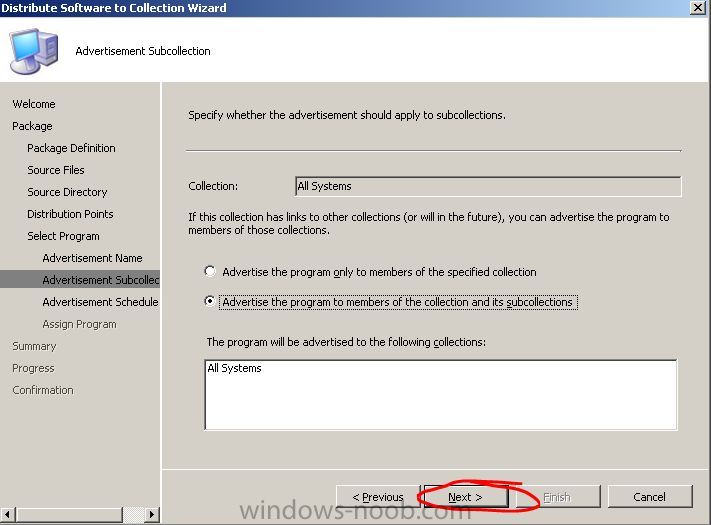
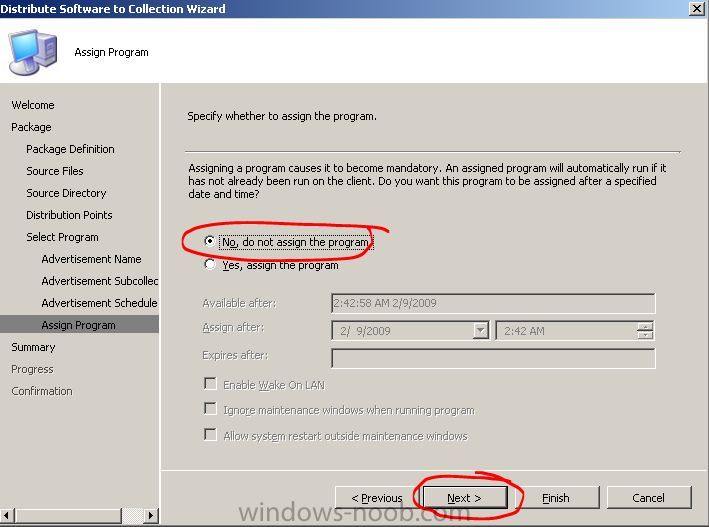
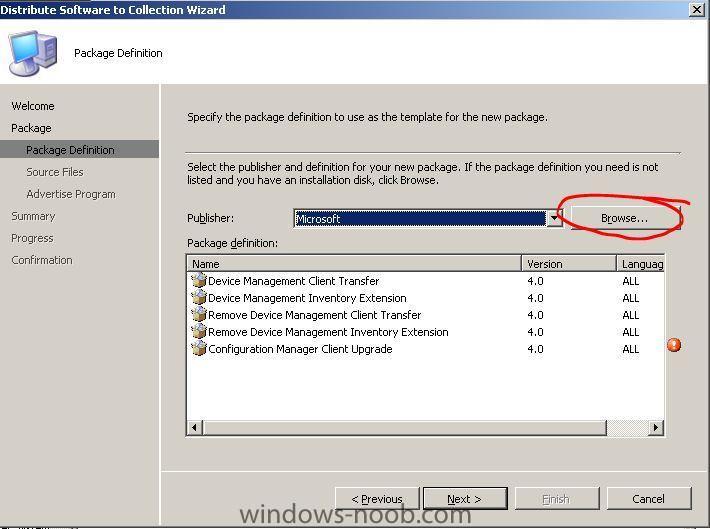
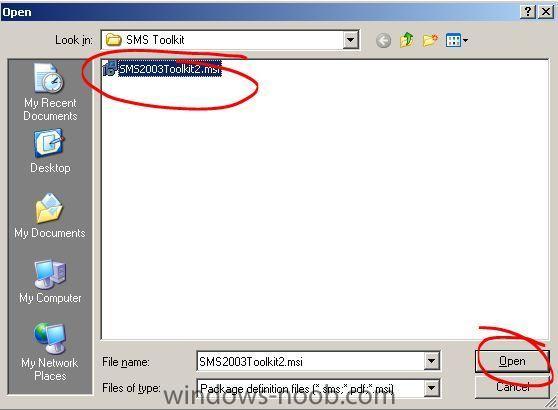
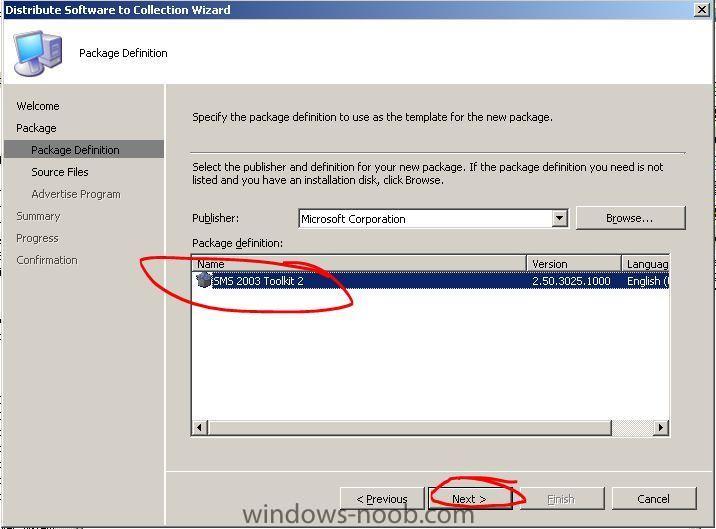
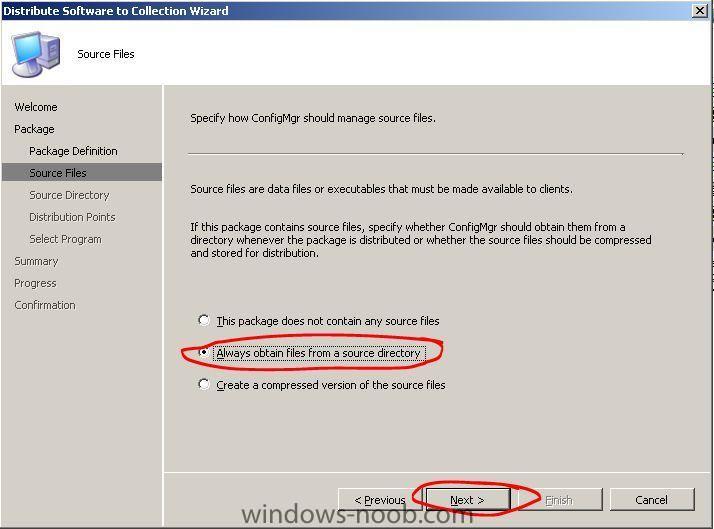
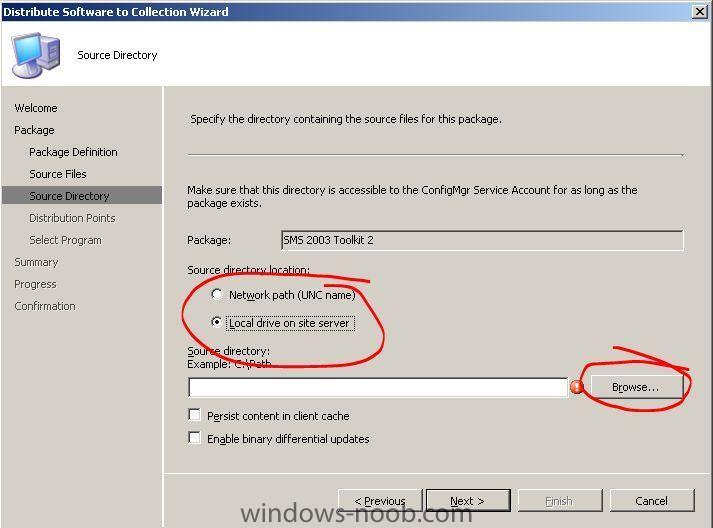
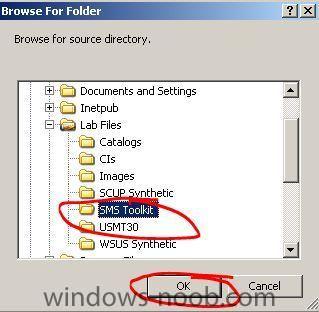
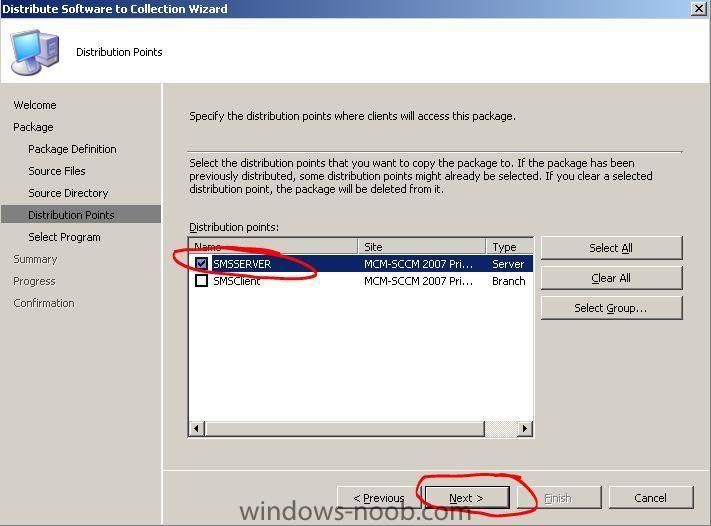
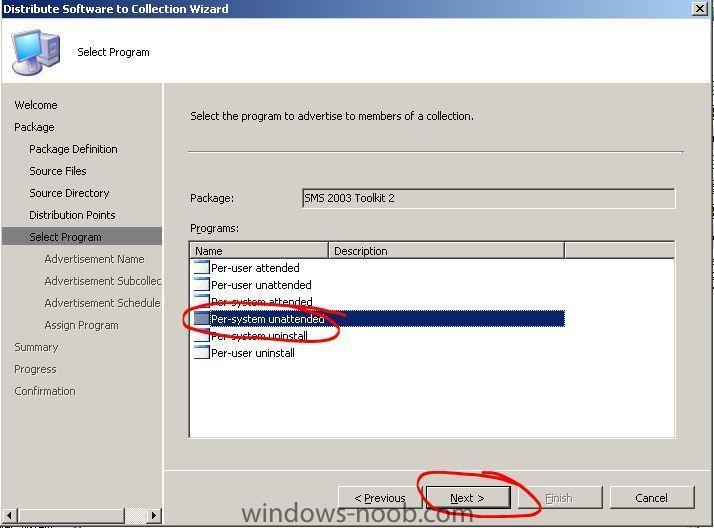
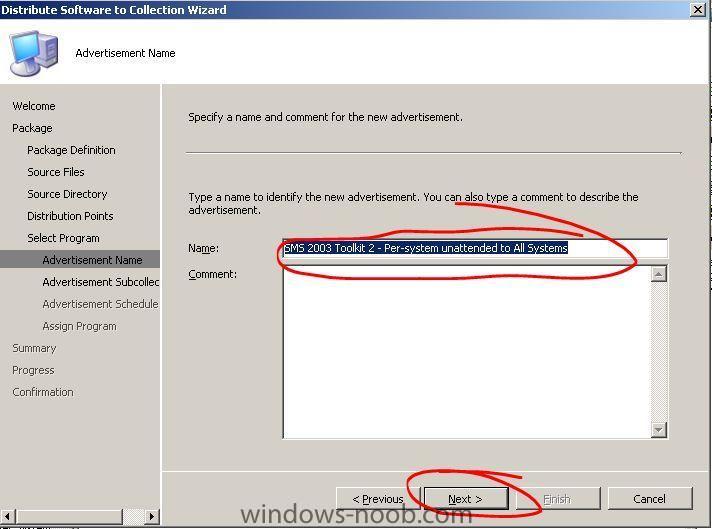
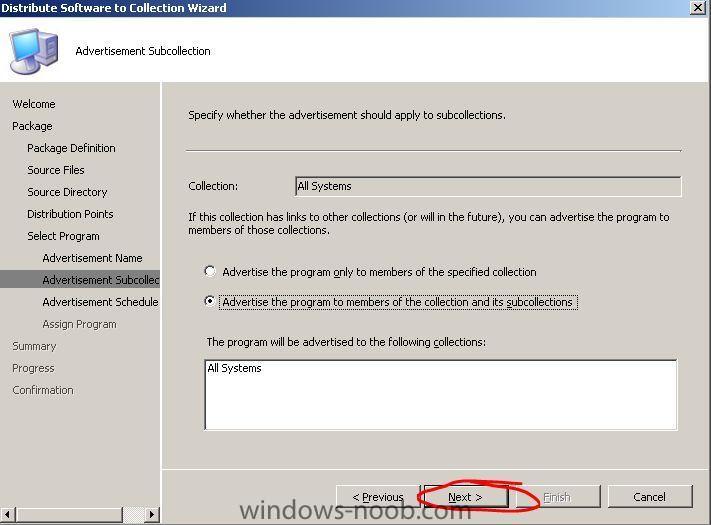
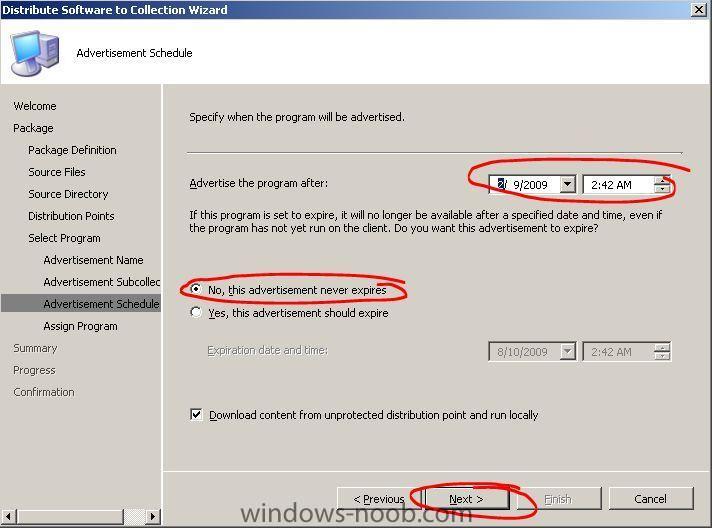
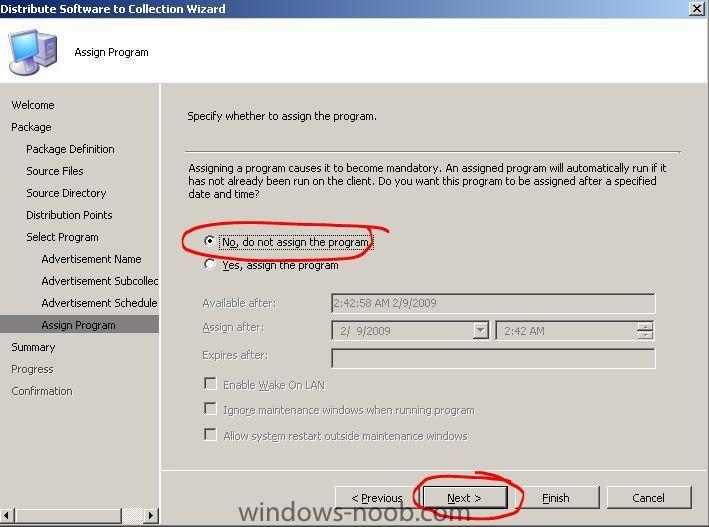
Distributing Software to the Configuration Manager Client Distribute an application to a client Expand Site Database, Computer Management, Collections, and then click All Systems (or your collection that you want to distribute the application to). Right click and choose Properties, Distribute, Software. Click Next on the welcome screen. Select Create a new package from a definition, and then click Next. The Distribute Software to Collection Wizard Package Definition dialog box appears allowing you to select the package definition file to use. Notice the default package definitions built into Configuration Manager. Click Browse. Select your MSI-package that you will distribute and press Open. Under Package definition, verify that SMS 2003 Toolkit 2 is highlighted, and then click Next. Click Always obtain files from a source directory, and then click Next Click Local drive on site server (or UNC NAME, choose whatever you want, I will use this one), and then click Browse. Choose the folder/path where the installation files is located. Press OK. Click Next. Under Distribution points, select Primary Distribution Point, and then click Next. Under Programs, click Per-system unattended, and then click Next. Click Next to accept the default name. Click Next to accept the default option of advertising to subcollections as well (even though we do not have any subcollections). After Advertise the program after, verify that the current date and time is displayed. Verify No, this advertisement never expires is selected, and then click Next. Verify that No, do not assign the program is selected, and then click Next. Click Next. Click Close.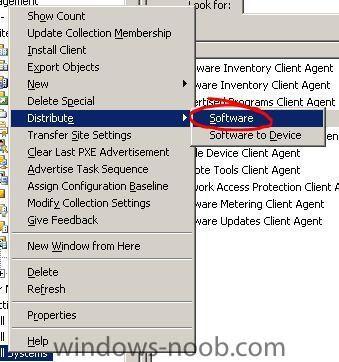
-
Guide: Implementing Branch Distribution Points in SCCM 2007
Tobie replied to Tobie's topic in Configuration Manager 2007
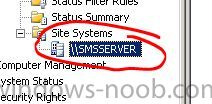
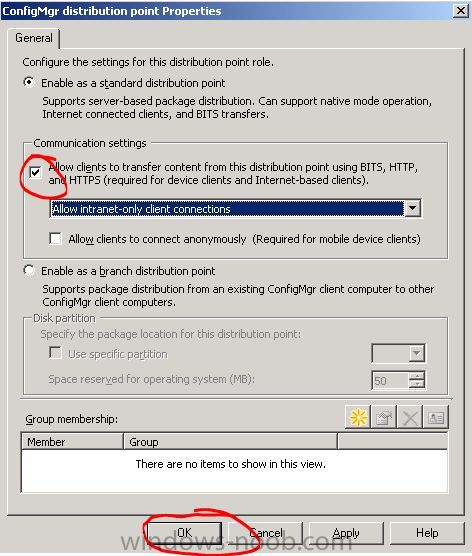
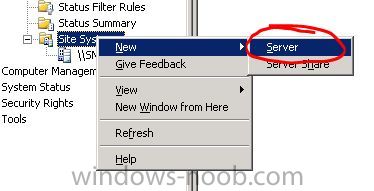
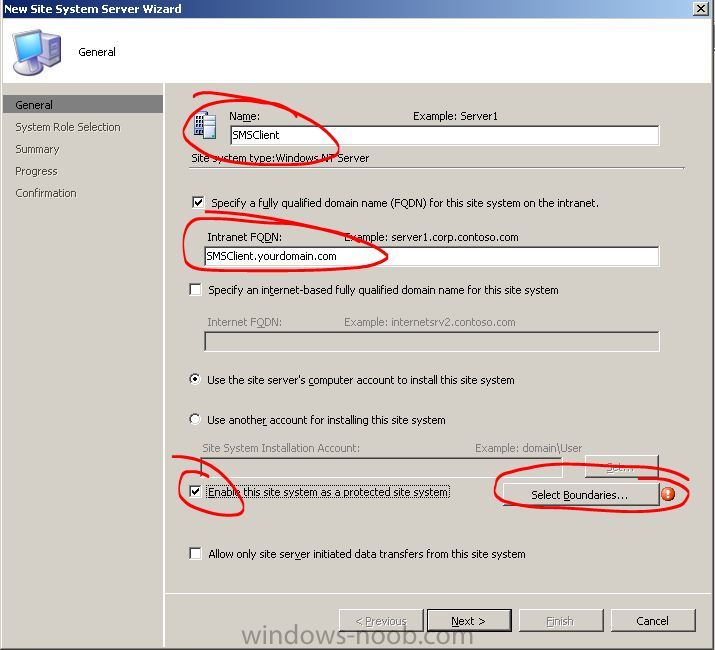
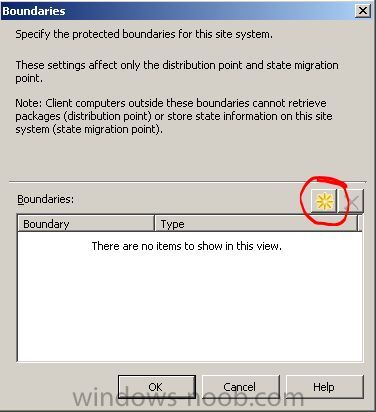
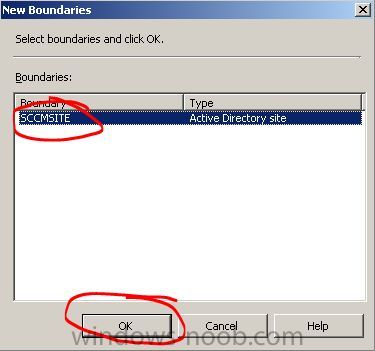
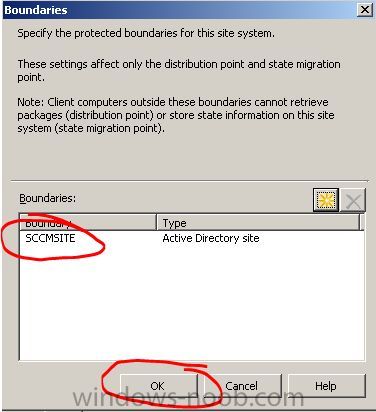
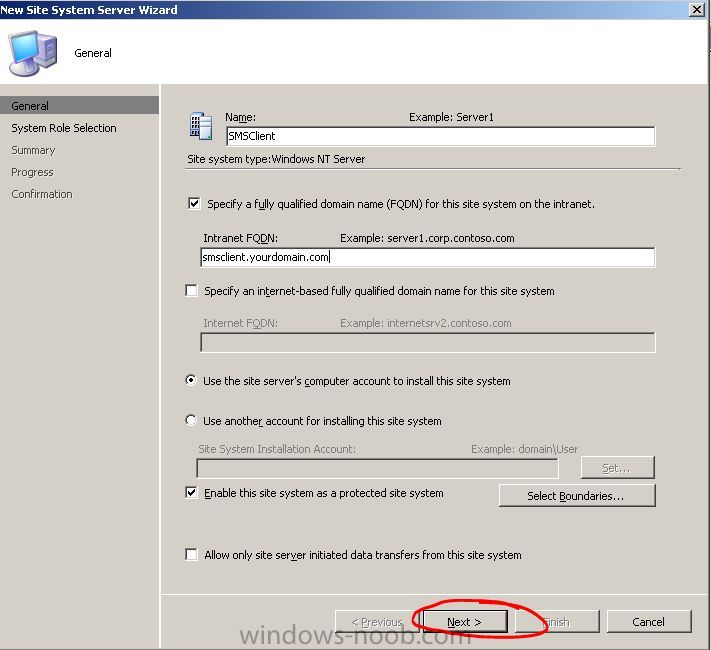
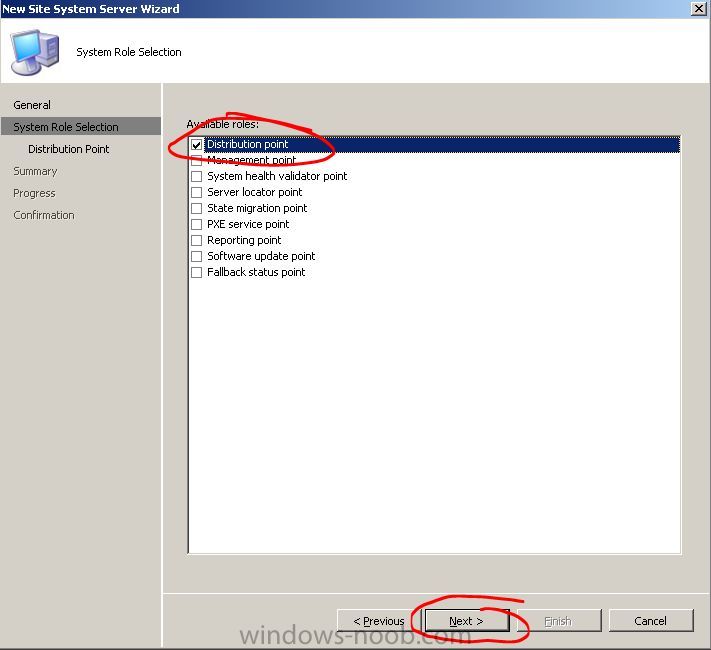
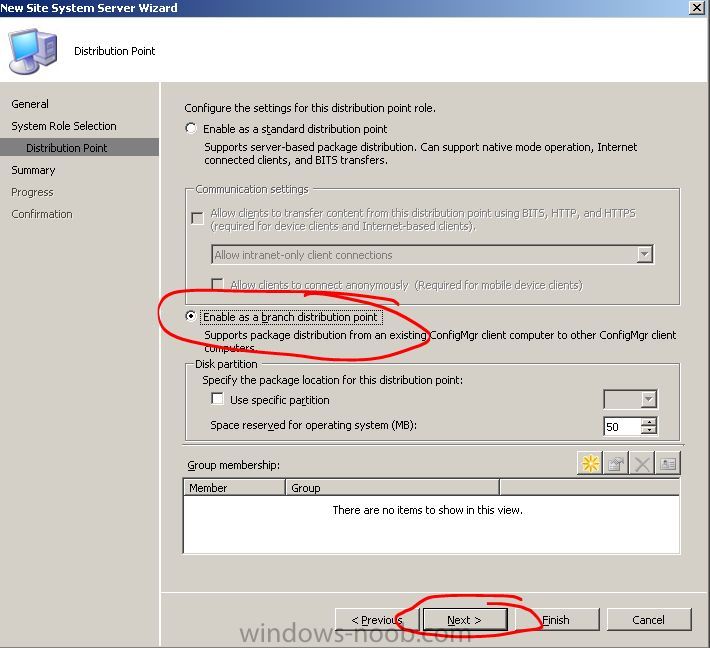
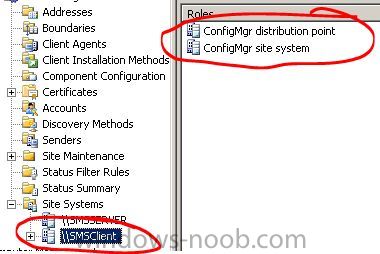
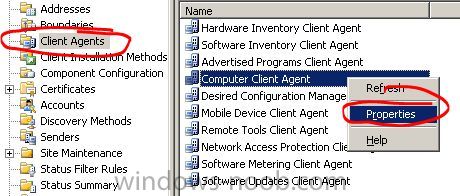
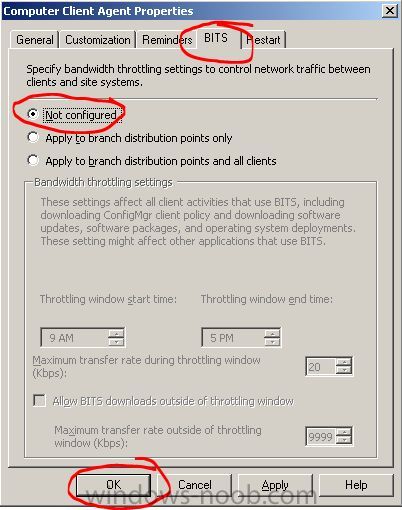
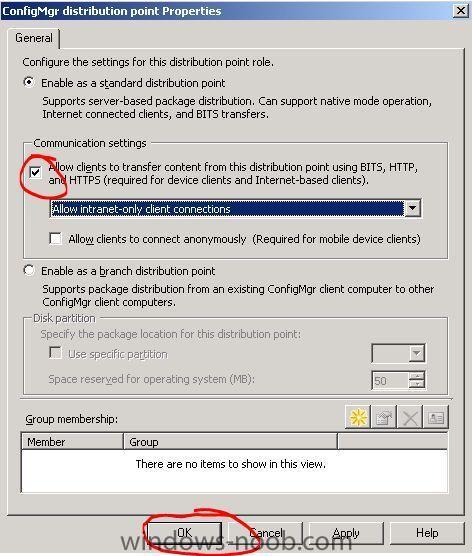
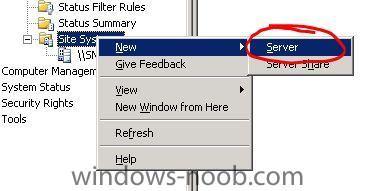
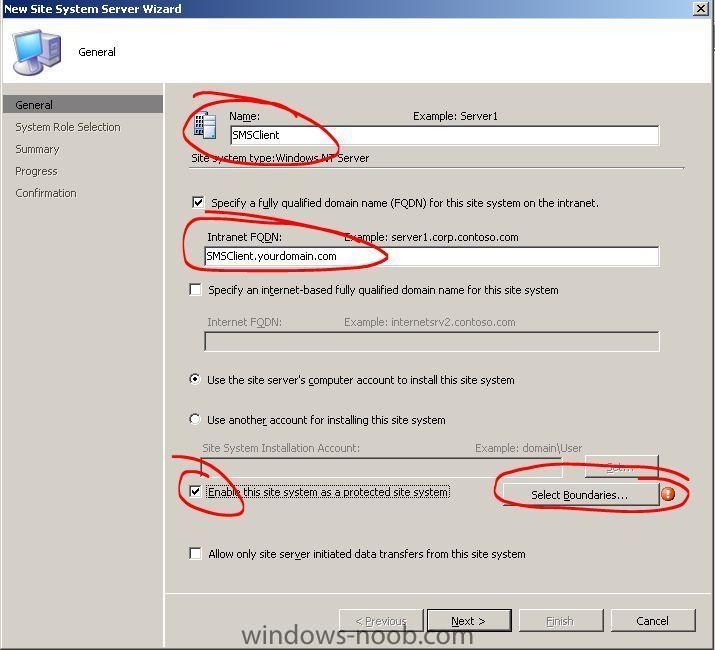
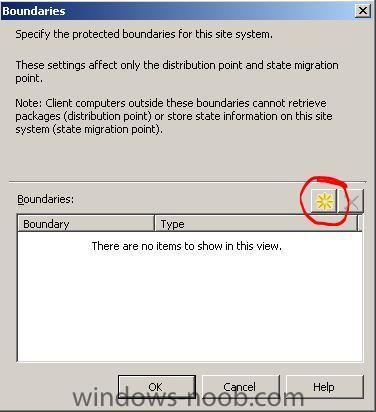
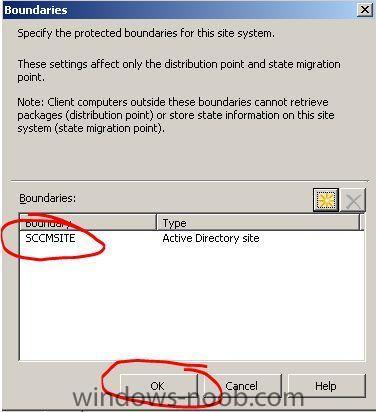
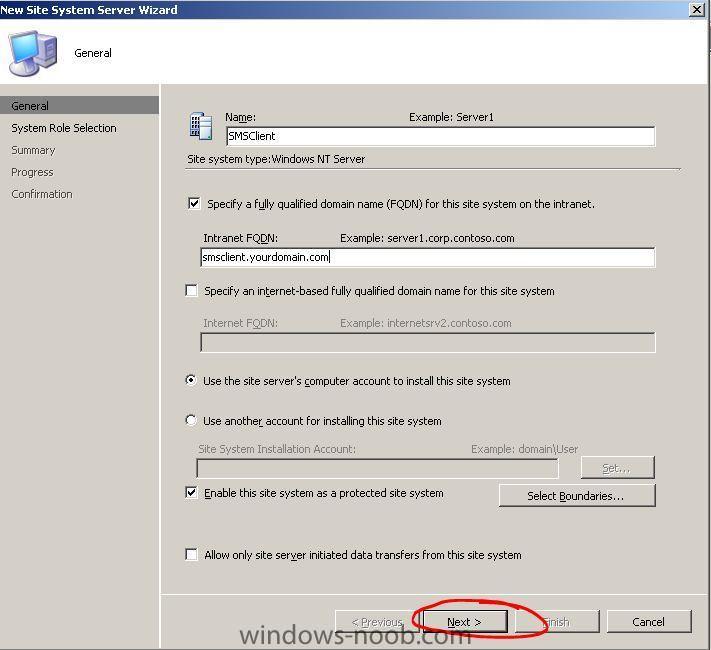
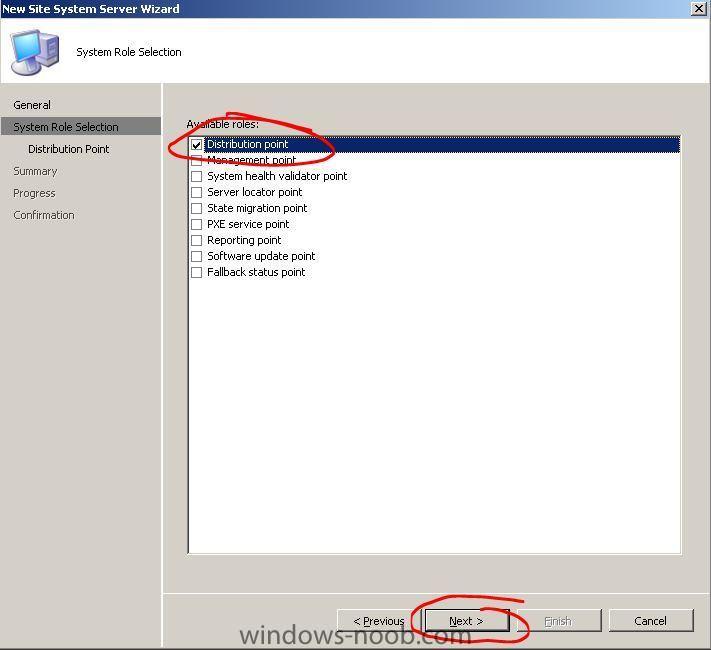
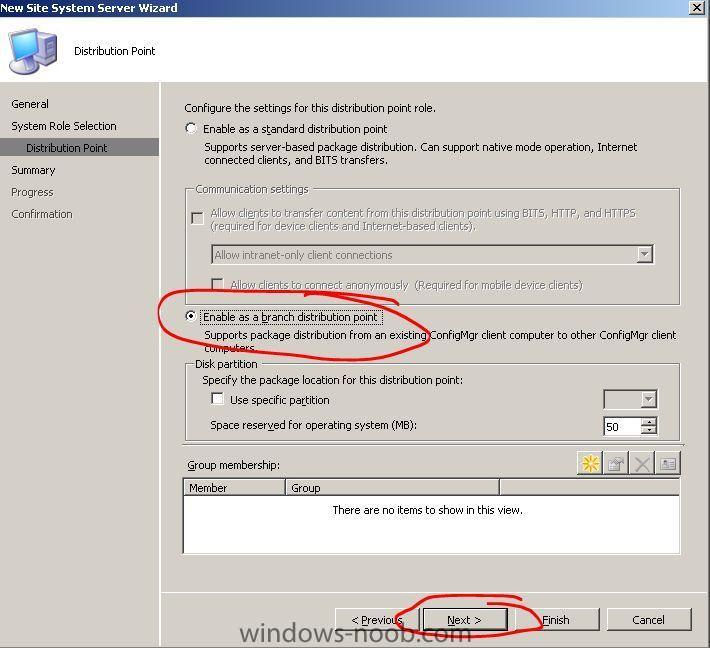
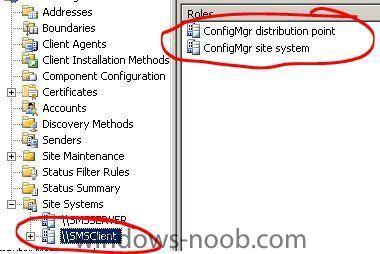
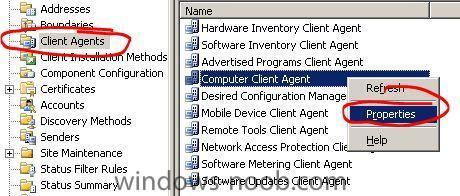
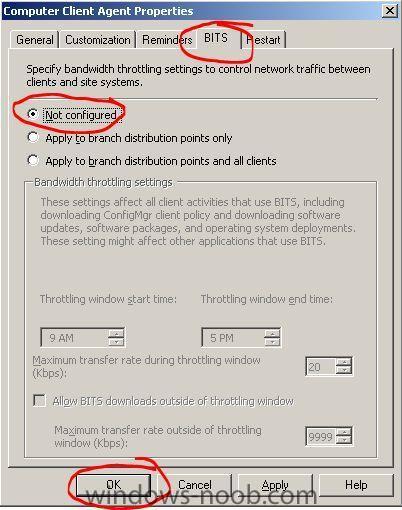
Configuring a Branch Distribution Point Configure the distribution point to support BITS downloads In this part, you will configure a branch distribution point for the site. You will begin by configuring the distribution point on the site server to support BITS downloads, which is required to support a branch distribution point. In the tree pane, expand Site Database, Site Management, %YOUR SITE%, Site Settings, Site Systems, and then click %SMSSERVER%. Right click on ConfMgr distribution point and choose Properties. Click Allow clients to transfer content from this distribution point using BITS, HTTP and HTTPS (required for device clients and Internet-based clients), and then click OK. Create a branch distribution point In the tree pane, expand Site Database, Site Management, %YOUR SITE%, Site Settings, and select Site Systems. Right click and choose New, Server. In the Name box, type %SERVER_NAME%. Under Intranet FQDN, type %SERVER_NAME%.yourdomain.com. Click Enable this site system as a protected site system, and then click Select Boundaries. Click New (the icon resembles a starburst). Choose your boundarie, click OK. I'm using Active Directory Sites and Services in this guide. Verify that your boundarie has been selected and the press OK. Press Next to continue. Under Available roles, select Distribution point, and then click Next. Click Enable as a branch distribution point, and then click Next. Click Next. Click Close. You should now see your new Distribution Point under Site Systems as below. Remove BITS throttling Expand Site Database, Site Management, %YOUR SITE%, Site Settings, and then select Client Agents. Right click and choose Properties. Click the BITS tab, click Not configured, and then click OK.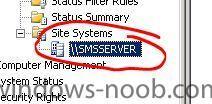

-
Implementing Branch Distribution Points in SCCM 2007 ***This post is not finished yet!!!*** Scenario You will deploy a package to a branch distribution point via an administrator action (adding the branch distribution point to the package). You can configured the package for distribute on demand, in which case the package would be distributed to a branch distribution point automatically after a client requested it. No administrator action is required to complete the assignment of a branch distribution point to a package in that scenario. Objectives Configure a standard distribution point to support BITS downloads Configure a branch distribution point Configure a protected site system Distribute software to a client to access a branch distribution point
-
Internet Explorer 8 RC1 is available in 25 languages for Windows Vista, Windows XP, and Windows Server. You can download IE8 RC1 here: http://www.microsoft.com/ie8.
-
Editions Last month Microsoft delivered the beta version of Windows 7 for public testing. Today the company announced its plans for Windows 7 SKU (Stock Keeping Unit) strategy, explaining that Microsoft expects that a majority of customers will be best served by two primary editions of Windows 7: Windows 7 Home Premium for consumers, and Windows 7 Professional for businesses. http://www.microsoft.com/presspass/feature...Win7SKU-QA.mspx Windows 7 technet forum Questions, answers and discussions about Windows 7 http://social.technet.microsoft.com/Forums...tegory/w7itpro/
-
In 10 weeks, Microsoft Corp. will begin to retire Windows XP by shifting the seven-year-old operating system into a more limited support plan. Windows XP, Microsoft's most successful operating system ever, will leave what the company calls "mainstream support" on April 14, and enter "extended support." Typically, Microsoft keeps a product in the former for five years, then moves it into the latter for another five, for a total of 10 years. However, the long span between the releases of XP and its successor, Windows Vista, forced the company to push out the support deadline to 13 years altogether. Also, two years ago, Microsoft bumped support for Windows XP Home and XP Media Center to the 2009 and 2014 dates, matching the dates that had previously been set for Windows XP Professional, the designated business edition of the operating system. By Microsoft policy, mainstream support delivers free fixes -- for security patches and other bug fixes -- to everyone. During extended support, all users receive all security updates, but nonsecurity hot fixes are provided only to companies that have signed support contracts with Microsoft. Several Microsoft spokespeople confirmed that today. "Customers will have access to extended support for paid support, security support updates at no additional cost and paid hot fix support," a company spokeswoman said in an e-mail. Firms must purchase an extended support contract within 90 days of XP's mainstream support News source: ComputerWorld
-
Automatic removal of applications
Tobie replied to Tobie's question in Deploy software, applications and drivers
Extend SMS Report to get out more if this concept. Fllow this post please! Extend "All advertisement for a specific computer" with latest runtime. /Tobias -
Thanks!
-
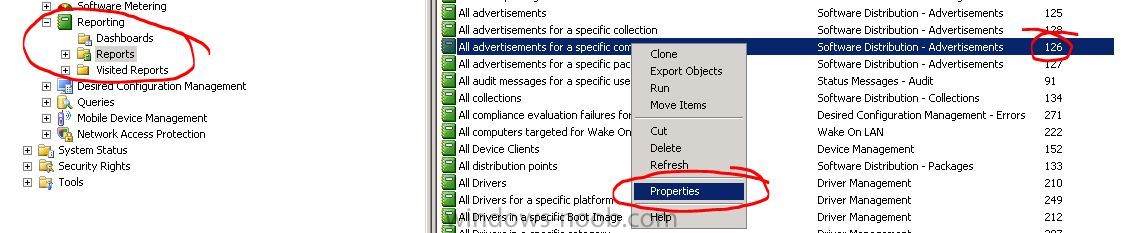
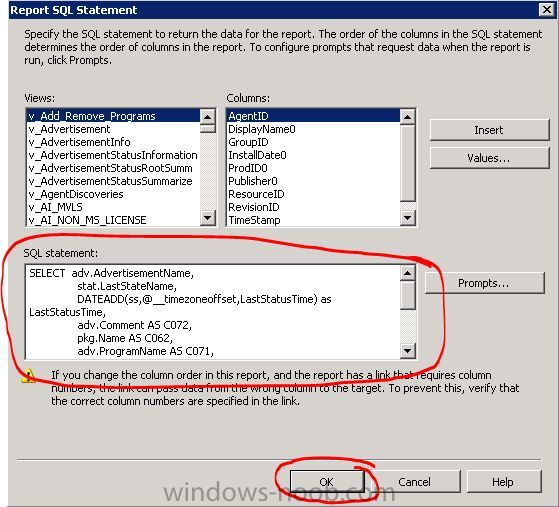
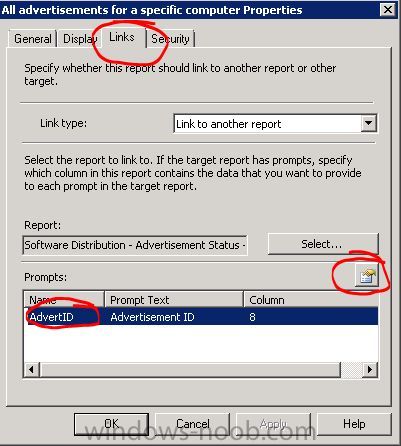
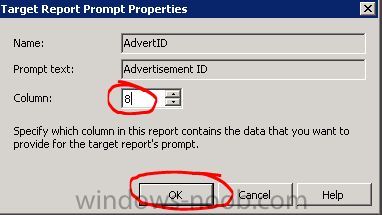
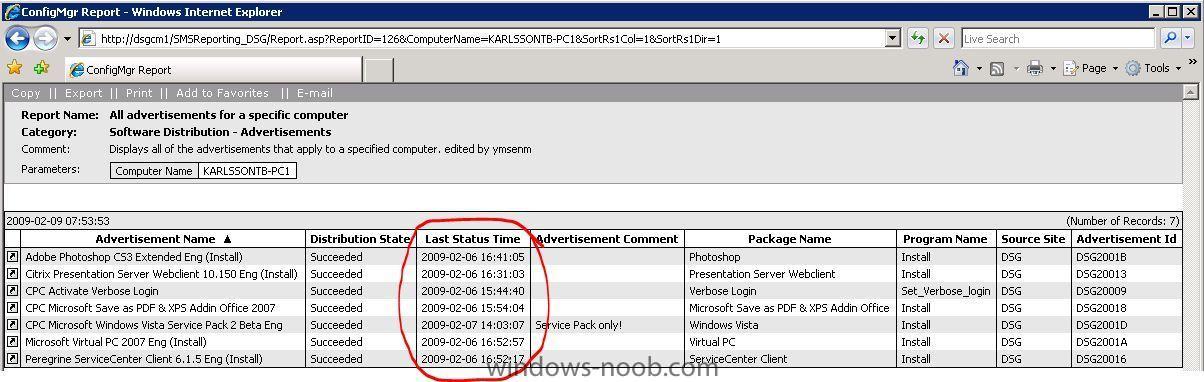
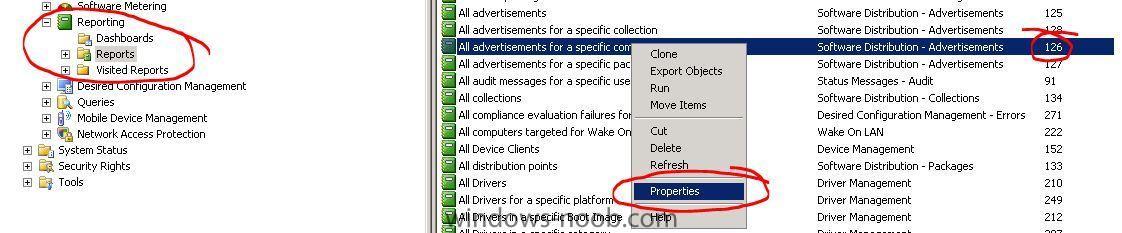
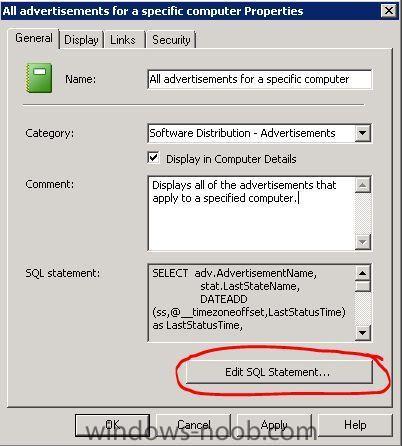
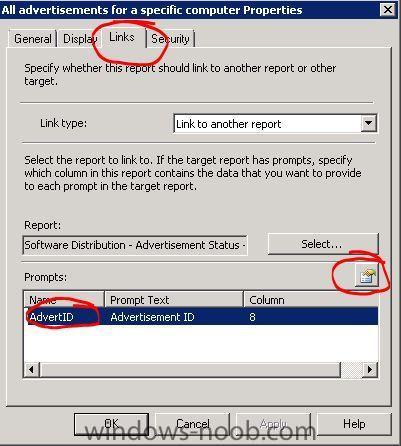
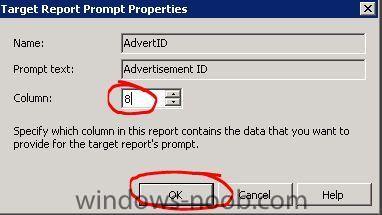
Extend "All advertisement for a specific computer" with latest runtime If you want to add a new column with Last Status Time in your SMS Report, fallow the steps below. Expand Site Database, Computer Management, Reporting and mark Reports. Right click on report All advertisement for a specific computer and and choose Properties. Report ID 126. Press on Edit SQL Statement... Replace SQL Statement with the contect below (CODE), press OK. SELECT adv.AdvertisementName, stat.LastStateName, DATEADD(ss,@__timezoneoffset,LastStatusTime) as LastStatusTime, adv.Comment AS C072, pkg.Name AS C062, adv.ProgramName AS C071, adv.SourceSite, adv.AdvertisementID FROM v_Advertisement adv JOIN v_Package pkg ON adv.PackageID = pkg.PackageID JOIN v_ClientAdvertisementStatus stat ON stat.AdvertisementID = adv.AdvertisementID JOIN v_R_System sys ON stat.ResourceID=sys.ResourceID WHERE sys.Netbios_Name0=@ComputerName Go to Links tab and mark AdvertID and press on Edit. Change the value "AdvertID" to Column = "8" instead of "7", press OK. All done, hit F5 to refresh your report. Thanks to WMMAYMS that has learned me this! /Tobias

-
I'm missing a section called SMS Reports under SMS, SCCM 2007... You can create some heavy reports if you are as brights as member WMMAYMS on this site Basically, I just want to post an instruction of how you can improve your standard reports a little with some minor changes and I dont' know where to place it. I think both me and WMMAYMS has some more publish if this section had been created. /Tobias
-
Deploy Service Pack with SCCM 2007
Tobie replied to Tobie's question in Deploy software, applications and drivers
Bug? I can see alot of attached pictures in the bottom that shouldnt be there, when I view the page in edit mode I was not able to see any wrong "code" in my input. -
Deploy Service Pack with SCCM 2007
Tobie replied to Tobie's question in Deploy software, applications and drivers
Thanks! -
Automatic removal of applications
Tobie replied to Tobie's question in Deploy software, applications and drivers
Thanks! More to come when I have more time over -
Automatic removal of applications
Tobie posted a question in Deploy software, applications and drivers
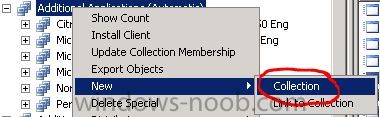
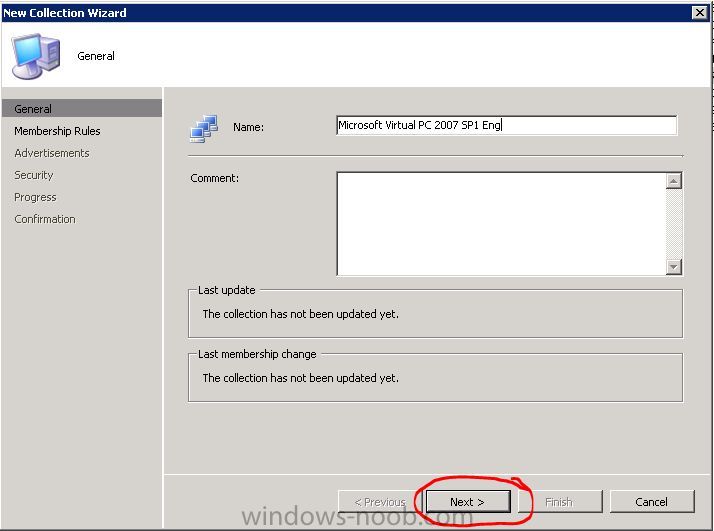
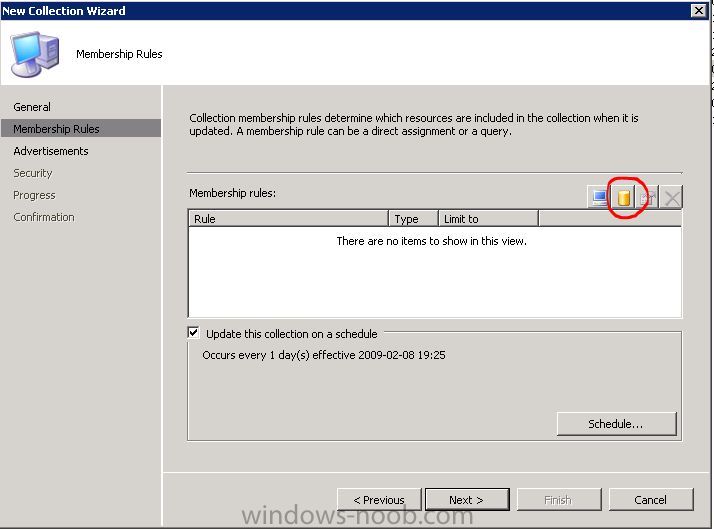
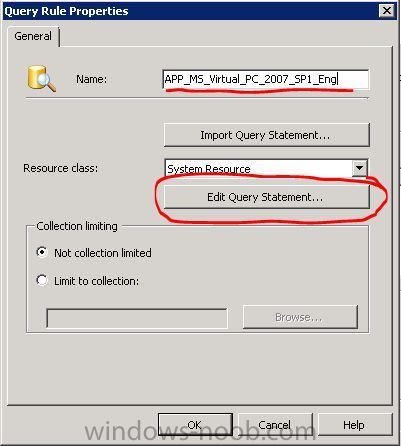
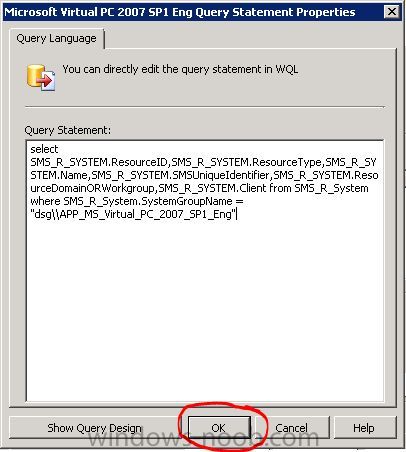
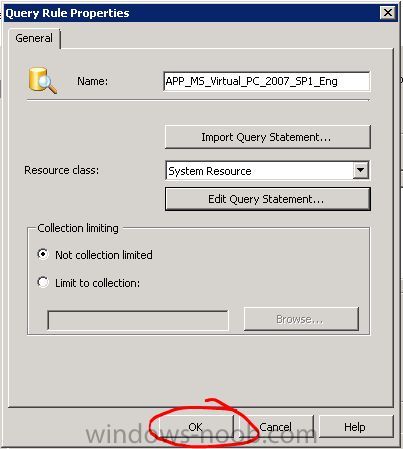
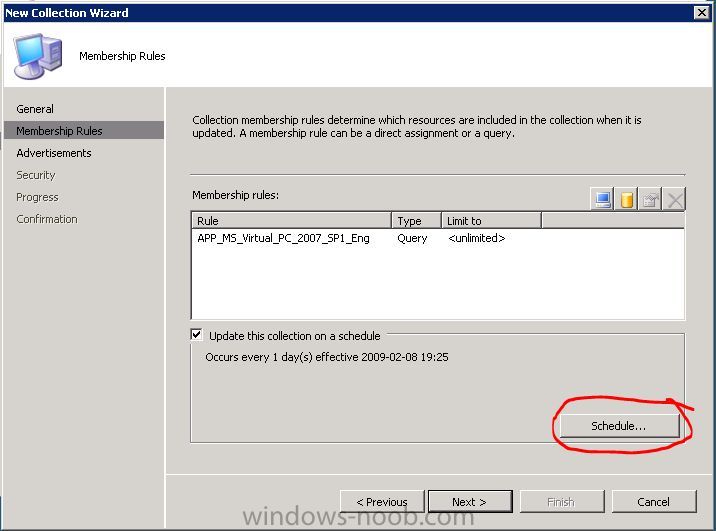
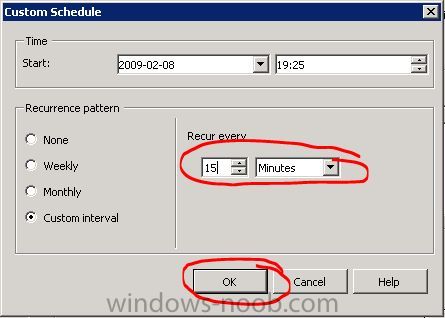
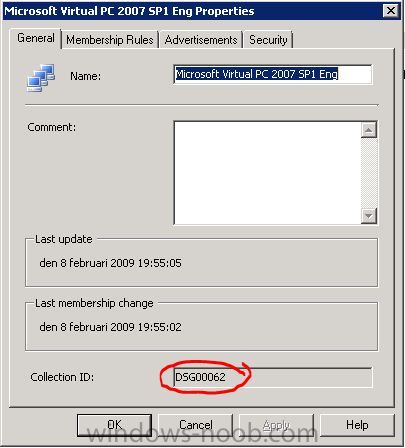
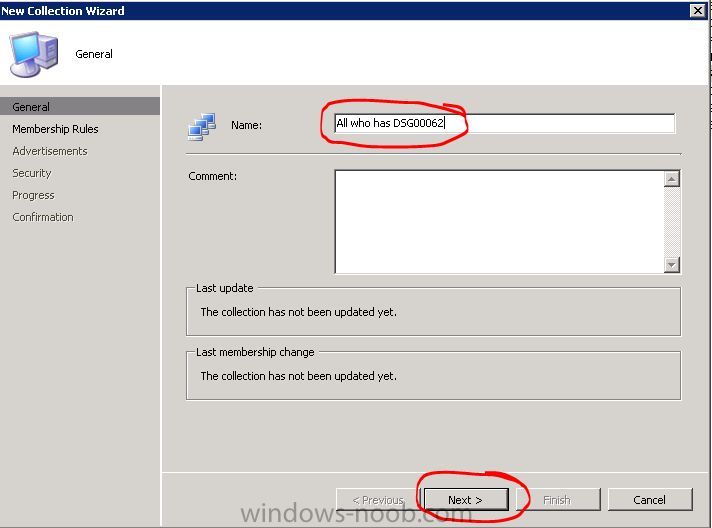
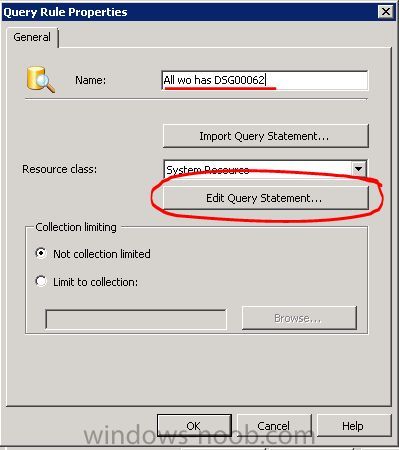
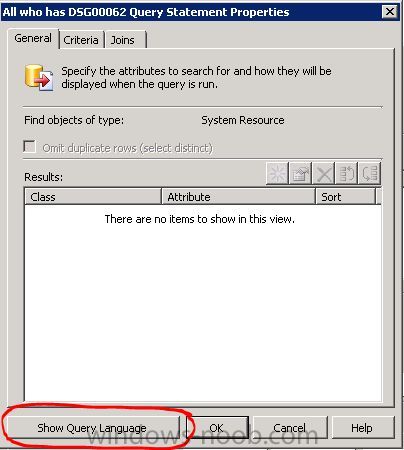
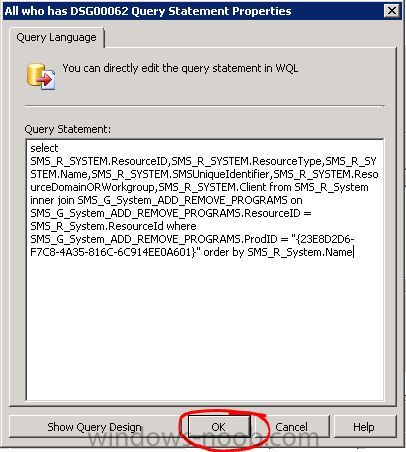
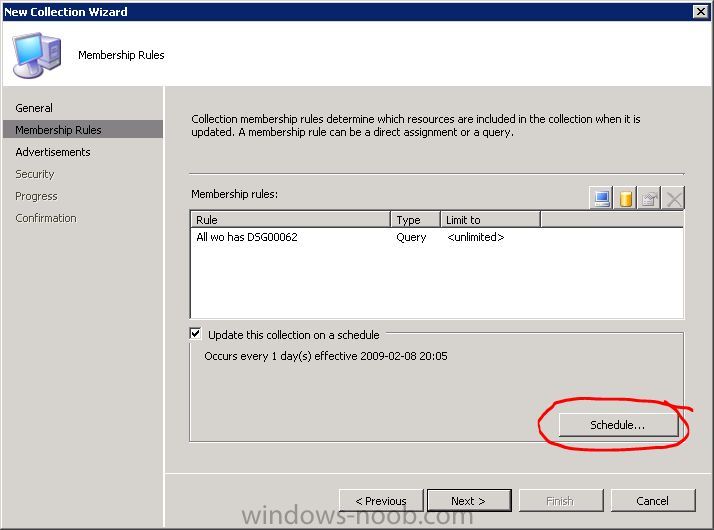
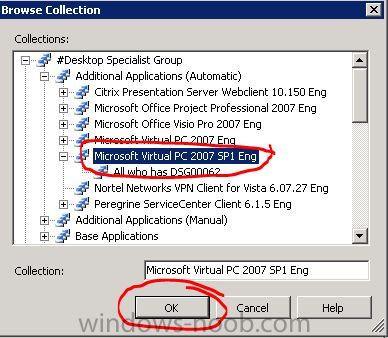
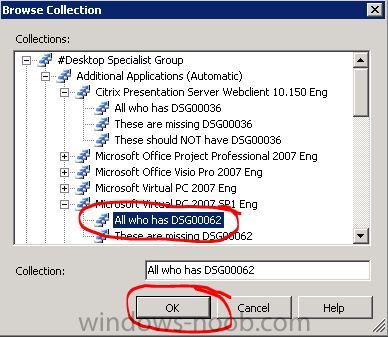
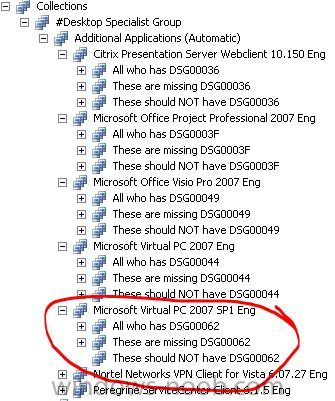
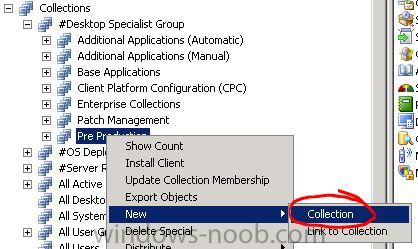
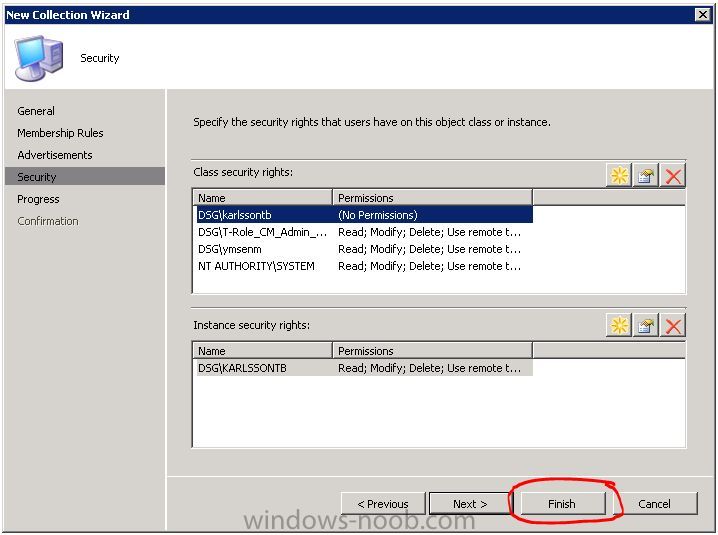
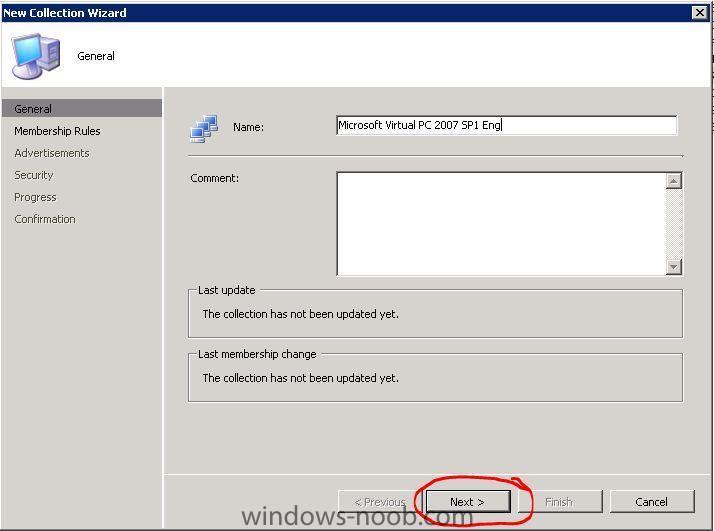
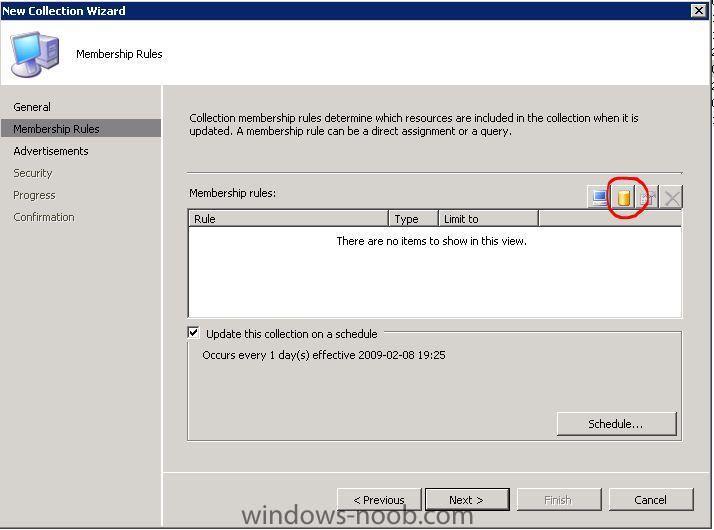
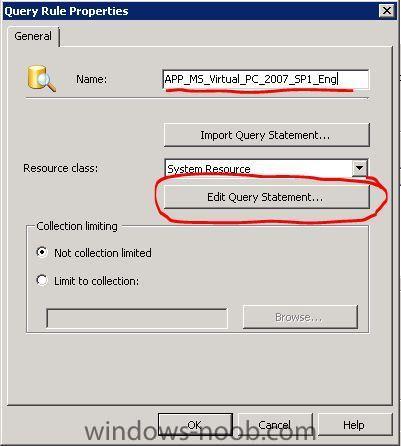
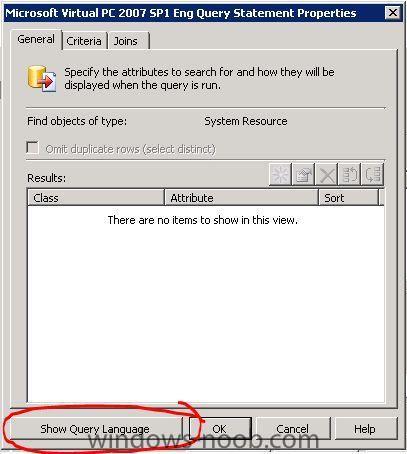
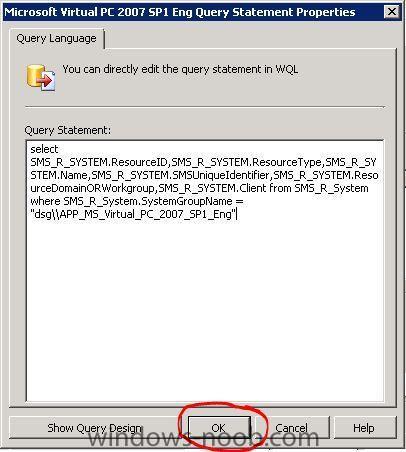
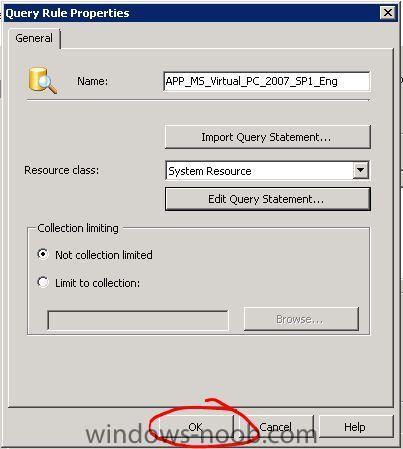
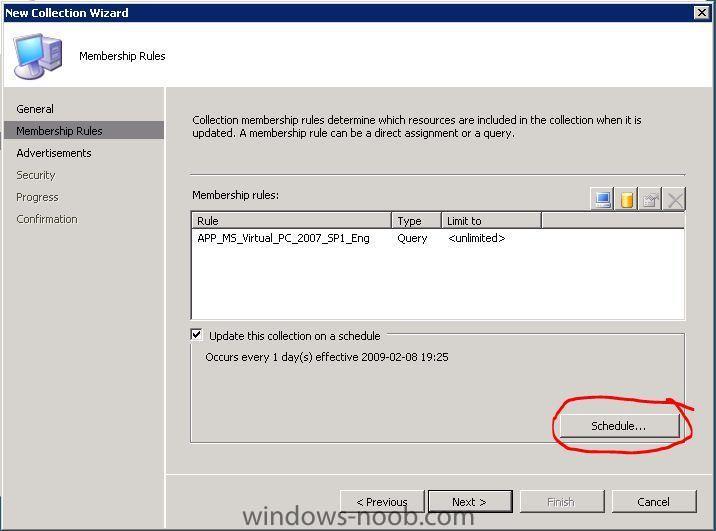
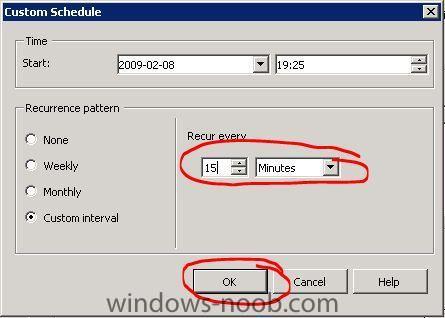
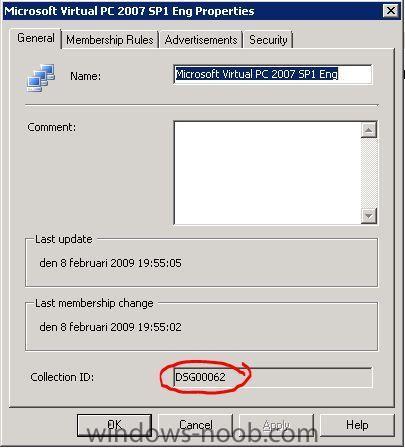
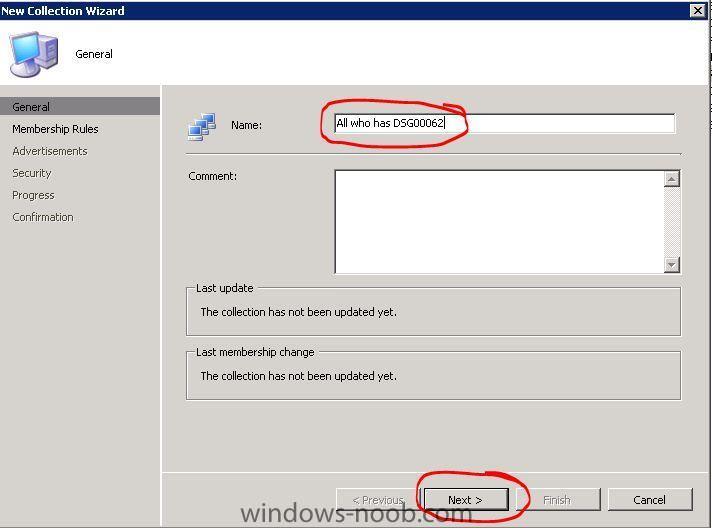
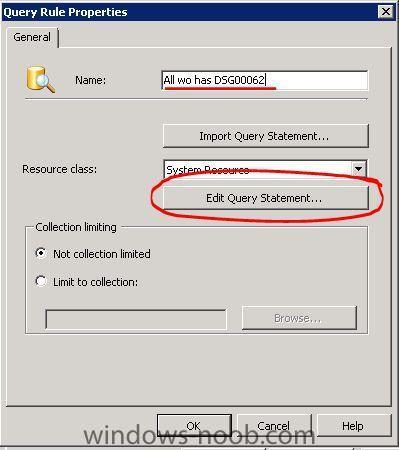
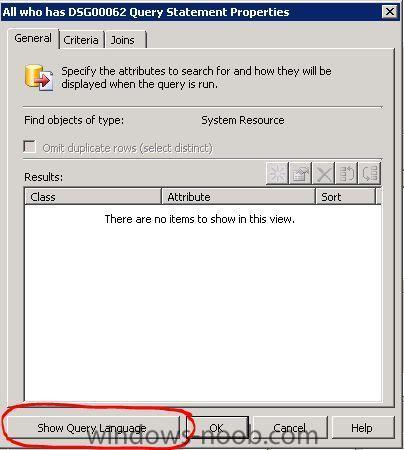
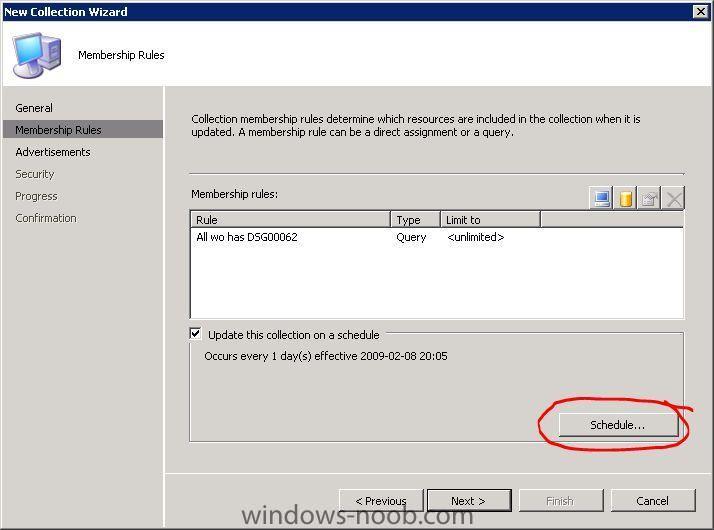
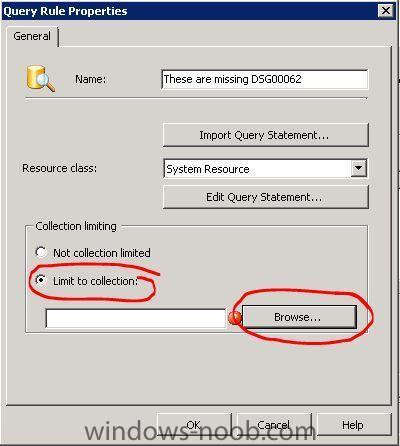
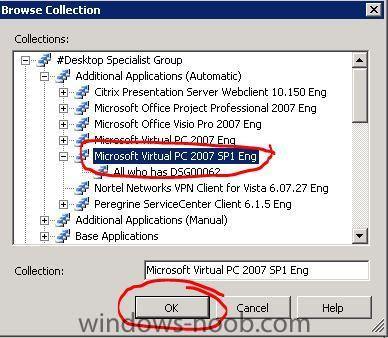
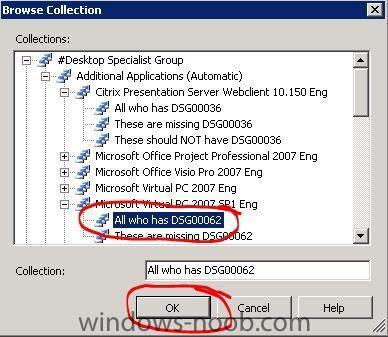
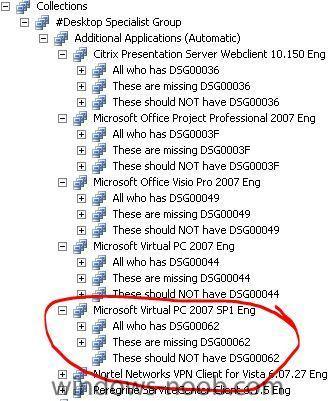
Automatic removal of applications Create collections that automatically activate the uninstall-advertisement for an application if the computer has been removed from the active directory application installation group. This is just for additional applications since this will mess up base applications that has been deployed during OSD or has been installed afterwards. This can be useful for those who wants to keep down licensing costs for expensive applications or collateral that applications is uninstalled for example when Service Desk staff removes the computer object from the application group. NOTE: I will use Microsoft Virtual PC 2007 SP1 as a application in this guide. Dependencies: Hardware Inventory must be enabled Active Directory Security Group is used for deploying applications Patience Create a Active Directory Security Group Open Active Directory User and Computer. Create a new group named APP_MS_Virtual_PC_2007_SP1_Eng. You can use which name and standard you want on your application group since I'm just using this application to create this guide. Create Collections Expand Site Database, Computer Management, Collections, right click and create a new collection. Give your collection a name, mine is Microsoft Virtual PC 2007 SP1 Eng, press Next. Press on Query Rule to create a query that will be connected to our Active Directory Security Group that we created erlier. Give your query a name, press on Edit Query Statement to create a query. Press on Show Query Language to enter the query. Enter your WQL statement and press OK. Change DSG\\APP_MS_Virtual_PC_2007_SP1_Eng to your own DOMAIN\\APPLICATION_INSTALLATION_GROUP. This query will collect computers from the Active Directory Security Group that we created erlier, those computers that are members of this group will be placed in our collection as well. select SMS_R_SYSTEM.ResourceID,SMS_R_SYSTEM.ResourceType,SMS_R_SYSTEM.Name,SMS_R_SYSTEM .SMSUniqueIdentifier,SMS_R_SYSTEM.ResourceDomainORWorkgroup,SMS_R_SYSTEM.Client from SMS_R_System where SMS_R_System.SystemGroupName = "DSG\\APP_MS_Virtual_PC_2007_SP1_Eng" Press OK to get back to the Create New Collection Wizard. Press on Schedule to change values of how often the collection will be updated automatically. I will use a low update value since I don't have many clients in my lab environment and the performance of my primary site server is pretty good. Make your changes and press OK. Press Next in the Membership Rules section. Press Next in the Advertisements section. Press Next in the Security section. Press Close to finish the wizard. Right click on your newly created collection and choose Properties. Remember Collection ID. Create Subcollections Here is the structure of the "Parent Collection" and "Sub Collection". Right click on your newly created collection and choose New, Collection. Name it to All who has %Collection ID% and press Next. Press on Query Rule to create a query that will collect computers that has a spicific software registered in Add or Remove Programs. Give your query a name, press on Edit Query Statement to create a query. Press on Show Query Language to enter the query. Enter your WQL statement and press OK. Change {23E8D2D6-F7C8-4A35-816C-6C914EE0A601} to your own {PRODUCT ID}. This query will collect computers that has this Product ID registered in Add or Remove Programs. Press OK twice to get back to the Wizard. Below, I will explain how you can gather information such like Product ID and stuff like that from your computers that are assigned to your Site.. select SMS_R_SYSTEM.ResourceID,SMS_R_SYSTEM.ResourceType,SMS_R_SYSTEM.Name,SMS_R_SYSTEM .SMSUniqueIdentifier,SMS_R_SYSTEM.ResourceDomainORWorkgroup,SMS_R_SYSTEM.Client from SMS_R_System inner join SMS_G_System_ADD_REMOVE_PROGRAMS on SMS_G_System_ADD_REMOVE_PROGRAMS.ResourceID = SMS_R_System.ResourceId where SMS_G_System_ADD_REMOVE_PROGRAMS.ProdID = "{23E8D2D6-F7C8-4A35-816C-6C914EE0A601}" order by SMS_R_System.Name Press on Schedule to change values of how often the collection will be updated automatically. I will use the same value as my first collection. Make your changes and press OK. Press Next in the Membership Rules section. Press Next in the Advertisements section. Press Next in the Security section. Press Close to finish the wizard. We need to create 2 more collections, let's starting with the second one and there it's just one more to go. Create a new collection called These are missing %Collection ID%. Don't forget to change the Product ID! Membership Rules Query. This query will collect computer that should have the application but don't have it, well, that's a lie, the collection will collect computers that don't has it when we have linked this collection to it's parent collection. I will show you how to it below. select SMS_R_SYSTEM.ResourceID,SMS_R_SYSTEM.ResourceType,SMS_R_SYSTEM.Name,SMS_R_SYSTEM .SMSUniqueIdentifier,SMS_R_SYSTEM.ResourceDomainORWorkgroup,SMS_R_SYSTEM.Client from SMS_R_System where Name not in (select distinct SMS_R_System.Name from SMS_R_System inner join SMS_G_System_ADD_REMOVE_PROGRAMS on SMS_G_System_ADD_REMOVE_PROGRAMS.ResourceID = SMS_R_System.ResourceId where SMS_G_System_ADD_REMOVE_PROGRAMS.ProdID = "{23E8D2D6-F7C8-4A35-816C-6C914EE0A601}") order by Name When you have entered your WQL statement, press OK and then select Limit to collection and press Browse. Choose the parent collection and press OK. Press OK to continue. Set the Update Schedule to 15 minutes and press Next. Press Next in the Advertisements section. Press Next in the Security section. Press Close to finish the wizard. Now, the last collection. Create a new collection called These should NOT have %Collection ID%. Don't forget to change Collection ID! Membership Rules Query. This query and limit together will watch after computers in the partent collection and verify if they computer should have the application or not. If it not should have the application (computer object has been removed from the application installation group), will trigger the uninstall-advertisement later. The last peace of the code is the Collection ID, that should be your parent connection. select SMS_R_SYSTEM.ResourceID,SMS_R_SYSTEM.ResourceType,SMS_R_SYSTEM.Name,SMS_R_SYSTEM .SMSUniqueIdentifier,SMS_R_SYSTEM.ResourceDomainORWorkgroup,SMS_R_SYSTEM.Client from SMS_R_System where ResourceId not in (select ResourceId from SMS_CM_RES_COLL_DSG00036) When you have entered your WQL statement, press OK and then select Limit to collection and press Browse. Choose All who has %Collection ID% and press OK. Press OK to continue. Set the Update Schedule to 15 minutes and press Next. Press Next in the Advertisements section. Press Next in the Security section. Press Close to finish the wizard. Now, let's do the last thing, connect our advertisements to our new collections. Connect your uninstall-advertisement to collection These should NOT have %Collection ID%. Connect your install-advertisement to collection These are missing %Collection ID%. Add a computer to your application installation group and let the application be installed on a computer, little later, remove the computer object from application installation group and watch the automatic process of how this application will be uninstalled. I can tell you that my Hardware Invetory runs every 30 minutes on my computers in my lab environment. Good luck!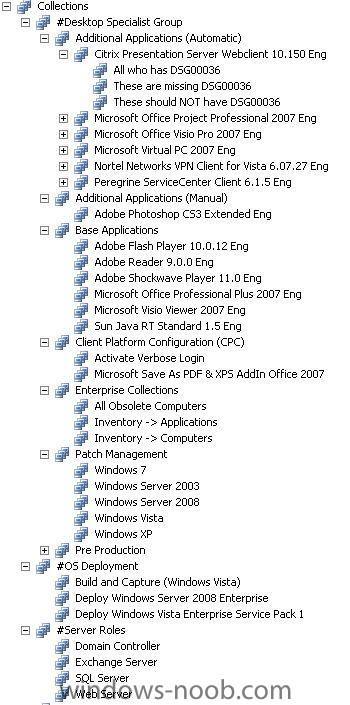


-
Deploy Service Pack with SCCM 2007
Tobie posted a question in Deploy software, applications and drivers
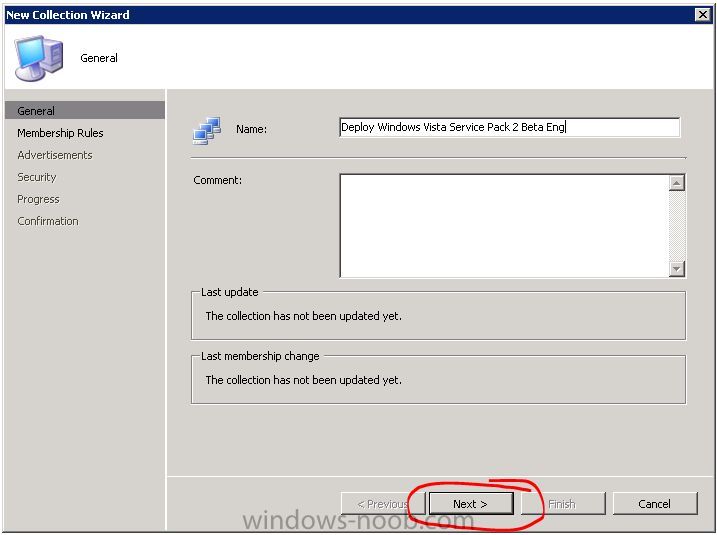
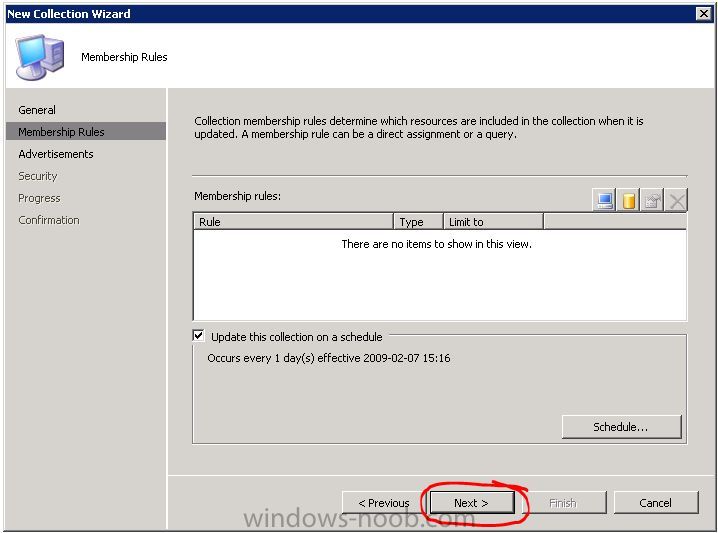
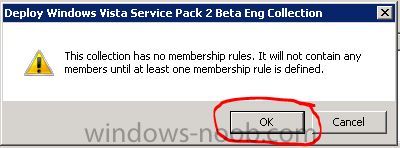
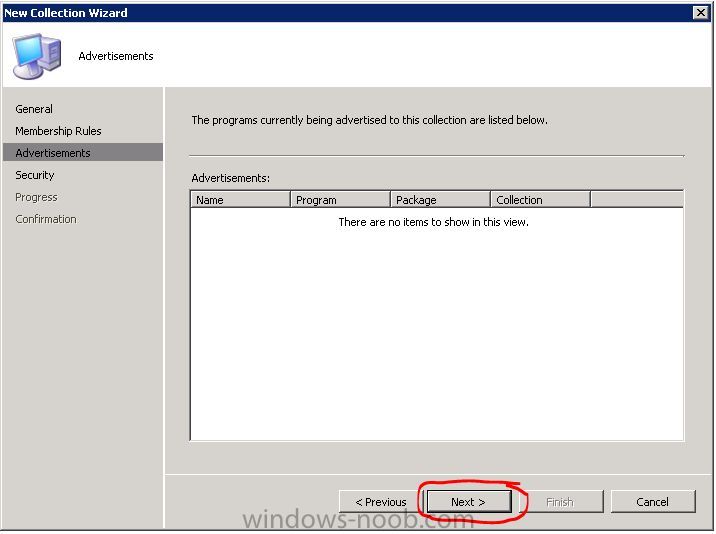
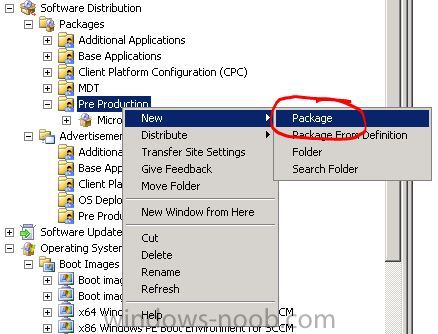
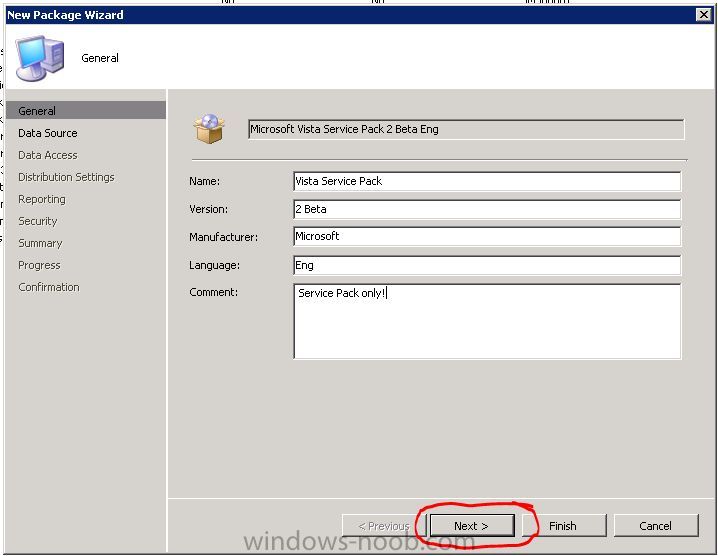
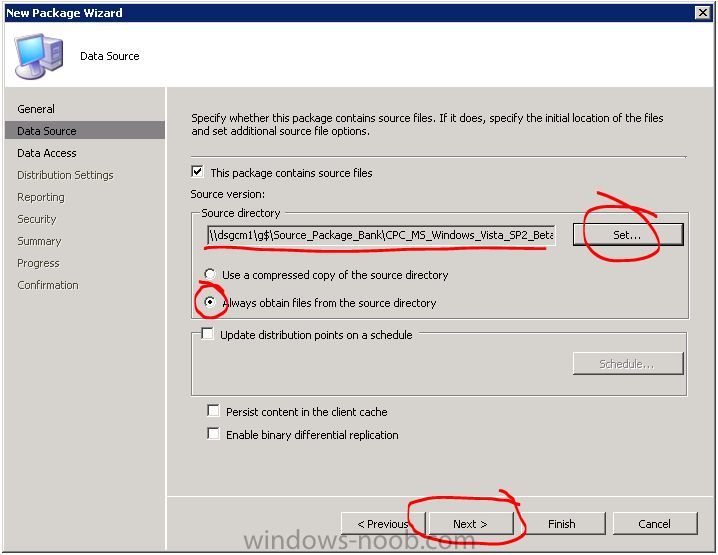
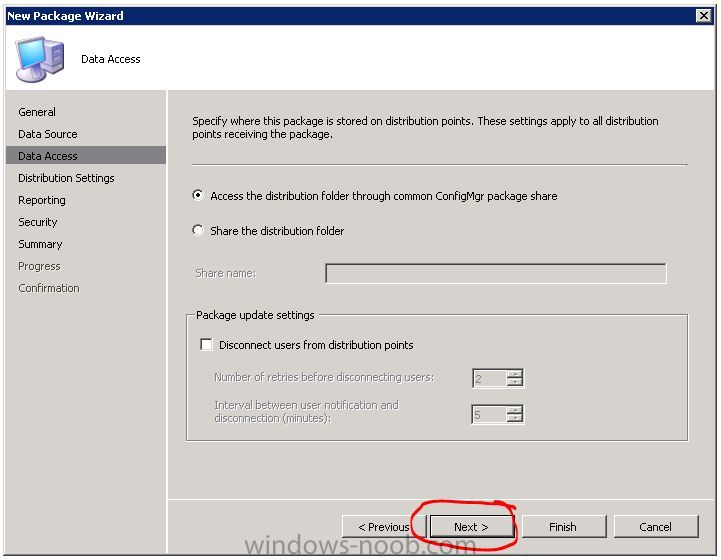
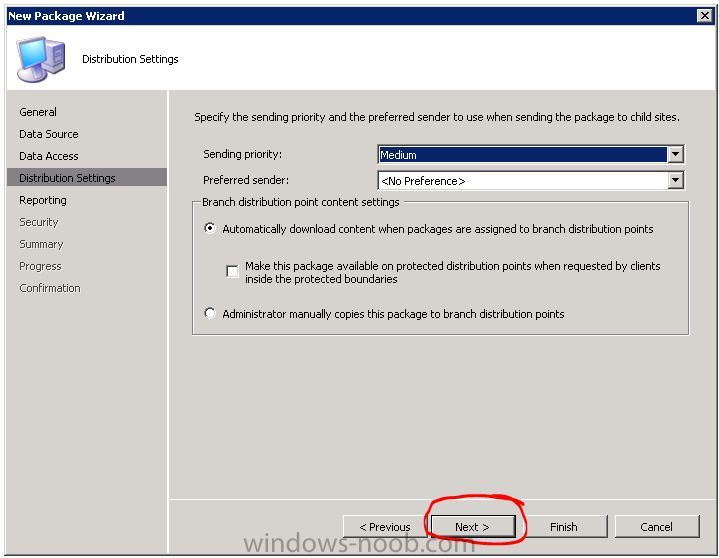
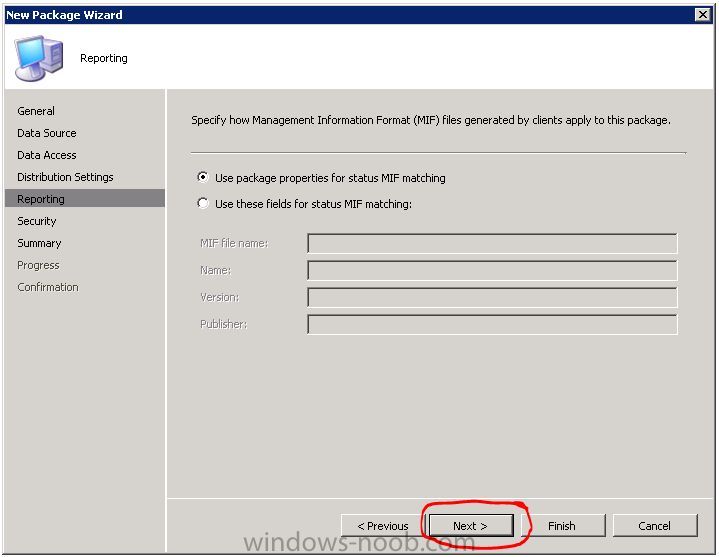
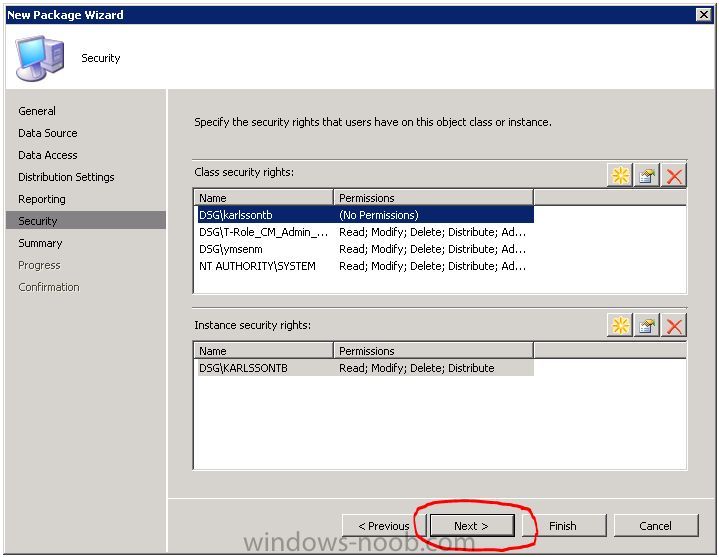
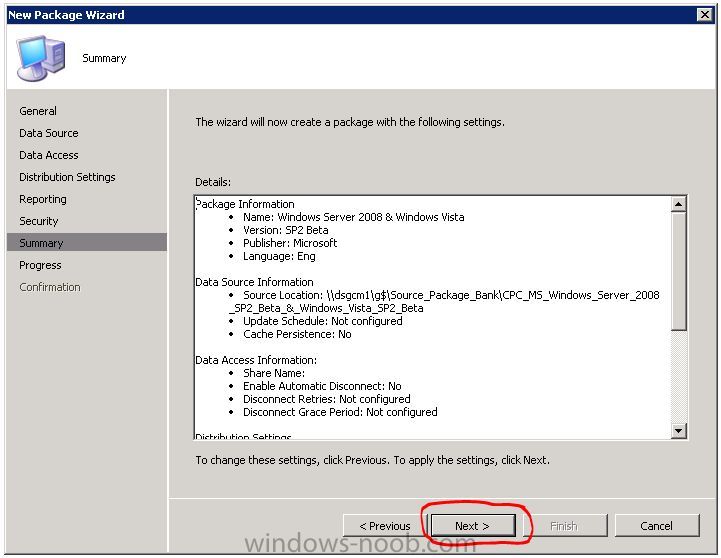
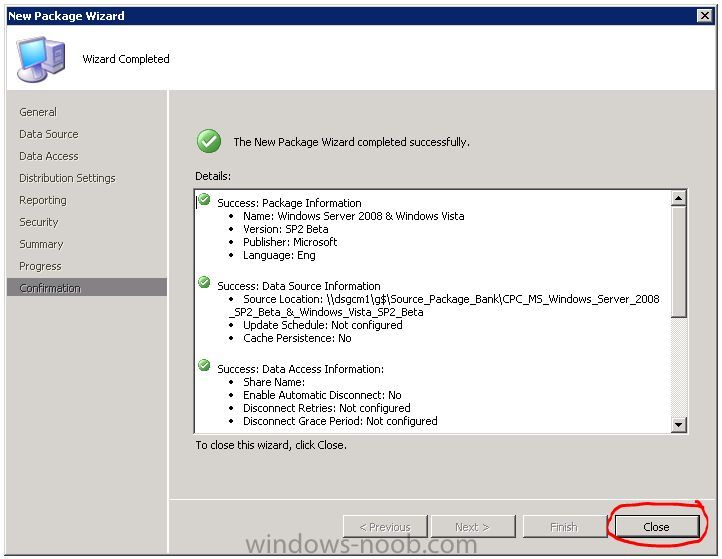
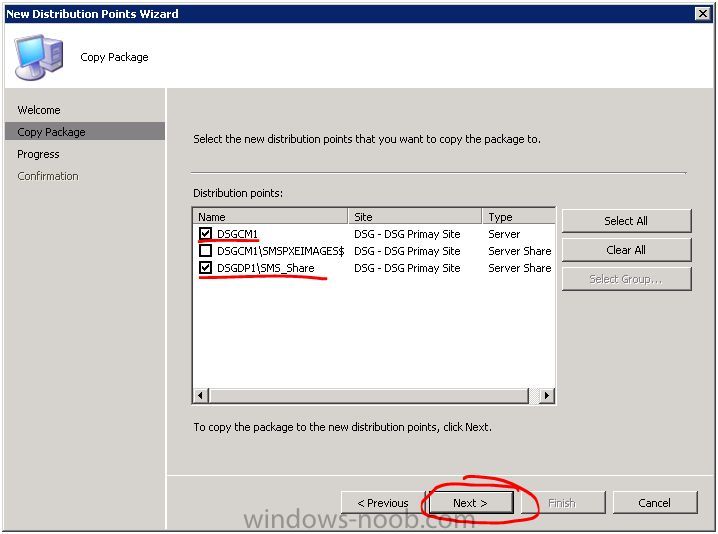
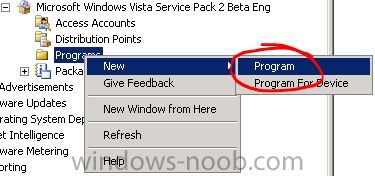
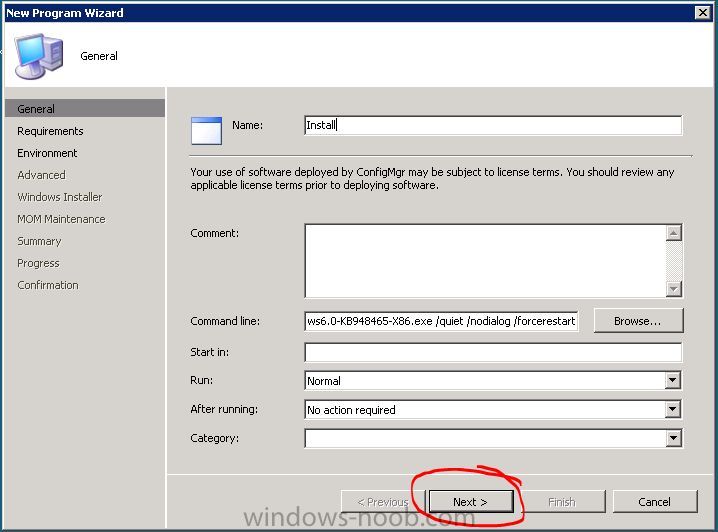
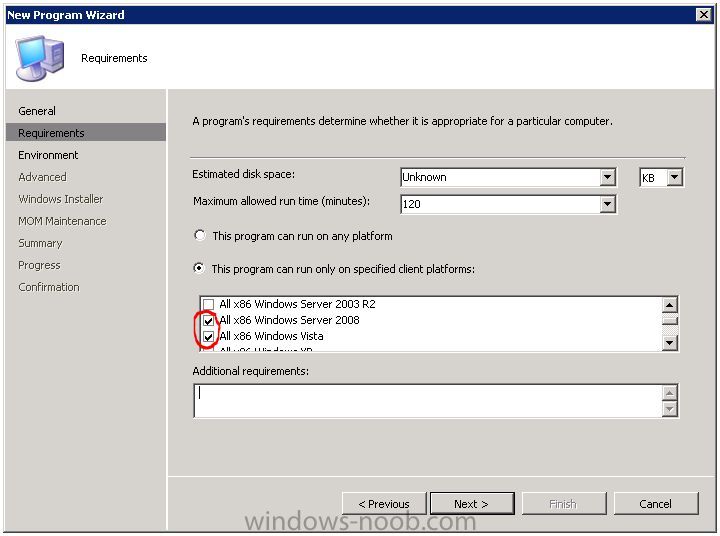
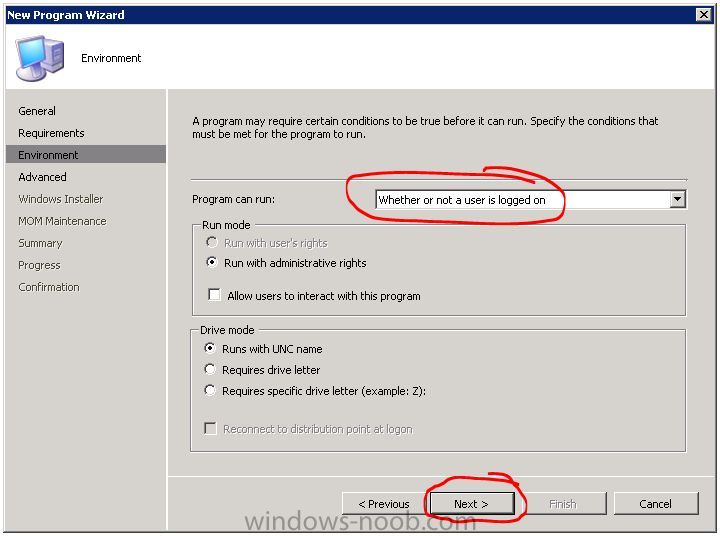
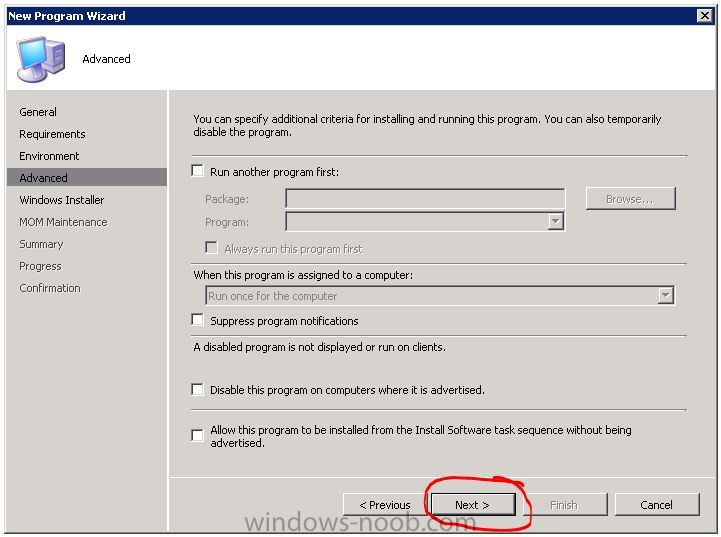
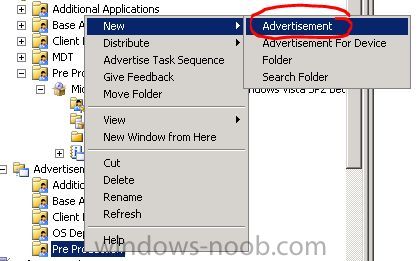
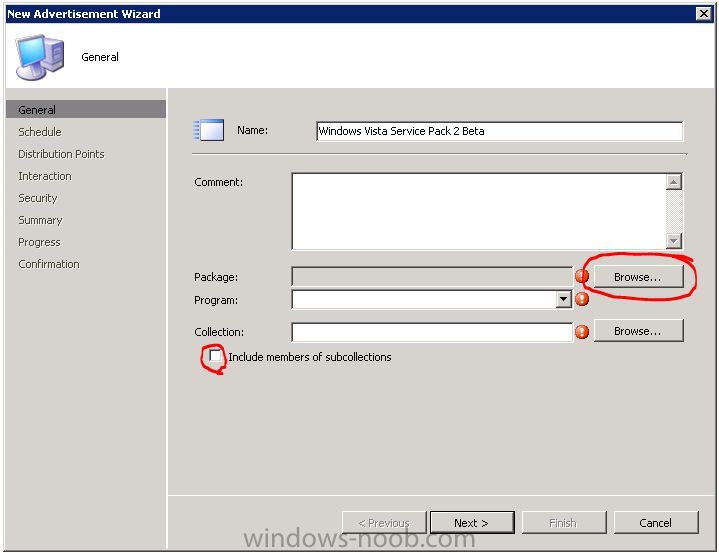
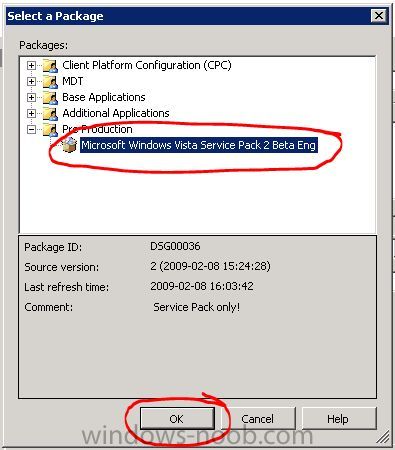
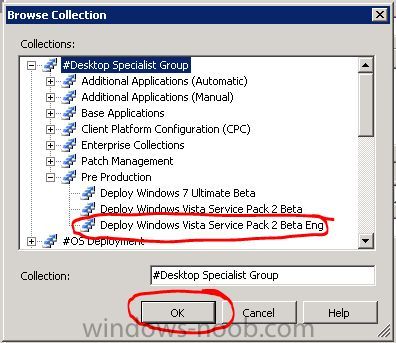
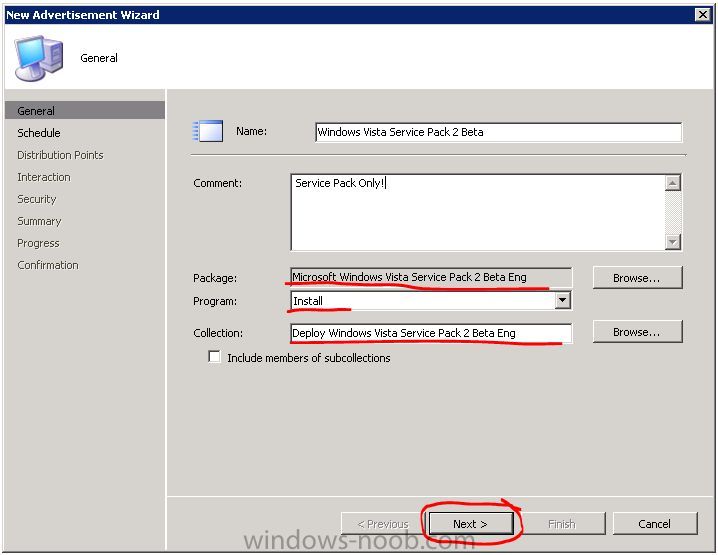
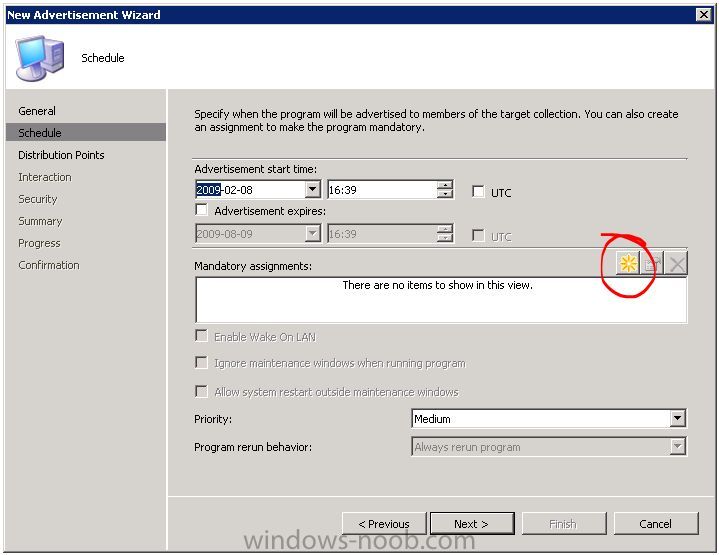
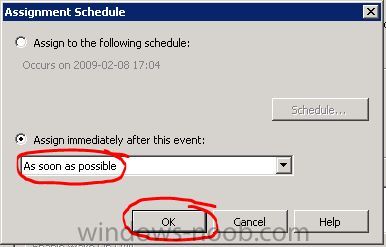
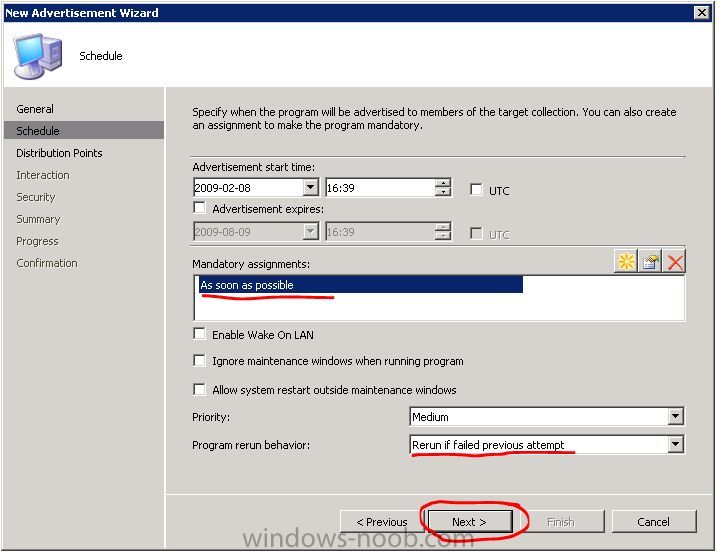
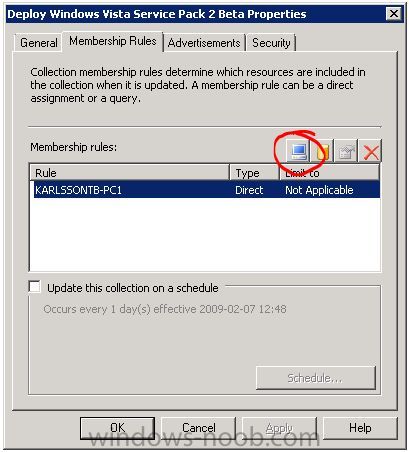
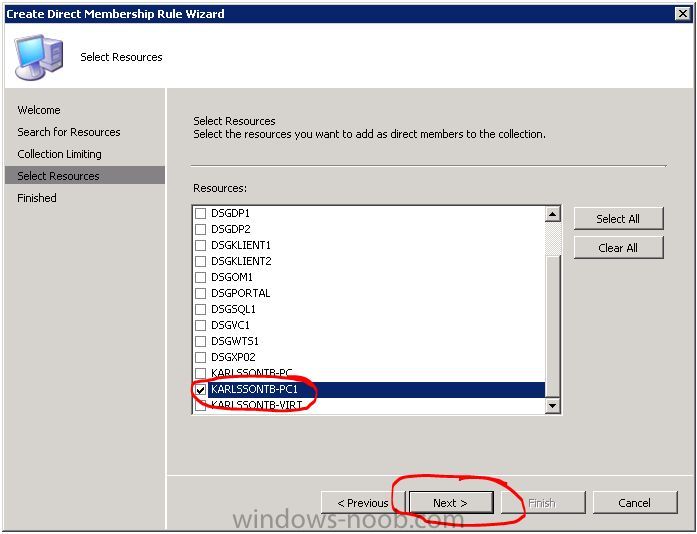
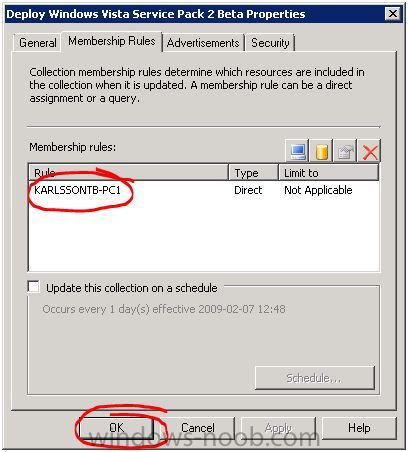
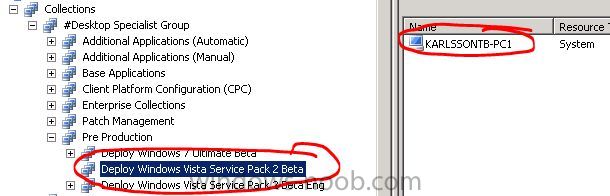
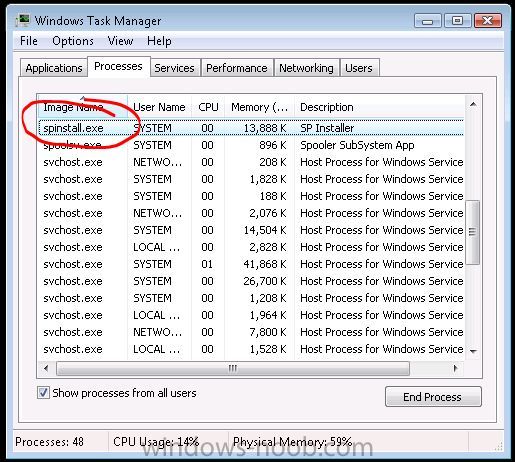
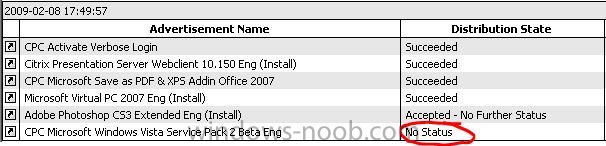
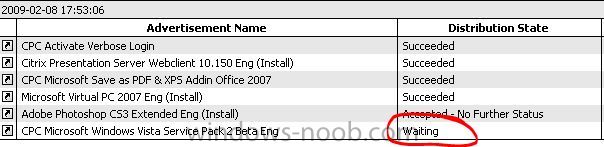
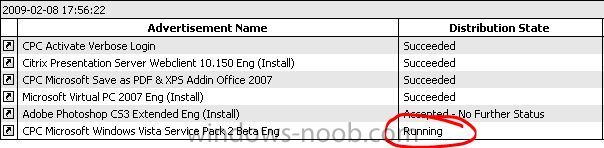
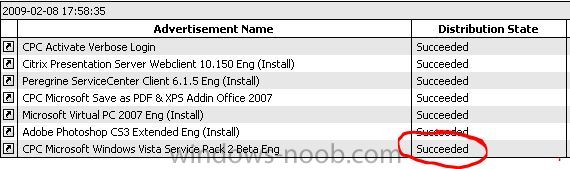
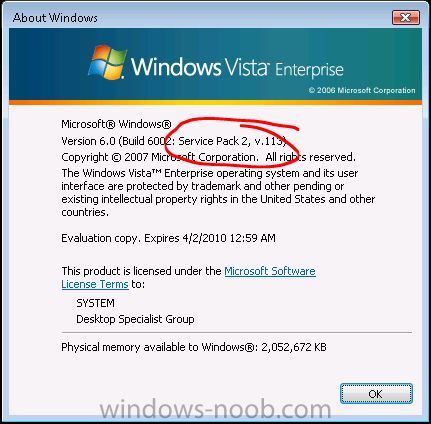
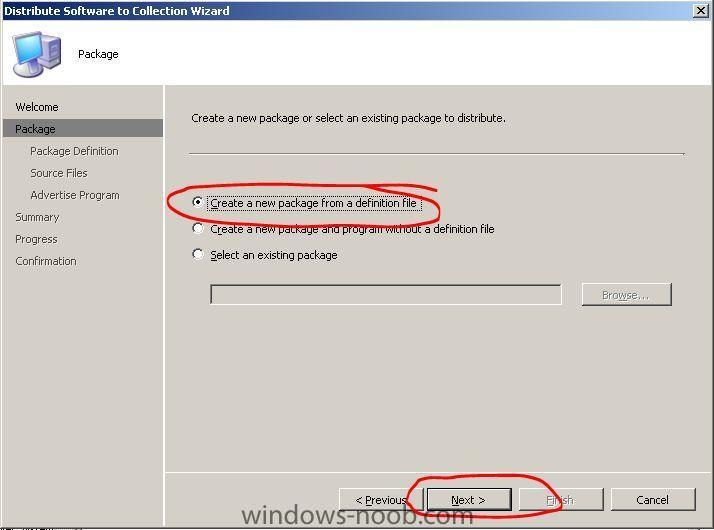
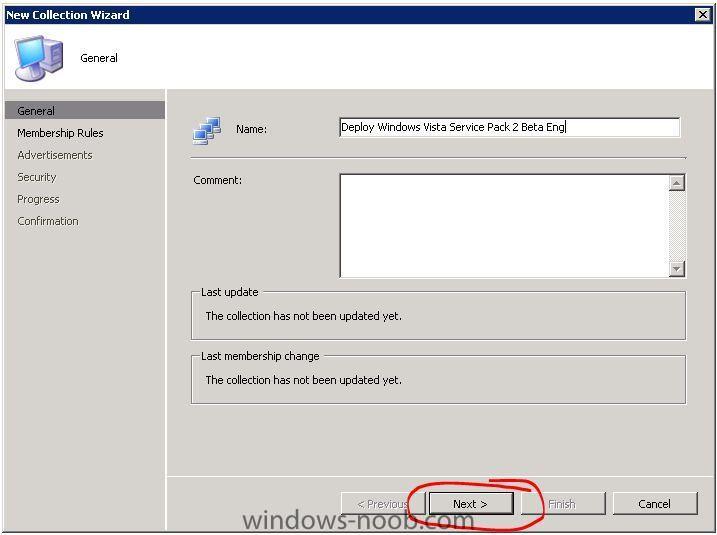
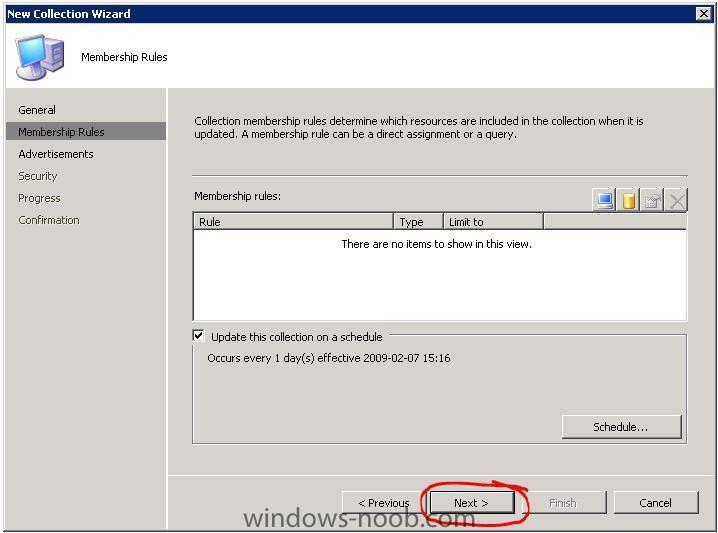
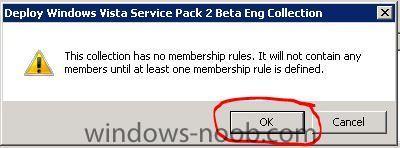
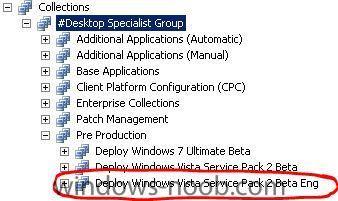
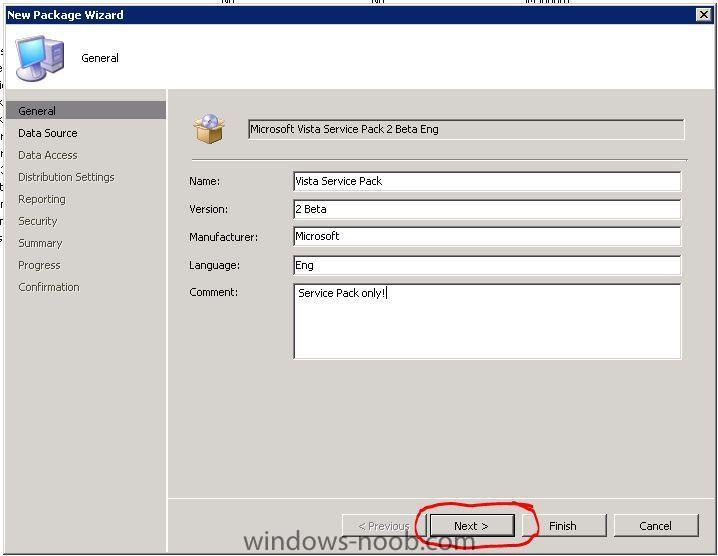
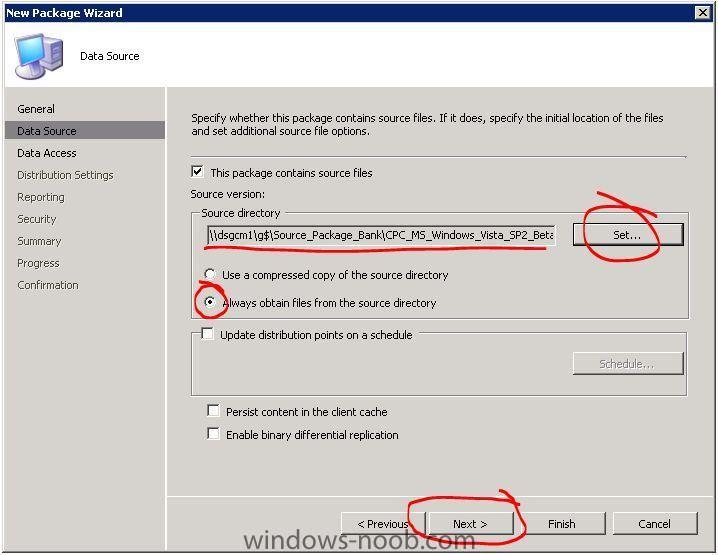
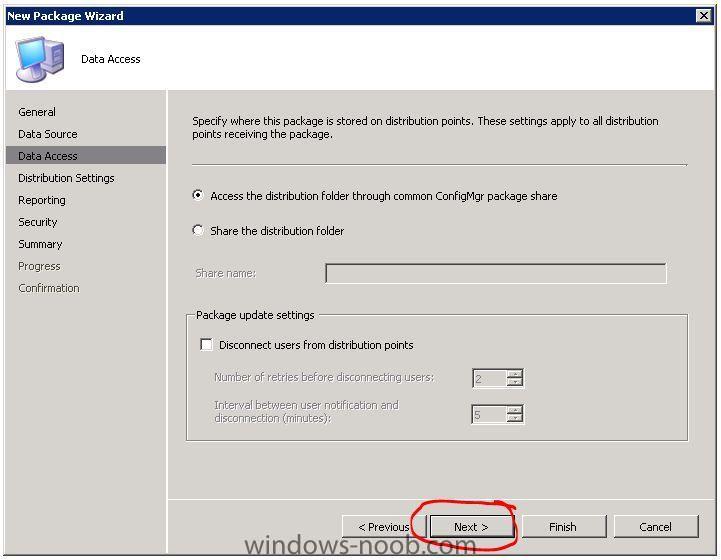
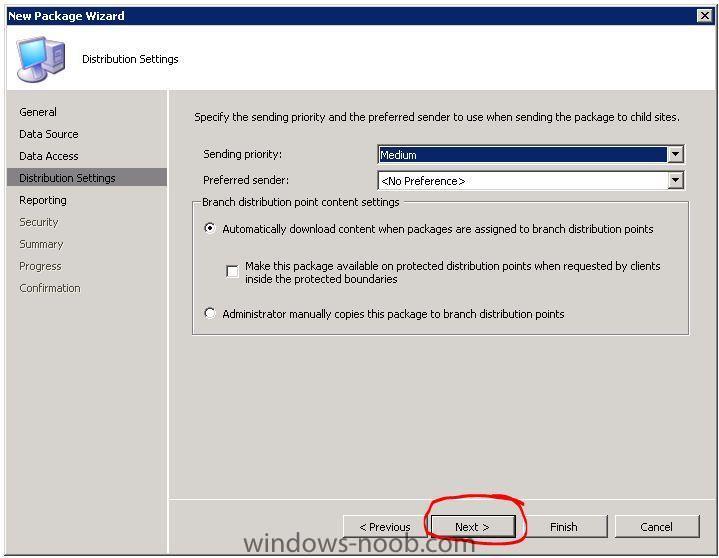
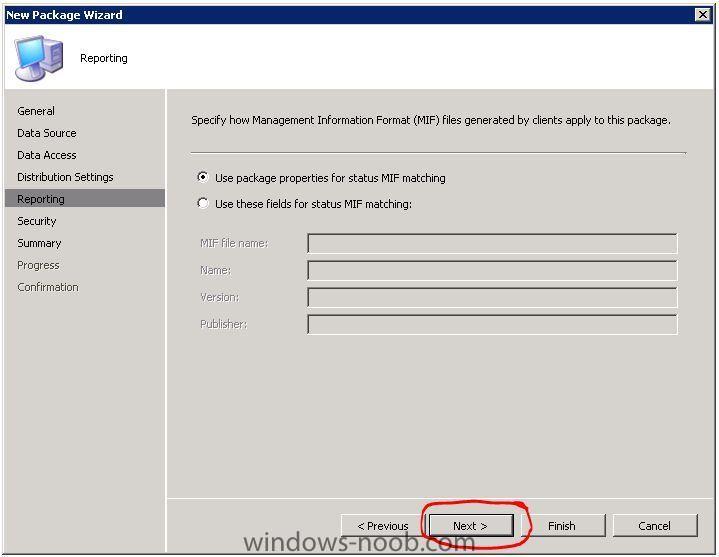
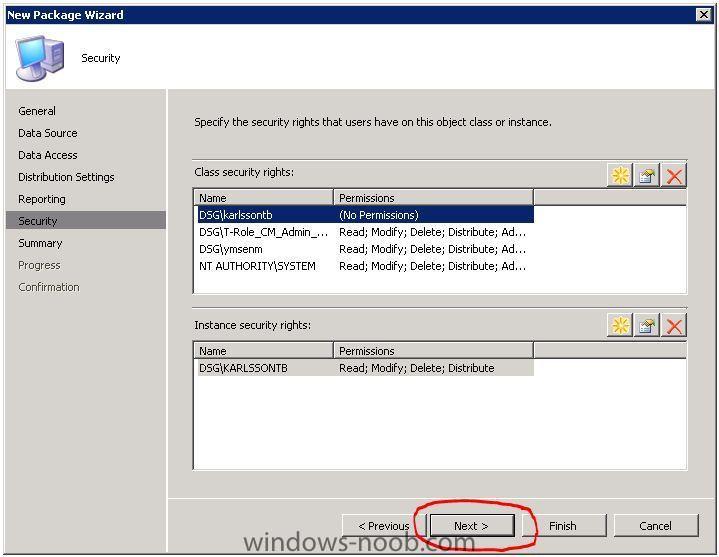
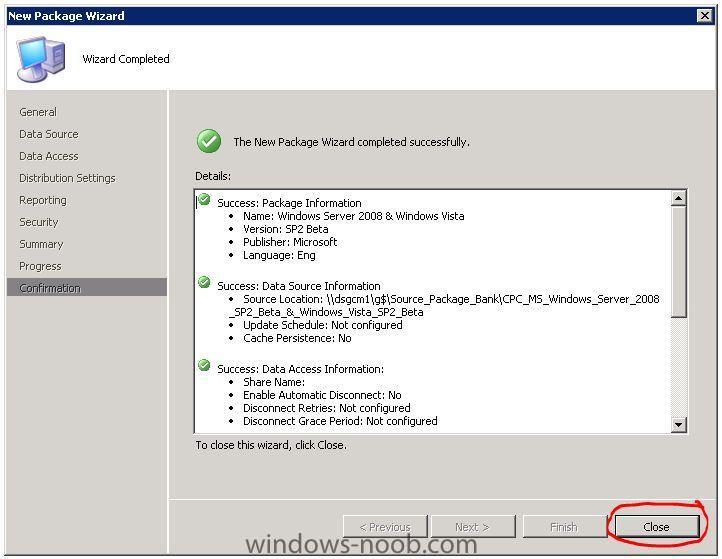
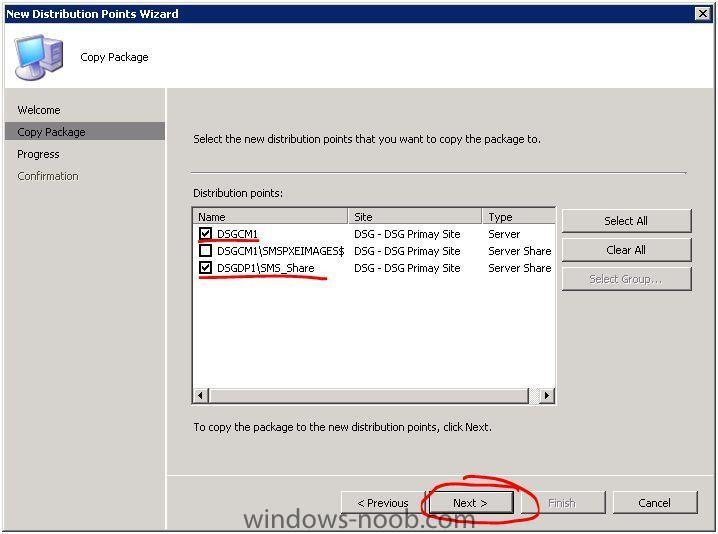
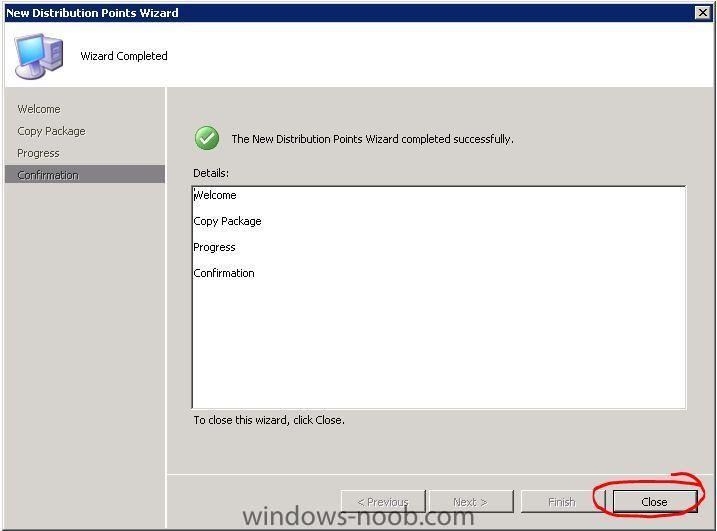
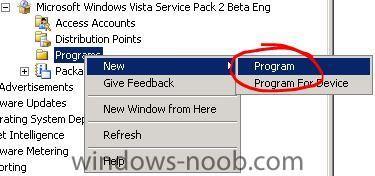
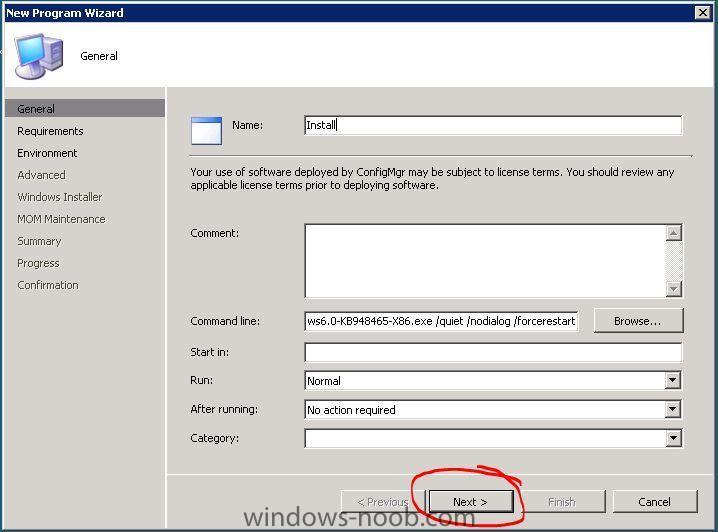
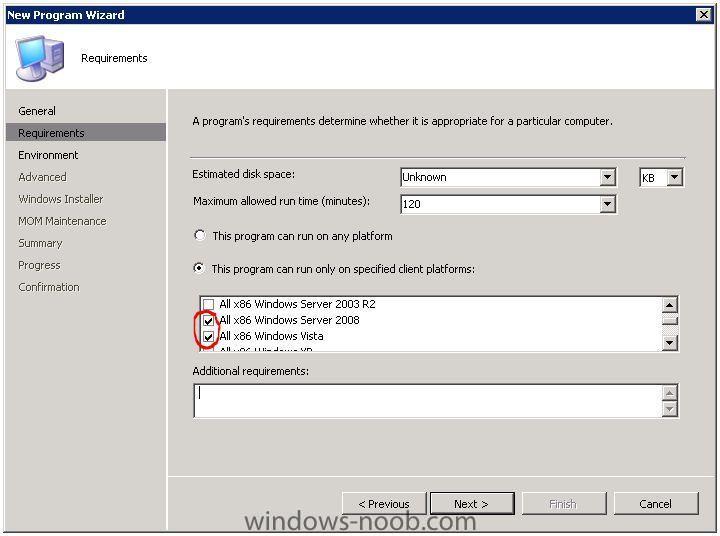
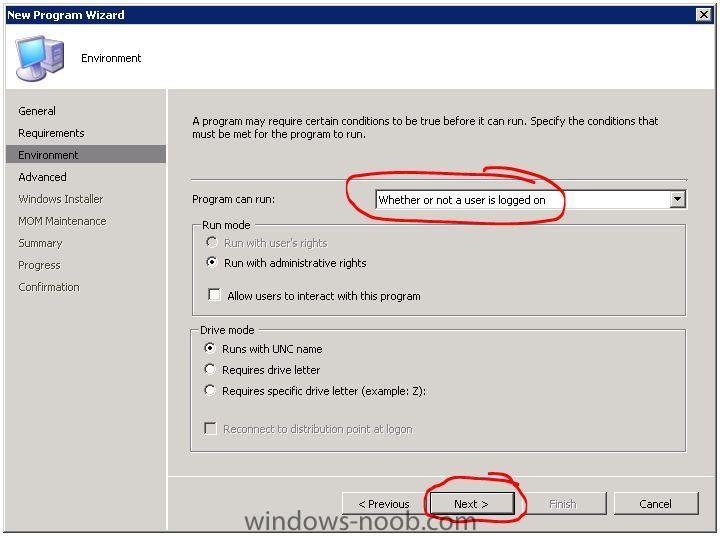
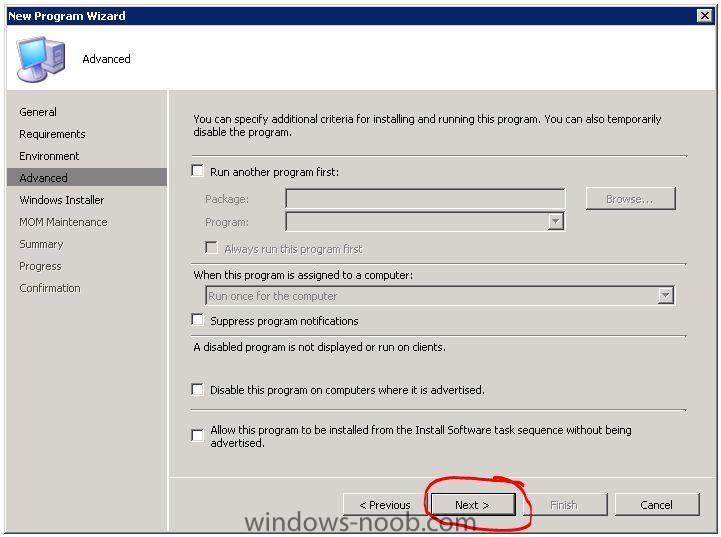
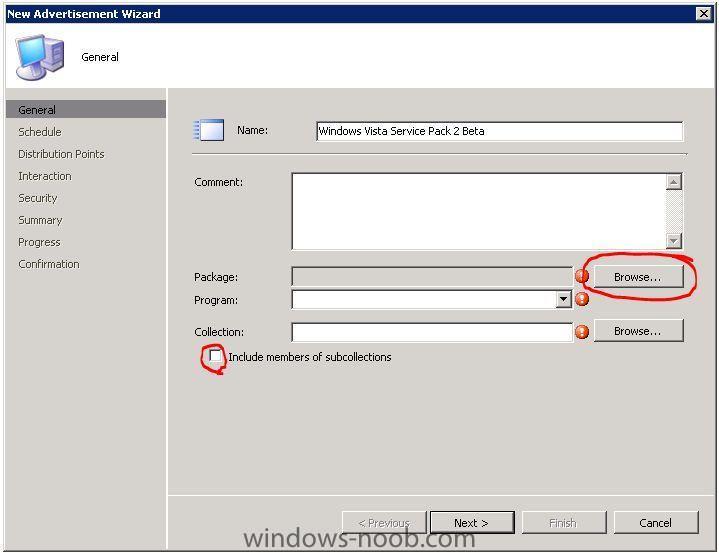
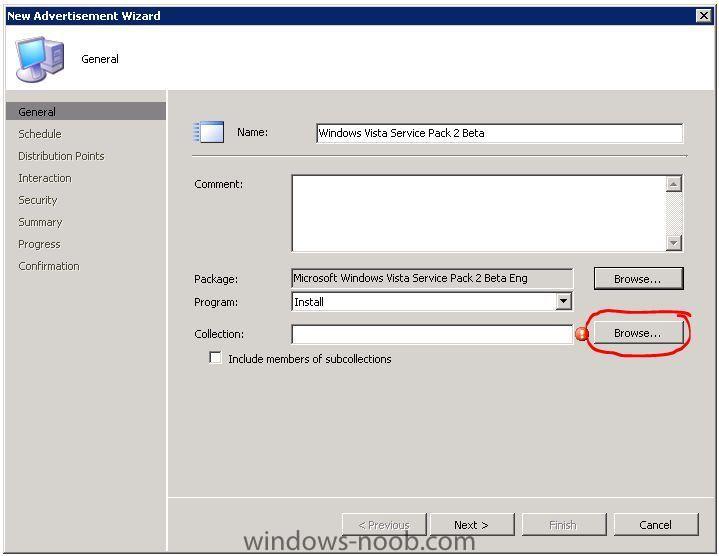
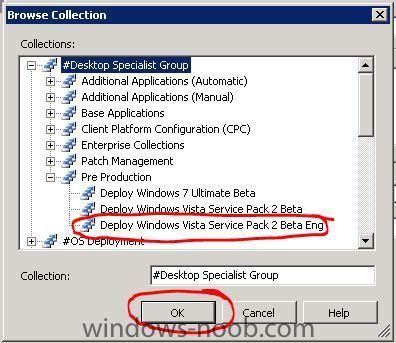
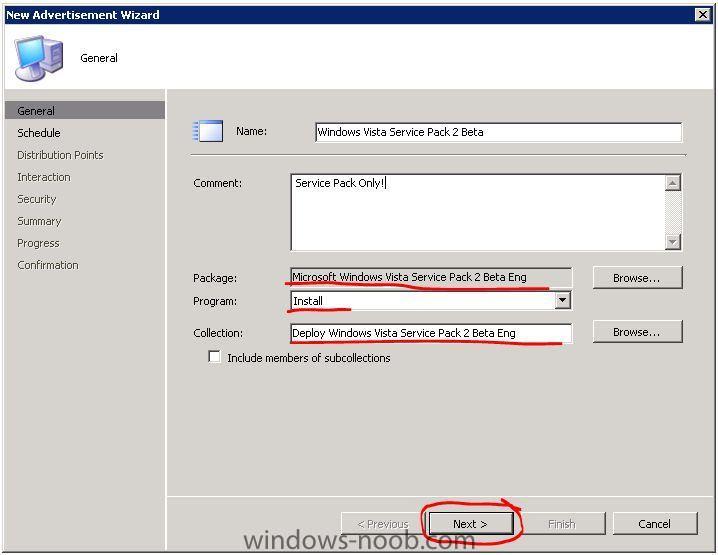
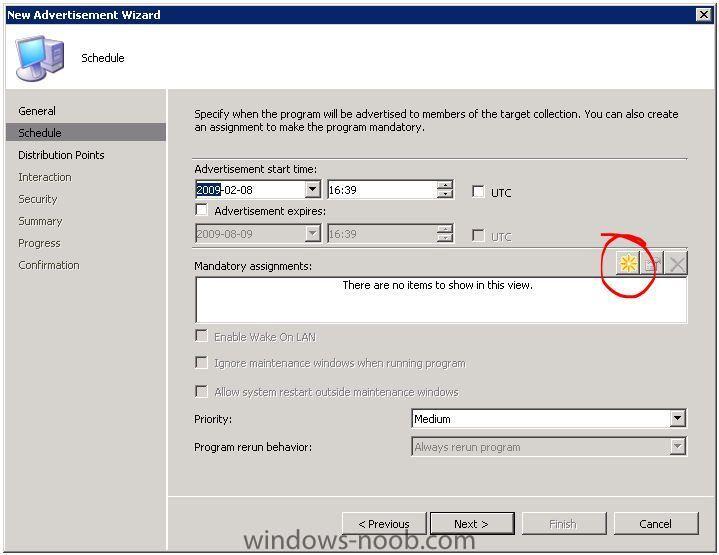
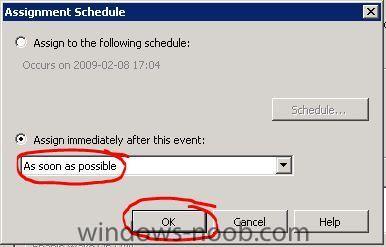
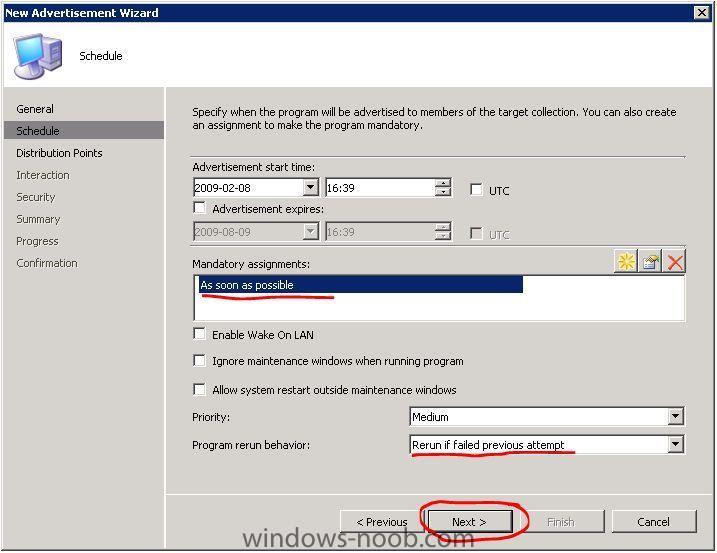
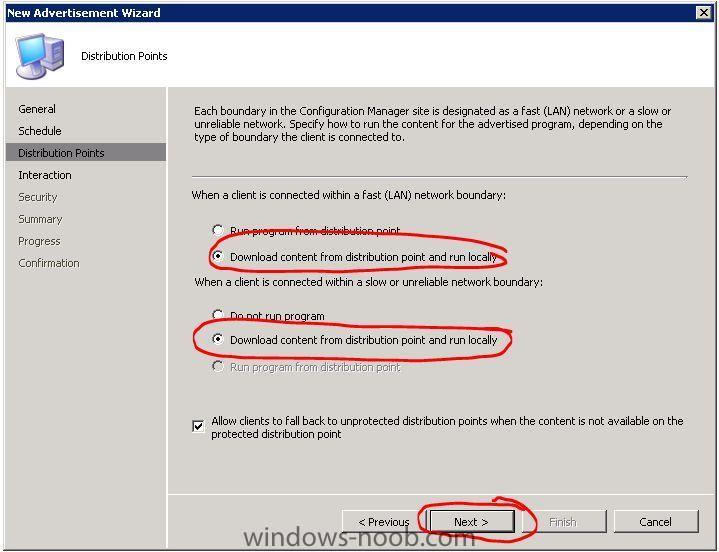
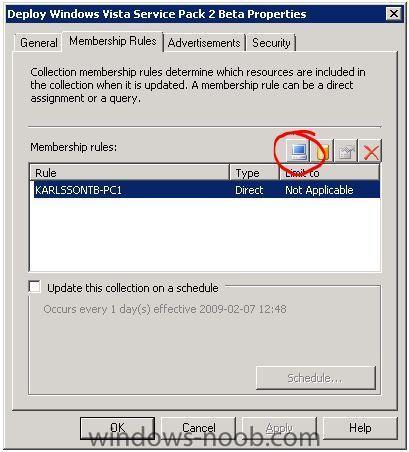
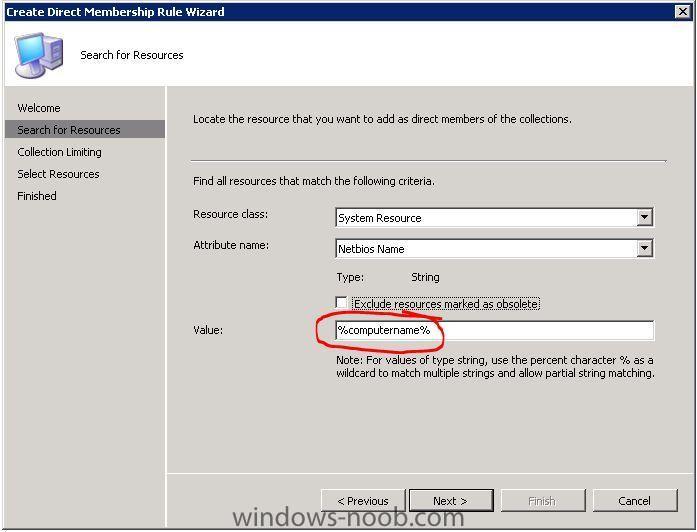
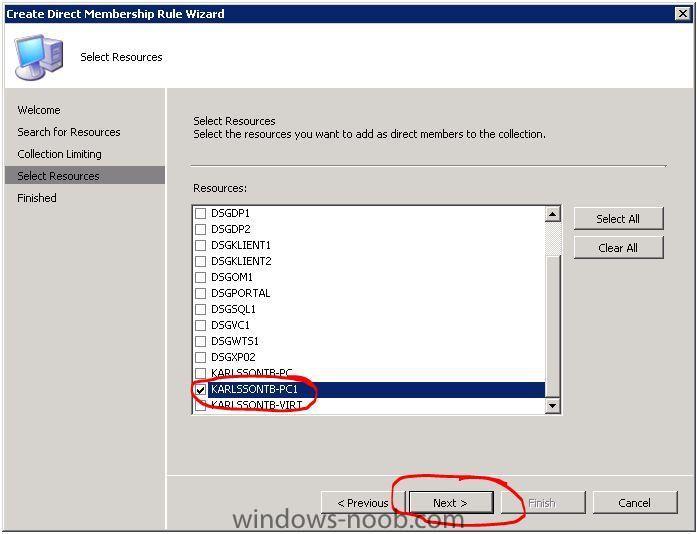
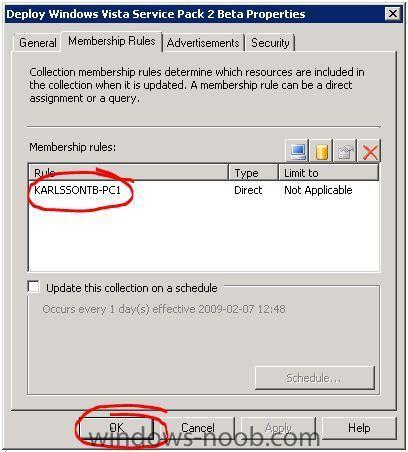
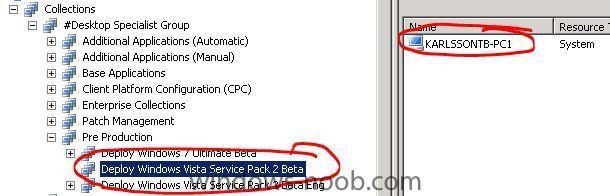
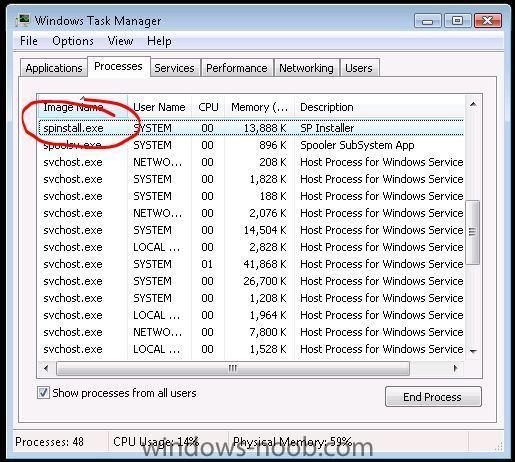
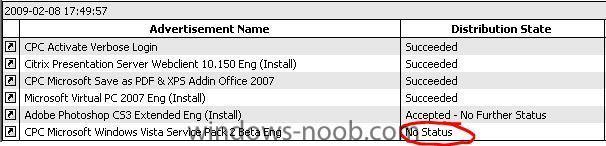
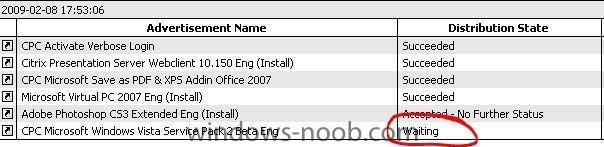
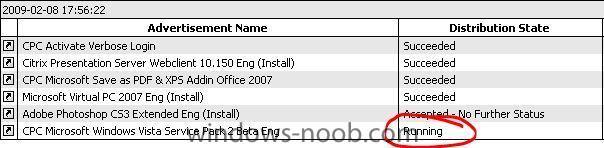
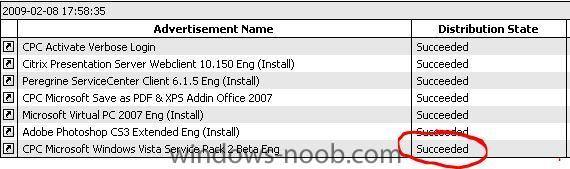
Deploy Service Pack with SCCM 2007 You can distribute a Service Pack in several ways and I will show you how to do it with a installation program in SCCM. In this guide I'm deploying Windows Vista Service Pack 2 Beta to Windows Vista machines to show you one of the ways to do it. You can distribute the same Service Pack to Windows Server 2008 operating systems as well. It's not recomended to distribute this Service Pack to clients in your corporate enterprise since it's still in the beta stage, this is just for testing purpose. Start the download of Windows Vista SP2 Beta while you continue to follow this guide. http://www.microsoft.com/downloads/details...;displaylang=en Create Collection Expand Site Database, Computer Management, Collections, right click and choose New, Collection. Name your Collection to a suitable name, e.g. Deploy Windows Vista Service Pack 2 Beta Eng. Press Next. Press Next in the Membership Rules section.We do not need to create a query on this Collection because it's for test/demonstration only!. When everything is ready we will do a "Direct Membership" and we'll get back to that later in this guide. Press OK. Press Next in the Advertisement section. Press Finish to create the Collection. Result: Create a Package Expand Site Database, Computer Management, Software Disitribution, Packages, right click and choose New, Package. Give the package a name, e.g. Microsoft Vista Service Pack 2 Beta Eng, press Next. Point out the Source Directory (the folder where your Service Pack installation file is placed) and verify that Always obtain files from source directory is checked. Press Next in the Data Access section. Press Next in the Distribution Settings section. Press Next in the Reporting section. Press Next in the Security section. Reiview the summary and press Next. Reiview the confirmation window and press Close. Create Distribution Point(s). Expand your newly created package and right click on Distribution Point, New Distribution Point. Press Next in the Welcome window. Select your distributions point(s) and press Next. Review confirmation and press Close. Use report ID 136 the verify that the package has been installed on your distribution point(s). http://<SERVER_NAME>/SMSReporting_<SITE_CODE>/Report.asp?ReportID=136 Create a Program Expand your newly created package and right click on Programs, New Program. Name your program to Install and enter your command line, press Next. ´ Command Line: Windows6.0-KB948465-X86.exe /quiet /nodialog /forcerestart /quiet = silent install /nodialog = No windows is shown on the computer where the Service Pack is installed to /forcerestart = As it sounds, force a restart if it's required. I have choosen to use this values since a Service Pack is always important to install on clients since it contains all the latest updates and fixes and we want to install it ASAP. Enter requirements, press Next. Choose that this program can run when Whether or not a user is logged on, press Next. Press Next in the Advanced section. Press Next in the Windows Installer section. Press Next in the MOM Mentenance section. Review the summary and press Next. Revied the confirmation and press Close. Create a Advertisement Expand Site Database, Computer Management, Software Disitribution, Advertisements, right click and choose New, Advertisement. Give your advertisement a name (e.g. Windows Vista Service Pack 2 Beta Eng) and uncheck Include members of subcollections, press on Browse (Package). Select your package and press OK. Press on Browse (Collection). Choose your Collection and Press OK. Press Next. Create a mandatory assigment by pressing the icon in the red circle. Choose As soon as possible and press OK. Press Next. Choose to Download content from distribution point and run locally and press Next. Press Next in the Interaction section. Press Next in the Security section. Review the summary and press Next. Press Close. Deploy Service Pack Go to collection Deploy Windows Vista Service Pack 2 Beta Eng and right click and choose Properties, click on Membership Rules tab. Click on Direct Membership icon. Press Next on the welcome screen. Use the below resources to make a membership to your collection. Resource class: System Resource Attribute name: Netbios Name Enter your computername in the Value field, press Next. Press Next in the Collection Limiting section. Select the computer that you want to distribute your service pack to, press Next. Verify that correct resource was selected and press Finish. Verify that your resource is listed, press OK. Select your collection and hit F5 to refresh your collection. Verify that your computer is shown in the collection. The deployment of your service pack will begin shortly. Open SMS Report ID 126 to fallow the deployment (detail level: LOW) http://<SERVER_NAME>/SMSReporting_<SITE_CODE>/Report.asp?ReportID=126&ComputerName=<COMPUTERNAME> If you want to be shure that the installation has started on your computer, open the task manager on your Vista machine and look for process spinstall.exe The package has not been advertised to the client yet. The computer is downlading the package (service pack) to the local cache folder (C:\Windows\System32\CCM\Cache) before the installation will start since we choosen this erlier when we created the advertisement. The installation is running. The installation has finished. Verify the installation To be 150% shure that your service pack has been installed, do like this... On your Vista comuter, press Start, Run. Type winver, press Enter. Good luck...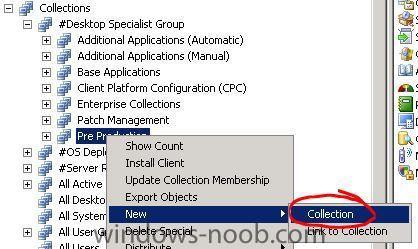


-
Screen resolution during OSD with SCCM (MDT integrated)
Tobie replied to Tobie's question in Troubleshooting, Tools, Hints and Tips
The problem disappeared when i had updated my GFX driver in my winPE image so I dont need to change this values manually for now. But, I'm still interested of how to it and I'll gett back when I know -
Tools and Utilities for ConfigMgr 2007
Tobie posted a question in Troubleshooting, Tools, Hints and Tips
Tools and Utilities for ConfigMgr 2007 This Wiki page contains tools, utilities, scripts, queries, and reports specifically designed to work with System Center Configuration Manager 2007. Feel free to edit and add your own. http://www.myitforum.com/myITWiki/Default....?Page=SCCMTools -
ConfigMgr 2007 Inboxes To Monitor ConfigMgr 2007 inboxes with a backlog of files to be processed generally indicates a problem is occurring. As a result your infrastructure may suffer and may become problematic. Listed here is a list of the ConfigMgr 2007 inboxes that should be checked on a regular basis to ensure that your site(s) function as expected. Auth\Dataldr.Box A backlog of files can indicate problems accessing the site database. Auth\Dataldr.Box\Process A backlog of files can indicate problems accessing the site database. Auth\Ddm.box\Bad_DDRs A backlog of files can indicate a network corruption problem or a problem with the DDM Auth\Sinv.Box A backlog of files can indicate that the Software Inventory Processor cannot connect to the site database or that too many files were received. Auth\Sinv.Box\Orphans A backlog of files can indicate problems with specific clients, with management points, or with the network that could cause data corruption. Compsumm.Box A backlog of files can indicate that the Component Status Summarizer cannot process the volume of messages. Dataldr.Box A backlog of files can indicate problems accessing the Systems Management Server (SMS) database Dataldr.Box\Badmifs A backlog of files can indicate a bad custom MIF file or that a client computer cannot transfer the file correctly. Ddm.Box A backlog of files can indicate a bad DDR is preventing other DDR’s to process. Ddm.Box\Bad_DDRs A backlog of files can indicate a network corruption problem or a problem with the DDM OfferSum.Box A backlog of files can indicate a performance problem that is caused by a large number of messages. Policypv.Box A backlog of files in the policypv.box folder indicates that the policy provider component is not running. Replmgr.Box\Ready A backlog of files can indicate that the Scheduler is backlogged or is already processing files of the same priority Schedule.Box A backlog of files can indicate that the Sender cannot connect to or cannot transfer data to another site. Schedule.Box\Outboxes A backlog of .srq files indicates that the sender cannot process the number of jobs scheduled for that sender or that the sender cannot connect to or transfer data to another site. Schedule.Box\Tosend A backlog of files can indicate that many send requests are not completed or that the Scheduler has not yet deleted the files. Sinv.Box A backlog of files can indicate that the Software Inventory Processor cannot connect to the site database or that too many files were received. Sinv.Box\BadSinv A backlog of files can indicate problems with specific clients, with management points, or with the network, causing data corruption. SiteStat.Box A backlog of files can indicate a performance problem. Examine status messages for the Site System Status Summarizer for possible problems. Statmgr.Box\Futureq A backlog of files can indicate that some site systems' clocks are not synchronized with the site server. Statmgr.Box\Queue A backlog of files can indicate a problem with the Status Manager or that the component is trying to process too many messages. Statmgr.Box\Retry A backlog of files can indicate problems with the connection to the computer that is running SQL Server. Statmgr.Box\Statmsgs A backlog of files can indicate a problem with the Status Manager or that the Status Manager is trying to process too many messages Swmproc.Box A backlog of .sum and .sur files can indicate that the Software Metering Processor component cannot connect to the SMS database. Additional Information: Inbox Folders in Configuration Manager 2007 http://technet.microsoft.com/en-us/library/bb892790.aspx Count Files In All The SMS inboxes And Send To Excel http://myitforum.com/cs2/blogs/dhite/archi...7/23/22467.aspx VBS Script To Count Objects In A Specified SMS Or ConfigMgr Inbox http://myitforum.com/cs2/blogs/dhite/archi...gmgr-inbox.aspx VBS Script To Count Objects In A Specified SMS Or ConfigMgr Inbox From A List Of Servers http://myitforum.com/cs2/blogs/dhite/archi...of-servers.aspx VBS Script To Count Objects In Specified SMS Site Server Inbox http://myitforum.com/cs2/blogs/dhite/archi...rver-inbox.aspx
-
Hi, Google tends to be my friend but we do not agree today. I have searched all over the Inernet but I cannot find what I'm looking for. I wonder if you can change the existing screen resolution during OSD, the current resolution is 640x480, the same resolution as the winpe.bmp picture (e.g. \\<server_name>\SMS_DSG\OSD\bin\i386\winpe.bmp). I want to use the same resolution as the screen can handle, e.g. 1280x1024. Can i do this with TS or do need to configure something else? Thanks in advance! /Tobias
-
Never heard of that problem. Is SP4 installed on that particular computer? Are you able to install SCCM Client if drivers/applications for your GFX is uninstalled? Same result? Can you find any valuable information in u'r logfiles (C:\WINDOWS\system32\ccmsetup)? /Tobias
-
Error code (Number) Error text (Text) 0 USMT_SUCCESS 1 USMT_DISPLAY_HELP 2 USMT_MEMORY_FAIL 3 USMT_INVALID_PARAMETERS (Bad command line) 4 USMT_INVALID_STORE_LOCATION 5 USMT_NO_MORE_TOKEN 6 USMT_UNABLE_SET_SCRIPTFILES 7 USMT_UNABLE_GET_SCRIPTFILES (Can’t find XML file(s) specified in the command-line) 8 USMT_UNABLE_SET_STOREPATH 9 USMT_UNABLE_SET_USERS 10 USMT_UNABLE_FINDMIGUNITS 11 USMT_UNABLE_DOMIGRATION (A file is in use) 12 USMT_FAILED_MIGSTARTUP (Error in XML file ‘Bad XML’) 13 USMT_FAILED_SETMIGRATIONTYPE 14 USMT_FAILED_LOCALONLY 15 USMT_UNABLE_GET_WORKINGDIR 16 USMT_UNABLE_SETKEY 17 USMT_UNABLE_READKEY 18 USMT_TOO_LONG_KEYSTRING 19 USMT_UNABLE_SETCOMPRESSION 20 USMT_ERROR_INSUFFICIENT_RIGHTS 21 USMT_UNABLE_DELETE_STORE 22 USMT_UNABLE_SET_BENONADMIN 23 USMT_ERROR_INSUFFICIENT_STRINGBUFFER 24 USMT_ERROR_UNSUPPORTED_PLATFORM 25 USMT_ERROR_UNABLE_TOVERIFY_PLATFORM 26 USMT_UNABLE_SET_EFSMODE 27 USMT_INIT_ERROR 28 USMT_UNABLE_SET_LAC_LAE 29 USMT_ERROR_CORRUPTED_ENCRYPTED_STORE (Store is encrypted and no or invalid key has been specified) 30 USMT_ERROR_NO_INVALID_KEY (Store is only compressed but a key has been specified) 31 USMT_ERROR_CORRUPTED_NOTENCRYPTED_STORE 32 USMT_ERROR_LOGFILES_INSIDESTORE 33 USMT_INVALID_PLATFORM_FOR_TARGETXP 34 USMT_STORE_VALID_ONLY_FOR_XP 35 USMT_UNABLE_TO_READ_CONFIG_FILE 36 USMT_INVALID_CONFIG_FILE_FORMAT 37 USMT_ERROR_UNABLE_CREATE_LOGS 38 USMT_ERROR_USE_LAC 39 USMT_FAILED_TO_EXCLUDE_FOLDERS 40 USMT_ERROR_UNABLE_CREATE_PROGRESS_LOG 41 USMT_STATUS_CANCELLED Source: http://blogs.technet.com/deploymentguys/ar...rror-codes.aspx
-
Deploying IIS for Windows XP
Tobie replied to getitfaster's question in Deploying Windows 10, Windows 8.1, Windows 7 and more...
Thanks! Unfortunately, I gave you incorrect information. IIS for Windows XP version is IIS 5.1. Windows 2000 uses IIS 5.0, XP is IIS 5.1, 2003 is IIS 6 and Windows Vista/2008 is IIS 7.0. Please go to this link - http://www.appdeploy.com/packages/detail.asp?id=93. Expand Command Lines, read it. Expand Notes, read it. Good luck! Regards, Tobias Karlsson -
Deploying IIS for Windows XP
Tobie replied to getitfaster's question in Deploying Windows 10, Windows 8.1, Windows 7 and more...
Hi, welcome to the forum. You will not be able to install IIS 7.0 on a Windows XP based machine since it's not supported. You can deploy windows components by creating an answering file. Unattended install is useful if you need to deploy multiple web servers and need to ensure that each of the web servers is setup with the identical with IIS. Unattended installs can also be used during the install of Windows Server 2003. This post will cover installing IIS unattended after the OS has been deployed. By default IIS installs the following directories: %systemroot%\InetPub %systemroot%\Help\IISHelp %systemroot%\System32\InetSrv %systemroot%\System32\InetSrv\MetaBack These directories contain content and cannot be moved. You can, however, select the location of your wwwroot and ftproot directories at installation by using a script during unattended setup. To start using unattended installs: 1. Create an answer file. Use notepad and type in the following: [Components] iis_common = on iis_www = on iis_inetmgr = on iis_asp = on aspnet = on complusnetwork = on [internetServer] PathFTPRoot = C:\Inetpub\Ftproot PathWWWRoot = C:\Inetpub\Wwwroot 2. Save the file as IIS_Unattended.txt 3. Next we run the unattended install by running the following command from a command line: Sysocmgr.exe /i:%windir%\inf\sysoc.inf /u:%PathToUnattendFile% Setup will now install IIS with the IIS Components chosen in the answer file above, in this example we’ll install: Components section: IIS Common Files - (iis_common) WWW Service - (iis_www) IIS Manager - (iis_inetmgr) Active Server Pages (ASP) - (iis_asp) ASP.NET - (aspnet) COM+ - (complusnetwork) InternetServer section: Desired path for www content, i.e. D:\Inetpub\Wwwroot - (PathWWWRoot) Desired path for ftp content, i.e. D:\Inetpub\Ftproot - (PathFTPRoot) To get a full overview over the IIS Components which you can add to your answer file, read the MS TechNet article: Microsoft TechNet - Creating an Answer File (IIS 6.0) http://www.microsoft.com/technet/prodtechn...f5f1145aa9.mspx Unattended install can be used for all Windows components, for more information on this read: Windows Server 2003 Technical Reference - How Unattended Installation Works http://www.microsoft.com/technet/prodtechn...ec740474b1.mspx Other references: Microsoft TechNet - Installing (IIS 6.0) http://www.microsoft.com/technet/prodtechn...370d7f26cd.mspx -
Windows 7 beta is avalible for download at Microsoft website - http://www.microsoft.com/windows/windows-7...a-download.aspx. The 32-bit version of Windows 7 Beta is available in five languages: English, German, Japanese, Hindi, and Arabic. The 64-bit version is available in English, German, Japanese, and Arabic. Windows 7 Beta is available for a limited time, to the first 2.5 million people who download the software. Just choose the version that fits the system you'll be using for the test, pick your language and click go to register for and download the Beta. Hurry up!
-
It is always time-consuming to move a forum or comminity from one ISP to another, especially if it's dedicated servers involved. Tell me if there is anything I can help with, please send a PM and we will see if I have knowledge of the requested assistance. I would once again give you praise for the fast work, windows-noob has become one of my favorites and hope for higher activity with time. Peace!