IT-Hilger
-
Posts
21 -
Joined
-
Last visited
-
Days Won
3
Everything posted by IT-Hilger
-
Nice that you're happy with the solution. And thanks for your hint, think this might help somebody.
-
Hi Mike, can you create a TS from scratch and test it there? BR
-
Hi, what are the error messages in smsts.log ?
-
go into your TS. Then Add -> General -> Set Task Sequence Variable. Add any task sequence variable. When you then run your TS, what is the result / exit code of this step? Is the TS variable created successful?
-
if you create a step just to set a TS variable - what is the result? Is it created successful?
-
do you use TS variables in any other steps in your TS? Are they working there? Have a look at your smsts.log - there you should find the resolved value of the variable.
-
don't know why task sequnce variables generally aren't working in your environment. But why must you use them? If a hardcoded "c:\" is working for you...
-
Hi, did you completely follow the guide? Did you extract the drivers in the source folders, so that you have the .inf, .cat, etc. files? BR
-
Okay nice. Cool that it's working for you now!
-
No, thats not correct. They must be 10.* I can tell you exactly tomorrow. You should add the new Boot Images. Maybe there's the fault.
-
Hi, have you installed the latest CU Packs for ConfigMgr? (SCCM 2012 R2 SP1 CU2) and are you using the latest version of MDT? (2013 Update 1) I did the test with a Latitude E6320 - so almost the same device - and was also using the Windows 8 driver pack from Dell. BR
-
Here it's working fine with Windows 10. Are you sure that the drivers are correct for Windows 10? BR
-
I test it in our W10 TS next week. I'll tell the results...
-
I didn't test it, but it should. You only need DISM to do it - and this is independent from SCCM. Starting with Windows Vista it's built into the OS. BR
-
Hi Max, thanks for your comment! Great that this solution also works for you. Don't know why you have to remove the trailing backslash, it's working in our environment. And good idea with %osdisk% variable. Maybe I'll change it in our environment, too. BR Achim
-
Hi Sant, thats different from (exe) package to package. You must try to extract them and then use the .inf, .sys and .cat files. You can try to extract the .exe with 7zip for example. If this doesn't work, run the .exe and wait at the first dialog of the .exe program and don't click next. Then open the %temp% folder on the pc and have a look inside the last modified folder in %temp% folder. I think you should find the extracted driver files there. BR Achim
-
Hi Jeff, after which step you get stuck with no IP adress? In WinPE phase or after applying the Windows image?
-
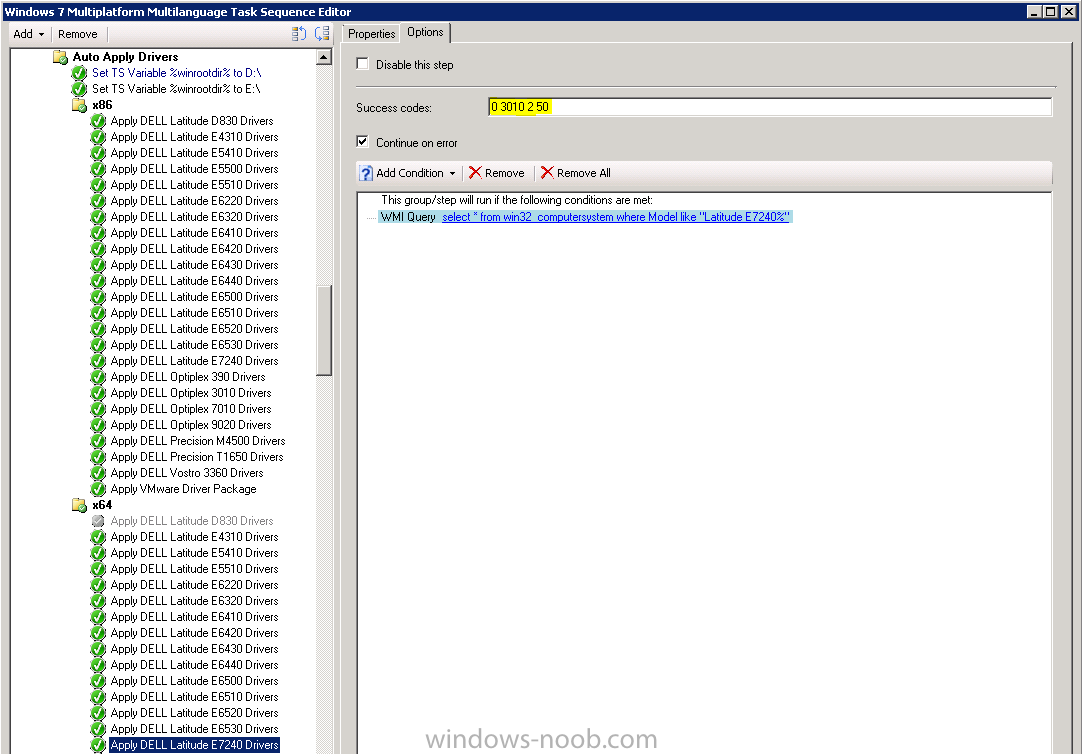
Hi Dietmar, nice to hear, thanks. Nice idea with OSDisk variable! DISM sometimes gives return code "2" or "50". By default, SCCM TS just takes "0" and "3010" as success codes. When you don't add the return codes 2 and 50 as success codes, the apply drivers works fine, but SCCM thinks that there was an error because it doesn't know that this return codes also mean success.
-
We also tried the above solutions but they didn't help. In our system the problem was a corruption in Windows performance counter library. Run this command in an Administrator CMD: cd C:\WINDOWS\system32 lodctr /R You should see a success message after the above command. Then restart SMS_SITE_COMPONENT_MANAGER and see if it works. BR Achim
-
This does work in CM12. Do you still have problems with it?
-
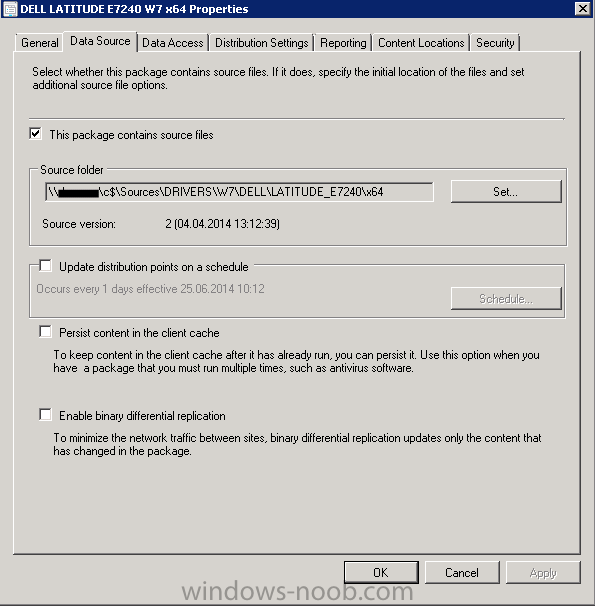
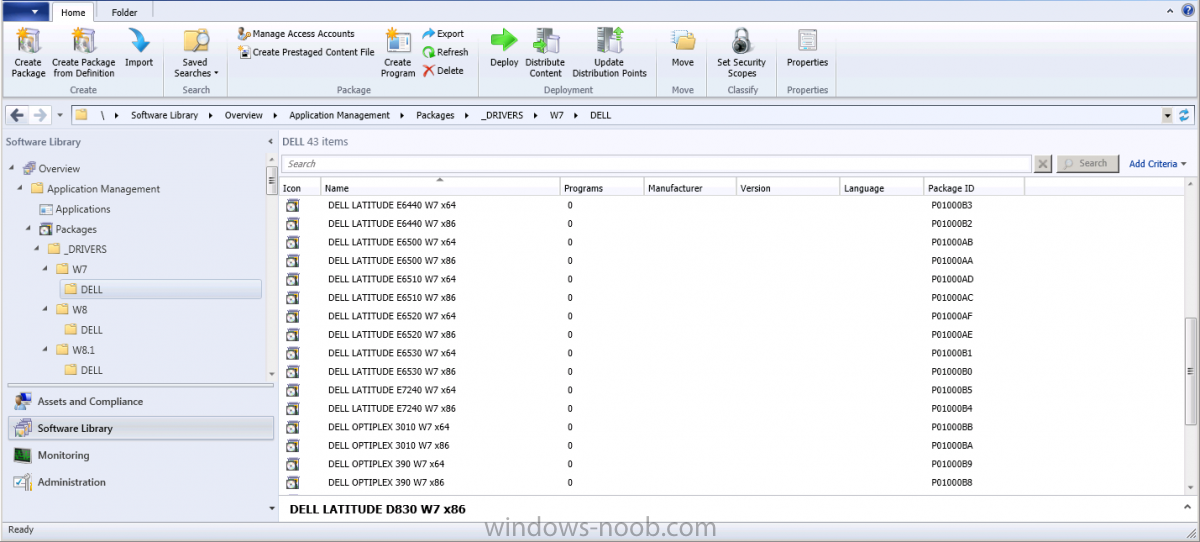
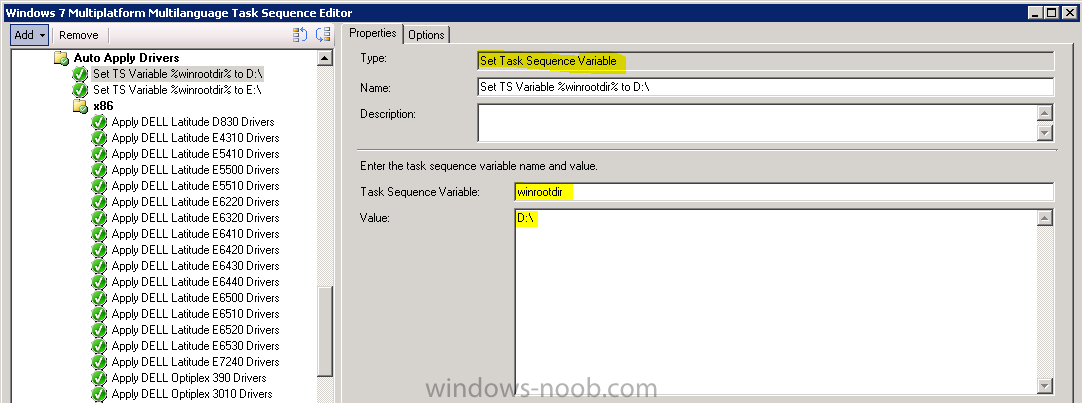
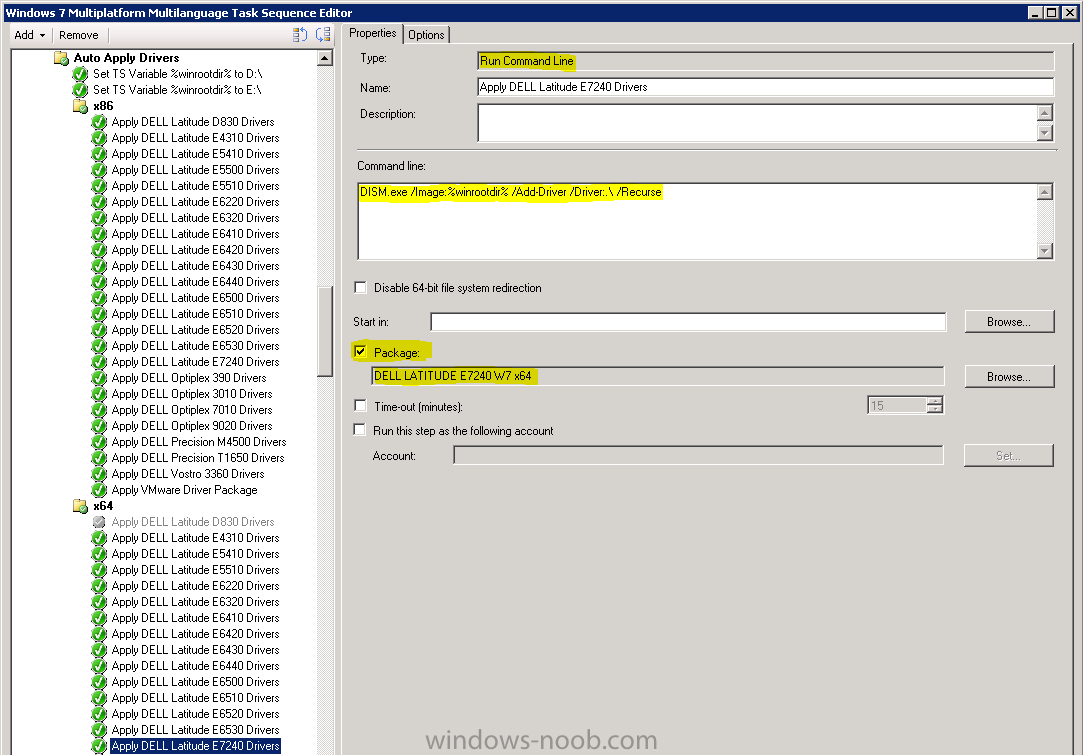
Hi Everybody, this thread is for those who want the old SCCM 2007 driver management back. Normally you have to import every driver to the database first, put them into a driver package, and then deploy them during OSD. In SCCM 2007 you could easily create a Driver Package from your Driver Source Folder and apply this Driver Package during OSD. This way of Driver Management was much easier and more reliable than the new way in SCCM 2012. But luckily there is still a method to prevent importing drivers into database and directly distribute driver packages to your clients. Step 1 Download drivers for your brands and models. Put them into seperate folders - one folder for one model - like you did in SCCM 2007 Step 2 Create a Package for each model and operating system. Then distribute this packages to your DP. Step 3 Create a Step "Set Task Sequence Variable" under your Auto Apply Drivers Group (after the Apply Operating System Step) in your Task Sequence. Task Sequence Variable: winrootdir Task Sequence Value: D:\ Condition: If Folder "D:\Windows" exists I created a second step after this with Drive Letter E:\. Because on some Notebooks the Systemroot is E:\ during OSD. Step 4 Create TS Steps for each model to apply the driver package. Type: Run Command Line Command line: DISM.exe /Image:%winrootdir% /Add-Driver /Driver:.\ /Recurse Package: Choose the corresponding package you created in step 2 Success codes: Add 2 and 50 Condition: WMI Query (here an example for Dell Latitude E7240) select * from win32_computersystem where Model like "Latitude E7240%" Repeat the steps above for each computer model you want to image. With this way of applying drivers we have 0 problems in our environment. Very easy and reliable. BR Achim If you have questions - feel free to contact me http://ithilger.de/kontakt