kdevries
-
Posts
14 -
Joined
-
Last visited
kdevries's Achievements
")
Newbie (1/14)
0
Reputation
-
Windows 8.1 clients showing inactive SCCM 2012 R2
kdevries replied to kdevries's topic in Configuration Manager 2012
They all were working and different days of different months it shows it hasn't had a heartbeat register. Was not on one day they all just quit working, but it is only the Windows 8 machines. The SMS agent service is running on all the machines and the installation was completed by pushing it out using the SCCM console. -
All of my Windows 8.1 machines are showing to be inactive in my SCCM 2012 R2 console. Does anyone know why this is? All my Windows 7, Server 2008 R2, and Server 2012 R2 are fine and showing active. Thanks!
-
I am trying to figure out how to create a package, then create a task sequence for deploying iTunes 11.1.5 in SCCM 2012 R2. Can anyone give me step by step instructions? I can't seem to get it working. Thanks
-
SCCM 2012 R2 Task Sequence Error 0X8007000B
kdevries replied to kdevries's topic in Configuration Manager 2012
That's exactly what I had to do. I had to start over. It worked on other computers..... -
2012 R2 not completing the Task Sequence
kdevries replied to jaskelly3578's topic in Configuration Manager 2012
I am having this same issue. I have SCCM 2012 R2 CU1 installed and I cannot get the applications to deploy during an install of a OSD. Can anyone give me any directions? Thanks -
SCCM 2012 R2 Task Sequence Error 0X8007000B
kdevries posted a question in Deploying Operating Systems
I have looked every where for an answer to this problem and I have not had any luck. I upgraded from SCCM 2012 SP1 CU3 to SCCM 2012 R2. Since then I have had issues with my OSD Task Sequence. I already recreated the images and redistributed them. I have deleted the task sequence and recreated it as well. I just want to be able to deploy an image to an unknown computer without having an issue. I get the task sequence failed with error 0X8007000B, and if I try to PXE Boot again after that fails, I then get PXE boot aborted......selected boot device failed. Press any key to reboot this system. I have been pulling my hair out for the last week trying to figure this out. Can anyone help me? -
I have looked every where for an answer to this problem and I have not had any luck. I upgraded from SCCM 2012 SP1 CU3 to SCCM 2012 R2. Since then I have had issues with my OSD Task Sequence. I already recreated the images and redistributed them. I have deleted the task sequence and recreated it as well. I just want to be able to deploy an image to an unknown computer without having an issue. I get the task sequence failed with error 0X8007000B, and if I try to PXE Boot again after that fails, I then get PXE boot aborted......selected boot device failed. Press any key to reboot this system. I have been pulling my hair out for the last week trying to figure this out. Can anyone help me?
-
THIS FIXED IT FOR ME!! 1. In the SCCM 2012 Admin Console, under the "Software Library" --> "Operating System Images" node, right click on the Windows 7 image being deployed and choose "Properties". 2. Click on the "Images" tab. 3. Under the option "Select image you want to view:", switch between the different images (i.e., "1-1" or "2-2") that are contained in the WIM file. Determine which image, i.e. 1-1 or 2-2, contains the Windows installation. The image that contains the Windows installation will have information next to the fields "OS version", "Architecture", "HAL Type", and "Description". The non-Windows data image will not have anything next to these fields. 4. Click on the "OK button. 5. In the SCCM 2012 Admin Console, under the "Software Library" --> "Task Sequences" -->right click the affected Task Sequence and choose “Edit”. 6. In the left pane of the Task Sequence select "Partition Disk 0". 7. Double click on the first item under "Volume" to bring up the "Partition Properties". 8. In the "Partition Properties" window: Under "Partition options", change the value next to "Use specific size" from 100 MB to 300 MB. Under "Partition options", make sure that the option "Make this the boot partition" is set. Under “Formatting options”, make sure the “Quick Format” option is selected. Click on the "OK" button. 9. Double click on the second item under "Volume:" to bring up the "Partition Properties" window. 10. In the "Partition Properties" window: Under "Partition options", select "Use a percentage of remaining free space" and set the field "Size(%)" to "100". Under "Formatting options", make sure the "Quick Format" option is selected. Click on the "OK" button. 11. Select the "Apply Operating System" task. 12. Under the "Apply operating system from a captured image" option, make sure that the "Image:" drop down menu is set to the Windows installation image as determined in Step 3 (i.e., "1-1" or "2-2"). 13. Select the "Apply Data Image 1" task. 14. Under the "Select the image from this package that you want to apply. This image can not contain any operating system." option, make sure the "Image:" drop down menu is set to the non-Windows data image as determined in Step 3 (i.e. 1-1 or2-2). 15. Move the "Apply Data Image 1" task immediately BEFORE the "Apply Operating System" task, but AFTER the "Partition Disk" task. 16. Click on the "OK" button to save the changes to the Task Sequence. The 100 MB boot partition that was captured using the Capture Media is applied first via the "Apply Data Image 1" task. This allows the "Apply Operating System" task that follows it to move on to the second partition and apply the Windows OS image to the second larger partition via the option "Next available formatted partition". If we did not include the "Apply Data Image 1" task or the "Apply Data Image 1" task is after the "Apply Operating System" task, the Task Sequence would try to apply the Windows OS image on the first smaller partition instead of the second larger partition. This would cause the "There is not enough space on the disk" since the size of the WIM image is larger than the partition size.
-
SCCM OSD Task Sequence failed with error code (0x80000FFFF)
kdevries replied to kdevries's question in boot images
THIS FIXED IT FOR ME!!! 1. In the SCCM 2012 Admin Console, under the "Software Library" --> "Operating System Images" node, right click on the Windows 7 image being deployed and choose "Properties". 2. Click on the "Images" tab. 3. Under the option "Select image you want to view:", switch between the different images (i.e., "1-1" or "2-2") that are contained in the WIM file. Determine which image, i.e. 1-1 or 2-2, contains the Windows installation. The image that contains the Windows installation will have information next to the fields "OS version", "Architecture", "HAL Type", and "Description". The non-Windows data image will not have anything next to these fields. 4. Click on the "OK button. 5. In the SCCM 2012 Admin Console, under the "Software Library" --> "Task Sequences" -->right click the affected Task Sequence and choose “Edit”. 6. In the left pane of the Task Sequence select "Partition Disk 0". 7. Double click on the first item under "Volume" to bring up the "Partition Properties". 8. In the "Partition Properties" window: Under "Partition options", change the value next to "Use specific size" from 100 MB to 300 MB. Under "Partition options", make sure that the option "Make this the boot partition" is set. Under “Formatting options”, make sure the “Quick Format” option is selected. Click on the "OK" button. 9. Double click on the second item under "Volume:" to bring up the "Partition Properties" window. 10. In the "Partition Properties" window: Under "Partition options", select "Use a percentage of remaining free space" and set the field "Size(%)" to "100". Under "Formatting options", make sure the "Quick Format" option is selected. Click on the "OK" button. 11. Select the "Apply Operating System" task. 12. Under the "Apply operating system from a captured image" option, make sure that the "Image:" drop down menu is set to the Windows installation image as determined in Step 3 (i.e., "1-1" or "2-2"). 13. Select the "Apply Data Image 1" task. 14. Under the "Select the image from this package that you want to apply. This image can not contain any operating system." option, make sure the "Image:" drop down menu is set to the non-Windows data image as determined in Step 3 (i.e. 1-1 or2-2). 15. Move the "Apply Data Image 1" task immediately BEFORE the "Apply Operating System" task, but AFTER the "Partition Disk" task. 16. Click on the "OK" button to save the changes to the Task Sequence. The 100 MB boot partition that was captured using the Capture Media is applied first via the "Apply Data Image 1" task. This allows the "Apply Operating System" task that follows it to move on to the second partition and apply the Windows OS image to the second larger partition via the option "Next available formatted partition". If we did not include the "Apply Data Image 1" task or the "Apply Data Image 1" task is after the "Apply Operating System" task, the Task Sequence would try to apply the Windows OS image on the first smaller partition instead of the second larger partition. This would cause the "There is not enough space on the disk" since the size of the WIM image is larger than the partition size. -
SCCM OSD Task Sequence failed with error code (0x80000FFFF)
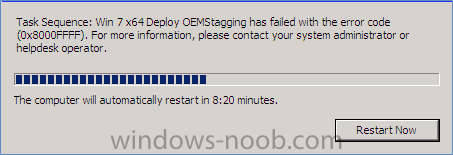
kdevries posted a question in boot images
When I boot to PXE, SCCM 2012 SP1 CU1 deploys a task sequence to my unknown computer that is new out of the box. As soon as I put the task sequence password in, I get the following error that is attached. Can anyone help me understand why I cannot get past this step? -
I finally just rebuilt the server, and now I get past that error and I get a new one when the task sequence tries to run

-
When I boot to PXE, SCCM 2012 SP1 CU1 deploys a task sequence to my unknown computer that is new out of the box. As soon as I put the task sequence password in, I get the following error that is attached. Can anyone help me understand why I cannot get past this step?
-
I have SCCM 2012 SP1 CU1 installed. I upgraded from no service pack. I am getting a File: Boot\BCD Status 0xc0000098 Info: The windows boot configuration data file does not contain a valid OS entry. I have added the Boot images again, ensure all PXE was enabled, redistributed everything with no luck. I have been banging my head for days.