BIGpete
-
Posts
12 -
Joined
-
Last visited
BIGpete's Achievements
")
Newbie (1/14)
0
Reputation
-
Still Management Point Issues After Resolution Applied (1511)
BIGpete replied to BzowK's topic in Configuration Manager 2012
Hi BzowK, I have come across exactly the same issue while upgrading from 1511 to 1606 as well. I've attempted the upgrade twice and both situations ended up either restoring the server or returning to snapshot. The first time I ran the upgrade process it did end up failing, but the second time ran until the MP issues started appearing. I have been through so many of the things like removing MP, re-installing IIS (which broke my officescan install), running that 64bit option on the Application pool. Where did you adjust the permissions on the Web.config file? Have you had any further issues since? Pete -
Hi All, I am trying to find a solution that will update the built in Windows Modern applications (i.e. Bing, Mail, Calendar etc) automatically. I cannot find any powershell or other script that has the ability to update these apps without launching the apps store and then hitting update. Everything I search for has the ability to remove the applications but nothing to update them with. I can use powershell to discover the applications requiring updates but nothing to get them to update: Get-EventLog -LogName system -Newest 2 -InstanceId 17 -source *update*| select timewritten,message | ft -AutoSize –Wrap Because none of the Modern Applications tie into Windows Updates it is not something that can be done with WSUS. I have discovered the Group Policy options are available for the store (as per MS KB http://support.microsoft.com/kb/2826659) which allows updates from the store to be disabled easily but nothing to schedule or install the updates automatically. Any suggestions would be appreciated. Pete
-
Apply Drivers doesn't actually Apply the Drivers
BIGpete replied to CountVonCount's topic in Configuration Manager 2012
How are you applying the drivers? Are you using the "Auto Apply Drivers" or the "Apply Driver Package". I know for OSD in my environment going from SCCM2007 to SCCM2012 I had to use "Apply Driver Package" with the drivers of that machine type. I found that the Auto apply drivers did not work. Also going from SCCM2012 no SP to SCCM2012 with SP1 I also noticed that some drivers that previously applied during task sequences even with Apply Driver Package did not install and I had to revert to run setup programs with either Application or Packages. -
Yep they are all java 6 MSI product codes: {26A24AE4-039D-4CA4-87B4-2F8AA1MMPPFF} Were: AA - 32 or 64 relating to architecture 32bit or 64bit MM - Major Release version PP - Patch/update version {26A24AE4-039D-4CA4-87B4-2F86416037FF} Therefore above is 64bit, Version 6.0 Patch 37
-
This one should be relatively easy as it could be done with a script. For Office 2010 Professional (32-bit) the MSI product is {90140000-0011-0000-0000-0000000FF1CE} and 64-bit {90140000-0011-0000-1000-0000000FF1CE}. Therefore all that you need to do is run: MsiExec.exe /X{90140000-0011-0000-0000-0000000FF1CE} /q /norestart MsiExec.exe /X{90140000-0011-0000-1000-0000000FF1CE} /q /norestart Depending on what version of office you are running the product code could be slightly different. If you check in HKEY_LOCAL_MACHINE\SOFTWARE\Microsoft\Windows\CurrentVersion\Uninstall\ (32-bit on 64-bit OS will be in HKLM\Software\Wow6432Node). Just do a search for Office and you should see an uninstall string with msiexec /x What version of SCCM are you running? If you are running 2007 you will already have an office 2010 package. Just create a new program under that package and call it uninstall. Put in the above command (or equivalent) to uninstall the product. Advertise the program and watch it uninstall. If you are running 2010 and if you are using the new application model no doubt you will have a Office 2010 application. Modify the scripted install method you have created to deploy it and place in the above command into the uninstall command. Deploy an uninstall of the application.
-
It is just as important to have the source as it is to have it on the DP shares. Just move the WIM images to another server share (that has space). Then go into the image properties and adjust the source location to the new share.
-
There are 2 ways 1 - Write a little batch script to do it with msiexec /x {javaMSIproductcode} /q /norestart for each product code of java 6. Put it in a package with a program and advertise it. For 32 bit java: MsiExec.exe /X{26A24AE4-039D-4CA4-87B4-2F83216000FF} /q /norestart MsiExec.exe /X{26A24AE4-039D-4CA4-87B4-2F83216001FF} /q /norestart MsiExec.exe /X{26A24AE4-039D-4CA4-87B4-2F83216002FF} /q /norestart MsiExec.exe /X{26A24AE4-039D-4CA4-87B4-2F83216003FF} /q /norestart MsiExec.exe /X{26A24AE4-039D-4CA4-87B4-2F83216004FF} /q /norestart MsiExec.exe /X{26A24AE4-039D-4CA4-87B4-2F83216005FF} /q /norestart MsiExec.exe /X{26A24AE4-039D-4CA4-87B4-2F83216006FF} /q /norestart MsiExec.exe /X{26A24AE4-039D-4CA4-87B4-2F83216007FF} /q /norestart MsiExec.exe /X{26A24AE4-039D-4CA4-87B4-2F83216008FF} /q /norestart MsiExec.exe /X{26A24AE4-039D-4CA4-87B4-2F83216009FF} /q /norestart MsiExec.exe /X{26A24AE4-039D-4CA4-87B4-2F83216010FF} /q /norestart MsiExec.exe /X{26A24AE4-039D-4CA4-87B4-2F83216011FF} /q /norestart MsiExec.exe /X{26A24AE4-039D-4CA4-87B4-2F83216012FF} /q /norestart MsiExec.exe /X{26A24AE4-039D-4CA4-87B4-2F83216013FF} /q /norestart MsiExec.exe /X{26A24AE4-039D-4CA4-87B4-2F83216014FF} /q /norestart MsiExec.exe /X{26A24AE4-039D-4CA4-87B4-2F83216015FF} /q /norestart MsiExec.exe /X{26A24AE4-039D-4CA4-87B4-2F83216016FF} /q /norestart MsiExec.exe /X{26A24AE4-039D-4CA4-87B4-2F83216017FF} /q /norestart MsiExec.exe /X{26A24AE4-039D-4CA4-87B4-2F83216018FF} /q /norestart MsiExec.exe /X{26A24AE4-039D-4CA4-87B4-2F83216019FF} /q /norestart MsiExec.exe /X{26A24AE4-039D-4CA4-87B4-2F83216020FF} /q /norestart MsiExec.exe /X{26A24AE4-039D-4CA4-87B4-2F83216021FF} /q /norestart MsiExec.exe /X{26A24AE4-039D-4CA4-87B4-2F83216022FF} /q /norestart MsiExec.exe /X{26A24AE4-039D-4CA4-87B4-2F83216023FF} /q /norestart MsiExec.exe /X{26A24AE4-039D-4CA4-87B4-2F83216024FF} /q /norestart MsiExec.exe /X{26A24AE4-039D-4CA4-87B4-2F83216025FF} /q /norestart MsiExec.exe /X{26A24AE4-039D-4CA4-87B4-2F83216026FF} /q /norestart MsiExec.exe /X{26A24AE4-039D-4CA4-87B4-2F83216027FF} /q /norestart MsiExec.exe /X{26A24AE4-039D-4CA4-87B4-2F83216028FF} /q /norestart MsiExec.exe /X{26A24AE4-039D-4CA4-87B4-2F83216029FF} /q /norestart MsiExec.exe /X{26A24AE4-039D-4CA4-87B4-2F83216030FF} /q /norestart MsiExec.exe /X{26A24AE4-039D-4CA4-87B4-2F83216031FF} /q /norestart MsiExec.exe /X{26A24AE4-039D-4CA4-87B4-2F83216032FF} /q /norestart MsiExec.exe /X{26A24AE4-039D-4CA4-87B4-2F83216033FF} /q /norestart MsiExec.exe /X{26A24AE4-039D-4CA4-87B4-2F83216034FF} /q /norestart MsiExec.exe /X{26A24AE4-039D-4CA4-87B4-2F83216035FF} /q /norestart MsiExec.exe /X{26A24AE4-039D-4CA4-87B4-2F83216036FF} /q /norestart MsiExec.exe /X{26A24AE4-039D-4CA4-87B4-2F83216037FF} /q /norestart For 64 bit java: MsiExec.exe /X{26A24AE4-039D-4CA4-87B4-2F86416000FF} /q /norestart MsiExec.exe /X{26A24AE4-039D-4CA4-87B4-2F86416001FF} /q /norestart MsiExec.exe /X{26A24AE4-039D-4CA4-87B4-2F86416002FF} /q /norestart MsiExec.exe /X{26A24AE4-039D-4CA4-87B4-2F86416003FF} /q /norestart MsiExec.exe /X{26A24AE4-039D-4CA4-87B4-2F86416004FF} /q /norestart MsiExec.exe /X{26A24AE4-039D-4CA4-87B4-2F86416005FF} /q /norestart MsiExec.exe /X{26A24AE4-039D-4CA4-87B4-2F86416006FF} /q /norestart MsiExec.exe /X{26A24AE4-039D-4CA4-87B4-2F86416007FF} /q /norestart MsiExec.exe /X{26A24AE4-039D-4CA4-87B4-2F86416008FF} /q /norestart MsiExec.exe /X{26A24AE4-039D-4CA4-87B4-2F86416009FF} /q /norestart MsiExec.exe /X{26A24AE4-039D-4CA4-87B4-2F86416010FF} /q /norestart MsiExec.exe /X{26A24AE4-039D-4CA4-87B4-2F86416011FF} /q /norestart MsiExec.exe /X{26A24AE4-039D-4CA4-87B4-2F86416012FF} /q /norestart MsiExec.exe /X{26A24AE4-039D-4CA4-87B4-2F86416013FF} /q /norestart MsiExec.exe /X{26A24AE4-039D-4CA4-87B4-2F86416014FF} /q /norestart MsiExec.exe /X{26A24AE4-039D-4CA4-87B4-2F86416015FF} /q /norestart MsiExec.exe /X{26A24AE4-039D-4CA4-87B4-2F86416016FF} /q /norestart MsiExec.exe /X{26A24AE4-039D-4CA4-87B4-2F86416017FF} /q /norestart MsiExec.exe /X{26A24AE4-039D-4CA4-87B4-2F86416018FF} /q /norestart MsiExec.exe /X{26A24AE4-039D-4CA4-87B4-2F86416019FF} /q /norestart MsiExec.exe /X{26A24AE4-039D-4CA4-87B4-2F86416020FF} /q /norestart MsiExec.exe /X{26A24AE4-039D-4CA4-87B4-2F86416021FF} /q /norestart MsiExec.exe /X{26A24AE4-039D-4CA4-87B4-2F86416022FF} /q /norestart MsiExec.exe /X{26A24AE4-039D-4CA4-87B4-2F86416023FF} /q /norestart MsiExec.exe /X{26A24AE4-039D-4CA4-87B4-2F86416024FF} /q /norestart MsiExec.exe /X{26A24AE4-039D-4CA4-87B4-2F86416025FF} /q /norestart MsiExec.exe /X{26A24AE4-039D-4CA4-87B4-2F86416026FF} /q /norestart MsiExec.exe /X{26A24AE4-039D-4CA4-87B4-2F86416027FF} /q /norestart MsiExec.exe /X{26A24AE4-039D-4CA4-87B4-2F86416028FF} /q /norestart MsiExec.exe /X{26A24AE4-039D-4CA4-87B4-2F86416029FF} /q /norestart MsiExec.exe /X{26A24AE4-039D-4CA4-87B4-2F86416030FF} /q /norestart MsiExec.exe /X{26A24AE4-039D-4CA4-87B4-2F86416031FF} /q /norestart MsiExec.exe /X{26A24AE4-039D-4CA4-87B4-2F86416032FF} /q /norestart MsiExec.exe /X{26A24AE4-039D-4CA4-87B4-2F86416033FF} /q /norestart MsiExec.exe /X{26A24AE4-039D-4CA4-87B4-2F86416034FF} /q /norestart MsiExec.exe /X{26A24AE4-039D-4CA4-87B4-2F86416035FF} /q /norestart MsiExec.exe /X{26A24AE4-039D-4CA4-87B4-2F86416036FF} /q /norestart MsiExec.exe /X{26A24AE4-039D-4CA4-87B4-2F86416037FF} /q /norestart 2. Create a task sequence to detect if the program exists then run one of the msiexec /x {javaMSIproductcode} /q /norestart. This will take you a heap longer to setup. I would go for the batch option personally.
-
We did have maintenance windows configured for the client machines and eventually it should have installed but it stumped me for a little while until I looked into it further.
-
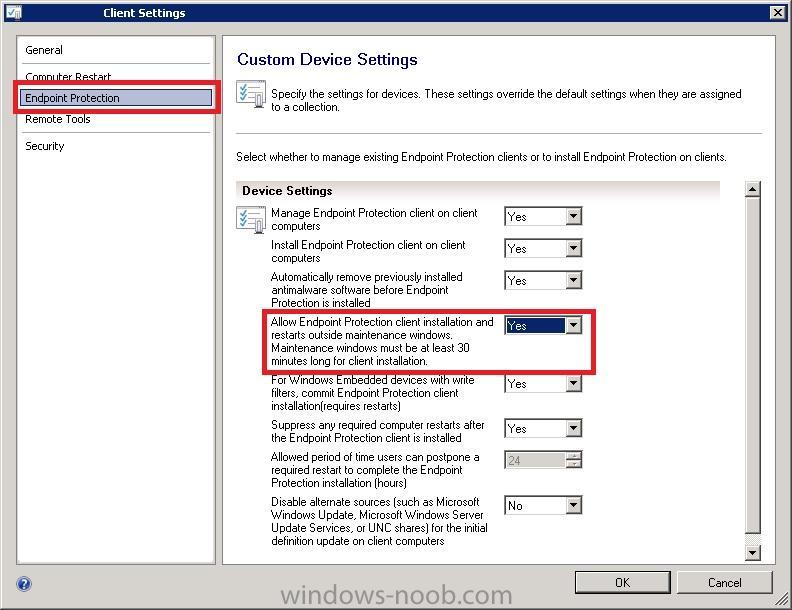
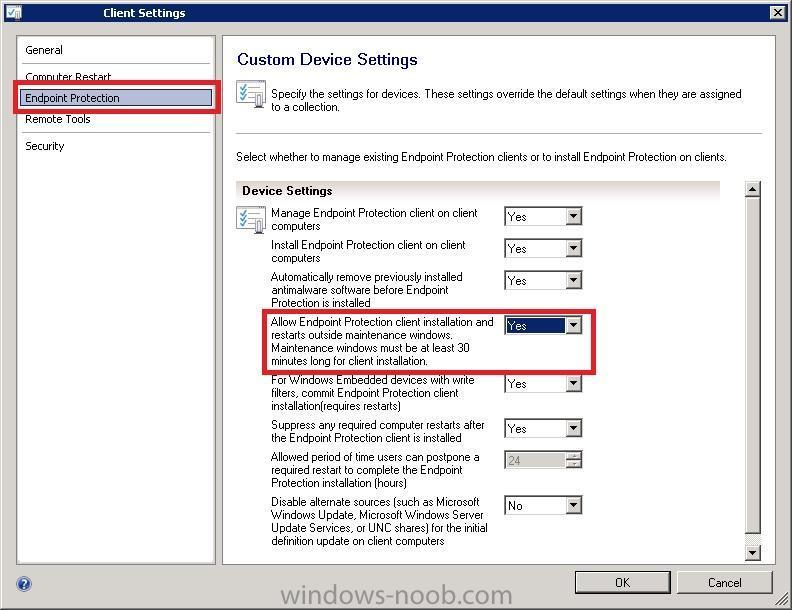
Since SCCM 2012 SP1 came out the "Client Settings" have changed with the endpoint protection options. The default option seams to be that it won't install the System Center Endpoint Protection unless it is during maintenance hours. It can easily be adjusted: Just a heads up for anyone that has issues with SCEP not installing after the client installs.
-
Clearly some people do not read the release notes / supported configurations before applying service packs these days. http://technet.microsoft.com/en-us/library/gg682077.aspx
-
Our network user guide for SCCM/Vanilla in our school
BIGpete replied to nry's topic in Configuration Manager 2012
thanks nyr Thats pretty useful info. -
HOWTO: Install itunes using SCCM
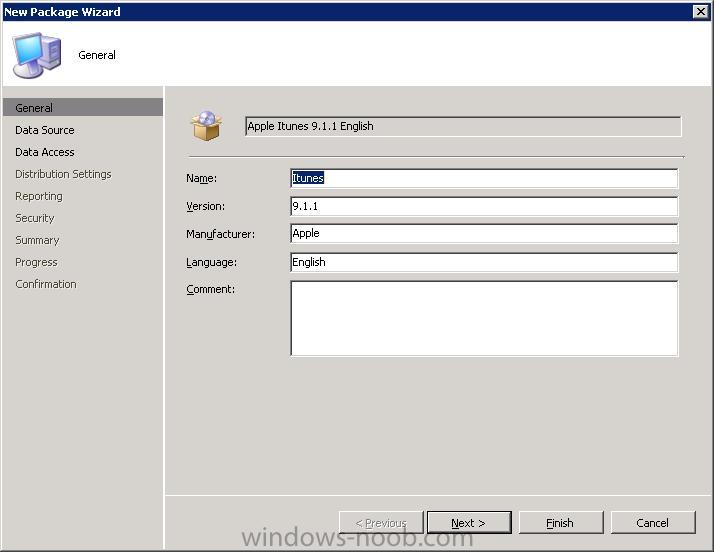
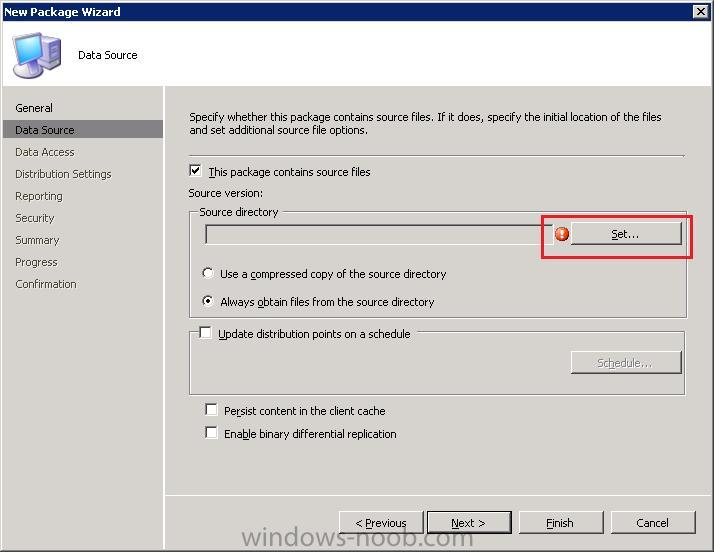
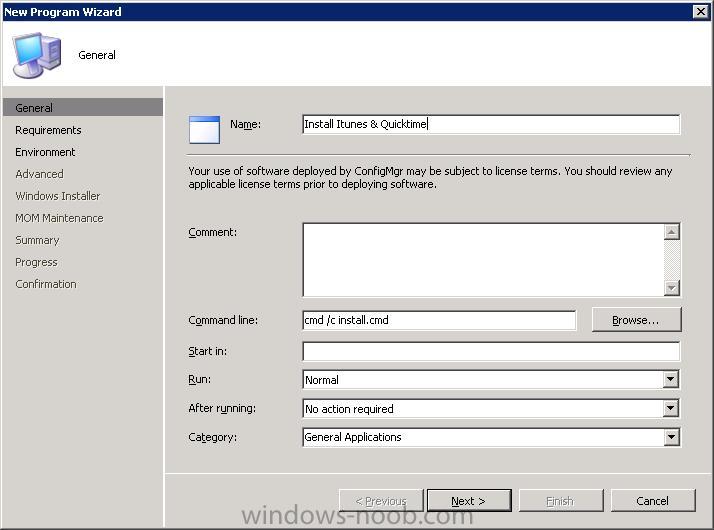
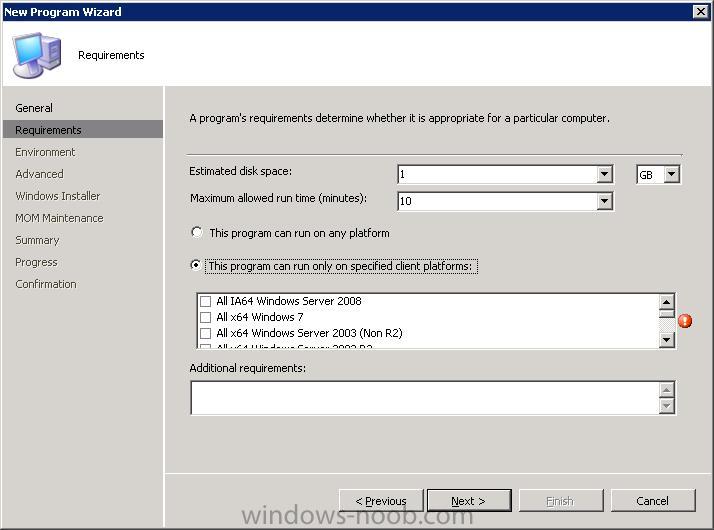
BIGpete posted a question in Deploy software, applications and drivers
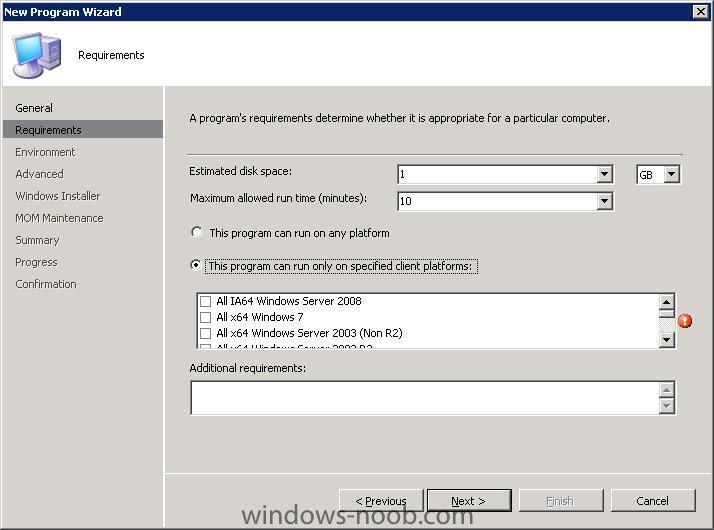
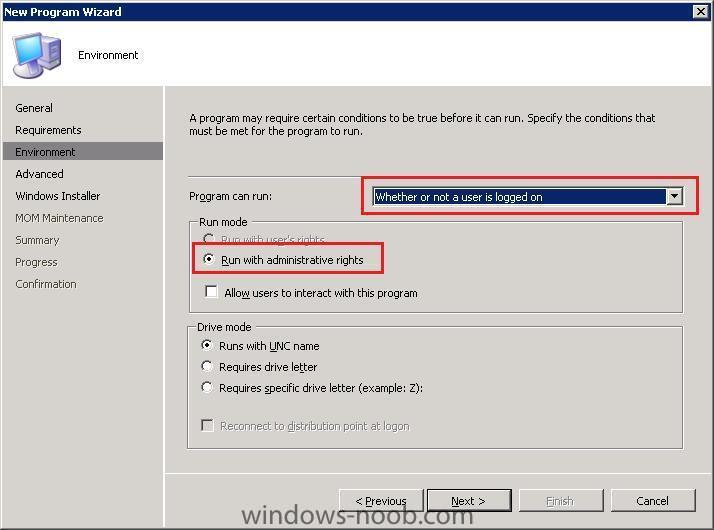
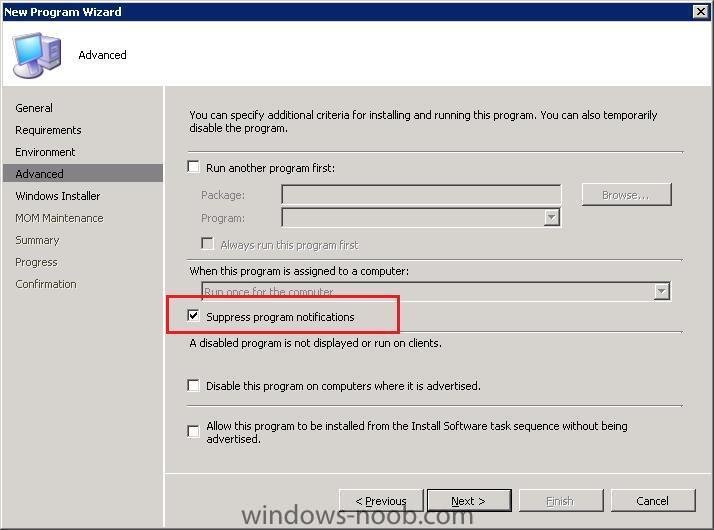
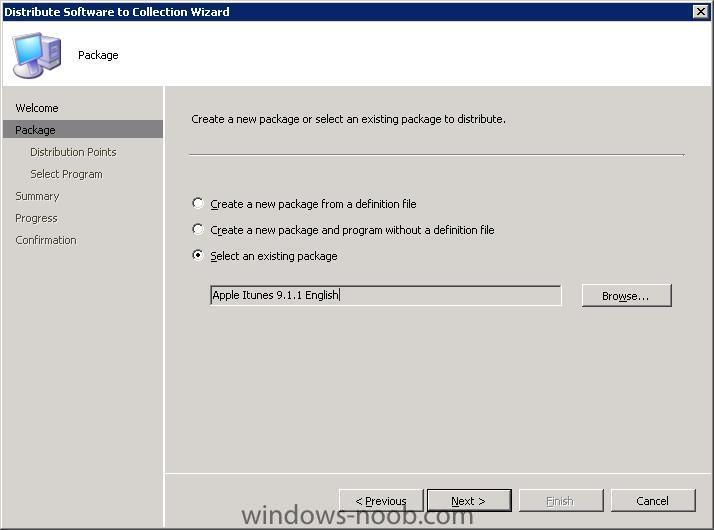
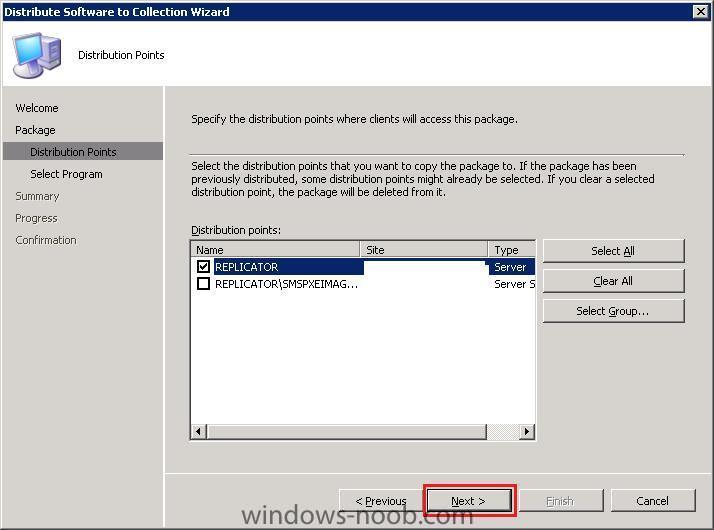
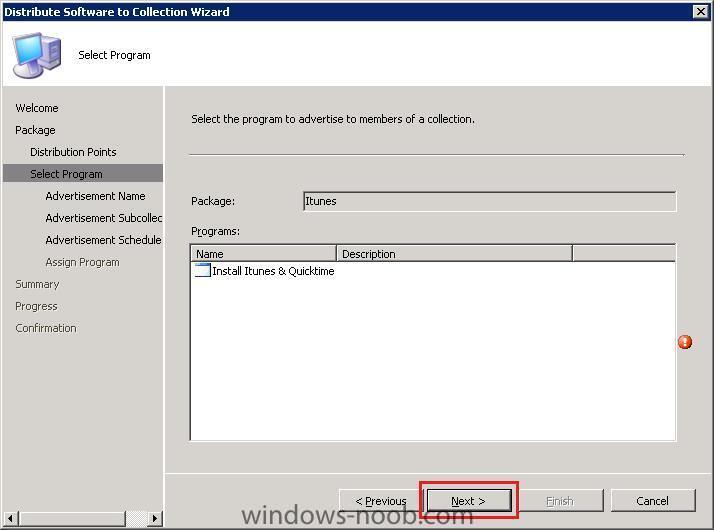
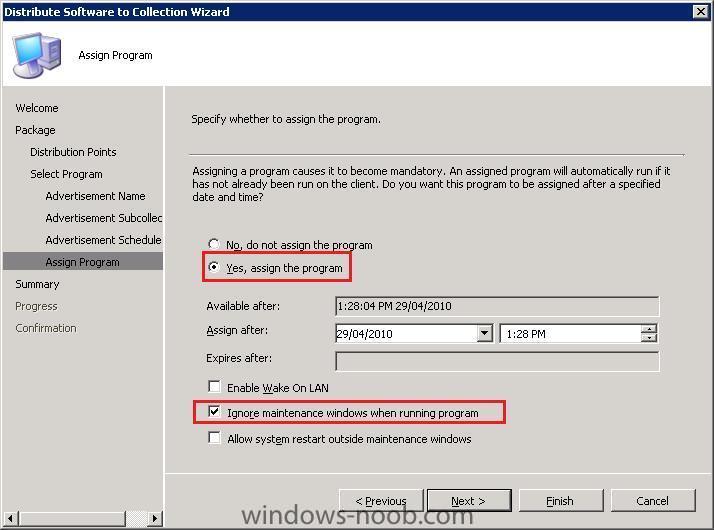
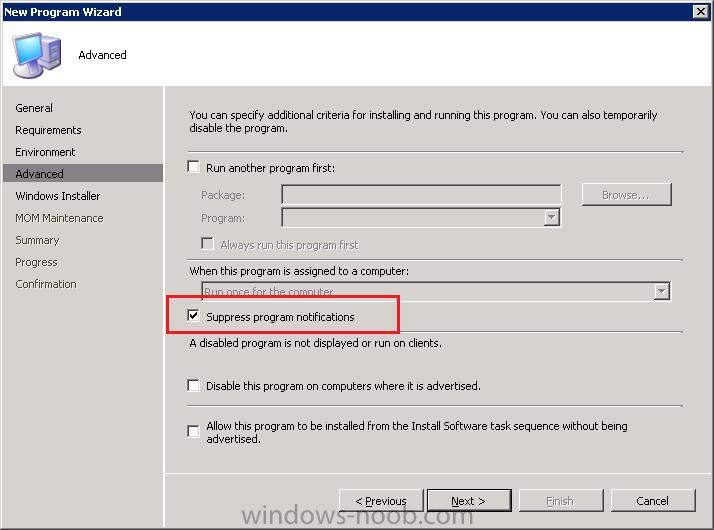
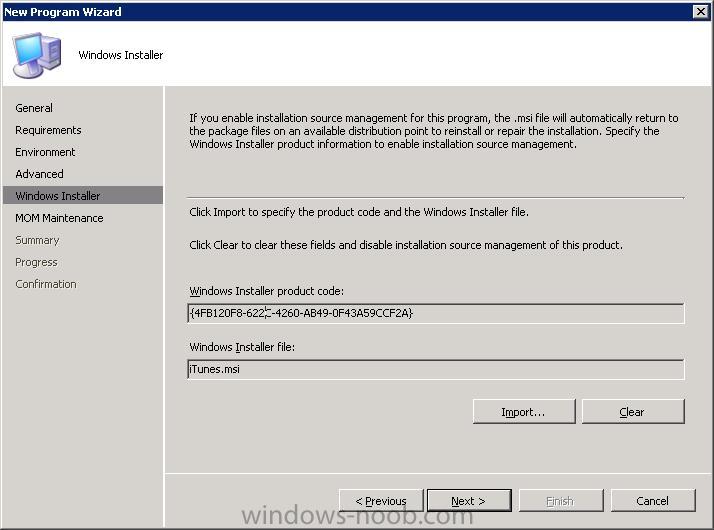
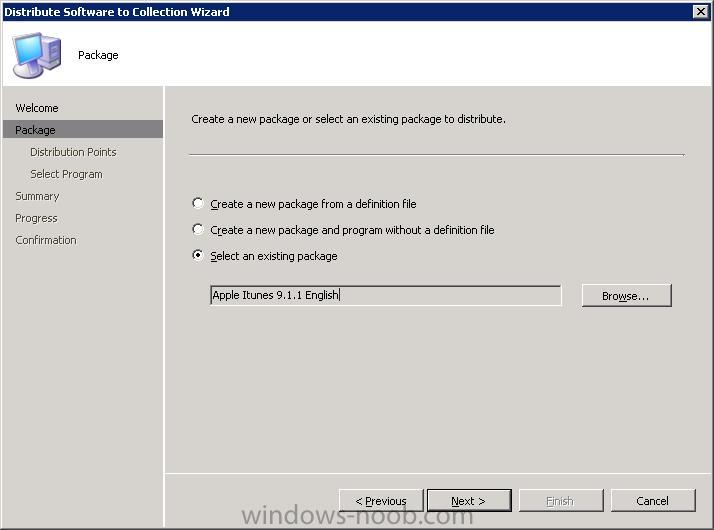
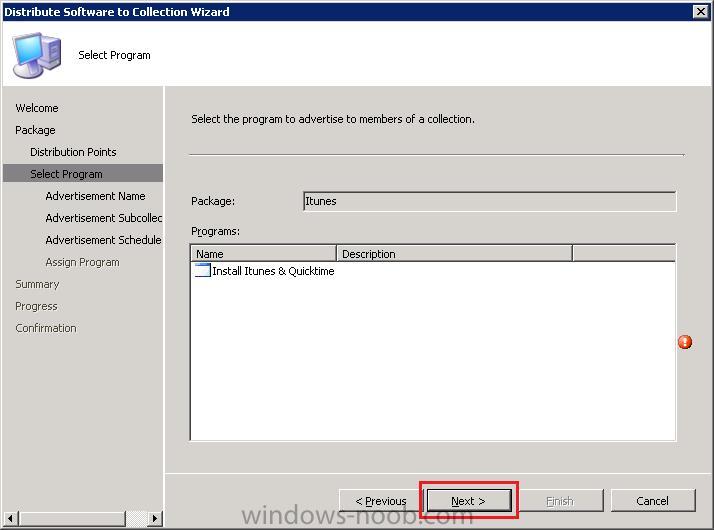
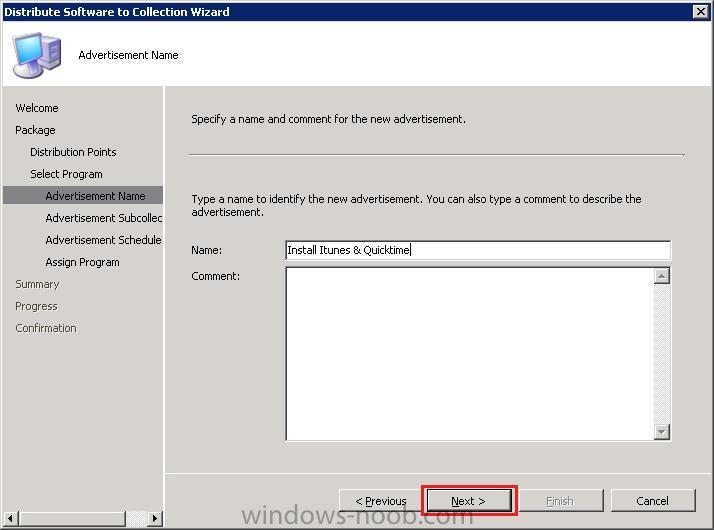
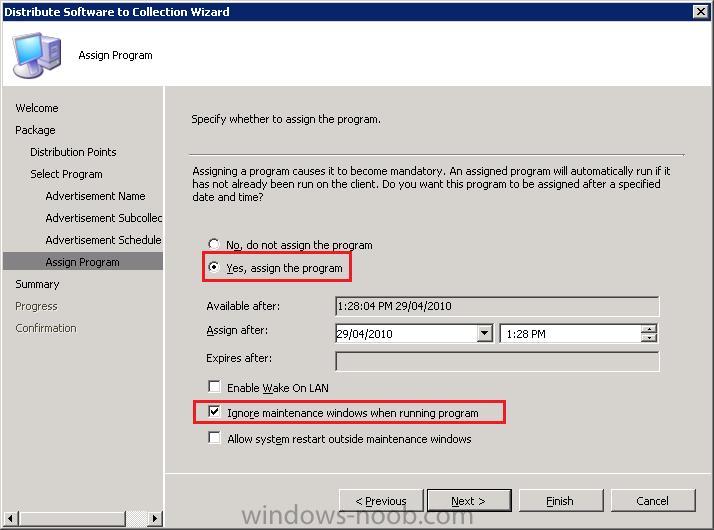
I am a network administrator for a school with 700+ machines and with apple releasing updates every 2 weeks to fix bugs and security holes in itunes & quicktime problems, I for one have had problems keeping on top of the updates and have spent a great deal of time getting updates out there, as well as slipstreaming my install process for image building. The 2 ways I have found to get the updates out there are: * 3rd Party WSUS plugins (eg http://eminentware.com/patch-management-solutions.html), however at over $5000 to get it licenced with ongoing yearly costs it was something that could not be justified * script the installs. Pain to setup, but only real option. For my setup I have gone down the scripted installs way. Unfortunately the default from itunes setup are annoying so I have made some customizations. This guide is for itunes 9.1.1 (April 2010) Goals for customization: * Remove Bonjour (not required on corporate network for sharing libraries or AppleTV) * Remove Apple software updates (meh) * Disable Quicktime System Tray * Disable the file types being taken over from quicktime/itunes I have based the customizations on my testing and from information from http://www.bdts.com.au/tips/48-msi-packaging/74-deploy-quicktime-765.html & http://jimcofer.com/personal/?p=1717 Tools Required for this modification: * Orca (MSI editor) Available from http://www.technipages.com/download-orca-msi-editor.html Step 1 Run itunessetup*.exe so that MSI's are extracted. This will be in a folder in %temp%\. Copy this to a new location Step 2 Delete Setupadmin.exe, AppleSoftwareUpdate.msi & Bonjour.msi from new source as you will not be needing these. Step 3 Edit itunes.msi Using orca. Now this is where it gets a little tricky. - From view select summary information. Within this window in languages remove all but 1033. Press OK - From the "Properties" table adjust the properties REGSRCH_DESKTOP_SHORTCUTS to 0, REGSRCH_MEDIA_DEFAULTS to 0, SCHEDULE_ASUW to 0. Create a new row REENABLEAUTORUN and set this to 0 (if you want to ensure autorun is not reenabled) - From "LaunchCondition" table drop the "NOT BNEWERPRODUCTISINSTALLED" entry. See one of the above URLS for the reason for this. - From the "checkbox" table set all values to 0. This will mean if a manual install is done of the application then all the annoying options are unticked by default. - Save MSI Step 4 Edit quicktime.msi using orca - From view select summary information. Within this window in languages remove all but 1033. Press OK - From the "Properties" table adjust the properties for REGSRCH_DESKTOP_SHORTCUTS to 0 and SCHEDULE_ASUW to 0. - From the "Checkbox " table adjust ChkOptInstASU to 0 & ChkOptInstShortcuts to 0. This will mean if a manual install is done of the application then all the annoying options are unticked by default. - From The "shortcut" table remove QuickTimePlayer_Desktop & QuickTimeUninstaller. This will remove the annoying shortcuts - From "LaunchCondition" table drop the "NOT BNEWERPRODUCTISINSTALLED" entry. See one of the above URLS for the reason for this. - Save MSI Step 5 At this point you will want to make sure that the MSI's work with a script. Here is a copy of mine that will install Itunes. You will need to add absolute or UNC paths to the files for it work in step 6: @echo off Title Installing Itunes + Quicktime @echo Installing Apple Application Support start /wait msiexec /i AppleApplicationSupport.msi /q @echo Installing Apple Mobile Device Support start /wait msiexec /i AppleMobileDeviceSupport.msi /q @echo Installing MobileMe start /wait msiexec /i MobileMe.msi /q @echo Installing Quicktime start /wait msiexec /i quicktime.msi /q @echo Installing itunes start /wait msiexec /i itunes.msi /q exit 0 Optional Extras Disabling QTTASK from Startup After installing quicktime it starts up QTTASK at login. Normally you would need to use msconfig to stop it from starting, however you can add the following to a script to remove it @echo Disable QTTASK from startup (optional) reg delete "HKEY_LOCAL_MACHINE\SOFTWARE\Microsoft\Windows\CurrentVersion\Run" /v "QuickTime Task" /f Disabling ituneshelper from Startup After installing itunes it starts up ituneshelper.exe at login. Normally you would need to use msconfig to stop it from starting, however you can add the following to a script to remove it @echo Disable ituneshelper from startup (optional) reg delete "HKEY_LOCAL_MACHINE\SOFTWARE\Microsoft\Windows\CurrentVersion\Run" /v "iTunesHelper" /f Applying Quicktime preferences Applying Quicktime preferences (from the control panel) to the default profile has caused me a few little hiccups on some of my previous images, however I have found a solution for this. In my original image I created a temp user which i copied to the default user (as per Microsoft KB http://support.microsoft.com/kb/959753) and applied the settings for quicktime in the control panel in this profile. Once this image was created a deployed, I found that normal users were not able to open quicktime videos on webpages and the quicktime preferences were missing. The apple preferences are stored at %USERPROFILE%\local settings\Application Data\Apple Computer\QuickTime\quicktime.qtp which is referenced in registry under HKEY_CURRENT_USER\Software\Apple Computer, Inc.\QuickTime\LocalUserPreferences\FolderPath The solution is to create a qtp file on an existing profile and then copy it to the default profile. In your script you can add the following @ Applying Quicktime preferences @echo - Create Quicktime Folder if exist "C:\Documents and Settings\Default User\Local Settings\Application Data\Apple Computer\QuickTime" goto folderexists mkdir "C:\Documents and Settings\Default User\Local Settings\Application Data\Apple Computer\QuickTime" :folderexists @echo - Copy Preference File xcopy QuickTime.qtp "C:\Documents and Settings\Default User\Local Settings\Application Data\Apple Computer\QuickTime" /q /y If it is an upgrade on a client machine you may want to copy in the qtp file in with a login script if you want updates disabled. Step 6 Move your working script to a location that SCCM can use a the source directory (eg. \\server1\applications\itunes\). you will need to update your script to point to this path (i.e. start /wait msiexec /i "\\server1\applications\itunes\itunes.msi\" /qn Step 7 Create A new package in SCCM * From the SCCM console, open Site database -> Computer Management -> Software Distribution -> Software Packages * From the Actions menu Create a New Package * Fill in the Wizard with the appropriate details and press next * Select "this package contains source files" and Select the the location you choose in step 6. Then Ensure it is "always obtain files from the source directory" and press next * Press Next all the way out * From this point for the newly created Package we need to create a new program * In the new program wizard fill out the form with the below details and press next. In my case my install script was called install.cmd * For estimated disk space allow 1GB and 10 minutes for install. Then specify the client OS's that it can run on. Press Next * For Environment Select Program can run "Whether or not a user is logged on", "Run with Administrative Rights" and then press Next * For Advanced select Suppress Program notifications and press next * Windows Installer. Specify the itunes msi file, incase the application needs to be repaired etc * Press next all the way through Step 8 Advertise the application * Find the collection you want to advertise the itunes installer to. I've created one called itunes. * Right click on the collection and select distribute Software * Locate the Itunes package and press next * Ensure your distribution point is selected. and press next * Select the Install itunes & quicktime program and press next * Give the Advertisement a name and press next * Specify whether the advertisement should be made available to subcollections and press next * Specfiy when the program will be advertised. In most cases you should not need to adjust these settings. * Specify whether to assign the program as mandatory. In this case I want to get it out ASAP ignoring any maintenance windows without restarting * Press next to complete the wizard. * The application should then install when the machine next updates it's machine policy.