In our last post we installed SCVMM, now we need to install Reporting.
Now that we have SCVMM installed, we want to be able to report on the utilization and capacity of our hosts and VMs.
The only requirement for SCVMM reporting, isn’t SCVMM at all, but rather System Center Operations Manager (SCOM)! Huh? Why do you need to install a different System Center product just to have reporting for SCVMM.
Well, according to Microsoft: “We did this for one big reason; to leverage the rich capabilities of object pickers available in the OpsMgr reporting infrastructure.” That, and “you need to establish the connection to Operations Manager since now in VMM we make our reports available exclusively from within the OpsMgr console.”
So, if you don’t have SCOM setup yet (and don’t forget to include SCOM Reporting as well), then see my other SCOM Guides.
SCOM Integration
To start, open the SCVMM console and navigate to the Settings area. From there navigate to the ‘System Center Settings’ section. You should see only one setting option, labelled ‘Operations Manager Server’.
Either right-click and choose Properties, choose Properties from the ribbon menu, or just double click on setting option.
On the Introduction screen, read the important information presented. You will notice that we need a few accounts, and SCOM itself needs specific Management Packs installed, as well as having the SCOM console installed on the SCVMM server.
Let’s start on satisfying these requirements. So for now, click Cancel.
In my lab environment, in my domain/Active Directory, I have 2 Security Groups I created for System Center Administrators (namely ‘SCOM Admins’ and ‘SCVMM Admins’). So, for this integration element, I am going to create a new AD account and add it to both admin groups.
I am not going to detail how to create AD accounts or Security Groups, but if detailed steps are needed, please let me know and I will add them.
For guided steps on how to install/import Management Packs in SCOM, please see my applicable Configuration Guide.
Install SCOM Console
So, at this point I will assume that you have SCOM setup, an account that is an Administrator in both System Center tools, and the applicable Management Packs imported into SCOM.
Let’s install the SCOM console.
Start by mounting/extracting the SCOM ISO you used for installing SCOM, and run the setup.exe.
On the Features screen, only select ‘Operations Console’ and click Next.
Now specify the location you want to install the console, and click Next.
The installer will run a prerequisite check to ensure there are no issues. In this example, for the SCOM console you need to install the Report Viewer Controls first (a link is provided). Correct any prerequisite issues, and then click ‘Verify Prerequisites Again’.
If all prerequisites are installed, then you will be able to proceed with the setup. Click Next.
Read the License Terms, check the ‘I have read, understood, and agree with the license terms’ checkbox, and click Next.
Decide if you want to join the CEIP program, and then click Next.
New to System Center 2012, you can choose to include this product as part of the Microsoft Updates check. Make your selection and then click Next.
Review the information on the Summary page, and then click Install.
The installation should be quick, since it is just the console. You can choose to de-select the ‘Start the Operations Console when the wizard closes’. I would suggest leaving this as-is, since we need the SCOM console to establish its connection with the SCOM server in order for the integration to work.
When the console launches for the first time, you will be prompted for the SCOM Management Server. Enter a server name and then click Connect.
Now that the SCOM console is installed and connected to the SCOM system, SCVMM will be able to utilize this for the integration communications.
Now let’s return to the SCOM integration steps.
SCOM Integration (Continued)
Now that we have the SCOM console installed (and all other SCOM-related elements completed), we can continue with the integration so that SCVMM Reporting will be available.
Go back to the SCVMM console and navigate to the Settings area. From there navigate to the ‘System Center Settings’ section. You should see only one setting option, labelled ‘Operations Manager Server’.
Either right-click and choose Properties, choose Properties from the ribbon menu, or just double click on setting option.
On the Introduction screen, read the important information presented. At this point I will assume that all prerequisites have been met. Click Next.
You now have to provide the SCOM server name to connect to, along with an account that will have Administrator access in SCOM. You will also notice that you have 2 additional options to choose; Enabling PRO, and Maintenance Mode Integration. These are checked off by default. Decide what is applicable for your environment and click Next. In my lab example, I will accept the defaults.
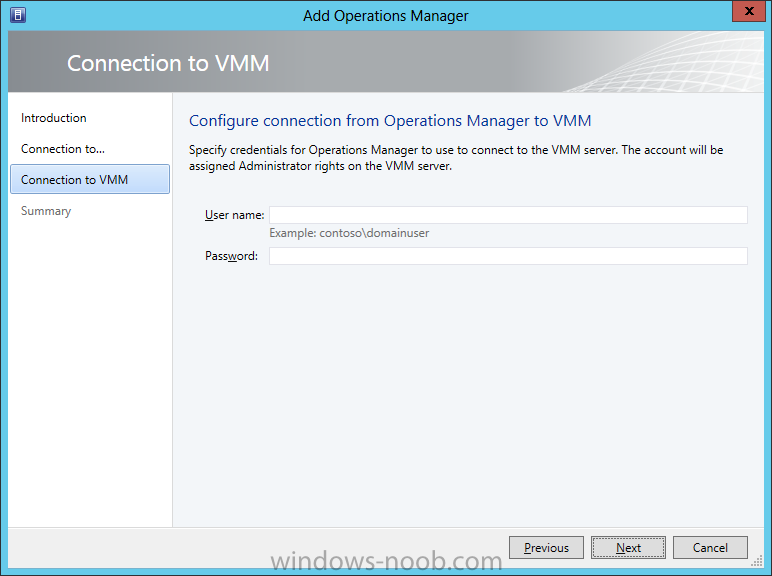
Now you need to provide an account that will allow SCOM to connect to VMM. Provide the username (along with domain) and password, and click Next.
[
Review the information on the Summary page, and then click Finish.
A Job dialog will appear, and show the progress of the task at hand.
Once this completes successfully, you will have to manually close the Jobs window.
You have now successfully integrated SCVMM with SCOM for the purpose of Reporting. To verify that everything is as it should be, open the SCOM console that was installed on the SCVMM server. This will initiate the connection, and import the necessary Management Packs and Reports into the system.
Navigate to the Reports space, and select the ‘System Center 2012 Virtual Machine Manager Reports’ folder. From there you should now see a list of reports available which utilizes information from SCVMM.
We now have SCVMM Reporting installed. But, there is an additional reporting element; Forecasting Analysis.
We have placed cookies on your device to help make this website better. You can adjust your cookie settings, otherwise we'll assume you're okay to continue.


")
In our last post we installed SCVMM, now we need to install Reporting.
Now that we have SCVMM installed, we want to be able to report on the utilization and capacity of our hosts and VMs.
The only requirement for SCVMM reporting, isn’t SCVMM at all, but rather System Center Operations Manager (SCOM)! Huh? Why do you need to install a different System Center product just to have reporting for SCVMM.
Well, according to Microsoft: “We did this for one big reason; to leverage the rich capabilities of object pickers available in the OpsMgr reporting infrastructure.” That, and “you need to establish the connection to Operations Manager since now in VMM we make our reports available exclusively from within the OpsMgr console.”
So, if you don’t have SCOM setup yet (and don’t forget to include SCOM Reporting as well), then see my other SCOM Guides.
SCOM Integration
To start, open the SCVMM console and navigate to the Settings area. From there navigate to the ‘System Center Settings’ section. You should see only one setting option, labelled ‘Operations Manager Server’.
Either right-click and choose Properties, choose Properties from the ribbon menu, or just double click on setting option.
On the Introduction screen, read the important information presented. You will notice that we need a few accounts, and SCOM itself needs specific Management Packs installed, as well as having the SCOM console installed on the SCVMM server.
Let’s start on satisfying these requirements. So for now, click Cancel.
In my lab environment, in my domain/Active Directory, I have 2 Security Groups I created for System Center Administrators (namely ‘SCOM Admins’ and ‘SCVMM Admins’). So, for this integration element, I am going to create a new AD account and add it to both admin groups.
I am not going to detail how to create AD accounts or Security Groups, but if detailed steps are needed, please let me know and I will add them.
For guided steps on how to install/import Management Packs in SCOM, please see my applicable Configuration Guide.
Install SCOM Console
So, at this point I will assume that you have SCOM setup, an account that is an Administrator in both System Center tools, and the applicable Management Packs imported into SCOM.
Let’s install the SCOM console.
Start by mounting/extracting the SCOM ISO you used for installing SCOM, and run the setup.exe.
On the Features screen, only select ‘Operations Console’ and click Next.
Now specify the location you want to install the console, and click Next.
The installer will run a prerequisite check to ensure there are no issues. In this example, for the SCOM console you need to install the Report Viewer Controls first (a link is provided). Correct any prerequisite issues, and then click ‘Verify Prerequisites Again’.
If all prerequisites are installed, then you will be able to proceed with the setup. Click Next.
Read the License Terms, check the ‘I have read, understood, and agree with the license terms’ checkbox, and click Next.
Decide if you want to join the CEIP program, and then click Next.
New to System Center 2012, you can choose to include this product as part of the Microsoft Updates check. Make your selection and then click Next.
Review the information on the Summary page, and then click Install.
The installation should be quick, since it is just the console. You can choose to de-select the ‘Start the Operations Console when the wizard closes’. I would suggest leaving this as-is, since we need the SCOM console to establish its connection with the SCOM server in order for the integration to work.
When the console launches for the first time, you will be prompted for the SCOM Management Server. Enter a server name and then click Connect.
Now that the SCOM console is installed and connected to the SCOM system, SCVMM will be able to utilize this for the integration communications.
Now let’s return to the SCOM integration steps.
SCOM Integration (Continued)
Now that we have the SCOM console installed (and all other SCOM-related elements completed), we can continue with the integration so that SCVMM Reporting will be available.
Go back to the SCVMM console and navigate to the Settings area. From there navigate to the ‘System Center Settings’ section. You should see only one setting option, labelled ‘Operations Manager Server’.
Either right-click and choose Properties, choose Properties from the ribbon menu, or just double click on setting option.
On the Introduction screen, read the important information presented. At this point I will assume that all prerequisites have been met. Click Next.
You now have to provide the SCOM server name to connect to, along with an account that will have Administrator access in SCOM. You will also notice that you have 2 additional options to choose; Enabling PRO, and Maintenance Mode Integration. These are checked off by default. Decide what is applicable for your environment and click Next. In my lab example, I will accept the defaults.
Now you need to provide an account that will allow SCOM to connect to VMM. Provide the username (along with domain) and password, and click Next.
[
Review the information on the Summary page, and then click Finish.
A Job dialog will appear, and show the progress of the task at hand.
Once this completes successfully, you will have to manually close the Jobs window.
You have now successfully integrated SCVMM with SCOM for the purpose of Reporting. To verify that everything is as it should be, open the SCOM console that was installed on the SCVMM server. This will initiate the connection, and import the necessary Management Packs and Reports into the system.
Navigate to the Reports space, and select the ‘System Center 2012 Virtual Machine Manager Reports’ folder. From there you should now see a list of reports available which utilizes information from SCVMM.
We now have SCVMM Reporting installed. But, there is an additional reporting element; Forecasting Analysis.
Share this post
Link to post
Share on other sites