All Activity
- Yesterday
-

SCCM 2403 and MDT and UDI Issue
keywan replied to keywan's topic in System Center Configuration Manager (Current Branch)
OK, thank you very much - Last week
-

SCCM 2403 and MDT and UDI Issue
anyweb replied to keywan's topic in System Center Configuration Manager (Current Branch)
ok i'll test this in my lab and come back to you -
SCCM 2403 and MDT and UDI Issue
keywan replied to keywan's topic in System Center Configuration Manager (Current Branch)
MDT version 6.3.8456.1000 And the ADK version

-
SCCM 2403 and MDT and UDI Issue
anyweb replied to keywan's topic in System Center Configuration Manager (Current Branch)
which version of MDT are you using ? -
SCCM 2403 and MDT and UDI Issue
keywan replied to keywan's topic in System Center Configuration Manager (Current Branch)
I have uninstalled the MDT and installed again and add to configured Configuration Integration, still the same issue -
SCCM 2403 and MDT and UDI Issue
anyweb replied to keywan's topic in System Center Configuration Manager (Current Branch)
I haven't tried it yet, but have you tried re-Configuring ConfigMgr Integration from the MDT Toolkit options in your start menu ? -
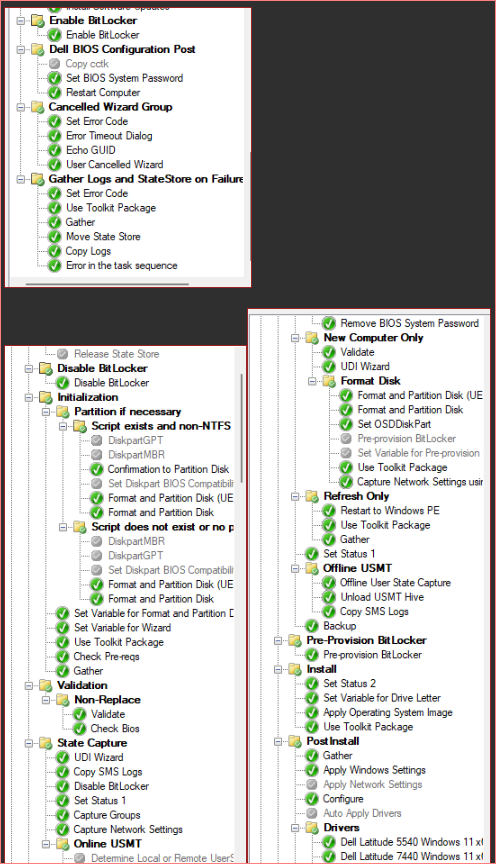
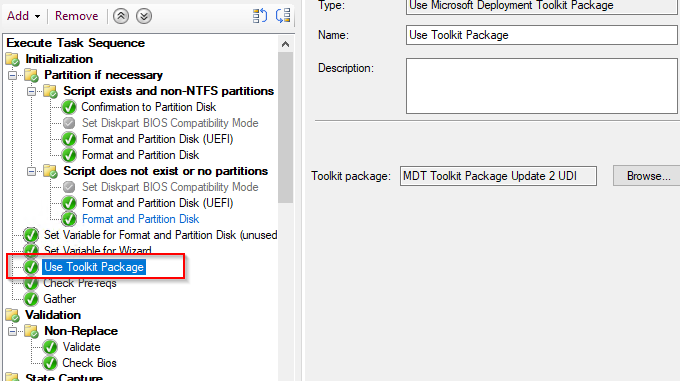
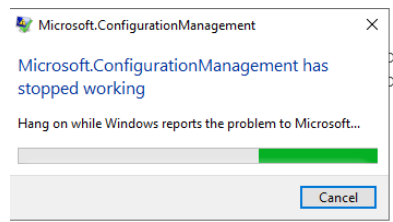
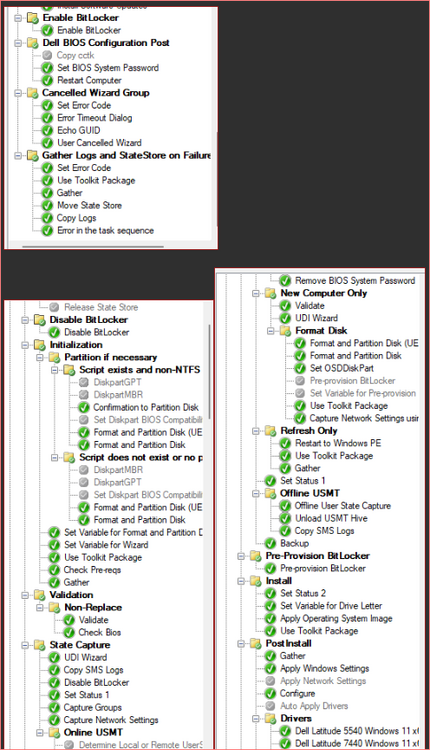
Hi, Since I upgraded my SCCM to the version 2403, I cannot use any more MDT and UDI. I cannot create a new MDT Task Sequence and all my created MDT Package for UDI does not work too. I could to use UDI for Task sequence in my previous SCCM 2207 and could install Windows with UDI, but since SCCM 2403, I get every time by the step "Use Toolkit Package" the error Task Sequence has failed with the error code 0x00000001 in the task sequence step 'Use Toolkit Package. And I try to create a MDT TS, getting the Error And the Console is away Is it not more supported MDT and UDI by SCCM 2403?
- Earlier
-
 Hey @Nerano, Did you manage to find a resolution for this? I'm having the exact same issue and haven't managed to get rid of the NA account yet. Cheers
 -
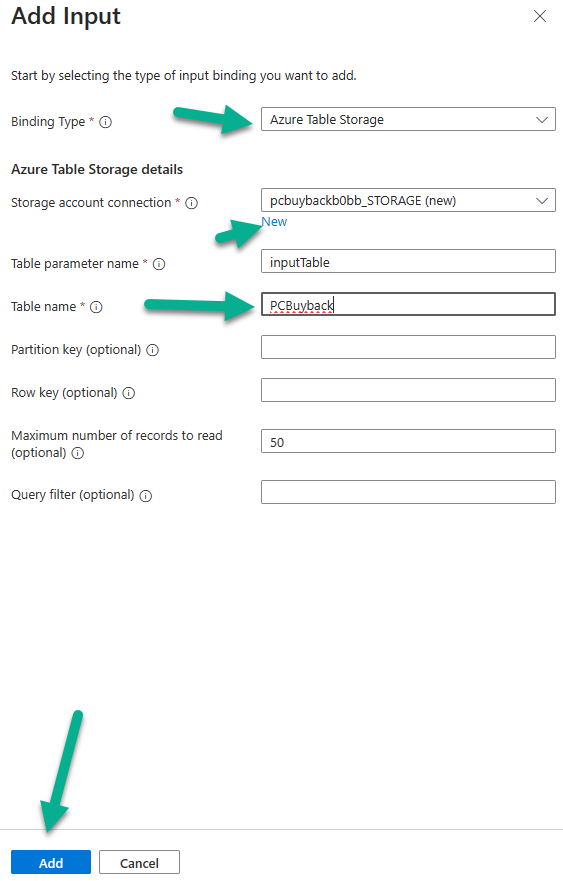
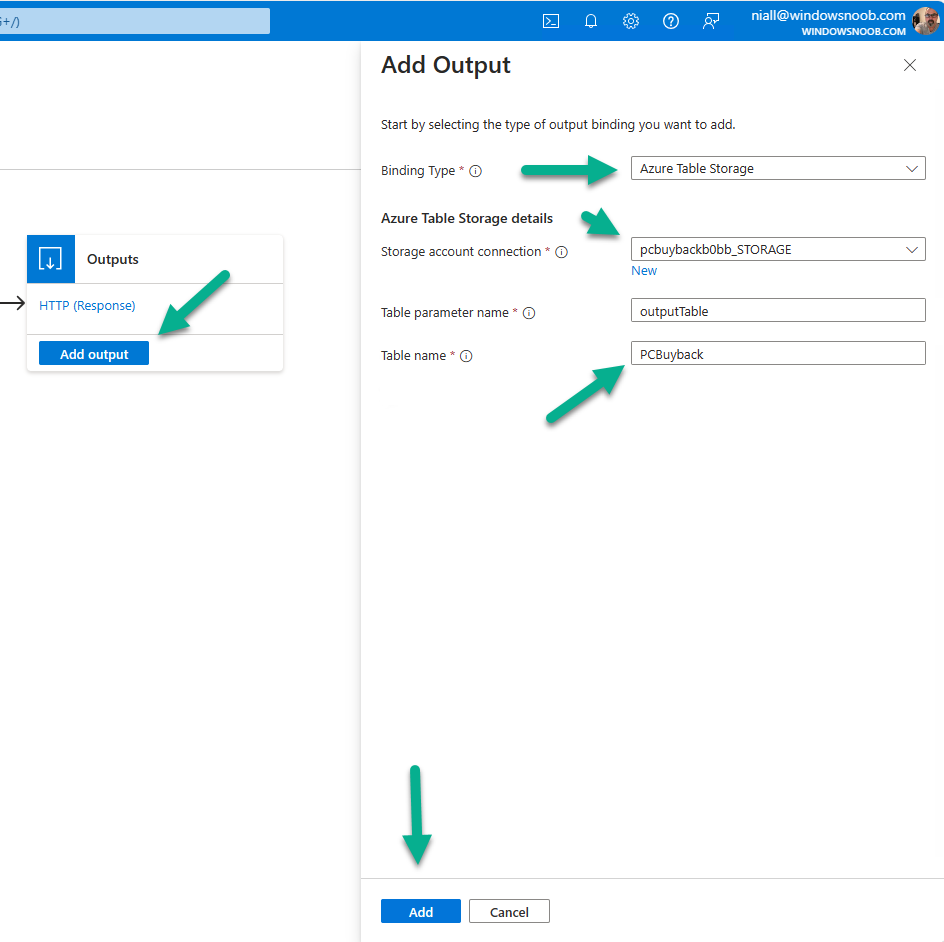
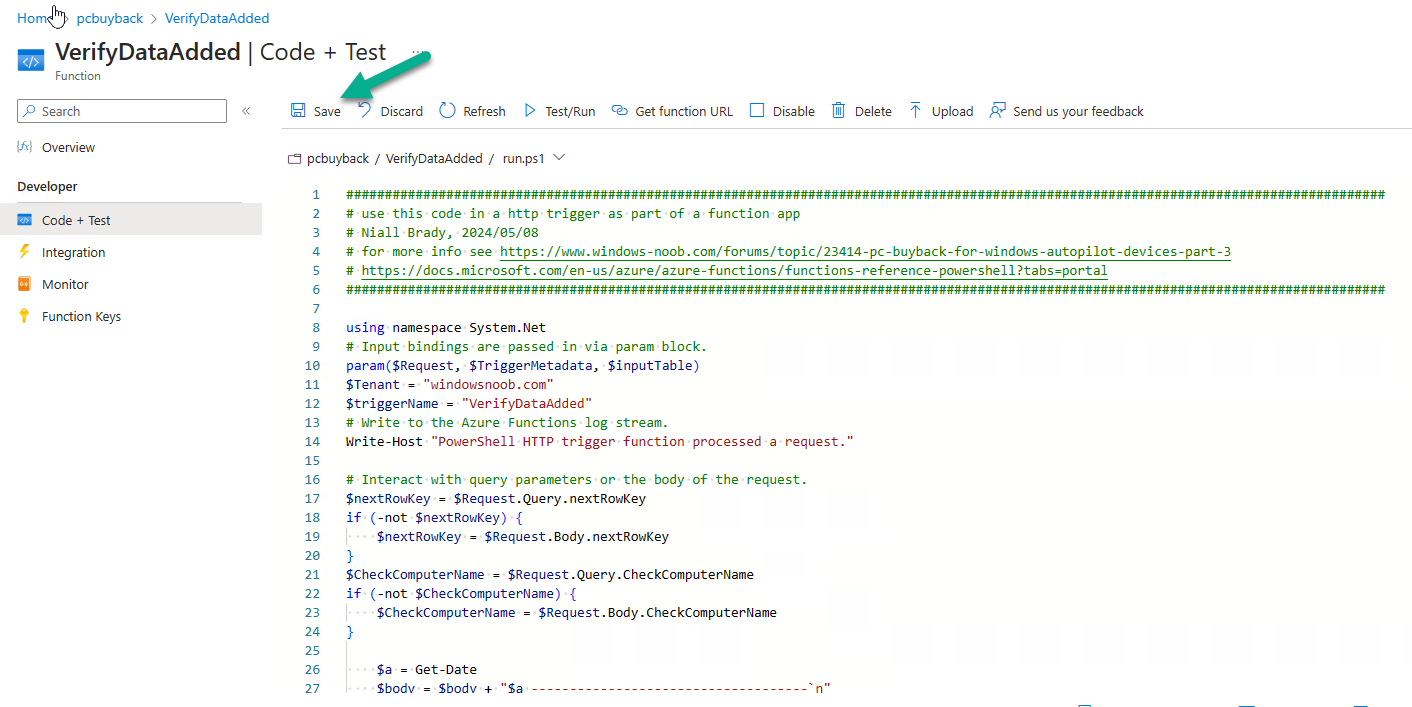
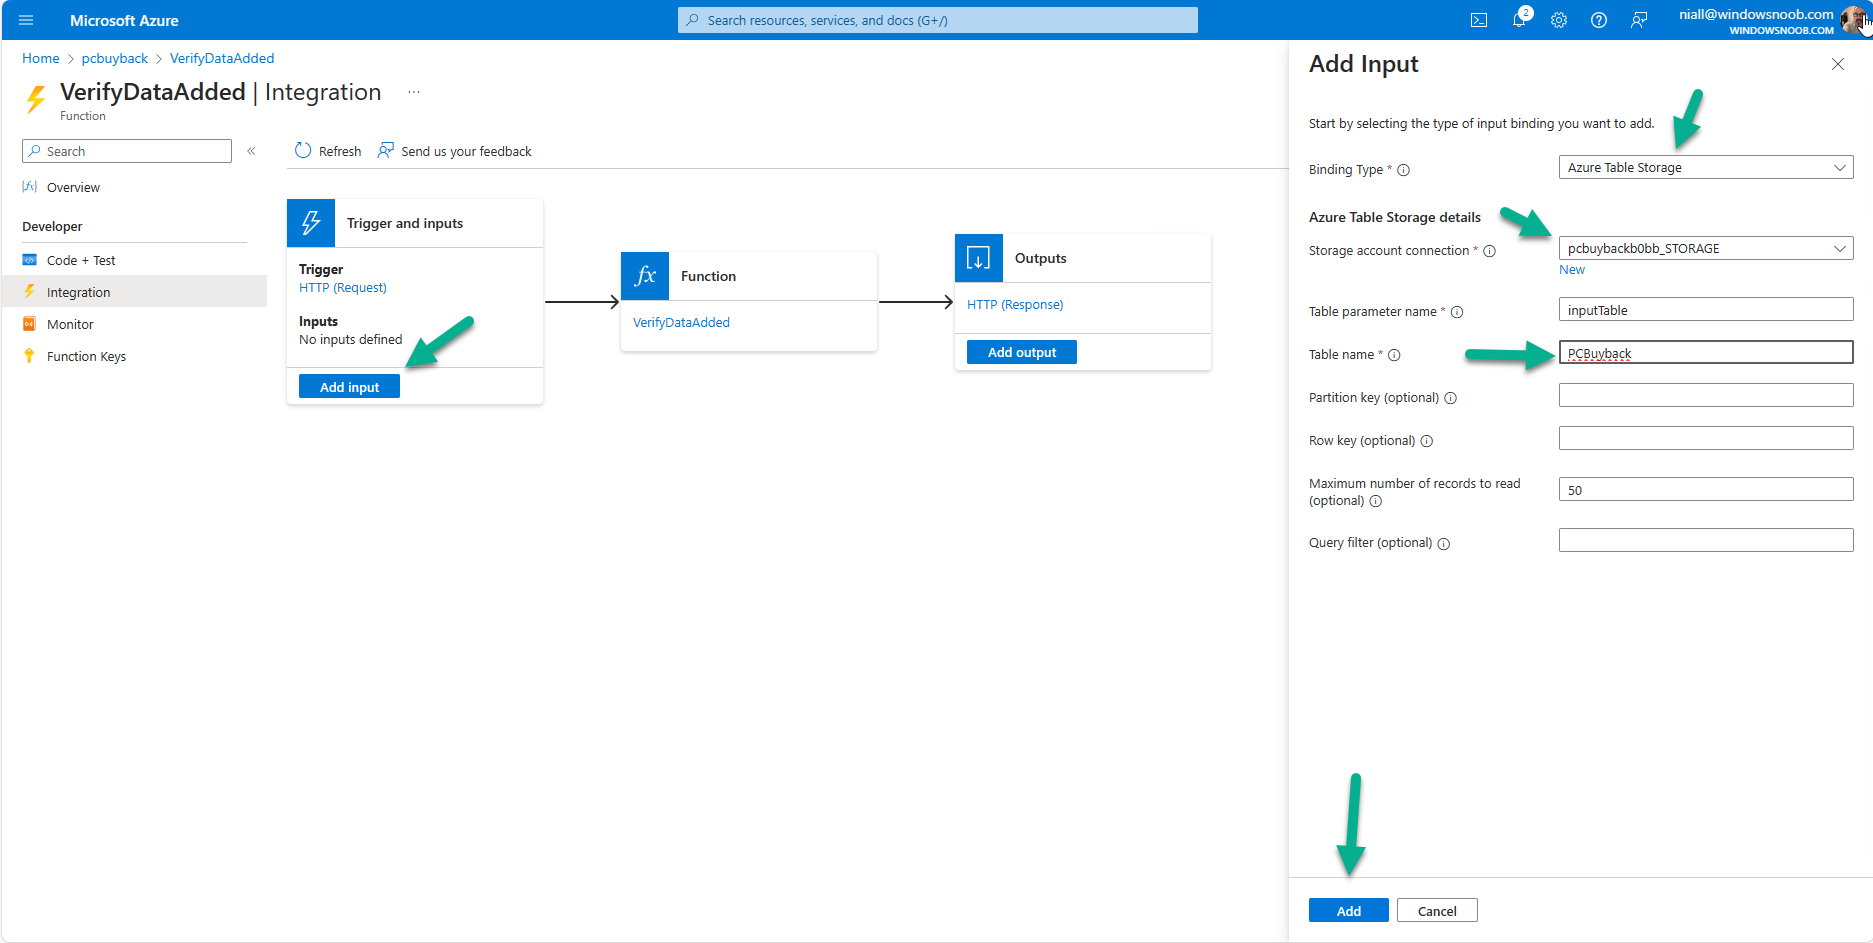
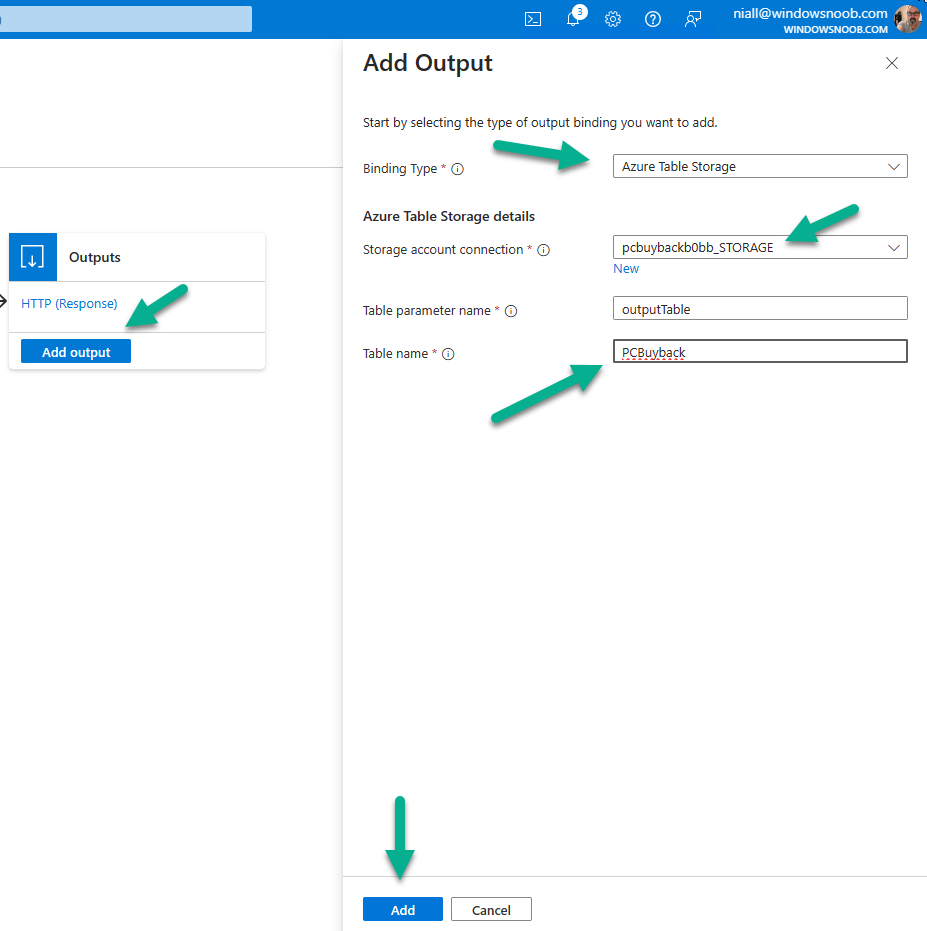
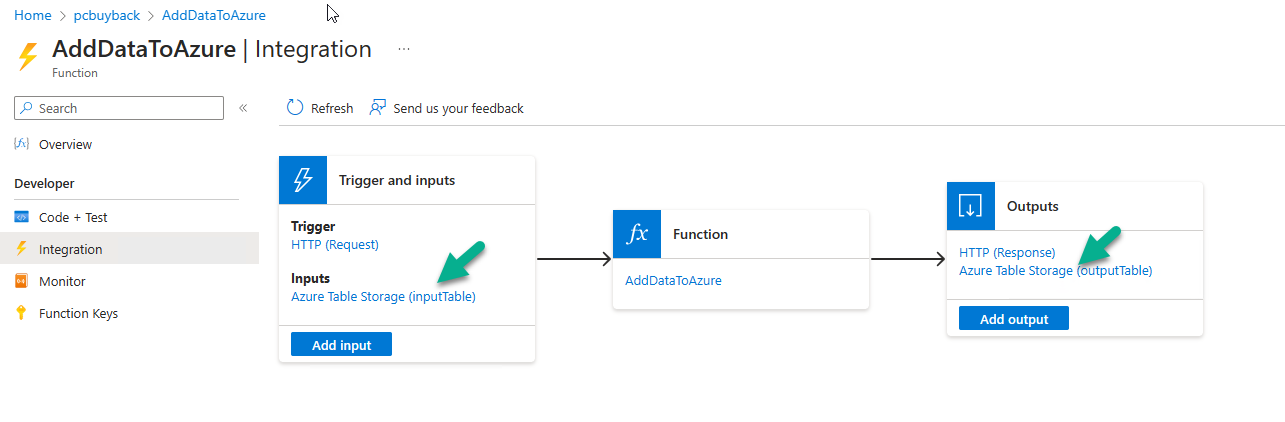
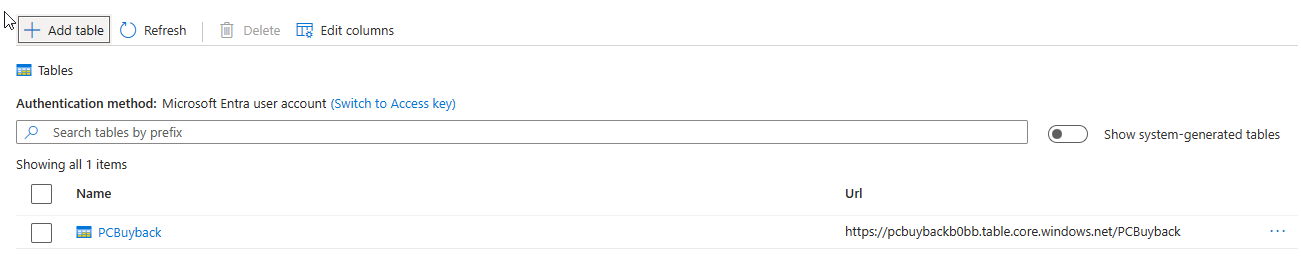
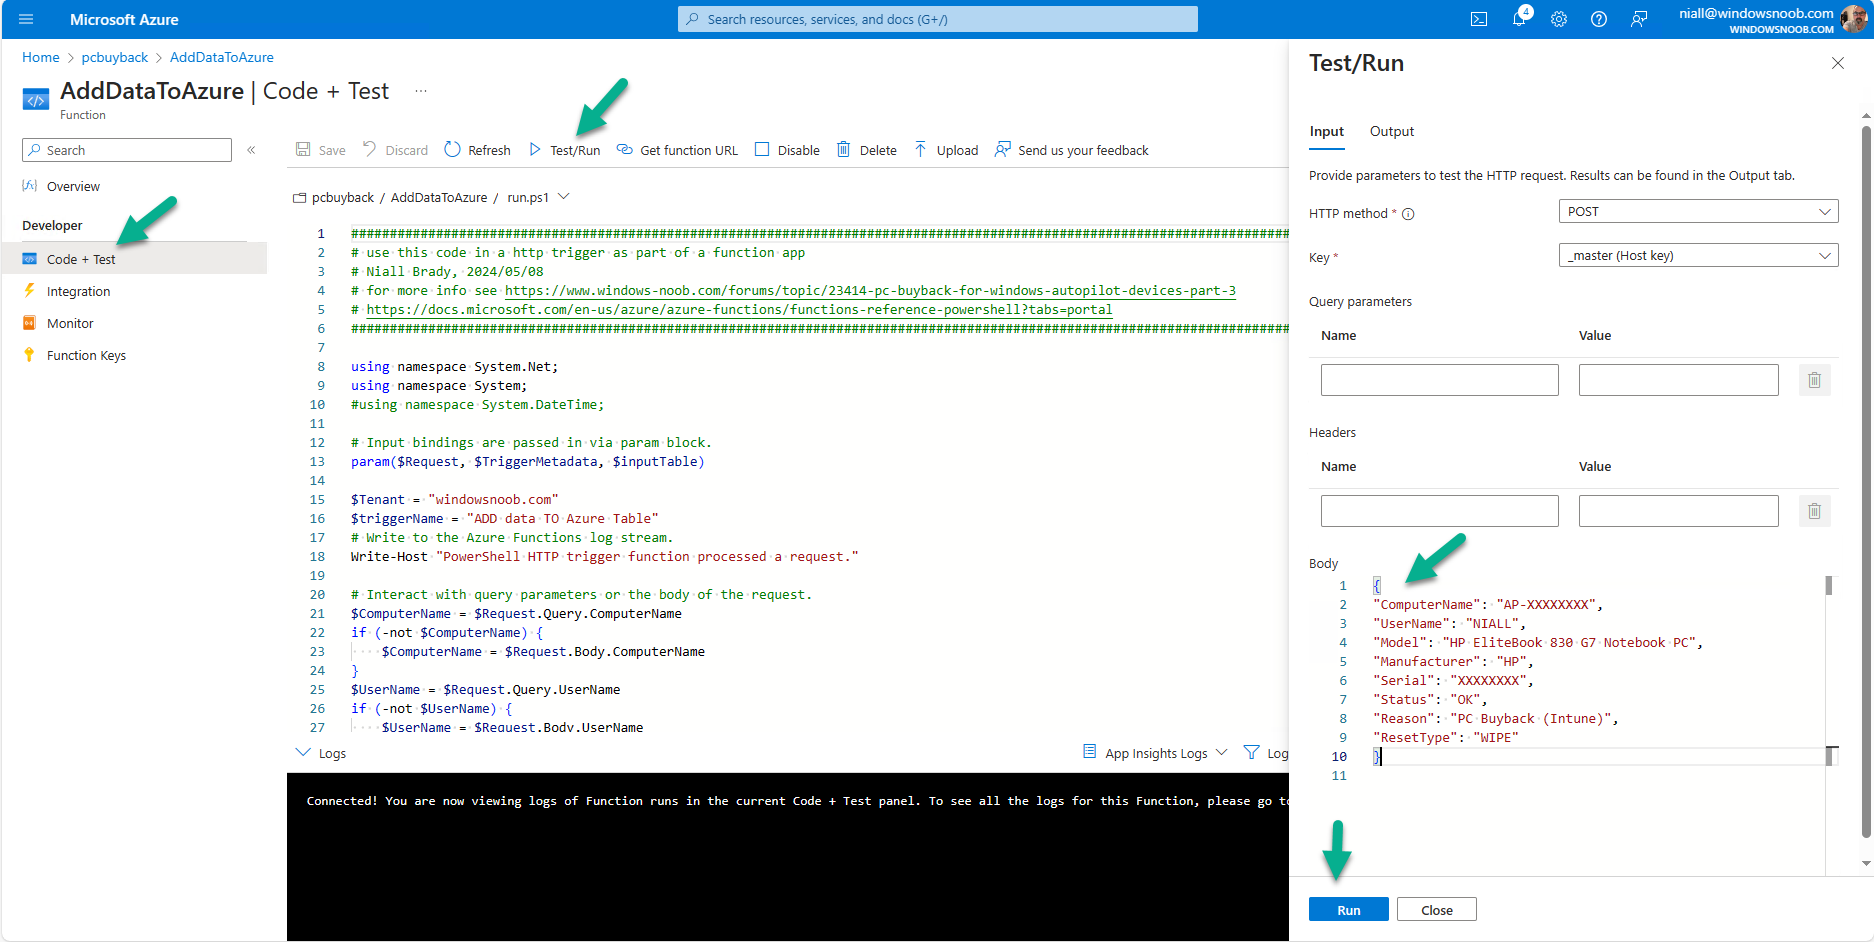
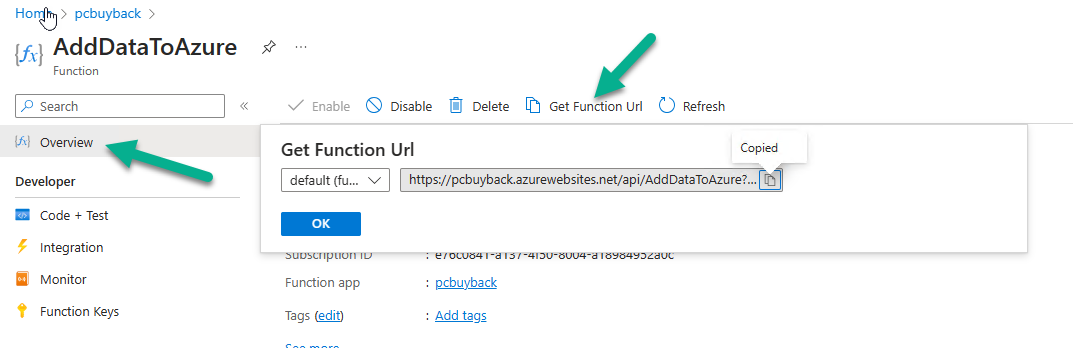
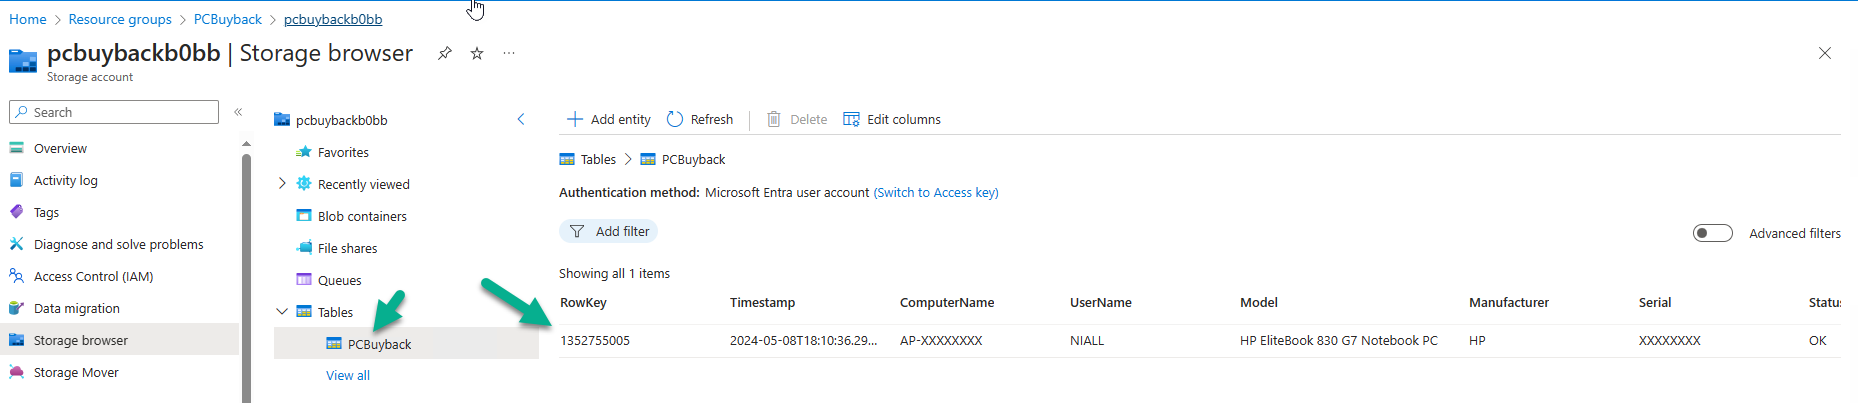
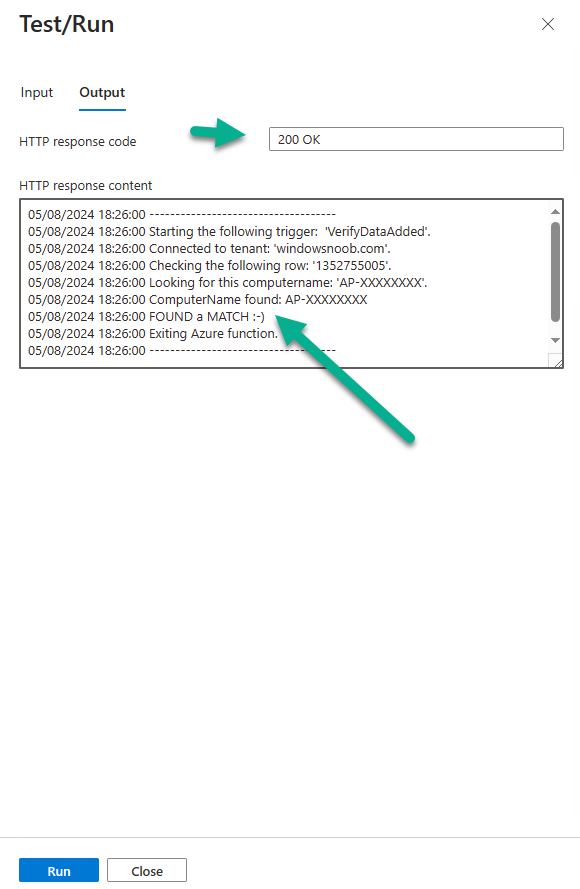
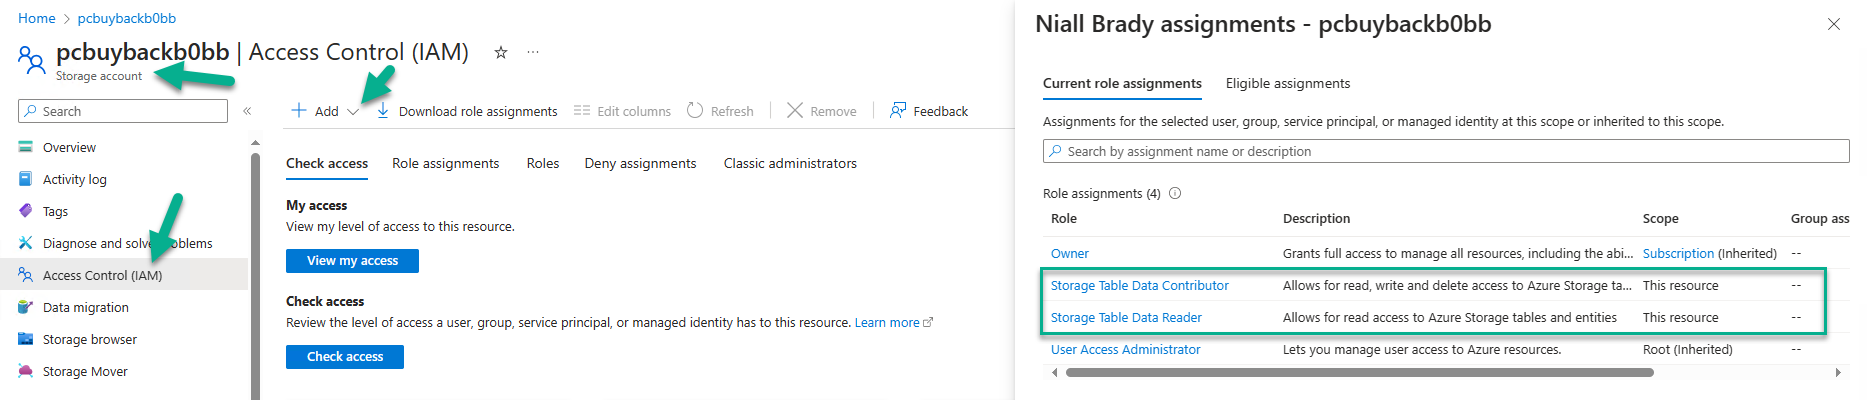
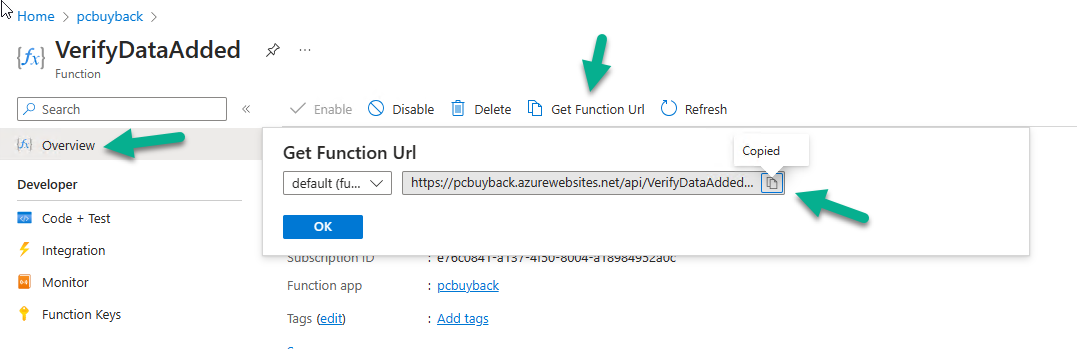
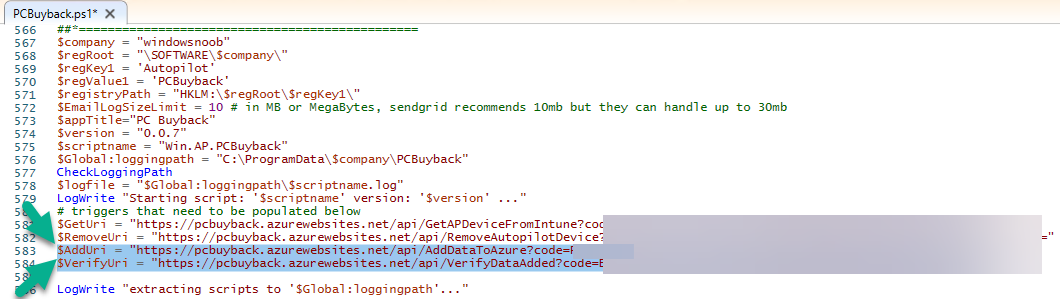
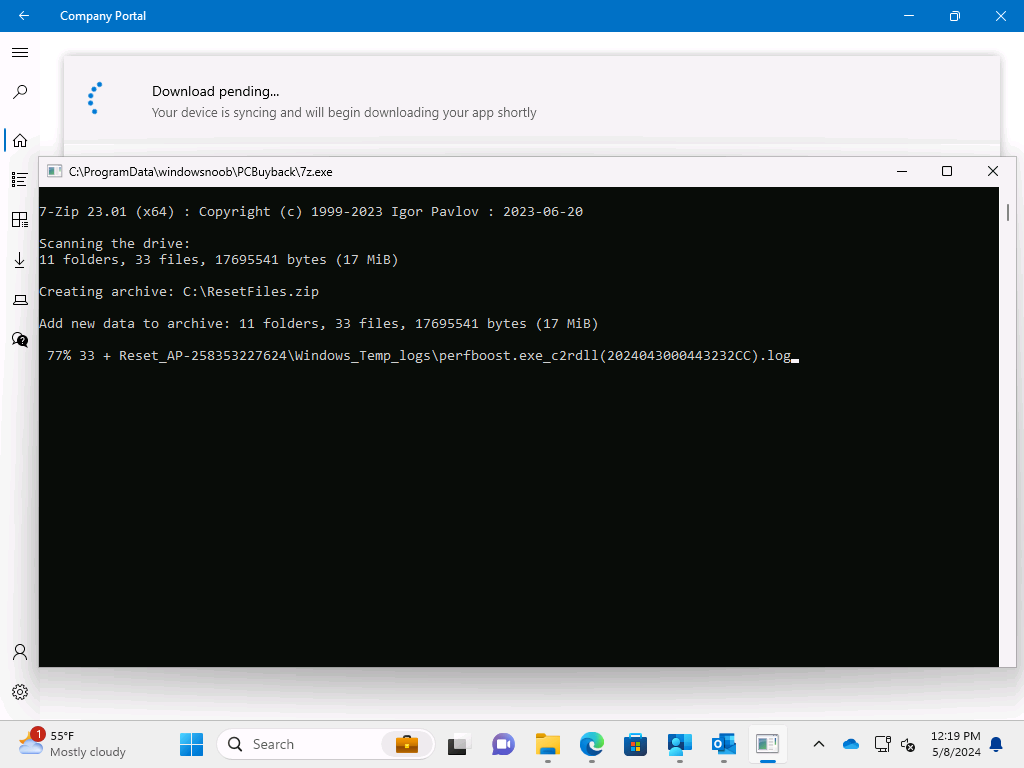
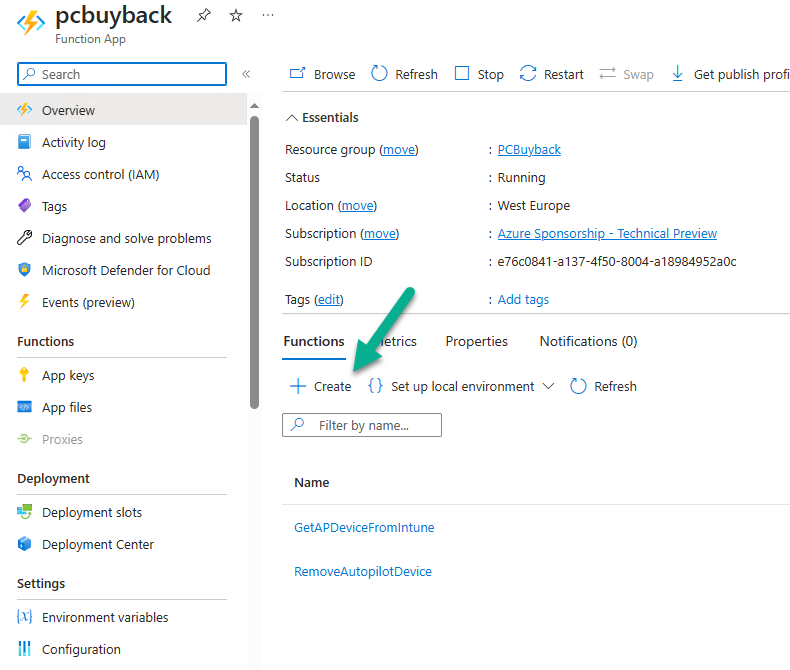
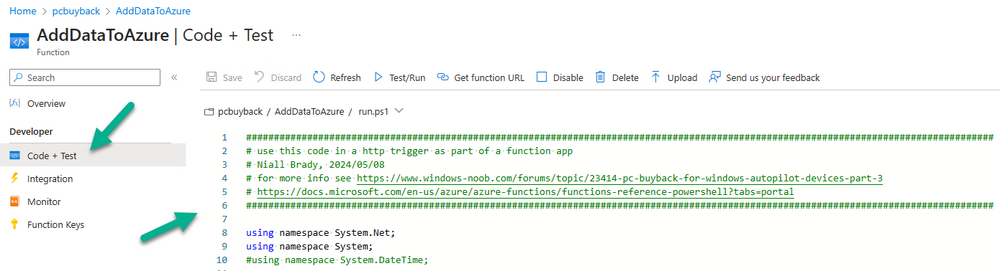
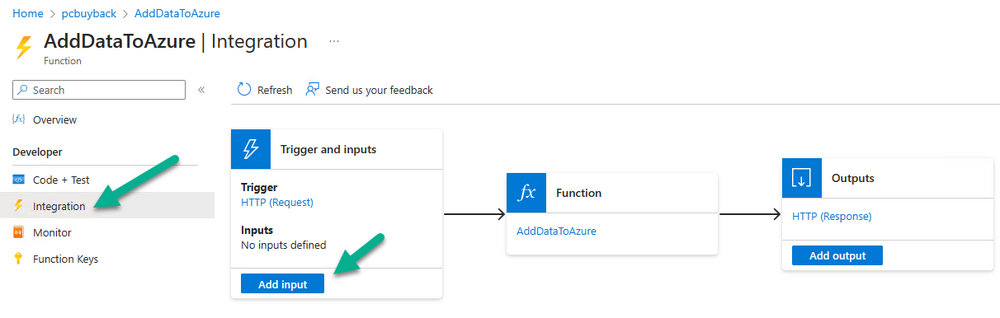
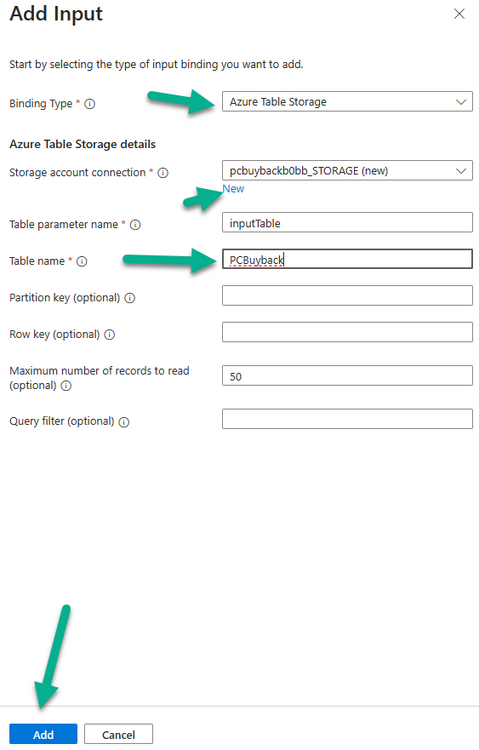
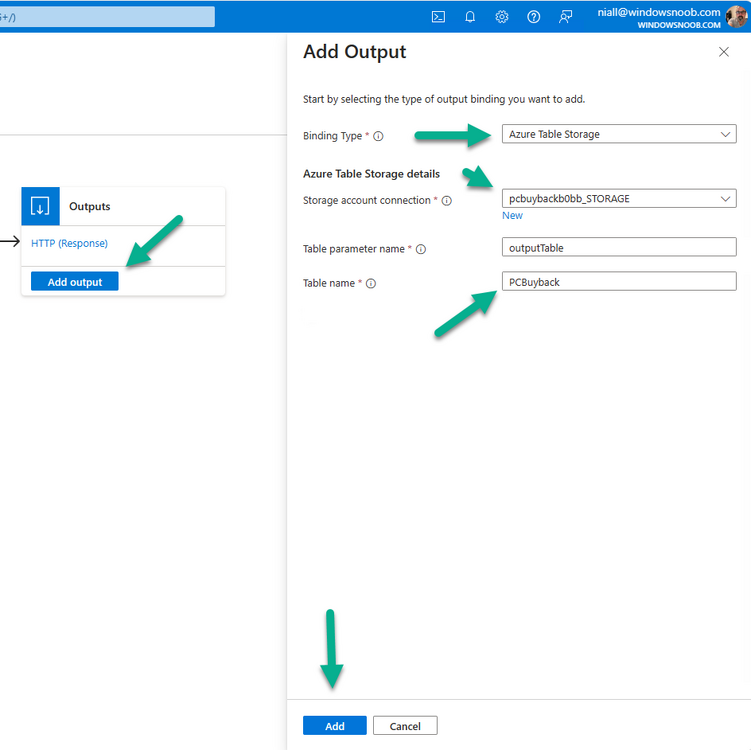
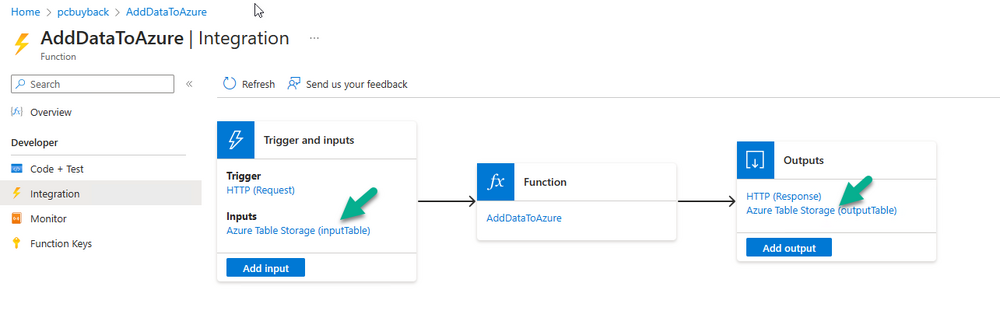
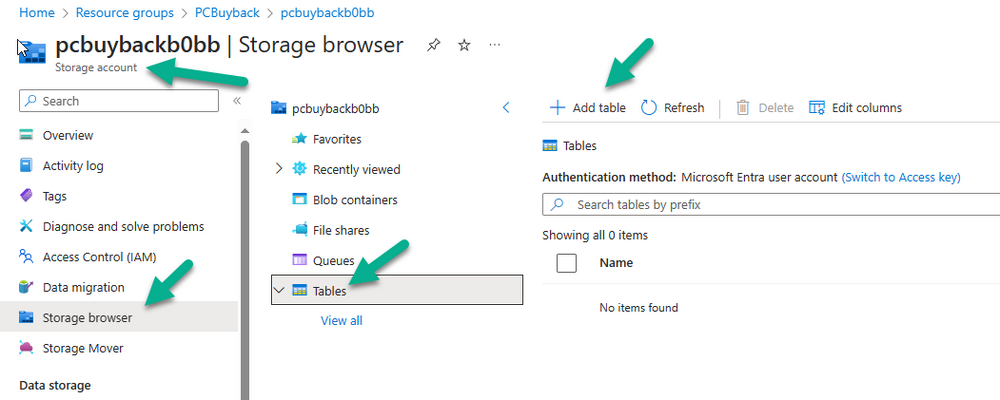
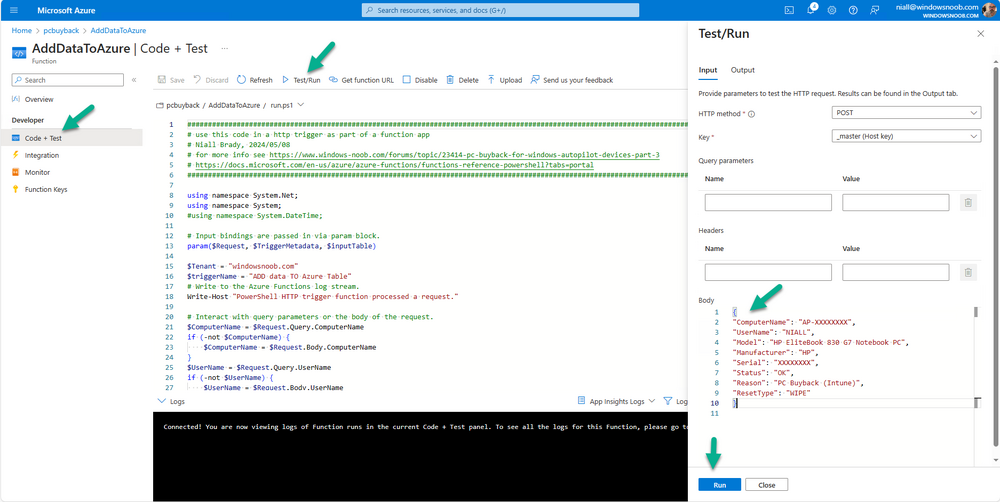
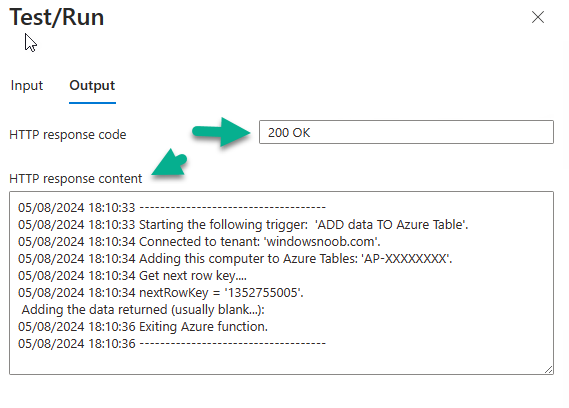
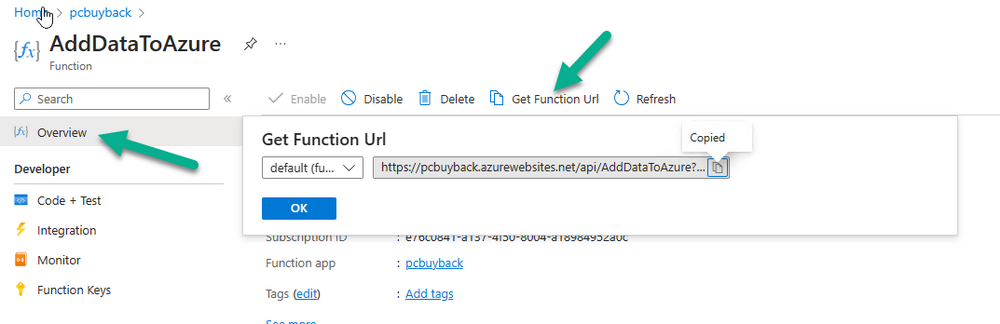
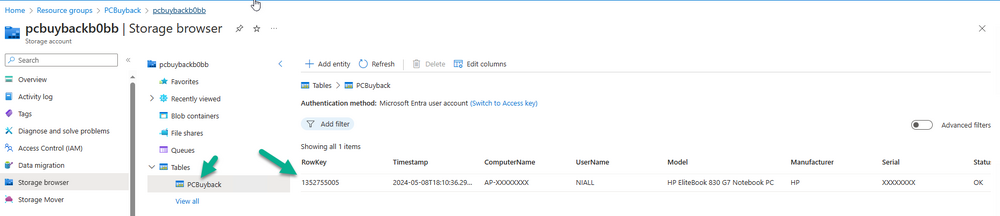
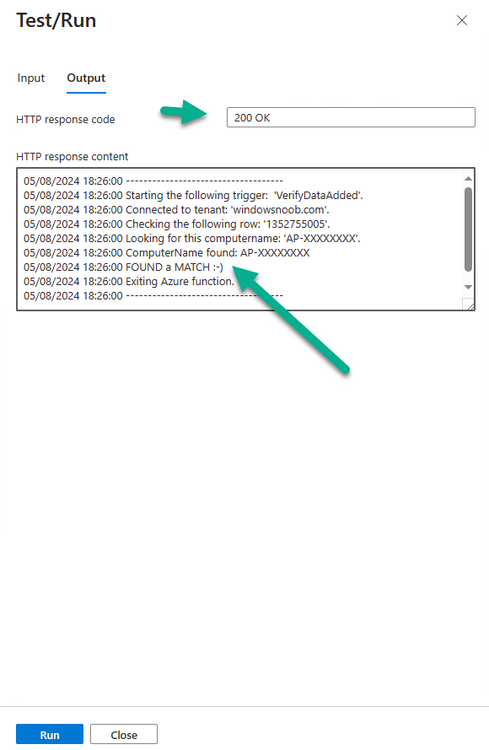
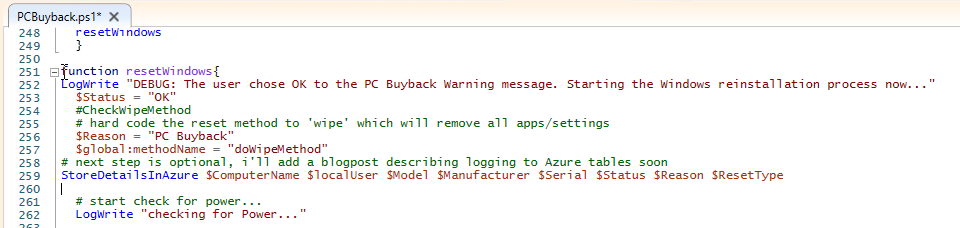
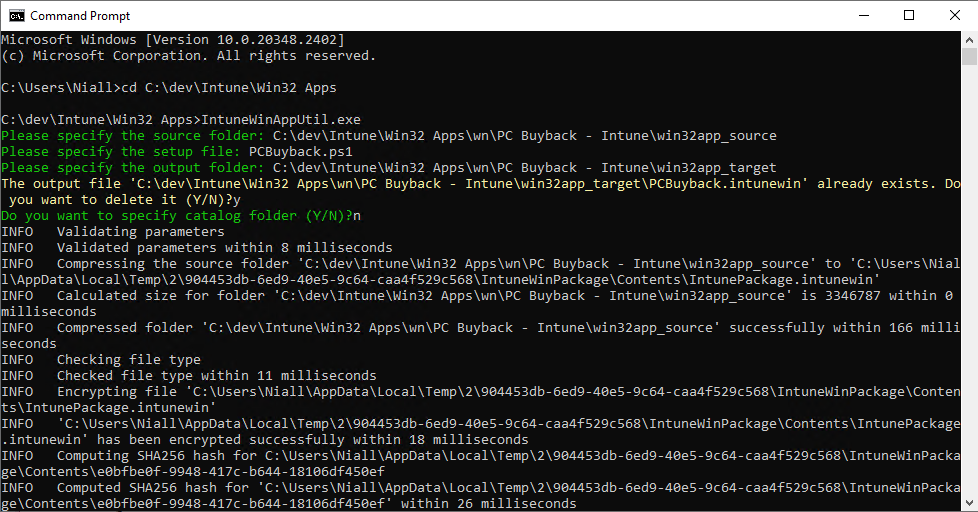
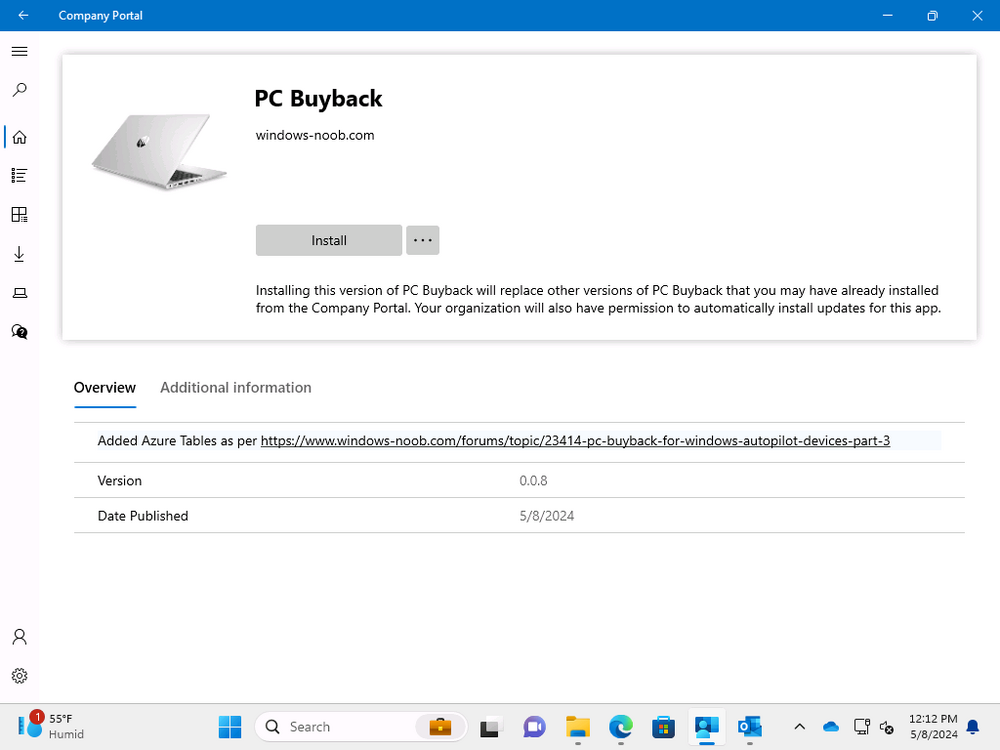
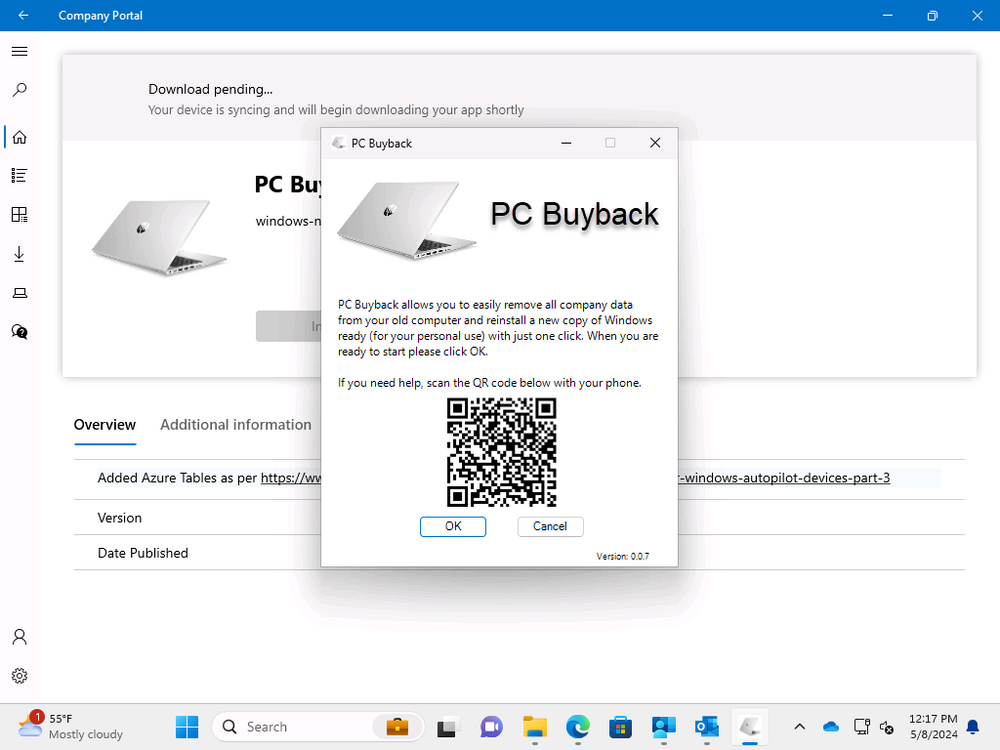
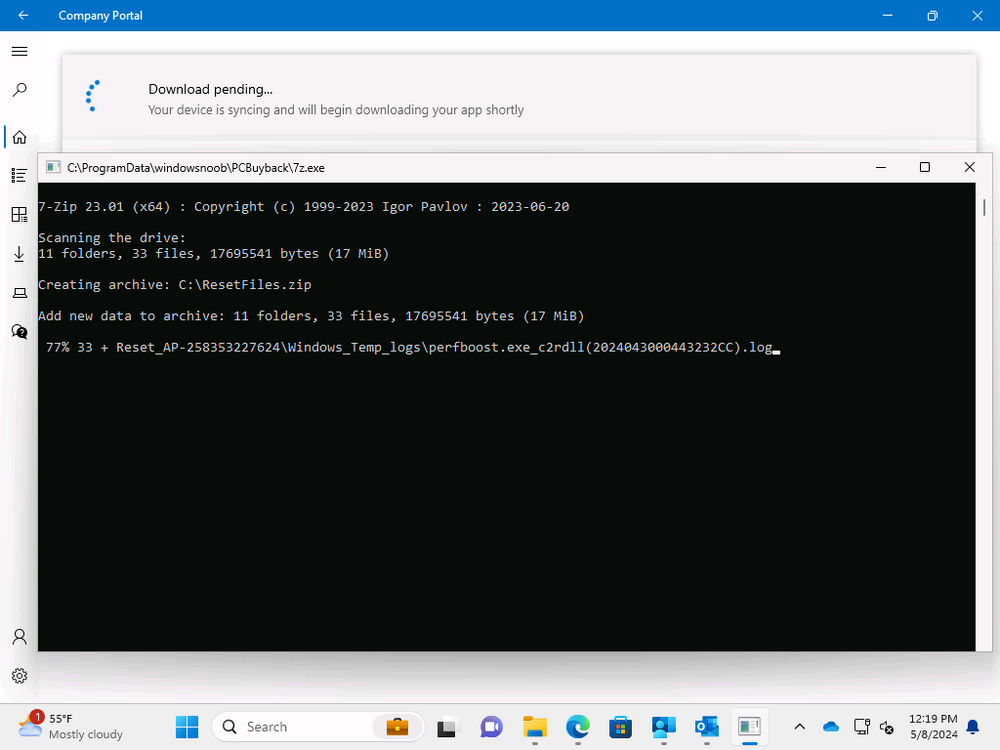
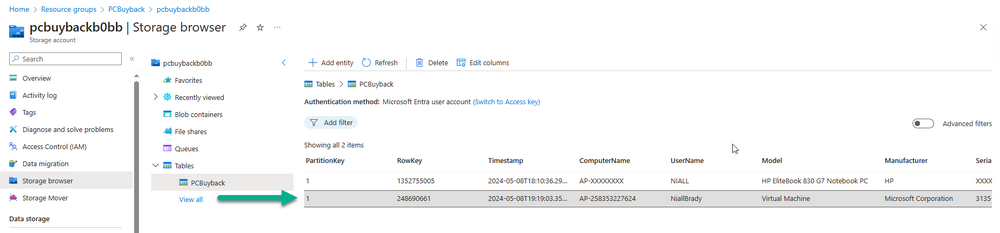
Introduction In part 1 I showed you how to prepare Azure for the PC Buyback app, in part 2 you added the Win32 app, deployed it and saw how it behaved on a Windows Autopilot registered device. In this part we'll add some additional functionality namely logging to Azure tables so that we have a record of when the PC went through the process of PC Buyback. To set this up we'll add another 2 http triggers, and then configure their integration. Note: If you are new to this it might seem overwhelming, don't panic, take your time and follow my guide, if you do it correctly you'll get a successful result. This mini series is broken down into the following parts: PC Buyback for Windows Autopilot devices - part 1 PC Buyback for Windows Autopilot devices - part 2 PC Buyback for Windows Autopilot devices - part 3 <--- You are here Step 1. Create the AddDataToAzure http trigger In the previously created PCBuyback Function app, create a new http trigger called AddDataToAzure In the newly created Http trigger, click on Code + Test and paste in the following code to overwrite the existing code... ####################################################################################################################################### # use this code in a http trigger as part of a function app # Niall Brady, 2024/05/08 # for more info see https://www.windows-noob.com/forums/topic/23414-pc-buyback-for-windows-autopilot-devices-part-3 # https://docs.microsoft.com/en-us/azure/azure-functions/functions-reference-powershell?tabs=portal ####################################################################################################################################### using namespace System.Net; using namespace System; #using namespace System.DateTime; # Input bindings are passed in via param block. param($Request, $TriggerMetadata, $inputTable) $Tenant = "windowsnoob.com" $triggerName = "ADD data TO Azure Table" # Write to the Azure Functions log stream. Write-Host "PowerShell HTTP trigger function processed a request." # Interact with query parameters or the body of the request. $ComputerName = $Request.Query.ComputerName if (-not $ComputerName) { $ComputerName = $Request.Body.ComputerName } $UserName = $Request.Query.UserName if (-not $UserName) { $UserName = $Request.Body.UserName } $Model = $Request.Query.Model if (-not $Model) { $Model = $Request.Body.Model } $Manufacturer = $Request.Query.Manufacturer if (-not $Manufacturer) { $Manufacturer = $Request.Body.Manufacturer } $Serial = $Request.Query.Serial if (-not $Serial) { $Serial = $Request.Body.Serial } #$DateReset = $Request.Query.DateReset #if (-not $DateReset) { # $DateReset = $Request.Body.DateReset #} $Status = $Request.Query.Status if (-not $Status) { $Status = $Request.Body.Status } $Reason = $Request.Query.Reason if (-not $Reason) { $Reason = $Request.Body.Reason } $ResetType = $Request.Query.ResetType if (-not $ResetType) { $ResetType = $Request.Body.ResetType } $a = Get-Date $body = $body + "$a ------------------------------------`n" $a = Get-Date $body = $body + "$a Starting the following trigger: '$triggerName'.`n" $a = Get-Date $body = $body + "$a Connected to tenant: '$Tenant'.`n" if ($ComputerName) { $a = Get-Date $body = $body + "$a Adding this computer to Azure Tables: '$ComputerName'.`n" #} #fix the date #$NewDate = $(get-date($DateReset) -UFormat '+%Y-%m-%dT%H:%M:%S.000Z') #$DateReset = $NewDate $a = Get-Date $body = $body + "$a Get next row key....`n" #$nextRowKey=$([int]$(($inputTable.RowKey|measure -Maximum).Maximum)+1) $nextRowKey=Get-Random $a = Get-Date $body = $body + "$a nextRowKey = '$nextRowKey'.`n" # this will be the row key that we insert in this operation # Input row into DB #$tableStorageItems = @() Add-Type @" public struct rowitem { public System.String PartitionKey; public System.String RowKey; public System.String ComputerName; public System.String UserName; public System.String Model; public System.String Manufacturer; public System.String Serial; public System.String Status; public System.String Reason; public System.String ResetType; } "@ $PCBuyback = New-Object rowitem $PCBuyback.PartitionKey = 1 $PCBuyback.RowKey = $nextRowKey.ToString() $PCBuyback.ComputerName = $ComputerName $PCBuyback.UserName = $UserName $PCBuyback.Model = $Model $PCBuyback.Manufacturer = $Manufacturer $PCBuyback.Serial = $Serial $PCBuyback.Status = $Status $PCBuyback.Reason = $Reason $PCBuyback.ResetType = $ResetType #$tableStorageItems += $PCBuyback # insert the data $Result = Push-OutputBinding -Name outputTable -Value $PCBuyback $body = $body + " Adding the data returned (usually blank...): $Result `n" } $a = get-date $body = $body + "$a Exiting Azure function.`n" $a = Get-Date $body = $body + "$a ------------------------------------`n" # Associate values to output bindings by calling 'Push-OutputBinding'. Push-OutputBinding -Name Response -Value ([HttpResponseContext]@{ StatusCode = [HttpStatusCode]::OK Body = $body }) Save the changes, like so... Step 2. Modify the http trigger Integration In the new http trigger AddDataToAzure, click on Integration and then click on Add input In the Binding Type drop down menu, select Azure Table Storage, in the Storage account connection click on New and select your pcbuyback storage account (which was created during part 1 in the initial creation of the function app. Change the Table name to PCBuyback. When done, click on Add. Next, do the same thing for Output by clicking on Add output, then configure it as shown in the screenshot below. Finally click Add. After adding both the input and output, the integration should appear like this. Step 3. Create the VerifyDataAdded http trigger In the previously created PCBuyback Function app, create a new http trigger called VerifyDataAdded In the newly created Http trigger, click on Code + Test and paste in the following code to overwrite the existing code... ####################################################################################################################################### # use this code in a http trigger as part of a function app # Niall Brady, 2024/05/08 # for more info see https://www.windows-noob.com/forums/topic/23414-pc-buyback-for-windows-autopilot-devices-part-3 # https://docs.microsoft.com/en-us/azure/azure-functions/functions-reference-powershell?tabs=portal ####################################################################################################################################### using namespace System.Net # Input bindings are passed in via param block. param($Request, $TriggerMetadata, $inputTable) $Tenant = "windowsnoob.com" $triggerName = "VerifyDataAdded" # Write to the Azure Functions log stream. Write-Host "PowerShell HTTP trigger function processed a request." # Interact with query parameters or the body of the request. $nextRowKey = $Request.Query.nextRowKey if (-not $nextRowKey) { $nextRowKey = $Request.Body.nextRowKey } $CheckComputerName = $Request.Query.CheckComputerName if (-not $CheckComputerName) { $CheckComputerName = $Request.Body.CheckComputerName } $a = Get-Date $body = $body + "$a ------------------------------------`n" $a = Get-Date $body = $body + "$a Starting the following trigger: '$triggerName'.`n" $a = Get-Date $body = $body + "$a Connected to tenant: '$Tenant'.`n" if ($nextRowKey -and $CheckComputerName) { $a = Get-Date $body = $body + "$a Checking the following row: '$nextRowKey'.`n" $body = $body + "$a Looking for this computername: '$CheckComputerName'.`n" #} #Put all table rows into $table $table="" foreach($row in $inputTable){ $table+="$($row.PartitionKey) - $($row.RowKey) - $($row.ComputerName) - $($row.UserName) - $($row.Model) - $($row.Manufacturer) - $($row.Serial) - $($row.Status) - $($row.Reason) - $($row.ResetType) " } # print out the results... #write-host ">>>>>$table<<<<<" #validate section #$body = $body + "Validate: $($($inputTable|Where-Object -Property RowKey -EQ 12).ComputerName)" $a = Get-Date $found = $($($inputTable|Where-Object -Property RowKey -EQ $nextRowKey).ComputerName) $body = $body + "$a ComputerName found: $found`n" #write-host "DEBUG: found " $found if ($found -match $CheckComputerName) { $a = Get-Date $body = $body + "$a FOUND a MATCH :-)`n" } else { $a = Get-Date $body = $body + "$a sorry, did not find a match :-(`n" } } $a = get-date $body = $body + "$a Exiting Azure function.`n" $a = Get-Date $body = $body + "$a ------------------------------------`n" # show the output to the browser...Associate values to output bindings by calling 'Push-OutputBinding'. Push-OutputBinding -Name Response -Value ([HttpResponseContext]@{ StatusCode = [HttpStatusCode]::OK Body = $body }) Click Save after adding the code above to the new trigger. Step 4. Modify the http trigger Integration In the new http trigger VerifyDataAdded, click on Integration and then click on Add input, configure it like so And next, make the following changes to the output. Step 5. Modify PCBuyback Azure table permissions In your PCBuyback storage (contained within the PCBuyback resource group) modify the Access control (IAM) and add the following role assignments to your user that you want to create the Azure Table in the next step. Storage Table Data Contributor Storage Table Data Reader Step 6. Create the PCBuyback Azure table In your PCBuyback storage (contained within the PCBuyback resource group) which may be named differently depending on how you setup the functionapp, using the Storage browser option in the menu, browse to Tables and click on + Add table as shown here. The Table name must be PCBuyback as shown here, click OK when done. The created PCBuyback table is shown. Step 7. Verify the http triggers Now that you've created the triggers and modified the integration, you'll need to verify that they do what they are supposed to do. Let's start with the AddDataToAzure trigger. To test this, paste in the following text and click on Test/Run. { "ComputerName": "AP-XXXXXXXX", "UserName": "NIALL", "Model": "HP EliteBook 830 G7 Notebook PC", "Manufacturer": "HP", "Serial": "XXXXXXXX", "Status": "OK", "Reason": "PC Buyback (Intune)", "ResetType": "WIPE" } as shown here... If you did everything correctly it'll return a 200 HTTP response code along with the HTTP response content, if not, verify the steps above again. Once the above trigger is tested successfully, click on Overview in the http trigger, and copy the function URL somewhere useful. Finally, you can verify that it actually has poked the data into Azure tables, by browsing to the PCBuyback table and reviewing the data added. Now that you have the RowKey and ComputerName, you can use that data to verify the other trigger in this part, namely the VerifyDataAdded trigger. Use the following code in that Test/Run and modify it as appropriate for your environment. Note: The nextRowKey value will be revealed in the previous test and will be random, you need to provide the exact one from the previous test or copy it from the PCBuyback Azure tables. In other words, the nextRowKey value I'm showing below is unique to my environment and will most likely NOT work in your verification test. { "nextRowKey": "1352755005", "CheckComputerName": "AP-XXXXXXXX" } After running that test, Success ! It found a MATCH. Once the above trigger is tested successfully, click on Overview in the http trigger, and copy the function URL somewhere useful. Step 8. Modify the PCBuyback.ps1 script At this point we are done with the Azure changes and now need to modify the PCBuyback.ps1 PowerShell script. In PowerShell ISE (or VSCode) find this line and remove the # infront of StoreDetailsInAzure as shown below, also remove the $DateReset variable as we don't need it. so that the line looks like this. Next, locate the URI section here and add the two function URLS you copied in the steps above. Save the script Step 9. Upload changes to Intune Use the IntuneWinAppUtil.exe to create a new version of the app that we created in Step 6, part 2 here, After uploading the new intunewin version, log onto a test PC targeted with the PC Buyback app and test it. The app launches by the user clicking on it... and after clicking OK and reading the warning, the PC Buyback process begins in earnest. and while the PC is busy resetting itself as described in Part 2, a record was added to our PCBuyback Azure tables, confirming that the user actually did buy back their PC. Success ! that's it for this blog series, see you in the next one, cheers Niall


-
 Hello, i've just installed a fresh Windows Server 2022 Standard File and Print server (Only roles "print server" installed what should be enough). Next i've installed two whole different network printers. I've also tried different drivers (PS, PCL). Nethertheless none of my printers is able to print. I can ping them. The web access is accessible through browser from the print server. The print spooler just pop ups with the message "error - printing" in the gui after trying to print a notepad test page. No other error is appearing. Print Service is running. I've got no clue what cloud be wrong.
 -
Thanks again, we've allowed above steps and also bitlocker RSAT its working, still testing it again
-
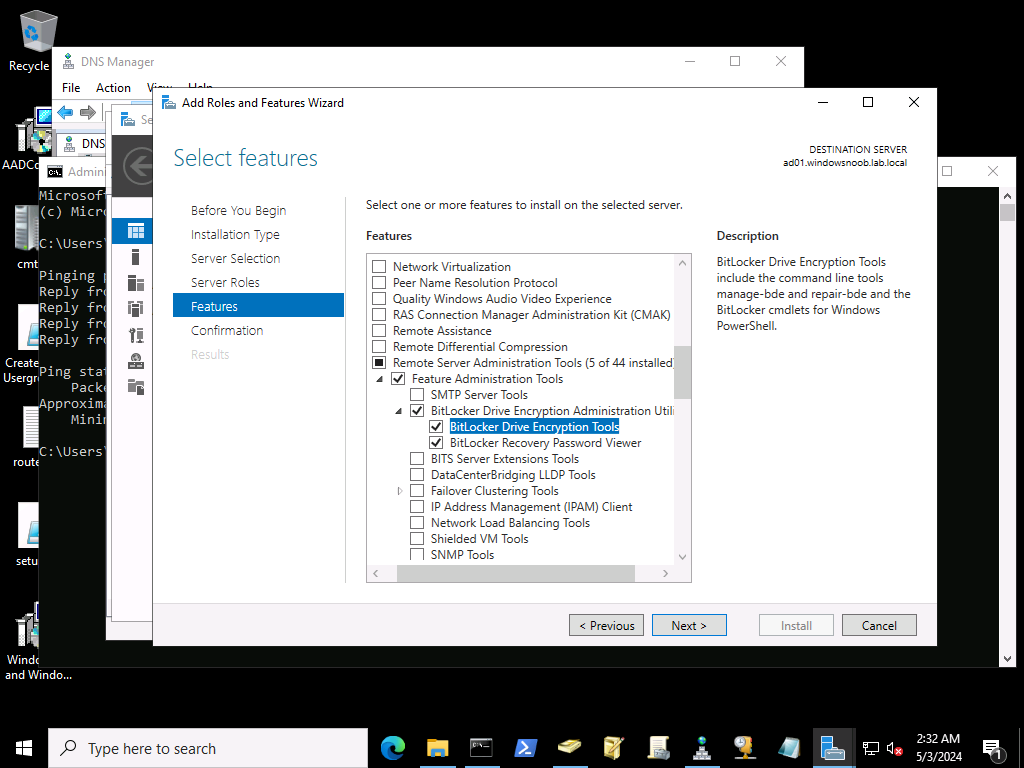
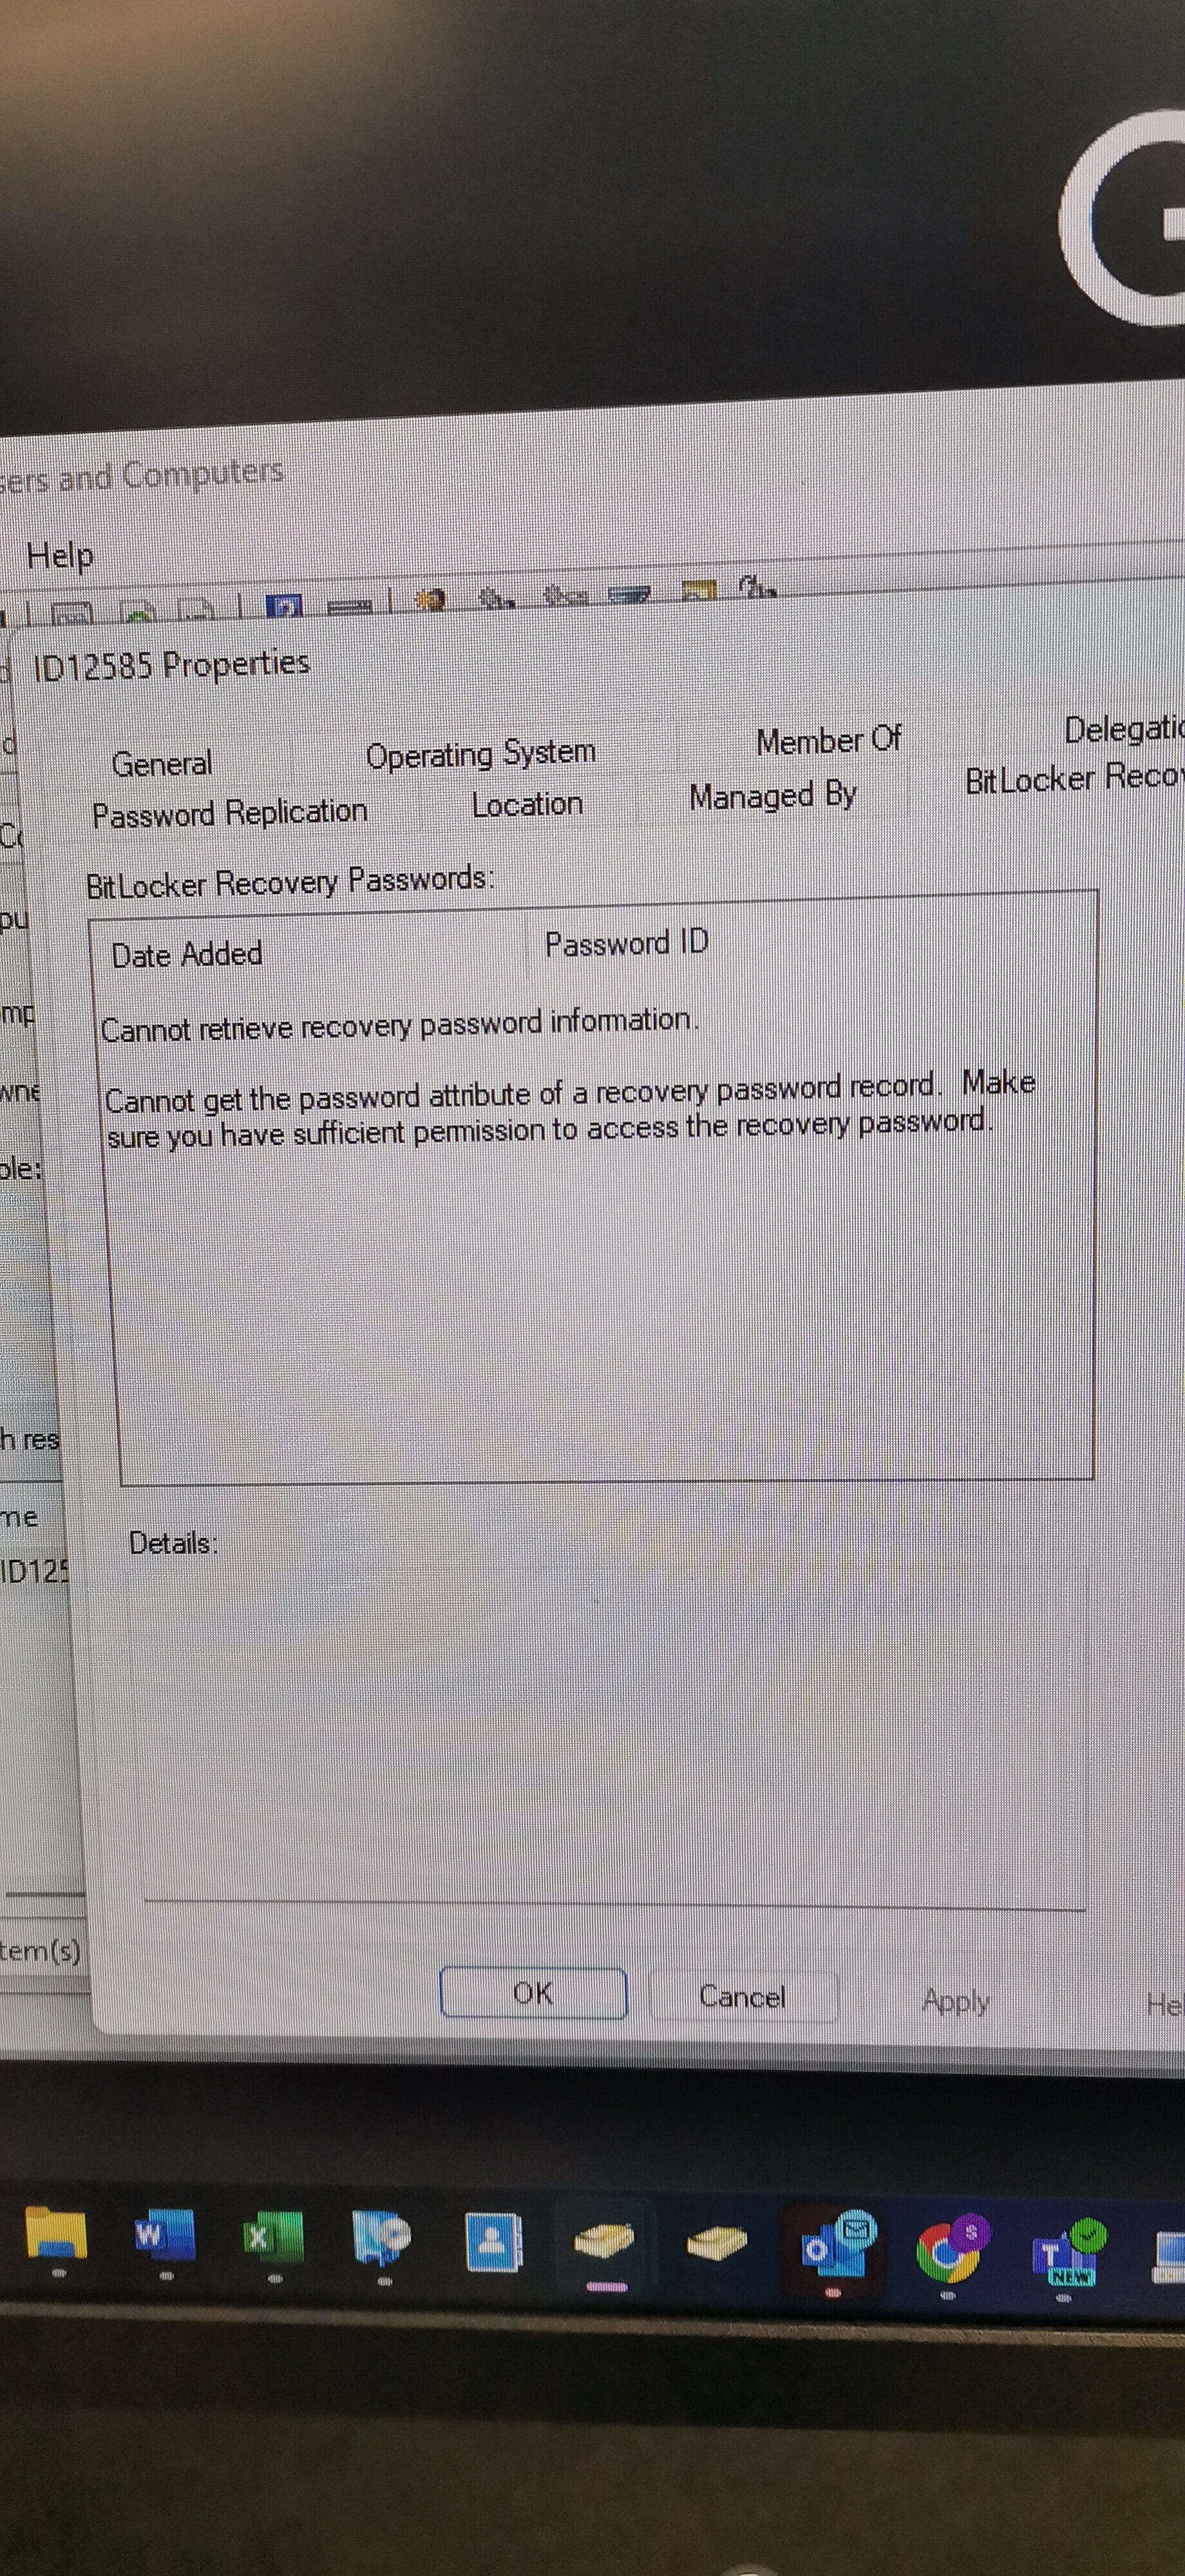
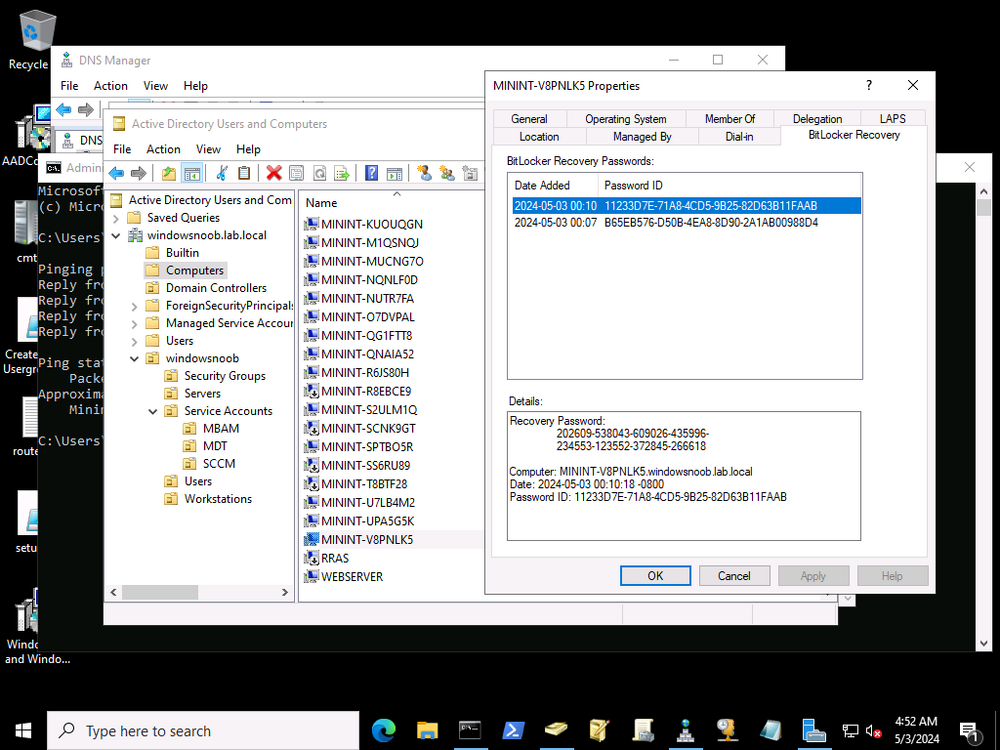
have you configured features to allow for the viewing of the keys ? and permissions ? which version of Windows Server are you using ? see >https://learn.microsoft.com/en-us/troubleshoot/windows-server/windows-security/bitlocker-recovery-password-viewer-tool see also > https://blog.michaellecomber.info/2019/05/05/ad-delegate-access-to-view-bitlocker-recovery-keys/ Once added you should be able to review the bitlocker recovery info If your user does not have permission to review these keys, (doman admins will already have access to view the recovery keys) but any other user will not have permissions to view the protected recovery keys. This permission has to be delegated down through the ‘Delegate Access’ wizard found in ‘AD User and Computers’. To do this follow the below: Log into AD Users and Computers Make a new Security group called “Bitlocker-Recovery-Admins” Add the relevant users to the group Navigate to the OU where you want to start the delegation. (The computers must sit in a OU below from starting the delegation) Right-click on the OU and select ‘Delegate Control’ In the ‘Users or Groups’ step enter the newly created ‘Bitlocker-Recovery-Admins’ In the ‘Tasks to Delegate’ select ‘Create a custom task to delegate’ In the Active Directory Object Type dialog, select Only the following objects in the folder. In the list select msFVE-RecoveryInformation objects and click Next For permissions set as ‘Full Control’ and select finish Now any user in our security group will be able to view the Bitlocker recovery keys.

-
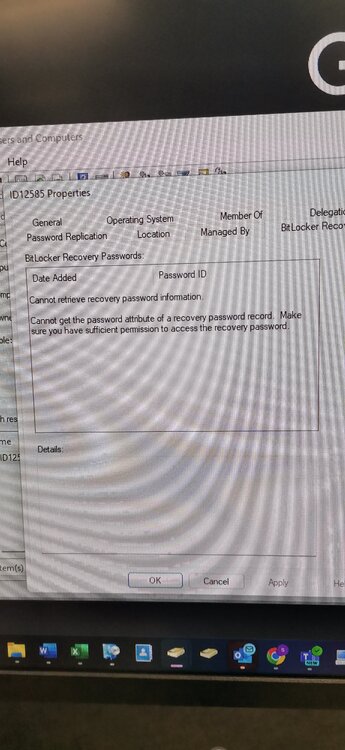
Bitlocker issue:- Task Sequence tries to escrow the key to AD it can't read it from registry. After deploying bitlocker i can see Bitlocker Recovery Tab on AD under the relevant PC im using for testing but there are no recovery keys and gives this message as per screenshot.
-

Citrix Workspace Uninstall
DamianIT replied to ITMick's question in Deploy software, applications and drivers
Hello there, Hope you were able to figure this out. I just got assigned a similar task and it looks like i'm having the same issue. Can you post the actual text of your powershell script or can you provide the link you found the link? i'd like to test on my end. -
 We have multiple versions of SQL installed on our SCCM server. We recently ran a Nessus scan on the server & there are many vulnerabilities for the old versions. I would like to uninstall the older SQL versions along with the ODBC drivers, if possible. Can I remove the old versions and just leave SQL server 2019? Will this break SCCM? I attached a screen shot below.
-
 Thanks a lot! this fixed my issue! What remains concerning is that; from SCCM console I have two SMS Issuing certificate and one was expired, the one will be till 2025, I didn't see any issues for now but not sure if that matters?
 -
 Update - I've decided that rather than move just the SCCM DB, I'll build a new site with a fresh DB and do a side-by-side migration. Although, If anyone does know the answer to the error above, I'd still be interested to know.
 -
Hi, Has anyone come across this before? I am moving our SCCM database from SQL 2012 on a 2012r2 server to SQL 2019 on a 2019 server, by recovering from a backup. All seems to have gone fine, until the final step of running config manager setup again to choose the site maintenance option, to 'modify SQL server configuration', in order to point SCCM to the new server that is now hosting the database. ERROR: SQL Server error: [42000][137][Microsoft][SQL Server Native Client 11.0][SQL Server]Must declare the scalar variable "@String". : dbo.spCreateAndBackupSQLCert Create_BackupSQLCert : Failed to execute spCreateAndBackupSQLCert CSiteControlSetup::SetupCertificateForSSB : Failed to create/backup SQL SSB certificate. ERROR: Failed to set up SQL Server certificate for service broker on "SERVER NAME" . I have enabled broker, set trustworthy on and honor broker priority on, on the new instance before running setup.exe again. From some reading online, I believe it could be something to do with setting up SCCM initially with one account, but then changing it to another domain account running the service(s) and now somehow not being able to unlock the master key for the database certs. Sorry if this is making no sense, I am no SQL expert. Being right at the final stage of moving the database, I'm really stuck with this issue now, so any advice/pointers would be greatly welcomed, even if it's just to point me in the direction of which account I need to try to figure out was initially running things - I'm not clear whether that means the account running the config mgr console, the database instance, or the running the sql or sccm services. Thanks Paul
-
and here's a video I did when a root cert expired -
-
renewing certificates isn't so bad, have a read of my guide here > https://www.niallbrady.com/2020/08/16/how-can-i-replace-an-expired-iis-certificate-in-a-pki-enabled-configmgr-environment/
-
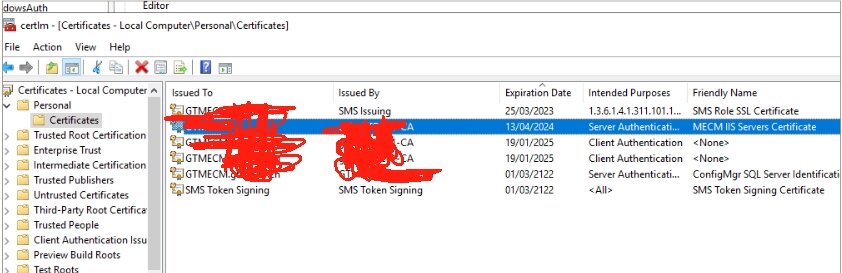
I‘m having issue with SMS_MP_CONTROL_MANAGER with Error 12175. I also checked my SCCM server's certificate and found that both SMS Role SSL Certificate expried 25/03/2023 and MECM llS Servers Certificate expired 13/04/2024. I suspected this might be the cause but how can I renew them step by step? If this is fixed, is it possible to renew them automatically? I have the GPO to handling certificate related configuration but maybe I've missted any? I've been using this SCCM server for around 2-3 years in production and recently I didn't touch it at all:( Any advice would be really appreciated. following are the erorr messages in SCCM console: MP Control Manager detected User Service is not responding to HTTP requests. The HTTP status code and text is 12175, . Possible cause: Internet Information Services (IIS) isn't running or configured to listen on the ports over which the site is configured to communicate. Solution: Verify that the designated Web Site is configured to use the same ports which the site is configured to use. Possible cause: The designated Web Site is disabled in IIS. Solution: Verify that the designated Web Site is enabled, and functioning properly. Possible cause: The User Service application pool identity does not have the required logon privileges. Solution: Verify that the User Service application pool is configured to run under Network Service account. Possible cause: ASP.NET is not installed. Solution: Ensure ASP.NET 4.5 or above is selected under Web Server - Application Development and Features in Windows Server. Possible cause: ASP.NET application does not function properly. Solution: Browse to http(s)://localhost/CMUserService_WindowsAuth/ApplicationViewService.asmx on the local server machine and follow error instructions.
-

Object Replication Error After R2 SP1 Upgrade
Wilson Betancurth replied to Aquintus's topic in Configuration Manager 2012
Your solution for this post worked, thanks. @Peter33 -
can you please show me a screenshot of where you are seeing this error ?
-
I have been trying to set this up but the "Boot to Cloud PC Enhanced" setting, set to "Enable Boot to Cloud Shared PC Mode", never works. It returns a 65000 error. Everything else from the wizard works as expected. I have been using the Windows 365 Boot wizard, as opposed to the Public Preview wizard you are using in this demo. I have opened a ticket with MS but things are moving very slowly with them. Any ideas?
-

Using UI++ With SCCM
coolsport00 replied to coolsport00's topic in System Center Configuration Manager (Current Branch)
I know it's been a while since I posted this question, I've been inundated with actual other work I wanted to provide an update on this. So, as I shared above, we use a default SCCM Web Site (SMS_DP_SMSPKG$) to house our UI++ xml file, which the physical location is in \\sccm-install-dir\SCCMContentLib\ folder. Then, we configure our Boot Image to point to this location in the Customization tab, as a prestart command, to use UI++. For us, we don't house the UI xml file in any of the default SCCM directories in this location, but seemingly a manually created "XML" folder, so: \\sccm-install-dir\SCCMContentLib\XML\UI.xml. When I was attempting to make changes (i.e. serverely clean up) our UI xml file, when attempting to image a device, UI++ wouldn't come up...our Task Sequence would. Someone above I believe suggested this could be because of an syntax error within the xml file. This still could be so. But, when I attempted to change the path of the xml in our Boot Image to point to an unaltered xml file, the same behavior happened...so I don't know. Fast foward to a day ago - we use our xml file to image various model computers in our environment. We since have procured a new model and needed to add it to our UI xml file. When we did so, it worked. No going directly to Task Sequence and skipping UI++ when imaging. 🤔 So, I don't know. That's where I'm at. I still need to make radical changes (remove a lot of things we no longer use/need) from our xml file. So, we'll see if the original unwanted behavior continues. For now, all is well. I'll post back if I continue having problems. Thanks for all the suggestions.