anyweb
-
Posts
9259 -
Joined
-
Last visited
-
Days Won
371
Everything posted by anyweb
-

how can I target applications to specific hardware
anyweb replied to anyweb's question in Deploy software, applications and drivers
Identify the hardware name in WMI Now we need to query WMI to find out the hardware name (we'll need it for later). Open a command prompt on your client hardware (the machines you intend to be deploying to....) and type wmic To find out the model name type this CSProduct Get Name The result is what we need Below is a sample output from a Dell Optiplex 745 -
how can I target applications to specific hardware
anyweb replied to anyweb's question in Deploy software, applications and drivers
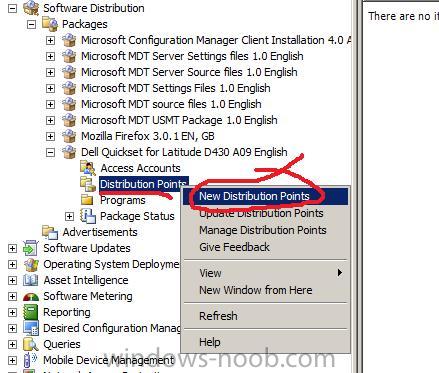
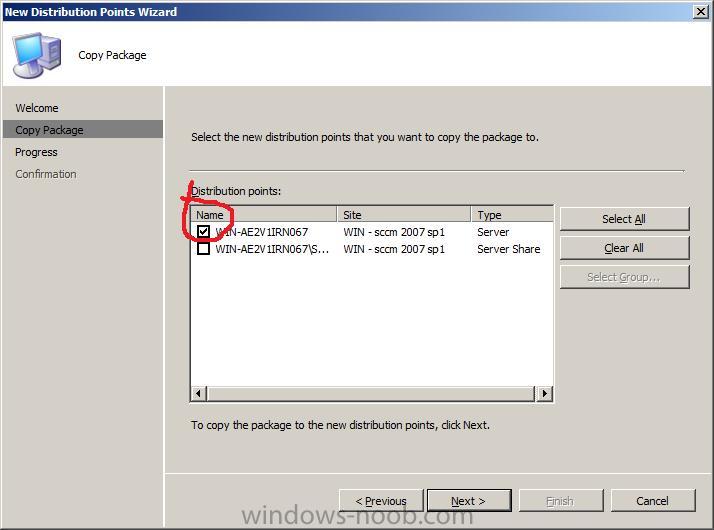
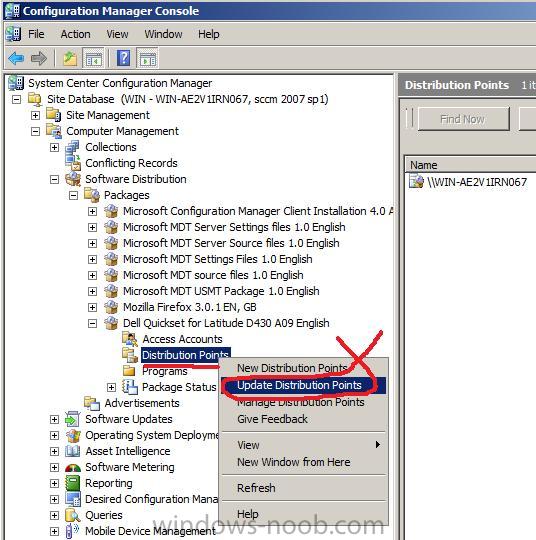
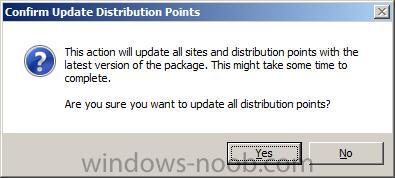
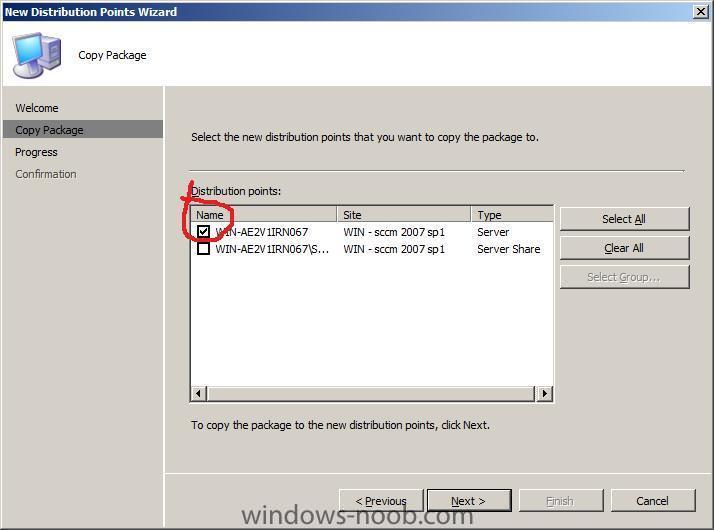
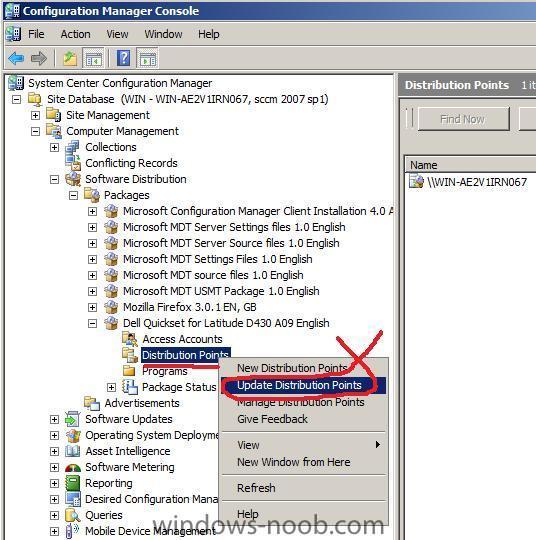
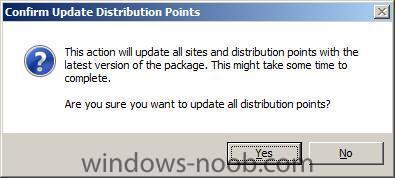
Distribute the Package and update distribution points Now that we have created our Package and created a program for it, we need to create a distribution point for it and then update that distribution point with the package. Right click on Distribution Points beside our newly created package and select New Distribution Points. click next when the Wizard appears and select the first distribution point (do not select the PXE DP as this is not a boot image....) click next and then close at the summary screen. Now that we've created a Distribution Point let's Update it, right click on our packages Distritbution Points and choose Update Distribution Points answer Yes when prompted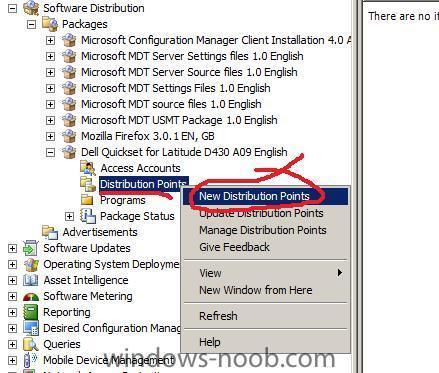
-
how can I target applications to specific hardware
anyweb replied to anyweb's question in Deploy software, applications and drivers
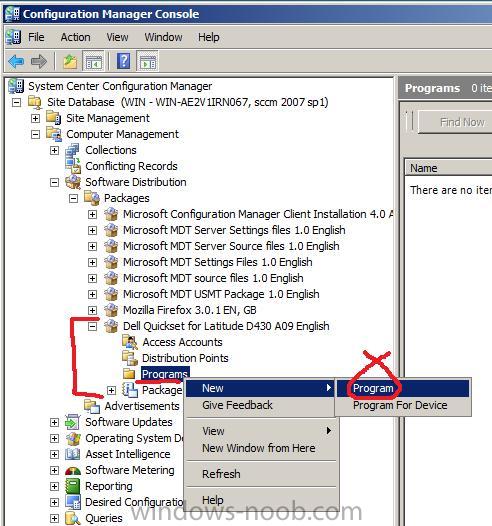
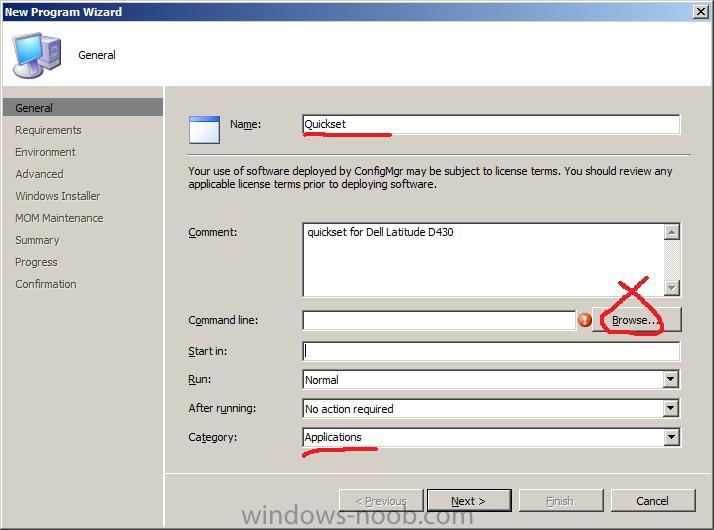
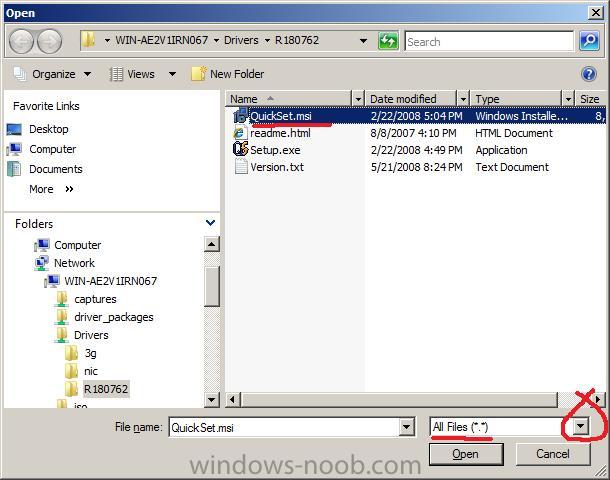
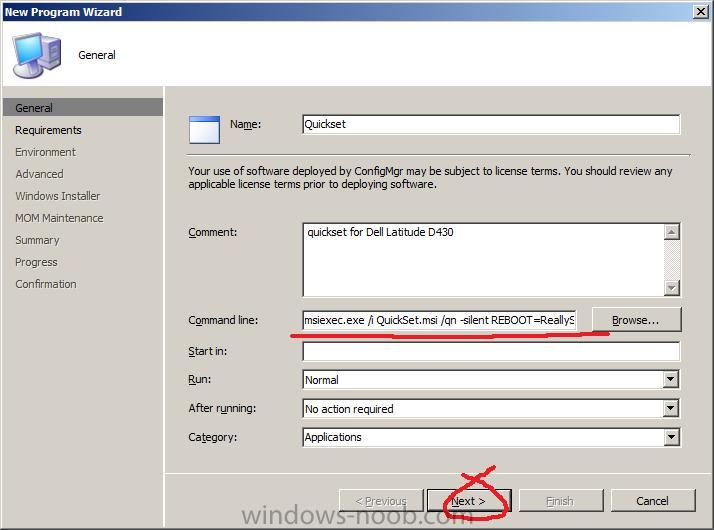
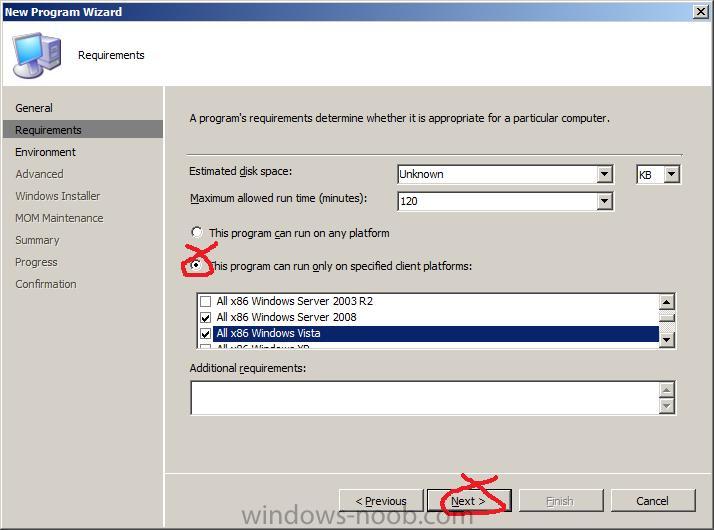
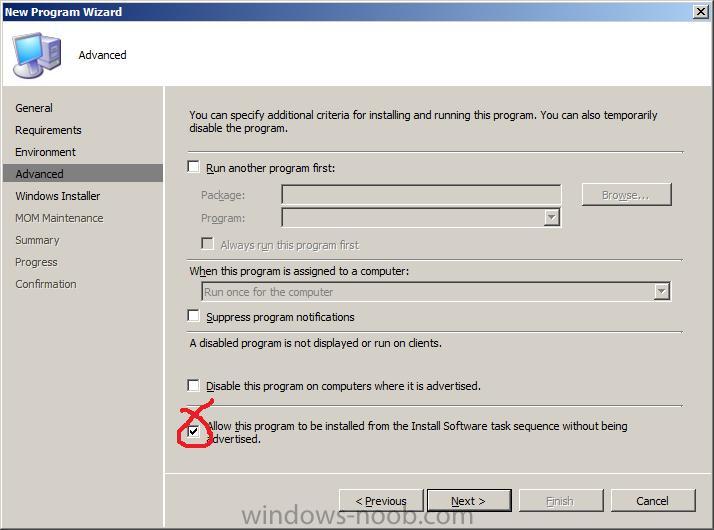
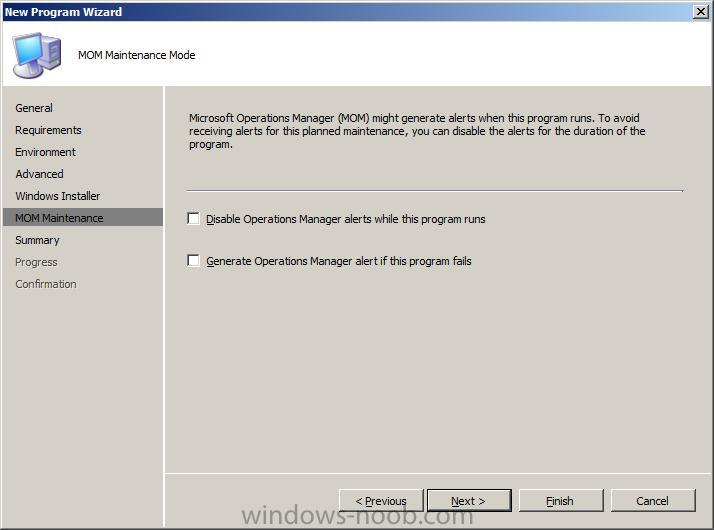
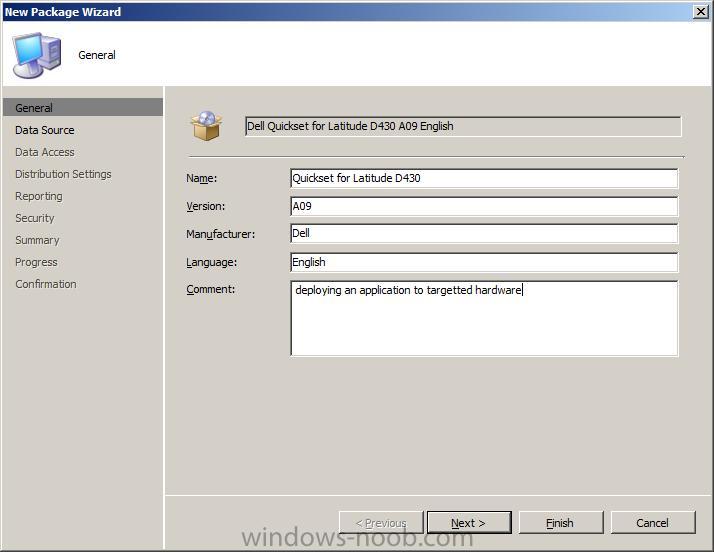
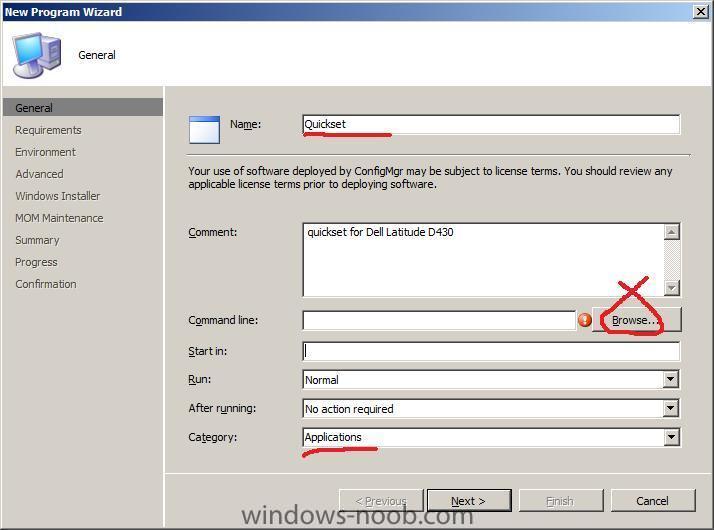
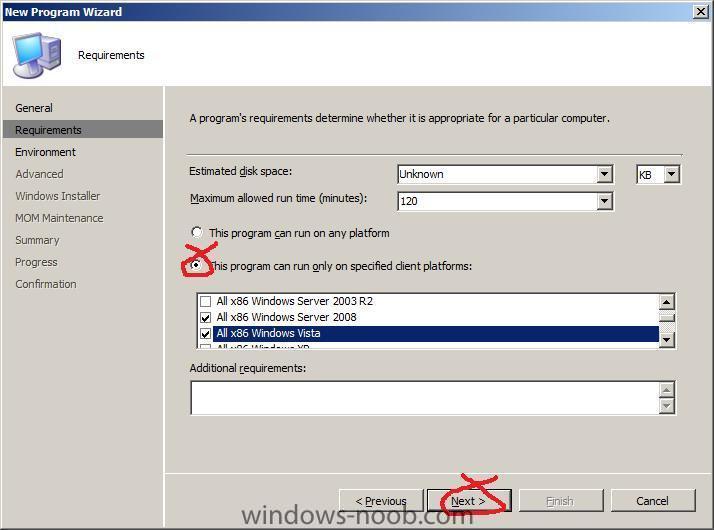
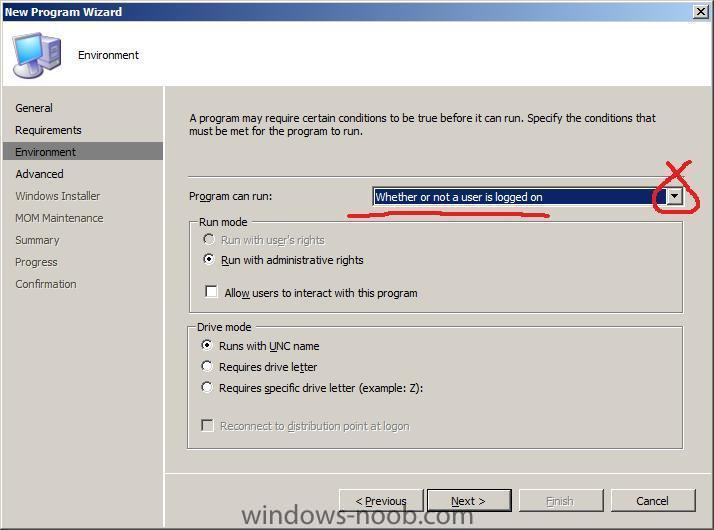
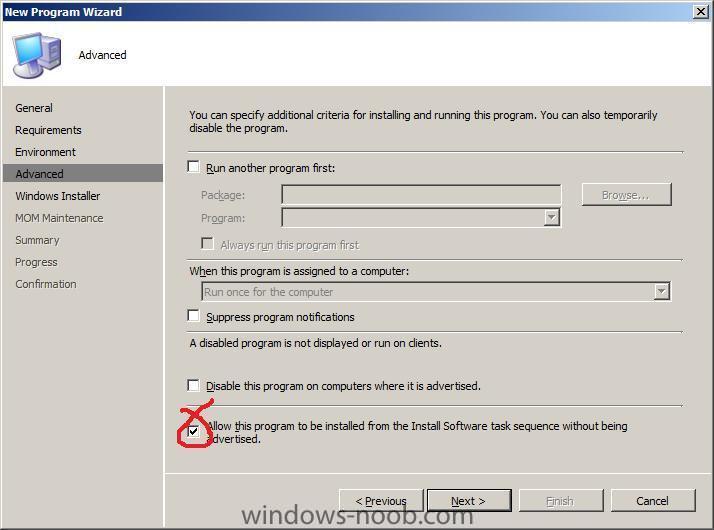
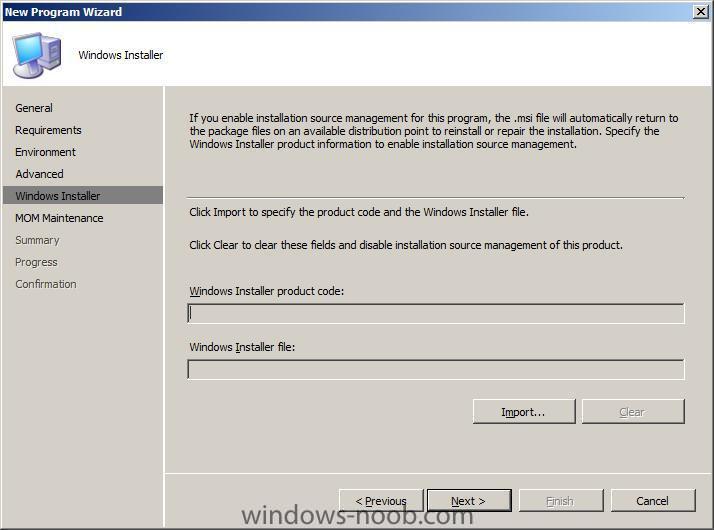
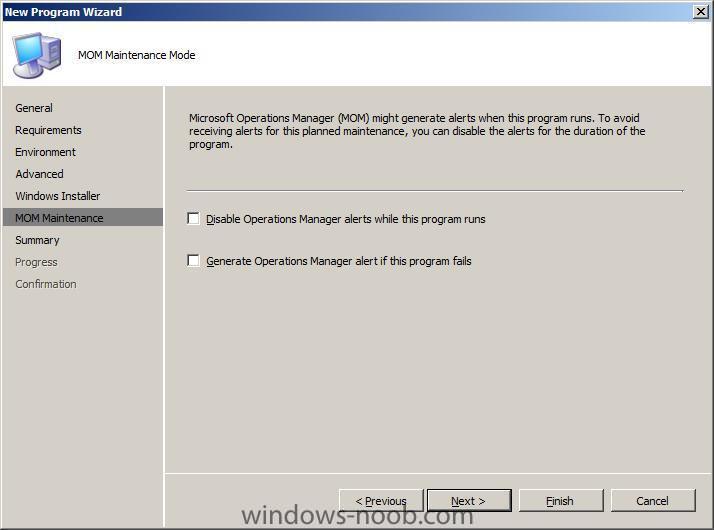
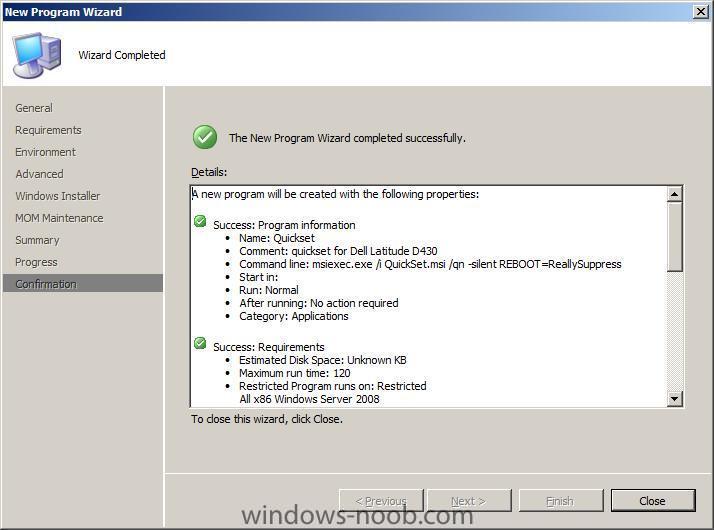
Create a Program ok now that we've created our package above, let's create a program (needed to install the application). Highlight the package, expand it and right-click on Programs, select New, Program. when the wizard appears, type Applications for category type, fill in the other details and click browse make sure to select file type to All files and then highlight quickset.msi and click open then paste in the folllowing line msiexec.exe /i "QuickSet.msi" /qn -silent REBOOT=ReallySuppress and click next, the switches were taken from the README.HTML file provided with this application On the requirements screen we can decide how long this application is allowed to take to install and on what OS types it can be installed on for Environment make sure that whether or not a user is logged on is highlighted from the choices available otherwise this will not work on the Advanced screen, also make sure that Allow this program to be installed from the Install software Task Sequence without being advertised is selected for the Windows Installer and MOM Maintenance screens stay with the defaults, click next at the summary and close at the confirmation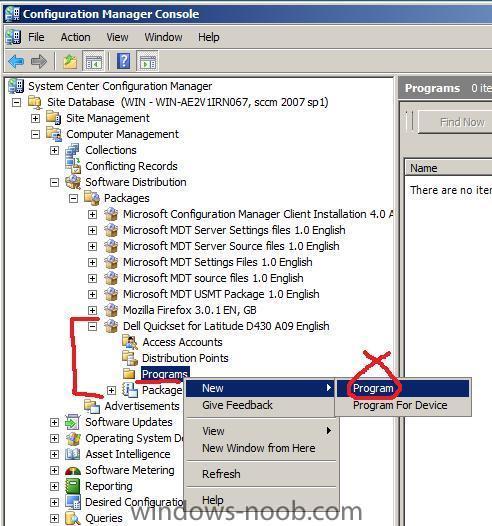


-
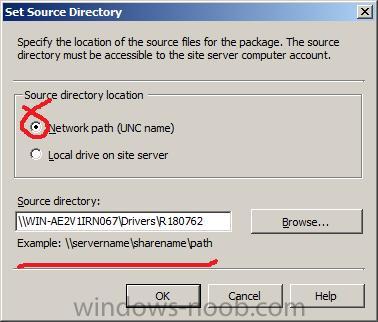
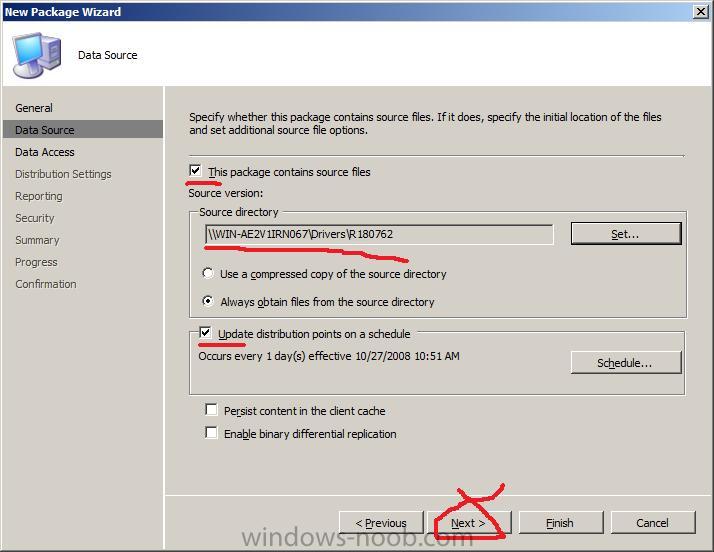
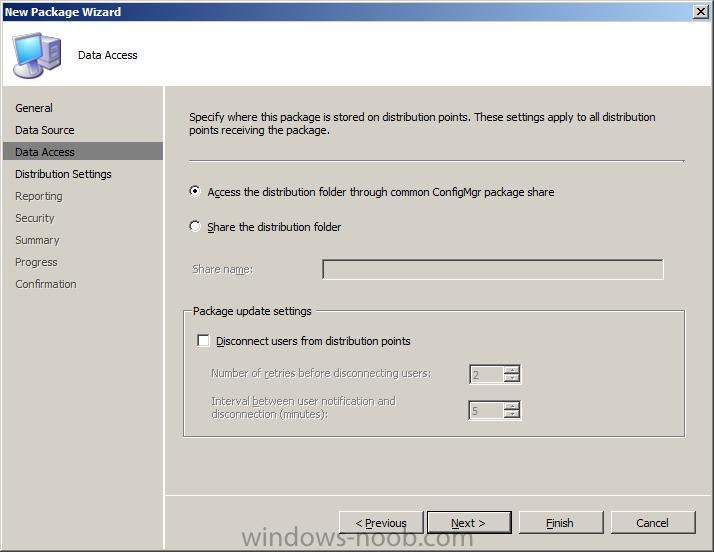
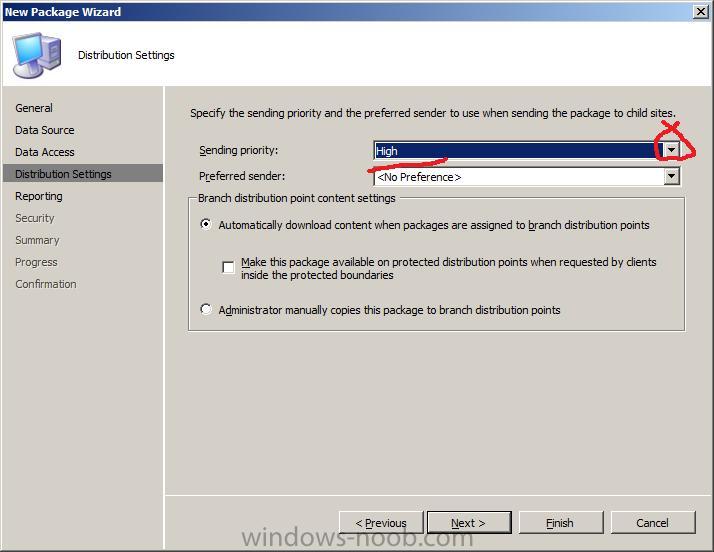
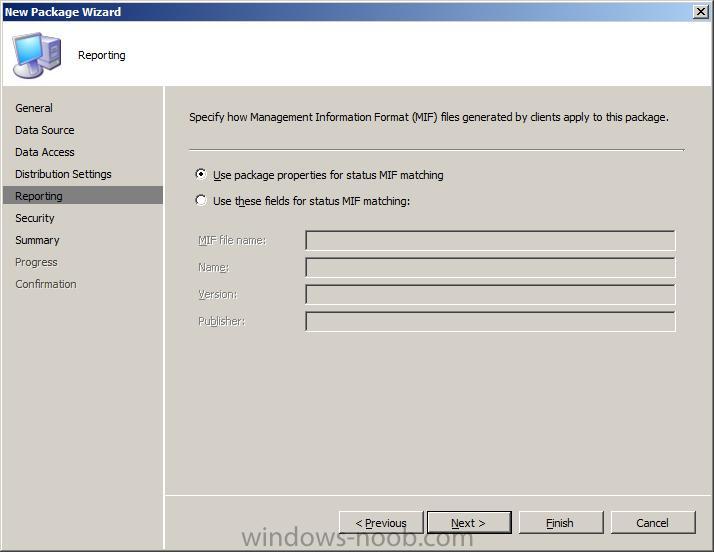
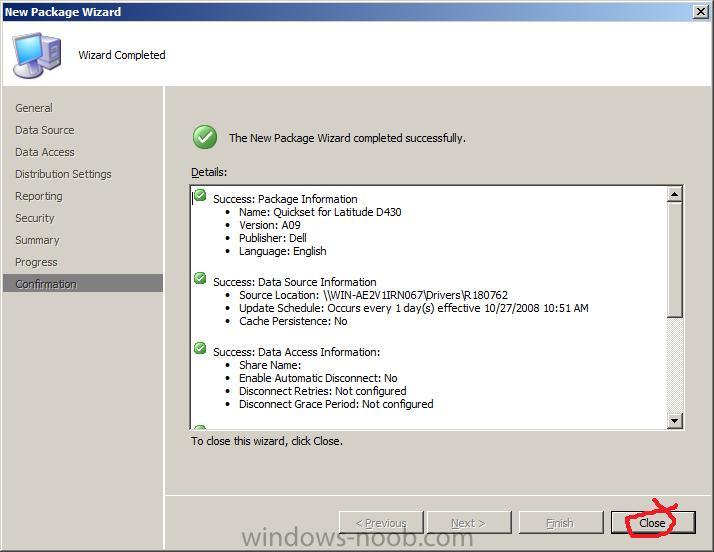
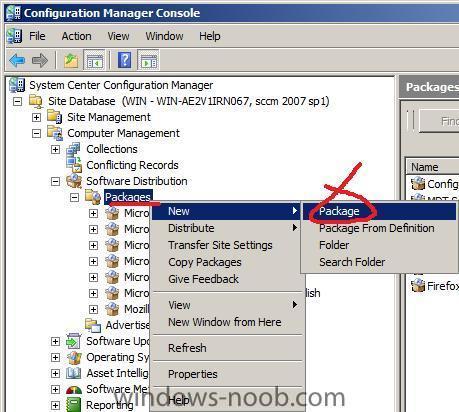
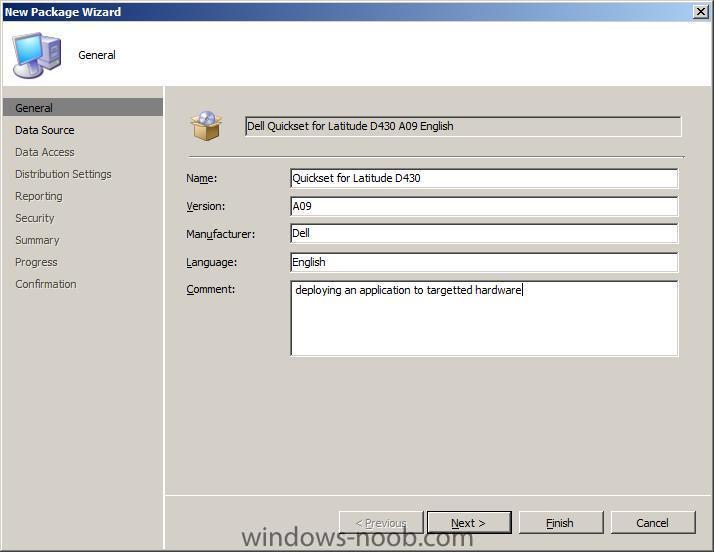
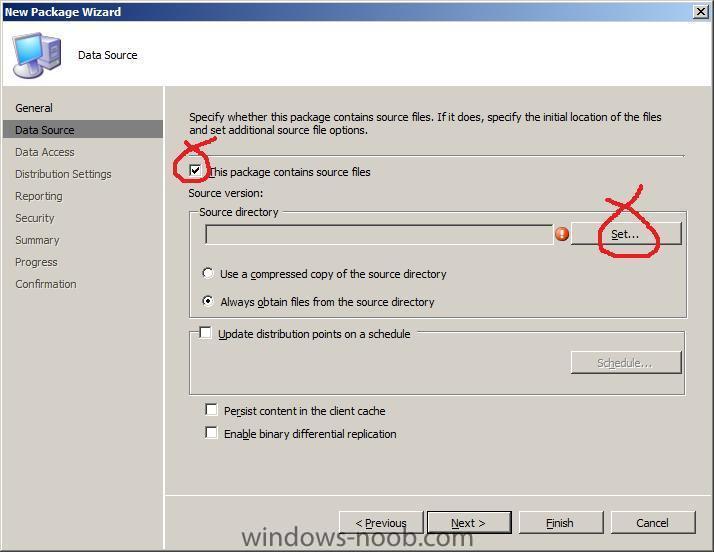
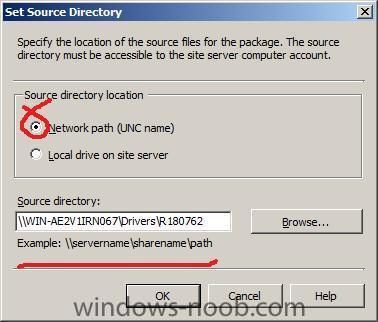
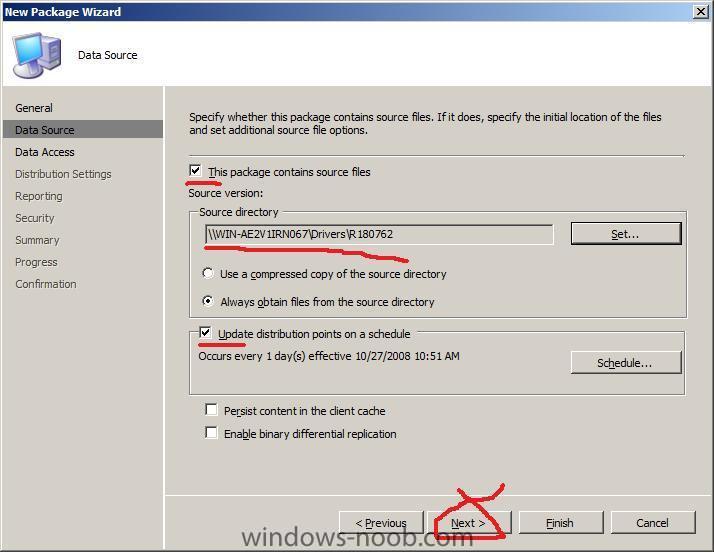
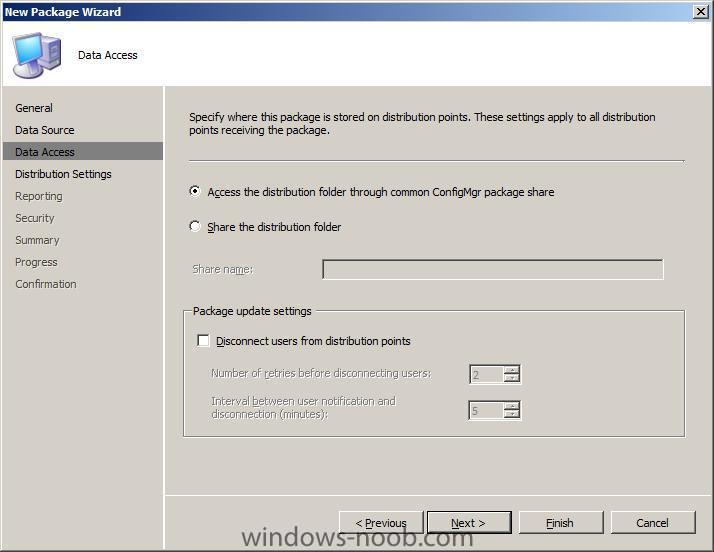
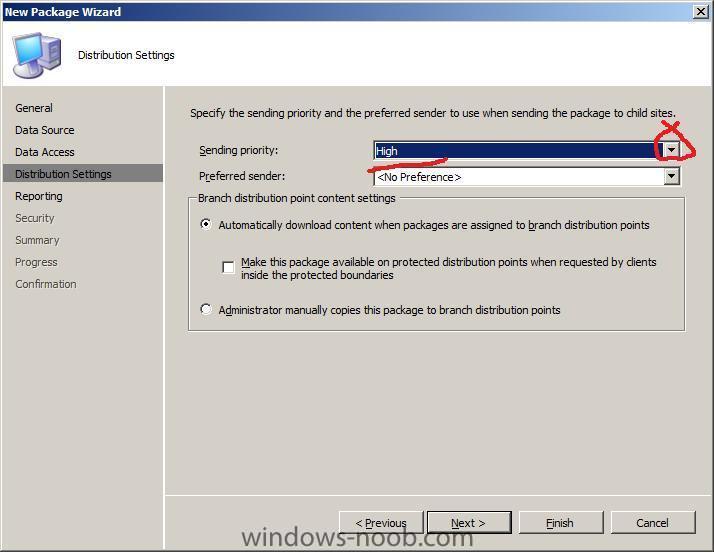
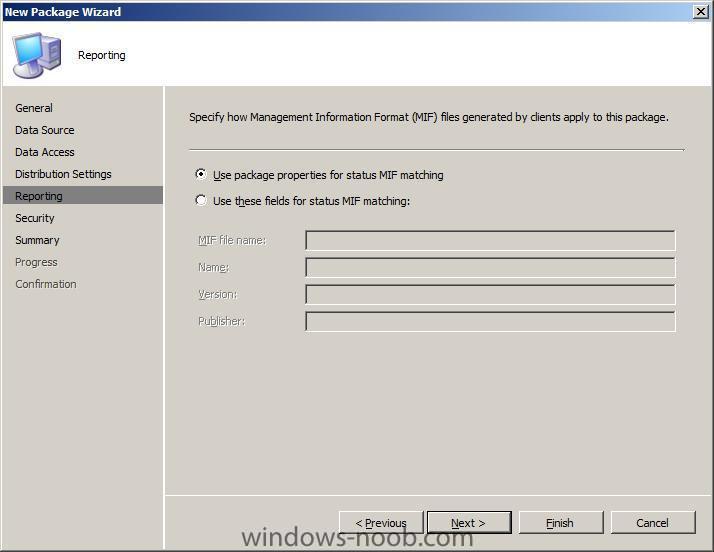
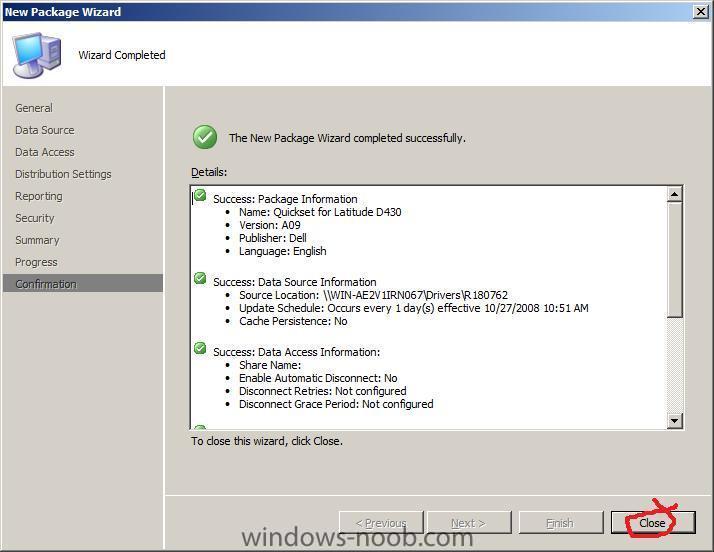
One of the big problems with deploying computers today is getting all drivers installed correctly, some drivers will install just fine using the standard PNP (plug and play) routines within Windows Setup providing of course that you have first added the drivers to driver packages and distributed them to your distribution point(s), some drivers however are not so easy to install and require an application to be run in order for the hardware to function, examples are Bluetooth, Wireless, 3G amonsgt others. These applications contain the drivers needed plus several support files/apps and what not. Therefore you need to have a method of installing applications and in addition you need to be able to target what hardware these applications get installed onto (you don't want wireless drivers being pushed out onto a non-wireless desktop for example. In the example below we will deploy an application called Quickset on a Dell Latitude D430, and I will quide you through the processes needed to get you there. Obviously you can replace the Hardware type with whatever model you are using and in addition you can use whatever application/driver you wish, the purpose of this guide is to show you how to target selected hardware Get the Application download the following file and run it on a test Dell computer, it will decompress the files to c:\dell\drivers\R180762, copy that folder and all files in it to your drivers share on your SCCM server (eg: \\servername\drivers\R180762) Create a Package Ok now that we have the files, and copied them to our SCCM drivers share, we need to create a package in SCCM, so open the Software Distribution node and expand Packages. Right click on Packages and choose New, Package. When the Wizard appears fill in the general details place a checkmark in this package contains source files and click on Set fill in the path to where you copied the driver (a driver share on your SCCM server) and place a checkmark in update distribution points on a schedule this will allow you to update versions of this application by simply copying the files to that folder... click next and leave data access settings as they are set the Distribution Settings to High for sending priority leave reporting and security as default review the summary and verify all green ticks, then click close at the confirmation screen

-
how can I troubleshoot Windows PE booting in SCCM
anyweb replied to anyweb's question in Troubleshooting, Tools, Hints and Tips
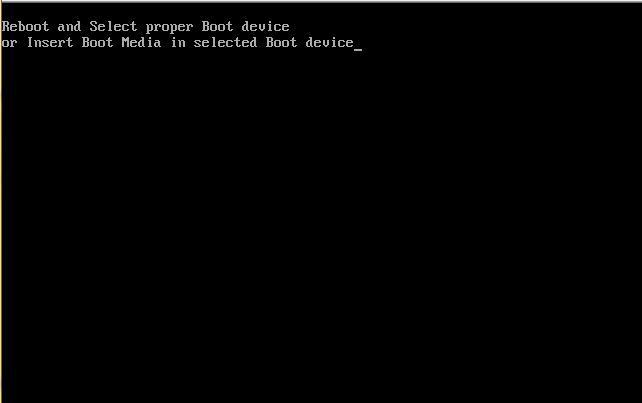
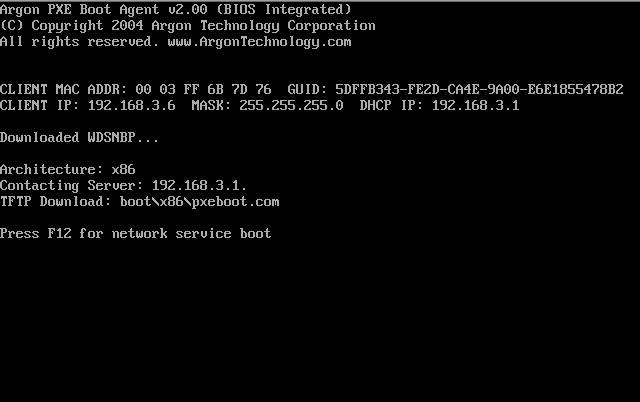
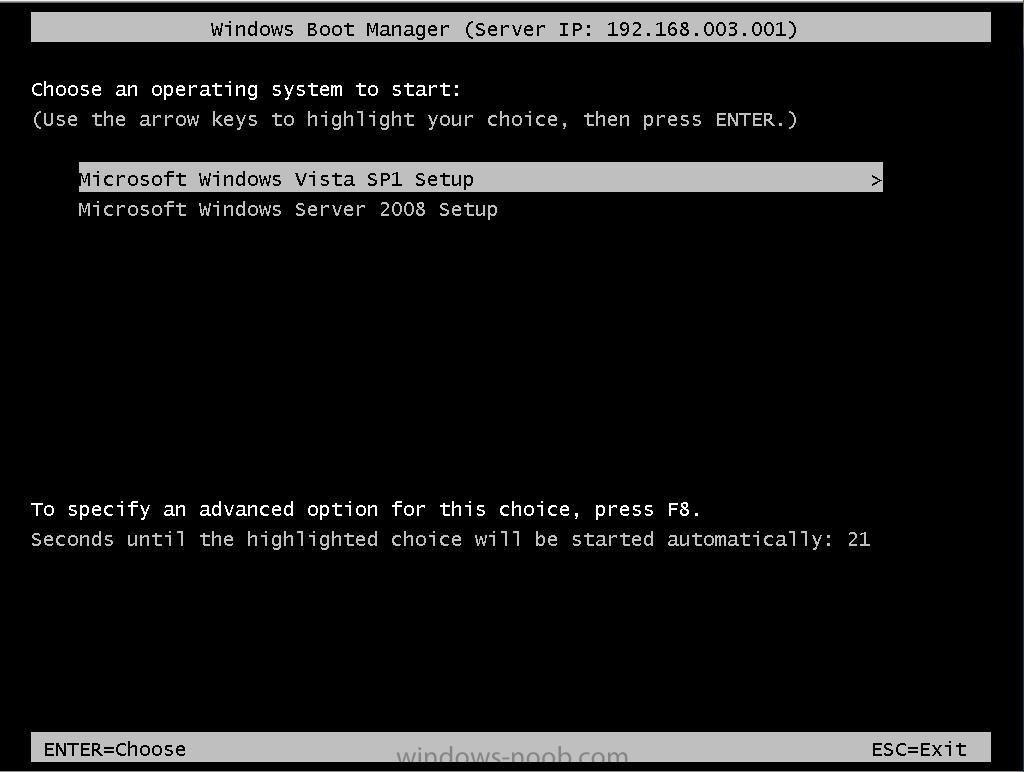
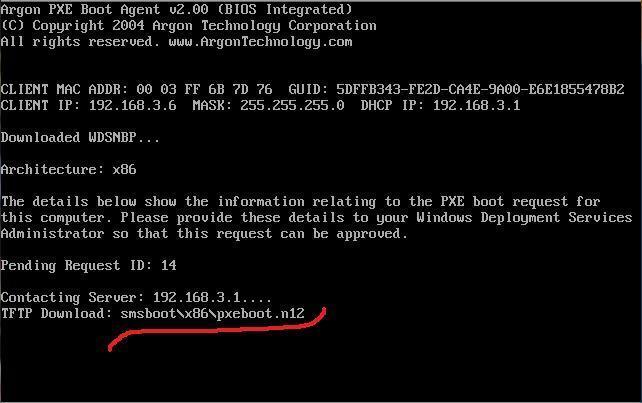
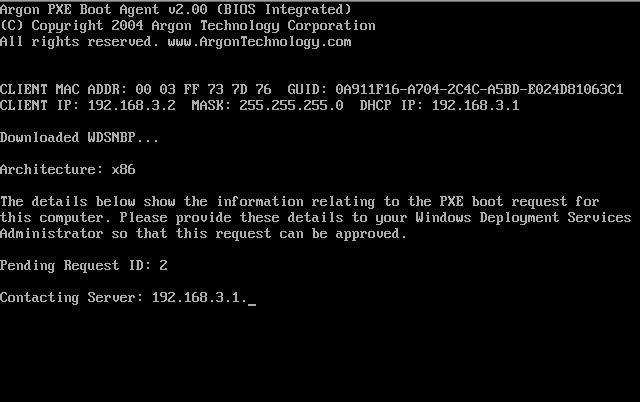
got this error today just after PXE booting The error had me confused for a bit but after rebooting a few times I eventually noticed that the PXE boot prompted me to press F12 to choose boot (like a normal lite touch or RIS menu) prior to the error, so one time I pressed F12 and it displayed the Windows Boot Manager menu with two choices, Setup Vista or Setupy Windows Server 2008 (my WDS menu basically...) So, why didn't it automatically PXE boot into the Server deployment, the reason was simple, even though I had imported the computers settings into the OSD section of SCCM, I had made a mistake in the MAC address, so it never would 'auto f12' the pc in question and instead, defaulted to prompting me for F12 followed quickly by the error above. solution, type in the correct MAC address ! Once done, it will PXE boot as normal and after verifying the MAC address with the one in SCCM's database will apply pxeboot.n12


-
ah good to hear it, you can get a lot of WDS info including how to capture and how to deploy images right here in the WDS section if you want semi interactive menus during the wds deployment then lite touch (LTi) is the way to go and you'll need to install MDT for that, if you think it's confusing now just wait till you try SCCM 2007, cheers anyweb
-
have you tried removing anything between the server and client, ie direct connection to rule out SWITCH or routing issues ? if that doesnt help have you checked your logs and event viewer for clues ? cheers anyweb
-
MSCCM 2007, trying to create a new collection but cannot...
anyweb replied to togeoff's question in Collections
have you tried this method ? if that's not what you need then please show me a sample of what you are trying to do (link) -
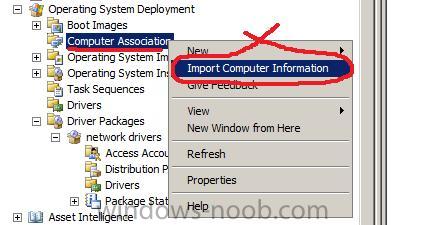
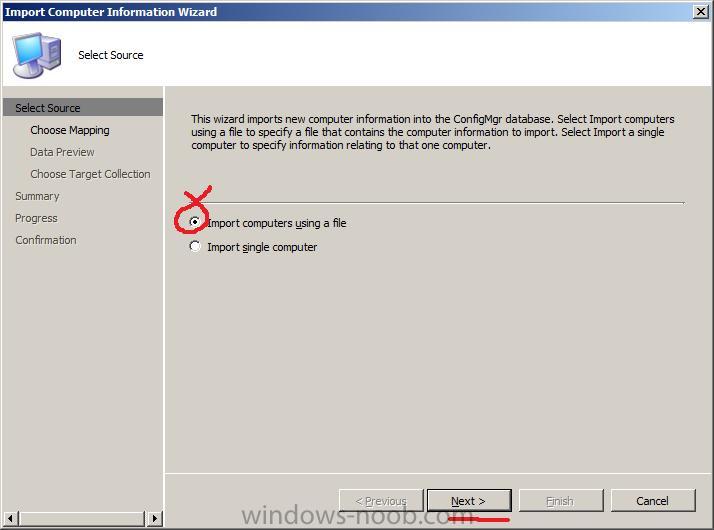
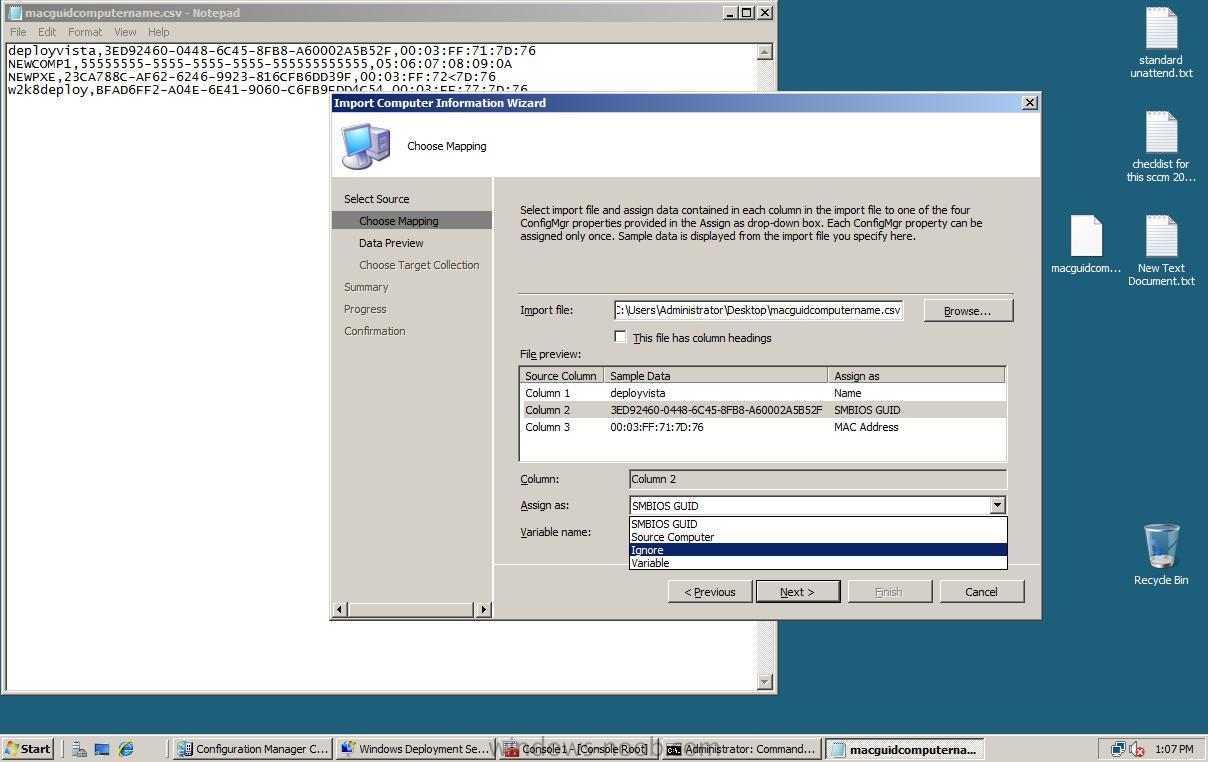
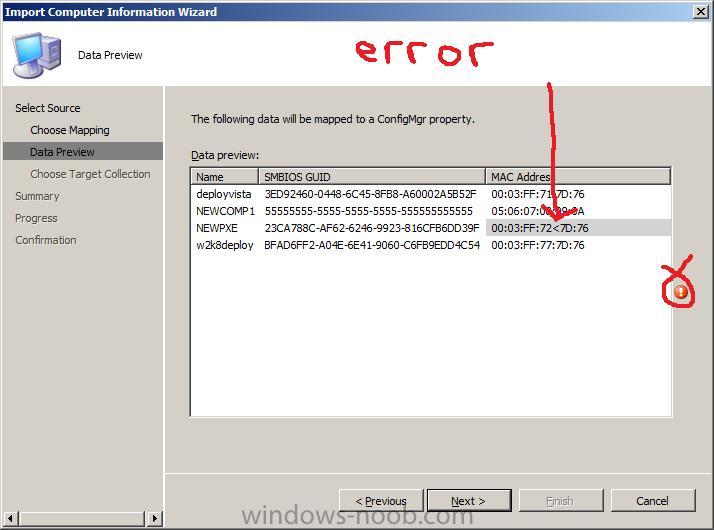
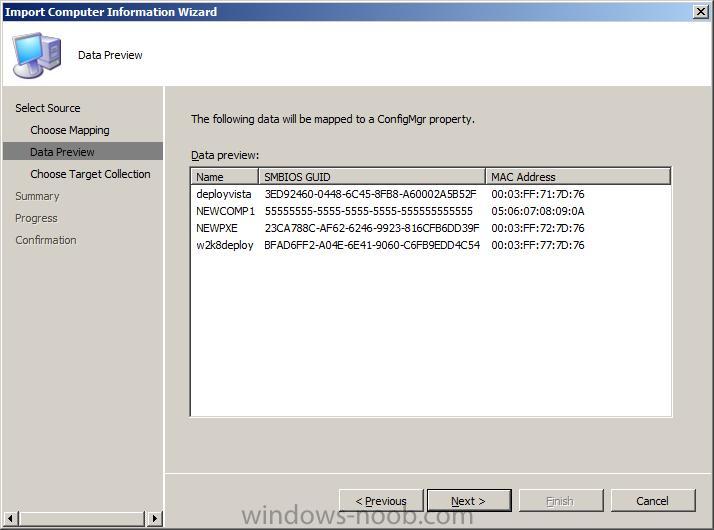
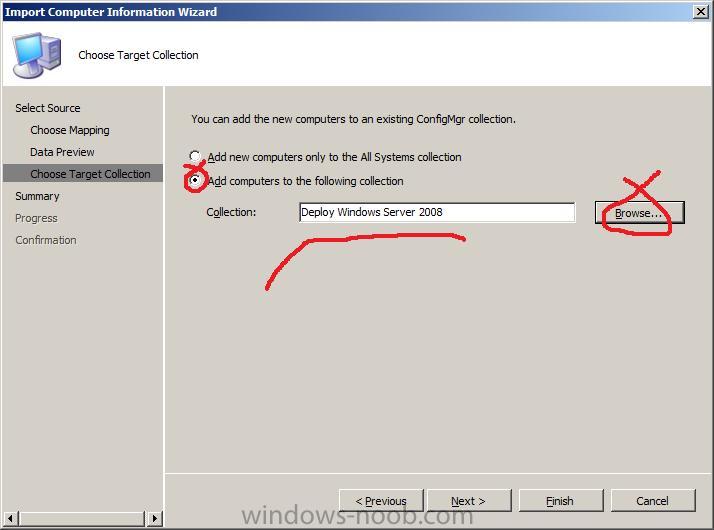
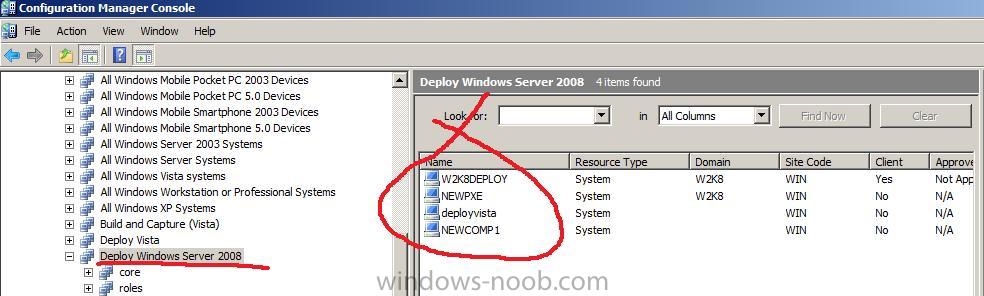
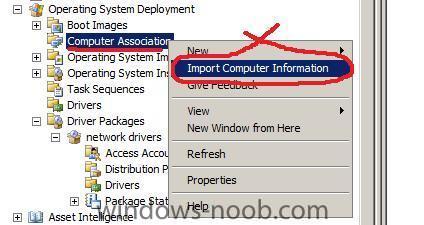
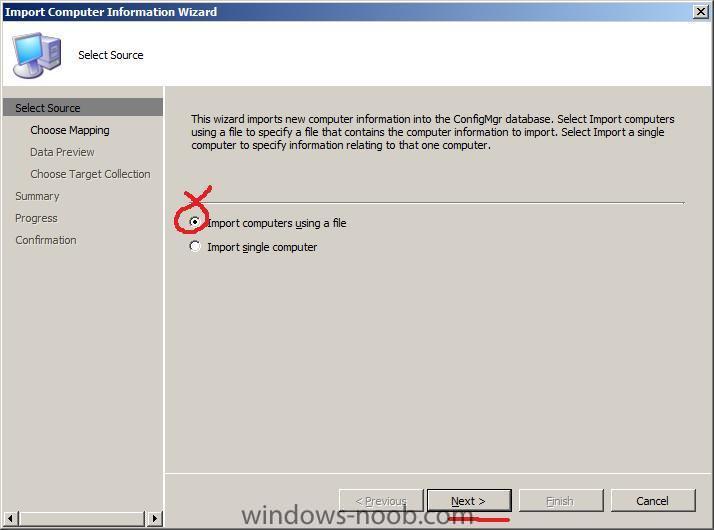
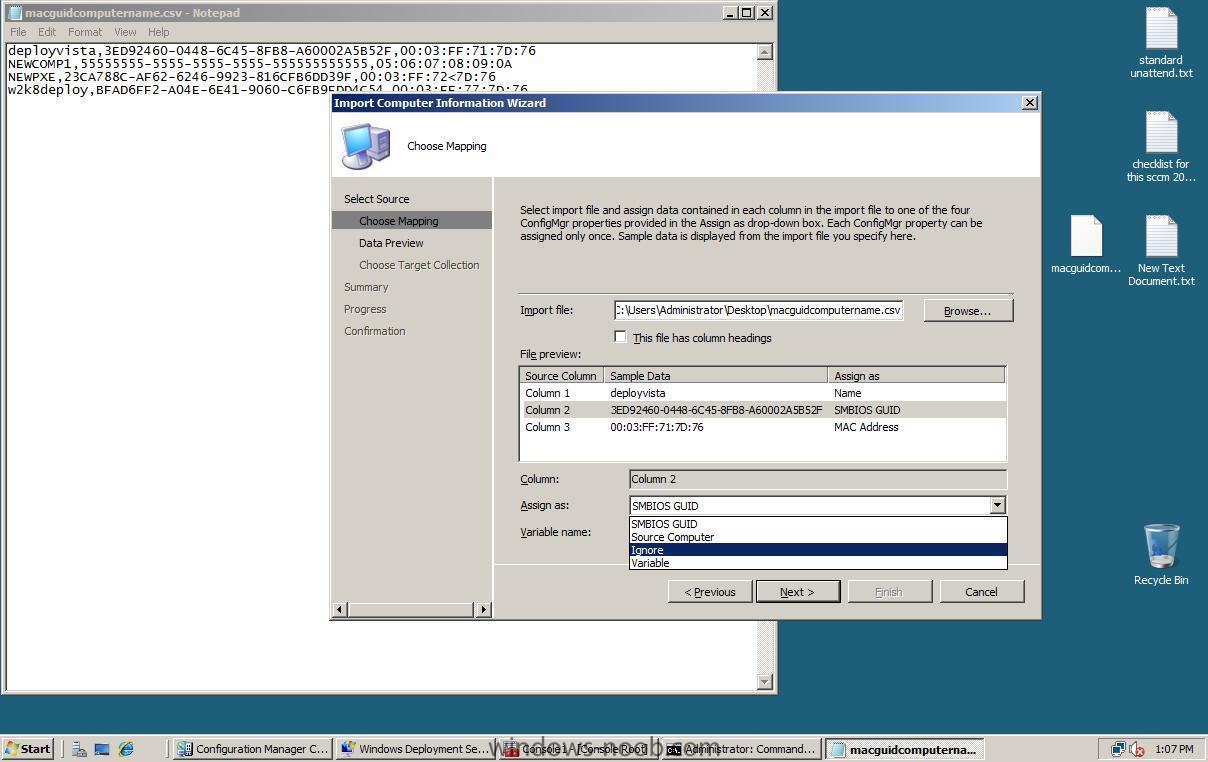
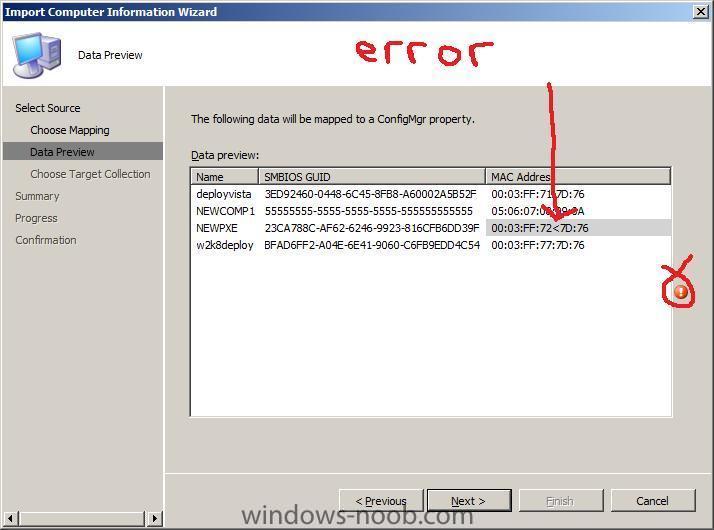
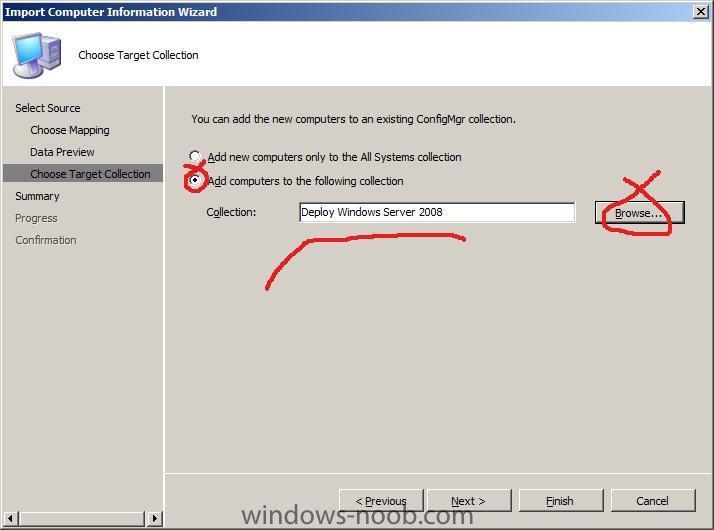
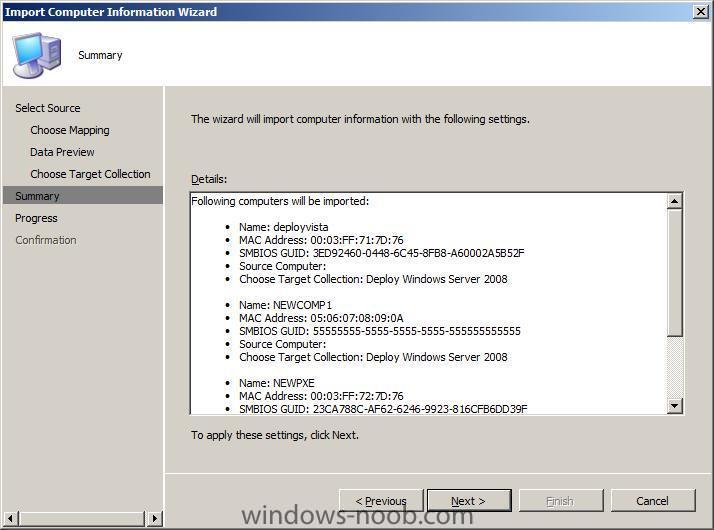
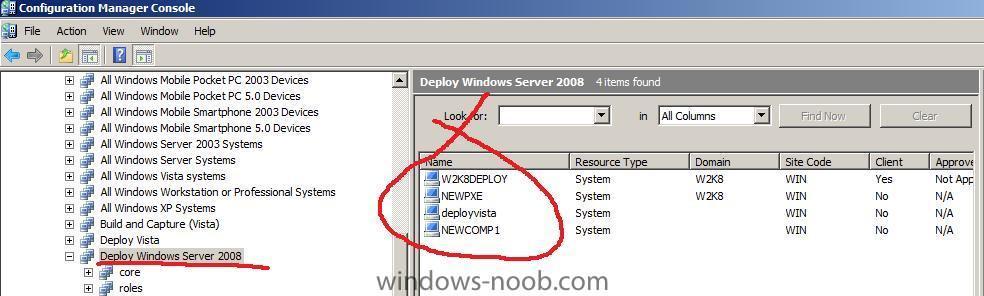
In the Operating System Deployment section of SCCM right click on Computer Association and choose Import Computer Information when the wizard appears select Import Computers using a file The file itself must contain the information we need in this (CSV) format COMPUTERNAME,GUID,MACADDRESS (sample below) if we look at the last line, I've marked the computer name in Red, the GUID in BLUE and the MAC address in GREEN, separate these values with commas as above. w2k8deploy,BFAD6FF2-A04E-6E41-9060-C6FB9EDD4C54,00:03:FF:77:7D:76 the file can be a standard TEXT file that you create in notepad, and you can rename it to CSV for easier importing into our wizard... so, click on Browse and browse to where you've got your CSV file on the Choose Mapping screen, you can select columns and define what to do with that mapping, eg: you could tell it to ignore the GUID value (we won't however) on the next screen you'll see a Data Preview, and this is useful as it will highlight any errors it finds with a red exclamation mark, in the example below a typo meant that it correctly flagged the MAC address as invalid so edit your CSV file again and fix the error, click previous (back) and try again until it looks like this here's a sample file..macguidcomputername.csv Next choose the target collection where you want these computers to end up in review the summary in SCCM collections, we can now see the computers we've just imported from File, thats it ! If you want to script this then read this post on MSDN cheers anyweb

-
Celebrating 25 years For 25 years, Microsoft Press books have focused on helping you take your skills and knowledge to the next level. Celebrate our 25th Anniversary with a "Free E-Book of the Month" offer! Simply sign up for the Microsoft Press Book Connection Newsletter for notification of offers, register, and download the selection of the month. Windows Server® 2008 TCP/IP Protocols and Services by Joseph Davies ISBN: 9780735624474 Your essential guide to TCP/IP—fully updated for Windows Server 2008 and Windows Vista. For more information or to buy the print version of this title, visit the Microsoft Learning website. View Chapter 1: Local Area Network (LAN) Technologies or Sign up to download the entire e-book (PDF, 21.1 MB).
-
"Windows 2000 code was 5.0 and then we shipped Windows XP as 5.1, even though it was a major release we didn't' want to change code version numbers to maximize application compatibility." ... "That brings us to Windows Vista, which is 6.0. So we see Windows 7 as our next logical significant release and 7th in the family of Windows releases." ... "So we decided to ship the Windows 7 code as Windows 6.1 - which is what you will see in the actual version of the product in cmd.exe or computer properties." read it all on the E7 blog send me a copy Mike ! cheers anyweb
-
NAP - What is it ? In simple terms, Network Access Protection is a client server technology for identifying compliant or non-compliant computers and then deciding what level of access they can have to the network (thereby stopping others from getting infected by viruses and such). If you think for example about remote users dialing in from their home pcs using a VPN connection, those computers are not directly controlled by the network administrator, at least not until now, if you enforce NAP then they could be denied access to your network resources until they are compliant. Note: NAP is not designed to protect a private network from malicious users. It is designed to help administrators maintain the system health of the computers on a private network. NAP is used in conjunction with authentication and authorization of network access, such as using IEEE 802.1X for wireless access. NAP does not prevent an authenticated and authorized user with a compliant computer from spreading a malicious program to the private network or engaging in other inappropriate behavior. But who decides the level of compliancy ? that of course is up to the network administrator, they decide upon a health policy which specifies what criteria you must meet in order to be compliant, for example having a certain level of Security patches and Antivirus updates. The health policy can decide 3 ways of interacting with your network, namely:- * If the system is non-compliant, patch it to the required level first before allowing access to the network * If the system is non-compliant, deny or restrict the user/system access until they meet the health policy criteria * If the system is non-compliant let the user/system have access but make a note of their non-compliance in a report (called reporting mode) In order for the 'health' of the client system to be determined there are two requirements that must be met, the client system (Enforcement Client or EC) must have a client component installed and the server must have a corresponding server component. For example, on the client a System Health Agent has the job of assessing the current state of the health of the client, and the server has a corresponding System Health Validator which checks over the report received from the System Health Agent in order to proceed. these two client/server components are reffered to as SHA and SHV. The information that the SHA sends to the SHV is called the Statement of Health (SoH), the SHV then checks this information and validates it to determine if the EC is compliant or not. The SHV then sends back a response to the client system (EC), this response is called the Statement of Health Response or SoHR. Statement of Health Responses (SoHr) are collected from all System Health Validators (SHV) so that a decision can be made about a clients network access, the decision is sent back to the client so that it knows whether it is compliant or non-compliant. What computers support NAP ? On Windows Vista and Windows Server 2008 computers, the Windows NAP agent is built into the operating system, with Windows XP you need Service Pack 3 installed to use the NAP client for XP, however, the NAP Client Configuration console and NAP product help are only available on Windows Vista and Windows Server 2008. Linux users too are supported with a Linux NAP client from Avenda Systems. How does NAP get enforced ? NAP enforcement mechanisms include DHCP, VPN, IPsec, 802.1X and Terminal Services Gateway, you can use one or many depending on your needs and each would require specific setup and configuration so you need to choose wisely. For more details on Network Access Protection mechanisms see the NAP page on Technet. How do I get NAP help ? Client help is available on computers running Windows Server 2008 or Windows Vista by typing the following at the command line:- hh nap.chm Alternatively you could of course open the NAP Client Configuration console and press F1. What is the Network Policy Server ? The Network Policy Server is a Windows Server 2008 computer that has a role called Network Policy Server installed on it. This server has policies configured on it which determine the network access that is allowed to the client depending on it's SoH from the SHA. This network access can only be decided by first configuring policies on the Network Policy Server, the three different policies are called Connection Request Policy (allows network access with at least one condition), Health Policy (identifies which SHV's are being used to determine the health of computers. You will normally setup two Health Policies, one for compliant (health checks pass) and the other for non-compliant (health checks fail) clients. Finally we have Network Policy which determines the level of network access a client will be given (or denied) based on the SHA checks. The policies on the Network Policy server ultimately determine whether non-compliant computers are remediated (patched) or whether they get full or restricted network access, so whoever defines the policies determines how non-compliant computers are treated. When the Network Policy Server is being used with Network Access Protection it is referred to as a NAP health policy server. How can I setup NAP in a test lab environment ? Here are 4 whitepapers from Microsoft detailing how to setup NAP: • Step-by-Step Guide: Demonstrate IPsec NAP Enforcement in a Test Lab • Step By Step Guide: Demonstrate 802.1X NAP Enforcement in a Test Lab • Step-by-Step Guide: Demonstrate VPN NAP Enforcement in a Test Lab • Step-by-Step Guide: Demonstrate DHCP NAP Enforcement in a Test Lab For a NAP Intro written by Microsoft, take a look at the following document.
-
and here's some info on Unknown computer Support in the R2 release
-
Clinic 5935 - Introducing Hyper-V in Windows Server 2008 This 2-hour online clinic provides IT Professionals experienced in Windows 2000 Server or Windows Server 2003 with the knowledge and skills to implement and manage Hyper-V in an IT environment. Topics covered in the clinic include: Features of Hyper-V Features of server consolidation Hyper-V implementation Creation of virtual machines Dynamic datacenters Clustering in virtual environments Access it online at http://www.microsoft.com/learning/elearning/course/5935.mspx Clinic 6334: Exploring Microsoft System Center Virtual Machine Manager 2008 This 2-hour online clinic provides IT Professionals experienced in Windows 2000 Server or Windows Server 2003 with the knowledge to implement and manage Microsoft System Center Virtual Machine Manager 2008. Topics covered in the clinic include: Features and functionalities of VMM Implementation and management of VMM Management of VMM library Management of hosts by using VMM Implementation of virtual machine Self-Services Access it online at http://www.microsoft.com/learning/elearning/course/6334.mspx Please note you will need to sign-in with a Live ID before accessing.
-
how can I deploy Windows Server 2008 using SCCM 2007 sp1
anyweb replied to anyweb's question in Deploy Server 2008
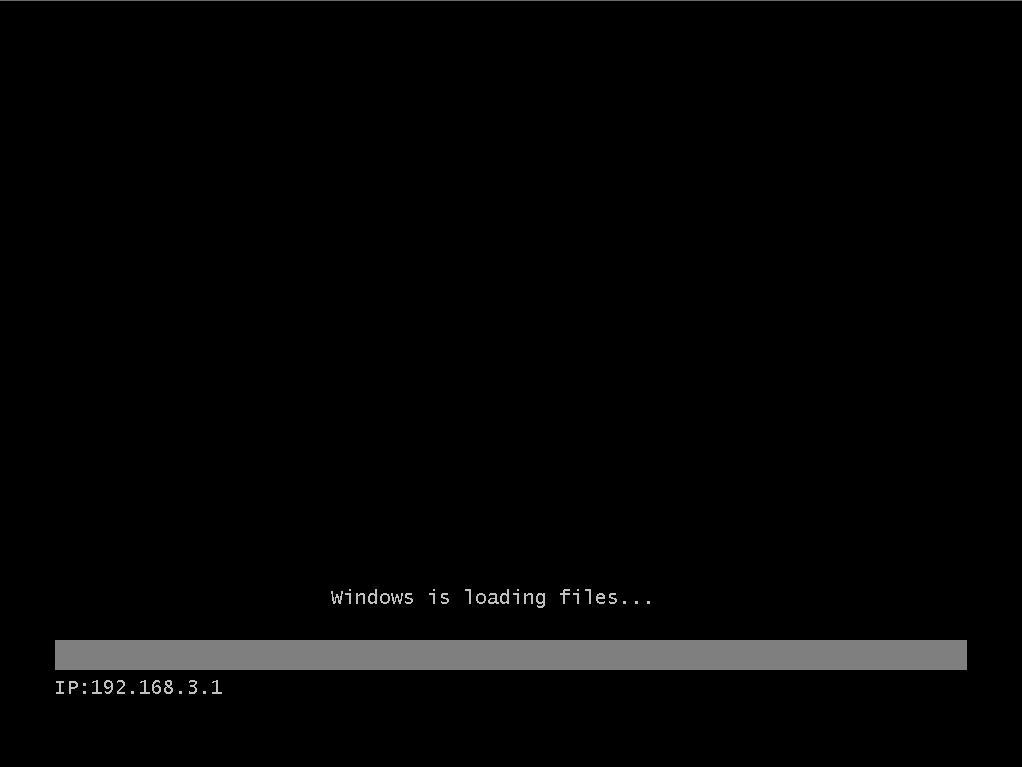
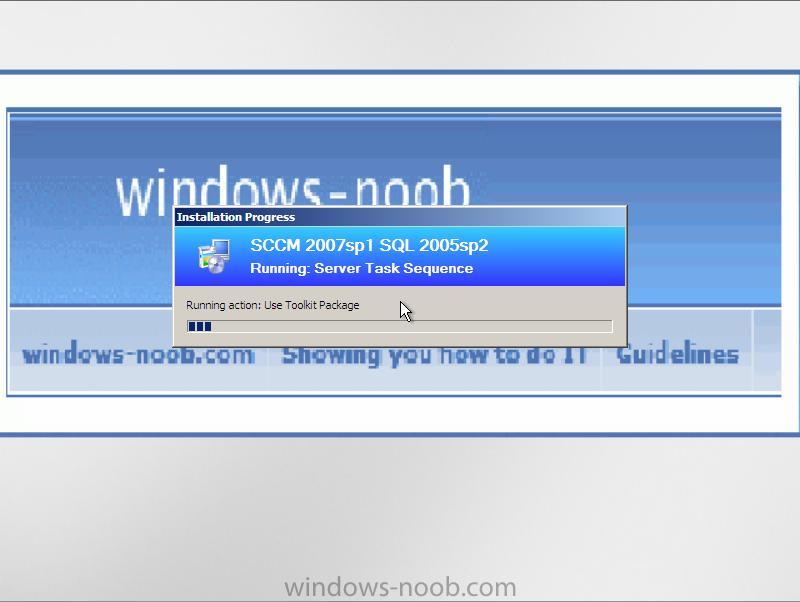
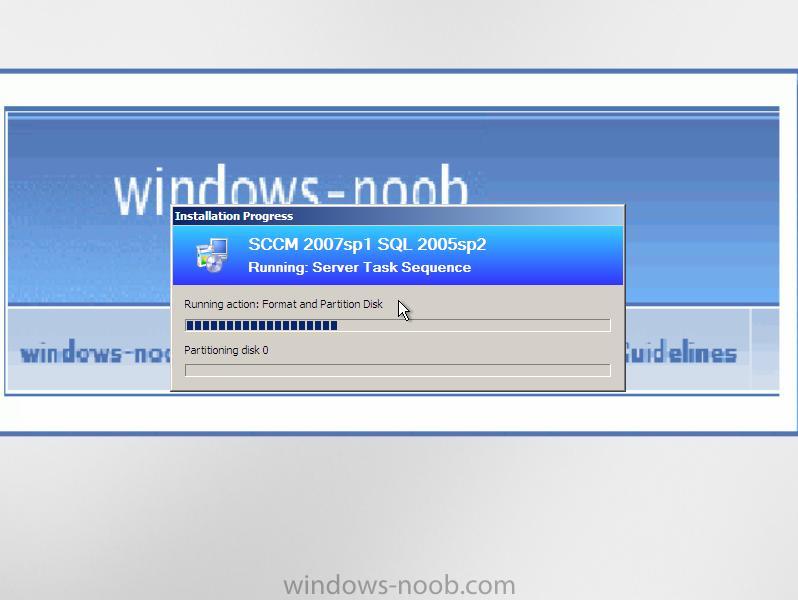
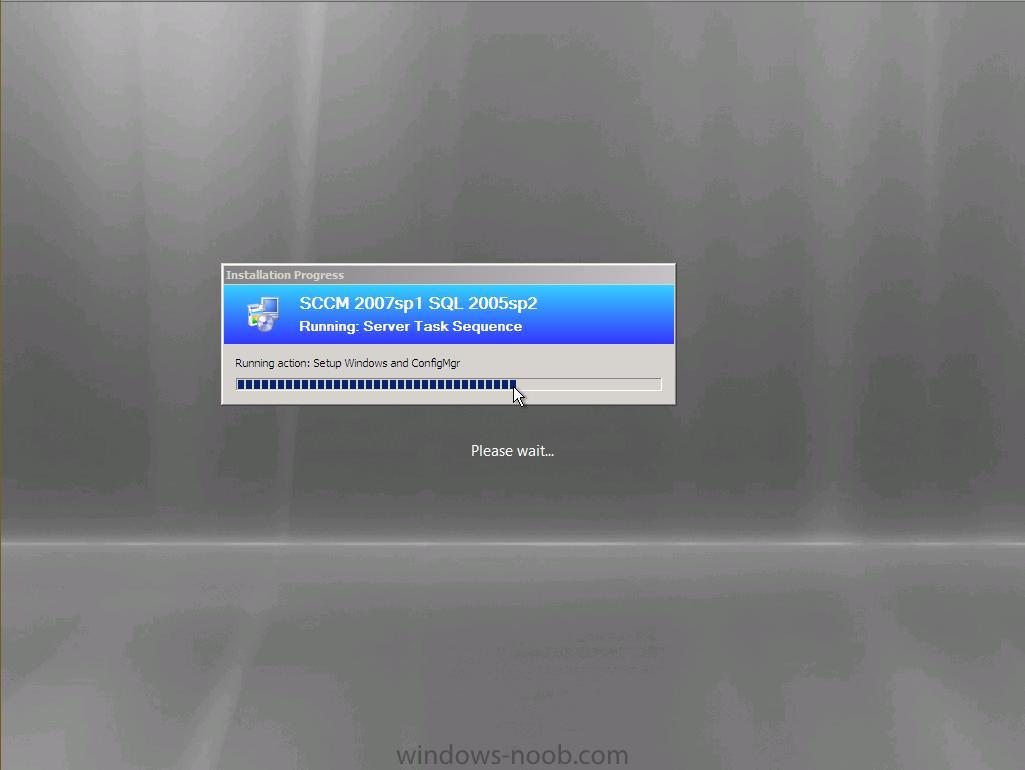
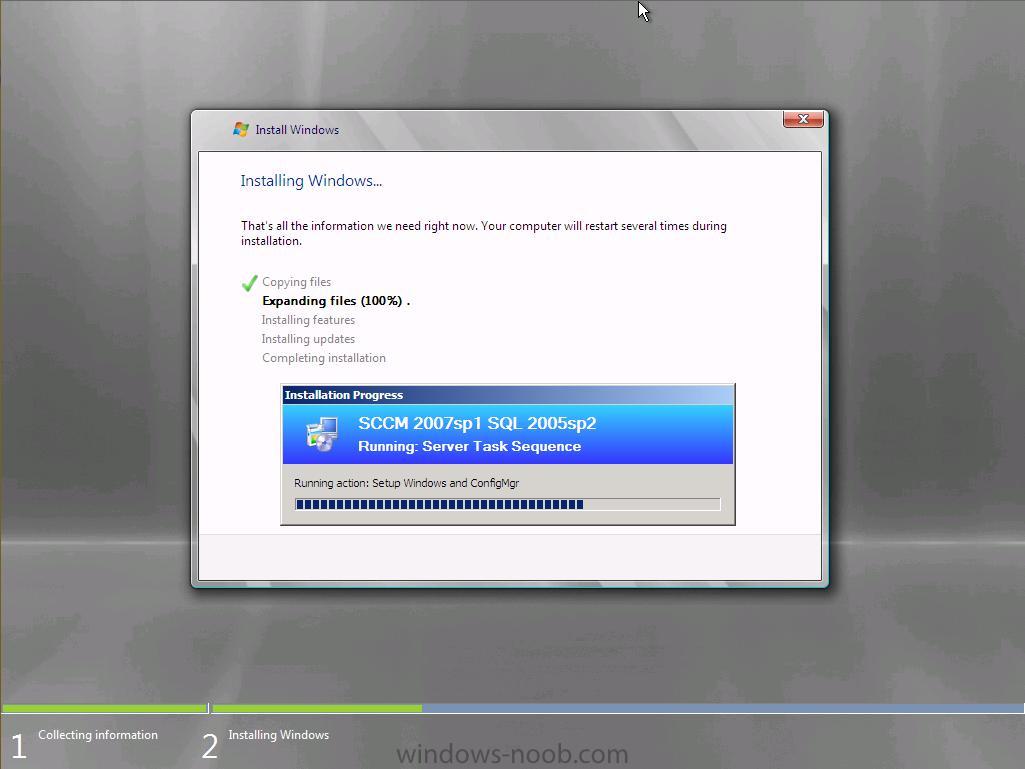
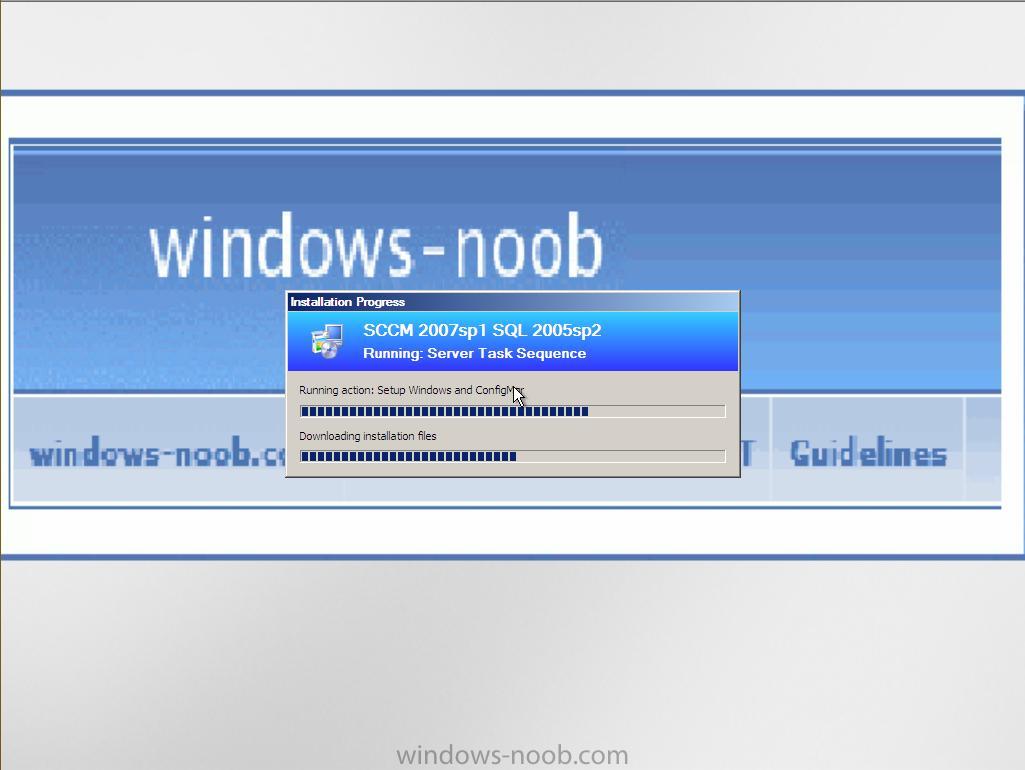
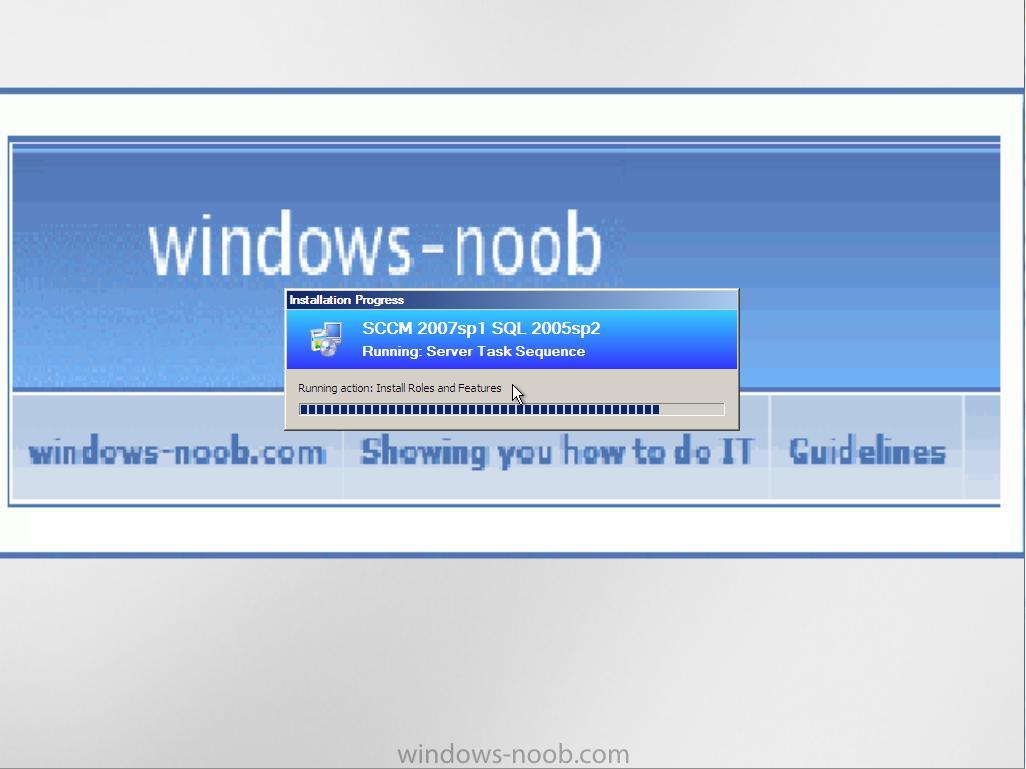
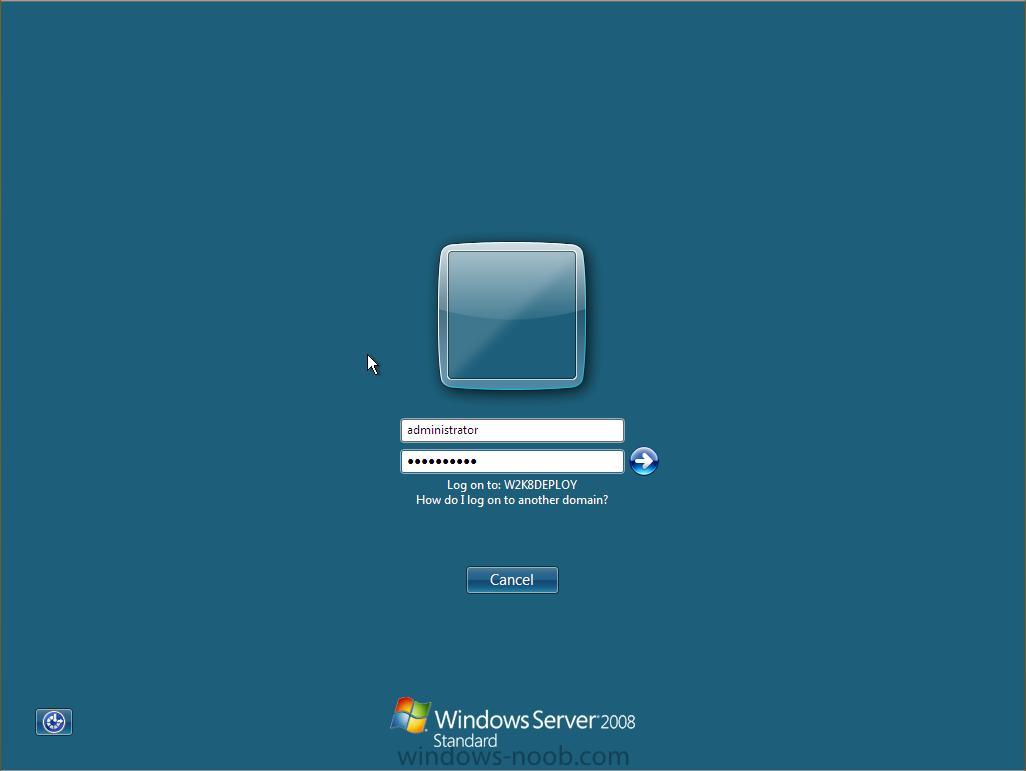
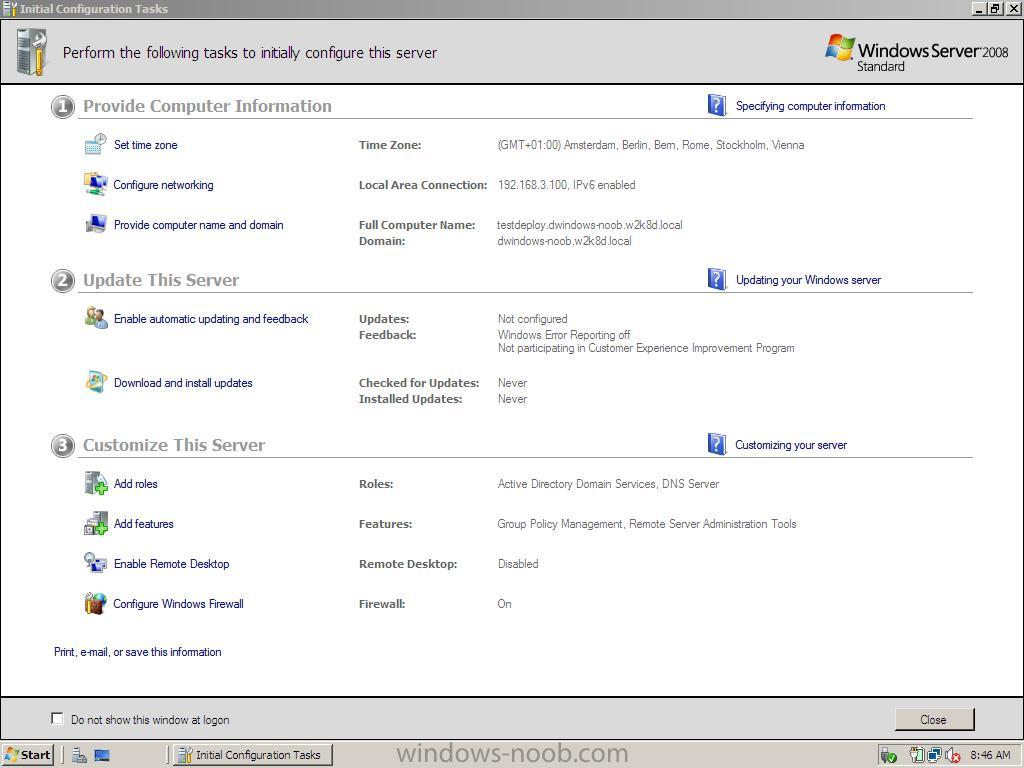
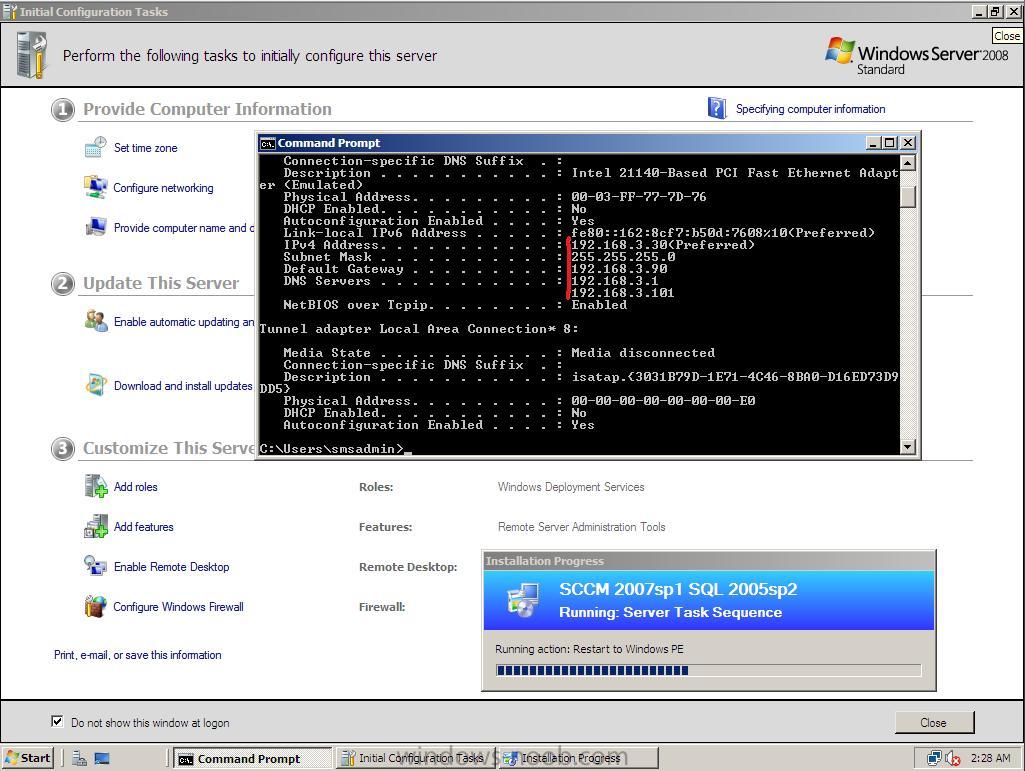
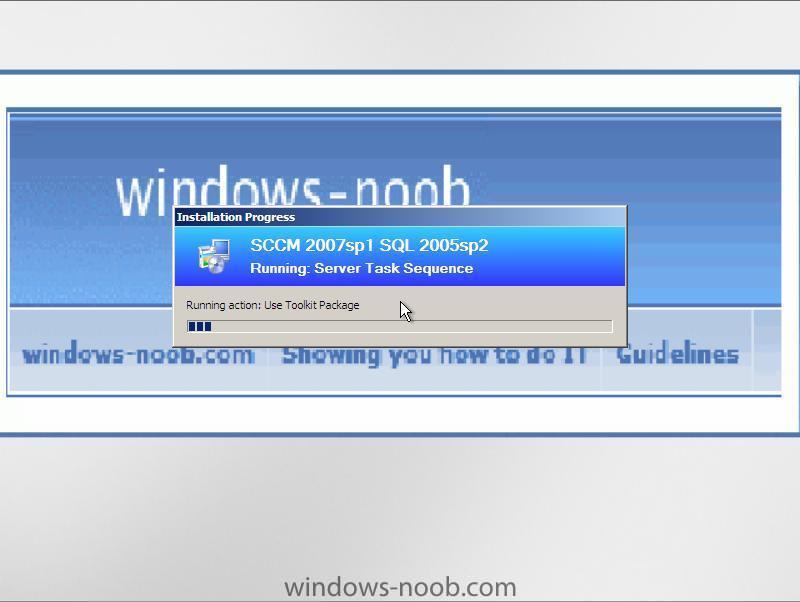
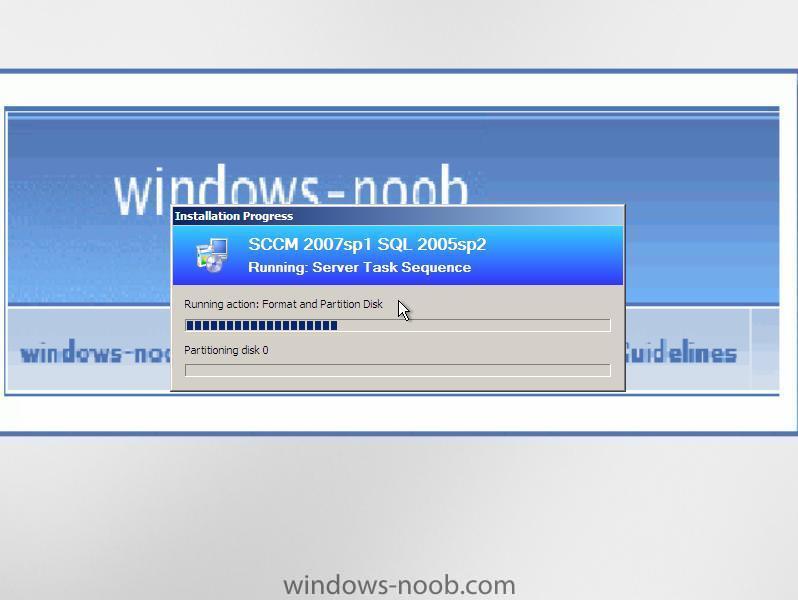
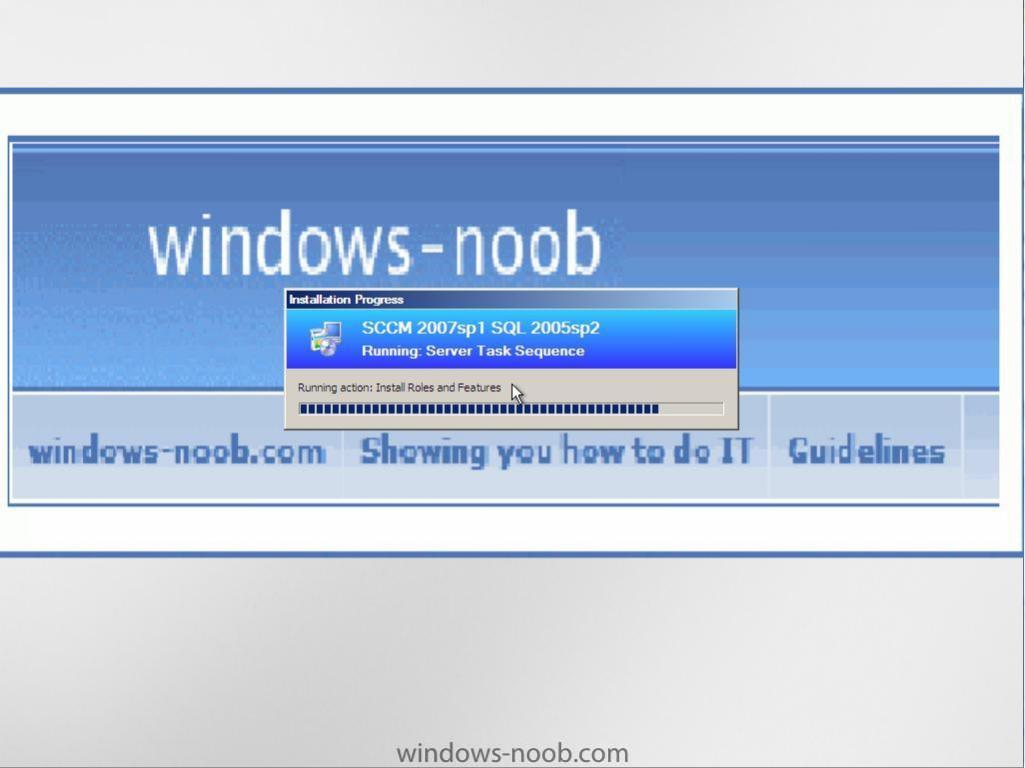
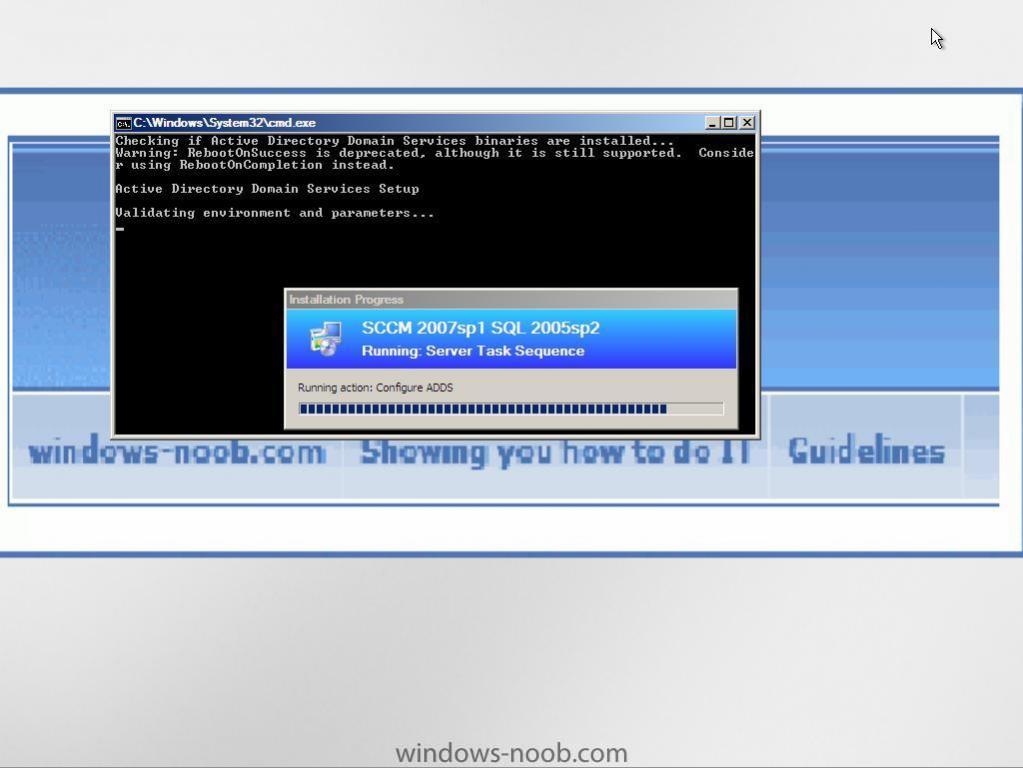
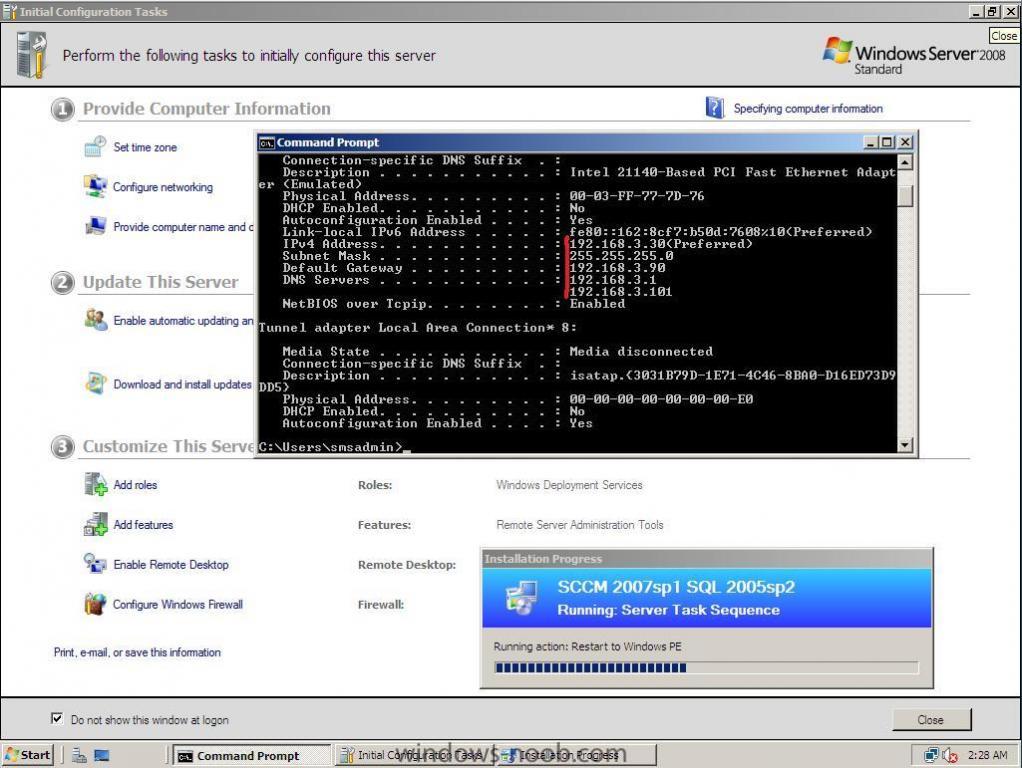
The Deployment Ok we have now got everything in place to deploy the Windows Server 2008 machine, so boot it up and let PXE boot take over Pxe booting the Server.... Windows PE starting.. Note: If PXE boot is not working as planned you may need to do some PXE troubleshooting. customised LOGO in the background :-) here it's starting the Task Sequence.... formatting and partitioning the hard disk... Windows Server 2008 Setup starting... copying and then expanding files.. (this takes a LONG time, especially if you are doing it virtually) a restart followed by... completing installation then another reboot and it starts the next part which is Installing the Configuration Manager client.. once that is installed, another reboot, then....initializing the Configuration Manager client followed by Install Roles and Features ... and here we can see ADDS is being run, configured and setup, as will DNS, and more.. and finally the Windows Server 2008 login Screen and once logged in, here it is, the end result (you have to reboot one more time to see the roles and features installed). if you do an ipconfig /all at this point you'll see that our w2k8deploy server now has the ip address/subnet/gateway settings we specified earlier as variables, however it lists it's DNS settings as localhost instead of the ones we specified, why is this ? because if you setup a server to host it's own AD then it will as part of the AD setup define DNS to point to itself if it is the only DC in a Domain or forest, to test that, simply create a new Task Sequence and instead of making a new Domain Controller, just create a standard server with some feature added. The result will look like this (please note that in this screenshot that another Task Sequence has kicked in and that the server has only one Role installed, namely Windows Deployment Services). If you appreciate the effort that went into helping you Deploy Windows Server 2008, then please Digg this.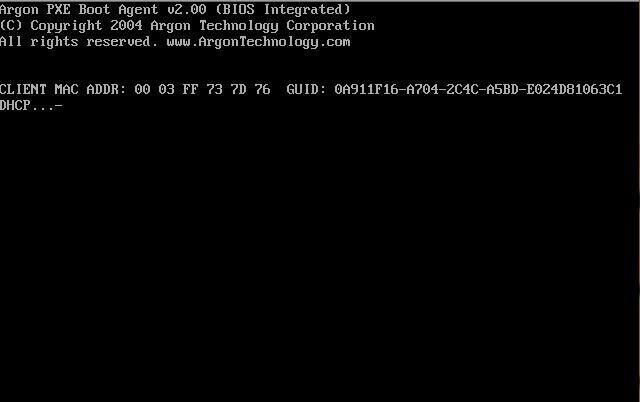


-
and to start the ball rolling here's a blog worth looking at with a video of NAP in action http://blogs.technet.com/systemcenter/arch...on-arrives.aspx cheers anyweb
-
how can I troubleshoot Windows PE booting in SCCM
anyweb replied to anyweb's question in Troubleshooting, Tools, Hints and Tips
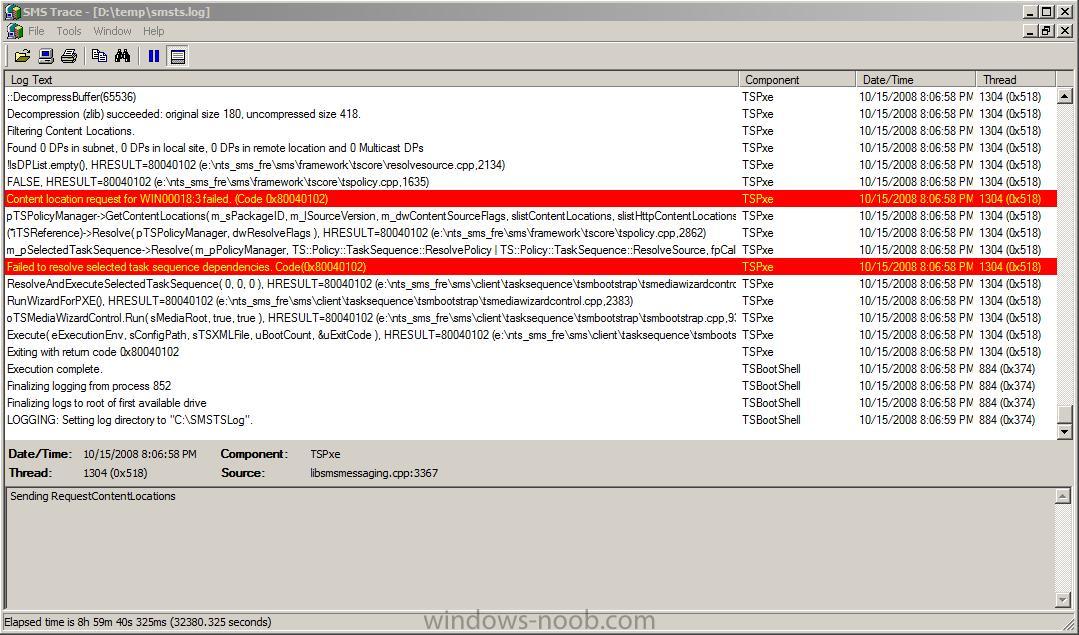
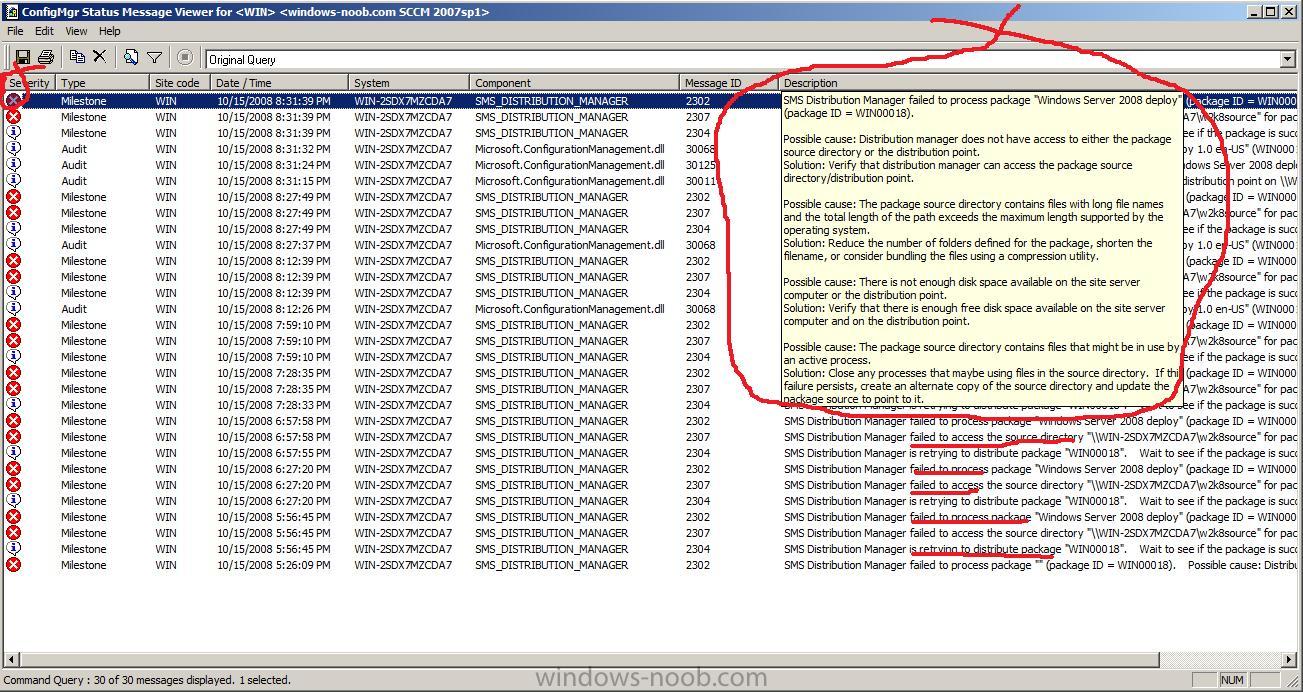
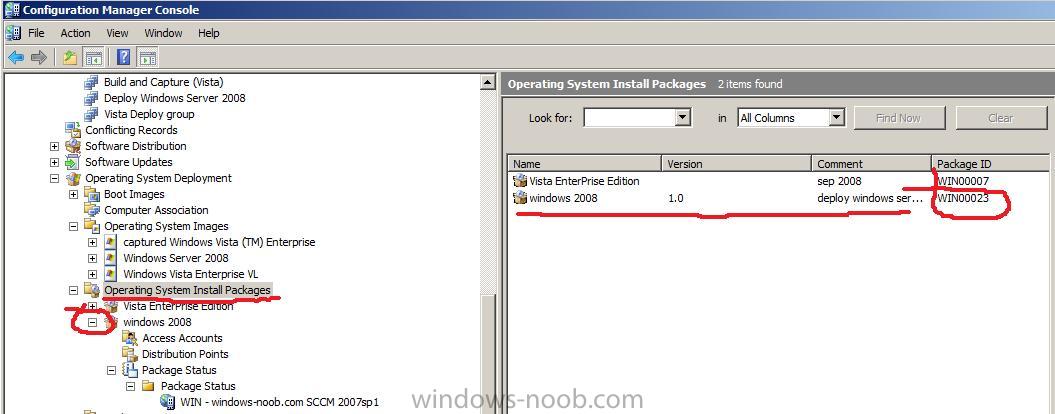
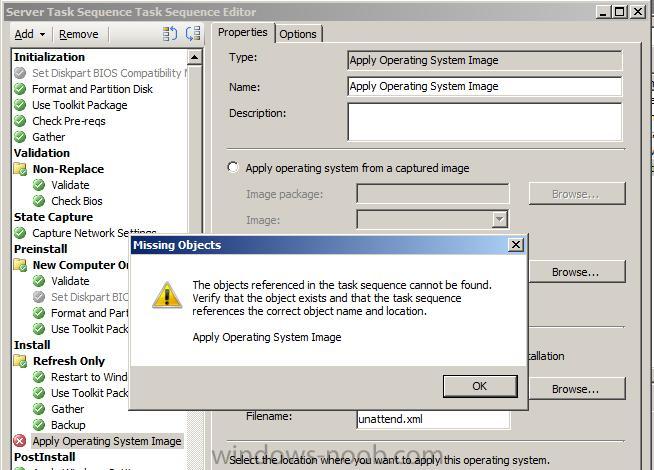
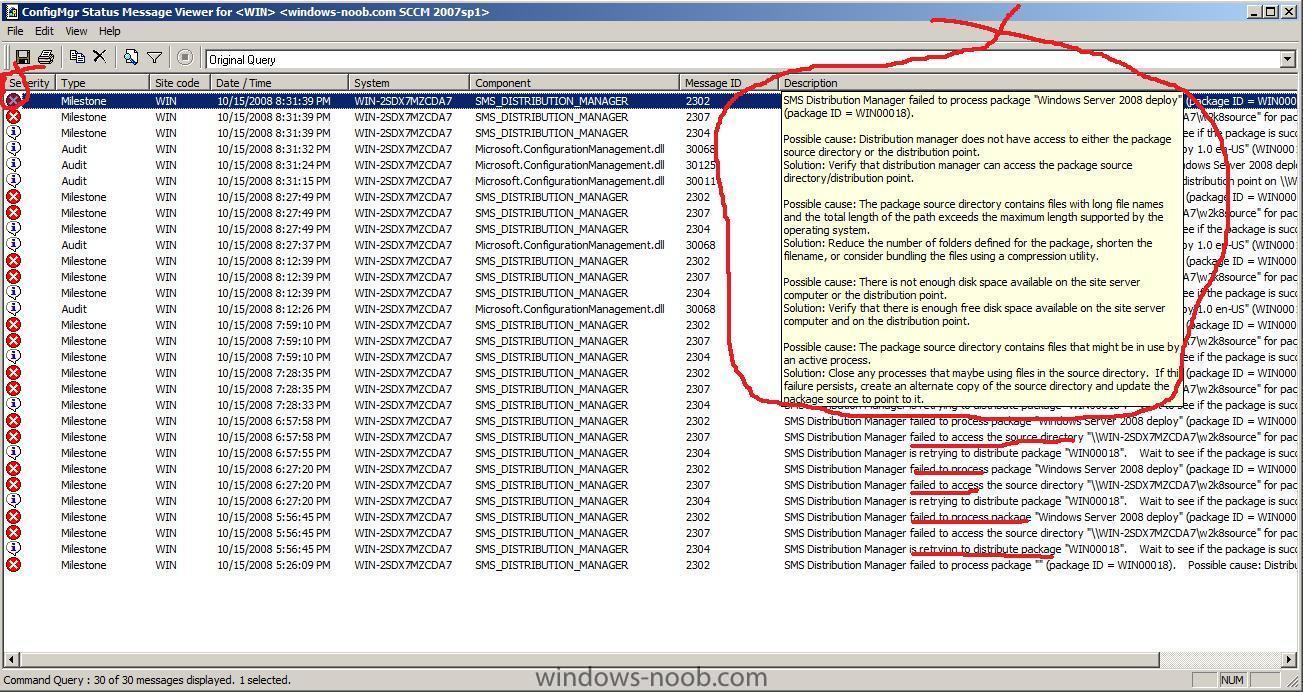
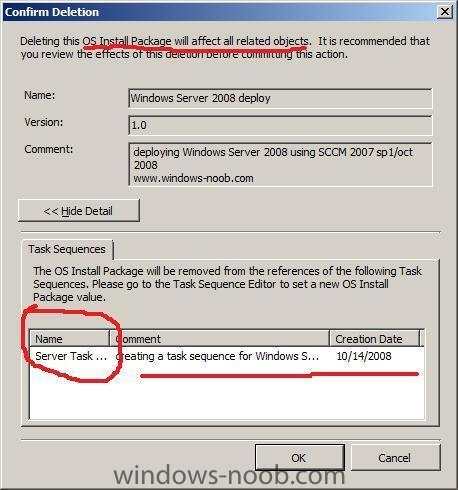
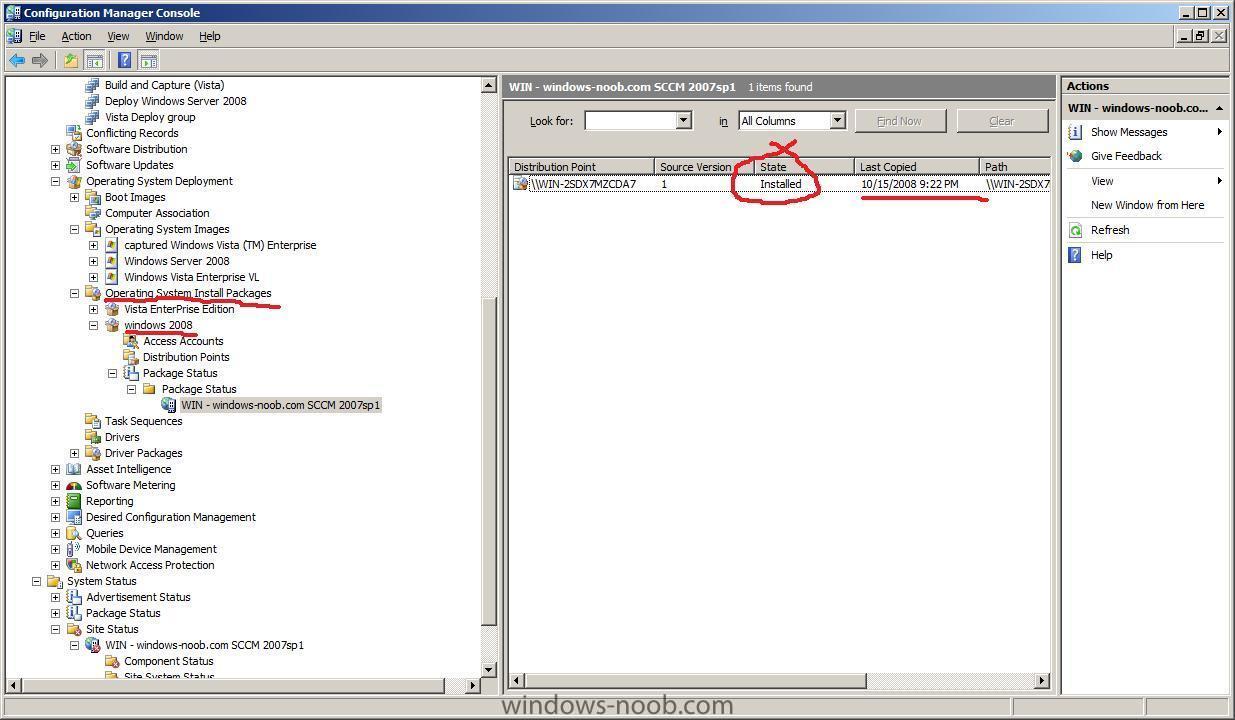
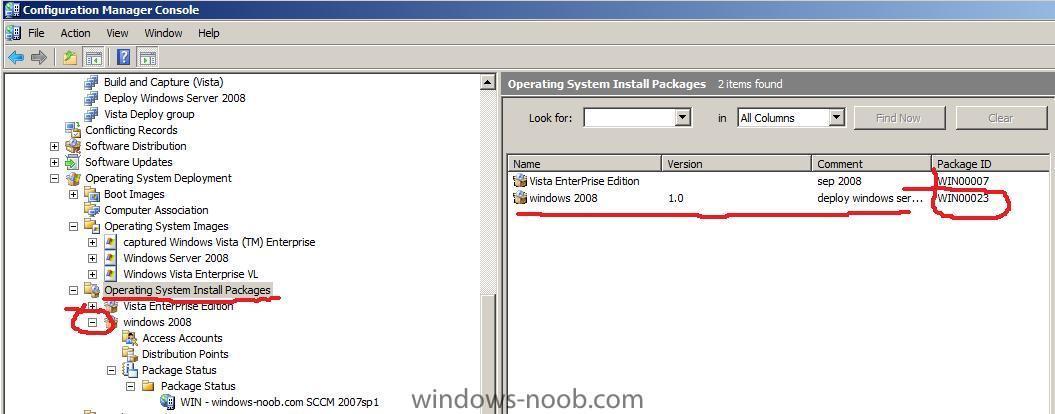
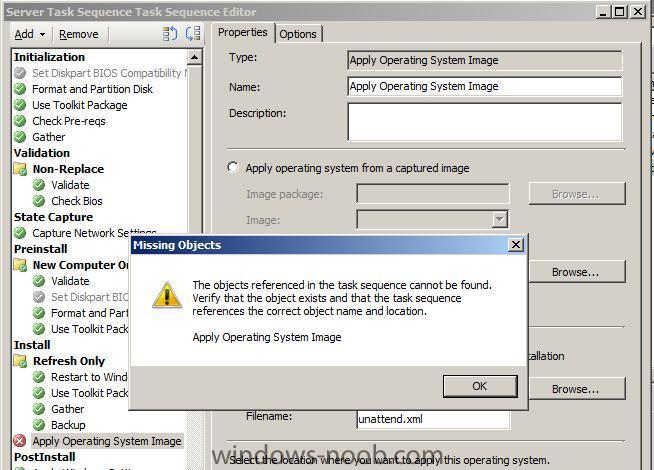
PXE Client Reboots After Booting In WinPE make sure the Operating System Installation Package is distributed to the distribution point This time I checked the SMSTS.log and found a new error followed by I checked ConfigMgr and found that the package was the Windows Server 2008 Deploy Operating System Installation Package, I checked that it had been distributed (it had) and updated (it had) it still rebooted Windows PE, so I checked ConfigMgr's package status loads of failed to access errors workaround delete the package and recreate it, then redistribute it, then verify that it's status in SCCM ConfigMGr (package status) is ok, get it's package ID then go back into Task Sequencer *it will alert you of the fact that it's missing anyway, as it's pointing to the old now deleted package ID* and point it to the new Operating System Install Package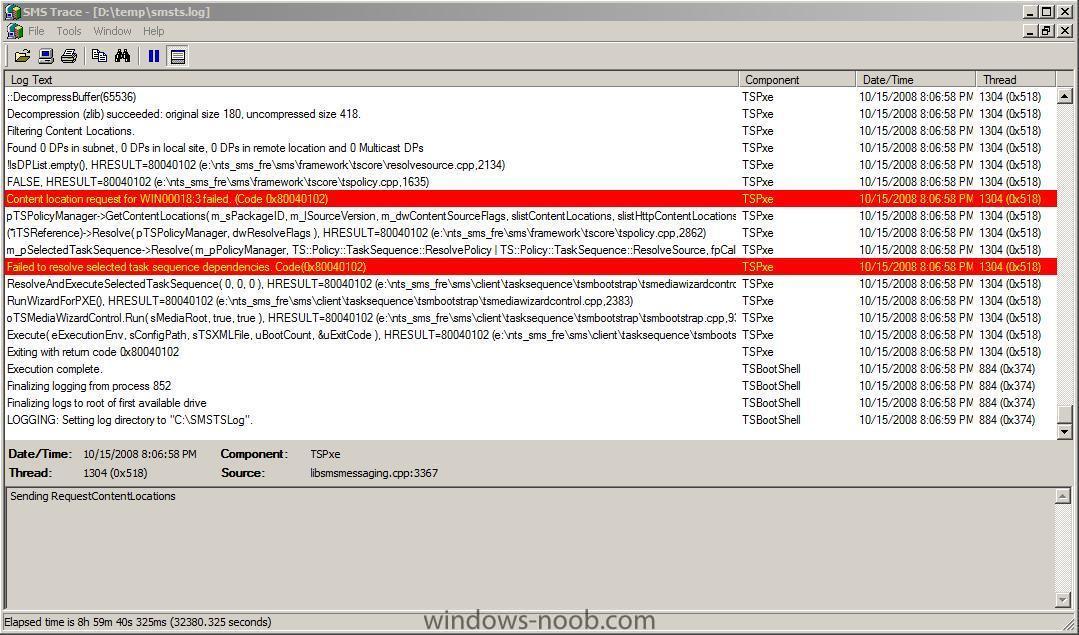
-
http://technet.microsoft.com/en-us/library/bb680753.aspx DHCP server with an active scope. WDS will utilize PXE which requires a DHCP server. Whether you plan to co-host WDS and DHCP on the same server or use two different servers you must configure WDS to listen on a specific port. DHCP and WDS both require port number 67. If you have co-hosted WDS and DHCP you can move DHCP or the PXE site role to a separate server or use the procedure below to configure the WDS server to listen on a different port. Modify the following registry key: HKEY_LOCAL_MACHINE\SYSTEM\CurrentControlSet\Services\WDSServer\Providers\WDSPXE Set the registry value to: UseDHCPPorts = 0 For the new configuration to take effect run the following command on the co-located DHCP and WDS server: WDSUTIL /Set-Server /UseDHCPPorts:No /DHCPOption60:Yes
-
SQL 2008 is now supported as Site Server Database. The driver issue can be resolved with this Hotfix http://support.microsoft.com/kb/955262 (SP1) http://support.microsoft.com/kb/955229 (RTM) guide to installing SQL 2008 is here
-
how can I troubleshoot Windows PE booting in SCCM
anyweb replied to anyweb's question in Troubleshooting, Tools, Hints and Tips
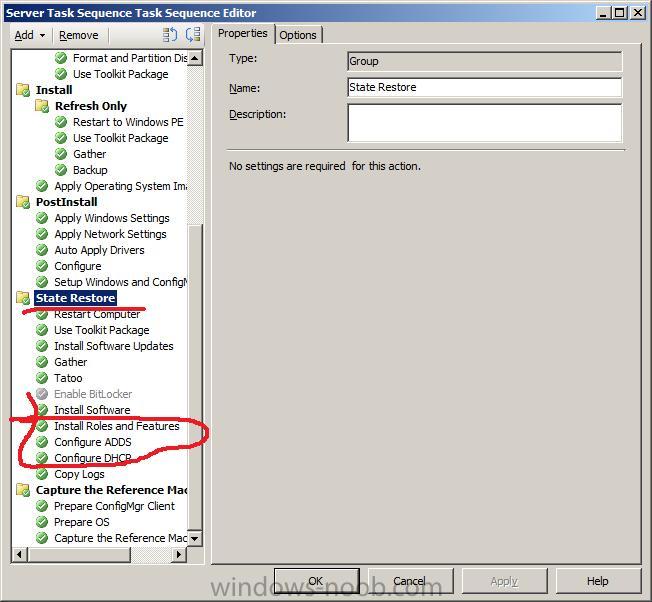
The below troubleshooting errors are for my own documentation purposes only, your results may vary:- reason: I had configured ADDS in the wrong section of the Task Sequencer, moved it down to the correct location which is StateRestore heading after the Install Software section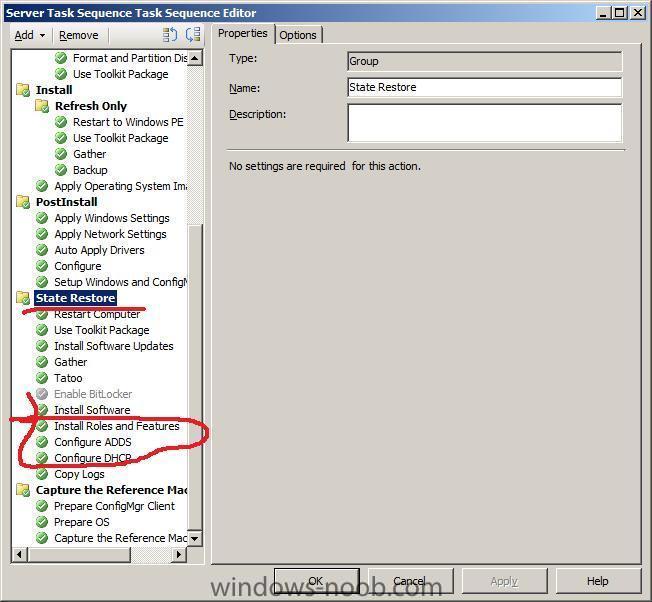
-
how can I deploy Windows Server 2008 using SCCM 2007 sp1
anyweb replied to anyweb's question in Deploy Server 2008
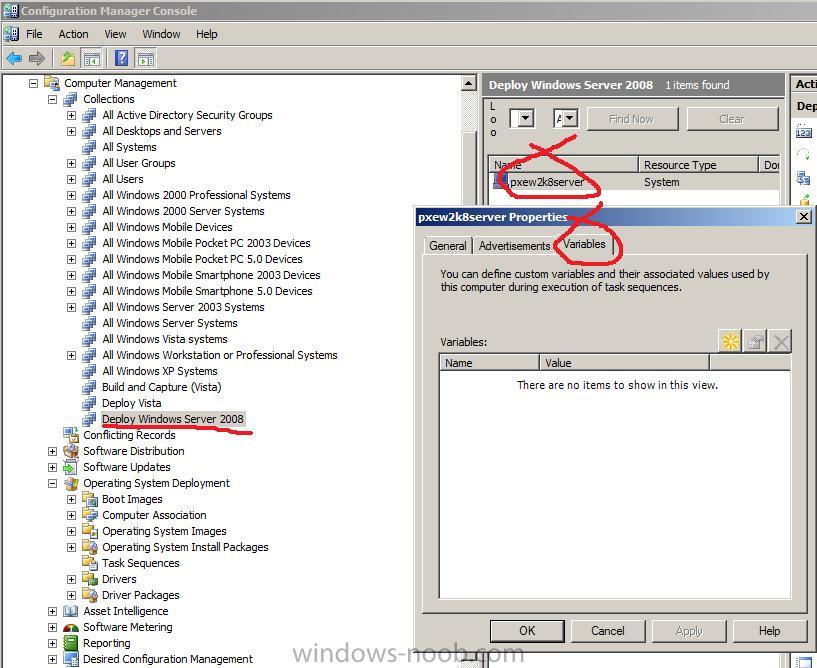
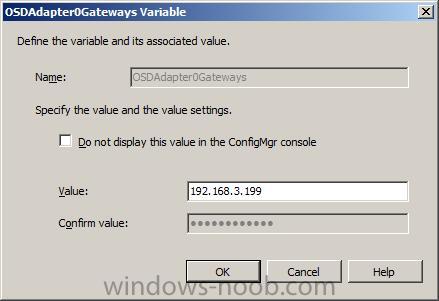
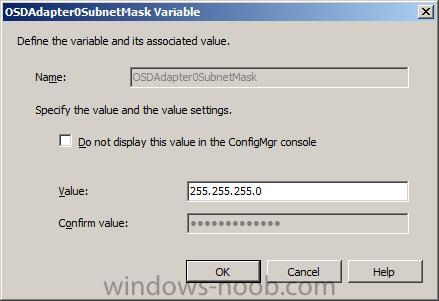
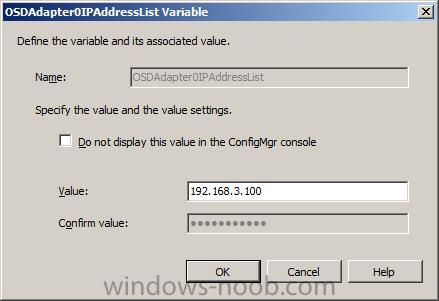
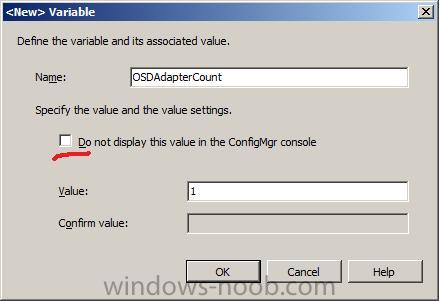
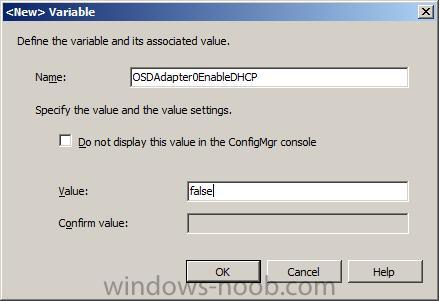
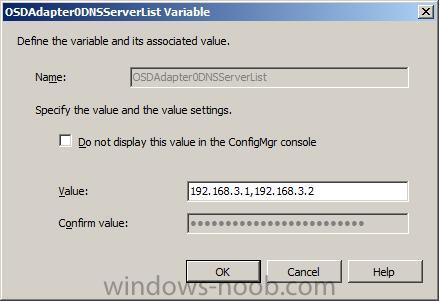
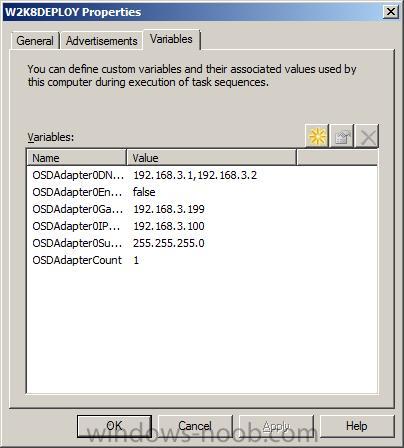
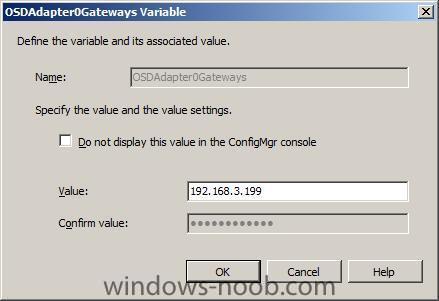
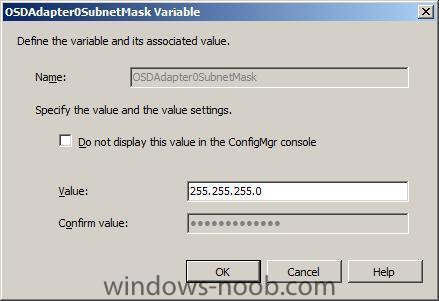
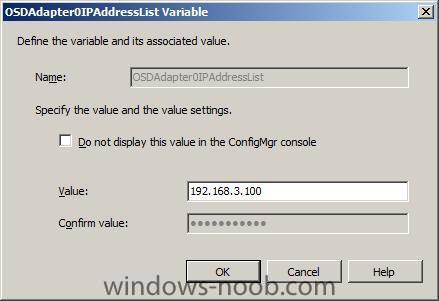
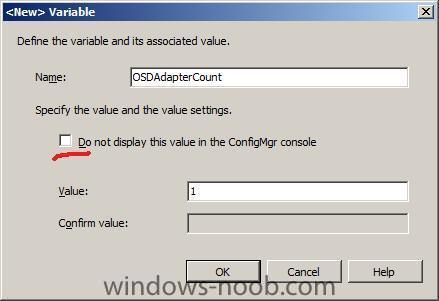
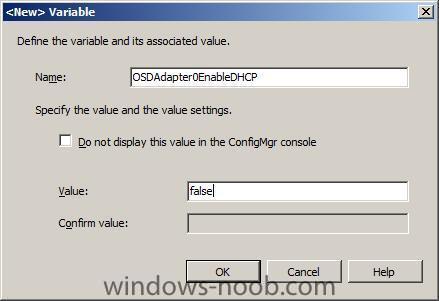
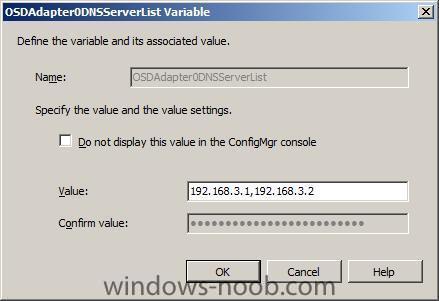
Set the IP address as a variable we are now going to define the IP address of the server, to do so, select the Collection we've just added it to and locate the computer, right click on it and choose properties and then click on the variables tab click on the yellow star to define a new variable... For a static IP address, we need to add the following variables: You can get a full list of available variables here here's a sample of values for the above variables so starting with the OSDAdapterCount variable, let's remove the checkmark from do not display this value and enter a value.... now we shall disable the ability to get an IP from a DHCP server For the OSDAdapter0IPAddressList variable, enter the IP address next we add the subnet gateway and DNS servers (keep in mind that the DNS ip address(s) must still allow contact back to our SCCM server or the Task Sequence will fail just after applying the network settings to the network card. until our IP address variables look like this

-
look at the bottom of this post for the answer (Configuring Vistas Firewall)
-
how can I deploy Windows Server 2008 using SCCM 2007 sp1
anyweb replied to anyweb's question in Deploy Server 2008
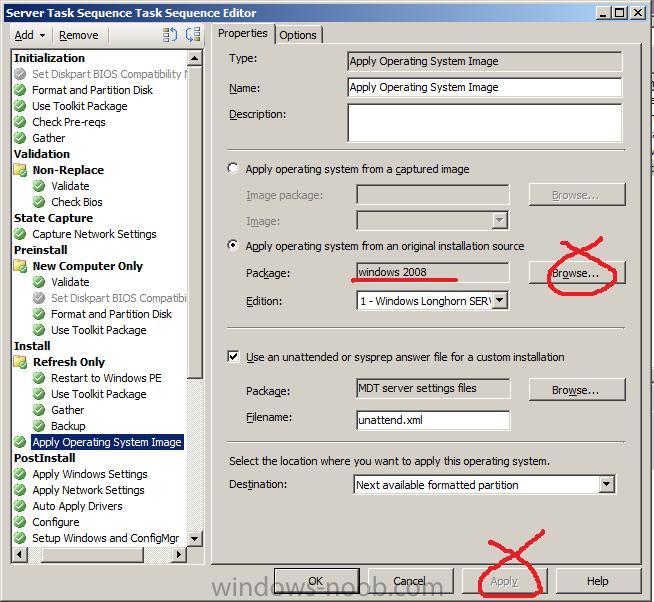
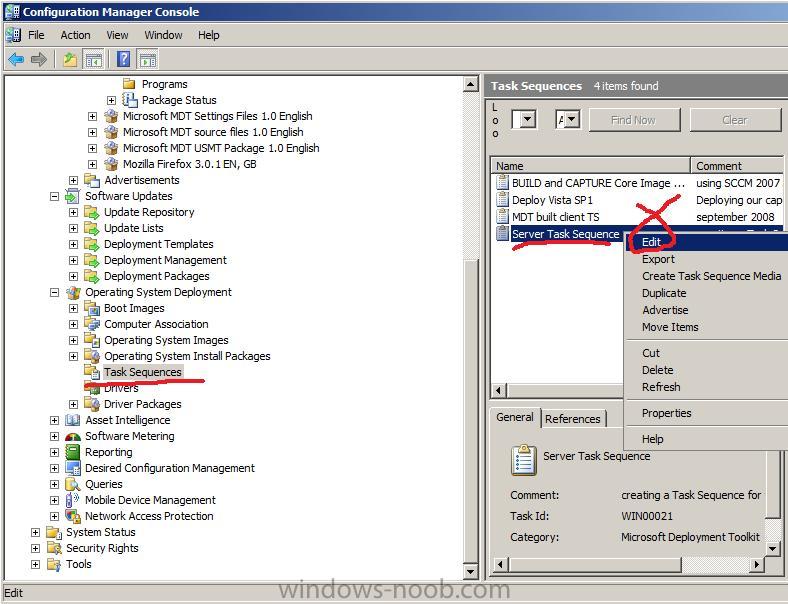
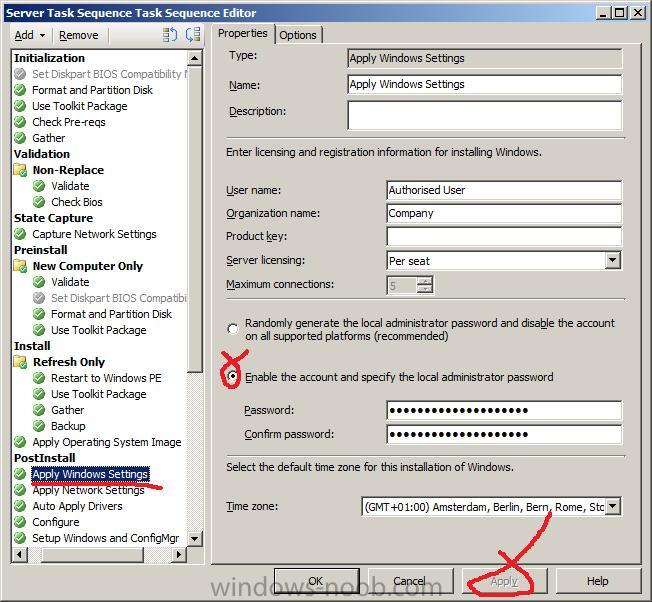
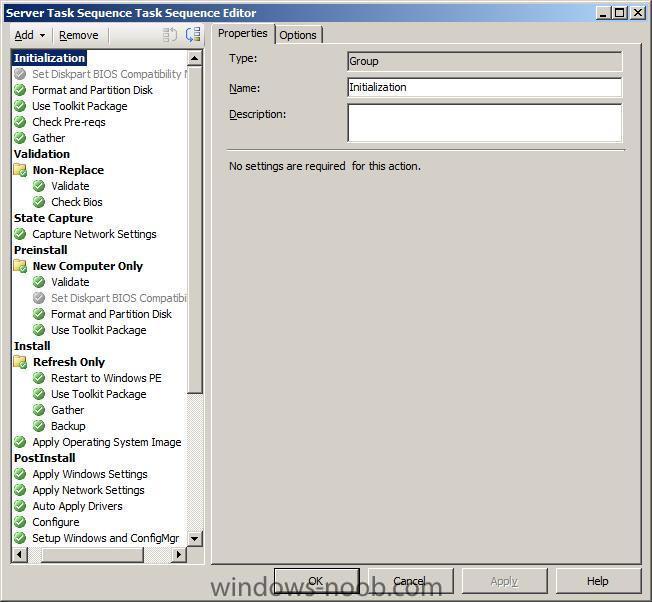
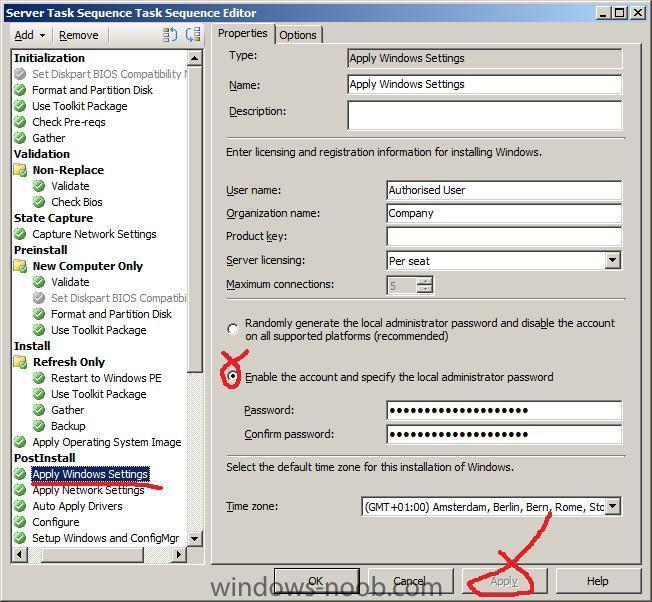
Editing the Task Sequence The Task Sequence is like a list of instructions telling our installer how to install the OS (in this case Windows Server 2008), you will probably want to customise several of the actions in the default task sequence. To modify the task sequence, right click the Server Task Sequence we created in Part 1 and choose edit The task sequence will then be displayed We could choose any of the categories on the left side and view the appropriate options tab on the right pane, Set the Administrator Password In the left pane of the Task Sequence click on the Post Install heading, and select Apply Windows Settings, select Enable the account and specify the local administrator password, enter a strong password and click apply. If you don't do this then you won't be able to logon to the server if something goes wrong.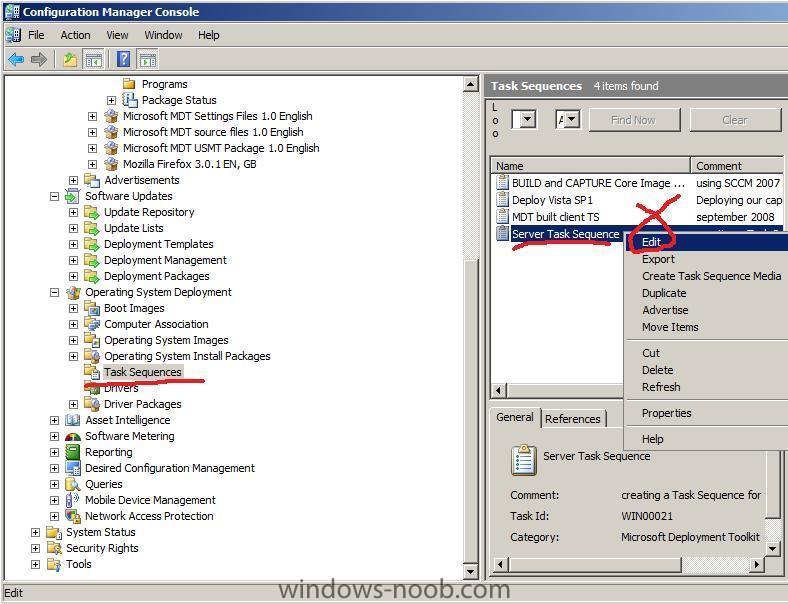
-
how can I deploy Windows Server 2008 using SCCM 2007 sp1
anyweb replied to anyweb's question in Deploy Server 2008
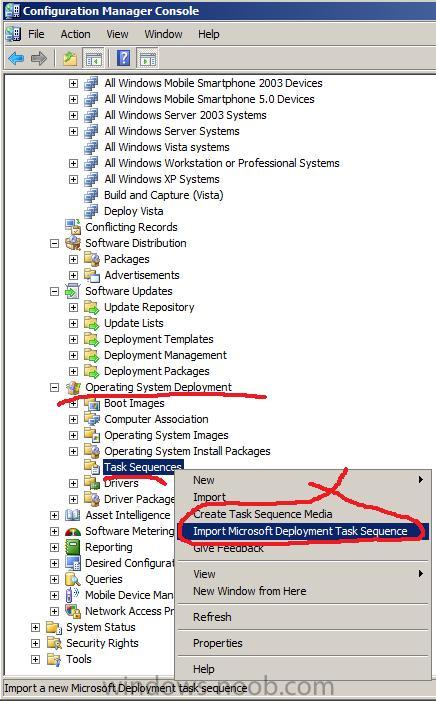
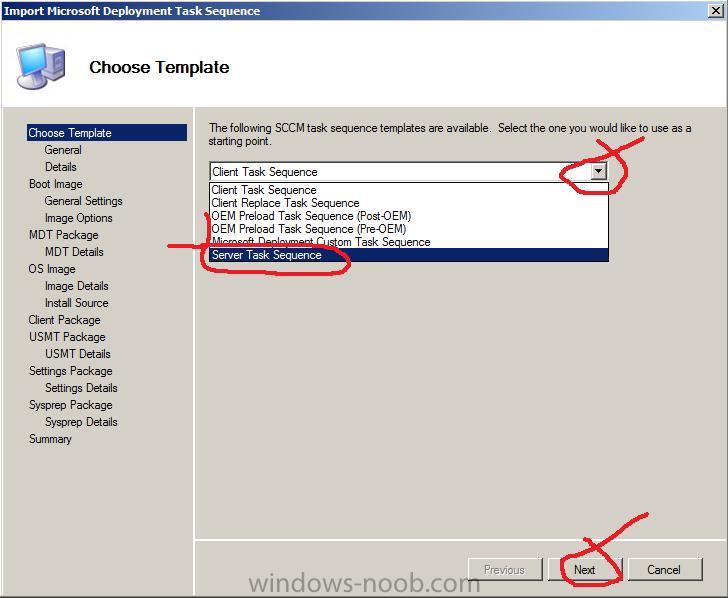
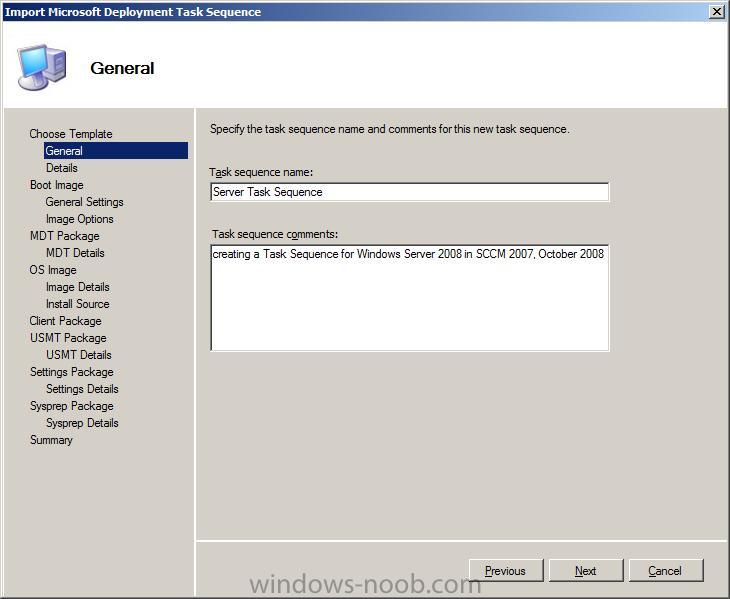
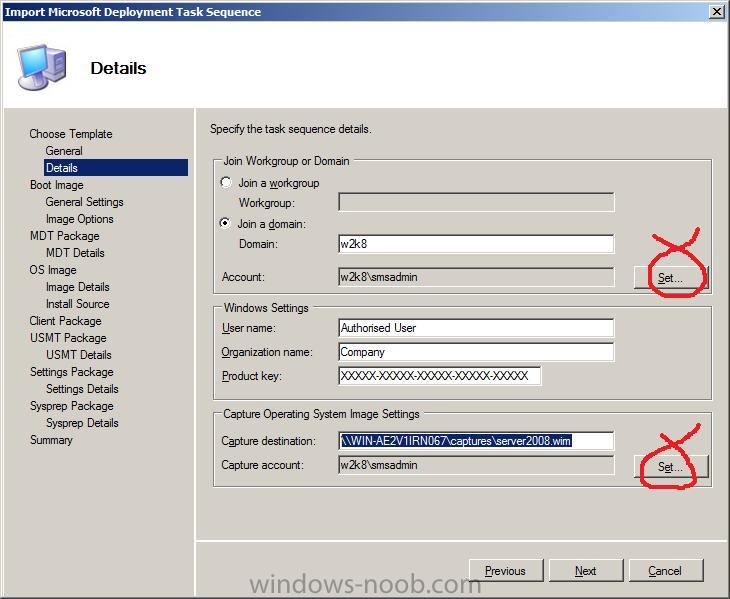
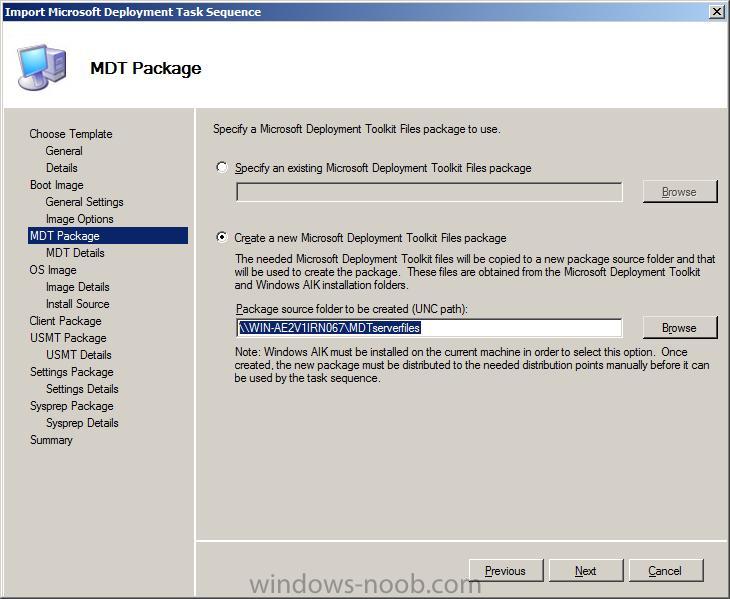
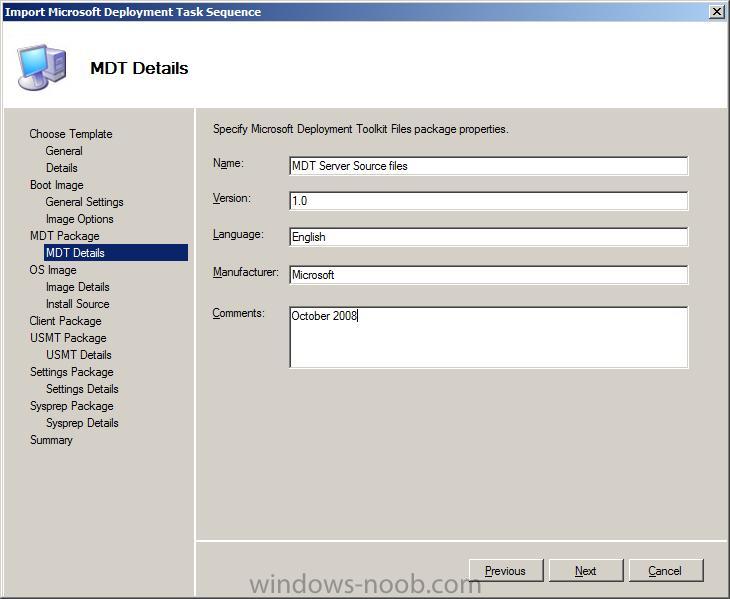
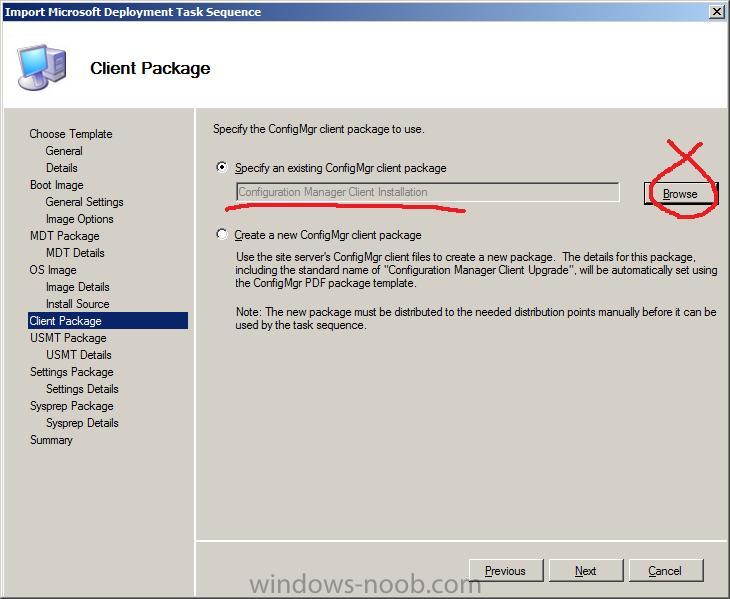
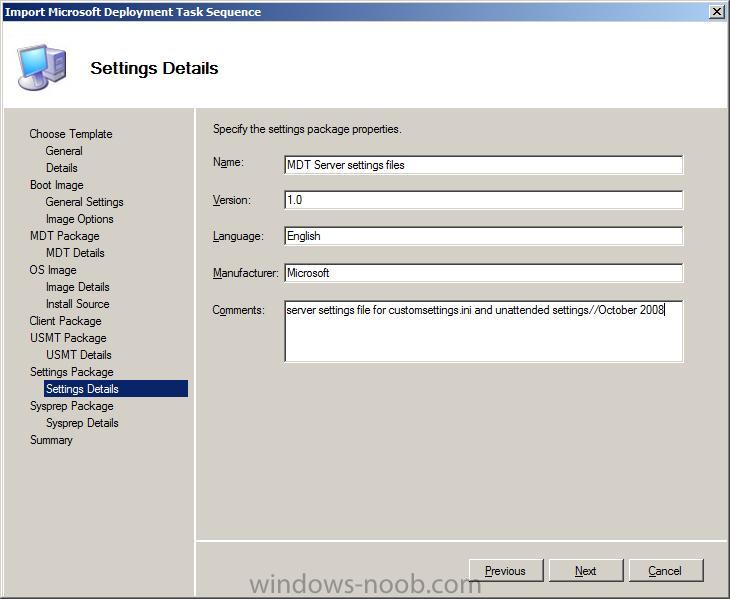
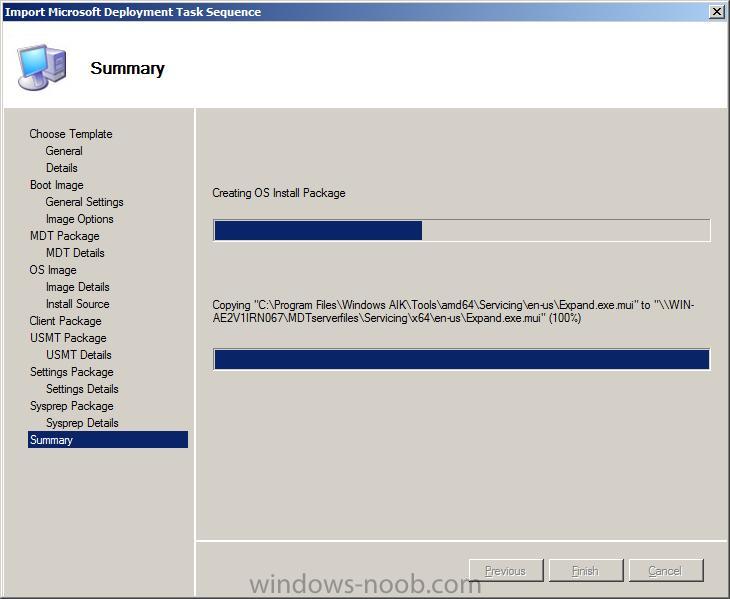
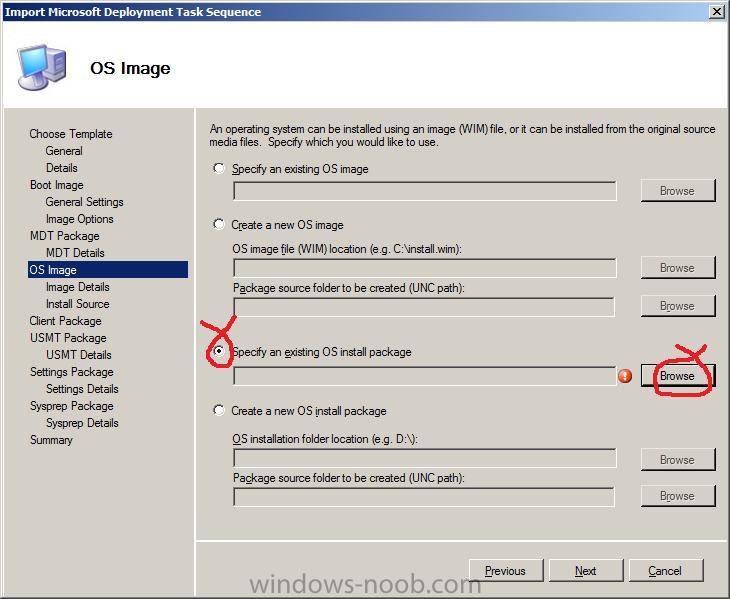
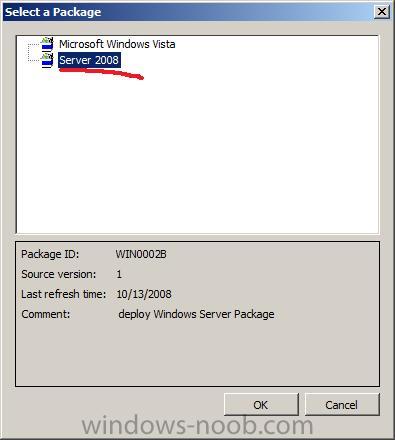
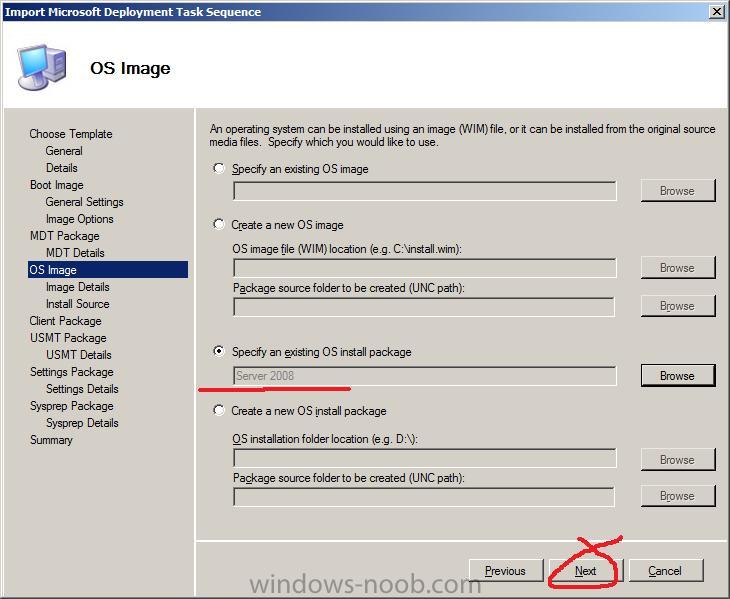
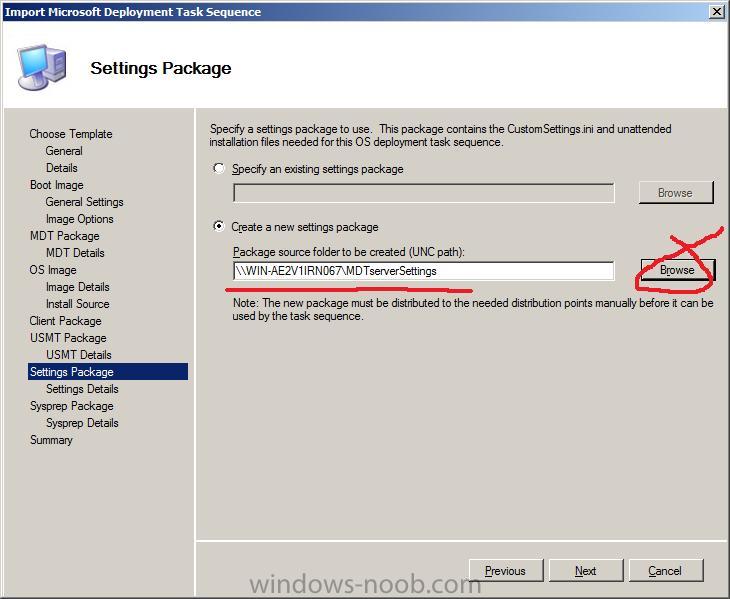
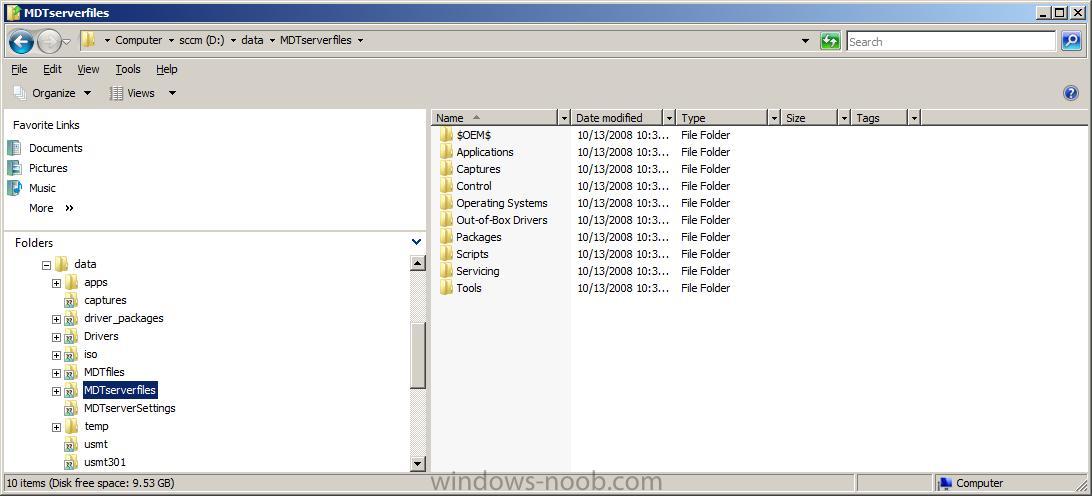
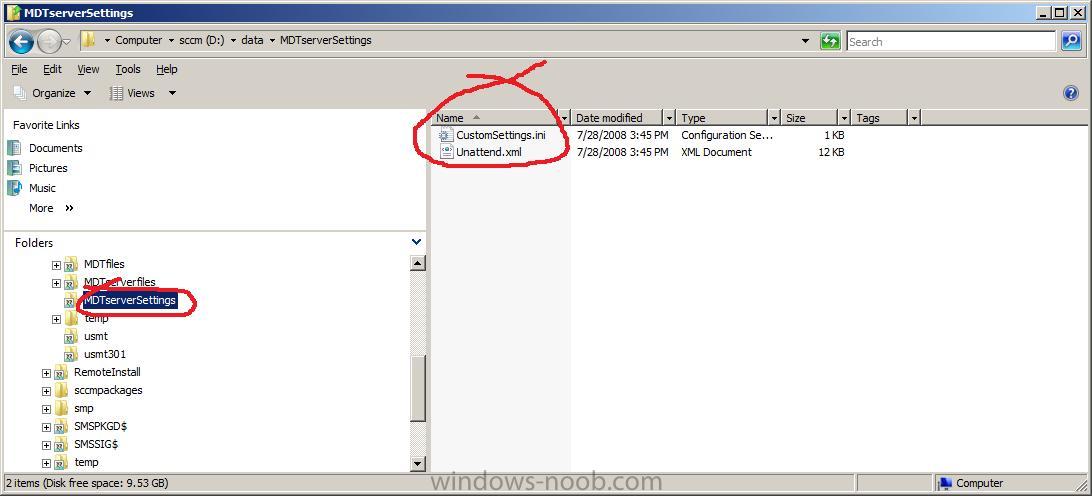
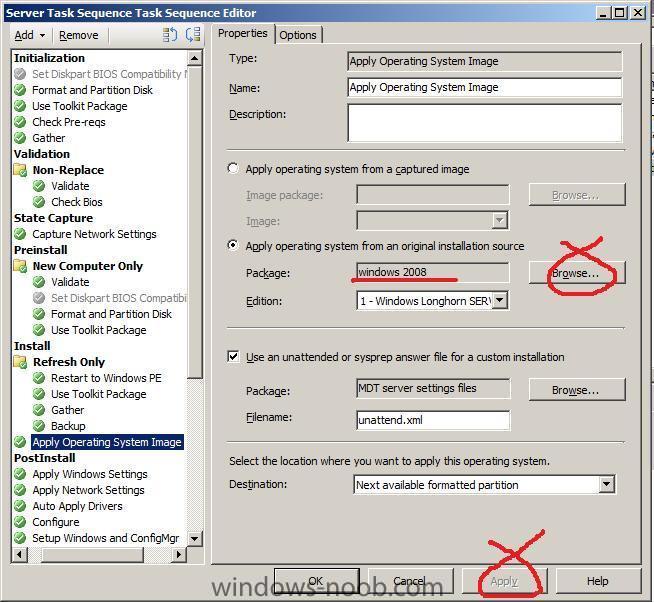
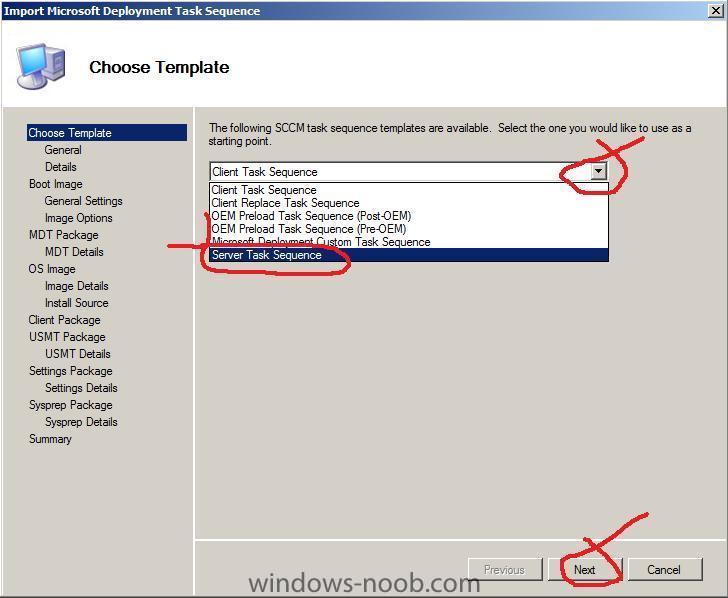
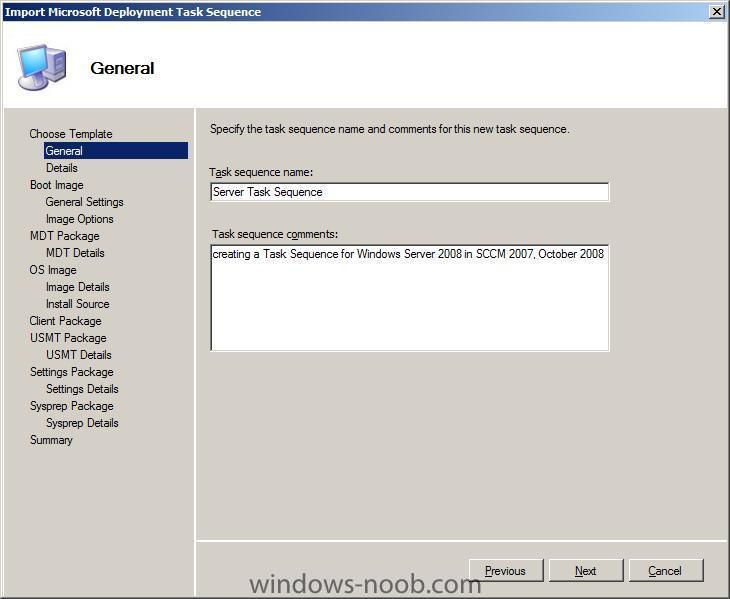
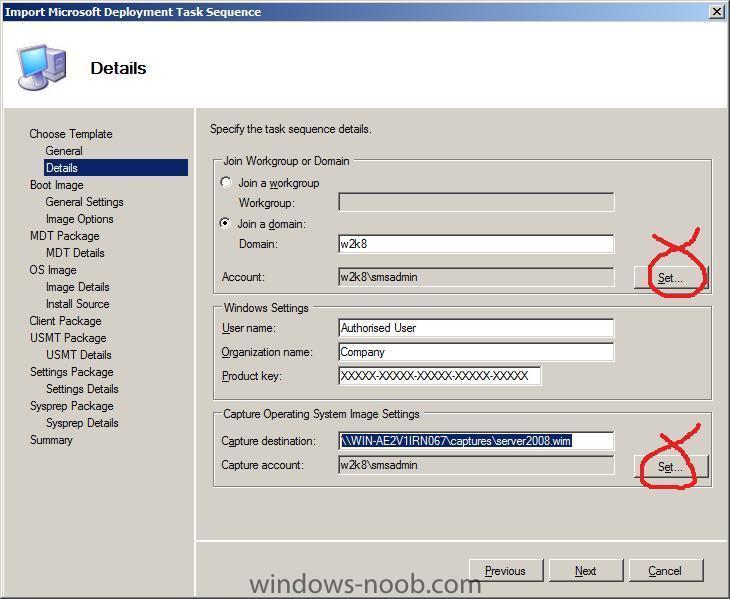
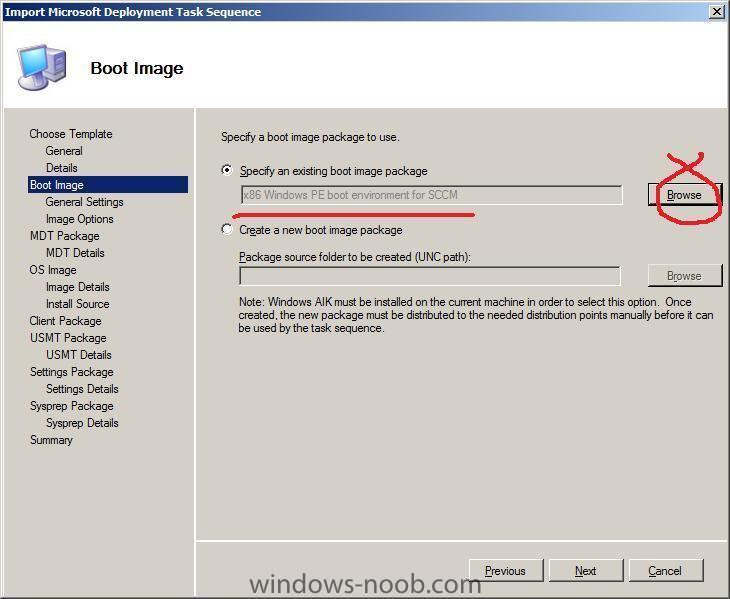
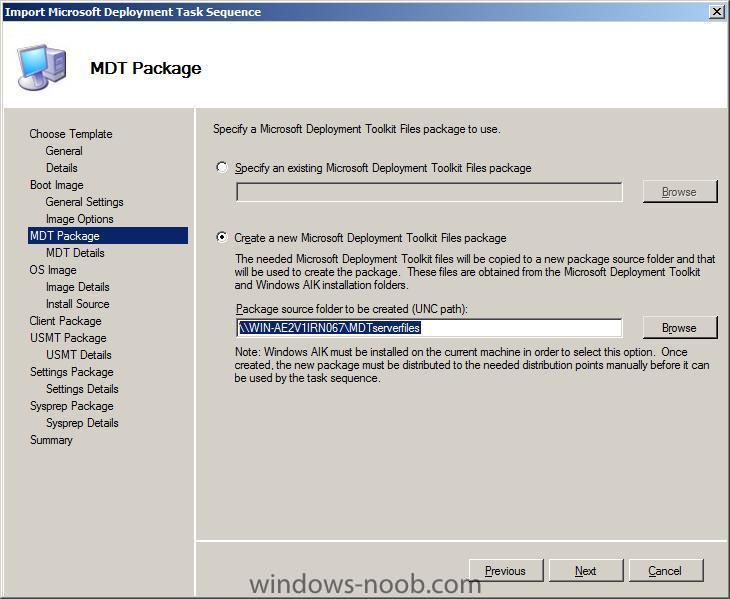
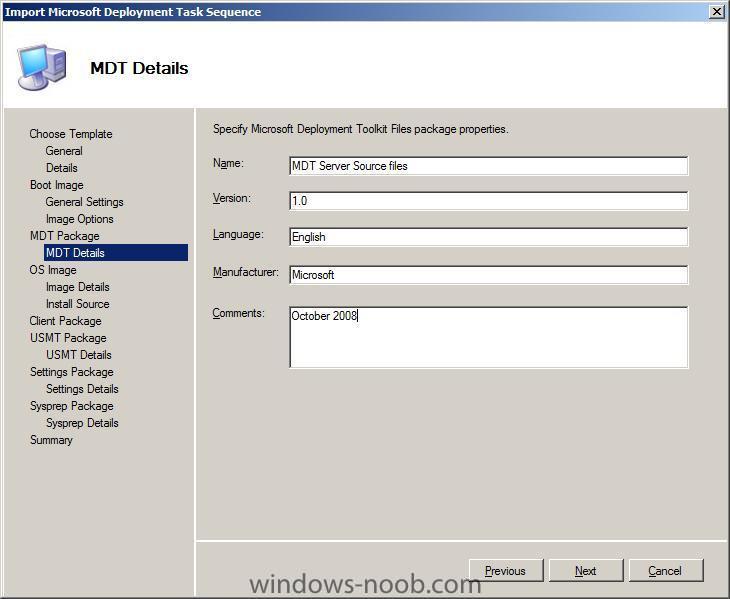
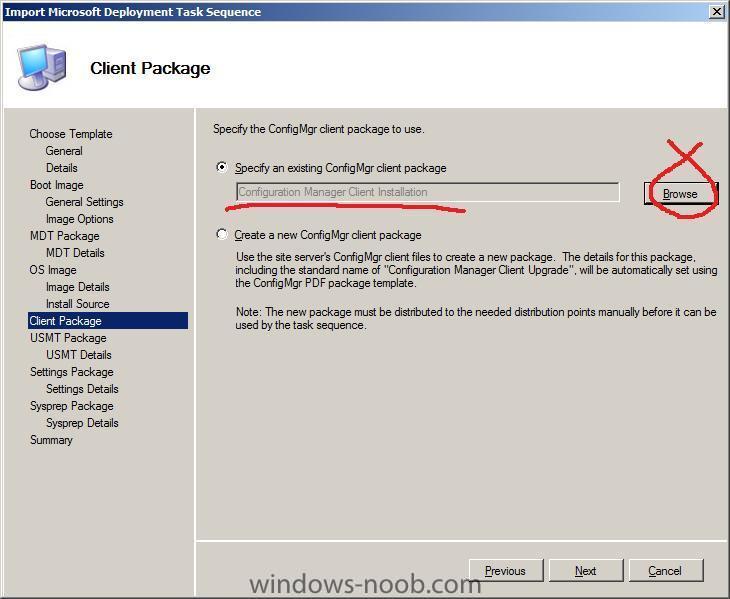
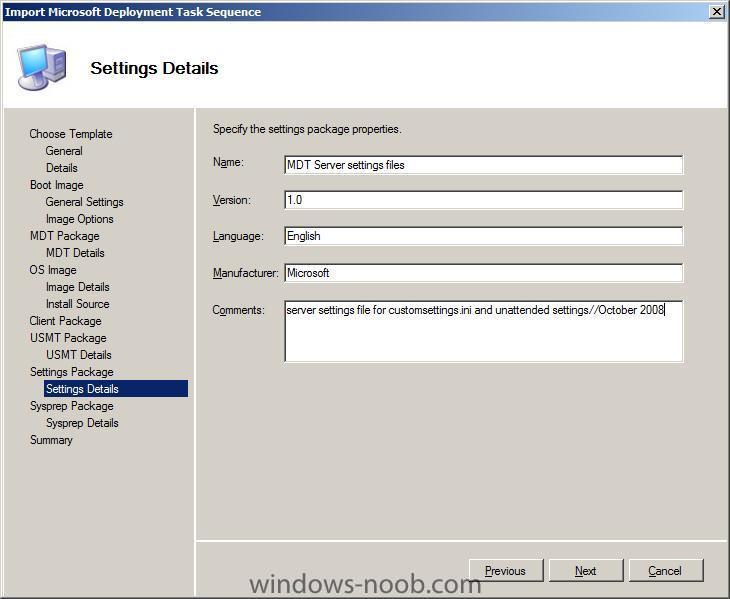
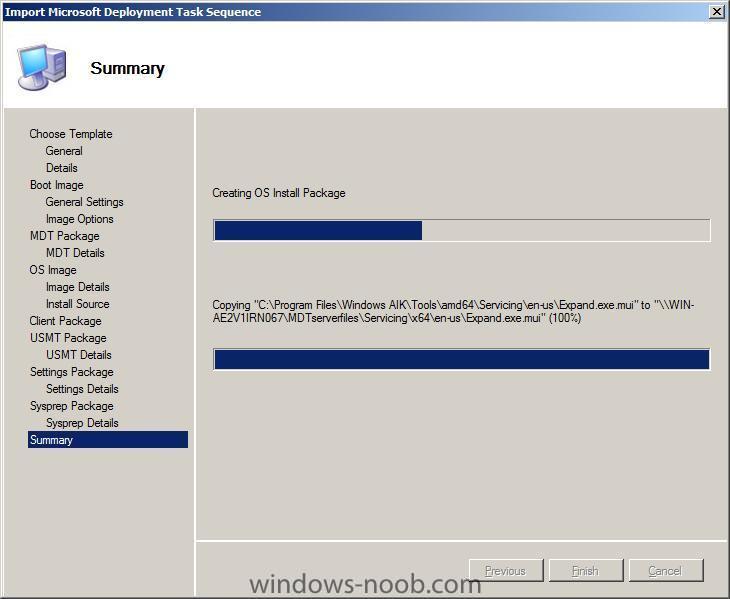
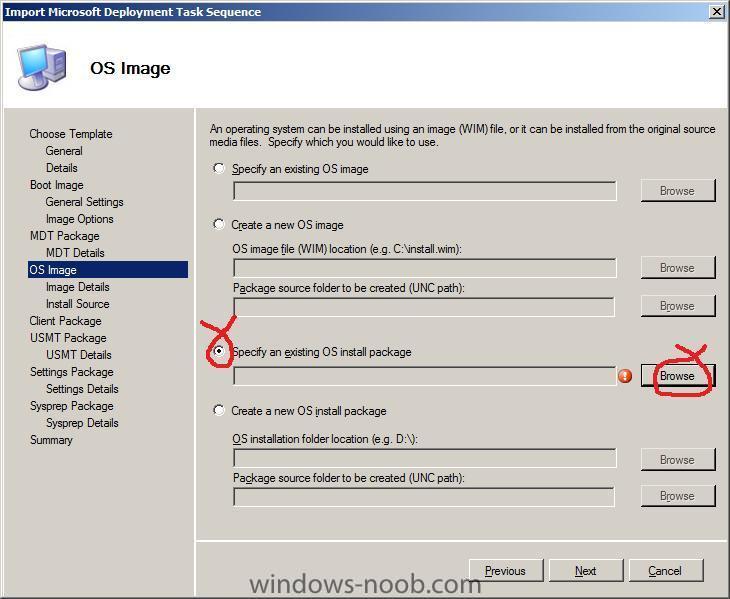
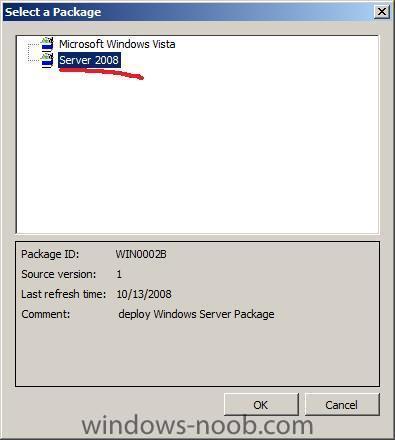
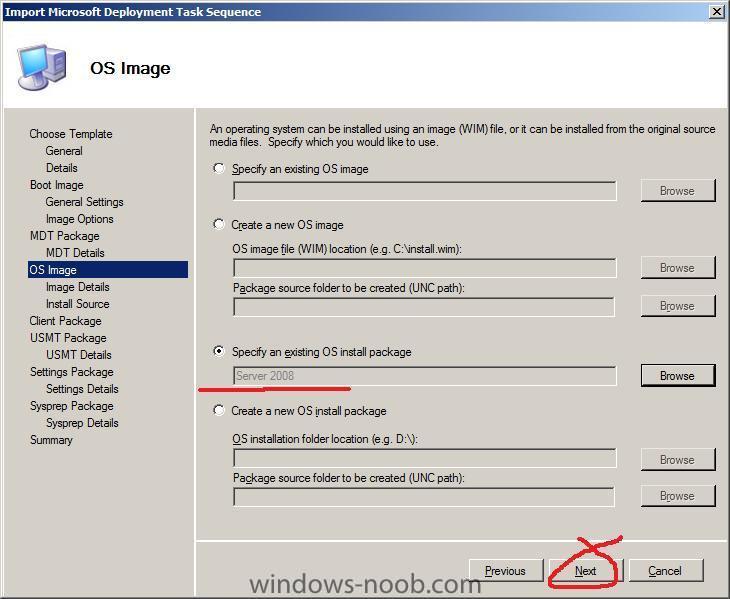
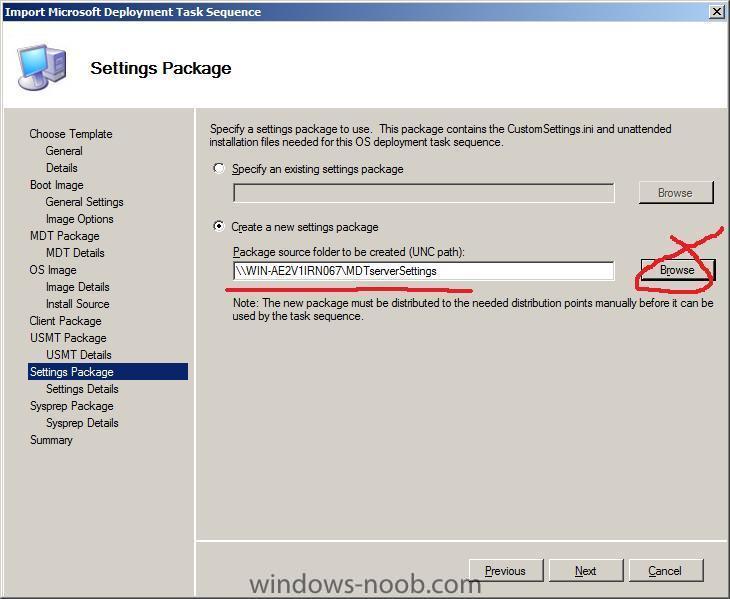
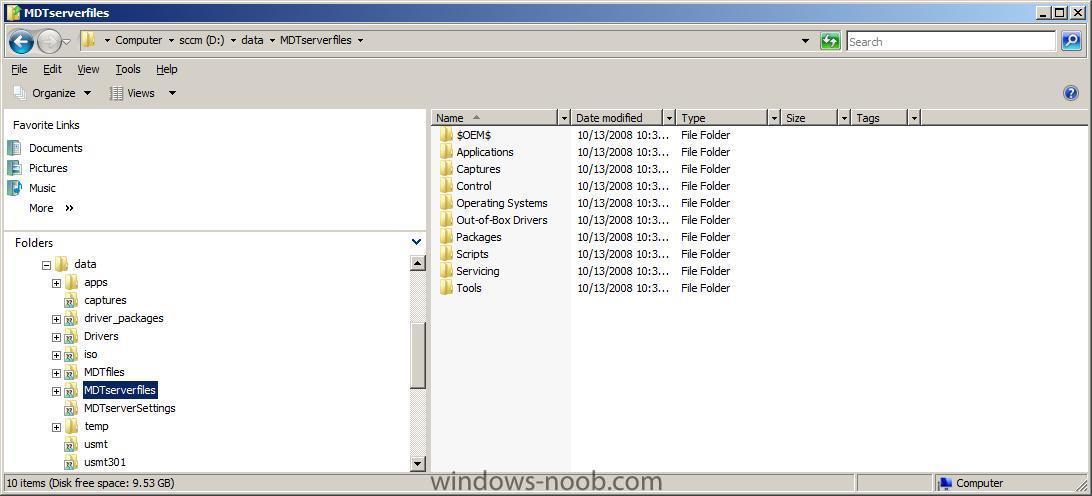
Import new Task Sequence In the Operating System Deployment node of ConfigMgr, select Task Sequence, right-click and choose Import Microsoft Deployment Task Sequence from the options Note: This guide was written when MDT 2008 was the current version, since then MDT 2010 has been released and Microsoft has reworded Import Microsoft Deployment Task Sequence to Create Microsoft Deployment Task Sequence. when the wizard appears select Server task sequence from the drop down menu and click next, fill in the general details, click next... on the next screen you need to fill in the workgroup or domain joining details (I chose to join the w2k8 domain), plus provide details of a user with that permission, and enter your product key, in addition you must specify the UNC path of where to store the captured WIM file which we will call server2008.wim. eg: \\WIN-AE2V1IRN067\captures\server2008.wim for boot image you can specify which one you require by clicking on the Browse button and selecting the boot.wim file that we created earlier (32 bit boot.wim), Next we will create the MDT server source files package (which will contain all of the scripts and supporting files needed for the Microsoft Deployment Toolkit). In explorer, create an empty folder called MDTserverfiles and share it. fill in the details... on the OS Image screen, choose to Specify an existing OS install package click on the Browse button and select the Server 2008 installation Package we created earlier click next when ready for the client package we can specify the one we created earlier from a predefined package Settings Package next we will create the Settings package (Contains the unattend.xml file used for an automated installation of Windows Server 2008 as well as the customsettings.ini file used with the Microsoft Deployment Toolkit), so create a folder in explorer called MDTserverSettings and share it as MDTserverSettings click on create a new settings package and browse to our network share eg: \\WIN-AE2V1IRN067\MDTserverSettings fill in the descriptive details For the Sysprep Package, choose No Sysprep Files required, and click Next, at this point it will create/update all package and settings we specified. when copying is complete, you can now browse the MDT Server files and MDT Server Settings folders we created and then shared, they are now populated with files and here is where our customisations will be stored... continue to >> Part 2

-
it's a really strange error you are getting, are you getting the same error for all xp versions you listed in the previous post ? what was different between your test setup and the production server ? cheers anyweb