anyweb
-
Posts
9223 -
Joined
-
Last visited
-
Days Won
367
Everything posted by anyweb
-
 Web services are all around us, and with the proliferation of Cloud computing (and the Microsoft strategy for Public and Private Cloud), use of web services will become more-and-more common over time. In this 3-part series, I am going to drill down into Opalis web services capabilities and share some tips, including: * Making web service calls with Opalis * Dissecting the XML Response Payload * How to construct queries to retrieve targeted values * Pushing the limits – What to do when ‘Invoke Web Service’ isn’t enough In the Series * Part 1: Making Calls and Parsing Output * Part 2: When Invoke Web Services Isn’t Enough * Part 3: XPath Query Primer In this Installment Okay, time to get started. Let’s quickly look at the topics for this article and then we’ll get down to business. * Scenario and Sample Workflow * Object Configuration * Viewing the XML Response Payload * Extracting Data of the XML Response Payload * Presenting Results Scenario and Sample Workflow We’ll begin with an explanation of the Opalis policy (workflow). Here is a workflow that queries a web service (a stock quote service) to retrieve details about the stock performance of a particular company. Objectives for this Workflow: * Call the web service * Pass in a stock ticker symbol to retrieve info about a target company * Parse the XML output (the response payload) to extract specific information: o Full Company Name o Current Price o Price-to-Earnings (PE) Ratio * Present this data in a nicely formatted pop-up message NOTE: The Custom Start object at the beginning of the workflow is there so we can run this workflow on demand from the UI or externally through command line or the Opalis web service. read the rest here > http://www.systemcentercentral.com/blogs/administrator/archive/tags/powershell/BlogDetails/tabid/143/IndexID/83740/Default.aspx?utm_source=feedburner&utm_medium=feed&utm_campaign=Feed%3A+systemcenterforum+%28SystemCenterForum.org+Rollup%29&utm_content=Twitter
 -
Microsoft demonstrated at a press conference on January 5 the “next version of Windows” running on ARM processors, as many Microsoft watchers had been expecting. At the press conference — held a few hours before CEO Steve Ballmer will keynote the Consumer Electronics Show (CES) — Microsoft Windows President Steven Sinofsky showed off an early build of Windows 8 runnong on new systems-on-a-chip (SoC) platforms from NVIDIA, Qualcomm and Texas Instruments on ARM. To prove Microsoft isn’t abandonning the x86 architecture with Windows 8, company officials also showed off Windows 8 running on x86 SOC. Rumors that Microsoft would show off Windows 8 running on ARM have been circulating for the past couple of weeks. Earlier this week, TechFlash reported that Microsoft had cut deals with the aforementioned ARM chip makers, which will enable Windows 8 to run on ARM-based systems once the next release of Microsoft’s operating system is available. Sinofsky told press conference attendees they were forbidden from videotaping demos of the next version of Windows. Unsurprisingly, he also said Microsoft would not discuss its release schedule plans or show off the new Windows 8 user interface. Microsoft has been working to port Windows to ARM for several years. I had heard about LongARM, a project to port Vista (codenamed Longhorn) to ARM a while back. Microsoft last year signed an architecture licensing agreement with ARM, but wouldn’t say anything about its plans at that time. Microsoft is believed to be finally backing ARM as that low-power processor is especially well suited to tablets and slates, which are one of the primary form factors Microsoft plans to target with Windows 8. Windows 8, according to my tipsters, is just around the Milestone 2 mark, which is the second major internal build for the operating system. A public test build of Windows 8 isn’t expected by most until later this year. Microsoft officials have continued to say when the company is planning to ship WIndows 8. GIven that Windows 7 was released to manufacturing in July 2009, one would think a 2012 launch date is a possibility. (I have heard from some that Microsoft, once it does talk dates, may say 2013 to eliminate any possibility of being “late.”) Update: More from the Microsoft CES press conference and press releases: * Sinofsky said that “normal” Windows software will continue to run on Intel’s SOC with the next version of Windows without requiring any rewrites. * Sinofsky also said Microsoft will insure that Office, going forward, will run on ARM SOC systems. via > http://www.zdnet.com/blog/microsoft/ces-microsoft-shows-off-windows-8-on-arm
-
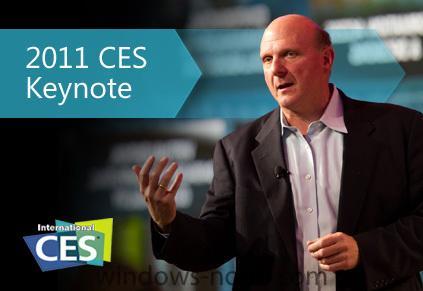
Watch Steve Ballmer's CES Keynote On-Demand Jan. 5, 2011 Watch the full on-demand video of Microsoft CEO Steve Ballmer's opening keynote address at 2011 CES on Wednesday evening in Las Vegas. On-Demand: Keynote Address Transcript: Steve Ballmer Keynote via > http://www.microsoft.com/presspass/events/ces/
-
we'll still be here when you come back to SCCM, by the way, did you ever manage to see what the SMSTS.log file said ? cheers niall.
-
Office 2010 Updates not showing up
anyweb replied to Antonius138's question in Software Update Point
check the sup component classifications, is Office 2010 enabled ?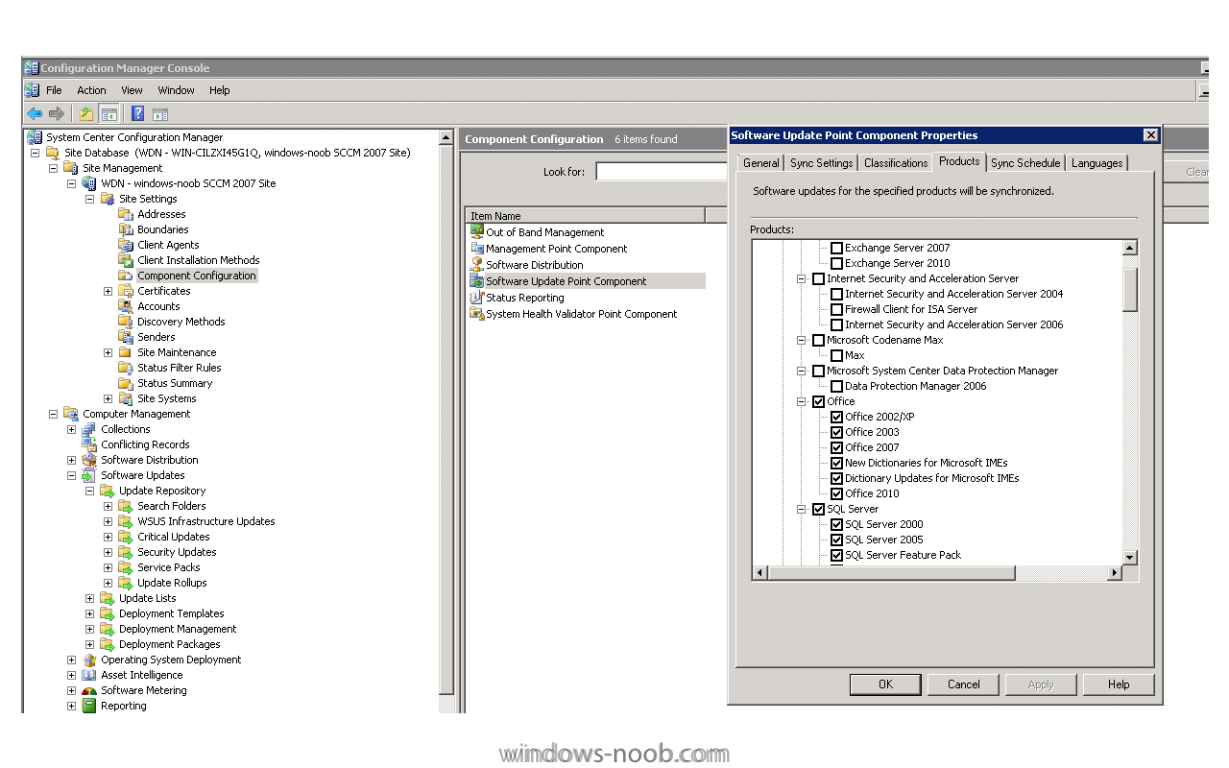
-
you'll need the original sccm installation media, its on technet/msdn if you cannot find it. and as i said before we'll help you with this but you must be patient with it, especially in the beginning with OSD cheers niall
-
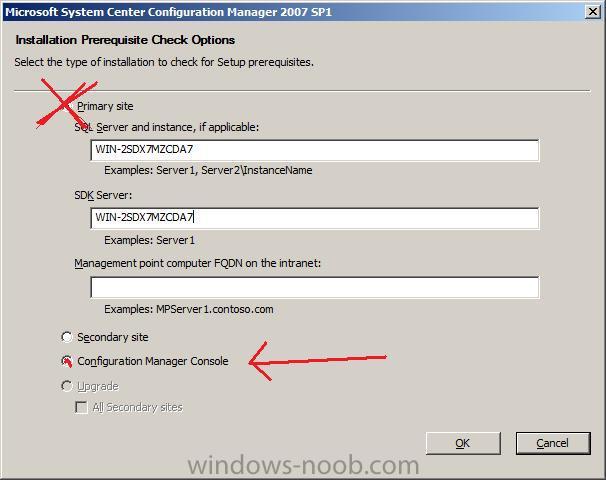
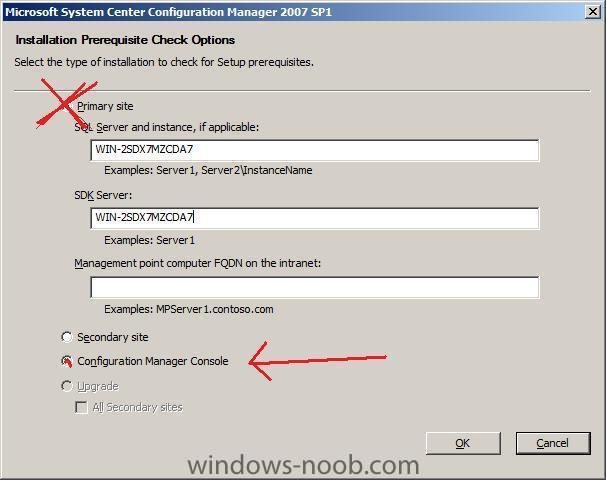
get your sccm 2007 sp2 media, as it's similar to installing a site, except choose to Install the console. see pic
-
Office 2010 Updates not showing up
anyweb replied to Antonius138's question in Software Update Point
can you please try these search folder criteria, does it help ? Product=Office 2010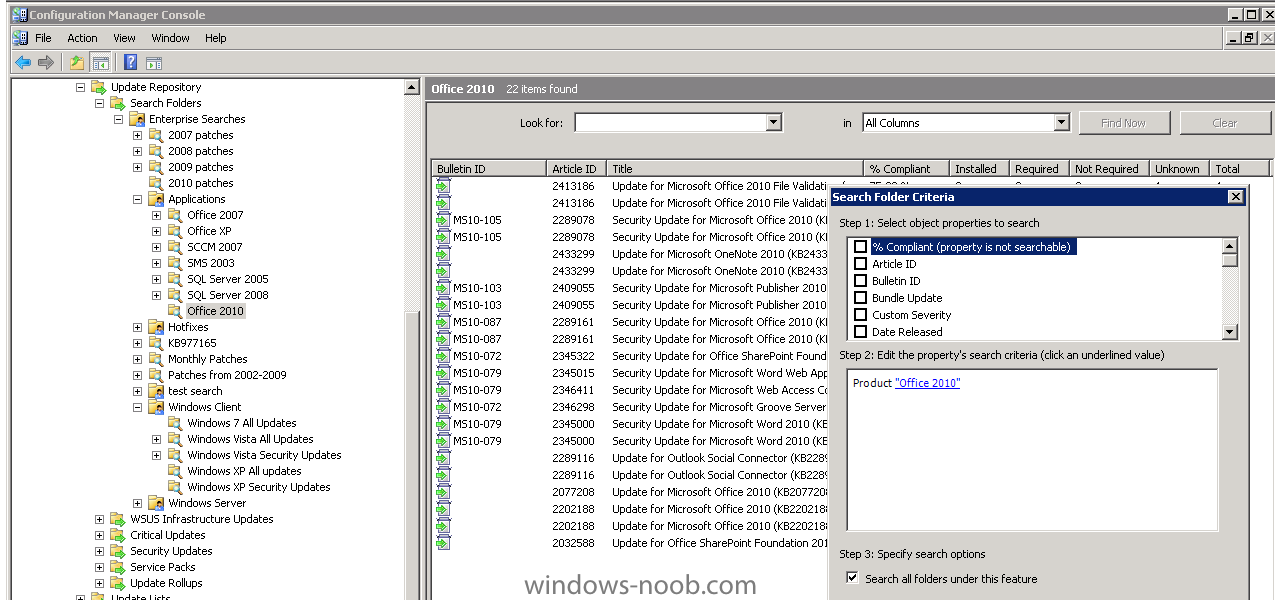
-
you dont need to insert a usb key in the server, just install the sccm console on your desktop (windows xp/7) and create the key there..
-
well try the custom capture windows 7 task sequence then...
-
ok then, let's try and fix the problem, what OS are you trying to capture ? you can try using this custom task sequence to capture windows 7, or is it XP ? there are many way's to capture an image to WIM file but it is not the same thing as a ghost file (gho), ghost is bit by bit, WIM is files... let us know.. cheers niall
-
Office 2010 Updates not showing up
anyweb replied to Antonius138's question in Software Update Point
what office 2010 updates are you expecting to see ? -
as regards your errors, 0x00000032 means not supported, 0x00000001 means incorrect function. Chris is just trying to help and you are most likely so frustrated with trying to get the job done that you failed to understand that, the SMSTS.log file can be found/accessed by reading this post after working with SCCM for some months/years you'll soon realise that it is a far better tool for the job than Ghost could ever be, as you can automate everything from start to finish in a repeatable way, I'd recommend you go the build and capture route, start from scratch, learn what you hve to learn and understand that Ghost's way of doing things may be fine for small deployments but is not diverse enough to allow you to take control of an enterprise. Sccm (Configmanager) will handle small deployments and very big ones too, and learning how to do build and capture will teach you loads about the process's involved and how to streamline everything. we will help you if you are willing, cheers niall
-
good work, please post the lines you added so others will learn cheers niall
-
I've upgraded the forums server software and it means new features as well as being up to date ! you'll notice that you can now twitter/facebook/digg/buzz up new posts by clicking on the relevant pic beneath your post amongst other new features, please tell me if there are any problems found cheers niall
-
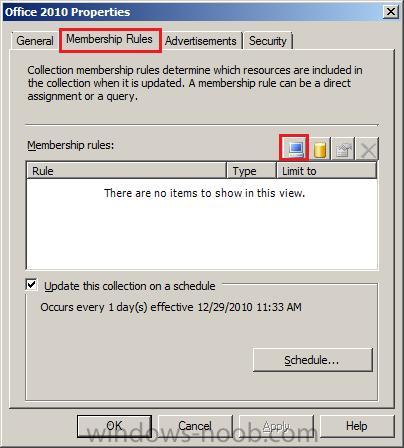
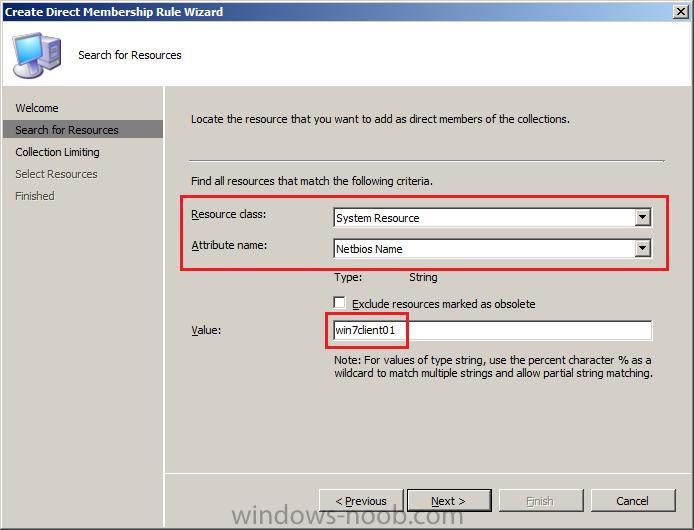
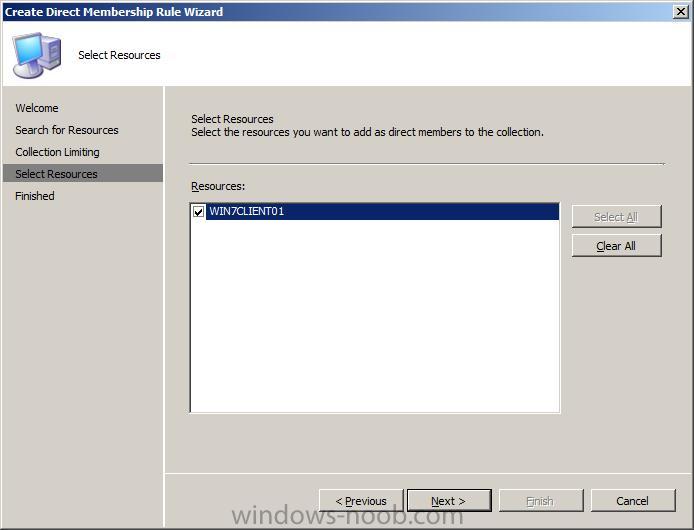
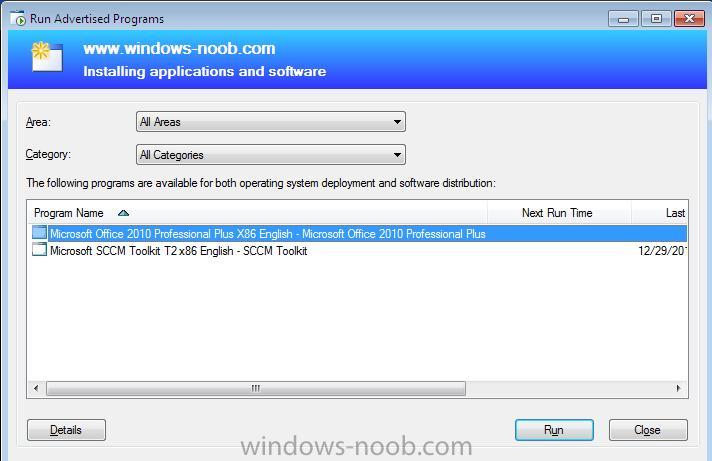
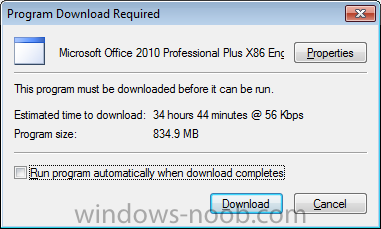
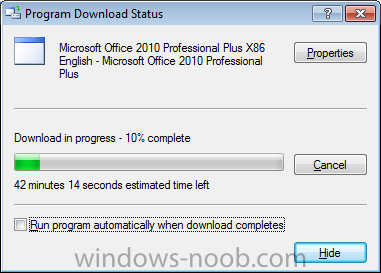
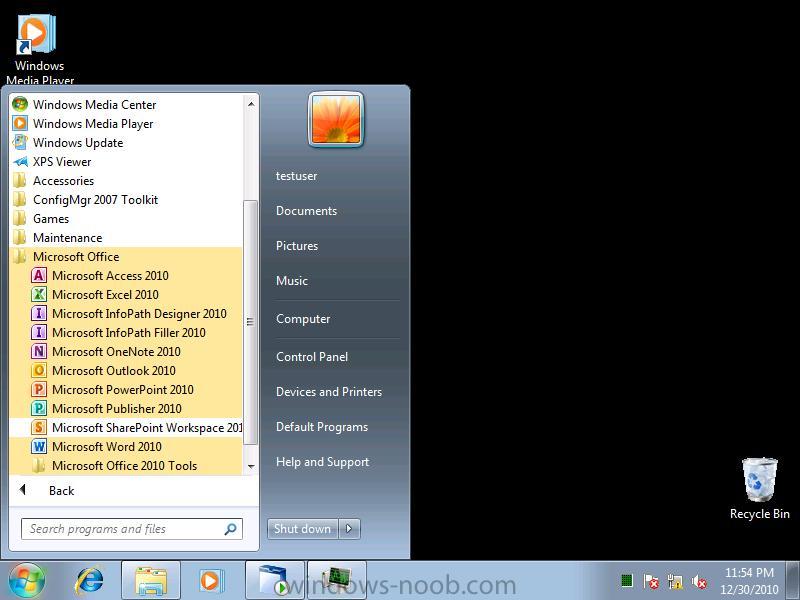
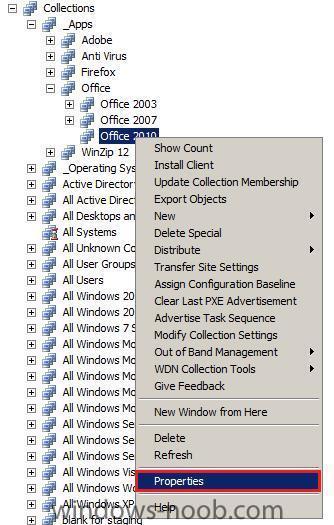
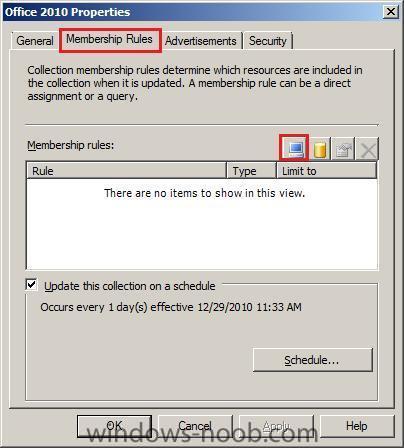
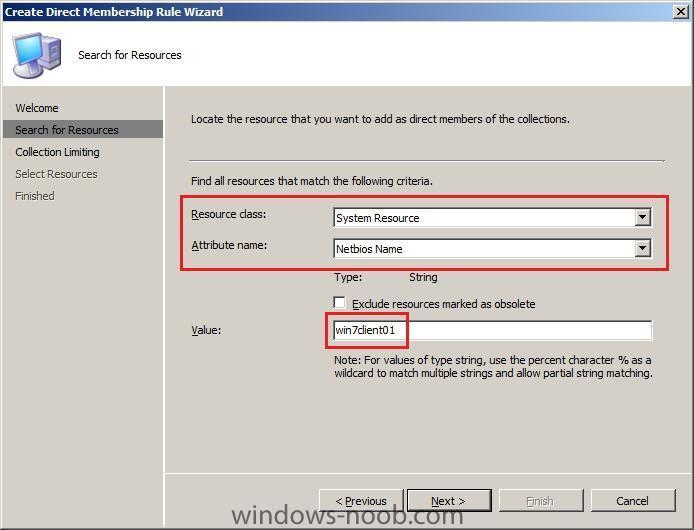
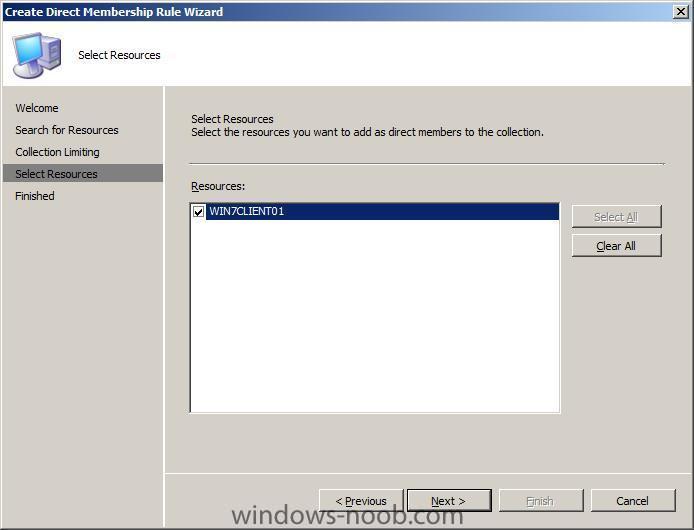
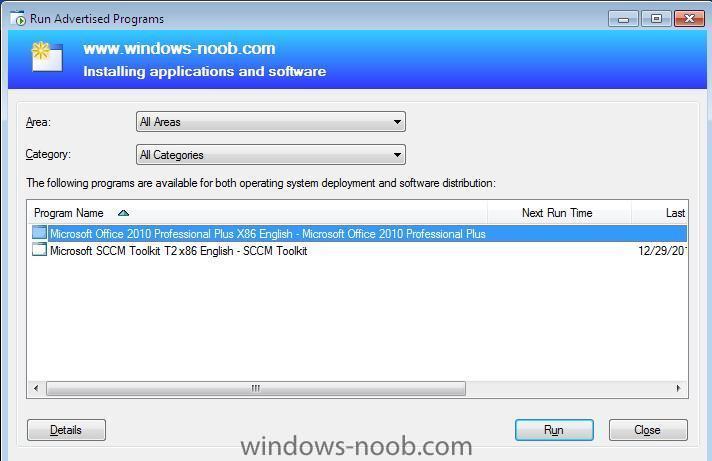
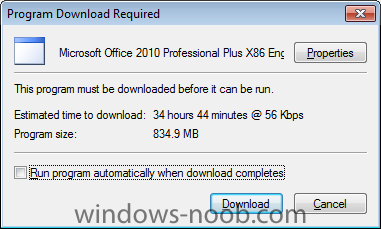
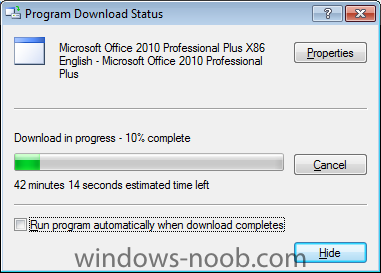
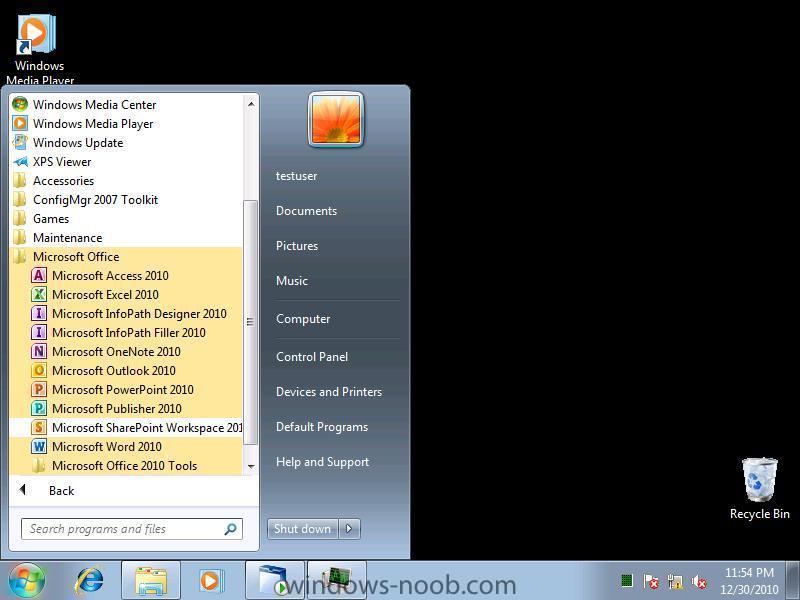
Test the Office 2010 Deployment Now that we have the groundwork done, you'll want to test the package on some Windows 7 clients. To do so you could use direct membership to add those computers to the Office 2010 collection, or better yet, setup a query on the collection and use Active Directory Group Membership to do it for you. But for the purpose of this guide, let's add a virtual machine (Windows 7) to our Office 2010 collection using direct membership. right click on your Office 2010 collection and choose properties click on the Membership Rules tab, then click on the new direct membership button in the create direct membership wizard, use the drop down menus to select Resource Class: System Resource Attribute Name: Netbios Name Value: Win7client01 input the values to match your computername you wish to test... in my case I used a virtual machine called win7client01 click next at collection limiting and on the Select resources screen, place a checkmark on the clients you want to add to the collection click finish to exit the wizard. On your Windows 7 client, monitor it until you see the New Program Notification prompt (or you can go into Configuration Manager Client, Actions tab and kick off the Machine Policy retrieval to speed things up). The program becomes available in RAP. Select it and click Run due to our Advertisements distribution settings for the package, we are informed that the program must be downloaded before being run. This is the desired effect as we do not want it to start downloading and have users interupt the process midway by turning off. They can do so with this setting and it will resume the next time they start the computer. click on Download and the program download begins when the Program is fully downloaded you'll be informed that it is ready to run. Click on Run. At this point Office 2010 is being installed in the background silently unless of course you are having a problem, in which case you should check the following folder on the client. C:\Windows\Temp Look for the setupexe log and check it to determine if there are any failure messages. All things should go well however and Office 2010 will be installed ! Further reading:- Technet: Troubleshooting a Configuration Manager 2007 Installation of Office 2010
-
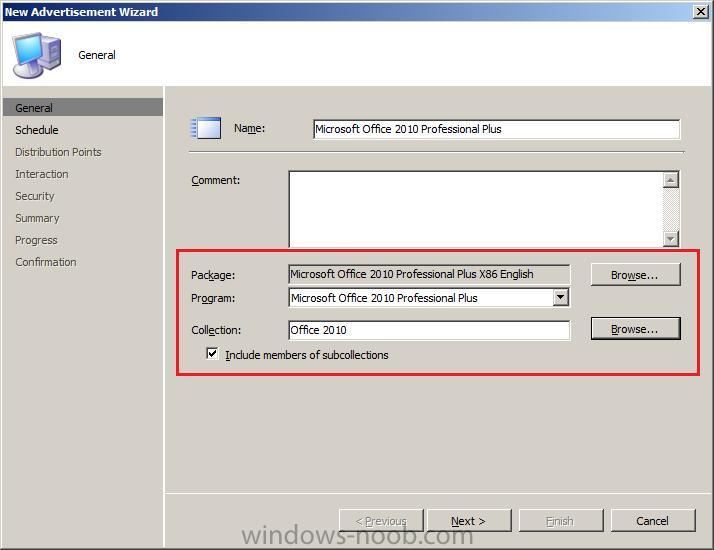
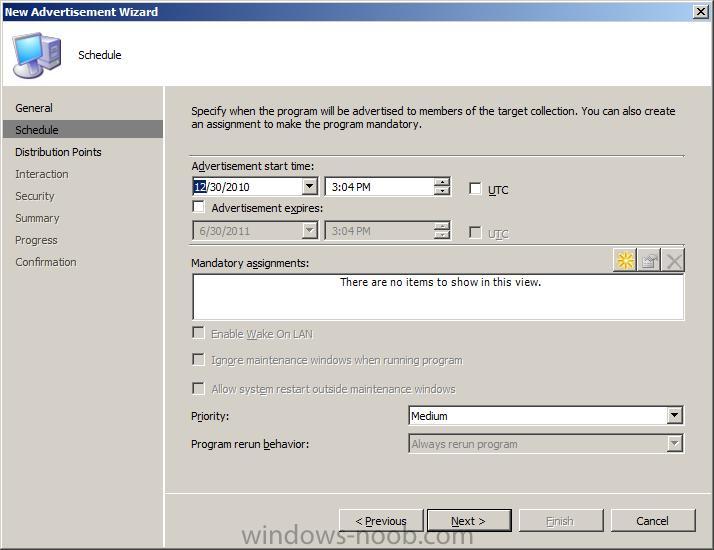
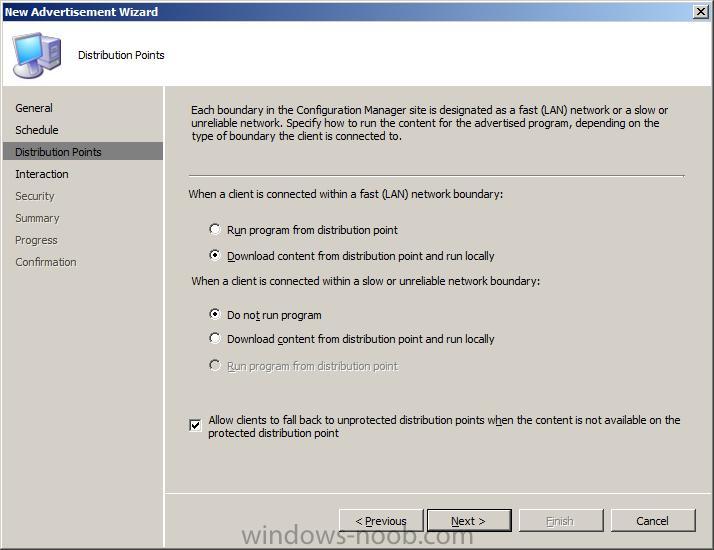
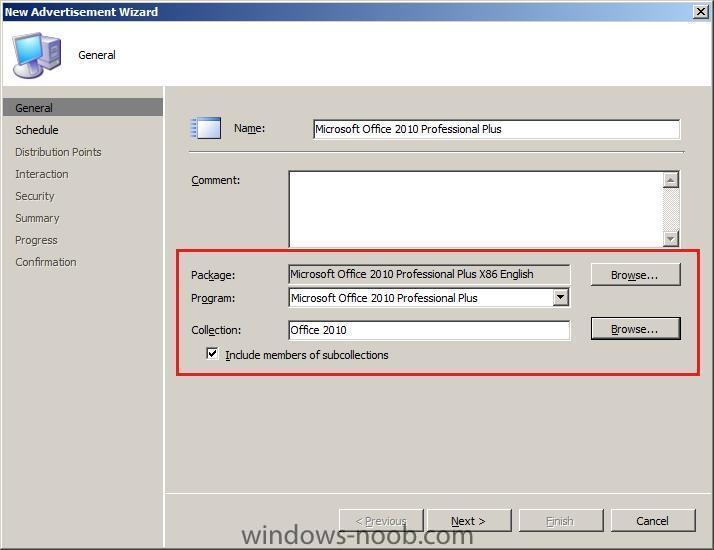
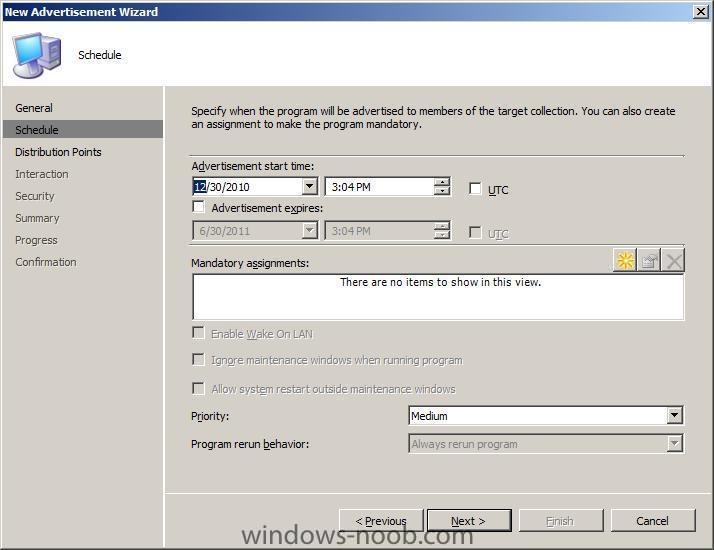
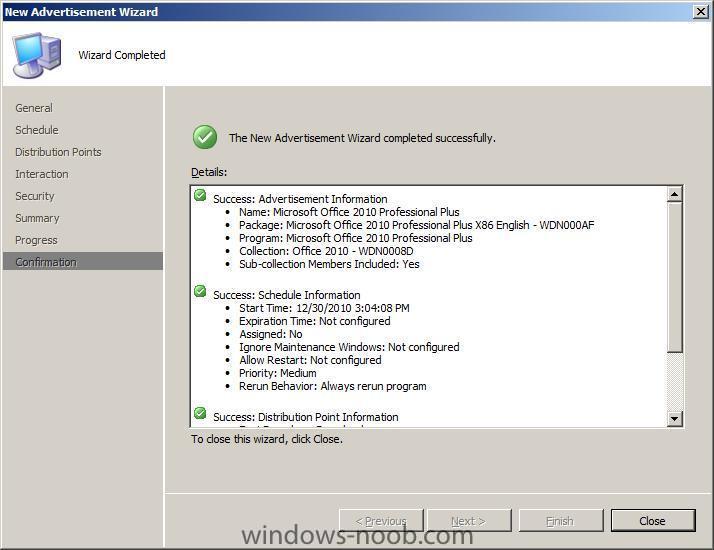
Step 4. Advertise the Office 2010 Package Ok you've nearly got everything in place, now you want to advertise the Package to a collection, if you havn't already done so create a collection called Office 2010. Expand software distribution and select Advertisements, right click on advertisements and select new advertisement. fill in the details Name=Microsoft Office 2010 Professional Plus Package=Microsoft Office 2010 Professional Plus X86 English Program=Microsoft Office 2010 Professional Plus Collection=Office 2010 We want the schedule to be optional, so leave it as it is set the Distribution Point settings as follows and click through to the confirmation screen click close to finish.


-
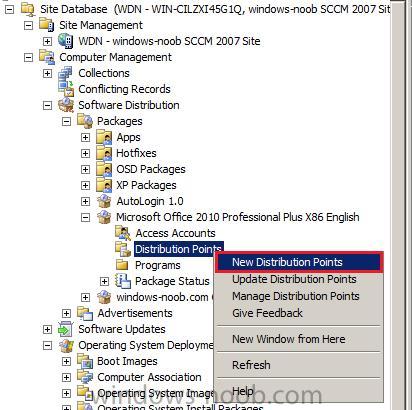
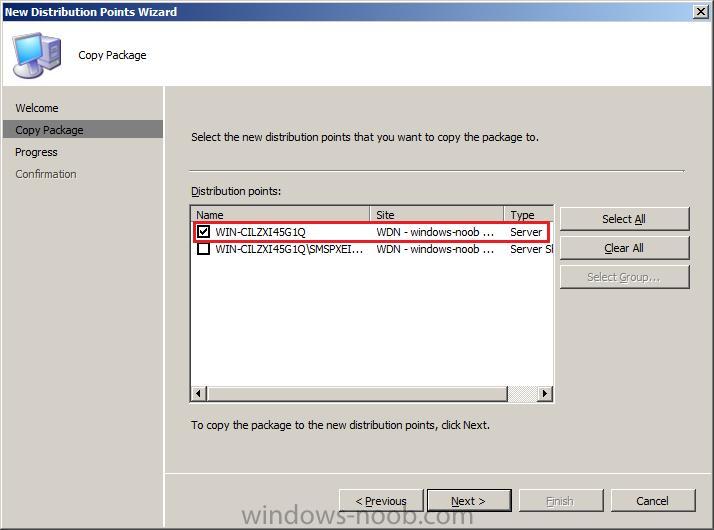
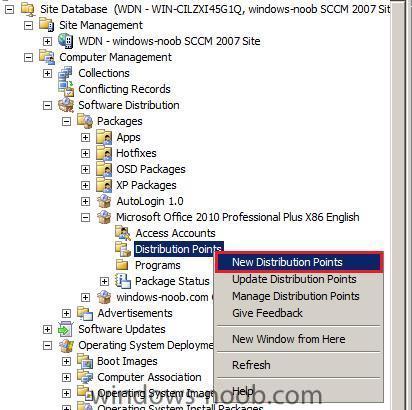
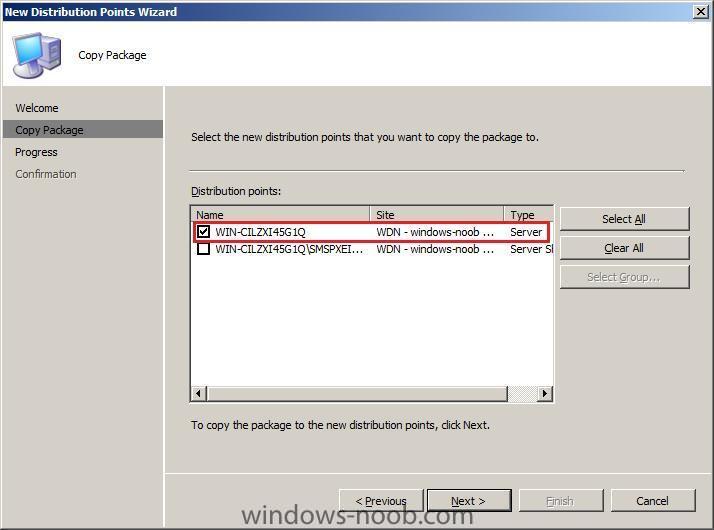
Step 3. Distribute to Distribution Points We now need to copy our package to the distribution points serving our clients. Select our package, right click on distribution Points and select New Distribution Point. click next at the welcome, then select your Distribution Points from the list (don't select any SMSPXE dps) click close at the confirmation screen.
-
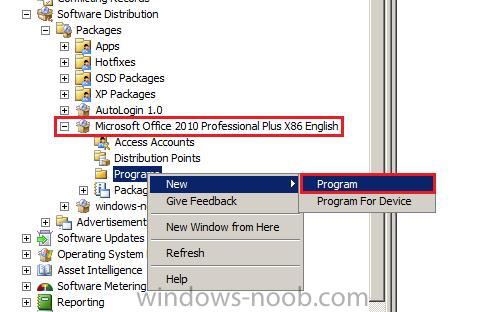
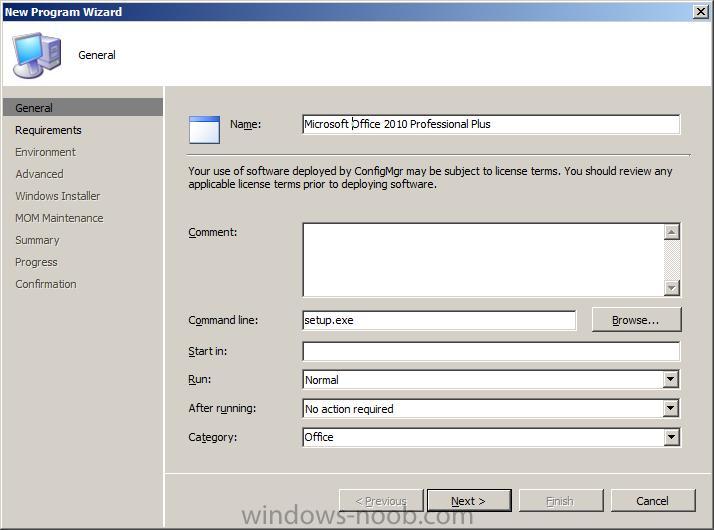
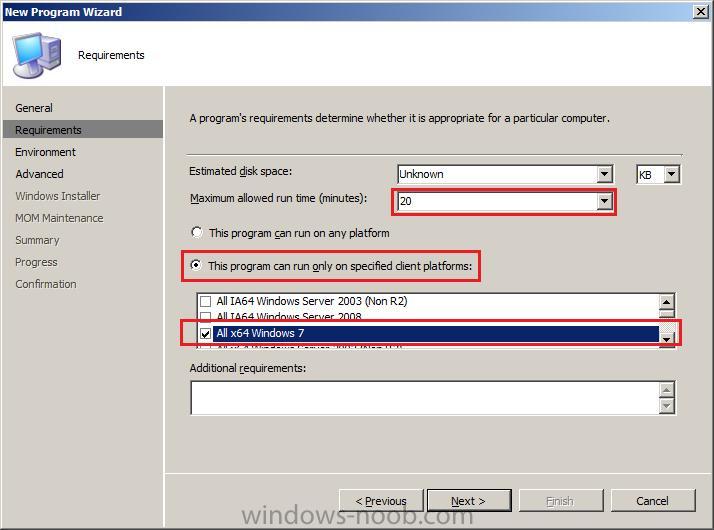
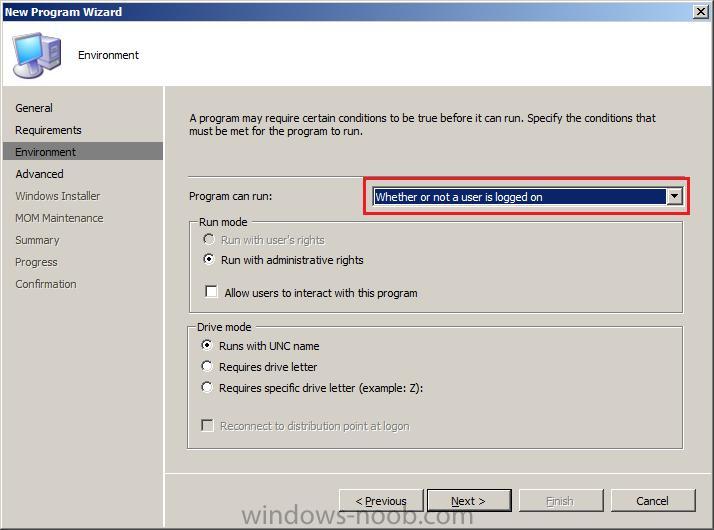
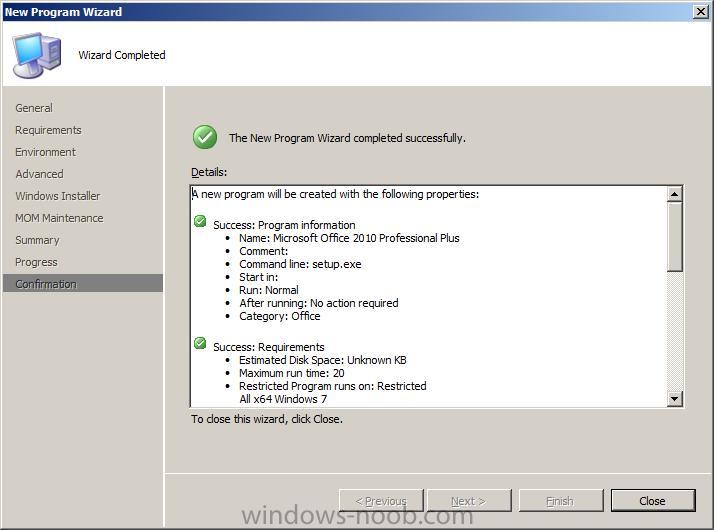
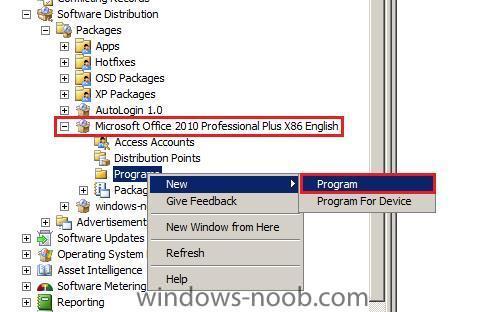
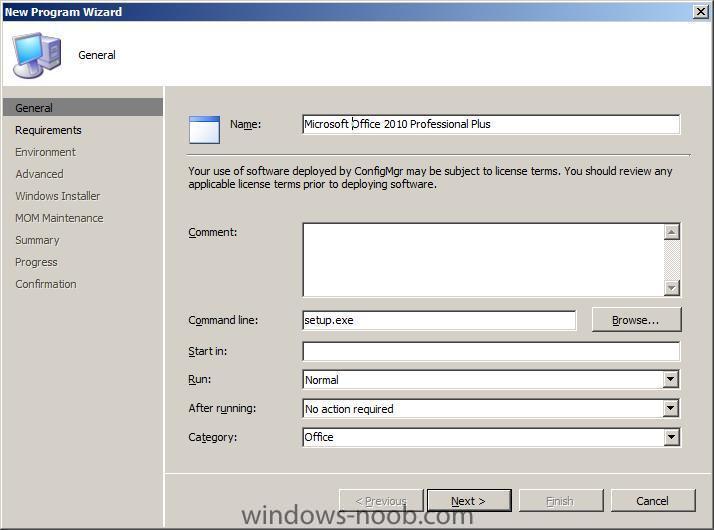
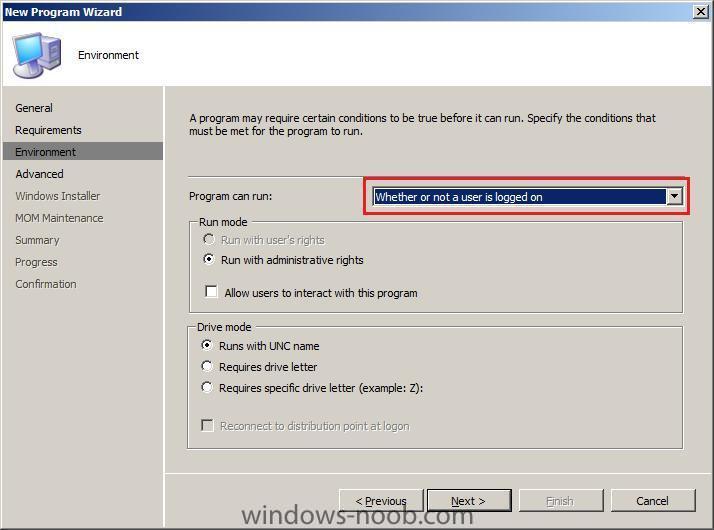
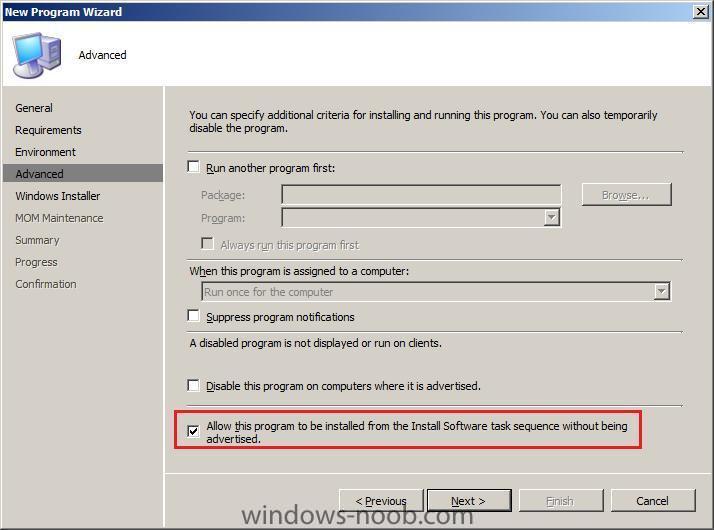
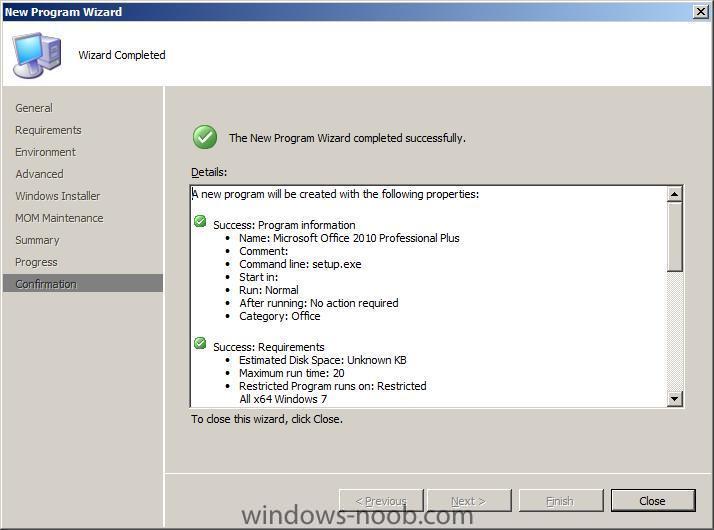
Step 2. Create the Office 2010 Program. Select our newly created package from above, expand it, right click on Programs and choose New Program fill in your program details enter your desired requirements, here you can limit the program availability to All Windows 7 X64 and All Windows 7 X86, set the Environment to run Whether or not a user is logged on and make sure that 'allow users to' is NOT selected. for the Advanced properties, set allow this program to be installed from the Install software task sequence without being advertised and then click next through to the confirmation screen. click Close.

-
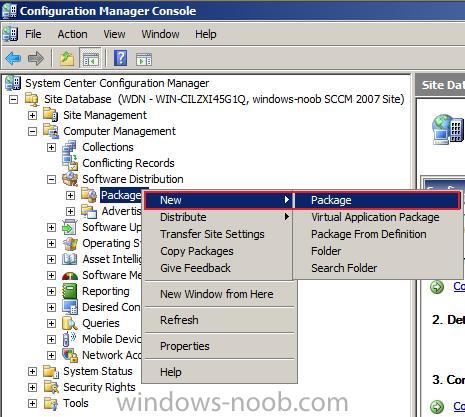
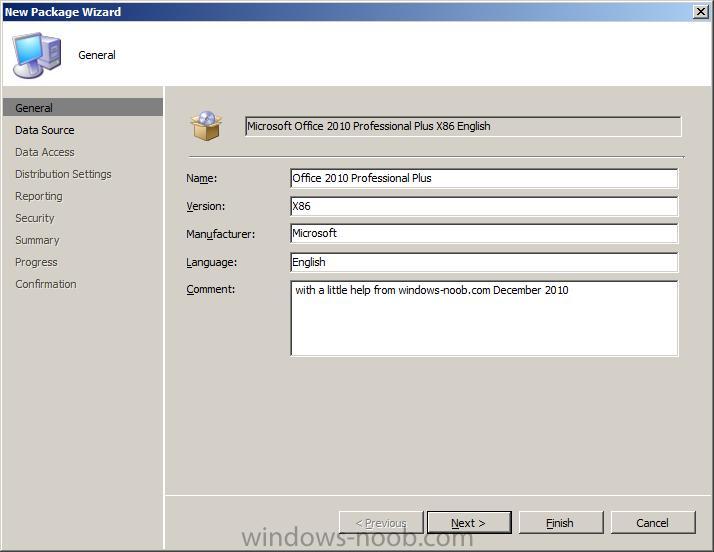
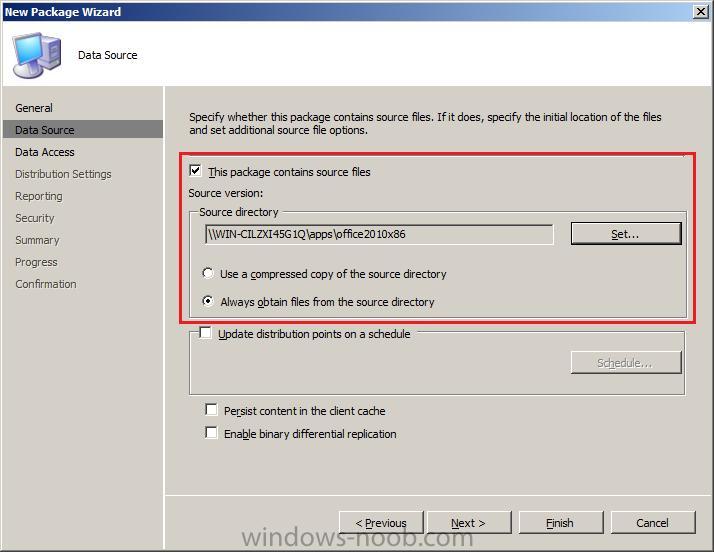
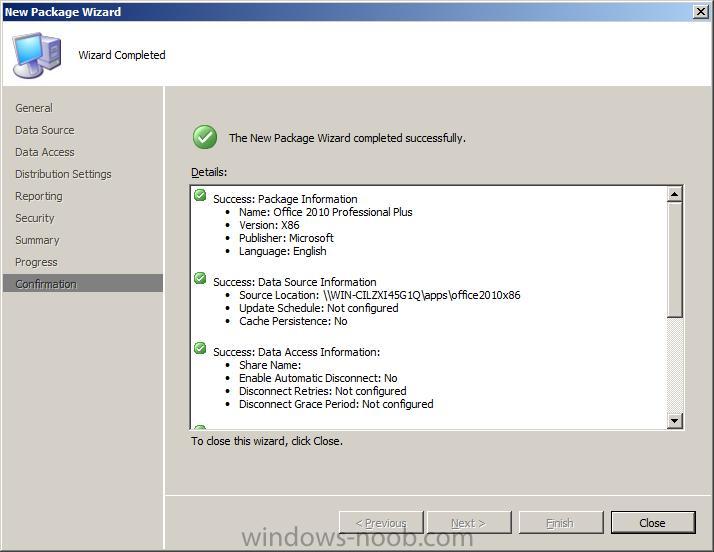
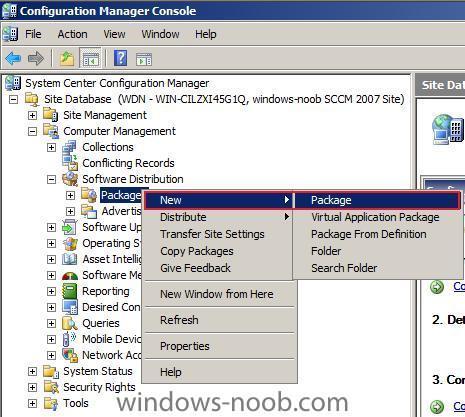
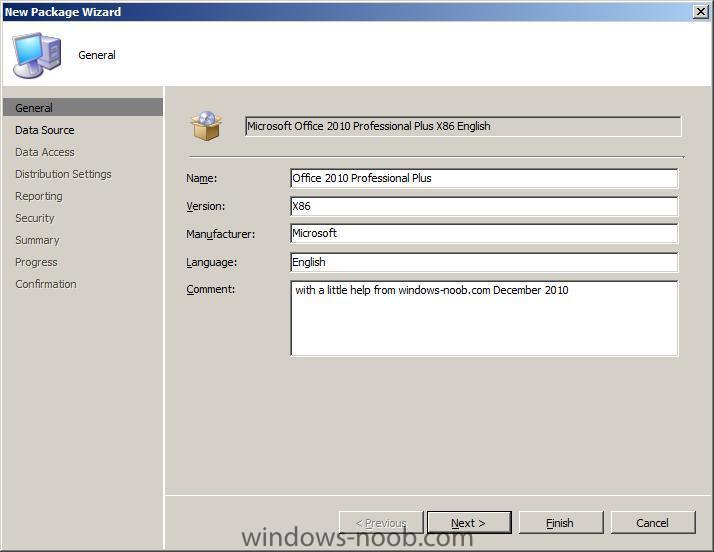
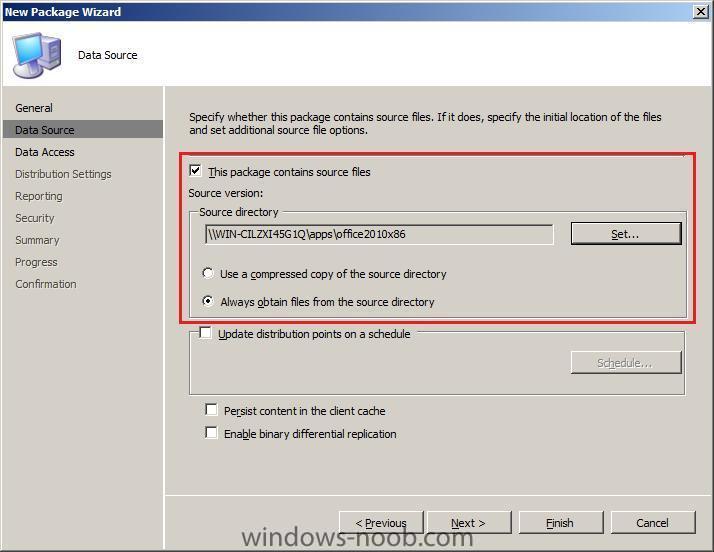
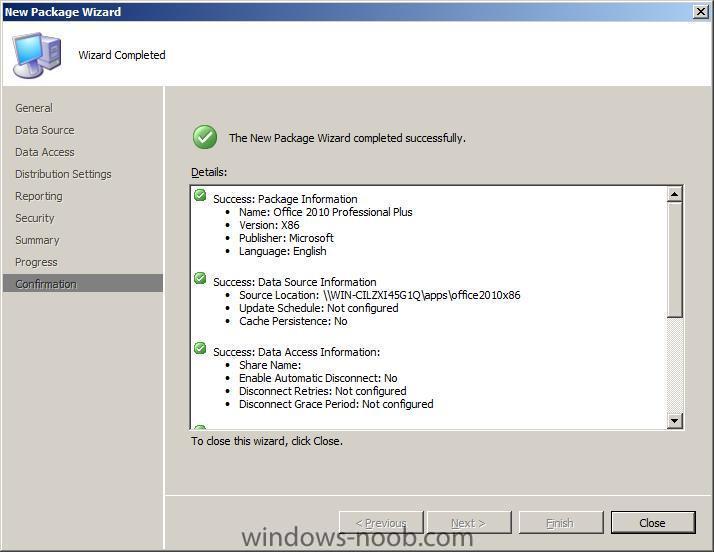
In part one of this guide, we prepared Office 2010 X86 by downloading the files required (including the OCT), and created our own MSP file. Now we will add that customised package to ConfigMgr. Step 1. Create the Office 2010 Package Note: Before starting this step, copy the c:\Office2010x86 folder we created in part one of this guide, to your application sources share on your SCCM server, eg: \\WIN-CILZXI45G1Q\apps\office2010x86 Open your ConfigMgr console, and expand Computer Management, Software Distribution. Right click on Packages and choose New Package. Fill in your package details on the wizard screen point it to the data source on your network share and click next through the wizard until you see the confirmation screen.
-
here's how eg: /config:\\bla.windows-noob.lab.local\SMSPKGE$\CEN00070\amd64\Config.xml
-
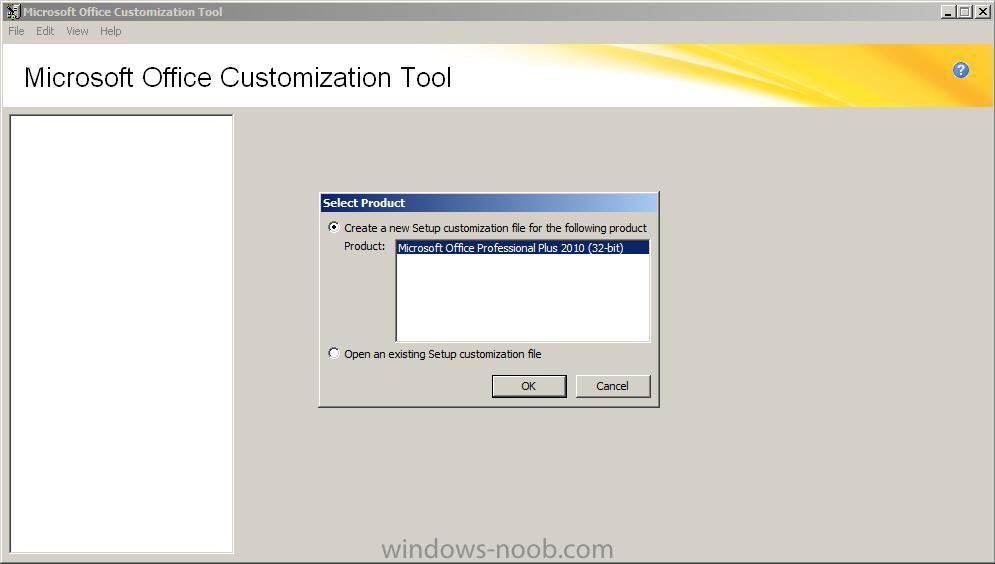
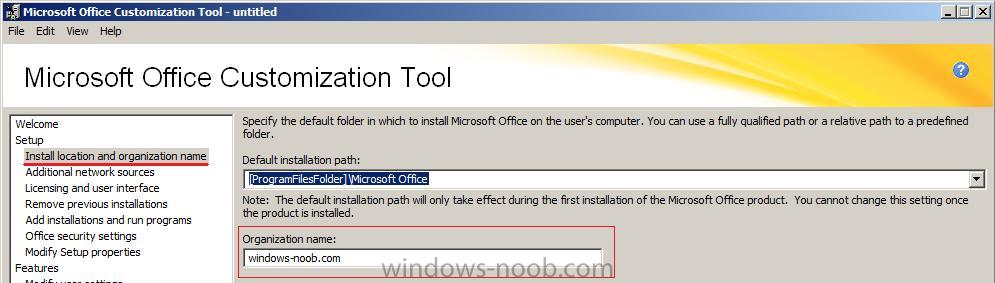
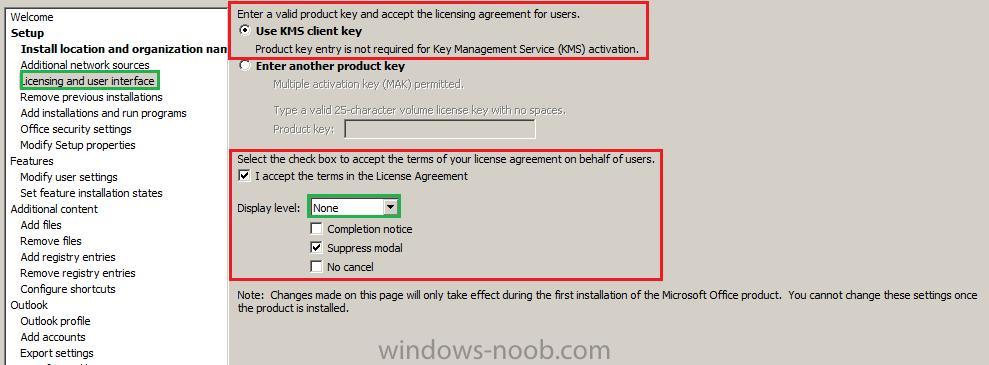
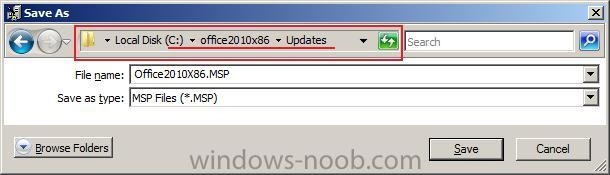
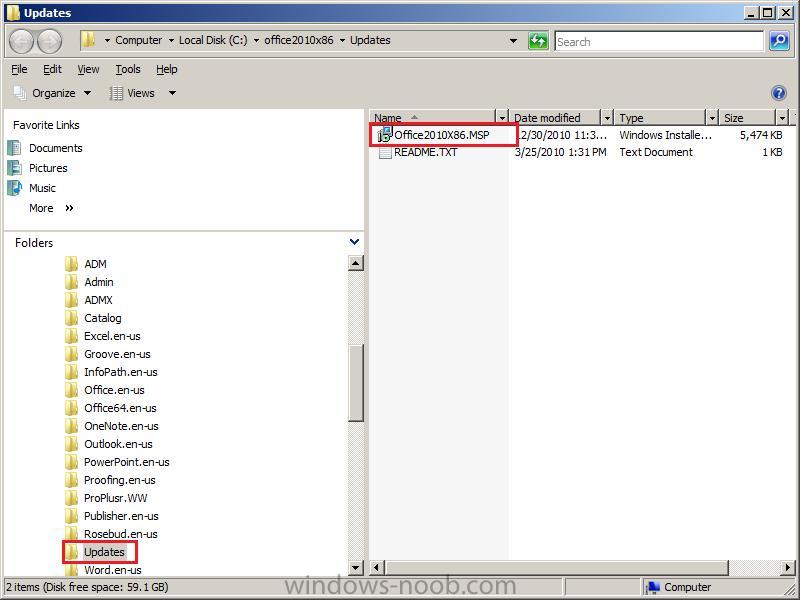
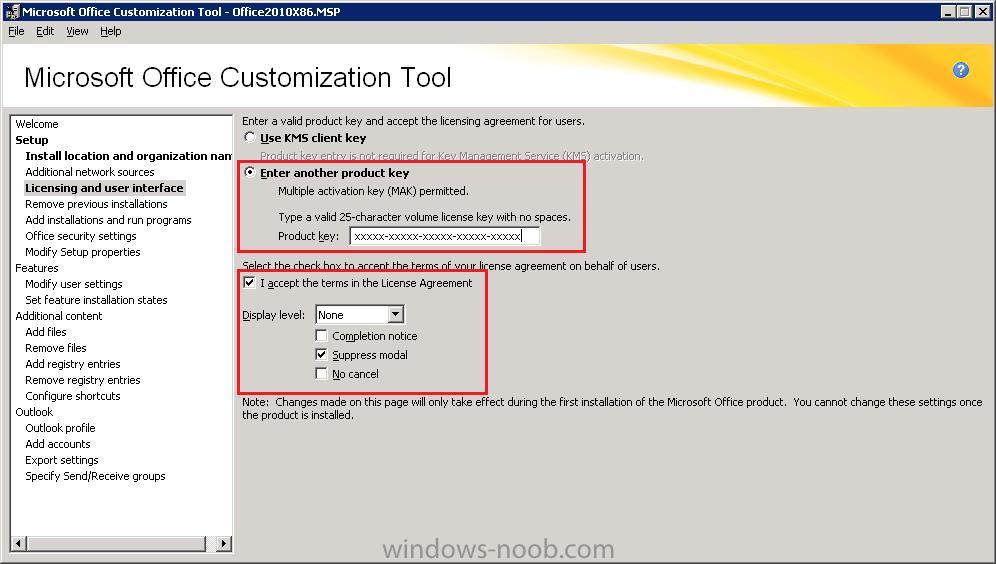
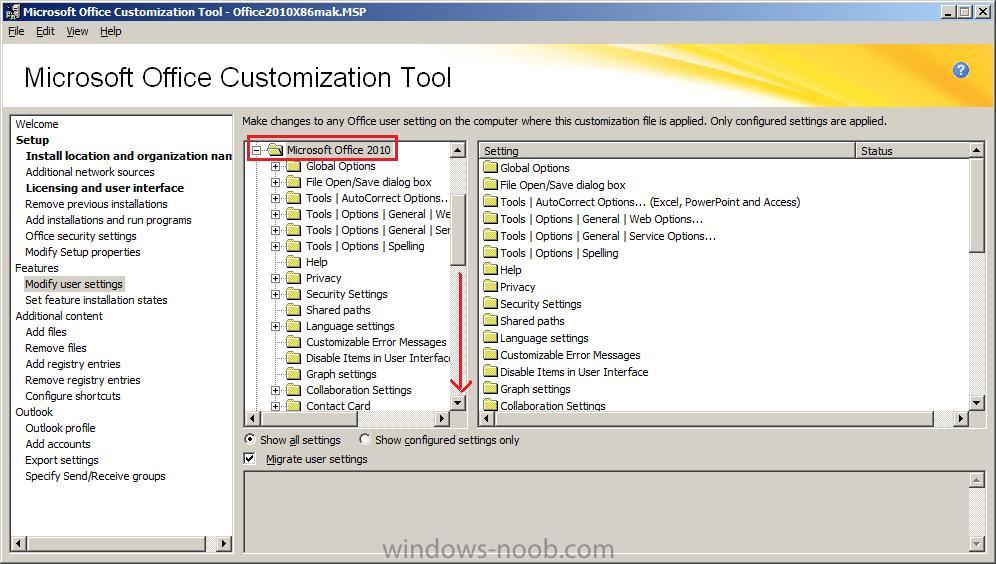
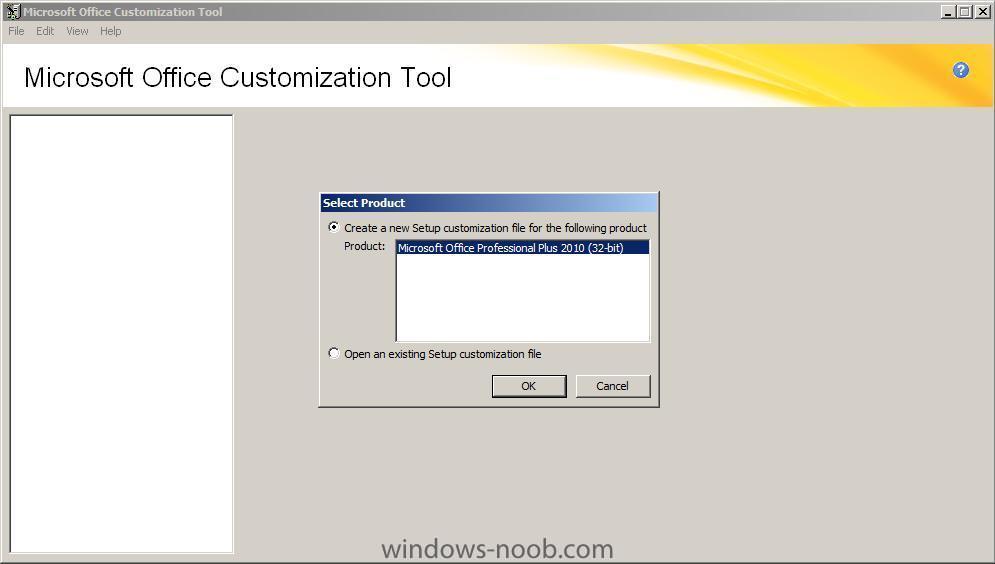
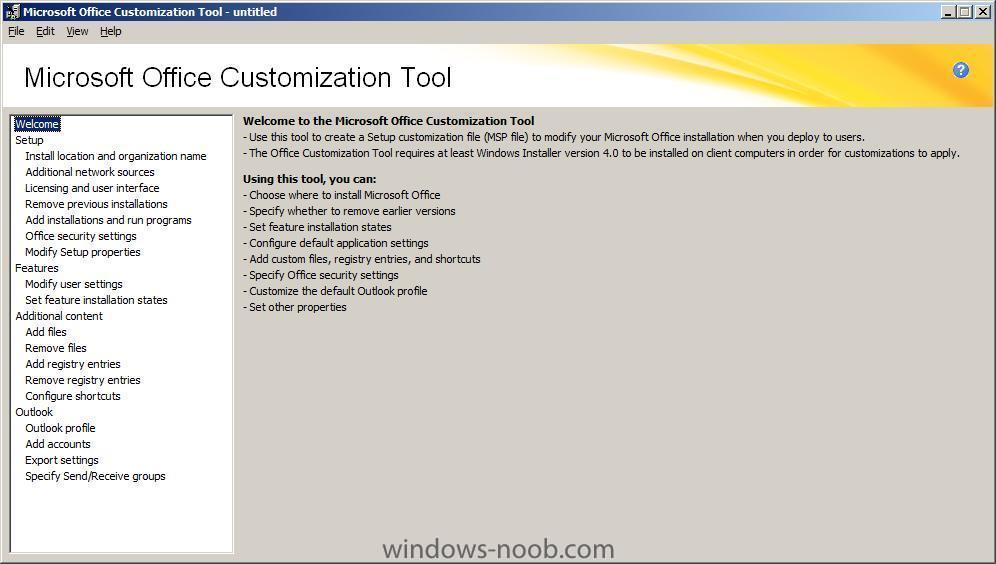
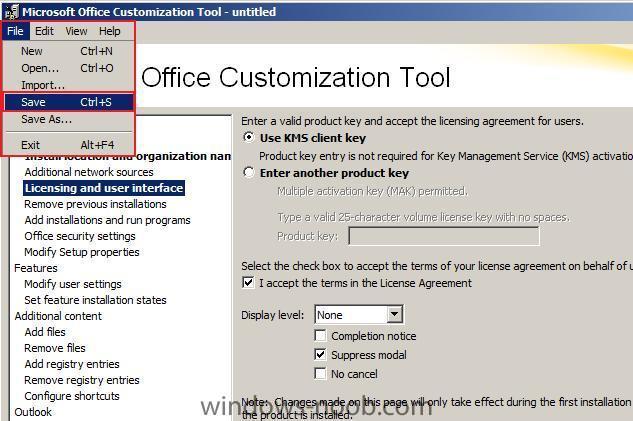
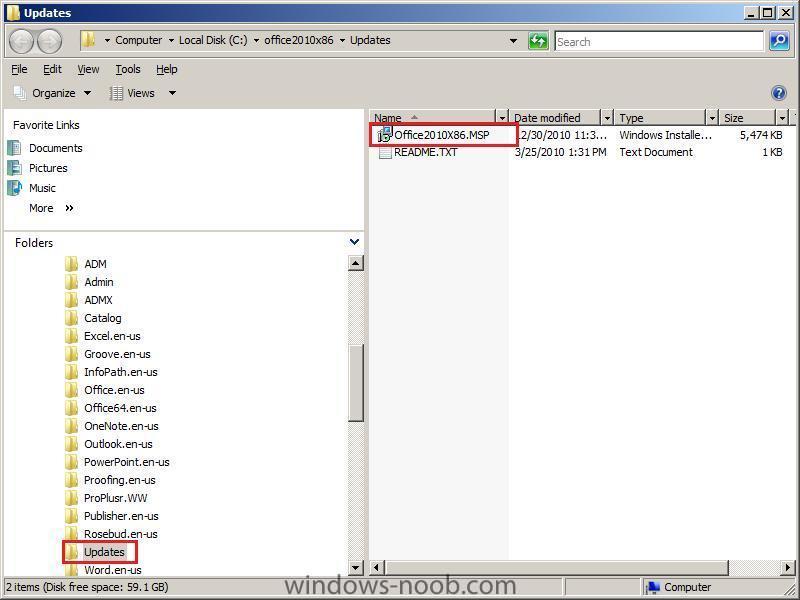
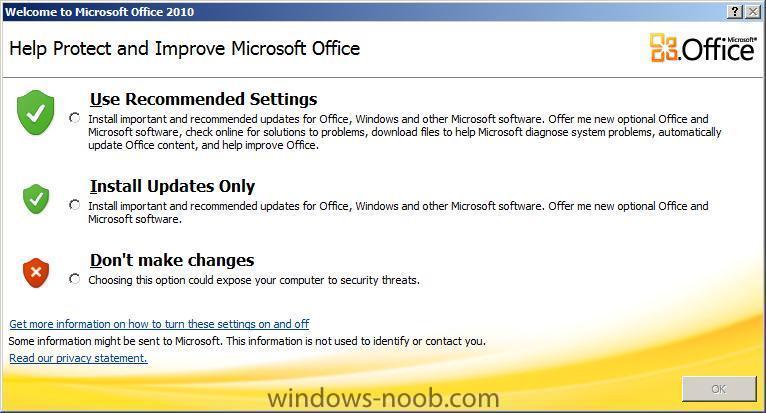
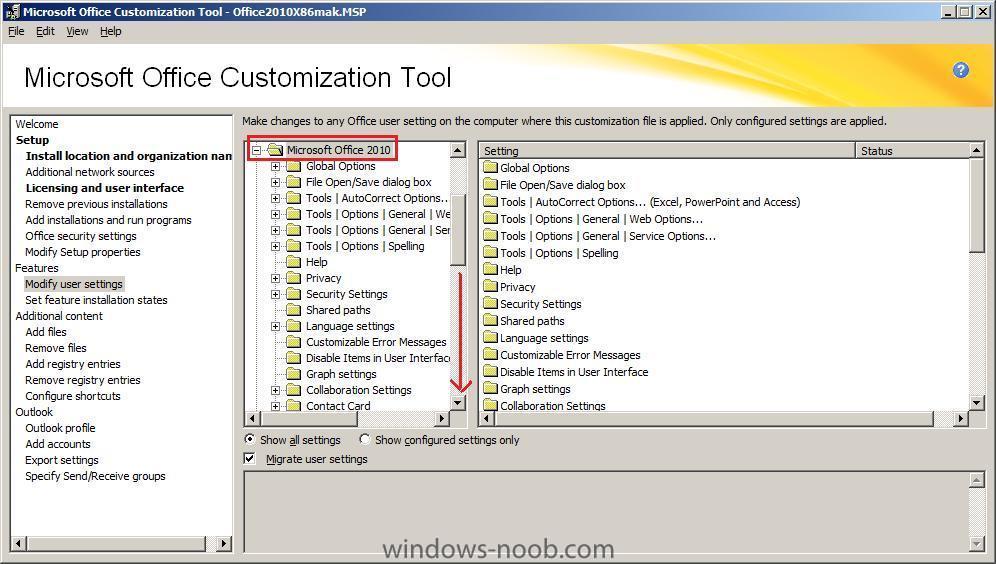
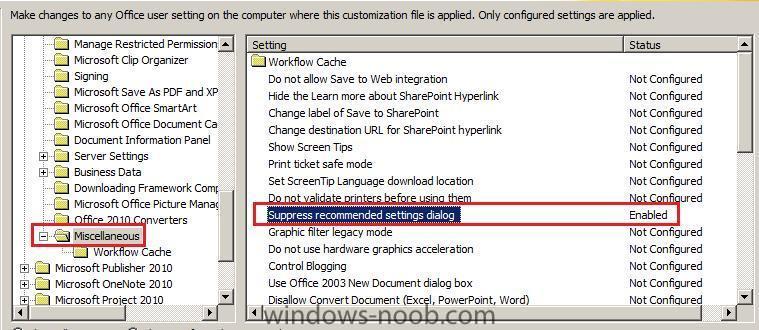
Step 4. Create a Setup customization file (.msp file) for Office 2010 Now that we have installed our OCT let's create our MSP file. To start the OCT in our office2010x86 directory enter the following in an Administrative command prompt. setup.exe /admin the OCT wizard will appear click OK to accept the default Office product and you'll see the OCT Wizard welcome screen. Install Location and Organization Name let's start by changing the Organization name to windows-noob.com, leave the install location as it is Decide which method of Office 2010 Activation Office 2010 now includes volume activation for Office 2010 Standard and Office 2010 Professional Plus. To simplify deployment as much as possible, enterprise customers should deploy only one of these editions throughout the organization whenever possible. If necessary, deployment can be configured to deliver certain applications or features to specific groups or departments. Activation establishes a relationship between the software's product key and the installation of that software on a computer system. It requires the end user or IT professional to perform steps such as entering a product key or contacting a networked server or telephone service center. Use of activation technologies helps protect license keys. Previous systems that relied on distribution of license keys to users were vulnerable to being leaked or pirated. Two volume activation methods for Office 2010 are available: • Key Management Service (KMS). KMS uses a KMS host key to activate a KMS host computer and establish a local activation service on the network. Office 2010 connects to the local KMS host for activation. KMS activation is targeted to managed environments where more than 50 physical or virtual computers regularly connect to the organization’s network. Windows Server 2008 R2 can be configured as a KMS server for both Windows and Office 2010, which lowers the requirement for additional infrastructure. • Multiple Activation Key (MAK). With a MAK, clients activate Office 2010 online with the Microsoft-hosted activation servers or by telephone. MAK activation supports users whose computers are unable to connect to the company network or experience unreliable connections. MAK activation behaves similarly to activation keys that retail customers use, except that a single key supports as many users as required. As with retail keys, computers must be activated with a Microsoft server over the Internet or by telephone through a Microsoft call center. Microsoft IT used KMS to deploy Office 2010. With KMS, the whole activation process stays within the company, and there is no requirement to activate the clients over the Internet or phone. * reference:- Deploying Office 2010 at Microsoft, How Microsoft IT deployed Office 2010 to more than 100,000 computers by using Microsoft deployment technologies Technical White Paper Select the Licensing and User Interface option. Please read the Office Activiation information above to decide what is applicable in your environment. You can enter your MAK license key or use the default KMS Server setting. Place a checkmark in the License agreement, and set the type of Display level to None. Verify that the Completion notice and No Cancel options are not selected. Disabling the Help Protect and Improve Microsoft Office popup when you install Office 2010 you'll notice that the first time you start Word 2010 or another Office application that the following Windows appears Well we don't want our users being bothered with that so let's configure that setting to not appear. Select Modify User Settings (under Features), and in the right pane, select Microsoft Office 2010. Once selected, Scroll down.... to Miscellaneous and select suppress recommended settings dialog and change it to Enabled. that is all the customization we will be doing for now, if you want to configure it further then do so, but make sure that above settings for Licensing and User interface remain in place. Let's save our MSP file. Click on File, Save give it a name like Office2010X86 and change the path to the updates subfolder within your extracted Office installation files eg:= C:\office2010x86\Updates close the wizard, click OK, and browse to the updates folder, you should see your newly created MSP file. Note: If you only have one .MSP file then you can place it in the Updates folder under the root folder and just run the "setup.exe" without switches. "Setup.exe" will automatic apply the saved .msp file from the updates folder. If you have more .MSP files then place them all in your Office 2010 root folder. Step 5. Copy Config.XML Finally, copy the config.xml file from "C:\office2010x86\ProPlusr.WW folder" and paste it in the root of source folder C:\office2010x86, failure to do this will mean that SCCM will attempt to install Office 2010 but fail as it doesn't know what package to install. Take me to Part 2.


-
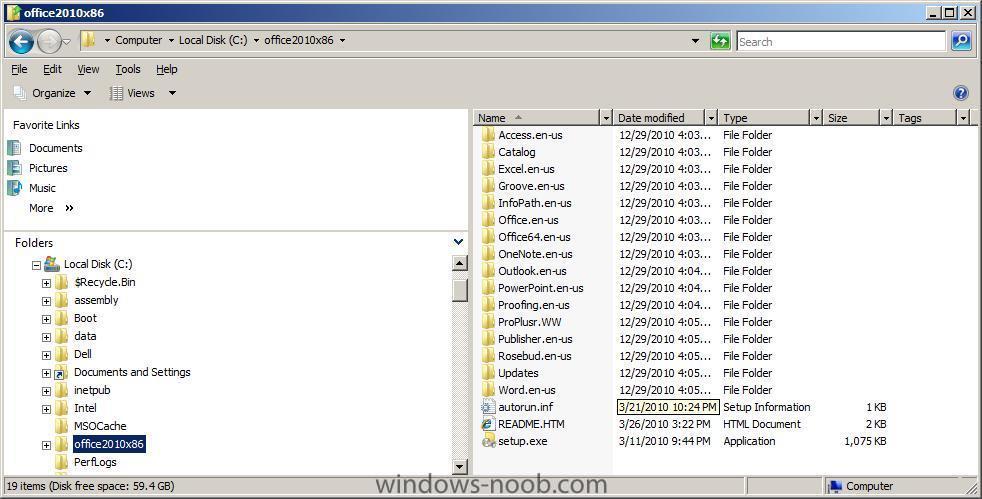
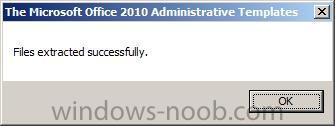
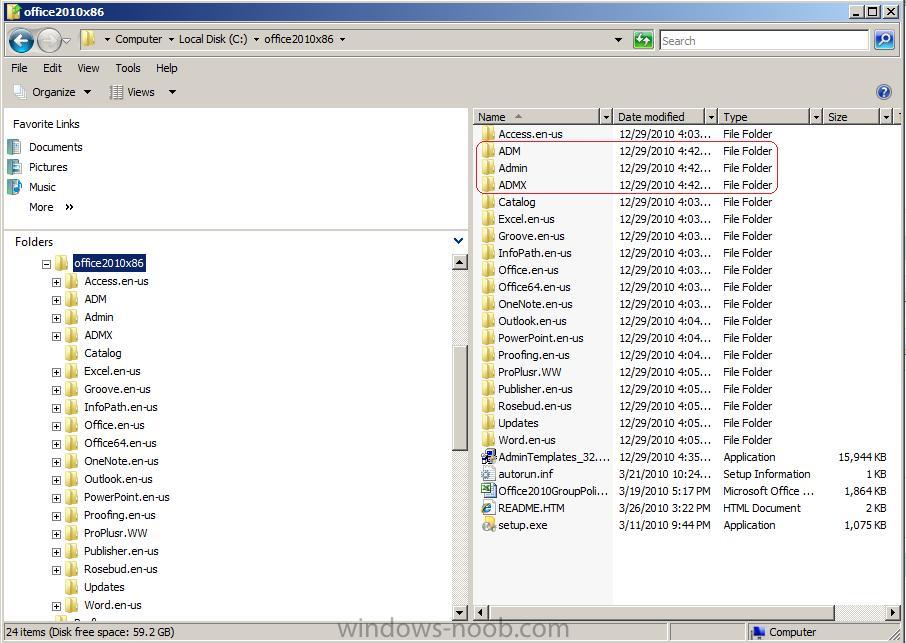
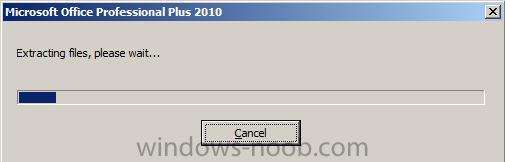
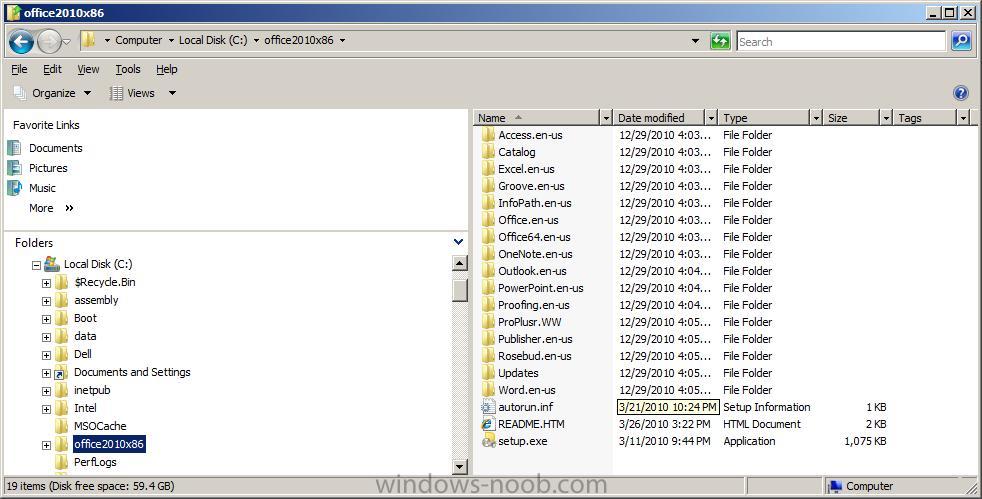
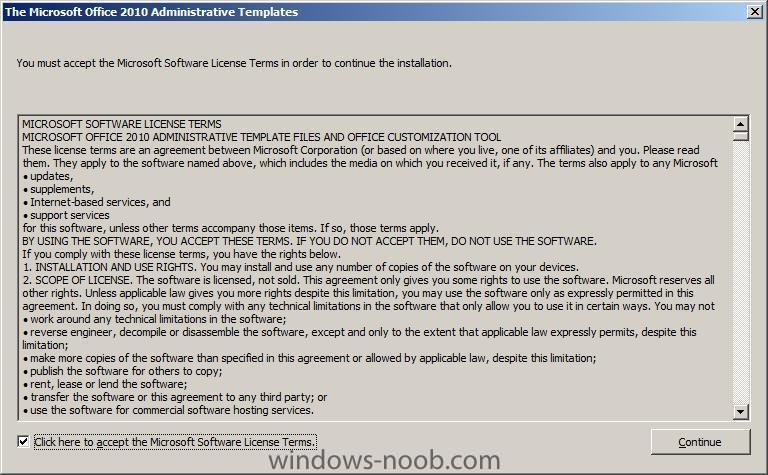
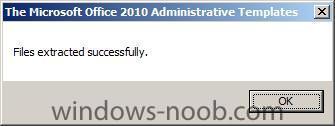
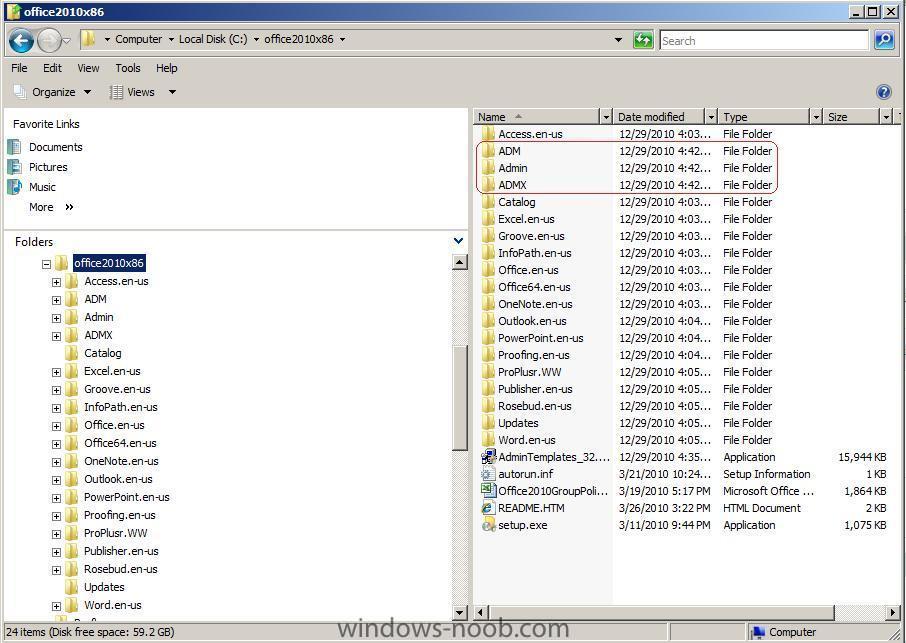
Step 3. Get the Office Customization Tool (OCT) The primary tool that administrators use to customize the installation of products in Office 2010 is the Office Customization Tool (OCT). The customization tools and methods in Office 2010 are the same as for the 2007 Microsoft Office system. For more information about how to use the OCT to create a Setup customization file and to learn about updates to the OCT in Office 2010, see Office Customization Tool in Office 2010. In order to create the Config.xml file we need some files available in the Admin folder of our Office 2010 root path. You'll notice in the extracted files above that we don't have an Admin folder (as this is not the volume license version). To get the Admin folder and the files necessary to run the OCT, download the Office 2010 Administrative Template files (ADM, ADMX/ADML) and Office Customization Tool. I chose to download the AdminTemplates_32.exe file. Once downloaded, copy the file to c:\office2010x86. You can now extract the files by opening a command prompt and typing the following in C:\office2010x86\ AdminTemplates_32.exe /extract:c:\office2010x86 place a checkmark in the box and click continue to accept the conditions..the files will be extracted the new files/folders are now in place.
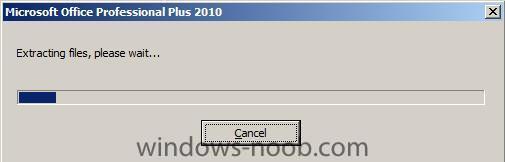
-
This guide will help you to deploy Office 2010 using SCCM 2007 in your LAB. If you'd like to get guidance from Technet on this subject then please see here. This guide is based upon and may reference content found below:- 1. Microsoft Technet Forums - Silent Deployment for Office 2010 with SCCM 2. Stealthpuppy - Customising Office 2010 before deployment 3. Microsoft Downloads - Office 2010 Administrative Template files (ADM, ADMX/ADML) and Office Customization Tool 4. Technet - Deploy Office 2010 by using System Center Configuration Manager 2007 5. Technet - Precache the local installation source for Office 2010 6. Technet - Config.xml file in Office 2010 7. Technet - Office Customization Tool in Office 2010 8. Microsoft - Best Practices and Lessons Learned (Deploying Office 2010 at Microsoft) Step 1. Download Office 2010 Professional Plus 32bit (x86). Download the file from Technet or MSDN, I used the following one for this guide and I downloaded it from MSDN. Office Professional Plus 2010 (x86) - (English) Why choose 32 bit ? well in an Enterprise even with 64 bit Operating System, Microsoft recommends using the 32bit version of Office 2010, please see here for reasons why. and below is what Microsoft recommend you install in an Enterprise:- File details below:- File Name: en_office_professional_plus_2010_x86_515486.exe Date Published (UTC): 4/22/2010 8:45:06 AM Last Updated (UTC): 4/22/2010 8:53:18 AM SHA1: 0E1840BF1AA81077692AF651BEFB75648CD9FAA7 ISO/CRC: 986EB4A1 Available to Levels: VS Pro with MSDN Premium (Empower); VS Premium with MSDN (MPN); VS Pro with MSDN Premium (MPN); BizSpark Admin; BizSpark; VS Ultimate with MSDN (VL); VS Premium with MSDN (VL); VS Premium with MSDN (Retail); VS Ultimate with MSDN (Retail); VS Ultimate with MSDN (MPN); VS Ultimate with MSDN (NFR FTE); Step 2. Extract the Files Note: don't use Winrar or similar to extract the exe, it won't work properly!! Once you have the file, extract it by using the command line, eg: en_office_professional_plus_2010_x86_515486.exe /extract:path E:\Apps\Office 2010>en_office_professional_plus_2010_x86_515486.exe /extract:c:\office2010x86 once done you'll be informed that they were extracted successfully and you can browse to the newly extracted files on C:\