anyweb
-
Posts
9271 -
Joined
-
Last visited
-
Days Won
371
Everything posted by anyweb
-
Microsoft Corp., the world’s largest software maker, will announce a version of its Windows computer operating system that runs on ARM Holdings Plc technology for the first time, said two people familiar with Microsoft’s plans. The new product will debut at the Consumer Electronics Show in January, said the people, who asked not to be identified because Microsoft’s plans are confidential. The software would be tailored for battery-powered devices, such as tablet computers and other handhelds, the people said. The operating system would give Microsoft another way to attack the market for tablets and phones, where it’s lost ground to Apple Inc. and Google Inc. ARM chips -- made by Qualcomm Inc., Texas Instruments Inc. and Samsung Electronics Co. -- are used in most smartphones, as well as Apple’s best-selling iPad. A full-featured version of Windows for ARM chips is the best way for Microsoft to make a dent in the iPad’s lead, said Robert Breza, a Minneapolis-based analyst for RBC Capital Markets. While Windows is dominant in the personal-computer market, it hasn’t parlayed that into tablet success yet. “They’ve got to come back with a product that’s better than ‘me too’ and is equal if not better in features,” Breza said. He has an “outperform” rating on Microsoft’s stock, which he doesn’t own. “A lot of tablets today are inferior to PCs.” ARM Climbs Microsoft rose 26 cents to $28.07 at 4 p.m. New York time in Nasdaq Stock Market trading. The stock has lost 7.9 percent this year. ARM’s U.S.-traded shares, which have more than doubled in value this year, climbed 6.6 percent to $19.78. The new software also will be able to work on Intel Corp. and Advanced Micro Devices Inc. processors -- the chips that power PC versions of Windows. While other versions of Microsoft software aimed at phones and mobile devices work on ARM chips, this is the first time it will make a full version of Windows available on that technology. Intel is trying to make its own forays into tablets and smartphones, squaring off against ARM’s technology. ARM, based in Cambridge, England, sells the rights to use its patents and chip designs and doesn’t manufacture the electronic components. Bill Cox, a spokesman for Redmond, Washington-based Microsoft, declined to comment. Charlene Marini, a California- based spokeswoman for ARM, said the company doesn’t comment on rumor or speculation. Tom Beermann, at Santa Clara, California- based Intel, also declined to comment. Apple sold 7.46 million iPads from the product’s April debut through September. The device accounted for 95 percent of the tablet market last quarter, according to Strategy Analytics. Microsoft may be able to win 10 percent to 20 percent of the as many as 50 million tablets that will be sold next year, Breza estimates. He predicted that Windows tablets will be cheaper than the iPad. via > http://www.bloomberg.com/news/2010-12-21/microsoft-is-said-to-announce-version-of-windows-for-arm-chips-at-ces-show.html related > 1. http://www.osnews.com/story/24165/Windows_NT_on_ARM_It_s_a_Server_Thing 2.http://arstechnica.com/microsoft/news/2010/12/microsoft-may-be-porting-windows-to-arm-but-it-makes-no-sense.ars
-

vNext Beta to Final Production Install?
anyweb replied to brianleejackson's topic in Configuration Manager 2012
as it's beta 1 and there are more releases planned i doubt it will be supported as an upgrade path to the final release of vNext, perhaps if it was a release candidate but not beta 1. however, that said i havnt seen (or heard) any official statement about this, cheers niall -
sounds like you need network drivers added to your boot.wim image, did you add any for the optiplex ? did you enable command prompt support (f8) ?
-
Microsoft announced today that they have sold over 1.5 million Windows Phone 7 through its various partners. The software giant had since avoided the question, but finally made their sales numbers available today. Achim Berg, Microsoft Vice President for mobile communications business and marketing group said that the sales figures were for the first six weeks of sales. Berg believes that Windows Phone 7 has been a success for the company, and that overall customer satisfaction is very high. "Sales are ramping well as our reputation is growing for offering users a unique experience and are in line with our expectations - especially when compared to other new platform introductions. With a new platform you have to look at a couple of things, first of all customer satisfaction. As I mentioned before, we've seen great response on the complete mobile phone experience." With over 1.5 million units sold, according to Microsoft, these early sales figures meet the companies expectations for a new smartphone in an already crowded market. Berg believes that Windows Phone 7 is already off to a great start and customers just need to experience the device before they will fall in love. Berg also mentioned that Microsoft is working on an update for the device, which is rumored to be landing in early 2011. via > http://www.neowin.net/news/microsoft-15-million-windows-phone-7-devices-sold

-
it would be better to build and capture your image on virtual hardware, that said, verify that your compuer isn't obsolete, what collection did you advertise the task sequence to ?
-
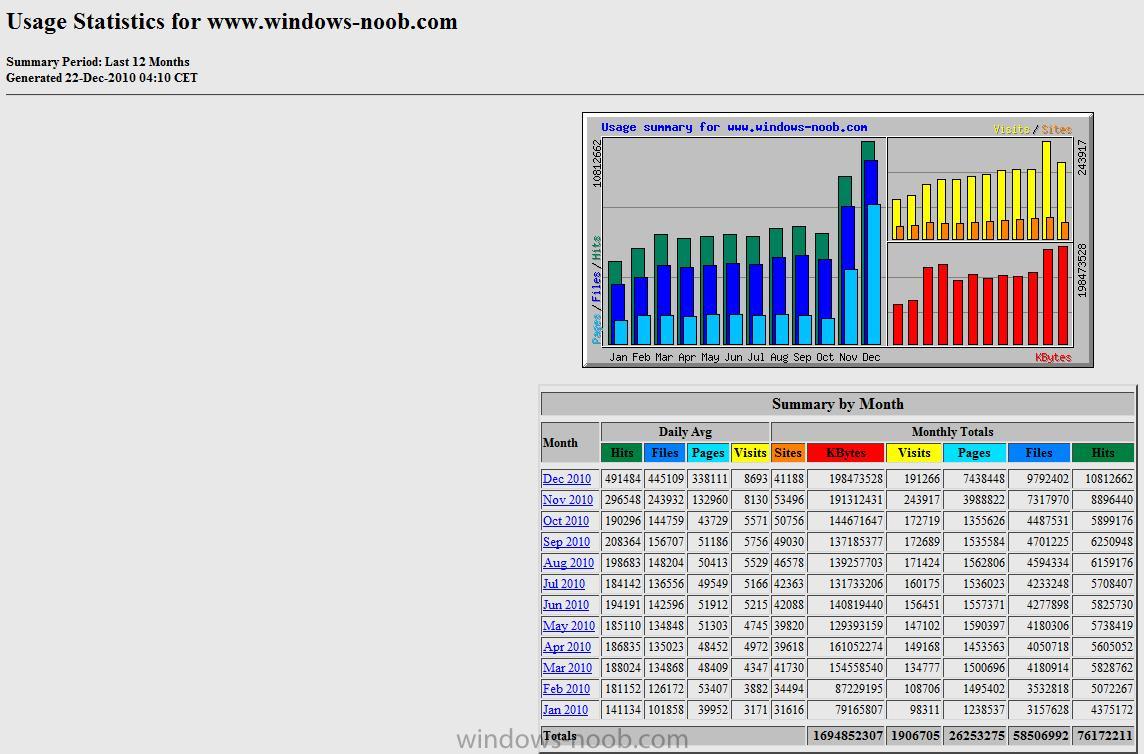
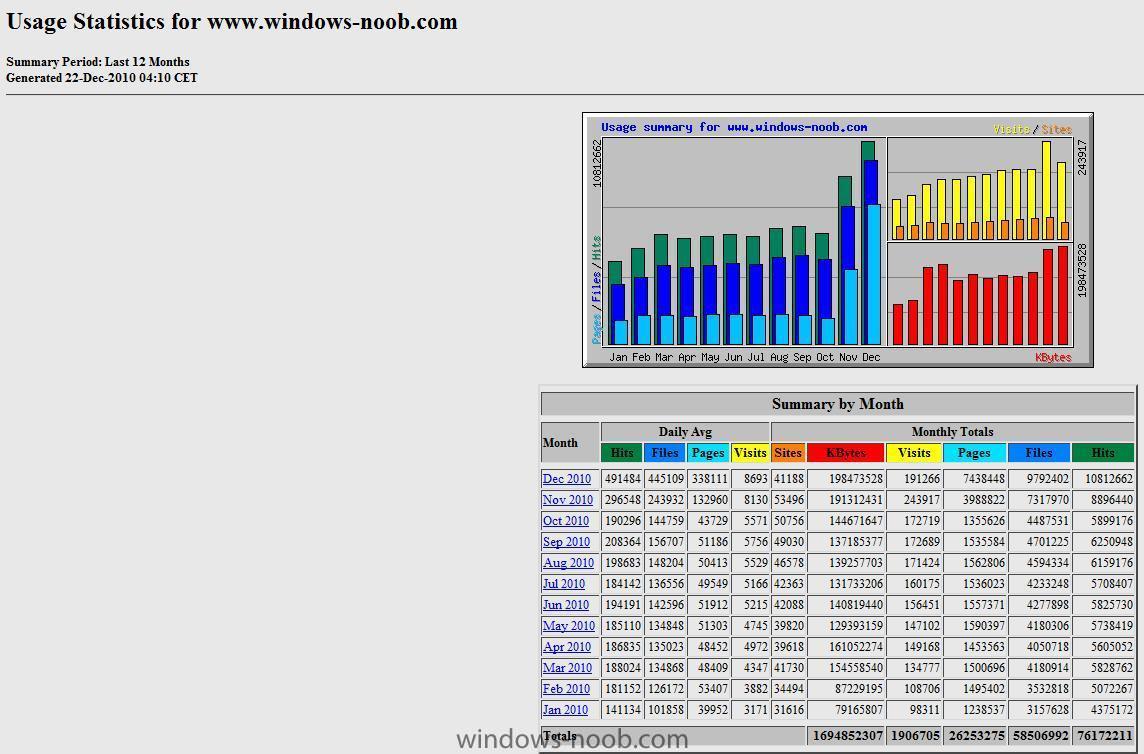
hi all, as the year is coming to a close I thought I would share with you some interesting results from the site stats, as you can see, Decembers traffic has beaten the previous months record high, and the daily average visitor count to windows-noob.com is now 8693 some interesting facts below for Decembers traffic:- Top 10 of 32 Total Entry Pages # Hits Visits URL 1 7019699 64.92% 175112 91.73% /forums/ 2 9851 0.09% 8328 4.36% / 3 308754 2.86% 6564 3.44% /forums/public/min/ 4 8921 0.08% 329 0.17% /forums/public/ 5 427 0.00% 189 0.10% /review/ie7/ 6 113 0.00% 79 0.04% /SecureXP/remote.htm 7 107 0.00% 71 0.04% /SecureXP/indexingService.htm 8 124 0.00% 57 0.03% /review/ie7/part_4.html 9 51 0.00% 32 0.02% /SecureXP/ 10 40 0.00% 29 0.02% /SecureXP/iislogxp.htm Top 20 of 17158 Total Search Strings # Hits Search String 1 210 0.81% kms server 2 138 0.53% windows noob 3 74 0.29% sysprep vista 4 57 0.22% windows system image manager 5 53 0.21% sccm asset intelligence 6 50 0.19% sccm 2012 7 50 0.19% sccm 4.00.6487.2000 8 48 0.19% usmt 4 9 47 0.18% proxydhcp service did not reply to request on port 4011 10 43 0.17% sccm versions 11 42 0.16% pxe-e55 proxydhcp service 12 41 0.16% windows-noob 13 40 0.16% windows sim 14 39 0.15% bdd 2007 15 39 0.15% kms server setup 16 39 0.15% wds capture image 17 32 0.12% vista sysprep 18 31 0.12% sccm software updates step by step 19 31 0.12% sccm version 20 31 0.12% setup kms Top 15 of 6865 Total User Agents # Hits User Agent 1 6411045 59.29% Mozilla/5.0 (compatible; bingbot/2.0; +http://www.bing.com/bingbot.htm) 2 648404 6.00% Mozilla/4.0 (compatible; MSIE 8.0; Windows NT 6.1; WOW64; Trident/4.0; SLCC2; .NET CLR 2.0.50727; .NET CLR 3.5.30729; .NET CL 3 488405 4.52% Mozilla/4.0 (compatible; MSIE 8.0; Windows NT 6.1; Trident/4.0; SLCC2; .NET CLR 2.0.50727; .NET CLR 3.5.30729; .NET CLR 3.0.3 4 224207 2.07% Mozilla/5.0 (compatible; Googlebot/2.1; +http://www.google.com/bot.html) 5 113488 1.05% Mozilla/5.0 (Windows; U; Windows NT 6.1; en-US; rv:1.9.2.12) Gecko/20101026 Firefox/3.6.12 6 90136 0.83% Mozilla/5.0 (Windows; U; Windows NT 6.1; en-US) AppleWebKit/534.10 (KHTML, like Gecko) Chrome/8.0.552.215 Safari/534.10 7 78542 0.73% Mozilla/5.0 (Windows; U; Windows NT 6.1; en-US; rv:1.9.2.13) Gecko/20101203 Firefox/3.6.13 8 75680 0.70% msnbot-media/1.1 (+http://search.msn.com/msnbot.htm) 9 70781 0.65% Mozilla/5.0 (compatible; MSIE 9.0; Windows NT 6.1; WOW64; Trident/5.0) 10 64171 0.59% Mozilla/4.0 (compatible; MSIE 8.0; Windows NT 5.1; Trident/4.0; .NET CLR 1.1.4322; .NET CLR 2.0.50727; .NET CLR 3.0.4506.2152 11 54969 0.51% Mozilla/4.0 (compatible; MSIE 8.0; Windows NT 5.1; Trident/4.0; .NET CLR 2.0.50727; .NET CLR 3.0.4506.2152; .NET CLR 3.5.3072 12 52108 0.48% Mozilla/4.0 (compatible; MSIE 8.0; Windows NT 6.1; WOW64; Trident/4.0; GTB6.6; SLCC2; .NET CLR 2.0.50727; .NET CLR 3.5.30729; 13 48392 0.45% Mozilla/5.0 (Windows; U; Windows NT 6.1; en-US) AppleWebKit/534.10 (KHTML, like Gecko) Chrome/8.0.552.224 Safari/534.10 14 47437 0.44% Mozilla/5.0 (compatible; MSIE 9.0; Windows NT 6.1; Trident/5.0) 15 42325 0.39% Mozilla/5.0 (Windows; U; Windows NT 6.1; en-US) AppleWebKit/534.7 (KHTML, like Gecko) Chrome/7.0.517.44 Safari/534.7 Daily Statistics for December 2010 Day Hits Files Pages Visits Sites KBytes 1 518118 4.79% 457245 4.67% 312021 4.19% 10869 5.68% 4769 11.58% 9329554 4.70% 2 529087 4.89% 470444 4.80% 324499 4.36% 9820 5.13% 4487 10.89% 10353016 5.22% 3 491294 4.54% 439673 4.49% 315093 4.24% 9529 4.98% 4155 10.09% 8930176 4.50% 4 343680 3.18% 326253 3.33% 290068 3.90% 6780 3.54% 2011 4.88% 5824746 2.93% 5 382401 3.54% 366544 3.74% 328203 4.41% 6835 3.57% 2078 5.05% 5811397 2.93% 6 563809 5.21% 508480 5.19% 366478 4.93% 10940 5.72% 4579 11.12% 10819151 5.45% 7 590930 5.47% 527779 5.39% 375992 5.05% 10925 5.71% 4792 11.63% 10849131 5.47% 8 587490 5.43% 522761 5.34% 377757 5.08% 10875 5.69% 4702 11.42% 10637681 5.36% 9 576265 5.33% 514663 5.26% 365281 4.91% 10646 5.57% 4826 11.72% 10603899 5.34% 10 554418 5.13% 496247 5.07% 372202 5.00% 9794 5.12% 4161 10.10% 10785218 5.43% 11 422371 3.91% 406474 4.15% 373143 5.02% 6772 3.54% 2042 4.96% 6839869 3.45% 12 412840 3.82% 390530 3.99% 352057 4.73% 6954 3.64% 2049 4.97% 6695055 3.37% 13 576446 5.33% 514554 5.25% 371124 4.99% 10240 5.35% 4636 11.26% 11853178 5.97% 14 571267 5.28% 506594 5.17% 354804 4.77% 9814 5.13% 4687 11.38% 12082212 6.09% 15 584849 5.41% 520697 5.32% 367235 4.94% 9988 5.22% 4762 11.56% 10846379 5.46% 16 575045 5.32% 515516 5.26% 361069 4.85% 9705 5.07% 4683 11.37% 10223289 5.15% 17 530694 4.91% 472098 4.82% 354073 4.76% 8929 4.67% 3941 9.57% 9632746 4.85% 18 394287 3.65% 378696 3.87% 339854 4.57% 6420 3.36% 2117 5.14% 6581576 3.32% 19 389835 3.61% 371850 3.80% 334452 4.50% 6396 3.34% 1981 4.81% 6878777 3.47% 20 548489 5.07% 492254 5.03% 355730 4.78% 9371 4.90% 4409 10.70% 10234182 5.16% 21 594224 5.50% 522167 5.33% 387101 5.20% 9303 4.86% 4210 10.22% 11488112 5.79% 22 74823 0.69% 70883 0.72% 60212 0.81% 1077 0.56% 639 1.55% 1174182 0.59% Referrers Usage Statistics for www.windows-noob.com Summary Period: December 2010 - Referrer Generated 22-Dec-2010 04:10 CET Hits Referrer ---------------- -------------------- 7040882 65.12% - (Direct Request) 3476055 32.15% http://www.windows-noob.com/forums/'>http://www.windows-noob.com/forums/index.php'>http://www.windows-noob.com/forums/'>http://www.windows-noob.com/forums/index.php 178079 1.65% http://www.windows-noob.com/forums/'>http://www.windows-noob.com/forums/public/min/index.php'>http://www.windows-noob.com/forums/'>http://www.windows-noob.com/forums/public/min/index.php 12680 0.12% http://translate.googleusercontent.com/translate_c 10347 0.10% http://www.google.com/url'>http://www.google.com/url 10082 0.09% http://www.google.com/search'>http://www.google.com/search 6526 0.06% http://webcache.googleusercontent.com/search 5474 0.05% http://ameermohammed.blogspot.com/2009/05/how-can-i-setup-wds-in-windows-server.html'>http://ameermohammed.blogspot.com/2009/05/how-can-i-setup-wds-in-windows-server.html 5029 0.05% http://www.windows-noob.com/forums/'>http://www.windows-noob.com/forums/ 2862 0.03% http://ameermohammed.blogspot.com/ 2515 0.02% http://myitforum.com/cs2/blogs/MainFeed.aspx 2515 0.02% http://www.google.co.uk/url'>http://www.google.co.uk/url 2322 0.02% http://www.google.co.uk/search'>http://www.google.co.uk/search 1670 0.02% http://www.bing.com/search 1592 0.01% http://www.google.com.au/search'>http://www.google.com.au/search 1396 0.01% http://www.google.co.in/search'>http://www.google.co.in/search 1385 0.01% http://www.google.com/ 1378 0.01% http://www.myitforum.com/forums/tm.aspx 1269 0.01% http://www.google.de/search'>http://www.google.de/search 1150 0.01% http://207.46.192.232/proxy.ashx 1124 0.01% http://www.windows-noob.com/ 1091 0.01% http://www.google.co.in/url'>http://www.google.co.in/url 1062 0.01% http://www.google.ca/search'>http://www.google.ca/search 1036 0.01% http://www.windows-noob.com/forums/'>http://www.windows-noob.com/forums/index.php'>http://www.windows-noob.com/forums/'>http://www.windows-noob.com/forums/index.php 1031 0.01% http://www.google.com.au/url'>http://www.google.com.au/url 960 0.01% http://www.alsoufi.org/ 955 0.01% http://www.google.ca/url'>http://www.google.ca/url 925 0.01% http://www.google.nl/search'>http://www.google.nl/search 872 0.01% http://forum.persiannetworks.com/f78/t33788.html 870 0.01% http://www.google.nl/url'>http://www.google.nl/url 742 0.01% http://myitforum.com/cs2/blogs/nbrady/archive/2010/02/19/using-offline-mode-in-windows-pe-using-usmt-4-via-a-task-sequence-in-s 734 0.01% http://www.google.co.in/ 677 0.01% http://www.google.de/url'>http://www.google.de/url 664 0.01% http://www.alsoufi.org/2010/09/28/how-can-i-deploy-an-application-in-sccm-2007-sp1-step-by-step-guide/ 628 0.01% http://www.google.fr/search 603 0.01% http://www.google.se/url 574 0.01% http://windows-noob.com/forums/index.php 564 0.01% http://www.google.fr/url 507 0.00% http://www.google.com.au/ 490 0.00% http://www.msfn.org/board/topic/145462-sccm-2007-guides/ 392 0.00% http://www.google.be/url 377 0.00% http://www.google.no/url 339 0.00% http://www.google.se/search 331 0.00% http://www.google.com.hk/search 329 0.00% http://www.google.co.uk/ 328 0.00% http://www.google.dk/url 311 0.00% http://www.google.no/search 300 0.00% http://myitforum.com/cs2/blogs/nbrady/archive/2010/12/03/using-vnext-in-a-lab-part-10-deploying-windows-7-enterprise-deploying- 288 0.00% http://www.google.ru/url 286 0.00% http://www.google.ch/url 278 0.00% http://www.google.ru/search 270 0.00% http://www.google.co.nz/search 269 0.00% http://www.google.ch/search 263 0.00% http://www.google.fi/search 246 0.00% http://www.google.be/search 243 0.00% http://www.google.nl/ 240 0.00% http://www.google.de/ 219 0.00% http://www.google.it/search 217 0.00% http://search.yahoo.com/search 211 0.00% http://www.google.ca/ Based on the above, approx 70% of visitors come for the forums, they come on a work day (Monday to Friday), most people that come to the site use Microsoft Windows 7 (or Windows Server 2008 R2, but the former is more likely), they use Internet Explorer 8 and arrived via a google search. Some people (0.12%) used translation services to translate the website. Surprisingly (to me) a lot of people came here after searching for KMS Server. If you guys would like me to post this type of info (and I can go into more detail if you wish) then let me know, cheers niall

-
Deploy program which installs driver at the end
anyweb replied to Aram's question in Deploy software, applications and drivers
on a vista virtual machine, try running that command via psexec using the system account and see what it reports -
for workaround look at my SCCM guides list and try the password in a task sequence..; might work. or wait until the next version of vNext
-
welcome to the forums !
-
hi an welcome brian, you'll enjoy vNext it's definetly different !
-
if its greyed out then add a boot image to the task sequence.
-
Computer Appearing in Wrong Collection
anyweb replied to troyvit's question in Deploy software, applications and drivers
right click on the collection and choose Update Collection Membership, then press F5 to refresh, does it show then ? -
do you mean that you want to use SCCM as a SUP (software update point) ? if so you can install the WSUS server on an internet facing pc, and install the SUP role on that server then
-
how can I DEPLOY an image captured using WDS ?
anyweb replied to anyweb's question in Windows Deployment Services (WDS)
if you remove the wds server, delete the remoteinstall folder (or move it somewhere) and empty c:\windows\temp\wds... and reinstall wds does it work then ? -
Both Apple and Microsoft are betting on H264 for HTML5 video, while Firefox and Opera focus on WebM and Chrome does both. Microsoft, however, is kind of an oddball; they first stated they would limit HTML5 video support in Internet Explorer 9 to H264, excluding all other codecs, but later made an exception for WebM, as long as the user installs the WebM codec. Now there's a new move by Microsoft: a Firefox plugin that allows the browser to hook into Windows 7's native video framework to provide H264 support. The Mozilla Foundation cannot, and will not, provide support for H264 in Firefox, for the simple reason that it's against their open nature, and, of course, because it's too expensive; the H264 patent license agreement isn't cheap, and on top of that, extremely limited in what it allows. However, Windows 7 has built-in support for playing H264 content, so why simply not allow Firefox to use that? Microsoft thought so too, and decided to release its own plugin that allows Firefox to hook into Windows 7's native H264 support. "H.264 is a widely-used industry standard, with broad and strong hardware support. This standardization allows users to easily take what they've recorded on a typical consumer video camera, put it on the Web, and have it play in a web browser on any operating system or device with H.264 support, such as on a PC with Windows 7," Microsoft told CNet, "The HTML5 Extension for Windows Media Player Firefox Plug-in continues to offer our customers value and choice, since those who have Windows 7 and are using Firefox will now be able to watch H.264 content through the plug-in." The plugin has its limitations - for instance, right now, it uses the Windows Media Player API for its controls, but Microsoft wants it to use those defined by the HTML5 standard instead. There's also an issue when pages call to canPlayType to determine if the browser supports H264; in that case, even with the plugin installed, the video won't play. Microsoft is working on fixing these issues. It's an interesting proposition, and will surely come in handy for those using Firefox on Windows 7. Still, WebM is a far better choice for HTML5 video due to it not being governed by a patent troll, and because it's open source and freely re-distributable. via > http://www.osnews.com/story/24137/Microsoft_Brings_H264_to_Firefox_on_Windows_7
-
Install ADDS via SCCM Task Sequence
anyweb replied to Toby's question in Deploy software, applications and drivers
here you go http://www.windows-noob.com/forums/index.php?/topic/543-how-can-i-deploy-windows-server-2008-using-sccm-2007-sp1/page__view__findpost__p__3774 -
We are extremely excited to announce that Forefront Endpoint Protection 2010 (FEP) has released to manufacturing! Customers can access the RTM release on the Microsoft Volume Licensing Service Center (VLSC) starting Jan. 1, 2010 -- or try the evaluation version immediately. This is our first – and very significant – step in making the convergence of desktop security and management a reality. Customers using System Center Configuration Manager 2007 can now quickly and efficiently deploy, configure, manage, update, and report on FEP protections, helping to lower infrastructure costs and improve overall security. And since both products are included in the Enterprise CAL (ECAL), customers who purchase ECAL automatically get access to all the licenses they need to implement the solution. To make deployment easier, FEP will even identify and replace the existing antimalware agents you may have previously installed. Customers have already begun seeing the advantages of bringing together powerful antimalware protection with their existing infrastructure for deploying, patching, and updating client systems. A large university medical center that participated in our Technology Adoption Program (TAP) said the following about their experience using FEP in their 50,000 desktop environment: “We’re primarily a paperless organization. We need 100% uptime so that medical records, prescriptions, and all other documentation is available to our healthcare professionals. The single console for Forefront Endpoint Protection 2010 [and System Center Configuration Manager 2007] gives me a view of our whole system and ensures that we can handle threats before they become an issue.” There are a ton of new features to explore in this new release including award-winning antimalware protection (FEP uses same engine as Microsoft Security Essentials), vulnerability shielding, Windows firewall management, and, of course, integration with System Center Configuration Manager 2007. You can find more product details on our Web site or TechCenter. And for more information about convergence, please visit our new Windows Optimized Desktop page. We hope that you will give FEP a test drive soon! via > http://blogs.technet.com/b/forefront/archive/2010/12/16/announcing-forefront-endpoint-protection-2010.aspx
-
did you re-distribute the boot images to the distribution points after enabling that option ?
-
if you enable command prompt support and press f8 in winpe, what does your SMSTS.log file say about the problem
-
or... md c:\somedir net share someshare=c:\somedir /UNLIMITED /REMARK:"someshare" /GRANT:Everyone,FULL cacls c:\someshare /E /T /C /G "%USERDNSDOMAIN%\Administrators:f
-
OS deployment and Lenovo computers
anyweb replied to jeaostro's question in Deploy software, applications and drivers
nice info, thanks for sharing -
take a look at this post to see why
-
Add multiple machines to a single collection in SCCM 2007
anyweb replied to minor22's question in Deploy software, applications and drivers
many ways of doing it, easiest way is to create a query to check for members of an active directory security group, and if found in there, they'll be automatically added to the collection you can see how to do that here -
what server is it trying to send that packet to ? have you tried disabling firewall temporarily to see is it a firewall/port issue ?
-
A new hole in Microsoft’s Internet Explorer browser has been identified. The flaw, reported by security firm Vupen, allows remote attackers to take complete control of a vulnerable system. The issue is caused by a use-after-free error within the mshtml.dll library when processing webpages featuring CSS that use “@import” rules. Attacks can exploit the flaw by executing arbitary code via a specially crafted web page. The vulnerability affects Internet Explorer 8 on Windows 7, Windows Vista SP2 and Windows XP SP3. Internet Explorer 6 and 7 are also affected on Windows XP SP3. The flaw is currently un-patched and example code is available. It’s unclear whether the vulnerability is being actively exploited in the wild. Microsoft announced last week that it’s planning a bumper Patch Tuesday on December 14. The software giant plans to patch a 0-day flaw in all supported versions of Internet Explorer. Researchers warned last week that they had successfully bypassed Protected Mode on both Internet Explorer 7 and 8. Microsoft responded to the findings by claiming that the bypass is not a vulnerability and that Protected Mode is not a full security boundary. WinRumors has reached out to Microsoft for clarification on the latest vulnerability. At the time of writing we have not yet received a response. via > http://www.winrumors.com/new-critical-un-patched-internet-explorer-css-vulnerability-discovered/#ixzz17zd3SH9U