


anyweb
-
Posts
9,108 -
Joined
-
Last visited
-
Days Won
363
Posts posted by anyweb
-
-
Create a Windows Update Share
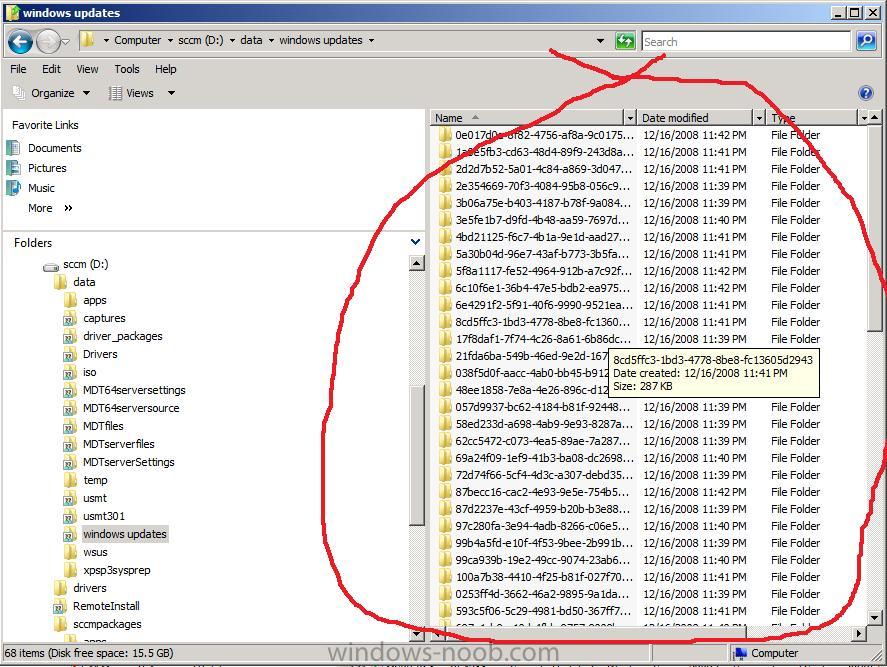
In Windows Explorer, create a share that Everyone can access called Windows Updates
Create a Deployment Management Task
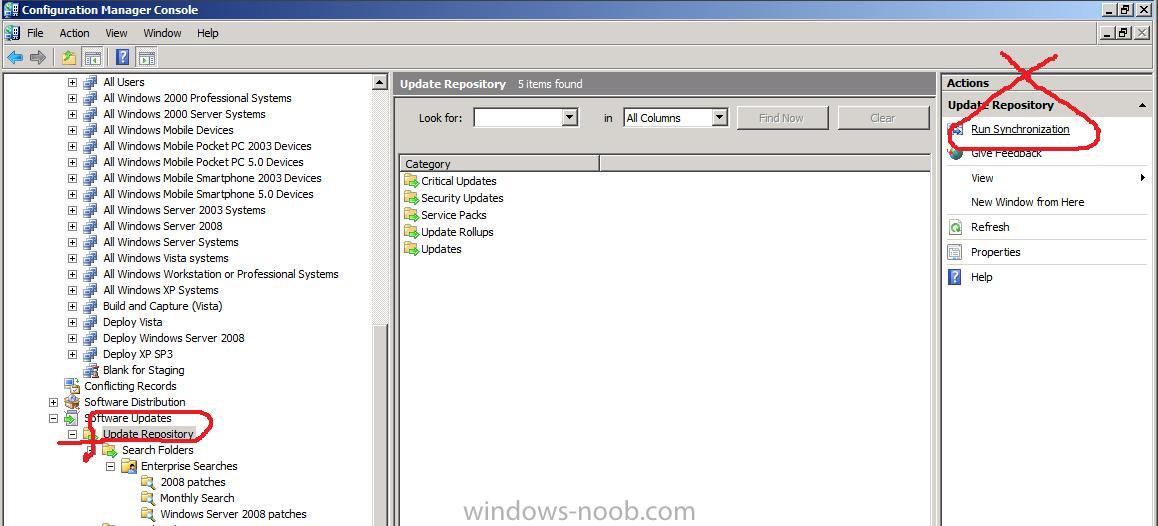
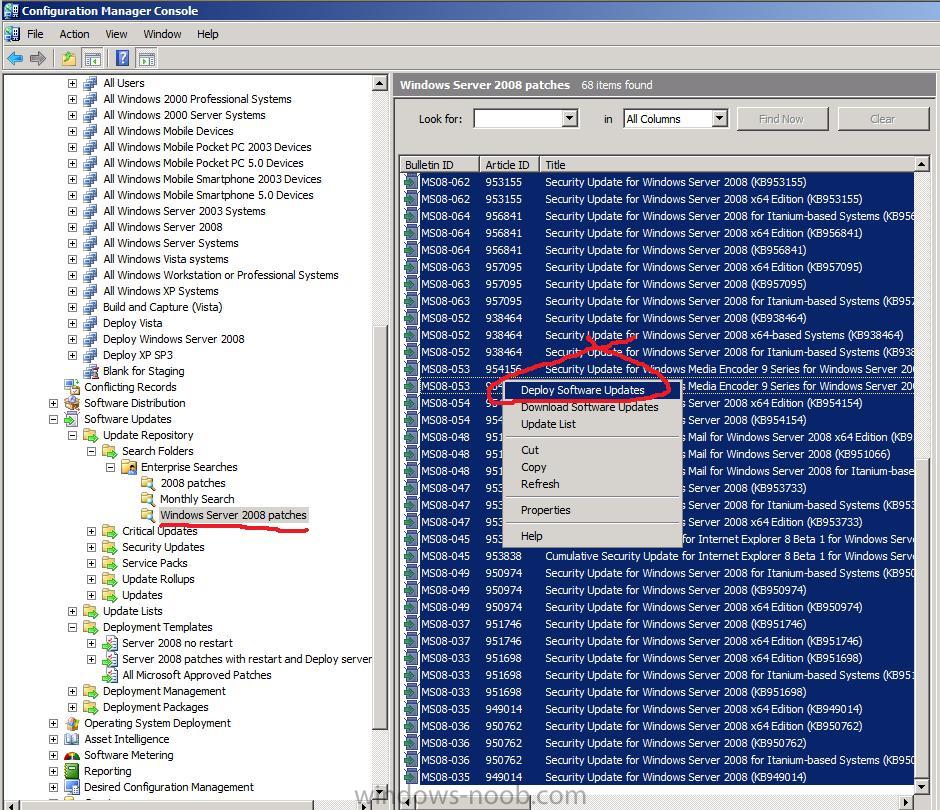
select a Search Folder that contains the patches you want to apply eg: select Windows Server 2008 Patches
in the right you'll see the list of patches available (if not, you need to Synchronise WSUS with Microsoft) to do that click on Update Repository and choose Run Synchronisation.
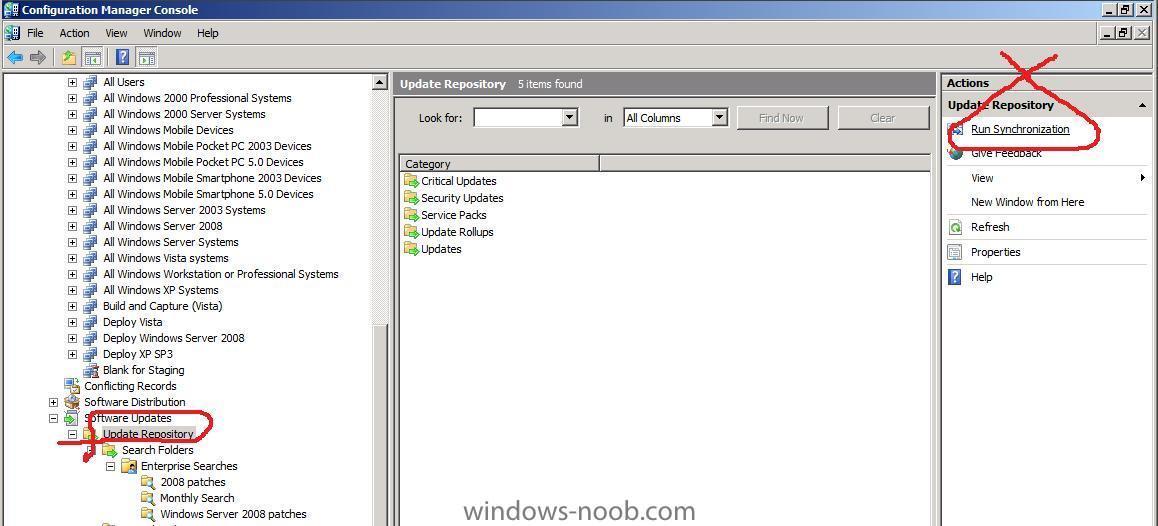
Select all and right click and choose Deploy Software Updates
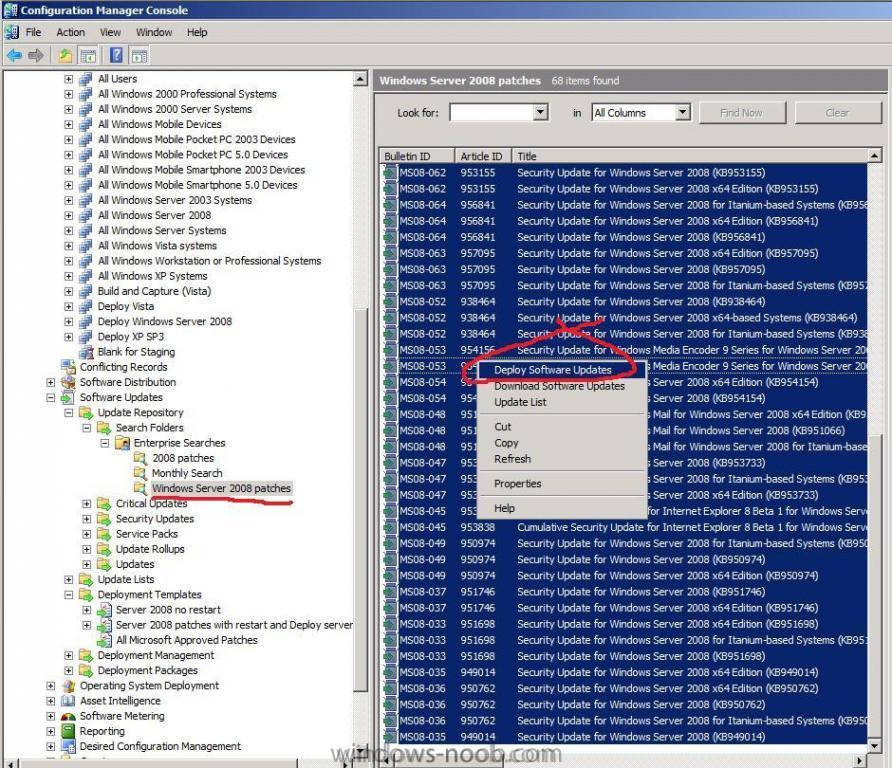
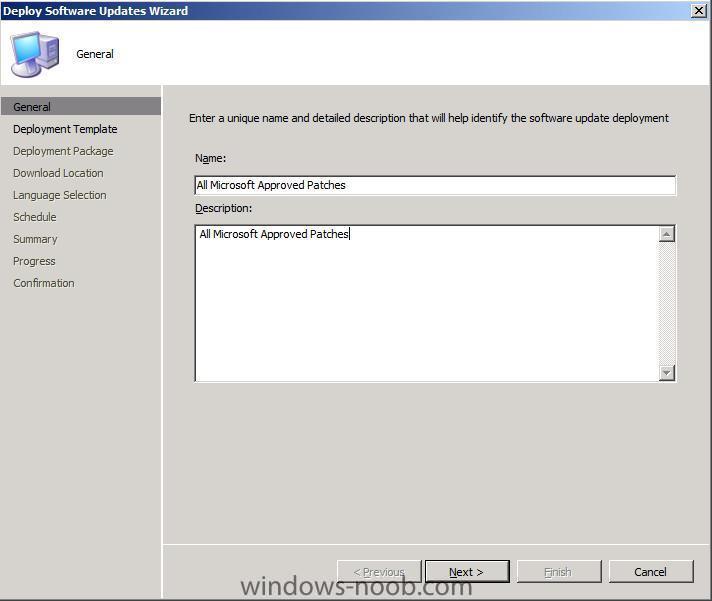
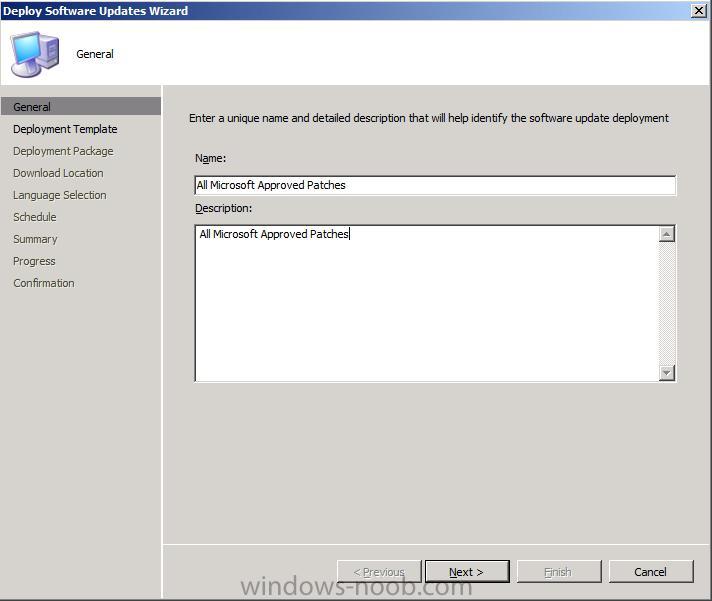
Enter a name for the new deployment, be descriptive eg: Windows Server 2008 Patches, the screenshot below is generic so refers to all updates..and click next ..
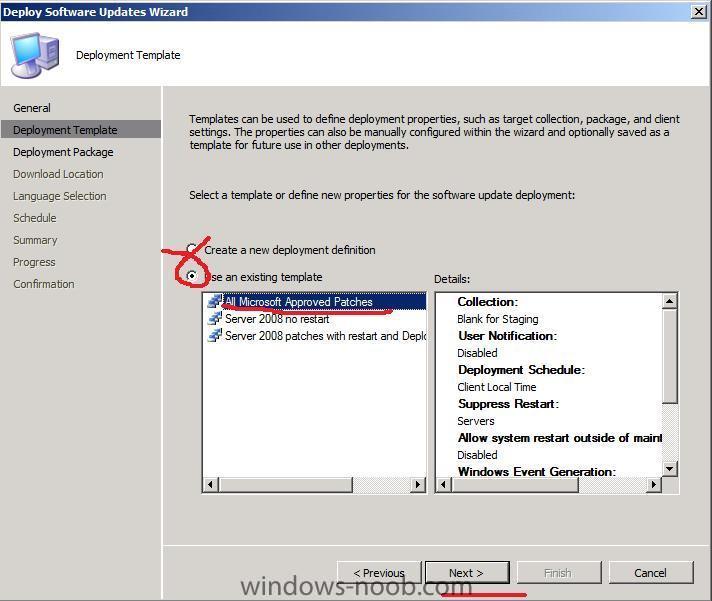
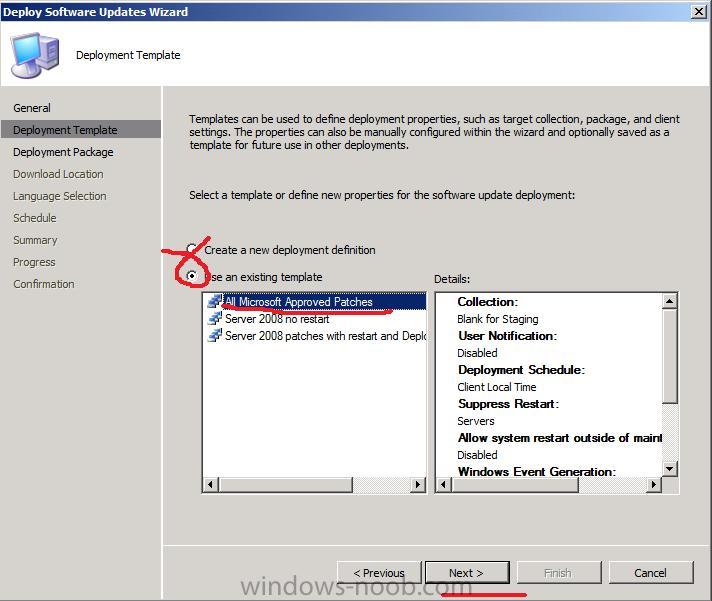
Select the Deployment Template you created earlier and click next..
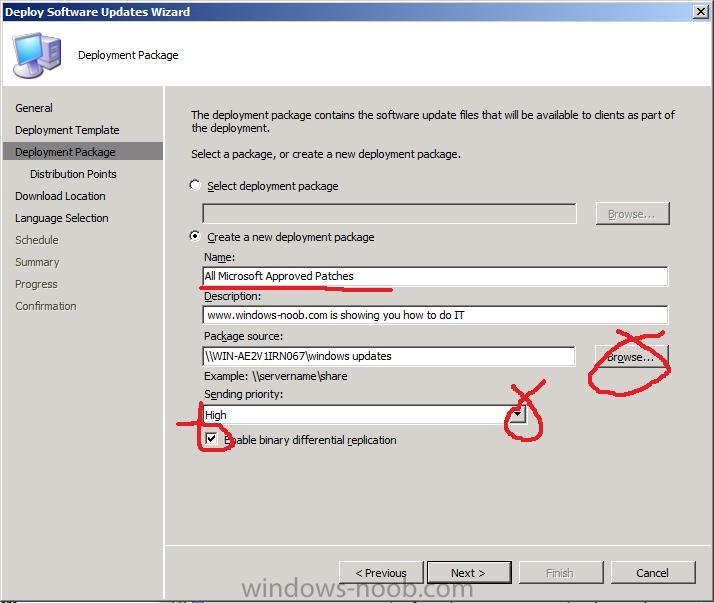
choose to Create a Package, be descriptive eg: Windows Server 2008 Patches, the screenshot below is generic so refers to all updates (All Microsoft Approved patches), point it to the Windows Updates share you created and give it a description, select Binary Replication
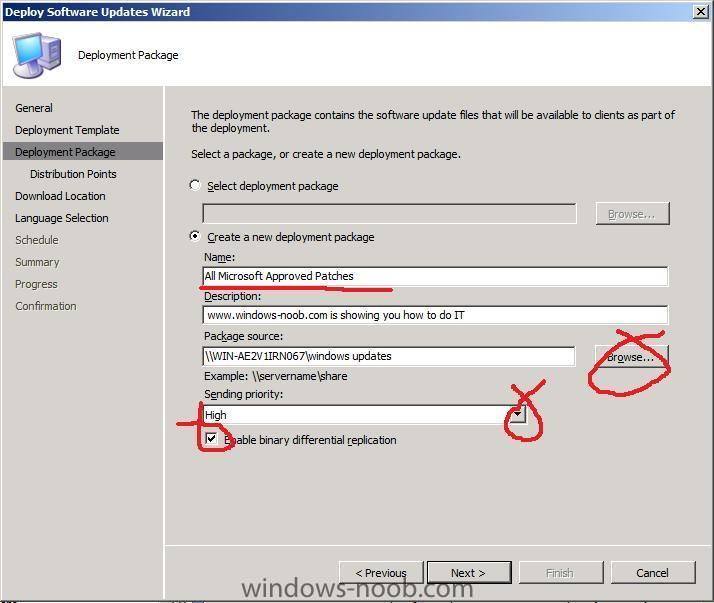
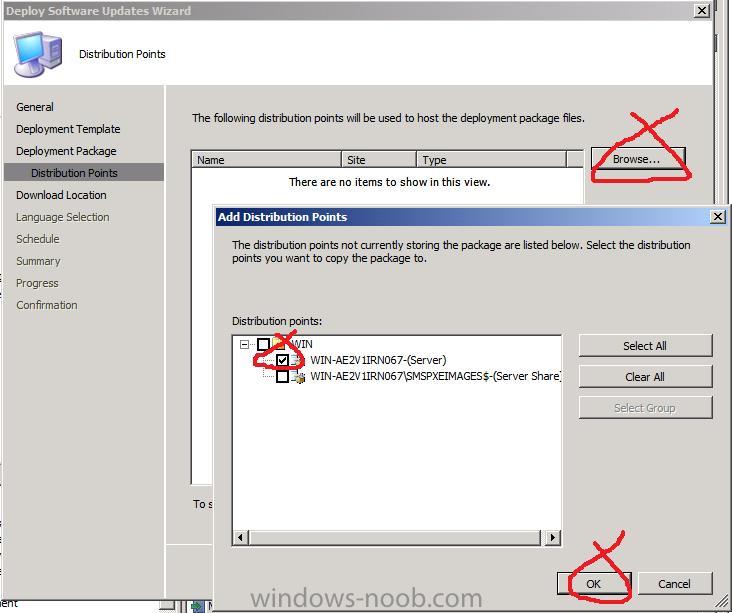
for distribution points, click browse and selct your distribution point

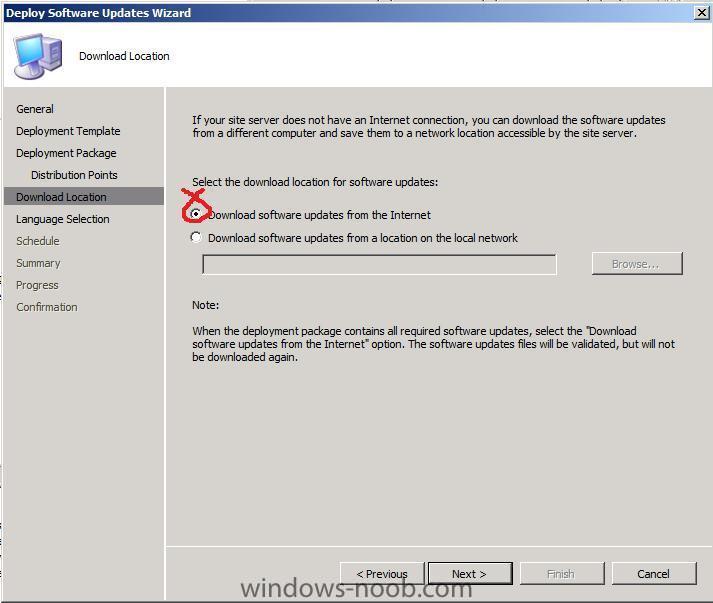
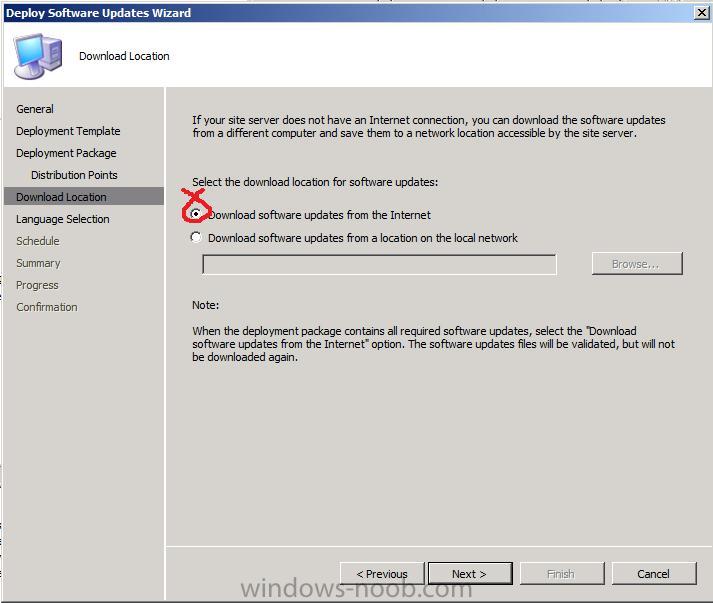
Choose download software updates from the internet
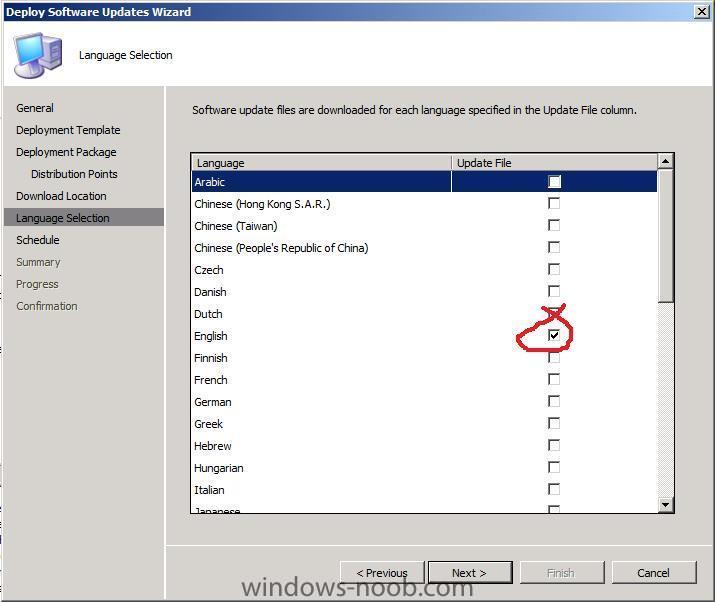
select your language
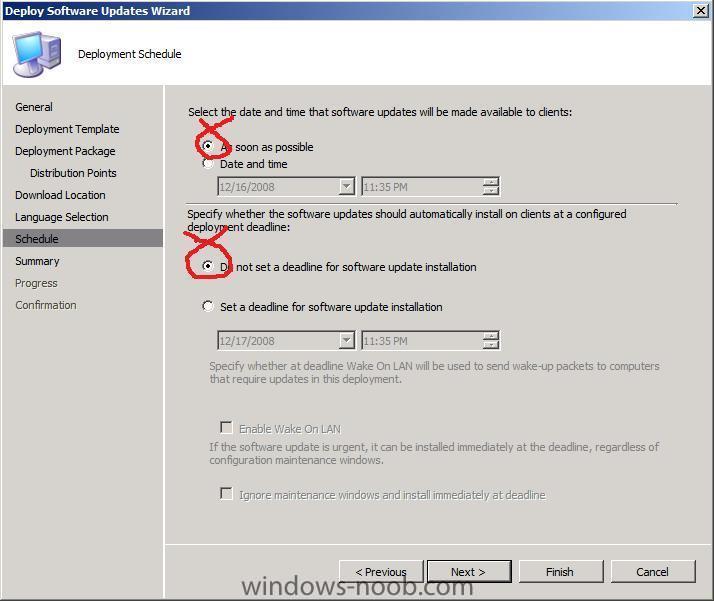
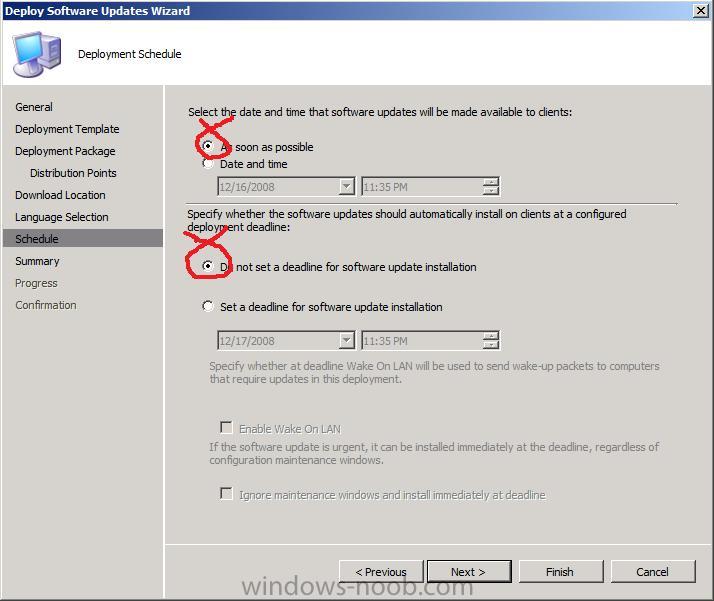
choose As soon as possible and Do not set a deadline for software update installation (keeps the updates OPTIONAL)...
Note: You can change this later to force the deployment of the updates but this is fine for our LAB, in other words if you do NOT set a deadline then the updates will not be forcefully installed (they are Optional), if you want them to install (mandatory/forced) then SET A DEADLINE
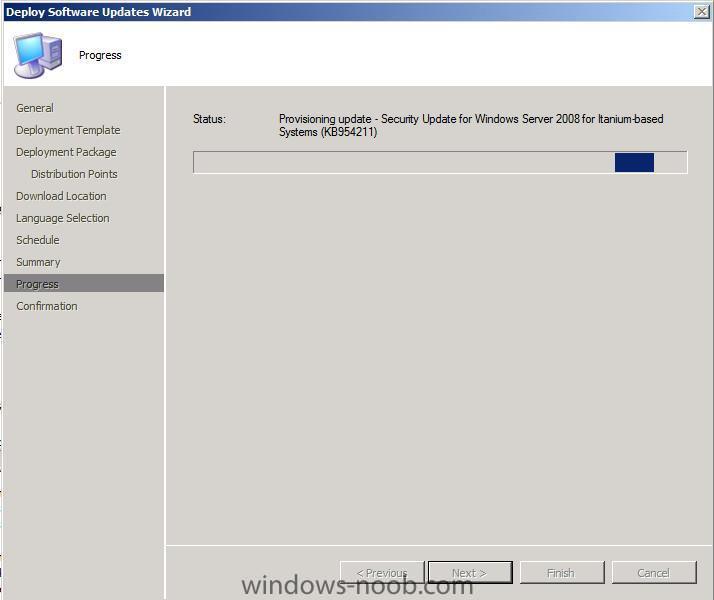
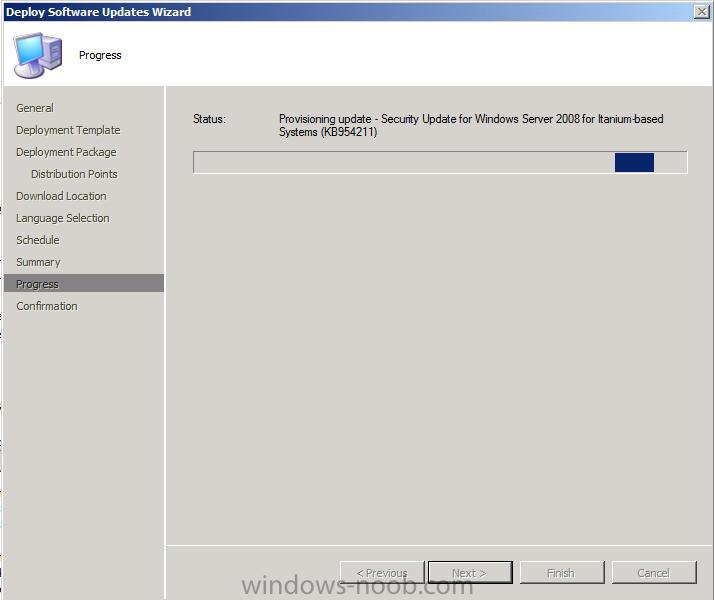
clicking next will start the Provisioning update progress....... *can take time...*
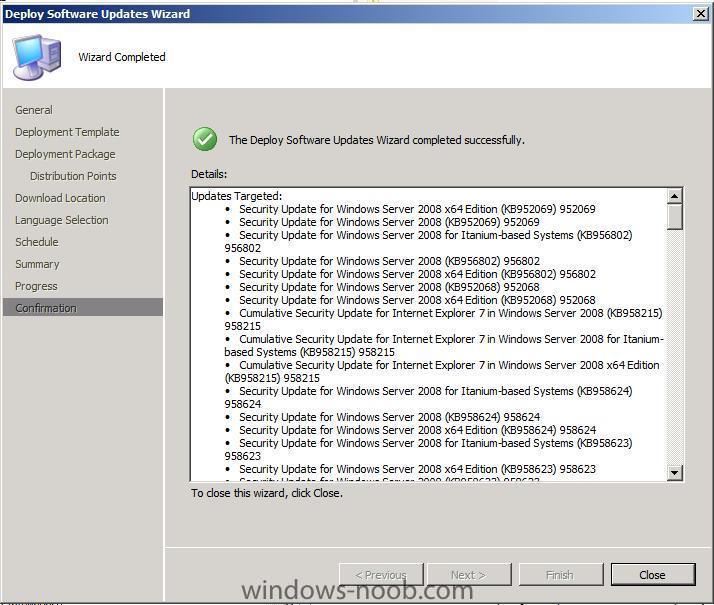
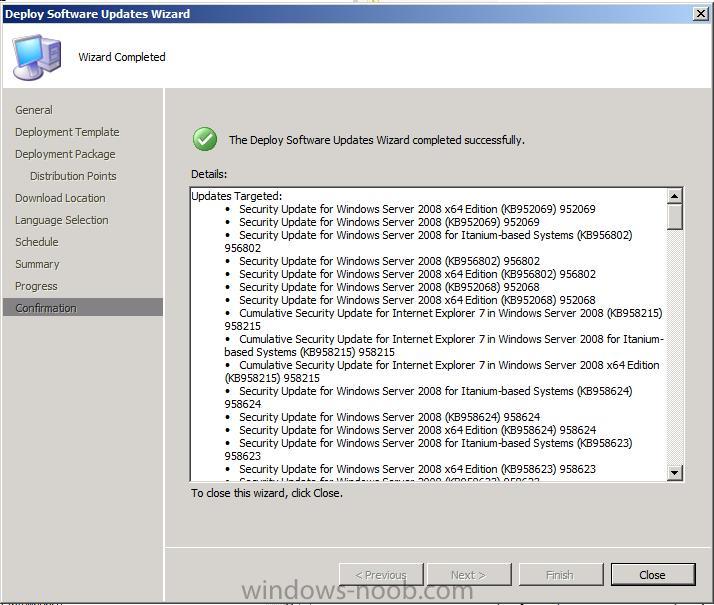
once done you should see this
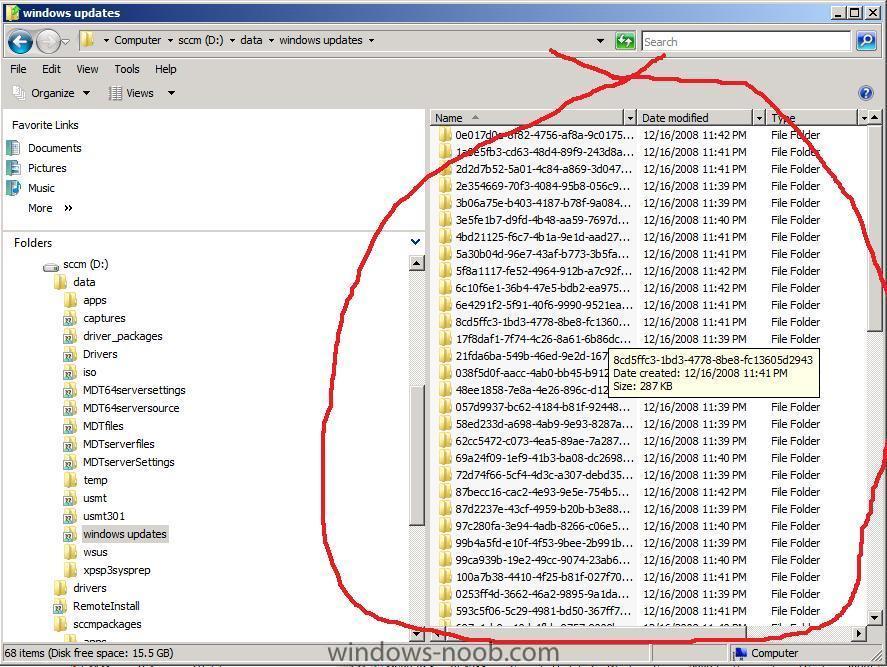
and you can browse the Windows Updates share and it should be full of packages
-
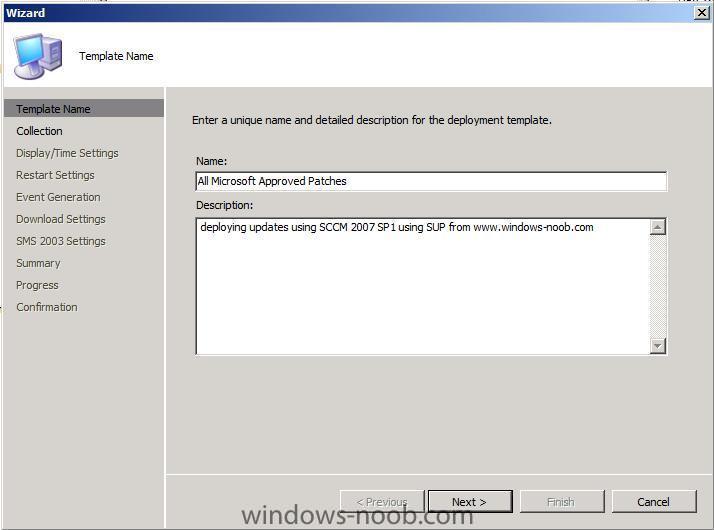
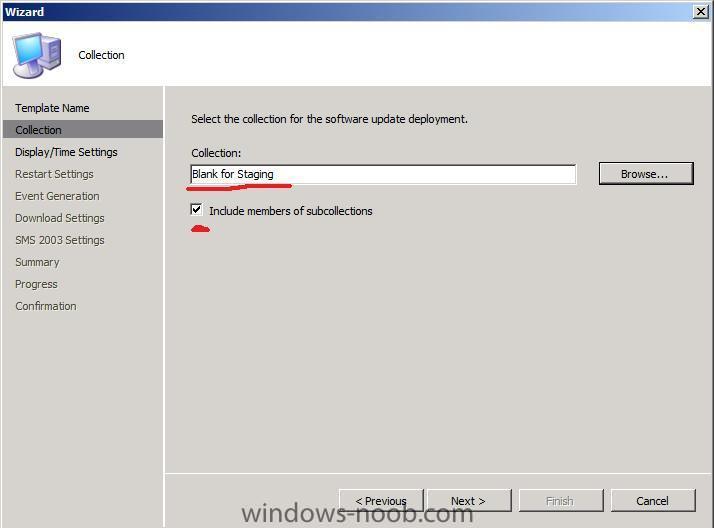
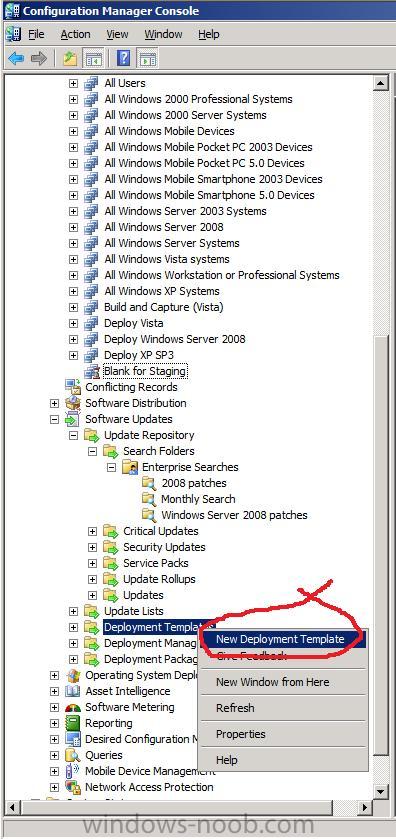
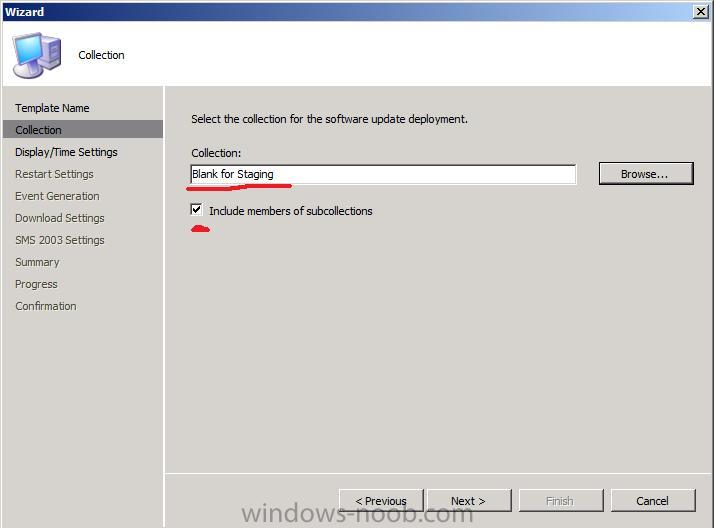
Create a Deployment Template
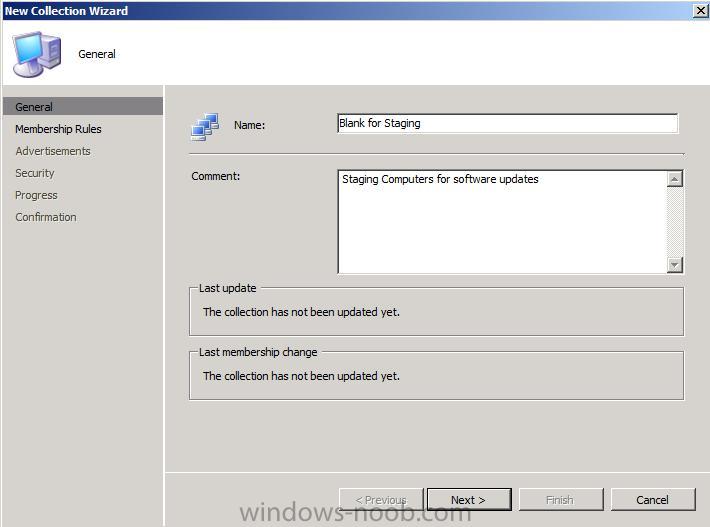
In Computer Management, right click on Collections and choose New Collection, create a new collection called Blank For Staging with no membership rules or advertisements.

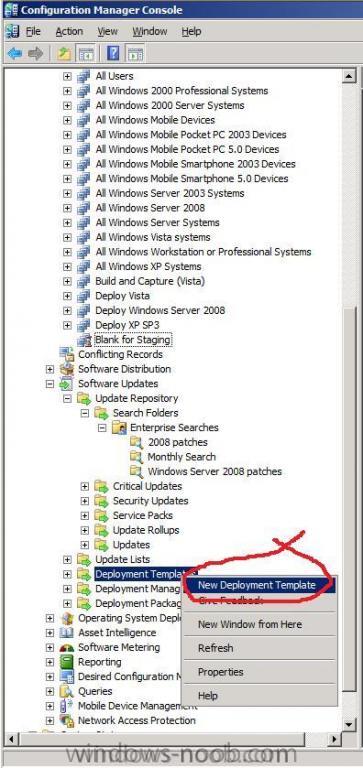
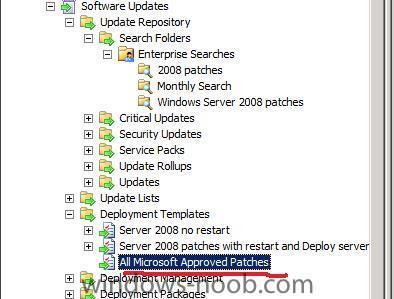
right click on Deployment Templates and choose New Deployment Template
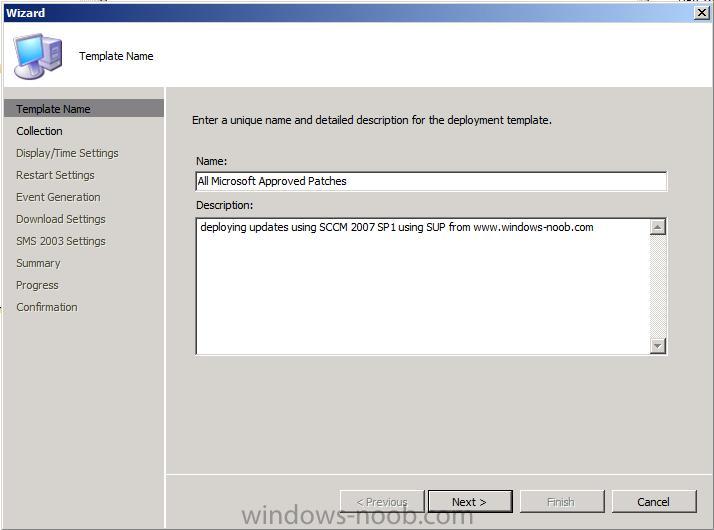
give the template a name like All Microsoft Approved Patches
for Collection, point it to the Blank For Staging one we created above, and make sure sub collections are selected.
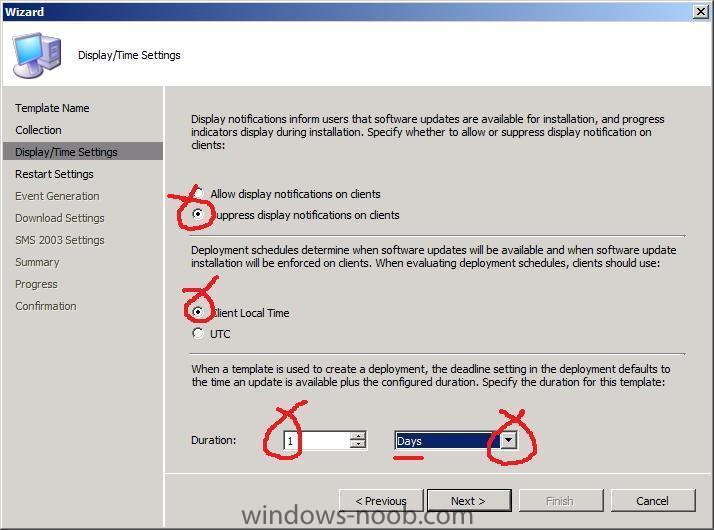
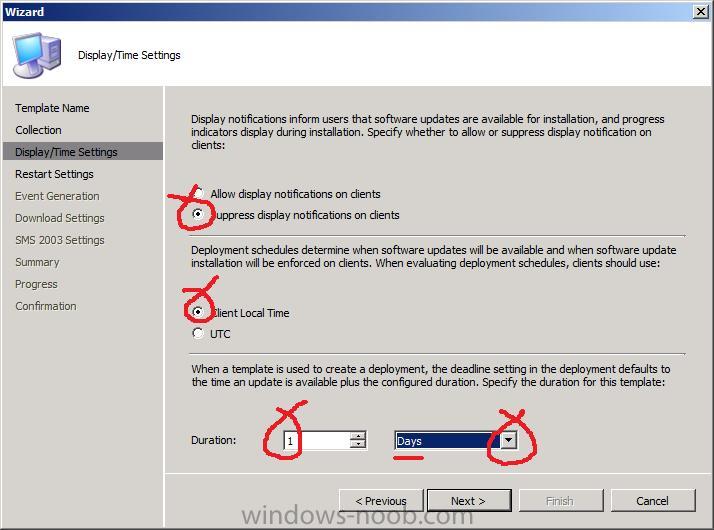
Set the Display/Time settings to suppress display notification on clients, client local time for deployment schedules and duration of 1 day
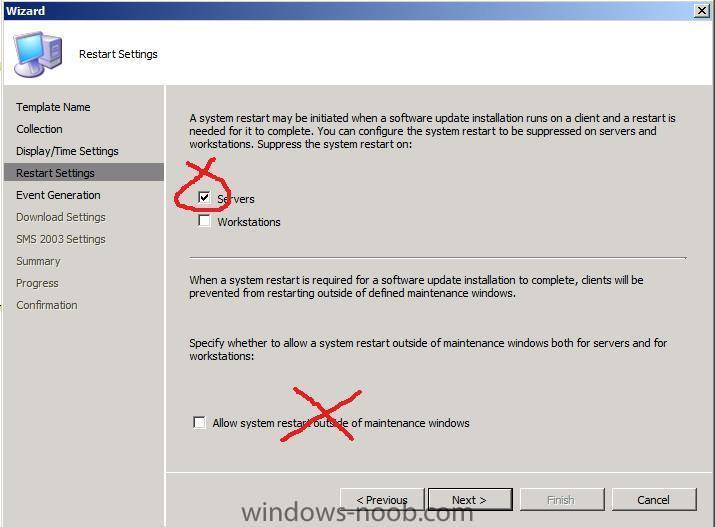
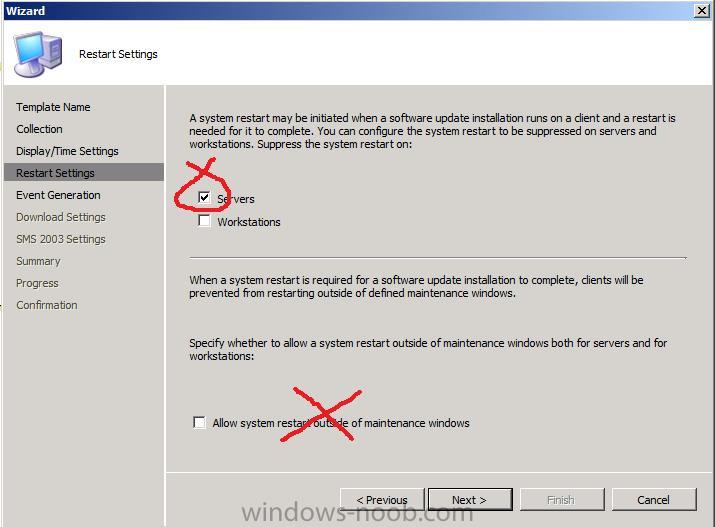
for Restart Setttings set them accordingly
leave Event Generation as it is unless you are using Operations Manager servers and want the reporting.,...
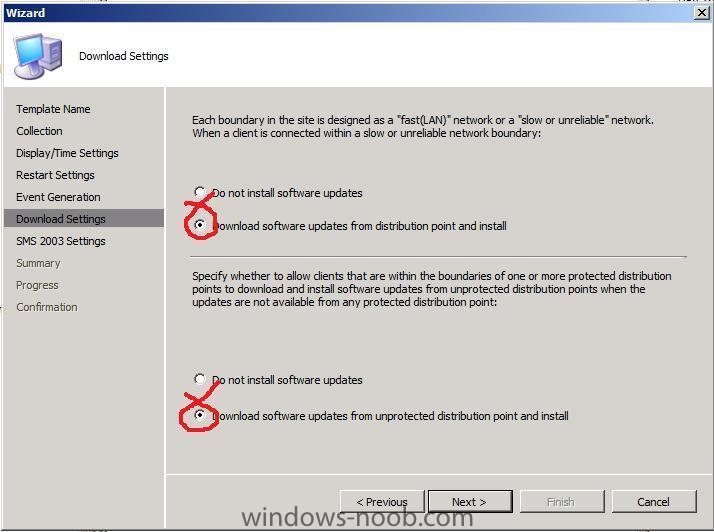
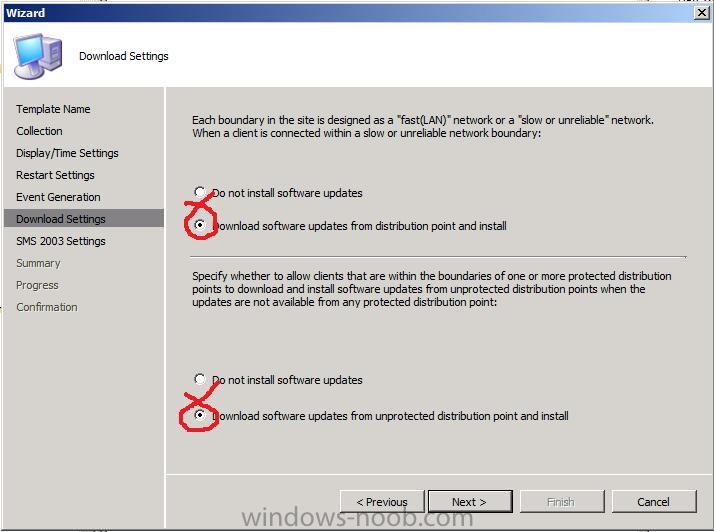
for download Settings, make sure to select download in both choices
leave SMS 2003 blank and next... and next to the summary and close.
your finished Deployment Template will appear
-
This guide assumes you have SCCM 2007 setup as described here. This guide was based upon a document entitled Patch Management directions for SCCM by Christopher Stauffer which you can find here.
Please note that this guide is designed to help you get a working SUP in SCCM in a LAB Environment as quickly as possible. This guide is provided as is, if you find any errors please report them in the forums.
In a production environment please consult Technet for best practise, see below links:
Superflow:
Software Update Deployment SuperFlow
About Software Update Point:
Planning:
Planning for Software Updates Client Settings
Configuration:
How to Configure the Software Updates Client Agent
How to Create and Configure an Active Internet-Based Software Update Point
Best Practices:
Configuring Configuration Manager Sites for Best Performance
Checklist for Security Best Practices
Best Practices for Central and Primary Site Hardware and Software Configuration
Best Practices for Operating System Deployment
Software Update Point process Flowcharts:
Software Updates Synchronization Process Flowchart
Software Update Deployment Process Flowchart
Deployment Package Process Flowchart
Related:
How to obtain the latest version of the Windows Update Agent
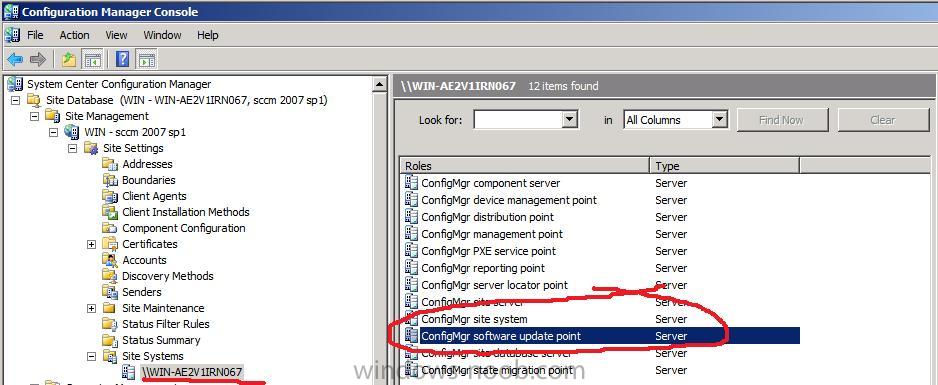
1. Install WSUS
Install WSUS but do not configure it. Once done, make sure the Software Update Point Role is installed on the SCCM Server.

Once you've added the Software Update Point role, verify that it is installed by checking the SUPSetup.log, it should have a line which reads Installation was successful
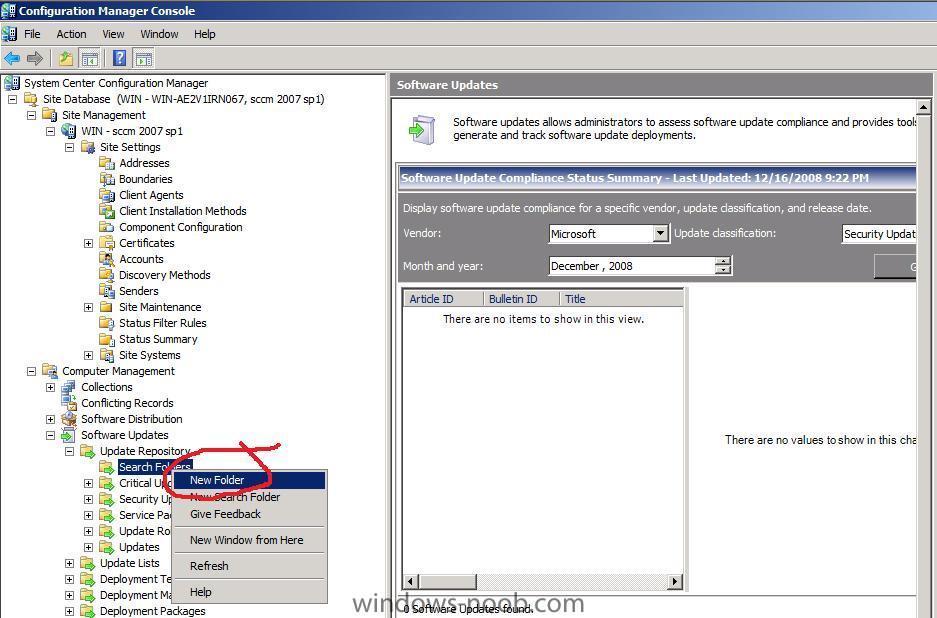
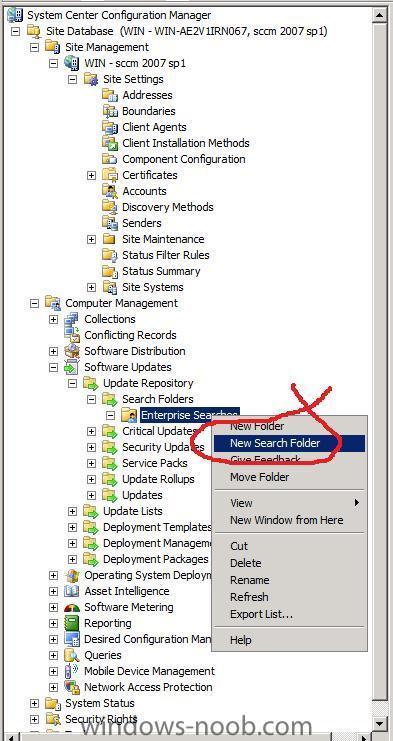
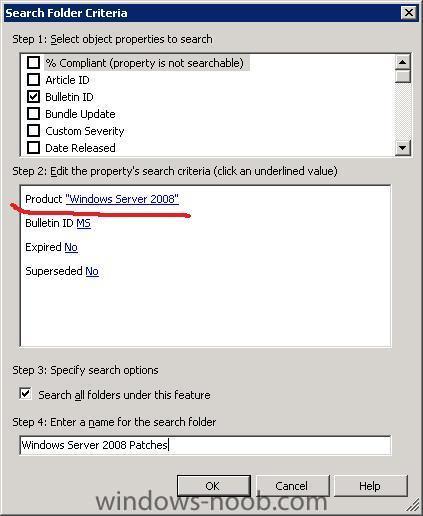
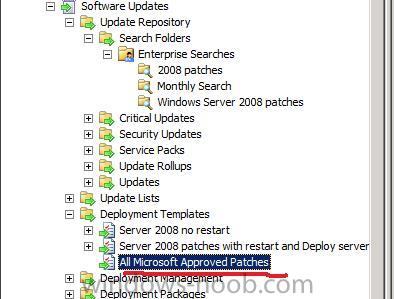
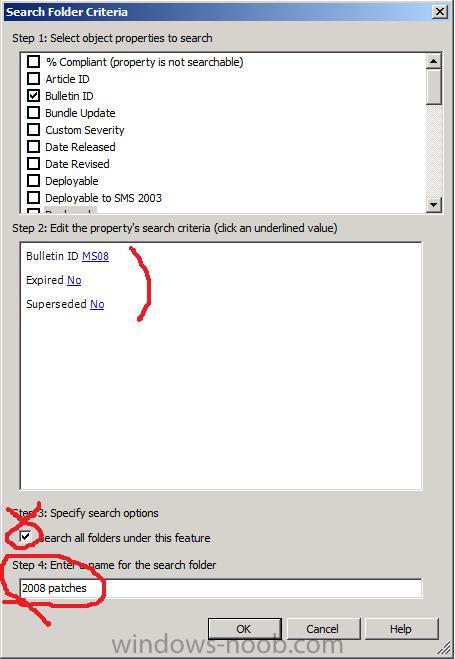
2. Create some Search Folders
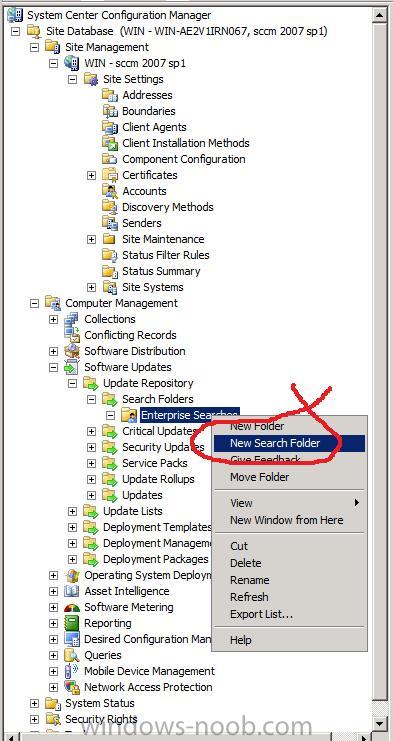
In the Software Updates section, right click on Search Folders and choose New Folder,
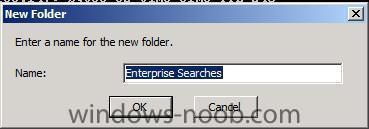
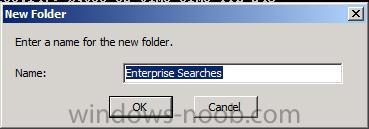
give the new folder a name like Enterprise Searches (we willl store our yearly searches here)
Right click on our new folder and choose New Search Folder,
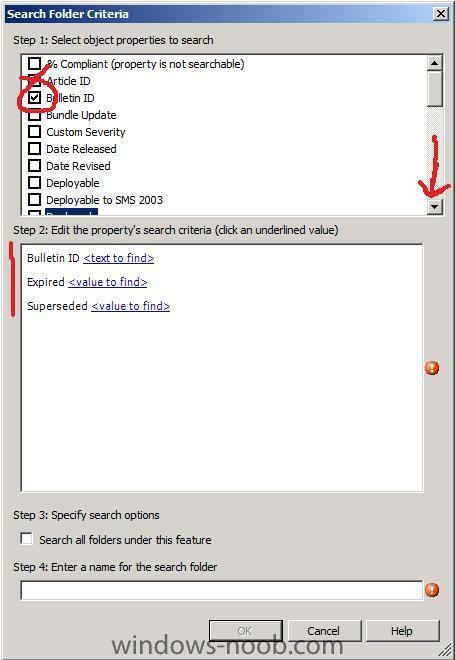
select the following options from step 1 (in the screenshot),
BulletinID, Expired and Superseded
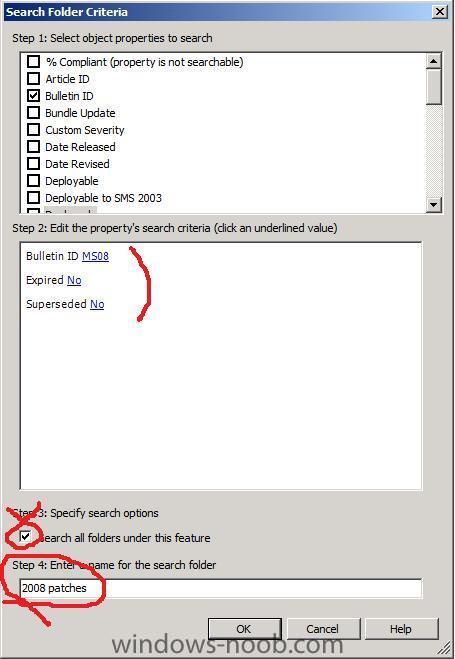
in step 2, Set the BulleinID to MS plus the last two digits of the year eg: MS08
Set Expired to No
Set Superseded to No
Make sure that Search All folders under this feature is selected and give the search a name, eg: 2008 patches
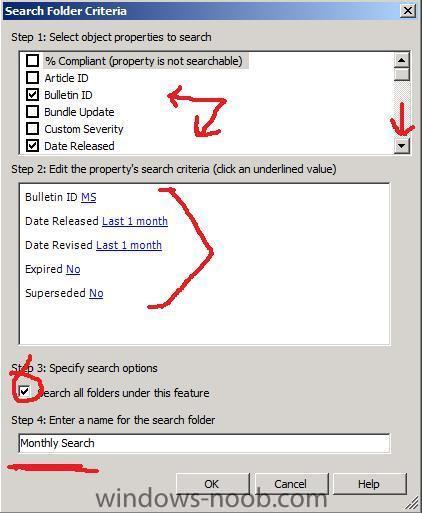
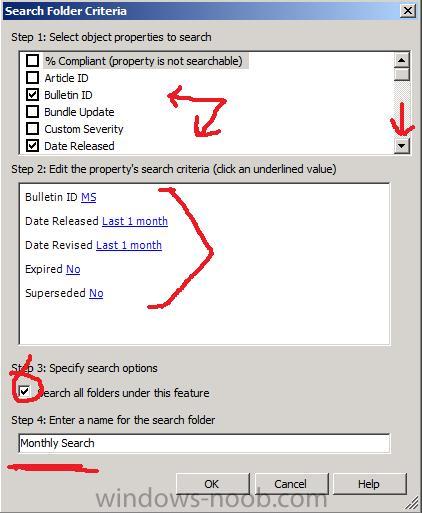
Now that you know how to make a Search Folder, let's make one for Monthly searches, so right click on Enterprise Patches and choose New Search Folder
Fill it in as follows
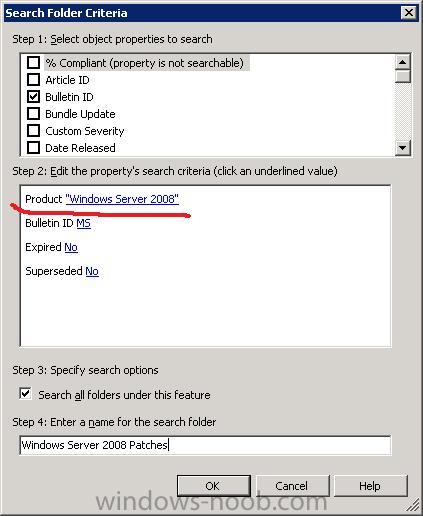
and now make one for Windows Server 2008, we do this by adding Product as a search criteria and typing in the search phrase to look for, naturally you can customise it to suit your needs.
-
This guide assumes you have installed SCCM 2007 SP1 and then configured it as outlined here in Part 1 you must then do the additional configuration outlined in Part 2, and you must have completed the final configuration tasks in Part 3. Lastly you must be able to deploy an application using SCCM 2007
In addition to the above you must have completed Part 1 of this guide
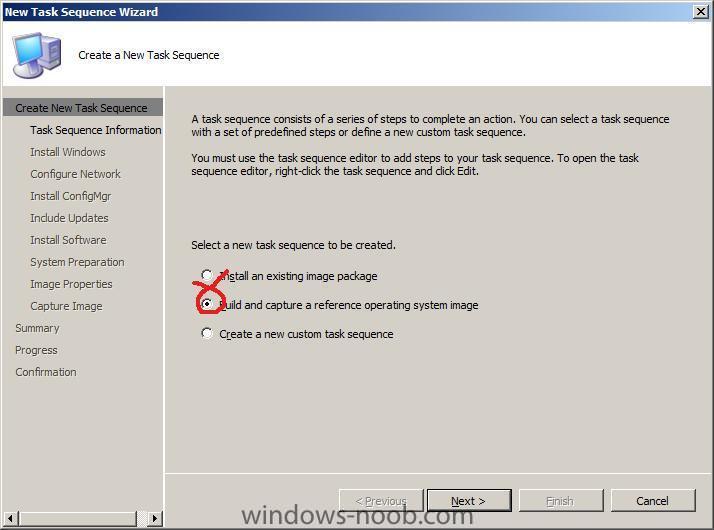
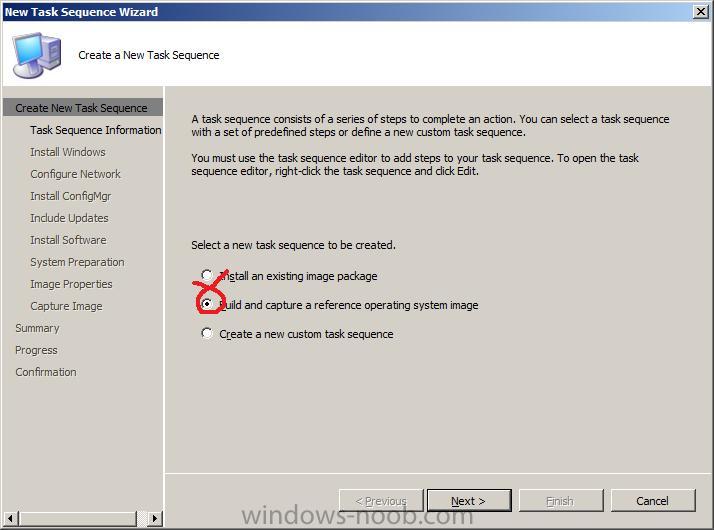
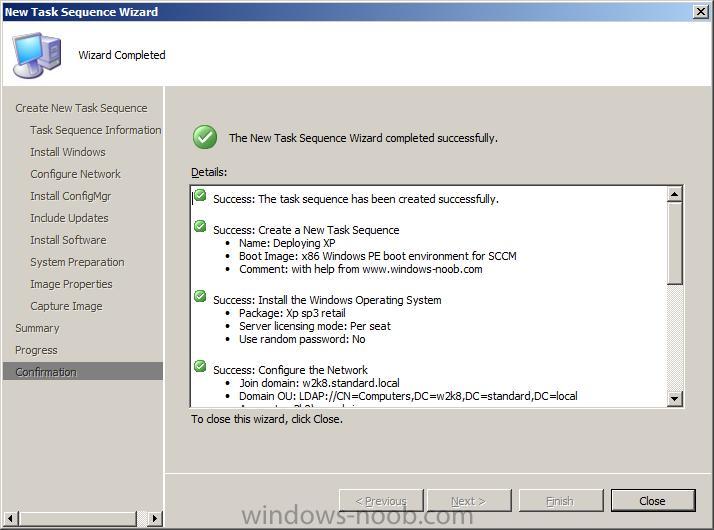
Create the Task Sequence
right click on Task Sequences and choose New Task Sequence

choose the second option (Build and Capture a reference operating system image)
fill in your Task Sequence Information
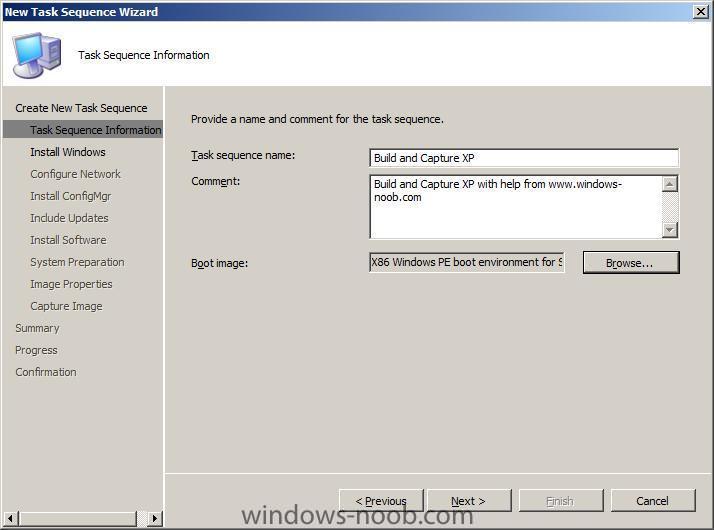
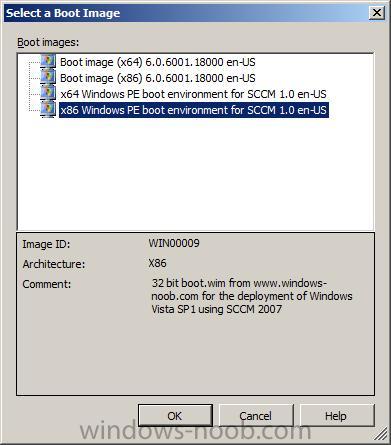
click browse and select our X86 boot image
Note: if you don't see the x86 windows PE boot enviroment for SCCM 1.0 EN-US image listed then follow these steps first.

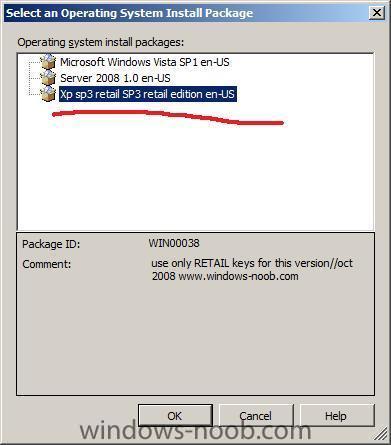
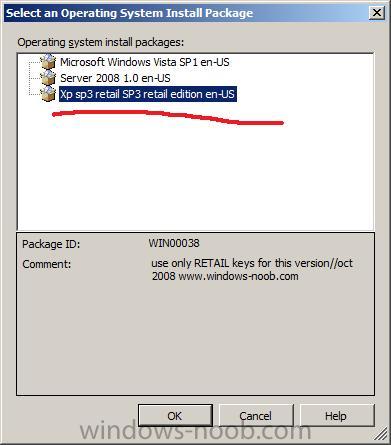
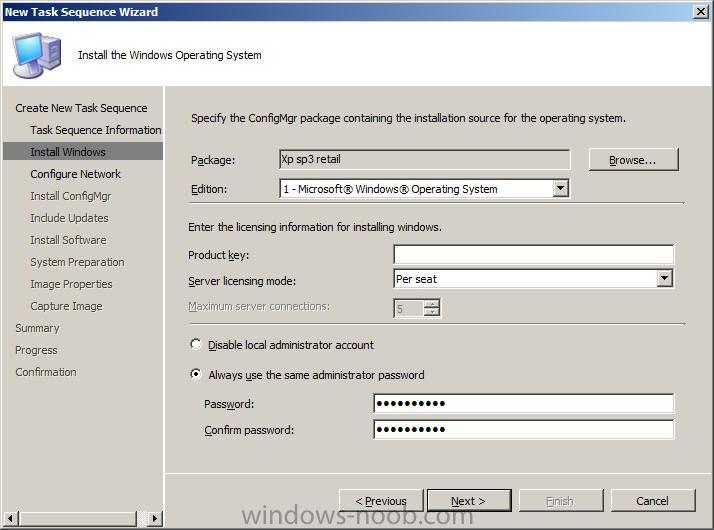
On the Install Windows screen click on Browse and select the XP SP3 operating system install package we created in Part 1.
Input your product key and make sure to enable the local Administrator account,
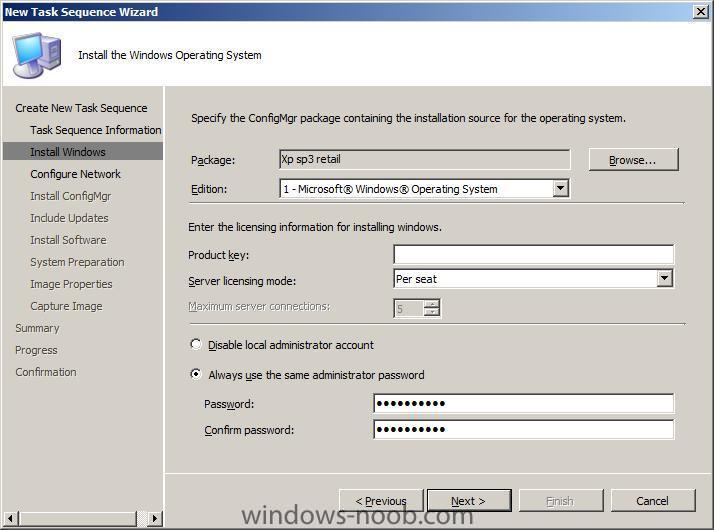
Configure Network
Here we need to enter our network configuration and click next, choose Join Workgroup (recommended best practise). Although joining the domain will work just fine you may have GPO's in place, or startup scripts (login scripts) etc which may taint your master image, keeping it off the domain will keep it clean.
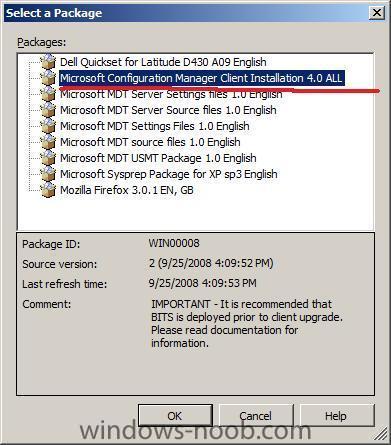
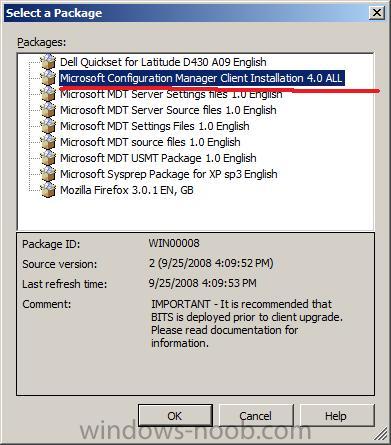
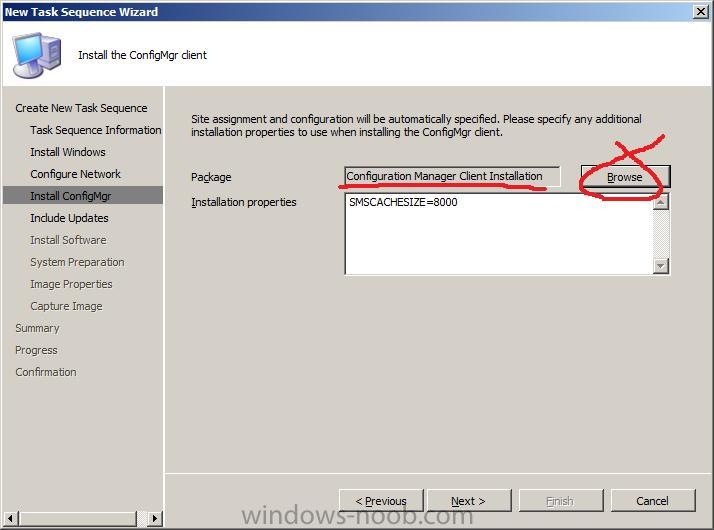
on the Install ConfigMgr screen, browse to the Predefined ConfigMgr Client Package we created earlier
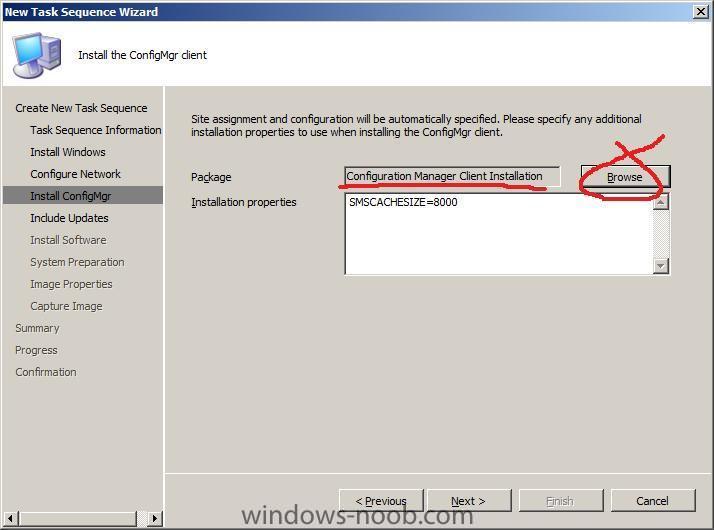
for the Updates and Software screens choose don't install any (ie: next, next)
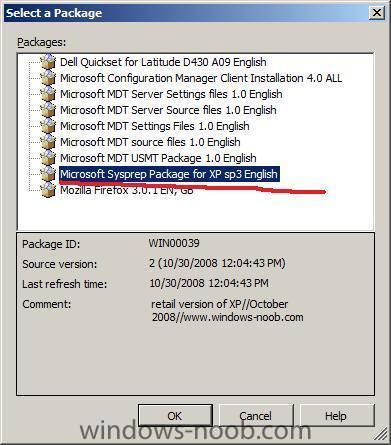
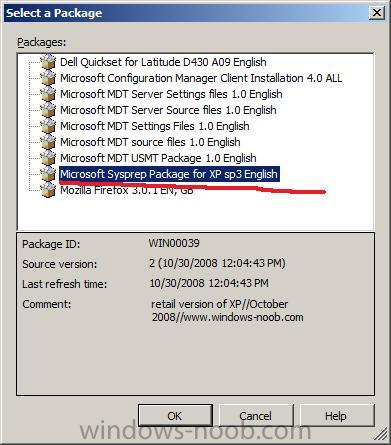
for the System Preparation screen click on browse and choose the sysprep package we created earlier
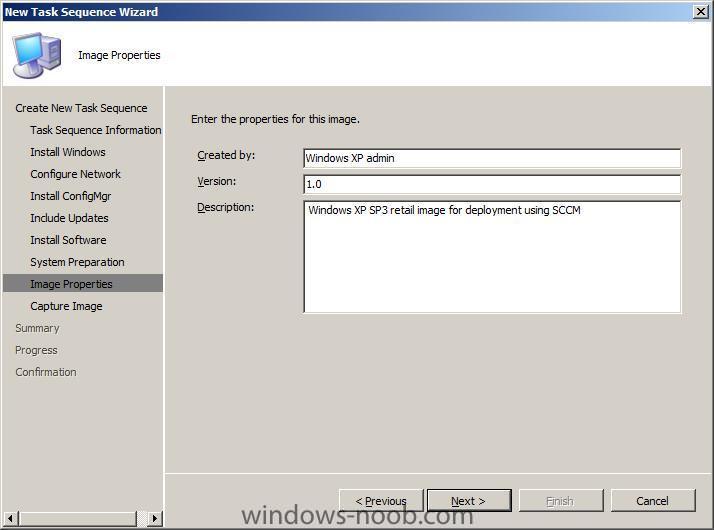
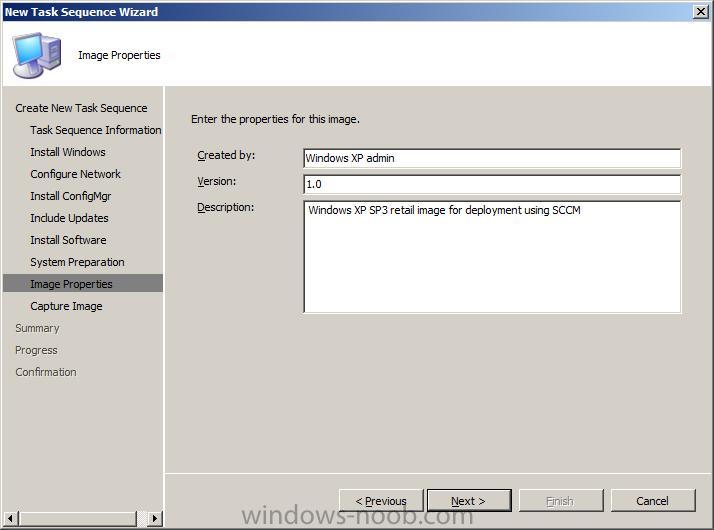
fill in the image properties
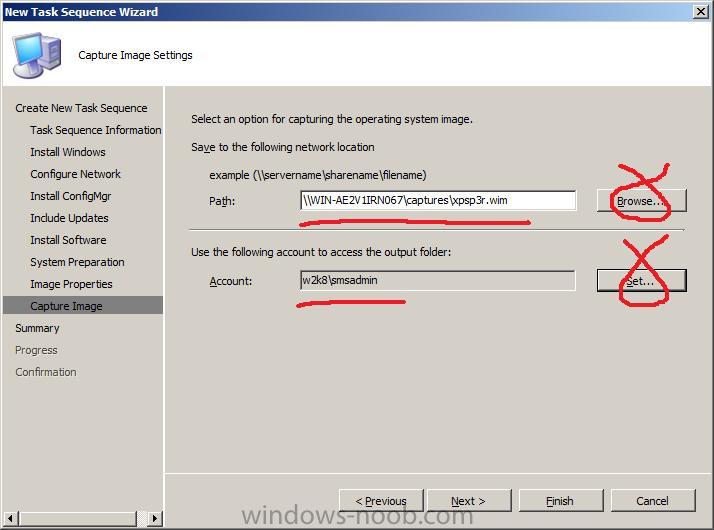
On the Capture image screen, browse to a share on your network for copying the image to, and give the file a name
eg:
\\WIN-AE2V1IRN067\captures\xpsp3r.wim
fill in your user account for capturing the image with, I use SMSadmin

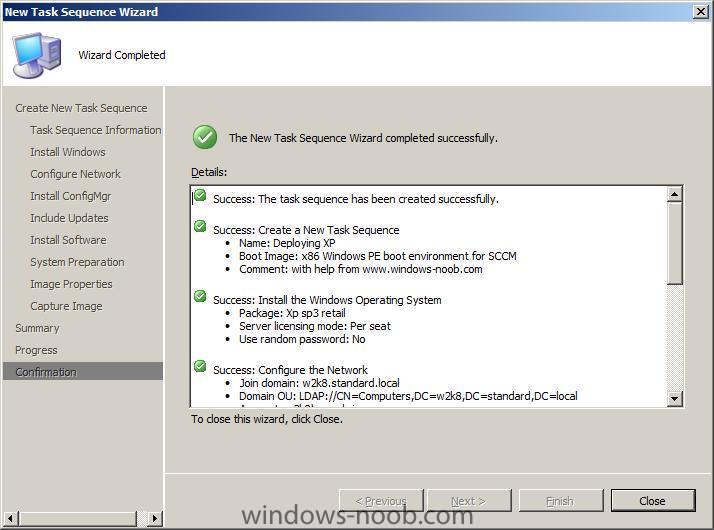
click next, next and close at the confirmation screen
-
Please note that this guide is designed to get you Deploying Windows XP with SCCM in a LAB Environment as quickly as possible. This guide is provided as is, if you find any errors please report them in the forums.
In a production environment please consult Technet for best practise, see below links:
Operating System Deployment:
Operating System Deployment in Configuration Manager
Overview of Operating System Deployment
Configuration:
System Center Configuration Manager 2007
Best Practices:
Configuring Configuration Manager Sites for Best Performance
Checklist for Security Best Practices
Best Practices for Central and Primary Site Hardware and Software Configuration
Best Practices for Operating System Deployment
This guide assumes you have installed SCCM 2007 SP1 and then configured it as outlined here in Part 1 you must then do the additional configuration outlined in Part 2, and you must have completed the final configuration tasks in Part 3. Lastly you must be able to deploy an application using SCCM 2007 and you should have reviewed part one and part two of Deploying Windows Vista, which covers setting up the PXE Service point.
Note: In this guide I've used the en_windows_xp_professional_with_service_pack_3_x86_cd_x14-80428.iso available on MSDN, this is the Retail version of XP, you should really use the VL (Volume License edition) in conjunction with your VL key to deploy XP.
Note: This Deploy XP guide will create a build image of Windows XP using the XP cd mentioned above. Once the image is created we will Capture the image. This whole process is known as 'Build and Capture'. The captured image can then be used in a separate task sequence to Deploy XP.
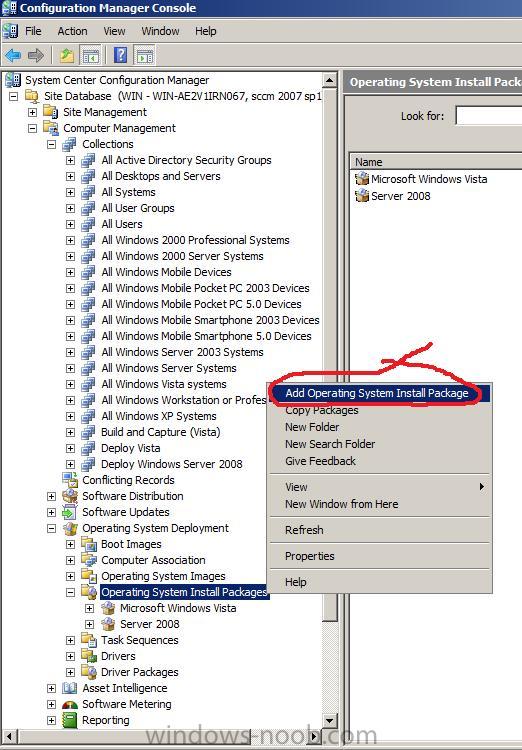
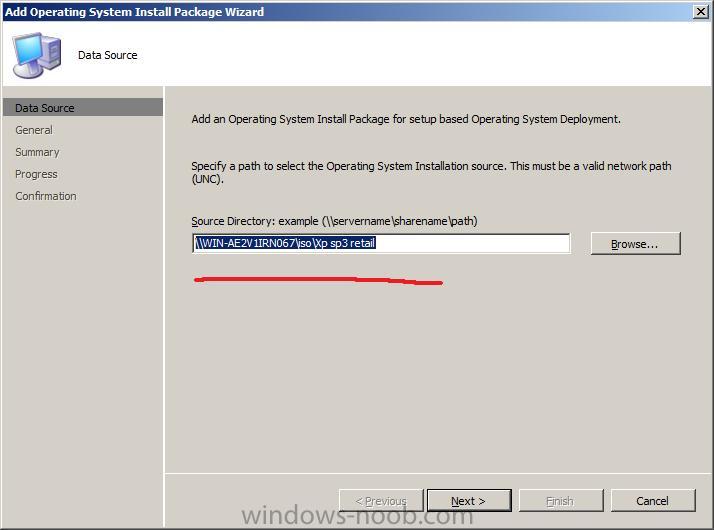
Import XP SP3 as an Operating System Install Package
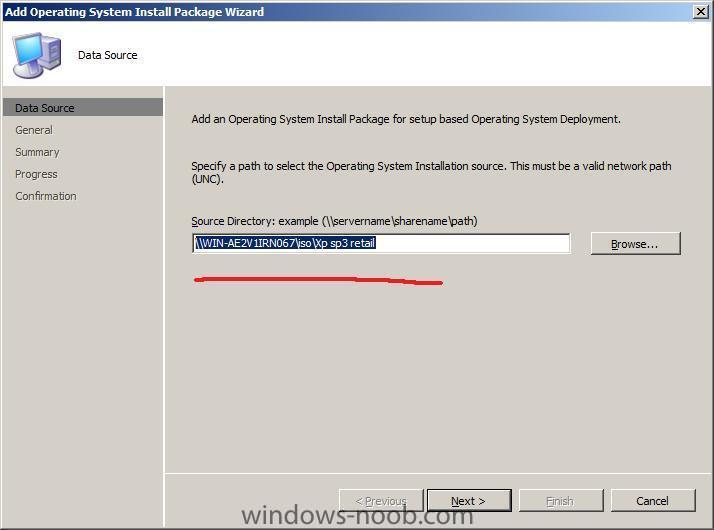
In the Operating System Deployment node of ConfigMgr, right click on Operating System Install Packages and choose Add Operating System Install Package.

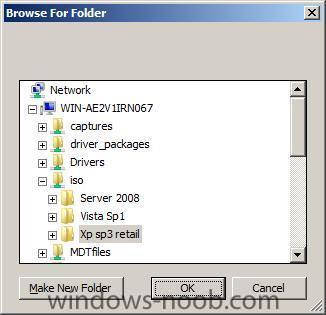
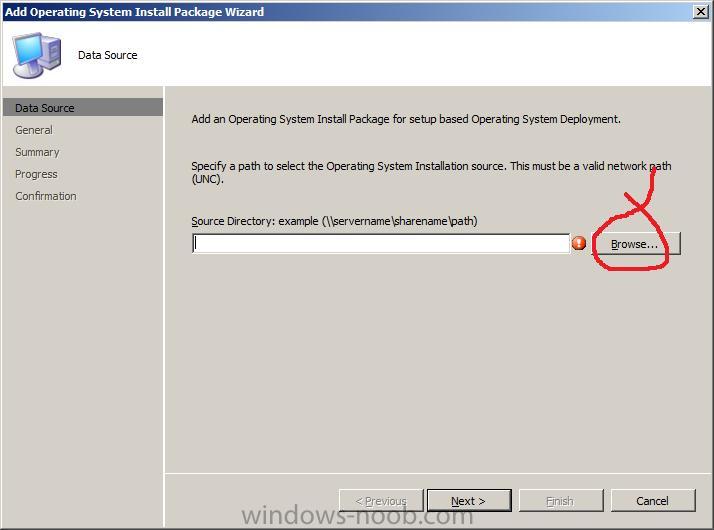
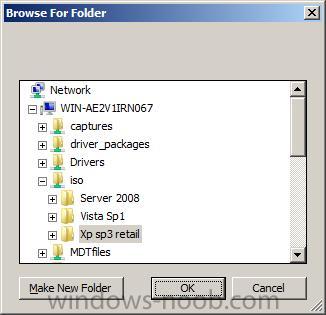
click on browse and browse to the network share where you have previously copied the XP SP3 CD contents to... (in my case that's \\WIN-AE2V1IRN067\iso\Xp sp3 retail)
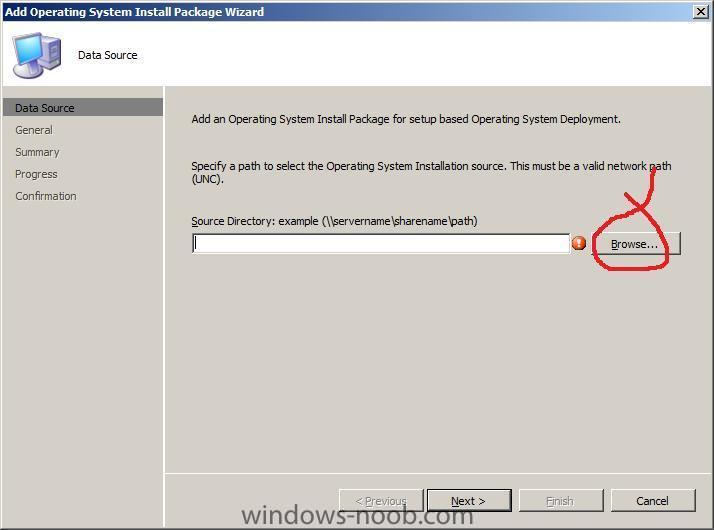
once you have the Data Source correctly specified, click next
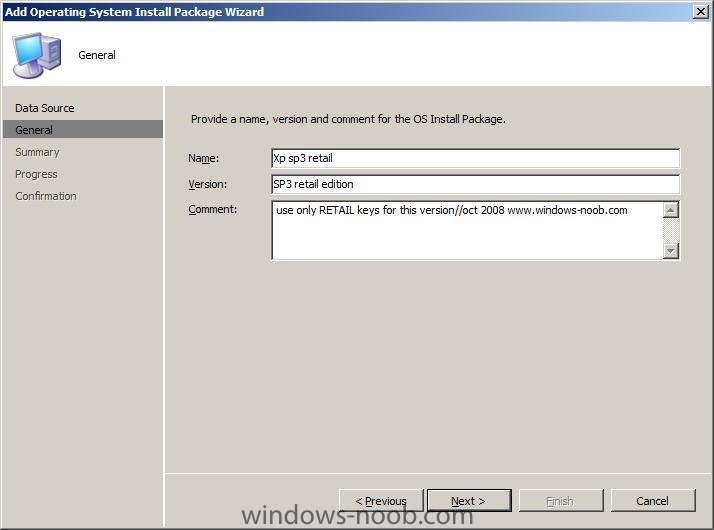
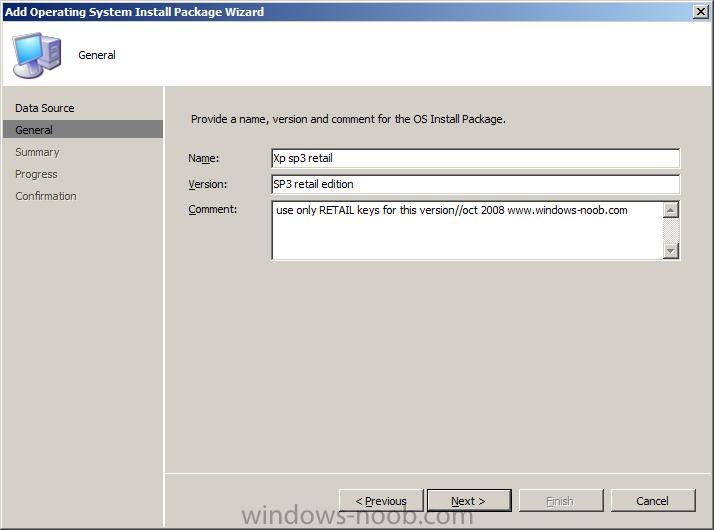
on the General Page fill in some details about this XP SP3 image...
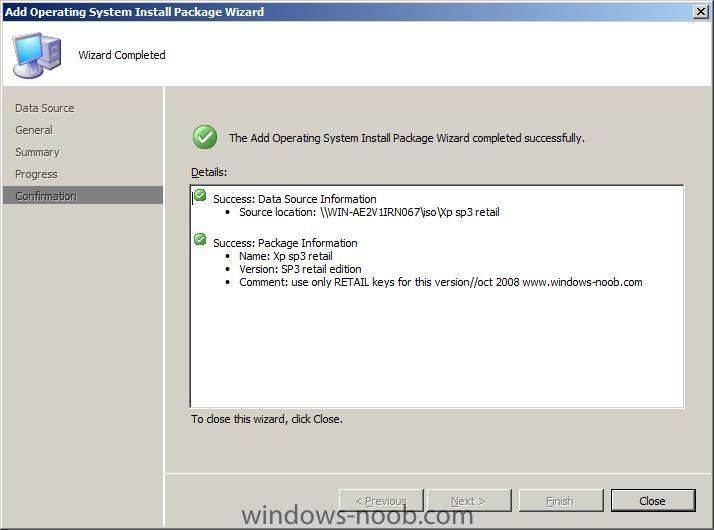
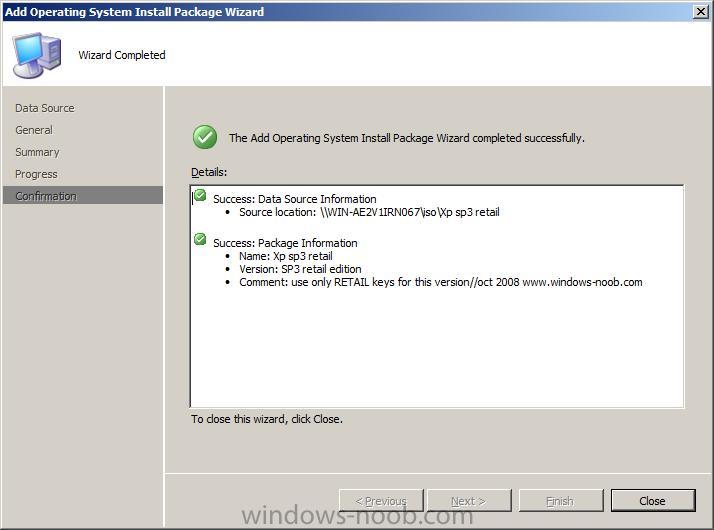
review the summary, click next and click close at the confirmation screen.
-
Please note that this guide is designed to get you up and running with SCCM in a LAB Environment as quickly as possible, so server roles are not going to be separated unless otherwise stated. This guide is provided as is, if you find any errors please report them in the forums.
This guide refers to Service Pack 1 but you should use the latest version available currently which is Configuration Manager 2007 Service Pack 2.
The latest version of this guide can always be found at http://www.windows-n...ws-server-2008/
In a production environment please consult Technet for best practise, see below links:
Prerequisites:
Prerequisites for Installing Configuration Manager
Configuration:
System Center Configuration Manager 2007
How to Configure Windows Server 2008 for Site Systems
Best Practices:
Configuring Configuration Manager Sites for Best Performance
Checklist for Security Best Practices
Best Practices for Central and Primary Site Hardware and Software Configuration
Best Practices for Operating System Deployment
Checklists:
Example Configuration Manager Installation Checklist
Example Configuration Manager Upgrade Checklist
This guide assumes that you have first setup Windows Server 2008 and configured it for Active Directory, with DHCP (you only need steps 1 and 2 this guide). If you want to deploy operating systems within SCCM you will then also need the Windows Deployment Services installed, and that is covered in steps 3 and 4 of this guide).
You must have installed and configured IIS (for SCCM) and installed SQL Server 2005 SP2 (or SQL Server 2008 with this hotfix) and WSUS (you can install WSUS later if you want, it's only required for the SUP role).
Please note: WSUS SP2 is a role within Server 2008 R2 so if you are using Server 2008 R2 you can install WSUS Sp2 by adding the role.
If you are thinking about hosting SQL Server on another server than the SCCM server then please read this post.
You should also read the SCCM prerequisites on Technet.
We will be using the MSDN version of SCCM 2007 Sp1 namely en_system_center_configuration_manager_2007_with_service_pack_1_x86_dvd_x14-66461.iso so burn it to DVD or mount it in Daemon tools (or similar).
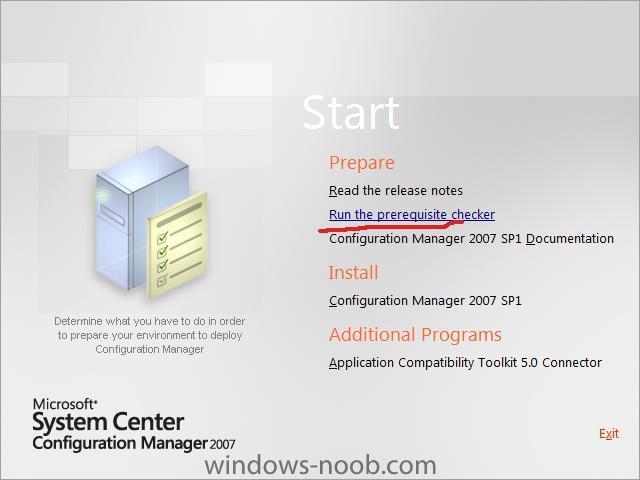
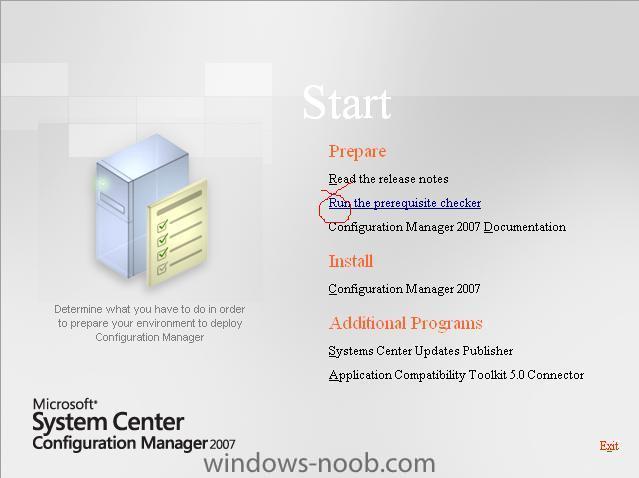
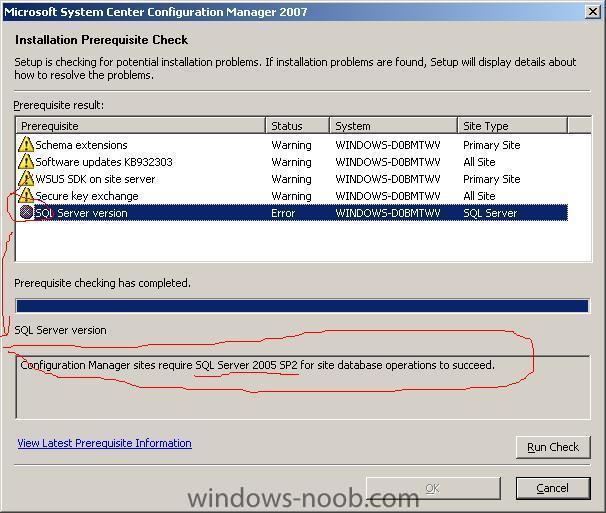
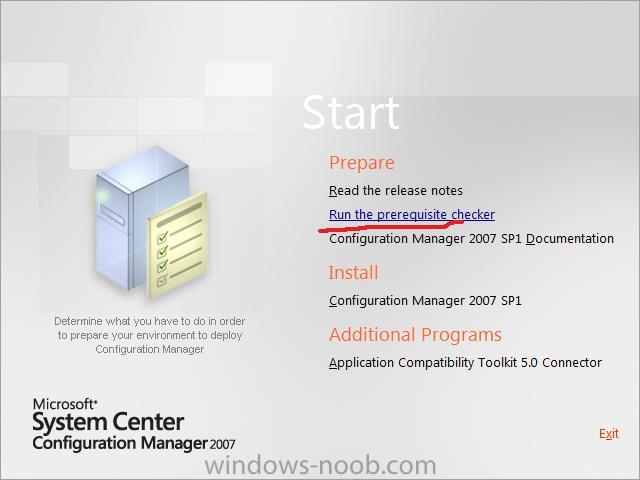
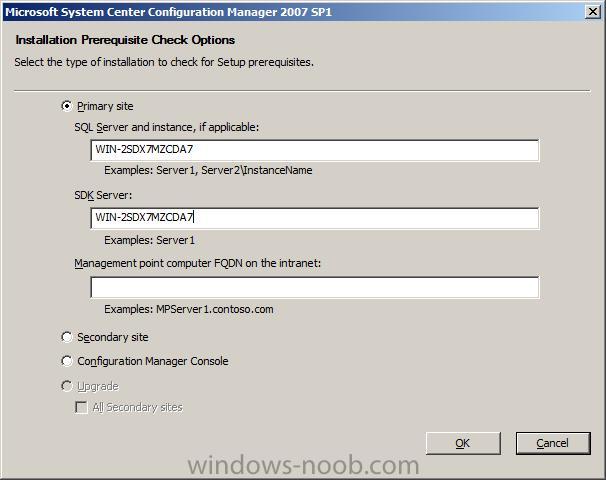
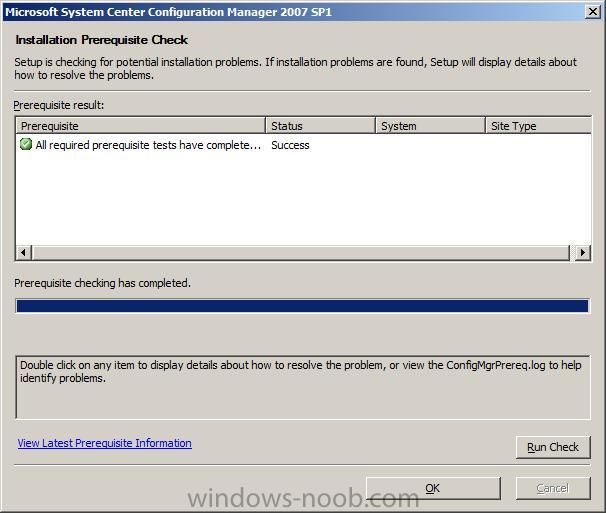
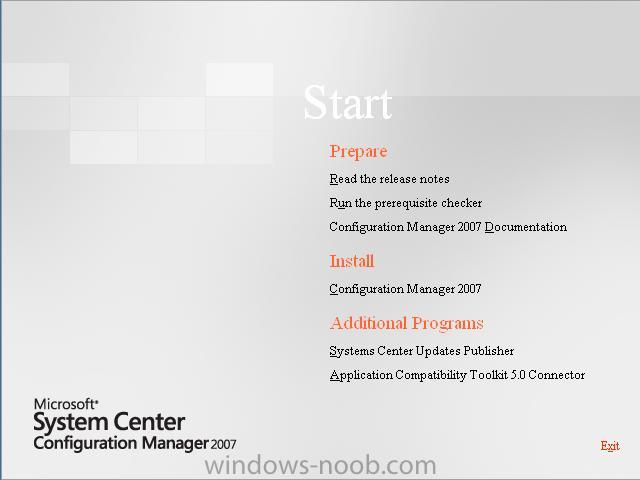
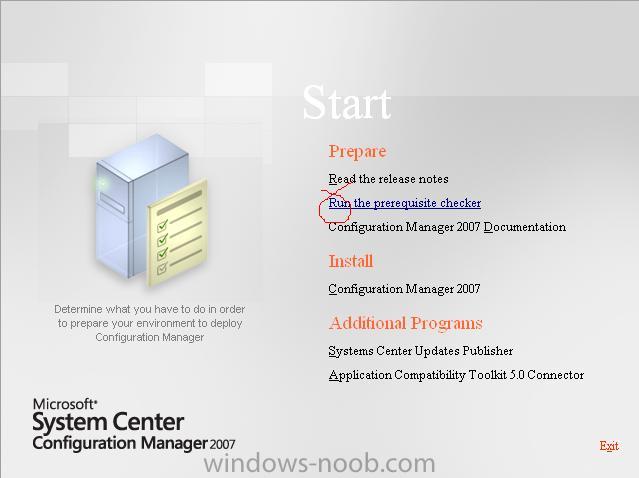
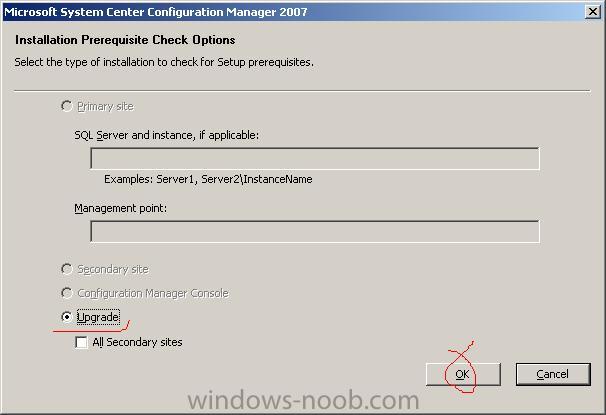
Part 1. Run the prerequisite checker and fix the warnings/errors.
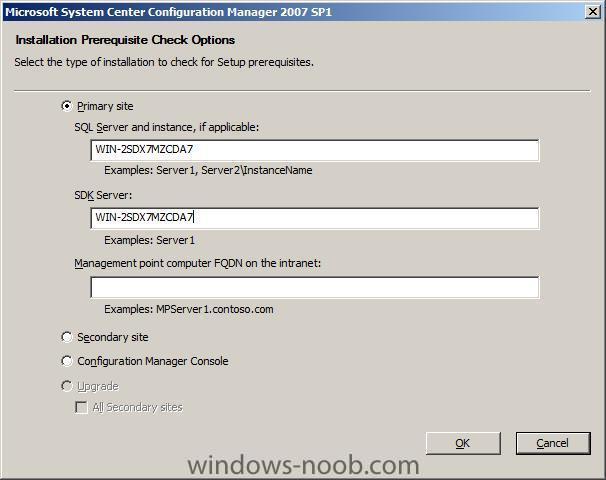
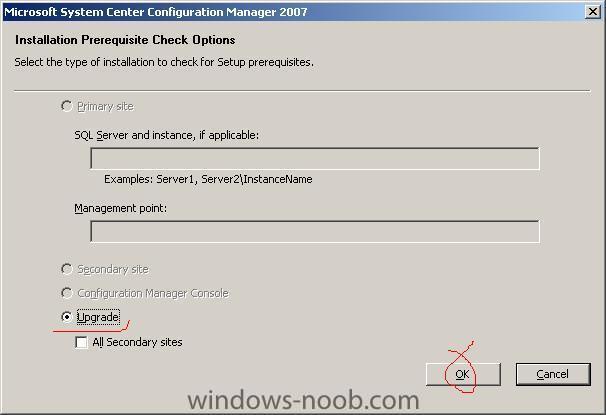
When the menu appears, click on Run the prerequisite checker, we'll do this to see if our Windows Server 2008 needs any additional tasks performed prior to installing SCCM 2007 sp1.
enter your servername as below (leave OUT the instance name or you may get errors explained in the Final Note)
this gave me two prerequisites which needed looking at, the AD Schema extensions, Microsoft Remote Differential compression.
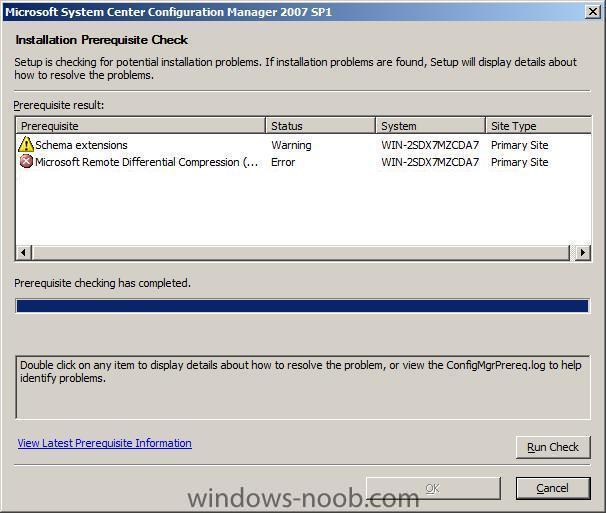
If you want to get more details of the problems identified, then check c:\ConfigMgrPrereq.log (and c:\ConfigMgrSetup.log) or double click each warning/error in turn to get a short description (scrollable) of the problem.
<08-22-2008 10:33:16> WIN-2SDX7MZCDA7; Schema extensions; Warning; Configuration Manager Active Directory schema extensions are not required, for site server installation, but are recommended to fully support the use of all Configuration Manager features.My first problem was that I needed to extend the Active directory schema, to do so I followed this guide.
Once I had extended the active directory schema, I ran the prerequisite checker again,
That left me with the RDC error,
The Microsoft Remote Differential Compression (RDC) library must be registered for Configuration Manager site server installationThat led me here and that in turn had this info
Site servers and branch distribution points require Remote Differential Compression (RDC) to generate package signatures and perform signature comparison. RDC is not installed by default on computers running Windows Server 2008 and is not installed automatically during Configuration Manager Setup. For information about installing RDC on Windows Server 2008 computers, see How to Configure Windows Server 2008 for Site System Roles.Site servers and branch distribution points require Remote Differential Compression (RDC) to generate package signatures and perform signature comparison. RDC is not installed by default on computers running Windows Server 2008.
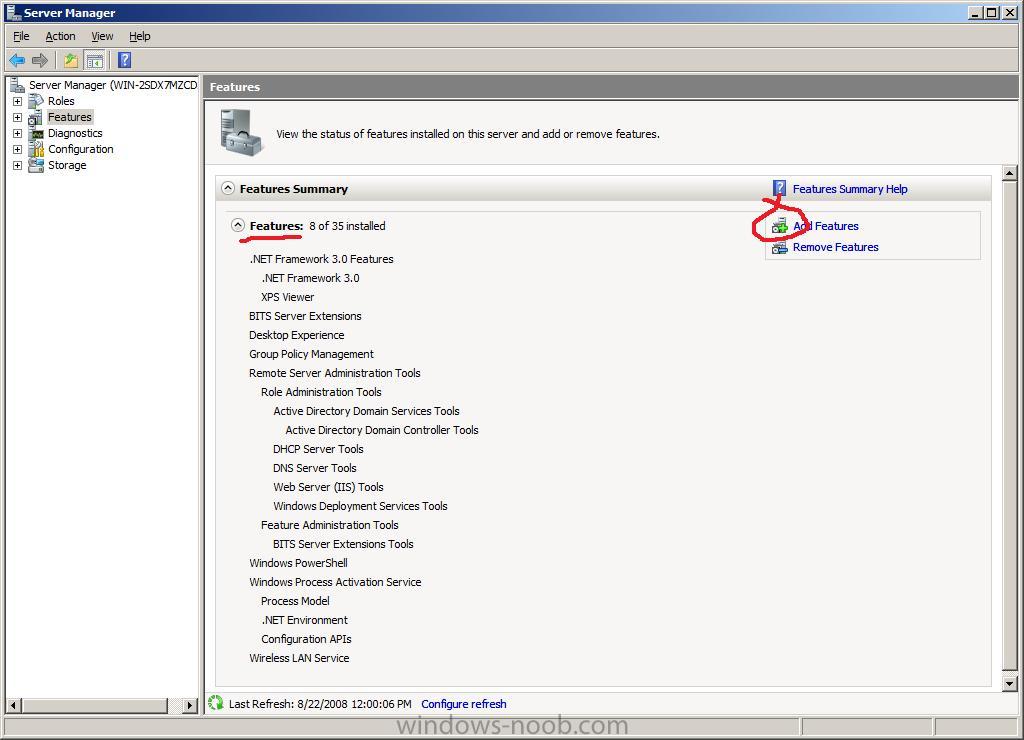
To add Remote Differential Compression to site servers and branch distribution points
In Server Manager, on the Features node, start the Add Features Wizard.
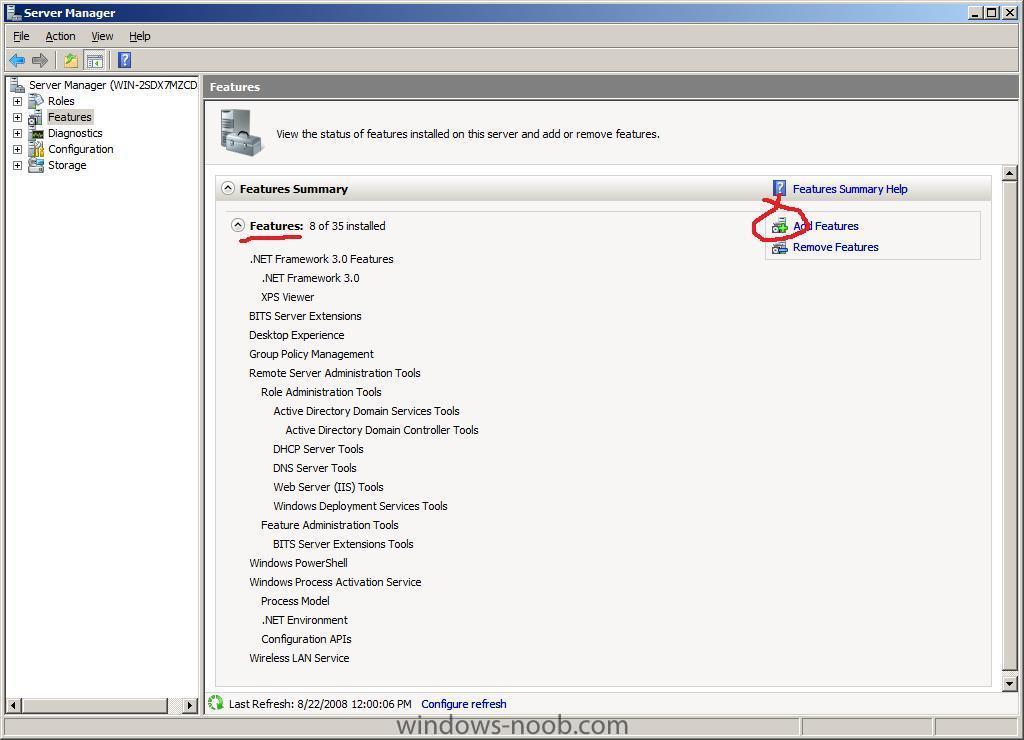
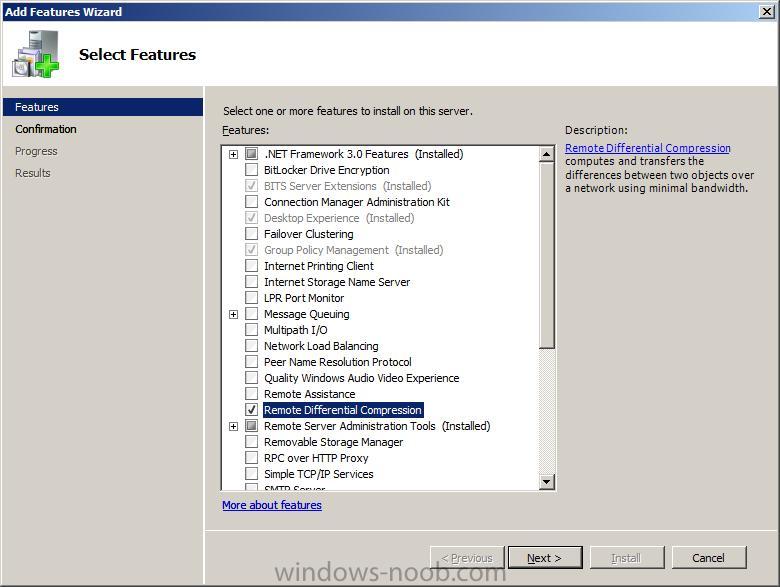
On the Select Features page, select Remote Differential Compression, and then click Next.

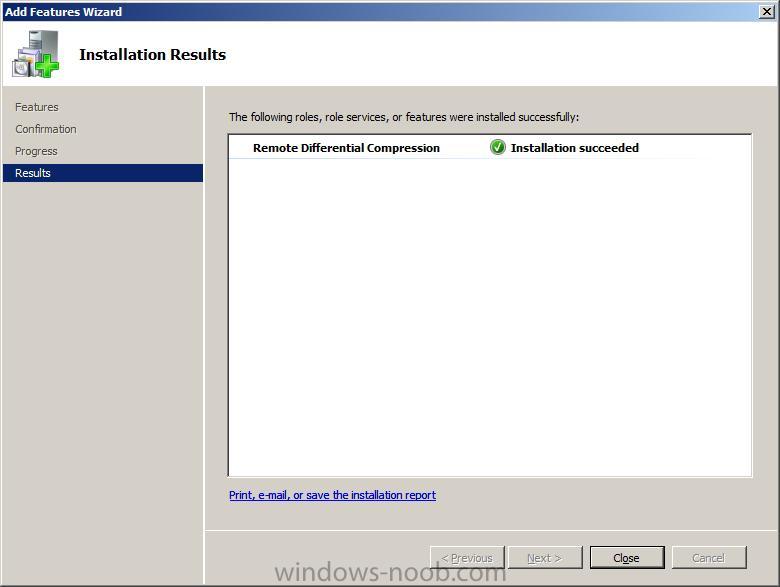
Complete the rest of the wizard by clicking install then close.
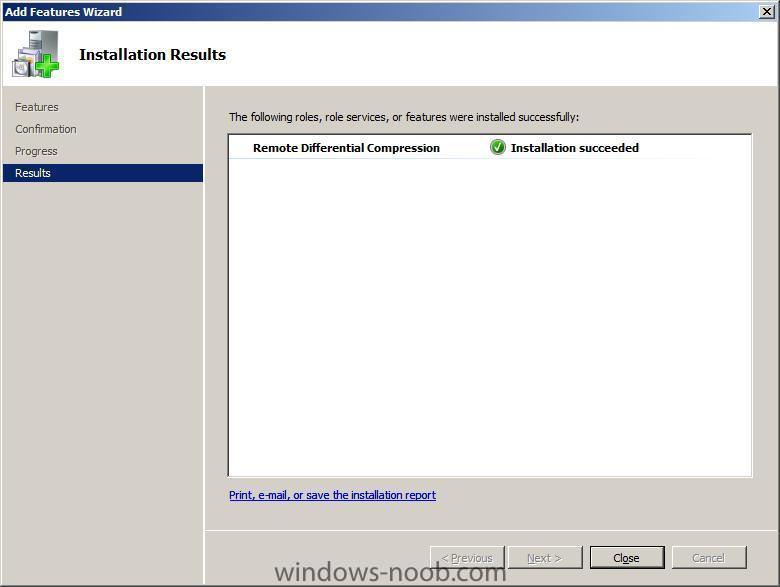
Now run the prerequisite checker again and the RDC error should be gone
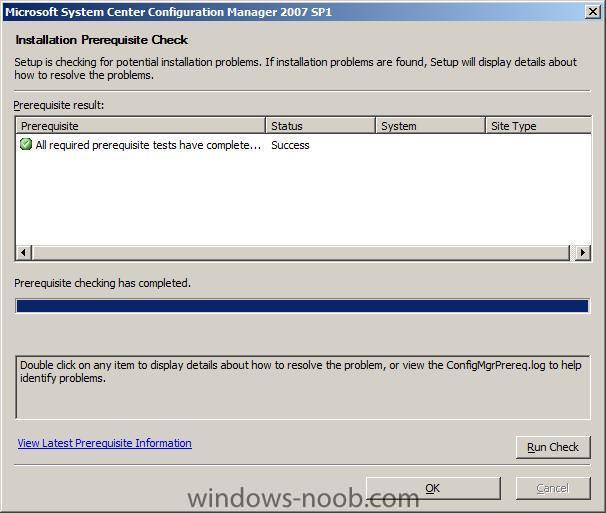
Once you have no warnings or errors, please proceed to Part 2.
Final Note: if you entered the instance name at the start of this guide, you may get an error which states
Either the user account running Configuration Manager Setup does not have sysadmin SQL Server role permissions on the SQL Server instance targeted for site database installation or the SQL Server instance could not be contacted to verify permissions. Setup cannot continue.The Technet page for Setup Prerequisite checks states:-
A SQL Server best practice is to remove the Builtin\Administrators group from the sysadmin role on installed SQL Server instances. If the Builtin\Administrators group has been removed from the sysadmin role, the user account running Configuration Manager Setup must be granted sysadmin role permissions for setup to succeed.-
 1
1
-
-
Before starting this, make sure to backup all your SQL databases, any problems arising from doing this are your own responsibility, always test this on a test lab computer scenario before doing it in your business environment.
Download the following from Microsoft connect or your MSDN downloads area.
en_sql_2005_std_x86_dvd.iso
and
en_sql_server_2005_sp2_x86_cd.iso
burn them to DVD/CD or mount them using tools such as Daemon tools.
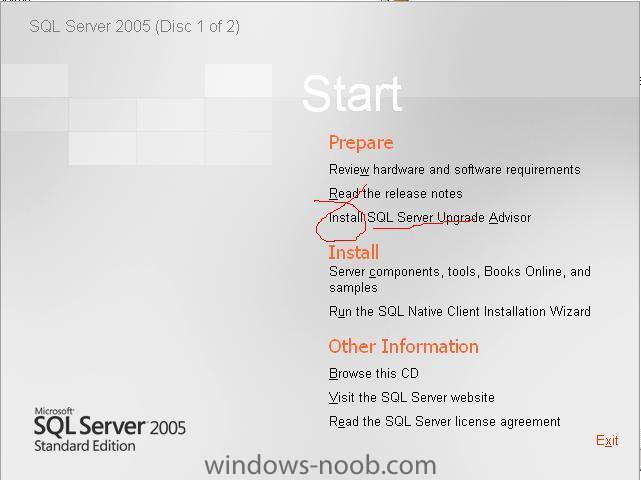
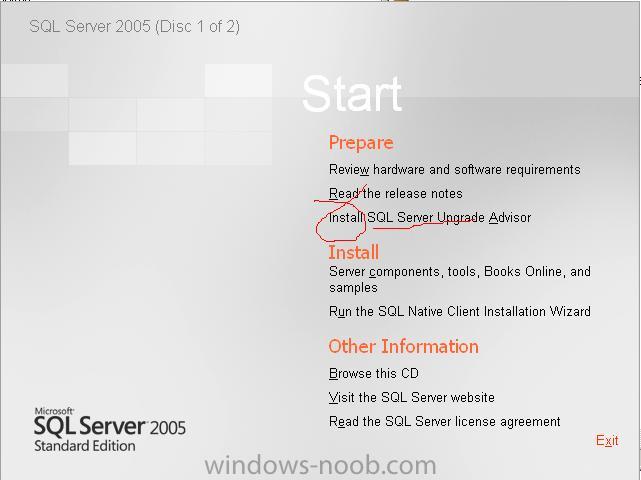
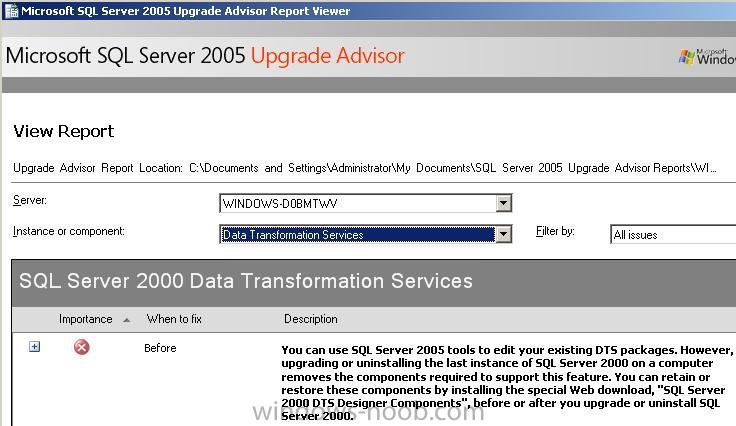
Step 1. Run the upgrade advisor to see what issues may need to be resolved
Start the SQL Server 2005 Standard edition DVD and select Install SQL upgrade Advisor from the list of options.
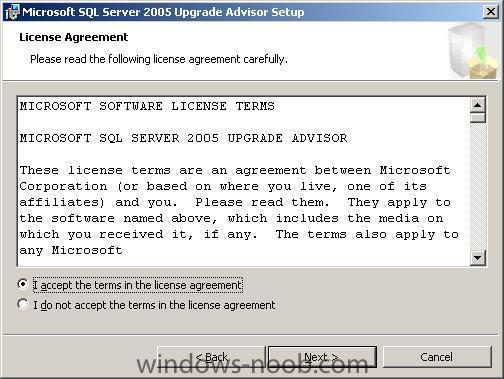
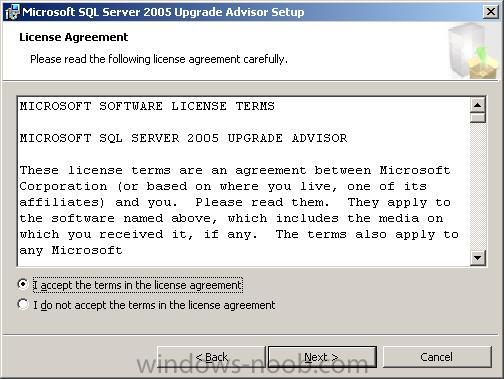
When the wizard appears click next

accept the license aggreement
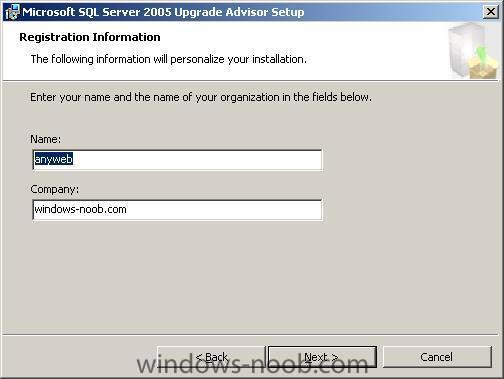
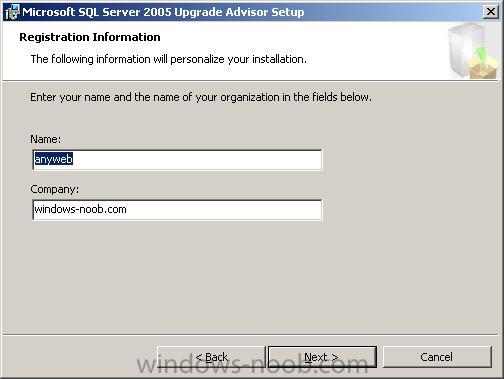
enter/verify your registration information
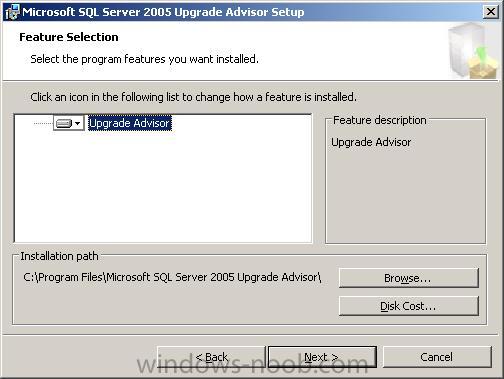
click next when asked what features to install (go with the default)
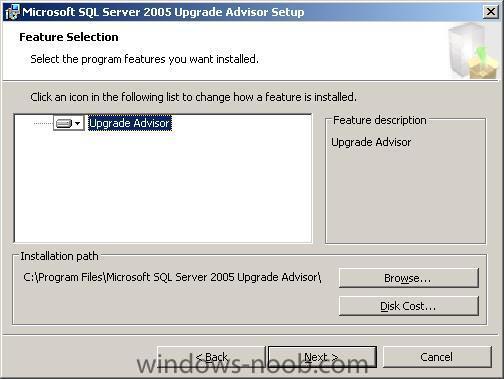
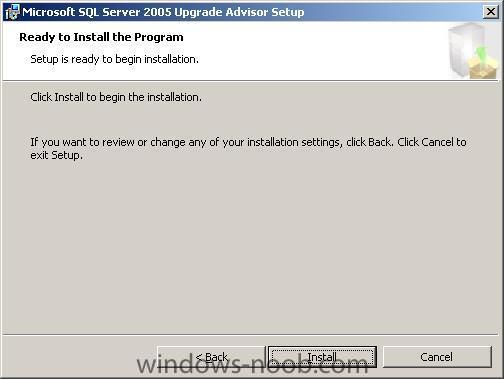
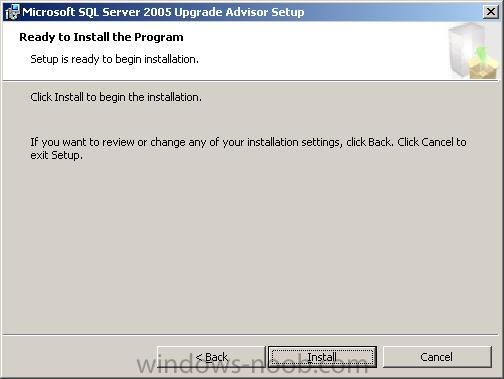
choose install to install the SQL Upgrade Advisor
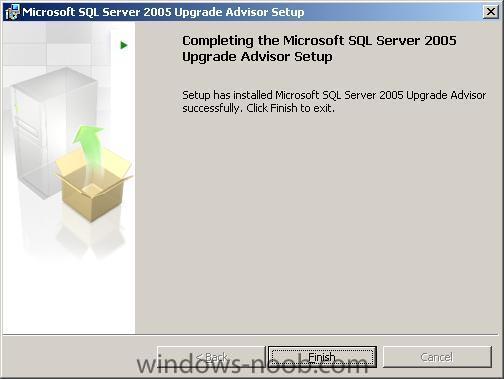
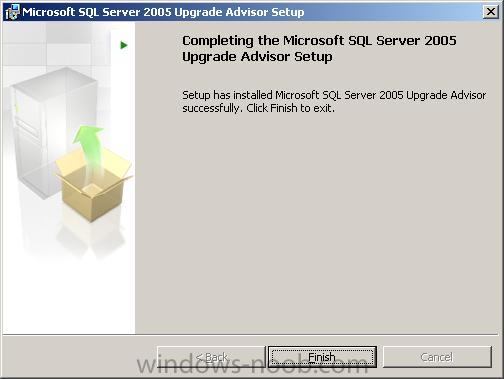
once done click on Finish
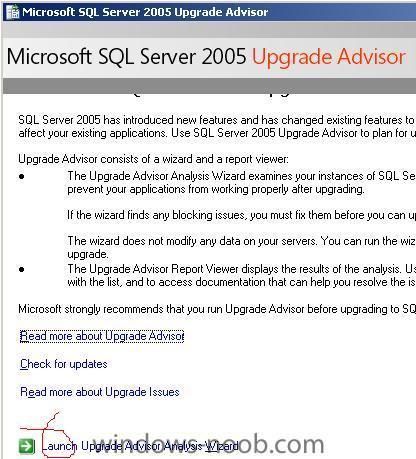
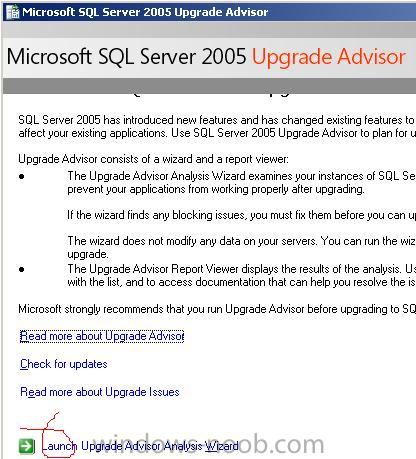
Now that it's installed, let's run it, so click on Start, All Programs, Microsoft SQL Server 2005, SQL Server 2005 Upgrade Advisor

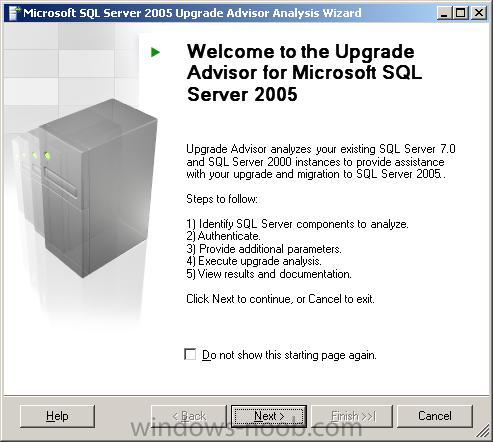
When the Upgrade Advisor splashscreen opens, click on Launch Upgrade Advisor Analysis Wizard.
This will launch another wizard

click next to continue
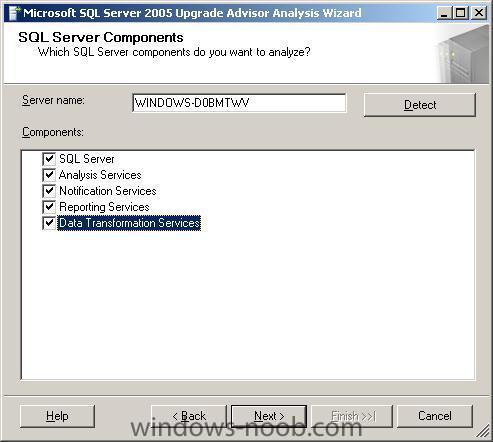
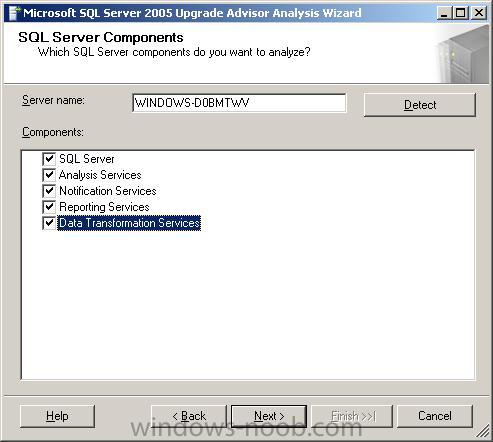
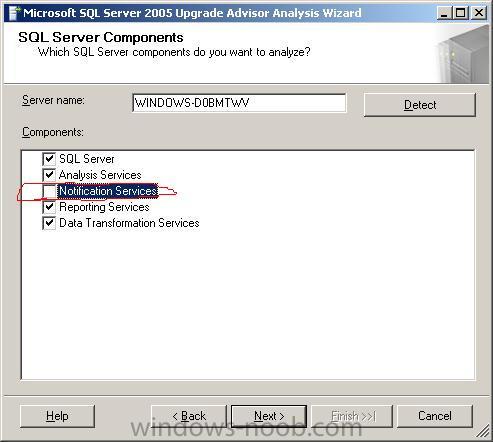
choose the components you want to analyze (i selected all)
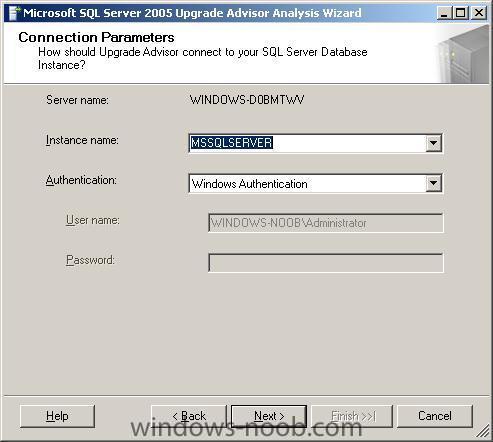
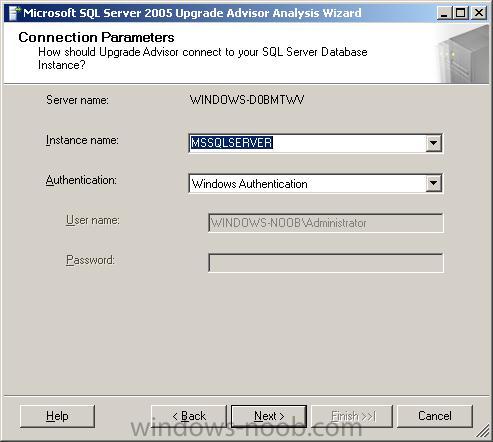
when asked how the Upgrade Advisor should connect go with the default settings unless you have changed them previously when installing SQL
click next when prompted for what databases to analyze
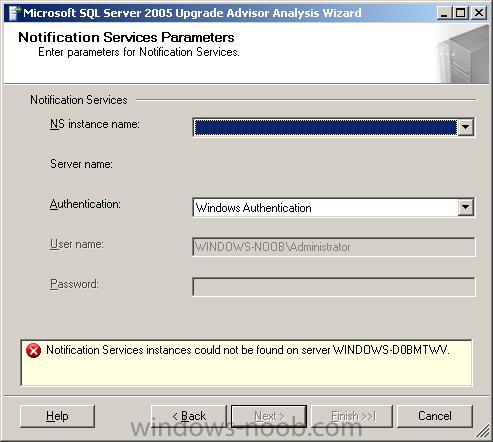
if you get an error about not finding the notification services
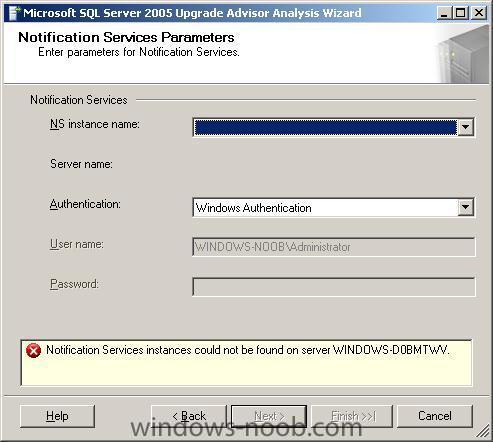
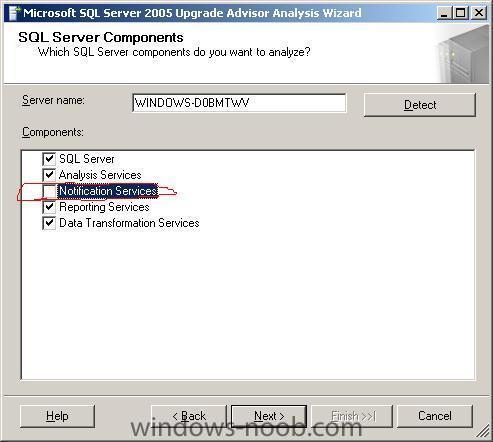
hit the back button three times and remove the checkmark from 'notification services' and continue again.
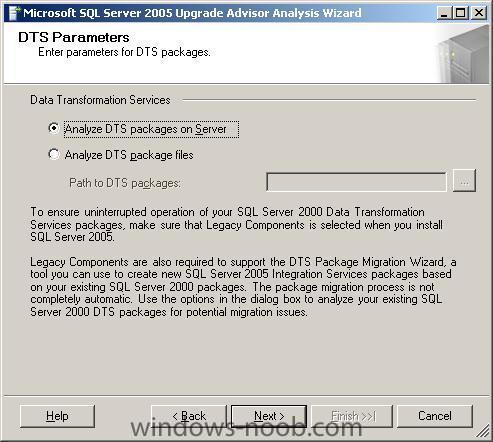
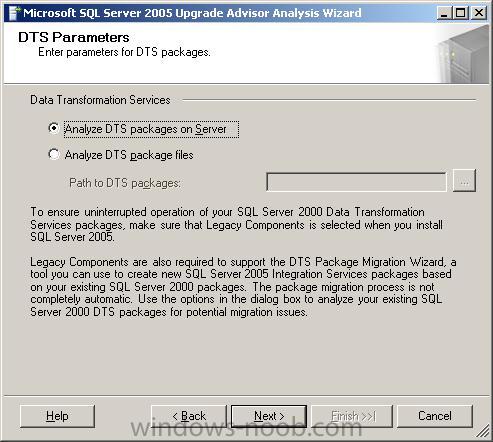
click next for the DTS parameters
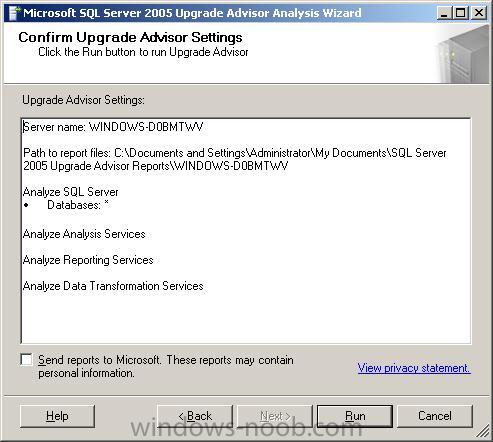
view the confirmation
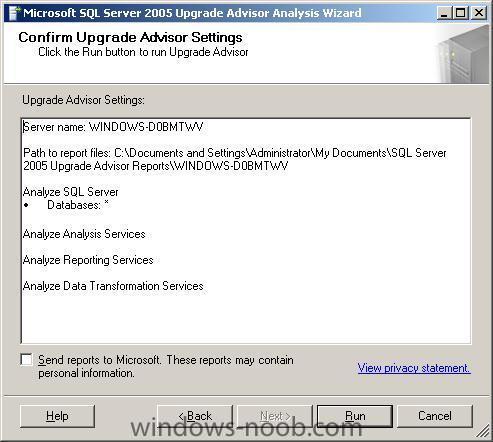
and click Run to start...
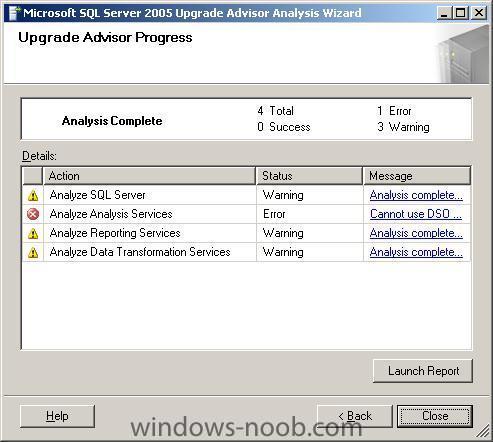
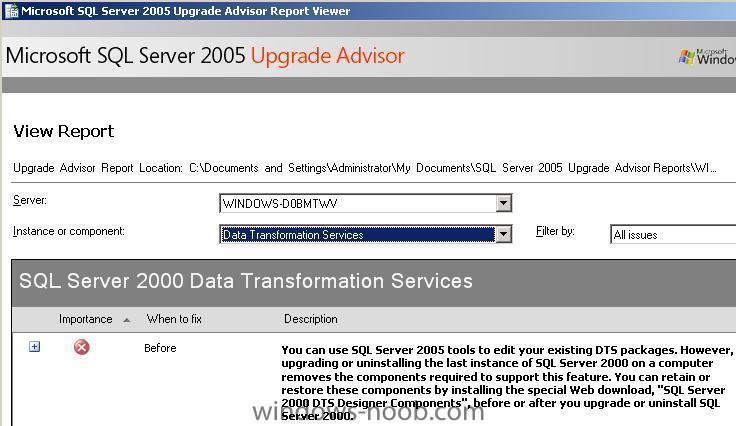
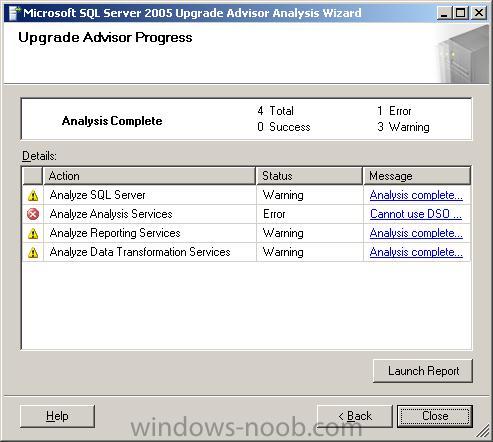
once done you can click on Launch Reprt to see the details
viewing the report will allow you to see what components to change before attempting the actual SQL upgrade.
-
Please note, this is for lab testing purposes, use it at your own risk, always backup your SMS database and site before attempting any radical changes such as an upgrade. If you break your production setup by doing anything here I am not responsible, use at your own risk. Test always in a LAB first.
Before performing the steps below you should perform a test DB (database) upgrade as detailed below.WARNING: the following can corrupt the database if used on a production database. It cannot be used more than once on the same database copy.
Step 1. Test the DataBase upgrade
Note you should have backed up your SMS database using SMS database backup prior to running this. In addition, copy your SCCM 2007 SP2 media to a local folder for the DB upgrade process.
On your SMS 2003 Server:-
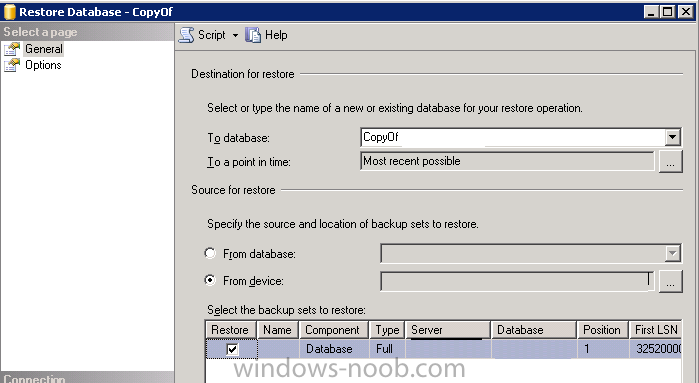
- Open SQL Server Management Studio.
- Right click Databases select Restore Database.
- For Database (type in): CopyofServerName (replace ServerName with your SMS server name)
- Select From Device, use ellipses button to browse. Click the Add button.
- in Files of Type, use drop down to select all Files(*)
- Expand the location where your SMS database is backed up to, for example C:\SMS_BACKUP\SiteDBServer select the SMSbkSQLDBsite.dat file.
- Click Ok, and Ok again. Select Restore Box to check.
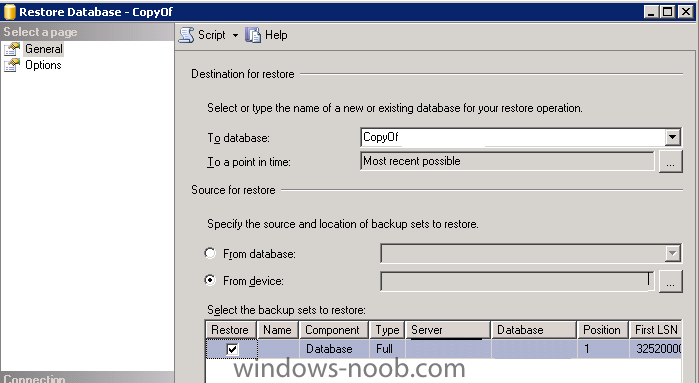
- Ok, and Ok to Restore was successful
- Open Command prompt and Browse to your SCCM Sources Media folder. SCCM 2007 with SP2\SMSSETUP\BIN\I386
setup.exe /testdbupgrade CopyofServerName
- Answer YES, Click Begin Upgrade
- Open log files: C:\ConfigMgrPrereq.log, C:\ConfigMgrSetup.log
- A window should appear and say successful
- If unsuccessful stop here, if successful, move forward.
- Clean up CopyofServerName Database. Right click CopyofServerName database, select Delete, leave defaults, click ok.
Step 2. Start the Upgrade
First of all download the iso from your MSDN account or Microsoft Connect.
once done, burn it to DVD or mount the ISO using Daemon tools or similar.
Before starting the process you'll need to know the prerequisites, and thankfully there is a prerequisite checker included on the DVD.
Next you should run the prerequisite checker
so let's run that and see what it says
If like me you already have an SMS 2003 server setup then it will automatically choose the upgrade option, as this server is the only SMS site we will click ok to continue.
After some scanning it will present you with a results page, double clicking on a result will tell you what you have to do to fix the problem.
As I was running SQL 2000 sp4, it correctly flagged that I needed to upgrade that to SQL 2005, at this point I exited the SMS>SCCM process (click on cancel) and got my SQL 2005 iso (en_sql_2005_std_x86_dvd.iso).
-
1
- Open SQL Server Management Studio.
-
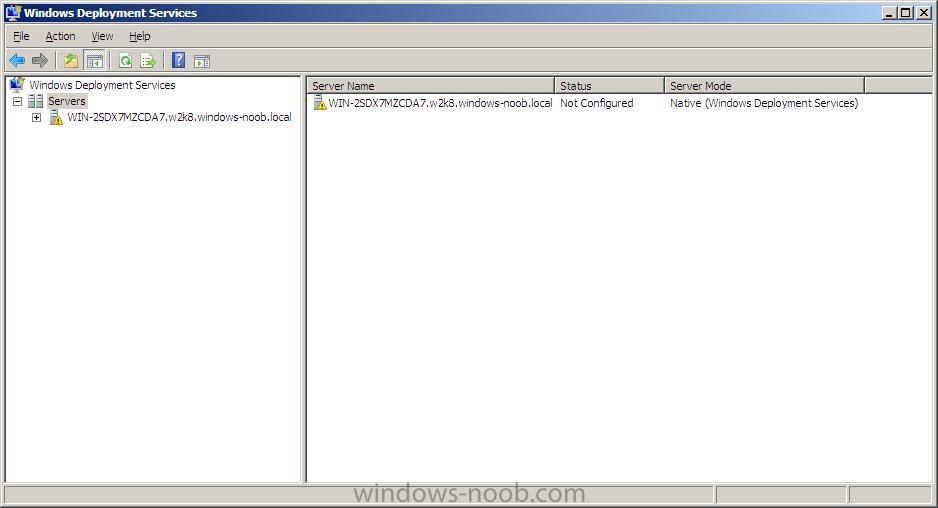
Step 4. Configure the Windows Deployment Services gui (mmc snap in)
Click on Start/All Programs/Administrative tools/Windows Deployment Services.
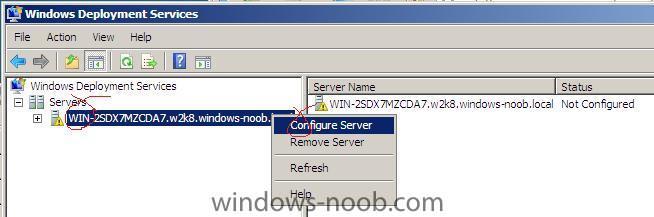
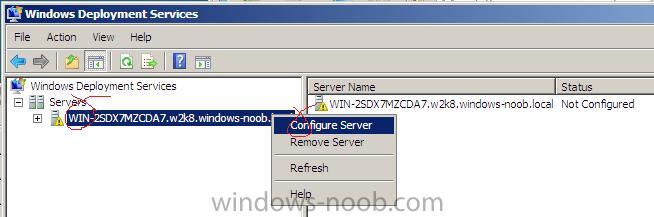
at this point we can see that WDS is not configured yet, so let's do that now.
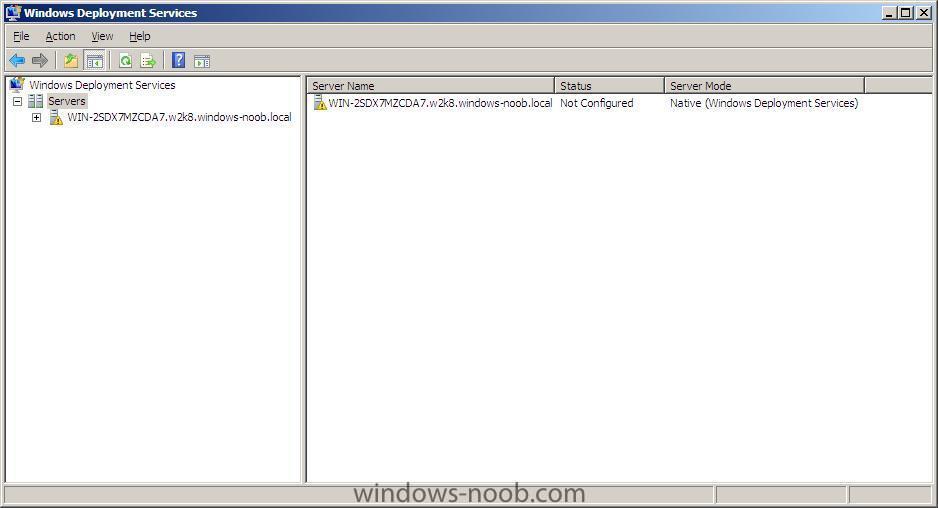
right click on the server name in the left pane and choose Configure Server
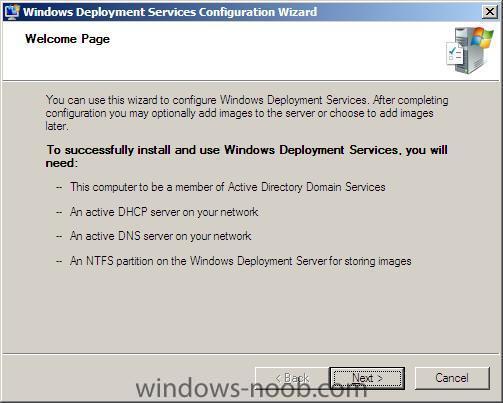
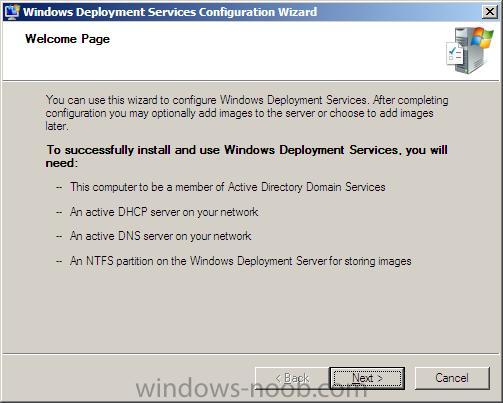
at the welcome page click next
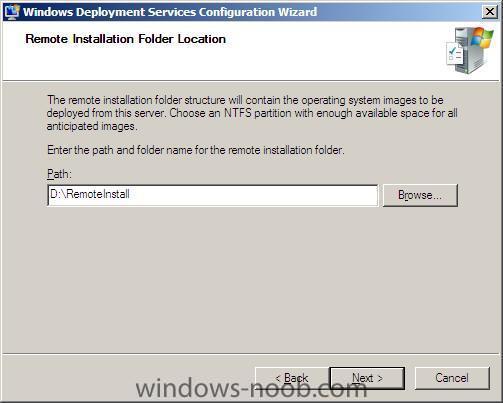
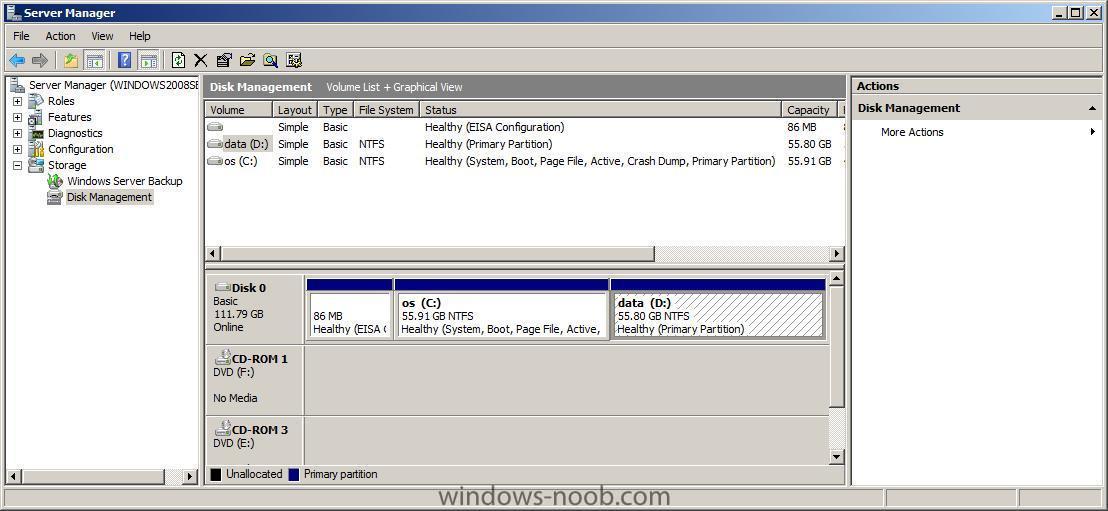
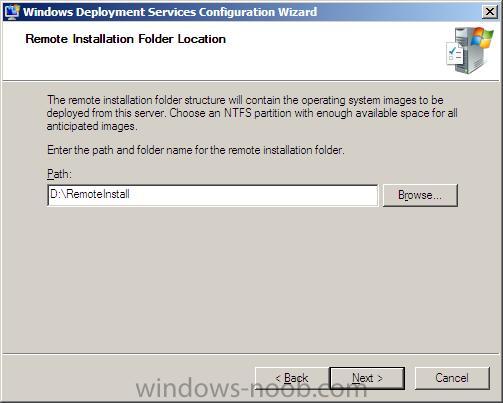
change the remoteinstall path from the default C:\RemoteInstall to D:\RemoteInstall
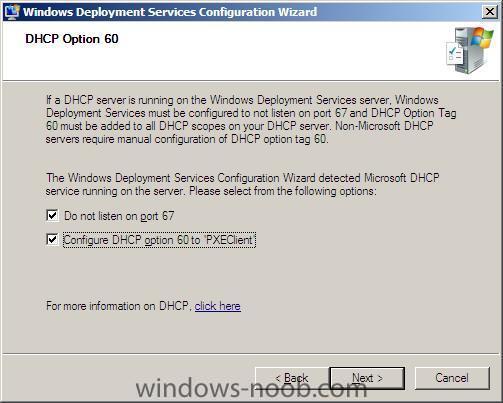
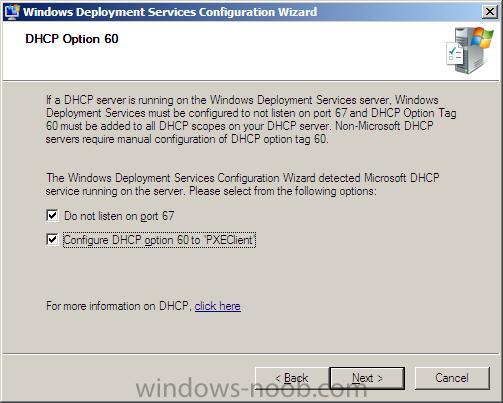
I put a checkmark in each of the DHCP options then clicked next
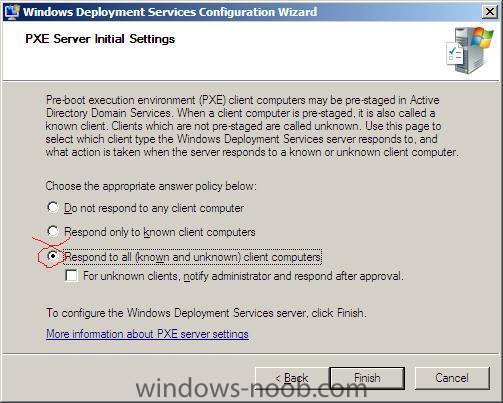
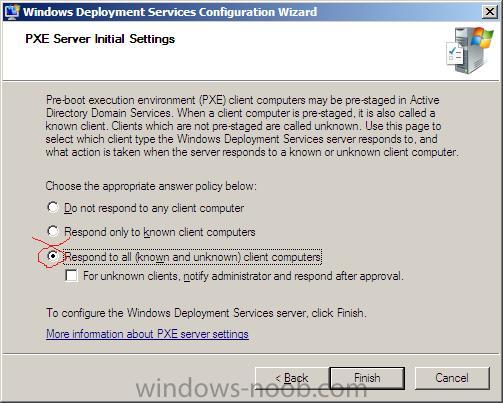
I then chose to respond to all known and unknown computers (by default it's set to Do not respond to any)
Please note, if you want to set this option to only respond to known computers, then you can do so, but you will have to prestage your computers in Active Directory to do so
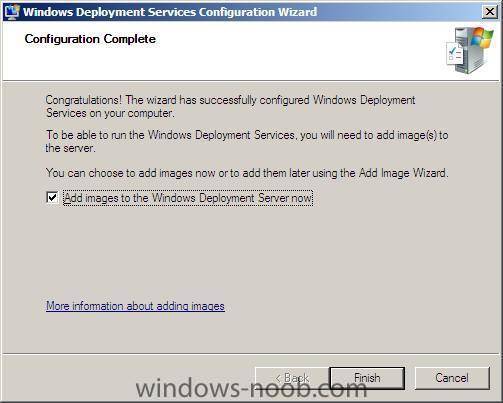
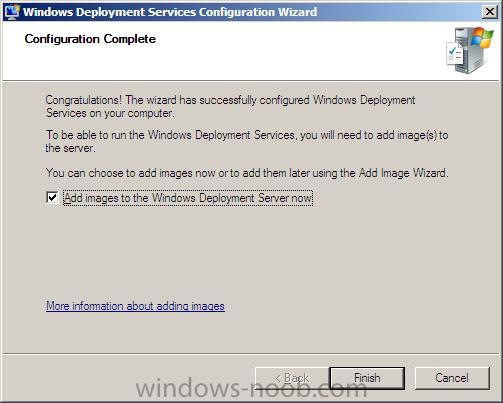
clicking on Finish applies these settings
when done, you'll be told that the configuration is complete and that you can now add images to the WDS server, click on Finish (again).
Step 5. Adding boot.wim and install.wim
Note: You should use only the boot.wim file from the Windows Server 2008 DVD. If you use the boot.wim file from the Windows Vista DVD, you will not be able to use the full functionality of Windows Deployment Services for example, multicasting. If you have the Windows Vista SP1 dvd, you can safely use that for the boot.wim.
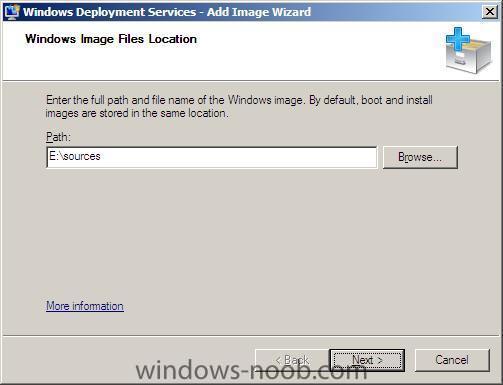
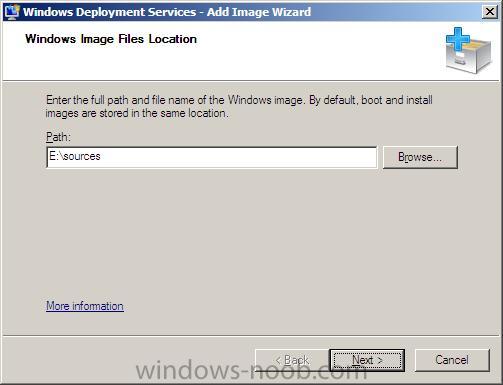
The Windows Deployment Add image wizard will appear, insert your Windows 2008 Server DVD and click Browse, select the sources folder on the Windows 2008 DVD and then click next
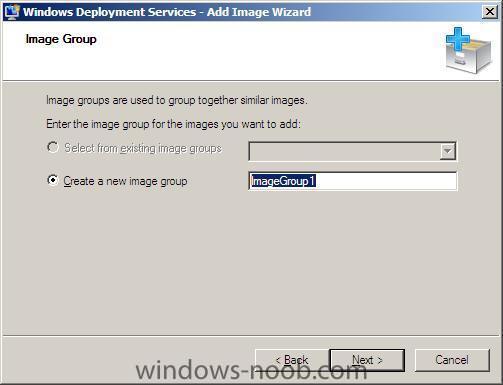
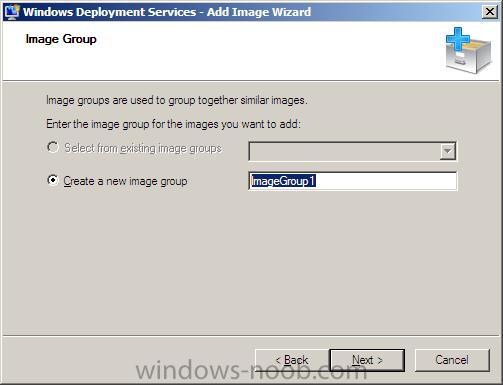
you'll be prompted to create a new image group, lets call it ImageGroup1 (the default name, you can change it later to Windows Server 2008 or Windows Vista Sp1 or whatever...).
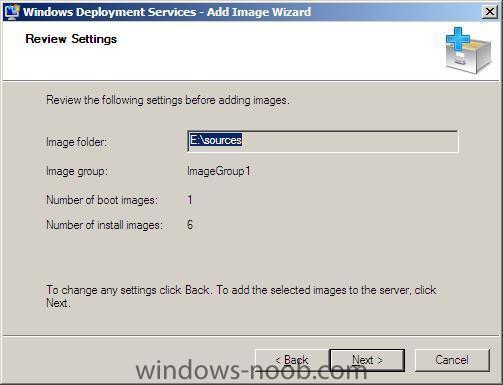
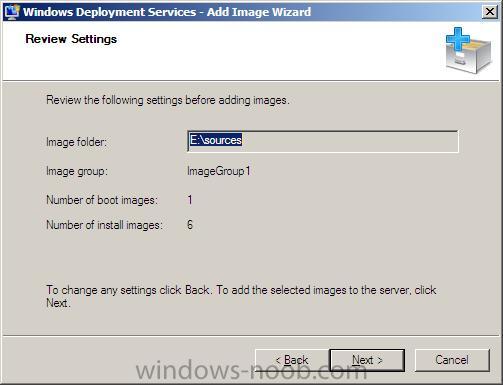
review your settings and click next when ready
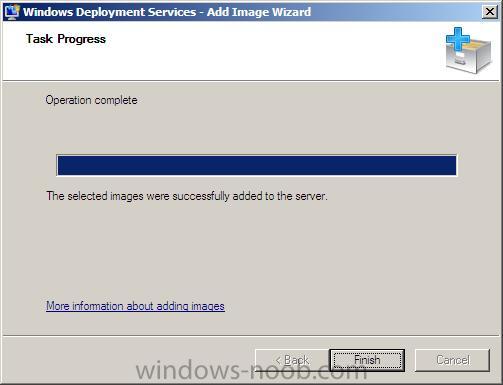
After a long while, the selected images will be added to the WDS server
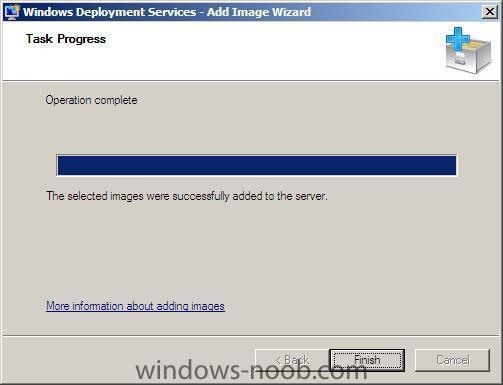
click finish and review the WDS server as it is now
in the Boot Images pane, you should see Microsoft Windows Longhorn Setup (x86) and this is the original boot.wim file from the Windows 2008 Server DVD, please note that this is the default description name of the image, you could change it when addint the boot.wim image to something more descriptive as in this example
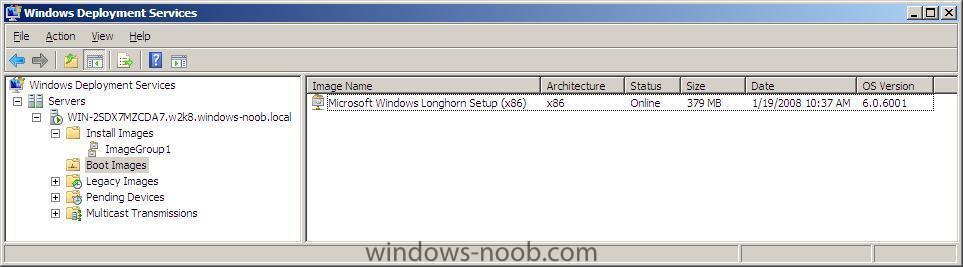
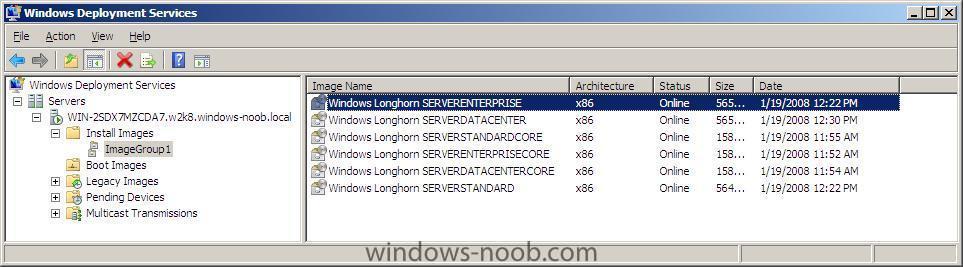
In the Install Images pane, we can see the six available images from the Windows 2008 Server DVD, these are based upon the install.wim file on the DVD.
you can now PXE boot your client computers to the Windows 2008 WDS server.
troubleshooting note: if you add a new image to WDS and attempt to pxe boot and then install the image but get an error saying something like 'could not display the list of' then make sure you have used BOOT.WIM from a Windows Server 2008 DVD or Windows Vista sp1.
-
1
-
-
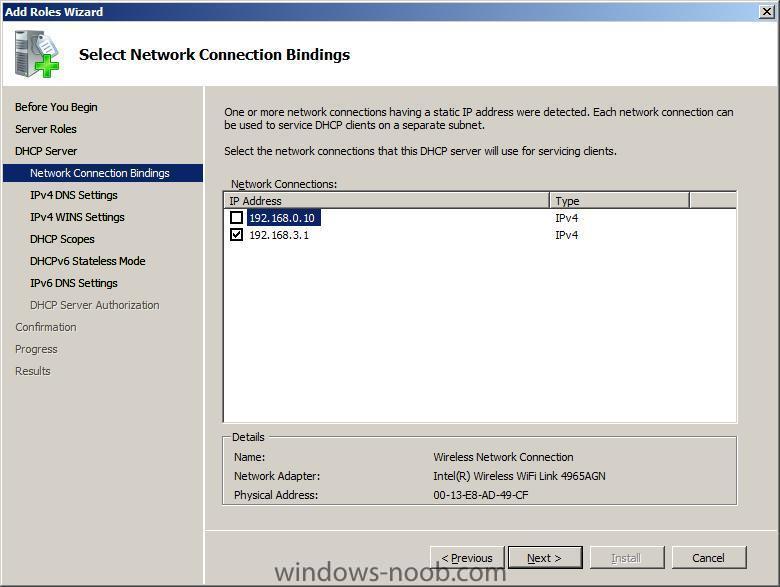
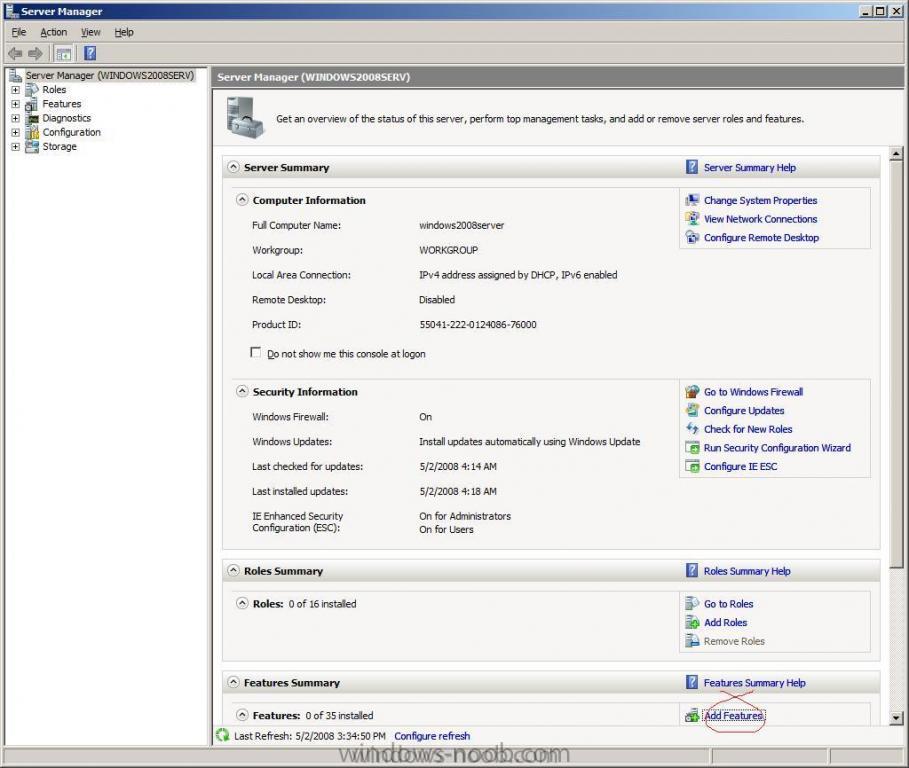
Step 2. Add the DHCP role
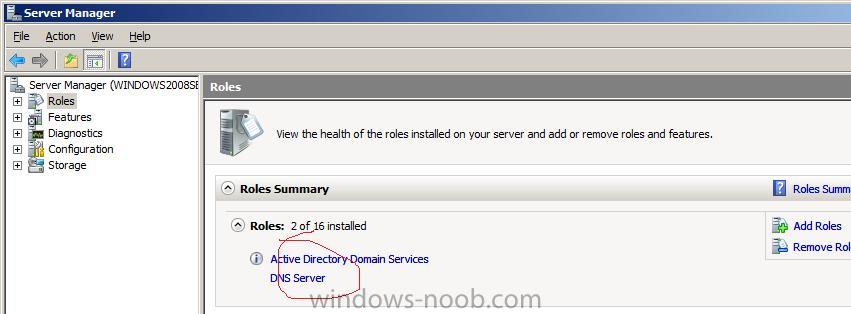
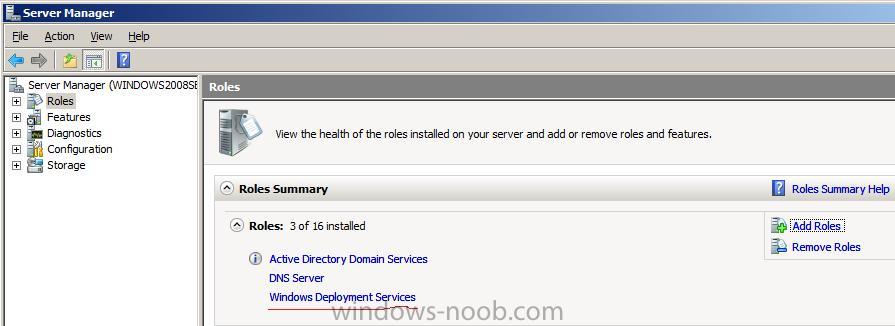
After completing Step 1, you now should see that Active Directory Domain Services and DNS server are installed (you can verify this in Server Manager, Roles, Roles Summary).
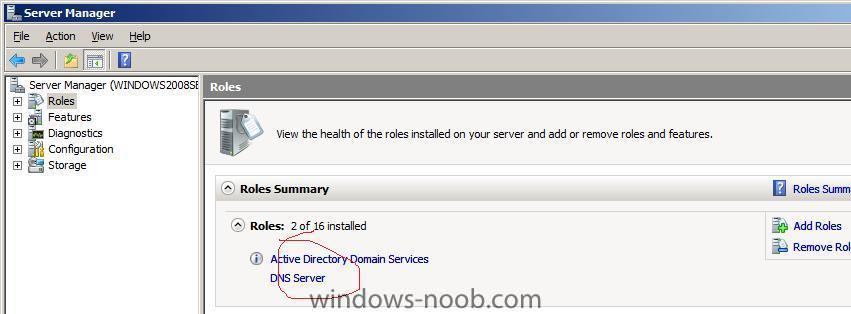
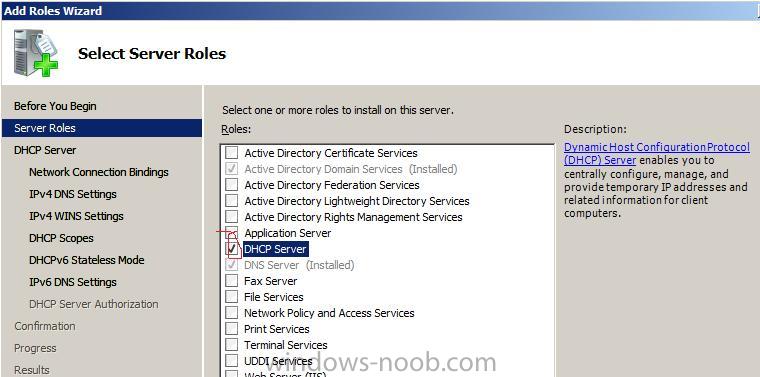
Now that we are in server manager lets click on Add roles again followed by next.
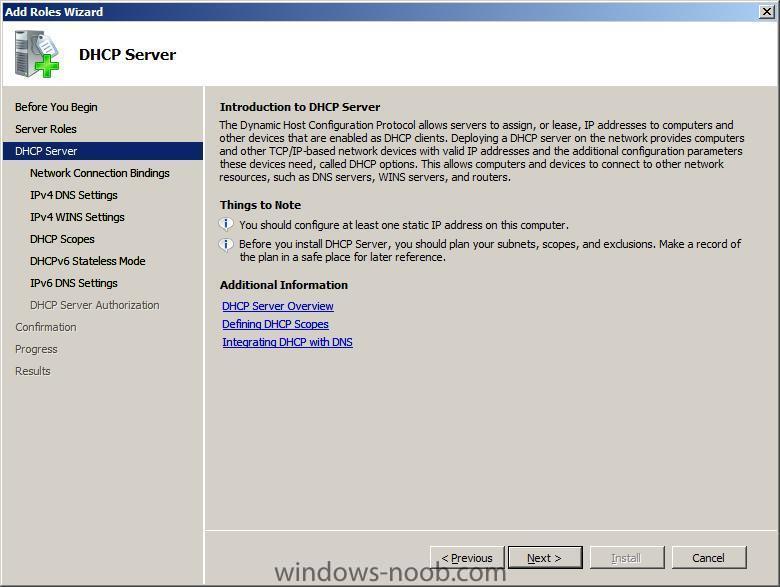
Select DHCP Server and click next.

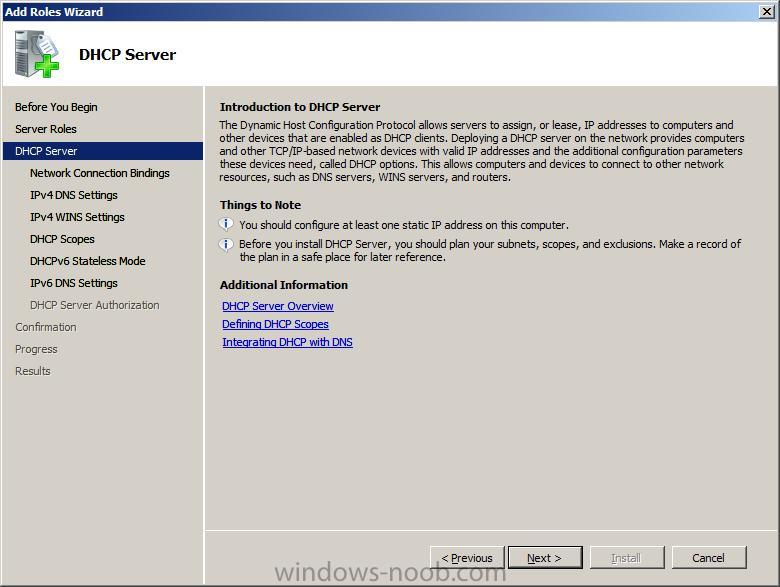
Review the information about DHCP server...
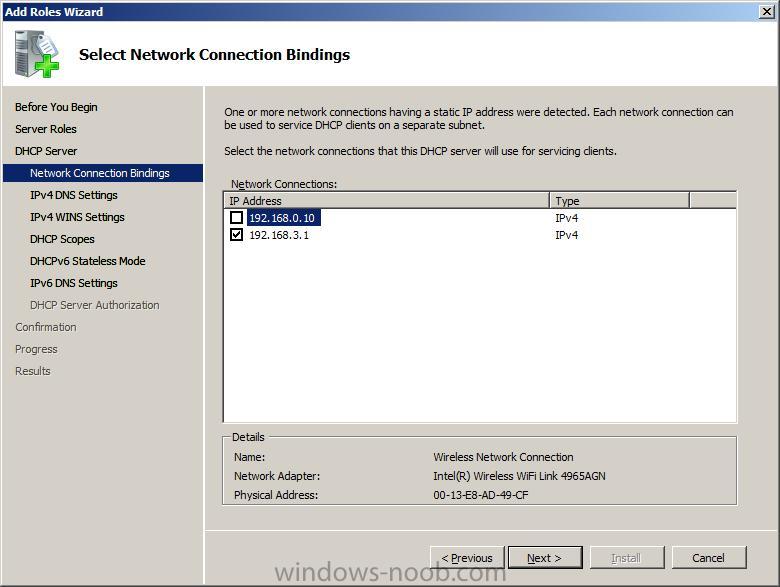
and if you have more than one network card in your Windows 2008 server, select the one which will be handing out ip's (in my case that is 192.168.3.1), I removed the tick from the other network card listed
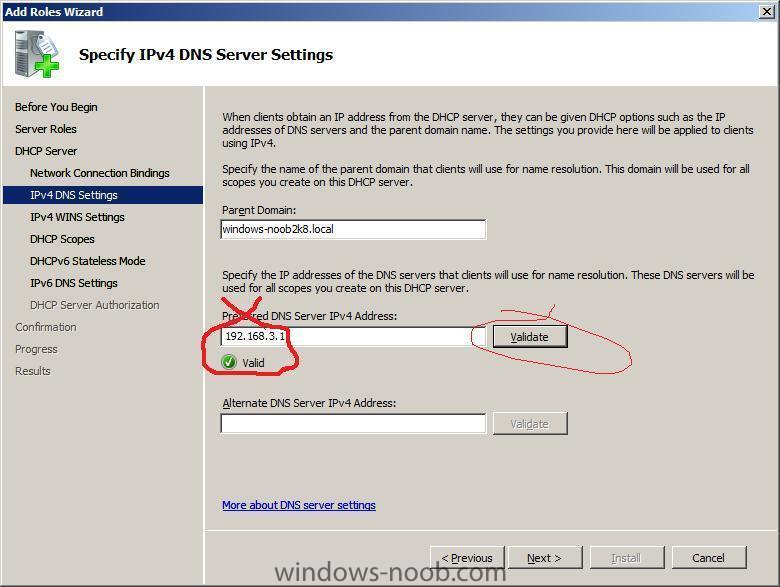
next you will need to clarify which DNS server ip address to listen to, I changed it from my second nic's ip address 192.168.3.1, clicking on Validate will verify that it's ok
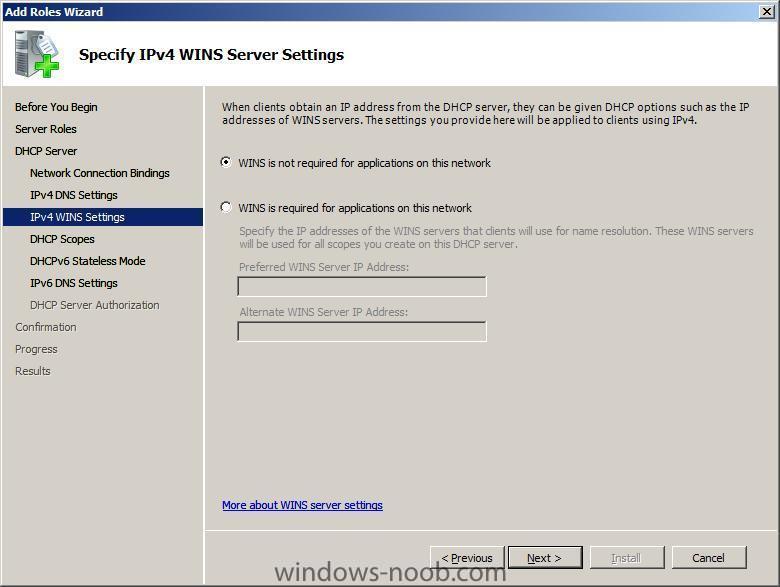
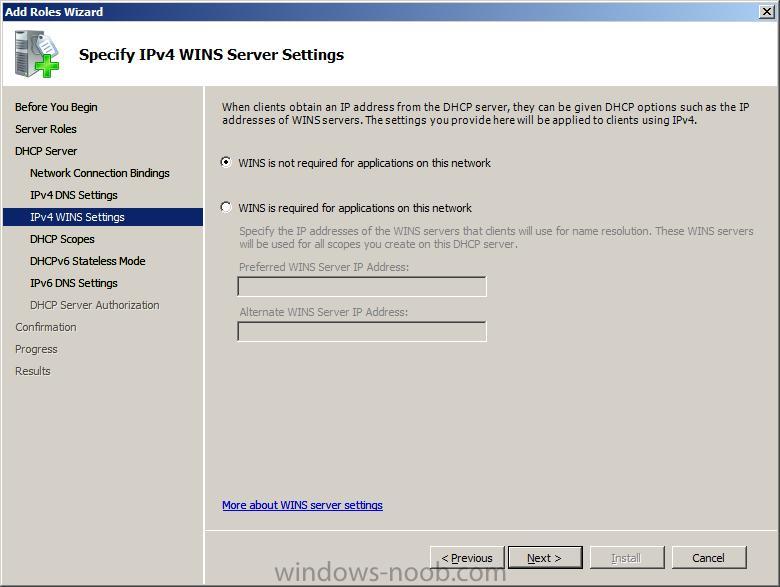
enter your WINS settings, I went with the default and clicked next,
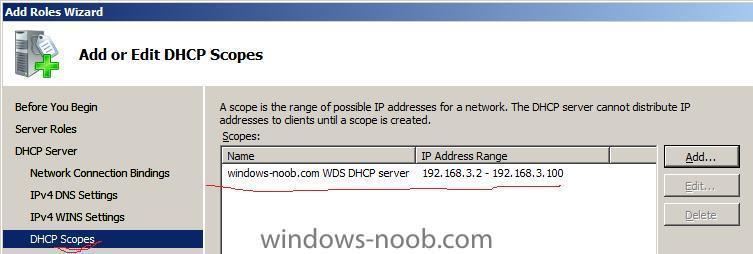
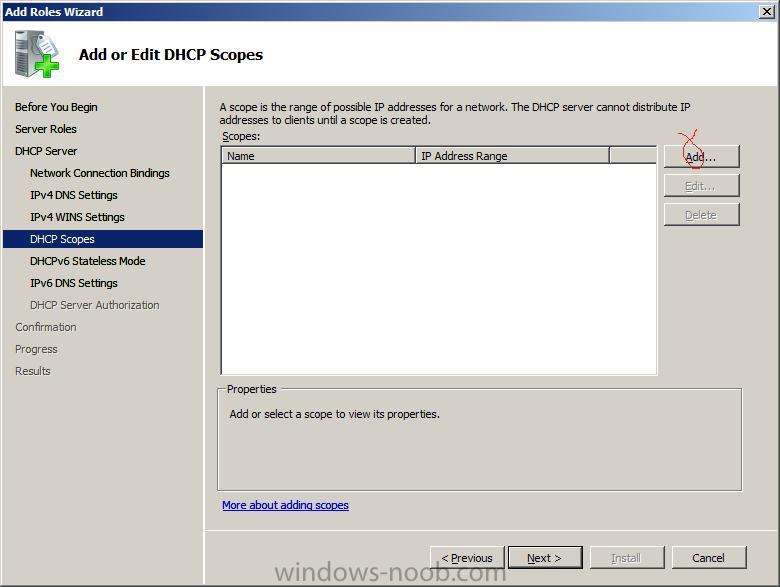
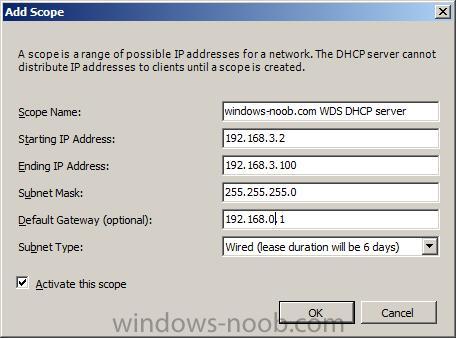
next we have to input our DHCP server scope options, to do this click on Add
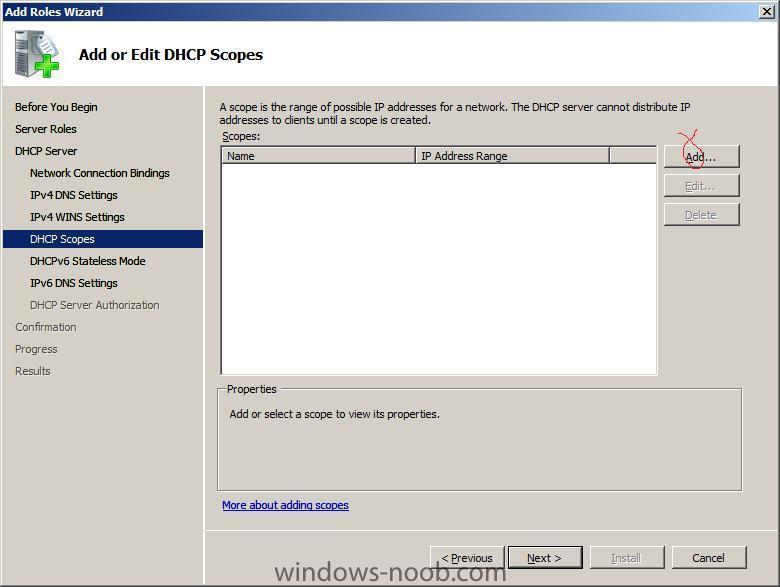
enter your scope settings (mine are listed below)
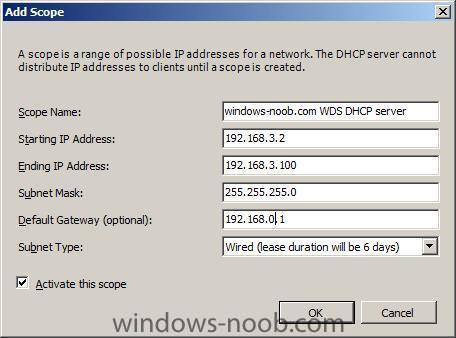
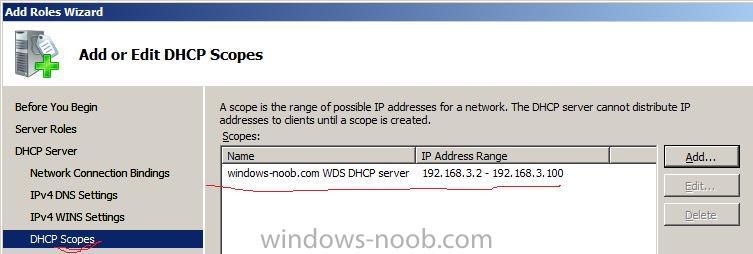
click ok and your DHCP scope will now be listed
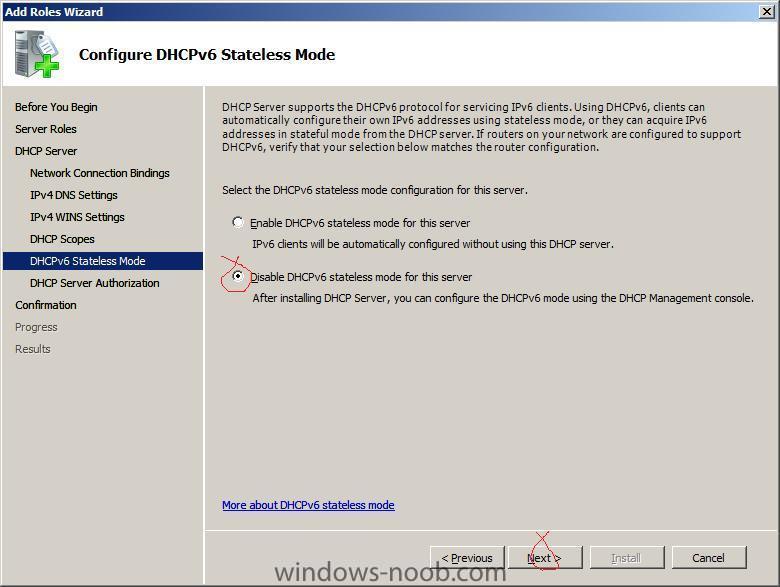
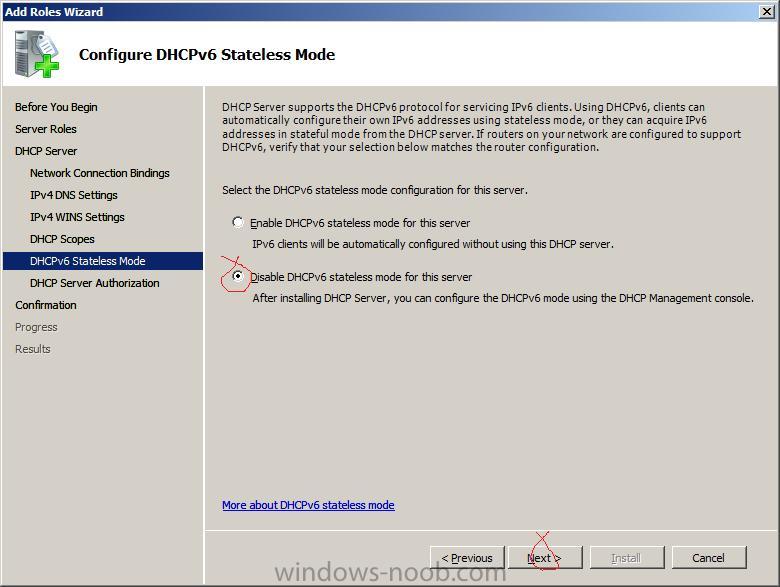
click next and you'll get IPV6 options, I chose to disable this as I'm not using IPv6 yet
Windows Server® 2008 supports stateless and stateful DHCPv6 server functionality. DHCPv6 stateless mode clients use DHCPv6 to obtain network configuration parameters other than the IPv6 address, such as DNS server addresses. Clients configure an IPv6 address through a non-DHCPv6 based mechanism such as IPv6 address auto-configuration (based on the IPv6 prefixes included in router advertisements), or static IP address configuration.In DHCPv6 stateful mode, clients acquire both the IPv6 address as well as other network configuration parameters through DHCPv6.
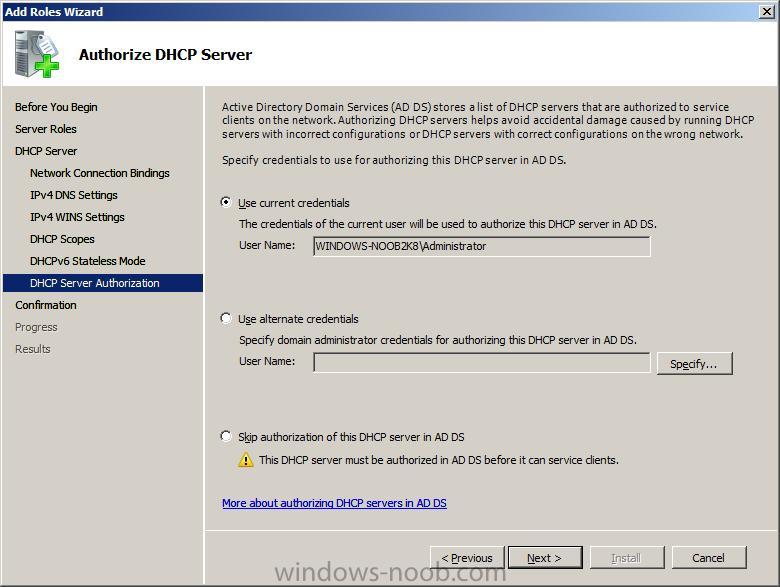
next we are asked about DHCP credentials for the AD DS, I stayed with the default,
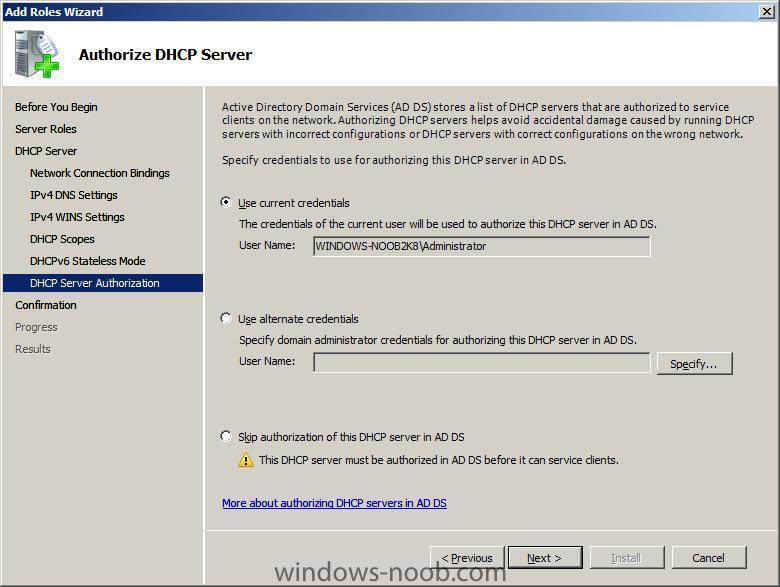
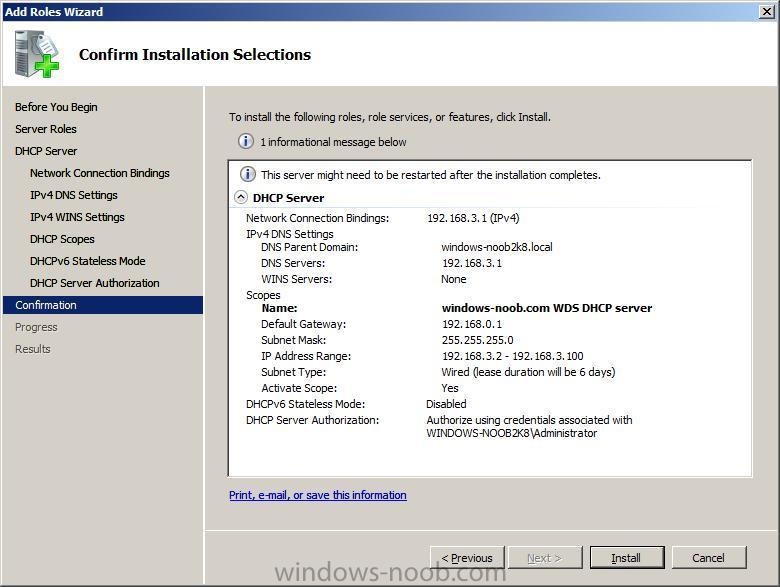
and then we will see a summary of our actions and choices for the DHCP server role

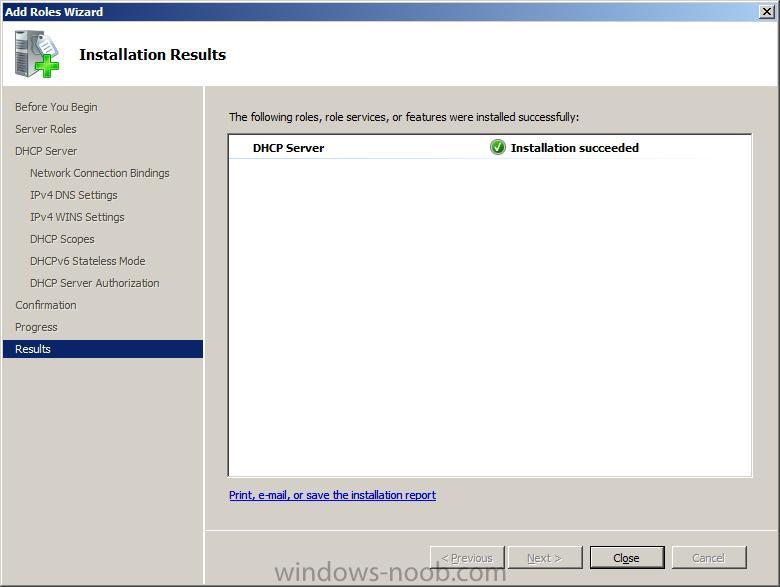
clicking on Install will apply these settings and after some time you should hopefully see the following:-
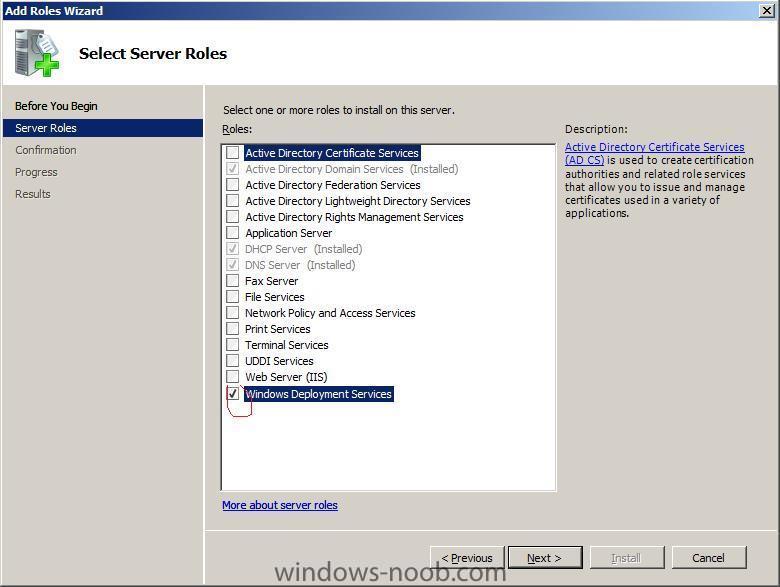
Step 3. Add the WDS role:-
In Server Manager, Highlight and select Windows Deployment Services and click next.
you will get an information screen which has some info including the following:-
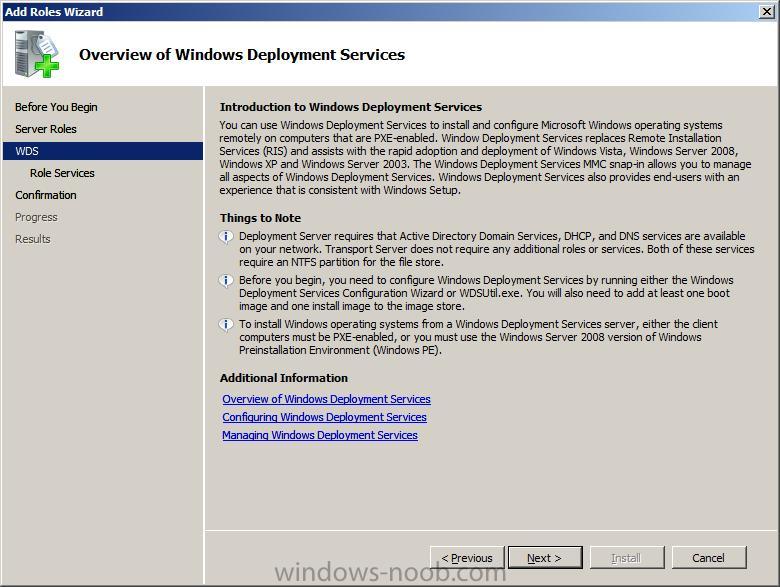
Before you begin, you need to configure Windows Deployment Services by running either the Windows Deployment Services Configuration Wizard or WDSUtil.exe. You will also need to add at least one boot image and one install image in the image store.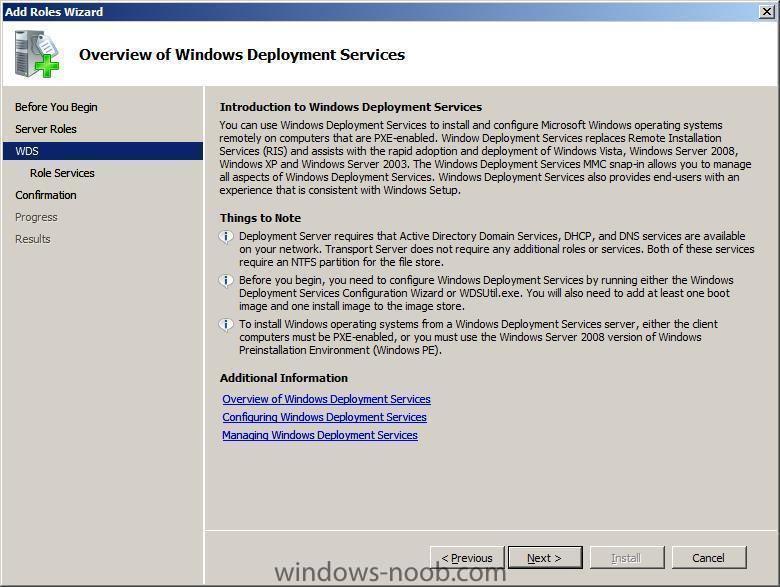
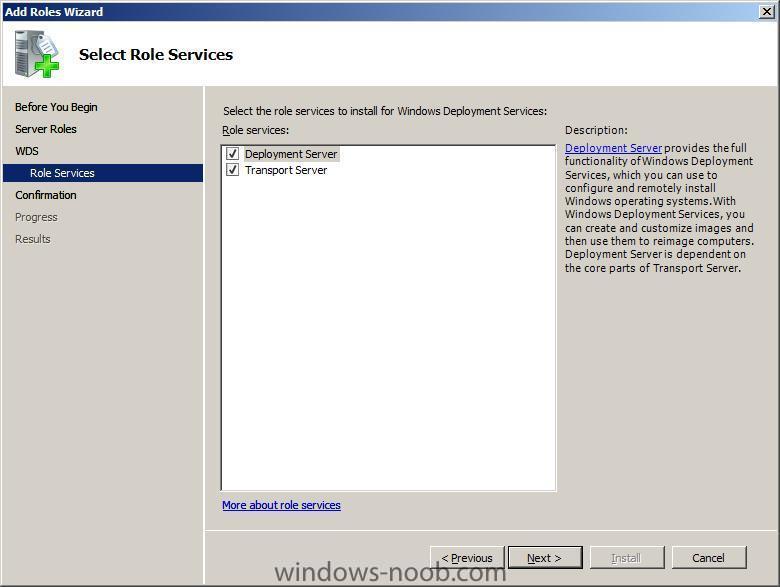
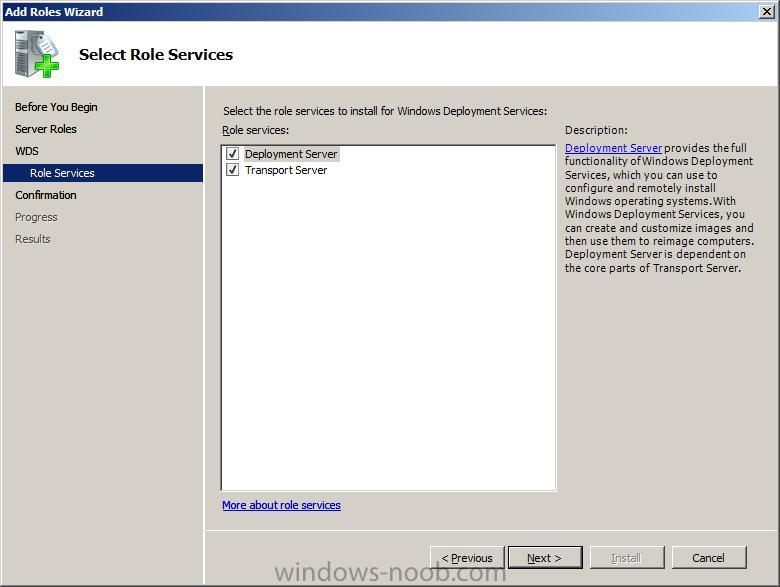
Click next and notice the two role services listed, Deployment Server and Transport Server, make sure they are both selected and click next to continue.
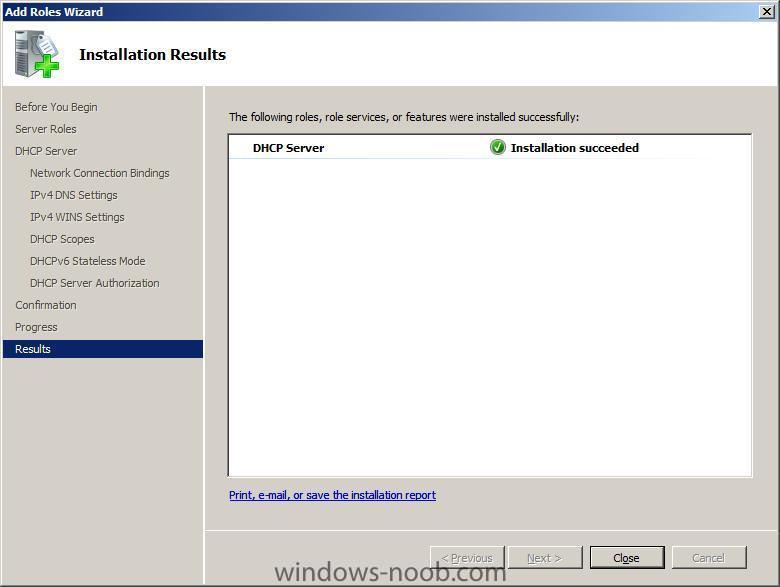
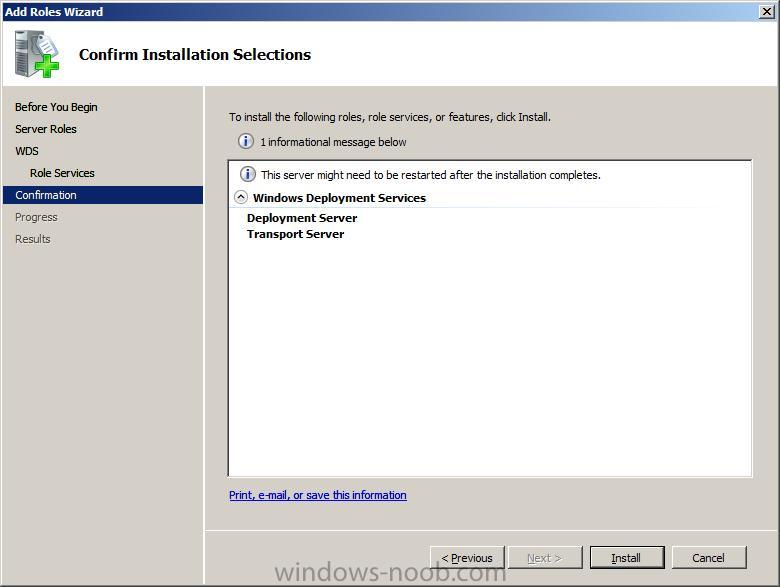
view the summary and click install to install the WDS role...
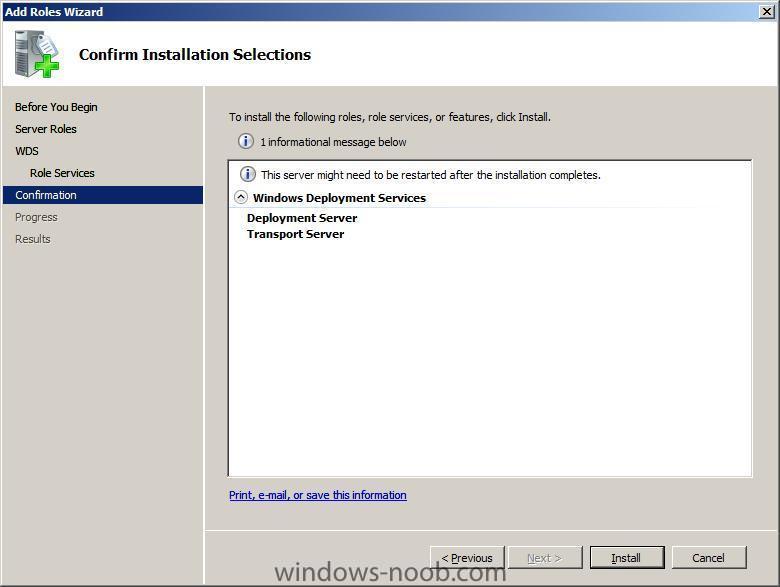
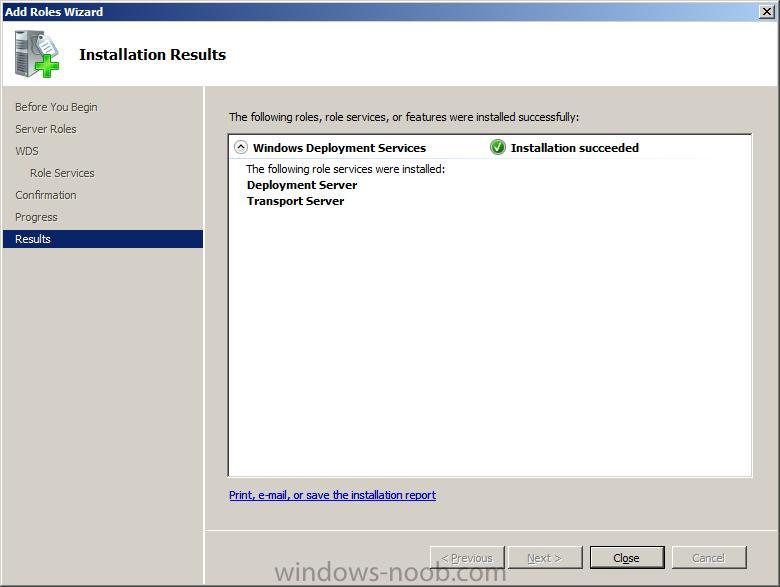
after some copying you should see this

if you check server manager under roles you should now see the WDS role added.

-
Note: If you already have an Active Directory setup and configured DNS then skip to Step 2 (Setup DHCP). If you have already configured AD, DNS and DHCP then please skip to Step 3 (Add the WDS role).
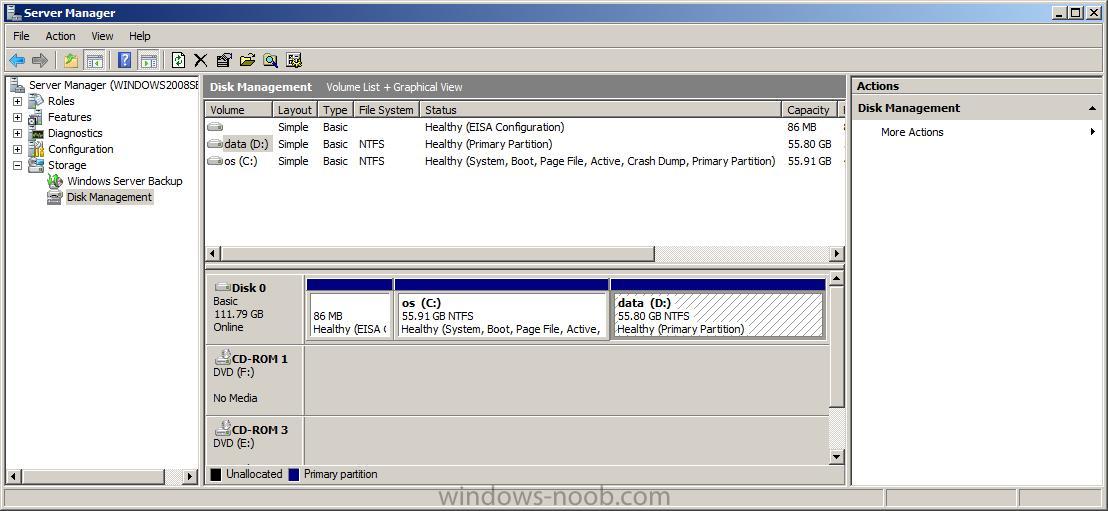
This guide assumes that you have first of all installed Windows 2008 server on your machine and partitioned it as c: (Operating system) and d: (data), note that you can change the partitions after the installation of Windows 2008 server by using disk management and right clicking on a disk and choosing to shrink or extend. This guide is to help you set things up in a LAB. In Production, you have to plan things according to Technet documentation.
Step 1. Setup and configure active directory
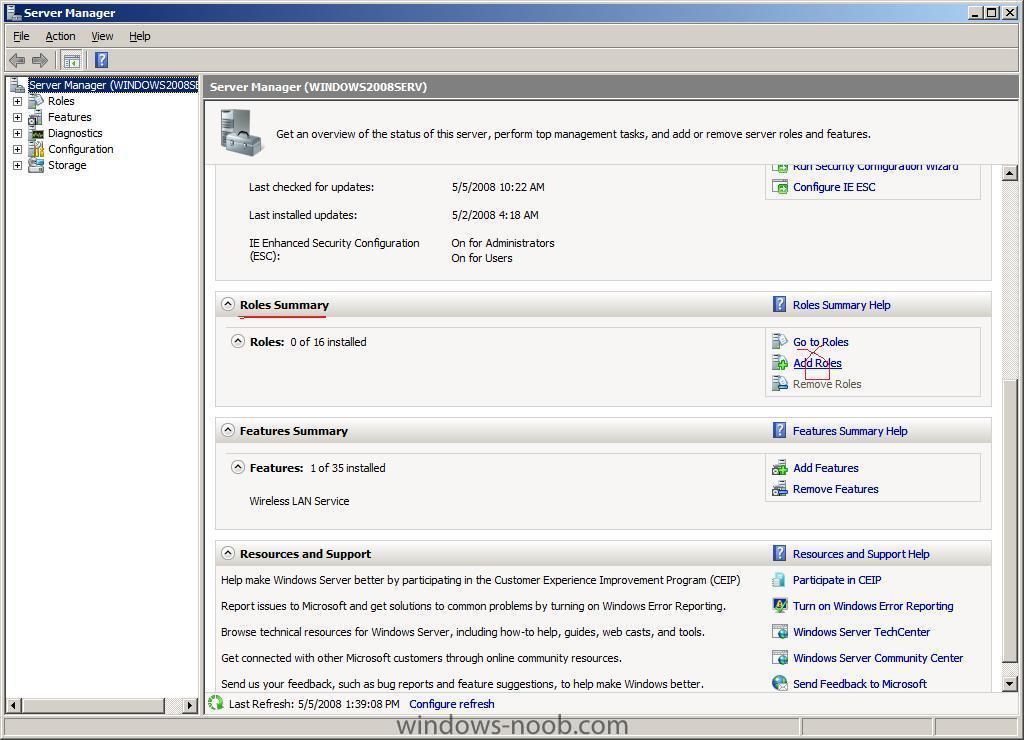
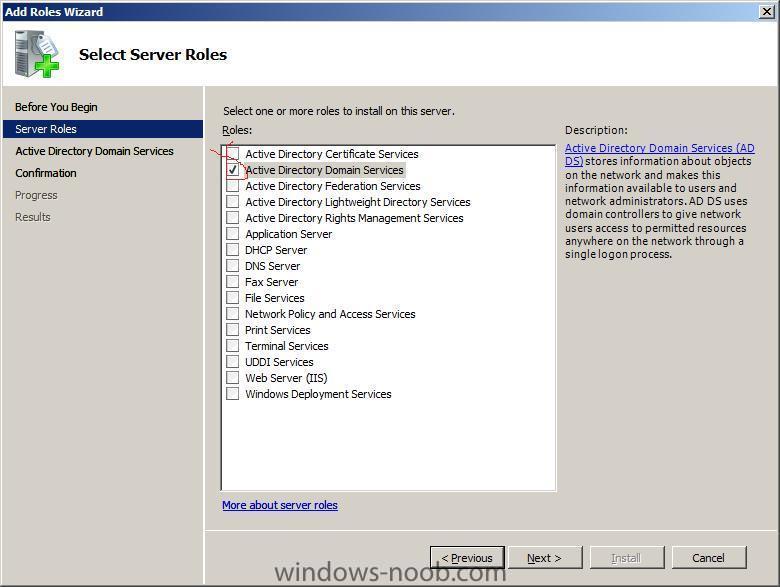
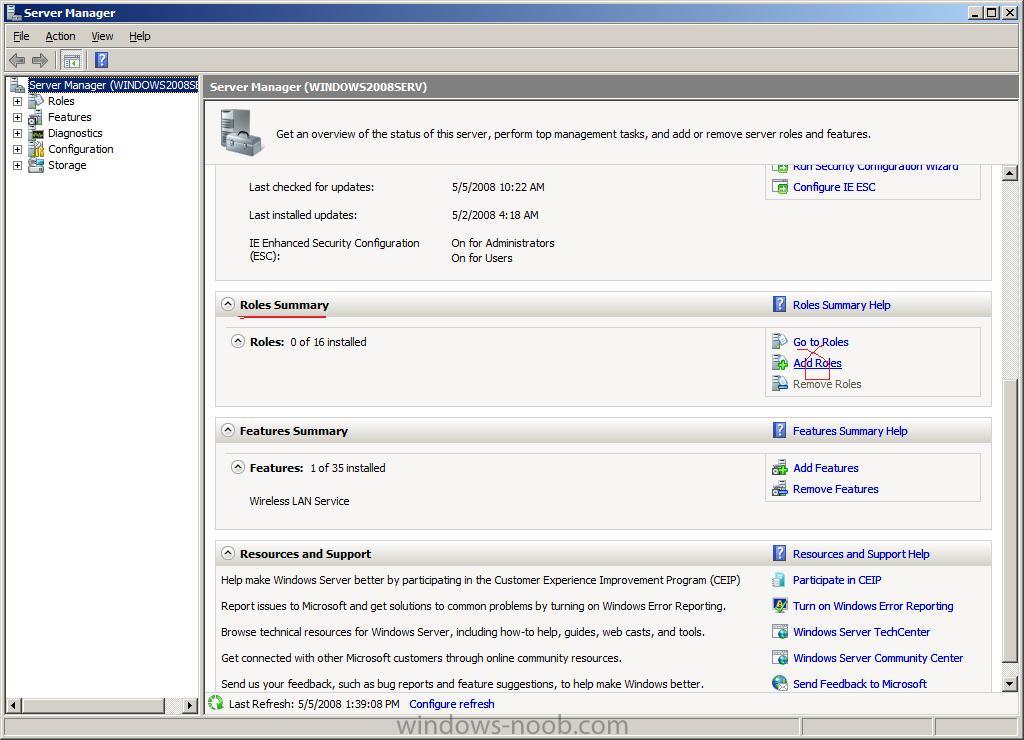
Click on Start and choose Server Manager, scroll down to Roles Summary and choose Add Roles.
When the wizard appears click next.
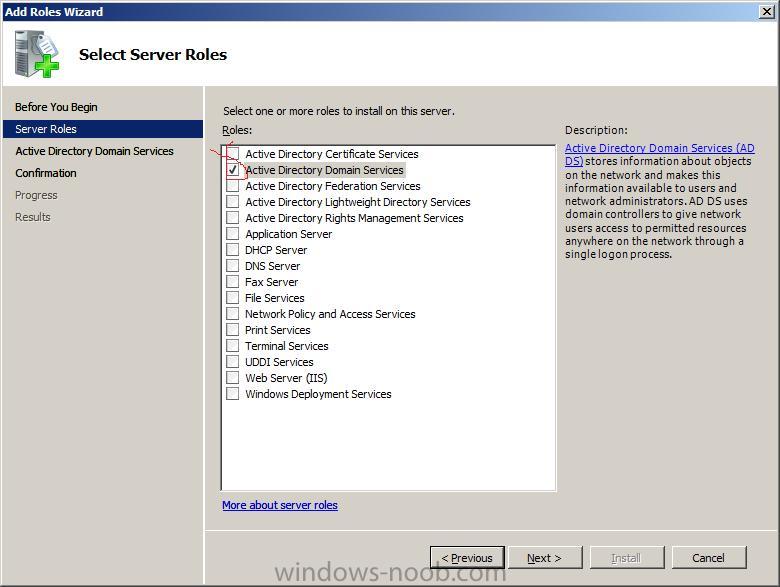
As WDS needs the folllowing:-
Active Directory Domain Services, DHCP, DNS, we will add the following role first:-
Active Directory Domain Services
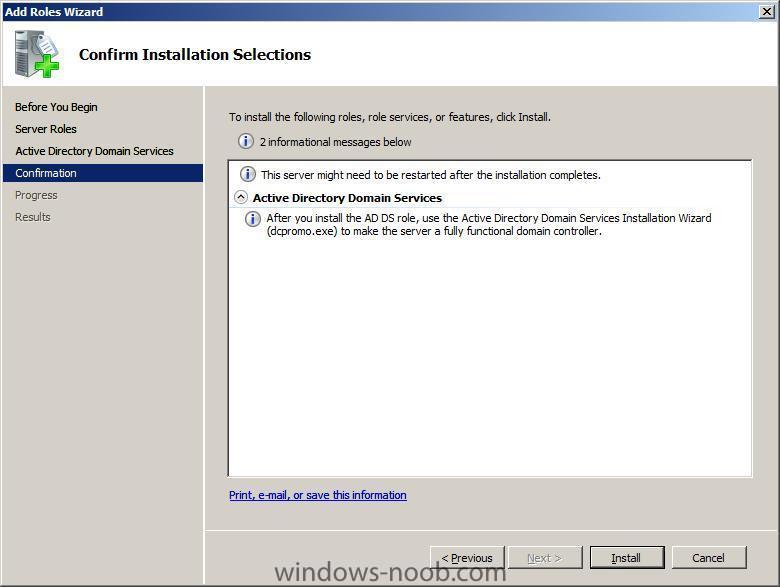
We must install this role first before continuing to add the other roles, so lets select it and click on next.
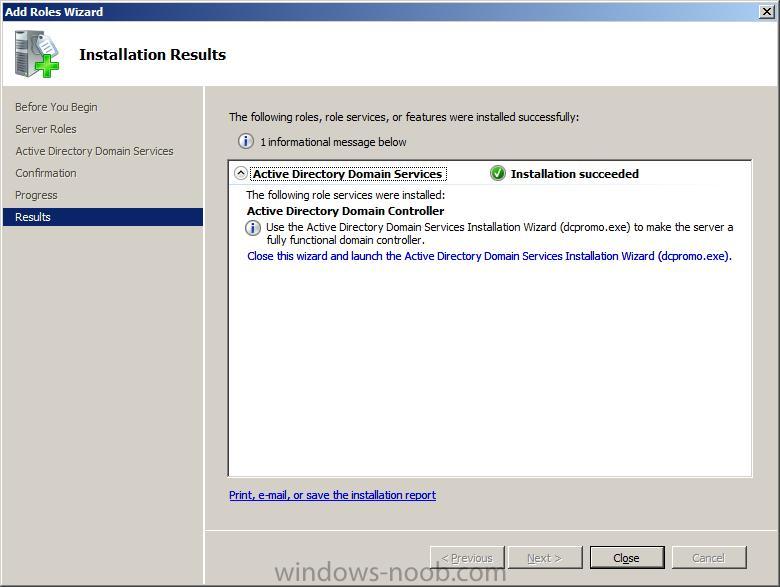
We will then be informed that installing AD requires us to run dcpromo.exe afterwards to make the server a fully functional domain controller. Click install to continue.
once done we'll get the success screen
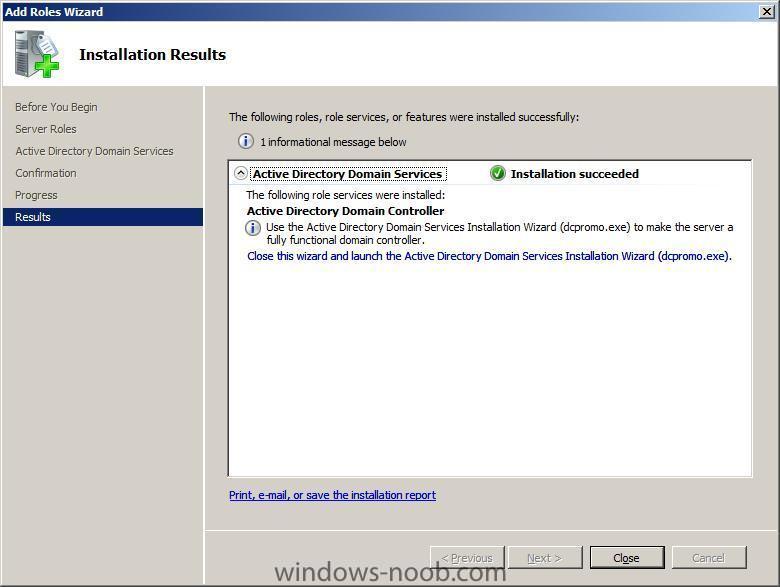
click close to continue
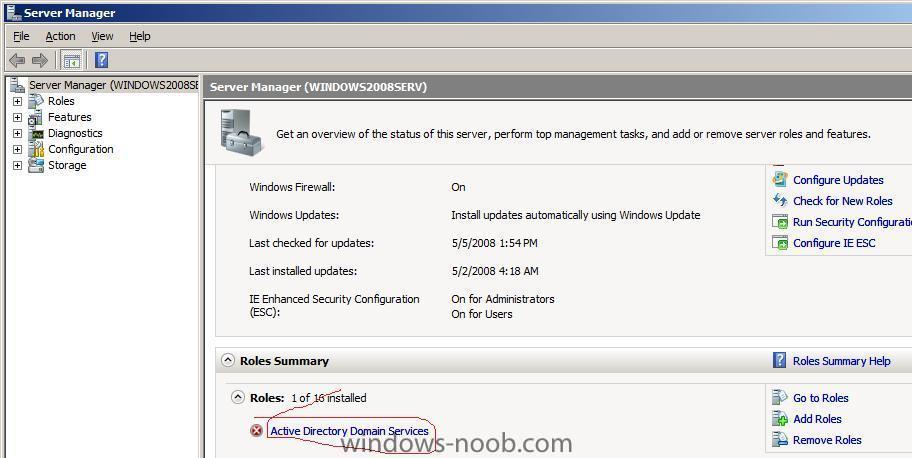
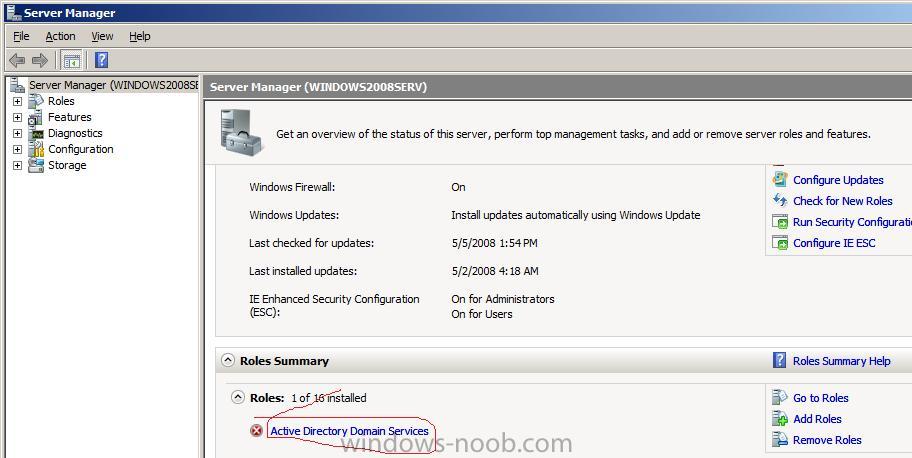
Once done the server manager will list our ADDS service with a red X beside it, click on it to run Dcpromo.exe.
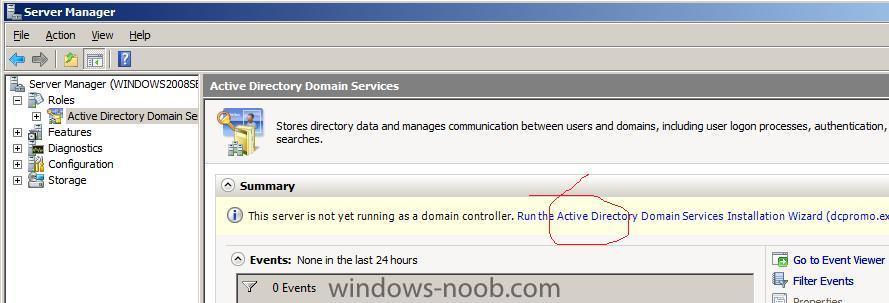
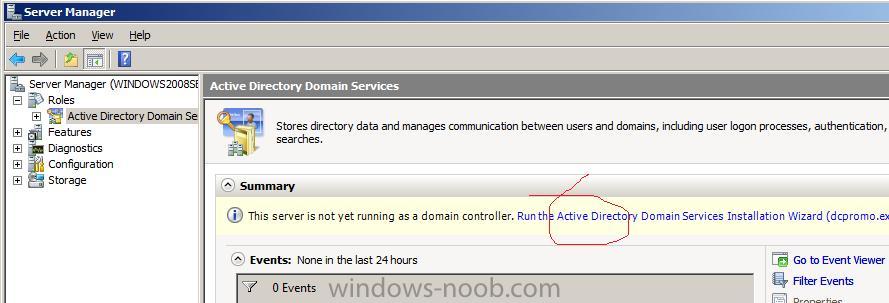
This will open up the Roles section of Server manager, and we'll see a summary which says This server is not yet running as a domain controller. Run the Active Directory Domain Services Installation Wizard (dcpromo.exe).
Click on the blue text to continue.
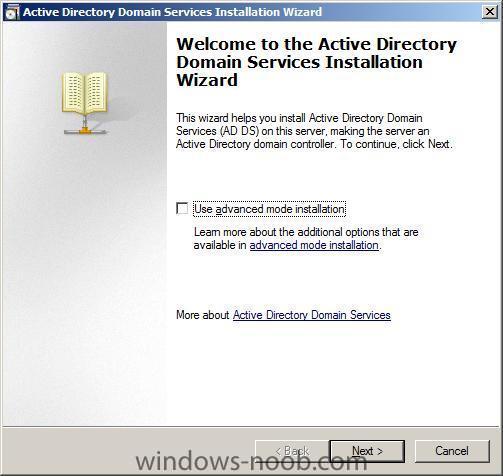
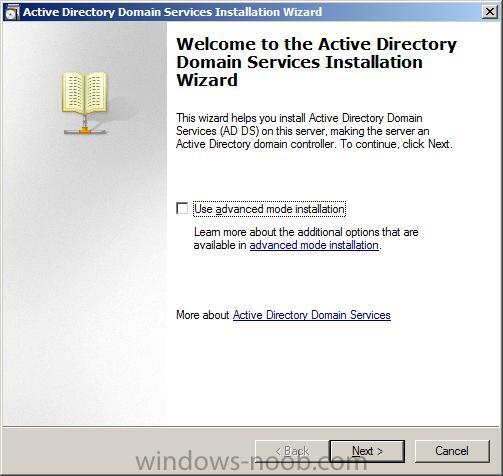
This will start the Active Directory Domain Services Installation Wizard. Click on next to continue.
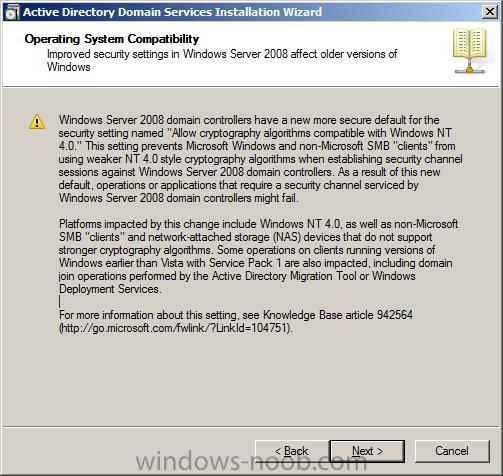
Next we will get a screen telling us that older versions of Windows (pre Vista Sp1 ....) may have problems with a bunch of things including Windows Deployment Services (for more info read KB942564)
Platforms impacted by this change include Windows NT 4.0, as well as non-Microsoft SMB "clients" and network-attached storage (NAS) devices that do not support stronger cryptography algorithms. Some operations on clients running versions of Windows earlier than Vista with Service Pack 1 are also impacted, including domain join operations performed by the Active Directory Migration Tool or Windows Deployment Services.
click next to continue
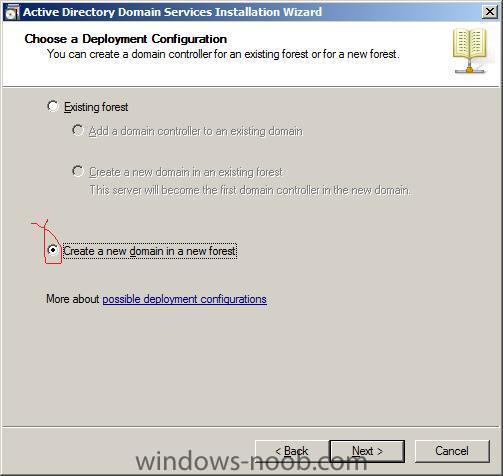
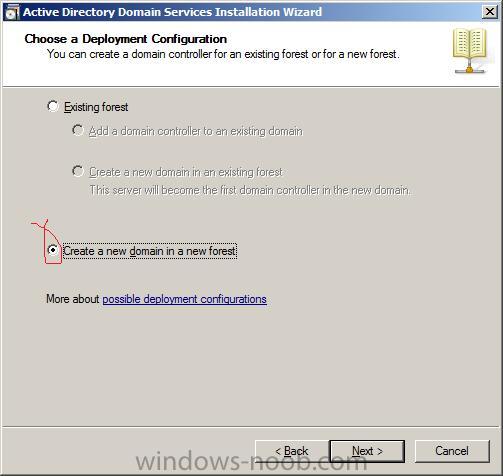
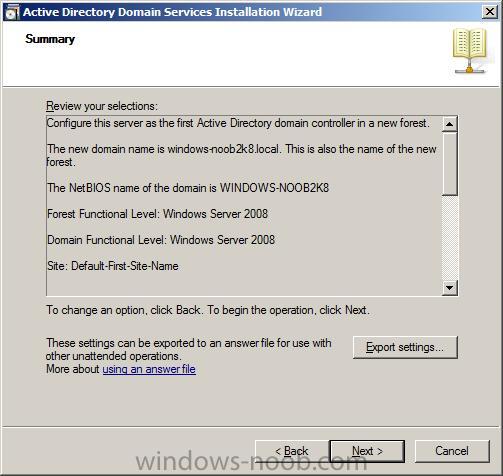
Now we get to choose what type of domain we will setup, and for the purpose of this lab, we will select the second option, Create a new domain in a new forest.
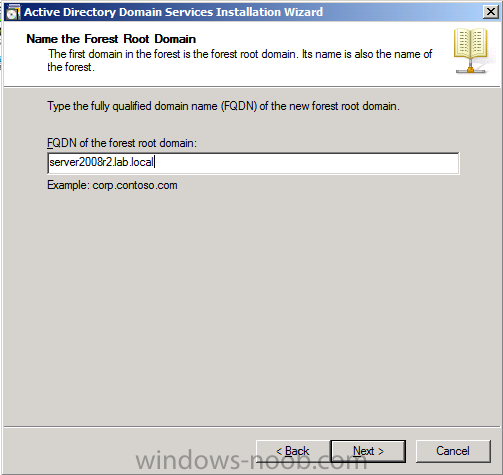
next we are prompted for the fully qualified domain name of the forest root domain (eg: corp.contoso.com)
Note: if you have not already given this server a good computername, then cancel this process and do so now. The computername will be prepended to whatever FQDN you enter, so if you enter corp.contoso.com then the FQDN of this domain controller will be AD1.corp.contoso.com
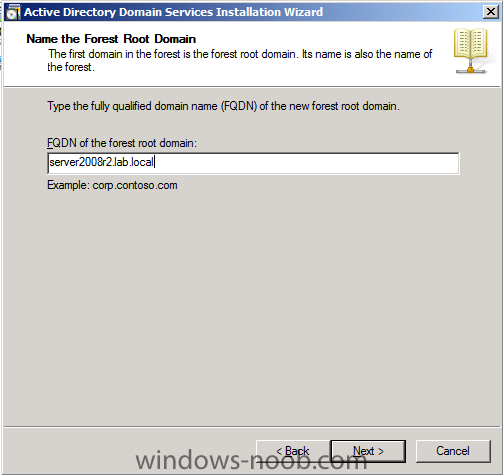
after clicking next the wizard will check the validity of the fqdn,
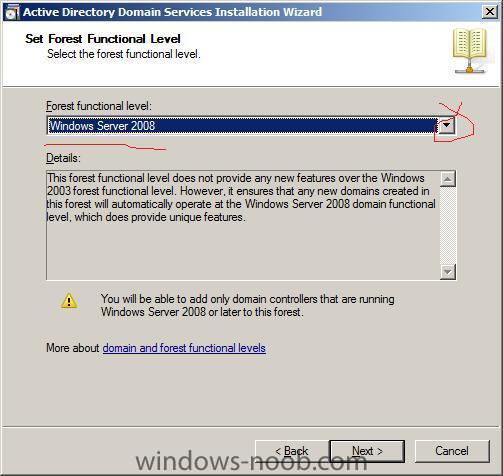
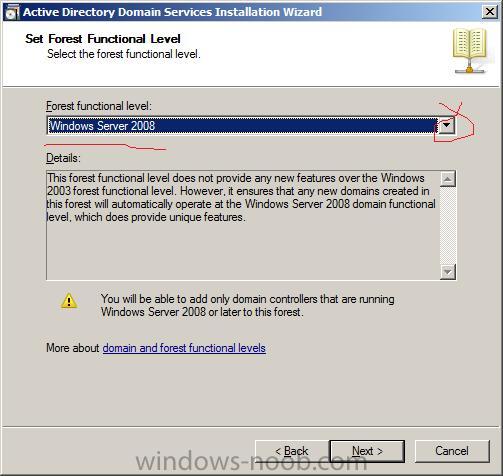
next we get to choose the forest functional level, click the drop down menu and select Windows Server 2008 from the three choices (Windows 2000, Windows Server 2003, Windows Server 2008).
As this is only a test lab, we are not concerned that we can only add Windows 2008 or later servers to this forest.
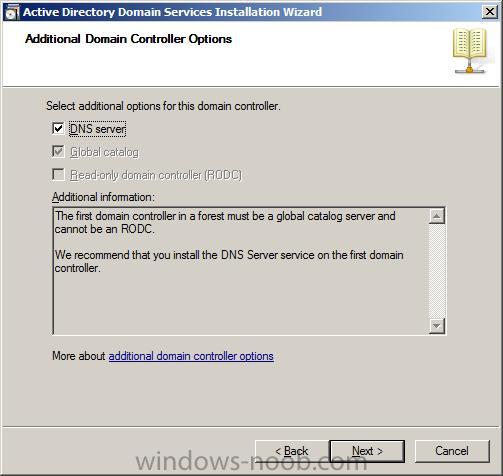
Clicking next will give some addtional options, leave them as they are (DNS Server selected) and click on Next again.
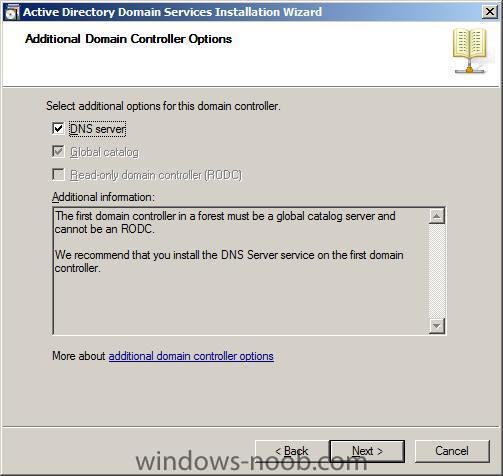
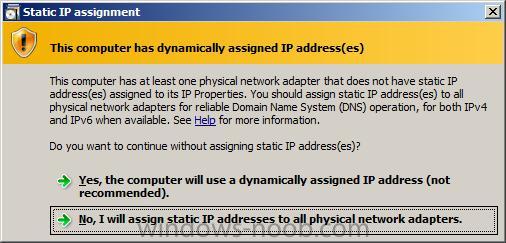
if you get a warning about dynamically assigned ip addresses ignore it (choose yes),

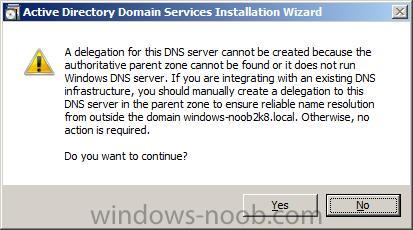
you will most likely get another DNS warning if like me you don't have a Windows DNS server in the forest. Click yes to continue.

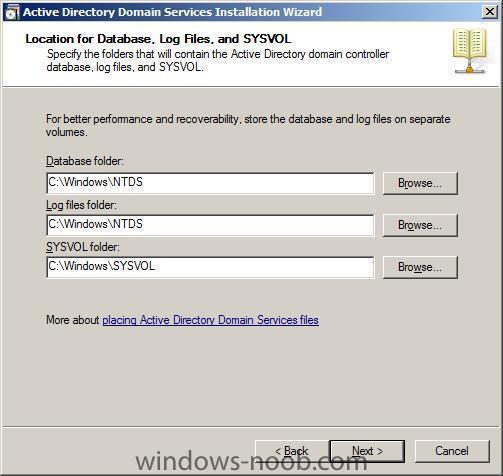
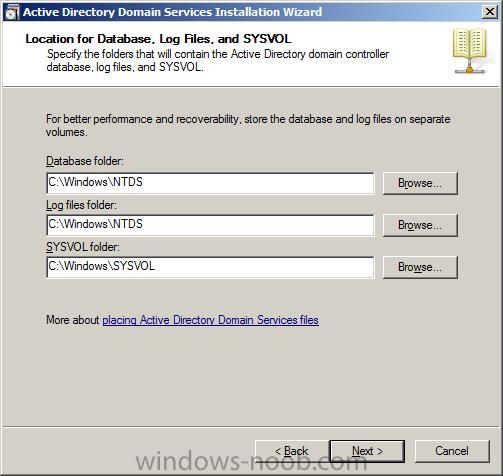
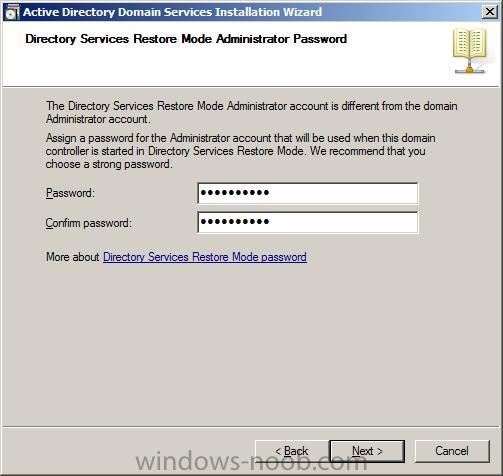
Next we are asked where to store the AD database, logfiles and sysvol, stay with the defaults and click next.
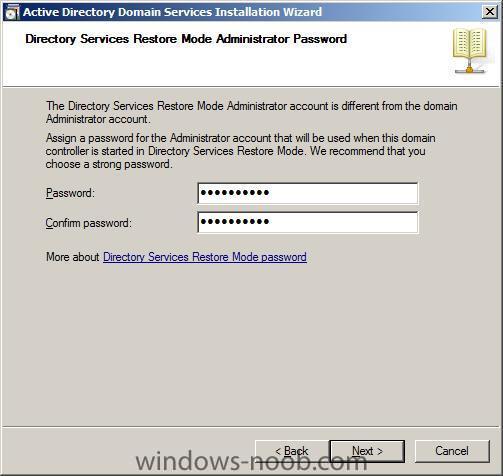
and we are then prompted to set the Directory Services restore mode administrator account password
finally we get a summary of our actions
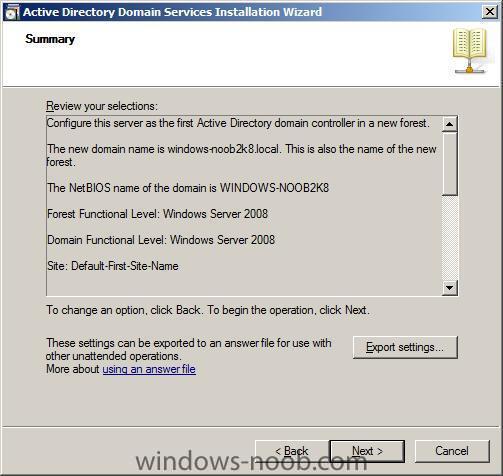
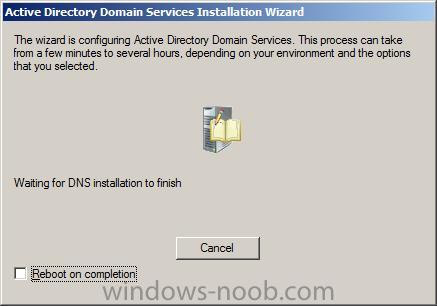
click next to get started
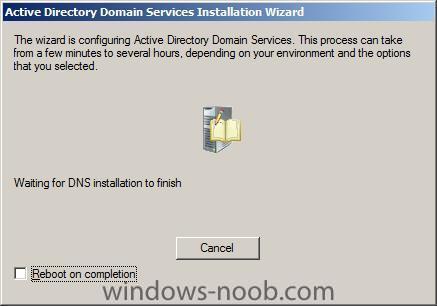
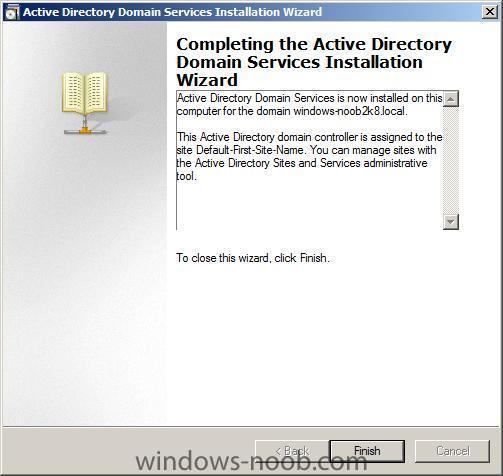
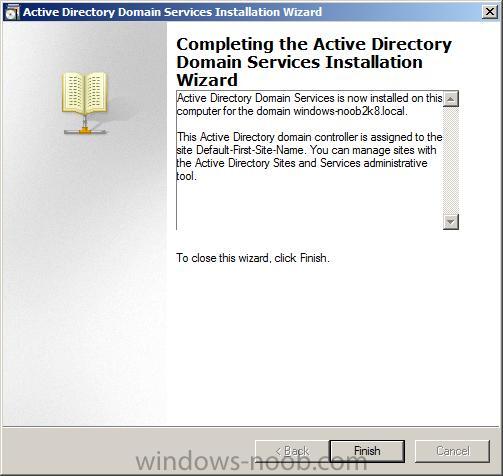
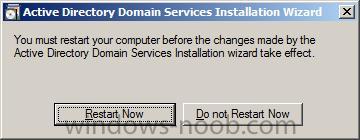
after a while you should see the AD wizard complete. Click Finish
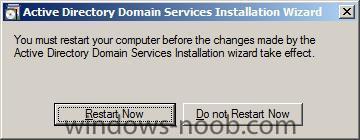
you'll be prompted to restart, so please go ahead and click on Restart Now.
-
ok what server OS are you using here ? windows 2003 ? and which service pack ?
i'll try and replicate this here
cheers
anyweb
-
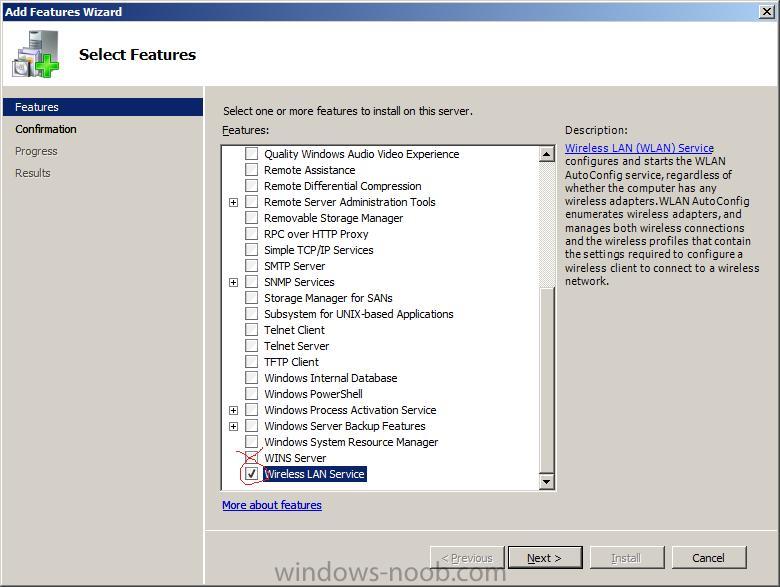
if you've just installed Windows Server 2008, and are trying to get connected to the internet via wireless you'll have no end of problems as it just will not see any wireless networks no matter what driver you install for your wireless card.
The reason is because Wireless is disabled by default in Windows Server 2008.
To resolve it, do as follows
in Server manager scroll down to Features Summary and click on Add Features.
When the Select Features window appears, scroll down to Wireless LAN Service, and place a checkmark in there.
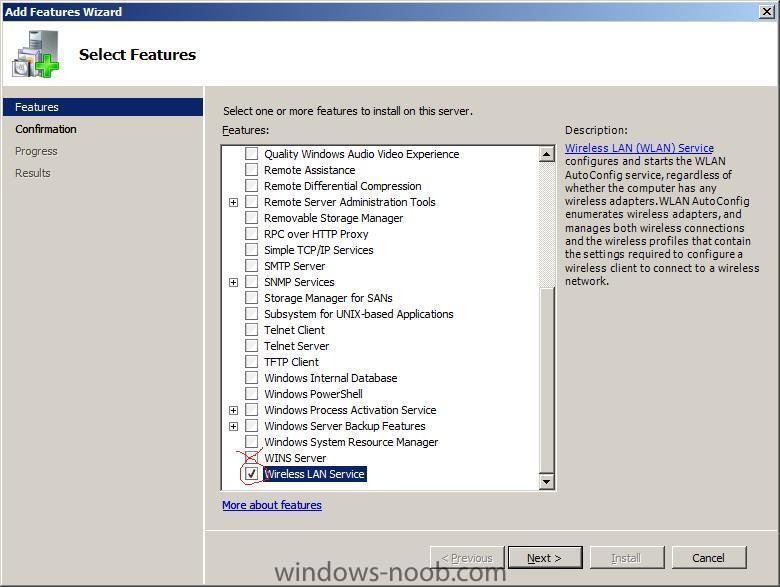
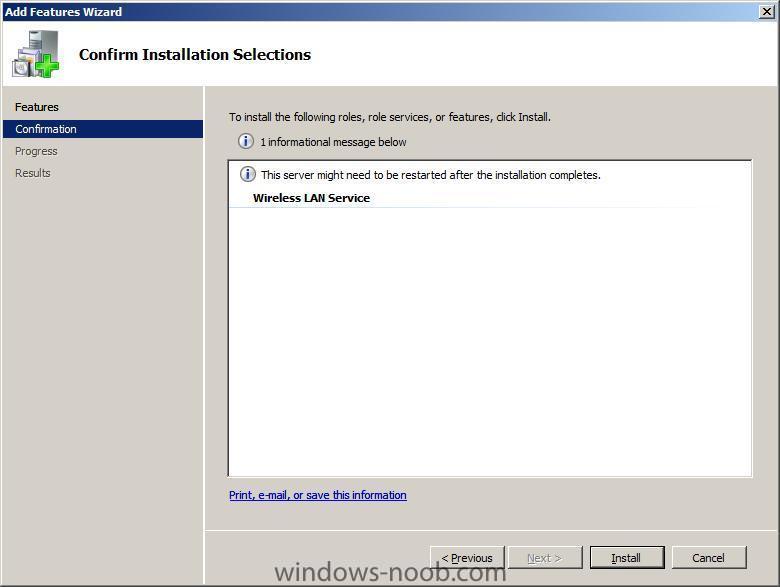
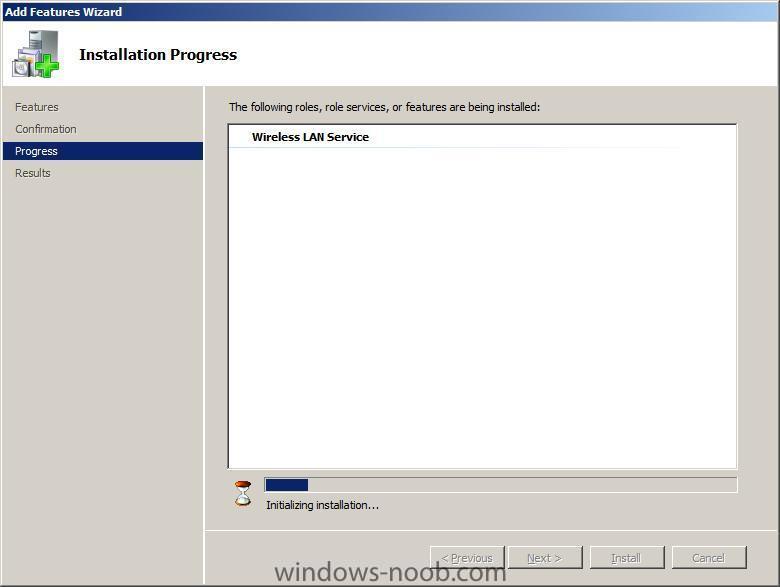
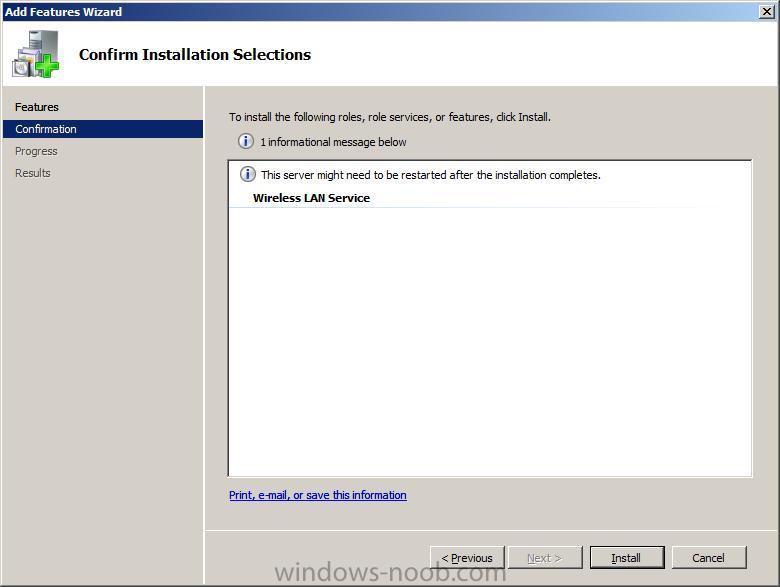
you'll be informed that the server may need a restart... click install to continue
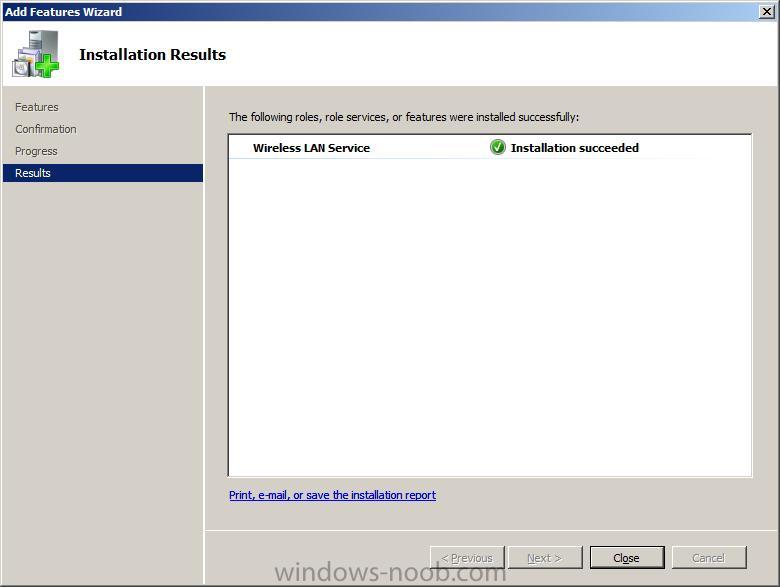
the wireless lan installation service will be initialized
and hopefully will succeed
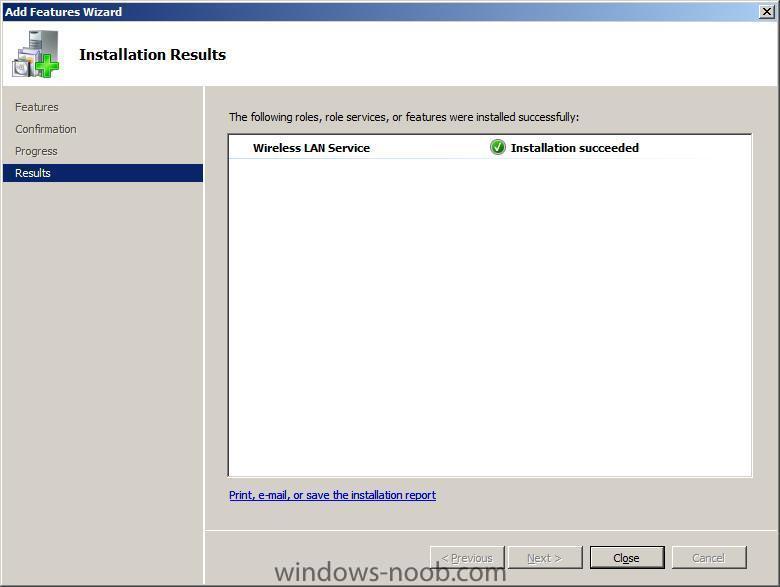
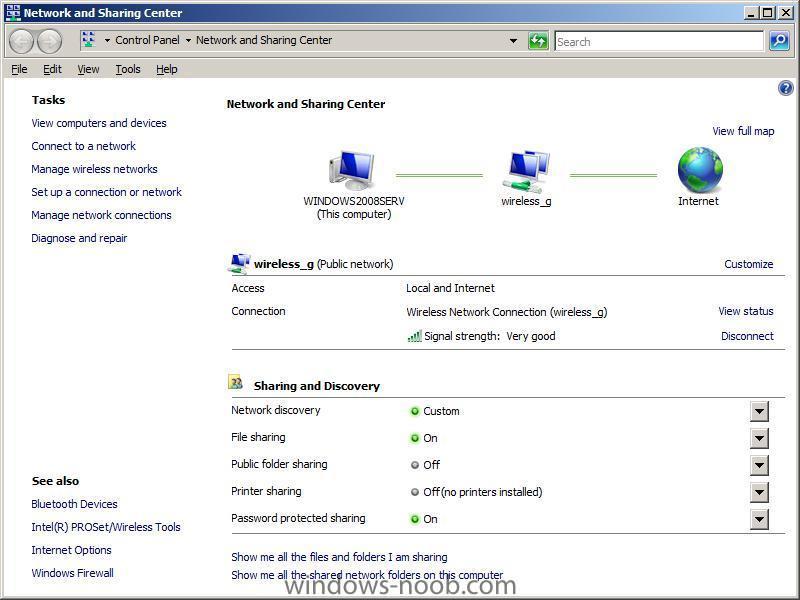
click close to continue and then browse your wireless networks as normal
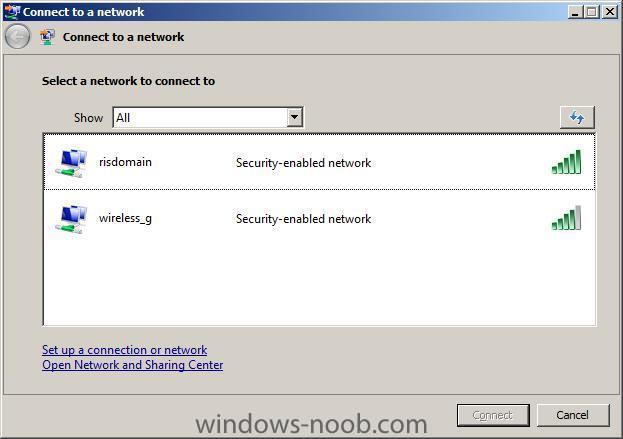
choose one to connect to and then you are done !
that's it,
cheers
niall
-
1
-
-
ok first of all lets rule out storage as the issue:-
have you tried changing the AHCI/SATA mode in bios ?
SATA Operation(RAID Autodetect/AHCI default for mini-tower and desktop)
(AHCI default for small form factor and ultra small form factor)
Options for Mini Tower and Desktop:
* RAID Autodetect/AHCI (RAID if signed drives, otherwise AHCI)
* RAID Autodetect/ATA (RAID if signed drives, otherwise ATA)
* RAID On (SATA is configured for RAID on every boot)
NOTE: When in Autodetect mode, the computer configures the drive as RAID if a RAID signature is detected on the drive. Otherwise the drive will be configured as AHCI or ATA.
Options for Small Form Factor and Ultra Small Form Factor:
* AHCI
* ATA
if changing that doesnt help your problem then we need to know exactly how you created your Windows PE image (what boot.wim file did you use and from what DVD (msdn/dell oem vista dvd)
please specify
cheers
anyweb
-
hi and welcome to the forums
are you trying to use WDS to load your optiplex 755's with vista or xp or are you doing something else (capturing/deploying wds images...)
on the front of your dell optiplex, does it say VPRO anywhere ?
-
After being released to manufacturing last week, SP3 for XP is now available as either a standalone installer (direct download link) or at Windows Update. PC Magazine has coverage of the new service pack, including launch details, a hands-on review, slideshows, and expert tips.
via osnews.com
-
Despite Microsoft's obvious focus on selling Windows Vista to its customers, it hasn't yet forgotten about all those people out there that still use Windows XP (personally, I use Windows XP MCE 2005). The company has confirmed it has finally 'released to manufacturing' the third service pack to Windows XP - 7 years after the operating system's original release.
via osnews.com
microsoft > http://forums.microsoft.com/TechNet/ShowPo...3&SiteID=17
-
hi Mike,
so it's all working now ? this is excellent ! did you use my new WIM file at all ? i'd like to know if you tested it and if it worked.
the reason we used the vista drivers was because WDS used the Windows Vista DVD to create the boot.wim file (which gives us windows PE....) and that needed the vista driver not the XP driver.
i actually live in Sweden, Europe and i'm happy to talk about this on the phone if you want or on MSN
either way i'm glad things are working for you now, spread the word !
cheers
anyweb
-
no that's not enough, you must import the wim into WDS by choosing 'add boot image' in the WDS gui
in addition i think we've been using the wrong INF's all along, instead of using the windows xp ones we should be using the vista ones for windows PE....
so i've updated the WIM one last time to include the correct infs (i hope) sorry about this, but as I don't have an Optiplex 755 it's hard for me to test the theory
please download this new WIM and test it, i'm very hopeful that it'll work
here's what I did to put it together,
C:\>"c:\Program Files\Windows AIK\Tools\PETools\copype.cmd" x86 c:\windowspe-x86
===================================================Creating Windows PE customization working directory
c:\windowspe-x86
===================================================
1 file(s) copied.
1 file(s) copied.
C:\Program Files\Windows AIK\Tools\PETools\x86\boot\bcd
C:\Program Files\Windows AIK\Tools\PETools\x86\boot\boot.sdi
C:\Program Files\Windows AIK\Tools\PETools\x86\boot\bootfix.bin
C:\Program Files\Windows AIK\Tools\PETools\x86\boot\etfsboot.com
C:\Program Files\Windows AIK\Tools\PETools\x86\boot\fonts\chs_boot.ttf
C:\Program Files\Windows AIK\Tools\PETools\x86\boot\fonts\cht_boot.ttf
C:\Program Files\Windows AIK\Tools\PETools\x86\boot\fonts\jpn_boot.ttf
C:\Program Files\Windows AIK\Tools\PETools\x86\boot\fonts\kor_boot.ttf
C:\Program Files\Windows AIK\Tools\PETools\x86\boot\fonts\wgl4_boot.ttf
9 File(s) copied
C:\Program Files\Windows AIK\Tools\PETools\x86\EFI\microsoft\boot\bcd
C:\Program Files\Windows AIK\Tools\PETools\x86\EFI\microsoft\boot\fonts\chs_boot
.ttf
C:\Program Files\Windows AIK\Tools\PETools\x86\EFI\microsoft\boot\fonts\cht_boot
.ttf
C:\Program Files\Windows AIK\Tools\PETools\x86\EFI\microsoft\boot\fonts\jpn_boot
.ttf
C:\Program Files\Windows AIK\Tools\PETools\x86\EFI\microsoft\boot\fonts\kor_boot
.ttf
C:\Program Files\Windows AIK\Tools\PETools\x86\EFI\microsoft\boot\fonts\wgl4_boo
t.ttf
6 File(s) copied
1 file(s) copied.
1 file(s) copied.
Success
Updating path to include peimg, cdimage, imagex
c:\Program Files\Windows AIK\Tools\PETools\
c:\Program Files\Windows AIK\Tools\PETools\..\x86
C:\windowspe-x86>Imagex /info "D:\remoteinstall\boot\x86\images\windows-noob_capture-(2).WIM"
ImageX Tool for WindowsCopyright © Microsoft Corp. All rights reserved.
WIM Information:
----------------
GUID: {5f5555ef-7031-4df2-8a10-6bfa6f2ced8e}
Image Count: 1
Compression: LZX
Part Number: 1/1
Boot Index: 1
Attributes: 0x8
Relative path junction
Available Image Choices:
------------------------
<WIM>
<TOTALBYTES>124214145</TOTALBYTES>
<IMAGE INDEX="1">
<NAME>Windows Vista/XP WDS capture</NAME>
<DESCRIPTION>WDS to capture images from windows-noob.com</DESCRIPTION>
<WINDOWS>
<ARCH>0</ARCH>
<PRODUCTNAME>Microsoft« Windows« Operating System</PRODUCTNAME>
<PRODUCTTYPE>WinNT</PRODUCTTYPE>
<PRODUCTSUITE></PRODUCTSUITE>
<LANGUAGES>
<LANGUAGE>en-US</LANGUAGE>
<DEFAULT>en-US</DEFAULT>
</LANGUAGES>
<VERSION>
<MAJOR>6</MAJOR>
<MINOR>0</MINOR>
<BUILD>6000</BUILD>
<SPBUILD>16386</SPBUILD>
</VERSION>
<SYSTEMROOT>WINDOWS</SYSTEMROOT>
</WINDOWS>
<DIRCOUNT>624</DIRCOUNT>
<FILECOUNT>3589</FILECOUNT>
<TOTALBYTES>343574533</TOTALBYTES>
<CREATIONTIME>
<HIGHPART>0x01C89AF3</HIGHPART>
<LOWPART>0x1DB1225C</LOWPART>
</CREATIONTIME>
<LASTMODIFICATIONTIME>
<HIGHPART>0x01C89EC0</HIGHPART>
<LOWPART>0xD3937568</LOWPART>
</LASTMODIFICATIONTIME>
<WDS>
<VERSION>1</VERSION>
</WDS>
</IMAGE>
</WIM>
C:\windowspe-x86>Imagex /mountrw D:\remoteinstall\boot\x86\images\windows-noob_c
apture-(2).WIM 1 c:\mount
ImageX Tool for WindowsCopyright © Microsoft Corp. All rights reserved.
Mounting (RW): [D:\remoteinstall\boot\x86\images\windows-noob_capture-(2).WIM, 1
] ->
[c:\mount]
Successfully mounted image (RW).
C:\windowspe-x86>peimg /inf="C:\dell\drivers\R162323\Vista32\*.inf" c:\mount
Preinstallation Environment Image Setup Tool for WindowsCopyright © Microsoft Corporation. All rights reserved.
Installing INF package: C:\dell\drivers\R162323\Vista32\E1E6032.inf
Installing INF package: C:\dell\drivers\R162323\Vista32\E1G6032.INF
PEIMG completed the operation successfully.
C:\windowspe-x86>imagex /unmount /commit c:\mount
ImageX Tool for WindowsCopyright © Microsoft Corp. All rights reserved.
Unmounting: [c:\mount]...
Successfully unmounted image.
C:\windowspe-x86>
the most important line above is this one
C:\windowspe-x86>peimg /inf="C:\dell\drivers\R162323\Vista32\*.inf" c:\mount
ok ?
cheers
anyweb
-
ok can you confirm thhat you disabled the wim in wds, then imported mine, then re-enabled it then pxe booted the optiplex 755
what happened then ?
-
Microsoft has finally pumped out Vista service pack one (SP1) in the remaining 31 languages as a manual download via its Windows Update site.
Swedish download > http://www.microsoft.com/downloads/details...;displaylang=sv
Bulgarian download > http://www.microsoft.com/downloads/details...4a-09146a0ba746
Danish download > http://www.microsoft.com/downloads/details...4a-09146a0ba746
-
hi Mike,
did you get a chance to test it yet ?
cheers
anyweb
-
ok
i've added the other inf to the wim, and here it is again to test
C:\windowspe-x86>peimg /inf="C:\dell\drivers\R162323\WinXP_2K\E1000325.inf" c:\mount
Preinstallation Environment Image Setup Tool for Windows
Copyright © Microsoft Corporation. All rights reserved.
Installing INF package: C:\dell\drivers\R162323\WinXP_2K\E1000325.inf
PEIMG completed the operation successfully.
C:\windowspe-x86>imagex /unmount /commit c:\mount
ImageX Tool for Windows
Copyright © Microsoft Corp. All rights reserved.
Unmounting: [c:\mount]...
Successfully unmounted image.
please test it and let me know are we getting anywhere...
cheers
anyweb
-
no problem, at least we know which inf doesnt work now, i'll add the other inf and re upload the wim for you to test ok ?


Configuring Software Update Point within SCCM
in Software Update Point
Posted
Optional: Create an Update List
Note: Update lists are useful for us as they can be used (after the event) to Report on what patches are deployed to computers and to review their compliance using those reports. If you are not interested in reporting or the compliance status of your machines then Update Lists will probably not matter to you at all and you can deploy patches without using them. If you do decide to utilise SCCM's reporting capabilities in regards to patching, then it would be a good idea to create separate Update Lists on a monthly basis to see what patches go out, and to what computers. If you want to read a guide aimed at using Update Lists for Reporting purposes then please see here.
Select a search folder for example Windows Server 2008 Patches and highlight the first Windows update contained and press Shift, scroll down to the last one and press again until all patches are selected.
Right click within the selection and choose Update List
choose Create New Update List from the options in the wizard
When the Deployment Package window appears, click on Browse to select one, or choose to create a new one and give it a descriptive name like All Windows XP Updates or Windows Server 2008 Updates
as this is just a lab, we will pick the one we made earlier..
The Deployment Package is selected...
choose the Internet as the download location *even if the WSUS server is on another Site Server*
choose a language *english*
click next to Security and Summary,
the updates will be provisioned
review the Confirmation, if there are any errors at this point then verify that you have correctly specified the WSUS site server
Hit refresh in the Configmgr console to see your Update List.