AdinE
-
Posts
217 -
Joined
-
Last visited
-
Days Won
12
Everything posted by AdinE
-
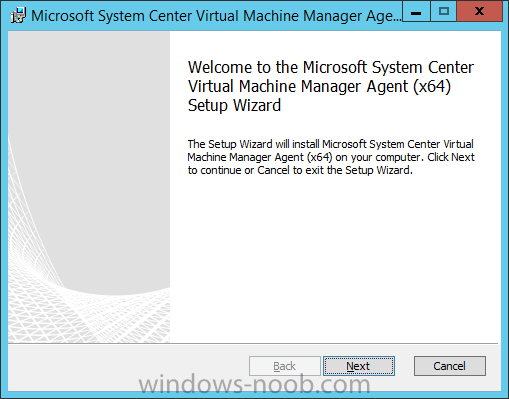
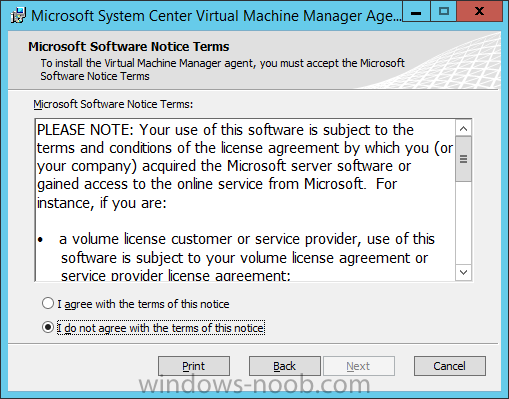
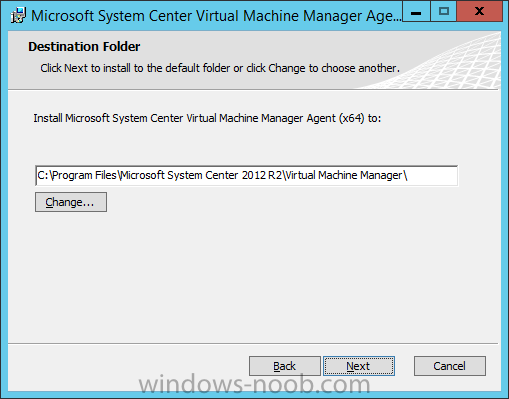
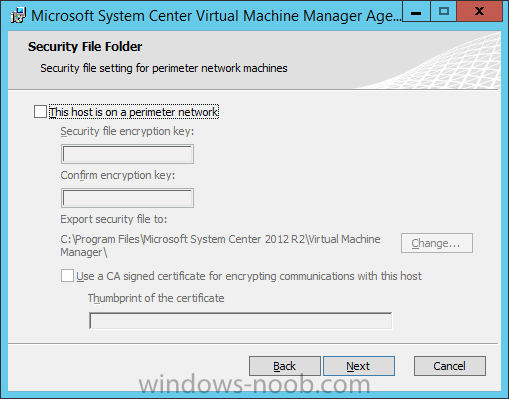
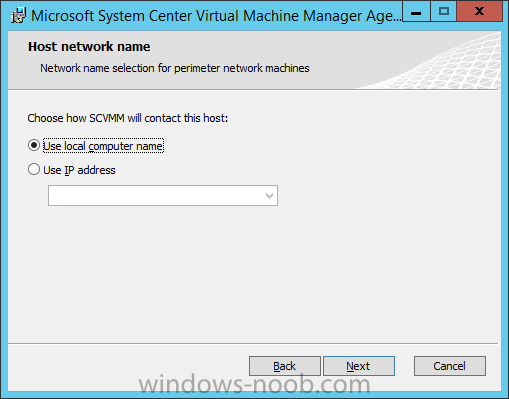
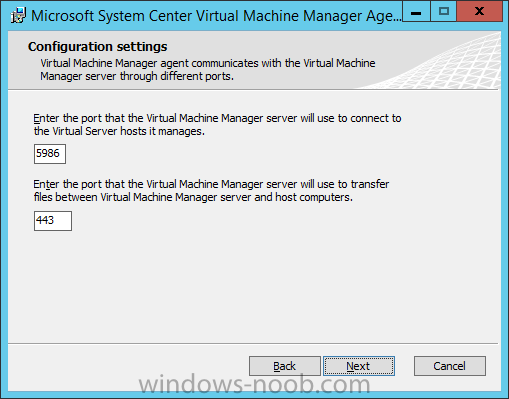
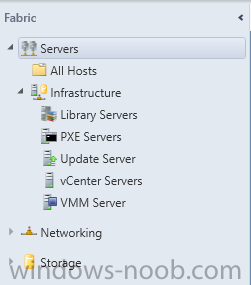
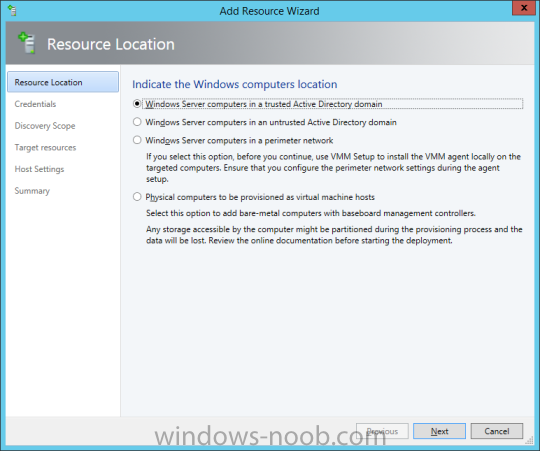
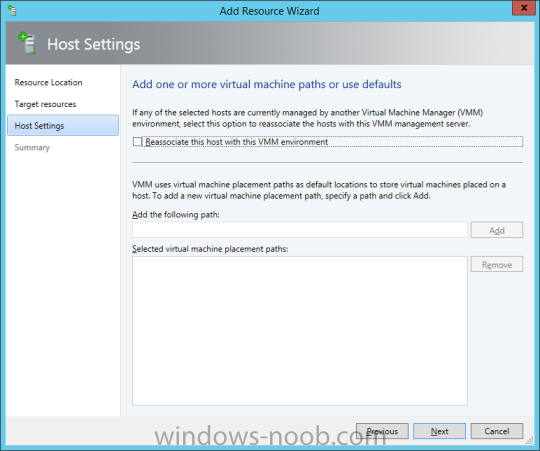
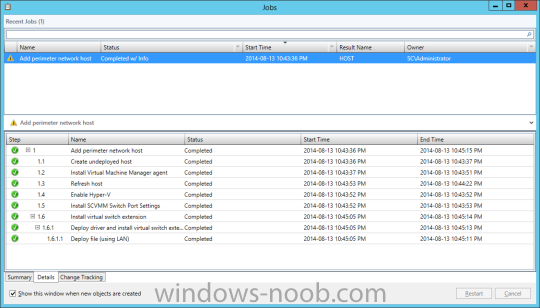
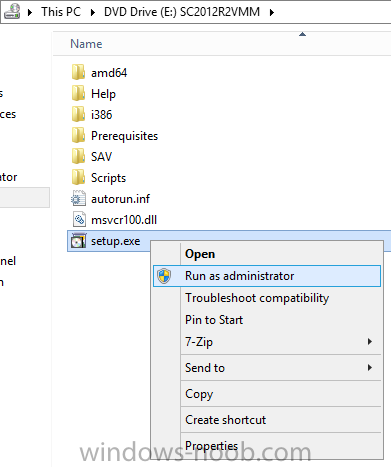
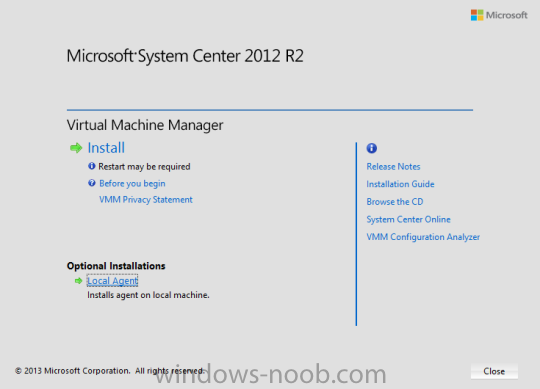
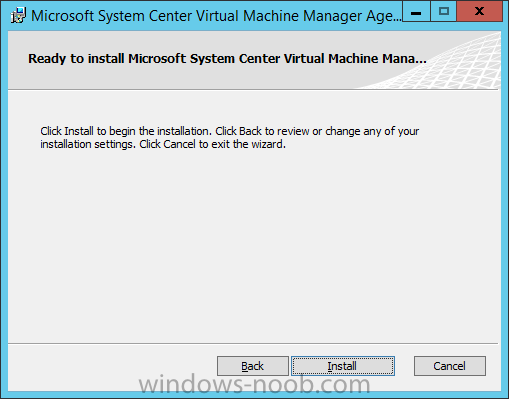
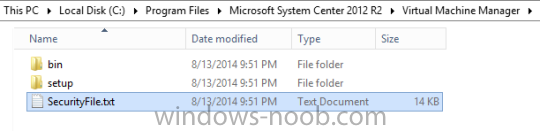
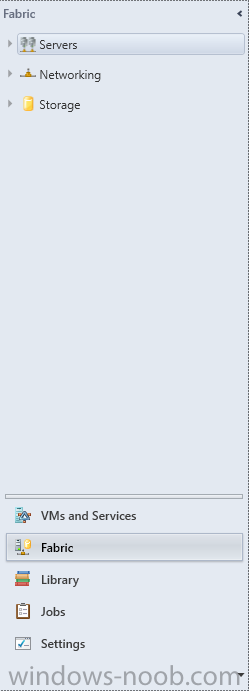
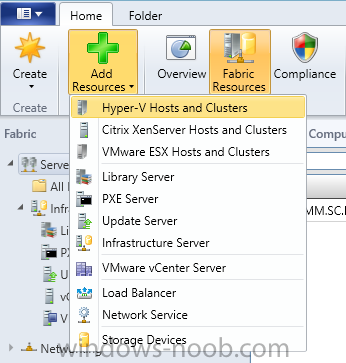
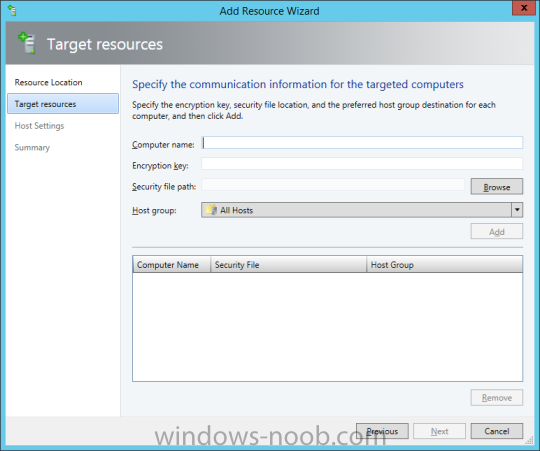
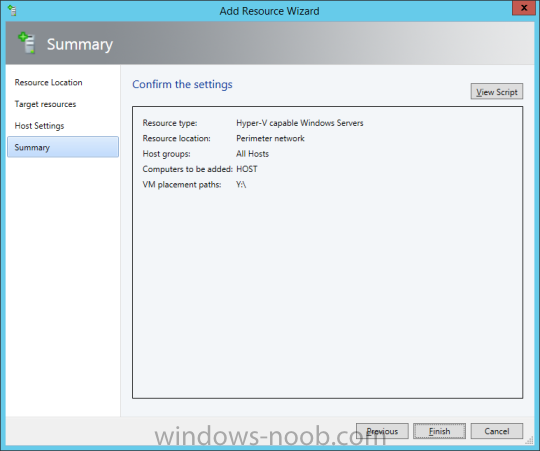
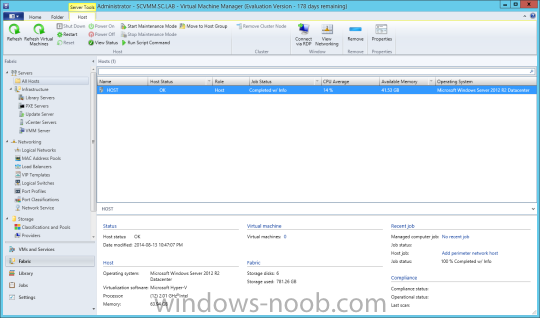
In my home lab environment, I have a single host, which is NOT a member of my lab’s domain. This is due to the fact that I am constantly re-building my lab environment, which includes my Active Directory Domain Controllers. Therefore, I don’t want to add my host to the domain, and then potentially loose access to it when rebuilding (although I could still use the Local Administrator account). With that being said, I want to add my Host to SCVMM (which is running in a VM on the Host itself). Therefore, I need to be able to add a Host that is not a domain member (aka. a Workgroup host). So, I will be following this TechNet article (http://technet.microsoft.com/en-ca/library/gg610642.aspx), which walks through the process. I will add screenshots to make it easier to follow. You can use the following procedure to add Hyper-V hosts that are in a perimeter network (also known as DMZ, demilitarized zone, and screened subnet) as managed Hyper-V hosts in Virtual Machine Manager. You can only add stand-alone hosts that are in a perimeter network. VMM does not support managing a host cluster in a perimeter network. NOTE: You can also use this procedure to add a stand-alone Hyper-V host that is in a workgroup and not part of a domain. Before you can add a host that is on a perimeter network to VMM, you must install an agent locally on the server that you want to add. TO INSTALL THE VMM AGENT ON THE TARGET HOST On the VMM product media or network share, right-click Setup.exe, and then click Run as administrator. On the Setup menu, under Optional Installations, click Local Agent. On the Welcome page, click Next. Review and accept the software license terms, and then click Next. On the Destination Folder page, accept the default location or click Change to specify a different location, and then click Next. On the Security File Folder page, do the following: Select the This host is on a perimeter network check box. In the Security file encryption key box, enter an encryption key, and then enter it again in the Confirm encryption key box. Security Note: The encryption key is a value that you choose. We recommend that you enter an encryption key that contains a mix of uppercase and lowercase letters, numbers and symbols. Important: Make note of the encryption key that you use to create the security file. You must enter this same key again when you add the host in the VMM console. Either accept the default location where the encrypted security file will be stored, or click Change to specify a different location to store the encrypted security file. Important: Make note of the location where you stored the security file. In the “To ensure that the Security.txt file is available to VMM” procedure, you must transfer the security file to a location that is accessible to the computer on which a VMM console is installed. To use a certificate to encrypt communications between the VMM management server and the host, select the Use a CA signed certificate for encrypting communications with this host check box. In the Thumbprint of the certificate box, enter the thumbprint of the certificate. Note: To obtain the thumbprint of a certificate, open the Certificates snap-in, and then select Computer account. In the Certificates snap-in, locate and then double-click the certificate that you want to use. On the Details tab, select theThumbprint field. In the lower pane, highlight the thumbprint value, and then press Ctrl+C to copy the value to the clipboard. When you are finished, click Next. On the Host network name page, specify how the VMM management server will contact the host, and then click Next. You can select either of the following options: Use local computer name Use IP address If you select Use IP address, click an IP address in the list. Important: Make note of the computer name or IP address of the host. You must enter this same information again when you add the host in the VMM console. On the Configuration settings page, accept the default port settings, or specify different ports, and then click Next. Important: We recommend that you do not change the default port 5986 for agent communication. The port settings that you assign for the agent must identically match the port setting that the VMM management server uses. By default, the VMM management server uses port 5986 for agent communication with hosts in a perimeter network, and port 443 for file transfers. On the Ready to install page, click Install. TO ENSURE THAT THE SECURITYFILE.TXT FILE IS AVAILABLE TO VMM On the target host, navigate to the folder where the security file is stored. By default, the location is C:\Program Files\Microsoft System Center 2012\Virtual Machine Manager. The name of the security file is SecurityFile.txt. Transfer the security file to a location that is accessible to the computer on which a VMM console is installed. For example, transfer the file to the computer where the VMM console is installed, to an internal file share, or to a USB flash drive. TO ADD THE HYPER-V HOST IN THE PERIMETER NETWORK In the VMM console, open the Fabric workspace. In the Fabric pane, click Servers. On the Home tab, in the Add group, click Add Resources, and then clickHyper-V Hosts and Clusters.The Add Resource Wizard starts. On the Resource location page, click Windows Server computers in a perimeter network, and then click Next. On the Target resources page, do the following: In the Computer name box, enter the NetBIOS name or the IP address of the host in the perimeter network. In the Encryption key box, enter the encryption key that you created when you installed the agent on the target host. In the Security file path box, enter the path of the SecurityFile.txt file, or clickBrowse to locate the file. In the Host group list, click the host group where you want to add the host.For example, click the Seattle\Tier2_SEA host group. Click Add.The computer is listed under Computer Name in the lower pane. Repeat this step to add other hosts in the perimeter network. When you are finished, click Next. On the Host settings page, in the Add the following path box, enter the path on the host where you want to store the files for virtual machines that are deployed on hosts, and then click Add. If you leave the box empty, the default path of %SystemDrive%\ProgramData\Microsoft\Windows\Hyper-V is used. Be aware that it is a best practice not to add default paths that are on the same drive as the operating system files. Repeat this step if you want to add more than one path. When you are finished, click Next. Note: You can ignore the Reassociate this host with this Virtual Machine Manager environment check box. This setting does not apply to hosts in a perimeter network. On the Summary page, confirm the settings, and then click Finish. The Jobs dialog box appears to show the job status. Make sure that the job has a status of Completed, and then close the dialog box. To verify that the host was successfully added, in the Fabric pane, expandServers, expand All Hosts, expand the host group where you added the host, and then click the host. In the Hosts pane, verify that the host status is OK. Tip: To view detailed information about host status, right-click the host in the VMM console, and then click Properties. On the Status tab you can view the health status for different areas such as overall health, host agent health, and Hyper-V role health. If there is an issue, you can click Repair all. VMM will to try to automatically fix the issue.


-
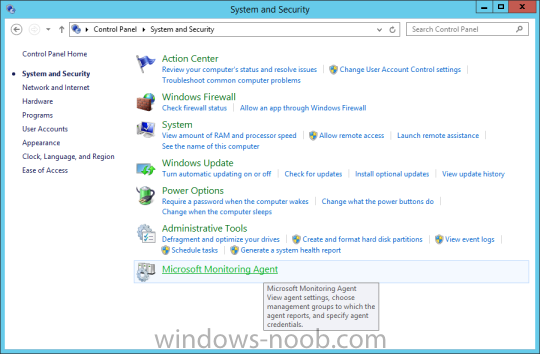
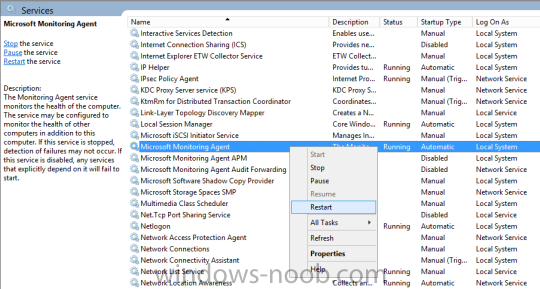
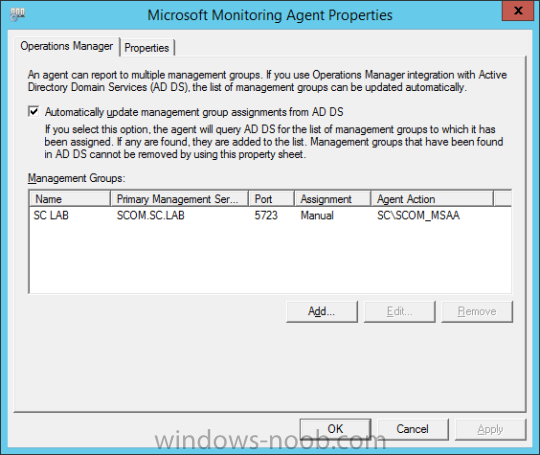
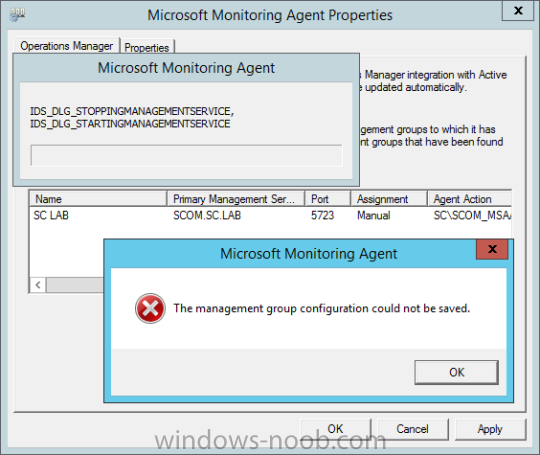
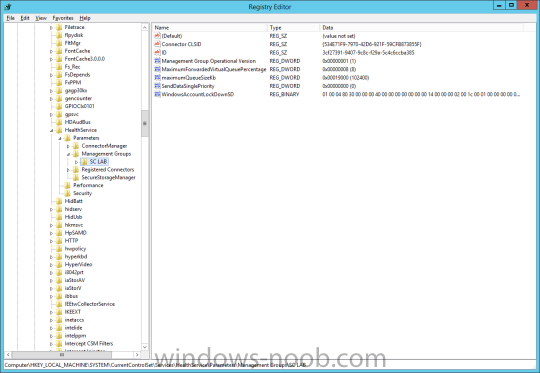
I encountered this error when attempting to configure SCOM monitoring of a Service Manager server. For those that may not be aware, you cannot push a SCOM Agent through the SCOM console onto a system the is running System Center Service Manager. Why is that? Well, because Service Manager is built on top of SCOM. What that means, is that they use a lot of the same code base. And, if you have ever installed SCOM, you will know that you can’t install a SCOM Agent onto the SCOM Management Server, it’s self-monitoring. However, since Service Manager is a separate component of the System Center product (as Microsoft labels “System Center” as a single product, and each application/tool as separate “components” of that product), Microsoft has included a “Microsoft Monitoring Agent” with the installation of Service Manager. When you install Service Manager, the Microsoft Monitoring Agent is automatically installed with it. If you navigate to Control Panel > System and Security, you will see an entry for the Microsoft Monitoring Agent. When you click on the item, it will open the Microsoft Monitoring Agent Properties dialog. Now, normally you could just click Add, and then enter the required information. However, when I attempted to do so, I encountered the following error: “The Management Group configuration could not be saved.” I also received a notice show: “IDS_DLG_STOPPINGMANAGEMENTSERVICE, IDS_DLG_STARTINGMANAGEMEN The issue is because the Management Group details is already added, even though they don’t appear in the Microsoft Monitoring Agent Properties. To correct this issue, open Registry Editor and navigate to: HKLM\System\CurrentControlSet\Services\HealthService\Parameters\Management Groups You will notice that that there will be an entry for the Management Group, even though it doesn’t show up in the Control Panel Applet. So, you will need to delete this entry, and then restart the Health Service. Open Services, find the Microsoft Monitoring Agent, right-click and choose Restart. NOTE: In System Center 2012 R2 Operations Manager, the SCOM Agent is renamed as “Microsoft Monitoring Agent”. In System Center 2012 and SP1, it is still labelled as “System Center Management Service”. After you restart the service, you should be able to successfully add the Management Group in the Control Panel Applet, and be able to successfully monitor Service Manager systems with Operations Manager.


-
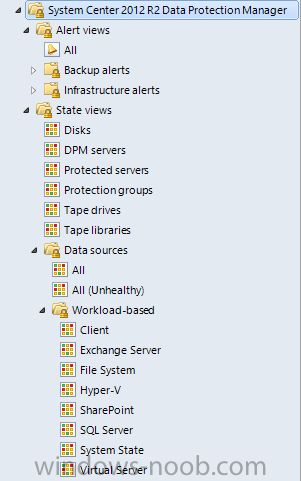
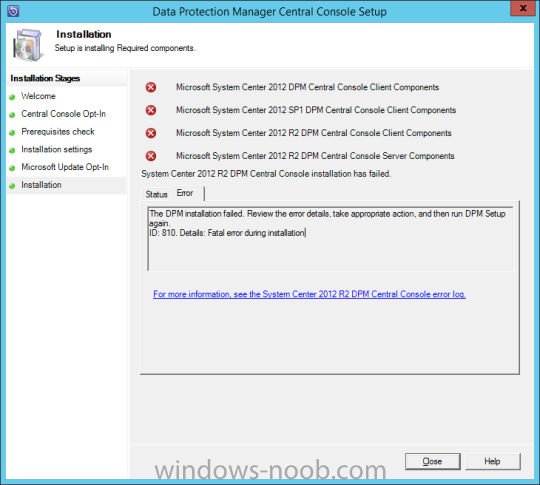
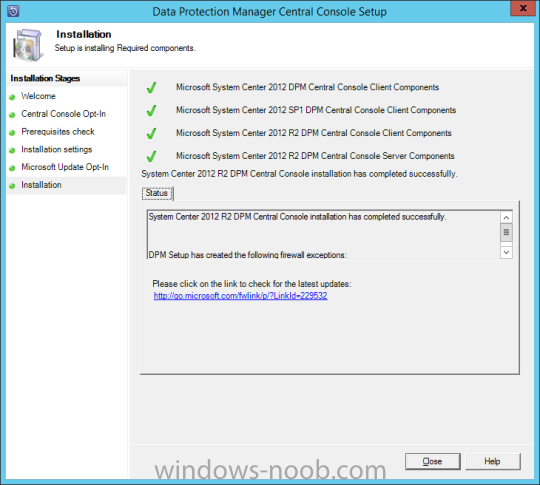
I encountered this error while attempting to install the System Center Data Protection Manager (DPM) Central Console on my Operations Manager (SCOM) Management Server. I was following this TechNet article: http://technet.microsoft.com/en-us/library/hh758189.aspx. The TechNet article lists 2 steps for this process, namely Install the Operations Manager agent, and Install Central Console. Of interesting note, the second step within the Install the Operations Manager agent step says: However, after I installed the SCOM Agent, this registry entry was not present. In fact, the Registry Key only went as far as: HKEY_LOCAL_MACHINE\SOFTWARE\Microsoft\Microsoft Operations Manager\3.0\Modules. But, after walking through the installation of the Central Console on the Operations Manager (SCOM) Management Server (although the installation failed, more on that in a bit), only then did this Registry entry appear on the DPM server. That aside, according to the error message, let’s check out the DPMCentralConsoleSetup.log file. Looking through the log file, we find this: That’s interesting. Especially when I specifically installed the Visual C++ 2008 Redistributable, since without it, you will encounter this error when first running the Central Console installer. However, if you navigate to the URL provided, you will end up at the download page for the Microsoft Visual C++ 2008 Redistributable Package (x64). Note the x64 part. But what is interesting is, if I install the x86 version of the Visual C++ 2008 Redistributable, this error no longer appears and I can continue with the installation. However, it’s not until the end of the attempted installation that the previously mentioned error occurs, and the log file states that the Microsoft Visual C++ 2008 Redistributable is not installed. So, I downloaded the x64 version of the C++ Redistributable, installed it, then attempted the DPM Central Console installation again. The result? And if we launch the Operations Manager (SCOM) console, we will now see the monitoring for System Center 2012 R2 Data Protection Manager. Notice that we can get details on specific workloads (i.e. Exchange, Hyper-V, SharePoint, SQL Server), along with state data on the disks, protection groups, and tape drives/libraries. Hope this helps someone.


- 1 reply
-
- 1
-

-
- DPM Central Console
- ID 810
- (and 1 more)
-
Thanks for the suggestion. I will work on making an updated guide for 2012 R2.
-
SCVMM usage and feature set
AdinE replied to cobramaster298's question in System Center Virtual Machine Manager
Hi, I have worked for/with many companies that use SCVMM. Some of the features that are valuable include: Automatic Cluster Patching Being able to manage/integrate with VMWare products (and not just Hyper-V) Support for 2nd gen VMs (i.e. Windows Server 2012 and Windows 8) Live cloning of virtual machines Dynamic Optimization and Power Optimization As for your question about how hard to make it a part of one's toolset, it is easy. The product itself is easy to setup (see the SCVMM guides that I have posted here, or here). Also, even if you don't utilize all the features, it works well as a centralized Host/VM management system. -
Can you check the options you chose during the install of ACS? Here's a screenshot of mine, which is working correctly. Remember that: Data Source = SQL Server name (and if you're using a Named Instance, it would be ServerName\InstanceName) Initial Catalog = ACS Database Name (supplied at time of ACS install) Confirm the security settings as well, as you had 2 options during ACS install; "Windows Authentication" or "SQL Authentication".
-
Learning ressources for App-V
AdinE replied to christian.schroeder's question in Application Virtualization
The AppV5 training videos are not free, but I don't think they cost too much. -
Start/Stop Maintenance Mode from a Collection, help required
AdinE replied to K11PER's question in System Center Orchestrator
One key thing in your statement: "The runbook runs fine only when I click on Run at the top." When you run a Runbook from the Runbook Designer, it does NOT run under the SCORCH credentials configured for the Integration Pack, etc. Instead, it is running under the USER'S credentials that the Runbook Designer is launched under (aka YOUR credentials). Two things to check, aside from ensuring that the product's Console is installed on the Runbook Server (I didn't see you mention/confirm this was done), is: Launch the Product's Console (in this case SCOM) and connect it to the SCOM Management Server at least once. If you just install the console and never launch/connect it, it might cause some issues. Double-check your Integration Pack's configuration, especially around security. Ensure that the account you entered when configuring the Integration Pack has the proper rights in the product you are trying to automate with (i.e. in this case SCOM). Note the following from the SCOM Integration Pack documentation (found here http://technet.microsoft.com/en-us/library/hh830690.aspx): Install the Operations Manager console on each computer where an Orchestrator Runbook server or Runbook Designer is installed, if that server needs to interact with Operations Manager. In the User name and Password boxes, type the credentials that the Orchestrator server will use to connect to the Operations Manager server. Think of it in the similar context of granting a user access into the SCOM console. Depending on the access/role given, will control what they can see/do. Since with SCORCH you want to be able to automate anything in relation to SCOM, I'd grant it Administrator rights in SCOM itself. -
Sorry, so does the error occur when you testing it from the Data Source screen in SSRS, or does it apply without issue and then give you an error when trying to access/use the reports in the SCOM console?
-
Learning ressources for App-V
AdinE replied to christian.schroeder's question in Application Virtualization
I've also watched this series: http://appv5training.com/, and found it to be good. It's a little short, but it helps having little "bite sized" videos instead of hours upon hours to watch. -
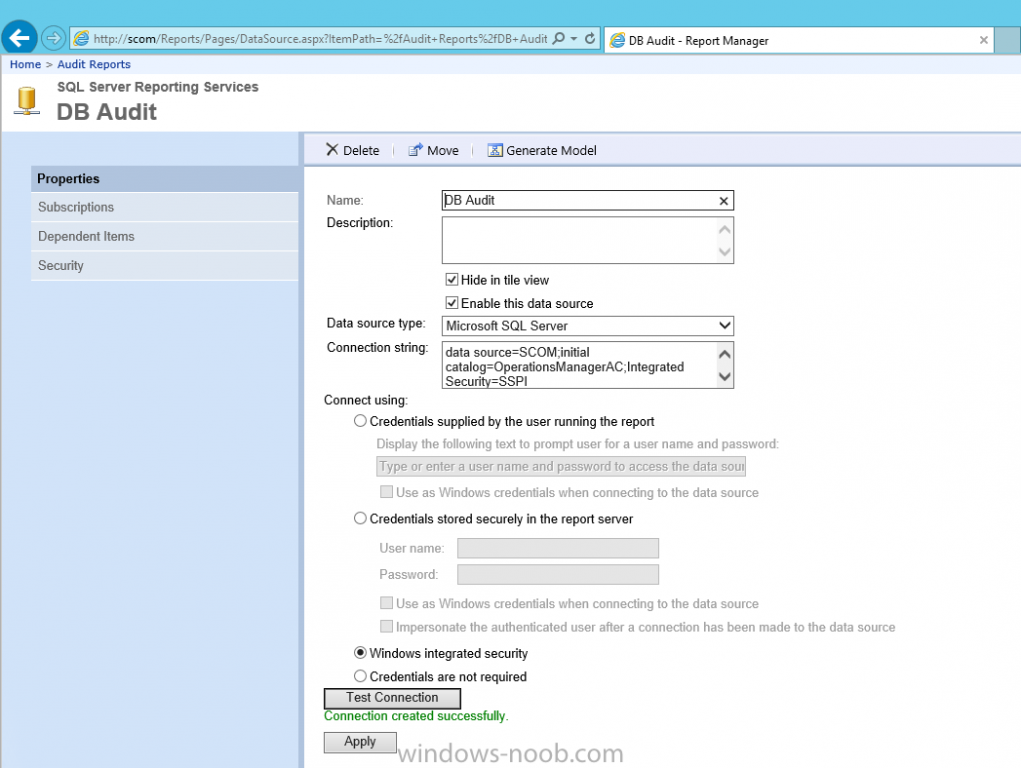
Hi rrasco, Can you check the Data Source Connection as shown in this picture: http://www.windows-noob.com/forums/uploads/monthly_07_2013/post-20464-0-77846500-1373853724.png Check the authentication is set appropriately. Let us know.
-
MaceUK, Based on your scenario, I would state the following. Even though all your systems may have the SCCM Client installed, does not mean that they will now look to/receive update from SCCM. Enabling the Software Update feature within SCCM does not automatically push updates to those clients; it just enables the feature. You need to do as you said. Have a separate AD OU to store your Windows 7 systems. Then you need to create a new GPO targetted to this OU to remove the WSUS pointer (from pointing to the old WSUS). You do NOT need to point your WIn7 systems to the SCCM WSUS, as the SCCM Agent itself will take care of all of this. You will then also need to create a SCCM Collection specific for the Win7 systems. Finally, you will have to create Software Update Groups, download the patches, and create deployment packages. You then need to target these deployments to the Win7 Collection. All of your other non-Windows 7 systems, even if they have the SCCM Agent installed, will NOT look to the SCCM WSUS for patching, since they still have the GPO/Registry entry pointing them to your old WSUS system. Hope this helps.
-
Start/Stop Maintenance Mode from a Collection, help required
AdinE replied to K11PER's question in System Center Orchestrator
That's great to hear! Just to clarify your edited statement for everyone else... If you are using SCORCH, and in particular you have a Runbook that uses an Activity from a System Center Integration Pack, then yes, you need that product's console installed on the Runbook server. For example, performing a backup/restore, you'd need the DPM console; monitoring would be SCOM, etc. The same thing applies to other non-Microsoft products that have Integration Packs (i.e. HP iLO, VMware, etc.). -
Start/Stop Maintenance Mode from a Collection, help required
AdinE replied to K11PER's question in System Center Orchestrator
Hi, welcome to the site/forum. I first have a question for you. Are you trying to place the system(s) into Maintenance Mode so that they do not generate Alerts when they are rebooted? If that is your ultimate goal, and thus you are using SCCM and SCOM in your environment, you don't have to use a Runbook necessarily. What you could do is create a script that will restart the system, and create a Package Deployment in SCCM to deploy the script (and run it) on the systems you want restarted. I mention this method because in SCCM, there will be 2 checkboxes, one to suppress Alerts and another to generate Alerts on failed actions. This will allow you to reboot the Collection of servers, without generating a false-positive Alert in SCOM. Is that your primary goal? I get why you plan to use a Runbook though, since you mentioned it occurs every week. I will have to look into the Runbook side of things, to help you figure out the answer to that part. To get you started, take a look at the following links, as they might point you in the right direction. http://systemcentertipps.wordpress.com/2013/01/31/orchestrator-2012-sp1-scom-2012-sp1-integration-pack-start-maintenance-mode-activity-changed/ http://www.systemcentercentral.com/using-orchestrator-2012-to-schedule-mmode-for-opsmgr-groups/ http://social.technet.microsoft.com/Forums/en-US/04b7b700-cd10-4ddc-8d59-65c12b060416/maintenance-mode-using-orchestrator?forum=scoscip -
Computer with agent showing as Not monitored
AdinE replied to FromTheUnderground's question in SCOM 2012
Glad to hear it is working. Maybe for the benefit of everyone else, can you specific what update it was (i.e. was it a SCOM UR that wasn't applied, or an OS patch, etc.)? If it was an OS patch, maybe provide the KB number so that it can be used for reference? Thanks. -
The server that has SCVMM installed should have 2 Services (the 2 I listed). Especially the "System Center Virtual Machine Manager" service. If it is missing this, then there is something wrong with the installation (maybe only partly-installed?). You mentioned an issue with using the SCVMM console. Are you trying to use it locally on the SCVMM server, or from and Administrator's desktop?
-
Computer with agent showing as Not monitored
AdinE replied to FromTheUnderground's question in SCOM 2012
FromTheUnderground, Can you try the following. - Uninstall the Windows Server Management Packs - Uninstall the SCOM Agent from the affected system(s) - Delete (or re-name) the Health Services folder - Re-install SCOM Agent By doing this, I want to see if the issue is with the Agent itself not reporting/showing as 'Healthy', or if it's something from the Management Pack. Also, can you let us know if the Windows Server 2012 R2 system(s) are running/configured with any Server Roles? -
Computer with agent showing as Not monitored
AdinE replied to FromTheUnderground's question in SCOM 2012
Try this: On one of the systems that are not showing as monitored, stop the Microsoft Monitoring Service (aka the SCOM Agent), and then rename the HealthState folder, and then restart the Agent. The Health State folder will re-generate the files/folders within. It may start out with 11 folders/objects, but should eventually contain 13. There will be 2 folders with "temporary files" in the name (I can't remember the full name). This will normally be in succession (i.e. "1",, "2"). If there is an issue, then one of the folders will disappear and be re-created constantly; and thus increasing the number each time. Start with that, and let us know. -
Hi KSL28, Can you check the VMM services themselves? Namely: System Center Virtual Machine Manager System Center Virtual Machine Manager Agent I know that with some of the other System Center products, the Services don't always start quick enough, and cause connection errors with the console. Also, check the Service Account that the System Center Virtual Machine Manager is running under, as that needs to have Local Administrator rights on the server that is running VMM. Again, I've seen scenarios when a GPO is used to control who has Local Admin rights, and this will wipe out any manually added accounts not contained within the GPO. This will also prevent the service from being able to start.
-
Hi JZeller01, Can you maybe try the SCCM Client Utility on the endpoint that is having an issue? It will attempt to fix WMI, and repair some things. Here's the link: http://gallery.technet.microsoft.com/SCCM-Client-Utility-WMI-ec270313 Let's start there and see what we can figure out. Let us know either way.
-
Error (2916) VMM is unable to complet the request.
AdinE replied to emmathews83's question in System Center Virtual Machine Manager
Hi Erik, Take a look at these 2 TechNet articles, hopefully it will get you on the right track to resolving your issue (let us know either way). http://social.technet.microsoft.com/Forums/systemcenter/en-US/6ff0a2ba-8b3c-4736-b7fa-3811a56a6115/error-2916-vmm-is-unable-to-complete-the-request-the-connection-to-the-agent-serverdomainse-was?forum=virtualmachinemanager http://social.technet.microsoft.com/Forums/systemcenter/en-US/5ad6295c-e37b-4bc6-b890-23641706d0f4/error-2916-vmm-is-unable-to-complete-the-request-0x8033810f-when-adding-vm-to-scvmm?forum=virtualmachingmgrsetup -
Start a child runbook from a child runbook via powershell?
AdinE replied to JCA's question in System Center Orchestrator
Hello JCA, Take a look at this article (http://msdn.microsoft.com/en-us/library/hh921685.aspx), it provides details/examples on starting a runbook using C# or PowerShell using the Orchestrator web service. Hopefully this gets you on the right path. I'm curious as to why you would try to call a runbook through a script, and not just use the Orchestrator Invoke Runbook Activity. -
Unable to get Virtual Machine Manager Service to start
AdinE replied to adenewton's question in System Center Virtual Machine Manager
Hello Adenewton, I haven't used VMM in an HA architecture before, so I won't be of a lot of help. That being said, take a look at the following links. The first one walks through setting up a High Available VMM environment. Maybe something is missing or not configured correctly in yours. The second link is a thread of some that have experienced a similar issue as you, maybe it will be of some help. http://blogs.technet.com/b/scvmm/archive/2014/07/03/setting-up-a-highly-available-vmm-2012-environment.aspx http://social.technet.microsoft.com/Forums/en-US/dbd4bf8d-ad10-438d-93f4-572502c8feca/scvmm-2012-sp1-beta-installation-errors Additionally, the error message says to use the Cluster Management Interface instead of Services. So, open the Failover Cluster Manager tool, and check for the clustered service there, and attempt to start it. Let me know. -
SMTrak, the SCSM 2012 Dashboard is now available
AdinE replied to tony.ibry's question in System Center Service Manager
Hello All, I am working on an articles series walk through on this product, on my blog: http://adinermie.wordpress.com/. Check it regularly for new articles. -
I have written a series on the PowerShell Deployment Toolkit (PDT). However, recently there has been a new addition of a GUI element. Check out the PDT GUI article on my blog here: http://adinermie.wordpress.com/2014/06/14/my-experience-with-the-powershell-deployment-toolkit-pdt-part-4-pdt-gui-for-powershell-deployment-toolkit/ Or check out the beginning of the series here: http://adinermie.wordpress.com/2014/01/26/my-experience-with-the-powershell-deployment-toolkit-pdt-part-1-downloader-ps1/