AdinE
-
Posts
217 -
Joined
-
Last visited
-
Days Won
12
Everything posted by AdinE
-
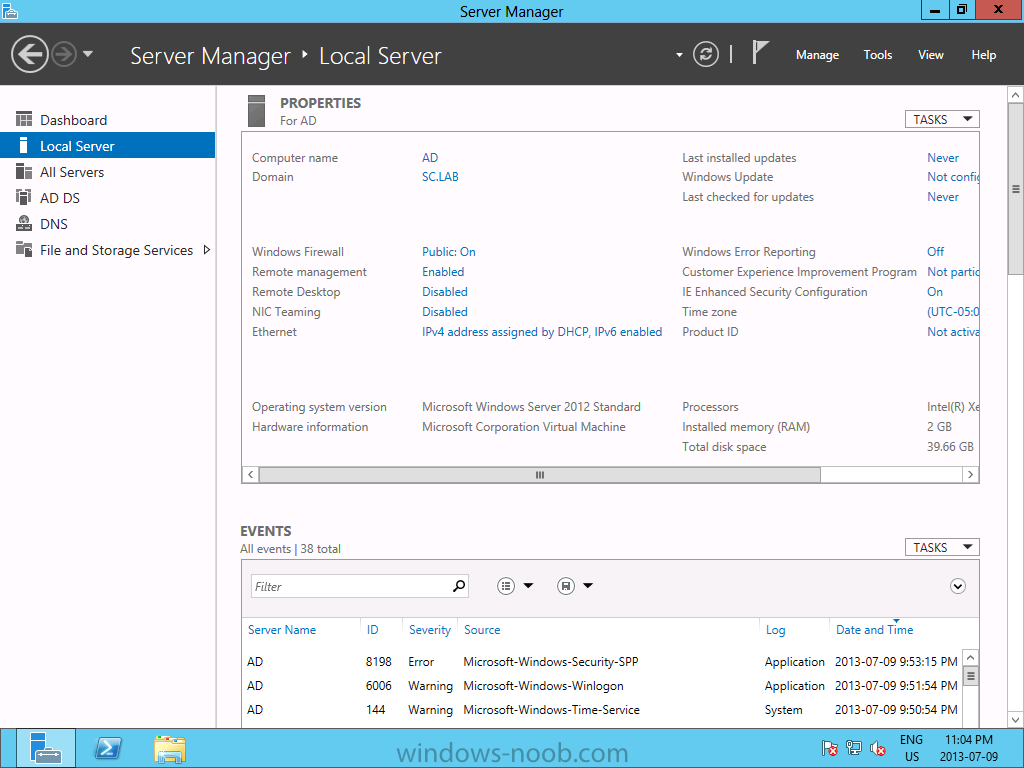
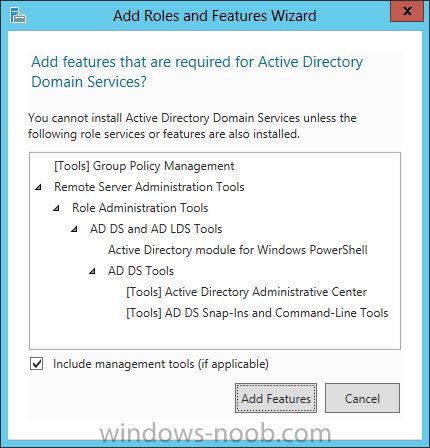
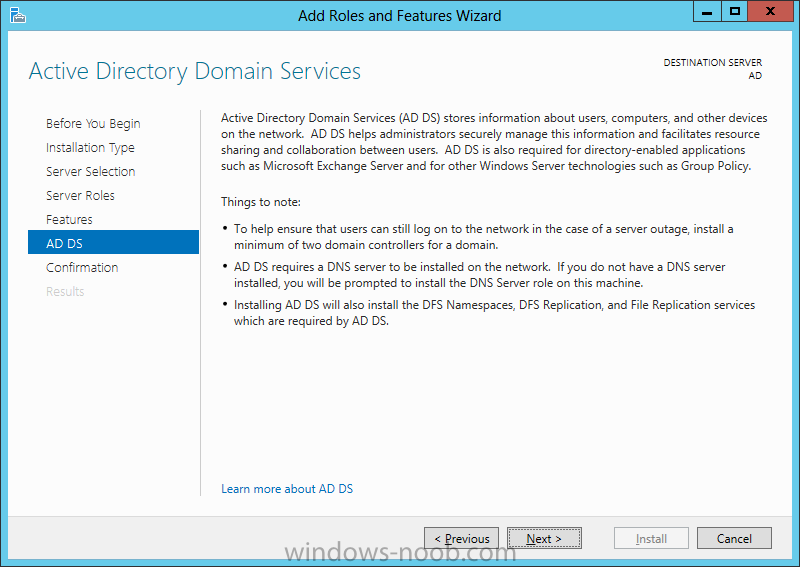
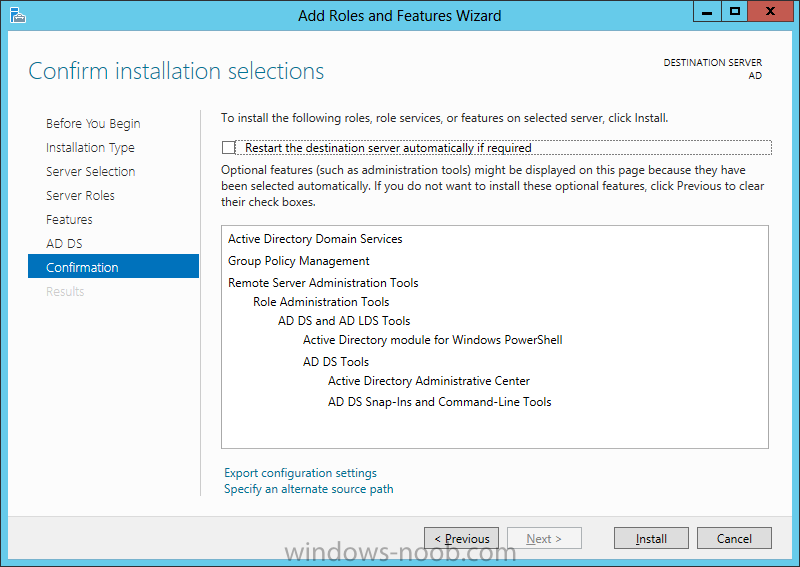
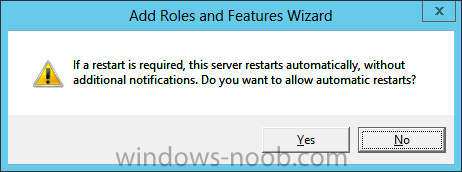
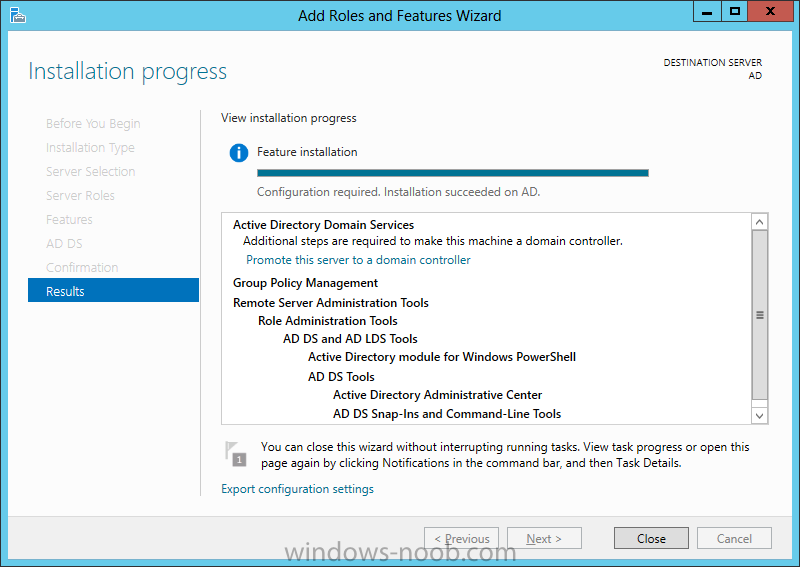
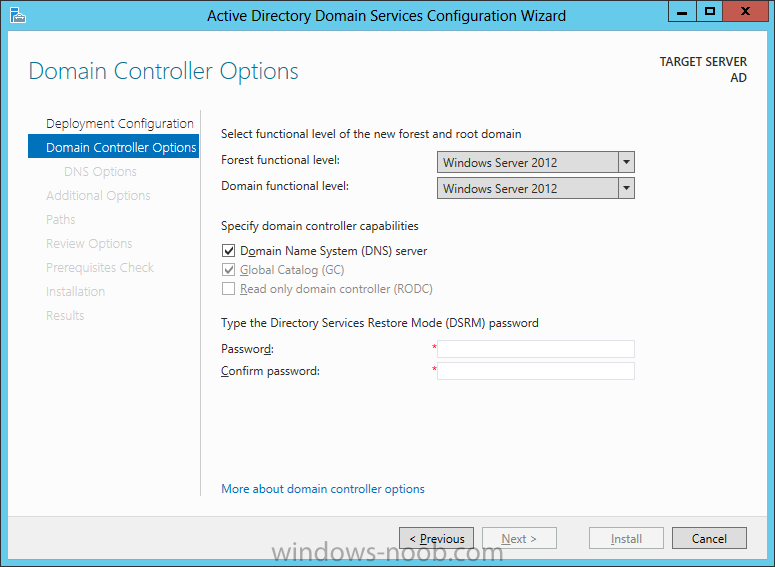
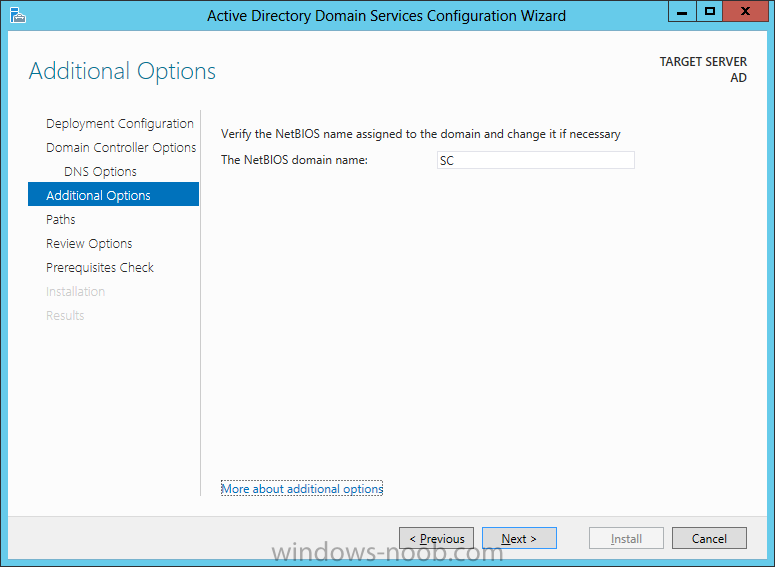
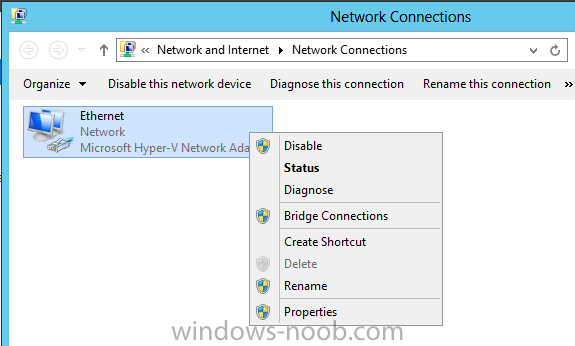
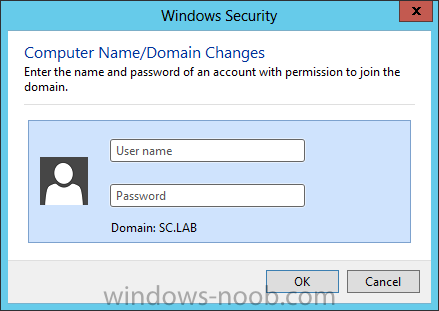
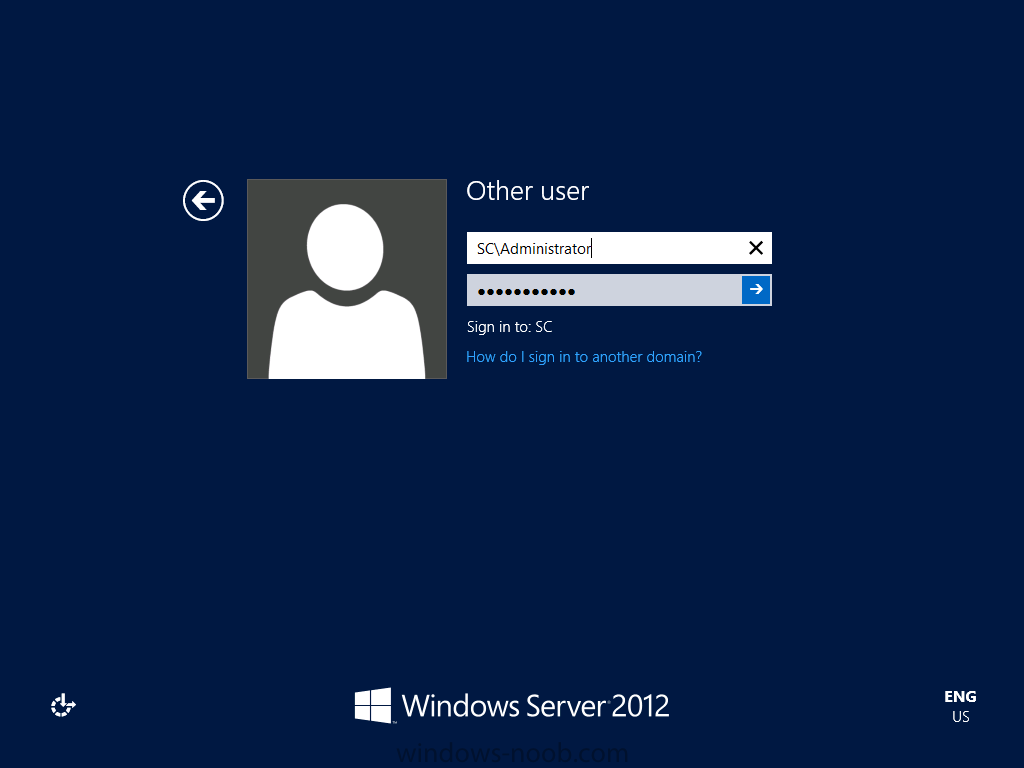
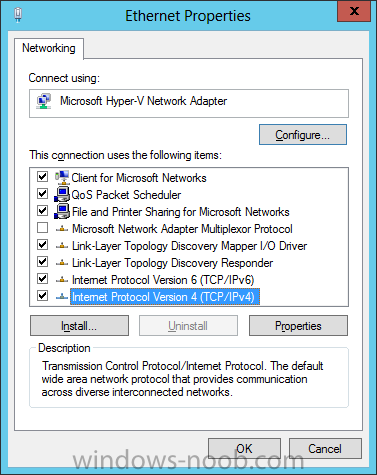
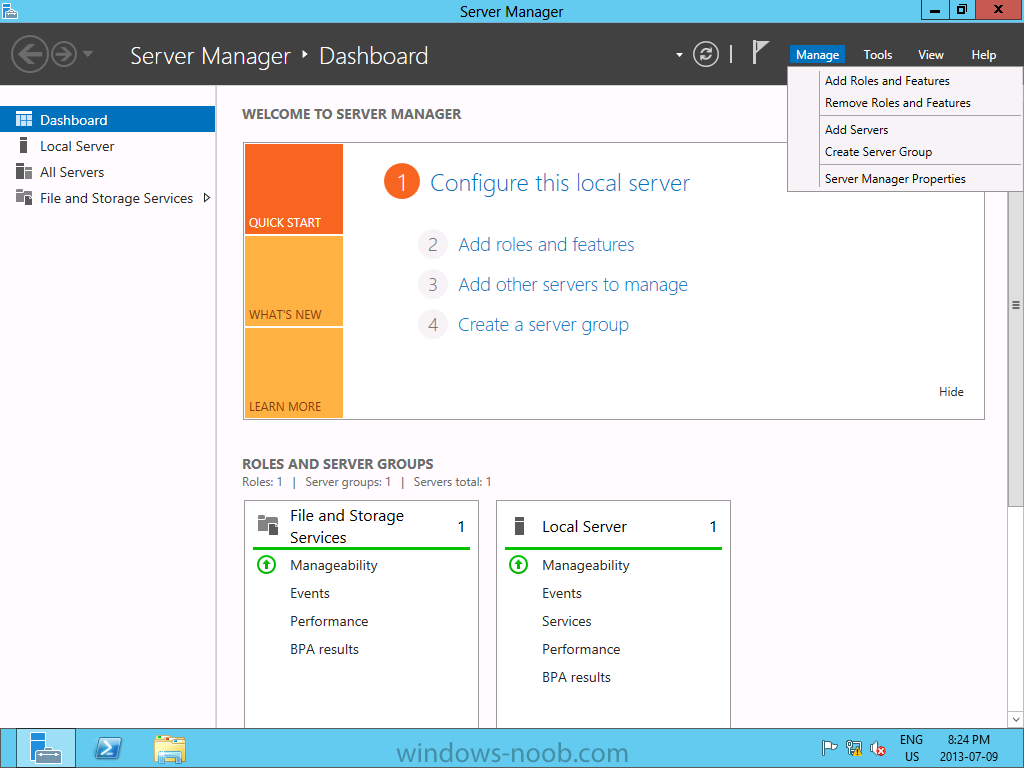
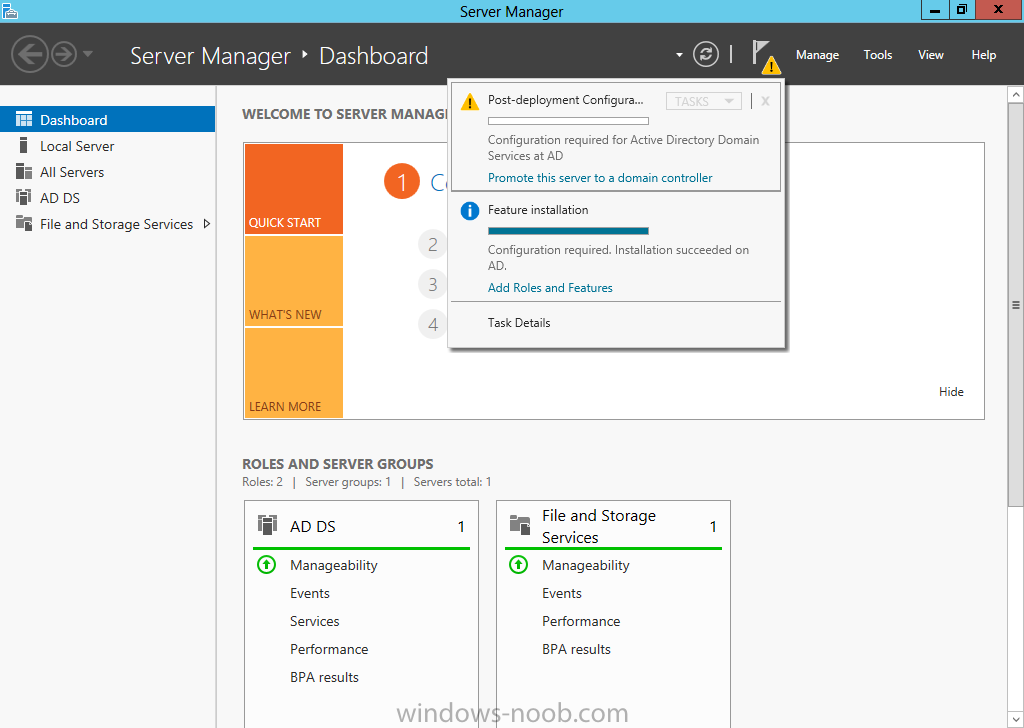
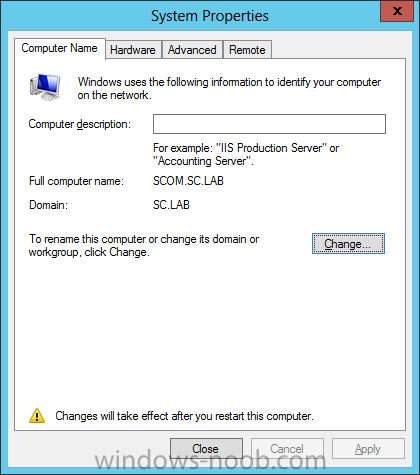
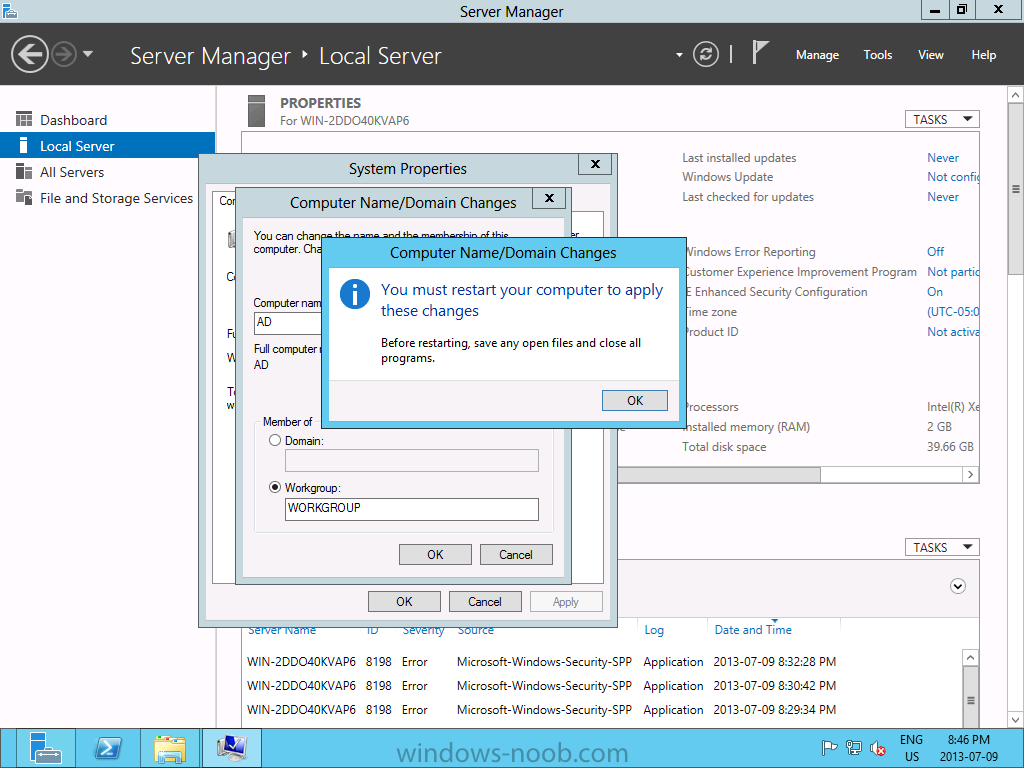
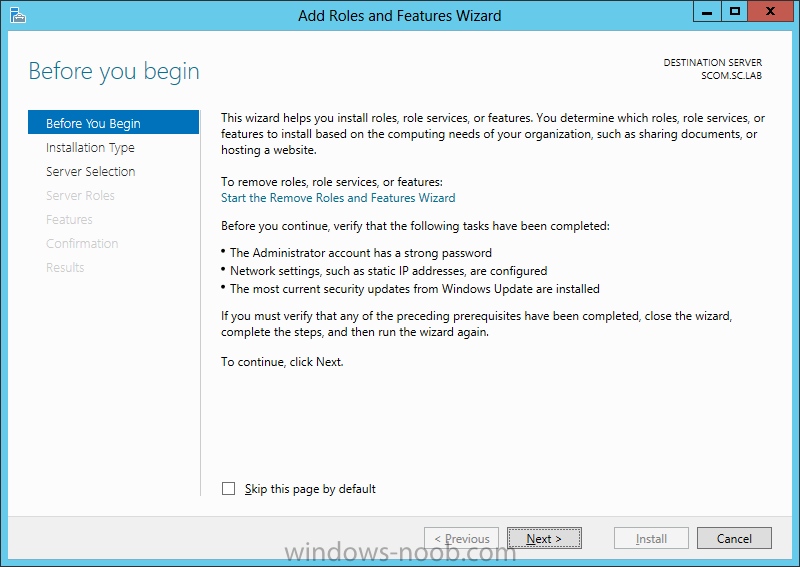
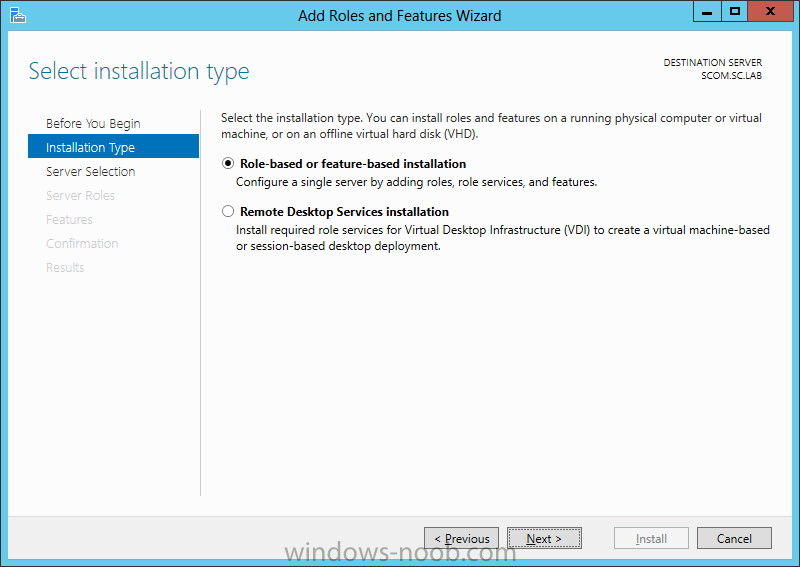
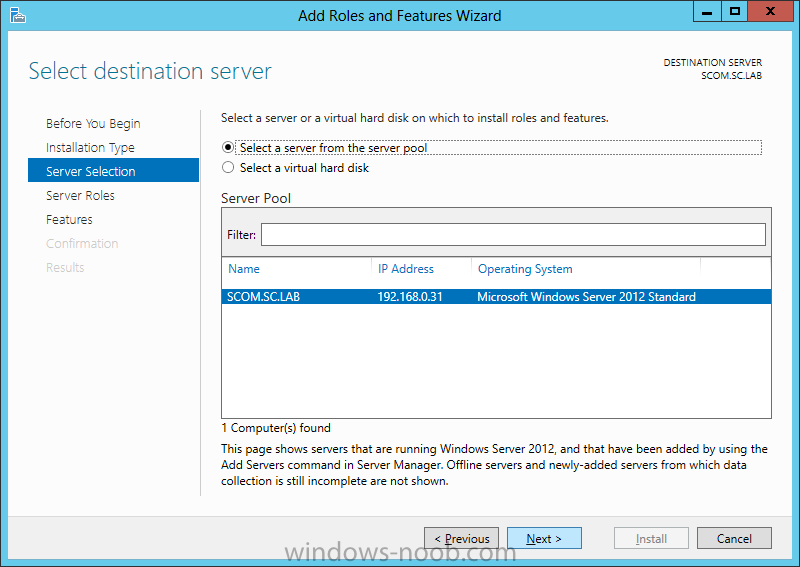
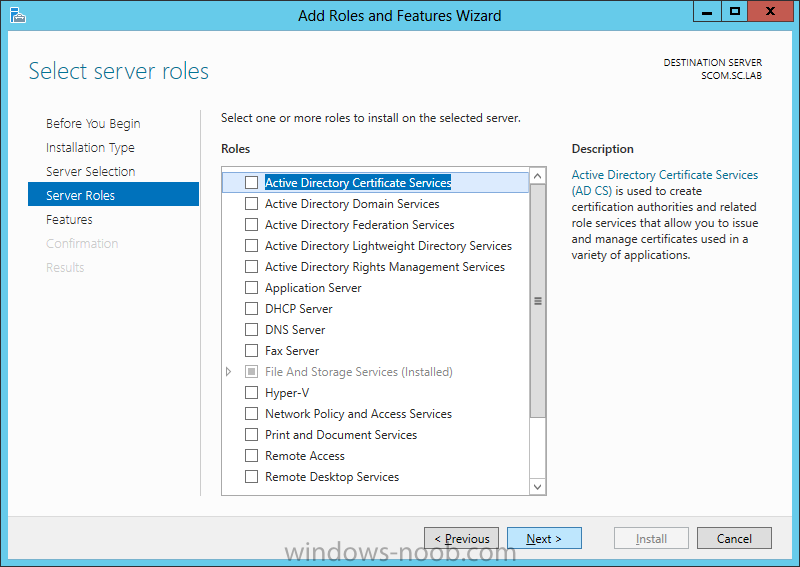
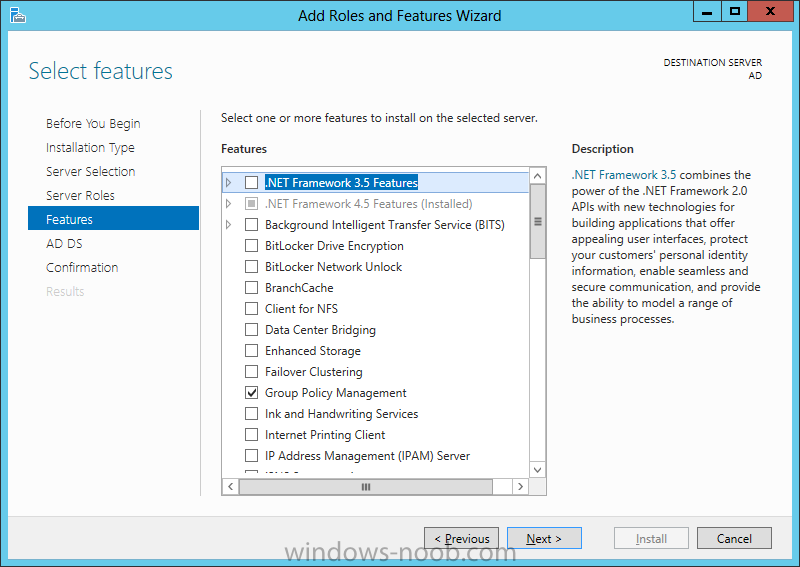
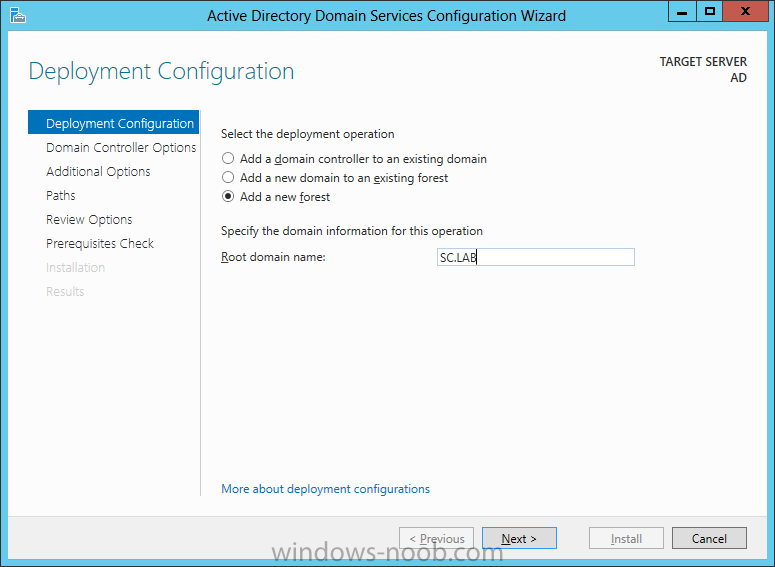
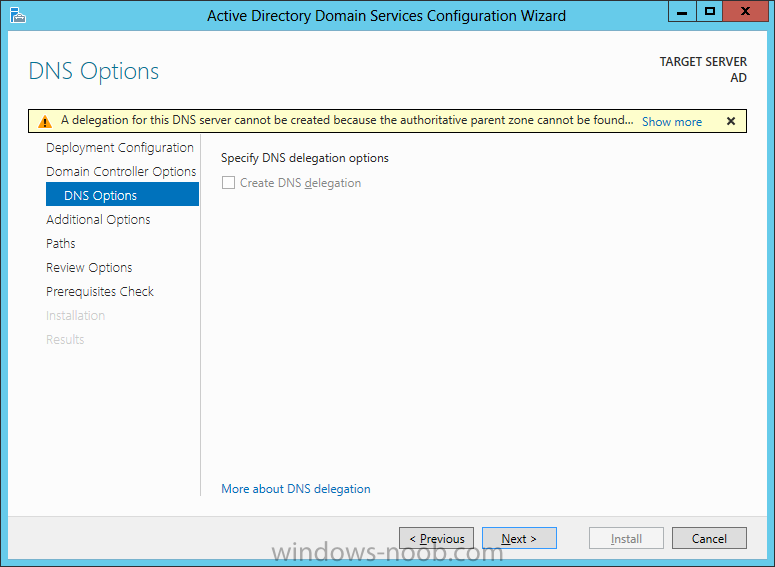
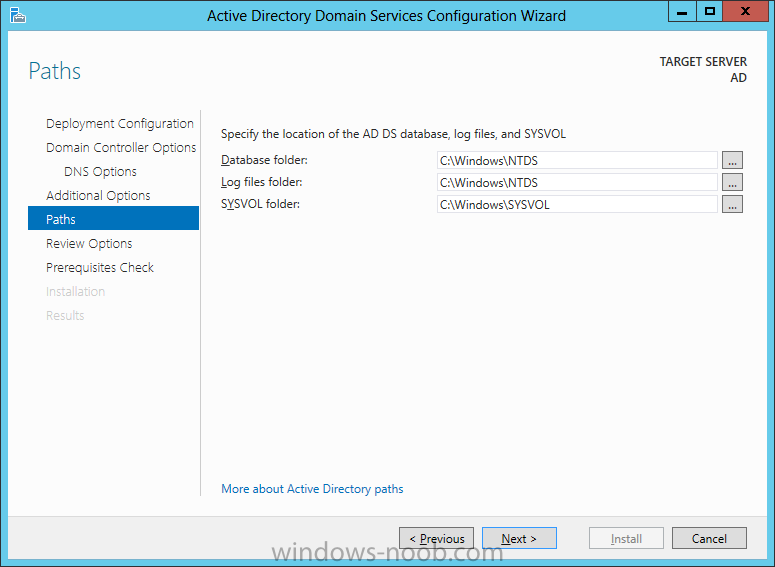
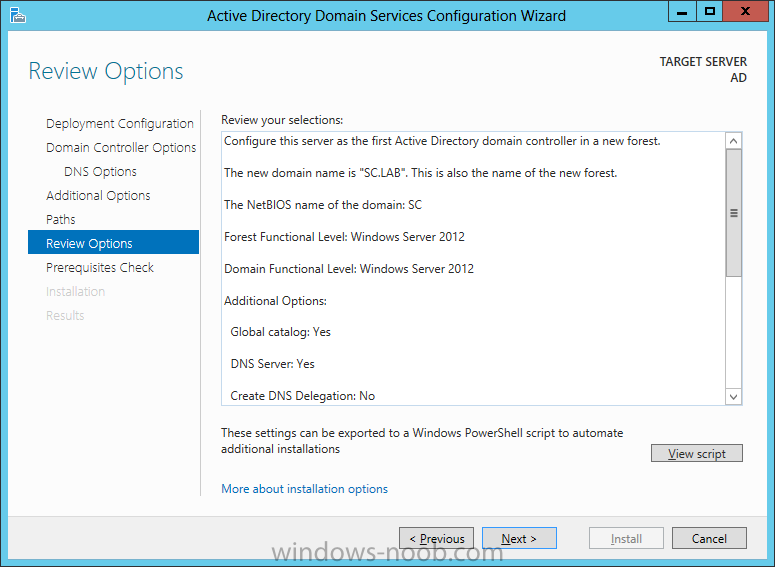
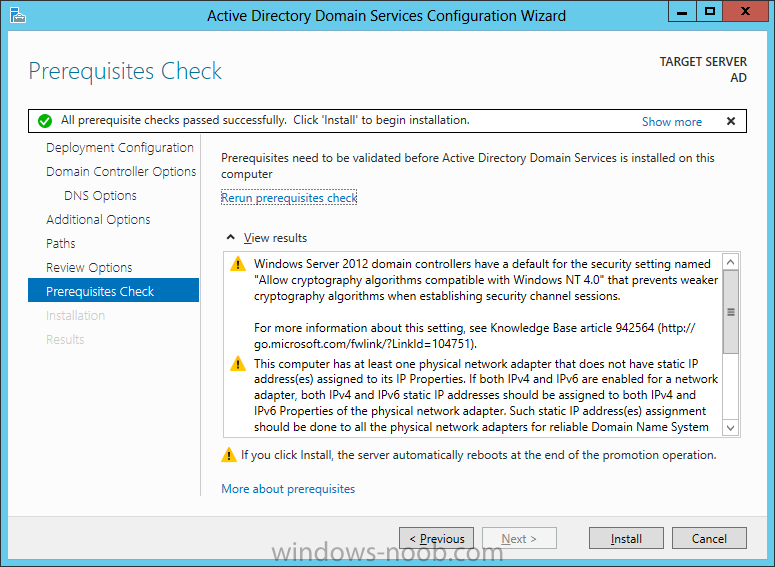
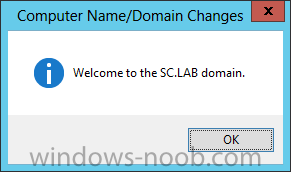
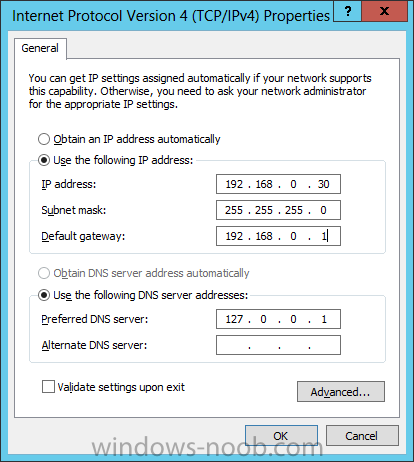
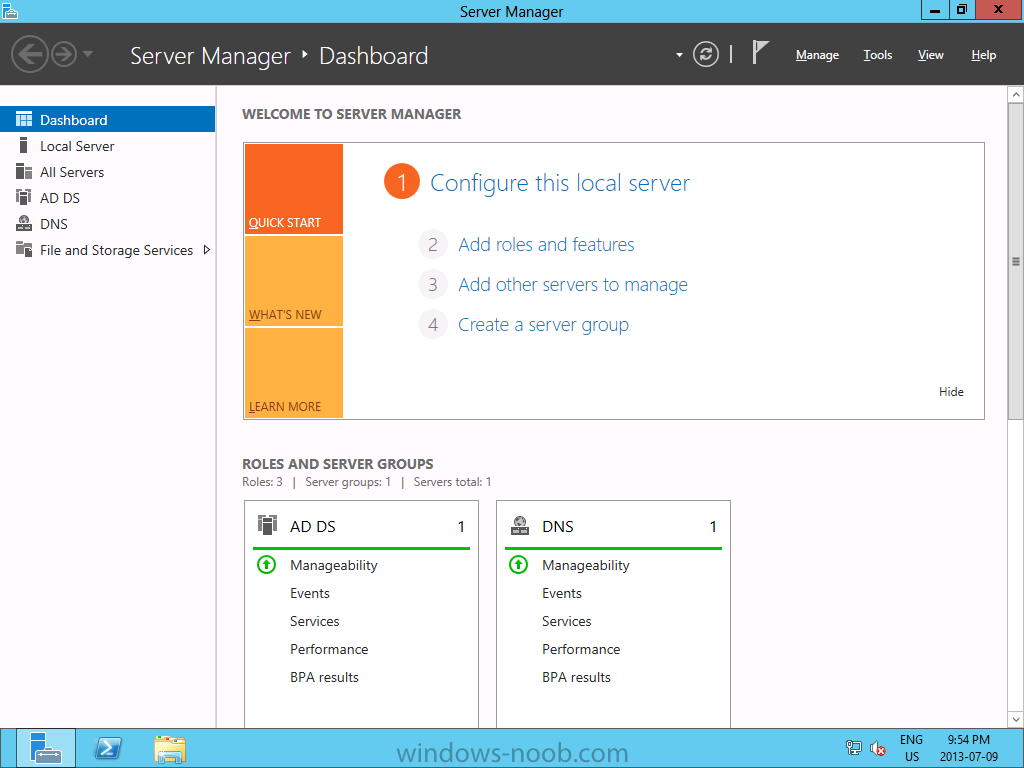
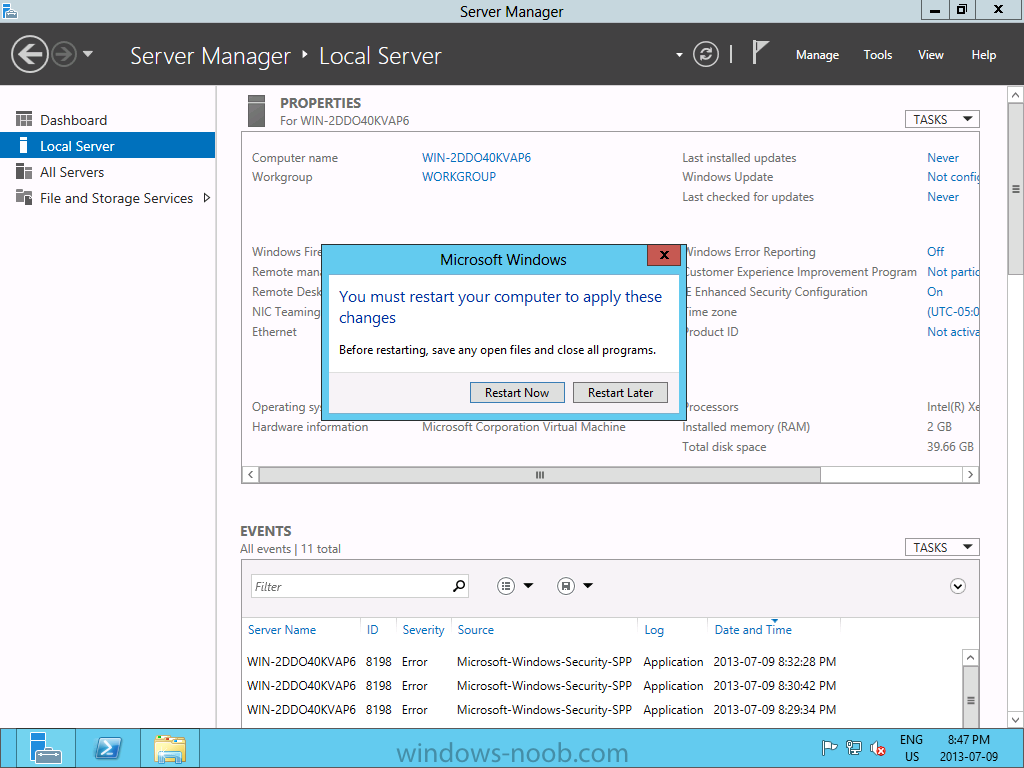
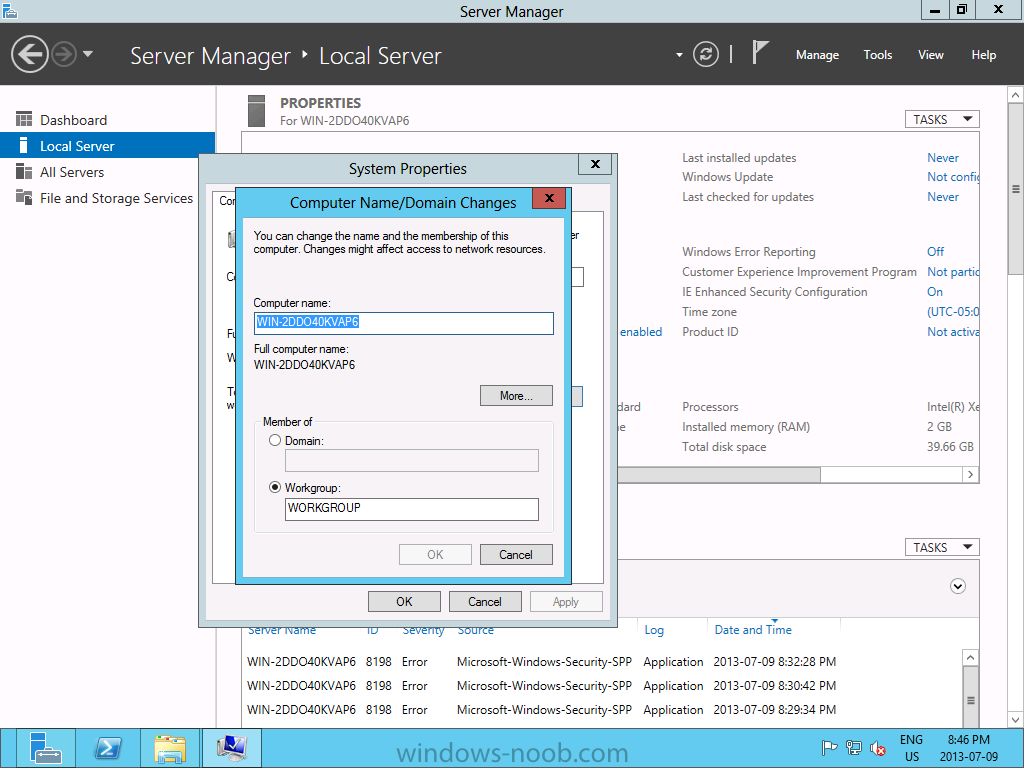
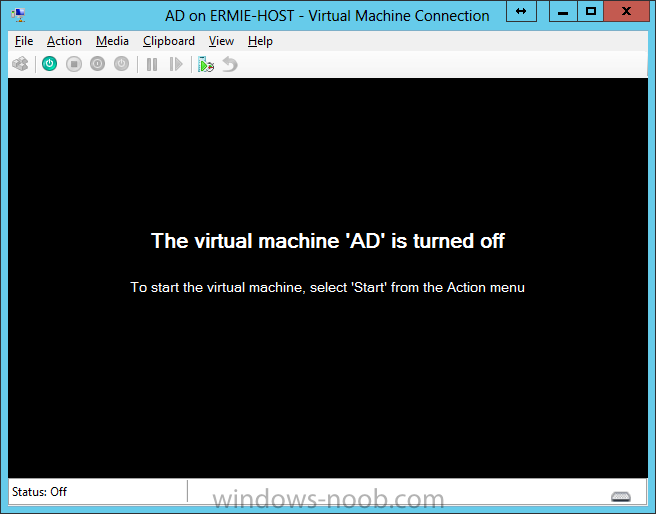
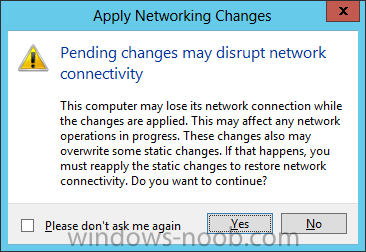
In our last post we installed the Operating System on our VM's. Now, we will install Active Directory. Install Active Directory Domain Services Now that we have the VMs created, and the OS installed on both, we need to first install/setup Active Directory (AD). When you log into a new installation of Server 2012, Server Manager will auto launch. From Server Manager, click on Manage, and choose ‘Add Roles and Features’. On the Add Roles and Features Wizard, read the information on the Before You Begin dialog, and then click Next. On the Installation Type screen, select ‘Role-based on feature-based installation’ and then click Next. On the ‘Server Selection’ screen, since we are installed Active Directory on this local system, ensure that it is selected, and click Next. Side note: Windows Server 2012 has a new feature that allows you to remotely install Roles and Features on other systems. On the Server Roles screen, select ‘Active Directory Domain Services’. When you select ‘Active Directory Domain Services’, immediately you will be presented with the following dialog. Click Add Features. On the Features screen, accept what has already been selected by default, and click Next. On the AD DS screen, read the information presented, and click Next. On the Confirmation screen, check the ‘Restart the destination server automatically if required’ checkbox, and then click Install. Note: You are not required to check the ‘restart’ checkbox, however, you’re going to have to restart the system anyways after the installation, so you might as well let the system do it for you. Note: When you check off the ‘Restart the destination server automatically if required’ checkbox, you will immediately be prompted with the following dialog. Click Yes. On the Results screen, click Close. After the system restarts, and Server Manager launches, you will have to promote the server as a domain controller. This is because Active Directory has been installed, but that process does not automatically promote the server. Click on the ‘Promote this server to a domain controller’ link. On the Deployment Configuration screen, select ‘Add a new forest’ since this is the first domain controller in our lab. Then enter a root domain name, and click Next. In my example I am using “SC.LAB” for System Center Lab (since I will be installing all other System Center products in my lab eventually). For the Domain Controller Options, select the appropriate Forest functional level, and Domain functional level. This is more applicable if you already have an existing domain and are adding a new domain controller. But since this is the first domain controller in our new domain, then we’ll use the highest level, that of Windows Server 2012. Also, don’t forget to create the Directory Service Restore Mode password. Then press Next. On the DNS Options screen, you can ignore this warning message and click Next. On the Additional Options screen, click Next. On the Paths screen, normally you would change the location for the database, log files, and SYSVOL, but since we are just in a lab environment, we’ll leave it at the defaults and click Next. On the Review Options scree, review what you have entered/selected, and click Next. The Prerequisites Check screen will check and confirm that everything passes before promoting the system as a domain controller. You will notice in my screenshot, that I have 1 warning because I didn’t set a static IP for the server yet. After installation completes, the system will automatically restart. You will then be presented with the login screen. Something to note here, that because we were originally logged in with a local account, the first time you want to log on using a domain account you will have to type the domain\username; in my example SC\Administrator. When you login, you will then see in the Server Manager, that AD DS is now listed, along with DNS. Now all that you need to do is assign a static IP to your domain controller. To do this, in Server Manager, select Local Server from the panel on the left. From there, click on the Ethernet link labelled ‘IPv4 address assigned by DHCP, IPv6 enabled’. This will cause the Networks Connections explorer to open. From here, right click on the Ethernet network that is displayed. This is in fact the network connection that we configured when we first created the VM. On the Ethernet Properties dialog, select ‘Internet Protocol Version 4 (TCP/IPv4)’ and click the Properties button. Within the Internet Protocol Version 4 (TCP/IPv4) Properties dialog, enter a static IP, gateway, and DNS that is applicable to your network. Once all the items have been entered, click OK. You will also have to click Close on the Ethernet Properties dialog as well. Congratulations, you now have a domain setup in your lab environment. Add Systems to Your Domain Now that you have your domain setup, you need to add your other VM (the one that we will use for SCOM) to the domain before being able to install SCOM. Log into the system you want to add to the domain. To do this in Server 2012, launch Server Manager, and click on Local Server. Then click on the computer name. This will launch the System Properties dialog. From this dialog, click the Change button. From this dialog, select the Domain option for ‘Member of’, and enter the domain name you want to join and press OK. After pressing OK, you are immediately presented with a Windows Security dialog, in which you need to enter the credentials of an account that has Domain Admin rights. Enter the credentials and click OK. Once the system is successfully joined to the domain, you will receive the following Welcome message. Press OK. After you press OK to the Welcome message, you will receive a second prompt, indicating that you need to restart the system for the changes to take effect. You will be back on the System Properties dialog. Press Close. When you press Close, you will receive yet another prompt about restarting the system. You can choose to Restart Now or Restart Later, but you won’t be able to install SCOM without the VM being added to the domain. After the system restarts, you will then be presented with the login screen. Something to note here, that because we were originally logged in with a local account, the first time you want to log on using a domain account you will have to type the domain\username; in my example SC\Administrator. Now we have our Active Directory server setup and ready, and the VM we will be installing SCOM on is joined to the domain. Now we can move onto installing SQL Server.


-
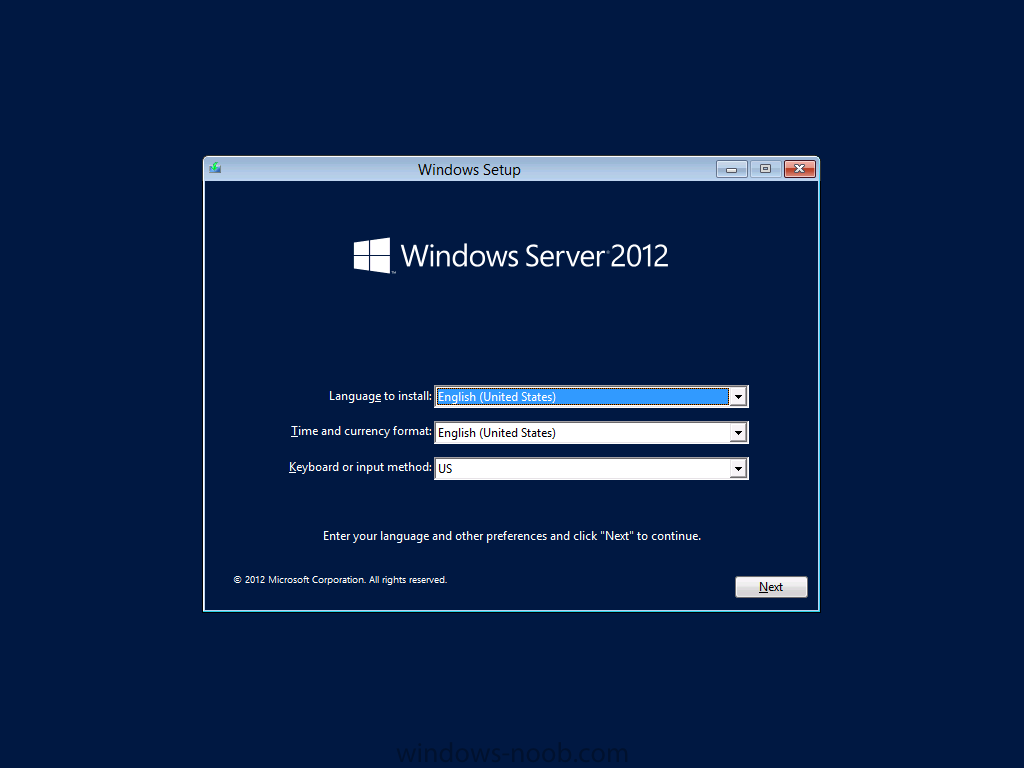
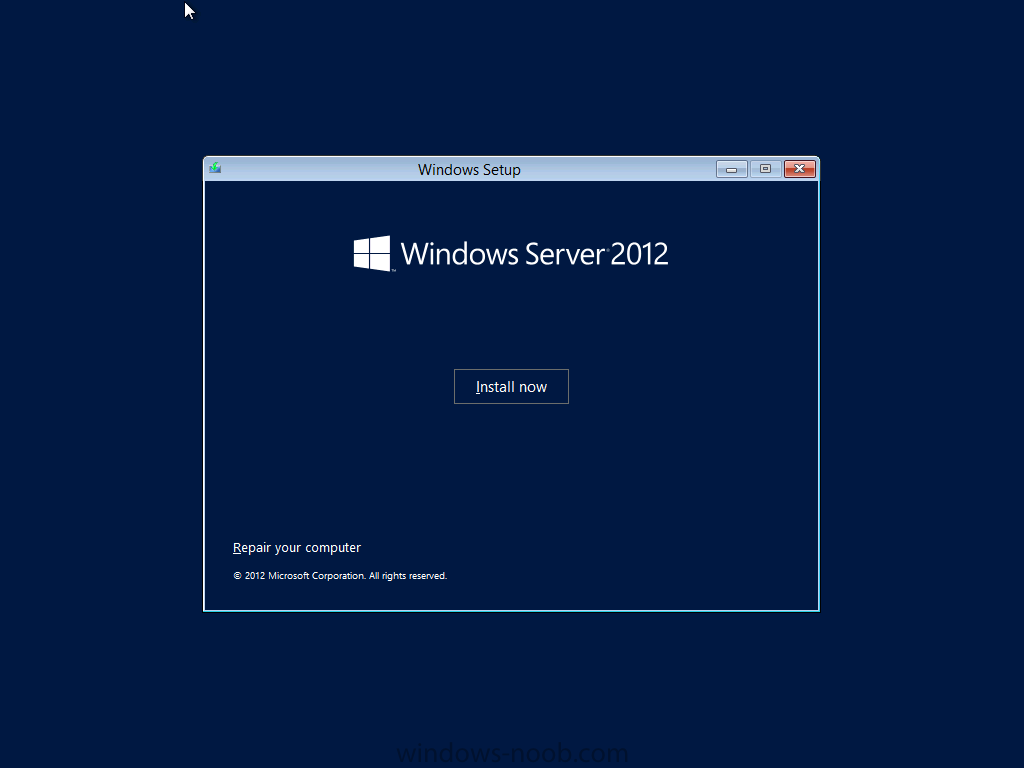
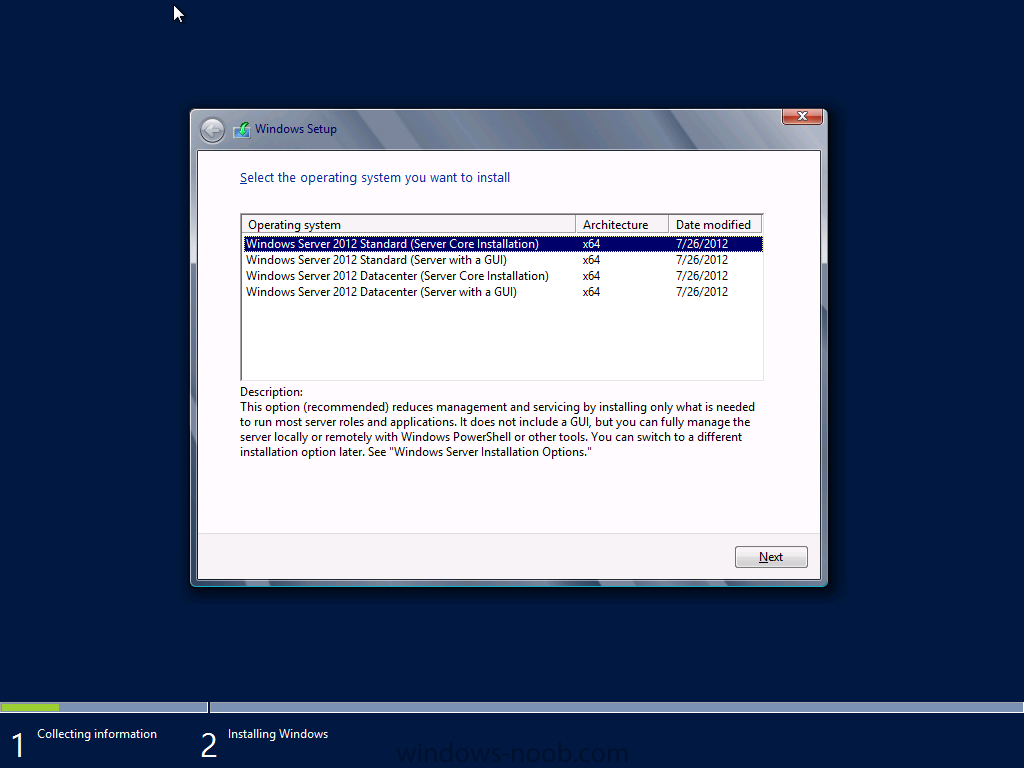
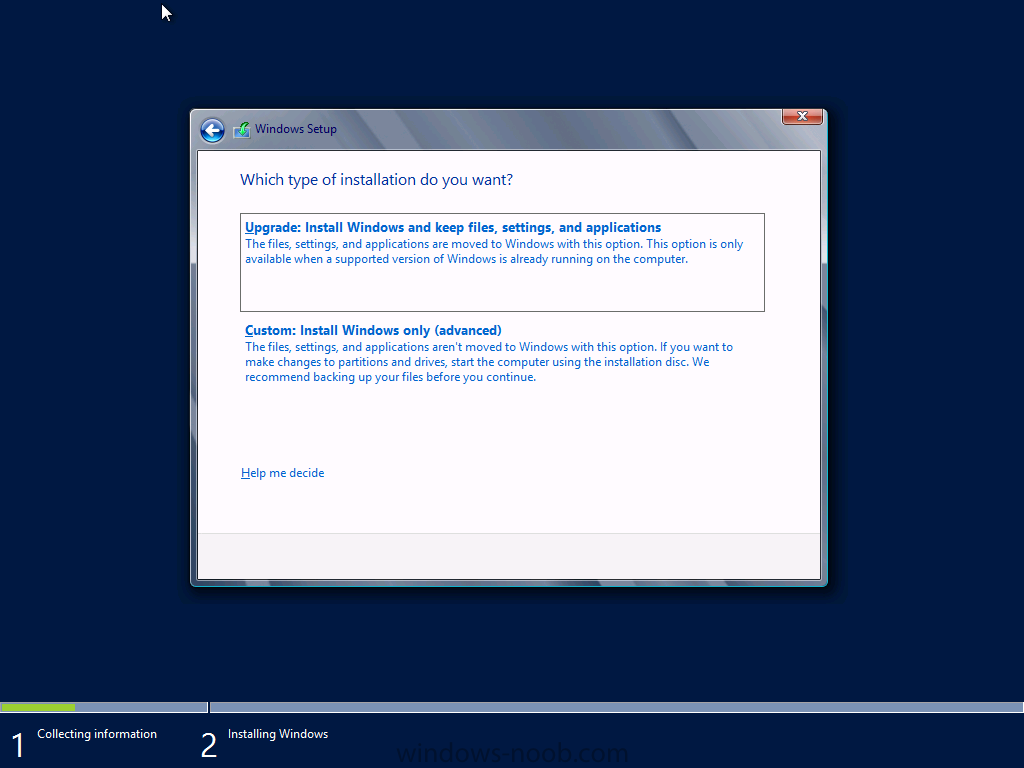
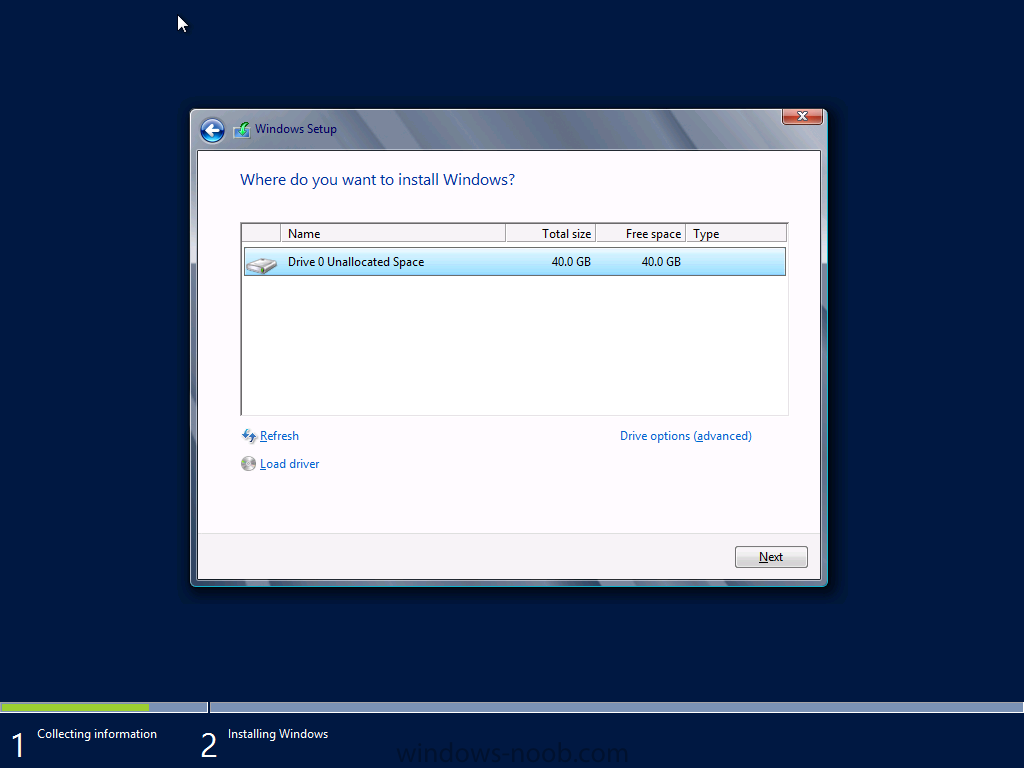
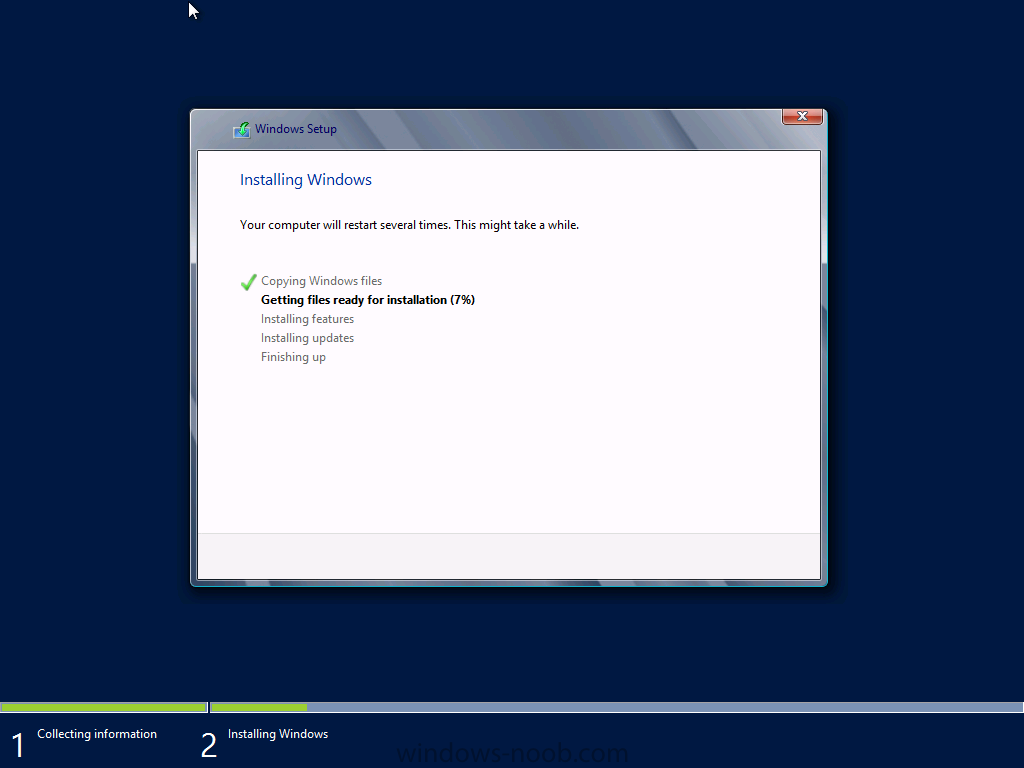
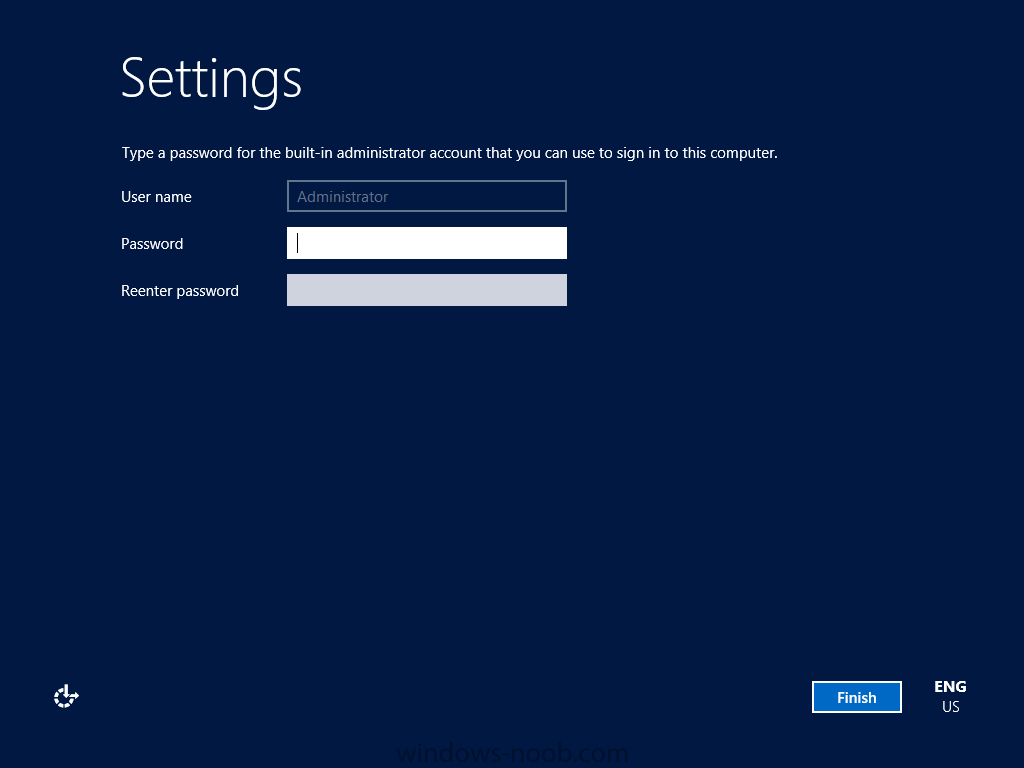
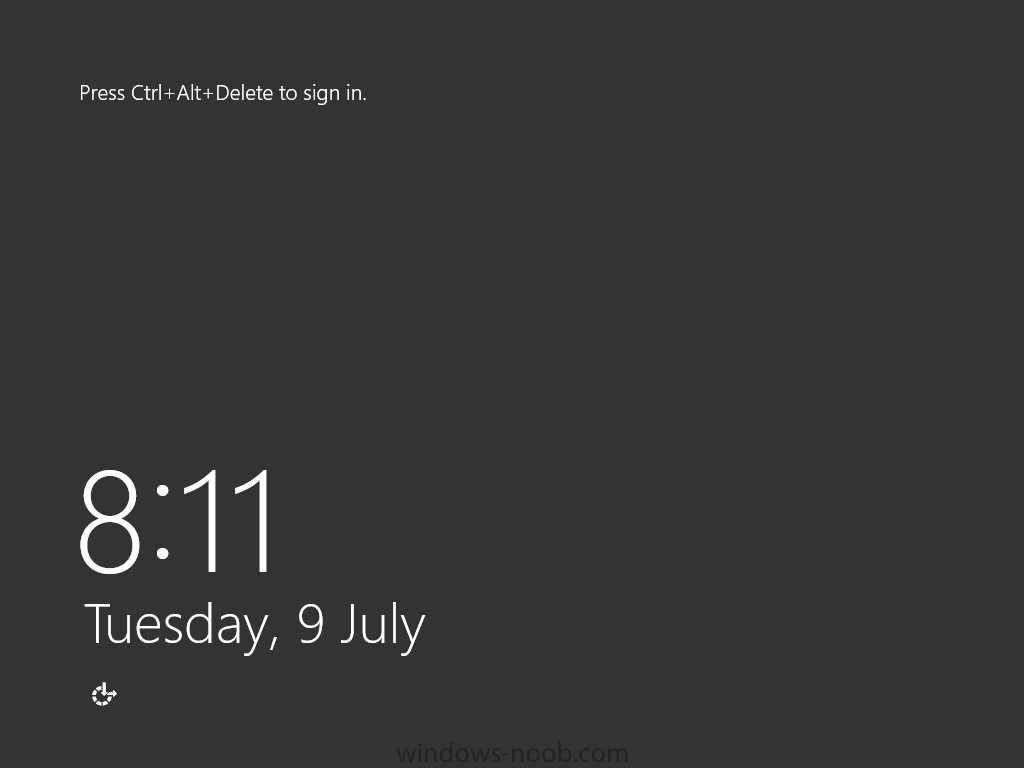
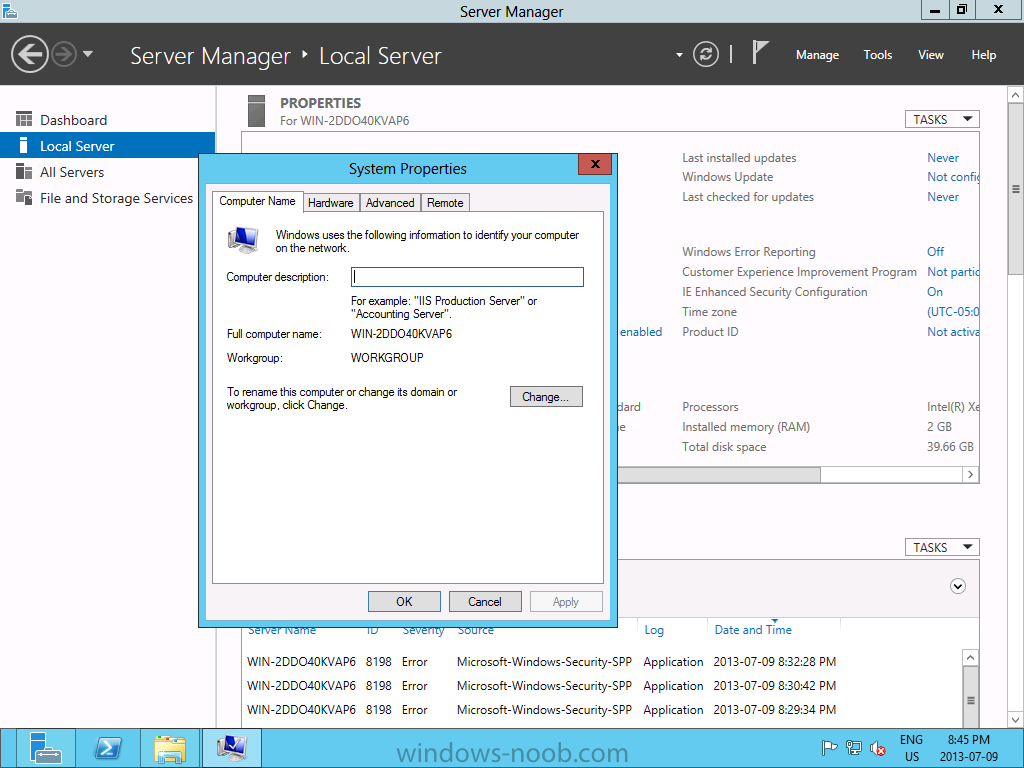
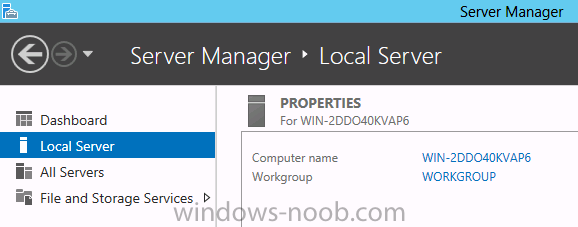
In our last post, we initially setup the VM's required for our lab. Now we'll focus on the OS. Install the Operating System Now that we have created the VMs for our lab, we can install the Operating System (OS). Start by connecting to one of the VMs, either by double clicking on the VM in Hyper-V Manager, right click the VM and choose Connect, or click on Connect from the Action pane/menu. When you have the VM connection up, and an ISO mounted, power the VM on. On the Windows Setup screen, select the Language, Time/Currency Format, and Keyboard Method appropriate, and click Next. All you have to do now is click Install Now. Next you have to choose the Operating System and version you want to install. In our lab example, I will choose Windows Server 2012 Standard (Server with a GUI). Make your selection and then click Next. You will have to accept the license terms, and then click Next. For the Installation Type, since we don’t already have an OS installed, we will choose the ‘Custom: Install Windows only (advanced)’ option. Now select the hard drive that you want to install the OS to. Since we only created one hard drive when setting up the VM, we only have one to choose from. Select it, and click Next. Now all you have to do is wait for the installation to finish. Once the installation is complete, you will be prompted to enter a password for the local administrator account. This is different from a domain-based local administrator account. Enter a password and click Finish. After some final quick configuration, you will then be presented with the login screen. Now repeat these steps for the other VMs in the lab. NOTE: After you install an OS, you will need to rename the computer within the OS. To do this in Server 2012, launch Server Manager, and click on Local Server. Then click on the computer name. This will launch the System Properties dialog. From this dialog, click the Change button. From this dialog, enter the name you want to call the computer. In my lab, I called the Active Directory computer “AD”, and the Operations Manager computer “SCOM”. Press OK after entering the name. You will encounter the following prompt. Click OK. Then click Close on the System Properties dialog. You can choose to either Restart Now or Restart Later, but the name change will not take effect until you do so. In the next part of our guide, we will install Active Directory Domain Services, so stay tuned.


-
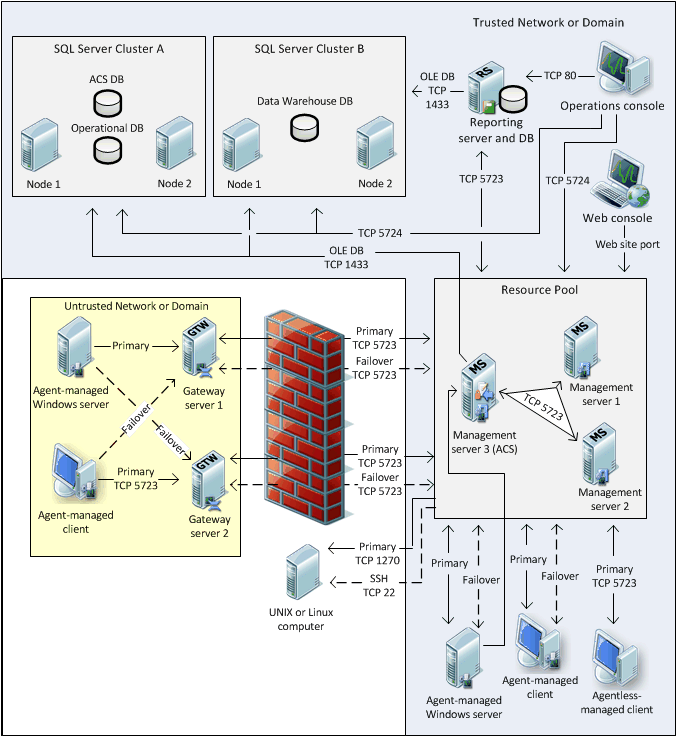
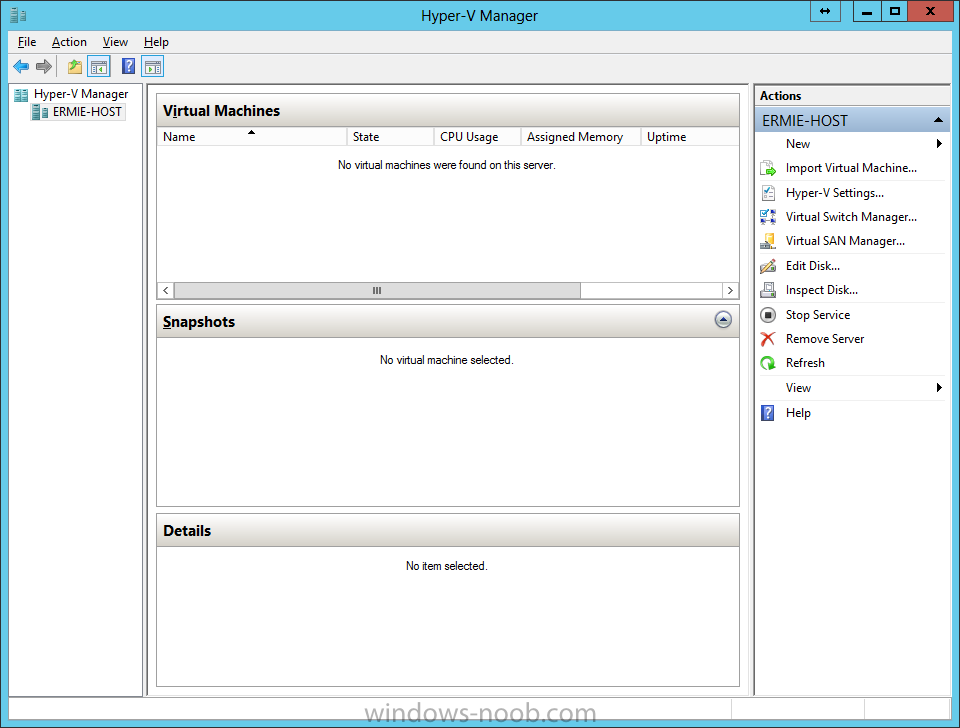
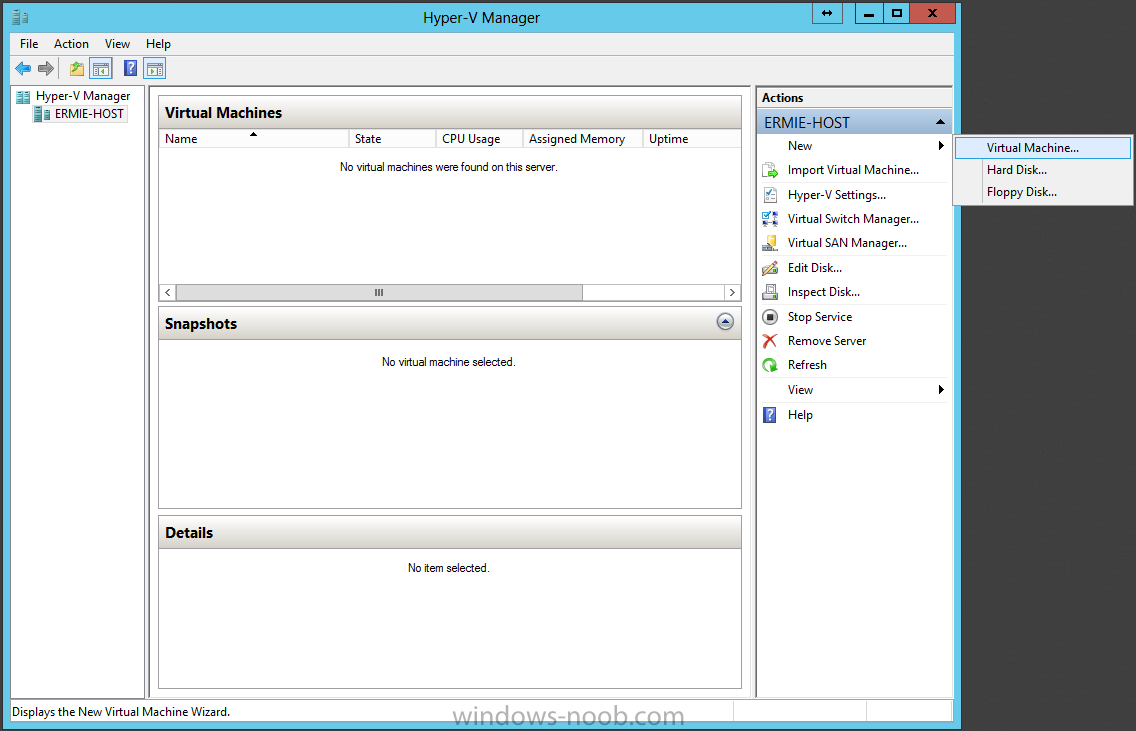
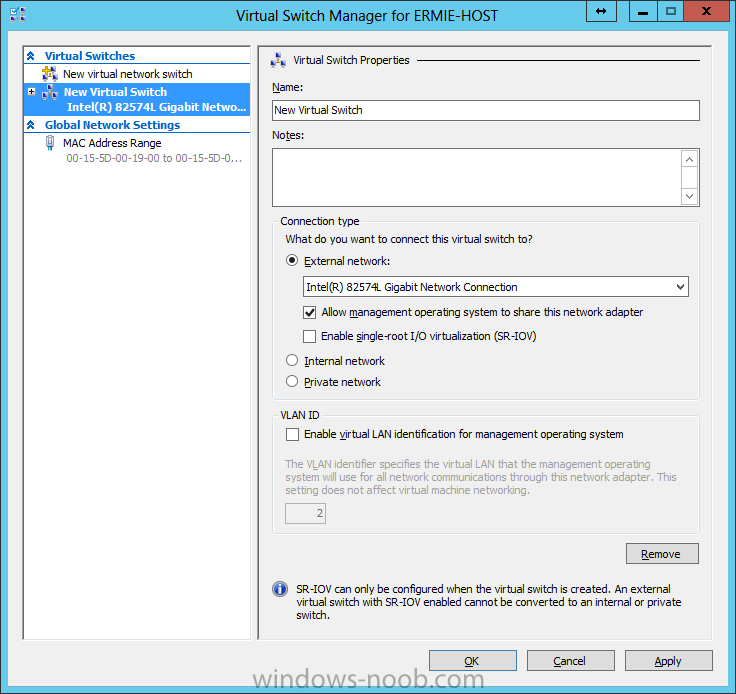
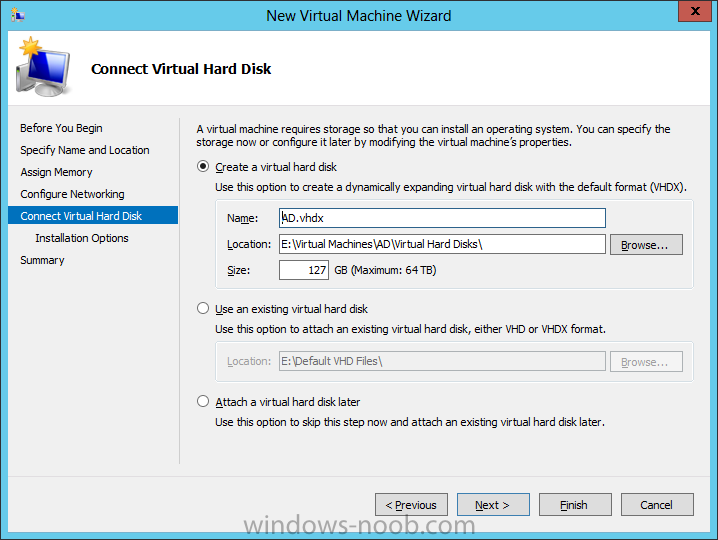
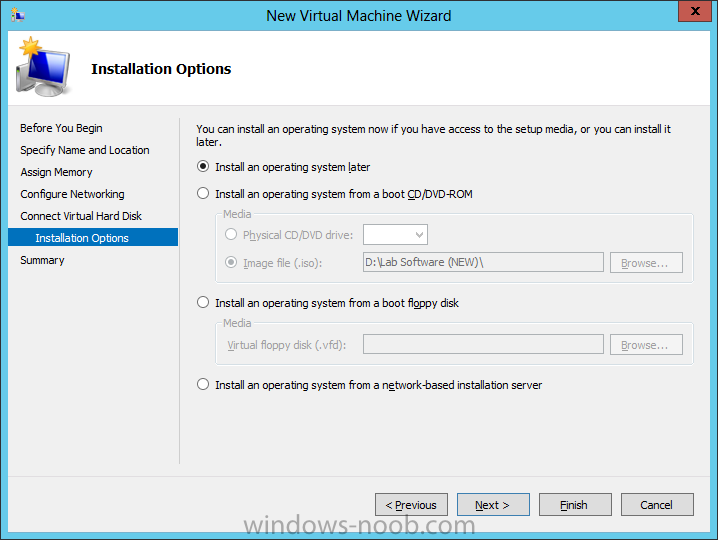
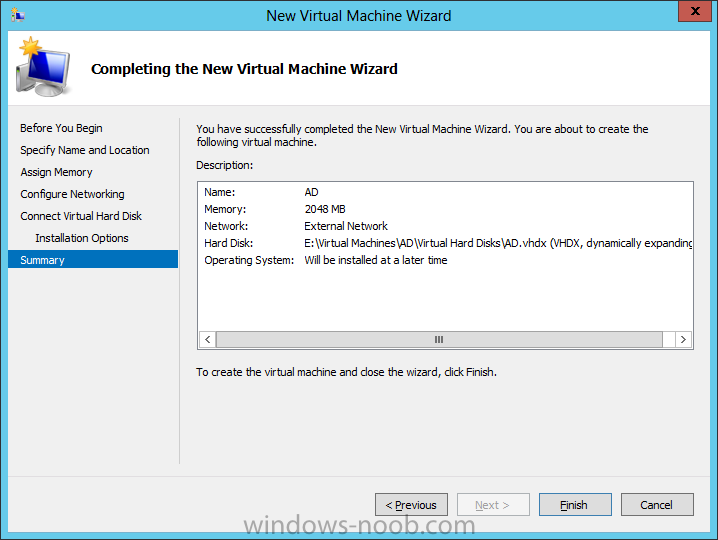
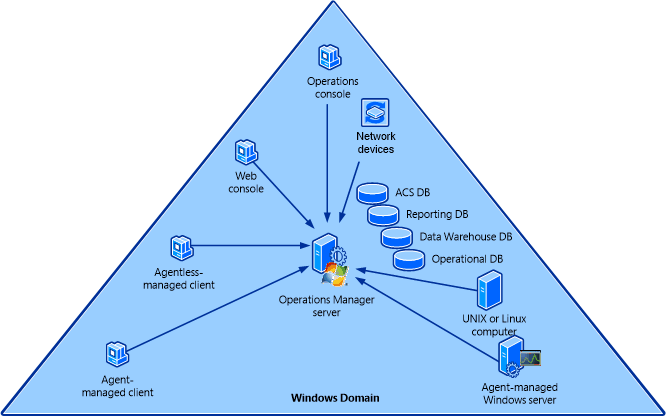
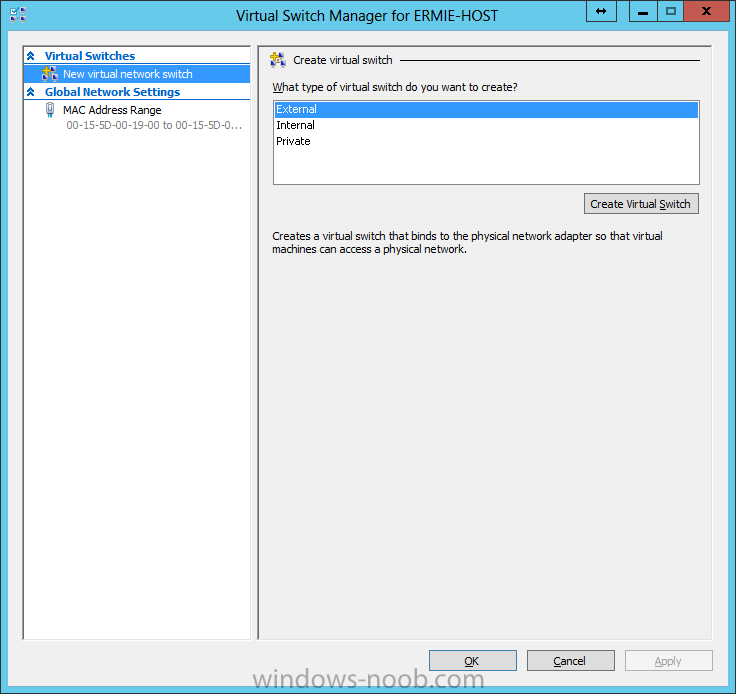
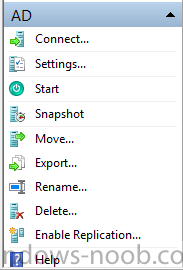
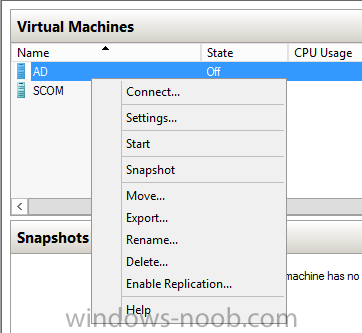
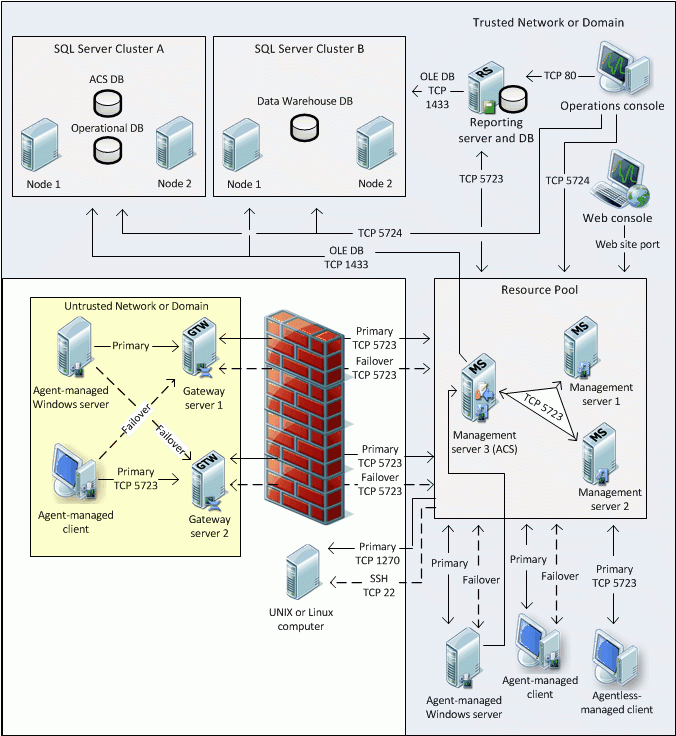
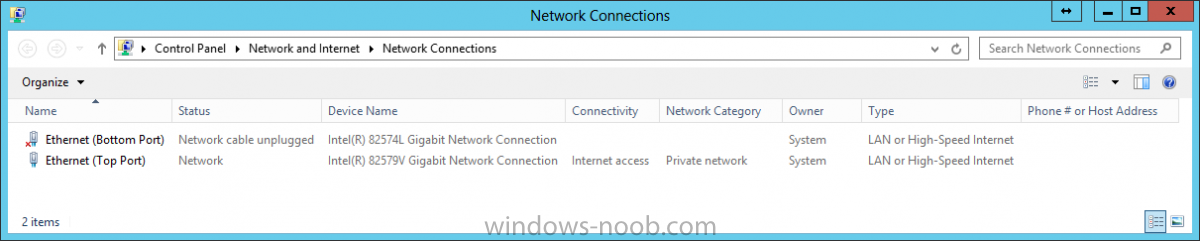
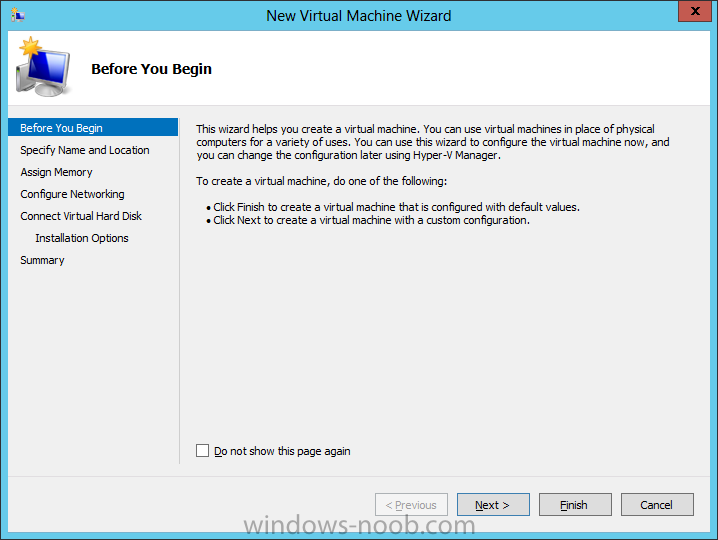
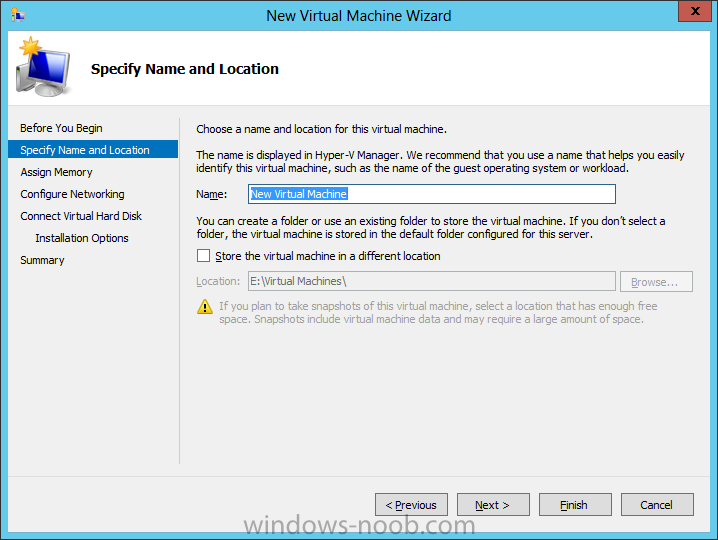
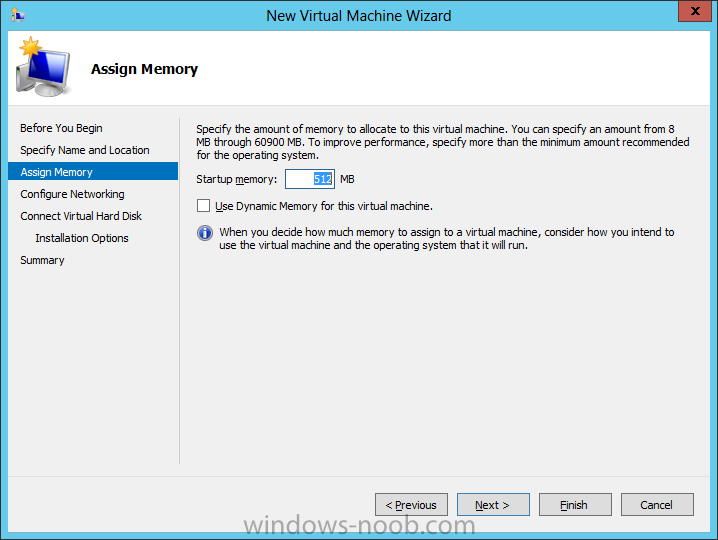
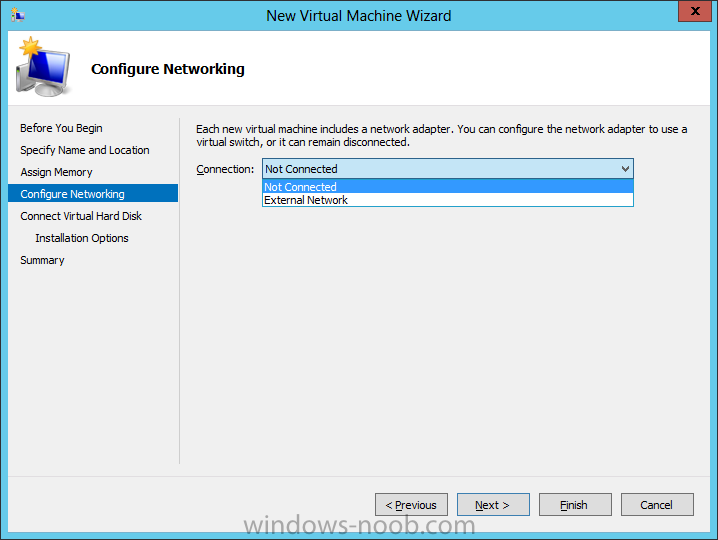
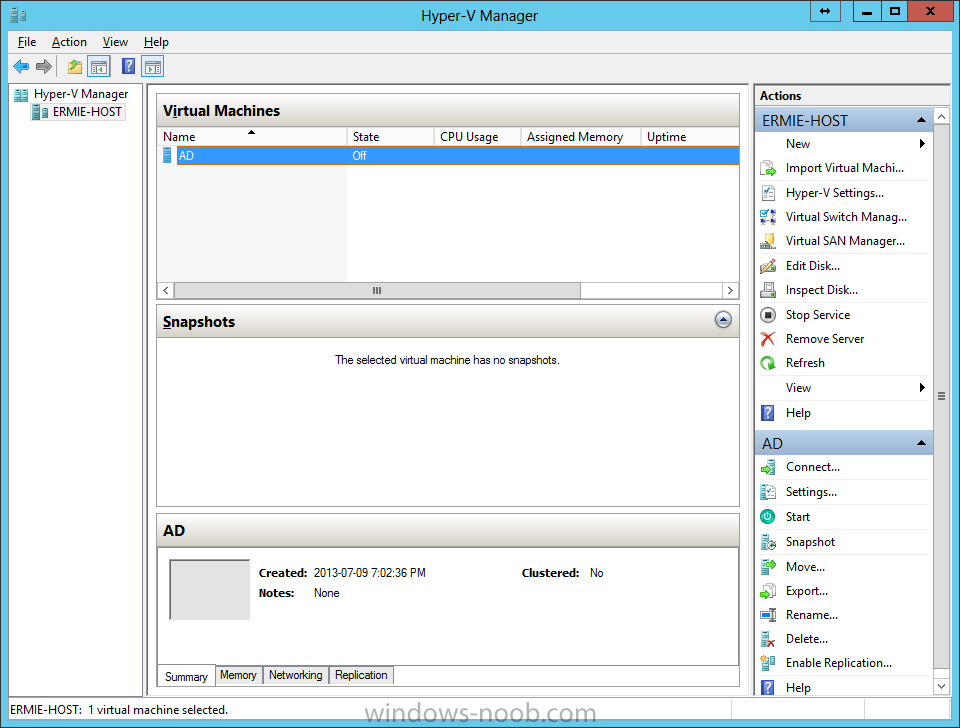
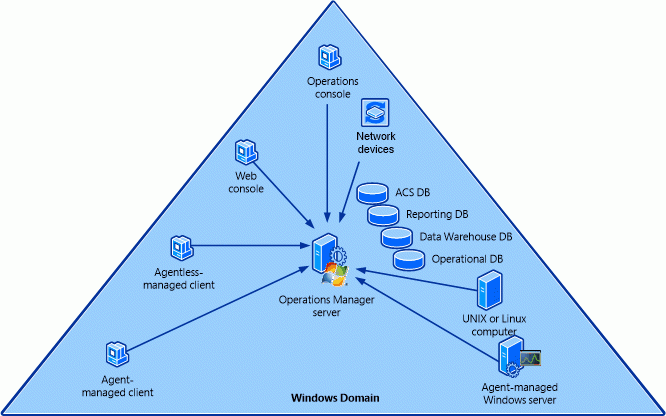
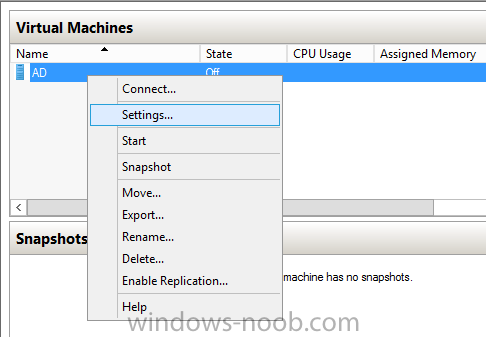
SCOM 2012 SP1 in a LAB – Installation (Part A – Create The Lab Environment) TechNet Recommended Reading: Release Notes for the System Center 2012 Operations Manager SP1: http://technet.microsoft.com/en-us/library/jj656651.aspx Deploying System Center 2012 - Operations Manager: http://technet.microsoft.com/en-us/library/hh278852.aspx System Requirements: http://technet.microsoft.com/en-us/library/jj656654.aspx Getting Started with System Center 2012 - Operations Manager: http://technet.microsoft.com/en-us/library/hh509025.aspx What’s New in Operations Manager: http://go.microsoft.com/fwlink/p/?LinkID=223462 Key Concepts for Operations Manager: http://go.microsoft.com/fwlink/p/?LinkID=224022 Operations Manager Release Notes: http://go.microsoft.com/fwlink/?LinkID=221147 Operations Manager for System Center 2012 Supported Configurations: http://go.microsoft.com/fwlink/p/?LinkId=223642 Deployment Guide for Operations Manager: http://go.microsoft.com/fwlink/p/?LinkID=213291 Operations Guide for Operations Manager: http://go.microsoft.com/fwlink/p/?LinkID=207751 Hardware Requirements Note: The following page on TechNet describes the recommend hardware requirements for the Management Server(s) along with other features. Use this information to help plan for hardware requirements for your Management Server(s). Management Server Disk space: %SYSTEMDRIVE% requires at least 1024 MB free hard disk space. Server Operating System: must be Windows Server 2008 R2 SP1, Windows Server 2012, or Windows Server 2012 Core Installation. Processor Architecture: must be x64. Windows PowerShell version: Windows PowerShell version 2.0, or Windows PowerShell version 3.0. Windows Remote Management: Windows Remote Management must be enabled for the management server. .NET Framework 4 is required. Installation There are 2 different deployment scenarios that you can use: Single-Server, and Distributed. Microsoft has created 2 diagrams to show the different deployments. In our example, we are going to use the Single-Server type. Single-Server Deployment of Operations Manager Distributed Deployment of Operations Manager For the purpose of our demonstration and simplicity, we are going to use the single server method, and install all features/elements within 1 server, this includes the databases, web console, reporting, ACS, etc. Introduction: I use Hyper-V in my LAB and that's what all these virtual machines will be running on. In my lab, I have Windows Server 2012 Datacenter installed as the server OS on the host machine. All other virtual machines will be running Windows Server 2012 Standard edition, with the graphical user interface (GUI). My hardware consists of the following: § Intel Xeon E5-2620 § Asus P90X79 WS § 64 GB G.Skill Ripjaws Z Series § 2 x 256 GB Samsung 840 Pro Series SSD High Level Plan Here is a high level of what we are going to complete in this initial part of the series. 1. Create the Lab Environment 2. Install the Operating System 3. Install Active Directory Domain Services 4. Install SQL Server 5. Install System Center Operations Manager In a later posts, we will also cover installing agents, reporting/dashboards, management packs, ACS, etc. So now let’s start with the first part, creating the lab environment. Create the Lab Environment: Hyper-V Configuration As mentioned, my environment uses Hyper-V. So, we’re going to start by configuring Hyper-V for our needs, and creating the Virtual Machines (VMs) required for our lab. The first thing we need to do is setup a Virtual Switch for the VMs to connect through. Launch Server Manager, click on Tools, and select Hyper-V Manager. When Hyper-V loads, it will have nothing in it. Even if we were to create a VM, it wouldn’t have a network connection to use. So we’ll start with creating a Virtual Switch. As you can from my screenshot, I have 2 LAN ports on my host. One of them has a connection to my home network and the Internet. In the Hyper-V Manager, click the Virtual Switch Manager from the Actions pane. Now, click on the Create Virtual Switch button. From here, you now need to configure the virtual switch that your VMs will use. Give it a name to clearly identify it (in my case I called it ‘External Network’), and choose the connection type. For more information about virtual networks, see the following TechNet article: http://technet.microsoft.com/en-us/library/cc816585(v=ws.10).aspx. Here is an excerpt from the article: External virtual networks. Use this type when you want to provide virtual machines with access to a physical network to communicate with externally located servers and clients. This type of virtual network also allows virtual machines on the same virtualization server to communicate with each other. This type of network may also be available for use by the management operating system, depending on how you configure the networking. (The management operating system runs the Hyper-V role.) For more information, see “A closer look at external virtual networks” later in this topic. Internal virtual networks. Use this type when you want to allow communication between virtual machines on the same virtualization server and between virtual machines and the management operating system. This type of virtual network is commonly used to build a test environment in which you need to connect to the virtual machines from the management operating system. An internal virtual network is not bound to a physical network adapter. As a result, an internal virtual network is isolated from all external network traffic. Private virtual networks. Use this type when you want to allow communication only between virtual machines on the same virtualization server. A private virtual network is not bound to a physical network adapter. A private virtual network is isolated from all external network traffic on the virtualization server, as well any network traffic between the management operating system and the external network. This type of network is useful when you need to create an isolated networking environment, such as an isolated test domain. For our demonstration, we are going to use an External Network so that the VMs can communicate with the Host system. Make all the appropriate selections and so forth, and then press OK. You may encounter the following warning message. This is because we are remotely connecting to the Host machine using the same network connection that we are about to setup as a Virtual Switch (hence selecting the ‘Allow management operating system to share this network adapter’ checkbox). Press ‘Yes’ to the dialog. Now that we have the virtual switch setup, we can start creating VMs for our lab. Create the Virtual Machines Let’s now create the VM’s we will need for the lab, specifically one for Active Directory, and another for SCOM (since we are install all roles within the same server). In Hyper-V Manager, from the Actions pane, click on New and choose Virtual Machine. On the New Virtual Machine wizard beginning screen, click read the information presented and then click Next. Enter a name for the VM. Note that this is NOT the name the VM will have within the Operating System (unless you name it the same), but rather, used as an identifier in Hyper-V Manager. After you have entered a name, click Next. Now assign the amount of memory you want your VM to have, and then press Next. This is the screen where you connect your VM to the network that we created, then press Next. This is the screen where you configure how large a hard drive the VM will have. Make the appropriate customizations and click Next. For the Installation Options, choose if you will install an OS later, or if you want to use an ISO, then click Next. On the Summary screen, review your selections and entries, and click Finish. Once the VM is created, it will appear in the Hyper-V Manager. If you want to configure further settings, like the number of CPUs and mounting an OS ISO, right click on the VM and choose Settings or click on Settings from the Actions pane. Repeat these steps for each VM you need to create, in our case one for Active Directory and another for SCOM. Here are the settings I have used for each of the VM’s: Active Directory: Virtual Machine Name: AD Memory: 2048 MB NOTE: Active Directory doesn't need 2 GB of RAM, it will run fine with 512 MB. I just increased the RAM so that the OS would install/respond faster. CPUs: 2 OS: Windows Server 2012 SCOM: Virtual Machine Name: SCOM Memory: 8192 MBNOTE: You may need to increase the amount of RAM this VM has, depending on performance. CPUs: 2 OS: Windows Server 2012 In the next part, we will install the Operating System, so stay tuned.


- 1 reply
-
- 2
-

-
- SCOM
- Operations Manager
- (and 3 more)
-
SCOM Alert vs Distributed application
AdinE replied to petebuk's question in System Center Operations Manager
First, I would start with importing the Windows Server Management Pack from the System Center Marketplace (found here: http://systemcenter.pinpoint.microsoft.com/en-US/home). Specifically look for the Windows Server Operating System Monitoring Management Pack (here's the link: http://systemcenter.pinpoint.microsoft.com/en-US/applications/Windows-Server-Operating-System-Monitoring-Management-Pack-12884901987). When you import this MP, there is a disk space Monitor that you can override to customize for your desired "Warning" and "Critical" levels for disk free space. -
System Center 2012 Operations Manager SP1 - Introduction
AdinE replied to AdinE's question in System Center Operations Manager
Hello everyone, Sorry for the delay, I've been really busy lately (starting a new job, etc.). I have the first part of the guide I am creating ready to post, I'm just having some issues with including the images. If anyone can educate me on how to include the images, so that you don't have a bunch of just text to look at, I'll be able to post the 'Installation Part A' for everyone. UPDATE: In the interest of providing at least something to assist everyone, I have posted the first part on my own Wordpress blog, which is here: http://adinermie.wordpress.com/ UPDATE 2: Per request, I have posted within these forums, the first part of the guide. You can find it here: http://www.windows-noob.com/forums/index.php?/topic/8582-scom-2012-sp1-in-a-lab-installation-part-a-create-the-lab-environment/. Enjoy, and I'm open to any feedback. -
You should download the Windows Server DHCP Management Pack and read through the documentation (found here: http://www.microsoft.com/en-us/download/details.aspx?id=8770). For example: Feature Summary This management pack alerts you of the following conditions: Ability to monitor for DHCP and DHCPv6 service availability (stopped state) Ability to monitor for startup failures that are due to issues found within service initialization data Ability to monitor for startup failures that are due to network or communication issues Ability to monitor for unexpected service terminations Ability to monitor DHCP and DHCPv6 scope Ability to detect when unauthorized DHCP and DHCPv6 servers are on the network Ability to detect when DHCP and DHCPv6 are unable to restore the DHCP database Ability to monitor DHCP NAP related events Ability to monitor the Link Layer filtering feature that is used to allow or deny the servicing of IP address to clients Ability to monitor the Name Protection feature that is used to prevent name squatting issues caused due to non-Windows operating system computers on the network that register with DNS using a name that is already with DNS Ability to monitor the scope with delay feature that is used to prevent exhaustion of IP addresses from a scope especially those deployed for redundancy such as split-scope Ability to monitor the configuration changes made on DHCP and DHCPv6 scopes and certain features at DHCP and DHCPv6 server levels
-
All you need to do is run the Setup.exe for SCOM itself on you workstation, and choose to install the Administrator Console only. After the install, it will ask you for your RMS server, and then it will establish its connection.
-
bingobongo, First off, custom management pack authorization is VERY complicated. It's not just simply creating XML files. There are rules, monitors, dependencies, classes, etc. Second, you can create Management Packs from within the SCOM console, but this is usually in reference to creating customization/overrides off of existing management packs. Microsoft has existing Management Packs for all the main technology platforms (i.e. SQL, Exchange, Windows Server, AD, IIS, etc.) They are available at the System Center Marketplace: http://systemcenter.pinpoint.microsoft.com/en-US/home Third, if you do actually still want to create new custom Management Packs from scratch, SCOM has a seperate Management Pack Authoring Tool with the Authorizing Resource Kit: http://www.microsoft.com/en-ca/download/details.aspx?id=18222. However, that's only in reference to SCOM 2007 R2, and not SCOM 2012 (though it will work for most things). Fourth, Once you create a Management Pack (using a tool outside of the SCOM console itself), you will then need to Import it into SCOM. If you create custom MPs in the SCOM console, then it is already a part of the system.
-
SCOM 2012 - Event Log Alerts?!?
AdinE replied to jonasthehobbit's question in System Center Operations Manager
Jonasthehobbit, You will have to create an Override for that monitor in reference to the Windows Server 2012 systems. Take a look at this link: http://kevingreeneitblog.blogspot.ca/2013/02/scom-opsmgr-hyper-v-2008-mp-issue.html It seems to answer your question in relation to Hyper-V 2008 and 2012. I can't take credit for the answer, but I will post it here for quick/easy reference. Here's how you resolve the issue: First up, click on the Authoring button from the wunderbar in the SCOM Operations console as below Now click on the Monitors view and then select the Scope button up top to scope your search criteria. When the Scope Management Pack Objects window appears, choose the View All Targets option and then type Hyper-V in the Look For field as shown below and then click OK to continue Back at the now scoped Monitors window, in the Look For field at the top of the screen, typePort Connectivity as shown in the screenshot below and then hit the Find Now button You should now be presented with the Port Connectivity monitor that forms part of the Microsoft Windows Hyper-V 2008 Monitoring management pack and this is one of the monitors that we need to disable for the Windows Server 2012 Hyper-V servers If we double click on the Port Connectivity monitor to view its properties, we can see that its management pack is indeed the Microsoft Windows Hyper-V 2008 Monitoring one and that its virtual target is the Hyper-V Virtual Network class. To confirm that this monitor is attempting to open the Microsoft-Windows-Hyper-V-Network-Admin event log that was mentioned in the original error message, we need to click on the Event Log (Unhealthy Events) tab as shown below. Hit the Close button to go back to the Monitors screen to disable this monitor. Right-click on the Port Connectivity monitor, choose Overrides, select Disable the Monitor and choose the group or object of class that represents your Windows Server 2012 servers. In this example, I've selected an Object of Class: Hyper-V Virtual Network and I am presented with all of the virtual networks that SCOM has discovered as shown below. We can see in the screenshot that there are two entries here for Microsoft Network Adapter Multiplexor Driver - Virtual Switch and these two entries represent the two Windows Server 2012 Hyper-V hosts that I have deployed SCOM agents to. These are also the two servers that I constantly get the warning health state and alert about not being able to access the windows event log. If I choose one of these entries and then hit OK, I will then be to the Override Properties window with the Enabled option set to False (as I had selected to disable this monitor earlier.) All that's left for me to do now is to add in a description for the override and choose an unsealed management pack to store it in - see below for details on what I've done Once you've made the override, click on the OK button to close the Override properties window to return to the Monitors screen. You will need to repeat this process again for one more monitor - this time selecting the Port Disconnectivity one as shown below Once you have disabled both monitors for all Windows Server 2012 Hyper-V servers in your environment, then this alert will disappear and health states will return to a valid representation of the agents. -
Unauthorized Login for servers... would like a SQL one
AdinE replied to Elemanzer's question in System Center Operations Manager
Elemanzer, are you trying to monitor when an actual users logs into a SQL server (i.e. the actual Windows server) using a Service Account, or when a Service Account connects with/to a SQL Server instance? Also, why did you create a custom monitor to monitor when someone other than you logs into a server, instead of implementing ACS which is much more robust in its data collection/reporting? -
Removed a child site by mistake using PREINST /DELSITE command
AdinE replied to sderman1's question in System Center Operations Manager
PS: This post is in the wrong forum. This is the SCOM area. You might get more applicable assistance if you post in the SCCM area. -
SCOM2012 system requirements
AdinE replied to djruslan's question in System Center Operations Manager
This isn't really just a SCOM question, but more of an architecture question. To answer it, in relation to SCOM, you can find the Operational Database requirements here: http://technet.microsoft.com/en-us/library/jj656649.aspx#BKMK_RBF_OperationsDatabase For quick reference, this is what it is. But you also have to factor in SQL clustering with other System Center databases, and don't forget the SSRS reporting. I know for a fact that SCOM Reporting can not be on the same instance as SCCM Reporting. Operational Database Disk space: The operational database must have at least 1024 MB free disk space. This is enforced at the time of database creation, and it will likely grow significantly. For information about SQL Server Planning, see Installing SQL Server 2008 or Installing SQL Server 2008 R2. File system: %SYSTEMDRIVE% must be formatted with the NTFS file system. Operating System: Windows Server 2008 SP2 or Windows Server 2008 R2 SP1. Processor Architecture: x64. Windows Installer version: at least Windows Installer 3.1. Microsoft SQL Server: SQL Server 2008 SP1, SQL Server 2008 SP2, SQL Server 2008 SP3, SQL Server 2008 R2, SQL Server 2008 R2 SP1, or SQL Server 2008 R2 SP2. SQL Server Full Text Search is required. Both .NET Framework 3.5 SP1 and .NET Framework 4 are required. For more information, see the following documents: .NET Framework 3.5 SP1 redistributable package .NET Framework 4 redistributable package -
SCOM-2012 - Discovering SharePoint & BizTalk
AdinE replied to Hamsaffar1's question in System Center Operations Manager
Hamsaffar1, Can you please elaborate a little on the issue? Do you have SCOM Agents installed on your SharePoint/BizTalk servers, and it is just not picking up the sub-elements? Or do you mean that you can't install the Agent on SharePoint/BizTalk servers? -
Is SCOM only for Servers or for clients too?
AdinE replied to Frosty5F11's question in System Center Operations Manager
Willisj318 is right, SCOM can monitor workstations, though I haven't seen that feature used very much. It's more adept at monitoring servers, and specific technology stacks/platforms. None-the-less, here is an excerpt: Client system monitoring—Added in recent updates to SCOM is the ability to monitor and report on not just servers, but also client workstations in a network. Client system monitoring is commonly used to monitor and help manage and support critical client systems. A critical client system might be a laptop that belongs to a key executive, or it could be a workstation that serves as a print server or data collection device. Whatever the case, SCOM has the ability to monitor servers as well as client systems in the enterprise. Source: http://www.informit.com/articles/article.aspx?p=1581426&seqNum=3 -
Power Management, and being able to modify the settings around such, is not accomplished via SCOM, but through the Client Settings with SCCM. If you (corporately) are licensed for SCOM, you are probably licensed for SCCM. Perhaps you could setup a POC/demo environment, to show whomever the value of implementing it, if power management is something that you want to be able to do.
-
Use Default MP for specific User
AdinE replied to maktoum's question in System Center Operations Manager
Maktoum, I would have to test it out in my lab to confirm the settings/selections you prose, however, I would think that a better/more flexible option would be for the SQL Admins to setup the various SQL-based views, dashboards, etc. customized for their specific servers into their own Workspace area. -
Servers in 1 domain apper offline
AdinE replied to wooju's question in System Center Operations Manager
Wooju, do you have the agents in the other domain (let's call it Domain reporting to a Management Server in Domain A? There may be a communication breakdown, or maybe a security/authentication issue. See this post about deploying agents across multiple domains: http://technet.microsoft.com/en-us/library/cc179947.aspx I'm wondering if you installed a separate Management Server or a Gateway in Domain B, if that would help. Because, then all the agents in Domain B would report their data/communicate with Management Server/Gateway in Domain B, which would then compress the data and send it back to Domain A (which I assume is where your main SCOM servers and database reside). -
StefanWe, just to make sure I clearly understand your environment and what you want to achieve, I'm going to attempt to summarize it. You have a physical system running Windows Server 2012, with the Hyper-V role installed. On that Hyper-V host, you have 'X' number of VM's running on it. You are trying to get performance data (CPU usage, Memory, Network, Disk, etc.) about/from your VM's. You didn't mention which Operating System (OS) your VM's are running, but I am assuming they are running a Windows Server OS. If this is so, then you DO need to install the SCOM Agent onto each VM that you want to collect this performance data from. The Agent Proxy setting won't allow you to collect performance data from Hyper-V VM's by just having the Agent installed on the host. See this posting: http://social.technet.microsoft.com/Forums/systemcenter/en-US/a373b34d-9b01-486c-a4f2-4b1f19bea46e/why-enable-scom-proxy-agent- Therefore, you will need to install the Agent onto each VM you want to collect data from. If you have a lot (i.e. you are in a Production environment), then if you can obtain a list, and copy/paste that into the Agent Deployment wizard, SCOM will use AD to validate/resolve the name/machine FQDN. Let me know if you have any other SCOM questions, as that is my #1 tool out of the System Center suite that I specialize in.
-
install SOCM 2012 SP1 and SQL Server 2008 R2
AdinE replied to elit's question in System Center Operations Manager
Based on your statement: "SCOM 2012 SP1 and SQL Server 2008 R2 resides on one server", I don't think you have to worry about firewall ports since SCOM is connecting to itself and not a different server for SQL/Reporting. However, based on the error message, did you confirm that you have installed SQL Server Reporting Services (SSRS) along with the Database engine? It doesn't automatically install the reporting feature, you have to check that off. It sounds like it is looking for an SSRS instance. Even though you have SQL Server (database) installed, which it detects, it can't find the Reporting Services of that system. -
Hello All, Inspired by the awesome SCCM 2012 guides, which were extremely helpful, and based on the numerous posts requesting guides on SCOM, I have decided to contribute to this site and create some. As an FYI on my background, I hold many certifications, and have been working with System Center for several years. Although that may not seem like a lot, I am a firm believer in the number of years don't fully represent the depth of experience. In my example, I worked with the Ministry of Transportation of Ontario, and specialized with SCOM. In fact it is the ONLY thing that I worked on for several years. Originally when I joined the Operations team, I had to re-build their SCOM environment from the ground up! It was such a mess, that even having Microsoft remote it to assist in fixing all the issues, agreed. As a testimony to my skill-set with SCOM, I rebuilt the entire environment in 2 weeks, when it took the original consultants 6 months! But, enough of my background, if you are interested in further details, please feel free to check out my LinkedIn profile: http://ca.linkedin.com/in/adinermie/. So to start, my home lab is running Windows Server 2012 with Hyper-V 3.0. I have a VM prepared (with Server 2012 as well); and have one VM for each of the System Center products. I will use my lab to write about the various System Center products. So enough of my rambling, let's start working with SCOM 2012 SP1. First up, pre-reqs and installation (stay tuned).