Francis Tran
-
Posts
3 -
Joined
-
Last visited
Francis Tran's Achievements
")
Newbie (1/14)
0
Reputation
-
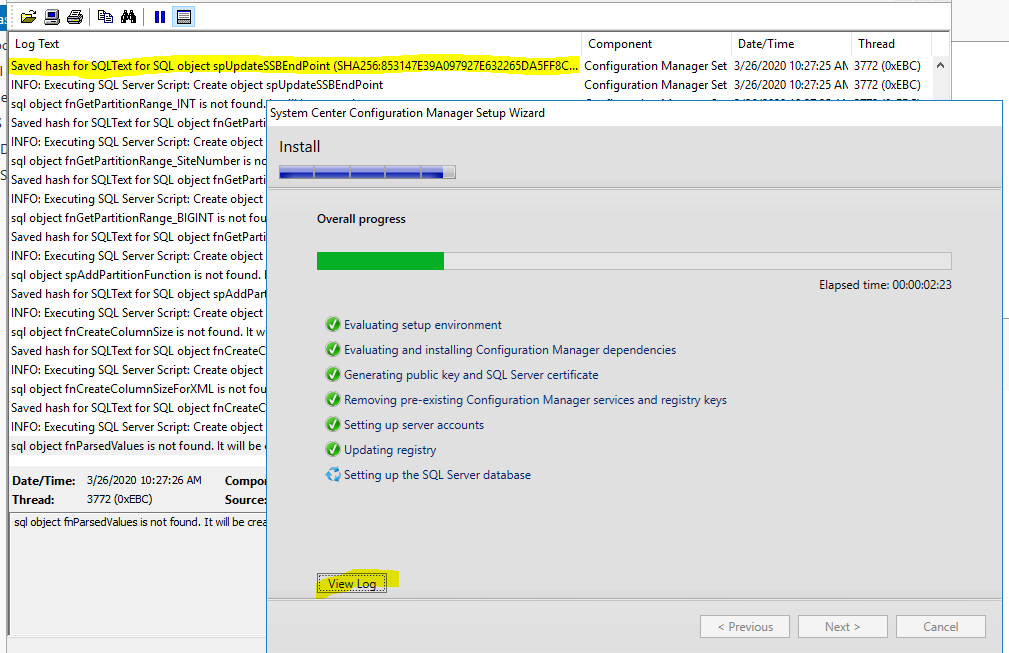
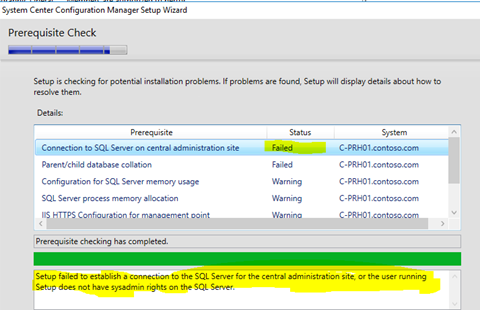
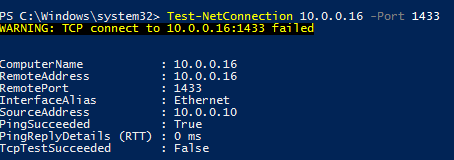
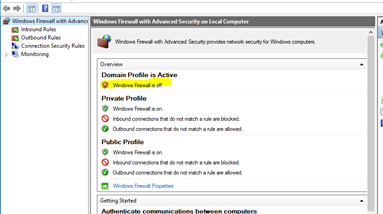
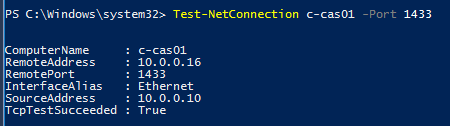
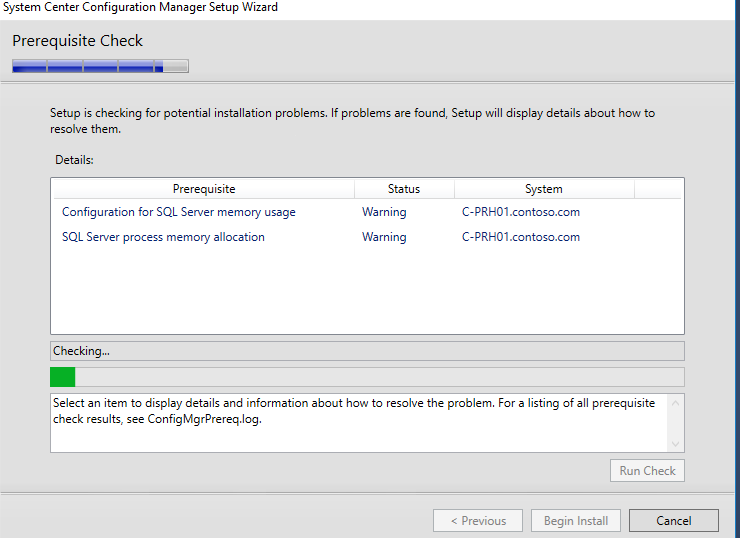
SCCM setup failed to establish a connection to the SQL Server for the Central Administration Site ... On the Primary Server : Test Test-NetConnection C-CAS01.contoso.com -port 1433 On the Central Site Server: Netstat -a | find /I “1433” Result is good, that mean it is not SQL problem, Check if proxy or FW blockage: Go to Windows Firewall and turn it off: Test again : Test-NetConnection C-CAS01.contoso.com -port 1433 Now SCCM Setup should be good again!

-
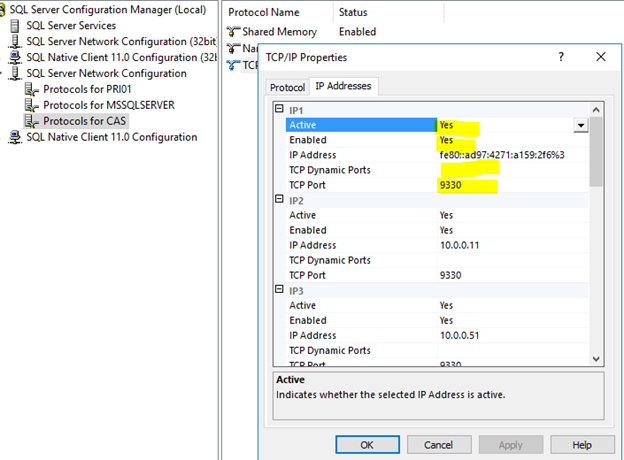
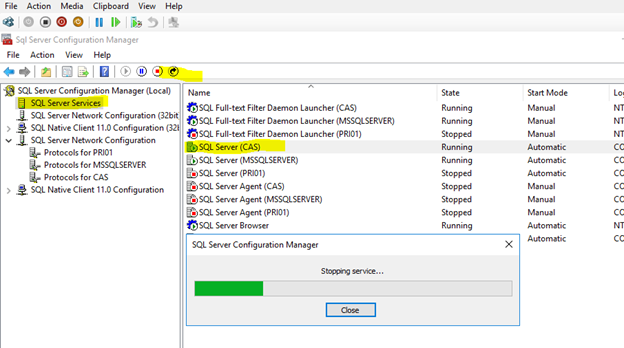
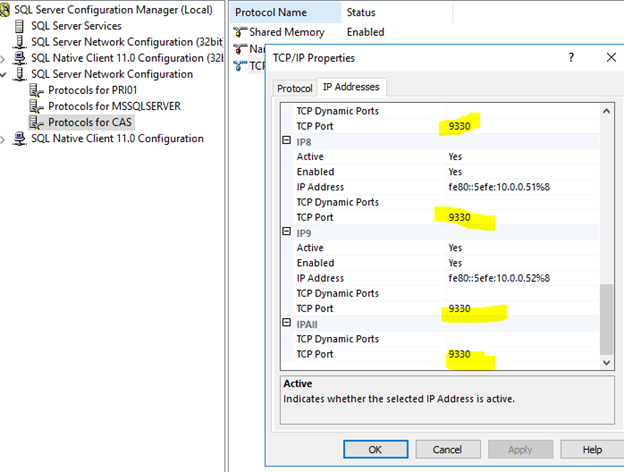
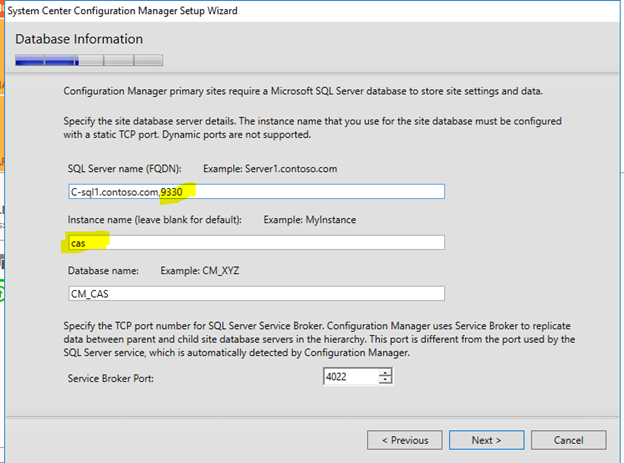
SCCM SETUP WITH DIFFERENT SQL PORT SQL SERVER CONFIGURATION MANAGER: Make sure all TCP Dynamic Ports are blank For every IP interface change the "TCP Port" field to your chosen static port For the "IP All" Interface change the value of the "TCP Port" field to your chosen Static Port Restart the SQL Engine : ON SCCM SETUP (CENTRAL SITE, PRIMARY SITE) Use comma and port number to specified port besides FQDN Continue with the setup as usual. You could do the same when setup WSUS Database, SCCM Primary Site Database, ... Continue monitoring the status of setup progress by clicking on view log button


-
SYMPTOM: Windows PE 1511 initialization Network Connection failed with error code 0x80220014 or Windows PE 1703, 1709 initialization Network Connection failed with error code 0x80040154 Smsts.log: m_pImpl->AddAdapterTcpIpSettings( XMLAnswerFileImpl::WindowsPE, adapterInfo ), HRESULT=80220014 pAnswerFile->AddNetworkAdapter(adapterInfo), HRESULT=80220014 Failed to configure adapter 0 adapterSettings.Configure( pAnswerFile ), HRESULT=80220014 Execution failed with error 80220014 CAUSE: boot.wim contained wrong registry configuration. SOLUTION: replace schema.dat of boot.wim from hotfix More detailed at : https://support.microsoft.com/en-us/help/3143760/windows-pe-boot-images-don-t-initialize-in-system-center-configuration ______________________________DETAIL__________________________________ You could down load hotfix at : https://support.microsoft.com/en-us/hotfix/kbhotfix?kbnum=3143760&kbln=en-US Hotfix include: schema-x64.dat (for WinPE 64bits) and schema-x86.dat (for WinPE 32bits). They must be renamed to "schema.dat" before injected to boot.wim Step 1: Preparation Copy the boot.wim to a directory of your workstation with "Deployment and Imaging Tool" 2. Start an elevated “Deployment and Imaging Tools Environment” command prompt. Step 2: Prepare Windows PE dism /mount-wim /wimfile:C:\temp\WinPEx86\boot.wim /index:1 /mountdir:C:\temp\WinPEx86\mount Step 3: Save schema-x86.dat state Back up the permissions that are applied to the existing schema-x86.dat file before you replace it. To back up the file, type the following command, and then press Enter: icacls c:\Temp\WinPEx86\mount\Windows\System32\schema.dat /save "%temp%\AclFile" Step 4: Update the schema-x86.dat file To replace the schema-x86.dat file that has the updated version, you must take ownership of the file and grant permissions to the local administrators group. To do this, type the following commands, and then press Enter after each command: takeown /F c:\Temp\WinPEx86\mount\Windows\System32\schema.dat /A icacls c:\Temp\WinPEx86\mount\Windows\System32\schema.dat /grant BUILTIN\Administrators:(F) xcopy c:\Temp\WinPEx86\schema-x86.dat c:\Temp\WinPEx86\mount\Windows\System32\schema.dat /Y Step 5: Reset permissions and ownership When the schema-x86.dat file is replaced, the permissions saved in step 5 must be restored by running the following commands: icacls c:\Temp\WinPEx86\mount\Windows\System32\schema.dat /setowner "NT SERVICE\TrustedInstaller" Restore original permission on the schema-x86.dat file icacls c:\Temp\WinPEx86\mount\Windows\System32\ /restore "%temp%\AclFile" Step 6: Commit Windows PE changes Commit the changes to the boot.wim file. To do this, type the following command, and then press Enter: dism /unmount-wim /mountdir:c:\Temp\WinPEx86\mount /Commit Step 7: Add update boot image back to SCCM Step 8: Update distribution points