anyweb
-
Posts
9276 -
Joined
-
Last visited
-
Days Won
371
Everything posted by anyweb
-
MDOP requires a specific license from Microsoft, you need to talk to your Microsoft Technical Account Manager for assistance with that, cheers
-

How to retrieve the smstslogs During OSD
anyweb replied to Gregory B's question in Troubleshooting, Tools, Hints and Tips
nice post, i'll pin it ! keep it up -
did you do anything differently in relation to the lab setup ?
-
strange, in your configmgr status logs do you see any clues as to what the failure is ?
-
if you restart that server does it work then ?
-
well for bitlocker the system reserved partition contains the boot info for the disc so you need it intact,
-
reimage as in refresh ? or reimage as in new computer, please explain which you mean
-
and you definetly added the hyperv role to this server ?
-
how can I configure SCCM 2007 in Windows Server 2008 - Part 3
anyweb replied to anyweb's topic in Configuration Manager 2007
it's been renamed to Create Microsoft Deployment Task sequence (from memory, havnt got access to a lab at the moment), did you integrate MDT with SCCM ? -
click on See Details, what does it say ?
-
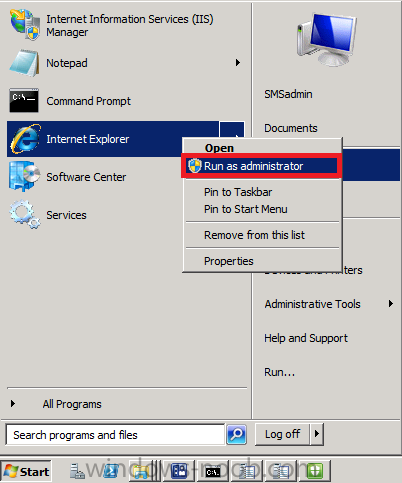
you didn't answer my question properly, are you starting Internet Explorer, by right clicking on it, and choosing Run As Administrator ?

-
are you starting internet explorer by right clicking it and choosing 'run as administrator' ?
-
Today we are sharing our plan to automatically upgrade Windows customers to the latest version of Internet Explorer available for their PC. This is an important step in helping to move the Web forward. We will start in January for customers in Australia and Brazil who have turned on automatic updating via Windows Update. Similar to our release of IE9 earlier this year, we will take a measured approach, scaling up over time. As always, when upgrading from one version of Internet Explorer to the next through Windows Update, the user’s home page, search provider, and default browser remains unchanged. Good for Consumers, Developers and Enterprises The Web overall is better – and safer – when more people run the most up-to-date browser. Our goal is to make sure that Windows customers have the most up-to-date and safest browsing experience possible, with the best protections against malicious software such as malware. For consumers, the safety benefits are one of the key reasons that the industry has been moving towards automatic updates as the norm. This is increasingly important since the biggest online threat these days is socially engineered malware, which typically targets outdated software like Web browsers. The latest Microsoft Security Intelligence Report, which is based on data from over 600 million systems in over 100 countries, is good reading to give you a sense of risks that stem from outdated software. We want to make updating to the best protection possible as fast and simple as we can for Windows customers. IE is how millions of Windows customers connect to the Web, so keeping that part of Windows updated at all times is critical to keeping them safe online. With automatic updates enabled through Windows Update, customers can receive IE9 and future versions of Internet Explorer seamlessly without any “update fatigue” issues. Wider deployment of the most up-to-date browser benefits the Web in other ways as well. Developers and online businesses can rely on better browsers to deliver richer and more capable Web experiences. We built IE9 with a focus on modern web standards and interoperability so that developers could spend less time coding for specific browsers and spend more time building the next big thing on the Web. More of the Web running an HTML5 capable browser, vs. something built ten years ago, is a great thing for developers and the businesses they support. Respecting Customer Choice and Control While the benefits of upgrading are numerous, we recognize that some organizations and individuals may want to opt-out and set their own upgrade pace. One of the things we’re committed to as we move to auto updates is striking the right balance for consumers and enterprises – getting consumers the most up-to-date version of their browser while allowing enterprises to update their browsers on their schedule. The Internet Explorer 8 and Internet Explorer 9 Automatic Update Blocker toolkits prevent automatic upgrades of IE for Windows customers who do not want them. Of course, we firmly believe that IE9 is the most compelling browser for business customers, and we want them to make the decision to upgrade at their convenience. Commercial customers can learn more about how this auto upgrade affects them here. Similarly, customers who have declined previous installations of IE8 or IE9 through Windows Update will not be automatically updated. Customers have the ability to uninstall updates and continue to receive support for the version of IE that came with their copy of Windows. And similar to organizations, consumers can block the update all together and upgrade on their own. Finally, future versions of IE will provide an option in the product for consumers to opt out of automatic upgrading. Peter Clarke, Chief Technology Officer for the Isle of Man government, recently talked about the importance of approach in moving the Web forward, while respecting customer choice: “Getting people to use the latest browser version has many benefits, chief among them is that newer browsers have better security features and keep users safer. The Internet Explorer team’s balanced approach to helping people move to the latest version is a good idea. Not only does it help individual users, it also takes into consideration the needs of enterprises.” Jeremiah Grossman, Chief Technology Officer and founder of WhiteHat Securityagrees as well, saying… "Automatic updates are a very good idea based on every piece of security research I've seen. Keeping software up to date - particularly Web browsers - is critical for online security. With that in mind, I'm pleased that Microsoft is moving toward an automatic update model, particularly since their approach balances the needs of enterprise customers who still need a mechanism to manage software updates." We are excited to help make the Web better by upgrading Windows customers to the latest version of Internet Explorer. Ryan Gavin General Manager, Internet Explorer Business and Marketing via > http://windowsteambl...-windows-7.aspx
-
using SCCM 2012 in a LAB - Part 2. Add SUP and WDS
anyweb replied to anyweb's topic in Configuration Manager 2012
1. I select this option as license files can be downloaded and stored in the WSUS local store. 2. yes you can run a WSUS cleanup monthly, I haven't tested the exact scenario you are asking about but if you beat me to it then please share your experiences -
The language specific BITS version wasn't found
anyweb replied to enginsoysal's topic in Configuration Manager 2007
have you verified DNS is working first of all, try nslookup does that work for you ? -
hi are you testing with Beta 2 or Release Candidate 1 ? RC1 is the current release and i have guides for it here
-
using Multiple Task Sequences via PXE
anyweb replied to anyweb's question in Troubleshooting, Tools, Hints and Tips
yes, no problem at all to advertise several task sequences to the All Unknown Computers collection and to use them like this the error you are seeing (if it occurs during applying the wim image) is network related, is it dropping the IP address ? try a different switch/location -
don't need to configure wds, are you sure you've advertised a ts to a collection that this computer is a member of ? try the unknown computers collection as well as a deploy OS collection and.. update both boot images to your dp's what is your SMSPXE.log file telling you about the problem ?
-
you can do it whatever works for you, you don't even have to use Update Lists unless you want to report on the deployments, this is only one way of doing it, feel free to post an alternative
-
if you pxe boot a client that is in the same vlan does it get the same error
-
Application push failure.
anyweb replied to mastergamer's question in Troubleshooting, Tools, Hints and Tips
can you zip up all the logs in C:\windows\ccm\logs and attach them here and i'll take a look is the application definetly on your distibutrion points ? is the configmgr client ok ? -
using SCCM 2012 in a LAB - Part 1. Installation
anyweb replied to anyweb's topic in Configuration Manager 2012
nothing strange about them, the SCCM box has 2gb RAM, 4gb is really recommended but in a lab 2gb seems to work fine, it's got 150GB hdd partitioned as os=30gb and d=rest of drive, the AD1 server (domain controller/dhcp/dns) is 512 mb ram and 30gb hdd, anything else you want to know ? i have created separate networks so for example #5_SCCM_RC is on a virtual network spanning 192.168.5.x and #3_SCCM_RC is 192.168.3.x means i can have multiple environments which are not interfering with each other -
using SCCM 2012 in a LAB - Part 1. Installation
anyweb replied to anyweb's topic in Configuration Manager 2012
sorry not following you KingsKawn, what's the issue exactly ? -
this should give you some ideas, look at all the snapshots ! same boxes were previously beta 2
-
this is the reason why you should virtualise everything in your lab, that way you can restore snapshots of BEFORE you started installing Beta 2 and you have a clean slate to work with, that's the way I do it, think ahead, virtualize now - install RC in the lab, snapshot each stage of the way, then when the code goes to RTM you can restore your clean boxes and start again