


anyweb
-
Posts
9,108 -
Joined
-
Last visited
-
Days Won
363
Posts posted by anyweb
-
-
This Configuration Pack helps track configuration compliance for your Configuration Manager 2007 site server roles, such as management points, distribution points, and software update points.
Overview
Software installation errors and misconfigurations compromise security and stability, resulting in escalated support costs. The System Center Configuration Manager 2007 Configuration Pack can help prevent errors, increasing your organizational uptime and helping you build a more secure and reliable Configuration Manager 2007 infrastructure. This Configuration Pack contains Configuration Items intended to manage your Configuration Manager 2007 site system roles using the desired configuration management component in Configuration Manager 2007. This configuration pack monitors the following site system roles: management points, distribution points, and software update points. The Configuration Pack can also monitor Windows Server Update Services (WSUS) components on software update points or upstream WSUS servers. To manage your site system roles with this Configuration Pack, import and assign the Microsoft System Center Configuration Manager 2007 Server Roles configuration baseline to a collection which contains your Configuration Manager 2007 site systems. While there is one configuration baseline for all site systems, it evaluates compliance only for roles configured on the site system. For example, if a computer has only the distribution point role, it will not be evaluated for management point configurations. To understand in detail what each configuration item will be evaluating, review the properties of that configuration Iitem in the context of the Configuration Manager 2007 Server Role being addressed.
System Center Configuration Manager 2007 site roles covered:
• Management points
• Distribution points
• Software update points
download it here
-
This Configuration Pack helps track common software mis-configurations which might make client computers more vulnerable to attack.
Software installation errors and misconfigurations compromise security and stability, resulting in escalated support costs.
System Center Configuration Manager 2007 Vulnerability Assessment Configuration Pack can help prevent errors, increasing your organizational uptime and helping you build a more secure infrastructure. This configuration pack provides vulnerability assessment reporting for common software misconfigurations using the desired configuration management component in Configuration Manager 2007. The Configuration Manager 2007 Vulnerability Assessment Configuration Pack monitors the configuration of Microsoft Windows operating systems, Internet Explorer, Microsoft Office, SQL Server, and Internet Information Services (IIS). To use this Configuration Pack, import and assign the three configuration baselines (Vulnerability Assessment: IIS Baseline, Vulnerability Assessment: SQL Server Baseline, Vulnerability Assessment: Windows Baseline) to a collection containing the computers you want to monitor. To understand in detail what each configuration item will be evaluating, review the properties of the configuration item.
Scenarios:
• Scan for potential security issues that may exist because of misconfigurations.
• Example checks:
o Are unnecessary services installed and running?
o Do shared folders have appropriate permissions?
o Is Windows Firewall enabled?
o Are strong passwords enforced?
o Are unsecured guest accounts enabled?
download it here
-
-
Note: if you are going to use SCCM to manage patch management, then do NOT run the WSUS configuration wizard below
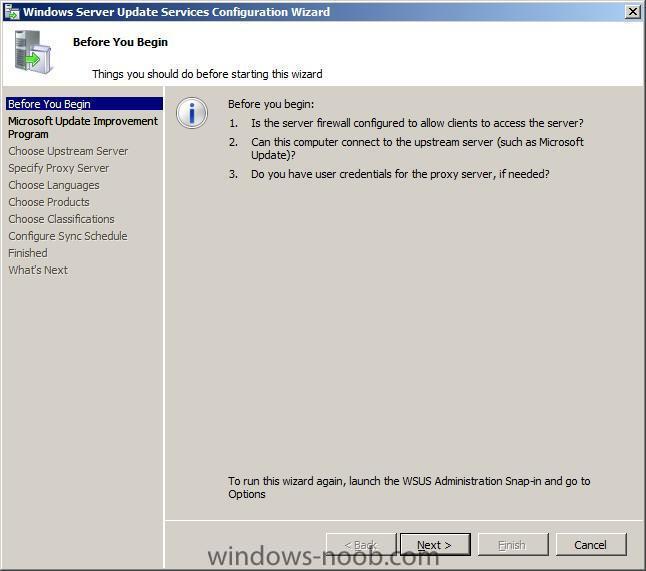
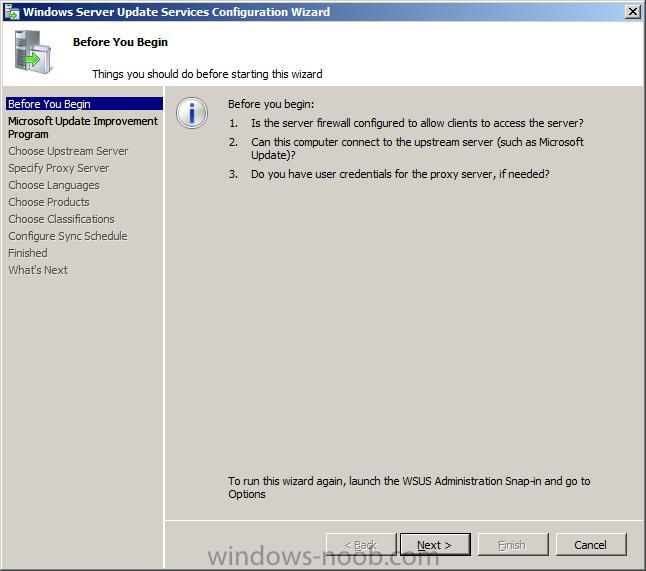
Starting WSUS for the first time
Click on Start/All Programs/Administrative tools/Microsoft Windows Server Update Services 3.0 SP1
this will start a wizard (pictured below) click next
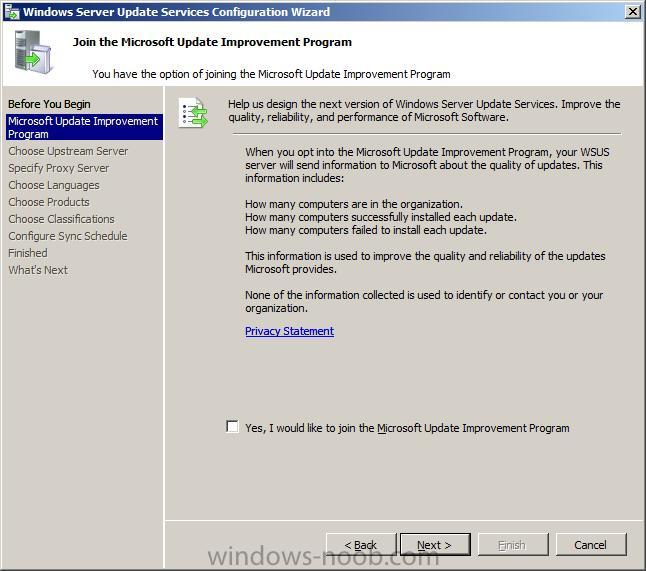
choose to opt in or opt out (default is opt in)

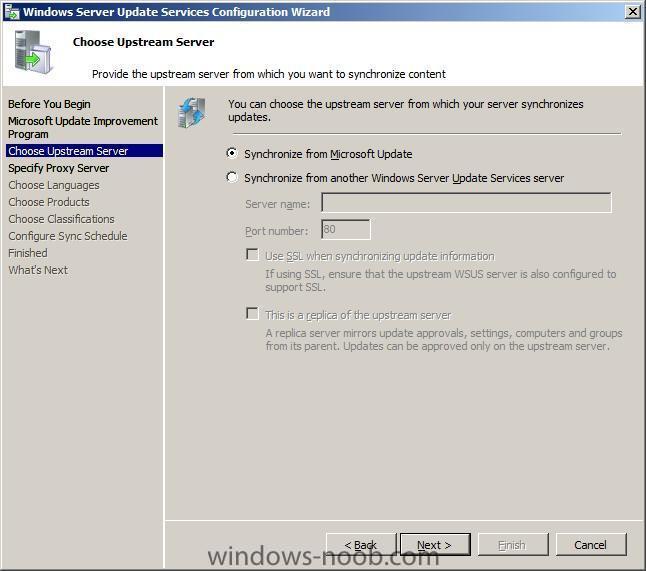
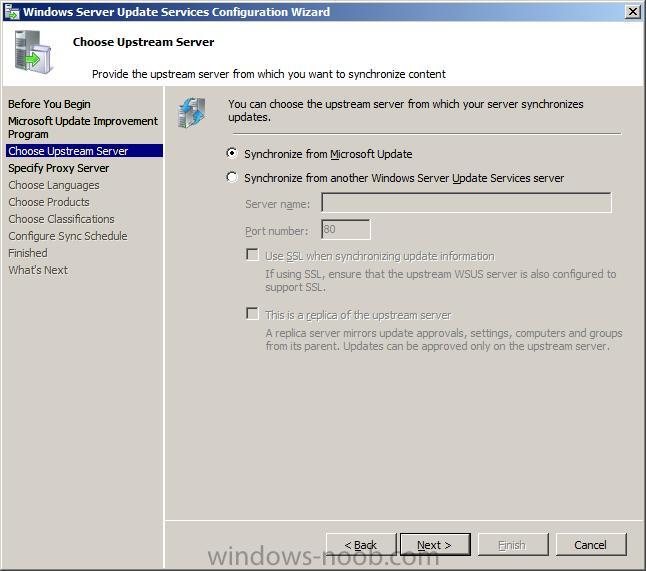
Next you can choose your Upstream Server, I stayed with the default option
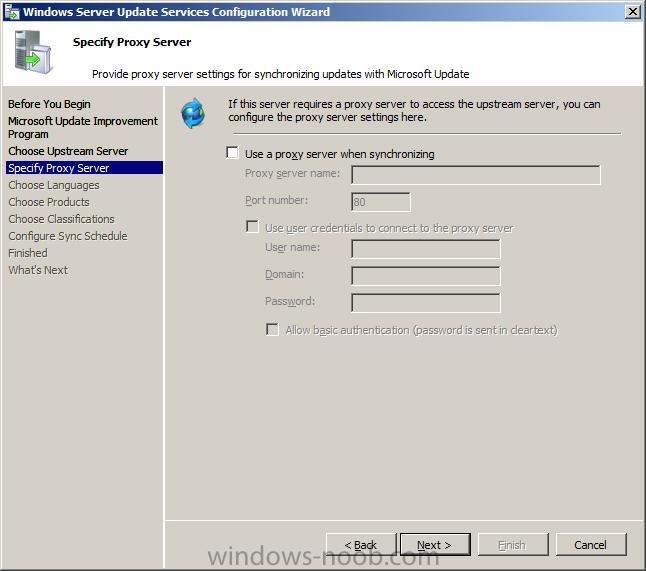
enter your proxy settings (if any)

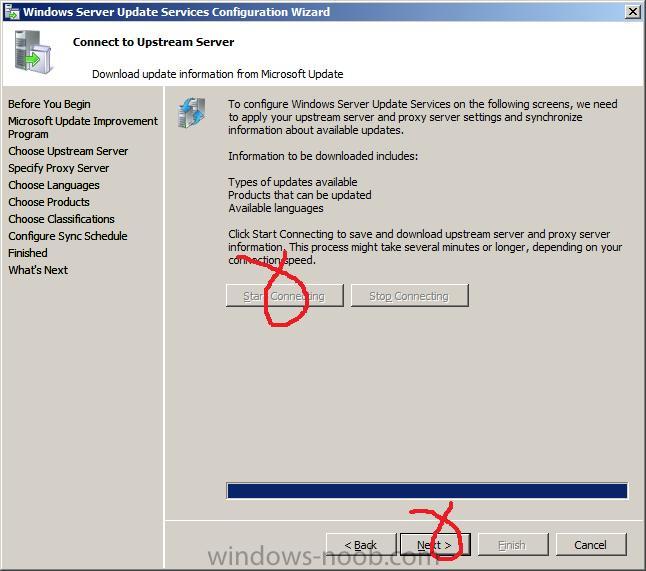
click next and then start connecting
once the Wizard has synchronized information with the Microsoft Update web servers you can click next to continue

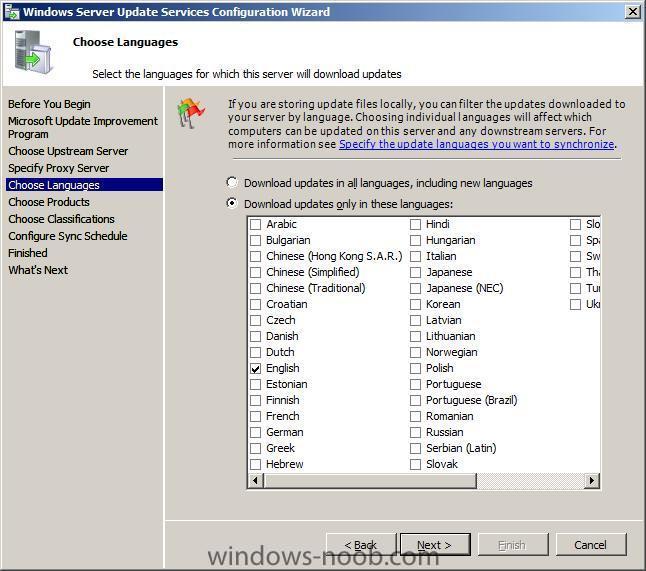
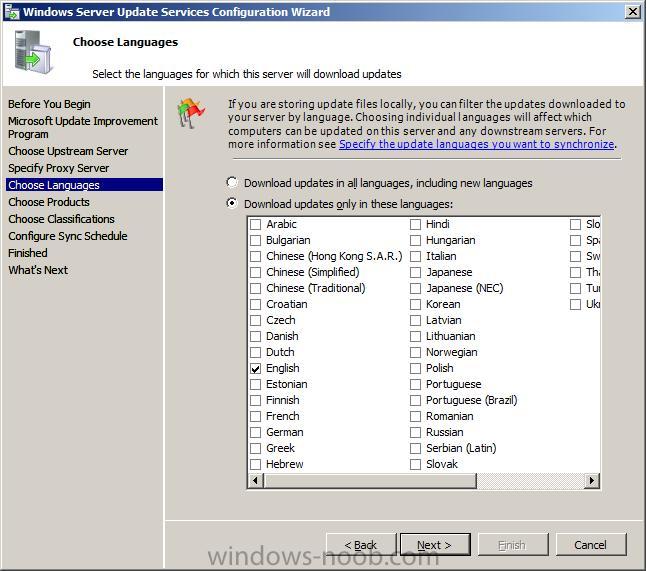
next you get to choose which languages to support
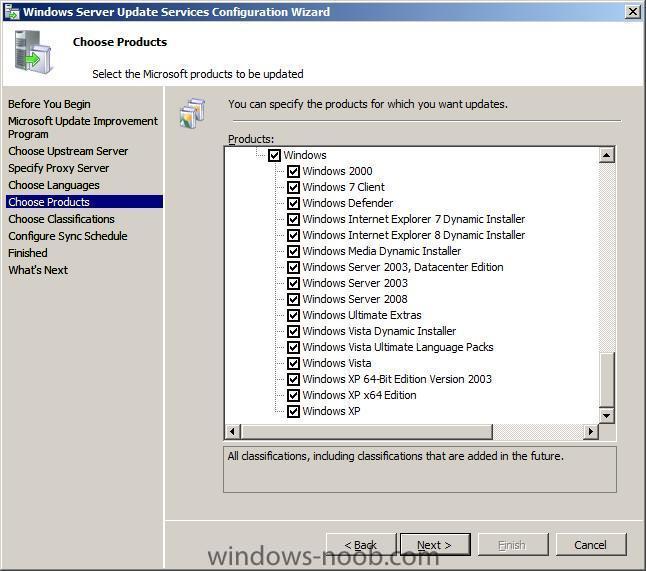
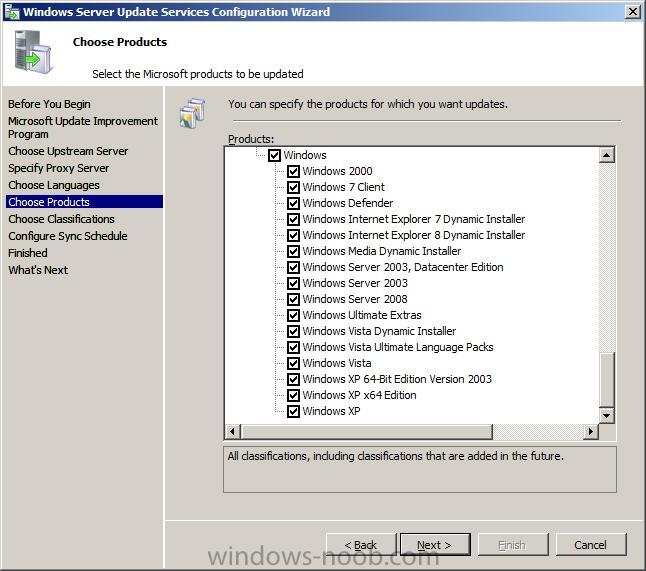
and which Microsoft Products to support by default all office versions and all windows versions are selected, remove those which you don't need as all of these updates etc will take up storage space
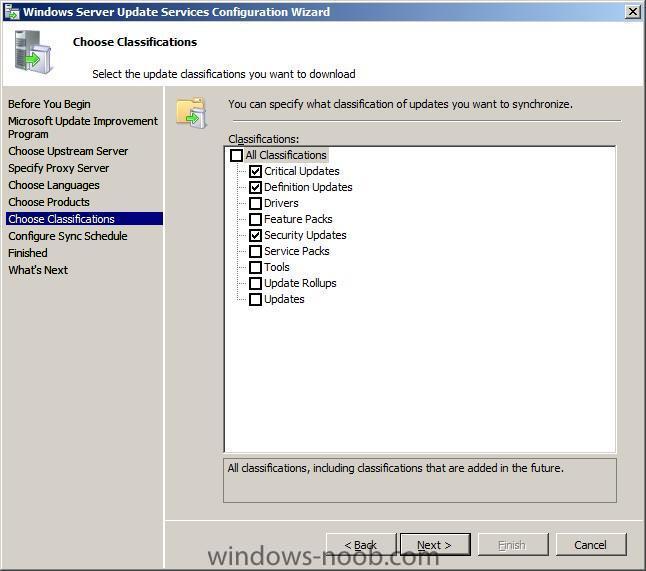
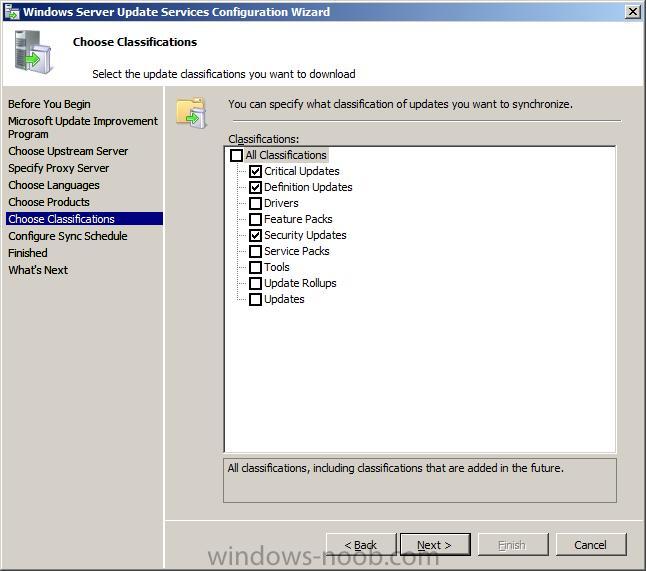
next you can choose what type of updates to download
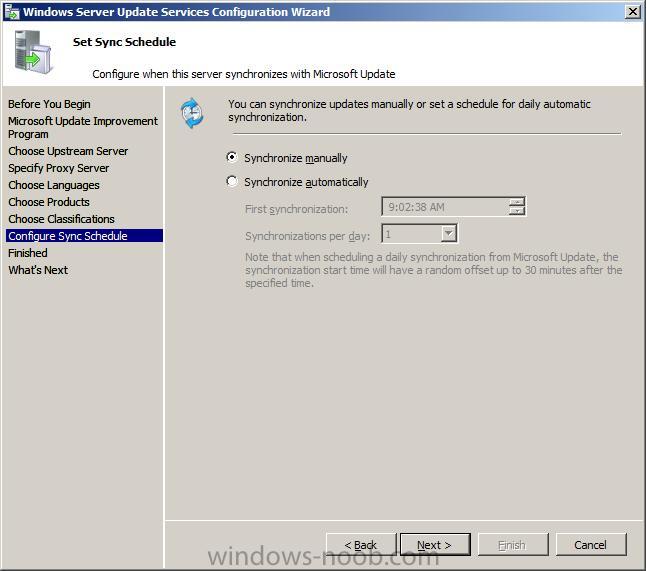
pick a schedule to synchronise

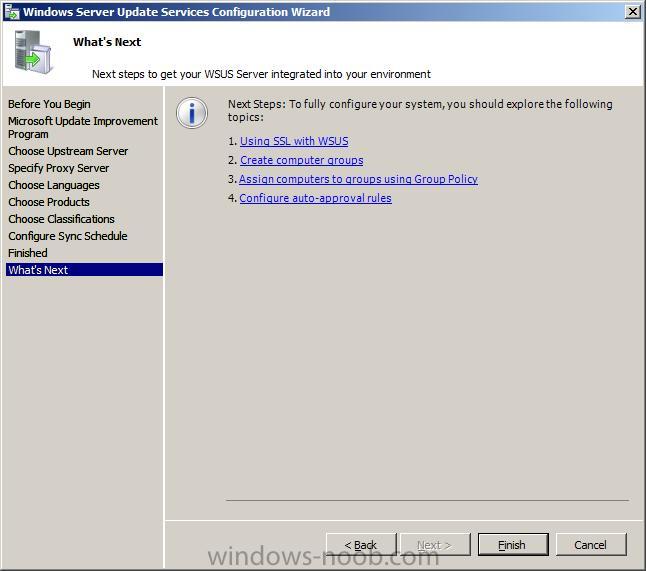
finished !
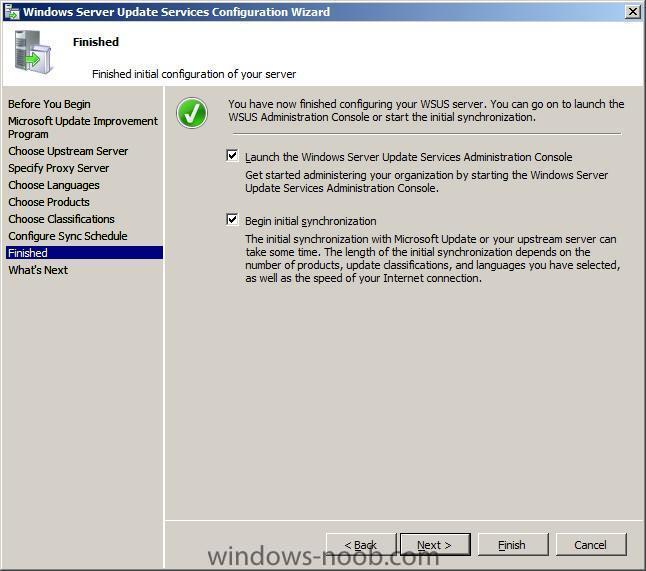
review next steps and then click on Finish to end the wizard.

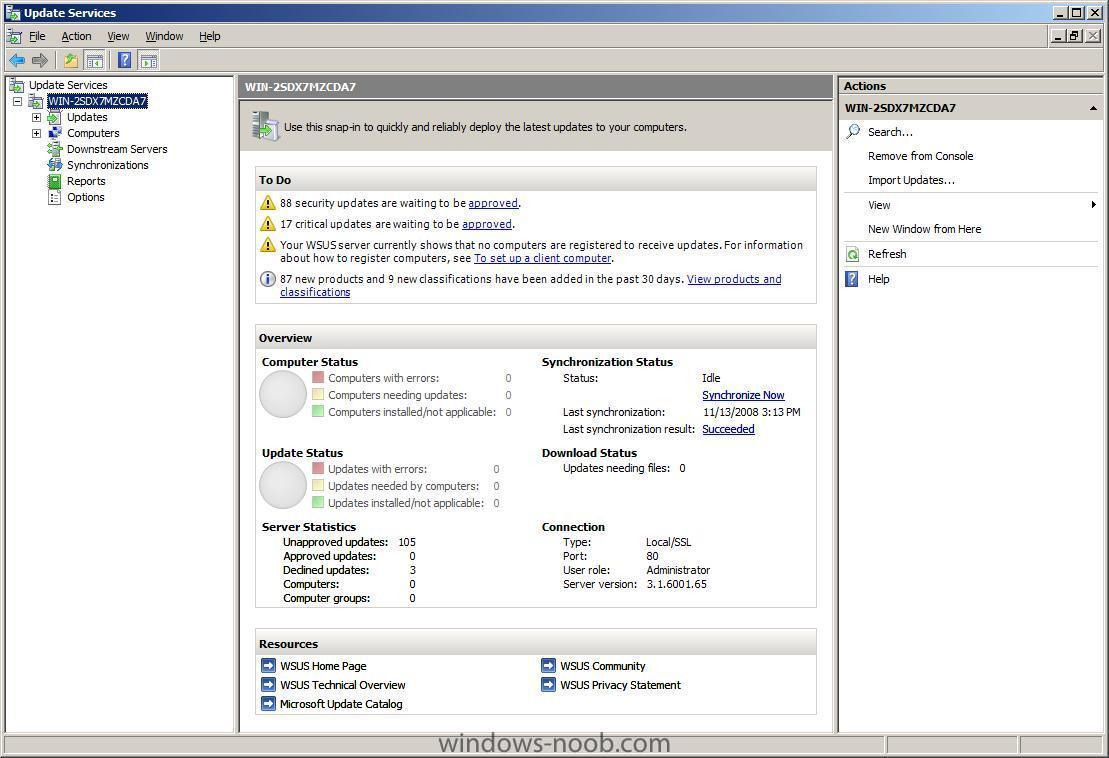
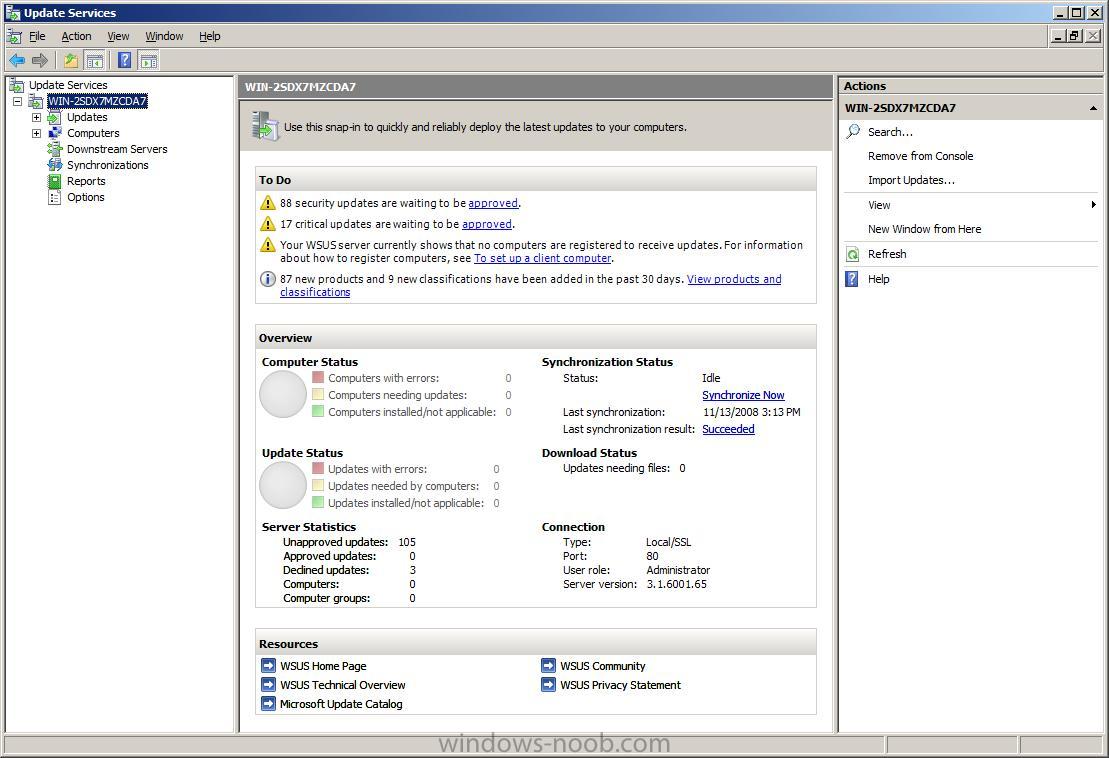
At this point you can now use the WSUS UI
Troubleshooting:
verify the following LOGS to see how WSUS installation went.
MWusSetup.log
WSUSSetup.log
WSUSSetupmsi_100211_2212.log
the last LOG will have it's name based upon the installation date/time as you can see. These logs will be found in the users AppData\Local\Temp folder
eg: if the user that installed WSUS was SMSadmin then these logs will be found here:
C:\Users\smsadmin\AppData\Local\Temp\
next steps >> how can I configure WSUS to deploy updates
-
did you verify you have advanced view turned on in AD users and computers...
-
if you want to install msu update files then you can use WUSA to do the job
eg:
wusa "Windows6.0-KB934307-x86.msu" /quiet /norestart
the /quiet switch means no user interaction and the /norestart means just that
you can add this to a task sequence
-
can you take a screenshot of your task sequence and/or export it to xml and attach it here ?
-
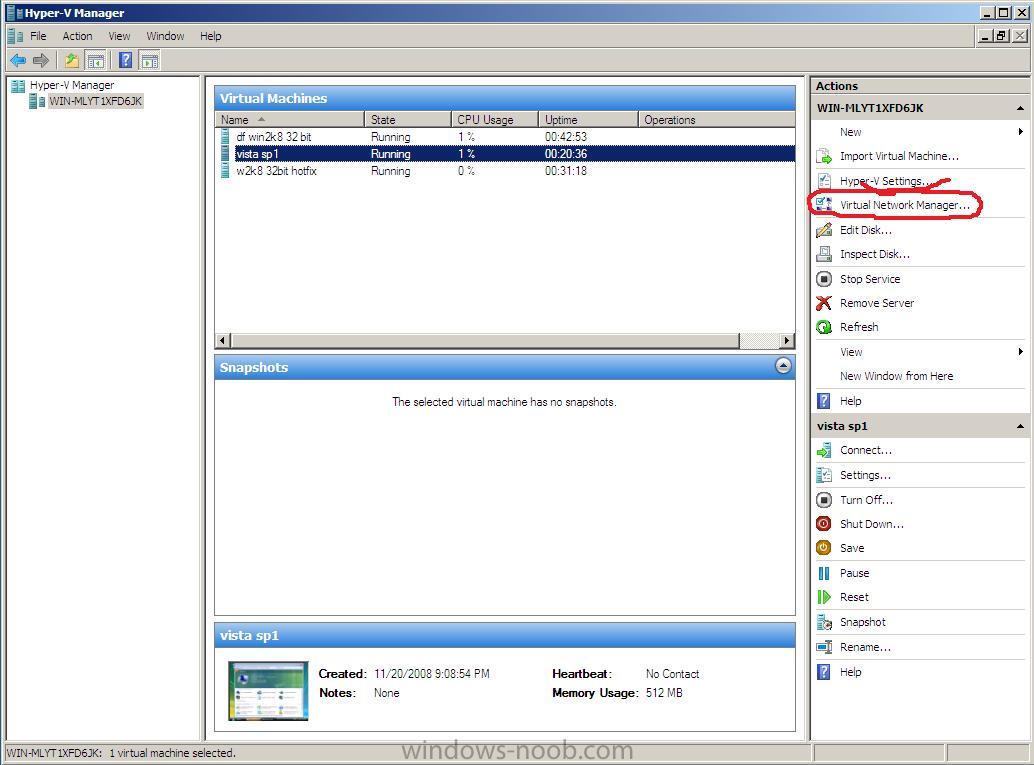
If you have just installed Hyper V in Windows 2008 Server and start a new VM and click on it's settings, you may notice that the network adapater does not have any option except 'Not Connected' in the drop down menu.
The solution is simple enough
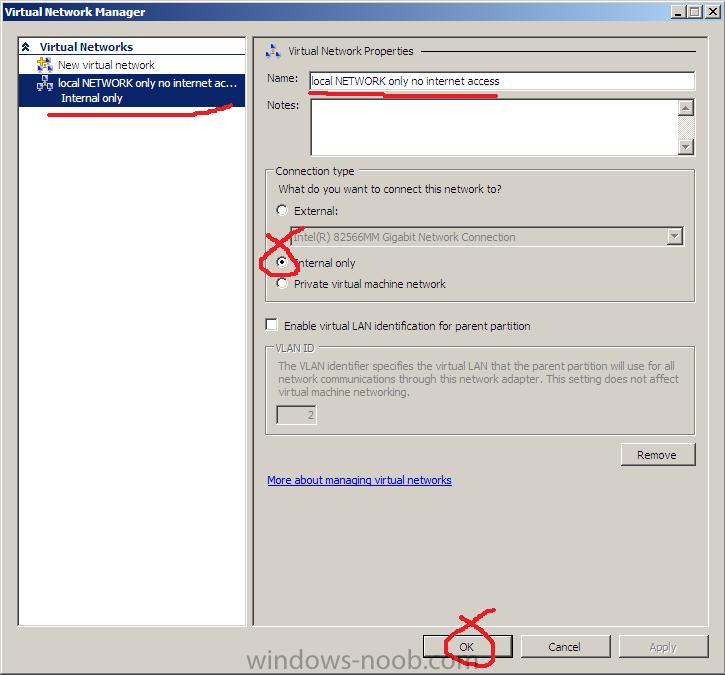
go into Hyper V Managerand right click on your Server (or in the Actions Pane on the right), choose Virtual network Manager,

click Add, and choose an External, Internal or Private network, give it a name (like Local network only...)
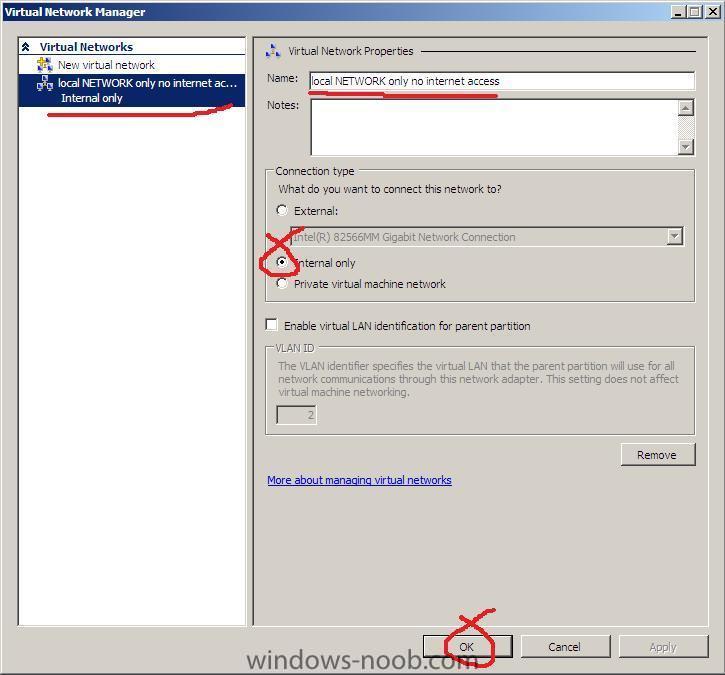
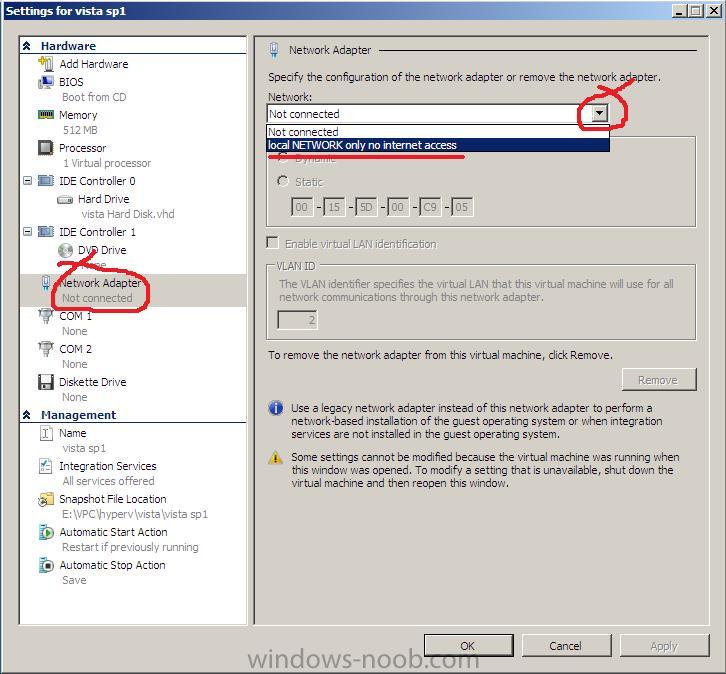
once done click apply, Now go back to your VM and click on settings, Network Adapter, you should now be able to choose the drop down menu and select the new virtual network you just created

cheers
anyweb
-
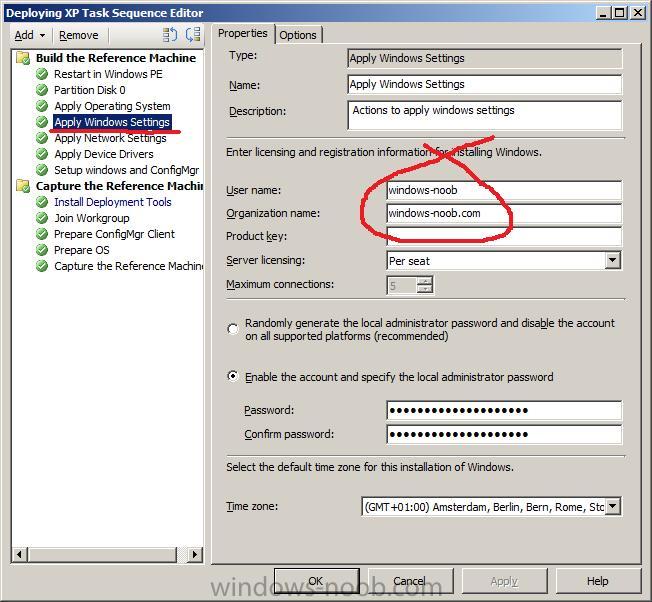
as regards the admin password did you check this ? (below the red circle...)
-
which admin account are you talking about ? the built in Administrator account or some other one that you created ?
-
how are you installing the image ? is the image already created ?
-
so let me get this straight, you are mounting boot.wim and writing the new driver to it, then unmounting the file with the changes (using imagex)
or are you doing this another way ?
-
great that it's working now, so it was just the network access account not being specified
I've updated that section in the Setting up SCCM guide part 3
cheers
anyweb
-
hi again
let's take that question as a separate topic please to keep this one focused
cheers
anyweb
-
This guide assumes that you intend on using WSUS to deploy updates and that you have already installed it as outlined here.
NOTE: this post is NOT FINISHED YET so it is INCOMPLETE
Note: If you intend on using SCCM 2007 to deploy updates using the WSUS integration then do NOT do any of the steps here.
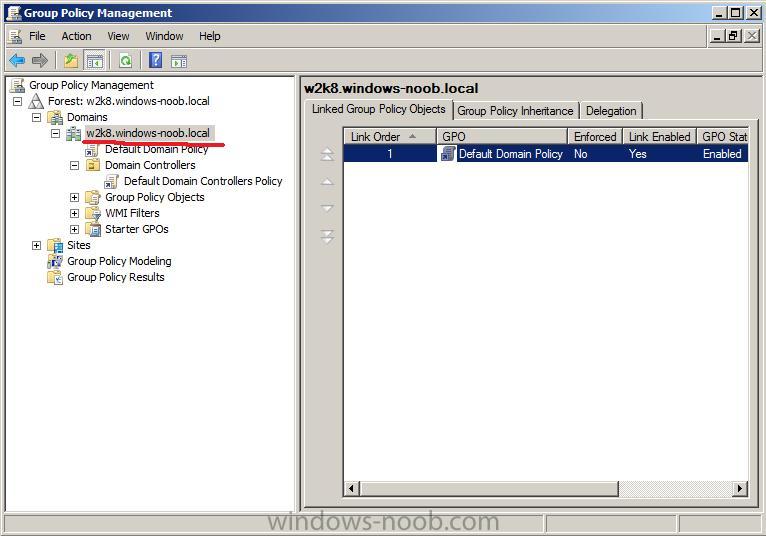
The instructions here also assume that your network runs Active Directory and that you use Group Policy to manage your network. For more information about Group Policy, see Microsofts Group Policy home page. You can configure one or more computers by including them in a Group Policy object (GPO). By configuring Automatic Updates using Group Policy, these settings will take precedence over any settings that are defined locally on the computers within your Domain.
Note: You should Link this WSUS GPO to an Active Directory container appropriate for your environment. In a simple environment, you link a single WSUS GPO to the domain. In a more complex environment, you might link multiple WSUS GPOs to different organizational units (OUs).
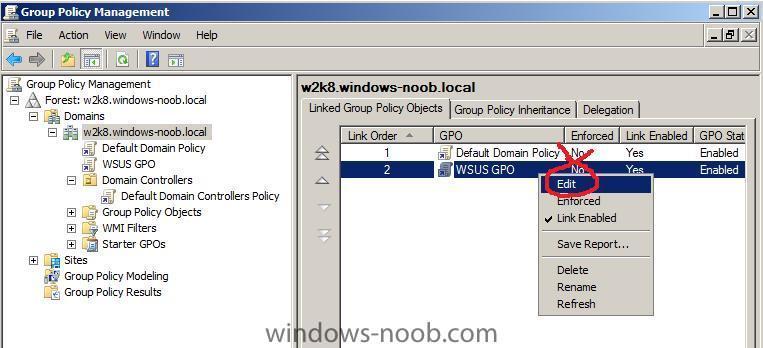
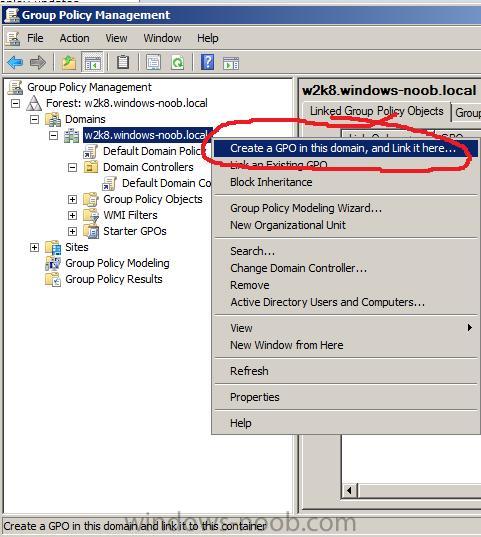
Start the Group Policy Management MMC and highlight your domain as in the screenshot below.

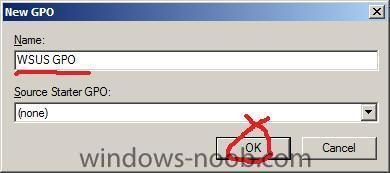
Right-click the domain and choose Create a GPO in this domain, and link it here

When the New Group Policy Object window appears, give it a name like WSUS GPO and click OK
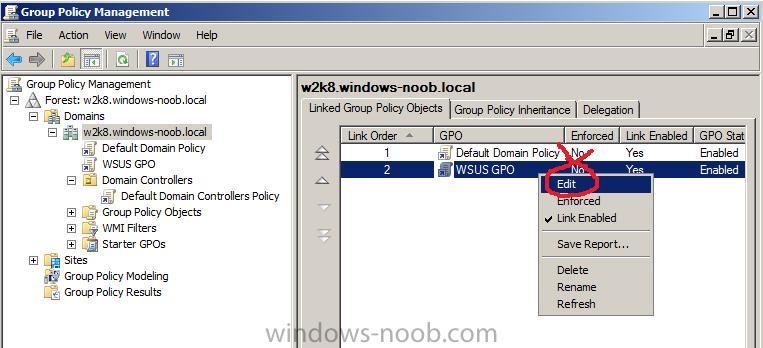
right click on our new GPO and choose Edit
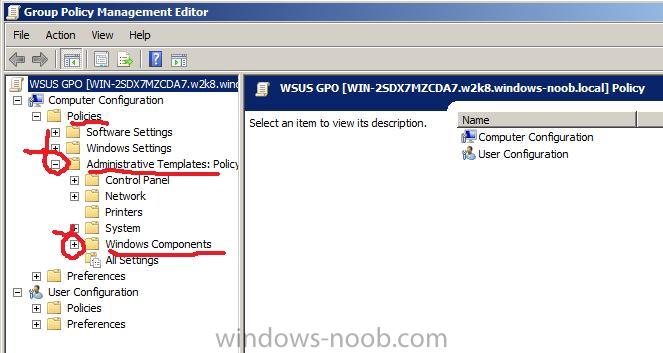
expand Policies then click and highlight Administrative Templates. Before you can configure WSUS group policy settings you should load the latest version of the administrative template, wuau.adm. Right click on Administrative Templates and choose Add/Remove Templates, click on the Add button and scroll down to the bottom until you can see the wuau.adm file. Select the file and click Open and close.
Now that you have loaded the wuau.adm template, you are ready to expand Windows Components.

Scroll down to Windows Update and enable the following options (circled in Red)
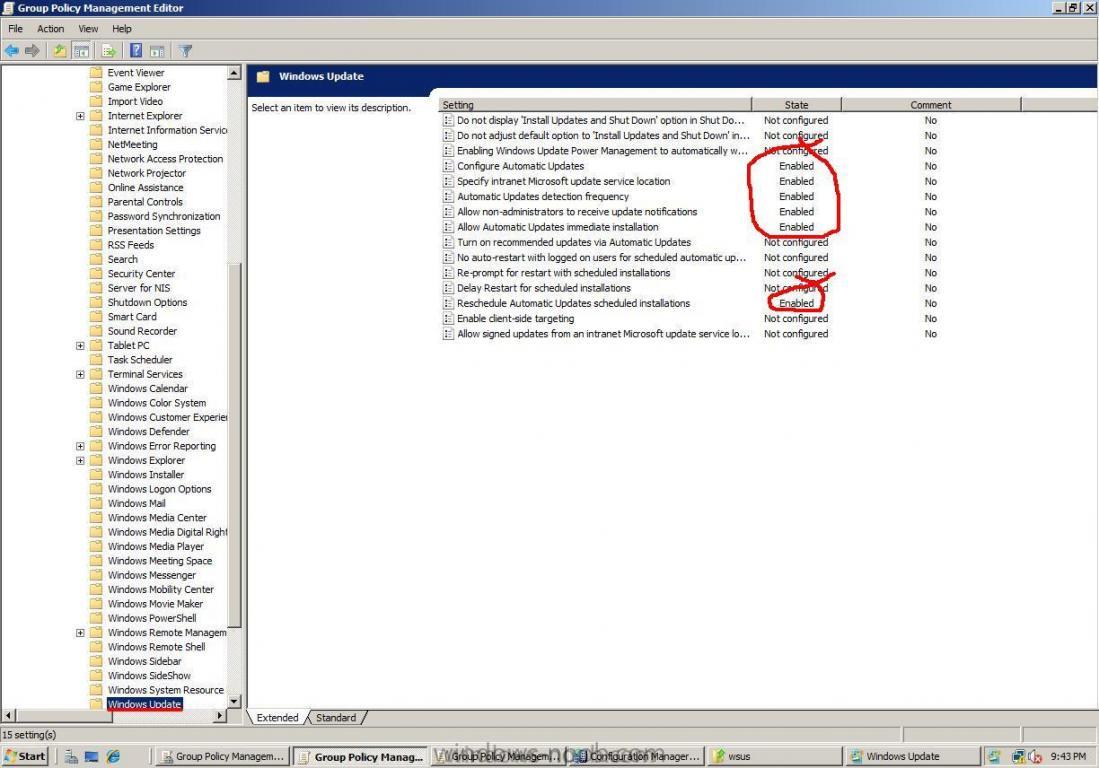
Automatic Updates are now enabled, but before the computers can receive updates from the WSUS server we need to configure the following group policy setting:
Specify intranet Microsoft Update service location and fill in the https address of the WSUS server, so click on it and view it's properties. We have already enabled the group policy setting as in the screenshot above, however we need to enter the https address of our WSUS server, so do that in the two empty fields provided and click ok.
Startup WSUS

-
 1
1
-
-
can you please read the package status LOGS for the package in question,
it should give us a clue, in addition, please distribute the package again, and update the distribution point before trying again
cheers
anyweb
-
what does your package status say for that package ? any errors reported ? you can check the package status in the SCCM console under 'status...'
-
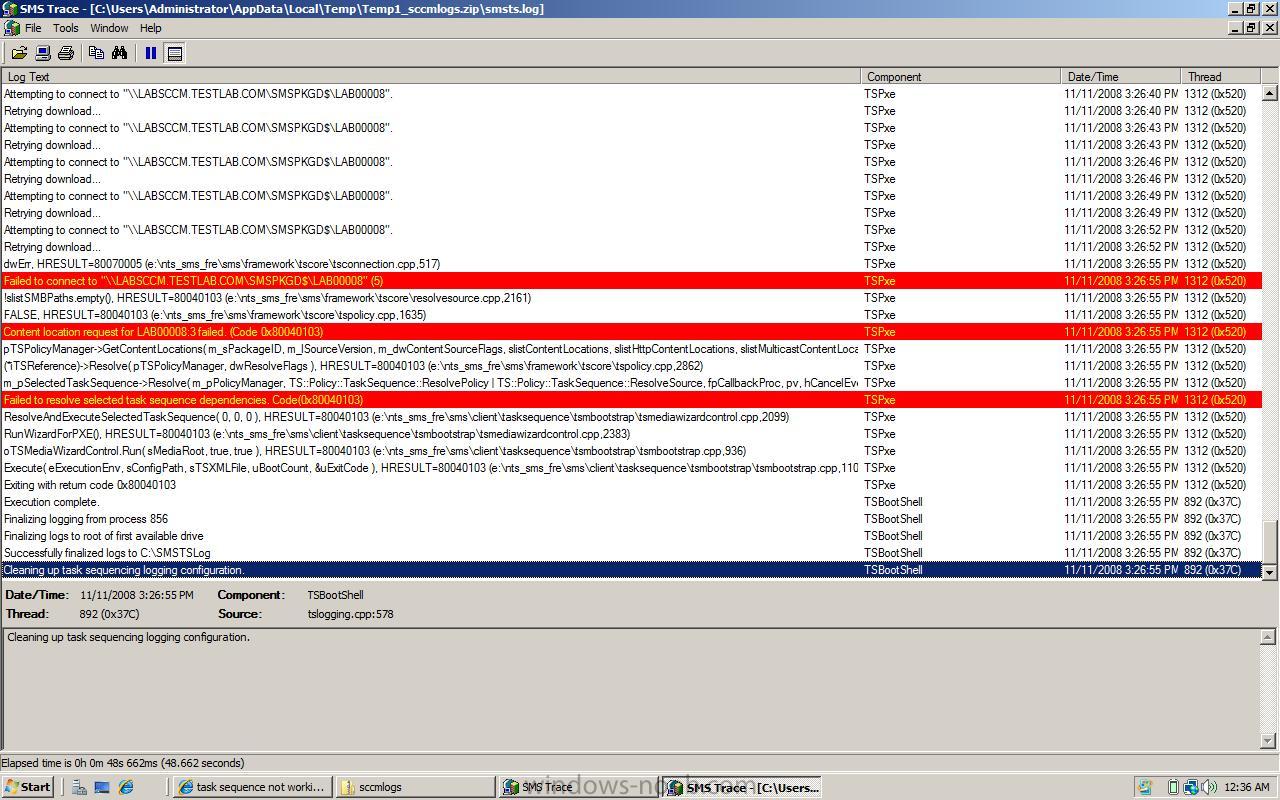
here is where you are having problems (the screenshot is of Trace32 part of the SCCM2007 toolkit, it highlights errors in logs in RED)
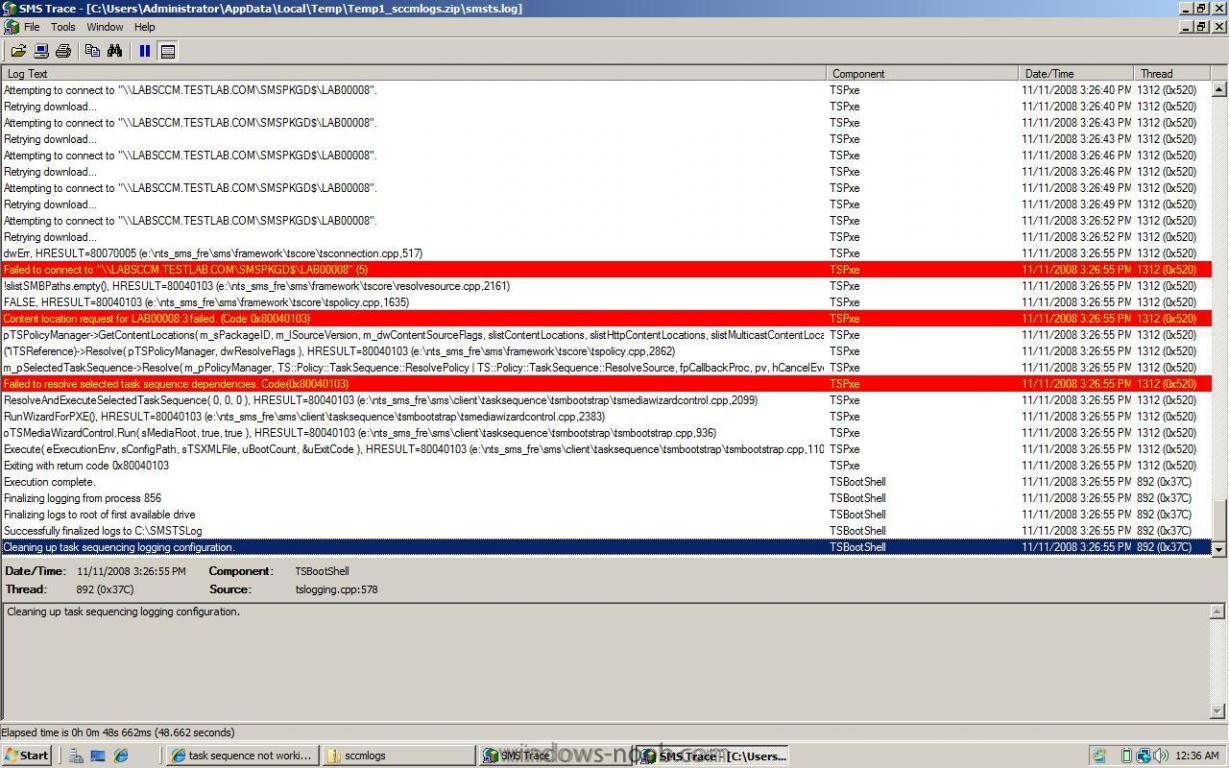
the first error is
Failed to connect to "\\LABSCCM.TESTLAB.COM\SMSPKGD$\LAB00008" (5)so what is that package ? please verify that it is distributed to a distribution point (check the package status)
Content location request for LAB00008:3 failed. (Code 0x80040103)the error above means it cannot find this packagepossible reasons are boot.wim has no network support for your nic or you havnt distributed the package properly (or need to do it again)
Failed to resolve selected task sequence dependencies. Code(0x80040103)this is where the Task Sequence aborts, it cannot continue because it cannot get some package(s)
cheers
anyweb
-
ok if its still failing just after starting windows PE with a reboot, then press F8 like i said, which will bring up a cmd prompt within windows PE
copy any log files that are in there, zip them up and post them here, (The logs for SCCM (in this case) are stored in X:\Windows\Temp\SMSTSLog\ and C:\SMSTSLog and C:\_SMSTaskSequence)
i need to see those logs to understand what is failing
cheers
anyweb
-
dont worry about that, i've also seen that when deploying clients, it doesnt matter as long as youve created boot.wims for both architecture (32 bit and 64bit) and that you have defined what operating system is being installed
cheers
anyweb
-
you must enable f8 funtionality within Windows PE to troubleshoot the issue
learn how to do that here
it's rebooting probably because you don'ät have the correct network drivers loaded in your boot.wim file
cheers
anyweb
-
What is a HTA ?
The term HTA is actually an acronym: it’s short for HTML Application. For our purposes an HTA is nothing more than a way to provide a graphical user interface for your scripts. As we’ve already noted, neither WSH nor VBScript provide much in the way of graphical user interface elements: no check boxes, no list boxes, no nothing. Internet Explorer, however, makes use of all of these elements - and more. Because an HTA leverages Internet Explorer, you can take advantage of all these graphical user interface elements when writing system administration scripts. (And, yes, we’re going to show you how to do just that.)
How closely related are HTML files and HTAs? Well, take any HTML file and change the file extension from .htm (or .html) to .hta. Congratulations: you’ve just created your first HTA.
Where Can I get some HTA’s ? check out the samples below:-The CM12 BitLocker HTA

- CM12 in a Lab -The CM12 BitLocker FrontEnd HTA - video
- CM12 in a Lab - The CM12 BitLocker FrontEnd HTA
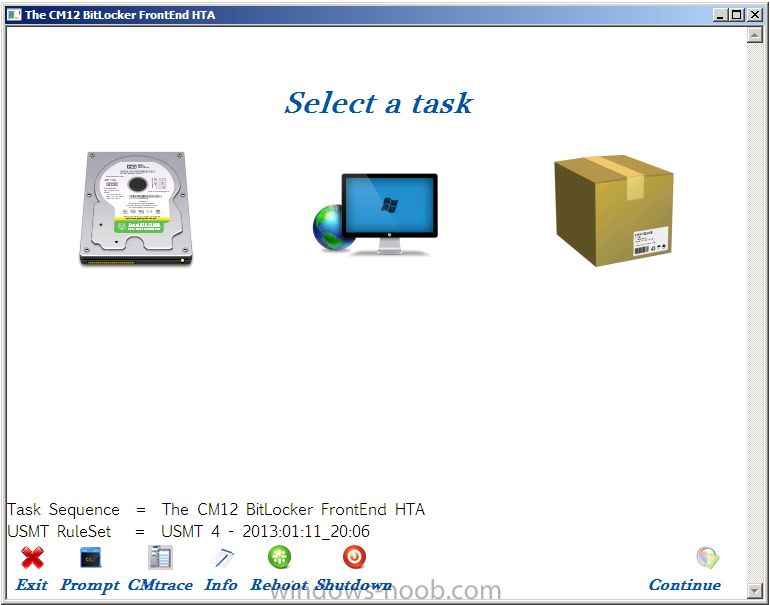
Introducing the BitLocker FrontEnd HTA
Multipurpose HTA with BitLocker Support for all three common scenarios, backup, reinstall, new computer
Windows-noob Front End
right here !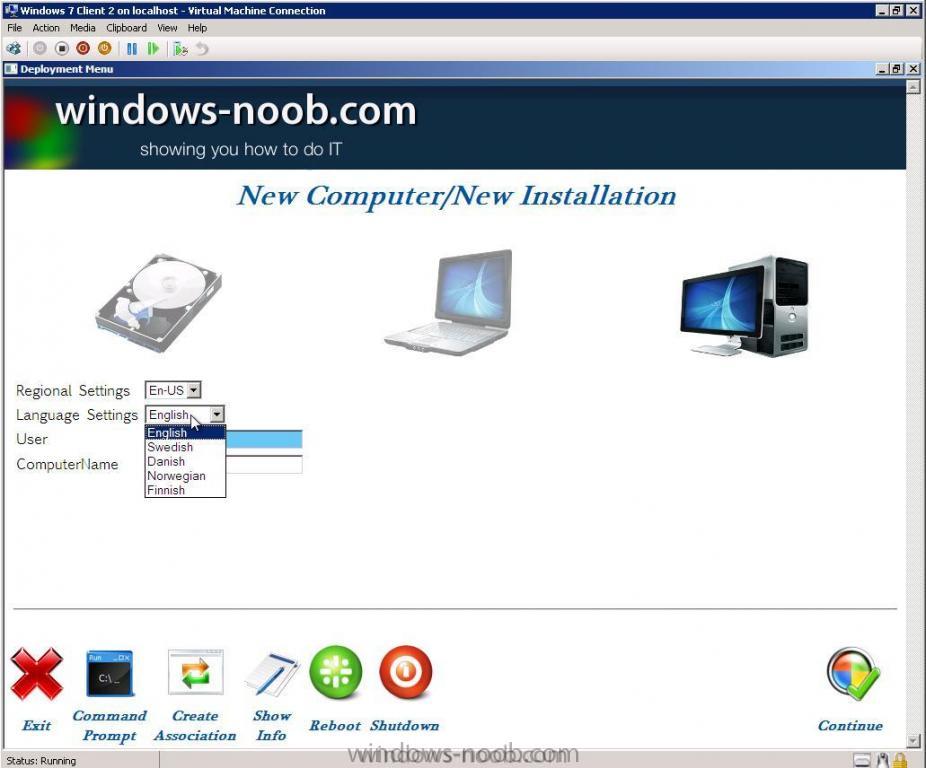
SCCM Operating System Deployment – Front-end HTA -http://joshuasmueller.wordpress.com/2010/06/15/sccm-operating-system-deployment-front-end-hta/
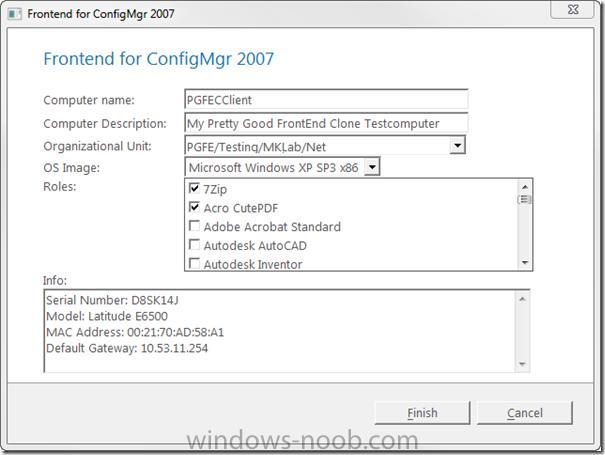
Johan ArwidMarks' Pretty Good Frontend - http://prettygoodfro...d.codeplex.com/ hi Johan !!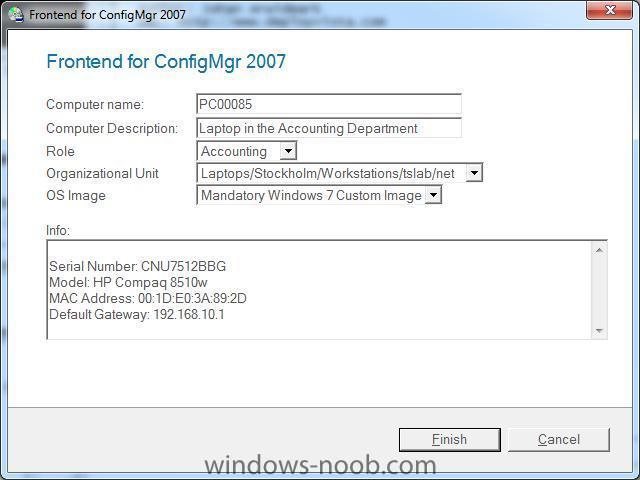
Maik Koster's Pretty Good Frontend Clone - http://myitforum.com...ntendclone.aspx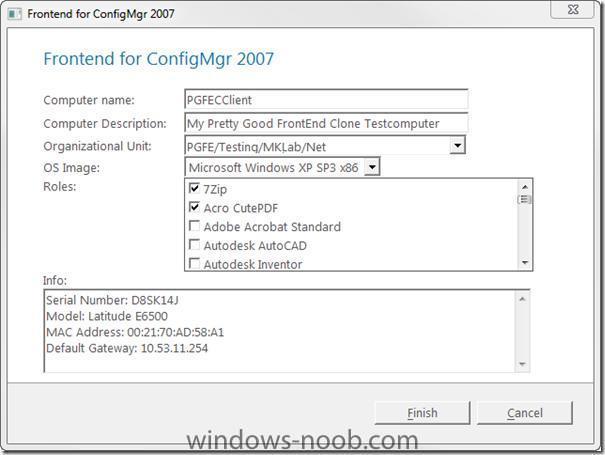
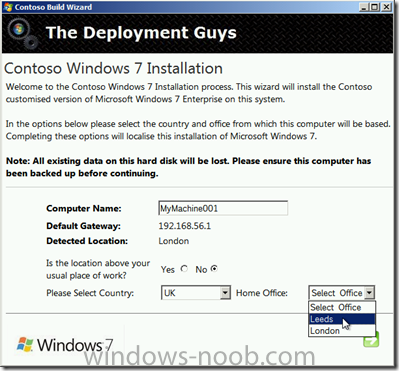
Location Deployment wizard from the deployment guys here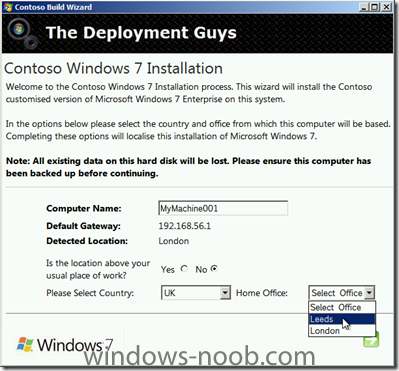
Resources
here's a good resource on myitforum with hta files to make the deployment more user friendly
http://www.myitforum...ew.asp?id=11652. -
hi again
can you confirm is it only your Windows XP SP2 systems that are having problems ?
-
You can install device drivers during Windows Setup by creating an answer file using Windows SIM. In this answer file, you can specify the paths to device drivers on a network share (or a local path) by adding the Microsoft-Windows-PnpCustomizationsWinPE or Microsoft-Windows-PnpCustomizationNonWinPE components and specifying the configuration passes in which you intend to install them. You can install device drivers in the windowsPE, offlineServicing, auditUser or auditSystem configuration passes.
By adding device drivers during the windowsPE or offlineServicing configuration passes, you can add out-of-box device drivers to the Windows image before the computer starts. This method can also be used to add boot-critical device drivers to a Windows image. Digitally signed device drivers can be added to an offline Windows image before Windows Setup or during Windows Setup.
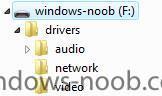
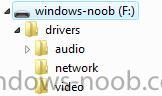
In our example here (local path) we are going to create a folder called drivers, that folder will have subfolders in it with our drivers neatly organised (audio/video/network/etc..) for easy management.
eg:
drivers/audio
drivers/video
drivers/network
and so on
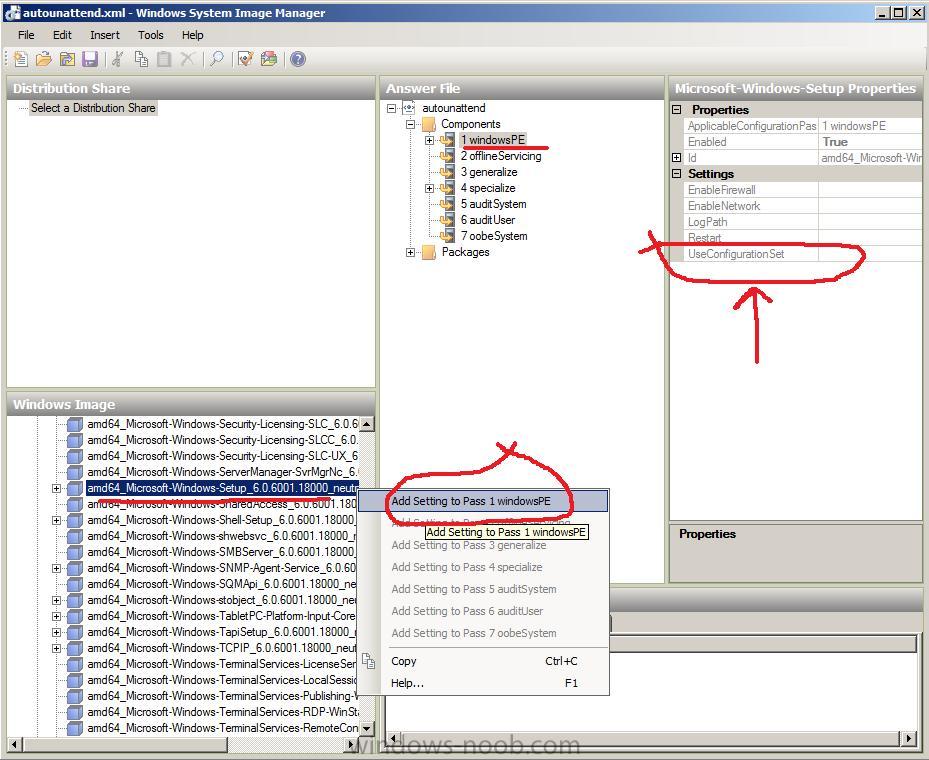
Prepare the Answer file
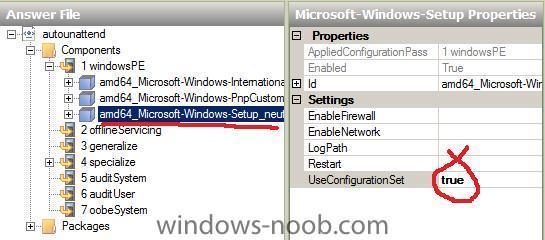
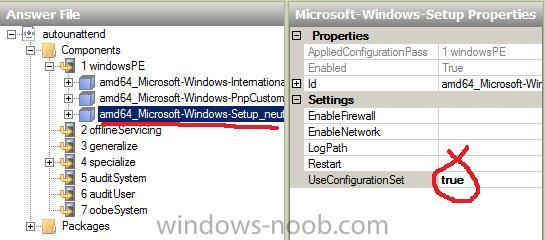
Startup Windows SIM and in the Windows Image pane, expand components. Select the component called Microsoft-Windows-Setup and add it to Pass 1 WindowsPE if it isn't already added.
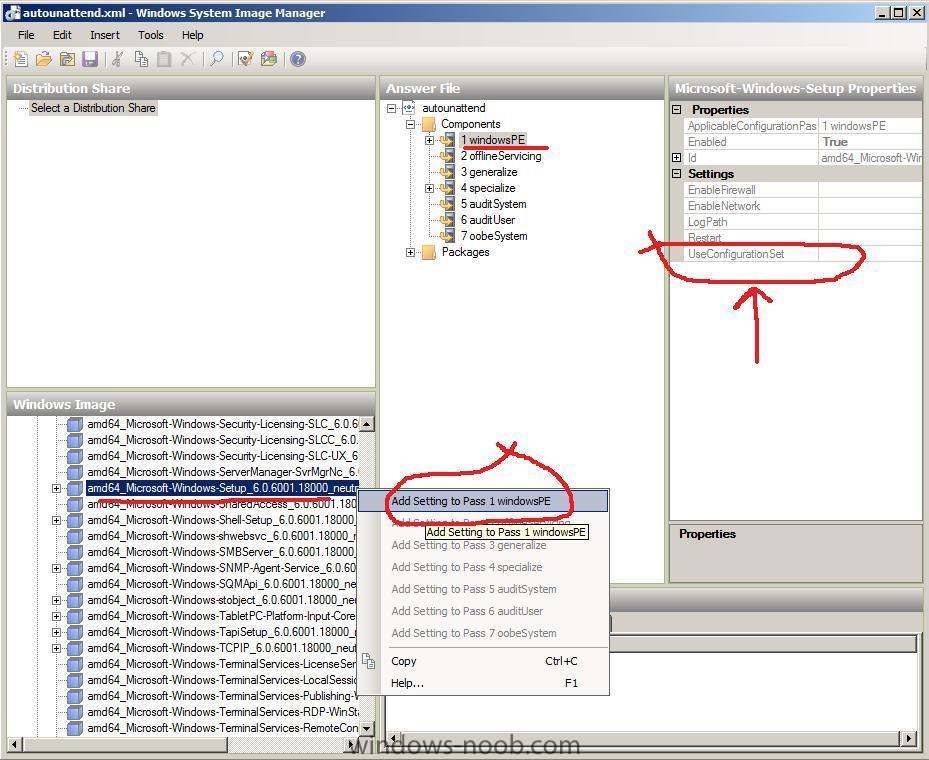
Set the UseConfigurationSet value to True using the drop down menu.
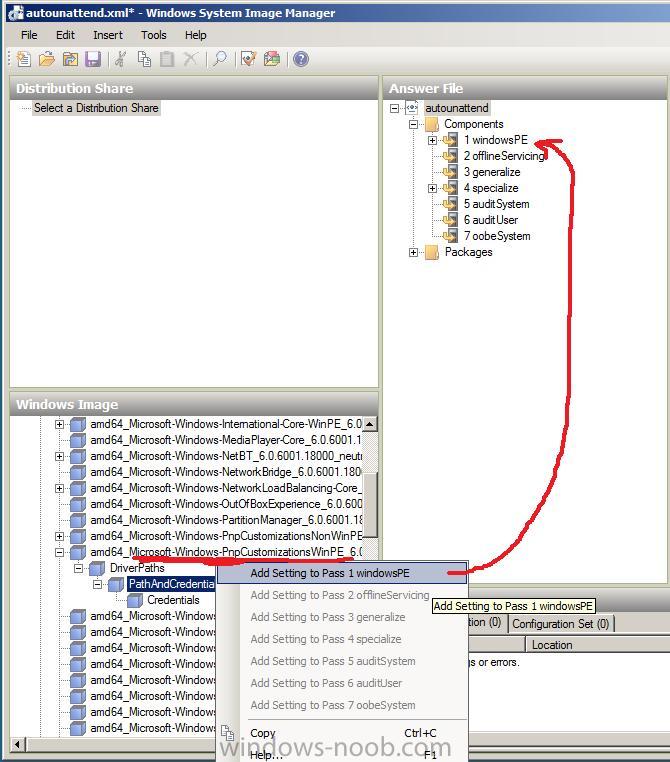
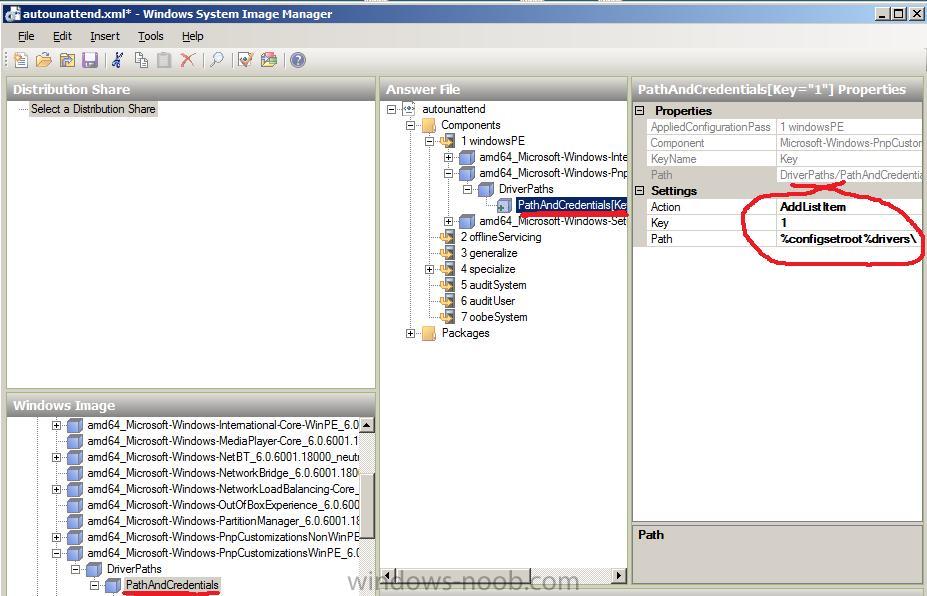
Back in the components pane, select the Microsoft-Windows-PnpCustomizationsWinPE/DriverPaths/PathAndCredentials node and right click, choose add setting to Pass 1 windowsPE.
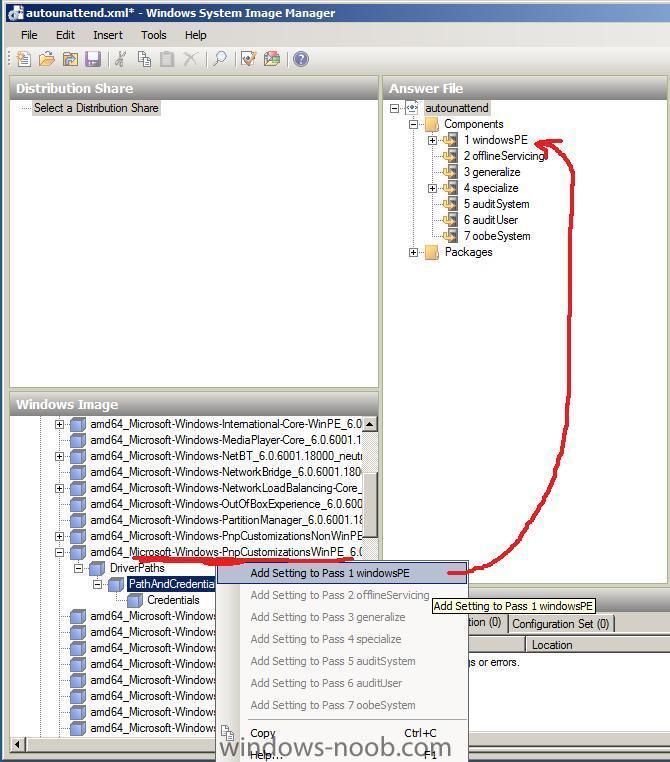
Set the Key value to 1 and edit the Path value to read as follows:-
%configsetroot%drivers\
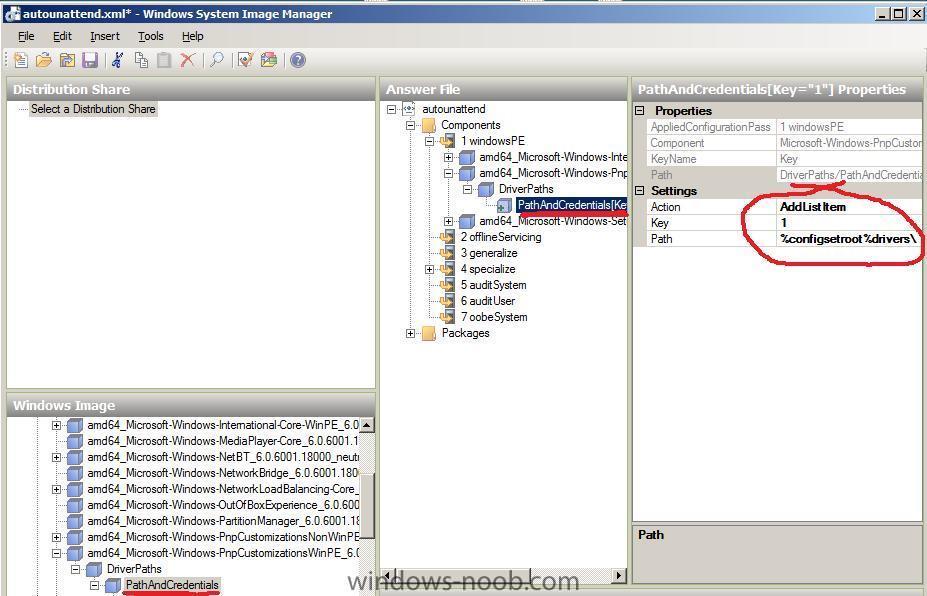
Validate your answer file and save it as AutoUnattend.xml.
Prepare the USB Key
Format a USB key and copy the Autounattend.xml file to the root of the key, once done, copy the Drivers folder structure which you prepared earlier to the root of the key
you are now ready to boot the client to test the unattended install.
Below is a sample of the drivers code in AutoUnattend.xml for 64bit Server 2008
<component name="Microsoft-Windows-Setup" processorArchitecture="amd64" publicKeyToken="31bf3856ad364e35" language="neutral" versionScope="nonSxS" xmlns:wcm="http://schemas.microsoft.com/WMIConfig/2002/State" xmlns:xsi="http://www.w3.org/2001/XMLSchema-instance">
<UseConfigurationSet>true</UseConfigurationSet>
	</component>
	<component name="Microsoft-Windows-PnpCustomizationsWinPE" processorArchitecture="amd64" publicKeyToken="31bf3856ad364e35" language="neutral" versionScope="nonSxS" xmlns:wcm="http://schemas.microsoft.com/WMIConfig/2002/State" xmlns:xsi="http://www.w3.org/2001/XMLSchema-instance">
		<DriverPaths>
			<PathAndCredentials wcm:action="add" wcm:keyValue="1">
				<Path>%configsetroot%drivers\</Path>
			</PathAndCredentials>
		</DriverPaths>
	</component>


how can I copy files between my hyper V server and the virtual machines ?
in Hyper V
Posted
those of you used to Microsoft Virtual PC will find it odd that you can no longer drag and drop files from your desktop to the virtual machine in Hyper V, but all is not lost, you can copy/paste files to/from the Virtual machine by using standard network sharing,
in the screenshot below I first connected to my virtual machine using Windows Explorer and browsed to the C$ share on the virtual machine, i then dragged a file from my desktop to that share, and you can see the file is present locally on the virtual machine which is also shown on the desktop (to the right)
f.y.i