anyweb
-
Posts
9277 -
Joined
-
Last visited
-
Days Won
371
Everything posted by anyweb
-
hi all, this is a good idea, I'd appreciate if you could add your vote (or 3) to it ! thanks ! cheers niall https://configurationmanager.uservoice.com/forums/300492-ideas/suggestions/8506180-show-computer-state-e-g-different-icon-for-compu
-
 yes i think so, you could force the date/time via my winpe timesync script here
 -
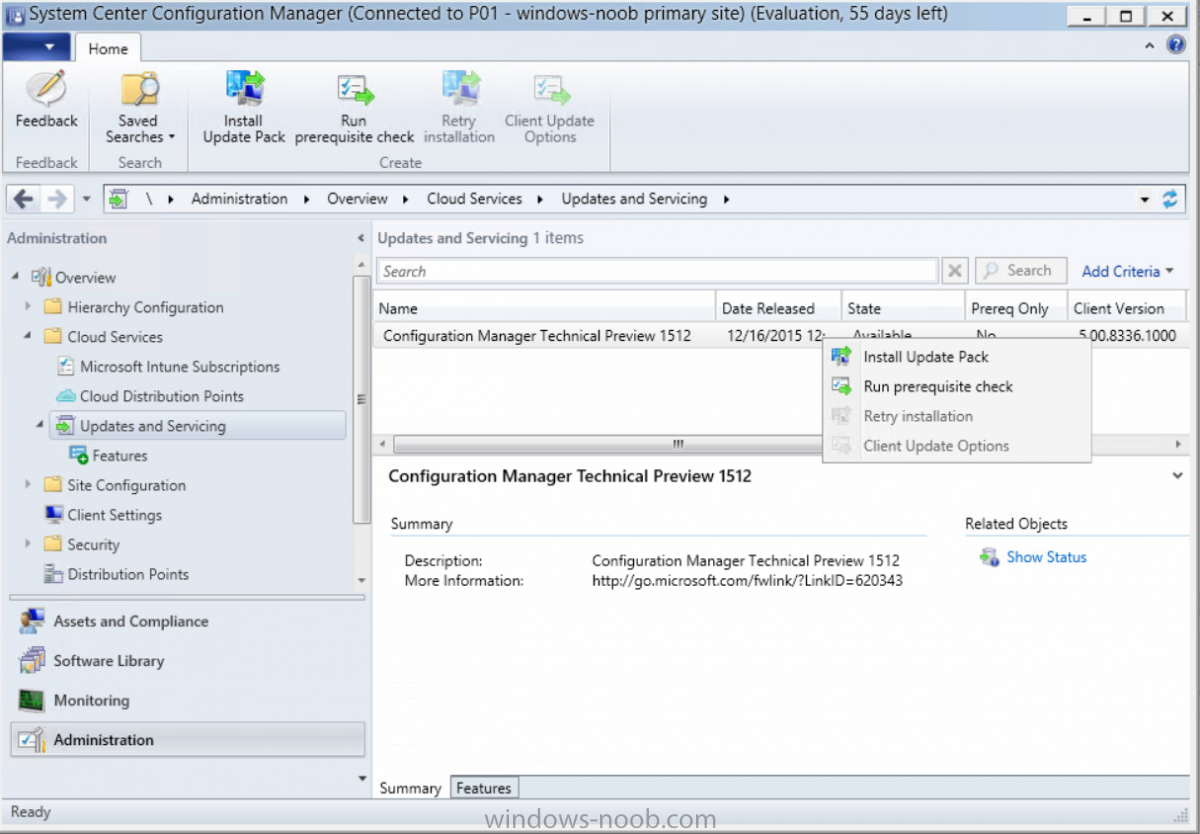
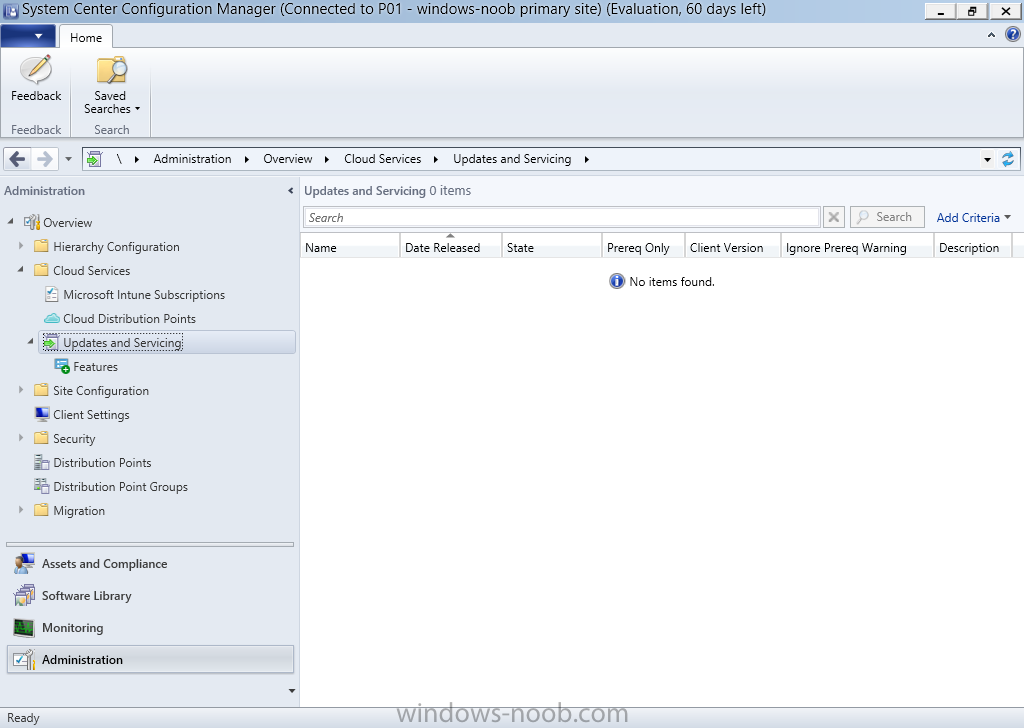
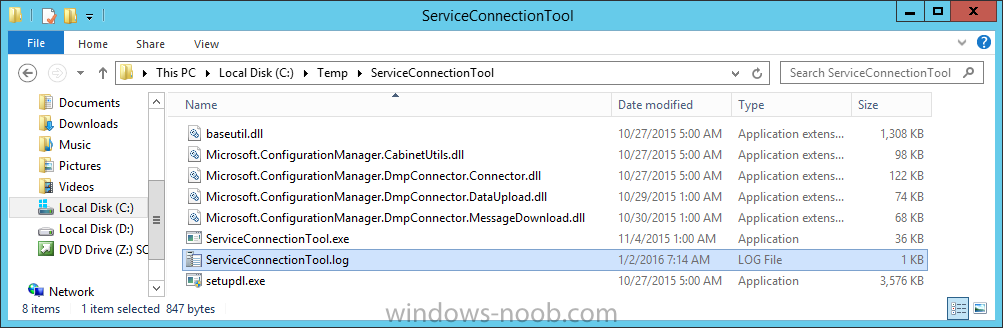
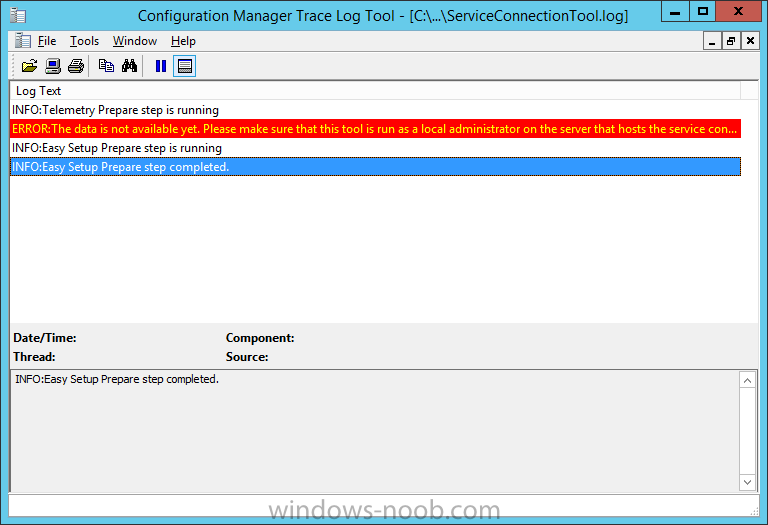
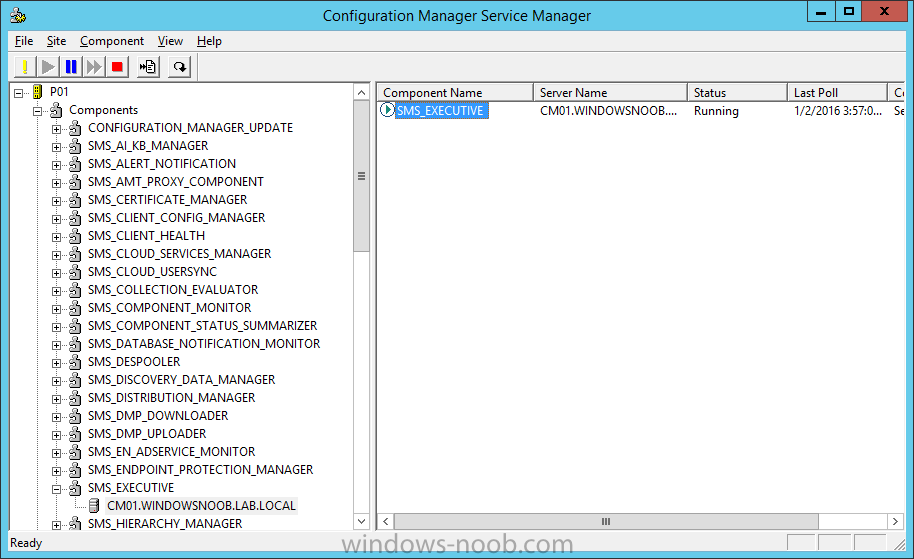
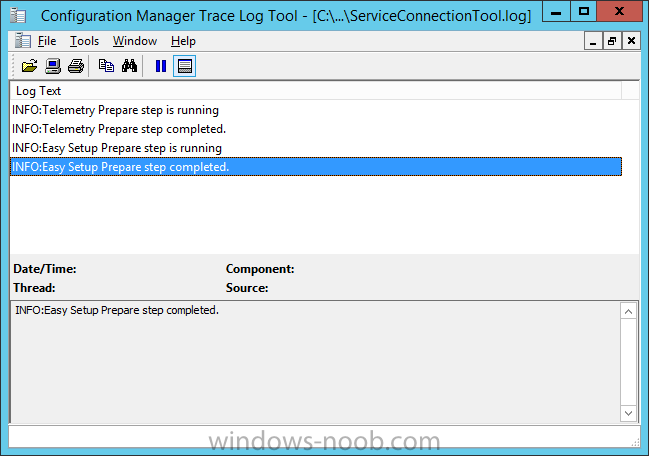
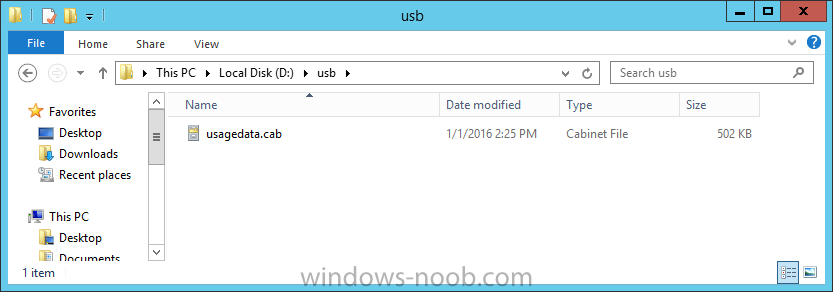
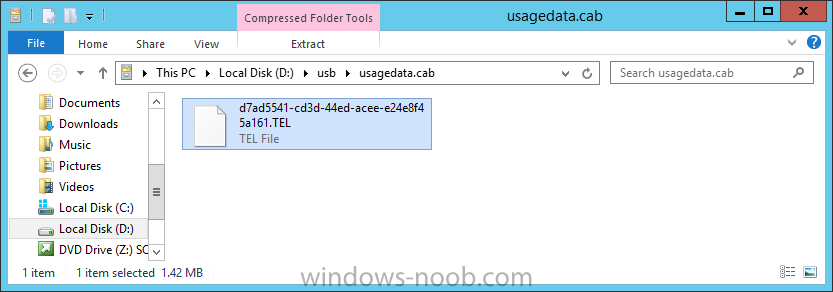
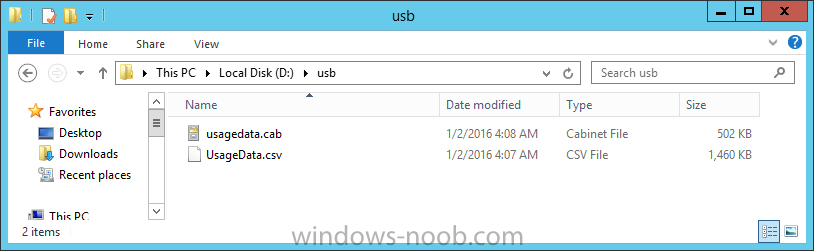
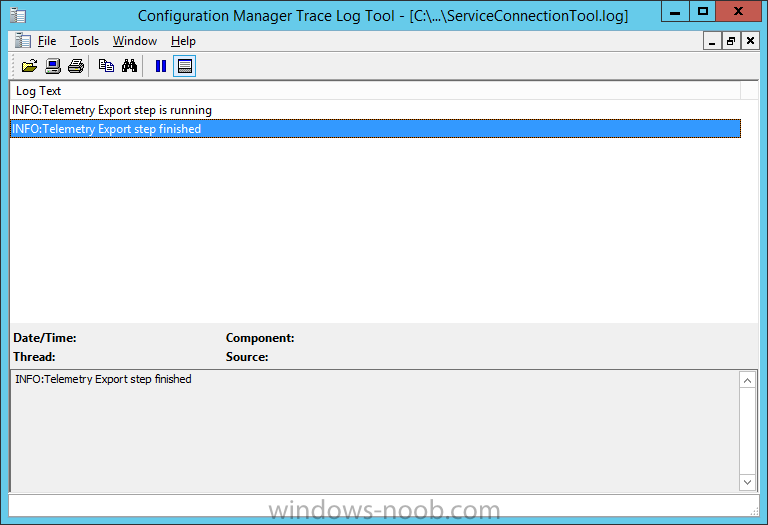
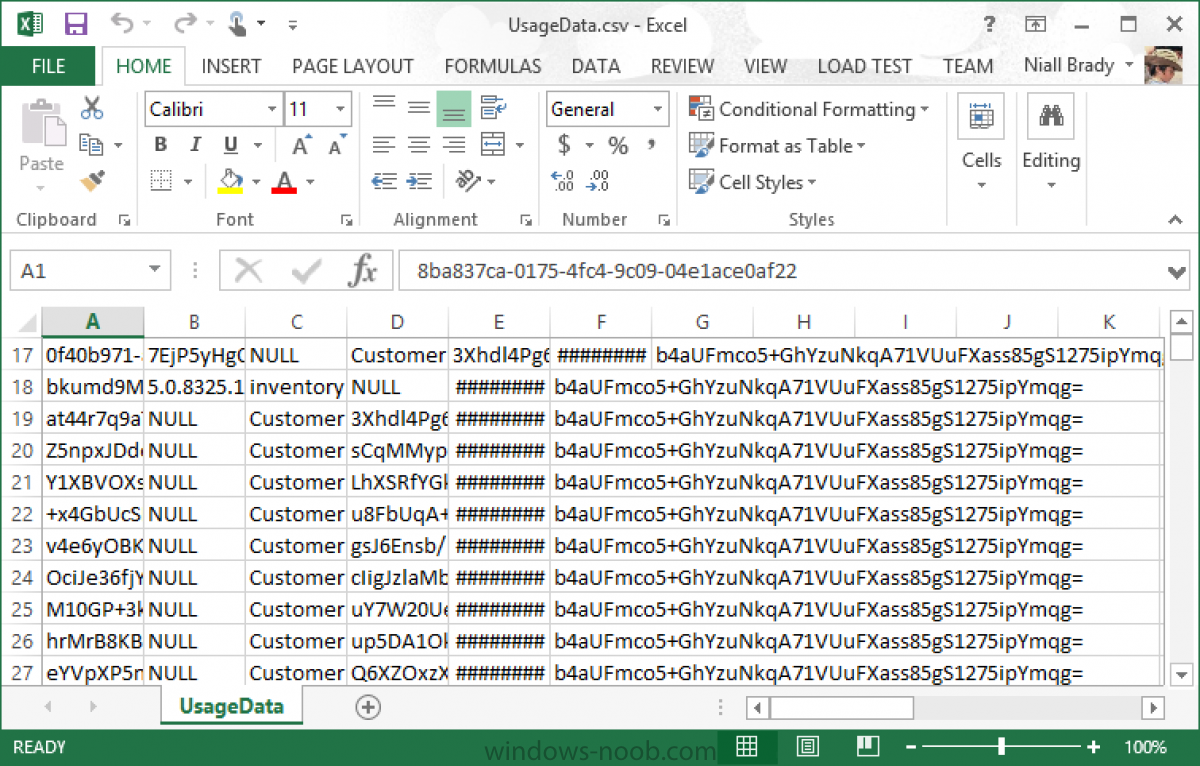
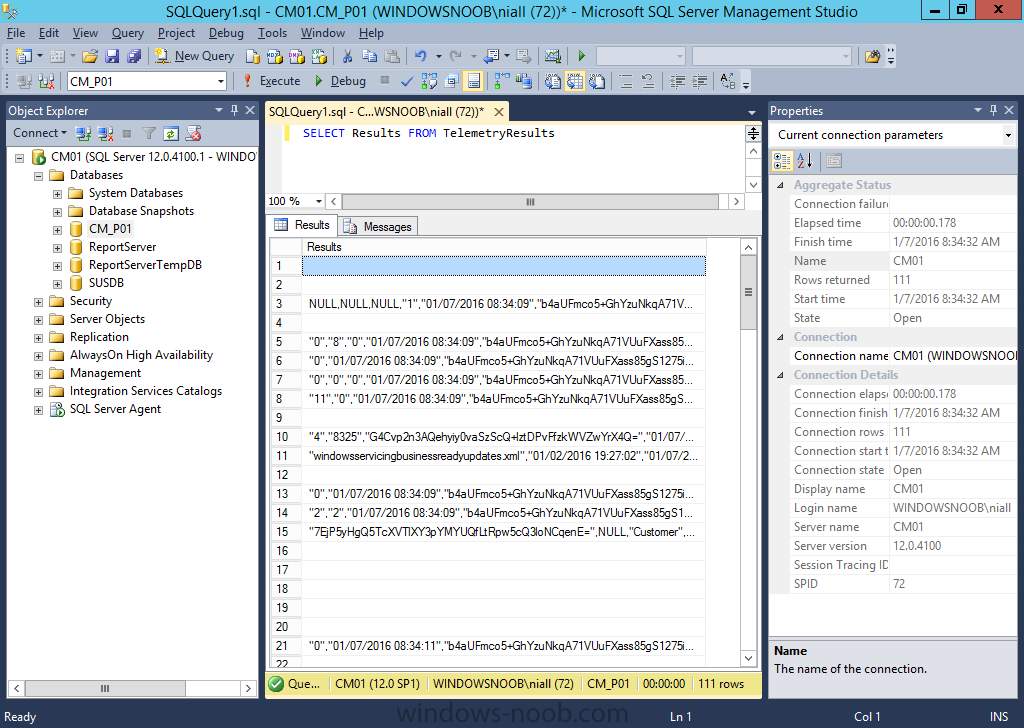
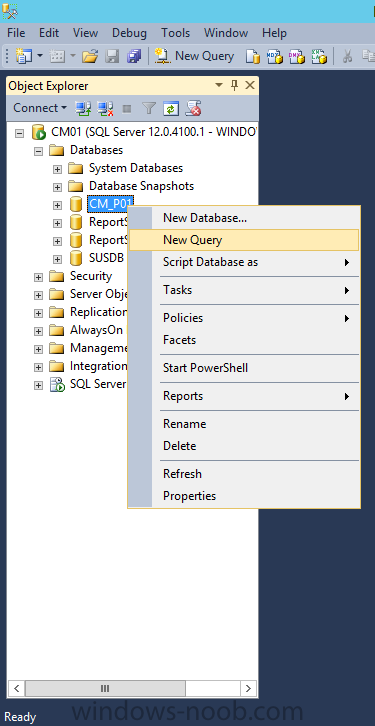
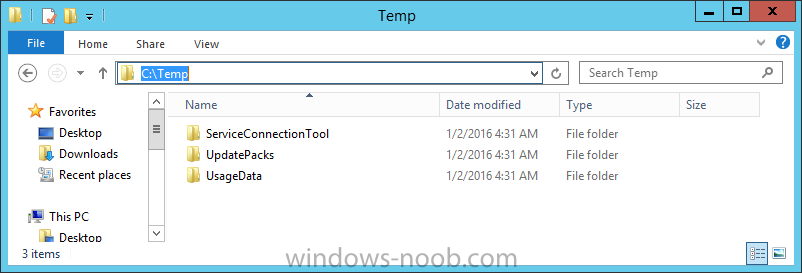
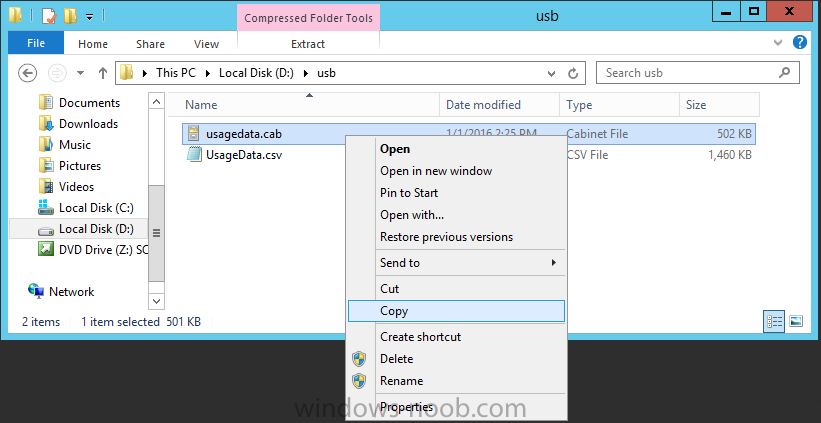
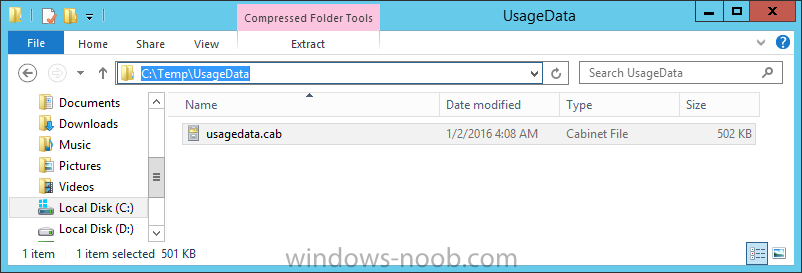
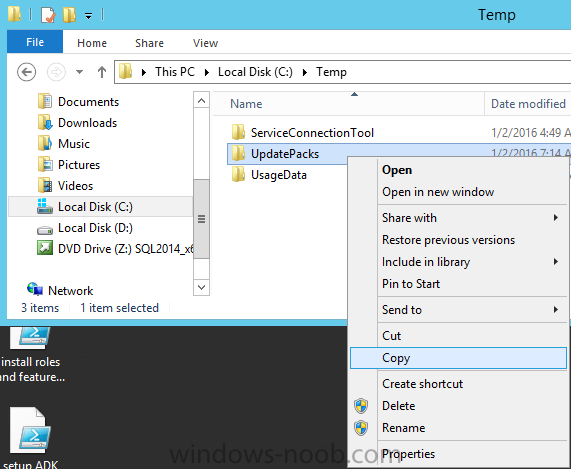
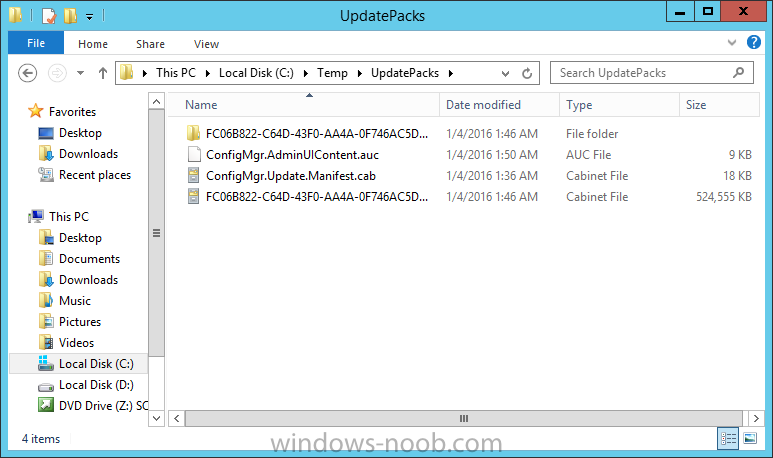
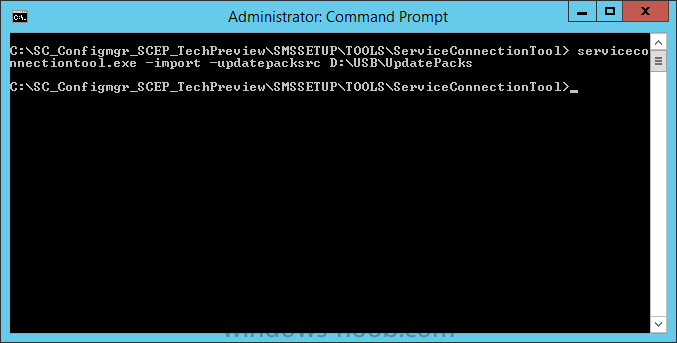
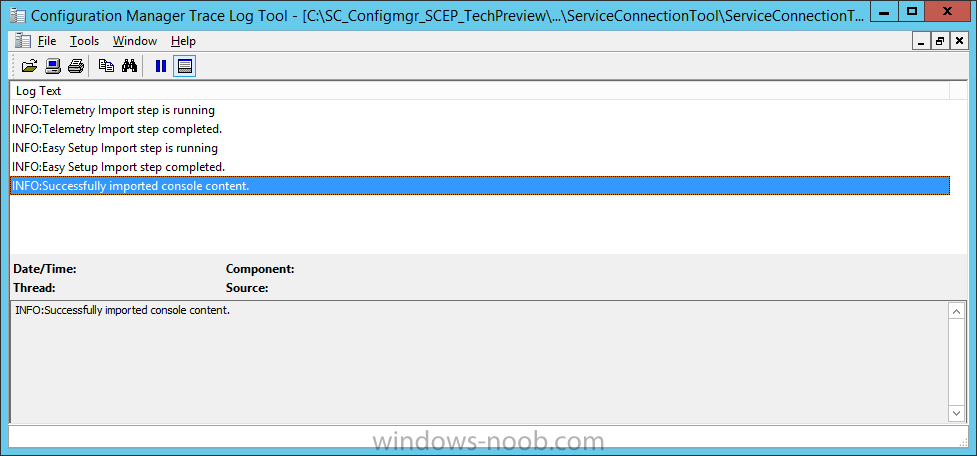
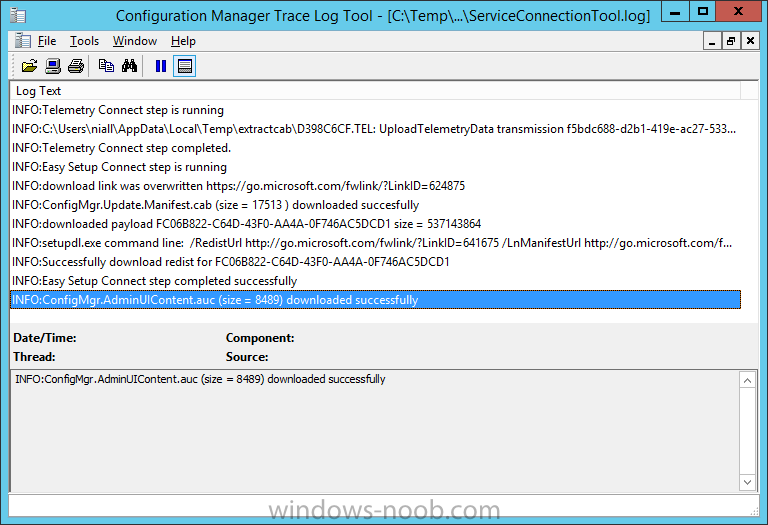
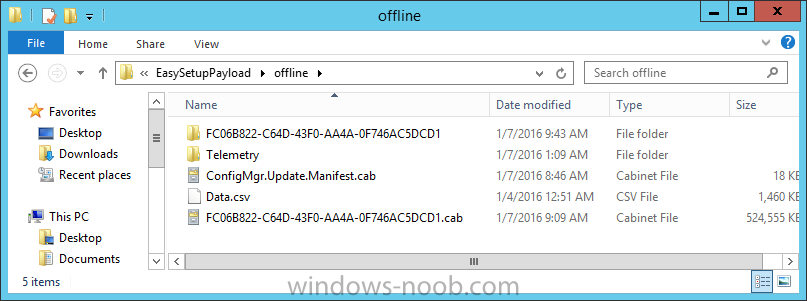
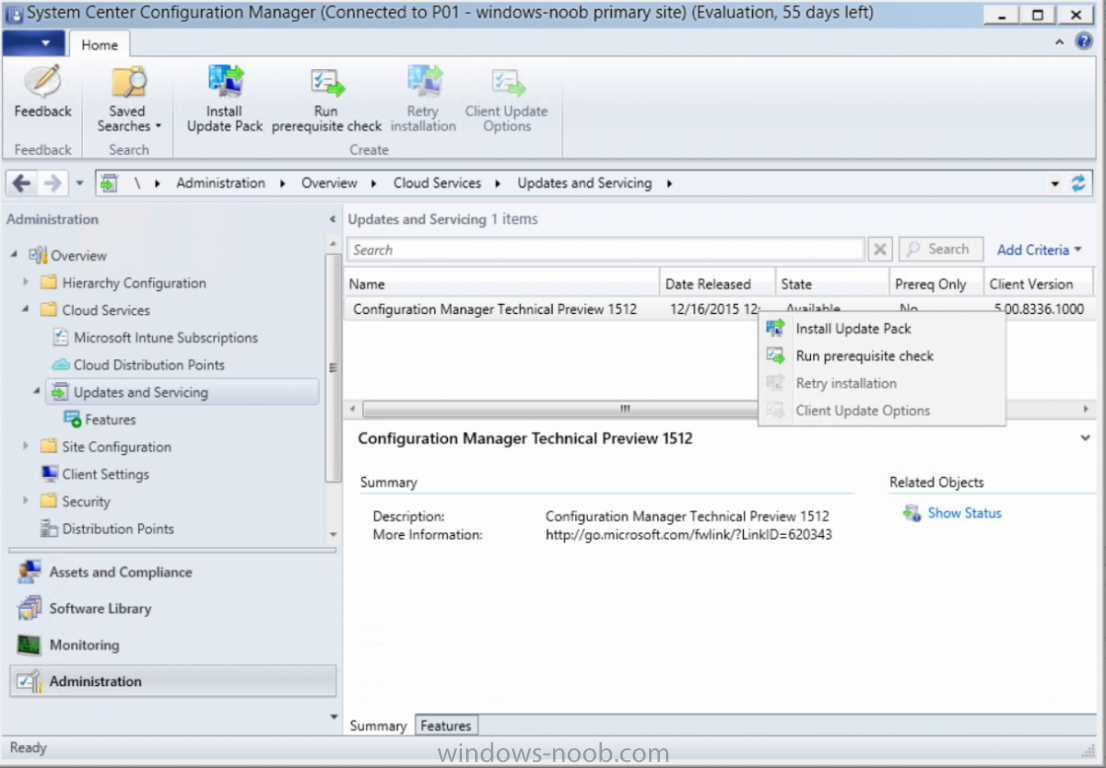
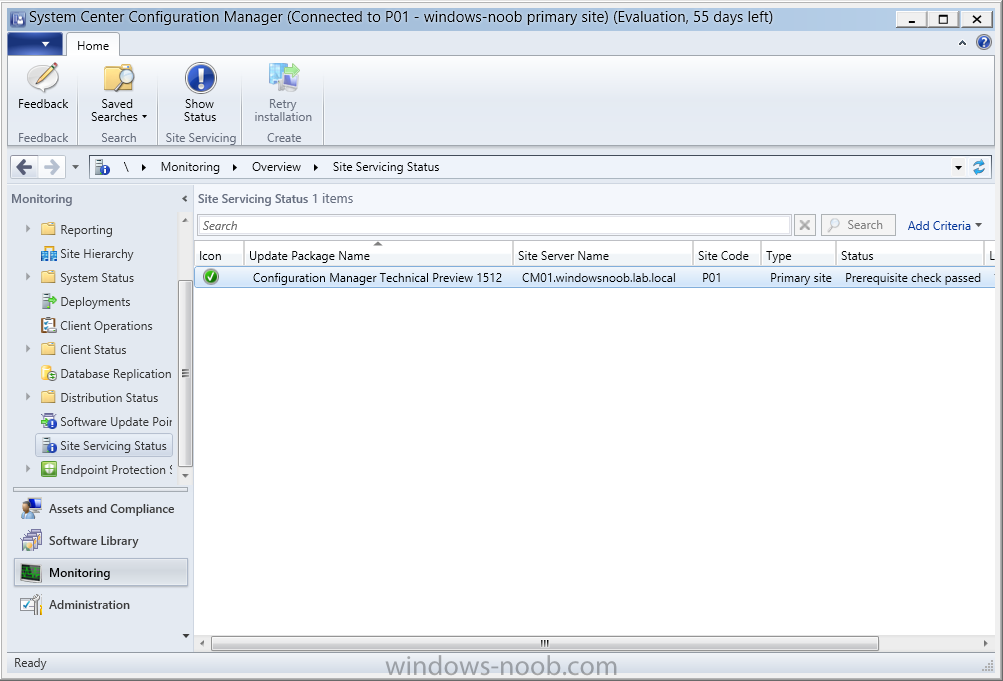
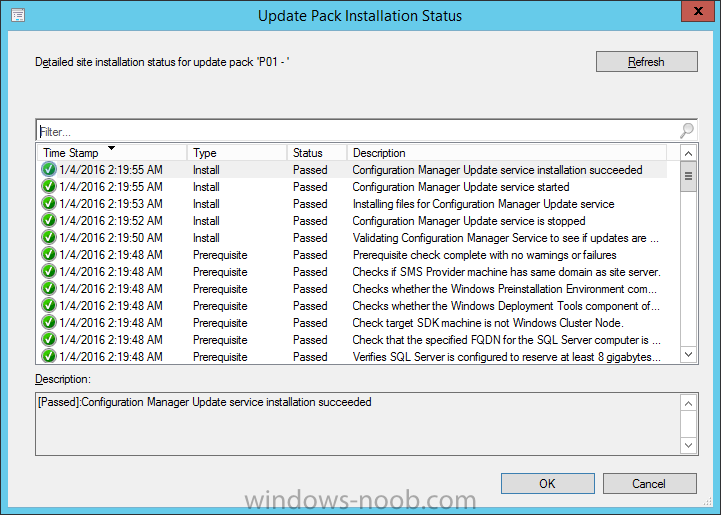
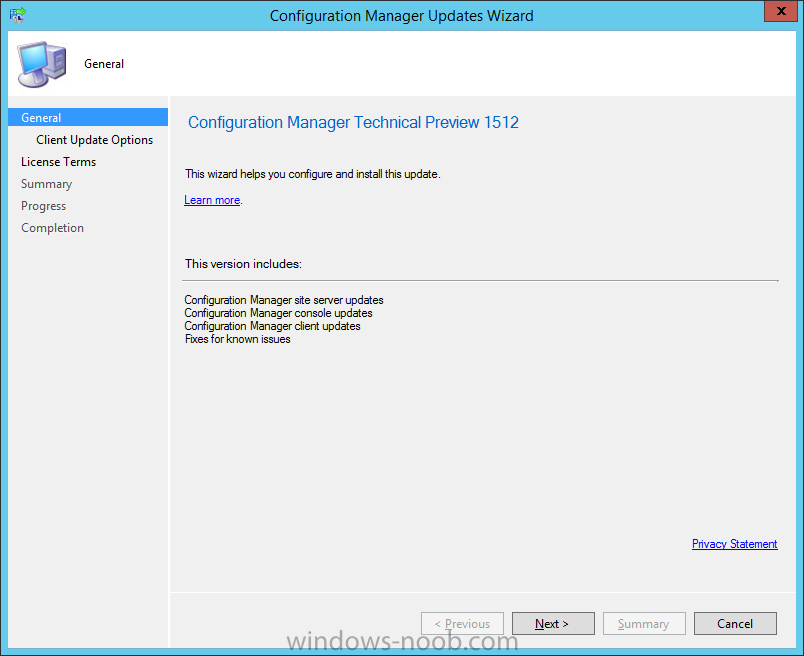
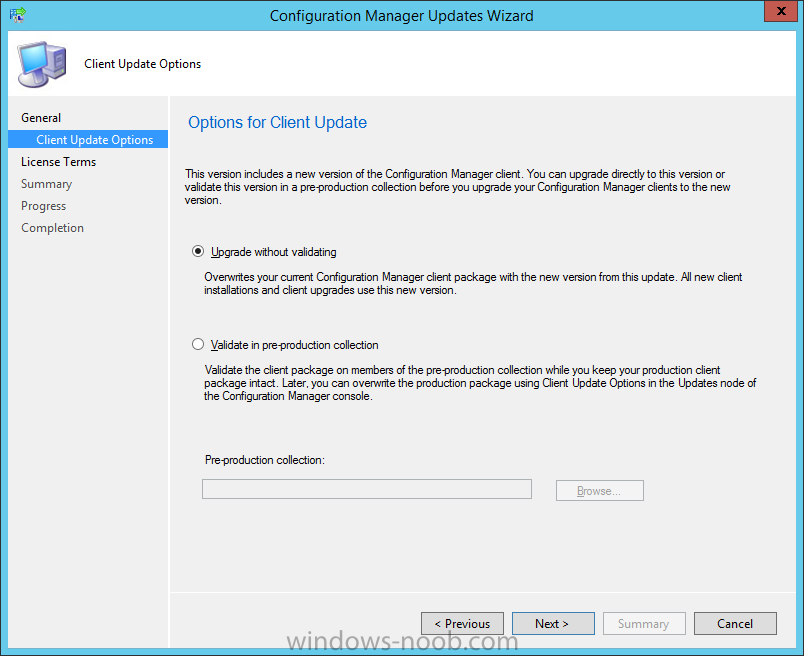
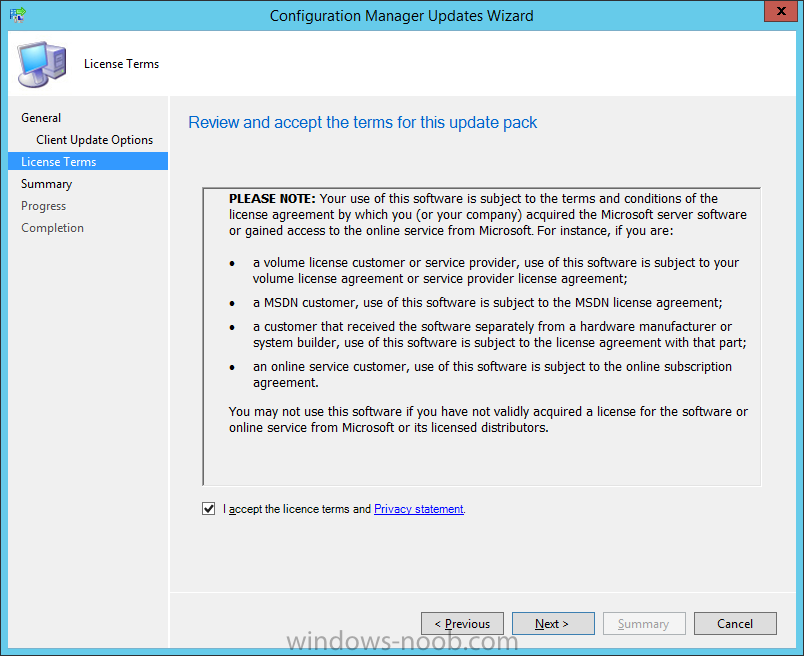
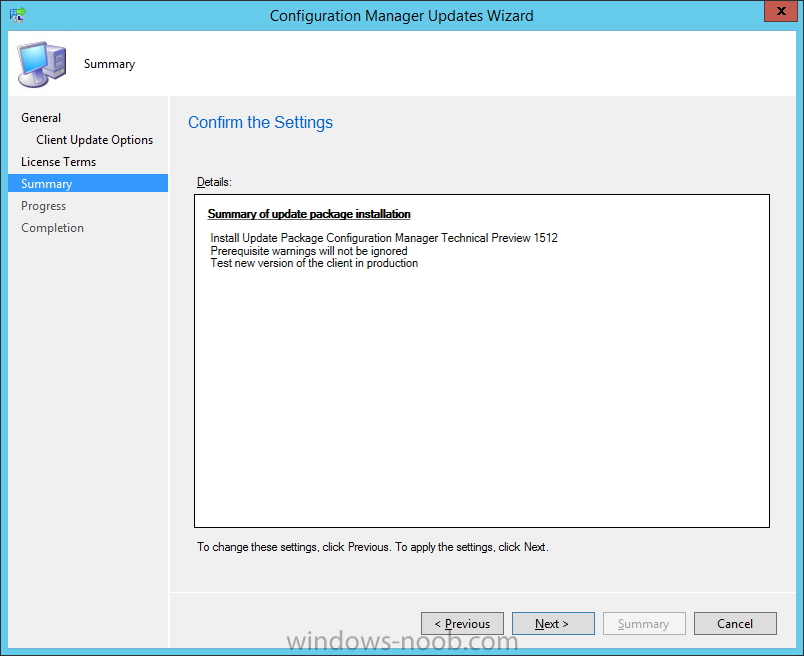
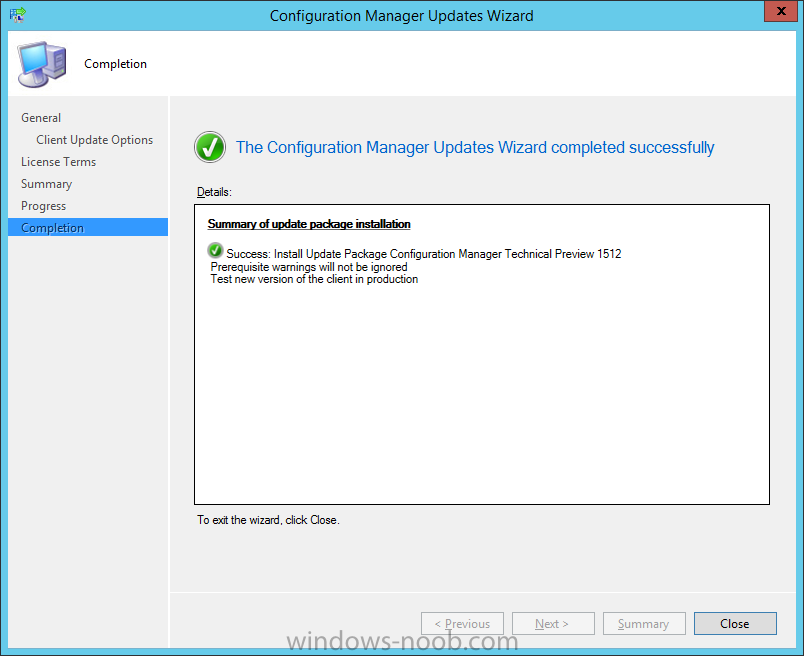
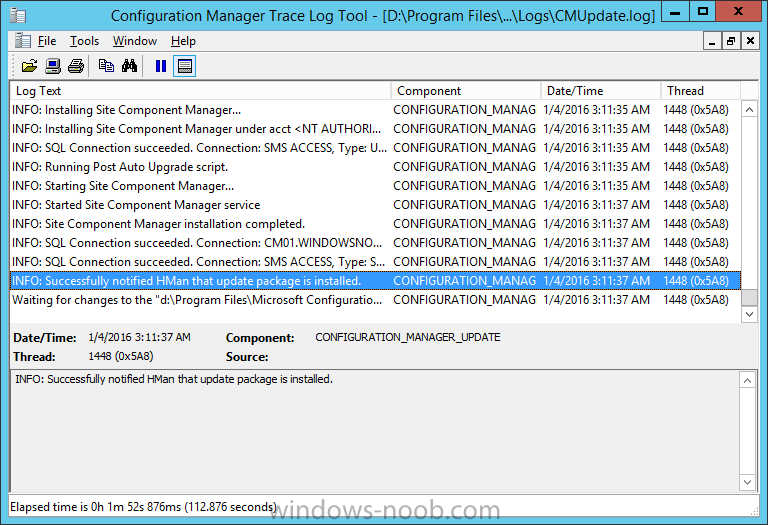
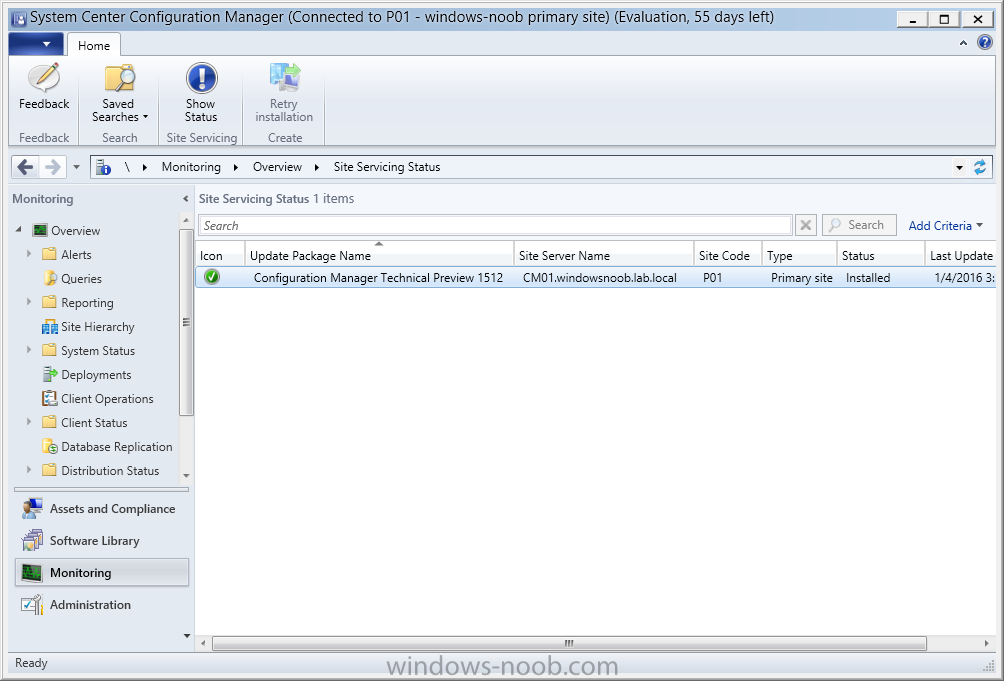
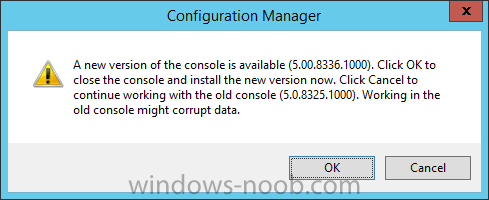
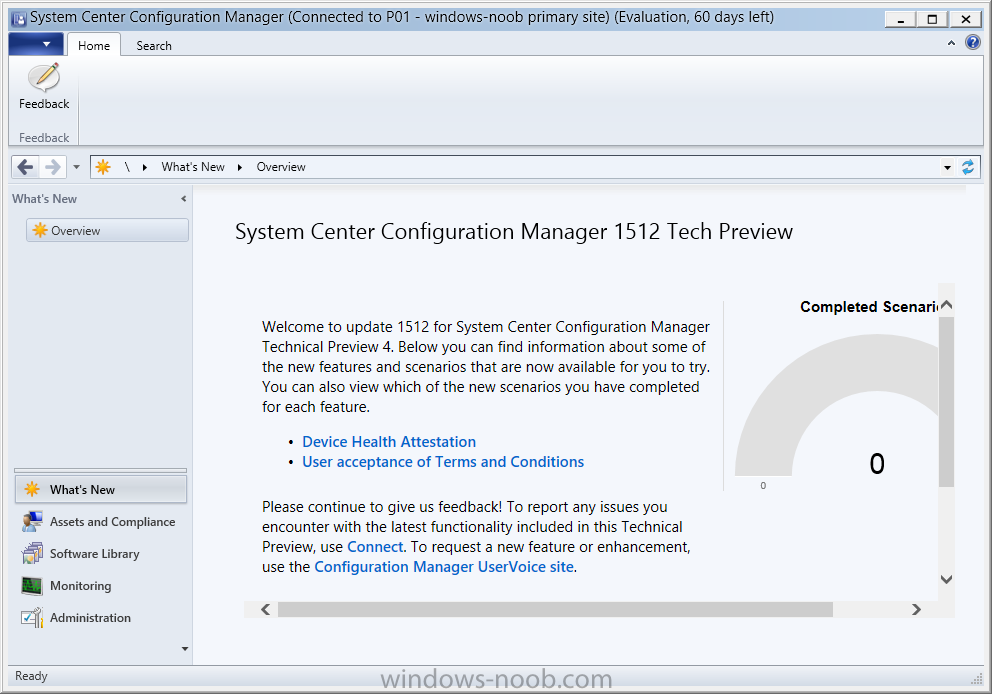
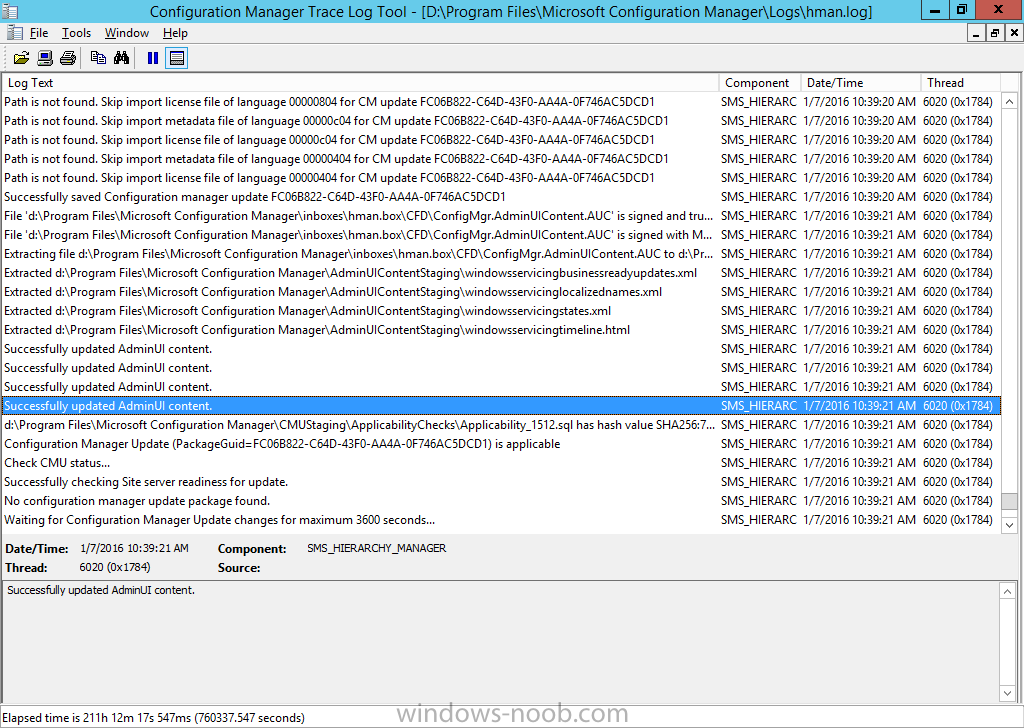
Introduction In an earlier post you installed System Center Configuration Manager (Current Branch), then you learned about configuring discovery methods. Next you configured boundaries to get an understanding of how automatic site assignment and content location works. In this guide you'll learn about a new method for updating ConfigMgr with new features and fixes using a new feature called Updates and Servicing. Note: This is an early release of this new technology so is quite likely to change/evolve in later versions. As a result I will amend this document to reflect those changes if and when they occur. Traditionally ConfigMgr would be updated via these 4 methods: Cumulative Updates Service Packs Hotfixes Extensions for Microsoft Intune What is Updates and Servicing ? Updates and Servicing is a new ability in the ConfigMgr Console which allows you to install updates that provide fixes and new capabilities to your Configuration Manager infrastructure and clients, it's Software as a Service (SAAS) in action. To see where Updates and Servicing is used in the ConfigMgr console open the Administration workspace, expand Overview, select Cloud Services, and then select Updates and Servicing. If no updates are available or you have not staged any updates manually using the service connection tool then it will appear empty as in the screenshot below. Note: This new ability is applicable to both the Technical Preview 4 and Current Branch releases of System Center Configuration Manager but not to any earlier versions of the product. However updates offered to Technical Preview will not be offered to Current Branch. At the time of writing this article (January 7th 2016) there are currently no updates available for the Current Branch release, however there are updates available for the Technical Preview 4 version of ConfigMgr. As a result of this all screenshots and logs are taken from the TP4 release of Configuration Manager. Updates and Servicing does not require a Microsoft Intune connection, and uses the Service Connection Point role when it is in online mode to check for new updates. If any updates are detected, it will download them before making them available to the ConfigMgr admin in the console for installation. The Service Connection Point role can be configured to run in two modes: Online (automatic process) Offline (manual process) How can I change the mode ? Please refer to Step 19 here to see how you can configure the Service Connection Point role from Online to Offline or vice-versa. How does online mode work ? I will cover this in detail in another guide however, when in online mode, ConfigMgr updates are checked for every 24 hours. Checking for available updates and then downloading them is in turn handled by the SMS_DMP_DOWNLOADER component. If an update is found, a check is made to see if it is applicable, and only if it is applicable does it get automatically downloaded to the following folder <installation path>\Microsoft Configuration Manager\EasySetupPayload, and then offered for installation in the Console. When in online mode, telemetry data is sent to Microsoft weekly. How does offline mode work ? Offline mode can be used provided that the Service Connection Point role is in Offline mode. Offline mode is a manual process carried out by using a tool called serviceconnectiontool.exe which is available on the Installation Media in a folder called SMSSETUP\TOOLS\ServiceConnectionTool. If you followed my previous guide on installing TP4 here then you'll find that tool in the following folder: C:\SC_Configmgr_SCEP_TechPreview\SMSSETUP\TOOLS\ServiceConnectionTool The offline process itself can be broken down into four separate phases of which three are required: Prepare Export (optional) Connect Import Each phase can be run by using specific switches for the service connection tool (ServiceConnectionTool.exe). The service connection tool produces a log file (ServiceConnectionTool.log) in the folder that it is executed in and that log file overwrites itself every time you run the tool. In addition, the log file does not contain date/time stamps as of January 2016. Step 1. Use the -prepare switch to create a cab file containing the telemetry data To use the -prepare switch, first create a folder on a drive that is on the ConfigMgr primary server hosting the Service Connection Point running in Offline Mode. In this example you will create a folder on D:\ called usb. mkdir d:\usb To create a CAB file containing telemetry data about your sites configuration using an administrative command prompt browse to the folder containing the ServiceConnectionTool.exe file, and enter the following command: serviceconnectiontool.exe -prepare -usagedatadest d:\usb\usagedata.cab Note: After issuing the command the tool will either go ahead and create the usagedata.cab file or complain that the Usage data is not yet available or it may inform you that you entered an invalid command. If you get an invalid command error, carefully verify what you enter and that the destination path exists and it matches the case sensitivity. Immediately after successfully running the command above I'd recommend you backup the usagedata.cab file to another folder. If you run the same command again the tool will overwrite the file and does not seem to create the Telemetry file within the cab as explained in this bug I raised on connect. Use CMTrace to review the ServiceConnectionTool.log file which should be present in the folder you ran the tool from. If usage data is not available yet you'll see the following in the ServiceConnectionTool.log file. To resolve this try stopping and then restarting the SMS_EXECUTIVE component using the Configuration Manager Service Manager tool available in the Monitoring, System Status, Component Status section of the ConfigMgr console. Once restarted, wait ten minutes and then try the -prepare command again, a successful attempt will log to the ServiceConnectionTool.log file like this. After succesfully creating the usagedata.cab file browse to it's location using Windows File Explorer. The file should be greater than 1kb in size, if it isn't you have a problem (see the note above). Note: Copies of the telemetry data (Data.csv and TelemetryData,cab) are stored in <ConfigMgr Installation Folder>\EasySetupPayload\offline\Telemetry. The cab file can be opened in Windows File Explorer by double clicking on it and should (if properly created) contain a file matching a long GUID with a .TEL extension such as in the example below Step 2. Review the telemetry data (optional step) This is an optional step, telemetry data is only sent when you run the manual command listed in Step 3 or when the Service Connection Point is in online mode and that requires an internet connection. If you want to review what data that will be sent to Microsoft in the Step 3, use either of the two methods listed here or indeed open the .TEL file created in Step 1 above using notepad. Export a CSV file Review the telemetry data in SQL Export a CSV file To export a CSV file containing the telemetry data enter the command below. Please enter the command below carefully because if there is any mistake the tool may not generate any error message and no CSV file will be created. serviceconnectiontool.exe -export -dest D:\USB\UsageData.csv When typed correctly, the tool creates the CSV file. After a successful -export the ServiceConnectionTool.log file will look like this. And the CSV file is located where you specified. You can open that file in Notepad or Microsoft Excel to browse the contents. Review the Telemetry data in SQL Server The following SQL command can be used to view the contents of this table, and shows the exact data that is sent SELECT Results FROM TelemetryResults To see this data on the ConfigMgr Primary server, start SQL Server Management Studio, and expand databases, right click on your ConfigMgr database (CM_xxx where xxx is the site code) and choose New Query. Paste in the command above and click on ! execute. Below is a sample readout of the telemetry data gathered. This data can be viewed using this method whether or not the Service Connection Point is in Offline or Online mode. Step 3. Use the -connect switch to submit the data to Microsoft and to receive available updates Note: Perform the following on a computer with Internet access. This can be another server or the ConfigMgr Primary server hosting the Service Connection Point role as long as it has access to the internet. Create a few folders in C:\ as follows: mkdir c:\temp\UpdatePacks && mkdir c:\temp\UsageData Then, using Windows File Explorer, copy the contents of <InstallationMedia>\SMSSETUP\TOOLS\ServiceConnectionTool to C:\Temp. The following directory structure should now be in place: Next, copy the usagedata.cab file from the D:\USB\UsageData folder created in Step 1 to the folder created above called C:\temp\UsageData. Next issue the following command via an Administrative command prompt to submit that telemetry data to Microsoft and to obtain any available updates that are applicable for your ConfigMgr infrastructure. Be careful that you type the UpdatePacks folder destination correctly otherwise the tool will crash with an I/O error. Also be warned that this command seems to be case sensitive in relation to the file/folder names. ServiceConnectionTool.exe -connect -usagedatasrc c:\temp\UsageData\usagedata.cab -updatepackdest C:\temp\UpdatePacks Note: When you run this command be patient and allow it time to complete, you might think it's doing nothing but it is more than likely downloading content. You can open Task Manager and look at the Ethernet performance to confirm that. You should also use CMTrace to review the ServiceConnectionTool.log file which will be present in the folder you ran the tool from. When the download is completed the CMD prompt should return. The size of the update that was pulled down in my Lab was was 1.2GB in size, but they may be larger or smaller depending on what updates are released. After a successful connection you'll see something similar to the following in the ServiceConnectionTool.log file. Next use Windows File Explorer to copy the contents that were downloaded in C:\temp\UpdatePacks to the ConfigMgr server hosting the Service Connection Point role in Offline Mode in the following folder D:\USB\UpdatePacks. The D:\USB\UpdatePacks folder should now contain a bunch of files similar to what you can see here: Step 4. Use the -import switch to import the downloaded updates Note: Perform the following on the ConfigMgr server that is running the Service Connection Point role in Offline mode. Now that you've created the Telemetry data, reviewed it and uploaded it to Microsoft in order to get the applicable updates, it's time to make those updates available to your ConfigMgr server by importing them. To do so, open an administrative command prompt and browse to the folder containing the serviceconnectiontool.exe file and then enter the following command: serviceconnectiontool.exe -import -updatepacksrc D:\USB\UpdatePacks You can now close the command prompt. The import process copies the data to <ConfigMgr installation path>\Microsoft Configuration Manager\EasySetupPayload\offline as you can see below. After a successful import review the ServiceConnectionTool.log file present in the folder you ran the service connection tool from. Step 5. Review Updates and Servicing in the console and run the prerequisite checker Open the Configuration Manager console and navigate to Administration, Cloud Services , Updates and Servicing. Updates that were imported (and are applicable) should now be listed as available to install. Note: After the import is complete you can restart the SMS_Executive component to 'kick start' the update appearing in the ConfigMgr console. To review any issues with making the update available, please refer to the hman.log available in <ConfigMgr installation path>\Microsoft Configuration Manager\Logs. When you right click on an Update listed, you'll get a number of options (some of which may be greyed out if not applicable). Before installing any update I'd recommend you click on the second option, Run Prerequisite check as shown below. Once this check is complete (fairly quick) you can click on Show Status (bottom right) which will take you to the Monitoring workplace of the ConfigMgr Console and to the Site Servicing Status section as shown below, this will list the status of the prerequisite check under the Status column. If you want more details you can right click on the Update Package Name and choose Show Status as shown in the Update Pack Installation Status. Step 6. Install the Update available in Updates and Servicing To Install the Update, right click on it and choose Install Update Pack. The Configuration Manager Updates Wizard appears. Click on Next to start the update, you'll see a window asking you about your Options for Client Update settings. If you want to test the client in pre-production, point to a collection otherwise leave the default settings of Upgrade without validating and click next. Accept the License terms and privacy statement to continue review the summary and at the completion screen click on Close. Note: You can check the CMUpdate.log file found in <ConfigMgr installation path>\Microsoft Configuration Manager\Logs for detailed info about the installation of the update. Here you can see the CMUpdate.log file showing that the installation was successful. and the site service status will list the update as installed in the Status column. If you then right-click on the update listed you'll see a popup appear informing you of an update available for the console. Click on OK and go through the installation of the new console. Once done setup will launch the updated console. Well that's it, I hope you enjoyed reading this guide, until next time adios! Summary Updating your ConfigMgr infrastructure has become even easier with the new Updates and Servicing feature in System Center Configuration Manager Current Branch, allowing you to keep your infrastructure up to date and packed full of features to manage all devices in a modern Enterprise. Related Reading Update 1601 now available in System Center Configuration Manager Technical Preview - https://www.niallbrady.com/2016/01/27/update-1601-now-available-in-system-center-configuration-manager-technical-preview/ Installation of Current Branch - How can I install System Center Configuration Manager (Current Branch) Configuring Discovery - How can I configure discovery for System Center Configuration Manager (Current Branch) Configuring Boundaries - How can I configure boundaries in System Center Configuration Manager (Current Branch) ? Install updates for System Center Configuration Manager - https://technet.microsoft.com/en-us/library/mt607046.aspx Diagnostics and usage data for System Center Configuration Manager - https://technet.microsoft.com/en-us/library/mt613113.aspx How to test client upgrades in a preproduction collection in System Center Configuration Manager - https://technet.microsoft.com/en-us/library/mt612863.aspx Installation of TP4 - How can I install System Center Configuration Manager and Endpoint Protection Technical Preview 4 Downloads You can download a Microsoft Word copy of this guide here dated 2016/01/07. What is Updates and Servicing and how does it work with System Center Configuration Manager.zip Next Post > Updates and Servicing Online mode


-
Surface pro 4 does not PXE boot
anyweb replied to jack_SCCM's question in Deploying Operating Systems
have you added the network driver for the sp4 to the x64 boot image ? -
more than likely it's missing sata (storage) or network drivers in the boot image you are booting from and as a result, it reboots with no error message, i'd suggest you take a look at this post to easily find out what the issue is, cheers niall
-
start here ! https://www.windows-noob.com/forums/topic/13288-step-by-step-guides-system-center-configuration-manager-current-branch/
-
XP Clients
anyweb replied to Kevin79's topic in System Center Configuration Manager (Current Branch)
get off XP which itself is unsupported or use another brand of Antivirus software like Symantec SEP until you can, -
because they are probably not applicable, can you post any errors you are seeing, and also at the time of the import failure what does the smsprov.log file tell you about the problem ?
-
Welcome to 2016! In the year ahead, we’re excited to bring you more Windows innovations, more incredible devices, and great new Windows apps and games that will deliver more productivity and entertainment experiences across the broadest range of devices. As we start the new year, I want to provide an update on Windows 10 and Windows 10 devices. We continue to be excited – and humbled – by the incredible response to Windows 10. First, a few updates on how we’re tracking toward our goal of seeing Windows 10 active on more than one billion devices. As of today, there are more than 200 million monthly active devices around the world running Windows 10. And Windows 10 adoption is accelerating, with more than 40% of new Windows 10 devices becoming active since Black Friday. In fact, Windows 10 continues to be on the fastest growth trajectory of any version of Windows – ever – outpacing Windows 7 by nearly 140% and Windows 8 by nearly 400%. We’re seeing increased preference for Windows 10 with consumers. Since Black Friday, US retail PC share* for Windows 10 grew 16 points to 62% compared to the prior four weeks. Windows 10 mix of PCs rose to 87% from 58% prior to the holiday. We are also seeing accelerating and unprecedented demand for Windows 10 among enterprise and education customers. As of today, more than 76% of our enterprise customers are in active pilots of Windows 10, and we now have over 22 million devices running Windows 10 across enterprise and education customers. more info > https://blogs.windows.com/windowsexperience/2016/01/04/windows-10-now-active-on-over-200-million-devices/
-
copyprofie=true causes many issues for Windows 10, i'd advise against it
-
Surface pro 4 does not PXE boot
anyweb replied to jack_SCCM's question in Deploying Operating Systems
have you enabled PXE on the x64 boot image and made sure to attach that boot image to the deployed task sequence ? have you also distributed both architecture boot wims to the dp's ? how are you connecting the SP4 to the network, via the USB network cable or via the DOCK ? -
id suggest you only add network (or storage) drivers as needed, adding hundreds of drivers will bloat the boot wim and make it harder to service later on... also, you are importing wireless drivers in the mix and theres no need for them they are not supported at all during pxe boot even if some people come up with hacks to make it work, so, long story short, i'd recommend you start with a clean boot image again, and ONLY import the nic drivers needed, here's some videos where i go into lots of details about adding drivers to boot images (surface pro 3 is the example but there's good info in there), lastly, since you are new to this i'd recommend you get some training or buy one of the many excellent books out there, for example these the first one in the list was written by yours truly and covers managing boot images with drivers manually as well as via powershell good luck !
-
it's usually the sql server logs (SQL transaction log), treesize will pinpoint the folder so that you can be sure...
-
Missing SMSadmin account.. Fresh install
anyweb replied to Drekko's topic in Configuration Manager 2012
take a look at this guide which covers creation of user accounts including installation of ConfigMgr 1511. -
Is the Step-By-Step Capture Process Outdated?
anyweb replied to MagnumVP's topic in Configuration Manager 2012
if you look at the offline servicing section of the book it covers adding all applicable updates to an already captured image, as regards doing this using MDT use any of Johan or Mikael's guides, here's one http://deploymentresearch.com/Research/Post/357/Building-reference-images-like-a-boss -
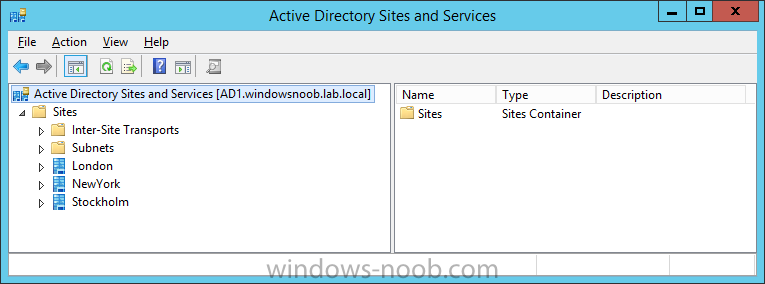
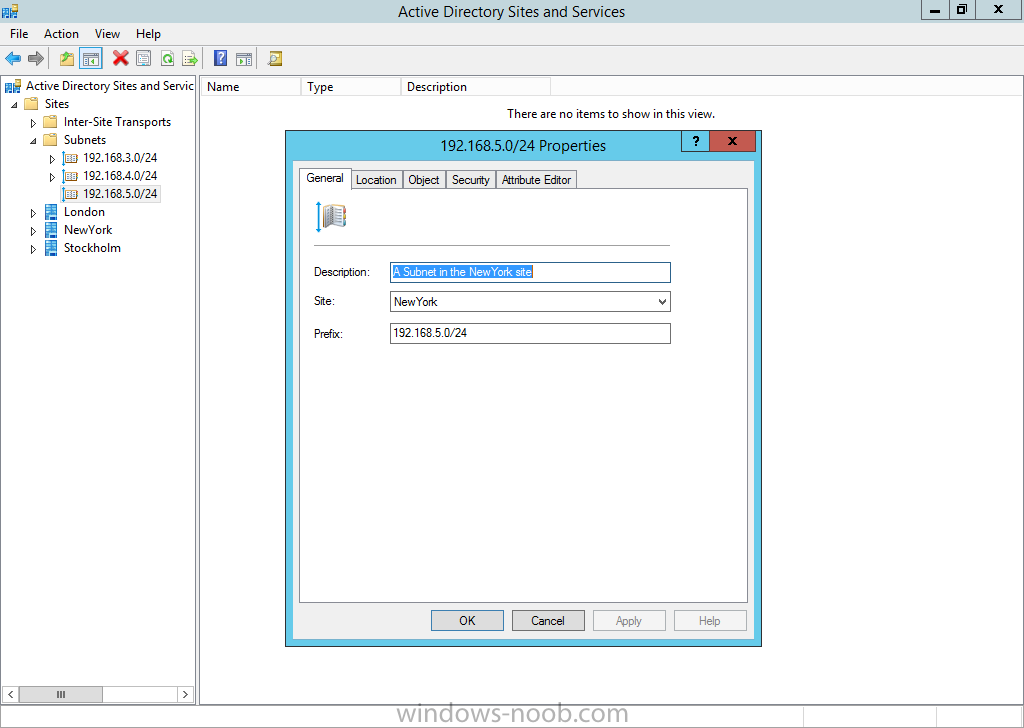
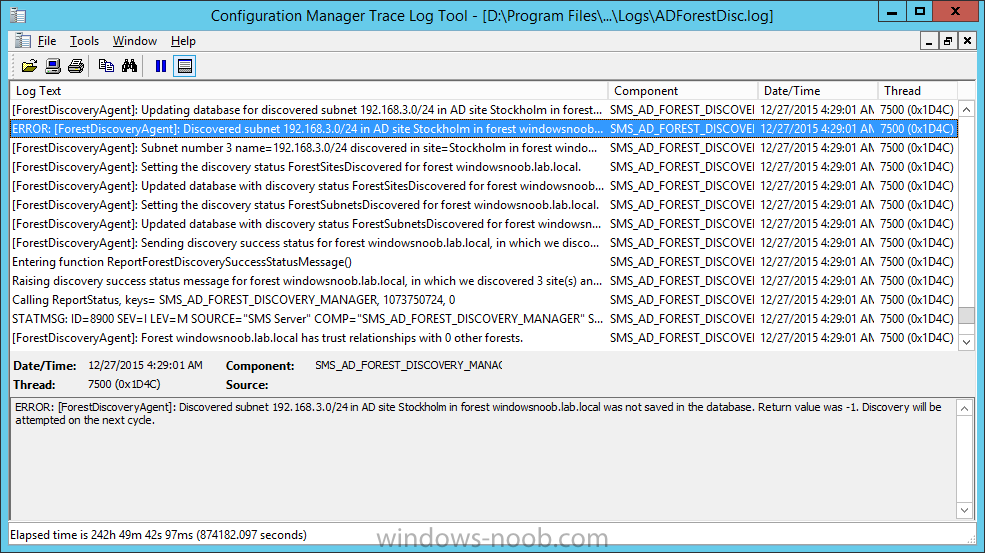
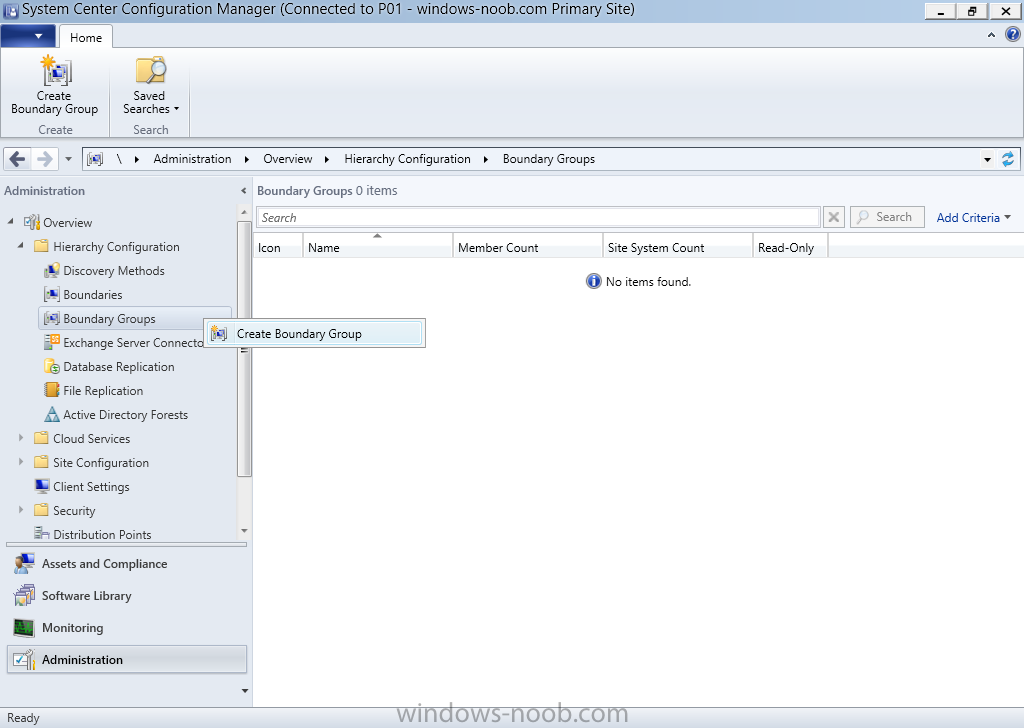
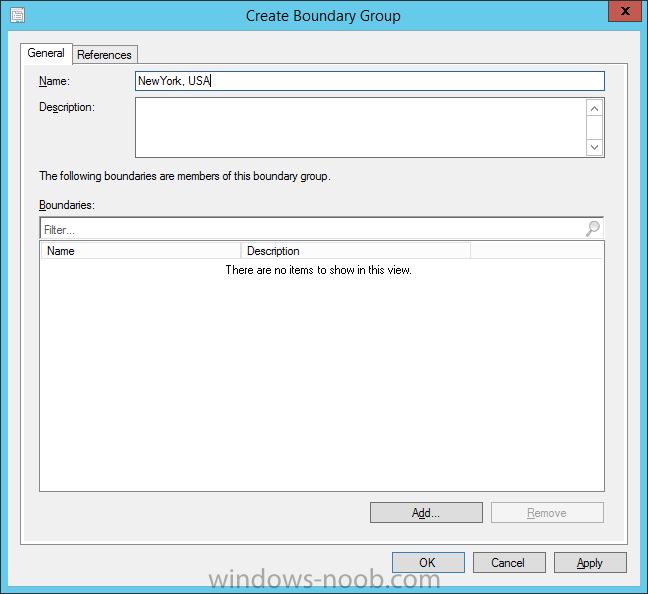
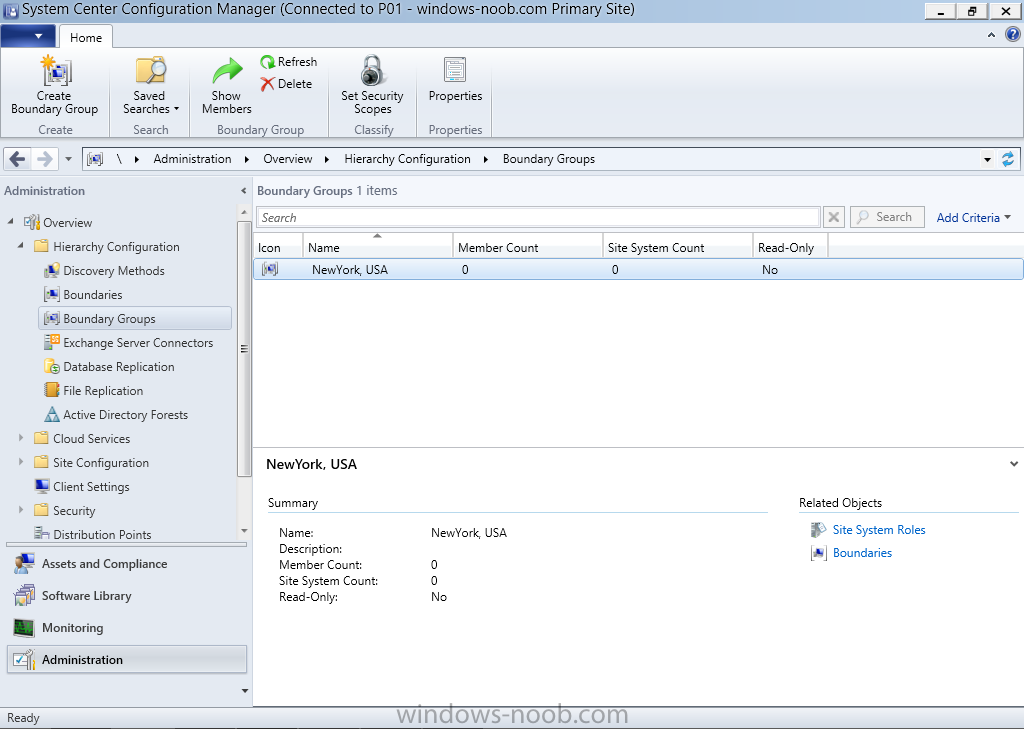
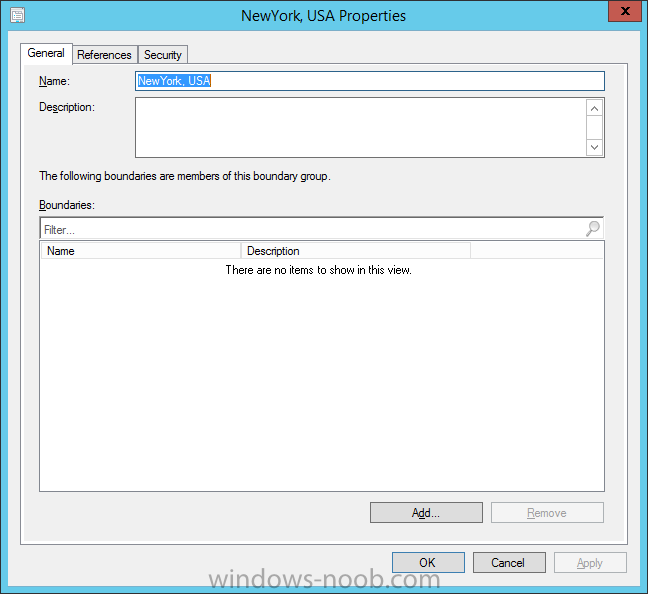
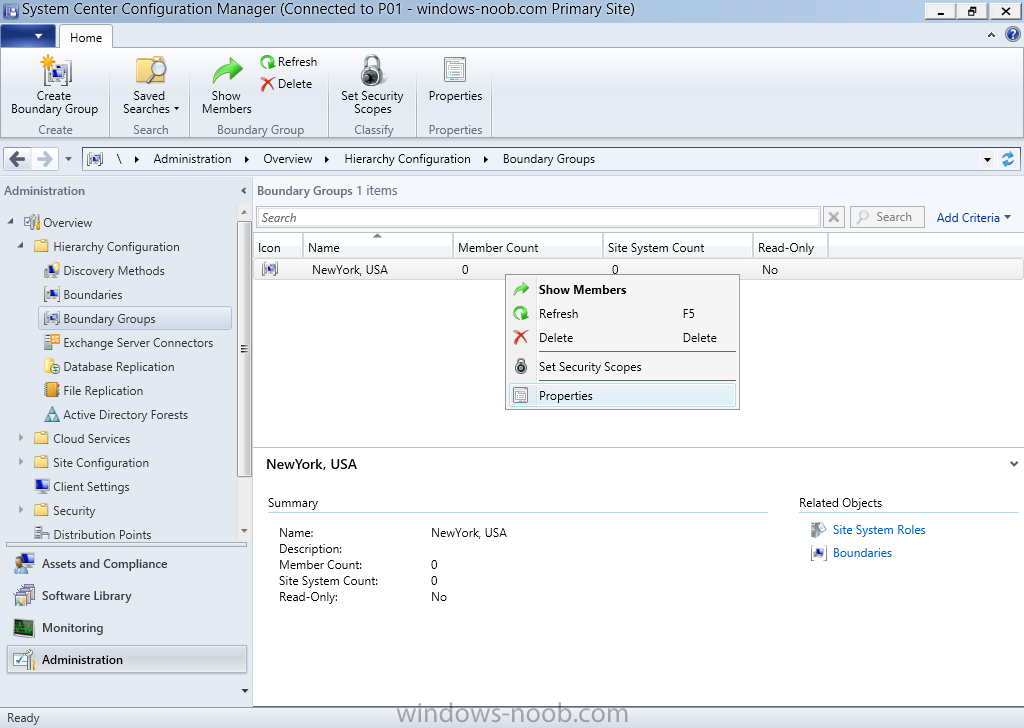
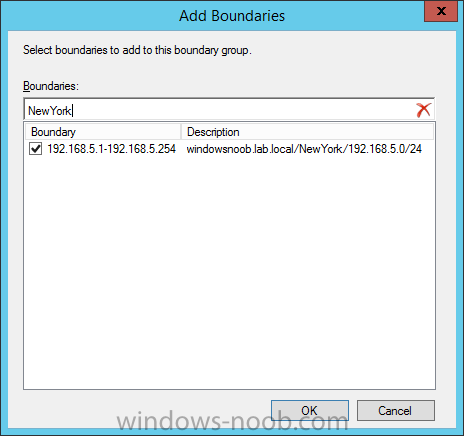
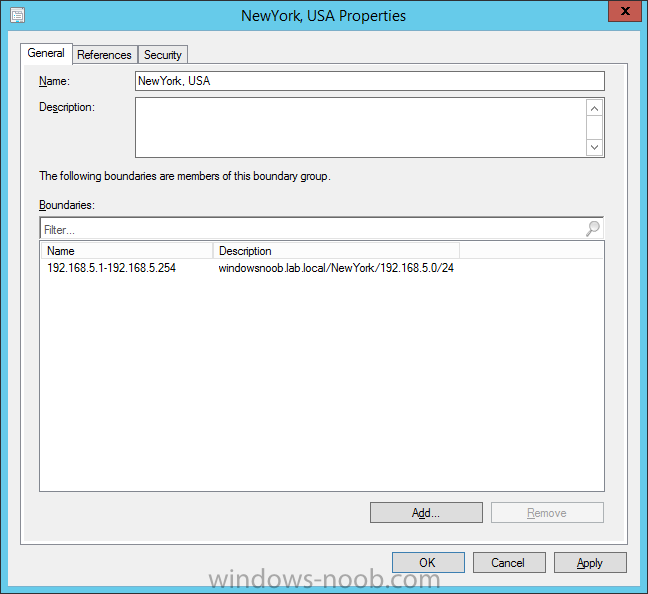
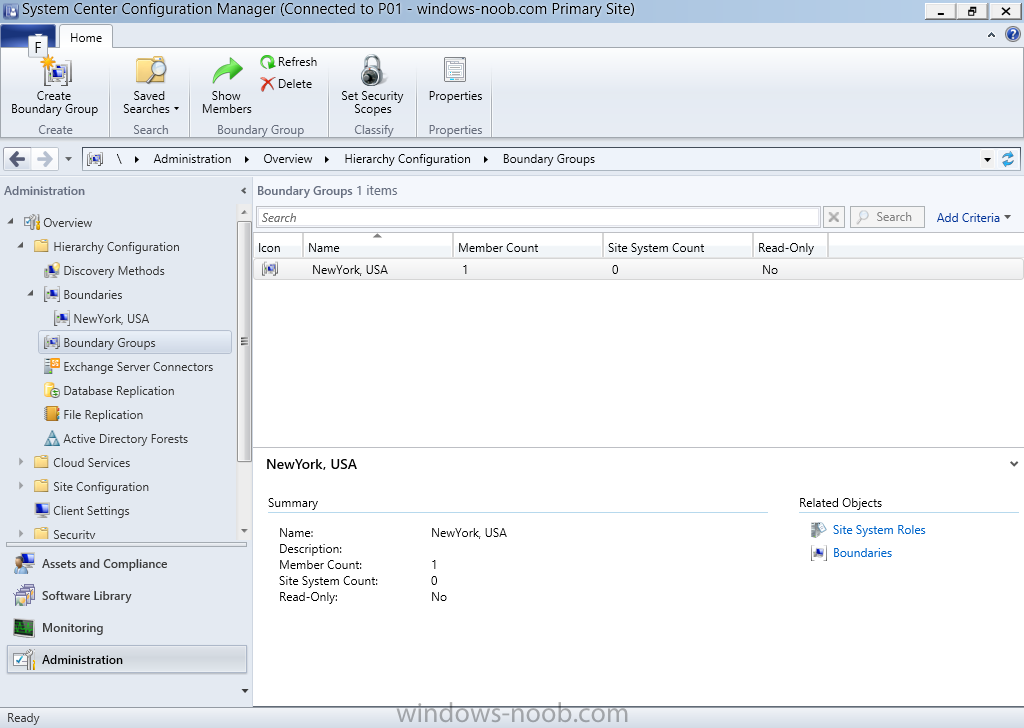
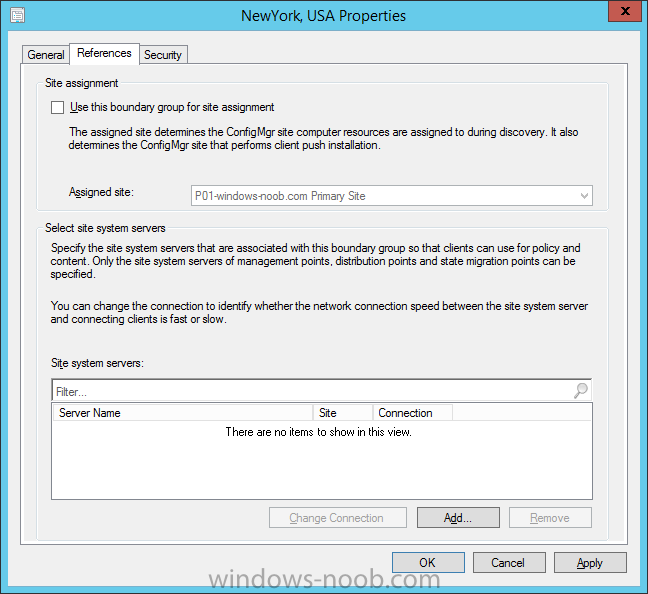
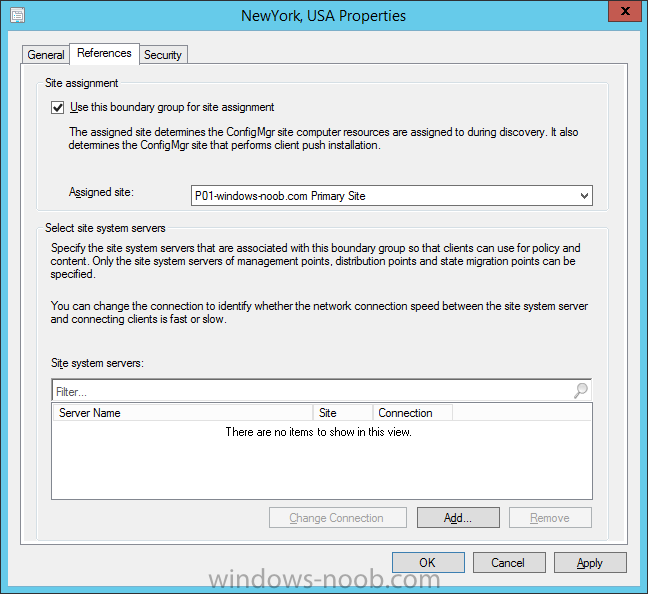
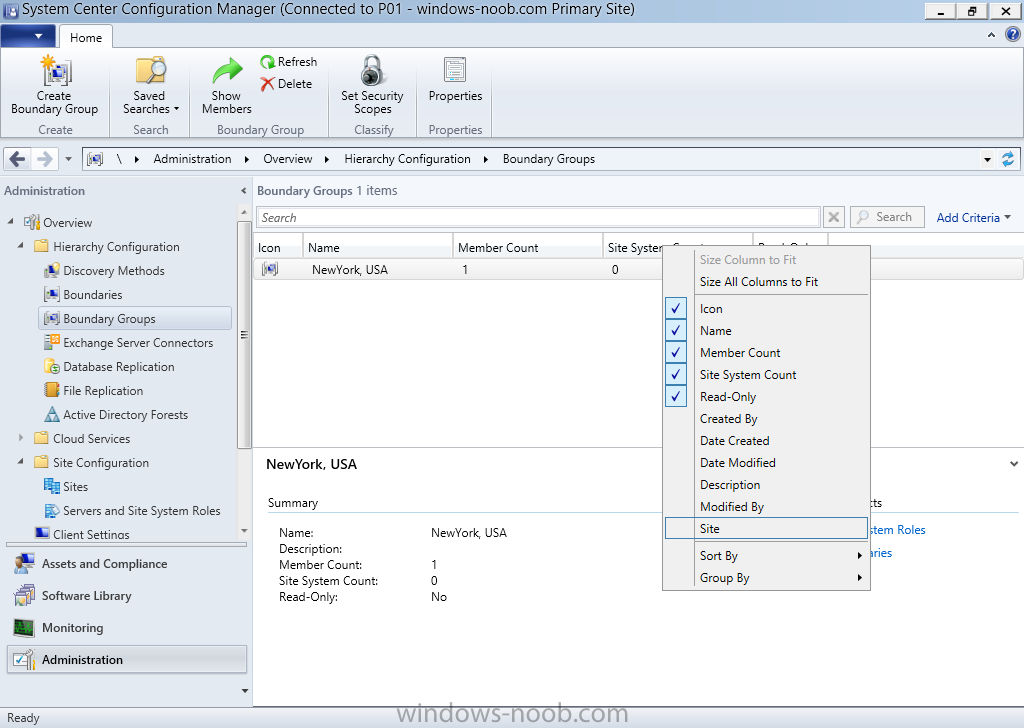
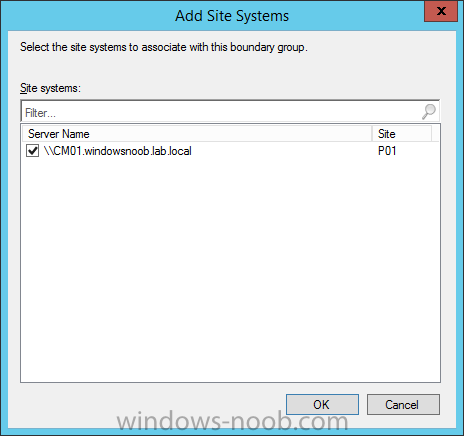
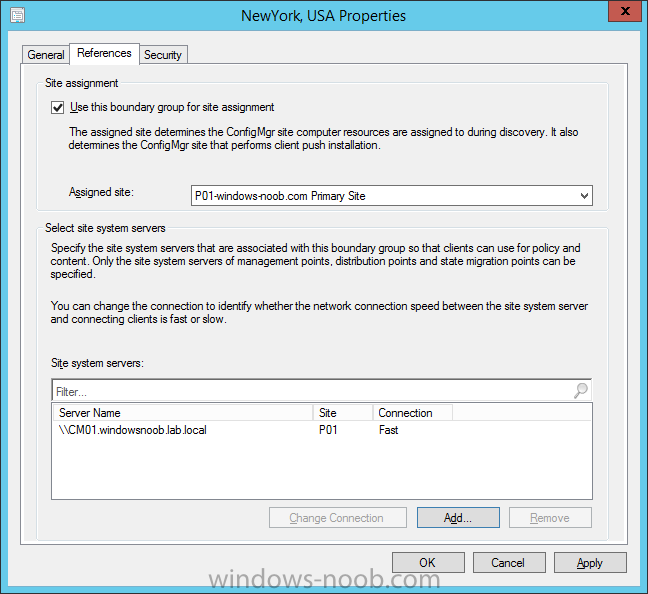
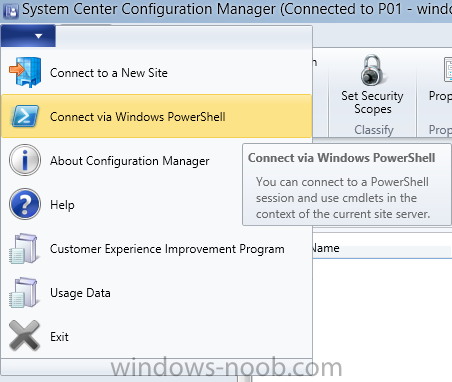
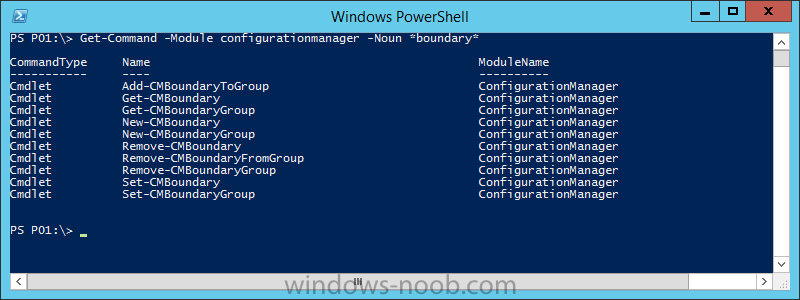
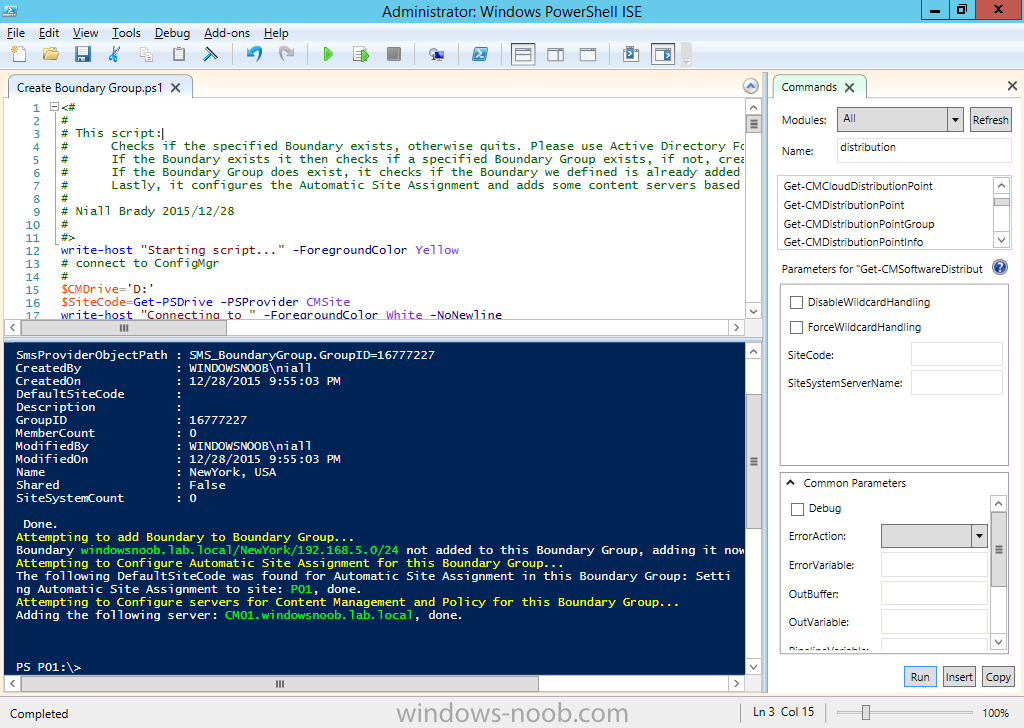
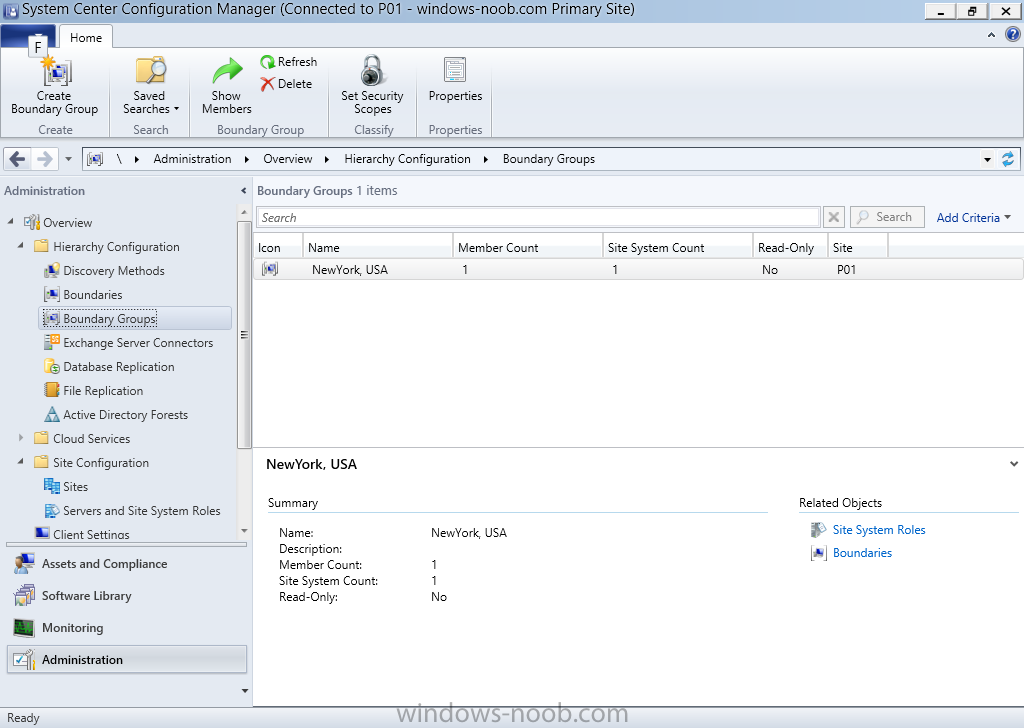
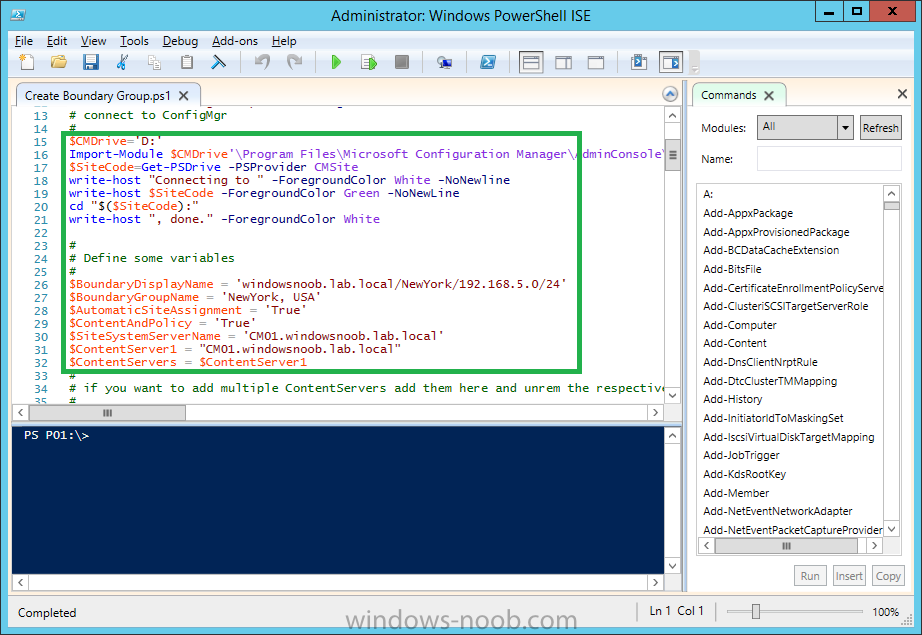
Introduction In an earlier post you installed System Center Configuration Manager (Current Branch), then you learned about configuring discovery. In this post you’ll take a look at configuring Boundaries to understand how automatic site assignment and content location works. What is a Boundary ? In System Center Configuration Manager, a boundary is a network location on the intranet that can contain one or more devices that you want to manage. Boundaries can be based on any of the following and the hierarchy can include any combination of these boundary types: IP subnet Active Directory site name IPv6 Prefix IP address range To use a boundary, you must add the boundary to one or more boundary groups. Boundaries are no longer site specific, but defined once for the hierarchy, and they are available at all sites in the hierarchy. Each boundary must be a member of a boundary group before a device on that boundary can identify an assigned site, or a content server such as a distribution point. You no longer configure the network connection speed of each boundary. Instead, in a boundary group you specify the network connection speed for each site system server associated to the boundary group as a content location server. What is a Boundary Group ? Boundary groups are collections of boundaries. By using boundary groups, clients on the intranet can find an assigned site and locate content when they have to install software, such as applications, software updates, and operating system images. What about Internet based clients ? When clients are on the Internet, or they are configured as Internet-only clients, they do not use boundary information. These clients cannot use automatic site assignment and always download content from any distribution point in their assigned site when the distribution point is configured to allow client connections from the Internet. Should I use automatic or manual boundary creation methods ? ConfigMgr can automatically create IP Address range and Active Directory Site based boundaries depending on your discovery preferences. This is useful in scenarios where you may have several subnet's or Active Directory Sites defined in Active Directory Sites and Services. If the number of subnets and sites in Active Directory Sites and Services is comparatively small, adding boundaries manually would be more suitable, however keep in mind that entering anything manually is prone to error. Ok now that you understand what boundaries and boundary groups are, let's continue. Step 1. Review AD Sites and Subnets in Active Directory Sites and Services Note: Perform the following on the Active Directory Domain Controller server (AD1) as Local Administrator To identify where ConfigMgr get's the information it needs to automatically create boundaries (depending on your discovery preferences) you can open Active Directory Sites and Services on the Active Directory Domain Controller. This tool allows you to edit, create, or delete Subnets or Active Directory sites or to change Forest or Domain Controller. To learn how to add new Sites or Subnets in Active Directory Sites and Services please review the following post on Technet: https://technet.microsoft.com/en-us/library/cc732761.aspx Note: A forest or domain consisting of a single site can be very efficient for a single location network connected completely by high-speed bandwidth. If your forest or domain contains multiple geographic locations that communicate over low-speed wide area network (WAN) connections, establishing multiple sites gives you more detailed control of Active Directory replication behavior, reduces authentication latency, and reduces network traffic on the WAN. In this sample setup I've already created 3 Active Directory Sites, and then I created 3 subnets and associated each of those subnets with an active directory site as listed below: NewYork - 192.168.5.0/24 London - 192.168.4.0/24 Stockholm - 192.168.3.0/24 Note: You will want to configure your Sites and Subnets according to your preferences as this is only an example configuration in a lab. Step 2. Review automatically discovered boundaries Note: Perform the following on your ConfigMgr server as a user with Full Administrator permissions in the ConfigMgr console. When you enabled Active Directory Forest Discovery in this guide, ConfigMgr automatically created boundaries for you based on the settings you selected. You can review those boundaries it created in the ConfigMgr console. To do so start the console and browse to the Administration workplace, select Hierarchy Configuration and then select Boundaries, the three Active Directory subnets detected by the discovery method are created as IP address range boundaries because you selected to automatically create IP address range boundaries for IP subnets when they are discovered in Active Directory Forest Discovery. Note: If you had configured Active Directory Forest Discovery to automatically create Active Directory Site boundaries when they are discovered then the active directory site names would be listed as boundaries also. If you change any subnets or sites within Active Directory Sites and Services they will not be shown until the Active Directory Forest Discovery method detects them as defined in it's schedule. In addition the discovery method will not remove previously detected subnets or sites. In addition to reviewing what boundaries are listed in the ConfigMgr console, you can use CMTrace to open the ADForestDisc.log file. The log file will be located in in the <InstallationPath>\LOGS folder. Tip: You can change the verbosity level of the logging engine for this discovery component by changing the Verbose Logs reg key found in HKLM\Software\Microsoft\SMS\Components\SMS_AD_FOREST_DISCOVERY_MANAGER from the default value of 0 to 2 for verbose logging. Thanks to my buddy Rob for reminding me. Once you've enabled the change, trigger Active Directory Forest Discovery by right clicking on the method and choose Run Forest Discovery Now. Step 3. Create a boundary group Note: Perform the following on your ConfigMgr server as a user with Full Administrator permissions in the ConfigMgr console. Start the ConfigMgr console and browse to the Administration workplace, select Hierarchy Configuration and then select Boundaries Groups. Right Click and choose Create Boundary Group. When the Create Boundary Group wizard appears, fill in some useful details about the boundary group you are creating. In this example you will name the Boundary Group as NewYork, USA. Tip: To make it easier to visualize what location your boundary groups deal with you could make the name descriptive of the Geographical location. For example for a boundary group that contains servers located in Sweden enter the name of the boundary group as Sweden, Europe. Another boundary group that contains servers in France could be called France, Europe and so on. Click OK when done. The newly created boundary group appears in the console. Step 4. Adding one or more boundaries to the boundary group Note: Perform the following on your ConfigMgr server as a user with Full Administrator permissions in the ConfigMgr console. To add one or more boundaries to a boundary group, start the ConfigMgr console and browse to the Administration workplace, select Hierarchy Configuration and then select Boundaries Groups. Right Click the previously created NewYork Boundary Group and choose choose Properties. The boundary group properties are shown. In this example you will add one IP Address Range boundary to this boundary group. Click on Add to add a boundary to the boundary group. Select the IP Address Range boundary that matches NewYork in the description. Alternatively if you have many boundaries, simply enter NewYork into the search field provided and select the available result. After clicking OK, the newly added boundary appears in the boundary group. Click OK to close the wizard, note that the member count in the boundary group has increased. Step 5. Enabling Automatic Site Assignment for the boundary group Note: Perform the following on your ConfigMgr server as a user with Full Administrator permissions in the ConfigMgr console. Site assignment is used by clients that use automatic site assignment to find an appropriate site to join, based on the clients current network location. After a client assigns to a site, the client will not change that site assignment. For example, if the client roams to a new network location that is represented by a boundary in a boundary group with a different site assignment, the client’s assigned site will remain unchanged. Source: Technet. To enable automatic site assignment for a boundary group, start the ConfigMgr console and browse to the Administration workplace, select Hierarchy Configuration and then select Boundaries Groups. Right Click the previously created NewYork Boundary Group and choose choose Properties. Click on the References Tab. Place a check mark in Use this boundary group for site assignment and using the drop down menu, select the site you wish to assign clients to. Click Apply and close the window by clicking on OK. Back in the console right click anywhere in the column view and choose Site from the list of available options as shown below. By default, the Site column is not selected. Once done, you'll see the site listed in that column provided that Automatic Site Assignment is enabled for that Boundary Group otherwise it will appear blank. Note: When you plan for boundary groups, to help avoid overlapping boundaries for site assignment, consider using of one set of boundary groups for site assignment, and a second set of boundary groups for content location. Step 6. Adding servers for Content and Policy retrieval for the boundary group Note: Perform the following on your ConfigMgr server as a user with Full Administrator permissions in the ConfigMgr console. In System Center Configuration Manager Current Branch you can add site servers to a boundary group for the following options: Content Location State Migration Points Preferred Management Point Note: If you intend to use preferred management points, you must enable this option for the hierarchy. To do so, in the Configuration Manager console, click Administration > Site Configuration > Sites > Hierarchy Settings. Then, on the General tab of the Hierarchy Settings, select Clients prefer to use management points specified in boundary groups as shown in the screenshot below. To enable automatic site assignment for a boundary group, start the ConfigMgr console and browse to the Administration workplace, select Hierarchy Configuration and then select Boundaries Groups. Right Click the previously created NewYork Boundary Group and choose choose Properties. Click on the References Tab. In the Site system servers section click on Add and place a check mark for each site system server you want added to this boundary group. Click OK when done and the selected site system servers will be listed. Note: If you want to change a Site System Servers connection speed from Fast (the default) to Slow, select the server name and click on Change Connection. Clients prefer Fast to Slow connections. Click Apply and then OK and you can now see that the Site System Count has increased. Step 8. Automate the above using PowerShell Note: Perform the following on your ConfigMgr server as a user with Full Administrator permissions in the ConfigMgr console. The above steps show how you can configure boundaries and boundary groups using the ConfigMgr console, however you could script it all using PowerShell. The ConfigMgr PowerShell cmdlets for Boundaries alone can be listed with the below command once you've connected to PowerShell in ConfigMgr. Get-Command -Module configurationmanager -Noun *boundary* To automate Boundary Group creation using Windows PowerShell either write your own script or take a look at this one I wrote, it will automate the above nicely and you can extend it to do multiple boundaries/boundary groups. Download the Create Boundary Groups.ps1 script in the Downloads section at the bottomg of this guide and extract it to C:\Temp. Open it with Windows PowerShell ISE by starting that as Administrator. Edit the variables in the script to match your environment, most are shown below in the Green box. When you are happy with the variables, Run the script by pressing F5 or clicking on the Green arrow. The following output will be observed. cool ! Summary Creating and configuring Boundaries and Boundary Groups helps Configuration Manager clients to locate content, use automatic site assignment and policy retrieval from preferred management points. Automating the process using Windows PowerShell is fun :-). Thanks for reading my guides ! until next time, adios. Downloads You can download a Microsoft Word copy of this guide dated 2015/12/28 here. How can I configure boundaries.zip The PowerShell script used in this guide is located here. Create Boundary Group.zip Note: There was a bug in the script up until Jan/14/2016. I've corrected it and uploaded the fixed script. Next Post > Updates and Servicing Offline mode


-
Is the Step-By-Step Capture Process Outdated?
anyweb replied to MagnumVP's topic in Configuration Manager 2012
it was relevant when i posted it and of course there's more than one way to do it, use whichever method works for you be it * capture media * build and capture process in ConfigMgr * use MDT to build and capture the image I wroted a book recently which covers how to do this in ConfigMgr, have you taken a look as it covers software updates also... http://www.amazon.com/Windows-noob-Guides-Configuration-Manager-2012/dp/9187445166 -
ok that's odd, works fine for me, are you sure you followed every step exactly as i explained in the guide above ? any deviation may cause problems.. prior to Configuration Manager 2012 SP1 you would not use the Install.wim file directly from the media as Windows would end up on D: or E:, however to deal with this natively you can add a new Configuration Manager variable called OSDPreserveDriveLetter to your task sequence and set it to False before the Apply Operating System Image step. OSDPreserveDriveLetter For System Center 2012 Configuration Manager SP1 and later: This variable determines whether or not the task sequence uses the drive letter captured in the operating system image WIM file when applying that image to a destination computer. In Configuration Manager with no service pack, the drive letter captured in the WIM file is used when applying the operating system image WIM file. In Configuration Manager SP1, you can set the value for this variable to False to use the location that you specify for the Destination setting in the Apply Operating System task sequence step. For more information about the Apply Operating System task sequence step, see the Apply Operating System Image section in the Task Sequence Steps in Configuration Manager topic.
-
ok and you are saying the Windows is on E: after the deployment is complete ?
-
good info, i wonder if you do an in-place upgrade of SQL Server will it remove the error, backup the DB first !
-
"For Capture Settings, select This task sequence will never be used to capture an image" I didn't capture the image in this guide, so, how did you capture it ?
-
Build and Capture or Build from Media - Windows 10
anyweb replied to MagnumVP's topic in Configuration Manager 2012
didn't you see this yet ? https://www.windows-noob.com/forums/topic/13368-how-can-i-install-system-center-configuration-manager-current-branch/ -
Build and Capture or Build from Media - Windows 10
anyweb replied to MagnumVP's topic in Configuration Manager 2012
SCCM Current Branch is what you are referring to as SCCM 2016. There will be multiple updates released yearly for System Center Configuration Manager Current Branch to deal with new capabilities in mobile platforms and Windows 10. Therefore, if you are deploying Windows 10 now (and TH2 is the current release), and want to be able to support it in the future, you need to upgrade to the SCCM Current Branch release in order to deploy and patch the newer versions of Windows 10. The 'when' is when Windows 10 TH2 expires for Software Updates support and that would be 12 months after TH2 was released, so you 'could' stay on Configuration Manager 2012 R2 SP1 CUx until................... around November at the latest next year, and after that you'd have to move to Current Branch. Or, you'll be in a situation of having Windows 10 computers that you cannot patch with ConfigMgr. see https://technet.microsoft.com/en-us/library/mt598226%28v=vs.85%29.aspx?f=255&MSPPError=-2147217396 for more details -
Build and Capture or Build from Media - Windows 10
anyweb replied to MagnumVP's topic in Configuration Manager 2012
you'll need to move to System Center Configuration Manager Current Branch if you want to service Windows 10 with updates for all releases of Windows 10 after TH2 (1511). -
Build and Capture or Build from Media - Windows 10
anyweb replied to MagnumVP's topic in Configuration Manager 2012
use a vm to build any reference image, always, I cover how to do this in my book here > http://www.amazon.com/Windows-noob-Guides-Configuration-Manager-2012/dp/9187445166