anyweb
-
Posts
9271 -
Joined
-
Last visited
-
Days Won
371
Everything posted by anyweb
-

Prerequsites for SCCM 2012 R2 and SCCM 1606
anyweb replied to charris211's topic in Configuration Manager 2012
hi Andy, drop me a message and i'll make them available to you cheers niall -
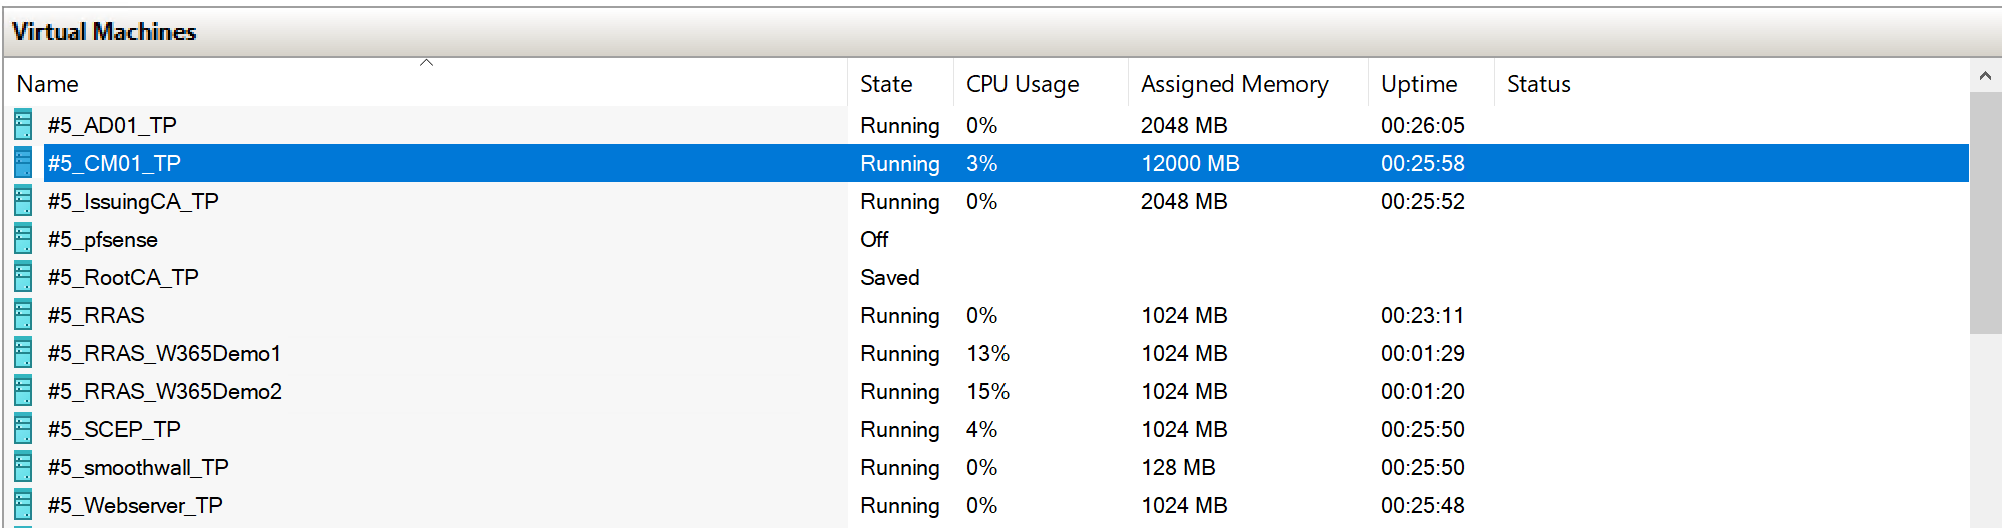
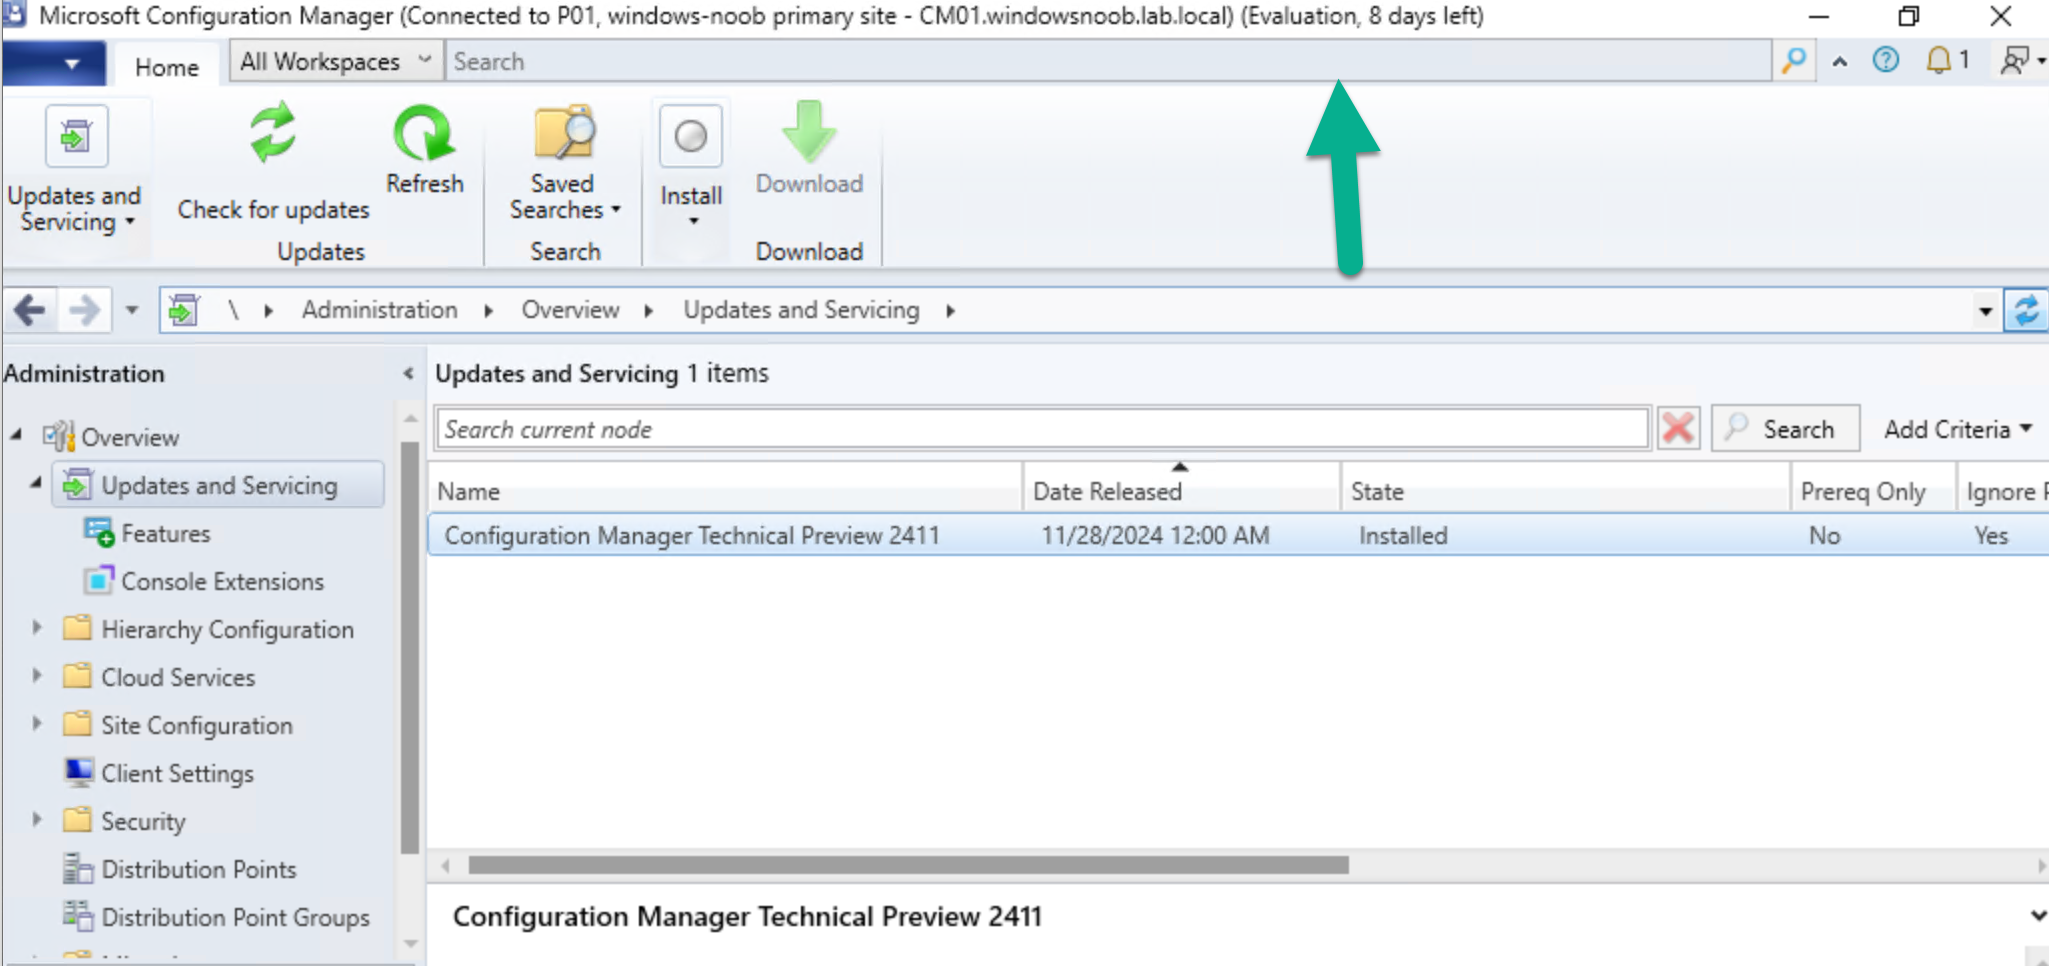
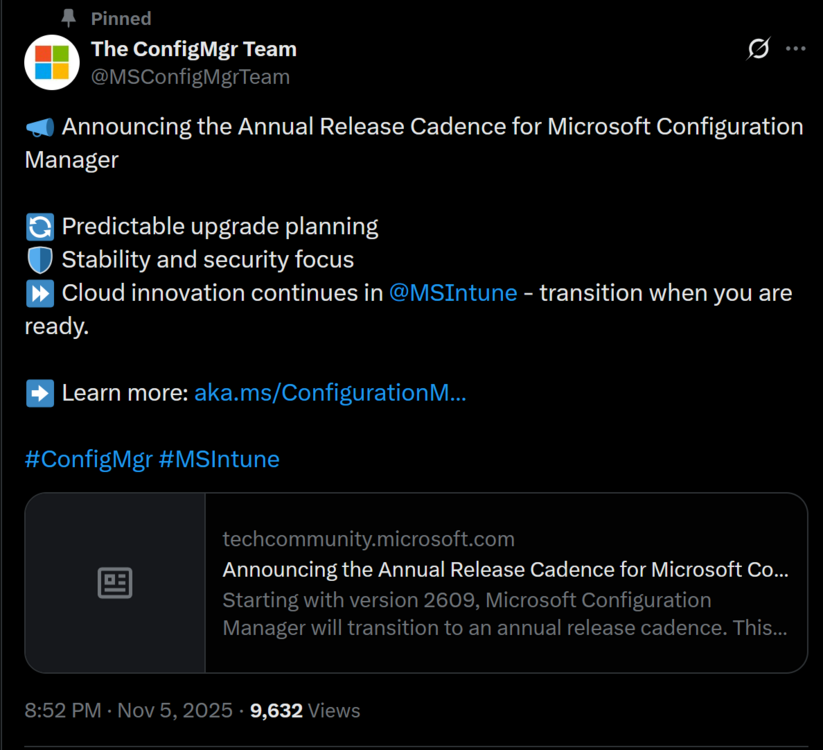
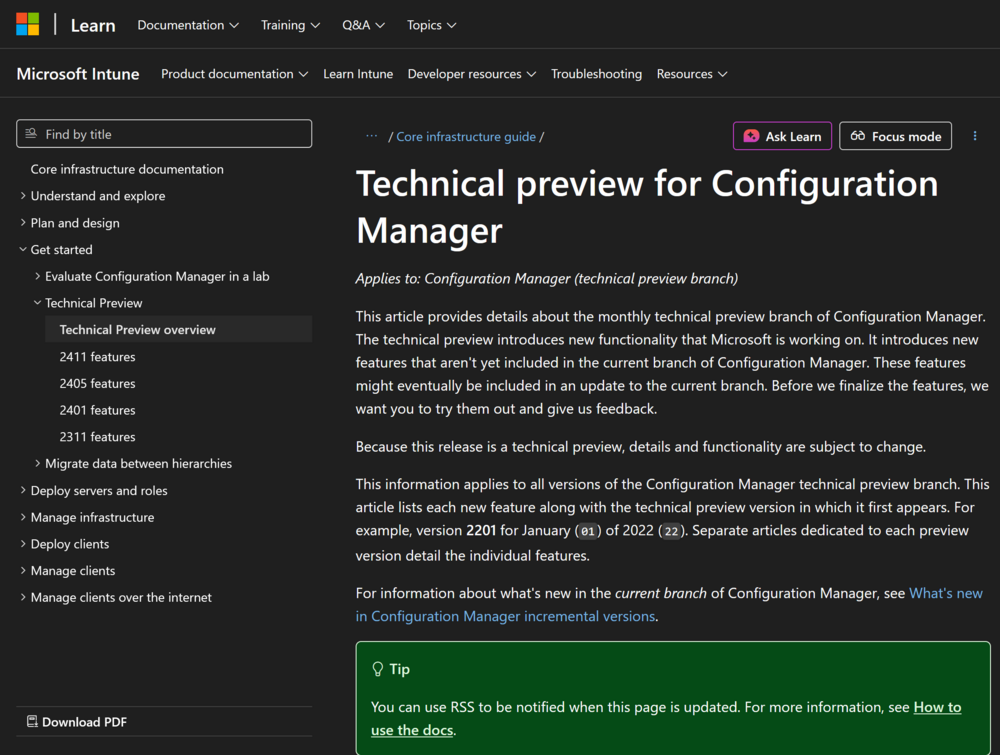
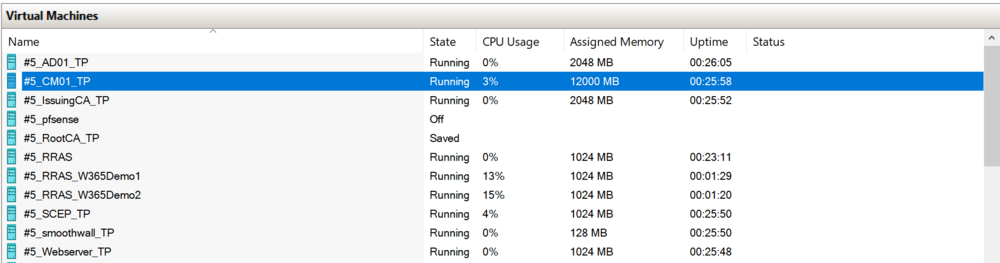
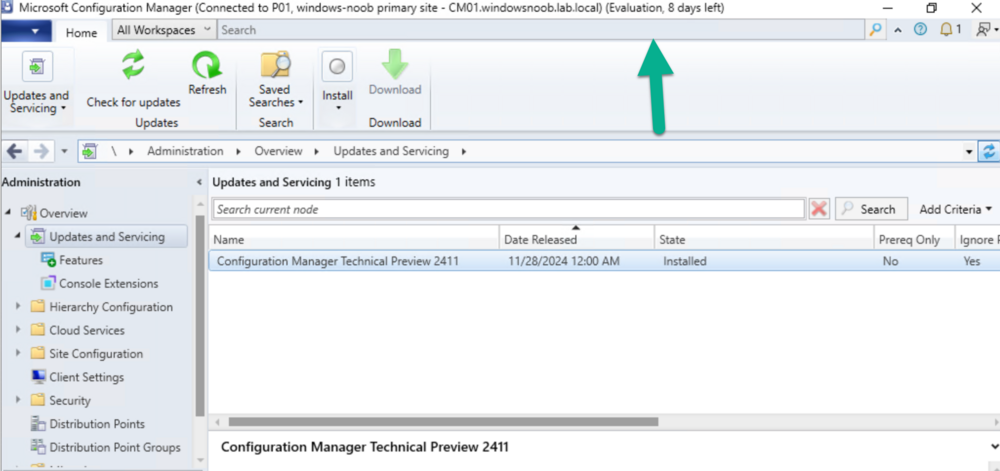
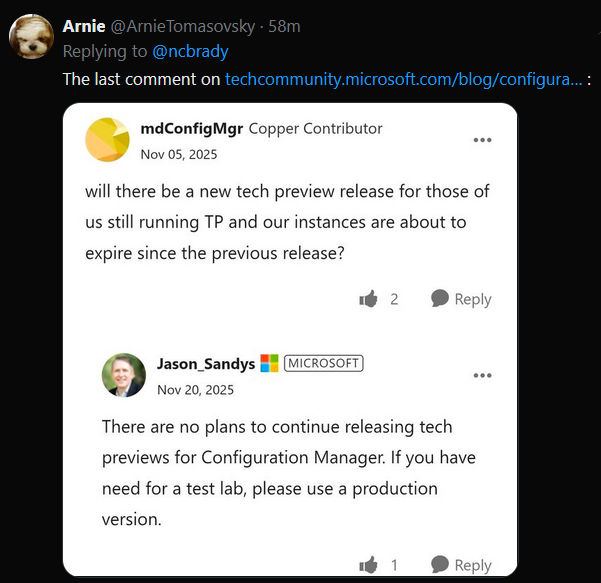
Introduction Microsoft recently released a blog post outlining predictable changes to the cadence of update releases for SCCM formally known as System Center Configuration Manager. The pinned tweet below had some interesting replies which you can read yourself here. The blog post didn’t even mention SCCM Technical Preview at all, but did TAG it as you can see here. What exactly is SCCM Technical Preview ? SCCM Technical Preview has been a test release of Configuration Manager that has been released very regularly (at first) and developed for years allowing SCCM admins to test the latest and greatest features coming to the product in advance, and allowing them to give valuable feedback to the product team, thereby shaping the mainstream product (Microsoft Configuration Manager) into what it is today. Technical Preview launched publicly in May 2015 and that journey started a decade long coding frenzy, where a large team of motivated developers led by none other than the great David James (djammmer) developed great features at an outstanding pace, at least until the last few years when things slowed down to a noticeable crawl about a year after David left in October 2021. Without the Technical Preview releases you could argue that the move to the Cloud would have taken a lot longer. Moving forward to today, the last documented release of SCCM Technical Preview was 2411 and you can still (at the time of writing) read documentation about that version here. I’ve personally tested and blogged about most of those releases over the last 10 years. Below you can see the timeline of upgrades I’ve done in my lab via the History feature within Configuration Manager. Note how it states Evaluation, 8 days left. And below are my many blog posts on the subject: Installation – How can I install System Center Configuration Manager and Endpoint Protection Technical Preview 4 Spot the difference, maintenance windows versus service windows, Microsoft is listening and fixing ! System Center Configuration Manager Technical Preview 1601 is now available ! System Center Configuration Manager Technical Preview 1602 is now available ! System Center Configuration Manager Technical Preview 1603 is now available ! System Center Configuration Manager Technical Preview 1604 is now available ! System Center Configuration Manager Technical Preview 1605 is now available ! System Center Configuration Manager Technical Preview 1606 is now available ! System Center Configuration Manager Technical Preview 1607 is now available ! System Center Configuration Manager Technical Preview 1608 is now available ! System Center Configuration Manager Technical Preview 1609 is now available ! System Center Configuration Manager Technical Preview 1610 is now available ! System Center Configuration Manager Technical Preview 1611 is now available ! System Center Configuration Manager Technical Preview 1612 is now available ! System Center Configuration Manager Technical Preview 1701 is now available ! What is the ContentLibraryCleanup tool and how can I use it ? System Center Configuration Manager Technical Preview 1702 is now available ! Video – Upgrading to System Center Configuration Manager 1703 Technical Preview System Center Configuration Manager Technical Preview 1704 is now available ! System Center Configuration Manager Technical Preview 1705 is now available ! System Center Configuration Manager Technical Preview 1706 is now available ! System Center Configuration Manager Technical Preview 1707 is now available ! System Center Configuration Manager Technical Preview 1708 is now available ! System Center Configuration Manager Technical Preview 1709 is now available ! System Center Configuration Manager Technical Preview 1710 is now available ! System Center Configuration Manager Technical Preview 1711 is now available ! System Center Configuration Manager Technical Preview 1712 is now available ! System Center Configuration Manager Technical Preview 1801 is now available ! Update 1802 for Configuration Manager Technical Preview available now Update 1803 for Configuration Manager Technical Preview available now ! System Center Configuration Manager Technical Preview 1804 released System Center Configuration Manager Technical Preview 1805 released System Center Configuration Manager Technical Preview 1806 released System Center Configuration Manager Technical Preview 1807 released System Center Configuration Manager Technical Preview 1808 released System Center Configuration Manager Technical Preview 1809 is out A quick look at System Center Configuration Manager Technical Preview version 1810 A quick look at System Center Configuration Manager Technical Preview version 1810.2 System Center Configuration Manager Technical Preview version 1901 is now available System Center Configuration Manager 1902 Technical Preview is available System Center Configuration Manager 1902.2 Technical Preview is now available System Center Configuration Manager 1903 is now available and it includes my uservoice ConfigMgr log files help you when you least expect it, oh and SCCM 1904 TP is out ! How can I use the new Community hub in SCCM Technical Preview 1904 SCCM Technical Preview version 1905 is available and this is a HUGE release ! SCCM Technical Preview version 1906 is available System Center Configuration Manager Technical Preview version 1907 is available now ! System Center Configuration Manager Technical Preview version 1908 is available now ! Make your task sequences go faster with the Run as high performance power plan How to configure keyboard layout in WinPE in SCCM How to select an index when importing an Upgrade package into SCCM System Center Configuration Manager Technical Preview version 1909 is released ! System Center Configuration Manager TP1910 is out ! Microsoft Endpoint Manager Configuration Manager technical preview version 1911 is released Microsoft Endpoint Manager Configuration Manager Technical Preview version 1912 released New BitLocker Management features in Microsoft Endpoint Manager Configuration Manager Technical Preview 2002 Microsoft Endpoint Manager Configuration Manager Technical Preview 2002.2 is out Microsoft Endpoint Manager TP 2003 is out Microsoft Endpoint Manager Technical Preview 2004 is out Microsoft Endpoint Manager Configuration Manager technical preview version 2005 is out Microsoft Endpoint Manager TP2006 is out Slides and recording from “New cloud features in Configuration Manager Technical Preview” A look at task sequence media support for cloud-based content Technical Preview 2007 is out ! Technical Preview 2007 Timeline improvements Cool new features in Technical Preview 2008 OSD via boot media and CMG, available in TP2009 New features in Configuration Manager Technical Preview 2010 Manage BitLocker policies and escrow recovery keys over a cloud management gateway (CMG) Required application deployments visible in Microsoft Endpoint Manager admin center Fixing One or more Azure AD app secrets used by Cloud Services will expire soon Improvements to BitLocker support via cloud management gateway Technical preview 2104 get BitLocker recovery keys for a tenant-attached device Creating a VMSS CMG and setting VM size with Technical Preview 2105 How to change the CMG (VMSS) size after it is deployed Use Windows Updates notifications instead of ConfigMgr client notifications in tp2105.2 Configuration Manager Technical Preview 2106 is out, and it’s huge !! Technical Preview 2108 is out ! Technical Preview 2109 is out, update your console manually Technical Preview 2201 – Tenant attach is now GA Technical Preview 2202 – delete collection references Enabling dark-mode in Configuration Manager 2203 Escrow BitLocker recovery password to the site during a task sequence in Configuration Manager 2203 Technical Preview 2204 is out, brings ADR organization, Admin service + dark mode improvements New video: First looks at Distribution point content migration in Configuration Manager 2207 First looks at Distribution point content migration Technical Preview 2208 is out, adds RBAC for tenant attached devices Technical Preview 2209 is out, adds improvements to search in the console and dark mode theme Quick tip: Free up space on your ConfigMgr server Technical Preview 2302 is out Technical Preview 2305 is out, should you upgrade ? yes A quick look at Technical Preview 2307 Technical Preview 2401 is out Technical Preview 2411 is out, upgrade now before your lab times out Who cares ? My trusty SCCM Technical Preview lab support is coming to an end, and currently there’s no sign that Microsoft will do anything about it. It has 8 days left of support and after that, if Microsoft doesn’t release an update for Technical Preview, then it will become unsupported and unusable. I’ve pinged some of the official product teams on Twitter, asking if SCCM Technical Preview is dead but so far, there is no response. If they do update or reply I’ll post it here. This IMHO is a crying shame as many dedicated SCCM admins like me have updated these labs for years, and now those very same labs are left to die by the very company that encouraged us to not only use them, but to provide ongoing feedback. My Technical Preview lab shown below, was used for things like setting up bitlocker management via Configuration Manager, Co-Management setup, Cloud Managed Gateway (CMG), hybrid management of Windows 365 Cloud PCs, tenant attach, OSD via CMG and most recently the integration of Microsoft Intune’s Cloud PKI & SCEP when I technically reviewed this great book from my friends Paul & David. But now the clock is ticking and soon I won’t be able to even use the console. Is this the end of Configuration Manager Technical Preview ? it certainly looks like it and based on this quote in their opening paragraph, I think the answer is yes. Microsoft Intune is the future of device management, and all new innovations will occur there. Update: No sooner than I posted this I got an reply on Twitter from Arnie, and here it is, confirmation from Jason Sandys @ Microsoft that Technical Preview is no more. RIP


-
cool but i found the issue comes back, please let me know how it goes for you, by the way are your users 'standard' users or local administrators ?
-
Slow App Deployment on Windows 365 During Initial Login
anyweb replied to PingPanda's topic in Windows 365
have you looked at the following, specifically the second link ? Application deployment in Windows 365: recommended practices | Microsoft Community Hub Use the Enrollment Status Page with Cloud PCs | Microsoft Learn @PingPanda -
Introduction Ever wished you could spin up a Cloud PC not just for your employees, but for contractors, partners, or even external collaborators? Good news—External Identity (preview) support in Entra ID now makes that possible. You can invite external users into your tenant and give them access to Cloud PCs, extending the same secure, managed experience your internal users already enjoy. Of course, there are a few strings attached. Prior to deploying out Cloud PCs to outside identities, you will need to be aware of a number of significant requirements and limitations so that everything runs smoothly. In this blog post, myself and my good friend Paul Winstanley took a look at what you need to be aware of and how to set up and access. Requirements The Cloud PC must be running Windows 11 Enterprise with the 2025-09 Cumulative Updates for Windows 11, version 24H2 (KB5065789) or later installed. The Cloud PC must be Entra only joined, hybrid is not supported. Single-sign on must be enabled in the provisioning policy. Connection to the Cloud PC must be via the Windows App or browser. Limitations User based Intune device configurations profiles will not be applied to the external users Cloud PC. Ensure you target the profiles to devices. Windows 365 Enterprise, Business, and Frontline are supported, Windows 365 Government is not. Cross-cloud users are not supported, i.e. you can’t invite users from Microsoft Azure Government or Microsoft Azure operated by 21Vianet. Be aware of the token limitations for external identities – https://learn.microsoft.com/en-us/entra/identity/conditional-access/concept-token-protection#known-limitations Authentication to on-premises resources with Kerberos or NTLM is not supported for external identities. Assigning the Windows 365 licence Assigning the licence should be a simple case of heading over to the Microsoft 365 admin center, navigating to Billing | Licenses and selecting the required Windows 365 subscription. When selected, we clicked Assign licenses and chose the guest user, in our case Niall’s guest account in Paul’s tenant. When finished we clicked Assign licenses. In our tenant, we received the following error message ‘Failed to assign license for Niall Brady: Cannot process request because a referenced item has an invalid usage location.’ You may not receive this error and not have to perform the fix. To fix this up for us, we went to the Entra admin center and clicked on Users. We located Niall’s guest account and clicked Edit properties. Under the Settings menu, we clicked the Usage location drop-down and selected a location for his account, then clicked Save. After a short period of time, we were able to assign a licence to Niall’s account with no issue. Provisioning the Cloud PC for the External Identity Back in the Intune admin center, under Devices | Device onboarding | Windows 365 | All Cloud PCs there should be a Not provisioned Cloud PC. It reports as Not provisioned as the user has not been assigned a provisioning policy. To resolve this we can either create a provisioning policy and assign this or we can use an existing policy, so long as we have single sign-on enabled and that the Cloud PC is running with 2025-09 Cumulative Updates for Windows 11, version 24H2 (KB5065789) or later. If using an existing policy, take a look at the assignment to ensure that Niall’s account is targeted. We decided to create a new provisioning policy using the new 25H2 release of Windows 11. We navigated to Devices | Device onboarding | Windows 365 | Provisioning policies in our tenant and clicked Create policy. As mentioned, ensure Use Microsoft Entra single sign-on is enabled and Microsoft Entra Join is selected for Join type as hybrid is not supported. We selected the Windows 11 Enterprise + Microsoft 365 Apps 25H2 gallery image to ensure that we met the O/S requirements. When assigning the policy, we targeted a group called Windows 365 External Identities. After completing the provisioning policy wizard, the policy was visible. Next, we simply added Niall’s guest account to the Windows 365 External Identities group. We navigated to Groups and searched for the group and added his account. Back in All Cloud PCs, a Cloud PC now reported a Status of Provisioning. After a period of time, the Cloud PC reported as Provisioned. Accessing the Cloud PC The Cloud PC can be accessed via the Windows App or web browser, however prior to attempting to access the following registry key needs to be created on the host device. Computer\HKEY_LOCAL_MACHINE\SOFTWARE\Microsoft\WindowsApp\Flights DWORD - EnableIdSignInUx Value - 0 There are slight variations to accessing via the app or the browser so let’s take a look at both. Also, thanks to our MVP friend Sune Thomsen for providing the details that steered us in the right direction to make this work! Windows App The user must be authenticated in the Windows App. They need to click their account profile picture on the top right of the application and click Sign in with another account. If the registry key has been entered, then the following Sign in window will be displayed. Note Sign-in options is available. This would not be displayed if the registry key is not present. Click Sign-in options. The next step is to click the Sign in to an organization option. and enter the domain of the organization hosting the Windows 365 Cloud PC. In our case, sccmsolutions.co.uk. Now, the guest account must authenticate in the tenant using their account credentials, and respond to any multi-factor authentication or other prompts. When authentication is complete, the user will be presented with their Cloud PC in the Windows app. The user is able to switch between organizations by clicking their account profile and selecting accordingly. Web Browser When navigating to windows365.microsoft.com, the user will authenticate with their account. Then in the top right hand corner of the web page, the user clicks their profile and then chooses Sign in with another account. Now, choose Use another account. The user will then have the Sign-in options available to select (if the reg key is present on the device). After selecting Sign-in options, choose Sign in to an organization. As with the Windows App, they enter the domain name of the organization hosting the Windows 365 Cloud PC. and authenticate with their user account. Finally, the user will be presented with the provisioned Cloud PC in the web browser. Using either Windows App or the web browser to log on to the Cloud PC, will allow the guest account access to the device, where previously they would have had to have had an account created in that tenant for them to have a Cloud PC assigned. As we can see, Niall’s account is accessing CPC-niall-ZMTAD in the sccmsolutions tenant. This is a hotly awaited addition to Windows 365 Cloud PC features. We look forward to using this feature with our customers. We hope that the registry key requirement is soon removed and is added as part of the installation of the Windows App, as this will help reduce steps required for onboarding for guest accounts. See you next time.
-
Introduction In a previous post we took a look at how you can determine the health of the Windows app and you can read about that here. Please read it to understand the new feature and why this blog post improves things from an admin perspective. In this blog post myself and my good friend Paul Winstanley took a look at yet another Windows 365 related ability and that is an Intune remediation solution called Windows App Health Check Log Reader. Note: This remediation solution is not supported by Microsoft. If your Windows app detects a health issue it’s logged in the following log file: C\Users\<USERNAME>\AppData\Local\Temp\DiagOutputDir\Windows365\logs\health_checks.log But that log file is on the device hosting the Windows app used to connect to your Windows 365 Cloud PC’s and that requires remote access by an admin or some other way of grabbing the log to determine the issue. In this blog post we take a look at a remedition solution which does just that, it looks at Windows devices that you target, determines if they have the Windows app installed and if that app matches a minimum version (needed for health checks), parses the health_checks.log file to see if there were any recent errors reported. If so, based on the cadence you select, it will copy that log to the root of your Intune logs folder, which is located at the following path: C:\ProgramData\Microsoft\IntuneManagementExtension\Logs Doing this allows you to grab the logs via the Intune console collect diagnostics ability. So let’s take a look at how it works. Get the scripts Head over to Github and download the 2 scripts here. They’ve changed a bit lately based on feedback we submitted, so do check regularly for updates. Once you’ve downloaded the scripts, extract them somewhere useful. Create the remediation In Microsoft Intune, create a remediation solution using these 2 scripts. On the Settings page, point it to the 2 scripts as appropriate. Once done, assign it to some devices that you want to monitor the health of the Windows app on, we used an Entra Id group containing some devices with and without the Windows app installed and we set a cadence of every hour to see the results quickly, however in production you’ll probably want to set that to run once a day. Analyzing the results After the remediation has run for some time, you can analyze the data it created by clicking on Device status in the remediation. In here we can see that most devices are without issues (good) but one device reports a detection status of With issues and it has recurred. Back in the Intune console, locate the device highlighted with issues, and click on the Collect diagnostics button. answer Yes when prompted. After some time those log files will be captured and you’ll see the status has changed. Click on Device diagnostics to download those files, by clicking the three dots and then selecting download. Within the extracted ZIP file, locate the (67) FoldersFiles ProgramData_Microsoft_IntuneManagementExtension_Logs folder and you’ll see the health_checks.log file. Open that file in CMTrace to review the issue. That’s a result! With this new remediation solution, you (as an Intune admin) can automate the copying of the health_checks.log file to a location that is easy to remotely grab without needing to bother the end user or use remote access to their PC. Awesome. see you in the next one !
-
please try again, the link only works for logged on users and now you are logged on
-
Introduction Microsoft has just pushed out yet another new feature for Windows 365 and Azure Virtual Desktop environments which is called health checks. Myself and my good friend Paul Winstanley took a look at the new feature and wanted to share our thoughts with you. We looked at the new functionality of the Windows app on Windows devices but this new feature is available via the Windows app on the following platforms: Windows: version 2.0.703.0 or later macOS: version 11.1.8 or later iOS: version 11.1.7 or later Android: version 11.0.0.46 or later What are health checks ? Good question. Think of it as a way for the Windows app to carry out a series of checks to verify that everything is in place to ensure that you have a consistently good connection to your Cloud PC and if something is not right, to report that there’s a problem to you via the app and via logs. These checks happen if it detects a network change, or can be triggered manually by the end user or automatically when the Windows App itself starts or when the user makes a connection to a resource such as a Cloud PC or Cloud App. Let’s take a look In the current version of the Windows app (2.0.704.0 at the time of writing), the health checks ability has been added. Please note that it is gradually rolling out to all regions, so if you have updated your Windows app and still don’t see the health symbol, don’t panic, it’s on its way. To verify which version of Windows app you are running see here. Before the feature rolls out your Windows app will look something like this. After the health check feature is enabled for your region, the Windows app will appear something like this, notice the new heart shaped icon on the left menu highlighted with a green arrow. Clicking it, brings up some information on the right side of the Windows app detailing the health of your connection. In there you can see the computer name, and what it determines to be the state of the system, the date and time of the check and the result of the check, in this case Everything looks good. You can also manually check the health by clicking Check again which will kick off the health checks, or click on Open log to see a log file containing what it has checked and the results of that check. Below is what the log file content looks like when everything is OK. The health_checks.log file location on Windows devices is: C\Users\<USERNAME>\AppData\Local\Temp\DiagOutputDir\Windows365\logs\health_checks.log You can also click on See all health checks to expand a list of what is checked. that’s all fine when everything is working, but what about when you have an actual problem ? Detecting network issues If something is detected to be not working, such as a failure to reach a required endpoint, then the Windows app will alert you with a banner, and the Health Check icon will have a red dot to signify something is wrong. These changes to the Windows App appearance happen if a network change is detected. Clicking on the health check icon itself, or clicking the Check device health warning button will allow you to check and reveal what the problem is. At this point you have many options. Check again Open log See all health checks Open network settings Clicking on See all health checks in this example reveals that the network connection is disconnected. And as mentioned above, that was detected when a network change was detected, as is revealed in the log file by clicking on Open log. Clicking on Check again in this failed state reveals (in the log) that this was a user initiated check. After you’ve sourced the root of the problem (in this case the router was turned off to simulate a network failure), and resolved it, the log reveals that there was another network change, and this time all is good. So there you have it, automated and manual health checks are now possible using the new feature in the Windows app. More info You can get more info about the new feature from Microsoft below: Run health checks to detect issues with Windows App connections – Windows App | Microsoft Learn https://techcommunity.microsoft.com/blog/windows-itpro-blog/enhancing-azure-virtual-desktop-and-windows-365-experience-with-health-checks/4446612 Summary The new health checks feature is a very welcome addition to the Windows app, as more and more companies have complex environments that contains proxies, ssl inspection, network sniffers that can interuppt or block the necessary traffic routes. The health check feature highlights when there is a problem with one or more of these endpoints, and alerts the end user with a popup. The admin in their turn can utilize the health check log to get more info about exactly what is failing. Thanks Microsoft for the feature and in particular thanks to the very helpful PM, Pavithra Thiruvengadam.
-
Introduction A new feature for Windows 365, and now in preview, is Windows 365 Cloud Apps. Instead of giving users a full remote desktop session, Windows 365 Cloud Apps are published as individual applications that run on a Cloud PC but look and behave like they are installed locally on the device. If you are familiar with Remote Apps, first introduced in Windows Server 2008 as part of Remote Desktop Services, then you will have an understand of how these operate. When Windows 365 Cloud Apps are published, you will be able to load up that individual application and if any interaction with another application is required, then that application will also fire up, even if it has not been published to the user. Note that Windows 365 Cloud Apps are only available to you with a Windows 365 Frontline subscription. myself and my good friend Paul Winstanley sat down to test run this new Windows 365 feature. It is nice and simple to set up so follow along. Create the Windows 365 Cloud Apps Provisioning Policy The first step is to create a provisioning policy for the Windows 365 Cloud Apps. This is done in the usual place for Windows 365 provisioning Devices | Device onboarding | Windows 365 | Provisioning Policies | Create Policy. You will notice a new Experience section in the policy wizard, here you will need to select Access only apps which run on a Cloud PC (preview) as the selection defaults to Access a full Cloud PC desktop. When you select the Access only apps which run on a Cloud PC (preview) option, Frontline will be automatically selected for License type and Frontline type will be Shared. All other options are greyed out as they are not applicable to Windows 365 Cloud Apps as mentioned earlier. Enter any other relevant information for join type, geography, region and SSO before proceeding through the wizard. The selection of the Image type is crucial for Windows 365 Cloud Apps as the solution will make available any discoverable applications in the devices’ start menu (Appx and MSIX are currently not supported discoverable app type – therefore Teams is not available at this stage). You can import a custom image to take advantage of other applications which are not included in the Microsoft Gallery images. Clicking the View link for Apps available on the image will display a list of the Cloud Apps that will be available to you when the device is provisioned. When assigning the policy, you will need to select the Frontline Cloud PC size from your Available Cloud PC’s drop down and create an Assignment name and choose the Number of Cloud PC’s, this number will reflect the number of licenses that you have available to use. After creating your policy, the Frontline Shared device, which will host the Cloud Apps will being provisioning. You can view this under All Cloud PCs. Give the device some time to provision and once completed it will report as such. Publishing some Cloud Apps Whilst clicking though the menu system, you may have noticed a new All Cloud Apps option, this is where we need to go to publish the discovered apps, making them available to the assigned users. We can see that 32 items were discovered from the image we selected and their App status is currently set to Ready to publish. Simply select the apps you want to publish and click Publish. Confirm your choice to Publish the apps. The App status will change to Publishing. and will, very quickly, become Published. You now have the option to Unpublish apps. The process is identical. Select apps you want to remove and click Unpublish. Confirm to remove them. The App status will revert to Ready to publish. How to access the Windows 365 Cloud Apps Windows App is the place to go to access your Windows 365 Cloud Apps. Prior to publishing apps to the users, the application will display any device based Cloud PCs the user has access to. With apps assigned a new option Apps appears. Look out for it as it’s a subtle addition and you could miss it initially. Clicking on Apps will display the published apps that you have made available. You can make an app a Favorite by clicking the ellipses. When launching an app a RemoteApp connection to the Frontline device will initiate and you may be prompted to authenticate along the way. and Allow remote desktop connection, depending on policies assigned to you. If this is the first time connecting to the Cloud App, it will take a little long to load up. You can click Configuring remote session to see that Windows is being prepared. You can identify the Cloud App from the icon on the Windows task bar, there is a Windows App logo on the top right hand corner of the icon. Once launched, you will feel as it the application is running on locally on your device. Pretty cool! Things to note To remove Cloud Apps from the All Cloud Apps view, you will need to delete the assignment of the provisioning policy. Since Cloud Apps run as Frontline Shared, the management of them is identical to management of a Frontline Shared Cloud PC, so be aware of any max connection limitations due to licencing. You can utilise policies assigned to Frontline devices, such as redirection. These will apply to Cloud Apps. When using a custom image, Windows 365 Cloud Apps will use a PowerShell script to scan the Start Menu for apps, so ensure that your tenant policies do not require extra authentication for PowerShell scripts to achieve this. Currently only apps discovered in the Start Menu are available. Microsoft are developing the ability to publish apps that are installed by Intune and are included in the Autopilot Device Preparation Policy associated with the Cloud App provisioning policy. We hope this blog post gives you a tester of this great new feaure.
-
what version of Configmgr are you using and what adk ?
-
SCCM 2007 SP2 prerequisites download
anyweb replied to EngiNerd's topic in Configuration Manager 2007
i'm curious, why are you guys installing such an old unsupported version of SCCM like this today anyway, can you please enlighten me ? -
SCCM Software Updates - KB5063875
anyweb replied to jackie_jack86's topic in Configuration Manager 2012
it looks to me like the update is failing on your clients, have you tried troubleshooting that ? I don't think this is an SCCM problem but a client problem. I asked copilot what it thought about the error given above and it came up with this script which does the following:... Renames Spupdsvc.exe to prevent interference. Stops Windows Update services. Renames update cache folders (SoftwareDistribution and Catroot2). Restarts update services. Runs sfc /scannow to fix system file corruption. Runs DISM /RestoreHealth to repair the Windows image. Prompts you to manually download KB5063875 if needed. Right-click the .bat file and choose "Run as administrator". Let it complete all steps (may take several minutes). Restart your PC and try installing the update again. fix_update_error_0x8024000B.bat -
I asked copilot, and here's the summary of it's answer: For a 12 TB upload to Azure Blob Storage, your main costs will be: Storage tier cost (Hot: $220/month, Cool: $122/month, Archive: $24.50/month) Write operations (~$9–$22 depending on tier) No cost for uploading (data ingress)
-
this is odd, so are you saying that in Windows File Explorer that you cannot browse the D:\ drive at all ? if that's not what you mean then please explain what "when accessed directly from the system" means.
-
issue with Powershell script in Task Sequence (output)
anyweb replied to keywan's question in Deploy software, applications and drivers
when you create a custom variable in the collection, you assign a value to it, eg: CheckOutput = 100 In your task sequence, you CHECK for the value of the CheckOutput variable and act accordingly. For example you can have a step or group that checks if CheckOutput = 100 and if so it runs, if not, it does not run that step or group. Does that make sense ? -
Introduction In the previous post I showed you what happens when a user or admin reset’s Windows after the August 2025 cumulative update (KB5063875) , basically the reset fails (rolls back). That problem can be fixed by applying an out of band update which can be deployed manually or automatically to affected clients. In this post I’ve once again teamed up with my buddy Paul to automate fixing this reset problem using Windows Autopatch in Microsoft Intune. It has a feature to Expedite updates. We’ve both tested this in our separate labs and are happy to share the results with you so that you too, can fix this in an automated way using Windows Autopatch. Expediting updates As the name sounds, this allows us to expedite (rush) updates to an Entra ID group containing our target computers, and this method can be used to get Quality Updates including Out of band updates to your devices via Windows Autopatch. There are some prerequisites, listed below: Devices meet the prerequisites for Windows Autopatch. Devices installed the update described in KB4023057 – Update for Windows 10 Update Service components (or a newer version). To verify that your devices meet the prerequisites for receiving an expedited update, use the Readiness test for expediting updates. Let’s create our Expedite updates policy. In Intune, browse to Devices, Windows Updates and select Quality Updates. In the Create + drop down, select Expedite policy. Give the policy a suitable name and description. In the Select the quality update you would like to expedite, select the 08/26/2025 D Update for Windows 10 and later option. If you are wondering what the D Update and B Security Updates are, here’s an explanation. B updates Released on the second Tuesday of each month (commonly called Patch Tuesday). These are the mandatory, cumulative updates that include security fixes and sometimes reliability improvements. D updates Released on the fourth week of the month (usually the preview releases). These are optional, non-security preview updates. They contain fixes and improvements that will roll into the next month’s B update. to summarize… B = Security & required (Patch Tuesday) D = Optional preview (late month, contains fixes but no new security fixes) So, as we already have deployed the August Cumulative update that would be the B update. We definitely need the fixes (out of band) that came after that and that would be the contained in the D updates. Finally, if a reboot is required (and it is required), decide on how many days before it’s enforced, so we’ll set it to 0 days. After clicking Next, select the group(s) you want to target with these out of band updates. Don’t worry about the fact that there’s no devices in that group yet, we’ll add them as needed later. Click Next and the policy is created. Finally, when you are ready to test this add one or more devices to the target Entra Id groups. After the device gets the policy, and as long as there are no policy conflicts your end users should be notified about the pending restart. After the restart is completed, you can verify Windows update settings, and view the history. The latest OOB (Out of band) update should be installed and as it’s also cumulative it will contain the fix to allow Windows reset to work again. Job done! Summary While this ability to expedite updates in Windows Autopatch is welcome, it’s far from perfect. There are several problems, which we’ll list here: Speed of delivery. The blurb from Microsoft claims the following, highlighted below But in several VM’s where myself and Paul tested, the expedited update arrived in an anything but their claimed speed. In reality, the update took several hours to approx one day and numerous syncs on the clients and in the Intune console before we saw the popup. On some vm’s we are still waiting for the magic to happen even though all the prerequisites are in place. Update: We got a reply from Peter Braune on Twitter, who stated the following, it may help you if you are going down this path. We actually had to create a policy via settings catalog “Automatically receive optional updates”, to get this update rolling out to clients. Once the policy was in place the update was installed immediately. Downside, preview updates being rolled out automatically too. Lack of ability to target a specific hotfix. You you can only choose between B or D updates and hope that they include the fix you need. What we really wanted was to be able to specficially install KB5066189, but that’s not possible currently with this method via the console. Lack luster reporting. If you want to see what’s happening with your expedited update in real time then you are out of luck. Of the several machines we targeted the reporting suggested nothing was wrong, which in a way was true because nothing was happening. And that’s the problem, how can you quickly determine whether your hotfix is applied or not to these target devices ? Policy conflicts. After enabling Expedited updates, you might end up troubleshooting policy conflicts on your target devices if your tenant has had the following installed. Windows Autopatch – Office Update Configuration – Expedited (Expedited updates for CVE-2023-23397). Hopefully Microsoft is listening and will improve this service going forward. That’s it from us, see you in the next one.
-
Repair .EXE Application from Software Center
anyweb replied to jackie_jack86's topic in Configuration Manager 2012
why not just wrap the exe as an MSI ? -
looks like you are missing storage drivers, if you open a cmd prompt (f8) and type diskpart, list disk does it list any hdd(s) ? if not, there's the answer, missing storage drivers. if it is showing, then what type of storage is it ? also what ADK are you using and what version of SCCM
-
is the client version the same as the primary version ?
-
Introduction If you work with computers like I do, then the Patch My PC name should be very familiar to you. They’ve been at the forefront of Patching Windows computers in enterprises for years now and are well known, trusted, admired and praised. They have some of the smartest names in tech working for them and certainly know how to produce excellent software. They actually started out in 2011 by releasing a free tool to Windows users to patch their PC’s and that tool was originally called PatchMyPC. They’ve since renamed that free tool to Patch My PC home updater. As the name implies, you can use home updater on your home computers and I’ll take a good look at it in this blog post. Home updater is designed for home use, not for your business, and it can patch up to 532 or so applications natively (the list is growing). But first off, why would you want to patch your 3rd party applications on your home computers ? well that’s how 70% of malware attacks exploit outdated vulnerabilities. Windows update will handle things like security updates for Windows and drivers, but third party apps are your problem. Not any more 🙂 Download home updater You can download the home updater from here. It comes in both MSI (installer) and EXE (executable) formats, I chose the MSI. After accepting the license terms and conditions it’s ready to install. After it’s installed you’ll be presented with (in my case) and load of apps that are out-dated. I’m so glad I decided to run this. When you start it it won’t automatically update these out-of-date applications until you actually click on the Start Updater button, however there is an option in the Settings to enable that and you can also configure it to run on a schedule. Let’s take a look at the options in the left of the app. Apps – The main interface screen, shows you which apps you have installed and whether they are out of date or not Startup – Gives an extensive list of apps that startup when your computer starts, this is great and shows much more than you see in the ‘startup apps’ option of Task Manager. Uninstaller – Use this to uninstalls apps you may not need any more Scheduler – use this to schedule scans and updates, comes with recommended settings and is disabled by default. Settings – Use this to configure home-updater specific settings About – About the home-updater app. On the right of the app you’ll see a Start Updater button, I wanted to see how good it was so that’s exactly what I clicked. After clicking that you’ll see your selected apps pending update as it attempts to download and update the latest version of those apps. Note: If you don’t want an app automatically updated, you can disable that ability by clicking on the three dots beside the app in question (ellipses) and selecting “Disable Auto Updating”. When running the updater, let it do it’s thing, you’ll see apps starting and updating right before your very eyes. Some apps may also prompt you to login, I’m not sure if that is required in order to complete the update but I hadn’t used some apps in a while and therefore those apps wanted me to login, such as the EA Account app shown below. After letting the home updater app run for some time, the status of individual applications started to change from Outdated, to PENDING, UPDATING and finally Up to Date as shown below. Side note. I’m not sure why pending and updating ended up all caps but that’s one for the UI guys at the Patch My PC team. After waiting some time, I could see that the home-updater was sitting on the Logitech G HUB app for quite some time. I can understand that, as it’s a terrible piece of software and has bricked a keyboard on me. But… what should I do ? Wait or try and move on. At this point the ‘tech in me’ wanted to look at the log file for the home-updater. I checked the installed folder but couldn’t find any logs there, next I checked the Settings section of the app, and it listed the log file location, great. And here’s the log, and guess what, there’s the Logitech app too… Opening the C:\ProgramData\PatchMyPC\PatchMyPCHomeUpdater.log file up with CMTrace (the best log file reader ever IMHO) revealed that not a whole lot has been happening for the last hour or more. So it does look like Logitech G Hub has thrown a spanner in the works. To fix it, I’ll cancel the updater. And for now, exclude Logitech’s crappy app. Except, after clicking Cancel Updater, nothing happened apart from the main UI showing most apps as Outdated in red again. Shouldn’t the Cancel Updater button change to Start updater again ? When I tried to exclude the troublesome app (Logitech G Hub) by clicking on Disable Auto Updating it was greyed out. most likely because the exe file for updating that app was in the logfile source folder and it was still trying to update that app. But then, why didn’t Cancel Updater kill it ? So I closed the home updater app, and restarted it to see would there be a difference. There was, now I could disable the auto-updating feature for Logitech G HUB. Once done, I clicked on Start Updater, and off it went for the second time. This time however, you can see the Logitech G HUB app has a disabled icon in red. Cool, let’s hope it works. This time around I could see it updating each app quickly, which was great, and I was seeing more and more green Up to date statuses. The OCD in me wants all the apps up to date, but let’s see what we can do. After a few more minutes it was done, as the updater button reverted to Start Updater, and all but 2 apps were updated! At this point, I wanted to see if it could fix Logitech G Hub and the other app, so I re-enabled updating on the troublesome app and started the updater again. It gave up and the log file revealed some issues with the EXE and a call to some SSL address. I don’t blame the home-updater tool here at all for this, but maybe it could inform the end user with a popup or some UI hint other than Outdated that clearly stated that it had a problem updating this app. At this point I managed to get 34 out of 36 apps updated. Not bad at all. Uninstalling bad apps As I had two apps that clearly were not interested in updating, I decided to uninstall them. You can do that by navigating to the Uninstaller section of the app or simply clicking the three dots on the app in question and selecting Uninstall App. That action prompted the apps to present me with various popups about uninstalling the app, which is OK, but would be nicer if it was a silent uninstall. Once done, I clicked on Re-Scan to check my current status as one of the two bad apps was still listed (guess which one). After the Re-Scan, it all looked good. Note to developers at Patch My PC, trigger a re-scan automatically, after a user chooses to Uninstall and app. I’m sure you are doing that already as it worked for the CrystalDiskMark app, but not for the Logitech G HUB app. Below you can see that All apps are up to date! Job done! Setting up a schedule Security waits for no one, so you should definitely setup a schedule for your Patch My PC home updater. Click on the Scheduler button and select the + ON button. Once done you can see that it has a default of running at Monday, 7PM and to repeat daily. What I like is it also enables the Run ASAP when Missed option by default, which is great as you probably are not using your computer every day. Once you are happy with your settings, make sure to click on Save Schedule, to save the schedule otherwise nothing will happen. You’ll get a popup (aha, they can do popups!) informing you that it’s saved. After clicking OK, you can see the schedule tasks are created, one for updating the app itself, and one for updating your third party apps. Modifying Startup apps I mentioned that the Startup button allows you to modify startup apps, and it does it much better than the similar option in Windows Task Manager Startup Apps. Compare these results. Below is what you see available in the Startup Apps view of Task Manager. Versus the really populated view from Patch My PC home-updater. Quite a difference! Summary The Patch My PC home updater app is incredible, it helps you patch your home computers third party apps with ease, and does it using a very easy to use interface. It also allows you to setup schedules to make sure those third party apps are kept up to date to ensure that you are as secure at home, as you are at work. I can highly recommend this software, and best of all, its FREE.
-
have you tried to submit feedback directly from the console and include your email address, that way the product group might contact you for more info
-
are you available now ? if not, what timezone are you in ?
-
if you'd like to do a remote session or share the actual logs files with me then ping me > niall@windowsnoob.com and i can take a look
-
have you checked the application settings i listed above are the same for yours ?
-
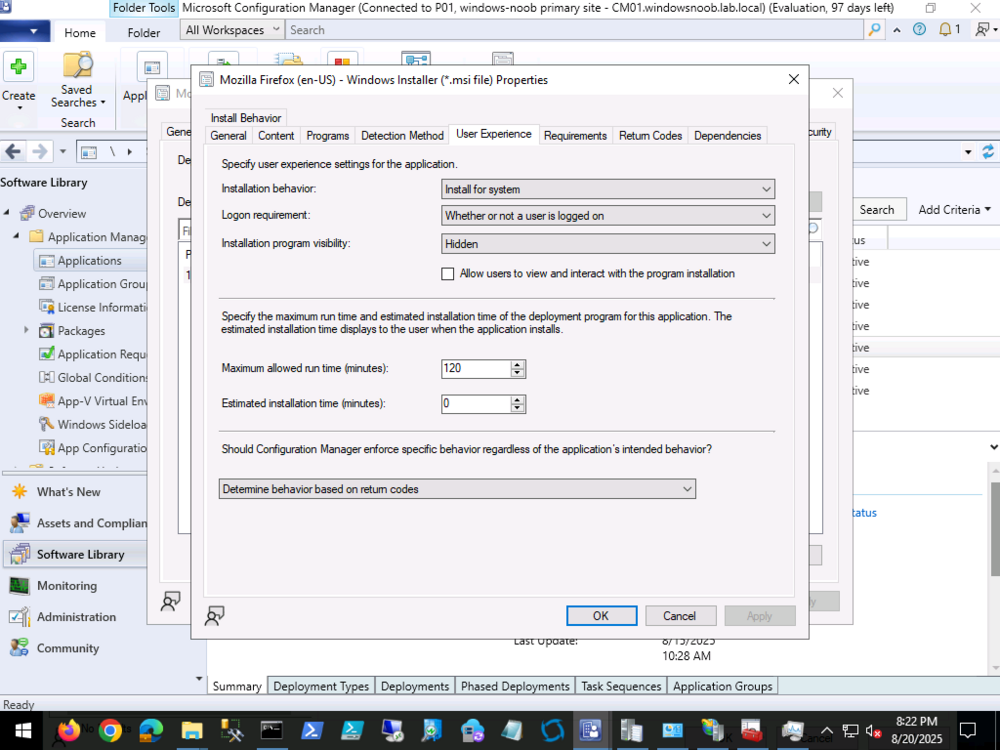
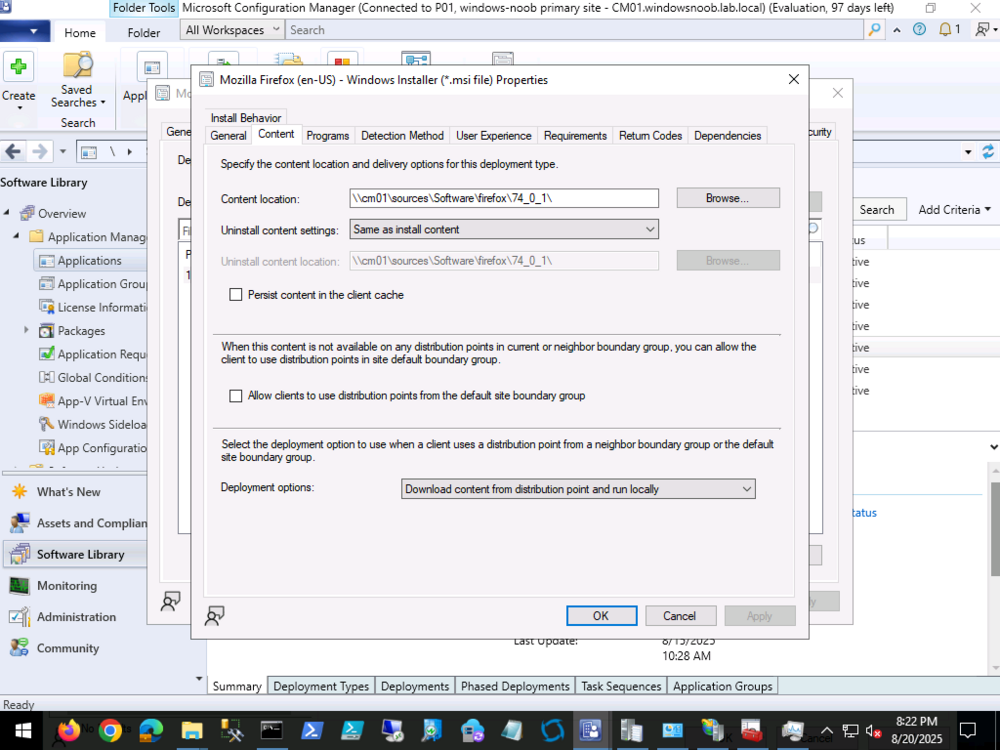
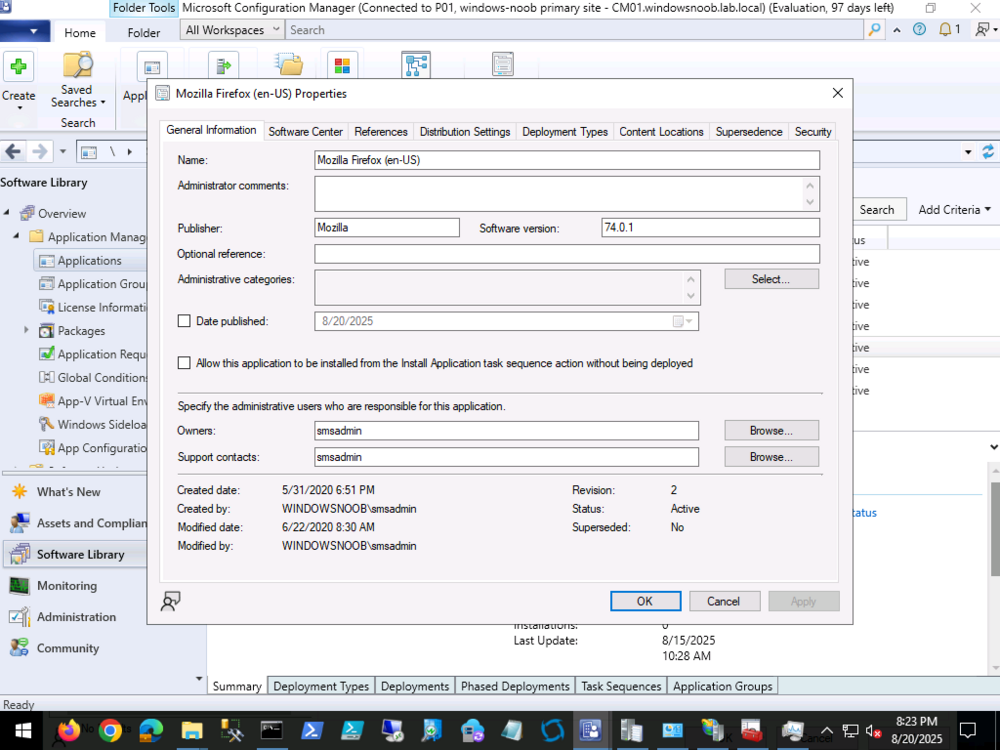
the firefox app is just a test old version here are some of the properties...