anyweb
-
Posts
9277 -
Joined
-
Last visited
-
Days Won
371
Everything posted by anyweb
-
 Introduction If you work with computers like I do, then the Patch My PC name should be very familiar to you. They’ve been at the forefront of Patching Windows computers in enterprises for years now and are well known, trusted, admired and praised. They have some of the smartest names in tech working for them and certainly know how to produce excellent software. They actually started out in 2011 by releasing a free tool to Windows users to patch their PC’s and that tool was originally called PatchMyPC. They’ve since renamed that free tool to Patch My PC home updater. As the name implies, you can use home updater on your home computers and I’ll take a good look at it in this blog post. Home updater is designed for home use, not for your business, and it can patch up to 532 or so applications natively (the list is growing). But first off, why would you want to patch your 3rd party applications on your home computers ? well that’s how 70% of malware attacks exploit outdated vulnerabilities. Windows update will handle things like security updates for Windows and drivers, but third party apps are your problem. Not any more 🙂 Download home updater You can download the home updater from here. It comes in both MSI (installer) and EXE (executable) formats, I chose the MSI. After accepting the license terms and conditions it’s ready to install. After it’s installed you’ll be presented with (in my case) and load of apps that are out-dated. I’m so glad I decided to run this. When you start it it won’t automatically update these out-of-date applications until you actually click on the Start Updater button, however there is an option in the Settings to enable that and you can also configure it to run on a schedule. Let’s take a look at the options in the left of the app. Apps – The main interface screen, shows you which apps you have installed and whether they are out of date or not Startup – Gives an extensive list of apps that startup when your computer starts, this is great and shows much more than you see in the ‘startup apps’ option of Task Manager. Uninstaller – Use this to uninstalls apps you may not need any more Scheduler – use this to schedule scans and updates, comes with recommended settings and is disabled by default. Settings – Use this to configure home-updater specific settings About – About the home-updater app. On the right of the app you’ll see a Start Updater button, I wanted to see how good it was so that’s exactly what I clicked. After clicking that you’ll see your selected apps pending update as it attempts to download and update the latest version of those apps. Note: If you don’t want an app automatically updated, you can disable that ability by clicking on the three dots beside the app in question (ellipses) and selecting “Disable Auto Updating”. When running the updater, let it do it’s thing, you’ll see apps starting and updating right before your very eyes. Some apps may also prompt you to login, I’m not sure if that is required in order to complete the update but I hadn’t used some apps in a while and therefore those apps wanted me to login, such as the EA Account app shown below. After letting the home updater app run for some time, the status of individual applications started to change from Outdated, to PENDING, UPDATING and finally Up to Date as shown below. Side note. I’m not sure why pending and updating ended up all caps but that’s one for the UI guys at the Patch My PC team. After waiting some time, I could see that the home-updater was sitting on the Logitech G HUB app for quite some time. I can understand that, as it’s a terrible piece of software and has bricked a keyboard on me. But… what should I do ? Wait or try and move on. At this point the ‘tech in me’ wanted to look at the log file for the home-updater. I checked the installed folder but couldn’t find any logs there, next I checked the Settings section of the app, and it listed the log file location, great. And here’s the log, and guess what, there’s the Logitech app too… Opening the C:\ProgramData\PatchMyPC\PatchMyPCHomeUpdater.log file up with CMTrace (the best log file reader ever IMHO) revealed that not a whole lot has been happening for the last hour or more. So it does look like Logitech G Hub has thrown a spanner in the works. To fix it, I’ll cancel the updater. And for now, exclude Logitech’s crappy app. Except, after clicking Cancel Updater, nothing happened apart from the main UI showing most apps as Outdated in red again. Shouldn’t the Cancel Updater button change to Start updater again ? When I tried to exclude the troublesome app (Logitech G Hub) by clicking on Disable Auto Updating it was greyed out. most likely because the exe file for updating that app was in the logfile source folder and it was still trying to update that app. But then, why didn’t Cancel Updater kill it ? So I closed the home updater app, and restarted it to see would there be a difference. There was, now I could disable the auto-updating feature for Logitech G HUB. Once done, I clicked on Start Updater, and off it went for the second time. This time however, you can see the Logitech G HUB app has a disabled icon in red. Cool, let’s hope it works. This time around I could see it updating each app quickly, which was great, and I was seeing more and more green Up to date statuses. The OCD in me wants all the apps up to date, but let’s see what we can do. After a few more minutes it was done, as the updater button reverted to Start Updater, and all but 2 apps were updated! At this point, I wanted to see if it could fix Logitech G Hub and the other app, so I re-enabled updating on the troublesome app and started the updater again. It gave up and the log file revealed some issues with the EXE and a call to some SSL address. I don’t blame the home-updater tool here at all for this, but maybe it could inform the end user with a popup or some UI hint other than Outdated that clearly stated that it had a problem updating this app. At this point I managed to get 34 out of 36 apps updated. Not bad at all. Uninstalling bad apps As I had two apps that clearly were not interested in updating, I decided to uninstall them. You can do that by navigating to the Uninstaller section of the app or simply clicking the three dots on the app in question and selecting Uninstall App. That action prompted the apps to present me with various popups about uninstalling the app, which is OK, but would be nicer if it was a silent uninstall. Once done, I clicked on Re-Scan to check my current status as one of the two bad apps was still listed (guess which one). After the Re-Scan, it all looked good. Note to developers at Patch My PC, trigger a re-scan automatically, after a user chooses to Uninstall and app. I’m sure you are doing that already as it worked for the CrystalDiskMark app, but not for the Logitech G HUB app. Below you can see that All apps are up to date! Job done! Setting up a schedule Security waits for no one, so you should definitely setup a schedule for your Patch My PC home updater. Click on the Scheduler button and select the + ON button. Once done you can see that it has a default of running at Monday, 7PM and to repeat daily. What I like is it also enables the Run ASAP when Missed option by default, which is great as you probably are not using your computer every day. Once you are happy with your settings, make sure to click on Save Schedule, to save the schedule otherwise nothing will happen. You’ll get a popup (aha, they can do popups!) informing you that it’s saved. After clicking OK, you can see the schedule tasks are created, one for updating the app itself, and one for updating your third party apps. Modifying Startup apps I mentioned that the Startup button allows you to modify startup apps, and it does it much better than the similar option in Windows Task Manager Startup Apps. Compare these results. Below is what you see available in the Startup Apps view of Task Manager. Versus the really populated view from Patch My PC home-updater. Quite a difference! Summary The Patch My PC home updater app is incredible, it helps you patch your home computers third party apps with ease, and does it using a very easy to use interface. It also allows you to setup schedules to make sure those third party apps are kept up to date to ensure that you are as secure at home, as you are at work. I can highly recommend this software, and best of all, its FREE.
 -
have you tried to submit feedback directly from the console and include your email address, that way the product group might contact you for more info
-
are you available now ? if not, what timezone are you in ?
-
if you'd like to do a remote session or share the actual logs files with me then ping me > niall@windowsnoob.com and i can take a look
-
have you checked the application settings i listed above are the same for yours ?
-
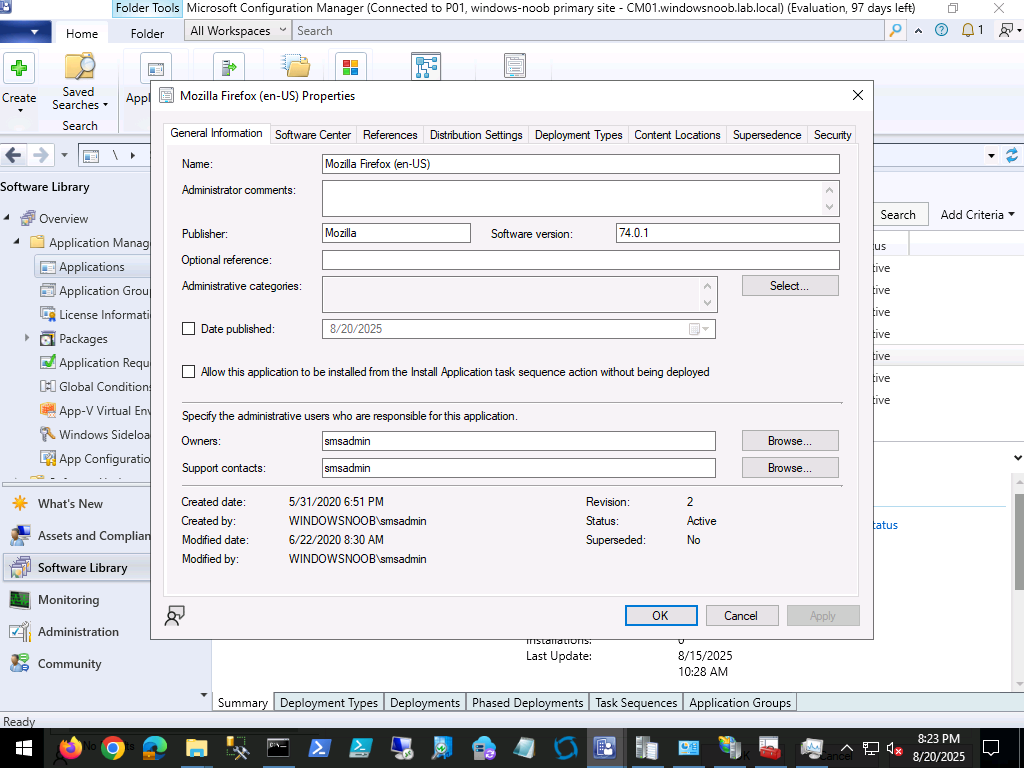
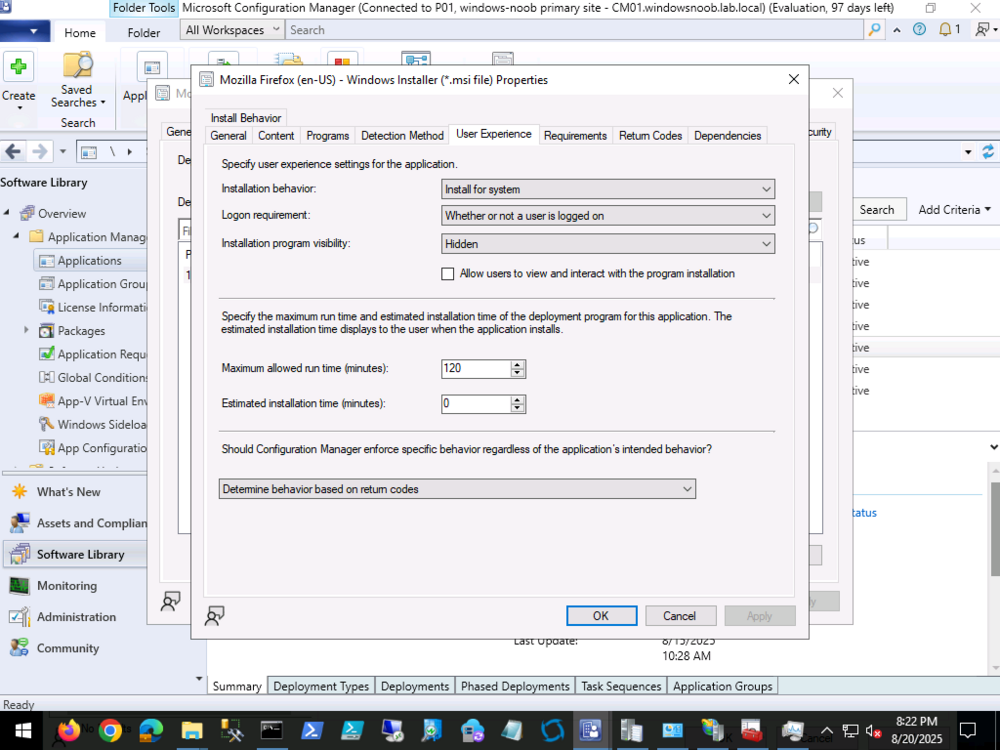
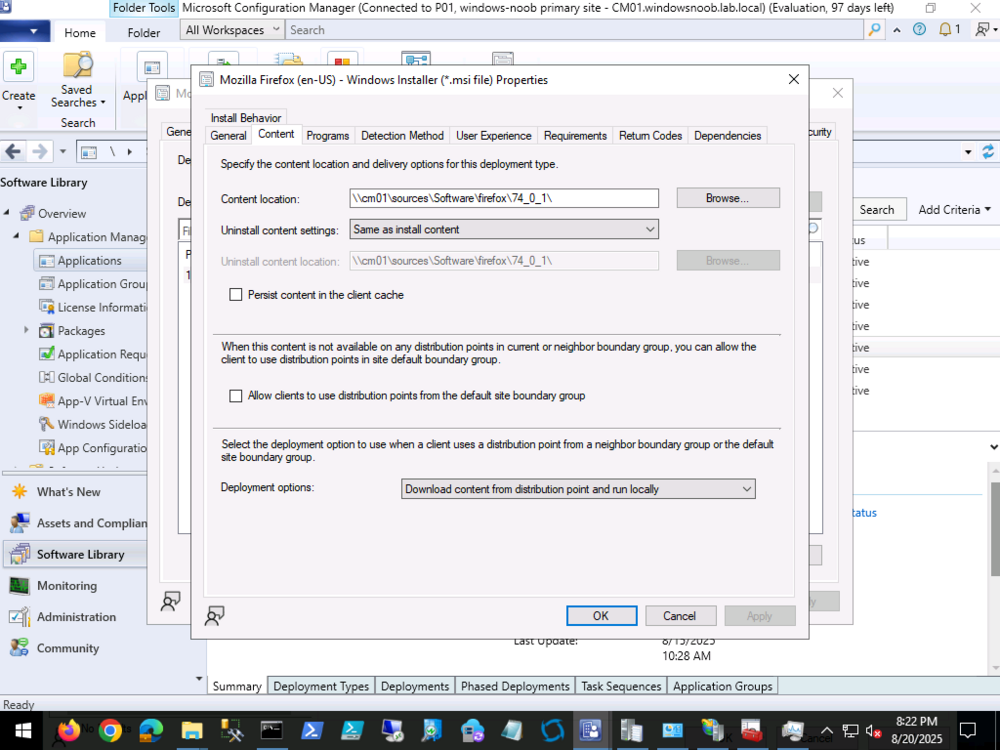
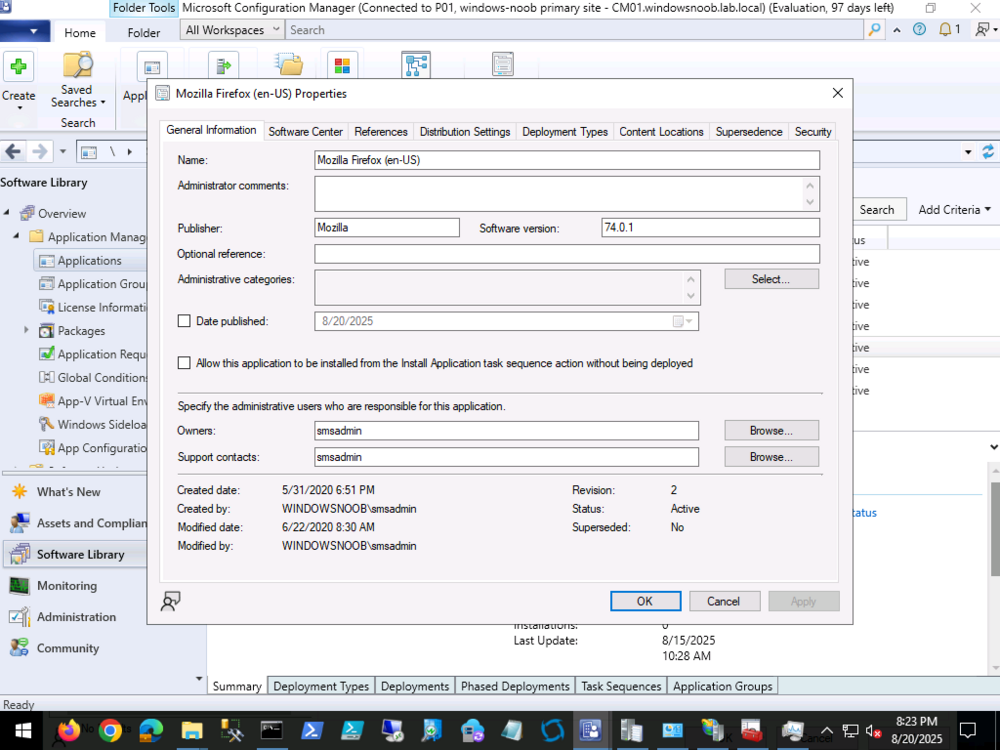
the firefox app is just a test old version here are some of the properties...
-
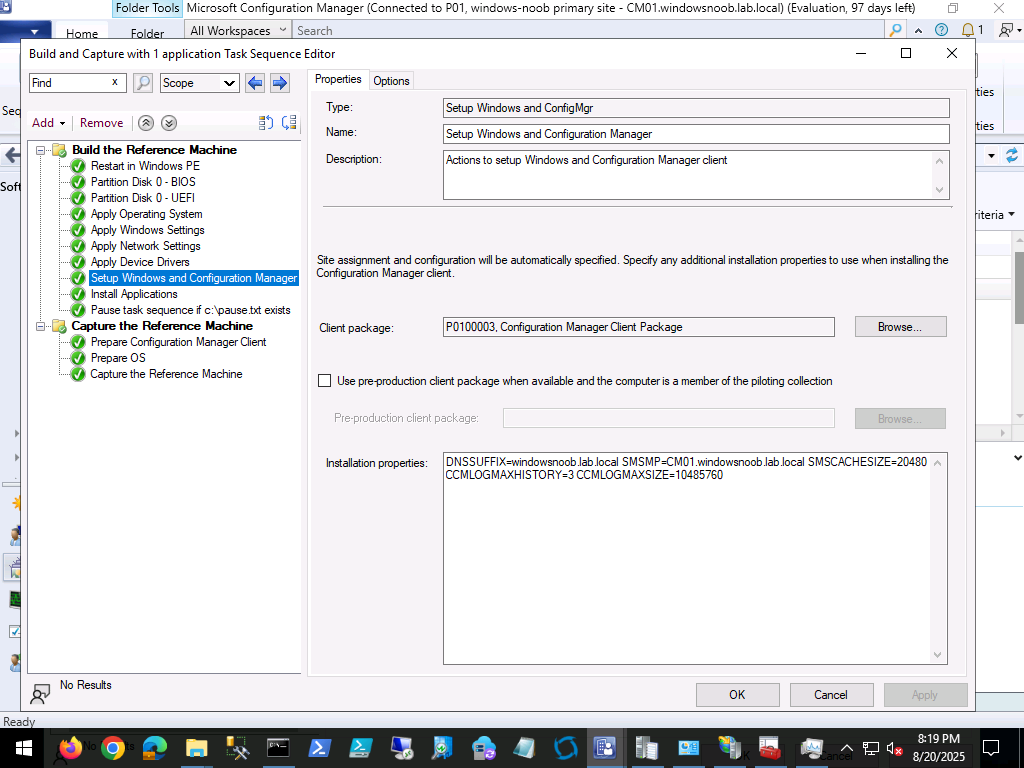
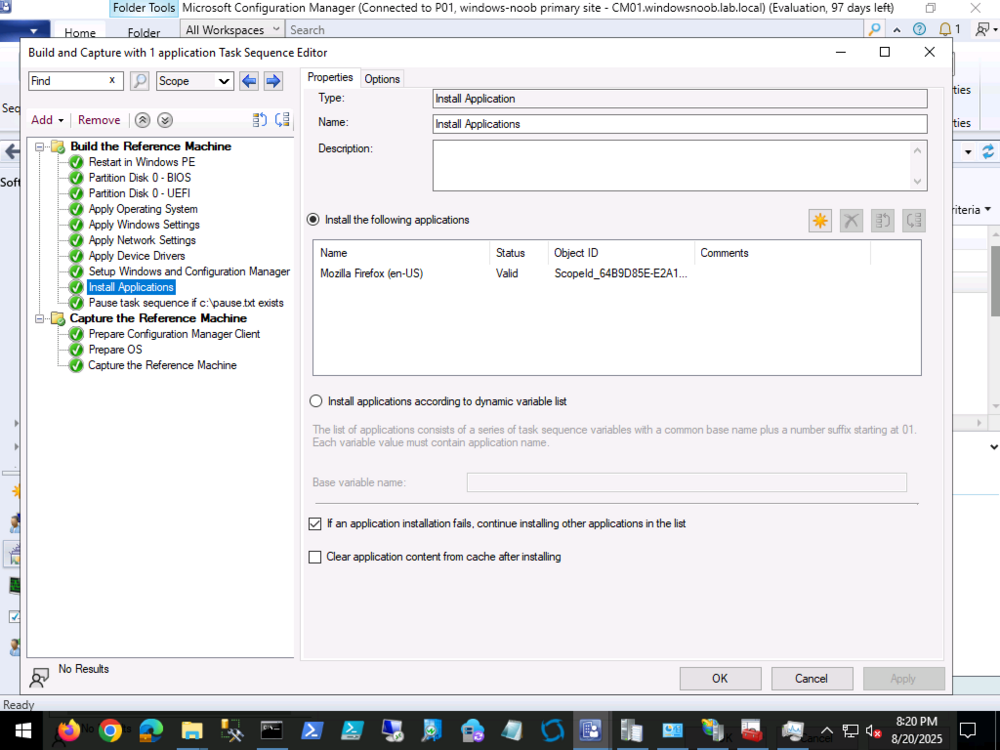
it seems to be working fine for me, here's my task sequence


-
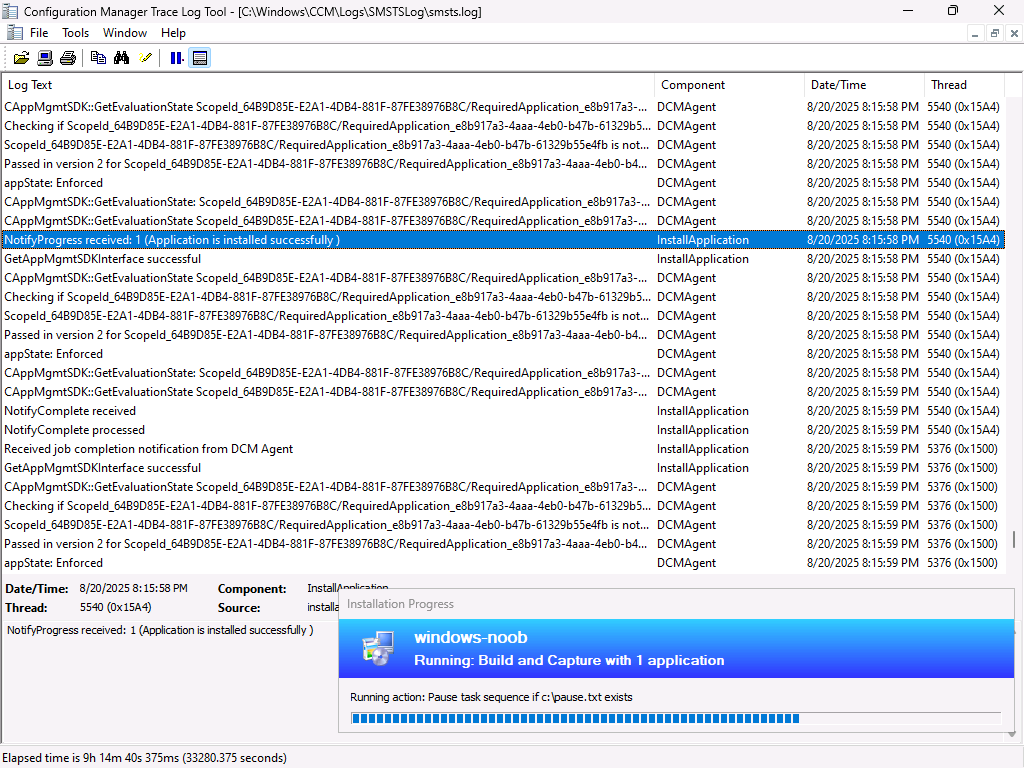
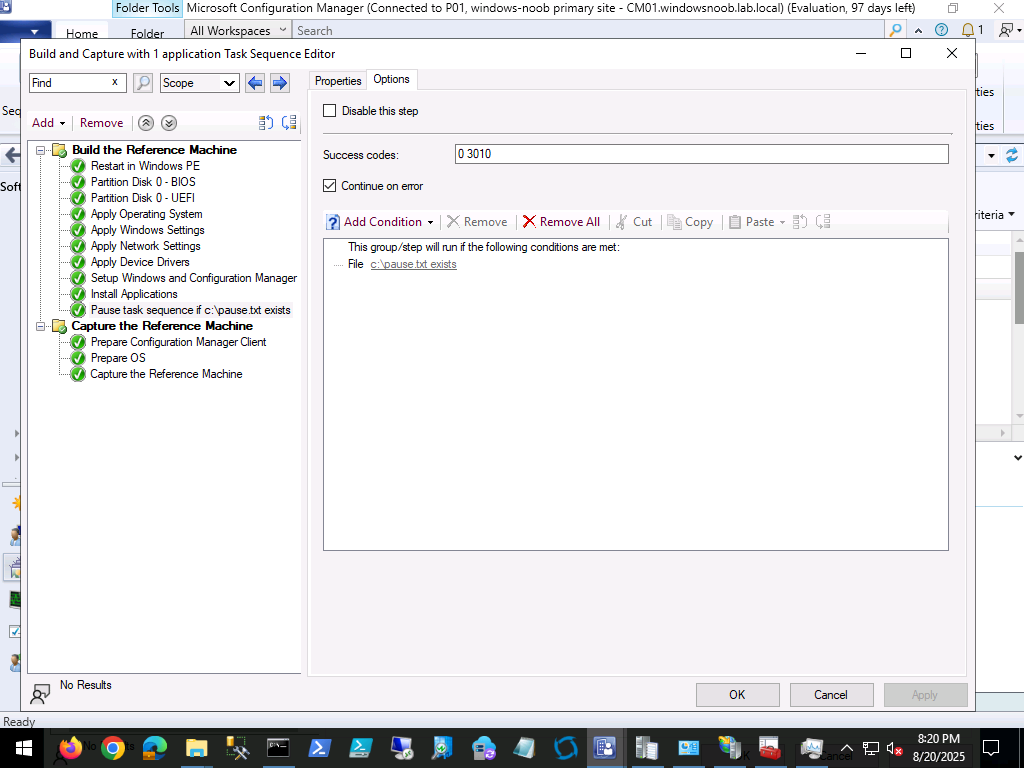
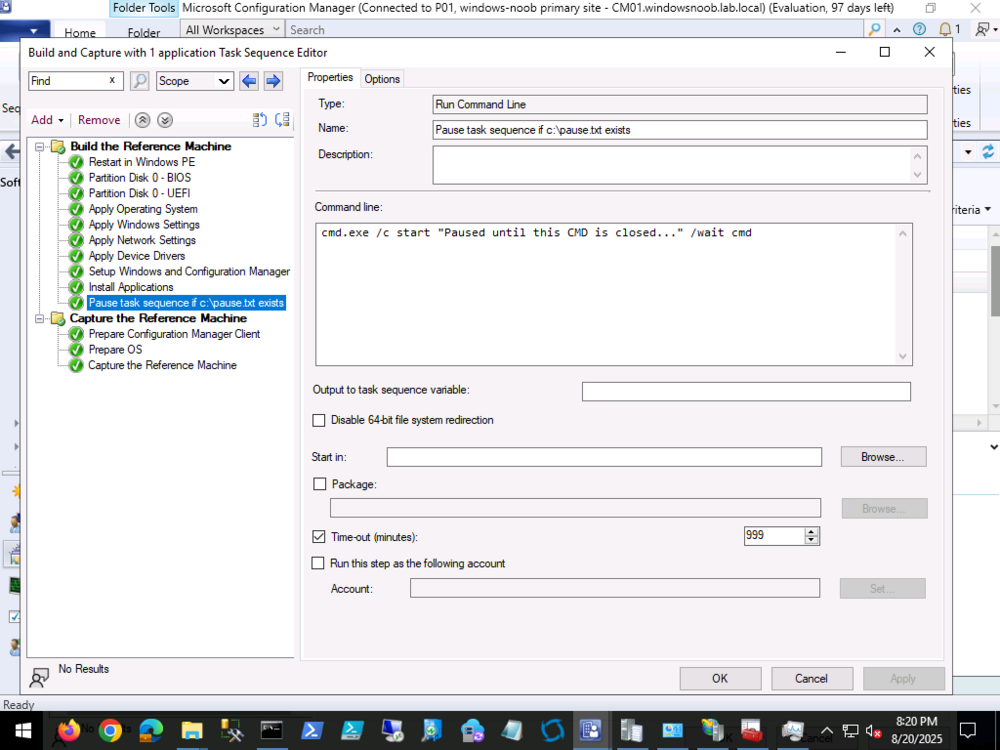
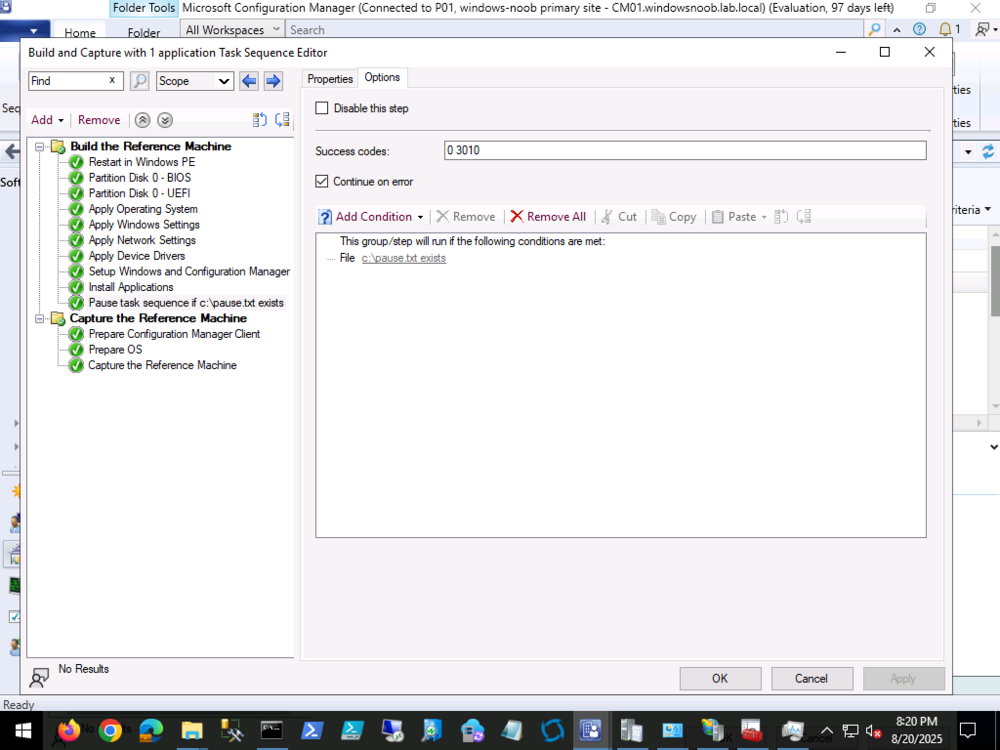
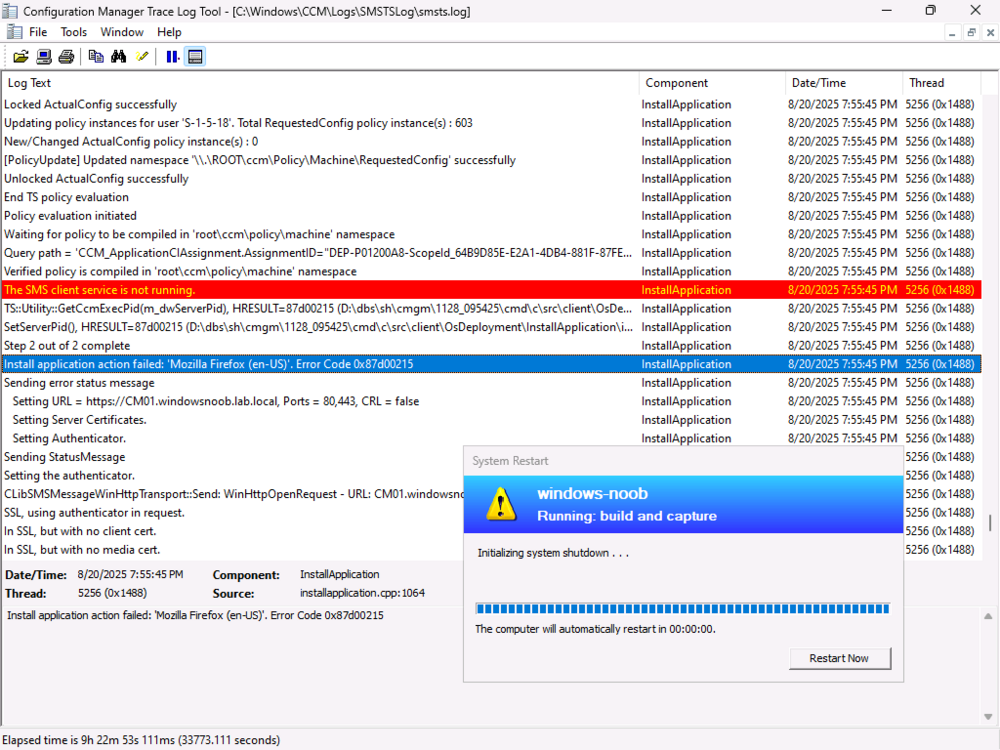
ok i've fixed my certificates and i'm now seeing this on a very simple build and capture task sequence with just one application, firefox, is this basically the same error you are seeing ? or not ? i'm going to stick a pause just after this step to do some further troubleshooting.
-
i created the task sequence just now but it's not working as i've expired certificates in the lab, i have to fix that first, so please be patient.
-
it's soooooooooooooo long since i've done a build and capture, let me test it in my lab and post back here, forget about the lmhosts for now. i'll post back later
-
Introduction Microsoft pushed out some new updates for Windows 365 Cloud PC’s recently and one that we thought was interesting was this one, the ability to recover a Cloud PC that was de-provisioned due to license expiration. The de-provisioning of a Cloud PC normally means that it is unusable and unrecoverable, it’s a destructive action. However, with this new feature and as long as you have previously enabled Point-in-Time-restore explained here then you should be covered by this new ability (for Windows 365 Cloud PC Enterprise only). In this blog post myself and my good friend Paul look at the new feature and test it out. We’ll be collaborating on more Windows 365 and Azure Virtual Desktop content during the year so stay tuned on the SCCMentor and windowsnoob websites! The prerequisites Before we test it, let’s look at what you need to have in place. To recover a previously de-provisioned Cloud PC, ensure that the expired Windows 365 licenses are renewed. The replacement licenses must be of the same SKU, so if the previous Cloud PC’s were Cloud PC Enterprise 2vCPU/8GB/128GB then the replacement license assigned must be for Cloud PC Enterprise 2vCPU/8GB/128GB. To recover a previously de-provisioned Cloud PC, ensure that the provisioning policy of the de-provisioned Cloud PC still exists. To recover a previously de-provisioned Cloud PC, ensure that assignments with the right users are assigned to the provisioning policy. To recover a previously de-provisioned Cloud PC, ensure the end users still exists, and are still assigned to the same Entra ID groups as before or the ones included in the policy assignments. Testing the new feature Ok now that’s all clear, let’s test it out. Before starting, we verified that our test Cloud PC had a point-in-time restore policy (User settings) applied. We also made sure to place a file on the Cloud PC outside of Onedrive known folders. And before continuing, we verified that there was at least one backup for this Cloud PC, and there were several. Note: If you are also testing this feature and you are doing it on a newly provisioned Cloud PC, you can click on Create restore point to create a manual restore point. As simulating a license expiry and then re-purchasing the same license is easier said than done we’ll simulate it by deleting a user that was assigned the following Cloud PC SKU: Cloud PC Enterprise 2vCPU/8GB/128GB. Below you can see that user (testuser100@windowsnoob.com) and their respective Cloud PC. Next, we deleted our licensed user. and were notified of that… Shortly after, the status of the Cloud PC that that user was using, changed from Provisioned to In-grace period. Clicking that In-grace period status and selecting Deprovision now, speeds up the testing process. Which kick starts de-provisioning Some time later, the Cloud PC was no longer in the Intune console and was no longer available to the (now deleted) end user to use. At this point, the de-provisioning process was completed. Recovering de-provisioned Cloud PCs In the real world, to see this new feature you’d renew an expired license and make sure that the user/group/policy and so on didn’t change during that time period. But we are simulating that, so to simulate it we’ll restore the user we deleted earlier, again, nothing else has changed other than that users Cloud PC’s went from in-grace period to de-provisioned. So let’s restore the deleted user. In Azure (Entra Id) select users, click Deleted users and locate your deleted user. Select the user and click Restore users. You’ll be notified of the restore. And as the user was still in the same groups, they’ll pick up the Cloud PC assignments targeting them and a new Cloud PC matching the SKU in question will be provisioned. After the Cloud PC is provisioned, you’ll see it appear with a new computer name. We need to do some final actions. Select the newly provisioned Cloud PC and click the Restore option. This will show a retention restore point. Select it and click the Select option to restore that de-provisioned Cloud PC. You’ll get a popup warning you about the restore. Click Restore and the restore will be initiated, you’ll see the status change to Restore pending. And during the restore the status will then change to Restore active. and after a while refreshing that device will reveal a ‘Not found‘ statement (sorry no screenshot, we’ll add it shortly). However, if you navigate back to Windows 365 devices, you’ll see that the old name (old Cloud PC) is back ! and logging on to that Cloud PC using the same user will indeed reveal that the content is as expected. Job done! Read more To learn more about this new feature see Microsoft’s own page here. To learn how to use Point-in-time-restore read here.
-
Introduction Look out for a new series of blogs from myself and my MVP buddy, Paul Winstanley as we explore the world of Azure Virtual Desktop (AVD). In the meantime, we have collaborated on a kick the tyres exercise to experience the AVD solution via the Microsoft quickstart. This blog post details that experience with a simple step-by-step guide. Microsoft provides the quickstart as a great way to test out an AVD environment with minimal fuss. It will create a small, low cost environment in approximately 20 minutes. Prerequisites To create the environment you will need to meet the following prerequisites: An active Azure subscription An Entra account with the following roles assigned: Contributor User access administrator Some test Entra accounts, for authentication into the AVD environment Available quota for your subscription for the Standard_D4ds_v4 virtual machine. If you have insufficient quote then you can increase – https://learn.microsoft.com/en-us/azure/quotas/per-vm-quota-requests Access to the required FQDNs and endpoints in Azure – https://learn.microsoft.com/en-us/azure/virtual-desktop/required-fqdn-endpoint?tabs=azure What gets deployed during the Quickstart A resource group called rg-avd-quickstart-<GUID> A virtual network and subnet. The IPv4 address space will be 192.168.0.0/24 and will use Azure provided DNS servers A network security group that is associated with the subnet of the virtual network and uses only the default rules. No inbound rules are required for Azure Virtual Desktop A host pool with single-sign-on (SSO) enabled An Entra joined session host running Windows 11 Enterprise multi-session with Microsoft 365 apps preinstalled with English (US). The virtual machine is a Standard_D4ds_v4 size virtual machine (4 vCPUs, 16 GiB memory) configured with a standard SSD disk An application group that publishes the desktop from the session host A workspace For a complete list of the resource published by the quickstart, take a look the Microsoft documentation https://learn.microsoft.com/en-us/azure/virtual-desktop/quickstart?tabs=windows#deployed-resources. Getting started The first step is to register the Microsoft.DesktopVirtualization resource provider on your Azure subscription In the Azure portal, go to your Subscriptions and select that one you will use for this exercise. Select Resource providers from the menu and look for Microsoft.DesktopVirtualization. If this is listed as NotRegistered in your subscription, then click the three dots and select Register as shown below. If it is already listed as Registered then there is nothing else you need to do. Before continuing, ensure that Microsoft.DesktopVirtualization is listed as registered. Deploying the quickstart solution You can find the quickstart solution in the Azure portal by searching for Azure Virtual Desktop and then selecting Quickstart from the menu. Click the Create button to begin the process. You will need to enter specific information on the Basics tab. Subscription: Ensure you choose the subscription where you have registered the resource provider previously. Location: Select the Azure region where you want the AVD resources deployed to. Local administrator account: Username: Enter the name for a local administrator Password: Enter and confirm your password for the local admin User assignment: Select a maximum of two users who will have access to the AVD devices (see screenshot below) Once all the details have been entered click Review + create to continue through the quickstart wizard. Ensure you receive a confirmation that Validation passed and click Create. The deployment of the resources will be in progress. If all goes well, Your deployment is complete will be returned. Connecting to your AVD desktops You can connect to your AVD desktops via the Windows app, which is available from the Microsoft Store. When installed, and one of your allocated users is authenticated to the app, you should see a SessionDesktop item (in addition to any Cloud PC’s or other AVD’s available to that user). This is your AVD desktop. Click Connect to access. Once done, you will be prompted to enter your password, or MFA details and then asked to Allow remote desktop connection. This message can be suppressed using a list of trusted devices (see https://learn.microsoft.com/en-us/azure/virtual-desktop/configure-single-sign-on for more information). Just to note, you can also alter the display settings for your AVD session by clicking the ellipsis (three dots) and adjusting. Eventually, you will hit the Windows 11 desktop. Since this is multi session, your other allocated user can log in and use the AVD desktop at the same time. Note, the screenshot below, the same hostname is in use. Removing the quickstart services Once you have used the quickstart, you may wish to clean up the resources, ready for your deeper dive into AVD. To do this, locate your AVD virtual machine under Virtual machines in the Azure portal and click on the device. Click Stop to deallocate the device. You will be prompted to confirm the deallocation. Make sure you have ony selected the AVD virtual machine that you want to stop. Click Yes. Wait until the device reports back as Stopped (deallocated) under its Status. Now we need to remove the resources which were created, as they encur costs when running. You can do this 2 ways, in Azure, search for Resource groups and find the one created by AVD. As mentioned, this will have a naming convention of rg-avd-quickstart-<GUID>, or simply click the AVD virtual machine and then select the resource group it’s in as shown here. Click into the resource group, select all the resources under Overview and then click Delete. You will need to confirm their removal by entering delete in the field below and also you can select Apply force delete for selected Virtual machines and Virtual machine scales sets, if you so wish. Once done, click the red Delete button. You will then need to confirm the deletion of the resources. Click Delete one more time. The resources will no longer be listed when they are removed. Next, click Delete resource group to remove the quickstart resource group. Enter the name of the resource group to confirm its deletion and click Delete. Once again, confirm by clicking Delete. I hope this guide gives you a good oversight into how quickly you can test out the Azure Virtual Desktop using Microsoft’s quickstart option. You can get a VM up and running in no time and experiment with it. As mentioned, we will be taking a deeper dive look at AVD very soon, so watch this space and keep an eye on the SCCMentor and windowsnoob websites.
-
SSRS SCCM Reporting Log
anyweb replied to Cerberus24's topic in System Center Configuration Manager (Current Branch)
great findings and glad you got it sorted are you sure with the changes made that it's going to work security wise ? -
SCCM 2007 SP2 prerequisites download
anyweb replied to EngiNerd's topic in Configuration Manager 2007
send me a pm -
I would try yes, but can i guarantee no issue, no. if you do get a problem post here and i'll do my best to help
-
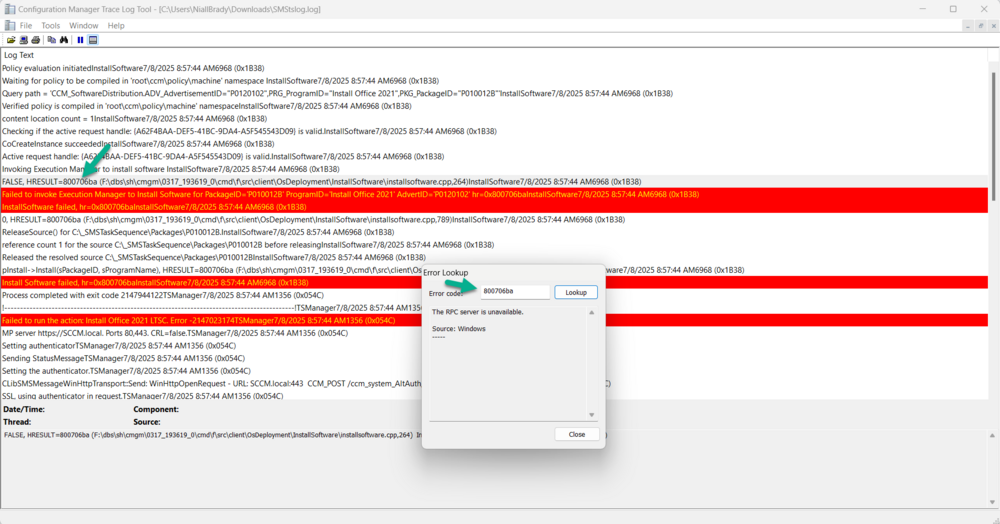
Using CMTrace error lookup, I can see that the error message is actually an RPC server is unavailable I asked Google (ai) what this could be, The "RPC server is unavailable" error (0x800706BA) in SCCM (System Center Configuration Manager) typically indicates a problem with communication between the SCCM server and a client machine. This usually stems from network connectivity issues, firewall restrictions, or incorrect service configurations. Here's a breakdown of potential causes and solutions: 1. Network Connectivity Issues: Verify Network Connectivity: Ensure that the SCCM server and the client machine can communicate over the network. Try accessing the client machine from the server using its hostname or IP address in Windows Explorer (e.g., \\clientname\c$ or \\192.168.1.10\c$). Check DNS Settings: Incorrect DNS settings can cause name resolution issues, preventing the server from finding the client. Verify that the DNS settings are correct on both the server and client. Time Synchronization: Ensure the time and time zone settings are synchronized between the client and server. Inaccurate time can also cause communication problems. 2. Firewall Restrictions: Firewall Configuration: Firewalls, both on the client and potentially on the network infrastructure, might be blocking the necessary ports for RPC communication. Specifically, verify that ports 135 (TCP and UDP) and the dynamic RPC port range are open. Outbound Traffic Inspection: Some firewalls with outbound traffic inspection capabilities might be blocking RPC traffic. Check if any such rules are in place. 3. Service Issues: RPC Services: The Remote Procedure Call (RPC) service and other related services, like the "DCOM Server Process Launcher" and "Remote Registry" services, must be running on both the client and server. Service Configuration: Ensure that these services are set to start automatically (Automatic) after a system restart. 4. Account Permissions: User Account Permissions: Verify that the account used for the SCCM connection has the necessary permissions to access the client machine and its resources. DCOM Permissions: Check DCOM (Distributed Component Object Model) permissions on the client machine, as they might be preventing the connection. 5. Troubleshooting Steps: Restart RPC Services: Restart the RPC service on both the client and server to reset its state. Reboot the Client: After making configuration changes, reboot the client machine to ensure the changes are applied. Use wbemtest.exe: Test WMI connectivity to the client machine using the wbemtest.exe tool. This can help isolate whether the issue is WMI-related or broader RPC communication problem. Deploy Recast Agents: If using Recast Software's Right Click Tools, deploying their agents can help resolve RPC communication issues. In Summary: The "RPC server is unavailable" error in SCCM is often a network or configuration issue. By systematically checking network connectivity, firewall settings, service states, and account permissions, you can identify and resolve the problem.
-
but you are already running SCCM 2403, right ? so... just go ahead and upgrade
-
You can upgrade directly to 2503 it's cumulative. So it should contain all the fixes and updates from the previous version. do check out the official known issues here: https://learn.microsoft.com/en-us/intune/configmgr/core/plan-design/changes/whats-new-in-version-2503 and my take here: https://www.niallbrady.com/2025/04/04/configuration-manager-2503-is-out-350-bugs-fixed/
-
Windows Driver Foundation - CPU Utilisation High
anyweb replied to jackie_jack86's question in Windows 10
I would escalate this to your Dell Technical Account Manager, this is not an SCCM problem,unless of course your quote here: was when you imaged the Dell using your own task sequence, is that the case ? -
SCCM - Task Sequence (Softwares)
anyweb replied to jackie_jack86's topic in Configuration Manager 2012
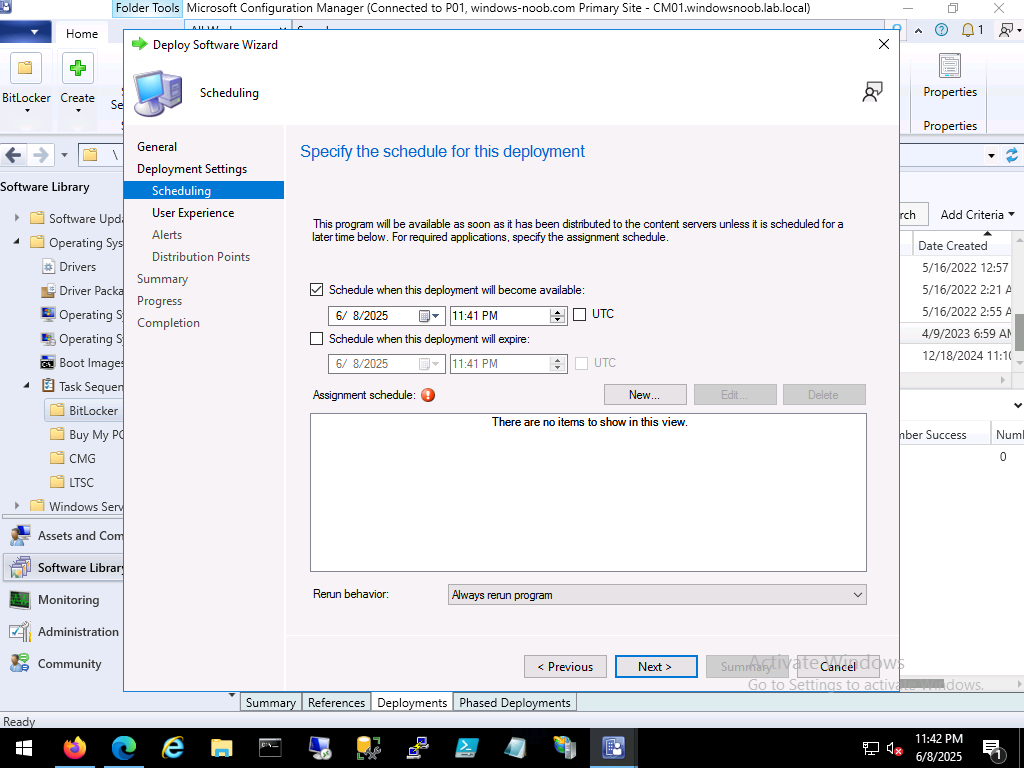
check the schedule is set to 'always rerun program' like below
-
ok in my 2503 lab it's working fine, just checked
-
i'll double check my 2503 env and let you know if it also has the same problem (or not)
-
well my CMG from the post above fixed itself over the period of 2 weeks after posting this blog post. I.e. it was a back-end fix from Microsoft and nothing that I did could change that. If you've made sure you have the latest updates/kb's applied to your 2503 environment and it's still showing this problem, try the fix mentioned above, if it helps great, if not hopefully microsoft will again fix it in the back end.
-
SCCM - SSRP - Http 503 Error
anyweb replied to jackie_jack86's topic in System Center Configuration Manager (Current Branch)
please see https://www.niallbrady.com/2020/09/15/fixing-an-evaluation-version-of-ssrs-with-http-error-503-the-service-is-unavailable/ -
Introduction Microsoft recently released a new feature for Windows 365 Cloud PC’s namely the ability to move one or more Cloud PCs to another region. This involves editing a previously created provisioning policy and then deciding whether you want to move all Cloud PC’s or only a subset targeted by that policy. All data/settings etc on the device (except for stored snapshots) will be retained with the move, which is great from an end user perspective. Microsoft themselves recommends testing this on a few Cloud PCs to review how the end to end process works for your users’ Cloud PCs. Why change location ? But first of all, why would we want to change the location of a Cloud PC ? Changing the location of a Windows 365 Cloud PC can be beneficial for several reasons: Improved Performance: Moving the Cloud PC to a location closer to the user can reduce latency and improve overall performance, making applications and services more responsive. Compliance and Data Sovereignty: Different regions have varying regulations regarding data storage and processing. Moving the Cloud PC to a location that complies with local laws can ensure adherence to data sovereignty requirements. Cost Optimization: Some regions may offer lower costs for cloud services. By relocating the Cloud PC to a more cost-effective region, businesses can reduce their operational expenses. Disaster Recovery and Redundancy: Relocating the Cloud PC to a different region can enhance disaster recovery plans by ensuring redundancy and availability in case of regional outages or disasters. User Experience: If a business has employees in different geographical locations, moving the Cloud PC closer to the majority of users can enhance their experience by providing faster access to resources. Scalability: Certain regions may offer better scalability options or more advanced infrastructure, allowing businesses to expand their operations more efficiently. Security: Some regions may have more robust security measures or offer specific compliance certifications that are important for certain industries. So let’s dig in and see how this works in reality. Moving one or more Cloud PC’s In the Intune console, locate the Windows 365 node and select Provisioning policies. Select the target provisioning policy, and click it to edit it. the policy details are revealed. Take note of the current location configured within the policy, this is optional but useful to know if you want to revert to that location later on. Review location before change At this point, pick a test Cloud PC to allow you to review that the move process goes smoothly. On that Cloud PC, verify the current location using a site such as https://www.whatismyipaddress.com or https://mylocation.org/. Below you can see the approximate location of our test Cloud PC before any move is attempted. As we can see it’s listed in Iowa, in the United States. 1. Inform the users Now that we know which provisioning policy we’ll be editing, and what location our target Cloud PC’s reside in, we need to pick one or more users of those Cloud PC’s and inform them of what is about to happen (and why). You need to explain to the users that they must save any open documents, close their apps and to sign out of their Cloud PC for the weekend. It’s a good idea to do the move over the weekend as obviously some Cloud PC’s will have more data/apps/settings to move than others. 2. Edit the policy In the General section of the provisioning policy, click Edit and modify the Geography. I chose European Union as that’s where I want to move my target Cloud PC’s. You can fine tune the region and select an actual region such as Sweden, but it’s recommended to choose the Automatic (Recommended) option to avoid provisioning failure. For a list of supported regions see here. As this is an actual move and not a provisioning, I chose Sweden. after editing the policy, click Next followed by Update. 3. Pick one or more target Cloud PC’s Now that you’ve changed the Geography and Region of your provisioning policy, click Apply this configuration to select one or more target Cloud PC’s. To select one or more devices, click the third option which is Region or Azure network connection for select devices and click Apply. That will bring up a list of devices to select. Select one or more targets and place a check in the Cloud PC’s will be disconnected and shutdown while the configuration is updating. Any unsaved work may be lost message. Note that the disconnect only affects selected devices, not all targeted by this provisioning policy. 4. Review the Cloud PC’s status The status of the selected Cloud PC’s will change to Moving region or network in the All Cloud PC’s section of the Windows 365 node. Individual Cloud PC’s will also show new status in Intune devices via the Overview and Device action status areas of each device. Also to note, the above statuses will have changed even before the move of the actual target takes place, so the Cloud PC may still be online for a brief period before it receives the instructions to shutdown. You can also monitor the status using the Cloud PC actions report. which reveals some more data for individual Cloud PC’s plus, if you selected multiple Cloud PC’s, click on Bulk batches. After some time, the status should update on the device to Completed and the Cloud PC actions report will be updated with the new status. And on the target PC itself, you can verify it’s location using the previously mentioned sites to confirm the new location. Job done! Final thoughts Keep in mind that after you’ve completed your Cloud PC move operations, that any new Cloud PC’s targeted by that provisioning policy will also be provisioned in the new region. This new ability is great, and I’ve tested it successfully in multiple tenants. I do however feel that with just a little bit more work it could be even better. What I’d like to see is native ability within Intune to send customizable emails/alerts/notification for any Cloud PC’s targeted by the move operation, both before and after the event to alert the end users about what is happening and when, and more importantly to let them know that operations are complete. Great job Microsoft!