anyweb
-
Posts
9271 -
Joined
-
Last visited
-
Days Won
371
Everything posted by anyweb
-
 take note of the mac address of your HP model, and check the SMSPXE.log on the distribution point, search for the mac address, if you don't see it you have other issues. Back to your HP model, which one is it ?
 -
it clearly states that it cannot install SMSSETUP\BIN\X64\SQLSysClrTypes.msi search for a log file for that msi, it might be called SQLSysClrTypes.log also, check that the file SMSSETUP\BIN\X64\SQLSysClrTypes.msi is not ZERO bytes in size, if so that's the issue cheers niall
-
have you tried this >
-
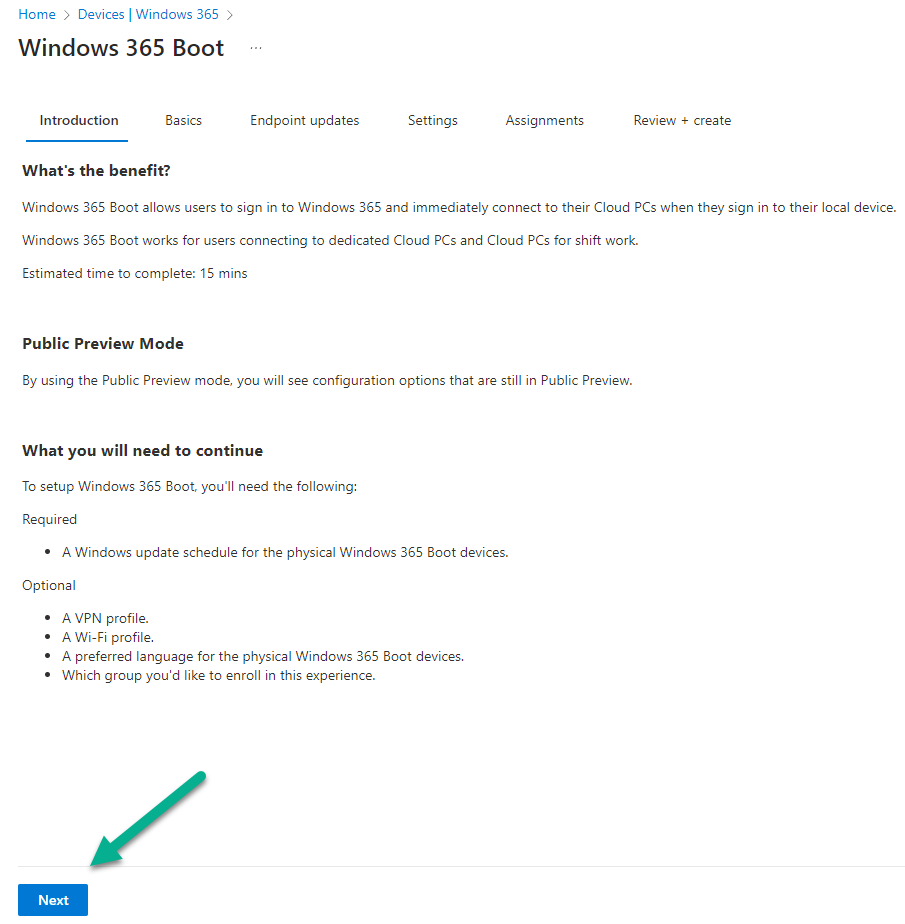
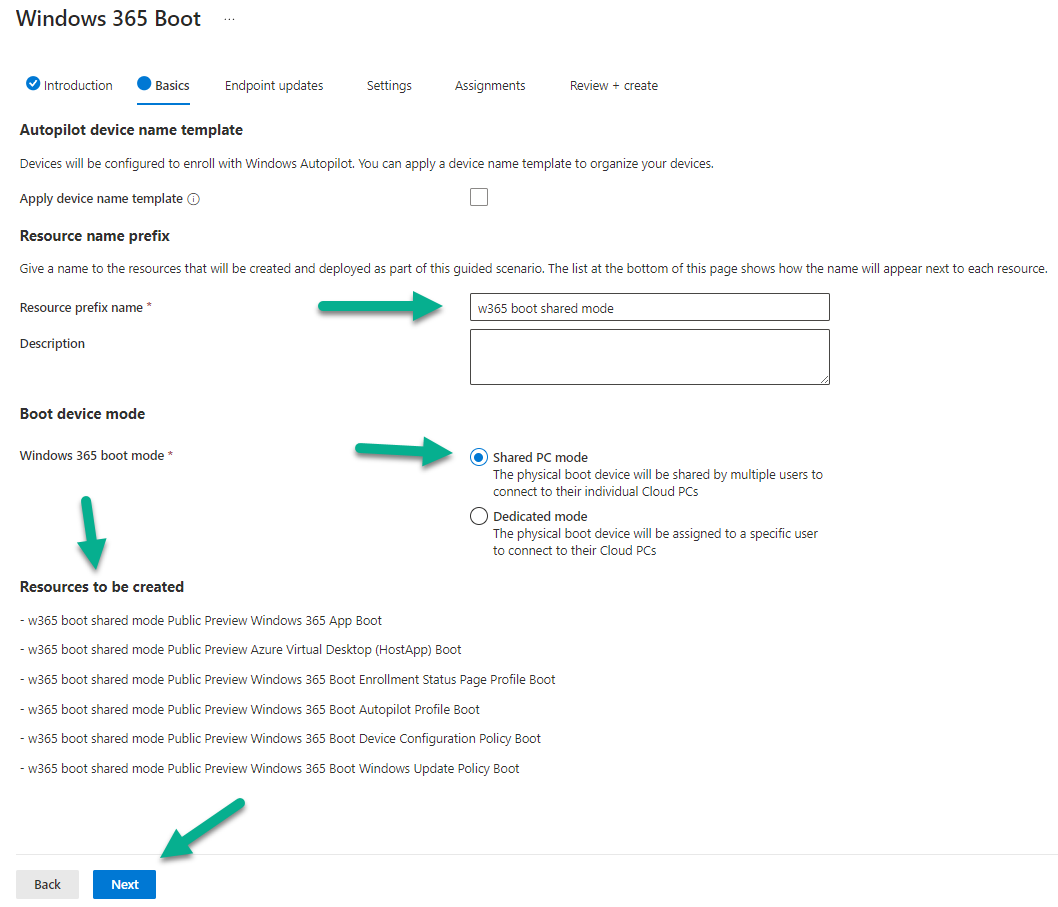
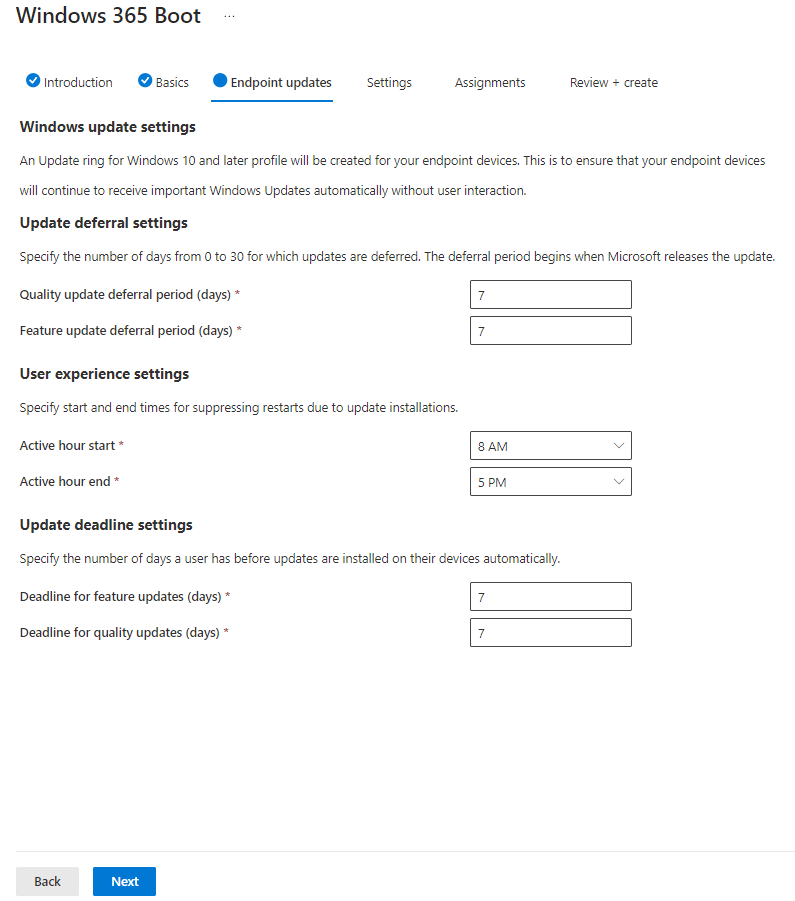
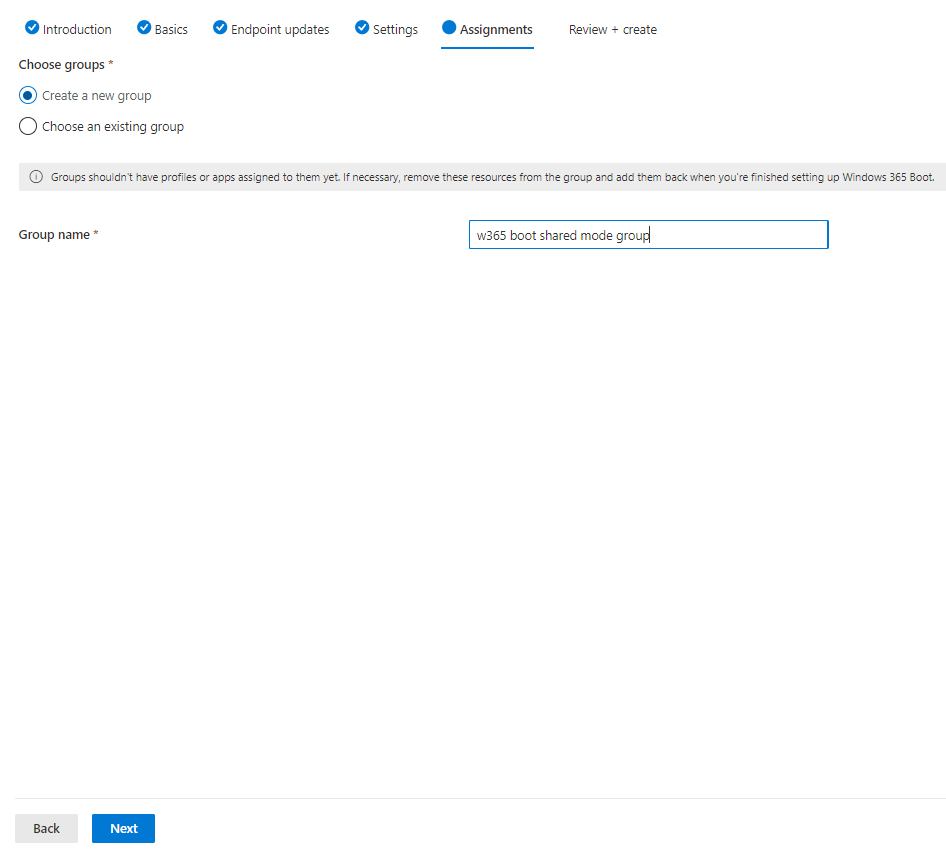
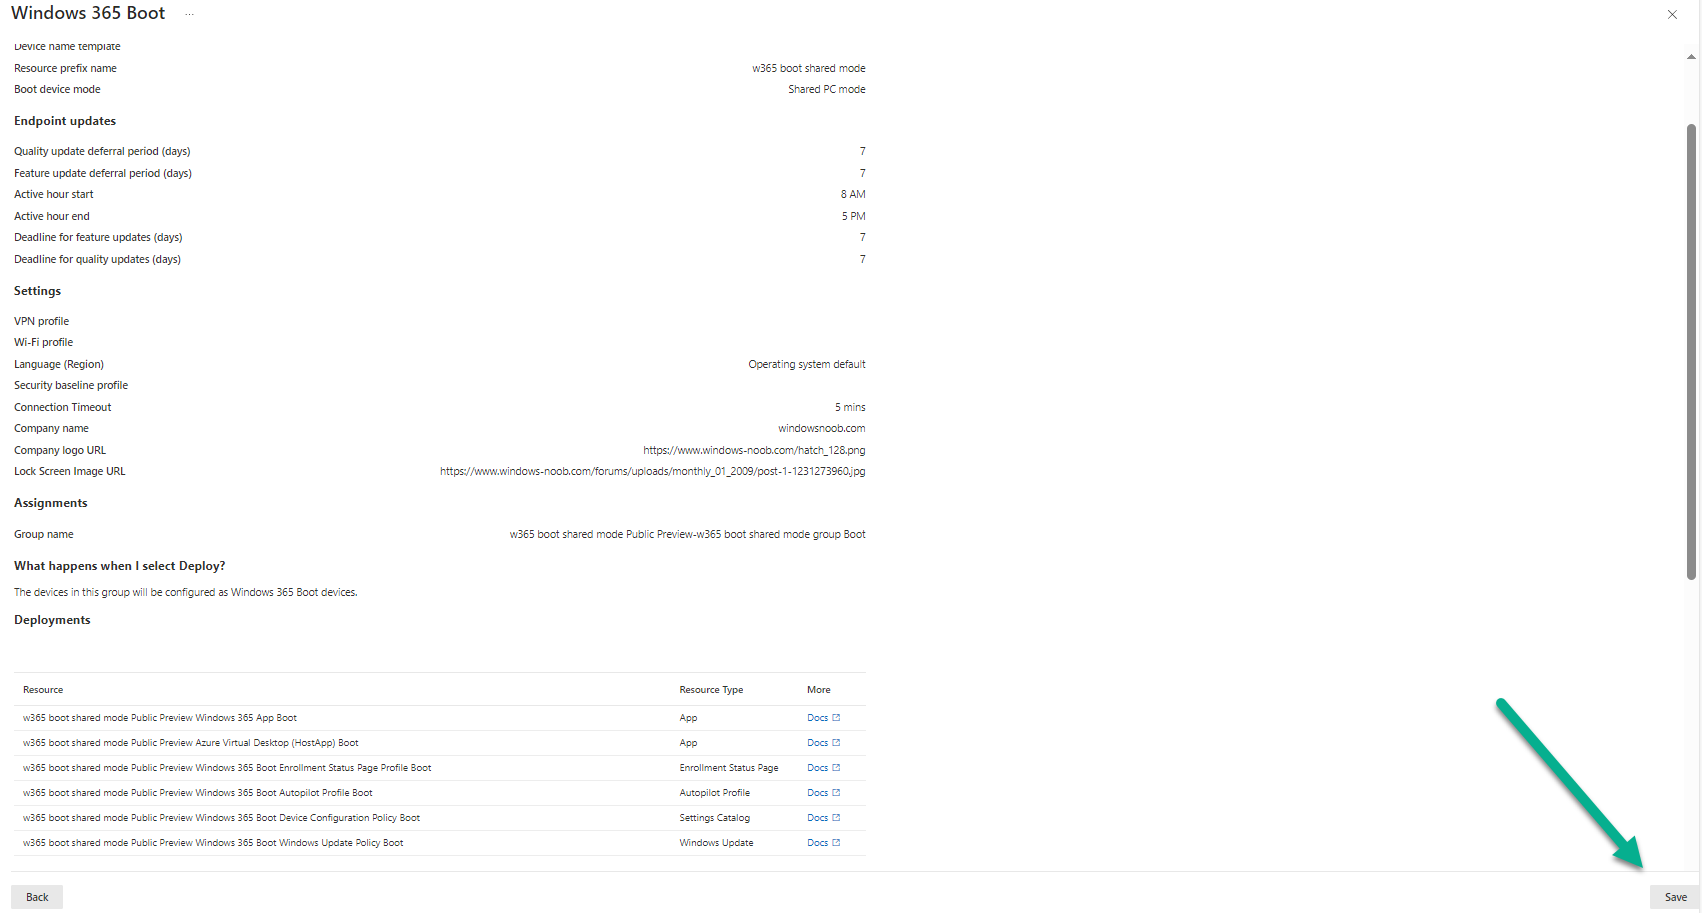
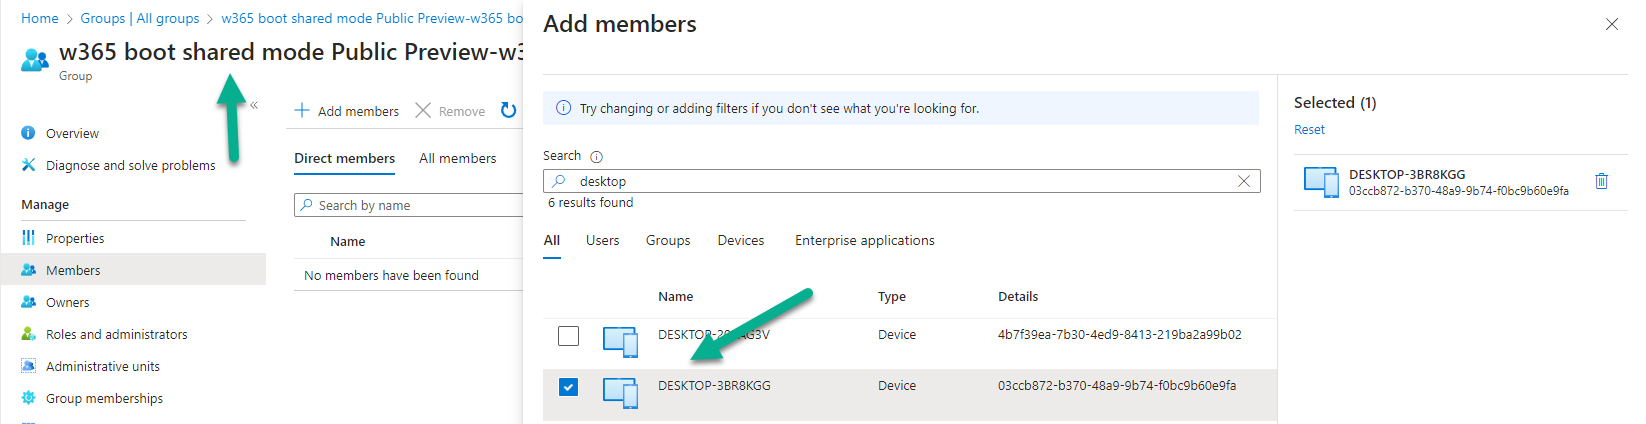
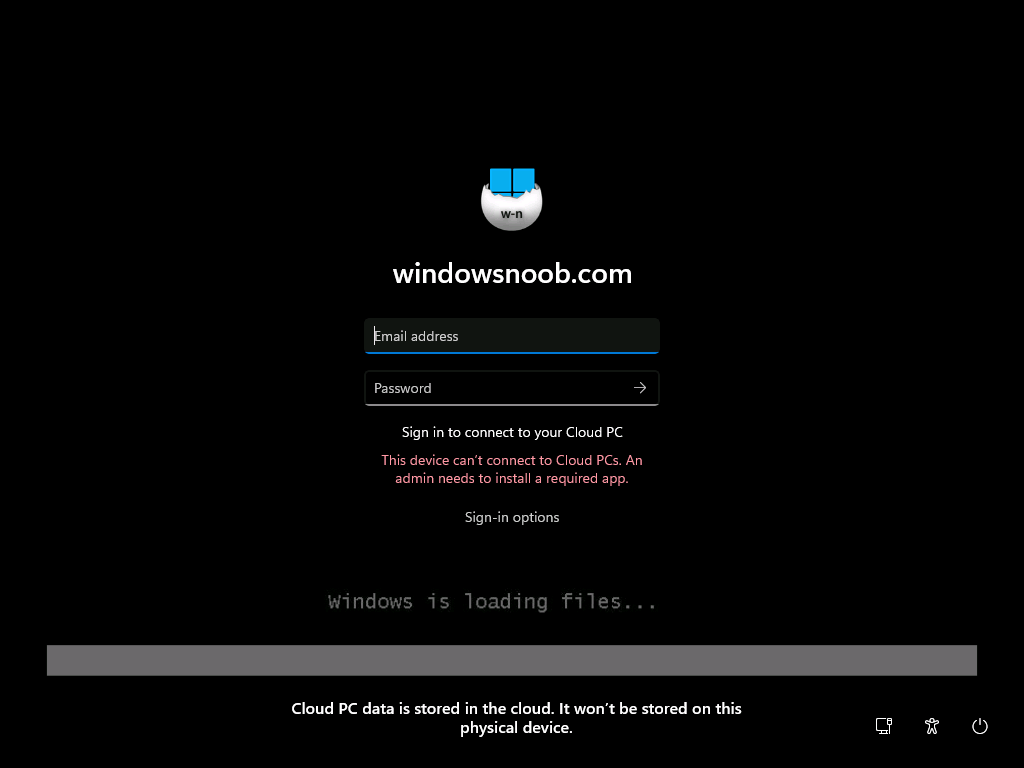
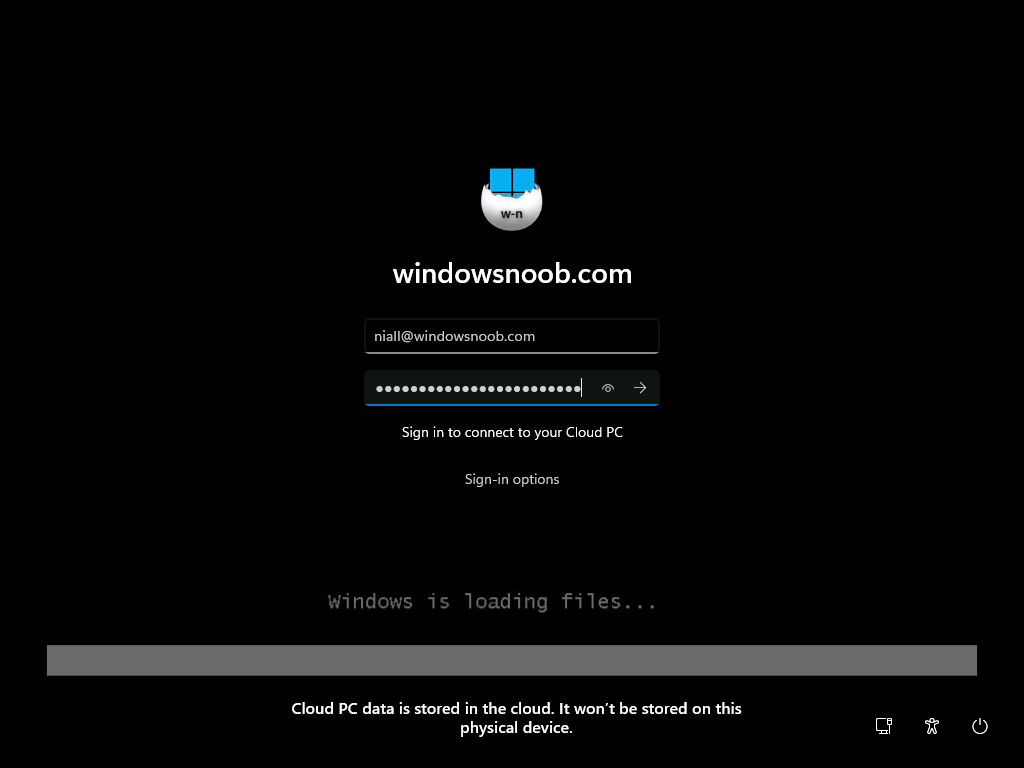
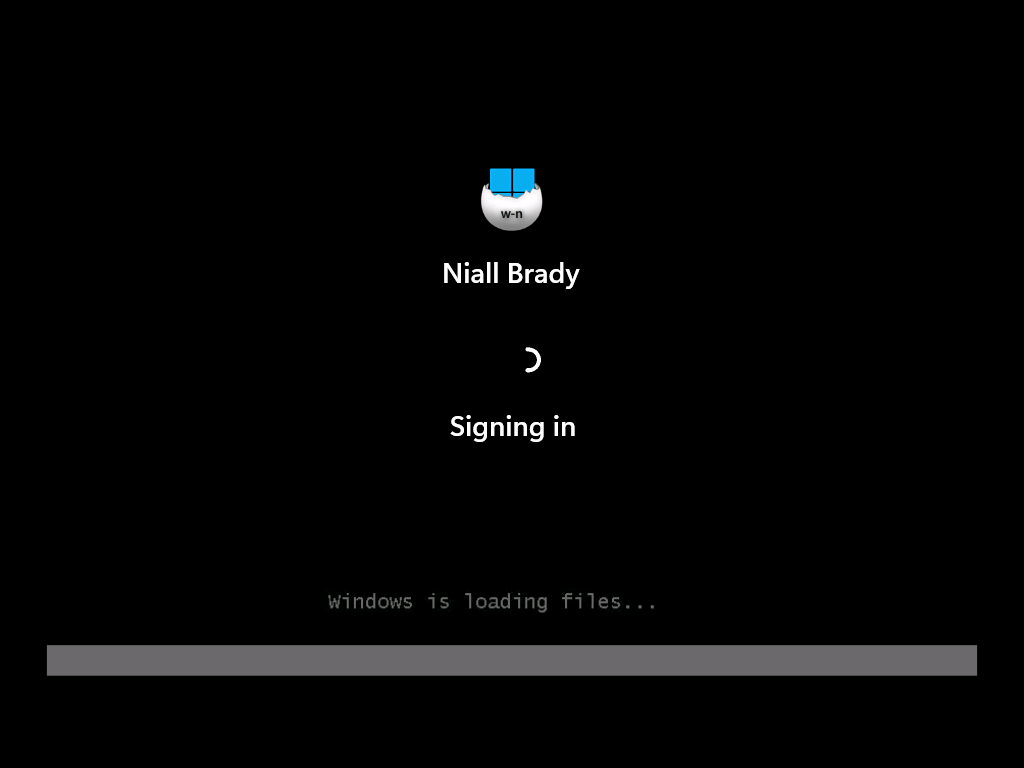
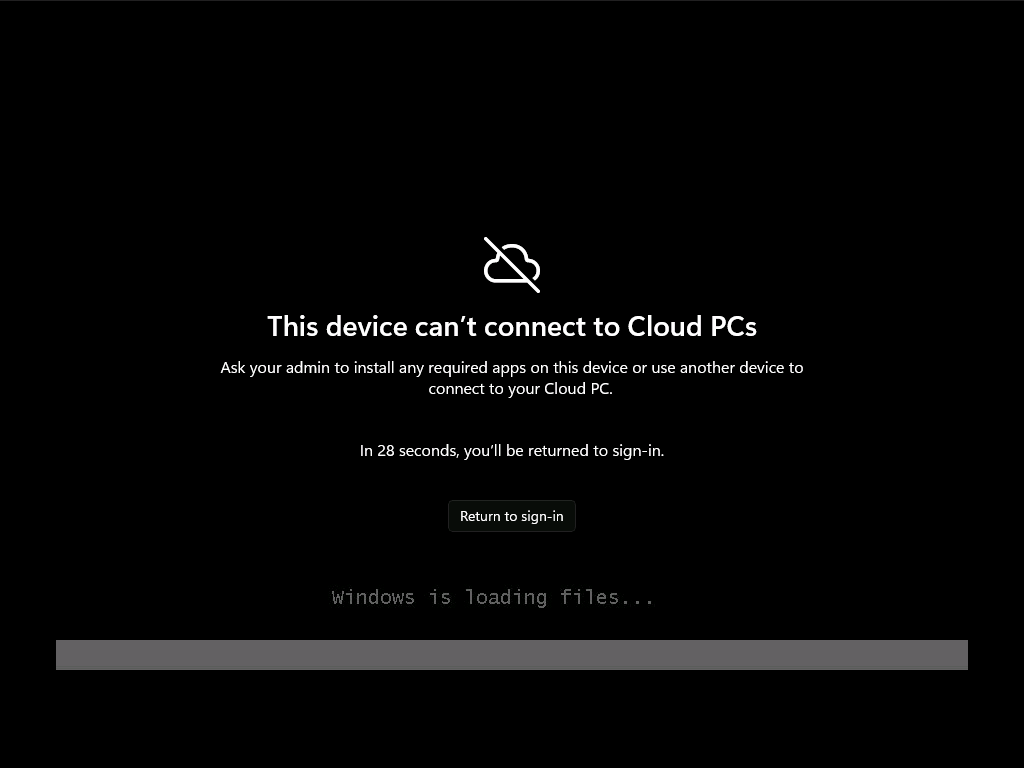
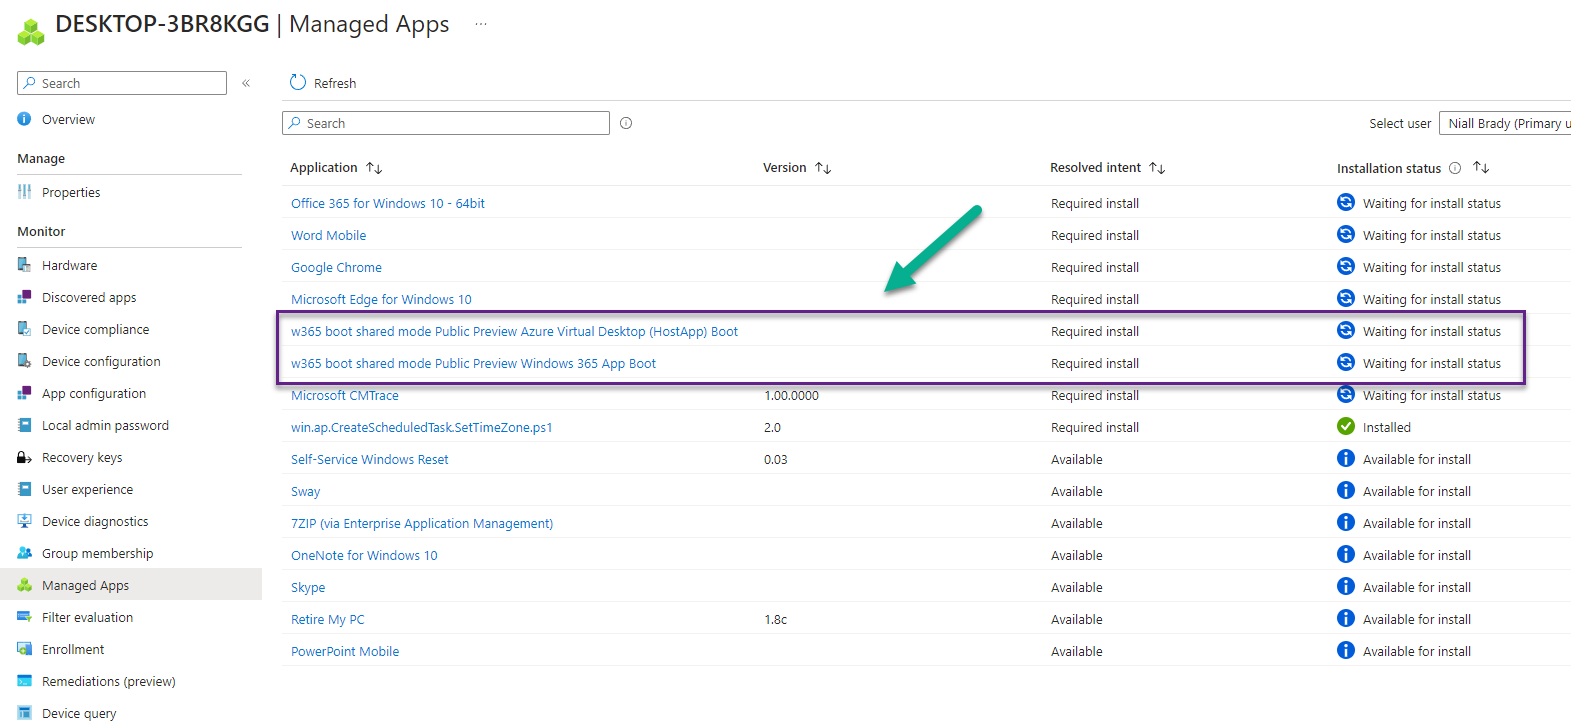
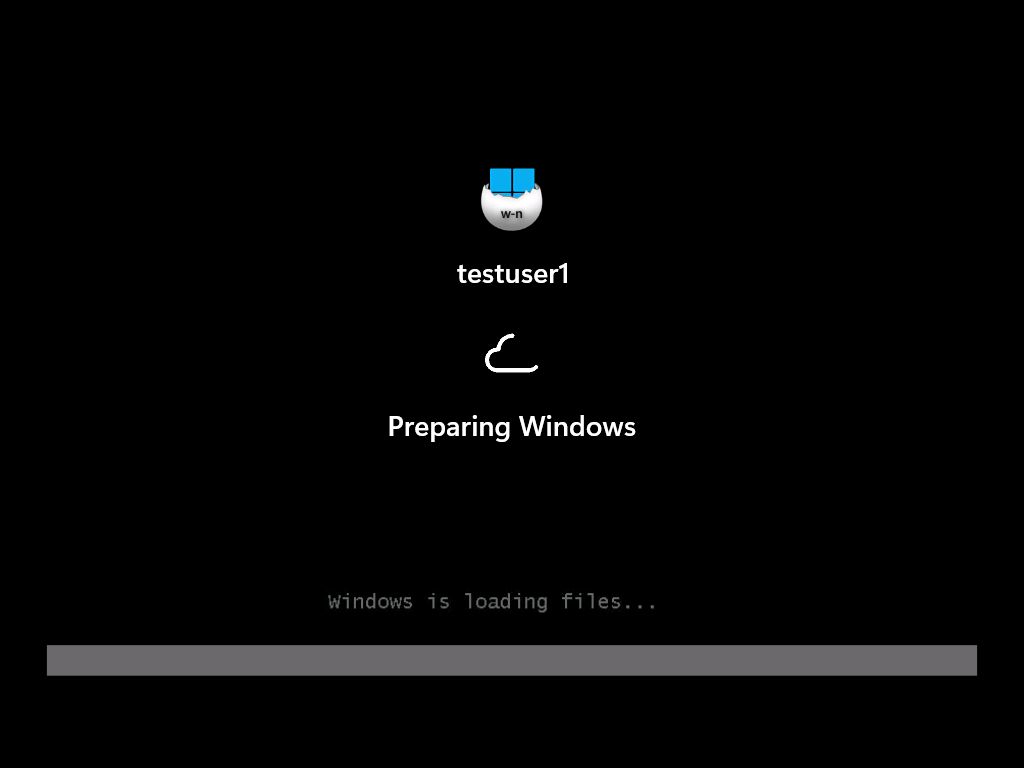
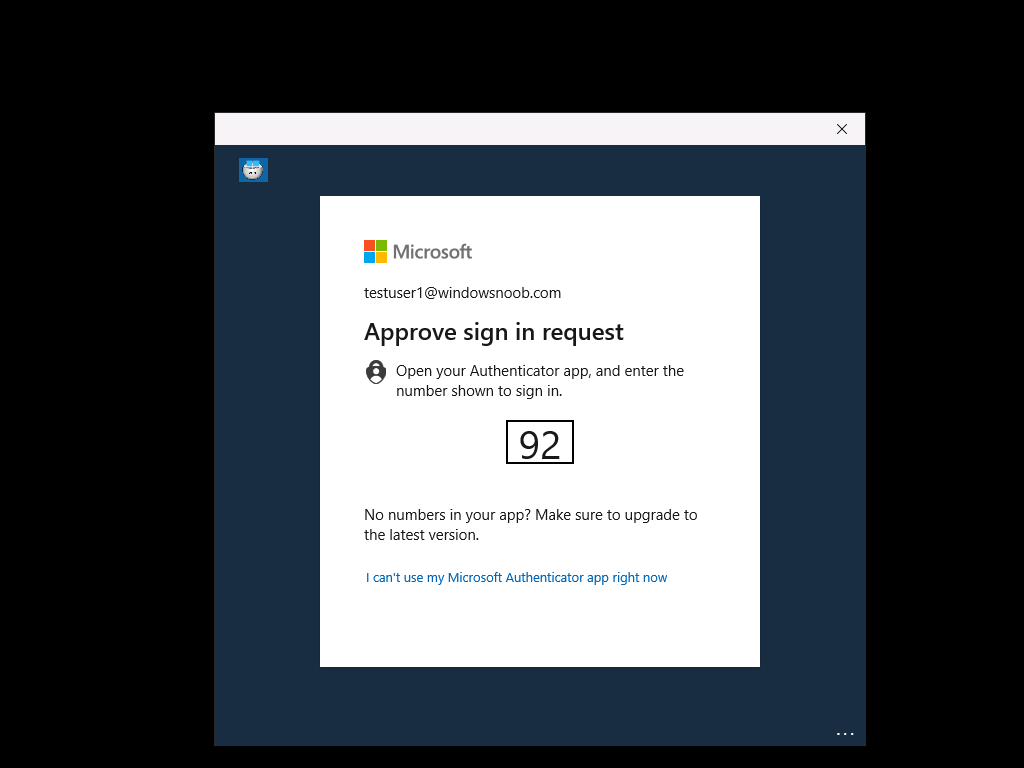
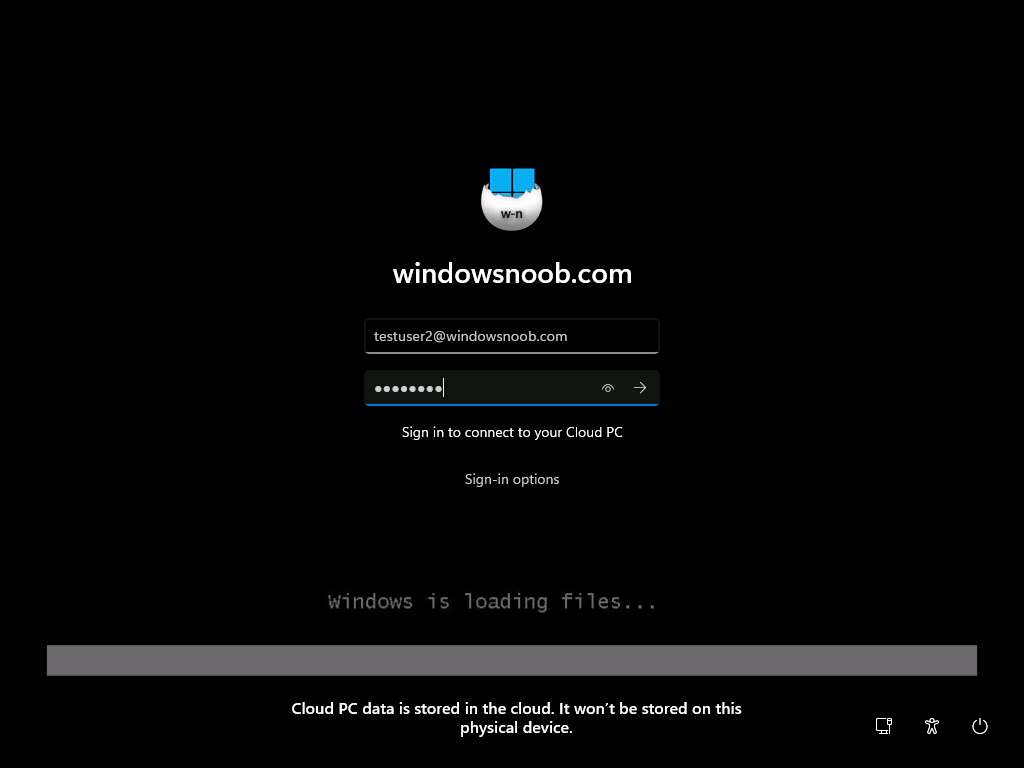
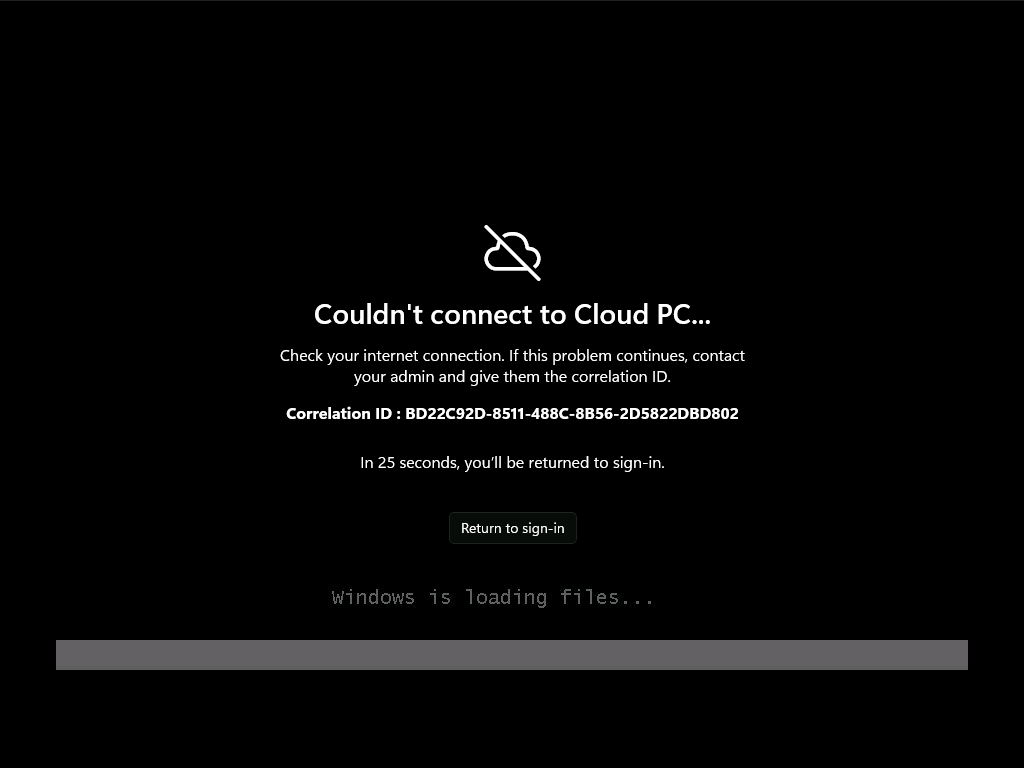
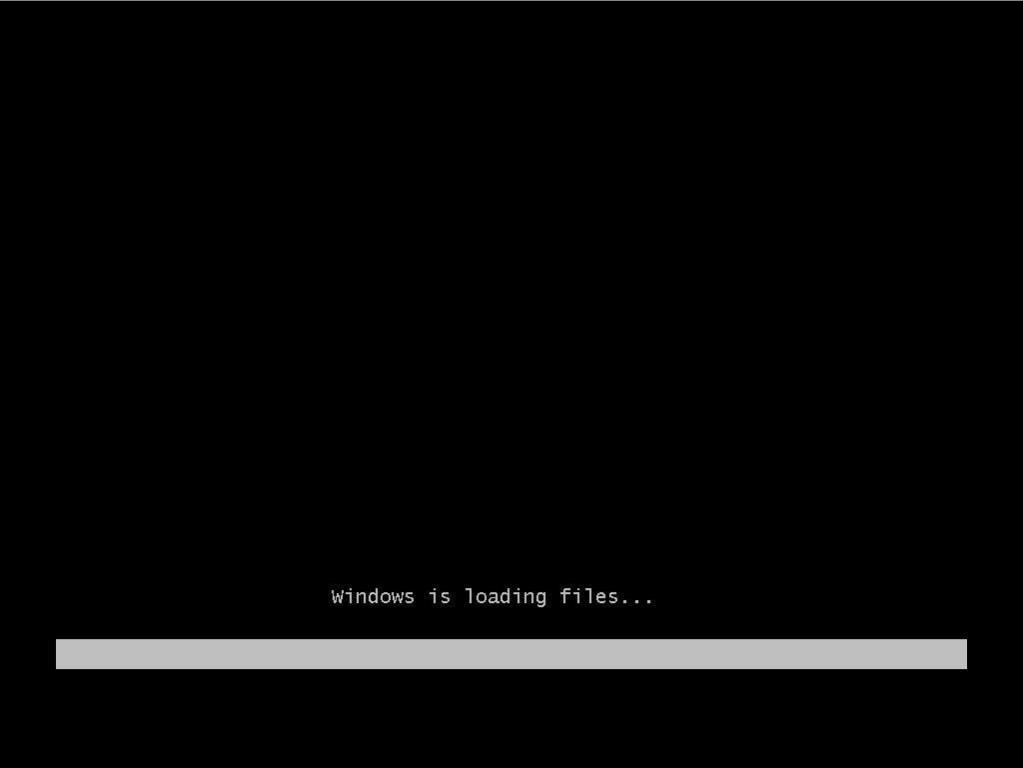
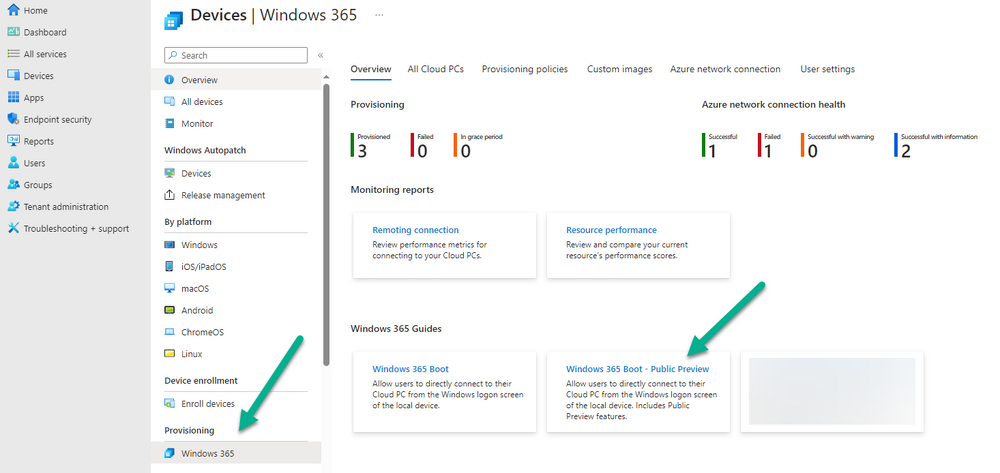
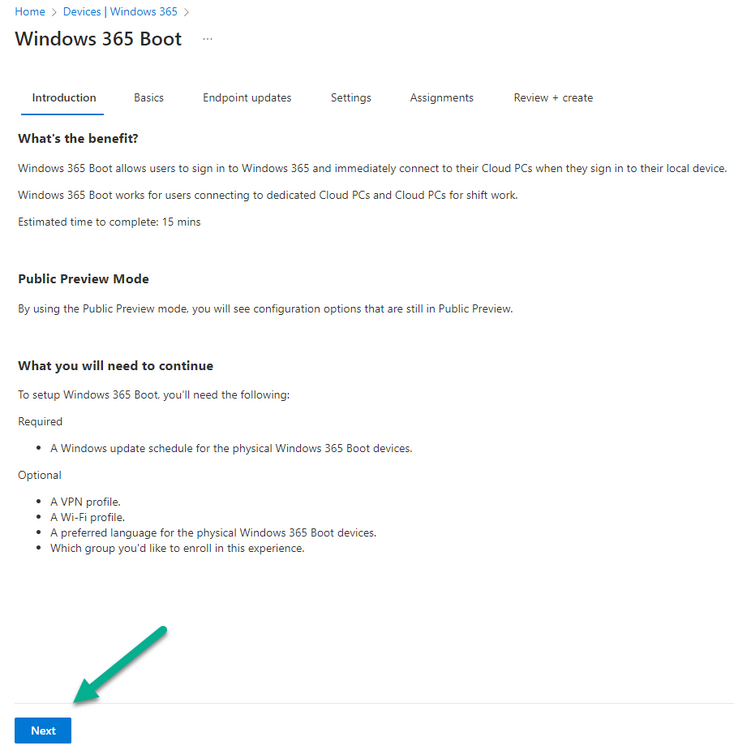
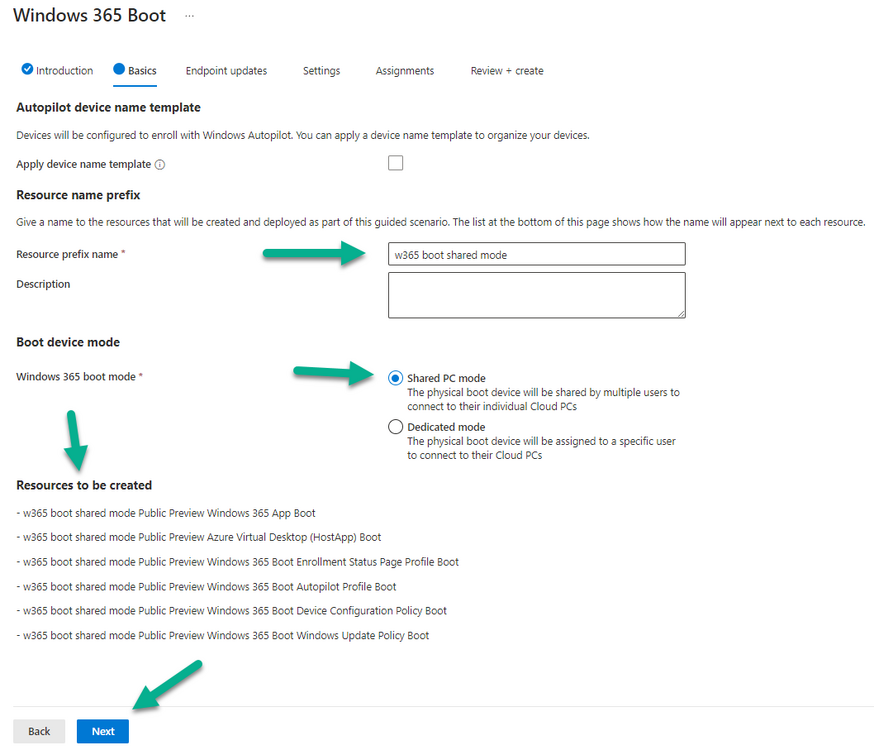
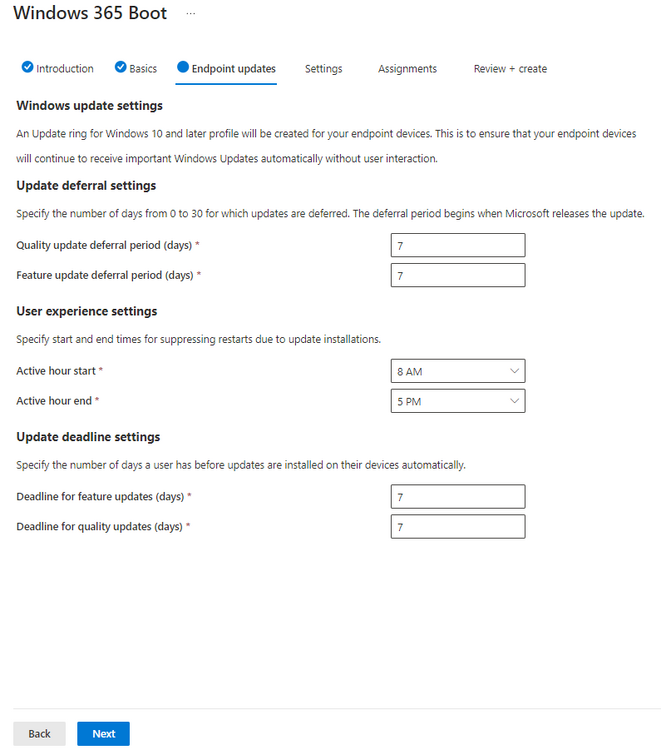
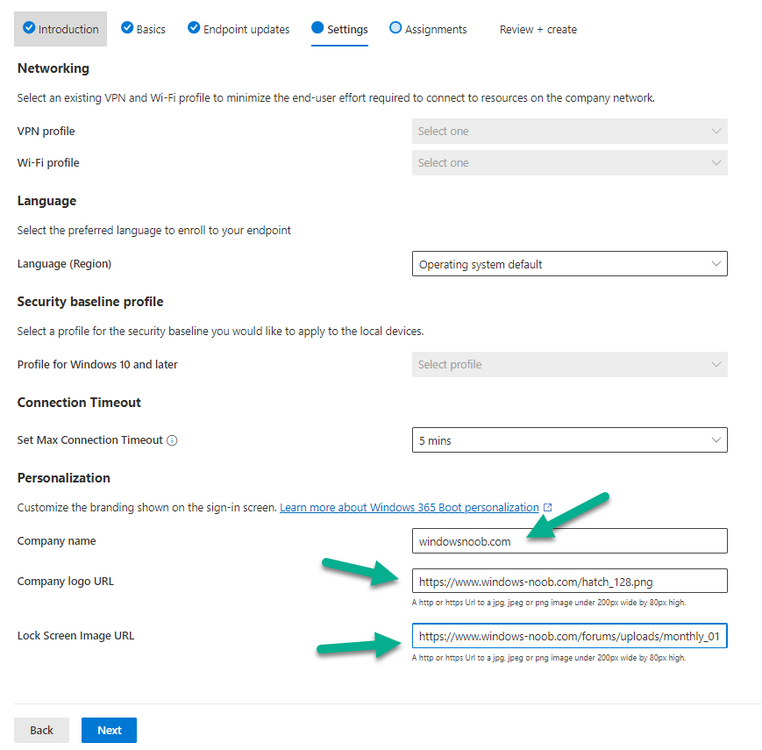
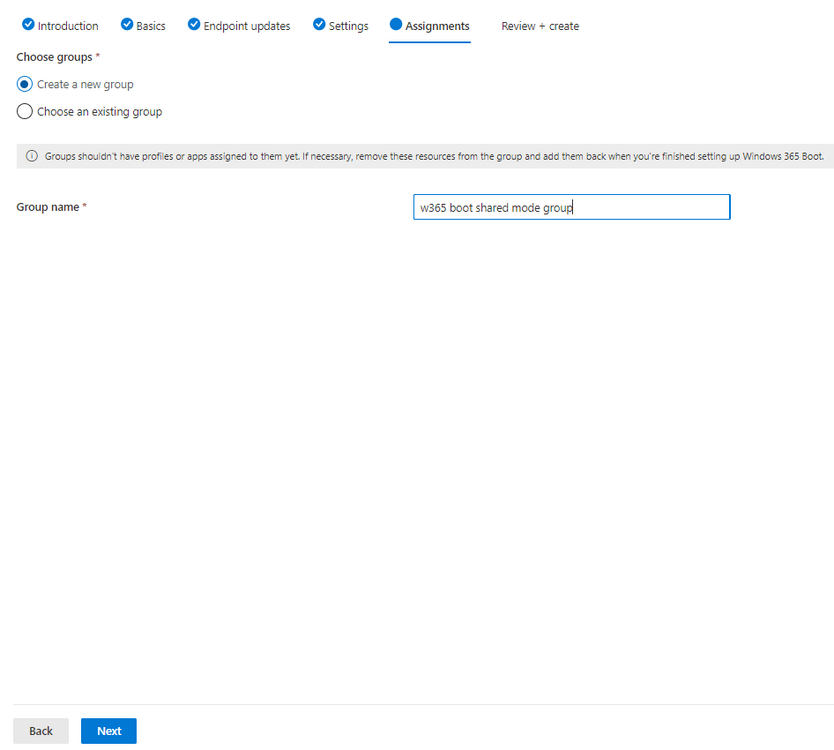
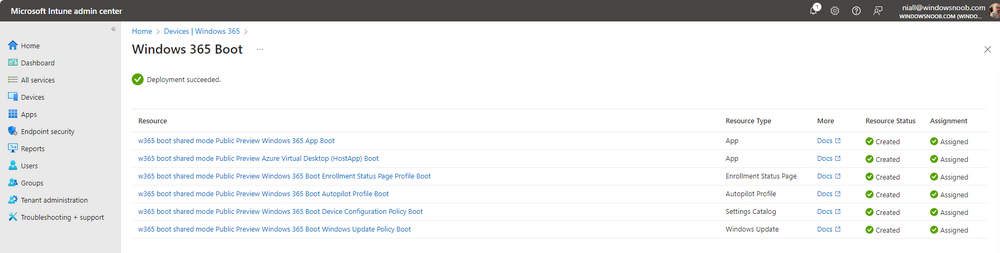
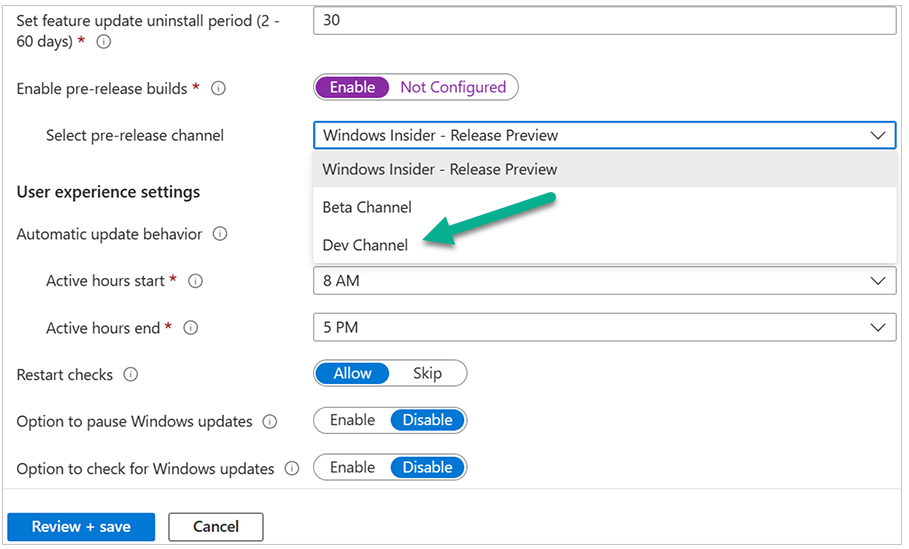
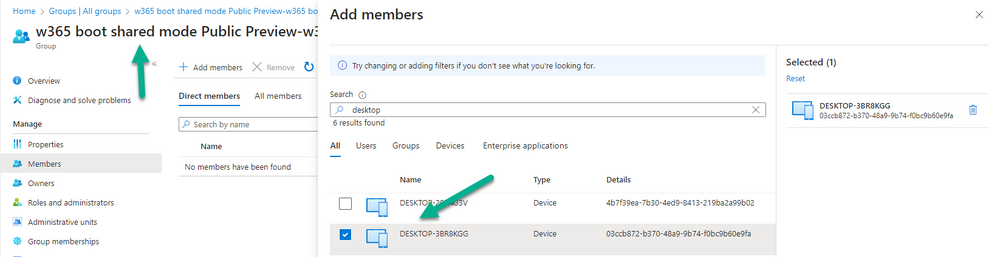
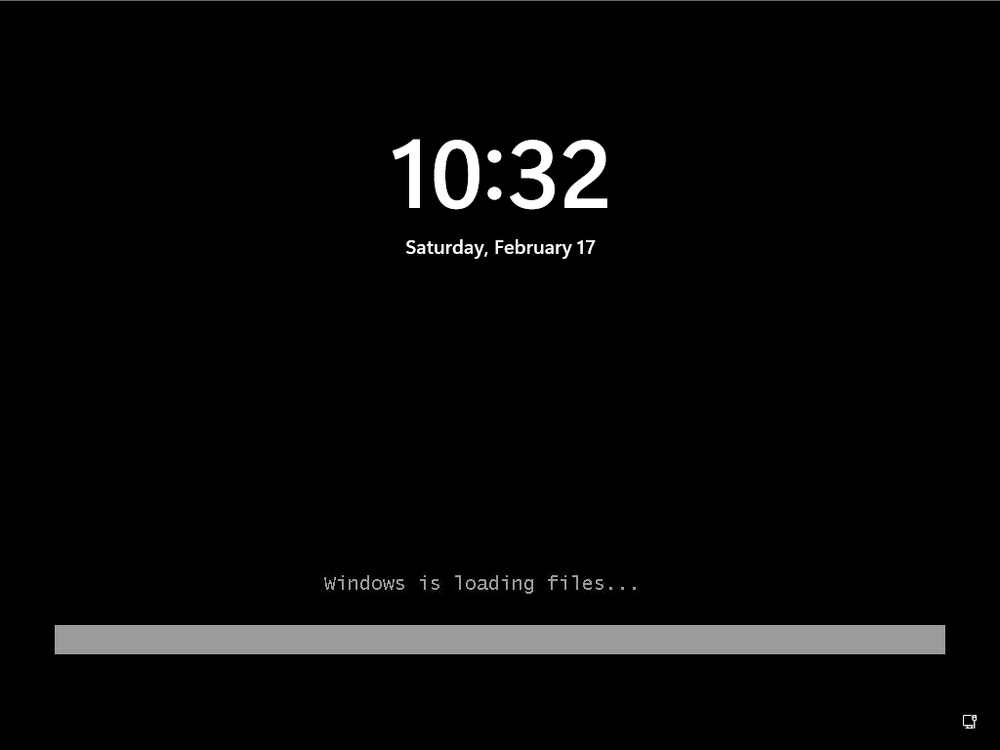
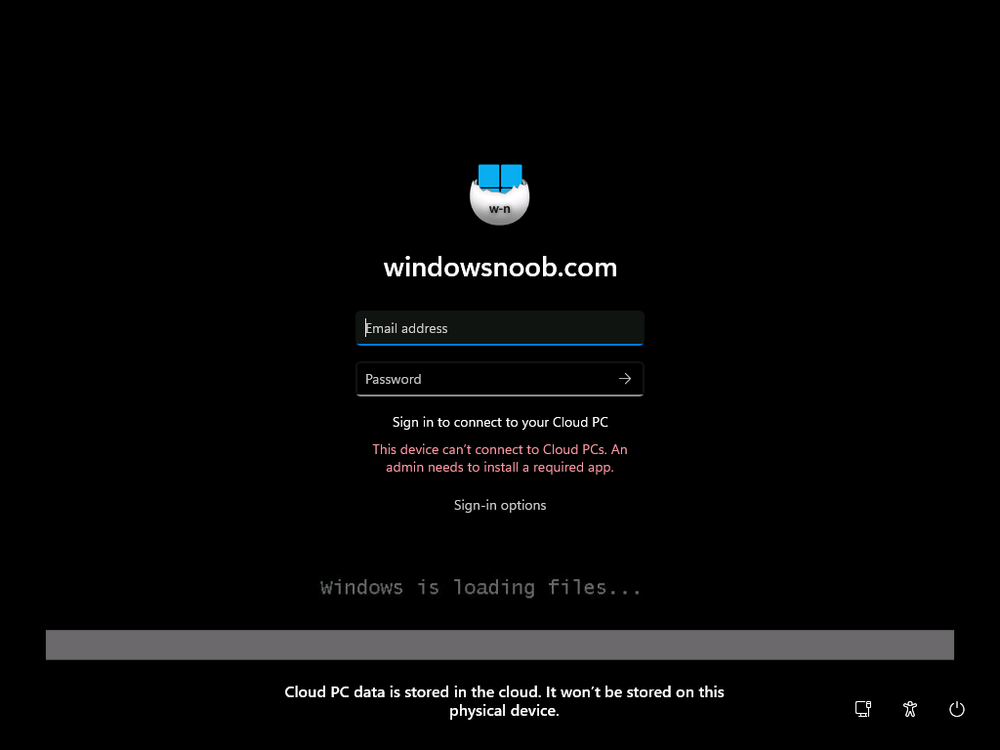
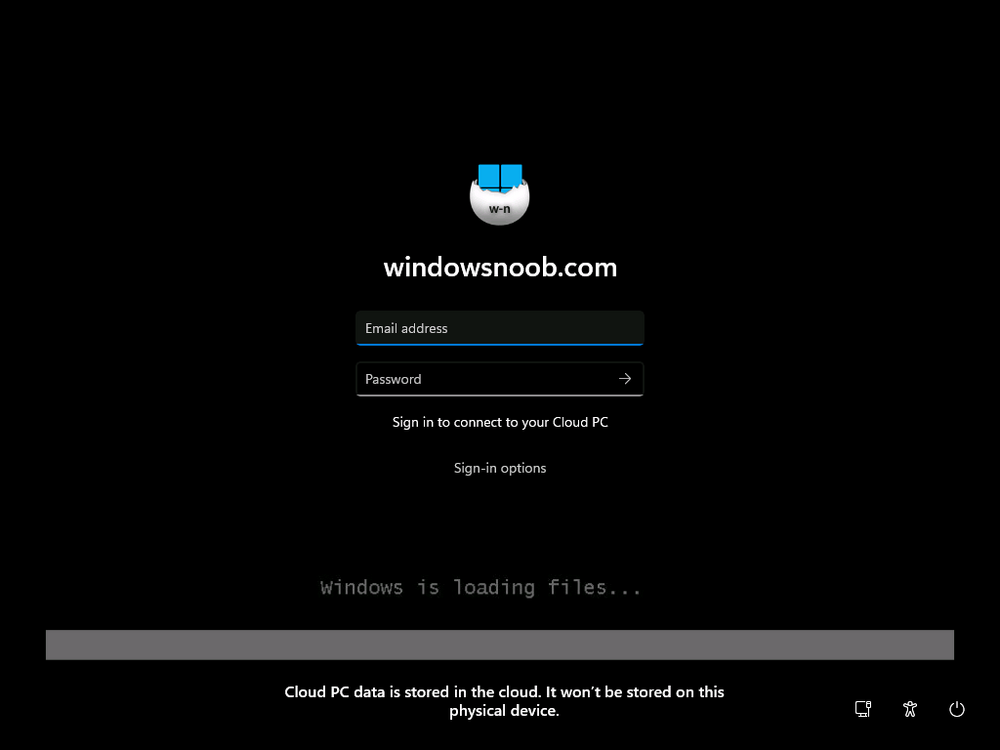
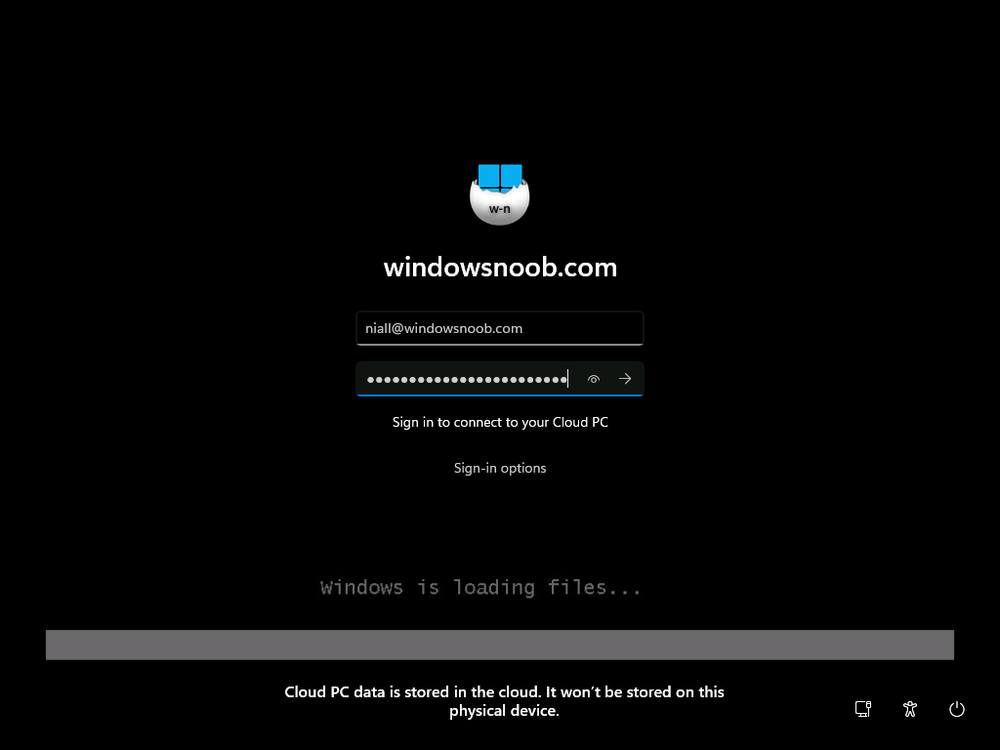
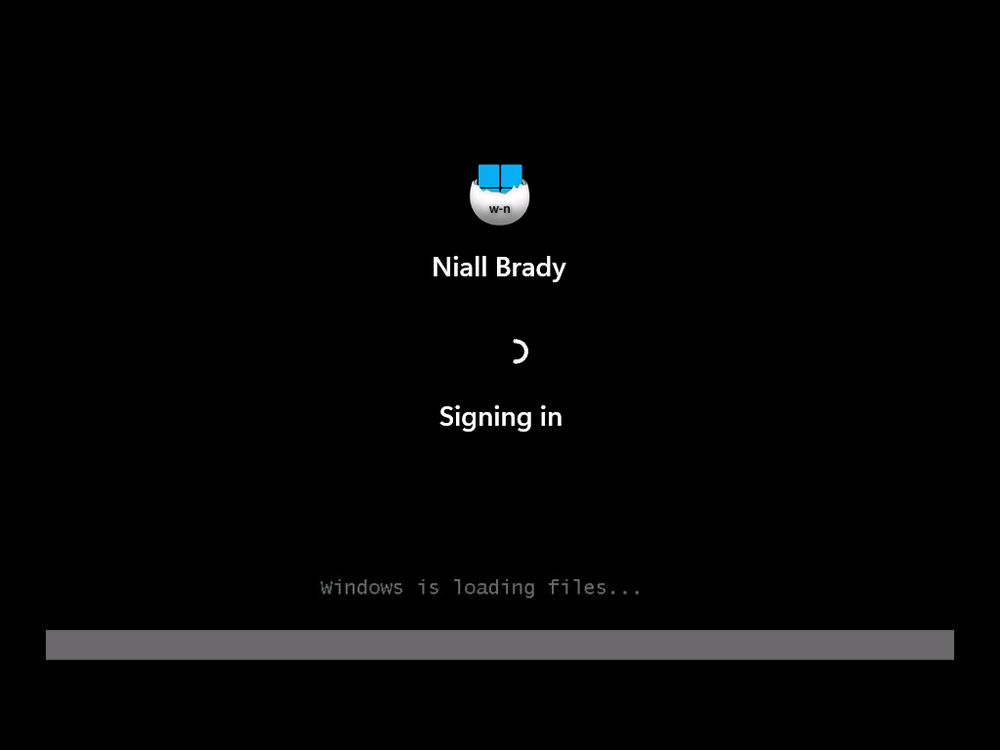
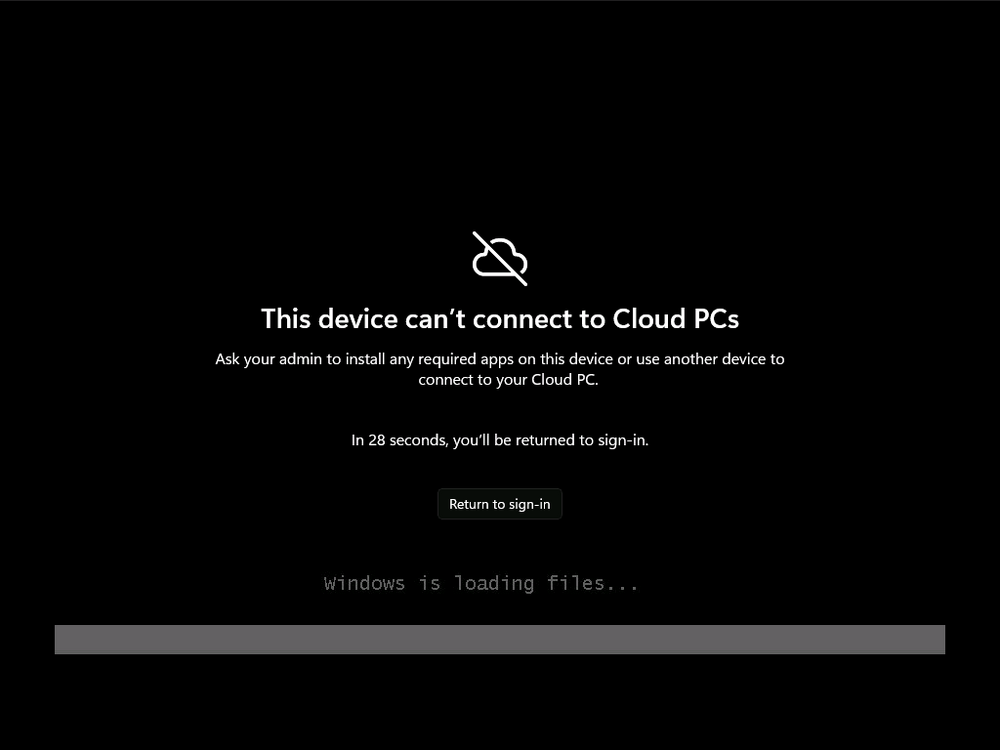
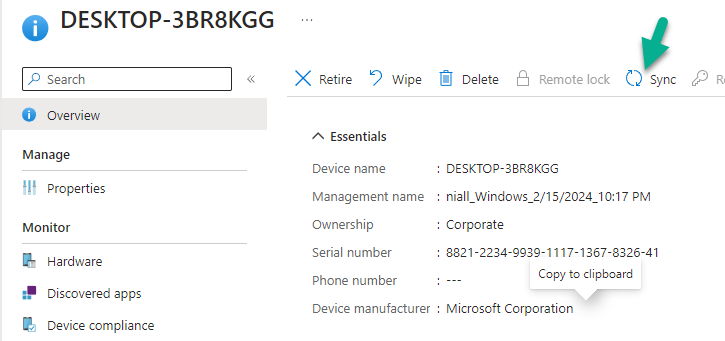
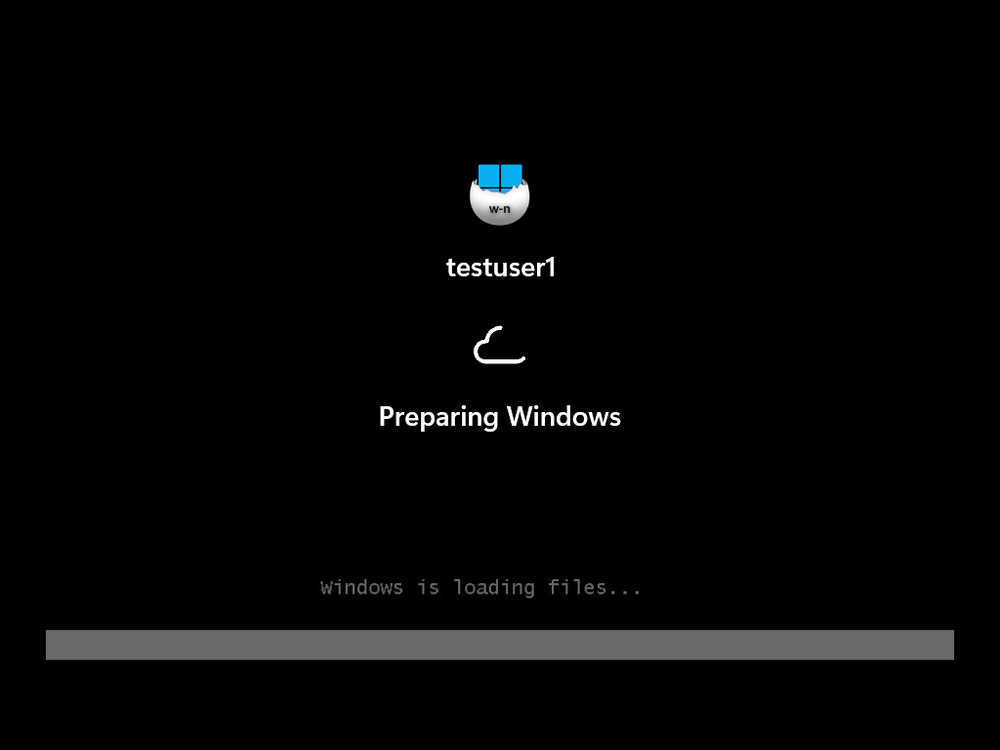
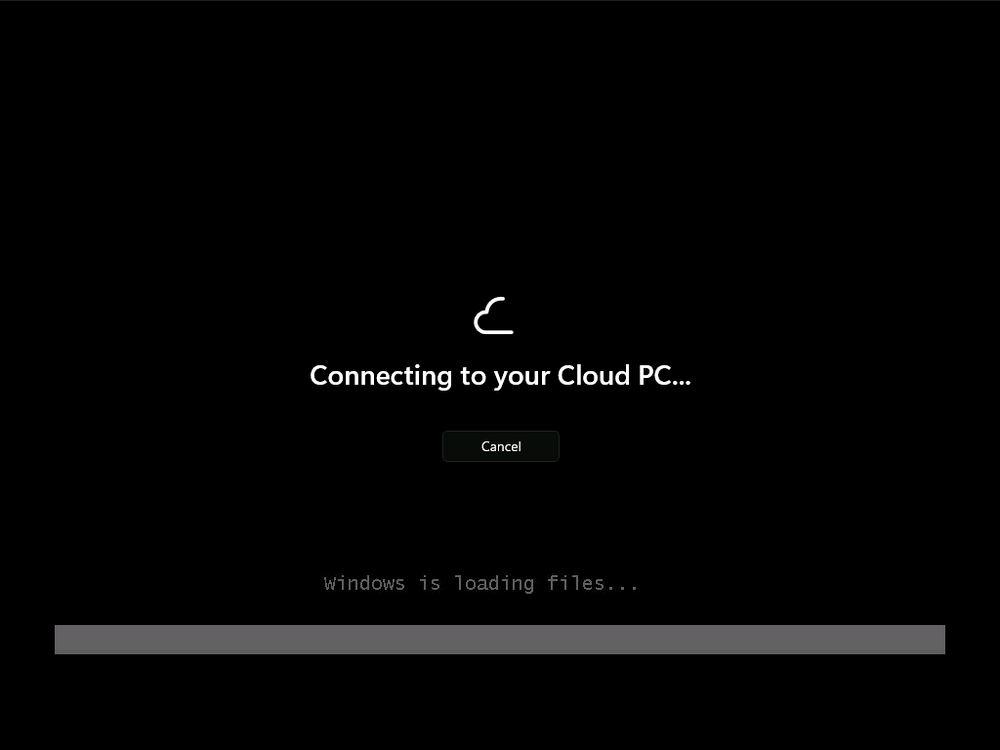
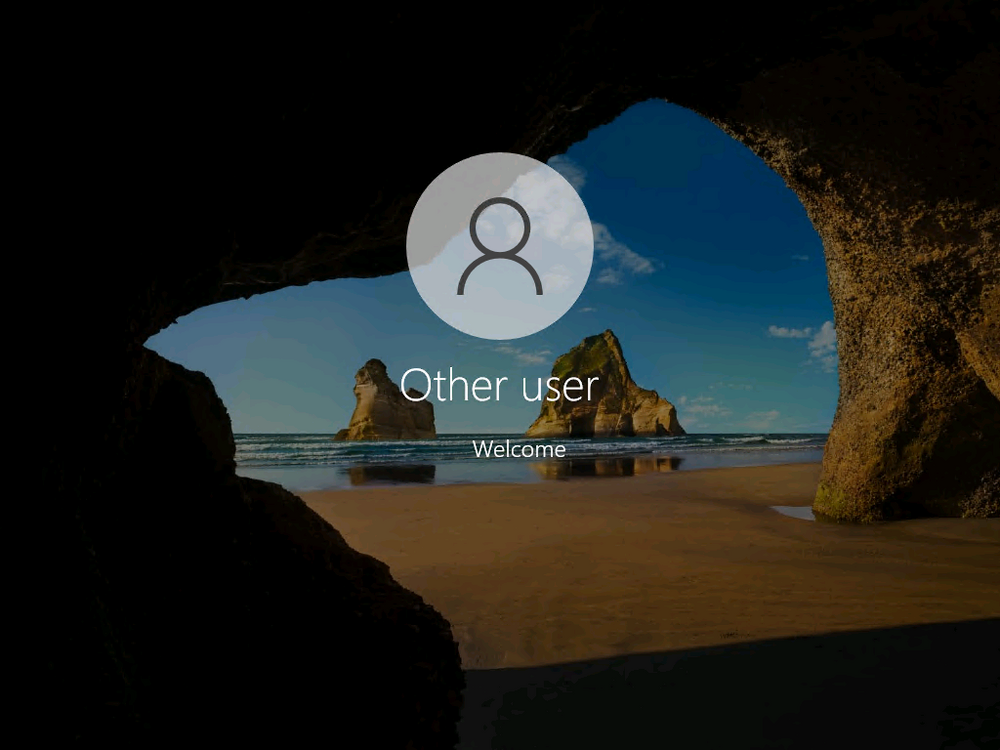
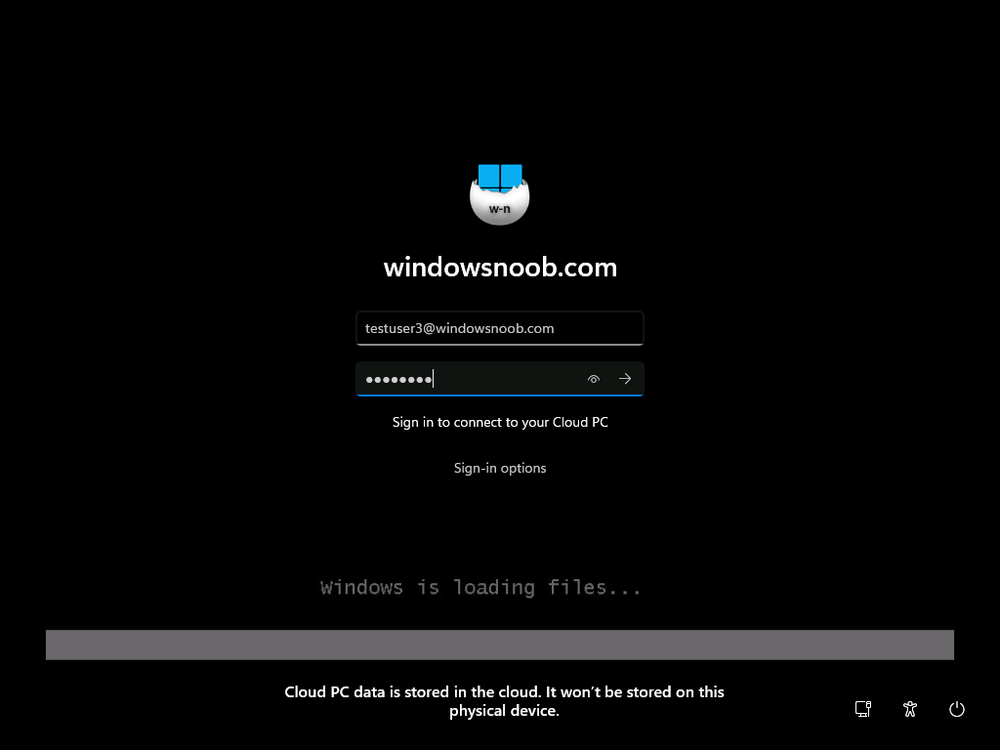
Introduction Microsoft released Windows 365 Boot (Generally Available) September 2023, and are now adding new abilities to that feature. If you are new to Windows 365 Boot please take a look at the blog post from myself and Paul on the subject here. So what's new ? 2 things stand out actually namely: Shared PC mode Dedicated mode for Windows 365 Boot Described here I took a look at these public preview features and I'll share my findings below. In this blog post, let's look at shared mode. I already looked at dedicated mode and you can review my blog post here. So what is Windows 365 Boot shared mode ? Shared PC mode means that the physical boot device will be shared by multiple users to connect to their individual Cloud PCs. So let's give it a try. Requirements Windows 11-based endpoints (Windows 11 Pro and Enterprise) Microsoft Intune Administrator rights Windows 365 Cloud PC license. See Create provisioning policies for guidance on how to create Cloud PCs Enrollment in the Windows Insider Dev Channel and running Windows 11 Insider Preview Build 23601 or higher Step 1. Configure policy Open the Intune portal and browse to the Windows 365 node. From there click on Windows 365 Boot Public Preview (or Windows 365 Boot) to launch the Windows 365 Boot - Public Preview guided scenario. That will launch a new wizard, have a read and then click Next On the Basics screen, give the Resource prefix a name and select Shared mode from the options. You can also optionally use the device name template, but I won't bother in this example. In the screenshot below I've also highlighted a list of resources that will be created when you complete the wizard. Click Next and you'll be presented with an Endpoint updates screen, select your desired options there to ensure that your Corporate devices used for Windows 365 Boot will get updates according to your desired schedule. Your Cloud PCs will have their own update settings and could for example be managed by Windows Autopatch. Click Next once done. The next screen will show settings available. Some will be greyed out and not selectable (as per my screenshot) as they require you to have previously created a VPN/Wi-Fi profile or security baseline. If you have previously created these profiles you can select them here. In addition you can select a language, select a security baseline and choose your desired connection timeout (the default is 5 minutes) which you can extend as far as 20 minutes before a timeout error message appears. Next you can see the Personalization section, and this is unique to Windows 365 Boot Shared Mode and it allows you to customize the branding shown in the sign-in screen. So let's configure those settings here. Note that the Company logo URL and Lock Screen Image URL must be under 200 pixels by 80 pixels and either a jpg, jpeg or png format. I pasted it some hastily found images from windows-noob.com as my first test. next, you can create a new group (recommended) or use an existing group. Pay close attention to the note, groups shouldn't have profiles or apps assigned to them yet. If necessary remove resources from the group and add them back when you are finished setting up Windows 365 Boot. I opted for creating a new group called w365 boot shared mode group. Finally review the summary and click Save, it was spaced out way over to the right for me, and strangely wasn't highlighted in blue like the previous screens, this is a strange decision UI wise but hopefully will be fixed when it goes Generally Available. after that if everything went well it'll create the resources and give you a summary of the actions including links to learn.microsoft.com docs sites for more info. Step 2. Prepare a computer Next you need to prepare a computer for use with Windows 365 Boot shared mode, as this is still in public preview it needs to be enrolled in the Windows Insider Dev Channel and running Windows 11 Insider Preview Build 23601 or higher. You can configure Intune update policy to target the device with this setting. Once the computer is at the desired level (Windows Insider Preview dev channel and greater than Windows 11 Insider Preview Build 23601) add it to the Windows 365 Boot shared mode group you created in step 1. then reset the device and hand the computer over to the user to enroll into Windows Autopilot. Step 3. Experience Windows 365 Boot shared mode Now everything is ready to test shared mode. You should see a new login experience. You can use Windows Hello for Business biometrics or PIN to login to your Cloud PC! Check out the login screen below, isn't it cool ! It comes complete with date and time. I selected this desktop background as I thought it would add a cool semi-retro look for a Cloud PC and remind us of the legacy on-premises ways of deploying PC's. Tip: If you want the same background you can grab it from here. Clicking on the login showed me the following, so I guess it hadn't installed the required Windows apps yet (more about that later)... but on a positive note it's showing the company name (windowsnoob.com) and both the desktop background and the logo I pointed it to during the guided scenario, so that's a win. In addition it clearly knows that this is a Cloud PC scenario as you are reminded of that with the text at the bottom of the screen. Note: In case it's not obvious, the 'Windows is loading files...' is a desktop background, it's nothing to do with Cloud PC's. The time it took me to write the text above, was enough for it to 'install the app' needed to continue, as when I clicked again I saw the following, much better. I entered my login info and clicked the arrow to start logging in After doing that I saw a cool animation here which very quickly jumped to the following screen So i guess it's not ready yet. But hey, it's public preview ! It does state that I should ask an admin to install any required apps on this device, so let's check out what IS installed on the device in Intune. Those 2 apps need to be installed successfully before everything will work, so time for a quick cup of coffee. I think a better use of real estate on the error screen would be a sync button to 'trigger' an actual Intune policy sync, to speed up the app delivery rather than having to annoy an admin to do the same thing. But that's what I ended up doing, as an Admin, I triggered a sync. while waiting for the sync I tried another user, testuser1. This moved forward ... and prompted me for MFA and that worked just fine ! After further troubleshooting, the obvious dawned on me, my normal user (niall@windowsnoob.com) Cloud PC license had expired and therefore would NEVER work for that user, I'll feed this info back to the Product Group as a possible area of improvement. To test some more I tried another Cloud PC user (testuser2) to see how that experience was. I clicked on sign out (for testuser1) and logged in as testuser2. Once again, I saw 'preparing Windows' and things looked totally fine, I was prompted for MFA and then...Connecting to your Cloud PC. That user had a Windows 10 Cloud PC assigned, so it flipped to that old UI. and sure enough, it logged on, all good ! Finally, I tried another user (testuser3) which had no Cloud PC license assigned, to see what if any error I got. but now I got a new error, shown below. I expected it to fail for this user, but it would be nice to get a more useful error message, such as 'no Cloud PC assigned to this user', error. Summary Windows 365 Boot shared mode works very nicely indeed as long as the shared users have valid Cloud PC licenses. If you have the prerequisites it works like a dream ! Quick and easy. In my testing for this blog post, I tested with 4 users, listed below: niall@windowsnoob.com - Expired Cloud PC license testuser1@windowsnoob.com - Valid Cloud PC license testuser2@windowsnoob.com - Valid Cloud PC license testuser3@windowsnoob.com - No Cloud PC license When errors occur I'd like to see more accurate info on the 'error' screen, for example it could have told me my license had expired, or that the user had no license assigned at all and saved me some time troubleshooting. Secondly I'd like to see a 'sync' button there to speed up app delivery if that is actually part of the problem, and lastly, why not extend the 30 seconds error screen to a few minutes ? When things go wrong, users want to take a photo of why they can't work so they can send it to their boss and the screen timing out and reverting to the login prompt happens a bit too quickly making a bad situation even more stressful. I don't want to focus on the negative, as this is definitely a great new feature, and one that I hope you test too ! thanks for the great work Windows 365 team, it's really developing at a fast pace !


-
did you distribute your updated boot.wim to all distribution points ?
-
this section goes into detail about the certificate in relation to the boot image -
-
please take a look at my video here -
-
you could just create a collection with these special computers and target them with different (custom) client settings with an appropriate forced restart time that works for those users, then deploy those custom client settings to the collection containing those computers and make sure the priority of these client settings is higher than the normal client settings
-
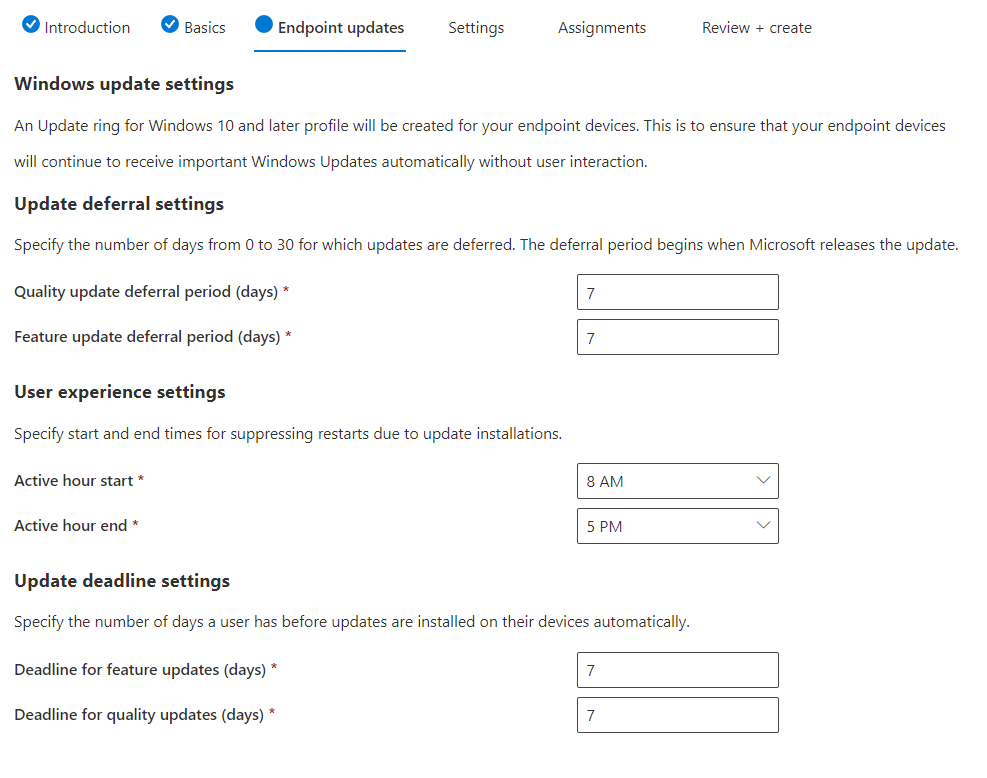
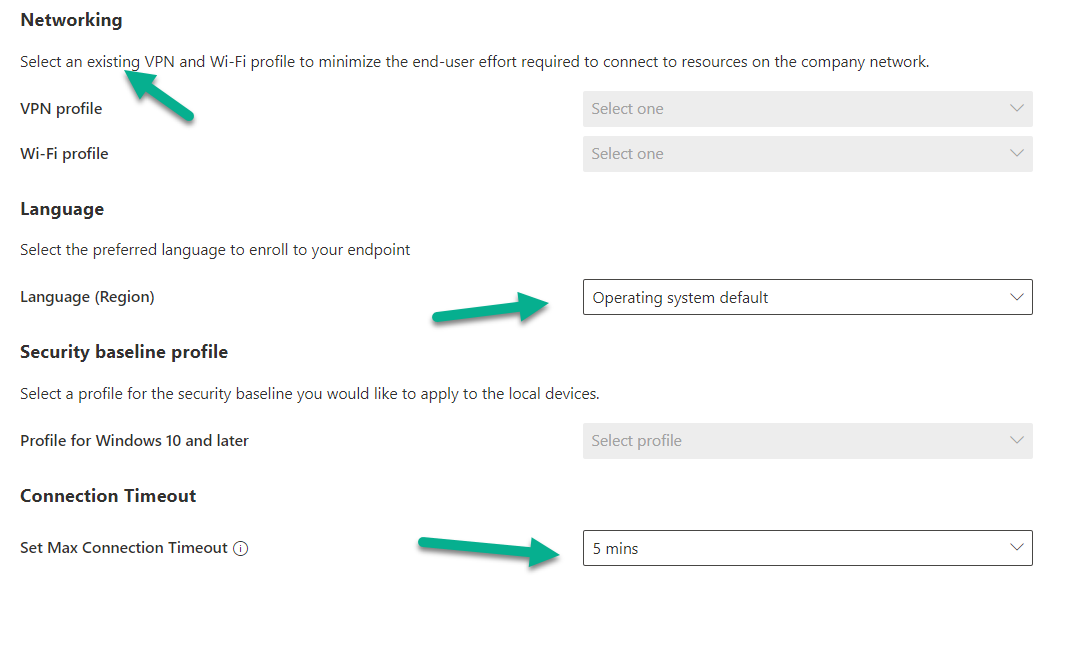
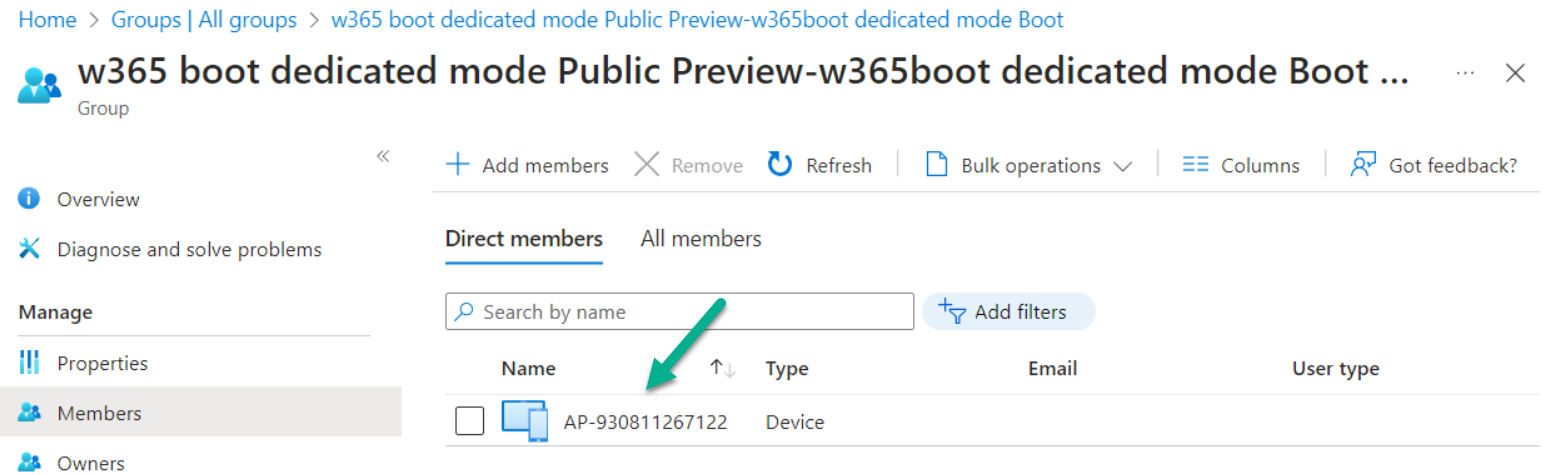
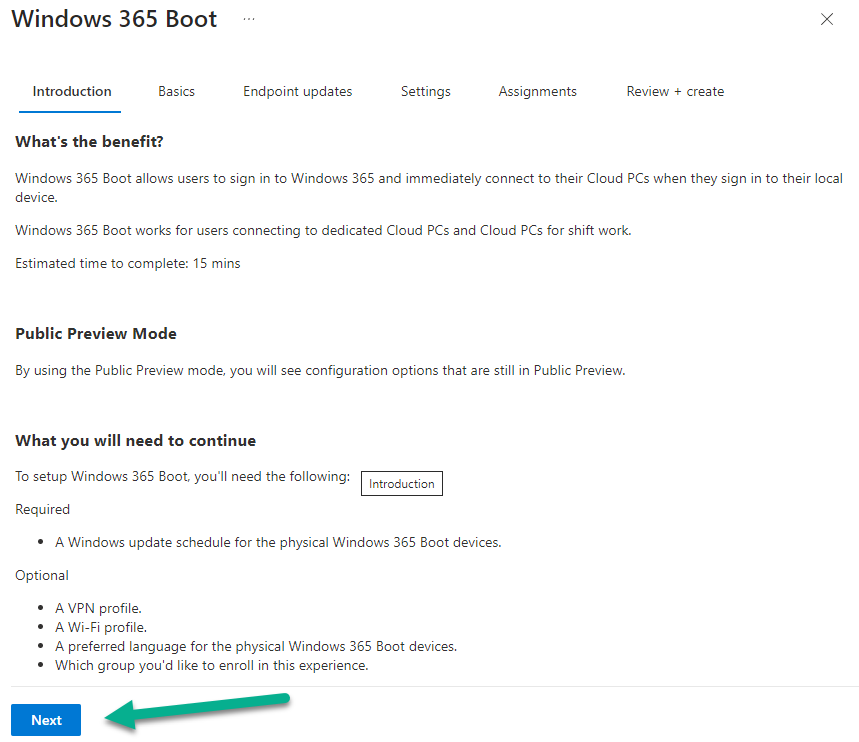
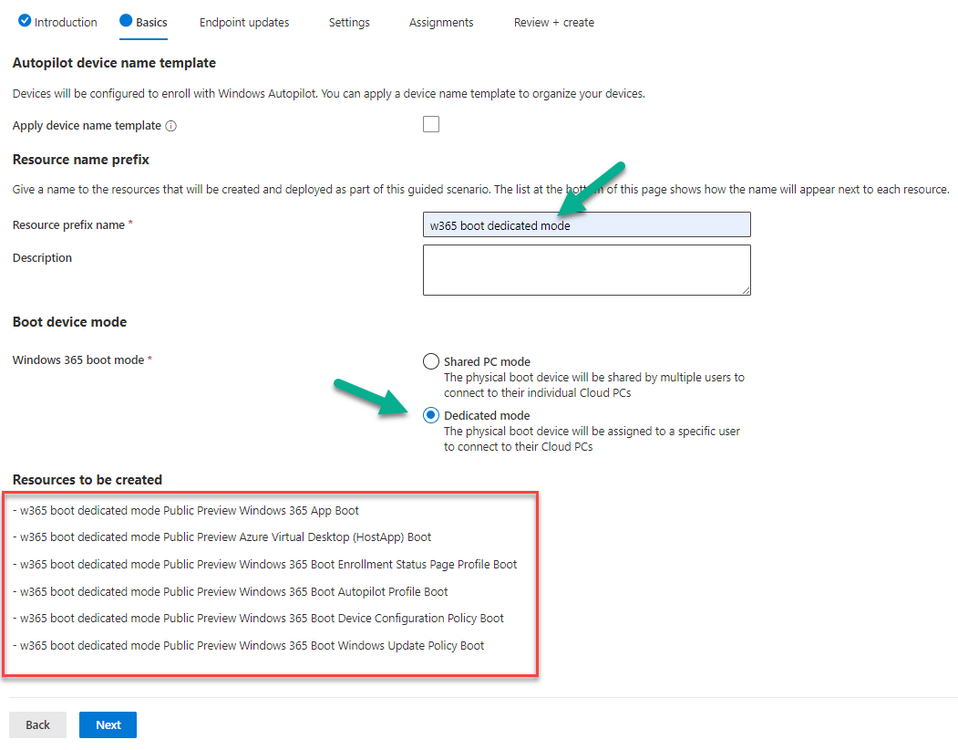
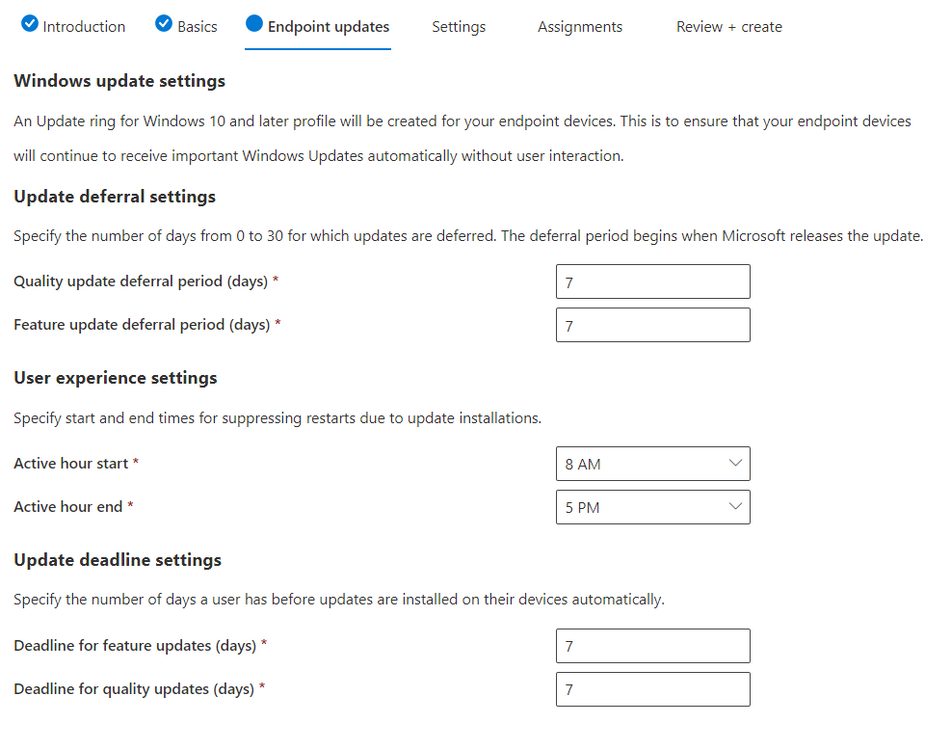
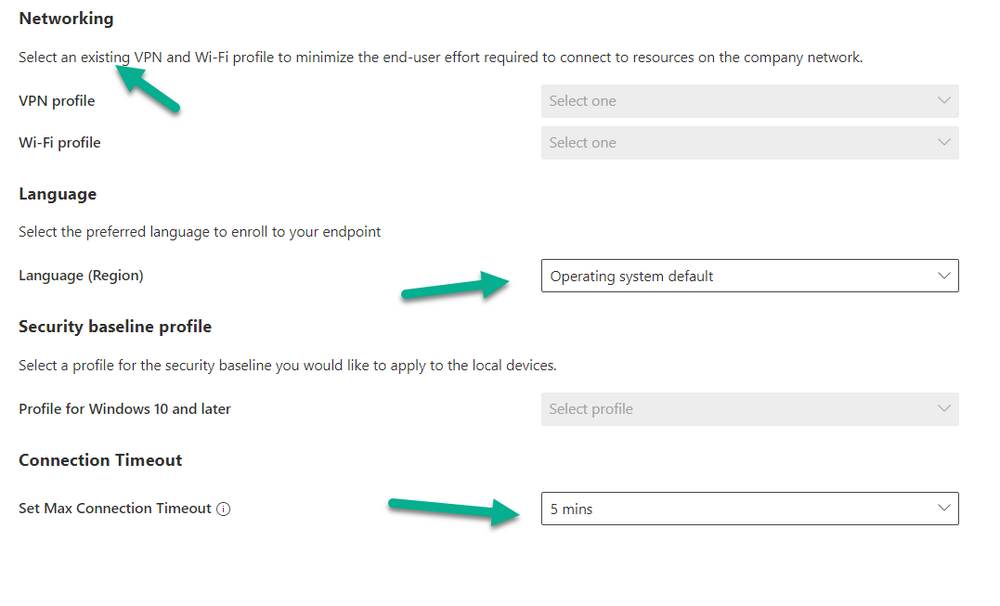
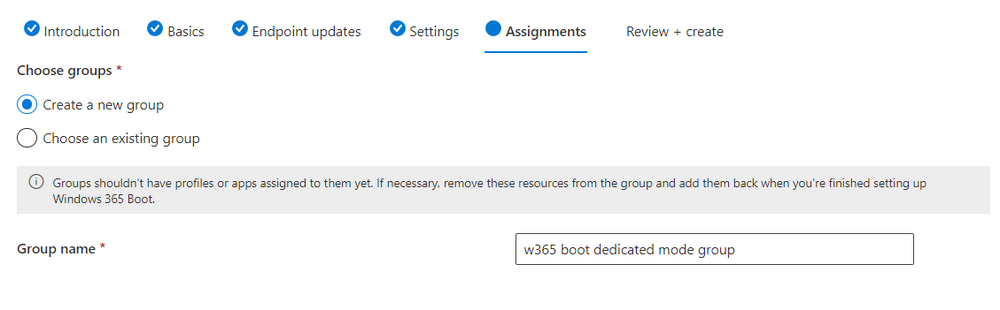
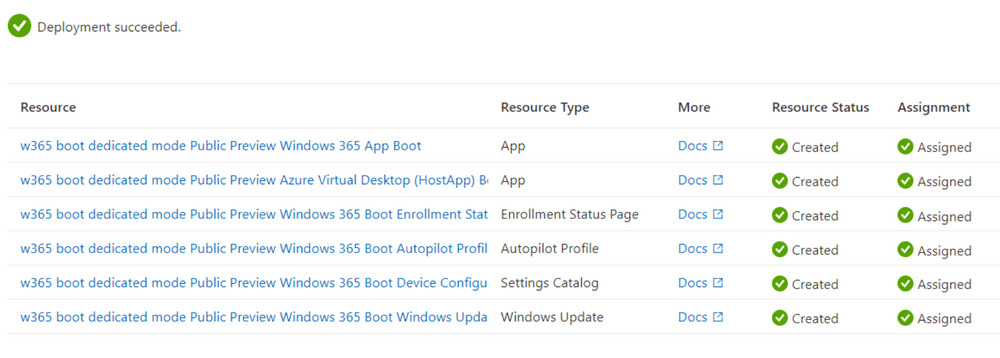
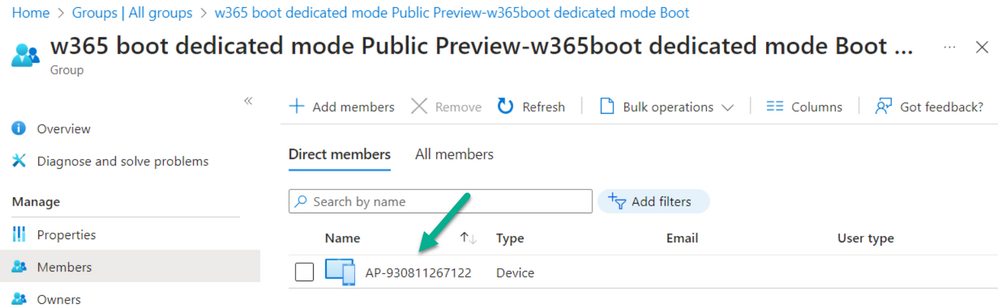
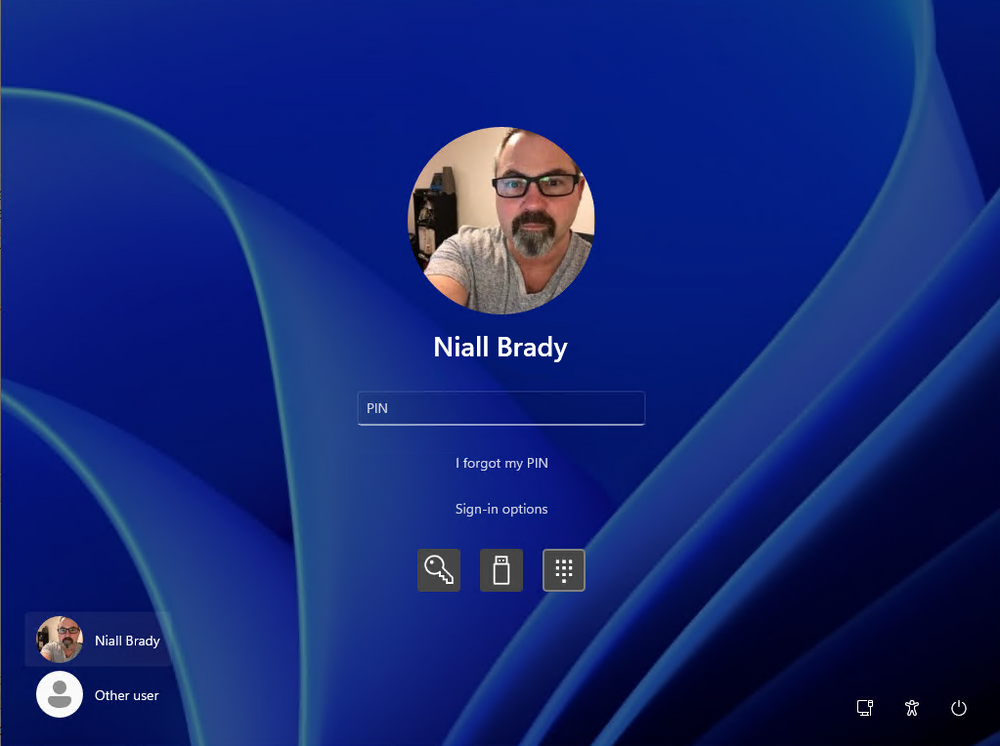
Introduction Microsoft released Windows 365 Boot (Generally Available) September 2023, and are now adding new abilities to that feature. If you are new to Windows 365 Boot please take a look at the blog post from myself and Paul on the subject here. So what's new ? 2 things stand out actually namely: Shared PC mode Dedicated mode for Windows 365 Boot Described here I took a look at these public preview features and I'll share my findings below. In this blog post, let's look at dedicated mode. But what is it ? well according to the official blog post it allows you to assign a dedicated corporate device to a users Cloud PC and to...: So let's give it a try. Step 1. Configure policy First off, open Intune and browse to the Windows 365 node. From there click on Windows 365 Boot Public Preview (or Windows 365 Boot) to launch the guided scenario. That will launch a new wizard, have a read and then click Next On the Basics screen, give the Resource prefix a name and select Dedicated mode from the options. You can also optionally use the device name template, but I won't bother in this example. In the screenshot below I've highlighted a box in red to show what resources will be created when you complete the wizard. Click Next and you'll be presented with an Endpoint updates screen, select your desired options there to ensure that your Corporate devices used for Windows 365 Boot will get updates according to your desired schedule. Your Cloud PCs will have their own update settings and could for example be managed by Windows Autopatch. Click Next once done. The next screen will show settings available. Some will be greyed out and not selectable (as per my screenshot) as they require you to have already created a VPN/Wi-Fi profile or securty baseline. If you have previously created these profiles you can select them here. In addition you can select a language, security baseline and connection timeout (default is 5 minutes) which you can extend as far as 20 minutes, although I think that the end user would be pretty miffed if they had to wait 20 minutes to connect to their Cloud PC or before an error message occurred. next, you can create a new group (recommended) or use an existing group. Pay close attention to the note, groups shouldn't have profiles or apps assigned to them yet. If necessary remove resources from the group and add them back when you are finished setting up Windows 365 Boot. Finally review the summary and click create. You'll get a nice summary screen complete with links to Docs explaining the features being created as part of the Windows 365 Boot feature. Step 2. Prepare a computer Next you need to prepare a computer for use with Windows 365 Boot dedicated mode, as this is still in public preview it needs to be enrolled in the Windows Insider Dev Channel and running Windows 11 Insider Preview Build 23601 or higher. You can configure Intune update policy to target the device with this setting. Once the computer is at the desired level (Windows Insider Preview dev channel and greater than Windows 11 Insider Preview Build 23601) you can reset the device and add it to the Windows 365 Boot dedicated mode group you created in step 1. Finally, hand the computer over to the user to enroll into Windows Autopilot. Step 3. Experience Windows 365 Boot dedicated mode Now everything is ready to test dedicated mode. Let the device get policy and once done you should see a new login experience. You can use Windows Hello for Business biometrics or PIN to login to your Cloud PC! the user logs on and... it should go pretty much straight to the Cloud PC desktop, but if there are any network issues, or anything that slows down that direct internet connection between the corporate device and the Cloud PC then you may see some logon delays as the bits and bytes navigate their way through VPN's. Below is an example of that. When network delays cause interference, they'll see the new login experience along with some new helpful text to explain what is going on As this was my first time logging on some work had to take place in the background and I saw the following followed by this, notice the timer showing how much time is left, that's the setting that you configure in the policy creation some moments later followed by your Cloud PC desktop Success ! Summary Dedicated mode is a cool new Windows 365 feature and one I'd recommend you start testing right now in public preview. This gives users the ability to use real hardware to connect quickly to their Cloud PC and informs them when things are being delayed due to traffic congestion etc. If you'd like to see how Windows 365 Boot shared mode differs, then please check out my blog post here.


-
normally with Virtual Machines you need to first remove any snapshots on that vm, power down the vm and then increase the size of the disk in question,after powering on the vm, you'll see the new expanded space on the disk in disk administration and you can expand the disk into the remaining space it would be a good idea to have a backup just in case, have you tried asking your VMWare guys about doing that operation ?
-
hi there, is this server virtual or real hardware ?
-
hi @LinPie I'm happy to hear it's working now! thanks for the update
-
Boot Media Cert Expiration
anyweb replied to SCCMNoob85's topic in System Center Configuration Manager (Current Branch)
normally you'd fix the expiring certificates first https://www.niallbrady.com/2021/12/26/cloud-attach-endpoint-managers-silver-lining-part-9-renewing-expiring-certificates/ i've done a video too however, you'll have to adapt the above for use with whatever boot media you created, and create NEW boot media with valid certificates in place. -
no, that is not necessary, leave the old boot image until you are sure you no longer need it, then clean it up
-
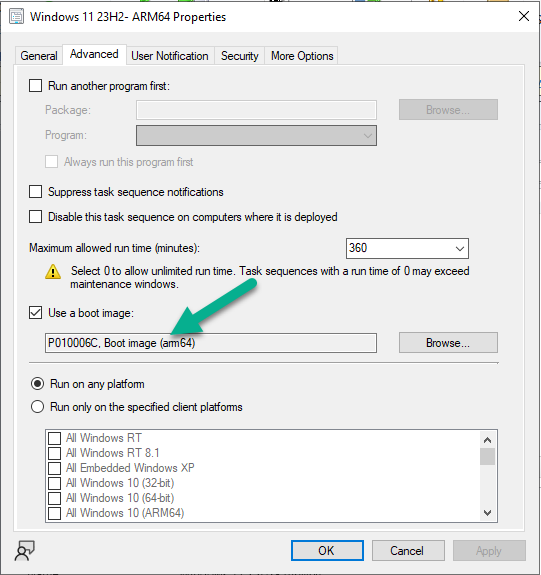
it will use LIFO method (LAST IN FIRST OUT), meaning, the last task sequence deployed to whatever collection your computer is in, that is the boot image it will pull down, if you select a different task sequence deployed to the same computer or collection, and that task sequence has a different boot image attached to it, then it will stage that new boot image once you select the task sequence
-
if you cannot find the boot image you manually created, make sure to first 'import' it by right clicking boot images, and choosing Add boot image

-
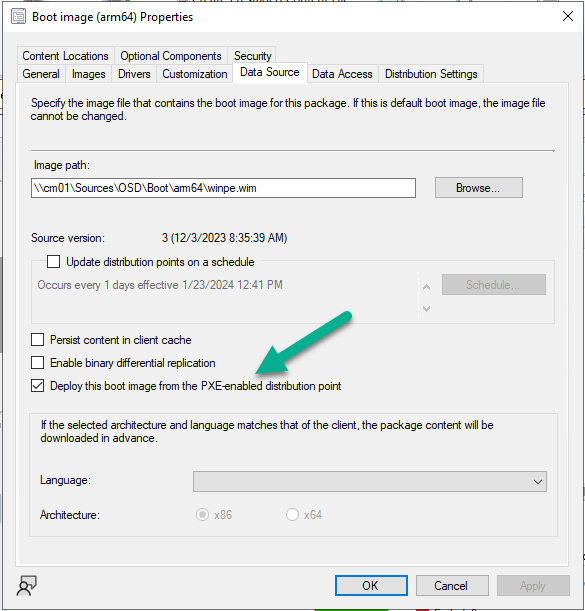
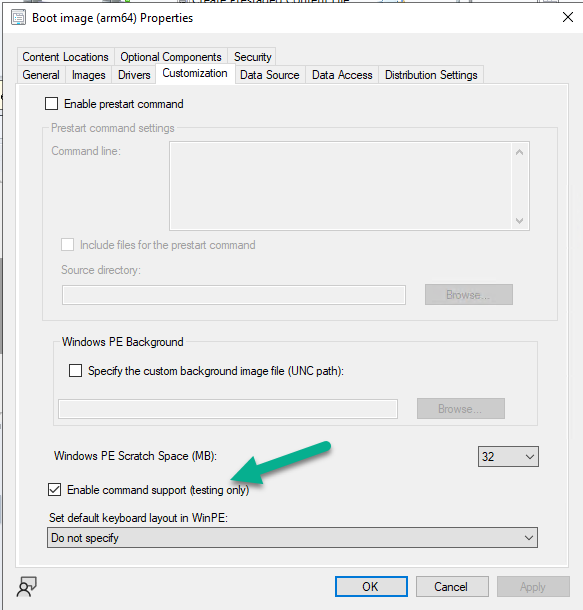
to change the boot image to a newly created one, first make sure that PXE boot is enabled on the boot image itself (if you are using Windows Deployment Services to serve boot images) and 'command support' (f8) and that it's distributed to your distribution points, after that, edit your task sequence and change the boot image assigned to that task sequence to use the 'new' boot image
-
what does the smsts.log file reveal ? the fact that it's not domain joined when it's failing points to lack of network connectivity, you can review the netsetup.log in C:\Windows\Debug to find out why it's failing to join the domain, start with those 2 issues first to figure out how to solve it
-
hi Lin did you run the script i posted to patch your boot.wim exactly as I explained ? if so then storage will not be a problem when pxe booting using that boot image, so i think you've missed something, please verify the steps i posted above again
-
yes of course it's easier, but if your company uses Windows 10 currently and wants minimal impact to a working ConfigMgr infrastructure, then what ?,. that is the purpose of this blog post. Surface Go 4 currently supports both windows 10 22h2 and windows 11 from Microsoft so the challenge here was to get it all to work with minimal impact to 'production'. I did test with Windows 11 ADK and that has it's own issues including the inability to use bitlocker during imaging. See the known issues here https://learn.microsoft.com/en-us/mem/configmgr/core/plan-design/configs/support-for-windows-adk
-
you could have a detection script for the KB like so, change the kb number to whatever kb you are looking for # niall brady 2023/10/04 # check if the KB is actually installed # $result = systeminfo.exe | findstr KB5030310 if ($result){ write-output "Found KB5030310" exit 0} else { write-output "Could not find KB5030310" exit 1}
-
check the security event viewer logs on the server hosting the share to see how your computer is connecting
-
The deployment system cannot be started using PXE
anyweb replied to zhangyongcheng's topic in Configuration Manager 2012
i just checked my own x64 boot image and it's 1.8GB so the size is ok, mine downloads very fast in my lab environment, it could be your switches in the network that are slowing it down -
The deployment system cannot be started using PXE
anyweb replied to zhangyongcheng's topic in Configuration Manager 2012
hi, without more info about this it's hard to tell, has it always been 18 minutes ? is the distribution point hosting the boot image far away from the device you are pxe booting ? or is this only happening on specific models ? more info is needed please -
The deployment system cannot be started using PXE
anyweb replied to zhangyongcheng's topic in Configuration Manager 2012
no my point was, in order to see WHEN pxe boot started you need to get the timestamp from the smspxe.log then, compare that with the smsts.log and you can work out exactly how long that device took to boot to the PXE password prompt (if enabled)