anyweb
-
Posts
9276 -
Joined
-
Last visited
-
Days Won
371
Everything posted by anyweb
-
 in the blog post you'll see it's deployed to 'autopilot users' that can be whatever users you want, it's up to you who get's this behaviour (or not)
 -
thanks for posting your solution so that others may learn from it
-
from you log i saw this line and a quick search brought me here https://learn.microsoft.com/en-us/troubleshoot/mem/configmgr/os-deployment/pxe-boot-not-work can you try the advice there and report back ?
-
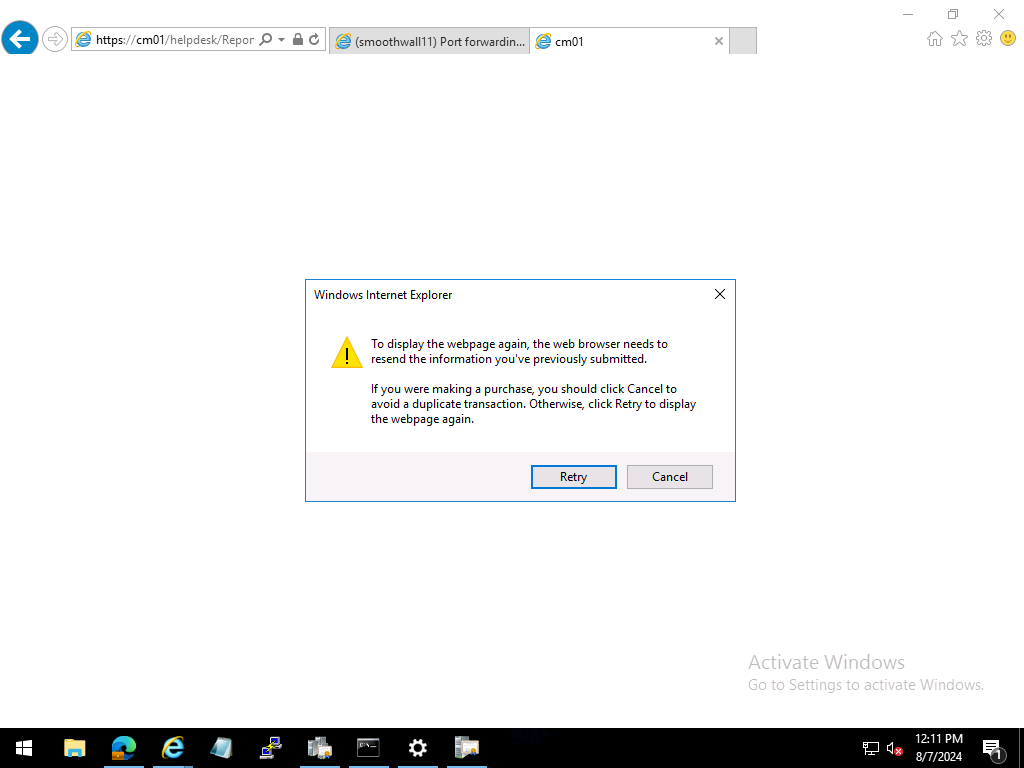
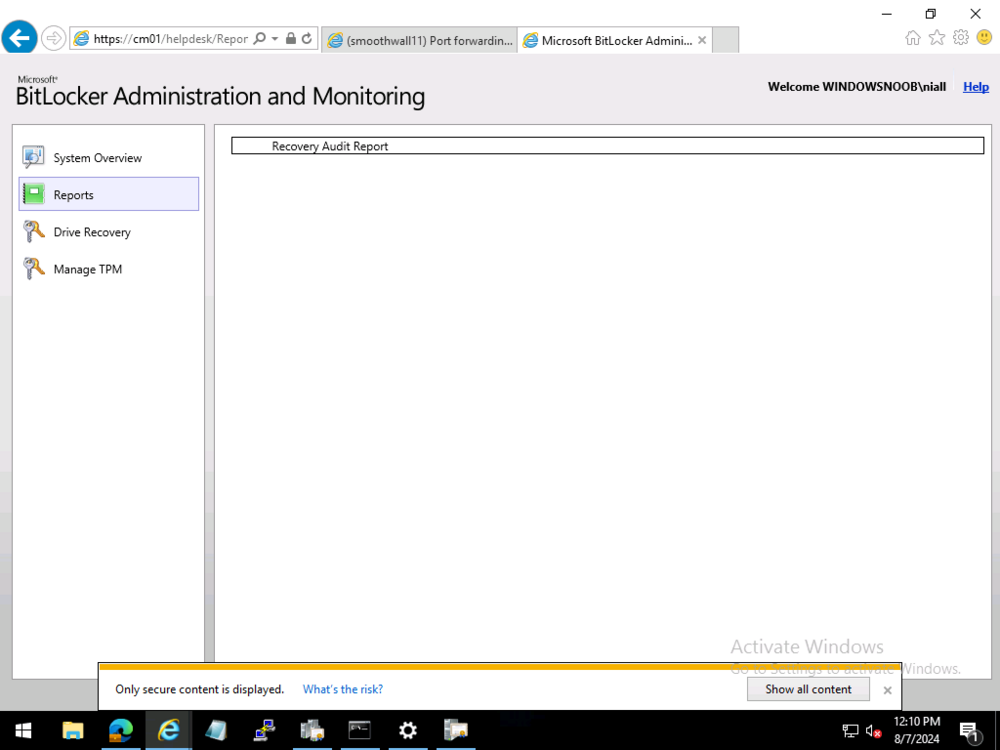
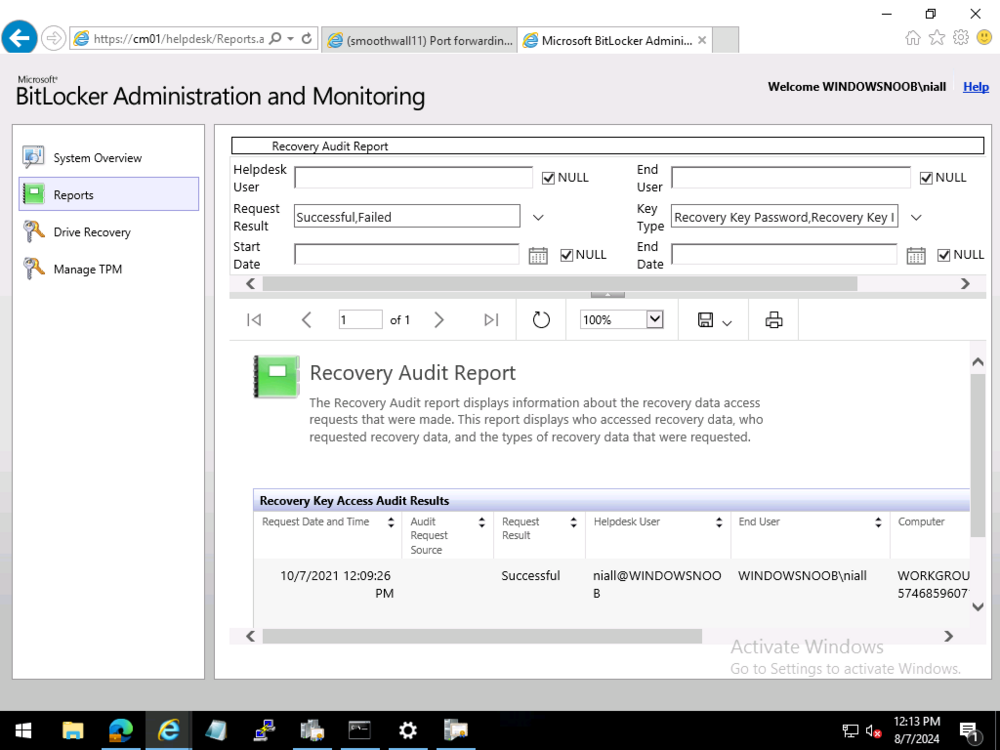
ok sorry for the delay in getting to the bottom of this, but after our Teams meeting I have a better understanding of your problem... first of all, in SCCM 2403 in my lab, i also do not see the Recovery Audit Report, and that is intentional as that report was moved out of SCCM in version 2002 see here > https://learn.microsoft.com/en-us/mem/configmgr/protect/deploy-use/bitlocker/view-reports#bkmk-audit and > https://www.reddit.com/r/SCCM/comments/pot0qu/bitlocker_management_recovery_audit_report_missing/?rdt=38888 so now that we know it shouldn't show up in SCCM versions greater than 2002, where do you find that report now ? the answer is below so go to your BitLocker Administration and Monitoring Website and click the Recovery Audit link, if that does nothing at all, then maybe we've found an issue. In my Technical Preview lab (2405) it does nothing. In my Current Branch 2403 lab, it does nothing in Edge, Chrome, Firefox, it looks like it trys but nada. So I tried IE. yeah I still have that installed on this server, and it prompted me with this > notice the 'only secure content is displayed' message ? after clicking Show all content I get this at this point, clicking Cancel, shows the actual report ! so i think this could be a bug, or at least an annoyance or a web browser setting that we need to 'change' to read the reports, i'll ping the Microsoft Product group and see what they say about it, if they reply i'll post back here cheers niall


-
see Johan's reply here
-
ping me a pm, we can do it via Microsoft Teams later this evening, not sure what timezone you are in, but i'm in Sweden/Europe
-
what version of SCCM are we talking about here ?
-
would you like me to do a short remote session with you so I can take a look ?
-
so what DO you see in Reports in SCCM under BitLocker Management ? or is that completely missing ? are you using MBAM or ConfigMgr to manage BitLocker policy ?
-
take a look at part 7 here, does it help ? https://www.niallbrady.com/2019/11/13/want-to-learn-about-the-new-bitlocker-management-in-microsoft-endpoint-manager-configuration-manager/
-
@Chazh if you post your smsts*.logs we can take a look at the cause
-
did you look at part 2 of this blog series ? it's all there
-
share the logs with me and i'll take a look are you sure you deployed this to the right group ?
-
Server 2022 Network not Reconnecting after Restart
anyweb replied to ETx13's topic in Windows Server General
great to hear it's working now ? -
SCCM CB and Bitlocker
anyweb replied to wanderer's topic in System Center Configuration Manager (Current Branch)
see here, i explain how this happens (after 10:28...) and how to resolve it (after 13:00) -
Server 2022 Network not Reconnecting after Restart
anyweb replied to ETx13's topic in Windows Server General
i'm guessing it's your NIC (network) drivers, what are they shown as in device manager ? have you tried installing the latest drivers+bios version from dell ? -
SCCM 2403 and MDT and UDI Issue
anyweb replied to keywan's topic in System Center Configuration Manager (Current Branch)
thanks for the update @keywan -
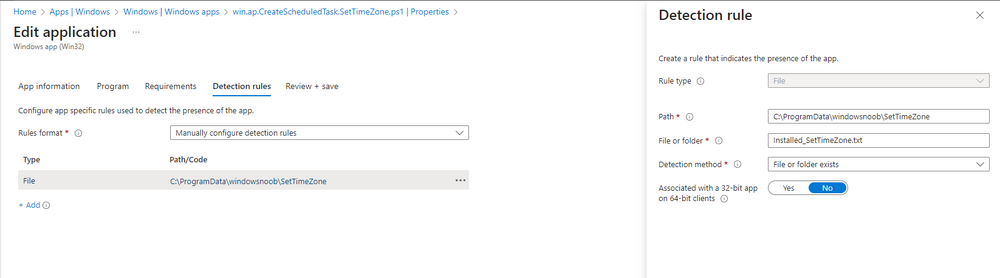
i tested it on an already enrolled device (not preprovisioned) and the log file is below, if you want it to detect your devices as preprovisioned then it'll need the whiteglove reg keys created from this solution I've uploaded yet another copy with slight changes above. the files below are what's left after a successful installation and run. win.ap.CreateScheduledTask.SetTimeZone.log Installed_SetTimeZone.txt win.ap.SetTimeZone-GUI.log
-
here you go, unzip, you'll need to modify the detection method to look at this location as that's another change SetTimeZone scripts - ppfix.zip
-
for preprovisioning scenarios we have removed the 72 hour check I've an updated version of this script that I can make available if needed
-
if i get time this weekend i'll see if i can amend it for that...
-
here's the original code <# Modify Registered user name/org name as shown in Winver adds a reg key, run as logged on user... niall brady 2020/08/06 #> # Add User name and Org name in the "this product is licensed under the Microsoft Software License Terms to: shown in WinVer $UserName = $env:UserName $OrgName = "windows-noob.com" $path = 'HKLM:\HKEY_LOCAL_MACHINE\SOFTWARE\Microsoft\Windows NT\CurrentVersion' $key = try { Get-Item -Path $path -ErrorAction STOP } catch { #New-Item -Path $path -Force } New-ItemProperty -Path $key.PSPath -Name RegisteredOwner -Value $UserName -Force New-ItemProperty -Path $key.PSPath -Name RegisteredOrganization -Value $OrgName -Force change it like so... <# Modify Registered user name/org name as shown in Winver adds a reg key, run as logged on user... niall brady 2020/08/06 #> # Add User name and Org name in the "this product is licensed under the Microsoft Software License Terms to: shown in WinVer $UserName = $env:UserName $OrgName = "windows-noob.com" $path = 'HKLM:\HKEY_LOCAL_MACHINE\SOFTWARE\Microsoft\Windows NT\CurrentVersion' $key = try { Get-Item -Path $path -ErrorAction STOP } catch { #New-Item -Path $path -Force } # when running in SYSTEM context, $UserName will be returned as the Computer # so Change RegisteredOwner to something else, such as your company name $RegisteredOwner = "windows-noob.com" New-ItemProperty -Path $key.PSPath -Name RegisteredOwner -Value $RegisteredOwner -Force New-ItemProperty -Path $key.PSPath -Name RegisteredOrganization -Value $OrgName -Force
-
That is normal when you deploy it in SYSTEM context, if you want to get something else change the variable for RegisteredOwner in the script to something else.
-
which version of ConfigMgr is this ? and please take a look at my troubleshooting blogs to give you some ideas
-
SCCM 2403 and MDT and UDI Issue
anyweb replied to keywan's topic in System Center Configuration Manager (Current Branch)
what is the solution you've found @mirshad.kp ? share it with others so that they may learn