anyweb
-
Posts
9277 -
Joined
-
Last visited
-
Days Won
371
Everything posted by anyweb
-

Capture image for Windows 7 64 bits computer
anyweb replied to lcusson's topic in Configuration Manager 2007
the recommended best practise way is to Build and Capture Windows 7 as described here Using SCCM 2007 Sp2 to deploy Windows 7 Deploy 7 (4 parts) -
Multiple OSD task sequences and boot images
anyweb replied to hyperspd7's question in Troubleshooting, Tools, Hints and Tips
if you are build and capturing windows 7 X64 then you'll need a x64 boot image, if you are not capturing, ie: just deploying images then you can use one x86 boot image to deploy both x64 and x86 wim images -
are you having this problem in Configuration Manager 2012 or CM07 ?
-
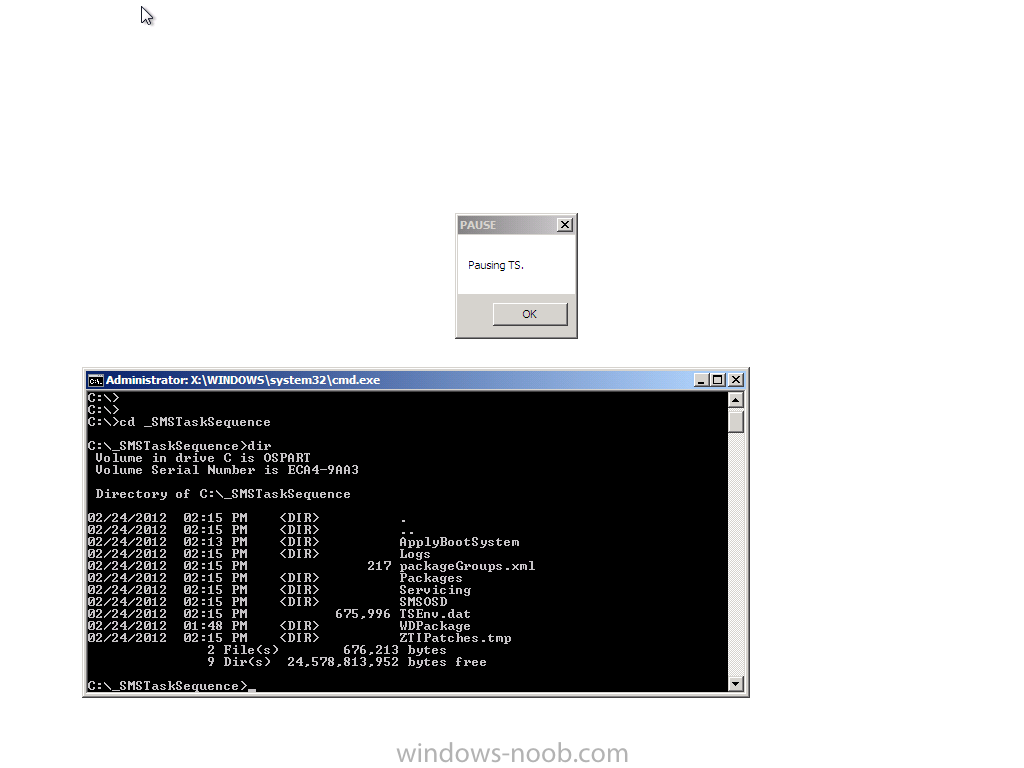
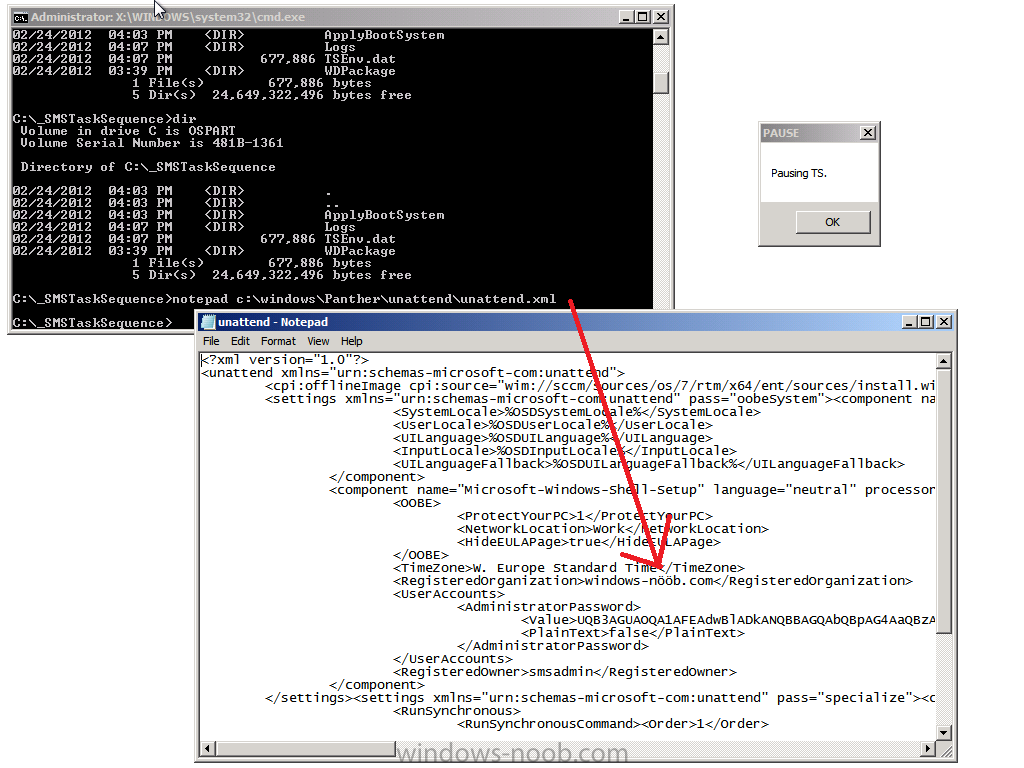
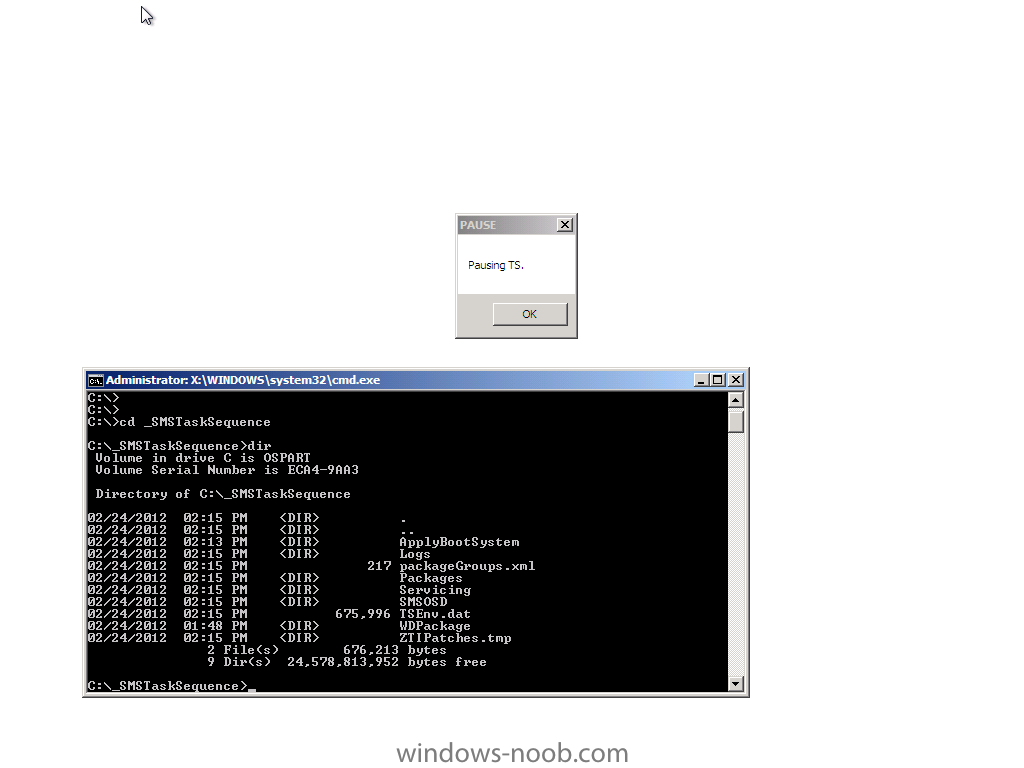
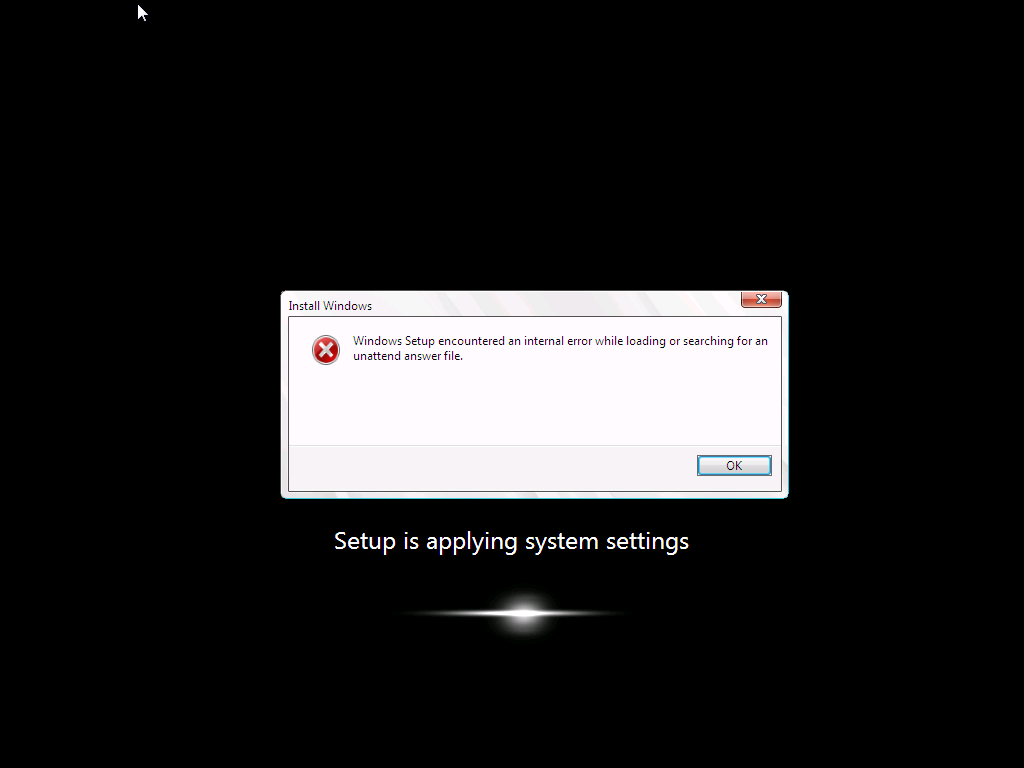
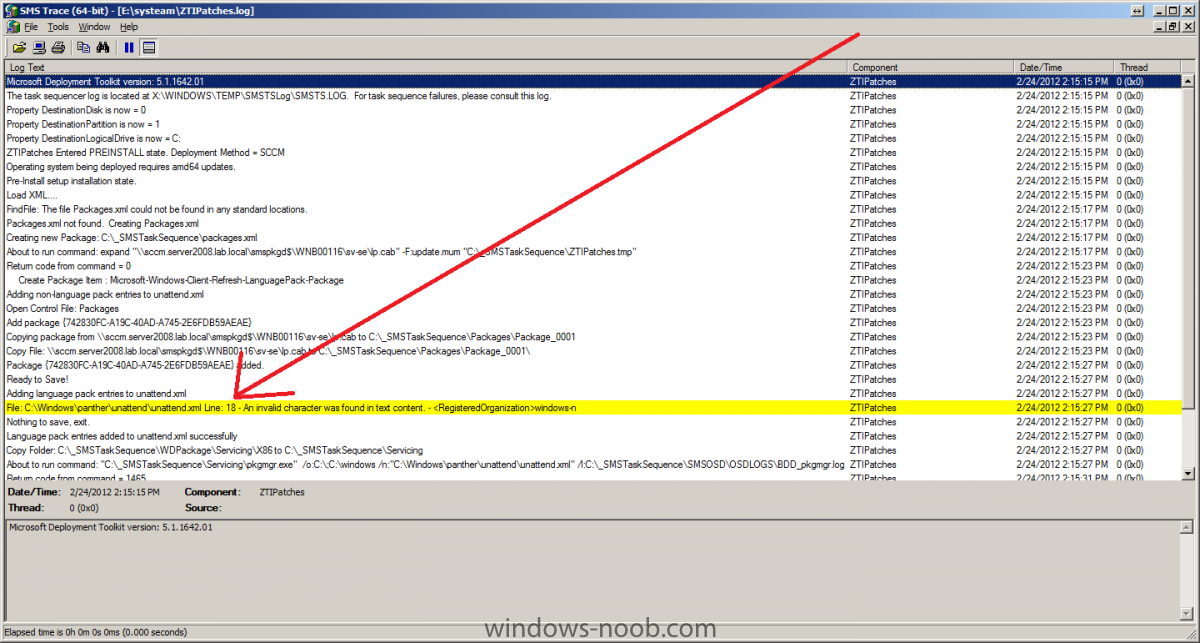
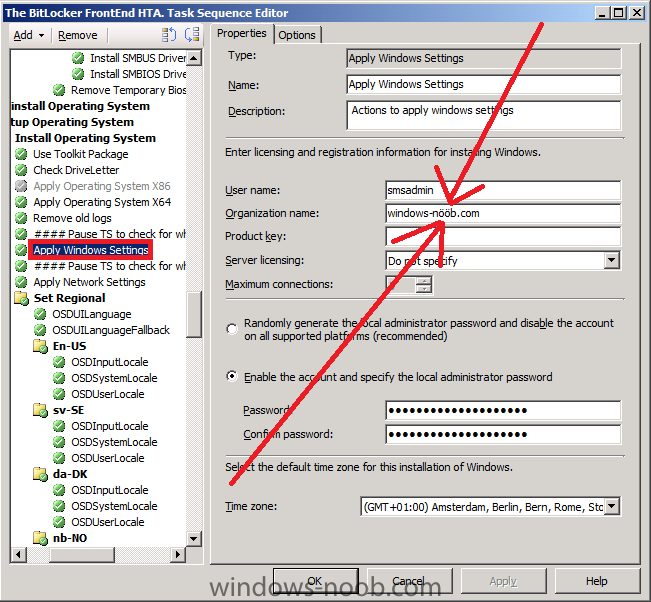
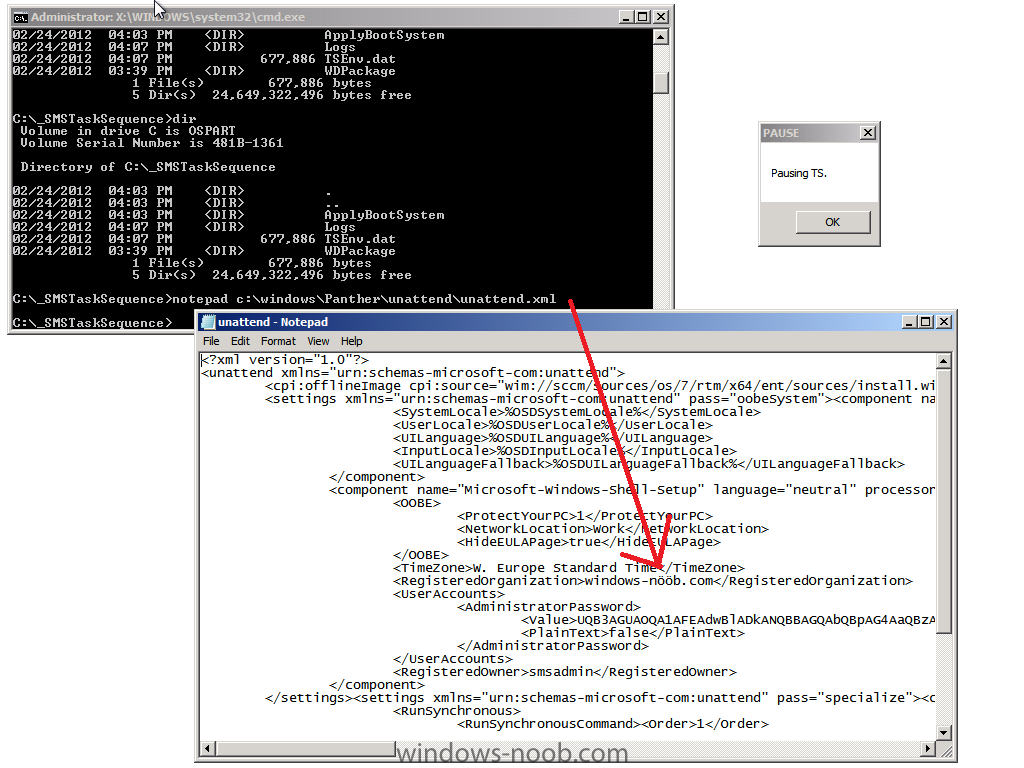
I came across this problem yesterday and after troubleshooting it for a few hours (initially thought it was related to a language pack package versioning issue) the eureka moment arrived, all thanks to reading the logs on the client. First of all let me describe the issue, it was a fairly standard task sequence to install Windows 7 Enterprise X86 Service Pack 1 with Offline Language Packs and it was failing just after the setup windows and configmgr step (after the first reboot) during windows setup. So what error did the customer see ? When they applied the language pack offline step, the Setup Windows and Configmgr step would restart the computer into Windows Setup and at this point shortly after, the installation would fail with the following error message Windows setup encountered an internal error while loading or searching for an unattend answer file As this was a language pack installation, and as the failure only started happening when the customer added language packs I presumed that there was something wrong with either:- The unattend.xml file used The language pack The steps in the task sequence used for installing the Language Pack The unattend.xml File So I set about determining what was causing the actual issue. First of all I needed to rule out the unattend.xml file itself which is specified in the Apply Operating System Step (needed so that the offline language package variables values can be injected), by replacing it with a known good one, stragely though I got the same error, the language pack was failing to install and windows setup was failing. As part of this troubleshooting I used a technique called pausing the task sequence to review logs/files before and after steps were taking place. I'd highly recommend you try pausing your task sequence if you are having issues debugging it. I would pause the task sequence and verify that the unattend.xml file was in the right place, it was present in c:\windows\panther\unattend\unattend.xml and it looked correct. Anyway, what I noticed from using a known good XML file was that the following error was present in the BDD_pkgmgr.log.txt logfile. followed shortly after by which told me that DISM was failing to inject the offline language pack and was having issues with parsing the unattended answer file, but didn't tell me why.... But I was using a known good unattend.xml file so what could possibly be wrong, were the logs lieing to me, it didn't make sense as the unattend.xml file looked fine, even after the Setup Windows and configMgr step, so something else must be wrong, right ? The language pack The next test I did was to rule out the Install Language Pack step itself, so I disabled that step (the group actually) and the installation of Windows 7 continued without any problems at all. Great, it must be the language pack ! The image the customer was deploying was Windows 7 Enterprise X86 Service Pack 1, so I made sure they downloaded the language pack files for that version of Windows, yes there are language pack files for both X86 and X64 so I wanted to be sure they were using the right ones, In addition, I recreated the language package used in the deployment task sequence, redistributed it to the distribution points and added that new package into the task sequence. I started another installation and noticed that the Apply Language Pack offline step was running through very quickly, normally when installing a language pack it takes some time to complete, this is an indication that something is wrong. Once again, dism pointed to the exact same failure as noted above, ok, i've ruled out the customers Unattend.xml file, I've ruled out the Language pack what else could it be. The steps in the task sequence Finally I looked very closely at each step in the task sequence involved in the Language pack installation, I examined each of the Set Task Sequence variable steps and made sure they were correct and that they were in the correct sequence and indeed that these steps were occuring after Apply windows settings, apply network settings but before Setup Windows and configMgr, they were all fine... and in the right place. This didn't make sense I must have missed something, so I set about reading all of the logs once again to try and determine what was going wrong. Reading the Logs I initiated another installation and paused the task sequence just before Setup Windows and configMgr, I brought up a command prompt and browsed to C:\_SMSTaskSequence in there were all the logs I needed. The first Log to look at was the SMSTS.log file, normally i'll look for the word failed or in Trace32.exe search for any red lines (indicating an error). Neither helped.. nothing jumped out at me. so then I opened the ZTIPatches.log file (this file is used to log information when installing updates or language packs offline) and it was there I had the Eureka moment huh ? could this be true, ok I opened the Unattend.XML file that the customer had and Registered Organization was not present, so I started another installation and opened the c:\windows\panther\unattend\unattend.xml file that was present, still no Registered Organization, so i let the installation continue right up until after the Apply Windows Settings Step and at this point the unattend.xml file DID have the Registered Organization field present, infact, it's added in the Apply Windows Settings step. And what I saw was the Eureka moment, the Registered Organization had a Swedish character present in it's name, i'm not going to name that company but I will show you what it could look like here so that was it !, I changed the Registered Organization name, by removing the Swedish characters and replacing them with standard 'o's and the problem was resolved and DISM worked correctly and the language packs got installed. Basically what this meant was that DISM wanted to interpret the unattend.xml file in order to know what it had to inject into the offline image, it couldn't understand the unattend.xml file due to the Swedish characters being present and therefore bombed out of what it was doing with a parse error message. Replacing the Registered Organization name with one that contained only English characters allowed DISM to work correctly and all was good. The log files really don't lie ! I wanted to post this incase any of you run into the same issue.. The moral of the story:- If you are using Offline Language Packs and they are failing to install, verify the following logs for any details that will give you a clue to the issue. SMSTS.log ZTIPatches.log BDD_PKGMGR.log.txt Oh and if you are in a European country that uses Non-English alphabetical characters be sure to check the Registered Organization field in your Apply Windows Settings Step and if necessary remove any strange characters if they are complained about in your ZTIpatches or SMSTS.log file. cheers niall
-
- 2
-

-
is the computer in a collection that the task sequence is advertised to ? what does your smspxe.log file reveal ?
-
how long did you wait ? did you reboot after adding the configmgr site server computer account as a local admin ?
-
and are you sure about the version ? 7678 is RC1, 7703 is RC2
-
first do this to enable better logging and understanding of what is going on when testing USMT migration strategies.. and see what it reveals ok ? don't forget to enable verbose logging (/v:13) you'll probably need to use the Merge rule and to be aware of USMT conflicts and precedence as described here
-
using SCCM 2012 in a LAB - Part 1. Installation
anyweb replied to anyweb's topic in Configuration Manager 2012
you should install those roles as part of setup, why wouldn't you want to ? -
SMS 2003 to SCCM 2012 - remote client deployment
anyweb replied to pxedave's topic in Configuration Manager 2012
nope it cannot uninstall the SMS 2003 client, you'll see that logged in ccmsetup.log, it can only deal with ConfigMgr Client's from 2007 and onwards -
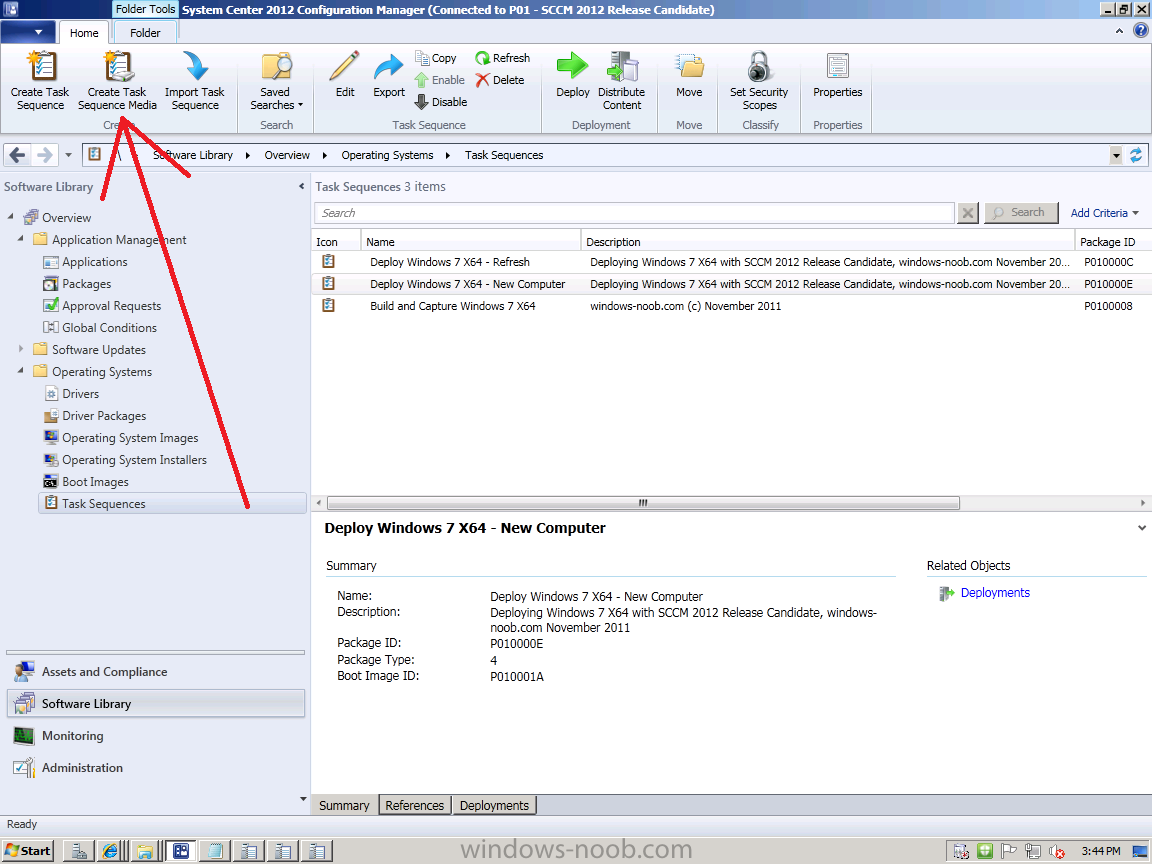
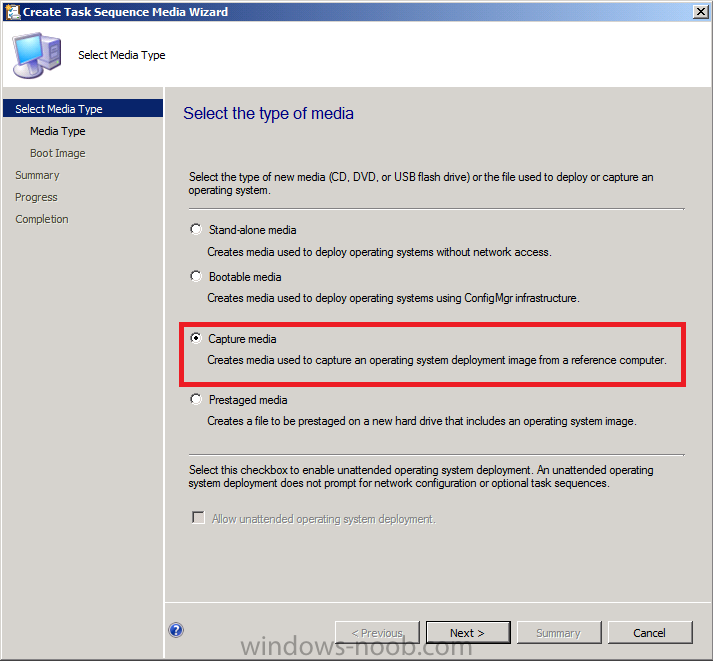
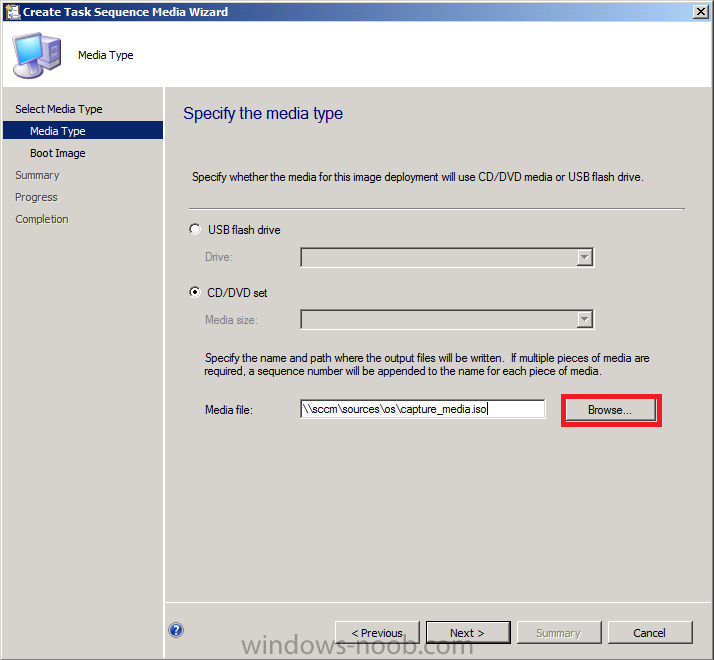
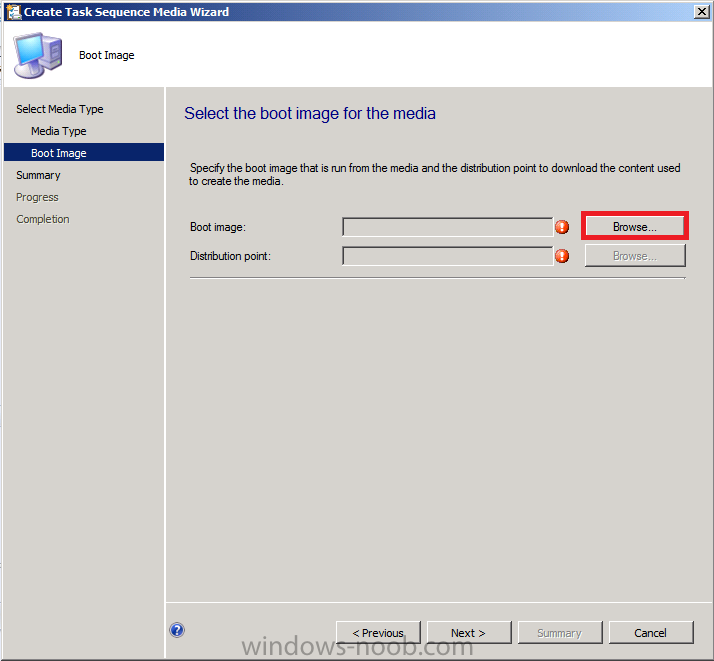
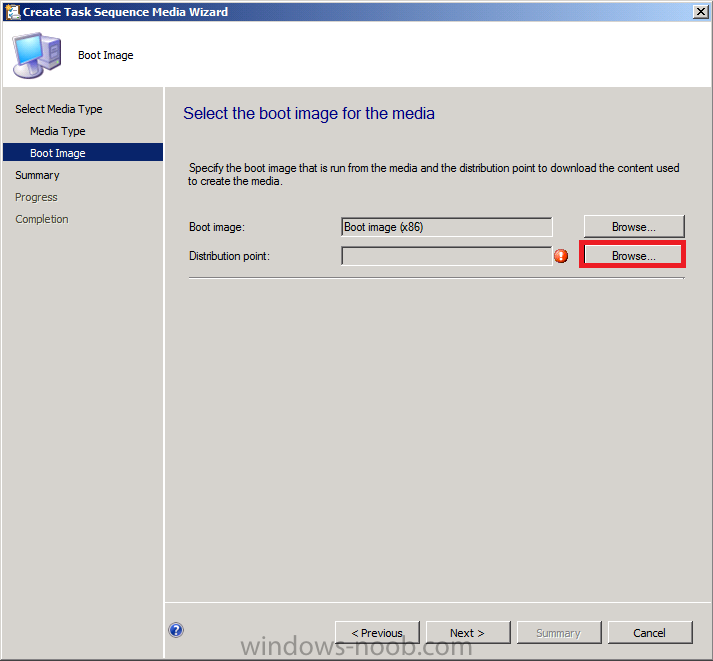
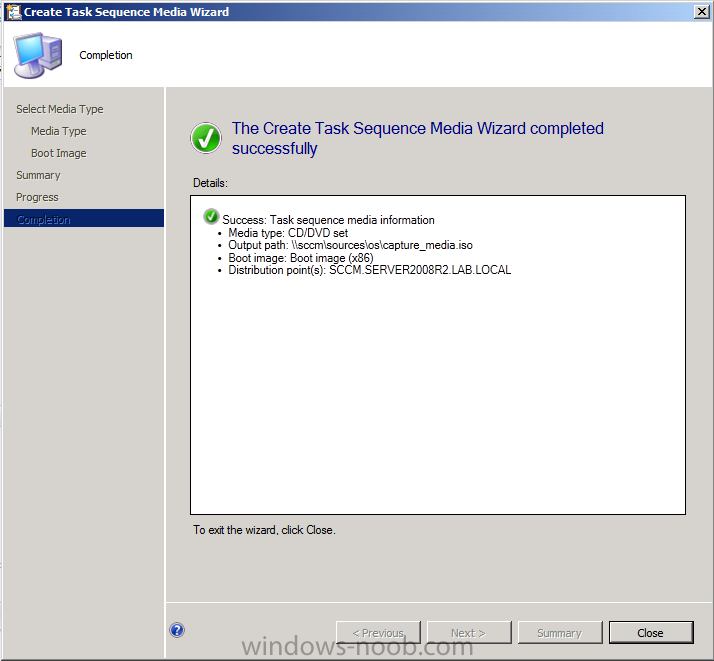
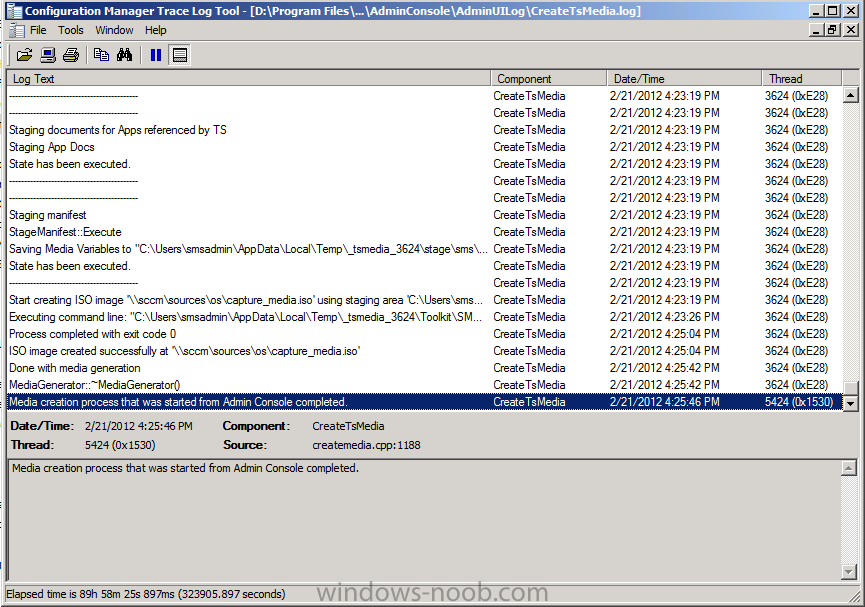
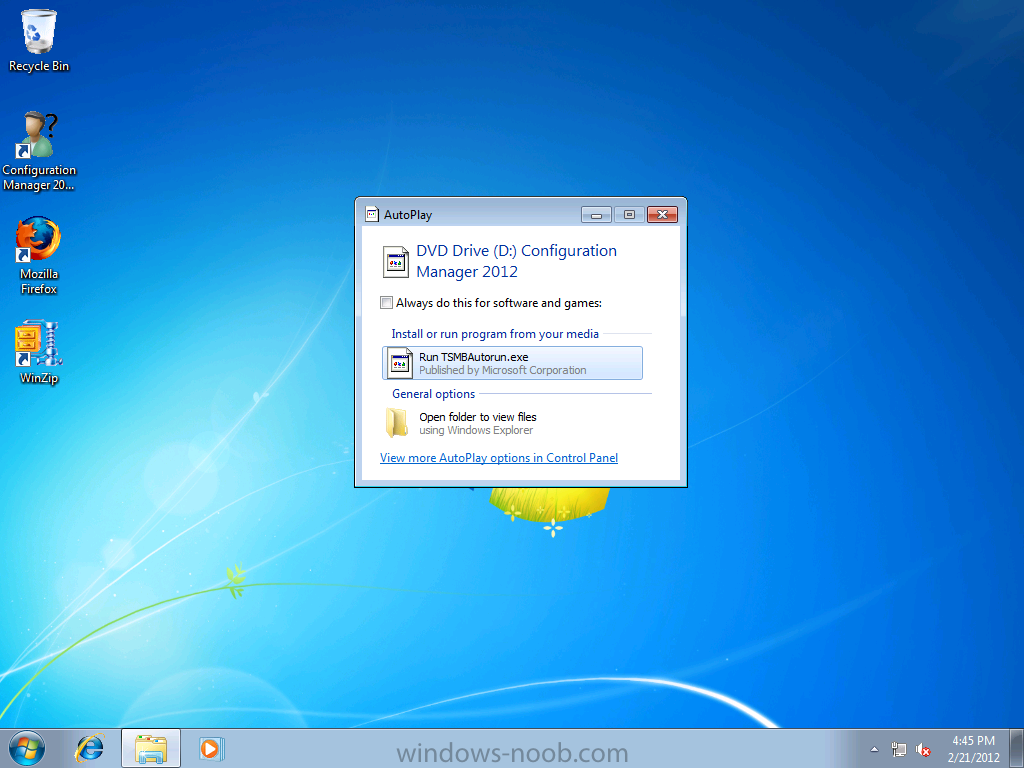
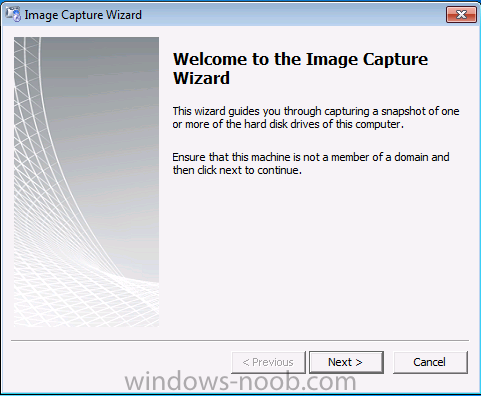
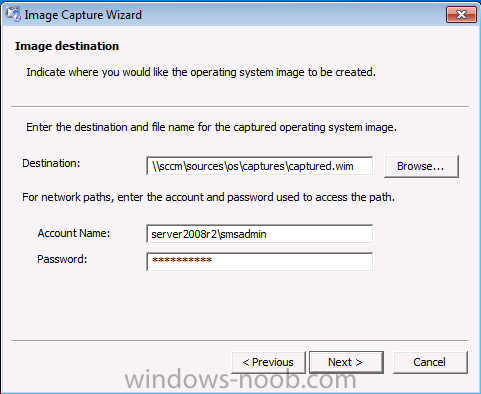
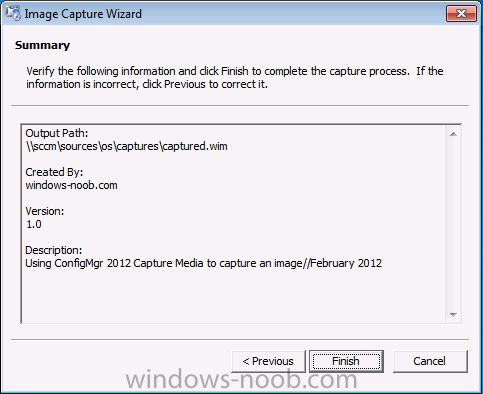
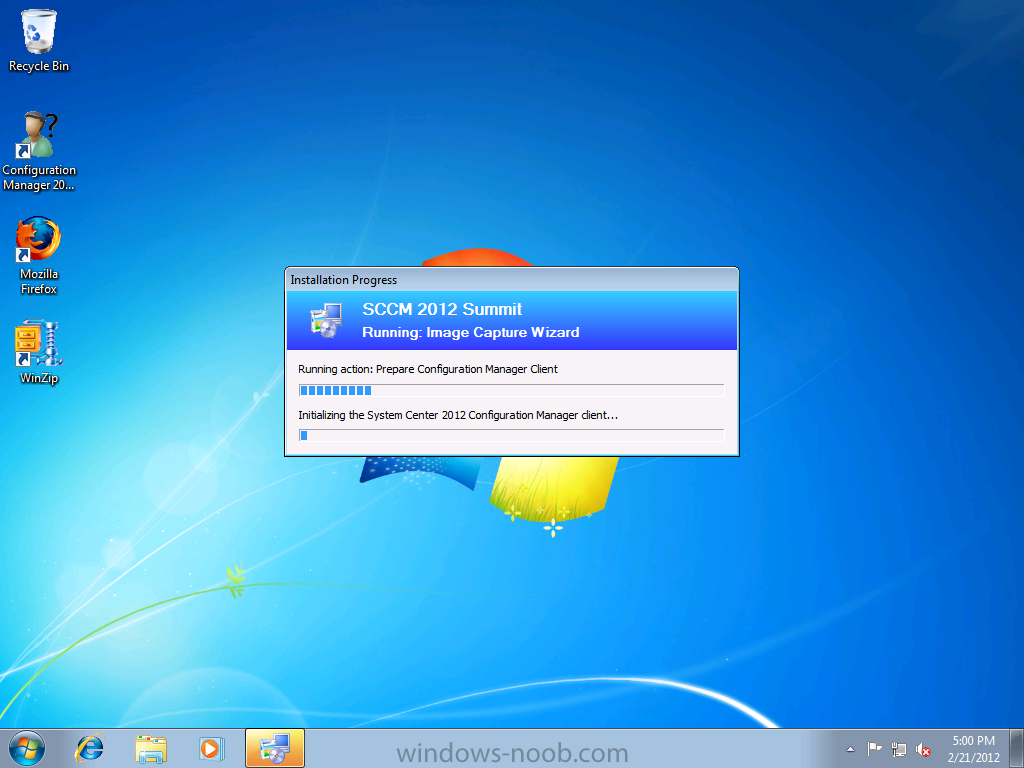
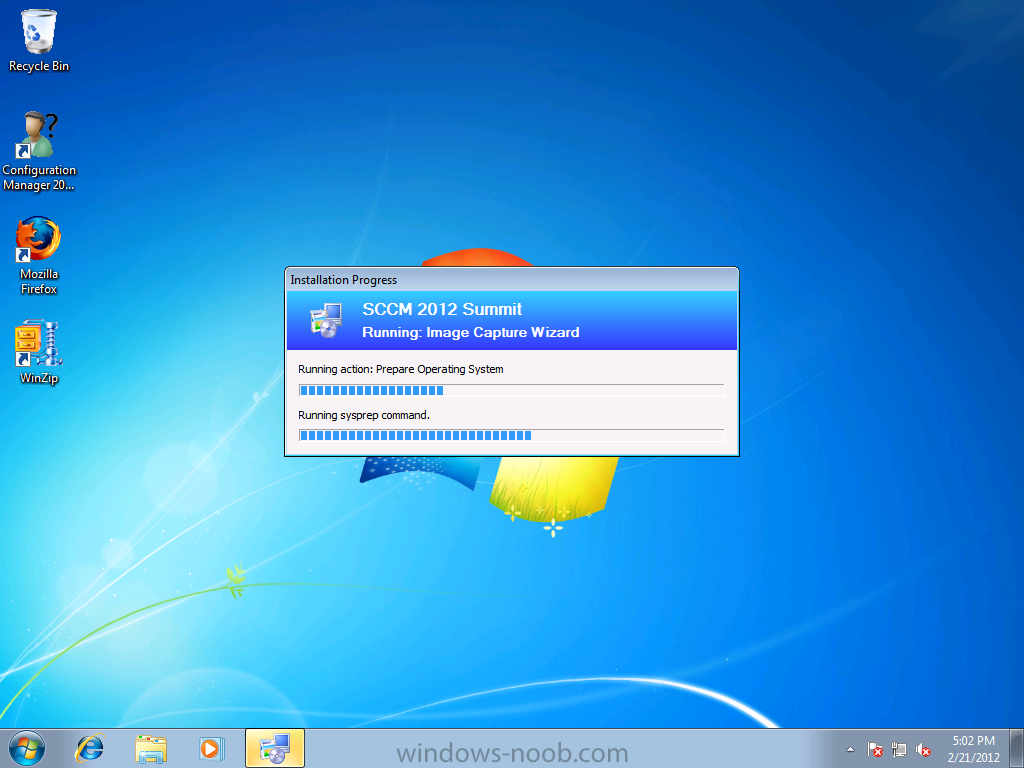
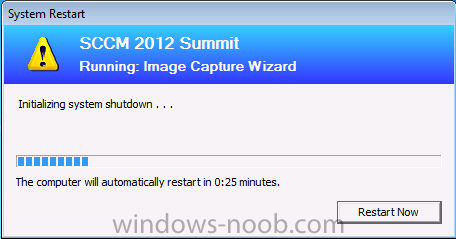
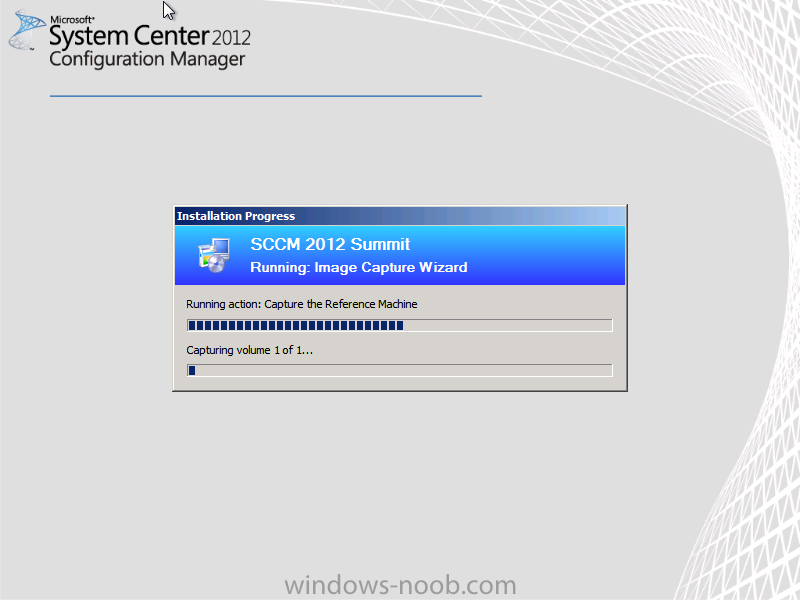
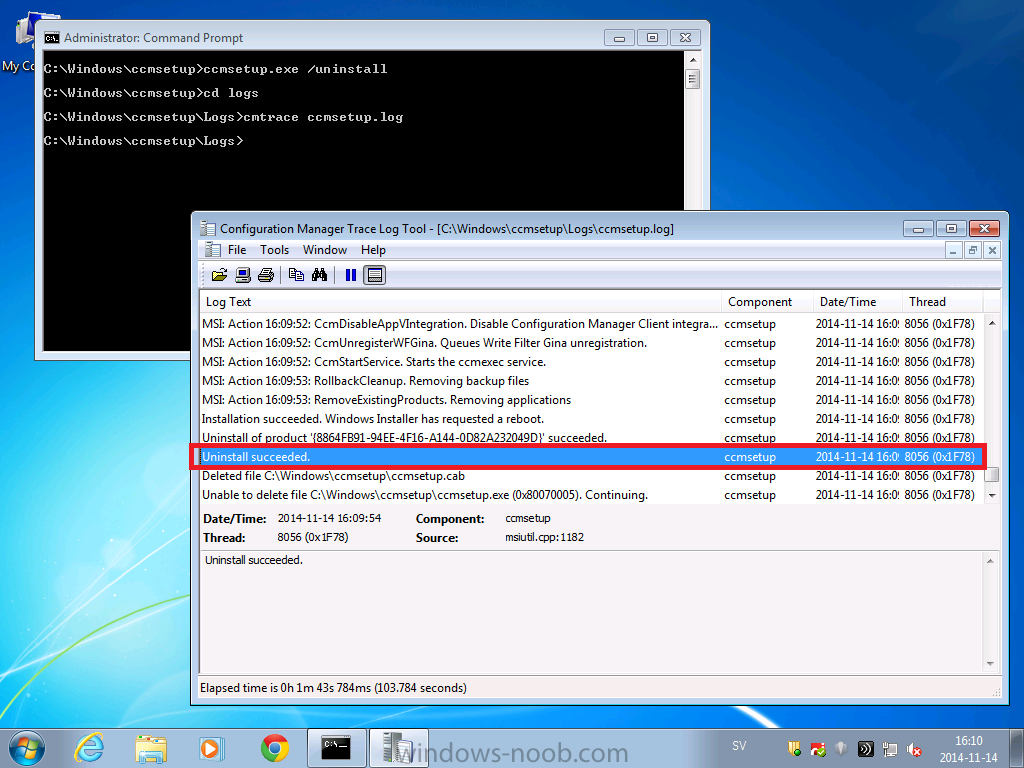
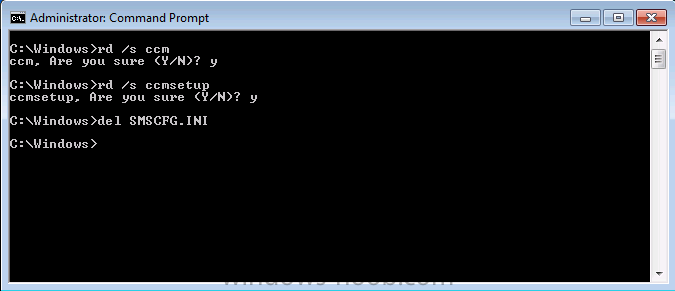
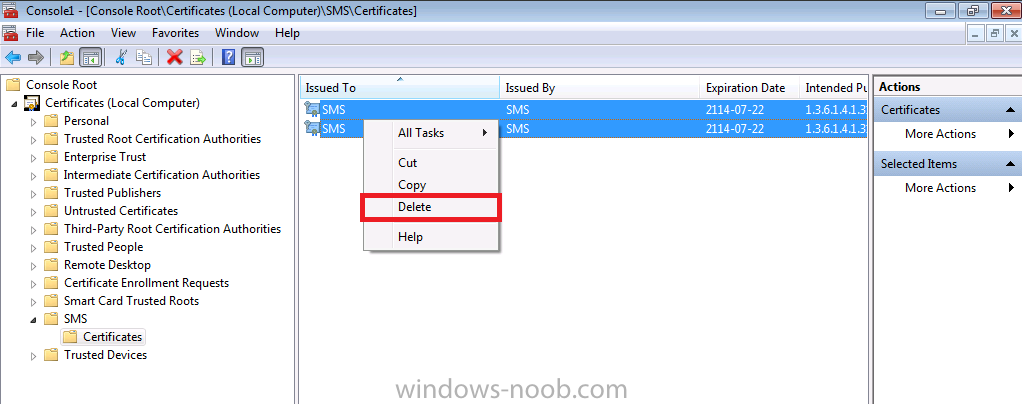
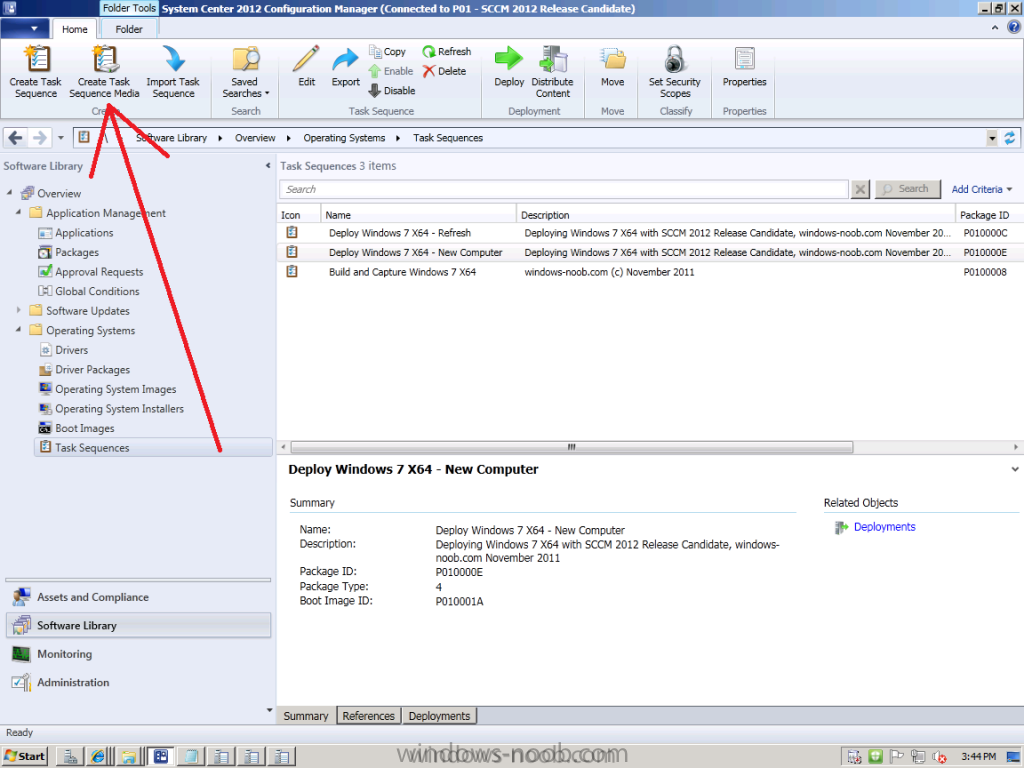
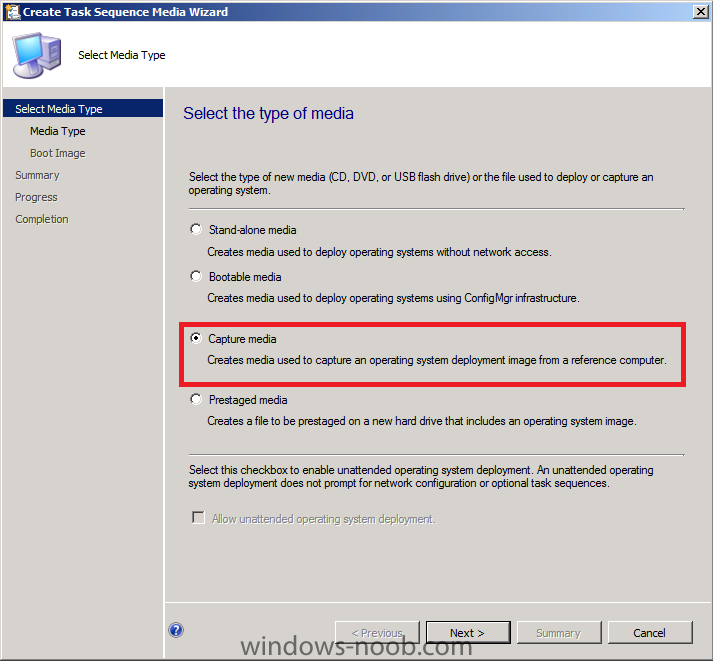
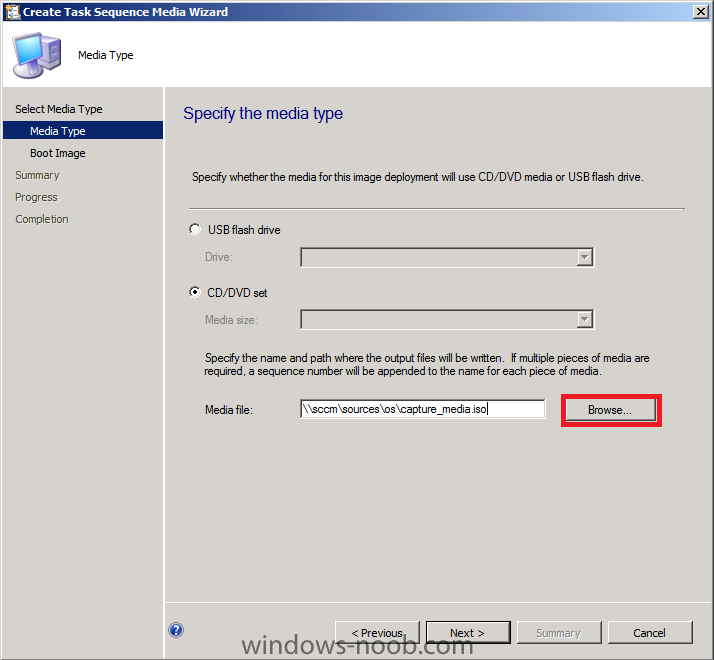
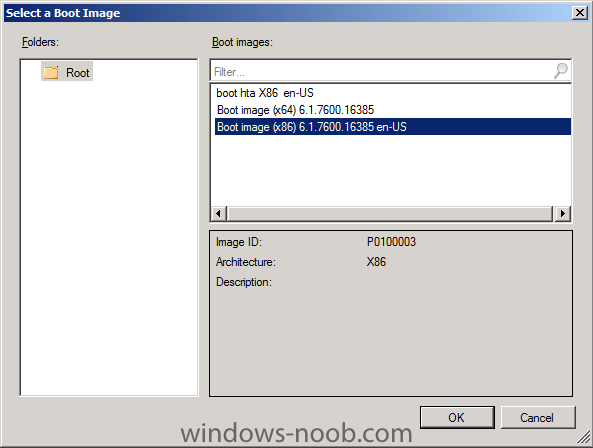
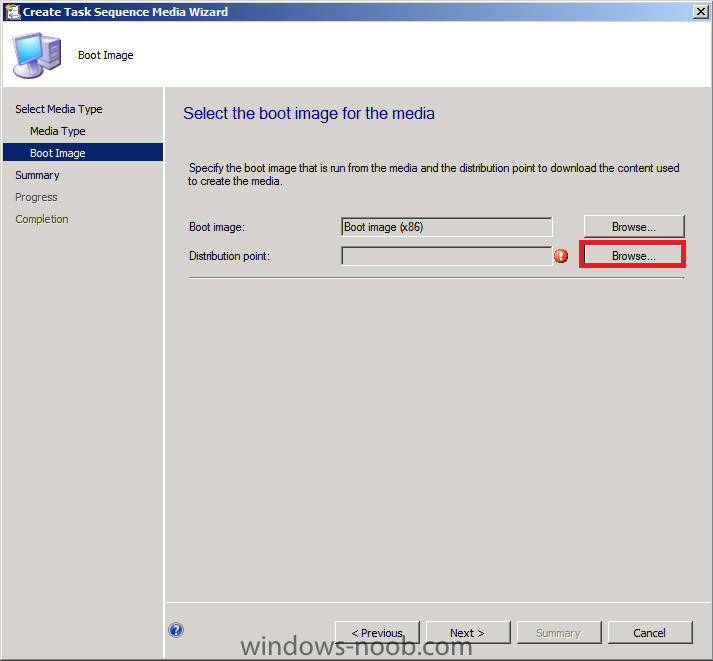
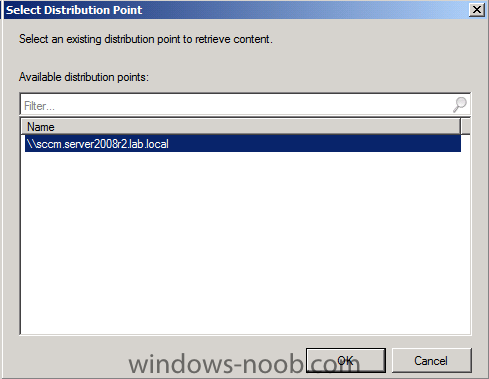
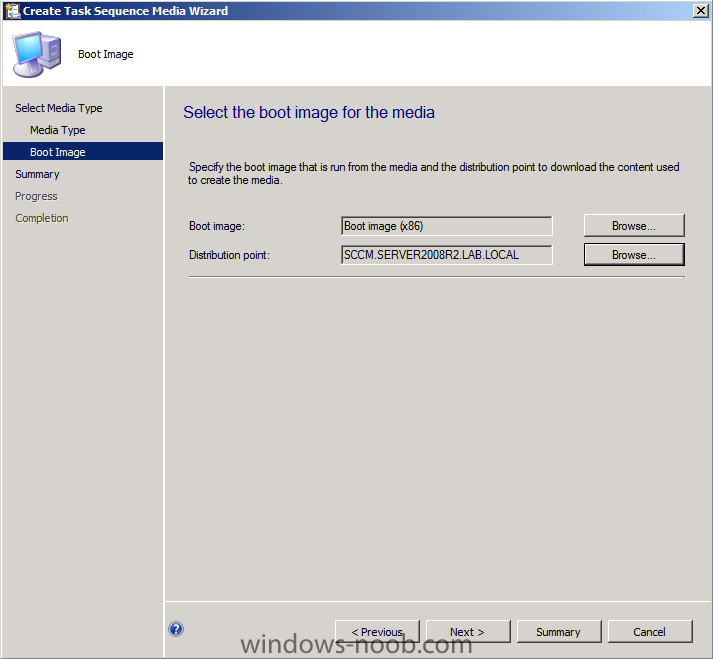
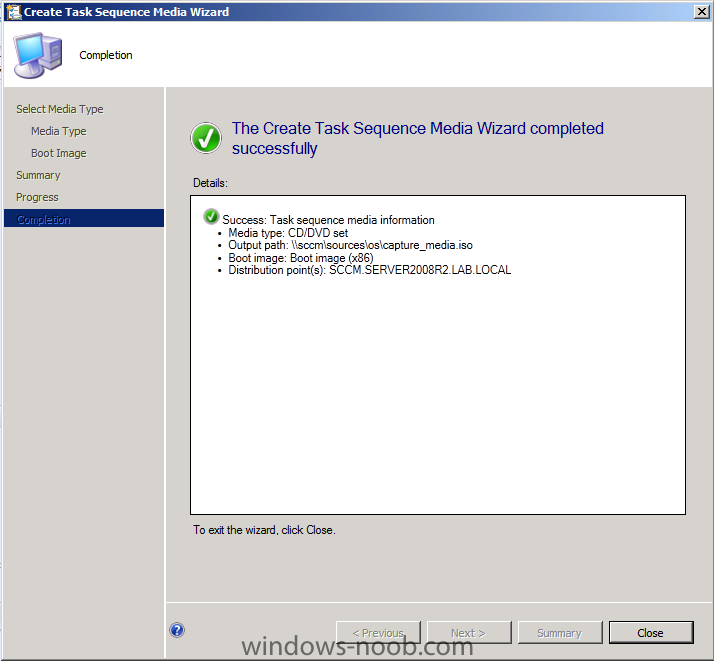
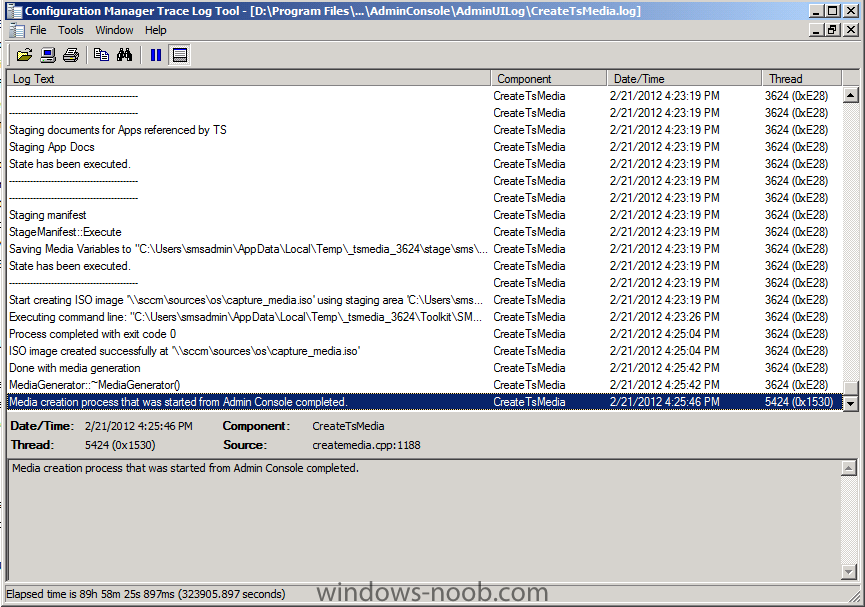
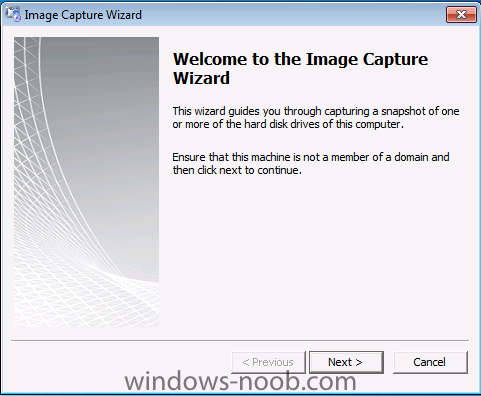
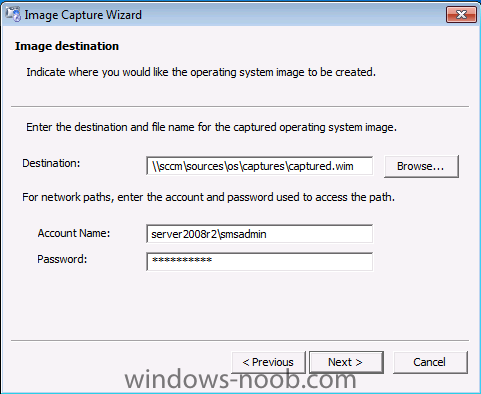
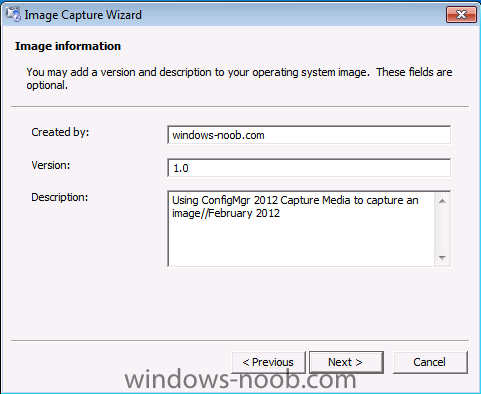
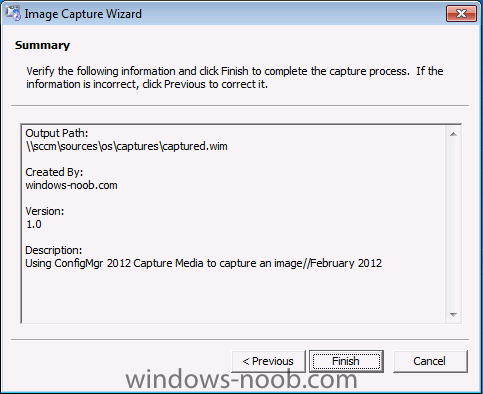
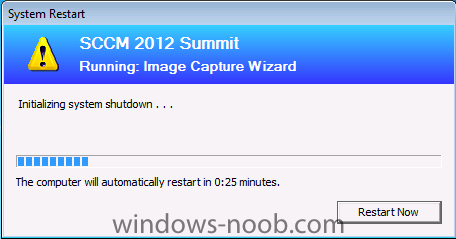
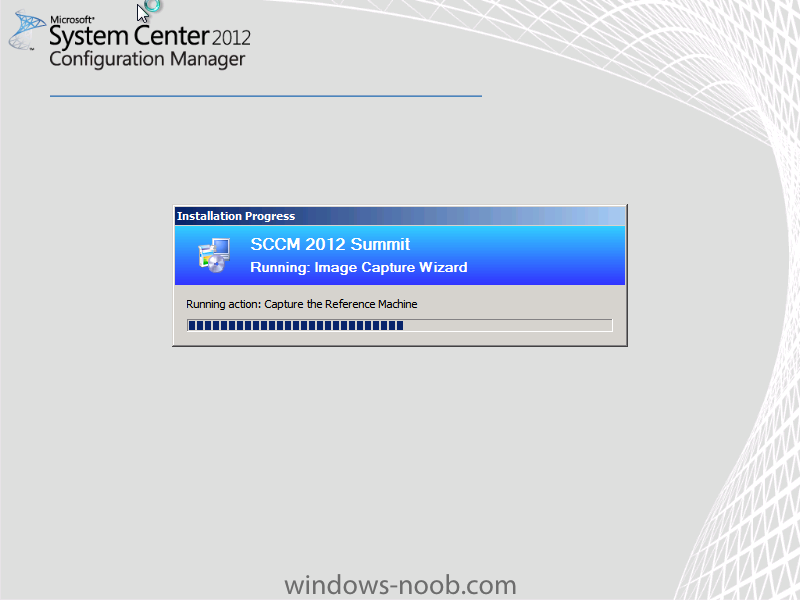
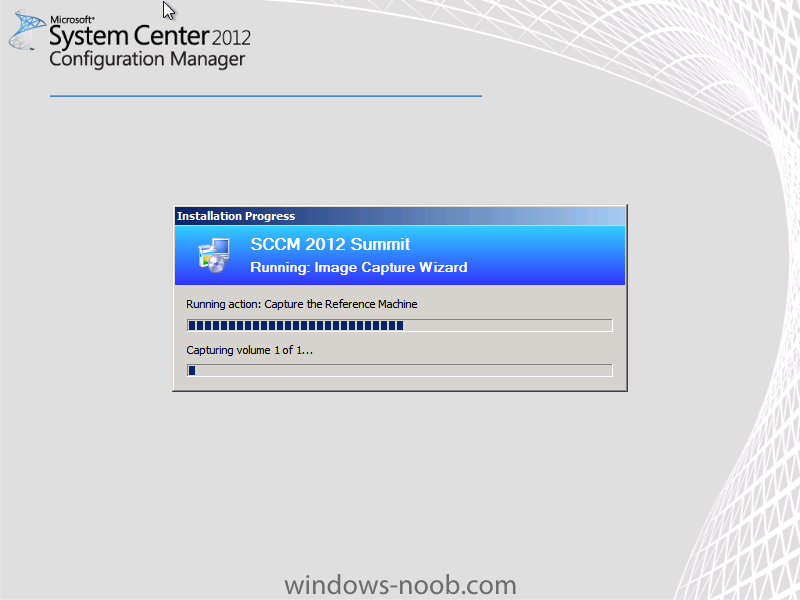
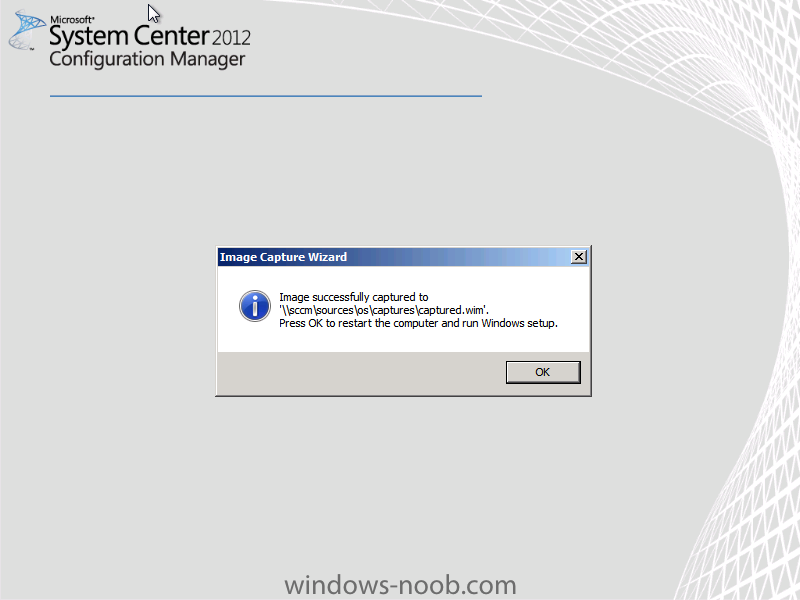
Normally you would want to automate building your reference image using Configuration Manager or MDT or a mixture of both. So if for example you want to capture a reference image you could do so using a fully automated Build and Capture task sequence in System Center 2012 R2 Configuration Manager. In this post however, I'll explain how you can capture an image manually and Configuration Manager 2012 provides a method of doing just that called Capture Media. This media is created as an ISO file which you burn directly to CD/DVD or mount in a virtual machine and use. But first you need to make sure that the image you want to capture is in the right state, listed below workgroup joinedIn order for the image to be captured the computer must be a member of a Workgroup, In other words, the machine you want to capture the image from must not be joined to a domain. Tip: It's recommended that you build your master image without joining a domain as domain join can impact an image and make troubleshooting problems that occur later on, harder. Settings get applied when you join a domain, such as Group Policies are set, software may be installed, registry keys might be changed. Keeping a computer off the domain before capturing it, eliminates these and other potential issues. I'd recommend you use Virtual Machines (Hyperv, Vmware Workstation) or whatever virtual software you like to create the 'image' you want to capture. Step 1. Create the Capture Media Perform the following on the Configuration Manager server as a SMSadmin. Open the ConfigMgr console, click on Software Library, Operating Systems, expand Task Sequences. In the ribbon click on Create Task Sequence Media when the Create Task Sequence Media wizard appears click on Capture Media click next and browse to the path of where you want to store the ISO file, give it a name like capture_media.iso click next, then click on browse beside boot image select your X86 boot image Note: if you are trying to capture x64 UEFI hardware such as the Microsoft Surface Pro 3, you must use a x64 boot wim. click ok, then click on Browse beside Distribution Point select your distribution point now your selected boot image and distribution point are listed, click next to continue through the wizard if you get a UAC prompt accept it finally the media is done ! if you need to troubleshoot it's creation look at the CreateTSMedia.log file in your confmgr LOGS dir. (D:\Program Files\Microsoft Configuration Manager\AdminConsole\AdminUILog) Step 2. Remove the Configuration Manager client if installed Run Ccmsetup.exe /uninstall from the C:\Windows\CCMsetup folder, you can monitor the CCMSetup.log file to verify it uninstalls successfully as shown below Once done remove the following:- delete any logs and files left behind in the ccmsetup and ccm folders delete c:\windows\smscfg.ini delete the two SMS certs for the local computer in CertMgr.Msc Step 3. While in Windows, start the ISO/CD/DVD on the Workgroup Computer Perform the following on the computer which you want to capture an image of as a local administrator. if you are using virtual hardware (hyperv or vmware) just mount the ISO on your workgroup computer (click on Media, Insert Disc, browse to the ISO location), otherwise burn the ISO to cd/dvd and insert that burned cd/dvd into the computer you need to capture. While still in Windows (do not try to boot from this ISO/CD/DVD) you should see the following click on Run TSMBAutorun.exe Welcome to the Image Capture Wizard appears, click next.. Enter a path and name for the WIM file, I chose \\sccm\sources\os\captures\captured.wim and then enter the credentials of a user with permissions to write to that location enter some Image Information review the summary and click finish to start the capture process, notice how it prepares the config manager client and then it syspreps before rebooting into Windows PE to capture the system and the capture begins ! success ! all done, the image is captured. Troubleshooting Tips: If there is no CCM client installed, check for the SMSTS.log file in C:\Users\Administrator\AppData\Local\Temp\ If you have the CCM client installed and you see an error in SMSTS.log (probably in C:\Windows\CCM\Logs or C:\Windows\SysWow64\CCM\logs) which sates Waiting for CCMExec service to be fully available, locate the SMS Agent Host service in services.msc and start the service. If you get the following error after inputting the Capture path and Network credentials "The network location cannot be reached. For information about network troubleshooting, see Windows Help. (Error: 800704CF; Source: Windows)" then verify you entered the credentials correctly, in addition you can test mapping a network drive using the same path and same credentials, if it fails, reboot the computer and try the wizard again


-
OSD with SCCM2012 and MDT2012; Succesrate 0% until now?
anyweb replied to BertWolters's topic in Configuration Manager 2012
hmm ok do you have teamviewer ? or some other remote desktop method ? -
Introducing the windows-noob.com FrontEnd HTA ver 1.0
anyweb replied to anyweb's question in Frontends, HTA's and Web Services
correct, it isnt, you have to backup to the SMP using a separate ts. you can however do a computer association using this ts. actually this is pointed out on the first page ! -
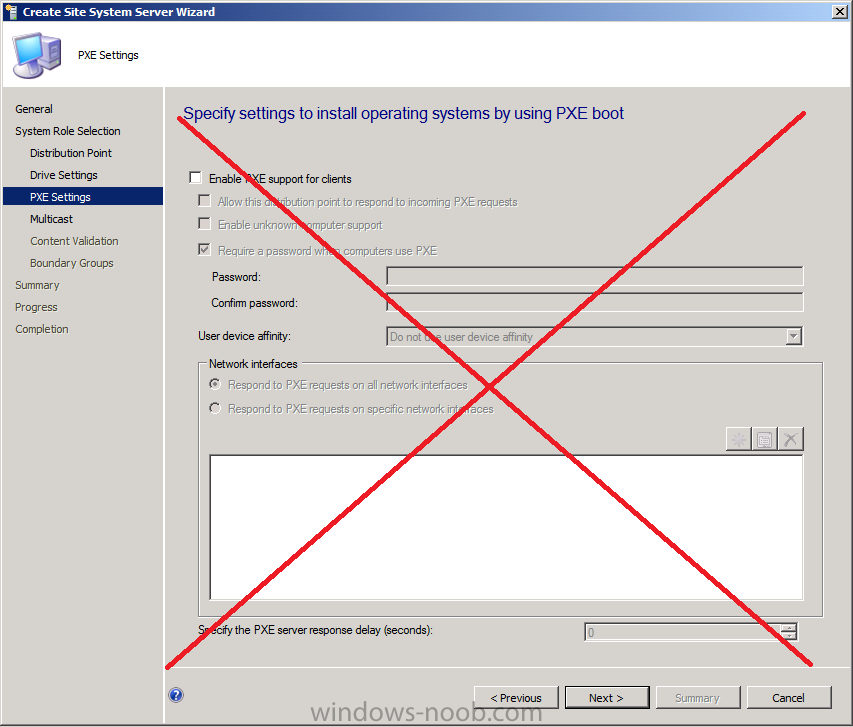
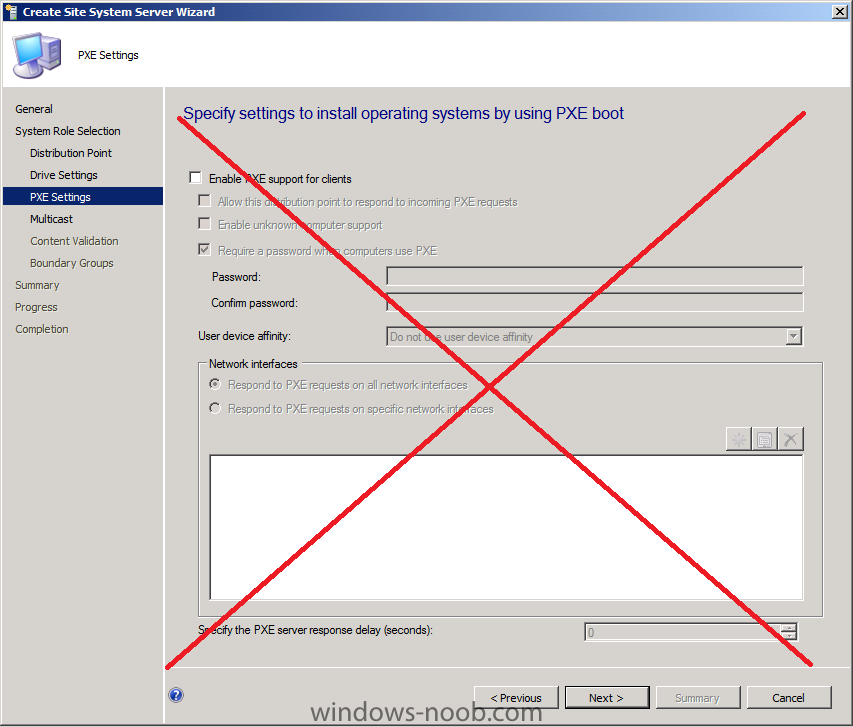
remember: Note that you cannot enable PXE or Multicast support on your Windows 7 Distribution Point.
-
OSD with SCCM2012 and MDT2012; Succesrate 0% until now?
anyweb replied to BertWolters's topic in Configuration Manager 2012
do you have issues with non-mdt task sequences ? is this CM2012 RC2 ? -
OSD with SCCM2012 and MDT2012; Succesrate 0% until now?
anyweb replied to BertWolters's topic in Configuration Manager 2012
if you manually partition one of these machines in WinPE using diskpart, reboot and then try again does it succeed ? -
try doing it in Windows PE instead, it's designed for Windows PE not Windows. cheers niall
-
We have said that Windows 8 is a complete reimagination of the Windows operating system. Nothing has been left unexplored, including the Windows logo, to evaluate how it held up to modern PC sensibilities. The Windows logo is a strong and widely recognized mark but when we stepped back and analyzed it, we realized an evolution of our logo would better reflect our Metro style design principles and we also felt there was an opportunity to reconnect with some of the powerful characteristics of previous incarnations. We had a very short list of agencies that we wanted to work with on the redesign of the logo and were thrilled when Pentagram agreed to join us in the project. Pentagram’s illustrious history speaks for itself, but we were particularly attracted to their sense of classic graphic design which fit well with our Metro design principles. Early in the development cycle for Windows 8, in a conference room on the Microsoft campus, we assembled a kick off meeting with Paula Scher, Michael Beirut and Daniel Weil from Pentagram and a few designers and marketing leaders from Windows and across the company. The team spent a full day sharing some of the Metro style design philosophy; the Windows brand history and values as well as graphic design and technology industry trends. "To see what is in front of one's nose needs a constant struggle."- George Orwell That is the feeling we had when Paula Scher (from the renowned Pentagram design agency) showed us her sketches for the new Windows logo. It’s a window… not a flag Paula asked us a simple question, “your name is Windows. Why are you a flag?” In some ways you can trace the evolution of the Windows logo in parallel with the advancements of the technology used to create logos. From the simple two color version in Windows 1.0 to the intricate and detailed renderings in Windows Vista and Windows 7, each change makes sense in the context in which it was created. As computing capabilities increased, so did the use of that horse power to render more colors, better fonts, and more detailed and life-like 3D visual effects like depth, shadows, and materiality. We have evolved from a world of rudimentary low resolution graphics to today’s rich high-resolution systems. And what started as a simple “window” to compliment the product name became a flying or waving flag. But if you look back to the origins of the logo you see that it really was meant to be a window. "Windows" really is a beautiful metaphor for computing and with the new logo we wanted to celebrate the idea of a window, in perspective. Microsoft and Windows are all about putting technology in people's hands to empower them to find their own perspectives. And that is what the new logo was meant to be. We did less of a re-design and more to return it to its original meaning and bringing Windows back to its roots – reimagining the Windows logo as just that – a window. Let’s look back at a few of the versions along the way. Windows 1.0 Few remember the original Windows logo, yet we found it both refreshing and inspiring in relation to the work we have been doing on the Metro style design visuals. Using simple lines and clear straight forward concept, this logo reminded us of what a great and evocative name we have with “windows”. Windows 3.1 For many of us this was the image in our mind when we think of past Windows logos. The now classic window shape and the introduction of the four colors were hallmarks of the Windows brand for many years to come. The introduction of the “waving effect” gives the logo a sense of motion. This logo would be the basis of the Windows versions throughout the 1990s. Windows XP The next major incarnation of the logo came with the release of Windows XP. What has come to be known as the “Windows flag” is a cleaner more sophisticated mark than its predecessors. The version that populated the lower left hand corner of Windows PCs next to the word “Start” also gained a sense of materiality (plastic?) and a 3D effect from the rich gradients and shadows. Windows Vista The Windows Vista release marked the beginning of the AERO design aesthetic in Windows with a key component of the interface being the “AERO glass” effect. Replacing the green Start button was the round glass-like button with a now flattened version of the “flag” from Windows XP. Internally, this icon became known as the “pearl”. You can see the intricate lighting effects of the faux glass. In many ways signaling just how powerful of a rendering engine the PC had become. This version of the logo was largely unchanged for Windows 7. Windows 8 With Windows 8, we approached the logo redesign with a few key goals on mind. 1. We wanted the new logo to be both modern and classic by echoing the International Typographic Style (or Swiss design) that has been a great influence on our Metro style design philosophy. Using bold flat colors and clean lines and shapes, the new logo has the characteristics of way-finding design systems seen in airports and subways. 2. It was important that the new logo carries our Metro principle of being “Authentically Digital”. By that, we mean it does not try to emulate faux-industrial design characteristics such as materiality (glass, wood, plastic, etc.). It has motion – aligning with the fast and fluid style you’ll find throughout Windows 8. 3. Our final goal was for the new logo to be humble, yet confident. Welcoming you in with a slight tilt in perspective and when you change your color, the logo changes to reflect you. It is a “Personal” Computer after all. We hope you enjoy our new logo. via > http://windowsteamblog.com/windows/b/bloggingwindows/archive/2012/02/17/redesigning-the-windows-logo.aspx


-
attach your scanstate.log and loadstate.log files here (as attachments) and i'll take a look
-
enable troubleshooting in USMT like I describe here, then review the logs and see what they tell you about your problem - start with scanstate.log see what it tells you it's migrating (or not) http://myitforum.com/cs2/blogs/nbrady/archive/2012/01/25/troubleshooting-usmt.aspx
-
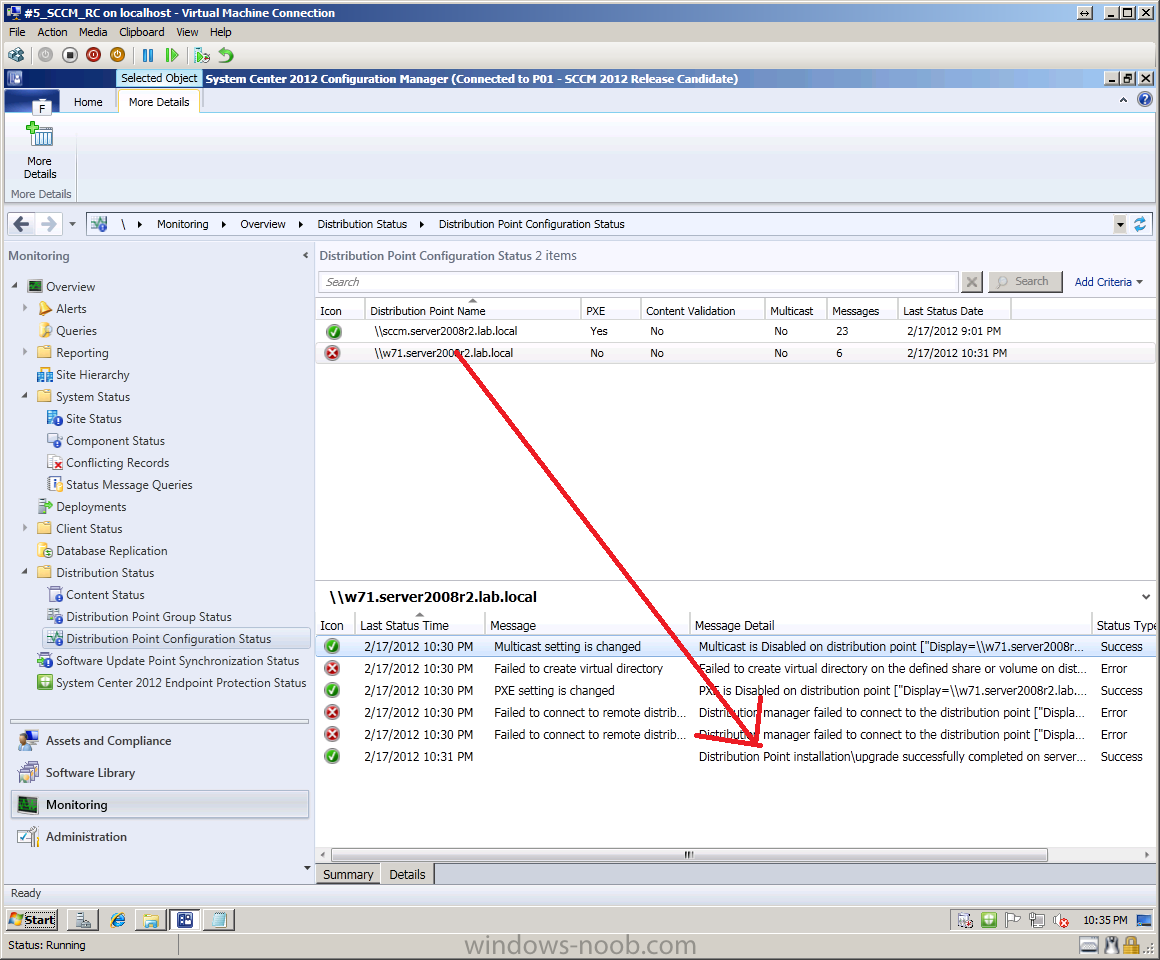
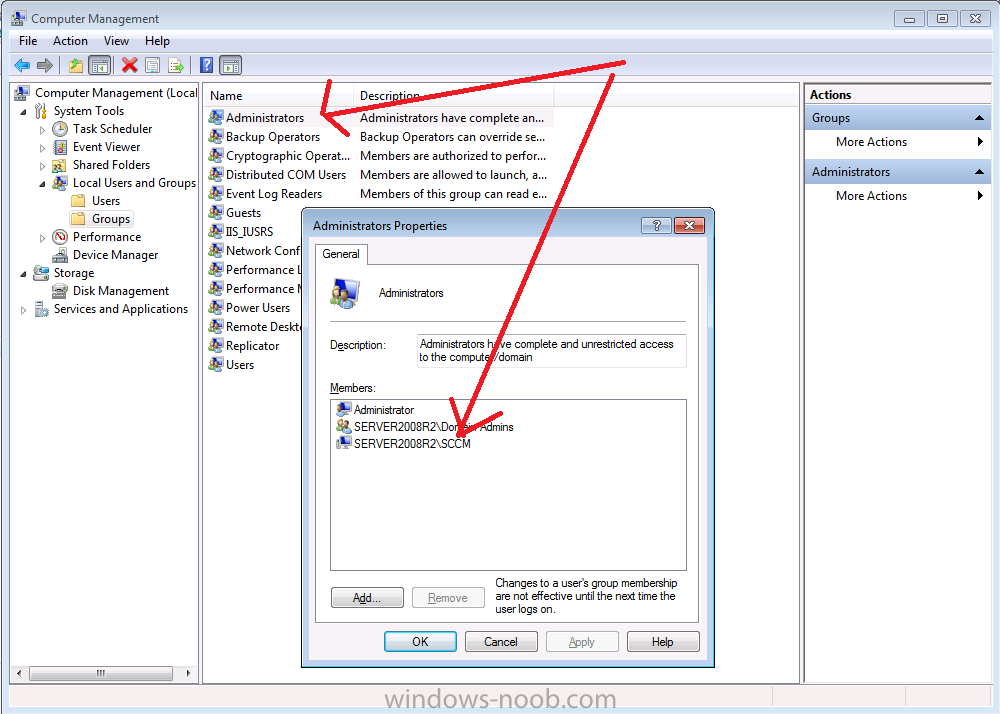
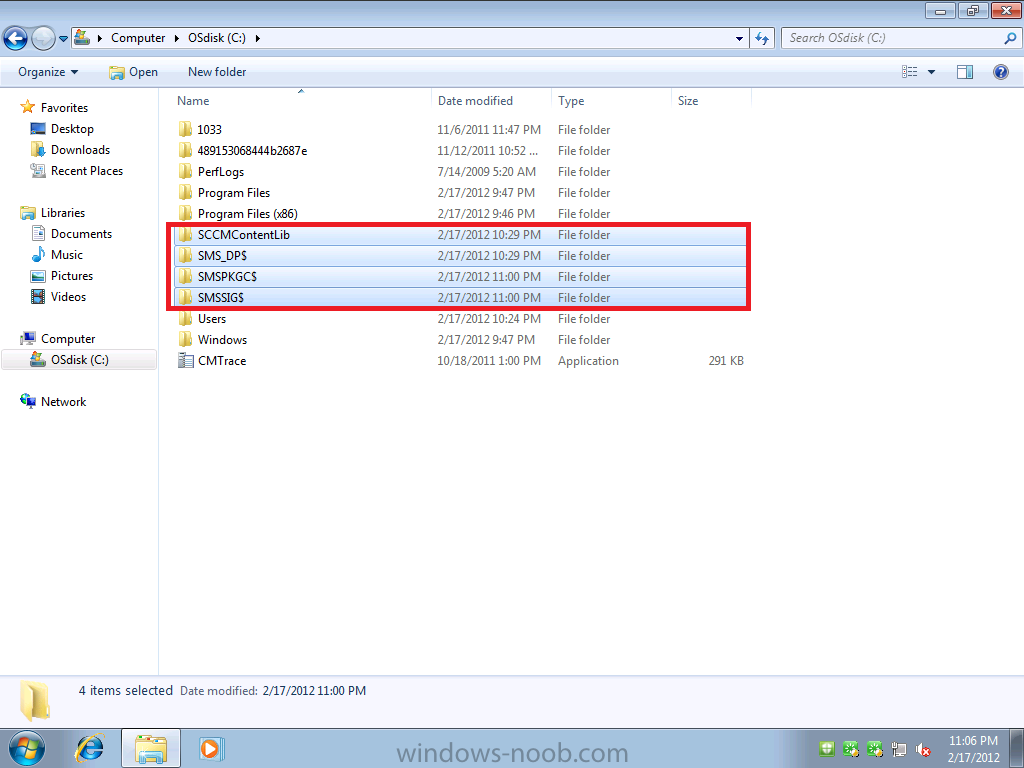
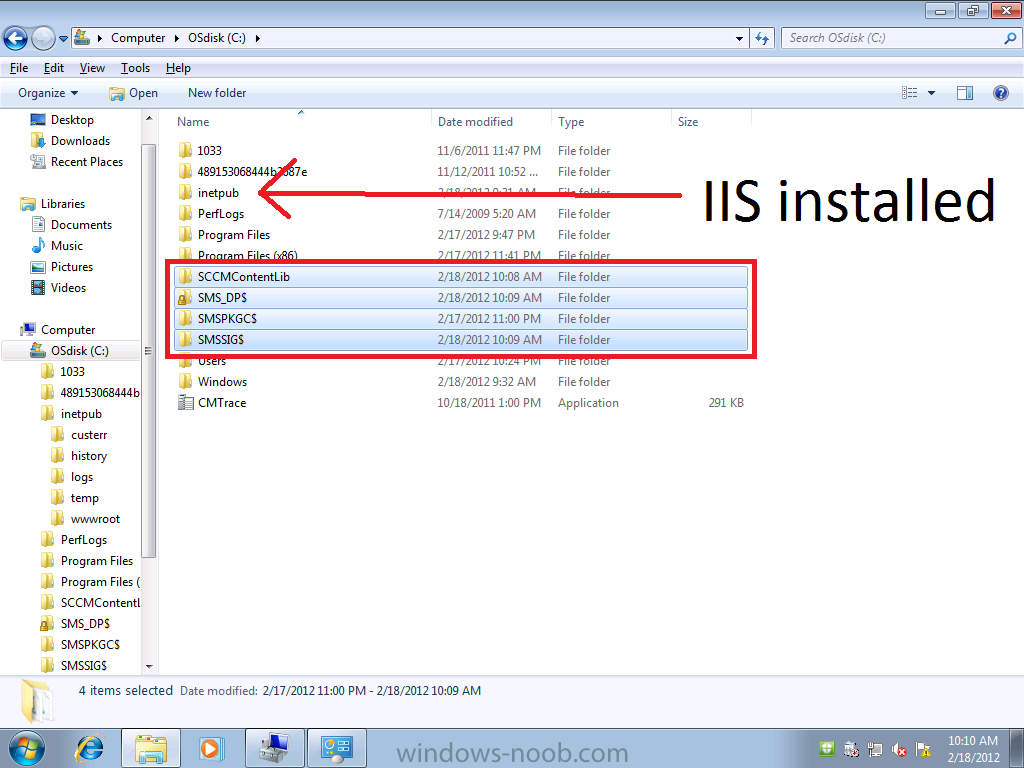
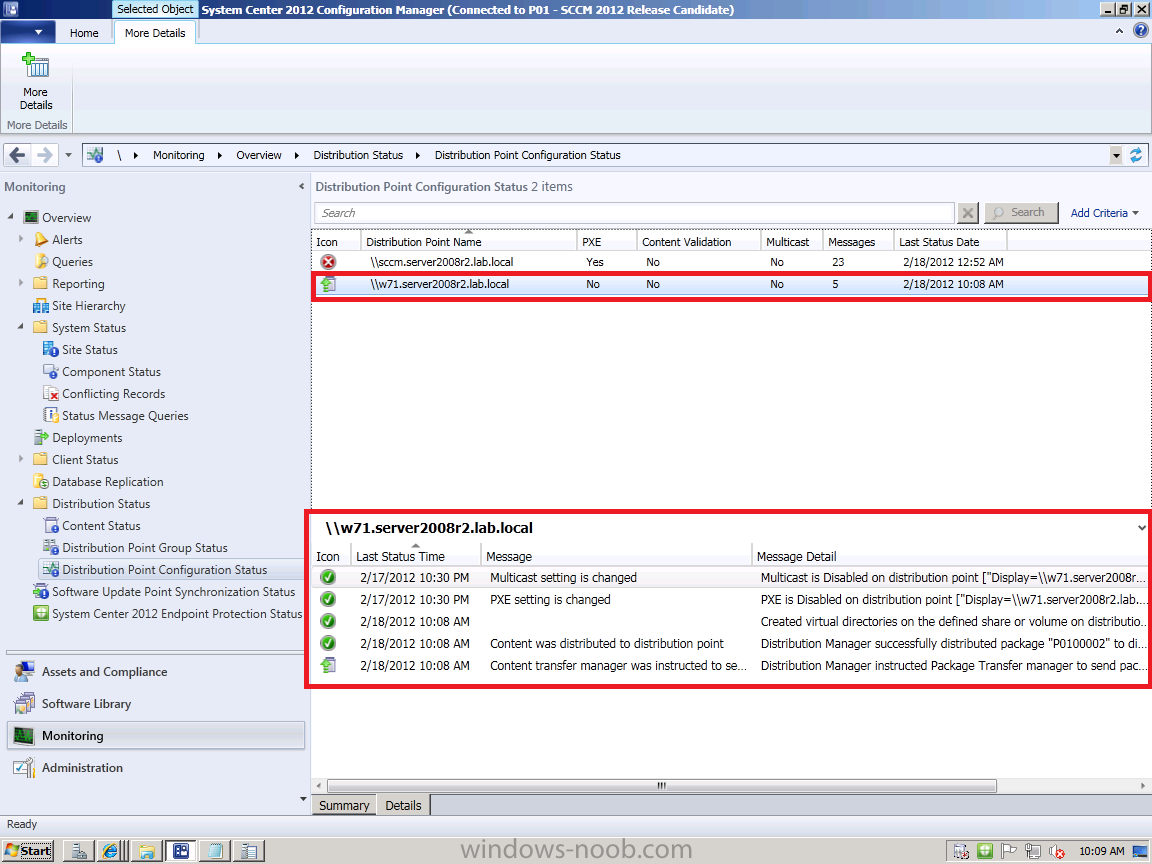
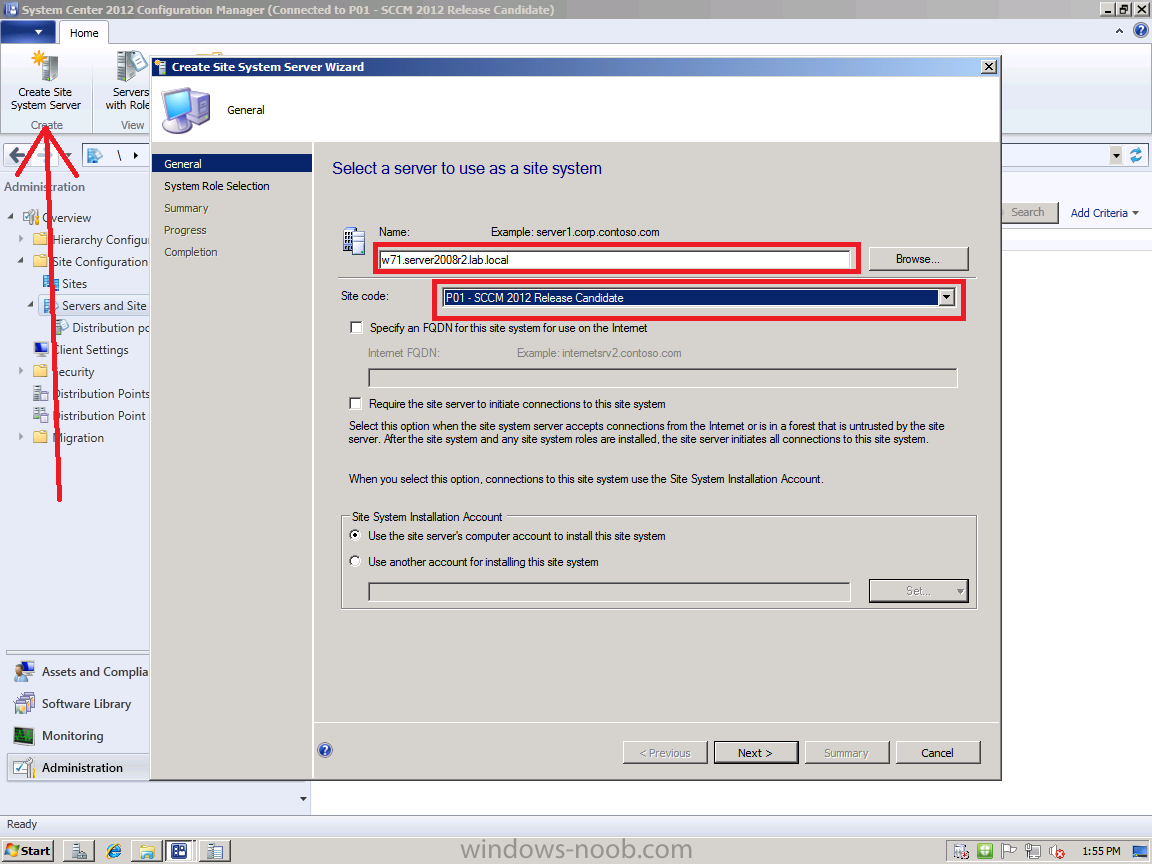
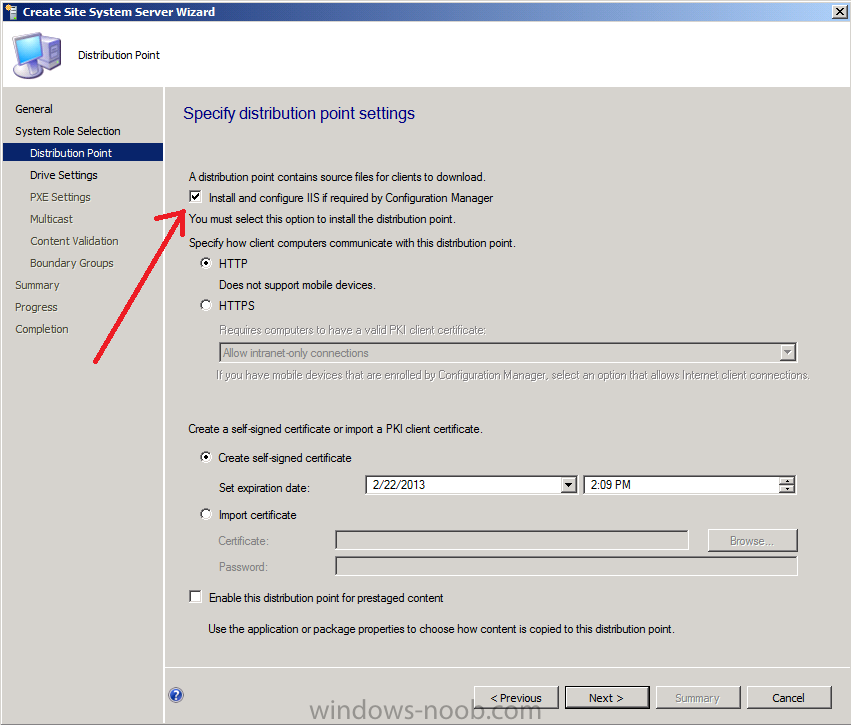
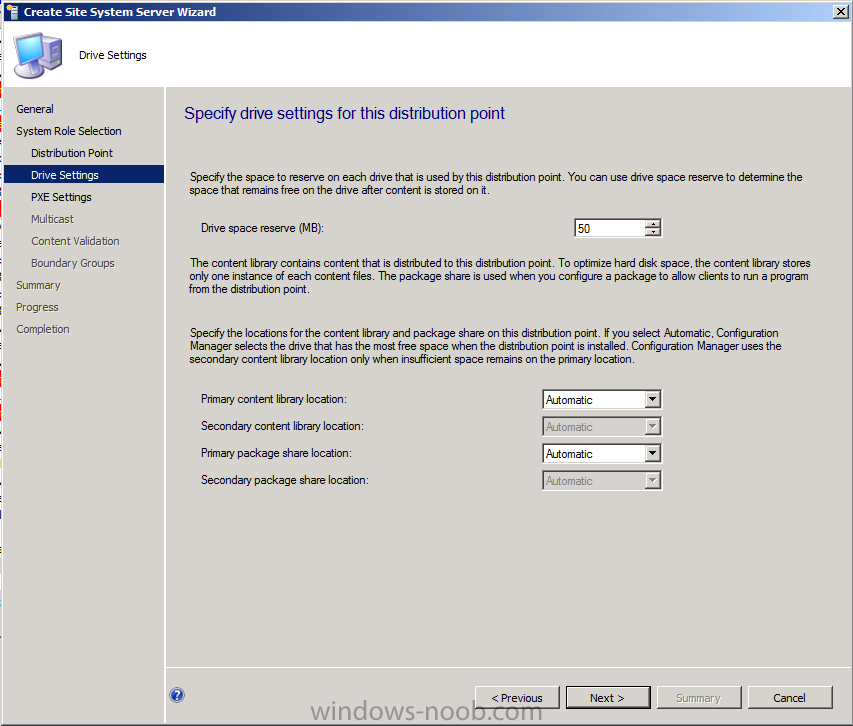
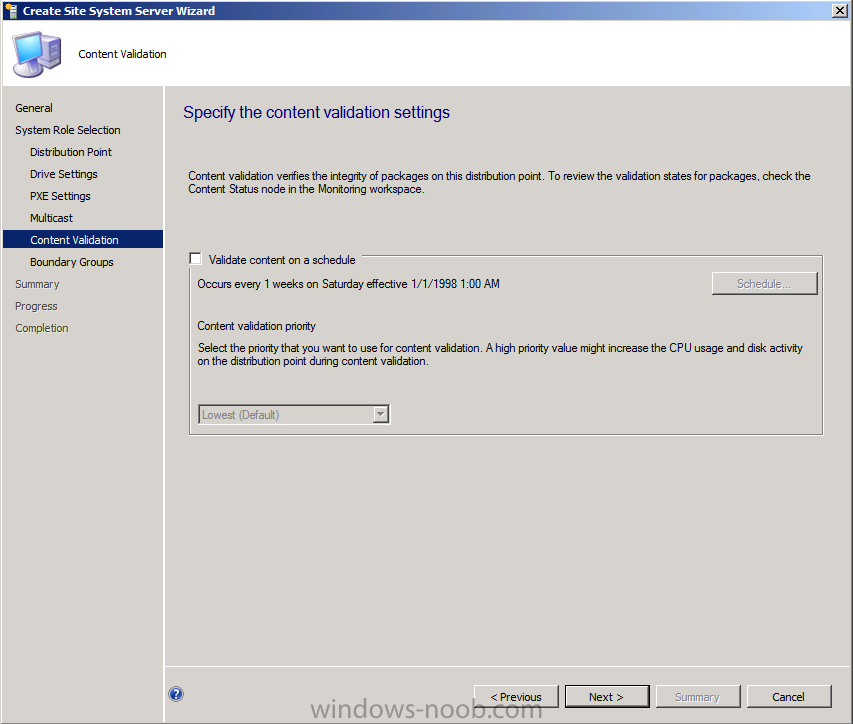
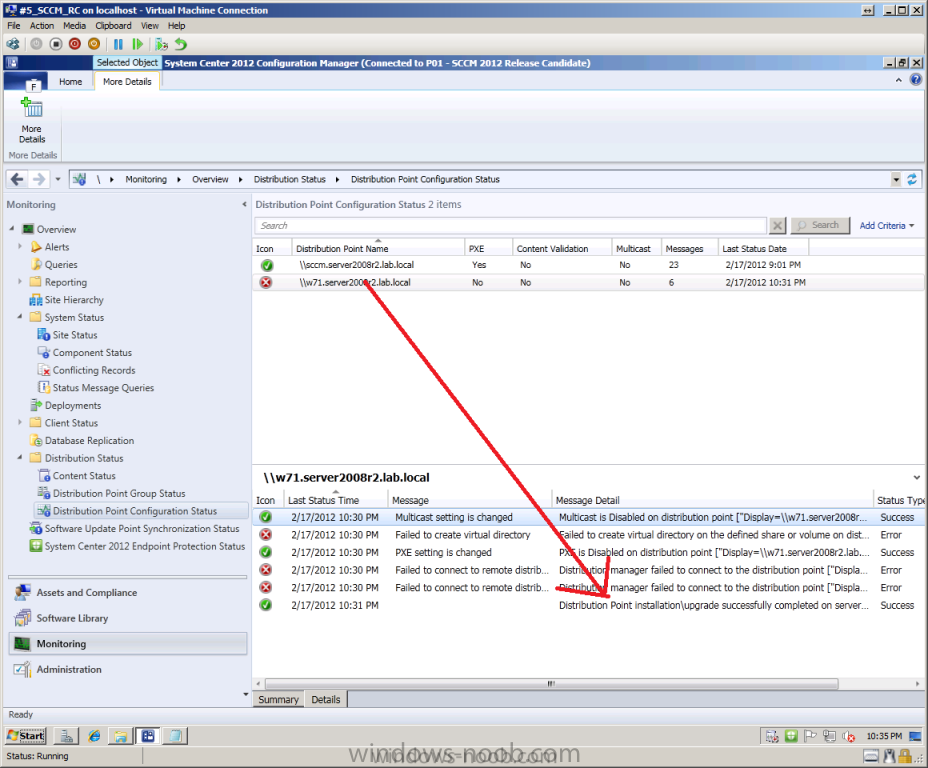
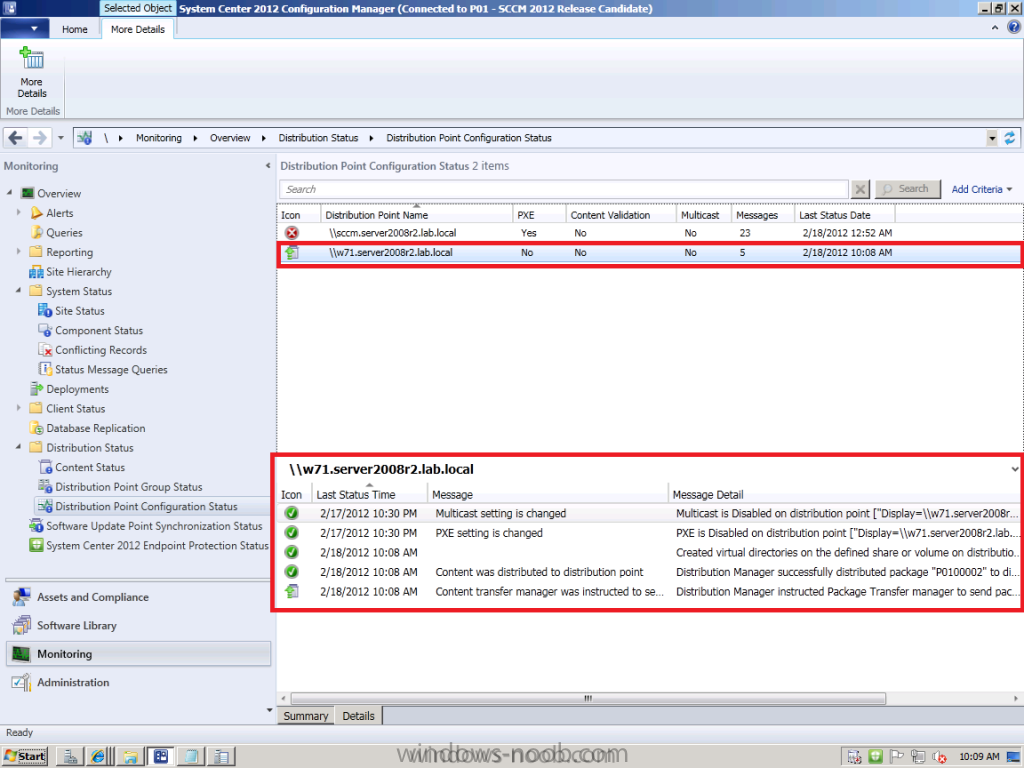
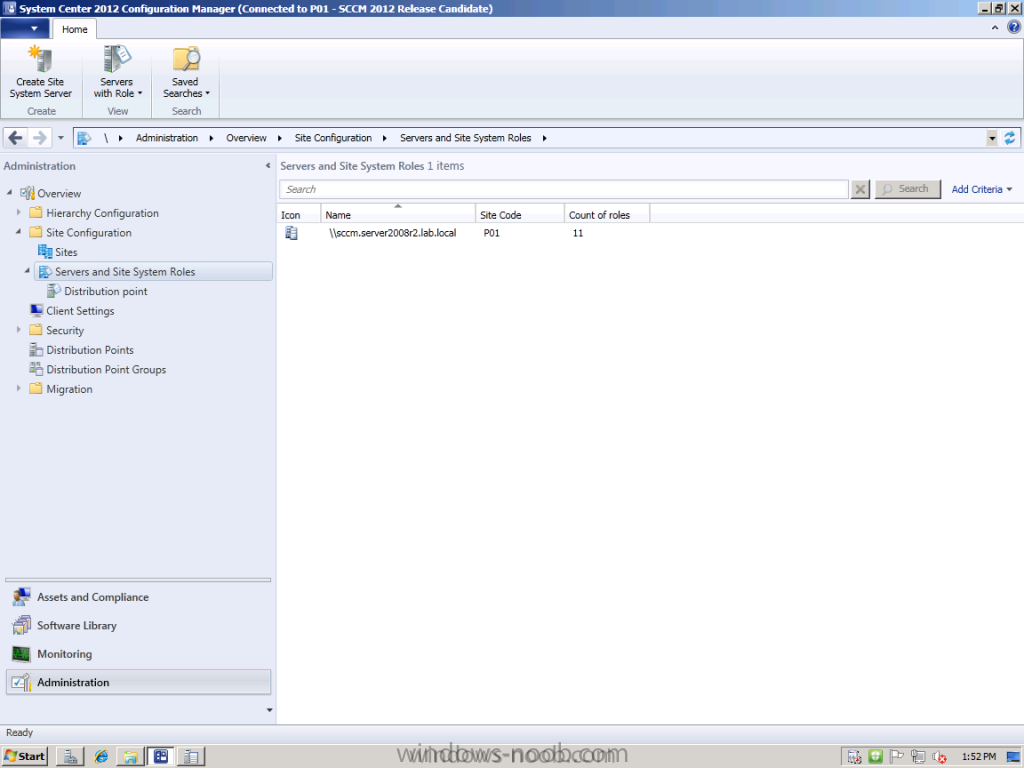
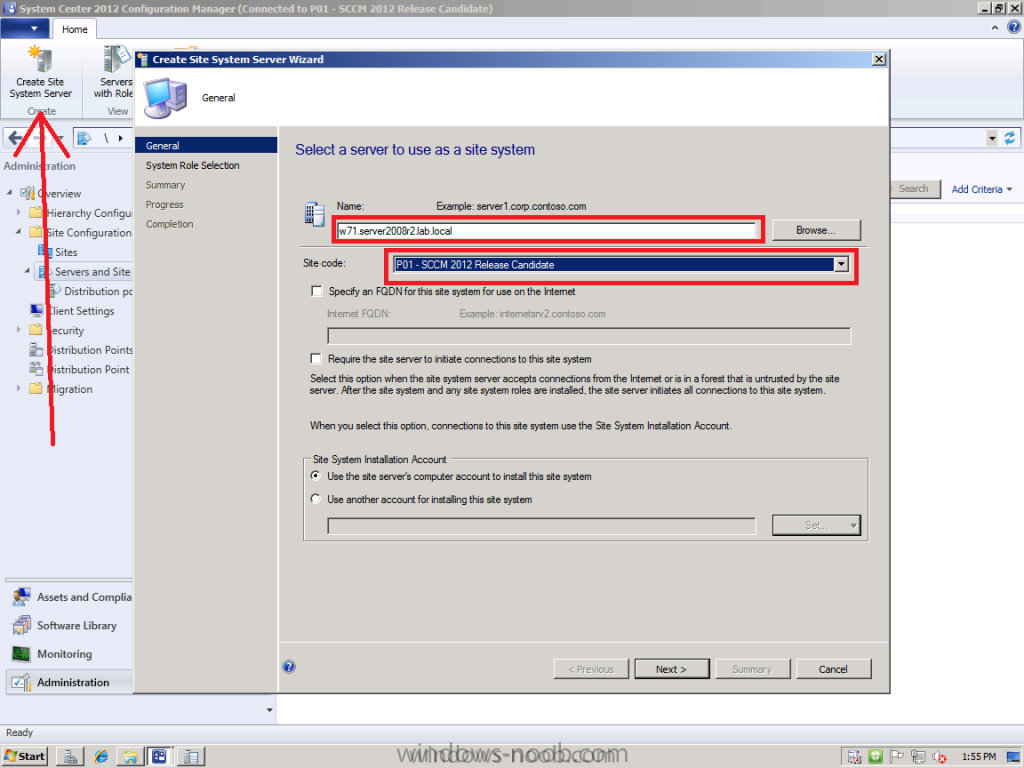
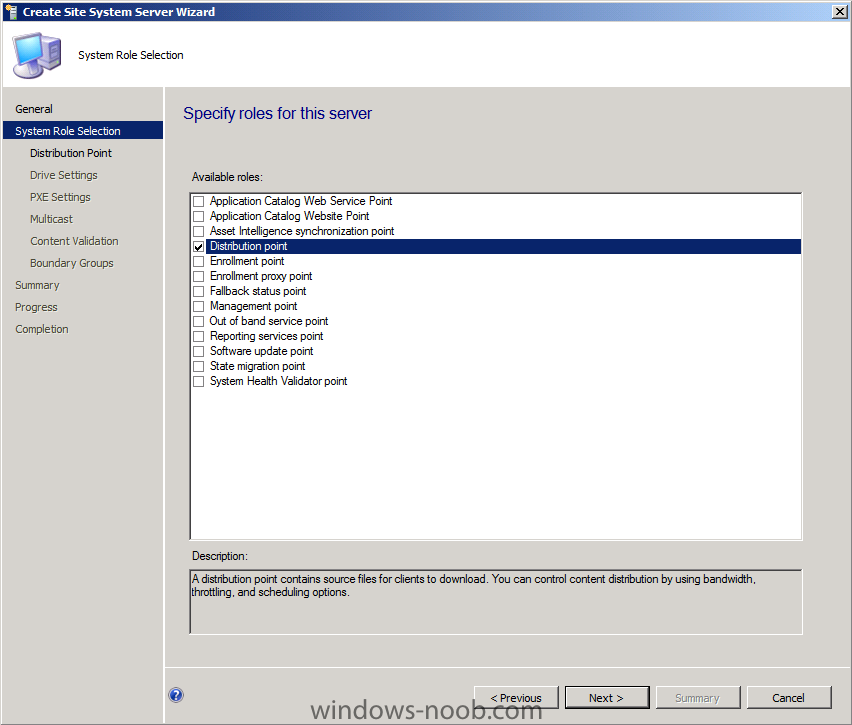
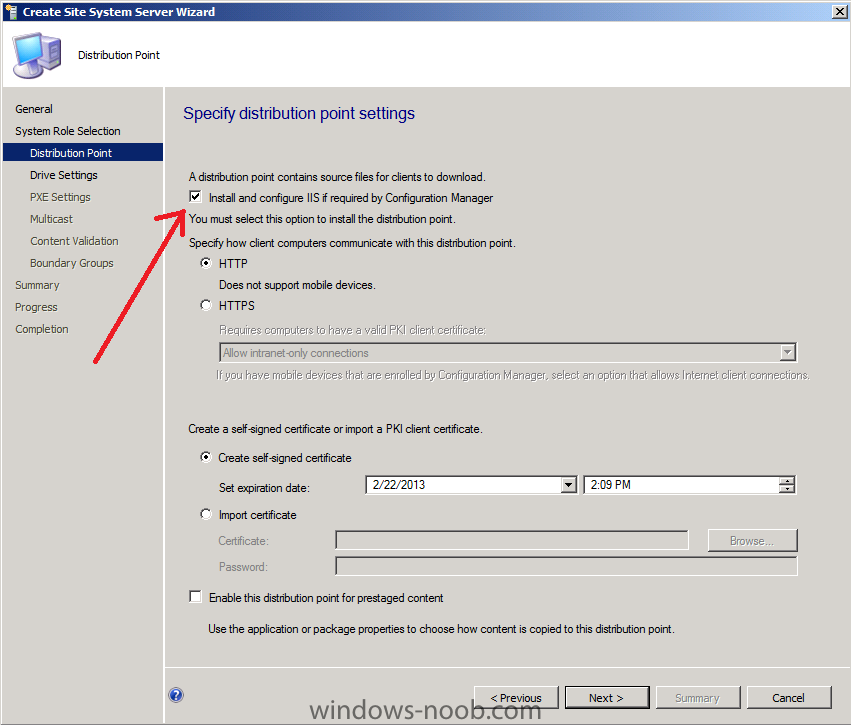
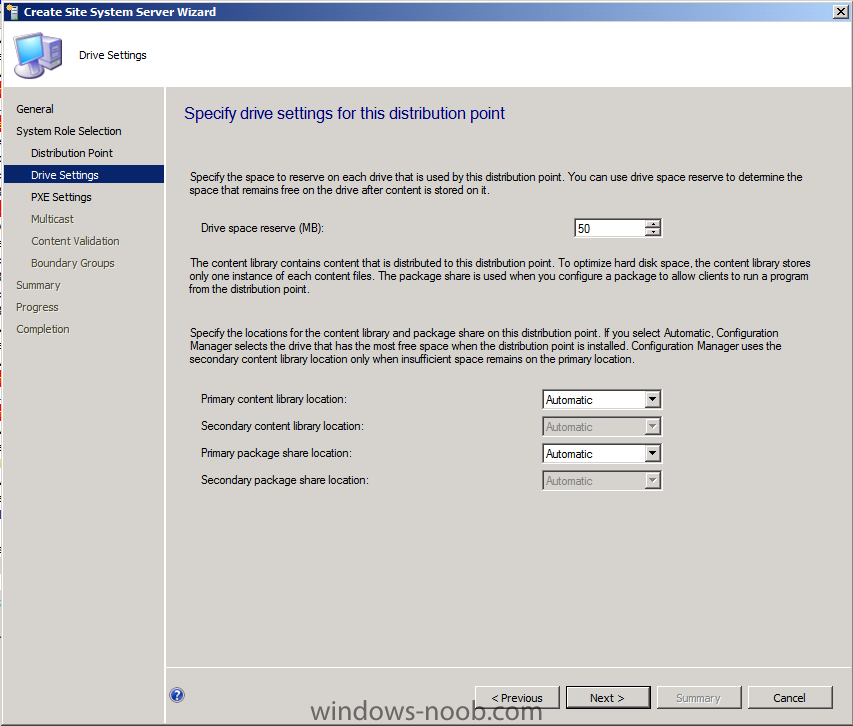
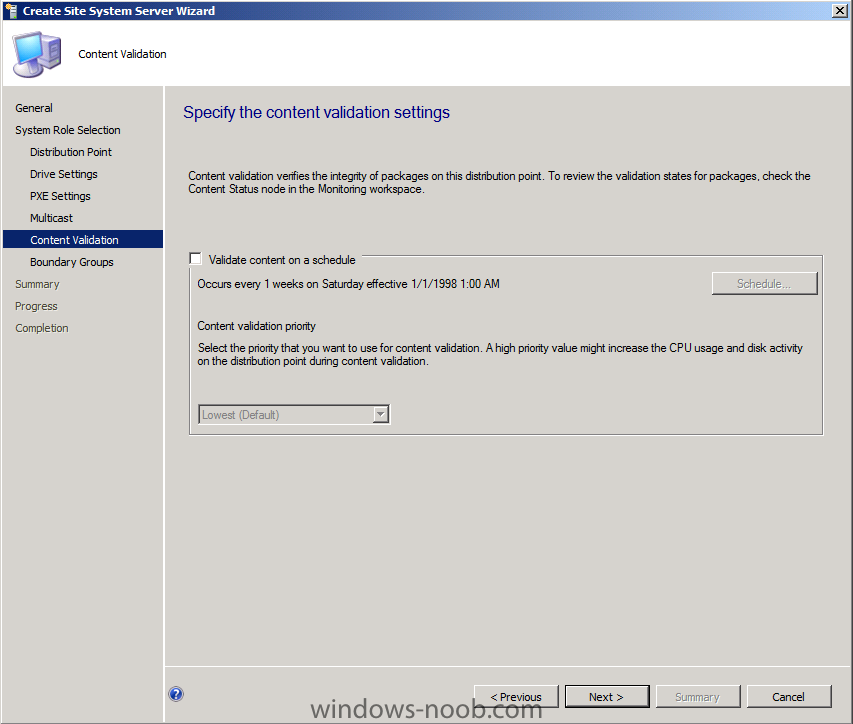
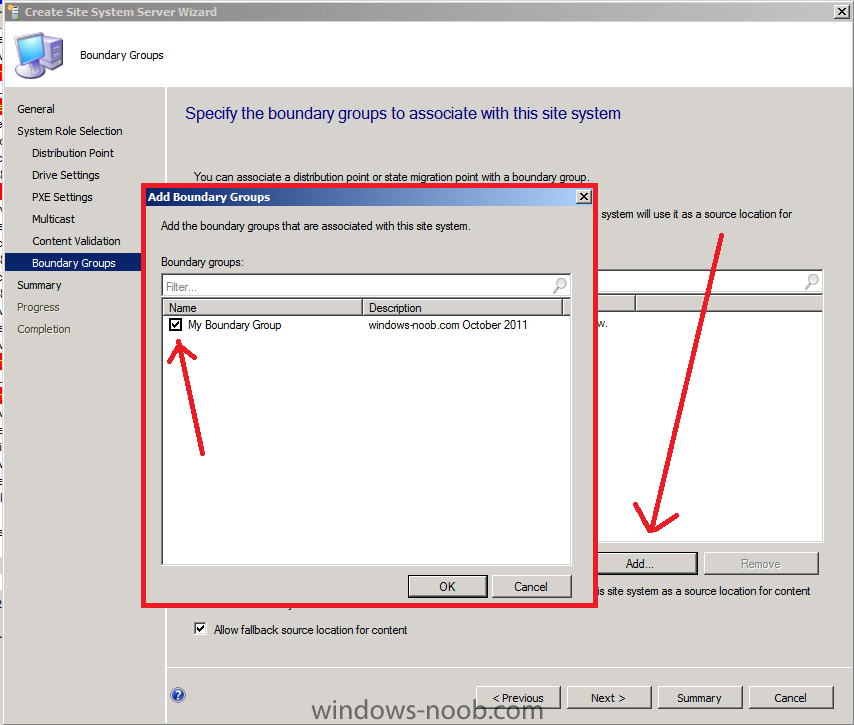
This is a good question so I've modified your original topic to make it more descriptive and i'm pinning this. Recommended reading:- Site System Requirements:- Technet Note that you cannot enable PXE or Multicast support on your Windows 7 Distribution Point. To troubleshoot your distribution point creation on the Windows 7 box, on your ConfigMgr site server, what does the distrmgr.log file tell you about the problem, if it's complaining about being unable to connect, then you could have firewall issues and/or wmi problems related to the fact that you have a firewall in place and/or IIS is not installed on the Windows 7 computer or doesn't have the following IIS features installed: * IIS 6 WMI compatibility Feature * IIS 6 Management compatibility feature so verify the firewall settings, and then verify that you installed IIS on the Windows 7 computer.. Next verify that you added the ConfigMgr site server computer account to the Local Administrators group on the windows 7 box. The screenshot below is from the Windows 7 computer. Once you've added the account to the Local Administrators group, Note: You must reboot the Windows 7 box before installing the DP role otherwise IIS may not get installed automatically. Installing the Distribution Point Role To start the installation of the Distribution Point role on the Windows 7 box, select Servers and Site System Roles from Site Configuration in the in the Administration part of the ConfigMgr Console. In the Ribbon, click on Create Site System Server, when the wizard appears, type in the FQDN of your Windows 7 computer and select your site code that it will be connected to from the drop down menu. For Site System Installation account you have the option of specifying a service account or the site server computer account, whichever one you use must be a member of the Local Administrators group on your Windows 7 computer. Click Next Select Distribution Point from the list of available roles specify if you want IIS installed automatically or not (Install and configure IIS if required by Configuration Manager) specify drive settings... Do NOT enable PXE support (as this is a Windows 7 box and Windows Deployment Services is not available on Windows 7), just click Next Do NOT enable Multicast (as above) If you want to validate content on a schedule select the box, otherwise click next click next, then for Specify the Boundary Groups to associate with this Site System, click Add and select your boundary from those listed click next through to completion of the Wizard. Monitoring the Distribution Point Role Installation to see how your distribution point installation is progressing, you can monitor it in the ConfigMgr console, check the Distribution Point Configuration Status in Monitoring. Click on the machine name, then select the Details tab underneath, what does it say for your Windows 7 machine, you can even click on More Details in the ribbon to see if it provides more details about your issue. once it's done installing the Distribution Point role you'll see it reports it successfully and creates the needed folder structure on your windows 7 box. if you forgot to install IIS then install it on your Windows 7 box (you don't need to reinstall the distribution point role) once again, monitor the status of your dp again, it should refresh to all Green (ok) and finally, it's all done and working and content is being copied to your new distribution point.


- 50 replies
-
- 1
-
-
- Site Systems
- Windows 7
- (and 2 more)
-
you need to use unconditional excludes like in this example
-
did you add the computer you are interesting in testing to the collection where you advertised a task sequence ? does that client have a working configuration manager client ?
-
if you want to migrate registry keys from one location to another (provided that they are detected) then use the following code in a custom XML file <?xml version="1.0" encoding="UTF-8"?> <migration urlid="http://www.microsoft.com/migration/1.0/migxmlext/WNB_move_reg_keys"> <!-- WNB_move_reg_keys.xml is basically a customized version of MigUser.xml --> <_locDefinition> <_locDefault _loc="locNone"></_locDefault> <_locTag _loc="locData">displayName</_locTag> </_locDefinition> <!-- This component migrates Old Reg Keys and moves them to NEW locations provided that the key exists --> <component context="User" type="Application"> <displayName _locID="regkeymove_user">Move old reg keys to new location</displayName> <role role="Settings"> <detects> <detect> <condition>MigXmlHelper.DoesObjectExist("Registry","HKLM\SOFTWARE\CUSTOM [CUSTOMval#1]")</condition> </detect> </detects> <rules> <include> <objectSet> <pattern type="Registry">HKLM\SOFTWARE\CUSTOM [CUSTOMval#1]</pattern> <pattern type="Registry">HKLM\SOFTWARE\CUSTOM [CUSTOMval#2]</pattern> </objectSet> </include> <locationModify script="MigXmlHelper.ExactMove('HKLM\SOFTWARE\CUSTOM [PrevCUSTOMval#1]')"> <objectSet> <pattern type="Registry">HKLM\SOFTWARE\CUSTOM [CUSTOMval#1]</pattern> </objectSet> </locationModify> <locationModify script="MigXmlHelper.ExactMove('HKLM\SOFTWARE\CUSTOM [PrevCUSTOMval#2]')"> <objectSet> <pattern type="Registry">HKLM\SOFTWARE\CUSTOM [CUSTOMval#2]</pattern> </objectSet> </locationModify> </rules> </role> </component> </migration> this code checks if the following registry key exists HKLM\SOFTWARE\CUSTOM\CUSTOMval#1 and if it does, it migrates the following two registry keys from the SOURCE pc HKLM\SOFTWARE\CUSTOM\CUSTOMval#1 HKLM\SOFTWARE\CUSTOM\CUSTOMval#2 to the following locations on the DESTINATION pc HKLM\SOFTWARE\CUSTOM\PrevCUSTOMval#1 HKLM\SOFTWARE\CUSTOM\PrevCUSTOMval#2 Note: if you are using a 64 bit OS with a 32bit application (X86) that you'll probably want to change the path statements for example, change HKLM\SOFTWARE\CUSTOM [CUSTOMval#1] to HKLM\SOFTWARE\Wow6432Node\CUSTOM\ [CUSTOMval#1] cheers niall
-
another quick USMT post, if you want to avoid your Pinned items (for example Microsoft Office Outlook) from being migrated in a Win7 to Win7 migration, then include the following in a custom XML file as explained in this post, why do you want to do this, well if you don't you just might see Microsoft Office Outlook 2007 (2) as your pinned item name (for example) in the taskbar. <component type="Documents" context="user"> <displayName _locID="miguser.User_Exclusions">User Exclusions</displayName> <role role="Data"> <rules> <unconditionalExclude> <objectSet> <!-- exclude items pinned on the taskbar otherwise it'll cause the same items to show up as (2) desktop--> <pattern type="File">%APPDATA%\Microsoft\Internet Explorer\Quick Launch\User Pinned\TaskBar\* [*.lnk]</pattern> </objectSet> </unconditionalExclude> </rules> </role> </component> and that's probably a good idea looking at my current Windows 7 taskbar the following items are pinned cheers niall