anyweb
-
Posts
9271 -
Joined
-
Last visited
-
Days Won
371
Everything posted by anyweb
-
 just so i understand you correctly, you've enabled command prompt support as per this guide (it's an option on the boot image), you press F8 during WinPE and a command prompt appears, at the point you type cd %temp% then cd SMSTSlog then notepad SMSTS.log ?
 -
x:\windows\temp\smstslog\ is a directory, it should have one or more files in it, namely SMSTS.log,. do you see that file in that directory ?
-
Require administrator approval if users request this
anyweb replied to ashridge uk's topic in Configuration Manager 2012
this question was already answered here fyi. -
that's not the whole screenshot, the deployments tab is listed at the bottom of the screen, do you see that ?
-
hi Dustin, did you follow my steps exactly ? please stay tuned for a coming post which will cover the next steps, but as a hint, you need to first of all make your MDT boot image PXE bootable.
-
Help | Few questions & problems regarding SCCM 2012 RC2
anyweb replied to Davidsod's topic in Configuration Manager 2012
first things first, ConfigMgr 2012 is in release candidate version right now, so i really hope you are not rolling it out in production. on to your questions... 8gb is not too much at all, more ram is always better, here's the supported hardware list from Microsoft on Technet - http://technet.microsoft.com/en-us/library/gg682077.aspx#BKMK_SupConfigSiteSystemReq Configmgr 2012 now has Active Directory Forest Discovery - read about it here - http://technet.microsoft.com/en-us/library/gg712308.aspx#BKMK_ADForestDisc tly do i need to do and configure in order to integrate the WSUS & the SCCM server? is it recommanded? where can i find information about it? ConfigMgr relies on WSUS to synchronise and download updates from Microsoft, - Software Updates in configmgr are described here on technet - http://technet.microsoft.com/en-us/library/gg682068.aspx error code 0x00000032 means unsupported meaning you tried to do something that you are not allowed to do, like capture while in windows when you should be in windows PE the smsts.log file will reveal what package is missing, you need to update that package to the dp's and then try again. you still have the legacy package/program model in ConfigMgr 2012 for just this purpose. -
it should work, can you check your spam inbox and see is there anything in there...
-
oh yes it has press F8 and browse to x:\windows\temp\smstslog\ what do you see in there ?
-
have you tried installing it at all ? did you get any errors ?
-
Setting computername during deployment
anyweb replied to anyweb's question in Troubleshooting, Tools, Hints and Tips
only thing to note is if you are using MDT integration to add scripts etc, then you'll need to use MDT 2012 Rc1 (currently) -
so what package is ST100004, the message is clearly telling you what the problem is, you need to distribute that package to your distribution points, then try again
-
same place, click on the deployments tab when you've selected your package, does it say 'no items found' or what ? show me a screenshot
-
you are looking in the wrong place for example if it's a deployment for an Application, go into software library, locate the app itself and click on the deployments tab, you can then select your Deployment and right click, delete
-
nothing has been said, so we are all in the dark, just like you
-
i've alerted the DOCS team and they will change the wording to spell this out clearly during the next scheduled Documentation Update
-
well it's not that obvious and I just checked the Docs, they state which still doesn't reveal that you must Deploy to a User collection in order for this option to be valid, however the actual option "Require administrator approval if users request this application" does mention users specifically and not Systems/Devices so hopefully that clears it up cheers niall
-
correct, you must deploy it to a User collection try it and see
-
what collection is it Deployed to ?
-
show me a screenshot of what you are seeing
-
How to spread the load of software updates with sccm 2012?
anyweb replied to bartb's topic in Configuration Manager 2012
well to spread the load, put your virtual machines on different SANS to increase your IOPS -
smsts.log file should reveal the issue (on the client you are trying to capture)
-
What do you use to write your HTAs?
anyweb replied to slater7607's question in Frontends, HTA's and Web Services
feel free to post some guides for the rest of us , actually when editing my changes live i use notepad in WinPE on the live code then press F5 to refresh the result -
What do you use to write your HTAs?
anyweb replied to slater7607's question in Frontends, HTA's and Web Services
notepad ++ is all you need, and then copy the bits and pieces that you find on the internet and you'll be good to go, what else do you need ? -
Allow HTA to write a line to smsts.log?
anyweb replied to slater7607's question in Frontends, HTA's and Web Services
or incorportate mdt and with ztiutility it will log to whatever your script is called, eg: mycustomscript.log -
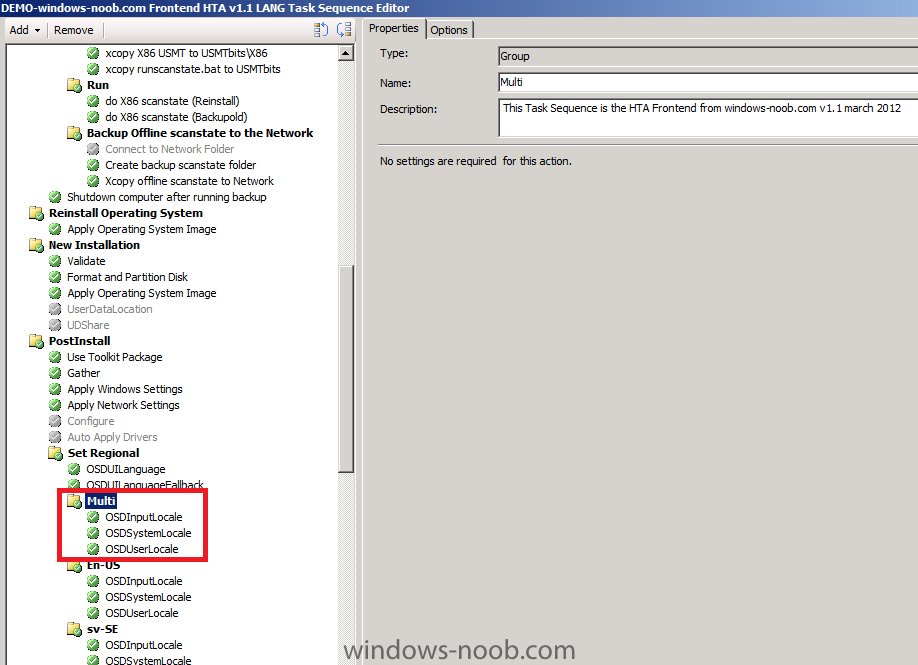
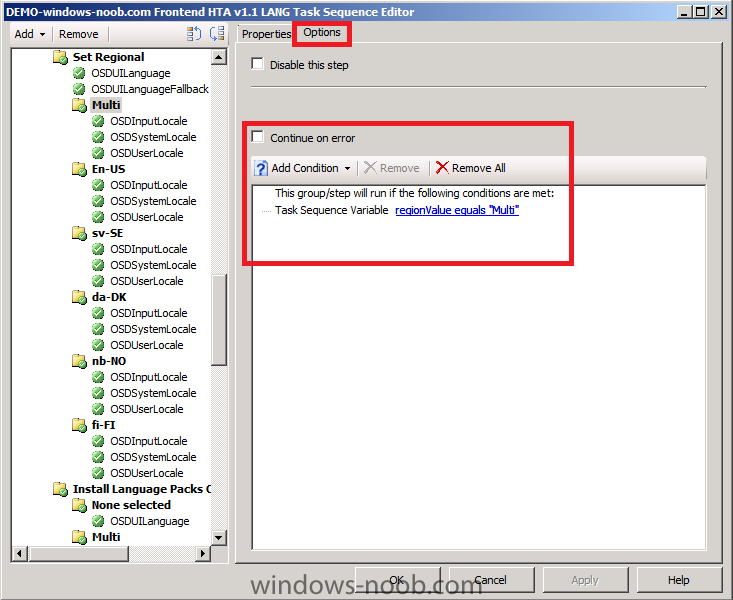
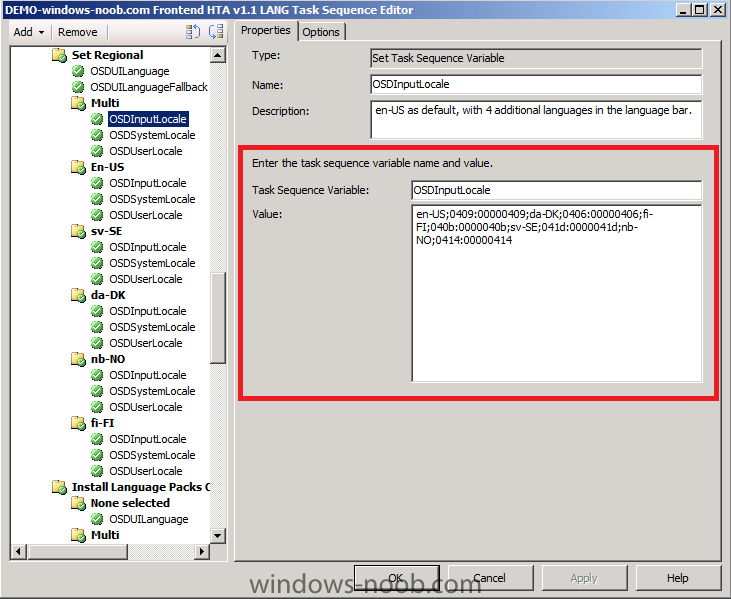
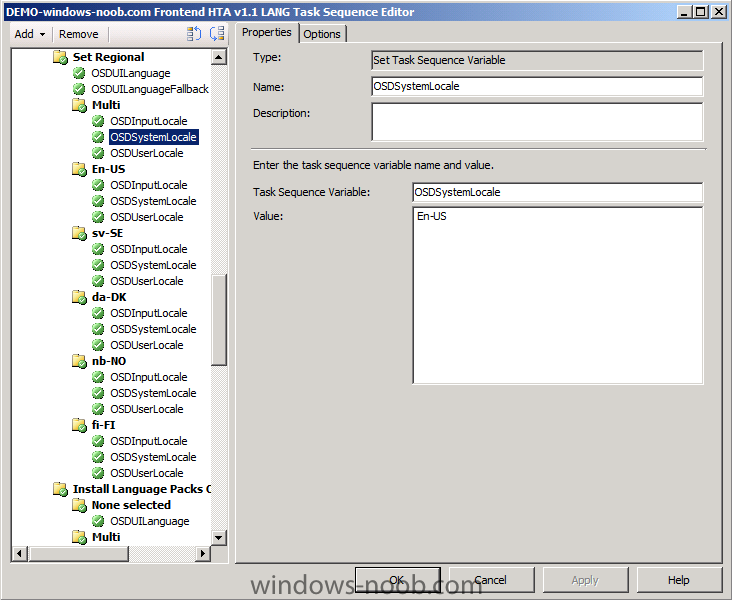
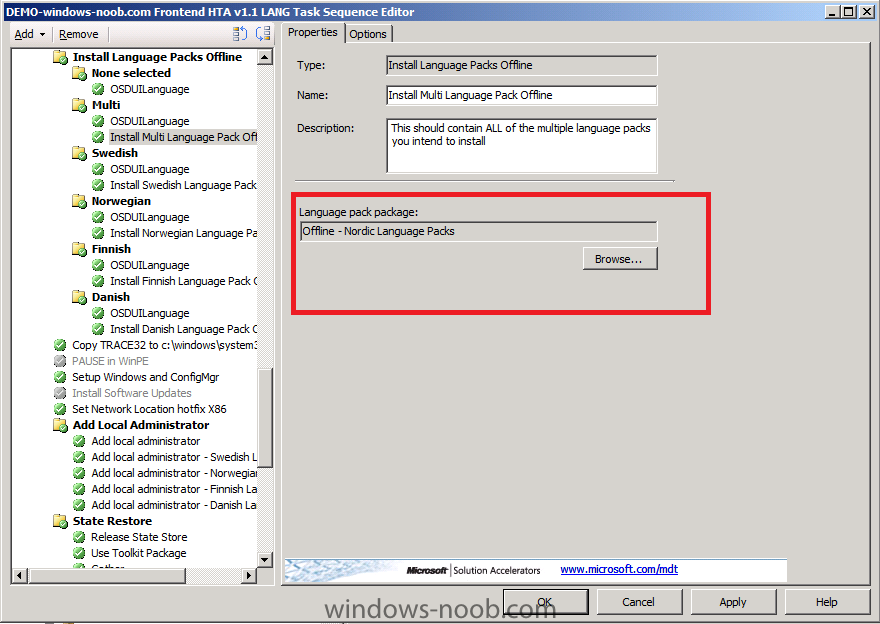
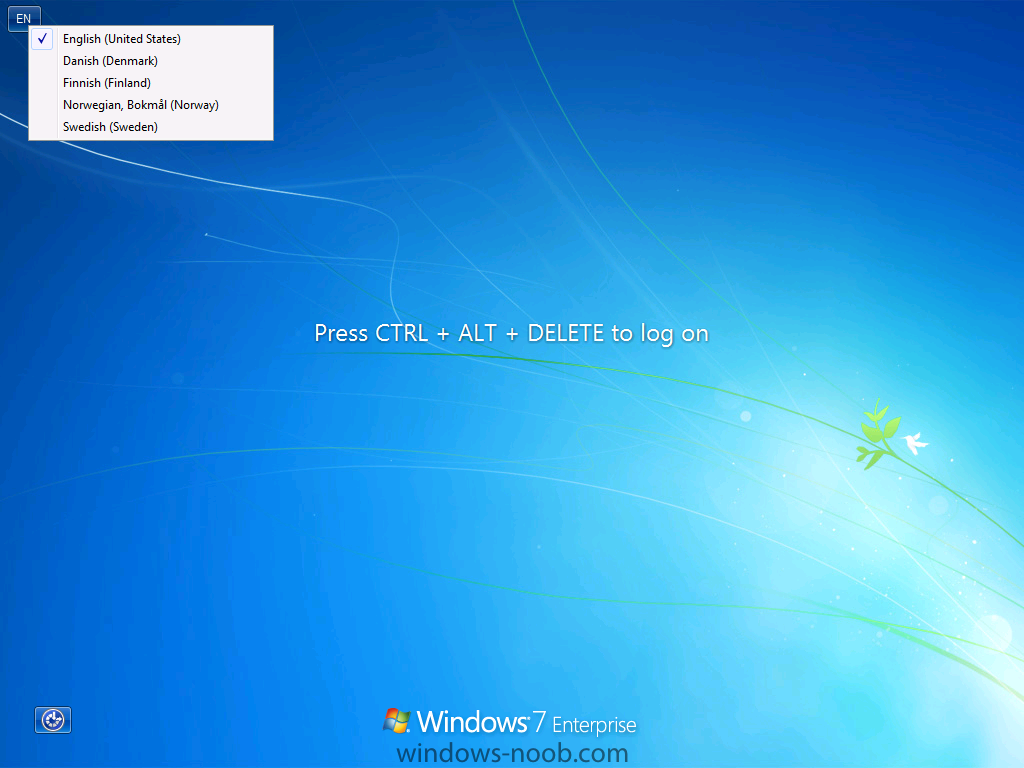
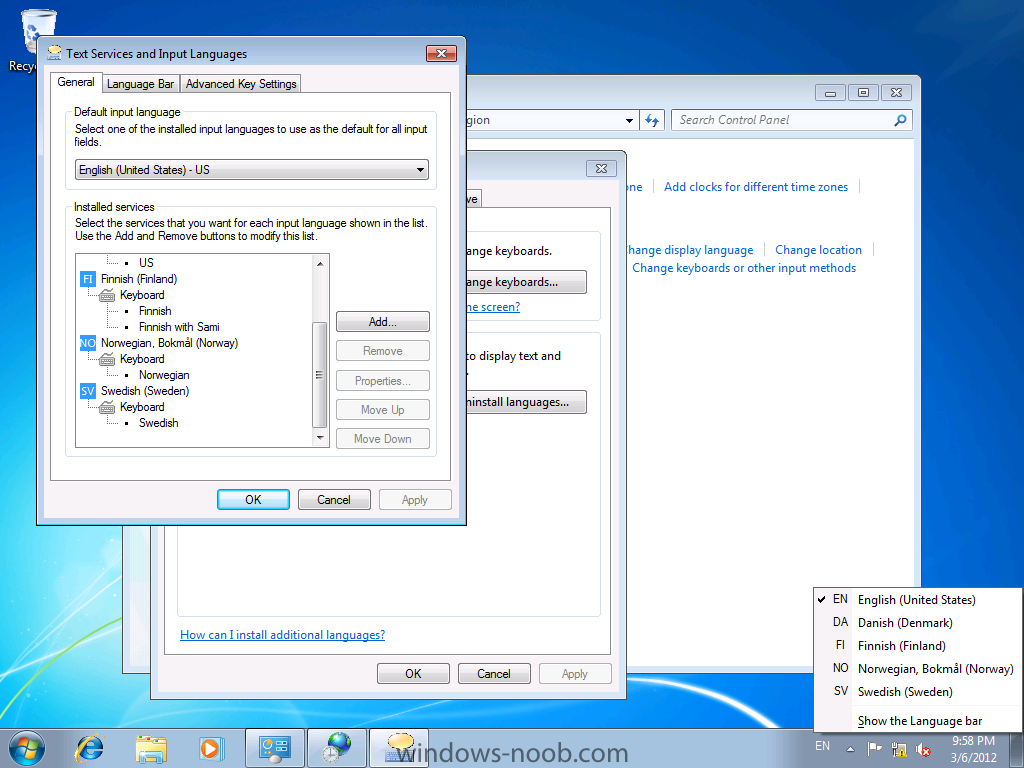
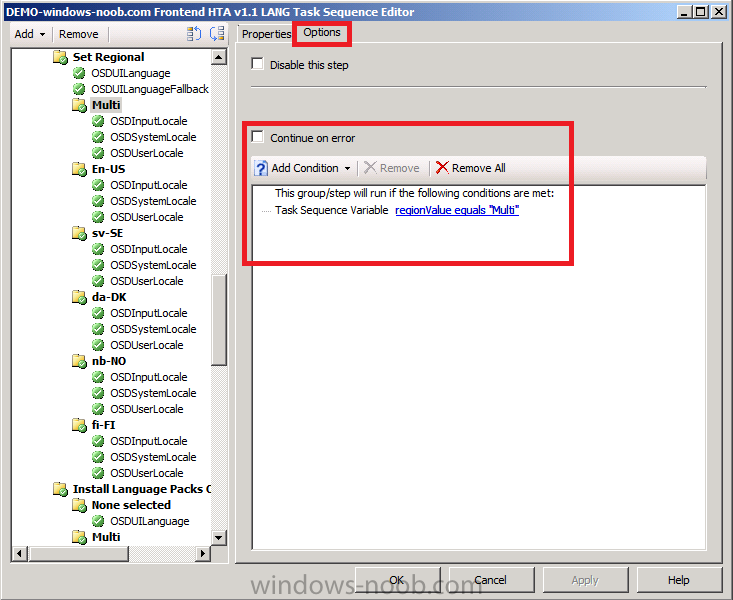
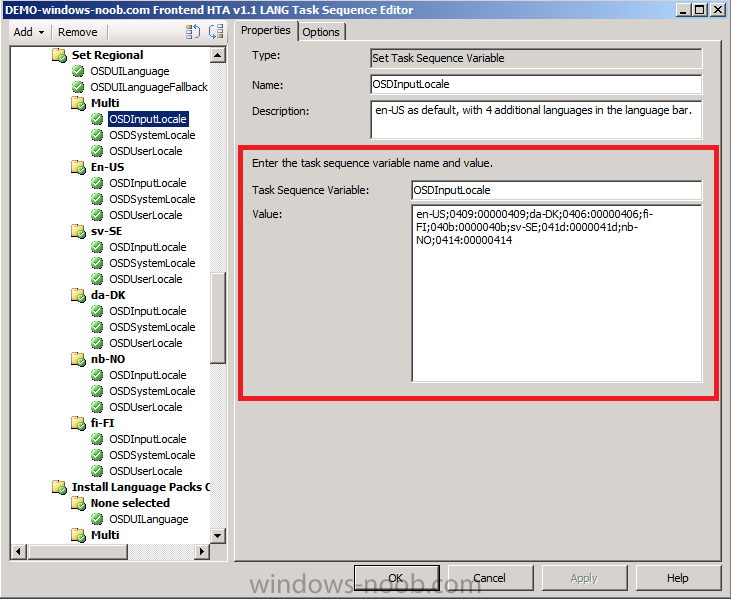
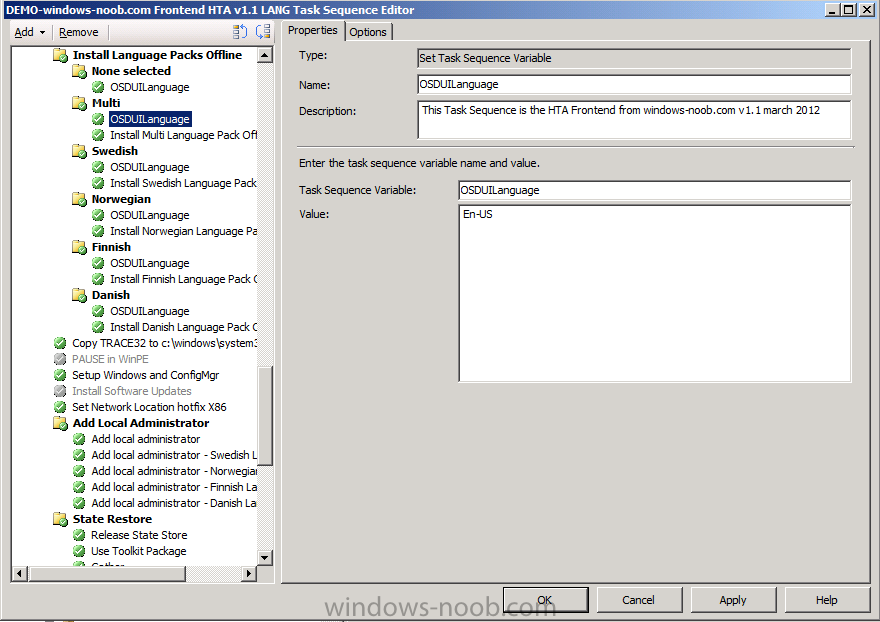
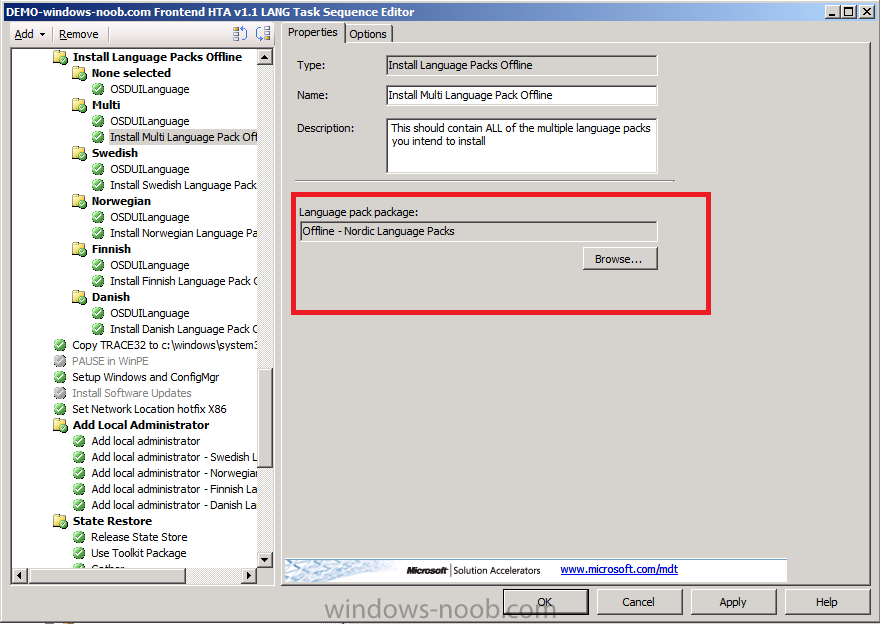
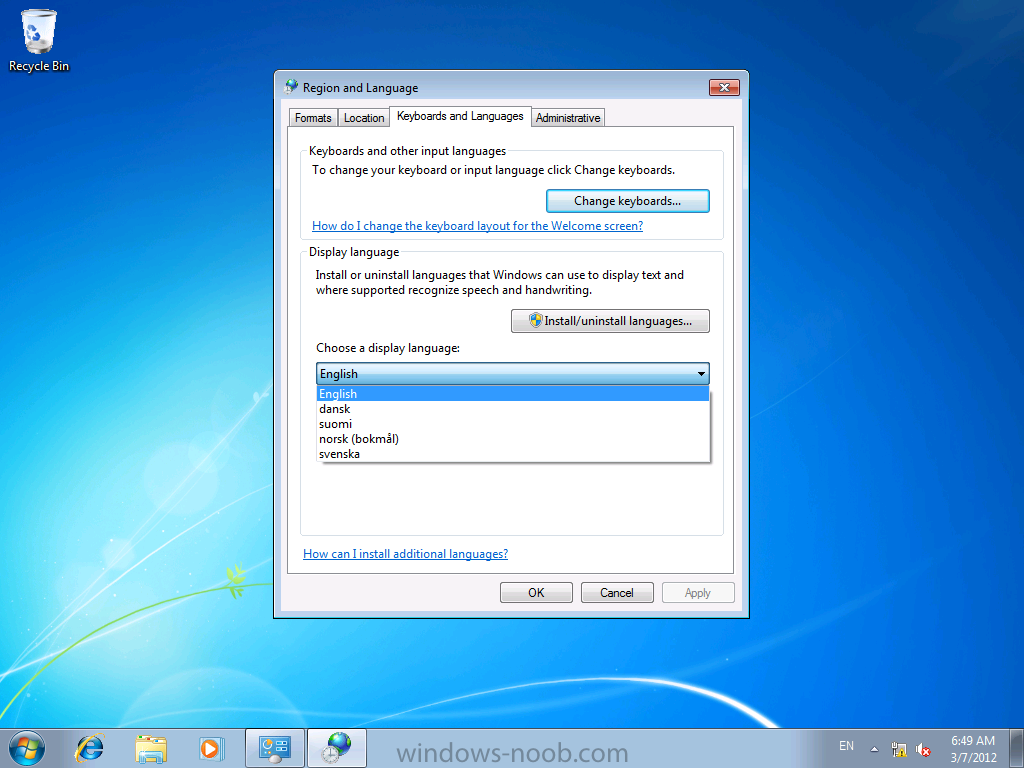
This post is an addition to Part 4 where we installed Language packs on a one-by-one basis (i.e. one language pack selected, one installed, one keyboard layout selected, one installed). What if you want to install multiple Language packs and multiple Keyboard Layouts well this is how to do it...but before we continue, make sure you have successfully completed Part 4 before attempting this. To make this possible I adapted the windows-noob.com Multipurpose FrontEnd HTA so that i could select Multiple languages and Multiple Keyboard Layouts, this change is only a minor one to both the backend script (HTA) and the task sequence itself, so rather than explain all about them i'll post this bits you need to know here. Also, I havn't ported these changes yet *but will soon* into the BitLocker Frontend HTA which I think looks much cooler, so I hope that you check that one out also. So where do we start, with the actual frontend HTA backend code.. aka, the HTA itself. The following section has been changed in the Deploymenu.HTA file, <tr> <td class="taskTableLeftCell" >Regional Settings</td> <td colspan="3" class="taskTableSpanSecondAndThirdCell"> <select name="regionDropDown" id="regionDropDown"> <option value="None">None</option> <option value="Multi">Multi</option> <option value="En-US">En-US</option> <option value="sv-SE">sv-SE</option> <option value="da-DK">da-DK</option> <option value="nb-NO">nb-NO</option> <option value="fi-FI">fi-FI</option> </select> </td> </tr> <tr> <td class="taskTableLeftCell" >Language Settings</td> <td colspan="3" class="taskTableSpanSecondAndThirdCell"> <select name="languageDropDown" id="languageDropDown"> <option value="None">None</option> <option value="Multi">Multi</option> <option value="English">English</option> <option value="Swedish">Swedish</option> <option value="Danish">Danish</option> <option value="Norwegian">Norwegian</option> <option value="Finnish">Finnish</option> </select> </td> </tr> the new bits in both drop down menus (regional/language) are this <option value="None">None</option> <option value="Multi">Multi</option> and they offer us the ability to set nothing (and get the default en-US/English) or to select Multi or to select ONE language or ONE keyboard layout. The MULTI option is special. It simply sets a variable which will run a group of steps to select multiple languages and/or keyboard layouts in the task sequence. The screenshot below shows both Regional (keyboard layout) and Language options have been set to Multi via the drop down menu. Setting the Regional options If we select Multi for Regional options then the following group is run in the task sequence the Options tab is where it detects the RegionValue variable value and if it equals Multi this group is executed the first step of the group sets the OSDInputLocale variable and it sets the Default keyboard layout (the first one listed) and the remaining available keyboards added to windows the values in that step are as follows en-US;0409:00000409;da-DK;0406:00000406;fi-FI;040b:0000040b;sv-SE;041d:0000041d;nb-NO;0414:00000414 Note: You can get a list of these values on MSDN here. the remaining steps of this group simply set OSDSystemLocale and OSDUserLocale to be equal to en-US. Setting the Language options The first step of this group (which only runs if the LanguageValue variable=Multi) is to set the OSDUILanguage, I set it to en-US. The next step installs the Language pack offline. The only magic here is in the language package, it must contain ALL of the language packs you intend to install as part of your Multi Language installation, so in my example I install 4 languages, Swedish Danish Finnish Norwegian and all those language packs are in my Offline Nordic Language Pack. Your multi language pack could contain however many languages you intend to install as a group, but the more you add the longer the install will take. What is the result ? so what do you get when it's all done ? you get the ability to use a drop down keyboard selector on the Windows 7 login screen and you can choose the same keyboard layouts within Windows and the languages are available also jod done, i'd say :-) Download the goodies Here's the updated task sequence and HTA files, you dont have to use a HTA to set the variables you can do that via collection variables or some other method but doing it in a HTA is cool. People will like you more. DeployMenu.zip have fun ! cheers niall