anyweb
-
Posts
9258 -
Joined
-
Last visited
-
Days Won
371
Everything posted by anyweb
-

how can I deploy Windows Server 2008 using SCCM 2007 sp1
anyweb replied to anyweb's question in Deploy Server 2008
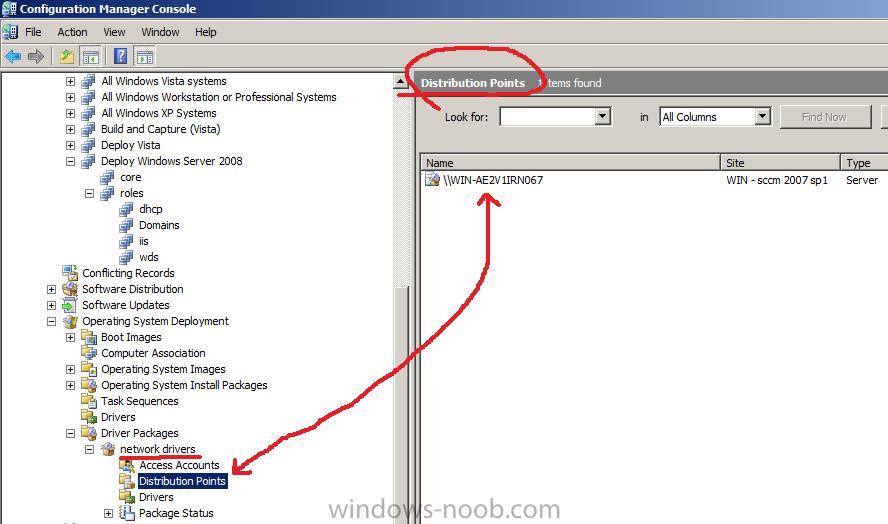
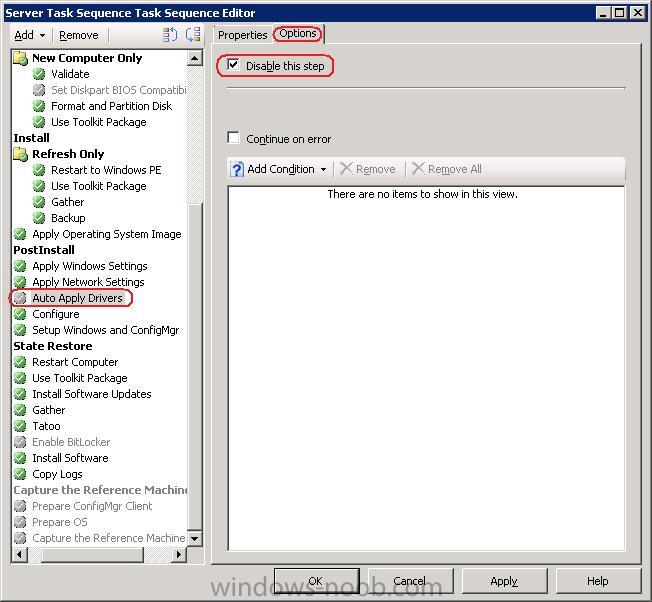
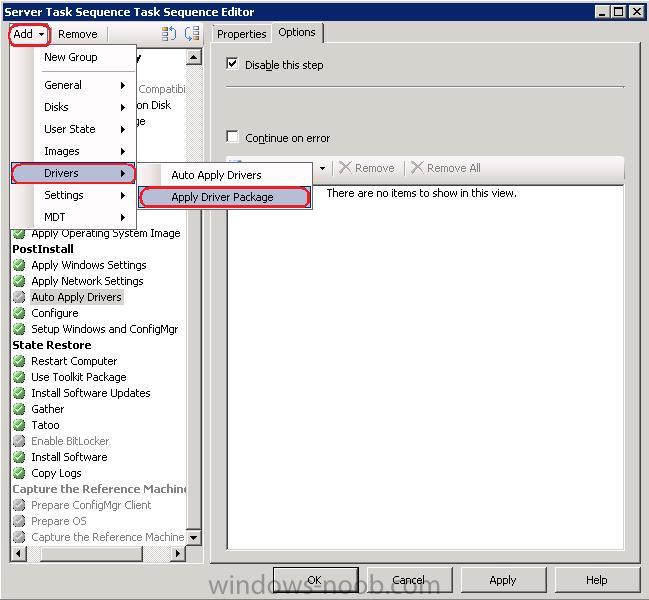
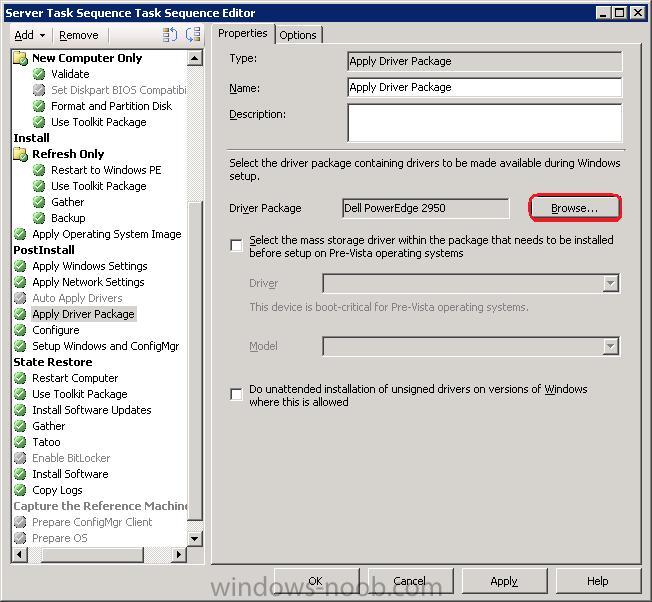
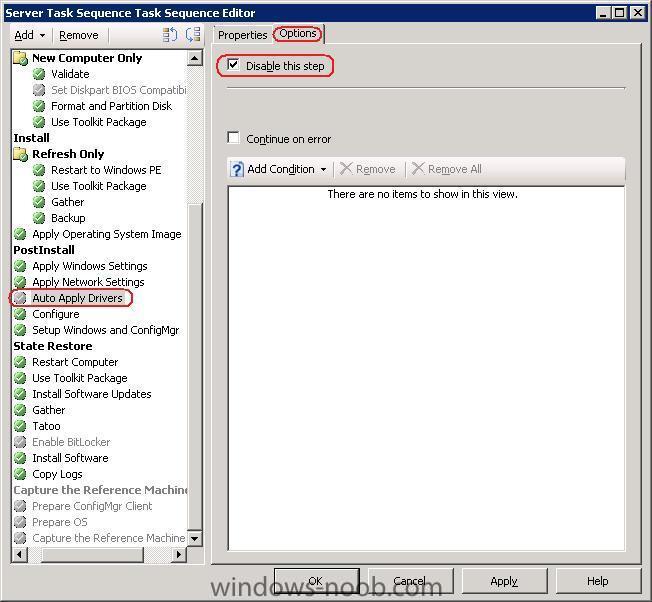
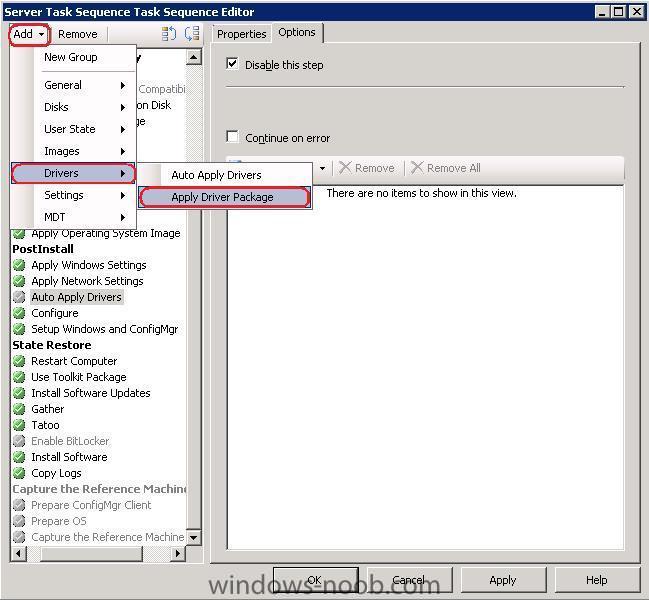
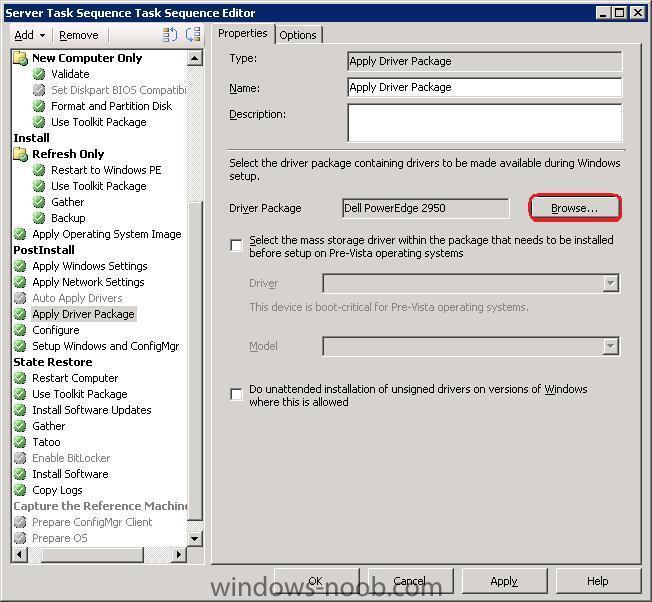
Apply drivers to the image If we wanted to apply drivers to our server, we could select the Auto Apply Drivers option in the PostInstall section of the task sequence and configure it to point to where our drivers are stored. Disable Auto Apply Drivers Step However we want to use an Apply Driver Package instead as it is more accurate in applying drivers that we choose, so select the Auto Apply Drivers step, click on the Options Tab and disable the Auto Apply Drivers step. Add the Apply Drivers Package Step Now click on our Add drop down menu and select Drivers, then select Apply Driver Package When the Apply Driver Package step appears, click on Browse and browse to your previously created Server 2008 driver package, in this example we use one for a Dell Poweredge server. To troubleshoot drivers not getting installed on your server check that:- 1. You have Created a Driver Package and added your drivers to it 2. Assigned that package to a Distribution Point 3. Make sure the Distribution Point(s) have been updated. TIP: When testing drivers in a working Task Sequence, only add ONE driver at a time, then test if it causes any problems by doing a full deployment, often times a driver can break a task sequence so adding many at a time will make it hard to find out which one is causing the problem without examing the SMSTS.log file. For detailed info on Targetting drivers see this Technet Article. Note: The Driver Packages folder (which you create and share to hold the driver packages..) must have the following permissions Creator=Owner Everyone=Reader System=Co-owner in the above example, System refers to the SYSTEM account of the COMPUTER that has SCCM running on it, make sure that SYSTEM also has NTFS write priveledges to the drivers package share read here for more info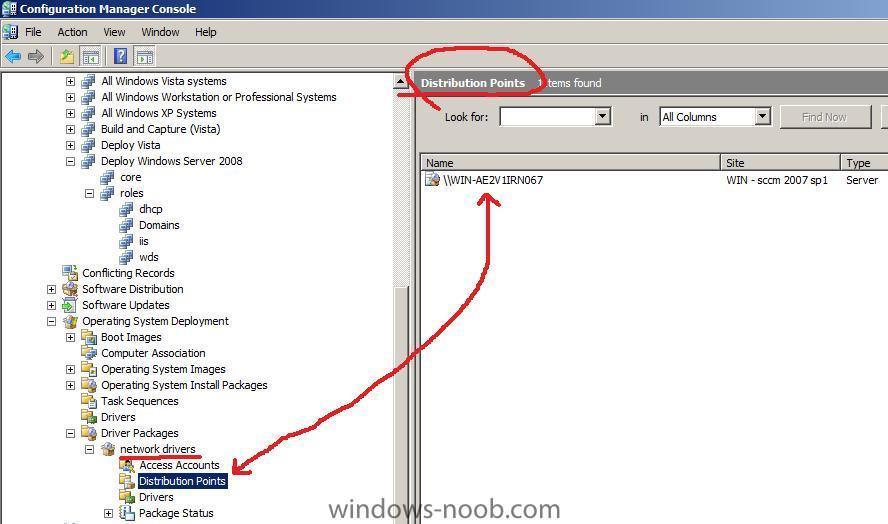
-
actually here is where your problem starts can you please verify what boot image you are using to capture with (32 or 64)
-
Configuring Software Update Point within SCCM
anyweb replied to anyweb's question in Software Update Point
change Description to Product and then you'll get only Windows XP stuff.. for All Windows XP Updates choose the following search criteria Product Windows XP Expired No Superseded No for All Windows XP Security Updates Product Windows XP Bulletin MS Expired No Superseded No cheers anyweb -
SCCM07 SP1: Problems with CfgMgr-Agent
anyweb replied to alittlelouder's topic in Configuration Manager 2007
have you extended the AD schema for SCCM ? if not please do so now and see does this error message go -
its not capturing because youve entered some details incorrectly, what did you enter in the capture settings ???
-
SCCM07 SP1: Problems with CfgMgr-Agent
anyweb replied to alittlelouder's topic in Configuration Manager 2007
a domain admin account is good enough, you must have something else incorrectly configured, are you SURE that your System Status component logs are all green and ok ????? can you post your entire MP log you mentioned above here ? (as an attachment) -
is there a switch/hub/anything between the server and the client ? can you eliminitate that temporarily from the equation ?
-
Collection: All Computers that don´t have a specific application installed
anyweb replied to wmmayms's question in Collections
great post, thanks for sharing and keep it up pinned ! -
have you verified there are no problems in DNS ? does everything work normally after winpe ? have you added network drivers to boot.wim ?
-
SCCM07 SP1: Problems with CfgMgr-Agent
anyweb replied to alittlelouder's topic in Configuration Manager 2007
which account are you using to do the actual Client Install, it is specified in the Site Settings, Client Installation Methods, client Push Installation, Accounts it is that user that must be a local administrator of the target machine you want to install the client on -
is this in a virtual environment ? have you checked your SMSTS.log ?
-
What is the Dell Deployment Pack? The Dell Deployment Pack (DDP) is an easy-to-use graphical user interface (GUI)-based tool that integrates directly into the Microsoft® System Center Configuration Manager (SCCM) 2007 (ConfigMgr) console. It eliminates the need for command-line tools and scripts normally used in the Dell™ OpenMange™ Deployment Toolkit (DTK) software. To configure and deploy your Dell systems, you need to select configuration options and commands on the GUI using drop-down lists and check boxes (see "Using The Dell Deployment Pack"). These selections make your system deployment an easy, automated task. http://www.delltechcenter.com/page/Dell+De...ver+Deployment)? Overview of Dell Deployment Pack Features Using the ConfigMgr Task Sequence Editor, you can do the following with the Dell Deployment Pack: * Configure your system's Baseboard Management Controller (BMC), Dell Remote Access Controller (DRAC), Redundant Array of Independent Disks (RAID), and BIOS. You can configure BIOS and RAID using .ini files. You can configure your system settings using the GUI or command-line interface (CLI) options. You can also configure RAID using the Array Builder wizard. * Create a Dell-specific boot image that will be used in the OS deployment. * Create and apply driver installation packages for specific Dell systems. System Requirements: * Microsoft System Center Configuration Manager with Service Pack 1 or newer * At least 1 GB of free disk space on the same drive that contains the ConfigMgr installation files * A configured Network Access Account for ConfigMgr site(s). Supported Hardware Systems The Dell Deployment Pack 1.0 supports the following Dell PowerEdge™ systems: PowerEdge 800, 830, 840, 850, 860, 1850, 1855, 2800, 2850, 6800, 6850, 1900, 1950, 1955, 2900, 2970, 6950, SC1435, 2950, T105, R200, R900, R805, M600, M605, T605, R300, T300, R805, PV0100, PV0500, PV0600, NX1950, M805, M905, and R905. Supported Operating Systems * Microsoft Windows Server® 2003, Small Business Server (SP2, R2) * Microsoft Windows Server 2003 x86, x86_64 Edition SP2 and SP2 R2 * Microsoft Windows Server 2008 Standard and Enterprise Editions (x86) and (x86_64) * Microsoft Windows® Small Business Server 2008 x64 (64 bit Edition) * Microsoft Windows Essential Business Server 2008 x64 (64 bit Edition) sounds cool, now if I can just persuade Dell to send me a Server to test this on.... cheers anyweb
-
yup, it's either one or the other, or separate them using subnets and networking. cheers anyweb
-
OnSearchComplete - Failed to end search job. Error = 0x80072efd.
anyweb posted a question in Software Update Point
I had this problem recently and the fix was quite easy, but finding out why it was failing (to install any updates on any machine connected to the SCCM SUP) was difficult. the basic errors in the WUAHANDLER.LOG file found on the client were repeated again and again I googled the Scan failed with error = 0x80072efd. error and got some ideas that it was a lack of commuinication between the client and the sccm sup. This turned out to be correct in the end. The SUP was a WSUS server running as a site server and was multihomed, one network card served the internal network and the other served the public. The SCCM server was on the internal network and tried to access the WSUS but got an error After much troubleshooting i decided to ping the Configuration Manager wsus server from a working machine, it reported the correct IP on the internal network. I then checked a non working client and pinged Configuration Manager wsus server from it, it replied back with the IP address of the WSUS public ip. That was the Eureka moment ~! As a quick test, and configuring IIS on the WSUS server to 'Listen To all IPs' the WSUS server was responding with the correct IP address when pinged, and windows updates started flowing hopefully this may help someone in the same situation cheers anyweb -
your WDS service can exist on the sccm server or elsewhere the choice is yours, you can also upgrade a RIS service to WDS, if its windows 2003 server sp1, simply upgrade to sp2 and the ris service will become wds... please review this Technet page about WDS and SCCM cheers anyweb
-
SCCM07 SP1: Problems with CfgMgr-Agent
anyweb replied to alittlelouder's topic in Configuration Manager 2007
welcome and thanks for your kind words :-) can you attach your SMS_MP_CONTROL_MANAGER log here please so that I can take a look at it ? -
how can I target applications to specific hardware
anyweb replied to anyweb's question in Deploy software, applications and drivers
if you notice the WMI query takes place in a GROUP, and the reason for that is it 'asks' the machine what it is, and if it matches what we expect it to be, then and only then does it do all the individual STEPS within that group (quickset and whatever else you add), so if it is NOT a D430 then it will not install anything within the D430 group and it will skip the group completely and go to the next step in the task sequence. I wouldn't mix operating systems types within a task sequence, that's just asking for trouble, it's probably possible but i wouldn't do it that way i hope this helps cheers anyweb -
ok then, try and catch me when i'm online and we'll do a session, my email is anyweb AT hotmail DOT com
-
are you willing to let me do a remote desktop to the server and look at it ?
-
ok so are you saying that the client software is not getting installed or that it just says 'client=no' in your collections ? is the client computer in your boundary ???
-
did you check your firewall settings on the client ? disable them for testing purposes the client push install account MUST BE A MEMBER of the LOCAL ADMINISTRATORS group just for the client installation, after it's installed you can remove the account from local admins group if it isnt, it will never install verify both those things cheers anyweb
-
how can I setup ISS for SCCM 2007 in Windows Server 2008
anyweb replied to anyweb's question in IIS/apache/web server
ok then, continue with the REST of the guide and ignore that problem for now. We'll come back to it later but i'm sure you have a configuration issue somewhere.. if you are willing I can do a remote desktop session with you but for now, for any new problems you get please open a NEW topic/thread cheers anyweb -
The Windows 7 beta release is already a few months old now, and Microsoft has already made quite a number of changes to its new windows release after that, as detailed in the Engineering 7 weblog. These changes would make it to the public via the release candidate, but it has always been a bit unclear as to when it would arrive. Thanks to a slip-up, we now know the RC is coming in May. via > http://www.osnews.com/story/21204/Windows_...e_Coming_in_May
-
ccm installed but console shows No Client
anyweb replied to smartmart's question in Troubleshooting, Tools, Hints and Tips
if it says 'client=no' then a Discovery Data Cycle hasnt been run yet, try running it manually by initiating the action on the client, then do a refresh in ConfigMgr cheers anyweb -
delete your X86 bootimage package and recreate it, then distribute it, then update the DP's then try again, cheers anyweb