anyweb
-
Posts
9277 -
Joined
-
Last visited
-
Days Won
371
Everything posted by anyweb
-
i'm seeing the same thing, i believe that it's acting as expected what are you hoping to do ?
-
thanks Mike and good luck with implementing it, please let us know how it goes and also feel free to contribute new matter as you learn cheers anyweb
-
There have been so many dates flying around concerning the upcoming Release Candidate for Windows 7, and it's beginning to become a daily subject in the blogosphere. Just when you thought that we were going to see a Windows 7 RC by the end of February, a trusted source within Microsoft has informed Neowin that the RC will not be ready by the end of February. At this time, Windows 7 RC is internally being tested and the official release date is set for April 10, 2009. The Windows team is right on schedule with development, and if there are no significant problems over the next few weeks the April 10, 2009 release date will remain in tact. Not much information is available at this time. We're uncertain if the release will be a world-wide, and Microsoft is expected to do more testing before releasing a RC build to the public. With that in mind, TechNet and MSDN subscribers should be the first to receive the RC build. A recent email conversation between Paul, over at GeekSmack, and Steven Sinofsky, Microsoft Senior Vice President of Windows, revealed that there have been over 500,000 suggestions since the public launch of the Windows 7 Beta. full story > http://www.neowin.net/news/main/09/02/20/e...april-10th-2009
-
can you post your smsts.log file here please sounds like it cannot find a policy which might mean you forgot to distribute something to a DP
-
nope, what version of SQL did you install ?
-
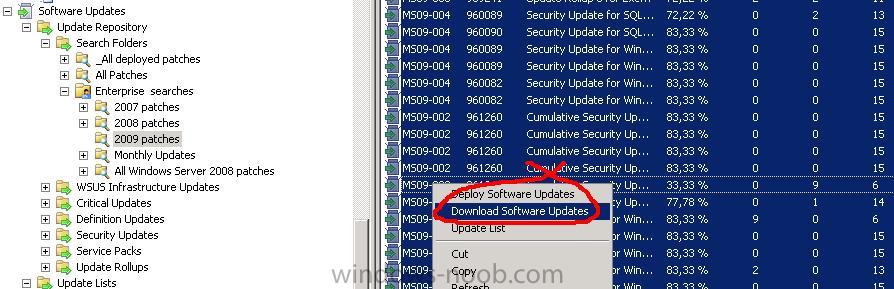
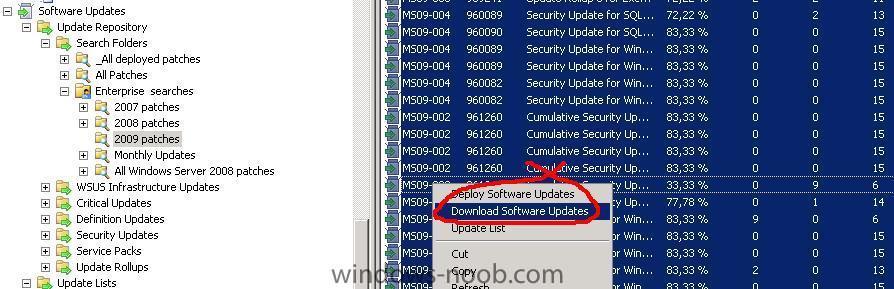
there are two ways of creating the files right click on updates listed in your search folders and choose DEPLOY or DOWNLOAD either way will 'provision' the updates locally, and the provisioning process is basically making a copy of said files within the SCCM hierarchy, note that if your permissions are ok that it may take some time for the WSUS server to actually download the updates to make them available for use to sccm, in other words, if wsus hasnt downloaded them yet then they cannot be provisioned cheers anyweb
-

Two children got different Software Update Lists from the same Upsteram server?
anyweb replied to Dom's question in Software Update Point
what do the logfiles on the site servers that are failing say.. -
sounds like share permissions problem, have you resolved this ?
-
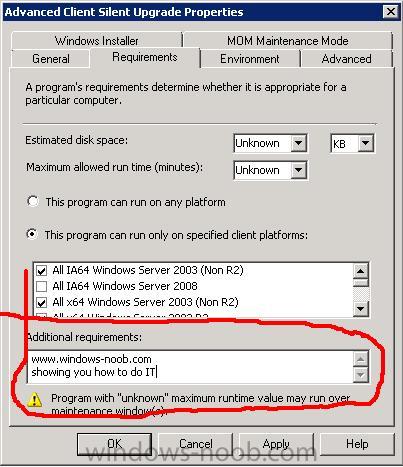
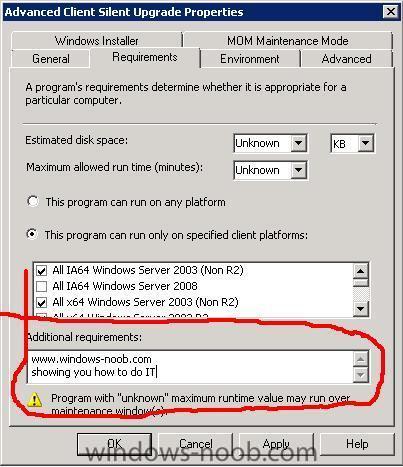
hi that field is just for informing users of what they might need to do before trying to run a program. below is from SCCMs help Program Name Properties: Requirements Tab Additional requirements Specifies any additional requirement information for clients, up to 127 characters. For example, you can notify users that they should shut down all other applications before running the program. This field is optional. If specified, the text appears on client computers in Run Advertised Programs in Control Panel. so you can safely ignore it... cheers anyweb
-
have you tried running a command line via the task sequence ?
-
Software Updates - The Network path was not found
anyweb replied to Dom's question in Software Update Point
what did you search for in the description field, it's quite fussy show me a screenshot and i'll tell you where youa re going wrong -
SCCM Server Changed - Architecture Changed
anyweb replied to Dom's topic in Configuration Manager 2007
you say the infrastructure is changing, but will any of the current SCCM setup remain ? -
No SMS_SiteToSiteConnection_WIN found, but
anyweb replied to togeoff's topic in Configuration Manager 2007
have a look at this post (which got lost when i lost two days data recently.... but I found the post again using googles cache -
How to Configure ConfigMgr 2007 with WSUS
anyweb replied to mazen's question in Software Update Point
did you read this yet ? i've moved your post to the correct area within SCCM -
how can I PRESTAGE a computer for WDS ?
anyweb replied to anyweb's question in Windows Deployment Services (WDS)
here's what microsoft say on the subject http://technet.microsoft.com/en-us/library/cc770832.aspx Prestaging Client Computers Creating Computer Account Objects in AD DS You can use Windows Deployment Services to link physical computers to computer account objects in Active Directory Domain Servers (AD DS). This is called prestaging the client. Prestaged clients are also called known computers. This allows you to then configure properties on the computer account to control the installation for the client. For example, you can configure the network boot program and the unattend file that the client should receive, as well as the server from which the client should download the network boot program. You can create a computer account object and associate it with a physical computer using the following methods: * Using WDSUTIL. You can prestage client computers before they have attempted a network boot, by running WDSUTIL /Add-Device /Device:<name> /ID:<ID>. You cannot prestage computers by using the Windows Deployment Services MMC snap-in, but you can set the Auto-Add policy and approve or reject pending computers. * Using the Active Directory Users and Computers snap-in. You can prestage client computers before they have attempted a network boot using AD DS. For instructions, see the section "To prestage a client computer" in How to Manage Client Computers. * Enabling the Auto-Add policy. If you enable this policy, when you approve the installation for an unknown client, the installation will proceed and a computer account will be created in AD DS for the client. For more information, see Enabling the Auto-Add Policy * Using Windows Deployment Services as part of the image installation. By default, all operating system installations using Windows Deployment Services result in a client computer that is joined to a domain. You can disable this functionality using the Client tab of the server’s properties page. Benefits Prestaging clients provides three main benefits: * An additional layer of security. You can configure Windows Deployment Services to answer only prestaged clients, therefore ensuring that clients that are not prestaged will not be able to boot from the network. * Additional flexibility. Prestaging clients increases flexibility by enabling you to control the following: o The computer account name and location within AD DS. o Which Pre-Boot Execution Environment (PXE) server should service the client. o Which network boot program (NBP) the client should receive. o Other advanced options — for example, what boot image a client will receive or what Windows Deployment Services client unattend file the client should use. * The ability for multiple PXE servers to service the same network segment. You can do this by restricting the server to answer only a particular set of clients. Note that the prestaged client must be in the same forest as the Windows Deployment Services server (trusted forests do not work). so, install WDS, reboot, verify its installed correctly and try again... cheers anyweb -
how can I PRESTAGE a computer for WDS ?
anyweb replied to anyweb's question in Windows Deployment Services (WDS)
this is a DC i've checked and some w2k8 servers (both DCs) have this ability and some don't, i havnt figured out what needs to be installed to make the change, i thought it was the WDS service but it seems not.... time to investigate -
how can I PRESTAGE a computer for WDS ?
anyweb replied to anyweb's question in Windows Deployment Services (WDS)
i've checked two windows 2008 servers one which doesnt have WDS installed, one with it installed. the one with it installed shows me the option to manage i'm not sure if this is the way forward with this but if you can test it by installing wds then i'd like to know cheers anyweb -
create a GPO to uninstall the configmgr client agent it should run ccmsetup /uninstall wait a few minutes before pushing out the new version (no need to reboot) cheers anyweb
-
it appears to be happening right after its looking for drivers... so if you have lots of drivers in your task sequence remove them all and try adding them back one by one
-
Microsoft is moving forward with plans to launch Windows 7 this year, although the company still refuses to publicly commit to that goal. PC industry sources in Asia and the U.S. tell CNET News that they have heard things are on track to launch by this year's holiday shopping season, which has been Microsoft's internal target for some time. Microsoft is also putting the finishing touches on a program to offer Vista buyers a free or low-cost update to Windows 7. That program could kick off as early as July, sources said. The company has run such "technology guarantee" programs in the past, typically allowing each PC maker to set the exact rules, but essentially offering buyers after a certain time to get a free upgrade to the next version. (TechArp has a post with even more details on Microsoft's planned Windows 7 Upgrade Program.) In an interview at the Consumer Electronics Show in January, Microsoft senior VP Bill Veghte cautioned that the release still could be pushed into 2010, depending on customer feedback. full story > http://news.cnet.com/8301-13860_3-10162609-56.html
-
Software Updates - The Network path was not found
anyweb replied to Dom's question in Software Update Point
the first sync takes time, you need to be patient you can verify the syncs progress by looking at your SMS_WSUS_SYNC_MANAGER logs (in your sites system status/site status/component status) -
keep it up ! moved to reports and pinned
-
wds 2003 srv virtual srv 2005 xp and vista
anyweb replied to nja's question in Windows Deployment Services (WDS)
on the virtual machine make the nic the first boot device, works the same way as a normal machine cheers anyweb -
excellent guide, well done and thank you what I'd like to see next is a guide for restoring a site from scratch using the backup files created using the backup feature in Tasks,
-
if you find that Advertised Applications are not appearing in Run Advertised Programs on your client, then verify that the computers client is picked up by your SCCM server, open the collection that the computer is a member of, click on Update collection Membership, then refresh the collection If the Client=No then you may have client issues, check the following logs for problems on the Client. Clients won't get any advertisements in the target collection until the collection reflects the fact that the systems are installed as clients (Client = Yes). First, verify that the SMS Agent Host service is installed and running. If it is, the Advanced Client really is installed. If it doesn’t show up in the All Systems collection, it might be either that the client is not assigned to a site or that the client cannot find the default management point in its assigned site. You can use the Advanced tab of the Systems Management program in Control Panel to verify that the client is assigned to a site. If not, you can configure the site code the client should be assigned to. If it is assigned to a site, view the LocationServices.log on the client (Windows\System32\CCM\Logs) to see if the client was able to retrieve the default management point for the assigned site. It may be that the management point installation failed due to lack of IIS or BITS services being installed prior to the management point role being assigned to the computer. ClientLocation.log to ensure that they are assigned to a site LocationServices.log to verify that they have found the default MP ClientIDManagerStartup.log to verify that they've registered with the site Ccmexec.log to verify that there are no HTTP errors if all of the above are ok then consider uninstalling and reinstalling the CCMclient to uninstall it open a cmd prompt with administrative privaledges and navigate to c:\windows\ccmsetup ccmsetup.exe /uninstall Once done, verify it is gone in control panel, wait a few minutes then reinstall it by pushing it via ConfigMgr console. cheers anyweb